

Page 1

DVD Navigation Map
EN
R
NVD-A802
SMART MAP PRO
Prog. Ver. 2.00
OWNER’S MANUAL
Please read before using this disc.
MODE D’EMPLOI
Veuillez lire avant d’utiliser ce disque.
FR
ES
MANUAL DE OPERACIÓN
Lea este manual antes de utilizar este disco.
Page 2

R
ALPINE ELECTRONICS MARKETING, INC.
1-1-8 Nishi Gotanda,
Shinagawa-ku, Tokyo 141-0031, Japan
Phone 03-5496-8231
ALPINE ELECTRONICS OF AMERICA, INC.
19145 Gramercy Place, Torrance,
California 90501, U.S.A.
Phone 1-800-ALPINE-1 (1-800-257-4631)
1-888-NAV-HELP (1-888-628-4357)
ALPINE ELECTRONICS OF CANADA, INC.
777 Supertest Road, Toronto,
Ontario M3J 2M9, Canada
Phone 1-800-ALPINE-1 (1-800-257-4631)
1-888-NAV-HELP (1-888-628-4357)
ALPINE ELECTRONICS OF AUSTRALIA PTY. LTD.
161-165 Princes Highway,
Hallam Victoria 3803, Australia
Phone 03-8787-1200
ALPINE ELECTRONICS GmbH
Frankfurter Ring 117,
80807 München, Germany
Phone 089-32 42 640
ALPINE ELECTRONICS OF U.K. LTD.
Alpine House
Fletchamstead Highway,
Coventry CV4 9TW, U.K.
Phone 0870-33 33 763
ALPINE ELECTRONICS FRANCE S.A.R.L.
(RCS PONTOISE B 338 101 280)
98, Rue de la Belle Etoile, Z.I. Paris Nord Il,
B.P. 50016, 95945 Roissy Charles de Gaulle Cedex,
France
Phone 01-48638989
ALPINE ITALIA S.p.A.
Viale C. Colombo 8, 20090 Trezzano
Sul Naviglio (MI), Italy
Phone 02-484781
ALPINE ELECTRONICS DE ESPAÑA, S.A.
Portal de Gamarra 36, Pabellón, 32
01013 Vitoria (Alava)-APDO 133, Spain
Phone 945-283588
ALPINE ELECTRONICS (BENELUX) GmbH
Leuvensesteenweg 510-B6,
1930 Zaventem, Belgium
Phone 02-725-13 15
© 2007 ALPINE ELECTRONICS, INC. All rights reserved.
© 2006 NAVTEQ. All Rights Reserved.
© info USA Inc, Omaha, NE
Interstate Exit and Service Data provided by ZENRIN CO.,LTD.
Copyright © 2006, All Rights Reserved.
Certain business data provided by infoUSA, Inc., Omaha, Nebraska,
Copyright © 2006, All Rights Reserved.
YAMAGATA Corporation
2-6-34, Takashima,
Nishi-ku, Yokohama,
Kanagawa, Japan
Designed by ALPINE Japan
Printed in Japan (Y)
68-06194Z86-A
Page 3

Page 4

•There may be situations where the navigation system
PRECAUTIONS
IMPORTANT INFORMATION, PLEASE READ
CAREFULLY BEFORE USING THIS PRODUCT.
This product is intended to safely provide turn by turn
instruction to get you to a desired destination. Please
read the following precautions to ensure that you use
this navigation system correctly.
• This product is not a substitute for your personal
judgment. Any route suggestions made by this
navigation system should never supersede any local
traffic regulations or your personal judgment and/or
knowledge of safe driving practices. Do not follow
route suggestions if the navigation system instructs you
to perform an unsafe or illegal maneuver, places you in
an unsafe situation, or routes you into an area which
you consider unsafe.
• Glance at the screen only when necessary and safe to
do so. If prolonged viewing of the screen is necessary,
stop in a safe and legal manner and location.
• Do not input destinations, change settings, or access
any functions requiring a prolonged view of the
monitor and/or remote control while you are driving.
Stop in a safe and legal manner and location before
attempting to access the system.
•When using the navigation system to find/route to an
emergency service, please contact the facility to
validate and verify availability, prior to driving to it.
Not all locations of emergency service providers such
as police and fire stations, hospitals, and clinics are
contained in the database. Please use your own
judgment and your ability to ask for directions in these
situations.
•The map database contained within the media (DVD
ROM) in which it is stored is the most recent map data
available at the time of production. Because of changes
in streets and neighborhoods, there may be situations
where the navigation system may not be able to route
you to your desired destination. In these cases, use your
own personal judgment.
•The map database is designed to provide you with route
suggestions, it does not take account of the relative
safety of a suggested route, or of factors which may
affect the time required to reach your destination. The
system does not reflect road closures or construction,
road characteristics (i.e. type of road surface, slope or
grade, weight or height restrictions, etc.), traffic
congestion, weather conditions, or any other factors
which may affect the safety or timing of your driving
experience. Use your personal judgment if the
navigation system is unable to provide you with an
alternate route.
• Make certain that the volume level of the monitor is set
• Please make certain that any other person who intends
If there is anything in the manual about the operation
of the navigation system which you are uncertain
about, please contact your local Alpine authorized
navigation dealer or Alpine at 1-888-NAV-HELP (1-888628-4357) before using the navigation system.
may display the vehicle’s location erroneously. Use
your own driving judgment in this situation, taking into
account current driving conditions. Please be aware that
in this situation, the navigation system should correct
the vehicle’s position automatically; however, there
may be times where you may have to correct the
position yourself. If this is the case, stop in a safe and
legal manner and location before attempting operation.
to a level which still allows you to hear outside traffic
and emergency vehicles. Driving while unable to hear
outside sounds could cause an accident.
on using this navigation system reads these precautions
and the following instructions carefully.
EN
1-EN
Page 5
Points to Observe for Safe Usage
• Read this manual carefully before using this DVDROM. It contains instructions on how to use this
product in a safe and effective manner. Alpine cannot
be responsible for problems resulting from failure to
observe the instructions in this manual.
•This manual uses various pictorial displays to show you
how to use this product safely and to alert you to
potential dangers resulting from improper
connections and operation. Following are the meanings
of these pictorial displays. It is important to fully
understand the meanings of these pictorial displays in
order to use this manual and the system properly.
WARNING
DO NOT PLACE HANDS, FINGERS OR FOREIGN OBJECTS
IN INSERTION SLOTS OR GAPS.
Doing so may result in personal injury or damage to the product.
MINIMIZE DISPLAY VIEWING WHILE DRIVING.
Viewing the display may distract the driver from looking ahead of
the vehicle and cause an accident.
DO NOT FOLLOW ROUTE SUGGESTIONS IF THE
NAVIGATION SYSTEM INSTRUCTS YOU TO PERFORM AN
UNSAFE OR ILLEGAL MANEUVER, OR PLACES YOU IN AN
UNSAFE SITUATION OR AREA.
This product is not a substitute for your personal judgment. Any
route suggestions by this system should never supersede any local
traffic regulations or your personal judgment or knowledge of
safe driving practice.
• Operation of the system while driving is
dangerous. Users should stop vehicle before
operating the software.
• Road conditions and regulations take
precedence over information contained on
the map display: observe actual traffic
restrictions and circumstances while
driving.
• This software is designed for use exclusively
in the NVE-N872A series. It cannot and may
not be used in conjunction with other
hardware.
WARNING
This symbol means important instructions.
Failure to heed them can result in serious
injury or death.
DO NOT OPERATE ANY FUNCTION THAT TAKES YOUR
ATTENTION AWAY FROM SAFELY DRIVING YOUR
VEHICLE.
Any function that requires your prolonged attention should only
be performed after coming to a complete stop. Always stop the
vehicle in a safe location before performing these functions.
Failure to do so may result in an accident.
CAUTION
This symbol means important instructions.
Failure to heed them can result in injury or
material property damage.
HALT USE IMMEDIATELY IF A PROBLEM APPEARS.
Failure to do so may cause personal injury or damage to the
product. Return it to your authorized Alpine dealer or the nearest
Alpine Service Center for repairing.
KEEP SMALL OBJECTS SUCH AS BATTERIES OUT OF THE
REACH OF CHILDREN.
Swallowing them may result in serious injury. If swallowed,
consult a physician immediately.
USE THIS PRODUCT FOR MOBILE 12V APPLICATIONS.
Use for other than its designed application may result in fire,
electric shock or other injury.
2-EN
Page 6

Table of Contents
Precautions
IMPORTANT INFORMATION. PLEASE READ
CAREFULLY BEFORE USING THIS
PRODUCT. ......................................................... 1
Points to Observe for Safe Usage.............................. 2
WARNING ................................................................ 2
CAUTION ................................................................. 2
Preface
Navigation Terminology............................................ 5
Features ..................................................................... 6
How to Use the Disc ................................................. 7
Manual Overview ...................................................... 8
Getting Started
Turning the System On ............................................. 9
How to View a Current Display .............................. 10
Point Display ........................................................... 11
Selecting an Item in a List ....................................... 11
Using the On-screen Keyboard ............................... 11
Changing the Map Scale ......................................... 12
Changing the Orientation of the Map...................... 13
Switching Day/Night Screen ................................... 13
Entering a Destination
Displaying the Destination Menu Screen ................ 14
Entering a Destination by Address .......................... 14
Entering a Point of Interest by Place Name ............ 16
Entering a Point of Interest by Place Type .............. 17
Entering a Destination by Previous Destinations .... 19
Entering a Destination Using the Address Book..... 19
Entering a Destination by Intersection .................... 20
Entering a Point of Interest by Phone Number ....... 22
Entering a Destination by Freeway Entrance .......... 23
Entering a Destination by Latitude and
Longitude .......................................................... 24
Using the Today's Plan Function ............................. 25
Entering a destination by Home .............................. 26
Entering a Destination Using the Favorites............. 26
Entering a Destination Using
ZAGAT SURVEY Data .................................... 27
Entering a Destination by Scrolling
Displayed Map .................................................. 29
Confirm Destination
Add to Today's Plan ................................................ 31
View Route .............................................................. 32
Change Method ....................................................... 32
Open Map ................................................................ 33
Displaying the Option Menu Screen ....................... 33
Find Local POI (Point of Interest) .......................... 33
Save to Address Book ............................................. 34
Save as Home .......................................................... 35
Add to Favorites ...................................................... 35
Set as Waypoint ....................................................... 35
Set as Point A to B .................................................. 36
ENGLISHENGLISH
Driving to Your Destination
Changing the Route Guidance Display ................... 37
Recalling the Maneuver List during Guidance ....... 38
Recalling the Arrow Route Guidance Display ..... 39
Avoiding ............................................................... 39
Selecting Freeway Exit during Route Guidance ..... 39
Auto Reroute ........................................................... 40
Detour ...................................................................... 40
Displaying the Route Menu Screen......................... 41
Display Entire Route ............................................... 41
Find POI Along Route............................................. 41
Change Method ....................................................... 42
Delete Destination ................................................... 43
Delete Waypoint ...................................................... 43
Edit Features
Displaying the Edit Menu Screen ........................... 44
Editing the Address Book ....................................... 44
Create a New Folder............................................. 45
Rename Folder ..................................................... 46
Delete Folder ........................................................ 46
Name Change ....................................................... 46
Address Change ................................................... 47
Phone Number Change ........................................ 47
Folder Change ...................................................... 47
Icon Change ......................................................... 48
Delete Address Book Entry.................................. 48
Editing the Favorites ............................................... 48
Edit/Delete Favorite Dest ..................................... 49
Delete Favorite Names ......................................... 50
Delete Favorite Types ........................................... 50
Delete Favorite Spots ........................................... 51
Deleting the Today's Plan ........................................ 52
Editing the Home .................................................... 53
Deleting the Previous Destinations ......................... 53
Editing the Avoided Roads ...................................... 54
Editing the Avoided Areas ....................................... 55
EN
3-EN
Page 7

Information Features
Displaying the Information Menu Screen ............... 56
Trip Information ...................................................... 56
System Information ................................................. 57
Satellite Information................................................ 58
Navigation Simulation ............................................ 58
Calendar .................................................................. 59
Calculator ................................................................ 59
Setup
Displaying the Setup Menu Screen ......................... 60
Map Display ............................................................ 60
Region Selection ............................................... 61
Color ................................................................. 61
Orientation ........................................................ 61
Map Features ........................................................... 61
POI Icons .......................................................... 62
Landmark Icons ................................................ 64
Building Outlines .............................................. 64
One Way Icons .................................................. 64
Trail ................................................................... 64
Guidance ................................................................. 65
Voice Prompt ..................................................... 65
Display .............................................................. 65
Auto Zoom Map................................................ 66
Estimated Time ................................................. 66
Routing Method ................................................ 66
Display/Volume ....................................................... 66
Screen Adjustment ............................................ 67
Nav Volume Adjustment ................................... 67
Clock ....................................................................... 67
Time Zone ......................................................... 68
Time .................................................................. 68
Clock Display ................................................... 68
Language / Units ..................................................... 68
Language ........................................................... 68
Units (mile/ft or km/m) ..................................... 69
Others ...................................................................... 69
Keypad .............................................................. 69
Confirm Home .................................................. 69
Confirm Favorite Dest....................................... 70
Confirm Address Book ..................................... 70
Confirm Voice Input .......................................... 70
Reference
Buttons and Functions of Remote Control
(RUE-4140)....................................................... 71
Names of the Parts ............................................ 71
Remote Control Reference Guide
for Head Unit .................................................... 72
Remote Control Reference Guide
for AV Head Unit .............................................. 73
Voice Recognition ................................................... 74
About Speak Button .......................................... 74
For Voice Recognition to Operate Correctly ..... 74
Using the Voice Control System ....................... 74
Using the Help Command of the Voice
Control System ................................................. 75
Voice Tag Function .................................................. 75
Inserting/Removing the PC Card ...................... 75
Recording Voice Tag ......................................... 76
Playing Back the Recorded Voice Tag .............. 77
Searching for a Route using Voice Tag ............. 77
Deleting Voice Tag ............................................ 77
Voice Command Index ............................................ 78
Navigation Operation ........................................ 78
Touch panel-compatible monitor IVA-D310/
IVA-W205/IVA-W200/IVA-D105/IVA-D100
operation ........................................................... 78
In Case of Difficulty................................................ 79
If this Message Appears .......................................... 80
ENGLISHENGLISH
END-USER TERMS
END-USER TERMS ............................................... 81
4-EN
Page 8
Preface
Address Book
Up to 300 personal locations and phone numbers can be
stored in the system’s memory.
Navigation Terminology
Navigation
The navigation system displays and tracks the vehicle’s
position and movement on a moving map display. When a
destination is input, the navigation system quickly
calculates a route and guides you along the route with
pictorial displays and voice prompts.
Present Vehicle Position Indicator
The present vehicle position is indicated by an arrowhead
within a circle
Present vehicle position
Map matching
Since GPS navigation has an error window of about 100 –
650 feet (30 m – 200 m), the position of your vehicle may
be calculated in such a way that it is displayed incorrectly
off the road. Map matching automatically corrects this error
so that the position is displayed on the road.
Popular Points of Interest
Fourteen different POI icons can be displayed on the map.
These icons indicate the locations and names of the
nearest gas/fuel stations, restaurants, parking garages,
parking lots, ATMs, banks, convenience stores, grocery
stores, freeway exits with IA data, hotels & motels, bed &
breakfast, post offices, hospitals and schools. All 14 icons
can be displayed on the screen at one time.
•The brand icons appear on the map. For details, see page
63 of this Manual.
EN
Destination
The destination point is represented by a bullseye icon.
b
a Destination icon
b Route (Blue)
a
5-EN
Page 9

Features
Automatic Route Calculation
The navigation system displays and tracks your vehicle’s
position and movement via a moving map display. When
you input a destination, the navigation system quickly
calculates a route and guides you with pictorial displays
and voice prompts. When determining the route, the system
can be programmed to minimize the use of toll roads and
freeways.
This system combines GPS signals received with map
information stored on DVD-ROM to display the position and
direction of the vehicle. This navigation system also
includes an electronic gyro-sensor and a speed sensor that
enable it to display the present vehicle position even in
locations where GPS signals may be blocked.
Next Turn Guide
When an upcoming turn is approaching, the system will
give maneuver instructions via arrow guides and simple
voice prompts.
Real Time Voice Guide
Using voice prompts, the system will notify you of upcoming
turns and highways to enter. Pressing the VOICE button on
the remote control or touching [ ] on the map display
allows you to access this voice guidance feature at any time
with a single press.
Street Name Input
Allows you to input your destination’s street name (via
Address or Intersection search) if you don’t know your
destination’s city name.
Direct Input of Name of Place of Interest
Input only the name of a place of interest (without inputting
the city name) to search for the route to the place of
interest.
Direct Inputting of Phone Number
You can search for a destination place of interest by
inputting the telephone number (if known).
Map Zooming
You can change the map display in nine magnification
scales to get more detail or more general views (1/32, 1/16,
1/8, 1/4, 1/2, 1, 2, 5, 15, 50, 150, 350 mile zoom scales). A
special 350 mile zoom scale is available when you view a
very long route.
3-Dimensional Map Display
A bird’s eye view, 3-dimensional map can also be
displayed.
Intersection Zoom (Auto Zoom Map)
As you near intersections and cross points, the map display
automatically zooms in to show a more detailed view that
you will need. This means there is no need to press the
zoom buttons.
Useful Functions during Route Guidance
The navigation system is equipped with various functions
available during route guidance, as shown below.
•Auto reroute
The system will automatically calculate a new route.
• Detour
The system will search for a detour.
• Display POI information on Freeway exits.
• Search for POI along route, etc.
Refer to “Driving to Your Destination” (page 37).
Built-in Gyroscope and Speed Sensors
The gyroscope for sensing direction and the speed pulse
sensor for detecting distance provide data which allows the
vehicle position and direction to be displayed even in
locations where the GPS signals cannot be received such
as between high buildings or in tunnels.
Three Types of Operation
The operation for the navigation system can be performed
with both the supplied remote control (RUE-4140), touch
button* or voice control.
* Touch button operation can be performed only when you
connect to Alpine Touch panel-compatible monitor IVAD310, IVA-W205, IVA-D105 or TME-M770S, etc. For
details, refer to “Manual Overview” on page 8. See also
the Owner’s Manual of the touch panel-compatible
monitor.
Voice Tag Function
Voice Tag is a function that allows you to use a certain
phrase as a voice command for voice recognition operation.
You can record places in Address Book or Favorites as your
favorite phrases to easily recall those places.
Real Time Information (Optional)
If you connect the XM Data Receiver HCE-100XM (sold
separately) or SIRIUS Data Receiver (sold separately), and
sign up for Traffic & Weather, you can receive traffic
information in real time. Traffic incidents and congestion can
be displayed on the map and also be listed by distance
from the vehicle. With the SIRIUS Data Receiver
connected, you can also obtain Gas prices, Movie
information and Ski resort conditions. For more information,
visit XM's website at www.xmradio.com., or SIRIUS'
website at www.sirius.com.
Three Languages Selectable for
the Voice Guidance
Three Languages Selectable for the Voice Guidance.
You can choose one of the three languages (English,
French, Spanish) for the voice route guidance.
6-EN
Page 10
How to Use the Disc
There are two discs available for NVD-A802: the NORTH version, and the SOUTH version. Phone number/POI (Point of Interest)
information, etc., contained in the South area disc cannot be searched by the North disc, and vice versa. Places in the South area, for
example, can only be found on the South disc.
The North and South version discs cover the areas as shown in gray below. There are some overlap areas which are stored in both discs.
North disc stored area
EN
South disc stored area
7-EN
Page 11
Manual Overview
If the navigation system is connected to Alpine touch panelcompatible monitor IVA-D310, IVA-W205, IVA-D105 or TMEM770S, etc., touch operation can be performed by directly
touching the monitor.
If the monitor (other than Alpine touch panel-compatible monitor
IVA-D310, IVA-W205, IVA-D105 or TME-M770S, etc.) is
connected, operation can be performed with the supplied remote
control.
Both touch button and remote control operations are
described in this manual. First, touch button operations,
and then remote control operations in italics are described.
Example:
Touch [Destination].
Select (highlight) “Destination” by tilting the
joystick and press ENTER.
L Touch Button Operation
L Remote Control Operation
Some of the remote control buttons have the same function
as touch buttons on the display. You can see the desired
map screen by pressing the corresponding button on the
remote control. For menu screen operations, select a
desired item by tilting the joystick and pressing the ENTER
button.
For details, refer to the “Buttons and Functions of Remote
Control (RUE-4140)”, on page 71.
Touch Button
• Be sure to touch the button lightly with the pad of your
finger on the display to protect the display.
• If you touch a button and there is no reaction, remove your
finger from the display once, and try again.
•Touch buttons that cannot be operated appear dull in color.
8-EN
Page 12
Getting Started
Turning the System On
With this system, when the display monitor is set in the
navigation display mode or external input display mode and the
ignition key is turned to the ACC or ON positions, the opening
screen will automatically be displayed.
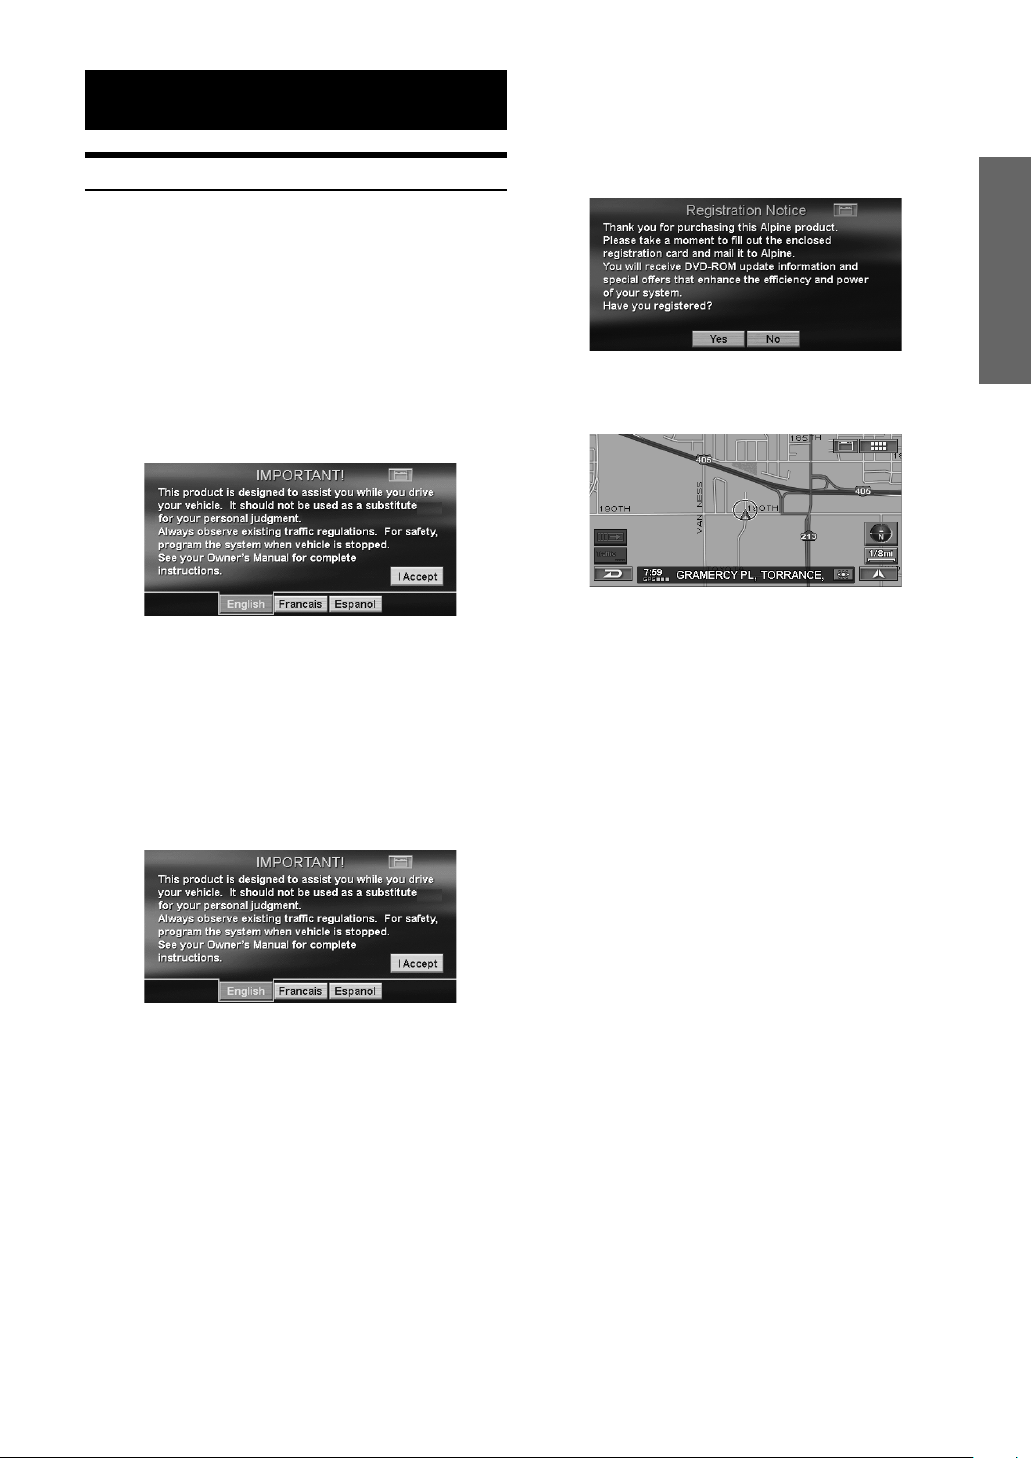
1
When the system is used for the first time,
both the language selection menu and
IMPORTANT! are displayed on the same
screen, touch the desired language.
Select (highlight) the desired language by tilting
the joystick and press ENTER.
After the language has been selected, important
information is displayed in each language.
Be sure to read the important information.
2
After you have read this important
information, touch [I Accept].
Select (highlight) “I Accept” by tilting the joystick
and press ENTER.
3
After you have read this registration notice,
touch [Yes].
Select (highlight) “Ye s ” by tilting the joystick and
press ENTER.
The map screen is displayed.
• If there is no disc in the navigation system, “Please
insert DVD-ROM” is displayed. For details on how to
load the disc, see “Inserting the DVD-ROM” and
“Removing the DVD-ROM” in the navigation system’s
Hardware Manual.
• If the disc cannot be read, the message “Error reading
DVD-ROM. Please check the disc.” is displayed. Try
reloading the disk and if message does not go away,
consult an authorized Alpine dealer.
• If the monitor is kept on with the engine off for an
extended period of time, the vehicle’s battery may
discharge.
EN
The Registration Notice screen is displayed.
9-EN
Page 13

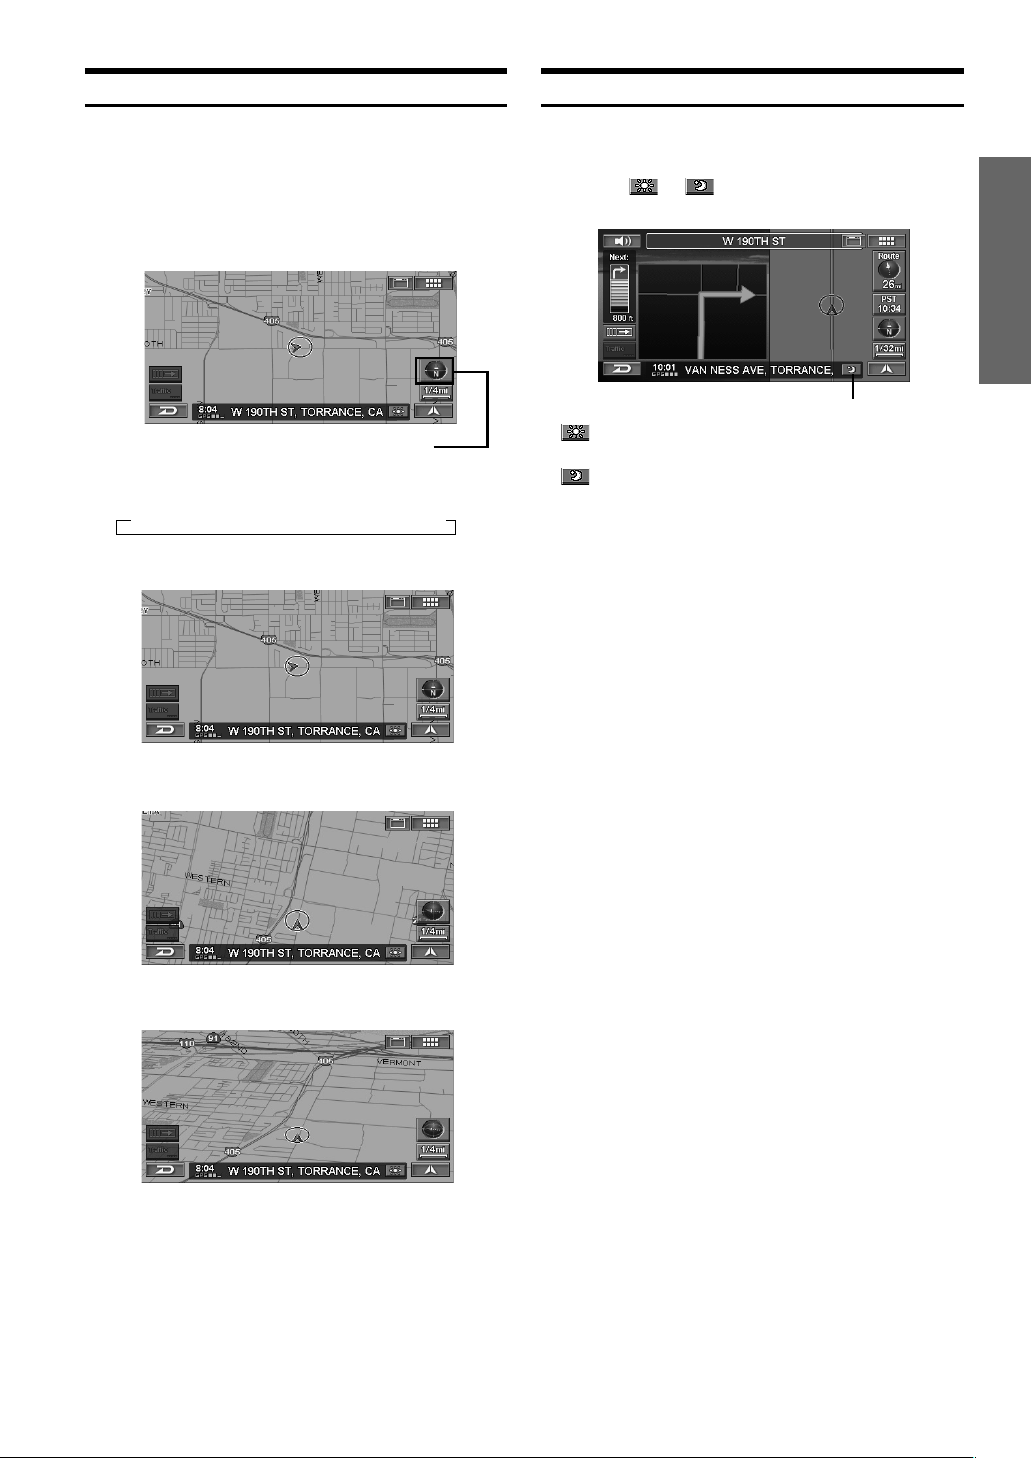
How to View a Current Display
The navigation map screen usually displays the current vehicle
position and surrounding area.
L Current Vehicle Position Map (without route)
c
a
b
h
i
j
k
l
a Landmark Icons
The 3D landmark icons can be displayed on the map
when map scale is 1/16 mile (100 m) or less, see
“Landmark Icons” (page 64).
b Building Outlines
The building outlines can be displayed on the map
when map scale is 1/16 mile (100 m) or less, see
“Building Outlines” (page 64).
c Current vehicle position icon
d One Way Icon
The one way icons can be displayed on the map when
map scale is 1/16 mile (100 m) or less.
e POI Icons
The POI icons can be displayed on the map when map
scale is 1/8 mile (200 m) or less, see “POI Icons” (page
62).
f Main Source Screen button ( )
Displays the main source screen of the Alpine touch
panel-compatible monitor. For details, refer to the
Owner's Manual of the Alpine touch panel-compatible
monitor.
If a monitor other than Alpine touch panel-compatible
monitor is connected, this button cannot be used.
g MENU button ( )
Displays the Nav Menu.
d
e
fg
m
n
p
o
h Traffic button*
Traffic Incident List screen is displayed.
* If the XM Data Receiver HCE-100XM (sold
separately) or the SIRIUS Data Receiver (sold
separately) is connected, the traffic button can be
used.
System Status
If Traffic & Weather is received, signal strength is
indicated by a 4-bar icon type display.
(No Signal)
(Weak Signal)
(Marginal Signal)
(Strong Signal)
(Very Strong Signal)
i Cancel button ( )
Cancels the current screen and returns to the previous
menu screen.
j Current Time
Current time received from GPS signals.
k GPS signal state
GPS signal strength (indicated by a dot).
GPS: No satellite information is being received.
GPS L: Current position is being calculated.
GPS LL: GPS signal 2-D is being received.
GPS LLL: GPS signal 3-D is being received.
l Street name
Name of the current street.
m Day/Night Screen Switching button
: The icon is displayed when the day screen is set.
Touching this icon will switch to the night screen.
: The icon is displayed when the night screen is
set. Touching this icon will switch to the day
screen.
n Current Map button ( )
Returns to the current position screen.
o Scale Icon ( )
Map scale is shown. (see page 12)
p Compass Icon
Indicates North, heading and 3-D mode on the current
map.
The arrowhead shows the direction of north. To change
the map orientation, see page 13.
•When powering on the unit for the first time, it takes the
GPS receiver approximately 10 minutes to calculate the
vehicle’s current position. During this period, the
vehicle position icon may not move even if the vehicle
is being driven.
•For displays during route guidance, see page 37.
10-EN
Page 14
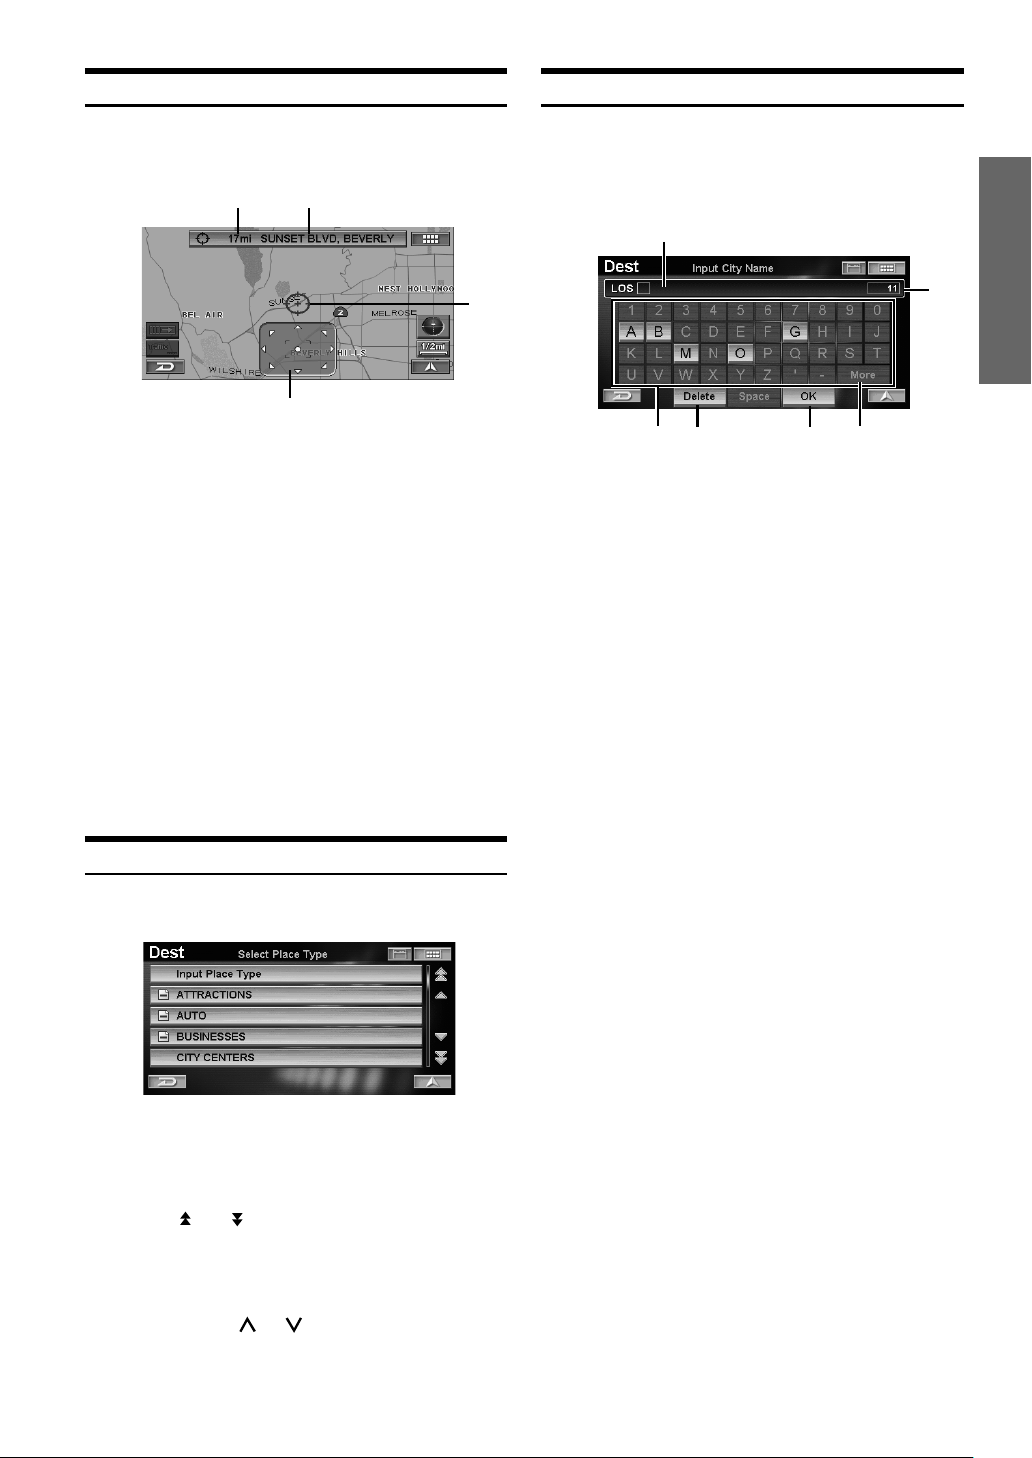
Point Display
The point display appears on the screen after you have scrolled
the map. “Entering a Destination by Scrolling Displayed Map”,
see page 29.
a
b
Using the On-Screen Keyboard
When you are required to input a character on the screen using
the keyboard, the display changes to the keyboard. Use the
displayed characters to input information. How to select
characters, see the following procedure.
a
EN
d
a Distance from the current vehicle position
Distance in a straight line from the current vehicle
position.
b Street name on the crosshair icon
If the street name of the crosshair icon cannot be
displayed, the longitude/latitude appears in the display.
c Crosshair icon
Align the crosshair icon over the place to be searched
by scrolling the map.
d Scroll pad
The scroll pad is displayed when you scroll the map by
touch operation. Touch [8] on the scroll pad to scroll
the map.
Touch [[] on the scroll pad to display the Point Display
sub menu (see page 29).
The scroll pad is not displayed when using the
remote control.
Selecting an Item in a List
To scroll through a list, perform operation as follows.
c
b
f
c
ed
a Text window
Displays the selected characters/numerals.
b Number of candidates
c Character pallet
d Delete
Returns to the previous character and erases it.
e OK
The selected character is set. The available characters,
depending on the item, are shown in the list.
f More
Changes the character pallet to display additional
characters.
Touch Operation:
Touch the desired character.
Remote Control Operation:
Tilt the joystick to select the desired character and
press ENTER.
•When 1 character is input, the candidates for the next
character are narrowed down (and the others disappear
from the character pallet).
•The phone number, etc. can be input using the numeric
keypad on the remote control. After pressing the MODE
button, numbers may be input while the status indicator
is blinking.
Touch Operation:
Touch [8] or [9] to scroll items one by one
up or down.
Touch [ ] or [ ] to scroll the page if the list is
more than 2 pages.
Remote Control Operation:
Tilt the joystick to up or down to scroll items one
by one or press
or to scroll the page if the
list is more than 2 pages.
11-EN
Page 15
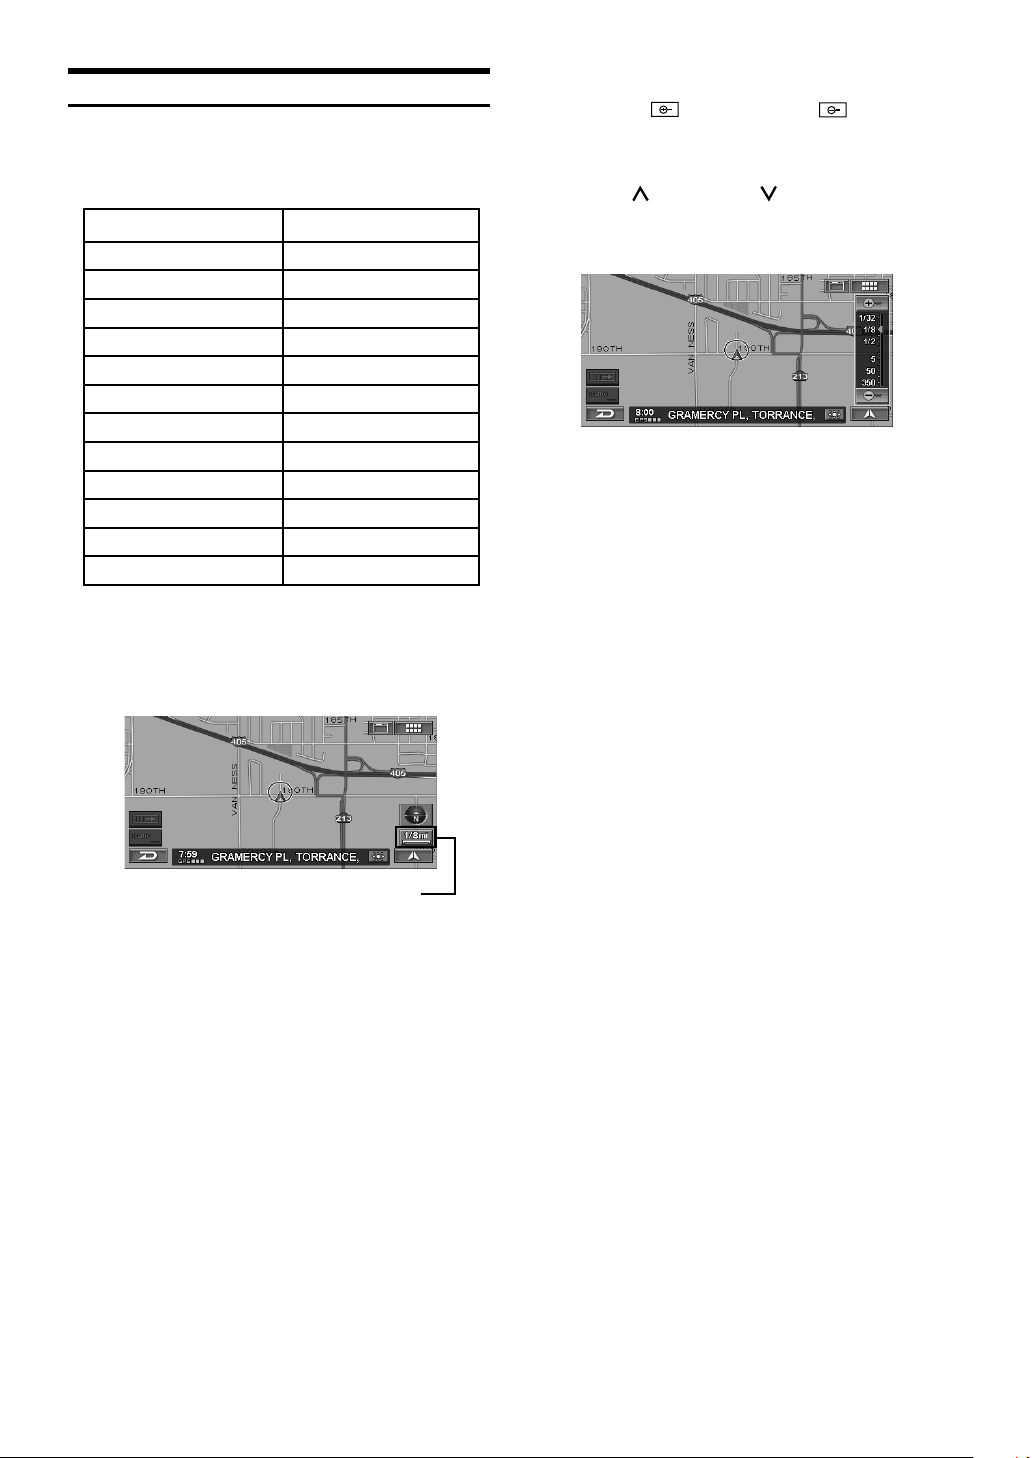
Changing the Map Scale
Change the map magnification ratio upwards or downwards
(in 12 steps).
Map scale
US (mile)
1/32 mile
1/16 mile
1/8 mile
1/4 mile
1/2 mile
1 mile
2 mile
5 mile
15 mile
50 mile
150 mile
350 mile
•You can change between miles or kilometers in setup,
see page 69.
1
Touch [Scale Icon].
Metric (km/m)
50 m
100 m
200 m
400 m
1 km
2 km
4 km
10 km
30 km
100 km
250 km
600 km
2
Change the map magnification ratio by
touching [ ] (zoom in) or [ ] (zoom
out) within 5 seconds.
This changes rapidly by touching and holding either
button.
Press the (zoom in) or (zoom out) button
while displaying the map screen.
• The 3D landmark icons can be displayed on the map
when map scale is 1/16 mile (100 m) or less.
•The building outlines can be displayed on the map
when map scale is 1/16 mile (100 m) or less.
• The POI icons can be displayed when map scale is 1/8
mile (200 m) or less. For details, see page 62.
•The one-way road icons can be displayed on the map
when map scale is 1/16 mile (100 m) or less.
• If the current map orientation is heading up, it
automatically changes to north up when the map scale
is 50 mile (100 km) or more.
• The 3-D map will automatically be switched to heading
up when the map scale is expanded more than 1/2 mile
(1 Km).
The scale bar is displayed.
12-EN
Scale Icon
Page 16
Changing the Orientation of the Map
The map orientation can be set for either north up, or your current
direction heading up. A 3-dimensional map can also be displayed.
The icon in the lower right of the screen above the map scale icon
indicates the current orientation.
1
Touch [Compass Icon].
Press H/N.
Compass Icon
Each press changes the map orientation.
→ North up → Heading up → 3D Heading up
North up
Switching the Day/Night Screen
You can switch between day and night screen to clearly view the
map screen.
1
Touch or .
a
a : The icon appears when the day screen is
• This function can be used only by touching the icon.
displayed.
: The icon appears when the night screen is
displayed.
EN
Heading up
3D Heading up
• If the current map orientation is heading up, it
automatically changes to north up when the map scale
is 50 mile (100 km) or more.
• The angle of the 3-D map cannot be changed.
• When the 3-D map is scrolled, it changes automatically
to 2-D map (heading up).
• The 3-D map will automatically be switched to heading
up when the map scale is expanded more than 1/2 mile
(1 Km).
13-EN
Page 17
Entering a Destination
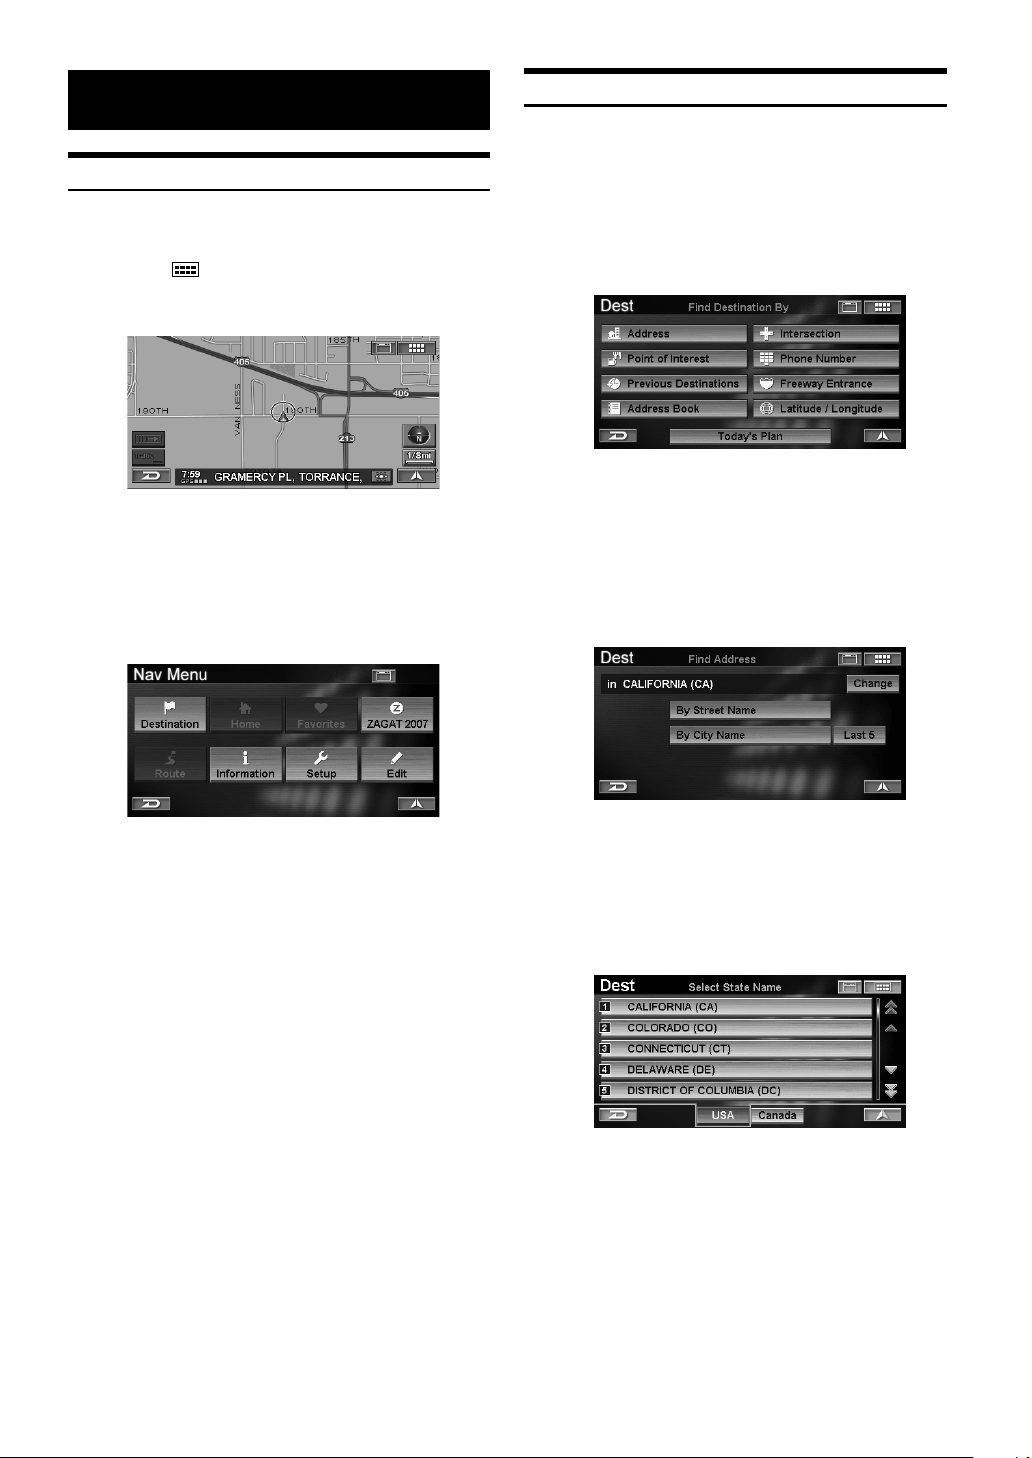
Displaying the Destination Menu Screen
To use the navigation guidance system, you must first, search for
a destination.
1
Touch [ ].
Press MENU.
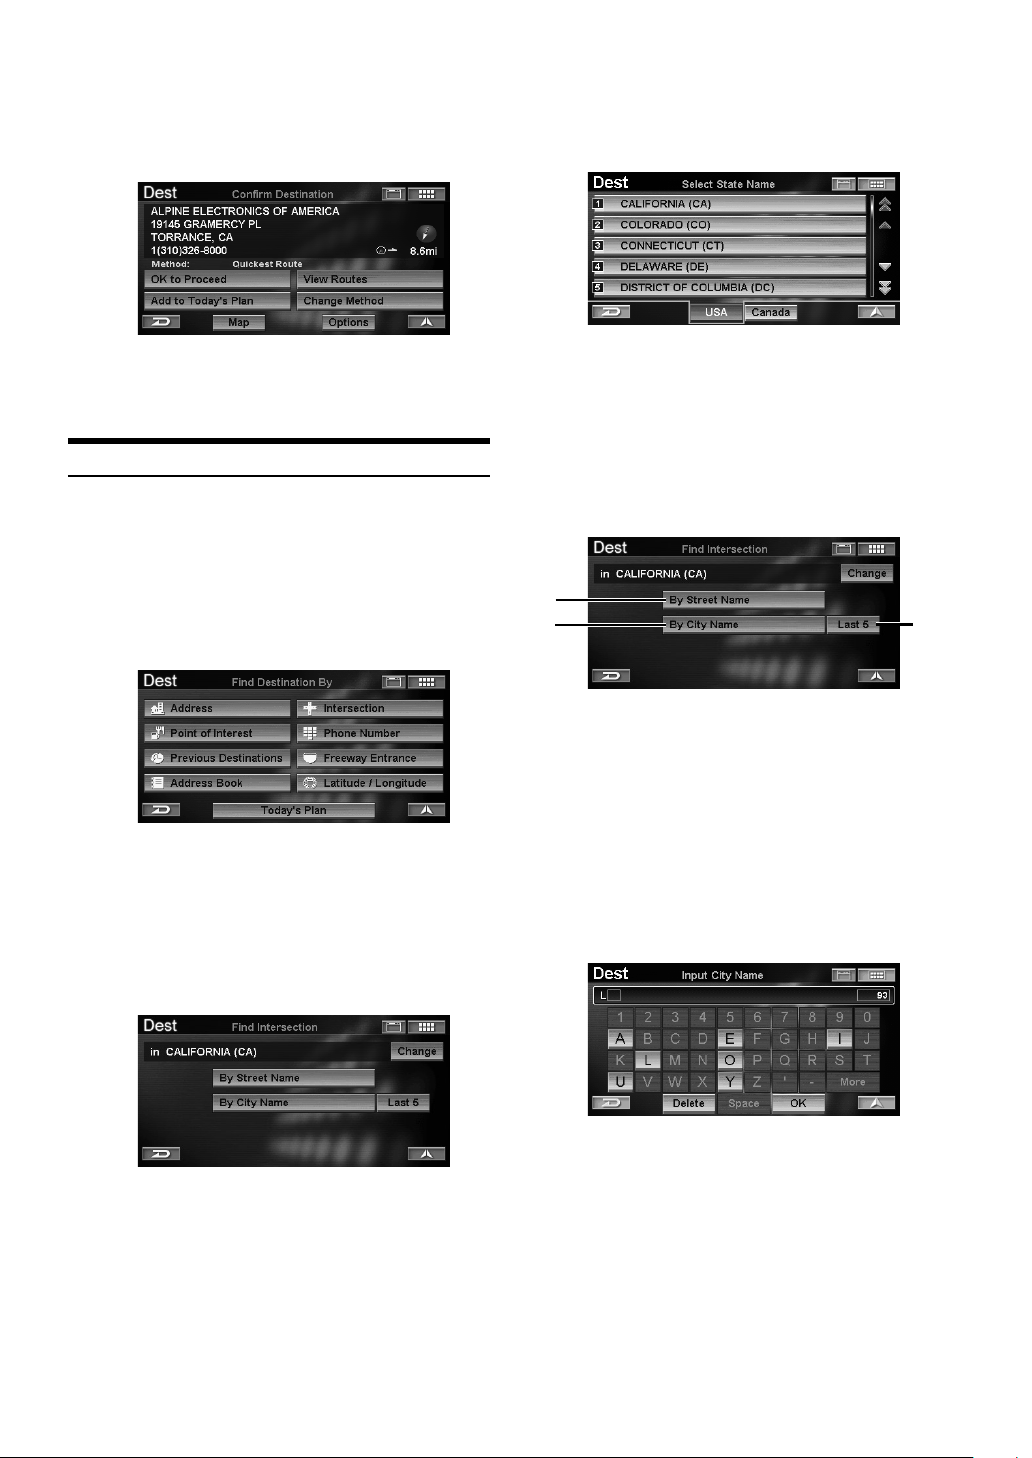
Entering a Destination by Address
If you know the address of the destination, the system can
calculate a route to that address.
1
Touch [Address] on the Find Destination
By screen.
Select (highlight) “Address” by tilting the joystick
and press ENTER.
The Find Address menu is displayed.
The Nav Menu screen is displayed.
2
Touch [Destination].
Select (highlight) “Destination” by tilting the
joystick and press ENTER.
The Find Destination By screen is displayed.
You can search for a destination as follows.
Find Destination By
• Address (see page 14)
• Point of Interest (see page 16)
•Previous Destinations (see page 19)
• Address Book (see page 19)
• Intersection (see page 20)
• Phone Number (see page 22)
•Freeway Entrance (see page 23)
• Latitude / Longitude (see page 24)
•Today’s Plan (see page 25)
Others
• Home (see page 26)
•Favorites (see page 26)
•ZAGAT 2007 (see page 27)
• Map scrolling and Map input (see page 29)
2
The State or Province you are in is displayed
at the top of the screen. If your desired
destination is in another state, select
“Change.”
The Select State Name screen is displayed.
3
Touch desired State or Province.
Select (highlight) the desired State or Province by
tilting the joystick and press ENTER.
• Select USA or Canada.
14-EN
Page 18
4
To find an address, touch one of the following
items.
To find an address, select one of the following
items and press ENTER.
a
b
a By Street Name
The Input Street Name screen appears. Go to step 7.
b By City Name
The Input City Name screen is displayed. Go to step 5.
c Last 5
The last five city names searched are stored in
memory. You can reselect a city name from this list.
5
Input the city name.
c
7
Input the street name.
• If the number of candidates narrows down to less than
5, the display automatically shows the Select Street
Name screen.
The Select Street Name screen is displayed.
8
Touch the desired street name.
Select (highlight) the desired street name by tilting
the joystick and press ENTER.
EN
• If the number of candidates narrows down to less than
5, the display automatically shows the Select City
Name screen.
•For details on how to input, see page 11.
The Select City Name screen is displayed.
6
Touch the desired city name.
Select (highlight) the desired city name by tilting
the joystick and press ENTER.
•For details on how to use the list, see page 11.
The Input Street Name screen is displayed.
•For details on how to use the list, see page 11.
The Input Address Number screen is displayed.
9
Input the house or building number.
a
a Any
Select Any if an address number is not known, or if you
want to search for the nearest street that matches your
input.
•For details on how to input, see page 11.
The Confirm Destination screen appears.
Continued
15-EN
Page 19
10
Touch [OK to Proceed].
Select (highlight) “OK to Proceed” by tilting the
joystick and press ENTER.
The system will begin calculating the route.
•For details of the Confirm Destination, see page 31.
3
Input a point of interest name.
• If the number of candidates narrows down to less than
5, the display automatically shows the Select Place
Name screen.
•For details on how to input, see page 11.
The Select Place Name screen is displayed.
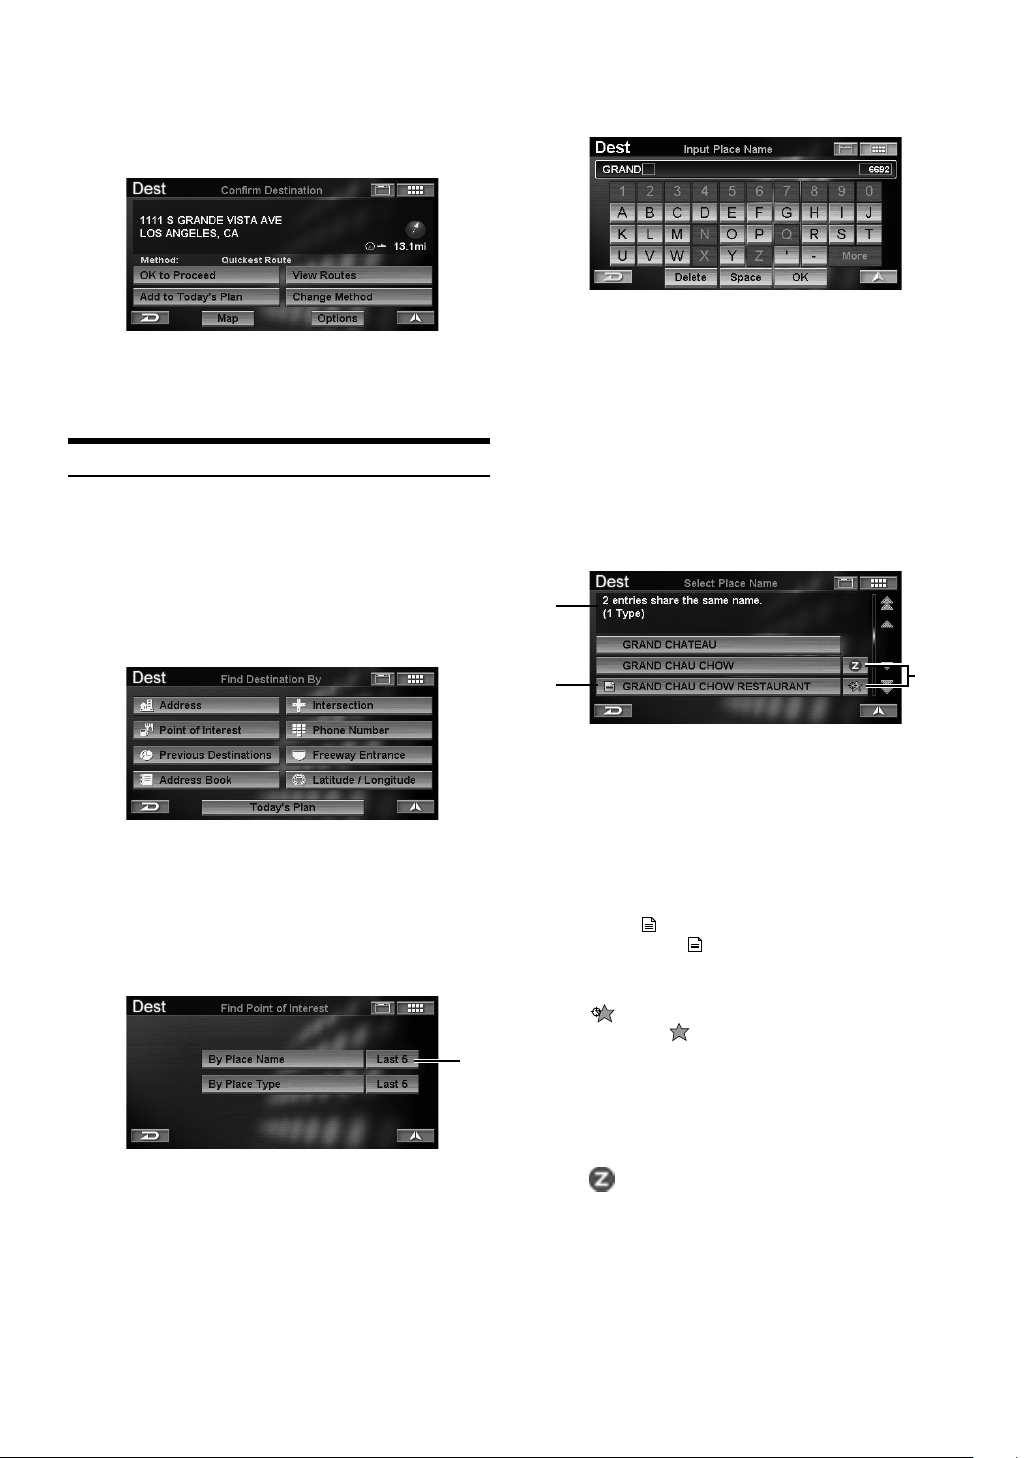
Entering a Point of Interest by Place Name
If you know the desired point of interest name, it can easily be
displayed by inputting that name using the on-screen keyboard.
1
Touch [Point of Interest] on the Find
Destination By screen.
Select (highlight) “Point of Interest” by tilting the
joystick and press ENTER.
The Find Point of Interest menu is displayed.
2
Touch [By Place Name].
Select (highlight) “By Place Name” by tilting the
joystick and press ENTER.
a Last 5
The last five place names searched are stored in
memory. You can reselect a place name from this list.
The Input Place Name screen is displayed.
a
4
Touch the desired point of interest name.
Select (highlight) the desired place name by tilting
the joystick and press ENTER.
b
c
b Information
Point of interest address, category, telephone number
and direction and distance from the current position are
displayed. If more than one point of interest name
exists, an entry number is displayed.
c Place Name
If more than one point of interest name exists, an icon
is displayed in front of its name. If the point of
interest name with is selected, the Select Place
Type or Select Address screen is displayed.
d POI Search Icon
: The system will display up to 10 asterisk
icons on the map screen representing
points of interest near the current vehicle
position. An icon can be selected and set as
a destination. You can easily find a point of
interest, such as a fast food restaurant, by
searching place names under the FAST
FOOD category.
:Review and Ratings of ZAGAT SURVEY
2007 are displayed. See page 27.
•For details on how to use the list, see page 11.
The Confirm Destination screen appears.
d
16-EN
Page 20
5
Touch [OK to Proceed].
Select (highlight) “OK to Proceed” by tilting the
joystick and press ENTER.
3
Touch the desired category of place type.
Select (highlight) the desired category of place
type by tilting the joystick and press ENTER.
EN
The system will begin calculating the route.
•For details of the Confirm Destination, see page 31.
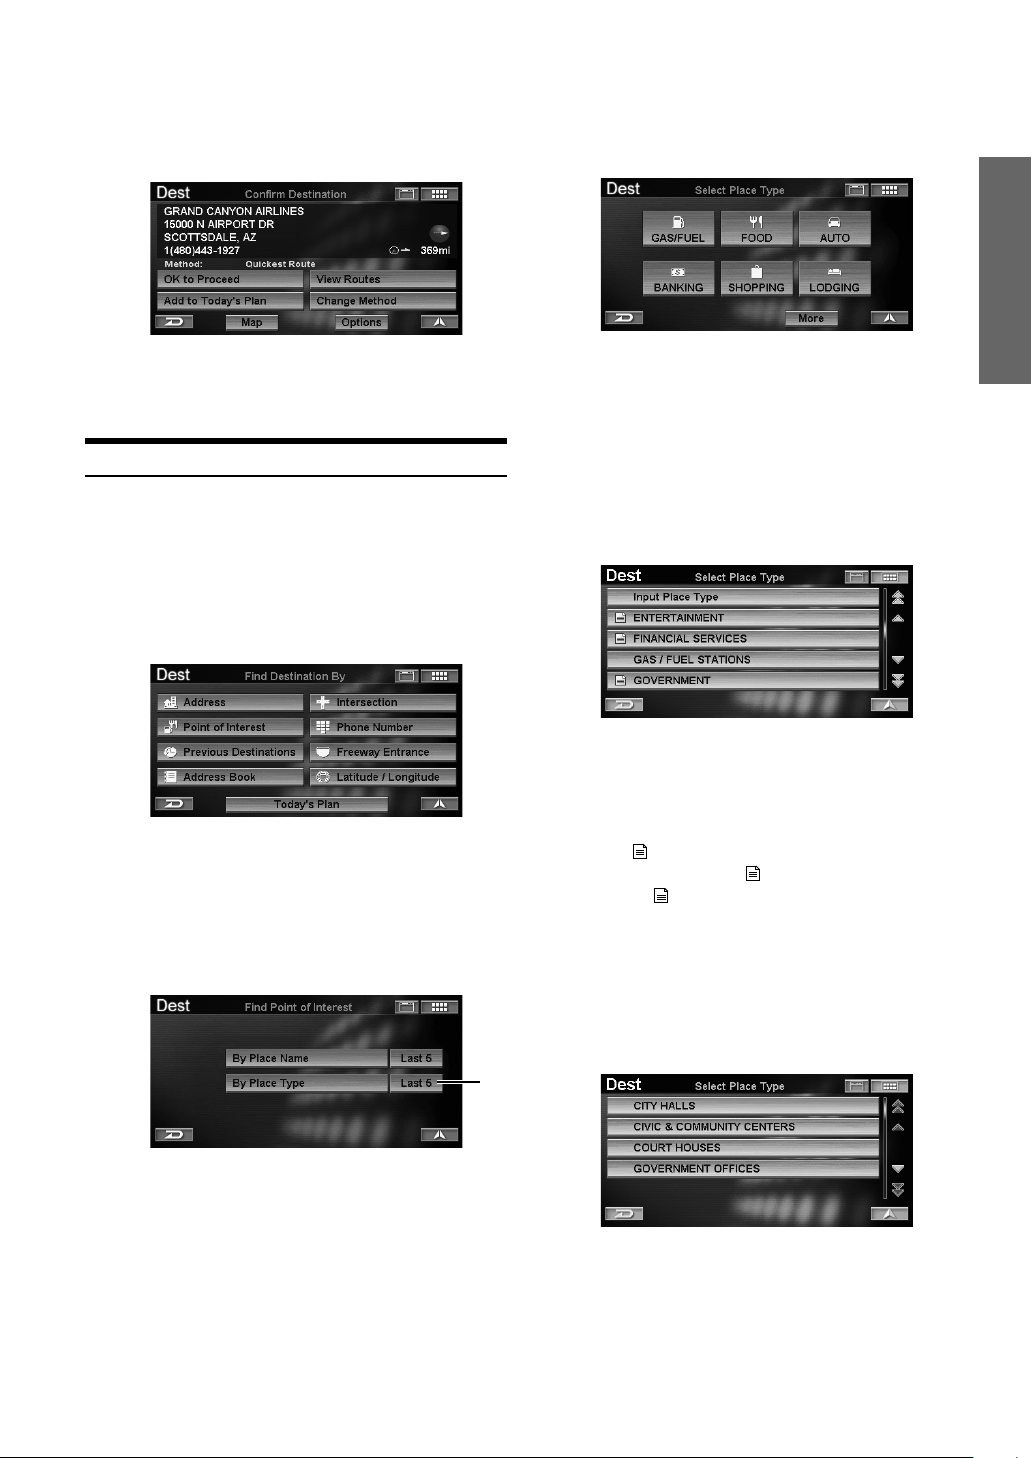
Entering a Point of Interest by Place Type
You can search for a destination place type (if known) by
selecting a list of categories.
1
Touch [Point of Interest] on the Find
Destination By screen.
Select (highlight) “Point of Interest” by tilting the
joystick and press ENTER.
The Find Point of Interest menu is displayed.
2
Touch [By Place Type].
Select (highlight) “By Place Type” by tilting the
joystick and press ENTER.
If you select the desired category from the six place
types (except GAS/FUEL), go to step 5. If you select
“GAS/FUEL,” go to step 6. If you select “More,” go to
step 4.
4
Touch the desired category of place type.
Select (highlight) the desired category of place
type by tilting the joystick and press ENTER.
•For details on how to use the list, see page 11.
• If you select “Input Place Type,” input a keyword of
place type and select it.
• If more than one point of interest type exists, an icon is
displayed
select the place type with
type without , go to step 6.
The sub-menu of Select Place Type screen is
displayed.
in front of point of interest type. If you
, go to step 5, or the place
a Last 5
The last five place types searched are stored in
memory. You can reselect a place type from this list.
The Select Place Type screen is displayed.
a
5
Touch the desired place type.
Select (highlight) the desired place type by tilting
the joystick and press ENTER.
•For details on how to use the list, see page 11.
The Find Place Type menu appears.
Continued
17-EN
Page 21
6
To find a point of interest, touch one of the
following items.
To find a point of interest, select one of the
following items and press ENTER.
a
b
c
d
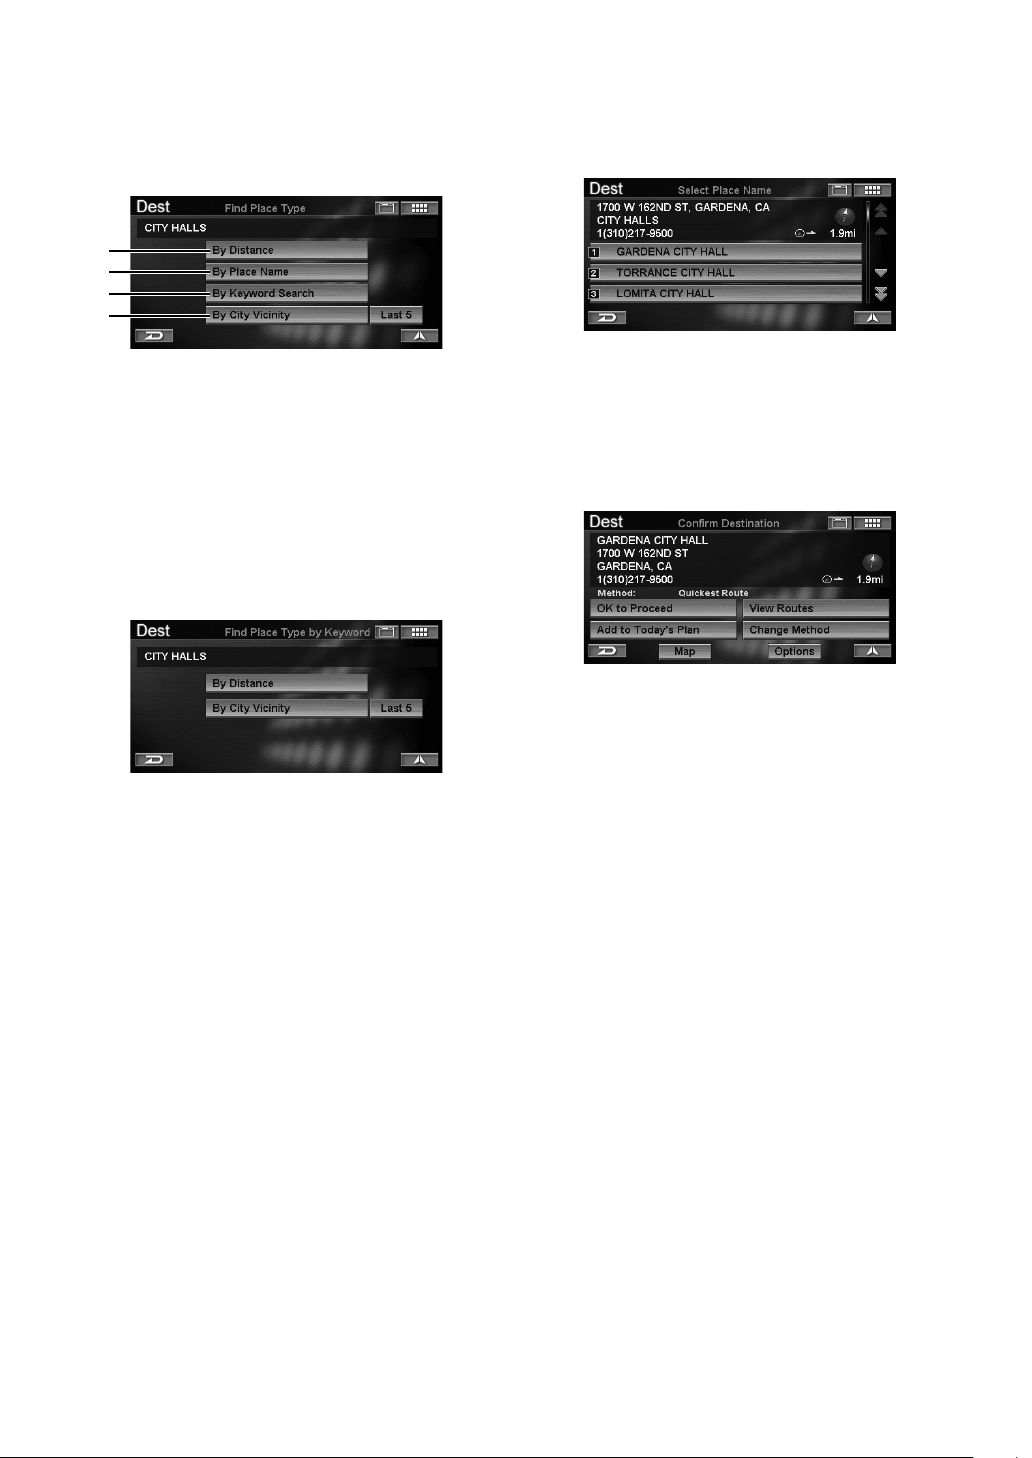
a By Distance
The point of interest name list is displayed in order of
distance from the current position.
b By Place Name
The Input Place Name screen is displayed. Input the
desired place name.
c By Keyword Search
If you do not know the exact name of the destination,
you can find the place with a keyword.
7
Touch the desired place name.
Select (highlight) the desired place name by tilting
the joystick and press ENTER.
The Confirm Destination screen appears.
8
Touch [OK to Proceed].
Select (highlight) “OK to Proceed” by tilting the
joystick and press ENTER.
By Distance:
Input a place name keyword.
By City Vicinity:
The system allows you to find points of interest in the
vicinity of the city you entered.
Select a city by inputting its name, then input a place
name keyword.
Last 5:
The last five city names searched are stored in
memory. You can reselect a city name from this list.
d By City Vicinity
The Input City Name screen is displayed.
Select a city by inputting its name, and input a point of
interest name.
The Select Place Name screen is displayed.
The system will begin calculating the route.
•For details of the Confirm Destination, see page 31.
18-EN
Page 22
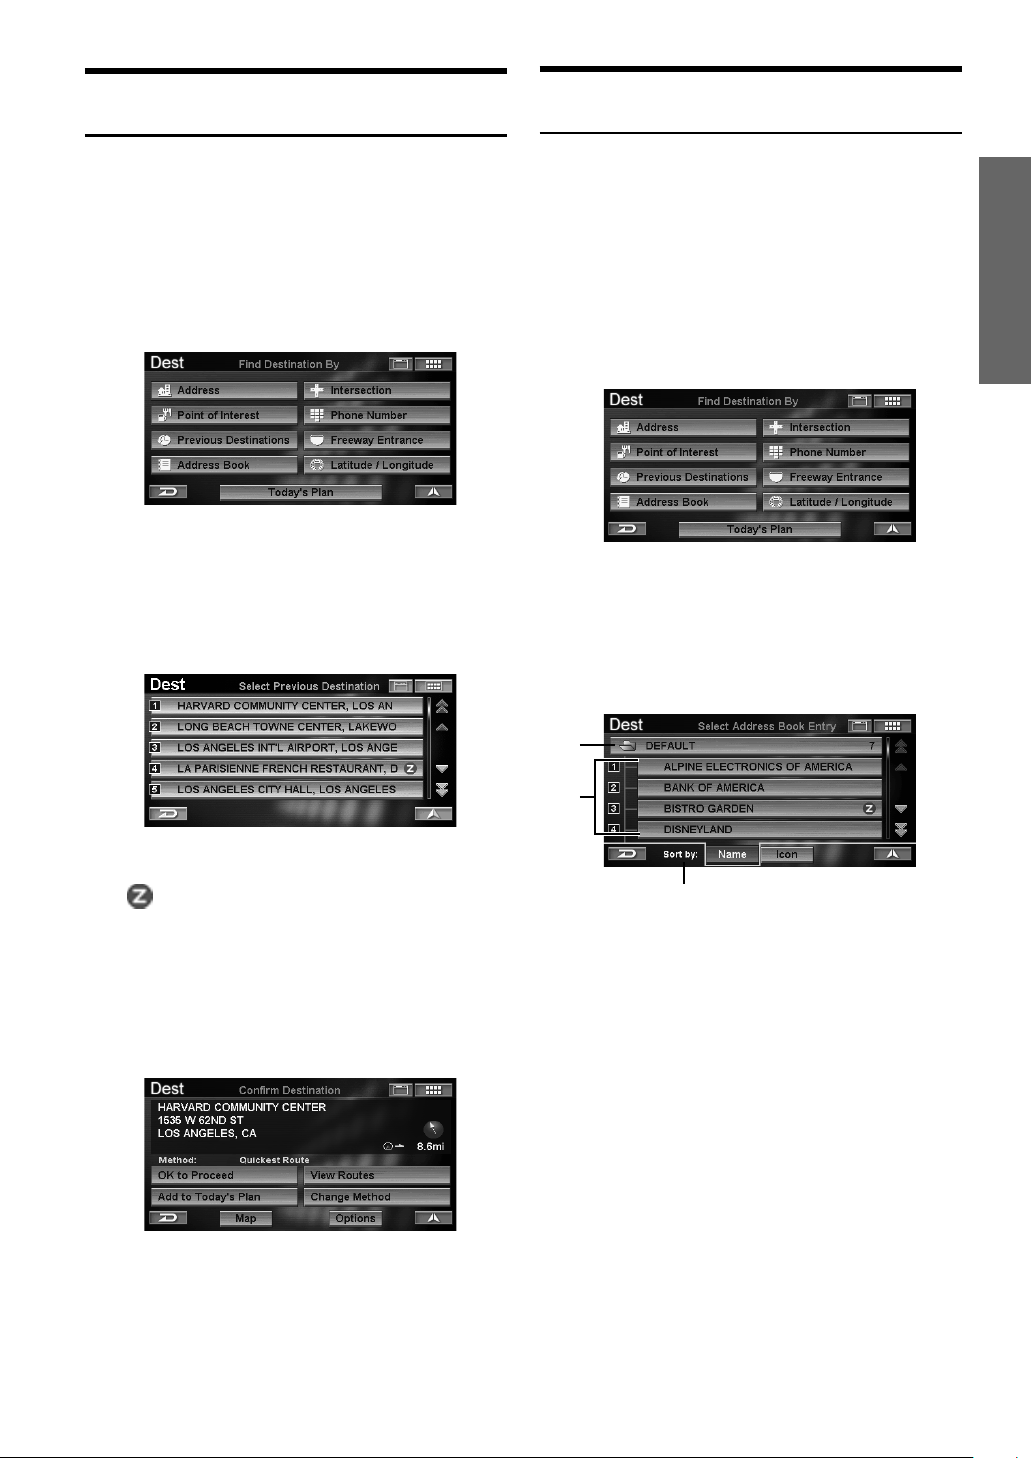
Entering a Destination by Previous
Destinations
If your destination is one of the fifty most recent destinations,
you can recall that destination using the procedure described in
this section.
1
Touch [Previous Destinations] on the
Find Destination By screen.
Select (highlight) “Previous Destinations” by
tilting the joystick and press ENTER.
The Select Previous Destination screen is displayed.
Entering a Destination Using the Address
Book
If a location has already been placed into your personal address
book, you can recall this location for use as a destination. The
Address Book holds up to 300 different addresses and phone
numbers. For more information on how to store locations in the
address book, see page 34.
1
Touch [Address Book] on the Find
Destination By screen.
Select (highlight) “Address Book” by tilting the
joystick and press ENTER.
EN
2
Touch the desired destination.
Select (highlight) the desired destination by tilting
the joystick and press ENTER.
•For details on how to use the list, see page 11.
•A “ ” icon is displayed for places reviewed by Zagat
Survey. See page 27.
The Confirm Destination screen appears.
3
Touch [OK to Proceed].
Select (highlight) “OK to Proceed” by tilting the
joystick and press ENTER.
The system will begin calculating the route.
•For details of the Confirm Destination, see page 31.
The Select Address Book Entry screen is displayed.
2
Touch the desired destination.
Select (highlight) the desired destination by tilting
the joystick and press ENTER.
a
b
c
a Folder Name
You can select the Address Book folder.
b Name
A list of places contained in the Address Book folder is
displayed.
c Sort by
You can sort the place list.
Name: You can sort the list by names.
Icon: You can sort the list by icons.
•For details on how to use the list, see page 11.
The Confirm Destination screen appears.
• If Confirm Address Book is set to “Never” and an
Address Book place is selected, the Confirm
Destination screen is not displayed, but the route is
calculated to the destination (see page 70).
Continued
19-EN
Page 23
3
Touch [OK to Proceed].
Select (highlight) “OK to Proceed” by tilting the
joystick and press ENTER.
3
Touch desired State or Province.
Select (highlight) the desired State or Province by
tilting the joystick and press ENTER.
The system will begin calculating the route.
• For details of the Confirm Destination, see page 31.
Entering a Destination by Intersection
If you know an intersection near where you want to go, you can
input two cross streets as your destination.
1
Touch [Intersection] on the Find
Destination By screen.
Select (highlight) “Intersection” by tilting the
joystick and press ENTER.
The Find Intersection menu is displayed.
2
Selecting the State or Province you are in is
displayed at the top of the screen. If your
desired destination is in another state, select
“Change.”
• Select USA or Canada.
4
To find an intersection, touch one of the
following items.
To find an intersection, select one of the following
items and press ENTER.
a
b
a By Street Name
The Input Street Name screen appears. Go to step 7.
b By City Name
The Input City Name screen is displayed. Go to step 5.
c Last 5
The last five city names searched are stored in
memory. You can reselect a city name from this list.
5
Input the city name.
c
The Select State Name screen is displayed.
20-EN
• If the number of candidates narrows down to less than
5, the display automatically shows the Select City
Name screen.
•For details on how to input, see page 11.
The Select City Name screen is displayed.
Page 24
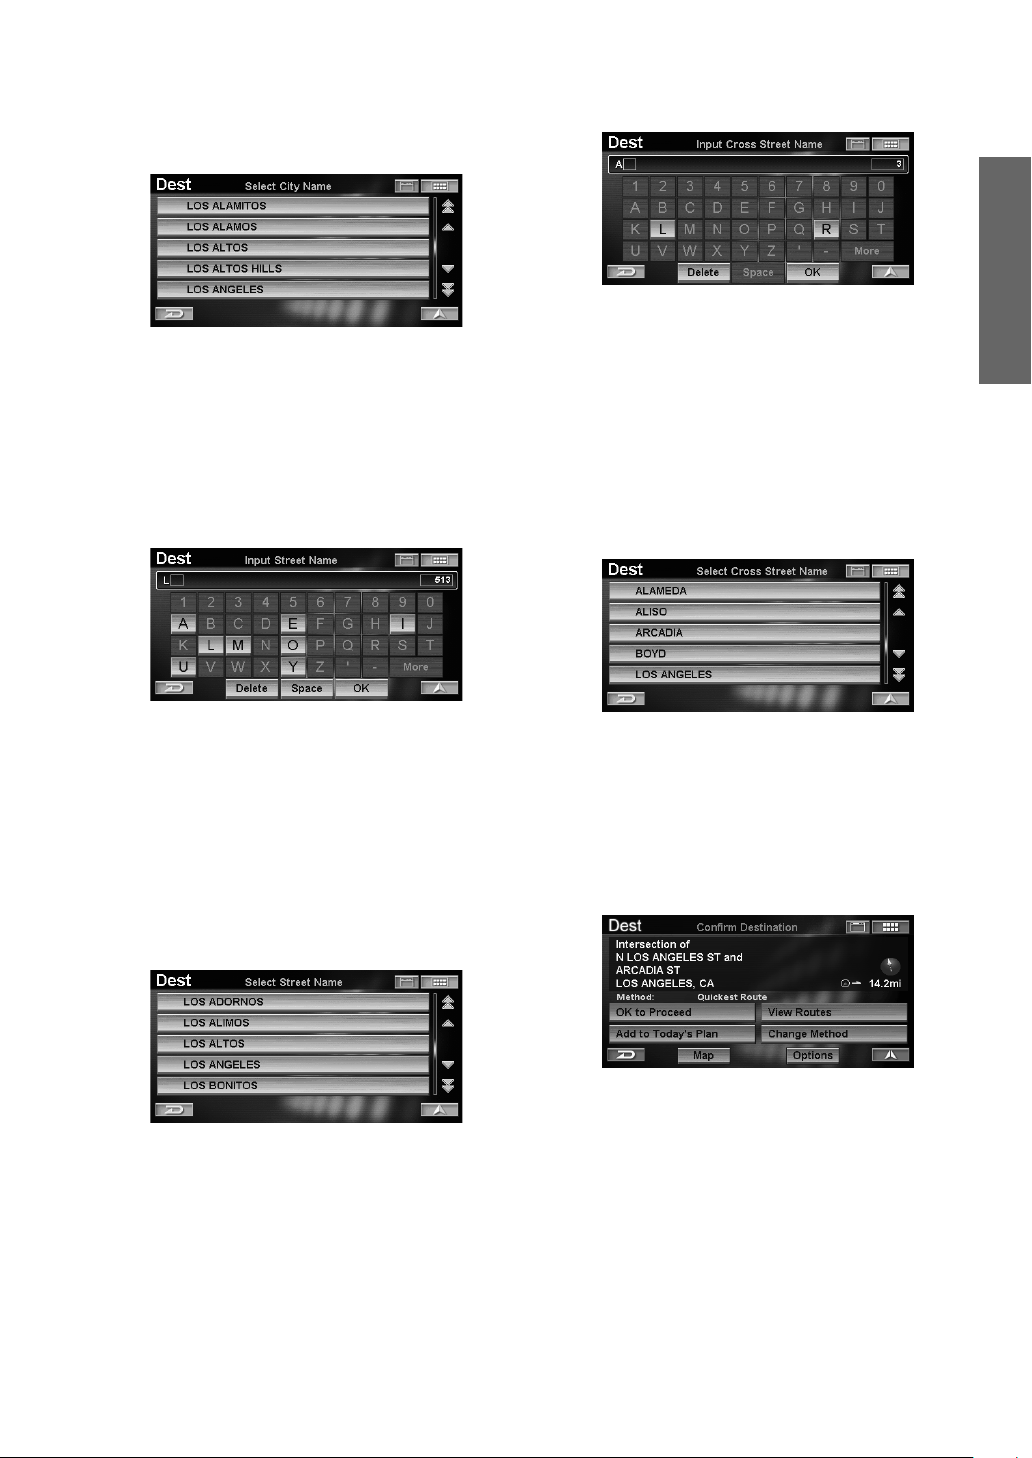
6
Touch the desired city name.
Select (highlight) the desired city name by tilting
the joystick and press ENTER.
•For details on how to use the list, see page 11.
The Input Street Name screen is displayed.
• If a street does not have an intersection in the city, the
no intersection dialog screen appears.
7
Input the street name.
9
Input the second street name.
• If the number of candidates narrows down to less than
5, the display automatically shows the Select Cross
Street Name screen.
•For details on how to input, see page 11.
The Select Cross Street Name screen is displayed.
10
Touch the desired second street name.
Select (highlight) the desired second street name
by tilting the joystick and press ENTER.
EN
• If the number of candidates narrows down to less than
5, the display automatically shows the Select Street
Name screen.
•For details on how to input, see page 11.
The Select Street Name screen is displayed.
8
Touch the desired street name.
Select (highlight) the desired street name by tilting
the joystick and press ENTER.
• If the number of candidates narrows down to less than
5, the display automatically shows the Select Cross
Street Name screen. Go to step 10.
•For details on how to use the list, see page 11.
The Input Cross Street Name screen is displayed.
•For details on how to use the list, see page 11.
The Confirm Destination screen appears.
11
Touch [OK to Proceed].
Select (highlight) “OK to Proceed” by tilting the
joystick and press ENTER.
The system will begin calculating the route.
•For details of the Confirm Destination, see page 31.
21-EN
Page 25
Entering a Point of Interest by Phone
Number
If you know the phone number of the point of interest you are
heading to, use this function to find the destination address.
3
Touch the phone number.
Select (highlight) the phone number by tilting the
joystick and press ENTER.
1
Touch [Phone Number] on the Find
Destination By screen.
Select (highlight) “Phone Number” by tilting the
joystick and press ENTER.
The Input Phone Number screen is displayed.
2
Input a telephone number.
•For details on how to input, see page 11.
The Select Phone Number screen is displayed.
a
b
a Information
Point of interest address, category and direction and
distance from the current position are displayed. If
more than one place of interest name exists for the
number, an entry number is displayed.
b Phone Number
If more than one point of interest with the phone
number exists, an icon is displayed in front of the
phone number. If you select the phone number with ,
the Select Place Name or Select Place Type or
Select Address screen is displayed.
• : If more than one point of interest for a phone
number exists, the button is displayed. If the
button is selected, the display will show up to 10
asterisk icons on the map screen, representing points
of interest (with the same phone number), near the
current vehicle position. An icon
and set as a destination.
•For details on how to use the list, see page 11.
The Confirm Destination screen appears.
4
Touch [OK to Proceed].
Select (highlight) “OK to Proceed” by tilting the
joystick and press ENTER.
can be selected
22-EN
The system will begin calculating the route.
•For details of the Confirm Destination, see page 31.
Page 26
Entering a Destination by Freeway Entrance
You can search for a location from the freeway entrance or exit.
1
Touch [Freeway Entrance] on the Find
Destination By screen.
Select (highlight) “Freeway Entrance” by tilting
the joystick and press ENTER.
The Find Freeway Entrance menu is displayed.
2
The State or Province you are in is displayed
at the top of the screen. If your desired
destination is in another state, select
“Change.”
4
To find a freeway entrance, touch one of the
following items.
To find a freeway entrance, select one of the
following items and press ENTER.
a
b
a By Distance
The Select Freeway Entrance screen is displayed in
order of distance from the current position. Go to step
8.
b By Name
The Input Freeway Name screen is displayed. Go to
step 5.
5
Input the freeway name.
EN
The Select State Name screen is displayed.
3
Touch the desired State or Province.
Select (highlight) the desired State or Province by
tilting the joystick and press ENTER.
• Select USA or Canada.
• If the number of candidates narrows down to less than
5, the display automatically shows the Select Freeway
Name screen.
•For details on how to input, see page 11.
The Select Freeway Name screen is displayed.
6
Touch the desired freeway name.
Select (highlight) the desired freeway name by
tilting the joystick and press ENTER.
• If the number of candidates narrows down to less than
5, the display automatically shows the Select Entrance
Name screen. Go to step 8.
•For details on how to use the list, see page 11.
The Input Entrance Name screen is displayed.
Continued
23-EN
Page 27
7
Input the entrance name.
• If the number of candidates narrows down to less than
5, the display automatically shows the Select Entrance
Name screen.
•For details on how to input, see page 11.
The Select Entrance Name screen is displayed.
8
Touch the desired entrance name.
Select (highlight) the desired entrance name by
tilting the joystick and press ENTER.
Select Freeway Entrance screen
Entering a Destination by Latitude and
Longitude
If you know the latitude and longitude of the desired location,
you can display that location by just inputting those numbers.
1
Touch [Latitude/Longitude] on the Find
Destination By screen.
Select (highlight) “Latitude / Longitude” by tilting
the joystick and press ENTER.
The Input Latitude screen is displayed.
2
Input the latitude.
Select Entrance Name screen
• If more than one entrance in the selected entrance name
exists, the Select Entrance screen is displayed.
•For details on how to use the list, see page 11.
The Confirm Destination screen appears.
9
Touch [OK to Proceed].
Select (highlight) “OK to Proceed” by tilting the
joystick and press ENTER.
•For details on how to input, see page 11.
The Input Longitude screen is displayed.
3
Input the longitude.
•For details on how to input, see page 11.
The Confirm Destination screen appears.
The system will begin calculating the route.
•For details of the Confirm Destination, see page 31.
24-EN
Page 28
4
Touch [OK to Proceed].
Select (highlight) “OK to Proceed“ by tilting the
joystick and press ENTER.
2
To use Today’s Plan, touch one of the
following items.
To use Today’s Plan, select one of the following
items and press ENTER.
The system plots a straight red dotted line from your
current position to the destination. This is only used as
a reference. There is no guidance during this mode.
Using the Today’s Plan Function
Today’s Plan will calculate the most efficient travel order for
multiple destinations. Up to 100 destinations can be stored in
“Today’s Plan.” For details about the registration method, see
page 31.
1
Touch [Today’s Plan] on the Find
Destination By screen.
Select (highlight) “Today’s Plan” by tilting the
joystick and press ENTER.
a
c
a By Optimum Route
Optimizes the route by minimizing the travel distance
between all destinations in Today’s Plan. The Confirm
Destination screen of the nearest destination in Today’s
Plan List is displayed. If you would like to visit this
destination first, select “OK to Proceed.” The system
will begin calculating the route.
b Set Last
The route will be calculated to ensure that the “Last”
destination will be the final destination in the plan.
Select the destination you would like to go last, then
“Done.”
c By Input Order
Destinations in the Today’s Plan list can be visited in
the order they were input.
The Confirm Destination screen of the first destination
in Today’s Plan List is displayed. If you would like to
visit this destination first, select “OK to Proceed.” The
system will begin calculating the route.
•For details on how to use the list, see page 11.
• If you would like to select a different destination to
route first, select “Today’s Plan List.” Today’s Plan list
will appear. Select the destination you would like to
visit first.
•The Sort Today’s Plan screen can also be recalled by the
following operation:
Touch Operation:
Touch [ ], then [PLAN].
Remote Control Operation
Press PLAN.
b
EN
The Sort Today’s Plan menu is displayed.
25-EN
Page 29
Entering a Destination by Home
If your home has already been registered, you can call it out with
a simple operation. For details about the registration method, see
page 35.
Entering a Destination Using the Favorites
If your favorite destinations have already been registered, a
simple operation can call them as your destination. For details on
the registration method, see page 35.
1
Touch [ ].
Press MENU.
The Nav Menu screen is displayed.
2
Touch [Home].
Select (highlight) “Home” by tilting the joystick
and press ENTER.
1
Touch [ ].
Press MENU.
The Nav Menu screen is displayed.
2
Touch [Favorites].
Select (highlight) “Favorites” by tilting the
joystick and press ENTER.
The system will begin calculating the route.
• If Confirm Home is set to “Always,” the Confirm
Destination screen is displayed (see page 69).
Select “OK to Proceed,” then set the destination.
The Favorites list is displayed.
26-EN
Page 30
3
Touch the desired favorites category, then
item.
Select (highlight) the desired favorites category by
tilting the joystick and press ENTER. After that
select an item and press ENTER.
ab c d
a Dest
A place that is registered as “Dest” in Favorites can be
set as the destination.
b Names
A place name that is registered in “Name” can be easily
searched.
c Types
A place name that is registered in “Type” can be easily
searched.
d Spots
Places surrounding the location registered in “Spots”
can be easily searched.
Entering a Destination Using ZAGAT SURVEY
Data
The system is supplied with data from the 2007 Zagat Survey
U.S. Restaurant Guide. The Zagat Survey ratings are displayed
for ease in selecting a desired restaurant.
1
Touch [ ].
Press MENU.
The Nav Menu screen is displayed.
2
Touch [ZAGAT 2007].
Select (highlight) “ZAGAT 2007” by tilting the
joystick and press ENTER.
EN
4
Touch [OK to Proceed].
Select (highlight) “OK to Proceed” by tilting the
joystick and press ENTER.
The system will begin calculating the route.
•For details of the Confirm Destination, see page 31.
• If Confirm Favorite Dest is set to “Never” and a
Favorite Dest place is selected, the Confirm
Destination screen is not displayed, but the route is
calculated to the destination (see page 70).
The Select Metro Area screen is displayed.
3
Touch the desired metro area.
Select (highlight) the desired metro area by tilting
the joystick and press ENTER.
•For details on how to use the list, see page 11.
The Select Neighborhood screen is displayed.
Continued
27-EN
Page 31

4
Touch the desired neighborhood.
Select (highlight) the desired neighborhood by
tilting the joystick and press ENTER.
6
Touch the desired restaurant name.
Select (highlight) the desired restaurant name by
tilting the joystick and press ENTER.
a
•For details on how to use the list, see page 11.
The Select Food Type screen is displayed.
5
Touch the desired food type.
Select (highlight) the desired food type by tilting
the joystick and press ENTER.
•For details on how to use the list, see page 11.
The Select Restaurant screen is displayed.
b
a Ranking
Selected ranking or average price is displayed.
b Name
Restaurant names are sorted alphabetically.
c Ratings
Restaurant names are sorted by rating.
•For details on how to use the list, see page 11.
The Review and Ratings screen is displayed.
7
Touch [OK].
Select (highlight) “OK” by tilting the joystick and
press ENTER.
a
b
cd
a Ranking
The ranking of each rating type and an average price
are displayed.
b Information
The address of the restaurant, telephone number and
review of the restaurant are displayed.
c Read
Information is read with voice guidance.
d Key
The ranking explanation is displayed.
The Confirm Destination screen is displayed.
c
28-EN
Page 32

8
Touch [OK to Proceed].
Select (highlight) “OK to Proceed” by tilting the
joystick and press ENTER.
The system will begin calculating the route.
•For details of the Confirm Destination, see page 31.
Entering a Destination by Scrolling
Displayed Map
This feature allows you quick and easy selection of a new
destination directly from a street segment or Point of interest icon
on the Detailed Map Display. By selecting a street segment or
icon, you can quickly enter a destination without inputting the
city name, street, etc.
1
Touch the Map Display.
2
Touch [8] for the direction you want to scroll
on the scroll pad and scroll the map.
Tilt the joystick to scroll the map in the desired
direction.
The map scrolls.
•While moving the crosshair icon, the street name
display changes to the latitude/longitude display.
3
Align the crosshair icon on the destination,
and touch the street name button or [[].
Align the crosshair icon on the destination, and
press ENTER.
The street name button
EN
The Scroll pad is displayed.
• The scroll pad is not displayed when scrolling the map
with the remote control.
[[]
• The latitude/longitude display changes to the street
name.
The Point Display sub menu appears.
Continued
29-EN
Page 33

4
Touch [Set as Destination].
Select (highlight) “Set as Destination” by tilting
the joystick and press ENTER.
a
b
c
d
5
Touch [OK to Proceed].
Select (highlight) “OK to Proceed” by tilting the
joystick and press ENTER.
e
a Set as Destination
A place can be set as a destination.
b View Icon List
The icons around the cursor are listed.
If a POI icon is set to “Hide,” “View Icon List” cannot be
selected. See “POI Icons” (page 62).
c Find Local POI
A selected place surrounding a POI can be searched.
d Save Position
A place is stored in Previous Destination.
e More
The following page is displayed.
f
g
h
i
f Add to Favorite Spot
A favorite place can be stored in Favorite Spot.
g Avoid Road
A place to be avoided can be stored in Avoid Road.
Select a distance from “1/2 mi”, “1 mi” or “2 mi.”
h Avoid Area
An area to be avoided can be stored in Avoid Area.
Select a distance from “1/2 mi”, “1 mi” or “2 mi.”
i Back
The previous page is displayed.
The Confirm Destination screen appears.
The system will begin calculating the route.
•For details of the Confirm Destination, see page 31.
30-EN
Page 34

Confirm Destination
After a destination is searched, use the Confirm Destination
screen to customize the route. Setting a new destination, storing
Today’s Plan and Address Book, etc., can be performed on the
Confirm Destination screen.
L Confirm Destination screen
a
Add to Today’s Plan
Today’s Plan will calculate the most efficient travel order for
multiple destinations. Up to 100 destinations can be stored in
“Today’s Plan.”
1
Touch [Add to Today’s Plan] on the
Confirm Destination screen.
Select (highlight) “Add to Today’s Plan” by tilting
the joystick and press ENTER.
EN
b
c
gf
a Information
A place name, address, telephone number, direction
and distance from the current position are displayed.
b OK to Proceed
When you set a destination, the system begins
calculating a route to the destination.
c Add to Today’s Plan
To store a place in Today’s Plan, see “Add to Today’s
Plan” (page 31).
d View Routes
The system displays the entire route in a North up map
display. Different routes are displayed in 5 different
colors for easy selection of the desired route (see “View
Route,” page 32).
e Change Method
The system lets you select the way you want to drive to
your destination, see “Change Method” (page 32).
f Map
A map of the area surrounding the selected destination
is displayed (see “Open Map,” page 33).
g Options
The Select Option screen is displayed, see “Displaying
the Option Menu Screen” (page 33).
d
e
The Today's Plan list is displayed with the added
destination highlighted. The system returns to the Find
Destination by screen.
31-EN
Page 35

View Route
Different routes are displayed in 5 different colors for easy
selection of a desired route.
1
Touch [View Routes] on the Confirm
Destination screen.
Select (highlight) “View Routes” by tilting the
joystick and press ENTER.
5 different routes are displayed.
2
Touch [;] or [:] to select the desired route.
Select (highlight) the desired route by tilting the
joystick.
Change Method
You can change the way the system calculates a route.
1
Touch [Change Method] on the Confirm
Destination screen.
Select (highlight) “Change Method” by tilting the
joystick and press ENTER.
The Select Method menu is displayed.
2
Touch the desired Method.
Select (highlight) the desired method by tilting the
joystick and press ENTER.
a
b
c
d
e
Current route, distance and anticipated arrival time to
the destination
3
Touch [ ].
Press ENTER.
The selected route starts to guide.
•For details on each route, refer to “Change Method”
(page 32).
f
a Quickest Route
When set to Quickest, the system will calculate the
most efficient way to arrive at your destination.
b Shortest Route
When set to Shortest Route, the system will calculate
the shortest route to the destination.
c Maximize Freeways
The Maximize Freeway option calculates a route that
makes most efficient use of freeways.
d Minimize Freeways
When set to Minimize Freeways, the system will
calculate a route that uses mostly regular streets or
roads.
e Minimize Toll Roads
The Minimize Toll Roads option calculates a route that
uses the least number of pay roads enroute to the
destination.
f Use Ferry
When you calculate a route, you can set whether to use
a ferry or not. If you set to Use Ferry, select any of the
above described methods so that the route can be
calculated to use ferries.
The display returns to the Confirm Destination screen.
• Changing the method via the screen will be applied
only for the current destination. To change the method
permanently, refer to “Routing Method” (page 66).
32-EN
Page 36

Open Map
A map of the area surrounding the selected destination is
displayed. The area can be changed by scrolling the map.
1
Touch [Map] on the Confirm Destination
screen.
Select (highlight) “Map” by tilting the joystick and
press ENTER.
A map surrounding a selected place is displayed.
2
Scroll the map to change a place, see
“Entering a Destination by Scrolling
Displayed Map” on page 29.
Displaying the Option Menu Screen
You can register the searched destinations in Address Book or
Home, or add to Favorites in the option menu.
1
Touch [Options] on the Confirm
Destination screen.
Select (highlight) “Options” by tilting the joystick
and press ENTER.
a Find Local POI
View and select local POIs surrounding the current
destination, see “Find Local POI (Point of Interest)”
(page 33).
b Save to Address Book
A place can be stored in Address Book, see “Save to
Address Book” (page 34).
c Save as Home
A place can be stored as Home, see “Save as Home”
(page 35).
d Add to Favorites
A place can be stored in Favorites, see “Add to
Favorites” (page 35).
e Set as Waypoint
You can set up to 1 waypoint from your current position
to the destination, see “Set as Waypoint” (page 35).
f Set as Point A to B
Set current destination as point A. Input a point B to
calculate between two points, see “Set as Point A to B”
(page 36).
Find Local POI (Point of Interest)
Local POIs surrounding the current destination are listed. These
may be selected as a new destination.
1
Touch [Find Local POI] on the Select
Option screen.
Select (highlight) “Find Local POI” by tilting the
joystick and press ENTER.
EN
The Select Option screen is displayed.
L Select Option screen
a
b
c
The Select Place Type screen is displayed.
d
e
f
Continued
33-EN
Page 37

2
Touch the desired category of place type.
Select (highlight) the desired category of place
type by tilting the joystick and press ENTER.
5
Touch [OK to Proceed].
Select (highlight) “OK to Proceed” by tilting the
joystick and press ENTER.
•For details on how to use the list, see page 11.
•When you select “Input Place Type,” input a keyword
of place type and select Place Type.
• If more than one point of interest type exists. an icon is
displayed
select the place type with , go to step 3. If you select
the place type without
The sub-menu of Select Place Type screen is
displayed.
3
Touch the desired place type.
Select (highlight) the desired place type by tilting
the joystick and press ENTER.
•For details on how to use the list, see page 11.
The Select Place Name screen is displayed.
in front of point of interest type. If you
, go to step 4.
The system will begin calculating the route.
Save to Address Book
Up to 300 addresses can be stored in Address Book. Address
Book can be stored in any folder.
1
Touch [Save to Address Book] on the
Select Option screen.
Select (highlight) “Save to Address Book” by
tilting the joystick and press ENTER.
The Save to Address Book screen is displayed.
2
Touch [Done].
Select (highlight) “Done” by tilting the joystick
and press ENTER.
4
Touch the desired place name.
Select (highlight) the desired place name by tilting
the joystick and press ENTER.
The Confirm Destination screen appears.
34-EN
•You can modify items in Address Book. For details, see
“Editing the Address Book” (page 44).
The display returns to the Confirm Destination screen.
Page 38

Save as Home
Register any destination as home. By doing so, it can be instantly
recalled for finding your way home.
1
Touch [Save as Home] on the Select
Option screen.
Select (highlight) “Save as Home” by tilting the
joystick and press ENTER.
The Save as Home screen is displayed.
2
Touch [Done].
Select (highlight) “Done” by tilting the joystick
and press ENTER.
2
Touch [Add] of the desired item.
Select (highlight) “Add” of the desired item by
tilting the joystick and press ENTER.
a Dest
Register Dest as a frequent destination, which can
easily be recalled. When the Confirm Favorite
Destination screen is displayed, select “Done.”
b Name
Register only a place name. This function is useful for
finding places of the same name.
c Type
Register only a place type. This function is useful for
finding places of a particular type.
d Spot
Register a location. Use this location to find local POIs
within the surrounding area registered.
The system returns to the Confirm Destination screen.
• Items in Favorite can be modified, see “Editing the
Favorites” on page 48.
a
b
c
d
EN
•You can modify items in Home. For details, see
“Editing the Home” (page 53).
•You can register only one “home.”
Add to Favorites
There are 4 categories, Destination, Name, Type and Spot. You
can register 5 different favorites for each category.
1
Touch [Add to Favorites] on the Select
Option screen.
Select (highlight) “Add to Favorites” by tilting the
joystick and press ENTER.
The Add to Favorites screen is displayed.
Set as Waypoint
You can set up to 1 waypoint from your current position to the
destination.
1
Touch [Set as Waypoint] on the Select
Option screen.
Select (highlight) “Set as Waypoint” by tilting the
joystick and press ENTER.
The system automatically calculates a route with your
set waypoints enroute.
•You can set up to 1 waypoint. Waypoint flag icon is
displayed on the map screen.
35-EN
Page 39

Set as Point A to B
Calculate a route between points A and B.
1
Touch [Set as Point A to B] on the Select
Option screen.
Select (highlight) “Set as Point A to B” by tilting
the joystick and press ENTER.
The confirmation message for whether to set a place
as A is displayed.
4
Touch [OK to Proceed A to B].
Select (highlight) the “OK to Proceed A to B” by
tilting the joystick and press ENTER.
The system begins calculating a route between A and B.
•Point A or B are displayed with a flag on the map.
Point A
Point B
a
2
Touch [OK].
Press ENTER.
The Find Point B by screen is displayed.
3
The place set as B is searched.
The Confirm Point A to B screen appears.
a View Routes A to B
Displays all routes between point A and B.
•For route selecting operation, refer to “View Route”
(page 32).
•For details on each route, refer to “Change Method”
(page 32).
36-EN
Page 40

Driving to Your
Destination
L Map Route Guidance Display
ac
d
Changing the Route Guidance Display
Once the route has been calculated and driving begins, the
navigation system will guide the driver, turn-by-turn, to the
destination. Real time voice directions and map displays aid the
driver throughout the entire route.
The type of display that appears during your trip can be selected
according to your preference.
The Map Route Guidance Display automatically appears when
the destination is selected while the vehicle is in motion.
1
Touch [ ].
The route sub menu is displayed.
• If operation is performed using the remote control, go
to step 2.
2
Touch [DISP.].
Press DISP.
b
e
f
a VOICE button ( )
Initiates vocal instruction for next route maneuver or
repeats last instruction.
b Information on the next intersection
c Street/highway name of next maneuver
d Route Line
A route is displayed in blue when you are driving on a
verified road to the destination. When you are driving
on an unverified road, a red dotted line gives the
bearing to your waypoint or destination. Before driving
onto an unverified road that traverses your route, a blue
dotted line is shown between the unverified roads.
e Distance to next maneuver
f
g Route icon
h Estimated Remaining/ Arrival Time
L Split Route Guidance Display
button
Displays the route sub menu.
The route icon for Distance and Direction to Destination
is displayed. Touching this icon will display the Route
menu.
g
h
EN
Route sub menu
• Each touch of DISP. changes the display.
•While driving on a freeway, Arrow Route Guidance
Display changes to the Freeway Junction display.
• During the Map Route Guidance Display or Split Route
Guidance display setting, if you set Auto Zoom Map to
ON in Setup, the map scale automatically zooms to a
suitable scale before an intersection (see page 66).
• When Display is set to Hybrid in Setup, the setting
automatically changes display type when approaching
an intersection (see page 65).
•You can also change the route guidance display by
touching [
].
i
i Arrow Route Guidance Display
Information on the next intersection.
j Map Route Guidance Display
j
Continued
37-EN
Page 41

L Arrow Route Guidance Display
m
k
k Arrow Route Guidance Display
Information on the next intersection.
l
The intersection or Freeway Junction map is displayed.
l
Recalling the Maneuver List during Guidance
During route guidance, you can display a list of maneuver to
preview upcoming turns and street names.
1
Touch [ ].
The route sub menu is displayed.
• If operation is performed using the remote control, go
to step 2.
2
Touch [LIST].
Press LIST.
m 8, 9
You can scroll the intersection or Freeway Junction
map display 2 ways:
Touch Operation:
Each touch of [8] or [9] scrolls items one by one, up or
down.
Remote Control Operation:
Tilt the joystick up or down.
L Freeway Junction Display
n
n Freeway Junction Display
Information on the next junction.
The Maneuver List is displayed.
a
a Distance / Arrow
b Next Street Name
b
38-EN
Page 42

Recalling the Arrow Route Guidance Display
The Arrow Route Guidance display for intersection or freeway
junction can be displayed.
1
Touch Distance/Arrow to preview a specified
Arrow Route Guidance display.
Select (highlight) the desired Distance / Arrow by
tilting the joystick and press ENTER.
Selecting Freeway Exit during Route
Guidance
During route guidance, you can display a list of freeway exits.
You can also set the exit as a waypoint by viewing exit POI
information.
1
Touch [ ].
EN
The Arrow Route Guidance screen is displayed.
Avoiding
You can choose to avoid a particular street or freeway junction
along your route.
1
Touch the street name to be avoided.
Select (highlight) the desired street name by tilting
the joystick and press ENTER.
The route sub menu is displayed.
• If operation is performed using the remote control, go
to step 2.
2
Touch [LIST].
Press LIST.
The Maneuver List is displayed.
3
Touch [Exit Info].
Select (highlight) “Exit Info” and press ENTER.
The street name is checked.
2
Touch [Avoid].
Select (highlight) “Avoid” tilting the joystick and
press ENTER.
The system begins calculating a new route.
The Select a POI Freeway Exit screen is displayed.
Continued
39-EN
Page 43

4
Touch the desired Exit.
Select (highlight) the desired exit and press
ENTER.
a b
a Exit Name
b Freeway No.
The Freeway Exit Information is displayed.
5
Touch the desired POI.
Detour
You can calculate a new route from your current position around
an approaching detour on the current route. If there is a
construction site ahead, for example, search for a detour by
estimating the distance from your current position to the site.
1
Touch [ ].
The route sub menu is displayed.
• If operation is performed using the remote control, go
to step 2.
2
Touch [DETOUR].
Press DETOUR.
The Confirm as Waypoint screen is displayed.
6
Touch [OK to Proceed].
Select (highlight) “OK to Proceed” by tilting the
joystick and press ENTER.
The system begins calculating a new route.
• Selecting “Map” will display a selected POI
surrounding map.
Auto Reroute
When you are driving to the destination following Route
Guidance, if you deviate from the route, the system will
automatically calculate a new route.
33
Select the estimated distance of the detour.
Touch [1/2mi], [1mi], [2mi] or [5mi].
Tilt the joystick to select “1/2mi,” “ 1mi,” “2mi” or
“5mi” and press ENTER.
The system begins calculating a new route.
• If the route is longer than 30 miles, you can select a
detour distance of up to 30 miles.
40-EN
Page 44

Displaying the Route Menu Screen
You can find a POI along the route using the Edit Route function,
or change a route condition.
1
Touch [ ].
Press MENU.
You can select the following items.
• Display Entire Route (see page 41)
•Find POI Along Route (see page 41)
• Change Method (see page 42)
• Delete Destination (see page 43)
• Delete Waypoint (see page 43)
The Nav Menu screen is displayed.
2
Touch [Route].
Select (highlight) “Route” by tilting the joystick
and press ENTER.
The Route menu is displayed.
a
b
c
d
Display Entire Route
The navigation system allows you to view the entire route so that
you can verify the navigation system’s route calculation.
1
Touch [Display Entire Route] on the route
menu screen.
Select (highlight) “Display Entire Route” by
tilting the joystick and press ENTER.
The entire route is displayed on a map with a large
enough view that you can see the entire route.
2
When you touch [ ], the system returns to
the map screen.
Press CANC., the system returns to the map
screen.
EN
a Driving Distance
b Driving Time
c Distance to Destination
d Estimated Remaining Time
• If touch operation is performed, the Route menu can
also be displayed by following operation.
1
Touch [Route icon].
Route
icon
Find POI Along Route
A POI along the route can be set as a waypoint.
1
Touch [Find POI Along Route] on the route
menu screen.
Select (highlight) “Find POI Along Route” by
tilting the joystick and press ENTER.
The Select Place Type screen is displayed.
Continued
41-EN
Page 45

2
Touch the desired category of place type.
Select (highlight) the desired category of place
type by tilting the joystick and press ENTER.
5
Touch [OK to Proceed].
Select (highlight) “OK to Proceed” by tilting the
joystick and press ENTER.
•For details on how to use the list, see page 11.
•When you select “Input Place Type,” input a keyword
of place type and select Place Type.
• If more than one point of interest type exists, an icon is
displayed
select the place type with , the Select Place Type
screen is displayed.
The Select Distance screen is displayed.
3
Touch the desired distance.
Select (highlight) the desired distance by tilting the
joystick and press ENTER.
The Select Place Name screen is displayed.
4
Touch the desired place name.
Select (highlight) the desired place name by tilting
the joystick and press ENTER.
in front of point of interest type. If you
The system begins calculating a new route.
•A map surrounding the searched POI is displayed by
selecting “Map.”
Change Method
Change Method allows you to select the way the system
calculates the drive to your destination.
1
Touch [Change Method] on the route menu
screen.
Select (highlight) “Change Method” by tilting the
joystick and press ENTER.
The Select Method menu is displayed.
2
Touch the desired Method.
Select (highlight) the desired method by tilting the
joystick and press ENTER.
The Confirm as Waypoint screen is displayed.
42-EN
The system begins calculating a new route.
•For details of each Method, see page 32.
• Changing the method via the screen will be applied
only for the current destination. To change the method
permanently, refer to “Routing Method” (page 66).
Page 46

Delete Destination
This section explains how to delete a destination you have
previously set. Any waypoints for that destination will also be
deleted.
1
Touch [Delete Destination] on the route
menu screen.
Select (highlight) “Delete Destination” by tilting
the joystick and press ENTER.
Delete Waypoint
This section explains how to delete all waypoints you have
previously set.
1
Touch [Delete Waypoint] on the route
menu screen.
Select (highlight) “Delete Waypoint” by tilting the
joystick and press ENTER.
EN
The confirmation dialog screen appears.
2
Touch [Yes].
Select (highlight) “Ye s ” by tilting the joystick and
press ENTER.
The destination is deleted and the screen returns to
the current vehicle position. If a waypoint existed, then
both the destination and the waypoint are deleted.
• If the destination was from Today’s Plan, then Today's
Plan guidance shall be canceled but destinations kept in
the Today’s Plan list.
•A destination can also be deleted by the following
operation.
Touch Operation:
Touch [ ], then [Delete Destination].
Remote Control Operation:
Press DEL.DEST.
The confirmation dialog screen appears.
2
Touch [Yes].
Select (highlight) “Ye s ” by tilting the joystick and
press ENTER.
The waypoint will be deleted. The system begins
calculating a new route.
•Waypoints can also be deleted by Touch Operation:
Touch [ ], then [Delete Waypoint].
43-EN
Page 47

Edit Features
Displaying the Edit Menu Screen
You can edit items registered in the system.
1
Touch [ ].
Press MENU.
Editing the Address Book
You can change the names, addresses, phone numbers, folders,
icons, etc. of the address books.
1
Touch [Address Book] on the edit menu
screen.
Select (highlight) “Address Book” by tilting the
joystick and press ENTER.
The Nav Menu screen is displayed.
2
Touch [Edit].
Select (highlight) “Edit” by tilting the joystick and
press ENTER.
The Edit menu is displayed.
The Select Folder screen is displayed.
2
Touch the desired folder.
Select (highlight) the desired folder by tilting the
joystick and press ENTER.
a
a Create a New Folder
You can create a new folder. (See “Create a New
Folder” on page 45.)
The Folder sub-menu is displayed.
3
Touch [Open Folder].
Select (highlight) “Open Folder” by tilting the
joystick and press ENTER.
You can edit the following items.
• Address Book (see page 44)
•Favorites (see page 48)
•Today’s Plan (see page 52)
• Home (see page 53)
•Previous Destinations (see page 53)
•Avoided Roads (see page 54)
•Avoided Areas (see page 55)
44-EN
b
c
b Rename Folder
The folder name can be modified. (See “Rename
Folder” on page 46.)
c Delete
A folder can be deleted. (See “Delete Folder” on page 46.)
The Address Book list in the folder is displayed.
Page 48

4
Touch the desired address book entry.
Select (highlight) the desired address by tilting the
joystick and press ENTER.
The Change Entry screen is displayed
5
Modify each item.
d
e
f
g
h
k
6
When all changes have been completed, be
sure to touch [Done] to set the change.
Select (highlight) “Done” by tilting the joystick
and press ENTER.
Create a New Folder
1
Touch [Create a New Folder] on the
Select Folder screen.
Select (highlight) “Create a New Folder” by
tilting the joystick and press ENTER.
EN
i
d Name
The name of the entry can be changed. (See “Name
Change” on page 46.)
e Address
The address of the entry can be changed. (See
“Address Change” on page 47.)
f Phone
The telephone number of the entry can be changed.
(See “Phone Number Change” on page 47.)
g Folder
The folder in which the entry is stored in can be
changed. (See “Folder Change” on page 47.)
h Icon
The icon on the map for this entry can be changed.
(See “Icon Change” on page 48.)
i Delete
The entry can be deleted from the address book. (See
“Delete Address Book Entry” on page 48.)
j Done
Confirm all your address book entry changes. Select
Done when you have completed all changes to
Address Book.
k Record Voice Tag
You can record your favorite phrase to be used for the
voice recognition operation.
(Refer to “Voice Tag Function” on page 75).
j
The Input Folder Name screen is displayed.
2
Input a folder name.
•For details on how to input the name, see page 11.
3
Touch [Save].
Select (highlight) “Save” by tilting the joystick and
press ENTER.
After the folder name is saved, a new folder is created.
Continued
45-EN
Page 49

Rename Folder
The ALL and DEFAULT folder names cannot be changed.
1
Touch [Rename Folder] on the Folder sub-
menu screen.
Select (highlight) “Rename Folder” by tilting the
joystick and press ENTER.
The Input Folder Name screen is displayed.
2
Input a folder name.
2
Touch [Yes].
Select (highlight) “Ye s ” by tilting the joystick and
press ENTER.
A folder is deleted.
• Address Book data in the deleted folder is also deleted.
If you do not want to delete the Address Book data,
move it to another folder before deleting. See “Folder
Change” (page 47).
Name Change
1
Touch [Name] on the Change Entry
screen.
Select (highlight) “Name” by tilting the joystick
and press ENTER.
•For details on how to input the name, see page 11.
3
Touch [Save].
Select (highlight) “Save” by tilting the joystick and
press ENTER.
A folder name is changed.
Delete Folder
The ALL and DEFAULT folders cannot be deleted.
1
Touch [Delete] on the Folder sub-menu
screen.
Select (highlight) “Delete” by tilting the joystick
and press ENTER.
The confirmation dialog screen appears.
The Input Name screen is displayed.
2
Input the address book entry name.
•For details on how to input the name, see page 11.
3
Touch [Save].
Select (highlight) “Save” by tilting the joystick and
press ENTER.
The address book name is changed.
46-EN
Page 50

Address Change
1
Touch [Address] on the Change Entry
screen.
Select (highlight) “Address” by tilting the joystick
and press ENTER.
The Find Address screen is displayed.
2
Refer to “Entering a Destination by Address”
in steps 4 to 9 (see page 15), and then input
an address.
2
Input a phone number.
•For details on how to input the number, see page 11.
3
Touch [Save].
Select (highlight) “Save” by tilting the joystick and
press ENTER.
The phone number of the entry is changed.
Folder Change
1
Touch [Folder] on the Change Entry
screen.
Select (highlight) “Folder” by tilting the joystick
and press ENTER.
EN
3
Touch [OK].
Select (highlight) “OK” by tilting the joystick and
press ENTER.
The address of the entry is changed.
Phone Number Change
1
Touch [Phone] on the Change Entry
screen.
Select (highlight) “Phone” by tilting the joystick
and press ENTER.
The Input Phone Number screen is displayed.
The Select Folder screen is displayed.
2
Touch the desired folder.
Select (highlight) the desired folder by tilting the
joystick and press ENTER.
The folder in address book is changed.
Continued
47-EN
Page 51

Icon Change
1
Touch [ Icon ] on the Change Entry screen.
Select (highlight) “Icon” by tilting the joystick and
press ENTER.
2
Touch [Yes].
Select (highlight) “Ye s ” by tilting the joystick and
press ENTER.
The entry is deleted from Address Book.
The Select Icon screen is displayed.
2
Touch the desired icon.
Select (highlight) the desired icon by tilting the
joystick and press ENTER.
The address book icon is changed.
Delete Address Book Entry
1
Touch [Delete] on the Change Entry
screen.
Select (highlight) “Delete” by tilting the joystick
and press ENTER.
Editing the Favorites
Favorite information stored in a different category such as
Destination, Name, Type, Spot can be changed or deleted.
1
Touch [Favorites] on the edit menu screen.
Select (highlight) “Favorites” by tilting the
joystick and press ENTER.
The Favorites sub-menu is displayed.
The confirmation dialog screen appears.
48-EN
Page 52

2
Touch the desired item.
Select (highlight) the desired item by tilting the
joystick and press ENTER.
a
b
c
d
3
The following items of Favorite Destination
can be changed or deleted.
a
b
c
d
EN
g
a Edit/Delete Favorite Dest
The contents of Favorite Destination registered in
Favorite Dest can be changed or deleted. (See “Edit/
Delete Favorite Dest” on page 49.)
b Delete Favorite Names
A POI Name registered in Favorite Names can be
deleted. (See “Delete Favorite Names” on page 50.)
c Delete Favorite Types
A POI Type registered in Favorite Types can be
deleted. (See “Delete Favorite Types” on page 50.)
d Delete Favorite Spots
A favorite location registered in Favorite Spots can be
deleted. (See “Delete Favorite Spots” on page 51.)
Edit/Delete Favorite Dest
1
Touch [Edit/Delete Favorite Dest] on the
Favorites sub-menu screen.
Select (highlight) “Edit/Delete Favorite Dest” by
tilting the joystick and press ENTER.
e
a Name
The Favorite Destination name can be changed. (See
“Name Change” on page 46.)
b Address
The address of Favorite Destination can be changed.
(See “Address Change” on page 47.)
c Phone
The phone number of Favorite Destination can be
changed. (See “Phone Number Change” on page 47.)
d Icon
The icon displayed on the map can be changed. (See
“Icon Change” on page 48.)
e Delete
Favorite Destination can be deleted. (See “Delete
Address Book Entry” on page 48.)
f Done
Save all your Favorite Destination changes. Select
Done.
g Record Voice Tag
You can record your favorite phrase to be used for the
voice recognition operation.
(Refer to “Voice Tag Function” on page 75).
4
When all changes have been completed,
touch [Done] to set the change.
f
Select (highlight) “Done” by tilting the joystick
and press ENTER.
The Select Favorite Destination screen is displayed.
2
Touch the desired favorite destination.
Select (highlight) the desired favorite destination
by tilting the joystick and press ENTER.
The Change Favorite Destination screen is displayed.
Continued
49-EN
Page 53

Delete Favorite Names
1
Touch [Delete Favorite Names] on the
Favorites sub-menu screen.
Select (highlight) “Delete Favorite Names” by
tilting the joystick and press ENTER.
4
Touch [Yes].
Select (highlight) “Ye s ” by tilting the joystick and
press ENTER.
The favorite name is deleted.
The Delete Favorite POI Name screen is displayed.
2
Touch the desired favorite POI name.
Select (highlight) the desired favorite POI name by
tilting the joystick and press ENTER.
The selected favorite POI name is checked.
• All favorite POI names can be selected by [Select All].
If all is selected, [Select All] is changed to [Deselect
All]. If [Deselect All] is selected, selection is canceled.
3
Touch [Delete].
Select (highlight) “Delete” by tilting the joystick
and press ENTER.
Delete Favorite Types
1
Touch [Delete Favorite Types] on the
Favorites sub-menu screen.
Select (highlight) “Delete Favorite Types” by
tilting the joystick and press ENTER.
The Delete Favorite POI Type screen is displayed.
2
Touch the desired favorite POI types.
Select (highlight) the desired favorite POI types by
tilting the joystick and press ENTER.
The confirmation dialog screen appears.
50-EN
The favorite POI types are checked.
• All favorite POI types can be selected by [Select All].
If all is selected, [Select All] is changed to [Deselect
All]. If [Deselect All] is selected, selection is canceled.
Page 54

3
Touch [Delete].
Select (highlight) “Delete” by tilting the joystick
and press ENTER.
2
Touch the desired favorite spots.
Select (highlight) the desired favorite spots by
tilting the joystick and press ENTER.
EN
The confirmation dialog screen appears.
4
Touch [Yes].
Select (highlight) “Ye s ” by tilting the joystick and
press ENTER.
The favorite POI types are deleted.
Delete Favorite Spots
1
Touch [Delete Favorite Spots] on the
Favorites sub-menu screen.
Select (highlight) “Delete Favorite Spots” by
tilting the joystick and press ENTER.
The selected favorite spots are checked.
• All the favorite spots can be selected by [Select All].
If all is selected, [Select All] is changed to [Deselect
All]. If [Deselect All] is selected, selection is canceled.
3
Touch [Delete].
Select (highlight) “Delete” by tilting the joystick
and press ENTER.
The confirmation dialog screen appears.
4
Touch [Yes].
Select (highlight) “Ye s ” by tilting the joystick and
press ENTER.
The Delete Favorite Spots screen is displayed.
The favorite spot is deleted.
51-EN
Page 55

Deleting the Today’s Plan
If you wish to delete a destination from Today’s Plan, you can use
this feature.
1
Touch [Today’s Plan] on the edit menu
screen.
Select (highlight) “Today’s Plan” by tilting the
joystick and press ENTER.
The Delete Today’s Plan screen is displayed.
2
Touch the desired destination.
Select (highlight) the desired destination by tilting
the joystick and press ENTER.
3
Touch [Delete].
Select (highlight) “Delete” by tilting the joystick
and press ENTER.
The confirmation dialog screen appears.
4
Touch [Yes].
Select (highlight) “Ye s ” by tilting the joystick and
press ENTER.
The selected destination is checked.
• All destinations can be selected by [Select All].
If all is selected, [Select All] is changed to [Deselect
All]. If [Deselect All] is selected, selection is canceled.
The destinations are deleted from Today's Plan.
52-EN
Page 56

Editing the Home
Information registered in home can be changed or deleted.
1
Touch [Home] on the edit menu screen.
Select (highlight) “Home” by tilting the joystick
and press ENTER.
The Change Home screen is displayed.
2
Touch the desired item.
Select (highlight) the desired item by tilting the
joystick and press ENTER.
a
b
c
d
3
When all changes have been completed,
touch [Done] to set the changes.
Select (highlight) “Done” by tilting the joystick
and press ENTER.
Deleting the Previous Destinations
If you wish to delete a destination from previous destinations,
you can use this feature.
1
Touch [Previous Destinations] on the edit
menu screen.
Select (highlight) “Previous Destinations” by
tilting the joystick and press ENTER.
EN
e
a Name
This cannot be changed.
b Address
Address can be changed. (See “Address Change” on
page 47.)
c Phone
Phone number can be changed. (See “Phone Number
Change” on page 47.)
d Icon
Icon displayed on the map can be changed. (See “Icon
Change” on page 48.)
e Delete
Home address can be deleted. (See “Delete Address
Book Entry” on page 48.)
f Done
Save all your Home changes. Select Done.
f
The Delete Previous Destination screen is displayed.
2
Touch the desired previous destinations.
Select (highlight) the desired previous destinations
by tilting the joystick and press ENTER.
The previously selected destination is checked.
• All previous destinations can be selected by [Select
All]. If all is selected, [Select All] is changed to
[Deselect All]. If [Deselect All] is selected, selection is
canceled.
Continued
53-EN
Page 57

3
Touch [Delete].
Select (highlight) “Delete” by tilting the joystick
and press ENTER.
2
Touch the desired road to avoid.
Select (highlight) the desired road to avoid by
tilting the joystick and press ENTER.
The confirmation dialog screen appears.
4
Touch [Yes].
Select (highlight) “Ye s ” by tilting the joystick and
press ENTER.
The previous destination is deleted.
Editing the Avoided Roads
Areas or roads to be avoided can be changed or deleted.
For how to set an avoided road, refer to “Entering a Destination
by Scrolling Display Map” (page 29).
1
Touch [Avoided Roads] on the edit menu
screen.
Select (highlight) “Avoided Roads” by tilting the
joystick and press ENTER.
A surrounding map of the area to be avoided and its
sub-menu are displayed.
3
Touch [/] or [-] to select length or
[Delete], and then touch [1/2 mi], [1 mi],
[2mi] or [Delete].
Select (highlight) “1/2 mi”, “1 mi”, “2mi” or
“Delete” by tilting the joystick and press ENTER.
• Select 1/2 mi, 1 mi or 2 mi, as the length of the road to
be avoided. The display returns to the Change/Delete
Avoided Distance screen.
• If you select Delete, the confirmation dialog screen is
displayed. Go to step 4.
4
Touch [Yes].
Select (highlight) “Ye s ” by tilting the joystick and
press ENTER.
The Change/Delete Avoided Distance screen is
displayed.
54-EN
The avoided road is deleted.
Page 58

Editing the Avoided Areas
The area to be avoided can be changed or deleted.
For how to set an avoided area, refer to “Entering a Destination
by Scrolling Display Map” (page 29).
1
Touch [Avoided Areas] on the edit menu
screen.
Select (highlight) “Avoided Areas” by tilting the
joystick and press ENTER.
The Change/Delete Avoided Area screen is displayed.
2
Touch the desired avoid area.
Select (highlight) the desired avoid area by tilting
the joystick and press ENTER.
4
Touch [Yes].
Select (highlight) “Ye s ” by tilting the joystick and
press ENTER.
The avoided area is deleted.
EN
A surrounding map of the area to be avoided and its
sub-menu are displayed. The current avoided area is
highlighted on the map.
3
Touch [/] or [-] to select length or
[Delete], and then touch [1/2 mi], [1 mi],
[2mi] or [Delete].
Select (highlight) “1/2 mi”, “1 mi”, “2mi” or
“Delete” by tilting the joystick and press ENTER.
• Select 1/2 mi, 1 mi or 2 mi, as the area to be avoided.
The display returns to the Change/Delete Avoided Area
screen.
• If you select Delete, the confirmation dialog screen is
displayed. Go to step 4.
55-EN
Page 59

Information Features
Displaying the Information Menu Screen
You can view various information provided by the navigation
system.
1
Touch [ ].
Press MENU.
The Nav Menu screen is displayed.
2
Touch [Information].
Select (highlight) “Information” by tilting the
joystick and press ENTER.
Information items are described as follows.
•Traffic Incident List*
•Trip Information (see page 56)
•Weather*
• System Information (see page 57)
• Satellite Information (see page 58)
•Navigation Simulation (see page 58)
• Calendar (see page 59)
• Calculator (see page 59)
*Traffic Information is available only when the Receiver
HCE-100XM (sold separately) or SIRIUS Data
Receiver (sold separately) is connected.
For details, refer to the Owner's Manual of the Data
Receiver.
“Weather Forecast” (NVD-A801) and “Weather”
(NVD-A802) share the same function.
Trip Information
The system displays the following information: Average Speed,
Overall Speed, Maximum Speed, Driving Time, Idle Time, Total
Time, Odometer and Current Speed.
1
Touch [Trip Information] on the
Information menu screen.
Select (highlight) “Trip Information” by tilting
the joystick and press ENTER.
The Information menu is displayed.
56-EN
Page 60

2
The Trip Information screen is displayed.
a
b
c
j
ih
a Average Speed
The average driving speed while the vehicle has been
in motion since Trip information was reset.
b Overall Speed
The average travelling speed since the beginning of the
trip, including idle time.
c Maximum Speed
The maximum speed the vehicle has reached during the
trip. Can be independently reset from all the other readings.
d Driving Time
Total time the vehicle has been moving since the trip
was reset.
e Idle Time
Total time the vehicle is idle (not moving).
f Total Time
Total elapsed time of the trip, i.e., driving time plus idle
time.
g Odometer button
The total distance in the odometer changes to the
distance of trip A or trip B. While displaying the
distance of trip A or trip B, touch and hold the odometer
button for at least 3 seconds or press and hold ENTER
to reset the odometer.
h Maximum Speed Reset button
Press or touch to reset Maximum Speed.
i Current Speed
The current speed is displayed by the analog
speedometer.
j Odometer
Total distance travelled since the odometer was last
reset.
k Reset All
Resets all values to zero, including the odometer
(Total, Trip A and Trip B).
k
d
e
f
g
System Information
The DVD-ROM’s version and the system status information are
viewable. Make note of this information and refer to it whenever
you contact Alpine Tech Support or an Alpine-authorized dealer.
1
Touch [System Information] on the
Information menu screen.
Select (highlight) “System Information” by tilting
the joystick and press ENTER.
The Software Information screen is displayed.
2
Touch [Status] to display the System Status
screen.
Press ENTER.
Software Information
Touch [Status] Touch [Software]
Press ENTER Press ENTER
System Status
a
EN
a 2nd Car
Select this when you use the NVE-N872A navigation
system in a second vehicle. It provides the user with a
means to recalibrate the speed sensor information
once the navigation system has been installed in the
second vehicle. The user will have to drive for a while
for recalibration to be completed.
57-EN
Page 61

Satellite Information
The navigation system allows you to view dynamic location
information received from GPS satellites.
This feature is very useful for off-road users in establishing a
starting point before trekking.
1
Touch [Satellite Information] on the
Information menu screen.
Select (highlight) “Satellite Information” by
tilting the joystick and press ENTER.
The Satellite Information screen is displayed.
a
c
d
Navigation Simulation
You can watch a demonstration of the navigation system’s voice
and screen guidance by using this function. The vehicle position
icon will automatically move along the desired route showing a
simulation of how the navigation system functions.
Use this function only while the car is parked.
1
Touch [Navigation Simulation] on the
Information menu screen.
Select (highlight) “Navigation Simulation” by
tilting the joystick and press ENTER.
The Navigation Simulation screen is displayed.
2
Touch [Start], then [ ].
Select (highlight) “Start” by tilting the joystick
and press ENTER. Select (highlight) “
tilting the joystick and press ENTER.
” by
b
a Number of satellites received
Number of satellites received can be up to 12.
b Today’s date
c Elevation
Elevation is based on GPS elevation. Car icon moves
as elevation changes.
d Satellites received
Satellites from which you are receiving are displayed
green. Yellow indicates that your position is being
calculated.
The drive simulation for the current route begins.
•When the drive simulation is activated, a DEMO icon is
displayed on the lower left side of the screen.
•When the drive simulation is activated, the map scale
and direction can be changed.
•The drive simulation can be activated only when a
destination has already been set.
• If the system detects that the vehicle is moving,
simulation mode will be stopped.
58-EN
Page 62

3
Touch [Stop] to finish the drive simulation.
Select (highlight) “Stop” by tilting the joystick and
press ENTER.
a
a : This icon is displayed during the
demonstration mode.
Calculator
You can use the calculator.
1
Touch [Calculator] on the Information menu
screen.
Select (highlight) “Calculator” by tilting the
joystick and press ENTER.
EN
Calendar
You can use the calendar.
1
Touch [Calendar] on the Information menu
screen.
Select (highlight) “Calendar” by tilting the
joystick and press ENTER.
Calendar screen is displayed with today’s date
highlighted.
2
Touch [/] or [-] to change the displayed
month.
Tilt the joystick to the left or right.
The Calculator screen is displayed.
2
Touch the screen or use the joystick to
calculate.
• If a value is stored in memory, a small “M” icon is
indicated.
•Touch [/] or tilt the joystick to the left: The previous
month is displayed.
•Touch [- ] or tilt the joystick to the right: The
following month is displayed.
59-EN
Page 63

Setup
Displaying the Setup Menu Screen
1
Touch [ ].
Press MENU.
Map Display
1
Touch [Map Display] on the Setup menu
screen.
Select (highlight) “Map Display” by tilting the
joystick and press ENTER.
The Map Display screen is displayed.
The Nav Menu screen is displayed.
2
Touch [Setup].
Select (highlight) “Setup” by tilting the joystick
and press ENTER.
The Setup menu is displayed.
Setup items are described as follows.
• Map Display (see page 60)
• Map Features (see page 61)
• Guidance (see page 65)
• Display/Volume (see page 66)
• Clock (see page 67)
•Traffic Information*
• Language / Units (see page 68)
• Others (see page 69)
*Traffic Information is available only when the Receiver
HCE-100XM (sold separately) or SIRIUS Data
Receiver (sold separately) is connected.
For details, refer to the Owner's Manual of the Data
Receiver.
2
Touch the desired item.
Select (highlight) the desired item by tilting the
joystick and press ENTER.
Setting items:
Region Selection / Color / Orientation
3
Touch the desired Item to change its setting.
Select (highlight) the desired item by tilting the
joystick and press ENTER.
60-EN
Page 64

Region Selection
Two discs (a North and South version) are available for use. If the
South version disc is used, the region to be used must be set.
Setting item: Region Selection
Setting content: Continental USA (Initial setting)/Hawaii
If you change regions, the confirmation screen is
displayed.
If you touch [Yes], the region is changed and
the opening screen is displayed.
Select (highlight) “Ye s ” by tilting the joystick and
press ENTER.
• If the North Version disc is used, the region is fixed as
Canada and North USA and cannot be changed.
Orientation
You can set your most frequently used map orientation.
Setting item: Orientation (Map Orientation)
Setting content: North Up (Initial setting) / Heading Up /
3D Heading Up
EN
North up: Displays the map with north always
at the top of the screen. The vehicle
position icon rotates depending on
the driving direction.
Heading up: Displays the map with the vehicle
position icon always pointed to the
top of the screen. The map screen
rotates depending on the driving
direction.
3D Heading up:A 3-dimensional Heading Up state
map is displayed.
Color
The system allows you to set the display's map color. For most
drivers, a dark tone screen is preferred when driving at night. The
system can be set to automatically switch to dark tone screen
when headlights are turned on.
Setting item: Color (Map Color)
Setting content: Day / Night / Auto (Initial setting)
Day:DAY mode maintains a bright tone screen even
while your headlights are on.
Night: NIGHT mode maintains a dark tone screen
even when your headlights are off.
Auto: AUTO mode switches automatically between
Day and Night screen color when your head
lamps are turned on and off.
Map Features
1
Touch [Map Features] on the Setup menu
screen.
Select (highlight) “Map Features” by tilting the
joystick and press ENTER.
The Map Features screen is displayed.
2
Touch the desired item.
Select (highlight) the desired item by tilting the
joystick and press ENTER.
Setting items:
POI Icons / Landmark Icons / Building Outlines / One
Way Icons / Trail
Continued
61-EN
Page 65

3
Touch the desired Item to change its setting.
Select (highlight) the desired item by tilting the
joystick and press ENTER.
POI Icons
The system can display icons on the map for points of interest
such as gas/fuel stations, restaurants, parking lots, etc.
Setting item: POI Icons
Setting content: Show (Initial setting) / Hide
Show: The selected POI icon is displayed on the map
screen. Select the Edit menu to display the POI
icon.
Hide: Clear the POI icon from the map screen.
“Show” is set, select the POI icon to be displayed.
1 Touch [Edit...] to display the Select Place Type screen.
Select (highlight) “Edit…” by tilting the joystick and press
ENTER.
2 Touch the desired place type.
Select (highlight) the place type by tilting the joystick and
press ENTER.
•The selected place type is checked and the POI icon
lights up at the same time.
• If “Restaurant” is selected, you can select food type.
3 Touch [Done].
Select (highlight) ”Done” by tilting the joystick and press
ENTER.
POI Icons
Icon Legend
GAS/FUEL STATIONS
RESTAURANTS
PARKING GARAGES
PARKING LOTS
ATMS
BANKS
CONVENIENCE STORES
GROCERY STORES
FREEWAY EXITS
HOTEL & MOTELS
BED AND BREAKFAST
POST OFFICE
HOSPITALS
SCHOOL
• If “Default” is selected, GAS/FUEL STATIONS (initial
setting) can be displayed.
• Brand icons are stored in the system.
62-EN
Page 66

Brand Icons
Icon Business Name
GAS/FUEL STATION
ARCO
BEACON
BP
CHEVRON
CIRCLE K
CITGO
CONOCO
DIAMOND
ESSO
EXXON
GULF
MOBIL
PETRO-CANADA
PHILLIPS 66
PIONEER
SHAMROCK
SHELL
SINCLAIR
TEXACO
ULTRAMAR
UNION 76
VALERO
RESTAURANT
APPLEBEE'S
ARBY'S
BASKIN-ROBBINS
BENNIGAN'S
BONANZA
BOSTON MARKET
BURGER KING
CHEVYS
CHILI'S
CHUCK E CHEESE'S
CHURCH'S CHICKEN
DAIRY QUEEN
DENNY'S
DOMINO'S
DUNKIN' DONUTS
EL TORITO
HAAGEN-DAZS
HARDEE'S
IN-N-OUT BURGER
JACK IN THE BOX
LONE STAR STEAKHOUSE & SALOON
OLIVE GARDEN
OUTBACK STEAKHOUSE
PANERA BREAD
PAPA JOHN'S
PAPA MURPHY'S
PERKINS
PIZZA HUT
PONDEROSA
POPEYES
QUIZNOS SUB
RED LOBSTER
SCHLOTZSKY'S
SHAKEY'S
SONIC
STEAK & ALE RESTAURANT
STEAK 'N SHAKE
SUBWAY
TACO JOHN'S
TACO TIME
TCBY
TGI FRIDAY'S
TOGO'S
WENDY'S
WHITE CASTLE
WIENERSCHNITZEL
CONVEN/ENCE STORE
7-ELEVEN
AM PM MINI MART
CUMBERLAND FARMS
WHITE HEN PANTRY
GROCERY STORE
ACME MARKETS
ALBERTSONS
IGA
JEWEL-OSCO
HOTEL/MOTEL
AMERIHOST
BEST WESTERN
CANDLEWOOD SUITES
CLARION
COMFORT SUITES
COUNTRY INN, SUITES BY CARLSON
CROWNE PLAZA
DAYS INN
DOUBLETREE
ECONO LODGE
EMBASSY SUITES
HAMPTON INN
HILTON GARDEN INN
HILTON
HOLIDAY INN EXPRESS
HOLIDAY INN
HOMEWOOD SUITES
HOWARD JOHNSON
INTER-CONTINENTAL
JAMESON INN
KNIGHTS INN
MAINSTAY SUITES
MARRIOTT
MOTEL 6
NOVOTEL
PARK INNS INTERNATIONAL
PARK PLAZA
QUALITY
RADISSON
RAMADA
RED ROOF INN
RENAISSANCE
RODEWAY INN
SIGNATURE INN
SLEEP INN
SOFITEL
STAYBRIDGE SUITES
STUDIO 6
SUPER 8 MOTEL
TRAVELODGE
VILLAGE INN
WINGATE INN
WYNDHAM
EN
63-EN
Page 67

Landmark Icons
The system can display on the map the landmark icons.
Setting item: Landmark Icons
Setting content: Show (Initial setting) / Hide
One Way Icons
The system can display on the map the one way icons.
Setting item: One Way Icons
Setting content: Show (Initial setting) / Hide
Show: Display Landmark icons on the map screen.
Hide: Clear Landmark icons from the map screen.
•For details on Landmark Icons, see “How to View a
Current Display” on page 10.
Building Outlines
The system can display on the map the building outlines.
Setting item: Building Outlines
Setting content: Show (Initial setting) / Hide
Show: Display building outlines on the map screen.
Hide: Clear building outlines from the map screen.
•For details on building outlines, see “How to View a
Current Display” on page 10.
Show: Display One Way Icons on the map screen.
Hide: Clear One Way Icons from the map screen.
•The one way icons can be displayed on the map when
map scale is 1/16 mile (100 m) or less.
Trail
A trail of dots showing where you have driven in the last 150
miles can be displayed on the map screen for easy location of
previously travelled roads.
Setting item: Trail (Recorded trail dots)
Setting content: Recording On /
Recording Off (Initial setting)
Recording On:Trail dots are recorded and displayed
on the map screen.
Recording Off:Trail dots are not recorded.
64-EN
• Select “Clear” to clear Recorded Trail dots displayed on
the map screen.
Page 68

Guidance
1
Touch [Guidance] on the Setup menu
screen.
Select (highlight) “Guidance” by tilting the
joystick and press ENTER.
Display
During route guidance, you can select the map display type.
Setting item: Display
Setting content: Arrow / Map / Split (Initial setting) /
Hybrid
EN
The Guidance screen is displayed.
2
Touch the desired item.
Select (highlight) the desired item by tilting the
joystick and press ENTER.
Setting items:
Voice Prompt / Display / Auto Zoom Map / Estimated
Time / Routing Method
3
Touch the desired Item to change its setting.
Select (highlight) the desired item by tilting the
joystick and press ENTER.
Voice Prompt
The system allows you to choose the type or frequency of audible
prompts you receive as you are guided along your route.
Setting item: Voice Prompt
Setting content: Off / Minimum / Normal (Initial setting)/
Maximum
Arrow:Your route is guided along by the Arrow Route
Guidance Display.
Map:Your route is guided along by the Map Route
Guidance Display.
Split:Your route is guided by a dual-screen display,
comprising of both Map Route Guidance and
Arrow Route Guidance.
Hybrid: Your route is guided by using the display
transition you chose in the Hybrid menu.
Hybrid Display Type
Current Display
Arrow
Map
Arrow
Map
•For details on each display, see “Changing the route
guidance display” on page 37.
• “Next Display” is shown when approaching the
intersection.
Next Display
Map
Arrow
Split
Split
• If you select Off, you are not guided with voice prompt.
• “Maximum” setting includes voice guidance for street
names using the TTS (Text to speech) Engine. (ie. “Left
turn on Gramercy Place”).
Continued
65-EN
Page 69

Auto Zoom Map
You can set whether to display the zoom map or not when
approaching a maneuver point.
Setting item: Auto Zoom Map
Setting content: On / Off (Initial setting)
Routing Method
You can change the way the system calculates a route.
Setting item: Routing Method
Setting content: Quickest Route (Initial setting) /
Shortest Route / Maximize Freeways / Minimize
Freeways / Minimize Toll Roads / Use Ferry
On: Zoom level is automatically adjusted depending
on distance to maneuver.
Off: Zoom level does not change.
Estimated Time
When the system calculates a route, it also estimates the time it
will take to the destination. Arrival (ETA) is displayed in the time
of the destination time zone (PST or EST,etc.), or Remaining
(ETE) is displayed as “to go.”
Setting item: Estimated Time
Setting content: Arrival (ETA) (Initial setting) /
Remaining (ETE)
Arrival (ETA):Arrival (ETA) is displayed in the time
of the destination time zone (PST or
EST, etc.).
Remaining (ETE): Remaining (ETE) is displayed as
“to go.”
•The time estimates are based on the average speed of
the vehicle. The Estimated Time will vary accordingly,
as the vehicles speed varies.
•For details on each route, refer to “Change Method”
(page 32).
Display/Volume
1
Touch [Display/Volume] on the Setup menu
screen.
Select (highlight) “Display/Volume” by tilting the
joystick and press ENTER.
The Display/Volume screen is displayed.
2
Touch the desired item.
Select (highlight) the desired item by tilting the
joystick and press ENTER.
66-EN
Setting items:
Screen Adjustment / Nav Volume Adjustment
3
Touch the desired Item to change its setting.
Select (highlight) the desired item by tilting the
joystick and press ENTER.
Page 70

Screen Adjustment
The navigation screen will appear out of position when connected
to some displays. The image position can be optimized for a
particular monitor being used with the system.
Setting item: Screen Adjustment
Setting content: -10 to +10 (horizontal)
-5 to +5 (vertical)
1 Touch [Adjust] to display the Screen Adjustment screen.
Select (highlight) “Adjust” by tilting the joystick and press
ENTER.
2 Touch [8], [9], [/] or [-] to adjust the display position.
Adjust the display position by tilting the joystick.
Clock
1
Touch [Clock] on the Setup menu screen.
Select (highlight) “Clock” by tilting the joystick
and press ENTER.
The Clock screen is displayed.
2
Touch the desired item.
Select (highlight) the desired item by tilting the
joystick and press ENTER.
EN
3 Touch [Set].
Select (highlight) ”Set” by tilting the joystick and press
ENTER.
• Select “Default” to return to the initial setting.
Nav Volume Adjustment
The volume of the tones and voice is adjusted in 11 steps.
Setting item: Nav Volume Adjustment
Setting content: 0 to 10 (Initial setting: 5)
1 Touch [/] or [-] to adjust volume.
Adjusting the volume by tilting the joystick.
Setting items:
Time Zone / Time / Clock Display
3
Touch the desired Item to change its setting.
Select (highlight) the desired item by tilting the
joystick and press ENTER.
Continued
67-EN
Page 71

Time Zone
Set a time zone selection to display approximate time.
Setting item: Time Zone
Setting content: Automatic (Initial setting) / Pacific
(PST) / Mountain (MST) / Central (CST)/
Eastern (EST)
Language / Units
1
Touch [Language/Units] on the Setup menu
screen.
Select (highlight) “Language/Units” by tilting the
joystick and press ENTER.
•The “More” button allows you to choose Newfoundland
(NST), Atlantic (AST) or Alaska (AKST) timezones.
Time
Select standard or Daylight Savings time.
Setting item: Time
Setting content: Standard (Initial setting) / Daylight
Savings
Clock Display
Set for the current GPS time is displayed or not on the map
screen.
Setting item: Clock Display
Setting content: Show (Initial setting) / Hide
The Language/Units screen is displayed.
2
Touch the desired item.
Select (highlight) the desired item by tilting the
joystick and press ENTER.
Setting items:
Language/Units
3
Touch the desired Item to change its setting.
Select (highlight) the desired item by tilting the
joystick and press ENTER.
Language
You can select the language for menu and voice guidance.
Setting item: Language
Setting content: English (Initial setting) / Français /
Español
Show: Current time is displayed on the map screen.
Hide: Current time is cleared from the map screen.
68-EN
• If you select a language other than the current one, a
disclaimer appears on the screen. Touch or press
ENTER.
Page 72

Units (mile/ft or km/m)
Allows you to select the units for the entire system (mile or km).
Setting item: Units
Setting content: US (mi/ft) (Initial setting) / Metric (km/m)
Keypad
Allows you to select the displayed keypad screen: Alphabet or
QWERTY.
Setting item: Keypad
Setting content: Alphabet (Initial setting) / QWERTY
EN
Others
1
Touch [Others] on the Setup menu screen.
Select (highlight) “Others” by tilting the joystick
and press ENTER.
The Others screen is displayed.
2
Touch the desired item.
Select (highlight) the desired item by tilting the
joystick and press ENTER.
Confirm Home
If you set your home as the destination, you can set whether to
confirm a route in the Destination screen.
Setting item: Confirm Home
Setting content: Always (Initial setting) / Never
Always: Confirm your route home in the Confirm
Destination screen.
Never: Calculate your route home without displaying
the Confirm Destination screen.
Setting items:
Keypad / Confirm Home / Confirm Favorite Dest /
Confirm Address Book / Confirm Voice Input
3
Touch the desired Item to change its setting.
Select (highlight) the desired item by tilting the
joystick and press ENTER.
Continued
69-EN
Page 73

Confirm Favorite Dest
If the destination you set exists in Favorites, you can set whether
to confirm the destination or not in the Confirm Destination
screen.
Setting item: Confirm Favorite Dest
Setting content: Always (Initial setting) / Never
Always: Confirm the destination in the Confirm
Destination screen.
Never: Calculates your route without showing the
Confirm Destination screen.
Confirm Address Book
If the destination you set exists in Address Book, you can set
whether to confirm the destination or not in the Confirm
Destination screen.
Confirm Voice Input
You can confirm whether the system has recognized the
command you spoke by using the voice recognition.
Setting item: Confirm Voice Input
Setting content: Always (Initial setting) / Never
Always: The command you spoke is always repeated.
Never: The command you spoke is never repeated.
Setting item: Confirm Address Book
Setting content: Always (Initial setting) / Never
Always: Confirm the destination in the Confirm
Destination screen.
Never: Calculates you route without showing the
Confirm Destination screen.
70-EN
Page 74

Reference
Buttons and Functions of Remote Control
(RUE-4140)
Names of the Parts
1
2
4
5
6
7
8
9
!
"
1 Remote Control transmitter
Transmits the remote control signals. Aim toward the
display monitor for operation.
2 Status indicator
Illuminates when the remote is transmitting.
3 Joystick/ENTER button
Selects highlighted items in menus and moves map
displays and vehicle position icon. Tilt this to scroll the
map. Press the ENTER button to select any highlighted
function, screen icon or street segment.
4 Zoom/Scroll buttons
Changes map magnification ratio upward or downward
in 12 steps.
mile: 1/32, 1/16, 1/8, 1/4, 1/2, 1, 2, 5, 15, 50, 150,
350
m: 50, 100, 200, 400 m, 1, 2, 4, 10, 30, 100,
250, 600 km
Changes map magnification ratio smoothly by pressing
and holding either button.
In menu scrolls the page if the list is more than 2
pages.
5 AUDIO/NAV. button
Switches between Audio and Navigation operations.
Pressing this button illuminates the keys on the remote
control.
6 VOICE button
Initiates vocal instruction for next route maneuver or
repeats last instruction.
3
#
$
%
&
(
)
~
+
,
7 Numeric Keypad
Use these buttons to enter phone numbers, address
numbers or street names containing numbers (i.e.,
42nd St.). Works in conjunction with the MODE button.
8 LIST button
Displays list of the streets currently set for the route. To
return to the guidance mode, press the DISP button.
9 PLAN button
Allows you to advance to the next destination in
Today’s Plan list.
! DEL. button
Deletes the character previously input. Works in
conjunction with the MODE button.
" SPEAK button
Press the button to operate the navigation using Voice
Commands.
# DISP. button
When setting the route, switches the map and guidance
display. If in a menu, displays the map.
$ MODE button
Press this button to input numerals using the numeric
keypad. The numerals can be input while the status
indicator blinks.
% MENU button
Displays the Nav Menu screen.
& CANC. button
Cancels current display screen and switches back to
previous screen with menus.
( H/N button
Toggles between Heading Up, North Up and 3-D
Heading Up orientation.
) DETOUR button
Allows user to select detouring distance or avoid traffic
congestion.
~ DEL. DEST. button
Deletes current destination.
+ HOME button
Calculates route to Home destination.
OK button
Executes numeral inputting. Works in conjunction with
the MODE button.
, TRAFFIC INFO. button
Traffic information list is displayed.
• If an operation is not accepted, the navigation system
beeps.
•The Alpine head unit can be operated with the remote
control.
For details, refer to pages 72 and 73.
• After pressing the MODE button, press the following
buttons while the status indicator is blinking : numerals
(0 to 9), DEL. and OK.
• Due to continuous product improvement, specifications
are subject to change.
EN
Continued
71-EN
Page 75

Remote Control Reference Guide for Head Unit
When you use an Alpine Head Unit, you can operate it with the
remote control (supplied with NVE-N872A). Change the
AUDIO/NAV. Switch, on the side of the remote control, to
AUDIO.
" V.SEL.
Not Used
# Numeric Keypad
Not Used
$ AUDIO/NAV.
Switching AUDIO/NAV.
% MODE
Operates 9 to ! (Flashes the Status Indicator for 5
seconds.)
2
$
3
5
7
8
9
1 :/J
Push : PLAY/PAUSE
Radio mode:Preset Selection (C/B), SEEK UP/DOWN
(@/A)
CD/MD Player/Changer mode:
Disc Selection (C/B), Music Sensor (@/A),
BW/FF (@/A Hold)
Tape Mode: Program Sensor (C/B), REW/FF (@/A
Hold)
2 VOL.
Volume Control
3 A.PROC.
Audio Processor
4 SOURCE
Source Selection
5 MUTE
Audio Mute
6 BAND
Radio Band Selection
7 FUNC.
Not Used
8 OP/CL
Not Used
9 9
Display Angle DOWN (MODE button must be pressed
first.)
! 8
Display Angle UP (MODE button must be pressed first.)
1
%
4
6
#
!
"
72-EN
Page 76

Remote Control Reference Guide for AV Head Unit
When you use the Alpine head unit with the monitor, you can
operate the AV head unit with the remote control (supplied with
NVE-N872A). Change the AUDIO/NAV. Switch, on the side of
the remote control, to AUDIO.
2
&
3
5
7
8
"
1 :/J
Push:
PLAY/PAUSE (IVA-W205/IVA-W200/IVA-D105/
IVA-D100/IVA-D310/IVA-D300/IVA-D901/IVAD900/CVA-1014/CVA-1004/CVA-1003)
Push: Changes the modes as follows:
Volume/Bass/Treble/Fader
(CVA-1005/CVA-1006/IVA-C800/IVA-C801)
Push hold: PLAY/PAUSE
(CVA-1005/CVA-1006/IVA-C800/IVA-C801)
Radio mode:
Preset Selection (C/B), SEEK UP/DOWN (@/A)
CD/MD Player/Changer mode:
Disc Selection (C/B), Music Sensor (@/A), BW/FF
(@/A Hold)
Tape Mode:
Program Sensor (C/B), REW/FF (@/A Hold)
2 VOL.
Volume Control
3 A.PROC.
Audio Processor
4 SOURCE
Source Selection
5 MUTE
Audio Mute
6 BAND
Radio Band Selection
7 FUNC.
This function button has the same function as the
following models:
CVA-1003/CVA-1005/CVA-1006/IVA-C800/IVA-C801.
1
(
4
6
%
9
!
#
$
8 OP/CL
Indash Display OPEN/CLOSE (only pressing MODE
button)
9 ;
Indash Display Angle LEFT(only pressing MODE
button)
! :
Indash Display Angle RIGHT(only pressing MODE
button)
" 9
Indash Display Angle DOWN(only pressing MODE
button)
# 8
Indash Display Angle UP(only pressing MODE button)
$ V.SEL.
Switching V.SEL
% Numeric Keypad
This numeric keypad has the same function of the
preset buttons (1 to 6) as the following models: CVA1003/CVA-1005/CVA-1006/IVA-C800/IVA-C801.
& AUDIO/NAV.
Switching AUDIO/NAV. Switch to AUDIO side.
( MODE
Operates 8 to # (Flashes the Status Indicator for 5
seconds.)
EN
73-EN
Page 77

Voice Recognition
About Speak Button
The Speak button is used for voice navigation. Press the button to
activate the voice operation mode.
For Voice Recognition to Operate Correctly
Voice navigation may not operate correctly, depending on the
situation in which it is used.
For voice recognition to operate correctly, make sure that you
read the following provisions.
Mount the microphone in a suitable location.
Mount the microphone where the driver’s voice can be picked
up clearly. Adjust the distance between microphone and the
driver’s position so that the driver has no difficulty speaking
into the microphone. For installation details, refer to the
supplied Installation Manual.
Lower the volume of the car audio.
To ensure your voice is recognized, reduce the car audio
volume (radio, etc.) as necessary.
Close the windows.
Make sure all windows are closed during voice operation as
ambient, engine or wind noise may interfere with recognition.
Using the Voice Control System
Most of the system’s functions can be controlled by voice
commands. The voice control system is activated with the
SPEAK button. To control your navigation system by voice, press
and release the SPEAK button, wait for the beep, then give a
voice command. Once the microphone picks up your command,
the system changes the display in response to the command and
prompts you for the next command. Using the SPEAK button,
answer the prompt as required.
1
Press the SPEAK button.
A sound beeps, and the voice icon is displayed
for 2 seconds on the screen.
2
When the voice icon is displayed, say the
desired voice command into the microphone.
The system changes the display in response to the
command and prompts you for the next command.
Speak clearly.
Speak directly into the microphone, at suitable pace, avoiding
long pauses.
Only use the specified voice commands.
The system only recognizes these commands.
Also, make sure you use the correct pronunciation.
Do not converse when speaking a voice command.
Your voice may not be recognized if you mix regular
conversation with voice commands.
Maintain a natural driving posture while speaking voice
commands, so that you can hold the steering wheel in
the usual way, without the need to lean in towards the
microphone to speak.
Any accent in your voice may not be recognized.
Therefore, always speak the commands clearly.
• If the IN-INT cable (supplied with the Alpine head unit)
is connected, volume is automatically lowered by the
mute cable connection.
For connection, refer to the extra Installation Manual.
• If your voice is not recognized, change the location of
the microphone. Your voice recognition may be
improved.
•Voice guidance announcements will be interrupted
during voice operation.
Voice Icon
3
Perform operations in steps 1 and 2
repeatedly.
•The spoken commands are mostly the same as the
phrases displayed on the screen. For those that are not,
see “Voice Command Index” (page 78).
• If you do not know which voice command to use, use
the help function, see “Using the Help Command of the
Voice Control System” (page 75).
• If the system does not understand a command or you
wait too long to give a command, it responds with
“Pardon me.” If the system cannot perform a command
or the command is not appropriate for the screen you
are on, it sounds a beep.
74-EN
Page 78

Using the Help Command of the Voice
Control System
For voice commands of the voice recognition control, see “Voice
Command Index” (page 78). If you do not know which voice
command to use, you can use the Help Command function. Then,
search the desired voice command.
1
Press the SPEAK button and say “Help.”
The Voice Command List screen is displayed.
2
To listen to the available voice commands,
press the SPEAK button and say “Read.”
(Help command screen example when Nav Menu is
displayed.)
The voice command is read.
•To scroll the list of Voice Commands say “Page up” or
“Page down.”
3
To stop reading the command list, press the
SPEAK button and say “Stop.”
•When the Voice Command is complete, the system will
automatically stop reading.
4
Press the SPEAK button and say “Done”,
“Cancel” or “(Go) Back.”
The Voice Command List screen closes.
•The Voice Command List can be controlled by touch or
remote control operation.
Inserting/Removing the PC Card
When using the voice tag function, insert the PC card (sold
separately) in the navigation unit.
Inserting the PC Card
1
Open the PC card slot cover of the navigation
unit.
PC Card Slot Cover
2
Insert the PC card into the PC card slot.
PC Card
• Insert the PC card deeply with the arrow mark (8)
facing up.
3
Close the PC card slot cover.
Removing the PC Card
1
Open the PC card slot cover of the navigation
unit, and press the eject button.
EN
Voice Tag Function
Voice Tag is a function that allows you to use a certain phrase as
a voice command for voice recognition operation.
You can record places in Address Book or Favorites as your
favorite phrases to easily recall those places. Voice tags can
record up to 50 places in the Address Book and 5 in the Favorites
in the PC card.
• If Voice Tag is recorded, a “Voice Tag Data” folder will
automatically be created in the PC card root folder. If
this folder is deleted or moved to another folder, the
Voice Tag function cannot be used.
Eject button
2
Remove the pulled out PC card.
3
Close the PC card slot cover.
Continued
75-EN
Page 79

About PC cards
• Use the type 1 and type 2 PC card.
• If PC card memory becomes insufficient, data cannot be
written any more. Each voice tag uses approx. 50kb of
memory.
• Be sure to close the PC card slot cover when used the
navigation unit. If dust, etc. enters, a malfunction may
result.
• Do not optimize or compress data on a PC card with a
personal computer.
• The PC card function is not guaranteed. Use the PC
card according to the terms of agreement.
• PC card may not function correctly at high or low
temperature.
• It is recommended to back up important data on a
personal computer.
•For available PC cards, contact your nearest Alpine
dealer, or Alpine at 1-888-NAV-HELP.
L PC Card Standard
Recording Voice Tag
1
Display the Change Entry screen in Address
Book or Change Favorite Destination screen
in Favorites.
Standard
Rated Voltage
Maximum Power
Output
* To prevent malfunction or damage, note the following
points. Read the PC card Owner's Manual thoroughly.
• Do not insert a PC card other than the above described
into the navigation unit.
• Do not leave the PC card slot cover of the navigation
unit open.
• Do not leave the PC card inserted in the navigation unit
in the car.
• Do not leave the PC card in a car.
• Do not use the PC card outside its working temperature
range.
Complies to PCMCIA TYPE1 and
TYPE2 (PCMCIA (PC) card slot
complies to regular standard).
3.3V or 5V
0.5A
CAUTION
Alpine accept no responsibility for lost data, etc.,
even if data, etc., is lost while using this product.
•For the Address Book edit screen, refer to “Editing the
Address Book” (page 44).
•For the Favorite edit screen, refer to “Editing the
Favorites” (page 48).
2
Touch [Record Voice Tag].
Select (highlight) “Record Voice Tag” by tilting
the joystick and press ENTER.
The Record Voice Tag screen is displayed.
3
Touch [Start Recording].
Select (highlight)“Start Recording” by tilting the
joystick and press ENTER.
76-EN
Page 80

4
Speak into the microphone for 2 seconds to
record a phrase as voice tag.
If a voice tag has been recorded, a voice tag icon is
displayed.
Searching for a Route using Voice Tag
You can use a recorded Voice Tag to search for a route.
1
Press the SPEAK button and say “(Go to)
{your recorded Voice Tag}”.
The Confirm Destination screen appears.
5
To re-record the recording, touch [ReRecord] and speak by the Record Voice Tag
screen.
To repeat the recording, select [Re-Record] on the
Record Voice Tag screen and press ENTER, then
speak.
• If Confirm Address Book is set to “Never” and an
Address Book place is selected, the Confirm
Destination screen is not displayed, but the route is
calculated to the destination (see page 70).
• If Confirm Favorite Dest is set to “Never” and a
Favorite Dest place is selected, the Confirm
Destination screen is not displayed, but the route is
calculated to the destination (see page 70).
2
Press the SPEAK button and say “Yes” or
“OK.”
The system will begin calculating the route.
Deleting Voice Tag
1
Touch [Delete] on the Record Voice Tag
screen.
Select (highlight)“Delete” by tilting the joystick
and press ENTER.
EN
Playing Back the Recorded Voice Tag
1
Touch [Playback Recording] on the
Record Voice Tag screen.
Select (highlight)“Playback Recording” by tilting
the joystick and press ENTER.
The recorded voice tag is played back.
The recorded voice tag is deleted.
77-EN
Page 81

Voice Command Index
The NVE-N872A navigation or Alpine touch panel-compatible
monitor IVA-D310/IVA-W205/IVA-W200/IVA-D105/IVA-D100
is controllable by voice recognition operation. When you use
voice recognition operation, most phrases displayed on the screen
are the actual voice commands you say to perform the operation.
The following explains the representative voice commands that
are not displayed on the screen.
• If you do not know which voice command to use, use
the Help function, see “Using the Help Command of the
Voice Control System” (page 75).
Navigation Operation
L Go back one step
“Cancel”
“(Go) Back”
L Help Command
“(Voice) (Command) Help”
L Respond to the Command of the System
“Yes”
“No”
L Repeat Voice Command of the System
“Repeat (Voice) Feedback”
L Displaying Map
“Show Map (Display)”
L Changing the Map Scale
“Zoom In”
“Zoom Out”
“Zoom to ## miles” (# is Map scale)
“Zoom to ## meters” (# is Map scale)
“Max Zoom In”
“Max Zoom Out”
L Changing the Orientation of the Map
“North Up”
“Heading Up”
“3-D”
“3-D Heading (Up)”
L Confirm the Current Vehicle Position
“Where am I ?”
L Finding nearest POI
“Find nearest ####” (# is POI name)
L POI Icons
“Show ##### Icons” (# is icon name)
“Hide ##### Icons” (# is icon name)
L Displaying the Nav Menu Screen
“(Nav) Menu”
L Entering a destination by Home
“Go home”
L To register your current location as Previous Destination
“Save current location”
L Changing the route guidance display
“Show Split (Display)”
“(Show) Split Display”
“Show Arrow (Display)”
“(Show) Arrow Display”
L Displaying the Traffic Incident List Screen
“Traffic (Information)”
L Traffic Icons
“Show Traffic Icons”
“Hide Traffic Icons”
Touch panel-compatible monitor IVA-D310/IVAW205/IVA-W200/IVA-D105/IVA-D100 operation
L Monitor action
“Display Open”
“Display Close”
“Display Flat”
L Source select
“Media Radio”
“Media Band”
“Media CD”
“Media DVD”
“Media Changer”
“Media TV”
“Media AUX or AUX One (or Two or Three)”
“Media VCR”
“Media GAME One (or Two)”
“Media External DVD”
“Media XM”
“Media iPod”
L Media action
“Media Skip”
“Media Back”
“Media Repeat”
“Media Play”
“Media Pause”
“Media Mute On”
“Media Mute Off”
“Media Next”
“Media Previous”
L System feature
“Media VSEL (or Media V select)”
L Navigation select
“Navigation”
78-EN
Page 82

In Case of Difficulty
If you encounter a problem, please review the items in the following checklist. This guide will help you isolate the problem if the unit is
at fault. Otherwise, make sure the rest of your system is properly connected or consult your authorized Alpine dealer.
Symptom
No operation
The present vehicle
position cannot be
measured correctly.
Vehicle position is
displayed incorrectly
on the screen.
Cannot read disc is
displayed for a certain
operation.
Unstable operation
Cause
Blown fuse
Ambient temperature over 122°F
(50°C)
Moisture condensation
The vehicle position changed after the
ignition was switched off.
• Movement on a ferry boat
• Rotation of a parking lot turntable
• Movement by tow truck
Poor satellite configuration
Measurement is 2-dimensional.
The disc is dirty.
The pickup lens is dirty.
The remote control batteries are
wearing out.
Solution
Replace with a fuse of the prescribed rating.
Lower the temperature in the vehicle below 122°F
(50°C), for example by running for a while with the
window open or by using the air conditioner.
Allow enough time for the condensation to evaporate
(about 1 hour, depending on ambient temperature and
humidity).
Drive the vehicle in an area of good GPS reception to
allow the unit to recalibrate itself.
Move to a location where GPS satellite reception is
easy. (See page 58.)
Clean the disc.
Do not use a commercial available lens cleaner disc.
Consult your nearest ALPINE dealer.
Replace the remote control batteries, see NVE-N872A
of the Owner's Manual on page 12.
EN
79-EN
Page 83

If this Message Appears
Va rious messages are displayed on the screen during operation. In addition to the messages telling you the current status or providing
guidance for the next operation, there are also the following error messages. If one of these error messages is displayed, carefully follow
the instructions in the solution column.
Message
Please insert DVD-ROM.
Error reading DVD-ROM.
Please check the disc.
If you are driving, please pull
over before using this
function.
Vehicle is out of Map display
region.
Please refer to the Owner's
Manual.
Destination is out of Map
display region.
Route cannot be calculated.
Cause
• The disc has been removed.
• There was no disc in the system
when the power was switched on.
•A disc that this system cannot
read has been loaded.
• The disc is dirty or upside down.
• The disc cannot be read because
of condensation.
• The MENU button was pressed
while the vehicle was running.
•A menu selection operation was
carried out while the vehicle was
running.
• The inserted DVD-ROM does not
cover the map display region or
map display region needs to be
changed to the correct region in
Setup (if map region exists in
Source Disc).
• The destination is outside the map
display region and not contained
in the inserted DVD-ROM.
Solution
Insert the disc.
Take out the disc, check if it was upside down,
clean it if necessary, then reinsert it.
Take out the disc, allow enough time for the
condensation to evaporate (about 1 hour), then
reinsert the disc.
Move the vehicle to a safe location, stop, and
engage the parking brake, then carry out this
operation.
Insert the DVD-ROM that applies to the current
map display region. If map region exists in the
Source Disc, change Map display region in Setup
to the correct region.
Insert the DVD-ROM in which the destination is
registered and contained in the map display
region.
Temperature is too high.
Please allow system to cool
down.
Update failed.
Please check your disc.
80-EN
• Ambient temperature over 122ºF
(50ºC)
• Application error
Lower the temperature in the vehicle below
122ºF (50ºC), for example by running for a while
with the window open or by using the air
conditioner.
If the South disc is inserted, replace it with the
North disc.
The application starts updating.
Page 84

END-USER TERMS
The data (“Data”) is provided for your personal, internal use only and not for resale. It is protected by copyright, and is
subject to the following terms and conditions which are agreed to by you, on the one hand, and ALPINE Electronics, Inc.
(“ALPINE”) and its licensors (including their licensors and suppliers) on the other hand. ©
The Data for areas of Canada includes information taken with permission from Canadian authorities, including: © Her
Majesty the Queen in Right of Canada, © Queen’s Printer for Ontario. GeoBase
®
TERMS AND CONDITIONS
Personal Use Only. You agree to use this Data together with ALPINE's authorized Application for the solely personal, non-
commercial purposes for which you were licensed, and not for service bureau, time-sharing or other similar purposes.
Accordingly, but subject to the restrictions set forth in the following paragraphs, you may copy this Data only as necessary
for your personal use to (i) view it, and (ii) save it, provided that you do not remove any copyright notices that appear and
do not modify the Data in any way. You agree not to otherwise reproduce, copy, modify, decompile, disassemble or
reverse engineer any portion of this Data, and may not transfer or distribute it in any form, for any purpose, except to the
extent permitted by mandatory laws.
Restrictions. Except where you have been specifically licensed to do so by ALPINE, and without limiting the preceding
paragraph, you may not (a) use this Data with any products, systems, or applications installed or otherwise connected to
or in communication with vehicles, capable of vehicle navigation, positioning, dispatch, real time route guidance, fleet
management or similar applications; or (b) with or in communication with any positioning devices or any mobile or
wireless-connected electronic or computer devices, including without limitation cellular phones, palmtop and handheld
computers, pagers, and personal digital assistants or PDAs.
No Warranty. This Data is provided to you “as is,” and you agree to use it at your own risk. ALPINE and its licensors (and
their licensors and suppliers) make no guarantees, representations or warranties of any kind, express or implied, arising
by law or otherwise, including but not limited to, content, quality, accuracy, completeness, effectiveness, reliability, fitness
for a particular purpose, usefulness, use or results to be obtained from this Data, or that the Data or server will be
uninterrupted or error-free.
Disclaimer of Warranty: ALPINE AND ITS LICENSORS (INCLUDING THEIR LICENSORS AND SUPPLIERS) DISCLAIM
ANY WARRANTIES, EXPRESS OR IMPLIED, OF QUALITY, PERFORMANCE, MERCHANTABILITY, FITNESS FOR A
PARTICULAR PURPOSE OR NON-INFRINGEMENT. Some States, Territories and Countries do not allow certain
warranty exclusions, so to that extent the above exclusion may not apply to you.
Disclaimer of Liability: ALPINE AND ITS LICENSORS (INCLUDING THEIR LICENSORS AND SUPPLIERS) SHALL NOT
BE LIABLE TO YOU: IN RESPECT OF ANY CLAIM, DEMAND OR ACTION, IRRESPECTIVE OF THE NATURE OF
THE CAUSE OF THE CLAIM, DEMAND OR ACTION ALLEGING ANY LOSS, INJURY OR DAMAGES, DIRECT OR
INDIRECT, WHICH MAY RESULT FROM THE USE OR POSSESSION OF THE INFORMATION; OR FOR ANY LOSS
OF PROFIT, REVENUE, CONTRACTS OR SAVINGS, OR ANY OTHER DIRECT, INDIRECT, INCIDENTAL, SPECIAL
OR CONSEQUENTIAL DAMAGES ARISING OUT OF YOUR USE OF OR INABILITY TO USE THIS INFORMATION,
ANY DEFECT IN THE INFORMATION, OR THE BREACH OF THESE TERMS OR CONDITIONS, WHETHER IN AN
ACTION IN CONTRACT OR TORT OR BASED ON A WARRANTY, EVEN IF ALPINE OR ITS LICENSORS HAVE BEEN
ADVISED OF THE POSSIBILITY OF SUCH DAMAGES. Some States, Territories and Countries do not allow certain
liability exclusions or damages limitations, so to that extent the above may not apply to you.
Export Control. You agree not to export from anywhere any part of the Data provided to you or any direct product thereof
except in compliance with, and with all licenses and approvals required under, applicable export laws, rules and
regulations.
Entire Agreement. These terms and conditions constitute the entire agreement between ALPINE (and its licensors,
including their licensors and suppliers) and you pertaining to the subject matter hereof, and supersedes in their entirety
any and all written or oral agreements previously existing between us with respect to such subject matter.
Governing Law. The above terms and conditions shall be governed by the laws of the Illinois, without giving effect to (i) its
conflict of laws provisions, or (ii) the United Nations Convention for Contracts for the International Sale of Goods, which is
explicitly excluded. You agree to submit to the jurisdiction of Illinois for any and all disputes, claims and actions arising
from or in connection with the Data provided to you hereunder.
2006 NAVTEQ All rights reserved.
EN
81-EN
Page 85

Government End Users. If the NAVTEQ Data is being acquired by or on behalf of the United States government or any
other entity seeking or applying rights similar to those customarily claimed by the United States government, (i) for
acquisitions conducted by the Department of Defense, the NAVTEQ Data is licensed with “Limited Rights” in accordance
with the rights set forth at DFARS 252.227-7013(b)(3), TECHNICAL DATA-NONCOMMERCIAL ITEMS, and NAVTEQ Data delivered
or otherwise furnished with “Limited Rights” shall be marked with the following “Limited Rights Notice” set forth at DFARS
252.227-7013(f)(3), and shall be treated in accordance with such Notice:
LIMITED RIGHTS
CONTRACT NO.: __________________________________________________
C
ONTRACTOR
The Government’s rights to use, modify, reproduce, release, perform, display, or disclose these technical data are
restricted by paragraph (b)(3) of the Rights in Technical Data-Noncommercial Items clause contained in the above
identified contract. Any reproduction of technical data or portions thereof marked with this legend must also reproduce
the markings. Any person, other than the Government, who has been provided access to such data must promptly notify
the above named Contractor.
and; (ii) for civilian agency acquisitions, the NAVTEQ Data is licensed in accordance with the rights set forth at FAR
52.227-14(g)(1), RIGHTS IN DATA-GENERAL (
Contracting Officer requires the delivery of limited rights NAVTEQ Data that has been withheld or would otherwise be
withholdable in accordance with FAR 52.227-14(g)(1), the NAVTEQ Data is licensed with “Limited Rights” as set forth in
the following “Limited Rights Notice” at FAR 52.227-14(g)(2) (Alternate II), which shall be affixed to the NAVTEQ Data
and the NAVTEQ Data shall be treated in accordance with such Notice (which shall be marked on any reproduction of
these data, in whole or in part):
(M
ANUFACTURER/SUPPLIER
CONTRACTOR (MANUFACTURER/ SUPPLIER) NAME: NAVTEQ
) A
DDRESS
: 222 Merchandise Mart Plaza, Suite 900, Chicago, Illinois 60654
Protection of limited rights data and computer software
). In the event that the
LIMITED RIGHTS NOTICE (JUN 1987)
These data are submitted with limited rights under Government Contract No. _____ (and subcontract ______, if
appropriate). These data may be reproduced and used by the Government with the express limitation that they will not,
without written permission of the Contractor, be used for purposes of manufacture nor disclosed outside the Government;
except that the Government may disclose these data outside the Government for the following purposes, if any, provided
that the Government makes such disclosure subject to prohibition against further use and disclosure:
additional purposes permitting disclosure of such Data.
The manufacturer/supplier of the Data is NAVTEQ, 222 Merchandise Mart Plaza, Suite 900, Chicago, Illinois 60654.
If the Contracting Officer refuses to use either of the licenses provided in (i) or (ii), herein, the Contracting Officer must notify
NAVTEQ prior to seeking additional or alternative rights in the NAVTEQ Data.
There are no
82-EN
Page 86

• Dans certains cas, le système de navigation peut ne pas
PRECAUTIONS
Ces informations sont importantes. Veuillez les
lire avec attention avant d’utiliser ce produit.
Ce produit est destiné à vous fournir de manière sûre
les instructions qui vous guideront jusqu’à votre
destination. Veuillez lire attentivement ces précautions
pour être certain d’utiliser correctement ce système de
navigation.
• Ce système de navigation n’est pas un substitut de votre
propre jugement. Tous les itinéraires que vous suggère ce
système de navigation ne peuvent en aucun cas
supplanter la règlementation routière locale ni votre
propre jugement, pas plus que votre connaissance des
règles fondamentales de sécurité routière. Ne suivez pas
l’itinéraire qu’il vous suggère si la manœuvre est interdite
ou dangereuse, vous expose à un danger ou bien s’il vous
conduit dans une zone apparemment dangereuse.
• Ne regardez l’écran que lorsque c’est nécessaire et sans
danger. Si vous devez regarder plus longtemps l’écran,
arrêtez-vous en lieu sûr en respectant les règles de sécurité.
• Ne désignez pas de destinations, ne faites pas de
réglages et ne cherchez pas à accéder à d’autres
fonctions exigeant un regard prolongé de l’écran et/ou
de la télécommande pendant la conduite. Arrêtez-vous
en lieu sûr en respectant les règles de sécurité avant
d’essayer d’accéder au système.
•Avant d’utiliser le système de navigation pour être guidé
jusqu’à un service d’urgence, veuillez d’abord vous
renseigner auprès de ce service pour savoir s’il est
disponible. Tous les services d’urgence, postes de
police, pompiers, hôpitaux et cliniques, ne sont pas
enregistrés dans la base de données. Usez de votre
propre jugement et renseignez-vous pour savoir quelle
direction prendre dans de telles situations.
• La base de données cartographiques contenue dans le
support (DVD-ROM) était la plus récente lors de la
fabrication du système. Suite aux changements de
routes et d’environnement, le système de navigation ne
pourra peut-être pas, dans certains cas, vous conduire à
votre destination. Dans ces cas, faites appel à votre
propre jugement.
• La base de données cartographiques est destinée à vous
indiquer des itinéraires possibles. Elle ne tient pas
compte de facteurs tels que la sécurité de l’itinéraire
suggéré ou d’autres facteurs pouvant affecter le temps
nécessaire pour arriver à destination. Par exemple, Elle
ne tient pas compte des fermetures de route ou des
travaux en cours, ou d’autres caractéristiques (type de
revêtement, montée ou descente, limites de tonnage ou
de hauteur, etc.), des bouchons, des conditions
atmosphériques, ni de tout autre facteur pouvant
affecter la sécurité ou le temps. Si le système est
incapable de vous indiquer un autre itinéraire, faites
appel à votre propre jugement.
•Afin d’éviter tout risque d’accident, veillez à régler le
• Assurez-vous que toute autre personne ayant l’intention
Si vous ne comprenez pas bien certaines parties de ce
manuel concernant le fonctionnement du système de
navigation, veuillez contacter votre revendeur autorisé
de systèmes de navigation Alpine le plus proche ou
Alpine au 1-888-NAV-HELP (1-888-628-4357) avant
d’utiliser ce système de navigation.
indiquer la position correcte du véhicule. Le cas
échéant, essayez de déterminer vous-même la direction
en tenant compte des conditions actuelles.
Normalement, le système de navigation devrait corriger
automatiquement la position du véhicule, cependant, il
peut arriver que vous soyez obligé de corriger vousmême votre position. Si le cas se présente, arrêtez-vous
en lieu sûr en respectant les règles de sécurité avant de
rectifier votre position.
volume de l’écran à un niveau qui ne vous empêche pas
d’entendre les bruits extérieurs de la circulation ou les
véhicules de secours.
d’utiliser ce système de navigation lise attentivement
les précautions et le mode d’emploi.
EN
FR
1-FR
Page 87

Précautions concernant la sécurité
• Lisez attentivement ce mode d’emploi avant la mise en
service de DVD-ROM. Il contient des instructions sur
la manière d’utiliser ce produit correctement et sans
danger. Alpine ne peut pas être tenu pour responsable
de problèmes dus au non respect des instructions de ce
manuel.
• Le manuel utilise différents symboles pour vous
indiquer comment utiliser ce produit en toute sécurité
et vous avertir des dangers potentiels résultant d’une
mauvaise connexion ou manipulation. Voici la
signification de ces symboles. Il est important de bien
comprendre leur signification pour utiliser
correctement le manuel et le système proprement dit.
AVERTISSEMENT
• L'utilisation du système pendant la conduite
est dangereuse. Il est indispensable de
s'arrêter avant d'utiliser le logiciel.
•Tenez compte des conditions routières et de
la réglementation avant de suivre les
informations de l'affichage cartographique.
Respectez les limites et adaptez votre
conduite aux circonstances.
• Ce logiciel est conçu pour la série NVEN872A exclusivement. Il ne peut pas être
utilisé avec un autre matériel.
NE PAS INTRODUIRE LES MAINS, LES DOIGTS NI DE
CORPS ETRANGERS DANS LES FENTES ET LES
INTERSTICES.
Il y a risque de blessures ou de dommages à l’appareil.
MINIMISER L’AFFICHAGE EN COURS DE CONDUITE.
La visualisation de l’affichage peut distraire le conducteur de la
conduite du véhicule et, partant, de provoquer un accident.
NE PAS SUIVRE LES ITINERAIRES CONSEILLES SI LE
SYSTEME DE NAVIGATION INVITE A EFFECTUER UNE
MANŒUVRE DANGEREUSE OU ILLEGALE, OU VOUS
PLACE DANS UNE SITUATION OU A UN ENDROIT
DANGEREUX.
Ce produit ne peut en aucun cas se substituer à votre bon sens.
Tout itinéraire conseillé par ce système ne peut se substituer au
code de la route local, à votre jugement personnel ni à la sécurité
de conduite.
ATTENTION
Ce symbole désigne des instructions importantes.
Le non-respect de ces instructions peut entraîner
des blessures ou des dommages matériels.
INTERROMPRE TOUTE UTILISATION EN CAS DE
PROBLEME.
Le non-respect de cette précaution peut entraîner des blessures ou
endommager l’appareil. Retourner l’appareil auprès du
distributeur Alpine agréé ou un centre de service après-vente
Alpine en vue de la réparation.
AVERTISSEMENT
Ce symbole désigne des instructions importantes.
Le non-respect de ces instructions peut entraîner
de graves blessures, voire la mort.
N’ACTIVER AUCUNE FONCTION SUSCEPTIBLE DE
DETOURNER VOTRE ATTENTION DE LA CONDUITE DU
VEHICULE.
Les fonctions requérant une attention prolongée ne doivent être
exploitées qu’à l’arrêt complet du véhicule. Toujours arrêter le
véhicule à un endroit sûr avant d’activer ces fonctions. Il y a
risque de provoquer un accident.
GARDER LES PETITS OBJETS COMME LES PILES HORS
DE PORTEE DES ENFANTS.
L’ingestion de tels objets peut entraîner de graves blessures. En
cas d’ingestion, consulter immédiatement un médecin.
UTILISER CET APPAREIL POUR DES APPLICATIONS
MOBILES DE 12 V.
Toute utilisation autre que l’application désignée comporte un
risque d’incendie, de choc électrique ou de blessure.
2-FR
Page 88

Table des matières
Précautions
Ces informations sont importantes. Veuillez les lire
avec attention avant d’utiliser ce produit. ........... 1
Précautions concernant la sécurité ............................ 2
AVERTISSEMENT................................................... 2
ATTENTION ............................................................ 2
Préface
Terminologie relative à la navigation ........................ 5
Fonctionnalités .......................................................... 6
Utilisation du disque ................................................. 7
Présentation du manuel ............................................. 8
Mise en route
Mise sous tension du système ................................... 9
Visualisation d’un affichage actuel ......................... 10
Affichage du point................................................... 11
Sélection d’un élément dans une liste ..................... 11
Utilisation du clavier à l’écran ................................ 11
Modification de l'échelle de la carte........................ 12
Modification de l’orientation de la carte ................. 13
Commutation de l’écran Jour/Nuit .......................... 13
Entrée d’une destination
Affichage de l’écran de menu de la destination ...... 14
Entrée d’une destination par adresse ....................... 14
Entrée d’un point d’intérêt par son nom ................. 16
Entrée d’un point d’intérêt par type ........................ 17
Entrée d’une destination par destinations
précédentes........................................................ 19
Entrée d’une destination à l'aide du carnet
d’adresses .......................................................... 19
Entrée d’une destination par croisement ................. 20
Entrée d’un point d’intérêt par numéro
de téléphone ...................................................... 22
Entrée d’une destination par entrée d’autoroute ..... 23
Entrée d’une destination par latitude
et longitude ....................................................... 24
Utilisation de la fonction Plan d'aujourd'hui ........... 25
Entrée d’une destination par la résidence................ 26
Entrée d’une destination à l'aide des favoris ........... 26
Entrée d’une destination à l'aide des données de
ZAGAT SURVEY ............................................. 27
Entrée d’une destination par défilement
Carte affichée .................................................... 29
Confirmez la destination
Ajouter au plan d'aujourd'hui .................................. 31
Voir les itinéraires ................................................... 32
Sélectionnez la méthode .......................................... 32
Ouvrir la carte ......................................................... 33
Affichage de l’écran de menu Option ..................... 33
Trouver un PI (Point d’intérêt) local ....................... 33
Sauvegarder dans le carnet d’adresses .................... 34
Sauvegarder comme résidence ................................ 35
Ajouter aux favoris .................................................. 35
Choisir comme escale ............................................. 35
Fixer point A à point B............................................ 36
ENGLISHENGLISH
Conduite jusqu'à votre destination
Modification de l’affichage du guidage
de l’itinéraire ..................................................... 37
Rappel de la liste des manoeuvres pendant
le guidage .......................................................... 38
Rappel de l’affichage du guidage de l’itinéraire
fléché ................................................................. 39
Evitement ............................................................. 39
Sélectionnez Sortie d’autoroute pendant le
guidage de l’itinéraire ....................................... 39
Recalcul automatique .............................................. 40
Déviation (DETOUR) ............................................. 40
Affichage de l’écran de menu de l’itinéraire........... 41
Afficher tout l’itinéraire .......................................... 41
Trouver PI sur l’itinéraire ........................................ 41
Modifier la méthode ................................................ 42
Effacer la destination............................................... 43
Effacer une escale.................................................... 43
Modifier des fonctions
Affichage de l’écran de menu d’édition .................. 44
Modification du carnet d’adresses .......................... 44
Créer un nouveau répertoire ................................. 45
Renommer le répertoire ....................................... 46
Effacer le répertoire.............................................. 46
Modifier le nom ................................................... 46
Modifier l’adresse ................................................ 47
Modifier le numéro de téléphone ......................... 47
Modifier le répertoire ........................................... 47
Modifier l’icône ................................................... 48
Effacer la fiche du carnet d’adresses.................... 48
Modification des favoris.......................................... 48
Modifier/Effacer Dest Favoris.............................. 49
Effacer Noms Favoris ........................................... 50
Effacer Type Favoris ............................................ 50
Effacer un lieu favori ............................................ 51
Effacement du plan d'aujourd'hui ............................ 52
Modification de la résidence ................................... 53
Effacement des destinations précédentes ................ 53
Modification des routes évitées ............................... 54
Modification des zones évitées ............................... 55
FR
3-FR
Page 89

Fonctions d'Informations
Affichage de l’écran de menu Informations............ 56
Présent déplacement ................................................ 56
Informations sur le système .................................... 57
Informations satellite ............................................... 58
Simulation de la navigation ..................................... 58
Calendrier ................................................................ 59
Calculatrice ............................................................. 59
Configuration
Affichage de l’écran de menu Configurer ............... 60
Affichage carte ........................................................ 60
Région sélectionnée .......................................... 61
Couleur.............................................................. 61
Carte .................................................................. 61
Fonctions carte ........................................................ 61
Icônes des points d’intérêt ................................ 62
Icônes site remarquable .................................... 64
Forme des bâtiments ......................................... 64
Icône de sens unique ......................................... 64
Parcours............................................................. 64
Guidage ................................................................... 65
Voix ................................................................... 65
Affichage........................................................... 65
Zoom auto sur carte .......................................... 66
Heure/temps ...................................................... 66
Méthode de calcul ............................................. 66
Affichage/Volume ................................................... 66
Régler l’écran .................................................... 67
Réglez volume guidage vocal ........................... 67
Horloge.................................................................... 67
Fuseau horaire ................................................... 68
Heure ................................................................. 68
Horloge ............................................................. 68
Langue et mesurs..................................................... 68
Langue .............................................................. 68
Mesurs (mile/pi ou km/m) ................................ 69
Autres ...................................................................... 69
Clavier ............................................................... 69
Confirmer la résidence ...................................... 69
Confirmer dest. fav. ........................................... 70
Confirmer dest. du carnet.................................. 70
Confirmer commande voc................................. 70
Référence
Touches et fonctions de la télécommande
(RUE-4140)....................................................... 71
Nomenclature des pièces .................................. 71
Guide de référence de la télécommande pour
l’unité principale ............................................... 72
Guide de référence de la télécommande pour
l’unité principale AV ......................................... 73
Reconnaissance vocale ............................................ 74
A propos de la touche PAROLE ....................... 74
Fonctionnement correct de la reconnaissance
vocale ................................................................ 74
Utilisation du système de commande vocale .... 74
Utilisation de la commande d’Aide de la voix
Système de contrôle .......................................... 75
Fonction de balise vocale ........................................ 75
Insertion/retrait de la carte PC .......................... 75
Enregistrement d’une balise vocale .................. 76
Lecture de la balise vocale ................................ 77
Recherche d’un itinéraire à l’aide d’une
balise vocale ...................................................... 77
Suppression d’une balise vocale ....................... 77
Index des commandes vocales ............................. 78
Navigation ......................................................... 78
Fonctionnement du moniteur compatible avec
l’écran tactile IVA-D310/IVA-W205/IVA-W200/
IVA-D105/IVA-D100 ........................................ 78
En cas de problème ................................................. 79
Affichage d’un des messages suivants .................... 80
ENGLISHENGLISH
CONTRAT DE LICENCE UTILISATEUR
FINAL
CONTRAT DE LICENCE UTILISATEUR
FINAL ............................................................... 81
4-FR
Page 90

Préface
Carnet d’adresses
La mémoire du système peut stocker jusqu’à 300 adresses
personnelles et numéros de téléphone.
Terminologie relative à la navigation
Navigation
Le système de navigation affiche et suit la position et le
mouvement du véhicule sur un affichage de carte en
mouvement. Quand une destination est entrée, le système
de navigation calcule rapidement un itinéraire et vous guide
le long de celui-ci avec des indicateurs topographiques et
des invites vocales.
Indicateur de la position actuelle du
véhicule
La position actuelle du véhicule est indiquée au moyen
d’une flèche insérée dans un cercle.
Position actuelle du véhicule
Points d’intérêt populaires
Jusqu’à quatorze icônes de points d’intérêt différents
peuvent être affichées sur la carte. Ces icônes indiquent les
positions et les noms des stations-essence/gaz,
restaurants, parcs de stationnement à étages, aires de
stationnement, ATM, banques, dépanneurs, épiceries,
sorties d’autoroute accompagnées de leurs données IA,
hôtels et motels, Bed & Breakfast, bureaux de poste,
hôpitaux et écoles les plus proches. Les 14 icônes peuvent
être affichées simultanément à l’écran.
FR
• Les icônes de marque apparaissent sur la carte. Pour plus
d’informations, voir la page 63 de ce manuel.
Equilibrage de la carte
Dans la mesure où la navigation GPS possède une fenêtre
d’erreur de 100 – 650 pieds environ (30 m – 200 m), la
position du véhicule peut être calculée de telle façon qu’elle
peut s’afficher de manière incorrecte, en dehors de la
route. L’équilibrage de la carte corrige automatiquement
cette erreur de façon à afficher la position sur la carte.
Destination
Le point de destination est représenté par l’icône d’une
cible.
b
a
a Icône de destination
b Itinéraire (en bleu)
5-FR
Page 91

Fonctionnalités
Calcul automatique d’itinéraire
Le système de navigation affiche et suit la position et le
mouvement du véhicule via un affichage de carte en
mouvement. Quand vous entrez une destination, le
système de navigation calcule rapidement un itinéraire et
vous guide le long de celui-ci avec des indicateurs
topographiques et des invites vocales. Pendant la
détermination de l’itinéraire, le système peut être
programmé pour minimiser la fréquentation des routes à
péage et des autoroutes.
Ce système combine les signaux GPS reçus avec des
informations topographiques stockées sur un DVD-ROM
pour afficher la position et la direction du véhicule. Ce
système de navigation inclut aussi un capteur gyroscopique
et un capteur de vitesse qui lui permettent d’afficher la
position actuelle du véhicule, même dans les régions où les
signaux GPS peuvent être bloqués.
Guide d’annonce des virages
Quand un virage devient imminent, le système fournit des
instructions de manoeuvre via des guides fléchés et des
invites vocales simples.
Guide vocal en temps réel
Le système utilise des invites vocales pour vous avertir de
l’imminence des virages et des entrées d’autoroute. Vous
pouvez activer cette fonction de guidage vocal à tout
moment, en appuyant une fois sur la touche VOIX de la
télécommande ou en touchant [ ] sur l’affichage de la
carte.
Entrée du nom de rue
Permet d’entrer le nom de la rue de votre destination (via la
recherche d’adresse ou de croisement) si vous ne
connaissez pas le nom de la ville.
Entrée directe du nom du point d’intérêt
Entrez seulement le nom d’un point d’intérêt (sans spécifier
le nom de la ville) pour rechercher l’itinéraire jusqu’à ce
lieu.
Entrée directe du numéro de téléphone
Vous pouvez rechercher un point d’intérêt de destination en
entrant son numéro de téléphone (si vous le connaissez).
Zoom de la carte
Vous pouvez modifier l’agrandissement de la carte à l’aide
de neuf échelles pour obtenir des vues plus détaillées ou
plus générales (échelles de zoom 1/32, 1/16, 1/8, 1/4, 1/2,
1, 2, 5, 15, 50, 150, 350 miles). Une échelle de zoom
spéciale de 350 miles est disponible pour visualiser un très
long itinéraire.
Affichage de la carte 3D
Une carte en 3D qui contient la distance à vol d'oiseau peut
également être affichée.
Guidage vocal en trois langues
Guidage vocal en trois langues
Vous avez le choix entre trois langues (anglais, français et
espagñol) pour le guidage vocal de l’itinéraire.
Zoom de croisement (Zoom auto de la carte)
A l’approche des intersections et des croisements,
l’affichage de la carte s'agrandit automatiquement pour
faire apparaître la vue plus détaillée dont vous avez besoin.
Vous ne devez donc même pas appuyer sur les touches de
zoom.
Fonctions utiles lors du guidage de l’itinéraire
Le système de navigation est équipé d’une série de
fonctions disponibles lors du guidage de l’itinéraire ; ces
fonctions sont les suivantes.
• Recalcul automatique
Le système recalcule automatiquement un nouvel
itinéraire.
• Déviation
Le système recherche une déviation.
• Affichage des informations de points d’intérêt aux sorties
d’autoroutes.
• Recherche de points d’intérêts le long de l’itinéraire, etc.
Reportez-vous à la section « Conduite jusqu’à votre
destination » (page 37).
Capteur gyroscopique et capteur de vitesse
intégrés
Le gyroscope détectant la direction et le capteur de vitesse
détectant la distance fournissent des données qui
permettent d’afficher la position et la direction du véhicule,
même dans des endroits où les signaux GPS sont
impossibles à recevoir, notamment entre des immeubles ou
dans des tunnels.
Trois types d'utilisation
L'utilisation du système de navigation peut être
commandée à l'aide de la télécommande fournie (RUE-
4140), des touches tactiles* ou de la commande vocale.
* L'utilisation de touches tactiles n'est possible que si vous
raccordez le moniteur compatible avec l'écran tactile
Alpine IVA-D310, IVA-W205, IVA-D105 ou TME-M770S,
etc. Pour plus d'informations, reportez-vous à la section
« Présentation du manuel » à la page 8. Reportez-vous
également au Mode d'emploi du moniteur compatible
avec l'écran tactile.
Fonction de balise vocale
La balise vocale est une fonction qui vous permet d’utiliser
une phrase comme commande vocale pour toute opération
de reconnaissance vocale. Vous pouvez enregistrer des
lieux dans le Carnet d’adresses ou dans les Favoris comme
phrases favorites afin de rappeler facilement ces lieux.
Informations en temps réel (en option)
Si vous raccordez le récepteur de données XM HCE100XM (disponible séparément) ou le récepteur de
données SIRIUS (disponible séparément) et si vous vous
abonnez au service Traffic & Weather, vous pouvez recevoir
des informations relatives aux incidents de circulation en
temps réel. Les incidents de trafic et les embouteillages
peuvent être affichés sur la carte et classés selon la
distance qui les sépare du véhicule. Si vous connectez le
récepteur de données SIRIUS, vous pouvez obtenir les prix
du carburant, les horaires des cinémas, les conditions des
stations de ski, etc. Pour plus d'informations, visitez le site
Web de XM à l'adresse www.xmradio.com. ou le site Web
de SIRIUS à l'adresse www.sirius.com.
6-FR
Page 92

Utilisation du disque
Deux disques sont disponibles avec le NVD-A802 : la version NORD et la version SUD. Les informations relatives aux numéros de
téléphone/points d’intérêt contenues sur le disque de la zone Sud ne peuvent pas être recherchées avec le disque de la zone Nord, et
inversement. Les lieux de la zone du Sud, par exemple, ne peuvent être trouvés que sur le disque Sud.
Les disques Nord et Sud couvrent les régions, comme illustré en gris ci-après. Quelques zones de chevauchement sont stockées sur les
deux disques.
Zone stockée sur le disque Nord
FR
Zone stockée sur le disque Sud
7-FR
Page 93

Présentation du manuel
Si le système de navigation est raccordé au moniteur compatible
avec l'écran tactile Alpine IVA-D310, IVA-W205, IVA-D105 ou
TME-M770S, etc., il est possible de commander le système
directement par simple contact avec le moniteur.
Si le moniteur (autre que le moniteur compatible avec l’écran
tactile IVA-D310, IVA-W205, IVA-D105 ou TME-M770S, etc.)
est raccordé, le système peut être commandé à l’aide de la
télécommande fournie.
L'utilisation des touches tactiles et celle de la
télécommande sont toutes deux décrites dans ce manuel.
L’utilisation des touches tactiles est décrite en premier lieu,
puis celle de la télécommande, en italique.
Exemple:
Appuyez sur [Destination].
Sélectionnez (affichez en surbrillance) « Destination »
en inclinant la touche multidirectionnelle et en
appuyant sur ENTER.
L Utilisation des touches tactiles
L Utilisation de la télécommande
Certaines touches de la télécommande ont les mêmes
fonctions que les touches tactiles de l’écran. Vous pouvez
consulter l'écran de la carte souhaité en appuyant sur la
touche correspondante de la télécommande. Pour les
commandes d’écran de menu, sélectionnez un élément
souhaité en inclinant la touche multidirectionnelle, puis
appuyez sur la touche ENTER.
Pour plus d’informations, reportez-vous à la section
« Touches et fonctions de la télécommande (RUE-4140) »,
à la page 71.
Touche tactile
•Veillez à toucher légèrement les touches avec le bout des
doigts afin de ne pas endommager l'écran.
• Si vous appuyez sur une touche et si celle-ci ne réagit pas,
éloignez le doigt de l'écran et recommencez.
• Les touches tactiles qui ne sont pas accessibles sont
estompées.
8-FR
Page 94

Mise en route
Mise sous tension du système
Quand l’écran d’affichage est réglé sur le mode d’affichage de la
navigation ou le mode d'entrée externe et que la clé de contact se
trouve sur la position ACC ou ON, l’écran d’ouverture s’affiche
automatiquement.
1
Lorsque vous utilisez le système pour la
première fois, le menu de sélection de la
langue et la mention IMPORTANT !
s'affichent sur le même écran. Appuyez sur la
langue souhaitée.
Sélectionnez (affichez en surbrillance) la langue
souhaitée en inclinant la touche multidirectionnelle
et en appuyant sur ENTER.
Une fois la langue sélectionnée, des informations
importantes s’affichent pour chaque langue.
Veillez à lire ces informations.
2
Après avoir lu les informations importantes,
appuyez sur [J’accepte].
Sélectionnez (affichez en surbrillance) l’option
« J’accepte » en inclinant la touche
multidirectionnelle et en appuyant sur ENTER.
3
Après avoir lu cette note d’enregistrement,
appuyez sur [Oui].
Sélectionnez (affichez en surbrillance) « Oui » en
inclinant la touche multidirectionnelle et en
appuyant sur ENTER.
L'écran de la carte s'affiche.
• Si le système de navigation ne contient pas de disque,
l’indication « Insérez un DVD de carte » s’affiche. Pour
plus d’informations sur le chargement du disque,
reportez-vous à la section « Insertion du DVD-ROM »
dans le manuel du matériel du système de navigation.
• Si le disque est impossible à lire, le message « Erreur de
lecture du DVD-ROM. Vérifiez le disque » s’affiche.
Essayez de réinsérer le disque. Si le message ne
disparaît pas, adressez-vous à un revendeur Alpine
autorisé.
• Si vous maintenez l'écran sous tension pendant une
période prolongée quand le moteur est arrêté, vous
risquez de décharger la batterie du véhicule.
FR
L’écran Note d’enregistrement s’affiche.
9-FR
Page 95

Visualisation d’un affichage actuel
L’écran de la carte de navigation affiche généralement la position
actuelle du véhicule et les alentours.
L Carte de la position actuelle du véhicule (sans
itinéraire)
g
e
f
p
o
h
i
a
b
c
d
h Touche de trafic*
L'écran de la liste des incidents de trafic s'affiche.
* Si le récepteur de données XM HCE-100XM (vendu
séparément) ou le récepteur de données SIRIUS
(vendu séparément) est connecté, la touche de trafic
peut être utilisée.
État du systèm
Si vous recevez Traffic & Weather, la puissance du
signal est indiquée par un affichage composé de 4
icônes verticaux.
(pas de Signal)
(Signal faible)
(Signal marginal)
(Signal fort)
k
l
m
nj
a Icônes du point de repère
Les icônes de point de repère en 3D peuvent être
affichées sur la carte si l'échelle de la carte est à
1/16 mile (100 m) ou inférieure, voir « Icônes site
remarquable » (page 64).
b Contours d’immeuble
Les contours des immeubles peuvent être affichés sur
la carte quand l’échelle est à 1/16 mile (100 m) ou
inférieure, voir « Forme des bâtiments » (page 64).
c Icône de la position actuelle du véhicule
d Icône de route à sens unique
Les icônes des routes à sens unique peuvent être
affichées sur la carte quand l’échelle est à 1/16 mile
(100 m) ou inférieure.
e Icônes des points d'intérêt
Les icônes des points d’intérêt peuvent être affichées
sur la carte si l’échelle de la carte est à 1/8 mile (200
m) ou inférieure, voir « Icônes des points d’intérêt »
(page 62).
f Touche d’écran de source principal ( )
Affiche l’écran de source principal du moniteur
compatible avec l’écran tactile Alpine. Pour obtenir plus
de détails, reportez-vous au Mode d’emploi du
moniteur compatible avec l’écran tactile Alpine. Si un
moniteur autre que le moniteur compatible avec l’écran
tactile Alpine est connecté, cette touche ne peut pas
être utilisée.
g Touche MENU ( )
Affiche le Menu Nav.
(Signal très fort)
i Touche Annuler ( )
Annule l’écran actuel et revient à l’écran de menu
précédent.
j Heure courante
Heure courante reçue par les signaux GPS.
k Etat du signal GPS
Force du signal GPS (indiquées par un point).
GPS: Aucune information satellite n’est reçue.
GPS L: Calcul de la position actuelle en cours.
GPS LL: Réception du signal GPS 2D.
GPS LLL: Réception du signal GPS 3D.
l Nom de la rue
Nom de la rue actuelle.
m Touche de commutation de l’écran Jour/Nuit
: cette icône s’affiche lorsque l’écran de jour est
sélectionné. Appuyez sur cette icône pour passer
à l’écran de nuit.
: cette icône s’affiche lorsque l’écran de nuit est
sélectionné. Appuyez sur cette icône pour passer
à l’écran de jour.
n Touche de la carte actuelle ( )
Revient à l’écran de la position actuelle.
o Icône de l’échelle ( )
L’échelle de la carte est affichée. (Voir page 12.)
p Icône de la boussole
Indique le Nord ainsi que le mode de direction et 3D
sur la carte actuelle.
La flèche indique la direction du Nord. Pour modifier
l’orientation de la carte, voir page 13.
• La première fois que le système est mis sous tension, le
récepteur GPS nécessite environ 10 minutes pour
calculer la position actuelle du véhicule. Pendant ce
temps, l’icône de la position du véhicule peut ne pas
bouger, même si le véhicule est en mouvement.
• Pour plus d’informations sur le guidage d’itinéraire,
voir page 37.
10-FR
Page 96

Affichage du point
L’affichage du point apparaît quand vous avez fait défiler la carte.
Reportez-vous à la section « Entrée d’une destination par
défilement de la carte affichée », à la page 29.
a b
Utilisation du clavier à l’écran
Quand vous devez entrer un caractère à l’écran à l’aide du clavier,
ce dernier s’affiche automatiquement. Utilisez les caractères
affichés pour entrer les informations. Pour sélectionner des
caractères, procédez comme suit.
a
d
a Distance à partir de la position actuelle du
véhicule.
Distance en ligne droite à partir de la position actuelle
du véhicule.
b Nom de rue sur l’icône du réticule
Si le nom de rue de l'icône du réticule ne peut pas être
affiché, la longitude/latitude s’affiche.
c Icône du réticule
Alignez l’icône du réticule sur le lieu que vous
souhaitez rechercher en faisant défiler la carte.
d Pavé de défilement
Il s’affiche quand vous faites défiler la carte à l’aide des
touches tactiles. Appuyez sur [8] sur le pavé de
défilement pour faire défiler la carte.
Appuyez sur [[] sur la barre de défilement tactile pour
afficher le sous-menu Affichage du point (voir page 29).
Le pavé de défilement n’est pas affiché quand vous
utilisez la télécommande.
Sélection d’un élément dans une liste
Pour faire défiler une liste, procédez comme suit:
Utilisation des touches tactiles:
Appuyez sur [8] ou [9] pour faire défiler les
éléments un à un vers le haut ou le bas.
Appuyez sur [ ] ou [ ] pour faire défiler la
page si la liste comporte plus de 2 pages.
c
b
c
d
e
f
a Fenêtre de texte
Affichent les lettres ou les chiffres.
b Nombre de candidats
c Liste de caractères
d Effacer
Revient au caractère précédent et l'efface.
e OK
Le caractère sélectionné est entré. Les caractères
disponibles, qui varient selon l’élément, sont répertoriés
dans la liste.
f Autres
Change de liste des caractères pour afficher des
caractères supplémentaires.
Utilisation des touches tactiles:
Appuyez sur le caractère souhaité.
Utilisation de la télécommande:
Inclinez la touche multidirectionnelle pour
sélectionner le caractère souhaité, puis appuyez
sur ENTER.
• Lorsque 1 caractère est entré, les candidats au caractère
suivant sont limités (et les autres disparaissent de la
liste des caractères).
• Le numéro de téléphone, etc. peut être entré à l’aide du
pavé numérique de la télécommande. Une fois que vous
avez appuyé sur la touche MODE, les numéros peuvent
être entrés pendant que l’indicateur d’état clignote.
FR
Utilisation de la télécommande:
Inclinez la touche multidirectionnelle vers le haut
ou le bas pour faire défiler les éléments un à un ou
appuyez sur la touche
la page si la liste comporte plus de 2 pages.
ou pour faire défiler
11-FR
Page 97

Modification de l'échelle de la carte
Augmente ou diminue le taux d’agrandissement de la carte
(en 12 pas).
Echelle de la carte
E-U (mile)
1/32 mile
1/16 mile
1/8 mile
1/4 mile
1/2 mile
1 mile
2 mile
5 mile
15 mile
50 mile
150 mile
350 mile
•Vous pouvez basculer entre les miles et les kilomètres
dans la configuration, comme décrit à la page 69.
1
Appuyez sur [Icône de l’échelle].
Métrique (km/m)
50 m
100 m
200 m
400 m
1 km
2 km
4 km
10 km
30 km
100 km
250 km
600 km
Icône de l'échelle
2
Modifiez le rapport d'agrandissement de la
carte en touchant [ ] (zoom avant) ou
[ ] (zoom arrière) dans les 5 secondes
qui suivent.
Maintenez l'une ou l'autre touche enfoncée pour
changer plus rapidement la carte.
Appuyez sur la touche (zoom avant) ou
(zoom arrière) quand l’écran de la carte est
affiché.
• Les icônes de point de repère en 3D peuvent être
affichées sur la carte si l'échelle de la carte est à
1/16 mile (100 m) ou inférieure.
• Les contours des immeubles peuvent être affichés sur la
carte quand l’échelle est à 1/16 mile (100 m) ou
inférieure.
• Les icônes de point d'intérêt ne peuvent pas être
affichées si l'échelle de la carte est à 1/8 mile (200 m)
ou inférieure. Pour plus d’informations, voir page 62.
• Les icônes des routes à sens unique peuvent être
affichées sur la carte quand l’échelle est à 1/16 mile
(100 m) ou inférieure.
• Si l’orientation actuelle de la carte est en haut, elle
passe automatiquement à l’orientation Nord en haut si
l’échelle de la carte est égale ou supérieure à 50 miles
(100 km).
• La carte 3D est automatiquement orientée vers le haut
lorsque l’échelle de la carte est augmentée à plus de
1/2 mille (1 Km).
La barre d’échelle s'affiche.
12-FR
Page 98

Modification de l’orientation de la carte
L’orientation de la carte peut être définie pour afficher le nord en
haut ou votre direction actuelle en haut. Il est également possible
d’afficher une carte en 3D. L’icône affichée dans le coin inférieur
droit de l’écran au dessus de l’icône de l’échelle de la carte
indique l’orientation actuelle.
1
Appuyez sur [Icône de la boussole].
Appuyez sur H/N.
Icône de la boussole
• Si l’orientation actuelle de la carte est en haut, elle
passe automatiquement à l’orientation Nord en haut si
l’échelle de la carte est égale ou supérieure à 50 miles
(100 km).
• L'angle de la carte 3D ne peut pas être changé.
• Lorsque vous vous déplacez sur la carte 3D, celle-ci
revient automatiquement au format 2D (direction vers
le haut).
• La carte 3D est automatiquement orientée vers le haut
lorsque l’échelle de la carte est augmentée à plus de
1/2 mille (1 Km).
Commutation de l’écran Jour/Nuit
Vous pouvez passer de l’écran de jour à l’écran de nuit afin de
visualiser correctement l’écran de la carte.
1
Appuyez sur ou .
Chaque appui change l’orientation de la carte
→Nord en haut → Direction en haut → Direction en haut 3D
Nord en haut
Direction en haut
Direction en haut 3D
FR
a
a : cette icône s’affiche lorsque l’écran de jour est
sélectionné.
: cette icône s’affiche lorsque l’écran de nuit est
sélectionné.
• Cette fonction peut être utilisée uniquement en
appuyant sur l’icône.
13-FR
Page 99

Entrée d’une destination
Entrée d’une destination par adresse
Si vous connaissez l’adresse de la destination, le système peut
calculer un itinéraire jusqu’à celle-ci.
Affichage de l’écran de menu de la
destination
Pour utiliser le système de guidage de navigation, vous devez tout
d’abord rechercher une destination.
1
Appuyez sur [ ].
Appuyez sur MENU.
L'écran Menu Nav. s'affiche.
2
Appuyez sur [Destination].
Sélectionnez (affichez en surbrillance)
« Destination » en inclinant la touche
multidirectionnelle et en appuyant sur ENTER.
1
2
Appuyez sur [Adresse] dans l’écran
Trouver la destination par.
Sélectionnez (affichez en surbrillance) « Adresse »
en inclinant la touche multidirectionnelle et en
appuyant sur ENTER.
Le menu Trouver une adresse s’affiche.
L’état ou la province dans lequel vous êtes
est affiché en haut de l’écran. Si la
destination souhaitée se trouve dans un
autre état, sélectionnez « Changer ».
L’écran Trouver la destination par s’affiche.
Vous pouvez rechercher une destination d’une des manières
suivantes.
Trouver la destination par
• Adresse (voir page 14)
•Point d’intérêt (PI) (voir page 16)
• Destin. précédentes (voir page 19)
• Carnet d’adresses (voir page 19)
• Intersection (voir page 20)
• Numéro de téléphone (voir page 22)
• Entrée d’autoroute (voir page 23)
•Latitude/longitude (voir page 24)
• Plan d'aujourd'hui (voir page 25)
Autres
• Résidence (voir page 26)
•Favoris (voir page 26)
•ZAGAT 2007 (voir page 27)
• Défilement de la carte et entrée de la carte
(voir page 29)
14-FR
L’écran Sélectionnez l’État s’affiche.
3
Appuyez sur l’état ou la province souhaité.
Sélectionnez (affichez en surbrillance) l’état ou la
province souhaité en inclinant la touche
multidirectionnelle et en appuyant sur ENTER.
• Sélectionnez É.-U. ou Canada.
Page 100

4
Pour rechercher une adresse, appuyez sur un
des éléments suivants.
Pour rechercher une adresse, sélectionnez un des
éléments suivants et appuyez sur ENTER.
a
b
a Par nom de rue
L'écran Entrez le nom de la rue s'affiche. Passez à
l’étape 7.
b Par nom de ville
L’écran Entrer le nom de la ville s’affiche. Passez à
l’étape 5.
c 5 précéd.
Les cinq derniers noms de ville recherchés sont
stockés en mémoire. Vous pouvez resélectionner un
nom de ville dans la liste.
5
Entrez le nom de la ville.
c
7
Entrez le nom de la rue.
• Si le nombre de candidats devient inférieur à 5, l’écran
Sélectionnez la rue s’affiche automatiquement.
L’écran Sélectionnez la rue s’affiche.
8
Appuyez sur le nom de rue souhaité.
Sélectionnez (affichez en surbrillance) le nom de
rue souhaité en inclinant la touche
multidirectionnelle et en appuyant sur ENTER.
FR
• Si le nombre de candidats devient inférieur à 5, l’écran
Sélectionnez la ville s’affiche automatiquement.
•Pour plus d’informations sur la saisie, voir page 11.
L’écran Sélectionnez la ville s’affiche.
6
Appuyez sur le nom de ville souhaité.
Sélectionnez (affichez en surbrillance) le nom de
ville souhaité en inclinant la touche
multidirectionnelle et en appuyant sur ENTER.
• Pour plus d’informations sur l’utilisation de la liste,
voir page 11.
L’écran Entrez le nom de la rue s’affiche.
• Pour plus d’informations sur l’utilisation de la liste,
voir page 11.
L’écran Entrez le numéro d’adresse s’affiche.
9
Entrez le numéro de la maison ou de
l’immeuble.
a
a Inconnu
Sélectionnez Inconnu si vous ne connaissez pas le
numéro d’adresse ou si vous souhaitez rechercher la
rue la plus proche qui correspond au point recherché.
•Pour plus d’informations sur la saisie, voir page 11.
L’écran Confirmez la destination s’affiche.
Suite
15-FR
 Loading...