

20
CLIMA
CLIMA
TISEUR
TISEUR
MOBILE
MOBILE
MONOBLOC
MONOBLOC
AC 100 CT
AC 100 CT
AC 120 CT
AC 120 CT
MODE D’EMPLOI
MODE D’EMPLOI
USER MANUAL
USER MANUAL
TROUBLESHOOTING
TROUBLESHOOTING
Check first the symptoms following before calling a qualified electrician.
BE CAREFUL !
• Unplug the unit and stop running immediately in case of something below happens. Then contact a qualified
electrician if the problem lasts or as soon as something abnormal occurs.
PROTECTION
• Restarting the unit at once after operationstops or changing mode during operation, you need to
wait 3 minutes.
• Connect to power supply and turn on the unit at once, it may start 20 seconds later.
• If the plug is taken out, when you restart the appliance, it will return to the original mode, Timer On and Timer
Off must be set again.
AUTODIAGNOSTIC FUNCTION
19
Check code Diagnosis of malfunction
E8 Overheating protection
E3 Faulty coils
E2 Room temperature faults
E4 Units faults
CONSIGNES DE SECURITE
CONSIGNES DE SECURITE
DANS TOUTE UTILISATION D’APPAREILS ÉLECTRIQUES, DES PRÉCAUTIONS DE BASE SONT À RESPECTER.
LIRE ATTENTIVEMENT CETTE NOTICE AVANT LA PREMIERE UTILISATION DE L’APPAREIL.
• Vérifier que le voltage indiqué sur la plaque signalétique de l’appareil correspond bien à celui de votre
installation électrique. Si ce n’est pas le cas, adressez-vous au revendeur et ne branchez pas l’appareil. Toute
erreur de branchement annule la garantie.
• Ne pas laisser l’appareil à la portée des enfants.
• Cet appareil est destiné à un usage domestique. Il doit être utilisé selon les instructions du manuel. Ne jamais
l’employer pour d’autres usages.
• Ne jamais laisser l’appareil sans surveillance lorsqu’il fonctionne.
• Si vous devez vous absenter même un court instant, arrêtez l’appareil.
• Vérifier régulièrement l’état du cordon d’alimentation. Ne jamais utiliser l’appareil si le cordon d’alimentation,
la prise ou l’appareil sont endommagés.
• La longueur du cordon de cet appareil a été calculée pour réduire les risques d’accidents. S’il est trop court,
utiliser une rallonge et prendre toutes les précautions utiles pour qu’on ne puisse pas se prendre les pieds
dedans ou la tirer accidentellement.
• Ne jamais utiliser l’appareil à l’extérieur.
• Prendre soin de brancher et débrancher la prise correctement pour éviter tout risque de rupture du câble
d’alimentation.
• Ne jamais utiliser d’autres accessoires que ceux livrés et recommandés par le fabricant. Ceci peut être
dangereux et risque d’endommager l’appareil.
• Ne pas exposer directement au soleil. Ne pas placer l’appareil près d’une source de chaleur.
• Ne pas utiliser l’appareil dans ou près de l’eau, afin d’éviter tout choc électrique. Eviter toutes projections d’eau.
• Ne pas placer l’appareil dans un lieu où il peut y avoir des projections de graisses.
• Respecter les instructions pour le nettoyage.
• Ne jamais insérer vos doigts ou tout autre objet métallique dans les orifices de ventilation. Prévenir vos enfants
du danger que cela pourrait engendrer.
• Toujours éteindre l’appareil avant de le débrancher.
• Débrancher la prise de connexion avant toute opération de nettoyage, de maintenance ou de réparation de
l’appareil.
• Ne jamais réparer l’appareil vous-même. Vous perdriez le bénéfice de la garantie. Comme tout appareil
électrique, il doit être réparé par une personne qualifiée. De même, le changement du cordon d’alimentation
représente un réel danger et il est nécessaire de contacter un réparateur agréé.
2
FRANÇAIS
FRANÇAIS
ALPATEC vous félicite d’avoir choisi ce produit et vous remercie de votre confiance.
Pour votre confort et votre sécurité, votre article a été vérifié à toutes les étapes de sa
fabrication et a passé avec succès tous nos tests de qualité.
Nos produits sont conçus pour vous plaire tant par leur design
que par leur facilité d’utilisation et dans l’objectif constant
de vous apporter complète satisfaction.
TROUBLE
The appliance does not run
Cooling efficiency is not good
The appliance do not run and the water full
indicator lights
ANALYSIS
- Please wait for 3 minutes and start again.
- Please check the batteries in the remote control
- Please control the plug
- Set temperature suitable
- Air outlet be blocked by obstacle
- Close the door and the window
- Move the heat sources
- Drain the condensate
( always drain it before moving)
- If it is often in this state, please contact the
services.
TIMER
OFF
SETTING
You can also set the timer off with Timer Off button. The instructions are similar to timer on mode.
MAINTENANCE
MAINTENANCE
• Unplug the appliance before any cleaning maintenance.
• Check there is no power supplied into the unit before any maintenance or repairs operation in order to avoid
any electric shock.
• Do not use chemical solvent (like benzene, alcohol glazer) to clean the surface of the unit. If you do so, the
surface will be scratched, damaged even the whole casing could become deformed.
• Never sprinkle water onto the main unit.
• Clean the outside part of the unit with a damp and dry cloth.
A
IR FILTER
• Clean the air filter regularly (every 2 weeks) for an optimum air flow.
• Open the air filter cover upwards, then take the air filter out of filter cover.
CLEANING
CLEANING
• Wash the air filter by immersing it gently into warm (about 40 °C) water with a neutral detergent, rinse the
filter and dry it thoroughly in a shaded place.
MAINTENANCE AFTER USING
MAINTENANCE AFTER USING
• Pull out the rubber plug of the drain port underside, in order to drain the water.
• Keep the appliance running with fan only for a half day ina sunshiny day to dry the appliance inside and
prevent from going moldy.
• Stop the appliance and pull out the power supply plug, then take out th batteries of remte control and keep it
well.
• Clean the air filter and reinstall it.
• Remove the air hoses and keep them well, and cover the hole tightly.
18
Précautions spécifiques
• Installer le climatiseur sur une surface plate et dans un endroit spacieux, sans obstacles. Laisser un minimum
de 50 cm entre le climatiseur et le mur.
• La prise de l’appareil doit toujours être accessible après son installation.
• Toujours mettre le climatiseur en position verticale, afin de maintenir le compresseur dans de bonnes conditions.
• Ne pas utiliser près d’appareils à gaz, ou à proximité de liquides inflammables.
• Eviter toute proximité avec des appareils tels que postes de télévision, radios afin d’éviter des interférences
magnétiques.
• Ne pas couvrir la sortie d’air.
• Ne pas utiliser d’aérosols (insecticides, peinture) ou tout autre produit inflammable à proximité de l’appareil
pour éviter de déformer les parties plastiques ou de provoquer des dommages électriques.
• Source d’alimentation
La prise doit être fiable et ne doit pas être endommagée.
Ne pas brancher le climatiseur à une prise multiple.
Brancher l’appareil sur une prise de terre puis appuyer sur la touche « ».
Après les deux bips sonores, l’appareil est en marche.
LE FABRICANT NE SAURAIT ÊTRE TENU POUR RESPONSABLE DE LA MAUVAISE UTILISATION
DE L’ APPAREIL.
CONSERVER SOIGNEUSEMENT CE MODE D’EMPLOI.
CARACTÉRISTIQUES TECHNIQUES
CARACTÉRISTIQUES TECHNIQUES
3
AC 100 CT AC 120 CTC
Compresseur rotatif R 407 C R 407 C
Puissance frigorifique maxi 2900 W 3500 W
Puissance absorbée nominale 1100 W 1380 W
Puissance de chauffe NON NON
Déshumidification 26,4 l/j 33,6 l/j
Débit d’air 300 m3/ h 300 m3/ h
Niveau sonore min.-max. dB (A) 46-50 46-50
Vitesses de ventilation 3 3
Longueur max. de la gaine 180 cm 180 cm
Diamètre de la gaine 130 mm 130 mm

USE OF THE CONTROL P
USE OF THE CONTROL P
ANEL
ANEL
DEHUMIDIFYING AND COOLING
• The operating ranges for cooling operation is 18°C – 40°C.
• The operating range for dehumidifying is 18° minimum.
• In cooling or dry operation, it is possible that water full indcator lights. Please cut off the power supply, move
the appliance to a suitable place to pull out the water plug and drain the water. After this, be sure to re-install
the plug, or the appliance maybe leak and make your room wet, and the appliance retruns to the original
mode.
C
OOLING
• Press on the “ MODE ” button to choose the cooling mode, the pictogram “ ” will light on the LCD
screen.
• When the unit is in use, always place the duct through the nearest opened window to exhaust warm air from
the room.
• Press the “ + , - ” button to select the desired room temperature between 18°C – 40°C.
• Press the “ ” button to choose the fan speed : automatic, low, high.
• Press on the “VOLET” button to adjust the direction of air flow
NOTE
Check these points before pressing the “ + ” button to increase the room temperature :
- If your room is in direct sunshine, draw the curtains ;
- Do not place the unit near hot or electric sources.
D
EHUMIDIFYING MODE
• Keep the windows and doors closed to help the unit dehumidifying the room.
• Press the “ MODE ” button to choose the dehumidifying mode, the LCD screen will display “ ”, the fan
speed can not be adjusted.
• If the unit is used in dehumidifying mode only, do not use the air outlet duct.
NOTE
• Dehumidifiying mode can not be used to cool the room.
• In dry mode, fan speed is preset by appliance, so fan button is not applicable.
S
MART MODE
• Press the smart button, the unit enters smart mode directly regardless of the unit is on or off. In this mode,
temperature and fan speed are automatically set based on the actual room temperature.
• Smart button is ineffective in super mode
S
UPER MODE
• Super mode is used to start or stop fast cooling. Fast cooling operates at high fan speed, changing the set
temperature automatically to 18 °C.
• In super mode, you can set airflow direction or timer. If you want to escape from super mode, press mode
button, the display will return to the original mode.
T
IMER ON SETTING
• When you press Timer On, the On indicator will flash 0,5 seconds, and the preset time with displaying 12:00
flashes at the same time.
• Press the + or - button once, the set time will increase or decrease 10 minutes. The set time clock is 24 hours
format.
• Hold down the timer On button 3 seconds to cancel timer on.
17
INST
INST
ALLA
ALLA
TION
TION
INSTALLATION DU CLIMATISEUR :
• Laisser un espace de 50 cm libre tout autour de
l’appareil.
• Installer l’appareil près d’une fenêtre.
M
ÉTHODE DE MONTAGE DE LA GAINE :
1. Fixer l’embout carré du conduit de sortie d’air à l’arrière de l’unité.
2. Placer l’autre bout à la fenêtre la plus proche. Attention : la longueur du conduit de la sortie d’air est
comprise entre 450 mm et 1800 mm. Utiliser la longueur minimale possible. Lors du montage, il est conseillé
de garder le conduit de sortie d’air horizontalement.
IMPOR
IMPORTT
ANT
ANT
NE PAS FORMER UN COUDE TROP PRONONCÉ AVEC LA GAINE.
RISQUE DE MAUVAIS FONCTIONNEMENT
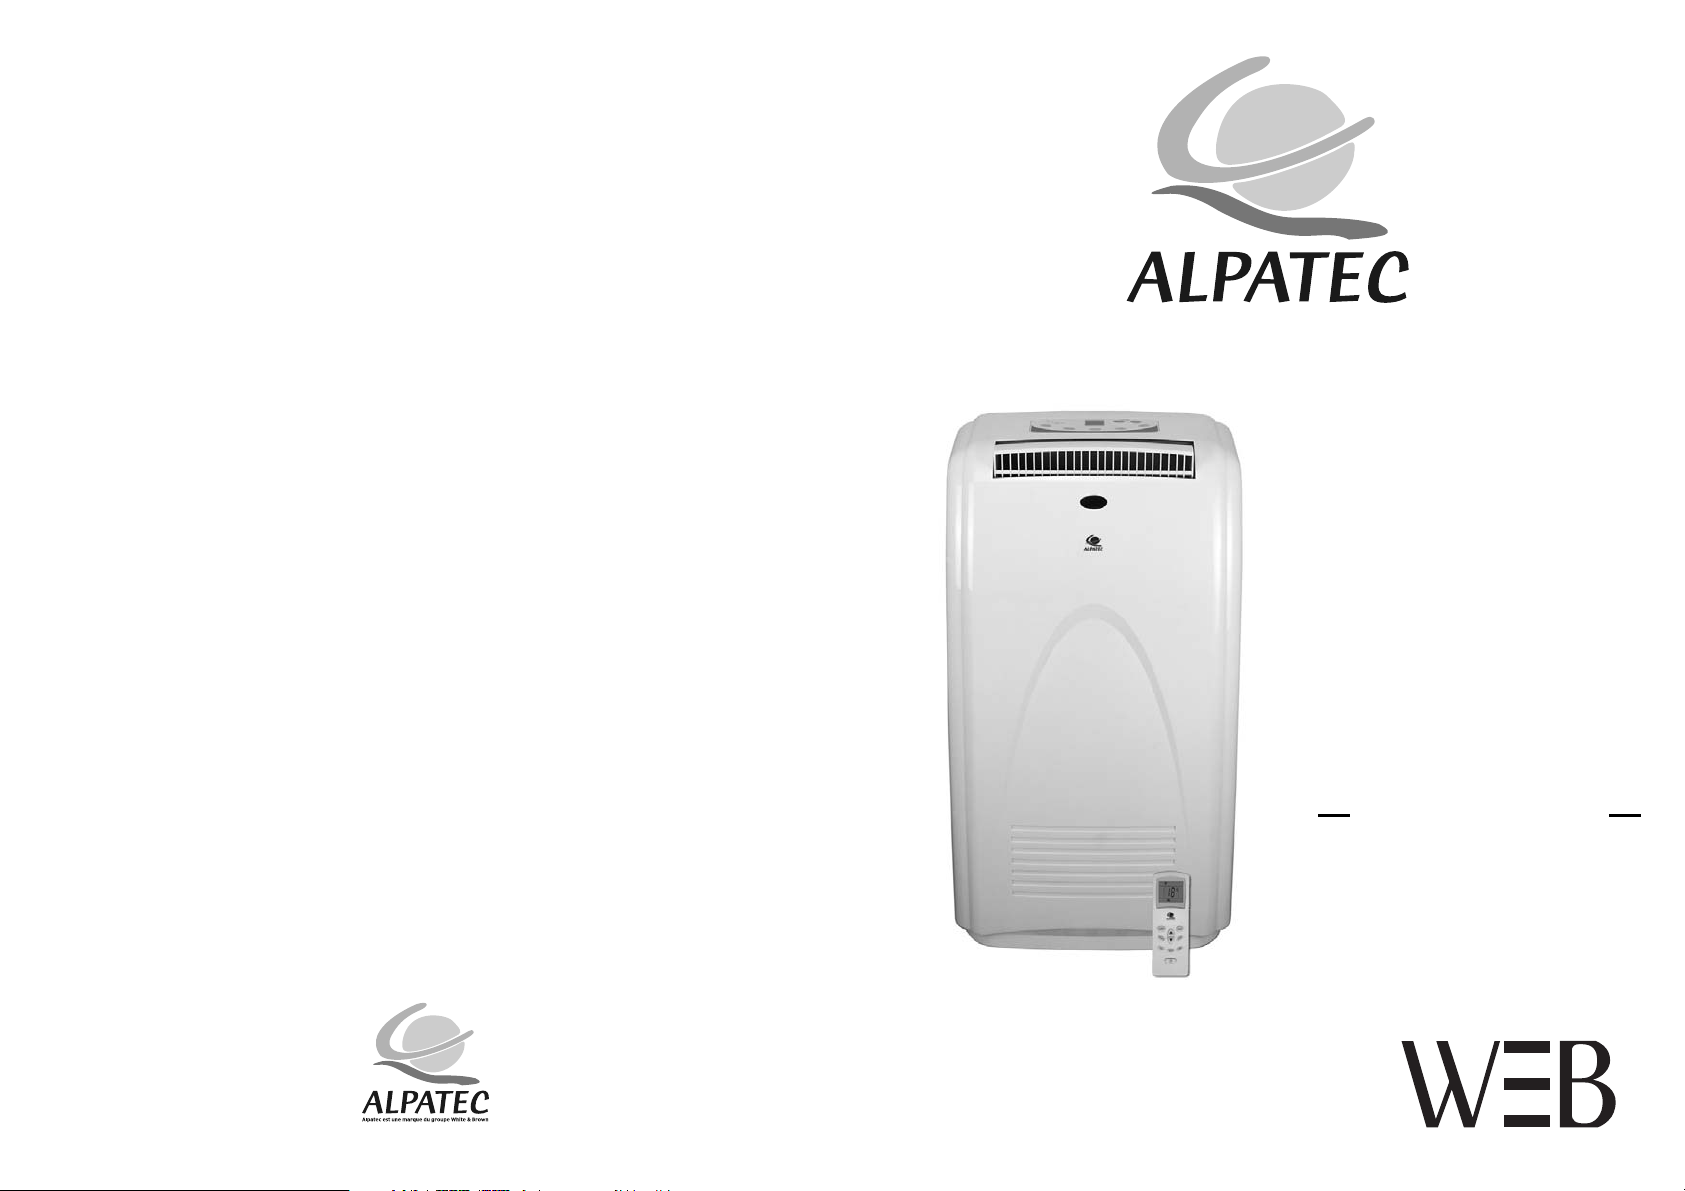
DESCRIPTION DE L
DESCRIPTION DE L
’APP
’APP
AREIL
AREIL
FAÇADE
1. Tableau de commandes
2. Sorties d’air frais
3. Recepteur
4. Télécommande
5. Poignées
4

REMOTE CONTROL
(for AC 100 CT – AC 120 CT models)
1. On/off button
Press this button will turn the machine
ON or OFF.The light indicator is ON or OFF
2. Mode selection button
Press this button will select among the
modes of cooling, dehumidifying, heating or
fan.
3. Fan speed button
Press this button to choose automatic, high,
or low speed of air delivery.
4. Temperature setting button
This button sets the room temperature. Each
pressing of the ( + ) or ( - ) button increases
or decreases by 1°C.
5. Swinging button
Press this button to adjust the direction of air
flow.
6. Smart button
Used to enter fuzzy logic operation directly,
regardless of the unit is on or off.
7. Timer ON button
Used to set or cancel the timer on operation.
8. Timer OFF button
Used to set or cancel the timer off operation.
9. SUPER button
used to start or stop the fast cooling.
16
Signal transmit
Smart indicator
Cooling indicator
Dry indicator
Fan only indicator
Auto fan speed
High fan speed
Low fan speed
Display set temperature
Used to regulate
temperature in SMART
mode or DRY mode
Indicator of Timer
on and Timer off
Display real time
ARRIÈRE
6. Gaine évacuation d’air
7. Entrée d’air
8. Sortie de purge des condensats
9. Câble d’alimentation et prise
A
CCESSOIRES
- 2 buses de sortie
- 3 adaptateurs pour buses de
sortie pour fenêtre coulissante
- 2 gaines d’évacuation d’air
(étirable de 45 à 180 cm)
FONCTIONNEMENT DU T
FONCTIONNEMENT DU T
ABLEAU DE COMMANDES
ABLEAU DE COMMANDES
A. Marche / Arrêt Appuyer sur ce bouton pour mettre en marche ou arrêter l’appareil.
B. Bouton de sélection du mode :
appuyer sur ce bouton pour sélectionner parmi les modes
CLIMATISATION, DÉSHUMIDIFICATION,
CHAUFFAGE ou VENTILATION.
C. Vitesse de ventilation : appuyer sur ce bouton pour choisir la vitesse de ventilation désirée :
automatique, lent, fort.
D. Programmation heure Marche.
E. Programmation heure Arrêt.
F. Réglage de la température de la pièce en appuyant sur les touches ( + ) et ( - ).
G. Voyant lumineux de
fonctionnement ( ).
H. Voyant lumineux du
“ RÉSERVOIR PLEIN ”.
I. Écran LCD
( Même écran que la télécommande )
5

USE OF THE CONTROL P
USE OF THE CONTROL P
ANEL
ANEL
A. On/Off button :
Press the button will turn the machine ON or OFF.
B. Mode button :
press this button to select the mode cooling, dehumidifying heating or fan.
C. Fan speed button :
Press this button to select the fan speed : automatic, low or high speed of air delivery.
D. Timer on button :
to set or cancel the timer on operation.
E. Timer OFF buton :
to set or cancel the timer off operation.
F. Temp button :
set the room temperature by pressing the ( + ) button and ( - ) button.
G. Power :
light indicator.
H. Water full :
light indicator.
I. LCD control panel :
(same as the remote control)
156
TELECOMMANDE
1. Bouton Marche/Arrêt
(
)
Appuyer sur ce bouton pour mettre l’appareil
en marche ou l’arrêter (le voyant lumineux de
l’appareil s’allume ou s’éteint).
2. Mode sélection
Appuyer sur ce bouton pour sélectionner
parmi les modes climatisation,
déshumidification, chauffage ou ventilation.
3. Vitesse de ventilation
Appuyer sur ce bouton pour choisir la vitesse
de ventilation : automatique, lente ou forte.
4. Bouton de réglage de températures
Régler la température de la pièce. Chaque
pression sur ( + ) ou ( - )
augmente ou diminue la température de 1°C.
5. Bouton de positionnement du volet
de sortie d’air
Appuyer sur ce bouton pour modifier
l’orientation des volets.
6. Mode automatique avec fonction “BRISE”
Appuyer sur ce bouton pour obtenir une
ventilation discontinue.
7. Bouton “Marche” de l’heure
Appuyer sur ce bouton pour programmer la
mise en route pour plusieurs heures.
8. Bouton “ARRÊT” de l’heure
Appuyer sur ce bouton pour arrêter la programmation.
9. Bouton “SUPER”
Appuyer sur ce bouton pour accélérer le changement de température ambiante.
INDICATION DE L’ÉCRAN DE LA TÉLÉCOMMANDE
Transmission signal
Mode fonction brise
Mode refroidissement
Mode déshumidification
Mode ventilation
Ventilation automatique
Ventilation forte
Ventilation faible
Indicateur de température
Indicateur de niveau
de température
Indicateur de
fonctionnement
de l’heure

DESCRIPTION OF THE APPLIANCE
DESCRIPTION OF THE APPLIANCE
FRONT
1. Control panel.
2. Cold air outlet
3. Signal receptor.
4. Remote controller
5. Transport handle
B
ACK
6. Air outlet hose
7. Evaporator air intake.
8. Drain port.
9. Power supply
- 2 window adapter (for tempory duct mounting)
- 3 window/patio door slider kit
- 2 ai outlet hose (stretches from 45cm up to 180 cm)
14
UTILISA
UTILISA
TION DU T
TION DU T
ABLEAU DE COMMANDES
ABLEAU DE COMMANDES
DÉSHUMIDIFICATION ET CLIMATISATION
• Le processus de climatisation est opérationnel avec des températures situées entre 18 et 40 °C.
• Le processus de déshumidification est opérationnel avec une température minimum de 18°C.
• En mode « CLIMATISATION » ou « déshumidification », le réservoir d’eau peut se remplir et le voyant
d’indication de réservoir plein peut s’allumer. Débrancher l’appareil, placer un récipient, ouvrir la sortie de
purge des condensas et l’eau s’écoule. Refermer la sortie de purge, rebrancher l’appareil, appuyer sur le
bouton « DÉMARRER » et l’appareil redémarre en mode par défaut.
M
ODE
CLIMATISEUR
• Appuyer sur la touche « MODE » pour choisir le mode climatiseur, le pictogramme « » apparaît sur
l’écran LCD. Pendant le fonctionnement du climatisatiseur, toujours placer le conduit à travers une
fenêtre entrouverte pour expulser l’air chaud de la pièce.
• Appuyer sur le bouton « + , - » pour sélectionner la température de la pièce désirée entre 18 et 40 °C.
• Appuyer sur le bouton « » pour choisir la vitesse de ventilation : automatique, lente, haute.
• Ajuster la direction de ventilation en appuyant sur le bouton “VOLET”.
NOTE :
Avant d’augmenter la puissance du climatiseur, vérifier les points suivants :
- si votre pièce est directement exposée au soleil, tirer les rideaux.
- ne pas placer l’appareil à proximité de sources de chaleur.
MODE DÉSHUMIDIFICA
TION
• Garder les fenêtres et les portes fermées pour aider à la déshumidification de la pièce.
• Appuyer sur le bouton « MODE » pour choisir le mode déshumidification, l’écran affichera « », la
vitesse de ventilation ne peut être ajustée.
• Si l’appareil est utilisé en mode déshumidification seul, ne pas utiliser le tuyau de sortie d’air.
NOTE :
Le mode Déshumidication ne permet pas de rafraichir une pièce.
En mode déshumidification, l’air est propulsé automatiquement en vitesse lente (la vitesse de ventilation ne
peut pas être modifiée)
M
ODE « BRISE »
• Appuyer sur la touche « MODE » pour choisir le mode « BRISE », le pictogramme “ ▲“ apparaît sur l’écran
LCD. Avec ce mode, la vitesse de ventilation et la température sont automatiquement choisies et ne peuvent
être modifiées.
• La fonction brise est inactive en mode « SUPER »
7

INST
INST
ALLA
ALLA
TION
TION
• Choice of the installation location
• Let a 50 cm space all around the unit.
• Install the unit near a window
A
IR
EXHAUST DUCT MOUNTING METHOD
1. Fix the square end of the exhaust duct to the exhaust terminal of the unit.
2. Put the other end to the nearest window. Be careful : the air outlet duct is between 480 mm and 1800 mm
length. Use the minimum length when working. When mounting we suggested to keep the air outlet duct in a
horizontal position.
CAUTION
CAUTION
THE BEND OF THE DUCT IS TOO IMPORTANT AND CAN OCCUR A WRONG WORKING OF THE UNIT.
13
MODE
« SUPER
»
• Appuyer sur la touche « SUPER » pour activer ou désactiver la fonction climatisation rapide. La température
est automatiquement choisie à 18°, la vitesse de ventilation ne peut être ajustée, la fonction « BRISE » est
inactive.
• La direction de ventilation et la programmation horaire peuvent être ajustées.
• Pour stopper la fonction « SUPER » appuyer sur « MODE » et l’appareil revient sur le mode précédemment
utilisé.
P
ROGRAMMATION HORAIRE
• Appuyer sur la touche « MARCHE », l’écran clignote pendant 5 secondes.
• Choisir la durée en appuyant sur les touches + ou - , la durée augmente de 10 minutes en 10 minutes.
Programmation maximale sur 24 heures.
• Appuyer sur la touche « MARCHE » pour valider la programmation.
• Pour annuler la programmation : appuyer sur la touche « ARRÊT »
MAINTENANCE
MAINTENANCE
• Débrancher l’appareil avant toute intervention de nettoyage.
• Vérifier qu’il n’y a pas de courant dans l’appareil avant toute opération de maintenance ou de réparation, afin
d’éviter tout choc électrique.
• Ne pas utiliser de solvant chimique (tel que benzène, produit lustrant alcoolisé) pour nettoyer la surface de
l’appareil. Ceci endommagerait la carrosserie ou la déformerait.
• Ne jamais laver l’appareil à grandes eaux.
• Nettoyer l’extérieur de l’appareil avec un chiffon doux et sec.
F
ILTRE À AIR
• Nettoyer régulièrement le filtre à air (toutes les deux semaines) pour une circulation de l’air optimale.
• Ouvrir le compartiment du filtre à air supérieur en tirant vers vous, puis sortir le filtre à air en le détachant du
couvercle.
• Laver le filtre à air en le plongeant dans l’eau chaude (environ 40 °C) avec un détergent neutre, rincer le filtre
et bien le sécher dans un endroit à l’ombre.
• Replacer le filtre à air dans son compartiment.
MAINTENANCE EN FIN DE SAISON
MAINTENANCE EN FIN DE SAISON
1. Débrancher l’appareil et vider l’eau du réservoir interne via la sortie de purge des condensas.
2. Faire fonctionner l’appareil en mode ventilation pendant une demi journée afin de réduire l’humidité.
3. Retirer les piles de la télécommande et les conserver précieusement.
4. Laver le filtre à air et le replacer.
5. Retirer les gaines de sortie et ranger les dans un endroit sec.
8

PROBLEMES
PROBLEMES
Consultez le tableau ci-dessous avant de contacter un réparateur agréé.
conditions.
• Do not use near gas appliances or near inflammable liquids.
• Keep the unit far from TV sets or radios in order to avoid electromagnetic interferences.
• Do not cover the air outlet.
• Do not use spray (insecticides, painting) or any other inflammable products near the appliance as the plastic
case may be deformed. The unit can have electric damages.
• Power sources
The plug has to be well fixed and should not be damaged.
Do not plug the appliance with an adaptor.
Plug first into the wall socket before switch on the appliance then press on the “ ” knob. After 2 bips
the unit is running.
THE MANUFACTURER WILL NOT ASSUME ANY RESPONSABILITY IN CASE OF NON ADHERENCE TO
THESE INSTRUCTIONS.
SAVE THIS USER MANUAL CAREFULLY.
TECHNICAL FEA
TECHNICAL FEA
TURES
TURES
12
AC 100 CT AC 120 CTC
Rotary compressor R 407 C R 407 C
Maximum cooling capacity 2900 W 3500 W
Nominal cooling input power 1100 W 1380 W
Heating capacity NO NO
Dehumidifying capacity 24,6 l/day 33,6 l/day
Air flow 300 m3/ h 300 m3/ h
Noise level min.-max. dB (A) 46-50 46-50
Number of fan speeds 3 3
Duct length max. 180 cm 180 cm
Duct diameter 130 mm 130 mm
9
SYMPTÔMES
L’appareil ne fonctionne pas
L’efficacité du climatiseur est faible
L’appareil ne fonctionne pas et
l’indicateur de réservoir plein est
allumé
VERIFICATIONS
- Attendre 3 minutes et redémarrer.
- Vérifier la charge des piles de la
télécommande
- Vérifier que l’appareil est
correctement branché.
- Ne pas obstruer la sortie ou
l’entrée d’air
- Choisir une température adaptée à
la pièce.
- Fermer les portes et les fenêtres
- Déplacer les éventuelles sources
de chaleur de la pièce
- Vider le réservoir interne via la
purge de condensas
- Si cela arrive fréquemment
contacter un réparateur agrée
- Note : toujours purger l’appareil
avant de le déplacer

CAUTIONS
CAUTIONS
PLEASE READ ALL THESE INSTRUCTIONS CAREFULLY BEFORE USING THIS APPLIANCE.
• Make sure that the voltage rating on the type plate corresponds to your main voltage. Any error in connecting
the appliance invalidates the guarantee.
• Keep out of reach of children.
• Only use this appliance for domestic purposes and in the way indicated in these instructions. Never use for any
other purposes.
• Never let the appliance unsupervised when in use.
• Switch off the appliance if you have to go away even a short time.
• From time to time, check the cord. Never use the cord, the plug or the appliance when they show any sign of
damage.
• The cord length of this product has been selected to reduce the possibility of being injured. If more cord length
is needed, an extension cord may be used. Ensure not to let it hang down the working area where someone
could accidentally pull or trip over it.
• Do not use the appliance outside and always place it in a dry environment.
• Never pull the cord to unplug or move the appliance.
• Never use accessories non delivered by the supplier. This could be dangerous and could damage the
appliance.
• Keep the appliance far from hot or electric sources and into direct sunlight.
• Never immerse the product in water or any other liquid for any reasons.
• Keep the appliance far from water splashes.
• Do not place the appliance in a place where it can have fat splashes.
• Respect the instructions for cleaning.
• Do introduce neither sharp metallic objects, nor fingers inside the air swinging fins of the appliance. Prevent
your children of this danger.
• Always switch off the appliance before unplugging it.
• Unplug the appliance before cleaning or changing any parts of the appliance or when it’s not in use.
• Never repair the appliance yourself. All interventions made by a non-qualified person can be dangerous ; in this
case guarantee conditions would cancel. As well as the change of the cord has to be done by a competent
electrician.
Special r
ecommendations :
• Install the mobile air conditioner on a flat location with a large space, without obstacles. Let a 50 cm minimum
space between the mobile air conditioner and the wall.
• The plug shall be always accessible after its install.
• Always place the appliance in a vertical position, in order to maintain the compressor in good working
11
ENGLISH
ENGLISH
For your comfort and safety,
ALPATEC has checked all the steps of manufacturing. The products have been
made for you to enjoy their design and easiness to use.
ALPATEC, a complete range of air conditioners, coolers, fans and
heaters for you to be completely satisfied.
ATTENTION
• Débrancher l’appareil immédiatement dès qu’un problème cité précédemment survient.
Contacter un réparateur agréé si le problème persiste ou si quelque chose d’anormal survient.
PROTECTION
• 3 minutes sont nécessaires au redémarrage de l’appareil.
• 20 secondes sont nécessaires à la mise en route de l’appareil après le branchement.
• En cas de coupure de courant ou si l’appareil est débranché, l’appareil redémarre sur le mode par défaut et
la programmation horaire doit être rétablie.
FONCTION D’AUTO DIAGNOSTIC
10
Code d’erreurs Diagnostic de mauvais fonctionnement
E8 Protection anti-surchauffe
E3 Problèmes dans les échangeurs
E2 Problèmes de température de la pièce
E4 Anomalies de l’appareil
 Loading...