

Page 1

Allworx
®
Verge™ IP Phone Series
User Guide
Version: H Updated December 7, 2017
Page 2

Page 3

Allworx® Verge™ IP Phone Series
User Guide
Page 4

Allworx® Verge™ IP Phone Series User Guide
Copyright
Documentation
©2017 Allworx Corp, a Windstream company. All rights reserved. No part of this publication may be
reproduced, stored in a retrieval system, or transmitted, in any form or by any means, electronic,
mechanical, photocopy, recording, or otherwise without the prior written permission of Allworx Corp.
Software
Software in this product is Copyright 2017 Allworx Corp, a Windstream company, or its vendors. All
rights are reserved. The software is protected by United States of America copyright laws and
international treaty provisions applicable worldwide. Under such laws, the licensee is entitled to use the
copy of the software incorporated with the instrument as intended in the operation of the product in
which it is embedded. The software may not be copied, decompiled, reverse-engineered,
disassembled, or otherwise reduced to human-perceivable form. This is not the sale of the software or
any copy of the software; all right, title, ownership of the software remains with Allworx or its vendors.
Warranty
This warranty shall not apply to any products to the extent the defect or non-conformance is due to (A)
accident, alteration, abuse, misuse, or repair not performed by Allworx, (B) storage other than specified,
(C) failure to comply with applicable environmental requirements for the products.
Environmental Conditions
Verge IP phone series
Operating:
Tem pe ra tu re
Relative Humidity
Storage:
Low Temperature Point
High Temperature Point
High Relative Humidity Point
-40° C / +40° and any convenient humidity
+5° to 40° C / +41° to +104° F
5 to 90% (non-condensing)
+66° C / +150° 15% RH
+32° C / +90° 90% RH
Page ii 866.ALLWORX * +1 585 421 3850
www.allworx.com
Version: H Revised: December 7, 2017
Page 5

Trademarks
The following trademarks are owned by Allworx:
Allworx Verge IP Phone Series User Guide
Allworx® Verge™ IP phone series
Allworx
Allworx
Allworx
Allworx
Allworx
Allworx
Allworx
®
92xx™ IP phone series
®
Verge™ 9308
®
Verge™ 9312
®
Verge™ 9318Ex
®
Reach™
®
Reach Link™
®
Extend™
Allworx
Allworx
Allworx
Allworx
Allworx
Allworx
Allworx
®
Interact™
®
Interact™ Professional
®
Interact Sync™
®
View™
®
View™
®
OfficeSafe™
®
Migrate™
Allworx
Allworx
Allworx
Allworx
Allworx
Allworx
Allworx
Allworx
®
Connect™ servers
®
Connect™ 731 server
®
Connect™ 536/530 server
®
Connect™ 536 server
®
Connect™ 530 server
®
Connect™ 324/320 server
®
Connect™ 324 server
®
Connect™ 320 server
The Bluetooth® word mark and logos are registered trademarks owned by the Bluetooth SIG, Inc. and
any use of such marks by Allworx Corp, a Windstream company, is under license. Other trademarks
and trade names are those of their respective owners.
866.ALLWORX * +1 585 421 3850 Page iii
www.allworx.com
Version: H Revised: December 7, 2017
Page 6

Allworx® Verge™ IP Phone Series User Guide
Revision History
Revision Date Description
A 02-FEB-2017
B 02-MAR-2017 • Updated Features > Contacts > Add Contact > add PIN note.
C 13-APR-2017
D 1-JUN-2017 • Updated transfer BLF / Contact descriptions and added transferred to screen.
E 6-JUL-2017 • Added notes to Features > Contacts > To manage contacts about Allworx Server
F 26-JUL-2017 • Clarified Features > Emergency Alerts > Emergency Programmable Button presses.
G 6-SEP-2017 • Updated section 3.10 Transfer a Call to distinguish between Allworx System Software
H 7-DEC-2017 • Added Reach Extend trademark to listings.
New Release
• Updated Overview > Phone Status Area > Icons - added syncing icon.
Updated Bluetooth information and screens.
Updated Contacts - how to add Allworx User contact image.
• Updated Call History Details screen.
• Updated Regulatory Notice statements.
• Clarified Transfer a Call > Merge Calls soft key definition.
Administrator permissions to delete contact directory image and control permissions
for user to set a contact directory image.
• Added note to Features > Contacts > To manage contacts about limitations of user
phone and presence status.
• Updated definition of Redial throughout document.
8.2 and 8.3 behaviors.
• Updated section 3.10 Transfer a Call to include the Park Monitor programmable
button as an option to complete the call transfer.
• Updated section 3.14 Presence / DND Setting to include new DND programmable
button.
• Updated section 4.1.5 Verge IP Phone Contact Buttons - add a contact - new feature
display order of letters when adding/editing a contact (capital/lowercase/numeric).
• Updated section 4.5 Allworx Message Center to include new caller features.
• Updated section 4.7 Bluetooth Wireless Technology to include new programmable
button labels/definitions and clarified programmable button support.
• Updated section 5.1 Bluetooth for new pairing/connecting instructions and examples.
• Updated section 5.1 Bluetooth for new connect/disconnect instructions and examples.
• Updated section 5.5 Programmable Buttons to include new Flash and DND options.
• Updated Bluetooth:
• Updated assigning a Bluetooth programmable button.
• Added the Bluetooth device Connect/Disconnect options.
• Added new Bluetooth programmable button labeling options.
• Updated adding a contact - entering a character display order.
• Updated Call Transfer to match current work flow.
• Added DND Programmable button information.
• Updated Hold - when dialed in phones on a Conference Bridge place the call on hold,
other callers in the Conference Bridge do not hear the Music on Hold.
• Updated Visual Voicemail navigation button behavior.
• Clarified Settings > Phone Preferences > Call Handling >Auto Retrieve Calls.
Page iv 866.ALLWORX * +1 585 421 3850
www.allworx.com
Version: H Revised: December 7, 2017
Page 7

Allworx Verge IP Phone Series User Guide
Contents
Chapter 1 - Introduction ................................................................................................ 1
1.1 - Who Should Read this Guide ........................................................................................................................ 1
1.2 - Guide Organization ........................................................................................................................................... 2
1.3 - Equipment Requirements ............................................................................................................................... 2
Chapter 2 - Overview ..................................................................................................... 3
2.1 - Verge IP Phone Screen .................................................................................................................................... 4
2.1.1 - Phone Status Area ................................................................................................................................... 4
2.1.2 - Call Status Area ........................................................................................................................................ 5
2.2 - Programmable Buttons ...................................................................................................................................6
2.3 - Soft Keys ................................................................................................................................................................ 7
2.4 - Function Buttons ................................................................................................................................................ 8
2.5 - Navigation Buttons ........................................................................................................................................... 8
2.6 - Keypad ................................................................................................................................................................... 9
2.7 - Volume ................................................................................................................................................................... 9
2.8 - Sleep Mode .......................................................................................................................................................... 9
Chapter 3 - Manage Calls ............................................................................................. 11
3.1 - Audio Path Options ........................................................................................................................................11
3.2 - Appearance Programmable Buttons ........................................................................................................11
3.3 - Place a Call .........................................................................................................................................................14
3.4 - Answer a Call .....................................................................................................................................................15
3.5 - End a Call ............................................................................................................................................................16
3.6 - Mute a Call .........................................................................................................................................................16
3.7 - Intercom Call .....................................................................................................................................................16
3.8 - Hold .......................................................................................................................................................................18
3.9 - Park a Call/Park Monitor ...............................................................................................................................18
3.10 - Transfer a Call .................................................................................................................................................20
3.11 - Conference Call ..............................................................................................................................................23
866.ALLWORX * +1 585 421 3850 Page v
www.allworx.com
Version: H Revised: December 7, 2017
Page 8

Allworx® Verge™ IP Phone Series User Guide
3.12 - Call History .......................................................................................................................................................25
3.13 - System Extensions .........................................................................................................................................27
3.14 - Presence / DND Setting ..............................................................................................................................27
3.15 - Call Handoff .....................................................................................................................................................28
Chapter 4 - Features ..................................................................................................... 31
4.1 - Contacts ...............................................................................................................................................................31
4.1.1 - Sharing Contacts ...................................................................................................................................32
4.1.2 - Contact Privacy .......................................................................................................................................32
4.1.3 - Data Protection ......................................................................................................................................32
4.1.4 - Managing Personal Contacts ............................................................................................................33
4.1.5 - Verge IP Phone Contact Buttons .....................................................................................................34
4.2 - Queue Appearance and Automatic Call Distribution Queues .......................................................37
4.3 - Queue Alarm .....................................................................................................................................................41
4.4 - Shared Call Appearance ................................................................................................................................42
4.5 - Message Monitoring ......................................................................................................................................43
4.6 - Allworx Message Center ...............................................................................................................................44
4.6.1 - Visual Message Center ........................................................................................................................45
4.6.2 - Audio Message Center ........................................................................................................................47
4.7 - Bluetooth Wireless Technology ..................................................................................................................52
4.8 - Dialing Modes ...................................................................................................................................................54
4.9 - Reach Remote Control ...................................................................................................................................54
4.10 - Electronic Hook Switch (EHS) for Wireless Headsets ......................................................................55
4.11 - My Allworx Manager ....................................................................................................................................55
4.12 - Busy Lamp Field (BLF) ..................................................................................................................................55
4.13 - Call Supervision ..............................................................................................................................................56
4.14 - Emergency Alert ............................................................................................................................................58
4.15 - Push To Talk ...........................................
.........................................................................................................59
4.16 - Hot Desk ...........................................................................................................................................................60
4.17 - Schedule ...........................................................................................................................................................61
Chapter 5 - Settings ..................................................................................................... 65
5.1 - Bluetooth ............................................................................................................................................................65
Page vi 866.ALLWORX * +1 585 421 3850
www.allworx.com
Version: H Revised: December 7, 2017
Page 9

Allworx Verge IP Phone Series User Guide
5.2 - Hot Desk Login .................................................................................................................................................73
5.3 - Network Profiles ...............................................................................................................................................73
5.4 - Phone Preferences ...........................................................................................................................................73
5.5 - Programmable Buttons .................................................................................................................................76
5.6 - Reboot Phone ...................................................................................................................................................78
5.7 - Ring Type Families ...........................................................................................................................................78
5.8 - About this Phone .............................................................................................................................................80
5.9 - Admin Soft Key .................................................................................................................................................80
Chapter 6 - Regulatory Notices ................................................................................... 83
Appendix A - Icons ....................................................................................................... 85
Appendix B - Phone Keypad Presses .......................................................................... 87
866.ALLWORX * +1 585 421 3850 Page vii
www.allworx.com
Version: H Revised: December 7, 2017
Page 10

Allworx® Verge™ IP Phone Series User Guide
Page viii 866.ALLWORX * +1 585 421 3850
www.allworx.com
Version: H Revised: December 7, 2017
Page 11

Allworx Verge IP Phone Series User Guide
Chapter 1 Introduction
The Allworx Verge IP phone series consists of two phone models (9308 and 9312) and the Verge
9318Ex expander. The Verge IP device capabilities include:
Verge 9318Ex
(each)
Number of programmable buttons
Sidecar Connectivity
Gigabit Ethernet
Contacts Support
Reach Remote Control Support
Bluetooth wireless technology
(Headset and Hands-Free Support)
Wireless Headset EHS Support
Call Handoff
Verge 9308 Verge 9312
81218
XX
XX
XXX
XXX
X
XXX
XXX
Unpack the Verge device and accessories, and then inspect for missing items from the list below for the
model purchased.
Verge 9308 Verge 9312 Verge 9318Ex
Verge IP phone and stand
Handset with cord
Verge 9318Ex and stand
XX
XX
X
Not included in the box:
• Ethernet Cable: connects the phone to the network.
• (Optional) Power Supply: provides power to the Verge device - rated 24VDC, 400 mA or higher
(or a network connection with Power over Ethernet).
• (Optional) Wall Mount Kit: enables hanging the Verge IP phone on the wall (catalog number
8400146).
• (Optional) Headset with cord or Bluetooth enabled device: enables hands-free phone use.
1.1 Who Should Read this Guide
This guide is for users of the Allworx Verge IP 9308, 9312, and 9318Ex expander models.
866.ALLWORX * +1 585 421 3850 Page 1
www.allworx.com
Version: H Revised: December 7, 2017
Page 12

Allworx® Verge™ IP Phone Series User Guide
1.2 Guide Organization
This User Guide describes the operation, features, and configuration options of the Verge devices.
• Chapter 1 - information about this guide.
• Chapter 2 - overview of the Verge IP phone screen and buttons.
• Chapter 3 - managing calls.
• Chapter 4 - Verge IP phone features.
• Chapter 5 - settings.
• Chapter 6 - regulatory notices.
1.3 Equipment Requirements
The table below is a complete list of equipment, requirements, and additional documentation
necessary to perform all operations identified in this User Guide. All guides are available at
www.allworx.com.
Equipment Requirements
Allworx server Allworx System Software Version 8.2 or higher.
Supported Web
Browsers
Allworx My Allworx
Manager User Guide
Allworx Interact and
Interact Professional
User Guide
Allworx Reach for
iOS User Guide
Allworx Reach for
Android User Guide
My Allworx Manager
User Guide
Allworx Verge IP
Phone Series Function
Card
• Microsoft Edge (latest release)
• Microsoft Internet Explorer 11 (latest release with auto upgrade enabled).
• Google Chrome (latest release).
• Mozilla Firefox (latest release).
The guide is specific to My Allworx Manager and describes the features within the application.
The guide is specific to the Allworx Interact and Interact Professional application and describes
the features within the application.
The guide is specific to the Allworx Reach for iOS smart phone app and describes the features
within the application.
The guide is specific to the Allworx Reach for Android smart phone app and describes the
features within the application.
The guide is specific to the Allworx My Allworx Manager PC application and describes the
features within the application.
The guide is specific quick reference to the Verge IP phone functions.
Allworx Verge IP
Phone Series Quick
Start Guide
Page 2 866.ALLWORX * +1 585 421 3850
The guide is specific to installation and mounting of the Verge IP phones.
www.allworx.com
Version: H Revised: December 7, 2017
Page 13

Allworx Verge IP Phone Series User Guide
Chapter 2 Overview
The Verge IP phone has a high-resolution, color screen; three soft keys; 8, 12, or 18 programmable
buttons; 10 function buttons; four navigation and select buttons, a multiple position tilt base (also wall
mountable) and Gigabit Ethernet connectivity.
866.ALLWORX * +1 585 421 3850 Page 3
www.allworx.com
Version: H Revised: December 7, 2017
Page 14

Allworx® Verge™ IP Phone Series User Guide
Phone Status Area
Call Status Area
Soft Keys
Programmable Buttons Area
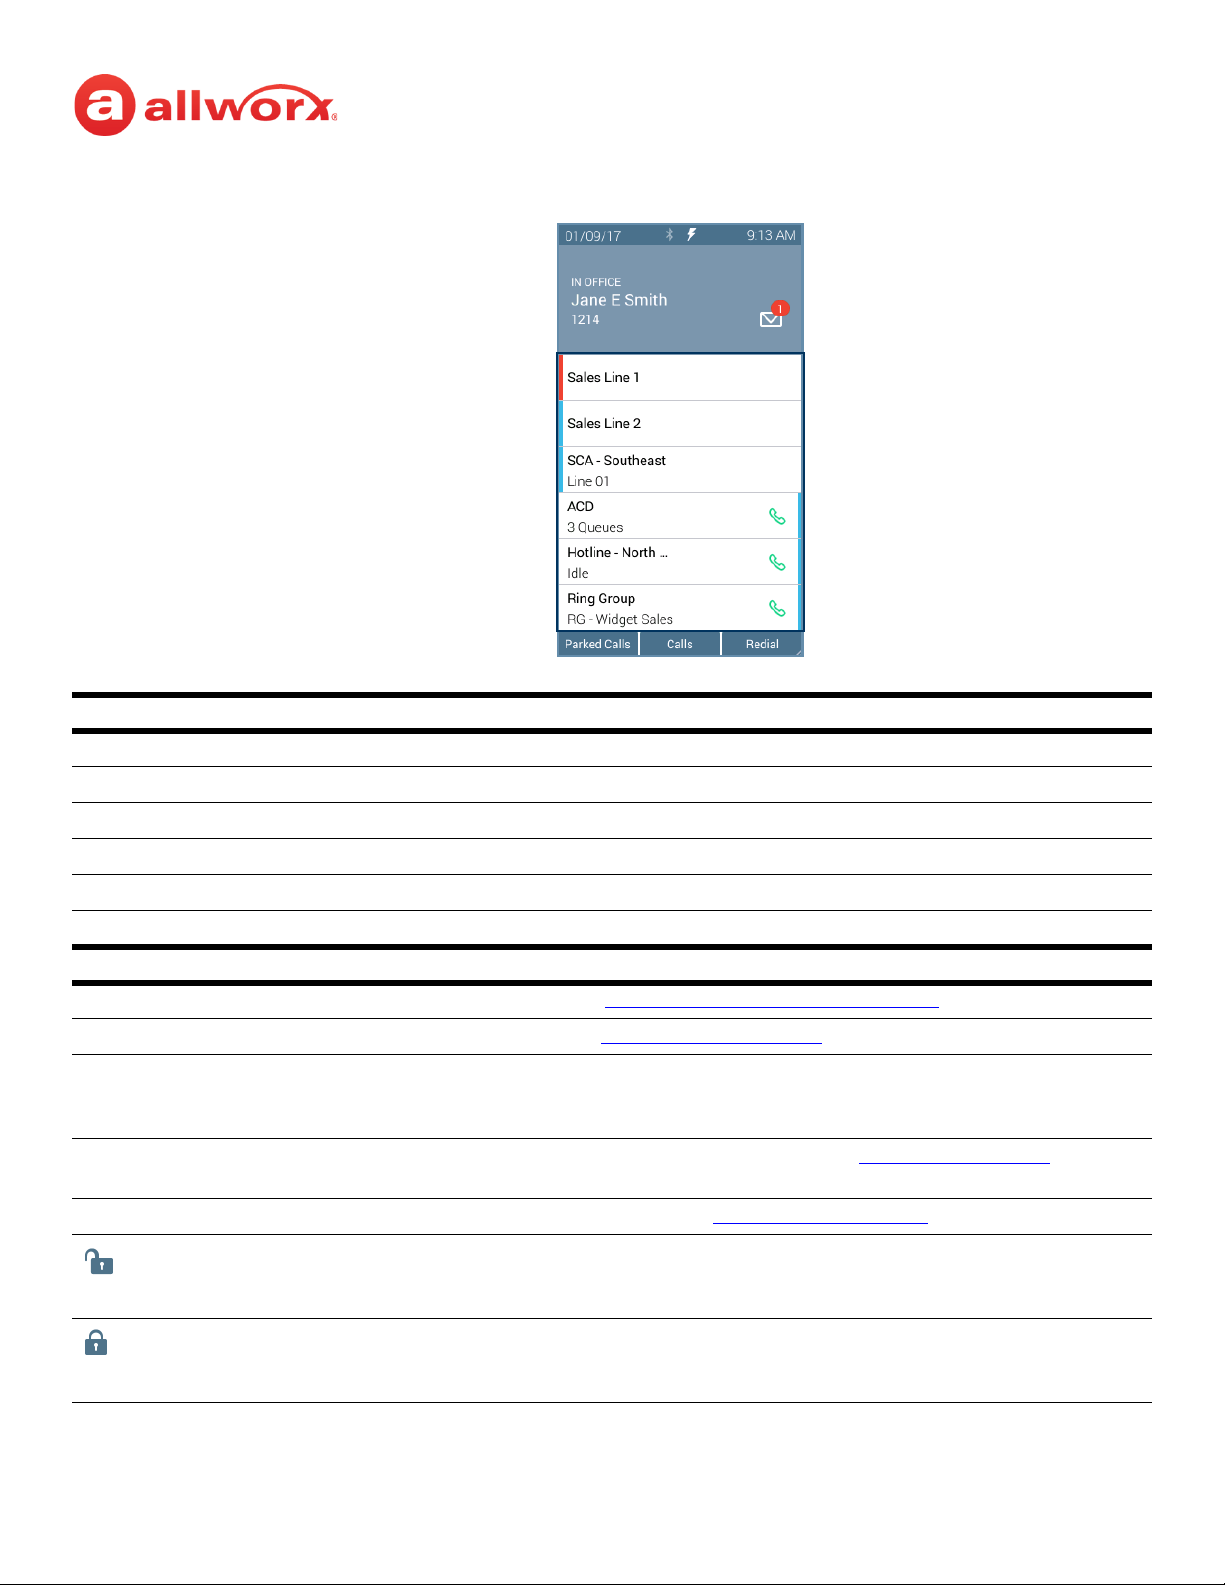
2.1 Verge IP Phone Screen
The Verge IP phone screen displays visual cues (such as icons and colors) relevant to the user or phone
status, call status, programmable buttons, soft keys, and feature instructions that are each defined in
more detail in later sections of this document.
• Phone Status area - about the phone such as Bluetooth connectivity or user Presence/DND
status.
• Call Status area – about the call state:
• idle - user presence, caller ID name/number, missed call and/or message notifications.
• incoming or active call - contact image (if available), call status, caller ID name / number,
call duration.
• programmable buttons - about contacts, appearances, and access to phone features.
• Soft Keys - manage the Verge IP phone or call. The soft key names and behaviors are dependent
on the current phone state.
• Feature Instructions - directions to complete a specific task (not shown in example below).
The Verge IP phone supports English, Canadian French, and Castilian Spanish on the phone screen.
Contact the Allworx Server Administrator to configure the phone screen to display the preferred
language; users cannot change the phone display language within the Verge IP phone Settings menu.
Verge IP phone screen example:
2.1.1 Phone Status Area
The status bar displays the current date/time and icons about the phone and user state. Verge IP phone
Page 4 866.ALLWORX * +1 585 421 3850
www.allworx.com
Version: H Revised: December 7, 2017
Page 15

status area examples:
Phone Status Icons
Phone Status Gray Background
User Available
User Status Icons
Phone Status Yellow Background
User Unavailable
Call Status Area - Idle Screen Call Status Area - Active Call Screen
Missed Calls/Messages Icons
Call Status: Outgoing
Verge IP phone series phone status area icons:
Contacts locked. Contacts unlocked.
Bluetooth disconnected. Bluetooth connected.
Do Not Disturb activated. Reach Remote Control, Interact, or Allworx TAPI
Presence - On Vacation. Presence - On Business Trip.
Allworx Verge IP Phone Series User Guide
connected and controlling the Verge IP phone.
Presence - Away. Presence - Busy.
Presence - At A Meeting. Presence - At Home.
Synchronizing new or updated contacts
with the Allworx server.
2.1.2 Call Status Area
During an active call, the Call Status area displays information of the current phone call status. If there
is no active call, the Call Status area identifies the assigned Allworx user’s current presence, caller ID
name and number, and the number of missed calls and/or new message (if available). If there is an
active call, the Call Status area displays the contact image (if available), the call status (active call, on
hold, call ended etc), the caller ID name/number, and the current call status duration.
866.ALLWORX * +1 585 421 3850 Page 5
www.allworx.com
Version: H Revised: December 7, 2017
Page 16

Allworx® Verge™ IP Phone Series User Guide
Verge IP phone series call status area icons:
Allworx User and System Contact badge. Allworx User Contact avatar, if no image is
available.
Allworx System Contact - example:
conference room.
Allworx System Contact - Door Relay. Allworx System Contact - Conference
Allworx System Contact - Email Alias (only
available in Visual Voice Mail Center)
Personal Contact or incoming caller avatar,
if no image is available.
Messages Available. Missed Calls.
Number of missed calls and/or messages
badge.
Call Status - Incoming call
Allworx System Contact - Auto Attendant.
Center.
Allworx System Contact - Message Center
(Voicemail).
Allworx Public Contact avatar.
Call Status - Outgoing call.
2.2 Programmable Buttons
The Verge 9308 IP phone has 8 programmable buttons, and the Verge 9312 IP phone has 12
programmable buttons. Additionally, the Verge 9312 IP phone supports connecting up to three Verge
9318Ex Expanders (18 programmable buttons each) to support up to 66 programmable buttons. Verge
IP phone users with permissions can assign features to the available programmable buttons for
customized functionality. Contact the Allworx Server Administrator to enable the permissions, if
necessary. To manage the programmable buttons, see “Programmable Buttons” on page 76
information. The available programmable buttons include:
for more
• Appearance • Emergency Alert • Hot Desk* • Queue Alarm
• Bluetooth Hands-Free* • Function*
• Busy Lamp Field (BLF) • Messages • Ring Group
• Call Appearance • Unassigned* • Schedule
• Call Supervision • Park Monitor Set • Shared Call Appearance
• Contacts* • Push to Talk
* User assignable . See “Programmable Buttons” on page 76
Page 6 866.ALLWORX * +1 585 421 3850
• Flash
• Headset
• Park
• Redial
• Release
• Line Appearance • Queue Appearance
for more information.
www.allworx.com
Version: H Revised: December 7, 2017
Page 17

Verge IP phone series programmable button icons:
Appearance is idle. Allworx User Contact has DND activated or
Allworx Verge IP Phone Series User Guide
only agent logged in ACD Queue.
Allworx User Contact or appearance is
active on another phone, ACD agent not
logged In, or Hot Desk log in is available.
Allworx User Contact has Do Not Disturb
activated.
Schedule - Day Mode active. Line Appearance - Call parked.
Shared Call Appearance - Shared Hold. Shared Call Appearance - Bridged Hold.
Presence - On Vacation. Presence - On Business Trip.
Presence - Away. Presence - Busy.
Presence - At A Meeting. Presence - At Home.
Messages button.
Appearance is ringing (blinking) or
appearance is active (solid).
Schedule - Night Mode active.
2.3 Soft Keys
The Verge IP phones each have three soft keys, which initiate actions; therefore, the names and
behaviors of the soft keys are dependent on the current phone screen. If more soft keys actions are
available, the rightmost soft key displays the More icon. Press the More ( ) function button to see the
additional soft keys. The appropriate sections of this guide explain the functionality of each soft key.
Verge IP phone series soft key icons:
Soft Key - Cell Phone Dialing (if enabled). More soft keys available.
Manage Contact Status - Make contact a
favorite.
866.ALLWORX * +1 585 421 3850 Page 7
www.allworx.com
Version: H Revised: December 7, 2017
Manage Contact Status - Remove contact
favorite.
Page 18

Allworx® Verge™ IP Phone Series User Guide
Navigate Left Navigate Right
Navigate Up
Navigate Down
Select Button
2.4 Function Buttons
The Verge IP phones have 10 function buttons, which are dedicated physical buttons used to perform a
single phone function. The functionality of each function button is explained in the appropriate section
of this guide.
Icon Button Function Icon Button Function
Contacts Visual or Audio Voicemail
Presence / DND Intercom
Transfer Hold
Mute Headset
Speaker Phone More soft key options available
2.5 Navigation Buttons
The Verge IP phones have four navigation buttons - up, down, left, or right navigation buttons to scroll
through the various phone screen listings (press and hold to quickly scroll). On some phone screens,
the left navigation button serves as a backspace and erases the previously entered information while
the right, up, or down navigation buttons move to another field to enter additional information.
Additionally, a select button is available to choose an option or to open a new screen that provides
more context of the highlighted option.
Verge IP phone navigation/select buttons:
Page 8 866.ALLWORX * +1 585 421 3850
www.allworx.com
Version: H Revised: December 7, 2017
Page 19

Allworx Verge IP Phone Series User Guide
2.6 Keypad
The Verge IP phone dialpad is available to dial phone numbers or to enter PIN numbers where required
such as Message Center, Call Queues/ACD Queues, and Hot Desk logins as well as to enter text to
manage contacts or perform a search. See “Phone Keypad Presses” on page 87 for more information
about entering text from a keypad.
2.7 Volume
The Verge IP phone volume control button adjusts the volume of the incoming ring, handset, speaker
phone, and the headset. The phone automatically saves any adjustments to any of the volume settings.
Press the volume control bar – (decrease) or + (increase) to adjust the audio level. The phone screen
displays which audio path is being adjusted.
• Incoming calls ring volume - prior to lifting the handset or turn on the speaker phone.
• All other volumes - pick up the handset or turn on the speaker phone or headset.
Alternate: Phone Preferences menu - see “Volume” on page 75 for more information.
2.8 Sleep Mode
A Verge IP phone time-out state after remaining idle for a specified period (default is 2 minutes). The
Verge IP phone displays the date/time, number of missed calls and new messages, caller ID name /
number, and the Allworx logo. The attached sidecars go blank during Sleep Mode. See “Phone
Preferences” on page 44 for more information on Sleep Mode. If the Verge IP phone does not register
with the server while in sleep mode, a red icon ( ) displays on the screen. If this happens, contact the
Allworx Server Administrator as the Verge IP phone is unable to place or receive calls.
To exit the Sleep Mode, press any Verge IP phone button to display the Idle screen, except for the
following buttons:
• Contacts*, Messages, or Presence function button opens the respective screen.
• Intercom function button accesses the Intercom appearance.
• Headset or speaker phone function button, keypad button or lifting the handset accesses
the call appearance programmable button and begins dialing the phone number.
• Volume Control button opens the Ringer Volume screen.
* If the Personal Contacts is set to Restricted (Settings > Phone Preferences > Personal Contacts),
Allworx users cannot immediately access the Personal Contacts. To unlock the Personal Contacts on the
Idle screen, tap the More Function button ( ) > (locked contacts) and enter the assigned
credentials. Press the Done soft key when complete. The Verge IP phone returns to the Idle screen, and
the Allworx user can access the Personal Contacts. The Personal Contacts remain available until the
Verge IP phone enters the Sleep mode.
866.ALLWORX * +1 585 421 3850 Page 9
www.allworx.com
Version: H Revised: December 7, 2017
Page 20

Allworx® Verge™ IP Phone Series User Guide
Verge IP phone Sleep Mode screen example:
Page 10 866.ALLWORX * +1 585 421 3850
www.allworx.com
Version: H Revised: December 7, 2017
Page 21

Allworx Verge IP Phone Series User Guide
Chapter 3 Manage Calls
The Verge IP phone users can manage active phone calls and the Presence / DND settings, which
determine the call route for incoming calls.
3.1 Audio Path Options
Place or answer a call using one of the options below. After selecting an option, the Call Appearance
(default line in use) lights green.
•Handset
• Headset function button1: toggle between a Bluetooth headset (Verge 9312 only) and the
handset or speaker phone.
• Headset programmable button1: toggle between a wired headset and the handset or speaker
phone.
• Speaker function button: toggle between the speaker phone and the handset. While using the
speaker phone, users can place the handset on hook or pick up the handset to continue using it.
When finished with the call, press the speaker phone function button to hang up.
1
The Verge 9312 IP phone supports one native Bluetooth headset and one wired headset at the same
time. In this case, the Headset function button controls the Bluetooth headset and a headset
programmable button controls the wired headset, if available. If the headset programmable button is
unavailable, contact the Allworx Server Administrator.
3.2 Appearance Programmable Buttons
Appearance programmable buttons are for placing or receiving calls.
Appearance Type Place Call Receive Call
Call Appearance (default)
Line Appearance
Shared Call Appearance
Automatic Call Distribution Appearance
Queue Appearance
Ring Group
XX
XX
XX
X
X
X
866.ALLWORX * +1 585 421 3850 Page 11
www.allworx.com
Version: H Revised: December 7, 2017
Page 22

Allworx® Verge™ IP Phone Series User Guide
• Call Appearance - (default line in use) places extension-to-extension calls or dial 91 to obtain an
outside line for external calls.
The Allworx Server Administrator can configure more than one programmable button to direct
multiple calls to the same Call Appearance. The Call Appearance does not appear busy until all
the programmable buttons defined for that Call Appearance are in use. This is similar to call
waiting except the system uses the LEDs to alert and select the new call. Example:
Requirements A sales rep at a busy office receives many phone calls each hour. He wants to answer each call
while minimizing the possibility of any caller getting a busy signal.
Phone
Configuration
Discussion When the first phone call comes in, the phone rings and the Call Appearance programmable
There is one Call Appearance defined on the phone. The Allworx Server Administrator sets up 8
of the available programmable buttons to map to the one Call Appearance.
button LED flashes green. While talking with the first caller, the phone rings again and the second
Call Appearance programmable button LED flashes green. He puts the first caller on hold and
presses the second Call Appearance programmable button to answer the call. He continues to
put callers on hold and answer new calls or switches to another Call Appearance programmable
button to terminate the call.
• Line Appearance - seizes an outside line for external calls immediately.
• Shared Call Appearance - handles a set of one or more appearances as a single appearance
shared across multiple phones. All phones in the Shared Appearance have common access to
calls and call operations within the group of phones. See “Shared Call Appearance” on page 42
for more information.
• Queue Appearance and Automatic Call Distribution Appearance - distributes calls to a
specific set of users. See “Queue Appearance and Automatic Call Distribution Queues” on
page 37 for more information.
• Ring Group - enables live call answering of any outside line or configured call route through the
associated Ring Group.
During an active call using any appearance type, the Verge IP phone call status area displays the
following information:
• contact image and Allworx badge (if either are available)
• call status and icon
• caller ID name and number
•call duration
1. Digits may vary. See My Allworx Manager > Phone Functions tab or contact the Allworx Server Administrator.
Page 12 866.ALLWORX * +1 585 421 3850
www.allworx.com
Version: H Revised: December 7, 2017
Page 23
Allworx Verge IP Phone Series User Guide
Call Status Area
Soft Keys
Line Appearance - in use by another user
Line Appearance - idle
Shared Call Appearance - idle
ACD Appearance
Queue Appearance - idle
Ring Group
Call Appearance - idle
Call Appearance - idle
Call Appearance - idle
Verge IP phone screen Appearance programmable button examples:
Appearance LED Programmable Button
solid blue Call Appearance, Line Appearance, Shared Call Appearance only. Appearance is idle.
solid green active call.
flashing green (fast) incoming call.
flashing green (slow) active call on hold.
flashing green/red active call temporarily held for Conference Call.
solid red Line Appearance and Shared Call Appearance only. Another phone is using the Line Appearance.
Soft Keys Available
Parked Calls opens the Parked Calls screen. See “
Calls opens the Call History screen. See “
Park a Call/Park Monitor” on page 18 for more information.
Call History” on page 25 for more information.
Redial Calls the last-dialed outbound call placed from the phone, the Interact application, or the Reach
Remote Control application. Unless the Line Appearance(s) Use of Dial Plan phone option is
enabled, the system only redials Call Appearance-dialed calls.
Settings opens the Settings screen to configure the Verge IP phone. See “
Settings” on page 65 for more
information.
Sleep place the Verge IP phone into sleep mode. See “
Sleep Mode” on page 9 for more information.
(available only if the Personal Contacts are set to Restricted and are locked in the phone settings
menu) indicates the Personal Contacts are available. Press the lock the access to the Personal
Contacts.
(available only if the Personal Contacts are set to Restricted and are locked in the phone settings
menu) indicates the Personal Contacts are unavailable. Press to open the Contacts log in screen
and assigned credentials to access Personal Contacts.
866.ALLWORX * +1 585 421 3850 Page 13
www.allworx.com
Version: H Revised: December 7, 2017
Page 24

Allworx® Verge™ IP Phone Series User Guide
Note:
Call Status area
• Contact image/Allworx user badge
• Call status (CALLING -> ACTIVE CALL)
• Caller or Contact ID name / number
• Call status icon
Soft Keys
Call Appearance Programmable Button
Status - Appearance is ringing (green fast flashing).
BLF - DND active
User Contact - busy
System Contact
Public Contact
Personal Contact
Call Appearance - idle
Call Appearance - idle
Personal Contact
3.3 Place a Call
If enabling the Cell Phone Dialing setting on the Verge IP phone, using a Call Appearance or Shared Call
Appearance programmable button requires pressing the send ( ) soft key. Cell Phone Dialing mode is
not available on calls using the Line Appearance programmable button.
When activating the handset, headset or speaker phone, the Call Appearance is the default line in use.
If necessary, press another appearance type. To place a call, do one of the following:
• Lift the handset or press the headset ( ) or speaker phone ( ) function button, and then dial
the extension or phone number. If using cell phone dialing mode, press the cell phone ( ) soft
key.
• Dial the extension or phone number to automatically activate the speaker phone or headset. If
using cell phone dialing mode, press the cell phone ( ) soft key.
• Press a Contact programmable button to place a call directly to that phone number.
• Press a BLF programmable button to place a call directly to that extension.
• Press the Contact function button or the Calls soft key, and then use the:
a. keypad buttons to perform a search, and then press the Call soft key or the Select button.
b. up/down navigation buttons to highlight the listing, and then press the Call soft key or
the Select button.
While dialing a phone number or extension:
• If the number dialed matches the dial plan, the call is placed.
• If the number dialed does not match the dial plan, hang up and dial the number again.
Verge IP phone placing a call example:
Page 14 866.ALLWORX * +1 585 421 3850
Version: H Revised: December 7, 2017
www.allworx.com
Page 25

Allworx Verge IP Phone Series User Guide
Call Status area
• Contact image/Allworx user badge
• Call status (INCOMING CALL -> ACTIVE CALL)
• Caller or Contact ID name / number
• Call Status icon
Soft Keys
Call Appearance Programmable Button
Status - Appearance is ringing (green fast flashing)
Call Appearance - idle
Call Appearance - idle
3.4 Answer a Call
The following programmable button LEDs indicate an incoming call:
• Call Appearance • Shared Call Appearance • Call Queue
• Line Appearance
1
Calls to a single extension route to and ring multiple phones where calls are answered in the first in, first out order.
• Ring Group
1
Verge IP phone incoming call example:
• Automatic Call Distribution Appearance
Call Appearance or Line Appearance Programmable Button LED
solid green active call.
flashing green (fast) incoming call.
flashing green (slow) active call on hold.
flashing green/red active call temporarily held for Conference Call.
solid red Line Appearance only. Another phone is using the Line Appearance.
Soft Keys Available
Park Active available during an active call when there is a second, incoming call. This places the first caller in
to a Parking Orbit to enable answering the second call.
To VM sends the incoming call directly to voicemail (only available for: Call Appearance, Intercom, and
ACD Appearance). The Messages
Ignore ends the ringing, and the phone screen does not display the incoming call information. The
() function button lights red if the caller leaves a message.
Appearance programmable button LED continues to flash until the call is answered or the call
goes to the next step in the call route.
Answer active when there is an incoming call, but user is not on the home screen (i.e. presence screen).
866.ALLWORX * +1 585 421 3850 Page 15
www.allworx.com
Version: H Revised: December 7, 2017
Page 26

Allworx® Verge™ IP Phone Series User Guide
Call Status Area
• Contact image/Allworx user badge
• Call Status (INTERCOM REQUEST -> ACTIVE CALL)
• Caller or Contact ID name/number
• Call status icon
Active Call / Intercom Call On Hold
Incoming Intercom Call
Call Status Area
• Contact image/Allworx user badge
• Call Status (ACTIVE CALL)
• Caller or Contact ID name/number
• Call status icon
• Intercom call on Hold indicator (green stripe with call information)
To manage the incoming call:
Do one of the following:
• Lift the handset, press the Headset ( ) or the Speaker phone ( ) function button, or the
Headset programmable button.
• Press an available soft key.
3.5 End a Call
Do one of the following:
• Place the handset on the hook (if audio is on handset path).
• Press the illuminated Headset ( ) or the Speaker phone ( ) function button.
• Press the Release programmable button, if available, to end the active call and place a new call.
• Press the Appearance programmable button. If an incoming call is on another Appearance
programmable button, press the Appearance programmable button to answer the incoming call
and end the current call (unless the phone configuration enables auto on hold - see “Auto on
Hold” on page 73 for more information).
3.6 Mute a Call
Prevent the caller from hearing a conversation. Press the Mute ( ) function button to toggle the phone
microphone on or off. The Mute function button is solid red while audio is muted.
3.7 Intercom Call
Intercommunication system between two phones. The discussion broadcasts over the receiving phone
speaker. All call features are available while on an active Intercom call. To configure the Verge IP phone
to automatically answer an Intercom call, see “
Verge IP phone Intercom Call example:
Intercom Auto Answer” on page 74.
Page 16 866.ALLWORX * +1 585 421 3850
Version: H Revised: December 7, 2017
www.allworx.com
Page 27

Intercom Function Programmable Button LED
solid green active call.
flashing green intercom call on hold.
flashing green/red transferring Intercom call or creating a conference call.
Soft Keys Available
Park
1
places the call on the lowest available parking orbit. See “Park a Call/Park Monitor” on page 18 for
more information.
Conference
1
create a conference call. See “Conference Call” on page 23 for more information.
Allworx Verge IP Phone Series User Guide
Handoff transition the call to a Reach device (if available). See “
Dismiss
1
Add Contact
1
available if the other party hangs up first. Returns to the Verge IP phone Idle screen.
opens the phone screen to add a new contact (available for callers not in the Contacts). See “Add
Call Handoff” on page 28 for more information.
Contact” on page 36 for more information.
Park Active available during an active call when there is a second, incoming call. This places the first caller in to a
Parking Orbit to enable answering the second call.
To VM sends the incoming call directly to voicemail (only available for: Call Appearance, Intercom, and ACD
Appearance). The Messages
() function button lights red if the caller leaves a message.
Ignore ends the ringing, and the phone screen does not display the incoming call information. The
Appearance programmable button LED continues to flash until the call is answered or the call goes to
the next step in the call route.
1
Available after the Intercom call is answered.
To manage an Intercom Call:
answer wait for the Verge IP phone to answer the Intercom Call automatically or press
the flashing Intercom ( ) function button.
place
press the Intercom ( ) function button and dial a number or press an Allworx
User Contact or BLF programmable button. If enabling Cell Phone Dialing, press
the send ( ) soft key.
transfer, conference, park, etc. press the function button or soft key and follow the on screen instructions.
end
hang up, press the Intercom ( ) function button.
866.ALLWORX * +1 585 421 3850 Page 17
www.allworx.com
Version: H Revised: December 7, 2017
Page 28

Allworx® Verge™ IP Phone Series User Guide
Soft Keys
Call Appearance - call on hold
• Call status hold duration
• Flashing call status indicator
Call Status Area
• Contact image/Allworx user indicator
• Call Status (ON HOLD)
• Caller or Contact ID name/number
• Call status hold duration
• Call status icon
Call Appearance - idle
Call Appearance - idle
3.8 Hold
Temporarily place the active call in a waiting state by pressing the Hold ( ) function button. The
Appearance programmable button LED slowly flashes green to indicate a held call. If the Allworx Server
Administrator enables the Music on Hold feature, callers on hold hear music. EXCEPTION: when dialed
into an Allworx Conference Bridge and placing the call in a hold state, the other callers on the
Conference Bridge do not hear the Music on Hold. The Hold function button also works while using a
connected Bluetooth device. To retrieve the call, press the flashing Appearance programmable button.
Verge IP phone screen Hold example:
Soft Keys Available
Park places the call on the lowest available parking orbit. See “
for more information.
Handoff transition the call to a Reach device (if available). See “
information.
3.9 Park a Call/Park Monitor
A system-wide hold so that any phone can retrieve the call. If the Allworx Server Administrator enables
the Music on Hold feature, callers on hold hear music.
Park a Call/Park Monitor” on page 18
Call Handoff” on page 28 for more
The Allworx Server Administrator defines each Park Monitor programmable button to monitor calls
assigned to a single parking orbit or multiple parking orbits as well as the reminder to ring the phone,
if the call has been parked longer than the specified time limit. If there is a call waiting in an assigned
parking orbit, the LED lights.
Page 18 866.ALLWORX * +1 585 421 3850
Version: H Revised: December 7, 2017
www.allworx.com
Page 29

Verge IP phone Park example:
Single Orbit Monitor
No Call Parked
Soft Keys
Multiple Orbit Monitor
No Calls Parked
Parked Calls
Press to retrieve a parked call.
Label changes to Park during an
active call.
Single Orbit Monitor
User Parked Call
Multiple Orbit Monitor
Calls Parked
Park Programmable Button Options Parked Call Listings
Single Orbit Monitor
Another user Parked Call
Allworx Verge IP Phone Series User Guide
Park Monitor Programmable Button LED
off (not lit) Parking Orbit is idle, no parked call.
flashing green call parked. If there is a flashing green box around the programmable button label, this phone
solid red one or more calls parked in the assigned Parking Orbits.
Soft Keys Available
Parked Calls displays the calls held in the Parking Orbits.
Back return the Verge IP phone to the idle screen.
Retrieve selects the highlighted parked call.
To park a call:
When placing the call into a parking orbit, the programmable button displays a green outline (see
example above). If another user places the call into a parking orbit, the Park Monitor programmable
button does not display a green outline (see example above). Press one of the following options:
• Park soft key - If the active call was on a:
• Call Appearance - the phone status area temporarily displays the call status and the
parking orbit number, and returns to the Idle screen.
• Line Appearance - the LED flashes green and the phone status area displays the Parking
• Parked Calls soft key, if the user is on an active call and there is a second, incoming call.
• Park programmable button, if available.
866.ALLWORX * +1 585 421 3850 Page 19
www.allworx.com
Version: H Revised: December 7, 2017
Orbit Number and the park duration.
parked a call in the orbit.
Page 30

Allworx® Verge™ IP Phone Series User Guide
To retrieve a parked call from a parking orbit:
Do one of the following:
• press the Park Monitor programmable button. When monitoring:
• a single parking orbit, press the programmable button to retrieve the call.
• multiple parking orbits, a list of all parked calls displays. Use the up/down navigation
button to highlight the call, and then press the Retrieve soft key.
•press the Parked Calls programmable button (if available). If there is more than one parked call,
use the up/down navigation button to highlight the call, and then press the select button.
• press the flashing Line Appearance programmable button, if parking the call from this
appearance.
• press the Parked Calls soft key. Use the up/down navigation buttons to highlight the parked
call, and then press the Retrieve soft key.
• dial the <parking orbit number>. If enabling Cell Phone Dialing, press the send ( ) soft key.
To retrieve a parked call from a line appearance:
When on an active call using the Line Appearance programmable button and placing the call in Park,
only Allworx Users with the same Line Appearance programmable button can retrieve the call by
pressing the blinking Line Appearance PFK.
If placing the call into a parking orbit, the Line Appearance programmable button display has a green
outline. If another user placed the call into a parking orbit, the Park Monitor programmable button
display does not have a green outline.
3.10 Transfer a Call
Send the active call to another number. The Verge IP phone supports the following transfer types:
• Blind Transfer - do not talk to the transfer recipient prior to transferring a call.
• Attended Transfer - talk to the recipient to announce the transfer prior to completing the
transfer.
• To VM - send the call to another Allworx user’s voicemail.
• Quick Transfer - send the active call to another user by pressing a BLF (Allworx assigned
extension) or Contact (assigned phone number) programmable button.
• Merge - joins the original caller, Allworx user, and the intended recipient of the transfer into a
temporary conference call to introduce the parties before completing the transfer.
Page 20 866.ALLWORX * +1 585 421 3850
www.allworx.com
Version: H Revised: December 7, 2017
Page 31

Verge IP phone Call Transfer example:
Call Transfer ( ) function
button pressed.
Select a recipient:
• Dial the recipient’s number
(contact matches display).
• Press the Contacts function
button (all contacts display).
Blind Transfer
Active Call in progress.
(Optional) Press the Attended soft key to perform the Attended Transfer.
Attended Transfer Merge Calls
Press Tra nsfe r to complete the call
transfer.
Press Merge Calls for
a temporary
conference call
Call transferred when user
hangs up.
Press Transfer to complete the
transfer and leave the call.
After a successful transfer, the
screen confirms the transfer
recipient.
Do one of the following:
• Hang up to transfer the call
immediately (Blind transfer).
• Wait for user to answer to
announce the transfer.
Allworx Verge IP Phone Series User Guide
866.ALLWORX * +1 585 421 3850 Page 21
www.allworx.com
Version: H Revised: December 7, 2017
Page 32

Allworx® Verge™ IP Phone Series User Guide
Note:
Call Transfer Function Button LED
solid red transfer process initiated.
Soft Keys Available
Cancel stop the transfer and reconnects the call. No further action.
To VM send the incoming call directly to voicemail (only available for: Call Appearance, Intercom, and
ACD Appearance).
Attended immediately places a call to the intended recipient.
Back return to the starting Call Transfer screen. Available on the Call Transfer Option: To VM.
Calls open the Call History screen to select a recipient of the transfer. Available on the Call Transfer
Option: To VM.
Redial Calls the last-dialed outbound call placed from the phone, the Interact application, or the Reach
Remote Control application. Unless the Line Appearance(s) Use of Dial Plan phone option is
enabled, the system only redials Call Appearance-dialed calls.
Transfer complete the call transfer action.
Merge Calls joins the original caller, Allworx user, and the intended recipient on a temporary conference call.
Dismiss clears the screen of the transfer completed message. Available when transfer is complete.
Add Contact open Add Contact screen (available for original callers not in the Contacts). See “
page 36 for more information.
Add Contact” on
To transfer an active call:
If enabling the Cell Phone Dialing setting on the Verge IP phone, using the Call Appearance
programmable button or Intercom function button requires pressing the send ( ) soft key. Cell Phone
Dialing is not available with Line Appearance calls.
1. Press the Call Transfer ( ) function button. To perform an announced transfer, it may be
necessary to press the Attended soft key based on the Allworx server settings.
2. Do one of the following:
• dial another extension or external phone number.
•press an available Call Appearance programmable button (this activates the Attended
Transfer mode) and then:
• press the Calls soft key and select a call history listing.
• press the Redial programmable button (if available) to call the last-dialed
outbound call placed from the phone, the Interact application, or the Reach
Remote Control application.
•press an available Line Appearance programmable button (this activates the Attended
Transfer mode), and then dial the phone number.
•press a Contact or BLF programmable button.
•press a Call or Line Appearance programmable button (this activates the Attended
Transfer mode) and dial the recipient’s phone number.
Page 22 866.ALLWORX * +1 585 421 3850
www.allworx.com
Version: H Revised: December 7, 2017
Page 33

Allworx Verge IP Phone Series User Guide
Active Call.
Press the Conference
soft key.
Dial recipient’s number.
(Contact matches display).
Second active call.
Press the Merge calls soft
key.
Calls merged. Begin conference
call or press Add Call to add a
fourth participant.
•press the Intercom ( ) function button, dial the target number, and then press Transfer.
•press the Contact ( ) function button, locate the contact, and press the Select button. If
the Personal Contacts are set to Restricted, Allworx users must enter the assigned
credentials, and then press the Done soft key to access the Personal Contacts.
3. Complete the transfer:
• Blind transfer - hang up.
• Announced transfer - wait for the recipient to answer the phone and introduce the call.
After announcing the call, hang up or press an available soft key:
• Cancel - stops the call transfer and reconnects the caller. Proceed with active call.
• Merge Calls - joins the original caller, Allworx user, and the intended recipient on a
temporary conference call. When finished with the temporary conference call,
press the Transfer soft key to complete the call transfer.
4. Optional: press the Add Contact soft key to manage the contact. After a successful transfer, the
phone screen confirms the transfer recipient.
3.11 Conference Call
Connect up to four parties (4-way conferences) on one conference call. Additionally, the Call Transfer >
Merge Calls soft key connects all callers for a conference call during an attended transfer.
Verge IP phone Conference Call example:
866.ALLWORX * +1 585 421 3850 Page 23
www.allworx.com
Version: H Revised: December 7, 2017
Page 34

Allworx® Verge™ IP Phone Series User Guide
Note:
Soft Keys
Conference initiates the conference call feature.
Cancel ignores the conference call request and returns to the active call screen.
Merge Calls connects all callers to a single conference call.
Add Call add a fourth party to the three-way conference call.
Options select a party to place on hold or to disconnect from the active conference call call.
Leave exit the conference call while the other callers continue the conversation. After selecting the Leave
option, the Verge IP phone updates to Left Conference status, and then returns to the idle screen. This
option is only available during a 3-way conference call.
To create a conference call:
1. Answer or place a call. Press the Conference soft key. If the call is already on hold, it is not
necessary to press the Conference soft key.
2. Do one of the following to place a call:
If enabling the Cell Phone Dialing setting on the Verge IP phone, using the Call Appearance or Shared
Call Appearance programmable button requires pressing the send ( ) soft key. Cell Phone Dialing is not
available with Line Appearance calls.
• dial another extension or external phone number.
•press an available Call Appearance programmable button and then:
• press the Calls soft key and select a call history listing.
• press the Redial programmable button (if available) to call the last-dialed
outbound call placed from the phone, the Interact application, or the Reach
Remote Control application.
•press an available Line Appearance programmable button, and then dial the phone
number.
•press a Contact, BLF, or Redial (if available) programmable button.
• press the Contacts ( ) function button, and then select a contact. If the Personal
Contacts are set to Restricted, Allworx users must enter the assigned credentials, and then
press the Done soft key to access the Personal Contacts.
3. Announce the conference call to the active caller.
4. Press the Merge Calls soft key. The Verge IP phone places both parties into the conference call.
Page 24 866.ALLWORX * +1 585 421 3850
www.allworx.com
Version: H Revised: December 7, 2017
Page 35

Allworx Verge IP Phone Series User Guide
During the active conference call, the originator can press one of the following soft keys:
• Options - select a party and do one of the following:
• place the selected party on hold while the remaining parties continue a discussion. To readd the party to the conference call, press the Conference soft key, and then select the
party on hold.
• disconnect the selected party from the call while the remaining parties continue a
discussion.
• Add Call - add a fourth caller to the conference call.
• Leave - exit the conference call while allowing the other callers to continue the conversation.
This feature is only available during a 3-way conference call.
To end the call, do one of the following:
• Hang up.
• Press the Appearance programmable button to remove the caller from the conference call.
• Press the Leave soft key (see above).
• Press the Options soft key (see above).
3.12 Call History
View up to 200 Call History listings by pressing the Calls soft key. When reaching the maximum entries
in the call history list, the Verge IP phone deletes the oldest entry and adds the newest entry. To place
an immediate call to the Call History listing, press the up/down navigation buttons to scroll through the
Call History listings, and then press the Select button to choose the highlighted listing.
The Call History listings persist after each phone reboot. Each Call History listing displays the Caller ID
name, date/time of the call, and the final call status:
• Transferred - call forwarded to another recipient. • Missed - inbound call that rings, but it is not answered.
• Ended - normal call ended. • Check - failed to route to an outbound call.
• Parked <orbit number> - call placed into a Parking Orbit. • Elsewhere - missed inbound, picked up somewhere else, i.e.,
• No Answer - outbound call that is not answered (internal calls
only).
Reach Device.
866.ALLWORX * +1 585 421 3850 Page 25
www.allworx.com
Version: H Revised: December 7, 2017
Page 36

Allworx® Verge™ IP Phone Series User Guide
Call History listing
• Contact image (if available)/Allworx User badge
• Caller ID or Contact name
• Date/time of call
• Call status and icon
Call Status Icons
and final Call
Status
Missed calls icon and
number badge.
Call History Listings Call DetailsIdle Phone Screen
Verge IP phone Call History notification, Call History Listing, and Call History details examples:
Soft Keys
Back return to the previous Verge IP phone screen.
Details display the detailed call statistics.
Call place a call to the selected Call History listing.
Select selects the highlighted Call History listing from the Call History list. New soft keys are available:
• Select All - choses all the Call History listings.
• Clear All - unselects all the Call History listings.
Delete remove the highlighted Call History listing from the Call History list. Use the Delete soft key only
removes the Call History listing from the Verge IP phone and Interact application Call History.
The Reach application is not affected.
Contact display the Contact details (available for calls from current contacts only). Available in the Call
History > Details phone screen.
Add Contact opens the phone screen to add a new contact (available for callers not in the Contacts). Available
in the Call History > Details phone screen.
To manage the Call History listings.
1. Press the Calls soft key. Use the up/down navigation buttons to highlight the Call History listing.
2. Use the displayed soft keys to manage the listing.
Page 26 866.ALLWORX * +1 585 421 3850
Version: H Revised: December 7, 2017
www.allworx.com
Page 37

Allworx Verge IP Phone Series User Guide
3.13 System Extensions
Dial the digits in the table below for a system extension. If the call does not complete, check the phone
functions tab of the My Allworx Manager page or contact the Allworx Server Administrator for the
actual dialed digits. If enabling Cell Phone Dialing, press the send ( ) soft key to complete the call.
Number Access
0 Initiate a call to the company operator.
3 + extension Connect to another user’s voicemail and leave a message.
402 Connect to an Overhead Paging System to make an announcement.
403 Activate the door relay, if connected and configured.
404 Access to the Audio Message Center.
408 Access the Conference Center. To set up a new conference, use My Allworx Manager.
4301 to 4332 Connect to an Auto Attendant - *400 is the default Auto Attendant. The number of Auto
Attendants is dependent upon the Allworx server.
45 + extension Forward calls to another extension. To disable, dial 450.
46# Connect to a Paging Zone to broadcast audio (# is a Page Zone number 0 through 9).
4950 to 4999 Retrieve a call from the assigned parking orbit.
701 to 709 Retrieve a call from the assigned parking orbit.
6 + extension Access the Audio Message Center from any Allworx phone.
7 + extension Answer another ringing phone.
9 + phone number Access outside line.
3.14 Presence / DND Setting
Identifies the Allworx User availability and uses the call route based on the setting selected. All setting
options, except In Office, display a yellow bar and Presence or DND icon in the phone status area. After
changing the status, the Verge IP phone screen status changes and all inbound calls follow the call
route for the new Presence state.
The Presence setting changes due to:
• Allworx Verge IP phone users manually configure the setting.
• automatic updates for users logged into Interact Professional using Interact Sync and the
Outlook application.
• automatic updates for users that control the presence setting with a selected schedule.
The DND setting causes the Verge IP phone not to ring for subsequent incoming calls. However, the
Allworx user can continue to send call.
866.ALLWORX * +1 585 421 3850 Page 27
www.allworx.com
Version: H Revised: December 7, 2017
Page 38

Allworx® Verge™ IP Phone Series User Guide
Presence icon
DND active icon
Set Presence/DND Screen
Phone Status Yellow Background - User Unavailable
DND programmable
button active
Verge IP phone screen Presence and DND examples:
Soft Keys
Back soft key return to the previous screen.
DND or End DND
Soft key
activates or de-activates the DND setting.
To manage the Presence or DND setting:
1. Press the Presence ( ) function button.
2. Do one of the following:
• Use the up/down navigation buttons to highlight the new Presence state, and then press
the Select button to accept the change.
• Press the DND/End DND soft key. The DND turns on or off, respectively.
The Phone Status area changes to yellow and displays the appropriate icons
3.15 Call Handoff
Seamlessly transition a call between the Verge IP phone and a Reach device. Allworx Verge IP phone
users with one or more Reach devices can migrate a call on the Allworx system from the Allworx Verge
IP phone to the Reach device using the Call Handoff soft key, and vice versa using the Reach action
icon, without disruption to the audio. Allworx users can hand off all calls except for the following:
Page 28 866.ALLWORX * +1 585 421 3850
www.allworx.com
Version: H Revised: December 7, 2017
Page 39

Allworx Verge IP Phone Series User Guide
Call Handoff Complete
Active Call - Press the
Handoff soft key.
Select handoff device -
(optional) if more than one
Reach device is available
Call Types Call Conditions
• ACD or Queue Appearance • Calls being recorded
• Call Supervision • Destination devices set to Do Not Disturb
• Bluetooth Appearance • Calls on hold
• Phone-hosted conferences • Devices registered on difference servers (does not support multi-site)
Verge IP phone screen Call Handoff example:
Soft Keys
Cancel dismiss the Call Handoff feature.
Dismiss returns to the Verge IP phone Idle screen when the other party has hung up.
Add Contact opens the phone screen to add a new contact (available for callers not in the Contacts). See “
Contact” on page 36 for more information.
To perform a call handoff:
1. Press the Handoff soft key.
If there is only one possible destination device, the Allworx system automatically transitions the
call to the destination device.
If multiple destination devices are available to receive the call handoff, use the up/down
navigation and Select button to select the receiving device and transition the call.
866.ALLWORX * +1 585 421 3850 Page 29
www.allworx.com
Version: H Revised: December 7, 2017
Add
Page 40

Allworx® Verge™ IP Phone Series User Guide
During a call handoff to an other devices:
• the previously used audio path on the destination device automatically becomes active.
• the Reach device switches to Remote Control Mode, if handing the call off to a Verge IP
phone. See “Reach Remote Control” on page 54 for more information.
2. Listen for the tones to indicate:
• the call handoff from the current device was successful.
• the call handoff to the new device was successful.
• if the call handoff fails.
Page 30 866.ALLWORX * +1 585 421 3850
www.allworx.com
Version: H Revised: December 7, 2017
Page 41

Allworx Verge IP Phone Series User Guide
Chapter 4 Features
The Verge IP phone has many features to easily manage day-to-day activities using the function
buttons, soft keys, or programmable buttons.
4.1 Contacts
The Allworx System supports four types of contacts on the Verge IP phone series:
• User and System contacts – contacts with an internal Allworx extension assigned. The Allworx
Server Administrator manages these contacts.
• Public Contacts – system-wide contacts (formerly known as Speed Dial). The Allworx Server
Administrator manages these contacts.
• Personal Contacts – (only available on Allworx systems with a Connect server) contacts managed
by the Allworx user.
• Allworx Personal Contacts
• created from the Verge IP phone, the Interact application, or a Reach device
contact application.
• imported from a .CSV file or vCard within the Interact application.
• External Personal Contacts
• synchronized from a Reach device originating application (device app such as
Contacts or People)
• synchronized from an account such as a Gmail email account or an Outlook email
account.
Visual example of Contacts:
866.ALLWORX * +1 585 421 3850 Page 31
www.allworx.com
Version: H Revised: December 7, 2017
Page 42

Allworx® Verge™ IP Phone Series User Guide
4.1.1 Sharing Contacts
The Allworx system shares the User, System, and Public Contact types with all of the Allworx user’s
connected Allworx phones, Reach devices, and the Interact application. Within the Reach and Interact
Professional applications, Allworx users control sharing and synchronizing the Personal Contacts to the
devices assigned to the Allworx user. See the Reach for iOS, Reach for Android, or the Interact and
Interact Professional User Guide for more information about sharing Personal Contacts.
Visual example of sharing contacts using a Connect server:
4.1.2 Contact Privacy
Allworx users control sharing and synchronizing the Personal Contacts to the devices assigned to the
Allworx user on the Settings > Phone Preferences > Display > Personal Contacts, screen:
• Unrestricted - Contact matches are displayed and require phone log in to view or modify
details. Login is valid until the user leaves the Contacts screen.
• Restricted - Contact matches are displayed and after authentication via soft key to see personal
contacts including Contact programmable buttons. Log in is valid until user logs out via soft
button on Contacts screen or automatically logged out when the phone is rebooted or enters
Sleep mode. Contact lock status always displays on the Verge IP phone series status bar.
4.1.3 Data Protection
Only the Allworx user has access to their personal contacts; the Allworx Server Administrator cannot
access the personal contacts. Allworx users can prevent others from see the personal contacts on their
Verge IP phone by restricting access. This requires the Allworx PIN to unlock the Verge IP phone.
Page 32 866.ALLWORX * +1 585 421 3850
www.allworx.com
Version: H Revised: December 7, 2017
Page 43

Allworx Verge IP Phone Series User Guide
4.1.4 Managing Personal Contacts
Allworx users can manage and update Personal Contacts by using the originating device or application.
The Verge IP phone Personal Contact Details screen identifies the originating application in the
Account line. Only the Allworx user can add, edit, or delete each Personal Contact. Allworx Server
Administrators can delete all of a user’s personal contacts from the Connect server permanently.
Example:
Jane Smith needs to update her Personal Contact, Tom Wright. Since Jane uses the Verge IP phone,
Reach for iOS, and the Interact application, she needs to determine how she added Tom to her
Personal Contacts. Jane opens the Contact Details for Tom Wright and scrolls to look at the Account
line and learn how she added Tom to her Personal Contacts.
If the Account line reads:
• Allworx Personal: Jane added Tom Wright using her Verge IP phone. To update the contact
information about Tom, Jane can use her Verge IP phone, the Reach application or the Interact
Professional application.
• Allworx User, Allworx System, Allworx Public* – The Allworx Server Administrator manages
these contacts using the Allworx System software.
• <email account>: Jane used her email account (such as Gmail or Outlook) to synchronize her
contacts with her Verge IP phone. To update the contact information about Tom, Jane must do
so in her email application.
• <Reach device>: Jane used an iOS or Android app (such as Contacts) to manage her contacts to
her Verge IP phone. To update the contact information about Tom, Jane must do so on the
identified device in the appropriate app.
* the only user-editable options for these contacts types are the Favorite status and the choice of
default phone number on the Verge IP phone, Reach application or Interact application.
866.ALLWORX * +1 585 421 3850 Page 33
www.allworx.com
Version: H Revised: December 7, 2017
Page 44

Allworx® Verge™ IP Phone Series User Guide
Contacts Function Button
Contacts Programmable Button
User Contact:
• Availability Status
• Presence/DND icons
• Contact image with Allworx User
badge
• Contact name
2
Public Contact:
• Contact image with Allworx
badge
• Contact ID name
2
Personal Contact:
• Contact image without
Allworx User badge
• Contact ID name
2
System Contact:
• Contact image with Allworx badge
• Contact name/number
2
BLF Programmable Button1:
• Availability Status
• Presence/DND icons
• Caller ID name/number
1
BLF programmable button - does not report the Allworx User presence state. Only assigned by the Allworx Server Administrator.
2
Caller name/number only available on the Contacts screen. Press the Contacts Function Button to view.
4.1.5 Verge IP Phone Contact Buttons
The Verge IP phone has a Contacts ( ) function button and a Contact programmable button.
• Contacts function button - opens the Contacts screen to view all contacts or to add/manage
Personal Contacts.
• Contact programmable button - (if available) immediately dials or transfers a call to the
extension or contact phone number. The Allworx Server Administrator or the Verge IP phone
user (with permissions) may configure one or multiple Contact programmable buttons on the
Verge IP phone. If using an Allworx Connect server, the contact programmable button displays
the Allworx user presence and availability status.
Each button type displays the following contact information:
• contact availability (Allworx User Contacts only) • contact name/number
• image and Allworx directory badge (if either are available) • favorite status
• presence setting (if other than In Office, Allworx User Contacts only)
Verge IP phone Contact programmable button and function button examples:
Page 34 866.ALLWORX * +1 585 421 3850
www.allworx.com
Version: H Revised: December 7, 2017
Page 45

Contacts Programmable Button LED
Note:
Note:
Note:
Note:
off Contact is idle and does not have DND active (Allworx User only).
solid amber Contact is idle and has DND active (Allworx User only).
flashes red Contact has an incoming call (Allworx User only).
solid red Contact is on the phone (Allworx User only).
To manage contacts:
The Contact PFK for Allworx users does not provide user status or presence status on phones connected to the
6x, 6x12, or 48x server. To monitor the phone status, use a BLF PFK instead.
Each Allworx user can add a contact image associated with their contact information using the Reach
application (with or without a handset license) or the Interact Professional application.
The Allworx Server Administrator can control the user permissions to manage their directory contact image.
The Allworx Server Administrator can delete an Allworx User’s directory contact image.
Settings available:
Allworx Verge IP Phone Series User Guide
• add a new Personal Contact
• set contact favorite status
• select the preferred contact number (for personal contacts with more than one phone number)
• update the Allworx Personal Contact information (Allworx Personal Contacts only)
1. Press the Contacts ( ) function button. If necessary, enter the Extension and PIN information and
press the Done soft key. The Contact listing screen displays.
2. Do one of the following:
• Use the up/down navigation buttons to locate the contact listing, and then press the
Select button. The Contact Details screen displays. To filter the contacts, press the More
( ) function button, and then the Groups soft key to select the contacts types to display.
• Use the keypad to enter search criteria. The digits entered display in the header (right
side) and the Verge IP phone displays the contacts matching the number and all
associated letters with the pressed key.
Press the left navigation arrow to delete the last entered digit. To recover the full list of
contacts, delete all of the digits entered.
• Press the Add Contact soft key to add a Personal Contact.
866.ALLWORX * +1 585 421 3850 Page 35
www.allworx.com
Version: H Revised: December 7, 2017
Page 46

Allworx® Verge™ IP Phone Series User Guide
Show Any Show Only*
Users (Allworx Users) Favorites
System (Allworx System Contacts including Public Contacts)
Personal (Allworx Personal and External Personal Contacts)
* Shows only the contacts marked as favorites with the selected Show Any groups
Cancel discards the entered information and returns to the Add Contact screen
Delete removes the previous character.
Done saves the entered information and returns to the Add Contact screen.
• Prefix • Middle name • Suffix • Organization
• First Name • Last name • Nickname
• Work • Mobile • Company • Work Mobile
• Home • PIN • Main
• Work • Mobile • Company • Work Mobile
• Home • PIN • Main
3. Use the following soft keys to manage the contact.
Soft Keys - available only on the Contacts screen (Contact function button)
Back return to the Verge IP phone main screen
add Favorite status to highlighted contact.
remove Favorite status highlighted contact.
Call place a call to the highlighted contact.
Groups displays the Group screen. Select the types of contacts to display.
Add Contact opens the phone screen to add a new contact or edit an existing contact.
1. Enter the Allworx PIN. If locked, press the Done soft key to access. If a wrong Allworx PIN number is
entered, press the Back soft key to remove one digit at a time or the Clear soft key to remove the
entered information and re-add the Allworx PIN.The Add Contact screen displays.
2. Use the up/down navigation and the Select button to choose a field to edit, and enter the contact
information using the keypad and the following soft keys:
Press the keypad number associated with the letter to toggle between the letters and numbers printed
on the key. See “
buttons to move the cursor within field.
Each stored contact can contain the following information:
3. Press the Add Number soft key to add one or more phone numbers.
NOTE: If adding a contact from a Call History listing, the Verge IP phone automatically enters the Caller ID
number as the Work number.
4. Highlight and select the number label, and then press the Select button to display the New number
screen. The following new number labels are available:
NOTE: use the PIN number label to dial a number directly from an active call (i.e. enter a verification code).
5. Press the Add Number soft key to add one or more phone numbers.
NOTE: If adding a contact from a Call History listing, the Verge IP phone automatically enters the Caller ID
number as the Work number.
6. Highlight and select the number label, and then press the Select button to display the New number
screen. The following new number labels are available:
NOTE: use the PIN number label to dial a number directly from an active call (i.e. enter a verification code).
Phone Keypad Presses” on page 87 for more information. Use the left/right navigation
Page 36 866.ALLWORX * +1 585 421 3850
Version: H Revised: December 7, 2017
www.allworx.com
Page 47

Allworx Verge IP Phone Series User Guide
Cancel discards the entered information and returns to the Add Contact screen
Delete removes the previous character.
Done saves the entered information and returns to the Add Contact screen.
Ringing (flashing)
Active Call (solid)
Logged Out
Busy - Displays
reason
Idle - only agent
in queue
Ringing (flashing)
Active Call (solid)
Wrapup
Add Contact
(con’t
Delete removes an existing Personal Contact listing.
* enter the Allworx PIN to display Personal Contacts.
*
* Only available when Settings > Phone Preferences > Display > Personal Contacts is set to Unrestricted.
7. Enter the new phone number, and then press the Select button to save the new number. The following
soft keys are available when entering a new phone number.
If entering more than one phone number, highlight and select the default number to automatically dial
when selecting the contact.
hide Personal Contacts.
4.2 Queue Appearance and Automatic Call Distribution Queues
The Allworx system distributes incoming calls that are too numerous for agents to answer immediately
in a first-in-first-out order. If enabled, queued callers hear music while on hold. When logged in, users
receive and answer calls, and then immediately enter a wrap-up time when the call ends.
• Queue Appearance - for sites that use Ring All queuing; the phone automatically logs into the
• ACD Appearance - for sites that use distributed queuing. In addition to log in / out of ACD
Verge IP phone Queue Appearance and ACD Appearance Programmable button examples:
Queue after power up. Additionally, users can manually log in to and out of queues.
queues, users can temporarily stop ACD calls from routing to the extension with a busy reason.
866.ALLWORX * +1 585 421 3850 Page 37
www.allworx.com
Version: H Revised: December 7, 2017
Page 48

Allworx® Verge™ IP Phone Series User Guide
Call Queue Appearance and ACD Appearance Programmable Button LED
solid red agent not logged in to the ACD queue.
flashing green incoming call or active call on hold.
solid green active call.
amber (ACD only) the only agent logged in.
flashing red incoming call while agent is in wrap-up time, incoming call while agent is not logged in call queue,
or (ACD only) agent has specified a busy reason.
Call Queue Appearance and ACD Appearance Soft Keys
Ok (Call Queue Appearance only) accept the entered log in information.
Cancel returns to the Idle screen.
Delete clears the entire entry field.
Done all field entries or selections are complete.
Clear clear the previously entered character.
Select All / Clear All choose all options at once / unselect all options at once.
Park a system wide hold. See “
Conference connect up to four parties together. See “
Merge Calls Combines all calls into one conference call. Only available when performing a conference call.
Options Enables placing a party on hold or hangs up a party. Only available during a conference call.
Leave Enables dropping off the conference call while the other parties remain active. Only available during
a conference call.
Add Call Enables a fourth party to join a conference call. Only available during a conference call.
Queue Stats/Hide Stats displays the number of queued calls and the longest wait time information during an active ACD
call.
Add Contact opens the phone screen to add a new contact (available for callers not in the Contacts) during an
active ACD call.
Dismiss return to the idle screen.
Queues displays queues assigned to the agent.
Log out all logs out the agent from all ACD queues.
Busy immediately opens the Select Busy Reason screen.
Park a Call/Park Monitor” on page 18 for more information.
Conference Call” on page 23 for more information.
Page 38 866.ALLWORX * +1 585 421 3850
www.allworx.com
Version: H Revised: December 7, 2017
Page 49

Allworx Verge IP Phone Series User Guide
Login Logout
To manually log in to or out of the Queue Appearance:
Press the Queue Appearance programmable button, and then press the OK soft key. The phone
automatically logs in to or out of the call queue, respectively.
To log in to the ACD Appearance:
Agents can log into an ACD queue from any desk phone and the ACD queue routes the calls to that
phone. This includes phones that may not be the phone on the agent’s desk.
1. Press the solid red ACD Appearance programmable button. The login prompt screen displays.
The Extension: field displays the last entered extension, which may be the extension number
assigned to another desk phone. If necessary: use the up navigation button to get to the
Extension: field, and enter the new extension. Press the down navigation button.
2. Enter the Allworx PIN, and then press Done. If necessary, press the Clear soft key to erase all
entered numbers or press the left navigation button to erase a single entered number. If a PIN
Change Request displays, follow the on screen instructions. Press Done.
3. (Allworx Users assigned to more than one ACD queue) Do one of the following:
• Use the up/down navigation buttons and the Select button to select queue(s).
• Press Select All to select all available queues.
The agent is logged in to selected ACD queues and ready to receive calls from the queue.
4. Press the Done soft key. If this is the only agent logged into one or more ACD queues, the ACD
Appearance programmable button status bar is yellow.
866.ALLWORX * +1 585 421 3850 Page 39
www.allworx.com
Version: H Revised: December 7, 2017
Page 50

Allworx® Verge™ IP Phone Series User Guide
Use the navigation/select
buttons to select the ACD
Queues or press the Select
All soft key. Press the Done
soft key.
Press the ACD
programmable button.
Enter the Allworx PIN and
press the Done soft key.
ACD programmable
button changes to logged
in status.
Uncheck the queues and
press the Done soft key.
Press the ACD
programmable button.
Press the Queues soft key.
ACD returns to logged out
status.
Verge IP phone ACD log in sequence:
To log out or change ACD queues:
1. Press the ACD Appearance button, and then press Queues or Log Out All soft key. If pressing
Queues, use the up/down navigation buttons and press Select button or the Clear All soft key.
2. Press the Done soft key. Re-enter the Allworx PIN, and then press the Done soft key.
Verge IP phone ACD log out sequence:
Page 40 866.ALLWORX * +1 585 421 3850
www.allworx.com
Version: H Revised: December 7, 2017
Page 51
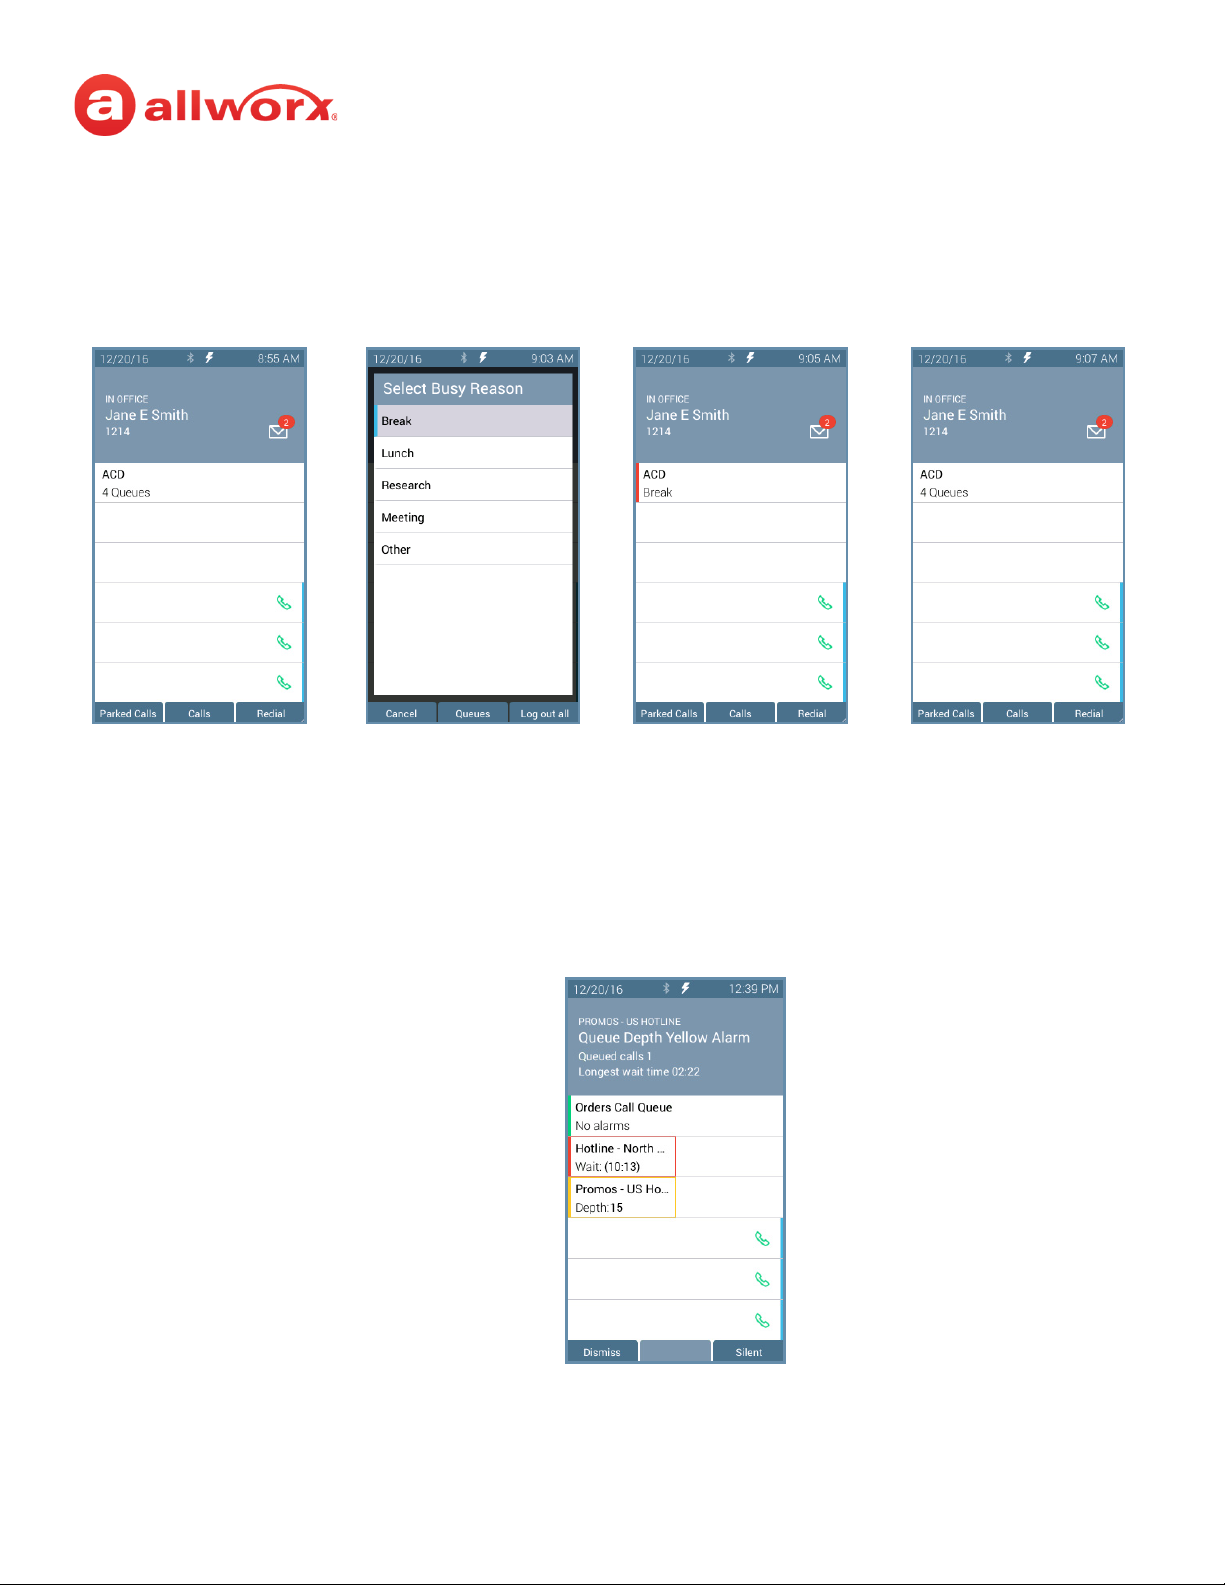
Allworx Verge IP Phone Series User Guide
The agent is unavailable to
accept ACD calls.
Press the ACD
programmable button.
Highlight the busy reason,
and press the Select
button.
Press the ACD programmable
button to end the Busy
Reason.
No queue alarms
Queue exceeded red threshold limit
Queue Wait Time Example
Queue exceeded yellow threshold limit
Queue depth example
To change the ACD Queue busy state:
Agents do not receive calls while in a busy state. Press and release the ACD programmable button. The
Select Busy Reason screen displays. Use the up/down navigation and the Select button to choose the
busy reason. To leave the busy state and resume taking calls, press the ACD programmable button.
4.3 Queue Alarm
Notifies users of the queue activity levels (number of calls in the queue and/or longest wait time). If
configured, the queue alarm produces an audible alarm with the queue status displayed on the Verge
IP phone screen. Press the button to silence the alarm.
Verge IP phone Queue Alarm programmable button examples:
866.ALLWORX * +1 585 421 3850 Page 41
www.allworx.com
Version: H Revised: December 7, 2017
Page 52

Allworx® Verge™ IP Phone Series User Guide
Note:
Note:
Queue Alarm Programmable Button LED
solid green no alarms.
solid amber yellow queue alarm.
solid red red queue alarm.
Queue Alarm Soft Keys
Dismiss clears the alarm from the call status area.
Silent keeps the alarm on screen, but quiets the audible alarm.
4.4 Shared Call Appearance
Handle a set of one or more appearances as a single appearance shared across multiple phones. All
phones in the Shared Appearance have access to calls and operations within the group of phones. For
example, an incoming call can ring on all phones using the appearance, one user answers the call and
places the call on hold, and then another user retrieves the call. The Shared Call Appearance is available
as a destination in any extension call route using My Allworx Manager (if permissions are enabled).
Phones that do not share the Shared Call Appearance can pick up ringing calls on a Shared Call
Appearance line. Once another call appearance picks up a call, the shared call appearance returns to
the idle state. If a phone outside the Shared Call Appearance group picks up a call, the call is no longer
a part of that Shared Call Appearance, i.e., a non-Shared Call Appearance phone picks up a call and
places it on hold, it is a “normal” hold and not one of the Shared Call Appearance hold types.
An active inbound call on a Shared Call Appearance line (or connecting an outbound call), renders the
line unavailable to all other phones using the Shared Call Appearance. When there is an active call on a
Shared Call Appearance, the Verge IP phone screen displays the Caller ID information of the party.
Using the Call Forwarding option on a phone does not forward Shared Call Appearance calls.
If a user parks a Shared Call Appearance call and the Park timeout setting for the system is set to ring
back to the phone that parked the call, the parked call rings back only to the phone that parked it. It
does not ring all phones in the Shared Call Appearance. The Shared Call Appearance programmable
button LED goes out and the call is no longer on the Shared Call Appearance.
Shared Call Appearances support three distinct types of hold behavior:
• Public Hold - any phone using the Shared Call Appearance can retrieve the call on hold. When
using this hold type, the system delivers Hold Reminders to all phones in the Shared Call
Appearance per the individual phone settings. If no one picks up the held call, all phones receive
a notification per the individual HOLD reminder settings. Press the Public soft key.
The Allworx System does not support including a call on a shared hold in phone-hosted conferences.
Page 42 866.ALLWORX * +1 585 421 3850
www.allworx.com
Version: H Revised: December 7, 2017
Page 53

Allworx Verge IP Phone Series User Guide
Shared Call Appearance - In use on another phone.
Shared Call Appearance - Idle
Shared Call Appearance - Public Hold
Intercom Call - On Hold for Shared Call Appearance
Shared Call Appearance - Bridged Hold
Shared Call Appearance -Privacy Hold
• Privacy Hold - only the phone that placed the call on hold can retrieve the call. If the user does
not pick up the call, the phone receives a notification per the phone HOLD reminder
settings.Press the Hold ( ) function button.
• Bridged Hold - the phone that placed the call on hold and one other phone that has the same
Shared Call Appearance can retrieve the call. The second phone can resume the held call by
selecting the flashing Shared Call Appearance programmable button. If neither party resumes
the call, the phone placing the call on hold receives a notification per the individual HOLD
reminder settings. Press the Bridge soft key or the Intercom ( ) function button, and then dial
the second phone number.
Verge IP phone Shared Call Appearance examples:
Shared Call Appearance LED Button
off idle
solid green in use locally - phone “owns” the Shared Call Appearance line. To place an outbound call, listen for the
dial tone, and then enter the number.
flashing green (fast) inbound call to the Shared Call Appearance. All parties are ringing on the same Appearance line. Any
user of a phone with that Appearance can answer the inbound call.
flashing green (slow) active call is in a public hold state (locally or remotely). Any shared Call Appearance participant can
retrieve the call.
flashing red (fast) inbound call to the Shared Call Appearance on a phone set to Do Not Disturb (DND). User can make
outgoing calls.
solid red in use remotely on another phone of the same Shared Call Appearance. The Shared Call Appearance
line releases:
• when pressing the Shared Call Appearance button again on the phone that seized it; or
• completing an active call on the Shared Call Appearance line.
4.5 Message Monitoring
Monitor and access the Message Center inbox for another Allworx User. If a message is available in the
866.ALLWORX * +1 585 421 3850 Page 43
www.allworx.com
Version: H Revised: December 7, 2017
Page 54

Allworx® Verge™ IP Phone Series User Guide
Monitored mailbox has 10 new messages
Monitored mailbox has no new messages
Information / active call area
Messages Indicator
mailbox, the Messages programmable button lights solid red and the programmable button label
displays the number of unread messages in the mailbox. Log in to the voice mail box using the
extension number and Allworx PIN assigned to the extension, and then manage the Voice Mail listings,
Allworx Message Center” on page 44 for more information.
see “
Verge IP phone Message Monitoring example:
4.6 Allworx Message Center
The Allworx Message Center provides unified messaging for Allworx users. When a new voicemail
message is available, the Allworx phone Messages ( ) function button lights and the number of new
messages displays on the Verge IP phone screen. If the phone has a programmable button to monitor
another mailbox, see “Message Monitoring” on page 43 for more information.
Verge IP phone Message Notification example:
• Visual Message Center - list of messages for the extension and uses navigation keys for
scrolling and/or soft keys for managing voicemail messages.
• Audio Message Center - audio menus and keypad presses to manage the voicemail messages
and settings. The Allworx system plays the default language on the Audio Message Center,
regardless of the outside line or call appearance used to access the account. If the Allworx Server
Administrator configured the Allworx server with the Multiple Language Pack feature, users can
press ## to play the Message Center prompts in a language other than English, when prompted.
Users can perform the following tasks within the Message Center:
• Listen to new or saved voicemails. • Clear all listings. • Manage message greetings.*
• Send a message to another user. • Clear a single listing. • Change password (or PIN).*
• Manage messages. • Change message listing appearance.*
• Reply to a voicemail. • Change name recording.*
* Available in the Audio Message Center only.
Page 44 866.ALLWORX * +1 585 421 3850
www.allworx.com
Version: H Revised: December 7, 2017
Page 55

Allworx Verge IP Phone Series User Guide
Note:
After pressing the Messages function
button, enter the assigned Allworx
PIN and press the Done soft key.
All messages display on the Verge IP phone screen.
• New/unread - Blue text
• Read/Saved - Black text
4.6.1 Visual Message Center
Displays the list of voicemail messages and draft messages on the Verge IP phone screen. Unread
messages display in blue text and read messages display in black text.
To manage the messages:
The Allworx Server Administrator may change the function of the MESSAGES button so pressing it immediately
calls the Audio Message Center making the Visual Message Center unavailable.
1. Press the Messages ( ) function button once or the Messages programmable button (if
programmed) to access the Visual Message Center. To exit the message center, press the Cancel
soft key.
2. Verify the extension. To log in as another user, press the Clear soft key to erase the
automatically populated Extension number. Enter the correct extension number, and then press
the down navigation button.
3. Enter the Allworx PIN, and press the Done soft key. If presented with a PIN Change Request,
enter a new Allworx PIN, press the down navigation button, and re-enter the new Allworx PIN.
Press Done to continue with the log in process.
• To erase a mis-entered PIN number, press the Delete soft key to erase the character to
the left of the cursor.
• To erase the entire PIN number, press the Clear soft key.
Verge IP phone Visual Message Center login example:
866.ALLWORX * +1 585 421 3850 Page 45
www.allworx.com
Version: H Revised: December 7, 2017
Page 56

Allworx® Verge™ IP Phone Series User Guide
4. Scroll through the voicemail messages using the up/down navigation buttons. Press the Select
button to choose a voicemail listing. Manage the messages using the available soft keys below.
Soft Keys
Back returns to the Verge IP phone Idle screen. No Further action for the Allworx Message Center.
Options manage the voicemail listing - Reply, Forward, Mark as Saved, Mark as New, Delete
Create create a message to send within the Message Center to one or more recipients.
Select manage the current message.
Switch User check messages for another extension. Enter the correct extension > down navigation arrow > Allworx PIN
> Login soft key.
Each of the soft keys above has any combination of the following soft keys to provide control managing the voicemail messages.
Back return to the previous screen.
Options enables selecting how to manage the voicemail - Reply (Allworx User Contacts only), Forward, Mark as
Saved, Mark a New, or Delete
Create make a new voicemail message to send.
Select chooses the highlighted Message listing and opens the ability to select additional message listings.
Switch User access another extension voicemail box.
Delete remove the message from the listings.
Clear All de-select all of the selected options.
Discard
Done action is complete. Move to the next screen.
Record create a message. When complete, press the Done soft key.
Select All select all available recipients in the Contacts list.
Send delivers the message to the intended recipient(s) and returns the user to the Messages List screen.
Reply record and send a response back to the originator.
Forward send the message to other recipients. NOTE: Verge IP phone users are not required to record an
Mark as Saved changes the current Message listing font color to black to indicate a read message.
Mark as New changes the current Message listing font color to blue to indicate an unread message.
Call place a call to the originator.
Cancel return to the previous screen.
Add Contact opens the phone screen to add a new contact (available for callers not in the Contacts).
Navigation Buttons
Up/Down scroll through the Voice Mail listings.
Select accepts the highlighted option or access message to:
erase the recording, and then return to the Messages listing screen.
introduction prior to forwarding the voicemail message.
• Select button - plays or pauses the message.
• Left navigation button - skips back in the message.
• Right navigation button - skips forward in the message.
• Up navigation button - go to the previous message.
• Down navigation button - go to the next message.
Page 46 866.ALLWORX * +1 585 421 3850
www.allworx.com
Version: H Revised: December 7, 2017
Page 57

Allworx Verge IP Phone Series User Guide
Note:
Key Option Key Option
1 or hang up
Send the message
#
Cancel the message
2
Review the message
*
Hear these options again
3
Change the message
Key Option
*# Disconnects (hangs up) the call and returns to the dial tone.
*# <Allworx PIN> # Returns to the Audio Message Center from the dial tone.
NOTE: The ability to hang up a call and return to a dial tone using *# is not available for some
combinations of originating phones / outside lines. Contact the Allworx administrator for more
information.
4.6.2 Audio Message Center
Uses prompts and keypad presses to manage voicemail messages and message center settings.
Dialed digits to access the Audio Message Center may vary per system. Check the My Allworx Manager page >
Phone Functions tab or consult the Allworx administrator.
To access the Audio Message Center:
1. Do one of the following:
• Press the phone Messages ( ) function button twice.
• Dial 6 + the primary extension from any phone or the company Auto Attendant.
• Dial 404. When calling from an outside line or phone not assigned to a user, the system
prompts users for a primary extension.
The Audio Message Center announces the number of new and saved voicemail messages and
the current Presence setting.
2. Press one the following keypad buttons and follow the audio prompts.
Key Option
1
2
3
4
7
Listen to voicemail messages. See “To manage voicemail messages:” on page 48 for more options.
Listen to saved voicemail messages. See “To manage voicemail messages:” on page 48 for more options.
Send a message.
• Enter the extension or alias to send the message. The Allworx system plays the selected user’s number
and name, and then prompts for another extension.
• Record a message, and then press the # key when complete to select one of the following options:
Change your Message Center system settings. See “To update the Audio Message Center settings:” on
page 49 for more options.
Access an outside line (if enabled).
• Dial the external phone number directly. It is NOT necessary to dial 9 or 78+PIN before the number.
• After connecting to an external call and the external party hangs up, users hear a dial tone to place
additional calls. Additional options include:
866.ALLWORX * +1 585 421 3850 Page 47
www.allworx.com
Version: H Revised: December 7, 2017
Page 58

Allworx® Verge™ IP Phone Series User Guide
• Outgoing message is playing
The Allworx system places the call immediately.
• During or after leaving a
message
The Allworx system delivers the message, and then
transfers the caller to the dialed extension.
• <extension number>
Enter another user’s extension for the voicemail message.
• 9
To send the message to each Allworx user on the system - if enabled
(digits may vary per system). Please check phone functions tab of the
My Allworx Manager page or consult the Allworx administrator.
Key Option Key Option
1 or hang up
Send the message
#
Cancel the message
2
Review the message
*
Hear these options again
3
Change the message
Key Option
9
hang up
#
*
* +
<extension>
To manage system recordings (requires Recording Manager permissions). See “To manage the Call
Queues/ACD Queues recordings and schedules:” on page 51 for more options.
End the call.
Return to the previous menu.
Replay the menu options.
Call any internal extension. This option is not announced during the menu prompts.
If connected to voicemail, call another internal extension by dialing * + extension on the numeric keypad
or dial “0” for the operator. When dialing the new extension:
Example: Mary calls John’s extension, but John’s voicemail answers. Mary decides to talk to Jim instead of
leaving a voicemail message. She dials *102 and immediately transfers to Jim’s extension.
To manage voicemail messages:
Log in to the Audio Message Center and play the message. Select an option from the table below to
manage the voicemail. Options 1 and 9 are only available if an Allworx user left the voicemail message.
The Allworx system automatically saves the messages unless the user chooses to delete the message.
Key
During
message
*1 1
*2 2
*3 3
*4 4
*6 6
After
message
Option
Reply to this message - Allworx Users only.
• Enter an extension to reply to the message. The Allworx system plays the selected user’s contact
information. Select one of the options:
• Record a message, and then press the # key when complete. Select one of the following options:
Forward this message - Allworx Users only. Follow the steps for Reply to this message.
NOTE: Recording an introduction is not required prior to forwarding the voicemail message.
Delete the message.
Replay this message.
Play the next message.
Page 48 866.ALLWORX * +1 585 421 3850
Version: H Revised: December 7, 2017
www.allworx.com
Page 59

Note:
Note:
Key
Key Option Key Option
1
In Office
6
Away
2
At A Meeting
7
Busy
3
On Vacation
#
Return to previous menu
4
On Business Trip
*
Listen to these choices again
5
At Home
Allworx Verge IP Phone Series User Guide
During
message
*9 9
*# #
** *
After
message
Option
Place a call to the sender of this message.
Return to the previous menu.
Listen to these choices again.
To update the Audio Message Center settings:
Send Voicemails directly to users without accessing the Audio Message Center. Dial 3 + extension.
Digits may vary per system. Please check phone functions tab of the My Allworx Manager page or consult the
Allworx administrator.
The Audio Message Center settings enable updating the presence setting, name recording, managing
the greetings, or updating the Allworx PIN.
1. Log in to the Audio Message Center and press 4 on the Verge IP phone numeric keypad.
2. Select one of the following options:
Key Option
1 Change your Presence setting
The Allworx system announces the current Presence. Select one of the following options:
NOTE: Users can change the Presence Setting without accessing the Audio Message Center. Press the Presence
( )function button. See “
Presence / DND Setting” on page 27 for more information.
866.ALLWORX * +1 585 421 3850 Page 49
www.allworx.com
Version: H Revised: December 7, 2017
Page 60

Allworx® Verge™ IP Phone Series User Guide
Key Option Key Option
2
Change your name recording
#
Return to previous menu
3
Review your name recording
*
Listen to these choices again
Key Option Key Option
1
Save your name recording
3
Review your name recording
2
Change your name recording
#
Cancel changing your name recording
Key Option Key Option
0
Manage your Default greeting
6
Manage your Away greeting
1
Manage your In Office greeting
7
Manage your Busy greeting
2
Manage your At a Meeting greeting
8
Manage your Reach Link lost connection
greeting
3
Manage your On Vacation greeting
4
Manage your On Business Trip greeting
#
Return to previous menu
5
Manage your At Home greeting
*
Listen to these choices again
Key Option Key Option
1
To change your default greeting
4
To prevent callers from leaving messages
2
To r evi ew i t
#
To return to the previous menu
3
To delete it
*
Listen to these choices again
Key Option Key Option
1
To save your <Presence> greeting
#
To quit without saving your greeting
2
To review your greeting
*
Listen to these choices again
3
To change your greeting
Key Option
2 Change the recording of your name
The Allworx system plays the current name recording for review. Select one of the following options:
If selecting option 2, follow the prompts to record a name, and then press the # key. Select an option:
3 Manage your greetings
The Allworx system plays the current name recording for review. Select one of the following options (NOTE: All
presences that do not have a greeting recorded use the default greeting. To skip the greeting recording, press
#. If there is no previously recorded greeting, only option 1 is available):
• Select an option:
• If changing your default greeting, follow the prompts to record the greeting, and then select an option:
To assist callers, mention in the voicemail greeting if you are unable to take the call. Example: When Mary is on
the road, she records her voicemail greeting: “Hi this is Mary. I am traveling today. If you need to speak to
someone immediately, please dial *100 now to reach Jack (or 0 for the operator), otherwise leave a message at
the beep.” Pause for 3 seconds, and end the greeting.
Page 50 866.ALLWORX * +1 585 421 3850
www.allworx.com
Version: H Revised: December 7, 2017
Page 61

Allworx Verge IP Phone Series User Guide
Key Option
1 To manage the <Auto Attendant> greeting. Enter the greeting number to manage after selecting
the option.
2 To manage the <Auto Attendant> status message.
3 To manage the <Auto Attendant> schedule
A message plays: “The Auto Attendant is using schedule <number>. To select a different schedule,
enter the schedule number followed by #.”
Enter the schedule number, and then enter the # sign. After successfully selecting a different
schedule, the user hears, “The Auto Attendant has been changed to use schedule <number>.” The
Message Center returns to the Manage Auto Attendant Menu.
If selecting a different schedule is unsuccessful, the user hears, “You must enter a valid schedule
number.” The Message Center returns to the Manage Auto Attendant Schedule Menu.
# Return to previous menu.
* Listen to these choices again.
Key Option
5 Change your PIN
• Users have an Allworx PIN and an Allworx password. The PIN is for Hot Desk logins, Message Center, ACD
Queues, and Reach application. The password is for logging into My Allworx Manager, Interact, and the
Allworx Admin page.
• Follow the prompts to enter and confirm a new PIN. Verify the PIN is at least 5 digits long.
# Return to the previous menu.
* Listen to the choices again.
To manage the Call Queues/ACD Queues recordings and schedules:
This option is only available to Allworx Users with recording manager permissions on Allworx systems.
1. Log in to the Audio Message Center and press 9 on the numeric keypad.
2. Select one of the following options.
Key Option
1 To manage the Auto Attendant
• Enter the Auto Attendant number (The number of Auto Attendants supported: 6x12 and Connect 300 series
- 9, 6x and Connect 500 series - 16, 48x and Connect 731 - 32).
Example 1 = Auto Attendant 431 and 32 = Auto Attendant 4332.
• Select the recording type:
866.ALLWORX * +1 585 421 3850 Page 51
www.allworx.com
Version: H Revised: December 7, 2017
Page 62

Allworx® Verge™ IP Phone Series User Guide
Note:
Note:
Note:
Note:
Key Option
1 Save the new system recording.
2 Change the custom message.
3 Review the message.
4 Delete the message.
# To return to the previous menu for all custom recordings except Call Queue status messages. For
Call Queue status messages, press # to cancel changing the message.
* To listen to these choices again
Key Option
1
(con’t)
2 To manage the Call Queue - Follow the steps in To manage the Auto Attendant, except enter the Call Queue
0 For <alternate language>. Changes the language heard for the prompts. Follow the prompts to continue
# To return to the previous menu.
* To listen to these choices again.
• Select an option and follow the prompts:
number (0 through 9) to change.
changing the Allworx system recordings.
4.7 Bluetooth Wireless Technology
The Allworx Server Administrator must enable the Bluetooth option for pairing a Bluetooth device to the
Verge 9312 IP phone.
Bluetooth devices supporting only A2DP Bluetooth profiles (such as tablets) are not supported.
The phone call audio is dependent upon the type of headset and the number devices in the 2.4GHz space.
During an active call, users may experience some noise or drop outs with a Bluetooth headset.
During an active call, Bluetooth users must use the Bluetooth Hands-Free programmable button to migrate the
active call from the Bluetooth smart phone to the Verge IP phone. The Verge IP phone does not accept pushed
audio so that users do not inadvertently send the call to the Verge IP phone while the user is not at the phone.
The Verge 9312 IP phone supports one Bluetooth Hands-Free programmable button. Additionally, the
Verge 9312 IP phone supports connecting both the Headset Profile (naive Bluetooth headsets) and the
Hands-Free Profile (mobile devices); however, use can connect only one device at a time.
If the user wearing a Bluetooth headset moves out of range while on an active call, the Verge 9312 IP
phone automatically places the active call on hold. To retrieve the call, press the Verge 9312 IP phone
call appearance programmable button.
• Headset Profile: conduct an Allworx call using a native Bluetooth headset.
Example: Joe is finishing a call with a supplier on speaker phone, but he needs to get to Room 1
for a meeting. Joe taps the Headset button to transition the audio to the Bluetooth headset. He
finishes the call with his supplier on the way to the room and is on time for his next meeting.
Page 52 866.ALLWORX * +1 585 421 3850
Version: H Revised: December 7, 2017
www.allworx.com
Page 63

Allworx Verge IP Phone Series User Guide
No Bluetooth device paired or
connected.
Bluetooth device connected.
Active Bluetooth call.
Bluetooth device paired but
not connected.
• Hands-free Profile: (requires a Bluetooth programmable button) initiate or answer a call
coming into the mobile device and transition the audio to the Verge 9312 IP phone or vice versa.
When using the Verge IP phone as a hands-free device, the cellular calls remain on the mobile
device service and do not route through the Allworx server. Allworx applications such as View do
not receive information about the calls and, therefore, do not include the calls in the View
reports. Additionally, the Call History feature does not see or display these calls.
Example: Mary is in her car talking to a distributor on her mobile device. Mary gets to work and
walks to her office. Mary taps the Bluetooth Appearance to activate the Verge 9312 IP phone
speaker. The cellular phone call audio transitions from the mobile device to the Verge 9312 IP
phone speaker, and Mary finishes her conversation with the distributor in hands-free mode.
The Verge 9312 IP phone automatically connects to and displays the first paired Bluetooth device from
the list of all discovered and paired devices. If there was a previous, active connection to a Bluetooth
device, the Verge 9312 phone automatically connects to that device, if enabling the device Bluetooth
radio and it is within range. To select a different Bluetooth enabled device:
• Allworx System Software 8.2 - turn off the other Bluetooth devices.
• Allworx System Software 8.3 - scroll and select the preferred Bluetooth device.
To pair and connect Bluetooth enabled devices, see “Bluetooth” on page 65 for more information.
Verge IP phone Bluetooth Hands-Free programmable button examples:
Bluetooth Programmable Button LED
flashing green incoming call or active call on hold.
solid green active call.
866.ALLWORX * +1 585 421 3850 Page 53
www.allworx.com
Version: H Revised: December 7, 2017
Page 64

Allworx® Verge™ IP Phone Series User Guide
Note:
Programmable Button Labels
Press to configure Opens the Bluetooth settings screen for the user to pair and connect a Bluetooth device to the
Verge 9312 IP phone.
<Hands-Free device name> A paired or connected hands-free device to the Verge 9312 IP phone.
The Bluetooth Hands-Free programmable button is not available for use with a mobile device
because a headset is already connected. Indicates a paired and connected Bluetooth enabled
headset. Pressing this programmable button opens the Bluetooth Settings screen to assign a
mobile device to the programmable button. This button does not activate the headset for a call use the Headset function button instead.
Connect (single hands-free
device paired)
Press to connect (multiple
hands-free devices paired)
Paired The Verge 9312 IP phone knows of the Bluetooth enabled devices. Requires the user to select and
Connecting The Verge 9312 IP phone is looking for the paired hands-free device.
Connected User has selected a hands-free device to use OR the Allworx system automatically found and
user had decided to disconnect from the Verge 9312 IP phone or the mobile device, and now
must press the Bluetooth Hands-Free programmable button to reconnect the hands-free device.
connect to the hands-free device.
connected to the preferred hands-free device.
4.8 Dialing Modes
Select how the Verge IP phone places a call using desk phone mode (default) or Cell Phone mode. To
set up the dialing mode, see “Cell Phone Dialing” on page 74.
• Desk Phone Mode - users dial a number and the Verge IP phone automatically places the call. If
users enter a wrong number, hang up and start over.
• Cell Phone Dialing mode - users can edit a number before placing the call, and requires users to
press the send ( ) soft key to place the call.
4.9 Reach Remote Control
Control the Verge IP phone on a Reach device. If an Allworx user has both a Reach device and a Verge
IP phone, the device and the phone automatically link together, and then the Allworx User can use the
Reach application to control the Verge IP phone using a robust user interface, especially if using a
tablet. In this way, the Reach Remote Control enables a desk phone to serve as an executive phone. The
Reach Remote Control feature enables users to answer calls on all appearance types.
The audio still comes to/through the Verge IP phone (headset recommended). The Verge IP phone continues
to respond to phone button presses.
For more information about using Reach Remote Control, see the Reach User Guide Version 3.0 or
higher.
Page 54 866.ALLWORX * +1 585 421 3850
www.allworx.com
Version: H Revised: December 7, 2017
Page 65

Allworx Verge IP Phone Series User Guide
4.10 Electronic Hook Switch (EHS) for Wireless Headsets
Use the call control button on the wireless headset to answer and terminate calls without touching the
Verge IP phone. EHS provides communication between a headset and a phone for call control,
generally used with wireless headsets to answer or hang up calls. The EHS feature enables Allworx users
to remotely receive an indication of an incoming call and tap the headset call control button to: answer
or terminate the call.
All Verge IP phones transmit signaling that is compatible with the Plantronics APD-80 adapter module.
The APD-80 adapter module works with the Plantronics CS500 and Savi 700 Series headsets and
supports full bi-directional EHS with these headsets. Connect the Verge 9312 IP phone to the headset
using the APD-80 adapter, and then enable EHS in the phone settings and disable the headset
sidetone. Allworx phone users can enable or disable the EHS feature on the phone in the Settings >
Phone Preferences > EHS Headset option. Disabled is the default value. If left disabled, the Verge IP
phone has one-way EHS communication.
To manage the Sidetone audio feedback for all headsets (except Bluetooth headsets) and handsets,
navigate to Settings > Phone Preferences > Headset Sidetone option. Enabled is the default value.
4.11 My Allworx Manager
Access the business directory, conference scheduling page, company phone list, distribution lists,
phone features chart, and shared folders. Enter the My Allworx Manager address into a web browser
(e.g. Internet Explorer).
The Allworx Server Administrator provides the address: http://ServerLANAddress, and then enter
the log in username and password. ServerLANAddress is the IP address or domain name of the
Allworx server.
For more information about My Allworx Manager, see the Allworx My Allworx Manager User’s Guide,
available at www.allworx.com.
4.12 Busy Lamp Field (BLF)
Monitor the activity of an Allworx assigned extension or do a quick call/quick transfer to the assigned
extension. If the Allworx User assigned to the BLF programmable button is unavailable, the BLF
programmable button displays the busy status and the call follows the next step in the Call Route.
866.ALLWORX * +1 585 421 3850 Page 55
www.allworx.com
Version: H Revised: December 7, 2017
Page 66

Allworx® Verge™ IP Phone Series User Guide
Active Call (solid)
Incoming Call (flashing)
Idle
Active call, DND Active
Idle, DND Active
Verge IP phone BLF programmable button examples:
Busy Lamp Field Programmable Button LED
off Allworx user is idle.
solid amber Allworx user is idle and has DND active.
solid red Allworx user is on the phone.
flashing red Allworx user has an incoming call.
4.13 Call Supervision
Enable supervisors to monitor Allworx Users handling calls in three modes using one of the modes
assigned to the assigned programmable button. The supervisor can transition between the assigned
mode and the silent monitoring mode by pressing the phone Mute function button. There is no
indication to the Allworx User that Call Supervision is in progress. While in Call Supervision mode, all
call management features (hold, transfer, etc) are available.
• Barge in - after connecting the call, both participants in the call hear the supervisor.
• Whisper - only the Allworx user hears sounds from the supervising phone, not the other
participant. The supervisor cannot initiate two-way communications with the other participant.
• Silent Monitor - Neither party in the call can hear the supervisor.
Page 56 866.ALLWORX * +1 585 421 3850
www.allworx.com
Version: H Revised: December 7, 2017
Page 67

Verge IP phone Call Supervision programmable button example:
Call Supervision Idle Call Supervision Active Call Supervision Toggle
Call Supervision LED Button
solid green call supervision is active.
flashing green call supervisor pressed the hold button to pause the feature.
Allworx Verge IP Phone Series User Guide
To supervise the call:
Press the Call Supervision programmable button, and then enter the agent extension or press the
agent Contact or BLF programmable button. To change the mode during a call, press the MUTE
feature button. Example:
Starting Mode Mute Toggle #1 Mute Toggle #2
Silent Barge In Silent
Whisper Silent Whisper
866.ALLWORX * +1 585 421 3850 Page 57
www.allworx.com
Version: H Revised: December 7, 2017
Page 68

Allworx® Verge™ IP Phone Series User Guide
Emergency Call Active
Information area displays:
• the owner of the phone which
placed the call.
• the station number originating the
emergency call.
• the date/time of the call.
Emergency Call Idle
Emergency Call Idle
Press programmable button to
view last alert.
4.14 Emergency Alert
Receive audible and visual alerts whenever an Allworx User makes an emergency call from any local or
remote phone on the system.
Verge IP phone Emergency Notification example:
Emergency Programmable Button LED
Alternating Red/Yellow emergency alert in progress.
Soft Keys
Silent emergency alert remains active, the LED button continues to flash, but the audio stops.
Clear removes emergency alert from phone screen, the Verge IP phone returns to idle status.
Pressing the programmable button:
• during an active alert - acknowledges the alert, silences the alert tone, and removes the alert
information from the display screen.
• during an inactive alert - retrieves the information from the last alert stored on the phone. Press
the programmable button again to close the alert and return to the idle screen.
When rebooting the Verge IP phone, the phone clears the stored alert details from the phone.
Page 58 866.ALLWORX * +1 585 421 3850
www.allworx.com
Version: H Revised: December 7, 2017
Page 69

Allworx Verge IP Phone Series User Guide
Ta rg et Ac ti ve
Target Idle
Push To Talk Active
Information area displays:
• the recipient of the Push To Talk
• contact image with Allworx badge
• status of the Push To Talk feature (READY TO TALK)
• contact name / number
• Push To Talk duration
4.15 Push To Talk
A one-way, walkie-talkie-like capability programmable button to a specific phone extension. To use the
Push to Talk feature, press and hold the programmable button, and then begin speaking. To respond,
the recipient must place a call back to the originator.
Verge IP phone Push to Talk Button example:
Push to Talk Programmable Button LED
Green Target phone extension is active during Push to Talk.
Soft Keys
Park place the call on the lowest available parking orbit. See “
Conference create a conference call. See “
Handoff transition the call to a Reach device (if available). See “
866.ALLWORX * +1 585 421 3850 Page 59
www.allworx.com
Version: H Revised: December 7, 2017
Park a Call/Park Monitor” on page 18 for
more information.
Conference Call” on page 23 for more information.
Call Handoff” on page 28 for more
information.
Page 70

Allworx® Verge™ IP Phone Series User Guide
Note:
Press the Hot Desk
programmable
button, if available.
Enter the user extension
and Allworx PIN. Press
Done.
Verge IP phon e
updates per the Hot
Desk request.
Allworx user is hot
desked to Verge IP
phone.
4.16 Hot Desk
Users can temporarily log in to a shared phone, and then the Allworx system directs the calls to the
shared phone and users can place outgoing calls using the updated caller ID. Users can initiate the
login using a Hot Desk button, if a Hot Desk programmable button is available or by selecting the Hot
Desk Login option from the Verge IP phone Settings menu.
The buttons configured on the Verge IP phones do not change when a new user logs in.
To Hot Desk into another phone:
1. Do one of the following to access the Hot Desk log in screen:
• Press the Hot Desk programmable button, if available.
• Press the More ( ) function button, and then the Settings soft key. Use the up or down
navigation and the Select buttons to choose the Hot Desk setting.
2. Enter the Allworx assigned extension and PIN number in the respective fields.
3. Press the Done soft key. To reenter the extension, press the Clear soft key. The Verge IP phone
displays the presence and the caller ID name/number on the phone screen.
Hot Desk Programmable Button LED
solid red phone is available for Hot Desk log in.
not lit Hot Desk feature is in use.
Page 60 866.ALLWORX * +1 585 421 3850
www.allworx.com
Version: H Revised: December 7, 2017
Page 71

Allworx Verge IP Phone Series User Guide
Press the Hot Desk
programmable
button, if available
Press the Logout soft
key.
Verge IP phone
updates Hot Desk
request.
Allworx user is no
longer hot desked to
Verge IP phone.
To log out of the Hot Desk feature:
1. Follow the steps above to access the Hot Desk Login option.
2. Press the Logout soft key. The Verge IP phone returns to the original state.
4.17 Schedule
A schedule consists of defined daily periods, associated day/night modes, and Auto Attendant
greetings. Schedules play the appropriate greetings of the Auto Attendants based on the time of day
and switching between day and night modes for call routes of system extensions. Verge IP phone users
can adjust the day/night mode to use and the greeting to play.
The programmable button displays:
• an icon to indicate day or night mode.
• the current schedule in use, as defined by the Allworx Server Administrator.
• the current greeting in use.
866.ALLWORX * +1 585 421 3850 Page 61
www.allworx.com
Version: H Revised: December 7, 2017
Page 72

Allworx® Verge™ IP Phone Series User Guide
Schedule: Default
Mode: Day
Greeting: Open
Schedule: Default
Mode: Night
Greeting: Closed
Schedule: Default
Mode: Day
Greeting: Weekend
Schedule programmable button examples:
Schedule LED Programmable Button
Solid amber Night mode is active.
Soft Keys Available
Cancel Returns to the idle screen.
Options Opens the Default screen to manage the mode and greeting in use.
OK Accepts the mode and greeting in use changes. The Verge IP phone reboots.
Back Returns to the previous screen.
To change the day/night mode or greeting options:
1. Press the Schedule programmable button. The default screen displays.
2. Do one of the following:
• Press the OK soft key to update to the New Settings on the Default screen. The Verge IP
phone reboots with the updated settings.
• Press the Options soft key. Use the up/down navigation buttons to highlight the setting,
and then press the Select button.
• Day/Night Mode - overrides the Allworx server defined schedule and changes the mode
to day or night. If selecting Night Mode, the programmable button LED is solid amber.
• Greetings - selects which greeting for the Auto Attendant to play.
Use the up/down navigation buttons to highlight the option to use, and then press the Select
(twice) > Back > OK. The Verge IP phone reboots with the updated selections.
Page 62 866.ALLWORX * +1 585 421 3850
www.allworx.com
Version: H Revised: December 7, 2017
Page 73

Allworx Verge IP Phone Series User Guide
Press the Schedule
programmable button.
The current/new settings
display. Press the OK soft key.
Phone reboots with the new
settings.
Option A
Option B
Press the Schedule
programmable button.
The current/new settings
display. Press the Options soft
key.
The Schedule Options screen
displays.
Highlight and select the mode to
use. Press the Back soft key.
866.ALLWORX * +1 585 421 3850 Page 63
www.allworx.com
Version: H Revised: December 7, 2017
Page 74

Allworx® Verge™ IP Phone Series User Guide
Highlight and select the
greeting to use. Press the Back
soft key.
The Schedule Options screen
displays. Press the OK soft key.
The Schedule Options screen
displays. Highlight and select the
Greetings option.
Page 64 866.ALLWORX * +1 585 421 3850
www.allworx.com
Version: H Revised: December 7, 2017
Page 75

Allworx Verge IP Phone Series User Guide
Note:
Note:
Note:
Note:
Chapter 5 Settings
The Settings soft key accesses the following features to configure the phone:
• Bluetooth • About this Phone • Reboot Phones
• Hot Desk Login • Phone Preferences • Ring Type Families
• Network Profiles • Programmable Buttons
Use the following controls while navigating the main phone configuration screen:
• LEFT navigation button or Back soft key - exits the menu
• RIGHT navigation button or Select soft key - saves the currently highlighted setting and exits the
menu.
• UP navigation button - moves up one entry in the list.
• DOWN navigation button - moves down one entry in the list.
• Admin soft key - access the Phone Administration page. Requires the Phone Admin Password.
To access the setting options:
1. Press the More ( ) function button, and then press the Settings soft key.
2. Press the up or down navigation button and highlight the setting, and then press the Select
button to choose the setting.
5.1 Bluetooth
Pair and connect Bluetooth enabled devices to the Verge 9312 IP phone only. The Allworx system
supports Bluetooth standard 4.0, class 1. If the Allworx Administrator has disabled the Bluetooth feature,
a message displays.
The Allworx Server Administrator must enable the Bluetooth option in the Handset Preference Group settings
to enable pairing a Bluetooth device to the Verge 9312 IP phone.
To pair a Bluetooth smart phone requires a Bluetooth Appearance programmable button.
Bluetooth devices supporting only A2DP Bluetooth profiles (such as tablets) are not supported.
Headsets: The quality of call audio is dependent upon the type of headset and the number of other devices in
the 2.4gHz space. Therefore, during an active call, users may experience some noise or drop outs when using a
Bluetooth headset.
866.ALLWORX * +1 585 421 3850 Page 65
www.allworx.com
Version: H Revised: December 7, 2017
Page 76

Allworx® Verge™ IP Phone Series User Guide
Note:
Note:
To pair Bluetooth mobile device or headset:
The Bluetooth Hands-Free programmable button only supports a mobile device. If pairing a Bluetooth headset,
use the Headset function button to manage calls.
The Verge 9312 IP phone supports only one Bluetooth Hands-Free programmable button assignment.
1. Do one of the following:
• Follow the steps in “To access the setting options:” on page 65. Open Bluetooth.
• Locate and press the Bluetooth programmable button.
2. Press the Turn o n soft key.
• The Verge IP phone displays a list of previously paired/connected Bluetooth devices (if
available), and an icon displays next to the connected device (if connected).
• To search for additional, unpaired Bluetooth devices, press the Scan soft key. To turn the
Verge 9312 IP phone Bluetooth radio off, press the Turn off soft key.
3. Press the up/down navigation buttons to highlight the Bluetooth device, and then press the
Select button to connect the Bluetooth device to the Verge 9312 IP phone. If connecting a
mobile device, accept the request on the Bluetooth mobile device.
4. Press the Yes soft key on the Verge 9312 IP phone. For mobile devices only:
If a Bluetooth Hands-Free programmable button is assigned, the Verge 9312 IP phone connects
the mobile device automatically for Call Audio. The programmable button is ready for use.
If a Bluetooth Hands-Free programmable button is not assigned, the Verge 9312 IP phone
displays a message to program a Bluetooth Hands-Free programmable button. Press one of the
following soft keys:
• Now - opens the Select a button to program screen.To assign a Bluetooth Hands-Free
programmable button:
• Press an available programmable button, and then press the Apply soft key.
• Press the Reboot soft key to save the programmable button assignment.
• Later - returns to the Bluetooth settings screen. The Bluetooth enabled device is
unavailable for use until a programmable button is assigned. Select one of the following:
• Back soft key - to return to the Settings screen.
• Select button - to manage the paired device details.
If the user returns to a Bluetooth Hands-Free screen later, the Verge 9312 IP phone
prompts the user again to assign the Bluetooth Hands-Free programmable button.
Page 66 866.ALLWORX * +1 585 421 3850
www.allworx.com
Version: H Revised: December 7, 2017
Page 77

Allworx Verge IP Phone Series User Guide
Press the Tur n on soft key,
and then the Scan soft key.
Highlight and select the
Bluetooth device.
Accept the request on the
Bluetooth mobile device.
Press Yes to pair the devices. Verge 9312 IP phone paired.
Android mobile device paired.
Verge 9312 IP phone Bluetooth mobile device configuration and Bluetooth Hands-Free
programmable button available example:
866.ALLWORX * +1 585 421 3850 Page 67
www.allworx.com
Version: H Revised: December 7, 2017
Page 78

Allworx® Verge™ IP Phone Series User Guide
Press the Tur n on soft key,
and then the Scan soft key.
Highlight and select the
Bluetooth device.
Accept the request on the
Bluetooth mobile device.
Press Yes to pair the devices. Assign an available
programmable button.
Reboot the Verge 9312 IP
Phone
Press Now to assign a
programmable button.
Verge 9312 IP phone Bluetooth mobile device configuration and assigning a Bluetooth
Hands-Free programmable button example:
Page 68 866.ALLWORX * +1 585 421 3850
www.allworx.com
Version: H Revised: December 7, 2017
Page 79

Allworx Verge IP Phone Series User Guide
Press the Tur n on soft key,
and then the Scan soft key.
Highlight and select the
Bluetooth device.
Accept the request on the
Bluetooth mobile device.
Press Yes to pair the devices.
Press Back to return to the
main Settings Screen or
Select button to manage the
Paired Device Details.
Press Later to assign a
programmable button.
Verge 9312 IP phone Bluetooth mobile device configuration and later assigning a Bluetooth
Hands-Free programmable button example:
866.ALLWORX * +1 585 421 3850 Page 69
www.allworx.com
Version: H Revised: December 7, 2017
Page 80

Allworx® Verge™ IP Phone Series User Guide
Press the Bluetooth Hands-Free
programmable button.
Press the Turn on soft key,
and then the Scan soft key.
Highlight and select the
Bluetooth device.
NOTE: if selecting a headset,
the Bluetooth headset uses
the Headset Function Key.
Verge 9312 IP phone Bluetooth headset example:
To manage the paired devices:
1. Follow the steps in “To access the setting options:” on page 65. Open Bluetooth.
2. Use the navigation and select buttons to highlight and select the device to manage.
3. Select one of the following options:
• Back - returns to the previous screen. If a Bluetooth Hands-Free programmable button is
not assigned, the Needs Hands-Free Button screen displays.
• Connect – the paired Bluetooth device is not currently connected with the Verge 9312 IP
phone for call audio. Press to connect the Bluetooth device to the Verge 9312 IP phone
and automatically disconnect the previously connected device.
• Disconnect – the paired Bluetooth device is currently connected with the Verge 9312 IP
phone for call audio. Press to disconnect the Bluetooth device from the Verge 9312 IP
phone. If another Bluetooth device is paired withe Verge 9312 IP phone, it may
automatically connect. The disconnected Bluetooth device remains in the paired devices
listings.
When selecting the Back, Connect, or Disconnect soft key, the Verge 9312 IP phone
returns to the Bluetooth listings.
Page 70 866.ALLWORX * +1 585 421 3850
www.allworx.com
Version: H Revised: December 7, 2017
Page 81

Allworx Verge IP Phone Series User Guide
Highlight and select device
to manage.
Press the Connect soft key.
Option 1: No Bluetooth
Hands-Free programmable
button is available. Assign a
programmable button first.
Option 2: Device Connects to
the Verge 9312 IP phone and
is ready for use.
• Forget – (existing) removes the Bluetooth device from the connected/paired devices list.
After the Verge 9312 IP phone forgets the current device one of the following happens:
• No other paired devices - the Verge 9312 IP phone is ready to scan for other
Bluetooth enabled devices.
• One or more paired Bluetooth enabled devices available - the Verge 9312 IP phone
automatically connects to the next available paired device in the Bluetooth device
listings, if the Bluetooth Hands-Free programmable button is available.
Verge 9312 IP phone Bluetooth Paired Device Details Connect management example:
866.ALLWORX * +1 585 421 3850 Page 71
www.allworx.com
Version: H Revised: December 7, 2017
Page 82

Allworx® Verge™ IP Phone Series User Guide
Highlight and select device
to manage.
Press the Disconnect soft key.
Device call audio status
changed to: Paired for Call
Audio. Device will not work
until reconnected.
Highlight and select device
to manage.
Press the Forget soft key.
Option 1: No other Bluetooth
enabled devices paired. The
Verge 9312 IP phone is ready
to scan for more devices.
Option 2: Next device in
listing automatically Connects
and is ready for use.
Verge 9312 IP phone Bluetooth Paired Device Details Disconnect management example:
Verge 9312 IP phone Bluetooth Paired Device Details Forget management examples:
Page 72 866.ALLWORX * +1 585 421 3850
www.allworx.com
Version: H Revised: December 7, 2017
Page 83

Allworx Verge IP Phone Series User Guide
5.2 Hot Desk Login
Enables users to hot desk into the Verge IP phone. See “Hot Desk” on page 60 for more information.
5.3 Network Profiles
The Verge IP phone stores Network Profiles, which are network and registration settings. Users can
select a Network Profile for use during different situations. Usage examples include connecting to a
second Allworx server for disaster recovery purposes or temporarily connecting to the Allworx server
from home. This avoids the need to manually change the individual network settings on the phone.
To change the Network Profile:
1. Follow the steps in “To access the setting options:” on page 65. Open Network Profiles.
2. Use the up/down navigation buttons and the Select button to highlight and choose the network
profile setting to use, or press one of the available soft keys to:
Back return to the previous screen.
View see the network profile details.
Use update the phone to the selected network profile.
5.4 Phone Preferences
1. Follow the steps in “To access the setting options:” on page 65. Open Phone Preferences.
2. Use the navigation button to highlight the setting and the Select button to choose the
preference setting, and then choose the preference setting option:
Setting Description Options
BUTTONS AND INDICATORS
Messages Button set the MESSAGE button function.
Visual On Call enable the phone visual ring indicator to light solid red for
an active call.
Visual Ringing enable the phone visual ring indicator to flash red for an
incoming call.
CALL HANDLING
Auto Answer answer incoming calls automatically.
Auto on Hold place the current call on hold automatically when
answering an incoming call.
Auto Retrieve
Calls
retrieve the on hold call or parked call alert automatically
when taking handset off hook.
• Call Message Center
• Displays Message List (default)
• Disabled
• Enabled (default)
• Disabled
• Enabled (default)
• Disabled (default)
• Enabled
• Disabled
• Enabled (default)
• Disabled (default)
• Enabled
866.ALLWORX * +1 585 421 3850 Page 73
www.allworx.com
Version: H Revised: December 7, 2017
Page 84

Allworx® Verge™ IP Phone Series User Guide
Setting Description Options
Caller ID Preference (Calling Party Caller ID) display the call information the
Verge IP phone using the Allworx TSP driver.
Interact Caller ID
Preference
Intercom Auto
Answer
Off Hook Auto
Answer
Off Hook Ringing enable the phone to ring when receiving a new call while
Pages Received enable the phone to receive pages.
CALL TRACKING
Call History Size adjust the number of calls kept in the History. 0 to 200 (Default: 99)
Missed Call
Tracking
Redial Memory store the last user extension or external number dialed by
(Calling Party Caller ID) display the call information in
Interact/Interact Professional and applications using the
Allworx TSP driver.
automatically answer an incoming intercom call using
Intercom/Speaker phone.
answer incoming calls when taking the phone off the
hook.
in use.
track missed call appearances.
the Verge IP phone.
• DNIS Information
• Calling Party Info (default)
• Calling Party Info
• DNIS Information (default)
• Disabled
• Enabled (default)
• Disabled
• Enabled (default)
• Disabled (default)
• Enabled
• Always
• Never
• Only while on hook (default)
• None
• Call Appearances only (default)
• All Appearance types
• Enabled (default)
• Disabled
DIALING
Audible Dialing hear tones when pressing a key.
Cell Phone Dialing no attempt to interpret the entered digits nor initiate the
call until the user presses “Send”. This mode is not
available with Line Appearance calls.
On Hook Dialing enable speaker mode when pressing a number on the
keypad without pressing the SPEAKER button first.
DISPLAY
Call Timer Display display the length of a phone call.
Clock Mode display the time mode format on the phone screen.
Contact Sort Order order for displaying the contacts.
Display Brightness adjust the phone screen display contrast and brightness
settings.
• Disabled
• Enabled (default)
• Disabled (default)
• Enabled
• Disabled
• Enabled (default)
• Disabled
• Enabled (default)
• Off
• 12 Hour (default)
• 24 Hour
• Last Name, First Name (default)
• First Name, Last Name
Adjust the slider bar to preferred
brightness. (default: 50%)
Press the Select button to move
back one screen.
Page 74 866.ALLWORX * +1 585 421 3850
www.allworx.com
Version: H Revised: December 7, 2017
Page 85

Allworx Verge IP Phone Series User Guide
Setting Description Options
Sleep Mode Timer amount of time the Verge IP phone remains idle before the
Idle Mode Behavior is active.
Personal Contacts access controls for Personal Contacts:
• Unrestricted – Contact matches are displayed and
require phone log in to view or modify details. Log in is
valid until the user leaves the Contacts screen. The
unlocked icon is on the Verge IP phone status bar only
when the user logs in via the Contacts screen.
• Restricted - Contact matches are displayed and after
authentication via soft key to see personal contacts
including Contact programmable buttons. Log in is valid
until user logs out via soft button on Contacts screen or
automatically logged out when the phone is rebooted
or enters Sleep mode. Contact lock status always
displays on the Verge IP phone status bar.
NETWORK AND CONNECTIONS
Server Network
Profile
SOUNDS AND NOTIFICATIONS
EHS Headset control the EHS headset activation control.
Handset Sidetone control the handset microphone feedback to the speaker.
control the network settings used on the phone.
Enter a number from 1 to 720
minutes. (default: 10 minutes)
• Unrestricted (default)
• Restricted
• User Server Selection
• Ignore Server Selection (default)
• Disabled (default)
• Enabled
• Disabled
• Enabled (default)
Headset
Microphone
Headset Sidetone control the headset microphone feedback to the speaker.
Hold Reminder
Mode
Hold Reminder
Timeout
Volume adjust the phone feature volumes in one menu. Adjust the slider bar to preferred
adjust the volume level of the headset. Adjust the slider bar to preferred
set the hold reminder functionality.
specifies a length of time a call is on hold before
triggering the reminder.
3. Press the Back soft key to return to the Settings menu.
volume. (default: 50%)
Press the Select button to move
back one screen.
• Disabled
• Enabled (default)
• No Reminder
• On Hook
• Timer (default)
• On Hook and Timer
Enter a number from 1 to 600
seconds. (default: 120 seconds)
volume. (default: 50%)
Press the Select button to move
back one screen.
866.ALLWORX * +1 585 421 3850 Page 75
www.allworx.com
Version: H Revised: December 7, 2017
Page 86

Allworx® Verge™ IP Phone Series User Guide
5.5 Programmable Buttons
Assign a feature (Contact, Park, Redial, Release, Hot Desk Login, or Bluetooth Hands-Free) to an
available programmable button on the Verge IP phone. Contact the Allworx System Administrator for
permissions.
The Allworx server administrator can program all other function functions and has the final control of
all programmable buttons.
To manage the Programmable Buttons assignments:
1. Follow the steps in “To access the setting options:” on page 65. Open Programmable Buttons.
Shortcut: Press an unassigned programmable button LED. The Button Programming screen
displays. Press the Yes soft key.
2. Select the programmable button to configure. The Select function screen displays. The
available programmable button types are:
• Contact
• If the contact has one phone number, the programmable button displays the full
contact name.
• If the contact has multiple phone numbers, the programmable button displays the
abbreviated Contact name and selected number label (i.e., work, mobile, etc).
• If the Allworx user changes the select default number to dial, the programmable
button updates to call updated the phone number.
•Park
•Redial
• Release
• Flash - Centrex Flash signaling on CO lines
•Hot Desk Login
• Bluetooth Hands-Free
• DND (Do Not Disturb)
• None - removes the programmable button assignment
3. Press the up and down navigation buttons to select the programmable button function. Press
the Select button.
For the Contacts programmable button: follow the on screen prompts to set up the button using
the up and down navigation buttons and with the Select button. Repeat for each available
programmable button, as necessary.
4. Press the Apply soft key, and then press the Yes soft key. This reboots the Verge IP phone, and
then phone screen displays the updated programmable buttons.
Page 76 866.ALLWORX * +1 585 421 3850
www.allworx.com
Version: H Revised: December 7, 2017
Page 87

Verge IP phone Programmable Button configuration examples:
Press the Settings soft key, and
then select Programmable
Buttons.
Press an available
programmable button LED.
Select the programmable button
type.
Press the Apply soft key.
Press the Yes soft key.
The Verge IP phone restarts with
the updated programmable
button.
Allworx Verge IP Phone Series User Guide
866.ALLWORX * +1 585 421 3850 Page 77
www.allworx.com
Version: H Revised: December 7, 2017
Page 88
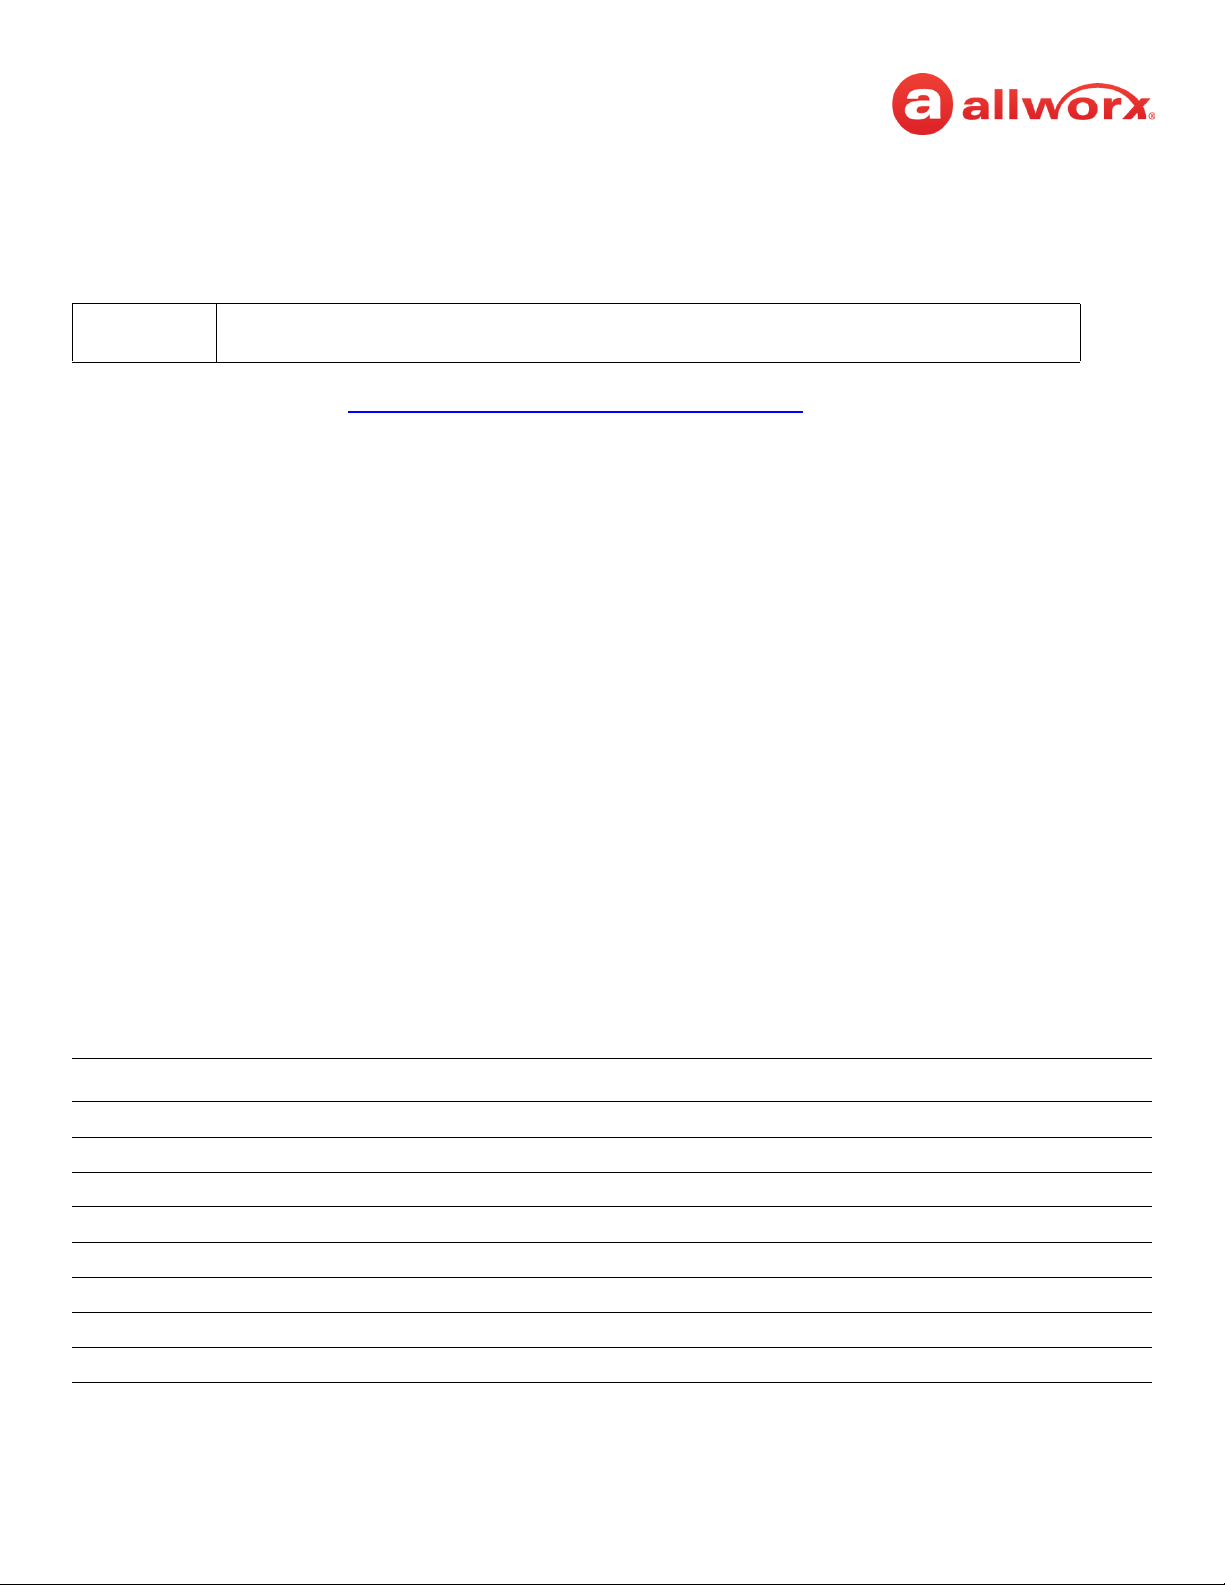
Allworx® Verge™ IP Phone Series User Guide
Note:
5.6 Reboot Phone
On occasion, it may be necessary to reboot the phone. For example, when the Allworx Server
Administrator makes changes to the phone configuration.
Do not reboot the phone unless instructed to do so by the Allworx Server Administrator or when
indicated while changing the phone configuration.
1. Follow the steps in “To access the setting options:” on page 65. Open Reboot Phone.
2. Select the Yes soft key on the confirmation prompt to reboot.
5.7 Ring Type Families
Ring Types
Enable phones connected to the Allworx server to be set to ring with different patterns and tones to:
• Differentiate between incoming internal calls and incoming external calls.
• Identify calls from a specific caller ID.
• Differentiate between the lines for the incoming call (including calls on certain Call Appearances,
Line Appearances, or ACD queues).
• Help multiple users in a shared space identify which phone is ringing.
Ring Type Family
A group of ring types of the same frequency (default is Family 6). The Allworx system provides eight
Ring Type Families with eight Ring Types within each family. The Allworx Server Administrator chooses
the Ring Type used on the phones in the extension and programmable button definitions. Verge IP
phone users can choose the family from which the selected Ring Types. The appearance programmable
button Ring Type setting overrides any call route specific Ring Type choices unless the appearance
programmable button Ring Type is set to Auto.
Family Frequency Range of Pitches A through D
Family 1 Default Frequencies
Family 2 Middle Frequencies
Family 3 High Frequencies
Family 4 Very High Frequencies
Family 5 Varying Frequencies
Family 6 Recorded ring types with a melodic theme
Family 7 Recorded ring types with a modern theme
Family 8 Recorded ring types with a traditional theme
Page 78 866.ALLWORX * +1 585 421 3850
www.allworx.com
Version: H Revised: December 7, 2017
Page 89

Allworx Verge IP Phone Series User Guide
To set the Ring Type Family:
1. Follow the steps in “To access the setting options:” on page 65. Open Ring Type Families.
2. Use the up and down navigation buttons to highlight the Ring Type Family.
Verge IP phone Ring Type Families selection example:
3. Press one of the following:
• a soft key to:
Back displays the Settings menu on the Verge IP phone screen.
Test displays the selected Ring Type information. Select from the following soft keys:
• Cancel - returns to the Ring Type main screen.
• Continue - popup message displays to Contact the Administrator to use a specific Ring
Type from the selected family.
• Play - provides an audio tone sample of the Ring Type Family.
• Stop - discontinues the audio tone sample of the Ring Type Family.
• Next - scroll through the ring types.
•the Select button to accept the Ring Type Family and return to the Settings menu.
866.ALLWORX * +1 585 421 3850 Page 79
www.allworx.com
Version: H Revised: December 7, 2017
Page 90

Allworx® Verge™ IP Phone Series User Guide
Note:
5.8 About this Phone
Displays a read-only set of status information regarding the current phone configuration and
information. Users cannot change any of the information.
1. Follow the steps in “To access the setting options:” on page 65 and open About this Phone.
2. Use the up and down navigation buttons to scroll through the available information.
5.9 Admin Soft Key
When entering an IP Address, use the keypad * button to enter the period between the octet digits.
To configure the Phone Administration options:
1. Follow the steps in “To access the setting options:” on page 65. Press the Admin soft key, and
then enter the Phone Admin Password. Press the Select button.
2. Use the navigation buttons and the Select button to choose the preference setting, and then
choose the preference setting option:
• Network Settings - configure the network settings associated with the phone. Phone
Admins cannot change the setting options with a vertical bar. The table below indicates
the option available for each setting. Press the Archive soft key to save the new settings.
• Factory Reset Phone - Restore the phone factory settings, and then reboot the
telephone to the new settings. Press the appropriate soft key to continue.
Network Settings
IP CONFIGURATION
DHCP
SERVICES
Boot Server enter the Boot Server IP number or press the Use Domain soft key
Contact Server enter the Contact Server IP number
SNTP Time Server enter the SNTP Time Server IP number
Auto NAT
• Disabled
• Enabled (default)
• On
• Off (default)
Plug and Play Key enter the Plug and Play Key
Page 80 866.ALLWORX * +1 585 421 3850
www.allworx.com
Version: H Revised: December 7, 2017
Page 91

VLAN CONFIGURATION
VLAN Mode
SWITCH CONFIGURATION
PC Port
Port Mirror
Allworx Verge IP Phone Series User Guide
• Auto
• LLDP
• CDP
• Manual
• Disabled (default)
• Disabled
• Enabled (default)
• Disabled (default)
• LAN Port
• CPU Port
866.ALLWORX * +1 585 421 3850 Page 81
www.allworx.com
Version: H Revised: December 7, 2017
Page 92

Allworx® Verge™ IP Phone Series User Guide
Page 82 866.ALLWORX * +1 585 421 3850
www.allworx.com
Version: H Revised: December 7, 2017
Page 93

Allworx Verge IP Phone Series User Guide
Chapter 6 Regulatory Notices
This equipment has been tested and found to comply with the limits for a Class B digital device,
pursuant to Part 15 of the FCC rules. These limits are designed to provide reasonable protection
against harmful interference in a residential installation. This equipment generates, uses, and can
radiate radio frequency energy and, if not installed and used in accordance with the instructions, may
cause harmful interference to radio communications. However, there is no guarantee that interference
will not occur in a particular installation. If this equipment does cause harmful interference to radio or
television reception, which can be determined by turning the equipment off and on, the user is
encouraged to try to correct the interference by one or more of the following measures:
• Reorient or relocate the receiving antenna.
• Increase the separation between the equipment and the receiver.
• Connect the equipment into an outlet on a circuit different from that to which the receiver is
connected.
• Consult the dealer or an experienced radio/TV technician for help.
FCC Caution: Any changes or modifications not expressly approved by the party responsible for
compliance could void the user’s authority to operate this equipment.
This device complies with Part 15 of the FCC rules. Operation is subject to the following two conditions:
(1) This device may not cause harmful interference, and (2) this device must accept any interference
received, including interface that may cause undesired operation.
This product adheres to the IEEE 802.3af standard for Power over Ethernet (PoE).
This equipment is Hearing Aid Compatible (HAC).
This device complies with Part 15 of the FCC rules. Operation is subject to the following two conditions:
(1) This device may not cause harmful interference, and (2) this device must accept any interference
received, including interface that may cause undesired operation.
Important Note:
FCC Radiation Exposure Statement:
This equipment complies with FCC radiation exposure limits set forth for an uncontrolled environment.
This equipment should be installed and operated with minimum distance 20 cm between the product
and your body.
866.ALLWORX * +1 585 421 3850 Page 83
www.allworx.com
Version: H Revised: December 7, 2017
Page 94

Allworx® Verge™ IP Phone Series User Guide
Warning:
Caution:
Industry Canada Statement
This digital apparatus does not exceed the Class B limits for radio noise emissions from digital
apparatus set out in the Radio Interference Regulations of the Canadian Department of
Communications.
This device complies with Industry Canada license-exempt RSS standard(2). Operation is subject to the
following two conditions:
1. this device may not cause interference, and
2. this device must accept any interference, including interference that may cause undesired
operation of the device.
Le présent appareil est conforme aux CNR d’Industrie Canada applicables aux appareils radio exempts
de licence. L’exploitation est autorisée aux deux conditions suivantes :
1. l’appareil ne doit pas produire de brouillage, et
2. l’utilisateur de l’appareil doit accepter tout brouillage radioeléctrique subi, même si le brouillage
est susceptible d’en compromettre le fonctionnement.
Radiation Exposure Statement:
This product complies with the Canada portable RF exposure limit set forth for an uncontrolled
environment and are safe for intended operation as described in this manual. The further RF exposure
reduction can be achieved if the product can be kept as far as possible from the user body.
Déclaration d’exposition aux radiations:
Le produit est conforme aux limites d’exposition pour les appareils portables RF pour le Etats-Unis et le
Canada établies pour un environnement non contrôle. Le produit est sûr pour un fonctionnement tel
que décrit dans ce manuel. La réduction aux expositions RF peut être augmentée si l’appareil peut être
conservé aussi loin que possible du corps de l’utilisateur.
For use only with the Verge 9312 IP phone.
(Optional): An Allworx-approved Limited Power Source, 24 VDC, 400 mA or higher – The optional wall
mount switching Power Supply has the following specifications: Input Voltage is 100-240VAC, 50/60Hz,
450mA. Output voltage is 24VDC @ 400mA or higher. UL Listed Limited Power Source. Output connector
size is 5.5 mm x 2.5 mm (inner diameter) x 9.5 mm with center positive.
The ear piece region on the handset can attract and retain small objects.
Page 84 866.ALLWORX * +1 585 421 3850
www.allworx.com
Version: H Revised: December 7, 2017
Page 95

Appendix A Icons
The Verge IP phone series uses the following icons:
Contacts Visual or Audio Voicemail
Presence / DND Intercom
Transfer Hold
Mute Headset
Speaker Phone More soft key options available
Allworx Verge IP Phone Series User Guide
Contacts locked. Contacts unlocked.
Bluetooth disconnected. Bluetooth connected.
Do Not Disturb activated. Reach Remote Control, Interact, or
Allworx TAPI is connected and
controlling the Verge IP phone.
Presence - On Vacation. Presence - On Business Trip.
Presence - Away. Presence - Busy.
Presence - At A Meeting. Presence - At Home.
Allworx User and System Contact
badge.
Allworx System Contact - example:
conference room.
Allworx System Contact - Door Relay. Allworx System Contact - Conference
Allworx User Contact avatar, if no
image is available.
Allworx System Contact - Auto
Attendant.
Center.
866.ALLWORX * +1 585 421 3850 Page 85
www.allworx.com
Version: H Revised: December 7, 2017
Page 96

Allworx® Verge™ IP Phone Series User Guide
Allworx System Contact - Email Alias
(only available in Visual Voice Mail
Center)
Personal Contact or incoming caller
avatar, if no image is available.
Messages Available. Missed Calls
Number of missed calls and/or
messages badge.
Call Status - Incoming call Call Status - Outgoing, no answer
Call Status - Incoming, missed call Appearance is idle
User Contact has DND activated or
only agent logged in the ACD Queue
User Contact or appearance is active
on another phone, agent not logged
In, or Hot Desk log in is available
Schedule - Night Mode active. Schedule - Day Mode active.
Allworx System Contact - Message
Center (Voicemail).
Allworx Public Contact avatar.
Call Status - Outgoing call
Appearance is ringing (blinking) or
appearance is active (solid)
Allworx User Contact has Do Not
Disturb activated.
Line Appearance - Call parked. Messages button
Shared Call Appearance - Shared Hold. Shared Call Appearance - Bridged
Hold.
Manage Contact Status - Make contact
a favorite
Bluetooth - smart phone connected Bluetooth - headset connected
Soft Key - Cell Phone Dialing (if
enabled)
Manage Contact Status - Remove
contact favorite
Phone registration error. Contact
Allworx Server Administrator.
Page 86 866.ALLWORX * +1 585 421 3850
www.allworx.com
Version: H Revised: December 7, 2017
Page 97

Allworx Verge IP Phone Series User Guide
Appendix B Phone Keypad Presses
Enter the following characters into the contact text fields when cycling though the applicable keypad
presses:
Keypad Press Available Characters
1 1 ; < = > ? @ [ \ ] ^ _ ` { | } ~
2 a b c A B C 2
3 d e f D E F 3
4 g h i G H I 4
5 j k l J K L 5
6 m n o M N O 6
7 p q r s P Q R S 7
8 t u v T U V 8
9 w x y z W X Y Z 9
0 0 ! " # $ % & \ ' ( ) * + , - . / :
#<space> #
**
A1-FF from document http://www.unicode.org/charts/PDF/U0080.pdf (pages 3-6).
866.ALLWORX * +1 585 421 3850 Page 87
www.allworx.com
Version: H Revised: December 7, 2017
Page 98

Allworx® Verge™ IP Phone Series User Guide
Page 88 866.ALLWORX * +1 585 421 3850
www.allworx.com
Version: H Revised: December 7, 2017
Page 99

Page 100

Toll Free 866.ALLWORX • +1 585 421 3850
www.allworx.com
Version: H Revised: December 7, 2017
 Loading...