Allworx 9212 User Manual

Allworx®
Phone Model 9212/9212L User Guide
Updated May 21, 2014

Allworx® Phone Model 9212/9212L User Guide

Allworx Phone Model 9212/9212L User Guide
©2014 Allworx Corp, a Windstream company. All rights reserved. No part of this publication may be reproduced, stored in a retrieval system, or transmitted, in any form or by any means, electronic, mechanical, photocopy, recording, or otherwise without the prior written permission of Allworx Corp.
Software in this product is Copyright 2014 Allworx Corp, a Windstream company, or its vendors. All rights are reserved. The software is protected by United States of America copyright laws and international treaty provisions applicable worldwide. Under such laws, the licensee is entitled to use the copy of the software incorporated with the instrument as intended in the operation of the product in which it is embedded. The software may not be copied, decompiled, reverse-engineered, disassembled, or otherwise reduced to human-perceivable form. This is not the sale of the software or any copy of the software; all right, title, ownership of the software remains with Allworx or its vendors.
Page ii |
+1 866 ALLWORX * +1 585 421 3850 |
|
www.allworx.com |
|
Revised: 5/21/14 |

Allworx Phone Model 9212/9212L User Guide
Contents
Introduction .......................................................................................... |
1 |
Setup ..................................................................................................... |
3 |
Connect the Phone ......................................................................................... |
3 |
Adjust the Phone Angle ................................................................................... |
5 |
Volume Adjustment ......................................................................................... |
5 |
Wall Mounting (Optional) ................................................................................. |
6 |
Wall Mounting Plate ................................................................................... |
6 |
Handset Retainer Clip ................................................................................ |
6 |
Overview ............................................................................................... |
7 |
Buttons ............................................................................................................ |
8 |
Feature Keys ................................................................................................... |
8 |
Messages ................................................................................................. |
8 |
Intercom .................................................................................................... |
8 |
Conference ................................................................................................ |
9 |
Transfer ..................................................................................................... |
9 |
Release ................................................................................................... |
12 |
Park ......................................................................................................... |
12 |
Info .......................................................................................................... |
12 |
Speaker ................................................................................................... |
13 |
Mute/DND ................................................................................................ |
13 |
Hold ......................................................................................................... |
13 |
My Allworx Manager ...................................................................................... |
14 |
Operation ............................................................................................ |
15 |
Place a Call ................................................................................................... |
15 |
Receive a Call ............................................................................................... |
15 |
End a Call ..................................................................................................... |
16 |
Headset ........................................................................................................ |
16 |
Directory Dialing ............................................................................................ |
16 |
Redial a Number ........................................................................................... |
16 |
+1 866 ALLWORX * +1 585 421 3850 |
Page iii |
www.allworx.com |
|
Revised: 5/21/14 |
|

Allworx Phone Model 9212/9212L User Guide |
|
Missed Calls .................................................................................................. |
17 |
Presence ....................................................................................................... |
17 |
Ignore and Silence Soft Keys ........................................................................ |
17 |
Programmable Function Keys (PFK) ............................................................. |
18 |
Features ............................................................................................... |
21 |
Operator ........................................................................................................ |
21 |
User / Resource Extensions .......................................................................... |
21 |
Leave Another User a Voicemail .................................................................. |
21 |
Business Speed Dial ..................................................................................... |
21 |
Auto Attendant ............................................................................................... |
21 |
Overhead Pages ............................................................................................ |
21 |
Activate Door Relay ....................................................................................... |
22 |
Call Queues ................................................................................................... |
22 |
Shared Call Appearance .............................................................................. |
22 |
Call Routes ............................................................................................... |
23 |
Phone LED Indicators .............................................................................. |
23 |
Outbound Calls ........................................................................................ |
24 |
Inbound Calls ........................................................................................... |
24 |
Ringing Call Pickup .................................................................................. |
24 |
Active Calls .............................................................................................. |
24 |
Shared Hold ............................................................................................. |
24 |
Privacy Hold ............................................................................................. |
25 |
Bridged Hold ............................................................................................ |
25 |
Park .......................................................................................................... |
25 |
Automatic Call Distribution (ACD) Queuing ................................................... |
25 |
Call Forwarding ............................................................................................. |
26 |
Paging Zones ................................................................................................ |
26 |
Conference Center ........................................................................................ |
27 |
Allworx Message Center ................................................................................ |
27 |
Answer a Ringing Phone Using another Handset ......................................... |
27 |
Park ............................................................................................................... |
27 |
Park a Call on a Line Appearance PFK ................................................... |
28 |
Park a Call from the Hold Screen ............................................................. |
28 |
Page iv |
+1 866 ALLWORX * +1 585 421 3850 |
|
www.allworx.com |
|
Revised: 5/21/14 |

|
Allworx Phone Model 9212/9212L User Guide |
Retrieve a Parked Call |
.............................................................................28 |
Call Monitors ................................................................................................. |
29 |
Busy Lamp Field (BLF) .................................................................................. |
29 |
Phone Configuration .......................................................................... |
31 |
Personal Speed Dial ..................................................................................... |
31 |
Preferences ................................................................................................... |
32 |
Reboot the Phone ........................................................................................ |
34 |
Hot Desk Login .............................................................................................. |
34 |
Clear Call History .......................................................................................... |
35 |
Refresh Directory .......................................................................................... |
35 |
Network Profiles ............................................................................................ |
35 |
Regulatory Notices ............................................................................. |
37 |
Abbreviations ..................................................................................... |
39 |
+1 866 ALLWORX * +1 585 421 3850 |
Page v |
www.allworx.com |
|
Revised: 5/21/14 |
|

Allworx Phone Model 9212/9212L User Guide
Page vi |
+1 866 ALLWORX * +1 585 421 3850 |
|
www.allworx.com |
|
Revised: 5/21/14 |

Allworx Phone Model 9212/9212L User Guide
1 Introduction
Unpack the Allworx phone and applicable accessories, identify each item in the checklist and inspect for missing items.
•Allworx phone and base: attach the base to the back of the phone. See “Adjust the Phone Angle” on page 5. for more information.
•Handset with cord: attach the cord to the jack on the back of the Allworx phone.
•Phone Functions Reference Card: slide the quick operating guide between the base and back of phone.
Additional equipment needed not included in the box:
•Ethernet Cable: connects the phone to the network
•Power Supply: provides power to the Allworx phone - rated 24VDC, 400 mA (or a network connection with Power over Ethernet).
+1 866 ALLWORX * +1 585 421 3850 |
Page 1 |
www.allworx.com |
|
Revised: 5/21/14 |
|

Allworx Phone Model 9212/9212L User Guide
Page 2 |
+1 866 ALLWORX * +1 585 421 3850 |
|
www.allworx.com |
|
Revised: 5/21/14 |

Allworx Phone Model 9212/9212L User Guide
2 Setup
2.1Connect the Phone
Caution: |
Do not connect the phone to an analog phone line. This may cause damage to the Allworx |
|
phone, which voids the warranty. |
||
|
||
|
|
|
To connect the phone: |
||
|
|
|
Note: |
Allworx 9212L handsets attached to the Allworx servers require using system software version |
|
7.3 or higher. |
||
|
||
|
|
|
1. Connect the cables to the jacks on the back of the phone.
Cable |
|
Connections |
|
|
|
|
|
Optional: Headset cord |
Headset jack ( |
) |
|
|
|
||
Handset cord |
Handset jack ( ) |
||
|
|
|
|
Ethernet cable |
Network jack ( |
) and Wall Ethernet jack |
|
Power over Ethernet (PoE): provides power to the phone after connecting the |
|||
|
Ethernet cable. |
|
|
|
|
|
|
Optional: Ethernet cable |
Computer jack ( |
) and the computer. |
|
|
|||
|
|
|
|
Optional: Power Supply |
Phone DC jack ( |
). Allworx recommends using a surge protector. |
|
Only required if the Ethernet cable does not provide PoE |
|||
|
|||
|
|
|
|
Back of Phone
+1 866 ALLWORX * +1 585 421 3850 |
Page 3 |
www.allworx.com |
|
Revised: 5/21/14 |
|

Allworx Phone Model 9212/9212L User Guide
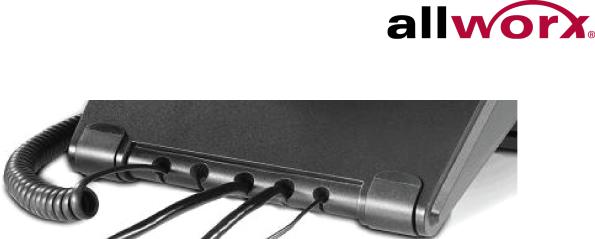
2.Thread cables through the strain relief guide on the phone base.
3.View the initialization progress on the phone screen. A normal sequence includes:
•Allworx Logo
•Configuring Network
•Starting network
•Loading configuration files
•Station Init complete
After successful startup, the phone displays a combination of the date, time, user presence, user name, and extension or the phone display may suggest assigning the handset to a user. If this occurs, follow the on screen directions. If the phone does not follow this sequence or displays an error, contact the Allworx Server Administrator.
To add or change the PFK (Programmable Function Keys) label:
Update the PFK labels whenever the PFK configuration changes to avoid misdialing.
1.Locate the PFK label. Lift the bottom edge of the plastic cover to release it, and then lift up on the plastic cover to remove it from the phone.
2.Remove the label from beneath the plastic label cover.
3.Add text on the label in the space corresponding to the desired PFK. There is a blank label Microsoft Word™ template on the Allworx.com website.
a.Navigate to www.Allworx.com. Click the Support button, and then click Resources.
b.Scroll to the Documentation section and locate the IP Phones section of the table, the specific phone model section, and then the template.
c.Follow the instructions to create the PFK labels.
4.Position the label onto the plastic label cover. Hold the label in place and snap the cover in place on the phone.
Page 4 |
+1 866 ALLWORX * +1 585 421 3850 |
|
www.allworx.com |
|
Revised: 5/21/14 |

Allworx Phone Model 9212/9212L User Guide
2.2Adjust the Phone Angle
The phone base angle adjusts for easier phone screen reading.
To adjust the phone base angle:
1.Unplug the phone from the PoE or the power supply. Remove the handset from the hook and lay the phone face down on a soft surface.
2.Hold the base with the fixed tabs facing the bottom of the phone. Select one of the three available positions to connect the base to the phone. The set of holes at the bottom of the phone provides the steepest angle.
3.Place the fixed tabs in the preferred holes on the back of the phone. Rotate the phone base upwards until the flexible tabs click into place.
To remove the base:
1.Remove the handset from the hook and lay the phone face down on a soft surface.
2.Press down on the flexible tabs and rotate the base towards the phone bottom until the fixed tabs easily lift out of the holes.
2.3Volume Adjustment
The volume of the incoming ring, handset, speaker phone, and the headset is adjustable.
To adjust the incoming call volume:
1.Locate the phone volume bar. Do not lift the handset or turn on speaker phone.
2.Press the volume bar – (decrease) or + (increase) to adjust the incoming ring audio level.
The phone plays the audio tone.
To adjust all other volumes:
1.Pick up the handset or turn on the speaker phone or headset. Locate the phone volume bar. The phone screen displays which audio path is being adjusted.
2.Press the volume bar to – (decrease) or + (increase) the audio level.
+1 866 ALLWORX * +1 585 421 3850 |
Page 5 |
www.allworx.com |
|
Revised: 5/21/14 |
|

Allworx Phone Model 9212/9212L User Guide
2.4Wall Mounting (Optional)
If using a standard telephone wall mount plate, DO NOT connect to the RJ-11 jack. This Caution: connection is for analog phones and may cause damage to the Allworx phone, which
voids the warranty.
2.4.1Wall Mounting Plate
Mounting the Allworx phone on a wall requires a mounting plate that meets the TIA-570-B,
Section standard and is available from a local telephone company or local retailer. The mounting plate has studs that position the Allworx phone flush to the wall surface.
Leviton 4108W-0SP
Remove the Allworx phone base and mount the phone over the mounting plate studs. All power and RJ-45 cable connections should exit between the phone back and the wall, and then routed to the network connection and/or a power connection.
2.4.2Handset Retainer Clip
The handset retainer clip prevents the handset from slipping out of the phone cradle while hanging on a wall.The Allworx phone ships with the adjustable handset retainer clip in the wall mount position on the phone cradle.
To adjust the retainer clip for desktop use (for easier handset removal/hang-up) insert a coin in the retainer clip slot and turn the coin clockwise, 180 degrees. To return the retainer clip to the wall mount position, insert a coin in the retainer clip slot and turn the coin counter-clockwise, 180 degrees.
Page 6 |
+1 866 ALLWORX * +1 585 421 3850 |
|
www.allworx.com |
|
Revised: 5/21/14 |

Allworx Phone Model 9212/9212L User Guide
3 Overview
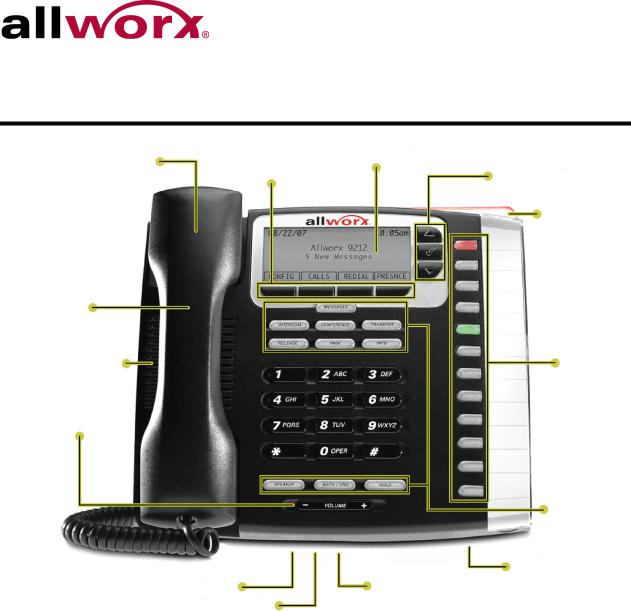
Higher audio fidelity
Handset with cord expandable up to nine feet
Full-duplex speakerphone
Volume control
Backlit graphical LCD screen (9212L Only)
Soft keys
Scroll and Select keys
Visual ring indicator
Twelve Programmable Function Keys (PFKs)
Ten feature keys
|
Power: |
Multiple position tilt base |
|
Two 10/100 switched Ethernet ports |
(also wall mountable) |
||
• |
802.3af PoE |
|
|
Two 10/10Headset jack |
• |
24V DC adapter |
|
The Allworx Server Administrator pre-configures the phone for either PBX (Private Branch
Exchange) or Key System mode of operation. This affects the functionality of each programmable button on the phone.
For Allworx Server Software Release 7.5 and later, the phone LCD screen backlight turns off after 2 minutes of inactivity. To turn it on, lift the handset off the hook or press a button.
In addition to English, the Allworx phone supports Canadian French and Castilian Spanish on the phone display when connected to Allworx servers using software 7.6.3.22 or higher. Contact the Allworx Server Administrator to configure the phone to display the preferred language; users cannot change the phone display language within the phone configuration menu. After making the change, the preferred language displays during the phone reboot.
+1 866 ALLWORX * +1 585 421 3850 |
Page 7 |
www.allworx.com |
|
Revised: 5/21/14 |
|
 Loading...