

Page 1

Guide to New Features
Release 4.6
InSciTek Microsystems
635 Cross Keys Park
Fairport, NY 14450
585-421-3850
Page 2

Page 3

Table of Contents
Feature Keys ............................................................................................................................................... 1
Remote Allworx........................................................................................................................................... 2
How to Set up a Remote Allworx............................................................................................................... 3
Sample Setup: 2 Sites ............................................................................................................................... 5
Sample Setup: 3 Sites ............................................................................................................................... 7
Remote Office SIP Phone......................................................................................................................... 11
How to Prepare the Phone ...................................................................................................................... 13
How to Set Up the User and Handset (SIP Phone) ................................................................................ 14
How to Set Up the Handset (SIP Phone) Only........................................................................................ 17
How to Obtain the New Phone’s User ID ................................................................................................ 19
How to Verify the Allworx Firewall is Open for SIP Support.................................................................... 20
How to Configure the Remote SIP Phone............................................................................................... 22
How to Verify the Phone Registration .....................................................................................................25
How to Test the SIP Phone ..................................................................................................................... 27
Auto Attendant .......................................................................................................................................... 28
Selecting an Operator Extension............................................................................................................. 28
How to Set up an Operator Extension for an Auto Attendant..............................................................30
Shortcuts for Auto Attendants ................................................................................................................. 32
How to Set up a Shortcut for an Auto Attendant..................................................................................33
Sample Setup: Set up an Auto Attendant Shortcut ............................................................................. 34
Page 4

Page 5

Release 4.6: New Features
Feature Keys
After version 4.6 is installed on your Allworx system, users on client computers may see
a message asking you to call for a key. These types of keys are available:
• Client key which enables the Message Center Software (new)
• VoIP key which enables the Remote Allworx (site-to-site), Remote SIP Phone,
SIP Gateways, and SIP Proxies (new)
• VPN key which enables the Virtual Private Network
Call Customer Support at 866-ALLWORX, extension 200 and ask for the type of key you
need.
1
Page 6

Release 4.6: New Features
Remote Allworx
For businesses with several locations, it makes sense to have an Allworx system at each
site. You can now network the Allworx systems together site-to-site so that a caller
connected to their local Allworx system can dial an extension at a remote Allworx.
You’ll need this much time
Setting up one Allworx to talk to another one will take less than 30 minutes.
Gather This Information
You’ll need the following information:
• IP Address on your local Allworx
• IP Address on the remote Allworx you want to connect to.
You can find this information by expanding Network and clicking Addresses
on each Allworx. Make a note of each WAN TCP/IP Address.
Before You Begin
• Determine the identical Login ID and password that will be used on
both the local and remote Allworx systems.
2
Page 7
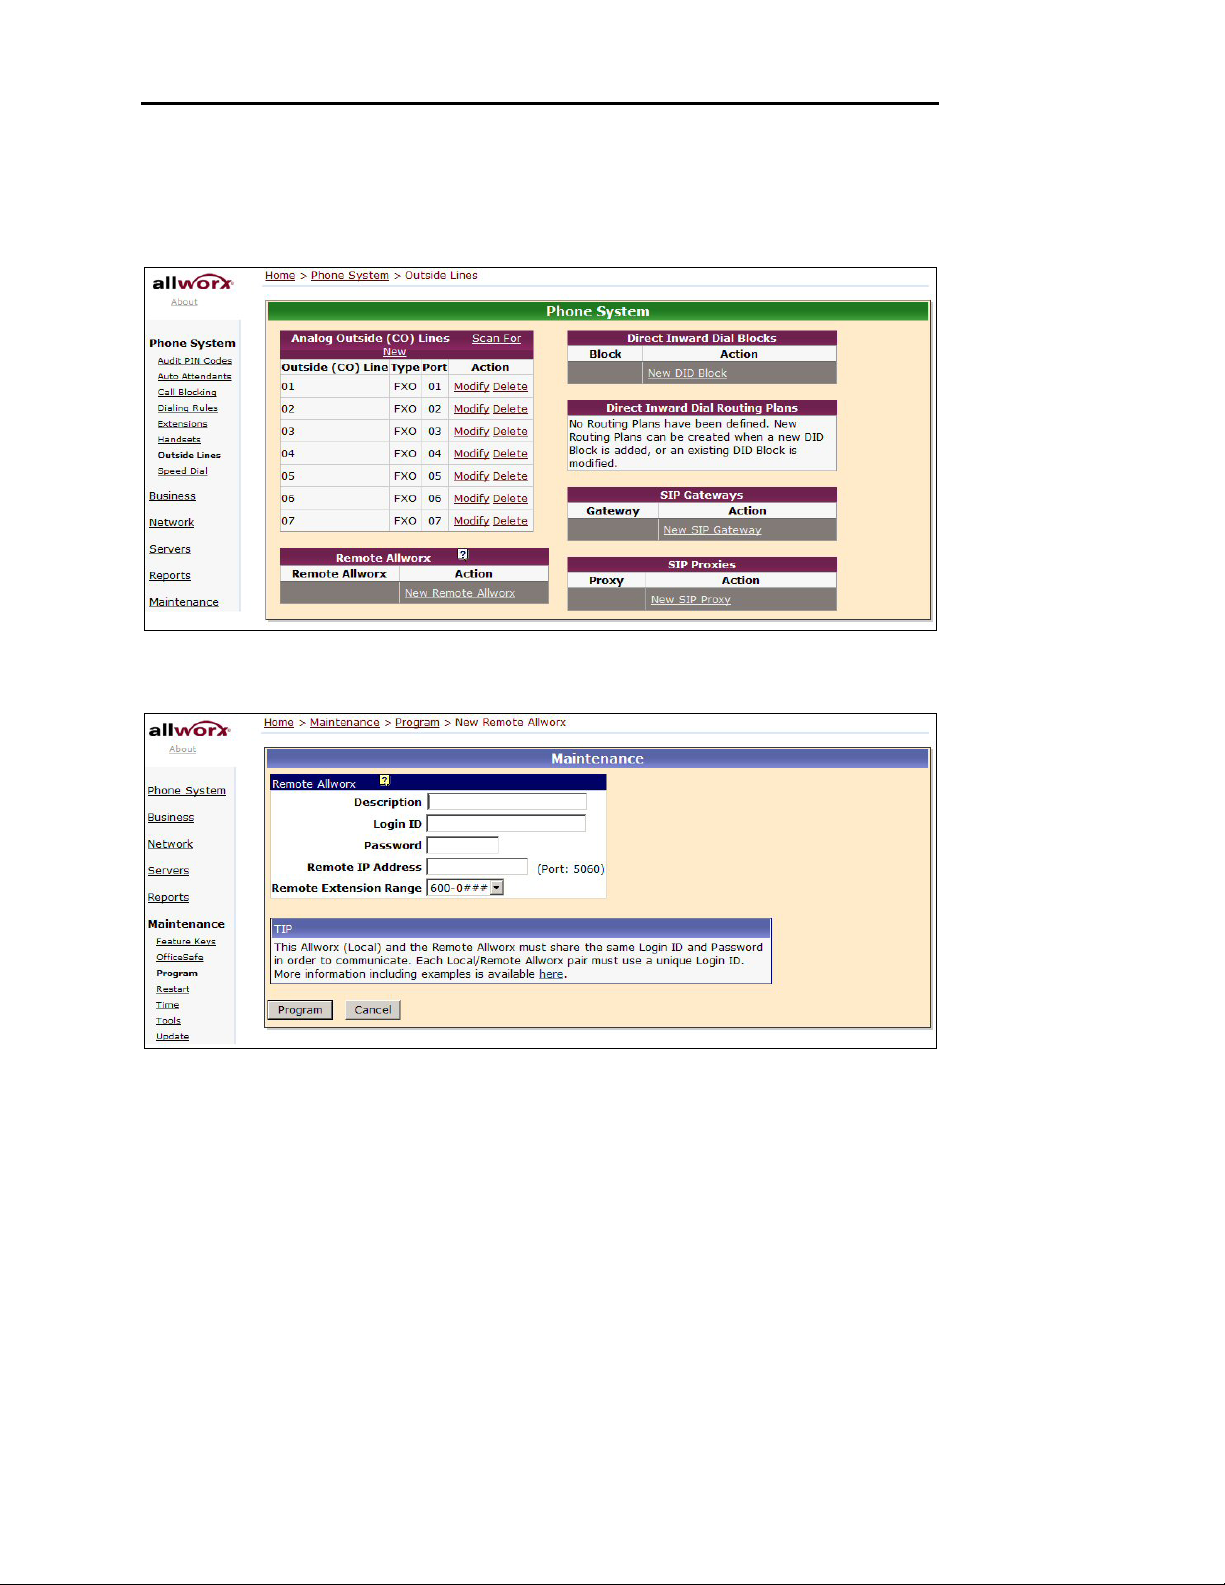
How to Set up a Remote Allworx
1. Expand Phone System and click Outside Lines.
Outside Lines page
Release 4.6: New Features
2. Click New Remote Allworx.
Remote Allworx page
3. Enter:
• Description -- Make sure the description is unique for each remote
Allworx.
• Login ID and Password – Each connection you make must have a
Login ID and Password that is different from any other pair. You'll use
this Login ID and Password when logging into either Allworx in the pair.
For example, the Login ID and Password for a connecting Site A to Site
B could be ConnectAtoB and PasswordAtoB on both Allworx systems. If
you also connect Site A to Site C, the Login ID and Password for that
pair could be ConnectAtoC and PasswordAtoC on both of those Allworx
systems.
• Enter the IP address for the remote Allworx.
3
Page 8

Release 4.6: New Features
4. Select a range of extensions. When selecting a range, ### is the remote
extension.
5. Click Program.
6. On each remote Allworx, repeat steps 2 – 5.
7. Verify that each site is connected by checking that each Remote Allworx is
registered on the Outside Lines page.
NOTE: The following features are not available when using a remote Allworx setup:
• Call to Operator
• Leave user at 1## a voicemail
• Leave system ext. 2## a voicemail
• Enable/Disable Do Not Disturb
• Cancel Call Forwarding
• Forward calls to ext. 1## or 2##
• Answer ringing ext. 1## or 2##
4
Page 9

Release 4.6: New Features
Sample Setup: 2 Sites
Let’s say you want to connect two Allworx systems, Site A and Site B. The System
Administrator at each site would follow these steps (for detailed instructions, see How to
Set Up a Remote Allworx).
It’s best to obtain the IP address for each site to be connected before starting. In this
sample, the IP addresses are as follows:
• Site A: IP address 64.65.105.2
• Site B: IP address 64.65.105.1
The extensions you select for each site are used by the site to call the remote site. You
can select any range from 600-0### to 609-9### -- the extensions you select don’t need
to match the extensions selected by the site being called.
NOTE: Check the online help for additional information.
At Site A:
1. Expand Phone System and click Outside Lines.
2. Click New Remote Allworx.
3. Enter:
4. Click Program.
At Site B:
1. Expand Phone System and click Outside Lines.
2. Click New Remote Allworx.
3. Enter:
• Description: Site B
• Login ID: ConnectAtoB
• Password: PasswordAtoB
• IP address: 64.65.105.1 (IP address for Site B)
• Extensions: 600-0###
• Description: Site A
• Login ID: ConnectAtoB
• Password: PasswordAtoB
• IP address: 64.65.105.2 (IP address for Site A)
• Extensions: 600-0###
4. Click Program.
5
Page 10

NOTE: Check the online help for additional information.
Release 4.6: New Features
6
Page 11

Release 4.6: New Features
Sample Setup: 3 Sites
If you are connecting three or more Allworx systems, you must set up each system to
be remotely connected to each other.
In this sample, the IP addresses are as follows:
• Site A: IP address 64.65.105.2
• Site B: IP address 64.65.105.1
• Site C: IP address 64.65.105.3
The extensions you select for each site are used by the site to call the remote site. You
can select any range from 600-0### to 609-9### -- the extensions you select don’t need
to match the extensions selected by the site being called.
NOTE: Check the online help for additional information.
At Site A:
Set up Site B:
1. Expand Phone System and click Outside Lines.
2. Click New Remote Allworx.
3. Enter:
• Description: Site B
• Login ID: ConnectAtoB
• Password: PasswordAtoB
• IP address: 64.65.105.1 (IP address for Site B)
• Extensions: 600-0###
4. Click Program.
Then set up Site C:
1. Expand Phone System and click Outside Lines.
2. Click New Remote Allworx.
3. Enter:
• Description: Site C
• Login ID: ConnectAtoC
• Password: PasswordAtoC
• IP address: 64.65.105.3 (IP address for Site C)
• Extensions: 600-0###
4. Click Program.
7
Page 12

At Site B:
Set up Site A:
1. Expand Phone System and click Outside Lines.
2. Click New Remote Allworx.
3. Enter:
• Description: Site A
• Login ID: ConnectAtoB
• Password: PasswordAtoB
• IP address: 64.65.105.2 (IP address for Site A)
• Extensions: 601-0###
4. Click Program.
Then set up Site C:
1. Expand Phone System and click Outside Lines.
Release 4.6: New Features
2. Click New Remote Allworx.
3. Enter:
4. Click Program.
At Site C:
Set up Site A:
1. Expand Phone System and click Outside Lines.
2. Click New Remote Allworx.
3. Enter:
• Description: Site C
• Login ID: ConnectBtoC
• Password: PasswordBtoC
• IP address: 64.65.105.3 (IP address for Site C)
• Extensions: 601-0###
• Description: Site A
• Login ID: ConnectAtoC
• Password: PasswordAtoC
• IP address: 64.65.105.2 (IP address for Site A)
• Extensions: 602-0###
4. Click Program.
8
Page 13

Then set up Site B:
1. Expand Phone System and click Outside Lines.
2. Click New Remote Allworx.
3. Enter:
• Description: Site B
• Login ID: ConnectBtoC
• Password: PasswordBtoC
• IP address: 64.65.105.1 (IP address for Site B)
• Extensions: 602-0###
4. Click Program.
Release 4.6: New Features
9
Page 14

Release 4.6: New Features
Remember, each site must also set up your local Allworx as a remote system using the
Login ID and Password you agreed to.
10
Page 15

Release 4.6: New Features
Remote Office SIP Phone
Many businesses have discovered that it is beneficial to have workers who are not
physically located in the main office. The workers may be located in a remote formal
rented office space or in a personal home office. Instead of installing a traditional phone
connection in each location, they make use of a Voice over Internet Protocol (VoIP)
software-based phone connected to the worker’s personal computer. Prior to release 4.6,
a Virtual Private Network (VPN) was needed for each computer in order to transport VoIP
calls. With this release, there is no need for a VPN in order for a remote worker to use a
VoIP phone. (Workers who already have a VPN installed to protect confidential
correspondence and files may continue to use it with their VoIP phone.)
NOTE: Currently only Cisco phones are supported.
NOTE: The instructions provided here are for setting up one remote phone. To set up
more than one phone, contact Allworx Customer Support.
Main Office
Allworx 10x
Analog Telephone
Computer
VoIP Telephone
Public Telephone
Network
Internet
Small Office/Home Office
Computer
Cable/DSL/T-1
Router
VoIP Telephone
Main Office to Small Office/Home Office configuration
11
Page 16

Release 4.6: New Features
You’ll need this much time
Setting up a Remote SIP Phone will take about 30 minutes.
Gather This Information
You’ll need the following information:
• IP Address: You can find this by expanding Network and clicking
Addresses. Make a note of the WAN TCP/IP Address.
Before You Begin
Make sure:
• Allworx 4.6 Server software is installed.
• The firmware of your phone is the latest version:
• Cisco phone models 7940 and 7960 sets require firmware POS3-
06-3-00.
• Cisco phone model 7905G requires firmware
CP7905010100SIP030807A.
• Cisco phone model 7912G requires firmware
CP7912010100SIP030807A.
• Each phone operates within a DHCP-enabled environment.
• Configure and test a Cisco phone on the main office Allworx system
before sending it to the remote location. This will verify that the correct
software is loaded, and the phone and server registration account data
match.
• Phones may be located behind a firewall.
Setting up a remote SIP phone consists of these procedures:
• Prepare the phone.
• Set up the user and handset (IP Phone) in Allworx OR set up a new handset (IP
Phone) in Allworx.
• Obtain the new phone’s User ID.
• Verify the Allworx firewall is open for SIP support.
• Configure the remote SIP Phone.
• Verify the phone registration.
• Test the SIP phone.
12
Page 17

How to Prepare the Phone
1. Plug in the power cord for the phone.
2. Connect the Ethernet cable from the phone to your Allworx server.
3. Expand Phone System and click Handsets.
Release 4.6: New Features
Handsets page
4. When a phone is connected to the Allworx server, handsets will automatically
be set up as plug-and-play phones. These will appear on the list of handsets
with “MAC” addresses in the Identification field. If any of these appear on
your list, remove them by clicking Delete.
5. If you have a Cisco 7940 or Cisco 7960 phone:
a. Press Services, then select Network Configuration.
• Change Alternate TFTP to Yes.
• Check that the value for Dynamic TFTP Server is 0.0.0.0.
b. Save your changes.
6. If you have a Cisco 7905 or Cisco 7912 phone:
a. Press Settings, then select Network Configuration.
• Change TFTP Enabled to No.
b. Save your changes.
13
Page 18

Release 4.6: New Features
How to Set Up the User and Handset (SIP Phone)
Follow these instructions to set up the user and handset at the same time. If the user is
already set up, continue on to How to Set Up the Handset.
After you complete this procedure:
• The user will be assigned an Allworx user name (system identifier for voicemail,
email, calendar, etc.).
• The user will also be assigned a 100-series extension.
• A SIP phone is setup with the 100-series extension.
1. Expand Maintenance and click Program.
Program page
14
Page 19

Release 4.6: New Features
2. Select Program New User and Handset.
New User and Handset page
3. Enter:
• Login Name – remember, this must start with a letter and contain only
letters, numbers, and underscores
• Full Name – type the user’s first name, middle name or initial, and last
name
• Password – type a default password that the user can later change
• Primary Extension
15
Page 20

Release 4.6: New Features
4. Enter:
• Description
• Caller ID – this will appear in the display when the user makes a call
5. Make sure that SIP Phone is selected as the type of handset.
6. Select the model that matches the user’s handset. When you select a model,
the corresponding number of call appearances (virtual handsets) will be
created on the Handsets page. For example, choosing the Cisco 7960
handset will result in six rows being created in the Handsets page.
7. Make sure that Phone must authenticate (register) is selected. Enter the
user’s Login ID and Password.
8. Click Program.
16
Page 21

Release 4.6: New Features
How to Set Up the Handset (SIP Phone) Only
If the user is already set up, you can just set up the phone. (If you followed the previous
procedure to set up both the user and SIP Phone, then skip this procedure and continue
on.)
1. Expand Phone System and click Handsets.
Handsets page
17
Page 22

2. Click New SIP Handset.
Release 4.6: New Features
New Handset page
3. Enter:
• Description
• Caller ID – this will appear in the display when the user makes a call
4. Make sure that SIP Phone is selected as the type of handset.
5. Select the model that matches the user’s handset. When you select a model,
the corresponding number of call appearances (virtual handsets) will be
created in the Handsets page. For example, choosing the Cisco 7960
handset will result in six rows being created in the Handsets page.
6. Make sure that Phone must authenticate (register) is selected. Enter the
user’s Login ID and Password.
7. Click Program.
18
Page 23

How to Obtain the New Phone’s User ID
1. Expand Phone System and click Handsets.
Release 4.6: New Features
Handsets page
2. Write down the User ID that appears in the Identification column for the SIP
phone you just set up. You will need this later after you plug in and set up the
SIP phone.
• Note that the Identification states that the User ID has “never registered.”
After you program the SIP phone, this will change to showing an expiration
date and time. NOTE: When the phone’s registration expires, the
“registration expired” appears as the status.
• NOTE: If you followed the procedure How to Set Up the Handset (IP Phone)
Only, the Owner of the handset is “admin.” To assign a user to this handset
(required if you want the message wait lamp to reflect voicemail
presence/absence). Click Modify for the handset and select the user.
19
Page 24

Release 4.6: New Features
How to Verify the Allworx Firewall is Open for SIP Support
The new SIP Phone must register themselves automatically with the Allworx server
before calls can be made. You will need to verify that the Allworx firewall permits SIP
traffic (SIP port 5060) so that the registration can occur.
1. Expand Network and click Security.
Network Security page
The Allworx Network Mode should be one of the following:
• NAT/Firewall
• NAT/Firewall with DMZ
• NAT/Firewall with Stealth DMZ
If it is not, follow these instructions:
20
Page 25

Release 4.6: New Features
2. Click Modify.
Modify Network Security page
3. Select one of the following:
• NAT/Firewall which exposes all ports to the Internet
• NAT/Firewall with DMZ (make sure that SIP (5060) is selected as an
exposed port)
• NAT/Firewall with Stealth DMZ (make sure that SIP (5060) is selected as an
exposed port)
4. Click Update.
5. Expand Maintenance and click Restart.
Restart page
6. Select Normal restart.
7. Click Restart.
21
Page 26

Release 4.6: New Features
How to Configure the Remote SIP Phone
Configure the new SIP phone in your office. After it is configured, you can move it to the
remote location.
1. If you have a Cisco 7940 or Cisco 7960 phone, follow these instructions.
a. Press Settings.
b. Select Unlock Configuration. Enter cisco as the password.
c. Press Settings, then select SIP Configuration.
d. Make sure the SIP configuration settings are as shown below. Make
changes, if necessary, and save your changes.
Item Setting
Messages URI 404
Preferred Cedec G711ulaw
Out-of-Band DTMF Out_always
Register with Proxy Yes
Register Expires 600
TFTP Directory Leave as is
Phone Label Leave as is
Enable VAD No
Voice Control Port 5060
Start Media Port Leave as is
End Media Port Leave as is
Backup Proxy Leave as is
Backup Proxy Port Leave as is
Emergency Proxy Leave as is
Emergency Proxy Port Leave as is
Outbound Proxy Use the WAN TCP/IP Address
that you noted earlier
Outbound Proxy Port 5060
NAT Enabled No
22
Page 27

Release 4.6: New Features
e. Press Settings, then select SIP Configuration. Select the first Line to
be configured. (The Cisco 7940 has 2 lines. The Cisco 7960 has 6 lines.)
f. Make sure the Line settings is as shown below. Make changes, if
necessary, and save your changes.
Item Setting
Name Enter the User ID you noted earlier.
Short Name Enter the name or number you want to
appear on the display.
Authentication Name Enter the Login ID you chose earlier.
Authentication Password Enter the Password you chose for the Login
ID.
Display Name Leave as is.
Proxy Address Enter the WAN TCP/IP address of the
Allworx server.
Proxy Port 5060
g. Repeat steps e – f for each line.
23
Page 28

Release 4.6: New Features
2. If you have a Cisco 7905 or Cisco 7912 phone, follow these instructions.
a. Press Services.
b. Press * * # (asterisk, asterisk, pound sign) to unlock the
configuration. Enter admin as the password on the keypad.
c. Press Services, then select Network Configuration.
d. Make sure the network configuration settings are as shown below.
Make changes, if necessary, and save your changes.
Item Setting
SIP Proxy Use the WAN TCP/IP Address
that you noted earlier
User ID Enter the User ID you noted earlier.
Password Enter the Password you chose for the Login ID.
Use Login ID Yes
Login ID Enter the Login ID you chose earlier.
Local SIP Port 5060
Local RTP Port Leave as is.
Backup Proxy Timeout Leave as is.
Outbound Proxy Use the WAN TCP/IP Address
that you noted earlier
Register Expires 600
Register with Proxy Yes
NAT WAN IP Address Leave as is.
24
Page 29

Release 4.6: New Features
How to Verify the Phone Registration
After the phone has been configured, it will automatically initiate registration to the remote
Allworx server. Verify that the registration was successful.
1. Expand Phone System and click Handsets.
Handsets page
2. The handsets that you set up should appear with a User ID, Login ID, an
expiration date, and the IP address of the registered remote phone in the
Identification field.
3. Using the configured SIP phone, dial 400 to reach the Allworx Auto
Attendant. Make sure to try the call on each line. If the call goes through, the
phone is properly registered.
4. If your remote IP phone is behind a firewall, then consult the documentation
that came with your firewall for instructions.
• Map the UDP port 5060 to the IP address of the phone.
• If you have a Cisco 7940 phone, also map ports 16384 and 16386 to the
IP address of the phone. If your firewall uses a range instead of
individual ports, use the range 16384 – 16387.
• If you have a Cisco 7960 phone, also map ports 16384, 16386, 16388,
16390, 16392, and 16394 to the IP address of the phone. If your firewall
uses a range instead of individual ports, use the range 16384 – 16395.
25
Page 30

Release 4.6: New Features
5. If you have a Cisco 7940 or Cisco 7960 phone, follow these instructions to
change the Line Settings.
a. Press Settings, then select Network Configuration.
b. Make sure the Default Router 1 is set to the local IP address of the
network setup of the router.
c. Press Settings, then select SIP Configuration.
d. Make sure that the Start Media Port is the same as the Start port for the
UDP protocol of your router (16384).
e. Leave the End Media Port at the default settings on the phone.
f. Make sure VOIP Control Port is set to 5060.
g. Make sure NAT Enabled is set to Yes.
h. The NAT Address is set to the WAN Address of the router/firewall.
i. Save your changes.
j. Verify that the phone is working for both inbound and outbound calls.
26
Page 31

Release 4.6: New Features
How to Test the SIP Phone
A remote SIP phone has the same capabilities as a local phone. Its features can be used
in exactly the same way:
• Dial 400 and the call will be routed to the Allworx Auto Attendant.
• Dial an extension and the call will be routed to the user of the extension.
If a problem persists, call Customer Support 866-ALLWORX, extension 200.
27
Page 32

Release 4.6: New Features
Auto Attendant
There are two new features available for Auto Attendants:
• Selecting an operator extension for each Auto Attendant
• Setting up shortcuts for Auto Attendants
Selecting an Operator Extension
You can set up 9 Auto Attendants on your Allworx system with their own Prompts and
Features. Prior to release 4.6, when a caller dialed 0 after listening to any Auto Attendant
message, the call was directed to the system operator.
Allworx 10X
All Auto Attendants
Caller
Users Operator
Extension 0
Before release 4.6
In release 4.6, you can now designate the extension that should be dialed when the caller
dials 0 during each Auto Attendant message. For example, the Auto Attendants could be
set up as follows:
• Callers who dial 0 while listening to Auto Attendant 1 would be directed to the
system operator.
• Callers who dial 0 while listening to Auto Attendant 9 would be directed to Sales
at extension 106.
28
Page 33

Release 4.6: New Features
Auto Attendant 1
Caller
Allworx 10X
.
.
.
.
.
.
.
After release 4.6
Users Operator
Auto Attendant 9
Users Operator
Extension 0
Extension 106
29
Page 34

Release 4.6: New Features
You’ll need this much time
Setting up operator extensions for Auto Attendants will take less than 10
minutes.
Gather This Information
You’ll need the following information:
• User extension or system extension to be called when the caller
dials 0.
Before You Begin
• Make sure the person at the extension you’re designating as the
operator is ready to receive calls.
How to Set up an Operator Extension for an Auto Attendant
1. Expand Phone System and click Auto Attendants.
Auto Attendants page
30
Page 35

Release 4.6: New Features
2. Review the list of Auto Attendants and the Prompts, Features, and Operator
Extension associated with each. Click Modify to change any Auto Attendant.
Modify Auto Attendants page
3. Select an Operator Extension that will be dialed if the caller dials 0 during
the Auto Attendant announcement. (Remember, you can select any
extension to be the Operator Extension.)
4. You can also make any changes desired to the Prompts and Features.
5. Click Update.
31
Page 36

Release 4.6: New Features
Shortcuts for Auto Attendants
You can now use shortcuts with the Auto-Attendants so a caller can transfer to an
extension using a single digit. The shortcut can direct the caller to a user extension, a
system extension, or another Auto Attendant. You can set up 8 different shortcuts for
each Auto Attendant.
NOTE: Check the online help for additional information.
You’ll need this much time
Setting up shortcuts for Auto Attendants one will take less than 15 minutes.
Gather This Information
You’ll need the following information:
• User extension, system extension, or Auto Attendant to be called
as a result of using the shortcut
Before You Begin
• Determine which Auto Attendants will use the shortcuts.
32
Page 37

How to Set up a Shortcut for an Auto Attendant
1. Expand Phone System and click Auto Attendants.
Release 4.6: New Features
Auto Attendants page
2. Click Modify in the Menu Shortcuts next to the Auto Attendant for which you
want to set up a shortcut.
Modify Menu Shortcuts page
3. Select the extension for each digit you want to assign.
4. Click Update.
5. Repeat steps 2 – 4 to set up shortcuts for each Auto Attendant.
33
Page 38

Release 4.6: New Features
Sample Setup: Set up an Auto Attendant Shortcut
Let’s say you have two Auto Attendants set up:
• Auto Attendant 431 which answers for your entire company
• Auto Attendant 432 which answers for Customer Support
You want to set up a shortcut for Auto Attendant 431 so the caller can quickly reach Auto
Attendant 432. You also want to set up two shortcuts for Auto Attendant 432 so the caller
can quickly reach Customer Support (extension 200) and the other Auto Attendant (431).
NOTE: Check the online help for additional information.
Auto Attendant for the company:
1. Expand Phone System and click Auto Attendants.
2. Click Modify next to the Auto Attendant 431.
3. For digit 1, select extension 432 for the Customer Support Auto Attendant.
4. Click Update.
5. Record a custom message for Auto Attendant 431 that includes “Press 1 for
Customer Service.”
Auto Attendant for Customer Service:
1. Expand Phone System and click Auto Attendants.
2. Click Modify next to the Auto Attendant 432.
3. For digit 1, select extension 431 for the company Auto Attendant.
For digit 2, select extension 200 for Customer Support.
4. Click Update.
5. Record a custom message for the Auto Attendant that includes “Press 1 to
speak to a customer service representative. Press 2 for the main company
operator.”
34
 Loading...