

Page 1

10x
User’s Guide
InSciTek Microsystems
635 Cross Keys Park
Fairport, NY 14450
585-421-3850
Page 2

User’s Guide
Information in this document is subject to change without notice.
2002 - 2003 InSciTek Microsystems, Inc.
Reproduction in any manner whatsoever without the written permission of InSciTek
Microsystems, Inc. is strictly forbidden.
Trademarks and trade names may be used in this document to refer to either the entities claiming
the marks and names or their products. InSciTek Microsystems, Inc. disclaims any proprietary
interest in trademarks and trade names other than its own.
June 2003 063003 Doc No. 5000210
Client Release 4.1/Server Release 4.1
ii
Page 3

User’s Guide
Table of Contents
1 Welcome to Allworx 1
2 Getting Started 3
2.1 User PC Requirements..............................................................................................3
2.1.1 Operating System...............................................................................................3
2.1.2 Hardware............................................................................................................3
2.1.3 Browser Software...............................................................................................3
2.2 Installing the Allworx Communication Center Software.........................................4
2.3 Logging On to the Allworx Communication Center................................................4
2.4 Allworx Communication Center Overview..............................................................5
2.5 Tasks and Reminders................................................................................................8
3 Creating and Updating Your Personal Information 11
4 Creating and Updating Your Telephone Handset Information 15
4.1 Handset Features.......................................................................................................15
4.2 Creating and Managing Presence Profiles................................................................17
4.2.1 Creating Caller ID Filters...................................................................................19
4.2.2 Configuring Call Routes ....................................................................................20
5 Using the Features of Your Handset 25
5.1 Making and Receiving Telephone Calls...................................................................25
5.1.1 Dialing External Phone Numbers ......................................................................25
5.1.2 Call Blocking and Restrictive Dialing ...............................................................25
5.1.3 Caller ID Display ...............................................................................................25
5.2 Allworx Call Handling Feature Operations for Analog Handsets............................26
5.3 Allworx Call Handling Feature Operations for IP Handsets....................................28
6 Managing Your Contacts 29
6.1 The Allworx Contact Manager.................................................................................29
6.2 Adding a New Contact .............................................................................................30
6.3 Updating Contact Information..................................................................................34
6.4 Deleting Contact Information...................................................................................34
iii
Page 4

User’s Guide
6.5 Contact Features .......................................................................................................34
6.5.1 Searching Contacts.............................................................................................34
6.5.2 Selecting Contact Columns................................................................................34
6.5.3 Column Control .................................................................................................35
6.5.4 Sorting Contacts.................................................................................................35
6.5.5 Printing Contacts................................................................................................35
7 All-in-One™ Inbox PC Message Center 37
7.1 The Allworx Message Center...................................................................................37
7.2 Creating and Sending New Email Messages............................................................40
7.3 Reading and Responding to Email Messages...........................................................42
7.4 Reading and Responding to Voicemail Messages....................................................42
7.5 Reading and Responding to Calendar Messages......................................................44
7.6 Using the Allworx Message Center Offline.............................................................45
8 All-in-One™ Inbox Telephone Message Center 47
8.1 Logging in to the Allworx Message Center..............................................................47
8.2 Recording Your Name for the First Time ................................................................47
8.3 Changing Your Name Recording .............................................................................49
8.4 Recording Your Outgoing Voicemail Message for the First Time ..........................50
8.5 Changing Your Outgoing Voicemail Message.........................................................51
8.6 Voicemail Message Playback...................................................................................52
8.7 Replying to a Message..............................................................................................54
8.8 Forwarding a Voicemail Message ............................................................................54
8.9 Sending a Message ...................................................................................................55
8.10 Viewing Message Distribution Lists.....................................................................56
9 Managing Your Calendar 59
9.1 Calendar Overview...................................................................................................59
9.2 Scheduling a New Event...........................................................................................61
9.3 Updating an Existing Event......................................................................................63
9.4 Deleting an Event .....................................................................................................64
iv
Page 5

User’s Guide
9.5 Sharing Calendar Information ..................................................................................64
9.5.1 Viewing Other Users’ Calendars .......................................................................64
9.5.2 Setting Up Viewing Permissions for Your Calendar.........................................65
10 Sharing Documents 67
10.1 Document Sharing through Your PC’s Network Folder.......................................67
10.2 Document Sharing through a Browser..................................................................67
11 Internet and Intranet Access 69
11.1 Internet Access ......................................................................................................69
11.2 Intranet Access ......................................................................................................69
12 Remote Access to the Allworx Server 71
12.1 Setting Up Your Computer for Remote Access....................................................71
12.1.1 Windows 2000................................................................................................71
12.1.2 Windows XP Professional..............................................................................72
12.1.3 Windows XP Home........................................................................................73
12.2 Establishing Remote Connections.........................................................................74
13 Working Offline from the Allworx Server 75
List of Figures
Figure 2-1 – Logon Dialog Box .....................................................................................................4
Figure 2-2 – The Allworx Communication Center .....................................................................5
Figure 2-3 – The Allworx Communication Center Layout Manager .......................................6
Figure 2-4 – Tasks and Reminders Window ...............................................................................8
Figure 2-5 – New Reminder Dialog Box ......................................................................................9
Figure 3-1 – User Settings – System User Information Dialog Box ........................................12
Figure 3-2 – User Settings – Person Information Dialog Box..................................................13
Figure 3-3 – User Settings – Person Details Dialog Box...........................................................14
Figure 4-1 – User Settings – Handset Info Dialog Box .............................................................15
Figure 4-2 – Primary Call Route for Caller ID Filter 315* .....................................................18
v
Page 6

User’s Guide
Figure 4-3 – Primary Call Route for Caller ID Filter * ...........................................................19
Figure 4-4 –Add New Caller ID Rule Dialog Box .....................................................................20
Figure 4-5 – Ring Group and Hunt Sequence Call Route Example .......................................21
Figure 4-6 – Add Connection Attempt Dialog Box...................................................................21
Figure 6-1 – The Allworx Contact Manager .............................................................................30
Figure 6-2 – Add New Contacts Buttons....................................................................................31
Figure 6-3 – The Add Contact Group Members Dialog Box...................................................32
Figure 6-4 –Contact Picker Dialog Box .....................................................................................33
Figure 6-5 – Non-Contact Dialog Box ........................................................................................33
Figure 7-1 – Allworx Messages Center ......................................................................................38
Figure 7-2 – Allworx Email Message Window..........................................................................40
Figure 7-3 – Allworx Voice Message Window...........................................................................43
Figure 7-4 – Allworx Calendar Message Window ....................................................................44
Figure 8-1 – Allworx User Homepage........................................................................................57
Figure 8-2 – Message Distribution Lists ....................................................................................57
Figure 9-1 – Allworx Calendar Month Window .......................................................................59
Figure 9-2 – Allworx Calendar Day View Window ..................................................................60
Figure 9-3 – Appointment Item Window – Attendees Dialog Box ..........................................62
Figure 9-4 – Contact Picker Dialog Box ....................................................................................63
Figure 9-5 – Selecting Shared Calendars...................................................................................64
Figure 9-6 – Resource Sharing – Permissions Dialog Box .......................................................65
Figure 10-1 – Company and User Directory Display Screen...................................................68
Figure 13-1 – My Preferences Dialog Box for Office Synchronization...................................75
Figure 13-2 – Database Synchronization Confirmation Box ...................................................76
Figure 13-3 –Synchronization Progress Window......................................................................77
vi
Page 7

User’s Guide
1 Welcome to Allworx
The Allworx 10x is an integrated business productivity and communications solution comprising
telephone features, networking capabilities and group collaboration tools. The Allworx User’s
Guide provides you with the information and instructions needed to:
• Set up and manage your personal contact list
• Benefit from the features of the All-in-One™ inbox, the Allworx unified messaging
capability
• Share documents with others in your organization
• Use the various features of your telephone handset
Key features of the December 2002 release include:
System Key Features
All-in-One™ Unified
Messaging
Provides access to and management of voice and email messages
from a common message center.
Play voicemail messages from your email inbox
Listen to email messages over the telephone
Network Supports local area networking among your peers and internet
access.
Intranet web server
External Internet web server
Internet access
Secured remote access using the Allworx virtual private
network (VPN)
Telephone Fully featured PBX capabilities.
Call control functions
3-way conferencing
Call hunt groups
Auto Attendant
Voicemail
Caller ID display (Name and number)
Distinctive ringing
1
Page 8

User’s Guide
2
Page 9

User’s Guide
2 Getting Started
Welcome to Allworx. This section provides information about:
PC requirements for users and system administrators
Installing the Allworx Communication Center software
Making the first connection to the Allworx server
Tasks and Reminders List
2.1 User PC Requirements
The Allworx features and functions are controlled through a PC client application called the
Allworx Communication Center. The Allworx Communication Center provides a window
through which you interact with the Allworx system. Your PC must have the Allworx
Communication Center installed to access collaboration features such as calendar, email,
scheduling and contact management. Check with your system administrator to be sure your PC
meets the requirements listed in the following sections.
2.1.1 Operating System
Be sure your PC has one of the following Microsoft® operating environments:
Windows XP Home and Professional
Windows 2000
2.1.2 Hardware
Your PC should also meet the following minimum
requirements:
64 MB of RAM
25 MB of available hard disk space
A 10/100 BaseT network interface card (NIC) connected to the Allworx server
over a local area network
Speaker(s) and sound card
Keyboard, mouse and monitor
CD drive
2.1.3 Browser Software
The Allworx system supports the following browsers:
Internet Explorer 5.5 or greater
Netscape 6.2 or greater
Opera 7.0.3 or greater
Mozilla 1.3 or greater
3
Page 10
User’s Guide
2.2 Installing the Allworx Communication Center Software
Each Allworx system comes with an Allworx Communication Center software CD (part number
6000140). Contact your system administrator to obtain this CD. The Allworx Communication
Center is designed to run only on Windows PCs.
Note: A copy of the Allworx Communication Center software is also stored on the Allworx
website in the event the CD is lost or damaged. Contact your System Administrator if you
need to access the Allworx website for the software.
To install the Allworx Communication Center software from the CD:
1. Remove the CD from its protective case and insert it in the PC’s CD drive.
2. The Install Wizard will automatically start. Follow the instructions on the screen to complete
the installation.
Note: If the Install Wizard does not automatically start, open My Computer on the PC
desktop, and double-click on the CD drive icon. Locate the file named “Setup.exe” and
double-click on it to start the Install Wizard.
When the Setup Type window appears, the Wizard offers the options for Typical or Custom
installations. Select Typical
to ensure only the Allworx Communication Center is installed.
When the installation is complete, the Allworx shortcut icon will appear on the desktop.
2.3 Logging On to the Allworx Communication Center
You will need your logon ID and password to access the Allworx Communication Center. This
information is on the Welcome Message you may have received previously. Contact your
System Administrator if you do not have your logon information.
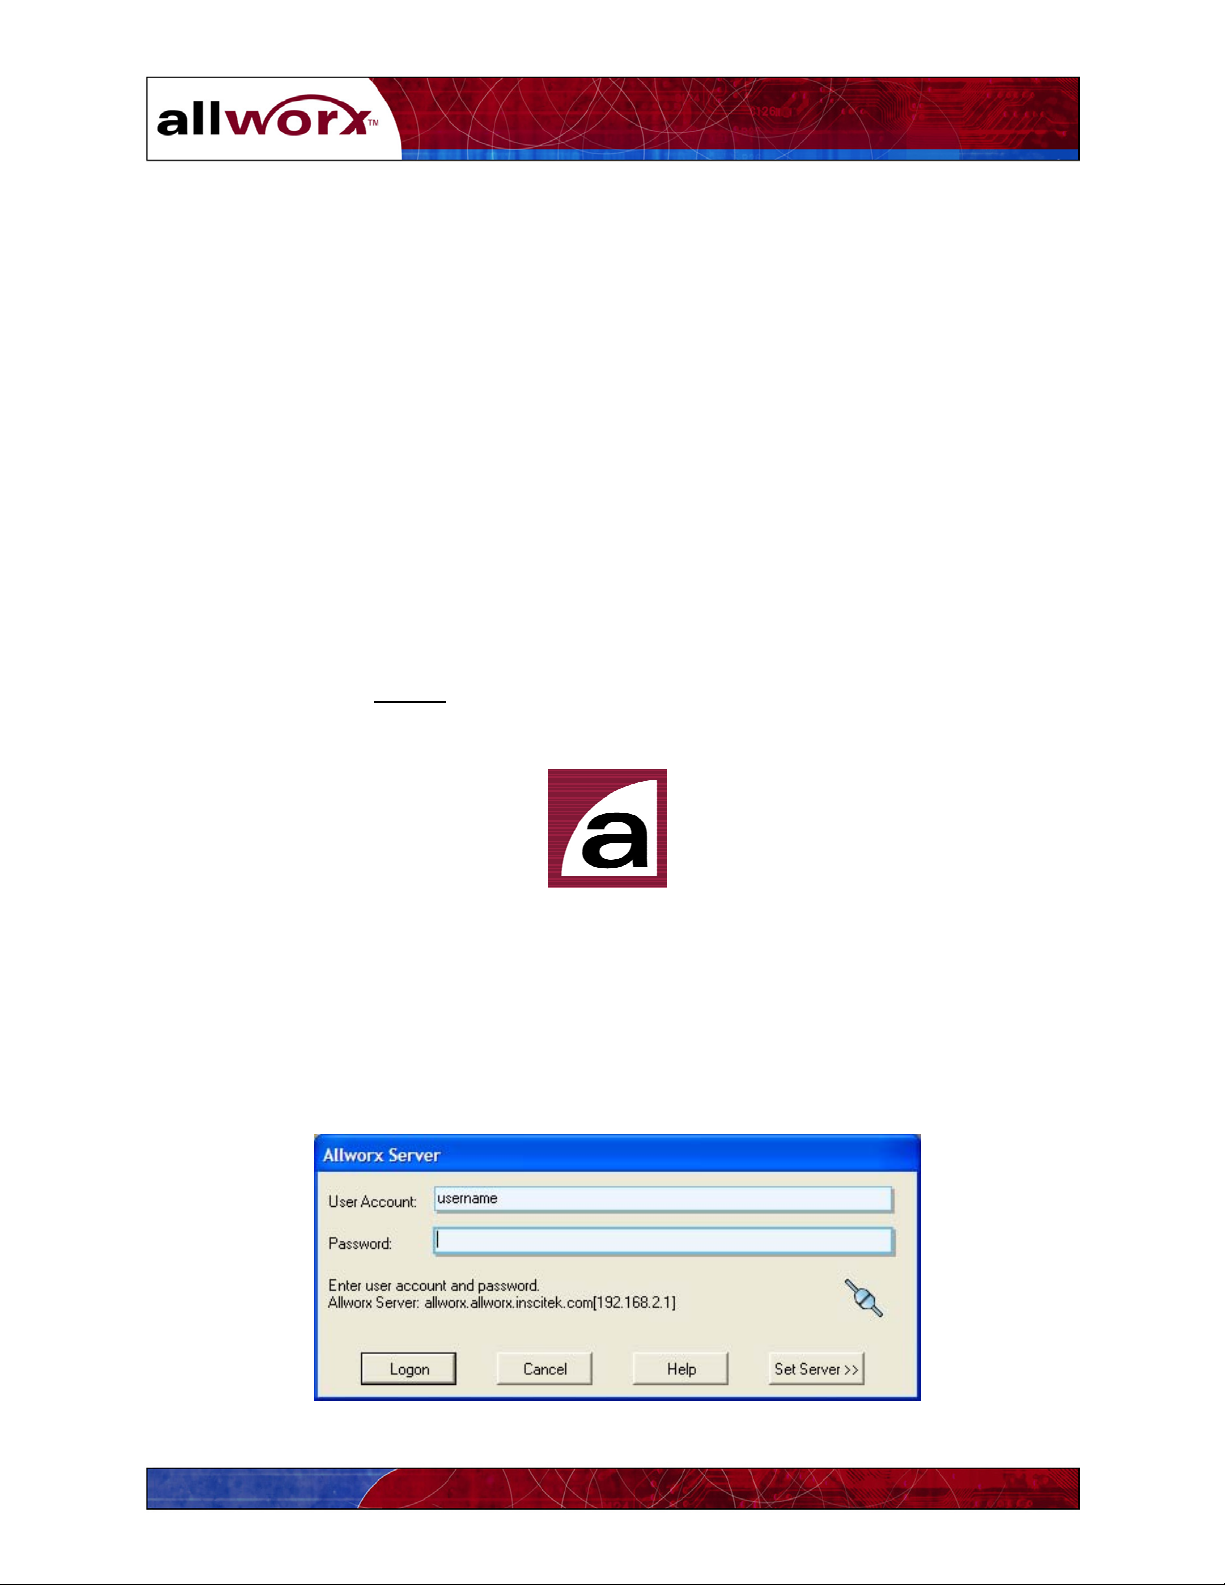
1. Double-click on the Allworx icon on the desktop. The logon dialog box will appear
(Figure 2-1).
Figure 2-1 – Logon Dialog Box
4
Page 11
User’s Guide
Notes: If the Logon dialog box does not appear and an error is message is displayed,
check the network connection to the Allworx server or contact your System
Administrator.
If the Allworx Communication Center was previously opened, click on the Allworx icon in
your PC’s Task bar at the bottom of the Windows screen to log in again.
2. Once you have logged on with the password assigned by your System Administrator, you
may want to change it. Refer to Section 3 to change your password.
3. Immediately after logging on the Tasks and Reminders
window may appear. Refer to
Section 2.5
2.4 Allworx Communication Center Overview
The Allworx Communication Center helps you quickly locate and activate the various features
and functions of the Allworx system. Figure 2-2 is an example of the Allworx Communication
Center display.
Calendar
Create and manage your
business and personal
activities and events.
Contacts
Create and manage your
person contacts, contact
groups, and access
company contacts.
Messages
Use the Allworx All-inOne Inbox to access and
manage voice and email
messages.
View Pane
Status Bar
Task Bar
Information Pane
Connection information
Drop -down
feature list
Active Call Route
Figure 2-2 – The Allworx Communication Center
5
Page 12

User’s Guide
View Pane
The View pane provides single-click access to the Contacts and Calendar functions of the
Allworx system.
Information Pane
The Information pane provides the details of the function you selected in the View pane. For
example, it will display your list of contacts.
Task Bar
The Task bar provides single-click access to commonly used functions.
The Exit
The Logoff
Communication Center will remain active. It can be opened again by double- or right- clicking
on the Allworx icon in your PC’s Windows Task bar. You will need to login again next time
you open the Allworx Communication Center.
The Layout Manager
You can arrange your Information pane layout in four different ways - single window, double
window horizontally split, double window vertically split, or triple window.
button is used to close the Allworx Communication Center window and application.
button is used to close the Allworx Communication Center and log off. The Allworx
button is used to create multiple information areas as shown in Figure 2-3.
Single Window
Double Horizontal Windows
Double Vertical Windows
Triple Windows
Figure 2-3 – The Allworx Communication Center Layout Manager
6
Page 13

User’s Guide
To create your preferred Information pane layout:
1. Click on the picture in the Layout Manager
dialog box of the Information pane layout
you want. The Layout Manager dialog box will close automatically.
2. Click on the icon in the View pane of the desired function to select the function to display
in each window. Or make your selection from the drop-down feature list in the upper
right corner of the Allworx Communication Center. Repeat this for each window.
3. Set each window to the size you prefer by moving the dividing line(s) up or down, or left
or right depending on the layout. Place your mouse pointer on the line. When the pointer
changes to a double arrow click and drag the line to the desired location. Release the
mouse when the window is the right size.
4. To save the Information pane layout, click the Layout Manager
the contents of the Store a Layout
Save Current Layout
to save the new layout.
field and type in a name for your new layout. Click
button again. Highlight
To restore a particular layout, click the Layout Manager
the Restore a Layout
section of the dialog box. Highlight the layout you wish to use and
button. Open the pull-down menu in
click. The dialog box will close and the new layout will appear in the Allworx
Communication Center.
To delete a particular layout, click the Layout Manager
the Delete a Layout
layout. Click Delete Layout
section of the dialog box. Select the location and file name of the desired
. Close the Layout Manager dialog box.
button. Click the Browse button in
The User Settings button is used to enter and modify your user information including password,
business and home addresses, business and home telephone numbers and email, and telephone
features. User Settings are discussed in Section 3.
The Reminders
button provides a list of reminders of calendar events for which you have been
scheduled. You can also add your reminders by clicking the Add Reminder button.
The About button displays information about the Allworx Communication Center software such
as version number.
The Help button provides a brief introduction to the features and functions of the Allworx
Communication Center.
Status Bar
The Status bar provides current information about the following Allworx operations:
The Current User
field indicates your user name and the date and time when you last logged on.
The Connection Status
field indicates the name of the Allworx server to which your PC is
connected.
7
Page 14
User’s Guide
The My Presence
determines how your incoming calls will be handled as explained in Section 4.
2.5 Tasks and Reminders
The Allworx system provides reminders for various scheduled and personal activities. Each time
you login, the Tasks and Reminders
can also check your tasks and reminders by clicking the Reminders
Communication Center Task bar. You will receive reminders for events scheduled by others
through the Allworx Calendar (Section 9). You can also create your own reminders for personal
activities.
field indicates your current location (e.g., In Office, At Home, etc.), which
window may appear if reminders have been triggered. You
icon on the Allworx
Figure 2-4 – Tasks and Reminders Window
To create a new reminder, click the Add Reminder
button. The window in Figure 2-5 will
appear. Enter the Subject of the reminder, and the date and time at which the reminder is to
expire (i.e., when the reminder should be activated and appear in the Tasks and Reminders List).
Click OK
to save the reminder.
When a reminder is presented, you can:
Dismiss
– The reminder will be permanently deleted.
Remind me again…
- Set a later time at which the reminder will reappear.
Open Appointment… - Display the details of the event.
8
Page 15

User’s Guide
Figure 2-5 – New Reminder Dialog Box
9
Page 16

User’s Guide
.
10
Page 17

User’s Guide
3 Creating and Updating Your Personal Information
The Allworx system allows you to manage your system identification information, personal
information, and a variety of system features.
This section provides information about:
Displaying and changing your system identification
Displaying and changing system features
Displaying and changing your personal information
Click the User Settings
System User Settings for Allworx User (Login ID) dialog box will appear (Figure 3-1).
The System User Info tab allows you to update your identification information and certain
Allworx system features.
Identification
button on the Allworx Communication Center task bar. The Update
You can change your Full Name
The Full Name
field includes first, last and middle names. Enter the name directly in the
field. Or, click the down arrow to fill in the Full Name
, Display Name and Password.
form, including prefix (Mr., Mrs.,
etc.) and suffix (Jr., II, etc.).
The Login Name field becomes part of the Allworx email name (e.g.,
jwb@yourcompany.com).
The Display Name
field is used for Caller ID. It is automatically filled in as the Full
Name field is entered, but can be changed.
The Password
must comprise at least 4 alphanumeric characters, and cannot have special
characters (?, /, etc.).
Click Change Password to change your password. The Password Reset dialog box
will appear.
1. Enter the password in the New Password
2. Enter the new password again in the Verify New Password
the same as in the New Password
3. Click the Apply
button. If the password is not accepted, an error message will
field.
field.
field. Type it exactly
appear. Repeat the Password Reset at step 1. If the password is accepted, the
Password Reset dialog box will close.
The Phone Extension
Administrator.
is the extension number assigned to you by the System
11
Page 18

User’s Guide
Figure 3-1 – User Settings – System User Information Dialog Box
System Features
The System Features section of the dialog box has been setup by your System
Administrator giving you permission for one or more of the following features. Contact
your System Administrator if you have questions about your access to these features.
Voicemail
– If Enable Voicemail is checked you have access to voicemail services. Note
the maximum number of voicemail messages you have been allocated.
Enable Dial-by-Directory – If this box is checked, your name will be played in the
Allworx auto-attendant directory (...John Smith extension 114...).
Email
– If Allow POP3 Email Access is checked, you have the ability to receive external
email in your Allworx Inbox. Note the amount of disk space allocated to you for both
voicemail and email messages.
12
Page 19

User’s Guide
The Person Info tab (Figure 3-2) allows you to enter more information about yourself or update
existing information. Your System Administrator may have filled in some of this information
previously.
The Primary Address,
that will be visible throughout the Allworx system.
Click the Private
Click the Update
Primary Phone, and Primary Email fields represent information
box if the information in this form is to be confidential.
button to save new or changed information.
Figure 3-2 – User Settings – Person Information Dialog Box
13
Page 20

User’s Guide
The Person Details tab (Figure 3-3) allows you to enter still more information about yourself.
Your System Administrator may have filled in some of this information previously.
Click the down arrow next to the Birthday
Click the left
and right arrows to change the month display. Click the date desired.
The Notes
field can contain any other information about the user. You can also paste
information into the field from other applications such as Microsoft Word.
Click the Update
button to save the information.
and Anniversary fields to display a calendar.
Figure 3-3 – User Settings – Person Details Dialog Box
14
Page 21

User’s Guide
4 Creating and Updating Your Telephone Handset Information
You can enter and update features of the physical telephones, referred to as handsets in the
Allworx system. This section provides information about:
Modifying handset features
Creating and updating presence profiles and call routes
4.1 Handset Features
The Handset Info tab (Figure 4-1) allows you to change certain features and settings of any
handsets assigned to you.
Figure 4-1 – User Settings – Handset Info Dialog Box
Handsets Assigned to User
This section of the window provides a list of handsets that have been assigned to you.
Select a handset in the left pane to show its associated information in the right pane.
15
Page 22

User’s Guide
Phone: (description)
The description reflects the name of the handset assigned by the System Administrator
and the associated analog port or TCP/IP address.
The Outgoing CallerID
and Phone Description are automatically filled in by the Allworx
or may have been completed by the System Administrator. However, you can change the
entries in these fields. Place your mouse pointer in a field and click to change the entry.
The Outgoing CallerID
field will appear on handsets within your organization that have
display capabilities.
Note: The Outgoing CallerID is not passed to the telephone company and will not
appear on telephones outside your organization.
The Phone Description
field can be any meaningful description such as Line 2, Marketing
Fax Machine, etc.
This Handset’s Call Handling
The Handset Call Handling features may have been set by the System Administrator.
However, you can now make changes. These features apply specifically to the handset
for which they are defined as indicated by the Phone Description
To activate Do Not Disturb,
check the box. Incoming callers will hear a ring tone, but the
.
handset will not actually ring. Calls to this handset will be routed as defined in User
Extension Setup.
To activate call forwarding, click the Forward to Ext
. button. Open the pull-down menu
and click the desired extension.
Advanced Setup
Advanced Setup
features may have been assigned to your handset. You cannot change
these features. Contact your System Administrator for information about these features.
Item Description
Allow Making
Calls
Outside Calls Do
Not Require 8 +
PINCode
When calling
outside
Enable Receiving
Calls
Indicates whether calls can be made from this handset to internal
handsets or outside numbers.
May require users to enter an authorization code to place outside
calls. The PIN code must always begin with 8, followed by 5
digits.
Indicates the telephone company lines and the order in which
they are used for calling outside.
Indicates whether incoming calls are permitted on this handset.
If not enabled, callers will hear ring tones and the call will be
handled according to the designated call route.
16
Page 23

User’s Guide
Second Call
Handling
Supports the following options for how a second incoming call
should be handled:
Option Description
Busy The caller hears a busy signal and the On
the Busy Call Route is followed.
Not Busy (Only applies to analog handsets.) The
caller hears a ring signal and the Primary
Route is followed.
Call
Waiting
The call recipient receives a beep tone every
16 seconds while the second incoming call
is active. The Primary Route
Enable Message
Provides an audio indicator to the user that a message is waiting.
Waiting Stutter
Dial Tone
Enable Message
Waiting Light*
Provides a visual indicator to the user that a message is waiting.
If the handset
does not support this feature, be sure this feature is
disabled.
Enable Caller ID
Display*
Click this box to present the incoming caller’s ID on the
handset‘s
display. If the handset does not support this feature, be
sure this feature is disabled.
Handset Caller ID
Type
Select the caller ID code format from the pull-down menu.
Refer to the manufacturer’s documentation provided with the
handset.
*Applies to handsets that support this feature.
is followed.
4.2 Creating and Managing Presence Profiles
Allworx allows you to set up inbound call handling plans to accommodate a variety of scenarios.
This high degree of flexibility will meet the needs of multi-location organizations, remote
management situations, frequent travelers or telecommuters. Calls can be routed and terminated
in a variety of ways depending on your active Presence
profile. A different call route and
termination arrangement can be configured for any or all of the following presence profiles.
At a
In Office On Vacation
Meeting
At Home On Business
Busy
Trip
Away
17
Page 24

User’s Guide
The marketing manager may set her presence profile to “At a Meeting,” so her calls are first be
routed to the main receptionist. If the receptionist does not answer or his handset is busy, the call
is then routed to the manager’s voicemail. Or, when she changes her presence profile to “On a
Business Trip,” her calls might be directly routed to her cell phone.
A presence profile is made up of one or more Caller ID Filters
The caller ID information of each incoming call is compared to the caller ID filters in the order
defined. When the caller ID information matches a filter, the associated call route and
termination plan is applied.
For example, the regional sales manager, Carl Jones, sometimes does his paper work at home
and wants calls from his western New York territory (area codes 315, 716 and 585) routed to the
assistant sales manager, Todd Smith, who is in the office. All other calls should terminate
directly to Carl’s voicemail. Figure 4-2 shows the caller ID filters in the left pane of the window.
Caller ID filter 91315* is highlighted, and the associated Primary Route
pane of the window. (91 is an internal prefix attached to the caller ID filter).
and their associated Call Routes.
is shown in the right
Figure 4-2 – Primary Call Route for Caller ID Filter 315*
Figure 4-3 shows the caller ID filter for all other calls outside the western New York territory.
All calls are routed directly to Carl’s voicemail after the handset rings one time.
18
Page 25

User’s Guide
In addition to the Primary Route, you can also define an On Busy Route to a caller ID filter. If
any of the handsets or extensions in the Primary Route ring busy, the call is directed according to
this secondary route.
Lastly, you can set up a Presence profile even if you don’t have a handset, but have an extension
(for example, voicemail boxes only). Consider the telecommuter who has calls directed to a
headquarters office. The call may first come to an administrative assistant, but route to the user’s
voicemail if that line is busy or not answered.
Figure 4-3 – Primary Call Route for Caller ID Filter *
4.2.1 Creating Caller ID Filters
Creating Caller ID filters is the first step in building a Presence profile.
1. Click the User Settings
button in the Task bar of the Allworx Communication Center.
The dialog window will display several tabs in the Update User Settings dialog box.
2. Click the User Ext. Setup
tab. The dialog box like the one in Figure 4-2 will be
displayed.
3. Open the Pick a Presence to Edit
pull-down menu and select a presence. The presence
you select will contain the caller ID filters defined in the following steps. Call routing
plans will be added in the following section.
19
Page 26
User’s Guide
4. Define the first Caller ID filter for the selected Presence profile. The default is all calls
will receive the subsequent call route treatment. However, you can specify other Caller
ID filters. To add a new filter:
Click Add New Route
. The window in Figure 4-4 is displayed.
Figure 4-4 –Add New Caller ID Rule Dialog Box
Enter the Caller ID pattern for an External
choose all calls from the 585 area code. Or, click Internal User
inbound call. For example, type 585* to
and choose an extension
from the pull-down menu. For example, you may want to route all calls from your
assistant to your cell phone for your On Business Trip
Presence profile. Your assistant
wouldn’t need to remember your cellular number, just your internal extension.
5. Add as many Caller ID filters as you need for each Presence profile.
6. To remove a Caller ID filter, highlight the filter name, then click Delete Selected Route
.
7. You can change the order of the Caller ID filters using the Move Selected… up and down
arrows.
8. To create another Presence profile, open the pull-down menu and Pick a Presence to Edit.
Repeat steps 1-7. You can create up to seven different Presence profiles.
4.2.2 Configuring Call Routes
The second step in creating a Presence profile is configuring the Primary
or On Busy call routes
for each Caller ID filter. Call routes can include simultaneous ring groups and hunt sequences,
configurations common to many multi-line businesses (Figure 4-5). The steps below enable you
set up call routes that meet the varying needs of your organization.
20
Page 27

User’s Guide
q
Simultaneous
Ring Group
Se
Hunt
uence
Figure 4-5 – Ring Group and Hunt Sequence Call Route Example
Figure 4-6 – Add Connection Attempt Dialog Box
To set up a Primary Call routing for a caller ID filter:
1. Be sure you have selected the correct Presence to Edit.
2. Highlight the Caller ID filter for which you want to configure the Primary call route.
3. Click No Connection Attempts Defined! Click to add
. The Add Connection Attempt
dialog box will appear (Figure 4-6).
21
Page 28

User’s Guide
4. Open the pull-down menu and highlight the first handset to which the incoming call will
be directed. Click Add
attempt.
You can also specify the number of rings and the type of ring for each handset.
Ring Type Description
Default One standard ring for internal calls. Two standard rings
. Repeat this if more than one handset is to ring on the first
for external calls.
Note: Some SIP phones may not support these ring types.
Double (int), Single
(ext)
Two standard rings for internal calls. One standard ring
for external calls.
Note: Some SIP phones may not support these ring types.
Single One standard ring
Double Two standard rings
Double One short and one long ring (· –)
Double One long and one short ring (– · )
Triple Three standard rings
Triple
Two short and one long ring (· · –)
Triple One short, one long, and one short ring (· – · )
Triple One long ring and two short rings (– · ·)
Click OK to save the first connection attempt telephone list.
5. If there is to be another connection attempt after the first has completed its sequence,
click Click to add another connection attempt.
Repeat Step 4 above.
Repeat Steps 4 and 5 until all connection attempts have been defined.
Click the X in the call attempt box to delete a call attempt.
6. Lastly, specify the action to take when the group has been exhausted. Click the
appropriate button.
If Voice Mail
is chosen, open the pull-down menu and select the user.
If Call External Number is chosen, select the format that is appropriate for the user and
enter the external number.
Note: You can enter any domestic or international dialing plan, but no more than 31
digits. Enter asterisks between digits as needed to provide pauses to accommodate your
telephone system. Each asterisk provides a 1-second delay.
7. Click Update
to save the call route configuration.
22
Page 29

User’s Guide
Your active Presence profile (My Presence) will appear in the Allworx Communication
Center status bar at the bottom of the window (Figure 2-2). Open the pull-down menu to
change your call route as your presence changes.
If Second Call Handling
Adminstrator) for any handset in the Primary call route, you can now define an On Busy Route.
This route will be followed in the event any of those handsets in the Primary route rings busy.
has been defined as Busy (Advanced set up – check with your System
1. Be sure you have selected the correct Presence to Edit.
2. Highlight the Caller ID filter for which you want to configure the On Busy call route.
3. Repeat steps 1-7 above.
23
Page 30

User’s Guide
24
Page 31

User’s Guide
5 Using the Features of Your Handset
The Allworx system supports standard analog handsets and more advanced internet protocol (IP)
handsets. The Allworx handset features may operate differently depending on the type of
handset and manufacturer. Check with your System Administrator if you are not sure about your
handset.
This section provides information about making and receiving telephone calls, and about the call
handling features of the Allworx system.
5.1 Making and Receiving Telephone Calls
5.1.1 Dialing External Phone Numbers
To dial an outside telephone number, lift your handset, listen for a dial tone, press 9
, and dial
the external telephone number.
Note: You may hear silence for about two seconds as the phone number is sent to your local
telephone company.
If you receive a busy signal after dialing, this can occur because either there is no available
outside line or the called number is busy.
5.1.2 Call Blocking and Restrictive Dialing
Your System Administrator may have established rules for blocking outbound calls and
restricting certain dialing patterns. Contact your System Administrator for more information.
5.1.3 Caller ID Display
The Allworx system will provide Caller ID information to your handset if this information is
available from your local telephone company. Caller ID information may be stored on your
handset and used for dialing back incoming callers. Contact your System Administrator for
more information.
25
Page 32

User’s Guide
5.2 Allworx Call Handling Feature Operations for Analog Handsets
Feature Description Operation
Call Forwarding Sends an incoming call to
another handset if your
handset is busy or not
answered.
Note: If the handset to
which calls have been
forwarded is not
answered, the call will be
routed to voicemail for
the user assigned to the
forwarded handset.
Do Not Disturb Automatically sends
incoming calls for your
extension to your
voicemail without
ringing your handset.
Call Park and
Retrieve
Allows a call to be put on
hold then picked up at
any extension.
1. Dial 45.
2. Enter the extension number to which
all calls will be forwarded (100-
299).
3. Hang up the handset.
Dial 450 to turn off the feature.
1. Pick up your handset.
2. Dial 420 to turn on the feature.
3. Dial 421 to turn off the feature.
1. Press the flash button.
2. Dial 700. Listen to the prompt
carefully. It will say the number of
the extension where the call is
parked.
3. Hang up the handset.
4. Tell the call recipient the parked
number. You can use the Paging to
Audio feature if this is activated.
Blind Call
Transfer
Allows a call to be
transferred to another
extension without talking
to the recipient.
Continued
26
5. The recipient picks up another
handset, dials the parked number
(701-709), then speaks to the caller.
1. Press the flash button. Listen for
the dial tone.
2. Dial the number to which the call
will be transferred.
3. Hang up the handset immediately.
Page 33

User’s Guide
Feature Description Operation
Attended Call
Transfer
Allows a call to be
transferred to another
extension, and talk to the
recipient before
completing the transfer.
Call Pickup Allows you to answer a
call ringing at another
extension.
Consultation Allows you to interrupt
the current call to talk
with a third party.
Call Waiting Allows you to take a
second call while you are
currently on a call.
1. Press the flash button. Listen for
the dial tone.
2. Dial the number to which the call
will be transferred.
3. Talk with the recipient.
4. Hang up the handset.
1. Pick up your handset.
2. Dial 7 and the number of the
ringing extension.
1. Press the flash button. Listen for the
dial tone.
2. Dial the third party and have your
conversation.
3. Press the flash button when finished
to disconnect the third party and
return to the original call.
1. If another calls comes in while you
are talking, you will hear a chirp
ring tone.
2. Press the flash button to answer the
new call. The first caller is put on
hold.
3. Press the flash button again to
return to the first call. Repeat this
to switch between callers.
4. Hang up the handset to disconnect
the active party. If the other party
is still on the call, you will hear a
chirp ring. Pick up the handset to
talk with the other party. Hang up
to disconnect.
Continued
27
Page 34

User’s Guide
Feature Description Operation
Paging to Audio
(Intercom)
Three-way
Conference
Line on Hold
Reminder
Allows you to make
general announcements
over your organization’s
public address or
intercom system.
Allows you to include a
third person in a
conversation.
Indicates that you
currently have a call on
hold.
1. Pick up your handset.
2. Dial 402.
3. Announce your message.
Hang up the handset.
1. Establish the first conversation.
2. Press the flash button.
3. Dial *33.
4. Dial the telephone number of the
third party.
5. After speaking with the new party,
press the flash button to add them to
the conversation.
6. To disconnect only the third party,
press the flash button again. Hang
up to disconnect all parties.
You will hear a chirp-ring every minute
while a call is on hold and the receiver
is on-hook.
5.3 Allworx Call Handling Feature Operations for IP Handsets
The Allworx call handling feature descriptions for IP handsets are the same as for analog
handsets. However, the features may operate differently for various IP handset models
depending on the manufacturer of the handset. Consult the user’s guide for your particular
handset or contact your System Administrator for more information. Consult the Allworx
website (www.allworx.com
) for the current list of Allworx qualified handsets.
28
Page 35

User’s Guide
6 Managing Your Contacts
The Allworx Contact manager allows you to create and update your own list of important
contacts, and see key organization contacts that are maintained by the System Administrator.
This section provides information about:
Displaying the organization’s commonly used contact list and your personal contact list.
Creating and maintaining your personal contacts, including
• People contacts
• Business contacts (companies and organizations)
• Personal distribution lists or contact groups
Key features and functions of the Allworx Contact manager
6.1 The Allworx Contact Manager
The Allworx contact manager provides a view of all contacts, the functions needed to display,
update and delete contacts, and the ability to add new contacts. Click the Allworx
Communication Center Contact
Task Bar
button in the View pane (Figure 6-1).
The Task bar provides the ability to add new contacts and contact groups, delete contacts, open a
contact to see more detail or update the information, import
export
your contact list to an Excel document, and print contact information.
contact information from a file,
Menu Bar
The Contact pull-down menu provides the same functions as those displayed on the Task bar.
The View
pull-down menu allows you to select which columns of contact information to display
in the Information pane.
Contact List Tabs
There are three lists of contacts that may be displayed using the Contact Selection Tabs under
the Menu bar. The first list comprises your personal contacts and contact groups and is identified
by your user name on the tab below the Task bar. The second list comprises Company contacts
that your System Administrator creates and maintains. These are individual contacts and contact
groups that are commonly used within your organization, for example suppliers, customers, or
emergency contacts.
Note: Only the System Administrator can change Company contacts and groups.
The third list combines both personal and Company contacts. Click on the tab to select the list
you need.
29
Page 36

User’s Guide
r
Personal Contact View
Your list of contacts and
contact groups.
Contact List
Selection
Tabs
Company Contact View
Contacts and contact groups
common to your organization.
Menu Ba
Contact Listings
Personal and Company
Contact View
Combined contact list.
Task Bar
Figure 6-1 – The Allworx Contact Manager
6.2 Adding a New Contact
New contacts can be added by clicking on New Person
, New Business, New Resource, or New
Group on the Task bar (Figure 6-2).
New Person –
Click on the New Person button to enter information about a new individual
contact. Select the tab at the top of the dialog box to enter Person Info and Person Details. The
Primary Address
, Primary Phone, and Primary Email will appear in the Contact Screen list when
the contact is saved. You can choose from any of the available options for these by selecting the
desired entry from the pull-down menu associated with the field. Check the Private box if this
contact is not to be viewed by others in your organization. After completing your entries and
selections, click the Add
button to save the new contact and close the window.
30
Page 37

Business Contacts
Companies and organizations
for which you need address,
telephone, web site and key
contact information. These
contacts can be inserted into
your email addresses.
Person Contacts
People for whom you need
address, telephone, email,
and other related
information.
User’s Guide
Resource Contacts
Commonly used items such
as conference rooms,
projectors, or laboratory
equipment for which you
need to determine location.
Contact Groups
Groups of related person,
business or resource
contacts.
Figure 6-2 – Add New Contacts Buttons
New Business -
Click on the New Business button to enter information about a new business
contact. Note that the business Contact Name will appear in the Assistant’s Name column in the
Allworx Contact Manager. After completing the Business Info fields, click the Add
button to
save the new contact and close the New Business Info window.
New Resource -
Click on the New Resource button to enter information about a new resource.
Resources are commonly used items or facilities that are shared within your organization.
Contact name, telephone, and email may represent the person in your organization responsible
31
Page 38

User’s Guide
for managing the resource. After completing the Resource Info fields, click the Add button to
save the new contact and close the Resource Info window.
New Group -
Click on the New Group button to enter information about a new contact group
The Add New Group Contact dialog box will appear (Figure 6-3). Contact groups are lists of
people, businesses, resources or other groups that are related, for example, by function or
location. Enter the name
of the new contact group in the first field.
Figure 6-3 – The Add Contact Group Members Dialog Box
To add members from your Allworx contact list to your contact group, click the Add Contact
Members button. The Contact Picker dialog box in Figure 6-4 will appear.
Highlight the entries in the left pane you wish to include in your contact group and click
the Members button. If you wish to remove members, highlight the entry in the right
pane and click the
button.
To find a name that does not appear in the left pane, begin keying the last name in the
Find Name
field. As you type, new contacts will appear that match the letters. Or, click
and drag the scroll bar to display more contacts.
When you have completed adding contacts, click OK to save the contact group and close
the window.
32
Page 39

User’s Guide
Figure 6-4 –Contact Picker Dialog Box
To add members that are not currently in your Allworx contact list, click the Add Non-Contact
Members button. Enter the information in the dialog box (Figure 6-5) and click OK to save and
add the contact to the group. The window will close automatically.
Figure 6-5 – Non-Contact Dialog Box
You can remove members by highlighting one or more entries and clicking the Delete
the Add New Group Contact window.
33
button on
Page 40

User’s Guide
When you have finished creating your contact group, press the Add button to save the contact
group and close the Add New Group Contact window.
6.3 Updating Contact Information
To update a contact, highlight the entry in the Contact Manager window and click the Open
button (or just double-click
Update
to save the contact information and close the window.
on the entry). When you have finished making changes, click
6.4 Deleting Contact Information
To delete a contact, highlight the entry in the Contact Manager window and click the Delete
button on the Task bar.
6.5 Contact Features
6.5.1 Searching Contacts
To search for a particular entry in the contact list:
1. Place your mouse pointer in any field of any contact entry in the list display.
2. Click once in the field.
3. Type the first few letters of the column-specific information for which you are searching.
For example, if your are in the Name column, type the first few letters of the last
contact’s last name. Or, if you are in the email field, type the first few characters of the
contact’s email address. As you type, the Allworx Contact Manager will move to the
entry that matches the characters you typed. The characters you typed will be highlighted
in the resulting contact listing.
6.5.2 Selecting Contact Columns
You can choose which columns of information are to appear in your Contact Information
pane using the View
button on the Menu bar.
1. Click the View button, then move your pointer over the word Columns to display the
Columns menu.
2. Highlight the column you wish to display or remove.
3. Click to check (select) or uncheck the column. The column will be added to or
removed from the display. Repeat this process until all desired columns appear in the
Information pane.
4. Click anywhere on the Information pane to close the View Columns menu and save
your selections.
34
Page 41

User’s Guide
6.5.3 Column Control
You can change the position of the columns and change column width.
To change the position of a column:
1. Highlight the column heading.
2. Click and drag the column to its new location, moving either left or right.
3. Release the mouse when the column heading is in the desired location.
To change the width of a column:
1. Place the mouse pointer on the line separating it from the column to the right or left.
2. When the double arrow pointer appears, click and drag the line to the right or left.
3. Release the mouse when the column reaches the desired width.
6.5.4 Sorting Contacts
You can change the order of contacts displayed in the Contact Manager by clicking on the
column heading. For example, names are normally shown in ascending (a-z) alphabetical
order as indicated by the upward pointing triangle in the column heading. To reverse the
alphabetical order (z-a), click on the column heading. The triangle now points downward.
6.5.5 Printing Contacts
To print contact listings:
1. Choose the contact list to be printed by clicking on the desired Contact Selection tab.
2. Click the Print
button on the Task bar. Contacts will be printed in the order in which they
are displayed.
Note: You may click the Print Preview
button first to see how the actual printed output will
appear.
35
Page 42

User’s Guide
36
Page 43

User’s Guide
7 All-in-One™ Inbox PC Message Center
The Allworx All-in-One inbox provides convenient access to email, voicemail and calendar
messages from your PC or from your handset. This section provides instructions for accessing
and managing messages from your PC. Section 8 provides instructions for accessing and
managing messages from a telephone. Important benefits of a unified message center include:
Eliminating time and energy spent retrieving messages from multiple points.
Increasing your productivity.
Reducing communications errors, confusion with contacts and other problems that arise
when there are too many messages from too many sources.
Reducing message redundancy.
Increasing the potential for better customer response time.
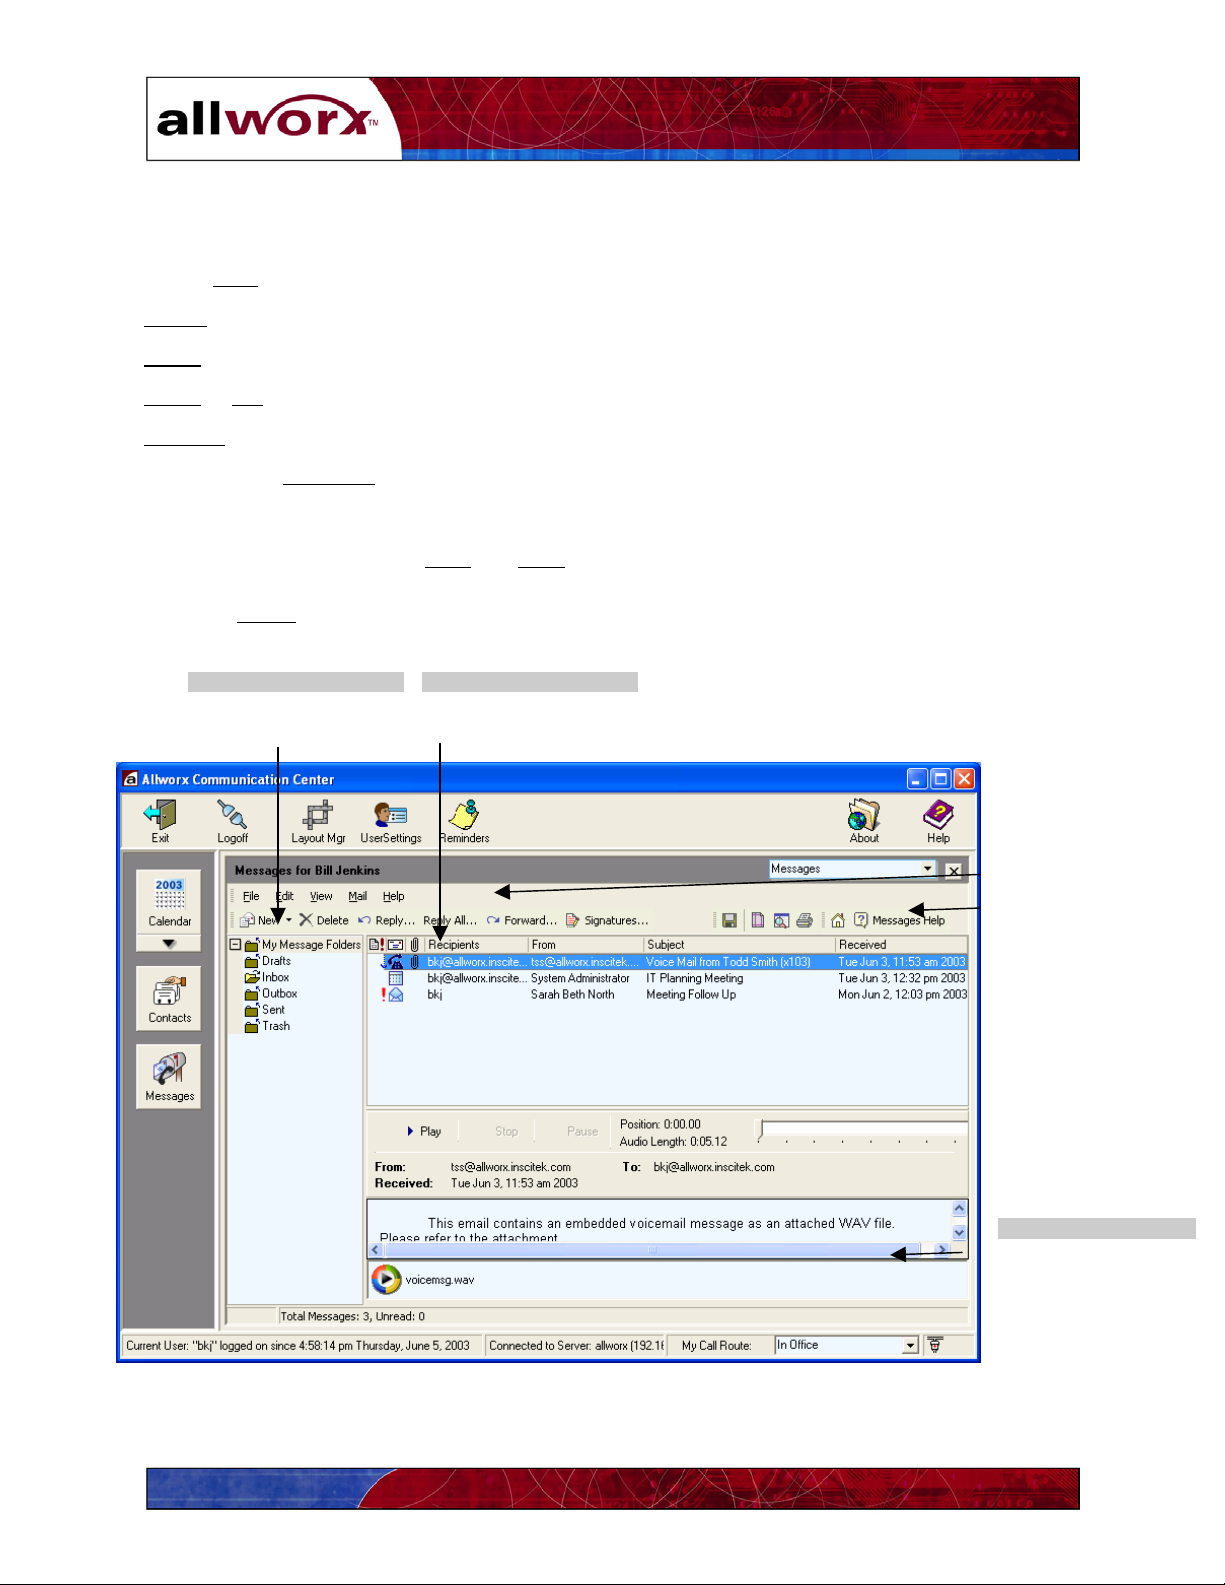
7.1 The Allworx Message Center
The Allworx Message Center provides a view of all messages and the functions needed to
manage messages. Click the Messages
(Figure 7-1).
The Allworx icon in your PC’s Task bar will change to an “envelope” when a new message is
received in your Allworx Inbox. New incoming messages are shown in bold type. Your inbox
can include email, voicemail and calendar events messages as indicated by the icon to the left of
each message.
button in the Allworx Communication Center View pane
To read a message, highlight the message and choose File
and Open. Or, double-click on a
message to open it. Once a message has been read the bold highlight is removed and the
Allworx icon returns to normal.
To Reply
to or Forward a message, highlight the message and click the appropriate command
button.
If the Preview
feature is turned on, you can do the following directly from the Allworx Messages
Center:
• See the contents of the incoming message automatically.
• View message attachments
• Listen to your voice message directly from the Allworx Messages Center using the Play
and Stop buttons and the playback progress control bar.
• Accept or decline calendar invitations.
Refer to Sections 7.3 – 7.5 for more information on reading and responding to different types of
messages.
37
Page 44
Task Bar
The Task bar mail features include:
User’s Guide
Create New
Delete
Reply
Reply
Forward
Add a custom Signature
messages or message folders.
unwanted messages.
only to the sender.
to All message recipients.
the message.
to your messages. You can choose the font for your text and indicate
whether the signature should be added automatically to new outgoing email messages.
Click the appropriate icon to Save
and Print messages.
Click the Home icon to be automatically connected to the Allworx.com home page.
Message Folders
Organize and manage
your messages
Message Display
Locate email, voicemail
and calendar messages.
Menu Bar
Task Bar
Preview Window
Preview the contents of
your messages.
Figure 7-1 – Allworx Messages Center
38
Page 45

User’s Guide
Menu Bar
The File button is used to open, save and print messages and includes Page Setup and Print
Preview functions.
The Edit
The View
and collapse or expand the folder list display. You can also choose to display a Preview
messages. The Preview
view Appointment Details
The Mail
the following features:
button is used to select all messages.
button allows you to select and change mail message headers, select tool bar options,
of
mode allows you to see the contents of a message including attachments,
then Accept or Decline invitations, and Play voicemail messages.
button provides the same functions as those displayed on the Task bar. It also provides
• Mark Message as Read/Unread – Applies bold face type to the message display as if it
were a new message.
• Set Message Priority
normal, or low (
– Allows you to indicate message priority as high (! appears),
↓ appears). Sort your messages in priority order by clicking the Priority
icon at the top of the column.
Changing Column Width
To change the width of a Message Header column, place your mouse pointer on the line between
two columns. When the double-arrow appears, click and drag the line to change the column
width.
Message Folders
The Allworx Message system provides several standard message folders:
The Drafts
folder stores messages that were started but not yet sent. These messages can be
reopened, edited, and sent as needed.
The Inbox
folder contains all incoming messages.
The Outbox
folder contains messages that are in the process of being sent. Messages usually stay
in this folder a very short time unless there is a network connection fault. It may also contain
messages that you created while working offline. These messages will be sent next time you
connect to the Allworx server.
The Sent
folder contains messages that have been sent. You should review this folder
periodically and delete unwanted messages to preserve Allworx server disk space.
39
Page 46
User’s Guide
The Trash folder contains messages that have been deleted. You should review this folder
periodically and delete unwanted messages to preserve Allworx server disk space. Messages
deleted from the Trash folder are permanently removed.
To move messages from one folder to another:
1. Highlight the message in the message display window.
2. Click and drag the message to the desired folder in the message folder list.
You can create additional folders within any of the standard Allworx message folders:
1. Highlight the folder into which the new folder will be placed.
2. Click the drop-down arrow next to New
in the Task bar and select Mail Folder. Or, you
can just right-click on the folder in which you want to place the new folder and select
New Folder
.
3. Type the name of the new folder.
4. Press Enter
on your keyboard.
Click the + or - box to expand or contract the message folder display.
7.2 Creating and Sending New Email Messages
To create a new message, click New
in Task bar. The Allworx Message box will appear (Figure
7-2).
Menu Bar
Task Bar
Edit Bars
Type your message content here.
Figure 7-2 – Allworx Email Message Window
40
Page 47

User’s Guide
1. Enter the names of the message recipients in the To, Cc and Bcc fields. Or, click the
button to open the Contact Picker dialog box. Select the contacts in the left window then
click the right-arrow button to place the contact in the appropriate recipient box.
To remove a contact, highlight the name and click the left-arrow button.
Use the Manually Entered
tab to enter recipients who are not in any contact list.
Click OK when you have completed your message’s recipient lists.
2. Type the Subject
of your message.
3. Type your message content using the various formatting and text editing features. The
Allworx system provides very powerful text editing capabilities, similar to those found in
Microsoft Word. These are shown in the Allworx Message Box Edit bar(s).
4. Click Attachments
in the Task bar to include other documents with your message as
needed.
5. Click Send
Menu Bar
in the Task bar when your message is ready.
The File button is used to save and print messages and includes Page Setup and Print Preview
functions. You can also open attachments.
The Edit
button includes many text editing commands, including cut, copy and paste, find and
replace, and undo and redo.
The View
button allows you to select and change tool bar options, zoom in and out, and select
various page layout options to simplify editing.
The Insert
button allows you to embed files, pictures, symbols and links in your message.
The Format
button is used to change the format of text, paragraphs, bullets and numbering.
The Tools button provides features to check spelling and a thesaurus.
The Table
button is used to insert a table into the text of your message.
The Mail
button provides the Send and Attachment functions as displayed on the Task bar.
The message is automatically saved in the Sent folder when you click the Send button.
41
Page 48

User’s Guide
7.3 Reading and Responding to Email Messages
To read a message, highlight the message and choose File and Open. Or, double-click on a
message to open it. The Message display window indicates all message recipients, the message
sender, date and time the message was received in your Allworx Inbox, subject, and message
content. You can also read and manage your message in Preview
Task Bar
The Task bar message functions allow you to:
mode.
Create a New
Delete
Reply
Reply
the message.
only to the sender.
to All message recipients.
message.
Forward the message.
Click the appropriate icon to Save and Print messages.
Click the Home
Menu Bar
icon to be automatically connected to the Allworx.com home page.
The File button is used to open, save and print messages and includes Page Setup and Print
Preview functions.
The Edit button is used to select and copy message content.
The View
The Mail
button allows you to select tool bar options.
button provides the same functions as those displayed on the Task bar.
7.4 Reading and Responding to Voicemail Messages
To play a voicemail message, highlight the message and choose File
and Open. Or, double-click
on a message to open it. The Voicemail Playback window (Figure 7-3) shows the message
sender, date and time the message was received in your Allworx Inbox, and the length of the
recorded message. You can also read and manage your message in Preview
42
mode
Page 49

User’s Guide
Menu Bar
Task Bar
Figure 7-3 – Allworx Voice Message Window
Task Bar
The Task bar provides Play and resume, Stop and Pause functions. Other mail functions include:
Reply
only to the sender.
Reply
to All message recipients.
Forward
the message.
Delete the message.
Click the Home
Menu Bar
icon to be automatically connected to the Allworx.com home page.
The File button is used to save the message or exit the playback window.
The View
The Voice
button allows you to select tool bar options.
button provides the same functions as those displayed on the Task bar.
Click and drag the playback progress control bar to select a particular point at which to play the
message.
43
Page 50
User’s Guide
7.5 Reading and Responding to Calendar Messages
To read a calendar message, highlight the message and choose File and Open. Or, double-click
on a message to open it. The Message display window (Figure 7-4) shows the Subject of the
appointment, the appointment Organizer
message was received in your Allworx Inbox. You can also read and manage your message in
Preview mode
, all invited Attendees, and the date and time the
Appointment Details
include Start and End dates and times, event Location, and event Priority.
The organizer may have also included a Note to Attendees
Figure 7-4 – Allworx Calendar Message Window
.
Menu Bar
Task Bar
Task Bar
The Task bar message functions include:
Accept
Decline
Add Response
an appointment invitation.
an appointment invitation.
when you Accept or Decline an appointment invitation. New Task and Menu
bars are displayed. Click Remove Response
Delete
the message.
Click the Print icon to print the message.
Click the Home
icon to be connected automatically to the Allworx.com home page.
to cancel.
44
Page 51

User’s Guide
Menu Bar
The File button is used to open, save and print messages, and includes Page Setup and Print
Preview functions.
The Edit
The View
display vertical and horizontal rulers
The Insert
The Format
button is used to select, copy, and modify message content.
button allows you to change the layout of the message display, zoom in and out, and
.
button allows you to add files, pictures, symbols, and links to your response message.
button provides options for changing the appearance of text in your response
message.
The Tools button includes options for spelling and grammar correction.
The Table
The Calendar
button is used to insert a table into your response message.
button provides the same functions as those displayed on the Task bar.
7.6 Using the Allworx Message Center Offline
You can create and send new messages while offline from the Allworx server. (Refer to Section
12 for information about working offline.) The messages will be stored in the Outbox folder
until you reconnect to the Allworx server. Once you have reconnected and synchronized your
PC, pending messages will be transmitted to the recipients.
While working offline, you cannot
:
• Move messages from one message folder to another
• Create new message folders
• Delete messages
45
Page 52

User’s Guide
46
Page 53

User’s Guide
8 All-in-One™ Inbox Telephone Message Center
The Allworx All-in-One Inbox Telephone Message Center provides a convenient way to play
and manage your voicemail and email messages over the telephone. This section provides
information about:
Creating and updating your outgoing voicemail message.
Playing, replying to and managing your messages.
8.1 Logging in to the Allworx Message Center
1. From any activated handset within the organization, dial 6 followed by your extension
number. If calling from outside the organization, be sure you call in through the Auto
Attendant. You will hear the standard welcome greeting. Press 6
extension number.
You will hear: “Welcome to the Allworx Message Center. Please enter your password
followed by the pound sign. Or press pound now to change users. Press star to listen to
these choices again.”
followed by your
2. Enter (or spell) your password using the handset keypad (see the table below), then press
the # key.
Keypad
Number
If you don’t know your password, contact your System Administrator.
Number
and
Letters
Keypad
Number
Number
and
Letters
Keypad
Number
Number
and
Letters
0 0 4 4GHI 8 8TUV
1 1 5 5JKL 9 9WXYZ
2 2ABC 6 6MNO
3 3DEF 7 7PQRS
8.2 Recording Your Name for the First Time
As a new user you will need to record your name as part of the your voicemail greeting. The
Allworx Auto Attendant will not list your name until you have recorded it.
To record your name for the first time:
1. Log in to the Allworx Message Center (Section 8.1).
2. You will hear an announcement indicating the number of new and saved messages in
your voicemail inbox and the following options:
47
Page 54

User’s Guide
Command Function
3 To send a message
4 To change your Message
Center system settings
9 or hang up To end your call
* To listen to these choices
again
3. Press 4. The system will announce the following options:
Command Function
1 To change your password
2 To change the recording of
your name
3 To change your outgoing
message recording
4 To change the maximum
recording time for messages
* To listen to these choices
again
4. Press 2. Listen to the announcement and instructions, then record your name. Press the #
key when you have finished. The system will replay your new name recording and offer
the following options:
Command Function
1 To save your name recording
2 To change your name recording
3 To review your name recording
# To cancel changing your name recording
* To listen to these choices again
5. Press 1 to save your new name recording, then hang up.
48
Page 55

User’s Guide
8.3 Changing Your Name Recording
To change an existing name recording:
1. Log in to the Allworx Message Center (Section 8.1).
2. You will hear an announcement indicating the number of new and saved messages in
your voicemail inbox and the following options:
Command Function
3 To send a message
4 To change your Message Center system settings
9 or hang up To end your call
* To listen to these choices again
3. Press 4. The system will announce the following options:
Command Function
1 To change your password
2 To change the recording of your name
3 To change your outgoing message recording
4 To change the maximum recording time for
messages
* To listen to these choices again
4. Press 2. The system will play your current name recording for your review and offer the
following options:
Command Function
2 To change your name recording
3 To review your name recording
# To return to the previous menu
* To listen to these choices again
5. Press 2. Listen to the instructions and record your name. Press the # key when you have
finished. The system will play your new name recording, then offer the following
options:
49
Page 56

User’s Guide
Command Function
1 To save your name recording
2 To change your name recording
3 To review your name recording
# To cancel changing your name recording
* To listen to these choices again
6. Press 1 to save your name recording.
8.4 Recording Your Outgoing Voicemail Message for the First Time
The Allworx system includes a standard message for each new user. Follow the steps below
to record a new message.
1. Log in to the Allworx Message Center (Section 8.1).
2. You will hear an announcement indicating the number of new and saved messages in
your voicemail inbox and the following options:
Command Function
3 To send a message
4 To change your Message Center system settings
9 or hang up To end your call
* To listen to these choices again
3. Press 4. The system will announce the following options:
Command Function
1 To change your password
2 To change the recording of your name
3 To change your outgoing message recording
4 To change the maximum recording time for
messages
* To listen to these choices again
50
Page 57

User’s Guide
4. Press 3. Listen to the announcement and instructions, then record your outgoing message
recording. Press the # key
message recording, and offer the following options:
Command Function
1 To save your outgoing message
2 To change your outgoing message
3 To review your outgoing message
# To cancel changing outgoing message
* To listen to these choices again
5. Press 1 to save your new message recording.
8.5 Changing Your Outgoing Voicemail Message
when you have finished. The system will replay your new
To change an existing outgoing message:
1. Log in to the Allworx Message Center (Section 8.1)
2. You will hear an announcement indicating the number of new and saved messages in
your voicemail inbox and the following options:
Command Function
3 To send a message
4 To change your Message Center system settings
9 or hang up To end your call
* To listen to these choices again
3. Press 4. The system will announce the following options:
Command Function
1 To change your password
2 To change the recording of your name
3 To change your outgoing message recording
4 To change the maximum recording time for
messages
* To listen to these choices again
51
Page 58
User’s Guide
4. Press 3. The system will play your current message for review and offer the following
options:
Command Function
2 To change your outgoing message
3 To review your outgoing message
# To return to the previous menu
* To listen to these choices again
5. Press 2. Listen to the instructions and record your new message. Press the # key when
you have finished. The system will offer the following options:
Command Function
1 To save your outgoing message
2 To change your outgoing message
3 To review your outgoing message
# To cancel changing your outgoing message
* To listen to these choices again
Press 1 to save your new message recording.
8.6 Voicemail Message Playback
The Allworx system may turn on the message indicator on your handset when you have a
new message. Check your handset’s user’s guide for more information or contact your
System Administrator to determine if your handset supports these features.
1. Log in to Allworx Message Center (Section 8.1).
2. You will hear an announcement indicating the number of new and saved voicemail and
email messages in your inbox. The system will then prompt with the following options:
52
Page 59

User’s Guide
Command Function
1 To listen to voicemail messages
2 To skip to playing saved voicemail messages
3 To send a message
4 To change your Message Center system settings
5 To listen to email messages
6 To skip to playing saved email messages
9 or hang up To end your call
* To listen to these choices again
3. Press 1, 2, 5, or 6. The system will announce the time the message was received and play
the message. For email you will hear the sender’s name, message subject and content.
After hearing the message select from the following options:
Command Function
1 To reply to this message
2 To forward this message (voicemail messages only)
3 To delete the message
4 To replay this message
5 To play the previous message
6 To play the next message
7 To rewind the message 10 seconds (while listening
to the message)
8 To advance the message forward 10 seconds (while
9
listening to the message)
To place a call to the sender of this message. (Only
applies to messages sent by other Allworx users)
# To return to the previous menu
* To listen to these choices again
Notes: Messages are automatically saved unless you choose to delete them.
To interrupt message playback and take an immediate action, press *
followed by the
command number. For example, to reply to a message before hearing the end of the
message, press *1.
53
Page 60

User’s Guide
8.7 Replying to a Message
You can reply to new or saved messages received from people inside or outside your
organization as follows:
• A message reply to an internal user will be left as a voicemail message and sent as an
email message with an audio attachment (.wav file).
• A reply to email from an external system will only include the .wav file attachment.
• You cannot reply to voicemail messages received from outside your organization (for
example, a call from an outside line answered by your voicemail).
To reply to messages:
1. After playing the message, press 1
to reply.
2. Listen to the announcement and instructions then record your message. Press the # key
when you have finished.
3. Select one of the following options for sending your reply:
Command Function
1 or Hang up To send to your message
2 To review your message
3 To change your message
# To cancel sending your message
* To listen to these choices again
8.8 Forwarding a Voicemail Message
You can forward new or saved voicemail messages received from people within or outside
your organization. You cannot forward email messages. Voicemail messages may be
forwarded to one or more people within or outside your organization.
Note: Messages to external contacts are forwarded as audio attachments (.wav files) to
email messages. Therefore, the intended recipients’ email addresses must be predefined in
the Allworx system. Contact your System Administrator for more details.
1. After playing the message, press 2
to forward.
2. After the Allworx prompt, enter the first extension number to which you wish to forward
the message. The system will play the selected user’s name, and prompt for the next
extension number. You can enter another extension number, press 9
message to all voicemail users, or press the #
key to finish entering forwarding extension
to send your
numbers. Repeat this process until all extension numbers are entered.
54
Page 61
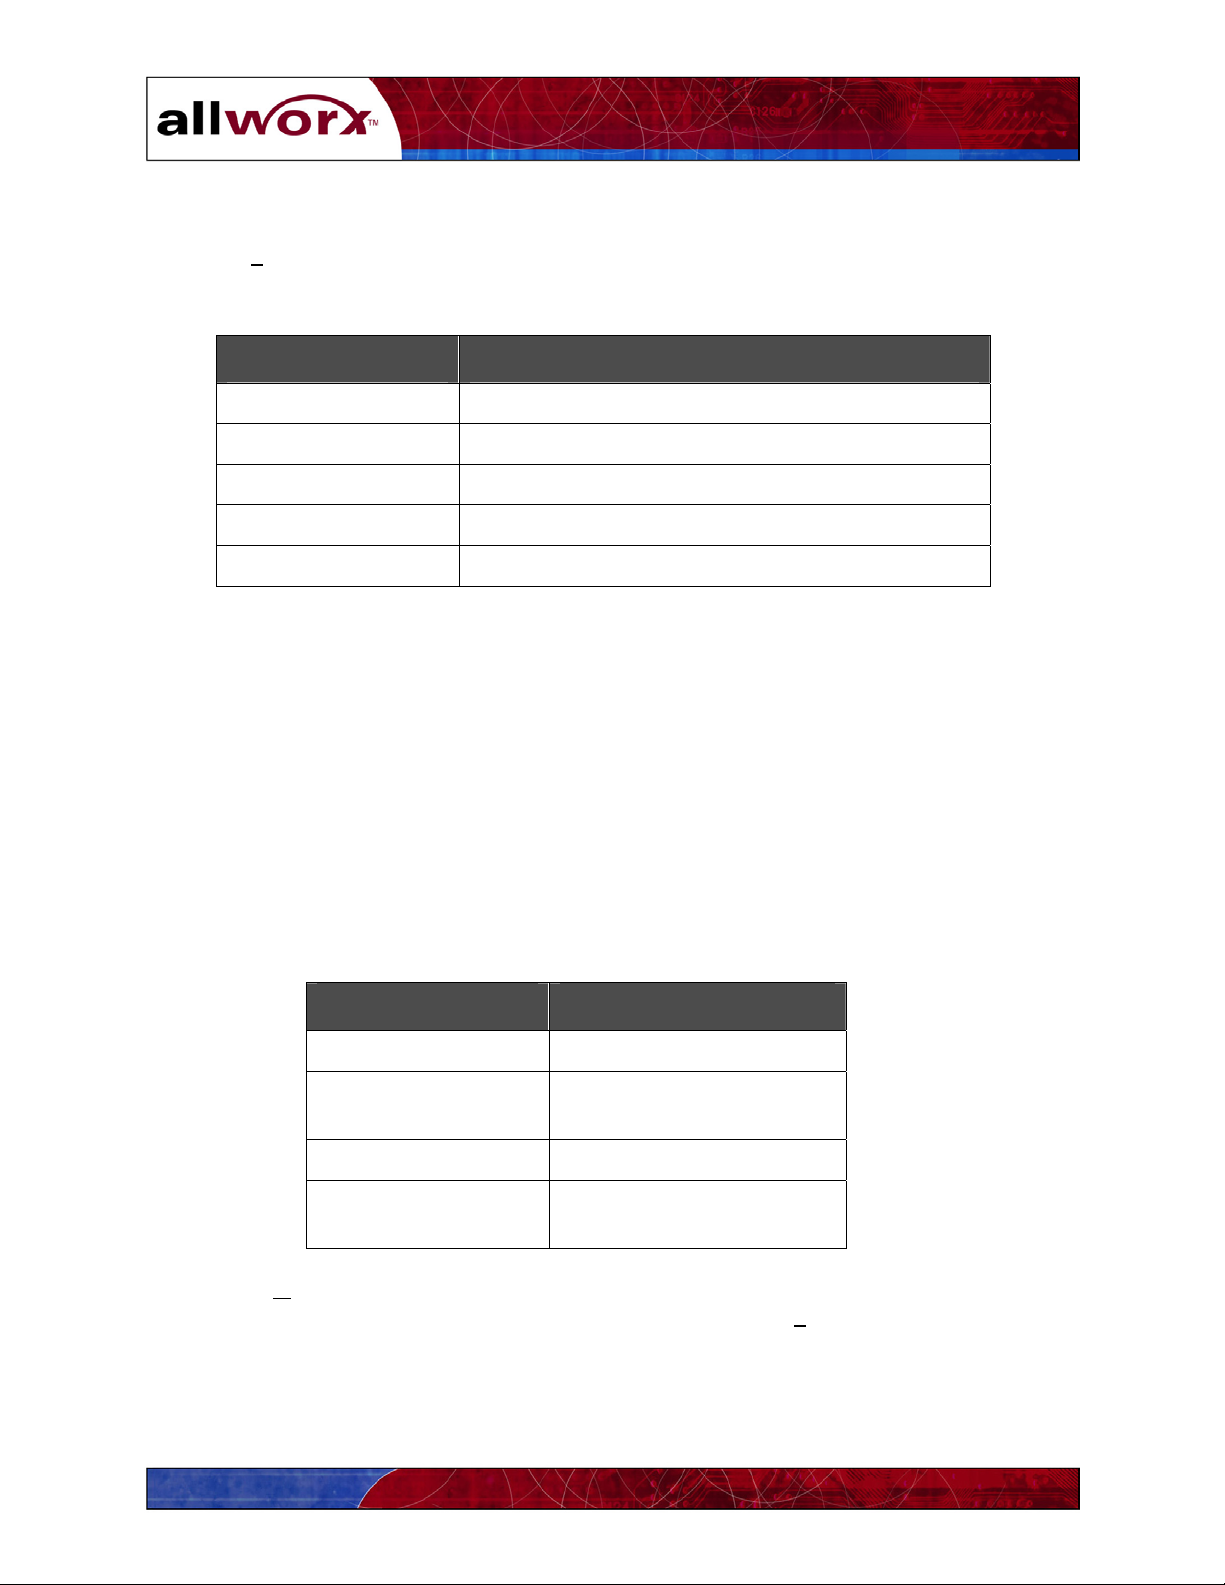
User’s Guide
3. When you have finished entering extension numbers, you will be prompted to record a
message to precede the forwarded message. Record your message at the beep, then press
the #
key when you have finished.
4. Select one of the following options for sending your reply message:
Command Function
1 or Hang up To send to your message
2 To review your message
3 To change your message
# To cancel sending your message
* To listen to these choices again
8.9 Sending a Message
Messages can be recorded and sent to multiple users and Message Aliases.
Note: Message Aliases are predefined designations for voicemail distribution lists set up by
the System Administrator, and are in range of 600-699. Refer to Section 8.10 for more
information about Message Aliases.
To record and send a new message:
1. Log in to the Allworx Message Center (Section 8.1).
2. You will hear an announcement indicating the number of new and saved messages in
your voicemail inbox and the following options:
Command Function
3 To send a message
4 To change your Message
Center system settings
9 or hang up To end your call
* To listen to these choices
again
3. Press 3. The system will prompt you to enter the first extension number or Alias number
to which you wish to send the message. You can also press 9 to send your message to all
voicemail users.
4. Enter the first extension number. The system will confirm your entry, and prompt you to
enter another.
55
Page 62

User’s Guide
5. Enter the next extension or Alias number. Repeat this process until all extension or Alias
numbers have been entered. When the last number has been entered, press the #
indicate you are ready to record your message.
key to
6. You will be prompted to begin recording. When you have finished recording, press #.
7. You will be prompted to complete the process as follows:
Command Function
1 or hang up To send a message
2 To review your message
3 To change your message
# To cancel sending your
message
* To listen to these choices
again.
8. Press 1 or hang up to send your message.
8.10 Viewing Message Distribution Lists
Distribution lists allow you to leave the same voicemail or email message for a related group of
contacts by entering just one number. A distribution list is identified by an Email Alias or
Voicemail Alias
number in the range 600-699. Message Aliases will be created by your System
Administrator. You can view the list of available Message Aliases using your PC’s browser.
1. Locate the browser application on your PC (Internet Explorer or Netscape).
2. Double-click on the browser icon to open a window.
3. In the Address
field, type the following then press Enter or click Go:
http://corp.yourcompanydomainname/
Note: Contact your System Administrator regarding your company’s domain name.
The Allworx User Home Page in Figure 8-1 will appear showing company directory and
user listing information.
4. Click Distribution Lists.
The window in Figure 8-2 will appear listing all available
Distribution lists and their associated Message Aliases.
The Allworx system automatically distributes the message to the individuals in the group.
Internal users receive voicemail messages; external members receive .wav files attached to an
email message.
56
Page 63
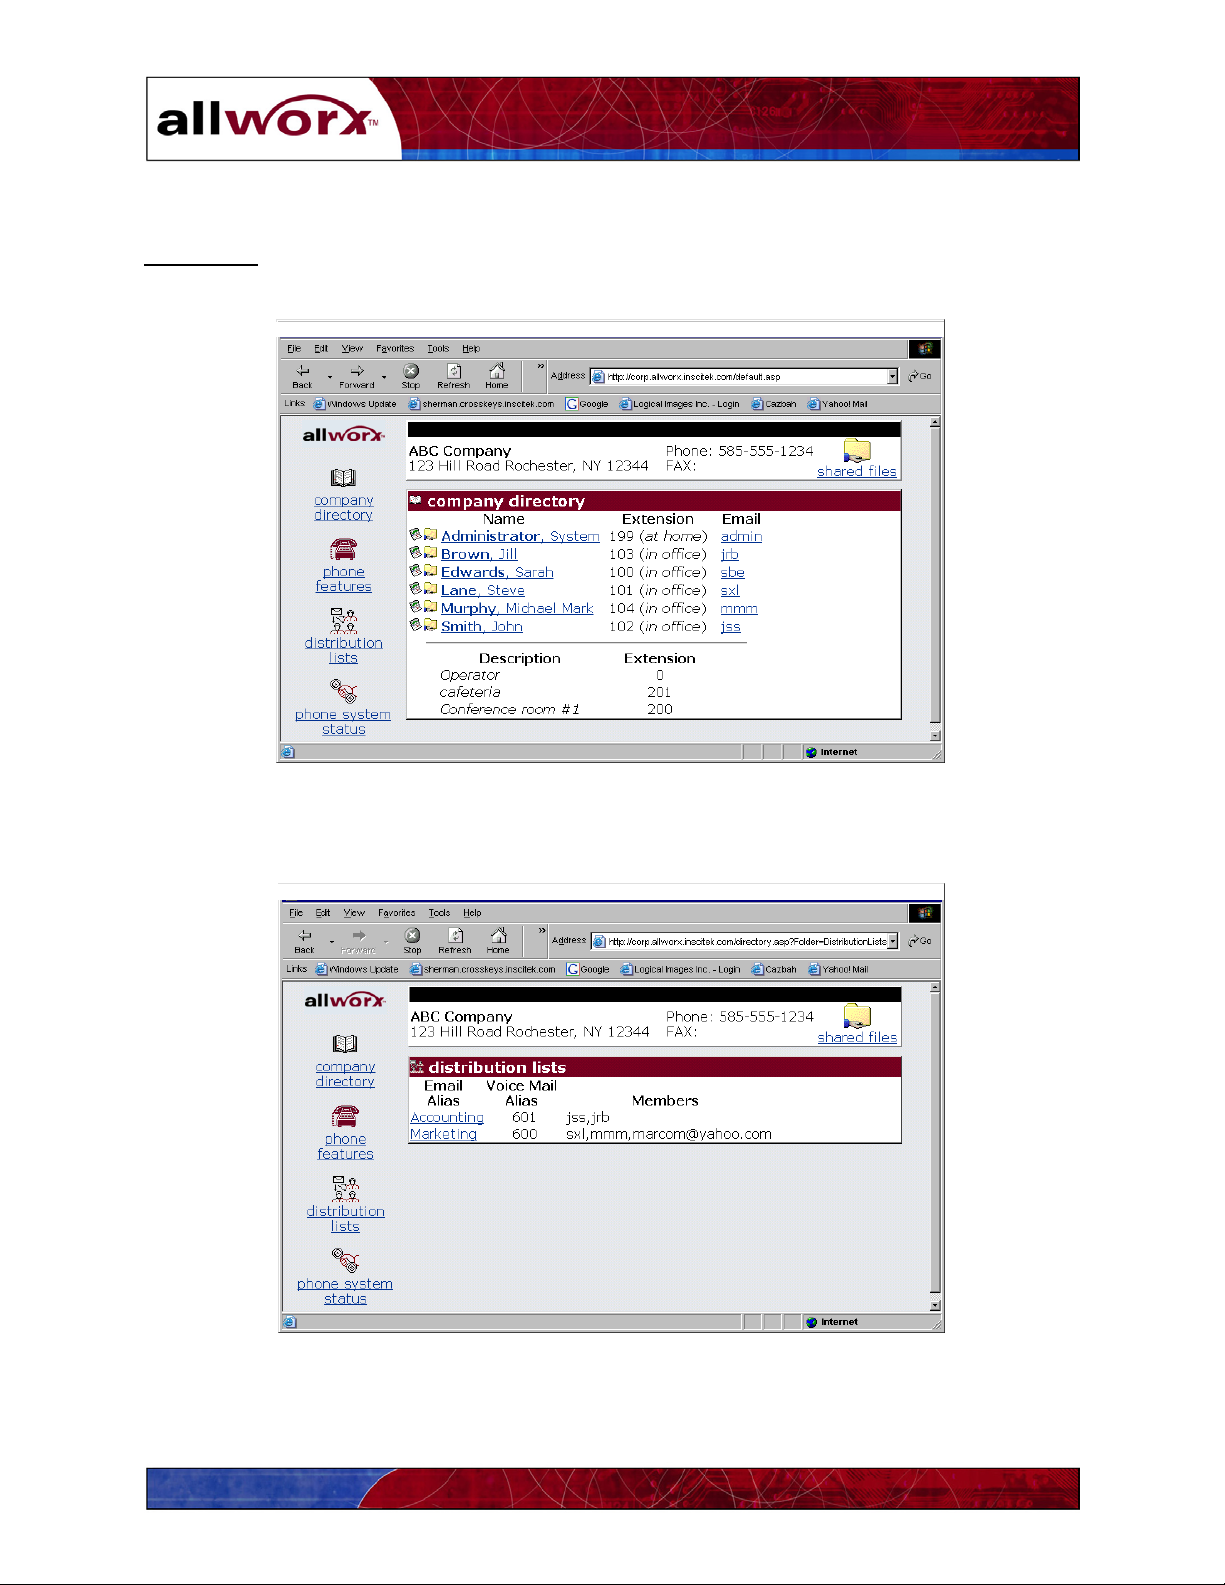
User’s Guide
When sending, replying to, or forwarding a message, you can enter the voicemail alias number
for distribution to all members of the list. To send email to the distribution list, click on the
Email Alias
send your message accordingly.
. Your PC’s default email application (e.g., Outlook Express) will open. Enter and
Figure 8-1 – Allworx User Homepage
Figure 8-2 – Message Distribution Lists
57
Page 64

User’s Guide
58
Page 65

User’s Guide
9 Managing Your Calendar
The Allworx Calendar allows you to setup, manage and track meetings and events on a daily or
monthly basis. This section provides information about:
Scheduling and updating events and activities
Sharing calendars
9.1 Calendar Overview
To access the Allworx Calendar, click the Allworx Communication Center Calendar
the View pane. Figure 9-1 illustrates the Month View
of the Allworx Communication Center
button in
calendar. Use the buttons on either side of the month name to move forward or back in time.
Menu Bar
Task Bar
Figure 9-1 – Allworx Calendar Month Window
Task Bar
The Task bar provides the ability to create New events, Open and edit scheduled events, Delete
events, and print
the Calendar. The Help feature provides an overview of the Calendar features.
59
Page 66

User’s Guide
y
Menu Bar
The Menu bar provides the following capabilities:
The File
button is used to print the calendar and includes Page Setup and Print Preview
functions.
The View
button allows you to display week numbers in the calendar.
The Calendar
button provides the same functions as those displayed on the Task bar.
The Help
button provides an overview of the Calendar features.
The Calendar also provides a day-at-a-time view (Figure 9-2). Click the Day View tab to see the
hours of the day. Use the scroll bar at the right of the Day View window to move forward or
backward through the hours of the day. Click the Yesterday
or Tomorrow to change the date
accordingly. The day and date at the top of the window will change to reflect the selected day.
Scheduled Event
Event Location
Event Notes
Indicates recurring
Event priorit
Reminder is set
Figure 9-2 – Allworx Calendar Day View Window
60
Page 67

9.2 Scheduling a New Event
To create and schedule a new event:
User’s Guide
1. Click New Event
on the Task bar. The Appointment Item View window will appear,
showing the Appointment Data dialog box.
2. Place your insertion point in the Subject
field, and type the relevant subject of the event
(for example, Sales Meeting, Customer Training, etc.).
3. Press Tab
or place your insertion point in the Location field. Type the description of the
location of the event, (for example, Main Conference Room, ABC Company address,
etc.).
4. Open the pull-down menus and select the Meeting Type (Meeting, Multiday event or
Occasion/Holiday) and Priority (High, Medium, or Low).
5. If the event is be recurring on a regular basis, click the Recurrence
button. The Setup
Meeting Recurrence dialog box will appear.
a. Click the button that reflects the recurrence pattern (for example, Daily, Weekly,
Monthly, etc.) of your event.
b. Next, define the recurrence frequency. For example, if you clicked Daily, then
you might indicate the event recurs every 3 days.
c. Indicate the recurrence range, including the Starting
and Ending dates for the
event using the pull-down calendar for these fields.
d. Finally, indicate the number of times the event should repeat during the date range
indicated above.
6. Click the Reminder
box to set an automatic reminder of the event. Then set the time at
which a reminder is to occur in the recipients’ reminder files in the Allworx
Communications Center. For example, if the event is set for 9:00 and the reminder time
is 10 minutes, the reminder will occur at 8:50.
7. Next, enter the Date
, Start and End Times, and Travel To and Travel From Times using
the pull-down calendar for these fields.
8. Enter any notes regarding the event, such as “Presentation of final sales numbers and
forecasts.” You can also paste text from other applications such as Microsoft Word. If
the Notes are to be confidential, click the Private
9. You can also Add Attachments
using your PC’s browser to locate and select the desired
button to restrict access.
document(s).
10. Click the Attendees
tab to include others in your event. The Attendees dialog box
(Figure 9-3) allows you to add and remove contacts, and plan a meeting venue (date and
time) that accommodates the schedules of your invited attendees. To limit the view to
only work hours, click the Show Only Work Hours
box. The time frame for the event
defined above is shown in red.
61
Page 68

User’s Guide
11. Click the Add Attendees button to display the Contact Picker dialog box (Figure 9-4).
You can choose from a merged list of all contacts, or separate lists of Personal or
Company contacts using the pull-down menu. Or, you can begin typing the last name to
find the desired contact. Contacts matching your keystrokes are highlighted as you type.
12. Once the desired contact name is highlighted, click Mandatory, Optional, or At Least
One. The contact name will be added to the appropriate attendee list.
To remove a contact from the attendee list, highlight the name and click the left arrow
button. The name will be removed from the attendee list. Click OK
finished selecting your attendees. The Attendees dialog box will show the attendees’
calendar information. Possible conflicts will be reflected as shown in Figure 9-3.
13. Click the Manually Entered
organization. You must enter a valid email address. Once the desired contact name is
entered, click Mandatory, Optional, or At Least One
14. Click the Add
button, when you are finished entering Appointment Data and Attendee
information for the event. The Allworx Communication Center will appear showing the
event on the scheduled day.
when you have
tab in the Contact Picker to include attendees outside the
.
Schedule overlap
Figure 9-3 – Appointment Item Window – Attendees Dialog Box
62
Page 69

User’s Guide
A
ttendees Lists
Click to remove from
attendees list
Figure 9-4 – Contact Picker Dialog Box
9.3 Updating an Existing Event
To update an event, double-click
on the event in either the Month or Day view. The
Appointment Item View window will appear. Make the changes to either the Appointment Data
or Attendees. Click Update
to save the changes. An update message will be sent to the attendees
of the original event.
You can also change the Recurring information or Priority of the event directly from the Day
View.
To change the Recurring information, place your mouse over the Recurring Event
icon (Figure
9-2). Click when the finger pointer appears. The Setup Meeting Recurrence dialog box will
appear. Make your changes and click Apply
when you are finished.
63
Page 70
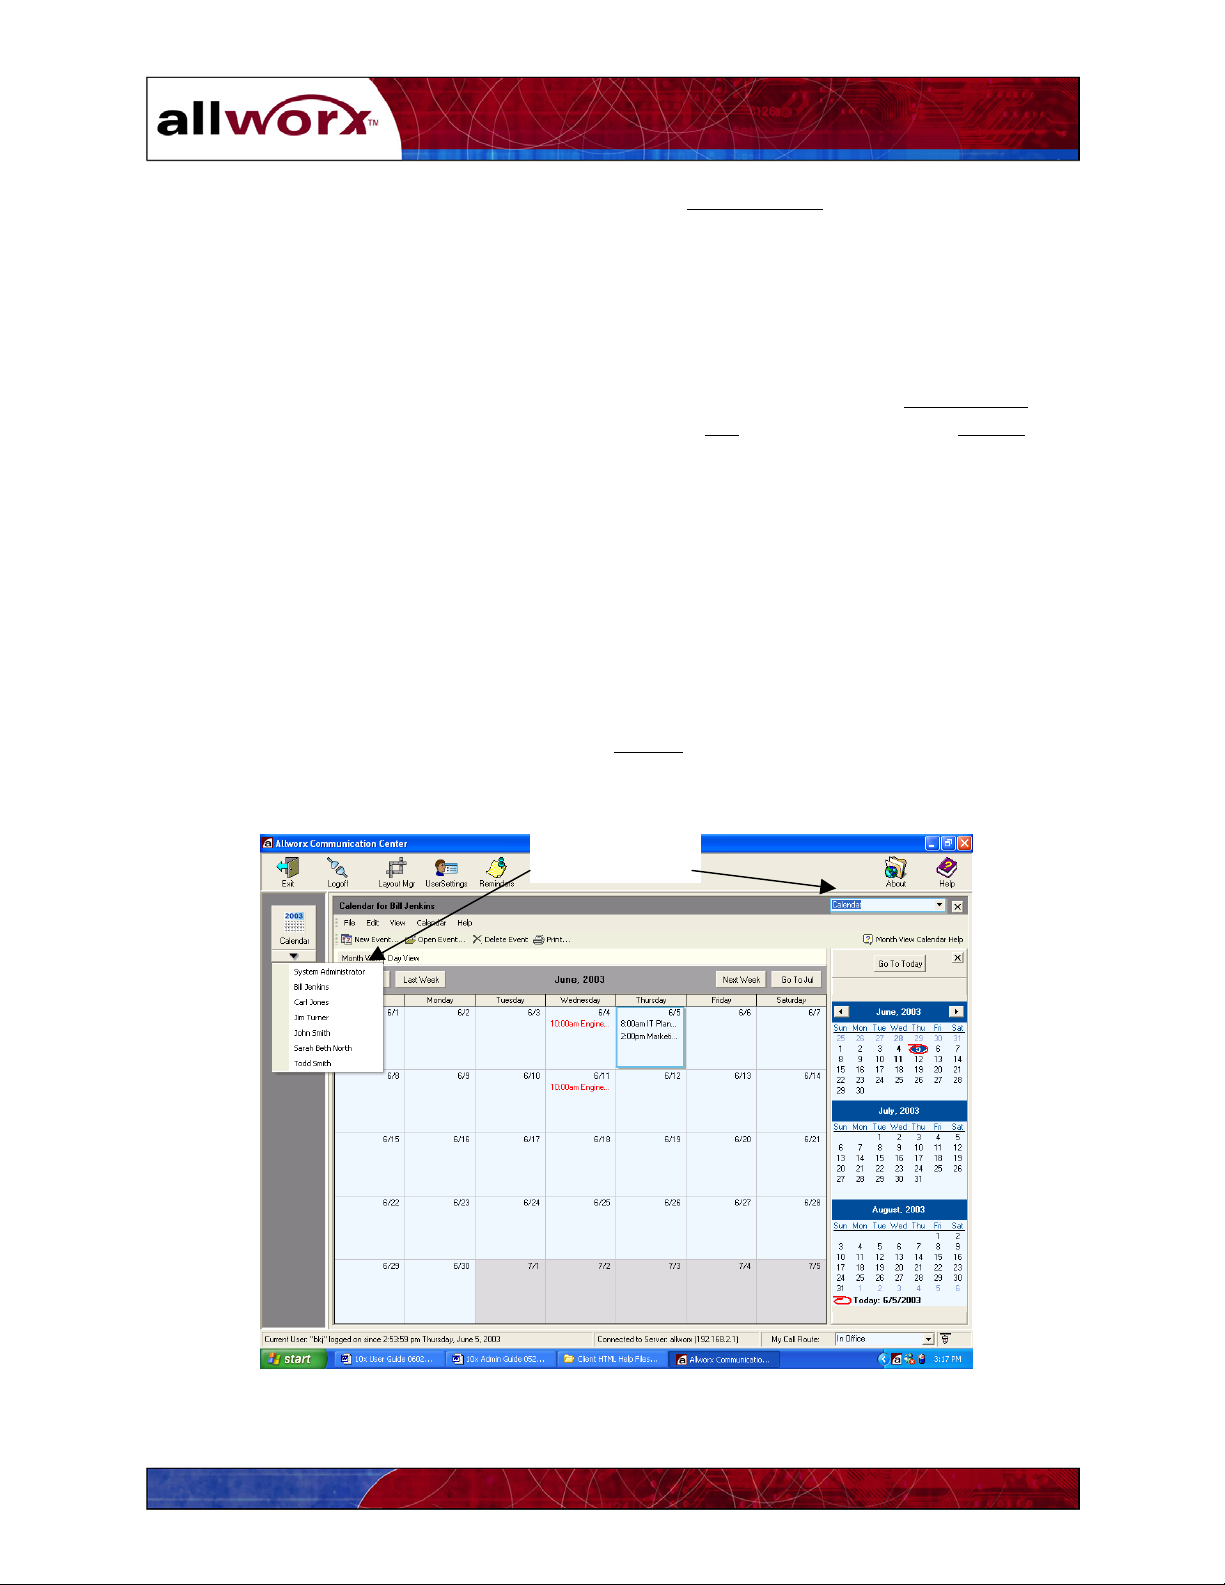
User’s Guide
To change the event priority, place your mouse over the Event Priority icon (Figure 9-2). Click
when the finger pointer appears. A pull-down menu will appear from which you can select a
new priority – high, medium, or low. The menu will close automatically after you make your
selection.
9.4 Deleting an Event
To delete an event, highlight the event in either the Month or Day view. Click Delete Event
the Task bar. A confirmation message will appear. Click OK
to delete the event, or Cancel to
on
keep it active.
9.5 Sharing Calendar Information
You can share your calendar with others in the organization, and they with you.
9.5.1 Viewing Other Users’ Calendars
To see the calendars of others in your organization, click the down arrow on the Calendar icon in
the View pane. Click on the user’s name to open his or her calendar. Or, open the function pulldown menu on the right side of the Allworx Communication Center (Figure 9-5) and click on the
user’s name. Any events that have been marked Private
will not be displayed. You will also be
restricted from seeing calendars of those who have not given you “read” permission (see Section
9.5.2 below).
List of Users’
Calendars
Figure 9-5 – Selecting Shared Calendars
64
Page 71

User’s Guide
9.5.2 Setting Up Viewing Permissions for Your Calendar
You can allow or restrict others in your organization from viewing (reading) your calendar. You
can assign a default permission to all users, or assign permission to individual users. To define
calendar viewing permissions:
1. Click the User Settings
icon on the Allworx Communication Center Task bar.
2. Click the Resource Sharing tab. The window in Figure 9-6 will appear.
3. Set the Default Allworx User Permissions.
Check the box to make read the default
permission, giving all users unrestricted access to your calendar information. Uncheck
the box to make restricted access the default for all users.
To set the default permission for all users, click the Default Permissions for All Users
button. The read boxes for all users will reflect the default permission.
4. To override the default permission for an individual, check or uncheck the associated
read
box. You can reset the default permission by clicking the Default Permissions
button.
5. Click the Update
button when you have finished to save the permission settings.
Figure 9-6 – Resource Sharing – Permissions Dialog Box
65
Page 72

User’s Guide
66
Page 73

User’s Guide
10 Sharing Documents
The Allworx system automatically creates a folder in which users can store documents they
intend to share.
10.1 Document Sharing through Your PC’s Network Folder
1. Open the network folder on your PC’s desktop.
Note: This may be called Network Neighborhood or My Network Places depending on
your Windows environment.
2. Locate and open the folder labeled Allworx.
Note: Depending on your Windows environment, there may be additional folders to step
through before reaching the Allworx folder (e.g., the Workgroup folder).
3. Locate and open the folder labeled Users.
4. You can now open any folder displayed to store and retrieve shared documents using the
Windows features of your PC.
10.2 Document Sharing through a Browser
Shared documents can only be retrieved through a browser. Follow the steps in 9.1 above to
place documents into shared folders.
1. Locate the browser application on your PC (Internet Explorer or Netscape).
2. Double-click
3. In the Address
on the browser icon to open a window.
field, type the following then press Enter or click Go:
http://corp.yourcompanydomainname/
Note: Contact your System Administrator if you do not know your company’s domain
name.
The screen in Figure 10-1 will appear showing company directory information and user
listing information.
67
Page 74
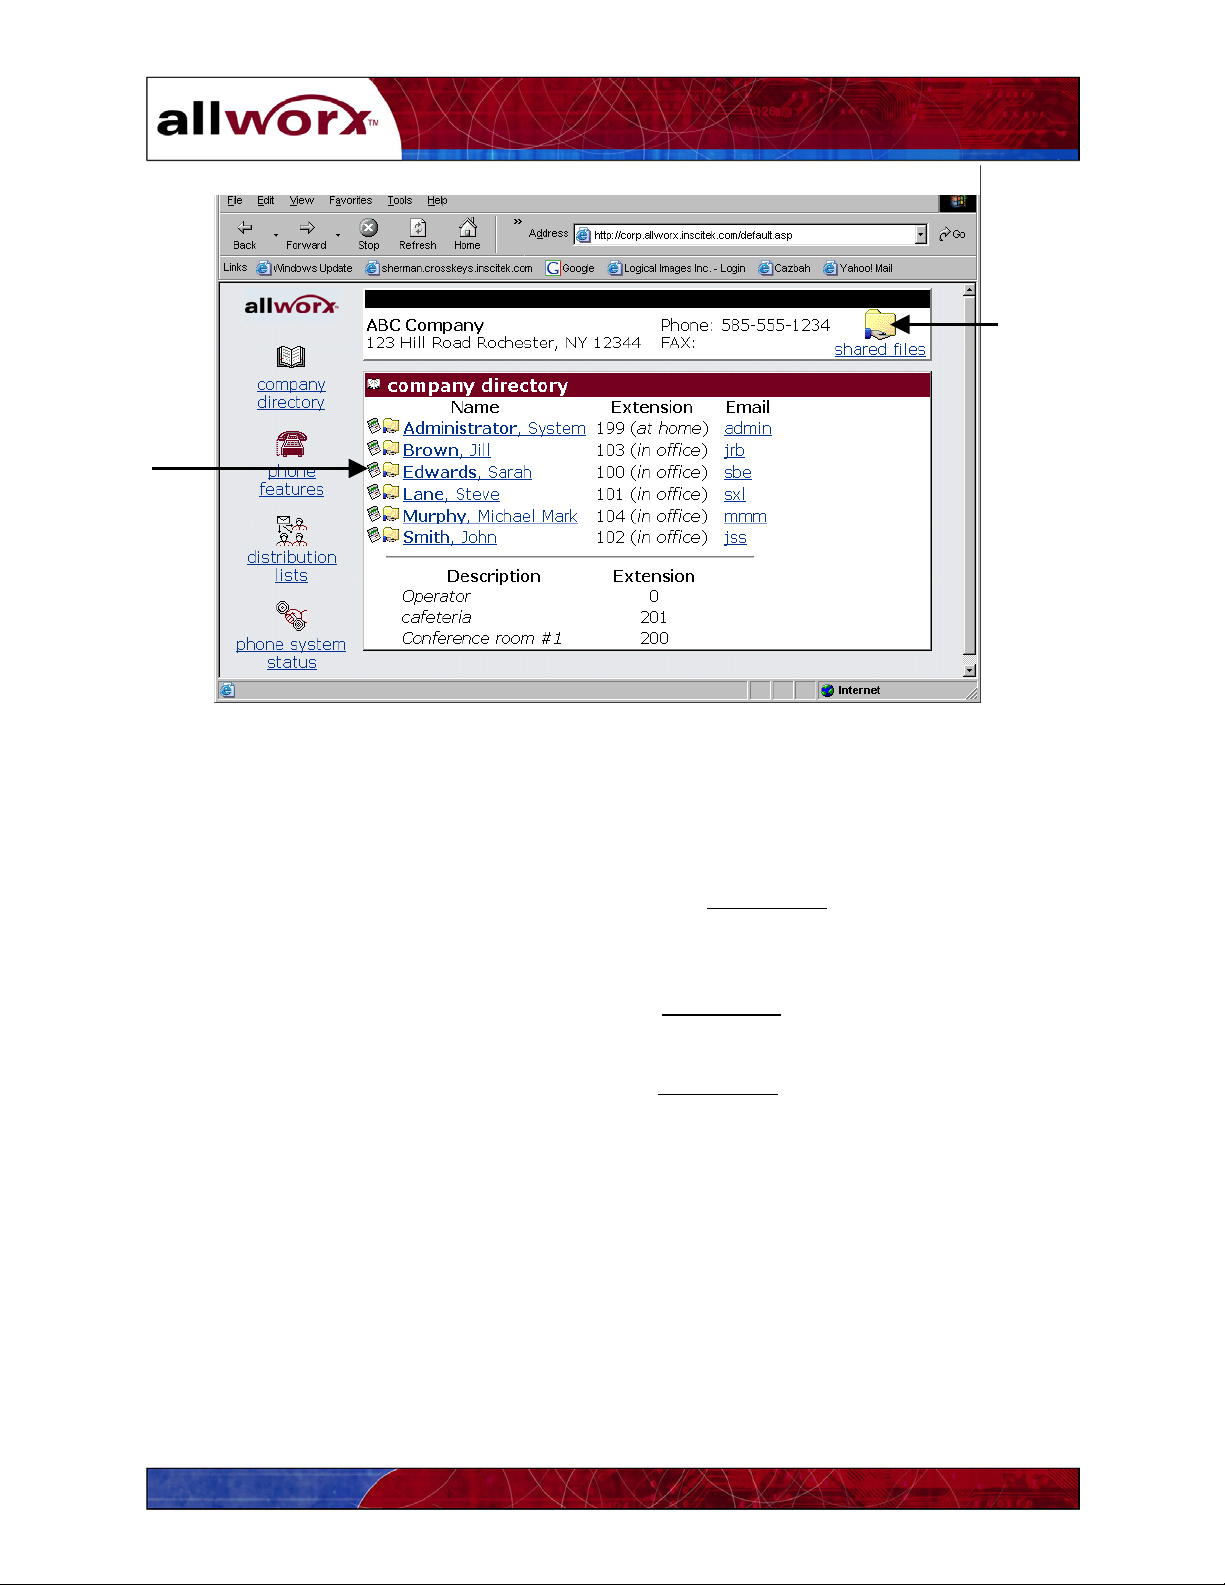
User
Shared
Folder
User’s Guide
Company
Shared
Folders
Figure 10-1 – Company and User Directory Display Screen
4. To locate shared company documents, click on the Shared Files
link in the upper right
corner of the browser window. Shared company documents may include human
resources policies, vacation schedules or other important notices.
To locate shared user documents, click on the Shared Files
icon next to the user’s name.
A window will appear displaying the available shared documents.
5. Identify the document you wish to open, then double-click on the document’s icon. The
application (for example, Microsoft Word) and the document will be launched
automatically.
Note: If you have trouble launching a document, contact your System Administrator and
review your browser’s settings or desktop applications.
68
Page 75

User’s Guide
11 Internet and Intranet Access
11.1 Internet Access
Your Allworx system may already be connected to the Internet through your organization’s
Internet Service Provider. Check with your System Administrator for more information.
To access the Internet:
1. Locate the browser application on your PC (Internet Explorer or Netscape).
2. Double-click
on the browser icon to open a window.
3. You are now ready to “surf” the Internet.
11.2 Intranet Access
An intranet is a private network reserved for use by people who are authorized to use it, and who
have the appropriate passwords for access. An intranet may be used by one organization or
several organizations that need to communicate. The Allworx system includes an intranet
through which you and others in your organization can share information.
To access your organization’s Allworx intranet:
1. Locate the browser application on your PC (Internet Explorer or Netscape).
2. Double-click
3. Enter the address of the your organization’s Allworx Intranet in the Address
on the browser icon to open a window.
field. You
may need to contact your System Administrator for this information.
http://corp.yourcompanydomainname/
4. You are now ready to search your organization’s Intranet.
69
Page 76

User’s Guide
70
Page 77

User’s Guide
12 Remote Access to the Allworx Server
The Allworx system’s virtual private network (VPN) feature provides secured remote access
through the Allworx firewall to your organization’s local area network. No special software is
required on users’ computers because Allworx uses the VPN features of Microsoft Windows 98,
XP and 2000.
The Allworx VPN allows users access to the server regardless of location and without concern of
compromising security. The System Administrator will enable VPN access for each user, and
assign appropriate login user names and passwords.
This section provides information about:
Configuring users’ PCs for remote access
Establishing remote connections
12.1 Setting Up Your Computer for Remote Access
12.1.1 Windows 2000
1. From your Windows screen open Network and Dialup Connections
.
2. Double-click Make New Connection and click Next.
3. Select Connect to a private network through the Internet and click Next.
4. If you need to establish a dial up connection with your Internet Service Provider, click
Automatically dial this initial connection
, click a connection from the list, and click Next.
Or, if you do not want to automatically dial an initial connection, click Do not dial the
initial connection, and click Next.
5. Type your Allworx host name or the Allworx static WAN IP address of the computer or
network to which you are connecting and click Next.
6. If you want this connection to be made available to all users on your network, click For
all users and click Next.
If you want to reserve the connection for your own use, click Only for myself
Next
.
7. Type a name for the connection and click Finish
.
and click
8. The Login window for this connection will appear. Click Properties
9. Click on the Networking tab.
71
.
Page 78

User’s Guide
10. While Internet Protocol (TCP/IP) is highlighted in the window, click Properties.
11. Click Advanced…
12. Under the DNS server addresses, in order of use and click Add…
13. Type in the LAN IP address of the Allworx server and click Add.
14. Select Append these DNS suffixes (in order) and click Add…
15. Type in the Domain suffix of the Allworx server (such as “mycompany.com”) and click
Add
.
16. Click OK (of the Advanced TCP/IP Settings window).
17. Click OK (of the Internet Protocol TCP/IP Properties window).
18. Click OK (of the VPN connection properties window).
Notes: To open Network and Dial-up Connections, click Start, point to Settings, and
click Network and Dial-up Connections.
To make the connection available to all users, you must be logged on as System
Administrator or as a member of the Administrator’s group.
12.1.2 Windows XP Professional
1. Click Start and select View Network Connections, then Create a New Network
Connection.
2. The New Connection Wizard will start. Click Next.
3. Select the Connect to the network at my workplace
and click Next.
4. Select the appropriate device, such as the network interface card you will use to connect
to the VPN and click Next
.
5. Enter a unique Connection Name (such as YourcompanyVPN).
6. If you need to establish a connection with your ISP or some other network before
tunneling to your destination computer or network, click Automatically dial this initial
connection. Click a connection in the list and click Next.
Or, if you do not want to automatically dial an initial connection, click Do not dial the
initial connection and click Next.
7. Type your Allworx host name or the Allworx static WAN IP address of the computer or
network to which you are connecting. Click Next
72
.
Page 79

User’s Guide
8. If you want this connection to be made available to all users on your network, click
Anyone’s use
Or, if you want to reserve the connection for your own use, click My use only and click
Next
.
9. You may add a shortcut to the desktop with the newly created connection name if
desired.
and click Next.
10. Click Finish
11. The Login window for this connection will appear. Click Properties
.
.
12. Click on the Networking tab.
13. While Internet Protocol (TCP/IP)
is highlighted in the window, click Properties.
14. Click Advanced…
15. Click Add…under the DNS server addresses, in order of use
16. Type the LAN IP address of the Allworx server and click Add.
17. Select Append these DNS suffixes (in order) and click Add…
18. In the TCP/IP Domain Suffix dialog box, enter the Domain suffix for the Allworx server
(such as “mycompany.com”) and click Add.
19. Click OK
to close the Advanced TCP/IP Settings window.
20. Click OK to close the Internet Protocol TCP/IP Properties window.
21. Click OK
to close the VPN connection properties window.
22. Click Cancel
to close the Login window.
12.1.3 Windows XP Home
1. Click Start
. Select Settings and Control Panels.
2. Be sure your Control Panel is in the Category View mode. The right pane heading will
read Pick a Category
. If it does not, click Switch to Category View at the top of the left
pane.
3. Click Network and Internet Connections.
4. Under Pick a task…, click Create a connection to the network at your workplace
5. Select Virtual Private Network connection
. Click Next.
73
.
Page 80

User’s Guide
6. If you need to establish a connection with your ISP or some other network before
tunneling to your destination computer or network, click Automatically dial this initial
connection. Click a connection in the list and click Next.
Or, if you do not want to automatically dial an initial connection, click Do not dial the
initial connection and click Next.
7. Enter a name for the connection (for example, server2atmycompany). Click Next.
8. Type your Allworx host name or the Allworx static WAN IP address of the computer or
network to which you are connecting. Click Next
9. To place a shortcut for the VPN connection on the user’s desktop, click Add a shortcut to
this connection to my desktop. Click Finish to close the new connection wizard.
10. The Login window for this connection will appear. Click Properties.
.
11. Click on the Networking
tab.
12. While Internet Protocol (TCP/IP) is highlighted in the window, click Properties.
13. Click Advanced…
14. Click Add…
under the DNS server addresses, in order of use
15. Type the LAN IP address of the Allworx server and click Add.
16. Select Append these DNS suffixes (in order) and click Add…
17. In the TCP/IP Domain Suffix dialog box, enter the Domain suffix for the Allworx server
(such as “mycompany.com”) and click Add.
18. Click OK to close the Advanced TCP/IP Settings window.
19. Click OK
to close the Internet Protocol TCP/IP Properties window.
20. Click OK to close the VPN connection properties window.
21. When the Login window appears, enter the user’s name and password, or click Cancel to
close the window.
12.2 Establishing Remote Connections
Double-click on the VPN connection you created in the previous section. The connection icon
will either be on your desktop, or located under Network Connections.
When the Login window appears, enter your Allworx user name password provided by the
System Administrator. Click Dial
or Connect.
74
Page 81

User’s Guide
13 Working Offline from the Allworx Server
The Allworx Communication Center can be used while you are disconnected from the Allworx
network. For example, if you are using a laptop PC while traveling, you can update your
calendar, or add new contacts. Then, when you return to your office, the new information can be
synchronized with the Allworx server.
To prepare your PC to work offline:
1. Click User Settings
2. Click the My Preferences
The window in Figure 13-1 will appear.
on the Task bar of the Allworx Communication Center.
tab to define your preferences for Offline Synchronization.
Figure 13-1 – My Preferences Dialog Box for Office Synchronization
75
Page 82

User’s Guide
Click the selection that indicates your preference for synchronizing your PC with Allworx
server information upon logging off from the Allworx Communication Center.
• Always ask before synchronizing: You will be asked if you wish to synchronize
your PC with information stored on the server.
• Never ask, always synchronize: The systems will automatically synchronize
information.
• Never ask, never synchronize: You will not be asked and synchronization will
not take place.
Click the Update
button to save the information.
When you are preparing to leave the office:
1. Click Exit
2. Click Yes
on the Allworx Communication Center Task bar.
to exit the application.
The window in Figure 13-2 will appear if you previously selected Always ask before
synchronizing. Click Yes to begin synchronizing. Click No to just exit the application.
If you selected Never ask, always synchronize
The Synchronization Progress dialog box is shown in Figure 13-3. All database
information will be synchronized. The box will close automatically when the process is
finished.
, synchronizing will begin automatically.
Figure 13-2 – Database Synchronization Confirmation Box
76
Page 83

User’s Guide
Figure 13-3 –Synchronization Progress Window
77
Page 84

User’s Guide
78
 Loading...