

Page 1

AT-9400Ts Series
Gigabit Ethernet
Switches
Basic Layer 3 AT-9424Ts
AT-9424Ts/XP
AT-9448Ts/XP
◆
AT-9400Ts Stack
Installation Guide
613-001191 Rev. B
Page 2

Copyright 2009 Allied Telesis, Inc.
All rights reserved. No part of this publication may be reproduced without prior written permission from Allied Telesis, Inc.
Allied Telesis and the Allied Telesis logo are trademarks of Allied Telesis, Incorporated. All other product names, company names, logos or
other designations mentioned herein are trademarks or registered trademarks of their respective owners.
Allied Telesis, Inc. reserves the right to make changes in specifications and other information contained in this document without prior
written notice. The information provided herein is subject to change without notice. In no event shall Allied Telesis, Inc. be liable for any
incidental, special, indirect, or consequential damages whatsoever, including but not limited to lost profits, arising out of or related to this
manual or the information contained herein, even if Allied Telesis, Inc. has been advised of, known, or should have known, the possibility of
such damages.
Page 3
Electrical Safety and Emissions Standards
This product meets the following standards.
U.S. Federal Communications Commission
Radiated Energy
Note: This equipment has been tested and found to comply with the limits for a Class A digital device pursuant to Part 15
of FCC Rules. These limits are designed to provide reasonable protection against harmful interference when the
equipment is operated in a commercial environment. This equipment generates, uses , and can radiate radio frequency
energy and, if not installed and used in accordance with this instruction manual, may cause harmful interference to radio
communications. Operation of this equipment in a residential area is likely to cause harmful interference in which case
the user will be required to correct the interference at his own expense.
Note: Modifications or changes not expressly approved of by the manufacturer or the FCC, can void your right to operate
this equipment.
Industry Canada
This Class A digital apparatus complies with Canadian ICES-003.
Cet appareil numérique de la classe A est conforme à la norme NMB-003 du Canada.
RFI Emissions FCC Class A, EN55022 Class A, EN61000-3-2, EN61000-3-3, VCCI
Class A, C-TICK, CE
Warning: In a domestic environment this product may cause radio interference in
which case the user may be required to take adequate measures.
EMC (Immunity) EN55024
Electrical Safety EN60950 (TUV), UL 60950 (
CULUS
)
Laser Safety EN60825
3
Page 4

Translated Safety Statements
Important: The indicates that translations of the safety statement are available in the PDF
document “Translated Safety Statements” (613-000405) posted on the Allied Telesis website at
www.alliedtelesis.com.
4
Page 5

Contents
Preface ..................................................................................................................................................................................................................... 9
Product Documentation ...................................................................................................................................10
Where to Go First .............................................................................................................................................11
Starting a Management Session ......................................................................................................................11
Safety Symbols Used in this Document ...........................................................................................................12
Contacting Allied Telesis ..................................................................................................................................13
Online Support........................ ... ... .... .......................................... ................................................................13
Email and Telephone Support.......................................... ... ... .... ... .......................................... ...................13
Returning Products.....................................................................................................................................13
Sales or Corporate Information ..................................................................................................................13
Warranty.....................................................................................................................................................13
Management Software Updates.................................................................................................................13
Chapter 1
Overview ...............................................................................................................................................................................................................15
Switch Descriptions ...... .......................................... .......................................... ................................................16
AT-9424Ts Switch......................................................................................................................................16
AT-9424Ts/XP Switch ......... ................................................................................ .......................................17
AT-9448Ts/XP Switch ......... ................................................................................ .......................................18
10/100/1000Base-T Twisted Pair Ports ...........................................................................................................19
Connector Type................................ ... ... ... .... ... ....................................... ... ... ... ... .... ... ... ... ..........................19
Speed.........................................................................................................................................................19
Duplex Mode ................ ... .... .......................................... .......................................... ...................................19
Maximum Distance.....................................................................................................................................19
Cable Type.................................................................................................................................................20
Auto-MDI/MDI-X .........................................................................................................................................20
Port Pinouts...................................... ... ... ... ....................................... ... .... ... ... ... ... .... ... ................................20
SFP Transceiver Slots .....................................................................................................................................21
XFP Transceiver Slots .....................................................................................................................................22
Redundant Twisted Pair Ports .........................................................................................................................23
Compact Flash Card Slot .................................................................................................................................24
Port LEDs ........ ... ... .... ... ... ... ... ....................................... ... .... ... ... ... .... ... .............................................................25
10/100/1000Base-T Twisted Pair Port LEDs..............................................................................................25
Fiber Optic Port and Transceiver Slot LEDs...............................................................................................26
System LEDs ...................................................................................................................................................27
Stack LEDs ............................... ... ... ... .... ... ... ... ....................................... ... .... ... ... ... ... .... ...................................28
AT-StackXG Stacking Module .. ... ... ... .......................................... .... ... ... ... .... ... ... ... ..........................................29
Terminal Port ...................................................................................................................................................30
AT-RPS3204 Redundant Power Supply ..........................................................................................................31
AC Power Connector .......................................................................................................................................32
Chapter 2
Installing the Hardware ...............................................................................................................................................................................33
Installation Overview ........................................................................................................................................34
Reviewing the Safety Precautions ...................................................................................................................36
5
Page 6

Contents
Planning the Installation of a Stack ..................................................................................................................38
Maximum Number of Switches in a Stack .................................... ... .... ... ... ... .... ................................................39
Unpacking a Switch ..........................................................................................................................................40
Installing the AT-StackXG Stacking Module .....................................................................................................41
Installing the Power Cord Retaining Clip (AC Switches Only) ..........................................................................44
Disconnecting the Network Cables ..................................................................................................................45
Installing the Switches in an Equipment Rack ..................................................................................................46
Labeling the Switches ........................... .... ... ... .......................................... .......................................................48
Chapter 3
Preparing the Switches .............................................................................................................................................................................. 49
Powering on a Switch .......................................................................................................................................50
Starting a Local Management Session .............................................................................................................52
Verifying the AT-S63 Version Number .............................................................................................................54
Updating the AT-S63 Management Software ............................ ...... ....... ...... ....... ...... ....... ...... ....... ...... .............55
Assigning the Static Module ID Number 1 to the Master Switch .................................. .... ... ... ... .... ... ... ... ..........56
Assigning Static Module ID Numbers to the Member Switches .......................................................................59
Chapter 4
Cabling and Powering on the Stack ...................................................................................................................................................61
Cabling the AT-StackXG Stacking Modules ................................. ....................................... .............................62
Powering On the Switches of the Stack ....................................................................... .... ... ... ... .... ...................65
Verifying the Installation ...................................................................................................................................67
Troubleshooting the Discovery Process ...........................................................................................................69
Chapter 5
Cabling the Network Ports ....................................................................................................................................................................... 71
Installing Optional Transceivers .......................................................................................................................72
Installing an SFP Transceiver.....................................................................................................................72
Installing an XFP Transceiver.....................................................................................................................74
Cabling the Twisted Pair and Fiber Optic Ports ...............................................................................................76
Chapter 6
Adding and Removing Switches .......................................................................................................................................................... 77
Replacing the Master Switch .............................. ................................. ................................ .............................78
Uploading the Active Configuration File......................................................................................................78
Removing the Current Master Switch.........................................................................................................79
Configuring the New Master Switch............................................................................................................84
Connecting the New Master Switch to the Stack........................................................................................86
Adding a New Member Switch ..................... ... ... .... .......................................... ... ... ... .......................................87
Replacing a Member Switch ............................... .... ... ... ... ... .... ..........................................................................89
Chapter 7
Troubleshooting ............................................................................................................................................................................................. 91
No Master Switch .............................................................................................................................................92
Power LED is Off ..............................................................................................................................................93
Twisted Pair Port Link LED is Off .....................................................................................................................94
Fiber Optic Port Link LED is Off ......................... .... ... ... ... ... .... ... ... ... .... ... ... ... .... ... ... ... .......................................95
Transceiver is Installed but the Status is “Not Present” ......................................................................
.............96
System Fault LED is Blinking ...........................................................................................................................97
System Fault LED is Steadily On .....................................................................................................................98
Cannot Establish a Local (Out-of-Band) Management Session .......................................................................99
Switch Functions Intermittently .................................. .......................................... ... ... ... .... ... ...........................100
6
Page 7

AT-9400Ts Stack Installation Guide
Appendix A
Technical Specifications ......................................................................................................................................................................... 101
Physical Specifications ..................................................................................................................................101
Environmental Specifications ................. .......................................... ... ... ... .... ... ... ... ... .....................................101
Power Specifications ......................................................................................................................................102
Certifications ..................................................................................................................................................102
RJ-45 Twisted Pair Port Pinouts ....................................................................................................................103
RJ-45 Style Serial Terminal Port Pinouts .......................................................................................................105
RPS 21-pin D-combo Port and Connector Pinouts ................ .......................................... ... ... .... ....................106
7
Page 8

Contents
8
Page 9

Preface
Note
This guide explains how to build an AT-9400Ts Stack of the AT-9424Ts,
AT-9424Ts/XP, and AT-9448Ts/XP Basic Layer 3 Gigabit Ethernet
Switches. This preface contains the following sections:
“Product Documentation” on page 10
“Where to Go First” on page 11
“Starting a Management Session” on page 11
“Safety Symbols Used in this Document” on page 12
“Contacting Allied Telesis” on page 13
For instructions on how to install the switches as stand-alone units,
refer to the AT-9400 Gigabit Ethernet Switch Installation Guide.
9
Page 10

Preface
Product Documentation
For overview information on the features of the AT-9400 Switches and the
AT-S63 Management Software, refer to:
AT-S63 Management Software Features Guide
(PN 613-001022)
For instructions on how to start a local or remote management session on
stand-alone AT-9400 Switches or AT-9400Ts Stacks, refer to:
Starting an AT-S63 Management Session Guide
(PN 613-001023)
For instructions on how to install or manage stand-alone AT-9400
Switches, refer to:
AT-9400 Gigabit Ethernet Switch Installation Guide
(PN 613-000987)
AT-S63 Management Software Menus User’s Guide
(PN 613-001025)
AT-S63 Management Software Command Line User’s Guide
(PN 613-001024)
AT-S63 Management Software Web Browser User’s Guide
(PN 613-001026)
For instructions on how to install or manage AT-9400Ts Stacks, refer to:
AT-9400Ts Stack Installation Guide
(PN 613-001191)
AT-S63 Management Software Command Line User’s Guide
(PN 613-001024)
AT-S63 Management Software Web Browser User’s Guide for
AT-9400Ts Stacks
(PN 613-001028)
The installation and user guides for all the Allied Telesis products are
available in portable document format (PDF) on our web site at
www.alliedtelesis.com. You can view the documents online or download
them onto a local workstation or server.
10
Page 11

Where to Go First
Allied Telesis recommends that you read Chapter 1, “Overview,” in the
AT-S63 Management Software Features Guide before you begin to
manage the switch for the first time. There you will find a variety of basic
information about the unit and the management software, like the two
levels of manager access levels and the different types of management
sessions. The AT-S63 Management Software Features Guide is also your
resource for background information on the features of the switch. You can
refer there for the relevant concepts and guidelines when configuring a
feature for the first time.
Starting a Management Session
For instructions on how to start a local or remote management session on
the AT-9400 Switch, refer to the Starting an AT-S63 Management Session
Guide.
AT-9400Ts Stack Installation Guide
11
Page 12
Preface
Safety Symbols Used in this Document
This document uses the safety symbols defined in Table 1.
Table 1. Safety Symbols
Symbol Meaning Description
Caution Performing or omitting a specific action may
result in equipment damage or loss of data.
Warning Performing or omitting a specific action may
result in electrical shock.
12
Page 13

AT-9400Ts Stack Installation Guide
Contacting Allied Telesis
This section provides Allied Telesis contact information for technical
support and for sales and corporate information.
Online Support You can request technical support online by accessing the Allied Telesis
Knowledge Base: www.alliedtelesis.com/support/kb.aspx. You can use
the Knowledge Base to submit questions to our technical support staff and
review answers to previously asked questions.
Email and
Telephone
Support
Returning
Products
Sales or
Corporate
Information
Warranty For hardware warranty information, refer to the Allied Telesis web site at
Management
Software Updates
For Technical Support via email or telephone, refer to the Allied Telesis
web site at www.alliedtelesis.com. Select your country from the list on
the web site and then select the appropriate tab.
Products for return or repair must first be assigned a return materials
authorization (RMA) number. A product sent to Allied Telesis without an
RMA number will be returned to the sender at the sender’s expense. For
instructions on how to obtain an RMA number, go to the Support section
on our web site at www.alliedtelesis.com.
You can contact Allied Telesis for sales or corporate information through
our web site at www.alliedtelesis.com.
www.alliedtelesis.com/support/warranty.
New releases of the management software for our managed products are
available from the following Internet sites:
Allied Telesis web site: www.alliedtelesis.com
Allied Telesis FTP server: ftp://ftp.alliedtelesis.com
If the FTP server prompts you to log on, enter “anonymous” as the user
name and your email address as the password.
13
Page 14

Preface
14
Page 15

Chapter 1
Note
Note
Overview
This guide explains how to install the AT-9424Ts, AT-9424Ts/XP and
AT-9448Ts/XP Gigabit Ethernet Switches as an AT-9400Ts Stack. This
chapter contains the following sections:
“Switch Descriptions” on page 16
“10/100/1000Base-T Twisted Pair Ports” on page 19
“SFP Transceiver Slots” on page 21
“XFP Transceiver Slots” on page 22
“Redundant Twisted Pair Ports” on page 23
“Compact Flash Card Slot” on page 24
“Port LEDs” on page 25
“System LEDs” on page 27
“Stack LEDs” on page 28
“AT-StackXG Stacking Module” on page 29
“Terminal Port” on page 30
“AT-RPS3204 Redundant Power Supply” on page 31
“AC Power Connector” on page 32
Allied Telesis recommends you read Chapter 1, “Overview,” and
Chapter 2, “AT-9400Ts Stacks,” in the AT-S63 Management
Software Features Guide before you begin to install the stack.
You should not begin the installation procedures in this guide until
you have read the Software Release Notes that are included with
the latest release of the AT-S63 Management Software. The Notes
list the features that AT-9400Ts Stacks support. Stacks may not be
suitable for all network environments because they do not support all
of the same features as stand-alone AT-9400 Switches. If your
network requirements include features that are not supported in a
stack, install the switches as stand-alone devices.
15
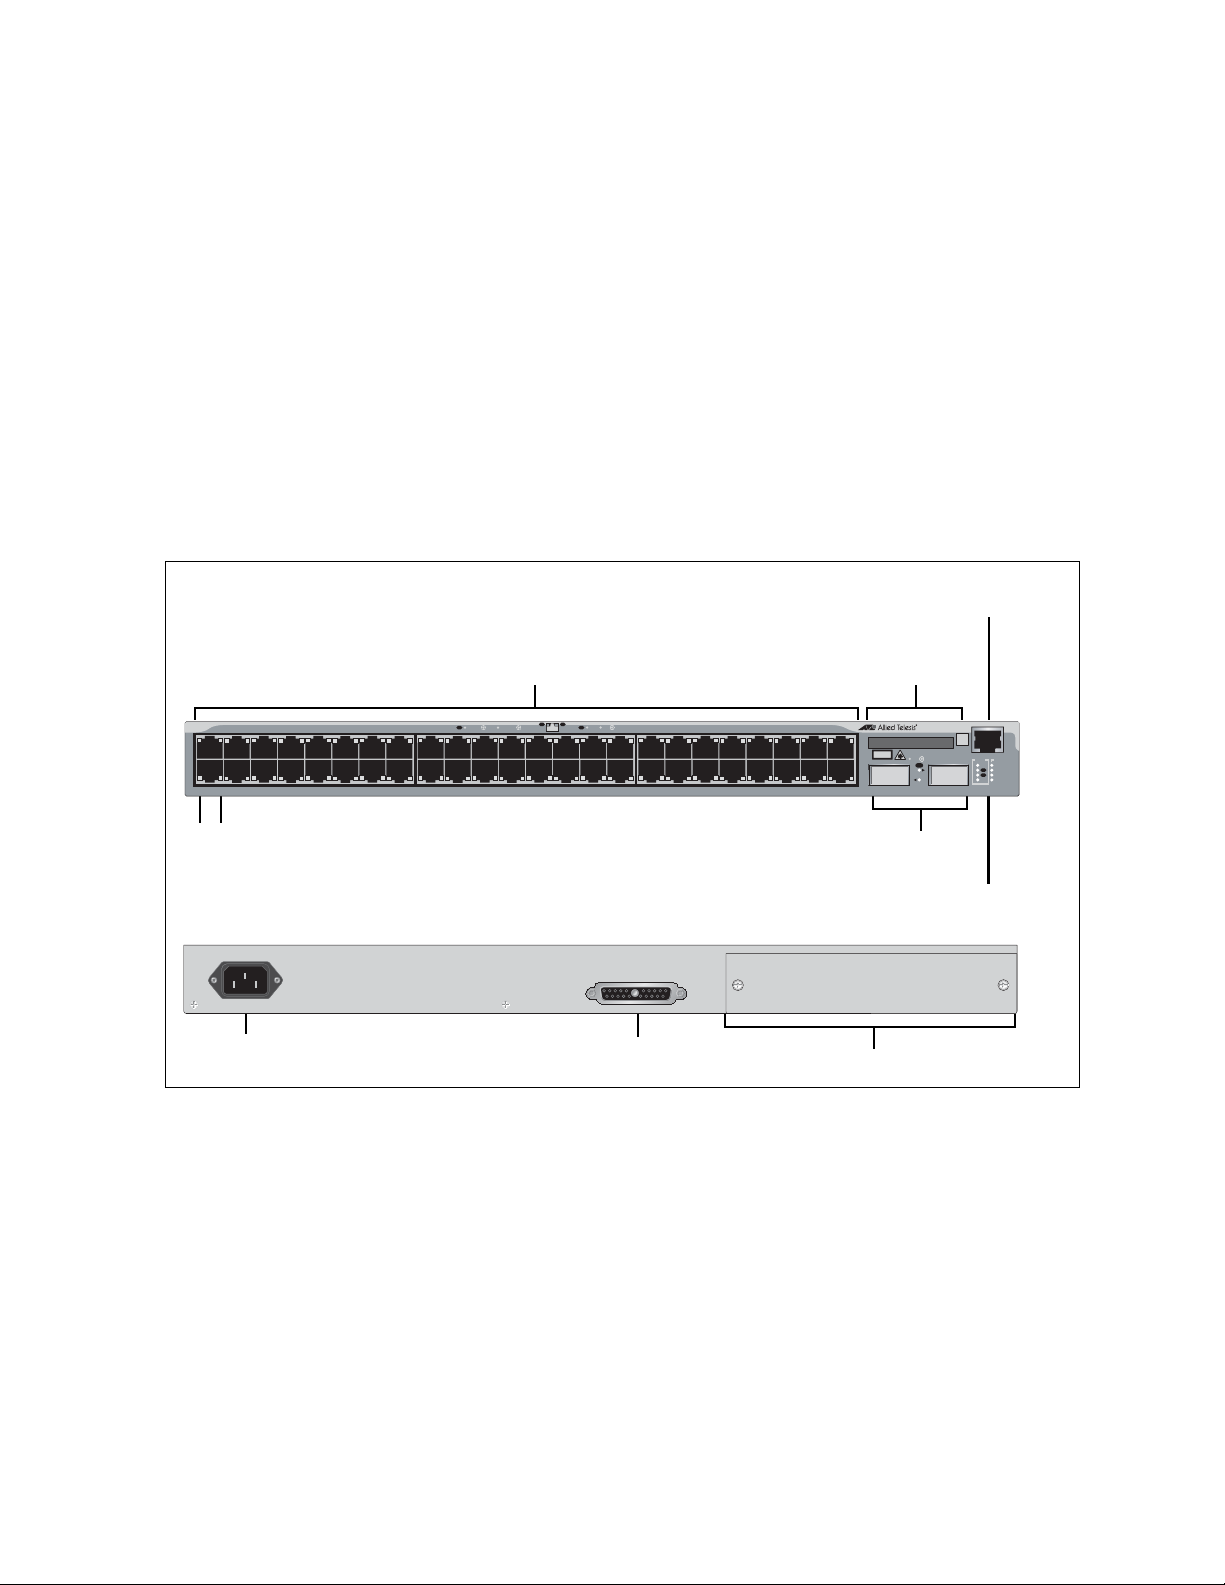
Page 16
Chapter 1: Overview
10/100/1000Base-T Ports
Port and SFP
RJ-45 Style Serial
Terminal Port
SFP Transceiver Slots
AC Power
Connector
RPS Connector
Slot LEDs
System
LEDs
1 3 5 7 9 11 13 15 17 19 21R 23R
2 4 6 8 1012 1416182022R24R
CLASS 1
LASER PRODUCT
AT-9424Ts
Gigabit Ethernet Switch
1 3 5 7 9 11 13 15 17 19 21R 23R
2 4 6 8 10 12 14 16 18 20 22R 24R
EJECT
TERMINAL
PORT
COMPACT FLASH
FAULT
RPS
MASTER
POWER
STATUS
SFP
21 22 23 24
L/A
D/C
D/C
L/AL/A
D/C
L/A
1000 LINK /
ACT
HDX /
COL
FDX
10/100 LINK / ACT
PORT ACTIVITY
STACK
PRES
MSTR
21
22
23
24
SFP
L/A
1
2
L/A
RPS INPUT
100-240VAC~
Expansion Slot
Switch Descriptions
The following sections describe the AT-9424Ts, AT-9424Ts/XP, and
AT-9448Ts/XP Gigabit Ethernet Switches.
AT-9424Ts
Switch
The AT-9424Ts Basic Layer 3 Switch has these hardware features:
24 10/100/1000Base-T ports
Four Gigabit Ethernet small form-factor pluggable (SFP) transceiver
slots
An RJ-45 style serial terminal port for local (out-of-band) management
Status LEDs for the ports, transceiver slots, and system
Redundant power supply connector
Compact flash card slot
Expansion slot for the AT-StackXG Stacking Module
Figure 1 shows the front and back panels of the AT-9424Ts switch.
16
Figure 1 AT-9424Ts Switch - Front and Back Panels
Page 17
AT-9400Ts Stack Installation Guide
10/100/1000Base-T Ports
Port and SFP
RJ-45 Style Serial
Terminal Port
SFP Slots
AC Power
Connector
RPS Connector
Slot LEDs
System
LEDs
1 3 5 7 9 11 13 15 17 19 21R 23R
2 4 6 8 1012 1416182022R24R
CLASS 1
LASER PRODUCT
AT-9424Ts/XP
Gigabit Ethernet Switch
1 3 5 7 9 11 13 15 17 19 21R 23R
2 4 6 8 10 12 14 16 18 20 22R 24R
EJECT
TERMINAL
PORT
COMPACT FLASH
FAULT
RPS
MASTER
POWER
STATUS
SFP
21 22 23 24
L/A
D/C
D/C
L/AL/A
D/C
L/A
1000 LINK /
ACT
HDX /
COL
FDX
10/100 LINK / ACT
PORT ACTIVITY
STACK
PRES
MSTR
21
22
23
24
SFP
L/A
1
2
L/A
L/A
25 26
XFP
XFP
XFP Slots
RPS INPUT
100-240VAC~
Expansion Slot
AT-9424Ts/XP
Switch
The AT-9424Ts/XP Basic Layer 3 Switch has these hardware features:
24 10/100/1000Base-T ports
Four Gigabit Ethernet small form-factor pluggable (SFP) transceiver
slots
Two 10 Gigabit Ethernet small form factor pluggable (XFP) tra nsceiver
slots
An RJ-45 style serial terminal port for local (out-of-band) management
Status LEDs for the ports, transceiver slots, and system
Redundant power supply connector
Compact flash card slot
Expansion slot for the AT-StackXG Stacking Module
Figure 2 shows the front and back panels of the AT-9424Ts/XP switch.
Figure 2 AT-9424Ts/XP Switch - Front and Back Panels
17
Page 18
Chapter 1: Overview
Port
LEDs
AC Power
Connector
RPS Connector
10/100/1000Base-T Ports
XFP Transceiver
RJ-45 Style Serial
Terminal Port
Slots and LEDs
System LEDs
AT-9448Ts/XP
STATUS
FAULT
MASTER
RPS
POWER
COMPACT FLASH
TERMINAL PORT
EJECT
49 50
15135791113 17 3331 473519 21 23 25 27 29 37 39 41 43 45
1000 LINK / ACT
10/100 LINK / ACT
FDX
HDX / COL
D/C
L/A
L/A D/C
CLASS 1
LASER PRODUCT
L/A
XFP XFP
LINK / ACT
STACK
PRES
L/A
L/A
34
4836 38 40 42 44 46
3216
2468 10 12 14 22 24 26 28 30
18
20
1
2
MSTR
Expansion Slot
Compact Flash
Card Slot
AT-9448Ts/XP
Switch
The AT-9448Ts/XP Basic Layer 3 Switch has the following hardware
features:
48 10/100/1000Base-T ports
Two 10 Gigabit Ethernet small form factor pluggable (XFP) tran sceiver
slots
An RJ-45 style serial terminal port for local (out-of-band) management
Status LEDs for the ports, transceiver slots, and system
Redundant power supply connector
Compact flash card slot
Expansion slot for the AT-StackXG Stacking Module
Figure 3 shows the front and back panels of the AT-9448Ts/XP switch.
100-240VAC~
18
RPS INPUT
Figure 3 AT-9448Ts/XP Switch - Front and Back Panels
Page 19

AT-9400Ts Stack Installation Guide
Note
Note
10/100/1000Base-T Twisted Pair Ports
This section describes the twisted pair ports on the switches.
Connector Type The ports have 8-pin RJ-45 connectors that use four pins at 10 or 100
Mbps and all eight pins at 1000 Mbps. For the pin assignments, refer to
“RJ-45 Twisted Pair Port Pinouts” on page 103.
Speed The ports can operate at 10, 100, or 1000 Mbps. The speeds can be set
automatically through Auto-Negotiation, the default setting, or manually
with the AT-S63 Management Software.
Twisted pair ports must use Auto -Negotiation to operate at 1000
Mbps. They cannot be manually set to 1000 Mbps.
Duplex Mode The twisted pair ports can operate at 10 or 100 Mbps in either half- or full-
duplex mode. (Ports that are operating at 1000 Mbps use only full-duplex
mode.) The twisted pair ports are IEEE 802.3u-compliant and can set the
duplex modes through Auto-Negotiation. You can disable AutoNegotiation on the switch ports and set the duplex modes manually
through the AT-S63 Management Software.
Maximum
Distance
Ports that are using Auto-Negotiation to set their duplex modes
should be connected to end nodes that are also using AutoNegotiation. Otherwise, duplex mode mismatches can occur.
Twisted pair ports that are using Auto-Negotiation default to halfduplex mode if they detect that the end nodes are not using AutoNegotiation. If the end nodes are operating at a fixed duplex mode of
full-duplex, the ports and the end nodes will operate at different
duplex modes, which can reduce network speed and efficiency.
To avoid a duplex mode mismatch when connecting an end node
with a fixed duplex mode of full-duplex to a switch port, use the
AT-S63 Management Software to disable Auto-Negotiation on the
port and to set the port speed and duplex mode manually.
The ports have a maximum operating distance of 100 meters (328 feet).
19
Page 20

Chapter 1: Overview
Cable Type Table 2 lists the cabling specifications for the 10/100/1000Base-T twisted
pair ports.
Table 2. Twisted Pair Cabling and Distances
Speed Cable Type
Maximum
Operating
Distance
Auto-MDI/
MDI-X
10 Mbps Standard TIA/EIA 568-B-compliant
Category 3 or better shielded or
unshielded cabling with 100 ohm
impedance and a frequency of 16
MHz.
100 Mbps Standard TIA/EIA 568-A-compliant
Category 5 or TIA/EIA 568-Bcompliant Enhanced Category 5 (Cat
5e) shielded or unshielded cabling
with 100 ohm impedance and a
frequency of 100 MHz.
1000 Mbps Standard TIA/EIA 568-A-compliant
Category 5 or TIA/EIA 568-Bcompliant Enhanced Category 5 (Cat
5e) shielded or unshielded cabling
with 100 ohm impedance and a
frequency of 100 MHz.
The twisted pair ports are IEEE 802ab-compliant and feature auto-MDI/
MDI-X. This feature, available when a port’s speed and duplex mode are
set through Auto-Negotiation, automatically configures a switch port to
MDI or MDI-X depending on the wiring configuration of the port on the end
node. This allows you to connect any network device to a port on the
switch using a straight-through twisted pair cable.
100 m (328 ft)
100 m (328 ft)
100 m (328 ft)
20
If Auto-Negotiation is disabled on a port and the speed and duplex mode
are set manually, the auto-MDI/MDI-X feature is also disabled and the
port’s wiring configuration defaults to the MDI-X setting. This setting can
be configured with the AT-S63 Management Software.
Port Pinouts Table 12 on page 103 has the port pinouts when the twisted pair ports are
operating at 10 or 100 Mbps in the MDI configuration. Table 13 on
page 103 has the port pinouts for the MDI-X configuration. Table 14 on
page 104 has the port pinouts for twisted pair ports that are operating at
1000 Mbps.
Page 21
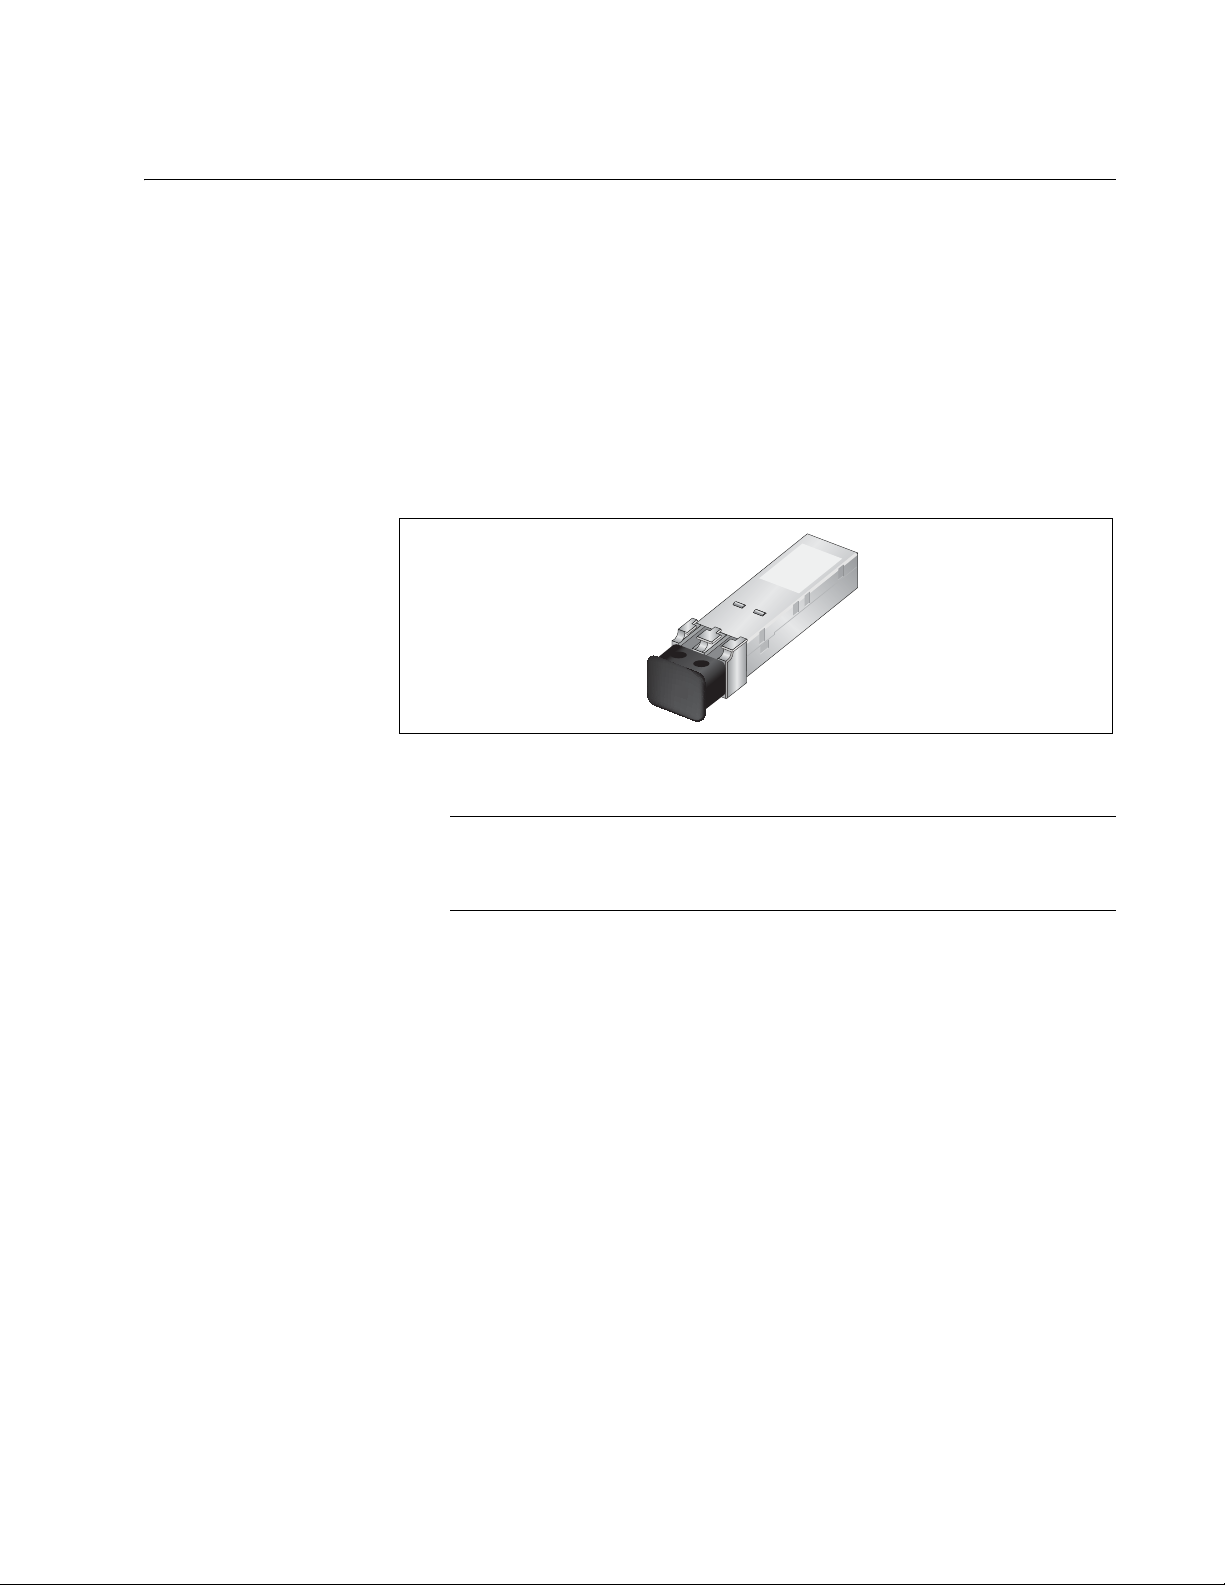
SFP Transceiver Slots
Note
The AT-9424Ts and AT-9424Ts/XP Switches feature four slots for optional
Gigabit Ethernet SFP transceivers. You can use the transceivers to
connect the switches to network devices over large distances using fiber
optic cable. Figure 4 illustrates an SFP transceiver.
Each SFP slot is paired with a twisted pair port. A link on an SFP
transceiver takes priority in the event both an SFP transceiver and its
paired twisted pair port have established links to their respective end
nodes. For further information, refer to “Redundant Twisted Pair Ports” on
page 23.
AT-9400Ts Stack Installation Guide
Figure 4 SFP Transceiver
For the list of supported SFP transceivers, contact your Allied
Telesis sales representative.
21
Page 22
Chapter 1: Overview
Note
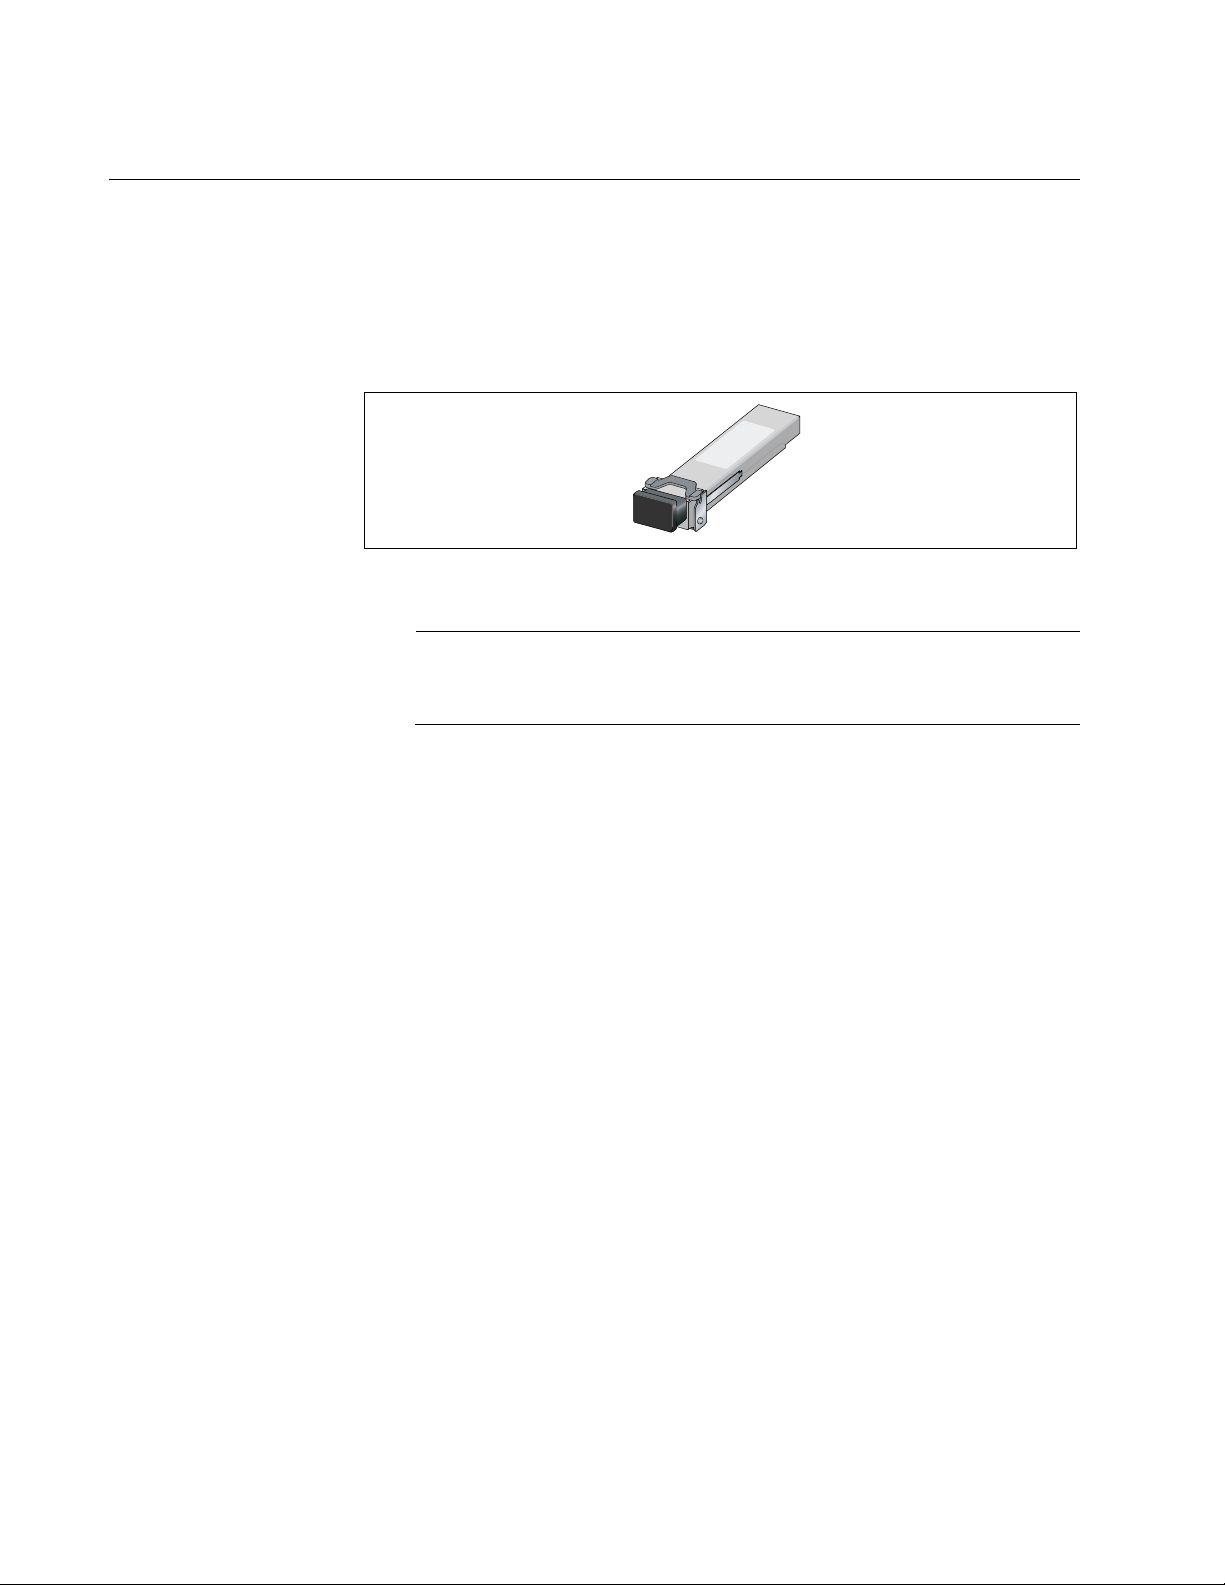
XFP Transceiver Slots
The AT-9424Ts/XP and AT-9448Ts/XP Switches have two slots for
optional XFP 10 Gigabit Ethernet transceivers that can be used to connect
high speed, 10 gigabit devices to the switches or to create high speed
backbone networks between the units. Figure 5 shows an example of an
XFP transceiver.
721
Figure 5 XFP Transceiver
For the list of supported XFP transceivers, contact your Allied
Telesis sales representative.
22
Page 23

Redundant Twisted Pair Ports
Note
The SFP slots 21 through 24 on the AT-9424Ts and AT-9424Ts/XP
Switches are paired with twisted pair ports 21R through 24R, respectively.
The “R” in the twisted pair port numbers on the front faceplates of the units
stands for “Redundant.” Here are the guidelines to using these ports and
slots:
Only one port in a pair -- the twisted pair port or the port on the
corresponding SFP module -- can be active at a time.
The twisted pair port is the active port when its SFP slot is empty, or
when an SFP module is installed but has not established a link to an
end node.
The twisted pair port automatically changes to the redundant status
mode when an SFP module establishes a link with an end node.
A twisted pair port automatically transitions back to the active status
when the link is lost on the SFP module.
AT-9400Ts Stack Installation Guide
In nearly all cases, a twisted pair port and an SFP module share the
same configuration settings, including port settings, VLAN
assignments, access control lists, and spanning tree.
An exception to the shared settings is port speed. If you disable Auto-
Negotiation on a twisted pair port and set the speed and duplex mode
manually, the speed reverts to Auto-Negotiation when an SFP module
establishes a link with an end node.
These guidelines do not apply to the XFP slots on the AT-9424T s/XP
and AT-9448Ts/XP Switches.
23
Page 24
Chapter 1: Overview
Note
Note
AT-9424Ts/XP
1 3 5 7 9 11 13 15 17 19 21R 23R
2 4 6 8 10 12 14 16 18 20 22R 24R
EJECT
TER
P
COMPACT FLASH
L/A
D/C
D/C
L/AL/A
COL
STACK
PRES
MSTR
21
22
23
24
SFP
L/A
1
2
L/A
26
XFP
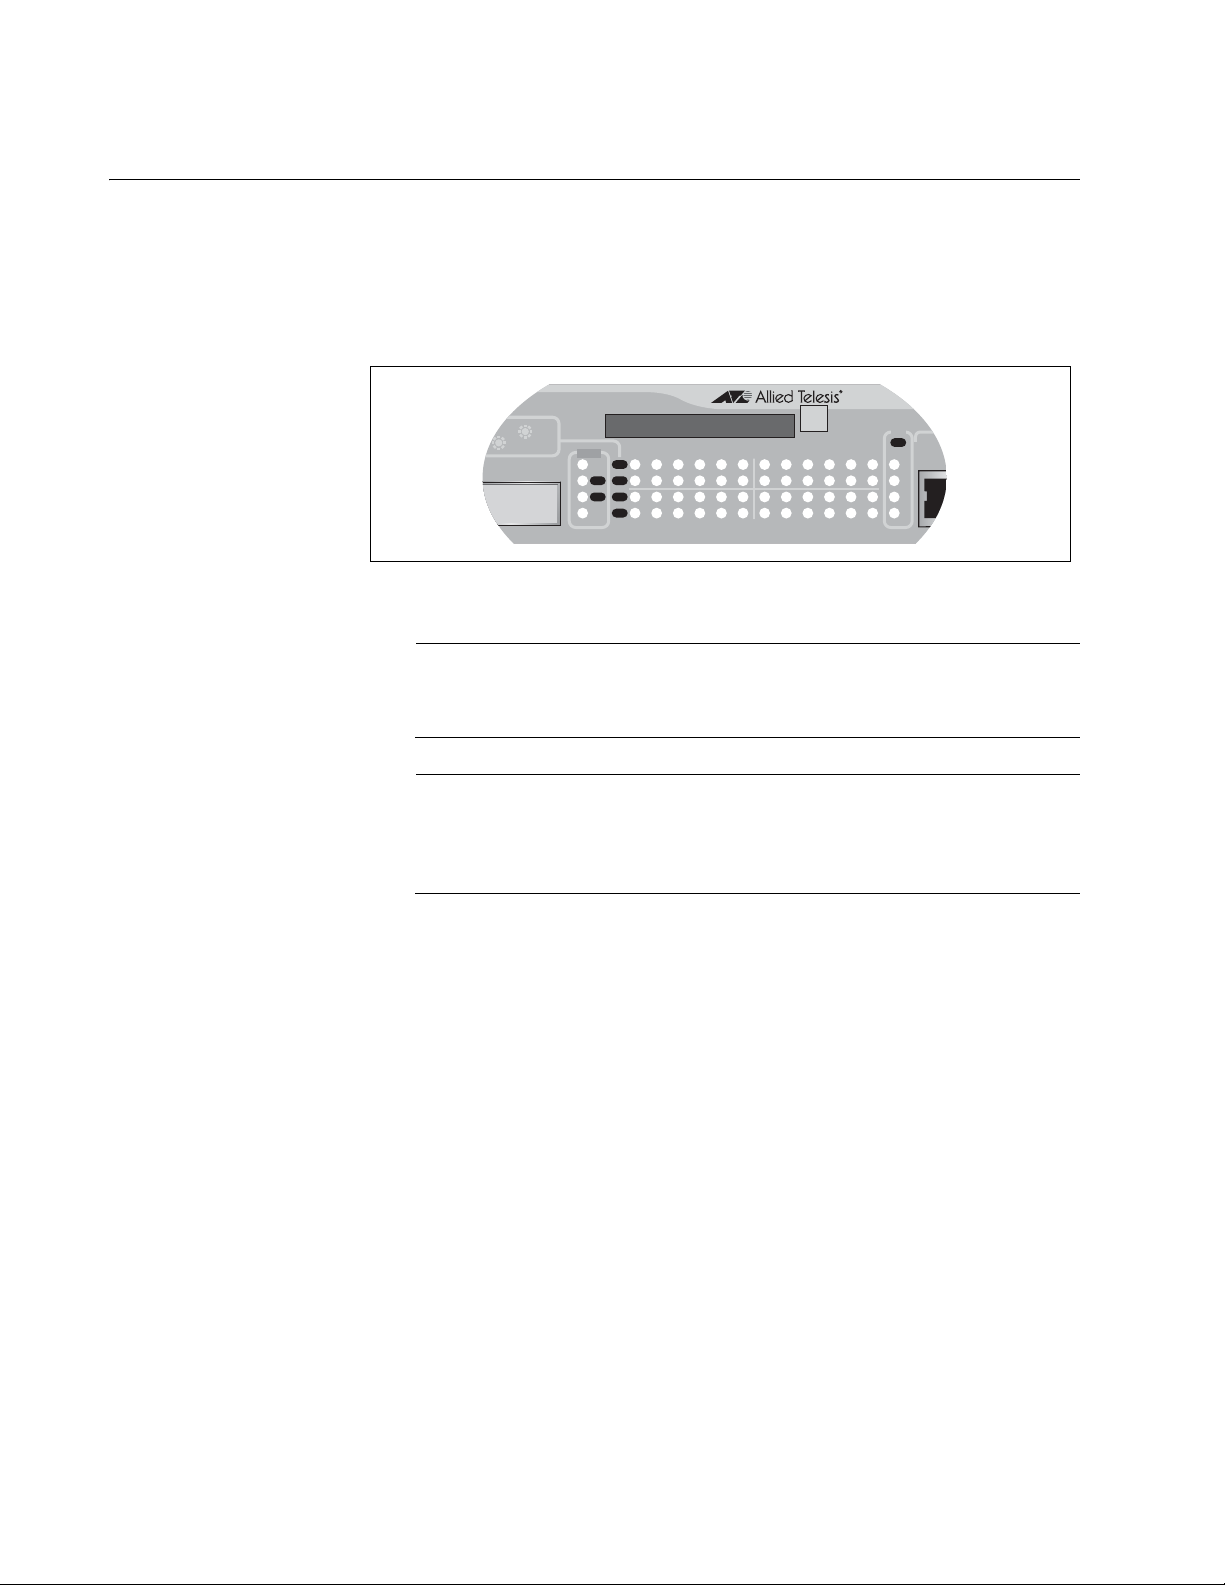
Compact Flash Card Slot
The switches have slots for compact flash memory cards. You can use the
cards to store configuration files or the AT-S63 Management Software
image file. Compact flash memory cards can make it easier for you to
upgrade the files on a switch or transfer files between AT-9400 Switches.
Figure 6 Compact Flash Card Slot
A flash memory card is not required for normal operations of the
switch.
The only active compact flash card slot in a stack is on the master
switch. The slots on the member switches are deactivated and are
not accessible.
The AT-9400 Switches support only the AT-CF128A 128MB compact
flash card from Allied Telesis. Contact your Allied Telesis sales
representative for more information.
To insert a compact flash card, position it so that the manufacturer’s brand
label is facing up and press it into the slot until the button marked “Eject”
pops out.
To remove the compact flash card, press the button marked “Eject” until it
is pressed in completely and then remove the compact flash card.
For information on how to transfer files to and from a flash memory card,
refer to the AT-S63 Management Software User’s Guides.
24
Page 25

Port LEDs
AT-9400Ts Stack Installation Guide
The following sections describe the twisted pair and fiber optic port LEDs.
10/100/1000Base-
T Twisted Pair
Port LEDs
Each twisted pair port has two LEDs labeled L/A (link/activity) and D/C
(duplex mode/collisions). The L/A LED indicates the speed and activity on
a port. The D/C LED indicates the duplex mode (full- or half-duplex) and
the status of collisions on the port.
Table 3 describes the LEDs for the 10/100/1000Base-T twisted pair ports.
Table 3 Twisted Pair Port LEDs
LED Function State Description
L/A Link Status
and Activity
Off No link is established between the
port and the end node.
Solid
green
Flashing
green
Solid
amber
Flashing
amber
The port has established a link at
1000 Mbps.
Packets are being received or
transmitted at 1000 Mbps.
The port has established a link at 10
or 100 Mbps.
Packets are being received or
transmitted at 10 or 100 Mbps.
D/C Duplex
Mode and
Collisions
Green The port is operating in full-duplex
mode.
Amber The port is operating in half-duplex
mode. (Only when operating at 10 or
100 Mbps.)
Flashing
amber
Collisions are occurring on the port.
(Only when operating at 10 or 100
Mbps, half duplex mode.)
25
Page 26
Chapter 1: Overview
Fiber Optic Port
and Transceiver
Slot LEDs
Each 10 Gigabit Ethernet transceiver slot on the AT-9424Ts/XP and
AT-9448Ts/XP Switches has one LED, defined in Table 4.
Table 4 XFP Slot LED
LED Function State Description
L/A Link Status
and Activity
Off No link is established between the
port and the end node.
Solid
green
Flashing
green
The port has established a link at 10
Gbps.
Packets are being received or
transmitted at 10 Gbps.
26
Page 27
System LEDs
AT-9400Ts Stack Installation Guide
The system LEDs on the front panel display the general status information
described in Table 5.
Table 5 System LEDs
LED State Description
FAULT or
FLT
MASTER
or MSTR
RPS Off No optional redundant power supply is
Off Normal operation.
Solid
Red
Flashing
Red
Off The switch is not a member of an enhanced
Green The switch has an enhanced stacking status of
The switch or management software has
malfunctioned. (Refer to Chapter 7,
“Troubleshooting” on page 91 for instructions
on how to troubleshoot a problem.)
The switch is saving its configuration or is
downloading a new version of the AT-S63
Management Software.
stack or has an enhanced stacking status of
slave or unavailable.
The enhanced stacking feature is not related to
or supported on AT-9400Ts Stacks. For
information on enhanced stacking, refer to the
AT-S63 Management Software Features
Guide.
master.
connected to the switch.
POWER
or PWR
Green An optional redundant power supply is
physically connected to the switch and may be
powered on or off.
Off The switch is not receiving power.
Green The switch is receiving power.
27
Page 28
Chapter 1: Overview
Stack LEDs
The Stack LEDs reflect the status of the two Stack ports on the
AT-StackXG Stacking Module. These LEDs remain off if the module is not
installed.
Table 6 Stack LEDs
LED State Description
MSTR Off The switch is not part of a stack or is a member
unit of a stack.
Green The switch is the master unit of a stack.
1 L/A Off Stack Port 1 has not established a link to a
stacking port on another AT-StackXG Stacking
Module.
Green Stack Port 1 has established a link to a
stacking port on another AT-StackXG Stacking
Module.
Flashing
Green
2 L/A Off Stack Port 2 has not established a link to a
Green Stack Port 2 has established a link to a
Flashing
Green
PRES Off The expansion slot for the AT-StackXG
Stack Port 1 has established a link to a
stacking port on another AT-StackXG Stacking
Module and is sending or receiving packet
traffic.
stacking port on another AT-StackXG Stacking
Module.
stacking port on another AT-StackXG Stacking
Module.
Stack Port 2 has established a link to a
stacking port on another AT-StackXG Stacking
Module and is sending or receiving packet
traffic.
Stacking Module is empty.
28
Green The AT-StackXG Stacking Module is installed
in the switch.
Page 29
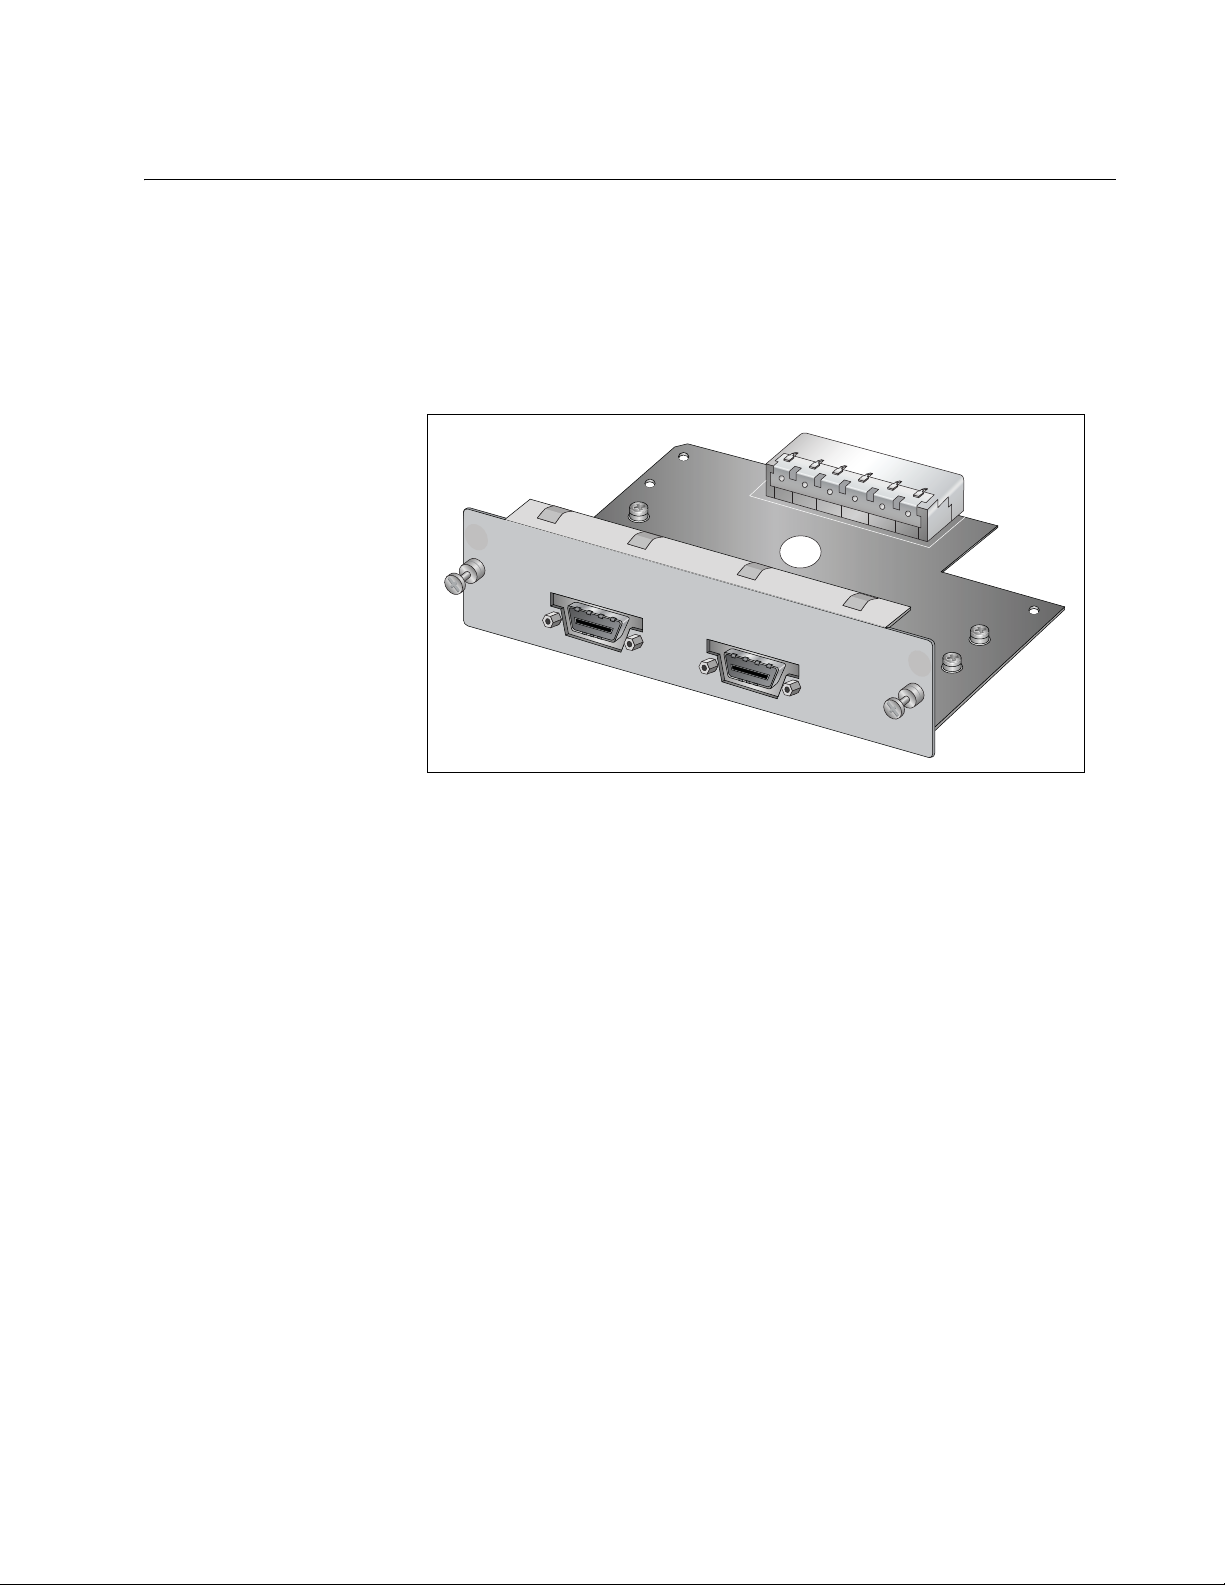
AT-StackXG Stacking Module
The AT-9424Ts, AT-9424Ts/XP, and AT-9448Ts/XP Switches have an
expansion slot on the back panels for the optional AT-StackXG Stacking
Module and its two full-duplex, 12-Gbps stacking ports. A switch must
have this module to be a part of a stack. The installation instructions are
found in “Installing the AT-StackXG Stacking Module” on page 41 and in
the installation guide that ships the module.
A
T
AT-StackXG
-LX44CPUCVR
Stack Port 1
AT-9400Ts Stack Installation Guide
Stac
k Port 2
Figure 7 AT-StackXG Stacking Module
1240
29
Page 30

Chapter 1: Overview
Note
Terminal Port
The terminal port is used to establish a local (out-of-band) management
session with the switch. You establish a local management session by
connecting a terminal or a personal computer with a terminal emulation
program to the port.
All local management sessions of a stack must be conducted through the
stack’s master switch. The master switch can be determined by viewing
the Stack MSTR LEDs on the front panels of the switches. The switch
whose LED is steady green is the master switch of a stack.
The terminal port has an RJ-45 style connector. An RJ-45 to RS-232
management cable is supplied with the switch.
The terminal port is set to the following specifications:
Default baud rate: 9600 bps (Range is 9600 to 115200 bps)
Data bits: 8
Parity: None
Stop bits: 1
Flow control: None
These settings are for a DEC VT100 or ANSI terminal, or an
equivalent terminal emulation program.
30
Page 31

AT-RPS3204 Redundant Power Supply
AT-PW
R3204
P
O
W
E
R
The RPS connector on the back panel of the switch connects to the
optional AT-RPS3204 redundant power supply unit, shown in Figure 8.
The unit can provide power to the switch in the event that the switch’s
internal power supply fails.
The AT-RPS3204 redundant external power supply features one
preinstalled AT-PWR3202 Power Module and three empty slots for
additional power modules. Each power module can support one switch.
When fully populated with AT-PWR3202 Power Modules, the
AT-RPS3204 unit can support up to four switches, simultaneously. For
information about installing an AT-RPS3204 unit, consult the
documentation that ships with the unit.
AT-9400Ts Stack Installation Guide
Figure 8 AT-RPS3204 Redundant Power Supply Unit
The pinouts for the redundant power supply’s 21-pin D-combo port and
connector are described in “RPS 21-pin D-combo Port and Connector
Pinouts” on page 106.
31
Page 32

Chapter 1: Overview
AC Power Connector
The AT-9400 Switch have a single AC power supply socket on the back
panel, which has autoswitch AC inputs. To power the switch on or off,
connect or disconnect the power cord.
Refer to “Technical Specifications” on page 101 for the input voltage
range.
Warning: Power cord is used as a disconnection device. To deenergize equipment, disconnect the power cord.
Warning: This unit might have more than one power cord. To
reduce the risk of electric shock, disconnect all power cords
before servicing the unit.
32
5
32
Page 33

Chapter 2
Installing the Hardware
This chapter contains an overview of the installation procedures for a stack
and the procedures for installing the hardware. The chapter contains the
following sections:
“Installation Overview” on page 34
“Reviewing the Safety Precautions” on page 36
“Planning the Installation of a Stack” on page 38
“Maximum Number of Switches in a Stack” on page 39
“Unpacking a Switch” on page 40
“Installing the AT-StackXG Stacking Module” on page 41
“Installing the Power Cord Retaining Clip (AC Switches Only)” on
page 44
“Disconnecting the Network Cables” on page 45
“Installing the Switches in an Equipment Rack” on page 46
“Labeling the Switches” on page 48
33
Page 34

Chapter 2: Installing the Hardware
Installation Overview
Table 7 lists the installation procedures for a stack of the AT-9424Ts,
AT-9424Ts/XP, and AT-9448Ts/XP Switches. The procedures, which are
divided into four chapters, should be performed in the order presented in
the table. Allied Telesis recommends that you print this table and place a
check mark beside the procedures as you complete them.
Chapter 2, “Installing the Hardware”
Table 7. Installation Procedures
Step Procedure
1 Refer to “Reviewing the Safety Precautions” on
page 36
2 Refer to “Planning the Installation of a Stack” on
page 38
3 Refer to “Maximum Number of Switches in a
St a ck” on page 39
4 Refer to “Unpacking a Switch” on page 40
5 Refer to “Installing the AT-StackXG Stacking
Module” on page 41
6 Refer to “Installing the Power Cord Retainin g Clip
(AC Switches Only)” on page 44
7 Refer to “Disconnecting the Network Cables” on
page 45
8 Refer to “Installing the Switches in an Equipment
Rack” on page 46
9 Refer to “Labeling the Switches” on page 48
Chapter 3, “Preparing the Switches”
10 Refer to “Powering on a Switch” on page 50
11 Refer to “Starting a Local Management Session”
on page 52
12 Refer to “Verifying the AT-S63 Version Number”
on page 54
34
13 Refer to “Updating the AT-S63 Management
Software” on page 55
14 Refer to “Assigning the St atic Module ID Numbe r
1 to the Master Switch” on page 56
Page 35

AT-9400Ts Stack Installation Guide
Table 7. Installation Procedures
Step Procedure
15 Refer to “Assigning Static Module ID Numbers to
the Member Switches” on page 59
Chapter 4, “Cabling and Powering on the Stack”
16 Refer to “Cabling the AT-StackXG Stacking
Modules” on page 62
17 Refer to “Powering On the Switches of the St ack”
on page 65
18 Refer to “Verifying the Installation” on page 67
19 Refer to “Troubleshooting the Discovery Process”
on page 69
Chapter 5, “Cabling the Network Ports”
20 Refer to “Installing Optional Transceivers” on
page 72
21 Refer to “Cabling the Twisted Pair and Fiber
Optic Ports” on page 76
35
Page 36

Chapter 2: Installing the Hardware
Note
Reviewing the Safety Precautions
Please review the following safety precautions before you begin to install
the switches or any of their components.
The indicates that a translation of the safety statement is
available in a PDF document titled “Translated Safety Statements”
(613-000405) posted on the Allied Telesis website at
www.alliedtelesis.com.
Warning: Class 1 Laser product.
Warning: Do not stare into the laser beam.
Warning: To prevent electric shock, do not remove the cover.
No user-serviceable parts inside. This unit contains hazardous
voltages and should only be opened by a trained and qualified
technician. To avoid the possibility of electric shock, disconnect
electric power to the product before connecting or disconnecting
4
5
the LAN cables.
Warning: Do not work on eq uipment or cables during periods of
lightning activity.
Warning: Power cord is used as a disconnection device. To deenergize equipment, disconnect the power cord.
Warning: Class I Equipment. This equipment must be earthed.
The power plug must be connected to a properly wired earth
ground socket outlet. An improperly wired socket outlet could
place hazardous voltages on accessible metal parts.
1
3
6
7
36
Pluggable Equipment. The socket outlet shall be installed near
9
8
10
the equipment and shall be easily accessible.
Caution: Air vents must not be blocked and must have free
access to the room ambient air for cooling.
Warning: Operating T emperature. This product is designed for a
maximum ambient temperature of 40° degrees C.
Page 37

AT-9400Ts Stack Installation Guide
All Countries: Install product in accordance with local and
National Electrical Codes.
Circuit Overloading: Consideration should be given to the
connection of the equipment to the supply circuit and the effect
that overloading of circuits might have on overcurrent protection
and supply wiring. Appropriate consideration of equipment
nameplate ratings should be used when addressing this
concern.
Caution: Risk of explosion if battery is replaced by an incorrect
type. Replace only with the same or equivalent type
recommended by the manufacturer. Dispose of used batteries
according to the manufacturer’s instructions.
Attention: Le remplacement de la batterie par une batterie de
type incorrect peut provoquer un danger d’explosion. La
remplacer uniquement par une batterie du même type ou de
type équivalent recommandée par le constructeur. Les batteries
doivent être éliminées conformément aux instructions du
constructeur.
24
25
11
Warning: Mounting of the eq uipment in the rack shou ld be such
that a hazardous condition is not created due to uneven
28
39
33
41
40
mechanical loading.
Warning: This unit might have more than one power cord. To
reduce the risk of electric shock, disconnect all power cords
before servicing the unit.
If installed in a closed or multi-unit rack assembly, the operating
ambient temperature of the rack environment may be greater
than the room ambient temperature. Therefore, consideration
should be given to installing the equipment in an environment
compatible with the manufacturer’s maximum rated ambient
temperature (Tmra).
Caution: Installation of the equipment in a rack should be such
that the amount of air flow required for safe operation of the
equipment is not compromised.
Warning: Reliable earthing of rack-mounted equipment should
be maintained. Particular attention should be given to supply
connections other than direct connections to the branch circuits
(e.g., use of power strips).
37
Page 38

Chapter 2: Installing the Hardware
Note
Planning the Installation of a Stack
Observe these requirements when planning the installation of the stack.
The switches of a stack should be installed in a standard 19-inch
equipment rack. Installing the switches on a table or desktop is not
recommended because it may create a hazardous work area.
The AT-9424Ts, AT-9424Ts/XP, and AT-9448Ts/XP Switches are the
only AT-9400 Switches that support the stacking feature.
Each switch must have the AT-StackXG Stacking Module.
Because of the 0.5 meter length of the AT-StackXG/.5 Stacking Cable,
the switches must be installed in the same equipment rack.
If the stack will include the optional AT-StackXG/1 Stacking Cable, the
distance between the top switch and the bottom switch of the stack
must not be greater than one meter.
Check to be sure the equipment rack is safely secured and will not tip
over. Devices in a rack should be installed starting at the bottom, with
the heavier devices near the bottom of the rack.
The power outlet for the switches should be located near the units and
be easily accessible.
The site should provide easy access to the ports on the front of the
switches. This will make it easy for you to connect and disconnect
cables, as well as view the system LEDs.
To allow proper cooling of the switches, air flow around the units and
through the cooling vents on the sides and rears should be
unrestricted.
Do not place objects on top of the switches.
Do not expose the switches to moisture or water.
Make sure the site is a dust-free environment.
Use dedicated power circuits or power conditioners to supply reliable
electrical power to the network devices.
38
Page 39

Maximum Number of Switches in a Stack
A stack can have up to eight 24-port AT-9424Ts and AT-9424Ts/XP
Switches, or up to four 48-port AT-9448Ts/XP Switches and four 24-port
switches, as shown in the following table.
The AT-9448Ts/XP Switch should not be used as the master switch of a
stack. A stack that has one or two AT-9448Ts/XP Switches should also
have at least one AT-9424Ts or AT-9424Ts/XP Switch to act as the
master switch. A stack that has three or four AT-9448Ts/XP Switches
should have at least two 24-port switches to act as the master switch and
the backup switch of the stack.
Table 8. Maximum Sizes of Stacks
Number of 24-Port AT-9424Ts and AT-9424Ts/XP Switches
AT-9400Ts Stack Installation Guide
Number of
48-Port
AT-9448Ts/XP
Switches
012345678
0
1
2
3
4
39
Page 40

Chapter 2: Installing the Hardware
Note
Unpacking a Switch
To unpack a switch, perform the following procedure:
1. Remove all the components from the shipping packages.
2. Place the switch on a level, secure surface.
3. Make sure the following components are included in your switch
Store the packaging material in a safe location. You must use the
original shipping material if you need to return the unit to Allied
Telesis.
package. If any item is missing or damaged, contact your Allied
Telesis sales representative for assistance.
One AT-9400 Gigabit Ethernet Switch
Two rack-mount brackets
Eight flathead Phillips rack-mount bracket screws
AC power cord (AC switches only; Americas, EU, Australia, and
UK only)
AC power cord retaining clip (AC switches only)
Management cable for local management
Documentation CD
40
Page 41

Installing the AT-StackXG Stacking Module
Note
Warning
This procedure contains the installation instructions for the AT-StackXG
Stacking Module. The module must be installed in all of the switches of the
stack. It is generally easier to install the module before a switch is mounted
in the equipment rack.
Although the stacking module can be hot-swapped, meaning that it
can be installed while the switch is powered on, Allied Telesis
recommends that the switches be powered off during the initial
installation of the stack.
The module can be damaged by static electricity. Be sure to observe
all standard electrostatic discharge (ESD) precautions, such as
wearing an antistatic wrist strap, to avoid damaging the device.
AT-9400Ts Stack Installation Guide
To install the AT-StackXG Stacking Module in the switch, perform the
following procedure:
1. Remove the blank panel from the expansion slot on the back panel of
the switch by loosening the two captive screws on the panel with a
cross-head screwdriver.
AT-LX44CPUCV
R
1241
Figure 9. Removing the Blank Panel from the Expansion Slot
41
Page 42

Chapter 2: Installing the Hardware
Note
Note
Note
Do not remove the blank panel from the chassis until you are ready
to install the module. An open slot allows dust to enter the unit and
reduces proper airflow and cooling in the chassis.
2. Unpack the AT-StackXG Stacking Module from its shipping package
and verify that the following items are included in the package:
One AT-StackXG Stacking Module
One AT-StackXG/.5 Stacking Cable
AT-StackXG Stacking Module Installation Guide
Warranty card
Store the packaging material in a safe location. You must use the
original shipping material if you need to return the unit to Allied
Telesis.
3. Align the edges of the module with the guides in the slot and carefully
slide the module into the chassis until it is flush with the back panel of
the chassis, as shown in Figure 10 on page 43. Light pressure may be
needed to seat the module on the connector on the back panel of the
chassis.
Do not force the module into place. Doing so may damage the
connector pins on the backplane inside the chassis. If there is
resistance, remove the module and reinsert it after verifying that the
edges of the card are properly aligned in the guides in the chassis’
expansion slot.
42
Page 43

AT-9400Ts Stack Installation Guide
A
T-LX44CPUCV
AT-StackXG
R
Stack Po
rt 1
Stack Po
rt 2
Figure 10. Installing the AT-StackXG Stacking Module
1242
4. Secure the module to the chassis by tightening the two captive screws
with a cross-head screwdriver. Refer to Figure 11.
-LX44CPUCV
A
T
AT-StackXG
R
Stack Po
r
t 1
Sta
ck Po
r
t 2
1243
Figure 11. Securing the AT-StackXG Stacking Module
5. Repeat this procedure to install an AT-StackXG Stacking Module in the
other switches of the stack.
You are now ready to install the power cord retaining clip, as explained in
the next procedure.
43
Page 44

Chapter 2: Installing the Hardware
100-240VAC
~
Installing the Power Cord Retaining Clip (AC Switches Only)
Perform the following procedure to install the power cord retaining clip on
the switches:
1. Locate the power cord retaining clip, shown in Figure 12.
Figure 12. Power Cord Retaining Clip
2. Install the clip on the AC power connector on the back panel of the
switch. With the “u” of the clip facing down, press the sides of the clip
toward the center and insert the short ends into the holes in the
retaining bracket, as shown in Figure 13.
100-240VAC
~
Figure 13. Inserting the Retaining Clip into the Retaining Bracket
If the switches of the stack were used as stand-alone units in your
network, go to the next procedure to remove the network cables.
Otherwise, go to “Installing the Switches in an Equipment Rack” on
page 46.
44
Page 45

Disconnecting the Network Cables
135
7
9
11
13
15 17
12
14
16 18
1
If the switches of the planned stack were used as stand-alone devices in
your network, label and disconnect all of the network cables from their
ports. You will reconnect the cables after the stack is created and after you
have reestablished the switches’ configuration settings. If you leave the
cables connected to the ports during the installation, loops might result in
your network topology and that could produce broadcast storms.
AT-9400Ts Stack Installation Guide
Figure 14. Removing the Network Cables from Stand-alone Switches
45
Page 46

Chapter 2: Installing the Hardware
Note
Installing the Switches in an Equipment Rack
Installing a stack on a table or desktop is not recommended
because it may create a hazardous work area.
Perform the following procedure to install the switches in a standard
19-inch rack:
1. Place the switch upside down on a level, secure surface.
2. Using a flat-head screwdriver, remove the snap-on plastic feet from
the bottom of the switch, as shown in Figure 15.
Figure 15. Removing the Feet
3. Turn the switch over.
4. Attach a rack-mount bracket to one side of the switch using four of the
screws that come with the switch, as shown in Figure 16.
Figure 16. Attaching Rack-Mount Brackets
46
Page 47

AT-9400Ts Stack Installation Guide
8LC
/S
P
Gigabit Ethe
r
net Sw
itc
h
F
A
U
LT
MAST
ER
RPS
P
O
WE
R
EJECT
ST
A
T
US
TERMINAL
PO
RT
L/A
5. Install the second rack-mount bracket on the other side of the switch
with the four remaining screws.
6. Mount the switch in a 19-inch rack using standard screws (not
provided), as shown in Figure 17.
Figure 17. Mounting the Switch in a Rack
After you have installed all the switches of the stack in the equipment ra ck,
you are ready to label the switches, as explained in the next procedure.
47
Page 48

Chapter 2: Installing the Hardware
135
246
COMPA
23 24
L/A
D/C
D/C
L/AL/A
D/C
L/A
1000 LINK /
ACT
HDX /
COL
FDX
10/100 LINK / ACT
PORT ACTIVITY
STACK
PRES
MSTR
L/A
1
2
Switch Number: 1
MAC Address:
00:0C:46:67:44:8B
135
246
COMPA
23 24
L/A
D/C
D/C
L/AL/A
D/C
L/A
1000 LINK /
ACT
HDX /
COL
FDX
10/100 LINK / ACT
PORT ACTIVITY
STACK
PRES
MSTR
L/A
1
2
Switch Number: 2
MAC Address:
00:0C:46:67:5E:11
135
246
COMPA
23 24
L/A
D/C
D/C
L/AL/A
D/C
L/A
1000 LINK /
ACT
HDX /
COL
FDX
10/100 LINK / ACT
PORT ACTIVITY
STACK
PRES
MSTR
L/A
1
2
Switch Number: 3
MAC Address:
00:0C:46:67:12:18
Labeling the Switches
Starting with the top or bottom switch of the stack, assign each unit a
number starting with 1 and affix labels with the numbers to their front
panels or adjacent to the units on the equipment rack. These numbers will
be their static module ID numbers, which you’ll assign later in “Assigning
the Static Module ID Number 1 to the Master Switch” on page 56 and
“Assigning Static Module ID Numbers to the Member Switches” on
page 59. The number has a range of 1 to 8. An example of a stack with
three switches is shown in Figure 18. When numbering the switches, note
the following:
The labels should also include the MAC addresses of the switches,
The switches can be numbered in any order, but they will be easier to
which are found on labels on the back panels. The switches will be
easier to identify and manage if the labels have both the stack ID
numbers and the MAC addresses.
identify and manage if they are numbered in sequence starting with
the top or bottom switch.
The switch assigned number 1 will be the master switch of the stack.
As explained in “Maximum Number of Switches in a Stack” on
page 39, the AT-9448Ts/XP Switch should not be used as the master
switch.
48
Figure 18. Labelling the Switches
After labeling the units, go to Chapter 3, “Preparing the Switches” on page
49.
Page 49

Chapter 3
Note
Preparing the Switches
The chapter contains the following procedures:
“Powering on a Switch” on page 50
“Starting a Local Management Session” on page 52
“Verifying the AT-S63 Version Number” on page 54
“Updating the AT-S63 Management Software” on page 55
“Assigning the Static Module ID Number 1 to the Master Switch” on
page 56
“Assigning Static Module ID Numbers to the Member Switches” on
page 59
The cables should not be connected to the AT-StackXG Modules
during the procedures in this chapter.
49
Page 50

Chapter 3: Preparing the Switches
100-240VAC
~
100-240VAC
~
Powering on a Switch
To power on a switch, perform the following procedure:
1. Position the power cord retaining clip in the up position, as shown in
Figure 19.
Figure 19. Power Cord Retaining Clip in the Up Position
2. Plug the power cord into the AC power connector on the back panel of
the unit (see Figure 20).
Warning: Power cord is used as a disconnection device. To de-
energize equipment, disconnect the power cord.
5
Warning: This unit might have more than one power cord. To
reduce the risk of electric shock, disconnect all power cords
before servicing the unit.
32
50
Figure 20. Connecting the AC Power Cord
Page 51

AT-9400Ts Stack Installation Guide
3. Connect the other end of the power cord to an appropriate AC power
outlet. For power specifications for the switch, refer to “Power
Specifications” on page 102.
Go to the next procedure to start a local management session on the unit.
51
Page 52

Chapter 3: Preparing the Switches
Note
AT-9408LC/SP
Gigabit Ethernet Switch
COMPACT FLASH
FAULT
MASTER
RPS
PO
WER
EJECT
STATUS
TERMINAL
PORT
464
Starting a Local Management Session
To start a local management session on the unit, perform the following
procedure:
1. Connect the RJ-45 end of the management cable included with the
AT-9400 Switch to the Terminal Port on the front panel of the switch,
as shown in Figure 21.
52
Figure 21. Connecting the Management Cable to the RJ-45 Terminal Port
on the Switch
2. Connect the other end of the cable to an RS-232 port on a terminal or
a personal computer with a terminal emulation program.
3. Configure the terminal or terminal emulation program as follows:
Baud rate: Default is 9600 bps (Range is 9600 to 115200 bps)
Data bits: 8
Parity: None
Stop bits: 1
Flow control: None
The port settings are for a DEC VT100 or ANSI terminal, or an
equivalent terminal emulator program.
4. Press Enter.
You are prompted for a user name and password.
Page 53

AT-9400Ts Stack Installation Guide
5. If the switch is new, the user name is “manager” and the default
password is “friend“. If the switch was used as a stand-alone unit in
your network, enter the appropriate user name and password for
manager access. The user name and password are case sensitive.
Go to the next procedure to verify the version number of the AT-S63
Management Software on the unit.
53
Page 54

Chapter 3: Preparing the Switches
Allied Telesis Ethernet Switch AT-9424Ts/XP - AT-S63 v4.0.0
<No system name>
#
Verifying the AT-S63 Version Number
After you have logged on, the command line interface (CLI) prompt,
shown in Figure 22, is displayed.
Figure 22. Command Line Prompt
The version number of the AT-S63 Management Software on the switch is
displayed after “AT-S63.” In the example it‘s “V4.0.0.”
Note the following:
The management software must be version 3.0.0 or later.
All the switches of a stack must have the same version of the
management software.
If you need to upgrade the management software on the switch, go to the
next procedure. Otherwise, go to “Assigning the Static Module ID Number
1 to the Master Switch” on page 56 if you are configuring the master
switch of “Assigning Static Module ID Numbers to the Member Switches”
on page 59 if you are configuring a member switch.
54
Page 55

Updating the AT-S63 Management Software
Caution
If you need to upgrade the management software on the switch, perform
the instructions in this section. If the switch already has the correct version
of the management software, go to the next section.
These instructions use Xmodem to transfer the new management software
to the switch. If you prefer, you can download the file using TFTP. For
instructions, refer to the AT-S63 Management Software User’s Guides.
This procedure causes the switch to reset. The switch will not
forward traffic during the reset. If the unit is connected to a live
network, some network traffic will be lost.
This procedure assumes that you established a local management
session with the switch, as explained in the previous sections, and that
you have obtained the necessary management software from the Allied
Telesis web site and stored it on your workstation. For instructions on how
to obtain new management software, refer to “Management Software
Updates” on page 13.
AT-9400Ts Stack Installation Guide
To load new management software on the switch, perform the following
procedure:
1. Enter this command at the command prompt:
load method=xmodem destfile=appblock
2. At the confirmation prompt, enter “Y” for yes to continue with the
procedure or “N” for no to cancel the procedure.
This prompt is displayed;
Use Hyper Terminal’s Transfer/Send file option to
select Filename & Protocol
Note: Please select ‘1K Xmodem’ protocol for faster
download...
3. Use your Xmodem utility on your workstation to begin the file transfer.
After receiving the file, the switch writes it to flash memory and then
resets. The entire file transfer takes about seven minutes at 115200
bpi on the Terminal port.
55
Page 56

Chapter 3: Preparing the Switches
Note
Local MAC Addr :00:30:84:00:00:03
Standalone Mode ID :1
Stack Mode :AUTO
Stack ID :1
Stack Priority :16
Assigning the Static Module ID Number 1 to the Master Switch
This procedure explains how to assign the static module ID number 1 to
the master switch of the stack. If the switch will be a member switch, go to
the next procedure for instructions on how to assign it a stack ID number.
This procedure assumes that you have already established a local
management session with the device that is to be the master switch of the
stack. For instructions, refer to “Starting a Local Management Sessio n” on
page 52.
To assign the stack ID number 1 to the master switch, perform the
following procedure:
1. Enter the following command to view the switch’s current module ID
assignment:
show stack
If the switch displays the message “CLI Command Not Found or
Ambiguous,” the AT-S63 Management Software on the unit needs
to be updated. For instructions, refer to “Updating the AT-S63
Management Software” on page 55.
An example of the display is shown in Figure 23.
Figure 23. SHOW STACK Command
This command displays the following information:
Table 9. SHOW STACK Command
Field Description
Local MAC Addr The MAC address of the switch.
Standalone Mode ID The module ID number of the switch
when the device is not a part of a stack.
This parameter can be ignored.
56
Page 57

AT-9400Ts Stack Installation Guide
Note
Table 9. SHOW STACK Command
Field Description
Stack Mode The assignment method of the module ID
number. Auto means the number was
assigned dynamically by the
management software when the switch
was powered on. Static means the
number was assigned with the SET
STACK command.
Stack ID The switch’s current module ID number.
Stack Priority The switch’s current stack priority value,
used to control dynamic module ID
numbers.
When this command is performed on a stack, it includes a table that
lists the units of the stack. However, since the unit is not yet part of a
stack, the table is omitted.
2. Examine the Stack Mode and Stack ID fields. If the Stack Mode is
Static and the Stack ID is 1, no command is necessary. Go to step 8.
If the current setting of Stack Mode is Auto, enter this command to
change the switch’s dynamic module ID value to the static value of 1:
set stack moduleid=1 newmoduleid=1
If Stack Mode is Static and Stack ID is a value other than 1, enter the
following command, where n is the current value of Stack ID:
n
set stack moduleid=
newmoduleid=1
For example, if the current value of Stack ID is 4, the command would
be:
set stack moduleid=4 newmoduleid=1
If you are already familiar with the AT-S63 Management Software,
then you probably know about the SAVE CONFIGURATION
command, which is used to save your configuration changes in the
active boot configuration file. That command is not required in this
procedure because the SET STACK command automatically saves
the new module ID number in a hidden system file in the switch’s file
system.
57
Page 58

Chapter 3: Preparing the Switches
3. The new module ID number does not take affect until the switch is
reset. Reset the unit with this command:
restart reboot
4. Wait for the switch to reset and afterwards reestablish the
management session by logging in again.
5. Enter the following command again to verify the switch’s stack ID
assignment:
show stack
6. Verify that the Stack Mode is Static and the Stack ID is 1. If the values
are correct, go to the next step. Otherwise, repeat the procedure
starting with step 2.
7. Power off the switch.
Repeat the procedures in this chapter on the other switches of the stack.
Afterwards, go to the next chapter for instructions on how to cable and
power on the stack.
58
Page 59

AT-9400Ts Stack Installation Guide
Assigning Static Module ID Numbers to the Member Switches
This procedure is used to assign a static ID number to a member switch of
the stack. It must be performed on a switch before the cables are
connected to the AT-StackXG Stacking Module.
This procedure assumes that you have already established a local
management session to the device, as explained in “Starting a Local
Management Session” on page 52.
To assign a static module ID number to a member switch, perform the
following procedure:
1. Enter the following command to view the switch’s current module ID
assignment:
show stack
An example of the information the command displays can be found in
Figure 23 on page 56.
2. Enter one of the following commands.
If the St ack Mode is Auto, enter this command, where n is the st ack ID
number you want to assign the switch:
set stack moduleid=1 newmoduleid=
For example, to assign the switch the stack ID number 2, enter:
set stack moduleid=1 newmoduleid=2
If the St ack Mode is Static, enter this command, where m is the current
stack ID number of the switch and n is the new value:
m
set stack moduleid=
For example, if the current value of the My ModuleID is 4 and you want
to assign the switch the ID 3, the command would be:
set stack moduleid=4 newmoduleid=3
3. The new module ID number does not take affect until the switch is
reset. Reset the unit with this command:
newmoduleid=
n
n
restart reboot
4. Wait for the switch to reset and afterwards reestablish the
management session by logging in again.
59
Page 60

Chapter 3: Preparing the Switches
5. Enter the following command again to verify the switch’s stack ID
assignment:
show stack
6. Verify that Stack ID is showing the number you assigned the switch in
step 2. If the value is correct, go to the next step. Otherwise, repeat the
procedure starting with step 2.
7. Power off the switch.
Repeat the procedures in this chapter on the other switches of the stack.
Afterwards, go to the next chapter for instructions on how to cable and
power on the stack.
60
Page 61

Chapter 4
Cabling and Powering on the Stack
The chapter contains the following procedures:
“Cabling the AT-StackXG Stacking Modules” on page 62
“Powering On the Switches of the Stack” on page 65
“Verifying the Installation” on page 67
“Troubleshooting the Discovery Process” on page 69
61
Page 62

Chapter 4: Cabling and Powering on the Stack
Note
A
T
-LX44CPUCVR
AT-StackXG
Stack Po
r
t 1
Stack Po
r
t 2
Cabling the AT-StackXG Stacking Modules
Allied Telesis recommends that during the initial installation you
power off the switches before you attach the stacking cables.
To connect the AT-StackXG/.5 Stacking Cables and the optional
AT-StackXG/1 Stacking Cable to the stacking modules, perform the
following procedure:
1. Remove the plastic protectors from the connectors on the
AT-StackXG/.5 Stacking Cable shipped with the stacking module.
Refer to Figure 24.
1244
Figure 24. Removing the Plastic Protector
2. Starting with the top switch of the stack, connect the cable to either the
Stack Port 1 or Stack Port 2 on the stacking module and tighten the
two thumbscrews to secure it to the module.
1245
62
Figure 25. Connecting the AT-StackXG/.5 Stacking Cable
Page 63

AT-9400Ts Stack Installation Guide
Note
3. Connect the other end of the stacking cable to a Stack Port on the
stacking module in the next switch of the stack. The cable connections
must crossover to a different numbered port on the next stacking
module. Stack Port 1 on a module must connect to Stack Port 2 on
another module. Do not connect two Stack Port 1 ports or Stack Port 2
ports together.
4. Repeat steps 1, 2, and 3 to cable the remaining switches of the stack
with the AT-StackXG/.5 Stacking Cables. Figure 26 illustrates the
cabling configuration for a stack of four switches.
RPS INPUT
RPS INPUT
RPS INPUT
RPS INPUT
AT-StackXG
AT-S ta ckX G
AT-StackXG
AT-StackXG
STACK PORT 1
STACK PORT 1
STACK PORT 1
STACK PORT 1
STACK PORT 2
STACK PORT 2
STACK PORT 2
STACK PORT 2
1246
Figure 26. Example of a Cabling Configuration for a Stack with Four
Switches
If you purchased the optional AT-StackXG/1 Stacking Cable,
continue with this procedure to install it. Otherwise, go to the next
procedure to power on the switches.
5. After removing the plastic protectors from the connectors on the
AT-StackXG/1 Stacking Cable as shown in Figure 24 on page 62,
connect the cable to the unused Stack Ports on the top and bottom
switches of the stack. The connections must crossover with the cable
connecting to different numbered ports on the stacking modules.
63
Page 64

Chapter 4: Cabling and Powering on the Stack
Figure 27 illustrates a stack of four switches in the ring topology.
RPS INPUT
RPS INPUT
RPS INPUT
RPS INPUT
AT-S ta ckX G
AT-StackXG
AT-S ta ckX G
AT-S ta ckX G
STACK PORT 1
STACK PORT 1
STACK PORT 1
STACK PORT 1
STACK PORT 2
STACK PORT 2
STACK PORT 2
STACK PORT 2
1247
Figure 27. Example Stack of Four Switches in the Ring Topology
6. Go to the next procedure to apply power to the switches of the stack.
64
Page 65

Powering On the Switches of the Stack
Note
Stack discovery is in progress ...
PLEASE DO NOT ADD/DELETE UNITS TO/FROM THE STACK UNTIL THE
CURRENT STACK SETUP AND THE STACK CONFIGURATION IS LOADED.
4 module(s) discovered
Local MAC address: 00:04:75:00:00:11
Master MAC address: 00:04:75:00:0 0: 11
After cabling the stacking modules, apply power to the switches of the
stack by connecting the power cords. The switches of a stack can be
powered on in any order. The units initialize their management software,
which takes about one minute, and afterwards perform the discovery
process. The discovery process, which ascertains the number of switches
in the stack, can take from fifteen seconds to severa l minutes to complete,
depending on the size of the stack and the number of the commands in the
active configuration file on the master switch.
You can monitor the progress of the stack during these tasks by
connecting a terminal or a personal computer with a terminal emulation
program to the Terminal Port on the stack’s master switch, assigned the
static ID number 1.
The commencement by the stack of the discovery process is signalled with
the messages in Figure 28.
AT-9400Ts Stack Installation Guide
Figure 28. Commencement of the Discovery Process
If you see any error messages during the discovery process, go to
“Troubleshooting the Discovery Process” on page 69.
At the completion of the discovery process, the master switch displays the
number of switches in the stack and its own MAC address twice, once as
the switch of the local management session and again as the master
switch of the stack. Figure 29 is an example of the messages.
Figure 29. Conclusion of the Discovery Process
65
Page 66

Chapter 4: Cabling and Powering on the Stack
Configuring the Stack............................. done!
Reinitializing Software Modules ... .. ... .. .. .. ... . do ne!
Configuration file "stack.cfg" not found!
Loading default configuration ........ done!
The master switch then configures the devices with the commands in the
active configuration file in its file system. If this is the first time the stack is
booted up, you will see the messages in Figure 30.
Figure 30. Console Messages at the Completion of the Discovery Process
The default configuration file for a stack is called STACK.CFG. The switch
does not come with this file which is why there is the message that the f ile
could not be found. In the next procedure you’ll create it with the SAVE
CONFIGURATION command.
At this point, the stack is operational and ready to forward network traffic
on the ports. To log in and manage the stack, press Return to display the
login prompt.
You can also monitor the initialization process by observing the Stack
MSTR LED on the front panel of the master switch. The LED is steady
green when the stack is ready for network operations. (Do not confuse the
Stack MSTR LED with the Status MASTER LED. The latter is used with
enhanced stacking, a feature that AT-9400Ts Stacks do not support. For
information on enhanced stacking, refer to the AT-S63 Management
Software Features Guide.)
Go to the next procedure, “Verifying the Installation” on page 67.
66
Page 67

Verifying the Installation
Allied Telesis Ethernet Switch AT-9424Ts - AT-S63
<No system name>
Local Mac Addr :0:4:75:0:0:11
Master MAC Addr :0:4:75:0:0:11
Backup Master MAC Addr :0:4:75:0:0:44
Topology :None
My ModuleID :1
ModuleID Assignment Mode :STATIC
Current State :Master
Module Count :3
----------------------------------------------------------Module Stack State Model Name Priority Mac Address
----------------------------------------------------------1 Master AT-9448Ts/XP 16 0:4:75:0:0:11
2 Member AT-9424Ts/XP 16 0:4:75:0:0:44
3 Member AT-9424Ts/XP 16 0:4:75:0:0:7
To verify the installation of the stack, perform the following procedure:
1. After powering on the stack, wait a least two minutes to give the
switches sufficient time to initialize their management software and to
complete the discovery process.
2. Examine the Stack MSTR LED on the front panel of the switch labeled
1. As the master switch of the stack, its Stack MSTR LED should be
green. (Do not confuse the Stack MSTR LED with the Status MASTER
LED. The latter is used with enhanced stacking, a feature that
AT-9400Ts Stacks do not support. For information on enhanced
stacking, refer to the AT-S63 Management Software Features Guide.)
If the Stack MSTR LED on the switch labelled 1 is off, examine the
same LED on the other switches of the stack. If all the Stack MSTR
LEDs are off, the discovery process may have encountered a problem.
For suggestions on how to resolve it, refer to “Troubleshooting the
Discovery Process” on page 69.
AT-9400Ts Stack Installation Guide
3. Establish a local management session on the master switch. For
instructions, refer to “Starting a Local Management Session” on
page 52.
4. At the command line prompt, enter this command:
show stack
The command lists the switches of the stack. An example is show in
Figure 31.
Figure 31. SHOW STACK Command
67
Page 68

Chapter 4: Cabling and Powering on the Stack
Note
5. Match the entries in the table with the switches in the equipment rack
by referring to the labels on the front panels of the units. The ID
number and MAC address on a switch’s label should match the unit’s
entry in the table. For example, the switch labelled 2 and assigned the
static module ID number 2 should correspond to Module 2 in the table.
If there is a mismatch, you may have assigned the wrong module ID
number to a switch. To correct the problem, disconnect the stacking
cables and perform “Assigning the Static Module ID Number 1 to the
Master Switch” on page 56 or “Assigning Static Module ID Numbers to
the Member Switches” on page 59 on any switch with an incorrect
module ID number . (The module ID number must be set while a switch
is functioning as a stand-alone unit.) Afterwards, reconnect the
stacking cables.
The stack is operating correctly when the physical switches
correspond correctly with the information from the command.
All of the switches in the new stack use the default values in the
AT-S63 Management Software for their parameter settings. This is
true even for switches that might have been used as stand-alone
units in your network, To restore the stand-alone configurations to
the switches, you must recreate the configurations by entering the
appropriate commands. This should be performed before you
connect the network cables to the ports on the switches. For
instructions, refer to the AT-S63 Management Software Command
Line User’s Guide.
68
6. To create the STACK.CFG configuration file, enter this command:
save configuration
To continue with the installation, go to Chapter 5, “Cabling the Network
Ports” on page 71.
Page 69

Troubleshooting the Discovery Process
The easiest way to troubleshoot a stack that cannot complete the
discovery process is by watching for error messages on the Terminal Port
of the master switch. Here are the steps:
1. Connect a terminal or a personal computer with a terminal emulation
program to the Terminal Port on the master switch, as explained in
“Starting a Local Management Session” on page 52.
2. Power on all the switches in the stack. If the switches are already
powered on, power off a switch, wait a few seconds and then power it
back on again. Alternatively, disconnect and then reconnect a stacking
cable from a stacking module.
Possible error messages are:
More than maximum allowed number of switches.
AT-9400Ts Stack Installation Guide
The stack has too many switches. Review “Maximum Number of Switches
in a Stack” on page 39 and remove one or more of the devices.
Mixed module ID mode is not supported. Failed to form a
stack
Failed to elect a stack Master in the static mode.
Stack setup has failed.
The appearance of either of these messages could indicate that the stack
has both dynamic and static stack ID numbers. The ID numbers of a stack
must be static. Resolving the problem requires disconnecting the stacking
cables from the switches and resetting the numbers with the SET STACK
command. For instructions, “Assigning the Static Module ID Number 1 to
the Master Switch” on page 56 and “Assigning Static Module ID Numbers
to the Member Switches” on page 59.
The second message could also indicate that there are no switches
numbered 1 or 2 in the stack. A stack must have one switch assigned ID
number 1 or 2.
Module ID conflict. Failed to form a stack
This message indicates that the same static ID number was assigned to
more than one switch. To resolve the issue, repeat the procedures
“Assigning the Static Module ID Number 1 to the Master Switch” on
page 56 and “Assigning Static Module ID Numbers to the Member
Switches” on page 59. Alternatively, refer to the SET STACK command in
the AT-S63 Command Line Interface User’s Guide.
69
Page 70

Chapter 4: Cabling and Powering on the Stack
If the master switch successfully completes the discovery process but the
SHOW STACK command does not display all of the switches in the stack,
try the following:
Verify that all of the switches are powered on.
Verify that all of the switches are using the same version of the AT-S63
Verify that the stacking cables are securely connected to the ports on
Management Software. For instructions, refer to “Verifying the AT-S63
Version Number” on page 54.
the AT-StackXG Stacking Modules and that the cables crossover to
different numbered ports on the modules. For information, refer to
“Cabling the AT-StackXG Stacking Modules” on page 62.
70
Page 71

Chapter 5
Cabling the Network Ports
This chapter contains the instructions that explain how to connect the
network cables to the ports on the switches in the stack. The chapter
contains the following sections:
“Installing Optional Transceivers” on page 72
“Cabling the Twisted Pair and Fiber Optic Ports” on page 76
71
Page 72

Chapter 5: Cabling the Network Ports
Warning
Note
Installing Optional Transceivers
Review the following guidelines before installing an optional SFP or XFP
transceiver in a switch:
A transceiver can be hot-swapped; the switch can be powered on
when you install it. However, you should always disconnect the cables
first before removing a transceiver.
You must install the transceiver before you connect the cables to it.
Fiber optic transceivers are dust sensitive. When a fiber optic cable is
not installed, or when you store the transceiver, always keep the plug
in the optical bores. When you do remove the plug, keep it for future
use.
Unnecessary removal and insertion of a transceiver can lead to
premature failure.
The SFP slots on the AT-9424Ts and AT-9424Ts/XP Switches are
paired with twisted pair ports. For operational information, refer to
“Redundant Twisted Pair Ports” on page 23.
Installing an SFP
Transceiver
A transceiver can be damaged by static electricity. Be sure to
observe all standard electrostatic discharge (ESD) precautions,
such as wearing an antistatic wrist strap, to avoid damaging the
device.
The cable specifications for optional SFP and XFP transceiver can
be found in the installation guides that ship with the devices.
To install an SFP transceiver in the AT-9424Ts or AT-9424Ts/XP Switch,
perform the following procedure:
1. Remove the dust plug from a transceiver slot on the switch, as shown
in Figure 32.
72
Page 73

AT-9400Ts Stack Installation Guide
Figure 32. Removing a Dust Plug for an SFP Slot
2. Remove the transceiver from its shipping container and store the
packaging material in a safe location.
3. Position the transceiver with the label facing up.
4. Slide the transceiver into the slot until it clicks into place.
Figure 33. Installing an SFP Transceiver
5. Verify that the handle on the SFP transceiver is in the upright position
to secure the module in the slot, as shown in Figure 34.
73
Page 74

Chapter 5: Cabling the Network Ports
SFP Handle
A
T-9448Ts/XP
S
TATU
S
F
A
ULT
MASTER
RPS
POWER
COMPACT FLASH
TERMINAL POR
T
EJECT
49
50
4745
C
L
AS
S
1
L
A
S
E
R
P
R
O
D
U
C
T
L/A
XFP
XFP
LINK
/
ACT
STA
CK
PRES
L/A
L/A
4846
1
2
M
S
TR
Figure 34. Positioning the SFP Handle in the Upright Position
6. Repeat this procedure to install another SFP transceiver or go to
“Cabling the Twisted Pair and Fiber Optic Ports” on page 76.
For the SFP optical and cabling specifications, consult the
documentation that ships with the module.
Installing an XFP
Transceiver
To install an XFP transceiver in the AT-9424Ts/XP or AT-9448Ts/XP
Switch, perform the following procedure:
1. Remove the dust plug from a transceiver slot on the switch. Refer to
Figure 35.
Figure 35. Removing an XFP Dust Plug
74
packaging material in a safe location.
3. Position the transceiver with the label facing down.
2. Remove the transceiver from its shipping container and store the
Page 75

AT-9400Ts Stack Installation Guide
A
T-9448Ts/XP
STA
TUS
F
A
UL
T
MASTER
RPS
P
OWER
COM
P
ACT FLAS
H
TERMINAL POR
T
EJECT
49 50
4745
C
L
A
S
S
1
LA
S
E
R
PR
O
D
U
C
T
L/A
XFP
XFP
LINK / ACT
ST
A
C
K
PRES
L/A
L/A
4846
1
2
M
ST
R
4. Slide the transceiver into the slot until it clicks into place, as shown in
Figure 36.
Figure 36. Installing an XFP Transceiver
5. Repeat this procedure to install a second XFP transceiver or go to
“Cabling the Twisted Pair and Fiber Optic Ports” on page 76.
For the XFP optical and cabling specifications, consult the
documentation that ships with the module.
75
Page 76

Chapter 5: Cabling the Network Ports
Cabling the Twisted Pair and Fiber Optic Ports
Observe the following guidelines when connecting a twisted pair or fiber
optic cable to a port on the switch:
The connector on the cable should fit snugly into the port on the
switch. The tab on the connector should lock the connector into place.
Because the twisted pair ports on the switch are auto-MDI/MDI-X, you
can use a straight-through twisted pair cable to connect any type of
network device to a port. If you disable Auto-Negotiation on the port, a
port defaults to MDI-X. For instructions on how to configure a port,
refer to the AT-S63 Command Line Interface User’s Guide.
If your network topology contains a loop where two or more network
devices can communicate with each other over more than one network
path, do not connect the network cables forming the loop until after
you have activated a spanning tree protocol on the stack. Data loops
can adversely affect network performance. For background
information on the different types of spanning tree protocols supported
by s stack, refer to the AT-S63 Management Software Features Guide.
If you are creating a port trunk, you must configure the stack’s
management software before connecting the cables of the trunk to the
switch. Otherwise, a network loop will result which can adversely affect
network performance.
In order for a switch port to successfully Auto-Negotiate its duplex
mode with an end node, an end node should also be using AutoNegotiation. Otherwise, a duplex mode mismatch can occur. A switch
port using Auto-Negotiation defaults to half-duplex if it detects that the
end node is not using Auto-Negotiation. This will result in a mismatch if
the end node is operating at a fixed duplex mode of full-duplex.
To avoid this problem, disable Auto-Negotiation on a switch port and
set the port’s speed and duplex mode manually if an end node has a
fixed duplex mode of full-duplex.
76
Page 77

Chapter 6
Adding and Removing Switches
The procedures in this chapter explain how to add and remove switches
from a stack. The chapter contains the following sections:
“Replacing the Master Switch” on page 78
“Adding a New Member Switch” on page 87
“Replacing a Member Switch” on page 89
77
Page 78

Chapter 6: Adding and Removing Switches
Boot configuration file .............. "stack_eng.cfg" (Exists)
Current configuration ................ "stack_eng.cfg"
Replacing the Master Switch
This procedure is divided into the following phases:
Phase 1: “Uploading the Active Configuration File” on page 78
Phase 2: “Removing the Current Master Switch” on page 79
Phase 3: “Configuring the New Master Switch” on page 84
Phase 4: “Connecting the New Master Switch to the St ack” on p age 86
The phases should be performed in the order presented here.
Uploading the
Active
Configuration
File
The first step to replacing the master switch of a stack is to upload the
active configuration file to your workstation or, alternatively, to a TFTP
server. The file contains the configuration settings of all the switches in the
stack. Later in these procedures you will download the file to the new
master switch.
If the current master switch is nonfunctional, perform this procedure on the
backup master switch, which has the stack ID number 2. The backup
master switch keeps a copy of the configuration file so that if the master
switch fails, it can assume the role as the master switch.
You can upload the file using either Xmodem or TFTP. This procedure
uses Xmodem. If you prefer to use TFTP, refer to the AT-S63
Management Software User’s Guides for instructions.
To upload the active configuration file from the master switch or the
backup master switch, perform the following procedure:
1. Start a local management session on the current master switch or, if
the master switch is not functional, on the backup master switch (stack
ID 2). For instructions, refer to “Starting a Local Management Se ssion”
on page 52.
2. To identify the name of the active configuration file, enter this
command:
show stack
Here is an example of the information the command displays.
Figure 37. SHOW CONFIG Command
78
Page 79

AT-9400Ts Stack Installation Guide
135
7
9
11
13
15 17
12
14
16 18
1
This command displays the switch’s active boot configuration file. If the
lines display different filenames, the active file is displayed in the first
line. For more information about this command, refer to the AT-S63
Management Software Command Line User’s Guide.)
3. Enter this command to upload the file to your workstation:
Removing the
Current Master
Switch
upload method=xmodem srcfile=
filename
.cfg
The filename variable is the name of the active boot configuration file
displayed with the SHOW CONFIG command in the previous step.
When entering the filename, be sure to include the .CFG extension.
4. At the confirmation prompt, type “Y” for yes.
5. After you enter the command, begin the file transfer using your
terminal emulator program. The upload, which takes only a few
seconds, is completed when the command prompt is displayed again.
6. Go to the next procedure.
Now that you have uploaded the configuration file to your workstation, you
can remove the master switch from the stack and the equipment rack.
1. Power off the master switch by disconnecting the power cord from the
power source and from the back panel of the switch.
2. Label and disconnect all of the network cables from the twisted pair
ports on the switch.
Figure 38. Removing the Network Cables
79
Page 80

Chapter 6: Adding and Removing Switches
Note
3. Label and remove the fiber optic cables from the SFP or XFP modules.
4. Install the dust covers on the fiber optic ports on the modules.
If the switch has SFP or XFP modules, perform steps 3 to 6.
Otherwise, go to step 7.
4745
C
O
M
AT-9448Ts/XP
P
A
C
T FL
A
S
H
CLASS 1
LASER PRODUCT
XFP
4846
L
49
T
ER
M
IN
A
L
P
O
R
IN
K
/
A
C
T
L/A
T
E
JE
C
T
XFP
S
T
A
C
K
M
S
STR
TAT
1
U
S
L/A
FAU
L
2
T
L/A
M
50
A
S
T
E
R
P
R
R
P
E
S
S
P
O
W
E
R
Figure 39. Installing the Dust Covers on the SFP and XFP Modules
80
Page 81

5. Label and remove the modules from the switch.
23
4745
C
OM
AT-9448Ts/XP
P
A
CT FLAS
H
C
L
L
A
A
S
S
S
E
1
R
P
R
O
D
U
C
T
X
F
P
4846
4
9
TER
M
INA
L PO
R
LINK /
A
C
T
L
/A
T
EJE
CT
X
F
P
S
T
A
C
K
M
S
S
TATU
T
R
1
S
L
F
/
A
A
U
LT
2
L
M
/A
50
A
S
T
E
R
P
R
R
P
E
S
S
P
O
W
E
R
AT-9400Ts Stack Installation Guide
49
Figure 40. Removing the SFP and XFP Modules
81
Page 82

Chapter 6: Adding and Removing Switches
6. Install the dust covers in the SFP and XFP slots.
4745
COM
A
P
A
T
CT FLASH
-9448Ts/X
C
L
L
A
A
S
S
S
E
R
1
P
R
O
D
U
C
T
X
F
P
4846
49
TERMINAL PO
P
R
L
IN
K
/ A
C
T
L/A
T
EJECT
X
F
P
S
T
A
C
K
M
S
STR
TATU
1
S
L/A
F
A
U
L
2
T
L/A
MASTER
50
PRES
RPS
P
O
W
E
R
Figure 41. Installing the Dust Covers in the SFP and XFP Slots
7. Disconnect the stacking cables from the AT-StackXG Stacking
Module.
AT-StackXG
Stack Po
rt 1
Stack Po
rt 2
Figure 42. Removing the Stacking Cables from the AT-StackXG Stacking
Module
82
Page 83

AT-9400Ts Stack Installation Guide
8. Remove the AT-StackXG Stacking Module by loosening the two
captive screws and sliding the module from the chassis.
-L
X
AT
4
AT
4
C
-StackXG
PU
C
V
R
Stack Po
AT
AT
-LX44CPUCVR
-StackXG
rt 1
S
ta
ck P
ort 1
S
ta
ck Po
rt 2
Stack Po
rt 2
Figure 43. Removing the AT-StackXG Stacking Module
83
Page 84

Chapter 6: Adding and Removing Switches
A
T
-LX44CPUCVR
A
T
-LX4
4C
PU
C
V
R
9. Install the slot cover by positioning it over the slot opening and
tightening the two captive screws.
Configuring the
New Master
Switch
Figure 44. Installing the Slot Cover
10. Remove the switch from the equipment rack.
11. Go to the next procedure.
With the master switch removed from the equipment rack, you are ready
to install and configure the new master switch. This stage includes
configuring the stack ID number and downloading the configuration file.
These steps should be performed before the switch is connected to the
stack.
To configure the new master switch, perform the following procedure:
1. Install the AT-StackXG Stacking Module in the new master switch. For
instructions, refer to “Installing the AT-StackXG Stacking Module” on
page 41.
2. Install the switch in the equipment rack. For instructions, refer to
“Installing the Switches in an Equipment Rack” on page 46.
3. Power on the switch by connecting the power cord to the back of the
switch and to a power source.
84
Page 85

AT-9400Ts Stack Installation Guide
Note
4. After the switch initializes its management software, start a local
management session, as explained in “Starting a Local Management
Session” on page 52.
5. Since this switch will be the master switch of the stack, you have to
assign it the static module ID number 1. For instructions, refer to
“Assigning the Static Module ID Number 1 to the Master Switch” on
page 56.
6. After configuring the stack ID number and resetting the unit,
reestablish your local management session.
7. You should now download onto the switch the configuration file that
you uploaded in the first procedure from the previous master switch.
Here is the command for downloading the file using Xmodem:
load method=xmodem destfile=
filename
.cfg
The filename.cfg variable is the name you want to assign the file whe n
it is stored in the switch’s file system. The name, which can be up to
fifteen alphanumeric characters, not including the “,cfg” extension,
must be unique from all of the configuration files that already are
stored in the file system on the switch. (To view the names of the files
in the file system, use the SHOW FILE command.)
For example, to assign the name “stack_eng.cfg” to the file, the
command is:
download method=xmodem srcfile=stack_eng.cfg
After entering the command, perform the file transfer using your
terminal emulator program.
You can skip the next step if the name of the configuration file is
“stack.cfg.” If the stack’s active configuration file is a different name,
continue with the next step.
8. You must now designate the file as the switch’s active configuration file
so that it knows to use that file to configure the stack and to save new
configuration settings. The command is SET CONFIG command. Here
is the format:
set config=filename.cfg
The filename.cfg variable is the name of the configuration file you
downloaded to the switch. For example, if the name of the file is
“stack_eng.cfg,” the command would be:
set config=stack_eng.cfg
85
Page 86

Chapter 6: Adding and Removing Switches
Note
9. To verify the new active configuration file, enter the SHOW CONFIG
10. Power off the switch by disconnecting the power cord from the back
11. Go to the next procedure.
Do not issue the SAVE CONFIGURATION command. If you do, the
switch will overwrite all of the settings in the configuration file with its
current settings. If you inadvertently enter the command, download
the file again from your workstation by performing step 7.
command. The “Boot configuration file” field should contain the name
of the configuration file you designated in the previous step.
panel of the unit.
Connecting the
New Master
Switch to the
Stack
To connect the new master switch to the stack, perform the following
procedure:
1. Power off all the switches in the stack by disconnecting the power
cords from the power sources or by turning off the power circuit.
2. Cable the AT-StackXG Stacking Module on the new master switch.
For instructions, refer to “Cabling the AT-StackXG Stacking Modules”
on page 62.
3. Power on the switches of the stack, including the new master switch.
4. To verify that the new master switch is operating properly, perform the
steps in “Verifying the Installation” on page 67.
5. Install the SFP and XFP modules in the master switch. For
instructions, refer to “Installing Optional Transceivers” on page 72.
6. Connect the network cables to the ports and modules in the switch.
For instructions, refer to “Cabling the Twisted Pair and Fiber Optic
Ports” on page 76.
86
Page 87

Adding a New Member Switch
Table 10 lists the steps to add a new member switch to a stack.
Table 10. Adding a New Member Switch to a Stack
Task Procedure
AT-9400Ts Stack Installation Guide
1 Before a new switch is added to a
stack, you should first verify that the
addition of the new member will not
exceed the maximum permitted size
of a stack.
2 Install the AT-StackXG Stacking
Module in the new switch.
3 Install the power cord retaining clip. “Installing the Power Cord Retaining Clip (AC
4 If the switch is a stand-alone device in
your network, label and disconnect all
of the network cables from the ports.
5 Install the switch in the same
equipment rack as the stack.
6 Add a label to the front panel of the
switch or adjacent to it on the
equipment rack, with the unit’s MAC
address, found on the back panel, and
the static ID number you intend to
assign it. This should be the next
available ID number in the stack. (If
you do not know the next available
stack ID number, start a local or
remote management session on the
stack and issue the SHOW STACK
command.)
“Maximum Number of Switches in a Stack” on
page 39
“Installing the AT-StackXG Stacking Module” on
page 41
Switches Only)” on page 44
“Disconnecting the Network Cables” on page 45
“Installing the Switches in an Equipment Rack”
on page 46
“Labeling the Switches” on page 48
7 Power on the switch. “Powering on a Switch” on page 50
8 Start a local management session on
the switch.
“Starting a Local Management Session” on
page 52
87
Page 88

Chapter 6: Adding and Removing Switches
Table 10. Adding a New Member Switch to a Stack
Task Procedure
9 Verify that the new switch has the
correct version of the AT-S63
Management Software. It has to be
Version 3.0.0 or later and it has to be
the same version as the management
software on the other switches. (If you
do not know the version number of the
management software on the stack,
start a local or remote management
session on the stack. The version
number is displayed in the window.)
10 If you need to update it s management
software, perform this procedure.
11 Assign the new switch its stack ID
number.
12 Power of f the switch by disconne cting
the power cord from the power source
and from the back panel of the unit.
13 Power off the stack. -14 Connect the new member switch to
the stack by cabling the AT-StackXG
Stacking Module.
“Verifying the AT-S63 Version Number” on
page 54
“Updating the A T-S63 Management So ftware” on
page 55
“Assigning Static Module ID Numbers to the
Member Switches” on page 59
--
“Cabling the AT-StackXG Stacking Modules” on
page 62
15 Power on the stack. “Powering On the Switches of the Stack” on
page 65
16 Verify that the stack is operating
“Verifying the Installation” on page 67
properly with the new member switch.
17 If there is a problem, refer to this
section for troubleshooting
“Troubleshooting the Discovery Process” on
page 69
suggestions.
18 Connect the network cables to the
ports on the switch.
88
“Cabling the Twisted Pair and Fiber Optic Ports”
on page 76
Page 89

Replacing a Member Switch
Table 11 lists the steps to replace a member switch in a stack.
Table 11. Replacing a Member Switch in a Stack
Task Procedure
1 Power off the stack.
AT-9400Ts Stack Installation Guide
2 Label and disconnect all of the
network cables from the switch you
are replacing and remove the unit
from the equipment rack. The steps
for a member switch are the same as
those for the master switch.
3 Install the AT-StackXG Stacking
Module in the replacement switch.
4 Install the power cord retaining clip. “Installing the Power Cord Retaining Clip (AC
5 Install the switch in the equipment
rack.
6 Add a label to the front panel of the
switch or adjacent to it on the
equipment rack, with the unit’s MAC
address, found on the back panel, and
with the static ID number of the unit it
is replacing.
7 Power on the switch. “Powering on a Switch” on page 50
“Removing the Current Master Switch” on
page 79
“Installing the AT-StackXG Stacking Module” on
page 41
Switches Only)” on page 44
“Installing the Switches in an Equipment Rack”
on page 46
“Labeling the Switches” on page 48
8 Start a local management session on
the switch.
9 Verify that the AT-S63 Management
Software on the new switch is the
correct version. It has to be Version
3.0.0 or later and it has to be the
same version that is on the other
switches. (If you do not know the
version number of the management
software on the stack, start a local or
remote management session. The
version number is displayed in the title
in the window.)
10 If you need to update it s management
software, perform this procedure.
“Starting a Local Management Session” on
page 52
“Verifying the AT-S63 Version Number” on
page 54
“Updating the A T-S63 Management So ftware” on
page 55
89
Page 90

Chapter 6: Adding and Removing Switches
Table 11. Replacing a Member Switch in a Stack
Task Procedure
11 Assign the new switch the stack ID
number of the replaced unit.
12 Power of f the switch by disconne cting
“Assigning Static Module ID Numbers to the
Member Switches” on page 59
-the power cord from the power source
and from the back panel of the unit.
13 Connect the replacement switch to
the stack by cabling the AT-StackXG
“Cabling the AT-StackXG Stacking Modules” on
page 62
Stacking Module.
14 Power on the stack. “Powering On the Switches of the Stack” on
page 65
15 Verify that the stack is operating
“Verifying the Installation” on page 67
properly with the replacement switch.
16 If there is a problem, refer to this
section for troubleshooting
“Troubleshooting the Discovery Process” on
page 69
suggestions.
17 Connect the network cables to the
ports on the replacement switch.
“Cabling the Twisted Pair and Fiber Optic Ports”
on page 76
90
Page 91

Chapter 7
Note
Troubleshooting
This chapter contains information about how to troubleshoot a switch in
the event a problem occurs. Sections in the chapter include:
“No Master Switch” on page 92
“Power LED is Off” on page 93
“Twisted Pair Port Link LED is Off” on page 94
“Fiber Optic Port Link LED is Off” on page 95
“Transceiver is Installed but the Status is “Not Present”” on page 96
“System Fault LED is Blinking” on page 97
“System Fault LED is Steadily On” on page 98
“Cannot Establish a Local (Out-of-Band) Management Session” on
page 99
“Switch Functions Intermittently” on page 100
If after following the instructions in this chapter you are unable to
resolve a problem, contact Allied Telesis Technical Support for
assistance. Refer to “Contacting Allied Telesis” on page 13 for
contact information.
91
Page 92

Chapter 7: Troubleshooting
No Master Switch
After powering on the switches of a stack and waiting two to three minutes
for the stack to complete the discovery process, you observe that the
Stack MSTR LEDs on the front panels on all the switches are off. This
could indicate that the discovery process encountered a problem that
prevented the stack from selecting a master switch. For suggestions on
resolving the problem, refer to “Troubleshooting the Discovery Process”
on page 69.
92
Page 93

Power LED is Off
AT-9400Ts Stack Installation Guide
Check the PWR LED on the front of the switch. If the LED is off, indicating
that the unit is not receiving power, do the following:
Make sure the power cord is securely connected to the power source
and to the AC connector on the back panel of the switch.
Verify t hat the power outlet has power by co nnecting another device to
it.
Try connecting the unit to another power source.
Try using a different power cord.
Check that the voltage from the power source is within the required
levels for your region.
93
Page 94

Chapter 7: Troubleshooting
Note
Twisted Pair Port Link LED is Off
When a twisted pair port on the switch is connected to a properly
operating end node, the Link LED for the port should be on. If a Link LED
is off, do the following:
A 1000Base-T connection can take from five to ten seconds to
establish a link.
Verify that the end node connected to the port is powered ON and is
operating properly.
Check that the twisted pair cable is securely connected to the port on
the switch and to the port on the end node.
Make sure that the twisted pair cable does not exceed 100m (328 ft).
Verify that you are using the ap propriate category of twisted pair cable.
For information, refer to Table 2 on page 20.
Determine if a crossover cable is required. Since the twisted pair ports
feature auto MDI/MDI-X, you should be able to use a straight-through
cable regardless of the type of device you connect to a port. However ,
if you disable Auto-Negotiation on a port and set a port’s speed and
duplex mode manually, the port defaults to MDI-X. Disabling AutoNegotiation may require manually configuring a port’s MDI/MDI-X
setting or using a crossover cable.
Make sure that the operating parameters of the port on the switch are
compatible with the end node to which the port is connected. This may
require using the switch’s management software.
In order for a switch port to successfully Auto-Negotiate its duplex
mode with an end node, the end node should also be using AutoNegotiation. Otherwise, a duplex mode mismatch can occur. A switch
port using Auto-Negotiation defaults to half-duplex if it detects that the
end node is not using Auto-Negotiation. This can result in a mismatch
if the end node is operating at a fixed duplex mode of full-duplex.
To avoid this problem, disable Auto-Negotiation on a switch port and
set the port’s speed and duplex mode manually if the end node has a
fixed duplex mode of full-duplex.
The switch has a bad cable detection feature that enables it to
determine if a twisted pair cable has a electrical short that might cause
a network loop. If the switch detects a bad cable on a port, it does not
establish a link on that port. Try replacing the cable.
94
Page 95

Fiber Optic Port Link LED is Off
Note
When a fiber optic port on the switch is connected to a properly operating
end node, the Link LED for the port should be on. If a Link LED is off, do
the following:
Verify that the end node connected to the port is powered ON and is
operating properly.
Check that the fiber optic cable is securely connected to the port on the
switch and the port on the end node.
If the fiber optic port is on an SFP or XFP transceiver, check to be sure
that the transceiver is firmly inserted into the slot on the switch.
Make sure that you are using the appropriate type of fiber optic cable
and that the cable length does not exceed the allowed maximum
distance. For cable specifications for an SFP or XFP module, refer to
the installation instructions shipped with the module.
Use a fiber optic tester to test the attenuation on the cable and the
strength of the optical signal. For operating specifications for an SFP
or XFP module, refer to the installation instructions shipped with the
module.
AT-9400Ts Stack Installation Guide
Check that the operating specifications (for instance, wavelength and
maximum operating distance) of the fiber optic port on the remote end
node are compatible with the fiber optic port on the switch.
Check to be sure that the fiber optic ports on the switch and on the end
node are operating at the same speed and duplex mode.
A fiber optic cable contains two separate fiber strands. One strand is
for receiving data and the other is for transmitting data. When you
connect a fiber optic cable to a port, be sure that the receive fiber
connector is connected to the transmit connector on the remote end
node, and that the transmit fiber connector is connected to the receive
connector on the remote node.
The L/A LED for an SFP transceiver slot may remain ON if you
remove the transceiver when it has a link to an end node without first
disconnecting the fiber optic cable. The L/A LED will change to OFF
the next time an SFP module is installed in the slot. To avoid this,
always disconnect the fiber optic cable before removing a
transceiver.
95
Page 96

Chapter 7: Troubleshooting
Note
Transceiver is Installed but the Status is “Not Present”
If an SFP or XFP transceiver is installed in a transceiver slot but the Uplink
Information menu in the AT-S63 Management Software interface displays
“Not Present” for that port, do the following:
Verify that t he transceiver is comple tely inserted in the slot on the fron t
of the switch.
The uplink status does not reflect whether a fiber optic cable is
connected to the transceiver.
96
Page 97

System Fault LED is Blinking
If the system FAULT LED is blinking, no action is required. A blinking
FAULT LED indicates that the switch is downloading a new version of the
management software or is updating the active boot configuration file. The
LED stops blinking after the switch has downloaded the new management
software or updated the boot configuration file.
AT-9400Ts Stack Installation Guide
97
Page 98

Chapter 7: Troubleshooting
Note
System Fault LED is Steadily On
If the system FAULT LED is steadily on, a problem has occurred in the
switch. Do the following:
Try resetting the switch by disconnecting and reconnecting the AC
power cord.
If the FAULT LED remains ON, try downloading a new version of the
switch’s management software. For instructions, refer to the AT-S63
Management Software Command Line User’s Guide.
If the FAULT LED remains steadily on, contact Allied Telesis
Technical Support for assistance.
98
Page 99

AT-9400Ts Stack Installation Guide
Cannot Establish a Local (Out-of-Band) Management Session
If you are unable to establish a local (out-of-band) management session
through the Terminal Port on the master switch of the stack, do the
following:
Check to be sure that the RJ-45 serial management cable is securely
connected to the serial terminal port on the switch and to the RS-232
port on the terminal or personal computer.
Check to be sure that the operating parameters on the terminal or the
terminal emulation program have been set correctly. The default
settings for the RJ-45 serial terminal port can be found in “Starting a
Local Management Session” on page 52.
99
Page 100

Chapter 7: Troubleshooting
Switch Functions Intermittently
If a switch functions intermittently, check the system hardware status
through the management software:
Note the current voltage for the power supply compared to the
optimum rating.
Verify that the system temperature is within the operating range.
100
 Loading...