

Page 1

Gigabit Ethernet Network
Adapters
AT-2916SX
AT-2931SX
AT-2972SX
AT-2972SX/2
AT-2972T/2
Installation Guide
613-000493 Rev. C
Page 2

Copyright © 2007 Allied Telesis, Inc.
All rights reserved. No part of this publication may be reproduced without prior written permission from Allied Telesis, Inc.
Microsoft and Internet Explorer are registered trademarks of Microsoft Corporation. Netscape Navigator is a registered trademark of
Netscape Communications Corporation. All other product names, company names, logos or other designations mentioned herein are
trademarks or registered trademarks of their respective owners.
Allied Telesis, Inc. reserves the right to make changes in specifications and other information contained in this document without prior
written notice. The information provided herein is subject to change without notice. In no event shall Allied Telesis, Inc. be liable for any
incidental, special, indirect, or consequential damages whatsoever, including but not limited to lost profits, arising out of or related to this
manual or the information contained herein, even if Allied Telesis, Inc. has been advised of, known, or should have known, the possibility of
such damages.
Page 3

Electrical Safety and Emissions Standards
This product meets the following standards.
Federal Communications Commission Interference Statement
Declaration of Conformity
Manufacturer Name: Allied Telesis, Inc.
Declares that the product: Gigabit Ethernet Adapters
Model Numbers: AT-2916SX, AT-2931SX, AT-2972SX, AT-2972SX/2, AT-2972T/2
This equipment has been tested and found to comply with the limits for a Class B digital device, pursuant to Part 15 of
FCC Rules. These limits are designed to provide reasonable protection against harmful interference in a residential
installation. This equipment generates, uses and can radiate radio frequency energy and, if not installed and used in
accordance with the instructions, may cause harmful interference to radio or television reception. However, there is no
guarantee that interference will not occur in a particular installation. If this equipment does cause harmful interference to
radio or television reception, which can be determined by turning the equipment off and on, the user is encouraged to try
to correct the interference by one of the following measures:
- Reorient or relocate the receiving antenna.
- Increase the separation between the equipment and the receiver.
- Connect the equipment into an outlet on a circuit different from that to which the receiver is connected.
- Consult the dealer or an experienced radio/TV technician for help.
This device complies with part 15 of the FCC Rules. Operation is subject to the following two conditions:
(1) This device must not cause harmful interference, and
(2) this device must accept any interference received, including interference that may cause undesired operation.
FCC Caution: Any changes or modifications not expressly approved by the party responsible for compliance could void
the user’s authority to operate this equipment.
IMPORTANT NOTE:
FCC Radiation Exposure Statement:
This equipment complies with FCC radiation exposure limits set forth for an uncontrolled environment. End users must
follow the specific operating instructions for satisfying RF exposure compliance.
This transmitter must not be co-located or operating in conjunction with any other antenna or transmitter.
IEEE802.11b or 802.11g operation of this product in the U.S.A. is firmware-limited to channels 1 through 11.
Industry Canada
This Class A digital apparatus complies with Canadian ICES-003.
Cet appareil numérique de la classe A est conforme à la norme NMB-003 du Canada.
European Union Restriction of the Use of Certain Hazardous Substances
(RoHS) in Electrical and Electronic Equipment
This Allied Telesis RoHS-compliant product conforms to the European Union Restriction of the Use of Certain Hazardous
Substances (RoHS) in Electrical and Electronic Equipment. Allied Telesis ensures RoHS conformance by requiring
supplier Declarations of Conformity, monitoring incoming materials, and maintaining manufacturing process controls.
RFI Emissions FCC Class B, EN55022 Class B, VCCI Class B, C-TICK, CE
Immunity EN55024
3
Page 4

Electrical Safety EN60950 (TUV), UL 60950 (CULUS)
Laser Safety EN60825
Translated Safety Statements
Important: The indicates that a translation of the safety statement is available in a PDF
document titled “Translated Safety Statements” (613-000405) on the Allied Telesis website at
www.alliedtelesis.com.
4
Page 5

Contents
Preface ................................................................................................................................................................................11
Safety Symbols Used in this Document................................................................................................................................12
Where to Find Web-based Guides .......................................................................................................................................13
Contacting Allied Telesis ......................................................................................................................................................14
Online Support ..............................................................................................................................................................14
Email and Telephone Support .......................................................................................................................................14
Warranty........................................................................................................................................................................14
Returning Products........................................................................................................................................................14
Sales or Corporate Information .....................................................................................................................................14
Management Software Updates ....................................................................................................................................14
Chapter 1: Introduction to the AT-29xxSX Series Gigabit Ethernet Network Adapters ..............................................15
Functional Description ..........................................................................................................................................................16
Contents of Your Shipment ...........................................................................................................................................17
Features ...............................................................................................................................................................................18
LEDs.....................................................................................................................................................................................19
Chapter 2: Installing the Hardware ..................................................................................................................................21
Reviewing Safety Precautions..............................................................................................................................................22
Pre-Installation Checklist ......................................................................................................................................................24
Installing a Network Adapter Card ........................................................................................................................................25
Connecting the Network Cables ...........................................................................................................................................29
Warranty Registration...........................................................................................................................................................30
Chapter 3: Installing Windows Server 2003 and Windows XP Driver Software ...........................................................31
Installing the Driver Software................................................................................................................................................32
Using the Driver Installer ...............................................................................................................................................32
Updating the Adapter Software .....................................................................................................................................35
Updating the Windows Server 2003 or Windows XP Driver Software ...................................................................35
Modifying Configuration Properties.......................................................................................................................................41
802.1p QOS ..................................................................................................................................................................41
Checksum Offload.........................................................................................................................................................43
Ethernet@Wirespeed™ (AT-2972/T2 only) ..................................................................................................................44
Flow Control ..................................................................................................................................................................44
Jumbo Mtu.....................................................................................................................................................................45
Large Send Offload .......................................................................................................................................................46
Locally Administered Address .......................................................................................................................................47
Speed/Duplex (AT-2972/T2 only) ..................................................................................................................................48
Wake Up Capabilities (AT-2972/T2 only) ......................................................................................................................49
WOL Speed (AT-2972/T2 only) .....................................................................................................................................50
Uninstalling the Driver Software ...........................................................................................................................................52
Chapter 4: Installing Windows 2000 Driver Software .....................................................................................................55
Installing the Windows 2000 Driver Software .......................................................................................................................56
Installing the Adapter Software .....................................................................................................................................56
Modifying Configuration Properties.......................................................................................................................................58
802.1p QOS ..................................................................................................................................................................58
Checksum Offload.........................................................................................................................................................60
Ethernet@Wirespeed™ (AT-2972/T2 only) ..................................................................................................................61
Flow Control ..................................................................................................................................................................61
Jumbo Mtu.....................................................................................................................................................................62
5
Page 6

Contents
Large Send Offload .......................................................................................................................................................63
Locally Administered Address .......................................................................................................................................64
Speed/Duplex (AT-2972/T2 only) ..................................................................................................................................65
Wake Up Capabilities (AT-2972/T2 only) ......................................................................................................................66
WOL Speed (AT-2972/T2 only) .....................................................................................................................................67
Updating the Driver Software................................................................................................................................................69
Removing the Driver Software..............................................................................................................................................70
Chapter 5: Installing the Linux Driver Software ..............................................................................................................73
Installing the Linux Driver Software ......................................................................................................................................74
Building a Driver from a TAR File ..................................................................................................................................74
Removing the tg3 Driver.........................................................................................................................................74
Network Installation...............................................................................................................................................................76
Removing the Linux Driver from a TAR Installation ..............................................................................................................77
Module Parameters...............................................................................................................................................................78
Chapter 6: Installing the NetWare Driver Software .........................................................................................................83
Driver Installation ..................................................................................................................................................................84
Pre-Installation Requirements...............................................................................................................................................85
Installing Novell NetWare Server 5.x or 6.0 Driver Software ................................................................................................86
Verifying or Modifying Adapter Parameters ..........................................................................................................................88
Configuration Parameters for B57.LAN driver: .......................................................................................................88
Removing Drivers from Autoexec.ncf ...................................................................................................................................93
Example: ................................................................................................................................................................93
Chapter 7: Installing the Boot Agent Driver Software ....................................................................................................95
Overview...............................................................................................................................................................................96
.......................................................................................................................................................................................96
Setup BIOS....................................................................................................................................................................96
Server Setup.........................................................................................................................................................................97
Windows 2000 ...............................................................................................................................................................97
Windows Server 2003 and Windows XP .......................................................................................................................97
DOS UNDI/APITEST .....................................................................................................................................................97
Red Hat Linux................................................................................................................................................................97
Chapter 8: Installing the NDIS2 Driver Software .............................................................................................................99
Installing the NDIS2 Driver Software for Use on MS-DOS Platforms .................................................................................100
Pre-Installation Requirements .....................................................................................................................................100
Modifying the Startup Disk...........................................................................................................................................100
Using Keywords for the B57.dos Drivers ............................................................................................................................105
Chapter 9: Key Protocols and Interfaces .......................................................................................................................107
Failover Teaming ................................................................................................................................................................108
VLANs Overview.................................................................................................................................................................109
VLANs Support............................................................................................................................................................111
Adaptive Interrupt Frequency ......................................................................................................................................111
Dual DMA Channels ....................................................................................................................................................111
32-bit or 64-bit PCI Bus Master ...................................................................................................................................111
ASIC with Embedded RISC Processor........................................................................................................................111
Chapter 10: Troubleshooting ..........................................................................................................................................113
Hardware Diagnostics.........................................................................................................................................................114
Checking Port LEDs on the Adapter...................................................................................................................................115
Troubleshooting Checklist...................................................................................................................................................116
Verifying the Correct Drivers are Loaded............................................................................................................................117
NetWare ......................................................................................................................................................................117
Linux ............................................................................................................................................................................117
Testing Network Connectivity .............................................................................................................................................118
Windows ......................................................................................................................................................................118
NetWare ......................................................................................................................................................................119
Linux ............................................................................................................................................................................120
Software Problems and Solutions.......................................................................................................................................121
6
Page 7

AT-29xx Series Gigabit Ethernet Network Adapters Installation Guide
Microsoft Remote Installation Service (RIS) Instructions ............................................................................................121
Windows 2000 Image...........................................................................................................................................121
Windows XP Image..............................................................................................................................................121
Windows 2000 and Windows Server 2003..................................................................................................................121
Miscellaneous..............................................................................................................................................................121
Chapter 11: DOS Diagnostics .........................................................................................................................................123
Introduction.........................................................................................................................................................................124
Prerequisites ...............................................................................................................................................................124
DOS Prompt Commands....................................................................................................................................................125
Diagnostic Tests .................................................................................................................................................................126
Test Names .................................................................................................................................................................126
Test Descriptions.........................................................................................................................................................127
Error Messages ..................................................................................................................................................................133
Appendix A: Specifications ............................................................................................................................................137
Physical Specifications .......................................................................................................................................................137
Environmental Specifications..............................................................................................................................................137
Power Specifications ..........................................................................................................................................................138
Performance Specifications................................................................................................................................................138
Operating Specifications.....................................................................................................................................................138
Appendix B: Cleaning Fiber Optic Connectors ............................................................................................................139
Using a Cartridge-Type Cleaner.........................................................................................................................................140
Using a Swab .....................................................................................................................................................................142
7
Page 8

Contents
8
Page 9

Figures
Figure 1. Removing the PC Cover.......................................................................................................................................25
Figure 2. Removing the Faceplate From PCI Slot...............................................................................................................26
Figure 3. Inserting the Network Adapter Card .....................................................................................................................27
Figure 4. Securing the Adapter Card...................................................................................................................................28
Figure 5. Welcome to the Found New Hardware Wizard Window.......................................................................................33
Figure 6. Found New Hardware Wizard Window.................................................................................................................34
Figure 7. System Properties Dialog Box..............................................................................................................................36
Figure 8. Hardware Tab.......................................................................................................................................................37
Figure 9. Device Manager Window......................................................................................................................................38
Figure 10. Welcome to Hardware Update Wizard Window .................................................................................................39
Figure 11. Hardware Update Wizard Window .....................................................................................................................39
Figure 12. Advanced Tab ....................................................................................................................................................42
Figure 13. Advanced Tab ....................................................................................................................................................59
Figure 14. Example of Servers Supporting Multiple VLANs with Tagging.........................................................................109
Figure 15. Run Command Window....................................................................................................................................118
Figure 16. Command Window with pconfig/all displayed ..................................................................................................119
Figure 17. Command Window with ping displayed............................................................................................................119
Figure 18. Ferrule in an SC Connector Plug......................................................................................................................139
Figure 19. Unclean and Clean Ferrule...............................................................................................................................139
Figure 20. Cartridge Cleaner .............................................................................................................................................140
Figure 21. Rubbing the Ferrule Tip on the Cleaning Surface ............................................................................................140
Figure 22. Lint-Free and Alcohol-Free Swabs ...................................................................................................................142
Figure 23. Cleaning a Recessed Ferrule...........................................................................................................................142
9
Page 10

Figures
10
Page 11

Preface
This guide contains instructions on how to install the AT-29xx Series
Gigabit Ethernet network adapters. In addition, procedures are provided
that describe how to install and configure the firmware.
The Preface contains the following sections:
“Safety Symbols Used in this Document” on page 12
“Where to Find Web-based Guides” on page 13
“Contacting Allied Telesis” on page 14
11
Page 12
Preface
Safety Symbols Used in this Document
This document uses the safety symbols defined in Table 1.
Table 1. Safety Symbols
Symbol Meaning Description
Caution Performing or omitting a specific action may
result in equipment damage or loss of data.
Warning Performing or omitting a specific action may
result in electrical shock.
12
Page 13

Where to Find Web-based Guides
The installation and user guides for all Allied Telesis products are available
in portable document format (PDF) on our web site at
www.alliedtelesis.com. You can view the documents online or download
them onto a local workstation or server.
AT-29xx Series Gigabit Ethernet Network Adapters Installation Guide
13
Page 14

Preface
Contacting Allied Telesis
This section provides Allied Telesis contact information for technical
support as well as sales and corporate information.
Online Support You can request technical support online by accessing the Allied Telesis
Knowledge Base: www.alliedtelesis.com/support/kb.aspx. You can use
the Knowledge Base to submit questions to our technical support staff and
review answers to previously asked questions.
Email and
Telephone
Support
For Technical Support via email or telephone, refer to the Support &
Services section of the Allied Telesis web site: www.alliedtelesis.com.
Select your country from the list displayed on the website. then select the
appropriate menu tab.
Warranty For hardware warranty information, refer to the Allied Telesis web site:
www.alliedtelesis.com/support/warranty.
Returning
Products
Sales or
Corporate
Products for return or repair must first be assigned a return materials
authorization (RMA) number. A product sent to Allied Telesis without an
RMA number will be returned to the sender at the sender’s expense.
To obtain an RMA number, contact the Allied Telesis Technical Support
group at our web site: www.alliedtelesis.com/support/rma. Select your
country from the list displayed on the website. Then select the appropriate
menu tab.
You can contact Allied Telesis for sales or corporate information through
our web site: www.alliedtelesis.com. To find the contact information for
your country, select Contact Us -> Worldwide Contacts.
Information
Management
Software Updates
14
New releases of management software for our managed products are
available from either of the following Internet sites:
Allied Telesis web site: www.alliedtelesis.com
Allied Telesis FTP server: ftp://ftp.alliedtelesis.com
If you prefer to download new software from the Allied Telesis FTP server
from your workstation’s command prompt, you will need FTP client
software and you must log in to the server. Enter “anonymous” for the user
name and your email address for the password.
Page 15

Chapter 1
Introduction to the AT-29xxSX Series Gigabit Ethernet Network Adapters
This chapter provides an introduction to the Allied Telesis AT-29xx Series
Gigabit Ethernet network adapters and contains the following sections:
“Functional Description” on page 16
“Features” on page 18
“LEDs” on page 19
15
Page 16

Introduction to the AT-29xxSX Series Gigabit Ethernet Network Adapters
Functional Description
The AT-29xx Series Gigabit Ethernet network adapters target the
increased congestion experienced at the backbone and server in today’s
networks and it provides a future upgrade path for high-end workstations
that require more bandwidth than Fast Ethernet can provide.
The adapter connects a PCI compliant server or workstation to a Gigabit
Ethernet network. The adapter incorporates a technology that transfers
data at a maximum rate of 2Gbps—20 times the rate of Fast Ethernet
adapters.
In addition, the adapters use fiber optic cabling and a connector that
meets 62.5/125um or 50/125um multimode specifications. This adapter
operates at 1000 Mbps full-duplex mode only.
The AT-29xxSX Series of Gigabit Ethernet adapters includes the following
models:
AT-2916SX
AT-2931SX
AT-2972SX
AT-2972SX/2
The AT-2916SX adapter is a 33/66Mhz 32-bit interface (PCI) card and is
available in two versions:
AT-2916SX/SC adapter
AT-2916SX/LC adapter
The AT-2931SX adapter is a 33/66/133Mhz 32/64-bit interface (PCI-X)
card and is available in two versions:
AT-2931SX/SC adapter
AT-2931SX/LC adapter
The AT-2972SX, AT-2972SX/2, and AT-2972T/2 adapters are PCI
Express 4-channel devices. The AT-2972SX has one port, and the
AT-2972SX/2 has two ports. All ports have LC connectors. The
AT-2972T/2 has two gigabit copper ports.
16
The adapter versions differ only in their PCI connector type. The SC
version adapters have an SC connector, and the LC version adapters
have an LC connector. The LEDs and software drivers are identical for all
adapter models and versions.
Page 17

AT-29xx Series Gigabit Ethernet Adapters Installation Guide
Contents of Your
Shipment
Included with your adapter are the following items:
Antistatic bag (used for protecting the adapter when stored or
shipped). Keep the adapter in its packaging until ready for installation.
CD-ROM with Gigabit Ethernet driver software and documentation.
Low-profile bracket
Inform your network supplier of any missing or damaged items. If you need
to return the adapter, you must pack it in the original (or equivalent)
packing material or the warranty will be voided. See “Returning Products”
on page 14.
17
Page 18

Introduction to the AT-29xxSX Series Gigabit Ethernet Network Adapters
Features
Following is a list of the AT-29xx Series Gigabit Ethernet network adapters
features for all of the supported operating systems:
Flow Control (IEEE 802.3X)
Jumbo frames (9 KB)
Layer 2 Priority Encoding (802.1P)
Adaptive interrupt frequency
Integrated 96 KB Frame Buffer Memory
Support for PXE
Note
Novell NetWare 5.1 does not support Jumbo Frames.
Load balancing (on Windows Server 2003 and Windows XP only, both
32- and 64-bit versions)
18
Page 19

LEDs
AT-29xx Series Gigabit Ethernet Adapters Installation Guide
All fiber adapter models have two LEDs: LINK and ACT. The LINK LED
indicates an active link and the ACT (Activity) LED indicates data transfer
status. After the driver is loaded and the cables are connected properly.
The LINK LED is lit and the ACT LED is on if data traffic is present. See
Table 1.
Table 1. Fiber Optic Port LED Status
LED State Description
LINK On Valid fiber link.
Off No fiber link.
ACT Blinking Data traffic is present
between the adapter and
the switch.
Off Data traffic is not present.
The AT-2972T/2 with its copper port has a single LED as described in
Table 2.
Table 2. AT-2972T/2 LED
State Description
On Valid link.
Off No valid link.
Blinking Data traffic is present between the adapter and the switch.
19
Page 20

Introduction to the AT-29xxSX Series Gigabit Ethernet Network Adapters
20
Page 21

Chapter 2
Installing the Hardware
This chapter contains the following sections:
“Reviewing Safety Precautions” on page 22
“Pre-Installation Checklist” on page 24
“Installing a Network Adapter Card” on page 25
“Connecting the Network Cables” on page 29
“Warranty Registration” on page 30
21
Page 22

Installing the Hardware
Reviewing Safety Precautions
Please review the following safety precautions before you begin to install
the network adapter card.
Note
The indicates that a translation of the safety statement is
available in a PDF document titled “Translated Safety Statements”
(613-000405) on the Allied Telesis website at
www.alliedtelesis.com.
Warning
This is a “Class 1 LED product”. L1
Warning
Do not stare into the laser beam. L2
Warning
Warning: Do not look directly at the fiber optic cable ends or inspect
the cable ends with an optical lens. E29
Warning
Do not work on this equipment or cables during periods of lightning
activity. E2
Warning
Operating Temperature: This product is designed for a maximum
ambient temperature of 40 degrees C. E7
Note
All Countries: Install this product in accordance with local and
National Electric Codes. E8
Warning
The adapter is being installed in a system that operates with
voltages that can be lethal. Before you remove the cover of your
system, you must observe the following precautions to protect
yourself and to prevent damage to the system components.
22
- Remove any metallic objects or jewelry from your hands and
Page 23

AT-29xx Series Gigabit Ethernet Adapters Installation Guide
wrists.
- Use only insulated or nonconducting tools.
- Verify that the system is powered OFF and unplugged before
accessing internal components.
- Installation or removal of adapters must be performed in a staticfree environment. The use of a properly grounded wrist strap or
other personal antistatic devices and an antistatic mat is strongly
recommended. E39
23
Page 24

Installing the Hardware
Pre-Installation Checklist
1. Check that your system has an appropriate open PCI slot.
2. Verify that your system is using the latest BIOS.
3. Review the information in the readme.txt file on the CD-ROM for
important information not available at the time this manual was
created.
Note
If you acquired the adapter software on floppy disk or from the
Broadcom support website, enter the path to where the adapter
driver files reside on your system.
4. If your system is active, shut it down.
5. When system shut down is complete, power OFF and unplug your
system.
6. Holding the adapter card by the edges, remove it from its shipping
package and place it on an antistatic surface.
7. Check the adapter for visible signs of damage, particularly on the
card’s edge connector.
Never attempt to install any damaged adapter. If the adapter is
damaged, report it to Allied Telesis. See “Contacting Allied Telesis” on
page 14.
24
Page 25
Installing a Network Adapter Card
The following instructions apply to installing the Gigabit Ethernet adapter
in most systems. Refer to the manuals that were supplied with your
system for details about performing these tasks on your particular system.
To install the network adapter card, perform the following procedure:
1. Review the “Pre-Installation Checklist” on page 24 and “Reviewing Safety Precautions” on page 22.
Before installing the adapter, ensure the system power is OFF and
unplugged from the power outlet, and that proper electrical grounding
procedures have been followed.
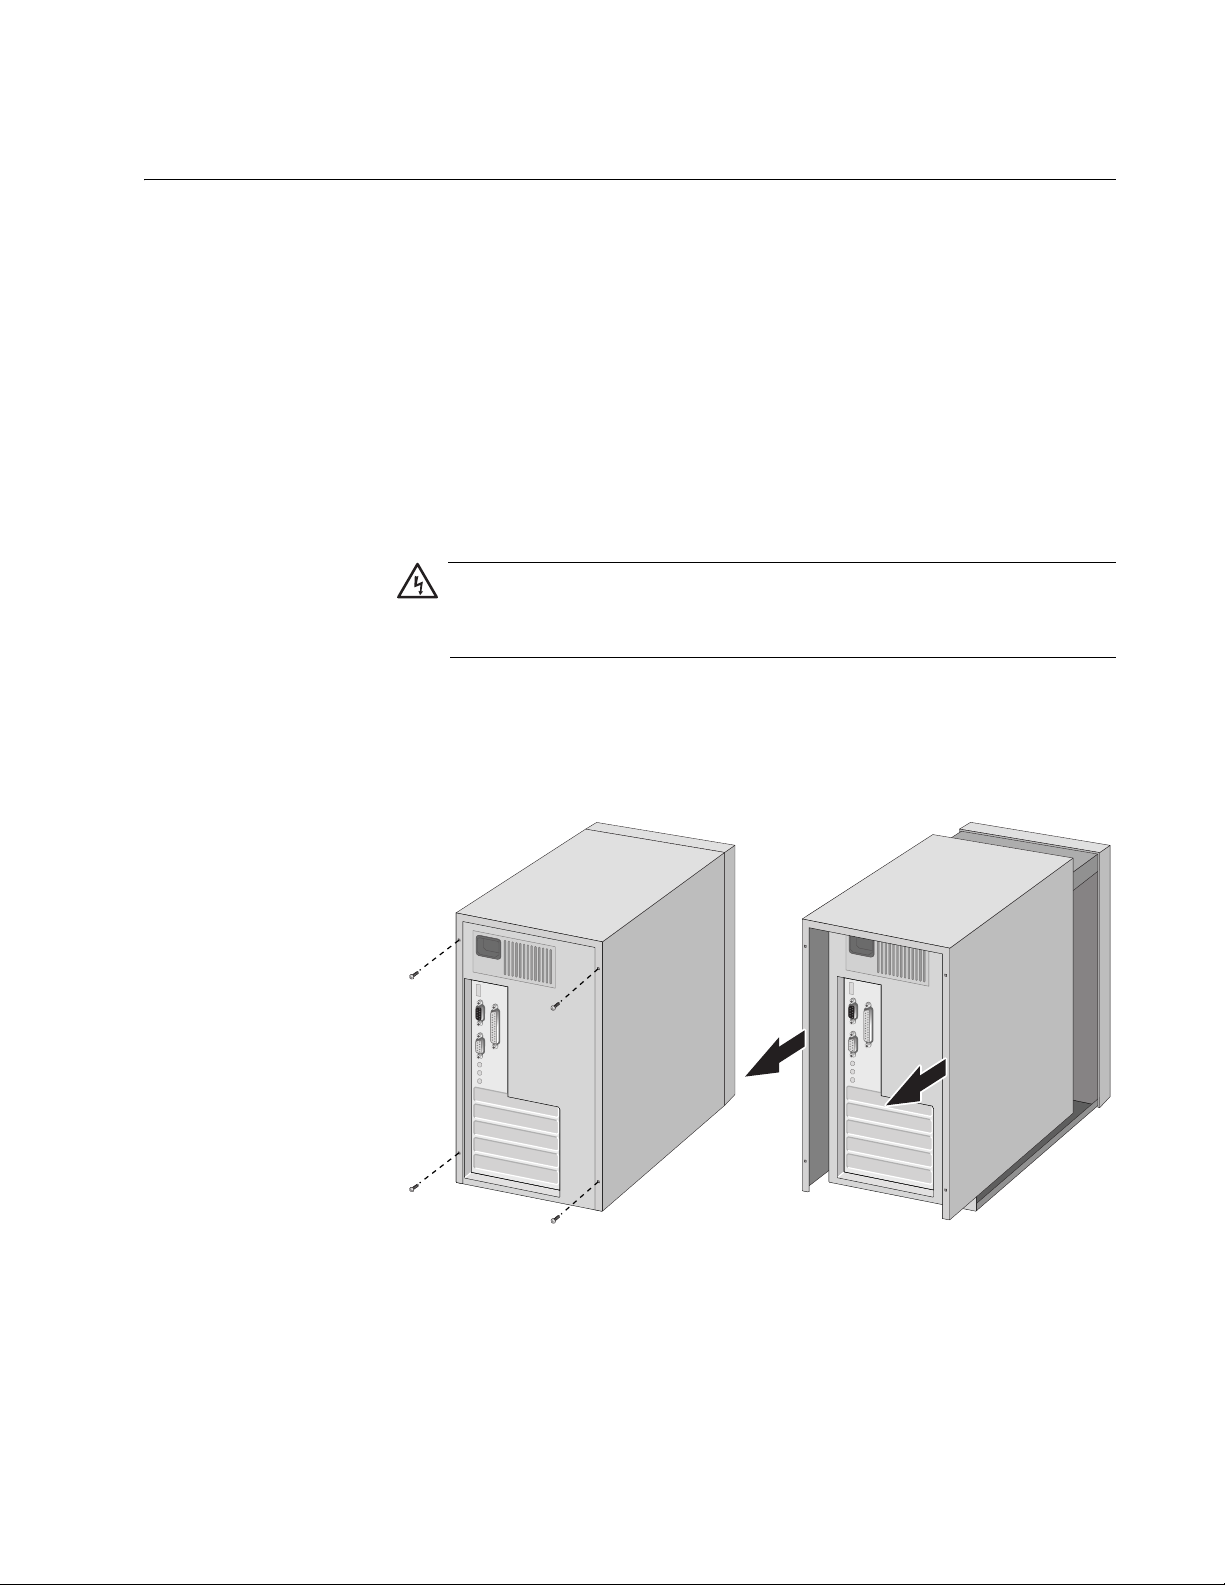
Warning
High voltage inside the system presents a safety hazard. Make sure
the power is off before removing the cover.
AT-29xx Series Gigabit Ethernet Adapters Installation Guide
2. Remove the system cover and select any appropriate empty PCI slot.
See Figure 1.
If you do not know how to identify an appropriate PCI slot, refer to your
system documentation.
Figure 1. Removing the PC Cover
25
Page 26
Installing the Hardware
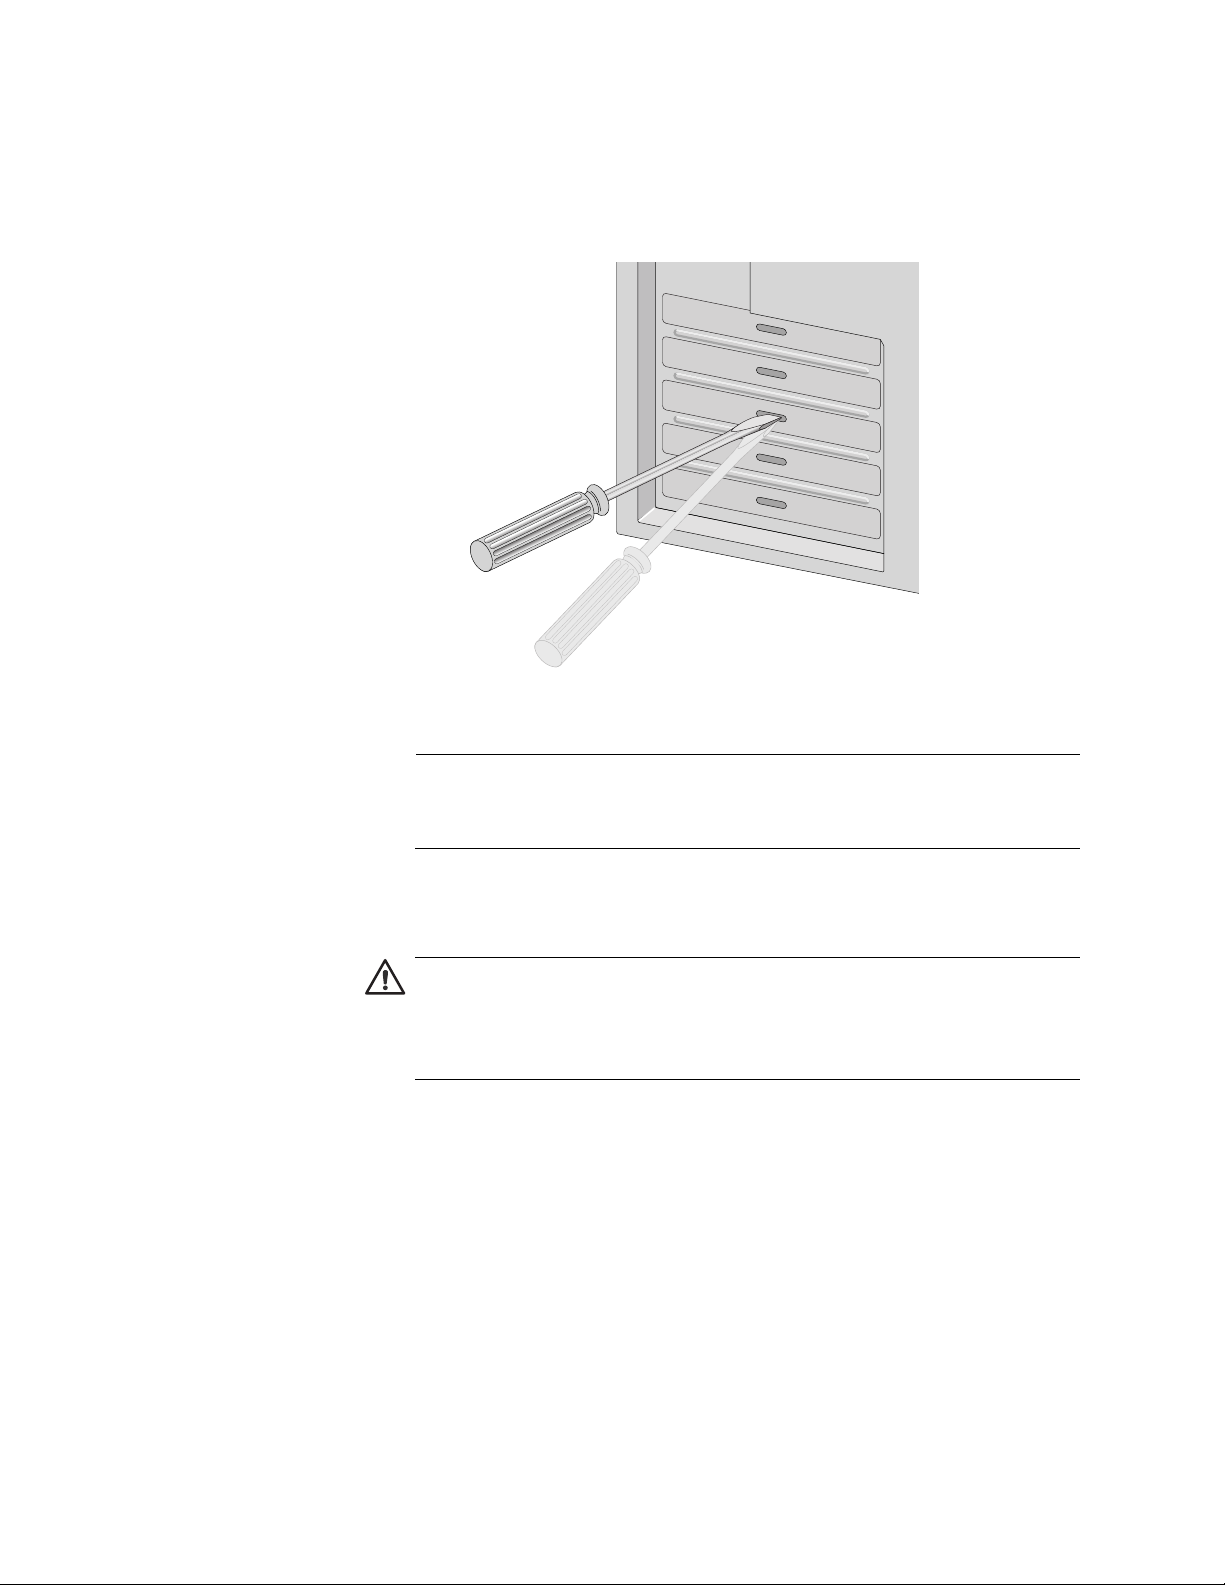
3. Select an empty, non-shared PCI slot and remove the faceplate.
Keep the faceplate in a safe place. You may need it for future use. See
Figure 2.
Figure 2. Removing the Faceplate From PCI Slot
Note
If you cannot locate or know how to find an appropriate PCI slot,
refer to the documentation that came with your system.
4. Remove the network adapter card from the shipping package and
store the packaging material in a safe location.
Caution
Wear a grounding device and observe electrostatic discharge
precautions when installing the network adapter card in a system.
Failure to observe this caution could result in damage to the card.
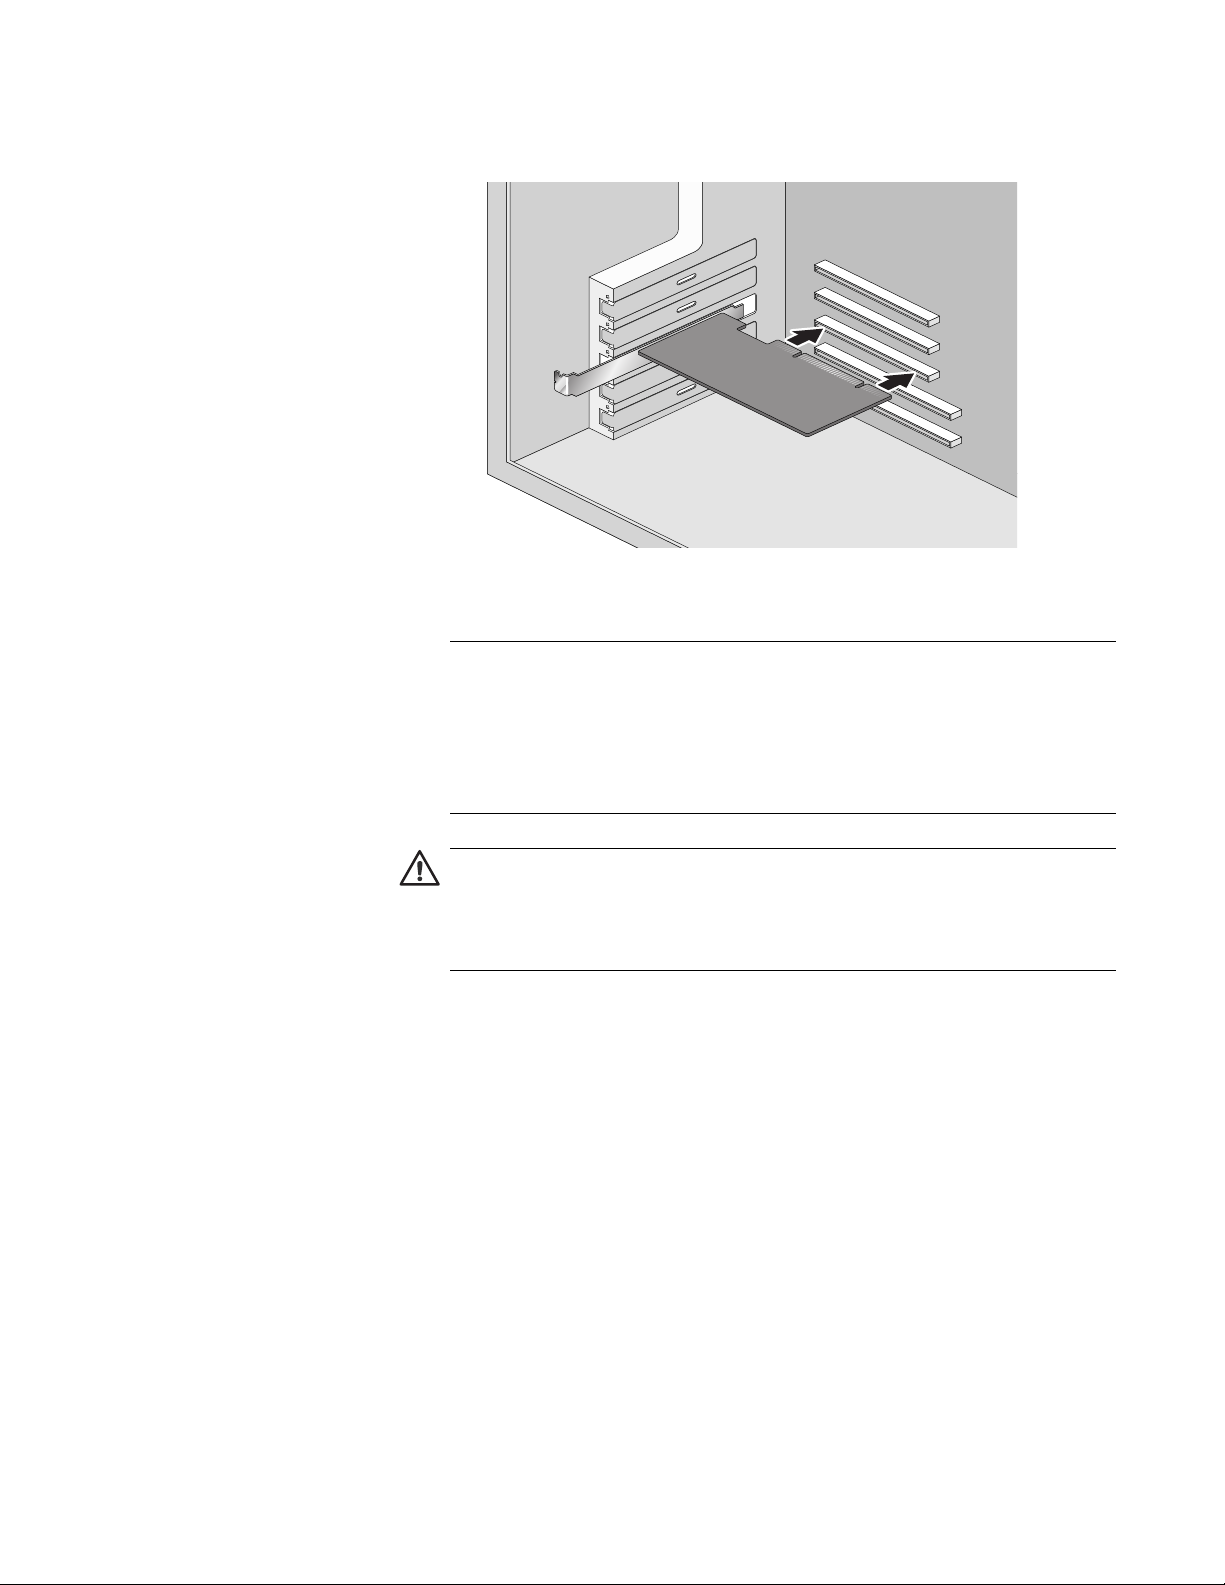
5. Applying even pressure at both corners of the card, push the adapter
card until it is firmly seated in the appropriate PCI slot.
26
Page 27
AT-29xx Series Gigabit Ethernet Adapters Installation Guide
Make sure the card is securely seated. See Figure 3.
Figure 3. Inserting the Network Adapter Card
Note
The connector dock in a 32-bit PCI slot is shorter than in a 64-bit PCI
slot. Although the AT-29xxSX series adapter is designed to fit in
either slot type, when installed in a 32-bit PCI slot, part of the
adapter’s connector edge remains undocked. This is part of normal
operation.
Caution
Do not use excessive force when seating the card, because this may
damage the system or the adapter. If the card resists seating,
remove it from the system, realign it, and try again.
27
Page 28
Installing the Hardware
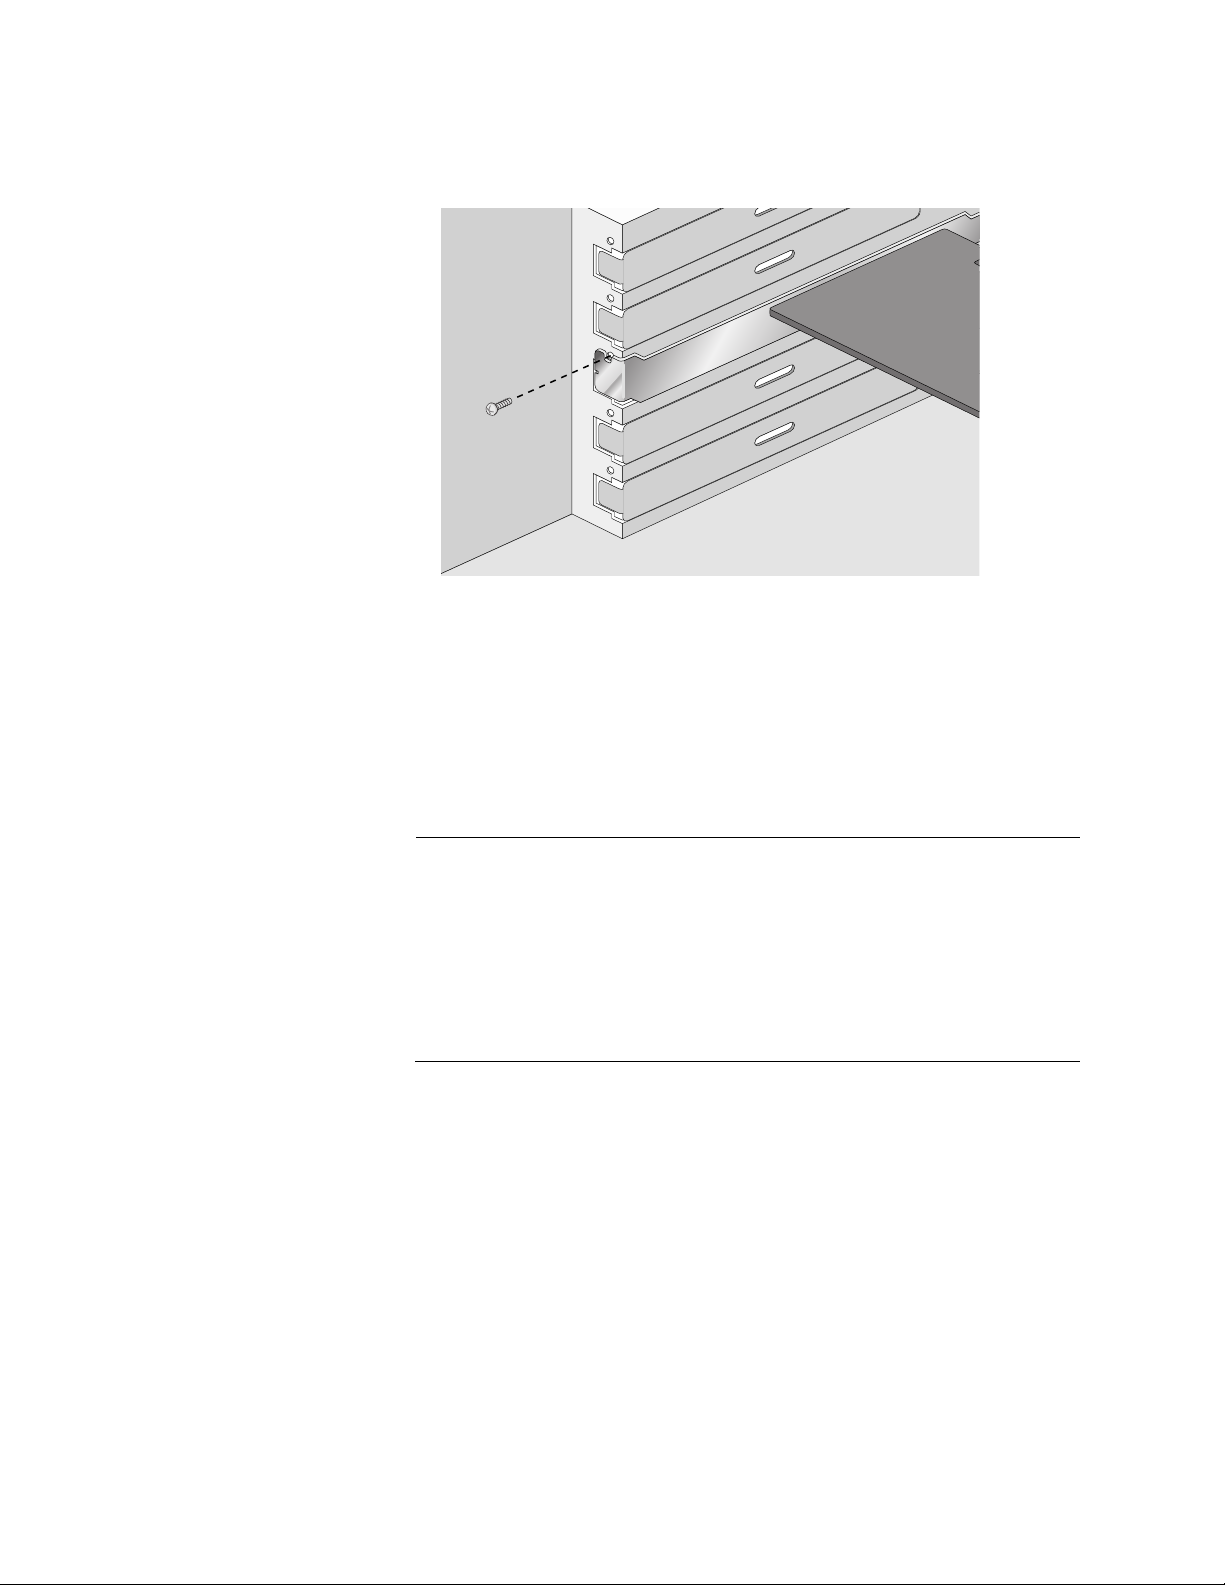
6. Secure the network adapter card to the chassis with a Phillips-head
screw (not provided) as shown in Figure 4.
Figure 4. Securing the Adapter Card
7. Replace the system’s cover and secure it with the screws removed in
Step 2.
8. Disconnect any personal antistatic devices.
9. Power the system on.
Note
If you installed the adapter card in a Microsoft Windows 2000,
Windows Server 2003, or Windows XP system before installing the
driver software, the Found New Hardware Wizard launches
automatically. For more information, see Chapter 3, “Installing
Windows Server 2003 and Windows XP Driver Software” on page
31 or Chapter 4, “Installing Windows 2000 Driver Software” on page
55.
Once the system returns to proper operation, the adapter hardware is fully
installed. Next, connect the network cables. See “Connecting the Network
Cables” on page 29.
28
Page 29

Connecting the Network Cables
All the fiber Gigabit Ethernet network adapters have two fiber optic
connectors for attaching the system to a compatible link partner, or an
IEEE 802.3z compliant gigabit switch. After connecting the system to the
network and power is supplied, the adapter performs auto-negotiation and
attempts to establish the connection at 1000 Mbps full-duplex only.
To connect a network cable to the adapter, perform the following
procedure:
1. Prepare a fiber optic cable according to the specifications in Table 3.
Table 3. 1000BASE-SX Fiber Optic Cable Specifications
AT-29xx Series Gigabit Ethernet Adapters Installation Guide
Port Type Connector Media
1000BASE-SX Fiber Optic 50 µm
multimode
1000BASE-SX Fiber Optic 62.5 µm
multimode
Warning
The fiber optic ports contain a Class 1 laser device. When the ports
are disconnected, always cover them with the provided plug.
Exposed ports may cause skin or eye damage.
2. Connect one end of the cable to the adapter.
3. Connect the other end of the cable to the appropriate Ethernet network
port or fiber optic port.
Note
After the cable is properly connected at both ends, the adapter port
LEDs should be functional. See Table 1 on page 19 for a description
of adapter port LED operation. For driver installation and
configuration instructions, refer to the software configuration for a
specific driver.
Maximum
Distance
550 meters
(1,804 feet)
275 meters
(853 feet)
The AT-2972T/2 has two copper connectors for attaching the system to a
compatible link partner. After you connect to the network and power is
supplied, the adapter performs auto-negotiation and attempts to establish
the connection at the appropriate speed and duplex mode.
29
Page 30

Installing the Hardware
Warranty Registration
Allied Telesis hardware products are covered under limited warranties.
Some products have a longer or more appropriate coverage the others.
The Allied Telesis gigabit Ethernet adapters have a limited warranty of
Lifetime.
All Allied Telesis warranties are subject to and provided only on the terms
and conditions set out in the Allied Telesis Limited Warranties listed on the
Allied Telesis website at http://alliedtelesis.com/support/warranty.
30
Page 31

Chapter 3
Installing Windows Server 2003 and Windows XP Driver Software
This chapter describes how to install the Windows Server 2003 and
Windows XP driver software. It contains the following sections:
“Installing the Driver Software” on page 32
“Modifying Configuration Properties” on page 41
“Uninstalling the Driver Software” on page 52
31
Page 32

Installing Windows Server 2003 and Windows XP Driver Software
Installing the Driver Software
When a Windows Server 2003 or Windows XP system first boots up after
installing a new Allied Telesis Gigabit Ethernet adapter, the system
automatically detects the new hardware and prompts you to install the
driver software for that device.
Note
The adapter must be physically installed in your system before
installing the driver software. See Chapter 2, “Installing the
Hardware” on page 21 for details.
Note
If the Windows Server 2003 or Windows XP system detects an
adapter and installs a default driver, update the driver as described
in “Updating the Adapter Software” on page 35.
Using the Driver
Installer
Note
If there is an onboard Broadcom network interface, the native
Broadcom driver may load. You can use this driver, or the latest
driver supplied by Allied Telesis.
To install the adapter software on a Windows Server 2003 or Windows XP
system, do the following:
Note
Before beginning this procedure, verify that the Windows Server
2003 or Windows XP system has been upgraded to the latest
version with the latest service pack applied.
Note
If you are installing in a standard Windows XP or Windows Server
2003 environment, use the driver in
installing in a Windows XP or Windows Server 2003 64-bit
environment, use the driver in \xp_w2k_w3k\x64.
When you boot up either system after installing the adapter card, a
series of Found New Hardware windows are displayed.
\xp_w2k_w3k\IA32. If you are
32
Note
You must have Administrator privileges to install the driver software.
Page 33

AT-29xx Series Gigabit Ethernet Adapters Installation Guide
Note
If you have a Windows XP system, the window in Figure 5 opens.
Start with step 1. If you have a Windows Server 2003 system, the
window in Figure 6 on page 34 opens. Start with step 2 on the same
page.
Figure 5. Welcome to the Found New Hardware Wizard Window
4. Click No, not this time to copy the driver software from the CD-ROM.
5. Click Next.
33
Page 34

Installing Windows Server 2003 and Windows XP Driver Software
The second Welcome to the Found New Hardware Wizard Window is
shown in Figure 6.
Figure 6. Found New Hardware Wizard Window
6. Insert the CD-ROM or floppy diskette.
7. Click Install the Software Automatically (Recommended).
8. Click Next.
9. If you are prompted to specify the location of the CD-ROM, click
Browse (do not use the text field) and locate the path.
10. When the software installation is complete, click Finish to close the
wizard and complete the software installation.
34
Page 35

AT-29xx Series Gigabit Ethernet Adapters Installation Guide
Updating the
Adapter Software
This section provides a procedure for updating the adapter software for the
Windows Server 2003 or Windows XP systems.
Note
You may need to reboot your system after completing the driver
update to properly load the new drivers.
When you update the adapter software on existing devices, the Advanced
Property settings may not be updated unless the existing device is
removed by following the instructions in “Uninstalling the Driver Software”
on page 52. Then you must perform a scan for hardware changes in the
device manager, followed by reinstalling the device with the current
adapter software as described in “Installing the Driver Software” on
page 32.
Note
Before uninstalling a device, capture all of the Advanced Property
settings because the properties will be lost.
Updating the Windows Server 2003 or Windows XP Driver Software
To update the adapter software on a Windows Server 2003 or a Windows
XP system, perform the following procedure.
Note
Update all adapters by repeating the following steps on each device.
1. Start either a Windows Server 2003 or a Windows XP system and log in.
You must have Administrator privileges to update the driver software.
2. On the desktop, right click My Computer.
The My Computer window opens.
3. Select Properties from the menu.
35
Page 36

Installing Windows Server 2003 and Windows XP Driver Software
The System Properties dialog box opens, as shown in Figure 7.
36
Figure 7. System Properties Dialog Box
4. Select the Hardware Tab.
The Hardware Tab is shown in Figure 8 on page 37.
Page 37

AT-29xx Series Gigabit Ethernet Adapters Installation Guide
Figure 8. Hardware Tab
5. Click Device Manager.
37
Page 38

Installing Windows Server 2003 and Windows XP Driver Software
The Device Manager Window is shown in Figure 9.
Figure 9. Device Manager Window
6. Insert the CD-ROM.
7. In the Device Manager window, click the + next to the Network
Adapters folder.
The selection expands to show the list of installed network adapter
cards.
8. Right click on the adapter whose driver you want to update and select
Update Driver.
38
Page 39

AT-29xx Series Gigabit Ethernet Adapters Installation Guide
The Hardware Update Wizard Window opens, as shown in Figure 10.
Figure 10. Welcome to Hardware Update Wizard Window
9. For a Windows Server 2003 system, skip to step 10. For a Windows
XP system, click No, not this time to copy the driver software from the
CD-ROM.
10. Click Next.
The Second New Found Hardware Wizard Window opens, as shown
in Figure 11.
Figure 11. Hardware Update Wizard Window
39
Page 40

Installing Windows Server 2003 and Windows XP Driver Software
11. Click Install the Software Automatically (Recommended).
12. Click Next.
13. If you are prompted to specify the location of the CD-ROM, click
Browse (do not use the text field) and locate the path.
After driver software installation is complete, you are ready to modify the
configuration properties. See “Modifying Configuration Properties” on
page 41.
40
Page 41

Modifying Configuration Properties
Although the default values should be appropriate in most cases, you can
change any of the available options to meet the requirements of your
specific system. After the adapter driver software has been installed, you
can use this procedure to verify or change the following adapter
properties:
“802.1p QOS” on page 41
“Checksum Offload” on page 43
“Ethernet@Wirespeed™ (AT-2972/T2 only)” on page 44
“Flow Control” on page 44
“Jumbo Mtu” on page 45
“Large Send Offload” on page 46
“Locally Administered Address” on page 47
“Speed/Duplex (AT-2972/T2 only)” on page 48
AT-29xx Series Gigabit Ethernet Adapters Installation Guide
“Wake Up Capabilities (AT-2972/T2 only)” on page 49
“WOL Speed (AT-2972/T2 only)” on page 50
Note
The following steps may be slightly different if the Classic Start
Menu is set.
802.1p QOS The 802.1p QOS property is a standard that enables Quality of Service
(QOS). It is responsible for the QOS provisions on the local segment, and
the avoidance of the “all packets are treated equally” issue, which falls
onto the hub or switch servicing segment. 802.1p QOS provides
prioritization of packets traversing a subnet. Thus, when the local segment
becomes congested and the hub or switch workload results in the delay
(dropping) of packets, those packets with flags that correspond to higher
priorities receive preferential treatment and are serviced before packets
with lower priorities.
To enable or disable the 802.1p QOS property, perform the following
procedure:
1. Start either a Windows Server 2003 or a Windows XP system and log in.
You must have Administrator privileges to update the driver software.
2. On the desktop, right click My Computer.
The My Computer window opens.
41
Page 42

Installing Windows Server 2003 and Windows XP Driver Software
3. Select Properties from the menu.
The System Properties dialog box opens, as shown in Figure 7 on
page 36.
4. Click the Advanced tab.
The Advanced tab is shown in Figure 12.
42
Figure 12. Advanced Tab
5. From the Properties list, select 802.1p QOS.
6. From the Values list, select one of the following:
Enable - Enables the 802.1p QOS property.
Disable - Disables the 802.1p QOS property. This is the default.
Note
Enabling 802.1p QOS also requires an 802.1p aware switch.
7. Click OK.
8. If prompted to restart your computer, click Yes.
Even though it is not necessary to reboot the system for new adapter
properties to take effect, rebooting is recommended to reinitialize all
registers.
Page 43

AT-29xx Series Gigabit Ethernet Adapters Installation Guide
9. Verify that the adapter port LEDs operate as described in “LEDs” on
page 19.
Checksum
Offload
Usually, the Checksum Offload function is computed by the protocol stack.
By selecting one of the Checksum Offload properties, the adapter can
compute the checksum.
To change the Checksum Offload setting, perform the following procedure:
1. Start either a Windows Server 2003 or a Windows XP system and log in.
You must have Administrator privileges to update the driver software.
2. On the desktop, right click My Computer.
The My Computer window opens.
3. Select Properties from the menu.
The System Properties dialog box opens, as shown in Figure 7 on
page 36.
4. Click the Advanced tab.
The Advanced tab is shown in Figure 12 on page 42.
5. From the Properties list, select Checksum Offload.
6. From the Values list, select one of the following:
None - Disables checksum offloading.
Rx TCP/IP Checksum - Enables receive TCP, IP, and UDP
checksum offloading.
Tx TCP/IP Checksum - Enables transmit TCP, IP, and UDP
checksum offloading.
Tx/Rx TCP/IP Checksum (default) - Enables transmit and receive
TCP, IP, and UDP checksum offloading.
7. Click OK.
8. If prompted to restart your computer, click Yes.
Even though it is not necessary to reboot the system for new adapter
properties to take effect, rebooting is recommended to reinitialize all
registers.
9. Verify that the adapter port LEDs operate as described in “LEDs” on
page 19.
43
Page 44

Installing Windows Server 2003 and Windows XP Driver Software
Ethernet@Wire-
speed
™
(AT-2972/T2
only)
The Ethernet@Wirespeed property enables a Gigabit Ethernet adapter to
establish a link at a lower speed when only two pairs of wires are available
in the cabling plant. By default, the Ethernet@Wirespeed property is
enabled.
To change the Ethernet@Wirespeed property, perform the following
procedure”
1. Start either a Windows Server 2003 or a Windows XP system and log in.
You must have Administrator privileges to update the driver software.
2. On the desktop, right click My Computer.
The My Computer window opens.
3. Select Properties from the menu.
The System Properties dialog box opens, as shown in Figure 7 on
page 36.
4. Click the Advanced tab.
The Advanced tab is shown in Figure 12 on page 42.
5. From the Properties list, select Ethernet@Wirespeed.
6. From the Values list, select one of the following:
Enable - Enables Ethernet@Wirespeed. This is the default.
Disable - Disables Ethernet@Wirespeed.
7. Click OK.
8. If prompted to restart your computer, click Yes.
Even though it is not necessary to reboot the system for new adapter
properties to take effect, rebooting is recommended to reinitialize all
registers.
9. Verify that the adapter port LEDs operate as described in “LEDs” on
page 19.
Flow Control The Flow Control property allows you to enable or disable the receipt or
transmission of PAUSE frames which enable the adapter and the switch to
control the transmit rate. The side that is receiving the PAUSE frame
momentarily stops transmitting. The recommended selection is Disable,
which configures the adapter to ignore PAUSE frames.
44
By default, the Flow Control property is disabled.
Page 45

AT-29xx Series Gigabit Ethernet Adapters Installation Guide
To change the Flow Control property, perform the following procedure:
1. Start either a Windows Server 2003 or a Windows XP system and log in.
You must have Administrator privileges to update the driver software.
2. On the desktop, right click My Computer.
The My Computer window opens.
3. Select Properties from the menu.
The System Properties dialog box opens, as shown in Figure 7 on
page 36.
4. Click the Advanced tab.
The Advanced tab is shown in Figure 12 on page 42.
5. From the Properties list, select Flow Control.
6. From the Values list, select one of the following:
Auto - (default) PAUSE frame receipt and transmission is
optimized.
Disable - PAUSE frame receipt and transmission is disabled
(recommended).
Rx PAUSE - PAUSE frame receipt is enabled.
Rx/Tx PAUSE - PAUSE frame receipt and transmission is
enabled.
Tx PAUSE - PAUSE frame transmission is enabled.
7. Click OK.
8. If prompted to restart your computer, click Yes.
Even though it is not necessary to reboot the system for new adapter
properties to take effect, rebooting is recommended to reinitialize all
registers.
9. Verify that the adapter port LEDs operate as described in “LEDs” on
page 19.
Jumbo Mtu The Jumbo Mtu property allows the adapter to transmit and receive
oversized Ethernet frames that are greater than 1,514 but less than 9,000
bytes in length. Note that this property requires a switch that is able to
process large frames.
By default, the Jumbo Mtu property is set to 1500 bytes.
45
Page 46

Installing Windows Server 2003 and Windows XP Driver Software
To increase the size of the received frames, perform the following
procedure:
1. Start either a Windows Server 2003 or a Windows XP system and log in.
You must have Administrator privileges to update the driver software.
2. On the desktop, right click My Computer.
The My Computer window opens.
3. Select Properties from the menu.
The System Properties dialog box opens, as shown in Figure 7 on
page 36.
4. Click the Advanced tab.
The Advanced tab is shown in Figure 12 on page 42.
Large Send
Offload
5. From the Properties list, select Flow Control.
6. From the Values list, increment the byte quantity in 500-byte
increments.
7. Click OK.
8. If prompted to restart your computer, click Yes.
Even though it is not necessary to reboot the system for new adapter
properties to take effect, rebooting is recommended to reinitialize all
registers.
9. Verify that the adapter port LEDs operate as described in “LEDs” on
page 19.
Normally, the protocol stack performs TCP segmentation. When you
enable the Large Send Offload property, the network adapter can do the
TCP segmentation.
To change the Large Send Offload property, perform the following
procedure:
1. Start either a Windows Server 2003 or a Windows XP system and log in.
46
You must have Administrator privileges to update the driver software.
2. On the desktop, right click My Computer.
The My Computer window opens.
Page 47

AT-29xx Series Gigabit Ethernet Adapters Installation Guide
3. Select Properties from the menu.
The System Properties dialog box opens, as shown in Figure 7 on
page 36.
4. Click the Advanced tab.
The Advanced tab is shown in Figure 12 on page 42.
5. From the Properties list, select Large Send Offload.
6. From the Values list, select one of the following:
Enable - Enables the Large Send Offload property.
Disable - Disables the Large Send Offload property. This is the
default.
7. Click OK.
8. If prompted to restart your computer, click Yes.
Locally
Administered
Address
Even though it is not necessary to reboot the system for new adapter
properties to take effect, rebooting is recommended to reinitialize all
registers.
9. Verify that the adapter port LEDs operate as described in “LEDs” on
page 19.
The Locally Administered Address is a user-defined address that is used
in place of the MAC address originally assigned to the adapter. Every
adapter in the network must have its own unique MAC address. This
locally administered address consists of a 12-digit hexadecimal number.
To change the Locally Administered Address property, perform the
following procedure:
1. Start either a Windows Server 2003 or a Windows XP system and log in.
You must have Administrator privileges to update the driver software.
2. On the desktop, right click My Computer.
The My Computer window opens.
3. Select Properties from the menu.
The System Properties dialog box opens, as shown in Figure 7 on
page 36.
4. Click the Advanced tab.
47
Page 48

Installing Windows Server 2003 and Windows XP Driver Software
The Advanced tab is shown in Figure 12 on page 42.
5. From the Properties list, select Locally Administered Address.
6. From the Values list, assign a unique node address for the adapter:
The range is 0000 0000 0001 to FFFF FFFF FFFD.
Do not use a multicast address (least significant bit of the high
byte = 1).
Do not use all 0's or all F's.
7. Click OK.
8. If prompted to restart your computer, click Yes.
Even though it is not necessary to reboot the system for new adapter
properties to take effect, rebooting is recommended to reinitialize all
registers.
9. Verify that the adapter port LEDs operate as described in “LEDs” on
page 19.
Speed/Duplex
(AT-2972/T2
only)
The Speed & Duplex property sets the connection speed and mode to that
of the network. Note that Full-Duplex mode allows the adapter to transmit
and receive network data simultaneously.
To select the speed and duplex, perform the following procedure:
1. Start either a Windows Server 2003 or a Windows XP system and log in.
You must have Administrator privileges to update the driver software.
2. On the desktop, right click My Computer.
The My Computer window opens.
3. Select Properties from the menu.
The System Properties dialog box opens, as shown in Figure 7 on
page 36.
4. Click the Advanced tab.
The Advanced tab is shown in Figure 12 on page 42.
48
5. From the Properties list, select Speed/Duplex.
6. From the Values list, select one of the following:
10 Mb Full. Sets the speed at 10 Mbit/s and the mode to Full-
Page 49

AT-29xx Series Gigabit Ethernet Adapters Installation Guide
Duplex.
10 Mb Half. Sets the speed at 10 Mbit/s and the mode to Half-
Duplex.
10 Mb Half and 100 Mb Half settings force the network adapter to
connect to the network in Half-Duplex mode. The network adapter
may not function if the network is not configured to operate at the
same mode.
100 Mb Full. Sets the speed at 100 Mbit/s and the mode to Full-
Duplex.
100 Mb Half. Sets the speed at 100 Mbit/s and the mode to Half-
Duplex.
10 Mb Full and 100 Mb Full settings force the network adapter to
connect to the network in Full-Duplex mode. The network adapter
may not function if the network is not configured to operate at the
same mode.
Auto (default). Sets the speed and mode for optimum network
connection (recommended). This setting allows the network
adapter to dynamically detect the line speed of the network.
Whenever the network capability changes, the network adapter
automatically adjusts to the new line speed and duplex mode. A
speed of 1 Gbit/s is enabled by selecting Auto, when that speed is
supported.
Wake Up
Capabilities
(AT-2972/T2
only)
7. Click OK.
8. If prompted to restart your computer, click Yes.
Even though it is not necessary to reboot the system for new adapter
properties to take effect, rebooting is recommended to reinitialize all
registers.
9. Verify that the adapter port LEDs operate as described in “LEDs” on
page 19.
The Wake Up Capabilities property enables the network adapter to wake
up from a low-power mode when it receives a network wake-up frame.
Two types of wake-up frames are possible: Magic Packet and Wake Up
Frame.
To specify the wake up capabilities, perform the following procedure:
1. Start either a Windows Server 2003 or a Windows XP system and log in.
You must have Administrator privileges to update the driver software.
2. On the desktop, right click My Computer.
49
Page 50

Installing Windows Server 2003 and Windows XP Driver Software
The My Computer window opens.
3. Select Properties from the menu.
The System Properties dialog box opens, as shown in Figure 7 on
page 36.
4. Click the Advanced tab.
The Advanced tab is shown in Figure 12 on page 42.
5. From the Properties list, select Wake Up Capabilities.
6. From the Values list, select one of the following:
Both (default). Selects both Magic Packet and Wake Up Frame as
wake-up frames.
Magic Packet. Selects Magic Packet as the wake-up frame.
None. Selects no wake-up frame.
Wake Up Frame. Selects Wake Up Frame as the wake-up frame
and allows the network adapter to wake the system when an event
such as a ping or an Address Resolution Protocol (ARP) request is
received.
WOL Speed
(AT-2972/T2
only)
7. Click OK.
8. If prompted to restart your computer, click Yes.
Even though it is not necessary to reboot the system for new adapter
properties to take effect, rebooting is recommended to reinitialize all
registers.
9. Verify that the adapter port LEDs operate as described in “LEDs” on
page 19.
WOL Speed. The WOL Speed property sets the speed at which the
network adapter connects to the network while the network adapter is in
Wake on LAN mode. By default, the WOL Speed property is set to Auto.
To specify the WOL speed, perform the following procedure:
1. Start either a Windows Server 2003 or a Windows XP system and log in.
You must have Administrator privileges to update the driver software.
2. On the desktop, right click My Computer.
50
The My Computer window opens.
3. Select Properties from the menu.
Page 51

AT-29xx Series Gigabit Ethernet Adapters Installation Guide
The System Properties dialog box opens, as shown in Figure 7 on
page 36.
4. Click the Advanced tab.
The Advanced tab is shown in Figure 12 on page 42.
5. From the Properties list, select WOL Speed.
6. From the Values list, select one of the following:
The options are:
10 Mb. Sets the speed to 10 Mbit/s. This is the network speed
when the system is in a standby mode awaiting a wake-up frame.
100 Mb. Sets the speed to 100 Mbit/s.
Auto (default). Sets the speed for optimum network connection.
7. Click OK.
8. If prompted to restart your computer, click Yes.
Even though it is not necessary to reboot the system for new adapter
properties to take effect, rebooting is recommended to reinitialize all
registers.
9. Verify that the adapter port LEDs operate as described in “LEDs” on
page 19.
51
Page 52

Installing Windows Server 2003 and Windows XP Driver Software
Uninstalling the Driver Software
Before physically removing an adapter from your system, first uninstall the
adapter driver software. For instructions on how to uninstall the driver
software, see the chapter that pertains to your platform.
Caution
Before uninstalling the Allied Telesis device, be sure to capture all
Advanced Property settings because the properties are lost during
the uninstall process.
To uninstall the adapter software from your system, perform the following
procedure:
1. Start Windows Server 2003 or Windows XP and log in.
Note
You must have Administrator privileges to remove the driver
software.
2. Choose from the following:
If you have a Windows Server 2003 Server system, click Start.
Then select the Control Panel from the menu. Double-click the
System icon.
If you have a Windows XP system, right click on My Computer
Then select Properties from the menu.
The System Properties dialog box opens, as shown in Figure 7 on
page 36.
3. Click the Hardware tab.
The Hardware Tab is shown in Figure 8 on page 37.
4. Click Device Manager.
The Device Manager Window is shown in Figure 9 on page 38.
5. In the Device Manager window, click the + next to the Network
Adapters folder.
The selection expands to show the list of installed network adapter
cards.
52
6. Right-click on the adapter to be removed and select Uninstall.
A Confirm Device Removal window opens.
Page 53

AT-29xx Series Gigabit Ethernet Adapters Installation Guide
7. Click OK to complete the uninstall.
Note
Not all driver files are removed as part of this procedure.
53
Page 54

Installing Windows Server 2003 and Windows XP Driver Software
54
Page 55

Chapter 4
Installing Windows 2000 Driver Software
This chapter provides procedures for installing the Windows 2000 Driver
software and contains the following sections:
“Installing the Windows 2000 Driver Software” on page 56
“Modifying Configuration Properties” on page 58
“Updating the Driver Software” on page 69
“Removing the Driver Software” on page 70
Note
The illustrations in this chapter show the driver installation using
Windows Server 2003. The Windows 2000 installation pages will
look somewhat different.
55
Page 56

Installing Windows 2000 Driver Software
Installing the Windows 2000 Driver Software
Note
The Allied Telesis adapter must be physically installed in your
system before installing the driver software. See Chapter 2,
“Installing the Hardware” on page 21 for details.
When the Windows 2000 system first boots up after installing a new
hardware device, such as an Allied Telesis adapter, the system
automatically detects the new hardware and prompts you to install the
driver software for that device.
If the system automatically loads an onboard Broadcom adapter driver.
You can use this driver, or the latest one supplied by Allied Telesis.
A network device driver must be installed before you can use the Allied
Telesis adapter with your Windows 2000 system.
Installing the
Adapter Software
When you update the adapter software on existing Allied Telesis devices,
the Advanced Property settings may not be updated unless you remove
the existing Allied Telesis device by following the instructions in
“Removing the Driver Software” on page 70. Then you must perform a
scan for hardware changes in the device manager and reinstall the Allied
Telesis device with the current adapter software as described in “Installing
the Windows 2000 Driver Software” on page 56.
To install the adapter software for Windows 2000, perform the following
procedure.
Note
Before beginning this procedure, verify that the Windows 2000
system has been upgraded to the latest version with the latest
service pack applied.
1. Start your Windows 2000 system and log in.
Note
You must have Administrator privileges to install the driver software.
56
When you boot up the Windows 2000 system after installing the
adapter card, a series of windows opens.
2. In the Install Hardware Device Drivers window, click Search for a
suitable driver for my device (recommended), then click Next.
Page 57

AT-29xx Series Gigabit Ethernet Adapters Installation Guide
3. In the Locate Driver Files window, select the applicable search location
check boxes, then click Next.
4. When prompted, insert the media to be searched into your CD-ROM
drive, type the path to the driver, and select OK.
For example, where "e" is the designation of the CD-ROM drive on
your system, enter:
e:
\xp_w2k_w3k
5. In the Driver Files Search Results window, verify that the correct path
to the driver software is shown, then click Next.
57
Page 58

Installing Windows 2000 Driver Software
Modifying Configuration Properties
Although the default values should be appropriate in most cases, you can
change any of the available options to meet the requirements of your
specific system. After the adapter driver software has been installed, you
can use this procedure to verify or change the following adapter
properties:
“802.1p QOS,” next
“Checksum Offload” on page 60
“Ethernet@Wirespeed™ (AT-2972/T2 only)” on page 61
“Flow Control” on page 61
“Jumbo Mtu” on page 62
“Large Send Offload” on page 63
“Locally Administered Address” on page 64
“Speed/Duplex (AT-2972/T2 only)” on page 65
“Wake Up Capabilities (AT-2972/T2 only)” on page 66
“WOL Speed (AT-2972/T2 only)” on page 67
802.1p QOS The 802.1p QOS property is a standard that enables Quality of Service
(QOS). It is responsible for the QOS provisions on the local segment, and
the avoidance of the "all packets are treated equally" issue, which falls
onto the hub or switch servicing segment. 802.1p QOS provides
prioritization of packets traversing a subnet. Thus, when the local segment
becomes congested and the hub or switch workload results in the delay
(dropping) of packets, those packets with flags that correspond to higher
priorities receive preferential treatment and are serviced before packets
with lower priorities.
To enable or disable the 802.1p QOS property, perform the following
procedure:
1. Start either a Windows Server 2003 system or a Windows XP system and log in.
You must have Administrator privileges to update the driver software.
2. On the desktop, right click My Computer.
58
The My Computer window opens.
3. Select Properties from the menu.
The System Properties dialog box opens, as shown in Figure 7 on
page 36.
Page 59

AT-29xx Series Gigabit Ethernet Adapters Installation Guide
4. Click the Advanced tab.
The Advanced tab is shown in Figure 13.
Figure 13. Advanced Tab
5. From the Properties list, select 802.1p QOS.
6. From the Values list, select one of the following:
Enable - Enables the 802.1p QOS property.
Disable - Disables the 802.1p QOS property. This is the default.
Note
Enabling 802.1p QOS also requires an 802.1p aware switch.
7. Click OK.
8. If prompted to restart your computer, click Yes.
59
Page 60

Installing Windows 2000 Driver Software
Even though it is not necessary to reboot the system for new adapter
properties to take effect, rebooting is recommended to reinitialize all
registers.
9. Verify that the adapter port LEDs operate as described in “LEDs” on
page 19.
Checksum
Offload
Usually, the Checksum Offload function is computed by the protocol stack.
By selecting one of the Checksum Offload properties, the adapter can
compute the checksum.
To change the Checksum Offload setting, perform the following
procedure:
1. Start either a Windows Server 2003 or a Windows XP system and log in.
You must have Administrator privileges to update the driver software.
2. On the desktop, right click My Computer.
The My Computer window opens.
3. Select Properties from the menu.
The System Properties dialog box opens, as shown in Figure 7 on
page 36.
4. Click the Advanced tab.
The Advanced tab is shown in Figure 13 on page 59.
60
5. From the Properties list, select Checksum Offload.
6. From the Values list, select one of the following:
None - Disables checksum offloading.
Rx TCP/IP Checksum - Enables receive TCP, IP, and UDP
checksum offloading.
Tx TCP/IP Checksum - Enables transmit TCP, IP, and UDP
checksum offloading.
Tx/Rx TCP/IP Checksum (default) - Enables transmit and receive
TCP, IP, and UDP checksum offloading.
7. Click OK.
8. If prompted to restart your computer, click Yes.
Even though it is not necessary to reboot the system for new adapter
properties to take effect, rebooting is recommended to reinitialize all
registers.
Page 61

AT-29xx Series Gigabit Ethernet Adapters Installation Guide
9. Verify that the adapter port LEDs operate as described in “LEDs” on
page 19.
Ethernet@Wire-
speed
™
(AT-2972/T2
only)
The Ethernet@Wirespeed property enables a Gigabit Ethernet adapter to
establish a link at a lower speed when only two pairs of wires are available
in the cabling plant. By default, the Ethernet@Wirespeed property is
enabled.
To change the Ethernet@Wirespeed property, perform the following
procedure”
1. Start either a Windows Server 2003 or a Windows XP system and log in.
You must have Administrator privileges to update the driver software.
2. On the desktop, right click My Computer.
The My Computer window opens.
3. Select Properties from the menu.
The System Properties dialog box opens, as shown in Figure 7 on
page 36.
4. Click the Advanced tab.
The Advanced tab is shown in Figure 13 on page 59.
5. From the Properties list, select Ethernet@Wirespeed.
6. From the Values list, select one of the following:
Enable - Enables Ethernet@Wirespeed. This is the default.
Disable - Disables Ethernet@Wirespeed.
7. Click OK.
8. If prompted to restart your computer, click Yes.
Even though it is not necessary to reboot the system for new adapter
properties to take effect, rebooting is recommended to reinitialize all
registers.
9. Verify that the adapter port LEDs operate as described in “LEDs” on
page 19.
Flow Control The Flow Control property allows you to enable or disable the receipt or
transmission of PAUSE frames which enable the adapter and the switch to
control the transmit rate. The side that is receiving the PAUSE frame
momentarily stops transmitting. The recommended selection is Disable,
61
Page 62

Installing Windows 2000 Driver Software
which configures the adapter to ignore PAUSE frames.
By default, the Flow Control property is disabled.
To change the Flow Control property, perform the following procedure:
1. Start either a Windows Server 2003 or a Windows XP system and log in.
You must have Administrator privileges to update the driver software.
2. On the desktop, right click My Computer.
The My Computer window opens.
3. Select Properties from the menu.
The System Properties dialog box opens, as shown in Figure 7 on
page 36.
4. Click the Advanced tab.
The Advanced tab is shown in Figure 13 on page 59.
5. From the Properties list, select Flow Control.
6. From the Values list, select one of the following:
Auto - (default) PAUSE frame receipt and transmission is
optimized.
Disable - PAUSE frame receipt and transmission is disabled
(recommended).
Rx PAUSE - PAUSE frame receipt is enabled.
Rx/Tx PAUSE - PAUSE frame receipt and transmission is
enabled.
Tx PAUSE - PAUSE frame transmission is enabled.
7. Click OK.
8. If prompted to restart your computer, click Yes.
Even though it is not necessary to reboot the system for new adapter
properties to take effect, rebooting is recommended to reinitialize all
registers.
62
9. Verify that the adapter port LEDs operate as described in “LEDs” on
page 19.
Jumbo Mtu The Jumbo Mtu property allows the adapter to transmit and receive
oversized Ethernet frames that are greater than 1,514 but less than 9,000
Page 63

AT-29xx Series Gigabit Ethernet Adapters Installation Guide
bytes in length. Note that this property requires a switch that is able to
process large frames.
By default, the Jumbo Mtu property is set to 1500 bytes.
To increase the size of the received frames, perform the following
procedure:
1. Start either a Windows Server 2003 or a Windows XP system and log in.
You must have Administrator privileges to update the driver software.
2. On the desktop, right click My Computer.
The My Computer window opens.
3. Select Properties from the menu.
The System Properties dialog box opens, as shown in Figure 7 on
page 36.
Large Send
Offload
4. Click the Advanced tab.
The Advanced tab is shown in Figure 13 on page 59.
5. From the Properties list, select Flow Control.
6. From the Values list, increment the byte quantity in 500-byte
increments.
7. Click OK.
8. If prompted to restart your computer, click Yes.
Even though it is not necessary to reboot the system for new adapter
properties to take effect, rebooting is recommended to reinitialize all
registers.
9. Verify that the adapter port LEDs operate as described in “LEDs” on
page 19.
Normally, the protocol stack performs TCP segmentation. When you
enable the Large Send Offload property, the network adapter can do the
TCP segmentation.
To change the Large Send Offload property, perform the following
procedure:
1. Start either a Windows Server 2003 or a Windows XP system and log in.
63
Page 64

Installing Windows 2000 Driver Software
You must have Administrator privileges to update the driver software.
2. On the desktop, right click My Computer.
The My Computer window opens.
3. Select Properties from the menu.
The System Properties dialog box opens, as shown in Figure 7 on
page 36.
4. Click the Advanced tab.
The Advanced tab is shown in Figure 13 on page 59.
5. From the Properties list, select Large Send Offload.
6. From the Values list, select one of the following:
Enable - Enables the Large Send Offload property.
Disable - Disables the Large Send Offload property. This is the
default.
Locally
Administered
Address
7. Click OK.
8. If prompted to restart your computer, click Yes.
Even though it is not necessary to reboot the system for new adapter
properties to take effect, rebooting is recommended to reinitialize all
registers.
9. Verify that the adapter port LEDs operate as described in “LEDs” on
page 19.
The Locally Administered Address is a user-defined address that is used
in place of the MAC address originally assigned to the adapter. Every
adapter in the network must have its own unique MAC address. This
locally administered address consists of a 12-digit hexadecimal number.
To change the Locally Administered Address property, perform the
following procedure:
1. Start either a Windows Server 2003 or a Windows XP system and log in.
You must have Administrator privileges to update the driver software.
64
2. On the desktop, right click My Computer.
The My Computer window opens.
3. Select Properties from the menu.
Page 65

AT-29xx Series Gigabit Ethernet Adapters Installation Guide
The System Properties dialog box opens, as shown in Figure 7 on
page 36.
4. Click the Advanced tab.
The Advanced tab is shown in Figure 13 on page 59.
5. From the Properties list, select Locally Administered Address.
6. From the Values list, select a unique node address for the adapter:
The range is 0000 0000 0001 to FFFF FFFF FFFD.
Do not use a multicast address (least significant bit of the high
byte = 1).
Do not use all 0's or all F's.
7. Click OK.
8. If prompted to restart your computer, click Yes.
Speed/Duplex
(AT-2972/T2
only)
Even though it is not necessary to reboot the system for new adapter
properties to take effect, rebooting is recommended to reinitialize all
registers.
9. Verify that the adapter port LEDs operate as described in “LEDs” on
page 19.
The Speed & Duplex property sets the connection speed and mode to that
of the network. Note that Full-Duplex mode allows the adapter to transmit
and receive network data simultaneously.
To select the speed and duplex, perform the following procedure:
1. Start either a Windows Server 2003 or a Windows XP system and log in.
You must have Administrator privileges to update the driver software.
2. On the desktop, right click My Computer.
The My Computer window opens.
3. Select Properties from the menu.
The System Properties dialog box opens, as shown in Figure 7 on
page 36.
4. Click the Advanced tab.
The Advanced tab is shown in Figure 13 on page 59.
65
Page 66

Installing Windows 2000 Driver Software
5. From the Properties list, select Speed/Duplex.
6. From the Values list, select one of the following:
10 Mb Full. Sets the speed at 10 Mbit/s and the mode to Full-
Duplex.
10 Mb Half. Sets the speed at 10 Mbit/s and the mode to Half-
Duplex.
10 Mb Half and 100 Mb Half settings force the network adapter to
connect to the network in Half-Duplex mode. The network adapter
may not function if the network is not configured to operate at the
same mode.
100 Mb Full. Sets the speed at 100 Mbit/s and the mode to Full-
Duplex.
100 Mb Half. Sets the speed at 100 Mbit/s and the mode to Half-
Duplex.
10 Mb Full and 100 Mb Full settings force the network adapter to
connect to the network in Full-Duplex mode. The network adapter
may not function if the network is not configured to operate at the
same mode.
Wake Up
Capabilities
(AT-2972/T2
only)
Auto (default). Sets the speed and mode for optimum network
connection (recommended). This setting allows the network
adapter to dynamically detect the line speed of the network.
Whenever the network capability changes, the network adapter
automatically adjusts to the new line speed and duplex mode. A
speed of 1 Gbit/s is enabled by selecting Auto, when that speed is
supported.
7. Click OK.
8. If prompted to restart your computer, click Yes.
Even though it is not necessary to reboot the system for new adapter
properties to take effect, rebooting is recommended to reinitialize all
registers.
9. Verify that the adapter port LEDs operate as described in “LEDs” on
page 19.
The Wake Up Capabilities property enables the network adapter to wake
up from a low-power mode when it receives a network wake-up frame.
Two types of wake-up frames are possible: Magic Packet and Wake Up
Frame.
To specify the wake up capabilities, perform the following procedure:
66
1. Start either a Windows Server 2003 or a Windows XP system and log in.
Page 67

AT-29xx Series Gigabit Ethernet Adapters Installation Guide
You must have Administrator privileges to update the driver software.
2. On the desktop, right click My Computer.
The My Computer window opens.
3. Select Properties from the menu.
The System Properties dialog box opens, as shown in Figure 7 on
page 36.
4. Click the Advanced tab.
The Advanced tab is shown in Figure 13 on page 59.
5. From the Properties list, select Wake Up Capabilities.
6. From the Values list, select one of the following:
Both (default). Selects both Magic Packet and Wake Up Frame as
wake-up frames.
WOL Speed
(AT-2972/T2
only)
Magic Packet. Selects Magic Packet as the wake-up frame.
None. Selects no wake-up frame.
Wake Up Frame. Selects Wake Up Frame as the wake-up frame
and allows the network adapter to wake the system when an event
such as a ping or an Address Resolution Protocol (ARP) request is
received.
7. Click OK.
8. If prompted to restart your computer, click Yes.
Even though it is not necessary to reboot the system for new adapter
properties to take effect, rebooting is recommended to reinitialize all
registers.
9. Verify that the adapter port LEDs operate as described in “LEDs” on
page 19.
WOL Speed. The WOL Speed property sets the speed at which the
network adapter connects to the network while the network adapter is in
Wake on LAN mode. By default, the WOL Speed property is set to Auto.
To specify the WOL speed, perform the following procedure:
1. Start either a Windows Server 2003 or a Windows XP system and log in.
You must have Administrator privileges to update the driver software.
2. On the desktop, right click My Computer.
67
Page 68

Installing Windows 2000 Driver Software
The My Computer window opens.
3. Select Properties from the menu.
The System Properties dialog box opens, as shown in Figure 7 on
page 36.
4. Click the Advanced tab.
The Advanced tab is shown in Figure 13 on page 59.
5. From the Properties list, select WOL Speed.
6. From the Values list, select one of the following:
The options are:
10 Mb. Sets the speed to 10 Mbit/s. This is the network speed
when the system is in a standby mode awaiting a wake-up frame.
100 Mb. Sets the speed to 100 Mbit/s.
Auto (default). Sets the speed for optimum network connection.
7. Click OK.
8. If prompted to restart your computer, click Yes.
Even though it is not necessary to reboot the system for new adapter
properties to take effect, rebooting is recommended to reinitialize all
registers.
9. Verify that the adapter port LEDs operate as described in “LEDs” on
page 19.
68
Page 69

Updating the Driver Software
To replace adapter driver software with newer versions as they become
available, perform the following procedure:
1. Start Windows 2000 and log in.
Note
You must have Administrator privileges to remove the driver
software.
2. Open the Control Panel and double-click the System icon.
The System Properties dialog box opens, as shown in Figure 7 on
page 36.
3. Click the Hardware tab.
AT-29xx Series Gigabit Ethernet Adapters Installation Guide
The Hardware Tab is shown in Figure 8 on page 37.
4. Click Device Manager.
The Device Manager Window is shown in Figure 9 on page 38.
5. In the Device Manager window, click the + next to the Network
Adapters folder.
The selection expands to show the list of installed network adapter
cards.
6. Click Update Driver.
The Update Device Driver Wizard opens.
7. Click Next.
The Install Hardware Device Driver dialog box opens.
8. Click Display a list of known drivers for this device so that I can
choose a specific driver, then click Next.
9. When prompted, click Have Disk and insert the media to be searched
into your CD-ROM drive, type the path to the driver, and select OK.
10. Select the appropriate driver to update, then click Next.
11. After the software update is complete, click Finish to close the wizard
and complete the driver update.
69
Page 70

Installing Windows 2000 Driver Software
Removing the Driver Software
To remove the network adapter driver software, perform the following
procedure:
Caution
Before uninstalling the Allied Telesis device, be sure to capture all
Advanced Property settings because the properties are lost during
the uninstall process.
Note
Before physically removing an adapter from your system, first
remove the adapter driver software.
1. Start Windows 2000 and log in.
Note
You must have System Administrator privileges to remove the driver
software.
2. Open the Control Panel and double-click the System icon.
The System Properties dialog box opens, as shown in Figure 7 on
page 36.
3. Click the Hardware tab.
The Hardware Tab is shown in Figure 8 on page 37.
4. Click Device Manager.
The Device Manager Window is shown in Figure 9 on page 38.
5. In the Device Manager window, click the + next to the Network
Adapters folder.
The selection expands to show the list of installed network adapter
cards.
6. Right-click on the adapter to be removed and select Uninstall.
70
A Confirm Device Removal window opens.
7. Click OK to complete the uninstall.
Page 71

AT-29xx Series Gigabit Ethernet Adapters Installation Guide
Note
Not all driver files are removed as part of this procedure.
71
Page 72

Installing Windows 2000 Driver Software
72
Page 73

Chapter 5
Installing the Linux Driver Software
This chapter describes the Linux driver for the AT-29xx Series Gigabit
Ethernet network adapters and includes the following sections:
“Installing the Linux Driver Software” on page 74
“Network Installation” on page 76
“Removing the Linux Driver from a TAR Installation” on page 77
“Module Parameters” on page 78
73
Page 74

Installing the Linux Driver Software
Installing the Linux Driver Software
The section describes the following Linux driver installations:
“Building a Driver from a TAR File” on page 74
“Removing the tg3 Driver” on page 74
Note
On some newer Distributions and Kernels, it may be necessary to
remove the tg3 driver before loading the tg3 driver supplied on the
CD. Follow the instructions in the “Removing the tg3 Driver” on
page 74.
Building a Driver
from a TAR File
To build a driver from a TAR file, perform the following procedure.
1. Create a directory and extract the TAR files:
tar xvzf tg3-<version>.tgz
2. Build the driver tg3.o as a loadable module for the running kernel:
cd tg3make
<version>
/src
3. Test the driver by loading it:
insmod tg3.o
4. Install the driver and man page:
make install
5. To configure network protocol and address, refer to the manuals
supplied with your operating system.
Removing the tg3 Driver
Many various Linux distributions may load the native tg3 driver by default
for the Allied Telesis Gigabit Ethernet adapters. It may be necessary to
unload the native tg3 driver first, before installing the tg3.o driver from this
installation.
74
Note
On some Distributions and Kernels, it may be necessary to remove
the native tg3 driver before loading the Allied Telesis tg3.o driver.
Even though tg3 is a fully functioning driver, Allied Telesis recommends
Page 75

AT-29xx Series Gigabit Ethernet Adapters Installation Guide
that you use the newer tg3 driver provided by Allied Telesis. Use ifconfig to
bring down all eth# interfaces used by tg3 and enter the following
command to unload the tg3 driver.
rmmod tg3
For more detailed Linux specific information on ifconfig, rmmod, or
modules.conf, refer to the respective man pages.
75
Page 76

Installing the Linux Driver Software
Network Installation
For network installations through NFS, FTP, or HTTP (using a network
boot disk or PXE), a driver diskette that contains the tg3 driver may be
needed. The driver diskette images for the most recent Red Hat versions
are included. Boot drivers for other Linux versions can be compiled by
modifying the Makefile and the make environment. Further information is
available from Red Hat's website, http://www.redhat.com
To create the driver diskette, select the appropriate image file and do the
following:
.
dd if=dd.img of=/dev/fd0H1440.
76
Page 77

AT-29xx Series Gigabit Ethernet Adapters Installation Guide
Removing the Linux Driver from a TAR Installation
If the driver was installed using make install from the tar file, you must
manually delete the tg3.o driver.
77
Page 78

Installing the Linux Driver Software
Module Parameters
Optional parameters for the driver can be supplied as command line
arguments to the insmod command. Typically, these parameters are set in
the file /etc/modules.conf (see the man page for modules.conf). These
parameters take the following form:
<parameter>
=value[,value,...]
where the multiple values for the same parameter are for multiple Allied
Telesis Gigabit Ethernet adapters installed in the system.
Note
The default or other meaningful values are used when invalid values
are selected. Some combinations of parameter values may conflict
and lead to failures. The driver cannot detect all such conflicting
combinations.
The module parameters are listed below:
line_speed
Selects the line speed of the link. This parameter is used together with
full_duplex and auto_speed to select the speed and duplex operation
of the link and the setting of Auto-Negotiation. Choose from the
following selections.
0 - Autonegotiate for highest speed supported by link partner
(default)
10 - 10 Mbps
78
100 - 100 Mbps
1000 - 1000 Mbps
If line_speed is set to 10, 100, or 1000 and the auto_speed is set to 1,
the NIC autonegotiates for the selected speed (and selected duplex
mode). If auto_speed is set to 0, the selected speed and duplex mode
are set without Auto-Negotiation. Note that 1000 Mbps must be
negotiated for copper twisted pair links.
auto_speed
Enables or disables Auto-Negotiation. Choose from the following
selections.
0 - Auto-Negotiation disabled
1 - Auto-Negotiation enabled (default)
Page 79

AT-29xx Series Gigabit Ethernet Adapters Installation Guide
Note
This parameter is ignored and assumed to be 1 if the line_speed
parameter is set to 0.
full_duplex
This parameter is used together with line_speed to select the speed
and duplex mode of the link. Note that this parameter is ignored if
line_speed is 0. Choose from the following selections.
0 - half duplex
1 - full duplex (default)
rx_flow_control
Enables or disables receiving flow control (pause) frames. This
parameter is used together with auto_flow_control. Choose from the
following selections.
0 - pause receive disabled
1 - pause receive enabled if auto_flow_control is set to 0, or pause
receive advertised if auto_flow_control is set to 1 (default)
tx_flow_control
Enables or disables transmitting flow control (pause) frames. This
parameter is used together with auto_flow_control. Choose from the
following selections.
0 - pause transmit disabled
1 - pause transmit enabled if auto_flow_control is set to 0, or pause
transmit advertised if auto_flow_control is set to 1 (default)
auto_flow_control
Enables or disables Auto-Negotiation of flow control. This parameter is
used together with rx_flow_control and tx_flow_control to determine
the advertised flow control capability. Choose from the following
selections.
0 - flow control Auto-Negotiation disabled
1 - flow control Auto-Negotiation enabled with capability specified
in rx_flow_control and tx_flow_control (only valid if line_speed is
set to 0 or auto_speed is set to 1) (default)
mtu
Enables jumbo frames up to the specified MTU size. The valid range
for this parameter is 1500 to 9000. The default is 1500 which is the
standard Ethernet (non-jumbo) MTU size. Note that the MTU size
excludes the Ethernet header size of 14 bytes. Actual frame size is
MTU size + 14 bytes.
79
Page 80

Installing the Linux Driver Software
The MTU size can also be changed using ifconfig after the driver is
loaded. See the ifconfig man page for details.
tx_checksum
Enables or disables hardware transmit TCP/UDP checksum. Choose
from the following selections.
0 - checksum disabled
1 - checksum enabled (default)
rx_checksum
Enables or disables hardware receive TCP/UDP checksum validation.
Choose from the following selections.
0 - checksum disabled
1 - checksum enabled (default)
scatter_gather
Enables or disables scatter-gather and 64-bit DMA on x86. This option
is only useful when running on TUX-enabled kernels or kernels with
zero-copy TCP. Choose from the following selections.
0 - scatter-gather and 64-bit DMA on x86 disabled
1 - scatter-gather and 64-bit DMA on x86 enabled (default)
tx_pkt_desc_cnt
Configures the number of transmit descriptors. Default is 100. The
valid range is from 1 to 600. Depending on kernel and system
architecture, the driver may require up to 268 bytes per descriptor.
Note that the driver may not be able to allocate the required amount of
memory if this parameter is set too high. This parameter should not be
set less than 80 if adaptive_coalesce (see below) is enabled.
rx_std_desc_cnt
Configures the number of receive descriptors for frames up to 1528
bytes. Default is 200. The valid range is from 1 to 511. This parameter
should not be set less than 80 on systems with high network traffic.
Setting this parameter higher allows the NIC to buffer larger bursts of
network traffic without dropping frames, especially on slower systems.
Note that the driver may not be able to allocate the required amount of
memory if this parameter is set too high. This parameter should not be
set less than 50 if adaptive_coalesce (see below) is enabled.
80
Page 81

AT-29xx Series Gigabit Ethernet Adapters Installation Guide
rx_jumbo_desc_cnt
Configures the number of receive descriptors for jumbo frames larger
than 1528 bytes. The default is 128 and the valid range is from 1 to
255. When jumbo frames larger than 1528 bytes are used, this
parameter should not be set lower than 60 on systems with high
network traffic. Setting this parameter higher allows the NIC to buffer
larger bursts of jumbo traffic without dropping frames, especially on
slower systems. Depending on kernel and system architecture, the
driver may require up to 268 bytes per descriptor. Note that each
descriptor also requires a buffer the size of a maximum jumbo frame.
On systems with insufficient memory, it may be necessary to reduce
this parameter. This parameter should not be set to less than 50 if
adaptive_coalesce (see below) is enabled. When the maximum frame
size is less than 1528 (MTU size less than 1514), this parameter is not
used and is always 0.
adaptive_coalesce
Enables or disables adaptive adjustments to the various interrupt
coalescing parameters. Enabling it allows the driver to dynamically
adjust the interrupt coalescing parameters to achieve high throughput
during heavy traffic and low latency during light traffic.
rx_std_desc_cnt, (and rx_jumbo_desc_cnt if using jumbo frames)
should not be set less than 50, and tx_pkt_desc_cnt should not be set
less than 80 when this parameter is enabled. Choose from the
following selections.
0 - disabled
1 - enabled (default)
rx_coalesce_ticks
Configures the number of 1 usec ticks before the NIC generates
receive interrupt after receiving a frame. This parameter works in
conjunction with the rx_max_coalesce_frames parameter. Interrupt will
be generated when either of these thresholds is exceeded. A value of
0 means this parameter is ignored and an interrupt is generated when
the rx_max_coalesce_frames threshold is reached. The valid range is
from 0 to 500 and default is 80. This parameter is not used and is
adjusted automatically if adaptive_coalesce is set to 1.
rx_max_coalesce_frames
Configures the number of received frames before the NIC generates
receive interrupt. The valid range is from 0 to 100 and the default is 15.
This parameter and rx_coalesce_ticks cannot both have a value of 0. If
both parameters are set to 0, no receive interrupts are generated. It
should also be set significantly lower than rx_std_desc_cnt (and
rx_jumbo_desc_cnt if using jumbo frames). This parameter is not used
and is adjusted automatically if adaptive_coalesce is set to 1.
81
Page 82

Installing the Linux Driver Software
tx_coalesce_ticks
Configures the number of 1 usec ticks before the NIC generates
transmit interrupt after transmitting a frame. This parameter works in
conjunction with the tx_max_coalesce_frames parameter. Interrupt is
generated when either of these thresholds is exceeded. A value of 0
means this parameter is ignored and an interrupt is generated when
the tx_max_coalesce_frames threshold is reached. The valid range is
from 0 to 500 and the default is 400. This parameter is not used and is
adjusted automatically if adaptive_coalesce is set to 1.
tx_max_coalesce_frames
Configures the number of transmitted frames before the NIC
generates transmit interrupt. The valid range is from 0 to 100 and the
default is 40. This parameter and tx_coalesce_ticks cannot both have
a value of 0. If both parameters have a value of 0, no transmit
completion interrupt is generated. This parameter should always be
set lower than tx_pkt_desc_cnt. This parameter is not used and is
adjusted automatically if adaptive_coalesce is set to 1.
stats_coalesce_ticks
Configures the number of 1 usec ticks between periodic statistics block
DMAs. The valid range is from 0 to 3600000000, and the default is
1000000 (1 sec.). Set this parameter to a value of 0 to disable
statistics updates. This parameter is not used and is set to default if
rx_adaptive_coalesce is set to 1.
enable_wol
Enables or disables magic packet Wake-On-LAN when the system is
shutdown. Note that not all systems support Wake-On-LAN. Choose
from the following selections.
0 magic packet Wake-On-LAN disabled (default)
1 magic packet Wake-On-LAN enabled
enable_tso
Enables or disables TCP Segmentation Option (TSO) when using
kernels that support it. Choose from the following selections.
TSO disabled (default)
TSO enabled
82
Page 83

Chapter 6
Installing the NetWare Driver Software
This chapter provides procedures for installing the NetWare driver
software and contains the following sections:
“Driver Installation” on page 84
“Pre-Installation Requirements” on page 85
“Installing Novell NetWare Server 5.x or 6.0 Driver Software” on
page 86
“Verifying or Modifying Adapter Parameters” on page 88
“Removing Drivers from Autoexec.ncf” on page 93
83
Page 84

Installing the NetWare Driver Software
Driver Installation
This chapter describes how to perform the following tasks:
Verify that the required OS support files are installed on the server and
the NetWare pre-installation parameters are set correctly.
Install the driver software in the Novell NetWare environment.
If necessary, reconfigure the driver software after installation.
For an adapter installation with an existing NetWare server, NetWare
automatically detects the new adapter and attempts to load the
appropriate driver. Ensure that your Allied Telesis CD-ROM is loaded
and select the appropriate driver for your Allied Telesis Gigabit
Ethernet adapter.
A commonly used method to install a driver on a NetWare server running
5.x or 6.0 and higher is through NWCONFIG.
84
Page 85

Pre-Installation Requirements
A network device driver must be installed before the AT-29xx Series
Gigabit Ethernet network adapters can be used with your Novell NetWare
system.
Before you can successfully install the adapter driver for Novell NetWare,
the adapter card must be physically installed in the server and, typically,
the NetWare OS software must already be running on the server. Make
sure that your server meets the hardware and operating system software
requirements described Chapter 2, “Installing the Hardware” on page 21.
To enable the Allied Telesis AT-29xx Series Gigabit Ethernet network
adapters to function correctly, you need to install the latest Novell NetWare
support pack files. The NetWare support pack or patch file(s) needed for
the operating system running on your server are indicated in Table 4.
AT-29xx Series Gigabit Ethernet Adapters Installation Guide
Table 4. NetWare Support Files
NetWare OS Support Pack or Patch Files to be Installed
NetWare 5.1 Latest NetWare 5.1
Support Pack
NetWare 6.0 Latest NetWare 6.0
Support Pack
Note
If you are installing NetWare 5.x or 6.0 for the first time on a system,
the process to install the adapter driver occurs during the OS
installation procedure. Install the NetWare 5 support pack after you
have successfully installed the operating system on the server.
To obtain the latest support pack files, go to the Novell support website
and click on the Minimum Patch List option in the navigation bar. Scroll
down the page and, using Table 4 above as a guide, select and download
the latest support pack or patch file(s) for the operating system running on
your server.
The latest support
pack can be found at
http://
support.novell.com/
patlst.htm
85
Page 86

Installing the NetWare Driver Software
Installing Novell NetWare Server 5.x or 6.0 Driver Software
Ensure that the server has the latest support pack available installed. The
latest support packs can be found at: http://support.novell.com/misc/
patlst.htm.
You may want to create an archive disk by copying all the files from the
CDROM\Driver\Netware directory onto a floppy disk. If you use the CDROM directly, be sure that the CDROM.NLM is loaded and that you are
aware of the NetWare Volume name for the CD-ROM that you just
installed.
To install the Novell NetWare Server 5.x or 6.0 driver software, perform
the following procedure:
1. From the NetWare Server console, type LOAD NWCONFIG (or just NWCONFIG) and press Enter.
2. From the Configuration Options screen, select Driver options and
press Enter.
3. Select the Configure network drivers option and press Enter.
4. Choose the Load an additional driver option and press Enter.
5. Insert the CD-ROM and select the Install an unlisted driver option,
by pressing Insert.
6. If you are using the archive disk that you created, insert the disk into
drive A: and press Enter. If you have the CD-ROM mounted as a
NetWare volume, go to step 7.
7. If you have the CD-ROM mounted as a NetWare volume, press F3
and enter <Volume Name>: Driver\Netware as the source path.
Where <Volume Name> is the name of the NetWare Volume for the
CD-ROM and Netware\Driver is the directory of the specific files on the
CD-ROM needed for this installation.
The name of the driver is displayed.
8. Press Enter to select the highlighted driver.
A copy the driver prompt appears.
86
9. Select Yes and press Enter.
10. Select Yes and press Enter to copy the .LDI file. This is the installation
script for the driver.
11. Follow the instructions for the installation.
Page 87

AT-29xx Series Gigabit Ethernet Adapters Installation Guide
12. Select Save parameters and load driver to continue.
13. Choose Exit to return to the server console prompt.
Note
If you are performing an initial installation of NetWare 5.x or 6.0 and
have more than two adapters installed, the install program allows
you to allocate the actual number of packet receive buffers needed
by the adapter. During installation, make sure the RxBuffers value is
set to 32 which is the minimum number of buffers the driver requires
for each adapter. While this setting affects adapter performance, it
allows installation of the operating system and up to eight adapters
during the initial installation. After installation is complete, increase
the number of buffers allocated to the driver as described in
“Verifying or Modifying Adapter Parameters” on page 88.
14. 5.x or 6.05.x or 6.0 NetWare 5.x or 6.0 has been successfully installed,
set the minimum packet receive buffers parameter in the startup.ncf
file to 1500 for each adapter in the system.
Set the maximum packet receive buffers to three times the minimum
packet receive buffers. Typically 4 MB of RAM is required per 1000
receive buffers. For more information, see “Verifying or Modifying
Adapter Parameters” on page 88.
15. In the autoexec.ncf file, delete the packet receive buffers parameter
(RxBuffers=32) in the load statement for this adapter. Deleting the
receive buffers phrase from the load statement resets the receive
buffers parameter to the default value of 200 for this adapter.
Note
The server needs to be restarted for the new configuration.
Example: The default maximum number of receive buffers for the system
is 500; the default minimum is 128. Edit the startup.ncf file to have the
following entries. The actual numbers will be a function of the number of
ports in the system. The following is an example for a system with 8 ports
installed:
set maximum packet receive buffers = 36000
set minimum packet receive buffers = 12000
87
Page 88

Installing the NetWare Driver Software
Verifying or Modifying Adapter Parameters
When an adapter configuration is saved, the NetWare install program
adds load and bind statements to the autoexec.ncf file. By accessing this
file, you can verify the parameters configured for each adapter, modify
them, or enter additional parameters.
Note
The Novell monitor program and the config command are also
useful for verifying driver configuration. For information on how to
use these programs, see the Utilities Reference in your Novell
NetWare online documentation.
The parameters that can be defined in the load statements are described
below:
Configuration Parameters for B57.LAN driver:
TxDescriptors=
This is to initialize Descriptor resources on the adapter
for transmits.
Min = 100
Max = 512
Default = 120
RxBuffers=
This is to pre-allocate receive ECBs & Receive adapter
resources. This setting may be affected by the NetWare
server maximum/minimum packet receive buffer settings.
Min = 32
Max = 1000
Default = 200
RxTicks=
This is to enable the use of batching receives within a
specific time period.
Min = 0, disabled
Max = 5000000, 5 seconds
Units are in micro seconds
Default value is 300
TxTicks=
This is to enable the use of a transmit "tick" threshold
interrupt within a specific time period.
Min = 0, disabled
Max = 5000000, 5 seconds
Units are in micro seconds
Default is 200
88
Page 89

AT-29xx Series Gigabit Ethernet Adapters Installation Guide
TxPacketsPer=
This is to enable the use of allowing an interrupt to
occur after a specific amount of packets are transmitted.
Min = 0, disabled
Max = 100
Default is 20
RxPacketsPer=
This is to enable the use of allowing an interrupt to
occur after a specific amount of packets are received.
Min = 0, disabled
Max = 100
Default is 75
CheckSum=
This is to enable or disable the transmit & receive
checksum off loading feature.The checksum off loading
support is only for TCP/IP packets, for that reason it is
defaulted to OFF.
Choices are:
OFF, ON, TX, RX
Default value is OFF
TxFlow=
This keyword allows enabling/disabling of TxFlow control.
Choices are:
ON, OFF
Default value is OFF.
RxFlow=
This keyword allows enabling/disabling of RxFlow control.
Choices are:
ON, OFF
Default value is OFF.
PDriver=
Allows for the driver to operate in persistent driver
mode. Only use if adapter is placed in a Hot Plug PCI
slot and only if required to swap with an exact same
board.
Choices are:
OFF, ON
Default value is OFF.
NODE=
This is a Novell NetWare keyword.
This keyword will allow an input Ethernet node address to
replace the adapter factory programmed Ethernet node
address until a subsequent reboot.
Choices are:
NODE=nnnnnnnnnnnn
89
Page 90

Installing the NetWare Driver Software
FRAME=
This is a Novell NetWare keyword.
String specifying the frame type.
Choices are:
ETHERNET_II
ETHERNET_802.3
ETHERNET_802.2
ETHERNET_SNAP
Default value is ETHERNET_802.2
SLOT=
This is a Novell NetWare keyword.
System-wide unique Hardware Instance Number (HIN) that
may be the physical slot number on a slot based bus such
as PCI.
SLOT=n
Jumbo=
Keyword to enable Jumbo frame support. When enabled,
jumbo packets of up to 9000 bytes are supported.
Choices are:
Jumbo=1536-9100
Default is no jumbo packets
Note
Jumbo frames are only supported on NetWare 6.0 and above. Plus
the first frame loaded must be ETHERNET_II
Note
Jumbo frame support must have the following text in the Startup.ncf
file: "Set maximum physical receive packet size = 18000".
P3=
This keyword is used when running perform3.exe tests and
may increase performance on networks running with many
ipx clients.
Set P3=1, when running the perform3 test back to back to
a single client.
Set P3=2, when running the perform3 test with many
clients.
Default: P3=0.
Spuriousfix=
When this keyword is set to 1 (spurious fix is on), the
spurious interrupts count that is sometimes displayed on
the NetWare console monitor, may be reduced. By setting
this keyword to 0 (spurious fix is OFF), performance of
the driver may be enhanced.
90
Page 91

AT-29xx Series Gigabit Ethernet Adapters Installation Guide
The Default is spurious fix = 1 (spurious fix is on).
Choices are:
Spuriousfix=0
Spuriousfix=1 (default).
Poll=
To disable interrupt driven mode in the driver set Poll=1
and the driver will not use interrupts, but will be
polled by the NetWare OS. This is a common feature
supported in NW. The poll mode may increase driver
performance in some environments.
Choices are:
Poll=1 (ON)
Poll=0 (OFF) (default).
WireSpeed=
This feature provides adapter link & data integrity even
when attached to a questionable cable and/or switch.
For example; an adapter trying to run 1000 speed on a
cat3 cable ordinarily would not link. With the
WireSpeed=1, the link will occur at 100Mbs.
Choices are:
WireSpeed=1 (ON) (Default)
WireSpeed=0 (OFF).
Model=
This keyword is to allow the addition of a sub-system ID
of a specific NIC so that the driver loads only on the
first NIC found with a matching sub-system ID.
e.g., MODEl= 0x14e4
Default = 0
MagicP=
When the MagicP=1 the driver will enable the adapter to
wake up the system when a magic packet is received after
the system is shutdown. MagicP=0 is the default setting
with the adapter having no wake up ability.
Choices are:
MagicP=0 (default)
MagicP=1
Fiber=
The driver has support for the 1000FD fiber adapter. The
fiber autonegotiates link with a fiber switch even though
it only supports 1000FD. In some cases the user may want
to force the adapter to 1000FD.
Choices are:
Fiber=AUTO (default)
Fiber=FORCE
91
Page 92

Installing the NetWare Driver Software
Note
If you modify any adapter parameters, you must reboot the system
before the changes take effect. If you make changes and do not
reboot, you may experience configuration problems.
A valid autoexec.ncf file is shown below. One set of load and bind
commands (in bold) is added for each frame type the adapter is
configured to support.
Set Time Zone = PST8PDT
set Daylight Savings Time Offset = 1
set Start Of Daylight Savings Time = (APRIL SUNDAY FIRST
2:00:00 AM)
set End Of Daylight Savings Time = (OCTOBER SUNDAY LAST
2:00:00 AM)
set Default Time Server Type = SINGLE
set Bindery Context = O=LAN
# WARNING!!
file server name NOVELLSERVER51
# WARNING!!
# If you change the name of this server, you must update
# all the licenses that are assigned to this server.
# Using NWAdmin, double-click on a license object and
# click on the Certificate Assignments button. If the
# old name of this server appears, you must delete it and
# then add the new server name. Do this for all license
# objects.
ServerID 1C8EE2C
LOAD ODINEB.NLM
LOAD TCPIP
LOAD B57 SLOT=2 FRAME=Ethernet_802.2 NAME=B57_1_E82
BIND IPX B57_1_E82 NET=FAFD3D25
LOAD B57 SLOT=2 FRAME=Ethernet_802.3 NAME=B57_1_E83
BIND IPX B57_1_E83 NET=5A2D8D6D
LOAD B57 SLOT=2 FRAME=Ethernet_SNAP NAME=B57_1_ESP
BIND IPX B57_1_ESP NET=477A35BD
LOAD B57 SLOT=2 FRAME=Ethernet_II NAME=B57_1_EII
BIND IPX B57_1_EII NET=C3C8F2E4
BIND IP B57_1_EII ADDR=172.16.1.1 MASK=ff.ff.ff.0
mount all
SEARCH ADD SYS:\JAVA\BIN
SEARCH ADD SYS:\JAVA\NWGFX
92
Page 93

Removing Drivers from Autoexec.ncf
To remove the drivers from the Autoexec.ncf, locate the Load and Bind
command lines associated with the Broadcom driver and remark them out
by inserting the # symbol at the beginning of each command line, or by
deleting the statement.
Example:
# LOAD B57 SLOT=2 FRAME=Ethernet_802.2 NAME=B57_1_E82
# BIND IPX B57_1_E82 NET=FAFD3D25
# LOAD B57 SLOT=2 FRAME=Ethernet_802.3 NAME=B57_1_E83
# BIND IPX B57_1_E83 NET=5A2D8D6D
# LOAD B57 SLOT=2 FRAME=Ethernet_SNAP NAME=B57_1_ESP
# BIND IPX B57_1_ESP NET=477A35BD
# LOAD B57 SLOT=2 FRAME=Ethernet_II NAME=B57_1_EII
# BIND IPX B57_1_EII NET=C3C8F2E4
# BIND IP B57_1_EII ADDR=172.16.1.1 MASK=ff.ff.ff.0
AT-29xx Series Gigabit Ethernet Adapters Installation Guide
Note
If you modify the Autoexec.ncf, you must reboot the system before
the changes take effect.
93
Page 94

Installing the NetWare Driver Software
94
Page 95

Chapter 7
Installing the Boot Agent Driver Software
This chapter provides procedures for installing the Allied Telesis boot
agent driver software. It contains the following sections:
“Overview” on page 96
“Server Setup” on page 97
95
Page 96

Installing the Boot Agent Driver Software
Overview
Setup BIOS To boot from the network with PXE, make PXE the first bootable device
The Allied Telesis AT-29xx Series Gigabit Ethernet network adapters
provide PXE (Preboot Execution Environment) support.
PXE is enabled by default. To enable or disable PXE, refer to the
b57udiag.pdf document located in the diagnostics directory.
under BIOS. This procedure depends on server BIOS implementation.
Please refer to the server's user manual.
96
Page 97

AT-29xx Series Gigabit Ethernet Adapters Installation Guide
Server Setup
This section discusses how to set up a server on a Windows 2000,
Windows Server 2003, Windows XP, DOS UNDI/APITEST, and Red Hat
Linux systems.
Windows 2000 The current version of Windows 2000 does not include a network driver for
the Allied Telesis AT-29xx Series Gigabit Ethernet network adapters. To
do remote installation with PXE, include a network driver for the adapter as
a part of the client's installation image on the server. Please refer to
Microsoft Article ID Q246184 - "How to Add Third-Party OEM Network
Adapters to RIS Installations." An example of this RIS installation to modify
your inf file, refer to the troubleshooting section under Software Problems
and Solutions.
Also, verify that you have the latest Windows 2000 service pack installed
on your system.
Note
For Windows 2000, if service pack 3 is installed, no modification to
the inf file is necessary.
Windows Server
2003 and
Windows XP
DOS UNDI/
APITEST
The current version of Windows Server 2003 does not include network
drivers for the Allied Telesis Gigabit Ethernet adapters. To do remote
installation with PXE, include a network driver for the adapter as a part of
the client's installation image on the server. Please refer to Microsoft
Article ID Q246184 - "How to Add Third-Party OEM Network Adapters to
RIS Installations." An example of this RIS installation to modify your inf file,
refer to the troubleshooting section under Software Problems and
Solutions.
To boot in DOS and connect to a network for the DOS environment,
download the Intel® PXE PDK from the Intel Web site. This PXE PDK
comes with a TFTP/ProxyDHCP/Boot server. The PXE PDK can be
downloaded from Intel at http://developer.intel.com/ial/WfM/tools/pxe/
index.htm.
Red Hat Linux Red Hat Linux 7.3 (or higher) distribution has PXE server support. It allows
you to do a complete Linux installation over the network. Distribution also
comes with boot images - boot kernel (vmlinuz) and initial ram disk (initrd).
The following images can be found on the CD-ROM disk#1:
/images/pxeboot/vmlinuz
/images/pxeboot/initrd.img
Refer to Red Hat documentation for how to install PXE server on Linux.
97
Page 98

Installing the Boot Agent Driver Software
In this version, it prompts you to insert a driver disk for drivers that are not
part of the standard distribution. You can create a driver disk for the
adapter from the image distributed on the Allied Telesis CD-ROM.
A remote boot does not require a standard Linux network driver for the
adapter. After the PXE client downloads the Linux kernel and initial ram
disk, the Linux universal driver that came with the Linux distribution binds
with the UNDI code of the PXE to form a Linux network driver.
98
Page 99

Chapter 8
Installing the NDIS2 Driver Software
This chapter provides procedures for installing the NDIS2 driver software.
and contains the following sections:
“Installing the NDIS2 Driver Software for Use on MS-DOS Platforms”
on page 100
“Using Keywords for the B57.dos Drivers” on page 105
99
Page 100

Installing the NDIS2 Driver Software
Installing the NDIS2 Driver Software for Use on MS-DOS Platforms
You can run the NDIS2 driver software from an MS-DOS startup disk
using Microsoft Network Client 3.0.
Pre-Installation
Requirements
Modifying the
Startup Disk
Before you can successfully install the NDIS2 driver software, the
Allied Telesis AT-29xxSX Series Gigabit Ethernet adapter must be
physically installed in the computer.
To modify the startup disk, perform the following procedure:
1. Edit A:\Net\Protocol.ini with Notepad or a similar text editor.
a. Change DriverName=$ to DriverName=B57$.
b. Remove all other parameter entries under the [MS$NE2CLONE] or
equivalent section such as IOBASE=0x300 or INTERRUPT=3, and
so on.
Example Protocol.ini for IP
[network.setup]
version=0x3110
netcard=ms$ne2clone,1,MS$NE2CLONE,1
transport=tcpip,TCPIP
lana0=ms$ne2clone,1,tcpip
100
[MS$NE2CLONE]
DriverName=B57$
[protman]
DriverName=PROTMAN$
PRIORITY=MS$NDISHLP
[tcpip]
NBSessions=6
DefaultGateway=0 ; SubNetMask=255 0 0 0
; IPAddress=192 168 0 1
DisableDHCP=0
DriverName=TCPIP$
 Loading...