

Page 1

Linux User’s Guide
Network Adapters
AT-2711FX
AT-2712FX
AT-2812FX
AT-2912T
AT-2916SX
AT-2931SX
AT-2972SX
613-001255 Rev. B
Page 2

Copyright 2009 Allied Telesis, Inc.
All rights reserved. No part of this publication may be reproduced without prior written permission from Allied Telesis, Inc.
Microsoft and Internet Explorer are registered trademarks of Microsoft Corporation. Netscape Navigator is a registered
trademark of Netscape Communications Corporation. All other product names, company names, logos or other designations
mentioned herein are trademarks or registered trademarks of their respective owners.
Allied Telesis, Inc. reserves the right to make changes in specifications and other information contained in this document without
prior written notice. The information provided herein is subject to change without notice. In no event shall Allied Telesis, Inc. be
liable for any incidental, special, indirect, or consequential damages whatsoever, including but not limited to lost profits, arising
out of or related to this manual or the information contained herein, even if Allied Telesis, Inc. has been advised of, known, or
should have known, the possibility of such damages.
Page 3

Contents
Preface ..................................................................................................................................................................................5
Safety Symbols Used in this Document..................................................................................................................................6
Where to Find Web-based Guides .........................................................................................................................................7
Contacting Allied Telesis ........................................................................................................................................................8
Online Support ................................................................................................................................................................8
Email and Telephone Support .........................................................................................................................................8
Returning Products..........................................................................................................................................................8
For Sales or Corporate Information.................................................................................................................................8
Warranty..........................................................................................................................................................................8
Management Software Updates ......................................................................................................................................8
Chapter 1: Enabling LINUX .................................................................................................................................................9
Introduction...........................................................................................................................................................................10
Limitations .....................................................................................................................................................................10
Packaging......................................................................................................................................................................10
Installing the LINUX TG3 File ...............................................................................................................................................11
Installing the Source RPM Package ..............................................................................................................................11
Building the Driver from the Source TAR File................................................................................................................12
Driver Settings...............................................................................................................................................................13
Driver Default Settings ..................................................................................................................................................14
Unloading and Removing the Driver.....................................................................................................................................16
Driver Messages...................................................................................................................................................................17
3
Page 4

Contents
4
Page 5

Preface
This guide contains instructions on how to configure the following Allied
Telesis adapters using the Linux driver software:
AT-2711FX
AT-2712FX
AT-2812FX
AT-2912T
AT-2916SX
AT-2931SX
AT-2972SX
The Preface contains the following sections:
“Safety Symbols Used in this Document” on page 6
“Where to Find Web-based Guides” on page 7
“Contacting Allied Telesis” on page 8
“Management Software Updates” on page 8
5
Page 6
Preface
Safety Symbols Used in this Document
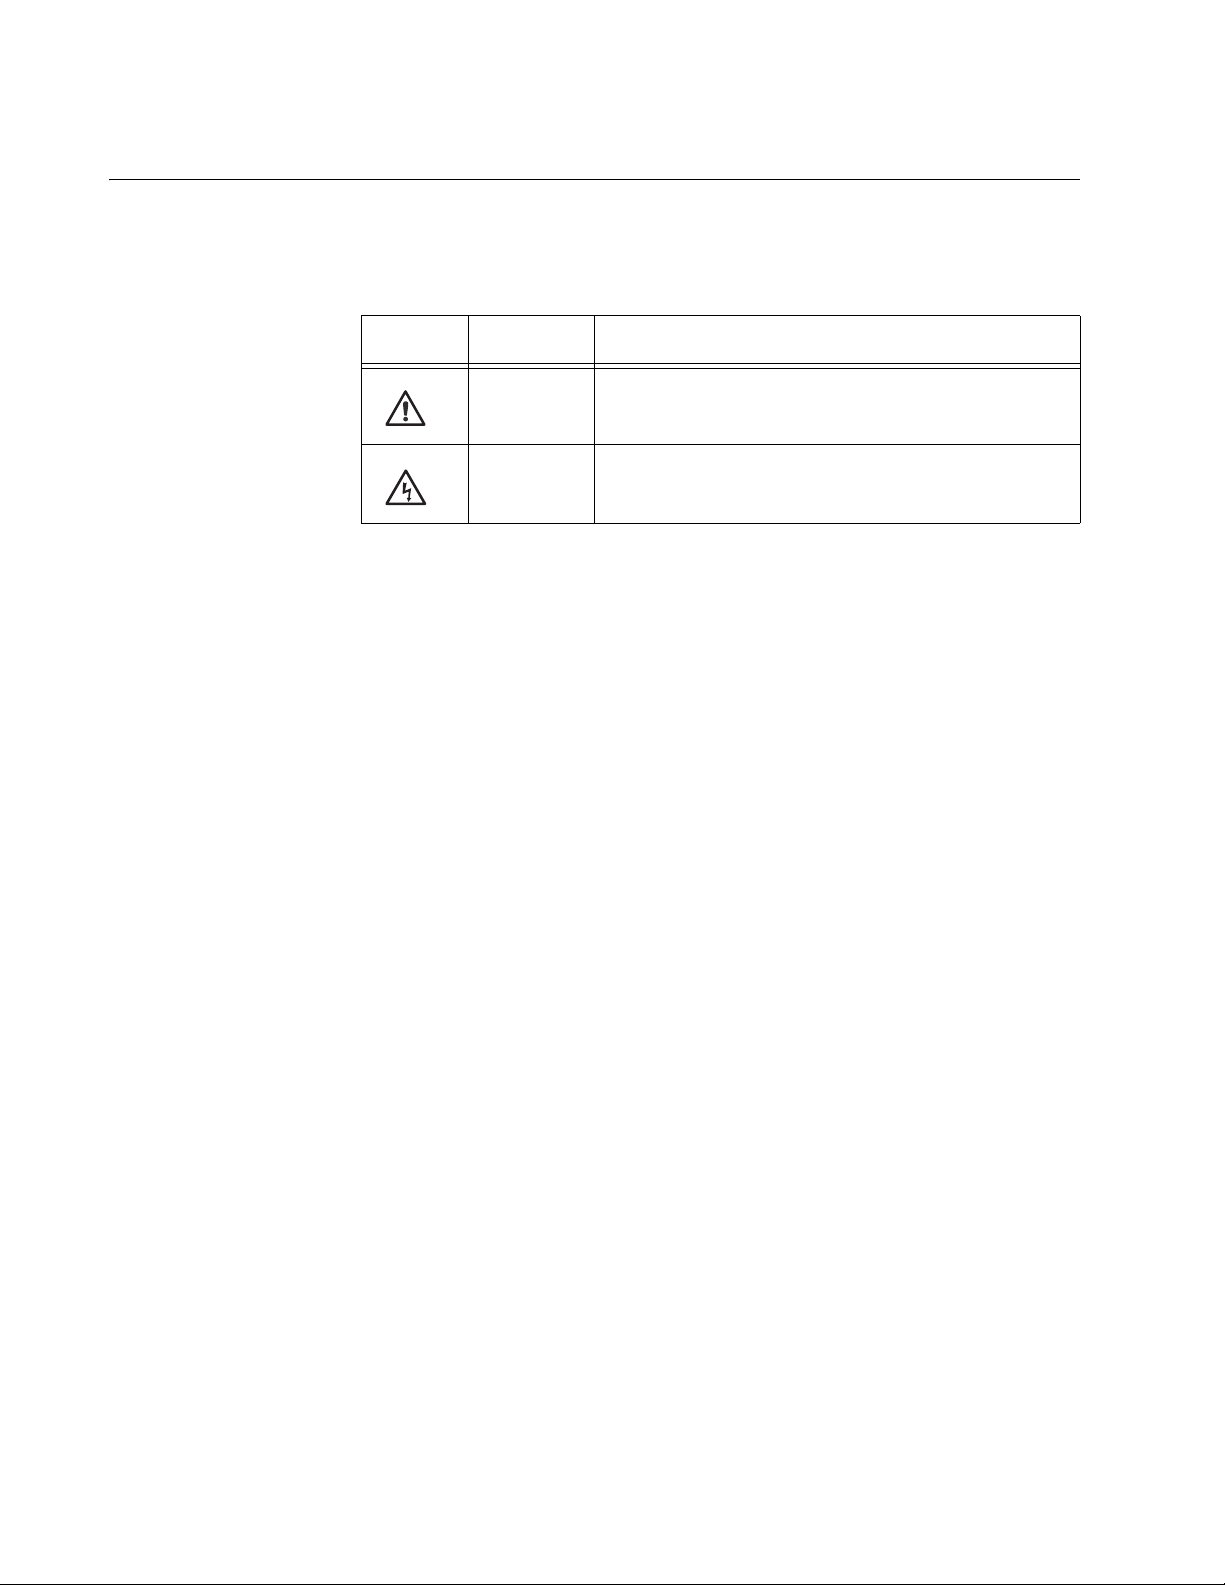
This document uses the safety symbols defined in Table 1.
Table 1. Safety Symbols
Symbol Meaning Description
Caution Performing or omitting a specific action may
result in equipment damage or loss of data.
Warning Performing or omitting a specific action may
result in electrical shock.
6
Page 7

Where to Find Web-based Guides
The installation and user guides for all Allied Telesis products are available
in portable document format (PDF) on our web site at
www.alliedtelesis.com. You can view the documents online or download
them onto a local workstation or server.
Network Adapters Linux User’s Guide
7
Page 8

Preface
Contacting Allied Telesis
This section provides Allied Telesis contact information for technical
support as well as sales or corporate information.
Online Support You can request technical support online by accessing the Allied Telesis
Knowledge Base: www.alliedtelesis.com/support/kb.aspx. You can use
the Knowledge Base to submit questions to our technical support staff and
review answers to previously asked questions.
Email and
Telephone
Support
Returning
Products
For Sales or
Corporate
Information
Warranty Go to www.alliedtelesis.com/warranty for the specific terms and
Management
Software Updates
For Technical Support via email or telephone, refer to the Support section
of the Allied Telesis web site: www.alliedtelesis.com/support.
Products for return or repair must first be assigned a return materials
authorization (RMA) number. A product sent to Allied Telesis without an
RMA number will be returned to the sender at the sender’s expense. For
instructions on how to obtain an RMA number, go to the Support section
on our web site at www.alliedtelesis.com/support/rma.aspx.
You can contact Allied Telesis for sales or corporate information through
our web site at http://www.alliedtelesis.com/purchase.
conditions of the warranty and for warranty registration for the Allied
Telesis adapters discussed in this manual.
New releases of management software for our managed products are
available from either of the following Internet sites:
Allied Telesis web site:www.alliedtelesis.com
Allied Telesis FTP server:ftp://ftp.alliedtelesis.com
If you prefer to download new software from the Allied Telesis FTP server
from your workstation’s command prompt, you will need FTP client
software and you must log in to the server. Enter “anonymous” for the user
name and your email address for the password.
8
Page 9

Chapter 1
Enabling LINUX
This chapter describes how to enable the LINUX System on the Allied
Telesis adapters. This chapter contains the following sections:
“Introduction” on page 10
“Installing the LINUX TG3 File” on page 11
“Unloading and Removing the Driver” on page 16
“Driver Messages” on page 17
9
Page 10

Enabling LINUX
Caution
Introduction
This chapter describes the tg3 Linux driver for the Broadcom NetXtremebased Allied Telesis PCI/PCI-X/PCI Express Ethernet Network
Controllers.
The most recent driver is included in the latest 2.6 Linux kernel. Generally,
you do not need to download the driver if you are using the latest 2.6
upstream kernel from www.kernel.org or one of the latest vendor kernels
from Red Hat, SuSE, or other vendors. However, you can download the
Linux driver as a source package from www.broadcom.com and then
select Downloads & Support, Ethernet NICS, Download Drivers, and
NetXtreme I Desktop/Mobile.
The tg3 driver from the Broadcom package is almost identical to the tg3
driver in the latest 2.6 upstream Linux kernel. It does include some
additional kernel-compatible code to allow it to compile on older 2.6 and
some 2.4 kernels. The version number is similar but generally has a oneletter suffix, for example 3.55b, to distinguish it from the in-kernel tg3
driver.
Limitations The current version of the driver has been tested on the 2.4x kernels
starting from 2.4.24 and all 2.6.x kernels.
The driver may not compile on kernels older than version 2.4.24.
Testing is concentrated on i386 and x86_64 CPU architectures. Only
limited testing has been done on some other architectures such as
PowerPC and SPARC64.
On some kernels, you may need to make minor changes to some source
files and the Makefile.
Packaging To replace an older previously installed or in-kernel tg3 driver, follow the
instructions in “Installing the LINUX TG3 File” on page 11.
The driver package from www.broadcom.com is released in two
packaging formats: source RPM and compressed tar formats. The file
names for the two packages are tg3<version>.src.rpm and
tgs<version>.tar.gz respectively. Identical source files to build the driver
are included in both packages.
10
Page 11

Installing the LINUX TG3 File
Note
There are two procedures to install the Linux TG3 file:
“Installing the Source RPM Package” on page 11
“Building the Driver from the Source TAR File” on page 12
Network Adapters Linux User’s Guide
Installing the
Source RPM
Package
Here are general guidelines for installing the driver:
1. Install the source RPM package by enter the following command:
rpm -ivh tg3<version>.src.rpm
2. Change directory to the RPM path and build the binary driver for your
kernel. Enter one of the following commands:
cd /usr/src/{redhat, OpenLinux, turbo, packages,
rpm..}
or
rpmbuild -bb SPECS/tg3.spec (for RPM version 4.x.x)
The RPM path is different for specific Linux distributions.
3. By default, the driver is compiled for the running kernel. To build the
driver for a kernel different from the running kernel, specify the kernel
by defining it in KVER. If this is not necessary, skip to step 4. Enter the
following command:
rpmbuild -bb SPECS/tg3.spec --define “KVER <kernel_
version>
where <kernel_version> in the form of 2.x.y-z is the version number of
another kernel that is installed on the system.
4. To install the newly-built package (driver and man page), enter the
following command:
rpm -ivh RPMS/<arch>/tg3-<version>.<arch>.rpm
where <arch> is the architecture of the machine such as i386. For
example:
rpm -ivh RPMS/i386/tg3-<version>.i386.rpm
11
Page 12

Enabling LINUX
Note
The force option may be needed on some Linux distributions if
conflicts are reported.
Depending on the kernel, the driver is installed in one of the following
directories:
2.4.x kernels:
/lib/modules/<kernel_version>/kernel/drivers/net/
tg3.o
2.6.x kernels:
/lib/modules/<kernel_version>/kernel/drivers/net/
tg3.ko
5. To load the driver, enter one of the following commands:
insmod tg3.o
Building the
Driver from the
Source TAR File
or
insmod tg3.ko (on 2.6 kernels)
or
modprobe tg3
To configure the network protocol and address, refer to the Linux versionspecific documentation.
To build the LINUX driver from the source TAR file, use the following
procedure:
1. Create a directory, called tg3 - version, and extract the TAR files to the
directory. Enter the following command:
tar xvzf tg3-version.tar.gz
2. Build the driver tg3.o or tg3.ko as a loadable module for the running
kernel. Enter the following commands:
cd src
make
3. The driver is compiled for the running kernel by default. To build the
driver for a kernel different from the one running, specify the kernel by
defining it in KVER. If this is not necessary, skip to step 4.
12
Page 13

Network Adapters Linux User’s Guide
Enter the following command:
make KVER=<kernel_version>
where <kernel_version> in the form of 2.x.y-z is the version of another
kernel that is installed on the system.
4. Test the driver by loading it. Enter the following commands:
insmod tg3.o
or
insmod tg3.ko (on 2.6 kernels)
or
modprobe tg3
5. Install the driver by entering the following command:
make install
See “Installing the Source RPM Package” on page 11 for the location
of the installed driver.
To configure the network protocol and address, refer to the Linux versionspecific documentation.
Driver Settings It is important to configure the speed and duplex settings for the following
adapters:
AT-2711FX
AT-2712FX
AT-2812FX
By default, the Linux driver is configured for autonegotiation which is not
supported with an 100 FX operation. Driver settings can be queried and
changed using the ethtool utility. Download the latest ethtool from the
following web site:
http://sourceforge.net/projects/gkernel
See Table 2 on page 14 for examples that describe how to use the ethtool
utility. In addition, see the ethtool man page for more information.
The ethtool settings do not persist across reboot or module reload.
However, you can place the ethtool commands in a startup script such as
/etc/rc.local to preserve the settings across a reboot.
13
Page 14

Enabling LINUX
On Red Hat distributions, you can specify “ethtool -s” parameters in the
ifcfg-ethx scripts using the ETHTOOL_OPTS keyword. The specified
ethtool parameters are set up during ifup. For example, go to the following
directory:
/etc/sysconfig/network-scripts/ifcfg-eth0
Add the following line to the script:
ETHTOOL_OPTS=”wol g speed 100 duplex half autoneg off”
Table 2. Ethtool Utility Examples
Action Commands
Display current speed, duplex, and link
status
Change speed, duplex mode, and
autonegotiation status to 100Mbps
half duplex, and no autonegotiation
Change speed, duplex mode, and
autonegotiation status to 100Mbps full
duplex mode, and no autonegotiation
Display flow control settings ethtool -a eth0
Turn off flow control ethtool -A eth0 autoneg off rx
Display offload settings ethtool -k eth0
Turn off TCP Segmentation Offload
(TSO)
Display statistics ethtool -S eth0
Perform a self-test on an interface that
is up and running
ethtool eth0
ethtool -s eth0 speed 100
duplex half autoneg off
ethtool -s eth0 speed 100
duplex full autoneg off
off tx off
ethtool -K etho tso off
ethtool -t eth0
Driver Default
14
Settings
See Table 3 for the default settings of the Linux driver.
Table 3. Linux Driver Settings
Feature Default Setting
Speed Autonegotiation with all speeds
advertised
Flow control Autonegotiation with Rx and Tx
advertised
Page 15

Network Adapters Linux User’s Guide
Table 3. Linux Driver Settings (Continued)
Feature Default Setting
MTU 1500 (range 46 - 9000)
Rx Ring Size 200 (range 0 - 511)
Rx Jumbo Ring Size 100 (range 0 - 255)
Tx Ring Size 511 (range (MAX_SKB_FRAGS+1) - 511
Coalesce Rx usecs 20 (range 0 - 1023)
Coalesce Rx usecs irq 20 (range 0 - 255)
Coalesce Rx frames 5 (range 0 - 1023)
Coalesce Rx frames irq 5 (range 0 - 255)
Coalesce Tx usecs 72 (range 0 - 1023)
Coalesce Tx usecs irq 20 (range 0 - 255)
Coalesce Tx frames 53 (range 0 - 1023)
Coalesce Tx frames irq 5 (range 0 - 255)
Coalesce stats usecs 1000000 (approximately 1 second)
Some coalescing parameters are not
used or have different defaults on some
chips
MSI Enabled if supported by the chip and
passes the interrupt test
TSO Enabled on newer chips that support TCP
segmentation offload in hardware
WoL (Wake on LAN) Disabled
15
Page 16

Enabling LINUX
Note
Unloading and Removing the Driver
To unload the driver, use the ifconfig command to bring down all eth#
interfaces opened by the driver. Then enter the following command:
rmmod tg3
On all 2.6 kernels, you do not need to bring down the eth# interfaces
before unloading the driver module.
If the driver was installed using rpm, enter the following command to
remove it:
rpm -e tg3
If the driver was installed using the make install command from the tar file,
you need to manual delete the driver tg3.o (or tg3.ko) from the system.
Refer to “Installing the Source RPM Package” on page 11 for the location
of the installed driver.
16
Page 17

Driver Messages
Network Adapters Linux User’s Guide
The following messages are the most common sample messages that are
logged in the /var/log/messages file. Use the dmesg -n<level> command
to control the level at which messages appear on the console. Most
systems are set to level 6 by default. To see all messages, set the level
higher than 6.
Driver Signon
tg3.c:v3.92n (September 29, 2008)
NIC Detected
eth0: Tigon3 [partno(BCM95704A6) rev 2003 PHY(5704)
(PCIX:100MHz:64-bit)
10/100/1000BaseT Ethernet 00:10:18:04:3f:36
eth0: RXcsums[1] LinkChgREG[0] MIirq[0] ASF[0]
Wirespeed[1] TSOcap[1]
eth0: dma_rwctrl[769f4000] dma_mask[64-bit]
Link Up and Speed Indication
tg3: eth0: Link is up at 1000 Mbps, full duplex.
tg3: eth0: Flow control is on for TX and on for RX.
Link Down Indication
tg3: eth#: Link is down.
17
Page 18

Enabling LINUX
18
 Loading...