

Page 1
iLive Dante Option Publication AP8340
Fitting and Setup Guide
Issue 2
This guide applies to Dante Release 1 (firmware 3.4.x). Some features will
become available with Release 2 (firmware 3.5.x) due for release soon.
M-DANTE is one of several plug-in card options available from Allen &
Heath that may be fitted to the iLive Series.
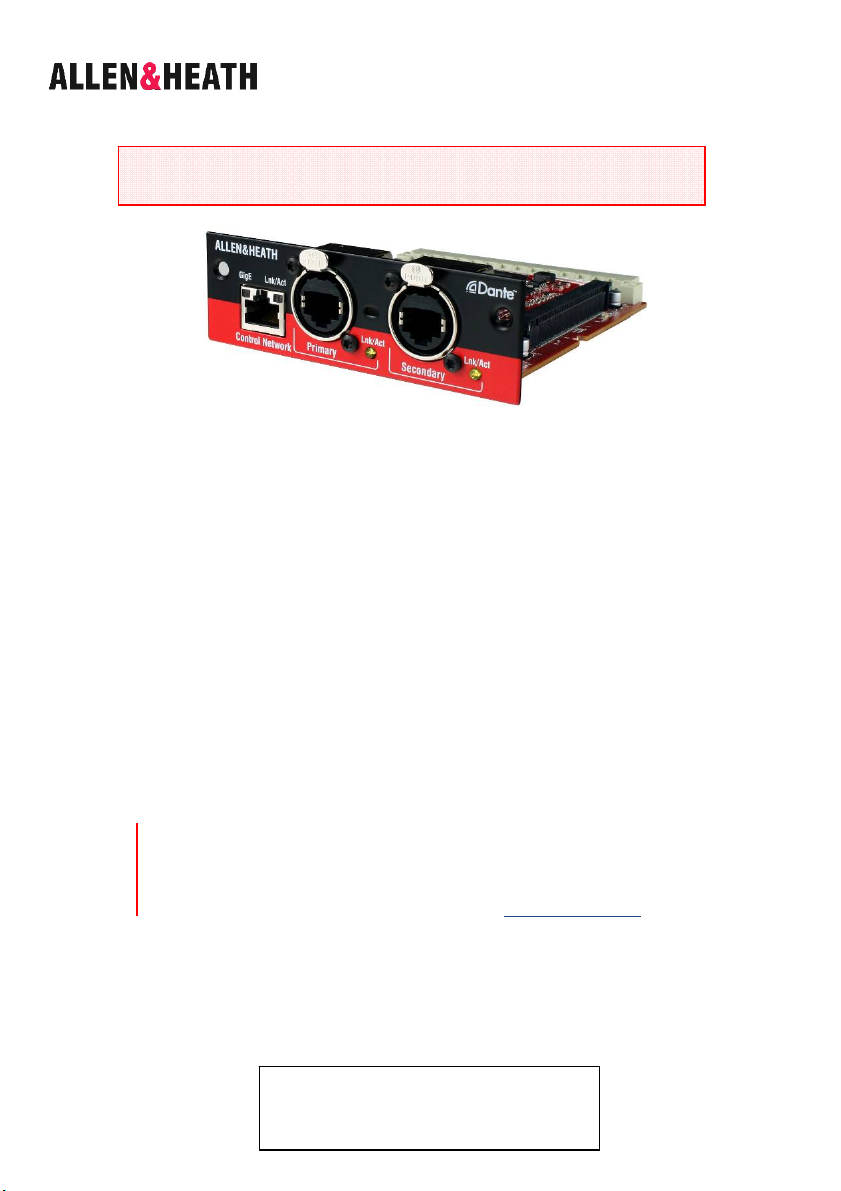
Part number M-DANTE-A
DanteTM is a high performance, multi-channel, AVB ready industry
standard digital media transport system developed by Australian
company Audinate that runs over standard IP networks and can
distribute signals between iLive, computers and 3
enabled equipment. Its main benefits for iLive are:
64 channel bi-directional audio plus control over CAT5
Uses standard off-the-shelf computer networking equipment
Easy to add, name, remove and rearrange devices
Secondary port for redundant connection option (page 5 Note 1)
Control port to bridge iLive or other network over Dante (Note 2)
Very low latency
Direct connection to computer for multitrack recording
Dante Virtual Soundcard (DVS) software
Dante Controller software for setting up the network
rd
party DanteTM
Note The Allen & Heath M-DANTE card provides an interface to the
Dante network. The Dante ‘Brooklyn II’ hardware used and the software
required to set it up and record to computer is provided and supported
by Audinate. For further information or help on using Dante please refer
to the documentation and support at Audinate: www.audinate.com
M-DANTE is supplied with one Dante Virtual Soundcard licence to
enable a single computer. More can be purchased from Audinate if
required. The token below is needed to obtain your licence Id. Please
read the instructions provided within this guide.
Dante Virtual Soundcard Licence ID token:
iLive M-DANTE Option Instructions 1 AP8340 issue 2
Page 2
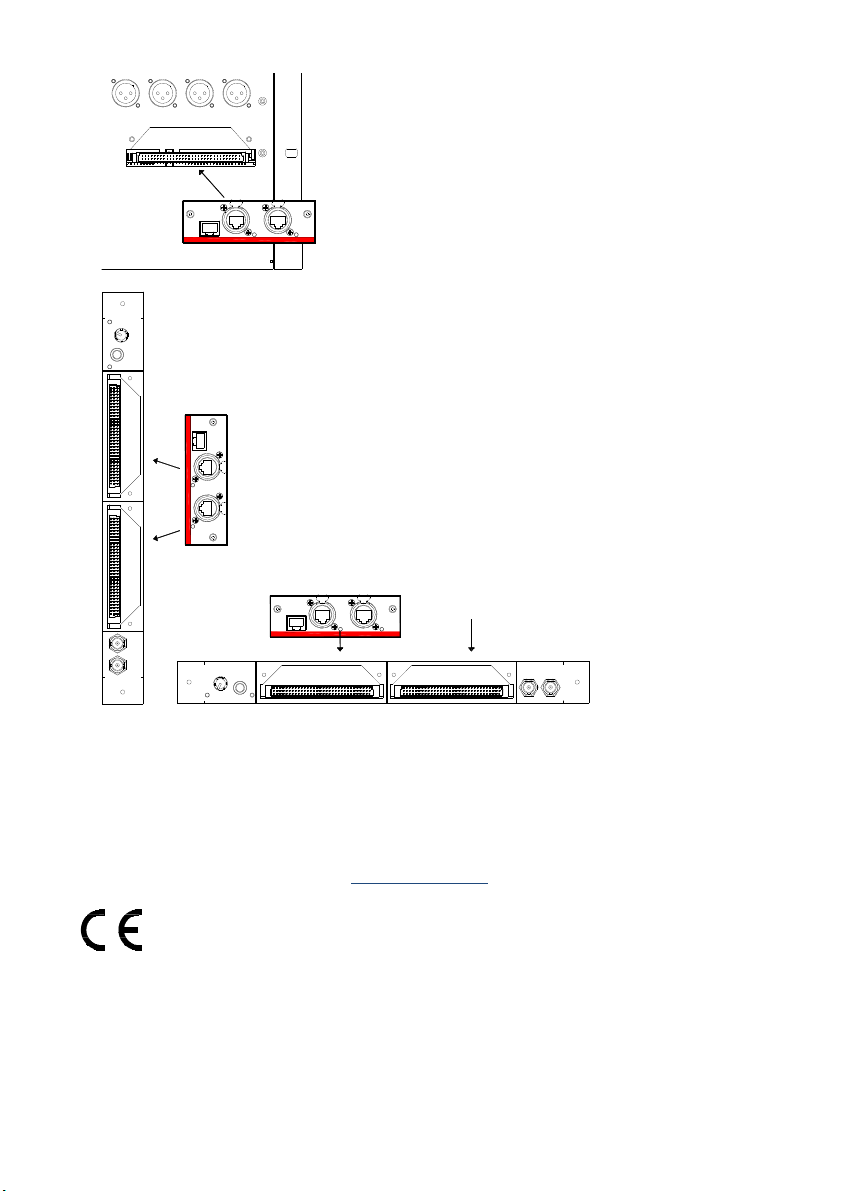
Fitting to the fixed format iLive
Port B
The M-DANTE card option may be fitted to Port B in the
iDR-16, iDR-32, iDR-48 or iDR-64 MixRack, or the xDR-16
expander. First make sure the MixRack is switched off.
Remove the 2 screws securing the blank panel over Port
B. Slide the card into the slot and press it firmly into the
mating connector. Secure the card using the 2 screws.
Fitting to the modular iLive
iDR10
REMOTE AUDIO 2
RAB2 module
Port A
Port B
Surface to MixRack audio link
Surface
RAB2 module
REMOTE AUDIO 2
Note The M-DANTE card requires iLive firmware V1.71 or higher.
For further information on Dante software, application and recommended
networking components refer to Audinate:
The option card can be fitted into the Port A (MixRack or
Surface) or Port B (MixRack only) slot in the Remote
Audio 2 (RAB2) module. Systems fitted with the older
Remote Audio module can be upgraded with the new
RAB2 module.
Note The M-DANTE card may not be fitted in Surface
Port B. The only option currently supported in Surface
Port B is the M-MMO (Mini Multi Out) card.
First make sure the System is switched off. Remove the
2 screws securing the blank panel over the port slot.
Slide the card into the slot and press it firmly into the
mating connector. Secure using the 2 screws.
X
Port A
www.audinate.com
Port B
This product complies with the European Electromagnetic Compatibility
directive 2004/108/EC.
NOTE: Any changes or modifications to the equipment not approved by
Allen & Heath could void the compliance of the equipment. Whilst we
believe the information in these instructions to be reliable we do not
assume responsibility for inaccuracies. We also reserve the right to make
changes in the interest of further product development.
Copyright© 2011 Allen & Heath Ltd. All rights reserved.
iLive M- DANTE Option Instructions 2 AP8340 issue 2
Page 3

Dante Virtual Soundcard (DVS) is a software application
that turns your PC or Mac into a Dante enabled device allowing up to 64
channels of bi-directional audio for recording, processing and playback
via a standard computer Gigabit Ethernet port, either direct from the M-
DANTE card or via an Ethernet switch. No additional hardware is
required.
Note For minimum system requirements and support information please
visit the Support section at Audinate: www.audinate.com
Note Install Dante Virtual Soundcard on the computer you intend to use
for recording. Once registered the licence cannot be transferred to
another computer.
Note Computer based recording applications use a lot of processing
power and memory. For best results we recommend that you do not run
other applications on the computer while recording. Use a different
computer to run iLive Editor. Refer to Audinate for more information.
Windows The DVS uses Steinberg’s ASIO audio interface and can be
used with any audio application that supports ASIO.
Mac OSX The DVS uses the standard Core Audio interface.
Please read Audinate’s Dante Virtual Soundcard User Guide for
information on how to install, configure and use the software.
To obtain your DVS Licence ID
Locate your DVS token on the label on the front of this guide. This is
of the format: XXXXX – XXXXX – XXXXX – XXXXX – XXXXX
Go to the Dante page on the Allen & Heath web site and follow the
link to the Audinate site. www.allen-heath.com/ilive/dante.
If not already logged in you will be asked to log in or register before
continuing.
Enter your token string in the field provided. Once validated a page
will be displayed with your Dante Virtual Soundcard Licence ID.
Follow the links to download the Dante Virtual Soundcard software
and User Guide. Choose the version you require – Mac OSX or
Windows.
Download the Dante Controller software and User Guide. Choose
the version you require – Mac OSX or Windows.
Install both applications and activate Dante Virtual Soundcard.
Note The DVS Licence ID is not the same as your token. Your token
cannot be used to activate the software.
iLive M-DANTE Option Instructions 3 AP8340 issue 2
Page 4

Dante Controller is a software application provided by Audinate
which allows users to configure and route audio across Dante networks.
It is available as a free download to registered users, and can be installed
on the same computer that is running the Dante Virtual Soundcard.
Using Dante Controller you can view and configure all Dante enabled
audio devices and their Dante audio channels.
Note To install Dante Controller on a PC you will need to download
‘Bonjour’ for Windows. A link is provided in the installer package.
Note You must have Dante Controller installed on a PC or Mac on your
Dante network to control and route audio. Once your network is
configured and audio set up you can remove the PC or Mac if required.
Please read Audinate’s Dante Controller User Guide for system
requirements and information on how to install, configure and use the
Dante Controller software. Refer to Audinate for further information.
Notes on setting up the network
Before starting you need to set up an Ethernet network connecting your
iLive M-DANTE cards, a PC or Mac running Dante Controller and Dante
Virtual Soundcard software, and any other Dante enabled audio devices
you want to access on the network.
Note The ilive M-DANTE card handles 64x64 channels of high quality
24bit/48kHz audio together with control traffic over a single link. For full
routing capability and glitch-free reliable operation it is important to use
network switches, components and recording computers that support
Gigabit Ethernet and are of a high specification. Refer to the Audinate
web site for more information on system requirements.
Cables Use CAT5e or CAT6 cable up to 100m (330’). For longer
distances use an optical fibre interface. Allen & Heath can supply an
80m drum of touring grade Neutrik Etherflex cable (AH7000).
Network switch Dante connects to multiple devices via a star topology
using a switch. Use a good quality multicast capable Gigabit switch
which supports Diffserv (DSCP) Quality of Service (QoS) with strict
priority and 4 queues. Refer to Audinate for more information on this.
IP addressing As with any Ethernet network, each Dante devices
including the iLive M-DANTE cards needs a unique IP address. Dante
makes this very easy by using Audinate’s ‘Zen’ Zero Config auto
addressing protocol.
Recording computer Choose a high specification PC or Mac with a
Gigabit Ethernet interface and set for DHCP. Install both the Dante Virtual
Soundcard and the Dante Controller applications.
Routing and clocking Please read the notes on page 7.
iLive M- DANTE Option Instructions 4 AP8340 issue 2
Page 5
Connections and indicators
&
ALLEN
HEATH
GigE
Lnk/Act
Control Network
Link status One LED
indicates network
activity. The other
indicates that a Gigabit
Ethernet link has been
established.
Control Network Gigabit Ethernet, RJ45
connector. Can be used to connect a
computer running Dante Controller for setting
up the network. See Note 2 below.
Important Notes regarding Release 1 Dante firmware (version 3.4.x):
Note 1 Release 1 does not currently support the Secondary connection dual
redundant link. This feature will be introduced in Release 2 due shortly.
Note 2 Release 1 does not currently support a mix of Gigabit and Fast
Ethernet (100 Mbit) on its ports. Use Gigabit network devices including the
switch and computers throughout the Dante network. Do not bridge the 100
Mbit iLive Network to Dante using Release 1 firmware.
Note 3 Do not use the Control Network port for recording. This port is
intended for connecting a computer running Dante Controller. Use the
Primary port or a port on a Gigabit switch for the recording as shown in the
diagrams later in this guide.
A Firmware Update application will be available from Audinate when a new
version of Dante firmware is released.
Please also read the Known Issues and Brooklyn II Release Notes on the
Audinate web site:
www.audinate.com/allen-heath/ilive/M-DANTE/BrooklynII
Primary Port Gigabit Ethernet, Locking
EtherCon RJ45 connector. The main port.
Connect to the Primary port on another
Dante equipped device to link the devices
directly. Connect to a Gigabit switch to
connect multiple Dante enabled devices.
Connect to the Ethernet port on a PC or
Mac to allow audio recording or playback
via the Dante Virtual Soundcard.
Primary
Lnk/Act
Lnk/Act
Secondary
Link status Flashes to
indicate network
activity.
Secondary Port Gigabit
Ethernet, Locking Ethercon
RJ45 connector. Independent
network that can be used for
dual redundant connection.
See Note 1 below.
iLive M-DANTE Option Instructions 5 AP8340 issue 2
Page 6

Connecting to a single device
This example shows connection to a PC or Mac for multitrack recording.
Use the M-Dante Primary port. Route signals to the device using the iLive
OUTPUTS screen Port B tab. Route signals from the Dante channels to
the device using Dante Controller.
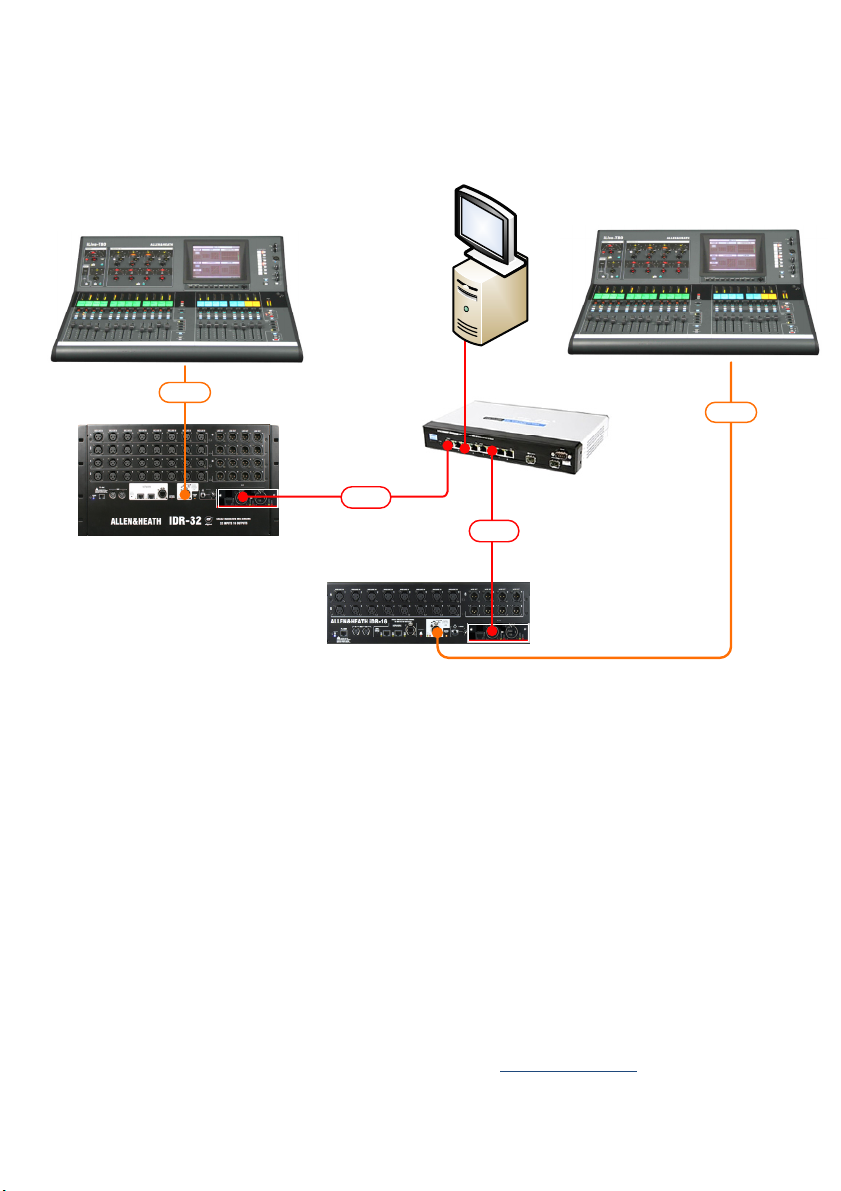
Connecting to multiple devices
This example shows connection to a PC or Mac for multitrack recording
as well as two other Dante equipped devices such as signal processors
or amplifiers. Route signals to Port B using the iLive OUTPUTS screen
Port B tab. Route signals around the Dante network using Dante
Controller.
ACE
MixRack
Port B M-Dante Primary port
3rd party DANTE devices
Dante Controller
and Dante Virtual
Soundcard software
Recording
computer
Ethernet port
DANTE
Gigabit Switch
iLive M- DANTE Option Instructions 6 AP8340 issue 2
Page 7
FOH
Linking iLive systems for FOH/Monitor
This example shows two iLive systems using Dante as a digital mic
splitter to share the Mic Preamps for FOH and Monitor mixing. The
Gigabit switch is needed if you want to add recording and other Dante
equipped audio devices.
ACE
Port B M-Dante
Primary port
Recording
computer
Ethernet port
Gigabit Switch
DANTE
DANTE
MONITOR
Port B M-Dante
Primary port
ACE
Routing and clocking signals
Route signals to the 64 Dante channels on Port B using the iLive
OUTPUTS screen Port B tab. Route signals around the Dante network
using Dante Controller.
Return signals from the Dante network to the iLive channels using the
PREAMP screen Source menu. To route a range of channels use the
Remote (Port B) option in the MIXRACK / Mixer Pref / Quick Input
Source Setup screen.
Remember to set the iLive Audio Clock Source to Internal on the Master
MixRack, and to Remote Port B on the Slave MixRack. Use Dante
Controller to tick ‘Preferred master’ and ‘Slave to external wordclock’
for the Master MixRack only.
For more on setting up and using the Dante network please refer to
Audinate’s user guides that come with Dante Controller and Dante
Virtual Soundcard and to further information at www.audinate.com.
iLive M-DANTE Option Instructions 7 AP8340 issue 2
Page 8

iLive M- DANTE Option Instructions 8 AP8340 issue 2
 Loading...