

Page 1

Remote Controller Getting Started Guide
Before starting please check www.allen-heath.com for the latest
dLive firmware and documentation.
AP10352 Issue 2
IP6
Page 2

IP6 Getting Started Guide
2
AP10352 Issue 2
Limited One Year Manufacturer’s Warranty
Allen & Heath warrants the Allen &Heath -branded hardware product and
accessories contained in the original packaging ("Allen & Heath Product”)
against defects in materials and workmanship when used in accordance with
Allen & Heath's user manuals, technical specifications and other Allen & Heath
product published guidelines for a period of ONE (1) YEAR from the date of
original purchase by the end-user purchaser ("Warranty Period").
This warranty does not apply to any non-Allen & Heath branded hardware
products or any software, even if packaged or sold with Allen & Heath hardware.
Please refer to the licensing agreement accompanying the software for details of
your rights with respect to the use of software/firmware (“EULA”).
Details of the EULA, warranty policy and other useful information can be found
on the Allen & Heath website: www.allen-heath.com/legal.
Repair or replacement under the terms of the warranty does not provide right to
extension or renewal of the warranty period. Repair or direct replacement of the
product under the terms of this warranty may be fulfilled with functionally
equivalent service exchange units.
This warranty is not transferable. This warranty will be the purchaser’s sole and
exclusive remedy and neither Allen & Heath nor its approved service centres shall
be liable for any incidental or consequential damages or breach of any express
or implied warranty of this product.
Conditions Of Warranty
The equipment has not been subject to misuse either intended or accidental,
neglect, or alteration other than as described in the User Guide or Service Manual,
or approved by Allen & Heath.
Any necessary adjustment, alteration or repair has been carried out by an
authorised Allen & Heath distributor or agent.
The defective unit is to be returned carriage prepaid to the place of purchase, an
authorised Allen & Heath distributor or agent with proof of purchase. Please
discuss this with the distributor or the agent before shipping. Units returned
should be packed in the original carton to avoid transit damage.
DISCLAIMER: Allen & Heath shall not be liable for the loss of any saved/stored
data in products that are either repaired or replaced.
Check with your Allen & Heath distributor or agent for any additional warranty
information which may apply. If further assistance is required please contact Allen
& Heath Ltd.
Page 3
IP6 Getting Started Guide
3
AP10352 Issue 2
IMPORTANT - Read before starting
Safety instructions
Before starting, read the Important Safety Instructions printed on the sheet supplied
with the equipment. For your own safety and that of the operator, technical crew and
performers, follow all instructions and heed all warnings printed on the sheet and on the
equipment panels.
System operating firmware
The function of the IP Remote Controller is determined by the firmware (operating
software) that the mixing system runs. Firmware is updated regularly as new features
are added and improvements made.
Check www.allen-heath.com for the latest version of mixer
firmware. IP6 requires dLive firmware V1.30 or higher.
Software licence agreement
By using this Allen & Heath product and the software within it you agree to be bound by
the terms of the relevant End User Licence Agreement (EULA), a copy of which can
be found at www.allen-heath.com/legal. You agree to be bound by the terms of the
EULA by installing, copying, or using the software.
Further information
Please refer to the Allen & Heath website for further information, knowledgebase and
technical support. For more information on dLive setup and mixing functions please
refer to the dLive Firmware Reference Guide available for download at www.allen-
heath.com.
Check for the latest version of this Getting Started Guide.
You can also join our Allen & Heath Digital Community to share knowledge and
information with other dLive users.
Page 4
IP6 Getting Started Guide
4
AP10352 Issue 2
General precautions
ALLEN&HEATH
Protect the equipment from damage through liquid or dust contamination.
Cover the equipment when it is not being used for a long period.
If the equipment has been stored in sub-zero temperatures allow time for it to
reach normal operating temperature before use at the venue. Recommended
operating temperature is 0 to 35 degrees Celsius.
Avoid using the equipment in extreme heat and direct sunlight. Make sure there
is adequate air movement around the equipment.
Clean the equipment with a soft brush and dry lint-free cloth. Do not use
chemicals, abrasives or solvents.
It is recommended that servicing is carried out only by an authorised Allen &
Heath agent. Contact details for your local distributor can be found on the Allen
& Heath website. Allen & Heath do not accept liability for damage caused by
maintenance, repair or modification by unauthorised personnel.
Register your product
Register your product online at www.allen-heath.com/register.
Any changes or modifications to the product not approved
by Allen & Heath could void the compliance of the product
and therefore the user’s authority to operate it.
Allen & Heath Limited, Kernick Industrial Estate, Penryn, Cornwall, TR10 9LU, UK
This product complies with the European
Electromagnetic Compatibility directive 2004/108/EC
and the European Low Voltage directive 2006/95/EC.
IP6 Getting Started Guide
Copyright © 2016 Allen & Heath. All rights reserved.
http://www.allen-heath.com
Page 5

IP6 Getting Started Guide
5
AP10352 Issue 2
Contents
IMPORTANT - Read before starting .............................................................................. 3
1. Introduction ....................................................................................................... 6
2. Mounting the Remote Controller ....................................................................... 7
2.1 Plinth mount ............................................................................................. 7
3. Front Panel ........................................................................................................ 8
4. Rear Panel ....................................................................................................... 10
5. Connect and power up.................................................................................... 11
5.1 Set up the unit Name and IP Address .................................................... 11
5.2 dLive connection .................................................................................... 12
5.3 Ethernet Switch ...................................................................................... 12
5.4 Programming the Remote Controller ...................................................... 13
6. Dimensions ..................................................................................................... 14
7. Technical specs .............................................................................................. 15
Page 6

IP6 Getting Started Guide
6
AP10352 Issue 2
Packed items
Check you have received the following:
IP6 Remote Controller
Getting Started Guide AP10352
Safety Sheet
12V Power Supply
1. Introduction
The IP6 is part of the Allen & Heath IP Series of remote controllers. It interfaces with the
dLive mixing system via standard TCP/IP Network connections and can therefore be
networked with other controllers, computers and third party devices using a standard
Ethernet infrastructure. It can be powered by an external 12V PSU or over Ethernet
(PoE).
The IP6 controls and functions are programmed using a dLive Surface or dLive Director
software for PC/Mac, and can suit a number of applications including:
- Personal Monitoring – The IP6 can be configured to control the Send levels,
Pans and assignments of multiple channels to a specific mix on the dLive, for
example for wireless IEM use, giving musicians the freedom to control their
own monitor sound.
- Installation – The installer or system integrator can configure the IP6 to
provide the degree of control needed by the day to day operator, for example
the levels of microphones and music sources in a room.
Page 7
IP6 Getting Started Guide
7
AP10352 Issue 2
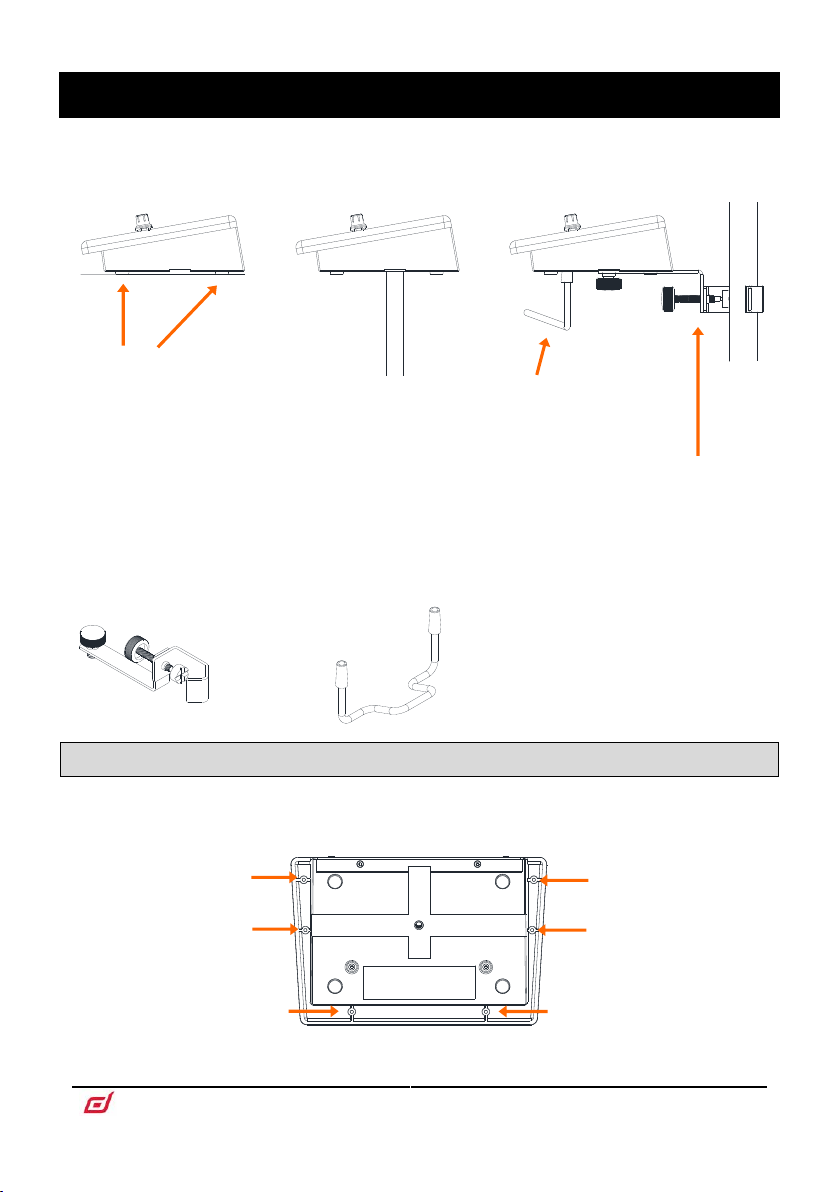
2. Mounting the Remote Controller
Non-slip feet fitted
for shelf use
Top of mic stand
with 3/8” thread
Side of stand
mount with
optional bracket
Optional headphone
holder for monitor
applications
The IP6 can be used free standing or mounted on a standard microphone stand thanks
to the integrated 3/8” threaded hole.
The following accessories can be used to mount the IP6:
AB8999 Mic stand bracket AB8705 Push in headphone holder
2.1 Plinth mount
Use the holes indicated below for 6B screws when mounting in a plinth, podium or
furniture. Ensure adequate air flow around the unit.
Page 8

IP6 Getting Started Guide
8
AP10352 Issue 2
3. Front Panel
1
2
4
3
1
1
2
6
5
Upper SoftKey function
Level bar and meter
Channel type, name and
colour
Lower SoftKey function
or second rotary
function
SoftKeys – 2 sets of 6x backlit assignable keys. Can be
configured individually or as part of a vertical ‘Rotary Strip’.
Available functions include Send On/Off, PAFL, Mute, Scene
Recall, Tap Tempo, Talkback Assign, Custom MIDI.
information on the channels and on the function of the SoftKeys.
LCD Displays – 6x colour displays providing
Page 9

IP6 Getting Started Guide
9
AP10352 Issue 2
Rotary Encoders – 6x assignable dual function rotary
3
4
5
6
controls. Can be configured individually or as part of a vertical
‘Rotary Strip’. Push and turn a rotary to control its second function.
Available functions include Input Level, Mix Level, DCA Level, Aux
Send Level, FX Send Level, Matrix Send Level, Pan, Custom MIDI.
Dimmer – Steps through different brightness presets for
all displays and keys, for use in low light environments.
SoftKey (Alt View) – Assignable key. Can be
configured to show alternative information on the LCD displays.
Other available functions include Send On/Off, PAFL, Mute, Scene
Recall, Tap Tempo, Talkback Assign, Custom MIDI.
SoftKeys (Layers) – 6x additional, backlit assignable
keys. Can be configured to change Layers on the Remote
Controller. This allows up to 6 different sets of controls / channels
instantaneously available at a press of a button. For example you
can control the sends of 36 individual Inputs to a monitor mix, or
set up the Layers to control the sound to 6 different zones in a
venue.
Other available functions include Send On/Off, PAFL, Mute, Scene
Recall, Tap Tempo, Talkback Assign, Custom MIDI.
Page 10

IP6 Getting Started Guide
10
AP10352 Issue 2
4. Rear Panel
1
2
3
2
1
3
Network – Fast Ethernet, PoE compliant Network port for
connection to the mixing system.
The IP6 provides a locking Neutrik EtherCon socket to protect
the connection. Use cables fitted with locking EtherCon for touring
or rental applications.
The maximum cable length is 100m. Use STP (shielded twisted
pair) CAT5 or higher cables. Those with both foil and braided
screens provide shielding from interference and are generally
more rugged. Stranded core cables are less prone to damage
when kinged or repeatedly coiled. Refer to www.allen-heath.com
for a list of CAT5 cables available to order.
be powered via the Network port when connected to a PoE switch.
A plastic P-clip cable clamp is provided to secure the DC cable.
Only use the power supply provided in the box.
reset the network settings to factory default. To reset, insert a
pointed object to press the switch whilst applying power to the
unit, then release.
Ext DC In – External PSU input. Alternatively, the IP6 can
Reset Network Settings - A recessed switch lets you
Page 11

IP6 Getting Started Guide
11
AP10352 Issue 2
5. Connect and power up
5.1 Set up the unit Name and IP Address
When connecting multiple IP Remote Controllers to the same network, ensure each unit
is set to a unique Name and IP Address beforehand. Alternatively you can enable DHCP
on the Remote Controllers, provided a DHCP Server is present on the network and the
DHCP range is compatible with the IP Address of the mixing system.
The factory default settings are as follows:
Unit Name IP6
DHCP Off
IP Address 192.168.1.72
Subnet Mask 255.255.255.0
Gateway 192.168.1.254
There are two ways of editing these settings:
Browser access – Connect a PC or Mac computer to the
Network port of the IP6. Set your computer to a compatible, static
IP Address, for example 192.168.1.100 with Subnet
255.255.255.0. Open a web browser and type the IP6 default IP
Address 192.168.1.72 in the URL bar. This will give access to the
unit network settings. Repeat the operation for each IP6 unit.
dLive software – Connect the IP6 to a dLive Network port. Use
the Surface touchscreen interface or Director software to edit the
IP6 network settings. Once applied, repeat the operation for each
IP6 unit.
Refer to the dLive Firmware Reference Guide available for
download at www.allen-heath.com for more information.
Page 12
IP6 Getting Started Guide
12
AP10352 Issue 2
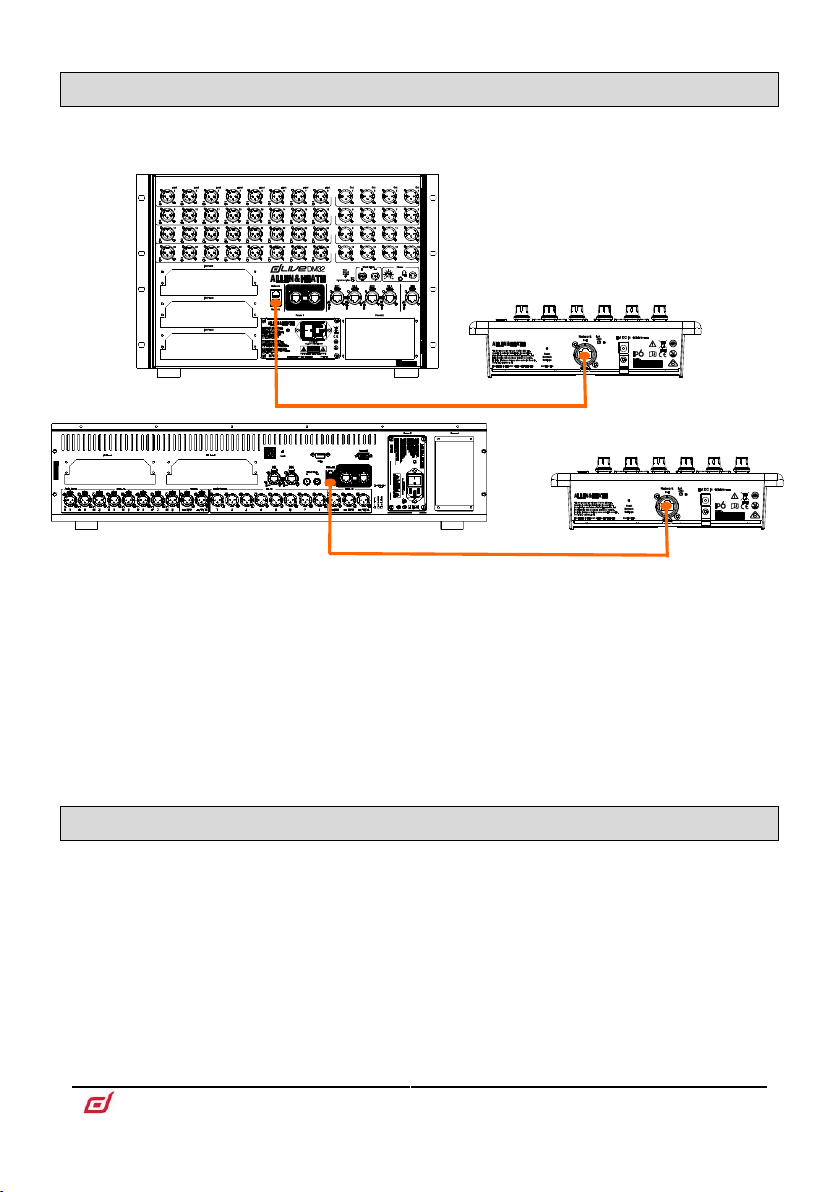
5.2 dLive connection
Connect the IP6 to a MixRack or Surface Network port using a CAT5 cable up to 100m
long.
Power up the IP6 by plugging the external PSU into the DC In socket. The port Lnk/Err
indicator flashes at a steady rate when the link is established. The unit Name and IP
address are displayed on the LCD Displays for easy identification of the unit. After a
few seconds the IP6 will display the assignments and functions if any have been set
for the unit.
If the firmware in a connected IP Remote Controller is not
the same version as that in the dLive mixer, then the mixer will
automatically update the IP firmware at power up.
5.3 Ethernet Switch
For parallel connection of multiple IP Remote Controllers you can use a standard
Ethernet switch.
For PoE (Power over Ethernet) either of the two standards
802.3af (15.4W at source) or 802.3at (25.5W at source) is
suitable. Check that the overall power rating is enough to
provide for all IP Remote Controllers you wish to connect
(allow 10W per IP6 unit).
Page 13

IP6 Getting Started Guide
13
AP10352 Issue 2
5.4 Programming the Remote Controller
Use the dLive Surface touchscreen interface or Director software to configure the
Remote Controller. You can assign each key or rotary individually, or use one of the
setup ‘Wizards’ on screen to get started quickly.
The IP6 can be set to link to either the dLive MixRack or the dLive Surface. This is
regardless of the physical Network connection, for example the unit might be physically
connected to the MixRack but set to link to the Surface. Linking to the MixRack provides
an independent Remote Controller that can be used with or without Surface connection.
Linking to the Surface adds the ability to assign extra functions to the IP6 SoftKeys such
as Sel and Mix.
The functions and assignments of the IP6 are stored in the dLive Scenes. They are not
stored locally on the Remote Controller.
Refer to the dLive Firmware Reference Guide available for
download at www.allen-heath.com for more information on
configuring the Remote Controller.
Page 14

IP6 Getting Started Guide
14
AP10352 Issue 2
6. Dimensions
213
12.20
154
132
28.4
150
54.9
227
2.8°
10.00°
194.40
Page 15

IP6 Getting Started Guide
15
AP10352 Issue 2
7. Technical specs
System
Network
Fast Ethernet 100MBps
Ext DC In
+12V, 2.5A
PoE
802.3af (15.4W at source)
Max power consumption
5W
Operating Temperature Range
0 deg C to 35 deg C (32 deg F to 95 deg F)
Dimensions and Weights
Width x Depth x Height x Weight
IP6
227 x 150 x 55 mm x 1.5kg (3.3lbs)
IP6 (boxed)
300 x 330 x 170 mm x 1.6kg (3.5lbs)
 Loading...