

Page 1
DX012 Getting Started Guide
AP11841 Issue 1
DX012
The DX012 is a 19” rack-mountable output expander for Allen & Heath digital
mixing systems. It provides 12 XLR outputs, configurable as 12 analogue, 8
analogue + 4 stereo AES, or 4 analogue + 8 stereo AES outputs. It connects to
the mixer over a single Cat5e cable.
A second DX012, DX168 or DX164-W can be connected when in Cascade mode.
Alternatively, a redundant connection can be made to compatible hardware.
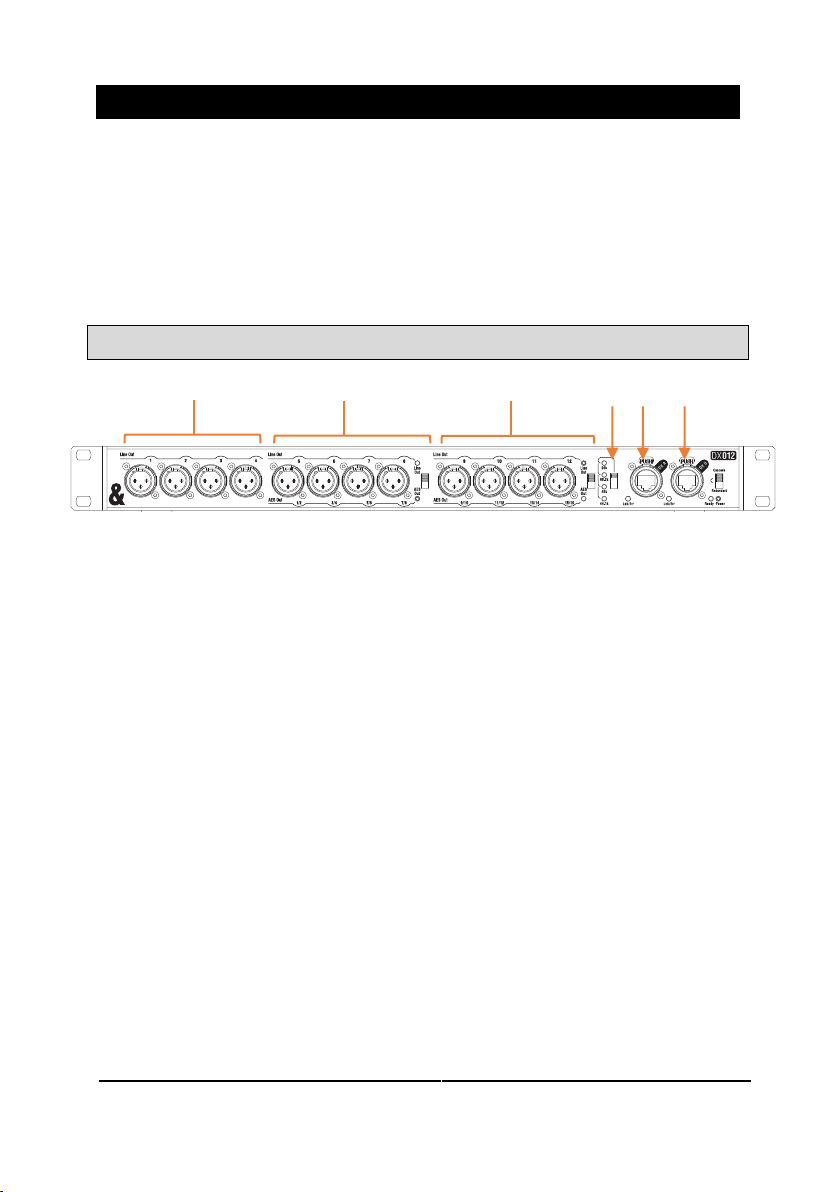
Front panel
Output sockets 1-4 Balanced analogue XLR outputs operating at
nominal +4dBu level.
Output sockets 5-8 Balanced analogue XLR outputs operating at
nominal +4dBu level, configurable to stereo AES outputs 1-8. Use the
recessed switch to choose analogue or AES digital operation.
Output sockets 9-12 Balanced analogue XLR outputs operating at
nominal +4dBu level, configurable to stereo AES outputs 9-16. Use the
recessed switch to choose analogue or AES digital operation.
Sample Rate Global selection for sample rate of the AES outputs -
44.1kHz, 48kHz, 88.2kHz or 96kHz.
DX A EtherCon port for connection to the mixing system.
DX B EtherCon port for daisy chaining of a second unit or cable
redundancy. Switch to Redundant for 2 cable connection to compatible
hardware e.g. dLive S Class or DX Link card. Switch to Cascade for connection
to a second DX012, DX168 or DX164-W unit.
Page 2
DX012 Getting Started Guide
AP11841 Issue 1
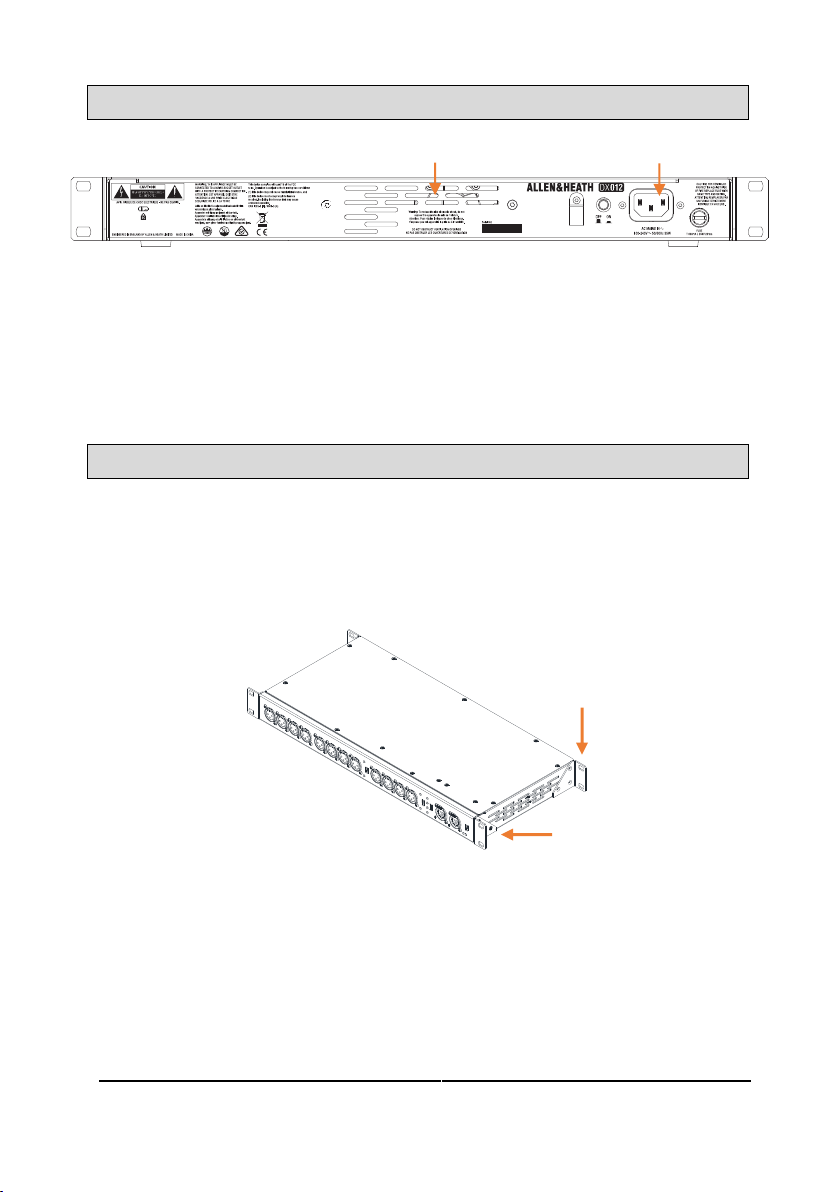
Rear panel
Vents Ensure good ventilation at the sides and back of the unit. Avoid
obstruction of vents while operating. Avoid dirt or liquid ingress.
Mains power input Switch, IEC connector and fuse for the built-in
universal voltage PSU. This accepts voltages from 100 to 240V AC 50/60Hz.
Secure the cable to the plastic P-clip using a T20 screwdriver.
Rack ears
The rack ears can be reversed so the unit is mounted with the XLR connectors
facing the rear of the rack. Using a Torx T8 driver, remove the 3x M3 screws
holding the rack ears in place on each side, reposition the rack ears as shown
below, and secure them again using the same screws.
Only use the M3x5mm countersunk screws provided with the unit.
Alternative
position (rear
mounting)
Default
position
Page 3
DX012 Getting Started Guide
AP11841 Issue 1
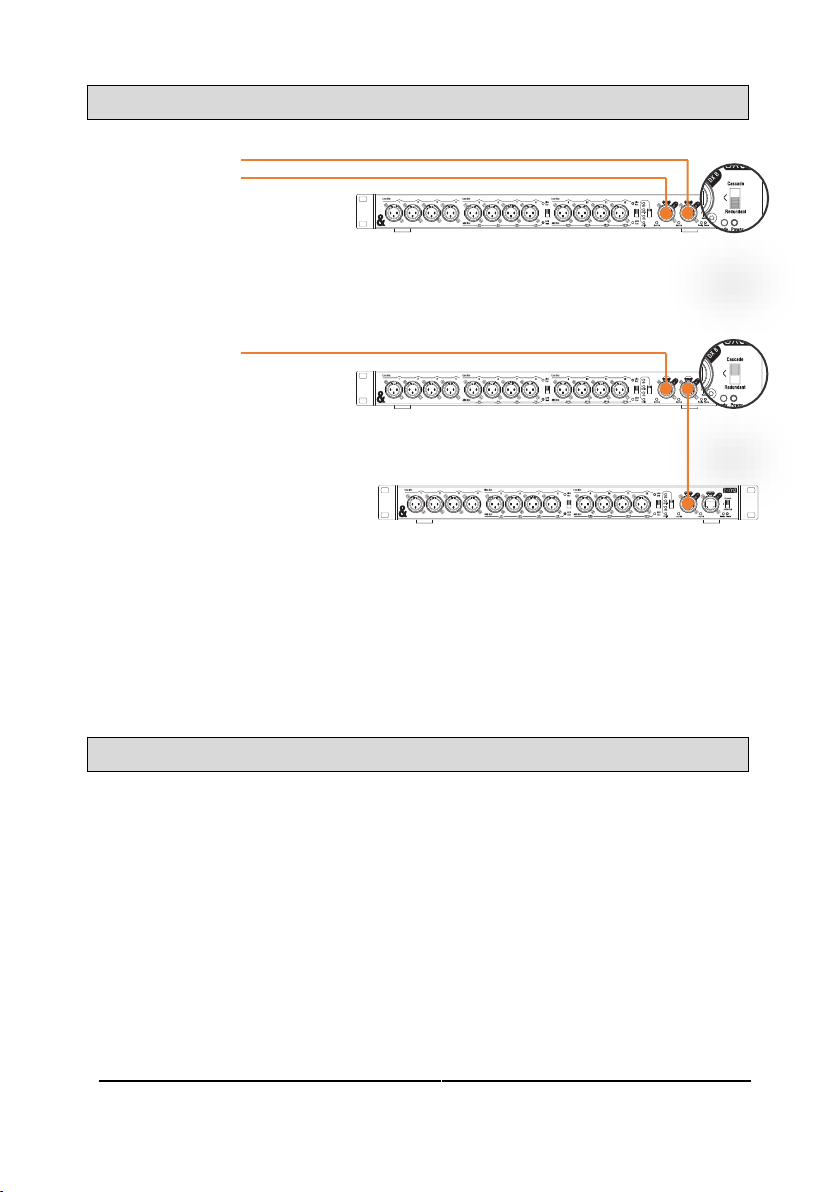
Connection
Redundant mode – to compatible hardware only
Cascade mode – add second DX012, DX168 or DX164-W
DX012 requires dLive firmware V1.8 or higher / SQ firmware V1.4 or
higher.
Cables
Cat5e or higher STP cable is required for connections, with a maximum cable
length of 100m per connection.
Allen & Heath can provide a number of Cat6 cables suitable for use with the
DX012:
AH10887-A 100m drum of CAT6 cable with Neutrik EtherCon locking connectors
AH10886-A 80m drum of CAT6 cable with Neutrik EtherCon locking connectors
AH10885-A 50m drum of CAT6 cable with Neutrik EtherCon locking connectors
AH10884-A 20m drum of CAT6 cable with Neutrik EtherCon locking connectors
Contact your local A&H dealer for more information.
dLive S Class
Surface / MixRack,
DX Hub (x2), or DX
Link card only
dLive Surface /
MixRack, DX Hub,
DX Link card, SLink
port, or GX4816
Page 4
DX012 Getting Started Guide
AP11841 Issue 1
Specification
Digital Outputs
AES3 2 Ch XLR, 2.5V balanced, terminated 110Ω
Sample Rate
44.1kHz, 48kHz, 88.2kHz, 96kHz
Analogue XLR Outputs
Balanced, Relay protected
Output Impedance
<60Ω
Nominal Output
+4dBu = 0dB meter reading
Maximum Output Level
+22dBu
Residual Output Noise
-95dBu (22Hz-22kHz)
THD+N
-98dB (0dBu, 1kHz)
Operating Temperature Range
0°C to 40°C (32°F to 104°F)
Power
Mains Voltage Operating Range
100-240V AC, 50/60Hz
Mains Power Consumption
35W max
Dimensions and Weight
Width x Depth x Height x Weight
DX012
482.6 x 48.2 x 214.7 mm x 2.95kg
(19” x 1.9” x 8.5” x 6.5lbs)
DX012 (boxed)
600 x 335 x 150 mm x 4.1kg
(23.6” x 13.2” x 5.9” x 9lbs)
Read the Safety Instructions Sheet included with the product and the information printed on the panel before operating.
A limited one year manufacturer’s warranty applies to this product, the conditions of which can be found at:
www.allen-heath.com/legal
By using this Allen & Heath product and the software within it you agree to be bound by the terms of the relevant End
User Licence Agreement (EULA), a copy of which can be found at: www.allen-heath.com/legal
Register your product with Allen & Heath online at: http://www.allen-heath.com/support/register-product/
Check the Allen & Heath website for the latest documentation and software updates
ALLEN&HEATH
Copyright © 2019 Allen & Heath. All rights reserved
 Loading...