


IEEE 802.11n Wireless Series
Long-Range USB Adapter
User Manual
Version: 2.0
Date: January 13, 2009

FCC Certifications
Federal Communication Commission Interference Statement
This equipment has been tested and found to comply with the limits for a Class B digital device, pursuant to Part 15 of the FCC Rules. These limits are designed to provide reasonable protection against harmful interference in a residential installation. This equipment generates, uses and can radiate radio frequency energy and, if not installed and used in accordance with the instructions, may cause harmful interference to radio communications. However, there is no guarantee that interference will not occur in a particular installation. If this equipment does cause harmful interference to radio or television reception, which can be determined by turning the equipment off and on, the user is encouraged to try to correct the interference by one of the following measures:
-Reorient or relocate the receiving antenna.
-Increase the separation between the equipment and receiver.
-Connect the equipment into an outlet on a circuit different from that to which the receiver is connected.
-Consult the dealer or an experienced radio/TV technician for help.
This device complies with Part 15 of the FCC Rules. Operation is subject to the following two conditions: (1) This device may not cause harmful interference, and (2) this device must accept any interference received, including interference that may cause undesired operation.
FCC Caution: Any changes or modifications not expressly approved by the party responsible for compliance could void the user's authority to operate this equipment.
IMPORTANT NOTE:
FCC Radiation Exposure Statement:
This equipment complies with FCC radiation exposure limits set forth for an uncontrolled environment. This equipment should be installed and operated with minimum distance 20cm between the radiator & your body.
This transmitter must not be co-located or operating in conjunction with any other antenna or transmitter.
January 13, 2009 / Version: 2.0 |
i |

CE Mark Warning
This equipment complies with the requirements relating to electromagnetic compatibility, EN 55022 Class B for ITE, the essential protection requirement of Council Directive 89/336/EEC on the approximation of the laws of the Member States relating to electromagnetic compatibility.
Company has an on-going policy of upgrading its products and it may be possible that information in this document is not up-to-date. Please check with your local distributors for the latest information. No part of this document can be copied or reproduced in any form without written consent from the company.
Trademarks:
All trade names and trademarks are the properties of their respective companies. Copyright © 2009, All Rights Reserved.
低功率射頻電機須忍受合法通信或工業、科學及醫療用電波輻射性電機設備之干擾。
January 13, 2009 / Version: 2.0 |
ii |
TABLE OF CONTENTS |
|
OVERVIEW .......................................................... |
1 |
UNPACKING INFORMATION ................................................................................................. |
1 |
INTRODUCTION TO THE IEEE 802.11N WIRELESS USB ADAPTER ........................................ |
1 |
KEY FEATURES ................................................................................................................ |
2 |
INSTALLATION GUIDE ........................................ |
2 |
SOFTWARE INSTALLATION ................................................................................................. |
2 |
MANAGEMENT GUIDE......................................... |
5 |
MAKING A BASIC NETWORK CONNECTION .......................................................................... |
5 |
Select a configuration tool .......................................................................................... |
5 |
To connect with Microsoft Zero Configuration tool...................................................... |
5 |
To connect with 802.11n Wireless LAN Utility ............................................................ |
7 |
INTRODUCTION TO THE 802.11N WIRELESS LAN UTILITY .................................................... |
8 |
Interfaces.................................................................................................................... |
8 |
Link Status Information ............................................................................................... |
9 |
Profile ....................................................................................................................... |
10 |
Network .................................................................................................................... |
19 |
Advanced.................................................................................................................. |
20 |
Statistics ................................................................................................................... |
21 |
WMM ........................................................................................................................ |
22 |
WPS ......................................................................................................................... |
24 |
CCX .......................................................................................................................... |
35 |
Radio On/Off............................................................................................................. |
35 |
AP MODE MANAGEMENT GUIDE FOR WINDOWS 2000/XP/VISTA ......................................... |
36 |
Config ....................................................................................................................... |
38 |
Security Setting ........................................................................................................ |
40 |
Access Control ......................................................................................................... |
41 |
MAC Table................................................................................................................ |
42 |
Event Log ................................................................................................................. |
43 |
Statistics ................................................................................................................... |
44 |
January 13, 2009 / Version: 2.0 |
iii |
Overview
Thank you for purchasing this product. Read this chapter to know about your IEEE 802.11n Wireless USB Adapter.
Unpacking Information
Before getting started, please verify that your package includes the following items:
1.IEEE 802.11n Wireless USB Adapter.
2.One Utility/ Manual CD.
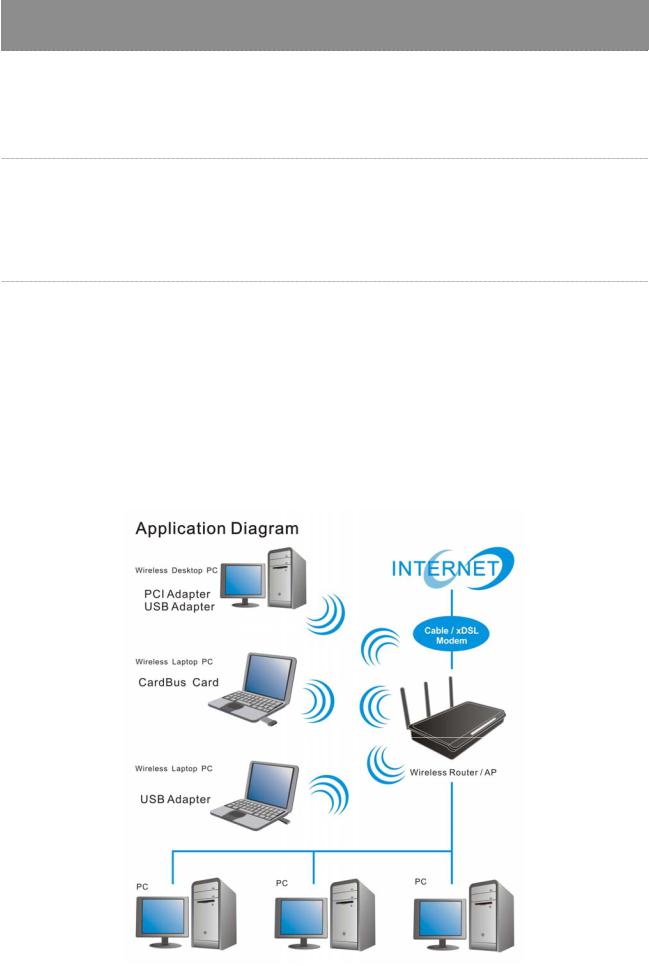
Introduction to the IEEE 802.11n Wireless USB Adapter
The IEEE 802.11n Wireless USB adapter provides users to launch IEEE 802.11n wireless network at 150 Mbps in the 2.4GHz (AWUS036NH / AWUS036NEH) or 2.4GHz & 5.8GHz (AWUS051NH) band, which is also compatible with IEEE 802.11b/g and IEEE 802.11a/b/g wireless devices at 11/54 Mbps. You can configure this adapter with ad-hoc mode to connect to other 2.4GHz (AWUS036NH/AWUS036NEH) or 2.4 GHz & 5.8GHz (AWUS051NH) wireless computers or with Infrastructure mode to connect to a wireless AP or router for accessing to Internet. This adapter includes a convenient Utility for scanning available networks and saving preferred networks that users usually connected with. Security encryption can also be configured by this utility.
January 13, 2009 / Version: 2.0 |
1 |
Key Features
yComplies with IEEE 802.11n wireless standards
y2.4GHz (AWUS036NH / AWUS036NEH) frequency band, MIMO
y2.4GHz & 5.8GHz (AWUS051NH) frequency band, MIMO
yComplies with USB 2.0
yHigh speed transfer data rate up to 150 Mbps
ySupports auto-installation
ySupports wireless data encryption with 64/128-bit WEP, WPA, WPA2, TKIP, AES
ySupports QoS: WMM, WMM-PS
ySupports multiple BSSID
ySupports driver for Windows 2000, XP 32/64, Vista 32/64, Windows 7, Linux (2.4.x/2.6.x), and Mac (10.3.x/10.4.x/10.5.x/10.6.x) Power PC & PC
Installation Guide
Software Installation
Note:
yFor Linux or Mac driver installation guide, please refer to the instruction in
/Driver/Linux/README or /Driver/Mac/README in the CD-Rom.
yThe following driver installation guide uses Windows XP as the presumed operation system. The procedures and screens in Windows 2000 and Vista are familiar with Windows XP.
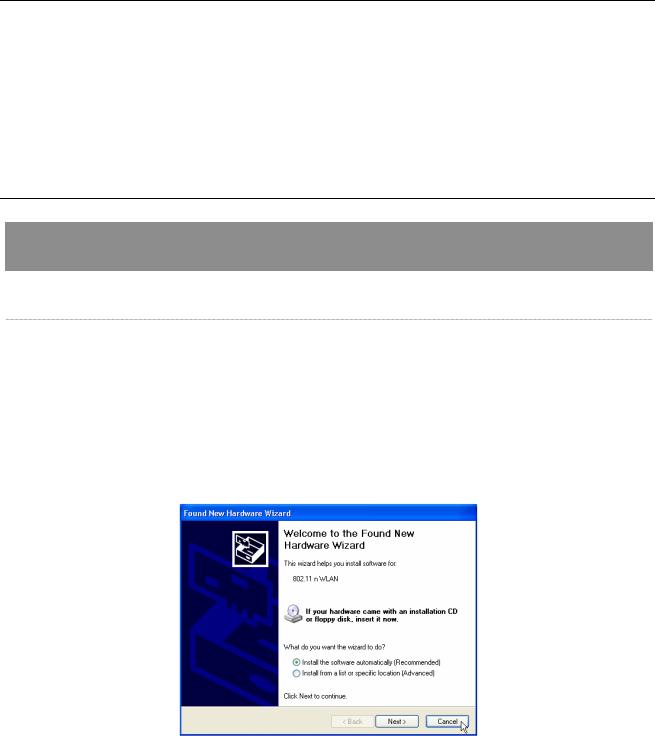
1.The system finds the newly installed device automatically. Click Cancel to close this window.
2.Insert the CD-Rom that came with this product to your CD-Rom drive. The menu window pops up automatically. Please click the Driver button of this product.
Note: If the CD-Rom fails to auto-run, please click on My Computer > your CD-Rom drive > (folder of this product) > Driver then double-click the Setup icon to start this menu.
January 13, 2009 / Version: 2.0 |
2 |

3.Select if you are going to install the driver and wireless utility; or install the driver only.
4.Select if you are going to configure your wireless network with this device or with Microsoft Zero Configuration tool.
Note: This can be changed after installing this software.
January 13, 2009 / Version: 2.0 |
3 |

5.Click the Install button to start installing.
6.Click the Finish button to complete installation.
January 13, 2009 / Version: 2.0 |
4 |
Management Guide
Read this chapter to understand the management interface of the device and how to manage the device.
Making a Basic Network Connection
Select a configuration tool
In the following instruction for making a network connection, we use the Utility we provide to configure your wireless network settings.
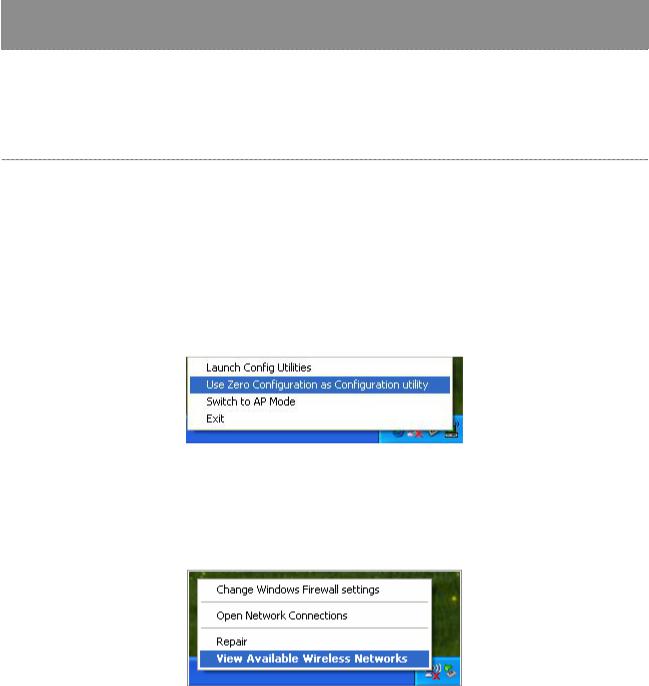
Note: You could use either the software we provide or Microsoft Zero Configuration tool to configure this adapter. To switch between the two configuration tools, please right click on the  icon on system tray to select.
To connect with Microsoft Zero Configuration tool
After specifying the Microsoft Zero Configuration tool to configure your wireless network, right
click on the  icon on system tray. Select View Available Wireless Networks to specify your wireless network.
January 13, 2009 / Version: 2.0 |
5 |

The tool shows the available wireless networks. Select your demanding network to connect with. To connect to a wireless network with more security settings, please click Change advanced settings to be compatible with your wireless network security settings.
January 13, 2009 / Version: 2.0 |
6 |
To connect with 802.11n Wireless LAN Utility
We provide this Utility for users to connect to a wireless network easily. It provides more information and configuration for this adapter. As default, the Utility is started automatically upon starting your computer and connects to a connectable wireless network with best signal strength and with no security setting. Right click on the  icon in the system ray and select Launch Config utilities if the Utility does not start. Please refer to the following chapters to get information regarding to the functions of this Utility.
January 13, 2009 / Version: 2.0 |
7 |
 User Manual")
Introduction to the 802.11n Wireless LAN Utility
Note: The Utility in Linux and Mac are different from the following.
Interfaces
This Utility is basically consisted of three parts:
1
2
3
1.Functional Buttons: on top of the window. You can click each button to access each configuration window.
Note: Click  to enable/disable wireless connection status.
2.Configuration Column: Center of the Utility window. Make your changes for each function in this part.
3.Link Status Information: bottom of the utility window. Shows the connection status and system information.
January 13, 2009 / Version: 2.0 |
8 |

Link Status Information
A C
D
B
A.Network Information:
Items |
Information |
|
Status |
Show the connecting status. Also shows the SSID while connecting to a |
|
valid network. |
||
|
||
Extra Info |
Display link status in use. |
|
Channel |
Display current channel in use. |
|
Authentication |
Authentication mode in use. |
|
Encryption |
Encryption type in use. |
|
Network Type |
Network type in use. |
|
IP Address |
IP address of current connection. |
|
Sub Mask |
Subnet mask of current connection. |
|
Default Gateway |
Default gateway of current connection. |
|
Link Speed |
Show current transmit rate and receive rate. |
|
Throughput |
Display transmit and receive throughput in Mbps. |
B.HT: Display current HT status in use, containing BW, GI, MCS, SNR0, and SNR1 value.
C.Link Quality and Strength Bar:
Items |
Information |
|
Link Quality |
Display connection quality based on signal strength and TX/RX packet |
|
error rate. |
||
|
||
Signal Strength 1 |
Receive signal strength 1. |
|
Noise Strength |
Display noise signal strength. |
User can choose to display Signal and Noise Strength as percentage or dBm format by mark the dBm checkbox.
D. Statistics:
Items |
Information |
Link Speed |
Show current transmit rate and receive rate. |
Throughput |
Display transmit and receive throughput in Mbps. |
January 13, 2009 / Version: 2.0 |
9 |

Profile
This profile page allows users to save different wireless settings, which helps users to get access to wireless networks at home, office or other wireless network environments quickly.
A C
B
A.Profile List: The list shows all the profiles you have added before.
B.Buttons: You can click on these buttons to add a new profile, edit, delete or activate an old profile.
Note: For Vista user, there are extra  and
and  buttons in this feature. Click on these buttons to import or export the selected profile.
C.Profile Information: While you select a profile in the profile list, you can see the profile information shows on here.
Items |
Information |
|
Profile Name |
The name of the selected profile. |
|
SSID |
The SSID of the wireless system. |
|
Network Type |
Shows Infrastructure / Ad-hoc to indicate the network type of the |
|
selected profile. |
||
|
||
Authentication |
Shows the authentication mode in use. There are total 8 modes: Open, |
|
Shared, LEAP, WPA, WPA-PSK, WPA2, WPA2-PSK and WPA-NONE. |
||
|
||
Encryption |
Shows the encryption mode in use. There are total 4 modes: None, |
|
WEP, TKIP and AES. |
||
|
||
Use 802.1x |
Shows Yes/No to indicate whether the selected profile use the 802.1x |
|
feature or not. |
||
|
||
Tx Power |
Shows the transmit power in use. There are total 7 types: Auto, 100%, |
|
75%, 50%, 25%, 10% and Low. |
||
|
||
Channel |
Shows the channel in use (1~14) for Ad-Hoc mode. |
|
Power Save Mode |
Shows the power save mode in use. Two selections: CAM (Constantly |
|
Awake Mode) and PSM (Power Saving Mode). |
||
RTS Threshold |
Shows the RTS threshold value in use. |
|
Fragment Threshold |
Shows the fragment threshold in use. |
January 13, 2009 / Version: 2.0 |
10 |
To add a new profile:
1.Click the Add button. The add profile window pops up.
Note: you could also add a new profile quickly by selecting an available network in the Network function then click the Add to Profile button.
← Click on these tabs
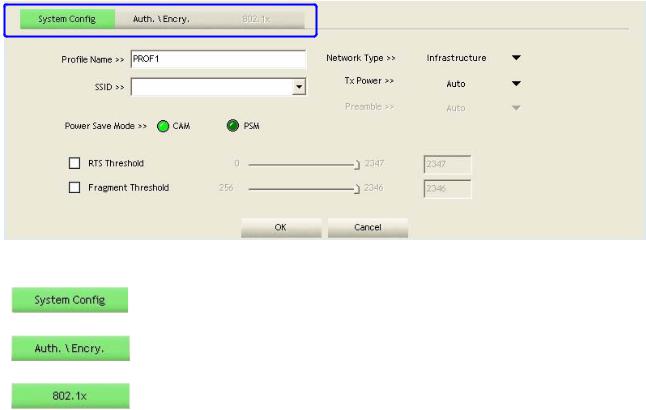
2. There are three tabs on the window:
Settings for: Profile Name, SSID, Network Type, Tx Power, Preamble, Power Save Mode, RTS Threshold, and Fragment Threshold.
Settings for: Authentication, Encryption, Preshared Key, and WEP Key.
Settings for: EAP Method, Tunnel Authentication, and Session Resumption. For different EAP Method, you also have to configure different require of ID/Password, Client Certificate, or Server Certificate.
Please follow the steps below to fill in the information gradually.
January 13, 2009 / Version: 2.0 |
11 |
 Loading...