

Page 1

AHPE303 HomePlug AV 200 Ethernet Adapter User Manual
AHPE305
HomePlug AV 200M Ethernet
User Manual
Last revised on December 2011
Adapter
Page 2

HomePlug AV 200 Ethernet Adapter User Manual
Safety Warnings
1. Do not use the adapter in high humidity or high temperature environment.
2. Do not open or repair the case yourself.
3. Avoid using this product and all its accessories outdoor.
4. Place the adapter on a stable surface.
5. Only “AHPE305 HomePlug AV” compliant Powerline Communication (PLC) adapter for remote
access is necessary.
6. Plug your AHPE305 HomePlug AV device directly to the AC outlet on the wall. It is best to
avoid using extension power cable as it may possess noise filter or surge protector functions that
may cause interference that may impact the performance of the device.
Page 3

HomePlug AV 200 Ethernet Adapter User Manual
Table of Contents
Chapter 1: Product ..................................................................................1
Introduction
Specifications
Features
.......................................................................................1
.....................................................................................2
.............................................................................................3
Chapter 2: Installing the Router ..............................................................4
Package
Connecting the AHPE305 HomePlug
Contents
Power
...............................................................................4
Adapter
....................................6
Connection ........................................................................
LAN Connection............................................................................7
Networking Setup
........................................................................
Setup Utility .................................................................................9
6
8
Quick Start (Setup Powerline
Push Button
Application
Powerline Network
Chapter 3:
Installation ...........................................................................
usage......................................................................
Scenarios .................................................................
Introduction to Power Packet
Different Platforms
Installation Instructions
Features of the Power Packet
Devices Supported
Using the Power Packet
...........................................................................
A. How to Set the Network Password and Form an AVLN
B. Upgrading a Device’s Firmware and PIB
Chapter 4:
Troubleshooting ...................................................................
Network) ............................................
Illustration ...................................................
Utility ................................................
Supported .........................................................
...................................................................
Utility ................................................
Utility .........................................................
..........
.................................
10
10
10
12
13
13
13
13
23
31
31
32
35
36
Page 4

Chapter 1: Product
HomePlug AV 200 Ethernet Adapter User Manual
Introduction
AHPE305 HomePlug AV 200M is a networking device that utilizes the existing wiring system as
a path to transmit data signal through the inter-conversion between digital and analog signal.
With this functionality, AHPE305 HomePlug AV devices can be plugged into an AC outlet to draw
power and at the same time establishing a network connection between two or more Ethernet
devices.
AHOE305 HomePlug AV 200M can be used to bridge any Ethernet device to your Powerline
network in your home or office. With this technology, Ethernet devices in your home or office
can equally share high speed data transmission rate without the need to spend excessive time
and money installing expensive Ethernet cable. It can be plugged into an Ethernet port on a
router to equip a network with Powerline capabilities and take advantage of the router features.
AHPE305 HomePlug AV device can also be plugged directly into a cable or DSL modem that
allows instant internet access over home Powerlines to each computer equipped with a
HomePlug AV certified Powerline network adapter. AHPE305 HomePlug AV 200M makes high-
speed modem sharing as fast and simple as plugging the devices in the wall.
~ 1 ~
Page 5

HomePlug AV 200 Ethernet Adapter User Manual
Specifications
Protocol: TDMA, CSMA/CA
Standard Ethernet specification: IEEE 802.3, IEEE 802.3x, IEEE 802.3u, Auto MDI/MDIX
Transmission Speed: 200Mbps
Optimal Coverage Range: 300M
Modulation: Supports OFDM - 1155 carriers, 1024 / 256 / 64QAM, QPSK, BPSK, and ROBO
Frequency Band: 2MHz ~ 30MHz
Security: 128-bit AES encryption over household power supplier grid
Device Port: Ethernet RJ-45
Operating System: Windows98 SE / Me/ 2000/ XP (32&64 bit)/ Vista (32&64 bit) / 7 (32&64
bit)
RAM: 64Mb
Power Supplier Input: 100~240V AC, 50~60Hz
Physical Interface:
Ethernet 10/100M (MDI/MDIX) switch
Sync button
Reset button
Power AC Plug (for AHPE305 HomePlug AV 200M Adapter only)
LED display:
Dimensions (W/D/H): 87x 55 x 27mm (for AHPE305)
Power Saving: Reduce power consumption by at least 60% during power saving mode.
Operating temperature: 0°C ~ 400°C
Storage temperature: -20°C ~ 70°C
Humidity: 10 ~ 90% non-condensing
~ 2 ~
Page 6

HomePlug AV 200 Ethernet Adapter User Manual
Features
1. Physical layer data rate up to 200Mbps over existing Powerline.
2. Uses Powerline technology that takes advantage of the unused bandwidth of the electrical
wiring in the home.
3. Ideal for Triple Play applications such as IPTV, VoIP telephony and high-speed Internet access.
4. Support 10/100 (MDI/MDIX) Ethernet switching.
5. Compliant with the HomePlug Powerline Alliance Industry specification HomePlug AV.
6. Power supplier design inside.
7. Ideal for Residential Users.
8. Power Saving mode: When PC / other Ethernet devices are completely power off or when
there is no Ethernet cable connected, HomePlug device will automatically enter power saving
mode which will help to reduce power consumption.
~ 3 ~
Page 7
Chapter 2: Installing the Router
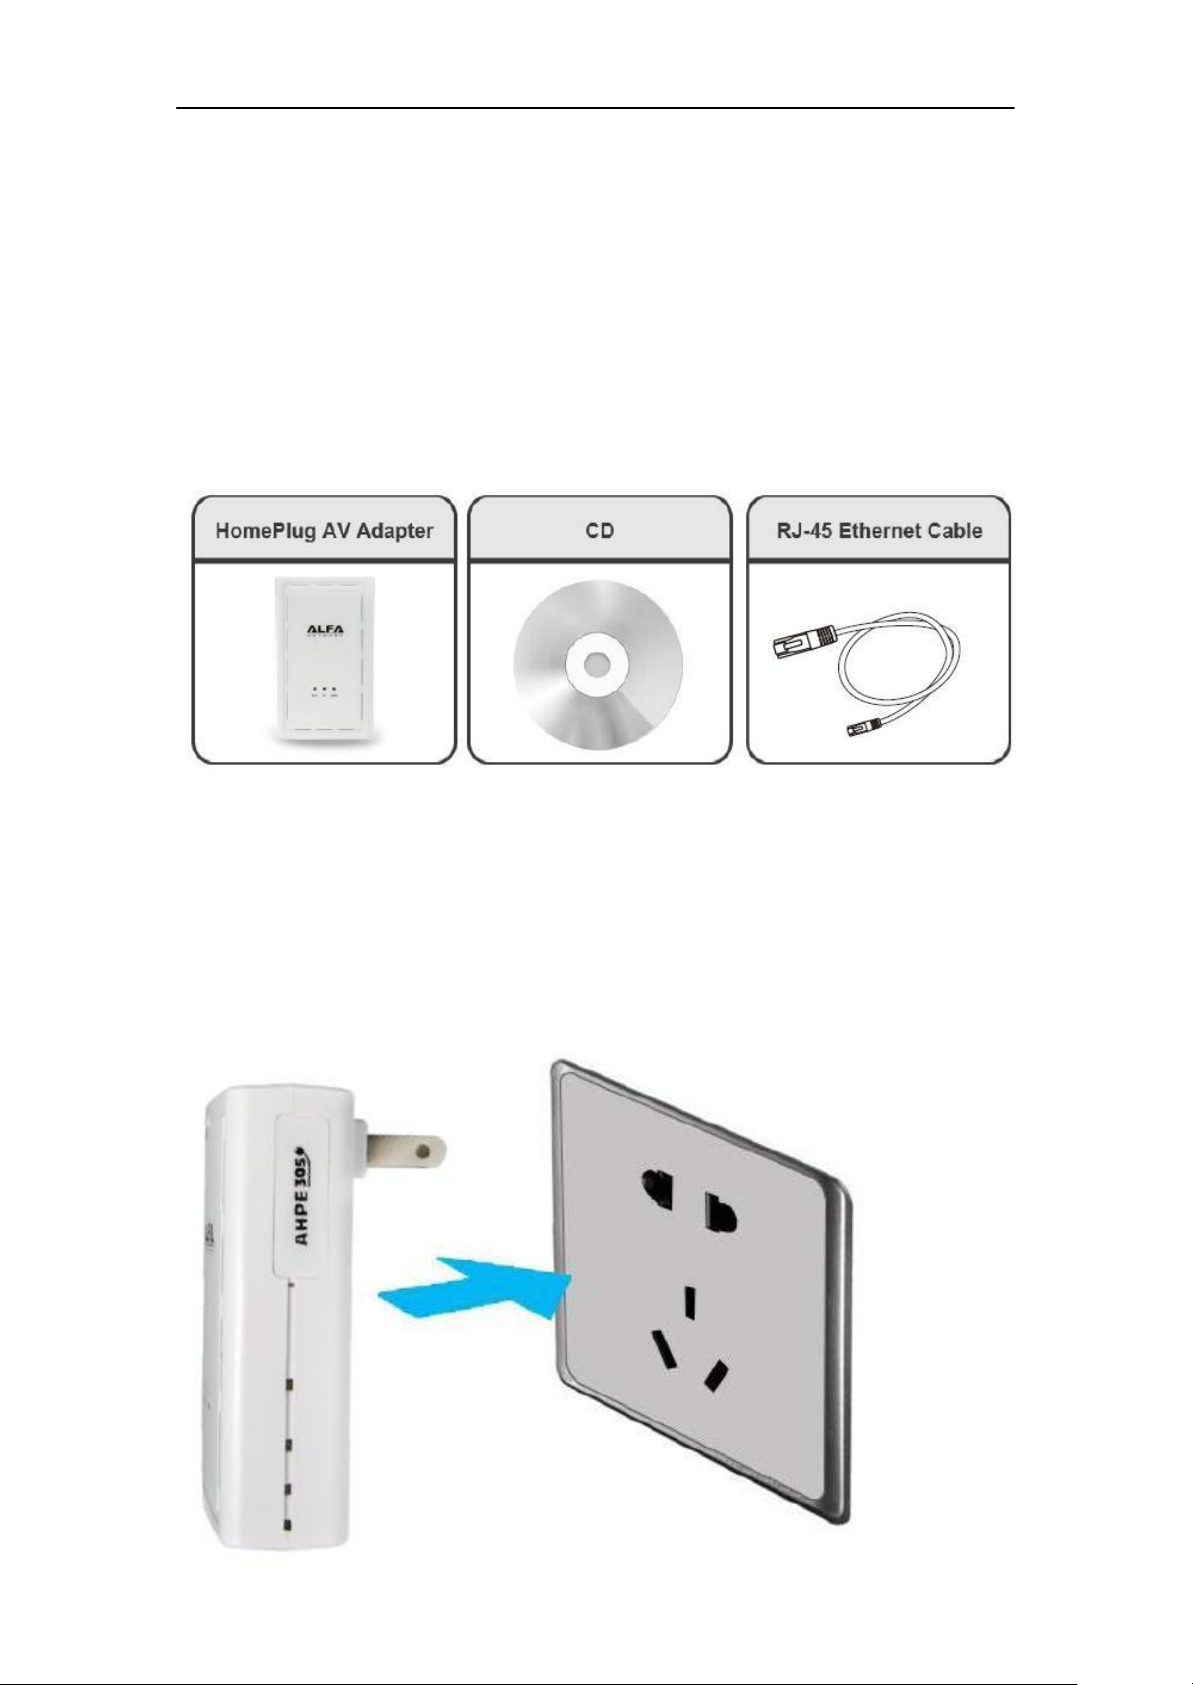
Package Contents
AHPE305
. AHPE305 HomePlug AV 200M Ethernet Adapter
. CD (containing user manual and QSG)
. Ethernet (CAT-5 LAN) cable
HomePlug AV 200 Ethernet Adapter User Manual
~ 4 ~
Page 8

Important note for using this adapter
HomePlug AV 200 Ethernet Adapter User Manual
~ 5 ~
Page 9
HomePlug AV 200 Ethernet Adapter User Manual
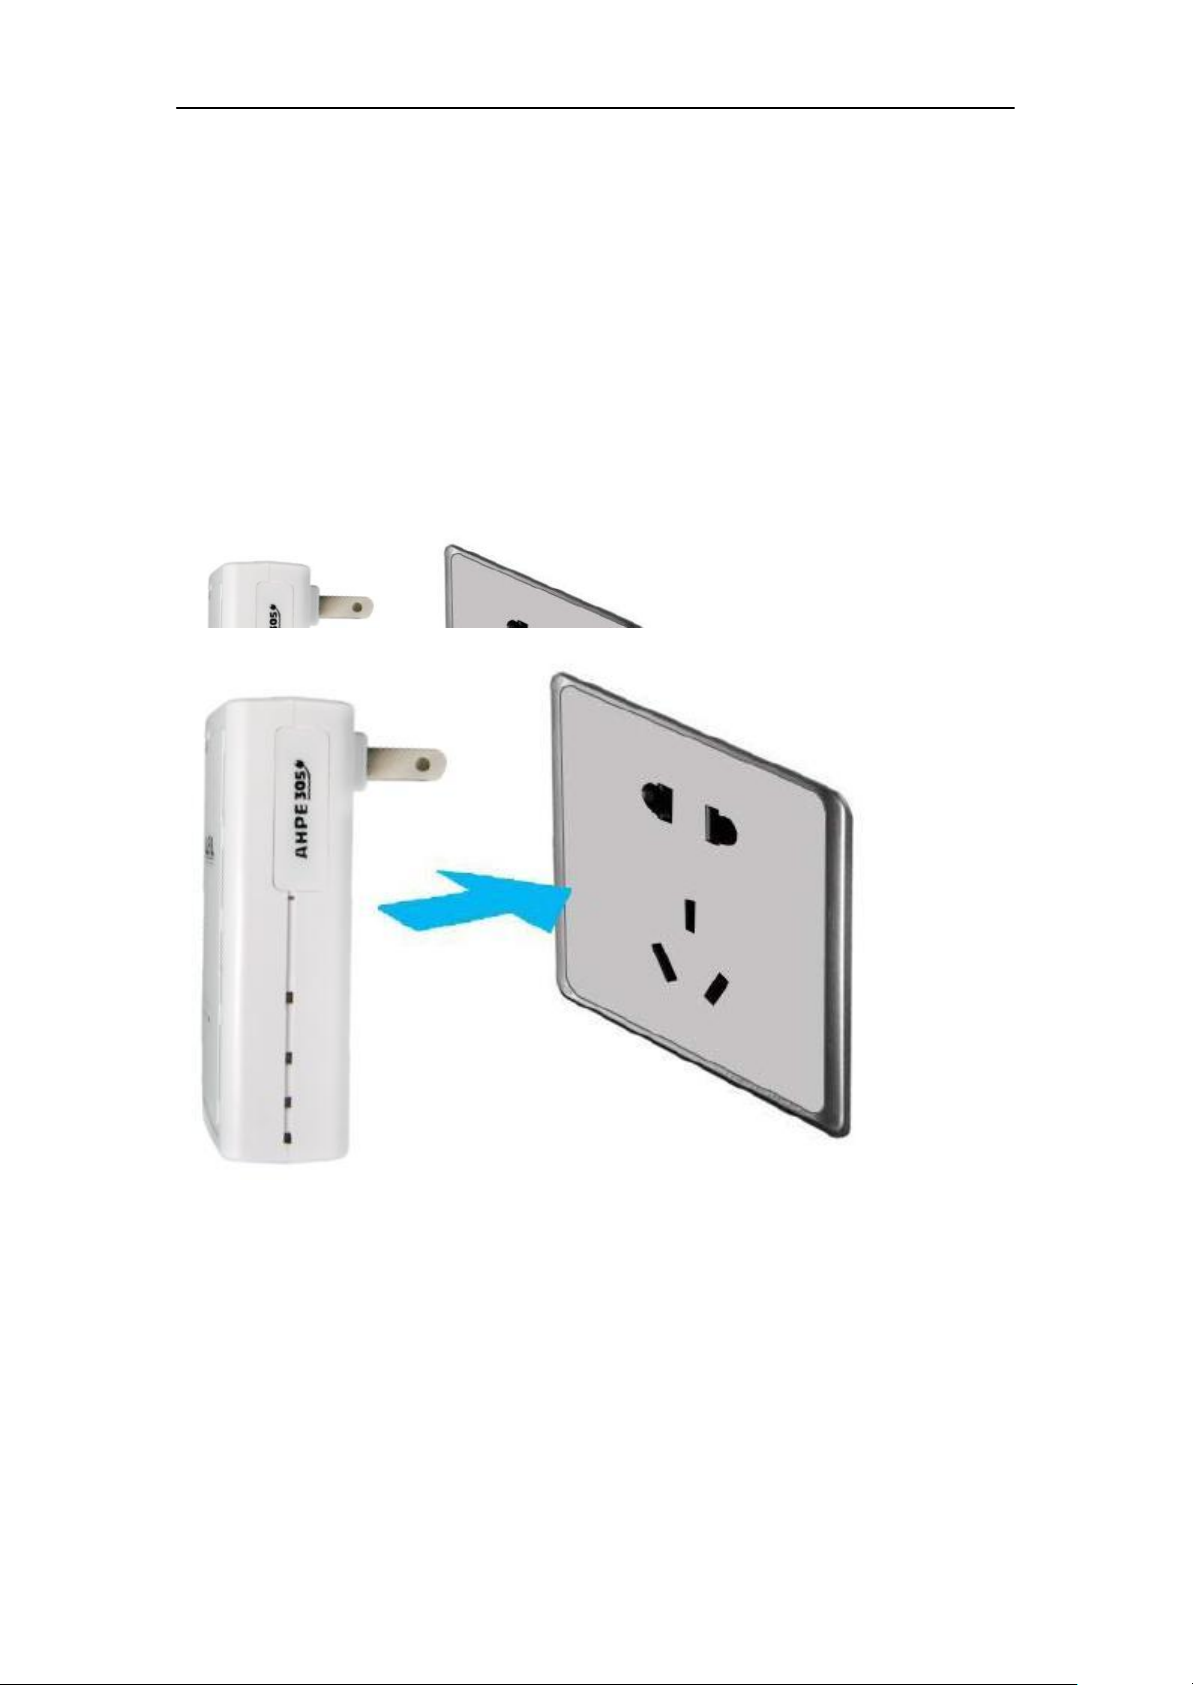
Connecting the AHPE305 HomePlug Adapter
It is easy to connect the device simply by performing the following instructions:
Power Connection
AHPE305
Plug the AHPE305 HomePlug AV 200M Ethernet Adapter into the wall outlet/socket.
Note: Plug/socket, power cable and input voltage/frequency may vary from country to
country.
~ 6 ~
Page 10
HomePlug AV 200 Ethernet Adapter User Manual
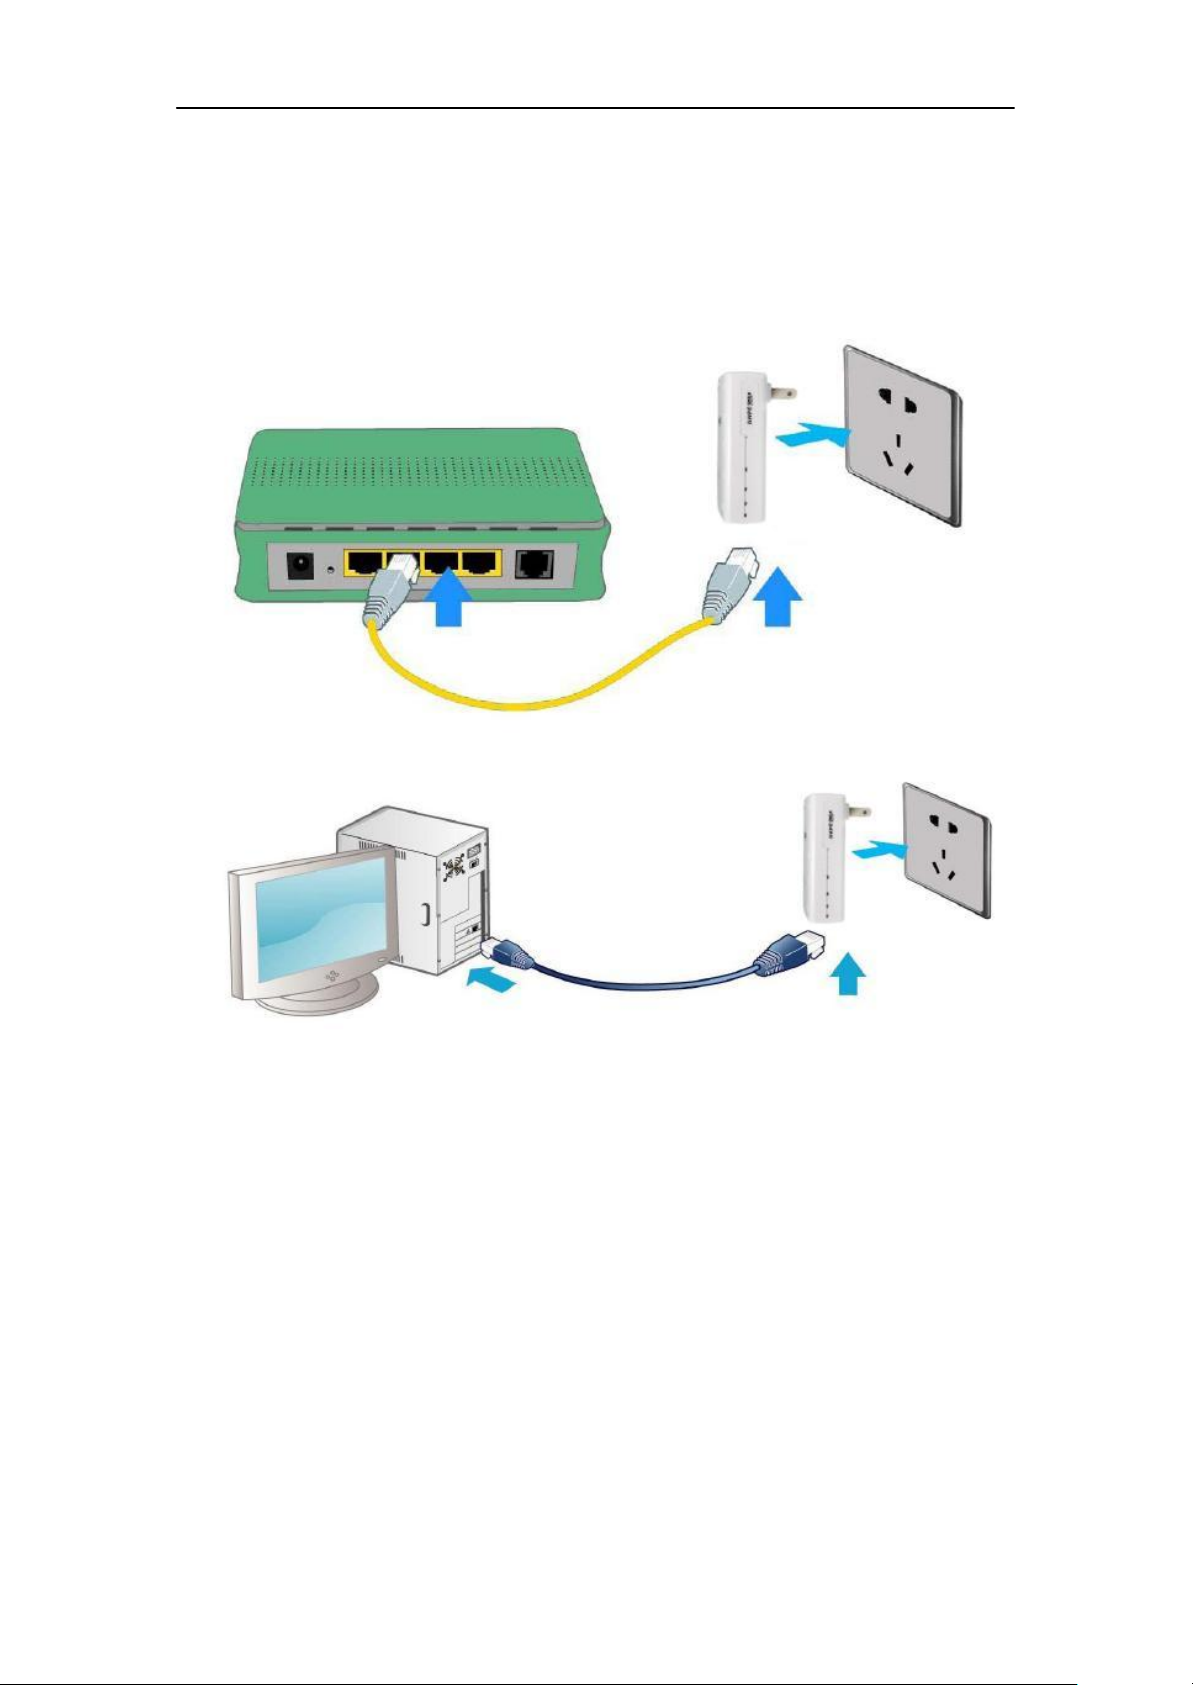
LAN Connection
Connect the supplied RJ-45 Ethernet cable to the Ethernet port on AHPE305 HomePlug AV 200M
Ethernet bridge/adapter and the other side to the device’s Ethernet interface.
~ 7 ~
Page 11

HomePlug AV 200 Ethernet Adapter User Manual
Networking Setup
Refer to the following steps:
1. Connect a network cable to the adapter or bridge and then plug the device into a power
socket.
2. Then connect the device to a PC, modem, router or set-top-box.
3. Create a secure network by simply pushing the SYNC button for 1~3 seconds.
~ 8 ~
Page 12

HomePlug AV 200 Ethernet Adapter User Manual
Setup Utility
After hardware installation is completed, insert the CD-ROM to the CD-ROM drive to
perform Setup Utility for network configuration. The Setup Utility will auto-run. Follow the
step-by-step configuration wizard, the utility will guide you complete the basic network
configuration.
See Installation Instructions section.
~ 9 ~
Page 13

HomePlug AV 200 Ethernet Adapter User Manual
Quick Start (Setup Powerline Network)
Push Button usage
Sync Button is used to add a AHPE305 HomePlug device to a Powerline network or enable it
to join a network by pressing the Sync Button of the device to turn it into Broadcast state or Join
state. There are 3 types of Sync Button trigger states:
1. Broadcast State: Enable AHPE305 HomePlug AV device to provide information for
another AHPE305 HomePlug AV device to join its Powerline network group
(works even if it is the only device existing within the network group).
2. Join State: This allows an ungrouped AHPE305 HomePlug AV device to join an existing
powerline network group.
3. Ungroup State: Press the Sync Button for more than 10 seconds to detach the device from its
network group.
Application Scenarios
Scenario 1: An AHPE305 HomePlug AV device A wants to form a network group with another
AHPE305 HomePlug AV device B. You can assign whichever device (A or B) to be in the Broadcast
State and the other in the Join State.
Example:
1. Press the Sync Button of device A for 1~3 seconds to turn it into Broadcast State, you should
find the Power LED blinks steadily signifying it is in Broadcast state.
2. Press the Sync Button of device B for 1~3 seconds to turn it into Join State, you should find
the Power LED blinks steadily signifying it is in Join state.
3. Wait for both devices to boot again (all LEDs will turn off and on) and when the PLC LEDs of
both devices lit steadily, you will now have these devices being in the same network group.
Scenario 2: An AHPE305 HomePlug AV device wants to join an existing network group BC Device
A wants to join a network group “BC” currently consisting of device B and device C. Any devices
within the “BC” group can become the “Broadcast State” and device A will be the “Join State”.
Example:
1. Press the Sync Button of device A for more than 10 seconds to make sure that it is detached
completely from any possible network group.
2. Press the Sync Button of device B or C of the BC network group for 1~3 seconds to turn it into
Broadcast State, you should find the Power LED blinks steadily signifying it is in Broadcast state.
3. Press the Sync Button of device A for 1~3 seconds to turn it into Join State, you should find
the Power LED blinks steadily signifying it is in Join state.
4. Wait for the devices to boot again and when the PLC LEDs of both devices lit steadily, you will
now have device A joined with the BC network group.
~ 10 ~
Page 14

HomePlug AV 200 Ethernet Adapter User Manual
Scenario 3: An AHPE305 HomePlug AV device A of network group AD wants to join an
existing network group BC. For a device which already belongs to a network group is to join
with a different
network group, that device has to be ungrouped from its current attached group first.
~ 11 ~
Page 15

HomePlug AV 200 Ethernet Adapter User Manual
Example:
1. Press the Sync Button of device A for more than 10 seconds to ungroup it from network
group AD.
2. Then press the Sync Button of device (B or C) of network group BC for 1~3 seconds to turn it
to Broadcast State, you should find the Power LED blinks steadily signifying it is in Broadcast
state.
3. Press the Sync Button of device A again for 1~3 seconds to turn it to Join State, you should
find the Power LED blinks steadily signifying it is in Join state.
4. Wait for the Sync LED of both devices A and (B or C) lit steadily. Now you will have device A
join the network group BC.
Powerline Network Illustration
~ 12 ~
Page 16

Chapter 3: Installation
HomePlug AV 200 Ethernet Adapter User Manual
Introduction to Power Packet Utility
The Power Packet Utility(PPU)is an End User Configuration Management Software tool that can
be on Atheros AHPE305 HomePlugAV as well as the AHPE305 HomePlug1.0 devices. The Utility
tracks and scans the AVLN and displays the list of Atheros HomePlugAV as well as the
HomePlug1.0 devices available in the network. The utility is fully customizable to fit your
companies’ look and feel.
Different Platforms Supported
The Power Packet Utility can be used on the following Windows platforms
Windows 7
Windows XP 32-Bit/ Windows XP 64-Bit
Vista 32-Bit/ Vista 64-Bit
All PPU screen shots in this document are generated from Windows XP, screen shots for
Windows Vista or Windows 7 will be similar.
Installation Instructions
Before installing a new version of the PPU, you must manually remove the previously installed
version of the PPU using the Microsoft Windows© Add or Remove Programs application.
Place the Power Packet Utility auto-installation CD into your CD-ROM/DVD-ROM drive and click
on PPU Installation to run and follow the installation wizard through the installation process.
~ 13 ~
Page 17

HomePlug AV 200 Ethernet Adapter User Manual
On workstations running Microsoft Windows Vista© or Microsoft Windows 7© operating
systems, the security configuration settings require the user to have Administer privileges to
install the PPU. Security settings such as “User Account Control (UAC)” may result Windows
authorization messages to be displayed during the installation process. If you are prompted for
an administrator password or confirmation, type the password or provide confirmation.
~ 14 ~
Page 18

HomePlug AV 200 Ethernet Adapter User Manual
The PPU installer will display an installation warning message if it discovers that a version of the
PPU is already installed on the workstation. Refer to step 1 if the following message box is
displayed.
However, if the same version of the PPU has already been installed, the Installer will not display
the above dialogue and it will not be necessary to manually remove the previous PPU installation.
Instead, the installer will display a ‘repair’ or ‘remove’ dialogue. The repair option re-installs the
PPU software at the previously installed folder location. The remove option uninstalls the PPU
software.
The PPU application requires the WinPcap© software product available from CACE Technologies
to be installed. For more information about WinPcap software refer to http://www.winpcap.org.
Please read and accept the WinPcap License agreement. For later reference, the WinPcap license
agreement and its copyright notices can also be found on the PPU application “about” menu. If
the WinPcap software has not been installed on the workstation, the PPU installer will launch the
WinPcap installer that is included on the PPU installation CD. If the WinPcap installer detects that
an old version of WinPcap is installed on the workstation, the installer will request the removal
the old WinPcap version before installing the newer WinPcap software.
~ 15 ~
Page 19

HomePlug AV 200 Ethernet Adapter User Manual
~ 16 ~
Page 20

HomePlug AV 200 Ethernet Adapter User Manual
~ 17 ~
Page 21

HomePlug AV 200 Ethernet Adapter User Manual
After the WinPcap software has been installed on the workstation, the Power Packet Utility
Setup Wizard will be automatically invoked.
~ 18 ~
Page 22

HomePlug AV 200 Ethernet Adapter User Manual
The user will be presented with the End User License Agreement. After reading the license
agreement, if ‘I Do not Agree’ is selected the installation will exit without installing the PPU
Software. If the ‘I Agree’ option is selected the installer will continue to the “Select Installation
Folder” dialogue.
~ 19 ~
Page 23

HomePlug AV 200 Ethernet Adapter User Manual
The default location is C:\Program Files\PPU\Power Packet Utility. If the PPU is being installed by
the Admin User, the PPU installer will create the shortcut to the PPU application on the desktop
of Admin User. If you want to create the short cut on the desktop for all Account Users of the
workstation, select the ‘Everyone’ Option during the installation process.
Note: All User Accounts that will be running the PPU application must have shared access to the
database file created by the PPU. Ensure that the Windows “Simple File Sharing” configuration
setting is enabled to allow multiple user accounts to have access to the PPU application. If the
PPU application is unable to access the PPU database file with Simple File Sharing enabled, the
file permissions of the PPU database file may need to be explicitly set to read, write, and modify
access. The PPU database file, Power Packet Utility data is located at:
For Microsoft Windows XP, the database file is located at:
\Documents and Settings\All Users\Application Data\PPU
For Microsoft Windows Vista and Microsoft Windows 7, the database file is located at:
\Users\public\Application Data\PPU
~ 20 ~
Page 24

HomePlug AV 200 Ethernet Adapter User Manual
After confirming the Installation, the PPU will continue with the software installation, install the
software at the specified folder location and display the “Installation Complete” dialogue.
~ 21 ~
Page 25

HomePlug AV 200 Ethernet Adapter User Manual
~ 22 ~
Page 26

HomePlug AV 200 Ethernet Adapter User Manual
Features of the Power Packet Utility
The Power Packet Utility Main tab displays information of the local devices as well as the
information of the different HomePlugAV or HomePlug1.0 devices found in the AVLN. The Utility
displays various information such as Device Name, Device Password, Quality, Rate (Mbps), and
MAC Address for the remote devices found in the AVLN.
The utility allows the user to understand whether the devices are in the public network or Private
Network using the displayed ‘Network Type’ displayed by the tool.
Figure 1: Main Tab displays the information of the local device as well as for the Remote
devices
~ 23 ~
Page 27

HomePlug AV 200 Ethernet Adapter User Manual
The ‘Rename’ button in the main tab of the Power Packet Utility allows the user to change the
Device Name.
Figure 2: Rename button used to rename the device name
~ 24 ~
Page 28

HomePlug AV 200 Ethernet Adapter User Manual
The ‘Enter Password’ under the main tab of the Power Packet Utility allows the user to store the
device password in the PPU database. A valid device password is required to be entered.
Figure 3: Enter Password button used to provide the Device Password
~ 25 ~
Page 29

HomePlug AV 200 Ethernet Adapter User Manual
The ‘Add Button’ in the main tab of the Power Packet Utility allows the user to manually add a
new device to the local device’s network.
Figure 4: Add button used to add the AHPE305 HomePlug1.0 devices
The ‘Scan’ button in the main tab of the Power Packet Utility allows the user to manually scan for
changes in the AVLN if the ‘Autoscan’ is disabled.
~ 26 ~
Page 30

HomePlug AV 200 Ethernet Adapter User Manual
Privacy tab allows the user to change the Network Name to a specified set of characters or to
select the default Network name. The default Network Name on AHPE305 HomePlug AV
devices is ‘HomePlugAV’. The default Network Name for HomePlug 1.0 devices is ‘HomePlug’.
The local device or all devices in the existing network can then be configured with the selected
Network Name.
NOTE: If the Network Name has been pre-configured on a local device to a value other than
HomePlug or HomePlugAV (e.g. the push button pairing function on AV devices), the PPU will
show the name as “Unknown Networkname”. Although a pre-configured Network Name can not
be displayed, the hidden Network Name will be used to add new devices to the local network.
Figure 5: Private Network Name displays the default network name depending on the type of
local device connected
Please refer to a further in the section “How to Set the Network Password and Form an AVLN“in
this document.
~ 27 ~
Page 31

HomePlug AV 200 Ethernet Adapter User Manual
Figure 6: Main Tab displays the remote devices information within a private AVLN
~ 28 ~
Page 32

HomePlug AV 200 Ethernet Adapter User Manual
The ‘Diagnostic’ tab of the Power Packet Utility displays detailed information about the local and
remote in the ‘System Information’ pane. This contains important information like Machine
name, User name, Firmware versions etc. It also displays historical information of the remote
devices in the ‘Remote Device History (log)’ pane. Information like the device name, MAC
Address, device password, network name and last seen time are displayed here.
Figure 7: Diagnostic Tab displays the local device and the remote devices detailed information
The ‘Delete’ button under the ‘Diagnostic’ tab allows the user to delete the previous history of a
particular device. To delete the history, the user should first select the device information and
then click on the ‘Delete’ button.
~ 29 ~
Page 33

HomePlug AV 200 Ethernet Adapter User Manual
The ‘Save Report’ allows the user to save the diagnostic report
Figure 8: Save Report button allows the user to save the diagnostic report
The ‘Print Report’ button allows the user to print the diagnostic report.
~ 30 ~
Page 34

HomePlug AV 200 Ethernet Adapter User Manual
The ‘About’ tab contains different information like Copyright information, the Power Packet
utility version and release date etc.
Figure 9: The About Tab
The ‘About’ tab also has a “AutoScan’ user selection which allows the utility to scan the AVLN at
regular intervals to detect any changes in the AVLN without manual intervention.
Devices Supported
The following devices are supported by the Power Packet Utility:
AHPE305 HomePlug 1.0
AHPE305 HomePlug 1.0 with Turbo
AHPE305 HomePlug AV Firmware v2.0 and greater
Using the Power Packet Utility
The Power Packet is used mainly for the below operations:
Discovery of AHPE305 HomePlugAV as well as AHPE305 HomePlug1.0 devices on the basis of the
Network Password. Setting the Network Password for the Local device as well as for the Remote
devices.
~ 31 ~
Page 35

HomePlug AV 200 Ethernet Adapter User Manual
A. How to Set the Network Password and Form an AVLN
Follow the steps below to set the Network Password on a device using the Power Packet Utility
and form an AVLN Launch the Power Packet Utility.
The utility displays the AHPE305 HomePlugAV/AHPE305 HomePlug1.0 devices details under the
Main tab.
Figure 10: The Main Tab
~ 32 ~
Page 36

HomePlug AV 200 Ethernet Adapter User Manual
Provide the device password using the ‘Enter Password’ for the device with which the local
device will form an AVLN.
Figure 11: Provide the device password
~ 33 ~
Page 37

HomePlug AV 200 Ethernet Adapter User Manual
Click on the “Privacy” Tab.
Provide a “Private Network Name” in the space provided (“AHPE305 HomePlugAV” has been
used in the example below).
Figure 12: Provide Network Name
Then click the button “Set All Devices”.
All the devices gets rebooted and form an AVLN with the Private Network name provided for the
devices which device password has been entered along with the local device.
Under the ‘Main’ tab, only the devices in the formed AVLN will be displayed.
Similarly, to create a public AVLN, click on the ‘Use Default (Public Network)’ button to get the
default network name and then click on the ‘Set All Devices’ button to form a public AVLN.
~ 34 ~
Page 38

HomePlug AV 200 Ethernet Adapter User Manual
B. Upgrading a Device’s Firmware and PIB
To upgrade the firmware in a device click the upgrade button. The screen shown in Figure 13
below appears. Use the browse buttons to select the firmware and PIB files.
Figure 13: Device Update
Figure 14: Device Update Progress
~ 35 ~
Page 39

Chapter 4: Troubleshooting
HomePlug AV 200 Ethernet Adapter User Manual
If your router is not functioning properly, please refer to the suggested solutions provided in this
chapter. If your problems persist or the suggested solutions do not meet your needs, please
kindly contact your service provider for support.
Problems with the device
Problem
I can not start my AHPE305 HomePlug device.
Suggested Solution
Please check your power supply is working. AHPE305 HomePlug device operates from the power
supplied by the home electrical wiring and can not operate without a working power supply.
My AHPE305 HomePlug device is unable to detect my other AHPE305 HomePlug device.
This may due to the accidental change of the device password. Access the AHPE305 HomePlug
AV Utility and select the Privacy Tab. Enter the password “AHPE305 HomePlugAV” (Case
Sensitive) in the blank provided. Then press the “Set to Local Device Only” button. Repeat the
same procedure to the other AHPE305 HomePlug device.
~ 36 ~
 Loading...