

Page 1
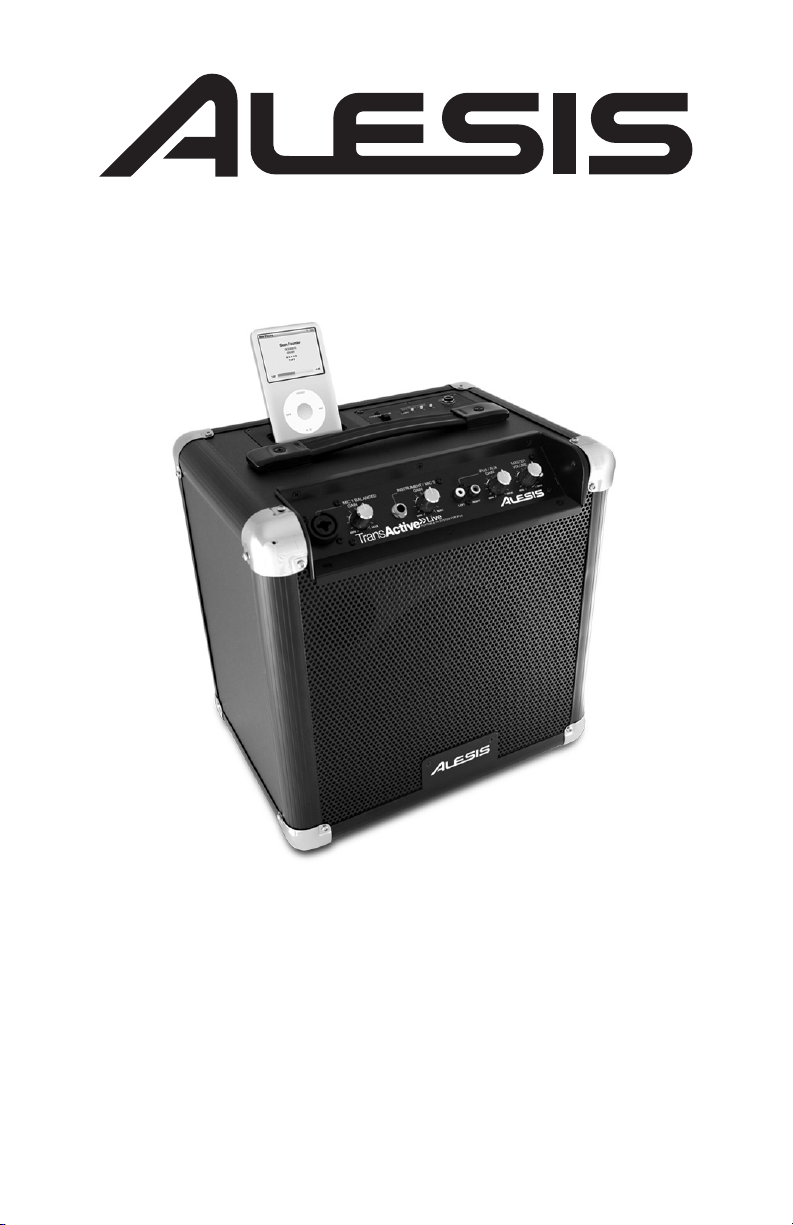
TRANSACTIVE LIVE
PORTABLE PA SYSTEM FOR iPod
QUICKSTART GUIDE
ENGLISH ( 1 – 2 )
MANUAL DE INICIO RÁPIDO
ESPAÑOL ( 3 – 4 )
GUIDE D'UTILISATION SIMPLIFIÉ
FRANÇAIS ( 5 – 6 )
GUIDA RAPIDA
ITALIANO ( 7 – 8 )
KURZANLEITUNG
DEUTSCH ( 9 – 10 )
Page 2
QUICKSTART GUIDE (ENGLISH)
BOX CONTENTS
Battery Powered Amplifier
Power Cable (standard IEC)
Quickstart Guide
Safety Instructions & Warranty
Information Booklet
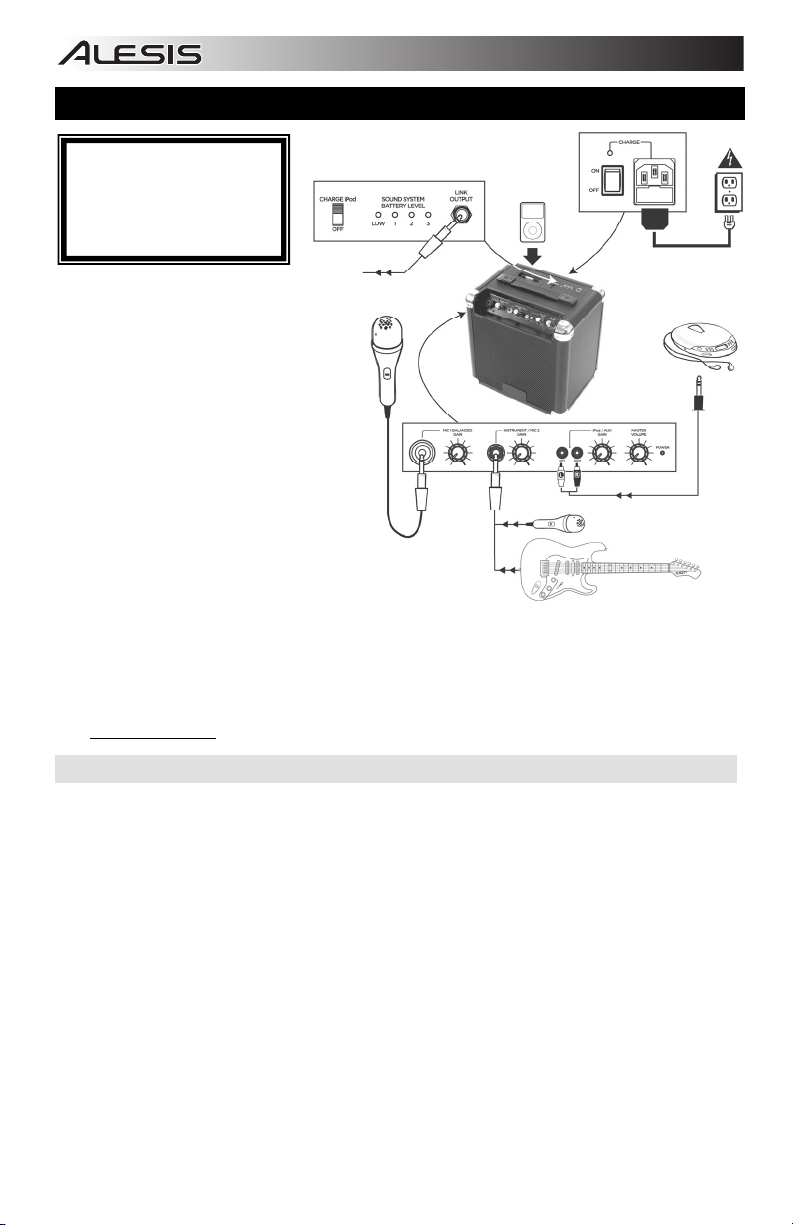
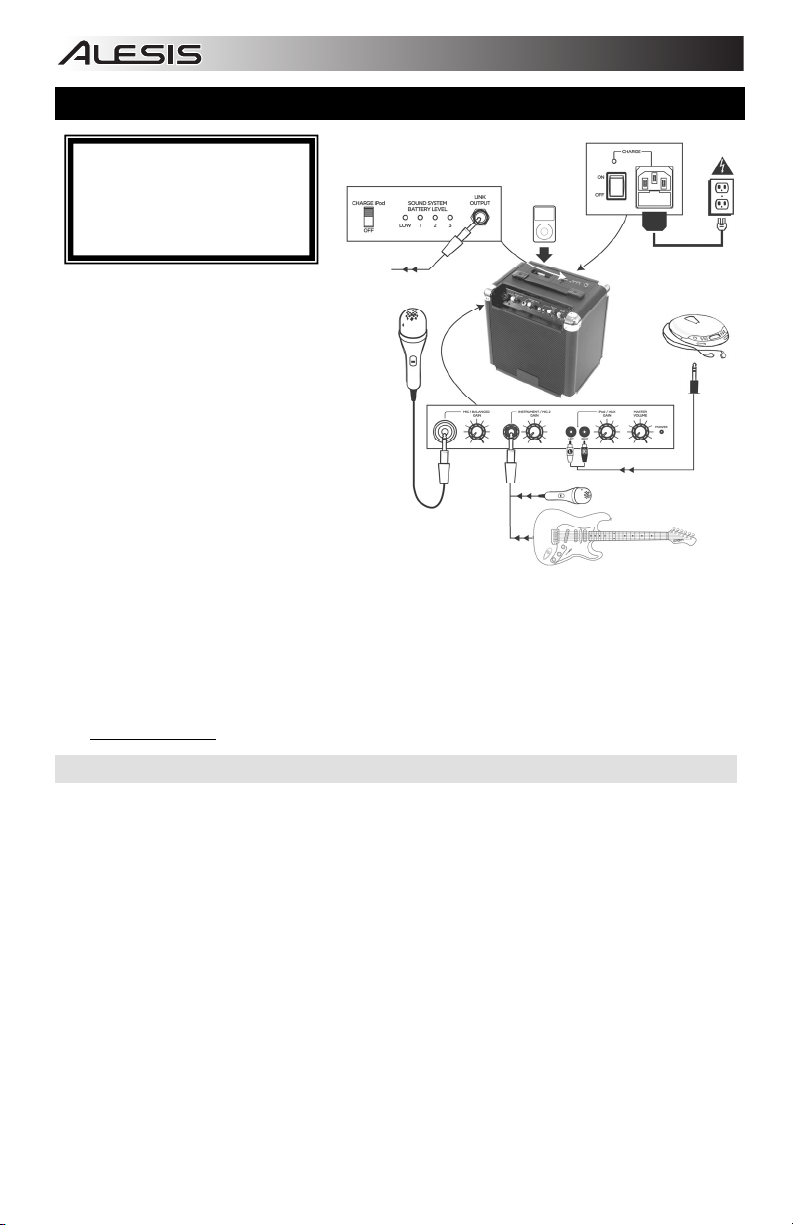
1. Make sure all items listed on the
front of this guide are included in the
box.
2. READ SAFETY INSTRUCTION
BOOKLET BEFORE USING THE
PRODUCT.
3. MAKE SURE THAT YOU HAVE
COMPLETELY CHARGED THE
BATTERY PRIOR TO FIRST USE
FOR MAXIMUM BATTERY LIFE.
4. Study this setup diagram.
5. Place product in an appropriate
position for operation.
6. Make sure all input devices such as
microphones, CD players, MP3
players, and linked amplifiers/PAs
are turned off and volume settings
are set at “zero.”
7. Connect all devices as shown
above.
8. Switch everything on in the following
order.
i. audio input sources (i.e.
microphones, instruments,
CD/MP3 Players)
ii. TransActive Live
iii. any additional amplifiers
9. When shutting down, always reverse this operation by turning off:
i. any additional amplifiers
ii. TransActive Live
iii. audio input sources (i.e. microphones, instruments, CD/MP3 Players)
Go to http://www.alesis.com for product registration.
LEAD-ACID BATTERIES
Rechargeable lead-acid batteries are the same type used in automobiles. As with your car battery, how you use this battery has
a significant impact on its lifespan. For example, if you forget to turn off your car's lights and drain the battery, a jump-start
might work a few times, but after a few full discharges, even a jump-start won't help and the battery will need to be replaced.
With proper use and treatment, a lead-acid battery can last for years. Here are some recommendations for getting the longest
life from the internal battery.
GENERAL USAGE
• Fully charge the battery before using it
• Avoid completely draining the battery
• For maximum life, drain the battery 80% once a month
• Charge the battery completely after each use
• When fully charged, the battery may be left for up to a week
• You may leave the unit plugged in for up to two weeks
STORAGE
• Avoid storing in high temperatures and moist places
• For long-term storage, periodically recharge the battery
• If you do not charge the battery for six months, it may not charge
REPAIR
• Do not attempt to service, modify, or replace the battery yourself
DISPOSAL
• Bring the unit to a recycling center or dispose of in accordance with local ordinances.
To an input on
additional
TransActive Live
(Cable sold
separately)
(Cables sold separately)
OR
1
Page 3
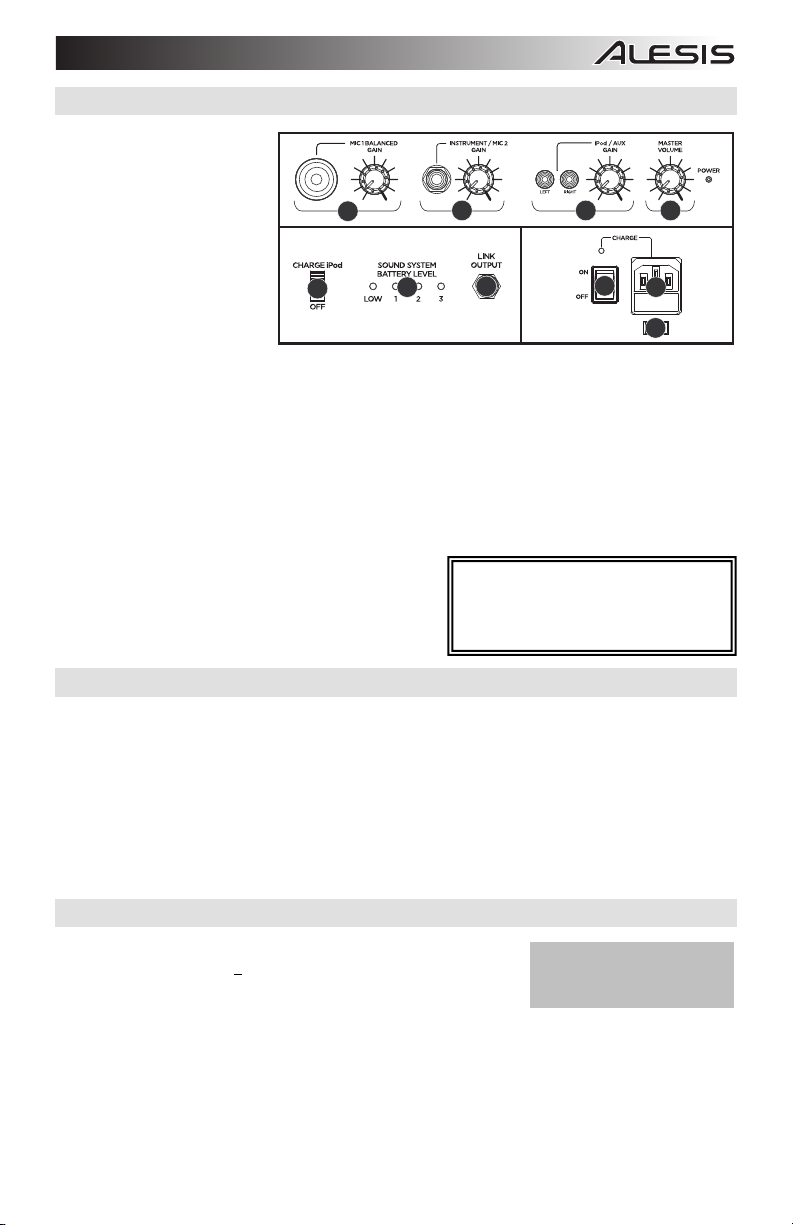
DIAGRAM AND PARTS DESCRIPTION
1. Microphone 1 Balanced
Input with Gain Control
(1/4” or XLR): This jack can
take either a ¼” balanced or
a XLR balanced cable.
2. Instrument/Microphone 2
Input with Gain Control
(1/4”): This mono input
accepts a ¼” input such as a
microphone, guitar, or other
musical instrument.
3. iPod/Auxiliary input with
Gain Control (Stereo
RCA): This stereo RCA
input can be used to connect a CD, MP3, or other audio source. The knob controls the level of the iPod and
the RCA input. To connect to a portable device with a 1/8” headphone jack, you need a standard 1/8”-to-RCA
adapter which is not included.
4. Master Volume Control: This knob controls the master volume of the TransActive Live.
5. iPod Charging Switch: Turn on iPod charging by setting this switch to the "Charge iPod" position.
6. Battery Level Indicator: While the unit is powered ON, these four lights indicate the power left in the battery.
Battery life varies based on volume and usage.
7. Link Output: Connect a 1/4" stereo (TRS) cable to this line-level output to connect another amplification
device, such as another TransActive Live.
8. Power In (IEC): Insert the included power cable here to charge the unit. Note that the TransActive Live can
run off wall power while it simultaneously charges the battery. The charge indicator illuminates when the
battery is charging.
9. Voltage Selector*: Set this to the correct voltage for your
location's standard.
10. Power ON/OFF Switch: Turns TransActive Live on or off.
Please note that while TransActive Live is connected to a
power source, it does not need to be powered on to
charge the battery.
1
5
6
7
* WARNING: U.S. users should set this
switch to "100-120V" whereas U.K. and most
European users should set this to "220240V."Selecting the improper voltage can
damage the unit.
324
10
8
9
IMPORTANT NOTES
If your sound is distorted at high volumes, please refer to the following troubleshooting scenarios:
• Input is clipping: Try lowering the input gain or the volume control on your sound source or music instrument.
• Output is clipping: Lower the main volume level.
• There is too much bass: Try adjusting the tone or EQ control on your sound source to lower the bass level.
This will allow you to play the music louder before clipping (distortion) occurs.
• The link cable: is being plugged into the instrument or MIC input instead of the RCA line input.
Important: With all speakers, an initial “break-in” period is needed to perform at optimal levels. To properly “breakin” your TransActive Live, play an audio source at medium volume for a few hours.
SPECIFICATIONS
Input Voltage: AC 100-120 V / 60 Hz, 220-240 V / 50 Hz
Output Wattage: 16 W (THD: < 1%)
Frequency Response: Aux Input: 78 Hz – 20 kHz
iPod Input: 63 Hz – 20 kHz
Time required to fully charge the TransActive Live: ~ 6 hrs.
Battery life: 12 hrs. with typical use
* Note: Battery life may vary
based on temperature, age,
and volume usage of product.
2
Page 4
MANUAL DE INICIO RÁPIDO (ESPAÑOL)
CONTENIDO DE LA CAJA
Amplificador alimentado
Cable de alimentación
Manual de inicio rápido
Folleto de información sobre la
seguridad y la garantía
1. Asegúrese que todos los artículos
incluidos al inicio de este manual estén
incluidos en la caja.
2. LEA LAS INSTRUCCIONES DEL
FOLLETO DE SEGURIDAD ANTES DE
UTILIZAR EL PRODUCTO.
3. ASEGÚRESE DE QUE HA CARGADO
COMPLETAMENTE LA BATERÍA.
PARA LOGRAR LA MÁXIMA VIDA ÚTIL
DE LA BATERÍA, CÁRGUELA
TOTALMENTE ANTES DEL PRIMER
USO.
4. Estudie este diagrama de instalación.
5. Coloque el producto en una posición
adecuada para su funcionamiento.
6. Asegúrese de que todos los dispositivos
de entrada tales como micrófonos,
reproductores de CD, reproductores MP3
y amplificadores/sistemas de
amplificadores para altavoces estén
apagados y con el control de volumen en
“cero”.
7. Conecte todos los dispositivos como se muestra arriba.
8. Encienda todo en el siguiente orden:
i. fuentes de entrada de audio (por ejemplo, micrófonos, instrumentos, reproductores de CD/MP3)
ii. TransActive Live
iii. amplificadores adicionales
9. Al apagar, realice siempre esta operación en sentido inverso. Apague:
i. amplificadores adicionales
ii. TransActive Live
iii. fuentes de entrada de audio (por ejemplo, micrófonos, instrumentos, reproductores de CD/MP3)
Visite http://www.alesis.com para registrar el producto.
BATERÍAS DE PLOMO-ÁCIDO
Las baterías de plomo-ácido recargables son del mismo tipo que se usa en los automóviles. Al igual que con la batería del
vehículo, la forma en que se usa tiene una influencia significativa en la duración de su vida útil. Por ejemplo, si olvida apagar
las luces del auto y se agota la batería, es posible que pueda usar un puente para arrancar unas cuantas veces, pero después
de varias descargas totales, el puente ya no podrá ayudarla y será necesario reemplazar la batería.
Con un uso y tratamiento correctos, una batería de plomo-ácido puede durar varios años. He aquí algunas recomendaciones
para prolongar la vida útil de la batería interna.
USO GENERAL
• Cargue completamente la batería antes de usarla
• Evite agotarla completamente
• Para obtener máxima vida, descargue la batería el 80% una vez por mes
• Cargue la batería completamente después de cada uso
• Cuando está completamente cargada, la batería puede dejarse por hasta una semana
• Puede dejar la unidad enchufada durante hasta dos semanas
ALMACENAMIENTO
• Evite almacenar la batería en lugares húmedos y de alta temperatura
• Si la almacena durante períodos prolongados, recárguela periódicamente
• Si no carga la batería durante seis meses, es posible que luego no pueda cargarse
REPARACIÓN
• No intente realizar el servicio, modificar o reemplazar la batería usted mismo
DISPOSICIÓN FINAL
• Lleve la unidad a un centro de reciclaje o deséchela de acuerdo a las ordenanzas locales
A entrado en
TransActive Live
adicional
(Cable vendido
por separado)
Cables vendido por
O
separado
3
Page 5

DIAGRAMA Y DESCRIPCIÓN
1. Entrada balanceada de
micrófono 1 con control
de ganancia (1/4” o
XLR): Este conector
admite un cable
balanceado de ¼” o XLR.
2. Entrada de
instrumento/Micrófono 2
con control de ganancia
(1/4”): Esta entrada
mono admite una entrada
de ¼” tal como un
micrófono, una guitarra u
otro instrumento musical.
3. iPod/Entrada auxiliar
con control de ganancia (RCA estéreo): Esta entrada se puede usar para conectar un reproductor de CD,
MP3 u otra fuente de audio. La perilla controla el nivel del iPod y de la entrada de RCA. Para conectar a un
dispositivo portátil con conector para auriculares de 1/8”, se necesita un adaptador estándar 1/8”-a-RCA que
no está incluido.
4. Control de volumen master: Esta perilla controla el volumen master (maestro) del TransActive Live.
5. Interruptor de carga del iPod: Active la carga de iPod colocando este interruptor en la posición "Charge
iPod."
6. Indicador de nivel de batería: Mientras la unidad está alimentada, estas cuatro luces indican la energía
remanente en la batería. La vida útil de la batería varía en función del volumen y el consumo.
7. Salida de enlace: Conecte un cable estéreo de 1/4" (TRS) a esta salida de nivel de línea para conectar otro
dispositivo de amplificación, tal como otro TransActive Live.
8. Adaptador de alimentación (IEC): Inserte aquí el cable de alimentación incluido para cargar la unidad.
Tenga en cuenta de que el TransActive Live puede funcionar con alimentación de un tomacorriente de pared
mientras carga simultáneamente la batería. El indicador de carga se enciende cuando se está cargando la
batería.
9. Selector de voltaje*: Regule este selector al voltaje
correcto para la norma de su localidad.
10. Interruptor de encendido/apagado: Enciende y
apaga el TransActive Live. Tenga en cuenta que
mientras el TransActive Live está conectado a un
suministro eléctrico, no es necesario encenderlo para
que cargue la batería.
1
5
324
6
7
* ADVERTENCIA: Los usuarios de EE.UU.
deben colocar este conmutador en "100-120V"
mientras que los usuarios del Reino Unido y la
mayoría de los países europeos deben
colocarlo e "220-240V. Si se selecciona el
voltaje incorrecto, se puede dañar la unidad.
10
8
9
NOTAS IMPORTANTES
Si el sonido se distorsiona a volúmenes altos, consulte los siguientes escenarios de solución de problemas:
• El sonido está distorsionado: Intente reducer la ganacia o el volumen de su fuente de sonido o instrumento
musical. Asimismo, intente reducir el volumen del TransActive Live.
• Hay demasiado bajos: Ajustar el tono o EQ de su fuente de sonido para bajar el nivel de graves.
• Conecte el cable de enlace en la entraded de línea RCA (en lugar del entrada de instrumento/micrófono).
Importante: un período inicial de "break-in" es necesaria para los amplificadores pueden jugar en los niveles
óptimos. Reproducir una fuente de audio a un nivel de volumen medio de unas pocas horas.
DATOS TÉCNICOS
Voltaje de entrada: CA 100-120 V / 60 Hz, 220-240 V / 50 Hz
Potencia de salida: 16 W (THD: < 1%)
Respuesta en frecuencia: Entrada auxiliar: 78 Hz – 20 kHz
Entrada de iPod: 63 Hz – 20 kHz
Tiempo requerido para cargar totalmente el TransActive Live: ~ 6 hs
Vida útil de la batería: 12 hs con el uso típico
*Nota: La vida útil de la batería
puede variar en función de la
temperatura, la antigüedad y el
volumen al que se usa el producto.
4
Page 6

GUIDE D'UTILISATION SIMPLIFIÉ (FRANÇAIS)
CONTENU DE LA BOÎTE
Amplificateur de puissance
Câble d’alimentation
Guide d'utilisation simplifié
Le livret des consignes de
sécurité et des informations
concernant la garantie
1. Assurez-vous que tous les articles
énumérés sur la page couverture de ce
guide sont inclus dans la boîte.
2. VEUILLEZ LIRE LE LIVRET DES
CONSIGNES DE SÉCURITÉ AVANT
D'UTILISER LE PRODUIT.
3. VEUILLEZ VOUS ASSURER QUE LA
PILE EST COMPLÈTEMENT
RECHARGÉE. RECHARGER
COMPLÈTEMENT LA PILE AVANT LA
PREMIÈRE UTILISATION AFIN
D’AUGMENTER SA DURÉE DE VIE.
4. Examinez bien le schéma d'installation.
5. Placez l'appareil en position de
fonctionnement.
6. Assurez-vous que tous les appareils
d'entrée tels que microphones, lecteur
de disques compacts, lecteur MP3 et les
autres appareils branchés tels que les
amplificateurs et les systèmes PA sont
hors tension et que leur volume soit
réglé à « zéro ».
7. Connectez tous les appareils tel qu'indiqué sur le schéma.
8. Mettre tous les appareils sous tension dans l'ordre suivant:
i. source d'entrée audio (p. ex. microphones, instruments, lecteurs CD/MP3)
ii. TransActive Live
iii. des autres amplificateurs
9. Pour mettre hors tension, toujours inverser l'opération. Éteindre:
i. des autres amplificateurs
ii. TransActive Live
iii. source d'entrée audio (p. ex. microphones, instruments, lecteurs CD/MP3)
Allez à la http://www.alesis.com pour l'enregistrement du produit.
PILES AU PLOMB
Les piles au plomb rechargeables sont du même type que les batteries utilisées dans les automobiles. Comme pour la batterie
de votre automobile, la manière dont vous l’utilisez a un impact direct sur sa durée de vie. Par exemple, si vous oubliez de
fermer les phares de votre véhicule et que la batterie est à plat, un démarrage-secours fonctionnera, mais si vous videz votre
batterie complètement plusieurs fois, cela ne fonctionnera plus et vous devrez remplacer la batterie. Cependant, avec une
bonne utilisation la pile au plomb peut avoir une durée de vie de plusieurs années. Voici quelques recommandations pour
prolonger au maximum la durée de vie de la pile interne.
UTILISATION GÉNÉRALE
• Chargez complètement la pile avant de l’utiliser
• Évitez de décharger la pile complètement
• Afin de prolonger la durée de vie, déchargez la pile à 80 % une fois par mois
• Rechargez la pile complètement après chaque utilisation
• Lorsque complètement chargée, la pile peut demeurer chargée jusqu’à une semaine
• L’appareil peut demeurer branché jusqu’à deux semaines
ENTREPOSAGE
• Évitez d’exposer l’appareil à de hautes températures et à l’humidité
• Durant l’entreposage à long terme, rechargez la pile régulièrement
• S’il se passe plus de six mois sans que la pile soit rechargée, il se pourrait qu’elle ne se recharge plus
RÉPARATION
• N’essayez jamais d’effectuer des réparations, des modifications ou de remplacer la pile vous-même
DISPOSER
• Apportez l’appareil dans un centre de recyclage ou disposez selon les règlements de votre municipalité
À entré sur
TransActive Live
additionnel
(Câbles vendus
séparément)
5
Câbles vendus séparément
OU
Page 7

SCHÉMA ET DESCRIPTION
1. Entrée microphone 1
symétrique avec commande de
gain (1/4 po ou XLR) : Cette
entrée peut accueillir un câble
symétrique de ¼ po ou un câble
symétrique XLR.
2. Entrée instrument/microphone
2 avec commande de gain
(1/4 po) : Cette entrée mono peut
accueillir un câble de ¼ po pour
microphone, guitare ou un autre
instrument de musique.
3. iPod/Entrée auxiliaire avec
commande de gain (stéréo RCA): Cette entrée permet de brancher un lecteur de disques compacts, un
lecteur MP3 ou autres sources audio. Le contrôle permet de régler le niveau de l'iPod et de l'entrée de RCA.
Pour brancher à un appareil portable à l’aide d’une prise de casque d’écoute de 1/8 po, il vous faut un
adaptateur standard 1/8 po-à-RCA non fourni.
4. Volume général : Ce contrôle permet de régler le niveau du volume général du TransActive Live.
5. Interrupteur de recharge pour iPod : Activez la fonction de rechargement pour iPod en mettant l’interrupteur
à la position « Charge iPod ».
6. Indicateur de niveau de charge : Lorsque l'appareil est sous tension, ces quatre témoins indiquent le niveau
de charge de la pile. La durée de vie de la pile dépend de l’utilisation de l’appareil et du réglage du niveau du
volume.
7. Sortie de liaison : Cette entrée permet de brancher un câble stéréo de 1/4 po afin de raccorder un autre
appareil d’amplification, tel qu’un autre TransActive Live.
8. Entrée d'alimentation (IEC) : Brancher le câble d'alimentation ci-inclus ici pour recharger l’appareil. Veuillez
remarquer que le TransActive Live peut également être alimenté par une prise murale en même temps qu’il
recharge la pile. L’indicateur de niveau de charge s’allume lorsque la pile se recharge.
9. Sélecteur de tension* : Assurez-vous que le
sélecteur soit réglé à la tension appropriée pour
votre pays.
10. Interrupteur Marche/Arrêt (ON/OFF) : Permet de
mettre le TransActive Live sous et hors tension.
Veuillez noter que lorsque le TransActive Live est
branché à une source d’alimentation, il peut
recharger la pile sans être sous tension.
1
5
6
* MISE EN GARDE: Pour l’Amérique du Nord, ce
sélecteur doit être réglé sur « 100-120 V », alors
que pour le Royaume-Uni et la majeure partie de
l’Europe il doit être réglé sur « 220-240 V ».
L'utilisation d’une tension inappropriée pourrait
endommager l’appareil.
7
324
10
8
9
NOTES IMPORTANTES
Si le son est déformé lorsque le volume est élevé, veuillez vous reporter aux scénarios suivants :
• Le son est déformé: Essayez de diminuer le gain ou le volume de votre source audio ou instrument de
musique. Aussi, essayez de réduire le volume du TransActive Live.
• Il y a trop des basses: Essayez de régler la tonalité ou EQ sur votre source audio pour baisser le niveau de
graves.
• Branchez le câble de liaison à la ligne d'entrée RCA (au lieu de la entrée instrument/microphone).
Important: Un premier période de "break-in" est nécessaire pour tous les amplificateurs de sorte qu'il peuvent
effectuer à un niveau optimal. Utilisez le TransActive Live à un volume moyen de quelques heures.
SPÉCIFICATIONS
Tension d'entrée : 100-120 V / 60 Hz, 220-240 V / 50 Hz CA
Puissance de sortie : 16 W (THD : <
Réponse en fréquence : Entrée auxiliaire : 78 Hz – 20 kHz
Entrée iPod : 63 Hz – 20 kHz
Temps de recharge complet du TransActive Live : ~ 6 heures.
Durée de vie de la pile : 12 h
1 %)
. avec utilisation typique
* Remarque: La durée de vie de la
pile peut être affectée par la
température, l’âge du produit, ainsi
que le niveau du volume d’utilisation.
6
Page 8

GUIDA RAPIDA (ITALIANO)
CONTENUTI DELLA CONFEZIONE
Amplificatore alimentato
Cavo di alimentazione
Guida rapida
Libretto di istruzioni di
sicurezza e garanzia
1. Verificare che tutti gli elementi elencati
sul frontespizio di questa guida siano
inclusi nella confezione.
2. PRIMA DI UTILIZZARE IL
PRODOTTO LEGGERE IL
LIBRETTO DELLE ISTRUZIONI DI
SICUREZZA.
3. ASSICURARSI DI AVER CARICATO
COMPLETAMENTE LA BATTERIA.
CARICARE TOTALMENTE LA
BATTERIA PRIMA DEL PRIMO
UTILIZZO PER GARANTIRNE LA
MASSIMA DURATA.
4. Esaminare attentamente lo schema di
montaggio.
5. Posizionare il prodotto in maniera
adeguata all’uso.
6. Assicurarsi che tutti i dispositivi
d’ingresso quali microfoni, lettori CD,
lettori MP3 e amplificatori/PA collegati
siano spenti e che il volume sia
impostato su “zero”
7. Collegare tutti i dispositivi come illustrato in precedenza.
8. Accendere tutto nel seguente ordine:
i. sorgenti di ingresso audio (microfoni, strumenti, lettori CD/MP3)
ii. TransActive Live
iii. ulteriori amplificatori
9. Al momento dello spegnimento, invertire l’operazione. Spegnendo:
i. ulteriori amplificatori
ii. TransActive Live
iii. sorgenti di ingresso audio (microfoni, strumenti, lettori CD/MP3)
Recarsi sul sito http://www.alesis.com per la registrazione del prodotto.
BATTERIE AL PIOMBO-ACIDO
Le batterie ricaricabili al piombo-acido sono dello stesso tipo di quelle utilizzate nelle automobili. Come nel caso della batteria
dell'auto, la maniera in cui si utilizza questa batteria ha un notevole impatto sulla sua vita utile. Ad esempio, se ci si dimentica di
spegnere i fanali dell'auto e la batteria si scarica, un avviamento volante con i cavi può funzionare alcune volte, ma dopo
alcune scariche complete, perfino questo non sarà di aiuto e la batteria dovrà essere sostituita. Con un utilizzo adeguato, una
batteria al piombo-acido può durare per anni. Ecco alcune raccomandazioni per garantire la massima durata dalla batteria
interna:
UTILIZZO GENERICO
• Caricare a fondo la batteria prima di utilizzarla
• Evitare di scaricare del tutto la batteria
• Per il massimo della durata, scaricare la batteria dell’80% una volta al mese
• Caricare a fondo la batteria dopo ciascun utilizzo
• Una volta carica, la batteria può essere lasciata inserita per una settimana
• È possibile lasciare l’apparecchio collegato alla rete elettrica per un massimo di due settimane
COME RIPORRE L’APPARECCHIO
• Evitare di riporre l’apparecchio a temperature elevate e in luoghi umidi
• Se si ripone l’apparecchio per lunghi periodi di tempo, ricaricare periodicamente la batteria
• Se non si carica la batteria per sei mesi, potrebbe non ricaricarsi più
RIPARAZIONI
• Non tentare di riparare, alterare o sostituire la batteria da soli
COME ELIMINARE L’APPARECCHIO
• Recarsi con l’apparecchi presso un centro di riciclaggio oppure eliminarlo in conformità con le normative locali
A immesso su
TransActive Live
supplementare
(Cavi venduti
separatamente)
Cavi venduti separatamente
OPPURE
7
Page 9

p
DIAGRAMMA E DESCRIZIONE
1. Ingresso bilanciato microfono 1
con controllo di guadagno gain
(1/4” o XLR): questo jack accetta
un cavo bilanciato da ¼” o XLR.
2. Ingresso strumento/microfono
2 con controllo di guadagno
gain (1/4”): questo ingresso
mono accetta un ingresso da ¼”
quali un microfono, chitarra o altro
strumento musicale.
3. iPod/Ingresso ausiliario con
controllo di guadagno gain
(RCA Stereo): Questo ingresso
può essere utilizzato per il collegamento di un CD, MP3, o altra sorgente audio. La manopola controlla il livello
del iPod e dell'input di RCA. Per collegare un dispositivo portatile dotato di jack cuffie da 1/8”, è necessario un
adattatore standard da 1/8”-a-RCA non incluso.
4. Comando volume master: questa manopola controlla il volume master del TransActive Live.
5. Interruttore di ricarica per iPod: attivare la ricarica dell’iPod impostando questo interruttore su "Charge iPod"
(carica iPod).
6. Indicatore di livello batteria: ad apparecchio acceso (ON), queste quattro luci indicano la carica residua della
batteria. La durata della batteria dipende dal volume e dall’uso.
7. Uscita Link: collegare un cavo stereo (TRS) da 1/4" a questa uscita a livello di linea per collegare altri
dispositivi di amplificazione, ad esempio un altro TransActive Live.
8. Ingresso di alimentazione (IEC): per caricare l’apparecchio, inserire a questo livello il cavo di alimentazione in
dotazione. Il TransActive Live è in grado di funzionare a energia elettrica caricando contemporaneamente le
batterie. La spia di ricarica si accende quando la batteria è sotto carica.
9. Selettore di voltaggio*: impostare questo
comando sulla tensione adeguata agli standard
locali.
10. Interruttore ON/OFF (accensione/spegnimento):
accende o spegne il TransActive Live. Va notato
che quando il TransActive Live è collegato ad una
fonte di alimentazione, non deve essere
necessariamente acceso per caricare la batteria.
1
5
6
* AVVERTENZA: gli utenti statunitensi devono
impostare l’interruttore su "100-120V", mentre i
residenti nel Regno Unito e nella maggior parte dei
Paesi europei devono impostarlo su "220-240V.
“Selezionare il livello di tensione inadeguato può
danneggiare l’apparecchio”.
7
324
10
8
9
NOTE IMPORTANTI
Se ad alti volumi il suono è distorto, fare riferimento alle seguenti casistiche di risoluzione di problemi:
• Il suono è distorto: Provare a ridurre il guadagno o il volume del vostro suono fonte o strumento musicale.
Anche cercando di ridurre il volume del TransActive Live.
• Vi è troppo basso: Prova di adeguamento il tono o EQ del vostro suono fonte di abbassare il livello dei bassi.
• Collegare il cavo de link per l'ingresso di linea RCA (invece per l'ingresso strumento/microfono).
Importante: Un primo "break-in" periodo è necessaria in modo che l'amplificatori possono funzionare a livelli ottimali.
Gioca una sorgente audio a volume medio per un paio d'ore prima.
SPECIFICHE TECNICHE
Tensione di ingresso: CA 100-120 V / 60 Hz, 220-240 V / 50 Hz
Wattaggio di uscita: 16 W (THD: < 1%)
Risposta di frequenza: Ingresso Aux: 78 Hz – 20 kHz
Ingresso iPod: 63 Hz – 20 kHz
Tempo richiesto per una ricarica completa del TransActive Live: ~ 6 ore
Durata della batteria: 12 ore con utilizzo tipico
* Nota bene: la durata della batteria
varia a seconda della temperatura,
dell’età e del volume di utilizzo del
rodotto.
8
Page 10

KURZANLEITUNG (DEUTSCH)
INHALT DER VERPACKUNG
Verstärker
Netzkabel
Kurzanleitung
Broschüre mit den Sicherheits- und
Garantierichtlinien
1. Überprüfen Sie, dass sich alle auf dem
Deckblatt genannten Teile in der
Verpackung befinden.
2. LESEN SIE DIE
SICHERHEITSHINWEISE, BEVOR SIE
DIESES PRODUKT VERWENDEN.
3. LADEN SIE DIE BATTERIE VOR DER
ERSTEN VERWENDUNG AUF, UM
DIE LEBENSDAUER DER BATTERIE
ZU MAXIMIEREN.
4. Sehen Sie sich die Aufbauabbildung
der an.
5. Stellen Sie den Produkt in einer für den
Betrieb geeigneten Position auf.
6. Schalten Sie alle Eingangsquellen
(Mikrofone, CD Player, MP3 Player und
Verstärker/PAs aus und drehen Sie
deren Lautstärke auf “Null.”
7. Verbinden Sie die Stereoausgänge mit
den Verstärkern, Tape Decks, und/oder
Signalquellen.
8. Schalten Sie das System in der folgenden Reihenfolge ein:
i. Eingangsquellen (z.B. Mikrofon, Instrumente und/oder CD-Player)
ii. TransActive Live
iii. die zusätzliche Verstärker
9. Gehen Sie beim Ausschalten in der genau umgekehrten Reihenfolge vor. Schalten Sie:
i. die Verstärker
ii. TransActive Live
iii. Eingangsquellen (z.B. Mikrofon, Instrumente und/oder CD-Player)
Registrieren Sie Ihr Produkt online unter http://www.alesis.com.
BLEIBATTERIEN
Bei wiederaufladbaren Bleibatterien handelt es sich um die gleiche Art von Batterien, die in Autos verwendet werden. Und wie
bei Ihrer Autobatterie ist es auch für die Benutzungsdauer dieser Batterie von äußerster Wichtigkeit, wie sie verwendet
wird. Vergessen Sie z. B. die Scheinwerfer Ihres Autos auszuschalten und die Batterie entleert sich deswegen, können Sie
einige Male mit einer Starthilfe das Auto wieder anlassen, aber nachdem die Batterie einige Male total entleert wurde, wird
auch dies nicht mehr helfen und die Batterie muss ersetzt werden. Bei vorschriftsmäßigem Gebrauch und richtiger Pflege kann
eine Bleibatterie jahrelang halten. Lesen Sie die nachstehenden Empfehlungen, um aus der eingebauten Batterie das Beste
herauszuholen.
ALLGEMEINE GEBRAUCHSHINWEISE
• Batterie vor Gebrauch immer voll aufladen
• Völliges Entleeren der Batterie sollte vermieden werden
• Um die maximale Benutzungsdauer auszuschöpfen, sollte die Batterie wenigstens einmal im Monat zu 80% entleert
werden
• Batterie nach jedem Gebrauch voll aufladen
• Eine voll aufgeladene Batterie bleibt eine Woche lang geladen
• Die Batterie kann bis zu zwei Wochen im Gerät belassen werden
AUFBEWAHRUNG
• Nicht unter hohen Temperaturen oder feuchter Umgebung aufbewahren
• Bei Langzeitaufbewahrung Batterie in regelmäßigen Abständen aufladen
• Wird die Batterie sechs Monate lang nicht geladen, kann sie unter Umständen nicht mehr aufgeladen werden
REPARIEREN
• Batterien bitte niemals selbst warten, verändern oder ersetzen
ENTSORGUNG
• Batterie zu einem Wiederverwertungszentrum bringen oder im Rahmen der geltenden Vorschriften entsorgen
Zu eingegeben auf
zusätzlichem
TransActive Live
(Kabel optional
erhältlich)
9
Kabel optional erhältlich
ODER
Page 11

BEDIENELEMENTE
1. Symmetrischer Mikrofon 1
Eingang mit Gain Regler
(6,3mm Klinke oder XLR):
Diese Buchse nimmt sowohl
ein 6,3mm Klinkenstecker als
auch einen XLR Stecker auf.
2. Instrument/Mikrofon 2
Eingang mit Gain Regler
(6,3mm Klinke): Dieser
Mono Eingang verarbeitet
normale
Klinkenkabelanschlüsse von
einem Mikrofon, einer Gitarre
oder einem anderen
Musikinstrument.
3. iPod/Aux Eingang mit Gain Regler (Stereo RCA): Dieser Eingang nimmt das Signal eines CD/MP3 Players
oder einer anderen Audioquelle auf. Der Regler steuert das Niveau des iPod und des RCA Einganges. Um
ein tragbares Gerät mit einem 3,5mm Miniklinkenstecker zu verwenden, benötigen Sie einen optionalen
Miniklinke/RCA Adapter.
4. Lautstärkenregler: Mit diesem Regler stellen Sie die Summenlautstärke der TransActive Live.
5. iPod Charging Schalter: Aktivieren Sie das Aufladen des iPod, indem Sie diesen Schalter in die "Charge
iPod" Position stellen.
6. Batteriestand-LEDs: Wenn das Gerät eingeschaltet wird, zeigen diese vier LEDs an, wie viel Spannung in der
Batterie vorhanden ist. Die Lebensdauer der Batterie variiert auf Grund von Lautstärke und Betriebsdauer.
7. Link Ausgang: Schließen Sie hier ein 6,3 mm Stereoklinkenkabel an, um ein zweites Verstärkersystem, wie
einen zweiten TransActive Live, mit einem Signal zu versorgen.
8. Netzanschluss (IEC): Stecken Sie das mitgelieferte Netzkabel hier ein, um das Gerät mit Strom zu versorgen.
Beachten Sie bitte, dass der TransActive Live bei der Stromversorgung über das Netzkabel auch seine interne
Batterie lädt. Die Ladelampe leuchtet auf, wenn die Batterie aufgeladen wird.
9. Spannungswahlschalter*: Stellen Sie hier die
richtige Spannung für das Gebiet, in dem Sie das
Gerät einsetzen möchten, ein.
10. Power ON/OFF Schalter: Schaltet den
TransActive Live an oder aus. Beachten Sie
bitte, dass beim Anschluss des TransActive Live
an ein Stromnetz das Gerät nicht eingeschaltet
werden muss, um die Batterie aufzuladen.
5
1
6
* ACHTUNG: Anwender in den USA sollten den
Schalter auf "100-120V" stellen, während Anwender in
den meisten europäischen Ländern und U.K. die "220240V" Position wählen sollten. Sollte der
Spannungswahlschalter falsch eingestellt sein, wird
beim Einschalten das Gerät beschädigt.
7
324
10
8
9
WICHTIGE HINWEISE
Falls der Klang bei hohen Lautstärken verzerrt wird, lesen Sie die folgenden Tipps zur Fehlerbehebung durch:
• Der Klang ist verzerrt: Versuchen Sie, zur Senkung der Gain oder das Lautstärke der Schallquelle oder
Musik-Instrument. Versuchen Sie auch, eine Senkung der Lautstärke der TransActive Live.
• Es ist zu viel Bässe: Versuchen Sie, zur Senkung der Ton der Schallquelle.
• Schließen Sie das Link-Kabel an den iPod/Aux Eingang (statt des Instrument/Mikrofon Eingang).
Wichtig: Eine erste "break-in"-Zeit benötigt wird, so dass ein Verstärker kann Funktion auf optimalem Niveau.
Spielen Sie eine Audio-Quelle in einer mittleren Band für ein paar Stunden zuerst.
TECHNISCHE DATEN
Eingangsspannung: AC 100-120 V / 60 Hz, 220-240 V / 50 Hz
Ausgangsleistung: 16 W (THD: <
Frequenzgang: Aux Eingang: 78 Hz – 20 kHz
iPod Eingang: 63 Hz – 20 kHz
Ladedauer zur vollständigen Aufladung der TransActive Live
Batterie: ~ 6 Stunden
Batterielebensdauer: 12 Stunden mit typischen Einsatz
1%)
* Hinweis: Die Lebensdauer der
Batterie variiert in Abhängigkeit von
Umgebungstemperatur, Alter und
Lautstärke.
10
Page 12

www.alesis.com
7-51-0284-C
 Loading...