

Page 1

Quick Start Owner’s Manual
Manual de inicio rápido para el usuario (Spanish)
Schnelles Hinweisbuch (Deutsch)
Guide d’installation rapide (Français)
Manuale rapido di utilizzazione (Italiano)
Page 2

This page intentionally left blank
Page 3

Thank You!
Thanks for purchasing the Fusion digital audio workstation! The Fusion is one of the most powerful
and fully-featured products we’ve ever built. We’re sure you’ll love using it!
To help you jump in and start using the Fusion quickly, we’ve created this Quickstart guide. This short
guide has everything you need to start playing quickly.
When you’re ready for more in-depth information, take a look at the Reference manual. The Reference
manual describes every single feature and parameter on the Fusion and provides answers to all of your
in-depth Fusion questions.
We hope your new Fusion workstation will provide you with years of enjoyment and you’ll find these
manuals to be informative and useful for you.
Sincerely,
The People of Alesis
Page 4

Fusion Architecture
The Alesis Fusion workstation features an arsenal of different synthesis types, hard-disk recording,
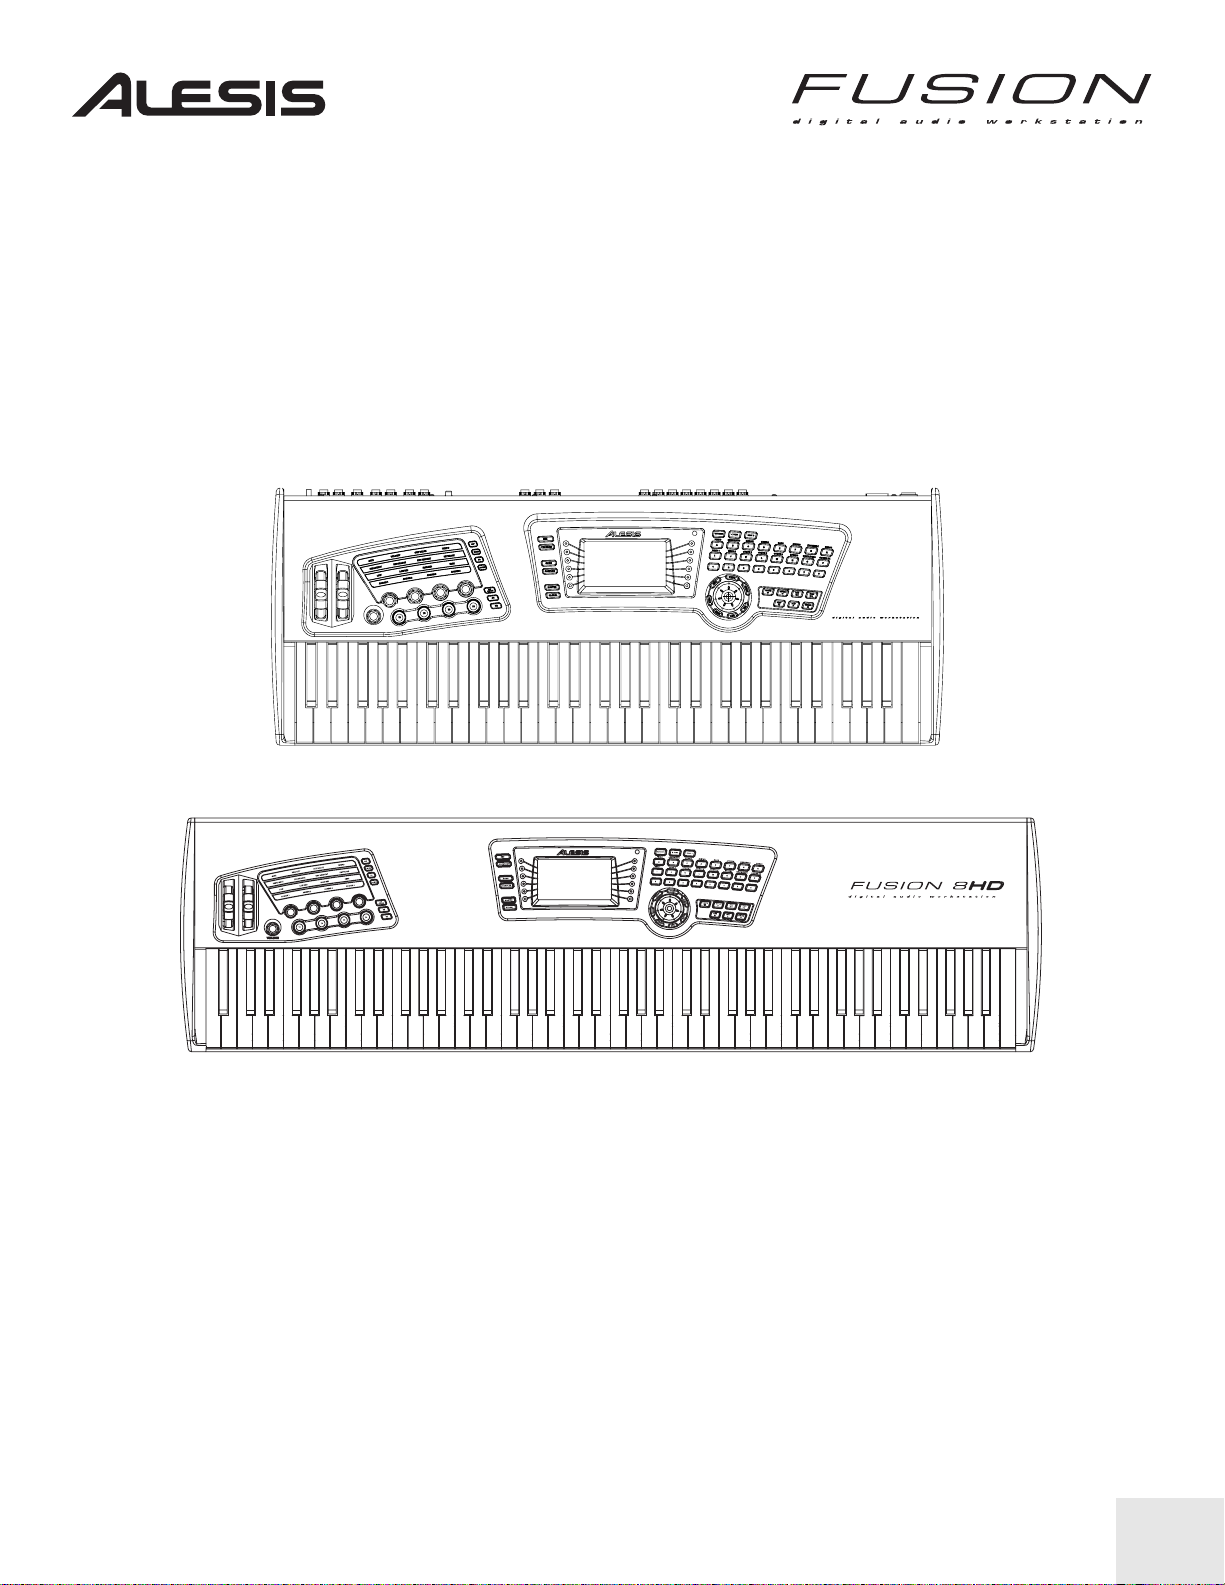
sampling, arranging, and real-time control in one beautiful machine. The Fusion 6HD and 8HD are
identical except for size, weight, and keyboard action. The 6HD has 61-notes and is semi-weighted
whereas the 8HD has 88 fully-weighted keys. Right out of the box, the Fusion gives you everything you
need to realize your wildest musical ideas.
The Fusion’s Synthesis Engine
The Fusion provides four types of synthesis: Sample Playback, Analog Modeling, FM
(frequency modulation) synthesis, and Physical Modeling. With Dynamic DSP Synthesis™,
the Fusion allows you to create sounds using any combination of synthesis types. There are
no artificial limits placed on synthesis or polyphony—you’re free to configure and push your
Fusion to its absolute limits.
Sample Playback
Whether you’re looking for the most realistic guitar or piano, a massive snare drum, or
a sound effect, the Fusion’s sample playback engine can make it happen. Right out
of the box, the Fusion has thousands of high-quality samples at your disposal.
Virtual Analog (VA) Synthesis
The Fusion’s VA synthesis engine is just what you need to make lush pads and deep,
massive bass. The three oscillators, ultra-flexible routing, and variable filter types allow
the Fusion to sound like any of the great analog synths of the past. Or, if you’re the
adventurous type, you can go wild and create a virtual analog synth that has never
been heard before!
FM Synthesis
FM synthesis is best known for its ability to produce electronic piano, bell-type sounds,
and melodic percussion such as vibes and marimba. Prior to the Fusion, FM
synthesis was considered a challenge to program because of the way the operators
and carriers interact to produce sound. With the Fusion, FM’s complicated
programming is a thing of the past. The Fusion’s graphical FM signal router greatly
simplifies sound creation, enabling you to intuitively realize the sound you want.
Physical Modeling
Physical modeling is a state-of-the-art process that mathematically describes how a
sound wave behaves inside an instrument. We’ve taken a great deal of care in
designing an interface that musicians can relate to—enabling you to tweak your
sounds in real-time without complex math or confusing parameters. With physical
modeling, you can create ultra realistic wind and reed instruments or create
instruments no one has heard before.
Eight Channel Hard Disk Recorder
For capturing vocals or live instruments, the Fusion has an integrated, 8-track, 24-bit /44.1kHz
hard disk recorder. The analog inputs on the rear panel let you record eight tracks
simultaneously allowing you to capture an entire band at the same time. Like any recorder, the
Fusion provides standard transport controls with locate points.
2
Page 5

Sampling Capability
If you want to create a custom instrument or sound effect, you can easily do it with the Fusion’s
sampler. The Fusion provides stereo inputs with a Trim knob for adjusting input levels. Your
samples can be either mono or stereo, and are recorded and stored as files that can be placed
on either the Fusion’s hard disk or compact flash cards.
An Integrated MIDI / Audio Recording and Editin g Environment
The Fusion makes composing easy by displaying both MIDI and audio data on one screen.
The Fusion can also import MIDI files for easy editing within the workstation.
The Mode Buttons
The Fusion has six main modes: Mix, Program, Song, Sampler, Mixer, and Global.
Mix, Program, and Song modes have parameters that you can edit. To go “under the hood” of
these modes, simply press the EDIT button located on the upper left of the data wheel. To
return to the “top” just press the Mix, Program, or Song mode button again.
Mix Mode
This is the mode where you can assemble your “band” for a song. Let’s say you want
to compose a song with piano, bass, and drums. After you’ve found the instruments
you want to use (using Program mode—see below), simply add your programs into a
“Mix” and now you’re ready to arrange your composition using either the Fusion’s built
in sequencer (in Song mode) or an external sequencer.
Mix mode is also where you can go to set up keyboard splits (for example bass on the
left half of the keyboard, and a synth on the right), or to layer sounds on top of each
other.
Program Mode
This mode is where you’ll probably spend most of your time. In Program Mode, you
can load and play one instrument at a time and explore the thousands of sounds in
the Fusion. Say you just want to play a Grand Piano—just enter Program mode, call
up the type of piano you want, and go!
The category buttons to the right of the display give you quick access to different
groups of sounds, such as Piano, Guitar, Bass, Strings, etc.
Song Mode
After assembling your band (like the piano, bass, and drums trio we discussed in Mix
mode), you can arrange, record, and edit your composition in Song mode. The
Fusion’s multitrack recorder is also integrated into this mode letting you record live
instruments along side your synth tracks.
On the display’s upper right, Active Tracks refers to the number of tracks you are
currently working with. The Fusion provides up to 32 MIDI tracks and 8 audio tracks
per song.
3
Page 6

Sampler Mode
When you’re ready to create your own custom instruments or sound effects, Sampler
mode is where you’ll need to go. All sampling and waveform editing takes place here.
Pressing Edit when you’re in Sampler mode and you’ll see the all the layering and
editing capabilities of the Fusion found within the Multi, Zone, Sample, Process, and
Utility tabs along the left side of the display.
Once you’re done creating your new instrument, you can load it up and play it just like
any other program in Program mode.
Mixer Mode
Mixer Mode has been created so you can conveniently mix your synthesizer and
audio tracks together on one screen. The mixer is only accessible when you are in
Mix and Song which are the only modes in which you can have multiple programs or
audio tracks to mix together. Program or Sampler modes only play one instrument at
a time and do not need a Mixer (because you have nothing to mix)
The mixer lets you set levels and pan positions for each synth and audio track. You
can also set send levels, and mute or solo tracks just like on a hardware mixer.
Global Mode
Global mode lets you set parameters that affect all areas of the Fusion. Things like
MIDI transmit channel, master tuning, and keyboard velocity scaling can be found
here.
The SETTINGS tab lets you modify various keyboard, MIDI, and controller related
settings, while the ITEM tab lets you open, load, move, or delete different items found
on your Fusion (items include programs, mixes, songs, samples, multisamples, and
arpeggiation patterns). The MEDIA tab gives you information about the hard drive
and Compact Flash cards and allows you to format these devices. The SYSTEM tab
lets you view and update the current system information.
4
Page 7
Basic Navigation: The Fusion’s General Layout
Let’s begin by familiarizing ourselves with the Fusion’s layout. This will make it easier to find what you
want as you start playing your Fusion or hooking it up to your studio.
THE FUSION’S TOP PANEL SECTIONS
FULL INSTRUMENT VIEW
As you look at each Fusion’s top panel, you’ll notice there are two separate sections:
• The section of knobs, buttons, and wheels located on the instrument’s left side is known as the
Performance Panel.
• The section that includes the Fusion’s display, the control wheel, and the various other buttons
is known as the Control Panel.
FUSION 6HD
5
Page 8
6
PERFORMANCE PANEL VIEW
3
1
2
8
7
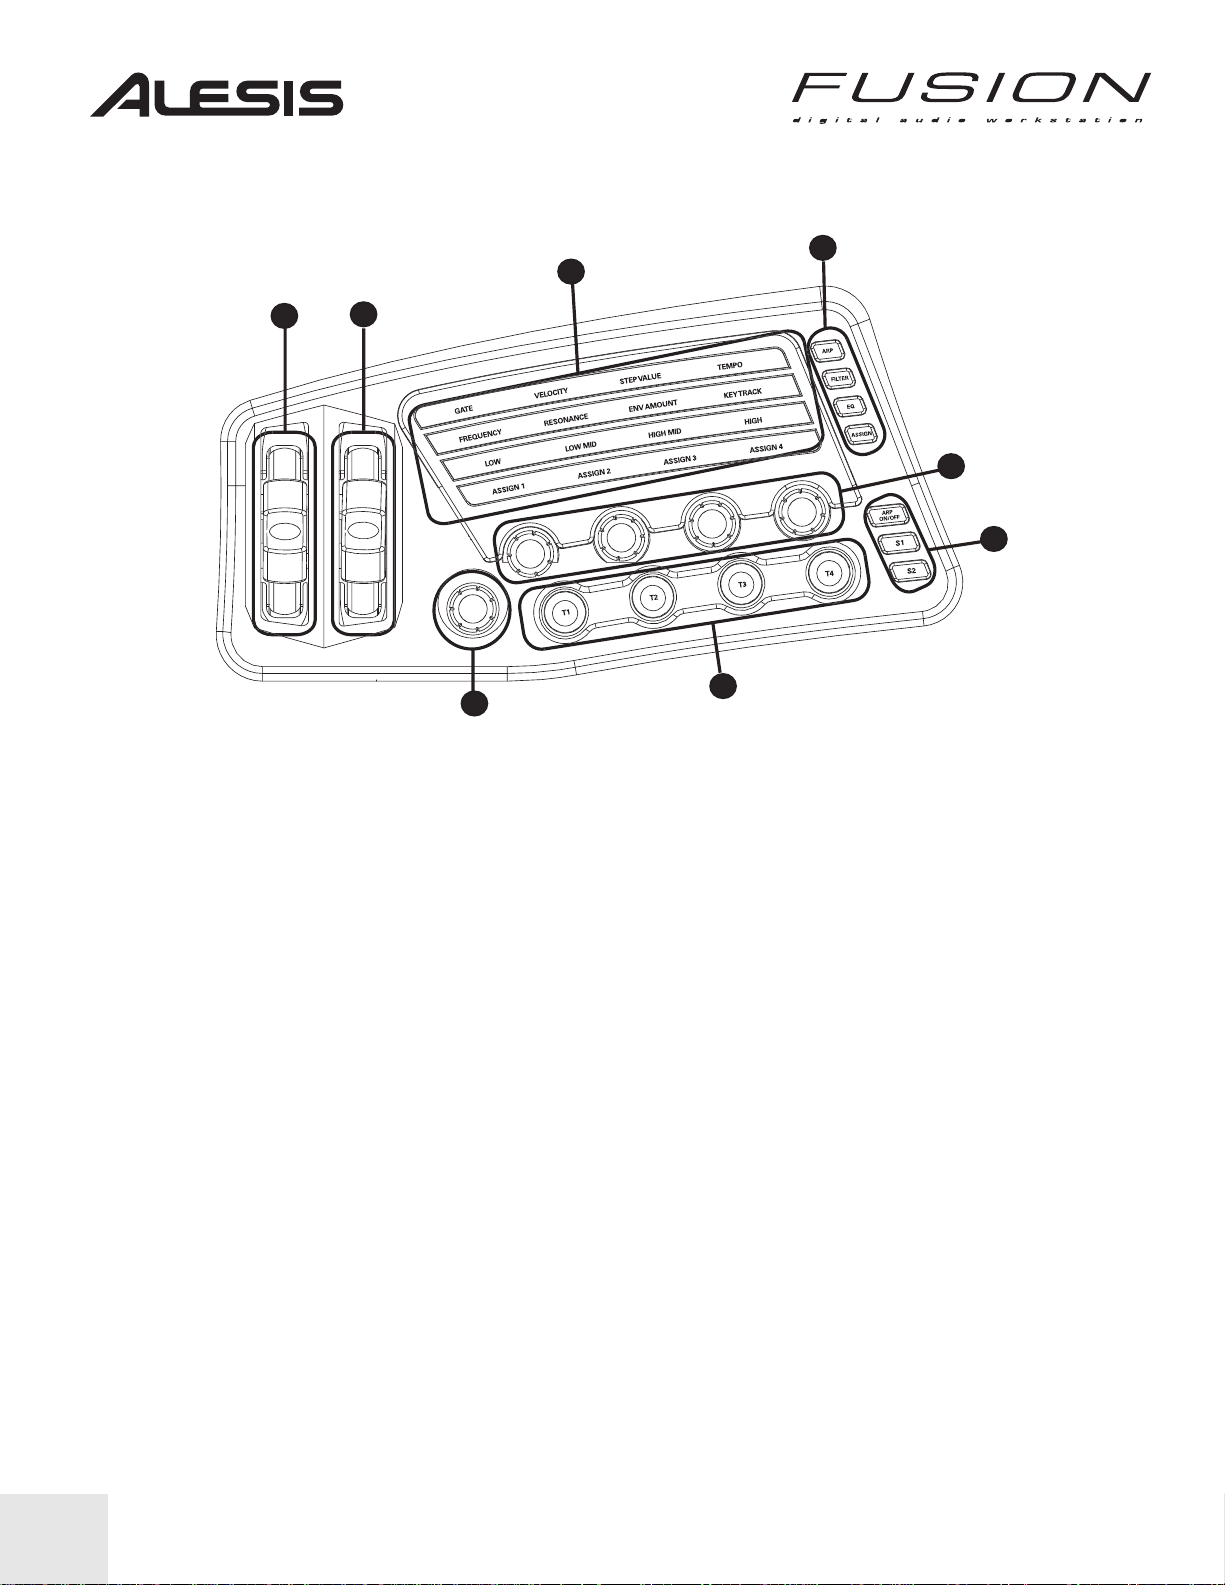
The Fusion’s Performance Panel is what you’ll often reach for during a performance. The
wheels, knobs, and buttons will allow you to tweak things like pitch, modulation, or filter cutoff
while you’re playing. This chapter will explain the basics—for more in depth coverage see the
reference manual.
The Performance Panel’s components consist of the following:
1. PITCH BEND WHEEL: This is a standard pitch bend wheel that behaves just like on any other
synthesizer. Use this to create expressive pitch changes during a performance.
2. MODULATION WHEEL: The modulation wheel (or “mod wheel” for short) can be assigned to
control many parameters within the keyboard like vibrato, tremolo, FM amount, etc. Like the
pitch wheel, it’s often used to add expressivity to your performance. The mod wheel is usually
mapped to vibrato as a default, but it is possible to map it to almost anything using the Fusion’s
Modulation Matrix. See the reference manual to find out how to do this.
3. PERFORMANCE GRID: The Performance Grid tells you what your Control Knobs are
currently assigned to. There are four rows and the active row is illuminated while other rows
remain dimmed. Use the ARP, FILTER, EQ, and ASSIGN buttons (see below) to select your
active row.
4. ARP, FILTER, EQ, ASSIGN: These buttons select the active row on the performance panel.
ARP, FILTER, and EQ are hard-wired to arpeggiator, filter, and EQ functions whereas the
assign row lets you map the Control Knobs to any parameter of your choosing.
4
5
6
Page 9

5. CONTROL KNOBS: These knobs can be used to control all kinds of parameters within the
Fusion like filter frequencies, resonance, modulation, or even tempo. You can use the Control
Knobs to tweak settings in real-time as you’re playing, giving you limitless creative possibilities.
TIP: The bottom of the Fusion’s display changes depending on what row you have
selected in the Performance Grid. For example, if you select the ARP row, the “virtual knobs”
on the bottom of the screen will say Gate, Velocity, Step Value, and Tempo. If you select
“EQ,” the bottom of the screen will change to Low, Low-Mid, High-Mid, and High.
When you turn a knob, you’ll notice the on-screen knob changes accordingly.
6. ARP On/Off, S1, S2: The ARP On/Off (Arpeggiator) button engages and disengages the
Fusion’s arpeggiator. The S1 and S2 buttons are assignable ON/OFF switches that can be set
to affect all kinds of functions within the Fusion such as filters or effects sends.
The Arpeggiator section is covered in more detail later in this guide. See the Reference
Manual for more on the S1 and S2 buttons.
7. TRIGGER 1 – 4: These four assignable buttons can trigger LFOs, envelopes, and many other
functions. Unlike the S1 and S2 switches described above, these trigger buttons are only
active when you are holding them down—once you release the triggers they become inactive.
See the Reference manual for more on how to assign these buttons.
8. MASTER VOLUME: This is the Fusion’s master volume control.
7
Page 10
CONTROL PANEL VIEW
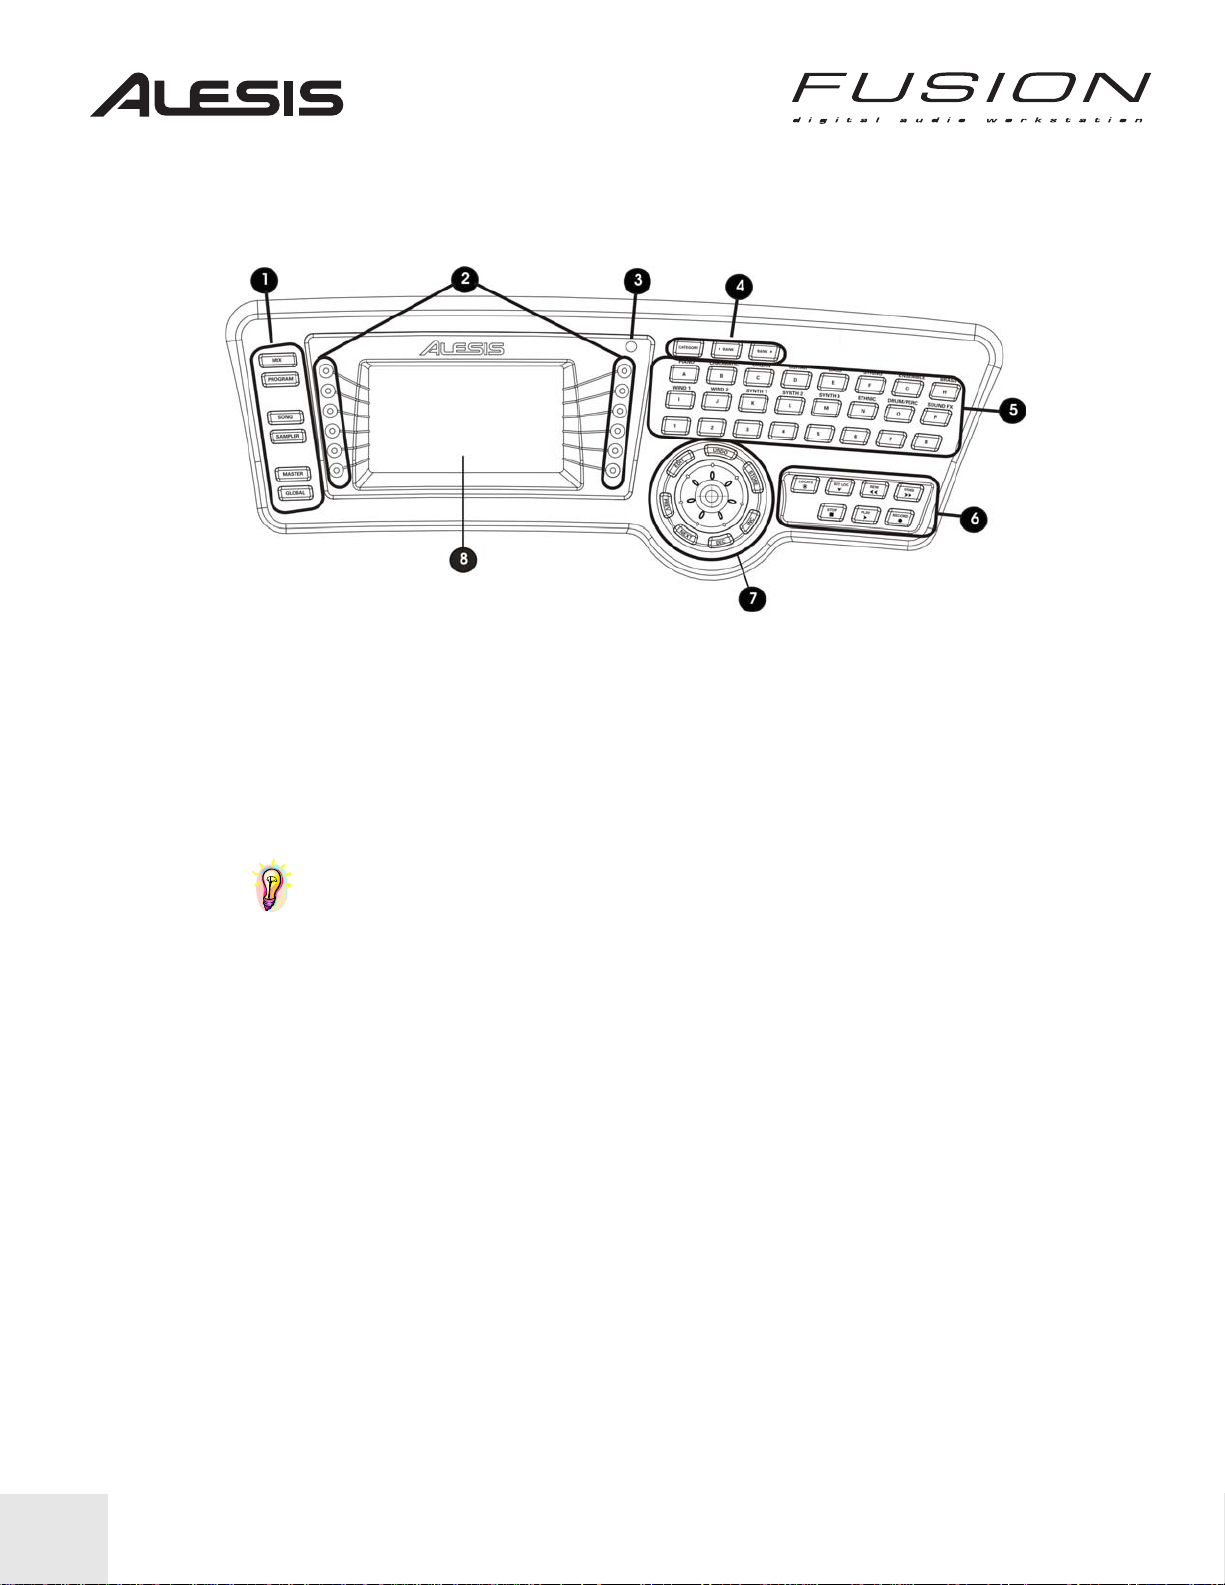
1. MODE SELECT BUTTONS: These buttons take you to the different modes of the Fusion. If
you’re already in a mode and press the button again, you will be returned to the “top level” of
that mode.
Use these buttons to switch into Mix, Program, Song, Sampler, Mixer, or Global modes.
2. SOFT BUTTONS: These buttons allow you to access different parts of the Fusion’s user
interface. SOFT BUTTONS correspond to on-screen parameters that are displayed along the
right and left sides of the display.
TIP: As an example, if you press PROGRAM, then EDIT (upper left side of the Control
Wheel), you will see Program, Synth, Mod, Arp, Effects, and Utility positioned along the left
side of the display. The SOFT BUTTONS along the left access these tabs. Similarly, the right
SOFT BUTTONS will access functions arranged along the right of each page.
3. CONTRAST: This knob allows you to adjust the contrast of the Fusion’s LCD screen.
4. CATEGORY and BANK: The CATEGORY button accesses the Fusion’s “sound librarian”
mode. This mode allows you to view your programs (or mixes if you are in MIX mode) sorted
by category. For example, when you’re in PROGRAM mode, the Category button brings up a
screen that lists programs contained within that category. This mode should make it easier to
find a particular program you’re looking for.
The BANK buttons allow you to cycle through the different banks of programs that are stored
on the Fusion.
5. QUICK ACCESS BUTTONS: The Fusion provides twenty-four QUICK ACCESS buttons
(arranged in three rows of eight) for easy access to your sounds. The top sixteen of these
buttons are labeled A through P whereas the remaining eight buttons (bottom row) are
numbered 1 through 8. This gives you access to all 128 sounds that can be stored in a bank
(since 16 * 8 = 128). Once you’re familiar with the sounds you like on the Fusion, you can call
them up directly from Program mode using these shortcut keys. For example, you can access
the Grand Piano (program A-1) by pressing “A” and “1.”
8
Page 11

6. TRANSPORT CONTROLS: These seven buttons control the Fusion’s integrated MIDI
sequencer/multitrack recorder. The SET LOC button sets a locator point in the song that you
can jump to using the LOCATE button. The remaining buttons control the recorder’s various
Record and transport functions just like on a regular tape machine (or computer-based
sequencer).
7. CONTROL WHEEL (& surrounding buttons): The Fusion’s control wheel lets you change
sounds and parameters quickly. Turning it clockwise is the same as pushing the “Inc” (or
Increment) button in rapid succession whereas turning it counter-clockwise is the same as
pushing the “Dec” (or Decrement) button. Generally, you’ll use this wheel to control large
parameter changes (such as going from 0% to 100%) and you’ll will use the Inc/Dec buttons
for fine tuning (for example, going from 10%-12%).
The EDIT, UNDO, STORE, PREV, NEXT, DEC, and INC buttons that surround the Control
Wheel have the following functions:
• EDIT: This button takes you “under the hood” of any given mode—letting you adjust or fine-
tune the mode’s various parameters.
• UNDO: This button allows you to undo actions in the event you change your mind about
something you’ve edited. You have 100 levels of undo.
• STORE: This button allows you to save any edits you’ve made to your program, mix or song.
• PREV, NEXT: The Previous and Next buttons allow you to navigate through pages on the
Fusion’s LCD screen.
• DEC, INC: The Decrement and Increment buttons allow you to alter the values of various
system parameters.
8. DISPLAY: The Fusion’s large, backlit LCD display keeps you advised of what is happening
within the synthesizer.
9
Page 12
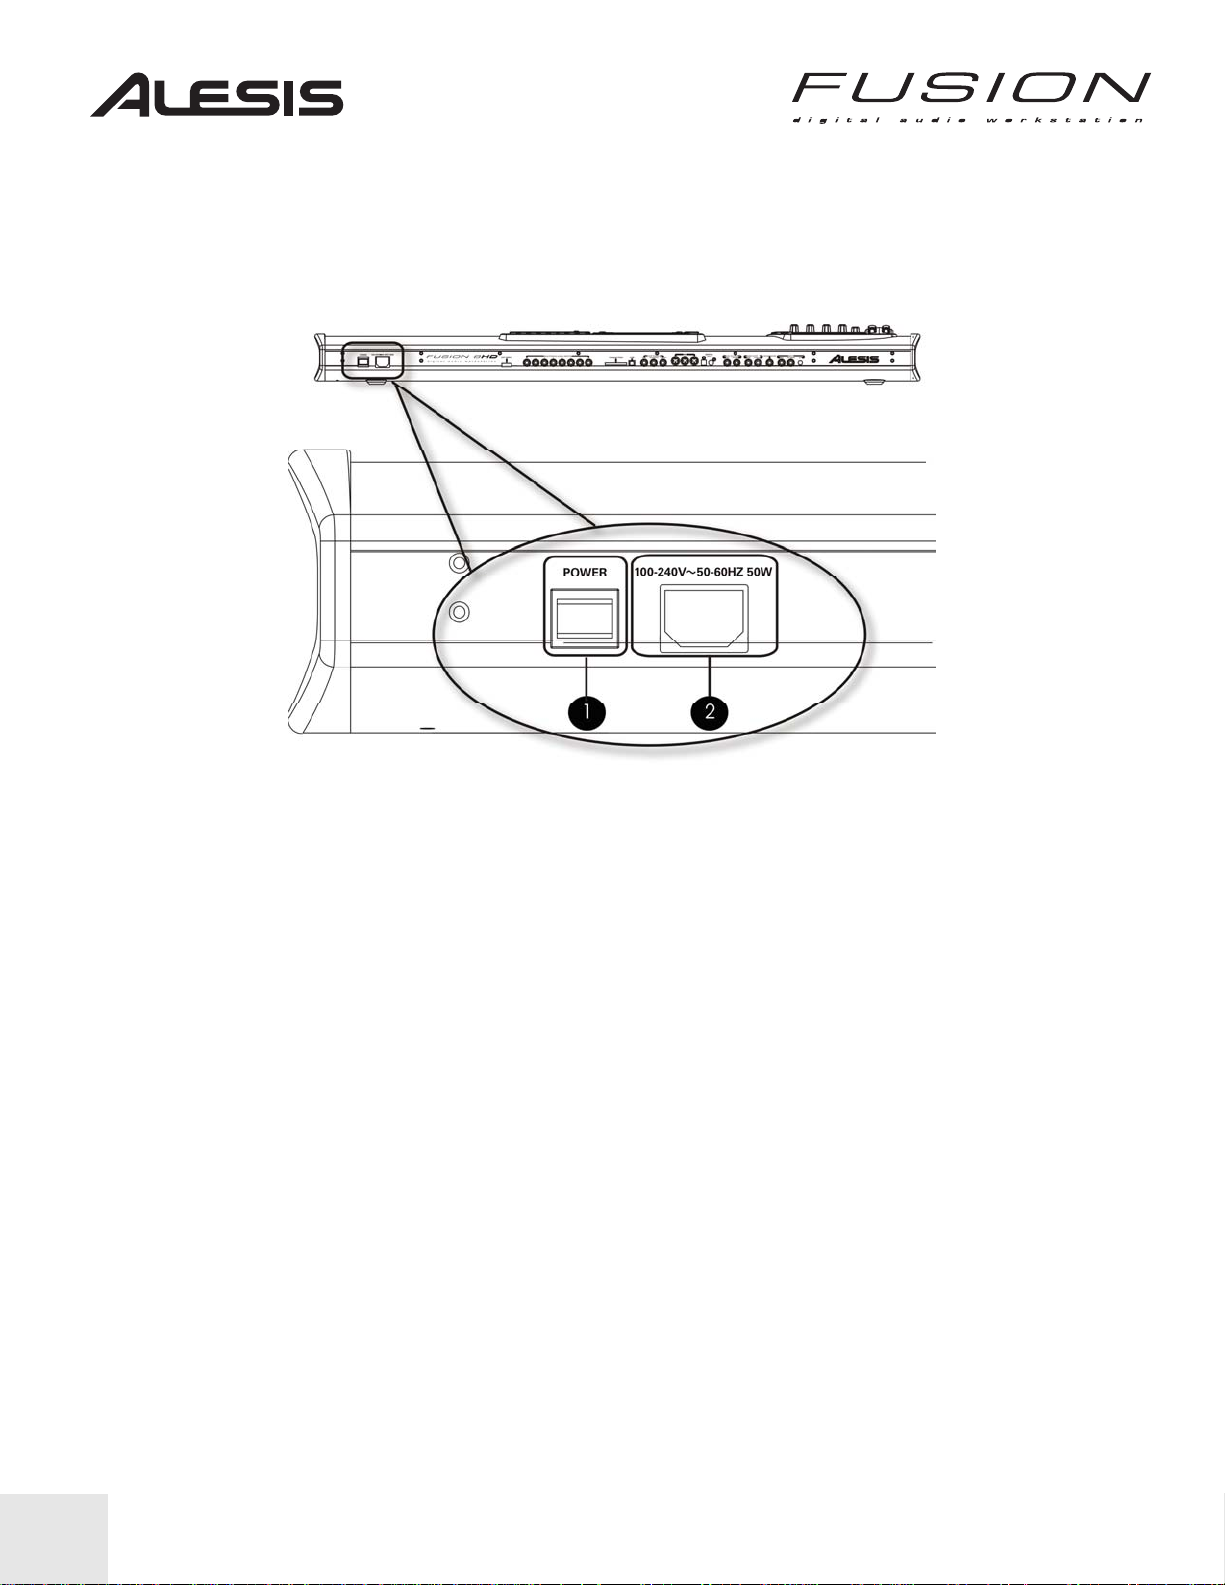
THE FUSION’S BACK PANEL SECTIONS
POWER SWITCH AND POWER CABLE SOCKET
As you face the Fusion’s back panel, the power switch and power cable socket are to the left.
1. POWER switch.
2. Power cord socket. The Fusion uses a standard IEC power cord.
10
Page 13
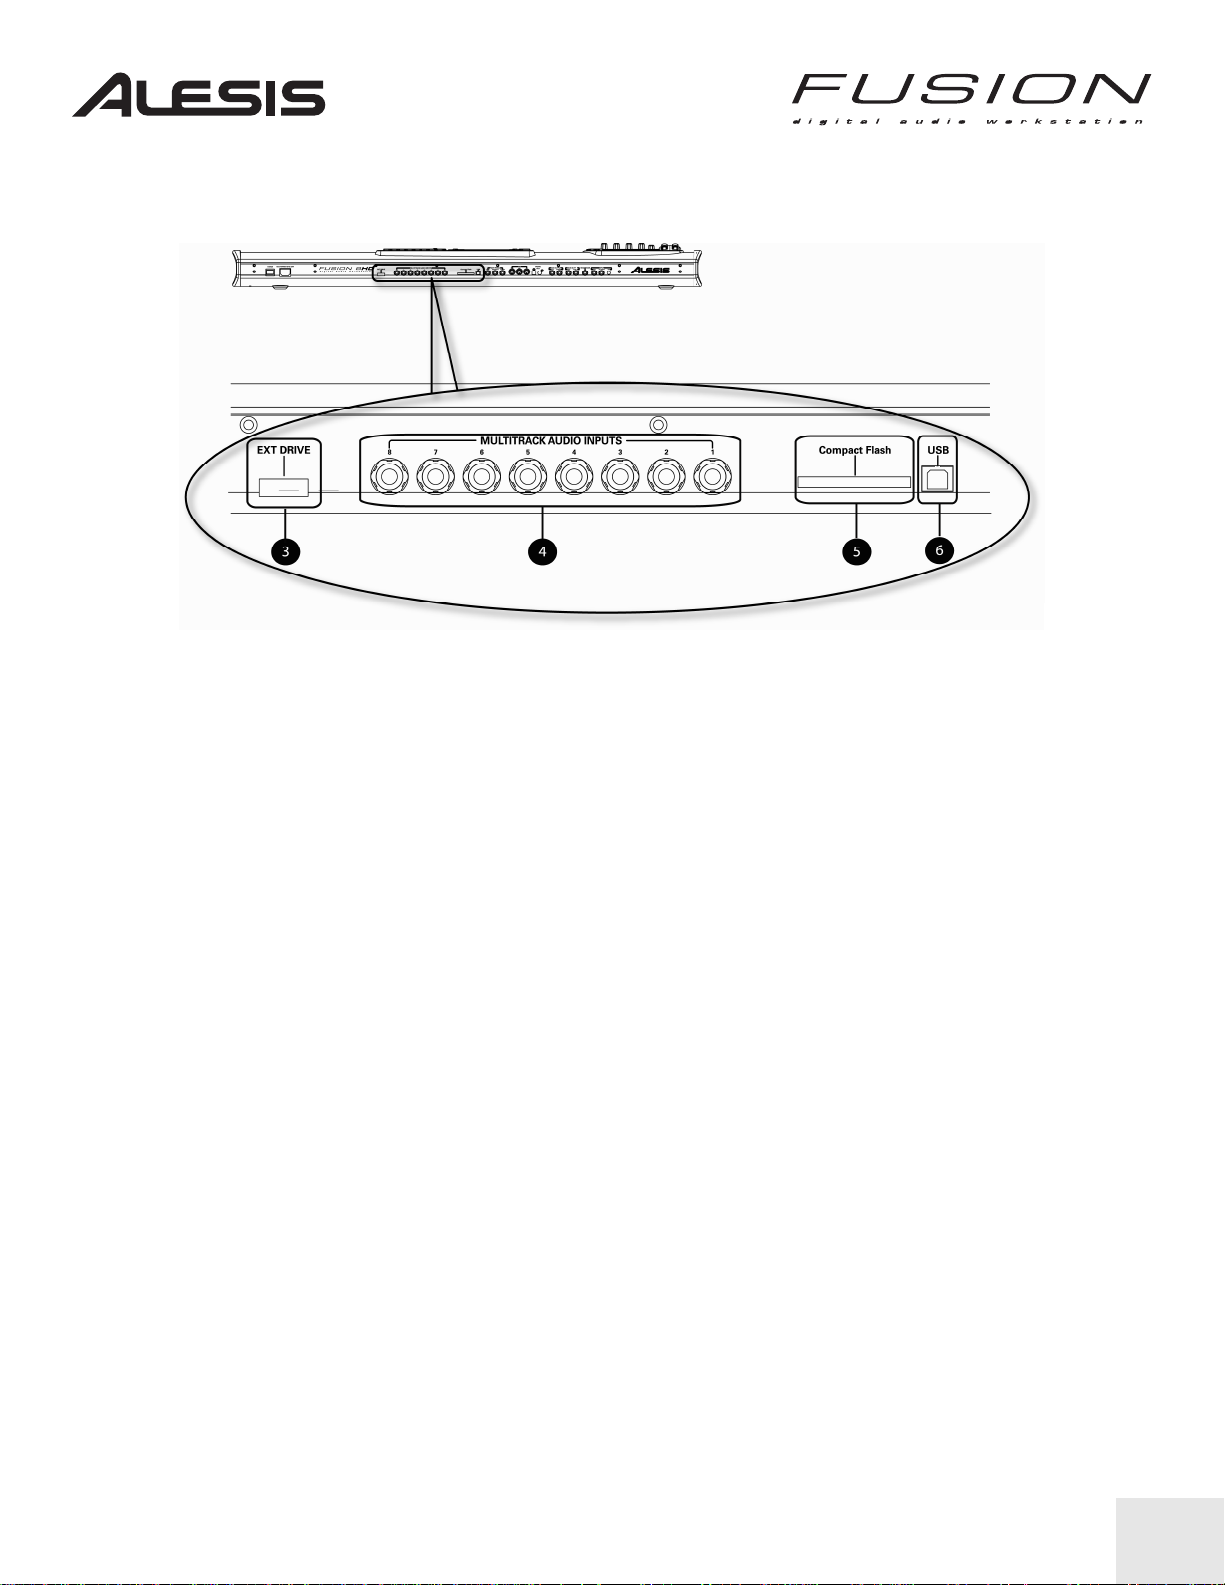
MULTITRACK INPUTS, EXTERNAL DRIVE PORT, COMPACT FLASH, USB
As you face the Fusion’s connections panel, the area toward the center left contains the
following:
3. EXT DRIVE: This Serial ATA-type connector allows you to connect an external CD-R or hard
drive to the Fusion.
4. MULTITRACK AUDIO INPUTS: These eight ¼-inch inputs connect to the Fusion’s multitrack
audio recorder. The Fusion can record 8 channels simultaneously.
5. COMPACT FLASH: This slot accepts CF cards for saving and loading programs, mixes,
samples, and many other kinds of files.
6. USB: This connector is used to hook up the Fusion to your computer. The Fusion supports
USB 2.0 and is backward-compatible with USB 1.1/1.0.
11
Page 14
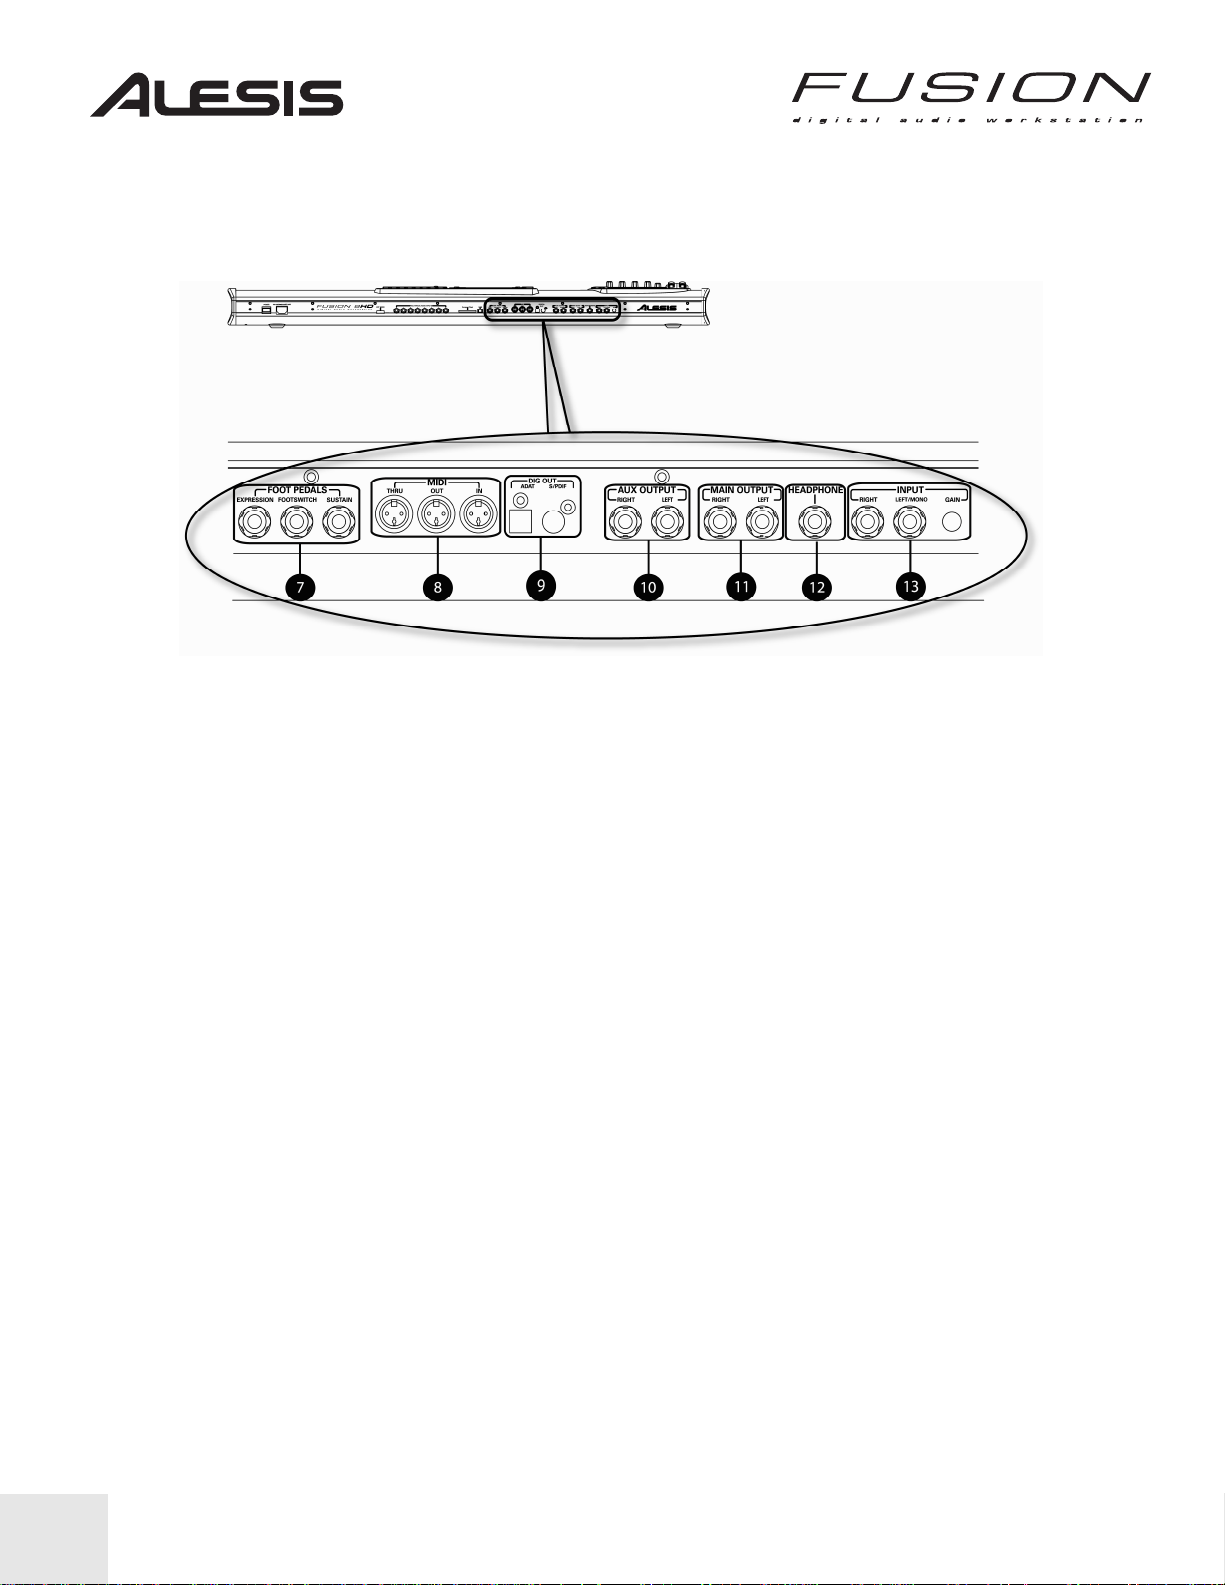
MIDI, DIGITAL OUTPUTS, MAIN / AUX / HEADPHONE OUTPUTS,
SAMPLING, AND PEDAL CONNECTIONS
As you face the Fusion’s rear panel, the right half of the workstation contains the following
connections:
7. FOOT PEDALS: These three inputs allow you to control a variety of functions. EXPRESSION
is the Fusion’s continuous controller expression pedal input and can be assigned to control
things like volume or expression.
The FOOTSWITCH input is configurable and enables you to trigger envelopes, LFOs, and
other events with your foot. It is similar to the trigger buttons found on the Performance Panel.
Unlike the EXPRESSION input, the FOOTSWITCH is binary, and is either “on” or “off” with no
range of control in between.
The SUSTAIN input is for a sustain pedal and is commonly used for piano, vibes, and other
instruments. Like the FOOTSWITCH, the SUSTAIN pedal input is either “on” or “off” and there
is no middle ground.
8. MIDI: These are standard 5-pin MIDI connections (In / Out / Thru) for interfacing with
computers, sound modules, and other MIDI equipment.
9. DIGITAL OUT: The Fusion has a coaxial S/PDIF and an optical digital output. The optical
output supports either 2-channel S/PDIF or 8-channel ADAT and can be set through the
Fusion’s software. See to the Reference Manual for more about this output.
10. AUX OUTPUT: The AUX OUTPUTS provide you with a second pair of analog outputs in
addition to your MAIN OUTPUT (see below). This is useful because it allows you to route
programs to a totally separate set of outputs on the keyboard. For example, you may want to
play a piano/bass split, but EQ and compress each program differently using your favorite
outboard EQs and compressors. No problem. Just route either one of the programs to the
AUX OUTPUT and you can treat your two sounds totally independently.
12
Page 15

11. MAIN OUTPUT: These two outputs—labeled Left/Mono and Right—are the Fusion’s primary
outputs. By default, all sounds are routed to these outputs and you’ll generally connect these
outputs to your amplifier (or mixer).
TIP: By combining the Fusion’s Aux and Main Outputs, you have two stereo-pair or four
discrete channels to work with. For example, let’s say you’ve composed a piece for a string
quartet and want to mix it using the mixer and outboard gear (compressors, EQs, etc.) in your
studio. You could route the violin, viola, cello, and double bass to separate outputs and then
mix each output as a separate sound source.
12. HEADPHONE: Connect your favorite pair of headphones to this jack when you want to play
without disturbing others.
13. INPUT: These inputs—Left/Mono and Right—feed the Fusion’s integrated sampler. You can
sample in stereo or mono, and the Gain control enables you to set the optimum input level.
Note that you can use these inputs to route a microphone (or other external device) through
the Fusion’s synthesis or effects engines. This effectively turns the Fusion into an extremely
powerful effects processor.
13
Page 16

Playing Sounds
Your Fusion workstation ships with an incredible assortment of Programs (in the Fusion, we
refer to individual sounds as “Programs.”) Let’s take a brief tour of how to find and play these
programs.
Selecting sounds is easy. Just do the following…
1. Press the PROGRAM button
This takes you to Program mode in the Fusion. If you are already in Program mode, pushing
this button again will make sure you return to the “top level” of the mode.
2. Press Category Button
The “Category” button takes you to the Fusion’s “Explorer.” The Explorer lists each instrument
Category on the Fusion and also lists what Programs are contained within each category.
Category names are listed on the left, whereas actual Programs are on the right.
3. Press the “A” button
This switches your Category to “Piano.” You’ll notice the category names are written above
the “A” through “P” keys on the Control Panel. When you press the “A” through “P” keys in
Category mode, you’ll jump to the corresponding Category in the Explorer.
4. Use the Control Wheel (or the Inc/Dec buttons) to select a sound
Once you highlight a Program name, you can use the Control Wheel (or the Inc/Dec) buttons
to cycle through all the different sounds in each category of sounds. Once a program is
loaded, you can play that program from within the Explorer. This makes finding the right sound
easy.
5. Press PROGRAM.
Play the sound while on this screen to make sure it’s the one you want. If you want to return to
the regular Program mode press Program again. This will return you to the top of the Program
section.
14
Page 17

For those of you who are curious, let’s take a l ook at what actually took place…
In Program mode, pressing the Category button and then A (Piano) caused the Fusion’s
display to show the screen below. Think of this as Program mode: Category view. Here, you
can see the categories on the left and the various programs within the current category on the
right. This is the Fusion’s “sound explorer”. It shows what programs are currently on the
keyboard. By pressing the NEXT and PREV buttons, you can move between the category and
the sounds within that category.
When you pressed the Program mode button (to the left of the display), the screen appeared
as it does below—with the current Program name displayed in the center of the screen. This is
the upper-most level of Program mode— the main mode for playing and auditioning sounds.
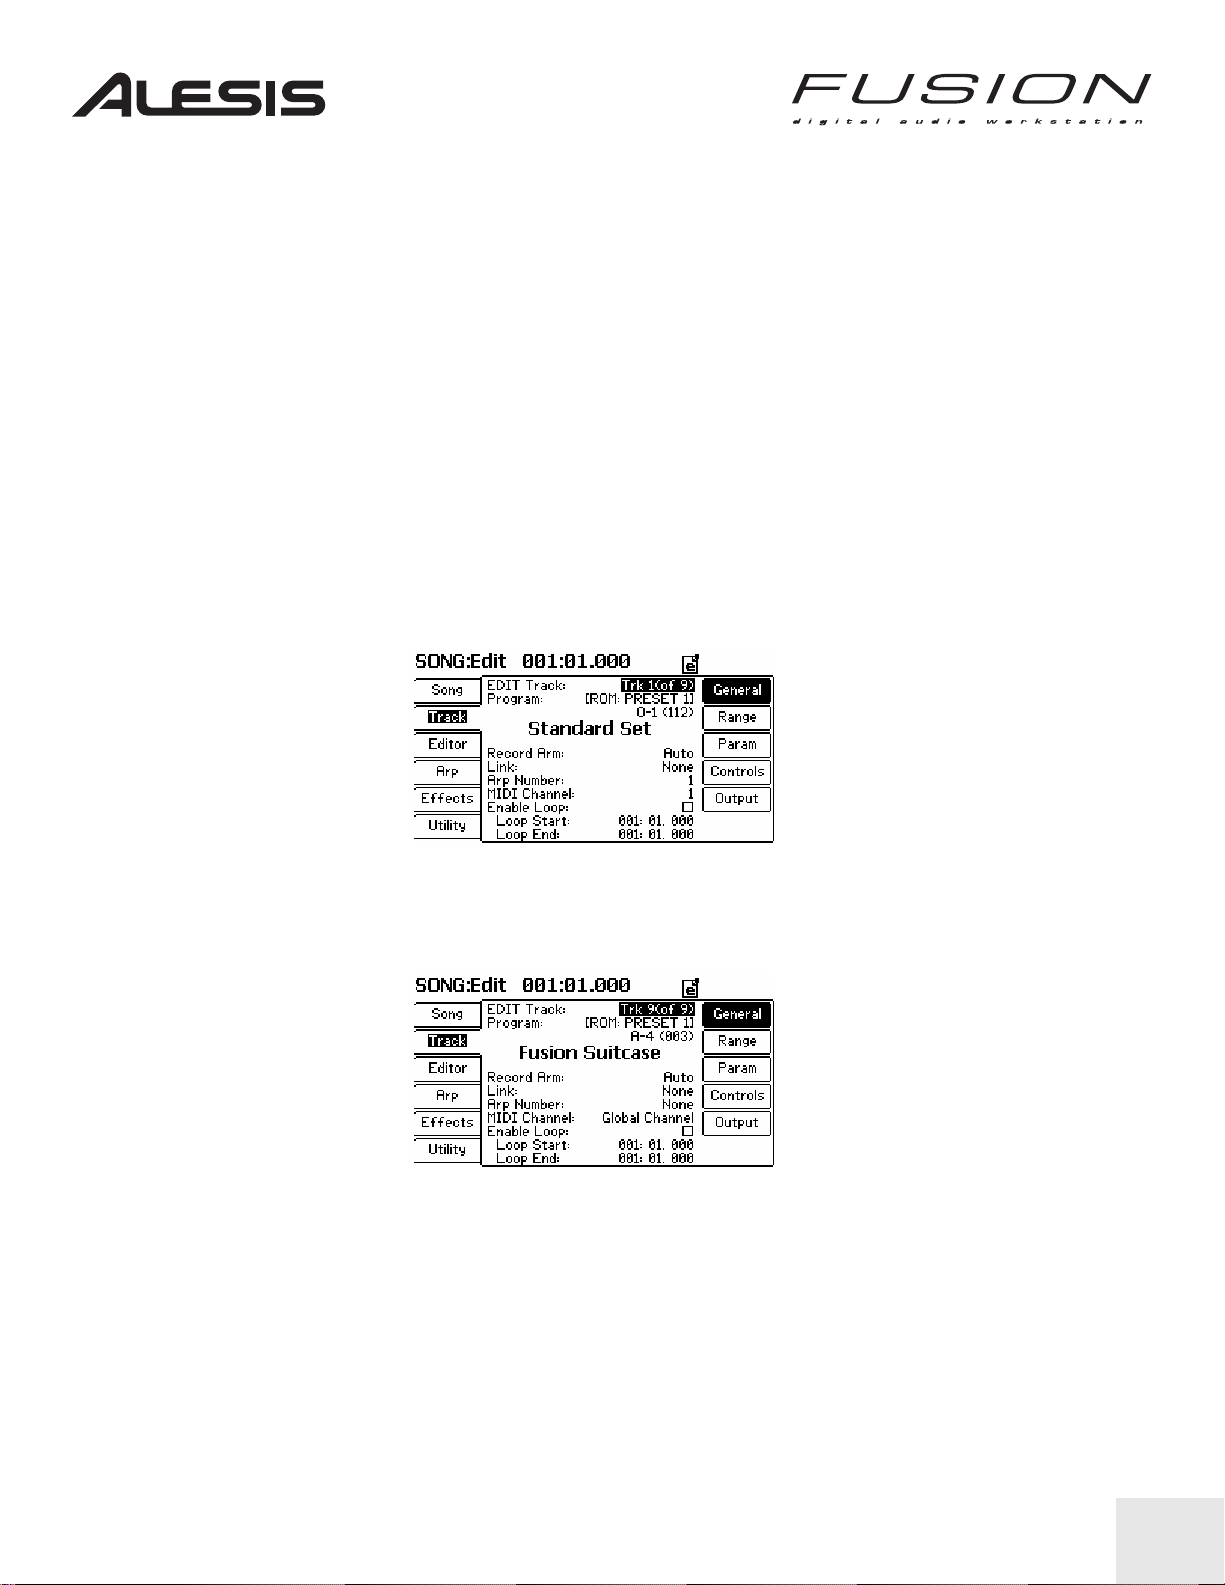
On the screen shown above, you’ll notice that the ROM bank is named “Preset 1”. In the Piano
category, A-1 calls “Holy Grail Grand Piano,” while A-4 calls the program “Fusion Suitcase” as
shown below.
TIP: The Fusion offers multiple Banks for organizing sounds. If you call a particular
sound, but get something unexpected, check what Bank you are in. Chances are, you’ve
changed banks. As an example, while in Program mode, each time you press the Bank left
and right buttons (“◄ Bank” and “Bank ►”), the display will show the currently selected Bank.
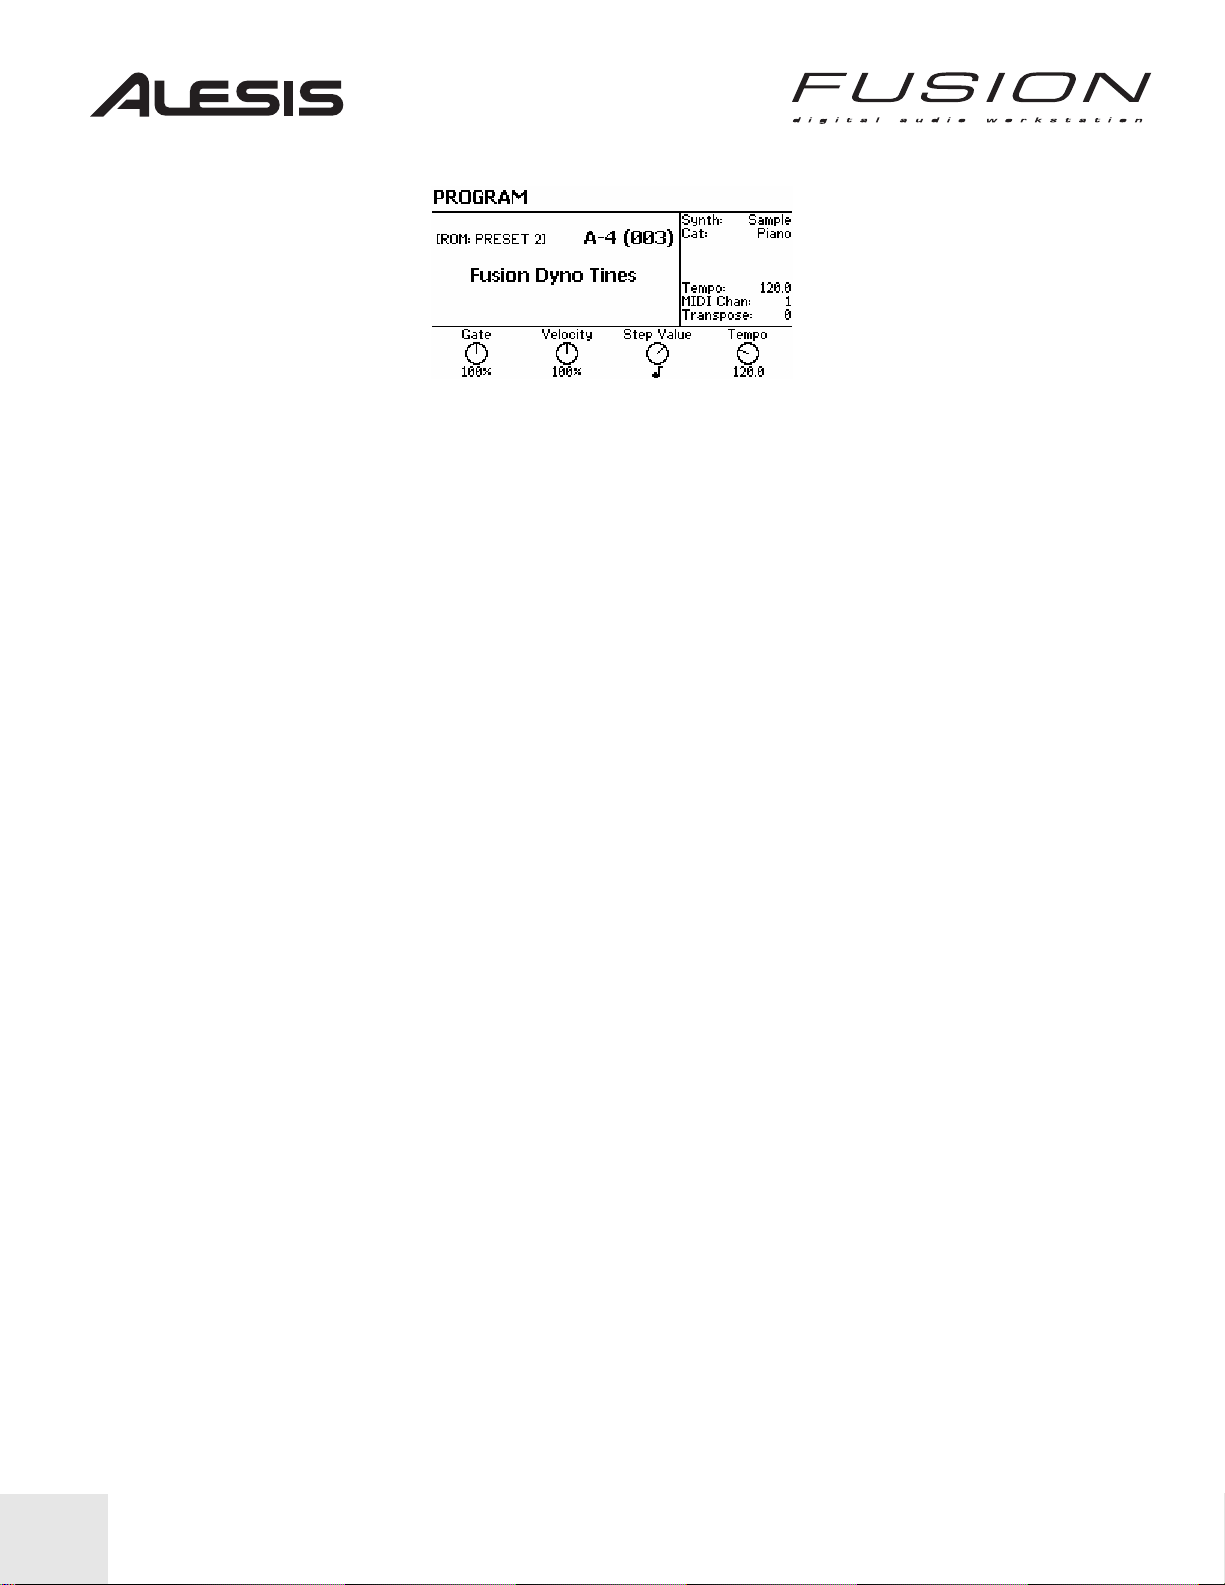
While the Bank name for the image above is displayed as “Preset 1”, pressing the Bank ►
button once will cause the display to look like the one shown below. You’ll notice that the ROM
Bank is now named “Preset 2” and that the program name has also changed to “Fusion Dyno
Tines.”
15
Page 18
By organizing Programs within the same Category and Bank, you have immediate access to
your favorite sounds.
Once you know where your favorite Programs a re located….
In time, you’ll likely come to rely on a core group of favorite sounds that you can use for a
variety of circumstances. Once you know where those favorites reside, calling those Programs
is as easy as selecting the right bank and pressing two buttons—such as A-1 and A-4 in the
examples above.
Program Mode: Category and Bank
The Fusion’s Programs are organized by Category and Bank. The Categories are labeled
(above the A through P keys) Piano, Chromatic, Organ, Guitar, and so on.
16
Page 19
Editing Sounds
The Fusion’s Control Knobs make it easy to tweak your sounds.
First, let’s select a sound:
1. Press PROGRAM.
This takes you to Program mode on the Fusion. If you are already in Program mode, pushing
this button again will return you to the “top level” of the mode.
2. Press the
corner of the screen.
The Fusion can store sounds in a virtually unlimited number of banks. You have to make sure
you’ve loaded the right bank otherwise you’ll find yourself loading unfamiliar programs.
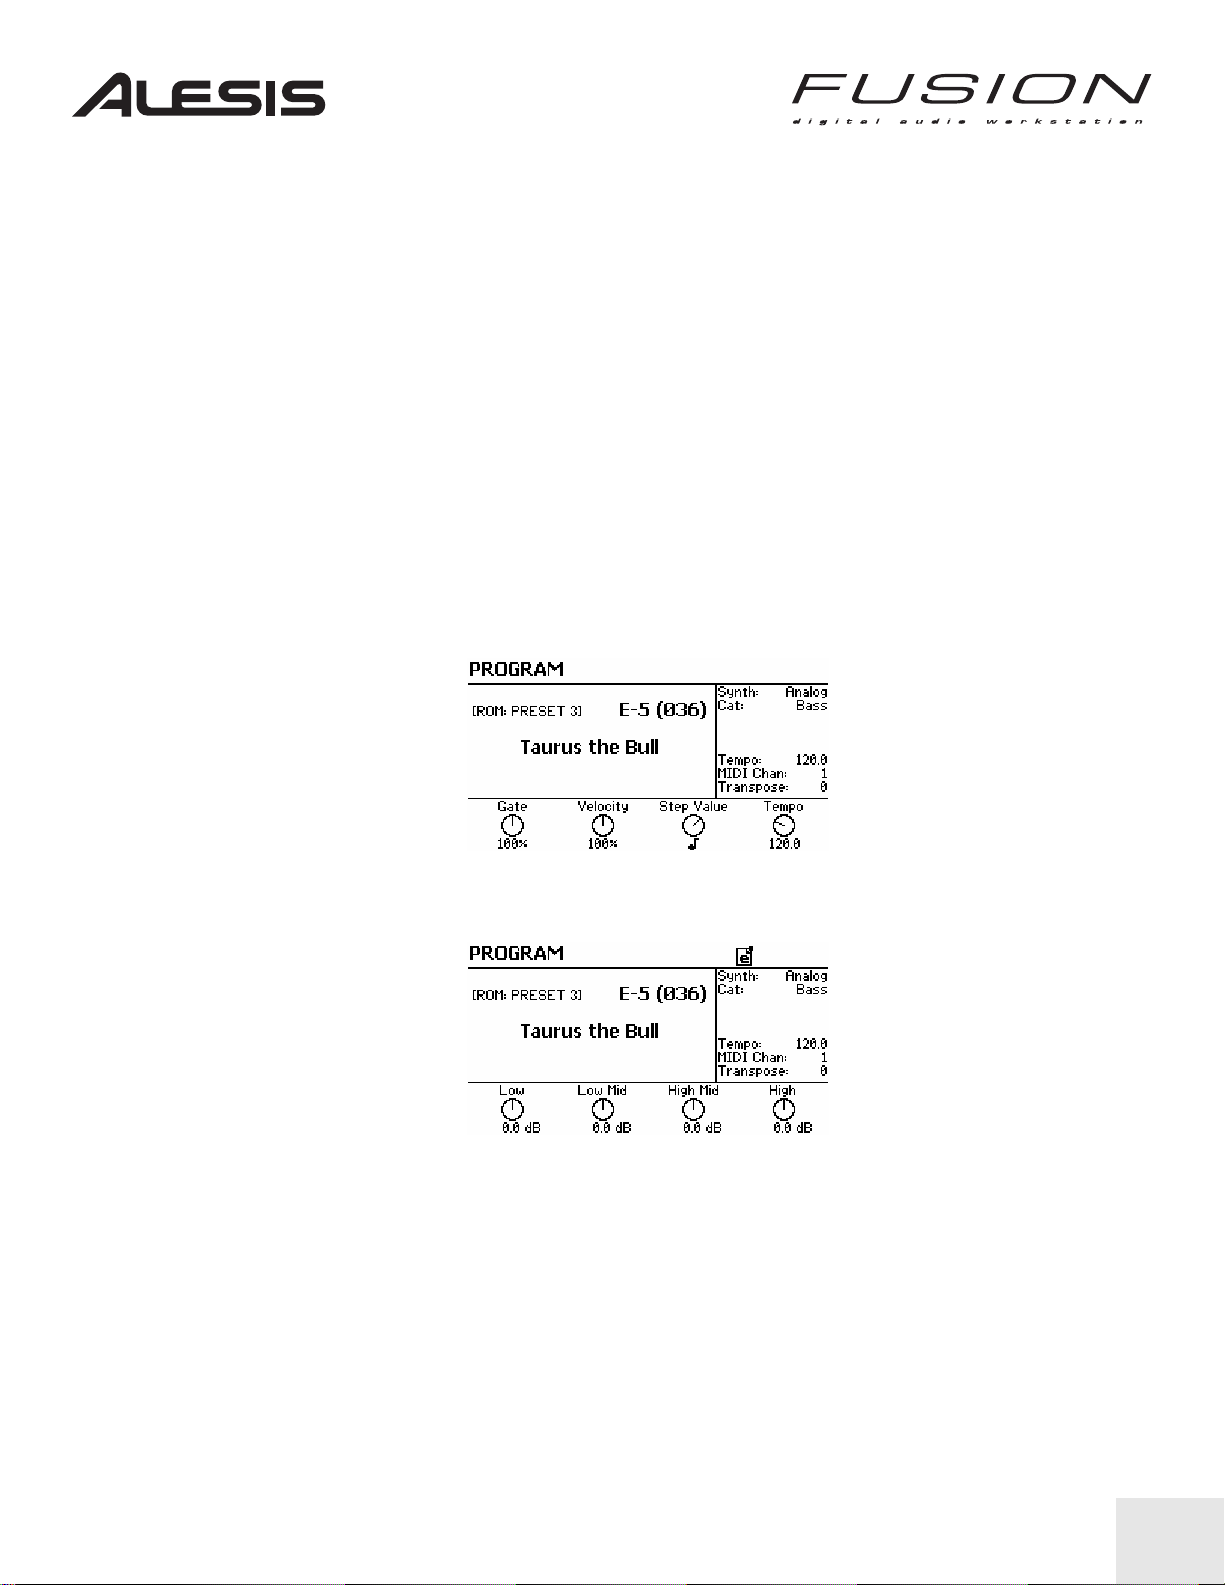
3. Press “E” and then “5” from the quick-access buttons on Control Panel.
Your display should now look like the screen below:
“◄ Bank” or “Bank ►” until you see “[ROM: Preset 3]” on the upper left
This loads program E-5, or “Taurus The Bull.”
Now press the EQ button on the Performance Grid. The bottom of your display will look like
the screen below.
Your four Control Knobs now correspond to Low, Low Mid, High Mid, and High EQ
respectively. As you play the bass sound and rotate the Low EQ knob clockwise, you can hear
the bass sound gain more fullness, or bottom end.
Similarly, you can press the Filter button to the right of the Grid on the Fusion’s Performance
Panel and your screen will look like the screen shot below. Now, the Control Knobs represent
a different set of parameters—in this case, the Filter.
17
Page 20
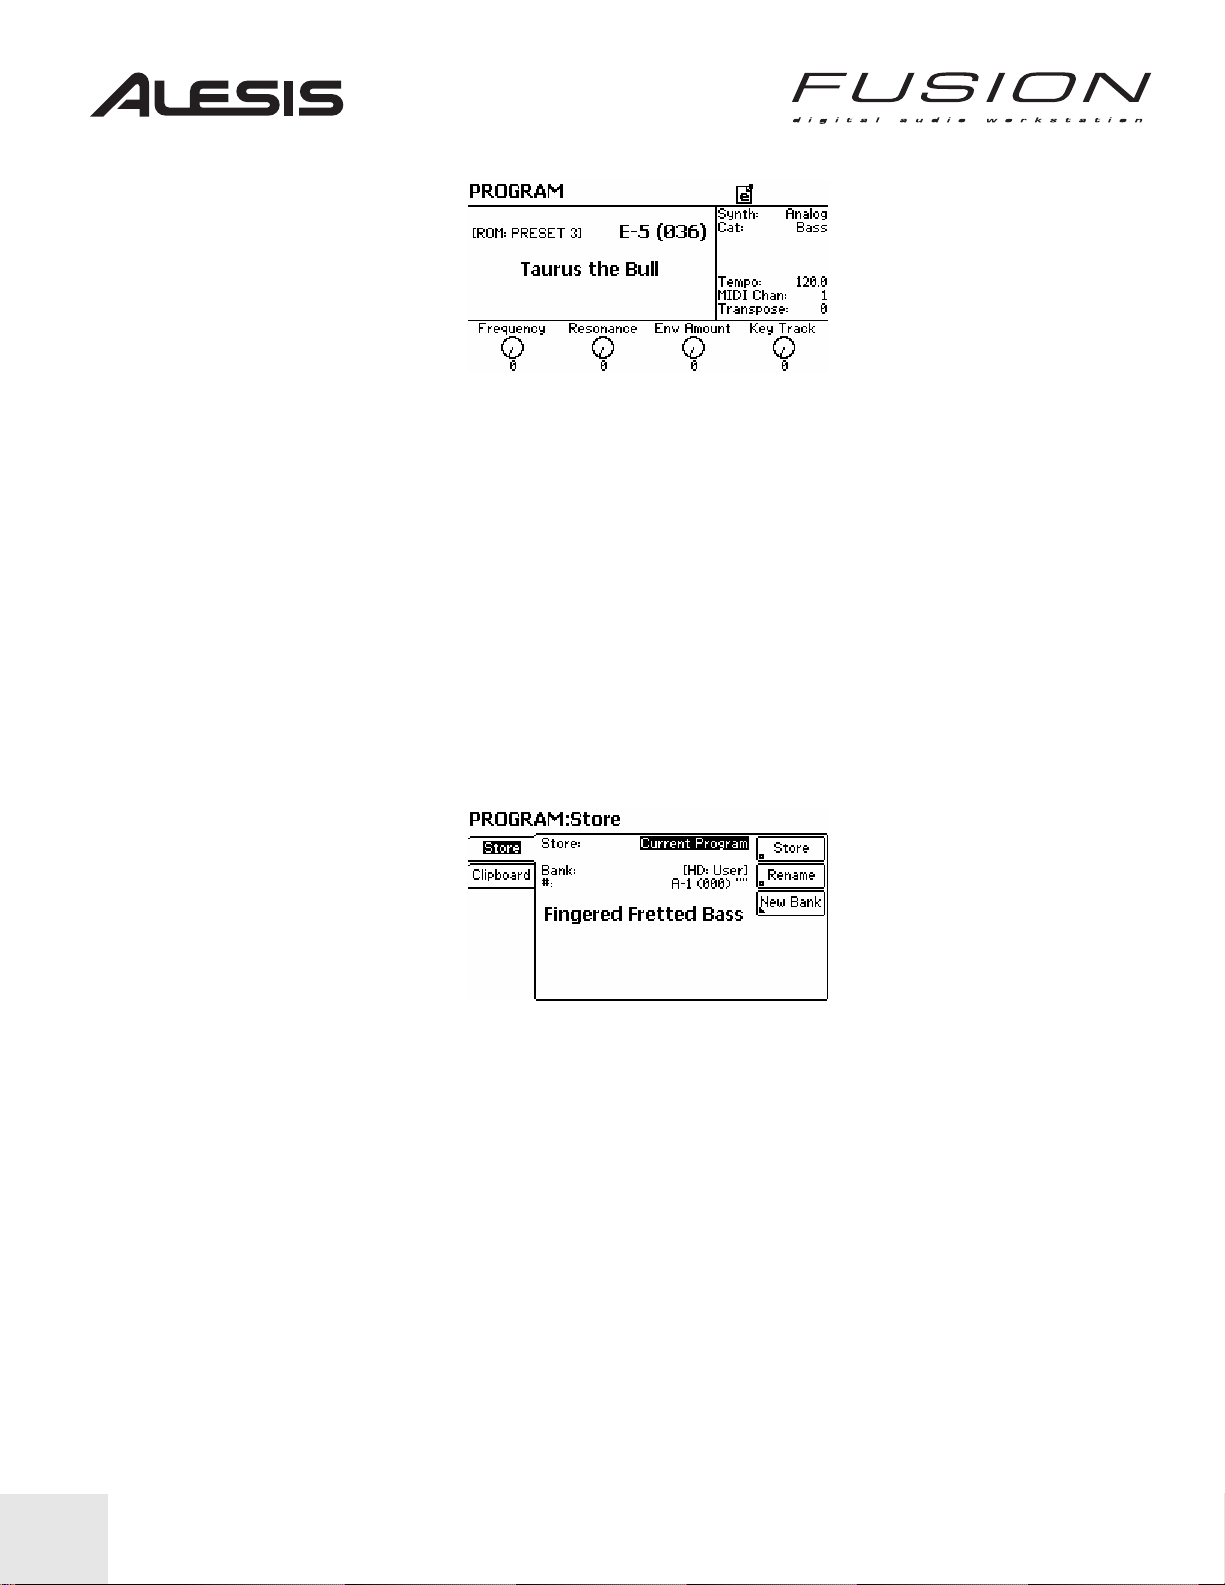
The four Control Knobs now correspond to Frequency, Resonance, Envelope Amount, and
Key Track. Play some notes as you rotate the Envelope Amount knob and you’ll hear your
tone change (you’ll also notice the on-screen knob changes to reflect the position of your
settings.)
Saving your edited programs….
You may have noticed a small “e” toward the top of certain pages (if not, you will see this icon
appear on many of the images below). This icon indicates that your sound has been edited.
Now that you’ve modified the original program, you may want to keep it—in which case, you’ll
need to save it somewhere. Here’s what you do.
1. Press STORE (adjacent to the control wheel). The screen will look like the one below.
2. Because this sound is a Preset sound it can’t be overwritten. You will be saving it to a different
location.
18
At this point, you are ready to save your program. Use the following steps to write your
program to a new location:
1. Use the NEXT and PREV buttons to position the cursor on the ROM Bank field (currently
shown as “ROM: Preset 2) and select your preferred storage Bank using the control wheel.
You have the ability to save it a Compact Flash card (if you have one inserted) or to the
internal hard drive of the Fusion. These will appear onscreen as either CF or HD; for example,
CF:My Bank.
2. Now, use the NEXT and PREV buttons to position the cursor on the location field within the
bank (currently shown as E-5) and select your preferred location using the control wheel.
3. Press STORE (either the soft tab button on the upper right of the display, or the dedicated
STORE button.
Page 21
Using the Arpeggiator
The Fusion’s arpeggiator is extremely easy to use—thanks to the instrument’s Real-Time
Control Knobs. If you’ve never used an arpeggiator, let’s start with a quick explanation of this
function…
An arpeggiator is a musical tool that plays a pre-programmed series of notes. This enables
you to hold, for example, an open-voiced chord with both hands and have the arpeggiator play
the individual notes as triplets, 16
th
notes, etc. at a tempo of your choice.
Playing a Standard Arpeggiation…
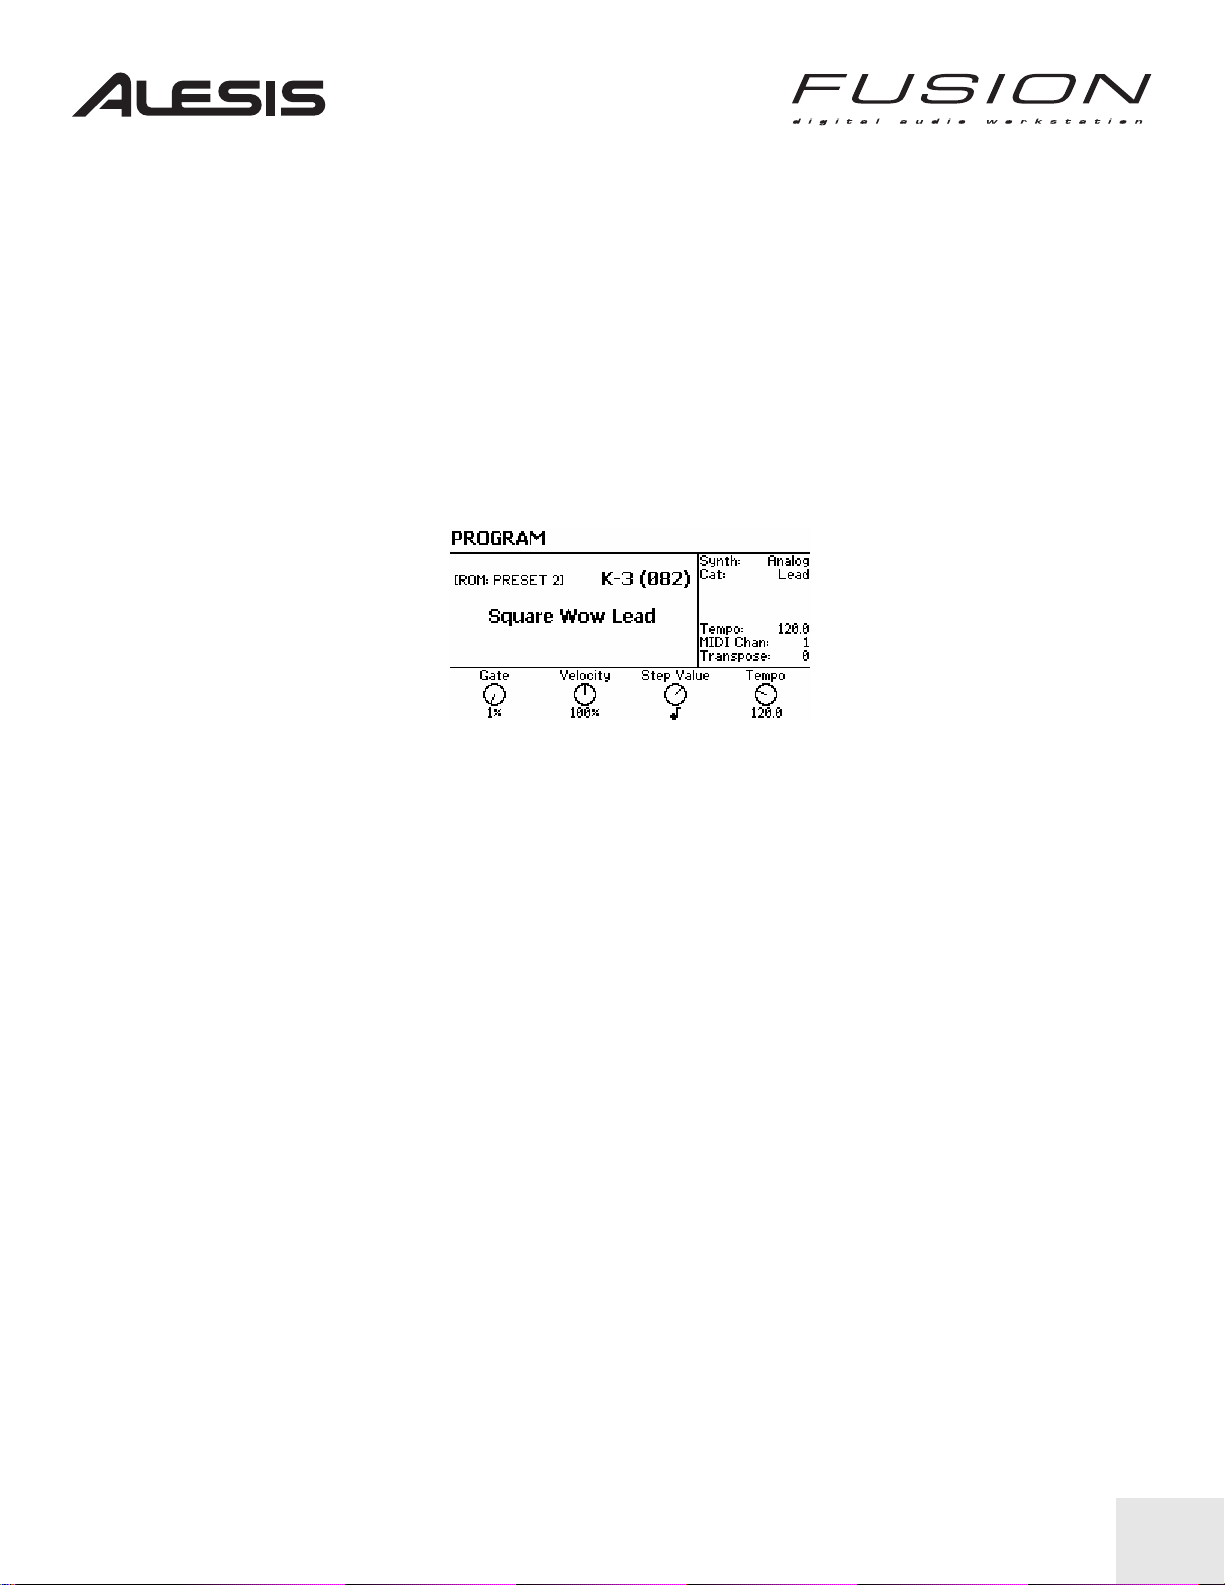
Begin by selecting a synth sound. For the sake of this example, press PROGRAM, switch to
the bank titled “Preset 2” and select program K-3. Your screen should look like the one below.
Take the following steps to enable and adjust the arpeggiator to your liking…
1. Press the ARP button to the upper right of the Grid on the Fusion’s Performance Panel. You
should now see the arpeggiator parameters assigned to the Control Knobs across the lower
portion of your display, as indicated in the picture above.
2. Press the ARP On/Off button, located on the lower right of the Grid. This engages the
arpeggiator.
3. While holding a chord with one hand, adjust the GATE, VELOCITY, STEP VALUE, and
TEMPO parameters to your liking.
Understanding the Parameters….
Here’s a brief explanation of each of the four parameters within the Fusion’s arpeggiator:
• Gate: This parameter adjusts the note duration. A counterclockwise rotation of this control
makes a note sound “staccato”.
• Velocity: This parameter adjusts the level of the subsequent “note ons” after the initial chord is
played.
• Step Value: This parameter enables you to select triplets, sixteenth notes, and other musical
values.
• Tempo: This parameter adjusts the speed of the arpeggiator.
19
Page 22
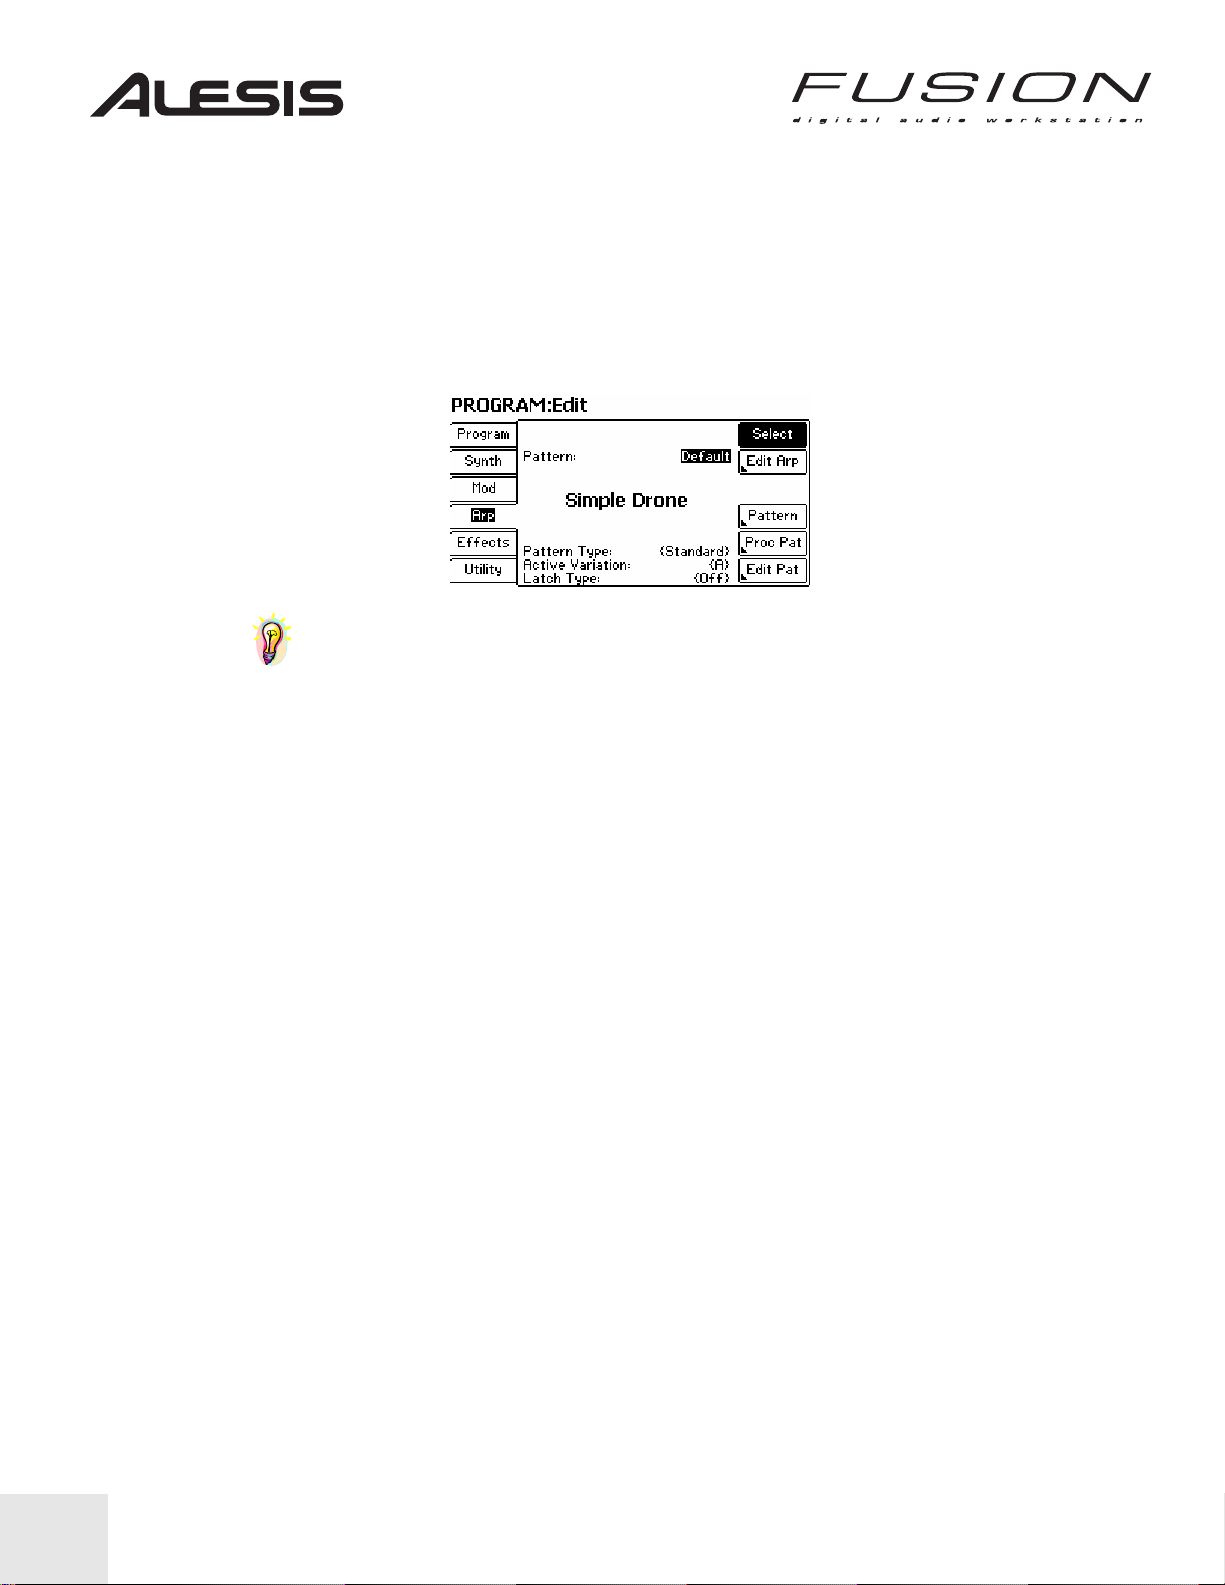
To change an arpeggiation type
1. Press the Edit button.
2. Select the Arp tab (using the corresponding soft button to the left of the LCD).
3. Use the NEXT and PREV buttons to position the cursor on the Pattern bank like the image
below.
4. Move the cursor to the Arpeggiator program number and use the Control Wheel or INC/DEC
buttons to change the arpeggiation program within the bank.
TIP: The Fusion’s arpeggiator can also be synchronized to internal and external clocks.
This enables the arpeggiator to play in time with a sequencer’s tempo setting. Refer to the
Reference Manual for additional information.
20
Page 23
Using Mix Mode
The Fusion’s Mix Mode is where you assemble your “band” for a song, or create a keyboard
split. As you find the instruments you want to use, adding them to the “mix” is quite easy.
Assembling your “band”…
One of the ways to create a Mix is locating your various programs in Program Mode. For this
example, we’ll use piano, guitar, and bass to create a multi-timbral mix.
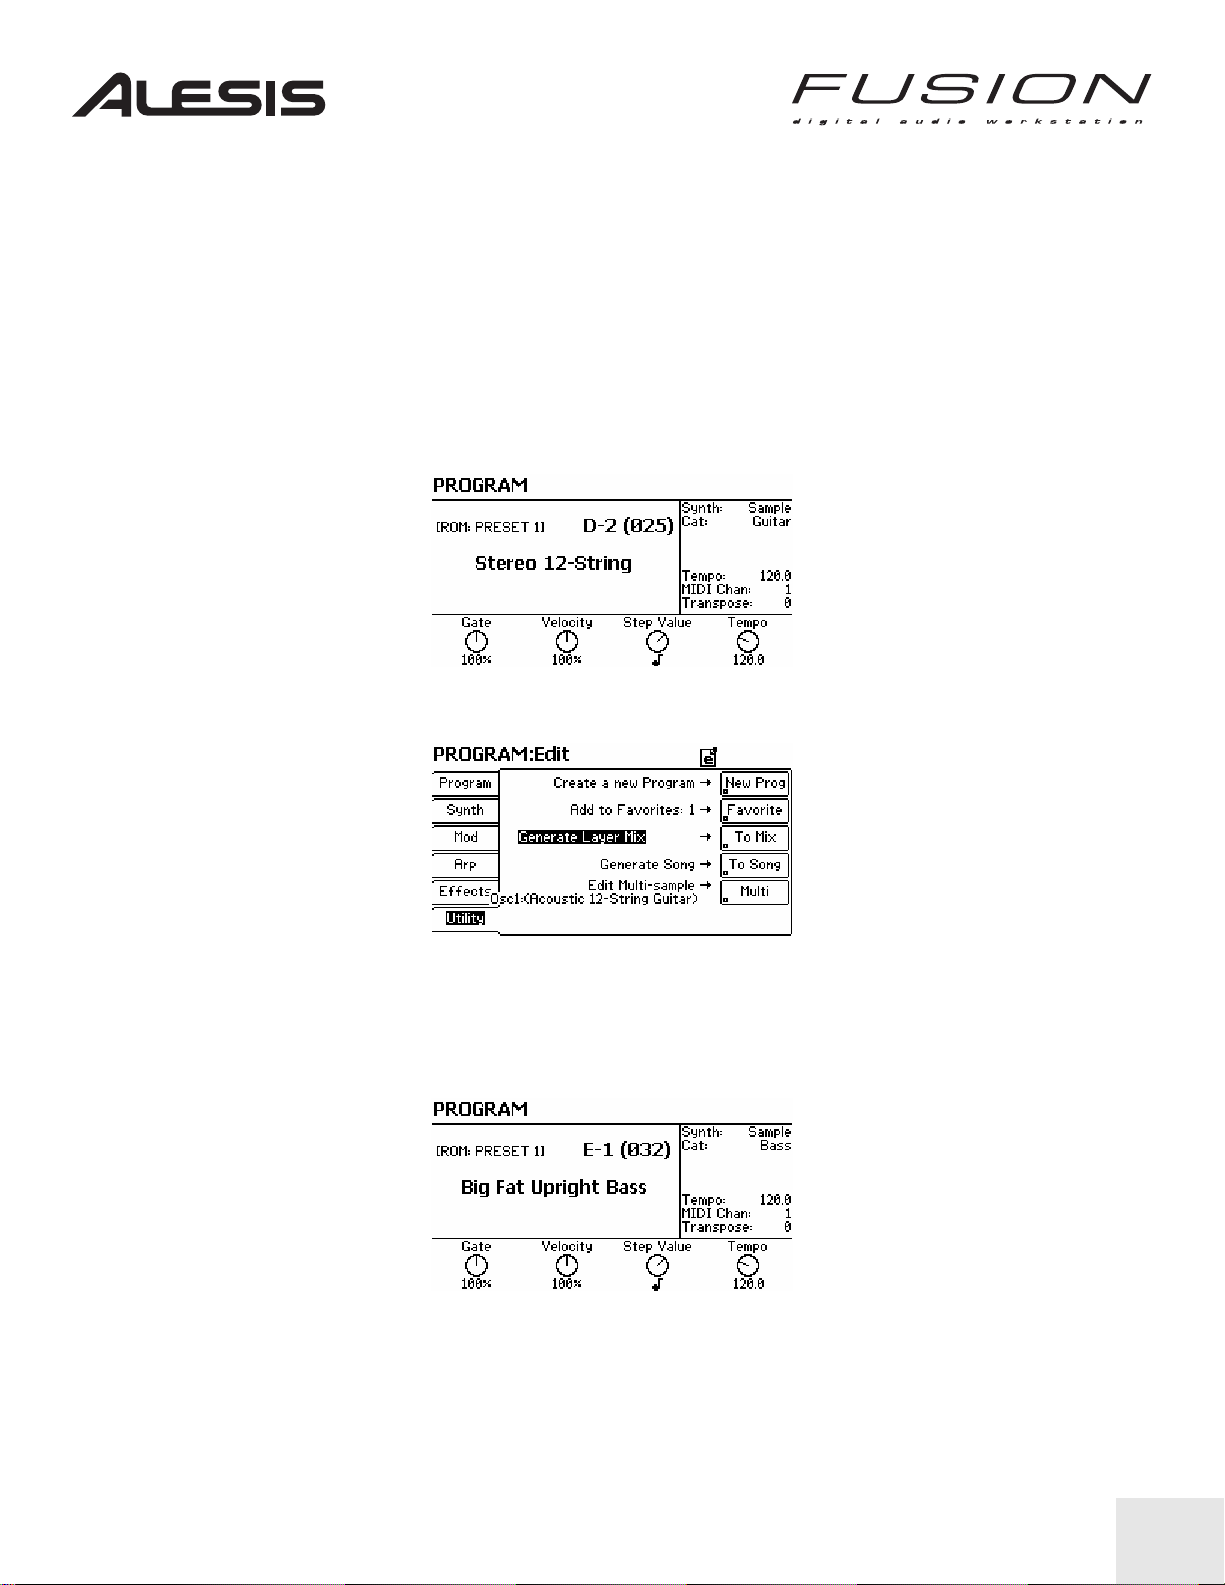
To begin, press Category when you’re in Program mode, then press Guitar.
Then Press the Program mode button, then 2. Your screen should look like the one below.
1. Press EDIT and Utility (using the soft-button on the left side of the LCD). Your screen will look
like the screen shot below.
2. Press “To Mix”. This will add your guitar to your band. At this point your band consists of the
guitar you just added and a default piano. Note that a piano is assigned to the first part of a
mix by default so you don’t need to worry about adding one in this case. If you don’t want a
piano, change the piano part to any other program you’d like. Now, let’s add a bass.
3. While in Program Mode, press Bass.
4. Now press 1. Your screen should look like the one below.
\
5. Press EDIT and go to the Utility tab.
6. Use the INC/DEC buttons to select your “To Mix” options and select “Add to Current Mix.”
Press the “To Mix” soft button. This will add your bass to your band. Your band now consists of
piano, bass, and guitar.
7. To add additional instruments, repeat this process.
21
Page 24
Defining MIDI channels for each instrument…
In order to play individual musical parts, you’ll want each instrument on its own independent
MIDI channel. Follow these steps to set the MIDI channels for each instrument:
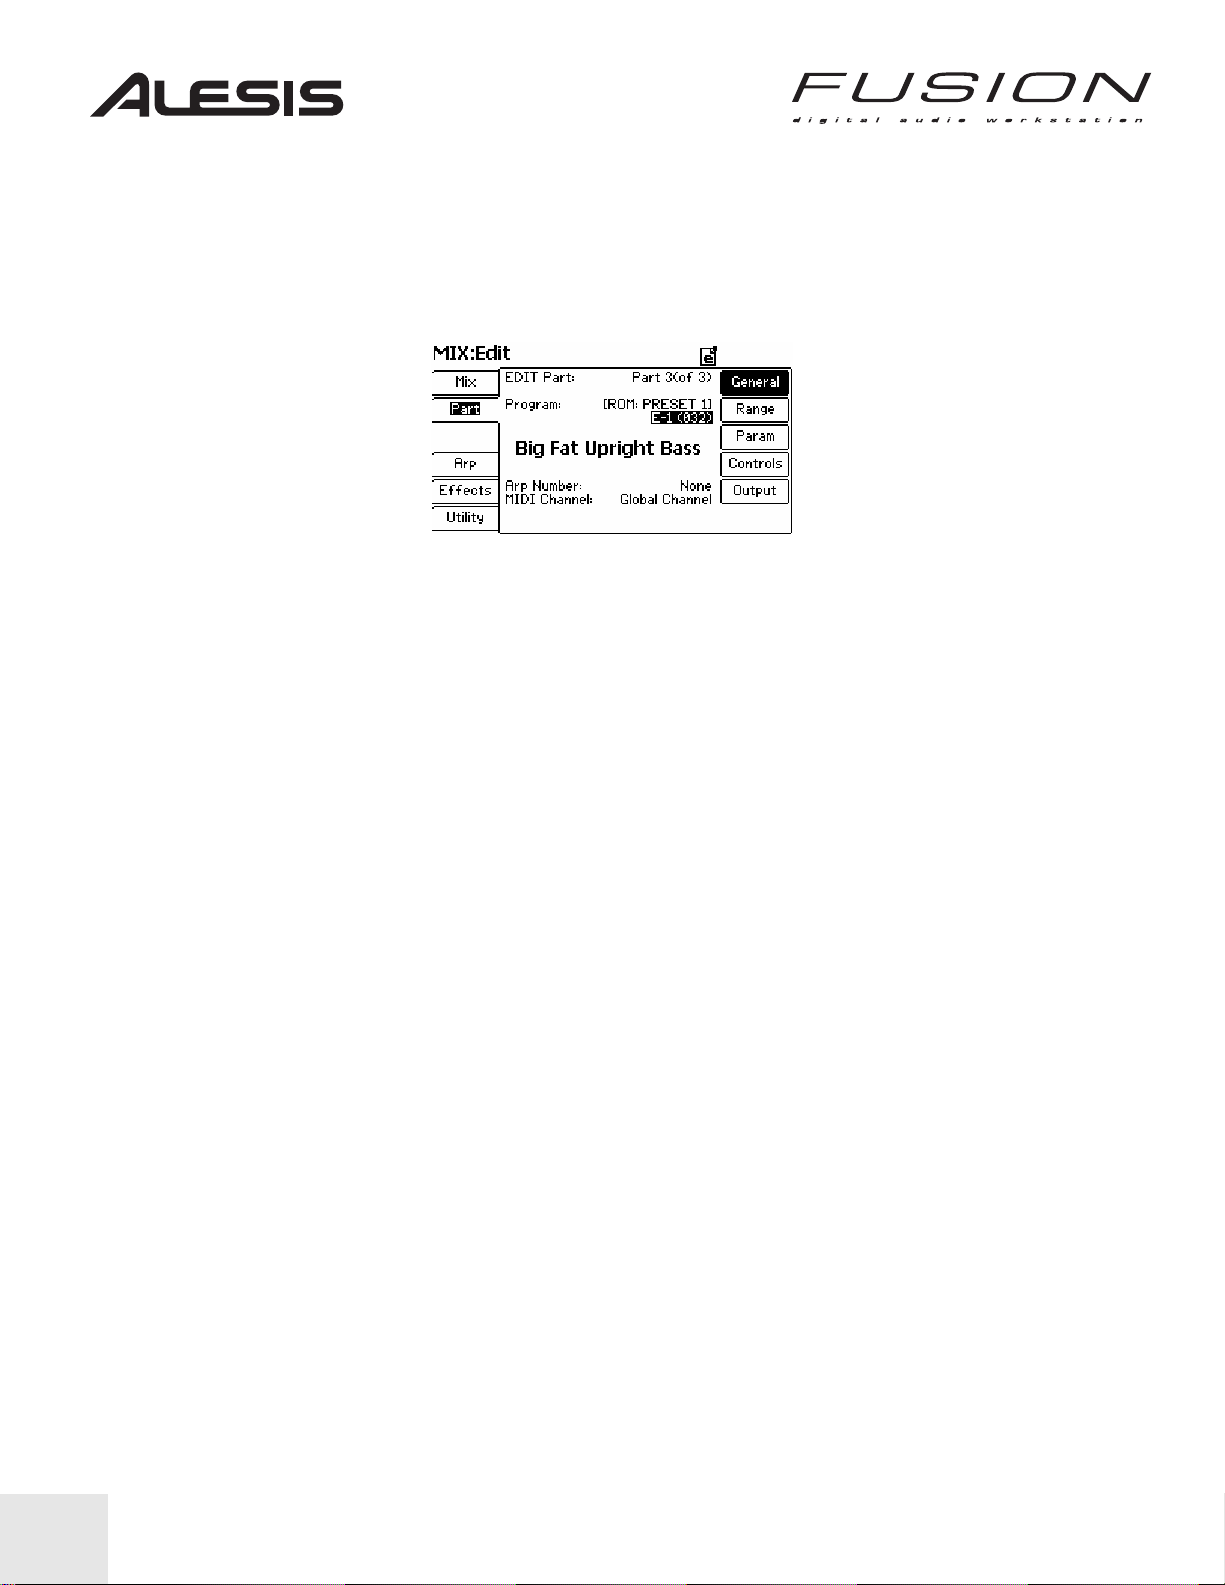
While in Mix Mode, press EDIT and then press PART. Your screen should look like below.
By using the PREV and INC buttons, you can move back and forth between the Edit Part
parameter and the MIDI Channel parameter at the bottom of the display. With your cursor on
the parameter you wish to change, simply rotate the Control Wheel to define either the Part or
the MIDI Channel you want to assign.
22
Page 25
Add to Favorites…
As you familiarize yourself with your Fusion’s sound library, you may want to create different
categories of your favorite programs. For example, you can store all of your favorite filmscoring programs under “Fav 1” while keeping all of your Hip Hop sounds in “Fav 2” and your
jazz programs in “Fav 3.” This gives you quick access to your favorite sounds without having
to remember where the each program is located.
Let’s add a piano to a favorites category.
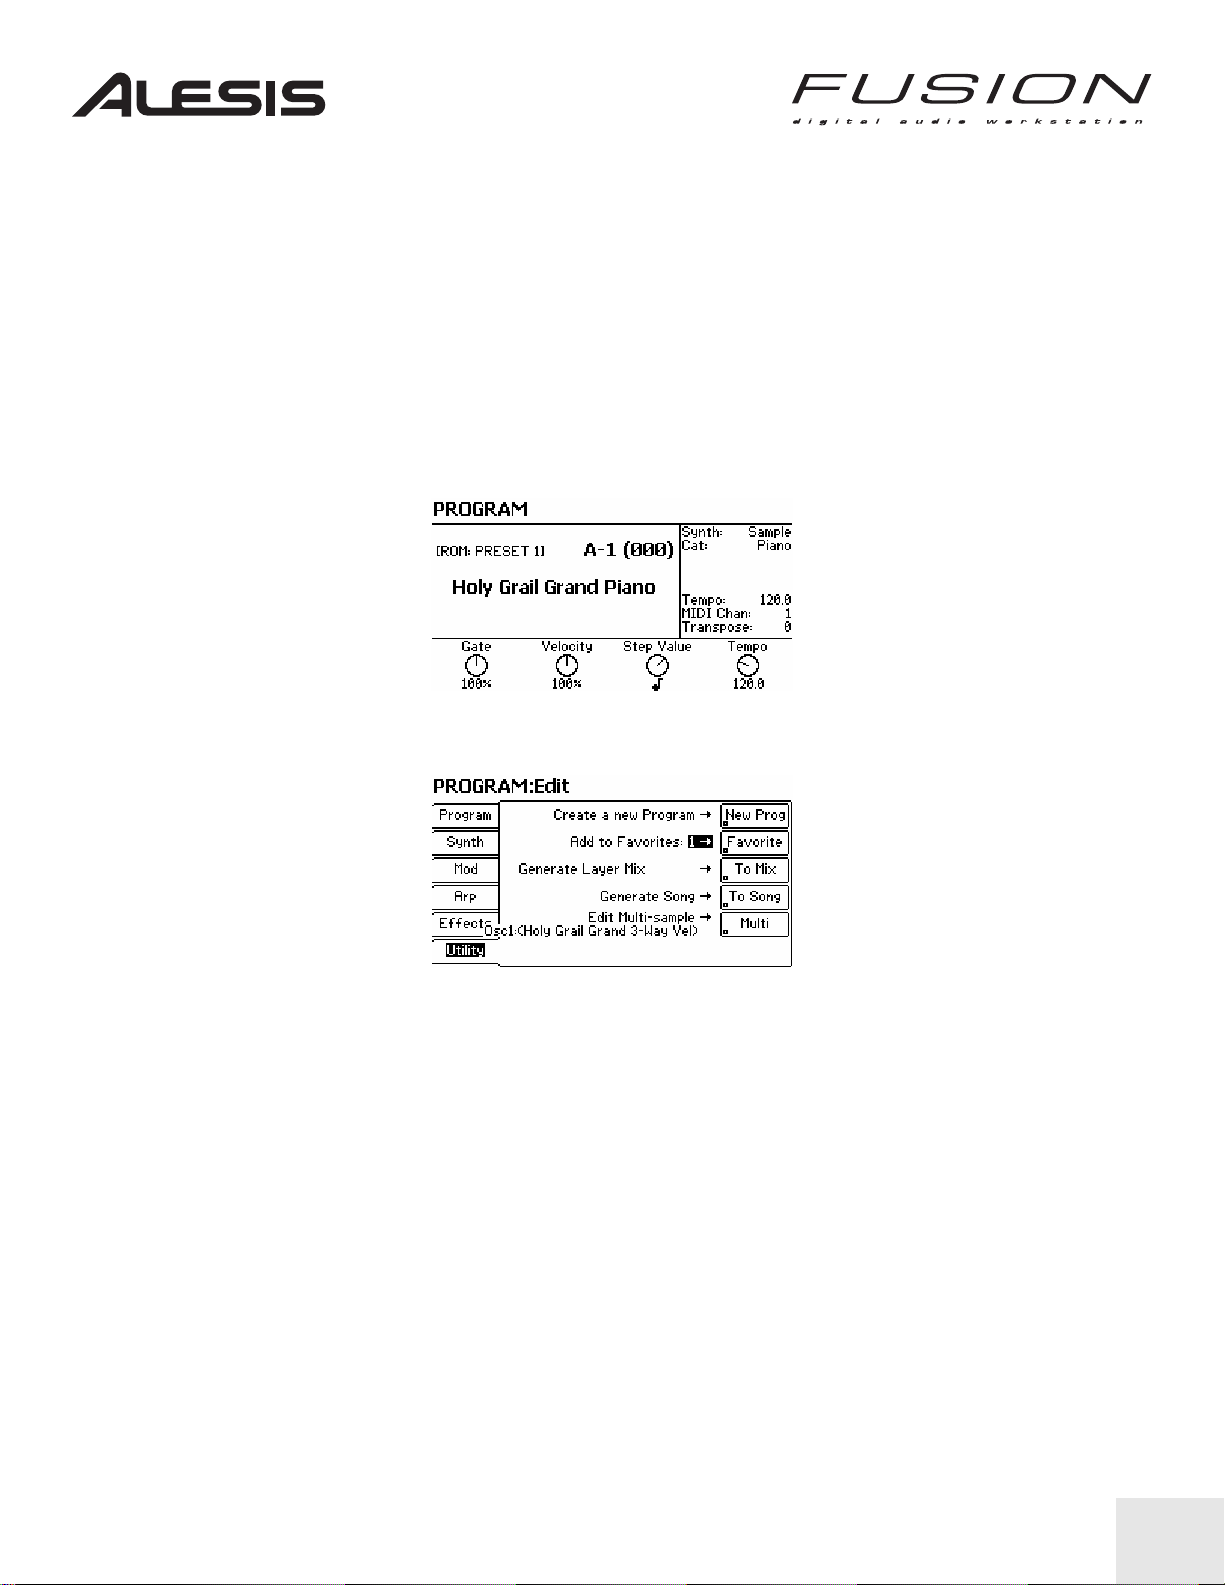
1. While in Program Mode, press Category, then Piano.
2. Press the Program Mode button, then 1. Your screen should look like below.
3. Press EDIT and select the Utility tab. You will see the screen as shown below.
4. Using the PREV and NEXT buttons, position the cursor on the “Add to Favorites” parameter.
5. Rotate the Control Wheel to select the Favorites category (1 through 8) you want the program
to reside in. For the sake of this example, let’s add the program to category 1.
6. Press Favorite.
Now you’ve added the piano to your Fav 1 category. You can access it by pressing Category
and scrolling down the left side of the display to the “Fav 1” through “Fav 8” categories. These
are your favorite programs and any program you’ve added (using the method described
above) will appear here. For example, the piano we added using the steps above should now
appear in the Fav 1 category.
Note that when you add a program to a Favorites category, the program is not actually moved
and can still be found in its original location. The program simply appears in multiple places.
23
Page 26
Creating a Keyboard Split…
Mix mode is also useful for creating keyboard splits. This feature enables you to have, for
example, one sound on the upper region of the keyboard, with a different sound on the lower
region—such as a piano/bass split. Here’s how it works:
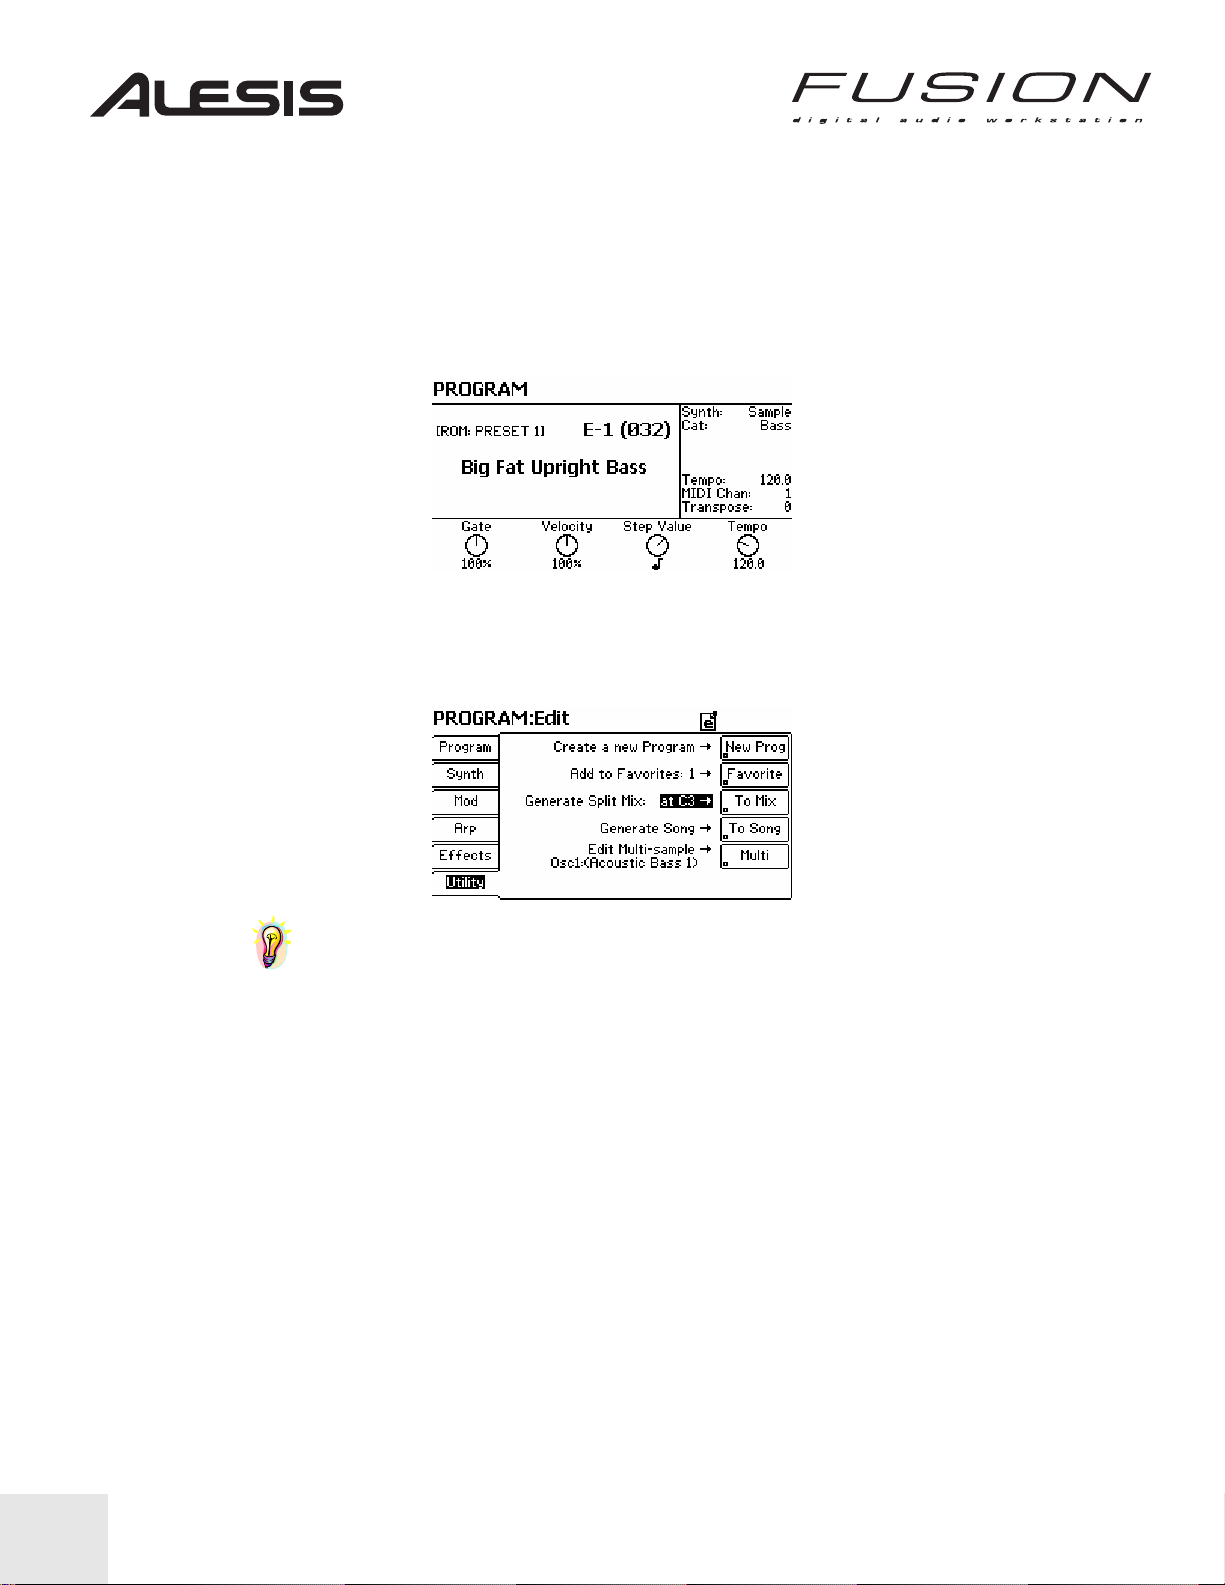
1. Press the Program Mode button and, for the sake of our example, press Category – Bass.
2. Select an acoustic bass program and then press Program.
3. Press EDIT, then select the Utility tab from the lower left of the display, as shown below. If at
first you don’t see this parameter, position the cursor on this third line (using the PREV and
NEXT buttons) and rotate the Control Wheel from either “Add to Current Mix” or “Generate
Layer Mix” to “Generate Split Mix”.
TIP: You can modify the split point by either positioning the cursor on the C3 and rotating
the Control Wheel to another note, or by positioning the cursor on C3, holding the LOCATE
button and pressing a note on the keyboard (that note will become the split point).
4. Press the To Mix button. This will generate a Mix with your Bass below the split key and a
piano above it. You should now have a piano/bass split.
24
Page 27

Playing and Editing Songs
You can learn quite a bit about your new Fusion workstation by spending a few minutes with
one of the built-in demo songs. In this section, we’ll get you started on some of the basic
aspects of sequencing with the Fusion.
Playing the Hip Hop Demo song…
1. Press the SONG mode button.
2. Press INC or DEC until you find the song called “Hip Hop Demo” The name of the song
should be displayed in bold letters in the middle of the screen once the song is fully loaded.
Press the PLAY button in the transport control area to the right of the Control Wheel. The song
will begin playing back. You can easily identify what tracks are playing by watching the Active
Tracks display. Each time a MIDI event is triggered, the Active Track containing that particular
event becomes highlighted.
TIP: By using the FFWD and REW keys in the Transport area, you can move through the
song one measure at a time. Holding LOCATE while pressing REW will return you to the
beginning of the song.
Setting Locate Points…
The SET LOC and Quick Access buttons (located under the Category and Bank buttons) in
the Fusion’s Transport area enable you to “mark” a specific location in your song. This feature
makes it easy to jump to a specific point with a single button push.
1. As the song plays, press the SET LOC button and one of the Quick Access buttons (A-P.) This
marks a specific point within the song.
2. Pressing the LOCATE button and the corresponding Quick Access button (during either
playback or in standby) jumps to the song position you captured earlier. This position is
identified by Measure, Beat, and Clock Pulse time and is shown at the top of the display (as
shown in the image above).
TIP: You can also use the FFWD and REW keys to skip to a particular location, and then
mark that position by pressing the SET LOC button.
25
Page 28
Muting and Soloing Tracks…
While working on your song, you may occasionally want to mute one or more tracks in order to
listen closely to other parts. Similarly, you may want to hear only one or more specific tracks.
This is called “soloing” a track(s.) Here’s how it’s done.
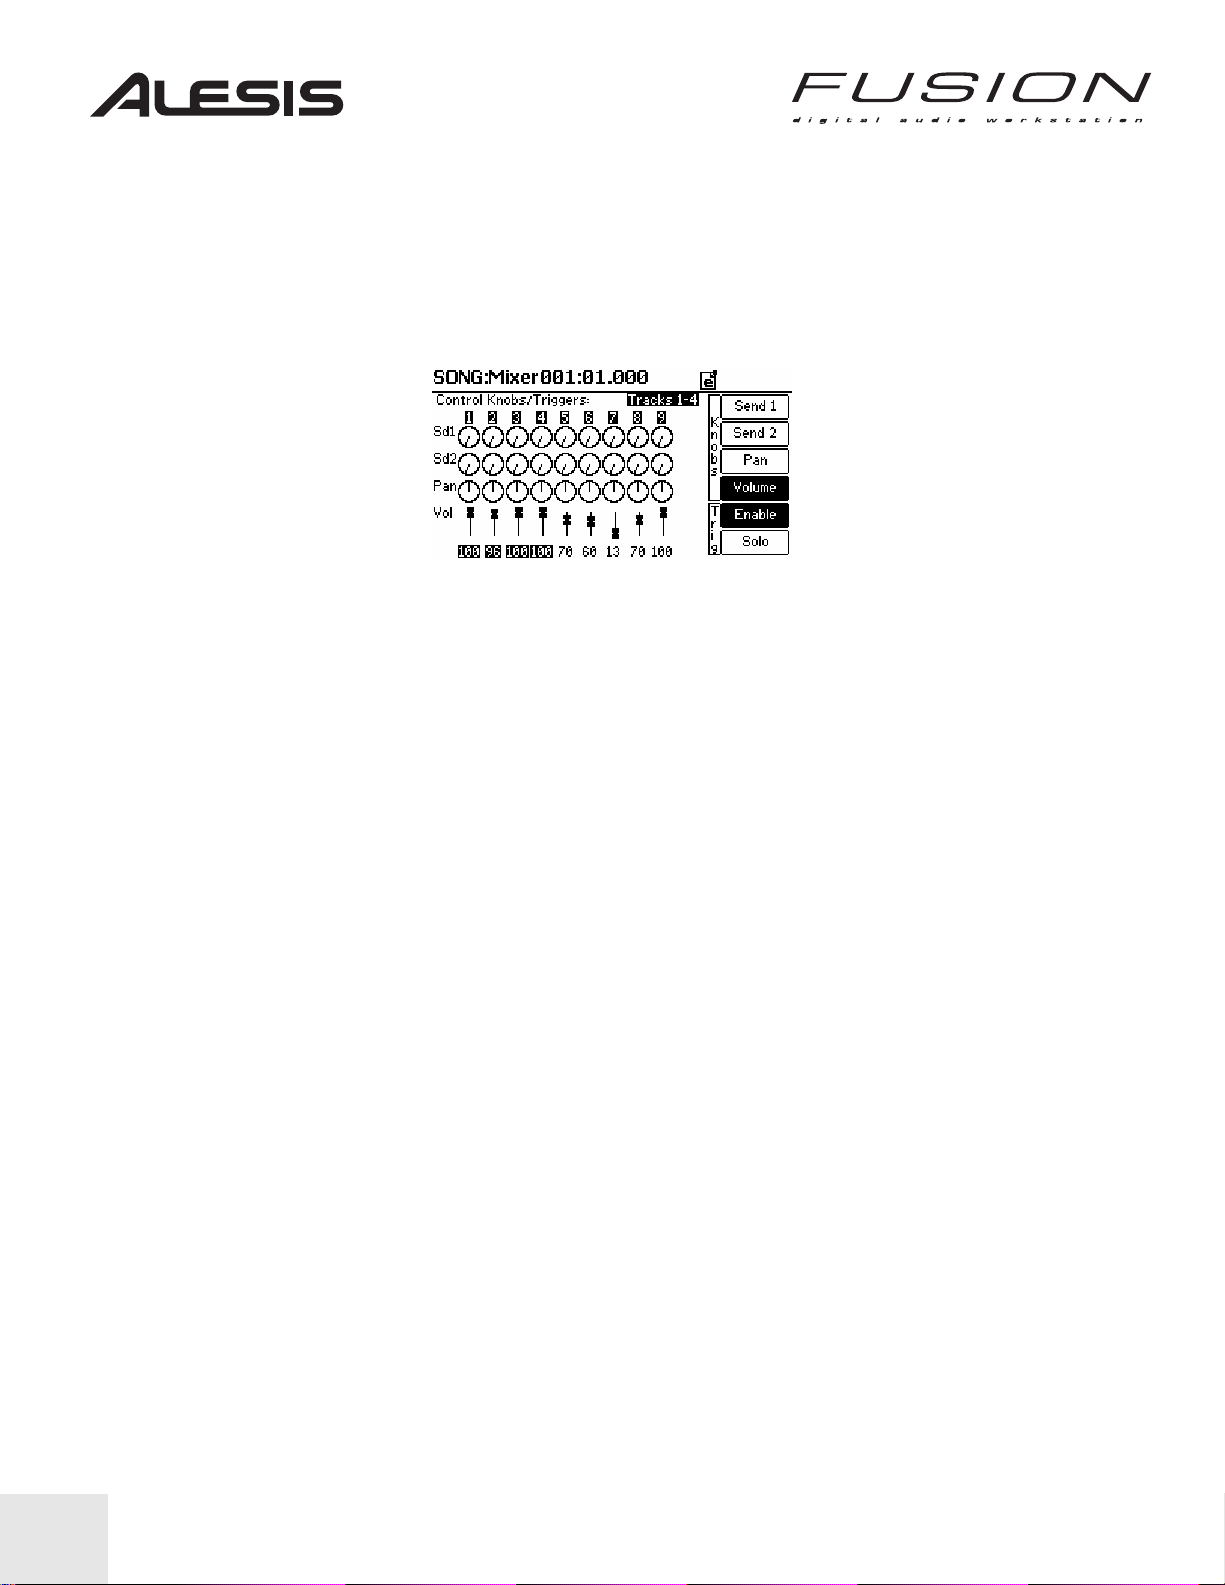
1. From SONG mode, press the MIXER button to the left of the Fusion’s display. Your screen will
look like the following.
Across the top of the display, you’ll notice the parameter “Control Knobs/Triggers:” This
parameter tells you what tracks your Control Knobs and T1 – T4 buttons are currently
controlling. By rotating the Control Wheel, you can change the assignment of these real-time
controllers from tracks 1-4 to tracks 2-5, 3-6, etc. in order to control other tracks available on
your mixer.
Along the display’s right, you see four buttons for Send 1, Send 2, Pan, and Volume that select
what the Fusion’s four Control Knobs will control. Beneath these, you will see two buttons for
selecting the function of the T1 – T4 trigger buttons.
Mute a track…
1. Press the Enable button on the display’s lower right. The T1 – T4 trigger buttons are now set to
Enable.
2. Press Play to start playback.
3. Press the T-1 and T-2 buttons simultaneously. The drums will be muted and the T1 and T2
buttons will be dimly lit (notice the T3 and T4 buttons will be brightly lit).
Solo a track…
1. Press the Solo button in the display’s lower left. The T1 – T4 trigger buttons are now set to the
Fusion’s solo function.
2. Press Play to start playback.
3. Press the T-1 and T-2 buttons. The drums are now playing solo and the T1 and T2 buttons are
brightly lit compared to the T3 and T4 buttons.
Pan and Volume Settings
You can change the Pan and Volume settings just like the Mute and Solo functions described
above. Here’s how it’s done.
Altering the Pan position for a track…
1. While in MIXER mode, press the Pan button to the right of the display. The four Real-Time
Control Knobs are now assigned to Pan.
2. Press Play to start playback. You should only hear the bass guitar.
3. The right-most Real-Time Control Knob is currently assigned to track 4, the bass. Rotate this
knob and move the bass guitar left and right in your stereo field.
26
Page 29
Adjusting a track’s volume…
If your drum track is still soloed, press the T4 button to un-solo that track.
1. While in MIXER mode, press the Volume tab to the right of the display. The four Real-Time
Control Knobs are now assigned to Volume.
2. Press Play to start playback.
3. As you rotate the first and second (from left) Real-Time Control Knobs, you’ll notice that you
are now altering the levels for the two drum tracks. If you rotate the right-most Real-Time
Control Knob, you’ll notice you are altering the volume of the bass.
Recording Tracks…Overwrite an Existing Track
If you’re not happy with a track you just recorded and you want to try it again, follow these
steps.
1. If you are still in Mixer mode, press the EDIT button to take you back to the page in Song
mode that you came from.
2. Make sure that the “Record Method” parameter on the Song/Song/Record page is set to
“Replace.” This ensures that what you record will overwrite what is already on that track.
3. While in SONG mode, press Edit, then the Track tab on the left of the display, as shown
below.
By using either the INC/DEC buttons or the Data Wheel, you can easily access the specific
track you want to work with.
4. For the sake of our example, select Track 9, “Fusion Suitcase” as shown in below.
5. Press the PLAY and RECORD buttons simultaneously. The RECORD button lights red and
the demo song plays, this time with the addition of the internal metronome.
6. As you play the program, you are now recording your performance and overwriting the existing
performance on the track.
27
Page 30
Recording Your First Song
When you’re ready to compose your own song, follow these steps:
1. Press the SONG mode button.
2. Press INC or DEC until you find the song called “Tutorial Song.” This song is blank, but it has
some programs loaded to help you get started with your composition.
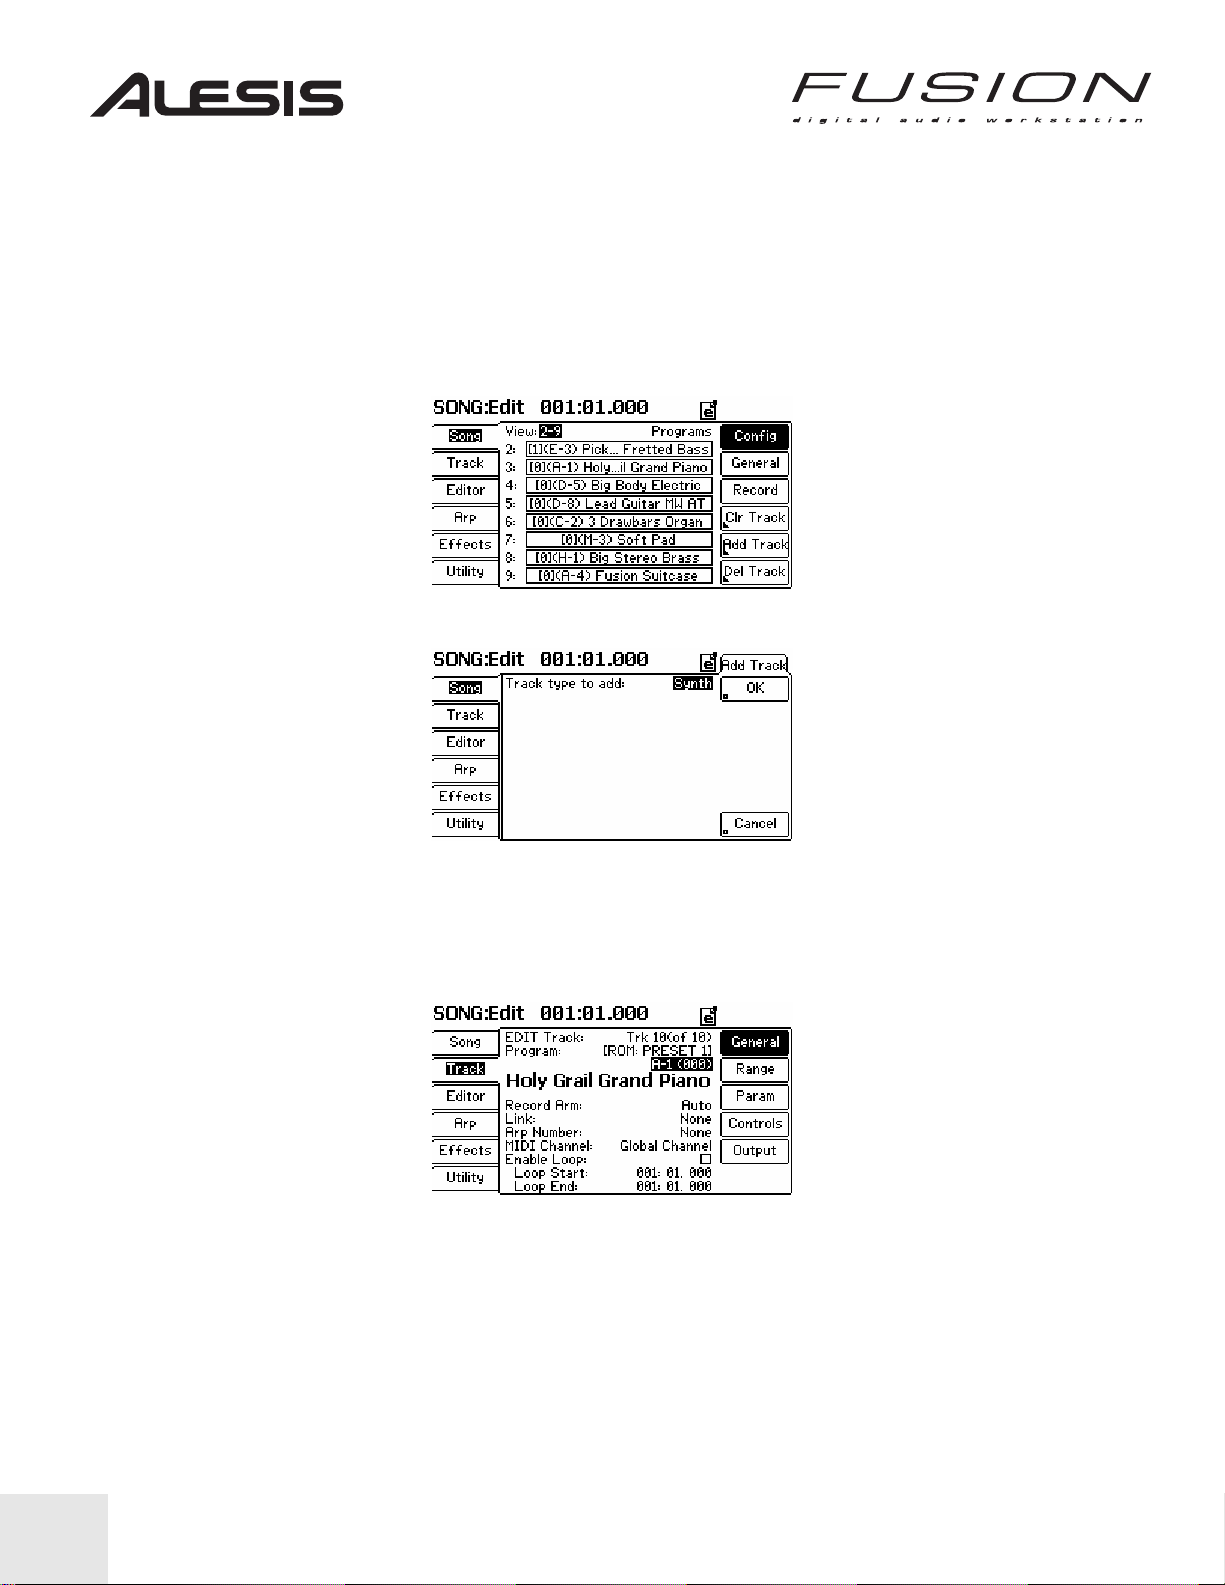
3. Press EDIT, and then press the Song tab on the upper-most left of the display. Your screen
will look like the one below:
4. Press the Add Track button (located on the lower right of the display). Your display will now
look like this:
Though the cursor is resting on “Synth” in image above, it could be changed to “Audio” by
rotating the Data Wheel. This particular screen is where you define whether a new track is to
be a synthesizer or audio track.
With the cursor on “Synth”, press the OK button on the upper right of the display. This will
create a new track—in this case, Track 10 as shown below.
5. Use the PREV and NEXT buttons to highlight “[Grand Piano]” or “A-1 (000).” “Preset 1:”
selects the bank under which you are looking for sounds, whereas the “A-1 (000)” lets you
cycle through the individual sounds contained within the selected bank.
6. Use the Control Wheel (or INC/DEC buttons) to select an instrument you want to play.
7. Press the SONG mode button once again to return you to the top level of Song mode.
8. Press PLAY and RECORD simultaneously to start recording. Once you do this, the RECORD
button will turn red, the song will start playing along with a metronome, and you will be
recording. Play whatever you’d like on the keyboard and press stop when you’re finished.
28
Page 31

Recording Tracks…New Audio Track
The Fusion is also an audio recorder. You can record up to eight tracks to play along with your
synth tracks. Follow these steps to record an audio track:
1. Press the SONG mode button. This will take you to the top level of Song mode.
2. Press EDIT, and then press the Song tab on the upper-most left of the display. Your screen
will look like the one below:
3. Press the Add Track button (located on the lower right of the display).
4. With the cursor on “Synth”, press the increment button below the control wheel. This will
change the selection from “Synth” to “Audio”. Then press the “Ok” button. This will create a
new track for recording audio. Your display will now look like this:
5. Plug in an audio source to multi-track input 1 on the back of the Fusion. Use something with a
line output level, such as another synthesizer or a CD player.
6. Press the “Song” tab button and then the “Record” button.
7. The display will show input level meters for tracks 1 and 2. Play your audio source into the
Fusion. You should see the meter for track 2 (audio track 1) moving at the bottom of the
screen.
8. When you are ready to record, Press “Rec” and “Play” simultaneously. The metronome will
count-down and then the Fusion will start recording your audio as it is playing into the inputs.
9. After you finished recording your audio press “Stop” and “Locate” to go to the beginning of your
song. You should be able to hear your audio tracks playing back.
29
Page 32

Saving a Song…
Now that we’ve edited the demo song, you’ll notice that the “e” icon appears at the top right of
the display. This indicates that the song has been edited and has not been saved yet.
1. Press the STORE button adjacent to the Control Wheel. Your screen will look like the one
below:
The Tutorial Song is a Preset Song, which cannot be overwritten so we will need to save it to a
new location.
2. Use the PREV/NEXT buttons to move the cursor left and right, and the Control Wheel to
change the selected Bank. Choose a Bank location to save it to such as CF (compact flash)
card or HD (the internal hard disk.)
3. Use the PRE/NEXT buttons to move to the specific location you want to save the Song to such
as A-1 (000).
4. Press the Store button on the display’s upper right to store the song. You have now saved
your edited song to that location.
30
Page 33

Creating your own song…
These steps have largely been covered earlier in this section of the Quickstart guide. But to
summarize, let’s take the following steps together…
If you have exited Song mode, go ahead and re-enter Song mode. Your screen should look
like the one below:
Press the EDIT button to take you “under the hood” of Song mode and then select the Utility
tab on the lower left of the display. Your display will then look like the one below:
1. Press the New Song button on the upper right. A new song is created and the display takes
you to a screen that looks very similar to the one below:
2. Use the PREV and NEXT buttons to highlight “Grand Piano” or “A-1 (000).” “ROM:Preset 1”
selects the bank under which you are looking for sounds, whereas the “A-1 (000)” lets you
cycle through the individual sounds contained within the selected bank.
3. Use the Control Wheel (or INC/DEC buttons) to select an instrument you want to play.
4. Press the SONG mode button once again to return you to the top level of Song mode.
5. Press PLAY and RECORD simultaneously to start recording. Once you do this, the RECORD
button will turn red, the song will start playing along with a metronome, and you will be
recording. Play whatever you’d like on the keyboard and press stop when you’re finished.
Your new track is now a recorded part of the Fusion’s sequencer data. You can repeat this
process (see the section Recording Tra cks…Ne w Track) to add subsequent parts to your
song.
31
Page 34

Legal Information:
All software and documentation except TTA lossless compression codec is Copyright 2005 Alesis
Studio Electronics. All rights reserved.
TTA lossless audio compression codec copyright notice and disclaimer: Copyright 2004 Alexander
Djourik. All rights reserved.
Redistribution and use in source and binary forms, with or without modification, are permitted provided
that the following conditions are met:
1. Redistributions of source code must retain the above copyright notice, this list of conditions and the
following disclaimer.
2. Redistributions in binary form must reproduce the above copyright notice, this list of conditions and
the following disclaimer in the
documentation and/or other materials provided with the distribution.
3. Neither the name of the True Audio Software nor the names of its contributors may be used to
endorse or promote products derived from this software without specific prior written permission.
THIS SOFTWARE IS PROVIDED BY THE COPYRIGHT HOLDERS AND CONTRIBUTORS "AS IS"
AND ANY EXPRESS OR IMPLIED WARRANTIES, INCLUDING, BUT NOT LIMITED TO, THE
IMPLIED WARRANTIES OF MERCHANTABILITY AND FITNESS FOR A PARTICULAR PURPOSE
ARE DISCLAIMED. IN NO EVENT SHALL THE COPYRIGHT OWNER OR CONTRIBUTORS BE
LIABLE FOR ANY DIRECT, INDIRECT, INCIDENTAL, SPECIAL, EXEMPLARY, OR
CONSEQUENTIAL DAMAGES (INCLUDING, BUT NOT LIMITED TO, PROCUREMENT OF
SUBSTITUTE GOODS OR SERVICES; LOSS OF USE, DATA, OR PROFITS; OR BUSINESS
INTERRUPTION) HOWEVER CAUSED AND ON ANY THEORY OF LIABILITY, WHETHER IN
CONTRACT, STRICT LIABILITY, OR TORT (INCLUDING NEGLIGENCE OR OTHERWISE)
ARISING IN ANY WAY OUT OF THE USE OF THIS SOFTWARE, EVEN IF ADVISED OF THE
POSSIBILITY OF SUCH DAMAGE.
32
Page 35

Fusion
Guía de inicio rápido
33
Page 36

¡Gracias!
¡Gracias por haber comprado Fusion, la estación de trabajo de audio digital! Fusion
es uno de los productos más potentes y completos en funciones que hemos creado.
¡Estamos seguros de que le encantará usarlo!
Para ayudarle a empezar y usar Fusion rápidamente, hemos creado esta guía de
inicio rápido. Esta pequeña guía tiene todo lo que necesita para comenzar a
reproducir rápidamente.
Cuando necesite información más profunda, consulte el Manual de referencia. El
Manual de referencia describe cada característica y parámetro de Fusion y le
responde sus preguntas más profundas acerca del equipo.
Esperamos que su nueva estación de trabajo Fusion le brindará años de diversión y
que encuentre estos manuales informativos y útiles.
Atentamente,
La Gente de Alesis
34
Page 37

Arquitectura de Fusion
La estación de trabajo Alesis Fusion ofrece un arsenal de tipos de síntesis
diferentes, grabación en disco duro, muestreo, ordenamiento y control en tiempo real
en una hermosa máquina. Las estaciones Fusion 6HD y 8HD son idénticas excepto
en tamaño, ponderación y acción del teclado. La 6HD tiene 61 notas y es
semiponderada, mientras que la 8HD tiene 88 teclas totalmente ponderadas. Lista
para usar, Fusion le brinda todo lo que necesita para hacer realidad las ideas
musicales más alocadas.
Motor de síntesis de Fusion
Fusion brinda cuatro tipos de síntesis: Reproducción de muestras,
modelización analógica, síntesis de FM (modulación en frecuencia) y
modelización física. Con Dynamic DSP Synthesis™, Fusion permite crear
sonidos usando cualquier combinación de tipos de síntesis. No existen
límites artificiales para la síntesis o la polifonía —usted es libre para
configurar y llevar su Fusion a sus límites absolutos.
Reproducción de muestras
Ya sea que busque la guitarra o el piano más reales, unos
impresionantes snare drum (tambores) o un efecto sonoro, el motor de
reproducción de muestras de Fusion lo hace posible. Fusion está listo
para usar y tiene miles de muestras de alta calidad a su disposición.
Síntesis analógica virtual (VA)
El motor de síntesis VA de Fusion es justo lo que necesita para crear
lujuriosos pads o impresionantes contrabajos. Los tres osciladores, el
enrutamiento ultraflexible y los tipos de filtros variables, permiten que
Fusion suene como cualquiera de los grandiosos sintetizadores
analógicos del pasado. O bien, si usted es del tipo aventurero, puede
descontrolarse y crear una síntesis analógica virtual que jamás se ha
escuchado antes.
Síntesis de FM
La síntesis de FM se conoce principalmente por su capacidad para
producir un piano electrónico, sonidos tipo campana y percusión
melódica, tal como vibes (vibráfono) y marimbas. Antes de Fusion, se
consideraba que la síntesis de FM era un desafío para programar,
debido a la manera en que los operadores y los portadores
interactuaban para producir sonido. Con Fusión, la complicada
programación de FM es cosa del pasado. El enrutador gráfico de
señales de FM de Fusion simplifica grandemente la creación sonora,
permitiéndole materializar intuitivamente el sonido que desea.
35
Page 38

Modelización física
La modelización física es un proceso de última generación que
describe matemáticamente cómo se comporta una onda sonora
dentro de un instrumento. Hemos tomado los mejores recaudos en
diseñar una interfaz con la que los músicos pueden relacionarse —
permitiéndole pellizcar sus sonidos en tiempo real sin matemáticas
complejas ni parámetros que confunden. Gracias a la modelización
física, es posible crear instrumentos de viento o de cuerdas ultra
reales, o crear instrumentos que nunca nadie escuchó antes.
Grabador en disco duro de ocho canales
Para capturar voces o instrumentos en vivo, Fusion tiene integrado un grabador en
disco duro de 8 pistas, 24 bits y 44.1 kHz. Las entradas analógicas del panel posterior
permiten grabar ocho pistas simultáneamente, habilitándolo para capturar una banda
completa al mismo. Como cualquier grabador, Fusion brinda controles de transporte
estándar con puntos de localización.
36
Page 39

Capacidad de muestreo
Si desea crear un instrumento o un efecto sonoro personalizados, puede
hacerlo fácilmente con el muestreador de Fusion. Fusion brinda entradas
estéreo con una perilla para ajustar los niveles de entrada. Sus muestras
pueden ser mono o estéreo, y se graban y almacenan como archivos que se
pueden colocar sea en el disco duro de Fusion o en tarjetas Compact Flash.
Un entorno de grabación y edición MIDI / de audio integr ado
Fusión facilita la composición al mostrar tanto los datos MIDI como de audio
en una pantalla. Puede importar también archivos MIDI para facilitar la
edición dentro de la estación de trabajo.
Botones de modo
Fusion tiene seis modos principales: Mix (Mezcla), Program (Programa),
Song (Canción), Sampler (Muestreador), Mixer (Mezclador), y Global.
Los modos de mezcla, programa y canción tienen parámetros que puede
editar el usuario. Para meterse “debajo del capó” de estos modos, pulse
simplemente el botón EDIT ubicado en la parte superior izquierda de la rueda
de datos. Para “salir de debajo del capó”, pulse simplemente el botón Mix,
Program o Song nuevamente.
Modo de mezcla Mix
Éste es el modo en el que usted puede ensamblar su “banda” para
una canción. Digamos que usted desea componer una canción con
piano, contrabajo y batería. Después de encontrar los instrumentos
que desea usar (usando el modo de programa, vea más abajo)
agregue simplemente sus programas a una “mezcla” y quedará listo
para arreglar su composición usando sea el secuenciador incorporado
de Fusion (en modo de canción) o un secuenciador externo.
El modo de mezcla es también donde puede ir para configurar las
divisiones del teclado (por ejemplo, contrabajo en la parte izquierda y
un sintetizador en la derecha) o disponer los sonidos en capas, uno
arriba de otro.
Modo de programa (Program)
Este modo es donde probablemente pasará la mayor parte de su
tiempo. En modo de programa, es posible cargar y reproducir un
instrumento por vez, así como explorar los millares de sonidos de
Fusion. Digamos que simplemente desea tocar un Grand Piano —
entre simplemente al modo de programa, llame al tipo de piano que
desea y… ¡adelante!
37
Page 40

Los botones de categoría de la derecha de la pantalla permiten un
rápido acceso a los diferentes grupos de sonidos, tales como piano,
guitarra, contrabajo, cuerdas, etc.
Modo de canción (Song)
Después de armar su banda (como con el trío de piano, contrabajo y
batería de que hablamos en el modo de mezcla), puede arreglar,
grabar y editar su composición en el modo de canción (Song). El
grabador multipistas de Fusion está integrado también en este modo,
permitiéndole grabar instrumentos en vivo junto con sus pistas
sintéticas.
En la parte superior derecha de la pantalla, Active Tracks (Pistas
activas) indica el número de pistas con la que está trabajando
actualmente. Fusion proporciona hasta 32 pistas MIDI y 8 pistas de
audio por canción.
38
Page 41

Modo de muestreador (Sampler)
Cuando esté listo para crear sus propios instrumentos o efectos
sonoros personalizados, el modo de muestreador es el que necesita.
Todo el muestreo y la edición de formas de onda se realiza en este
modo. Pulse Edit en modo de muestreador. Verá todas las
capacidades de disposición en capas y edición de Fusion en las fichas
Multi, Zone (Zona), Sample (Muestra), Process (Proceso) y Utility
(Utilidad) del lado izquierdo de la pantalla.
Una vez que haya creado su nuevo instrumento, puede cargarlo y
ejecutarlo como si fuera cualquier otro programa en modo de
programa.
Modo de mezclador (Mixer)
El modo de mezclador se creó para poder mezclar convenientemente
sus pistas de sintetizador y de audio en una pantalla. Sólo puede
accederse al mezclador en modos de mezcla y canción, puesto que
son los únicos modos en los que puede tener varias pistas de
programas o de audio para mezclar. Los modos de programa o
muestreador sólo reproducen un instrumento a la vez y no necesitan
mezclador (porque no hay nada que mezclar).
El mezclador permite fijar niveles y posiciones de pan para cada pista
de sintetizador o de audio. También es posible fijar los niveles de
envío y pistas de silencio o solo exactamente igual que en un
mezclador de hardware.
Modo global
El modo global permite configurar parámetros que afectan a todas las
áreas de Fusion. Pueden encontrarse en este modo cosas tales como
el canal de transmisión MIDI, la afinación maestra y el ajuste de escala
de velocidad del teclado.
La ficha SETTINGS (Parámetros) permite modificar los diversos parámetros
relacionados con el teclado, MIDI y el controlador, mientras que la ficha ITEM
(artículo) permite abrir, cargar, mover o borrar diferentes artículos que se encuentran
en su Fusion (los artículos incluyen programas, mezcladores, canciones, muestras,
multimuestras y patrones de arpegios). La ficha MEDIA (Medios) le da información
acerca del disco duro y tarjetas Compact Flash y le permite formatear estos
dispositivos. La ficha SYSTEM (Sistema) permite ver y actualizar la información
actual del sistema.
39
Page 42

Navegación básica: Disposición general de Fusion
Empecemos con familiarizarnos con el diseño de Fusion. Esto lo hará más fácil
encontrar lo que quiere cuando use su Fusion o cuando lo conecte a su estudio.
SECCIONES DEL PANEL SUPERIOR DE FUSION
VISTA COMPLETA DEL INSTRUMENTO
A medida que mire cada panel superior de Fusion, verá que hay dos
secciones separadas:
• Esta sección de perillas, botones y ruedas ubicada del lado izquierdo del
instrumento se conoce como panel de ejecución.
• La sección que incluye la pantalla de Fusion, la rueda de control y los demás
botones se conoce como panel de control.
FUSION 6HD
40
Page 43

6
VISTA DEL PANEL DE EJECUCIÓN (PERFORMANCE)
3
1
2
4
5
8
7
El panel de ejecución (Performance) de Fusion es lo que usará más seguido
durante una actuación. Las ruedas, perillas y botones le permitirán ajustar
cosas como el pitch, la modulación o el corte del filtro mientras está tocando.
Este capítulo explicará los fundamentos —para más detalle consulte el
manual de referencia.
Los componentes del panel de ejecución constan de lo siguiente:
1. RUEDA PITCH BEND (Rueda de inflexión del tono): Es una rueda de pitch
estándar que se comparta igual que en cualquier otro sintetizador. Úsela
para crear cambios expresivos del pitch durante una interpretación.
2. RUEDA DE MODULACIÓN La rueda de modulación (conocida como “mod
wheel”) puede asignarse a controlar varios parámetros del teclado como
vibrato, trémolo, cantidad de FM, etc. Como la rueda de pitch, se usa muy
seguido para añadir expresividad a su interpretación. La rueda de
modulación suele estar dirigida a vibrato de manera predeterminada, pero es
posible dirigirla a casi cualquier cosa usando la matriz de modulación de
Fusion. Consulte el manual de referencia para ver cómo hacer esto.
3. GRILLA DE EJECUCIÓN (PERFORMANCE GRID): La grilla de ejecución
indica a qué se han asignado las perillas de control. Hay cuatro filas y la fila
activa está iluminada mientras las demás se mantienen apagadas. Use los
botones ARP, FILTER, EQ, y ASSIGN (ver abajo) para seleccionar su fila
activa.
41
Page 44

4. ARP, FILTER, EQ, ASSIGN: Estos botones seleccionan la fila activa en el
panel de ejecución. ARP, FILTER, y EQ están cableados a las funciones de
arpegiador, filtro y ecualizador, y la fila de asignación le permite dirigir las
perillas de control a cualquier parámetro que desee.
5. PERILLAS DE CONTROL: Estas perillas pueden usarse para controlar todo
tipo de parámetro dentro de Fusion, como las frecuencias de filtros,
resonancia, modulación o incluso el tempo. Puede usar las perillas de control
para ajustar los parámetros en tiempo real mientras toca, con posibilidades
creativas sin límites.
CONSEJO: La parte inferior de la pantalla de Fusion cambia
dependiendo de la fila que seleccionó en la grilla de ejecución (Performance
Grid). Por ejemplo, si selecciona la fila ARP, las “perillas virtuales” de la parte
inferior de la pantalla indicarán Gate, Velocity (Velocidad), Step Value (Valor
de paso) y Tempo. Si seleccionó “EQ”, la parte inferior de la pantalla
cambiará a Low, Low-Mid, High-Mid, y High (graves, graves-medios, agudosmedios y agudos).
Cuando gire una perilla, verá que la perilla de la pantalla cambia de manera
correspondiente.
6. ARP On/Off, S1, S2: El botón ARP On/Off (Arpegiador) activa y desactiva el
arpegiador de Fusion. Los botones S1 y S2 son interruptores de encendido y
apagado (ON/OFF) asignables que pueden ser configurados para afectar a
todo tipo de función de Fusion, como los filtros o el envío de efectos.
La sección del arpegiador se cubre con más detalle más adelante en esta
guía. Consulte el Manual de referencia para saber más acerca de los
botones S1 y S2.
7. DISPARO 1 – 4: Estos cuatro botones asignables pueden hacer disparar los
LFOs, sobres, y muchas funciones más. A diferencia de los interruptores S1
y S2 descritos arriba, estos botones de disparo están activos solamente
cuando los mantiene presionados —después de soltar los disparadores se
vuelven inactivos. Consulte el Manual de referencia para saber más acerca
de cómo asignar estos botones.
8. VOLUMEN MASTER: Este es el control de volumen master de Fusion.
42
Page 45

VISTA DEL PANEL DE CONTROL
1. BOTONES DE SELECCIÓN DE MODOS: Estos botones cambian los diferentes modos de
Fusion. Si ya hay un modo seleccionado y pulsa el botón otra vez, volverá al nivel superior
(top level) de ese modo.
Use estos botones para cambiar a los modos Mix (mezcla), Program (programa), Song
(canción), Sampler (muestreador), Mixer (mezclador) o Global.
2. BOTONES PROGRAMABLES: Estos botones le permiten acceder diferentes partes de la
interfaz de usuario de Fusion. Los BOTONES PROGRAMABLES corresponden a parámetros
en pantalla que se visualizan a los lados derecho e izquierdo de la misma.
CONSEJO: Por ejemplo, si pulsa PROGRAM, y luego EDIT (lado
superior izquierdo de la rueda de control), verá Program, Synth, Mod, Arp,
Effects y Utilitity del lado izquierdo de la pantalla. Los BOTONES
PROGRAMABLES de la parte izquierda acceden a estas fichas. De forma
similar, los BOTONES PROGRAMABLES de la derecha acceden a funciones
localizadas en la parte derecha de cada página.
3. CONTRASTE: Esta perilla le permite ajustar el contraste de la pantalla LCD de Fusion.
4. CATEGORY (categoría) y BANK (banco): El botón CATEGORY accede el modo “sound
librarian” (bibliotecario de sonidos) de Fusion. Este modo le permite visualizar sus programas
(o mezclas si está en el modo MIX) ordenados por categoría. Por ejemplo, cuando está en
modo PROGRAM, el botón de categoría hace aparecer una pantalla que enumera los
programas que contiene esa categoría. Este modo le facilita encontrar un programa que
busca específicamente.
Los botones BANK le permiten recorrer los diferentes bancos de programas que están
almacenados en Fusion.
5. BOTONES DE ACCESO RÁPIDO: Fusion brinda veintiún botones de acceso rápido (QUICK
ACCESS) (ordenados en tres filas de ocho) para acceder sus sonidos rápidamente. Los
dieciséis primeros botones están marcados desde A hasta P mientras que los otros ocho (fila
inferior) están numerados de 1 a 8. Esto le da acceso a los 128 sonidos que pueden
almacenarse en un banco (ya que 16 * 8 = 128). Una vez que se familiarice con los sonidos
que le placen en Fusion, puede hacerlos aparecer directamente desde el modo de programa
usando estas teclas de método abreviado. Por ejemplo, puede acceder el Grand Piano
(programa A-1) al presionar “A” y “ 1”.
43
Page 46

6. CONTROLES DE TRANSPORTE: Estos siete botones controlan el grabador
multipistas/secuenciador MIDI integrado de Fusion. El botón SET LOC fija un punto de
localización en la canción que puede saltar usando el botón LOCATE (localizar). Los otros
botones controlan las diversas funciones de transporte y grabación del grabador igual que en
una máquina de cinta normal (o secuenciador computarizado).
7. RUEDA DE CONTROL y botones circundantes: La rueda de control de Fusion le permite
variar los sonidos y parámetros rápidamente. Girarla en sentido horario es lo mismo que
pulsar el botón “Inc” (Aumento) en rápida sucesión, mientras que girarla en sentido antihorario
es lo mismo que pulsar el botón “Dec” (Disminución). Generalmente, usará esta rueda para
controlar cambios grandes de los parámetros (como cambiar del 0% al 100%) y usará los
botones Inc/Dec para el ajuste fino (por ejemplo, cambiar del 10% al 12%).
Los botones EDIT, UNDO, STORE, PREV, NEXT, DEC e INC de alrededor de la rueda de
control tienen las funciones siguientes:
a. EDIT (editar): Este botón le muestra “debajo del capó ” de todos los modos —permitiéndole
ajustar o afinar los diversos parámetros del modo específico.
b. UNDO (deshacer): Este botón le permite deshacer las acciones cuando cambia de idea sobre
algo que ha editado. Tiene 100 niveles de deshacer.
c. STORE (almacenar): Este botón le permite guardar cualquier modificación hecha a su
programa, mezcla o canción.
d. PREV (anterior), NEXT (siguiente): Los botones Previous (anterior) y Next (siguiente) le
permiten navegar por las páginas de la pantalla LCD de Fusion.
e. DEC, INC (disminución/aumento): Los botones Decrement (disminución) e Increment
(aumento) le permiten alterar los valores de diversos parámetros del sistema.
8. PANTALLA: La pantalla LCD con luz de fondo de gran tamaño de Fusion le mantiene
notificado de lo que está ocurriendo dentro del sintetizador.
44
Page 47

SECCIONES DEL PANEL TRASERO DE FUSION
INTERRUPTOR DE ENCENDIDO Y ZÓCALO DEL CABLE DE ALIMENTACIÓN
Mirando el panel trasero de Fusion, el interruptor de encendido y el zócalo del
cable de alimentación están a la izquierda.
1. Interruptor POWER (encendido).
2. Zócalo del cable de alimentación. Fusion usa un cable de alimentación IEC
estándar.
45
Page 48

ENTRADAS PARA MULTIPISTAS, PUERTO PARA UNIDAD EXTERNA,
COMPACT FLASH, USB
Mirando el panel de conexiones de Fusion, el área central izquierda contiene
lo siguiente:
3. EXT DRIVE (unidad externa): Este conector de tipo ATA serie le permite
conectar un CD-R externo o disco duro al Fusion.
4. MULTITRACK AUDIO INPUTS (entradas de audio multipistas): Estas
entradas de ocho y ¼-de pulgada se conectan a la grabadora de audio
multipistas de Fusion. Fusion puede grabar 8 canales simultáneamente.
5. COMPACT FLASH: Esta ranura acepta las tarjetas CF para guardar y cargar
programas, mezclas, muestras y muchos más tipos de archivos más.
6. USB: Este conector se usa para conectar Fusion a su computadora. Fusion
soporta USB 2.0 y es retrocompatible con USB 1.1/1.0.
46
Page 49

MIDI, SALIDAS DIGITALES, SALIDAS PRINCIPAL / AUX /
AURICULARES, MUESTREO Y CONEXIONES PARA PEDALES
Mirando el panel trasero de Fusion, el lado derecho de la estación de trabajo contiene las
conexiones siguientes:
7. FOOT PEDALS (PEDALES): Estas tres entradas le permite controlar una
variedad de funciones. EXPRESSION es la entrada del pedal de expresión
con controlador continuo de Fusion y puede ser asignado para controlar
cosas como el volumen o la expresión.
La entrada FOOTSWITCH puede configurarse y le permite hacer disparar
envueltas, LFO y otros eventos con el pie. Se parece a los botones de
disparo que se encuentran en el panel de ejecución (Performance). A
diferencia de la entrada EXPRESSION, la de FOOTSWITCH es binaria y
está activada (“on”) o desactivada (“off”) sin rango de control intermedio.
La entrada SUSTAIN es para un pedal de sostenido y suele usarse para
piano, vibes (vibráfono) y otros instrumentos. Como el FOOTSWITCH, el
pedal SUSTAIN está activado (“on”) o desactivado (“off”) y no hay nada
intermedio.
8. MIDI: Éstas son conexiones (In / Out / Thru) MIDI de 5 pines para
comunicarse con computadoras, módulos de sonidos y otros equipos MIDI.
9. DIGITAL OUT (salida digital): Fusion cuenta con un S/PDIF coaxial y una
salida digital óptica. La salida óptica soporta un S/PDIF de 2 canales o un
ADAT de 8 canales y puede ser configurada con el software de Fusion.
Consulte el Manual de referencia para saber más sobre esta salida.
47
Page 50

10. AUX OUTPUT (salida auxiliar): Las salidas auxiliares le proporcionan un
segundo par de salidas análogas además de su salida principal (MAIN
OUTPUT) (ver abajo). Esto es útil porque le permite dirigir los programas a
un conjunto totalmente separado de salidas en el teclado. Por ejemplo,
puede ser que desee tocar el piano/bajo de manera separada, pero ecualizar
y comprimir cada programa de manera diferente usando sus ecualizadores
externos y compresores favoritos. Ningún problema. Simplemente dirija uno
de los programas a la salida AUX OUTPUT y podrá tratar sus dos sonidos de
manera completamente diferente.
11. MAIN OUTPUT (salida principal): Estas dos salidas —marcadas Left/Mono
(izquierda/mono) y Right (derecha)— son las salidas primarias de Fusion.
Todos los sonidos están dirigidos a estas salidas de manera predeterminada
y generalmente conectará estas salidas a su amplificador (o mezclador).
CONSEJO: Combinando las salidas principales y auxiliares de Fusion,
tiene dos pares de estéreo o cuatro canales discretos para usar. Por
ejemplo, digamos que ha compuesto una pieza para un cuarteto de cuerdas
y quiere mezclarla usando el mezclador y equipos externos (compresores,
ecualizadores, etc.) en su estudio. Podría dirigir el violín, la viola, el chelo y el
doble bajo a salidas diferentes y luego mezclar cada salida como una fuente
de sonido independiente.
12. HEADPHONE (Auriculares): Conecte su par de auriculares favoritos a este jack cuando
quiera tocar sin molestar a los demás.
13. INPUT (entrada): Estas entradas —Left/Mono (izquierda/mono) y Right
(derecha)—alimentan al muestreador integrado de Fusion. Puede muestrear
en estéreo o en mono y el control de ganancia le permite ajustar el nivel de
entrada óptima.
Note que puede usar estas entradas para dirigir un micrófono (u otro
dispositivo externo) a través de la síntesis o de los motores de efectos de
Fusion. Esto convierte al Fusion efectivamente en un procesador de efectos
extremamente potente.
48
Page 51

Cómo producir sonidos
Su estación de trabajo Fusion tiene un surtido increíble de programas (en
Fusion, nos referimos a los sonidos individuales como “programas”.) Veamos
ahora brevemente cómo encontrar y tocar estos programas.
Seleccionar sonidos es fácil. Sólo haga lo siguiente…
1. Pulse el botón PROGRAM
Esto le lleva al modo de programa de Fusion. Si ya está en el modo de
programa, pulse este botón otra vez para asegurar que vuelva al “nivel
superior” del modo.
2. Pulse el botón Category (categoría)
El botón “Category” le lleva al explorador (“Explorer”) de Fusion. El
explorador enumera cada categoría de instrumentos de Fusion y también los
programas contenidos dentro de esta categoría. Los nombre de categorías
se indican a la izquierda, mientras que los programas propiamente dichos
están a la derecha.
3. Pulse el botón “A”
Este botón cambia su categoría a “Piano”. Verá que los nombres de las categorías están
escritos sobre las teclas desde la “A” hasta la “P” en el panel de control. Cuando pulse desde
la tecla “A” hasta la “P” mientras en modo de categoría, saltará a la categoría correspondiente
en el explorador.
4. Use la rueda de control (o los botones Inc/Dec) para seleccionar un sonido
Después de que seleccione el nombre de un programa, puede usar los botones de la rueda
de control (o Inc/Dec) para recorrer todos los sonidos diferentes de cada categoría de sonidos.
Después de cargar un programa, puede hacerlo funcionar desde el explorador. Esto facilita la
búsqueda del sonido correcto.
5. Pulse PROGRAM.
Toque el sonido mientras esté en pantalla para asegurar que sea el que desea. Si desea
volver al modo de programa normal, pulse Program otra vez. De esta forma volverá a la
parte superior de la sección Programas.
49
Page 52

Para los curiosos, veamos lo que ocurrió en verdad …
En modo de programa, pulsar el botón de categoría y luego el A (Piano)
causó que la pantalla de Fusion mostrara lo siguiente. Piénselo como modo
de programa: Vista de categoría. Aquí puede ver las categorías a la izquierda
y los diversos programas de la categoría actual a la derecha. Éste es el
“explorador de sonidos” de Fusion. Muestra los programas que están en el
teclado actualmente. Pulsar los botones NEXT y PREV le permite moverse
entre la categoría y los sonidos de esa categoría.
Cuando pulsó el botón de modo de programa (a la izquierda de la pantalla), la pantalla
apareció como se muestra aquí —con el nombre del programa actual en el centro de la
pantalla. Este es el nivel superior del modo de programa —modo principal para tocar y
escuchar sonidos.
En la pantalla que se muestra arriba, notará que el banco ROM se llama “Preset 1”
(predeterminado 1). En la categoría de piano, el A-1 llama “Holy Grail Grand Piano” (gran
piano del sagrado grial), mientras que el A-4 activa el programa “Fusion Suitcase” (maleta de
Fusion) como se muestra abajo.
50
Page 53

CONSEJO: Fusion ofrece varios bancos para organizar los sonidos. Si llama a un sonido
en particular, pero pasa algo inesperado, revise en qué banco está. Lo más probable es que
lo haya cambiado de banco. Como ejemplo, en el modo de programa, cada vez que presiona
los botones derecha/izquierda del banco (“◄ Bank” y “Bank ►”), la pantalla mostrará el banco
seleccionado actualmente. Mientras el nombre del banco de la imagen anterior se muestra
como “Preset 1” (predeterminado 1), pulse el botón Bank ► para hacer que la pantalla sea la
que se muestra a continuación. Notará que el banco ROM se llama ahora “Preset 2”
(predeterminado 2) y que el nombre del programa cambió a “Fusion Dyno Tines” (dientes de
dinosaurio).
Al organizar los programas dentro de la misma categoría y banco, tendrá acceso inmediato a
sus sonidos favoritos.
Cuando sepa donde se ubican sus programas favoritos….
Con el tiempo, es probable que confíe en un grupo de sonidos favoritos que puede usar para
varias circunstancias. Cuando ya sepa donde se ubican esos favoritos, llamar a esos
programas sólo significará seleccionar el banco derecho y dos botones —como el A-1 y el A-4
en los ejemplos anteriores.
Modo de programa (Program): Categoría y banco
Los programas de Fusion se organizan por categoría y banco: Las categorías se marcan
(sobre las teclas A hasta P) Piano, Chromatic, Organ, Guitar, etc.
51
Page 54

Cómo editar sonidos
Las perillas de control facilitan el ajuste de los sonidos.
Primero, seleccionemos un sonido:
1. Pulse PROGRAM.
Esto le lleva al modo Programa de Fusion. Si ya está en el modo de
programa, pulse este botón otra vez para volver al “nivel superior” del modo.
2. Pulse “◄ Bank” o “Bank ►” hasta que vea “[ROM: Preset 3]” en la esquina
superior izquierda de la pantalla.
Fusion puede almacenar sonidos en una cantidad de bancos virtualmente
ilimitada. Tiene que asegurarse de que cargó el banco derecho, de lo
contrario se puede encontrar cargando programas que no conoce.
3. Pulse “E” y luego “5” de los botones de acceso rápido del panel de control.
De esta forma se carga el programa E-5 o “Taurus The Bull” (Taurus el
toro).
Su pantalla debería aparecer así:
52
Ahora pulse el botón EQ de la grilla de ejecución (Performance Grid). La parte inferior de su
pantalla se parecerá a la pantalla que sigue.
Sus cuatro perillas de control corresponden ahora a Low, Low Mid, High Mid, y High EQ
respectivamente. A medida que toca el sonido de bajo y gira la perilla Low EQ en sentido
horario, puede escuchar que el sonido gana más integridad o llega al extremo inferior.
Page 55

De manera similar, puede presionar el botón Filter (filtro) a la derecha de la grilla del panel de
ejecución (Performance) de Fusion y su pantalla se parecerá a la que sigue. Ahora, las
perillas de control representan un conjunto diferente de parámetros —en este caso, el filtro.
Las cuatro perillas de control corresponden ahora a Frecuencia, Resonancia, Cantidad de
Envelope (envuelta) y Key Track. Toque algunas notas a medida que gira la perilla de
cantidad de envuelta (Envelope Amount) y escuchará que su tono cambia (también notará
que la perilla cambia en pantalla para reflejar la posición de sus configuraciones).
Cómo guardar su programas editados….
Puede haber notado una pequeña “e” hacia la parte superior de ciertas páginas (si no, verá
este icono aparecer en varias de las imágenes que siguen a continuación). Este icono indica
que su sonido ha sido editado.
Ahora que ha modificado el programa original, puede que desee guardarlo, en cuyo caso
necesitará guardarlo en algún lado. Haga lo siguiente:
1. Pulse STORE (almacenar) (adyacente a la rueda de control). Aparecerá la siguiente pantalla:
2. Debido a que este sonido es un sonido predeterminado (Preset) no puede ser sobrescrito. Lo
guardará en una ubicación diferente.
En este momento, está listo para guardar su programa. Use los pasos siguientes para escribir
su programa en una nueva ubicación:
4. Use los botones NEXT (siguiente) y PREV (anterior) para posicionar el cursor en el campo del
banco ROM (conocido como “ROM: Preset 2) y seleccione su banco de almacenamiento
preferido usando la rueda de control. Tiene la capacidad de guardarlo en una tarjeta Compact
Flash (si tiene una insertada) o en el disco duro interno de Fusion. Estos aparecerán en
pantalla sea como CF (Compact Flash) o HD (disco duro); por ejemplo, CF:My Bank.
5. Ahora, use los botones NEXT y PREV para colocar el cursor en el campo de ubicación dentro
del banco (mostrado ahora como E-5) y seleccionar su ubicación preferida usando la rueda de
control.
6. Pulse STORE (almacenar) (sea el botón programable de la parte superior derecha de la
pantalla o el botón dedicado STORE).
53
Page 56

Cómo usar el arpegiador
El arpegiador de Fusion es muy fácil de usar —gracias a las perillas de
control en tiempo real del instrumento. Si no ha usado nunca un arpegiador,
comencemos con una explicación rápida de esta función.
El arpegiador es una herramienta musical que toca una serie de notas
preprogramadas. Esto le permite sostener, por ejemplo, una cuerda de voz
abierta con ambas manos y hacer que el arpegiador toque las notas
individuales como tresillos, semicorcheas, etc., con el tempo que desee.
Cómo tocar un arpegio estándar…
Comience seleccionando un sonido de sintetizador. Para el propósito de este
ejemplo, pulse PROGRAM, cambie al banco llamado “Preset 2” y seleccione
el programa K-3. Su pantalla debe ser como la siguiente.
Tome los pasos siguientes para activar y ajustar el arpegiador según sus
deseos…
1. Pulse el botón ARP de la parte superior derecha de la grilla del panel de
ejecución (Performance) de Fusion. Debe ver ahora los parámetros del
arpegiador asignados a las perillas de control a través de la porción inferior de
su pantalla, como se indica en la imagen anterior.
2. Pulse el botón ARP On/Off, ubicado en la parte inferior derecha de la grilla.
Esto hace activar el arpegiador.
3. Mientras sostiene una cuerda en una mano, ajuste los parámetros de GATE,
VELOCITY, STEP VALUE y TEMPO como desee.
54
Page 57

Entendiendo los parámetros….
He aquí una breve explicación de cada de los cuatro parámetros internos del arpegiador de
Fusion.
• Gate (compuerta): Este parámetro ajusta la duración de la nota. Girar este
control en sentido antihorario hace que una nota tenga un sonido “staccato”.
• Velocity (velocidad): Este parámetro ajusta el nivel de las “note ons”
(activaciones de notas) subsiguientes después de tocar la cuerda inicial.
• Step Value (valor de paso): Este parámetro le permite seleccionar tresillos,
semicorcheas y otros valores musicales.
• Tempo: Este parámetro ajusta la velocidad del arpegiador.
Para cambiar el tipo de arpegio.
1. Pulse el botón EDIT (editar).
2. Seleccione la ficha Arp (usando el botón programable correspondiente, que
se encuentra a la izquierda de la pantalla LCD).
3. Use los botones NEXT y PREV para posicionar el cursor en el banco de
patrones (Pattern) como se muestra a continuación.
4. Mueva el cursor al número del programa del arpegiador y use la rueda de
control o los botones INC/DEC para cambiar el programa de arpegio dentro
del banco.
CONSEJO: El arpegiador de Fusion se puede sincronizar también a
relojes internos y externos. Esto permite que el arpegiador toque en
sincronismo con un ajuste de tempo del secuenciador. Consulte el Manual de
referencia para obtener más información.
55
Page 58

Cómo usar el modo de mezcla (Mix)
El modo MIX de Fusion es el que le permite reunir su “banda” para una
canción o crear una división del teclado. A medida que encuentra los
instrumentos que desea usar, es fácil agregarlos a la “mezcla”.
Cómo reunir su “banda”…
Una de las maneras de crear una mezcla es ubicar sus diversos programas
en el modo de programa. Para este ejemplo, usaremos el piano, la guitarra y
el bajo para crear una mezcla multitimbral.
Para comenzar, pulse Category en el modo de programa y luego pulse Guitar
(guitarra).
Ahora pulse el botón del modo de programa y el 2. Su pantalla debe ser
como la que sigue.
1. Pulse EDIT (editar) y Utility (utilidad) (usando el botón programable en el lado
izquierdo de la pantalla LCD). Su pantalla será como la que sigue a
continuación.
2. Pulse “To Mix”. Así agregará su guitarra a la banda. En este momento, su
banda consiste en la guitarra que acaba de agregar y un piano elegido de
manera predeterminada. Note que el piano se asigna a la primera parte de
una mezcla de manera predeterminada para que no necesite preocuparse de
agregar uno en este caso. Si no quiere un piano, cambie la parte de piano a
cualquier otro programa que desee. Ahora, agreguemos un bajo.
56
Page 59

3. En modo de programa, pulse Bass (bajo).
4. Ahora pulse 1. Su pantalla será como la que sigue.
5. Pulse EDIT (editar) y vaya a la ficha marcada Utility (utilidad).
6. Use los botones INC/DEC para seleccionar sus opciones “To Mix” y
seleccione “Add to Current Mix” (agregar a la mezcla actual). Pulse el botón
programable “To Mix”. Así agregará su bajo a la banda. Su banda consiste
ahora en el piano, el bajo y la guitarra.
7. Para agregar más instrumentos, repita este proceso.
57
Page 60

Cómo definir los canales MIDI para cada instrumento…
Para tocar partes musicales individuales, necesitará que cada instrumento esté en su propio
canal MIDI. Siga estos pasos para configurar los canales MIDI para cada instrumento.
En modo de mezcla (Mix), pulse EDIT (editar) y luego PART (parte). Su pantalla debe ser
como se muestra a continuación.
Use los botones PREV y INC para moverse hacia delante y atrás entre el parámetro Edit Part
(editar parte) y el parámetro del canal MIDI de la parte inferior de la pantalla. Con su cursor en
el parámetro que desea cambiar, gire simplemente la rueda de control para definir la parte o el
canal MIDI que desea asignar.
58
Page 61

Cómo agregar a los favoritos…
A medida que se familiarice con la biblioteca de sonidos de Fusion, puede ser que quiera
crear diferentes categorías para sus programas favoritos. Por ejemplo, puede almacenar
todos sus programas favoritos de grabación de bandas sonoras bajo “Fav 1” y mantener
todos sus sonidos de Hip Hop en “Fav 2” y sus programas de jazz en “Fav 3”. Esto le permite
un acceso rápido a sus sonidos favoritos sin tener que recordar dónde se ubica cada
programa.
Agreguemos el piano a la categoría de favoritos.
1. En modo de programa, pulse Category y luego Piano.
2. Pulse el botón de modo de programa y el 1. Su pantalla debe ser como la
que sigue.
3. Pulse EDIT (editar) y seleccione la ficha marcada Utility (utilidad). Verá la siguiente pantalla.
4. Usando los botones PREV (anterior) y NEXT (siguiente), posicione el cursor en el parámetro
“Add to Favorites” (agregar a favoritos).
5. Gire la rueda de control para seleccionar la categoría de favoritos (1 a 8) donde quiere que se
almacene el programa. Para el propósito de este ejemplo, agreguemos el programa a la
categoría 1.
6. Pulse Favorite (favorito).
59
Page 62

Ahora ha agregado el piano a su categoría Fav 1. Puede acceder a la misma pulsando
Category y desplazándose por el lado izquierdo de la pantalla a las categorías “Fav 1” a “Fav
8”. Estos son sus programas favoritos y cualquier programa que haya agregado (usando el
método descrito anteriormente) aparecerá aquí. Por ejemplo, el piano que agregamos
usando los pasos anteriores debería aparecer ahora en la categoría Fav 1.
Note que cuando agrega un programa a una categoría de favoritos, el programa en realidad
no se mueve y puede todavía encontrarse en su ubicación original. Simplemente el programa
aparece en varios lugares.
Cómo crear una división del teclado…
El modo de mezcla (Mix) es útil también para crear divisiones del teclado. Esta característica
le permite tener, por ejemplo, un sonido en la parte superior del teclado y un sonido diferente
en la parte inferior —como una división de piano/bajo. Haga lo siguiente:
1. Pulse el botón de modo de programa y, para el propósito de nuestro ejemplo, pulse CategoryBass.
2. Seleccione un programa de bajo acústico y luego pulse Program.
3. Pulse EDIT y seleccione la ficha Utility de la parte inferior izquierda de la pantalla, como se
muestra a continuación. Si no ve este parámetro, coloque el cursor en esta tercera línea
(usando los botones PREV y NEXT) y gire la rueda de control desde “Add to Current Mix”
(agregar a la mezcla corriente) o “Generate Layer Mix” (generar mezcla con capas) hasta
“Generate Split Mix” (generar mezcla con división).
60
CONSEJO: Puede modificar el punto de división posicionando el cursor en C3 y girando
la rueda de Control a otra nota o posicionando el cursor en C3, manteniendo el botón
LOCATE (ubicar) presionado y pulsando una nota en el teclado (esa nota se convertirá en el
punto de división).
4. Pulse el botón “To Mix”. De esta forma generará una mezcla con su bajo debajo de la tecla
de división y un piano sobre la misma. Ahora deberá tener una división de piano/bajo.
Page 63

Cómo tocar y editar canciones
Puede aprender bastante de su nueva estación Fusion si se toma unos
minutos de práctica con una de las canciones demo integradas. En esta
sección, le presentaremos ciertos de los aspectos básicos del
secuenciamiento con Fusion.
Cómo tocar la canción demo de Hip Hop…
1. Pulse el botón del modo SONG (canción).
2. Pulse INC o DEC hasta que encuentre la canción llamada “Hip Hop Demo”. El nombre de la
canción debe aparecer en negrita en el centro de la pantalla cuando la canción esté
completamente cargada.
Pulse el botón PLAY (reproducir) del área de control de transporte a la derecha de la rueda de
control. La canción comenzará a reproducirse. Puede identificar fácilmente qué pistas se
están reproduciendo mirando la pantalla de pistas activas (Active Tracks). Cada vez que se
dispara un evento MIDI, la pista activa (Active Track) que contiene ese evento en particular
aparece resaltada.
CONSEJO: Usando las teclas FFWD y REW del área Transport (transporte), puede
mover dentro de la canción una medida a la vez. Mantenga LOCATE (ubicar) presionada
mientras pulsa REW y volverá al comienzo de la canción.
Cómo configurar los puntos de ubicación…
Los botones SET LOC y Quick Access (ubicados debajo de los botones Category y Bank) del
área de transporte de Fusion le permite “marcar” un punto específico en su canción. Esta
característica le facilita el salto a un punto específico con sólo presionar un botón.
1. Mientras se reproduce la canción, pulse el botón SET LOC y uno de los botones de acceso
rápido (A-P). Así se marca un punto específico en la canción.
2. Pulse el botón LOCATE (ubicar) y el botón de acceso rápido correspondiente (durante la
reproducción o en “standby”) para saltar a la posición de la canción que capturó
anteriormente. Esta posición se identifica por la medida (Measure), el ritmo (Beat), y el tiempo
de pulso del reloj (Clock Pulse) y aparece en la parte superior de la pantalla (como se muestra
en la imagen anterior).
CONSEJO: También puede usar las teclas FFWD y REW para saltar a una posición
específica y marcar esa posición, presionando el botón SET LOC.
61
Page 64

Cómo silenciar y producir solos de pistas…
Mientras trabaja en su canción, algunas veces puede querer silenciar una o más pistas para
escuchar otras partes más detenidamente. También, puede ser que quiera escuchar
solamente una o más pistas específicas. Esto se llama hacer un “solo” de pista. Haga lo
siguiente:
1. En modo SONG (canción), pulse el botón MIXER (mezclador) del lado izquierdo de la pantalla
de Fusion. Su pantalla será como la siguiente.
A través de la parte superior de la pantalla verá el parámetro “Control Knobs/Triggers” (perillas
de disparo/control): Este parámetro le dice cuáles pistas están controladas actualmente por
las perillas de control y los botones T1-T4. Gire la rueda de control para cambiar la asignación
de estos controladores en tiempo real desde las pistas 1-4 hasta las pistas 2-5, 3-6, etc. a fin
de controlar las otras pistas disponibles en su mezclador.
A la derecha de la pantalla, verá cuatro botones de Send 1 (enviar 1), Send 2 (enviar 2), Pan
(desplazar) y Volume (volumen) que seleccionan lo que controlarán las cuatro perillas de
control de Fusion. Debajo de estos, verá dos botones que se usan para seleccionar la función
de los botones de disparo T1 – T4.
Cómo silenciar una pista…
1. Pulse el botón Enable (activar) de la parte inferior derecha de la pantalla. Los botones de
disparo T1 – T4 están ahora configurados como activados
2. Pulse Play (reproducir) para iniciar la reproducción.
3. Pulse los botones T-1 y T-2 simultáneamente. Se silenciará la batería y los botones T1 y T2
quedan con iluminación tenue (note que los botones T3 y T4 están brillantemente
encendidos).
Cómo hacer un solo de pista…
1. Pulse el botón Solo de la parte inferior izquierda de la pantalla. Los botones de disparo T1 –
T4 están configurados ahora a la función solo de Fusion.
2. Pulse Play (reproducir) para iniciar la reproducción.
3. Pulse los botones T-1 y T-2. Las baterías tocan ahora en solo y los botones T1 y T2 quedan
poco iluminados comparados con los botones T3 y T4.
Configuraciones de pan y volumen
Puede cambiar las configuraciones de pan y volumen igual que las funciones Mute (silenciar)
y Solo mencionadas en el párrafo anterior. Haga lo siguiente.
62
Page 65

Cómo alterar la posición de pan para una pista…
1. En modo de mezclador (MIXER), pulse el botón Pan que se ubica en la parte derecha de la
pantalla. Las cuatro perillas de control en tiempo real se asignan ahora a pan
(desplazamiento).
2. Pulse Play (reproducir) para iniciar la reproducción. Sólo debe escuchar la guitarra baja.
3. La perilla de control en tiempo real del extremo derecho está asignada actualmente a la pista
4, el bajo. Gire esta perilla y mueva la guitarra baja hacia la izquierda y derecha en su campo
de estéreo.
63
Page 66

Cómo ajustar el volumen de una pista…
Si su pista de batería sigue en solo, pulse el botón T4 para quitar esa pista del solo.
1. En modo de mezclador (MIXER), pulse el botón Volume (volumen) que se encuentra en la
parte derecha de la pantalla. Las cuatro perillas de control en tiempo real se asignan ahora al
volumen.
2. Pulse Play (reproducir) para iniciar la reproducción.
3. A medida que gire la primera y segunda perillas de control en tiempo real (desde la izquierda),
verá que se alteran los niveles de las dos pistas de batería. Si gira la perilla de control en
tiempo real que se ubica al extremo derecho, verá que altera el volumen del bajo.
Cómo grabar las pistas… sobrescribir una pi sta existente
Si no está contento con una pista que acaba de grabar y quiere intentar otra vez, siga estos
pasos.
1. Si todavía está en el modo de mezclador (Mixer), pulse el botón EDIT para volver a la página
del modo de canción (Song) donde estaba.
2. Asegúrese de que el parámetro “Record Method” (método de grabación) de la página
Song/Song/Record (canción/canción/grabar) está configurada como “Replace” (reemplazar).
Esto le asegura que lo que grabe sobrescribirá lo que ya está en esa pista.
3. En modo SONG (canción), pulse Edit (editar) y la ficha Track (pista) del lado izquierdo de la
pantalla, como se muestra a continuación.
Si usa los botones INC/DEC o la rueda de datos, puede acceder fácilmente a la pista
específica que quiere usar.
4. Para el propósito de nuestro ejemplo, seleccione la Pista 9, “Fusion Suitcase” (maleta de
Fusion) como se muestra a continuación.
5. Pulse los botones PLAY y RECORD simultáneamente. El botón RECORD se ilumina de color
rojo y se reproduce la canción demo, esta vez con el metrónomo interno.
6. Cuando usa el programa, está grabando su interpretación y sobrescribiendo la interpretación
que existe en la pista.
64
Page 67

Cómo grabar su primera canción
Cuando esté listo a componer su propia canción, siga estos pasos:
1. Pulse el botón de modo SONG (canción).
2. Pulse INC o DEC hasta que encuentre la canción llamada “Tutorial Song”. Esta canción está
en blanco, pero tiene algunos programas cargados para ayudarle a comenzar su
composición.
3. Pulse EDIT y luego la ficha Song de la parte superior izquierda de la pantalla. Aparecerá la
siguiente pantalla:
4. Pulse el botón Add Track (agregar pista) (ubicado en la parte inferior derecha de la pantalla).
Aparecerá ahora la siguiente pantalla:
Aunque el cursor está en “Synth” en la imagen anterior, puede cambiarse a “Audio” girando la
rueda de datos. Esta pantalla particular es donde especifica si una nueva pista será un
sintetizador o una pista de audio.
Con el cursor en “Synth”, pulse el botón OK de la parte superior derecha de la pantalla. De
esta forma creará una nueva pista —en este caso la pista 10 como se muestra abajo.
5. Use los botones PREV y NEXT para resaltar “[Grand Piano]” o “A-1 (000)”. “Preset 1”:
selecciona el banco que usa para buscar sonidos, mientras que “A-1 (000)” le permite
visualizar los sonidos individuales contenidos dentro del banco seleccionado.
6. Use la rueda de control (o los botones INC/DEC) para seleccionar el instrumento que desea
tocar.
7. Pulse el botón del modo SONG (canción) otra vez para volver al nivel superior de dicho modo.
8. Pulse PLAY y RECORD simultáneamente para comenzar a grabar. Después de hacer esto,
el botón RECORD (grabar) cambiará a color rojo, la canción comenzará a reproducirse junto
con un metrónomo y usted grabará. Toque lo que quiera en el teclado y pulse Stop (parar)
cuando termine.
65
Page 68

Cómo grabar pistas… nuevas pistas de audio
Fusion es también una grabadora de audio. Puede grabar hasta ocho pistas para tocar junto
con sus pistas del sintetizador. Siga estos pasos para grabar una pista de audio:
1. Pulse el botón de modo SONG (canción). Esto le llevará al nivel superior de dicho modo.
2. Pulse EDIT y luego la ficha Song de la parte superior izquierda de la pantalla. Aparecerá la
siguiente pantalla:
3. Pulse el botón Add Track (agregar pista) (ubicado en la parte inferior derecha de la pantalla).
4. Con el cursor en “Synth”, pulse el botón de aumento (INC) debajo la rueda de control. De esta
forma cambiará la selección de “Synth” a “Audio”. Ahora pulse el botón “OK”. De esta forma
creará una nueva pista para grabar audio. Aparecerá ahora la siguiente pantalla:
5. Enchufe una fuente de audio a la entrada 1 de multipistas de la parte trasera de la estación
Fusion. Use algo con nivel de salida de línea, como otro sintetizador o un reproductor de CD.
6. Pulse el botón de la ficha “Song” y luego el botón “Record” (grabar).
7. La pantalla mostrará los medidores de nivel de entrada de las pistas 1 y 2. Reproduzca su
fuente de audio en Fusion. Debe ver el medidor de la pista 2 (pista de audio 1) moviéndose en
la parte inferior de la pantalla.
8. Cuando esté listo a grabar, pulse “Rec” y “Play” simultáneamente. El metrónomo contará
hacia atrás y Fusion comenzará a grabar su audio a medida que se reproduce en las
entradas.
9. Después de terminar de grabar su audio pulse “Stop” y “Locate” para volver al comienzo de su
canción. Debe poder escuchar la reproducción de sus pistas de audio.
66
Page 69

Cómo guardar una canción…
Ahora que hemos editado la canción demo, notará que el icono “e” aparece
en la parte superior derecha de la pantalla. Esto indica que la canción ha sido
editada y no ha sido guardada.
1. Pulse el botón STORE (almacenar) adyacente a la rueda de control.
Aparecerá la siguiente pantalla:
La canción Tutorial es una canción predeterminada, que no puede ser sobrescrita, de modo
que tendremos que guardarla en otro lugar.
2. Use los botones PREV/NEXT para mover el cursor de derecha a izquierda y
la rueda de control para cambiar el banco seleccionado. Elija una ubicación
de banco donde guardarla, como CF (tarjeta compact flash) o HD (disco duro
interno).
3. Use los botones PRE/NEXT para moverse a la ubicación específica donde
quiere guardar la canción, como A-1 (000).
4. Pulse el botón Store (almacenar) de la parte superior derecha de la pantalla
para guardar la canción. Ya ha guardado su canción editada en ese lugar.
67
Page 70

Cómo crear su propia canción…
Estos pasos han sido cubiertos en gran parte anteriormente en esta sección
de la guía de inicio rápido. Pero para resumir, sigamos juntos los siguientes…
Si ha salido del modo de canción, siga y vuelva a entrar en este modo. Debe
aparecer la siguiente pantalla:
Pulse el botón EDIT para ver “debajo del capó” del modo de canción y seleccione la ficha
Utility de la parte inferior izquierda de la pantalla. Aparecerá entonces la siguiente pantalla:
1. Pulse el botón New Song (nueva canción) de la parte superior derecha. Se crea una nueva
canción y la pantalla cambia a una que se parece mucho a la siguiente:
2. Use los botones PREV y NEXT para resaltar “[Grand Piano]” o “A-1 (000)”. “ROM:Preset 1”
selecciona el banco en el que busca sonidos, mientras que el “A-1 (000)” le permite recorrer
los sonidos individuales contenidos dentro del banco seleccionado.
3. Use la rueda de control (o los botones INC/DEC) para seleccionar el instrumento que desea
tocar.
4. Pulse el botón de modo SONG (canción) otra vez para volver al nivel superior de dicho modo.
5. Pulse PLAY y RECORD simultáneamente para comenzar a grabar. Después de hacer esto,
el botón RECORD (grabar) cambiará a color rojo, la canción comenzará a reproducirse junto
con un metrónomo y usted grabará. Toque lo que quiera en el teclado y pulse Stop (parar)
cuando termine.
Su nueva pista es ahora una parte grabada de los datos del secuenciador de Fusion. Puede
repetir este proceso (vea la sección Cómo grabar pistas… pistas nuevas) para agregar
partes subsiguientes a su canción.
68
Page 71

Información legal:
Todo el software y la documentación, excepto el códec de compresión sin pérdidas TTA están sujetos
a derechos de Copyright 2005 de Alesis Studio Electronics. Todos derechos reservados.
Aviso de copyright y aviso legal relativo al códec de compresión de audio sin pérdidas TTA: Copyright
2004 Alexander Djourik. Todos derechos reservados.
La redistribución y el uso en formas de fuente o binarias, con o sin modificación, se permiten siempre
que se cumplan las condiciones siguientes:
1. Las redistribuciones del código fuente deben conservar el aviso de derechos de copyright
precedente, esta lista de condiciones y el aviso legal siguientes.
2. Las redistribuciones en forma binaria deben reproducir el aviso de derechos de copyright
precedente, esta lista de condiciones y el siguiente aviso legal
en la documentación y/o otros materiales provistos con la distribución.
3. Ni el nombre del True Audio Software ni los nombres de sus contribuidores pueden usarse para
promover o recomendar los productos derivados de este software sin permiso específico por escrito.
ESTE SOFTWARE ES PROPORCIONADO POR LOS TITULARES DEL COPYRIGHT Y
CONTRIBUIDORES EN SU CONDICIÓN ACTUAL Y SE EXCLUYE TODA GARANTÍA EXPRESA O
IMPLÍCITA, INCLUIDAS SIN LIMITARSE A ELLAS, LAS GARANTÍAS IMPLÍCITAS DE
COMERCIABILIDAD Y ADECUACIÓN PARA UN PROPÓSITO ESPECÍFICO. EN NINGÚN CASO
EL PROPIETARIO DEL COPYRIGHT O LOS CONTRIBUIDORES TENDRÁN RESPONSABILIDAD
LEGAL POR DAÑOS Y PERJUICIOS DIRECTOS, INDIRECTOS, INCIDENTALES, ESPECIALES,
EJEMPLARES O CONSECUENTES (INCLUIDOS, SIN LIMITARSE A ELLOS, LA COMPRA DE
BIENES O SERVICIOS, LA PÉRDIDA DE USO, DATOS O GANANCIAS, O INTERRUPCIÓN DE
LOS NEGOCIOS) SEA COMO FUERE CAUSADO Y BASADO EN CUALQUIER TEORÍA DE
RESPONSABILIDAD, SEA CONTRACTUAL, RESPONSABILIDAD LEGAL ESTRICTA O AGRAVIO
NO ORIGINADO EN EL CONTRATO (INCLUIDAS LA NEGLIGENCIA U OTRAS CAUSAS) QUE
SURJAN DE CUALQUIER MANERA DEL USO DE ESTE SOFTWARE, AUNQUE ESTÉN
NOTIFICADOS DE LA POSIBILIDAD DE TALES DAÑOS Y PERJUICIOS.
69
Page 72

Fusion
Kurzanleitung
70
Page 73

Vielen Dank!
Für Ihre Entscheidung, sich für die Fusion Digital Audio Workstation zu entscheiden, danken wir Ihnen!
Die Fusion gehört zu den leistungsfähigsten Produkten, die wir je gebaut haben. Wir sind uns sicher,
dass Sie die Fusion lieben werden.
Wir haben diese Kurzanleitung geschrieben, damit Sie sofort mit der Fusion loslegen können. Hier
finden Sie kurz all das aufgelistet, was Sie benötigen, um schnell mit Ihrem Gerät klar zu kommen.
Ausführliche Informationen finden Sie im Referenzhandbuch, welches ebenfalls Ihrem Gerät beiliegt.
Das Handbuch beschreibt jede einzelne Funktion and jeden Parameter der Fusion und hält Antworten
auf alle Fragen über die Fusion parat.
Wir hoffen, dass Ihnen Ihre Fusion Workstation über viele Jahre Spaß beim Arbeiten bereitet und dass
Sie mit den Anleitungen dieses Handbuches Ihre ersten erfolgreichen Schritte mit Ihrer Fusion
unternehmen können.
Mit musikalischen Grüßen,
Die Mitarbeiter von Alesis
71
Page 74

Die Grundstruktur der Fusion
Die Alesis Fusion Workstation verbindet in einem Gerät mehrere verschiedene Klangerzeugungen,
Hard-Disk Recording, Sampling, Arrangementmöglichkeiten und die Echtzeitsteuerung verschiedener
Komponenten. Die Fusion 6HD und 8HD unterscheiden sich bis auf die Größe, das Gewicht und die
Tastatur nicht voneinander. Während die 6HD eine Synthesizertastatur mit 61 Tasten besitzt, ist die
8HD mit einer vollgewichteten 88er Tastatur ausgestattet. Ohne weitere Optionen können Sie mit der
Fusion Ihre wildesten musikalischen Ideen in die Tat umsetzen.
Die Klangerzeugung der Fusion
Die Fusion kann Sounds auf vier Arten erzeugen: Sample Playback, Analog Modeling, FM
(Frequenzmodulation) Synthese und Physical Modeling. Unter der Verwendung der Dynamic
DSP Synthesis™ ermöglicht die Fusion die Erzeugung von Soundkombinationen aus diesen
Synthesearten. Es gibt keine werksseitigen Limitierungen, die die Synthesen oder die
Polyphonie einschränken—sie können also Ihre Fusion bis an die absoluten Grenzen fordern.
Sample Playback
Wenn Sie nach richtig realistischen Gitarren- oder Pianosounds, Natur-Drums und
Soundeffekte suchen, ist die Sample Playback Synthese der Fusion genau das
richtige. Schon nach dem ersten Einschalten besitzt die Fusion tausende
professionelle Samples.
Virtual Analog (VA) Synthese
Die VA-Synthese der Fusion ist der richtige Anlaufpunkt, wenn Sie warme Padsounds
und tiefe Bassklänge benötigen. Drei Oszillatoren, ulltra-flexible Routings und variable
Filtertypen ermöglichen der Fusion, wie jeder der großartigen Analogsynthesizer der
Vergangenheit zu klingen. Wenn Sie mehr der Entdeckertyp sind, können Sie einen
virtuellen Analogsynth erschaffen, den noch niemand vorher gehört hat
FM Synthese
Die FM Synthese ist am bekanntesten für seine E-Pianos, die glockenartigen klänge
und für melodische Percussionsounds, wie zum Beispiel Vibes und Marimba. Vor der
FM-Synthese der Fusion war das Programmieren eigener FM Sounds eine echte
Herausforderung, da man das Zusammenspiel der Operatoren und der Carrier, die
zur Klangerzeugung eingesetzt werden, erst einmal verstehen musste. In der Fusion
gehört das komplizierte Programming von FM der Vergangenheit an. Der graphische
FM-Router der Fusion vereinfacht das Editieren von FM-Klängen und ermöglicht den
intuitiven Umgang mit der FM-Synthese.
Physical Modeling
Physical Modeling ist ein hochmoderner Prozess, der mathematisch das Verhalten
eines Klanges im Inneren eines Instrumentes beschreibt. Wir haben sorgfältig eine
Benutzeroberfläche geschaffen, die sich speziell an Musiker wendet. So können Sie
Ihre Sounds in Echtzeit verändern, ohne sich über komplexe und verwirrende
mathematische Parameter zu sorgen. Mit der Physical Modeling Synthese können
Sie natürlich klingende Holzblasinstrumente oder Instrumente, die noch niemand
zuvor gehört hat, erzeugen.
Acht-Kanal Hard Disk Recorder
Um Gesang oder live gespielte Instrumente aufnehmen zu können, haben wir die Fusion mit
einem integrierten 8-Spur, 24-Bit/44.1kHz Hard Disk Recorder ausgestattet. Die analogen
Eingänge der Rückseite erlauben durch die gleichzeitige Aufnahme von acht Spuren das
Mitschneiden einer ganzen Bandperformance. Wie jeder andere Recorder besitzt die Fusion
die normalen Laufwerksfunktionen mit mehreren Locate Punkten.
72
Page 75

Sampling
Wenn Sie ein eigenes Sample-Instrument erzeugen möchten, können Sie den Sampler der
Fusion verwenden. Die Fusion stellt dazu Stereoeingänge mit einem Trim Regler zur
Pegelanpassung bereit. Sie können Samples in Mono oder in Stereo aufnehmen. Samples
können entweder auf der internen Festplatte oder einer Compact Flash Card aufgenommen
oder gespeichert werden.
Eine integrierte MIDI / Audio Recording und Editing-Umgebung
Die Fusion erleichtert den Prozess der Songkomposition durch Darstellung sowohl der MIDIals auch der Audiodaten im Bildschirm. Die Fusion kann auch MIDI Files zur weiteren
Bearbeitung in der Workstation importieren.
Die Mode Buttons
Die Fusion besitzt sechs Hauptbetriebsarten: Mix, Program, Song, Sampler, Mixer und
Global.
Die Mix, Program und Song Modes haben editierbare Parameter. Um in die Tiefen der
Betriebsarten hinabzutauchen, drücken Sie einfach den EDIT Button, den Sie links oben über
dem Data Rad finden. Um zurück an die „Oberfläche“ zu gelangen, drücken Sie noch einmal
den Mix, Program oder Song Mode Button.
Mix Mode
In diesem Mode können Sie sich Ihre eigene „Band“ für einen Song
zusammenstellen. Nehmen wir einmal an, Sie möchten einen Song mit Piano, Bass
und Drums komponieren. Nachdem Sie sich die gewünschten Instrumente gesucht
haben (mit dem Program Mode—siehe unten), fügen Sie diese Programs einfach
einem „Mix” bei und schon sind Sie bereit, Ihre Komposition entweder mit dem
internen Sequencer der Fusion (im Song Mode) oder mit einem externen Sequencer
zu arrangieren.
Im Mix Mode können Sie auch Keyboard-Splits (zum Beispiel Bass auf der linken
Hälfte der Tastatur und einen Synthsound rechts) oder übereinander liegende
Layersounds programmieren.
Program Mode
In diesem Mode werden Sie sicherlich die meiste Zeit verbringen. Im Program Mode
können Sie ein Instrument laden und spielen und die unzähligen Sounds der Fusion
entdecken. Sie möchten den gediegenen Klang eines Kozertflügels? Gehen Sie in
den Program Mode, rufen Sie das Piano auf und legen Sie los!
Die Category Buttons rechts vom Display gestatten den schnellen Zugriff auf
Soundgruppen, wie beispielsweise Piano, Guitar, Bass, Strings, usw.
Song Mode
Wenn Sie Ihre „Band“ (bleiben wir bei dem Piano, Bass und Drum Trio aus dem Mix
Mode) gebildet haben, können Sie Ihre Komposition im Song Mode arrangieren,
aufnehmen und bearbeiten. Der Mehrspur-Recorder der Fusion ist in diesem Mode
ebenfalls enthalten, damit Sie Live-Instrumente zusammen mit Ihren Synth Tracks
aufnehmen können.
In der oberen rechten Ecke des Displays werden die aktiven Tracks angezeigt, damit
Sie wissen, mit welchen Instrumenten Sie gegenwärtig arbeiten. Die Fusion kann bis
zu 32 MIDI- und bis zu 8 Audio Tracks pro Song verwalten.
73
Page 76

Sampler Mode
Wenn Sie Ihr ganz eigenes Sample-Playback Program von Grund auf erstellen
möchten, ist der Sampler Mode die richtige Adresse. Das Aufnehmen und
Nachbearbeiten der Grundwellenformen findet hier statt. Wenn Sie den Edit Button
innerhalb dieses Modes drücken, sehen Sie die gesamten Editier- und
Zuweisungsmöglichkeiten der Fusion in den Multi-, Zone-, Sample-, Process- und
Utility Untermenüs entlang der linken Displayseite.
Wenn Sie alle benötigten Samples aufgenommen haben, können Sie im Program
Mode weiterarbeiten, um das Program fertig zu stellen. Dieses können Sie dann wie
jedes andere Program der Fusion anwählen und spielen.
Mixer Mode
Damit Sie bequem Ihre Synthesizer- und Audiospuren abmischen können, haben wir
einen Mixer Mode in die Fusion integriert. Der Mixer ermöglicht das Setzen der
Lautstärken und Panoramapositionen für jede Synth- und Audiospur. Des Weiteren
können Sie Effect Send Pegel einstellen und Spuren stumm oder solo schalten, wie
Sie es von einem richtigen Hardware Mixer her auch kennen.
Global Mode
Im Global Mode können Sie die Parameter verändern, welche die Fusion im
Gesamten betreffen. Hier finden Sie Dinge, wie die Gesamtstimmung des Gerätes,
und die Anpassung der Anschlagskurve der Tastatur an Ihre Anforderungen.
Mit dem SETTINGS Tab können Sie die Einstellungen des Keyboards, die MIDIVoreinstellungen und die steuerungs-relevanten Parameter modifizieren. Unter dem
MEDIA Tab können Sie auf die Festplatte und die Compact Flash Card zugreifen. Der
SYSTEM Tab gibt den Blick frei auf alle Systeminformationen und ermöglicht die
Aktualisierung der Betriebssoftware der Fusion.
74
Page 77

Navigation: Die Bedienoberfläche der Fusion
Erkunden wir also zunächst einmal die Bedienoberfläche der Fusion. Es wird so leichter, die
gewünschte Funktion zu finden, wenn Sie sofort auf Ihrer Fusion spielen möchten oder die Integration
ins Studio sofort gelingen soll.
DIE OBERSEITE DER FUSION
Instrumentenansicht
Wenn Sie sich die Oberflächen der Fusion Modelle ansehen, erkennen Sie zwei getrennte
Bereiche:
• Der Bereich mit den Reglern, Buttons und den Handrädern auf der linken Seite des
Instruments nennen wir Performance Panel.
• Die Sektion, die das Display, das Control Rad und die zahlreichen anderen Buttons
beherbergt, wird Control Panel bezeichnet.
FUSION 6HD
75
Page 78

6
PERFORMANCE PANEL ANSICHT
3
1
2
8
7
Zum Performance Panel der Fusion werden Sie oft während des Spielens greifen. Die
Wheels, Regler und Buttons ermöglichen die Veränderung von Dingen wie Tonhöhe,
Modulation oder Filter Cutoff während Sie spielen. Hier erklären wir nur die Grundlagen –
mehr Informationen erhalten Sie in der Referenzanleitung.
Das Performance Panel besitzt die folgenden Komponenten:
1. PITCH BEND WHEEL: Das ist ein normales Pitch Bend Rad, das genau das gleiche tut, wie
andere Pitch Räder an anderen Synthesizern. Hiermit können Sie ausdrucksvolle
Tonhöhenveränderungen bei der Performance erzeugen.
2. MODULATION WHEEL: Das Modulation Rad (oder kurz „Mod Rad”) kann zur Steuerung
vieler Parameter innerhalb des Keyboards (Vibrato, Tremolo, FM Stärke, usw.) verwendet
werden. Wie auch das Pitch Rad wird es oft verwendet, wenn bei der Performance Akzente
gesetzt werden sollen. Das Mod Rad ist normalerweise dem Vibrato zugeordnet, kann aber
über die Modulations Matrix der Fusion fast alles beeinflussen. In der Referenzanleitung
erfahren Sie, wie das funktioniert.
3. PERFORMANCE GRID: Das Performance Grid teilt Ihnen mit, welche Ihrer Control Regler zu
welchem Parameter zugeordnet ist. Es gibt vier Zeilen. Die aktive Zeile ist wird heller
beleuchtet, während die anderen Zeilen dunkler bleiben. Mit den ARP, FILTER, EQ und
ASSIGN Buttons (siehe unten) können Sie eine Zeile aktivieren.
4. ARP, FILTER, EQ, ASSIGN: Diese Buttons wählen eine aktive Zeile im Performance Panel
aus. ARP, FILTER und EQ sind fest mit dem Arpeggiator, dem Filter und den EQ Funktionen
zugeordnet. Die ASSIGN Zeile enthält Zuordnungen, die Sie frei konfigurieren können.
4
5
76
Page 79

5. CONTROL REGLER: Diese Regler können verwendet werden, um zahlreiche Parameter der
Fusion (Filter Frequenzen, Resonanz, Modulation oder auch das Tempo) in Echtzeit zu
steuern. Dadurch erhalten Sie zahlreiche kreative Möglichkeiten.
TIPP: Im unteren Displaybereich der Fusion verändern sich die Anzeigen, je nachdem,
welche Reihe im PERFORMANCE GRID ausgewählt wurde. Wenn Sie beispielsweise die
ARP Zeile auswählen, heißen die virtuellen Displayregler Gate, Velocity, Step Value und
Tempo. Wenn Sie „EQ” wählen ändern sich die Bezeichnungen zu Low, Low-Mid, High-Mid
und High.
Wenn Sie einen Regler drehen, werden Sie bemerken, dass sich die virtuellen Regler
dementsprechend mitbewegen.
6. ARP On/Off, S1, S2: Der ARP On/Off (Arpeggiator) Button aktiviert und deaktiviert den
Arpeggiator der Fusion. Die S1 und S2 Buttons sind zuweisbare ON/OFF Schalter, die mit
allen Funktionsarten der Fusion, wie Filters oder Effects Sends verknüpft werden können.
Die Arpeggiator Sektion werden wir später noch genauer untersuchen. Im Referenzhandbuch
finden Sie Details zu den S1 und S2 Buttons.
7. TRIGGER 1 – 4: Diese vier zuweisbaren Buttons können LFOs, Hüllkurven und viele andere
Funktionen triggern. Anders als die oben beschriebenen S1 und S2 Schalter, sind diese
Trigger Buttons nur dann aktiv, wenn Sie diese herunterdrücken—wenn Sie die Buttons
loslassen, werden sie inaktiv. Im Referenzhandbuch finden Sie Informationen dazu, wie diese
Buttons belegt werden.
8. MASTER VOLUME: Das ist der Lautstärkeregler der Fusion.
77
Page 80

ANSICHT DES CONTROL PANELS
1. MODE SELECT BUTTONS: Diese Buttons wählen die verschiedenen Betriebsarten der
Fusion. Wenn Sie schon in einem Mode sind und diesen Button noch einmal drücken, kehren
Sie an die „Oberfläche“ dieses Modes zurück.
Mit diesen Buttons schalten Sie in den Mix, Program, Song, Sampler, Mixer oder Global Mode.
2. SOFT BUTTONS: Diese Buttons ermöglichen es Ihnen, verschiedene Menüs des
Benutzerinterfaces der Fusion anzuwählen. SOFT BUTTONS korrespondieren mit den
Parametern, die im Display links und rechts angezeigt werden.
TIPP: Wenn Sie zum Beispiel PROGRAM, dann EDIT (obere linke Seite des Control
Rades) drücken, sehen Sie auf der linken Seite des Displays die Anzeigen Program, Synth,
Mod, Arp, Effects und Utility. Die SOFT BUTTONS links neben dem Display greifen auf diese
Tabs zu. Die rechten SOFT BUTTONS aktivieren die Funktionen entlang der rechten Seite
jeder Displayseite.
3. CONTRAST: Dieser Regler ermöglicht es, den Kontrast des Displays einzustellen.
4. CATEGORY und BANK: Mit dem CATEGORY Button gelangen Sie in die „Soundbibliothek“
der Fusion. Hier können Sie sich Ihre Programs (oder Mixe, wenn Sie im MIX Mode sind)
nach Kategorien geordnet ansehen. Wenn Sie sich zum Beispiel im PROGRAM Mode
befinden, öffnet der Category Button eine Displayseite, auf der alle Programs der betreffenden
Kategorie aufgelistet werden. Auf diese Weise sollte es Ihnen leicht fallen, ein bestimmtes
Program schnell zu finden.
Die BANK Buttons ermöglichen den schnellen Wechsel zwischen den verschiedenen
Soundbänken, die in der Fusion gespeichert sind.
5. QUICK ACCESS BUTTONS: Die Fusion besitzt vierundzwanzig QUICK ACCESS Buttons (in
drei Achterreihen), damit die Soundanwahl zum Kinderspiel wird. Die oberen sechzehn
Buttons sind mit Buchstaben (A bis P) bezeichnet. Die restlichen acht Buttons (untere Reihe)
sind von 1 bis 8 durchnummeriert. Sie können so die 128 Sounds einer Bank (16 x 8 = 128)
direkt anwählen. Wenn Sie die Lieblingssounds Ihrer Fusion kennen, können Sie sie direkt im
Program Mode mit diesen Buttons auswählen. Das Grand Piano (Program A-1) wählen Sie
mit den Buttons „A” und „1” an.
78
Page 81

6. TRANSPORT CONTROLS: Diese sieben Buttons steuern den internen MIDI
Sequencer/Multitrack Recorder der Fusion. Der SET LOC Button bestimmt einen Locator
Punkt im Song, den Sie mit dem LOCATE Button anspringen können. Die anderen Buttons
steuern die verschiedenen Aufnahme- und Laufwerksfunktionen, wie sie es von anderen
Bandmaschinen oder einem Software-Sequencer her kennen.
7. CONTROL WHEEL (& umgebende Buttons): Das Control Rad der Fusion ermöglicht die
schnelle Soundauswahl und Parameterveränderung. Wenn Sie das Rad im Uhrzeigersinn
drehen, hat das denselben Effekt, als wenn Sie schnell den „Inc” Button drücken. Wenn Sie
das Rad im entgegengesetzten Uhrzeigersinn drehen, wirkt sich das so aus, als wenn Sie
schnell hintereinander den „Dec” Button drücken würden. Im Normalfall werden Sie das Rad
für große Paramerteränderungen verwenden (wie einer Veränderung von 0% auf 100%). Die
Inc/Dec Buttons dienen zur Feinabstimmung von Parameterwerten (zum Beispiel von 10%12%).
Die EDIT, UNDO, STORE, PREV, NEXT, DEC und INC Buttons, die um das Control Rad
angeordnet sind, haben die folgenden Funktionen:
a. EDIT: Dieser Button versetzt Sie in das Innere eines Modes und ermöglicht die Justierung der
zahlreichen Parameter dieses Modes.
b. UNDO: Dieser Button nimmt Aktionen zurück, falls Sie Ihre Meinung über eine
Parameterveränderung ändern. Sie haben 100 Undo-Ebenen.
c. STORE: Dieser Button ermöglicht das Speichern von Änderungen, die an Ihrem Program, Mix
oder Song vorgenommen haben.
d. PREV, NEXT: Die Previous und Next Buttons ermöglichen die Navigation durch die Seiten der
LCD-Anzeige der Fusion.
e. DEC, INC: Die Dec und Inc Buttons ermöglichen die Justierung vieler Systemparameter.
8. DISPLAY: Das große, hintergrundbeleuchtet LCD-Display der Fusion informiert über alles,
was innerhalb der Workstation passiert.
79
Page 82

DIE RÜCKSEITE DER FUSION
NETZSCHALTER UND NETZKABELANSCHLUSS
Wenn Sie sich die Rückseite der Fusion ansehen, finden Sie auf der linken Seite den
Netzschalter und den Netzkabelanschluss
1. POWER Schalter.
2. Netzkabelanschluss. Die Fusion verwendet ein normales IEC Netzkabel.
80
Page 83

MULTITRACK EINGÄNGE, EXTERNAL DRIVE PORT, COMPACT FLASH, USB
Dieser Bereich der Fusion-Rückseite enthält von der Mitte nach links betrachtet:
3. EXT DRIVE: Der Serial ATA-Type Anschluss ermöglicht die Verbindung mit einem externen
CD-R- oder Festplattenlaufwerk.
4. MULTITRACK AUDIO INPUTS: Diese acht 6,3 mm Klinkenanschlüsse sind die Verbindung
zum Multitrack Audio Recorder der Fusion. Die Fusion kann 8 Audiokanäle gleichzeitig
aufnehmen.
5. COMPACT FLASH: Dieser Slot nimmt CF Cards zum Speichern und Laden von Programs,
Mixen, Samples und andere Dateitypen auf.
6. USB: Dieser Anschluss wird verwendet, um die Fusion mit einem Computer zu verbinden. Die
Fusion unterstützt USB 2.0 und ist mit USB 1.1/1.0 abwärtskompatibel.
81
Page 84

MIDI, DIGITALAUSGÄNGE, MAIN / AUX / HEADPHONE AUSGÄNGE,
SAMPLING UND PEDAL-ANSCHLÜSSE
Wenn Sie vor der Rückseite der Fusion stehen, erkennen Sie auf der rechten Seite der
Workstation die folgenden Anschlüsse:
7. FOOT PEDALS: Diese drei Eingänge ermöglichen eine Vielzahl von Funktionen.
EXPRESSION ist der Anschluss für ein Continuous Controller Expression Pedal. Dieses kann
Parameter, wie Volume oder Expression steuern.
Der FOOTSWITCH Eingang kann frei zugewiesen werden und ermöglicht das Triggern von
Hüllkurven, LFOs und anderen Elementen mit Ihrem Fuß. Der Fußschalter funktioniert wie die
Trigger Buttons im Performance Panel. Im Gegensatz zum EXPRESSION Eingang, ist der
FOOTSWITCH „binär“ ausgelegt und kann deshalb nur die Schaltzuständen „an“ und „aus“
ohne weiterem Wertebereich dazwischen, generieren.
Der SUSTAIN Eingang wird zum Anschluss eines Sustain Pedal verwendet. Wie auch der
FOOTSWITCH ist der Schaltzustand SUSTAIN Eingang entweder „an“ oder „aus.“
8. MIDI: Diese 5-Pin MIDI Anschlüsse (In / Out / Thru) stellen das Interface zur MIDI-Verbindung
mit Computern, Sound-Modulen und anderen MIDI-Geräten bereit.
9. DIGITAL OUT: Die Fusion besitzt einen koaxialen S/PDIF- und einen optischen
Digitalausgang. Der optische Ausgang unterstützt entweder das 2-Kanal S/PDIF- oder das 8Kanal ADAT-Format (Sie können die Funktion im Global Menü der Fusion bestimmen). In der
Bedienungsanleitung finden Sie weitere Einzelheiten.
10. AUX OUTPUT: Die AUX OUTPUTS ermöglichen es, neben den MAIN OUTPUTS (siehe
unten) ein zusätzliches analoges Stereosignal der Fusion an einen Mixer weiter zugeben. So
können Sie zum Beispiel verschiedene Programs zu zwei verschiedenen Ausgängen führen.
Nehmen wir an, Sie spielen einen Piano/Bass Split. Jedes Program soll aber unterschiedlich
mit EQ und Compressor nachbearbeitet werden. Routen Sie einfach einen der beiden
Sounds zum Main- und den anderen Sound zum Aux-Ausgang, um beide Klänge getrennt
bearbeiten zu können.
82
Page 85

11. MAIN OUTPUT: Diese zwei Ausgänge sind die Summenausgänge Ihrer Fusion. Ab Werk
sind alle Sounds auf diese Ausgänge gelegt. Im Normalfall verwenden Sie die Ausgänge, um
ihre Fusion mit einem Verstärker oder einem Mixer zu verbinden.
TIPP: Durch die Kombination der Aux- und Main-Ausgänge der Fusion können Sie zwei
Stereoausgangspaare verwenden. Sie haben zum Beispiel ein Stück für ein Streichquartett
geschrieben und möchten einen Mixer und einige externe Geräte (EQ und Compressor) zur
Nachbearbeitung der Klänge verwenden. Sie können nun die Violine, die Viola, das Cello und
den Kontrabass zu einzelnen Ausgängen routen und jedes Instrument getrennt mit den
externen Signalprozessoren behandeln.
12. HEADPHONE: Schließen Sie an diesen Ausgang Ihren Stereokopfhörer an.
13. INPUT: Diese Eingänge—Left/Mono und Right—führen direkt in den integrierten Sampler der
Fusion. Sie können Samples in Mono oder Stereo aufnehmen. Der Gain Regler ermöglicht
das Einpegeln der Eingangssignale.
Beachten Sie, dass Sie über diese Eingänge auch Signale in die Klangerzeugung oder den
Effektprozessor einspeisen können. So wird die Fusion ein extrem leistungsstarker
Soundprozessor.
83
Page 86

Sounds spielen
Ihre Fusion Workstation wird mit einer unglaublichen Auswahl an Programs ausgeliefert (in der
Fusion nennen wir einzelne Klänge „Programs”). So finden und spielen Sie diese Programs.
Die Auswahl eines Sounds ist einfach. Folgen Sie einfach den Anweisungen…
1. Drücken Sie den PROGRAM Button
Dadurch gelangen Sie in den Program Mode der Fusion. Wenn Sie schon im Program Mode
sind, drücken Sie den Button noch einmal, damit sichergestellt wird, dass Sie sich auf der
obersten Ebene des Modes befinden.
2. Drücken Sie den Category Button
Der „Category” Button öffnet den Fusion-„Explorer” im Display. Der Explorer führt jede
Instrumentenkategorie der Fusion auf und listet auch die darin enthaltenen Programs. Die
Kategorienamen finden sie links, die Programs jeder Kategorie finden Sie rechts.
3. Drücken Sie den „A” Button
So schalten Sie in die Kategorie „Piano.” Sie sehen, dass jeder der Buttons „A” bis „P” des
Control Panels mit einem Kategorienamen versehen ist. Wenn Sie diese Buttons im Category
Mode drücken, springen Sie direkt zu der dazu gehörenden Kategorie im Explorer.
4. Verwenden Sie das Control Wheel (oder die Inc/Dec Buttons), um einen Sound zu wählen
Wenn Sie einen Namen eines Programs angewählt haben (der Name wird im Display
hervorgehoben), können Sie mit dem Control Wheel (oder den Inc/Dec Buttons) durch alle
verschiedenen Programs einer Klangkategorie fahren. Wenn das Program geladen ist,
können Sie es innerhalb des Explorers spielen. So finden Sie sehr leicht Soundprogramme.
5. Drücken Sie PROGRAM.
Sehen Sie im Display nach, ob das richtige Program geladen ist. Wenn Sie in den regulären
Program Mode wechseln wollen, drücken Sie Program noch einmal. Dadurch gelangen Sie
zurück auf die oberste Ebene der Program Sektion.
84
Page 87

Wenn Sie wissen wollen, was alles dahinter steckt, lesen Si e hier weiter…
Drücken Sie im Program Mode den Category Button und danach auf A (Piano), um die unten
angezeigte Displayseite aufzurufen. Stellen Sie sich die Ansicht als Bibliothek vor. Sie sehen
links im Display die Kategorien und rechts im Display die verschiedenen Programs innerhalb
der ausgewählen Kategorie. Sie sind also im „Sound Explorer der Fusion.” Er zeigt an, welche
Programs gegenwärtig im Keyboard vorhanden sind. Drücken Sie die NEXT und PREV
Buttons, um sich zwischen Kategorie und den Sounds hin- und her zu bewegen.
Wenn Sie den Program Mode Button (links neben dem Display) drücken, ändert sich das
Display zu unten abgebildeter Anzeige. Sie sehen das gegenwärtig ausgewählte Program in
der Mitte des Bildschirms. Nun sind Sie in der obersten Ebene des Program Modes.
In der Anzeige sehen Sie, dass Sie einen Sound der ROM Bank „Preset 1” ausgewählt haben.
Sie sind in der Piano Kategorie, und haben den Sound A-1 „Holy Grail Grand Piano” vor sich.
Schalten Sie mal auf A-4. Dieses Program heißt „Fusion Suitcase” (siehe Abbildung unten).
85
Page 88

TIPP: Die Fusion enthält mehrere Soundbänke, um Sounds zu verwalten. Wenn Sie
einen bestimmten Sound aufrufen, jedoch ein unerwartetes Program geladen wird, überprüfen
Sie, die Bank, in der Sie sich befinden. Möglicherweise müssen Sie die Bank wechseln. Jedes
Mal, wenn Sie im Program Mode die Buttons ◄ Bank oder Bank ► drücken, zeigt das Display
die jeweils ausgewählte Bank an. Die obere Abbildung zeigt einen Sound der Bank „Preset 1”
an. Drücken Sie einmal den Bank ► Button. Nun sollte die Anzeige der nächsten Abbildung
gleichen. Wie Sie sehen, heißt die ROM Bank nun „Preset 2” und ein anderes Program mit
dem Namen „Fusion Dyno Tines“ wurde geladen.
Durch die Organisation von Programs innerhalb derselben Kategorie einer Bank können Sie
schnell auf Ihre Lieblingssounds zugreifen.
Wenn Sie dann einmal wissen, wo Ihre Lieblingssounds g espeichert sind….
Über die Zeit werden sich bestimmte Sounds als Ihre Lieblingssounds herauskristallisieren.
Wenn Sie einmal wissen, an welchen Plätzen diese gespeichert sind, können Sie diese
Programs einfach in die Bank des Program wechseln. Dann genügen zwei Buttons—wie zum
Beispiel A-1 und A-4 für die oberen Beispiele, um den gewünschten Sound aufzurufen.
Program Mode: Kategorie und Bank
Die Programs der Fusion sind nach Kategorie und Bank organisiert. Die Kategorien sind (über
den A bis P Buttons) mit Piano, Chromatic, Organ, Guitar, und so weiter, benannt.
86
Page 89

Sounds editieren
Die Control Regler der Fusion erleichtern die Anpassung der Sounds an Ihren persönlichen
Geschmack.
Wählen Sie zuerst einen Sound aus:
1. Drücken Sie PROGRAM.
So gelangen Sie in den Program Mode der Fusion. Wenn Sie sich schon im Program Mode
befinden, drücken Sie diesen Button noch einmal, um auf die oberste Ebene dieses Modes zu
gelangen.
2. Drücken Sie „◄ Bank” oder „Bank ►” bis Sie „[ROM: Preset 3]” in der oberen linken Ecke des
Displays sehen.
Die Fusion ist nicht limitiert auf eine bestimmte Anzahl von Bänken. Sie sollten sicher sein,
dass Sie sich in der richtigen Bank aufhalten, da ansonsten ein Program geladen wird, mit
dem Sie gar nicht arbeiten wollen.
Drücken Sie im Control Panel die Buttons „E” und „5,” um das Program E-5, oder “Taurus The
Bull” zu laden.
Ihr Display sollte nun wie die folgende Abbildung aussehen
Drücken Sie nun den EQ Button im Performance Grid. Der untere Bereich mit den virtuellen
Reglern sollte nun so aussehen:
Ihre vier Control Regler sind nun den Low, Low Mid, High Mid und High EQ Bändern
zugewiesen. Wenn Sie den Basssound spielen und den Low EQ Regler nach rechts drehen,
hören Sie, wie der Sound bassiger wird.
87
Page 90

Wenn Sie den Filter Button auf der rechten Seite Grids im Performance Panel der Fusion
drücken, sollte der Bildschirm wie in der unteren Abbildung aussehen. Nun sind die Control
Regler verschiedenen Parametergruppen—in diesem Falle dem Filter—zugewiesen.
Die vier Control Regler steuern nun die Frequency (Frequenz), Resonance (Resonanz),
Envelope Amount (Hüllkurvenmodulation) und Key Track (Filtermodulation des Keyboards).
Spielen Sie ein paar Noten und drehen Sie den Regler Envelope Amount. Sie hören, wie sich
der Klang ändert (sehen Sie auch im Display, wie sich die virtuellen Regler ändern, um die
Position der Einstellung wiederzugeben).
Speichern eines editierten Programs….
Sie haben bestimmt schon das kleine „e” im oberen Bereich mancher Displayseiten bemerkt
(wenn nicht, sehen Sie es in vielen der unteren Abbildungen). So weist Sie die Fusion darauf
hin, dass Ihr Sound verändert wurde.
Wenn Sie Ihr Program angepasst haben, wollen Sie es möglicherweise behalten. Also sollten
Sie es speichern.
1. Drücken Sie STORE (unter dem Control Wheel). Die Anzeige Ihrer Fusion sollte jetzt der
unteren Abbildung gleichen.
2. Da dieser Sound ein Preset Sound ist, kann er nicht überschrieben werden. Sie müssen ihn
an einem anderen Ort ablegen.
88
Nun sind Sie soweit, den Speichervorgang zu vollenden. Folgen Sie den weiteren Schritten:
3. Verwenden Sie die NEXT und PREV Buttons, um den Cursor im Feld ROM Bank
(gegenwärtig wird „ROM: Preset 2“ angezeigt) zu positionieren und wählen Sie mit dem
Control Wheel eine Bank (allerdings keine ROM Bank) aus. Sie können Programs auf einer
Compact Flash Card (wenn eine im Gerät steckt) oder auf die interne Festplatte der Fusion
speichern. Diese erscheinen im Display als CF oder HD (zum Beispiel CF:My Bank).
4. Bewegen Sie jetzt mit den Buttons NEXT und PREV den Cursor auf das Feld unter der Bank
(gegenwärtig E-5) und wählen Sie mit dem Control Wheel eine Speicherposition aus.
5. Drücken Sie STORE (entweder den Soft Tab Button in der oberen rechten Displayecke oder
den STORE Button rechts oberhalb des Control Wheels).
Page 91

Den Arpeggiator verwenden
Der Arpeggiator der Fusion ist, dank der Echtzeit-Controller des Instruments, sehr einfach zu
verwenden. Wenn Sie noch nie einen Arpeggiator verwendet haben, möchten Sie sicherlich
wissen, was ein Arpeggiator überhaupt ist…
Ein Arpeggiator ist ein musikalisches Tool, das vorprogrammierte Notenfolgen abspielt. So
können Sie beispielsweise mit beiden Händen einen Akkord auf dem Keyboard gedrückt
halten, während der Arpeggiator einzelne Noten in Sechzehnteln oder in Triolen im tempo
Ihrer Wahl dazu abspielt.
Ein Arpeggiator-Pattern spielen…
Wählen Sie zunächst erst einmal einen Synthsound aus. Für dieses Beispiel drücken Sie
PROGRAM, schalten sie zur „Preset 2”-Bank und nehmen das Program K-3. Ihr Bildschirm
sollte nun wie folgt aussehen:
Verwenden Sie die folgenden Schritte, um den Arpeggiator einzuschalten und Ihren
Wünschen anzupassen …
1. Drücken Sie den ARP Button auf der rechten Seite des Grids im Performance Panel der
Fusion. Sie sollten nun sehen, wie die Arpeggiator Parameter im unteren Displaybereich den
Control Reglern zugeordnet wurden.
2. Drücken Sie den ARP On/Off Button, der sich im rechten unteren Bereich des Grids befindet.
So schalten Sie den Arpeggiator ein.
3. Während Sie mit eine Hand einen Akkord halten, können Sie die GATE, VELOCITY, STEP
VALUE und TEMPO Parameter nach Ihrem Geschmack anpassen.
Was bedeuten diese Parameter?
Hier finden Sie eine kurze Erklärung der Parameter des Fusion-Arpeggiators:
• Gate: Dieser Parameter passt die Notendauer an. Wenn Sie den Regler nach links drehen,
wird die Note kürzer, drehen Sie den Regler nach rechts, um längere Noten zu erhalten.
• Velocity: Dieser Parameter definiert die Stärke der „gedrückten“ Noten.
• Step Value: Mit diesem Parameter können Sie zwischen Notenwerten (Triolen, Sechzehntel
usw.) und anderen musikalischen Werten wählen.
• Tempo: Dieser Parameter bestimmt die Geschwindigkeit des Arpeggiators.
89
Page 92
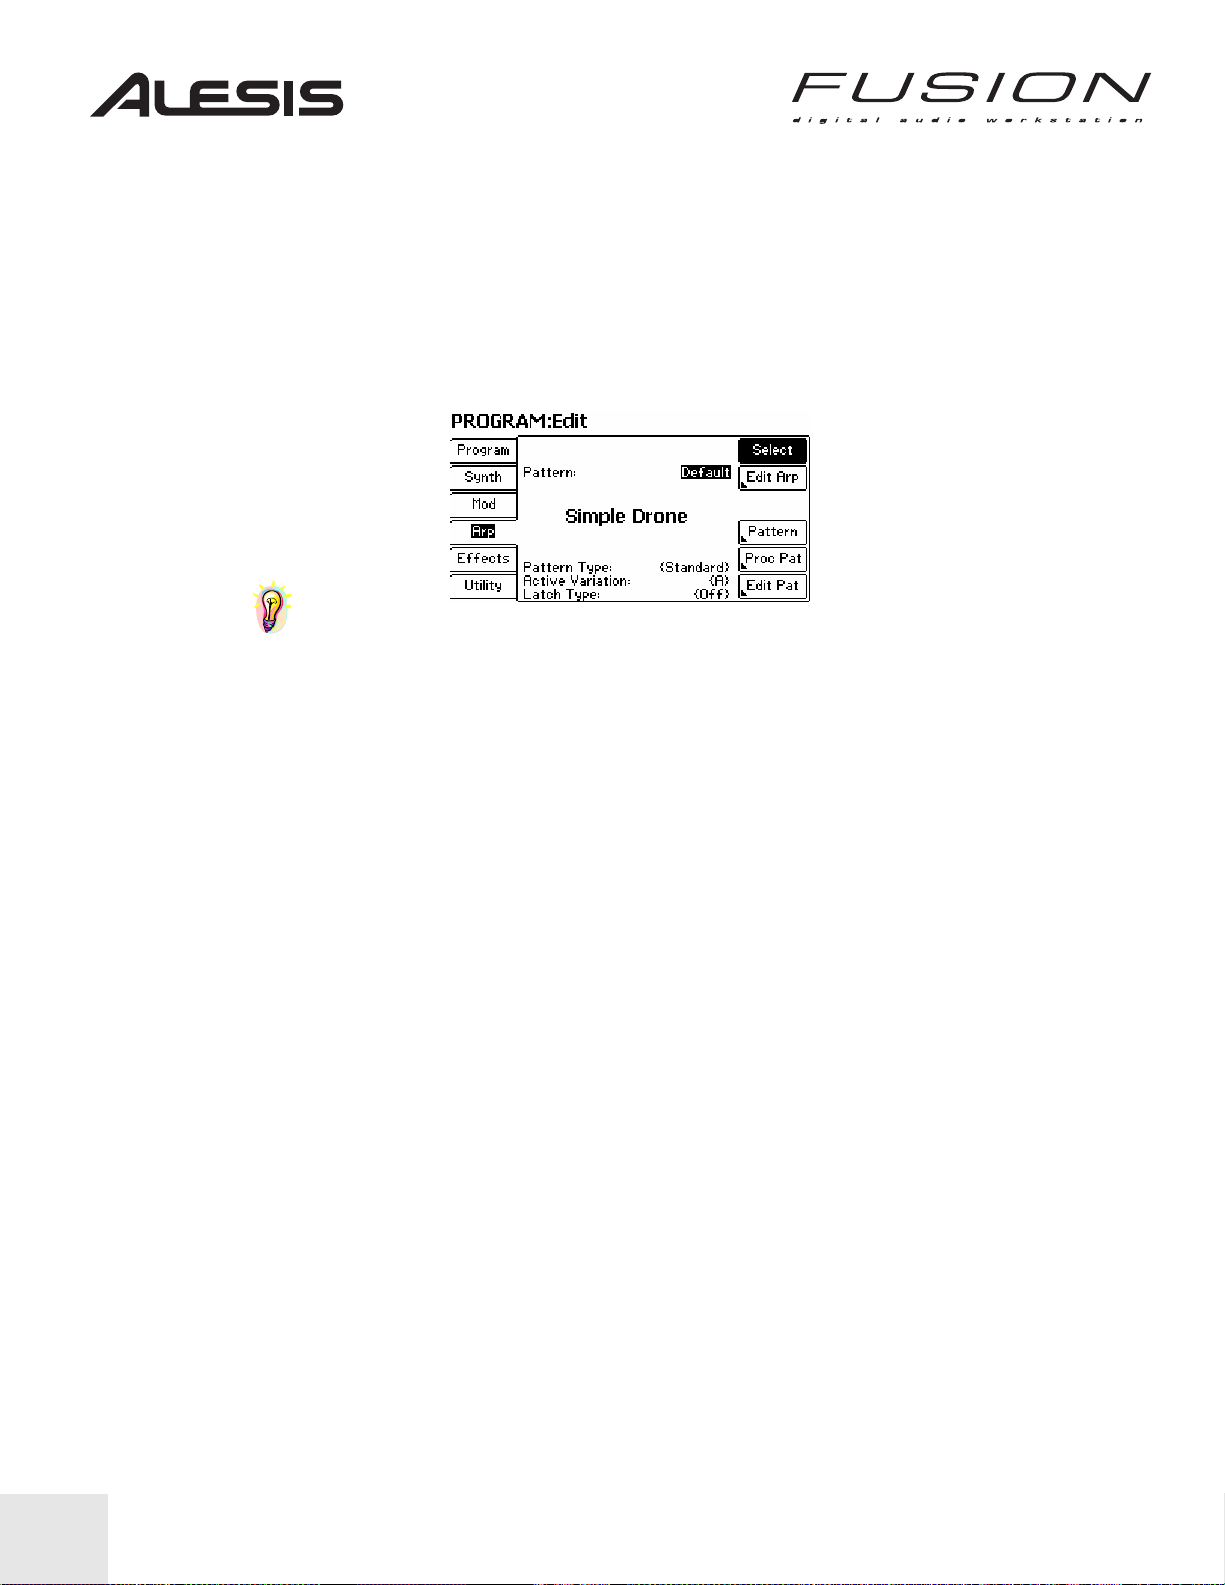
Ein Pattern wechseln
1. Drücken Sie den Edit Button.
2. Wählen Sie den Arp Tab (mit dem dazugehörigen Soft Button links vom LCD).
3. Platzieren Sie mit den Buttons NEXT und PREV den Cursor auf die Pattern Bank, wie in der
Abbildung unten gezeigt.
4. Bewegen Sie den Cursor auf die Arpeggiator Program-Nummer und verwenden Sie das
Control Wheel oder die INC/DEC Buttons, um das Arpeggiator-Program innerhalb der Bank
zuwechseln.
TIPP: Die Clock des Arpeggiators kann zur internen oder zur externen Clock
synchronisiert werden. Dadurch können Sie die Geschwindigkeit des Arpeggiators zum
Tempo eines Songs der Fusion oder zu einem externen Tempo anpassen. Dazu finden Sie in
der Bedienungsanleitung weitere Informationen.
90
Page 93

Den Mix Mode verwenden
Der Mix Mode der Fusion dient dazu, eine „Band“ für einen Song zu bilden oder einen
Keyboard-Split zu erzeugen. Wenn Sie die Instrumente, die Sie verwenden wollen, gefunden
haben, ist es ganz einfach, Sie einem Mix hinzuzufügen.
Ihre „Band“ zusammenstellen…
Eine Möglichkeit,, einen Mix zu erzeugen ist, sich verschiedene Programs im Program Mode
zusammenzusuchen. Wir verwenden für dieses Beispiel Piano, Gitarre und Bass und „bauen“
uns einen multitimbralen Mix.
Drücken Sie also den Category Button im Program Mode, gefolgt vom Guitar Button.
Drücken Sie noch einmal den Program Mode Button. Ihr Display sollte nun wie folgt aussehen:
1. Mit dem EDIT Button und dem Utility Soft Tab wechseln Sie zu folgender Ansicht:
2. Drücken Sie „To Mix.” Dadurch wird Ihre Gitarre das nächste „Bandmitglied.“ Zu diesem
Zeitpunkt besteht Ihre Band aus der gerade hinzugefügten Gitarre und einem Piano, welches
als Grundeinstellung geladen wird. Beachten Sie, dass ein Piano zum ersten Part des Mixes
als Grundeinstellung verwendet wird, so dass Sie kein weiteres Piano hinzufügen müssen.
Wenn Sie keinen Pianoklang gebrauchen können, ändern Sie den Klang zu einem anderen.
Jetzt brauchen wir nur noch den Bass.
3. Drücken Sie im Program Mode auf Bass.
4. Drücken Sie die 1. Ihr Display sieht nun so aus:
\
91
Page 94

5. Drücken Sie EDIT und gehen Sie auf die Utility Seite.
6. Verwenden Sie die INC/DEC Buttons zur Auswahl der „To Mix” Optionen und nehmen Sie
„Add to Current Mix.” Drücken Sie den „To Mix” Soft Button. Dadurch wird Ihr Bass in die
„Band“ aufgenommen. Ihre Band besteht jetzt aus Piano, Bass und Gitarre.
7. Um weitere Instrumente zu integrieren, wiederholen Sie die Vorgänge.
Festlegen von MIDI Kanälen für jedes Instrument…
Damit Sie verschiedene musikalische Teile spielen, können Sie jedem Instrument einen
eigenen MIDI Kanal zuweisen. Folgen Sie den folgenden Schritten, um diese Zuweisungen
vorzunehmen:
Drücken Sie im Mix Mode erst auf EDIT und dann auf PART. Das Display sollte folgendes
Aussehen annehmen.
Gehen Sie mit den PREV und INC Buttons auf den Parameter „MIDI Channel“ am Ende des
Menüs. Nun können Sie, unter der Verwendung des Control Wheels, für den ausgewählten
Part einen MIDI Kanal zuweisen.
92
Page 95

Lieblingssounds…
Wenn Sie die Sounds der Fusion kennen, möchten Sie möglicherweise verschiedene
Kategorien Ihrer Lieblingssounds erstellen. So können Sie zum Beispiel die Sounds für eine
Rock-Performance „Fav 1” speichern, während Sie alle Hip Hop Sounds in „Fav 2” und Ihre
Jazz Programs in „Fav 3” haben. Auf diese Art und Weise haben Sie ihre Lieblingssounds
immer beieinander und müssen sich nicht merken, wo sie alle in der Fusion gespeichert sind.
Wir wollen nun ein Piano zu einer Favoriten-Kategorie hinzufügen.
1. Drücken Sie im Program Mode den Category-Button und dann auf Piano.
2. Drücken Sie nun den Program Mode Button, und danach auf die 1. Ihre Bildschirmanzeige
sollte so aussehen:
3. Drücken Sie EDIT und wählen Sie den Utility Tab. Hier ist das Display, wie es auch bei Ihnen
aussehen müsste:
4. Verwenden Sie die PREV und NEXT Buttons und platzieren Sie den Cursor auf dem
Parameter „Add to Favorites.”
5. Drehen Sie das Control Wheel um die Favoriten-Kategorie (1 bis 8), in der das Program
enthalten sein soll, zu wählen. Wir entscheiden uns in diesem Beispiel für die Kategorie 1.
6. Drücken Sie Favorite.
Sie haben gerade das Piano zur Kategorie Fav 1 hinzugefügt. Sie rufen es auf, indem Sie
Category drücken und auf der linken Seite des Displays zu den „Fav 1” bis „Fav 8” Kategorien
scrollen. Das sind Ihre Lieblingsprograms. Jedes Program, welches Sie unter der
Verwendung der oben beschriebenen Vorgehensweise hinzugefügt haben, erscheint hier.
Unser Piano liegt in der Fav 1 Kategorie.
Beachten Sie bitte, dass durch das Hinzufügen zu einer Fav-Kategorie das Program nicht
verschoben wird. Es liegt immer noch auf dem originalen Speicherplatz. Das Program
erscheint nur in verschiedenen Speicherplätzen.
93
Page 96

Einen Keyboard Split erzeugen…
Der Mix Mode eignet sich auch für Keyboard-Splits. Mit dieser Funktion können Sie zum
Beispiel einen Sound im oberen Bereich des Keyboards und einen anderen im unteren
Bereich des Keyboards spielen (zum Beispiel ein Piano/Bass-Split). So erstellen Sie einen
Split:
1. Drücken Sie den Program Mode Button und in unserem Fall den Category – Bass Button.
2. Wählen Sie ein Bass Program und drücken Sie Program.
3. Drücken Sie EDIT und dann den Utility Tab in der unteren linken Ecke des Displays. Gehen
Sie nun mit dem Cursor (unter Verwendung der PREV und NEXT Buttons) auf den dritten
Parameter von oben und drehen Sie das Control Wheel von „Add to Current Mix” oder
„Generate Layer Mix” auf „Generate Split Mix.”
94
TIPP: Sie können den Splitpunkt der Tastatur modifizieren, indem Sie entweder den
Cursor auf C3 platzieren und das Control Wheel drehen oder indem Sie den Cursor auf C3
platzieren, den LOCATE Button halten und eine Note, die den Splitpunkt definieren soll, auf
dem Keyboard anschlagen.
4. Drücken Sie den Button „To Mix.“ Ein neuer Mix mit Ihrem Bass unterhalb des Splitpunktes
und einem Piano darüber wird erzeugt.
Page 97

Songs spielen und editieren
Sie haben nun Ihre Fusion näher kennen gelernt und haben bestimmt auch einmal die
vorhandenen Demosongs abgespielt. In diesem Abschnitt erklären wir die Grundlagen des
Sequencings mit der Fusion.
Den Hip Hop Demosong abspielen…
1. Drücken Sie den SONG Mode Button.
2. Drücken Sie INC oder DEC, bis Sie den „Hip Hop Demo” Song finden. Der Name des Songs
sollte in großen, dicken Buchstaben in der Mitte des LCDs stehen, nachdem der Song
vollständig geladen wurde.
Drücken Sie den PLAY Button der Laufwerkssteuerungen rechts neben dem Control Wheel.
Die Wiedergabe des Songs beginnt. Es lässt sich leicht herausfinden, welche Tracks gerade
spielen, wenn Sie die Active Tracks Anzeige betrachten. Jedes Mal, wenn ein MIDI Event
getriggert wird, wird der Active Track, der dieses Event abspielt, hervorgehoben.
TIPP: mit den FFWD und REW Tasten des Transportfeldes können Sie sich in
Taktschritten durch den Song bewegen. Halten Sie LOCATE und drücken Sie REW, um zum
Anfang des Songs zu gelangen.
Locate Punkte setzen…
Die SET LOC und Quick Access Buttons (unter den Category und Bank Buttons) ermöglichen
es, eine bestimmte Position innerhalb eines Songs zu markieren. Diese Funktion erleichtert
es, gezielt zu dieser Position mit nur einem Tastendruck zurückzuspringen.
1. Wenn der Song spielt, drücken Sie den SET LOC Button und einen der Quick Access Buttons
(A-P.) dadurch setzen Sie eine Markierung im Song.
2. Drücken Sie während der Wiedergabe oder während der Pause den LOCATE Button und
den zugehörigen Quick Access Button, um zu einer früher markierten Songposition zu
springen. Diese Position erkennen Sie im oberen Displaybereich und ist im Format Takt, Beat
und Clock Pulse gehalten.
TIPP: Sie können auch mit den FFWD und REW Tasten zu einer bestimmten Position
springen und dann den SET LOC Button drücken, um diese Position zu markieren.
95
Page 98

Tracks stumm schalten und Solo abhören…
Bei der Arbeit mit einem Song kommen Sie oft in die Situation, dass Sie einen oder mehrere
Tracks stumm schalten möchten, um andere Tracks genauer hören zu können. Genauso
kann es passieren, dass Sie nur einen oder mehrere bestimmte Tracks hören möchten. Das
funktioniert so:
1. Drücken Sie aus dem SONG Mode den MIXER Button links neben dem Display der Fusion.
Ihre Displayanzeige sieht dann so aus:
Im oberen Displaybereich sehen Sie den Parameter „Control Knobs/Triggers:” der Ihnen
mitteilt, welche Tracks gegenwärtig mit den Control Reglern und den T1 – T4 Buttons
kontrolliert werden. Wenn Sie das Control Wheel drehen, können Sie die Zuweisung dieser
Echtzeit-Controller von den Tracks 1-4 auf die Tracks 2-5, 3-6, usw. verschieben, um auch auf
die anderen Tracks des Mixers zugreifen zu können.
An der rechten Displayseite sehen Sie vier Buttons für Send 1, Send 2, Pan und Volume.
Damit stellen Sie ein, was die vier Control Regler der Fusion steuern sollen. Darunter finden
Sie zwei Buttons zur Auswahl der Funktionen für die T1 – T4 Trigger Buttons.
Einen Track stumm schalten…
1. Drücken Sie den Enable Button in der rechten unteren Ecke des Displays. Die T1 – T4 Trigger
Buttons sind nun dem Enable-Parameter zugewiesen.
2. Starten Sie mit der Play-Taste im Transportfeld die Wiedergabe.
3. Drücken Sie gleichzeitig die Buttons T-1 und T-2. Die Drums werden stumm geschaltet und
die T1 und T2 Buttons leuchten schwach (während die beiden T3 und T4 Buttons hell
leuchten).
Einen Track solo abhören…
1. Drücken Sie den Solo Button in der rechten unteren Ecke des Displays. Die T1 – T4 Trigger
Buttons sind nun der Solo-Funktion der Fusion zugewiesen.
2. Starten Sie mit der Play-Taste im Transportfeld die Wiedergabe.
3. Drücken Sie die Buttons T-1 und T-2. Die Drums spielen jetzt alleine. Die T1 und T2 Buttons
leuchten im Vergleich zu den anderen beiden Buttons heller.
Pan und Volume Einstellungen
Sie können die Pan und Volume Einstellungen fast genauso wie die Mute und Solo
Funktionen ändern. Gehen Sie dabei so vor:
Veränderung der Pan Position für einen Track…
1. Drücken Sie im MIXER Mode den Pan Button rechts neben dem Display. Die vier Control
Regler sind dem Pan-Parameter zugeordnet.
2. Drücken Sie Play. Sie sollten nur eine einzelne Spur solo abhören (zum Beispiel Track 4).
3. Der rechte Control Regler ist gegenwärtig dem Track 4, dem Bass, zugeordnet. Drehen Sie
den Regler und bewegen Sie so den Bass im Stereofeld von links nach rechts.
96
Page 99

Die Lautstärke eines Tracks einstellen…
Gehen Sie wieder zum Ausgangspunkt, dem Hip Hop Demo Song zurück und stellen Sie alle
Tracks so ein, dass sie zu hören sind.
1. Im MIXER Mode drücken Sie nun den Volume Tab auf der rechten Displayseite. Die vier
Control Regler sind nun dem Volume-Parameter zugeordnet.
2. Starten Sie die Wiedergabe des Songs.
3. Drehen Sie den ersten und den zweiten Regler, damit Sie hören, wie sich die Lautstärke für
die beiden Drum Tracks ändert. Wenn Sie den am weitesten rechts stehenden Control Regler
drehen, ändert sich die Lautstärke des Bass-Sounds.
Tracks aufnehmen…einen vorhandene n Track übersch reiben
Wenn Sie mit der Aufnahme eines Tracks nicht zufrieden sind und die Aufnahme wiederholen
möchten, folgen Sie diesen Schritten.
1. Wenn Sie noch im Mixer Mode sind, drücken Sie den EDIT Button, um zu der Seite des Song
Modes zu gelangen, von der Sie ursprünglich kamen.
2. Gehen Sie auf die Song/Song/Record Seite und stellen Sie den „Record Method” Parameter
auf „Replace.” Dadurch wird bei der Aufnahme das bereits vorhandene Material des Tracks
überschrieben.
3. Drücken Sie im SONG Mode den Edit Button und danach den Track Tab links des Displays.
Ihr Display sollte nun wie folgt aussehen:
Definieren Sie den aufzunehmenden Track mit dem Control Wheel oder den INC/DEC
Buttons.
4. In unserem Beispiel wollen wir Track 9, „Fusion Suitcase” neu aufnehmen.
5. Drücken Sie die PLAY und RECORD Buttons gleichzeitig. Der RECORD Button leuchtet rot
und der Demo Song wird abgespielt. Zusätzlich hören Sie das interne Metronom.
6. Wenn Sie das Program spielen, nehmen Sie Ihre Performance auf und überschreiben
existierende Daten auf diesem Track.
97
Page 100

Aufnahme Ihres ersten Songs
Wenn Sie Ihren ersten Fusion-Song aufnehmen möchten, folgen Sie diesen Schritten:
1. Drücken Sie den SONG Mode Button.
2. Drücken Sie INC oder DEC, bis Sie den „Tutorial Song” finden. Dieser Song ist leer, besitzt
jedoch schon einige Tracks, die mit oft benötigten Programs belegt sind.
3. Drücken Sie EDIT und dann den Song Tab in der obersten linken Ecke des Displays. Im
Display sollten Sie folgende Informationen finden:
4. Drücken Sie den Add Track Button in der rechten unteren Displayecke. Ihr Anzeige ändert
sich, wie folgt:
Auch wenn Ihr Cursor, wie in der Abbildung, auf „Synth” steht, können Sie den Track-Typ mit
dem Control Wheel auf „Audio“ ändern. In diesem Menü definieren Sie also, ob Sie einen
Audio- oder einen Synth-Track hinzufügen möchten.
Wir belassen die Einstellung auf „Synth” und drücken Sie den OK Button in der oberen rechten
Displayecke. Dadurch erstellen Sie einen neuen Track—in diesem Fall Track 10.
5. Mit den PREV und NEXT Buttons bewegen Sie den Cursor auf „[Grand Piano]” oder „A-1
(000).” „Preset 1:” wählen Sie die Bank, in der Sie nach Sounds suchen. Der “A-1 (000)”
Parameter ermöglicht die gezielte Anwahl eines Sounds innerhalb einer ausgewählten Bank.
6. Mit dem Control Wheel (oder den INC/DEC Buttons) wählen Sie das Instrument, welches Sie
spielen wollen, aus.
7. Drücken Sie den SONG Mode Button noch einmal und gehen Sie so auf die oberste Ebene
des Song Modes.
8. Drücken Sie gleichzeitig PLAY und RECORD, um die Aufnahme zu beginnen. Danach
leuchtet der RECORD Button rot. Der Song wird zusammen mit einem Metronom abgespielt.
Spielen sie etwas auf dem Keyboard und drücken Sie den STOP Button, wenn Sie fertig sind.
98
 Loading...