

Page 1
USERS MANUAL
DBX-82
Page 2
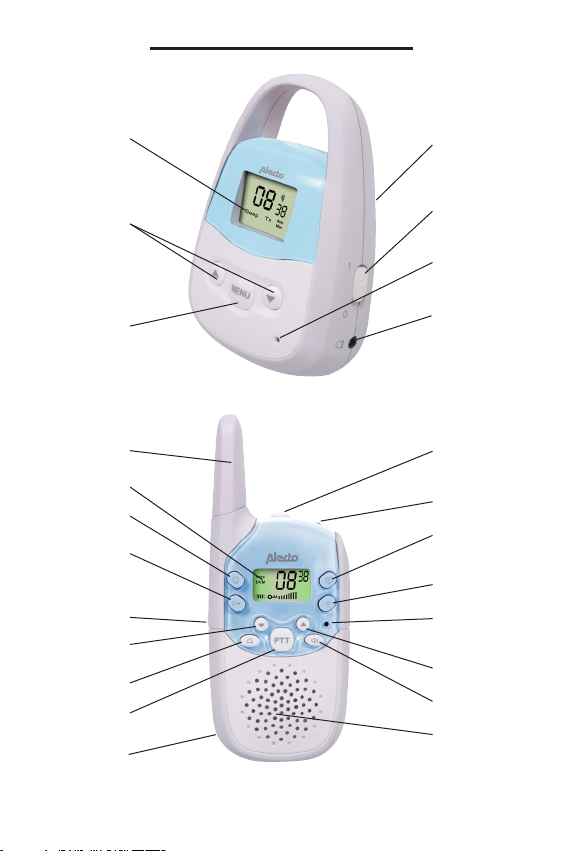
BABY-UNIT:
GENERAL FUNCTIONS
display
adjustment
buttons
menu button
PARENT UNIT:
antenna
display
light button
key pad lock
power adapter
input
settings key
talk button (*)
send button (*)
battery
compartment
(back)
Sensitivity
control (back)
on/off switch
built-in
microphone
external
microphone
jack
earphone input
ashlight
on / off push
button
functions key
built-in microphone (*)
setting key
monitor key
loudspeaker
*: More information on these functions
2
2
can be found in the chapter entitled
RADIO FUNCTIONS on page 11.
Page 3
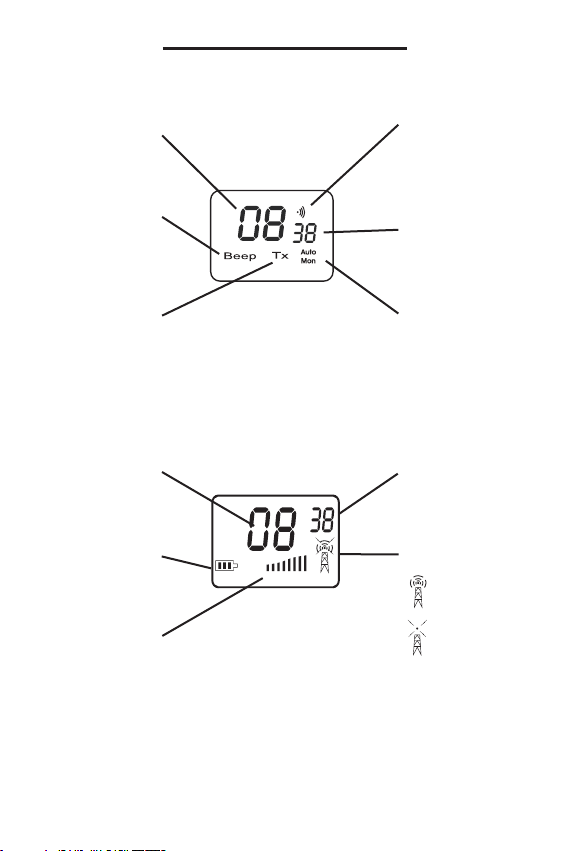
BABY-UNIT:
DISPLAY OVERVIEW
channel
number
lights up when
the connec-
tion control is
switched on
lights up when
transmitting
PARENT UNIT:
channel
number
battery charge
indicator
volume-level
indicator
lights up when
the ‘alert tone’ is
enabled
sub-channel
lights up when the
monitor function is
switched on.
sub-channel
number
transmit /receive
indicator:
send
receive
3
3
Page 4

INSTALLATION
BABY UNIT:
The baby unit is powered from the supplied xed power adapter. The power
adapter can be connected to a 230V electrical outlet.
Place the baby unit in the nursery. It is recommended to keep the baby and the
baby monitor at a minimum distance of 2 meters. Ensure that the baby cannot
touch the baby monitor or the power adapter cord.
The baby unit can also be mounted on the wall. There is an opening for mounting
located at the back of the baby unit.
PARENT UNIT:
The parent unit is powered by an included NiMH battery pack (4.8V). The parent
unit is not xed to a power adaptor so it can be used cordless.
1
1. Take off the belt clip 2. Open the battery
compartment located
on the bottom of the
unit by clicking open
the cover
Connect the power adapter to the parent unit, and then plug the power adapter
into a 230V 50Hz electrical outlet.
Please note that the battery pack needs about 14 hours in order to fully charge.
2
4
4
3
3. Place the battery pack
into the battery com partment as indicated
and close the cover.
Page 5

HOW TO USE
ON / OFF SWITCH:
Baby unit:
Switch on the baby unit located on the right side of the baby unit by sliding the on
/ off switch to position 1. This will allow to switch the channel.
Slide this switch to the 0 position in order to turn the baby unit off.
Parent unit:
Press and hold down the on/off button for about 2 seconds until the display
lights up. The parent unit is now switched on.
Press this button down again until the display goes off. The parent unit is now
turned off.
Channel and sub-channels:
Make sure the parent unit and the baby units are set to the same channel and
sub channel (see the illustration on page 3). Refer to the next page if the settings
need to be changed.
OPERATION:
If the baby unit detects sound, the transmitter will be activated and the sound sent
to the parent unit.
Level of sensitivity:
Turn the dial VOXSENS located on the back of the baby unit to set the level
of sensitivity. The very left of the dial is the least sensitive, turn the dial in a
clockwise direction to increase the level of sensitivity.
Receiving volume:
You can set the call volume level on the parent unit by pressing the or the
button; there will be conrmation beep tone. The display screen will show the
level of the selected volume ( ).
Multiple baby units:
See page 10 if you would like to use more than one baby unit.
5
5
Page 6

ADDITIONAL FEATURES AND SETTINGS
CHANGE SEND / RECEIVE CHANNEL:
Baby unit:
1. Push 1x on the
2. Push on the button or to select a new channel (1-8)
3. Push on the button
Parent unit:
1. Push 1x on the button ; the channel display will start ashing
2. Push on the button or to select a new channel (1-8)
3. Push on the button
CHANGE SUB CHANNELS (CTCSS):
Baby unit:
1. Push 2x on the button
the letters [Ct] behind.
2. Use the buttons or to select or disable the sub-channel (1-38) or to
enable or disable this feature by setting sub-channel to 00.
3. Push on the
Parent unit:
1. Push 2x on the button; the sub-channel indicator will begin to ash.
2. Use the buttons or to select or disable the sub-channel (1-38) or to
enable or disable this feature by setting sub channel to 00.
3. Push the
MENU
button, after the channel indicator light [CH] comes on
MENU
to set the new channel
to set the new channel
PTT
MENU
; the sub channels will show up in large with
MENU
button to set the selected sub-channel.
button to set the selected sub-channel
PTT
ENSURE THAT THE PARENT UNIT
AND BABY UNIT ARE ON THE
SAME CHANNEL AND THAT THE
SAME SUB-CHANNELS ARE
SELECTED.
ALSO SEE PAGE 10, CHAPTER
ENTITLED ‘BABY MULTIPLE
UNITS’.
Explanation of the CTCSS code:
Continuous Tone Controlled
Squelch System is the tone code
that is sent when transmitting. This
code is not an audible tone.
Only when the tone code from the
baby unit corresponds to the tone
code from the parent unit, will the
parent unit display the signal. This
prevents the baby monitor from
interference from other devices
that may communicate on the
same channel.
6
6
Page 7

CONNECTION CONTROL:
Every 30 seconds, you can send three short beep tones from the baby unit to the
parent unit. This enables the connection to be checked every 30 seconds. This
function can be switched on or turned off as follows:
Baby unit only:
1. Push 3x on the button
2. Push on the button to turn this function [ON] in the display or push on the
button to turn this function [OFF] in the display.
3. Push on the
MENU
MENU
; the word [BEEP] will light up.
button to set the selected function.
MONITORING: (forced listening)
Baby unit:
You can set the baby unit so that it broadcasts every 5 minutes for 5 seconds,
even when the baby unit does not detect sound.
1. Push 4x on the
2. Push the button to turn this function ([ON] in the display) or press the
button to turn this function [OFF] in the display.
3. Push on the
Parent unit:
You can temporarily or permanently disable the noise reduction of the parent unit
so you can still hear the baby unit when a weak signal is received.
- Push on the button to switch off the noise reduction, when you release this
button, the noise reduction will be switched on again.
- If you push and hold the button for more than 3 seconds, you will hear a
short beep sound which will indicate that the continuous noise reduction has been
turned off. If you release the button you can continue to listen for a short
time. Push the button to turn the noise reduction on again.
MENU
button; the word [AUTO MON] will light up.
MENU
button to set the selected function.
7
7
Page 8

SOUND ALERT:
You can set the baby unit to send an alert tone rst before a transmission is sent.
The alert signal will be different from any other signals you receive.
Only baby unit:
1. Push on the
2. Push on the button to turn the function [ON] in the display or push the
button to turn the function [OFF] on the display.
3. Push the
Note: These sounds are NOT added to the beeps sent for the purpose of connection control.
MENU
button 5x; the word [CA] will then light up.
MENU
button to set the selected function.
KEYPAD LOCK:
To avoid accidentally changing the channel on the parent unit or turning the
volume too low, you can lock the keypad in the following way:
Only parent unit:
1. Push on the () button until the icon lights up in the display.
2. To unlock it, push the () button again until the icon disappears from the display.
The buttons , and will be blocked when the icon lights up on the
display.
STOPWATCH:
The parent unit is equipped with a stopwatch function,
1. Push on the button for 3 seconds to turn on the stopwatch
- Push the button to start the stopwatch
- Push the button for the laps time (the time will continue to run)
- Push the button to continue
- Push the button to set the stopwatch at 00:00
2. Push the button for 3 seconds to turn off the stopwatch
During this mode, the baby monitor function on the parent unit will still be active.
KEYPAD TONE:
When you push a button on the parent unit a beep tone will sound. You can
switch the beep tones on or off using the following steps:
1. Push the button 6x; [ONto] or [OFFto] will then ash on the display.
2. Push the button to switch the beep tone function [ON] in the display, or push
the button to deactivate the function [OFF] in the display.
3. Push the
button to set the selected function.
PTT
8
8
Page 9

EARPHONE:
You can connect a headset with a 2.5mm plug into the parent unit in order to
monitor your baby without disturbing other people in the same room as you. The
built-in loud speaker will be disabled when the headset is plugged in.
FLASHLIGHT:
The parent unit is equipped with a ashlight. Press the button to turn on the
ashlight. When you release the button, the ash light will go out.
BELT CLIP:
The parent unit is equipped with a belt clip; this enables you to have the parent
unit on you while also keeping your hands free.
The belt clip can be removed by pressing on the latch with a small screwdriver
and sliding the belt clip upwards.
EXTERNAL MICROPHONE:
You can attach an external microphone on the right side of the baby unit which
can be connected with a 2.5 mm plug. The built in baby unit microphone will then
be muted.
The external microphone function can be used in the event that the baby unit
itself cannot be put in the room.
9
9
Page 10

MULTIPLE BABY UNITS
After you have purchased loose baby units (DBX-83) you can set up multiple
babies ‘monitoring’. Ensure that the baby units and the parent unit are connected
on the same channel and sub-channel. In case this does not work, you can also
choose an alternate monitoring, see below:
ALTERNATE MONITORING OF 2 BABY UNITS:
Baby units:
1. Set the two baby units on different channels (the sub-channel setting may be
selected too)
Parent unit:
1. First set the parent unit to the same channel and sub-channel as the 1st baby
unit, press the
2. Now push 7x on the button and by using the button or the button
select the channel of the 2nd baby unit (select [OFF] to disable this feature).
3. Push 1x on the button and using the button or the button select the
sub-channel of the 2nd baby unit.
button to conrm the setting.
PTT
4. Push the
unit 1 and baby unit 2.
ALTERNATE MONITORING OF MORE THAN 2 BABY UNITS:
Baby units:
1. Set the baby units to different channels (set the sub-channel settings to 00)
Parent unit:
1. Push the button and button simultaneously, this enables the parent
unit to consecutively listen to all the channels.
2. When the parent unit picks up sound from one of the channels it will stop
scanning and transmit only the signal from that camera. The parent unit will
continue scanning a few seconds after the sound has stopped.
- Push the button to continue scanning if only noise or an unwanted channel
is received on the signal.
- Push the
button, the parent unit will now alternately listen between baby
PTT
button to end the scanning function.
PTT
10
10
Page 11

RADIO FEATURES
The parent unit is also proper radio transmitter and can therefore be in communication with other (Alecto) radios as long as they meet the PMR-446 standard.
SEND/RECEIVE:
* Push the
message.
CALL SIGNAL:
* Push the button to send a call signal.
* Push 4x on the button and use the buttons or to select the desired
tone (when choosing [OFF], this feature will be switched off); push the
button to conrm.
VOX: (Voice Operated Transmission)
* Push 3x on the button and use the buttons or to select the level of
sensitivity (or choose the [OFF], feature to switch off); press the
to conrm.
ROGER BEEP: (Beep After Sending)
* Push 5x on the button and use the buttons or to switch the function
([ON]) or ([OFF]) to switch off; push the
button to send a message, release this button to receive a
PTT
button to conrm.
PTT
PTT
PTT
button
11
11
Page 12

USER TIPS
GENERAL:
* The baby monitor is only to be used as an additional aid and NOT as a
substitute for an adult or responsible baby-sitter.
* Check the proper functioning of the baby monitor each time before use and
regularly during use.
* You do not need a license in order to use this baby monitor cordless. This
system can be used in a domestic situation. There is no guarantee that there
will always be an interference-free signal.
* Always switch off the units when not in use.
PLACEMENT:
* DO NOT place the baby unit in the bed with the baby and keep a minimum
distance of 2 meters between the baby and the baby unit. Also make sure that
the baby cannot touch the power adapter cord.
* Do not place the baby unit or the parent unit in direct sunlight or in a damp
place.
POWER SUPPLY:
Batteries:
The parent unit has a rechargeable battery pack that must be installed with the
following battery specications:
* Format: 4x AAA
* Type: NiMH (Nickel-Metal-Hydride), rechargeable
* Power: 600mAh or more
Battery indicator:
The parent unit has a built-in battery indicator ( ) shown on the display
screen. If the battery icon shows full, the battery pack is charged. If the battery
icon shows empty or half full, the battery pack needs to be recharged. Once
plugged in the battery indicator will show that it is charging until the battery pack
is fully charged. The batteries will be fully charged after 14 hours after which
the power adaptor can be unplugged from the unit and from the electrical wall
outlet. The adapter can remain permanently connected as the charging current is
controlled electronically.
Adapters:
Only use the included power adapters. Connecting a power adapter other than
the included adapter can damage the electronics of the baby monitor.
12
Page 13

RADIO LINK:
* The DBX -82 baby monitor is a transmitter/receiver that uses radio waves on
a 446 MHz band. The signal may be disturbed by external factors such as
other baby monitors, radios, transmitters or cordless phones, etc. If your are
experiencing radio interference, changing the channel will most often be the
best solution.
* The range of the baby monitor is up to 3Km. The range can depend on local
conditions such as high buildings, and high-voltage overhead lines. An opti mum range is achieved if the baby unit has a clear range to the parent unit.
* If you are taking the baby monitor abroad, please rst look into the local
restrictions on the use of PMR446 equipment where you will be staying.
* The product is permitted in Belgium, Denmark, Germany, Finland, France,
Great Britain, Ireland, Italy, Luxembourg, Netherlands, Austria, Portugal, Spain,
Iceland, Sweden and Switzerland. If the country of your choice is not on this
list, please consult the relevant country embassy. Amended legislation may
make it possible for this product to now be allowed.
* Note that the signal from your baby monitor may be heard by other 446 MHz
baby monitors, radios or receivers.
* The baby monitor should never be used outside during a thunderstorm.
MULTIPLE BABY UNITS:
* When two or more baby units are transmitting at the same time, it may be
possible that they push away each other’s signal, rather use the alternate
monitoring method.
SERVICE & MAINTENANCE:
* Only clean the baby monitor with a damp cloth. Before cleaning, the power
adapter should be taken out of the electrical wall outlet.
* Ensure that water and / or sand cannot come into the units.
* It is not permitted in any manner whatsoever to make changes to the
electronics or to the antenna of the baby monitor. Servicing the device should
only be done by qualied technicians.
ENVIRONMENT:
* If the baby monitor needs to be discarded, hand it over to your
supplier. They will dispose of the baby monitor in an environmentally
friendly manner.
* Dispose of the battery pack in an environmentally-friendly manner
according to your local regulations. Never throw away batteries with
your household waste.
13
Page 14

DECLARATION OF CONFORMITY
The declaration of conformity is available at:
doc.hesdo.com/DBX-82-DOC.pdf
TECHNICAL SPECIFICATIONS
Operating Frequency: 446.00625 MHz to 446.09375 MHz
(8 channels, 38 sub-channels)
RF power: < 27 dBm
Channel separation 12.5 KHz
Power: parent unit: Rechargeable Battery Pack 4.8V, NiMH
baby-unit: 9V / DC, via adapter
Range: Up to 3Km
14
Page 15

INTERFERENCE CHART
If a fault occurs, rst check the operation of the DBX-82 at another location.
Does nothing:
- The battery pack of the parent unit is empty, recharge or replace.
- The power adapter of the baby unit is not plugged in, or there is no power
coming from the electrical outlet, check outlets.
Poor or no reception:
- The battery pack of the parent unit is empty, recharge or replace.
- The channel or sub-channel has been set incorrectly (the baby unit and the
parent unit must both be set to the same channel and sub-channel).
- The distance between the baby unit and the parent unit is too large, decrease
the distance.
Noise and other Interferences:
- Someone else is on the same channel, change of channel.
- Interference from other devices, turn off the other devices (if possible).
High Pitched Sound:
- The parent unit is too close to the baby unit or the volume of the parent unit is
too high, increase the distance or lower the volume.
If the fault is not resolved, then remove the battery pack from the parent unit and
remove the power adapter from the electrical wall outlet. Shut everything down
and after a few minutes start the unit up again.
Please contact your dealer if the problem is still not resolved.
15
Page 16

WARRANTY
Service Help
WWW.ALECTO.NL
SERVICE@ALECTO.NL
Hesdo, Australiëlaan 1
5232 BB, ‘s-Hertogenbosch
The Netherlands
Name: Attach here
Address: your receipt
Post code: or voucher
City:
Tel:
For the Alecto DBX-82 you have a warranty of 24 months from the date
of purchase. During this period, we guarantee the free repair of defects
caused by material and workmanship errors. All this subjected to the
final assessment of the importer.
HOW TO HANDLE:
If you notice any defect, first refer to the user’s manual. If the manual
provides no definite answer, please contact the supplier of this baby
video monitor or contact customer service of Hesdo on www.alecto.nl
THE WARRANTY BECOMES NULL AND VOID:
In case of improper use, incorrect connections, leaking and/or incorrectly installed batteries, use of unoriginal parts or accessories, negligence and in case of defects caused by moisture, fire, flooding, lightning and natural disasters. In case of unauthorised modifications and/
or repairs performed by third parties. In case of incorrect transportation
of the device without adequate packaging and when the device is not
accompanied by this warranty card and proof of purchase. The warranty does not cover connecting cables, plugs and batteries.
All further liability, especially concerning any consequential damages,
is excluded.
Service
Help
WWW.ALECTO.NL
SERVICE@ALECTO.NL
Hesdo, Australiëlaan 1, 5232 BB,
‘s-Hertogenbosch,
The Netherlands
V4.5
 Loading...