

Page 1

1
1. GETTING STARTED . . . . . . . . . . . . . . . . . . . . . . . . . . . . . . . . . . . . . . . . . . . . . . . . . . . . 3
1.1 Installation . . . . . . . . . . . . . . . . . . . . . . . . . . . . . . . . . . . . . . . . . . . . . . . . . . . . . . . . . . . . 3
1.2 Preparing the base . . . . . . . . . . . . . . . . . . . . . . . . . . . . . . . . . . . . . . . . . . . . . . . . . . . . . .4
1.3 Preparing the handset . . . . . . . . . . . . . . . . . . . . . . . . . . . . . . . . . . . . . . . . . . . . . . . . . . . 5
1.4 Identification . . . . . . . . . . . . . . . . . . . . . . . . . . . . . . . . . . . . . . . . . . . . . . . . . . . . . . . . . . . 6
2. USING THE TELEPHONE . . . . . . . . . . . . . . . . . . . . . . . . . . . . . . . . . . . . . . . . . . . . . . . 7
2.1 Receiving a call . . . . . . . . . . . . . . . . . . . . . . . . . . . . . . . . . . . . . . . . . . . . . . . . . . . . . . . . 7
2.2 Making a call . . . . . . . . . . . . . . . . . . . . . . . . . . . . . . . . . . . . . . . . . . . . . . . . . . . . . . . . . . 8
2.3 Adjusting the earpiece volume during the call . . . . . . . . . . . . . . . . . . . . . . . . . . . . . . . . . 9
3. ACTIVATING/DEACTIVATING THE LOUDSPEAKER AND ADJUSTING
LOUDSPEAKER VOLUME . . . . . . . . . . . . . . . . . . . . . . . . . . . . . . . . . . . . . . . . . . . . . . . 10
4 REDIAL LAST NUMBER . . . . . . . . . . . . . . . . . . . . . . . . . . . . . . . . . . . . . . . . . . . . . . . . . 11
5. ORGANISING YOUR ADDRESS BOOK . . . . . . . . . . . . . . . . . . . . . . . . . . . . . . . . . . . . . 12
5.1 Creating a contact page . . . . . . . . . . . . . . . . . . . . . . . . . . . . . . . . . . . . . . . . . . . . . . . . . 12
5.2 Modifying a contact page . . . . . . . . . . . . . . . . . . . . . . . . . . . . . . . . . . . . . . . . . . . . . . . . . 13
5.3 Deleting a contact page . . . . . . . . . . . . . . . . . . . . . . . . . . . . . . . . . . . . . . . . . . . . . . . . . . 14
5.4 Calling a correspondent recorded in the address book . . . . . . . . . . . . . . . . . . . . . . . . . . 15
6. CONSULT CALLER LOG . . . . . . . . . . . . . . . . . . . . . . . . . . . . . . . . . . . . . . . . . . . . . . . . 16
6.1 Recording a contact page in the address book . . . . . . . . . . . . . . . . . . . . . . . . . . . . . . . . 17
6.2 Deleting a contact page from the list of calls received . . . . . . . . . . . . . . . . . . . . . . . . . . 18
BILOBA250gb.qxd 07/12/00 12:14 Page 1
Page 2

2
7. CUSTOMISING YOUR TELEPHONE . . . . . . . . . . . . . . . . . . . . . . . . . . . . . . . . . . . . . . . . 19
7.1 Activate/Deactivate handset ringer . . . . . . . . . . . . . . . . . . . . . . . . . . . . . . . . . . . . . . . . . . 19
7.2 Activating/Deactivating key "BEEPS" . . . . . . . . . . . . . . . . . . . . . . . . . . . . . . . . . . . . . . . 20
7.3 Record date and time . . . . . . . . . . . . . . . . . . . . . . . . . . . . . . . . . . . . . . . . . . . . . . . . . . . . 21
8. BILOBA AND ACCESS TO OPERATOR SERVICES . . . . . . . . . . . . . . . . . . . . . . . . . . . 22
9. USING YOUR TELEPHONE WITH MORE THAN ONE HANDSET . . . . . . . . . . . . . . . . . 23
9.1 Adding a new handset . . . . . . . . . . . . . . . . . . . . . . . . . . . . . . . . . . . . . . . . . . . . . . . . . . . 23
10. IDENTIFYING YOUR HANDSET TO ANOTHER BILOBA BASE . . . . . . . . . . . . . . . . . . 24
11. OTHER SETTINGS . . . . . . . . . . . . . . . . . . . . . . . . . . . . . . . . . . . . . . . . . . . . . . . . . . . . . 25
12. ADDITIONAL INFORMATION . . . . . . . . . . . . . . . . . . . . . . . . . . . . . . . . . . . . . . . . . . . . . 26
12.1 Technical specifications . . . . . . . . . . . . . . . . . . . . . . . . . . . . . . . . . . . . . . . . . . . . . . . . . .26
12.2 Warranty . . . . . . . . . . . . . . . . . . . . . . . . . . . . . . . . . . . . . . . . . . . . . . . . . . . . . . . . . . . . . 27
12.3 Safety . . . . . . . . . . . . . . . . . . . . . . . . . . . . . . . . . . . . . . . . . . . . . . . . . . . . . . . . . . . . . . . 28
12.4 Maintenance . . . . . . . . . . . . . . . . . . . . . . . . . . . . . . . . . . . . . . . . . . . . . . . . . . . . . . . . . . 29
12.5 Consumer services . . . . . . . . . . . . . . . . . . . . . . . . . . . . . . . . . . . . . . . . . . . . . . . . . . . . . 29
BILOBA250gb.qxd 07/12/00 12:14 Page 2
Page 3

3
1. GETTING STARTED
1.1 INSTALLATION
The base must not be placed near any excessive heat sources (radiator, sunlight, etc.)
and should be protected against vibration, dust, humidity, splashes.
Take care when choosing the location of the base, as the quality of communications depends on it.In
particular avoid placing it near the following:window, reinforced concrete, large metal object, television
set, fluorescent tube, halogen lamp, burglar alarm unit, Hi-Fi system, etc.
!
The range of your telephone varies according to its environment. Obstacles such as thick
walls and metal structures can alter the range.To optimise the range,you can alter the direction
of the base and its aerial.
BILOBA250gb.qxd 07/12/00 12:14 Page 3
Page 4
4
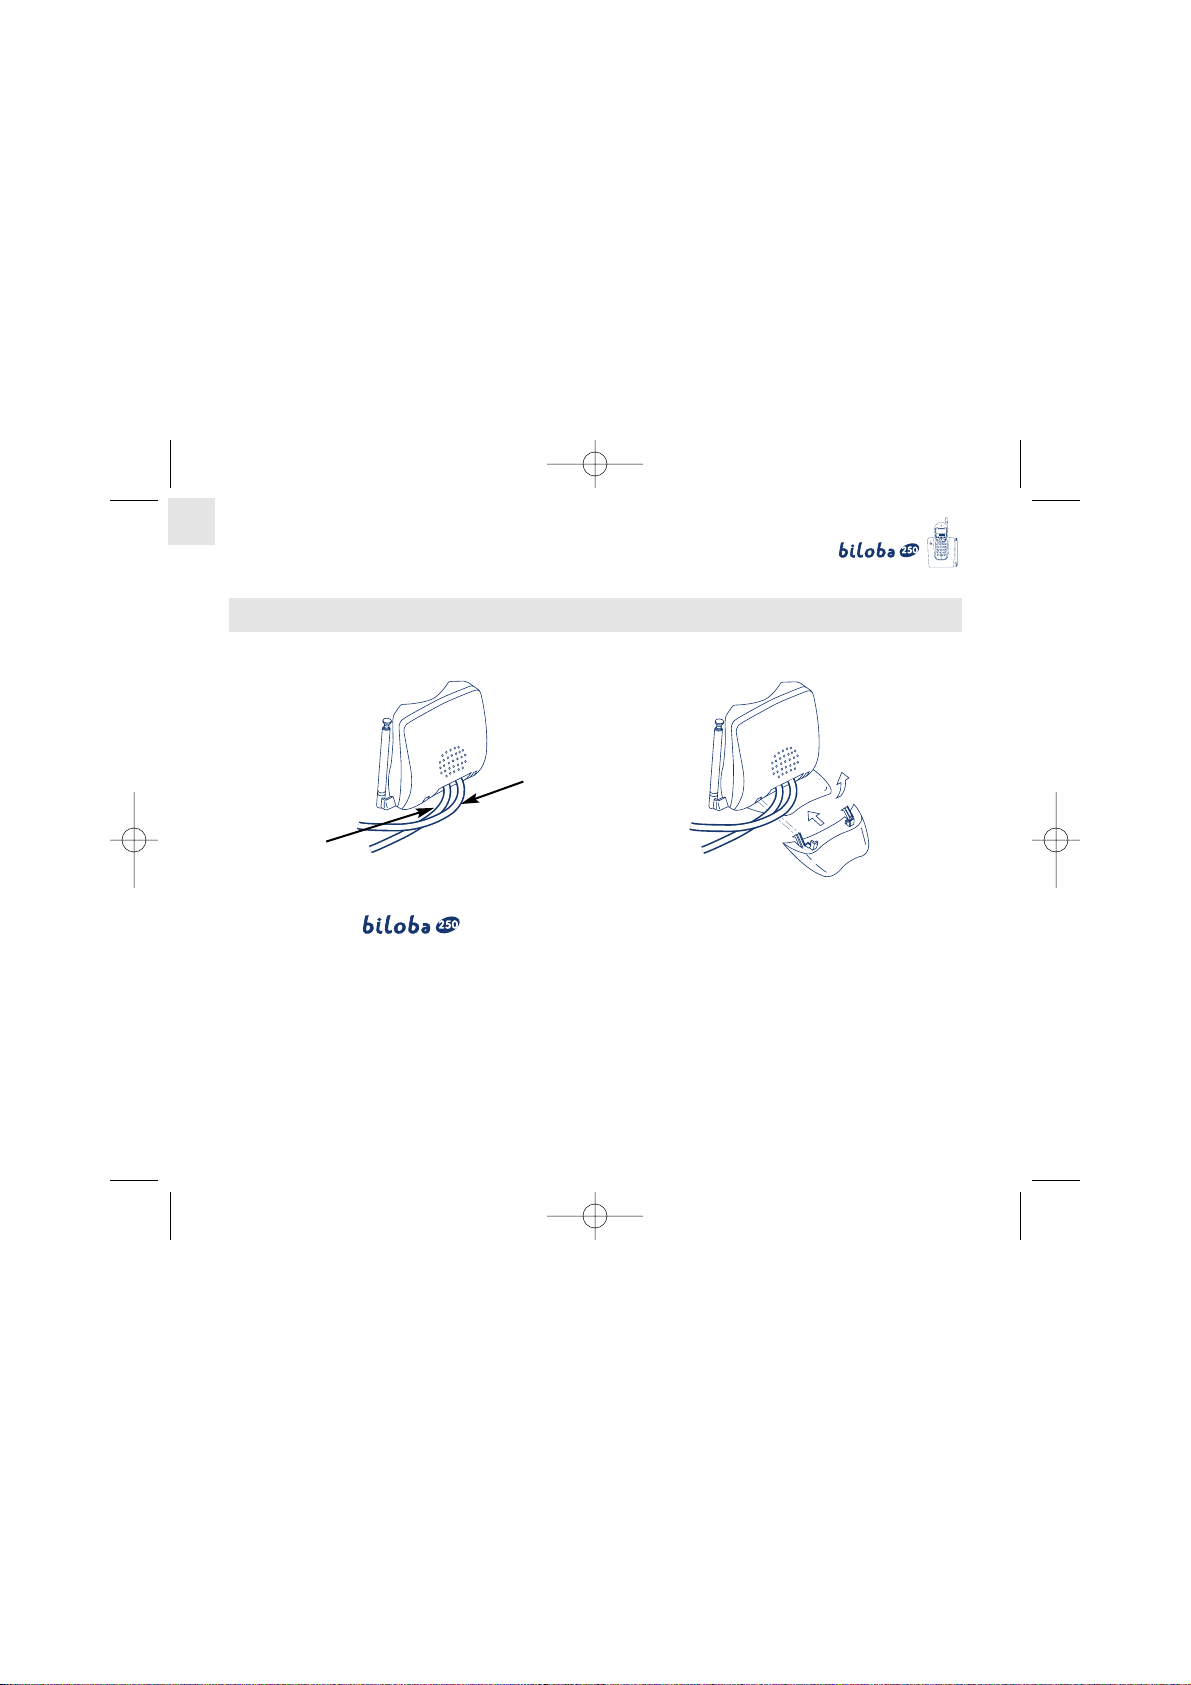
1.2 PREP ARING THE BASE
l Connect the telephone cable and the power supply cable to the rear of the base as shown.
l Secure the stand to the base, under the cables.
l Connect your telephone jack to the telephone socket.
l Connect the mains adapter to a 230V/50 Hz power outlet.
4
The green led shows that the base is powered.
l Extend the telescopic aerial on the base.
telephone
cable
mains power
cable
BILOBA250gb.qxd 07/12/00 12:14 Page 4
Page 5
5
1.3 PREP ARING THE HANDSET
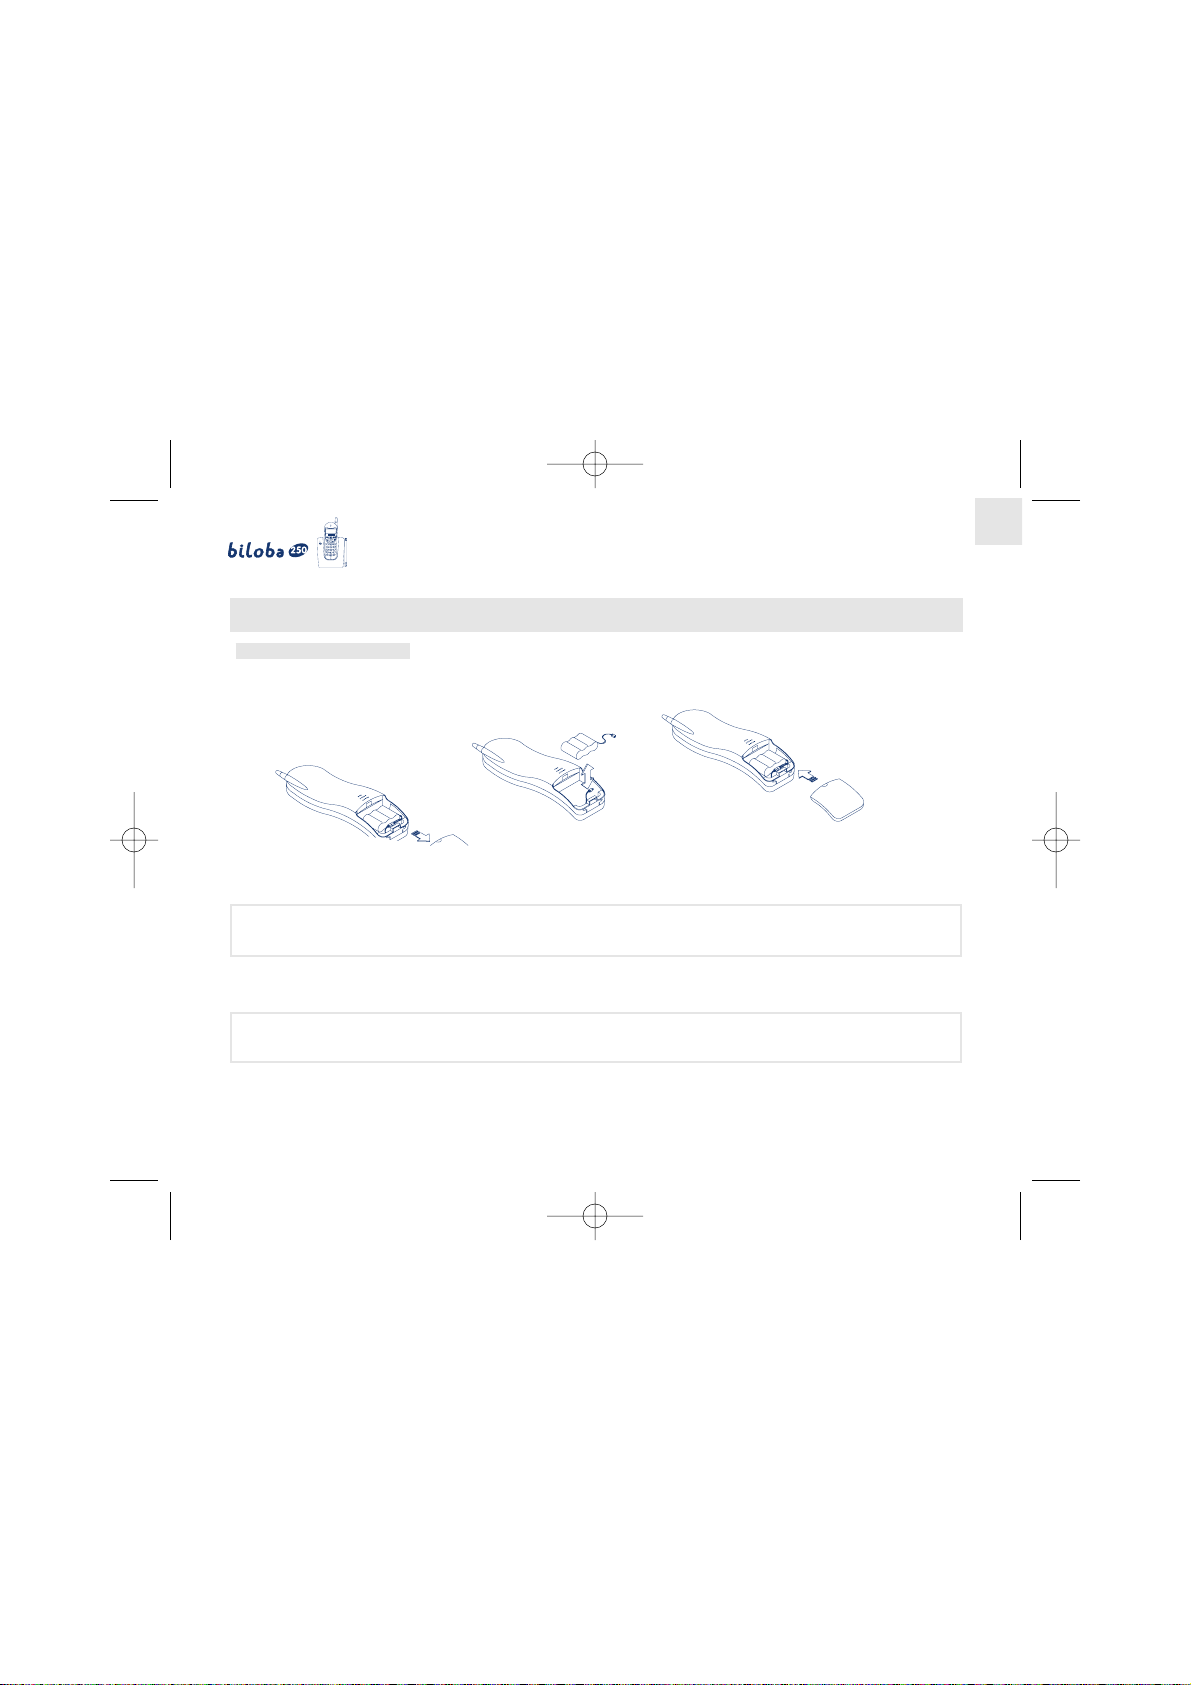
Connect the battery
l Open and remove the battery compartment cover.
l Connect the battery connector.
l Close the cover.
open the cover connect and install close the cover
the battery
l Place the handset on the base: the battery is now charging.
4
The battery icon will light up a few seconds later.
!
Before using for the first time, we recommend that you leave the handset to charge on the
base for a whole day (12 hours),in order to optimise battery performance and life.
!
Only use rechargeable batteries with exactly the same specifications as those supplied with
the product.Any failure to do so will immediately invalidate any warranty on the part of A TLINKS.
BILOBA250gb.qxd 07/12/00 12:14 Page 5
Page 6
6
1.4 IDENTIFICATION
l Press to obtain a line.
4
If you hear the tone, the base is registered, if not, the handset emits 3 error beeps:
l In this case, hang up the handset on the base.
4
A short beep then a long beep confirm the identification of the handset.
BILOBA250gb.qxd 07/12/00 12:14 Page 6
Page 7

7
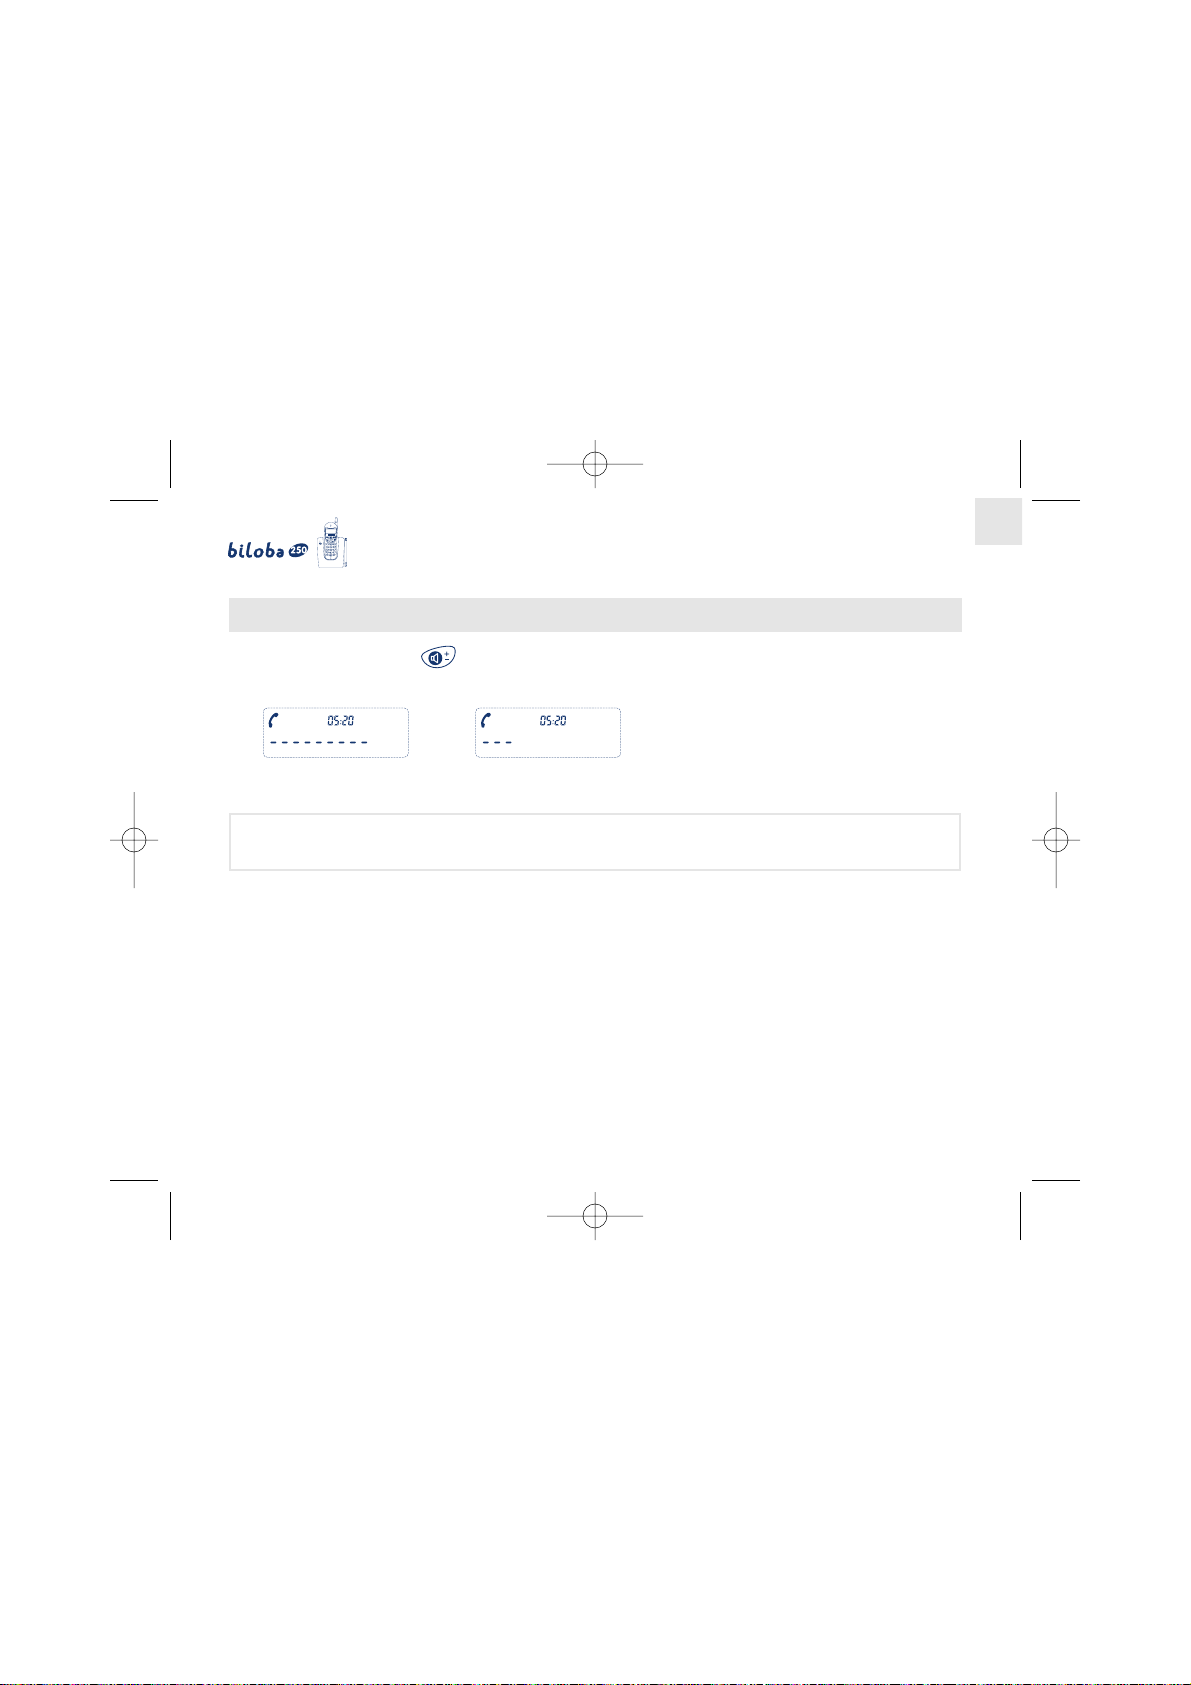
2. USING THE TELEPHONE
2.1 RECEIVING A CALL
While the phone is ringing:
If you do not have the caller number identification service*:
4
The icon flashes.
If you do have the service:
4
The caller's number appears on the screen.
4
The icon on the display and the led on the base flash at the same rate
as the ringer.
If the person calling you has overriden the caller identify function:
4
SECRET appears.
If the network does not transmit the information:
4
INCONNU appears.
l To take the call, lift the handset and press .
4
The icon is lit steady as soon as the call is established.
l To hang up, press .
* Check with your operator.
BILOBA250gb.qxd 07/12/00 12:14 Page 7
Page 8
8
2.2 MAKING A CALL
To call an outside correspondent, there are two possibilities:
F
obtain a line dial when the hang up
icon is steady
F
dial move to delete obtain hang up
correct blinking a line
character
NOTE :The length of the call is displayed throughout the communication and remains displayed for a
few seconds after it ends.
!
No modification of the number is possible.
BILOBA250gb.qxd 07/12/00 12:14 Page 8
Page 9
9
2.3 ADJUSTING THE EARPIECE VOLUME DURING THE CALL
l During the call, press .
4
Each time you press it, the volume changes and the result appears briefly on the screen.
or
Maximum volume Minimum volume
!
When you use it for the first time,the volume is set to minimum.
At the end of the call, the volume level is memorised.
BILOBA250gb.qxd 07/12/00 12:14 Page 9
Page 10

10
3. ACTIVATING/DEACTIVATING THE LOUDSPEAKER AND
ADJUSTING LOUDSPEAKER VOLUME
A loudspeaker is built into the base of your .
l To activate the loudspeaker: long press on during the conversation.
l Adjust the loudspeaker volume during the call: short press on .
4
The corresponding volume level appears on the screen:
Low Medium High
l To deactivate the loudspeaker: long press on .
!
At the end of the call, the loudspeaker mode is automatically deactivated.
BILOBA250gb.qxd 07/12/00 12:14 Page 10
Page 11

11
4. REDIAL LAST NUMBER
First option
l Press .
l Press .
4
The last number dialled appears and is automatically redialled.
l To hang up, press .
Second option
l Press .
4
The last number dialled appears and you can change it.
l Press to dial the number.
l To hang up, press .
BILOBA250gb.qxd 07/12/00 12:14 Page 11
Page 12

12
5. ORGANISING YOUR ADDRESS BOOK
The telephone enables you to use a 10-contact address book.
Each contact page can be used to memorise the phone numbers of your usual correspondents.You can
create, modify, delete contact pages and make calls directly from the address book.
5.1 CREATING A CONTACT PAGE
l Access the address book by pressing and holding the key until you hear a long confirmation
beep.
l Enter the telephone number using the numerical keys on the keypad (to insert a pause, use
the key, to insert a flash, use the key).
l To delete a character, press .
l Confirm by pressing the key and then choose the number of the contact page to be created
(0 to 9).
4
A confirmation tone is heard.
NOTA : Recording a new number in a contact page which already had one will delete the previous record.
The address book can contain up to 10 contact pages, with each contact page comprising a number
of up to 20 digits and/or characters.
BILOBA250gb.qxd 07/12/00 12:14 Page 12
Page 13

13
5.2 MODIFYING A CONTACT PAGE
l A contact page is modified by re-recording a new number in the page which already contains one.
l Access the address book by a long press on key until a long confirmation beep is heard.
l Enter the new telephone number with the numerical keys on the keypad (to insert a pause, use the
key, to insert a flash, use the key).
l To delete a character, press .
l Confirm by pressing the key and then choose the number of the contact page to be created (0
to 9).
4
A confirmation tone is heard.
BILOBA250gb.qxd 07/12/00 12:14 Page 13
Page 14

14
5.3 DELETING A CONTACT PAGE
l Access the address book by a long press on key until a long confirmation beep is heard.
l Press the key then choose the contact page number to be deleted (from 0 to 9).
4
A confirmation tone is heard.
4
The contact page is empty.
BILOBA250gb.qxd 07/12/00 12:14 Page 14
Page 15

15
5.4 CALLING A CORRESPONDENT RECORDED IN THE ADDRESS BOOK
To call a correspondent recorded in the address book, there are 2 possible ways:
F
access then enter page or use the arrows to move
address book number (0 to 9) from one page to another
establish hang up at end
communication of communication
F
obtain a line access type in page number
address book (0 to 9)
0432455002
the number memorised the communication hang up at end of
is automatically dialled is established communication
BILOBA250gb.qxd 07/12/00 12:14 Page 15
Page 16

16
6. CONSULT CALLER LOG *
With a subscription to the caller identification service, will compile a list of the last 10 calls
received.
Example :
Figure “3” means that you have 3 new calls in your log since the last time you
checked it.
The icon means that you hav e messages if y ou ha v e subscribed to the "T OP MESSAGE" service*.
To access this list
l Press the key.
4
If the list is empty, 1 beep is heard.
4
If calls have been recorded, the screen displays:
l the date and time of the call
l the number of times the person called (9 is the maximum number
displayed)
l the number of the person who called you.
* Provided that you have subscribed to this service with your operator.
!
The calls are listed from most recent to oldest.
BILOBA250gb.qxd 07/12/00 12:14 Page 16
Page 17

17
6. CONSULT CALLER LOG* (CONT.)
l Select the call you want with .
ring back the caller hang up
To quit the list
To quit the list while checking it, you can:
l Long press .
4
The phone returns to standby.
If you press no key for 10 seconds while consulting the list, the telephone automatically goes back to
standby.
6.1 RECORDING A CONTACT PAGE IN THE ADDRESS BOOK
To record the number of the caller in the list of calls received:
l Press .
l Select the call you want with .
l Press , followed by the number of the contact page to be recorded (from 0 to 9).
4
An audible confirmation signal is heard.
* Provided that you have subscribed to this service with your operator.
BILOBA250gb.qxd 07/12/00 12:14 Page 17
Page 18

18
6.2 DELETING A CONTACT PAGE FROM THE LIST OF CALLS RECEIVED
l Press .
l Select the page to be deleted with .
l Press .
4
The page is deleted.
4
The next page appears.
4
At the end of the list, you will return to the welcome screen.
l To delete all the pages, repeat this operation.
BILOBA250gb.qxd 07/12/00 12:14 Page 18
Page 19

19
7. CUSTOMISING YOUR TELEPHONE
7.1 ACTIVATE/DEACTIVATE HANDSET RINGER
l Long press on key .
4
A long confirmation beep is heard to indicate that the programming mode is active.
To activate the ringer:
l Press key , the ringer is proposed.
l Again press the key to confirm activation.
To deactivate the ringer:
l Press the key.
4
A confirmation beep is heard to indicate that the ringer is deactivated.
4
The icon appears on the display.
BILOBA250gb.qxd 07/12/00 12:14 Page 19
Page 20

20
7.2 ACTIVATING/DEACTIVATING KEY "BEEPS"
An audible signal is heard each time you press a key:this can be activated or deactivated.
l Long press the key.
4
A long confirmation beep is heard, indicating that the programming mode is active.
To activate the key "beeps":
l Press the key.
4
A confirmation beep indicates that the key "beeps" are active.
To deactivate the key "beeps":
l Press the key.
4
A confirmation beep indicates that the key "beeps" are deactivated.
l In this case, only the key "beeps" are deactivated, all other signals remain active.
!
By default, the beeps are active.
BILOBA250gb.qxd 07/12/00 12:14 Page 20
Page 21

21
7.3 RECORD DATE AND TIME
This function can be used to set the date and time of the display.
l Long press on the key.
4
A long confirmation beep is heard to indicate that the programming mode is active.
l Press the key, the screen displays:
l Type in the date and time on the keypad.
l Press the key to confirm.
NOTE :If you make a mistake, a beep is heard and the date/time entry screen waits for a correct value.
BILOBA250gb.qxd 07/12/00 12:14 Page 21
Page 22

22
8. BILOBA AND ACCESS TO OPERATOR SERVICES
The , and keys can be used to access additional services (find out from your operator
or installer).
TOP MESSAGE*
is compatible with the France Télécom Top Message service.Y ou can forward your calls
to a voice mailbox.
l If you have a message in your voice mailbox, the screen displays the icon.
l Access the voice mailbox as indicated by France Télécom.
*
!
Once on-line, you will be guided by the France Télécom mail service.
BILOBA250gb.qxd 07/12/00 12:14 Page 22
Page 23

23
9. USING YOUR TELEPHONE WITH MORE THAN ONE HANDSET
9.1 ADDING A NEW HANDSET
Each base station can recognise up to 3 additional handsets.
l Press to register your extra handset with the base.
4
If you hear the tone, the handset is registered, if not, an error beep is heard.
l In this case, place the handset on the base to be used.
4
The handset emits a double tone:a charge beep followed by a handset registration beep.
BILOBA250gb.qxd 07/12/00 12:14 Page 23
Page 24

24
10. IDENTIFYING YOUR HANDSET TO ANOTHER BILOBA BASE
To change the base with which the handset is associated:
l Press to obtain a line.
If you have no tone
l Place the handset on the new base.
4
A short beep then a long beep confirm identification.
If you still have no tone
You can:
l Long press key .
l Press key .
l Place the handset on the new base.
4
The handset emits a short beep then a long confirmation beep.
BILOBA250gb.qxd 07/12/00 12:14 Page 24
Page 25

25
11. OTHER SETTINGS
THE KEY
This key is used to access the network services.Three durations are possible:270 ms, 115 ms or 100 ms.
l Long press until a long confirmation beep is heard.
l Press .
l Press , or to select the time-delay:
l 1 : 100 ms
l 2 : 115 ms
l 3 : 270 ms.
l A confirmation beep is heard.
!
By default, the time-delay is 270 ms.
BILOBA250gb.qxd 07/12/00 12:14 Page 25
Page 26

26
12. ADDITIONAL INFORMATION
12.1 TECHNICAL SPECIFICATIONS
* This value may vary according to the environment.
** Depends on the initial battery charge.
If you move out of range during a conv ersation: appears and an audible signal is heard.
Move closer to the base, otherwise the communication will be broken after a few seconds.
!
During the conversation,if the battery charge level becomes too low, the icon flashes and 3
beeps are emitted every 30 seconds. In this case, only about 10 mn of conversation are left.
After the 10 mn, the battery is completely discharged, the communication is broken and the
handset is deactivated.The battery must now be recharged.
!
When buying a new battery ,follow the vendor's recommendations.Only use the battery specified
for the handset. Using inappropriate batteries can lead to malfunction.
Standard CTO
Free field range 300 meters *
Handset battery life
6 hours conversation **
(average values)
4 days standby **
Number of handsets Up to 4
Rechargeable batteries 3.6V, Ni Cd 2/3AA
AC/DC mains Input: 230V AC
Output: 11V DC, 200 mA
BILOBA250gb.qxd 07/12/00 12:14 Page 26
Page 27

27
12.2 WARRANTY
This product is covered by the applicable guarantee from your distributor.
In order to be covered by this warranty, you must use the device as instructed in the manual.You must
also keep your invoice (or till receipt) specifying the date of purchase and name of reseller.
This warranty does not apply in the following cases:
l fault arising from abnormal use or incorrect connection,
l device subjected to shocks or falls,
l device damaged by lightning, voltage surge, fire or water,
l incorrect use, negligence,
l maintenance or repair of the product by unauthorised persons.
In any case, the legal warranty covering hidden defects applies in compliance with articles 1641 and
following of the applicable civil code.
BILOBA250gb.qxd 07/12/00 12:14 Page 27
Page 28

28
12.3 SAFETY
The device is supplied by an AC/DC adapter in conformity with standard EN 60950.
Its input is classified hazardous and its output is classified TBTS.
The mains adapter must be installed close to the device and must be easily accessible.
To disconnect the device from the primary power source, the mains adapter must be removed from the
230V AC 50 Hz outlet.
If the mains adapter fails, it must be replaced by an identical model.
If not connected to the mains power or if there is a mains power failure, can no longer
work.You will then be unable to make or receive calls in the event of an emergency.
This is why we recommend that you also have an ordinary telephone designed for connection to a
conventional TRT3 telephone line.
The handset battery must be disposed of in compliance with waste regulations.
!
Do not use your telephone to notify a gas leak when standing close to this leak.
This telephone is built in compliance with European directives 73/23/CEE and 89/336/CEE.
BILOBA250gb.qxd 07/12/00 12:14 Page 28
Page 29

29
12.4 MAINTENANCE
Clean your telephone with a lightly moistened antistatic cloth.
Avoid using a dry cloth (static charge) and abrasive or aggressiv e cleaning products which could damage
the surfaces.
12.5 CONSUMER SERVICES
The shop where you bought this telephone will be able to help you and provide after-sales service.
However, our telephone hot-line is available for any additional information (02 07 867 0016) from 8 am
to 7 pm, Monday to Saturday.
BILOBA250gb.qxd 07/12/00 12:14 Page 29
Page 30

30
BILOBA250gb.qxd 07/12/00 12:14 Page 30
 Loading...