

Page 1
EN
Bluetooth Headset
User Guide
FR
Kit mains libres Bluetooth
Guide d’utilisation
IT
Auricolare Bluetooth
Guida dell'utente
ES
RU
Auriculares Bluetooth
Manual del usuario
Bluetooth-гарнитура
Руководство пользователя
CJB1CY0ALAAA
Page 2

English
Specifications
Bluetooth specification BT BLE4.0, Class 2
Bluetooth profile details HFP v1.6 + HSP v1.2 +
Operating range About 10m
Charging time less than 1.5 hour
Talk time* Up to 5 hours
Standby time* Up to 168 hours
Dimensions 60 x 12.3 x 6.30 mm
Weight 7g
Operating temperature
range
Storage temperature range -30°C to 70°C
* May vary due to the user’s habit, different modes of
operation and mobile phone settings.
A2DP v1.2
(One week charge)
-20°C to 55°C
Page 3

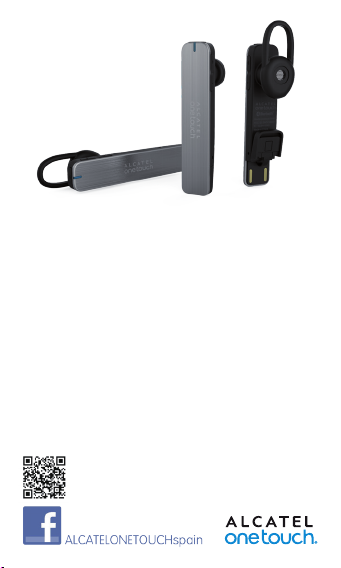
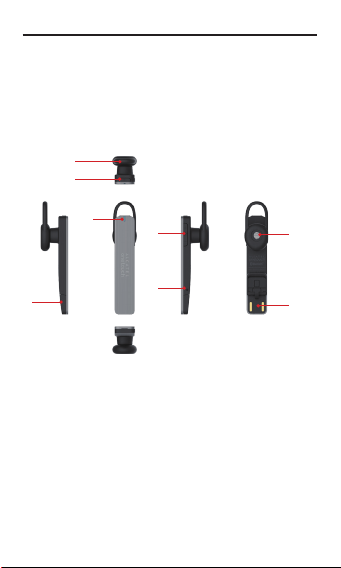
Overview
2
1
3
4
6
5
1. Power Key
• Power on / off
• Pair with mobile phone
• Answer / End a call
• Reject / Transfer a call
• Stop / Play music
2. In-ear Rubber
3. Indication LED
4. Volume Key
• Volume increased / decreased
• Previous / Next song
• Setting language
5. USB Cap
6. Speaker
7. USB Pins
• Charging battery
8. Microphone
8
7
Page 4

Getting started
To use the BH60 Bluetooth headset, follow these steps:
1. Charging your headset
Ensure your headset is fully charged and powered on before
using it. The headset comes with a built-in rechargeable
battery. It is recommended to fully charge prior to using the
headset for the first time. Open the USB Cap and insert the
USB Pins into a PC, laptop computer, charger or other USB
port.
2. Pairing
Once charged, you can pair your headset with a Bluetooth
enabled mobile phone.
1) Ensure that the headset is off.
2) To activate the pairing mode, press and hold the
headset’s Power Key without releasing your finger until
its status indicator flashes red/blue.
3) Make sure that your mobile device’s Bluetooth is
activated. Search Bluetooth devices and select “ALCATEL
onetouch BH60” to connect. After pairing, the LED
changes to blue and lights up every six seconds.
4) After pairing the headset with the first phone, turn off
the Bluetooth. The headset LED flashes blue. Pair the
second phone with the headset. After connecting, turn on
the Bluetooth of the first phone and choose ‘ALCATEL
onetouch BH60’ to pair again. The headset should be
paired with two phones now.
Page 5

Using your headset
Power on
Press power key for more than 3 seconds, red LED will flash
for 5 seconds. "Power on" alarm will be heard through in-ear
headset.
Pairing
After powering on, it will automatically switch to pairing
status. Blue LED will light up once each second.
Paired
It's not necessary to enter your PIN. After pairing, LED
changes to blue and lights up once every six seconds. "Phone
1 connected" alarm will sound through in-ear headset.
Volume +
Long Press will switch songs when listening to music. Short
Press will adjust the volume of sound. "Maximum volume"
alarm will sound if changed to maximum volume.
Volume -
Long Press will switch songs when listening to music. Short
Press will adjust the volume of sound. "Minimum volume"
alarm will sound if changed to minimum volume.
Music Play
In standby, press power key one time to play music and
press again to stop. Long press the volume up key and it will
change to previous song. Long press the volume down key
and it will change to next song.
Disconnected
Once the headset is disconnected or the BT function on
the device has been switched off, you will hear the 'Phone 1
disconnected' alarm through the in-ear headset. Blue LED
Page 6

will light up for three seconds, after two minutes the light
will shut off automatically.
Power off
Press the power key for over three seconds after switching
on. You will hear the "Power off" alarm through the in-ear
headset. The red LED will light up for three seconds and
then powers off.
Low power
If the battery has less than 15% power, the red LED will
continuously light up three times every minute. You will hear
the "Low power" alarm through the in-ear headset. The
power symbol will change to blank on the device.
If the battery has less than 5% power, the red LED will
light up for three seconds. You will hear the "Power off"
alarm through the in-ear headset and it will switch off
automatically.
Incoming call
System default alarm voice will ring and ringing from in-ear
headset, press power key button one time to answer the
call.
Reject call
Press the power key twice within three seconds to reject
the call.
Voice transfer
In standby, press the power key twice within three seconds
to activate the voice dialling function.
Call transfer
While talking, press and hold a volume key. You will hear a
short beep and audio will change to the mobile device.
Charging battery
Direct USB plug, constant red LED lighting, changed to
constant blue LED lighting or no lighting once fully charged.
Page 7

LED Status
Pattern Status Action Blue Lighting
Working
Mode
Standby
Mode
Pair Mode /
Connected
Mode
Reconnected
/ /
flash frequency:
once each
seconds (remain
120s at the
Just connect flashes slowly
Keep
connecting
Just
disconnect
Keep
reconnecting
pairing status)
flash frequency:
once per
6seconds
(Because of
power cost)
flashes slowly
flash frequency:
once per
3seconds
Page 8

Pattern Status Action Red Lighting
long press
power button
3s
long press
power button
3s
Direct USB
plug
battery
capacity is less
than 15%
battery
capacity is
less than 5%
(After playing
prompt voice,
power off)
Power
Power on
Power off
Charging
Low
battery
flashes 5s;
flash frequency:
once each second
lighting 3s
constantly
lighting constantly
(after fully charged,
turn off)
flashes constantly;
flash frequency:
once per 3mins
lighting 3s
constantly
Troubleshooting
I can hear crackling noise.
To receive the best audio quality, it is recommended to wear
your headset on the same side of the body as your mobile
phone.
I can't hear anything in my headset.
• Ensure the headset is turned on and is properly charged.
Page 9

• Ensure the headset is properly paired with the mobile
phone.
• Ensure that the mobile phone is connected with the
headset
If it does not connect, either refer to the mobile phone's
Bluetooth menu or see “Using Your Headset” and
“Pairing Your Headset with a Bluetooth Mobile Phone”.
I can't connect my headset with my mobile phone.
• Ensure your headset is turned off and is properly
charged.
• Ensure the headset is properly paired with your mobile
phone.
• Ensure your mobile phone’s Bluetooth feature is
activated.
Please refer to your mobile phone user guide for specific
instruction.
• Ensure the headset is within 32 feet range of your mobile
phone and there are no obstructions, such as walls or
other electronic devices in between.
If the above steps do not solve your problem, recharge the
headset and remove your mobile phone’s battery for a while.
Safety Information
Check and observe local laws regarding the use of a mobile
phone and a headset while driving. If you use the headset
while driving, ensure your full attention and focus. It is your
responsibility to drive safely. Consider to pull off the road
before making or answering a call.
Page 10

Never leave your headset above any air bag deployment area
inside your car as serious injury may result when an air bag
deploys.
Never allow children to play with the headset – small parts
may be of choking hazard.
Observe all signs and displays that require an electrical
device or RF radio product to be switched off in designated
areas. These could include hospitals, blasting areas, and
potentially explosive atmospheres.
Turn off your headset prior to boarding an aircraft. Do not
use your headset inside an aircraft.
To prevent damage to your hearing, please do not set the
listening volume too high.
Do not attempt to modify the headset.
Do not keep the headset near a wash basin or other wet
places.
Do not use the headset outdoors in the rain.
Do not use the headset in stormy weather.
Do not clean the headset while it is being charged. Always
disconnect the charger from the headset before cleaning.
Do not attempt to force open the built-in battery.
Only charge the headset’s built-in battery in accordance with
the instructions described in this user guide.
Declaration of Conformity
Hereby, TCL Communication Ltd. declares that this product
is in conformity with the following essential requirements
of Council Directive 1999/5/EC (referred to as R&TTE
Directive): Article 3.1a, 3.1.
Page 11

Federal Communications Commission (FCC) Statement
BH60 complies with Part 15 of the FCC Rules. Operation
is subject to the following two conditions: (1) this device
may not cause harmful interference, and (2) this device must
accept any interference received, including interference that
may cause undesired operation.
NOTE: The manufacturer is not responsible for any radio
or TV interference caused by unauthorized modifications
to this equipment. Such modifications could void the user’s
authority to operate the equipment.
NOTE: This equipment has been tested and found to
comply with the limits for a Class B digital device, pursuant
to part 15 of the FCC Rules. These limits are designed to
provide reasonable protection against harmful interference
in a residential installation. This equipment generates uses
and can radiate radio frequency energy and, if not installed
and used in accordance with the instructions, may cause
harmful interference to radio communications. However,
there is no guarantee that interference will not occur in a
particular installation. If this equipment does cause harmful
interference to radio or television reception, which can be
determined by turning the equipment off and on, the user
is encouraged to try to correct the interference by one or
more of the following measures:
- Reorient or relocate the receiving antenna.
- Increase the separation between the equipment and
receiver.
- Connect the equipment into an outlet on a circuit different
from that to which the receiver is connected.
- Consult the dealer or an experienced radio/TV technician
for help
Page 12

Industry Canada (IC) statement
BH60 complies with Industry Canada license-exempt RSS
standard(s). Operation is subject to the following two
conditions: (1) this device may not cause interference,
and (2) this device must accept any interference, including
interference that may cause undesired operation of the
device.
Guarantee
Your accessor y is guaranteed against all manufacturing
defects for twelve (12) months from the date of purchase
shown on your invoice. Nevertheless, if the legal warranty
period in force in your country exceeds twelve (12) months,
the legal warranty alone shall be applicable.
Hot Line Number: see "TCL Communication Services"
leaflet or go to our website. (In North America, please
contact the customer care center by calling (855) 368-
0829. in Canada, please contact the customer care center by
calling (855) 844-6058)
On our Internet site (www.alcatelonetouch.com), you will
find our FAQ (Frequently Asked Questions) section. You can
also contact us by e-mail to ask any questions you may have.
Dispose of the packaging and this product in accordance
with the latest provisions. The Bluetooth® word mark and
logos are owned by the Bluetooth SIG, Inc. and any use of
such marks by TCL Communication Ltd. is under license.
Page 13

ALCATEL is a trademark of Alcatel-Lucent and is used under
license by TCL Communication Ltd..
© Copyright 2015 TCL Communication Ltd. All rights
reserved
TCL Communication Ltd. reserves the right to alter material
or technical specification without prior notice.
Français
Spécifications
Spécifications Bluetooth BT BLE4.0, Classe 2
Détails du profil Bluetooth HFP v1.6 + HSP v1.2 +
Portée environ 10m
Durée de recharge Moins de 1,5heure
Durée de conversation* Jusqu’à 5heures
Durée de veille* Jusqu’à 168heures
Dimensions 60x12,3x6,30 mm
Poids 7g
Plage de températures de
fonctionnement
Plage de températures de
stockage
A2DP v1.2
(Une semaine de charge)
-20°C à 55°C
-30°C à 70°C
Page 14
*Peut varier selon les habitudes de l’utilisateur, les
différents modes de fonctionnement et les paramètres
de l’appareil mobile.
Présentation
2
1
3
5
1. Touche Marche-Arrêt
• Mettre sous tension/ hors tension
• Associer à votre appareil mobile
• Répondre/ Mettre fin à un appel
• Rejeter/ Transférer un appel
• Arrêter/ Lire la musique
2. Écouteur intra-auriculaire en caoutchouc
3. Voyant LED
4. Touche Volume
• Augmentation/ Réduction du volume
4
8
6
7
Page 15

• Morceau précédent/ suivant
• Paramétrage de la langue
5. Capuchon USB
6. Haut-parleur
7. Prise USB
• Mise en charge de la batterie
8. Microphone
Mise en marche
Pour utiliser le kit mains libres Bluetooth BH60, procédez
comme suit:
1. Mise en charge du kit mains libres
Avant d’utiliser le kit mains libres, assurez-vous qu’il est
complètement rechargé et mis sous tension. Le kit mains
libres vous est fourni avec une batterie rechargeable
intégrée. La première fois que vous utilisez le kit mains
libres, il est recommandé de le recharger complètement.
Ouvrez le capuchon USB et branchez la prise USB sur un
ordinateur de bureau, un portable, un chargeur ou tout
autre port USB.
2. Association du kit mains libres avec
un téléphone mobile Bluetooth
Une fois la mise en charge terminée, vous pouvez associer
le kit mains libres avec un téléphone mobile Bluetooth.
1) Assurez-vous que le kit mains libres est éteint.
2) Pour activer la procédure d’association, maintenez la
touche Marche-Arrêt enfoncée jusqu’à ce que le voyant
d’état clignote en rouge ou en bleu.
Page 16

3) Vérifiez que votre appareil mobile Bluetooth est activé.
Recherchez les appareils Bluetooth et sélectionnez
«ALCATEL onetouch BH60» pour établir l’association.
Une fois l’association établie, le voyant LED devient bleu
et clignote à un intervalle de six secondes.
4) Après l'appairage avec le premier téléphone, désactiver
le bluetooth du premier téléphone. Le LED du kit
clignotte en bleu. Appairez ensuite le deuxième
téléphone avec le kit. Lorsque la connection est établie,
réactiver le bluetooth du premier téléphone et choisir
"ALCATEL onetouch BH60" pour les ré-appairer. Le kit
sera connecté simultanément aux deux téléphones.
Utilisation du kit mains libres
Mise sous tension
Maintenez la touche Marche-Arrêt enfoncée pendant
3secondes, le voyant LED rouge clignote pendant
5secondes. Vous entendez alors le message audio «Power
on» qui vous prévient que le kit mains libres est allumé.
Association du kit mains libres avec un téléphone
mobile Bluetooth
Une fois le kit mains libres allumé, il passe automatiquement
en mode association. Le voyant LED bleu se met alors à
clignoter à un intervalle d’une seconde.
Association établie
Il est inutile de saisir votre code PIN. Une fois l’association
établie, le voyant LED devient bleu et clignote à un intervalle
de six secondes. Vous entendez alors le message audio
«Phone 1 connected » qui vous prévient que le téléphone
est connecté.
Page 17

Volume +
Une pression longue permet de changer de morceau lors
de l’écoute d'une musique. Une pression brève permet de
régler le volume sonore. Vous entendez alors le message
audio «Maximum volume» qui vous prévient que le volume
maximal est atteint.
Volume -
Une pression longue permet de changer de morceau lors
de l’écoute d'une musique. Une pression brève permet de
régler le volume sonore. Vous entendez alors le message
audio «Minimum volume» qui vous prévient que le volume
minimal est atteint.
Lecture de musique
En mode veille, appuyez une fois sur la touche Marche-Arrêt
pour lire la musique et appuyez à nouveau sur cette même
touche pour interrompre la lecture. Maintenez la touche
Volume haut enfoncée pour passer au morceau précédent.
Maintenez la touche Volume bas enfoncée pour passer au
morceau suivant.
Déconnexion
Une fois le kit mains libres déconnecté ou la fonction
Bluetooth de l’appareil désactivée, vous entendez alors
le message audio «Phone 1 disconnected » qui vous
prévient que le téléphone est déconnecté. Le voyant LED
bleu clignote à un intervalle de trois secondes et s’éteint
automatiquement au bout de deux minutes.
Mise hors tension
Maintenez la touche Marche-Arrêt enfoncée pendant plus
de trois secondes alors que le kit mains libres est allumé.
Vous entendez alors le message audio «Power off » qui
vous prévient que le kit mains libres est en cours d’extinction.
Le voyant LED rouge reste allumé pendant trois secondes,
puis s’éteint.
Page 18

Autonomie faible
Si la batterie dispose de moins de 15% d’autonomie, le
voyant LED rouge s’allume à trois reprises par minute. Vous
entendez alors le message audio «Low power » qui vous
prévient que l’autonomie est insuffisante. Sur l’appareil, le
symbole de la batterie devient vide.
Si la batterie dispose de moins de 5% d’autonomie, le voyant
LED rouge s’allume pendant trois secondes. Vous entendez
alors le message audio «Power off», puis le kit mains libres
s’éteint automatiquement.
Appel entrant
Dès que la sonnerie par défaut retentit, appuyez sur la
touche Marche/ Arrêt pour répondre à l’appel.
Rejet d’appel
Appuyez deux fois sur la touche Marche/ Arrêt dans un
intervalle de trois secondes pour rejeter l’appel.
Composition vocale
En mode veille, appuyez deux fois sur la touche Marche/
Arrêt dans un intervalle de trois secondes pour activer la
fonction de composition vocale.
Transfert d’appel
Au cours de la conversation, maintenez l’une des touches
Volume enfoncée. Un bref bip retentit et l’appel vocal passe
sur le téléphone mobile.
Mise en charge de la batterie
Branchez la prise USB. Le voyant LED devient rouge, puis
passe au bleu et finalement s’éteint dès que la mise en
charge est terminée.
Page 19

Voyant LED
Configuration
Mode
fonctionnement
État Opération Allumé en bleu
Mode veille / /
Mode
association
Mode
connecté
Reconnecté
/
Au moment
de la
connexion
Connexion
en cours
Au moment
de la
déconnexion
Reconnexion
en cours
Intervalle de
clignotement:
une fois par
seconde (reste
allumé pendant
120s une fois
l’association
établie)
Clignote
doucement
Intervalle de
clignotement:
une fois toutes
les 6secondes
(pour des
raisons
d’économie)
Clignote
doucement
Intervalle de
clignotement:
une fois toutes
les 3secondes
Page 20

Configuration
MarcheArrêt
État Opération Allumé en bleu
Maintien de la
Mise sous
touche Marche-
tension
Arrêt pendant
3s
Maintien de la
Mise hors
touche Marche-
tension
Arrêt pendant
3s
Mise en
Branchement
charge
USB
Autonomie
de la batterie
inférieure à
15%
Batterie
Autonomie
faible
de la batterie
inférieure à
5% (éteindre
dès que vous
entendez le
message)
Clignote
pendant
5secondes.
Intervalle de
clignotement:
une fois par
seconde
Reste allumé
pendant
3secondes
Reste allumé
(s’éteint une
fois la mise
en charge
terminée)
Clignote
constamment.
Intervalle de
clignotement:
une fois toutes
les 3minutes
Reste allumé
pendant
3secondes
Page 21

Problèmes et solutions
J’entends un grésillement.
Afin de bénéficier d’une qualité audio optimale, il est
conseillé de porter le kit mains libres du même côté du
corps que votre téléphone mobile.
Je n’entends rien du tout dans le kit mains libres.
• Assurez-vous qu’il est allumé et correctement chargé.
• Vérifiez que le kit mains libres est correctement associé
à votre téléphone mobile.
• Vérifiez que le téléphone mobile est connecté au kit
mains libres.
En cas d’échec de la connexion, reportez-vous au menu
Bluetooth du téléphone mobile ou consultez les sections
«Utilisation du kit mains libres» et «Association du kit
mains libres avec un téléphone mobile Bluetooth» de ce
guide d’utilisation.
Je n’arrive pas à connecter mon kit mains libres à mon
téléphone mobile.
• Assurez-vous que le kit mains libres est allumé et qu’il
est correctement chargé.
• Assurez-vous que le kit mains libres est correctement
associé à votre téléphone mobile.
• Assurez-vous que l’option Bluetooth de votre téléphone
mobile est activée.
Veuillez consulter le guide d’utilisation de votre
téléphone mobile pour toute autre information
particulière.
Page 22

• Assurez-vous que le kit mains libres se trouve dans un
rayon de moins de dix mètres de votre téléphone mobile
et qu’il n’existe aucun obstacle, tel un mur ou d’autres
appareils électroniques, entre les deux appareils.
Si les étapes précédentes ne vous permettent pas de
résoudre votre problème, veuillez recharger le kit mains
libres et enlever la batterie de votre téléphone mobile
pendant quelques instants.
Précautions d’emploi
Veuillez consulter et respecter les lois locales en vigueur
concernant l’utilisation des téléphones mobiles et des
kits mains libres lors de la conduite d’un véhicule. Si vous
utilisez le kit mains libres en conduisant, restez toujours
parfaitement concentré sur la route. Il est de votre
responsabilité de conduire avec prudence. Pensez à vous
ranger sur le bas-côté de la route avant d’appeler ou de
répondre à un appel.
Ne laissez jamais le kit mains libres à proximité d’un airbag
dans votre voiture car cela pourrait provoquer de graves
blessures lors de son déploiement.
Ne laissez jamais un enfant jouer avec le kit mains libres. Les
petites pièces pourraient provoquer un étouffement.
Soyez attentif aux indications et aux affichages demandant
d’éteindre tout appareil électrique ou produit utilisant
des radiofréquences dans certaines zones, telles que
les hôpitaux, les zones d’utilisation d’explosifs et les
atmosphères potentiellement explosives.
Éteignez le kit mains libres avant d’embarquer à bord d’un
avion. N’utilisez pas le kit mains libres à bord d’un avion.
Afin d’éviter d’endommager votre audition, évitez les
écoutes à fort volume.
Page 23

N’essayez pas de modifier le kit mains libres.
Ne laissez pas le kit mains libres à proximité d’un lavabo ou
d’un endroit humide.
N’utilisez pas le kit mains libres sous la pluie.
N’utilisez pas le kit mains libres par temps d’orage.
Ne nettoyez pas le kit mains libres en cours de charge.
Avant chaque nettoyage, veillez à toujours débrancher le
chargeur du kit mains libres.
N’essayez pas de forcer l’ouverture de la batterie intégrée.
Veuillez charger la batterie intégrée du kit mains libres
conformément aux instructions décrites dans le présent
guide d’utilisation.
Déclaration de conformité
Par la présente, TCL Communication Ltd. déclare que ce
produit est conforme aux exigences essentielles suivantes
de la Directive du Conseil 1999/5/CE (appelée Directive
ETRT): article3.1a, 3.1.
Déclaration de la Commission fédérale des
communications (FCC)
Le kit mains libres BH60 est conforme à la partie15
des règles de la FCC. Son fonctionnement est soumis
aux conditions suivantes (1) cet appareil ne doit pas
provoquer d’interférences, et (2) cet appareil doit accepter
toute interférence reçue, y compris celles causant un
fonctionnement indésirable.
REMARQUE: le fabricant décline toute responsabilité pour
toute interférence avec une radio ou un téléviseur due à
des modifications non autorisées de l’équipement. De telles
Page 24

modifications pourraient annuler le droit de l’utilisateur à
faire fonctionner cet équipement.
REMARQUE: Cet équipement a été testé et jugé
conforme aux limites pour un appareil numérique de classe
B, conformément à la partie15 des règles de la FCC.
Ces limites sont conçues pour fournir une protection
raisonnable contre les interférences nuisibles dans une
installation résidentielle. Cet équipement génère et utilise
de l’énergie radiofréquence et, s’il n’est pas installé et utilisé
conformément aux instructions, il peut occasionner des
interférences nuisibles au niveau des communications radios.
Cependant, il n’existe aucune garantie que ces interférences
ne se produiront pas dans une installation particulière. Si cet
équipement génère des interférences nuisibles à la réception
de la radio ou de la télévision (ce qu’il est possible de
déterminer en mettant l’équipement hors tension, puis sous
tension), l’utilisateur est invité à suivre une ou plusieurs des
mesures suivantes pour corriger le problème:
- Modifier l’emplacement ou l’orientation de l’antenne de
réception.
- Éloigner l’appareil du récepteur.
- Brancher l’appareil sur une prise située sur un circuit
différent de celui du récepteur.
- Consulter le revendeur ou un technicien expérimenté
pour obtenir de l’aide.
Déclaration d’Industrie Canada (IC)
Le kit mains libres BH35 est conforme aux normes
RSS exemptées de licence d’Industrie Canada. Son
fonctionnement est soumis aux conditions suivantes
(1) cet appareil ne doit pas provoquer d’interférences,
et (2) cet appareil doit pouvoir recevoir toutes les
interférences, notamment celles qui pourraient provoquer
un fonctionnement indésirable de l’appareil.
Page 25

Garantie
Votre accessoire est garanti contre tout défaut de
fabrication pendant une durée de douze (12) mois à partir
de la date d’achat figurant sur votre facture. Néanmoins,
si la période légale de garantie en vigueur dans votre pays
dépasse les douze (12) mois, seule la garantie légale est
applicable.
N° Hotline : consultez la brochure « TCL Communication
Services » ou notre site Web. (En Amérique du Nord,
consultez le centre d’assistance client en appelant le (855)
368-0829. En Canada, consultez le centre d’assistance client
en appelant le (855) 844-6058.)
Sur notre site Internet (www.alcatelonetouch.com), vous
pourrez consulter en ligne notre rubrique FAQ (Foire aux
Questions). Vous pouvez également nous contacter par
e-mail pour poser vos éventuelles questions.
Jetez l’emballage et le produit conformément aux
dispositions les plus récentes en la matière. Le nom,
la marque et les logos Bluetooth® sont la propriété
de Bluetooth SIG, Inc, et leur utilisation par TCL
Communication Ltd. est régie par une licence.
ALCATEL est une marque déposée d’Alcatel-Lucent utilisée
sous licence par TCL Communication Ltd.
© Copyright 2015 TCL Communication Ltd. Tous droits
réservés
TCL Communication Ltd se réserve le droit de modifier
sans préavis les caractéristiques de ses matériels.
Page 26

Italiano
Specifiche
Specifiche Bluetooth BT BLE4.0, Classe 2
Dettagli del profilo
Bluetooth
Portata di funzionamento Circa 10 m
Tempo di ricarica Inferiore a 1,5 ore
Tempo di utilizzo* Fino a 5 ore
Tempo di standby* Fino a 168 ore (carica
Dimensioni 60 x 12,3 x 6,30 mm
Peso 7g
Gamma di temperatura di
funzionamento
Gamma di temperatura di
conservazione
* Variabile a seconda delle abitudini dell'utente, delle
diverse modalità di funzionamento e delle impostazioni
del telefono cellulare.
HFP v1.6 + HSP v1.2 +
A2DP v1.2
di una settimana)
Da -20°C a 55°C
Da -30°C a 70°C
Page 27

Panoramica
2
1
3
5
1. Tasto Accensione
• Accensione/spegnimento
• Associazione al telefono cellulare
• Risposta/fine di una chiamata
• Rifiuto/trasferimento di una chiamata
• Interruzione/riproduzione della musica
2. Gommino auricolare
3. LED di indicazione
4. Tasto Volume
• Aumento/riduzione del volume
• Brano precedente/successivo
• Impostazione della lingua
5. Tappo USB
6. Altoparlante
7. Connettori USB
4
8
6
7
Page 28

• Ricarica della batteria
8. Microfono
Primi passi
Per utilizzare l'auricolare Bluetooth BH60, attenersi alla
seguente procedura:
1. Ricarica dell'auricolare
Assicurarsi che l'auricolare sia completamente carico e
acceso prima dell'utilizzo. L'auricolare è dotato di una
batteria ricaricabile integrata. Si consiglia di eseguire una
ricarica completa prima di utilizzare l'auricolare per la prima
volta. Aprire il tappo USB e inserire i connettori USB in un
computer desktop, un computer laptop, un caricatore o
un'altra porta USB.
2. Associazione
Una volta effettuata la ricarica, è possibile associare
l'auricolare a un telefono cellulare Bluetooth compatibile.
1) Assicurarsi che l'auricolare sia spento.
2) Per attivare la modalità di associazione, tenere premuto
il tasto Accensione dell'auricolare senza sollevare il dito
finché l'indicatore di stato lampeggia in rosso/blu.
3) Assicurarsi che il Bluetooth del dispositivo mobile sia
attivato. Eseguire la ricerca dei dispositivi Bluetooth
e selezionare ALCATEL onetouch BH60 per la
connessione. Dopo l'associazione, il LED passa al blu e si
illumina ogni sei secondi.
4) Dopo aver connesso l’auricolare con il primo telefono
spegnere il Bluetooth. Il lLED dell’auricolare lampeggia
blu. Associare il secondo dispositivo all’auricolare.
Page 29

Dopo la connessione accendere il Bluetooth del primo
dispositivo e scegliere ‘ALCATEL onetouch BH60’
per associarlo di nuovo. L’auricolare dovrebbe essere
associato a due telefoni ora.
Utilizzo dell'auricolare
Accensione
Premere per più di 3 secondi il tasto Accensione. Il LED
rosso lampeggerà per 5 secondi. Sarà possibile udire l'allarme
di accensione attraverso il gommino auricolare.
Associazione
Dopo l'accensione, l'auricolare passerà automaticamente
allo stato di associazione. Il LED blu si accenderà una volta
al secondo.
Dopo l'associazione
Non è necessario inserire il PIN. Dopo l'associazione, il
LED passa al blu e si illumina ogni sei secondi. Nel gommino
auricolare sarà possibile udire l'allarme di connessione del
telefono.
Aumento del volume
Tenere premuto per cambiare brano quando si ascolta
musica. Premere brevemente per regolare il volume
dell'audio. Se si imposta il volume massimo, sarà emesso il
relativo allarme.
Riduzione del volume
Tenere premuto per cambiare brano quando si ascolta
musica. Premere brevemente per regolare il volume
dell'audio. Se si imposta il volume minimo, sarà emesso il
relativo allarme.
Page 30

Riproduzione di musica
In standby, premere una volta il tasto Accensione per
riprodurre musica e premere di nuovo per interrompere
la riproduzione. Tenere premuto il tasto di aumento del
volume per passare al brano precedente. Tenere premuto
il tasto di riduzione del volume per passare al brano
successivo.
Dopo la disconnessione
Una volta che l'auricolare è disconnesso o la funzione BT
sul dispositivo è stata disattivata, attraverso il gommino
auricolare sarà possibile udire l'allarme di disconnessione del
telefono. Il LED blu si accenderà per tre secondi e dopo due
minuti la spia si spegnerà automaticamente.
Spegnimento
Premere per più di tre secondi il tasto Accensione dopo
l'accensione. Attraverso il gommino auricolare sarà possibile
udire l'allarme di spegnimento. Il LED rosso si accenderà per
tre secondi e quindi si spegnerà.
Batteria scarica
Se la carica residua della batteria è inferiore al 15%, il LED
rosso si accenderà continuamente tre volte al minuto.
Attraverso il gommino auricolare sarà possibile udire
l'allarme di batteria scarica. Il simbolo di alimentazione
diventerà vuoto sul dispositivo.
Se la carica residua della batteria è inferiore al 5%, il LED
rosso si accenderà per tre secondi. Attraverso il gommino
auricolare sarà possibile udire l'allarme di spegnimento e
l'operazione avverrà automaticamente.
Chiamata in arrivo
Verrà emesso l'allarme vocale predefinito del sistema che
sarà udibile attraverso il gommino auricolare. Premere una
volta il tasto Accensione per rispondere alla chiamata.
Page 31

Rifiuto di una chiamata
Premere due volte il tasto Accensione entro tre secondi per
rifiutare la chiamata.
Trasferimento vocale
In standby, premere due volte il tasto Accensione entro tre
secondi per attivare la funzione di composizione vocale.
Trasferimento di chiamata
Durante una conversazione, tenere premuto un tasto del
volume. Sarà emesso un breve segnale acustico e l'audio
passerà al dispositivo mobile.
Ricarica della batteria
Spina UBS diretta, LED acceso fisso in rosso, passaggio al
LED acceso fisso in blu o nessuna spia accesa una volta
completata la ricarica.
Page 32

Stato del LED
Pattern Stato Operazione Luce blu
Modalità di
funziona
-
mento
Modalità di
standby
Modalità di
associazione
Modalità di
connessione
Riconnessione
/ /
/
Connessione
appena
instaurata
Ripetizione
della
connessione
Disconnessione
appena
effettuata
Ripetizione
della
riconnessione
Frequenza di
lampeggiamento:
una volta al
secondo (resta
120 secondi
nello stato di
associazione)
Lampeggiamento
lento
Frequenza di
lampeggiamento:
una volta ogni
6secondi
(in ragione
del consumo
energetico)
Lampeggiamento
lento
Frequenza di
lampeggiamento:
una volta ogni
3secondi
Page 33

Pattern Stato Operazione Luce rossa
Tenere
premuto per
3 secondi
il tasto
Accensione
Tenere
premuto per
3 secondi
il tasto
Accensione
Spina USB
diretta
Capacità
della batteria
inferiore al
10%
Capacità
della batteria
inferiore al 5%
(spegnimento
dopo la
riproduzione
del messaggio
vocale)
Alimen
tazione
Accensione
Spegnimento
Ricarica
-
Batteria
scarica
Lampeggiamento
5secondi;
frequenza di
lampeggiamento:
una volta al
secondo
Luce fissa per
3secondi
Luce fissa
(spegnimento
dopo la ricarica
completa)
Lampeggiamento
costante;
frequenza di
lampeggiamento:
volta ogni 3
Luce fissa per
3secondi
minuto
una
Page 34

Problemi e soluzioni
Si sente un fruscio.
Per ottenere la migliore qualità audio, si consiglia di
indossare l'auricolare sul medesimo lato del corpo del
telefono cellulare.
Non si sente nulla con l'auricolare.
• Assicurarsi che l'auricolare sia acceso e correttamente
caricato.
• Assicurarsi che l'auricolare sia correttamente associato
al telefono cellulare.
• Assicurarsi che il telefono cellulare sia connesso
all'auricolare.
Se non è connesso, consultare il menu Bluetooth
del telefono cellulare oppure consultare "Utilizzo
dell'auricolare" e "Associazione dell'auricolare a un
telefono cellulare Bluetooth".
Non è possibile connettere l'auricolare al telefono
cellulare.
• Assicurarsi che l'auricolare sia spento e correttamente
caricato.
• Assicurarsi che l'auricolare sia correttamente associato
al telefono cellulare.
• Assicurarsi che la funzionalità Bluetooth del telefono
cellulare sia attivata.
Consultare la guida dell'utente del telefono cellulare per
istruzioni specifiche.
Page 35

• Assicurarsi che il telefono cellulare si trovi a meno di
10 metri dal telefono cellulare e che non siano frapposti
ostacoli, ad esempio pareti o altri dispositivi elettronici.
Se i suggerimenti precedenti non risolvono il problema,
ricaricare l'auricolare e rimuovere per un certo periodo la
batteria del telefono cellulare.
Informazioni di sicurezza
Consultare e rispettare le leggi locali relative all'utilizzo di
un telefono cellulare e un auricolare durante la guida. Se si
utilizza l'auricolare durante la guida, assicurarsi di mantenere
tutta l'attenzione e la concentrazione. È responsabilità
dell'utente guidare in condizioni sicure. Sostare prima di
effettuare una chiamata o rispondere a una chiamata.
Non lasciare mai l'auricolare sopra l'area di espansione di
un airbag all'interno dell'autovettura onde evitare possibili
lesioni gravi alla sua espansione.
Non consentire mai ai bambini di giocare con l'auricolare
onde evitare il pericolo di soffocamento a causa di piccole
parti.
Rispettare tutti i segnali e i cartelli che richiedono lo
spegnimento di un dispositivo elettrico o una radio RF nelle
aree designate, quali ospedali, aree destinate a esplosioni e
atmosfere potenzialmente esplosive.
Spegnere l'auricolare prima di imbarcarsi su un aereo. Non
utilizzare l'auricolare all'interno di un aereo.
Onde evitare il danneggiamento dell'udito, non impostare un
volume di ascolto eccessivamente alto.
Non cercare di modificare l'auricolare.
Non conservare l'auricolare nei pressi di un lavandino o altri
luoghi bagnati.
Page 36

Non utilizzare l'auricolare all'aperto sotto la pioggia.
Non utilizzare l'auricolare in caso di temporale.
Non pulire l'auricolare durante la ricarica. Disconnettere
sempre il caricatore dall'auricolare prima della pulizia.
Non cercare di aprire con forza la batteria incorporata.
Ricaricare la batteria incorporata dell'auricolare soltanto
in conformità alle istruzioni contenute in questa guida
dell'utente.
Dichiarazione di conformità
TCL Communication Ltd. dichiara che questo prodotto è
conforme ai seguenti requisiti essenziali della Direttiva del
Consiglio 1999/5/CE (denominata Direttiva R&TTE): Articoli
3.1a, 3.1.
Certificazione Commissione Federale delle
Comunicazioni (FCC)
Il dispositivo BH60 è conforme alla Parte 15 delle Norme
FCC. Il funzionamento è soggetto alle due condizioni
seguenti: (1) il dispositivo non può causare interferenze
dannose, e (2) deve accettare le interferenze ricevute,
incluse quelle che potrebbero causare un suo funzionamento
indesiderato.
NOTA: Il produttore non si assume la responsabilità di
eventuali interferenze radio o TV causate da modifiche
non autorizzate di questa apparecchiatura. Tali modifiche
possono annullare l'autorizzazione dell'utente a utilizzare
l'apparecchiatura.
NOTA: Questa apparecchiatura è stata collaudata ed è
risultata conforme ai limiti di un dispositivo digitale di Classe
B, ai sensi della Parte 15 delle Norme FCC. Questi limiti
Page 37

sono concepiti per offrire una ragionevole protezione da
interferenze nocive in un'installazione residenziale. Questa
apparecchiatura genera, usa e può emettere frequenze
radio e, se non installata e usata secondo le istruzioni, può
causare interferenze dannose alle comunicazioni via etere.
Non è però possibile garantire che in una determinata
installazione non si verifichino interferenze. Qualora questa
apparecchiatura generi interferenze dannose alla ricezione
radiotelevisiva, evento che può essere accertato spegnendo
e riaccendendo l'apparecchiatura, è possibile tentare di
risolvere il problema eseguendo una o più delle operazioni
indicate di seguito:
- Modificare l'orientamento o la posizione dell'antenna di
ricezione.
- Allontanare l'apparecchiatura dal ricevitore.
- Collegare l'apparecchiatura a una presa su un circuito
differente rispetto a quello a cui è collegato il ricevitore.
- Per assistenza, rivolgersi al rivenditore o a un tecnico
radiotelevisivo esperto.
Certificazione Industry Canada (IC)
Il dispositivo BH60 è conforme allo standard o agli standard
RSS esenti da licenza dell'Industry Canada. Il funzionamento
è soggetto alle due condizioni seguenti: (1) il dispositivo
non può causare interferenze, e (2) deve accettare le
interferenze, incluse quelle che potrebbero causare un suo
funzionamento indesiderato.
Garanzia
Se nella confezione è presente un certificato di garanzia, fare
riferimento alle norme in esso contenute, altrimenti valgono
le norme di seguito riportate.
Page 38

L'accessorio è garantito contro tutti i difetti di fabbricazione
per i dodici (12) mesi successivi alla data di acquisto indicata
sulla fattura. Ciononostante, qualora il periodo di garanzia
legale in vigore nel paese dell'utente sia superiore ai dodici
(12) mesi, sarà applicabile la sola garanzia legale.
Numero Hot Line: consultare l'opuscolo "TCL
Communication Services" oppure il nostro sito Internet.
Dal nostro sito Internet (www.alcatelonetouch.com)
sarà possibile consultare in linea la rubrica "Domande più
frequenti" oppure inviarci eventuali domande via e-mail.
Smaltire l'imballaggio e questo prodotto in conformità
alle disposizioni più recenti. La denominazione e i loghi
Bluetooth® sono di proprietà di Bluetooth SIG, Inc. e ogni
utilizzo di tali marchi da parte di TCL Communication Ltd. è
sotto licenza.
ALCATEL è un marchio di Alcatel-Lucent utilizzato su
licenza da TCL Communication Ltd.
© Copyright 2015 TCL Communication Ltd. Tutti i diritti
riservati
TCL Communication Ltd. si riserva il diritto di modificare il
materiale o le specifiche tecniche senza alcun preavviso.
Page 39

Español
Especificaciones
Especificaciones del Bluetooth BT BLE 4.0, Clase 2
Detalles de perfiles Bluetooth HFP v1.6 + HSP v1.2 +
Radio de alcance Aproximadamente 10m
Tiempo de carga Menos de 1,5 horas
Tiempo en uso* Hasta 5 horas
Tiempo en espera* Hasta 168 horas
Dimensiones 60 x 12,3 x 6,30 mm
Peso 7 g
Temperatura de funcionamiento -20 °C a 55 °C
Temperatura de almacenaje -30 °C a 70 °C
* Puede variar en función de los hábitos del usuario, los
diferentes modos de uso y los ajustes del teléfono.
A2DP v1.2
(una carga por semana)
Page 40

Descripción general
2
1
3
5
1. Tecla de encendido
• Encendido / Apagado
• Emparejar con el teléfono móvil
• Responder / Finalizar una llamada
• Rechazar / Transferir una llamada
• Detener / Reproducir música
2. Almohadilla para los oídos
3. Indicador LED
4. Tecla de volumen
• Aumentar / Reducir el volumen
• Canción anterior / siguiente
• Ajustes de idioma
5. Tapa del USB
6. Altavoz
4
8
6
7
Page 41

7. Pines USB
• Carga de la batería
8. Micrófono
Puesta en marcha
Para utilizar los auriculares BH60 Bluetooth, siga estos
pasos:
1. Carga de los auriculares
Asegúrese de que están completamente cargados y
encendidos antes de usarlos. Los auriculares vienen con una
batería recargable incorporada. Se recomienda cargarlos
completamente antes de usarlos por primera vez. Abra la
tapa del USB e inserte los pines USB en un PC, ordenador
portátil, cargador u otro puerto USB.
2. Emparejamiento
Una vez cargados, puede emparejar los auriculares con un
teléfono móvil con Bluetooth.
1) Asegúrese de que están apagados.
2) Para activar el modo de sincronización, mantenga pulsada
la tecla de encendido de los auriculares hasta que el
indicador de estado se ilumine en rojo/azul.
3) Asegúrese de que el Bluetooth del dispositivo móvil está
activado. Busque dispositivos Bluetooth y seleccione
“ALCATEL onetouch BH60” para conectarse. Después
de la sincronización, el LED cambia a azul y se ilumina
cada seis segundos.
4) Después de emparejar los auriculares con el primer
teléfono, apague el Bluetooth del teléfono. El LED
parpadea en azul. Empareje el segundo teléfono con los
Page 42

auriculares. Tras conectar, enciende el Bluetooth del
primer teléfono y elija ‘ALCATEL onetouch BH60’ para
emparejarlo de nuevo. Ahora los auriculares estarán
conectados con dos teléfonos.
Uso de los auriculares
Encender el teléfono
Pulse la tecla de encendido durante más de 3 segundos,
el LED rojo parpadeará durante 5 segundos. La alarma de
"Power on" se oirá a través de los auriculares.
Emparejamiento
Al encenderlo, se cambiará automáticamente al estado
de emparejamiento. Se iluminará el LED azul una vez por
segundo.
Emparejado
No es necesario que introduzca su PIN. Después del
emparejamiento, el LED cambia a azul y se ilumina cada seis
segundos. La alarma "Phone 1 connected" sonará a través de
los auriculares.
Subir volumen
La pulsación larga cambiará canciones cuando se escucha
música. Una pulsación corta ajustará el volumen del sonido.
La alarma "Maximum volume" sonará si se alcanza el
volumen máximo.
Bajar volumen
La pulsación larga cambiará canciones cuando se escucha
música. Una pulsación corta ajustará el volumen del sonido.
Alarma "Minimum volume" sonará si se alcanza el volumen
mínimo.
Page 43

Reproducir música
En modo de espera, pulse la tecla de encendido una vez
para reproducir música y pulse de nuevo para detenerla.
Mantenga pulsada la tecla Subir volumen y cambiará a la
canción anterior. Mantenga pulsada la tecla Bajar volumen y
cambiará a la siguiente canción.
Desconectado
Una vez los auriculares estén desconectados o la función
de BT en el dispositivo está apagada, escuchará la alarma
"Phone 1 disconnected" a través de los auriculares. El LED
azul se iluminará durante tres segundos; transcurridos dos
minutos, la luz se apagará automáticamente.
Apagar
Pulse la tecla de encendido durante más de tres segundos
cuando esté encendido. Escuchará la alarma "Power off" a
través de los auriculares. El LED rojo se iluminará durante
tres segundos y luego se apagará.
Batería baja
Si la batería tiene menos del 15 % de carga, el LED rojo se
iluminará de forma continua hasta tres veces cada minuto.
Escuchará la alarma "Low power" a través de los auriculares.
El símbolo de la batería cambiará a vacío en el dispositivo.
Si la batería tiene menos del 5 % de carga, el LED rojo
se iluminará durante tres segundos. Escuchará la alarma
"Power off" a través de los auriculares y se apagará
automáticamente.
Llamada recibida
Se oirá la alarma predeterminada del sistema en los
auriculares; pulse la tecla de encendido una vez para
contestar la llamada.
Page 44

Rechazar llamada
Pulse la tecla de encendido dos veces antes de tres segundos
para rechazar la llamada.
Marcación por voz
En modo de espera, pulse la tecla de encendido dos veces
antes de tres segundos para activar la función de marcación
por voz.
Transferencia de llamada
Mientras habla, mantenga pulsada una tecla de volumen. Se
escuchará un pitido corto y el audio cambiará al dispositivo
móvil.
Carga de la batería
Al conectar el USB habrá iluminación constante del LED
rojo, cambio a iluminación constante del LED azul o sin
iluminación una vez cargado completamente.
Page 45

LED de estado
Patrón Estado Acción Iluminación azul
Modo
de
trabajo
Modo de
espera
Modo de
emparejamiento
Modo
conectado
Reconectado
/ /
/
Recién
conectado
Seguir
conectado
Recién
desconectado
Seguir
reconectando
Frecuencia de flash:
una vez cada segundo
(permanece 120s
en el estado de
emparejamiento)
Parpadea lentamente
Frecuencia de
flash: una vez cada
6segundos (debido al
gasto de la batería)
Parpadea lentamente
Frecuencia de
flash: una vez cada
3segundos
Page 46

Patrón Estado Acción Iluminación roja
Pulsación larga
Encender
3 s en la tecla
de encendido
Pulsación larga
Apagar
3 s en la tecla
de encendido
Conectar por
Cargando
USB directo
Encendido
La capacidad
de la batería es
inferior al 10 %
Batería
La capacidad
baja
de la batería
es inferior al
5 % (después
de escuchar la
voz del sistema,
apagar)
Parpadea 5 s
Frecuencia de
flash: una vez cada
segundo
Iluminado 3 s
constantemente
Iluminación
constante (después
de cargarse por
completo, se apaga)
Parpadea
constantemente
Frecuencia de
flash: una vez cada
3minuto
Iluminado 3 s
constantemente
Page 47

Problemas y soluciones
Puedo oír un chisporroteo.
Para recibir la mejor calidad de audio, se recomienda usar
los auriculares en el mismo lado del cuerpo que el teléfono
móvil.
No oigo nada en los auriculares.
• Asegúrese de que los auriculares están encendidos y
correctamente cargados.
• Asegúrese de que los auriculares están emparejados
correctamente con el teléfono móvil.
• Asegúrese de que el teléfono móvil está conectado con
los auriculares.
Si no se conecta, consulte el menú Bluetooth del
teléfono móvil o consulte “Uso de los auriculares” y
“Emparejamiento de los auriculares con un teléfono
móvil Bluetooth”.
No puedo conectar los auriculares con mi teléfono
móvil.
• Asegúrese de que los auriculares están apagados y
correctamente cargados.
• Asegúrese de que los auriculares están emparejados
correctamente con el teléfono móvil.
• Asegúrese de que la función Bluetooth del teléfono
móvil esté activada.
Consulte la guía de usuario del teléfono móvil para
consultar instrucciones específicas.
Page 48

• Asegúrese de que los auriculares están a menos de 10
metros de su teléfono móvil y no hay obstrucciones,
como paredes u otros dispositivos electrónicos.
Si los pasos anteriores no resuelven su problema, recargue
los auriculares y retire la batería de su teléfono móvil
durante un tiempo.
Información de seguridad
Compruebe y siga las leyes locales en relación con el uso del
teléfono móvil con auriculares mientras conduce. Si utiliza
los auriculares mientras conduce, asegúrese de prestar toda
su atención y concentración. Es su responsabilidad conducir
con seguridad. Considere salir de la carretera antes de
hacer o recibir una llamada.
Nunca deje sus auriculares encima de ningún sistema de
airbag dentro de un vehículo, ya que puede resultar herido
al desplegarse el airbag.
Nunca permita que los niños jueguen con los auriculares, ya
que contiene piezas pequeñas que pueden ocasionar asfixia.
Observe todos los letreros y pantallas que indiquen que se
deben apagar los dispositivos eléctricos o de radiofrecuencia
en las áreas designadas. Estas podrían incluir hospitales,
áreas de voladura y atmósferas potencialmente explosivas.
Apague los auriculares antes de embarcar en un avión. No
use los auriculares en el interior de un avión.
Para evitar daños en los oídos, no ajuste el volumen
demasiado alto.
No intente modificar los auriculares.
No deje los auriculares cerca de un lavabo o en otros
lugares húmedos.
Page 49

No utilice los auriculares al aire libre cuando llueva.
No use los auriculares cuando haya tormenta.
No limpie los auriculares mientras se están cargando.
Desconecte siempre el cargador de los auriculares antes de
limpiarlos.
No intente forzar la apertura de la batería incorporada.
Solo cargue la batería incorporada de los auriculares de
acuerdo con las instrucciones descritas en este manual del
usuario.
Declaración de conformidad
Por la presente, TCL Communication Ltd. declara que este
producto cumple con los siguientes requisitos esenciales de
la Directiva 1999/5/CE del Consejo (referida como Directiva
R&TTE): Artículo 3.1a, 3.1.
Declaración de la FCC (Federal Communications
Commission, comisión federal de comunicaciones)
BH60 cumple con lo estipulado en el apartado 15 de las normas
de la FCC. Su funcionamiento está sujeto a las siguientes dos
condiciones: (1) el dispositivo no puede provocar interferencias
perjudiciales, y (2) el dispositivo debe aceptar cualquier
interferencia que reciba, incluidas aquellas que puedan provocar
un funcionamiento no deseado.
NOTA: El fabricante no se hace responsable de las
interferencias de radio o TV causada por modificaciones no
autorizadas en este equipo. Dichas modificaciones pueden
anular la autorización del usuario para utilizar el equipo.
NOTA: Este equipo ha sido probado y se ha determinado
que cumple los límites de un dispositivo digital de clase B,
Page 50

según el apartado 15 de las normas de la FCC. Estos límites
están pensados para ofrecer una protección razonable
contra las interferencias perjudiciales en una instalación
residencial. Este equipo genera, utiliza y puede emitir energía
de radiofrecuencia y, si no se instala y utiliza de acuerdo con
las instrucciones, puede producir interferencias perjudiciales
en las comunicaciones por radio. Sin embargo, no está
garantizado que no se produzcan interferencias en una
instalación en concreto. Si este equipo causara interferencias
perjudiciales en la recepción de radio o televisión, lo cual
puede determinarse apagando y encendiendo el equipo, se
recomienda al usuario que intente corregir las interferencias,
por ejemplo, con una de las medidas siguientes:
- Reoriente o reubique la antena receptora.
- Aleje el equipo del receptor.
- Conecte el equipo a una toma de corriente de un circuito
distinto al que está conectado el receptor.
- Solicite ayuda al proveedor o a un técnico experto en
radio o televisión.
Declaración de Industry Canada (IC)
BH60 cumple con los estándares de excepción de
licencia RSS del Ministerio de industria de Canadá. Su
funcionamiento está sujeto a las siguientes dos condiciones:
(1) el dispositivo no puede provocar interferencias, y (2) el
dispositivo debe aceptar cualquier interferencia, incluidas
aquellas que puedan provocar un funcionamiento no
deseado.
Page 51

Garantía
Este accesorio posee una garantía de hasta seis (6) meses a
partir de la fecha de compra que se indica en la factura ante
cualquier defecto de fabricación. Sin embargo, si el período
de garantía legal de su país excede los seis (6) meses, se
aplicará la garantía local legal solamente.
Esta garantía no cubre los defectos que se presenten en el
dispositivo y/o en los accesorios debidos (entre otros) a:
1) No cumplimiento de las instrucciones de uso o instalación
o de las normas técnicas y de seguridad aplicables en la zona
geográfica donde se utilice el dispositivo.
2) Conexión a un equipo no proporcionado o no
recomendado por TCT Mobile Limited.
3) Modificaciones o reparaciones realizadas por particulares
no autorizados por TCT Mobile Limited o sus filiales o el
centro de mantenimiento autorizado.
4) Modificaciones, ajustes o alteraciones de Software o
hardware realizadas por individuos no autorizados por TCT
Mobile Limited.
5) Inclemencias meteorológicas, tormentas eléctricas,
incendios, humedad, filtraciones de líquidos o alimentos,
productos químicos, descarga de archivos, golpes, alta
tensión, corrosión, oxidación, etcétera.
El dispositivo no se reparará si se han retirado o alterado
etiquetas o números de serie (IMEI).
Esta garantía no afecta a los derechos de que dispone el
consumidor conforme a las previsiones de la ley 23/2003 de
10 de Julio de 2003.
En ningún caso TCT Mobile Limited o sus filiales serán
responsables de daños imprevistos o consecuentes de
Page 52

ninguna naturaleza, entre ellos, la pérdida de operaciones
o actividad comercial, en la medida en que la ley permita el
descargo de responsabilidad respecto a dichos daños.
Algunos países o estados no permiten la exclusión o
limitación de daños imprevistos o consecuentes, ni la
limitación de la duración de las garantías implícitas, por
lo que es posible que las limitaciones o exclusiones
precedentes no se apliquen en su caso.
Para cualquier reclamación sobre la aplicación de la garantía
legal de su dispositivo, de acuerdo con las provisiones de la
ley 16/11/2007, puede ponerse en contacto con nosotros a
través de nuestro teléfono de atención al cliente (902 113
119) o por correo a:
TCT Mobile Europe SAS
Immeuble Le Capitole
Parc des Fontaines
Avenue des Champs Pierreux
92000 Nanterre
France
La duración de la batería del dispositivo en cuanto a tiempo
de conversación, tiempo de inactividad y vida útil total
dependerá de las condiciones de uso y la configuración de
la red. Puesto que las baterías se consideran suministros
fungibles, las especificaciones indican que obtendrá un
rendimiento óptimo para su dispositivo durante los seis (6)
primeros meses a partir de la compra y aproximadamente
para 200 recargas más.
Page 53

Número del Servicio de Atención al Cliente: véase el folleto
“TCL Communication Services” o visite nuestro sitio web.
(En América del Norte, contacte con el servicio de atención
al cliente en el teléfono (855) 368-0829. En Canada,
contacte con el servicio de atención al cliente en el teléfono
(855) 844-6058.)
En nuestro sitio de Internet (www.alcatelonetouch.com),
podrá consultar nuestra sección de preguntas frecuentes
(FAQ). También puede ponerse en contacto con nosotros
por correo electrónico para consultarnos cualquier duda
que tenga.
Deseche el envase y el producto de conformidad con las
últimas normativas. La marca y el logotipo de la palabra
Bluetooth® son propiedad de Bluetooth SIG, Inc. y el uso de
dichas marcas por parte de TCL Communication Ltd. y sus
filiales está permitido bajo licencia.
ALCATEL es una marca registrada de Alcatel-Lucent y se
utiliza bajo la licencia de TCL Communication Ltd.
© Copyright 2015 TCL Communication Ltd. Reservados
todos los derechos
TCL Communication Ltd. se reserva el derecho a alterar el
material o las especificaciones técnicas sin previo aviso.
Page 54

Русский
Технические
характеристики
Спецификация Bluetooth BT BLE4.0, класс 2
Профиль Bluetooth HFP v1.6 + HSP v1.2 +
Рабочий диапазон Около 10 м
Время зарядки менее 1,5 часа
Время разговора* До 5 часов
Время работы в режиме
ожидания*
Размеры 60 x 12.3 x 6.30 мм
Вес 7 г
Диапазон рабочих
температур
Диапазон температуры
хранения
* Может меняться в зависимости от активности
использования пользователем, различных
режимов работы и настроек мобильного телефона.
A2DP v1.2
До 168 часов
(зарядка 1 раз в неделю)
-20°C до 55°C
-30°C до 70°C
Page 55

Обзор
2
1
3
5
1. Клавиша включения
• Включение / выключение
• Сопряжение с мобильным телефоном
• Принять / Завершить вызов
• Отклонить / Переадресовать вызов
• Остановка / Воспроизведение музыки
2. Вкладыши
3. Светодиодный индикатор
4. Клавиши громкости
• Увеличение / уменьшение звука
• Предыдущая / Следующая песня
• Установка языка
5. Заглушка USB-разъёма
6. Динамик
7. USB-разъём
4
8
6
7
Page 56

• Зарядка батареи
8. Микрофон
Перед началом работы
Для использования Bluetooth-гарнитуры BH60,
выполните следующие действия:
1. Зарядка гарнитуры
Перед использованием убедитесь, что гарнитура
полностью заряжена и включена. Гарнитура
поставляется со встроенной аккумуляторной батареей.
Перед использованием гарнитуры в первый раз
рекомендуется полностью зарядить аккумуляторную
батарею. Откройте заглушку USB-разъёма и
подключите гарнитуру к ПК, ноутбуку, зарядному
устройству или другому USB-порту.
2. Сопряжение
После зарядки, вы можете выполнить сопряжение
гарнитуры с мобильным телефоном с поддержкой
Bluetooth.
1) Убедитесь, что гарнитура выключена.
2) Для активации режима сопряжения, нажмите и
удерживайте клавишу включения гарнитуры и не
отпускайте палец, пока индикатор состояния не
начнет мигать красным/синим.
3) Убедитесь, что функция Bluetooth на вашем
мобильном устройстве включена. Запустите поиск
Bluetooth-устройств и выберите “ALCATEL onetouch
BH60” для сопряжения. После сопряжения,
светодиодный индикатор изменит цвет на синий и
будет мигать каждые шесть секунд.
Page 57

4) После сопряжения гарнитуры с первым
телефоном выключите на нем Bluetooth. LEDиндикатор замигает синим. Произведите
сопряжение гарнитуры со вторым телефоном.
После подключения включите Bluetooth на первом
телефоне и выберите "ALCATEL onetouch BH60" для
повторного сопряжения. Гарнитура должна быть
сопряжена теперь с двумя телефонами.
Использование гарнитуры
Включение
Нажмите и удерживайте клавишу включения более
3 секунд, красный светодиод будет мигать в течение
5 секунд. Сигнал включения будет слышен через
гарнитуру.
Сопряжение
После включения, гарнитура автоматически
переключается в состояние сопряжения. Синий
светодиод мигает раз в секунду.
В состоянии сопряжения
Нет необходимости вводить PIN-код. После
сопряжения, светодиодный индикатор изменит цвет
на синий и будет мигать каждые шесть секунд. Сигнал
подключения первого телефона будет слышен через
гарнитуру.
Увеличение громкости
Долгое нажатие будет переключать песни при
прослушивании музыки. Короткое нажатие будет
регулировать громкость звука. Сигнал оповещения
о максимальной громкости будет слышен через
гарнитуру, если достигнута максимальная громкость.
Page 58

Уменьшение громкости
Долгое нажатие будет переключать песни при
прослушивании музыки. Короткое нажатие будет
регулировать громкость звука. Сигнал оповещения
о минимальной громкости будет слышен через
гарнитуру, если достигнута минимальная громкость.
Воспроизведение музыки
В режиме ожидания нажмите клавишу включения
один раз для воспроизведения музыки и нажмите
снова, чтобы остановить. Долгое нажатие на клавишу
увеличения громкости: переход к предыдущей песне.
Долгое нажатие на клавишу уменьшения громкости:
переход к следующей песне.
Отключение
После того, как гарнитура будет отключена или
функция BT на устройстве выключена, сигнал
отключения первого телефона будет слышен через
гарнитуру. Синий светодиод будет светиться в
течение трех секунд, через две минуты светодиод
автоматически погаснет.
Выключение
Нажмите и удерживайте клавишу включения в течение
трех секунд после включения. Сигнал отключения
будет слышен через гарнитуру. Красный светодиод
загорится на три секунды, а затем выключится.
Режим энергосбережения
Если заряд аккумуляторной батареи ниже 15%,
красный светодиод будет постоянно гореть три раза
каждую минуту. Сигнал низкого заряда батареи
будет слышен через гарнитуру. Символ питания на
устройстве изменится на пустой.
Page 59

Если заряд аккумуляторной батареи ниже 5%,
красный светодиод будет мигать каждые три секунды.
Сигнал выключения будет слышен через гарнитуру и
устройство автоматически выключится.
Входящий вызов
По умолчанию звонит система голосового оповещения,
а также раздается сигнал через гарнитуру, нажмите
клавишу включения один раз, чтобы ответить на
вызов.
Отклонить вызов
Дважды нажмите клавишу включения в течение трех
секунд, чтобы отклонить вызов.
Передача голоса
В режиме ожидания нажмите клавишу включения
дважды в течение трех секунд, чтобы активировать
функцию голосового набора номера.
Переадресация вызова
Во время разговора, нажмите и удерживайте клавишу
громкости. Вы услышите короткий звуковой сигнал и
звук будет переведен на мобильное устройство.
Зарядка батареи
При зарядке по USB, постоянно горящий красный
светодиод изменится на постоянно горящий синий или
погаснет при полном заряде батреи.
Page 60

Состояние светодиодного
индикатора
Режим Состояние Действие Синий светодиод
Режим
работы
Режим
ожидания
Режим
сопряжения
Режим
подключения
Пере
подключение
-
/ /
/
Подключение
Поддержка
соединения
Отключение
Поддержка
переподключения
частота мигания:
ежесекундно
(продолжительность
120 с в режиме
сопряжения)
медленно мигает
частота мигания:
раз в 6 секунд (из-за
энергосбережения)
медленно мигает
частота мигания:
раз в 3 секунды
Page 61

Режим Состояние Действие Красный светодиод
Включение
Выключение
Выполняется
зарядка
Зарядка
Низкий
уровень
заряда
батареи
долгое нажатие
клавиши включения
(3 с)
долгое нажатие
клавиши включения
(3 с)
USB-подключение
Емкость батареи
составляет менее
10%
Емкость батареи
составляет
менее 5% (после
воспроизведения
голосовой подсказки,
выключение)
мигает 5 с;
частота вспышки:
ежесекундно
горит постоянно 3 с
горит постоянно
(после полной
зарядки
отключается)
мигает постоянно;
частота мигания:
раз в 3 минуту
горит постоянно 3 с
Возможные неисправности
и способы их устранения
Слышен потрескивающий шум.
Для получения наилучшего качества звука
рекомендуется носить гарнитуру на той же стороне
тела, где и мобильный телефон.
Ничего не слышно в гарнитуре.
• Убедитесь, что гарнитура включена и заряжена.
Page 62

• Убедитесь, что гарнитура корректно сопряжена с
мобильным телефоном.
• Убедитесь, что телефон подключен к гарнитуре
Если соединение не устанавливается, обратитесь
к меню Bluetooth мобильного телефона или
к разделам "Использование гарнитуры" и
"Сопряжение гарнитуры с мобильным телефоном с
поддержкой Bluetooth".
Невозможно подключить гарнитуру к мобильному
телефону.
• Убедитесь, что гарнитура выключена и заряжена.
• Убедитесь, что гарнитура корректно сопряжена с
мобильным телефоном.
• Убедитесь, что функция Bluetooth вашего
мобильного телефона активирована.
Обратитесь за информацией к Руководству
пользователя вашего мобильного телефона.
• Убедитесь, что гарнитура находится в диапазоне 10
метров от вашего мобильного телефона, и между
ними нет никаких препятствий, таких как стены или
другие электронные устройства.
Если вышеуказанные действия не помогли решить
проблему, зарядите гарнитуру и извлеките на
несколько секунд аккумуляторную батарею из вашего
мобильного телефона.
Меры безопасности
Ознакомьтесь и соблюдайте местные законы,
касающиеся использования мобильного телефона и
Page 63

гарнитуры во время вождения. Если вы используете
гарнитуру во время вождения, обеспечьте ваше
полное внимание и сосредоточенность. Вы несете
ответственность за безопасное управление
автомобилем. По возможности припаркуйтесь, прежде
чем позвонить или ответить на звонок.
Никогда не оставляйте гарнитуру в зоне раскрытия
подушки безопасности внутри вашего автомобиля,
это может привести к получению серьезной травмы в
случае срабатывания подушки безопасности.
Никогда не позволяйте детям играть с гарнитурой –
мелкие детали могут представлять опасность удушья.
Обращайте внимание на знаки и таблички,
требующие выключение электрических приборов и
радиочастотных устройств. Это могут быть больницы,
районы взрывных и потенциально взрывоопасных
сред.
Всегда выключайте гарнитуру перед посадкой в
самолет. Не используйте гарнитуру на борту самолета.
Для предотвращения повреждения слуха, пожалуйста,
не устанавливайте слишком высокую громкость
прослушивания.
Не пытайтесь модифицировать гарнитуру.
Не храните гарнитуру возле умывальника или в других
влажных местах.
Не используйте гарнитуру на открытом воздухе во
время дождя.
Не используйте гарнитуру в штормовую погоду.
Не чистите гарнитуру во время зарядки. Всегда
отключайте зарядное устройство от гарнитуры перед
очисткой.
Не пытайтесь вскрыть встроенный аккумулятор.
Page 64

Заряжайте встроенную аккумуляторную батарею
гарнитуры в соответствии с инструкциями, описанными
в настоящем руководстве пользователя.
Декларация о соответствии
Данное устройство соответствует основным
требованиям и соответствующим предписаниям
директивы1999/5/EC (именуемой как R&TTE Directive):
Статья 3.1a, 3.1.
Заявление Федерального агентства по связи США (Fcc)
BH60 соответствует части 15 Правил Федерального
агентства по связи США (FCC). Эксплуатация данного
устройства допускается при соблюдении следующих
двух условий: (1) данное устройство не должно
становиться источником помех и (2) данное устройство
должно работать в условиях любых помех, включая
помехи, которые могут вызывать сбои в работе.
ПРИМЕЧАНИЕ: Производитель не несет
ответственности за любые радио или телевизионные
помехи, вызванные несанкционированными
модификациями данного оборудования. Такие
модификации могут лишить пользователя права на
эксплуатацию оборудования.
ПРИМЕЧАНИЕ: Данное оборудование было испытано
и признано соответствующим ограничениям для
цифровых устройств класса B, согласно части 15 правил
FCC. Эти ограничения разработаны для обеспечения
разумной защиты против вредных помех в жилых
помещениях. Данное оборудование генерирует,
использует и может излучать радиочастотную энергию
Page 65

и, если установлено и не используется в соответствии
с инструкциями, может вызывать вредные помехи для
радиосвязи. Тем не менее, нет гарантии, что помехи
не будут возникать в каждом конкретном случае. Если
это оборудование действительно вызывает вредные
помехи для радио или телевизионного приема, что
можно определить путем включения и выключения
устройства, так же пользователь может попытаться
устранить помехи одним из следующих способов:
- Переориентировать или переместить приемную
антенну.
- Увеличить расстояние между оборудованием и
приемником.
- Подключить оборудование к розетке, отличной от
той, к которой подключен приемник.
- Обратиться к дилеру или опытному радио/
телемастеру.
Заявление агентства Промышленность Канады (IC)
BH60 соответствует стандартам Промышленности
Канады нелицензируемой RSS. Эксплуатация данного
устройства допускается при соблюдении следующих
двух условий: (1) данное устройство не должно
становиться источником помех и (2) данное устройство
должно работать в условиях любых помех, включая
помехи, которые могут вызывать сбои в работе.
Гарантия
На ваш аксессуар предоставляется гарантия от
производственных дефектов в течение двенадцати
(12) месяцев со дня покупки, указанного в чеке. Тем
Page 66

не менее, если юридически гарантийный срок в
вашей стране превышает двенадцать (12) месяцев,
применяется одна правовая гарантия.
Номер горячей линии: 8 (800) 555 65 95.
Дополнительную информацию вы можете найти на
нашем веб-сайте.
Кроме того, на нашем сайте вы можете просмотреть
раздел «Часто задаваемые вопросы» или задать
вопрос, связавшись с нами напрямую по электронной
почте.
Утилизируйте упаковку и продукт с соблюдением
действующего в вашей стране законодательства.
Товарный знак и эмблемы Bluetooth® принадлежат
корпорации Bluetooth SIG, и любое их использование
компанией TCL Communication Ltd. и ее филиалами
осуществляется в рамках соответствующей лицензии.
ALCATEL является торговым знаком компании AlcatelLucent и используется в соответствии с лицензией,
выданной компании TCL Communication Ltd.
Все права защищены © Copyright 2015 TCL
Communication Ltd.
Компания TCL Communication Ltd. сохраняет за собой
право вносить изменения в материалы и технические
спецификации продукции без предварительного
уведомления.
 Loading...