

Page 1

Quick Start Guide
Alcatel would like to thank you for your purchase. We hope you
will enjoy your high-quality mobile communication experience.
For more information about your phone or to
download the complete user manual version, please visit
https://us.alcatelmobile.com
BC
English - CJB1L6001AAC
Page 2

Table of contents
1 Your Device ...............................................................1
1.1 Keys and Connectors ....................................................... 1
1.2 SIM Card .............................................................................. 4
1.3 Battery .................................................................................. 5
1.4 Home Screen ...................................................................... 6
1.5 Applications ......................................................................... 8
2 Calls ..........................................................................10
2.1 Placing a Call ..................................................................... 10
2.2 International Call ............................................................ 11
2.3 Wi-Fi Calling ..................................................................... 12
3 Contacts ...................................................................13
3.1 Create a New Contact .................................................. 13
3.2 Make a Call from Contact List ..................................... 13
4 Email ........................................................................13
4.1 Set up Email Accounts .................................................... 13
5 Messaging .................................................................14
5.1 Create and Send a Message .......................................... 14
5.2 Send a Multimedia Message ........................................... 15
6 Getting Connected .................................................15
6.1 Web Browser ................................................................... 15
6.2 CloserTV
6.3 Accessing Files .................................................................. 16
6.4 Data Sharing ...................................................................... 17
6.5 Bluetooth
7 Volume & Ringtone ................................................18
8 Software Updates ...................................................19
9 Security ...................................................................20
9.1 Screen Lock....................................................................... 20
TM
........................................................................ 16
®
........................................................................ 18
2
Page 3

9.2 Fingerprint ......................................................................... 20
9.3 Face Recognition .............................................................. 20
Safety and Use ..............................................................21
General Information ....................................................33
®
by T-Mobile Information ................................34
Metro
12 Month Limited Warranty ......................................40
Recycling Information .................................................40
Troubleshooting ...........................................................41
This product meets applicable national SAR
limits of 1.6 W/kg. The specific maximum
SAR values can be found on page 28 of this
user guide. When carrying the product or
using it while worn on your body, either
www.sar-tick.com
use an approved accessory such as a holster
or otherwise maintain a distance of 15 mm
from the body to ensure compliance with
RF exposure requirements. Note that the
product may be transmitting even if you are
not making a phone call.
To prevent possible hearing damage, do
not listen at high volume levels for long
periods. Exercise caution when holding your
device near your ear while the loudspeaker
is in use.
3
Page 4
Your Device
1
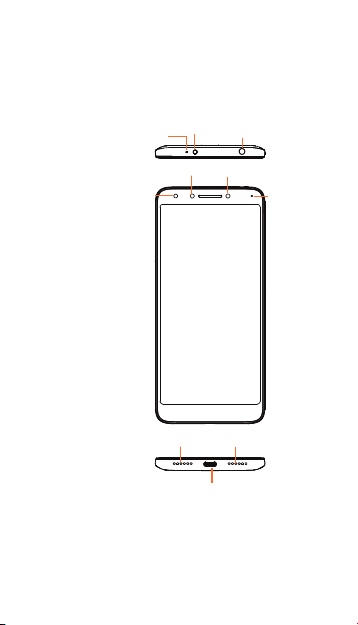
1.1 Keys and Connectors
Microphone
Proximity & Light Sensor
Infrared
Front Flash
Headset Connector
Front Camera
LED Indicator
Microphone
1
Speaker
USB Type-C
Page 5
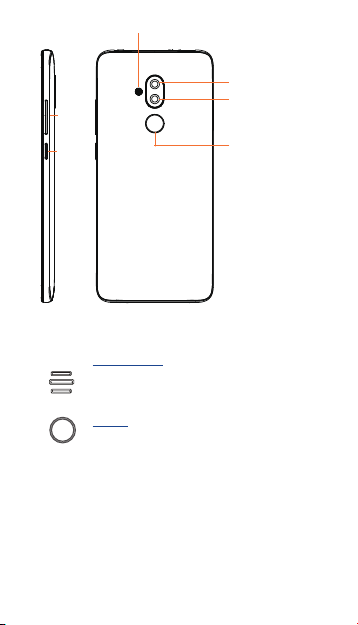
Dual-tone Flash
Primary rear Camera
Volume
Keys
Power
Key
Recent Apps
• Touch to open a card view of applications you've
worked with recently.
Home
• From any application or screen, touch to return
to the Home screen.
• Long press to turn on Google Assistant. You
can get help such as getting directions and
restaurant information based on the content
detected on the screen.
Secondary rear Camera
Fingerprint Sensor
2
Page 6

Back
• Touch to go back to the previous screen,
or close a dialog box, options menu, the
Notification panel, etc.
Power key
• Press: Lock the screen/Light up the screen.
• Press and hold: Show the popup menu to select
from Power off/Restart.
• Press and hold the Power key and Volume key to
make a screenshot.
• Press and hold the Power key for at least 10
seconds to force reboot.
Volume Keys
• In call mode, adjusts the earpiece or headset
volume.
• In Music/Video/Streaming mode, adjusts the
media volume.
• In general mode, adjusts the ringtone volume.
• Mutes the ringtone of an incoming call.
• In camera preview mode, press Volume key
to take a photo or press and hold to make
burst shot.
3
Page 7
1.2 SIM Card
The SIM (Subscriber Identity Module) card identifies your
device to the wireless network. You can't make or receive
phone calls without a properly installed SIM card unless it's an
emergency call (911).
You don't need to power off your device before inserting or
removing the SIM card.
Note: Your phone only supports NANO SIM cards. Do not
attempt to insert other SIM types like mini and micro cards to
avoid damage to your device.
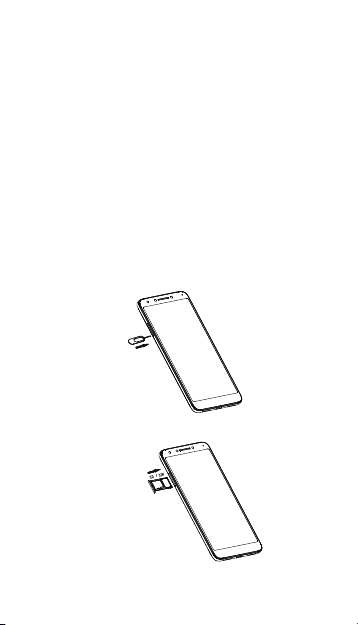
1.2.1 Insert/Remove the Nano SIM and Micro
SD Cards
1. Use a SIM pin to open the slot.
2. Inser t/Remove the SIM card and microSD card.
Note: microSD Cards are sold separately.
4
Page 8
1.3 Battery
To optimize battery performance, be sure to fully charge your
device before using it for the first time.
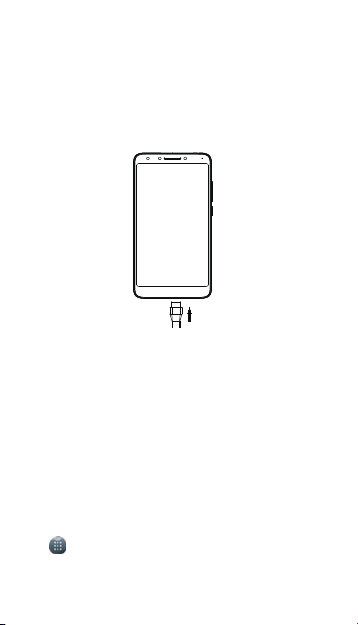
1.3.1 Charging the Device
1. Insert the small end of the charging cable into the charge
port as shown.
2. Connect charger to power outlet.
Note: Please use the cable that came with your device. Using
other cables may damage the charging port or reduce battery
performance.
1.3.2 Optimize Battery Life
To optimize battery life, adjust your screen brightness and
display timeout.
1. Adjusting brightness level: Lowering your screen
brightness level can optimize your battery level. To
adjust the brightness level, from the Home screen, touch
> Settings > Display > Brightness level. To
lower the brightness level, move the wheel to the left.
2. Power Saving Mode: Power Saving mode minimizes
5
Page 9
battery usage to extend battery life. To turn on your
Power Saving mode, from the Home screen, touch
> Settings > Battery. Then turn on the Standby
intelligent power saving and the Battery saver.
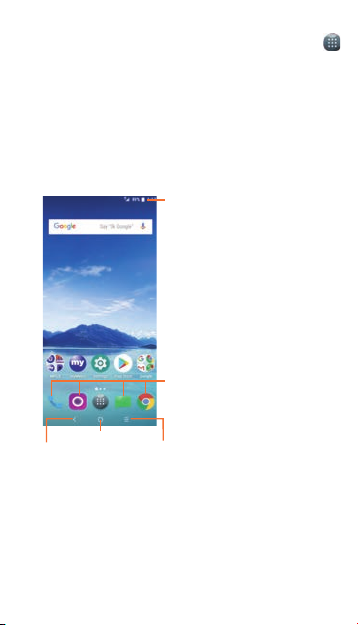
1.4 Home Screen
You can bring all the items (applications, shortcuts, folders and
widgets) you love or use most frequently to your Home screen
for quick access. Touch the Home key to get instant access
to the Home screen.
Home
Back
• Touch to go back to
last screen.
Home screen is provided in an extended format to allow more
space for adding applications, shortcuts etc. Slide all Home
screens horizontally left and right to get a complete view of
the Home screens. The white circles at the lower part of the
screen indicate which screen you are viewing.
Status bar
• Touch and drag down to
open the notications panel.
Search bar
• Tou ch to enter
text se arch sc reen .
• Tou ch to enter voice
search screen.
Favorite applications tray
• Touch to enter the applications.
• Touch and hold to move or change
applications.
Recent apps
• Touch to view recent apps.
6
Page 10
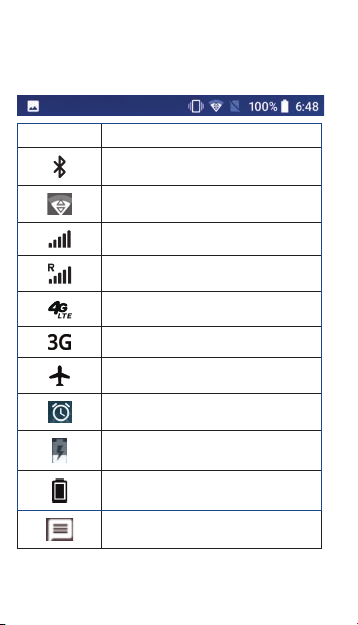
1.4.1 Status Bar
The Status bar appears at the top of your Home screen.
You will find icons indicating your device’s status and new
notification alerts appear in the Status bar.
Icon Status
Bluetooth® active
Wi-Fi® active
Network (full signal)
Network (roaming)
4G LTE data service
3G data service
Airplane mode
Alarm set
Battery (charging)
Battery (fully charged)
New message
7
Page 11
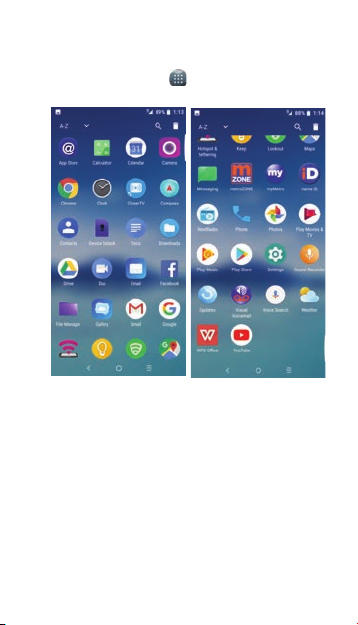
1.5 Applications
1.5.1 App Drawer
Press the Application icon from the idle screen to access
the App Drawer.
1.5.2 Add/Remove Application
1. Add: You can touch and hold a folder, an application, or
a widget to activate the Move mode and drag the item to
any Home screen you prefer.
2. Reposition: Touch and hold the item to be repositioned
to activate the Move mode, drag the item to the desired
position and then release.
You can move items both on the Home screen and the
Favorite tray. Hold the icon on the left or right edge of
the screen to drag the item to another Home screen.
8
Page 12

3. Remove: Touch and hold the item to be removed to
activate the Move mode, drag the item up to the top of
the icon, and release after the item turns red.
4. Create folders: To improve the organization of items
(shortcuts or applications) on the Home screen, you can
create a folder by stacking one app on top of another.
To rename a folder, open it and touch the folder’s title
bar to input the new name.
5. Wallpaper customization:
You can cha nge your w allp aper in t wo dif fere nt ways:
i Touch and hold an empty area on the Home screen
and then select WALLPAPERS from bottom options.
Slide left and right to view and select one Wallpaper
image option, select Set wallpaper on top left bar and
then select Home screen to set image as Home screen.
You can set different wallpapers for Lock screen and
Home screen.
ii Change your wallpaper by going to Settings > Display
> Wallpaper.
9
Page 13
Calls
2
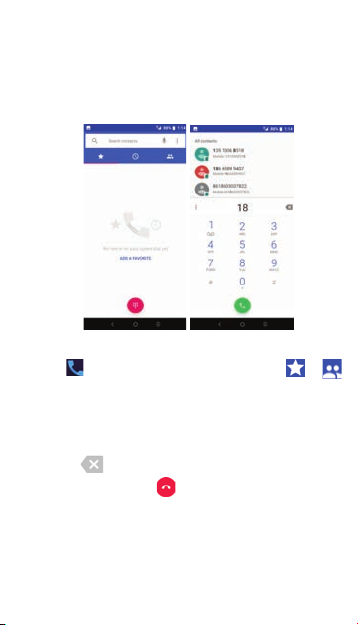
2.1 Placing a Call
You can easily place a call using Call from the Home screen.
Enter the desired number from the keyboard directly and
touch to place the call or select a contact from or
by sliding or touching tabs, then to make the call.
The number you entered can be saved to Contacts by
touching Create new contact or Add to a contact. If
you make a mistake, you can delete the incorrect digits by
touching
To hang up a call, touch
.
.
10
Page 14
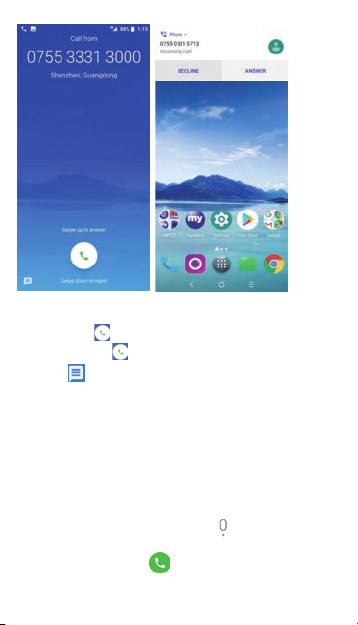
When you receive a call:
• Slide up the icon or touch ANSWER to answer.
• Slide d own the icon or t ouch DISMISS to reject ;
• Tou ch to reje ct the c all by se nding a p reset messa ge.
To mute the ringtone volume of an incoming call, press the
Volume Up/Down Key.
Note: For your convenience, your phone features a unique
Reversible UI functionality that can accept calls even in the
upside down position.
2.2 International Call
To dial an international call, long press to enter “+”, then
enter t he int ernationa l count ry pre fix followe d by the fu ll
phone n umber and tou ch
.
11
Page 15

2.3 Wi-Fi Calling
Wi-Fi Calling can improve your coverage by allowing you to
make phone calls over a Wi-Fi network (when a Wi-Fi network
is available).
To use Wi-Fi Calling, please use the SIM card shipped with
your device. A different SIM card may not work with the Wi-Fi
Calling feature.
Important!
You must also have a 9-1-1 emergency address
registered with your account. Log into your account at
(https://www.metropcs.com/my-account/sign-in). Go to your
profile, click Line Settings and select to edit your E911 Address.
Check periodically to ensure your address is always up to date.
• Corpor ate account s may require ad ministra tor assist ance
for 9-1-1 Add ress re gistratio n.
To enable/disable Wi-Fi Calling
1. From the home screen, touch
Calls > Wi-Fi calling.
2. Touch Enable Wi-Fi Calling to activate/deactivate
the feature.
To change the connection preference for Wi-Fi Calling
1. Touch
2. Touch Wi-Fi Calling > Connection preferences.
3. Touch the desired Wi-Fi Calling preference.
> > Settings > Calls .
> > Settings >
12
Page 16

Contacts
3
3.1 Create a New Contact
1. From the Home screen, touch Application , and
select Contacts
2. Touch
3. Enter contact’s name and other contact information.
4. When finished, touch SAVE to Save.
3.2 Make a Call from Contact List
1. From the Home screen, touch > Contacts .
2. Touch a contact to view details, then touch
Email
4
4.1 Set up Email Accounts
1. From the Home sc reen , touch > Email , An
email w izard will gu ide you through the ste ps to se t
up an email acco unt.
2. Enter the em ail add ress and pass word of t he accou nt
you wan t to set up .
3. If the account yo u entered is not provided by
your ser vice p rovide r in the device, you can t ouch
MANUAL SETUP after ent ering the em ail address,
selec t an acco unt ty pe and enter the pass word for
your em ail, then correctly ll in server and por t in
both Incoming server sett ings and Outgoing
server setti ngs interfaces. Finally touch FINISH
to complete setup.
.
to create a new contact.
to call.
13
Page 17

Messaging
5
Use the messaging feature to send and receive text (SMS) and
multimedia (MMS) messages.
5.1 Create and Send a Message
1. From the Home screen, touch > Messaging
to enter .
2. Touch
3. Enter the phone number of the recipient in the bar at
4. Press the Type message bar to enter the text of the
5. Press
An SMS message of more than 160 characters will be charged
as several SMS. A counter will be on the right of the text box
to remind you how many characters are allowed to be entered
in one message.
Note: Specific letters (accented) will also increase the size
of the SMS, this may cause multiple SMS to be sent to your
recipient.
to write text messages.
the top of the page or touch
message.
to send text messages.
14
to add recipients.
Page 18

5.2 Send a Multimedia Message
MMS enables you to send video clips, images, animations,
slides and sounds to other compatible mobile device and
e-mail addresses.
An SMS will be converted to MMS automatically when media
files (image, video, audio, etc.) are attached or subject or email
addresses are added.
To send a multimedia message, enter the recipient’s phone
number in the To bar and touch the Type message bar to enter
the text of the message. Touch
audio and so on.
When finished, touch
Note: Data must be turned on to successfully send MMS
messages.
Getting Connected
6
to attach a picture, video,
to send the multimedia message.
6.1 Web Browser
From the Home screen, touch > Chrome . A web
browser with which you can surf the Internet.
Your bookmarks, browsing history, and settings across all
devices with the browser installed can be synchronized with
your Google Account.
15
Page 19

6.2 CloserTV
This function can universally access both live TV and Over The
(1)
Top
content, fully control both mobile and TV screens, and
TM
seamlessly swap between live TV channels and OTT content:
From the home screen, touch
> CloserTV
TM
• Tou ch to search th e video you want t o watc h.
• Tou ch to sea rch con tent by voice.
• Tou ch to con trol th e TV content .
Note: you need to set the Remote control by touching
and following the instructions before using it for the
first time.
6.3 Accessing Files
To access media files and photos saved on your device or to
transfer files from your device’s SD card (sold separately) to
your computer, follow these steps:
To connect device to PC
(1) OTT: The deliver of lm and TV content provided via a high-speed
Internet connection rather than a cable or satellite provider. OTT does not
mean free, some of OTT services require a subscription, i.e. one does not
have access to Netix without a subscription.
16
Page 20

1. Use the USB cable that came with your device to
connect the device to a USB port on your computer.
You will receive a notification that the USB is connected.
2. If you use MTP or PTP, your phone will be automatically
connected. Note: Before using MTP, make sure that the
driver (Windows Media Player 11 or higher version)
has been installed.
To locate data you have transferred or downloaded in
your microSD card/internal storage:
• Tou ch
• Touch Files .
All data you have downloaded is stored in the Files.Here you
can view media files (videos, photos, music and others), rename
files, install applications into your device, etc.
to open the app licat ions list.
6.4 Data Sharing
You can share your device’s mobile data connection with a
single computer via USB cable (USB tethering) or with up to
eight devices at once by turning your device into a portable
Wi-Fi hotspot.
To turn on USB tethering or Wi-Fi Hotspot:
1. Touch Settings > Network & Internet > Tethering
& Mobile Hotspot.
2. Touch the USB tethering switch to activate this
function.
3. Touch Wi-Fi Hotspot then touch the switch to
activate this function.
Note: These functions may incur additional network charges
from your network operator. Extra fees may also be charged
in roaming areas.
17
Page 21

6.5 Bluetooth®
Your device comes with Bluetooth connectivity, a wireless
technology that enables a data connection between your
device and a Bluetooth headset or other Bluetooth device
(sold separately).
6.5.1 Connect to Bluetooth
1. From the Home screen, touch > Settings >
Connected devices.
2. Touch the Bluetooth switch to activate this function.
3. The device will automatically search for device.
4. Select the desired Bluetooth device to pair with your
device.
Volume & Ringtone
7
Adjust In-call Volume
While on a call, press the Volume Up/Down Key to adjust
volume.
Adjust Ringtone and Volume
1. From the Home screen, press and select Settings
, and then select Sound.
2. Position the slider to adjust volume for Media, Alarm,
or Notification separately.
3. Touch Advanced to get more settings.
18
Page 22

Software Updates
8
To access Software Updates, follow these steps:
1. Connect your device to a Wi-Fi network and make sure
it has a strong data connection.
2. Ensure your battery is fully charged before starting the
software update. Your device’s current battery level can
be found on your device under Settings > Battery.
3. Touch
4. Touch Check for update and the device will search for
5. If software update is available, click on Download
6. Now your device has the latest version of the software.
from the Home screen then select Settings
> System > About phone > System updates.
the latest software.
update. Once the software is downloaded, touch
Install update > Install.
19
Page 23

Security
9
To help prevent others from using your device without your
permission, activate the following security options:
From the Home screen, touch
location > Device security
> Settings > Security &
9.1 Screen Lock
• None: Touch to di sable screen unloc k secur ity.
• Swipe: Touch to enable slide u nlock mode.
• Pattern: Touch to dr aw a pattern to u nlock scree n.
• PIN: Touc h to setu p a nume ric PIN to unlo ck scre en.
• Pas sw or d: Touch t o setup a p assword to unlock screen.
9.2 Fingerprint
1. Touch and follow the instruction to set up fingerprint
scanner to unlock your device.
2. To use this function you n eed to t urn the switch on,
go to Set ting s > Securit y & location > Screen
lock
3. Turn the Fingerprint switch on.
9.3 Face Recognition
You can use Face recognition to unlock your device.
From the Home screen, touch
recognition and follow the instructions to set up face
recognition.
> Settings > Face
20
Page 24

Safety and Use
We recommend that you read this chapter carefully before
using your mobile phone. The manufacturer disclaims any
liability for damage, which may result as a consequence of
improper use or use contrary to the instructions contained
herein.
Trafc Safety
Given that studies show that using a mobile device while driving
a vehicle constitutes a real risk, even when the hands-free kit
is used (car kit, headset...), drivers are requested to refrain
from using their mobile device when the vehicle is not parked.
Check the laws and regulations on the use of wireless mobile
devices and their accessories in the areas where you drive.
Always obey them. The use of these devices may be prohibited
or restricted in certain areas.
When driving, do not use your mobile device and headset
to listen to music or to the radio. Using a headset can be
dangerous and forbidden in some areas.
When switched on, your mobile device emits electromagnetic
waves that can interfere with the vehicle’s electronic systems
such as ABS anti-lock brakes or airbags. To ensure that there
is no problem:
• Do not place your mobile device on top of the dashboard
or within an airbag deployment area,
• Check with your car dealer or the car manufacturer to
make sure that the car’s electronic devices are shielded from
mobile device RF energy.
21
Page 25

Conditions of Use
You are advised to switch off the mobile device from time to
time to optimize its performance.
Remember to abide by local authority rules of mobile device
use on aircrafts.
Operational Warnings: Obey all posted signs when using
mobile devices in public areas.
• Turn off your mobile device in any location where posted
notices instruct you to do so. In an aircraft, turn off your
mobile device whenever instructed to do so by airline staff.
If your mobile device offers an airplane mode or similar
feature, consult airline staff about using it in flight.
• Switch the mobile device off when you are in health care
facilities, except in designated areas. As with many other
types of equipment now in regular use, mobile devices can
interfere with other electrical or electronic devices, or
equipment using radio frequency.
• Switch the mobile device off when you are near gas or
flammable liquids. Strictly obey all signs and instructions
posted in a fuel depot, gas station, or chemical plant, or in
any potentially explosive atmosphere.
• When the mobile device is switched on, it should be kept
at least 15 cm from any medical device such as a pacemaker
or insulin pump. In particular when using the mobile device
you should hold it against the ear on the opposite side to
the device, if any.
Note: Using your device in landscape mode with polarized
sunglasses on may cut light from the screen. Take your polarized
sunglasses off or use your device in portrait orientation to
continue use.
22
Page 26

Read and follow the directions from the manufacturer of your
implantable medical device. If you have any questions about
using your mobile device with your implantable medical device,
consult your healthcare provider.
It is recommended to have proper supervision while small
children use your mobile device.
Do not attempt to disassemble your phone. If you disassemble
your phone, the warranty will not apply.
Always handle your mobile device with care and keep it in a
clean and dust-free place.
Do not allow your mobile device to be exposed to adverse
weather or environmental conditions (moisture, humidity, rain,
inltration of liquids, dust, sea air, etc.). The manufacturer’s
recommended operating temperature range is 0°C (32°F) to
+50°C (122°F)
Note: The max value depends on the device condition,
materials around it, and the housing paint and texture.
Over 50°C (122°F) the legibility of the mobile device’s display
may be impaired, though this is temporary and not serious.
Do not open or attempt to paint or repair your mobile device.
Do not drop, throw or try to bend your mobile device.
Do not use the mobile device if the screen is damaged, cracked,
or broken to avoid any injury.
Use only batteries, battery chargers, and accessories which are
recommended by TCL Communication Technology Holdings
Limited and its afliates and are compatible with your mobile
device model. TCL Communication Technology Holdings
Limited and its afliates disclaim any liability for damage caused
by the use of other chargers or batteries.
23
Page 27

Your mobile device should not be disposed in municipal
waste. Please check local regulations for disposal of electronic
products.
Remember to make back-up copies or keep a written record of
all important information stored in your mobile device.
Some people may suffer epileptic seizures or blackouts when
playing video games. These seizures or blackouts may occur
even if a person never had a previous seizure or blackout. If
you have experienced seizures or blackouts, or if you have a
family history of such occurrences, please consult your doctor
before playing video games on your mobile device. Parents
should monitor their children’s use of video games or other
features that incorporate ashing lights on the mobile devices.
All persons should discontinue use and consult a doctor
if any of the following symptoms occur: convulsion, eye or
muscle twitching, loss of awareness, involuntary movements, or
disorientation. To limit the likelihood of such symptoms, please
take the following safety precautions:
• Play at the farthest distance possible from the screen.
When you play games on your mobile device, you may
experience occasional discomfort in your hands, arms,
shoulders, neck, or other parts of your body. Follow these
instructions to avoid problems, such as tendinitis, carpal tunnel
syndrome, or other musculoskeletal disorders:
• Take a minimum of a 15-minute break every hour of game
playing.
• If your hands, wrists, or arms become tired or sore while
playing, stop and rest for several hours before playing again.
• If you continue to have sore hands, wrists, or arms during or
after playing, stop the game and see a doctor.
24
Page 28

PROTECT YOUR HEARING
To prevent possible hearing damage, do not
listen at high volume levels for long periods.
Exercise caution when holding your device near
your ear while the loudspeaker is in use.
Privacy
Please note that you must respect the laws and regulations of
your jurisdiction or other jurisdiction(s) where you will use
your mobile device regarding taking photographs and recording
sounds with your mobile device. Pursuant to such laws and
regulations, it may be strictly forbidden to take photographs
and/or to record the voices of other people or any of their
personal attributes, and reproduce or distribute them, as this
may be considered to be an invasion of privacy.
It is the user’s sole responsibility to ensure that prior
authorization be obtained, if necessary, in order to record
private or condential conversations or take a photograph of
another person; the manufacturer, the seller or vendor of your
mobile device (including the operator) disclaim any liability
which may result from the improper use of the mobile device.
Battery and Accessories
Following air regulation, if the battery of your product is not
charged, please charge first.
Before removing the battery from your device, make sure that
the device is switched off.
Observe the following precautions for battery use:
• Do not attempt to open the battery (due to the risk of
toxic fumes and burns).
25
Page 29

• Do not puncture, disassemble or cause a short-circuit in
a battery.
• Do not burn or dispose of a used battery in household
garbage or store it at temperatures above 60ºC.
• Do not disassemble or open crush, bend or deform,
puncture or shred.
• Do not modify or remanufacture, attempt to insert foreign
objects into the battery, immerse or expose to water or
other liquids, expose to fire, explosion or other hazard
Products that have the below symbol must be taken to
collection points at the end of their life:
• Municipal waste disposal centers with specific
bins for these items of equipment.
• Collection bins at points of sale.
They will then be recycled, preventing substances being
disposed of in the environment, so that their components
can be reused.
In European Union countries:
These collection points are accessible free of charge. All
products with this symbol must be brought to these collection
points.
In non-European Union jurisdictions:
Equipment with this symbol are not be thrown into ordinary
bins if your jurisdiction or your region has suitable recycling
and collection facilities; instead they are to be taken to
collection points for them to be recycled.
In the United States you may learn more about CTIA’s
Recycling Program at http://www.recyclewirelessphones.com
26
Page 30

CAUTION: IF BATTERY IS REPLACED BY AN INCORRECT
TYPE, DEVICE MIGHT EXPLODE. DISPOSE USED BATTERIES
ACCORDING TO THE INSTRUCTION.
Chargers
Home A.C./ Travel chargers will operate within the temperature
range of: 0°C (32°F) to 45°C (113°F).
The chargers designed for your mobile device meet with the
standard for safety of information technology equipment and
ofce equipment use. Due to different applicable electrical
specications, a charger you purchased in one jurisdiction may
not work in another jurisdiction. They should be used for this
purpose only.
The charger shall be installed near the device and shall be
easily accessible.
Travel charger: 100-240V, 50/60Hz, 0.6A
Output: 5V, 2A /9V, 1.67A
Radio Waves
THIS MOBILE DEVICE MEETS THE GOVERNMENT’S
REQUIREMENTS FOR EXPOSURE TO RADIO WAVES.
Your mobile device is a radio transmitter and receiver. It
is designed and manufactured not to exceed the emission
limits for exposure to radio-frequency (RF) energy. These
limits are part of comprehensive guidelines and establish
permitted levels of RF energy for the general population.
The guidelines are based on standards that were developed
by independent scientic organizations through periodic and
thorough evaluation of scientic studies. These guidelines
include a substantial safety margin designed to ensure the safety
27
Page 31

of all persons, regardless of age and health.
The exposure standard for mobile devices employs a unit of
measurement known as the Specic Absorption Rate, or SAR.
The SAR limit set by public authorities such as the Federal
Communications Commission of the US Government (FCC),
or by Industry Canada, is 1.6 W/kg averaged over 1 gram
of body tissue. Tests for SAR are conducted using standard
operating positions with the mobile device transmitting at
its highest certied power level in all tested frequency bands.
The FCC has granted an Equipment Authorization for this
model device with all reported SAR levels evaluated as
in compliance with the FCC RF exposure guidelines. SAR
information on this model device is on file with the FCC and
can be found under the Display Grant section of www.fcc.gov/
oet/ea/fccid after searching on FCC ID:2ACCJBT09.
Although the SAR is determined at the highest certied power
level, the actual SAR level of the mobile device while operating
can be well below the maximum value. This is because the
mobile device is designed to operate at multiple power levels
so as to use only the power required to reach the network.
In general, the closer you are to a wireless base station
antenna, the lower the power output of the mobile device.
Before a mobile device model is available for sale to the public,
compliance with national regulations and standards must be
shown. The highest SAR value for this model mobile phone
when tested is 1.03 W/Kg for use at the ear and 1.18 W/Kg for
use close to the body.
While there may be differences between the SAR levels of
various mobile devices and at various positions, they all meet
the government requirement for RF exposure. For body-worn
operation, the device has been tested when positioned a
28
Page 32

minimum of 15 mm from the body without any metal parts
in the vicinity of the device or when properly used with an
appropriate accessory and worn on the body. Use of other
accessories may not ensure compliance with FCC RF exposure
guidelines. Additional information on SAR can be found on the
Cellular Telecommunications & Internet Association (CTIA)
Web site: http://www.phonefacts.net
The World Health Organization (WHO) considers that present
scientic information does not indicate the need for any
special precautions for use of mobile devices. If individuals
are concerned, they might choose to limit their own or their
children’s RF exposure by limiting the length of calls, or using
“hands-free” devices to keep mobile devices away from the
head and body. (fact sheet n°193). Additional WHO information
about electromagnetic elds and public health are available on
the following website: http://www.who.int/peh-emf.
Note: This equipment has been tested and found to comply
with the limits for a Class B digital device pursuant to
part 15 of the FCC Rules. These limits are designed to
provide reasonable protection against harmful interference in
a residential installation. This equipment generates, uses and
can radiate radio frequency energy and, if not installed and
used in accordance with the instructions, may cause harmful
interference to radio communications. However, there is no
guarantee that interference to radio or television reception,
which can be determined by turning the equipment off and on,
the user is encouraged to try to correct the interference by
one or more of the following measures:
• Reorient or relocate the receiving antenna.
• Increase the separation between the equipment and
receiver.
• Connect the equipment into an outlet on a circuit different
29
Page 33

from that to which the receiver is connected.
• Consult the dealer or an experienced radio/TV technician
for help.
• Changes or modifications not expressly approved by the
party responsible for compliance could void the user’s
authority to operate the equipment.
For the receiver devices associated with the operation of
a licensed radio service (e.g. FM broadcast), they bear the
following statement:
This device complies with Part 15 of the FCC Rules. Operation
is subject to the condition that this device does not cause
harmful interference.
For other devices, they bear the following statement:
This device complies with Part 15 of the FCC Rules. Operation
is subject to the following two conditions:
(1) This device may not cause harmful interference
(2) This device must accept any interference received, including
interference that may cause undesired operation.
Your mobile device is equipped with a built-in antenna. For
optimal operation, you should avoid touching it or degrading it.
As mobile devices offer a range of functions, they can be used
in positions other than against your ear. In such circumstances
the device will be compliant with the guidelines when used with
headset or USB data cable. If you are using another accessory
ensure that whatever product is used is free of any metal and
that it positions the mobile device at least 15 mm away from
the body.
30
Page 34

Licenses
microSD logo is a trademark of SD-3C, LLC.
The Bluetooth® word mark and logos are
owned by the Bluetooth SIG, Inc. and any use of
such marks by TCL Communication Technology
Holdings Limited and its affiliates is under
license. Other trademarks and trade names are
those of their respective owners.
Alcatel 6062W Bluetooth® Declaration
ID D037883
The Wi-Fi Logo is a certification mark of the
Wi-Fi Alliance.
The 5150-5350 MHz band is restricted to
indoor use only for the following countries:
BE BG CZ DK DE EE IE
LT LU HU MT NL AT PL
EL ES FR HR IT CY LV
PT RO SI SK FI SE UK
NO IS LI CH TR
You have purchased a product which uses the open source
(http://opensource.org/) programs mtd, msdosfs, netfilter/
iptables and initrd in object code and other open source
programs licensed under the GNU General Public License
and Apache License. We will provide you with a complete
copy of the corresponding source codes upon request within
a period of three years from the distribution of the product
by TCL Communication Technology Holdings Limited. You
may download the source codes from http://sourceforge.net/
31
Page 35

projects/alcatel/files/. The provision of the source code is free
of charge from Internet.
Hearing Aid Compatibility
Your mobile phone is rated, to assist hearing device users
in finding mobile phones that may be compatible with their
hearing devices.
This device is HAC M4&T3 compatible. Reference ANSI
C63.19-2011
For more information please visit our website:
https://us.alcatelmobile.com
FCC ID: 2ACCJBT09
32
Page 36

General Information
• Website: https://us.alcatelmobile.com
• Facebook:https://www.facebook.com/alcatelmobileus
• Twitter: https://twitter.com/alcatelmobileus
• Hotline Number : In the United States, call 855-368-0829
for technical support.
On our In tern et site , you will find our FAQ (Fre quent ly
Asked Q uest ions) section. You can also cont act us by e -ma il
to ask any questions yo u may have .
An electron ic vers ion of this user guide is available in E nglis h
and oth er language s according to av ailabilit y on our we bsit e:
https://us.alcatelmobile.com
Your phone i s a tran sceiver that o pera tes on G SM in
quad-band (850/ 900 /1800/1900 MHz), U MTS in quad-band
(B1/2/4/5 ), or LTE in hexa -ban d B2/4/12/5/66/71.
Company Address:
5/F, Building 22 E, 22 S cien ce Park E ast Ave nue, H ong Kong
Scien ce Par k, Sha tin, N T, Hong Kong
Disclaimer
There m ay be cer tain differences bet ween t he user m anua l
description and the device’s operation, depending on the
soft ware release of your d evice or s pecific op erat or
services.
TCL Communication Technology Holdings Limited shall not be
held legally responsible for such differences, if any, nor for their
potential consequences, which responsibility shall be borne by
the operator exclusively.
33
Page 37

Metro® by T-Mobile Information
Service
You will need the following information when activating service:
• Your name, ad dress a nd an eight-digit n umber that
you will u se to access your accoun t (your p erso nal
identication number “PIN”).
• Your serial number (IMEI) and SIM card number. If your
phone has a removable battery, to locate the serial number,
remove the phone from the box and remove the battery
cover from the phone. The serial number is located near the
bar code. It will be either 14 or 18 digits. If your phone does
not have a removable battery, check the box label or phone
settings to locate the serial number. The SIM card number
can be located below the bottom bar code on the back of
the SIM card holder.
• Your choice of Metro plan and services including unlimited
data, talk and text plans.
• Install the battery, if applicable, and SIM card in your new
phone by following the step by step instructions in this
phone’s User Guide.
• Once your phone is powered up, dial 1.888.8metro8
(1.888.863.8768) to connect with an activation
representative who will assist you in activating your
phone. You can also activate your phone online by visiting
metropcs.com. (As soon as your service is activated, be sure
to fully charge the phone’s battery before using it again.)
Don’t hesitate to ask your Metro representative for more
information on additional features and services or visit
metropcs.com.
34
Page 38

Account Detail:
• Text Message Reminder. Metro pr ovide s a text
message reminder o n your phone before paym ent is due.
• E-statement. View yo ur sta teme nt summ ary online .
(Only av ailab le in sel ect st ates.)
• Call Detail. View yo ur call d etai l onlin e for a lis ting of
all loc al calls made d uring t he ser vice c ycle. (Additional
charge applies.)
Payment Options:
There are several ways to pay for your Metro service.
• Auto Pay. Your credit o r debit card is automatica lly
debit ed two d ays bef ore payment is d ue.
• Express Pay. Pay by credi t or deb it card o nline a t
metropcs.com.
• By Mail. Inc lude your accou nt numb er and phone
numbe r on your c heck or m oney order and m ail to:
Metro b y T-Mobi le, P.O. Box 5119, Carol Strea m, IL
6019 7-5119.
• B y Phone v ia Automate d Syste m. Pay by c redit
or debi t card fr om your Metro ph one by di aling
1.888.8metro8. (Convenience fee applies.)
• Store Payment Machine.* Accept s cash, debit or
credi t card (wi th PIN). (Conve nience fee applies .)
• Over the Counter.* Pay at an A uthorized P aymen t
Locat ion with cas h, che ck, credit or d ebit c ard.
• eWallet. Sign up fo r MyAcco unt through
metro pcs.c om and cr eate yo ur own secure eWallet
where yo u can sa fely store ca rds for q uick payment a nd
set up au to pay.
• Text to Pay. The secure a nd eas y way to pay your
35
Page 39

month ly Metro ser vice. Regist er your credit o r debit card
with t he Met ro
®
by T-Mobile eWalle t serv ice and s imply
respo nd to a text from PAYNOW ( 729699) to pay.
* Not available at all locations.
®
MyMetro
• Manage your Metr o account right on your ph one.
By dialing any of the customer service numbers you can change
your rate plan, change your features and pay for service. Just
follow the instructions on your phone.
For Assistance:
Please visit your local Metro store or refer to the following
options if you need additional assistance.
• Sign up for MyAccount to view account details, check your
balance, make a payment, manage eWallet and more.
• Metro® by T-Mobile automated customer service from
any phone: 1.888.8metro8 and follow the prompts
(1.888.863.8768)
• Online information: metropcs.com
Please follow us at:
@metrobytmobile facebook.com/Metrobytmobile
Copyright: Metro, MetroPCS and other words, slogans,
designs and devices are registered or unregistered trademarks
of T-Mobile USA, Inc. Copyright © 2019 T-Mobile USA, Inc.
All other trademarks and other intellectual property are the
properties of their respective owners.
Your device may not work if you alter its original software.
This device will only operate with firmware versions that have
been approved for use by Metro and the device manufacturer.
If unauthorized firmware is placed on the device it will not
function.
36
Page 40

Hearing aid compatibility: This phone has been tested
and rated for use with hearing aids for some of the wireless
technologies that it uses. However, there may be some newer
wireless technologies used in this phone that have not been
tested yet for use with hearing aids. It is important to try the
different features of this phone thoroughly and in different
locations, using your hearing aid or cochlear implant, to
determine if you hear any interfering noise. Consult your
service provider or the manufacturer of this phone for
information on hearing aid compatibility. If you have questions
about return or exchange policies, consult your service
provider or phone retailer.
Your phone’s GPS system is enabled by default in order to
permit use of planned future services; see your phone’s manual
for instructions should you wish to disable your GPS for non-
911 purposes.
Metro Terms and Conditions of Service
For the most recent and up-to-date version of the Metro
Terms
and Conditions of Service to which you agree and will be
bound when you activate, use, change or pay for your Metro®
by T-Mobile service, please visit metropcs.com/terms.
Welcome to Metro. We are pleased that you have selected us
as your wireless carrier. Our Terms and Conditions of Service
are available at https://www.metropcs.com/terms-conditions/
terms-conditions-service.html. These Terms and Conditions of
Service apply to all devices and wireless services provided by
us to you and consist of several parts, which may be amended
from time to time.
In the event that the terms and conditions relating to a feature
you may have selected or may be included in your Rate Plan
conflict with the Metro Terms and Conditions of Service, the
37
Page 41

Metro Terms and Conditions of Service shall control.
By: (a) giving us a written or electronic signature or telling
us orally that you accept the Metro Terms and Conditions of
Service; (b) activating Service (if you are a new subscriber); (c)
using your Service after your Service is activated or after you
make a change or addition to your Service; (d) paying for the
Service; or (e) failing to activate Service within 30 days after
the purchase of your wireless device, unless you return your
wireless device within Metro’s applicable return period, you
agree to the Metro Terms and Conditions of Service and the
terms and conditions of service and use related to any feature
you may have selected or may be included in your Rate Plan,
including, but not limited to:
• You waive your right to a jury trial in disputes with Metro;
• Your disputes with Metro will be decided by an arbitrator;
• You waive your right to institute or participate in class
action litigation against Metro;
• You will provide Metro with accurate information about
yourself;
• Metro may communicate with you from time to time about
your Service;
• You will pay all taxes and regulatory fees even if your rate
plan is inclusive of taxes and regulatory fees; and
• Metro may terminate your Service if you fail to timely
pay for your Service or violate the Terms and Conditions
of Service in any way, including abuse of the Service or
violations of applicable laws.
Customer Service. If you have any questions regarding
your Service or information in this Agreement, you
may call our activation center at 1-888-8metro8
(1.888.863.8768).
38
Page 42

Billing for Premium and Third-Party Services
California Residents Only
Certain parties besides Metro have the ability to place
charges on your bill for premium services. You may access
these services and authorize the placement of charges on
your bill through your phone or online account. Metro also
provides customers, at no additional cost, with the ability to
restrict the placement of charges for premium and third-party
services on your account. Contact customer care or go to
www.metropcs.com/blocking for more information.
Wi-Fi Calling
Wi-Fi Calling allows you to make and receive phone calls and
messages over a Wi-Fi connection.
Important! You must have an E911 address registered with
your account in order to use Wi-Fi Calling. You can register
an E911 address via the myMetro
®
Android™ app that is
either preinstalled on your phone, or available for download
from the Google Play™ Store. If you do not have an Android
smartphone, you can call 611 to update the address.
39
Page 43

12 Month Limited Warranty
For Warranty information and support, please visit
https://us.alcatelmobile.com/warranty/. You can also call Alcatel
[US] Customer Support at 1-855-368-0829 to request a hard
copy of the warranty.
Recycling Information
For more information on Electronic Recycling:
1) Visit Alcatel Electronic Recycling Program website at
https://us.alcatelmobile.com/accessibility-compliance/
electronic-recycling-program/, or
2) Call Alcatel US Customer Support at 1-855-368-0829.
Battery Recycling (USA & Canada):
Alcatel partners with Call2Recycle® to offer a safe and
convenient battery recycling program. For more information
on our Battery Recycling Program, please visit the USA and
Canada website at https://us.alcatelmobile.com/accessibility-
compliance/battery-recycling/ and https://ca.alcatelmobile.com/
accessibility-compliance/battery-recycling/.
40
Page 44

Troubleshooting
Before contacting the service center, here are some instructions
to help you troubleshoot your device:
• You are advised to fully charge the battery for optimal
operation.
• Avoid storing large amounts of data on your phone as this
may affect its performance.
• Update your phone's software via the Updates application.
Or you can touch Settings > System > About phone >
System Updates to update software.
• Reset your phone via Factory reset. You can touch
Settings > System > Reset options > Erase all data
(Factory reset), and then touch RESET PHONE.
and carry out the following checks:
My phone can't be switched on or is frozen
• Check the battery power level and charge for at least 20
minutes.
• If it still does not work, please reset the phone using the
Power key and the Volume up key.
My phone has not responded for several minutes
• Restart your phone by pressing and holding the Power key.
My phone turns off by itself
• Check that your screen is locked when you are not using
your phone, and make sure the Powe r key is not mis-
contacted due to unlocked screen.
• Check the battery charge level.
My phone can't charge properly
• Make sure that your battery is not completely discharged;
if the battery power has been empty for a long time, it
may take around 20 minutes to display the battery charger
indicator on the screen.
41
Page 45

• Make sure charging is carried out under normal conditions
(0°C (32°F) to +50°C (122°F)).
• When abroad, check that the voltage input is compatible.
My phone can't connect to a network or "No service"
is displayed
• Try connecting in another location.
• Verify the network coverage with your service provider.
• Check with your service provider that your SIM card is
valid.
• Try selecting the available network(s) manually.
• Try connecting at a later time if the network is overloaded.
My phone can't connect to the internet
• Check that the IMEI number (press *#06#) is the same as
the one printed on your warranty card or box.
• Make sure that the internet access service of your SIM card
is available.
• Check your phone's internet connection settings.
• Make sure that you are in a place with network coverage.
• Try connecting at a later time or another location.
Invalid SIM card
• Make sure that the SIM card has been correctly inserted
(see "Inserting or removing the SIM card").
• Make sure that the chip on your SIM card is not damaged.
• Make sure that the service of your SIM card is available.
My phone can't make outgoing calls
• Make sure that you have dialed a valid number and have
touched Call.
• For international calls, check the country and area codes.
• Make sure that your phone is connected to a network, and
the network is not overloaded or unavailable.
• Check your subscription status with your operator (credit,
SIM card valid, etc.).
42
Page 46

• Make sure that you have not barred outgoing calls.
• Make sure that your phone is not in airplane mode.
My phone can't receive incoming calls
• Make sure that your phone is switched on and connected to
a network (check for overloaded or unavailable network).
• Check your subscription status with your operator (credit,
SIM card valid, etc.).
• Make sure that you have not forwarded incoming calls.
• Make sure that you have not barred certain calls.
• Make sure that your phone is not in airplane mode.
The caller’s name/number doesn't appear when a call
is received
• Check that you have subscribed to this service with your
operator.
• Your caller may have concealed his name or number.
I can't find my contacts
• Make sure that your SIM card is not broken.
• Make sure that your SIM card is inserted properly.
• Import all contacts stored in SIM card to phone.
The sound quality of the calls is poor
• Adjust the volume during a call by pressing the Volume
up/down key.
• Check the network strength. Move to a location with
stronger signal strength.
• Make sure that the receiver, connector, or speaker on your phone
is clean.
I can't use the features described in the manual
• Check with your operator to make sure that your
subscription includes this service.
• Make sure that this feature doesn't require an Alcatel
accessory.
43
Page 47

When I select a number from my contacts, the
number can't be dialed
• Make sure that you have correctly recorded the number in
your file.
• Make sure that you have selected the country code when calling
an international number.
I can't add a contact
• Make sure that your SIM card contacts are not full; delete
some files or save the files to the phone.
My callers can't leave messages on my voicemail
• Contact your network operator to check service availability.
I can't access my voicemail
• Make sure that your operator’s voicemail number is
correctly entered in "Voicemail number".
• Try later if the network is busy.
I can't send and receive MMS
• Check your phone memory as it might be full.
• Contact your network operator to check service availability
and MMS parameters.
• Verify the server center number or your MMS profile with
your operator.
• The server center may be swamped. Try again later.
SIM card PIN locked
• Contact your network operator to obtain the PUK
(Personal Unblocking Key) code.
I can't connect my phone to my computer
• Check that your USB driver is installed properly.
• Check that you have marked the USB debugging checkbox.
• Make sure that you’re using the right cable from the box.
44
Page 48

I can't download new files
• Make sure that there is sufficient phone storage space for
your download.
• Select the microSD card as the location to store downloaded
files.
• Check your subscription status with your operator.
The phone can't be detected by others via Bluetooth
• Make sure that Bluetooth is turned on and your phone is
visible to other users.
• Make sure that the two phones are within Bluetooth’s detection
range.
The battery drains too fast
• Make sure that you follow the complete charge time with
default charger (minimum 140 minutes).
• After a partial charge, the battery level indicator may not
be exact. Wait for at least 20 minutes after removing the
charger to obtain an exact indication.
• Adjust the brightness of the screen as appropriate.
• Extend the email auto-check interval for as long as possible.
• Update news and weather information on manual demand,
or increase their auto-check interval.
• Exit background-running applications if they are not being
used for extended periods of time.
• Deactivate Bluetooth, Wi-Fi, or GPS when not in use.
The phone becomes warm following prolonged calls,
game playing, internet surfing, or running other
complex applications
• This heating is a normal consequence of the CPU handling
excessive data. Ending the above actions will make your
phone return to normal temperature.
After Factory reset is performed, I can't use my
45
Page 49

phone without entering Google Account credentials
• After reset is performed, you must enter the original
Google Account credentials that were used on this phone.
• If you don’t remember your Google Account credentials,
complete Google Account recovery procedures.
• If you still cannot access your phone, apply to the authorized
repair center, but remember that it will not be regarded as
warranty case.
The phone doesn't ring when a call or message arrives
• Make sure that Do Not Disturb mode (go to Settings
> Sound & notification > Do Not Disturb) is not
activated.
• Press the Volume up/down key to adjust volume.
I forget some passwords/codes/keys on phone
• Perform Factory reset.
• If you still cannot access your phone, apply to the authorized
repair center, but remember that it will not be regarded as
warranty case.
Alcatel is a trademark of Nokia used under license by
TCL Communication Technology Holdings Limited.
© 2019 TCT Mobile Limited. All rights reserved.
TCL Communication Technology Holdings Limited
reserves the right to alter material or technical
specification without prior notice.
46
 Loading...