

Page 1

S2000 Series Scanners
S2000w Series Scanners
User’s Guide
A-61895
Page 2

The SuperSpeed USB Trident Logo is a registered trademark of USB Implementers Forum, Inc.
3rd Party Licenses
This software is based in part on the work of the Independent JPEG Group
Copyright (C)2009-2013 D. R. Commander. All Rights Reserved.
Redistribution and use in source and binary forms, with or without modification, are permitted provided that the
following conditions are met:
- Redistributions of source code must retain the above copyright notice, this list of conditions and the following
disclaimer.
- Redistributions in binary form must reproduce the above copyright notice, this list of conditions and the
following disclaimer in the documentation and/or other materials provided with the distribution.
- Neither the name of the libjpeg-turbo Project nor the names of its contributors may be used to endorse or
promote products derived from this software without specific prior written permission.
THIS SOFTWARE IS PROVIDED BY THE COPYRIGHT HOLDERS AND CONTRIBUTORS "AS IS", AND ANY
EXPRESS OR IMPLIED WARRANTIES, INCLUDING, BUT NOT LIMITED TO, THE IMPLIED WARRANTIES OF
MERCHANTABILITY AND FITNESS FOR A PARTICULAR PURPOSE ARE DISCLAIMED. IN NO EVENT SHALL
THE COPYRIGHT HOLDERS OR CONTRIBUTORS BE LIABLE FOR ANY DIRECT, INDIRECT, INCIDENTAL,
SPECIAL, EXEMPLARY, OR CONSEQUENTIAL DAMAGES (INCLUDING, BUT NOT LIMITED TO,
PROCUREMENT OF SUBSTITUTE GOODS OR SERVICES; LOSS OF USE, DATA, OR PROFITS; OR
BUSINESS INTERRUPTION) HOWEVER CAUSED AND ON ANY THEORY OF LIABILITY, WHETHER IN
CONTRACT, STRICT LIABILITY, OR TORT (INCLUDING NEGLIGENCE OR OTHERWISE) ARISING IN ANY
WAY OUT OF THE USE OF THIS SOFTWARE, EVEN IF ADVISED OF THE POSSIBILITY OF SUCH DAMAGE.
Open Source Software Licensing
Additional information about open source software licensing for firmware in the scanner can be found in the Scan
Validation Tool:
Setup > Settings > Device
General tab > Diagnostics
Logs tab > choose License from the drop-down menu.
Page 3

Contents
Safety . . . . . . . . . . . . . . . . . . . . . . . . . . . . . . . . . . . . . . . . . . . . . . . . . . . . . . . . . . . . . . . . . . . . . . . v
User Precautions ........................................................................................................................v
Acoustic emission ...................................................................................................................... v
1 Overview . . . . . . . . . . . . . . . . . . . . . . . . . . . . . . . . . . . . . . . . . . . . . . . . . . . . . . . . . . . . . . . . . .1
Scanner models .........................................................................................................................1
Alaris S2060w/S2080w Scanners ........................................................................................1
Alaris S2040/S2050/S2070 Scanners ...................................................................................2
Scanner Specifications ..........................................................................................................2
Illustrations in this guide ........................................................................................................2
Supporting documentation .........................................................................................................3
Accessories ................................................................................................................................3
Scanner components .................................................................................................................4
Front view ..............................................................................................................................4
Back view ..............................................................................................................................6
Underside view ......................................................................................................................7
Inside view .............................................................................................................................8
2 Installation . . . . . . . . . . . . . . . . . . . . . . . . . . . . . . . . . . . . . . . . . . . . . . . . . . . . . . . . . . . . . . . . .9
Unboxing the scanner ................................................................................................................9
Setting up your scanner .............................................................................................................9
Additional set up steps for S2060w/S2080w .......................................................................10
Install ferrite core (Ethernet only for S2060w/S2080w) ....................................................... 11
Install driver software ...............................................................................................................12
Verify scanner’s firmware .........................................................................................................13
Update scanner’s firmware ......................................................................................................14
Computer with driver software installed ..............................................................................14
Web Browser .......................................................................................................................15
Available Alaris Scanning Software ..........................................................................................16
Smart Touch ....................................................................................................................16
Capture Pro LE ...............................................................................................................16
ScanMate+ mobile app ...................................................................................................16
3 Scanning . . . . . . . . . . . . . . . . . . . . . . . . . . . . . . . . . . . . . . . . . . . . . . . . . . . . . . . . . . . . . . . . .17
Basic scanning .........................................................................................................................17
Scanner controls .................................................................................................................17
Getting your scanner ready to scan ....................................................................................18
Getting your pages ready to scan .......................................................................................18
Scanning Applications .........................................................................................................19
Initial scan with an Alaris scanning application ..............
Sharing the S2060w/S2080w scanner among multiple PCs ..........................................20
Restricting use of the S2060w/S2080w scanner to one PC ...........................................22
Other scanning applications ...........................................................................................22
Scanner display and buttons:
S2040/S2050/S2070 scanners ................................................................................................23
Ready ..................................................................................................................................23
Scanning .............................................................................................................................23
.................................................19
A-61895 May 2018 i
Page 4

Waiting .................................................................................................................................24
Pause ..................................................................................................................................24
Document handling .........................................................................................................24
Scanner settings ..................................................................................................................25
Scanner display and buttons:
S2060w/S2080w scanners .......................................................................................................25
Conventions in the S2000w display screens .......................................................................25
Ready ..................................................................................................................................26
Scanning .............................................................................................................................27
Waiting .................................................................................................................................27
Pause ..................................................................................................................................27
Document handling .........................................................................................................28
Scanner settings ..................................................................................................................28
Paper handling challenges and solutions .................................................................................29
Input tray capacity ...............................................................................................................29
Preparing documents for scanning ......................................................................................29
Settings for reliable feeding .................................................................................................31
Active Feeding ................................................................................................................31
Enhanced Separation .....................................................................................................31
Mixed paper .........................................................................................................................31
Enhanced stacking, to maintain order in output stack ....................................................32
Lightweight paper ................................................................................................................32
NCR paper ..........................................................................................................................32
Scanning small items ..........................................................................................................32
Long paper ..........................................................................................................................33
Fragile or oversize paper .....................................................................................................34
Handle with care .............................................................................................................34
Handle with extra care ....................................................................................................35
Oversize paper ...............................................................................................................35
Multifeeds ............................................................................................................................36
Detecting multifeeds during scanning .............................................................................36
If scanner is stopping when paper is not multifed ...........................................................36
Disabling multifeed detection for special input pages .....................................................36
If you still have trouble .........................................................................................................37
Improving image quality ...........................................................................................................37
Recommended settings .......................................................................................................37
Other Perfect Page settings ................................................................................................37
Turning the scanner off ......................................................................................................
......38
“Wake up” actions ....................................................................................................................38
From off ...............................................................................................................................38
From standby/sleep .............................................................................................................38
4 Maintenance . . . . . . . . . . . . . . . . . . . . . . . . . . . . . . . . . . . . . . . . . . . . . . . . . . . . . . . . . . . . . .39
Scanner meters ........................................................................................................................39
Opening the scanner cover ......................................................................................................40
Cleaning procedures ................................................................................................................40
Clean in this order ...............................................................................................................41
Running a transport cleaning sheet .....................................................................................41
Cleaning the separation roller .............................................................................................42
Cleaning the feed rollers .....................................................................................................44
Cleaning the transport rollers ..............................................................................................45
Cleaning the imaging area ..................................................................................................46
Replacement procedures .........................................................................................................46
ii A-61895 May 2018
Page 5

Replacing the separation roller ............................................................................................47
Replacing the pre-separation pad .......................................................................................48
Replacing the urging roller tire ............................................................................................49
Replacing the feed roller .....................................................................................................50
Supplies and Consumables .....................................................................................................51
Customer Replaceable Parts and Accessories ...................................................................51
Updates ....................................................................................................................................52
5 Troubleshooting . . . . . . . . . . . . . . . . . . . . . . . . . . . . . . . . . . . . . . . . . . . . . . . . . . . . . . . . . . . .53
Scanner error indicators ...........................................................................................................53
Problem solving ........................................................................................................................53
Scanner exception handling ................................................................................................53
Self-help for problems .........................................................................................................54
Calibrations ..............................................................................................................................55
Contacting Technical Support ..................................................................................................56
Appendix A Regulatory Information . . . . . . . . . . . . . . . . . . . . . . . . . . . . . . . . . . . . . . . . . . . . . .57
Environmental information ...................................................................................................57
European Union ..................................................................................................................57
EMC Statements for S2000 Series Scanners: .........................................................................59
EMC and Wireless Regulatory Statements for S2000w Series Scanners: ..............................60
Appendix B Warranty — US and Canada only . . . . . . . . . . . . . . . . . . . . . . . . . . . . . . . . . . . . . .65
A-61895 May 2018 iii
Page 6

iv A-61895 May 2018
Page 7

Safety
User Precautions
• Place the scanner on a sturdy, level work surface capable of supporting 3.2 kg (7 lbs).
• Do not install the scanner in a location subject to dust, humidity or steam. This may cause electrical shock or a fire. Only use
the scanner and power supply indoors in a dry location.
• Make sure the electrical power outlet is located within 1.52 meters (5 feet) of the scanner and is easily accessible in case of
an emergency.
• Plug the power adapter securely into the wall outlet. Failure to do so may cause electrical shock or fire.
• Do not damage, knot, cut or modify the power cord. This may cause electrical shock or fire.
• Use only the AC adapter that is supplied with the scanner. Do not use the scanner’s AC adapter with any other product. This
may cause electrical shock or fire.
• Do not use the scanner if it becomes inordinately hot, has a strange odor, emits smoke, or makes unfamiliar noises.
Immediately stop the scanner and disconnect the power cord from the power outlet. Contact Alaris Technical Support.
• Do not disassemble or modify the scanner or the AC power adapter.
• Do not move the scanner with the power cord and interface cable attached. This may cause damage to the cord/cable.
Remove the power cord from the wall outlet before moving the scanner.
• Follow the Kodak Alaris recommended cleaning procedures. Do not use air, liquid or gas spray cleaners. These cleaners
displace dust, dirt and debris to another location within the scanner, which may cause the scanner to malfunction.
• Safety Data Sheets (SDS) for chemical products are available on the Kodak Alaris website at: www.kodakalaris.com/go/ehs.
When accessing the SDS from the website, you will be required to provide the catalog number. See “Supplies and
Consumables” on page 51 for supplies and catalog numbers.
• This device is not intended for use in the direct field of view at visual display workplaces. To avoid incommoding reflexions at
visual display workplaces this device must not be placed in the direct field of view.
Acoustic emission
Maschinenlärminformationsverordnung – 3, GSGV
Der arbeitsplatzbezogene Emissionswert beträgt <70 dB(A).
[Machine Noise Information Ordinance — 3, GSGV
The operator-position noise emission value is <70 dB(A).]
A-61870 May 2018 v
Page 8

Safety
vi A-61870 May 2018
Page 9
1 Overview
Scanner models
This User’s Guide provides information and procedures for using and
maintaining the Alaris S2040, S2050, S2060w, S2070, and S2080w
Scanners.
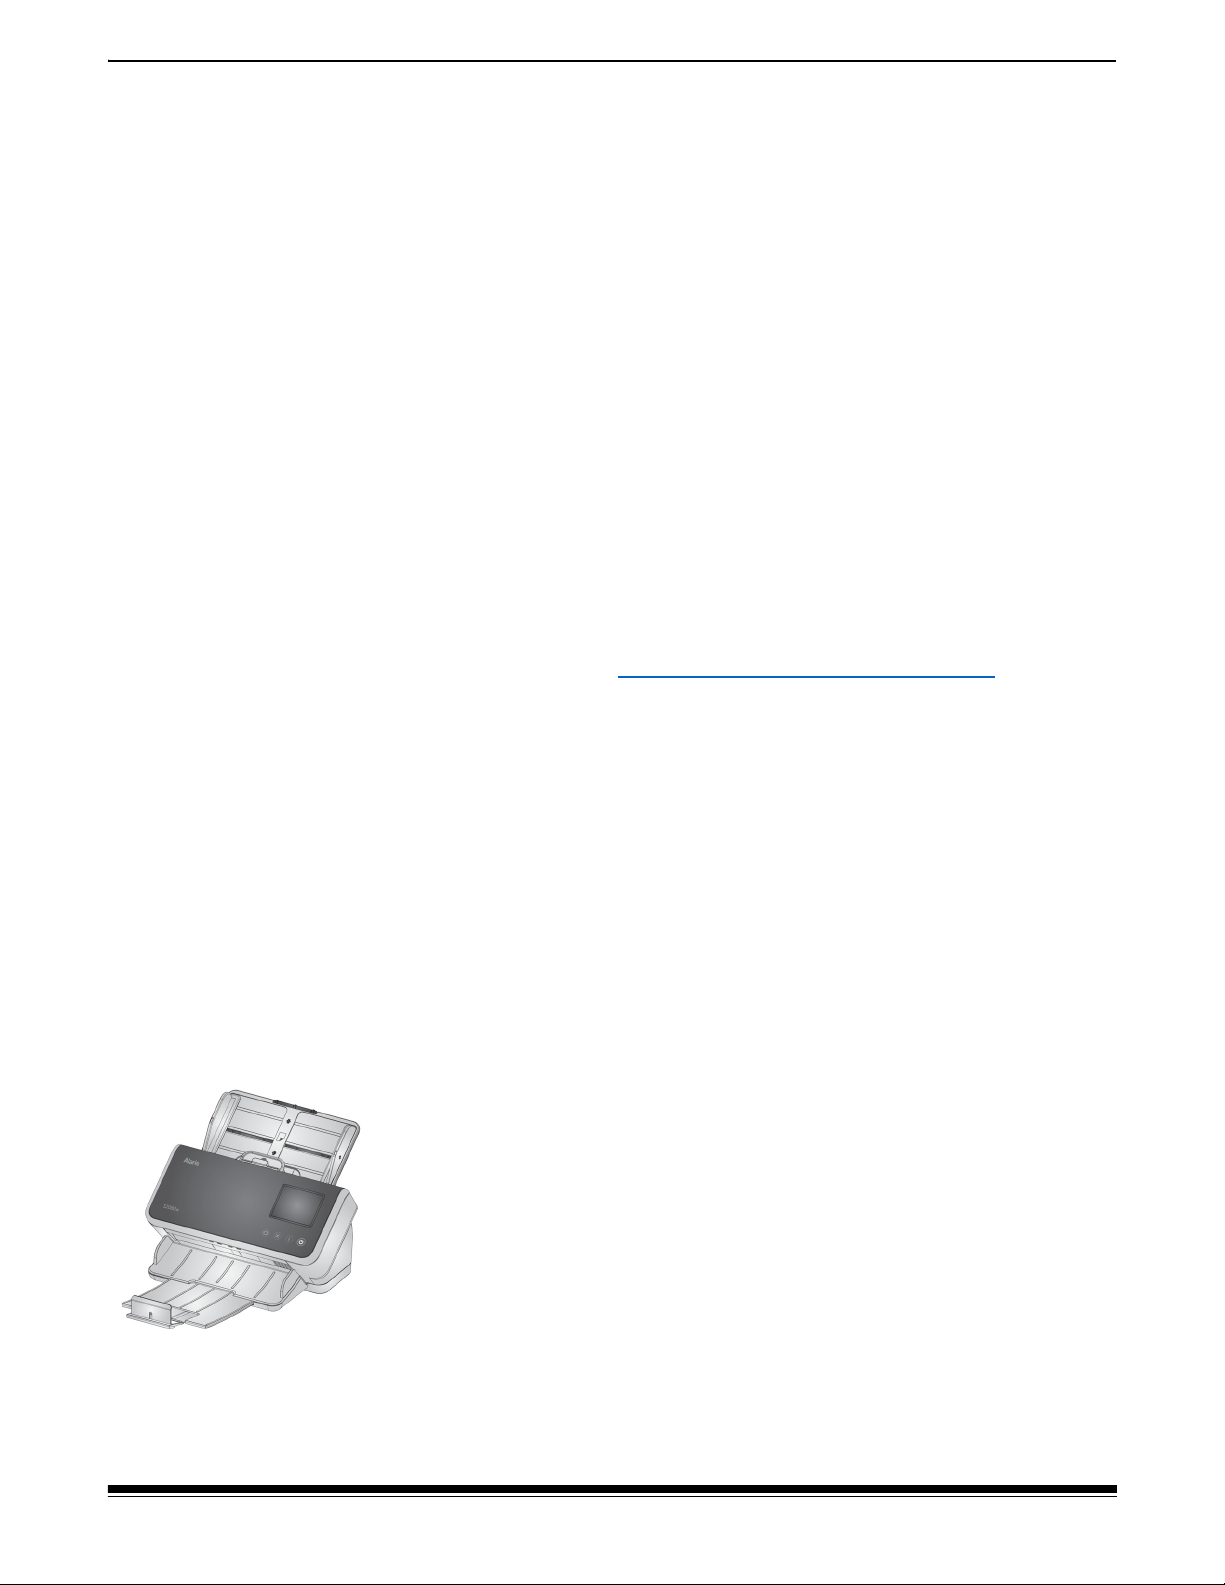
The Alaris S2000/S2000w Series Scanners are compact, duplex color
document scanners perfect for personal and workgroup use. They scan
40-80 A4/letter size pages per minute (200/300 dpi black and white,
grayscale, and color). The input tray holds 80 pages. The dual LED
indirect illumination provides excellent image quality.
The S2000/S2000w Series Scanners have built-in embedded image
processing capabilities, to process images within the scanner
electronics. This feature reduces dependency on the PC processor, so
a lower specification PC can be used to support these scanners.
All these scanner models are entitled to use a freely downloadable
Alaris scanning application, available at the support page for your
model, for example www.kodakalaris.com/go/S2080wsupport
scanning applications allow you to scan your documents and send
them to various destinations with the touch of a button, then search for
and view your digitized documents based on different search criteria.
. Alaris
The S2000/S2000w scanners may also be used with other PC-based
scanning applications by means of the TWAIN or ISIS driver interface.
The S2000/S2000w Series Scanners also support the following flatbed
accessories:
• Kodak A3 Size Flatbed (not available for model S2040)
• Alaris Passport Flatbed
• Alaris Integrated A4/Legal Size Flatbed
Alaris S2060w/S2080w Scanners
The S2000w model scanners offer wired (USB or Ethernet) or wireless
connection to your network. One scanner can therefore be accessed by
more than one PC on the network. The S2060w and S2080w scanner
models support the ScanMate+ Mobile app, which allows you to scan
documents and receive them directly from the scanner on your iOS or
Android mobile device.
The S2000w scanners let you monitor and direct the scanner using a
3.5 inch display touch screen on the scanner itself.
The S2060w model scans at 60 pages per minute and the S2080w at
80 pages per minute (duplex scanning of portrait oriented pages, 200/
300 dpi, in black and white, grayscale, or color).
A-61895 May 2018 1
Page 10

1 Overview
Alaris S2040/S2050/S2070 Scanners
The S2040, S2050, and S2070 scanners connect to your PC over a
USB cable. They offer a 1.5 inch display screen and buttons so you can
monitor and direct the scanner from the scanner itself.
The S2040 models scan A4/letter-size documents at 40 pages per
minute, the S2050 model at 50 pages per minute, and the S2070 at 70
pages per minute (duplex scanning of portrait oriented pages, 200/300
dpi, in black and white, grayscale, or color).
Scanner Specifications
Current scanner specifications may be found here:
www.kodakalaris.com/go/S2000
www.kodakalaris.com/go/S2000w
Look for a link to specifications for your specific scanner model.
NOTE: Specifications on the web site refer to the latest scanner driver
and firmware versions.
Illustrations in this guide
This User’s Guide provides information and procedures for all Alaris
S2000/S2000w Series Scanners. The illustrations in this guide show
either the Alaris S2080w Scanner or the Alaris S2070 Scanner; your
model may look slightly different from a specific illustration. The
information in this guide applies to all S2000/S2000w scanner models
unless otherwise noted.
2 A-61895 May 2018
Page 11

Supporting documentation
In addition to this User’s Guide, the following documentation is also
available:
• Installation Guide — quick visual steps for installing your scanner.
• Reference Guide — easy visual steps for cleaning your scanner.
Download this guide and keep it close to the scanner.
• User Guides for Alaris scanning applications — information on
how to use freely downloadable Alaris scanning applications.
• Help for TWAIN and ISIS — information on how to use the TWAIN
Datasource and ISIS Driver is available in Help. Use the F1 key after
you have selected a driver and the user interface appears. This
information is also available in PDF on the support page for your
scanner model.
• Videos — some operations are explained using videos.
• The manuals and videos for your scanner model can be found on the
Support page for your model:
1 Overview
Accessories
S2040:
S2050: www.kodakalaris.com/go/S2050support
S2070: www.kodakalaris.com/go/S2070support
S2060w: www.kodakalaris.com/go/S2060wsupport
S2080w: www.kodakalaris.com/go/S2080wsupport
Accessories, including flatbeds of different sizes and a sleeve for
scanning delicate or oversize pages, can be found on the following
support pages:
S2040/S2050/S2070: www.kodakalaris.com/go/S2000support
S2060w/S2080w: www.kodakalaris.com/go/S2000wsupport
www.kodakalaris.com/go/S2040support
A-61895 May 2018 3
Page 12
1 Overview
1
3
4
2
5
6
7
8
9
10
11
12
13
14
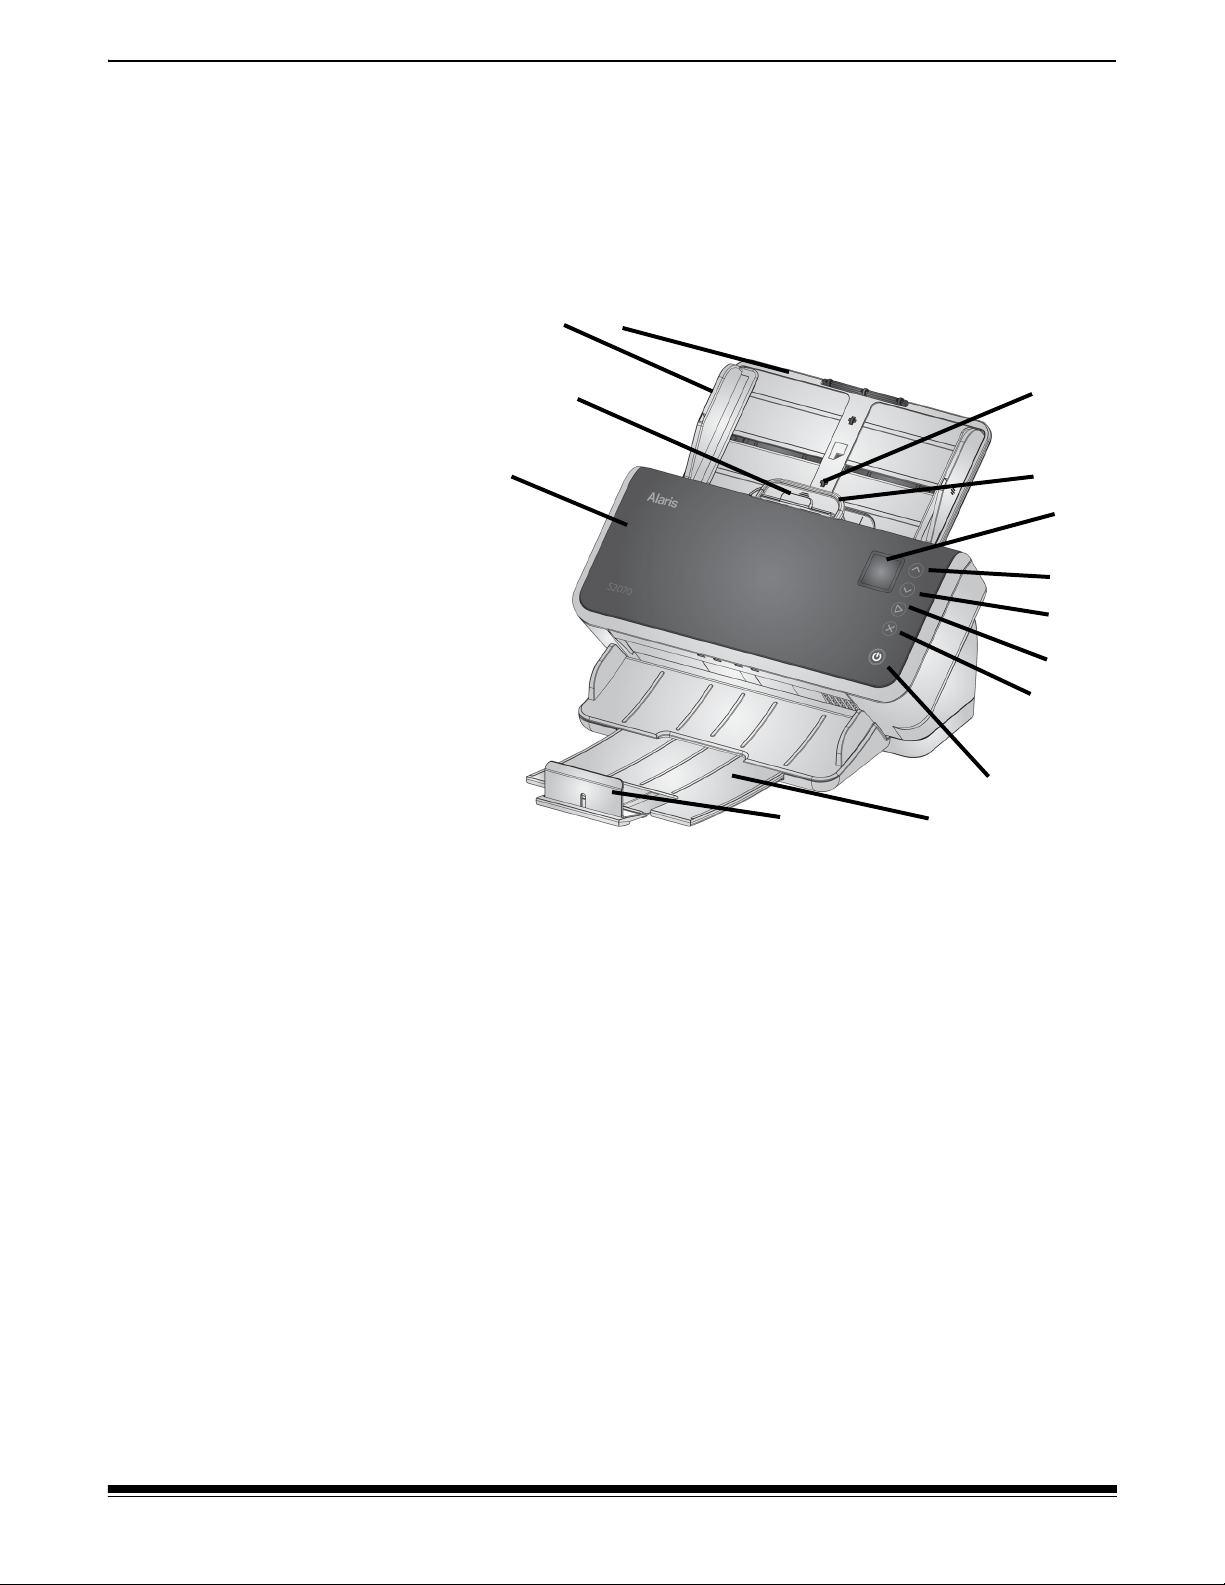
Scanner components
Front view
This illustration shows the S2040/S2050/S2070 model scanners.The
scanner screen and buttons differ in the S2060w/S2080w models, as
illustrated below.
1 Input tray — the input tray holds up to 80 pages of A4
80 g/m
2
paper and can be extended to accommodate pages up to legal size
(14 inches/355.6 mm). In long document mode it will accept pages
up to 118 inches/3 m. (Long documents need additional support to
hold them up so they don’t droop off the back of the input tray. See
“Getting your scanner ready to scan” on page 18 for illustration of
input tray extension)
2 Side guides — the side guides can be moved in and out to
accommodate the size of pages you are scanning. Side guides may
be locked in place for letter size or A4 size paper. See “Getting your
scanner ready to scan” on page 18.
3 Gap release — allows you to manually adjust the space between
the feed roller and separation roller for pages that require special
handling (e.g. thick paper, envelopes, hard cards). When using the
gap release, pull the gap release out to feed special pages. When
finished, push the gap release back in place.
4 Scanner cover — when opened, provides access to internal
components such as the imaging area and the feed and separation
rollers.
5 End Stop — can be lifted up when scanning, for better stacking of
output pages
4 A-61895 May 2018
Page 13

1 Overview
12
16
8
17
7
15
NOTE: some of the items on this page refer to the illustration on the
previous page.
6 Output tray — collects the scanned pages. The output tray can be
pulled out and extended to accommodate pages up to 35.56 cm (14
inches) in length. For longer pages, keep the end stop down.
7 Power button — touch this button to turn the scanner on or off. The
power button is lighted when the scanner is powered on. The
lighted button blinks when a situation requires your attention: for
example, to close the scanner cover. It blinks more slowly when the
scanner is in low power mode.
8 X button — this multi-function button can End or Pause a scanning
job, Cancel out of a menu, or (on the S2040/S2050/S2070
scanners) display a Menu. Its function varies at different times
during scanner operation.
9 Play / Select button — (S2040/S2050/S2070 scanners) starts
scanning and launches the scanning application; in some menus, it
will Select the indicated menu option.
10 & 11 Down and Up buttons — (S2040/S2050/S2070 scanners)
allow you to scroll through a display too long to fit on the scanner
screen. Touch the Up or Down buttons to scroll.
Front view — S2060w and
S2080w models
12 Scanner screen — for the S2040/S2050/S2070 scanners, color
graphic display of scanner information; for the S2060w/ 2080W
scanners, a larger touch screen with color graphic display of
scanner information and controls. For all models, the screen
provides access for Alaris scanning applications that allow you to
initiate scanning at the scanner.
NOTE: On the S2060w/S2080w scanners, the Play, Up, and Down
functions are available using the scanner touch screen.
13 Scanner cover release lever — opens the scanner to allow
access to the paper path for cleaning or for clearing a document
jam.
14 ID card positioning — for scanning one small card (such as US
driver’s license or other credit card sized ID cards) in landscape
orientation. Refer to “Scanning small items” on page 32 for precise
positioning of credit card.
15 Close scanner cover by pressing here.
16 Home button — (S2060w/S2080w scanners) returns you to the
scanner home display. For Alaris scanning applications, you will
see the list of scanning setups. For applications that must initiate
scanning at the PC, you will see the Ready screen.
17 i button — (S2060w/S2080w scanners) takes you to a display of
scanner information.
A-61895 May 2018 5
Page 14
1 Overview
1
2
3
5
4
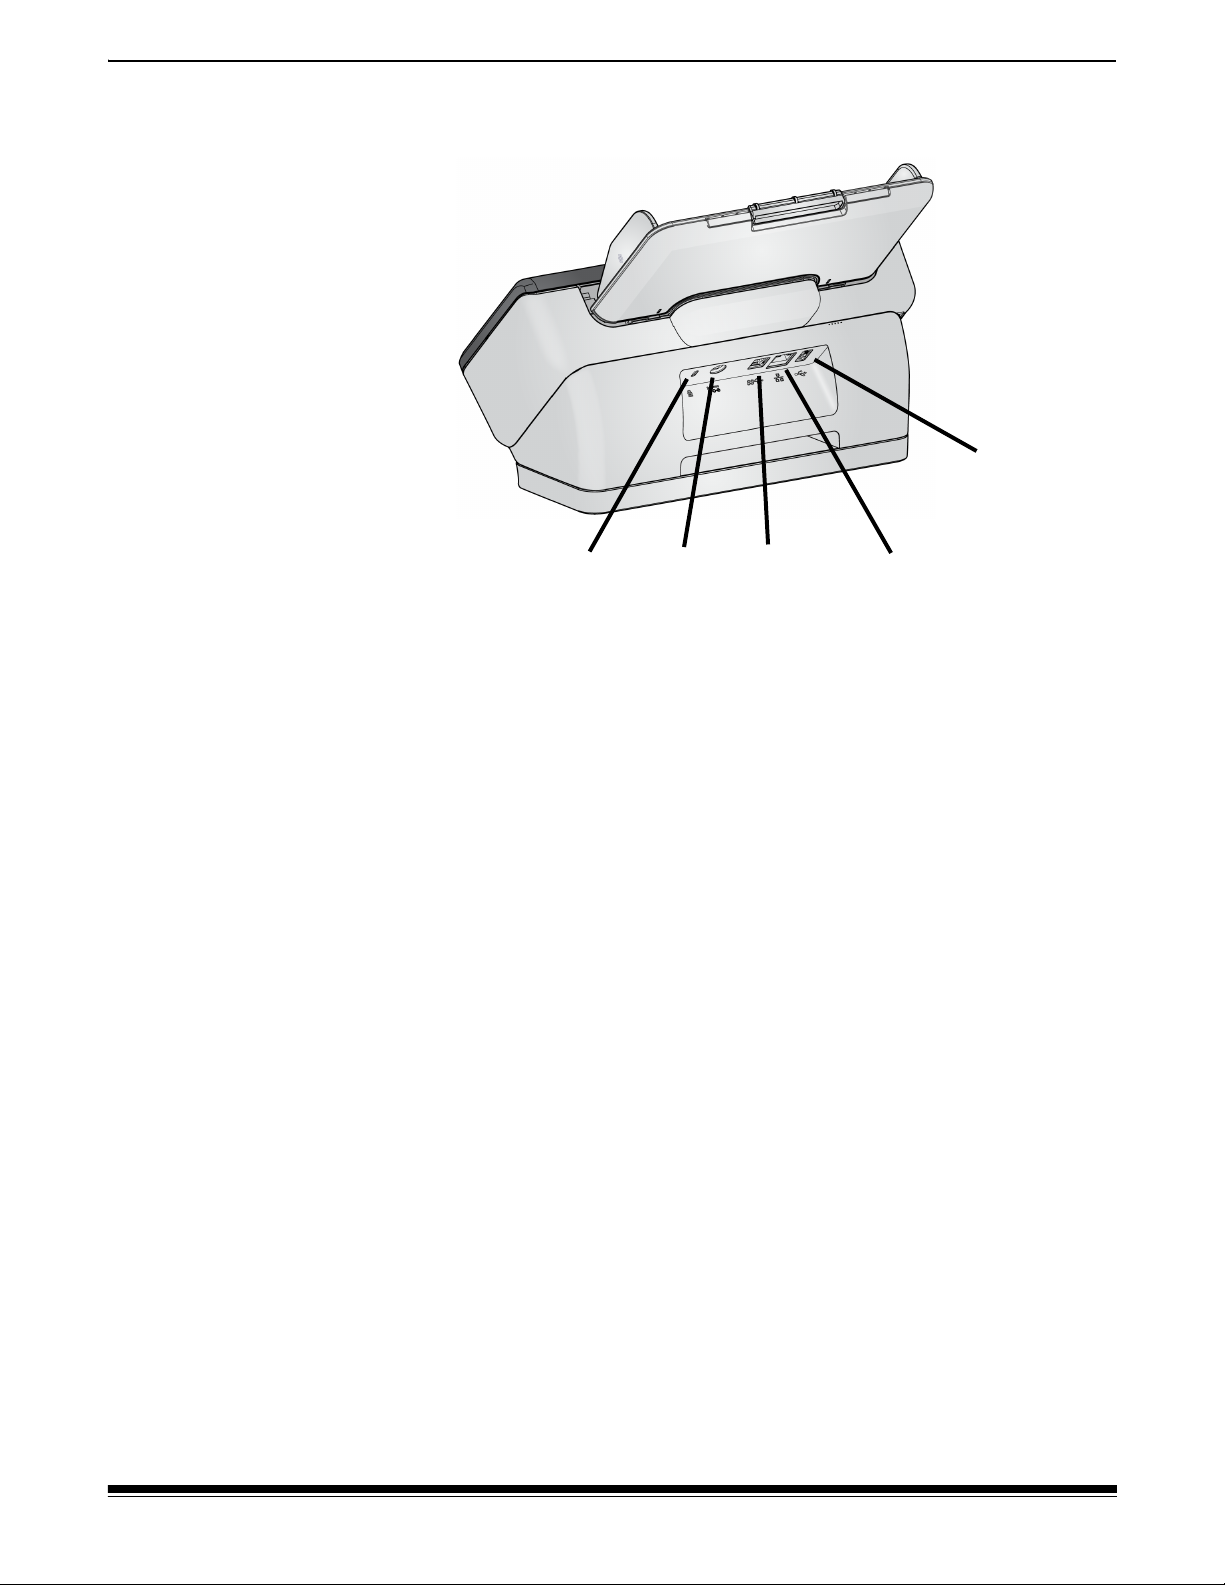
Back view
1 Security lock port — allows you to connect a security lock to the
scanner. You can purchase a standard security lock at an office
supply store.
2 Power port — connects the power supply to the scanner.
3 USB 3.1 Super Speed port — connects the scanner to the PC.
4 Ethernet port — (not available in S2040/S2050/S2070 models)
connects the scanner to the network.
5 USB 2.0 High Speed port — connects the scanner to an Alaris
integrated flatbed.
6 A-61895 May 2018
Page 15
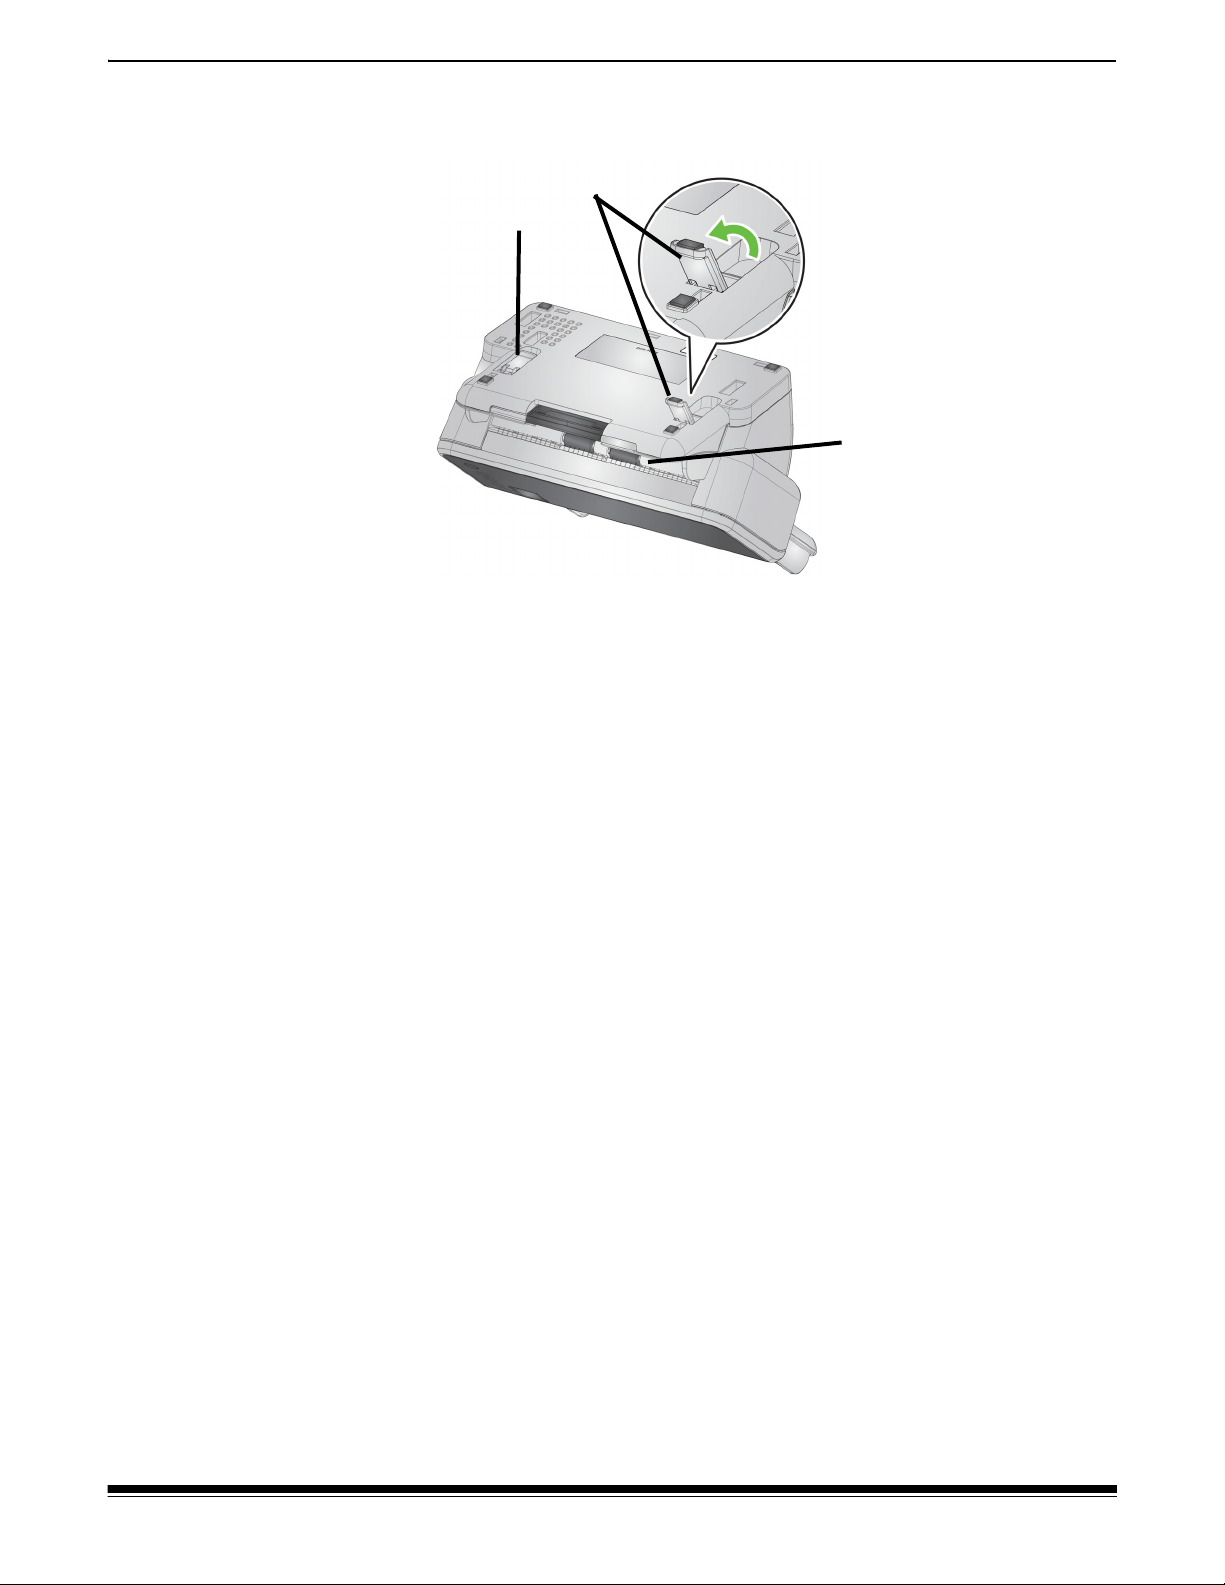
Underside view
1
2
3
1 Overview
1 Tilt stand leg — recessed into scanner base (not provided with
S2040).
2 Tilt stand leg — fully extended to lift front edge of scanner —
assists output of long pages (not provided with S2040).
NOTE: In operation, either recess or fully extend both legs.
3 Transport rollers — six transport rollers should be cleaned from
inside the scanner (see “Inside view” on page 8); these two should
be cleaned from the underside.
A-61895 May 2018 7
Page 16
1 Overview
1
3
4
5
6
7
8
9
2
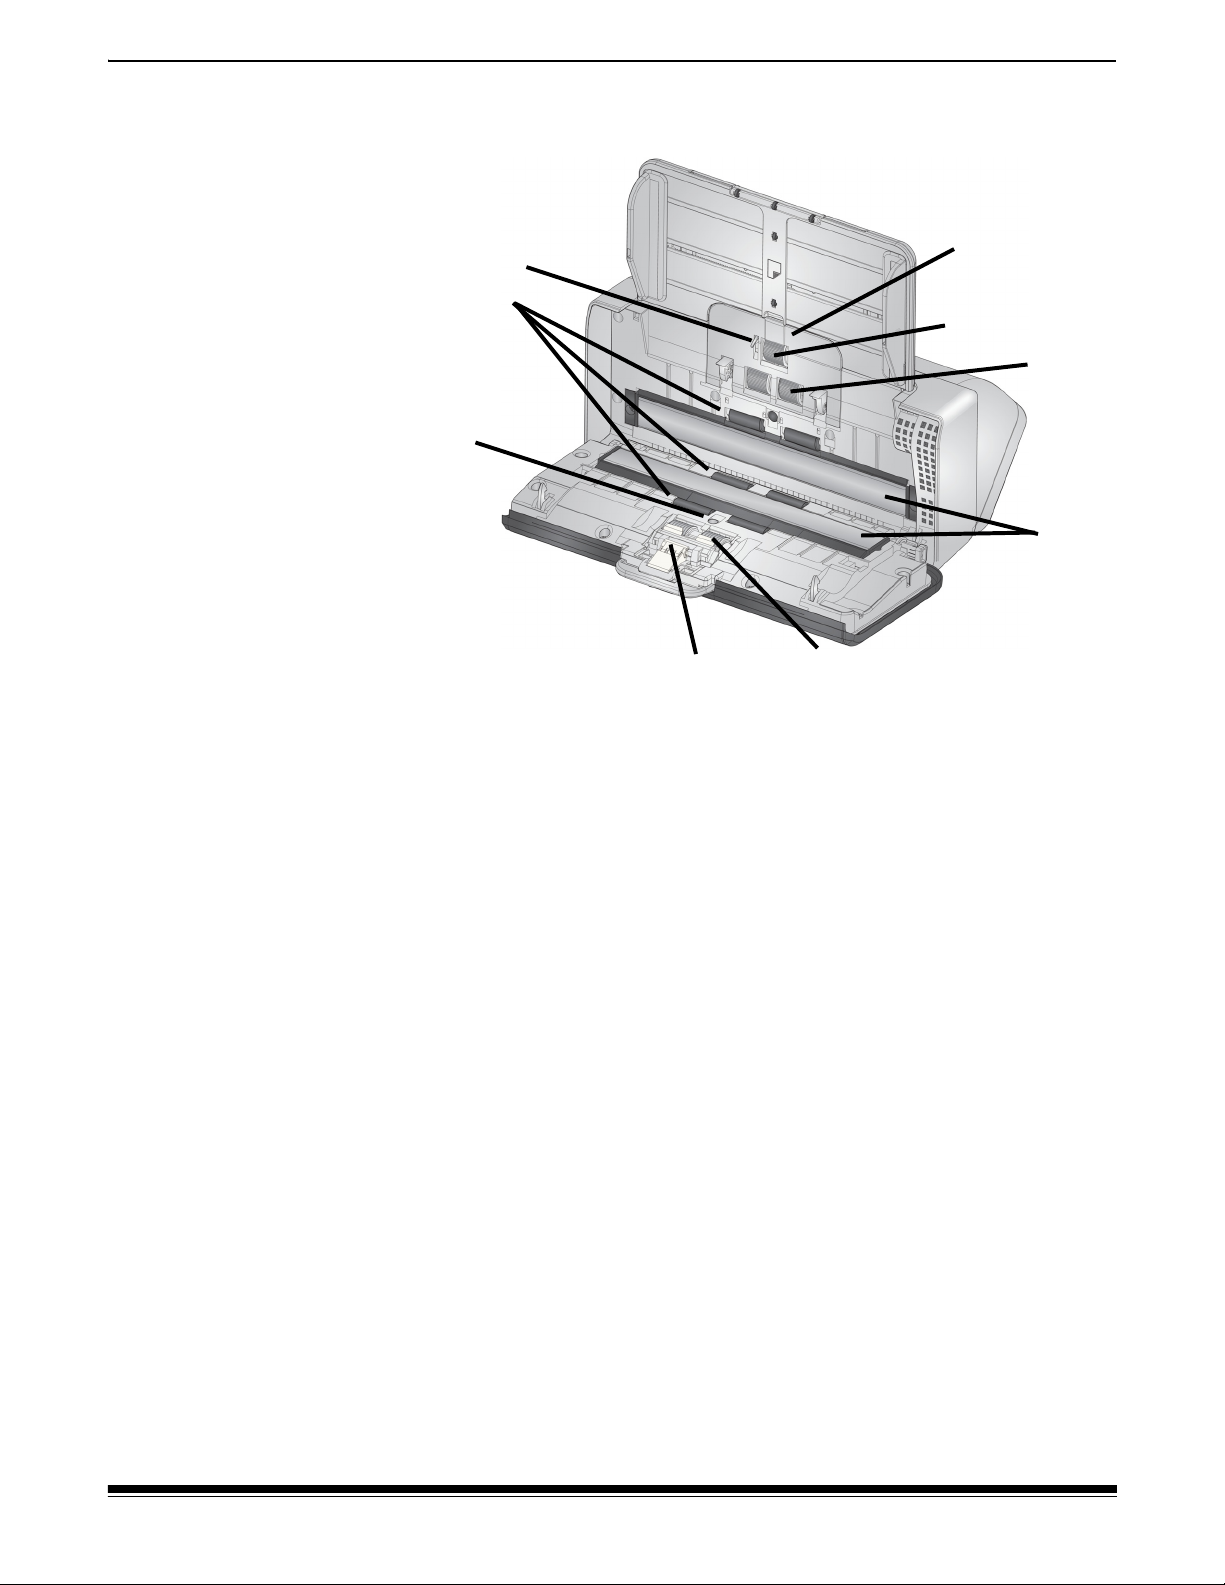
Inside view
1 Paper present sensor — detects the presence of paper in the
input tray.
2 Transport rollers — (three pairs) these six rollers, plus the two
visible on the “Underside view” on page 7, help move paper
smoothly through the scanner.
3 Multifeed and intelligent document protection sensor —
detects multifed pages and pages that are crinkling in the scanner.
4 Pre-separation pad — helps to feed one page at a time from the
input tray.
5 Separation roller — provides smooth page feeding and separation
of various sizes, thicknesses and textures of input pages.
6 Image glass — the area of the scanner where imaging takes place.
7 Feed roller — provides smooth feeding and separation of various
sizes, thicknesses and textures of pages.
8 Urging roller — pulls next page into scanner from the input tray.
9 Feed roller cover — provides access to feed rollers.
8 A-61895 May 2018
Page 17

2 Installation
The following is a list of steps you will need to perform in order to get
your scanner set up and connected to your computer.
1. Unbox your scanner.
2. Set up your scanner for the first time.
3. Install driver software.
4. Verify the scanner’s firmware.
5. Optionally update scanner’s firmware.
6. Optionally install available Alaris scanning software.
NOTE: When installing updates, update the driver software before
updating the scanner’s firmware.
If you need additional assistance with any scanner issues, go to the
troubleshooting website for your scanner model:
S2040/S2050/S2070:
www.kodakalaris.com/go/S2000-troubleshooting
S2060w/S2080w:
www.kodakalaris.com/go/S2000w-troubleshooting
Unboxing the scanner
Follow these steps to unbox your scanner and get it ready to be set up.
1. Open the scanner box.
2. Remove all the contents from the scanner box.
3. Remove all the shipping tape from the scanner.
4. Find the Installation Guide and open it.
5. Verify the contents of scanner box. (Refer to left panel of the
Installation Guide.)
Setting up your scanner
Follow these steps from the Installation Guide.
1. Install the input tray.
2. Attach the correct AC plug adapter to the power supply. Attach the
power supply to the scanner, and then to a power outlet.
NOTE: Do not attach any other cables to the scanner at this time
(e.g. USB). You will be instructed when to do that, at the proper
time.
3. Turn the scanner on by pressing the power button on the front
of the scanner.
A-61895 May 2018 9
Page 18

2 Installation
Additional set up steps for S2060w/S2080w
In addition to the above steps from the Installation Guide, you will need
to configure the scanner’s network settings using the scanner’s display.
The Language selection screen will be displayed, unless the scanner
was previously configured. If the scanner was previously configured,
you can reset the scanner so it will start this set up again:
-Press on the scanner’s display to open the Settings menu.
-Scroll down to “Reset”, then press it.
-Follow any prompts.
NOTE: The Settings menu can also be used to change individual
network and power settings.
To navigate through the scanner’s display set-up screens, make your
selection(s) and then press the right arrow to go to the next
screen/step. To go back to the previous screen/step, press the left
arrow .
There are three main set up paths:
• “Setup Wizard” – Allows you to use the scanner’s display to set up
the scanner for three common configurations. This is a good choice
for a small company or small group. The choices are:
- Wired Network: USB is also available, but Wireless access is
turned off/disabled.
- Wireless Network: USB is also available, but the wired connection
is turned off/disabled.
- USB Only: both Wireless or Wired access is turned off/disabled.
• “Scan EasySetup Document” – Allows you to scan a previously
created EasySetup configuration document. This is more suited for a
large installation where a system administrator can set up the
parameters for uniform use across the company or multiple sites.
To create an EasySetup configuration document, go to https://
easysetup.kodakalaris.com and follow the instructions. You can then
print the PDF for your use, or e-mail the PDF to your users.
• “Advanced” – Allows you to have full control over all the network
settings. This is appropriate when the “Setup Wizard” combinations
are not sufficient and EasySetup is not desired.
NOTE: You can cancel out of the network set up process by pressing
the button on the scanner. If you cancel, the scanner will use the
default network settings: Wired Network is turned on/enabled in
automatic (DHCP) mode, Wireless is turned on/enabled in Access
Point mode, and USB is available.
10 A-61895 May 2018
Page 19
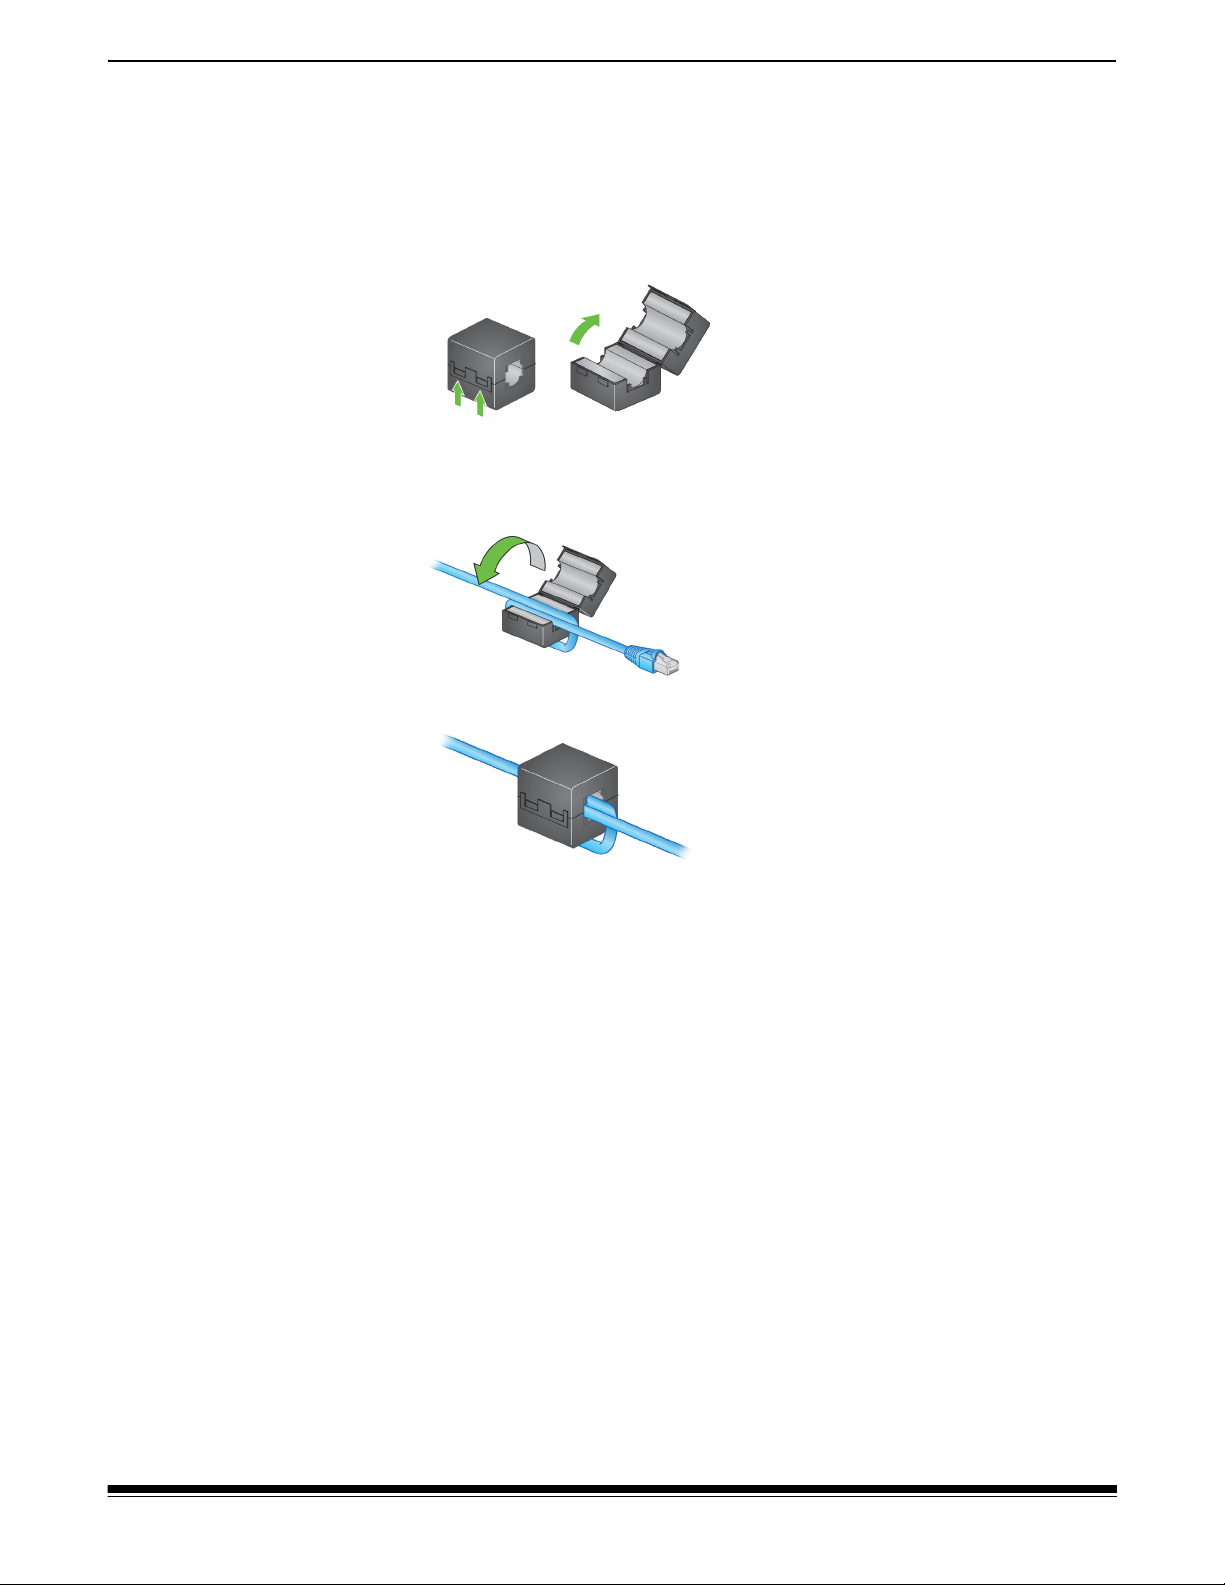
Install ferrite core (Ethernet only for S2060w/S2080w)
If you are using an Ethernet cable, you will want to install the provided
ferrite core. Without a properly attached ferrite core, the scanner may
cause interference to nearby wireless devices.
1. Open the ferrite core that came with the scanner.
2. Wrap the Ethernet cable around the ferrite core as shown. Place it
approximately 3 in./7.6 cm from the end of the Ethernet cable that
will be plugged into the scanner.
2 Installation
3. Close the ferrite core, being careful not to pinch the Ethernet cable.
A-61895 May 2018 11
Page 20

2 Installation
Install driver software
While the driver software on the provided disc will work with your
scanner, to assure you have the latest software, please download it
from the scanner’s product support website.
You should only use the disc from the scanner box if your PC does not
have access to the internet or you are unable to download executable
files.
NOTE: The disc only contains driver software for Windows Operating
Systems. You must go to the scanner’s product support website (below)
to get drivers for other Operating Systems.
1. If your computer has access to the internet, obtain the driver
software from scanner’s product website:
-Go to your scanner’s product support website:
S2040/S2050/S2070:
www.kodakalaris.com/go/S2000install
S2060w/S2080w:
www.kodakalaris.com/go/S2000winstall
-Scroll to the driver section that matches your computer’s Operating
System.
-Select the file to download. For Windows, “Windows – EXE”. For
Linux, pick the package that is appropriate for your distribution.
-Run the driver software installer.
2. If you are unable to download from the scanner’s product website,
and your computer is running a Windows Operating System:
-Place the disc from the scanner box into the disc drive of your
computer.
-If your computer does not automatically start the installer, browse
to the disc and run set_up.exe.
3. Follow the steps of the “Alaris S2000 Scanners” driver software
installation. Be sure to follow the ‘Typical’ installation in order for
your computer to be properly connected to your scanner and to
verify the scanner is working.
12 A-61895 May 2018
Page 21

Verify scanner’s firmware
Follow these steps to see if your scanner’s firmware needs updating.
1. Determine your scanner’s firmware version by doing the following
on the scanner:
S2040/S2050/S2070:
-Make sure your scanner is turned on and in the Ready screen.
-Press the button to display the Settings menu on the scanner’s
display.
-Make sure ‘Information’ is selected/highlighted. You can use the
arrow buttons to change the highlighted selection.
-Press the button to display the scanner’s information. The
scanner’s current firmware version number is shown after
‘Firmware:’. It will be a six-digit number.
-Press the button to exit the Settings menu.
2 Installation
-Press the button to return to the Ready screen.
S2060w/S2080w Scanner:
-Make sure your scanner is turned on and in the Ready screen.
-Press the button to display the Information menu on the
scanner’s display.
-Scroll down to get the scanner’s current firmware version number.
It is shown after ‘Firmware:’. It will be a six-digit number.
-Press the button to exit the Information menu and return to the
Ready screen.
2. Determine the version of the firmware that is on the scanner’s
product website:
-Go to your scanner’s product support website:
S2040/S2050/S2070:
www.kodakalaris.com/go/S2000install
S2060w/S2080w:
www.kodakalaris.com/go/S2000winstall
-Scroll to the Firmware section that matches your scanner’s model
name.
-If the version is not shown, then click the ‘Release Notes’ link.
3. If the firmware version number on the website is higher than the
scanner’s firmware version, then you should update the firmware
version.
A-61895 May 2018 13
Page 22

2 Installation
Update scanner’s firmware
Use one of the following methods to update your scanner’s firmware:
• Computer with driver software installed – Use this option when the
computer already has the driver software installed and it is connected
to/can access the scanner.
• Web Browser – You have a S2060w or S2080w that has at least one
network connection turned on/enabled, and you have a computer
that is on the same network as the scanner.
Computer with driver software installed
Follow these steps to update your scanner’s firmware from a computer
that already has the driver software installed.
The scanner must be connected/available to the computer. If you can
scan from the computer, then it can be used to update the scanner’s
firmware.
1. Go to your scanner’s product support website:
S2040/S2050/S2070:
www.kodakalaris.com/go/S2000install
S2060w/S2080w:
www.kodakalaris.com/go/S2000winstall
2. Scroll to the Firmware section that matches your scanner’s model
name.
3. Download the firmware installer that matches your computer’s
Operating System.
4. Make sure your scanner is turned on, is connected/available to your
computer and not showing any errors.
5. Run the firmware installer.
6. Follow the steps of the firmware installer.
14 A-61895 May 2018
Page 23

Web Browser
2 Installation
Follow these steps to update your scanner’s firmware via the scanner’s
internal web page. You will do this using the web browser from a
computer that is on the same network as the scanner.
NOTE: This is only available for S2060w and S2080w scanners that
have at least one network connection turned on/enabled. Networking is
turned on/enabled by default.
1. Go to your scanner’s product support website:
www.kodakalaris.com/go/S2000winstall
2. Scroll to the Firmware section that matches your scanner’s model
name.
3. Select the “Web Browser (.sig)” file to download
4. Make sure your scanner is turned on and available on the network
and not showing any errors.
5. Obtain the scanner’s network IP Address:
-Press the button to display the Information menu on the
scanner’s display.
-Scroll down to the appropriate IP Address. If you will connect via
the wired network, then use the IP Address under “Wired Address:”.
If you will connect via the wireless network, then use “Wireless
Address:”.
-Press the button to exit the Information menu.
6. Open a web browser on the computer and do the following within
the web browser:
-Enter the scanner’s network IP Address to get to the scanner’s
internal web page.
-Click the ‘Support’ tab.
-Click the “UPDATE SCANNER FIRMWARE” button; it is in the
lower left corner.
-Click the ‘Browse’ button.
-Navigate the folder, on the computer, that you downloaded the *.sig
file to.
-Select the *.sig.
-Click the “Start Firmware Update” button.
-Wait for the firmware update to complete. It may take several
minutes.
A-61895 May 2018 15
Page 24

2 Installation
Available Alaris Scanning Software
Easy-to-use Alaris scanning applications have been customized to
work with your scanner (see descriptions below). They can be
downloaded from your scanner’s product support website:
Smart Touch
Capture Pro LE
S2040:
S2050: www.kodakalaris.com/go/S2050support
S2070: www.kodakalaris.com/go/S2070support
S2060w: www.kodakalaris.com/go/S2060wsupport
S2080w: www.kodakalaris.com/go/S2080wsupport
Training information can be found at:
www.kodakalaris.com/go/scanningsoftware
Easy to use application that allows you to scan your paper documents,
then search for and view the digitized documents.
Application allows you to quickly scan large, high resolution, or
uncompressed documents. Capture, edit and output batches to
repository or other applications.
www.kodakalaris.com/go/S2040support
ScanMate+ mobile app
Application allows you to scan documents from your network scanner
(S2060w/S2080w) using your iOS or Android mobile device. The
ScanMate+ mobile app is available from the App Store or Play Store for
your device.
16 A-61895 May 2018
Page 25

3 Scanning
Basic scanning
Scanner controls
S2040/2050/S2070 Scanner
The cover of the S2040/S2050/S2070
Scanner contains a screen with a 1.5”
diagonal color display, and five buttons.
The power button is always active
and is used to turn the scanner on and
off. The function of the other four buttons
may change depending on the scanner
screen display.
Refer to “Scanner display and buttons:
S2040/S2050/S2070 scanners” on
page 23 for more information.
S2060w/S2080w Scanner
The cover of the S2060w/S2080w
Scanner contains a touch screen with a
3.5” diagonal color display and four
buttons.
The power button is always active
and is used to turn the scanner on and
off.
Refer to “Scanner display and buttons:
S2060w/S2080w scanners” on page 25
for more information.
NOTE:
• Throughout this chapter, the , , and button
illustrations represent the buttons on your scanner. For S2040/
S2050/S2070 model scanners, the buttons are on the scanner cover.
• For S2060w/S2080w model scanners, the button functions are
accomplished on the touch screen. An button is also provided on
the scanner cover.
A-61895 May 2018 17
Page 26

3 Scanning
Input tray
extension for
long documents
Output tray
extension and
end stop
Getting your scanner ready to scan
1. Be sure the scanner is on and ready to scan (power button on and
not blinking).
2. Move the side guides in or out to fit the size of pages you are
scanning. If scanning letter or A4 size paper, the side guides may be
restricted to the maximum width of the paper using the switch in the
inset below on right. The switch is shown in the letter size position.
See “Preparing documents for scanning” step number 6 on page 30.
3. If necessary, adjust the input and output trays for the length of your
pages. The output tray can be extended to accommodate pages up
to 35.56 cm (14 inches) in length. An end stop is available to assist
output page stacking. Lift this end stop as needed for scanning
pages up to 14 in/35.6 cm. Keep the end stop down when scanning
longer pages. See “Long paper” on page 33.
Getting your pages ready to scan
Refer to the following sections for detailed help:
• “Input tray capacity” on page 29
• “Preparing documents for scanning” on page 29
Later sections of this chapter provide advice on how to scan hard
cards, batches of mixed size paper, NCR paper, etc.
18 A-61895 May 2018
Page 27

Scanning Applications
Initial scan with an Alaris scanning application
Alaris scanning applications are available for download with your
scanner purchase and will allow you to quickly and easily perform
common scanning tasks, such as:
• create a searchable PDF of a printed report
• scan an invoice and store it with your other invoices
• scan a photo to add to a presentation
If you installed an Alaris scanning application, the following steps show
you how to create an output file of your document. For more information
about the scanning options enabled by Alaris scanning applications,
refer to the documentation for your specific application.
1. Put paper in the scanner input tray, face down and lead edge first
2. Using the or buttons on the S2040/S2050/S2070
scanners, or the scroll bar on the S2060w/S2080w scanners, scroll
up or down until Color PDF appears on the scanner screen. (If you
are using Capture Pro, choose Scan to PDF.) The front and back of
your pages will be scanned and produce a color PDF file as output.
3 Scanning
3. On the S2040/S2050/S2070 scanner, press the
Play / Select button. On the S2060w/S2080w scanner, press
on the scanner screen to begin scanning.
The document will be scanned. When you output it, the PDF file with
your image(s) will be sent to a folder. Refer to the documentation for
your Alaris scanning application to see details of the folder location.
A-61895 May 2018 19
Page 28

3 Scanning
Sharing the S2060w/S2080w scanner among multiple PCs
NOTE: This section is relevant only for scanning with button-enabled
applications which allow scanning to be initiated at the scanner
(requires an Alaris scanning application).
By default, the S2000w scanners (the network scanners):
• will allow any PC or mobile device to connect over an enabled wired
or wireless connection.
• are in multiple PC mode. Multiple PC mode enables unlimited access
by PCs using TWAIN, ISIS or WIA drivers over a network connection.
Up to 10 PCs with button-enabled applications installed will be
displayed on the scanner screen. Limiting scanner access to a single
PC is explained in “Restricting use of the S2060w/S2080w scanner to
one PC” on page 22.
Setup for sharing the network scanner among PCs:
1. The S2060w or S2080w scanner is configured for wireless or wired
connections.
2. Several PCs or laptops install the S2000w scanner driver and install
an Alaris scanning application.
3. The users may optionally add a 4-digit numeric network security PIN
to their Alaris scanning application configuration.
4. The users may set up custom activities in an Alaris scanning
application, based on their needs. For example, users may set up
an activity to scan to their own One Drive account.
Usage Example:
1. The S2060w or S2080w Scanner is turned on.
2. The three PCs that are on the network connect to the S2000w
scanner. The logged in user name and account picture are
displayed on the scanner screen list of users.
20 A-61895 May 2018
Page 29

3 Scanning
3. Users with laptops come into the office and power on their laptops.
The laptop user’s user name and account picture are displayed on
the scanner as each one comes on the network.
4. A PC user needs to send a document to their One Drive.
- The user walks up to the scanner and selects their user name
from the list of users on the scanner screen.
- The user enters their network security PIN when prompted by the
scanner.
- The scanner displays the user’s Alaris scanning application
activities on the scanner screen.
- The user places a document in the scanner and chooses their
One Drive activity from the list.
- The scanner scans the document.
- When the last image is read from the scanner, the Alaris scanning
application processes the document on the user’s PC and sends
the document to the user’s One Drive account.
- The user presses the Home button on the scanner to log out, so
the scanner is available for the next user. (If a user forgets to log
out, their access will time out.)
5. A laptop user powers their laptop off to go to an off-site meeting.
The S2000w scanner notes that the laptop is no longer connected
and removes the user name and account picture from the scanner’s
user list.
6. A user at a PC needs to scan with scanning software that uses the
TWAIN or ISIS driver.
- The user launches their scanning application and selects the
S2000w scanner.
- The S2000w scanner shows that the scanner is currently in use
by that user. No other users will be able to use the scanner until
that user’s scanning is completed.
- The user places paper in the S2000w scanner and starts the
scan.
- The document is scanned by the user’s scanning software. The
scanner is then free for other users to connect.
7. A user needs to scan from the ScanMate+ mobile app or from an
application that uses the Kodak Alaris Web API.
- The user launches their scanning application and selects the
S2000w scanner.
- The S2000w scanner shows that the scanner is currently in use
by that user. No other users will be able to use the scanner until
that user’s scanning is completed.
- The user places paper in the S2000w scanner and starts the
scan.
- The document is scanned by the user’s scanning software. The
A-61895 May 2018 21
Page 30

3 Scanning
scanner is then free for other users to connect.
Restricting use of the S2060w/S2080w scanner to one PC
The S2000w scanners may be set up to limit access by PCs using
TWAIN, ISIS, or WIA drivers over a network connection. By enabling
Single PC Mode in the S2000w display screen (Settings menu) or the
scanner’s embedded web site, only the “owning PC” can connect using
the scanner drivers. The “owning PC” is the first PC to connect (using
the connect scanner utility) after the scanner is placed into Single PC
Mode. The scanner screen will display the owning PCs activities
directly (for example; activities, tasks, button shortcuts).
When in Single PC Mode, Alaris button-enabled applications will not
allow user selection at the scanner screen.
A user can still access a Single PC Mode scanner from a mobile
device.
If you want to limit use of your scanner by others but still access it
yourself from a mobile device, you should set up Single PC Mode.
NOTE: Single PC Mode does not prevent access to the scanner from
applications enabled by the Kodak Alaris Web API (such as the
ScanMate+ mobile application). Access to the scanner’s
embedded web server is not limited in Single PC Mode.
Other scanning applications
In Single PC Mode
1. Log in on the PC that “owns” the scanner.
2. Load your pages into the input tray.
3. At the touch screen, scroll to the desired activity name (e.g.
License). Choosing the name will initiate scanning.
4. Retrieve your pages from the output tray.
5. Access your images on the PC using your Alaris scanning
application, or the file system.
Alaris offers scanning options, such as Capture Pro Software and Info
Input Solution. These applications have other capabilities that can
improve your data capture, processing, and retrieval. Contact your
reseller for more information, or go to http://www.kodakalaris.com/go/
software.
You may already have a different scanning application that accesses
your scanner using its TWAIN or ISIS driver.
In addition, you may access the Scan Validation Tool. The Scan
Validation Tool offers access to the TWAIN and ISIS driver user
interface. It is intended to be used for diagnostic purposes, not for
normal scanning.
, use the scanner in this way:
22 A-61895 May 2018
Page 31

Scanner display and buttons: S2040/S2050/S2070 scanners
The scanner screen display is used in different ways during the different
scanner states:
• Ready
• Scanning
• Pause
• Settings
• Waiting
When the scanner has gone into Energy Star sleep, the scanner screen
is dark.
Ready
When the scanner is ready to start scanning, the scanner screen tells
you what the scanner is prepared to do (e.g. by displaying the current
activity for your Alaris scanning application) and which of the scanner
buttons are available.
3 Scanning
Scanning
When the scanner is ready, you can:
• See the scan setting name — if you are using an Alaris scanning
application, you will see activity names.
• Scroll up and down the list of predefined scanning settings, using the
up and down scrolling buttons. The up button will count up to the
next scan setting number, i.e. from setting 1 to setting 2.
• Start scanning, using the Play button.
If you want to view or adjust scanner capabilities, from the Ready state
you can go to the Settings menu, using the button.
NOTE: If you are not using a scanning application that
enables scanning from the scanner, you will see
this display on the scanner screen. From here
you can access Settings using the button.
When the scanner is scanning, the scanner screen
shows the number of pages scanned since the last time
you stopped scanning. While scanning you can use
the button, to pause scanning or to end scanning
and complete this document.
To ignore multifeed warnings for a document, press and hold the Play
button while that document is transporting through the machine.
For example, if you are scanning mail, you can hold down the Play
button when the envelope passes through the scanner.
A-61895 May 2018 23
Page 32

3 Scanning
Waiting
Pause
Document handling
If you have set up special settings for your pages, the
display during scanning will have an indicator of the
special handling: for instance scanning with multifeed
detection disabled.
Sometimes the scanner will wait for you to take some action:
• A feeding situation such as a multifeed waits for you
to take some action. The scanner screen indicates
your options.
• Restart required — power the scanner off, wait 5
seconds, then power it on.
• Scanner cover open — close the cover.
Use the button to pause during scanning. Pause allows you to
change some settings dynamically.
The setting for document Handling determines how the scanner
transports pages through the scanner. It affects how pages are fed into
the scanner, how fast they move through the scanner, and how they are
placed in the output tray. An enhanced handling option can improve
output stacking. You may find it helpful for mixed page sizes, lightweight
paper, paper with some static, or paper with some curl.
Special document handling can be set up for your job using the driver.
During scanning, you can adjust document handling using the scanner
screen:
• First pause the scanner. Press the button to pause
scanning. The scanner screen indicates the pause;
the scanner waits for you to resume or stop scanning.
• While the scanner is paused, press the down arrow to
get to the document handling menu. Use the arrow
buttons to select Normal, Improved, or Best:
- Normal: No additional handling is performed. Use
Normal when all documents are similar in size.
- Improved: Aids in controlling how the documents are stacked/
ordered in the output tray for mixed document sets. Improved
should work for the majority of mixed sets.
- Best: When your document set contains great variability in size,
this option provides the best control of how pages are stacked in
the output tray.
• Press Play / Select to resume scanning with the handling
method you selected.
24 A-61895 May 2018
Page 33

Scanner settings
When you are not scanning you can reach the Settings
menu with the button. Settings offers these options:
• Information gives you a few key facts about your
scanner, such as firmware version.
• Calibrations lets you calibrate the multifeed detection
system.
NOTE: Multifeed calibration is needed rarely and should be done
only if an Alaris Technical Support person instructs you to
calibrate, or if the scanner has been moved to a location at a
high elevation.
• Maintenance gives you the ability to record performance of important
scanner maintenance, such as scanner cleaning.
Scanner display and buttons:
3 Scanning
S2060w/S2080w scanners
Conventions in the S2000w display screens
The Status bar on the display
screen shows connections for the scanner: USB, wired network,
wireless network, or wireless directly.
The Back button goes back once.
The Next button advances to the next screen.
The menu icon leads to network and power Settings.
This icon beside a menu option means you have a choice of “on”
or “off” for the option:
The colored icon means “on” and the gray icon means “off.”
A-61895 May 2018 25
Page 34

3 Scanning
Ready
A check mark means the option is selected:
When more options are available than the screen can display, a scroll
bar is provided:
Several displays are possible when the scanner is ready to start
scanning:
• Choose yourself from the list of possible users.
• Enter your identification number.
• Choose the scan setting or activity to use for scanning.
• The generic Ready display (shown here) if your scanning application
does not allow you to initiate scanning at the scanner.
NOTE: If another user is scanning, the display screen will indicate that
the scanner is in use by someone else.
26 A-61895 May 2018
Page 35

Scanning
Waiting
3 Scanning
When you are scanning, the display shows the page count for this scan
session and whether any special settings are enabled. It also allows
you to pause scanning or end the job.
Sometimes the scanner will wait for you to take some action:
• A feeding situation such as a multifeed waits for you to take some
action. The scanner screen indicates your options: rescan, accept
the images and continue scanning, or end scanning.
Pause
• Restart required — power the scanner off, wait 5 seconds, then
power it on.
• Scanner cover open — close the cover.
Pause the scanner with the button or Pause on the scanner
screen. The scanner screen indicates the pause; the scanner waits for
you to either resume, or stop scanning or .
If you pause the scanner, options are available from the menu. For
instance, if you know an envelope will enter the scanner and you don’t
want a multifeed reported, you can pause scanning, choose the menu
icon , and disable multifeed detection during the pause.
A-61895 May 2018 27
Page 36

3 Scanning
Document handling
Scanner settings
Document handling options and when to use them are explained in
“Document handling” on page 24.
From the Settings screen you can review or change the network and
power choices for the scanner.
Also in Settings you can:
• Record Maintenance events such as when the scanner was cleaned
or parts replaced.
• Choose the language for the display.
• Choose whether the user from only one PC or users from multiple
PCs can initiate scanning at the scanner.
• Access diagnostics.
28 A-61895 May 2018
Page 37

Paper handling challenges and solutions
Input tray capacity
Paper weight and size determine how much paper can feed smoothly
from the input tray. The input tray will accommodate 80 pages of 20 lb
2
(75 g/m
80 sheets:
) paper. Even if you use thinner paper, do not load more than
3 Scanning
Paper weight — g/m
27 - 80 7.2 - 21 80 sheets 50 sheets
> 80 - 104 > 21 - 28 60 sheets 50 sheets
> 104 - 157 > 28 - 42 40 sheets 30 sheets
> 157 - 256 > 42 - 69 25 sheets 20 sheets
> 256 - 413 > 69 - 110 15 sheets 10 sheets
2
Paper weight — lb For A4, letter,
Preparing documents for scanning
The pages being scanned and physical setup of the scanner affect how
smoothly your input pages will feed into the scanner and stack after
passing through the scanner. Standard paper size pages feed easily.
Be sure your pages conform to size, weight, and type of documents that
the scanner can handle. See the scanner specifications for your
scanner model, at
S2040/S2050/S2070:
S2060w/S2080w:
Follow these “good practices” tips to ensure good feeding:
For legal size
or shorter size
www.kodakalaris.com/go/S2000
www.kodakalaris.com/go/S2000w
1. Remove all staples and paper clips from the pages. Staples and
paper clips may damage the scanner and your pages.
2. All inks and correction fluids on the paper must be dry before
scanning is started.
3. If your pages stick together, they may have trouble feeding one by
one. Fan the pages to help them separate, before putting them in
the input tray. It can be helpful to fan them in two directions if they
stick tightly together (e.g. because of static or because they are very
smooth).
4. After fanning, straighten the stack of pages. If the pages have mixed
sizes, straighten just at the edge that will lead them into the scanner.
If the pages are all the same size, straighten them first on a side
edge and then on the lead edge.
5. Place the pages centered in the input tray, between the side guides.
Position the front side of your pages face down against the input
tray and the top of the pages into the input tray, lead edge first.
Extend the input tray so it supports the input stack.
A-61895 May 2018 29
Page 38

3 Scanning
6. Slide the side guides so they touch the sides of your input stack. If
your paper is standard letter or A4 size, the input tray has a switch
to restrict the side guides from opening wider, as shown.
7. Extend the output tray so it is longer than the input stack by about
1/2 in/1 cm. Raise the end stop of the output tray, if the paper is
shorter than 14 in/35 cm.
8. For pages that are difficult to feed or separate, feather the lead
edges of the stack, as shown. Hold the back of the stack and bend
the stack so the lead edges of the bottom documents are forward of
the top documents. Maintain this shape in the stack when you place
the pages into the input tray.
9. Some paper types can affect feeding and separation performance:
- Thermal papers
- Coated papers
- Glued edge papers
- Perforated pages
- Carbonless paper
- Pre-folded paper
- Papers with static charge
- Photographs (glossy)
- Rough textured paper
- Previously stapled documents
You may need to experiment with these tips and with active feeding
(see “Mixed paper” on page 31) to find the preparation steps and input
stack size that work well for your documents.
30 A-61895 May 2018
Page 39

Settings for reliable feeding
Active Feeding
Active Feeding can help to align and prepare the leading edges of small
stacks (30 or fewer sheets) prior to feeding. If the document set for a
typical job is smooth paper of mixed sizes, Active Feeding can help it
feed reliably. To enable active feeding, refer to the TWAIN or ISIS driver
help or set-up guides. Set-up guides are available on the support page
for your model:
3 Scanning
Enhanced Separation
Mixed paper
S2040:
S2050: www.kodakalaris.com/go/S2050support
S2070: www.kodakalaris.com/go/S2070support
S2060w: www.kodakalaris.com/go/S2060wsupport
S2080w: www.kodakalaris.com/go/S2080wsupport
Enhanced Separation aids in reducing multifeeds at the start of
scanning. This feature is on by default because it is recommended for
all feeding applications. Page types that separate easily may feed
reliably with this feature turned off. Turning enhanced separation off will
allow scanning to begin slightly more quickly. To enable enhanced
separation, refer to the TWAIN or ISIS driver help or set-up guides. Setup guides are available on the support page for your model. For a list of
support page links, see “Active Feeding” on page 31.
Follow the tips in “Preparing documents for scanning” on page 29, and
above in “Settings for reliable feeding”. Try to stack the input paper so it
is centered, side to side in the input tray. Lead edges should align or be
feathered.
www.kodakalaris.com/go/S2040support
If you want output pages to align at the trailing edge (which can be
useful when input pages are different lengths), raise the scanner on its
tilt stand:
1. Tip the scanner backwards.
2. Pull the tilt stand legs down until they snap into their extended
position. See “Underside view” on page 7.
3. Tip the scanner forwards until it rests on the tilt stand legs. This
configuration will encourage output pages to settle against the
scanner.
NOTE: Tilt stand legs are not available on the S2040.
A-61895 May 2018 31
Page 40

3 Scanning
Enhanced stacking, to maintain order in output stack
Using the tilt stand may be especially helpful with enhanced stacking.
To enable enhanced stacking, refer to the TWAIN or ISIS driver help or
set-up guides. Set-up guides are available on the support page for your
model. For a list of support page links, see “Active Feeding” on
page 31.
Lightweight paper
Straighten the stack of input paper, then fan pages, before placing them
in the feeder, lead edge first.
Do not push lightweight paper too far into the input tray. The scanner
needs to detect the pages, but pushing too far may crumple delicate
paper.
NCR paper
Scanning small items
For pages less than 7.2 lb/27 gm
to the TWAIN Settings > Device - Transport tab).
“No carbon required” (NCR) paper is coated with chemicals that affect
the scanner rollers and can degrade scanner feeding performance.
After scanning NCR paper you should clean the scanner. See
“Cleaning procedures” on page 40.
If you are scanning small items such as a driver’s license or credit card
— especially hard cards that are relatively thick — they should be
scanned with the embossed side up and ideally one at a time. You may
need to assist them by hand.
One card may be scanned first in a batch with larger pages.
Feed hard cards in landscape orientation.
2
weight, set Active Feed to None (go
32 A-61895 May 2018
Page 41

Long paper
3 Scanning
1. Provide support to the input stack. For long paper, extend the input
tray as far as possible. Give additional support to very long paper by
hand, if needed.
2. Set the output tray length at the maximum. Do not raise the end
stop.
3. If you gently pull the output tray past its detent, the far end will drop,
which enhances stacking of long pages.
A-61895 May 2018 33
Page 42

3 Scanning
Gap release tab
Fragile or oversize paper
Handle with care
If you are concerned that delicate pages might crumple as they pass
through the scanner, you can enable Intelligent Document Protection.
This setting will stop the scanner if it detects a page at risk. To enable
Intelligent Document Protection, refer to the TWAIN or ISIS driver help
or set-up guides. Set-up guides are available on the support page for
your model. For a list of support page links, see “Active Feeding” on
page 31.
• You may have to experiment to find the optimal setting for your
specific pages, balancing care of your pages against scanning
throughput.
Using gap release is another option to handle with care. Some pressure
is used to separate the first (bottom) page in a stack from the rest of the
stack. If you want to feed one delicate page or a photo with no pressure
on it, pull up the gap release tab, put your page into the input tray, and
scan it.
Return the gap release tab to its normal position for scanning a stack of
pages.
34 A-61895 May 2018
Page 43

Handle with extra care
Oversize paper
3 Scanning
For fragile paper that you can’t risk damaging, put each page into a
document sleeve (to order Alaris Carrier Sleeves (5 packs), refer to the
link for your scanner in “Supplies and Consumables” on page 51). To
enable scanning with a carrier sleeve, refer to the TWAIN or ISIS driver
help or set-up guides. Set-up guides are available on the support page
for your model. For a list of support page links, see “Active Feeding” on
page 31. Then:
• Put the paper in the sleeve and scan.
NOTE: Intelligent Document Protection should be off when scanning
with a carrier sleeve. See “Handle with care” above.
If you regularly scan fragile paper, you should consider adding an Alaris
flatbed accessory. To see Alaris flatbed accessories available, refer to
the link for your scanner in “Supplies and Consumables” on page 51.
If you want to scan paper that is wider than the input opening of the
scanner but less than twice that width, you can scan it folded, in a
sleeve accessory (to order Alaris Carrier Sleeves (5 packs), refer to the
link for your scanner model in “Supplies and Consumables” on
page 51). To enable scanning a folded document, refer to the TWAIN or
ISIS driver help or set-up guides. Set-up guides are available on the
support page for your model. For a list of support page links, see
“Active Feeding” on page 31. Then:
• Fold the paper in half so it fits into the sleeve.
• Both sides of the sleeved document will be scanned, and the images
will be merged into one.
A-61895 May 2018 35
Page 44

3 Scanning
Multifeeds
A multifeed is more than one page passing through the imaging area
together. It results in either one or more images not being captured, or
an image that combines content from more than one page.
Detecting multifeeds during scanning
Adjust multifeed sensitivity in your scanning application.
If a multifeed occurs when you are scanning (and interactive multifeed
is set up for your job):
1. Look at the image on your PC. If the image is acceptable, choose to
accept it in your scanning application or press the Play button at the
scanner to resume scanning.
2. If the image is not acceptable:
- Open the scanner cover.
- Separate the multifed pages and put them back at the bottom of
the stack.
- Shuffle the stack into good feeding form again.
- Close the scanner.
- Put stack into the input tray.
- Choose Rescan at the scanner or in your scanning application.
The image will be deleted and scanning will resume.
If scanner is stopping when paper is not multifed
Adjust multifeed sensitivity in your scanning application. Refer to the
TWAIN or ISIS driver help or set-up guides. Set-up guides are available
on the support page for your model. For a list of support page links, see
“Active Feeding” on page 31. You may have to experiment to find the
ideal setting with your types of pages.
Disabling multifeed detection for special input pages
Your scan settings may be set to detect multifeeds. If you want to keep
that normal setting, but occasionally disable it to scan an envelope or a
page with paper taped to it, without stopping:
• For the S2040/S2050/S2070 scanners, press and hold the Play
button while the document is transporting through the scanner.
• For the S2060w/S2080w scanners, pause scanning, then go into
Settings > Advanced view and override multifeed detection.
36 A-61895 May 2018
Page 45

If you still have trouble
If you have tried the other suggestions in this section and still have
trouble, then check the scanner:
• See “Cleaning procedures” on page 40 for how to clean the scanner.
Roller cleanliness and wear affect how well pages feed.
• See “Replacement procedures” on page 46 to be sure that feed
rollers, separation rollers, and pre-separation pad are installed
correctly.
• See “Problem solving” on page 53 for more suggestions.
NOTE: Certain options you may select, such as feeding documents with
more care or improved output stacking, will slow scanning
throughput.
Improving image quality
Your scanner is able to produce images optimized for your purpose.
Here are some of the commonly used enhancements. These and more
features are described in the Help system for your driver (TWAIN or
ISIS). These features are set up through the driver, so your Alaris
scanning application may be able to use them in programmed scanning
profiles or settings.
3 Scanning
Recommended settings
Black and White Perfect Page and Color Perfect Page shortcuts in your
driver provide our recommended settings for document scanning.
Other Perfect Page settings
The following settings can improve the appearance of your images or
documents:
1. Auto blank page removal: Images with little or no data can be
automatically removed from output, saving manual editing and
storage.
2. Hole fill: Black holes from paper punches can be changed to the
background color of the image.
3. Background color smoothing: In color images, uneven image
background color can be changed to a more uniform background,
for a cleaner looking image.
4. Noise reduction (despeckle): Black and white images may have
noise (black specks) because of uneven paper thickness. Noise
reduction options can make the image look cleaner. They also have
some risk of removing information from the image, so if automated
data recognition is your primary purpose, noise reduction may not
be a good choice.
5. Image border: To remove all background at the image border, turn
on edge fill (either automatic or automatic with tears).
6. Color dropout: Unneeded form data, in one or multiple colors, can
be eliminated from the image.
A-61895 May 2018 37
Page 46

3 Scanning
7. Image merge: Front and back images can be merged into one —
e.g. the front and back of a check can become one image.
8. Dual stream: You can receive both a black and white and a color (or
grayscale) image of the scanned page, for front, back, or both sides.
Turning the scanner off
To turn the scanner off, touch the power button for 1 second.
NOTE: The Power Off energy saver feature will also turn the scanner
off after an extended period of time in power saver mode. The
default is 15 minutes. For the S2040/S2050/S2070 scanners
you can configure this period of time using your scanning
application. For the S2060w/S2080w scanners, configure on the
scanner touch screen or embedded web site.
“Wake up” actions
From off
From standby/sleep
• Press the scanner power button.
Any of the following will wake the scanner from low power mode:
• Press the scanner power button.
• Put paper into the input tray.
• Use a scanning application that is connected to the scanner.
• On the S2060w/S2080w scanners, touch the scanner screen.
• Access the scanner over USB for the S2040/S2050/S2070, or on
wireless network, USB, or Ethernet for S2060w/S2080w.
NOTE: PC wake-up will not wake up the scanner from either Energy
Star or power off.
38 A-61895 May 2018
Page 47

4 Maintenance
Scanner meters
Your scanner has several meters with information about when to clean
and replace various scanner parts. Using the meters will help to
maintain image quality and scanning performance.
To see the meters display, choose Maintenance at the scanner screen.
The meters display will show the tools symbol in either teal (cleaning or
replacement limit not reached) or yellow (time to clean or replace):
No cleaning or
replacement needed
Choosing Meters from this screen will display the number of scans
since the last cleaning or part replacement, and the number at which
cleaning of the scanner or replacement of the part is needed.
Choosing Reset for Clean, Tires, or Separation Pad will turn the
count back to 0 (number of scans since the last cleaning/
replacement).
NOTE: Tire replacement refers to the separation roller assembly. Feed
roller tire replacement should not be needed. The feed roller
assembly may be replaced if needed, though it is expected to
perform well for normal life of the scanner.
Time to clean or
to replace a part
Meter counts (scans
since last cleaning or
replacement)
A-61895 May 2018 39
Page 48

4 Maintenance
Opening the scanner cover
1. Pull the scanner cover release lever to release and open the
scanner cover.
2. When you finish cleaning the scanner or replacing a part, close the
scanner cover.
Cleaning procedures
Your scanner needs to be cleaned periodically. For any of these issues
you should first clean your scanner:
• your pages do not feed easily
• several pages feed at the same time
• streaks appear on your images
• pages exiting the scanner have roller/tire marks
Transport cleaning sheets, roller cleaning pads, and Staticide and
Brillianize wipes are all available for purchase from Kodak Alaris. Refer
to the link for your scanner in “Supplies and Consumables” on page 51
for supplies required to clean your scanner.
IMPORTANT: Use only cleaners recommended by Kodak Alaris. Do not
use household cleaners. Do not use alcohol or products
containing alcohol.
Allow surfaces to cool to ambient temperature before
cleaning. Do not use cleaners on hot surfaces.
Use adequate ventilation. Do not use cleaners in
confined areas.
After cleaning, allow rollers to dry before resuming
scanning.
40 A-61895 May 2018
Page 49

Clean in this order
1. Before cleaning, disconnect the electrical power.
2. Use a transport cleaning sheet several times to remove residue
from the rollers. This cleaning technique is simpler for you and helps
preserve the rollers. See “Running a transport cleaning sheet”.
3. If the rollers do not come clean with the transport cleaning sheet,
then clean them with roller cleaning pads. Refer to “Cleaning the
separation roller” and “Cleaning the feed rollers”.
4. When the rollers are clean, clean the imaging area. Refer to
“Cleaning the imaging area”.
5. Wash your hands with soap and water after performing
maintenance procedures.
6. Go to Maintenance on your scanner screen display and choose
Clean > Reset. See “Scanner meters” on page 39.
Running a transport cleaning sheet
1. Remove the wrapping from the Transport Cleaning Sheet.
2. Adjust the side guides to fit the cleaning sheet.
4 Maintenance
3. Place a transport cleaning sheet in the input tray (adhesive side up,
toward you) in portrait orientation.
4. Using your scanning application, scan the transport cleaning sheet.
5. After the transport cleaning sheet is scanned, turn it over (adhesive
side down, toward the input tray) and scan it again.
6. Open the scanner cover and wipe the imaging area with a lint-free
cloth.
7. Close the scanner cover.
8. Scan a few pages. Check that ink or toner from the rollers is not
visible on scanned pages or on images.
9. If necessary, repeat this procedure.
NOTE: When a transport cleaning sheet gets very dirty, discard it and
use a new one. If the sheet is not dirty, put it back into its
wrapping to save for re-use.
A-61895 May 2018 41
Page 50

4 Maintenance
Cleaning the separation roller
The separation roller should be removed from the scanner for best
cleaning results.
1. Open the scanner cover.
2. Remove the pre-separation pad by grasping it and pulling it straight
out.
3. Grasp the separation roller and pull it straight out.
4. Wipe the separation roller tires with a roller cleaning pad. If there are
grooves in the tires, wipe in the direction of the grooves. The tires on
your model may look different than the tires in this illustration.
42 A-61895 May 2018
Page 51

4 Maintenance
5. Inspect the separation roller.
If the separation roller tires show signs of wear or damage, replace
the separation roller assembly. See “Replacement procedures” on
page 46 for more information.
6. Reinstall the separation roller by aligning the tab with the slot and
snapping it into position.
7. Reinstall the pre-separation pad by aligning the slots with the holes
on the pre-separation pad and snapping it into place.
8. Close the scanner cover.
A-61895 May 2018 43
Page 52

4 Maintenance
Cleaning the feed rollers
1. Open the scanner cover.
2. Grasp the top edge of the feed roller cover and lift it out of position.
NOTE: Be careful not to damage the paper present sensor when
removing the feed roller cover or cleaning around the feed
roller.
3. Remove the urging roller, then clean it with a roller cleaning pad.
4. Replace the urging roller.
5. Clean the lower feed roller tires without removing them. Rotate the
roller in place with one hand and wipe with the other, using a roller
cleaning pad.
6. Inspect the feed rollers. If the feed roller tires show signs of wear or
damage, replace the feed roller. See “Replacement procedures” on
page 46 for more information.
44 A-61895 May 2018
Page 53

4 Maintenance
Step 2
Step 3
Step 1
7. Look at the cavity in which the feed rollers are housed. If it seems to
contain excessive dust, wipe out the dust with a folded roller
cleaning pad. You may also use a vacuum to clean this area.
8. Reinstall the feed roller cover by positioning it around the paper
present sensor (step 1), aligning the bottom edge of the cover with
the scanner (step 2), and pushing it back into position until it snaps
into place (step 3).
Cleaning the transport rollers
Use a roller cleaning pad to clean the transport rollers. Six are
accessible from inside the scanner (shown below). Two are more easily
reached from the underside. See “Underside view” on page 7.
A-61895 May 2018 45
Page 54

4 Maintenance
Cleaning the imaging area
1. Wipe the upper and lower imaging area using a Brillianize Detailer
IMPORTANT: Staticide wipes contain isopropanol which can cause eye
wipe (Step 1) or Staticide wipe. Be careful not to scratch the imaging
area when cleaning.
irritation and dry skin. Wash your hands with soap and
water after performing maintenance procedures. Refer to
the Safety Data Sheet for more information.
2. Wipe the upper and lower imaging area again using a Brillianize
wipe (Step 2) or an almost dry Staticide wipe to remove any streaks.
3. When finished, close the scanner cover.
Replacement procedures
Alaris Scanners use replaceable feed roller modules that can feed a
wide range of document types, sizes and thicknesses. The nominal
feed roller module life is approximately 200,000 pages. Operating
environment, document type, the condition of pages being scanned, the
frequency of cleaning paper path and tires, and not following the
recommended schedule for changing the feed roller module can cause
the life of consumables to vary. Change the feed roller module if you
notice an increase in multiple feeds or stoppages, or a decrease in
feeder performance that is not resolved by following the cleaning
procedures.
NOTES:
• Before replacing parts, disconnect the electrical power.
• Certain paper types (such as carbonless paper or newsprint), failure
to clean regularly, and/or use of non-recommended cleaning solvents
can shorten roller life.
46 A-61895 May 2018
Page 55

Replacing the separation roller
1. Open the scanner cover.
2. Remove the pre-separation pad by grasping it and pulling it straight
out.
3. Grasp the separation roller and pull it straight out. Discard it.
4 Maintenance
4. Install the new separation roller by aligning the tab with the slot and
snapping it into position.
A-61895 May 2018 47
Page 56

4 Maintenance
5. Re-install the pre-separation pad by aligning the slots with the holes
on the pre-separation pad and snapping it into place.
6. Close the scanner cover.
7. Go to Maintenance on your scanner screen display and choose
Tires > Reset. See “Scanner meters” on page 39.
Replacing the pre-separation pad
1. Remove the pre-separation pad by grasping it and pulling it out of
position.
2. Discard the worn pre-separation pad.
3. Install the new pre-separation pad by aligning the slots with the
holes on the pre-separation pad and snapping it into place.
4. Go to Maintenance on your scanner screen display and choose
Separation pad > Reset. See “Scanner meters” on page 39.
48 A-61895 May 2018
Page 57

Replacing the urging roller tire
An animation of this process is available at our on-line support for your
scanner model, for instance:
www.kodakalaris.com/go/S2070support
www.kodakalaris.com/go/S2080wsupport
1. Open the scanner cover.
2. Pull on the edge of the feed roller cover and lift it out of position.
4 Maintenance
NOTE: Be careful not to damage the paper present sensor when
removing or cleaning around the feed roller.
3. Remove the urging roller and replace the tire.
4. Reinstall the urging roller, aligning it correctly.
A-61895 May 2018 49
Page 58

4 Maintenance
Replacing the feed roller
1. Rotate the feed roller so the pin is aligned with the open slot. The
roller rotates in only one direction. Use the white bracket at the end
to rotate the roller. When the pin is aligned properly, lift the roller out
of position.
2. Discard the worn feed roller.
3. Install the new feed roller: align the pins with the open slots and fit
the roller into position. Be sure the gears and brackets are aligned
and the roller snaps into place.
50 A-61895 May 2018
Page 59

4. Reinstall the feed roller cover by positioning it around the paper
present sensor, aligning the bottom edge of the cover with the
scanner, and pushing it back into position until it snaps into place.
Supplies and Consumables
4 Maintenance
Customer Replaceable Parts and Accessories
For a full list of scanner cleaning supplies, consumables, accessories,
and maintenance guidelines; refer to the support page for your scanner
(below) and click on “Supplies.”
S2040/S2050/S2070: www.kodakalaris.com/go/S2000support
S2060w/S2080w: www.kodakalaris.com/go/S2000wsupport
Contact your scanner supplier to order supplies.
A-61895 May 2018 51
Page 60

4 Maintenance
Updates
The drivers and internal firmware for your scanner can be updated by
you. Find the latest driver and scanner firmware downloads here:
S2040:
S2050: www.kodakalaris.com/go/S2050support
S2070: www.kodakalaris.com/go/S2070support
S2060w: www.kodakalaris.com/go/S2060wsupport
S2080w: www.kodakalaris.com/go/S2080wsupport
On your scanner screen, use the scanner Settings > Information
display to see your scanner firmware version. Go to the About screen
in the TWAIN or ISIS driver to find the driver version installed on your
computer. More recent versions normally contain problem fixes and
may also have feature enhancements.
www.kodakalaris.com/go/S2040support
52 A-61895 May 2018
Page 61

5 Troubleshooting
Scanner error indicators
A blinking power button indicates a scanner error or alert condition,
which will be displayed on the scanner screen. A yellow alert needs
your attention, e.g. if the scanner cover is open. A red alert is a critical
error. If you can not correct the problem by following the guidance on
the scanner screen, you may need to power-cycle the scanner. If the
problem persists, call Technical Support.
NOTE: A slowly blinking power button with a blank scanner screen
indicates the scanner is in low power mode. An error situation
has a faster blink of the power button.
Problem solving
If your scanner does not function as you expect, this section may help
you resolve the situation.
Scanner exception handling
The following user correctable error conditions will be reported on the
scanner screen and will remain until you correct them:
• Paper jam — open the scanner cover and remove the jammed pages
(see “Opening the scanner cover” on page 40).
• Multifeed — open the scanner cover and removed the multifed
pages. Choose one of the options presented on the scanner screen.
• Cover opened — close the scanner cover.
• Document protection warning — open the scanner cover and remove
the page that caused the warning. If necessary to protect the page,
use a document sleeve or scan on an attached flatbed. Otherwise
replace the page in the input tray, adjust scanner settings as needed
(see “Paper handling challenges and solutions” on page 29) and
resume scanning.
A-61895 May 2018 53
Page 62

5 Troubleshooting
Self-help for problems
Use the chart below as a guide to help resolve the situation, before
calling Alaris Technical Support. The self-help page for your scanner is
also a good resource:
www.kodakalaris.com/go/S2070support
www.kodakalaris.com/go/S2080wsupport
Problem Possible Solution
Scanner will not scan/feed pages Check that:
• the power adapter is plugged securely into the back of scanner and the
wall outlet.
• the wall outlet is not defective (call a licensed electrician).
• the PC was restarted after installing the software.
• page(s) are in contact with feed rollers and the paper present sensor.
• scanner power light is on and the display screen indicates the scanner
is ready.
No images are being displayed If you are scanning one-sided pages, be sure the side you want to scan
is facing the right way — for front side scanning, face down; for back side
scanning, face up. For more information, see “Getting your pages ready
to scan” on page 18.
Pages are jamming or multiple pages
are feeding
To remove a jam:
IMPORTANT: Do not pull the jammed page out of the scanner;
open the scanner cover first.
• Remove any jammed page(s) from inside the scanner.
• Close the scanner cover.
To reduce future jamming or multifeeding, see “Paper handling
challenges and solutions” on page 29.
Paper is too wide for input tray • Move side guide lock to LTR setting, if it is on A4 setting.
• For oversize pages, see “Oversize paper” on page 35.
Images are not being cropped correctly • If the cropping options (Automatically Detect and Straighten or
Automatically Detect) are enabled and your images are not being
cropped correctly, clean the imaging area. See “Cleaning the imaging
area” on page 46.
• Straighten pages in the input tray.
54 A-61895 May 2018
Page 63

5 Troubleshooting
Roller marks appear on the paper after
scanning
Images have black background bleedthrough
Red, green or blue streaks are running
through a color photo
Images have speckles Speckles happen because paper thickness is not uniform. See
Scanner is running slow • Your PC may not meet the minimum requirements for the scanner.
Clean the rollers. See the procedures in “4 Maintenance” on page39.
Scanning pages with wet ink will cause ink to transfer to the tires, and
from the tires to your pages. Do not scan pages unless the ink on them is
dry.
When scanning translucent paper, black bleed-through may appear on
the image. To minimize this, adjust the Contrast and Brightness values or
select Draft (Fixed) in TWAIN or Fixed Processing in ISIS to improve
the image.
The scanner is dirty and needs to be cleaned. Refer to “Cleaning
procedures” on page 40.
“Improving image quality” on page 37.
Refer to the page for your scanner model:
www.kodakalaris.com/go/S2000
www.kodakalaris.com/go/S2000w
• The scanner is USB 3.1 Super Speed compliant. It is designed to
operate with USB 3.1 or USB 2.0, but will function in a USB 1.1 port. If
you are using a USB 1.1 connection, update your USB connection.
• When scanning wirelessly, other network traffic can slow performance.
• Several settings, such as active feeding and enhanced stacking, can
slow the scanner. Experiment to find the settings that work best for you.
“Length protection active” message
shows on scanner screen
• The combination of driver settings may result in a jam message when
scanning occurs. If a jam message occurs, adjust one or more of these
settings in the scanner driver.
reduce the maximum document length
lower the image resolution
turn on compression
lower compression quality
change to simplex scanning
change the image type (color, gray scale, or black and white)
turn off Dual Stream
turn off Auto Color Detection
Calibrations
Scanner multifeed calibration should be done only when Alaris
Technical Support personnel tell you to calibrate.
The touch screen of the S2060w/S2080w scanners can be calibrated.
Again, this calibration should be performed only if Alaris Technical
Support personnel advise it and tell you how.
A-61895 May 2018 55
Page 64

5 Troubleshooting
Contacting Technical Support
1. Visit www.kodakalaris.com/go/IMsupport to obtain the most current
phone number for your country.
2. When calling, please have the following information ready:
- A description of your problem.
- The scanner model and serial number.
- Computer configuration.
- Scanning application you are using.
56 A-61895 May 2018
Page 65

Appendix A Regulatory Information
Environmental information
• The Alaris S2000 and S2000w Series Scanners are designed to meet worldwide environmental requirements.
• Guidelines are available for the disposal of consumable items that are replaced during maintenance or service; follow local
regulations or contact Kodak Alaris locally for more information.
• Disposal of this equipment may be regulated due to environmental considerations. For disposal or recycling information,
contact your local authorities or, in the USA, visit: www.kodakalaris.com/go/scannerrecycling.
• The product packaging is recyclable.
• Parts are designed for reuse and recycling.
• The Alaris S2000 and S2000w Series Scanners are Energy Star compliant and are shipped from the factory with the default
time set to 15 minutes.
European Union
This symbol indicates that when the last user wishes to discard this product, it must be sent to
appropriate facilities for recovery and recycling. Please contact your local Kodak Alaris representative
or refer to www.kodakalaris.com/go/ehs for additional information on the collection and recovery
programs available for this product.
Please consult www.kodakalaris.com/go/ehs for information about the presence of substances included on the candidate list
according to article 59(1) of Regulation (EC) No. 1907/2006 (REACH).
A-61895 May 2018 57
Page 66

Appendix A Regulatory Information
Product Disclosure Table - Alaris S2040/S2050/S2060w/S2070/S2080w
Scanners
有毒有害物质或元素名称及含量标识表
Table of hazardous substances’ name and concentration
有毒有害物质或元素
部件名称
Component name
适配器
(AC Adapter)
电路板
Circuit Board
O: 该有毒有害物质在该部件所有均质材料中的含量均在 S J/T 11363-2006 规定的限量要求以下。
X: 该有毒有害物质至少在该部件的某一均质材料中的含量超出 SJ/T 11363-2006 规定的限量要求。
O: indicates hazardous substance concentration lower than MCV
X: indicates hazardous substance concentration higher than MCV
hazardous substances’ name
铅
(Pb)
XOOO O O
XOOO O O
汞
(Hg)
镉
(Cd)
六价铬
(Cr6+)
多溴联苯
(PBB)
多溴二苯醚
(PBDE)
环保使用期限 (EPUP)
在中国大陆,该值表示电子信息产品中含有的有毒有害物质或元素在正常使用的条件下不会发生外泄或突
变,用户使用此产品不会对环境造成严重污染或对人身、财产造成严重损害的期限 (以年计)。
该值根据操作说明中所规定的产品正常使用条件而定
Environmental Protection Use Period (EPUP)
In mainland China, this number indicates the time period (calculated by year) within which any hazardous
substances present in the product are not expected to be released such that there is risk to human health,
property, or the environment.
This value is assigned based on normal use of the product as described in the operating instructions.
58 A-61895 May 2018
Page 67

Appendix A Regulatory Information
Taiwan:
設備名稱:掃描器 ,型號(型式) Alaris S2040 Scanner,
Equipment name Type designation (Type) Alaris S2050 Scanner, Alaris 2060w Scanner
Alaris S2070 Scanner, Alaris S2080w Scanner
限用物質及其化學符號
單元Unit
Restricted substances and their chemical symbols
外殼
Covers
電路板
Circuit Boards
掃描模組
Scan Module
取紙模組
Feed Module
配件
Accessories
鉛
Lead
(Pb)
○○○○ ○ ○
-○○○ ○ ○
-○○○ ○ ○
○○○○ ○ ○
-○○○ ○ ○
汞
Mercury
(Hg)
鎘
Cadmium
(Cd)
六價鉻
Hexavalent
chromium
+6
(Cr
)
多溴聯苯
Polybrominated
biphenyls
(PBB)
多溴二苯醚
Polybrominated
diphenyl ethers
(PBDE)
備考1.〝超出0.1 wt %〞及〝超出0.01 wt %〞係指限用物質之百分比含量超出百分比含量基準值。
Note 1:“Exceeding 0.1 wt %” and “exceeding 0.01 wt %” indicate that the percentage content of the restricted substance exceeds the reference
percentage value of presence condition.
備考2.〝○〞係指該項限用物質之百分比含量未超出百分比含量基準值。
Note 2:“○” indicates that the percentage content of the restricted substance does not exceed the percentage of reference value of presence.
備考3.〝-〞係指該項限用物質為排除項目。
Note 3:The “−” indicates that the restricted substance corresponds to the exemption.
EMC Statements for S2000 Series Scanners:
Notice to users in South Korea: As this equipment has obtained EMC registration for household use, it can be
used in an area including residential areas.
Notice to users in the US: FCC: This equipment has been tested and found to comply with the limits for a Class
B digital device, pursuant to Part 15 of the FCC Rules. These limits are designed to provide reasonable protection
against harmful interference in a residential installation.
A-61895 May 2018 59
Page 68

Appendix A Regulatory Information
Notice to users in
by information Technology Equipment (VCCI). If this is used near a radio or television receiver in a domestic environment, it may
cause radio interference. Install and use the equipment according to the instruction manual.
Japan: This is a Class B product based on the standard of the Voluntary Control Council for interference
EMC and Wireless Regulatory Statements for S2000w Series Scanners:
This device contains a preinstalled 2.4 GHz Wireless LAN module (Model: WN4615L)
For Indoor Use: This device is intended for indoor use only.
Radio Frequency Exposure
CAUTION: When using this product, it should be installed and operated with a minimum distance of 7.9 in. (20 cm)
for 2.4 GHz operations between the radiator and your body. This transmitter must not be collocated or operated in
conjunction with any other antenna or transmitter. The radiated output power of this device is far below radio
frequency exposure limits during normal operation.
Notice to users in Argentina: Acceso Inalambrico de Red
CNC C-20571, CNC C-20572
Notice to users in Brazil: “Este equipamento opera em caráter secundário, isto é, não tem direito a proteção
contra interferência prejudicial, mesmo de estações do mesmo tipo, e não pode causar interferência a sistemas
operando em caráter primário.”(ANATEL 282/2001)
Anatel: 07890-17-02458
Notice to users in Canada/Note à l'attention des utilisateurs canadiens:
For Indoor Use. This device complies with Industry Canada’s licence-exempt RSSs. Operation is subject to the
following two conditions:
(1) This device may not cause interference; and
(2) This device must accept any interference, including interference that may cause undesired operation of the
device.
Utiliser à l'intérieur. Le présent appareil est conforme aux CNR d’Industrie Canada applicables aux appareils radio
exempts de licence. L’exploitation est autorisée aux deux conditions suivantes :
1) l’appareil ne doit pas produire de brouillage;
2) l’appareil doit accepter tout brouillage radioélectrique subi, même si le brouillage est susceptible d’en
compromettre le fonctionnement..
The radiated output power of this device is below the Industry Canada (IC) radio frequency exposure limits. This
device has been evaluated for and shown compliant with the IC Radio Frequency (RF) Exposure limits. The device
should be used in such a manner such that the potential for human contact during normal operation is minimized.
This device has been certified for use in Canada. Status of the listing in the Industry Canada’s REL (Radio
Equipment List) can be found at the following web address:
http://www.ic.gc.ca/app/sitt/reltel/srch/nwRdSrch.do?lang=eng
60 A-61895 May 2018
Page 69

Appendix A Regulatory Information
La puissance rayonnée de sortie de cet appareil est inférieure aux limites d'exposition à la fréquence radio
d'Industry Canada (IC). Cet appareil a été évalué et jugé conforme aux limites d'exposition à la fréquence radio
(FR) d'IC. Cet appareil devrait être utilisé de manière à ce que le risque de contact humain au cours d'un
fonctionnement normal soit réduit.
Cet appareil est homologué pour l'utilisation au Canada. Pour consulter l'entrée correspondant à l'appareil dans la
liste d'équipement radio (REL - Radio Equipment List) d'Industry Canada, rendez-vous
https://sms-sgs.ic.gc.ca/equipmentSearch/searchRadioEquipments?execution=e1s1&lang=fr_CA
IC: 4491A-WN4615L
Notice to users in China: CCC; SRRC certification CMIIT ID: 2015DP0826
Notice to users in EU/EFTA: We, Kodak Alaris Inc. hereby declare that this equipment type (document scanner)
is in compliance with Directive 2014/53/EU. The full text of the EU declaration of conformity is available at the
following internet address: www.kodakalaris.com/go/ehs.
Notice to users in Japan: Japan Telec: 201-170777
■ Cautions prior to use of this product
When using this product in locations where use of radio waves is restricted (such as medical facilities, etc.), comply
with the instructions from the location, and set the wireless switch to off. This product may affect electronic and
medical equipment, or implanted medical devices (artificial pacemakers, etc.). Please take sufficient care, as this is
a general characteristic of devices that utilize radio waves. For detailed information see the website of the Ministry
of Internal Affairs and Communications.
http://www.tele.soumu.go.jp/j/sys/ele/index.htm
■ Cautions when using this product in a wireless LAN environment
• Please install this product and wireless access points/routers in locations with as few obstacles present as
possible. The presence of obstacles that block radio waves (walls, metal sheets, etc.) may prevent
communication or slow down communication speeds.
• Please use this product in a wireless LAN environment that you deem, at your responsibility, to be secure. Use in
a non-secure wireless LAN environment may result in the disclosure of important data such as personal
information to other parties. This company will bear no responsibility for any damage or disclosure of information
occurring in a wireless LAN environment when this product is used in a non-secure environment or when
security is breached using special methods. We would ask for your understanding on this matter.
• This product utilizes the 2.4GHz frequency band. This frequency band is utilized by microwave ovens, industrial/
scientific/medical devices, factory production lines, and amateur radio stations.
- Before using this product, check that there are not devices utilizing this frequency band close by.
- In the unlikely event that radio frequency interference occurs when using this product, take measures
required to avert jamming (change the channel used or the installation location, etc.), stop using the device,
or set the wireless to “off” to stop radio wave emissions.
- Additionally, when radio wave interference is causing difficulties, inquire at the distributor/store from which
the product was purchased, or contact Alaris service and support.
This product contains wireless equipment that has received technical standards compliance certification based
on the Radio Law, and features a certification label on the wireless equipment.
A-61895 May 2018 61
Page 70

Appendix A Regulatory Information
The listings on the label on the wireless equipment have the following meaning.
Listing Content
2.4 This is a wireless device utilizing the 2.4 GHz (2400MHz)
frequency band.
DS / OF This device utilizes the DS-SS and OFDM modulation methods.
4 Assumed interference distance is 40 m or less.
Able to utilize the full band, and to avoid bands used by mobile
identification equipment.
• Use in the following circumstances may prevent communication or slow down communication speeds.
- When this product and the wireless access point/router are separated by extreme distance.
- When used in close proximity to devices that cause radio wave interference (microwave ovens, etc.).
- When multiple wireless LAN access points are located close by, and using the same channel.
■ The Radio Law
This product is equipped with wireless equipment that has received technical standards compliance certification
based on the Radio Law. Disassembling this product or modifying its internal circuitry for use is prohibited by law,
and may incur penalties for the customer. Additionally, this company bears no responsibility for any injuries
occurring due to disassembly or modification of this product. We would ask for your understanding on this matter.
Notice to users in Mexico: “Este equipo opera a titulo secundario, consecuentemente, debe aceptar
interferencias perjudiciales incluyendo equipos de la misma clase y puede no causar interferencias a sistemas
operando a titulo primario.”
IFETEL: 223
Notice to users in Singapore: Complies with IDA Standards: (DA106764)
Notice to users in South Africa: ICASA APPROVED: TA-2017/1931
Notice to users in South Korea:
해당 무선설비는 전파혼신 가능성이 있으므로 인명안전과 관련된 서비스는 할 수 없음
Notice to users in Taiwan:
CCAF17LP0860T6
62 A-61895 May 2018
Page 71

Appendix A Regulatory Information
Notice to users in Thailand: This wireless communication equipment has the electromagnetic field strength in
compliance with the Safety Standard for the Use of Wireless Communication Devices on Human Health
announced by the National Telecommunications Commission.
Notice to users in the US: FCC: This equipment has been tested and found to comply with the limits for a Class
B digital device, pursuant to Part 15 of the FCC Rules. These limits are designed to provide reasonable protection
against harmful interference in a residential installation.
This equipment generates, uses, and can radiate radio frequency energy and, if not installed or used in
accordance with the instructions, may cause harmful interference to radio communications. However, there is no
guarantee that interference will not occur in a particular installation.
If this equipment does cause harmful interference to radio or television reception, which can be determined by
turning the equipment off and on, the user is encouraged to try to correct the interference by one or more of the
following measures:
1) reorient or relocate the receiving antenna;
2) increase the separation between the equipment and the receiver;
3) connect the equipment to an outlet on a circuit different from that to which the receiver is connected;
4) consult the dealer or an experienced radio/TV technician for additional suggestions.
Any changes or modifications not expressly approved by the party responsible for compliance could void the user’s
authority to operate the equipment. Where shielded interface cables have been provided with the product or
specified additional components or accessories elsewhere defined to be used with the installation of the product,
they must be used in order to ensure compliance with FCC regulation.
FCC ID: PPQ-WN4615L
Networking Performance Statement, notice to users: It should be understood that wireless networks and,
therefore, system performance, are impacted negatively by a number of factors including: interference from other
RF sources; physical obstructions; distance between devices; and relative location. Competing network traffic will
additionally degrade performance for both wired and wireless interfaces.
A-61895 May 2018 63
Page 72

Appendix A Regulatory Information
64 A-61895 May 2018
Page 73

Appendix B Warranty — US and Canada only
Congratulations on the purchase of an Alaris Scanner. Alaris Scanners are designed to provide end users with the highest
performance and reliability. All Alaris Scanners are covered by the following Limited Warranty.
Limited Warranty for Alaris Scanners
Kodak Alaris Inc. provides the following Limited Warranty on Alaris Scanners (excluding spare parts and consumables)
distributed by Kodak Alaris or through Kodak Alaris’ authorized distribution channels:
Kodak Alaris Inc. warrants that an Alaris Scanner, from the time of sale through the Limited Warranty period applicable to the
Product, will be free of defects in materials or workmanship and will conform to the performance specifications applicable for the
particular Alaris Scanner.
All Alaris Scanners are subject to the Warranty Exclusions described below. An Alaris Scanner found to be defective or which
does not conform to the product specifications will be repaired or replaced with new or refurbished product at Kodak Alaris’
option.
Purchasers may determine the applicable Limited Warranty period for the Alaris Scanners purchased by visiting
www.kodakalaris.com/go/imsupport
Proof of purchase is required to demonstrate eligibility for warranty service.
Warranty exclusions
Kodak Alaris’ Limited Warranty does not apply to an Alaris Scanner that has been subjected to physical damage after purchase,
caused, for example, by casualty, accident, acts of God or transportation, including (a) by a failure to properly package and ship
the Scanner back to Kodak Alaris for warranty service in accordance with Kodak Alaris’ then current Packaging and Shipping
Guidelines, including failure to replace the shipping restraint prior to shipping, or by a failure to remove the shipping restraint
prior to use; (b) resulting from the user’s installation, system integration, programming, re-installation of user operating systems
or applications software, systems engineering, relocation, reconstruction of data, or removal of the product or any component
(including breakage of a connector, cover, glass, pins, trays or seal); (c) from service, modification or repair not performed by
Kodak Alaris or a service provider authorized by Kodak Alaris or by tampering, use of counterfeit or other non-Kodak Alaris
components, assemblies, accessories, or modules; (d) by misuse, unreasonable handling or maintenance, mistreatment,
operator error, failure to provide proper supervision or maintenance, including use of cleaning products or other accessories not
approved by Kodak Alaris or use in contravention of recommended procedures or specifications; (e) by environmental
conditions (such as excessive heat or other unsuitable physical operating environment), corrosion, staining, electrical work
external to the product or failure to provide electro-static discharge (ESD) protection; (f) by failure to install firmware updates or
releases available for the product and (g) by such other supplemental exclusions published from time to time online at
www.kodakalaris.com/go/imsupport
Kodak Alaris provides no Limited Warranty for products purchased from countries other than the United State and Canada.
Purchasers of products from foreign distribution channels must seek warranty coverage, if any, through the original source of
purchase.
Kodak Alaris provides no Limited Warranty for products that are purchased as part of a third party manufacturer’s product,
computer system or other electronic device.
Any warranty for these products is provided by the OEM (Original Equipment Manufacturer) as part of that manufacturer’s
product or system.
The replacement product assumes the remainder of the Limited Warranty period applicable to the defective product or thirty
(30) days, whichever is longer.
Installation Warning and Disclaimer
KODAK ALARIS WILL NOT BE RESPONSIBLE FOR ANY CONSEQUENTIAL OR INCIDENTAL DAMAGES RESULTING
FROM THE SALE, INSTALLATION, USE, SERVICING OR IMPROPER FUNCTIONING OF THIS PRODUCT, REGARDLESS
OF THE CAUSE. SUCH DAMAGES FOR WHICH KODAK ALARIS WILL NOT BE RESPONSIBLE, INCLUDE, BUT ARE NOT
LIMITED TO, LOSS OF REVENUE OR PROFIT, LOSS OF DATA, DOWNTIME COSTS, LOSS OF USE OF THE PRODUCT,
COST OF ANY SUBSTITUTE PRODUCT, FACILITIES OR SERVICES OR CLAIMS OF CUSTOMERS FOR SUCH
DAMAGES.
If there is any conflict between other sections of this appendix and the Limited Warranty, the terms of the Limited Warranty
prevail.
or by reviewing the Limited Warranty Summary Card enclosed with the Alaris Scanner.
.
A-61895 May 2018 65
Page 74

Appendix B Warranty — US and Canada only
How to obtain Limited Warranty service
Alaris Scanners are supplied with information on unpacking, setup, installation and operation. Careful reading of the User’s
Guide will answer most of the technical questions the end user might have regarding proper installation, operation and
maintenance of the product. However, should additional technical support be required, you may visit our website at:
www.kodakalaris.com/go/imsupport
The Response Center is available Monday – Friday (excluding Kodak Alaris holidays) 8 a.m. to 5 p.m. EST.
Before placing the call, the eligible purchaser should have the Alar is Scanner model number, part number, serial number and
proof of purchase available. The eligible purchaser should also be prepared to provide a description of the problem.
Response Center personnel will assist the end user in resolving the problem over the phone. The end user may be asked to run
some simple, self-diagnostic tests and report the resulting status and error code messages. This will assist the Response
Center in determining if the problem is the Alaris Scanner or another component and if the problem can be resolved over the
phone. If the Response Center determines a hardware problem exists that is covered either under the Limited Warranty or a
purchased Maintenance Agreement, a Return Material Authorization Number (RMA) will be assigned as needed, a service
request will be initiated and repair or replacement procedures will follow.
or contact: Kodak Alaris’ Response Center: (800) 822-1414
Packaging and shipping guidelines
Purchaser must ship all warranty returns in a method that guarantees full protection of the product from shipping damage.
Failure to do so will void the Alaris Scanner warranty. Kodak Alaris advises the purchaser to keep the original box and packing
materials for storing or shipping. Kodak Alaris is not responsible for issues related to shipping damage. The purchaser must
return only the Alaris Scanner. Prior to shipment, purchaser must remove and retain all “add-on” items, (i.e. adapters, cables,
software, manuals, etc.). Kodak Alaris accepts no responsibility for these items and they will not be returned with the repaired or
replacement Alaris Scanner. All products should be returned to Kodak Alaris in the original shipping container, or an authorized
packaging box for the units being returned. Purchaser must install the shipping restraint before the Alaris Scanner is shipped.
When the original packaging is not available, contact Kodak Alaris’ Response Center at (800) 822-1414 for part numbers and
replacement packaging ordering information.
Return procedure
Eligible purchasers seeking services for Alaris Scanners covered under this Limited Warranty must obtain a Return Material
Authorization Number (“RMA”) by calling (800) 822-1414 and within ten (10) business days from the date of issuance of the
RMA must return the Alaris Scanner to the address designated in the RMA at the end user’s own expense and risk, in
compliance with Kodak Alaris’ current Packaging and Shipping Guidelines.
Any defective products or parts replaced by Kodak Alaris become the property of Kodak Alaris.
Customer responsibility
BY REQUESTING SERVICE, THE ELIGIBLE PURCHASER ACKNOWLEDGES THE TERMS OF THE LIMITED WARRANTY,
INCLUDING THE DISCLAIMER AND LIMITATION OF LIABILITY PROVISIONS. PRIOR TO SEEKING SERVICE, THE END
USER MUST BACK-UP ANY DATA OR FILES THAT MAY BECOME DAMAGED OR LOST. KODAK ALARIS IS, WITHOUT
LIMITATION, NOT RESPONSIBLE FOR LOST OR DAMAGED DATA OR FILES.
Warranty Service descriptions
Kodak Alaris offers a range of service programs to support its Limited Warranty and to assist with the use and care of the Alaris
Scanner (“Service Methods”). An Alaris Scanner represents an important investment. Alaris Scanners provide the productivity
needed to stay competitive. The sudden loss of this productivity, even temporarily, could seriously affect the ability to meet
commitments. Downtime can be very expensive, not just in the cost of the repair but also in time lost. To help alleviate these
problems, Kodak Alaris may use one of the service methods listed below, depending upon product type, in providing service
under its Limited Warranty.
Included with selected Alaris Scanners is a Limited Warranty Registration card and a Limited Warranty Summary card. The
Limited Warranty Summary card is specific by model. The Limited Warranty Summary card contains important warranty
information, including the model number and the Limited Warranty. Refer to the Limited Warranty Summary card to determine
the available Service Methods applicable to the particular Alaris Scanner.
If the Limited Warranty Registration card or Limited Warranty Summary card cannot be located, additional information may be
obtained about the product, including updated warranty and service program information and restrictions, online at
www.kodakalaris.com/go/imsupport
To avoid service delays, Kodak Alaris urges end users to complete and return the enclosed Limited Warranty Registration Card
at the first opportunity. If you cannot locate the Limited Warranty Registration card, you may register online at
www.kodakalaris.com/go/imsupport
Kodak Alaris also provides a variety of service programs that may be purchased to assist with the use and care of the Alaris
Scanner.
Kodak Alaris is committed to providing its customers with quality, performance, reliability and service under the Limited
Warranty.
.
.
66 A-61895 May 2018
Page 75

Appendix B Warranty — US and Canada only
We expect to have a supply of spare parts and consumables for at least 5 years after product manufacture has been
discontinued.
Advanced Unit Replacement (AUR)
AUR may be one of the easiest and most comprehensive service offerings in the industry. In the unlikely event of a product
defect, for eligible purchasers of certain Alaris Scanners, Kodak Alaris will replace that product within two business days.
The AUR provides advance replacement on specific failed or broken Alaris Scanners. To be eligible to take advantage of the
AUR, the eligible purchaser must obtain an RMA number, sign an Advance Replacement Agreement and provide a credit card
deposit to secure the replacement product. The RMA number should be kept in the event that the status of the replacement
product needs to be checked. The eligible purchaser will be asked for the address where the replacement product is to be
shipped. The eligible purchaser will also be faxed packing and shipping instructions for the malfunctioning product. The eligible
purchaser will then receive a replacement product within 2 business days after the service call initiation and Kodak Alaris’
receipt of the signed agreement. The malfunctioning product must be received by Kodak Alaris within ten (10) days of the end
user’s receipt of the replacement product or the end user’s credit card will be charged the list price of the replacement product.
Shipment of replacement Imaging Product will be made at Kodak Alaris’ expense and choice of freight carrier. Shipments not
made under Kodak Alaris’ directions and choice of freight carrier may void the Limited Warranty.
Before the product is returned to Kodak Alaris, be sure to remove all options and accessories (which include power cord,
documentation, etc.) that are not covered by the Limited Warranty. The box and packaging in which the replacement product
was shipped must be used to return the malfunctioning product. If the malfunctioning product is not returned in the box and
packaging in which the replacement product was shipped the Limited Warranty may be voided. The Return Material
Authorization Number (“RMA”) must be clearly marked on the outside of the box to ensure proper receipt and credit of the
defective product.
Depot service
If the Alaris Scanner is not eligible for AUR or On-Site Service, an eligible purchaser may utilize our Depot Repair Service. The
eligible purchaser will be instructed to ship the product to the nearest authorized Depot Repair Center. Product must be shipped
at the eligible purchaser’s risk and expense to the repair center. Before the product is returned to the repair center, be sure to
remove all options and accessories (which include power cord, documentation, etc.) not covered by the Limited Warranty. All
products should be returned to Kodak Alaris in the original shipping container, or in a recommended packing box. The Alaris
Scanner must have the shipping restraint installed before it is shipped. When the original packaging is not available, contact
Kodak Alaris’ Response Center at (800) 822-1414, for ordering information. Eligible purchasers seeking services for Alaris
Scanners must obtain a Return Material Authorization number (“RMA”) by calling (800) 822-1414, and within ten (10) business
days from the date of issuance of the RMA must return the Alaris Scanner to the address designated in the RMA at the end
user’s own expense and risk. The Return Material Authorization Number (“RMA”) must be clearly marked on the outside of the
box to ensure proper receipt and credit of the defective product.
Upon receipt of the product, the repair center will repair product within ten (10) business days. The repaired product will be
shipped back two-day express mail at no expense to the eligible purchaser.
Important restrictions
Eligibility: The Advance Exchange Program and the Depot Repair Service are available to eligible purchasers in the fifty (50)
United States for products purchased from authorized distributors of Kodak Alaris. The Alaris Scanner will be ineligible for any
service under warranty if the product falls under any of Kodak Alaris’ then-current Warranty Exclusions, including a purchaser’s
failure to return defective products to Kodak Alaris in compliance with Kodak Alaris’ then current Packaging and Shipping
Guidelines. Persons are only considered “eligible purchasers” or “end users” if they originally purchased the Alaris Scanner for
their own personal or business use, and not for resale.
Consumables: Consumables are items that wear out under normal use and must be replaced by the end user as needed.
Consumables, supplies, other expendable items and those items identified as being the user’s responsibility in the User’s Guide
are not covered under the Limited Warranty.
Any defective products or parts replaced by Kodak Alaris become the property of Kodak Alaris.
A-61895 May 2018 67
Page 76

Appendix B Warranty — US and Canada only
Contacting Kodak Alaris
For Information on Alaris Scanners:
Website: www.kodakalaris.com/go/IM
For U.S. contact Technical Support by telephone:
Telephone technical support is available Monday-Friday between the hours of 5 a.m. to 5 p.m. excluding Kodak Alaris holidays.
Phone: (800) 822-1414
For technical documentation and FAQs available 24 hours a day:
Website: www.kodakalaris.com/go/IM
For Service Program information
Website: www.kodakalaris.com
Phone: (800) 822-1414
68 A-61895 May 2018
Page 77

Page 78

All trademarks and tr ade names
used are the proper ty of their
respective holders.
The Kodak tr ademark and trade
dress a re used under l icense from
Eastman Ko dak Company.
© 2018 Kodak Alar is Inc.
TM/MC/MR : Alaris
 Loading...