

AKG DMS 70 QUATTRO, DMS 70 DUAL User Instructions

DMS 70 Quattro/Dual
BEDIENUNGSANLEITUNG ...................... 2
Bitte vor Inbetriebnahme des Gerätes lesen!
USER INSTRUCTIONS .......................... 22
Please read the manual before using the equipement!
MODE D’EMPLOI ................................. 42
Veuillez lire cette notice avant d’utiliser le système!
MODO DE EMPLEO.............................. 62
¡Sirvase leer el manual antes de utilizar el equipo!
INSTRUÇÕES DE USO .......................... 82
Favor leia este manual antes de usar o equipamento!

Table of Contents
22 DMS 70
DMS 70DMS 70
DMS 70 Quattro/Dual
1 Safety and Environment........................................................................................... 23
Safety ........................................................................................................................ 23
Environment .............................................................................................................. 23
2 Description ............................................................................................................... 24
Introduction ............................................................................................................... 24
Scope of supply ......................................................................................................... 24
Optional Accessories .................................................................................................. 24
DSR 70 Dual receiver ................................................................................................. 24
DSR 70 Quattro receiver ............................................................................................. 24
Front panel .......................................................................................................... 25
Rear panel ........................................................................................................... 26
DHT 70 handheld transmitter ...................................................................................... 27
Controls ............................................................................................................... 27
DHT 70 Perception handheld transmitter ..................................................................... 28
DPT 70 bodypack transmitter ...................................................................................... 29
Controls ............................................................................................................... 29
Microphones, guitar cables ................................................................................... 30
3 Installation and Connection ..................................................................................... 31
Positioning the receiver .............................................................................................. 31
Rack assembly ........................................................................................................... 31
Connecting the receiver to power ................................................................................ 31
Connecting the audio outputs of the DSR 70 Quattro receiver ....................................... 32
Connecting the receiver to a balanced input ........................................................... 32
Connecting the receiver to a speaker ..................................................................... 32
Connecting the DSR 70 Dual receiver to a balanced input ............................................. 32
4 Setting up ................................................................................................................ 33
Setting up the receiver ............................................................................................... 33
Inserting and testing batteries in the handheld transmitter DHT 70 ................................ 33
Inserting and testing batteries in the bodypack DPT 70 transmitter ................................ 33
Identifying the channel and/or appliance ...................................................................... 34
Assign the transmitter to a free channel or change the channel ..................................... 34
Registering a new transmitter on the receiver............................................................... 34
Setting up the handheld transmitter ............................................................................. 35
Setting up the bodypack transmitter ............................................................................ 35
Connecting a microphone ..................................................................................... 35
Connecting an instrument ..................................................................................... 36
Adjusting the audio level on the receiver ...................................................................... 36
Adjusting internal error correction ............................................................................... 36
Switching off DMS 70 System ..................................................................................... 36
5 Microphone technique ............................................................................................. 37
DHT 70 handheld transmitter ...................................................................................... 37
Working distance and proximity effect ................................................................... 37
Angle of incidence ................................................................................................ 37
Feedback ............................................................................................................. 37
Backing vocals ..................................................................................................... 37
DPT 70 bodypack transmitter ...................................................................................... 38
CK97 lavalier microphone ..................................................................................... 38
C 544 L headset microphone ................................................................................ 38
Putting on the microphone .................................................................................... 38
Windshield ........................................................................................................... 38
Moisture shield .................................................................................................... 38
6 Cleaning ................................................................................................................... 39
Internal windshield of handheld transmitter .................................................................. 39
7 Troubleshooting ....................................................................................................... 40
8 Specifications .......................................................................................................... 41
Table of Contents

Safety and Environment
DMS 70
DMS 70DMS 70
DMS 70
Quattro/Dual
23
• Do not spill any liquids on the equipment.
• The equipment must only be used in dry rooms.
• The equipment must only be opened, serviced, and repaired by authorised personnel. The
equipment contains no user-serviceable parts.
• Before connecting the equipment to power, check that the AC mains voltage stated on the
supplied AC adapter is identical to the AC mains voltage available where you will use the
equipment.
• Only operate the equipment with the supplied AC adapter with a 12-VDC output. Using
adapters with a different output voltage or current type may cause serious damage to the
unit.
• If any solid object or liquid should get into the equipment, shut down the system
immediately. Disconnect the AC adapter from the power outlet at once and have the
equipment checked by our customer service department.
• If the equipment is not going to be used for a long time, disconnect the AC adapter from
the power outlet. Please note that if you turn the equipment off while leaving the AC
adapter plugged in, it is not fully isolated from the power supply.
• Do not place the equipment near heat sources such as radiators, heating ducts, amplifiers,
etc. and do not expose it to direct sunlight, excessive dust, moisture, rain, mechanical
vibrations, or shock.
• To avoid hum or interference, route all audio lines, particularly those connected to the
microphone inputs, away from power lines of any type. If you use cable ducts, be sure to
use separate ducts for the audio lines.
• Clean the equipment with a moistened (not wet) cloth only. Be sure to disconnect the AC
adapter from the power outlet before cleaning the equipment. Never use caustic or
scouring cleaners or cleaning products containing alcohol or solvents since these may
damage the enamel and plastic parts.
• Only use the equipment for the applications described in this manual. AKG cannot accept
any liability for damages resulting from improper handling or misuse.
• The power supply unit consumes a small amount of electricity even when the unit is
switched off. To save energy, unplug the power supply unit from the socket if you are not
going to be using the unit for some time.
• The packaging is recyclable. Dispose of the packaging in an appropriate recycling
collection system.
• If you scrap the unit, separate the case, electronics and cables and dispose of all the
components in accordance with the appropriate waste disposal regulations.
1 Safety and Environment
Safety
Environment
Description
24 DMS 70
DMS 70DMS 70
DMS 70 Quattro/Dual
Thank you for purchasing an AKG product. This Manual contains important instructions for
setting up and operating your equipment. Please take a few minutes to read the instructions
below carefully before operating the equipment. Please keep the Manual for future
reference. Have fun and impress your audience!
The DMS 70 is available in five sets:
Vocal Dual Set
Vocal Dual SetVocal Dual Set
Vocal Dual Set
Instrumental Dual Set
Instrumental Dual SetInstrumental Dual Set
Instrumental Dual Set
1 DHT 70 Perception handheld
transmitter
2 AA batteries
1 tripod adapter
1 DSR 70 Dual receiver
1 SMPS switched mode power supply
3 adapters (EU/UK/US)
1 guarantee card
1 Quick Start Guide
1 DPT 70 bodypack transmitter
2 AA batteries
1 MKG L cable
1 DSR 70 Dual receiver
1 SMPS switched mode power supply
3 adapters (EU/UK/US)
1 guarantee card
1 Quick Start Guide
Vocal Quattro Set
Vocal Quattro SetVocal Quattro Set
Vocal Quattro Set
Instrumental Quattro Set
Instrumental Quattro SetInstrumental Quattro Set
Instrumental Quattro Set
Mixed Quattro Set
Mixed Quattro SetMixed Quattro Set
Mixed Quattro Set
2 DHT 70 D5 handheld transmitters
2 AA batteries
2 tripod adapters
1 DSR 70 Quattro receiver
2 rack brackets including fittings
1 SMPS switched mode power supply
3 adapters (EU/UK/US)
1 guarantee card
1 Quick Start Guide
2 DPT 70 bodypack transmitters
2 AA batteries
2 MKG L cables
1 DSR 70 Quattro receiver
2 rack brackets including fittings
1 SMPS switched mode power supply
3 adapters (EU/UK/US)
1 guarantee card
1 Quick Start Guide
1 DHT 70 D5 handheld transmitter
1 DPT 70 bodypack transmitter
2 AA batteries
1 tripod adapter
1 MKG L cable
1 DSR 70 Quattro receiver
2 rack brackets including fittings
1 SMPS switched mode power supply
3 adapters (EU/UK/US)
1 guarantee card
1 Quick Start Guide
Check that the packaging contains all of the items listed for your system. If anything is
missing, please contact your AKG dealer.
For optional accessories, refer to the current AKG catalog or folder, or visit www.akg.com.
Your dealer will be glad to help.
The DSR 70 Dual is a stationary receiver for up to 2 DMS 70-system transmitters.
The DSR 70 Dual operates within the 2.4 GHz ISM frequency range. Two DSR 70 Duals can
be used in parallel (4 channels). Communication between the receiver and the transmitter is
digital and bidirectional. Transfer is uncompressed (24 bit) and encrypted (128 bit AES).
The DSR 70 Quattro is a stationary receiver for up to 4 DMS 70-system transmitters.
The DSR 70 Quattro operates within the 2.4 GHz ISM frequency range. Two DSR 70 Quattros
can be used in parallel (8 channels). Communication between the receiver and the transmitter
is digital and bidirectional. Transfer is uncompressed (24 bit) and encrypted (128 bit AES).
NOTE
In order to ensure interference-free operation, ensure that other devices within the 2.4 GHz
range (e.g. WLAN, Bluetooth, Access Points) are switched off.
If this is not possible, you can use the AUTO CORRECTION switch (8) on the receiver to
increase the robustness of the system compared with other 2.4 GHz devices. ("Mid" or "High"
position)
2 Description
Introduction
Scope of supply
Optional Accessories
DSR 70 Dual receiver
DSR 70 Quattro receiver
Description
DMS 70
DMS 70DMS 70
DMS 70
Quattro/Dual
25
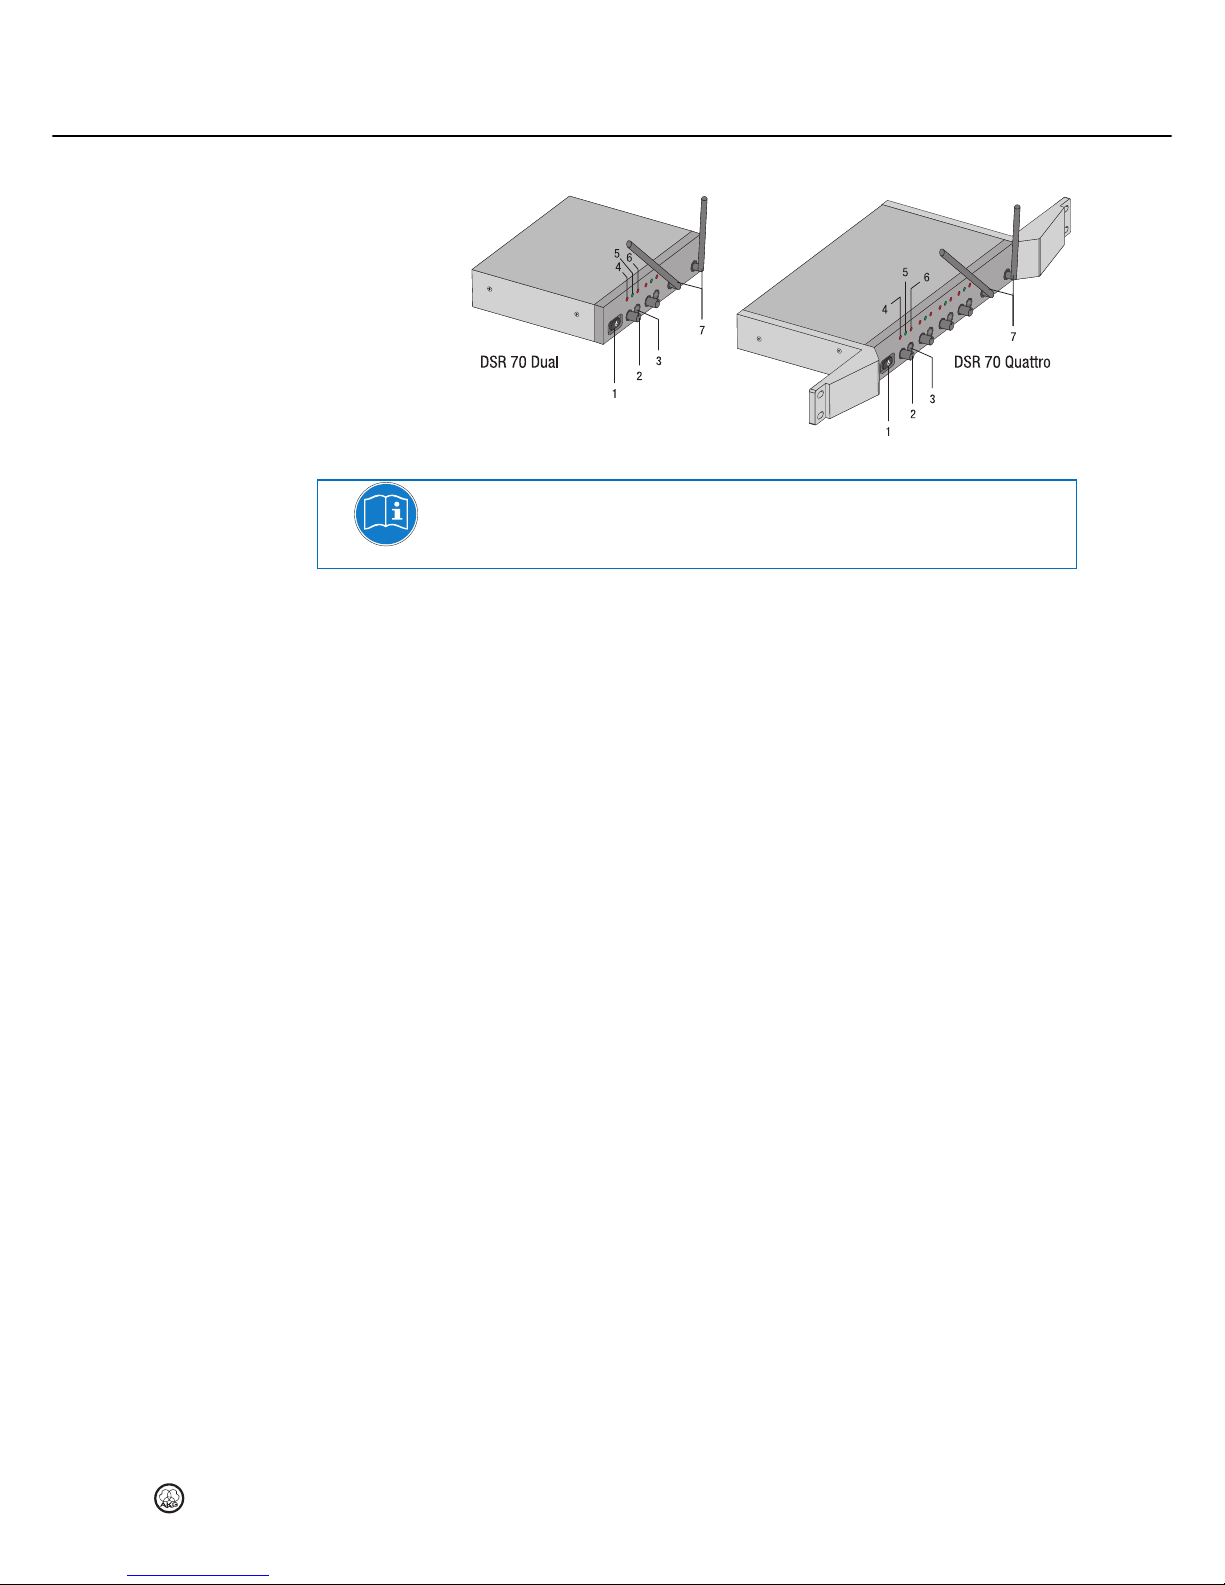
Front panel
Figure 1: Controls on the front panels of the DSR 70 Dual and Quattro receivers
NOTE
The controls (2 and 3) and the LEDs (4 to 6) are the same for all channels.
1 On/off button: This button is lit green when the receiver is switched on and ready for use. It
is sufficient to switch off the receiver to switch off the DMS 70 system. Switching off the
receiver switches off all transmitters connected to this receiver.
2 VOLUME potentiometer: This potentiometer allows continuous adjustment of the audio
output level on this channel (10/10a). The Mixing Function means that this potentiometer also
influences the sum output (9) on the DSR 70 Quattro.
3 CONNECT: This button has two functions:
Press briefly: to check the transmitters assigned to this channel.
Press and hold down (approximately 2 seconds): to assign a transmitter to a free
channel or to register a transmitter on this channel.
4 LOW BATT. LED: This LED lights up when the batteries of the transmitter registered on this
channel are flat. If the LED starts to flash red the battery will be flat within about one hour.
Replace with new batteries as soon as possible.
5 STATUS LED: This LED lights up green if a registered transmitter is active on this channel
and is ready for operation. The LED flashes green during the channel identification and
channel assignment processes.
6 CLIP LED: This LED lights up red if the audio level on this channel is too high.
7 Antennas: Fixed transmitter and receiver antennas. The best transmission and reception
performances are achieved when both antennas are pointing upwards in the "normal position"
(see diagram on the title page).
Description
26 DMS 70
DMS 70DMS 70
DMS 70 Quattro/Dual
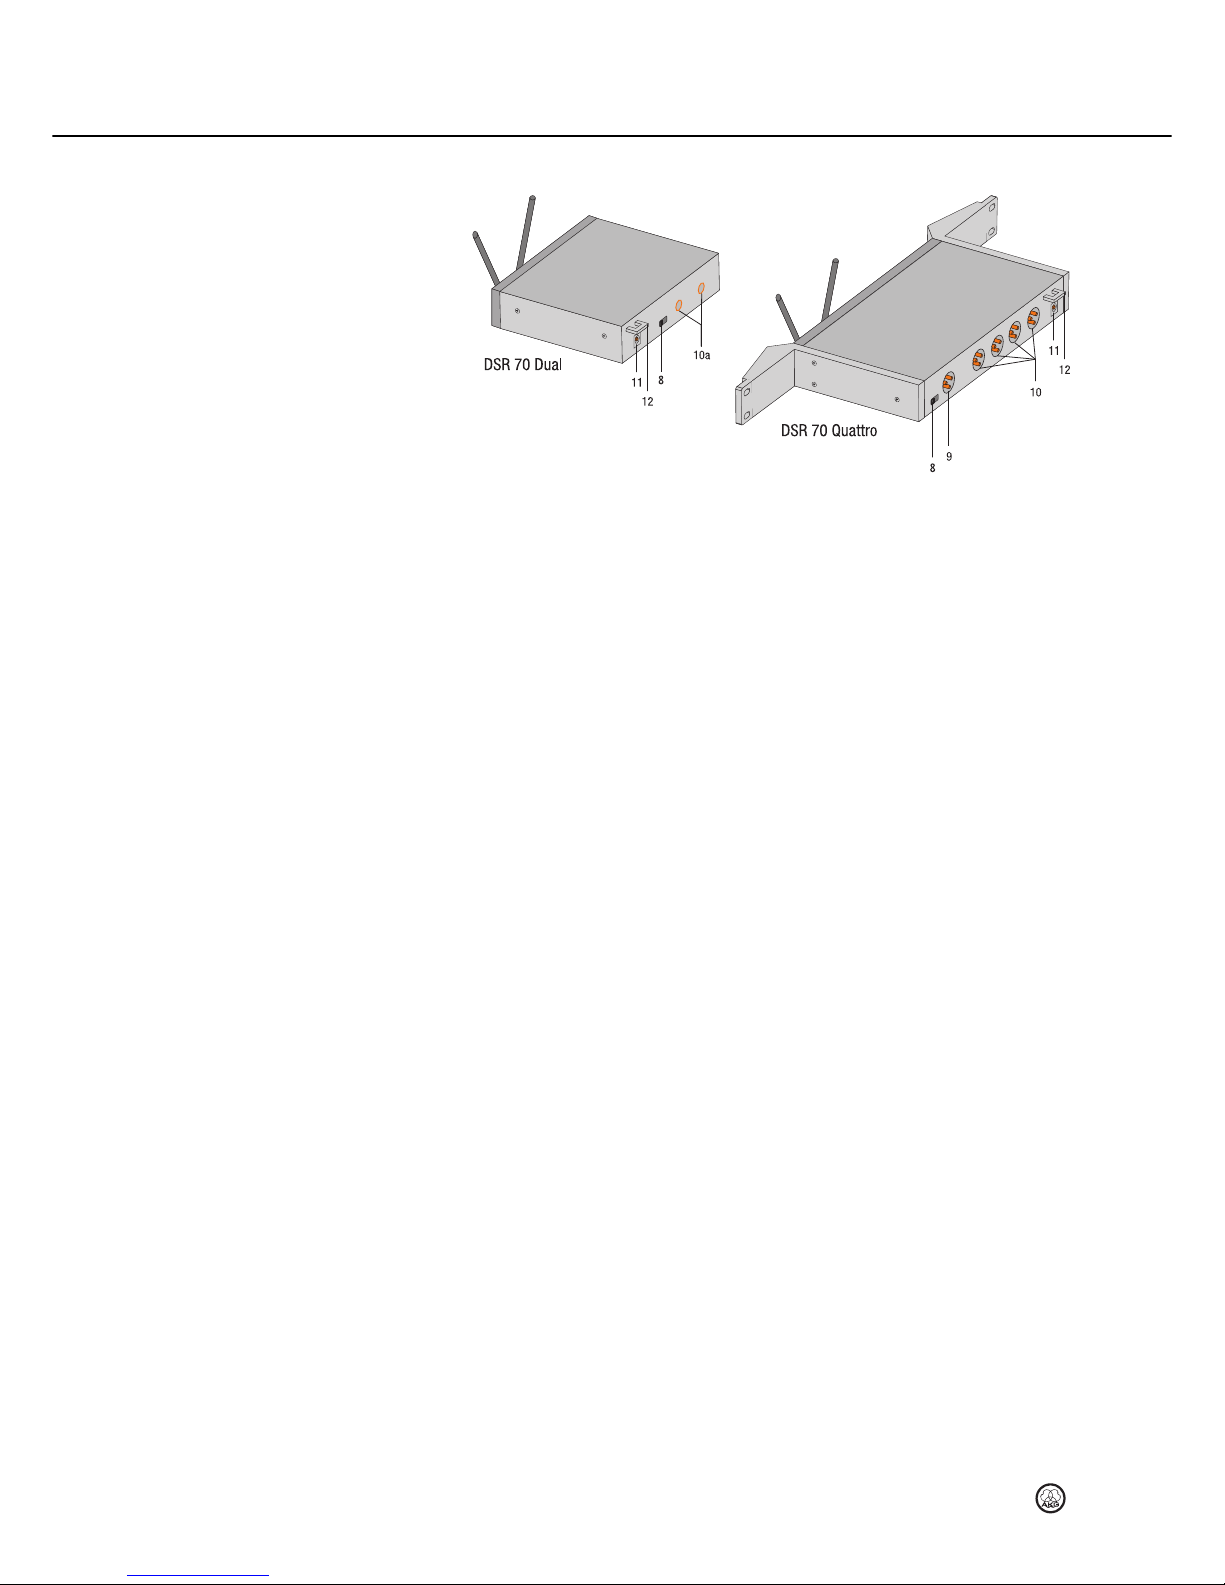
Rear panel
Figure 2: Controls on the rear panels of the DSR 70 Dual and Quattro receivers
8 AUTO CORRECTION switch: to adjust internal error correction.
9 Sum output/BALANCED (x1): Balanced audio output to 3-pin XLR connector. This output
transmits the combined audio signal of all 4 channels and you can connect it directly to an
active speaker.
10a CHANNEL OUT (x2): Balanced audio output to 6.35 mm jack. This output transmits the
audio signal of the respective channel. Can be connected to a microphone input on a mixer,
for example.
10 CHANNEL OUT/BALANCED (x4): Balanced audio output to 3-pin XLR connector. This
output transmits the audio signal of the respective channel. Can be connected to a
microphone input on a mixer, for example.
11 DC IN jack 12 V, 0.5 A: for connection to supplied external plug adapter.
12 Strain relief for the feeder cable of the supplied AC adapter.
Description
DMS 70
DMS 70DMS 70
DMS 70
Quattro/Dual
27
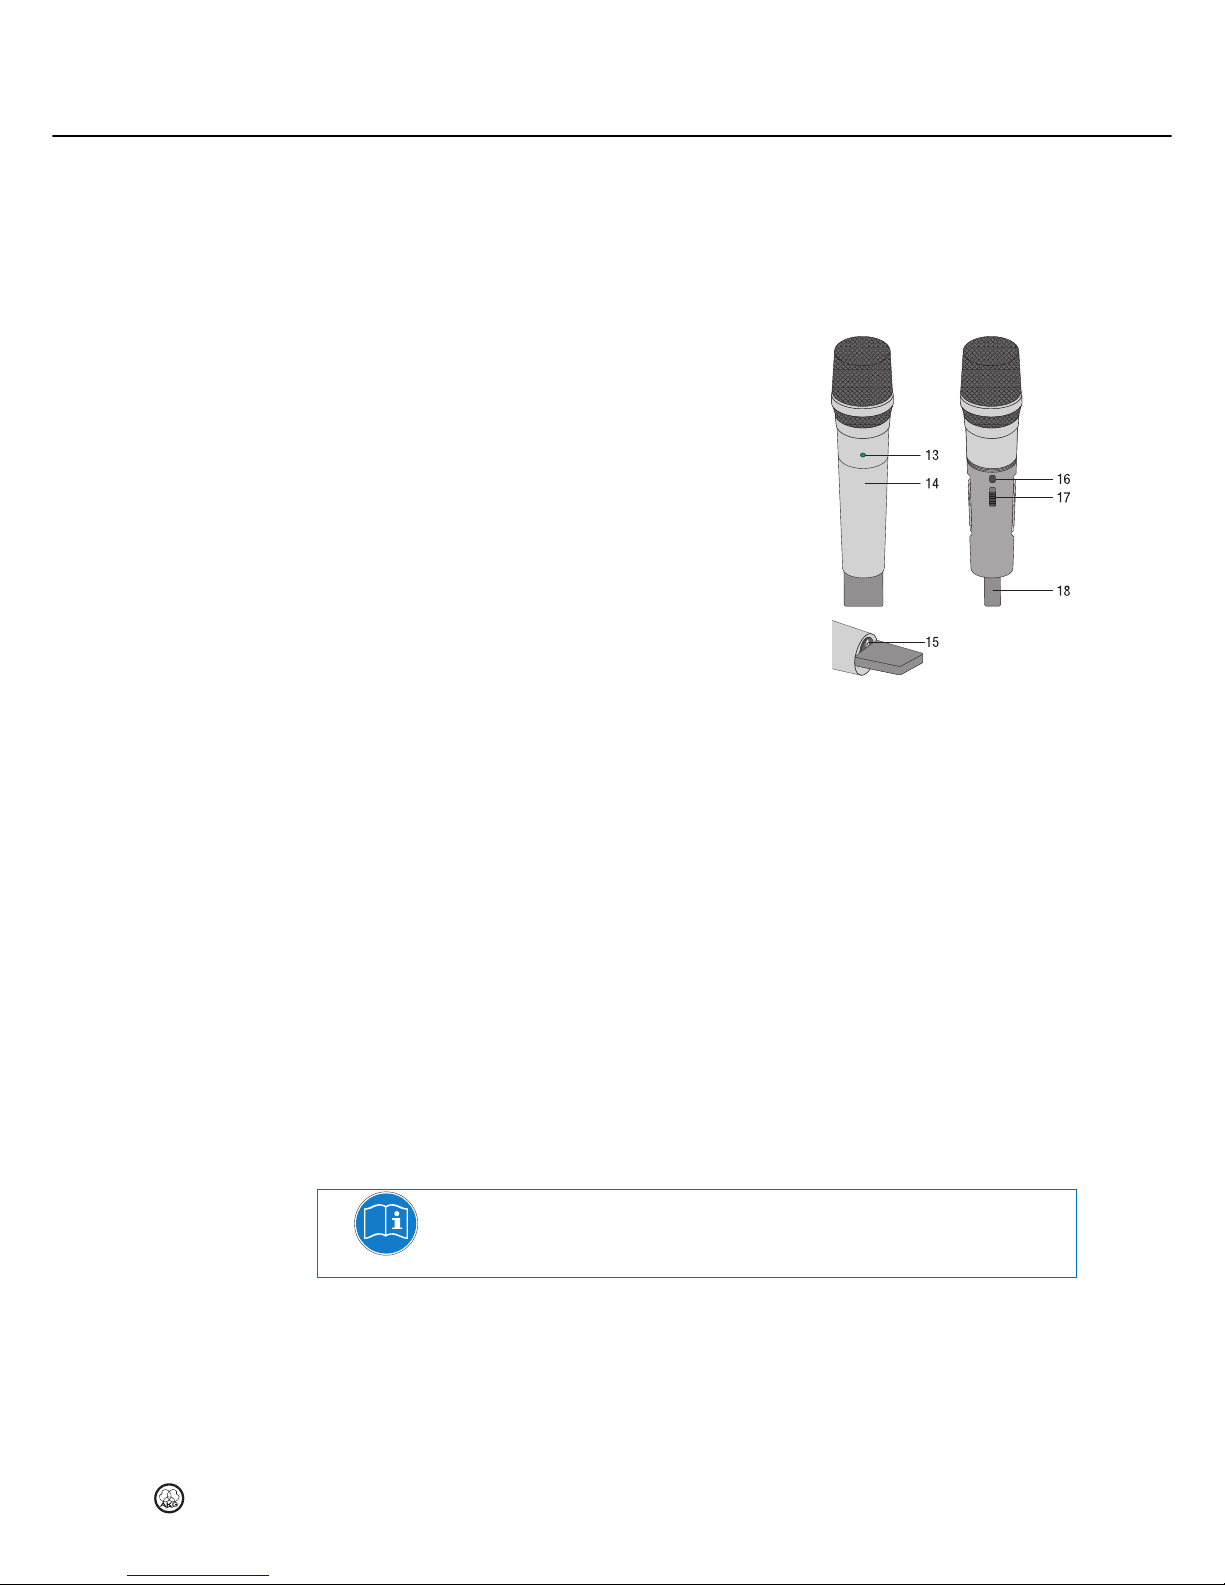
The DHT 70 handheld transmitter operates within the 2.4 GHz ISM frequency range. The
transmitter uses two antennas integrated within the housing.
The capsule in the transmitter is the patented dynamic AKG D5 capsule with its hypercardioid
directional characteristic. It provides low handling noise sensitivity, high gain before feedback
and brilliant sound quality, as well as a built-in wind and pop filter to reduce wind and breath
noise.
Controls
13 Status LED: Indicates the transmitter's
operating status.
LED lit green: The transmitter is
connected to the receiver
LED flashing green: No radio contact
between the transmitter and receiver
(receiver is OFF, power failure, outside
range, etc). The transmitter must be
connected to the receiver. After two
minutes without radio contact to the
receiver, the transmitter switches off
automatically.
LED lit red: From the moment the LED
changes to red, the battery capacity will
provide a maximum of one operating
hour. We recommend replacing the
batteries with new ones as soon as
possible.
14 Battery cover: See Inserting and testing batteries in the handheld transmitter
Inserting and testing batteries in the handheld transmitterInserting and testing batteries in the handheld transmitter
Inserting and testing batteries in the handheld transmitter
(see Page 33)
15 On/off button:
On: Power to the transmitter is on. The transmitter is ready for use as soon as it is
switched on.
Off (Digital Mute): Power to the transmitter is off.
16 Connect button: This button has two functions:
Press briefly: Check the assigned channel on the receiver
Press and hold down (approximately 2 seconds): Assign a free channel on the
receiver to this transmitter.
15 / 16 On/off / Connect button: Use the on/off (15) and Connect button (16) to assign this
transmitter to a free channel on the receiver.
17 GAIN switch: This slide switch allows you to set the audio input sensitivity of the
transmitter to one of two positions: "HI" = high input sensitivity, "LOW" = low input sensitivity.
18 Antenna section: The handheld transmitter has a digital diversity antenna system with two
antennas integrated within the housing.
NOTE
Do not hold the transmitter by the antenna section (18) as this will reduce the transmission
range.
DHT 70 handheld transmitter
Figure 3: Controls on DHT 70
transmitter
 Loading...