

Page 1

MICRO MUSIC SYSTEM
CDP-280
Operator's manual (E) 1~17
Page 2
BEFORE WE BEGIN
Thank you .......................
for purchasing this audio product. This is your assurance of quality, performance and
value.
Our engineers have included many useful and convenient features in this product. Please
be sure to read this Owner's Manual completely to make sure you ar e getting the maximum
benefit from each feature.
This product was manufactured using the highest quality components and standards of
workmanship. It was tested by inspectors and found to be in perfect working order before
it left our factory. However, there is always the chance that some problem may occur
because of rough handling during shipment to the retail store or to the final consumer.
If, after reading this Manual, you experience any problems with the operation of this
product, please refer to the instructions for obtaining services at the end of this Manual.
Once again, thanks for purchasing this audio product.
For future reference, record the serial number in the space provided.
Model No: CDP-280
Serial Number:
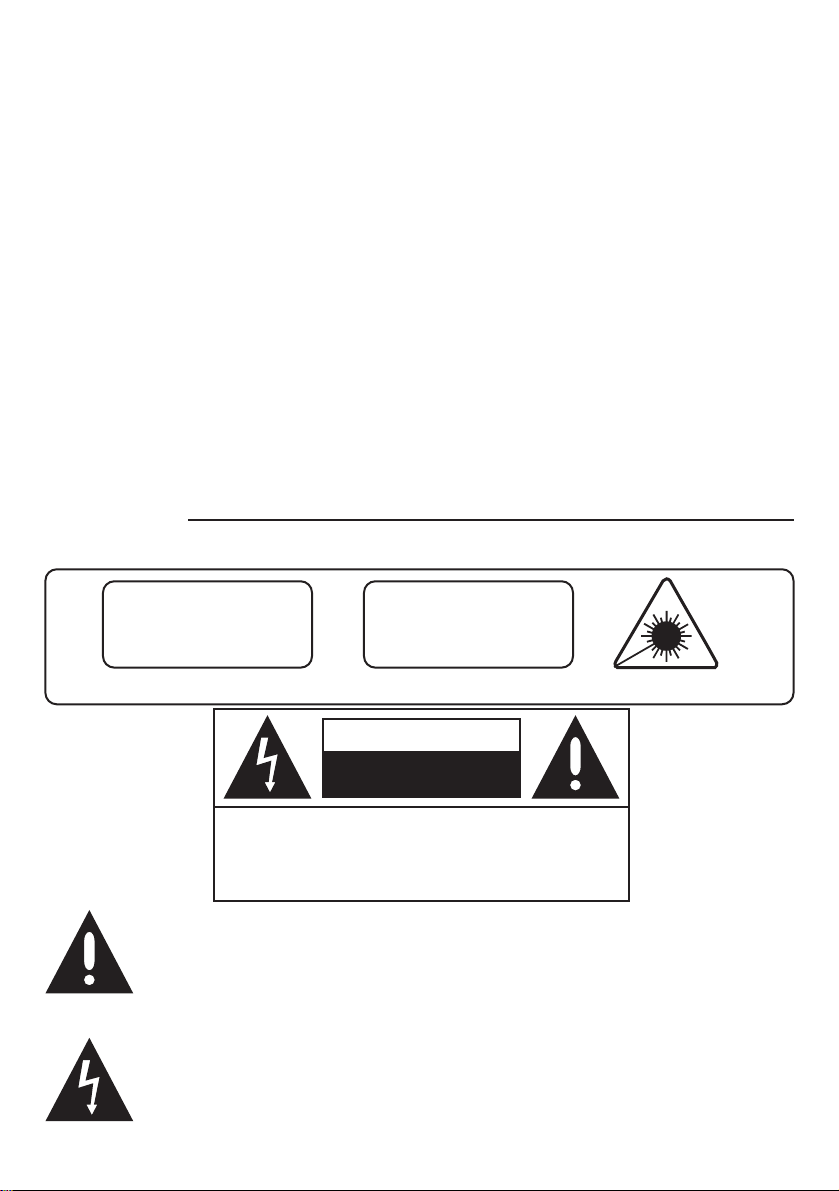
CLASS 1 LASER PRODUCT
CAUTION
CLASS 1 LASER PRODUCT
APPAREIL Á LASER DE CLASSE 1
PRODUCTO LAESR DE CLASE 1
INVISIBLE LASER RADIATION
WHEN OPEN AND INTERLOCKS
DEFEATED.
AVOID EXPOSURE TO BEAM.
This product contains a low power Laser Device.
CAUTION
RISK OF ELECTRIC SHOCK
DO NOT OPEN
CAUTION : TO REDUCE THE RISK OF ELECTRIC
SHOCK, DO NOT REMOVE COVER (OR BACK). NO
USER-SERVICEABLE PARTS INSIDE. REFER
SERVICING TO QUALIFIED SERVICE PERSONNEL.
DANGEROUS VOLTAGE
Uninsulated Dangerous Voltage, that may be of sufficient magnitude to
constitute a risk of electric shock to persons is present within this product's
enclosure.
ATTENTION
The Owner's Manual contains important operating and maintenance
instructions.
For your safety, it is necessary to refer to the manual.
E 1
Page 3

IMPORTANT NOTES
• Avoid installing this unit in places
exposed to direct sunlight or close to
heat radiating appliances such as electric
heaters, on top of other stereo equipment
that radiates heat, places lacking
ventilation or dusty areas, places subject
to constant vibration and/or humid or
moist areas.
• Do not attempt to clean this unit with
chemical solvents as this might damage
the finish. Use a clean dry cloth.
WARNING: TO PREVENT FIRE OR SHOCK HAZARD,
DO NOT EXPOSE THIS UNIT TO RAIN OR MOISTURE.
• Operate controls and switches as
described in the manual.
• Before turning on the power , make certain
that the connecting cords and power
cord are properly installed.
• Store your CDs in a cool area to avoid
damage from heat.
• When moving the set, be sure to first
disconnected the power cord and remove
cords connected to other equipment.
E 2
Page 4
PREPARATION FOR USE
UNPACKING AND SET-UP
• Carefully remove the unit from the carton and r emove all packing material from the unit.
• Remove any labels or stickers which may be on the front or top of the set, but do not
remove any labels from the back or bottom.
• We suggested that you retain the original carton and packing materials in case it ever
becomes necessary to return your unit for service. This is the only sure way to protect
the unit from damage in transit.
• If you do dispose of the carton and packing materials, please do so properly. We cares
about our environment.
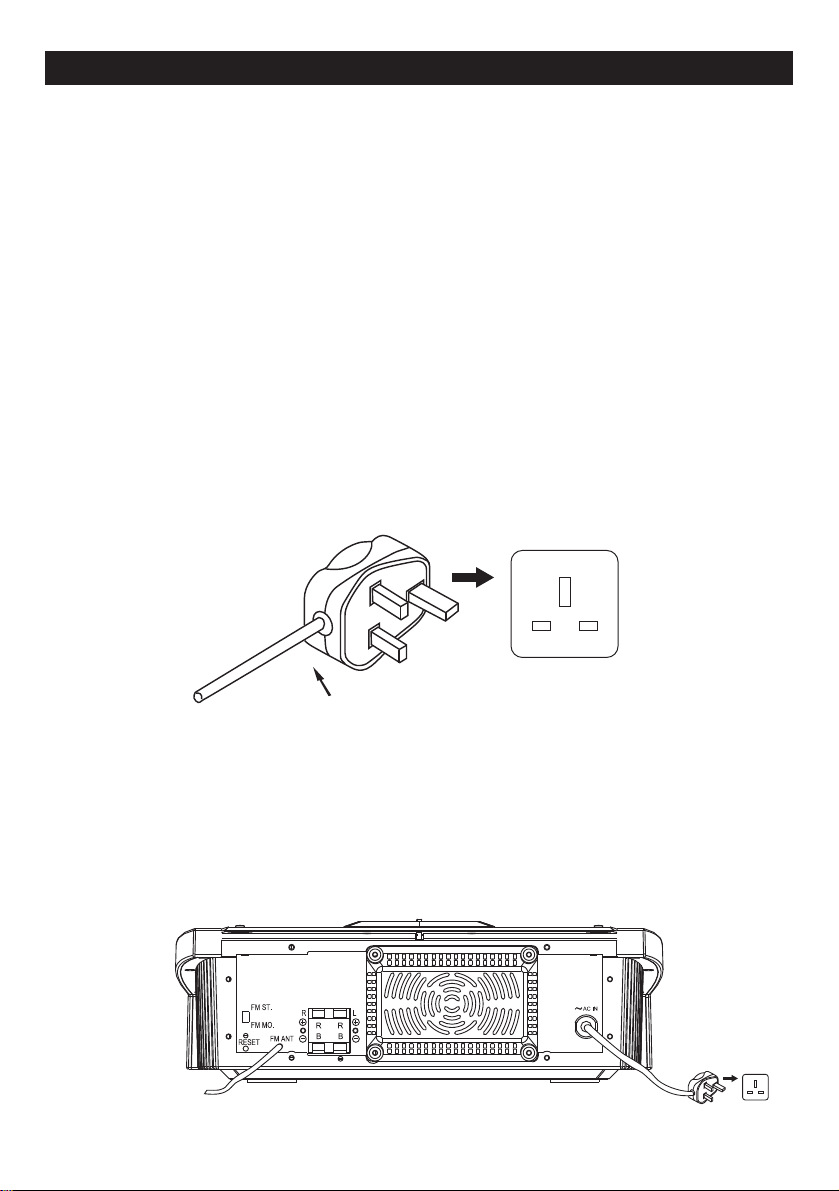
POWER SOURCE
This system is designed to operate on 230V 50Hz AC house current. Connecting this
system to any other power supply could result in damage to the unit which is not covered
by your warranty.
AC Plug
AC OPERATION
1. Unwind the AC Power cord completely.
2. Insert the plug into any convenient 230V 50Hz AC outlet.
SPEAKER 4 OHM
E 3
Page 5
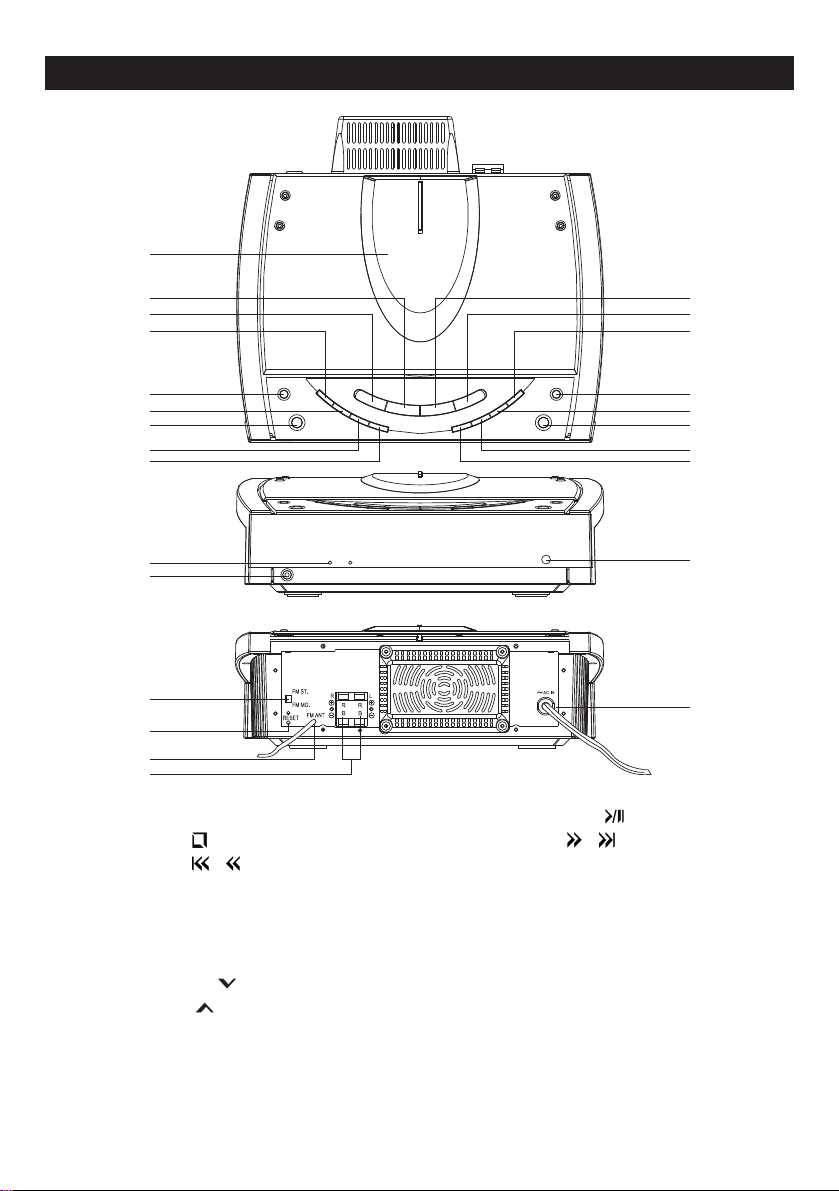
LOCATION OF CONTROLS
1
2
3
4
5
6
7
8
9
10
11
24
25
12
13
SPEAKER 4 OHM
1. CD Compartment.
2. Stop/Band Button
3. Skip Down
/ /Down Tuning Button
4. Program(Memory) / C-ADJ Button
5. EQ Button
6. Repeat / M-UP Button
7. Power On / Off Button
8. Volume Down Button
9. Volume Up Button
10. Standby / On Indicator
11. Phones Jack
12. FM Wire Antenna
13. Speakers Impedance R/L Socket
14. Play / Pause Button
15. Skip Up /
/ Up Tuning Button
16. CD Button
17. X-Bass Button
18. Tuner Button
19. Open Close Button
20. Timer / Sleep Button
21. Mode Button
22. Remote Sensor
23. AC Cord
24. FM ST.-MONO Switch
25. Reset Button
14
15
16
17
18
19
20
21
22
23
E 4
Page 6

REMOTE CONTROL
1. Direct Search Button
2. Mode Button
3. Intro Button
4. Tuning Down/CD Skip
5. CD Play/Pause
Button
1
Button
POWER
13
6. Repeat/Memory Up Button
7. CD Stop/Band Button
8. Timer Button
9. Function Button
10. Sleep Button
11. Snooze Button
12. Volume Up / Down Buttons
13. Power On/Off Button
14. Random Button
15. Tuning Up/CD Skip
Button
2
3
4
5
6
7
8
9
10
11
12
MODE INTRO RANDOM
REPEAT
BAND
M-UP
FUNCTION
TIME
SNOOZESLEEP
MUTE
MEMORY
C-ADJ
EQ
14
15
16
17
18
16. Program(Memory)/Clock Button
17. EQ Button
18. Mute Button
CDP-280
BATTERY INSTALLATION
Insert 2 pcs 'AA' (Alkaline) size batteries (not included) into the battery compartment of
the remote controller and close the cover.
BATTERY REPLACEMENT
When the batteries become too weak, the operating distance of the remote controller is
greatly reduced and you will need to replace the batteries.
NOTES:
• To maintain the accuracy and long life of the transmitter, do not press two or more
buttons simultaneously.
• If the remote control is not to be used for a long time, remove the batteries to prevent
possible damage through leaking batteries.
• Do not mix different types of batteries, or old batteries with new ones.
USING THE REMOTE CONTROLLER CORRECTLY
• Point the remote controller at the Remote Sensor.
• The functions of the buttons on the remote control are the same as the corresponding
controls on the main unit.
• When there is a strong ambient light source, the performance of the infrared Remote
Sensor may be degraded, causing unreliable operation.
• The maximum effective distance for remote control operation is about 15 feet.
E 5
Page 7

OPERATING INSTRUCTIONS
SPEAKER CONNECTION
Connect each speaker to the corresponding speaker terminals on the back panel of the
main unit. Make sure that the left speaker plug is connected to the left (L) speaker jack
and the right speaker plug is connected to the right (R) speaker jack.
SPEAKER 4 OHM
PRESET EQUALIZER
• This unit is equipped with a preset equalizer which has been added to enhance your
listening pleasure by altering the frequency response of the music.
• Press the Preset EQ button on main unit repeatedly to cycle through the following
equalization modes.
CLASSIC ROCK POP EQ OFF (FLAT)
REMARKS:
If there is any abnormal situation arise, press the RESET button at the rear cabinet. Then
the unit will be re-started and back to normal.
(All previous memories or programming will be deleted)
E 6
Page 8

X-Bass
Press X-Bass button to obtain the X-Bass effect as desired "X-Bass" indicator will light
"GREEN". Press this button again the "X-Bass" indicator will disappear and resume to
the normal sound effect.
Random
In CD mode, press "Random" button (on Remote), the display will show "Random" and
CD disc will play in random sequence immediately . Pr ess "Random" again, the "Random"
mark will disappear from display and CD disc will play in normal sequence. Press "Stop"
button to stop the CD.
FM ST.-Mono
In FM tuner mode, slide FM ST-MONO Switch to Mono will force the FM tuner into Mono,
this will reduce the noise in case of very week FM signal. Slide FM ST-MONO Switch back
to ST, FM tuner will in stereo mode.
SLEEP FUNCTION
You can set the unit to switch off after certain period of time as follows:
1. Press POWER to turn on the unit.
2. Press the SLEEP button. The display will show SLEEP and 90.
3. Keep pressing the SLEEP button to change the minute shown in display. You can set
the unit to switch off after 10-90 minutes.
4. Release the SLEEP button to take effect.
5. At any time, you can press SLEEP button the second time to cancel the sleep function.
LISTENING TO RADIO OPERATION
1. Press the POWER button to turn the unit 'ON'.The STANDBY/ON indicator lights'OFF'
and the LCD Backlights'ON'.
2. Select the Tuner function by pressing the TUNER button.
3. Select the desired band (AM or FM) with the BAND button.
4. T une to the desir ed radio station by pressing the UP TUNING or DOWN TUNING buttons
on the unit or on the remote control.
5. If you hold the UP TUNING or DOWN TUNING button for more than half a second the
Tuner will begin to automatically scan until a strong signal is found.
6. To turn off the radio, press the POWER button to switch the unit into standby mode.
The STANDBY/ON indicator lights 'RED'.
STORING PRESET STATIONS
1. Tuner either automatically or manually (as described in
steps 4 or 5 above) to the station to be stored.
2. Press the PROGRAM(Memory)/C-adj button once. "PROG"
will flash in the display for 5 seconds. During this time
you must select the desired memory location by pressing
the REPEAT/ M-UP button.
3. Press the PROGRAM(Memory) Button again to store the
station at that location.
4. The unit can store up to 10 FM stations, 10 AM stations.
E 7
Page 9

TUNING TO A PRESET STATION
Select the desired station preset number by pressing the REPEAT/M-UP button.
ANTENNA
For FM reception there is a built-in antenna wire at the rear of the unit. Unravel the wire
and move it around to obtain the best reception
CLOCK SETTING
1) Press the POWER button to turn the unit off standby.
2) Press and hold the memory button, the 24Hr will appear on the display. Press the
skip/search
or button. Once for select your suitable Hours for the clock.
3) Pr ess the MEMORY button ONCE. The Minutes segments
display "0". The Hour segments flash continuously.
4) Pr ess the Skip/Search
or button to select the desired
hour.
5) Pr ess the MEMOR Y button again and the minute segments
flash.
6) Pr ess the Skip/Search
or button to select the desired
minute.
7) Pr ess the MEMORY button once more. The flashing stops
and the time is set.
TO SET THE WAKE-UP TIMER
1) Press the POWER button to turn the unit off STANDBY.
TIMER
Press MODE button. The TIMER indicator appears on the
LCD and flashes. Press MEMORY button the hour segment
flashes.
2) Press the skip/search
3) Pr ess the MEMOR Y button again. The hour segment stops
or button to select the wake-up hour.
TIMER
flashing. The minute segment flashes.
4) Press the Skip/Search
or button to select to wake-
up minute.
5) Press the MEMORY button to conclude the setting process. Press MODE / REMAIN
button for Timer Check readout appears the times on the LCD.
6) Pr ess and hold the TIMER button once for timer operation. To disable timer operation
press and hold the TIMER button again. Timer on setting will still be kept in memory
for future occasions when timer operation is desired. (Press the TIMER button again
to activate.)
NOTE: The timer will turn on the function last used as follows:
• Previousty selected radio station
• CD-track 1
E 8
Page 10

NOTE:
• Clock time is only retained while the unit is plugged into the AC outlet. In the event of
a power failure the clock will need to be reset the power supply resumes.
• Clock time is only shown when unit is in Standby mode.
PLAYING COMPACT DISCS
LOADING AND UNLOADING COMPACT DISCS
1. Press the POWER button to turn the unit 'ON'.The STANDBY/ON indicator lights'OFF'
and the LCD Backlights'ON'.
2. Select the CD function by pressing the CD button.
3. Press the CD OPEN/CLOSE button to open the CD compartment.
4. When the disc compartment has opened, insert the disc with the label side facing up.
Push down in the center until disc is locked in place.
5. Close the disc compartment by pressing the CD OPEN/CLOSE button. When the
compartment is fully closed, the disc wills start turning automatically. The total number
of tracks and playing time will appear in the display.
6. The disc compartment may be opened at any time by first pressing the stop
button
and then pressing the CD OPEN/CLOSE button. Remove the CD only after the
compartment has fully opened and the disc has stopped spinning.
CAUTION
• Do not put anything except a compact disc into the compartment.
• Foreign objects can damage the mechanism.
• Keep the disc compartment closed when not in used to prevent dirt and dust from
entering the mechanism.
• Never place more than one disc into the disc compartment at any time.
• If the disc is correctly loaded, the total number of tracks on the disc will be displayed.
NOTES:
After the disc compartment is fully closed, the disc information may not appear on the
display. This means that the disc is improperly loaded (most likely it is upside down). To
check, open the disc compartment again and reload the disc.
The CD door may be can not closed, when turned power off during the CD door opened.
The CD door can be closed by turn the power on again.
CDRW PLAYBACK
This unit can play CD-RW disc
NOTE:
"CD-R/CD-RW play capability of this unit may vary depend on quality of media, CD burner
and application software"
E 9
Page 11

DISC PLAY
1. Insert a CD as described in the previous section and close the disc compartment.
2. The display will then show the total number of tracks and total play time.
3. Press the PLAY/PAUSE
button. Disc play will begin from the start of the first
track of the disc.
4. As each track on the CD disc is played, show in the display.
5. A particular track can be selected using either of the CD Skip
this is done before pressing the PLAY/PAUSE
the selected track when the PLAY/PAUSE
button, disc play will start with
button is pressed.
/
buttons. If
6. At the end of the disc, the unit will switch to stop mode.
NOTES:
• If the disc is deeply scratched, or too dirty, disc play may not start.
• If the disc is inserted incorrectly, or the disc is damaged the "no disc" indicator will
appear on display.
DISC ERRORS
• This compact disc player has built-in error compensation circuits to correct for minor
defects in a disc. There are limits, however, to the amount of correction available.
• In some cases, the CD player may skip some tracks, or parts of tracks, on a disc during
disc play . This problem may be caused by defects (such as scratches) in the disc being
played, which are too large for the error compensation cir cuits to handle. If you encounter
this problem, check the CD player's operation as follows, before having the until serviced:
Play a new disc. If the CD player operates normally, the skipping problem is probably
due to a defective disc.
E 10
Page 12

TO STOP A CD BEFORE THE DISC ENDS
1. Press the Stop button. Disc play will stop, and the display will show the total number
of tracks.
2. To temporarily stop disc play (Pause mode), press the PLAY/PAUSE
button. Disc
play will stop at the current play position. The display will flash.
3. To resume disc play, press the PLAY/PAUSE
button again.
Direct Search
Press the direct search buttons on the remote control to select the desired track. The
number of the selected track will be show on the CD display and begin to play. Press
+10 and the number buttons to select the tracks over 10.
TRACK SKIP
Starting disc play from the beginning of a particular track.
Press the Forward
or Reverse Skip Track buttons to select the desired track. The
number of the selected track will be shown on the CD display. Press the PLAY/PAUSE
button to start play.
To skip the next track.
For example, to skip ahead to the beginning of track 5 while trace 4 is playing.
1. Press the Forward
Skip track button once. Disc play will resume at the beginning
of track 5.
2. The CD player will skip ahead to the next track each time the Forward Skip track
button is pressed. Repeatedly pressing the Forward Skip track button makes the
CD player skip ahead through the disc track by track. Once the beginning of the last
track is reached the CD player advance to the first track.
E 11
Page 13

To skip to the previous track on a disc.
For example to skip back to the beginning of track 3 while track 4 is playing.
1. Press the Reverse Skip track button twice. Disc play will resume at the beginning
of track 3.
2. The CD player will skip back one track each time the Reverse Skip track button is
pressed. If this button is pressed in the middle of a track, the CD player will skip back
to the beginning of that track. To make if skip back to the previous track press the
Reverse Skip track button twice.
3. Repeatedly pressing the Reverse Skip track button makes the CD okayer skip back
through the disc track by track. Once the beginning of the first track is reached, the
CD player will go to the last track.
NOTES:
The Forward
and Reverse Skip track buttons can be used to select a desired track
to play before disc play starts. In this case the number of the selected track will be
displayed until the Play/Pause
button is pressed.
TRACK SEARCH
You can search through the track by holding the Forward or Reverse track skip
button down. Normal play will resume when the button is released.
Repeat disc play of one of the tracks
1. Select the desired track by pressing the Forward
or Reverse Skip track buttons.
The track will be shown in the display.
2. Press the REPEA T/M-UP button once. The "REPEAT" indicator
REPEAT
will flash in the display.
3. Press the PLAY/PAUSE
button.
4. The selected track will then begin playing through to its end. At which point it will
automatically return to the beginning of that track. This will continue until the Stop
button is pressed.
5. If the REPEA T/M-UP button is pr essed twice more, the "REPEAT" indicator will disappear
and, repeat play will end. Normal disc play will resume from that point.
6. When the last track has finished playing, the CD player will then Stop.
E 12
Page 14

REPEAT DISC PLAY
Use the REPEAT button to play an entire disc or one track continuously.
Repeat play of all tracks
1. Press the REPEAT/M-UP button twice. The "REPEAT"
indicator appears in the display.
REPEAT
2. Press the Play/Pause
button.
3. The disc will then begin playing through to the end of the last track. At which point it
will automatically return to the beginning of the first track. This will continue until the
Stop button is pressed.
4. If the REPEA T/M-UP button is pr essed once mor e, the "REPEAT" indicator will disappear
and repeat play will end. Normal disc play will resume from that point.
5. When the last track has finished playing, the CD play will Stop.
PROGRAMMED DISC PLAY
• It is possible to program the tracks you wish to play in a sequence of your choice. It
is not possible to enter program a disc during playback. Press the Stop button first,
then follow the instructions below.
• It is easier to use the remote control for the following settings, however, you may also
use the controls on the main unit if desired.
ENTERING A PROGRAM
1. Press the PROGRAM(Memory)/C-adj button. "PROG"
flashed and the following information will be display on
the display:
2. Select the first desired track using the Forward
Reverse
Skip Buttons.
and
3. Press the PROGRAM(Memory)/C-adj button. The first
program selection is now stored in the program memory.
The display will now show:
4. Select the next desired track using the Forward and Reverse
Skip Buttons.
5. Press the PROGRAM(Memory)/C-adj button. Continue entering tracks in this way
until all the desired tracks are stored (up to 20 tracks).
E 13
Page 15

NOTES:
• If the PLAY/PAUSE
button is pressed before the PROGRAM(Memory)/C-adj button
is pressed to store a track, the track will not be programmed, and the disc will start
playing from the first selected track.
• Any track can be programmed to play more than once.
• Repeatedly pressing the PROGRAM(Memory)/C-adj button will enable you to check
the program if required.
LISTENING TO PROGRAMMED TRACKS
1. Enter all tracks you want to program into memory following the procedures above.
2. Press the PLAY/PAUSE
button. Disc play will start at the beginning of the first
programmed track. "PROG" indicator appears on the display display.
TO CLEAR THE PROGRAM MEMORY
• press PROGRAM(Memory)/C-adj button to enter programming mode, then press the
Stop
button.
• The program memory will also be cleared if the disc compartment is opened, if the
function is changed, or if the power is turned "OFF".
MUTE
• Press the MUTE button on the remote control to switch off the sound, the MUTE
indicator will appear.
• Press MUTE button again to restore the sound to the previous level.
STEREO HEADPHONE JACK
For private listening without disturbing others connect a set of stereo headphones (not
included) to the PHONES Jack on the front panel. The built-in speakers automatically
shut off when stereo headphones are connected to the headphone jack. When using
stereo headphones always start with the volume control set to a low level and gradually
increase until you find the desired level.
E 14
Page 16

CARE AND MAINTENANCE
COMPACT DISC CARE
• To remove a disc from its storage case, press down on the centre of the case and lift
the disc outs, holding if carefully by the edges.
• Fingerprints and dust should be carefully wiped off the disc's recorded surface with a
soft cloth. Unlike conventional records, compact discs have no grooves to collect dust
and microscopic debris, so gently wiping with a soft cloth should remove most particles.
Wipe in a straight line from the inside to the outside of the disc. Small dust particles
and light stains will have absolutely no effect on reproduction quality.
• Clean the disc periodically with a soft, lint-free, dry cloth. Never use detergents or
abrasive cleaners to clean the disc. If necessary, use a CD cleaning it.
• Never write on or affix labels to the surface of compact discs.
CARE OF THE CABINETS
• If the cabinets become dusty wipe them with a soft dust cloth. Do not use any wax or
polish sprays on the cabinets.
• If the front panel becomes dirty or smudged with fingerprints it may be cleaned with
a soft cloth slightly dampened with a mild soap and water solution. Never use abrasive
cloths or polished as these will mar the finish of your unit.
CAUTION:
Never allow any water or other liquids to get inside the unit while cleaning.
E 15
Page 17

TROUBLESHOOTING GUIDE
Should this unit exhibit a problem, check the following before seeking service.
Symptom
Radio
Noise or sound distorted
on AM or FM
broadcasts.
FM STEREO indicator
does not light.
AM or FM, no sound.
Compact Disc Player
CD Player will not play.
CD skips while playing.
Possible Cause
Station not tuned properly for
AM or FM.
FM: Wire antenna is not
extended.
AM: The bar antenna is not
positioned correctly.
FM station is mono or station
signal is weak.
Function is not set to Tuner.
Volume at minimum.
Function is not set to CD.
CD is not installed or installed
incorrectly.
Disc is dirty or scratched.
Solution
Retune the AM or FM
broadcast station.
Extend FM Wire antenna.
Reposition the unit best
reception is obtained.
Extend FM Wire antenna. Try
other strong stations.
Press TUNER button to select
Tuner function.
Increase Volume.
Press CD button to select CD
function.
Insert CD with label side up.
Wipe disc with cloth or use
another disc.
Remarks:
If there is any abnormal situation arise, press the RESET button at the bottom cabinet.
Then the unit will be re-started and back to normal. (All previons memories or programming
will be deleted)
E 16
Page 18

Model : CDP-280
Specification
Main Unit
FM tuner section
Tuning range 87.5 MHz to 108 MHz (50 KHz Step)
Usable sensitivity (30 dB S/N) 26 dBµ
Antenna terminals Antenna Wire
MW tuner section
Tuning range 522 KHz to 1620 KHz (9 KHz Step)
Usable sensitivity 1500 µV /M
Antenna Ferrite Bar
Amplifier section
Power Output 12.5 Watt (4 ohms)
Output PHONES (Stereo mini jack) : accepts
Compact disc player section
Laser Semiconductor laser (760 ~ 800 mm)
D-A converter 1 bit dual
Signal -to -noise ratio 60 dB (1 KHz, 0 dB)
Harmonic distortion 0.3% (1 KHz, 0 dB)
Wow and flutter Immeasurable
General
Power requirements 230VAC, 50Hz
Power consumption 35W
Standby power consumption 8W
Dimensions of main unit 295 (W) x 95 (H) x 265 (D) mm
Weight of main unit 3.5 Kg
Headphones of 32 ohms or more
Speaker system
Cabinet type
Speakers 2 Way bass reflex
Tweeter:
Impedance 4 ohms 15W
Specifications and external appearance are subject to change without notice.
4 ohms
E 17
Page 19

 Loading...