

Page 1

INTRODUCTION ................................................................ .......................................................... 1
FEATURES ................................................................ .................................................... 2
ABOUT THIS MANUAL .................................................................................................. 5
FRONT PANEL ................................................................ .............................................. 6
TAKING CARE OF YOUR DISKS ................................................................ ................... 8
REAR PANEL ................................................................ ................................................. 9
SETTING UP THE S3000XL ................................................................ .......................... 11
CONNECTIONS.............................................................................................................. 11
LOADING THE DEMO FLOPPY DISKS.......................................................................... 12
MOUNTING THE S3000XL ................................................................ ............................. 13
GETTING AROUND THE S3000XL ................................................................................ 14
OPERATING MODES ....................................................................................... 14
SOFT KEYS ..................................................................................................... 14
SELECTING PARAMETERS AND ENTERING DATA ........................................ 15
MARK AND JUMP KEYS .................................................................................. 16
NAMING FILES - THE NAME KEY .................................................................... 17
THE ENT/PLAY KEY ........................................................................................ 17
LCD CONTRAST ............................................................................................................ 17
RECORD LEVEL, MAIN VOLUME, HEADPHONE OUTPUT ............................................ 18
HOW THE S3000XL WORKS ........................................................................................ 19
S3000XL FLOWCHART ................................................................................................. 20
SINGLE MODE ........................................................................................................................... 23
MULTI MODE - COMBINING SEVERAL PROGRAMS ................................................................. 37
SELECTING PROGRAMS .............................................................................................. 23
VIEWING PROGRAMS ................................................................ .................................. 24
SETTING PROGRAM LEVELS, PAN, FX SENDS .......................................................... 24
SETTING PROGRAMS’ MIDI PARAMETERS ................................................................. 25
SETTING PROGRAM LOUDNESS AND VELOCITY ....................................................... 26
LOADING FROM FLOPPY DISK ................................................................ .................... 28
LOADING FROM HARD DISK ................................................................ ........................ 28
DELETING PROGRAMS................................................................................................ 30
RENUMBERING PROGRAMS........................................................................................ 32
USING THE S3000XL IN ‘OLD AKAI’ MODE! ................................................................. 33
USING SELECT PROG - PROGRAMS WITH THE SAME NUMBER .................. 33
LAYERING PROGRAMS ................................................................................... 33
CREATING KEYBOARD SPLITS ................................................................ ...... 33
USING RENUMBERING TO CREATE MULTI-TIMBRAL SETUPS ..................... 34
SINGLE VS MULTI ........................................................................................... 35
ASSIGNING PROGRAMS TO PARTS ............................................................................ 38
SETTING A PART’S MIDI CHANNEL .............................................................................. 38
MIXING THE PARTS ................................................................ ...................................... 38
SENDING PARTS TO THE INTERNAL EFFECTS ........................................................... 38
ASSIGNING PARTS TO THE INDIVIDUAL OUTPUTS .................................................... 39
TUNING AND TRANSPOSING PARTS ........................................................................... 39
SETTING A PART’S LOW AND HIGH KEYRANGES ...................................................... 39
SETTING A PART’S PRIORITY ...................................................................................... 40
INITIALISING A PART.................................................................................................... 40
SETTING UP A MULTI ................................................................................................... 41
MODIFYING THE MULTI ................................................................ ................................ 42
NAMING A MULTI .......................................................................................................... 43
SAVING A MULTI .......................................................................................................... 43
LOADING A MULTI ........................................................................................................ 43
RENUMBERING PROGRAMS........................................................................................ 44
USING MULTI MODE FOR LAYERING PROGRAMS ...................................................... 47
USING MULTI MODE TO SET KEYBOARD SPLITS ...................................................... 48
PROGRAM EDITING ................................................................................................................... 50
WHAT IS A KEYGROUP? .............................................................................................. 51
KEYGROUP ZONES ...................................................................................................... 52
OVERLAPPING AND CROSSFADING KEYGROUPS..................................................... 53
ASSIGNABLE PROGRAM MODULATION ...................................................................... 54
Page 2

EDIT SINGLE................................................................................................................. 58
NAMING PROGRAMS - COPYING AND RENAMING ...................................................... 59
DELETING PROGRAMS................................................................................................ 60
MIDI PAGE .................................................................................................................... 64
OUTPUT LEVELS PAGE................................................................................................ 66
PAN PAGE ................................................................ .................................................... 69
THE TUNE PAGE ........................................................................................................... 71
MODULATION PAGES .................................................................................................. 72
KEYGROUP PARAMETERS - CREATING KEYGROUPS ............................................... 85
ASSIGNING SAMPLES TO KEYGROUPS AND ZONES - SMP1 .................................... 90
THE FILTERS ................................................................................................................. 96
ENV1 - SHAPING AMPLITUDE ...................................................................................... 99
ENV2 - SHAPING THE FILTER................................................................ ....................... 101
THE SECOND FILTERS ................................................................................................. 103
ENV3............................................................................................................................. 111
KEYGROUP PITCH/AMPLITUDE MODULATION ............................................................ 112
PITCH BEND ................................................................ .................................... 72
LFO1................................................................................................................ 74
SETTING LFO1 MODULATION DEPTH ............................................................ 77
LFO2................................................................................................................ 78
SETTING UP THE SOFT PEDAL ................................................................ ...... 81
PORTAMENTO ................................................................................................. 82
MAPPING OUT YOUR KEYGROUPS - SETTING KEYSPAN ............................ 88
SMP2............................................................................................................... 93
SMP3............................................................................................................... 95
USING THE FILTER AND ENVELOPE GENERATORS ..................................... 102
CREATING 24db/8ve 4-POLE LOWPASS FILTER ............................................ 107
THE TONE PAGE ................................................................ ............................. 109
EDIT MULTI ................................................................................................................................. 114
SAMPLE MODE .......................................................................................................................... 116
EDIT SAMPLE ............................................................................................................................ 125
SCREEN DIFFERENCES IN EDIT MULTI ................................................................ ....... 115
WHAT IS SAMPLING? ................................................................................................... 116
RECORD MODE ............................................................................................................ 118
THE MAIN RECORD PAGE ................................................................ ............................ 120
NAMING SAMPLES FOR RECORDING ......................................................................... 120
ADJUSTING THE RECORDING AND THRESHOLD LEVELS .......................................... 122
RECORDING ON THE S3000XL ................................................................ .................... 122
DIGITAL RECORDING................................................................ .................................... 123
NAMING SAMPLES - COPYING AND RENAMING ......................................................... 127
DELETING SAMPLES .................................................................................................... 128
TRIMMING SAMPLES ................................................................ ................................... 129
LOOPING....................................................................................................................... 133
LOOP AUTO FIND AND CROSSFADE LOOPING ........................................................... 134
MAKING A GOOD LOOP ................................................................ .................. 136
LEVEL NORMALISATION ................................................................ .............................. 138
DSP FUNCTIONS - TIMESTRETCH, RE-SAMPLING AND EQ........................................ 139
TIMESTRETCH ................................................................................................. 139
PERFORMING A TIMESTRETCH ................................................................ ...... 142
RE-SAMPLING ................................................................................................. 143
PERFORMING A RE-SAMPLE ......................................................................... 144
EQ.................................................................................................................... 145
EQ’ING A SAMPLE .......................................................................................... 147
USING THE EQ ................................................................................................ 147
FURTHER EDITING FUNCTIONS ................................................................ ................... 148
THE PARAMETER PAGE ................................................................................. 148
REVERSING SAMPLES ................................................................................... 150
SECTIONAL EDITING ....................................................................................... 151
THE JOIN PAGE ................................................................ ............................... 154
SPLICING SAMPLES ....................................................................................... 154
Page 3

CROSSFADING ................................................................................................ 155
MIXING AND LAYERING SAMPLES ................................................................ 155
SETTING DIGITAL FADES ................................................................ ................ 157
EFFECTS MODE ......................................................................................................................... 159
EFFECTS EDIT ................................................................ ........................................................... 173
ORGANISATION OF EFFECTS FILES ........................................................................... 162
ASSIGNING EFFECTS TO SINGLE PROGRAMS .......................................................... 163
ASSIGNING EFFECTS TO MULTI PARTS ................................................................ ...... 165
ASSIGNING EFFECTS TO INDIVIDUAL KEYGROUPS .................................................. 167
PROCESSING EXTERNAL SOUND SOURCES THROUGH THE EFFECTS .................... 168
ROUTING EXTERNAL SOUNDS THROUGH THE EFFECTS........................................... 169
SELECTING THE EFFECTS OUTPUT ............................................................................ 169
CHAINING EFFECTS ................................................................ ..................................... 170
MUTING EFFECTS ................................................................ ........................................ 172
DISTORTION/RING MODULATION ................................................................ ................ 174
EQ ................................................................................................................................. 175
MODULATION EFFECTS ............................................................................................... 177
CHORUS, PHASE SHIFT AND FLANGING EFFECTS ....................................... 177
ROTARY SPEAKER EFFECTS ......................................................................... 179
AUTOPAN AND FREQUENCY MODULATION EFFECTS .................................. 182
STEREO PITCH SHIFT EFFECTS................................................................ ..... 183
BYPASSING THE MODULATION EFFECTS ..................................................... 185
DELAY AND ECHO EFFECTS ........................................................................................ 186
MONO DELAY/ECHO EFFECTS ................................................................ ....... 188
PING PONG ECHO EFFECTS ................................................................ .......... 189
CROSSOVER DELAY ....................................................................................... 190
STEREO DELAY/ECHO EFFECTS ................................................................. .. 191
REVERB EFFECTS ........................................................................................................ 192
REVERSE REVERB ................................................................ .......................... 195
GATED REVERB .............................................................................................. 196
EFFECTS OUTPUT SECTION ................................................................ ........................ 198
EFFECTS DIRECTION................................................................ .................................... 199
SOLOING THE CURRENT EFFECT ................................................................................ 201
COPYING EFFECTS...................................................................................................... 202
SAVE MODE ............................................................................................................................... 204
LOAD MODE ............................................................................................................................... 216
SELECTING FLOPPY OR HARD DISK ........................................................................... 204
SELECTING THE HARD DISK PARTITION ..................................................................... 204
SELECTING THE HARD DISK VOLUME........................................................................ 204
SELECTING THE TYPE OF SAVE ................................................................ ................. 204
SAVING TO FLOPPY DISK ................................................................ ............................ 206
SAVING TO HARD DISK ................................................................................................ 207
RENAMING FILES......................................................................................................... 209
DELETING ITEMS FROM DISK ................................................................ ..................... 210
HARD DISK CONTROL .................................................................................................. 211
FORMATTING A FLOPPY DISK ..................................................................................... 212
FORMATTING A HARD DISK ......................................................................................... 214
NOTES ON USING EXISTING S1000/S1100 SOUND LIBRARY..................................... 215
SELECTING FLOPPY OR HARD DISK ........................................................................... 216
SELECTING THE HARD DISK PARTITION ..................................................................... 216
SELECTING THE HARD DISK VOLUME........................................................................ 217
SELECTING THE TYPE OF LOAD ................................................................ ................. 217
LOADING FROM FLOPPY DISK ................................................................ .................... 219
LOADING FROM HARD DISK ................................................................ ........................ 220
LOADING S900/S950 SAMPLES AND PROGRAMS ...................................................... 222
LOADING S1000/S1100 DATA ................................................................ ...................... 222
AUTO LOADING FROM DISK ................................................................ ........................ 222
SEARCHING FOR FILES - USING THE FIND FUNCTION ............................................... 223
USING THE TAG DIRECTORY SYSTEM ................................................................ ........ 225
Page 4

NAMING TAGS................................................................................................. 226
HARD DISK CONTROL .................................................................................................. 228
IMPORTING SOUNDS FROM OTHER MANUFACTURER’S CD-ROMS ........................... 229
NOTES ON USING THE TAGGING SYSTEM .................................................... 227
GLOBAL MODE .......................................................................................................................... 231
TUNING THE S3000XL .................................................................................................. 231
SETTING THE MASTER OUTPUT LEVEL...................................................................... 231
MIDI FUNCTIONS ................................................................ .......................................... 232
MIDI FILTER ..................................................................................................... 232
PPM PAGE - MONITORING MIDI..................................................................... 233
MIDI RECEIVE PAGE - ANALYSING MIDI ........................................................ 233
TRANSMIT TEST PAGE - SETTING THE ENT/PLAY KEY ................................ 234
MIDI SAMPLE DUMPS ..................................................................................... 235
PERFORMING A MIDI SAMPLE DUMP ............................................................ 236
MIDI VIA SCSI .................................................................................................. 237
ME35T DRUM SETTINGS.............................................................................................. 238
DAT BACK-UP AND RESTORE ...................................................................................... 240
PERFORMING A DAT BACK UP....................................................................... 241
PERFORMING A DAT RESTORE ...................................................................... 241
STANDARD MIDI FILE - MIDI SONG FILE PLAY ............................................................ 242
LOADING STANDARD MIDI FILES ................................................................. .. 243
USING THE SMF FUNCTION ............................................................................ 244
HARD DISK RECORDING ................................................................ .............................. 245
APPLICATIONS................................................................................................ 245
FORMATTING THE HARD DISK FOR DISK RECORDING ................................. 246
CREATING NEW TAKES .................................................................................. 251
COPYING TAKES............................................................................................. 251
RENAMING TAKES .......................................................................................... 251
DELETING TAKES FROM DISK ................................................................ ....... 251
RECORDING A TAKE ....................................................................................... 255
EDITING A RECORDING................................................................ ................... 258
PLAYING A TAKE IN THE EDIT PAGE ............................................................. 259
USING THE EDITING FUNCTIONS ................................................................ ... 259
PLAYING TAKES ............................................................................................. 261
USING THE PLAY PAGE ................................................................ .................. 263
EDITING A TAKE FOR SYNCHRONISED PLAYBACK ...................................... 264
NOTES ABOUT SYNCHRONISING TO EXTERNAL AUDIO............................... 264
USING THE SONG MODE ................................................................ ................ 265
CREATING A SONG ......................................................................................... 265
TRIGGERING TAKES FROM MIDI .................................................................... 268
USING MIDI TRIGGERING ................................................................................ 268
USING THE SONG MODE TO CHAIN TAKES................................................... 271
USING THE NUMERIC KEYPAD IN THE SONG MODE..................................... 272
BLOCK EDITING IN SONG MODE ................................................................ .... 273
NAMING SONGS .............................................................................................. 275
SAVING A SONG ................................................................ ............................. 275
LOADING A SONG ................................................................ ........................... 275
BACKING UP TAKES TO DAT .......................................................................... 276
RESTORING TAKES BACK FROM DAT TO DISK ............................................. 277
Page 5

APPENDIX 1 ............................................................................................................................... 279
CONNECTING AN EXTERNAL HARD DISK DRIVE ......................................................... 279
NOTES ON USING HARD DISK DRIVES................................................................ ........ 279
SCSI CABLES.................................................................................................. 279
TERMINATION ................................................................................................. 279
SCSI CABLE LENGTH ................................................................ ...................... 280
APPENDIX 2 ............................................................................................................................... 281
APPENDIX 3 ............................................................................................................................... 283
APPENDIX 4 ............................................................................................................................... 285
APPENDIX 5 ............................................................................................................................... 301
DATA COMPATIBILITY ISSUES .................................................................................... 281
SOUND DATA................................................................ ................................... 281
EFFECTS FILES ................................................................ ............................... 282
MULTIS............................................................................................................ 282
ME-35T DRUM SETTINGS ................................................................ ................ 282
SONGS AND QLISTS ....................................................................................... 282
INSTALLING THE OPTIONS ................................................................ .......................... 283
INSTALLING MEMORY EXPANSION............................................................... 283
USING THE FXM008 FLASH ROM BOARD(S) ............................................................... 285
APPLICATIONS............................................................................................................. 286
HOW THE FLASHROM WORKS ................................................................ .................... 287
SAVING DATA TO THE FLASHROM .............................................................................. 288
WHAT TO DO NEXT ....................................................................................................... 291
USING THE FLASHROM AS A FAST HARD DISK.......................................................... 292
EDITING SOUNDS ON THE FLASHROM ................................................................ ....... 293
COPYING A FLASHROM SAMPLE TO RAM ................................................................ . 294
FORMATTING AND ARRANGING THE FLASHROM ....................................................... 295
SAVING FLASHROM DATA BACK TO DISK .................................................................. 297
BACKUP/RESTORE OF THE FLASH ROM TO/FROM DAT ............................................ 297
INSTALLING THE FLASHROM ................................................................ ....................... 298
MIDI CONTROLLER LIST ................................................................ .............................. 301
Page 6

Page 7

INTRODUCTION
Welcome to the Akai S3000XL stereo digital sampler and thank you for buying it!
The S3000XL features 32-voice polyphony, expandable memory, DSP functions, etc.,
and using the S3000XL’s resonant lowpass filters, multiple LFOs, envelope generators
and extensive modulation possibilities, your new sampler can double as a first class
synthesiser as well.
Certain new functions are introduced in the S3000XL In software, the new MULTI mode
of operation simplifies multi-timbral sequencing and layering whilst hardware options
include a multi-effects processor that offers no less than four channels that include two
multi-effects channels with distortion, EQ, ring modulation, modulation effects such as
chorus, flanging, pitch shifting, auto panning and rotary speaker effects plus delay and
reverb. Two ‘spare’ channels of reverb are also available providing a total of four reverbs.
Add to this the second bank of optional resonant multi-mode filters and you can see that
the S3000XL is a sampler that can grow with your needs.
Bundled with the S3000XL is a software application for the Macintosh™ computer that
allows you to operate the sampler from your Macintosh allowing large screen operation of
waveform and program editing, sophisticated organisation of your sound library on the
Macintosh as well as the ability to integrate your sampler more conveniently with your
computer sequencer.
Naturally, all sound library developed for the Akai S900, S950, S1000, S1100, S2000 and
the S3000 range of samplers is compatible in the S3000XL giving you access to
thousands of sounds on floppy disk, hard disk, removable cartridges, MO disks and CDROM. The ability to read CD ROMs made for other manufacturer's samplers gives access
to an even further range of sounds.
All this adds up to a price breakthrough in sampling technology - the new Akai S3000XL.
S3000XL Operator’s Manual Page 1
Page 8

INTRODUCTION
FEATURES
• Polyphony 32 voices
• A-D Conversion 16-bit stereo with 64-times oversampling
• Internal processing 28-bit accumulation
• D-A Conversion 18-bit with 8-times oversampling
• Sampling rates 44.1kHz/22.050kHz
• Phase locked stereo sampling and playback
• Internal memory 2Mbytes standard, expandable to 32Mbytes using SIMMs
• Sampling times 2Mbytes 24 seconds mono @ 44.1kHz
• Inputs L/Mono and R jack inputs
• Outputs L/R stereo jack outputs
32Mbytes 5.94 minutes mono @ 44.1kHz
(Halve these times for stereo sampling)
8 assignable individual outputs
Stereo headphone jack output
• Display 40 x 6 character backlit LCD with graphic waveform editing.
• Digital I/O SPDIF digital audio input/output on RCA phonos.
• Effects Optional 4-channel multi-effects processor offering two
channels of simultaneous distortion, three-band EQ, ring
modulation, modulation (chorus, phase shift, flanging,
pitch shift, autopan or rotary speaker), stereo delay and
reverb plus two ‘spare’ channels of reverb (four reverb
processors in total).
• DSP Functions Timestretch, re-sampling and digital EQ.
• Filters 2-pole (12dB/Octave) resonant lowpass per voice.
Optional IB304F offers a 2nd bank of 2-pole resonant
multi-mode (HP, BP, LP, EQ) filters and tone control.
• Envelopes 1 x ADSR and 1 x multi-stage envelope generator (an
extra multi-stage envelope is added with the installation of
the IB304F).
• LFOs 2 x multi-wave low frequency oscillators (triangle, square,
sawtooth and random waves).
• Legato mode Single trigger playback to emulate old monophonic synths
and solo instruments’ playing styles.
• Portamento Polyphonic and monophonic portamento.
• Sound library Fully compatible with Akai S900, S950, S1000, S1100,
S2800, S3000, S3200, S2000 and S3200XL samplers.
Page 2 S3000XL Operator’s Manual
Page 9

INTRODUCTION
The S3000XL can also read CD-ROMs made for other
manufacturer's samplers1.
• Data storage A variety of storage devices may be used to store data
including floppy disk, hard disk, Syquest™ removable
cartridges and Magneto Optical (MO) disks. Hard disk data
may be backed up to a normal DAT tape using the digital
i/o.
• Flash ROM You may install up to 16Mbytes of FLASH ROM over and
above the 32Mbytes of ordinary RAM giving you a total of
48Mbytes of memory. FLASH ROM allows you to keep
your favourite sounds in memory even when the sampler is
switched off.
• Disk recording Capable of stereo recording and editing on hard disk.
• SMF capability The S3000XL an play Standard MIDI files (sequences)
from the floppy disk drive. This allows you, for example, to
play sequenced backing tracks directly from the S3000XL.
• DAT Backup You can backup the hard disk (sound data and/or disk
recordings) to an ordinary DAT recorder.
• Real-time digital output This digital audio output can be used to mix down digitally
to DAT or any other digital recorder such as DCC, MiniDisk
or a hard disk recorder such as the Akai DR4d, DR8 or
even the S3000XL’s disk recorder. With the optional EB16
multi-effects processor installed, you may add four
channels of effects processing to the mixdown.
• OPERATING MODES
SING LE For playing single programs.
MULTI For playing up to 16 programs together for multi-timbral
sequencing, layering and key splits.
SAMPLE For making recordings.
EFFECTS For selecting effects.
EDIT For editing programs, samples and effects.
GLOBAL For setting parameters that affect the sampler as a whole
plus access to utilities such as DAT backup, MIDI song file
play and hard disk recording
SAVE For saving programs, samples, multis, effects and
operating systems, etc., to floppy or hard disk.
LOAD For loading programs, samples, multis, effects, operating
systems, etc., from floppy or hard disk and CD-ROM.
1 Some sounds may need adjustment and ‘tweaking’ depending on the sampler they were
originally created on.
S3000XL Operator’s Manual Page 3
Page 10

INTRODUCTION
• EDITING FEATURES
EDIT SAMPLE Trim, Loop (with FIND and CROSSFADE functions), Join,
EDIT PROGRAM Resonant lowpass filters, ADSR envelope generator (with
MULTI Part select, program select, MIDI channel, level, pan,
EFFECTS In the two multi-effects channels (with the EB16 effects
Merge, Splice, Chop, Extract, Reverse, Gain normalisation,
Timestretch, Re-sample.
templates), multi-stage envelope generator (with
templates), 2 x multi-wave LFOs, sample layering, 4-way
velocity crossfade and switching, keygroup crossfade,
portamento (rate and time modes), monophonic legato
triggering, mute group function, panning and autopanning,
held pitchbend mode, separate pitchbend up/down
ranges, output selection. (With 2nd filter bank installed, a
further set of multi-mode filters and a third multi-stage
envelope generator are added).
transpose, fine tune, output routing, FX routing, FX send,
low key range, high key range, note priority.
processor installed):
DISTORTION - distortion, level
EQ - low gain, mid gain, high gain,
RING MODULATION - frequency, depth
MODULATION EFFECTS - chorus, flange, phase shift,
rotary speakers, autopan/frequency mod, pitch shift with
parameters as appropriate.
DELAY - effect select (mono, stereo, ping pong), delay
times, feedback.
REVERB - effect select (large hall, small hall, large room,
small room, gated, reverse, etc.), size, decay time, HF
damping, LF damping, pre-delay.
FX DIRECTION:
dist/EQ/ring mod > mod/delay + reverb (parallel)
dist/EQ/ring mod > mod/delay > reverb (series)
dist/EQ/ring mod > reverb > mod/delay (series)
In the two reverb channels:
Effect select (large hall, small hall, large room, small room,
reverse, gated, etc.), decay time, HF damping, LF
damping, pre-delay, diffusion.
A multi-effects channel may also be routed to its
‘neighbouring’ reverb channel for dual reverb multi-effects.
Page 4 S3000XL Operator’s Manual
Page 11

INTRODUCTION
ABOUT THIS MANUAL
This manual has been written to allow you to get the most out of your new sampler.
Please take the time to read it as a fuller understanding of the instrument will enable you
to use the S3000XL’s remarkable facilities to the full. Not only are the controls and
screens explained in detail but you will find hints and tips to help you with your sampling
and programming. If you are new to sampling or synthesisers, some of the sections
explain the basic principles behind the techniques employed in the S3000XL so if words
like ”bandpass”, “modulation”, “diffusion”, “multi-timbral” and “sample rates”, etc., are
unfamiliar to you, we hope that this manual is not just a boring explanation of functions
but something you can refer to for information beyond the scope of the S3000XL. Even if
you’re a seasoned programmer, we hope that there is information in this manual that you
find useful..
S3000XL Operator’s Manual Page 5
Page 12
INTRODUCTION
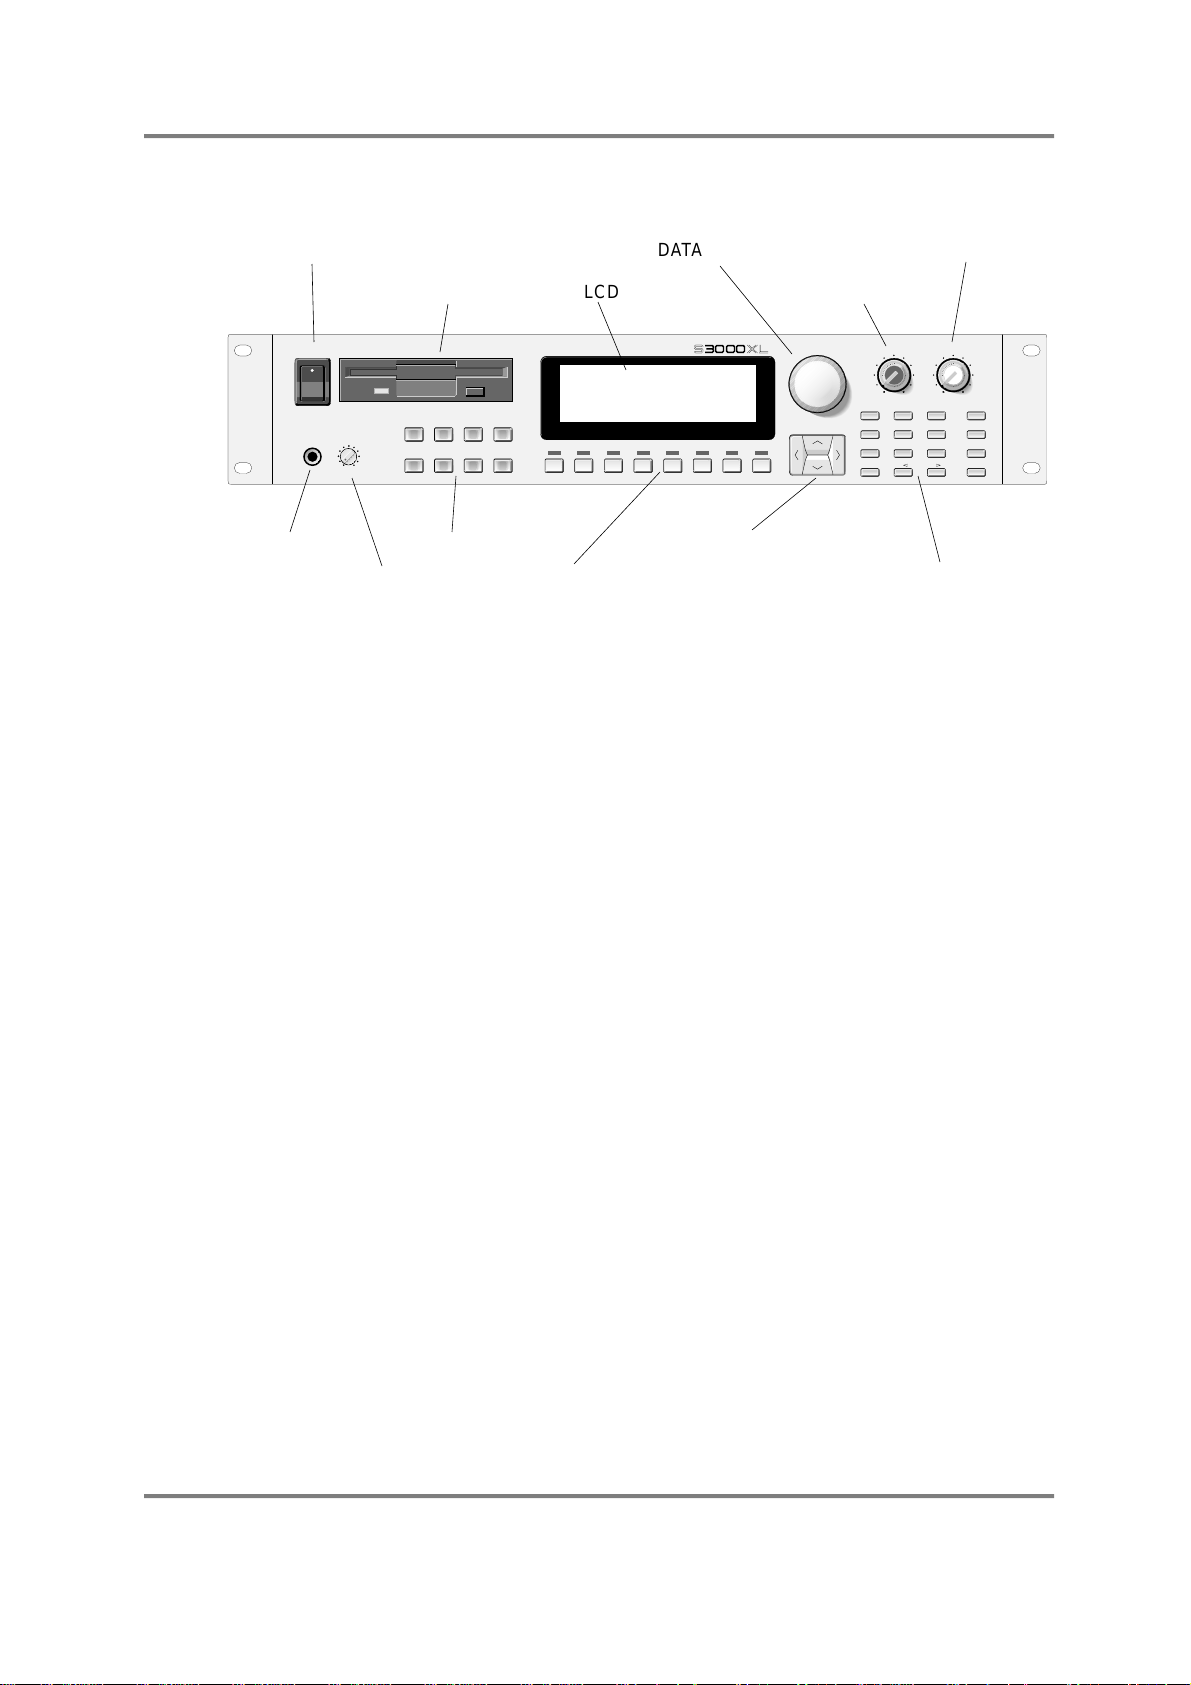
FRONT PANEL
POWER SWITCH
AKAI
ON
OFF
POWER
PHONES
HEADPHONE
FLOPPY DISK DRIVE
professional
SINGLE/ MULTI/BSAMPLE/CEFFECTS/
DISPLAY
CONTRAST
PUSH ON/OFF
A
EDIT/
GLOBAL/ SAVE/GLOAD/
EF
CONTRAST
DATA ENCODER
LCD
MIDI DIGITAL STEREO SAMPLER
D
F1 F2 F3 F4 F5 F6 F7 F8
F1/IF2/JF3/KF4/LF5/MF6/NF7/OF8/
H
SCREEN FUNCTION
SOFT KEYSDISPLAY
s3000xl
CURSOR KEYSMODE KEYS
RECORD LEVEL
DATA
CURSOR
P
MAIN VOLUME
MAIN VOLUME
REC GAIN
MIN MAX
MIN MAX
8/
7/
Q
4/
T
1/
W
0/
Z
9/
R
5/
U
2/
X
MARK/#
S
6/
JUMP/.
V
3/
NAME
Y
ENT/PLAY
-/+/
NUMERIC KEYPAD
MARK/JUMP,
NAME and ENT/PLAY
MODE KEYS Selects the operating mode for the sampler.
‘SOFT’ KEYS These select functions displayed on the LCD above. They
have no fixed function but change according to the page
currently displayed on the screen.
LCD The 40 x 8 character display shows parameters and values
and displays the ‘soft’ keys’ function and graphic display of
waveforms for sample editing, etc..
CURSOR KEYS This block of keys moves the cursor up, down and left and
right around the screen.
DATA ENCODER Allow s you to enter data values and for scrolling through
lists, etc..
NUMERIC KEYPAD This is used to enter data numerically.
MARK/JUMP These keys allow you to mark two functions and switch
between them using the JUMP key. In this way, it is quick
and easy to enter data even across two different screens.
NAME KEY This takes you the ‘naming mode’ where you may name
samples, programs, effects, etc..
ENT/PLAY KEY Allows you to play a sound without the need for a MIDI
controller to be connected.
RECORD LEVEL Sets the record level for the analogue inputs.
MAIN VOLUME The MAIN VOLUME control sets the main output level of
the L/R stereo outputs (this control does not affect the
level of the signal appearing at the individual outputs or
digital output).
POWER SWITCH Applies power to the S3000XL.
Page 6 S3000XL Operator’s Manual
Page 13
INTRODUCTION
PHONES This stereo jack socket allows you to monitor the L/R
(stereo) output of the S3000XL through stereo
headphones. The level is regulated using the MAIN
VOLUME control (see below).
DISPLAY CONTRAST Sets the viewing angle for the LCD. You will note that
pressing this control in switches off the LCD’ backlight thus
preserving the LCD (think of it like a ‘screen saver’ on a
computer.
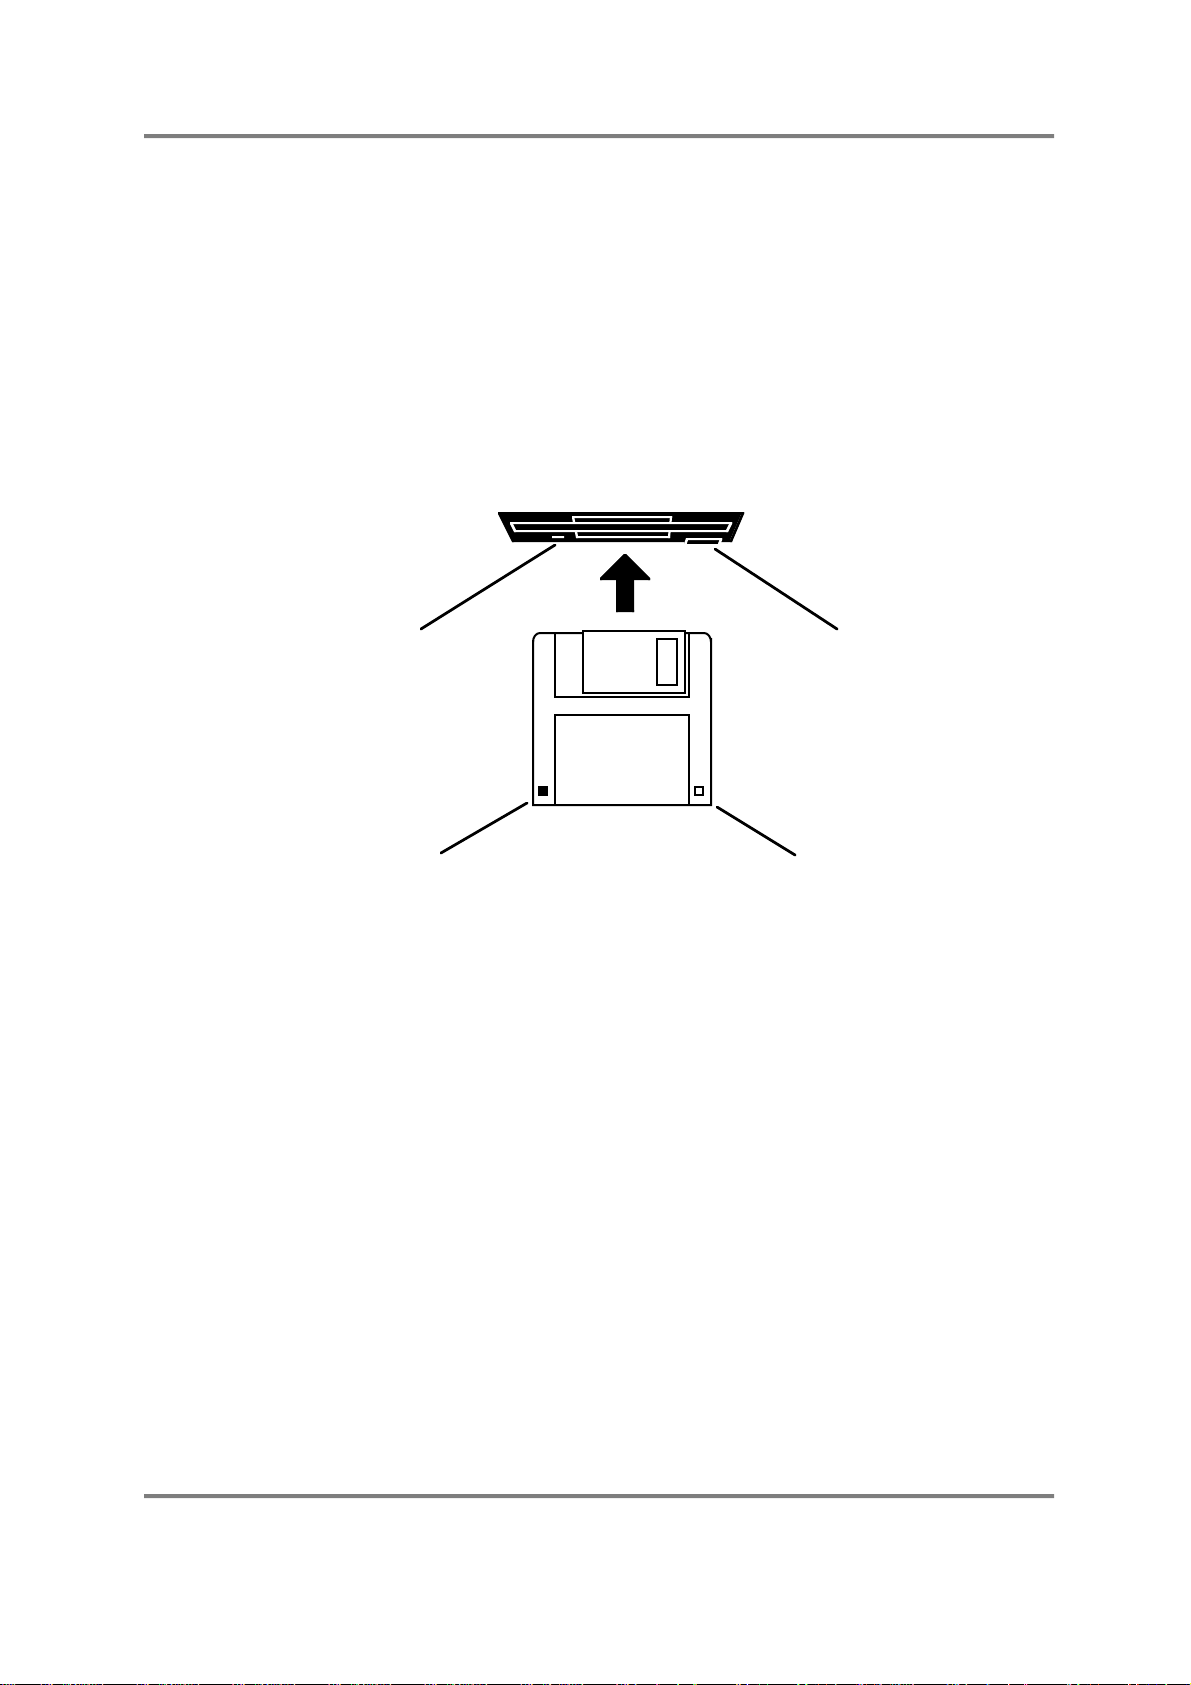
FLOPPY DISK DRIVE The 3.5 inch floppy disk drive will accept high density and
low density disks. Disks are inserted into the drive thus:
DISK EJECT BUTTONDISK ACTIVITY LED
WRITE PROTECT TAB
HIGH DENSITY
DETECTION TAB
The label should be facing upwards when it is inserted
(actually, it is physically impossible to insert disks the wrong
way round without using an extreme amount of brute
force!).
To eject the disk, simply press the DISK EJECT button.
When a disk is loading, saving or formatting, the DISK
ACTIVITY LED will be lit.
It is important to remember that, unlike a synthesiser, the
S3000XL has no means of storing sounds in an internal
memory. As a result, it is vital that you save your work to
disk before turning the power off otherwise you will lose
your work and, unless previously saved, it will be gone for
ever. In fact, it is a good idea to regularly save your work
as you are working. All good computer users do this and it
prevents the accidental loss of data should power be
accidentally removed from the instrument. This also serves
as a form of ‘undo’ - if you make some kind of mistake in
your programming and editing and can’t fix it, you can load
the last level of editing back into the sampler. It may be a
bit tedious to keep stopping every now and then to save
your work but it is better than losing some valuable
sounds.
S3000XL Operator’s Manual Page 7
Page 14

INTRODUCTION
TAKING CARE OF YOUR DISKS
These floppy disks contain valuable sound data and, as such, should be treated with
extreme care. Please observe the following points, therefore:
1 Never slide the metal cover back and touch the disk. Finger marks may render the
disk unreadable.
2 Don’t leave the disk in the drive wherever possible. When the disk is in the drive, the
metal protective cover slides back exposing the actual disk inside - this makes the disk
susceptible to picking up dust which may cause read errors.
3 Do not leave your disks in a hot car.
4 Do not place your disks next to any magnetic sources such as speakers, amplifiers,
televisions, etc.. Also, try to avoid X-ray machines. At airports, it is sometimes possible
to ask for your disks to be inspected by hand at security desks but, with the added
security at airports these days, this may not be possible. Always check with the
security officer though, just in case. Security X-ray machines are generally safe with
disks, though. If in doubt, make backup copies which should be left at home.
NOTE: Some checked in luggage is X-rayed by quite powerful machines that are not as
safe as those that check hand luggage. It is probably best to take your disks as hand
luggage.
5 Do not leave your disks around when drinking liquids - one accidental spillage could
ruin a lot of work!
6 Always use high quality disks. Whilst cheap ones may be appealing, they are prone to
errors more than good ones.
7 Try to ensure that the write protect tab is switched on (i.e. the tab blocks the hole).
This will prevent accidental erasure, formatting and loss of data. It may be a nuisance
to try to write to the disk and find it write protected but it is less of a nuisance than
accidentally over-writing a set of your favourite samples and programs!
8 Try to get into the habit of labelling your disks - it will pay dividends in the end when
you are searching for something.
9 Invest in a sturdy carrying case for your floppies especially if you are a gigging
musician. Heavy duty metal camera cases are ideal and some flight case
manufacturers now make special heavy duty disk flightcases.
1 0 Even if you are using a hard disk of any sort, please make sure you have backed up
your work to floppy disks. It can be time consuming but it will be worth it if you ever
have a problem with your hard disk!
Page 8 S3000XL Operator’s Manual
Page 15
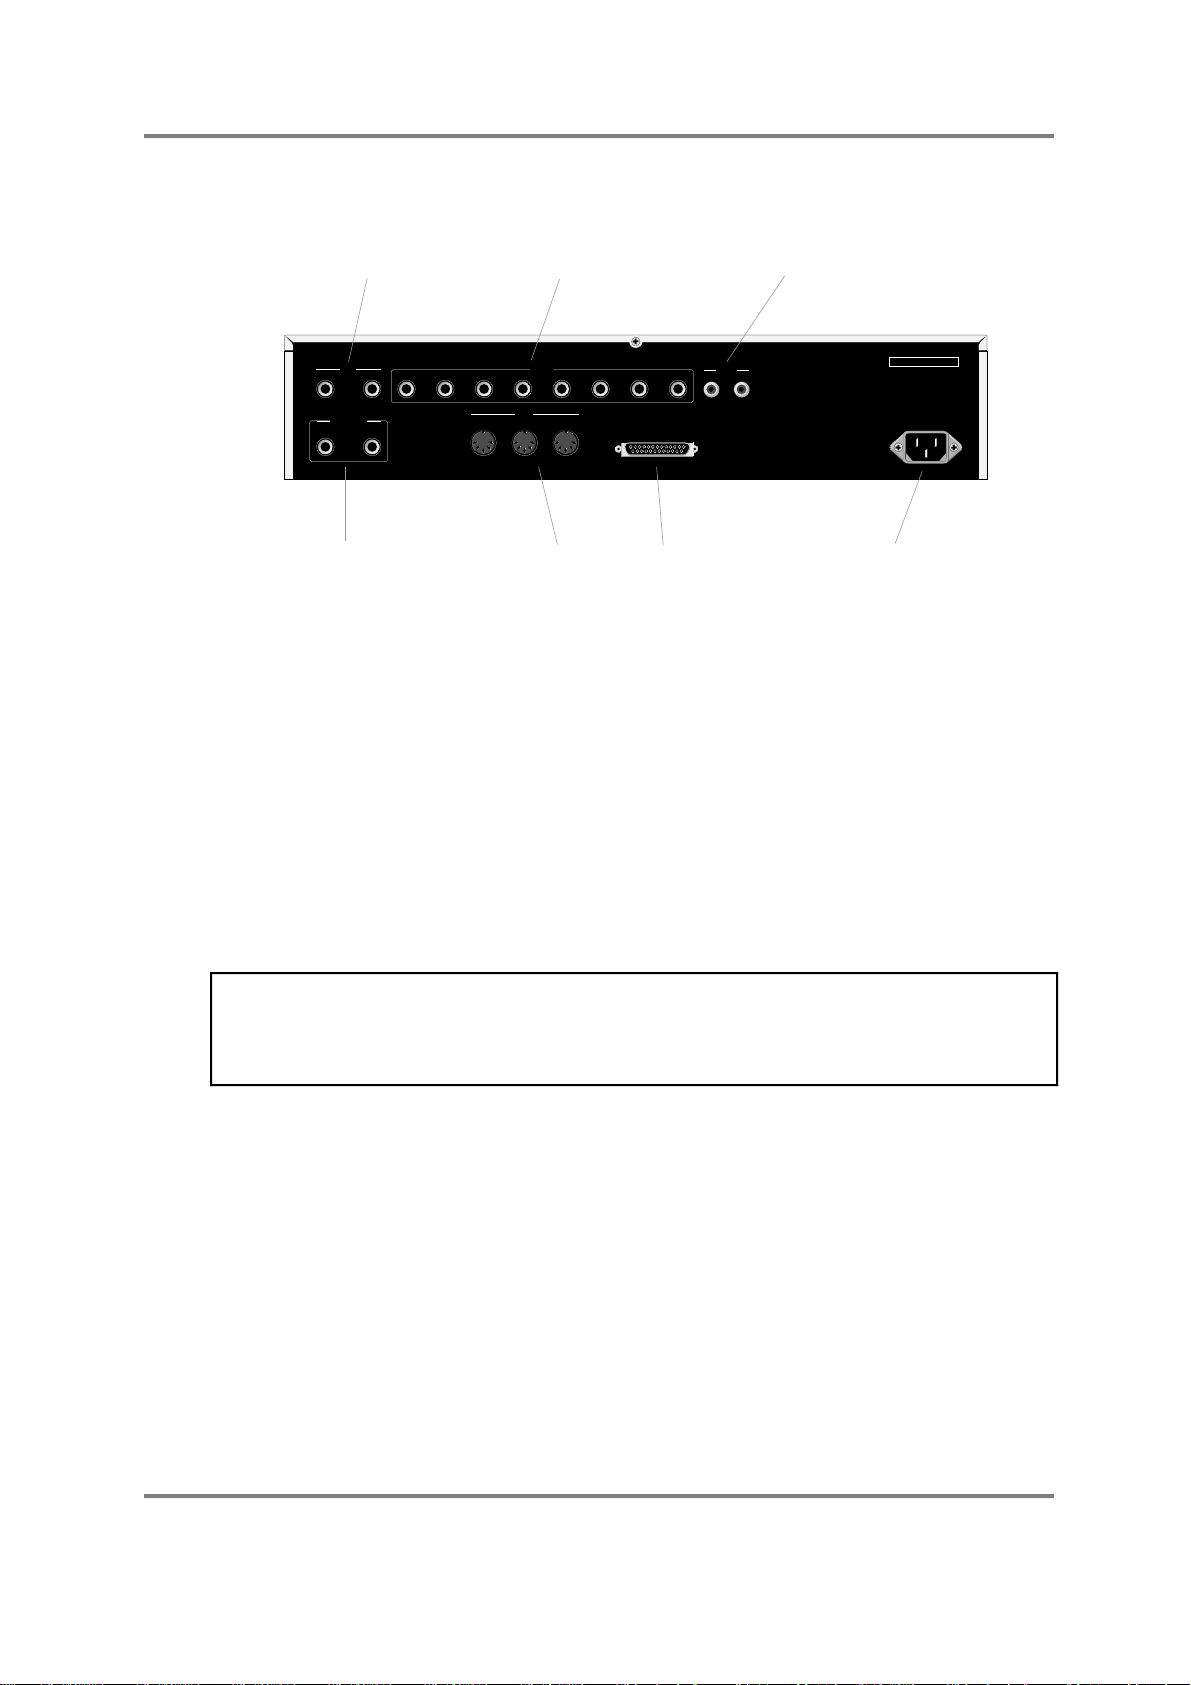
REAR PANEL
INTRODUCTION
ANALOGUE AUDIO INPUTS
INPUT
L/MONO R
STEREO OUT
L/MONO R
L/R STEREO OUTPUTS
12345678IN OUT
INDIVIDUAL AUDIO OUTPUTS
OUTPUT
MIDI
IN OUT THRU
MIDI IN/OUT/THRU
DIGITAL IN/OUT
DIGITAL
SCSI
SCSI CONNECTION
AKAI ELECTRIC CO., LTD
S3000XL
POWER CONNECTION
ANALOGUE AUDIO INPUTS You make recordings through these two inputs. You can
record in mono by connecting the audio source to only the
L/MONO input.
INDIVIDUAL OUTPUTS The S3000XL has a total of ten analogue audio outputs.
There are the stereo L/R outputs which take a mix output
of all programs. If the optional EB16 multi-effects
processor is installed, the outputs of the four effects
channels are also mixed here. You may also use the eight
assignable individual outputs. Programs (or groups of
programs) may be assigned to these outputs for mixing on
a mixing console. Furthermore, individual keygroups may
be assigned to these outputs so that, for example,
individual drums could have a separate channel on the
mixer for EQ’ing, adding effects, etc..
NOTE: In the case of you only connecting the L/MONO outpput, the S3000XL only
outputs the left channel signal and the left/right stereo signals are not mixed at this
output. The old S3000 series carried a mix ed output of the left/right channels. In the case
of wanting to play some existing sound library in mono using only the L/MONO output,
some 'tweaking' may be necessary to /monofy' the program.
DIGITAL I/O The digital input can be used to record digitally from CD or
DAT or any other audio source that has a digital output.
The digital output carries a digital clone of the main stereo
outputs so you may also mixdown digitally from the
S3000XL to any digital audio recorder such as DAT or a
hard disk recorder/editor such as the Akai DR4 or DR8
thereby ensuring the highest quality audio during mixdown.
The digital i/o is also used to back data up to a normal
DAT tape.
SCSI This 25-way connector is used to attach hard disks, CD-
ROMs, Magneto Optical (MO) disks and removable
cartridges to the S3000XL for data storage and retrieval.
You may also connect the S3000XL to a Macintosh™
S3000XL Operator’s Manual Page 9
Page 16

INTRODUCTION
MIDI Your MIDI controller (keyboard, drum pads, EWI, etc.)
POWER CONNECTION This should be connected to an AC power source.
BEFORE CONNECTING ANY AC POWER, PLEASE ENSURE THAT YOUR UNIT IS
DESIGNED FOR YOUR AREA’S POWER SUPPLY. A MISTAKE NOW COULD RUIN
computer for use with the editing software that is bundled
with the S3000XL.
should be connected to the MIDI IN. The THRU socket
carries a duplicate of the MIDI IN signal ‘thru’ to other
modules or MIDI devices that may be connected. The OUT
is normally only used to transmit MIDI System Exclusive
data to another Akai sampler or to a computer.
** IMPORTANT NOTE **
YOUR WHOLE DAY NOT TO MENTION YOUR S3000XL!!!
Page 10 S3000XL Operator’s Manual
Page 17
INTRODUCTION
SETTING UP THE S3000XL
This short section tells you how to get ‘up and running’ fast. For full details of operation,
please refer to the appropriate section in this manual.
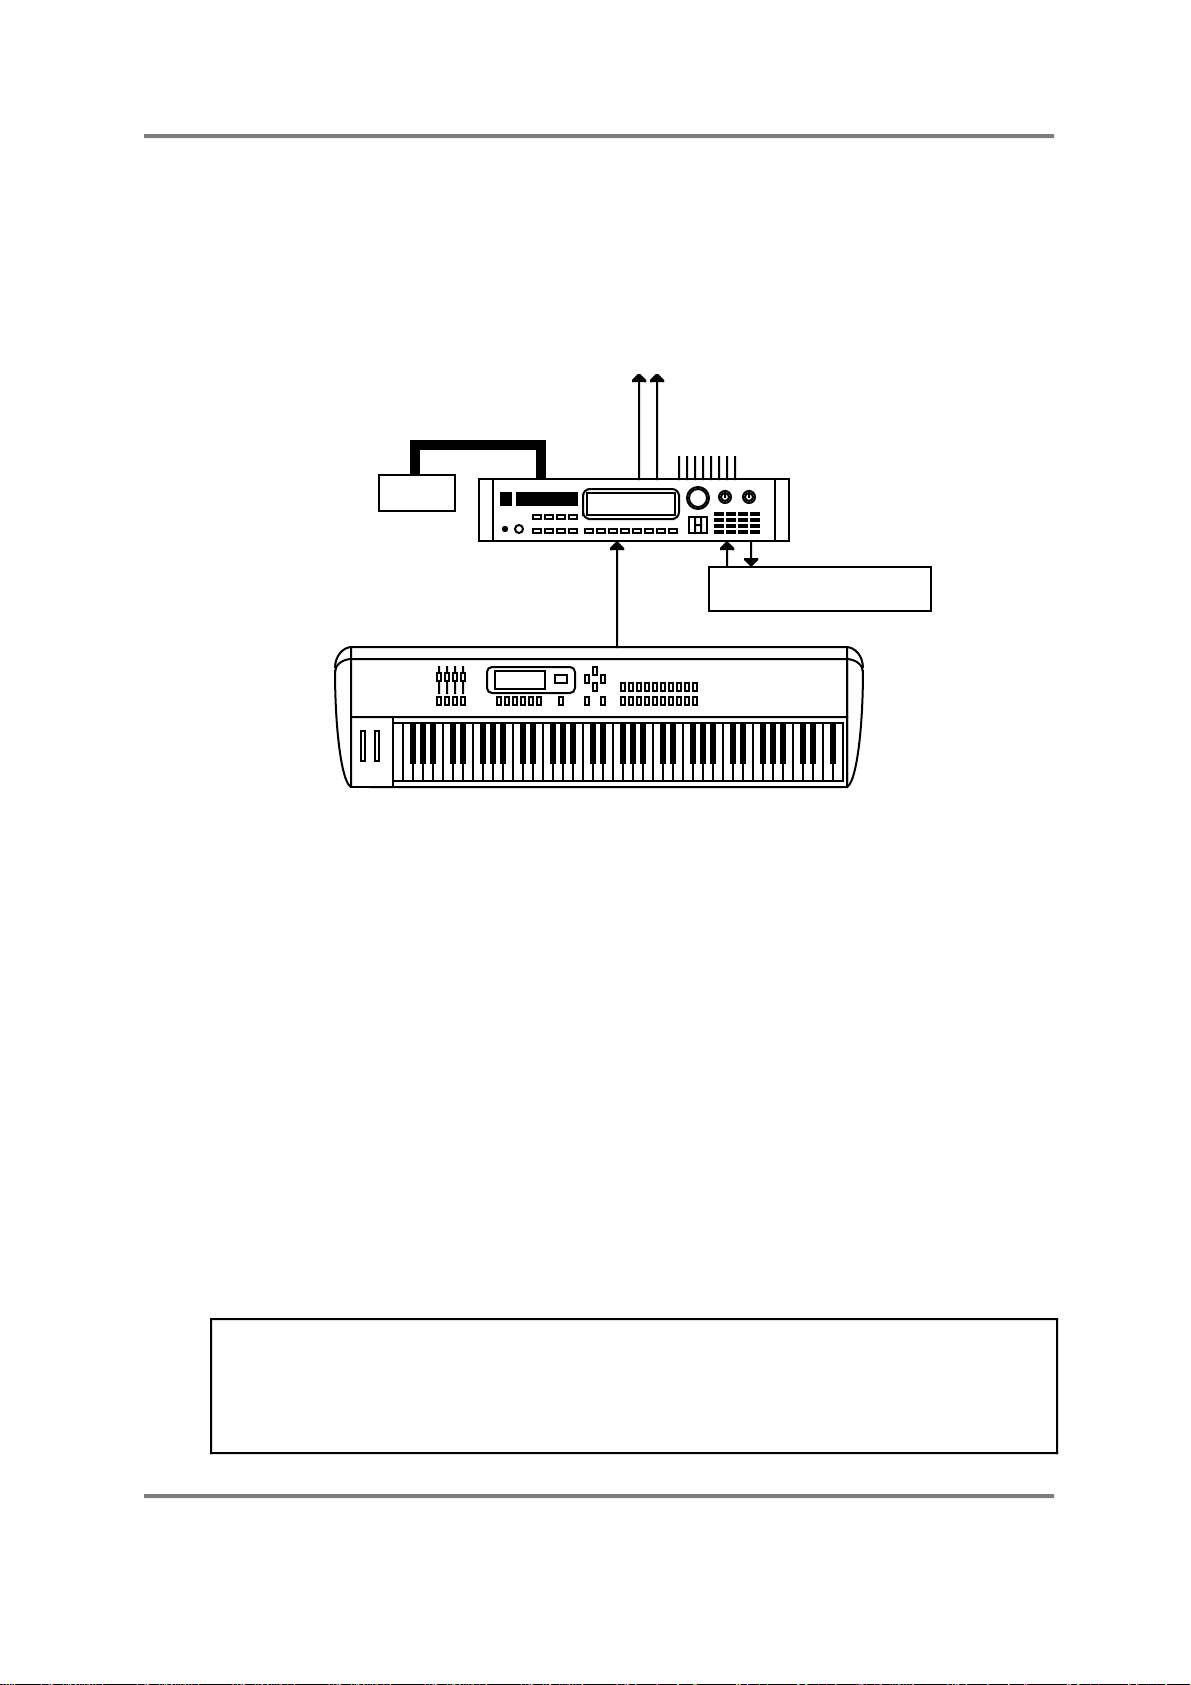
CONNECTIONS
Don’t switch the S3000XL on for the moment.
L/R OUTPUTS
SCSI
HARD DISK,
CD-ROM,
MO DRIVE, etc..
AKAI
MIDI IN
MIDI OUT
IND OUTS - to mixer
DIGI I/O
DAT
mx1000
Connect the MIDI output of your MIDI controller (in this example, an Akai MX1000 master
keyboard) to the MIDI input of the S3000XL. Connect the L/R audio output to a stereo
amplifier (or use the L/MONO output of the sampler if you only have a mono amp) or to
two channels of a mixer (remembering to pan each channel hard left and right accordingly
to take full advantage of the S3000XL’s stereo outputs). The digital i/o can be connected
to a DAT machine (or any other digital recording device) or you could leave the digital
outputs of a CD player connected to the S3000XL’s digital input for sampling from the
many special sampling CDs that are currently available..
Before turning on the sampler, it’s a good idea to turn its volume down or to turn the
volume down on the amplifier or the mixer channels as the power up ‘thump’, although
very slight, could damage sensitive speakers, especially if the amp is turned up loud. Now
turn on the S3000XL. You will see a message in the LCD informing you of what is going
on.
After 15 seconds or so, your S3000XL is ready for use. Turn the volume up on the
sampler, amplifier and/or mixer.
Making sure that the MIDI controller is sending data on MIDI channel 1, play a few notes.
You will hear the oh so impressive test tone! Hardly inspiring is it? We want something a
bit more interesting than that.
NOTE: If no sound appears, check your MIDI connections and check that your MIDI
controller is sending MIDI channel 1. If, after this, you still hear no sound, try pressing the
ENT/PLAY key on the S3000XL’s front panel. If you hear a sound, then at least your
audio connections are o.k. and it’s the MIDI that needs attention. If you still don’t hear a
sound when you press the ENT/PLAY key, check your audio connections, volume
controls, etc..
S3000XL Operator’s Manual Page 11
Page 18

INTRODUCTION
LOADING THE DEMO FLOPPY DISKS
To get you started, some sounds are provided on floppy disk.
To load the sound library disk, insert it into the drive and press the LOAD key. Now simply
press F7 - CLR. You will receive a prompt asking you if you want to clear the entire
memory. Respond by pressing F8 - YES
The library disk supplied comes with several programs. In SINGLE mode, these may be
selected from the S3000XL’s front panel using the DATA wheel or alternatively, you may
use MIDI PROGRAM CHANGE commands from your MIDI controller to select new
programs.
You will also note that they are laid out in a MULTI for multi-timbral sequencing. You may
use this to play the demo sequence that is also supplied on floppy disk with the S3000XL.
To play the demo sequence on the S3000XL, assuming the sound data disk has been
loaded, follow the procedure below.
1 Insert the DEMO SEQUENCE floppy disk into the disk drive.
2 In GLOBAL mode, press (F5) to get to the MIDI SONG PLAY page and press
(F2) to get to the LOAD page for song files.
3 Select and load a MIDI song file from the file list. You can load as many files as you
like as long as there is enough memory space.
4 Once the files are loaded, press (F1) to return to the MIDI SONG PLAY page.
Select the file you wish to play and press (F7) to play the selected MIDI song
file. Press (F8) to stop playback.
If you have owned an Akai sampler before, you may also have other sounds on CD-ROM
or hard disk. Operation is virtually identical to the S3000 series and the S1000/S1100. To
load sounds from hard disk, press the LOAD key and select HARD at the top of the
screen. Move the cursor to the volume name field and select the volume you wish to load.
Press F7 - CLR - followed by F8 - YES - to clear the current contents of memory and load
the entire hard disk volume. If you have not used an Akai sampler before and you need
more detailed information on loading from hard disk or CD-ROM, please see the section
LOAD MODE.
However you load sounds, whether it’s from floppy disk, hard disk, cartridge or CD-ROM,
just load them and enjoy playing with your new sampler. Although we suggest you read
the operator’s manual thoroughly, of course, at this stage, you don’t want be bothered
with that so just experiment and get a feel for the S3000XL. As long as you don’t press
the SAVE key and accidentally overwrite your floppy disk or hard disk volume, you can’t
damage your sounds permanently or come to any harm (you can’t damage a CD-ROM as
it’s a read only device). If you do start messing with the samples and programs and don’t
like the results, simply re-load the sounds in or load another bunch of sounds to play with.
Page 12 S3000XL Operator’s Manual
Page 19

INTRODUCTION
MOUNTING THE S3000XL
If you plan to rack mount the S3000XL, try to leave some ‘breathing space’ around it to
prevent overheating. It is recommended you leave 1U of rack space above and below the
sampler.
If you are placing the sampler on a table, make sure that the table is sturdy and that the
sampler is not positioned precariously.
If you are using the S3000XL with a hard disk device of any kind, the disk drive MUST be
mounted horizontally. If the disk drive is at an angle, even a slight one, you may have
unreliability problems and even data corruption.
If you are planning to rack mount the hard disk with the sampler, it is recommended you
use the ‘padded’ type of rack mount adapter available from most manufacturers of rack
and flight cases especially if you are likely to be travelling a lot with the set-up. The
padding will help protect the disk drive’s delicate head mechanism against shock and
excessive vibration.
It goes without saying that the S3000XL and the disk drive are delicate pieces of precision
electronics and they don’t take kindly to being thrown around however sturdy your flight
case might be!
S3000XL Operator’s Manual Page 13
Page 20
INTRODUCTION
GETTING AROUND THE S3000XL
The S3000XL is pretty straightforward to use. Basically, it operates in different ‘modes’
which are selected according to what it is you want to do. In these modes, you navigate
your way around the functions using the soft keys. You move around the screens using
the CURSOR keys and data is entered either using the DATA wheel or numerically from
the numeric keypad.
OPERATING MODES
The S3000XL has various modes in which it works and these are selected using the eight
large mode keys found beneath the floppy disk drive. Each key is illuminated to indicate
the sampler’s current status.
These modes are:
SINGLE For playing single programs. This mode is best suited for ‘playing’ the
sampler (i.e. performing a piano solo or whatever) although it can also be
used when sequencing a single sound from the S3000XL.
SINGLE/ MULTI/BSAMPLE/CEFFECTS/
A
EDIT/
GLOBAL/ SAVE/GLOAD/
EF
D
H
MULTI For playing up to sixteen programs together. Typically, this mode would be
used for multi-timbral sequencing by setting each ‘part’ to a different MIDI
channel but it can also used for layering and creating key splits by setting
two or more parts to the same MIDI channel.
SAMPLE For making recordings.
EFFECTS For selecting effects to assign to single programs or to parts in a multi if
the optional EB16 multi-effects processor board is installed.
EDIT Puts the sampler into edit mode for any of the four modes described
above. For example, EDIT SINGLE allows you to edit single programs;
EDIT MULTI allows you to edit the program in the currently selected part;
EDIT SAMPLE allows you to edit the recording you have just made (or
samples currently in memory, of course); EDIT EFFECTS allows you to edit
the parameters of the optional effects processor (if fitted).
GLOBAL Allows you to set certain ‘global’ settings that affect the S3000XL as a
whole such as MIDI channel, SCSI ID, output level, overall tuning, etc.. It
also gives access to utilities such as disk recording, MIDI song file
playback, importing ‘foreign’ CD-ROMs from other manufacturers, etc..
SAVE For saving data to floppy or hard disk.
LOAD For loading data into the sampler.
SOFT KEYS
The SOFT KEYS directly under the LCD call up various functions and pages within each
mode - these vary from mode to mode and have no pre-defined function. As such, they
cannot be easily explained here!
F1/IF2/JF3/KF4/LF5/MF6/NF7/OF8/
P
Page 14 S3000XL Operator’s Manual
Page 21
INTRODUCTION
There are many common keys in many of the functions, however, such as, for example,
COPY, RENAME and DELETE which are always on F6, F7 and F8 in those pages where
they appear. Commands such as GO, and ABORT always appear on F7 and F8. There is
also a convention to the type of functions available which is worth noting.
If a key has this highlighted type of display: then this signifies that pressing this key
will take you to another page. If the key has this type of display: (i.e. the function
simply has a box around it and is unhighlighted) then this signifies that the key is an ‘do it’
key and will instigate some kind action such as SAVE, LOAD, DELETE, GO, ABORT, etc..
If the key has no form of box around it and is not highlighted - i.e: , then this
indicates the page you are currently in although this is always shown in the top left corner
of the display as well. This type of key switches between two types of display - pressing it
once displays note names, pressing it again displays notes as MIDI note numbers.
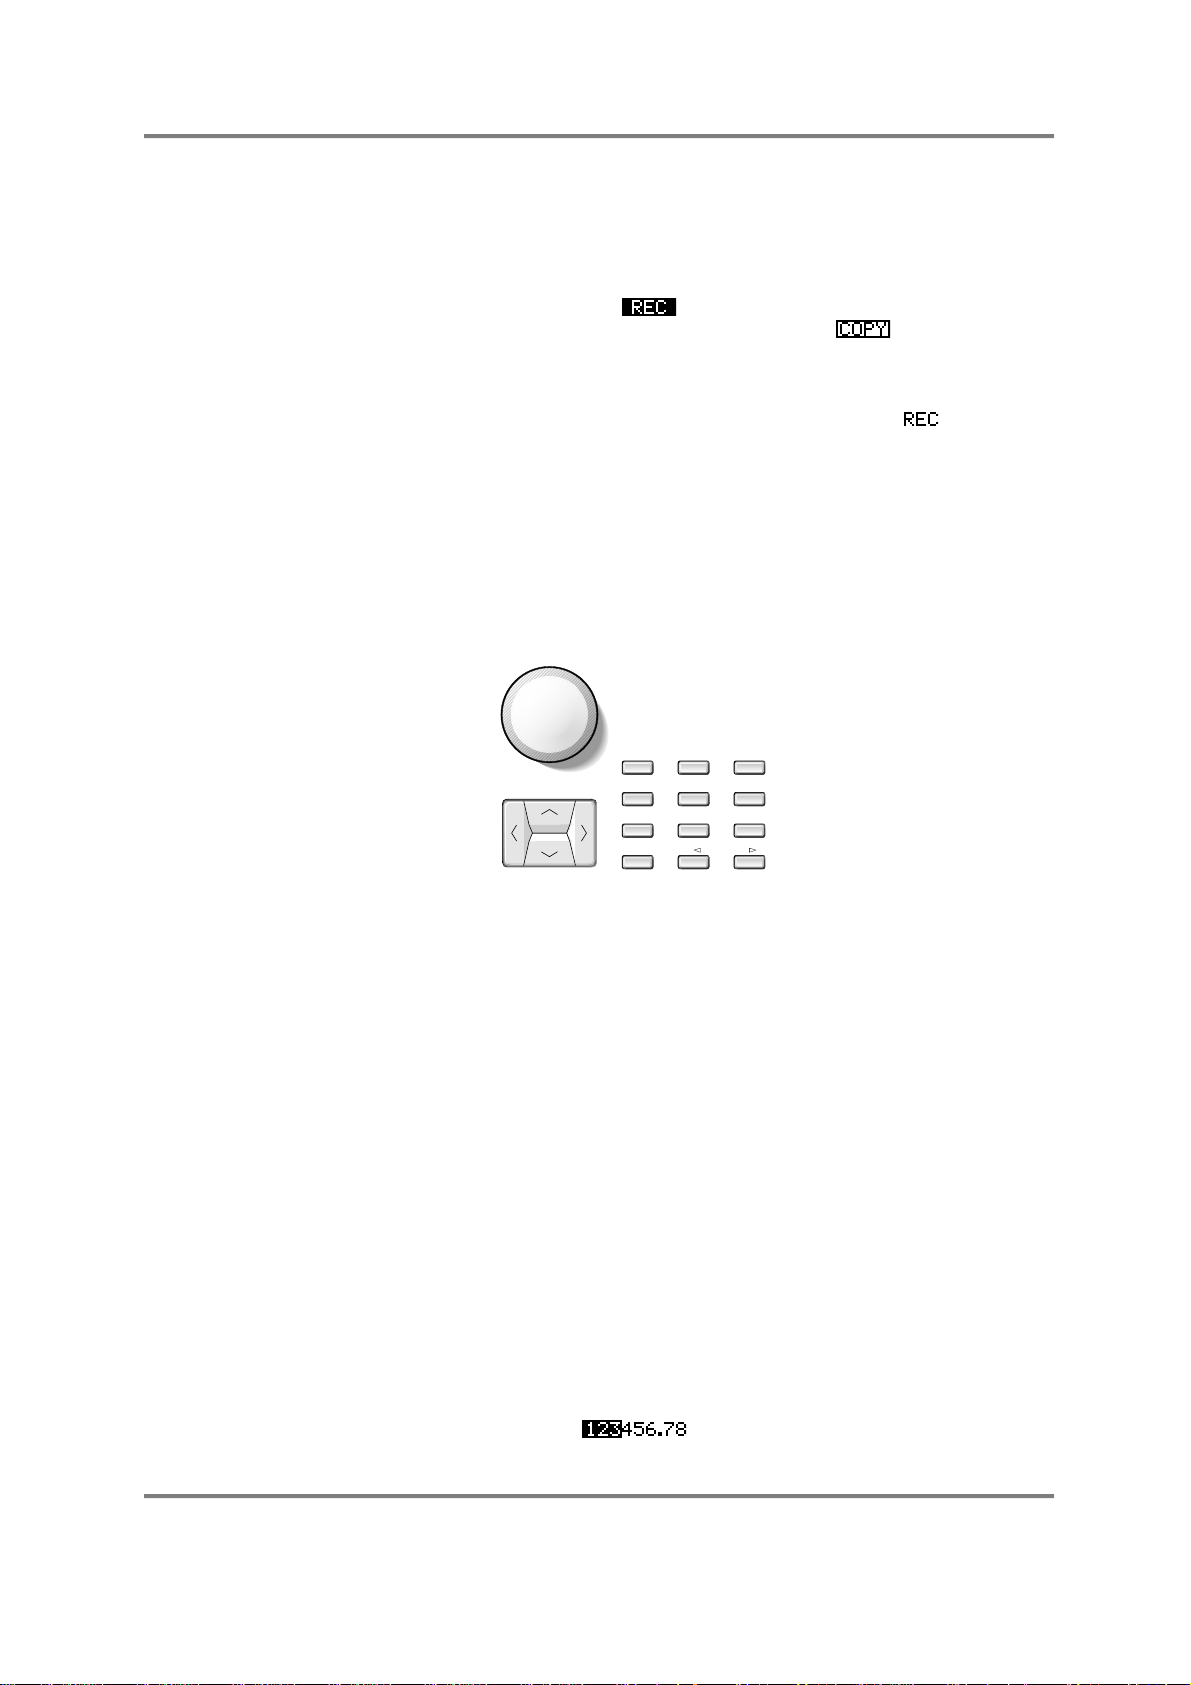
SELECTING PARAMETERS AND ENTERING DATA
You move around the screen using the CURSOR KEYS and data is input either from the
DATA ENTRY ENCODER or from the NUMERIC KEYPAD. You may move around within
digit fields using the +/< and -/> keys found on the numeric keypad.
DATA
8/
9/
R
S
5/
6/
U
V
2/
3/
X
Y
-/+/
CURSOR
7/
Q
4/
T
1/
W
0/
Z
On simple fields like filter cutoff, attack time, MIDI channel, etc., that have two digits, you
may simply type in a two digit number - i.e. 23, 45, etc.. On such fields, you will find that
the DATA ENTRY ENCODER will cover the whole range quite quickly so you may find that
more convenient. The same is true of three digit fields. Turning it clockwise increases
numeric values, and turning it counter-clockwise decreases these values. You may also
use the +/< and -/> keys to position the cursor on the ‘tens’ or ‘hundreds’ field to make
more rapid changes. For non-numeric values (i.e. sample rates, sample type, loop type,
etc.), turning the encoder will display all the options in order. Normally, there is no other
entry procedure required; simply displaying the correct value of a parameter using the
DATA encoder selects and stores it into the S3000XL’s memory. Our sound programmers
at Akai usually use a combination of the numeric keypad and the DATA WHEEL for
speedy input of parameter values.
When editing numeric parameters, some of the values can be quite large, and it would be
necessary to turn the DATA WHEEL thousands of times (literally!) in order to go through
the whole range if the value was only changed by 1 for every click of the DATA control.
There is an alternative to turning the control thousands of times, though. When you press
the CURSOR keys, you move from one parameter to another and, using the +/< and -/>
keys, you may move around within a large numeric field.
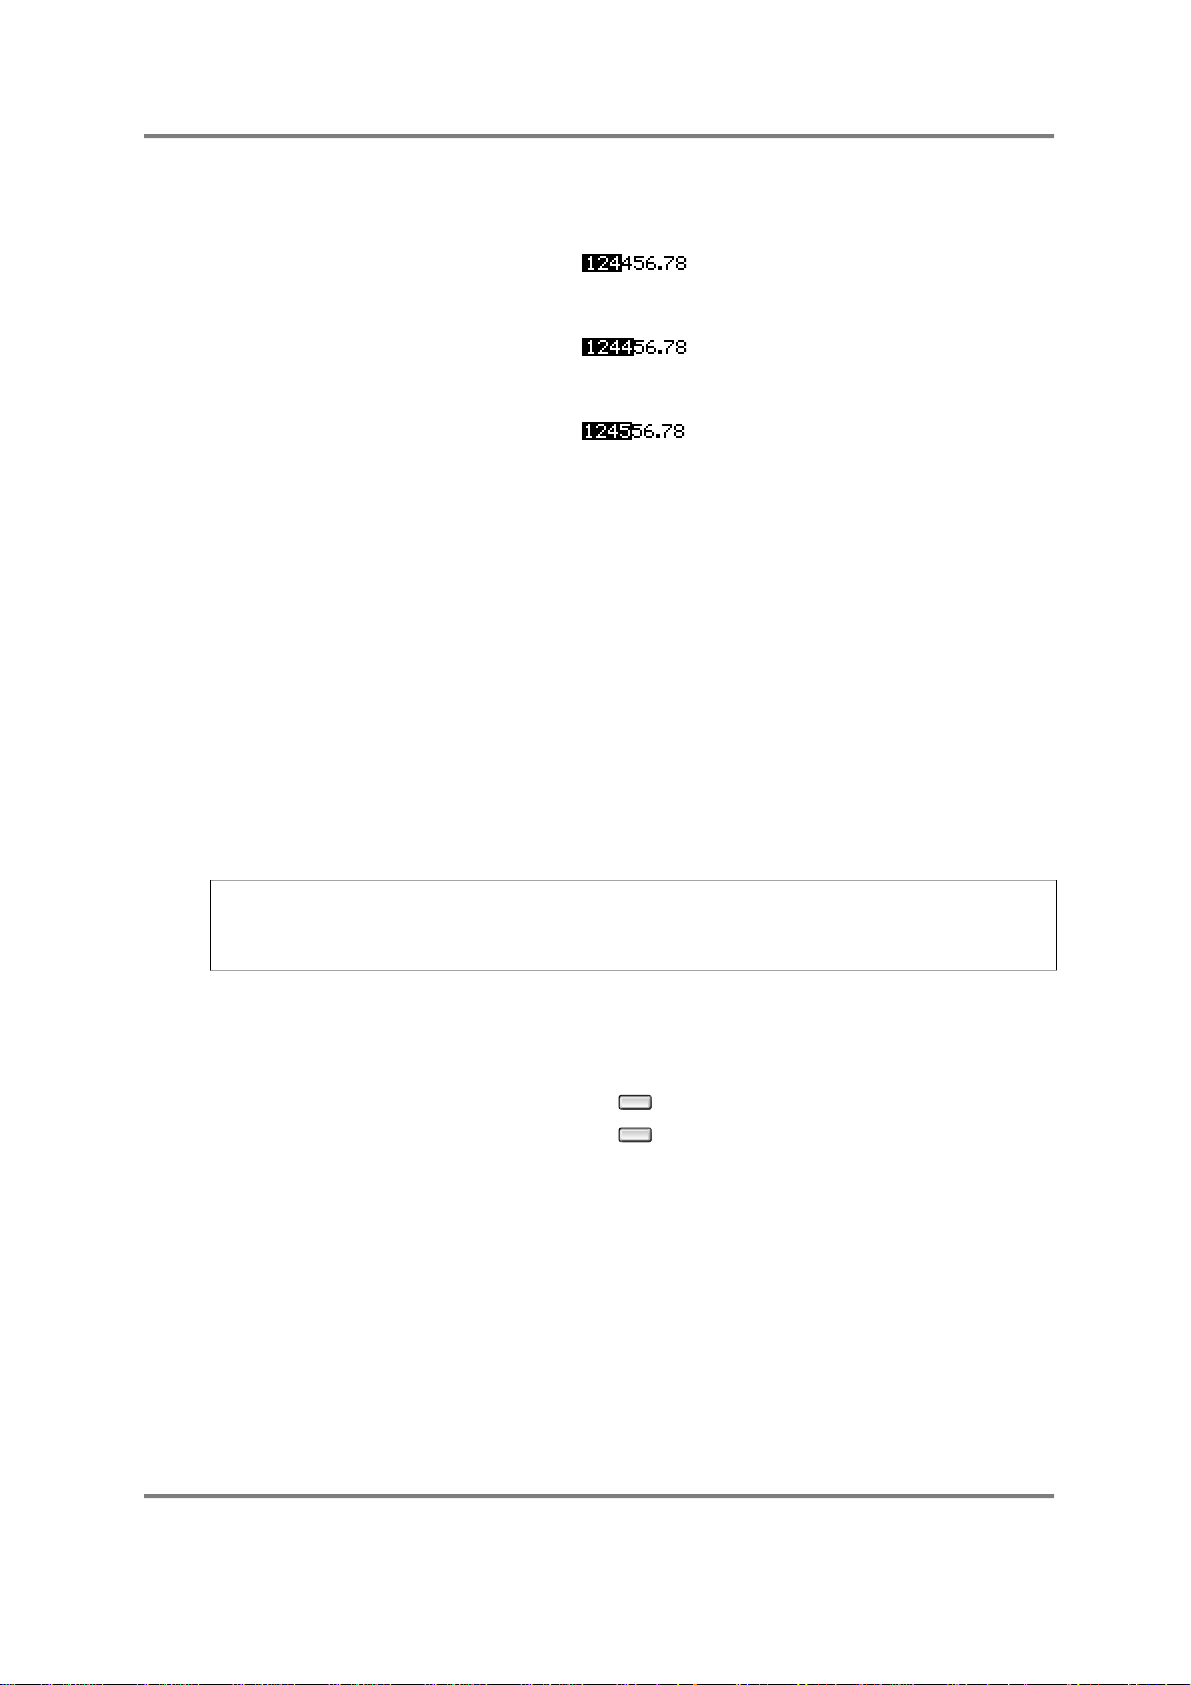
If a number such as 123456.78 is displayed, and the +/< key is pressed so that only the
first three digits are highlighted thus:
S3000XL Operator’s Manual Page 15
Page 22
INTRODUCTION
Turning the DATA ENTRY ENCODER clockwise by one step now will increase the value of
the last highlighted digit, so:
Now if the -/> key is pressed once, the first four digits will be highlighted:
and turning the DATA ENTRY ENCODER one click clockwise will produce:
If you turn the DATA control more than ten clicks, of course, the value of the whole
parameter will be incremented or decremented by the number of clicks. In this way, with
very little effort, fast accurate editing of numbers can be achieved using only the +/< and
-/> keys and the DATA ENTRY ENCODER. The best way to learn how this works is to
practise; after a short time, it should become second nature.
On ‘signed’ fields (that is, fields that have a + or a - before them), the +/< and -/> will do
two things. Pressing the +/< key will move the cursor left within the field and, when it
reaches the furthermost left digit, you may use it to switch between + and - depending on
the selection you wish to make. The -/> key will move the cursor right and, when it reaches
the furthermost right digit you may toggle between + and - again.
As mentioned above, as an alternative to turning the DATA control, you can also use the
numeric keypad for direct entry of data. When you know the exact number you want to
enter, this can be faster than using the DATA control, but when experimenting (for
example, when setting loop points or sample start and end times), the DATA control may
be faster than the numeric keypad. You’ll probably discover quickly what method works
best for you in each situation.
NOTE: The cursor always stays on the last currently selected field in any screen. For
example, if you are in, say, the filter pages and are setting envelope 2’s depth and then
go to the ENV2 page to make an adjustment there, when you return to the filter page, the
cursor will still be on envelope 2’s depth parameter.
MARK AND JUMP KEYS
These two grey buttons to the right of the number keypad are used in conjunction with
each other.
MARK/#
JUMP/.
If you are carrying out editing operations which require changing display pages a lot,
these can save a lot of time and effort. Pressing the MARK/# button when the cursor is
on a field will cause the S3000XL to remember the position of the cursor, and pressing
JUMP/. will take the cursor back to the MARK(ed) position from any other page. Pressing
JUMP/. again will take you back to the page and function you were at before you
JUMP(ed).
You can reset the MARK position at any time. This position is lost when the power is
turned off. At power-on, this position defaults to the program select field in the initial
SINGLE mode.
Page 16 S3000XL Operator’s Manual
Page 23
INTRODUCTION
NAMING FILES - THE NAME KEY
When samples, programs, effects or drum input settings are changed, they should be
given a name for easy reference.
NAME
Pressing the NAME button in certain pages will enable you to name the data and you will
notice that each button has a letter following its primary function (i.e. EDIT PROG/K, F4/D,
HELP/P). Up to 12 characters (uppercase only) are entered by pressing the front panel
buttons (although you may also scroll through letters and numbers using the DATA
control). When actually entering names, pressing the NAME button will switch the function
of the numeric keypad between letters and numbers. The CURSOR keys moves the
cursor around inside the name field when naming a sample or program.
When entering names in letter mode, the +/< and -/> buttons work as backspace and
space-bar buttons respectively (when in number mode, they enter the “+” and “-”
characters), and the MARK/# and JUMP/. keys enter “#” and “.” respectively. The last
button, ENT/PLAY, enters and confirms the name and the S3000XL prompts you to
either copy or rename the item.
THE ENT/PLAY KEY
Underneath the NAME key, you will see the ENT/PLAY key:
ENT/PLAY
This is a dual-purpose button. When naming samples, programs, etc., pressing this
button will end the naming process in conjunction with COPY and REN(ame) as described
above. In other modes of operation, this key will play the sound at a pitch, velocity and
MIDI channel as set in the GLOBAL mode. The default may be freely set as you wish.
NOTE: When editing samples in EDIT SAMPLE, pressing this button will play back the
sample at its correct pitch and not necessarily the one set in the GLOBAL pages.
LCD CONTRAST
Underneath the floppy disk drive, you will find the DISPLAY CONTRAST CONTROL:
DISPLAY
CONTRAST
PUSH ON/OFF
You may adjust the viewing angle for the screen using the DISPLAY CONTRAST control.
NOTE: To preserve the life of your LCD, this control also has a switch which you can use
to turn the backlight of the LCD on or off. At times when you are not actively using the
S3000XL’s front panel for programming (i.e. when actually sequencing or recording to
tape, for example, or when using the sampler live on stage), you might like to switch this
off. All LCD’s of this type progressively get dimmer with age and this switch can help
prevent this. The switch should be pushed in to switch the backlight off and pushed in
again to switch it back on.
S3000XL Operator’s Manual Page 17
Page 24
INTRODUCTION
RECORD LEVEL, MAIN VOLUME, HEADPHONE OUTPUT
Above the numeric keypad, you will find the RECORD LEVEL and MAIN VOLUME
controls:
REC GAIN
MIN MAX
MAIN VOLUME
MIN MAX
Input level for sampling is regulated using the RECORD LEVEL control and the
S3000XL’s overall output level is controlled, not surprisingly, by the MAIN VOLUME
control. This also governs the level of the sound appearing at the HEADPHONE OUTPUT.
NOTE: The MAIN VOLUME control does not affect the level appearing at the individual
outputs or the real-time digital audio output.
Page 18 S3000XL Operator’s Manual
Page 25

INTRODUCTION
HOW THE S3000XL WORKS
Despite its versatility, the S3000XL is very straightforward and once you have a basic
grasp of the flowcharts shown on the next pages, things will make more sense.
Basically, you can have SAMPLES. These are the pieces of raw digital audio that are
always the basis of any sound in the S3000XL. These may be derived from floppy disk,
hard disk (including Magneto Optical (MO) Disks, removable cartridge types), CD ROM or,
of course, you may sample your own sounds via the analogue or the digital inputs.
Once you have a raw sample, there are many things you can do with it within EDIT
SAMPLE. You may TRIM it - that is, remove any unwanted audio from the start or end.
You may CHOP it - that is, remove a section in the middle and splice the two remaining
sections together or you may CUT it - that is, remove a section in the middle and keep the
gap thus created. You may also EXTRACT part of the sound - that is isolate a section
(such as one snare drum in a breakbeat) and extract that snare hit from the original. You
may also TUNE and/or REVERSE the sample.
Of course, one problem always associated with sampling is LOOPING. Because any given
sample is only a few seconds long, if you want to sustain that sample longer than its
original length, some method has to be sought to do this. This is LOOPING. A loop is a
section of the sound that repeats as long as you hold your finger on the key and is set by
setting a start and end point for the loop. This is something of an art and a science and
something we won’t delve into here in great detail. To make looping as easy as possible,
the S3000XL has FIND and CROSSFADE functions to help you set good loops.
Other sample editing functions include TIMESTRETCH which allows you to lengthen or
shorten a sample without changing its pitch (again, we will look at this in more detail later
in this manual) and RE-SAMPLING, a technique that allows you to squeeze the optimum
performance out of available memory space. On the S3000XL, you may also
NORMALISE a sample’s level for optimum signal to noise performance.
Once you have edited a sample you place it into a PROGRAM.
A PROGRAM is where you assemble your sample(s) for playback. In a program, you
allocate a sample to a KEYGROUP (in fact, you can allocate 4 samples to one keygroup
for layering, velocity switching and velocity crossfading but more on that later!). A program
may have as little as one keygroup spanning the entire keyboard or as many as one
keygroup for every key each with four samples in them! To overcome the abrupt tonal
discrepancies sometimes experienced when two different samples are placed ‘side by
side’ on the keyboard, positional keygroup crossfading can be used for a smoother
transition.
Once in a keygroup, the sample may be passed through resonant filters for tonal
modification, through amplifiers for amplitude control and through a pan section for stereo
placement. Keygroups may be freely assigned to the individual outputs for external
processing on a mixing console.
On top of this, you may apply modulation from 2 x Low Frequency Oscillators (LFOs) for
vibrato and other effects. A SINGLE TRIGGER LEGATO mode allows you to emulate solo
instruments such as woodwind and brass more realistically and to allow for greater
expression when playing synth bass parts or lead sounds.
One powerful feature of the S3000XL is the flexible ASSIGNABLE PROGRAM
MODULATION known as APM for short) in EDIT PROGRAM. Using this, any modulation
source may be routed to virtually any control input. In this way, the S3000XL is a powerful
synthesiser as well, except that you may use almost any sampled sound (of your own or
from a sound library) as the basis of your own powerful and expressive sounds.
S3000XL Operator’s Manual Page 19
Page 26
INTRODUCTION
Once you have placed your sample(s) into a program, you may play them from a MIDI
controller in SINGLE mode. If the optional effects processor is fitted in your S3000XL, you
may add powerful multi-effects such as simultaneous distortion, EQ, chorus/flange, delay
and reverb to these programs.
Once you have several programs in memory, you may use the MULTI mode to combine
them together. Typically, this will be to set different programs to different MIDI channels
for multi-timbral sequencing but you may also use the MULTI mode for layering programs
and for key splits. In MULTI mode, the four channels of the optional effects processor
may be used so that different programs may have different effects applied to them.
Furthermore, the MULTI’s internal mixer allows you to mix the level and pan of each
program as well as set its effects send level. With the individual output board fitted, these
programs may be assigned to their own output for mixing on an external mixing console.
Once you are happy with everything, the whole thing may be saved to disk for recall at a
later date.
One of the beauties of the Akai samplers is that there are no restrictions on what you do
with samples - any sample can be placed into any keygroup in any program. One sample
may be placed into a variety of different programs, each of which impose different
envelope or filter settings to create a wide range of possibilities from very little. One or
more samples may be used in any other programs even on other disks and/or one
program can be used as the basis for processing other samples.
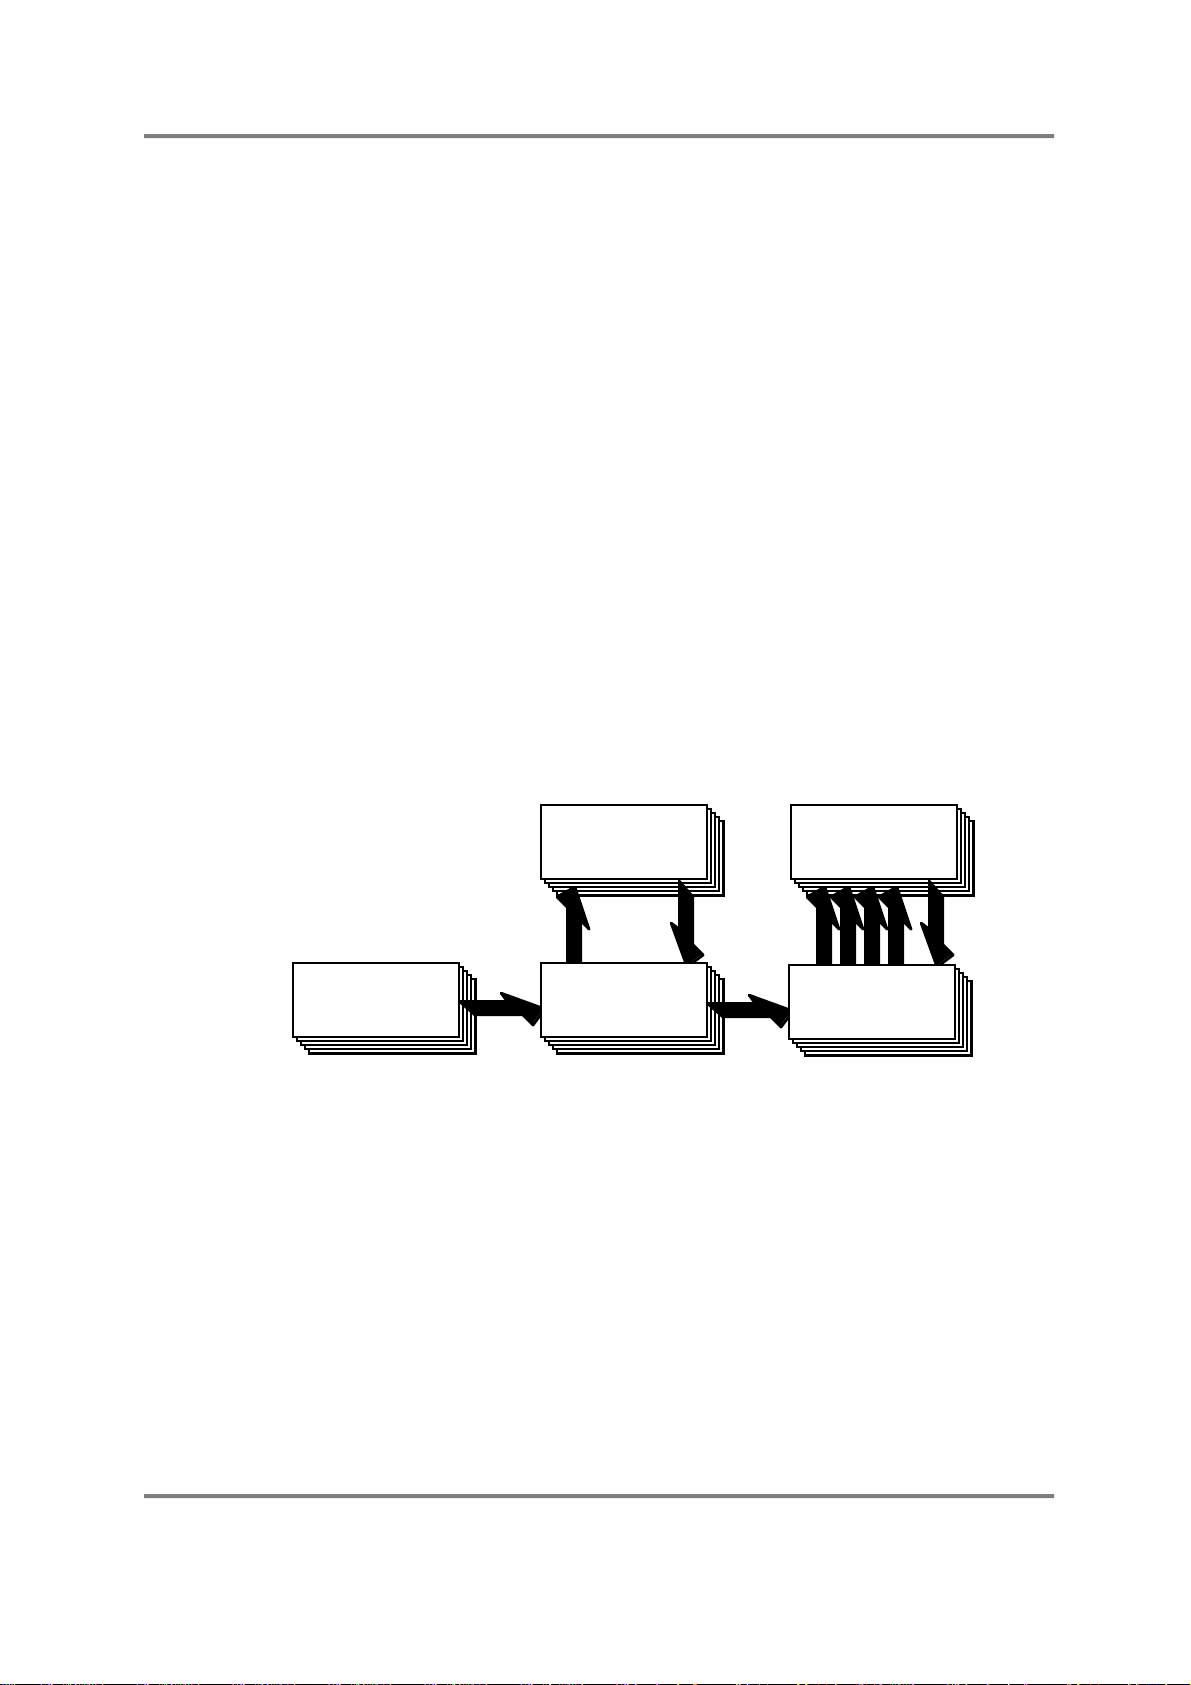
S3000XL FLOWCHART
The following flowcharts will help your understanding of the S3000XL.
EFFECTS
(optional)
PROGRAM(S)SAMPLE(S)
Here, samples are made and edited, placed into programs (which can be played singly if
you wish) and these programs can be placed into a multi (where several programs my be
played together). Programs and multis can use the optional effects processor if fitted.
EFFECTS
(optional)
MULTI
Page 20 S3000XL Operator’s Manual
Page 27
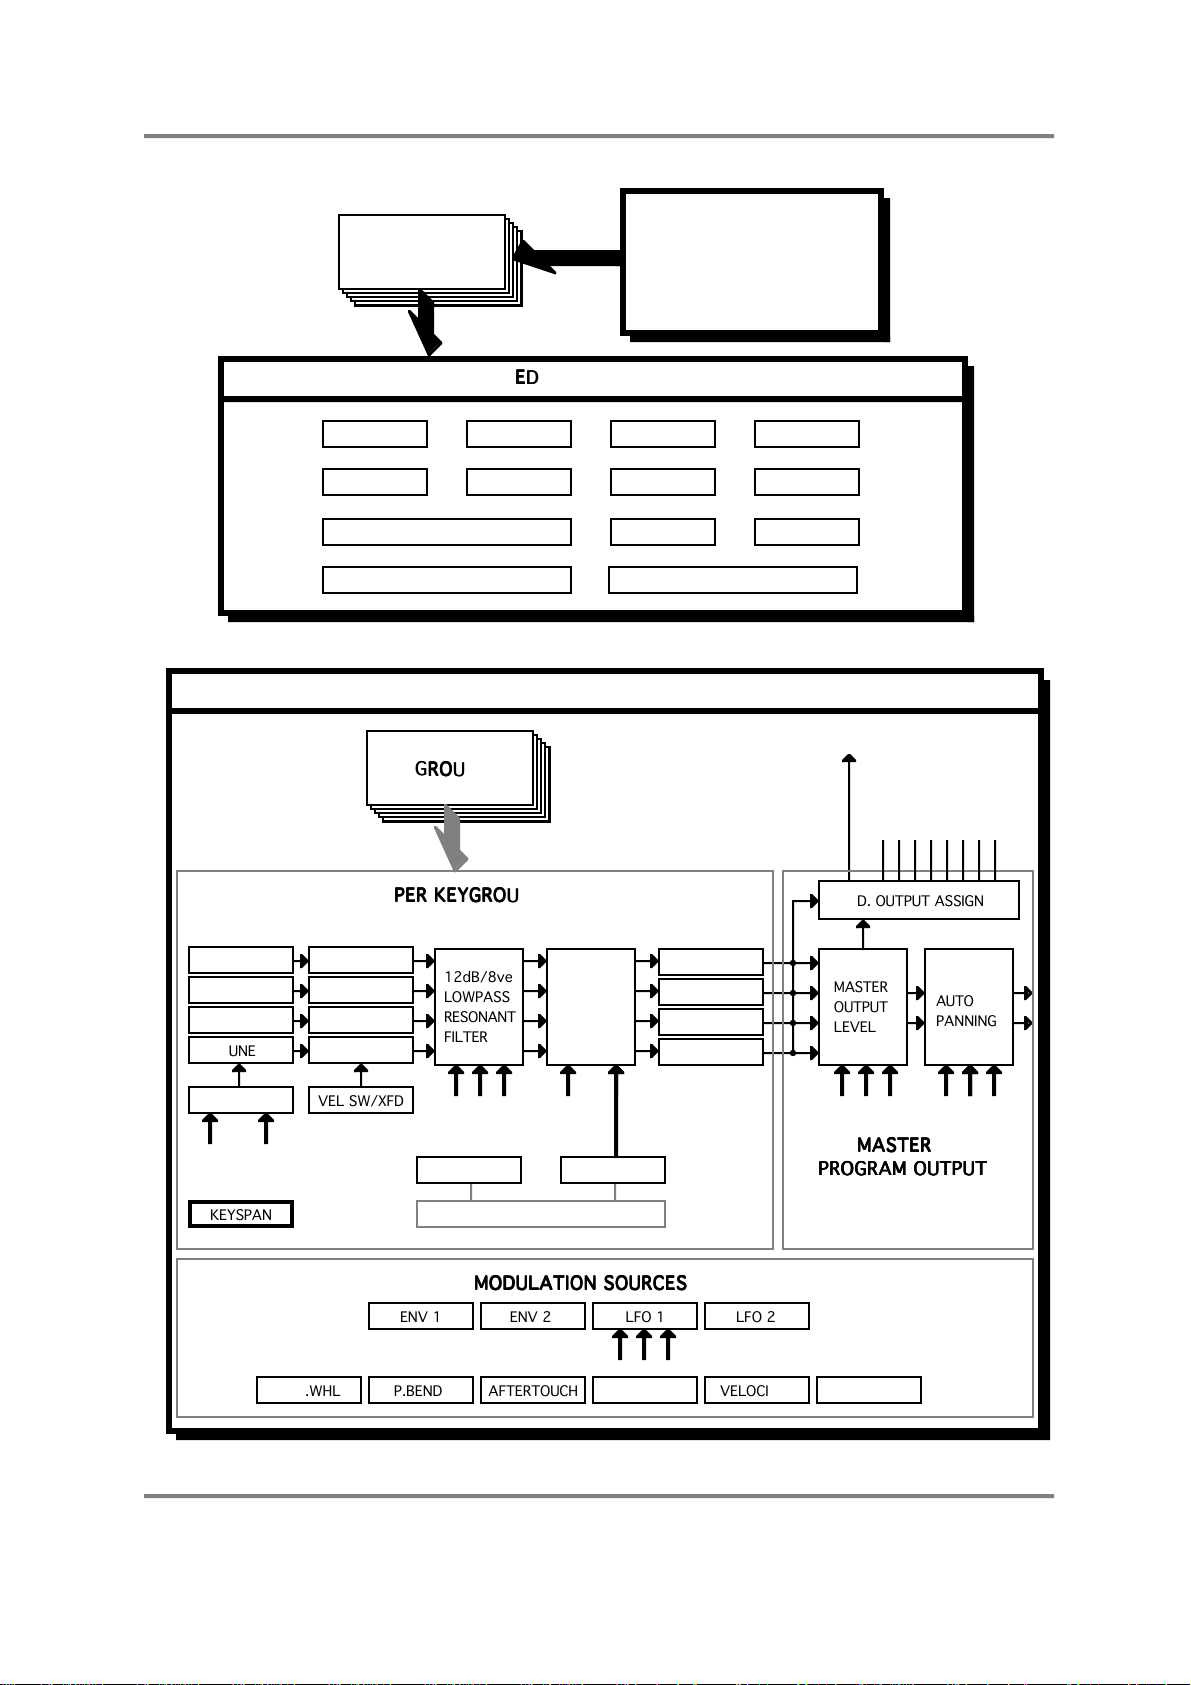
SAMPLE(S)
EDIT SAMPLE
KEYGROUP(S)
EDIT PROGRAM
PER KEYGROUP
MODULATION SOURCES
MASTER
PROGRAM OUTPUT
INTRODUCTION
ANALOGUE INPUTS
DIGITAL INPUTS
FLOPPY DISK
HARD DISK/CARTRIDGE
CD ROM
TUNE
TUNE
TUNE
TUNE
TRIM CHOP CUT
LOOP (X4) JOIN
NORMALISE/RE-SCALE
XFADE
FADE
TIMESTRETCH RESAMPLE
SAMPLE 1
SAMPLE 2
SAMPLE 3
SAMPLE 4
12dB/8ve
LOWPASS
RESONANT
FILTER
AMP
PAN
PAN
PAN
PAN
EXTRACT
TUNE
REVERSE
FX SEND
MASTER
OUTPUT
LEVEL
IND. OUT 1 - 8
IND. OUTPUT ASSIGN
AUTO
PANNING
KG PITCH
VEL SW/XFD
ENV 2 ENV 1
KEYSPAN
MOD.WHL P.BEND AFTERTOUCH VELOCITY EXT.MIDIKBD
ENVELOPE TEMPLATES
ENV 1 ENV 2 LFO 1 LFO 2
S3000XL Operator’s Manual Page 21
Page 28
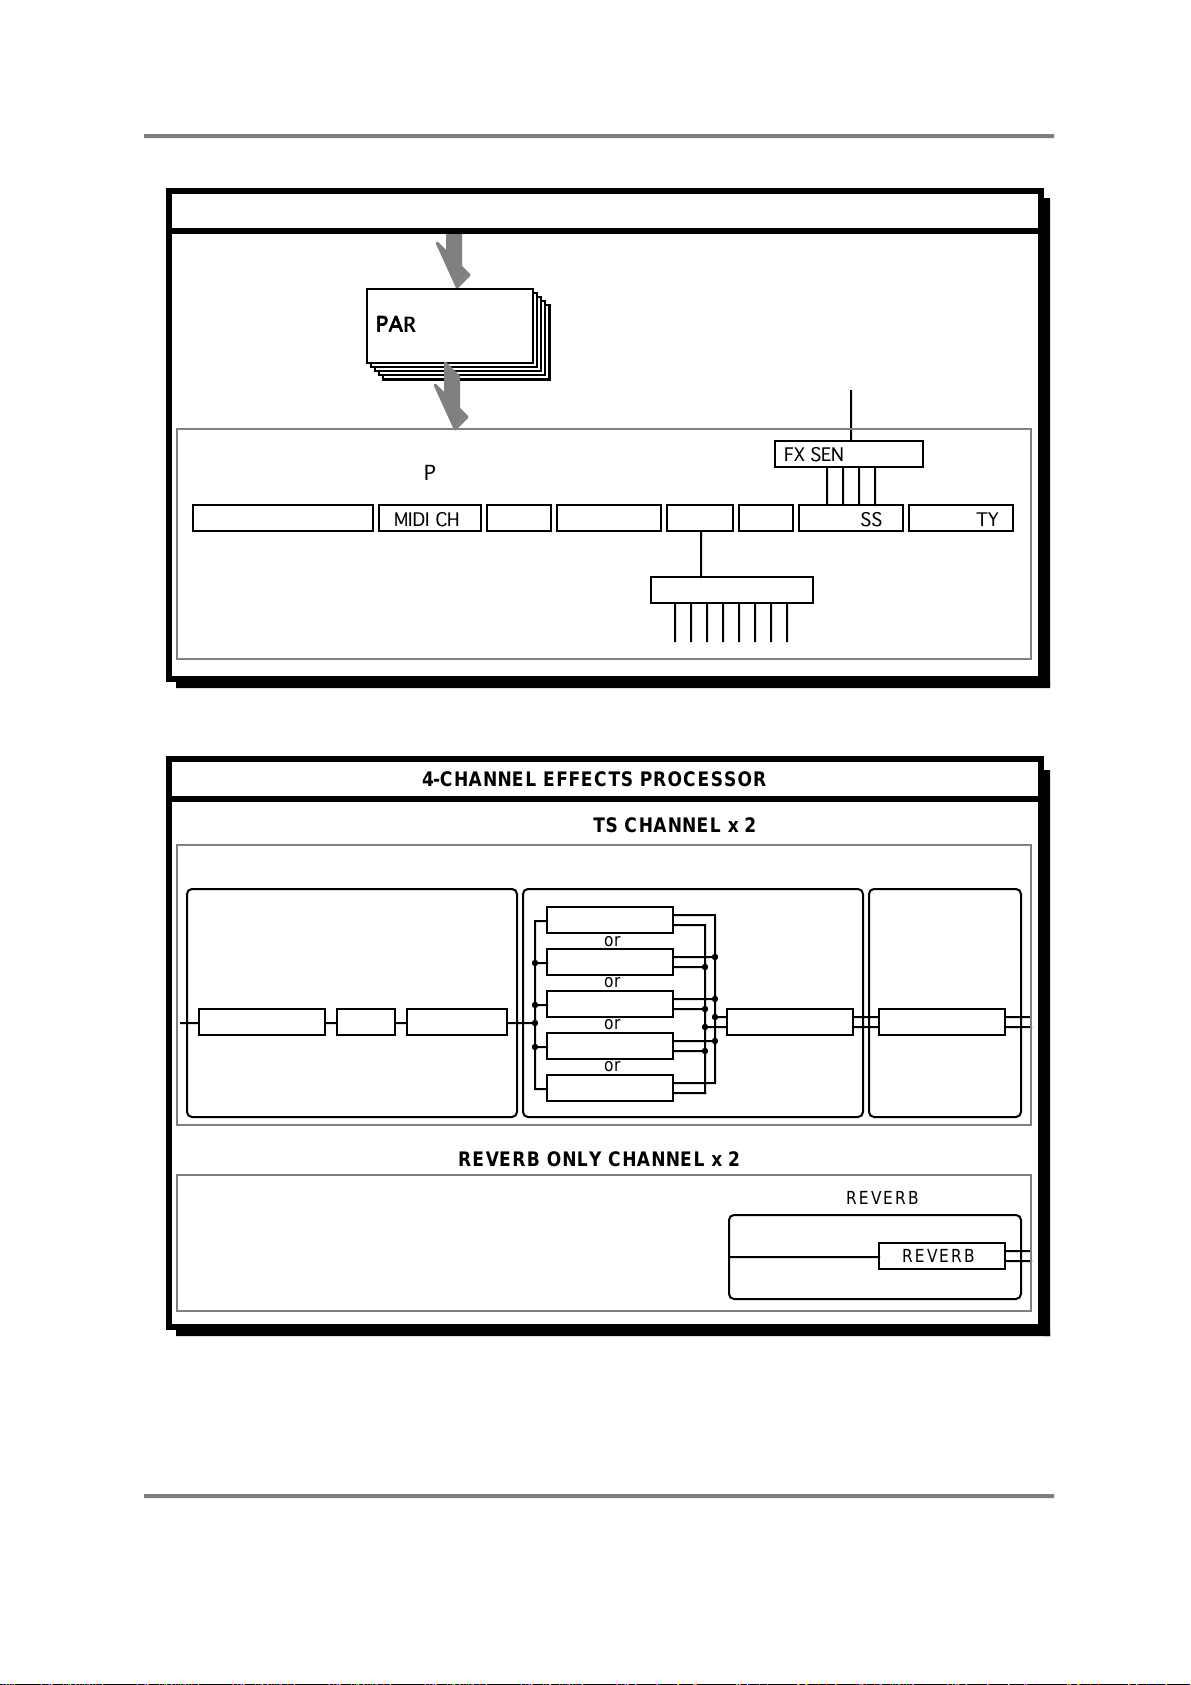
INTRODUCTION
PARTS 1-16
PER PART
MULTI-MODE
FX SEND LEVEL
4-CHANNEL EFFECTS PROCESSOR
MULTI-EFFECTS CHANNEL x 2
DISTORTION EQ RING MOD
TUNEPROGRAM SELECT OCTAVE LEVEL PAN FX BUSS
OUTPUT ASSIGN
MOD/DELAY EFFECTS REVERBDISTORTION/EQ
CHORUS
or
FLANGE
or
PHASE
or
PITCH SHIFT
or
PAN/FMOD
DELAY REVERB
PRIORITYMIDI CH
REVERB ONLY CHANNEL x 2
REVERB
REVERB
Page 22 S3000XL Operator’s Manual
Page 29

SINGLE MODE
SINGLE MODE
SINGLE is where you may select and play programs. Pressing SINGLE gives this screen
display.
NOTES REGARDING THE S3000XL’S SINGLE MODE
Before we look at the functions in this mode, please bear the following in mind.
SINGLE mode, as the name suggests, is essentially designed to play single programs.
However, for historical reasons, in order to be compatible with sound disks created on Akai
S1000, S1100 and the S3000 series, you can, in fact, play several programs at once.
This is done by setting two or more programs to the same program number (see below RENUMBERING PROGRAMS). Furthermore, you may have several programs active at
any one time and each of these may have a different MIDI channel so that they play
multi-timbrally. However, as mentioned, this is included here so that such disks created on
earlier Akai samplers can be used without tedious re-programming or conversion.
NOTES FOR EXISTING AKAI SAMPLER USERS
If you have used an Akai S1000, S1100 or any of the S3000 series samplers and are
familiar with the concept of several programs sharing the same program number, you may
continue to work in this way if you wish but we feel sure you will appreciate the speed and
convenience of the MULTI mode for layering and multi-timbral sequencing once you give
it a try as it has many advantages over the way earlier Akai samplers dealt with multitimbral applications. However, retaining the old method as well gives you the best of both
worlds in that any setups you may have using the older method can still be used plus you
can avail yourself of the new functions as and when you like. You may like to convert
existing S1000/1100/3000 multi-timbral setups into new MULTI files if you wish.
NOTE FOR NEW USERS
If you are new to Akai samplers but have had some experience of other sound modules,
you will probably feel more at home setting up multi-timbral data, layered programs and
key splits in the MULTI mode as this is more in keeping with how other sound modules
work these days. You can use the SINGLE mode for playing single programs. With that
in mind, you may like to skip a lot of this section as it really refers to the ‘old method’ of
using earlier Akai samplers.
SELECTING PROGRAMS
Selecting sound to play can be done in several ways:
1 In the main SELECT PROG screen as shown above, turning the DATA
control will select different programs for playback.
2 In the main SELECT PROG screen, use the numeric keypad to select
sounds by number. To do this, press the </+ key twice followed by a three
digit number. I.e. to select program 25, press </+ and 025. To then select
program 26, simply press 6. To then select program number 1, press </+
once followed by 01 or twice followed by 001.
3 Send MIDI program change commands from your keyboard, synthesiser,
sequencer or whatever MIDI controller you are using. You will note that the
S3000XL uses ‘actual’ program numbers 1-128 - if your keyboard sends
S3000XL Operator’s Manual Page 23
Page 30
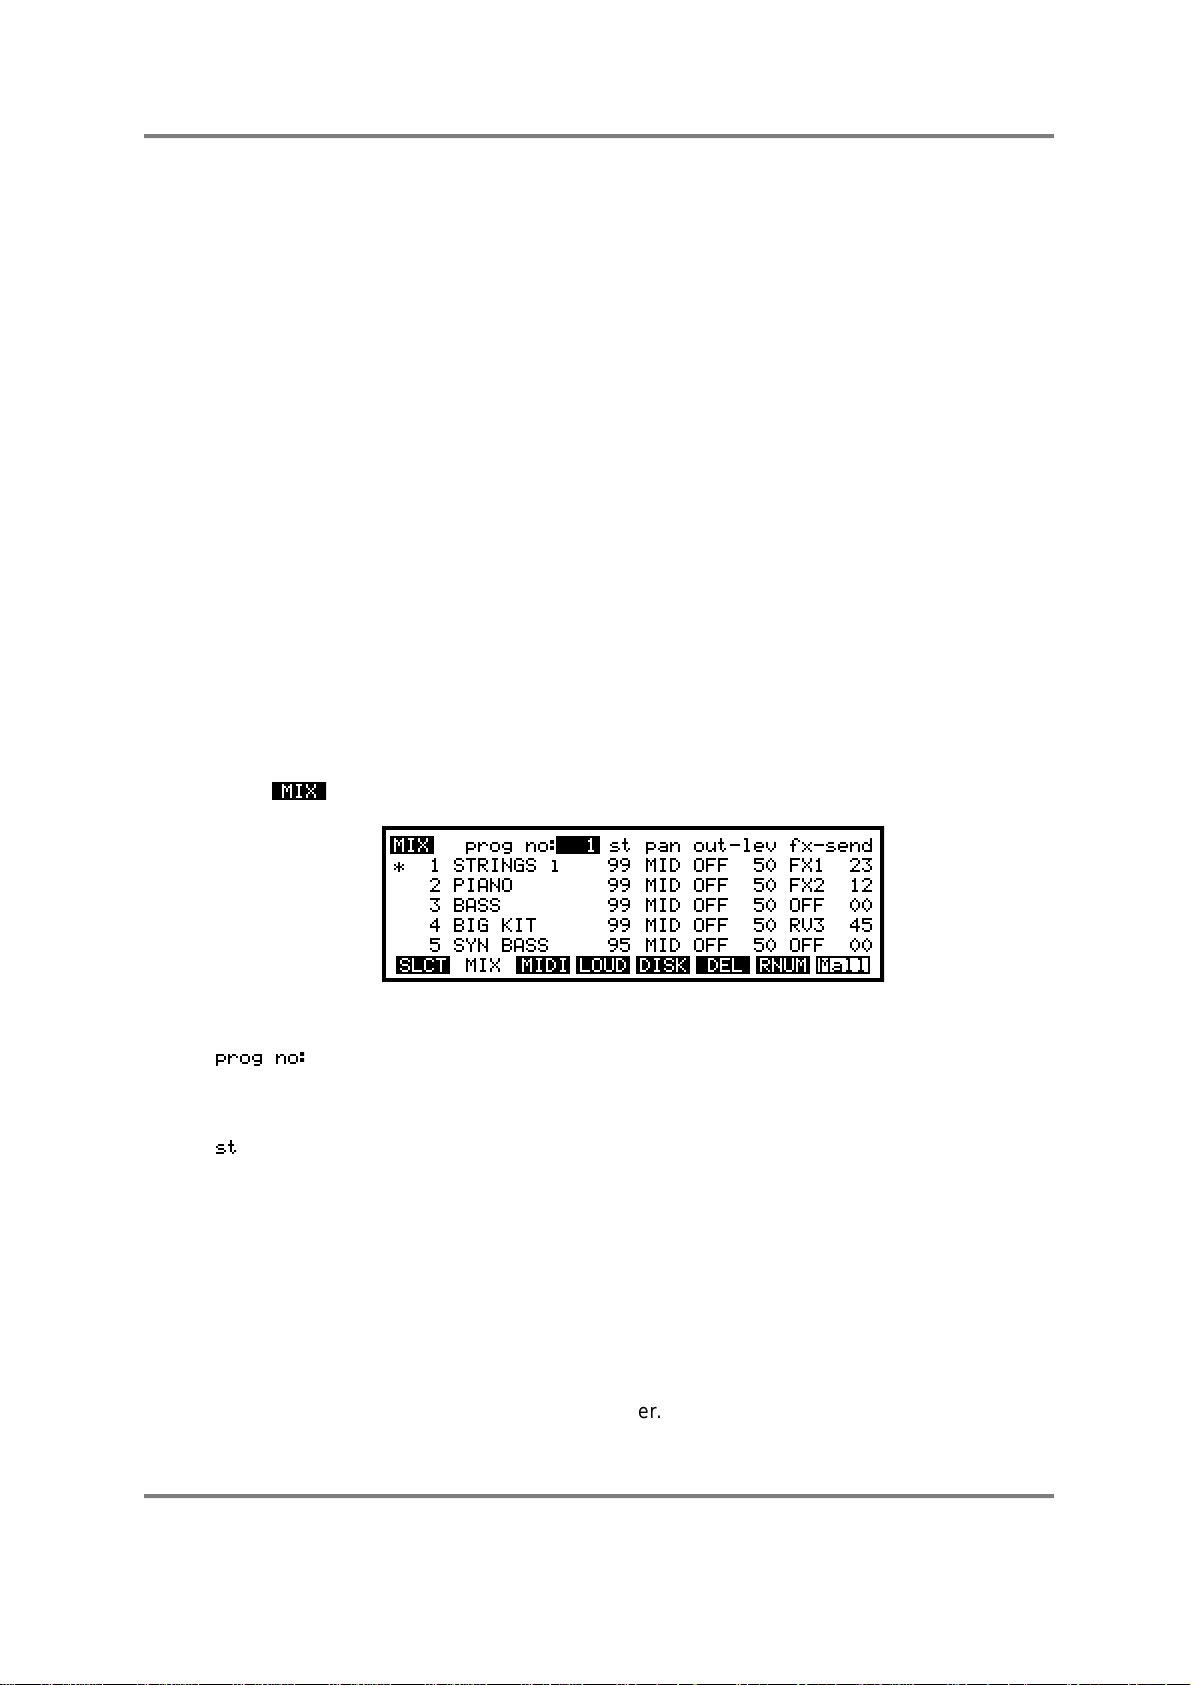
SINGLE MODE
Whichever method you use for selecting programs, when the program is selected, an
asterisk appears alongside it number and the program number is indicated. One useful
feature of the S3000XL is that it is possible to be playing one program whilst another is
being selected. For example, whilst holding down a low string note you could select, say,
a brass sound. The strings will continue to sound and you may now play the brass part.
Please note, however, that if you are using the internal effects on either or both of these
sounds, there may be a noticeable change as only one effect can be used at once. In
this case, the brass program’s effects would take priority.
VIEWING PROGRAMS
The LCD can display 5 programs at any one time. There may be occasions when you
have more than this and so you may use the CURSOR keys to scroll through your
program list. Pressing the CURSOR LEFT or RIGHT keys will scroll though the list one at a
time and pressing the CURSOR DOWN or UP keys will increment through the list in steps
of five programs. This can be helpful if you are searching for a particular sound and need
to see what is loaded in the S3000XL. The display will tell you how many programs are
loaded and in the above example, we can see that there are actually 8 programs in
memory even though only the first five are displayed. It is possible to be viewing other
programs whilst playing another.
out 0-127, please bear this in mind as you will have to offset all program
change commands you issue by 1.
SETTING PROGRAM LEVELS, PAN, FX SENDS
In the MIX page of SINGLE, you may view the programs in memory and set their level,
pan, etc.. This is a convenient and quick way to adjust the levels of single programs
masse
press and you will receive the following display:
On this page you may set, from left to right across the screen:
without having to edit each one individually in EDIT PROGRAM. To access this,
This shows the number of the program selected in the main SINGLE page
although you may select another program or group of programs in this
field.
This sets the level of the program as it appears at the left/right stereo
outputs of the S3000XL. This would normally be used to mix the levels of
different programs and is the equivalent of a mixers fader control. It is
possible to send programs to individual outputs but, by mixing them out of
the stereo outputs by setting this parameter to 00, you remove them from
the main mix. In this way, for example, you could send individual drums to
separate channels of an external mixer for more elaborate level and tonal
control whilst other instruments appear only at the stereo outputs of the
S3000XL. In this way, very complex mixes can be set up. Another method
may be to send, say, snare and kick to individual outputs (but take them
out of the stereo mix) and just have toms and percussion in a stereo
image coming out of the main stereo mix. In this way, you save on
channels on your external mixer.
en
Page 24 S3000XL Operator’s Manual
Page 31

SINGLE MODE
This sets the pan position of the program in the stereo outputs and the
range is L50 through MID (00) to R50.
This allows you to assign any program to one of the 8 individual outputs
should you wish to mix the program using an external mixer. The range is
OFF, 1-8.
NOTE: It is possible to send individual keygroups to these outputs so the results you get
may sometimes be a little unpredictable if you are not sure of the keygroup assignments.
This sets the level of the audio appearing at the individual outputs.
This allows you to route the program to one of the four effects channels,
FX1, FX2, RV3 or RV4. You may also switch the effects routing to OFF.
This sets the effect send level. The range is 0-99.
NOTE 1: The and the parameters only function when the optional EB16 multi-
effects processor is installed.
NOTE 2: In any of the SINGLE mode’s pages, if the EB16 is installed, you may
conveniently mute them using F8 - . This will turn off all four effects channels so
that you can hear the program(s) in isolation.
SETTING PROGRAMS’ MIDI PARAMETERS
Pressing F3 - - will display the following screen:
This could be regarded as a ‘MIDI mixer’ as it follows a similar layout to the MIX page
described above. This page allows you to set various MIDI parameters for each program.
The parameters are:
This shows the number of the program 1-128 selected in the main
SINGLE page although you may select another program or group of
programs in this field.
This allows you to set the MIDI channel for any program and the range is
OM (omni) through 1-16. This parameter allows you to layer programs
together by setting two or more programs to the same program number
and setting their MIDI channels the same in this field. It also allows you to
set up sophisticated multi-timbral configurations (i.e. set several programs
to the same program number and assign different MIDI channels to each
program). You may also layer two or more programs within a multi-timbral
configuration of course.
When two programs are given the same program number, it is possible to
set up keyboard splits by setting the note range of the programs. This
parameter ignores each programs keygroup ranges and simply imposes a
range on the whole program. In this way, you can quickly set up very
S3000XL Operator’s Manual Page 25
Page 32
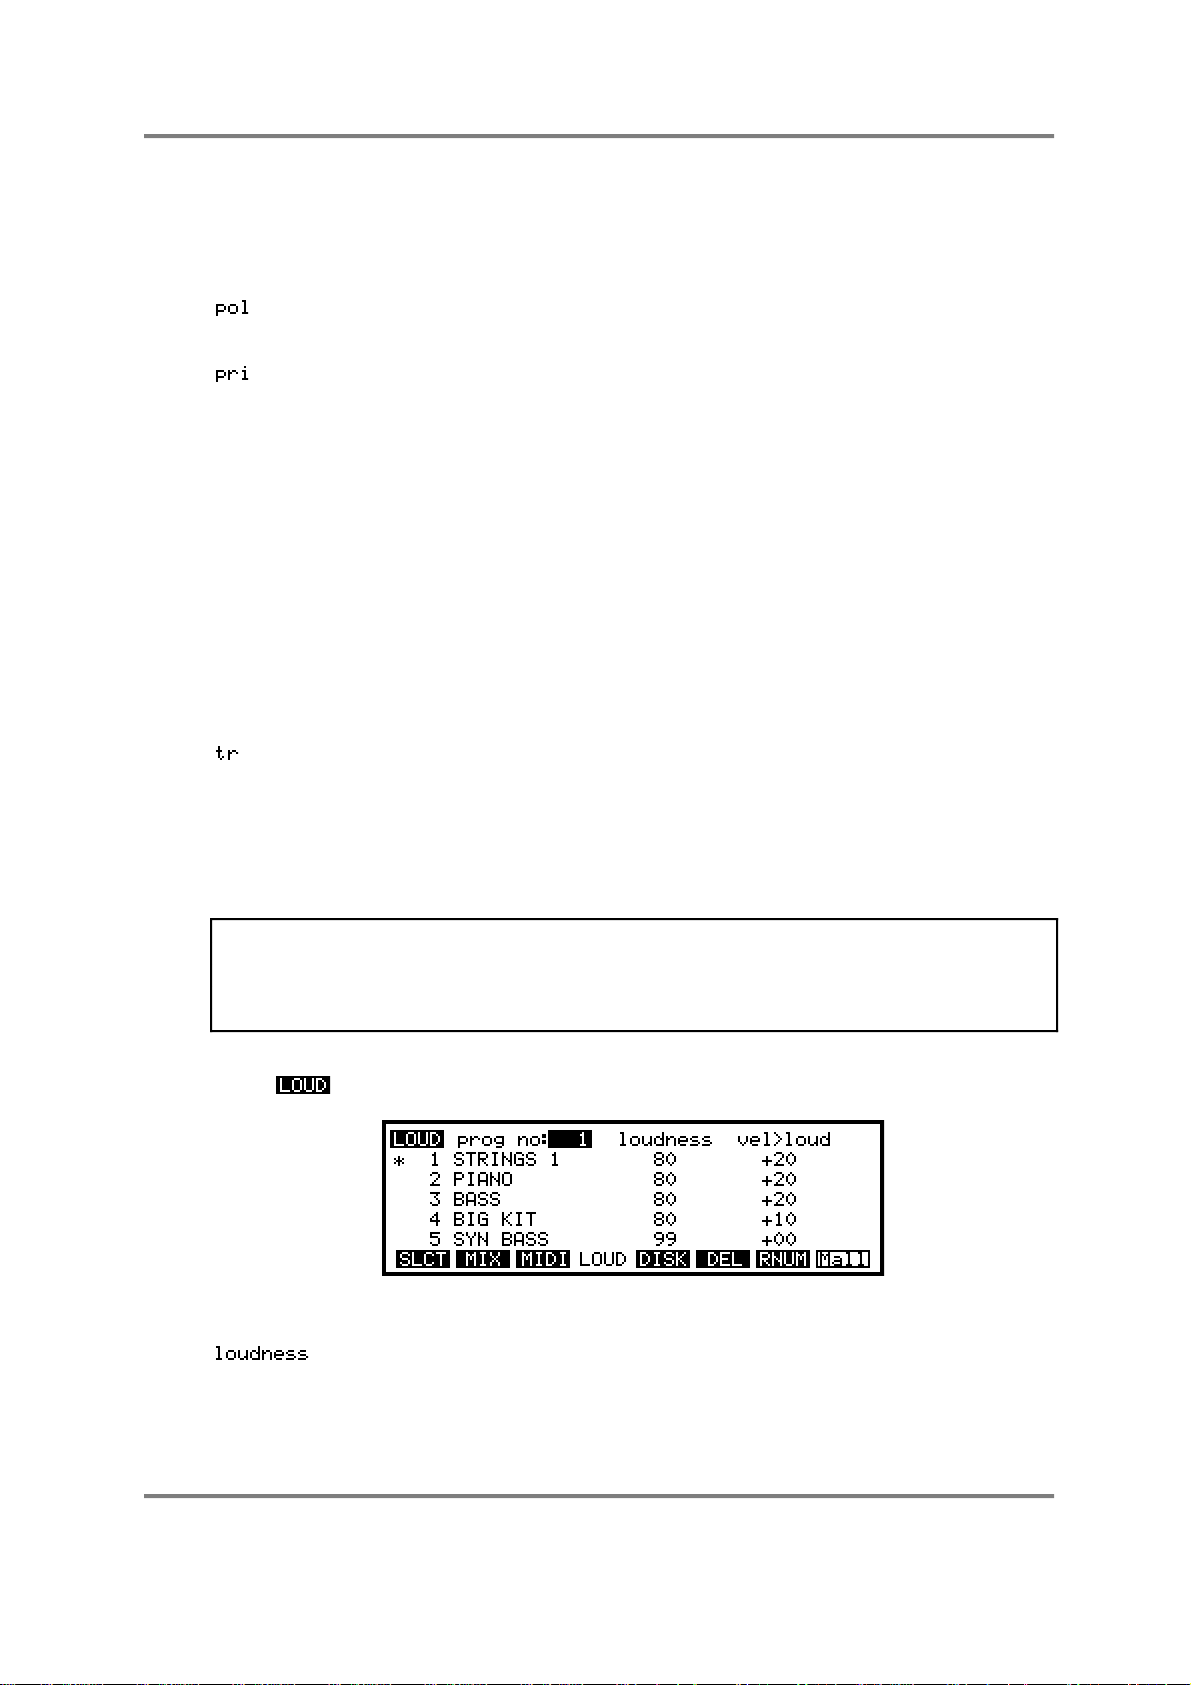
SINGLE MODE
complex keyboard splits and layers without having to concern yourself with
the intricacies of setting keygroups within a program itself. Please note
that this parameter has no effect on single programs, it is only when two or
more programs have the same program number that it is effective.
This is an abbreviation of POLYPHONY and allows you to limit the
polyphony of a program.
This is an abbreviation of PRIORITY and allows you to set how notes will
be ‘stolen’ by other programs if the 32 voice polyphony is exceeded.
There are four settings: LOW, NORM, HIGH and HOLD. If the program is
set to LOW priority, then notes from this program will be stolen first. If set
to HIGH, then notes from other programs with lower priority will be stolen
first before they are stolen from this program. NORM is, of course, normal
priority and sets standard dynamic voice allocation and note stealing will
take place with no particular priority. If a program’s priority is set to HOLD,
then notes can only be stolen from this program by the same program.
If you are playing a complex piece of music using many programs in a
multi-timbral configuration, it is a good idea to set important programs to
HIGH or HOLD and less important, background programs to LOW. If the
piece of music is not overly complicated and polyphony is not going to be
exceeded, you may prefer just to leave the priority at the default setting of
NORM.
This is an abbreviation of TRANSPOSE and sets the basic octave range
for the program. The range is +/- 50 semitones. You will note that this is
not a pitch shift function as such but a MIDI transpose function - this
overcomes the problem of playing back samples out of their range. What
this function does is introduce an offset so that, even if you play C3 on the
keyboard, this is offset to play the samples on C4 (with a +12 setting) - it is
not playing the samples on C3 an octave higher.
NOTE: It must be said that this page is really an inheritance from earlier Akai samplers
when using multi-timbral setups. We strongly recommend that for such purposes, you use
the MULTI mode but retaining these functions ensures compatibility with data created on
earlier models. If you have used Akai samplers before, you may continue to work in this
way, of course, but, as mentioned, the new MULTI mode may be more convenient
SETTING PROGRAM LOUDNESS AND VELOCITY
In the page, you may set the program’s overall loudness and velocity sensitivity:
The parameters are:
This sets the overall loudness for the program and affects the level
appearing at the main left/right outputs, the individual outputs and the
real-time digital audio output. It will also affect the level going to the
internal effects.
Page 26 S3000XL Operator’s Manual
Page 33

SINGLE MODE
NOTE: You will note that at a setting of 99, the program is at maximum level but you will
not have any velocity sensitivity.
This sets the program’s sensitivity to velocity. As mentioned, with
set to 99, this parameter will have no effect.
S3000XL Operator’s Manual Page 27
Page 34
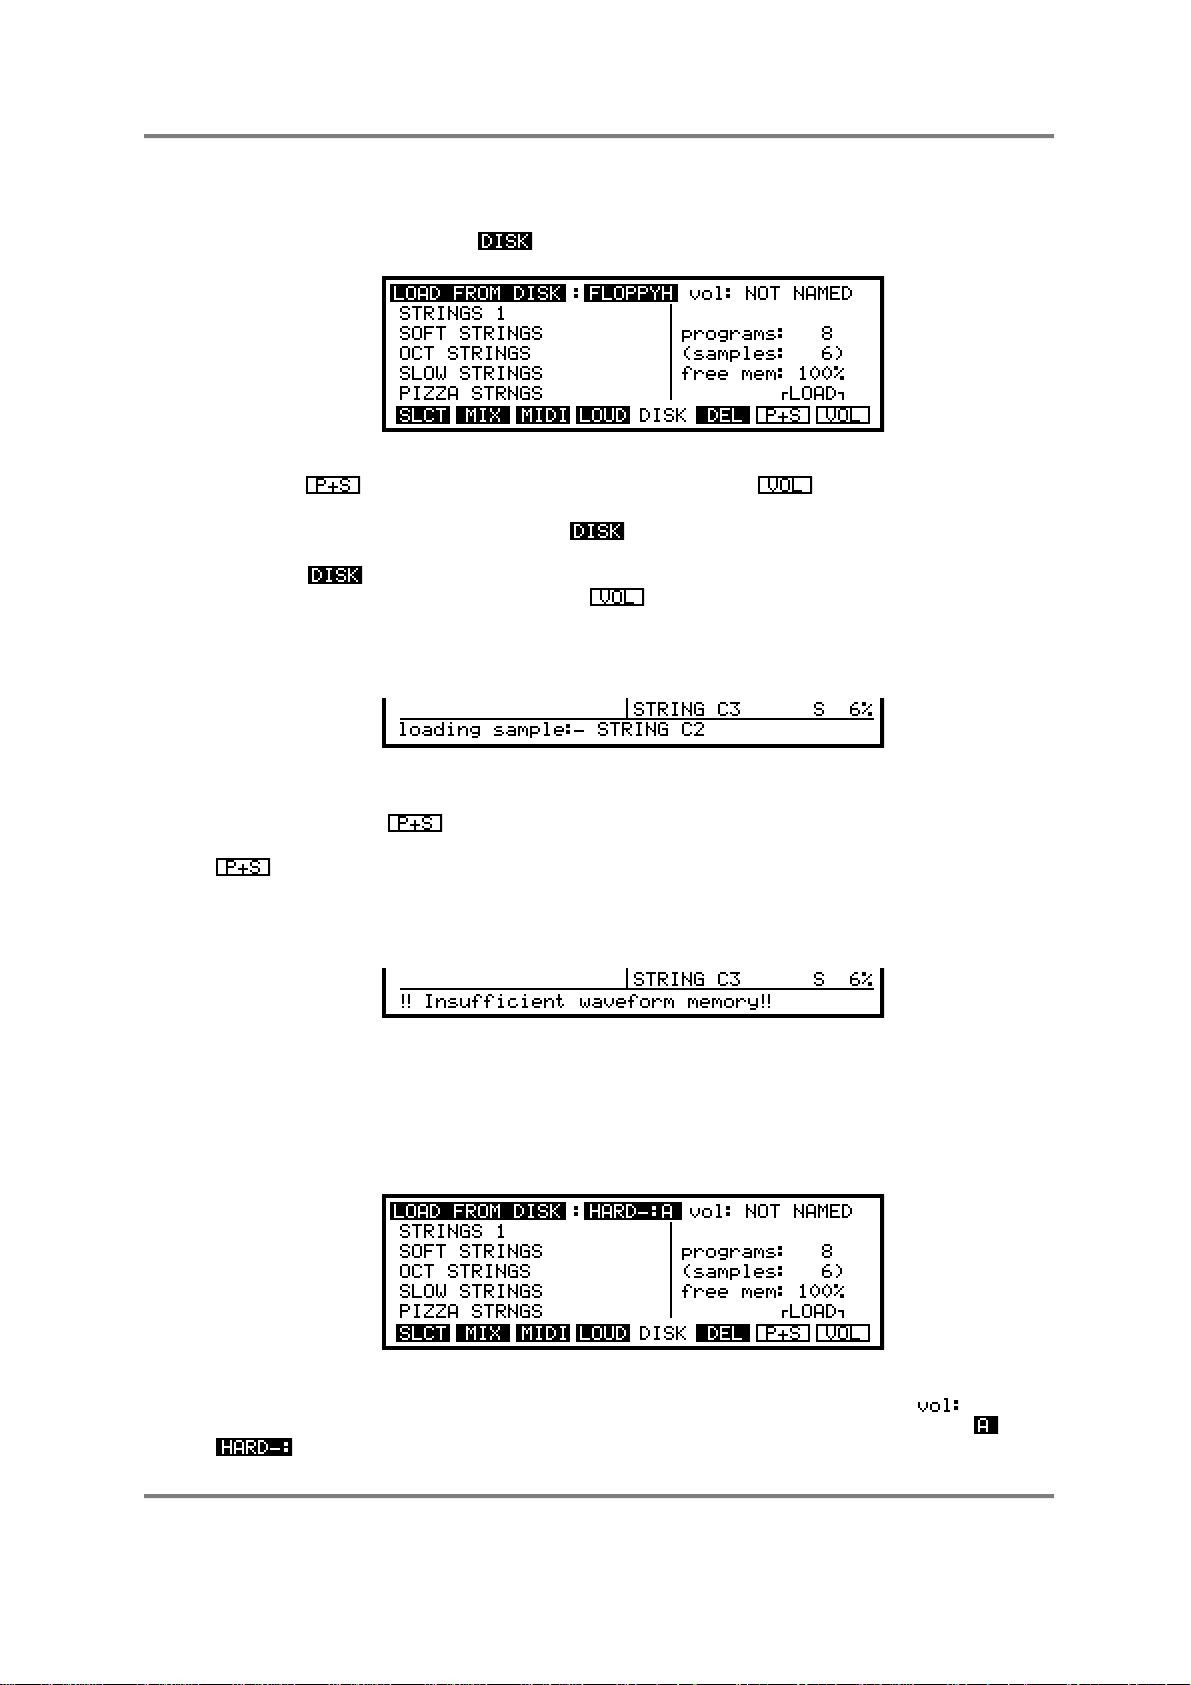
SINGLE MODE
LOADING FROM FLOPPY DISK
The next key along, F5, gives you access to some basic disk functions for loading sounds
into the S3000XL. Pressing in the SELECT PROG mode gives you this screen:
Here, you have a choice of two options: loading a particular program and its associated
samples ( ) or loading the entire contents of the disk ( ).
If you have inserted a disk, pressing will bring up a list of all programs stored on
that disk. If you have inserted the wrong disk or wish to change it, insert a new disk and
press the key again. If you want to wipe out all programs and samples in memory
and load the contents of the disk, press . You will be asked if this is what you really
want to do. Make sure that you either do not want the programs and samples in memory,
or that they are saved to disk before you proceed. As the disk is loading, you will receive
this display
indicating the loading progress.
The other option, , allows you to load a program and all associated samples (free
memory permitting). To do this, highlight a program using the CURSOR keys, and press
. The program, and its associated samples, will be loaded into memory. If the
samples required by this program already exist in memory, they will be loaded anyway,
but they will overwrite the samples currently in memory. If there is not enough memory to
load a program and its samples, the message
will be displayed. In this case, you will have to delete some existing programs and/or
samples to free up some memory space.
LOADING FROM HARD DISK
If you have a hard disk of any description connected via SCSI for loading sounds, you will
receive the following display when F5 is pressed:
This is almost the same as for floppy except that you can see it tells you that it is a hard
disk. You may select from different volumes by moving the cursor to the field and
scrolling through the volumes on the disk. By moving the cursor to where it says ‘ ’ after
, you may select different partitions to choose other volumes. Loading is done in
Page 28 S3000XL Operator’s Manual
Page 35

SINGLE MODE
the manner described above - press to load the entire volume and to load a
particular program and its associated samples.
NOTE: There is more to using a hard disk than that, unfortunately, such as matching
SCSI ID’s, formatting, etc.. For details on using the S3000XL with a hard disk, please refer
to the section HARD DISK CONTROL in the DISK section.
Other disk operations, like saving and formatting disks, are performed in the DISK mode,
not from this page. This page is intended purely for quick access to loading from disk.
S3000XL Operator’s Manual Page 29
Page 36
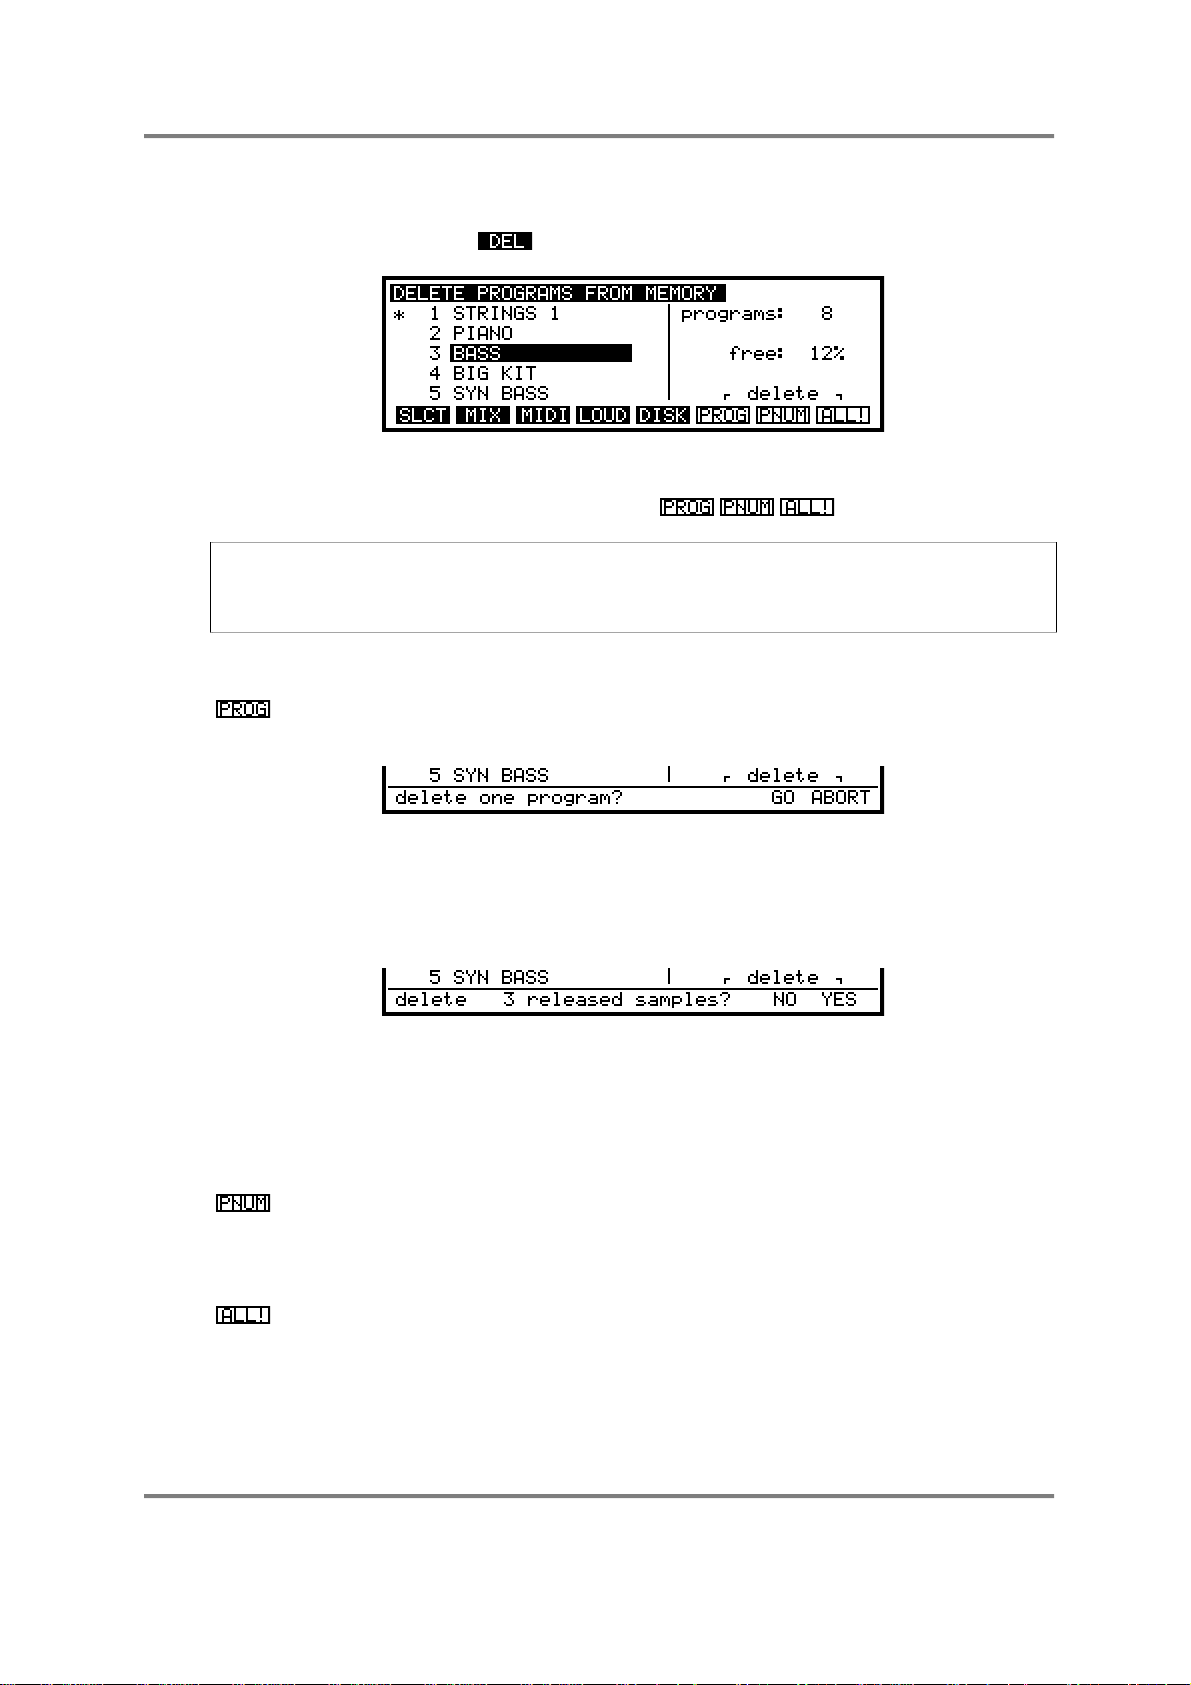
SINGLE MODE
DELETING PROGRAMS
Programs and their associated samples may be deleted from memory in this page, which
is accessed by pressing the key. Pressing this key displays this screen:
When this page is displayed, the cursor will highlight a program. Highlight the program
you want to delete using the CURSOR keys. There are three soft key actions that you
can take, all concerned with deleting programs:
NOTE: If you delete a program from memory, make sure that you really do not need that
program in the future or that you have saved it to disk first. In some cases, as explained
below, deleting a program will also delete samples. Make sure these really are unwanted
or have been saved to disk before proceeding.
The three ‘action’ keys are as follows:
Pressing this will display this prompt:
and you should press GO or ABORT as necessary.
If the program is the only one in memory using a particular set of samples,
you will receive the following prompt:
Press the appropriate soft key if you are sure that you want to delete the
program and its associated samples.
If the samples contained in the program are used elsewhere in other
programs, you will not receive this prompt as it is assumed you don’t want
to lose these samples.
This will delete all programs which have the same number as the
highlighted program. You will be asked if you want to proceed with the
bulk program delete. If these programs are the only ones using particular
samples, you will be asked if you want to delete the samples as well.
This, of course, is the most drastic of these three options. If you answer
GO and YES to the questions regarding released samples, then all
programs, (except for an S3000XL generated program - TEST
PROGRAM) and samples will be deleted. Deleting samples and
rearranging memory space may take a little time, so be patient while this
takes place.
Page 30 S3000XL Operator’s Manual
Page 37

SINGLE MODE
NOTE: Obviously, is an option to be used with some caution. If the programs and
samples in memory have not been saved to disk, deleting programs and/or samples at
this point will be fatal - YOU WILL NOT BE ABLE TO RETRIEVE THEM. Please be
careful.
S3000XL Operator’s Manual Page 31
Page 38

SINGLE MODE
RENUMBERING PROGRAMS
On the S3000XL, program numbers correspond to patch numbers on a synthesiser.
When a MIDI Program Change message is received, the appropriate program is selected.
However, to match S3000XL programs with the patch numbers on your synthesiser, you
may want to renumber the programs, so that selecting a brass sound on the S3000XL will
call up a similar (or complementary) patch on a remote synthesiser module. To do this,
press the key.
You will receive something like this screen display:
As the screen informs you on this page, you select the program to be renumbered using
the CURSOR keys and alter the current number to the new number using the DATA
control. You can also use the numeric keypad for this, setting the program number to a
value of between 1 and 128 (these are MIDI specification limits). When you have altered
the number, you have several options to choose from on soft keys 6, 7 and 8. These are:
This will set all programs to the same number as that set in the currently
selected program. For example, placing the cursor on 3 - BASS and
setting that to 1 would renumber all the programs to program number 1.
This is useful when you have loaded in a variety of sounds from different
disks or hard disk volumes and wish to sequence them multi-timbrally (see
later).
This causes all subsequent programs to be renumbered with an offset to
the currently selected program. For example, if you renumbered program
4 to 10, all subsequent programs (i.e. SYN BASS and others off the
screen) will be renumbered 11, 12, 13, etc.. whilst programs 1, 2 and 3
would be unaffected.
This will only renumber the currently selected program. All other programs
will be unaffected. You may also use this to renumber several programs in
one go. For example, change the programs accordingly (i.e. 1, 2, 3, 4, 5,
etc.) and then press (although the would be more appropriate
for this).
This will renumber all programs sequentially 1-? depending on how many
programs are in memory.
Once you are happy with the result of your renumbering, press to return you to the
main SINGLE screen display. Also, if you change your mind and do not wish to renumber
something now, simply leave the RNUM page without pressing F3, F4, F5 or F6.
Page 32 S3000XL Operator’s Manual
Page 39

SINGLE MODE
USING THE S3000XL IN ‘OLD AKAI’ MODE!
The next group of explanations deal with using the SINGLE mode like the SELECT PROG
mode on earlier Akai samplers such as the S1000, S1100 and S3000 series. As
mentioned, these functions have been retained in order to preserve compatibility with
data created on these samplers. In keeping with other sound modules, the S3000XL
sees the introduction of a new MULTI mode. This is a quick and easy way of combining
several programs together for multi-timbral sequencing, layering and key splits. However,
progress brings with it certain compatibility issues and the fact remains that, as THE
industry standard sampler the world over, there is a lot of data out there that was created
on Akai samplers. For compatibility (and to be considerate to our customers!), the ‘old
Akai’ way of working is retained. The following explanations, therefore, refer to this method
of operation should you wish to work in this way or if you have existing sound library that
uses this method. If you have used Akai samplers before, you may well wish to continue
working in this way but, if you are new to our samplers (welcome!), you may prefer to skip
this section and refer to the section that explains MULTI mode and all it advantages.
USING SELECT PROG - PROGRAMS WITH THE SAME NUMBER
Most of the time, you will probably want to load in the sounds you need and these will be
single programs for playing from the keyboard (or whichever MIDI instrument you play). As
we have seen, this is easy enough - simply scroll through using the DATA control or select
them via MIDI program change. There are occasions when you want to play several
programs together, however, and this is where the renumbering becomes useful.
LAYERING PROGRAMS
Although it is possible to layer sounds within one program or within MULTI mode, it is
useful to be able to call up several programs together.
For example, let’s say you have a string program and brass program you want to
combine. As mentioned, you could make up a program that combined all of these
samples but an easier way is to simply give them the same program number - for
example, renumber them both to, say, program 1. When you select program 1 you will
then select the combined programs with the strings and brass layered together. You may
also set the balance and pan positions between these sounds in the MIX page.
You may prefer to layer sounds using RNUM rather than creating one program with the
required sample(s) in it because there are certain aspects to creating a program that
affect all things the same. For example, the auto-panning and effects send would affect
all samples equally - when using the RNUM function, one sound in the layer could be
panning slowly left to right routed to FX1 whilst another stays central through RV3. You
also have easier control of the respective levels of the programs in the layers.
Of course, you are not limited to layering just two sounds - you could layer up to 32
programs for a monster monophonic lead line or bass sound!
CREATING KEYBOARD SPLITS
As for layering, it is easy to set key splits in EDIT PROGRAM or in MULTI mode but,
again, it may be more convenient to create the split using the RNUM function.
Let us say you have two programs - UPRIGHT BASS and VIBES - and you want to create
a split so that you can perform a walking bass line with your left hand and a jazzy vibes
solo with the right. By setting the RANGE parameter in the MIDI page (F4) accordingly,
the bass can be set to finish at B2 and the vibes set to start at C3. Even though both
these programs originally spanned the entire keyboard, this function allows you to impose
limits on the programs’ keyranges. Now, assuming that both programs have the same
program number (i.e. both are renumbered 1 or something), then you can play both
programs with the keyboard split.
S3000XL Operator’s Manual Page 33
Page 40

SINGLE MODE
USING RENUMBERING TO CREATE MULTI-TIMBRAL SETUPS
One of the most appealing things about MIDI is its multi-channel ability. Originally, synth
modules could be set to a specific MIDI channel number so that several modules could
be set to play several musical parts from a sequencer. Of course, as technology
advanced, it became possible to do this within one module and such a module is known
as ‘multi-timbral’ - i.e. ‘many sounds’. The S3000XL is no exception and has powerful
multi-timbral capabilities.
Multi-timbral setups are more easily created in the new MULTI mode but, if you want to
use old method, read on.
To set up a multi-timbral assignment in SINGLE, we use the renumbering function again.
Assuming you have loaded in a pile of programs you wish to sequence, give them all the
same program number. This is done in the RNUM page and you simply give the same
number to all programs using the function. You should receive a display something
like this when you return to the main SELECT PROG screen:
Here, all programs are number 1.
Of course, you will need to assign each program to have different MIDI channels:
You can also use the MIX page to set the levels, pan position, output assignment and
effects send for each program:
Remember, also, that you may use a combination of all of these techniques and you can,
of course, have a mix of split and layered programs within a multi-timbral assignment.
Using the S3000XL live, you may have several multi-timbral setups in memory at any time
(memory allowing, of course!). In this way, you may have sets of programs for each song
recalled from a MIDI program change from your sequencer (this is one advantage of
using this method over MULTI - you may only have one multi file in memory at any one
time).
Page 34 S3000XL Operator’s Manual
Page 41

SINGLE MODE
SINGLE VS MULTI
As mentioned, you may avhieve similar results in the MULTI mode where you can create
multi-timbral setups, key splits, layered programs (and combinations of these) very quickly
and easily. The advantages MULTI has over the ‘old Akai’ methods are
• Selection of programs for a part is quick and easy.
• You can try out different sounds very easily and is therefore ideal for loading in, say, a
few pianos, a few basses, a few drum kits, etc., and experimenting with different
combinations of sounds. Equally, when layering, choosing and experimenting with
combinations is extremely quick.
• When changing sounds, any mixer parameters, effects assignments, etc., you may
have set in the MULTI remain constant so you do not have to reset everything every
time you change a sound.
• You can use the same program several times in a MULTI. For example, you may
layer a strings program (or whatever) on top of itself with some detune for a richer
sound simply by applying the same program to two (or more) parts, giving those parts
the same MIDI channel and setting a FINE TUNE value for each as appropriate (to
achieve the same result in SINGLE requires that you make a copy of the program).
• In the case where a program is layered on top of itself for detuning, editing one of
them will affect both so that you can make changes to the whole sound with one
sionple action (for example, layering a string pad on top of itself with some detune
and editing the attack of one of the parts will cause both parts to be affected).
• You may select different programs independently on different MIDI channels (i.e.
send a program change on channel 5 to select a new string sound in part 5).
• You can save the multi file with a meaningful name (i.e. BACK TRACK 3 or the name
of the song, whatever).
• If you are new to samplers, the MULTI mode corresponds more with most other
sound module’s implementation that you may be more familiar with.
The disadvantages of MULTI is that only one multi file may reside in memory at once
(although any number may be saved to disk) and you can’t have more than sixteen
programs active at any one time.
The advantages of using the ‘old Akai’ method are:
• You can have several multi-timbral setups or layers in memory at any one time and
recall them with a single MIDI program change (ideal for live work where you may
have the backing tracks for all your songs in memory).
• You may have more than sixteen programs active at once (although there are not
more than sixteen MIDI channels, you may have layered programs in a multi-timbral
setup).
The disadvantages, however, are:
• Changing sounds in a multi-timbral setup and experimenting with different
combinations of sounds can be awkward.
• You cannot select a new program for one of the parts using MIDI program change
commands (you can’t send a MIDI program change on MIDI channel 5 to select a
new string sound for that part, for example).
S3000XL Operator’s Manual Page 35
Page 42

SINGLE MODE
• When you assign a new program to the setup, its level, pan, effects routings are
recalled with it. This may be an advantage for some users but it does mean you have
to reset the mix every time you replace one sound with another. Furthermore, even
though a program’s effects channel is recalled when you assign a new program to the
multi-timbral setup, the effects preset associated with that effects channel may be
different and so cause unpredictable results.
• You can’t name a set up and so you can’t see the multi-timbral setup referred to by
name when you come to load it.
Basically, there are pros and cons to both methods - it’s up to you to decide which you
want to use depending on your application. At least you have the flexibility to use either.
The big advantage is that you may load older sound library material and use it with no
conversion process or editing required. As mentioned, whether you choose to convert
older Akai sound data into S3000XL ‘format’ using the MULTI mode is up to you
depending on your application.
Page 36 S3000XL Operator’s Manual
Page 43

MULTI MODE
MULTI MODE - COMBINING SEVERAL PROGRAMS
Multi mode is where you can combine up to sixteen programs together so that they may
be played in combination. The MULTI mode has 16 ‘parts’ - slots into which up to 16
programs may be assigned and typically, this is used to sequence several programs multitimbrally2 by setting each part to be on a different MIDI channel.
However, it is also possible to set parts to the same MIDI channel so that you can layer
programs for a rich, expansive (expensive?) sound. Furthermore, you may set low and
high keyboard ranges for each part so that sophisticated keyboard splits may be created.
With the optional multi-effects processor fitted, each part may be routed to one of the four
effects channels and you have a total of four effects that can be applied to the parts in
the multi. More than one part may be routed to any one of the effects channels so that
parts may share effects and each part has its own effects send level.
However, you may prefer to use the S3000XL with external effects processors using a
mixing console. To accommodate this, each part may be routed to one of the 8 individual
outputs. By doing this, each part may have its own mixer channel where it can be EQ’d,
mixed, panned and effected using your favourite outboard effects processors.
Of course, a combination of these is possible. In one multi, some parts may be on unique
MIDI channels whilst others share the same channels for layering and/or key splits and
some parts may be routed to the internal effects processor in the S3000XL whilst others
are sent out via the individual outputs for processing on the mixing console.
As you can see, the MULTI mode is very flexible.
NOTE: Strange though it may seem, you may also use SINGLE mode to set up multitimbral setups, program layering and key splits. Although it may seem a contradiction in
terms to use the SINGLE mode for ‘multi’ applications, this is to maintain compatibility with
data created on earlier Akai samplers. If you are an experienced Akai sampler user, you
can continue to work this way but we do recommend you use the new MULTI mode as it
does offer certain advantages in terms of ease and speed of use and convenience.
Please refer to the section SINGLE mode for details on this.
2 The S3000XL can respond to all 16 MIDI channels simultaneously in the MULTI mode.
‘MULTI-TIMBRAL’ literally means ‘many sounds’. In the early days of synthesisers, you
needed a separate synthesiser for every part you wanted to play but, with the advent of
MIDI, a synthesiser or sampler could be coaxed into playing several different sounds
together so that only one synth/sampler was required to play several parts. With the
S2000’s 32-voice polyphony, complex multi-part arrangements can be performed using the
MULTI mode.
S3000XL Operator’s Manual Page 37
Page 44

MULTI MODE
Pressing MULTI will give you this screen:
ASSIGNING PROGRAMS TO PARTS
To assign a program to a part, simply move the cursor to the program name field and use
the DATA wheel to scroll through the programs in memory. Once you’e done that, move
the cursor to the next part and select the program for that and so on.The other parts show
a “?” indicating that no programs are assigned (the “?” would also show if a program was
assigned to a part but that program wasn’t currently in memory). All the MULTI screens
show the parts in a vertical list and on each screen, you can see the program name and
the MIDI channel it is assigned to.
SETTING A PART’S MIDI CHANNEL
Simply move the cursor to the column and set the MIDI channel as appropriate. For
multi-timbral sequencing, you would normally set each part to a different MIDI channel but
for layering and/or key splits, you can set two or more parts to the same MIDI channel so
that they will play together.
MIXING THE PARTS
Once you have several parts being played, you need to balance their levels and pan
position. To do this, simply move the cursor to the field to set the part’s level and to
the field to set its pan position. You will note that even if you change the program
assigned to that part, the level and pan values weill stay the same.
SENDING PARTS TO THE INTERNAL EFFECTS
Each part may be sent to one of the internal effects if the optional EB-16 is fitted.
Because the EB16 offers no less than four channels of effects processing, you can have
up to four completely separate reverbs at once (two channels also offer multi-effects).
More than one part may be sent to the same effects channel.
To assign the part to an effects channel, move the cursor to the column and select the
effect (FX1, FX2, RV3, RV4) and set the effects send level using the parameter.
NOTE 1: The and the parameters only function when the optional EB16 multi-
effects processor is installed.
NOTE 2: In any of the MULTI mode’s pages, if the EB16 is installed, you may
conveniently mute them using F8 - . This will turn off all four effects channels so
that you can hear the program(s) in isolation.
These are the most commonly used MULTI parameters. Less commonly used ones are
accessed via the soft keys.
Page 38 S3000XL Operator’s Manual
Page 45

MULTI MODE
ASSIGNING PARTS TO THE INDIVIDUAL OUTPUTS
Pressing F2 - - will take you to the output assignment page:
Here, you can set which of the 8 individual outputs each part will appear through. You
may also set the level of the sound appearing at any of the outputs.
TUNING AND TRANSPOSING PARTS
To tune the parts, press F3 - :
The column allows you to tune the part in semi-tone steps and the
column allows you to fine tune parts.
NOTE: The range of the TRANSPOSE parameter is +/- 50 semitones. You will note that
this is not a pitch shift function as such but a MIDI transpose function - this overcomes the
problem of playing back samples out of their range. What this function does is introduce
an offset so that with a +12 setting, if you play C3 on the keyboard, this is offset to play
the samples on C4 - it is not playing the samples on C3 an octave higher and hence
introducing transposition distortion of any kind.
SETTING A PART’S LOW AND HIGH KEYRANGES
When setting key splits, you need to set a low and high note limit for each of the
programs used. This is done on the RNGE (range) screen:
Here, you may set the and for the parts. To create a keysplit, you
would normally assign two programs to two parts, assign them to the same MIDI channel
and then set an appropriate keysplit (i.e. Part 1: C0-B2 and Part 2: C3-G8). More details
on setting up key splits is given later in this section.
S3000XL Operator’s Manual Page 39
Page 46

MULTI MODE
SETTING A PART’S PRIORITY
When sequencing multi-timbrally, you may need to give certain parts higher or lower
priority to prevent ‘note stealing’ when the 32-voice limit is exceeded. This is done in the
PRIO(rity) page:
The choices available are:
LO W If the program is set to LOW priority, then notes from this program will be
stolen first.
HIGH If set to HIGH, then notes from other programs with lower priority will be
stolen first before they are stolen from this program.
NORM NORM is, of course, normal priority and sets standard dynamic voice
allocation and note stealing will take place with no particular priority.
HOLD If a program’s priority is set to HOLD, then notes can only be stolen from
this program by the same program.
If you are playing a complex piece of music using many programs in a multi-timbral
configuration, it is a good idea to set important programs to HIGH or HOLD and less
important, background programs to LOW. If the piece of music is not overly complicated
and polyphony is not going to be exceeded, you may prefer just to leave the priority at the
default setting of NORM.
INITIALISING A PART
There will be times when you want to reset a part to its default values. To do this, move
the cursor to the part you wish to initialise (any filed will do) and press F6 ( ) in any of
the MULTI pages. This will reset all the parameters described above to their default values
and will clear the program name field, leaving it blank.
Page 40 S3000XL Operator’s Manual
Page 47

MULTI MODE
SETTING UP A MULTI
Assigning programs to a multi is simplicity itself. You simply move the cursor to the
appropriate part and selecting the program using the DATA control. To set parameters
such as level, pan, etc., move the cursor to the appropriate column and adjust the value
for the selected part. The MULTI mode is always active for modifying with no special edit
mode to enter. Let’s now see how to make up a simple multi.
Firstly, you need to load in a few sounds. Referring to the section that explains the LOAD
mode, load a few programs.
NOTE: It is suggested you use the IND P+S (individual programs and samples) selection.
For the first program and samples you load, use the CLEAR option to clear out any junk
that may be in memory. After you have loaded the first program and its associated
samples, just use LOAD so that the new programs you load are added to the programs in
memory. Load in something sensible. For example, load in a drum kit, a few acoustic and
electric pianos, a few bass sounds and some string and/or pad sounds. We will use these
sounds as the basis for this tutorial.
Assuming that you now have some programs in memory (you can check this in SINGLE
mode by scrolling through them with the DATA wheel), press MULTI. You should see
something like this screen:
This is showing us that the multi currently in memory is called MULTI FILE 1, the default
name given to a multi when you power up the S3000XL (you can rename it to something
more suitable as we shall see later). It is also showing us that PART 1 has the default
TEST PROGRAM assigned to it. Now, let’s imagine we want to arrange our multi as
follows:
Part 1 Drums
Part 2 Piano
Part 3 Bass
Part 4 Strings
After you have loaded some suitable programs and assigned them, you should end up
with something like this:
On your sequencer, record a basic rhythm intousing the drums program so that you have
a rhythm to play the other parts to and then overdub some piano chords, a bass part and
S3000XL Operator’s Manual Page 41
Page 48
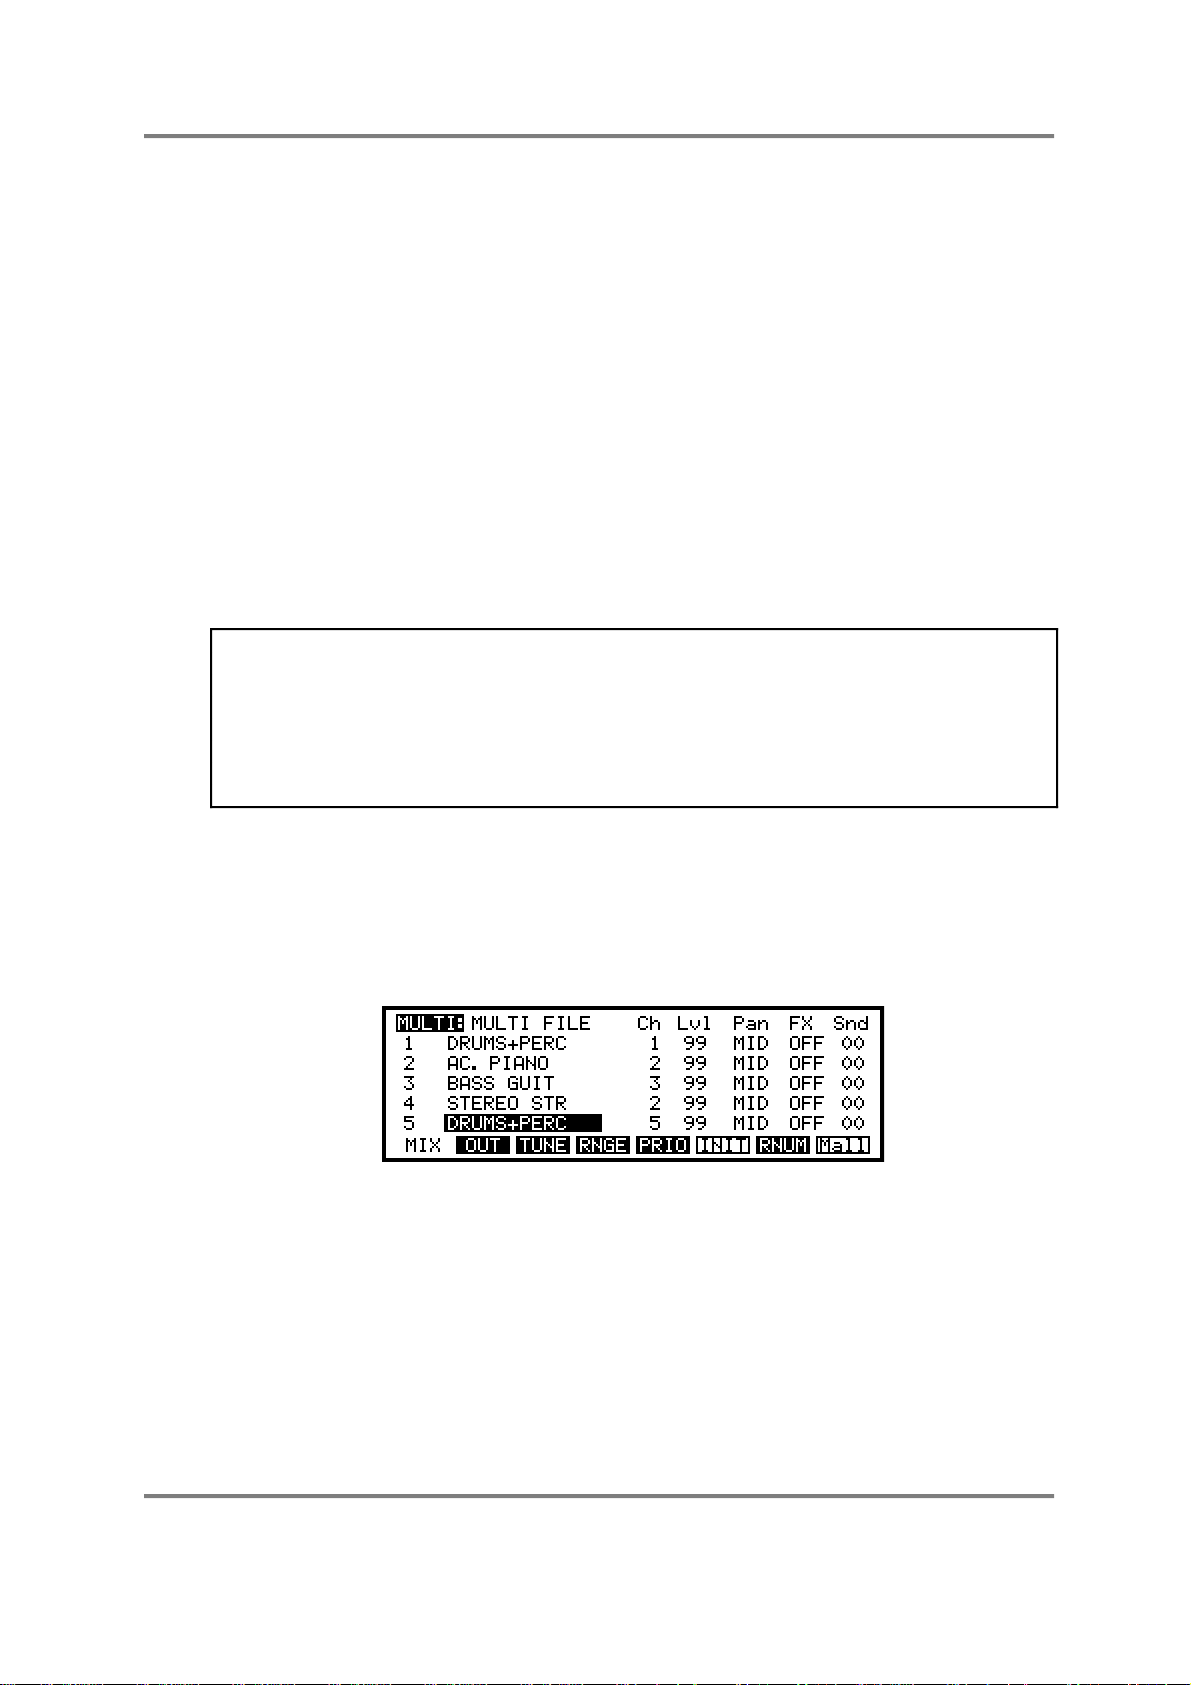
MULTI MODE
string part. It was suggested that you have a few pianos, basses and string/pad sounds this is so that we have a choice of alternative sounds for each part.
MODIFYING THE MULTI
The beauty of the S3000XL’s MULTI mode is that, as the sequencer is playing back your
sequence, you can interact with the parts, assigning different programs to parts ‘on the fly’
within the context of the sequence (you can also edit program parameters such as
envelope and filter settings, etc., within the context of your tune as we shall see later).
The MULTI mode has no separate edit mode (the EDIT key is used to edit the actual
programs in the parts) so, as the song is playing from the sequencer, you can make
changes immediately if needs be. For example, you might like to see how PART 2 sounds
with different piano sounds - move the cursor to PART 2 and, as the sequencer is
running, scroll through the different piano programs you loaded using the DATA wheel.
You can try alternative piano sounds and hear how they sound. Do the same for the
basses. For example, you may have loaded some acoustic basses, an electric bass, a
slap bass and some synth basses - as the sequence plays, scroll through them, trying out
different ones till you find one that suits the track. The same, of course, can be done with
the string part.
HINT: When loading the programs from disk, try to load certain types together. For
example, load all the piano sounds you think you may need one after another so that
they are all grouped together in memory. Similarly, load all your basses one after another
so that these are all grouped together. This is suggested as it will make selection and
comparison of different sounds in any given part easier.
If you forget to load them in order, don’t worry as you can renumber each program to
something more suitable as we shall see in a moment.
You may decide that you want the strings to play the same part in unison with the piano.
To achieve this, simply set part 4 to MIDI channel 2, the same as the piano.
You may also decide you want to add some percussion from the DRUMS+PERC
program. You could do that in part 1 on MIDI channel 1 but, if you prefer, you may like to
separate the drums and percussion so, in part 5, assign the DRUMS+PERC program. You
will see this:
Even though the same drums program is used twice in different parts, you may record
sequence data on a separate MIDI channel (giving you more flexibility for editing the part
on your sequencer) plus, the DRUMS+PERC program assigned to part 5 may have its
own independent mix settings, effects sends, etc..
Page 42 S3000XL Operator’s Manual
Page 49
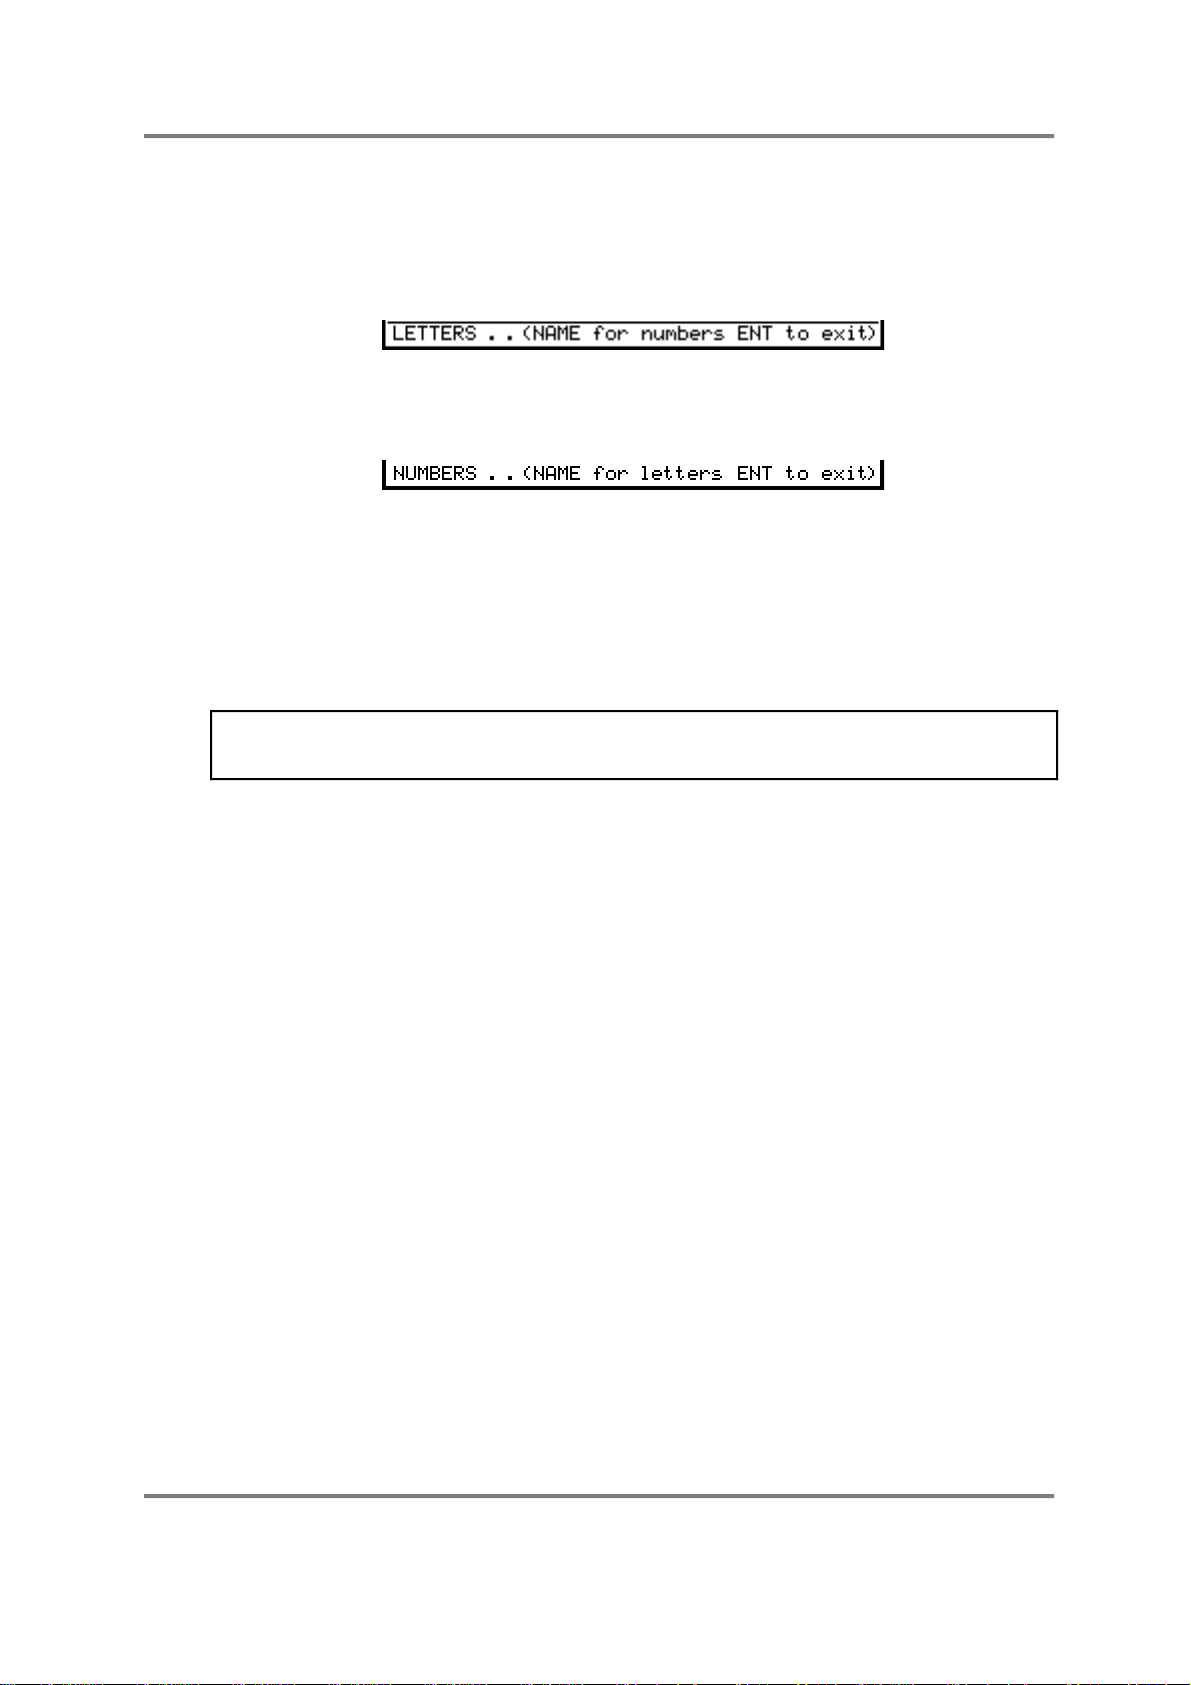
MULTI MODE
NAMING A MULTI
You may wish to name the multi file to something more suitable. Simply press the NAME
key and enter a name of up to 12 characters from the front panel keys. You will receive
the usual naming prompts:
Pressing the NAME key again switches the numeric keypad from letters to numbers and
you will receive this prompt:
You may press NAME again to access the numeric keypad’s letters. When in the
‘numbers’ mode, the +/< and -/> keys input ‘+’ and “-’ to a name. Pressing NAME again
reverts you to entering letters from the numeric keypad.
Alternatively, in conjunction with the CURSOR keys which can be used to move the cursor
around within the name, you can use the DATA control to scroll through characters.
Once you have completed the name, press ENT/PLAY to finish the naming process.
NOTE: Because only one MULTI can exist in memory at any one time, you cannot copy
the multi file, only rename it. As such, the COPY REN EXIT prompt we have seen
elsewhere is not shown.
SAVING A MULTI
You may save a multi to disk and this will save the multi and all its associated programs
very simply in the SAVE mode. You may then load this multi (and its associated
programs) with one simple operation in the LOAD mode. Please see SAVE and LOAD for
details on this.
LOADING A MULTI
To load a MULTI, press LOAD and select MULTI+PROGS+SAMPS as the type of load.
Now move the cursor to the multi-file stored on the floppy disk/hard disk volume and press
F8 and/or F7. This will load the selected multi and any programs associated with it plus
the samples used in those programs.
S3000XL Operator’s Manual Page 43
Page 50
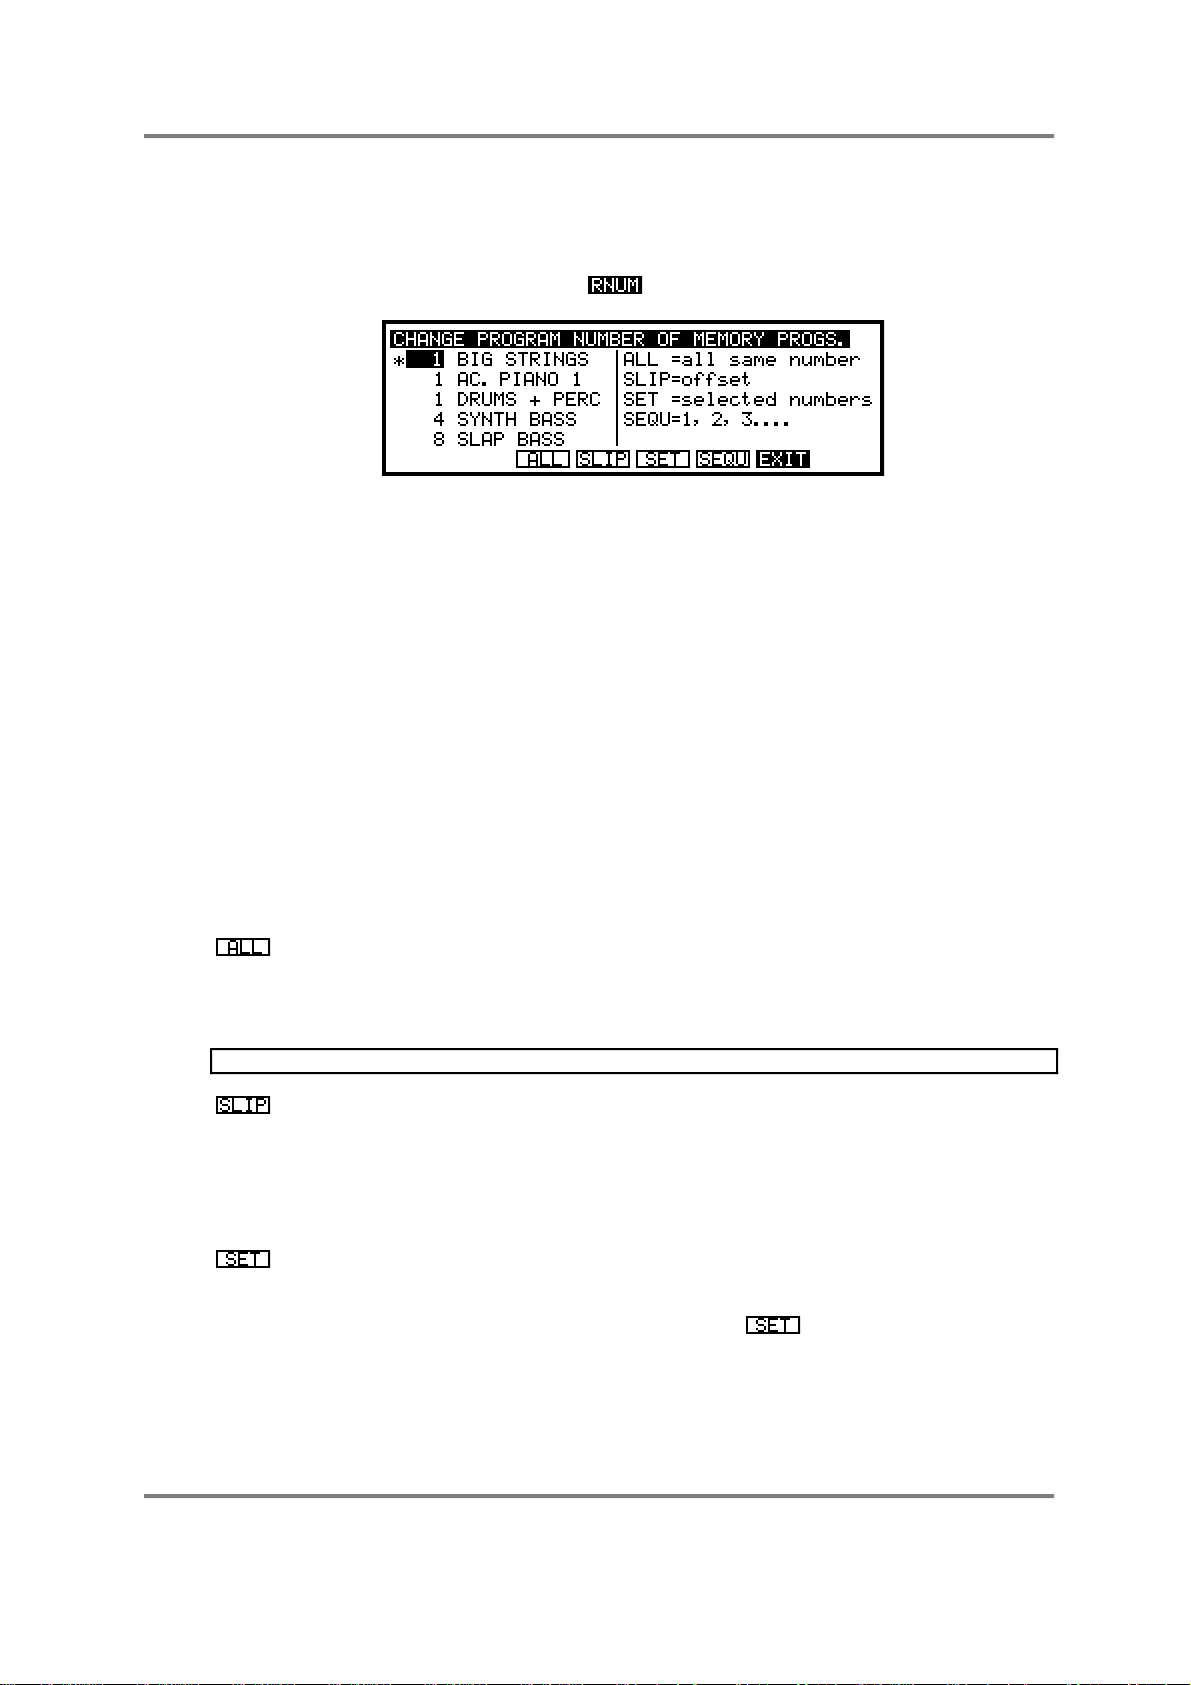
MULTI MODE
RENUMBERING PROGRAMS
There will often be occasions when you load in several programs, maybe from different
disks or hard disk volumes and the programs you have loaded have the same program
numbers or the numbers of the programs you have loaded are not well ordered, etc.. To
overcome this, F7 in the MULTI screen ( ) takes you to the RENUMBER page:
In this example, you have loaded a variety of programs some of which have the same
program number, others of which are non-sequential. Ordinarily, this is not a problem and
you can set up a multi very easily without even having to think about program numbers.
However, in the MULTI mode, you can send program change commands over MIDI on
selected channels to select new programs within one part (for example, send a MIDI
program change command on MIDI channel 5 to select a new program in Part 5). If
programs share the same program number, you will have a conflict (for example, send a
MIDI program change command 1 where two programs share the program number 1 as
in the above example, and only the first of the programs - i.e. BIG STRINGS - would be
selected).
To overcome this, use the RNUM page to renumber programs so that they are better
organised for your use.
Select the program to be renumbered using the CURSOR keys and alter the current
number to the new number using the DATA control. You can also use the numeric
keypad for this, setting the program number to a value of between 1 and 128 (these are
MIDI specification limits). When you have altered the number, you have several options to
choose from on soft keys 1, 2 and 3. These are:
This will set all programs to the same number as that set in the currently
selected program. For example, placing the cursor on, say, 4 - SYNTH
BASS and setting that to 1 would renumber all the programs to program
number 1.
NOTE: There is little benefit to be had doing this in MULTI mode.
This causes all subsequent programs to be renumbered with an offset to
the currently selected program. In the example given above, if you moved
the cursor to program 4 (SYNTH BASS) and renumbered it to 10, SYNTH
BASS will be renumbered to 10 and all subsequent programs (i.e. SLAP
BASS and any others off the screen) will be renumbered 11, 12, 13, etc..
The programs lower than 10 would be unaffected.
This will only renumber the currently selected program. To specifically
renumber a program, use the CURSOR UP/DOWN keys to select the
program you wish to renumber, set the new number using the DATA
wheel or the numeric keypad and press . Only that program will be
renumbered.
Page 44 S3000XL Operator’s Manual
Page 51
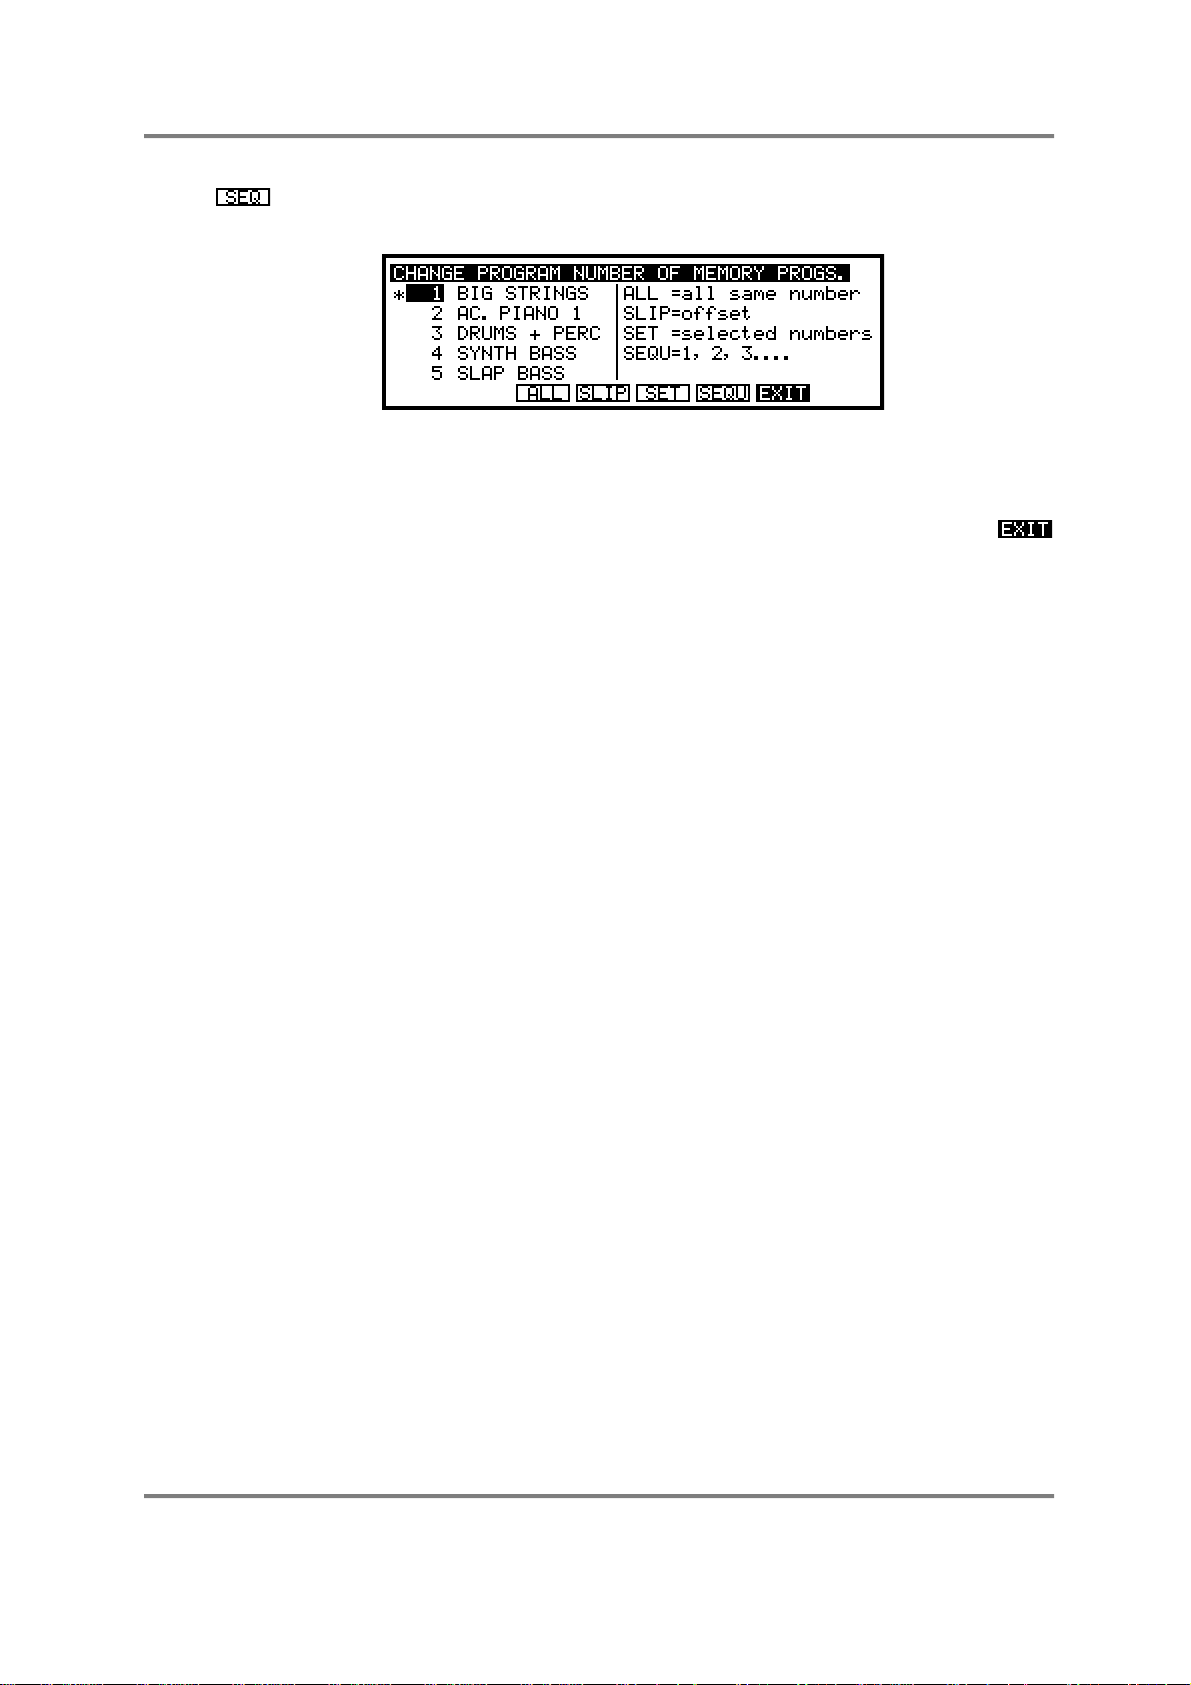
MULTI MODE
This is probably the best selection as it will simply renumber the programs
1-? sequentially regardless of the programs’ original numbers. I.e.:
Once you are happy with the result of your renumbering, press F7 to return you to the
main MULTI screen display.
If you change your mind and do not wish to renumber any programs, simply press
without pressing F3, F4, F5 or F6.
S3000XL Operator’s Manual Page 45
Page 52

MULTI MODE
The parameters in the multi such as level, pan, tuning, etc., are unique to the multi and
override any similar parameters in the program assigned to any part.
For example, it is possible to set a pan position within a program. You may load a sound,
the pan position of which is set to L50. However, when you first assign that sound to a
part, the part will be set to MID, the MULTI’s PAN setting.
This has another implication. If you assign a sound to a part and set the part’s pan
position to R50, for example, if you then assign a new program to that part later on, the
new program will also be panned to R50 within the multi. The same would be true of any
of the other multi parameters such as level, FX send, tuning, output assign, etc..
The reason for this is that, if you have assigned a sound to a part and set that part’s
parameters in a particular way, it is assumed that this is because you want it to sound that
way. To use the example of panning again, let’s say you assign a piano sound to a part
and set the pan position to R25 - you might back the level off a bit as well. If you then feel
that the piano sound is not the right one and want to try a different one, the new sound
will be in exactly the same position and at the same level in the mix. If the multi always
adopted the program’s parameters when a sound is assigned to a part, selecting a new
piano sound in this example would reset the part’s pan and level parameters and you
would then have to adjust these parameters. Then when you assign another new piano
sound, you would have to reset the parameters all over again. If you have set many
parameters like level, output assignment, FX routing and send levels, etc., all of these
would need to be reset manually every time you assign a new sound to a part.
IMPORTANT NOTES ABOUT MULTI PARAMETERS
The way the multi works means that once you have set the parameters for any of the
parts, they remain constant regardless of which sound you place in them and you do not
have to keep resetting them manually all the time.
You will note that the above does not apply when setting up a multi-timbral set of
programs in the SINGLE mode (i.e. using the ‘old Akai’ method). In SINGLE mode, as
you select new programs and renumber them, so the program’s parameters will be used.
This may or may not be an inconvenience depending on the way you want to work.
Page 46 S3000XL Operator’s Manual
Page 53

MULTI MODE
USING MULTI MODE FOR LAYERING PROGRAMS
So far we have seen how to use the MULTI mode for creating multi-timbral set-ups for
sequencing. For this, you set each of the sixteen parts to a unique MIDI channel so that
can they may all be played from a sequencer outputting a complex arrangement with
each element of the arrangement playing on a different MIDI channel.
It is also possible, however, to use the MULTI mode to layer programs. By setting more
than one part to the same MIDI channel as another, sending MIDI data on that channel
will cause both parts to play simultaneously. For example...
You have a string sound and a piano sound that you want to play together. Place the
string sound into one part and the piano into another and set the same MIDI channel for
both parts. Now, when you send MIDI data on that channel, you will play piano and
strings together. Use the LEVEL parameter to set the balance of the two parts.
Another use for this is to fatten up sounds.
Let’s imagine you have a synth bass in memory that you think could do with fattening up.
Assign the sound to, say, PART 1 and also to PART 2. Now set those two parts to the
same MIDI channel (for example, MIDI channel 1). When you send MIDI data on that
channel, both parts will play. To add the ‘fattening’, go down to the TUNE page and
detune the two parts against each other using the CENTS parameter (you could either set
one part to +10 but a better idea is to set one to -05 and the other to +05). Now play
them. In this example, one program has been layered on top of itself and detuned so
that it sounds fatter and warmer. Experiment with the FINE TUNE settings of each part to
achieve the sound you want. You may also like to experiment with the PAN settings of
each part so as to achieve a ‘pseudo stereo’ effect.
Another example may be to create a 12-string guitar out of an ordinary acoustic guitar
program. Place the guitar program into two parts and set the same MIDI channel for
those parts. Now go to the TUNE page and set one of the programs an octave up (set a
transpose value of +12) and try a bit of fine tuning to create the characteristic chorus
effect.
Of course, the same can be done with any sound from synths to strings or brass or vocal
sounds - anything in fact!
But why stop there! You can layer three parts if you wish. For example, layer two string
sounds in the same way by assigning one strings program to two parts, giving them the
same MIDI channel and detuning them. Now take a bell sound and place that in a part
and assign the same MIDI channel as the strings. Now when you send MIDI data on that
channel you will have detuned strings and bell. Experiment with tuning and panning too
(for example send one strings sound left, the other right and keep the bell sound in the
centre).
You might like to try layering more parts. For a really killer sound, why not try layering 16
programs on top of each other!
NOTE: When layering programs in this way, please note that polyphony is reduced. In the
example of layering strings and piano or the bass synth program, total polyphony will be
halved. In the case of layering three sounds, polyphony will be cut to around ten voices. If
you’re mad enough to try layering 16 programs, polyphony will be reduced to one voice!
S3000XL Operator’s Manual Page 47
Page 54
MULTI MODE
USING MULTI MODE TO SET KEYBOARD SPLITS
Using the same techniques for layering programs described above, you may also set key
splits. For example, you may have an acoustic bass sample and a piano which you want
to set up so that the bottom two octaves play the bass the sound and the upper three
octaves the piano.
Assign the bass to one part and the piano to another and set both parts to the same
MIDI channel. Now go to the RANGE page and in the bass part, set the to C 0
and the to B2 and in the piano part, set the to C 3 and the
to G 8. You will now have the following keysplit:
C 3 G 8
BASS
C 0 B 2
PIANO PART 1
PART 2
MIDI Ch 1
MIDI Ch 1
You could take this a stage further and add strings to the whole things. I.e.:
PIANO PART 1
C 3 G 8
BASS
C 0 B 2
STRINGS PART 3 MIDI Ch 1
C 0 G 8
PART 2
MIDI Ch 1
MIDI Ch 1
You could create an even more sophisticated split:
C 3
PIANO
B 4
PART 1
MIDI Ch 1
BASS
C 0 B 2
BRASS
C 5
PART 2
PART 3 MIDI Ch 1
G 8
MIDI Ch 1
In this example, we have bass on the bottom octaves, piano between C3 and B4 with
some brass on the very top octaves.
There are even more possibilities. For example, by putting the piano into PART 4 as well
on the same MIDI channel and detuning it against PART 1, you could create a ‘honky
tonk’ piano effect on MIDI channel 1. Similarly, if the bass part is a synth bass instead of
acoustic bass, you could also assign that same bass sound into PART 5, set the same
MIDI channel and LO/HI key ranges as PART 2, detune it and pan it hard left and hard
right to create a pseudo stereo detuned synth bass sound in the bottom octaves.
The possibilities are almost endless (up to the 16 part limit in fact)!
Page 48 S3000XL Operator’s Manual
Page 55

MULTI MODE
And don’t forget...
If you have the multi-effects processor installed, layers and splits may be sent to different
effects in varying amounts to create even more variation. In the case of layering one
program on top of itself, you might find sending parts to same effects processor is
sufficient but, in the case of layering different sounds on top of each other (for example,
bells and strings), the strings could be sent to one effects processor and the bell to
another. In the case of key splits (let’s use the above as a good example) the bass could
be routed to a small room, the piano to a large hall and the brass to a chorus/delay/small
hall multi-effects channel.
Alternatively...
Each of the elements in a layered or split multi could be assigned to separate outputs
where they may be mixed and processed on an external mixing console.
COMBINING THESE TECHNIQUES
The S3000XL’s MULTI mode is so flexible that it can accommodate all of these
techniques simultaneously. For example, PARTs 1, 2 and 3 could have layered programs
on one MIDI channel whilst 4, 5 and 6 have parts on separate channels. PARTs 7 and 8
could be set to the same MIDI channel but have key splits set whilst PARTs 9-11 could
have parts on separate channels. For example:
PART
1
2
3
4
5
6
7
8
9
10
11
12
13
14
15
16
MIDI CH FINE TUNE PAN FX BUSS FX SEND OUTPUTTRANSPOSE LO HI
G 8
G 8
G 8
G 8
G 8
G 8
B 2
G 8
G 8
G 8
G 8
01
02
C 0
C 0
C O
C O
C O
C O
C 0
C 3
C 0
C 0
C 0
1
1
1
2
3
4
5
5
6
7
8
+12
+00
+00
+00
-12
+00
+00
+12
+00
+00
+00
+00
+05
-05
+00
+00
+00
+00
+03
+00
+00
+00
MID
L50
R50
MID
L23
R45
MID
MID
MID
MID
MID
A
A
A
OFF
B
C
A
A
D
D
OFF
12
23
34
00
45
56
17
17
23
45
00
OFF
OFF
OFF
OFF
OFF
OFF
OFF
OFF
OFF
S3000XL Operator’s Manual Page 49
Page 56

EDIT PROGRAM - SINGLE
PROGRAM EDITING
Once you have a few programs in memory, it may be that you need to edit them to make
them more suitable for your application. They may need simple tweaking such as altering
the attack times or the filter cutoff or adding a bit of vibrato. You may want to totally reprogram the sound or create a new program for the latest batch of samples you have
made. Whatever it is you want to do with a program, all this is done in EDIT PROGRAM.
But before we look at the program editing functions, let’s first look at what a program is.
A program is where you assemble your raw, edited samples for playback. In the EDIT
SAMPLE mode, the samples are unprocessed by envelopes, vibrato, etc.. If they have
been looped, it is quite possible they have lost all their dynamics - this can be overcome in
a program. Furthermore, because of powerful synthesiser functions, the S3000XL can be
used to play and process samples much like an analogue synth. With 2 low frequency
oscillators (LFOs), ADSR and multi-stage envelope generators, resonant filters, panning
and more, the S3000XL can radically transform any sound offering the creative musician
and programmer endless possibilities. In short, what it means is that as well as owning a
superb sampler, you also have a very excellent and versatile analogue style synthesiser.
On top of this, you may set sophisticated keyboard splits and layers, set velocity switching
and crossfading, assign samples to individual outputs and/or pan them in the stereo
outputs as well as tune and transpose your samples. You may also set MIDI parameters
for your sample(s).
“But”, you may be asking “why have programs? Why not just play samples from EDIT
SAMPLE?” A good question. The reason we have programs is because raw samples,
however much you may have trimmed, looped, crossfaded, stretched, etc., are only half
the story. In EDIT SAMPLE, you can only play one sample at a time spanning the entire
keyboard range whereas in a program, you can assign them to different areas of the
keyboard for playback. This is known as ‘multi-sampling’.
Multi-sampling is the technique where you take several samples of one instrument across
its range or where you take several samples of different instruments (such as drums, for
example). Aside from all the fun things you can do with envelope shaping, filtering and so
forth, it is in a program that you map all these multi-samples across the keyboard. To do
this, we place the samples into what we call KEYGROUPS.
Page 50 S3000XL Operator’s Manual
Page 57

EDIT PROGRAM - SINGLE
WHAT IS A KEYGROUP?
A KEYGROUP is precisely that - a group of keys which have a particular note range on
the keyboard. The simplest program you can have is with one keygroup in it that spans
the entire MIDI range on C0-G8. The TEST PROGRAM that always boots up into the
S3000XL is just such a program. I.e:
KEYGROUP 1
Perhaps the next level up is to have a program with two keygroups. One covers the range
C0-B2, the other C3-G8 - this would be a simple keyboard split. I.e:
KEYGROUP 1 KEYGROUP 2
The next level may be a program which has five keygroups - one for each octave on a
normal synth keyboard. Such a program may be useful for something like piano or strings
which have been sampled on the G of every octave. I.e:
KG1 KG2 KG3 KG4 KG5
After that, of course, it’s anyone’s guess what the next level may be but it could be
something like this:
Here we have 17 keygroups in one program - some are assigned to individual keys whilst
some span an octave or so. Hopefully, you can now get a feel for how flexible the
keygroup assignment can be. But there can be more to it than that.
S3000XL Operator’s Manual Page 51
Page 58

EDIT PROGRAM - SINGLE
KEYGROUP ZONES
Within each keygroup, you may assign up to four samples in what are referred to as
ZONES. These can be used for a number of things that include velocity switching and
crossfading, playback of stereo samples and layering.
To playback stereo samples or to layer sounds or just to do a simple velocity switch/xfade,
you could have something like this:
Here we have five keygroups, each with two zones being used. You could use this type of
assignment for playing back stereo samples where the left and right samples are
assigned to their own zones (1 and 2 respectively) in one keygroup and each zone is
panned hard left and hard right. As an example, you could have five stereo string
samples each sampled at G on every octave which could be assigned into such a
program.
KG1 KG2 KG3 KG4 KG5
This kind of program is also suitable for layering sounds on top of each other. In the
above example, four synth samples could be mapped out on the keyboard (one for each
octave, perhaps) and zone 2 of each keygroup could also contain the same sample as
zone 1 and these could be panned and detuned for a fat, pseudo stereo layered synth
sound. Of course, each zone could have different synth sounds in them.
This type of program is also suitable for a two way velocity switch - by setting zone 1 of
each keygroup to a velocity range of 0-90 and setting zone 2 to 91-127, you could, for
example switch between a thumbed bass and a slapped bass or a normal snare hit and a
rim shot using velocity.
To round things off, each keygroup has no less than four zones and a program may ‘look’
something like this:
KG1 KG2 KG3 KG4 KG5
Here, we have five keygroups, each using the four zones. This may be for a four way
velocity switch or for velocity switching between two stereo samples or for layering four
samples together.
The ultimate program, would be for each key to have its own keygroup with each
keygroup containing four samples using a four way velocity switch!
Page 52 S3000XL Operator’s Manual
Page 59

EDIT PROGRAM - SINGLE
OVERLAPPING AND CROSSFADING KEYGROUPS
So far we have seen keygroups side by side. This is usually fine for most applications but
there are sometimes occasions where the abrupt transition between one keygroup and
another can be a bit obvious. For example, in a strings program where you have five
string samples each at the G of every octave, the transition between B2 and C3 may
sound a little strange.
The reason for this will normally be that the G2 sample is transposed up by four
semitones at B2 and so sounds a little brighter whilst the G3 sample is being played 7
semitones down so it may sound a little duller and so, next to each other, especially when
playing a scale, the crossover point is not even.
To overcome this, we can overlap keygroups simply by setting their key ranges
accordingly:
It may be, however, that this does still not overcome the problem and so there is a facility
to crossfade keygroups for an even smoother transition where one keygroup gradually
fades down through the overlap whilst the other fades up thereby giving a smooth
transition. I.e:
Of course, you can use a combination of any of the above techniques and have
crossfading, velocity switched keygroups in programs alongside layered and split keyboard
assignments. The above diagram examples represent only part of the flexible program
editing and multi-sampling potential of the S3000XL.
If all this seems very confusing, don’t worry for the moment. There are many easy routines
in EDIT PROG that allow you to edit all keygroups simultaneously or to copy keygroups.
Key ranges can be conveniently set by playing your MIDI keyboard if you wish and, within
a short time, you will be making programs very quickly and easily.
If you have already owned an Akai sampler, then you will probably be familiar with a lot of
what we have just seen but, if this is your first time with an Akai sampler, it is worth taking
the time to get a fairly good understanding of these principles and the concept of
keygroups if you are going to get the best out your sampler.
S3000XL Operator’s Manual Page 53
Page 60

EDIT PROGRAM - SINGLE
ASSIGNABLE PROGRAM MODULATION
First introduced on the Akai S2800, S3000 and S3200, the S3000XL has Assignable
Program Modulation (or APM for short) and this allows you to route virtually any controller
(such as the LFOs, envelope generators, MIDI controllers such as modwheel, pitchbend,
etc.) to a number of destinations (pitch, amplitude, tone, etc.). Many synthesisers have
had such facilities before but it is uncommon on samplers and APM turns the S3000XL
into a powerful synthesiser as well as offering a great deal of flexibility in the manipulation
of acoustic samples.
In the early days of synthesisers, each building block of sound was referred to as a
‘module’ and it was possible to route any module to any other using patch cords. This was
called ‘modular synthesis’. On the S3000XL, each ‘module’ (i.e. the filters, amplifiers, pitch
inputs, LFOs, envelope generators, etc.), has several control inputs and, although we
don’t use patch cords, controllers may be freely assigned to these modules. On other
samplers (and indeed even some synthesisers), these control inputs are fixed - that is,
you have no choice as what you can send to them. Whilst acceptable a lot of the time,
this can be a bit frustrating when there is some specific sound you want to make or
musical effect you want to achieve.
Here are some examples:
• You may route the mod wheel to open the filter in a brass program for swells and
growls. You could use aftertouch for the same effect.
• You could route aftertouch to control the panning’s LFO speed to emulate the sound
of a rotary speaker speeding up and slowing down in a classic rock organ sound.
• The multi-stage envelope generator ENV2 could be routed to pitch for special effects
whilst, at the same time LFO1 (whose rate may separately be being controlled by the
modwheel) is being routed to a resonant filter cutoff.
• You could use ENV2 to control LFO1 depth for ‘shaped’ vibrato that fades in, fades
out and fades back in again.
• To reduce the ‘cyclicness’ of normal vibrato, you could modulate LFO1’s rate very
slightly with LFO2.
• It is possible to ‘trigger’ the RANDOM wave from the keyboard so, if LFO2 is applied to
filter, each note can have a totally random tone. With LFO2 applied to panning, each
note will appear at a randomly different position in the L/R stereo field (great when
sequencing or arpeggiating percussive sounds)
All sorts of things are possible from the subtle to the ridiculous! We are the first to admit
that this kind of modulation is not that useful when trying to accurately recreate the sound
of a Gamelan orchestra but, when the need arises to create that special sound or when
your synthesiser just isn’t up to it, the S3000XL will oblige you willingly - in fact, you may
get so used to the S3000XL’s versatility as a synthesiser that some of your current
synth(s) may be in the classifieds sooner than you think!
Page 54 S3000XL Operator’s Manual
Page 61

EDIT PROGRAM - SINGLE
KEYGROUP(S)
EDIT PROGRAM
PER KEYGROUP
MODULATION SOURCES
MASTER
PROGRAM OUTPUT
This block diagram may help you to understand the concept of APM.
TUNE
TUNE
TUNE
TUNE
KG PITCH
KEYSPAN
SAMPLE 1
SAMPLE 2
SAMPLE 3
SAMPLE 4
VEL SW/XFD
12dB/8ve
LOWPASS
RESONANT
FILTER
ENV 2 ENV 1
ENVELOPE TEMPLATES
ENV 1 ENV 2 LFO 1 LFO 2
AMP
MOD.WHL P.BEND AFTERTOUCH VELOCITY EXT.MIDIKBD
PAN
PAN
PAN
PAN
FX SEND
IND. OUT 1 - 8
IND. OUTPUT ASSIGN
MASTER
OUTPUT
LEVEL
AUTO
PANNING
KEY = SIGNAL FLOW = CONTROL INPUT
The sources you have at your disposal are:
No source It seems almost pointless explaining this one! It means no modulation
source is routed!
Modwheel This selects the modulation wheel as the control source.
Bend This selects the pitchbend wheel or lever as the modulation source
Pressure This selects aftertouch as the control source. This is channel aftertouch
and not polyphonic aftertouch.
External This selects the MIDI controller set in the external control field of the main
GLOBAL - MIDI page. This can be BREATH (cntl#2), FOOT (cntl#04) or
VOLUME (cntl#07). Using a MIDI merger on your keyboard would allow
you to merge a breath controller with your keyboard and users of the Akai
S3000XL Operator’s Manual Page 55
Page 62

EDIT PROGRAM - SINGLE
EWI MIDI wind synthesiser will no doubt be able to use this function to
great effect when playing the S3000XL directly from the EWI and
selecting BREATH.
Velocity This selects velocity as the controller.
Key This selects keyboard position as the modulation control source.
Lfo1 This selects LFO 1 as the modulation source. LFO1 may also be a
modulation destination and it is possible to modulate its rate, depth and
delay.
Lfo2 No prizes for guessing that this selects LFO 2 as the modulation source.
Env1 This selects the ADSR amplitude envelope, ENV1, as the modulation
source.
Env2 This selects the multi-stage ENV 2 as the controller.
! Modwheel This selects the current position of the modwheel at the time of note-on as
the current controller. Moving it whilst the note is held will have no effect - it
is only its position at the point of note-on that has the effect.
! Bend As above, this selects the current position of the bend wheel at note-on as
the controller.
! External This selects the current position of an external MIDI controller at the point
of note-on as the modulation source. The choices you have for external
MIDI control are breath (cntrl#2), footpedal (cntrl#4) and volume (cntrl#7).
These are selected in the MIDI mode.
All of these are available to be routed in any amount to virtually any source which include
filter cutoff, LFO 1 rate, depth and delay, overall program amplitude and keygroup
amplitude, pitch and pan position. To select them, you simply move the cursor to the
modulation input field found on every module and scroll through the list.
All of these are available to be routed in any amount to virtually any source which include
filter cutoff, LFO1 rate, depth and delay, overall program amplitude and keygroup
amplitude, pitch and pan position. Modulation sources may be mixed at each ‘modules’
input to further expand the possibilities available and each control input may be inverted
for even more flexibility. These modulation sources are routed to their destinations in a
group of pages at the end of the program
Each keygroup has these modulation facilities available separately allowing an enormous
amount of flexibility and this, combined with the all the other PROGRAM EDIT functions
should keep you happy for a long time!
At first, the modulation system may seem a little difficult and maybe even confusing. Don’t
worry - if you are not into programming you can largely forget about it and just use the
defaults. Similarly, if you do not like synthesisers and prefer instead to use the S3000XL
for the reproduction of high quality samples of acoustic instruments again, you need not
concern yourself with these functions. If, however, you are one those who likes to
experiment with sound and tweak those knobs, we feel sure you will appreciate the
flexibility of this method.
Page 56 S3000XL Operator’s Manual
Page 63

EDIT PROGRAM - SINGLE
NOTES ABOUT ASSIGNABLE PROGRAM MODULATION
1. When loading S1000 or S1100 library disks (which do not have APM), the S3000XL
loads the assignments of the S1000/S1100 - i.e. the fixed assignments. Again, as a
result, you need not worry about having to set these assignments yourself. On library
disks developed for the S3000XL, you will see the assignments made by our sound
programmers. Please study these and see if you can learn from them.
2. It is possible to route the same controller twice (or three times in some cases) to the
same destination. This is not an oversight but simply a way to keep things simple and
open ended. If you were, for example to route LFO1 to filter cutoff three times at a
value of +50 you would simply get three times more LFO sweep.
3. As just mentioned, you can route the same controller to the same destination several
times. Please be aware that if you assign, for example, LFO2 to filter cutoff twice and
set a value of +50 and -50 respectively, you will get no effect as the two cancel each
other out.
4. You will note that assigning a particular controller to a destination WILL ROUTE THAT
CONTROLLER TO ALL KEYGROUPS. The control inputs at any destination are not
keygroup specific but affect all keygroups the same.
S3000XL Operator’s Manual Page 57
Page 64
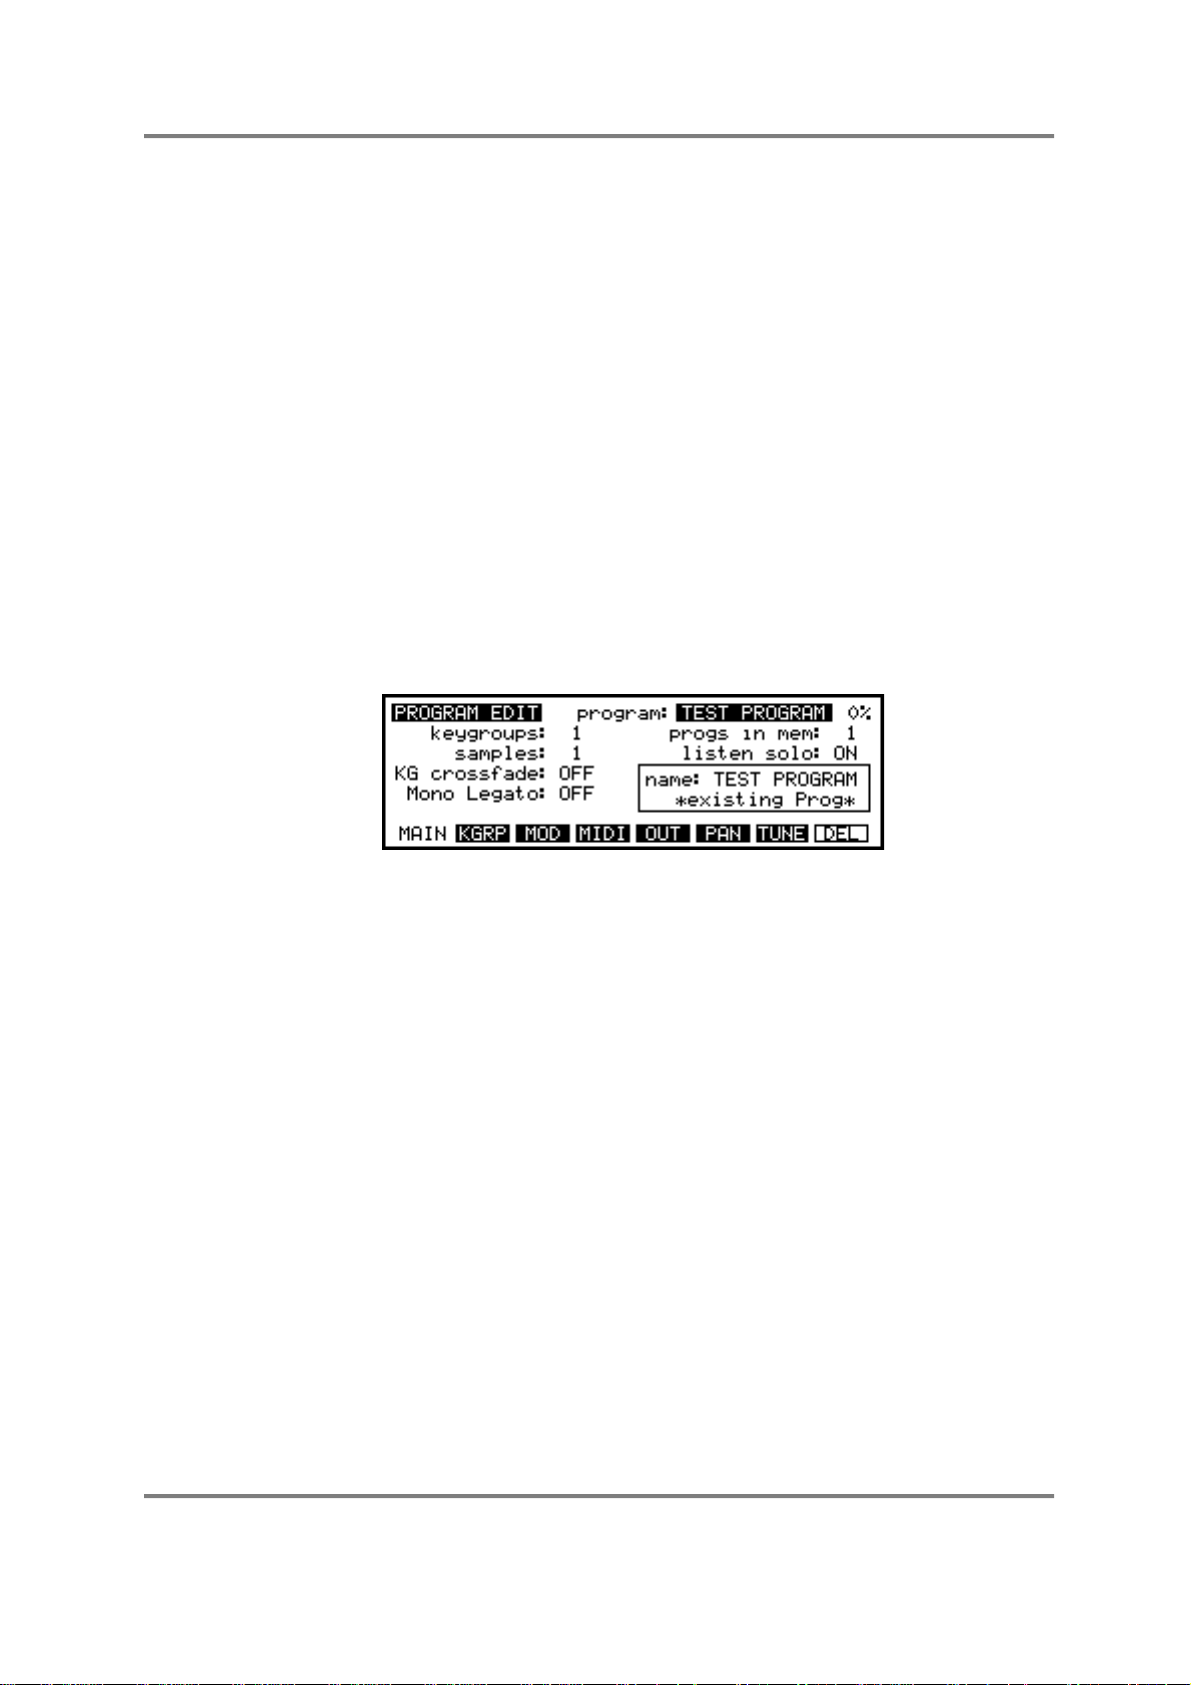
EDIT PROGRAM - SINGLE
EDIT SINGLE
EDIT SINGLE is used to create programs. In the S3000XL, we always use another
program as the basis for a new one. There are several ways you can work this.
You can use an existing program from your sound library that closely resembles the one
you wish to create. In the main PROGRAM EDIT page, copy this to a new program. This
may be edited accordingly with new sample(s) assigned, envelopes changed, filter cutoff
altered, etc..
Alternatively, let us say you have just taken five samples - you can create a program from
scratch using the default TEST PROGRAM. Using this single keygroup program you could
work three ways - you could just have the one keygroup and set that up with one of the
samples and then, when your happy with that, copy that keygroup four times and set the
appropriate key span. Each individual keygroup may then be refined according to the
sample assigned to it. Alternatively, you could simply copy keygroup 1 four times and, by
selecting ALL, edit them together. The third method is where you copy keygroup 1 four
times and work on each keygroup separately.
Our sound library programmers have several ways in which they work and the fact that
you can combine all methods makes the S3000XL very quick and convenient.
In SINGLE mode, when you press EDIT, you will see something like this screen display:
In EDIT SINGLE, you may select other programs for editing as well as rename, copy and
delete programs.
In this way, EDIT SINGLE is used to edit programs in isolation. It is the ideal mode for
creating new programs from scratch or for creating and/or editing programs prior to placing
them into a MULTI.
Page 58 S3000XL Operator’s Manual
Page 65

EDIT PROGRAM - SINGLE
NAMING PROGRAMS - COPYING AND RENAMING
If you have already recorded your own samples, then this procedure should be familiar as
it follows the same conventions.
To copy or rename a program, press the NAME key - this turns the front panel keys into
letter entry keys and you may type in a name of up to 12 characters (upper case only).
The +/< and -/> keys on the numeric keypad may be used to input backspace and spaces
respectively. When naming, you will see this prompt:
Pressing the NAME key again switches the numeric keypad from letters to numbers and
you will receive this prompt:
You may press NAME again to access the numeric keypad’s letters. When in the
‘numbers’ mode, the +/< and -/> keys input ‘+’ and “-’ to a name. Pressing NAME again
reverts you to entering letters from the numeric keypad.
Alternatively, in conjunction with the CURSOR keys which can be used to move the cursor
around within the name, you can use the DATA control to scroll through characters.
When you have entered your name, press ENT and you will get this prompt:
Pressing will copy the original program - use this to create a new program.
If the program name is an existing one, the boxed area in the bottom right of the screen
will show:
You will receive the following prompt:
You must enter a unique new name.
Pressing will simply rename the currently selected program with the name just
entered. If the name exists, you will be prompted as above and you must re-enter a
unique name.
Pressing will exit the naming process altogether with no action taking place.
Should you press this by mistake, you will see that the boxed area in the lower right of the
screen still retains the new name you entered so press NAME immediately followed by
ENT and make your choice again.
S3000XL Operator’s Manual Page 59
Page 66
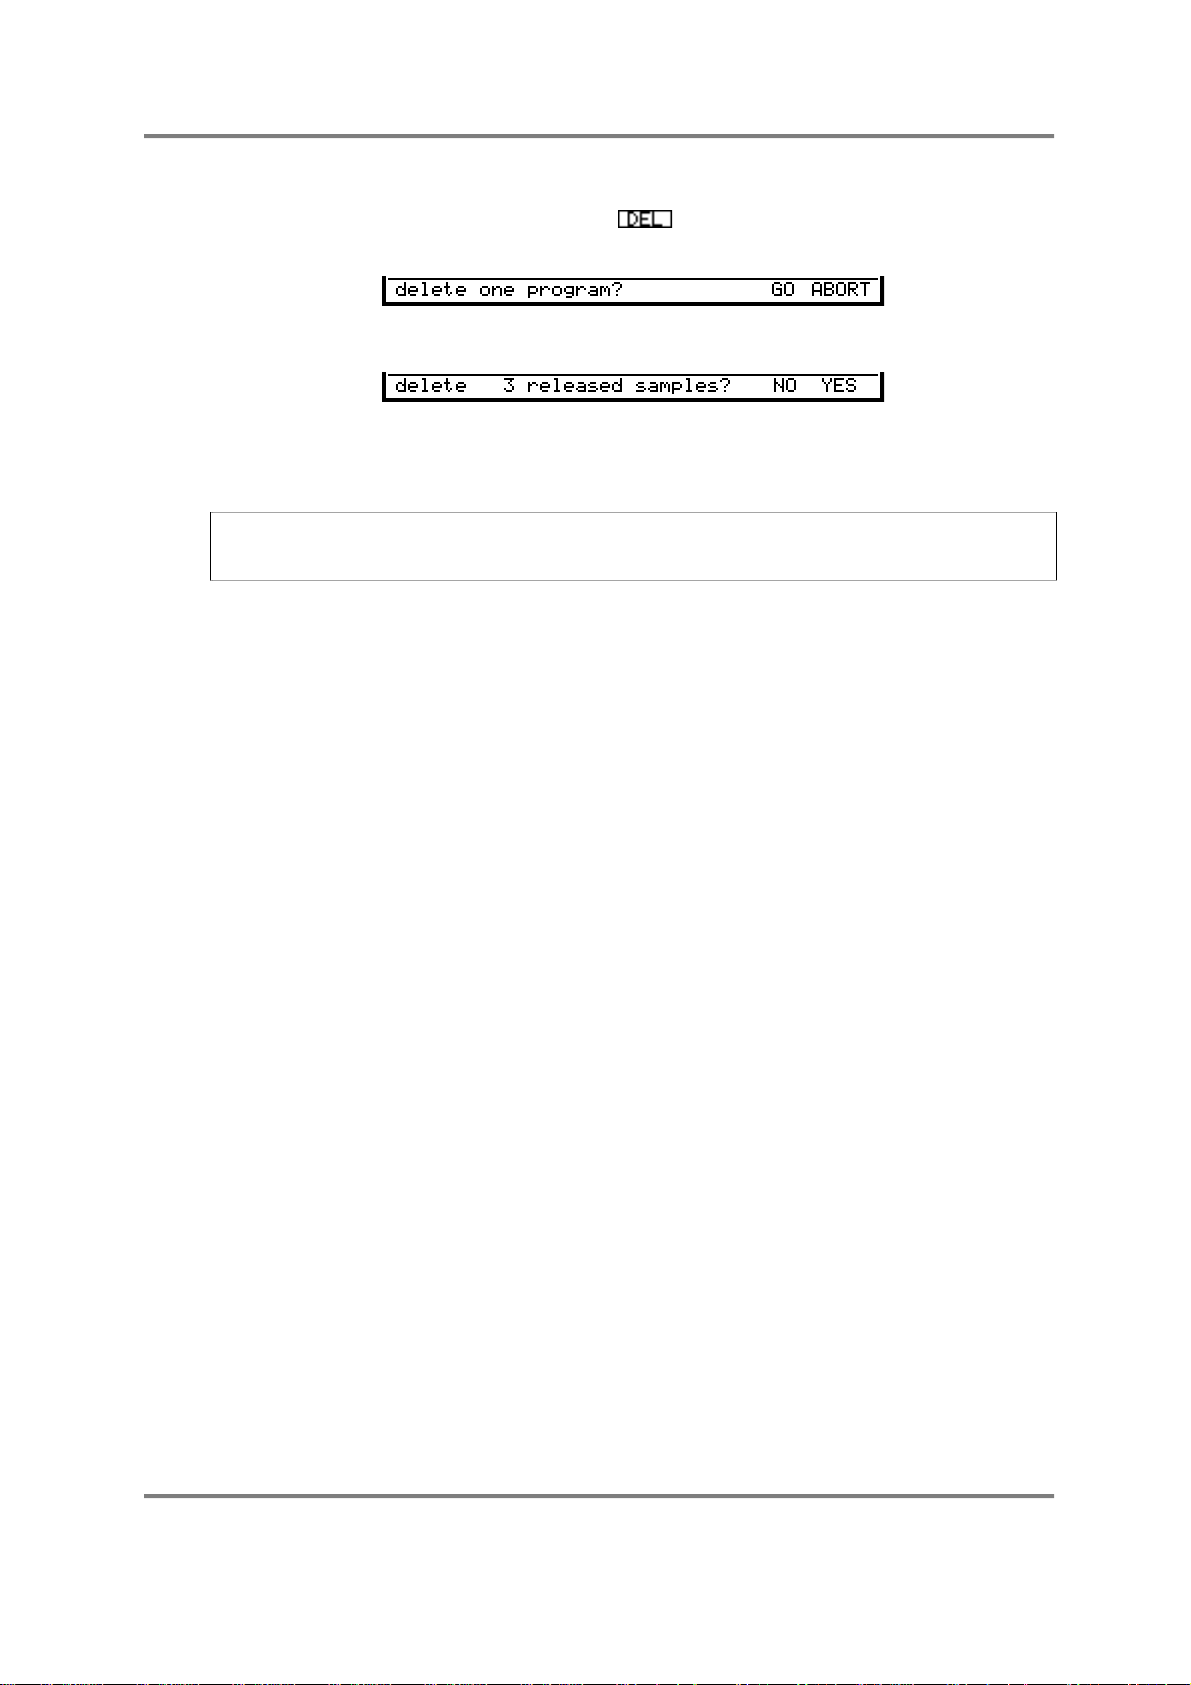
EDIT PROGRAM - SINGLE
DELETING PROGRAMS
It is possible to delete programs using the key - F8. Pressing this will give you the
following prompt:
You should press F7 or F8 accordingly. If you press GO, you may receive the prompt:
This is asking if you want to delete the samples contained within that program as well. If
the samples are used in other programs, then you will not receive this prompt. If you wish
to lose the samples, press F7 - YES but if you need to keep them, press F8 - NO.
NOTE: Deleting samples and programs is ultimately destructive. Please ensure that you
have saved them to disk before deleting in case you want to come back to them at a later
date.
Page 60 S3000XL Operator’s Manual
Page 67

The fields on the main EDIT SINGLE page are:
This shows the selected program name. Different programs may
be selected for editing by scrolling with the DATA control. You may
also select them using MIDI program change.
This field is not accessible but shows the number of keygroups
used in the selected program.
This field is also not accessible and shows the number of samples
used in the selected program. Please note that, because each
keygroup has four zones, it is possible for there to be more
samples in a program than there are keygroups. For example, a
stereo program with 5 keygroups would typically show 10 samples
(5 x L and R).
This allows you to set crossfades for keygroups that overlap. As
described above, this can be used to smooth out abrupt
transitions between keygroups. You will note that this is a ‘global’
parameter that affects the whole program and so any keygroups
that overlap will be subject to crossfading.
This special function turns the program into a monophonic
program with single triggering. The effect of single triggering is that
if you hold one note and play another, the pitch changes to the
new note but the attack of the new note is not re-triggered. For
example:
EDIT PROGRAM - SINGLE
Even when is ON, playing each note separately will
cause the attack of each note to be re-triggered.
This function is extremely useful for emulating the playing styles
and phrasing of solo instruments such as flutes, oboe, clarinet,
saxophone, etc.. It can also be effectively used on solo and
ensemble strings and brass. It is almost essential when playing
synth bass sounds as it emulates the classic monophonic synth
keyboard. You will find it useful too, when playing leadlines of any
kind. Owners of the Akai EWI wind synthesiser will find this function
invaluable in obtaining better expression and phrasing.
S3000XL Operator’s Manual Page 61
Page 68
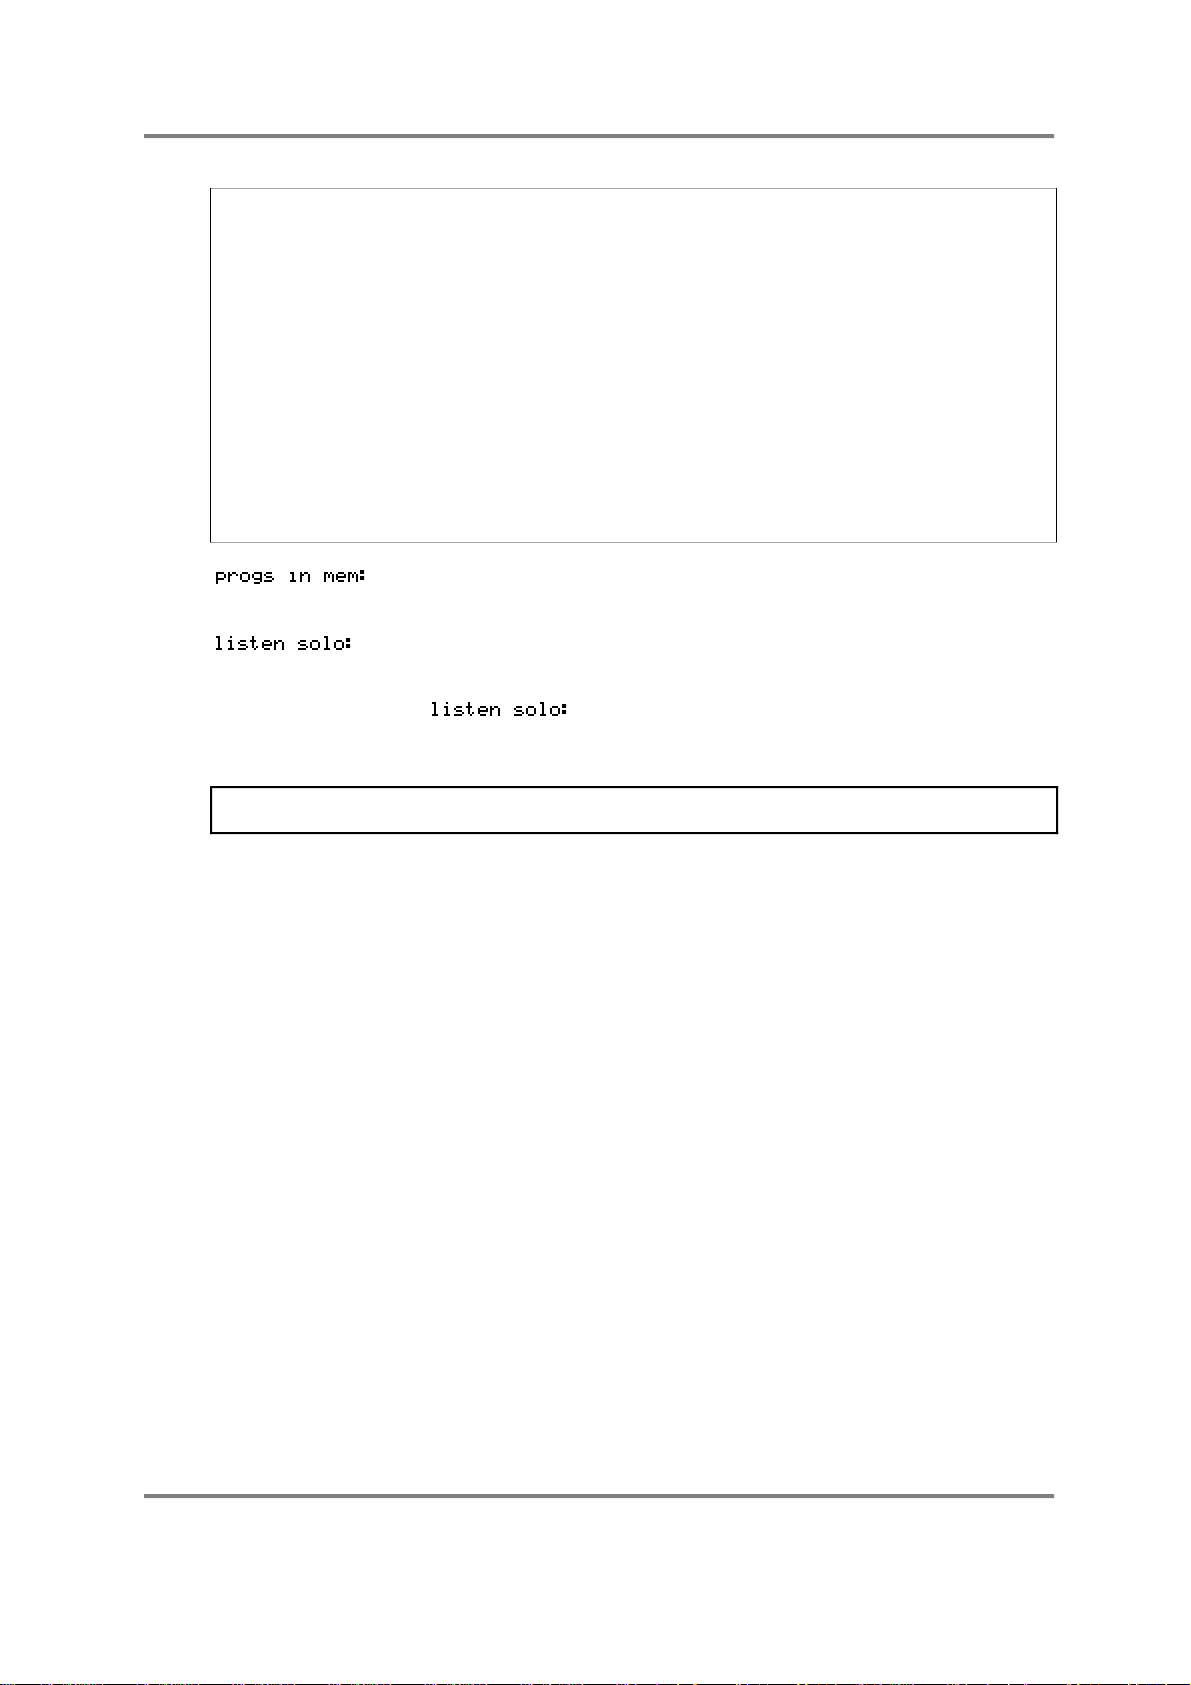
EDIT PROGRAM - SINGLE
IMPORTANT NOTE REGARDING MONO LEGATO ON/OFF
Because this function is playing a single sample (or group of samples when playing stereo
or layered sounds) through the sustain or loop, if you were, for example, to do a long
legato run from the top of the keyboard to the bottom, you would be transposing the
original sample you started with several octaves down. For example, in a 7 keygroup flute
program, if you were to start your run on C5 and finish at C2, the sound played on the last
note would, in fact, be the C5 sample transposed 3 octaves down - the samples in the
other keygroups would not be re-triggered as you cross the keygroup boundaries. As a
result, if you sustained that last note, it may sound very strange indeed! Similarly, if you
‘trilled’ between C2 and C5, it would also sound quite odd (but then, so would a trill
between C2 and C5!). This is brought to your attention so that you may make allowances
when playing legato across keygroups. If you bear this in mind, you will find this function
very useful and expressive.
There is a way around this using the KEYGROUP MUTE function (see below).
This field is not accessible and shows you how many other
programs are in memory at the time.
This field allows you to select whether you wish to listen to other
programs that have the same program number as you edit the
currently selected program. The selection is ON or OFF. When
is switched to ON, you will only hear the currently
selected program and when it is OFF, you will be able to monitor
any other programs that share the same number.
NOTE: This function is only really of relevance of you are using the ‘old Akai’ method to
sequence programs sharing the same program number.
Page 62 S3000XL Operator’s Manual
Page 69

EDIT PROGRAM - SINGLE
The soft keys along the bottom of the PROGRAM EDIT main screen are:
This shows the currently selected MAIN PROGRAM EDIT page.
This takes you to the parameters concerned with individual
keygroups. These include the keyboard spanning, filters,
envelopes, sample assignments, pitch and level adjustments,
individual output assignment, etc., for individual keygroups.
This takes you to the pages where you may set program
modulation parameters such as pitch bend ranges, LFO 1 and
LFO 2 parameters and parameters for the sostenuto pedal
functions.
This takes you to the MIDI page where you may set the program’s
MIDI channel, polyphony, transpose and other functions.
This takes you to the OUTPUT page where you may set the
program’s overall level, individual output assignment, effects send
level, pan position and other parameters.
This takes you to the AUTO PAN section where you may set
parameters that affect the program’s auto pan functions.
This takes you to the TUNE pages where you may set the
program’s overall tuning as well as select and create alternative
tunings and temperaments.
This is not a page key but an ‘action’ key for deleting programs. Its
function is described above.
We will now look at the functions of these pages. We will skip and for the
moment and look at the function of , , and first as these affect
the program as a whole.
S3000XL Operator’s Manual Page 63
Page 70
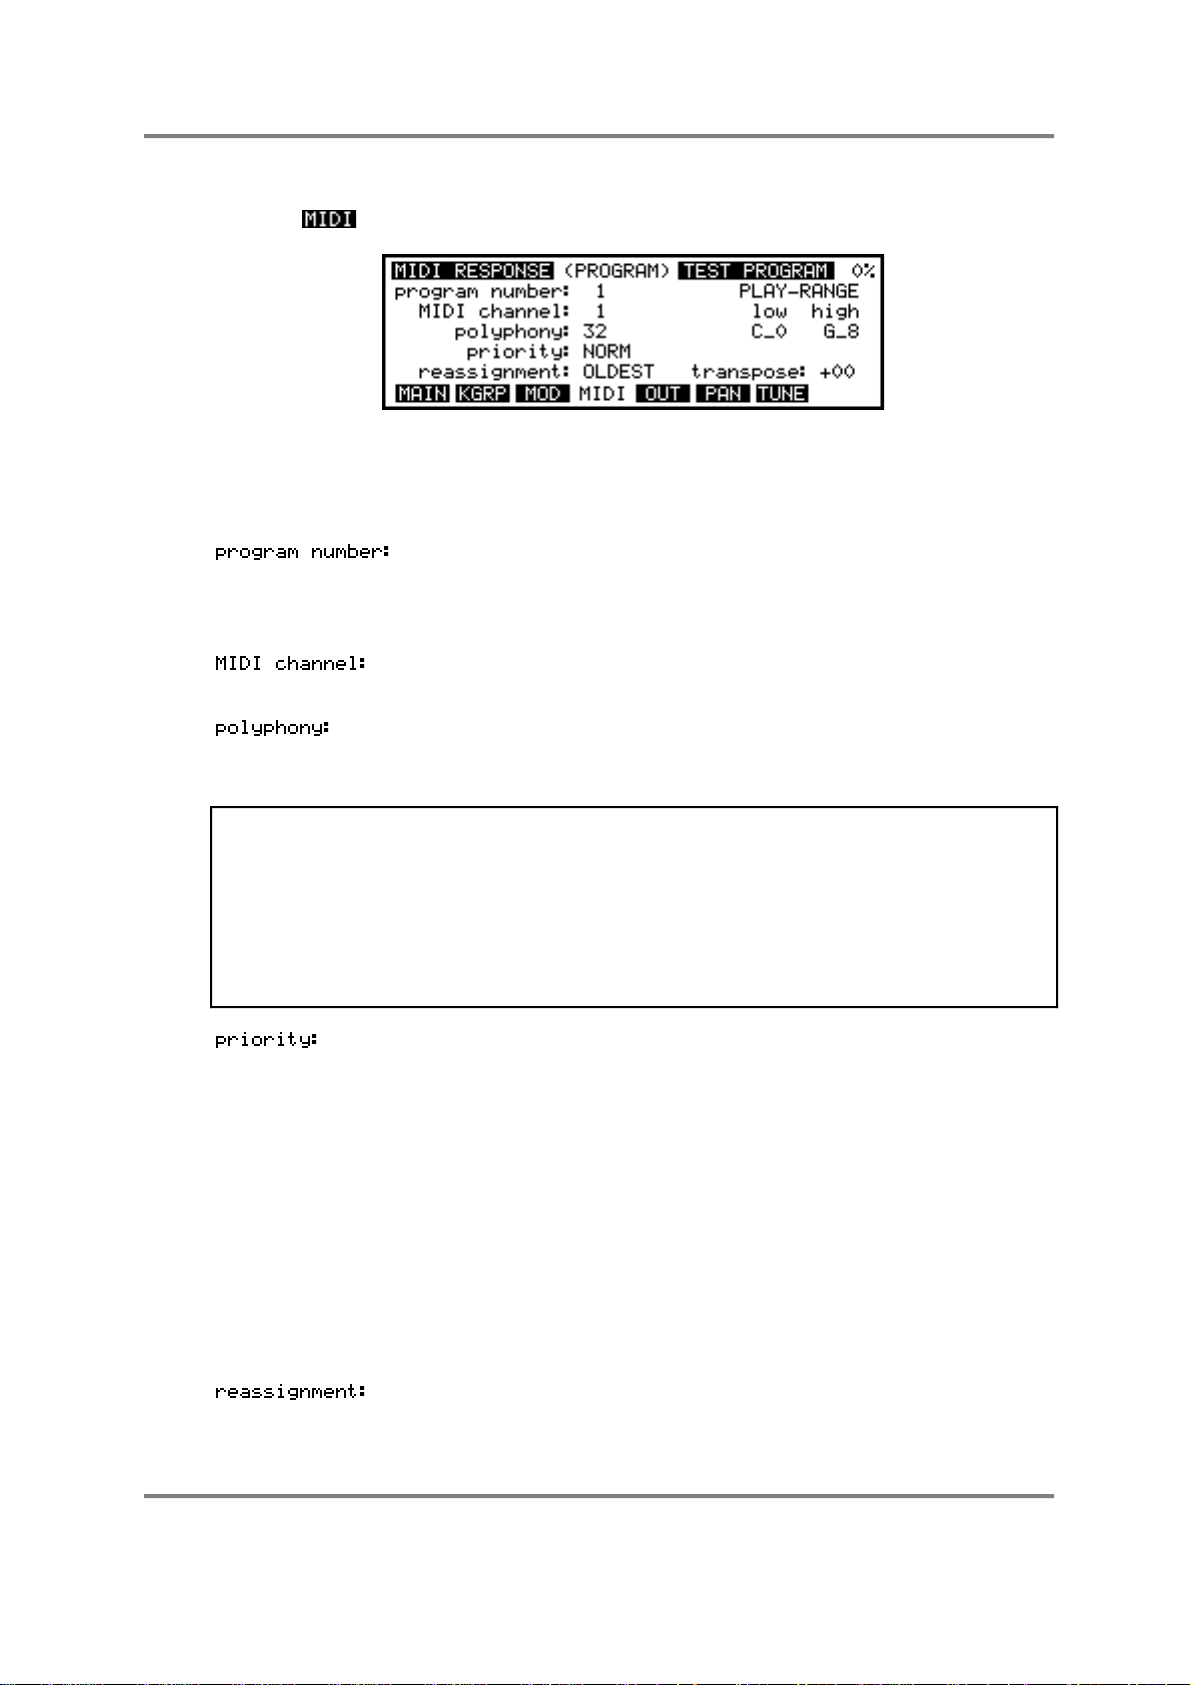
EDIT PROGRAM - SINGLE
MIDI PAGE
Pressing displays this screen:
The top line of this page contains a field which allows you to change the program currently
being edited. You may select different programs for editing here if you wish.
The parameters on this page are as follows:
This field allows you to set the program number of the program.
This is the number which will be called up on receipt of a MIDI
Program Change message and corresponds to a patch number
on a synthesiser.
This parameter selects the program's MIDI channel! The choice is
OM (omni) and 1 to 16.
This allows you to select how many notes (1 to 32) can be played
at a time by this particular program. This should normally be left at
the default, 32.
NOTE: This parameter should normally be set to the default of 32. Its inclusion here is
mostly for historical purposes. On the S1000/S1100 (and early versions of software for the
S2800, S3000 and S3200), it was common to use this parameter for hi-hats and the like
layered over a drums program (i.e. the hi-hats would be set to a polyphony of 1 voice so
that the closed hi-hat shut off the open hi-hat). With the MUTE GROUP function, however
(see later in this section), this parameter is not used so much but is retained should you
load an old S1000/S1100 or early S2800, S3000 or S3200 sound library disk.
See below for a description of the MUTE GROUP function.
This allows you to specify how notes will be 'stolen' by other
programs if this is necessary. There are four settings: LOW,
NORM, HIGH and HOLD. If a program is set to LOW priority, then
notes from this program will be stolen first. If set to HIGH, then
notes from other programs with lower priority will be stolen before
they are stolen from this program. NORM is, of course, normal
priority and, if any note stealing has to take place, this program will
be affected no more or less than others with NORM assignment.
If you are playing a complex piece of music using many programs,
it is a good idea to set important, lead-line sounds to HIGH, and
less important background programs to LOW.
HOLD is a special priority. If a program’s priority is set to HOLD,
notes from this program can only be stolen by the same program.
The notes which will be stolen are determined by this parameter either the OLDEST note will stop playing when a note is stolen or
the QUIETEST one.
Page 64 S3000XL Operator’s Manual
Page 71
EDIT PROGRAM - SINGLE
This allows you to set the overall keyboard range C0-G8 of the
program and this will override any keygroup range settings made
in the keygroup SPAN page. For example, even though your
program's keygroups may extend up to G8, if you set, say, C4 as
the high extreme in this field, no sound will be heard above C4.
You may use this function to create keyboard splits with other
programs of the same program number.
This allows you to transpose the program +/-50 semi-tones in
semi-tone increments. You will note that this is not a pitch shift
function as such but a MIDI transpose function - this overcomes
the problem of playing back samples out of their range. What this
function does is introduce an offset so that, with a +12 setting,
even if you play C3 on the keyboard, this is offset to play the
samples on C4 - it is not playing the samples on C3 an octave
higher.
NOTE: Most of the parameters in this page are retained for compatibility with data created
on earlier Akai samplers. When editing a program in MULTI mode, the MIDI channel,
priority, play range and transpose functions are not shown here as these parameters are
irrelevant, being overridden by the MULTI’s parameters.
However, if you are using the ‘old Akai’ method for multi-timbral sequencing, you will want
to set the parameters shown above (although they may be more easily set in the SINGLE
mode on the MIDI page).
S3000XL Operator’s Manual Page 65
Page 72
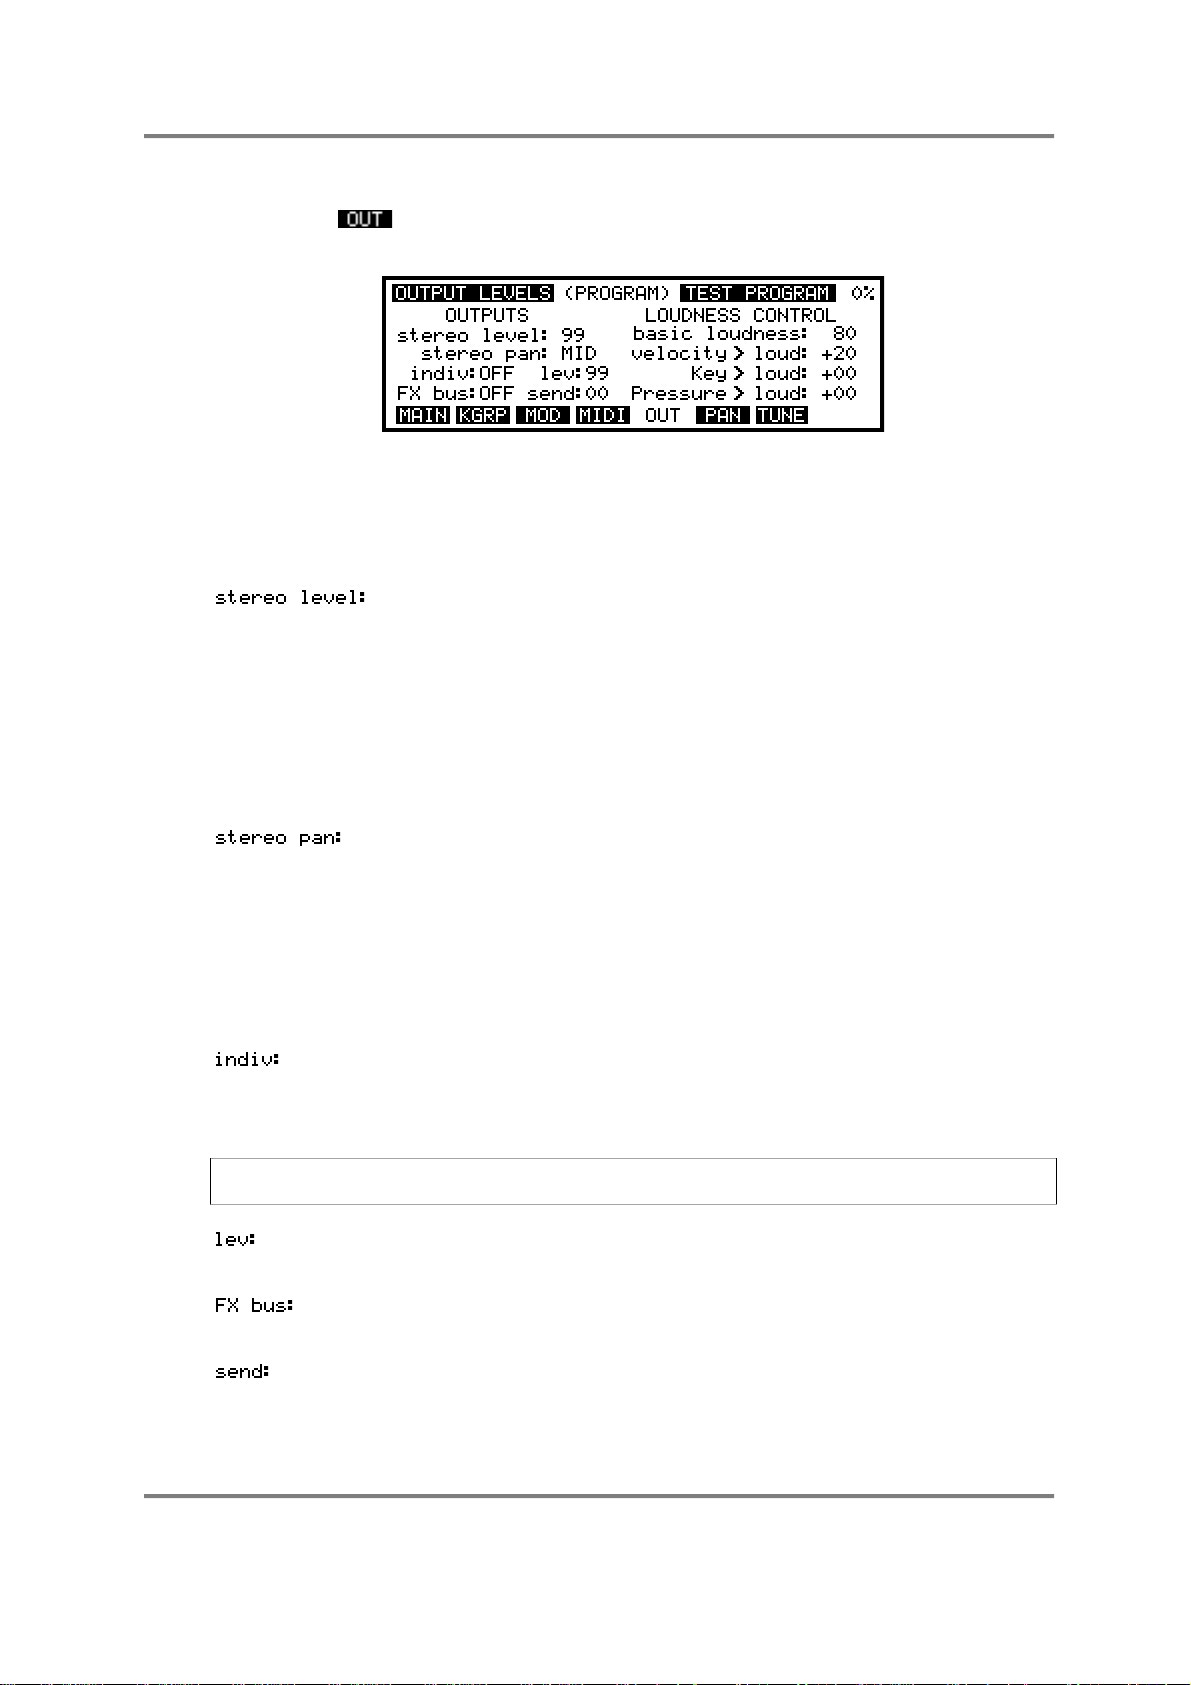
EDIT PROGRAM - SINGLE
OUTPUT LEVELS PAGE
Pressing the button takes you to the OUTPUT LEVELS page where you can control
the audio output of the program from the S3000XL. You will receive this screen display:
At the top right of the screen is the currently selected program name - in EDIT SINGLE,
this may be changed and another selected for editing by scrolling with the DATA control.
The parameters on the left of the screen set parameters concerned with output routing
and levels, etc.. They are as follows:
This sets the level 0-99 of the program as it appears at the L/R
stereo outputs. Adjusting this has no effect on the level of the
signal appearing at the individual outputs or the real-time digital
outputs.
By setting this field to 00, you may use this parameter to mix a
program out of the L/R mix completely if you are sending it to an
individual output (see above). In this way, you may have some
programs appearing only at the L/R outputs with other programs
appearing only at the individual outputs.
This sets the overall pan position of the program. You can set the
parameter L50-MID-R50. You will note that this may be affected
by other pan settings elsewhere in the program such as when the
auto pan facilities are used or when individual keygroups are
panned.
You will note that this parameter also affects the level of the signal
appearing at the individual outputs (see below) and at the realtime digital audio output.
This allows you to select which of the 8 individual outputs the
whole program will appear at. The default is OFF and you may
select 1-8. You will note that these outputs are polyphonic and can
use the full 32-voice polyphony of the S3000XL.
NOTE: This parameter works in conjunction with a field found in SMP2 (see below) where
it is possible to route single keygroups to the individual outputs
This sets the level 0-99 of the signal appearing at the output
selected above. If OFF is selected, then this control has no effect.
This sets the FX channel the program is routed to. You may select
OFF, FX1, FX2, RV3, RV4
This sets the effects send level 0-99 going to the selected effects
channel
Page 66 S3000XL Operator’s Manual
Page 73
EDIT PROGRAM - SINGLE
The parameters down the right of the screen allow you to affect the overall loudness of
the program.
Here you may set the overall output level 0-99 for the program.
This also affects the program’s sensitivity to velocity and you will
note that if this parameter is set to 99, the program will be quite
loud but will have no velocity sensitivity.
The default for this parameter is 80. This offers the optimum range
for velocity and other dynamics. Setting it higher than this will, of
course, turn the overall level up but it will reduce the amount of
overhead for dynamics. Reducing this parameter will give greater
extremes of velocity range although please note that you will not
be using the full resolution of the sampler’s dynamic range.
There are three loudness modulation inputs and each one has a default controller
selected. If you wish, these need not be changed - it is only in more specialised
applications that you may wish to set something other than these defaults. The defaults
are:
This is a fixed assignment and sets how much velocity will affect
the overall loudness of the program. You may set a value of ±50.
The default is +20 which gives a sensible dynamic range although
this may be changed if you wish. A setting of +50 will give you a
very wide dynamic range where soft key presses will produce
virtually no sound and hard key presses will output a very loud
sound. A setting of -50 will give the opposite effect - a hard key
press will produce virtually nothing whilst a soft key press will give a
loud output. At first, this may seem a bit strange to allow this but
this does enable you to crossfade between programs using
velocity - i.e. set one program to +50 and the other to -50.
NOTE: You cannot select any other modulation source in this field. This is one of only two
fixed assignments in the APM system.
This sets how much key position will affect the overall loudness of
the program. You may set a value of ±50. When set to positive
value, the sound will be louder in the upper reaches of the
keyboard and by setting it to a negative value, the sound will be
louder on lower notes. You may use this function to balance the
program level across the keyboard.
You may change the default modulation source from to
anything you like simply by placing the cursor where it says
and scrolling through the modulation options.
This sets how much pressure or aftertouch will affect loudness
after a note has been played. You may set a value of ±50.
Positive values will cause the sound to get louder as you press
harder on the keyboard and negative values will, of course, have
the opposite effect. You may use this function for expressive
phrasing of such instruments as strings, vocal, wind and other
such instruments to great effect.
By layering two programs and setting opposite values (i.e. + 50 on
one program and - 50 on the other), you may use this function to
crossfade between them using pressure. As an example, you
S3000XL Operator’s Manual Page 67
Page 74

EDIT PROGRAM - SINGLE
The effect the loudness modulation parameters have on the overall loudness of the
program depends on the modulation source you select. Here are some suggestions:
LFO 1 or 2 This will impart a tremolo effect on the sound and so is useful for
Modwheel Use this, perhaps, instead of pressure.
could layer a distorted guitar program and a distorted feedback
program and introduce the feedback element of the sound using
pressure to create a powerful heavy metal guitar.
You can, of course, change the default selection from
to anything you like simply by placing the cursor where it says
and scrolling through the modulation options.
simulating old rock and roll guitars where this effect was common
in amplifiers. This may also be useful in simulating the tremolo
effect found on organs. It may also be used to simulate the
tremolo effect of woodwind on sustained notes. Using a triangle
wave for modulation, it is particularly good for vibes sounds,
especially those with a static loop. It is probably not suitable to
simulate tremolando strings, however, using LFO modulation. Of
course, it may be used for special effects.
Bend Use this instead of pressure or modwheel.
External Depending on the selection made in the GLOBAL MIDI page’s
main page, you could apply footpedal, volume or breath control to
control the program’s overall loudness. The breath option will be
very popular with owners of the Akai EWI MIDI wind controller.
These three modulation input sources may be combined and mixed together. When
layering programs in MULTI, identical mod sources in other programs may be inverted for
crossfade effects.
NOTE 1: You will note that if the parameter is set to full (i.e. 99) the output
level of the S3000XL is at maximum and so you will not hear any effect if one or more
modulation sources are applied.
NOTE 2: In some cases it is possible to overload the S3000XL and cause distortion. This
will normally only happen with particularly loud samples recorded at full level when
excessive modulation is applied. Increasing the filter resonance may also lead to distortion
in some cases. If this happens, back off the
parameter.
Page 68 S3000XL Operator’s Manual
Page 75

EDIT PROGRAM - SINGLE
PAN PAGE
In this page you may set the characteristics of the auto panning functions. Pressing
will display this screen:
As usual, the program name of the program currently selected for editing is shown here
which you may change if you like. As in the OUTPUT page, we have three modulation
inputs which can control panning. The defaults for these three control inputs are:
This will produce the classic auto panner effect with the sound
gradually moving between left and right at a rate set by LFO 2.
You can use this for special effects, of course, but one popular
application is to use it to simulate a rotary speaker effect. You may
set a value of ±50.
This selects that key position will affect overall loudness. You may
set a value of ±50. With positive setting (i.e. +50) the sound will
pan from left to right across the keyboard and, if set to a negative
value (i.e. -50), will pan the sound from right to left across the
keyboard. You may use this parameter to create pseudo stereo
samples out of mono ones. For example, with samples such as
piano or marimba or vibes, you could create the stereo effect of
microphones being placed at either end of their keyboards to
produce a panning effect.
This allows you to control pan position using the modulation wheel.
This could be put to good effect in a solo line, perhaps, where,
every time you introduce vibrato via the wheel, the sound pans
around the stereo image. You may set a value of ±50.
NOTE: Due to limitations with the panning hardware, whilst slow sweeps work well, fast
sweeps may, on some sounds, introduce some ‘zipper noise’. Please be aware of this
when setting pan modulation.
As with all control inputs on the S3000XL, any combination of controllers can be mixed
together. Here are a few suggestions:
Bend Use this instead of modwheel perhaps.
Pressure Use this instead of modwheel or bend.
External Use maybe a footpedal to pan the sound around. EWI players
may use breath control.
Velocity You can use your keyboard dynamics to pan the sound around
with loud sounds appearing at one output and soft sounds at the
other.
LFO1 Use this as an alternative to LFO2. This LFO’s extra facilities allow
some very odd things to be done. Try applying this and
S3000XL Operator’s Manual Page 69
Page 76

EDIT PROGRAM - SINGLE
ENV1/ENV2 These may be put to good effect to pan the sound around
! Modwheel Use this (and ! Bend or ! External) to reposition each new note
And don’t forget that layering samples in zones and panning them to extreme hard left
and right will cause the two samples to crossover in the stereo image when these effects
are applied. Layering two programs and setting the modulation amounts to opposite
values can also yield some interesting panning effects.
modulating LFO1’s rate with LFO2 so that the pan from side to
side gradually speeds up and down or modulate LFO1’s rate with
the modwheel to emulate the slowing down and speeding up of a
rotary speaker in an organ program.
according to the envelope of the sound. Perhaps ENV2 is the
most interesting with its multiple rates and levels.
according to the position of these controller.
Page 70 S3000XL Operator’s Manual
Page 77

EDIT PROGRAM - SINGLE
THE TUNE PAGE
The next soft key is the key and this takes us, not surprisingly, to the main program
tuning page. Pressing will give you this display:
As usual, the program name is displayed at the top right of the screen - a different one
may be selected if you wish.
In this page, you set up different tuning temperaments for each program, if desired. If
you are playing a percussive sample (for example, congas) in one program, which you do
not want to correspond to standard Western chromatic equal temperament tuning, this is
where you can alter things. Select the program whose temperament is to be altered on
the top line of this screen. Use the CURSOR keys to select the note on the keyboard
octave which will be re-tuned, and use the DATA control to alter the tuning away from
equal temperament by ±25 cents (one quarter-tone). If you are re-tuning the C# key, for
example, all notes played with the C# keys on the keyboard will be detuned by the
amount you have set. You may tune the scale to anything you want which can be very
useful for enriching orchestral sounds and also for setting your own special scales
To help you with this, there are also some alternative tuning templates which are selected
in the field . These offer preset tunings which you can apply to the
program.
The other parameter in this page is the function. This transposes the
program +/-50 semitones. This may be adjusted in very fine steps (100ths of a tone) for
fine tuning the program.
Those, then, are the master pages for the program where you can set parameters that
affect the program as a whole. In any of the pages described, you may always directly
access another from the soft keys.
S3000XL Operator’s Manual Page 71
Page 78

EDIT PROGRAM - SINGLE
MODULATION PAGES
The next group of pages we will look at also affects the program as a whole but also has
a direct influence on individual keygroups. These are the modulation pages where you
may set the parameters for the two low frequency oscillators and the pitch bend. You may
also set the parameters for the sostenuto pedal. These modulation sources may be
applied to the filter, loudness, pitch and panning for a wide range of the usual modulation
effects such as vibrato or for more outrageous synthesiser effects. These pages are
accessed by pressing the key.
Pressing the key displays this screen:
PITCH BEND
The first page we encounter is the PITCH page where you may set the parameters
associated with pitch bend. As usual, you may select a program for editing at the top right
hand of the corner.
The pitch bend on the S3000XL allows you to set a different range for bend up and down
as well as use pressure and a special mode is also available to make it more flexible. The
parameters are:
This sets the range for bending pitch up with the pitchbend wheel
or lever. The range is 0-24 semitones. The default is 2 semitones.
This sets the range for bending pitch down and, again, the range
is 0-24 semitones. The default is 2 semitones.
As well as using the pitchbend wheel or lever, you may also use
pressure to bend notes. The range is -12 to +12. You may only
bend up or down depending on the selection made - unlike the
bend wheel/lever, you cannot pitchbend both ways.
This is a mode select option that allows you to choose whether the
pitchbend will happen on all notes or only on held notes. This is
particularly useful on sounds with long releases. The options are
NORMAL and HELD.
Let us say, for example, that you have a sound that has a long
release and you are performing a solo that uses a lot of pitchbend.
Using NORMAL, when you pitchbend the note, all the notes
currently in the release stage of their envelope will also bend.
Sometimes this is what you want but there can be times when this
spoils the effect you are trying to create.
By selecting the HELD mode of pitchbend, ONLY THE KEY(S)
YOU ARE CURRENTLY HOLDING DOWN WILL BEND and all
those notes you are not playing but which are fading through their
release stage will remain unchanged. If you release your finger
from the key with the pitchbend up (or down), as the note dies
away, if you let the pitchbend return to zero, that last note’s pitch
will not change. If you release just one note of a chord with
Page 72 S3000XL Operator’s Manual
Page 79

EDIT PROGRAM - SINGLE
pitchbend up or down, if you let the wheel or lever settle at zero,
only the notes you are holding will bend.
The pitchbend options on the S3000XL allow some very interesting performance
techniques. By setting the pitch to UP: 2 and DOWN:12, with a heavy metal guitar
sample, you can emulate string bending up and an octave ‘whammy bar dive bomb’
down. Many things are possible.
S3000XL Operator’s Manual Page 73
Page 80

EDIT PROGRAM - SINGLE
LFO1
Pressing will give you this screen display:
This is the page used for setting up LFO1. Again, the program name is shown at the top
right of the screen and other programs may be selected for editing if you wish. The
parameters for LFO1 are as follows:
This allows you to select from three waveforms. They are:
TRIANGLE ( ) - This gives a rising and falling effect. At around a setting
of 75, this would normally be used for vibrato but can be assigned
anywhere you like and can be used for filter sweeps, panning, amplitude
modulation and slow pitch sweeps. This is a ‘bi-polar’ modulation
waveform that ‘rotates’ around the note you are playing to give a natural
vibrato effect.
0
SAWTOOTH ( ) - This waveform is used mostly for special effects. It rises
slowly and falls abruptly. This is a ‘uni-polar’ waveform that jumps between
the held note and the modulation level set at the destination.
0
SQUARE ( ) - This gives stepped ‘up and down’ effect. When applied to
pitch it can be set to give trills or large octave jumps. This is a ‘uni-polar’
waveform that jumps between the held note and the modulation level set
at the destination.
0
RANDOM ( ) - This gives a totally random, stepped waveform and is
suitable for special effects. The effect that immediately springs to mind, of
course, is the classic ‘sample and hold’ effect found on analogue
synthesisers - by routing this to pitch you can create random pitch effects
suitable for, say, creating computer effects, especially when the LFO
speed is set quite fast. When applied to the filter(s), you can create many
interesting random tone change effects. You can even use this wave to
control LFO1’s rate so that not only will pitch, tone or whatever modulation
input this LFO is assigned to be random but the speed of modulation will
change randomly.
This selects whether the LFO’s (all 32 of them!) are synchronised or not.
With ON, all the LFO’s are not synchronised and so give a
Page 74 S3000XL Operator’s Manual
Page 81
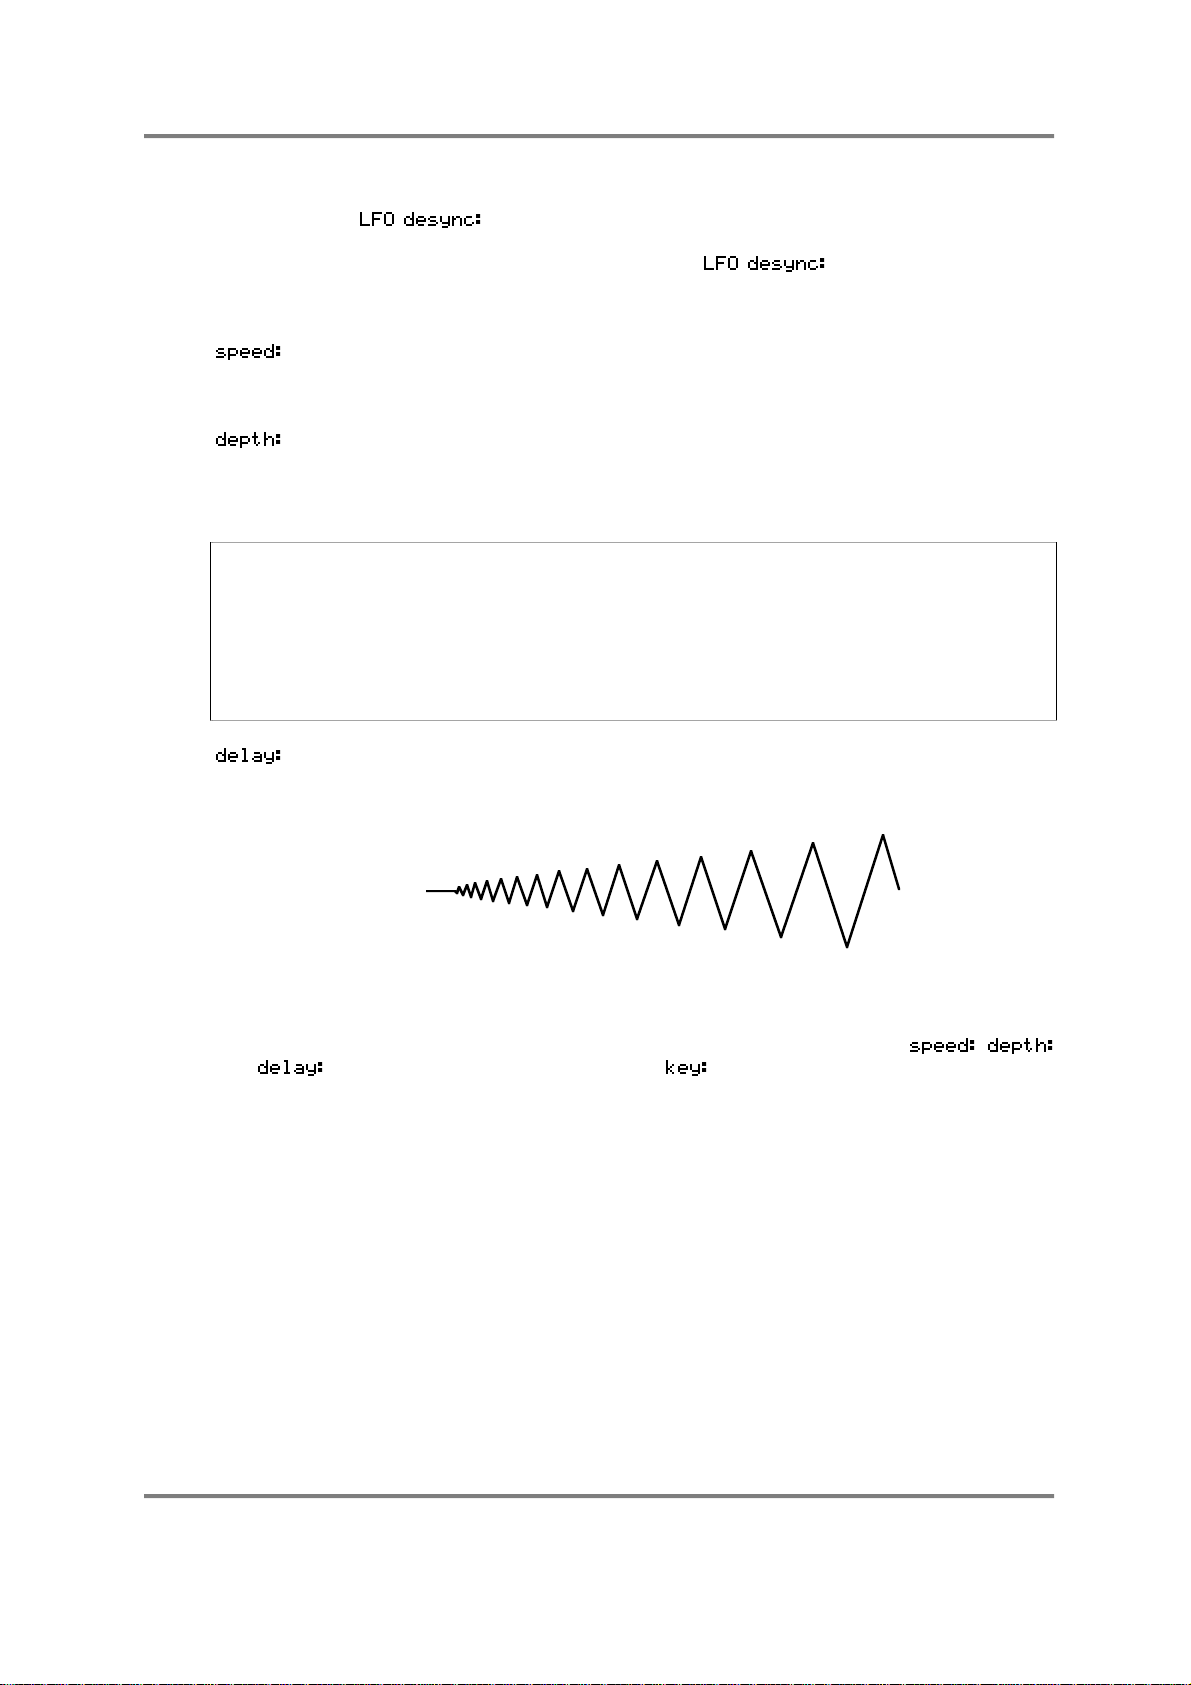
EDIT PROGRAM - SINGLE
rich texture to ensemble sounds when being used for vibrato. When
is set to OFF, all LFO’s are in sync. This latter option is
probably more suited to use with synthesiser effects. You will find that
slower LFO speeds are possible with set to off.
The three fixed parameters for setting up LFO1 are:
This sets the rate of LFO1. This is variable between very slow (01) for such
effects as auto panning and filter sweeps and fast (99) for vibrato and
other effects.
This sets the output level of LFO1. This acts as a master LFO modulation
control for all destinations that have LFO1 routed to them. In this way, if
you wish to change the modulation level going to
simply change this parameter. The range is 0-99.
NOTE: You may find that nothing happens when you route LFO1 to a destination and set
a modulation level at the destination’s input. This will be because LFO1’s depth is set to
00. This may seem a strange default at first but the reason is to do with the use of the
modwheel for vibrato. In order to be able to have the modwheel for vibrato as an
immediate effect, the LFO depth needs to be at 00 otherwise, there will be constant LFO
modulation of pitch. It is only when you are using LFO1 to apply a constant vibrato or for
something other than vibrato in specialist applications that you will need to specifically set
the depth control here.
all
destinations easily,
This parameter sets the time it takes for the LFO1 effect to take place
after a note-on. At 00, the effect will be instantaneous but at 99 the effect
of LFO1 to take effect will be delayed. I.e:
NOTE ON
The three ‘VARIABLE’ fields apply to the modulation inputs of LFO1. Although not
specifically named, they relate to the parameters directly to their left - i.e. ,
and . The default for these parameters is so that you may affect speed, depth
and delay according to keyboard position, thereby emulating the fact that, for example,
high violins’ vibrato is often slightly faster, deeper and less delayed than low cellos or
contrabasses. These parameters allow you to create quite rich orchestral textures where
vibrato is never constant across the keyboard range.
Of course, you may select other modulation options for these inputs. Here are a few
ideas:
• Using LFO1 as an assignment to control its own rate will change the symmetry of the
waveform and you can use this to create new modulation waveforms (i.e. using a
square wave to modulate itself will create an asymmetric pulse wave). Using LFO1 to
modulate its own output level does create an effect but this can best be described as
subtle! Applying LFO1 to modulate its own delay is also very subtle to the point that,
with the exception of very slow sweeps, you probably won’t hear anything!
• Applying a slow LFO2 to speed will give a gradual speed up and slow down of LFO1
rate. This can be used for special effects, especially in synth sounds - for example,
S3000XL Operator’s Manual Page 75
Page 82
EDIT PROGRAM - SINGLE
apply a slow LFO1 mod to the filter cutoff and assign a slow LFO2 to control LFO1’s
speed, setting a value of + 50. Assigning it to depth will cause the effect of LFO1 to
whatever destination it is applied to increase and decrease at a rate set by LFO2.
Applying LFO2 to delay will only have an effect at the point of note-on.
• Selecting ENV1 or ENV2 to control speed will give changes in speed according to the
shape of the envelope. Applying it to depth allows you to ‘shape’ the output of LFO1.
Applying it to delay will have no effect.
• Selecting any of the continuous controllers will allow to change the parameters in realtime as you play. For example, routing modwheel to speed will let you change the
modulation rate as you introduce vibrato (note that routing modwheel to control depth
is not really worthwhile as this is a fixed assignment anyway in the EXTRA parameters
described below). Assigning any of the continuous controllers to delay is not going to
produce much effect except at the point of note on (pressure will have no effect on
delay at all, by the way).
• Any of the ‘!’ continuous controllers will only have an effect at the point of note on as
well - you may use these to set speed, depth and delay in real-time as you play.
The parameters allow you to introduce more modulation and these have
fixed assignments which are:
This allows you to set the level of modulation that will be introduced via the
modwheel. This works in conjunction with the parameter. Even
with set to 00, you may still use the modwheel for vibrato and other
modulation. With set at anything other than 00, this will set a basic
level of modulation that will be present in the sound all the time and the
modwheel will introduce more again. With the LFO set at 99, the
modwheel will have no effect because the LFO output is now at
maximum. The default for this parameter is 30 so that modwheel is
instantly available for vibrato without you having to do anything.
As with , this selects that pressure can be used to introduce
modulation. The same principles apply that even with set to 00,
you may still use pressure for vibrato and other modulation. With the
depth set at anything other than 00, this will set a basic level of
modulation and pressure will introduce more. With depth set at 99,
pressure will have no effect because the LFO output is now at maximum.
This allows you to use note-on velocity to introduce LFO1 modulation.
With a positive value set here, playing a note hard will introduce a level of
modulation which may be augmented using the modwheel or pressure.
Page 76 S3000XL Operator’s Manual
Page 83
EDIT PROGRAM - SINGLE
SETTING LFO1 MODULATION DEPTH
The master output of the LFO is set using the control and this has to be set to
something other than 00 for there to be any effect unless the modwheel is moved - you
may assign the LFO to a destination and set that destinations modulation level to
maximum only to find that there is no effect. The reason for this is that the control
in this page is not set or the modwheel is not up.
A useful function of this master depth control is that in the case where you have applied
LFO1 to several destinations and you wish to increase or reduce the level of modulation
going to all the destinations, you may change the modulation level to all destinations with
just the one control instead of having to individually adjust every destinations’
modulation input level.
NOTE: Because it is felt that LFO1 will mostly be used for vibrato effects, the default in the
PTCH page (see later) is set so that simply setting a value in the
vibrato. If you intend to use LFO1 for something other than vibrato (i.e. slow filter sweeps,
panning, amplitude modulation, etc.), then be sure to set the LFO1 parameter in the
PTCH page to 00 unless you really want the sound of an American police siren!
Once you have set the LFO1 parameters, you may return to the main program edit page
by pressing .
field will apply
S3000XL Operator’s Manual Page 77
Page 84
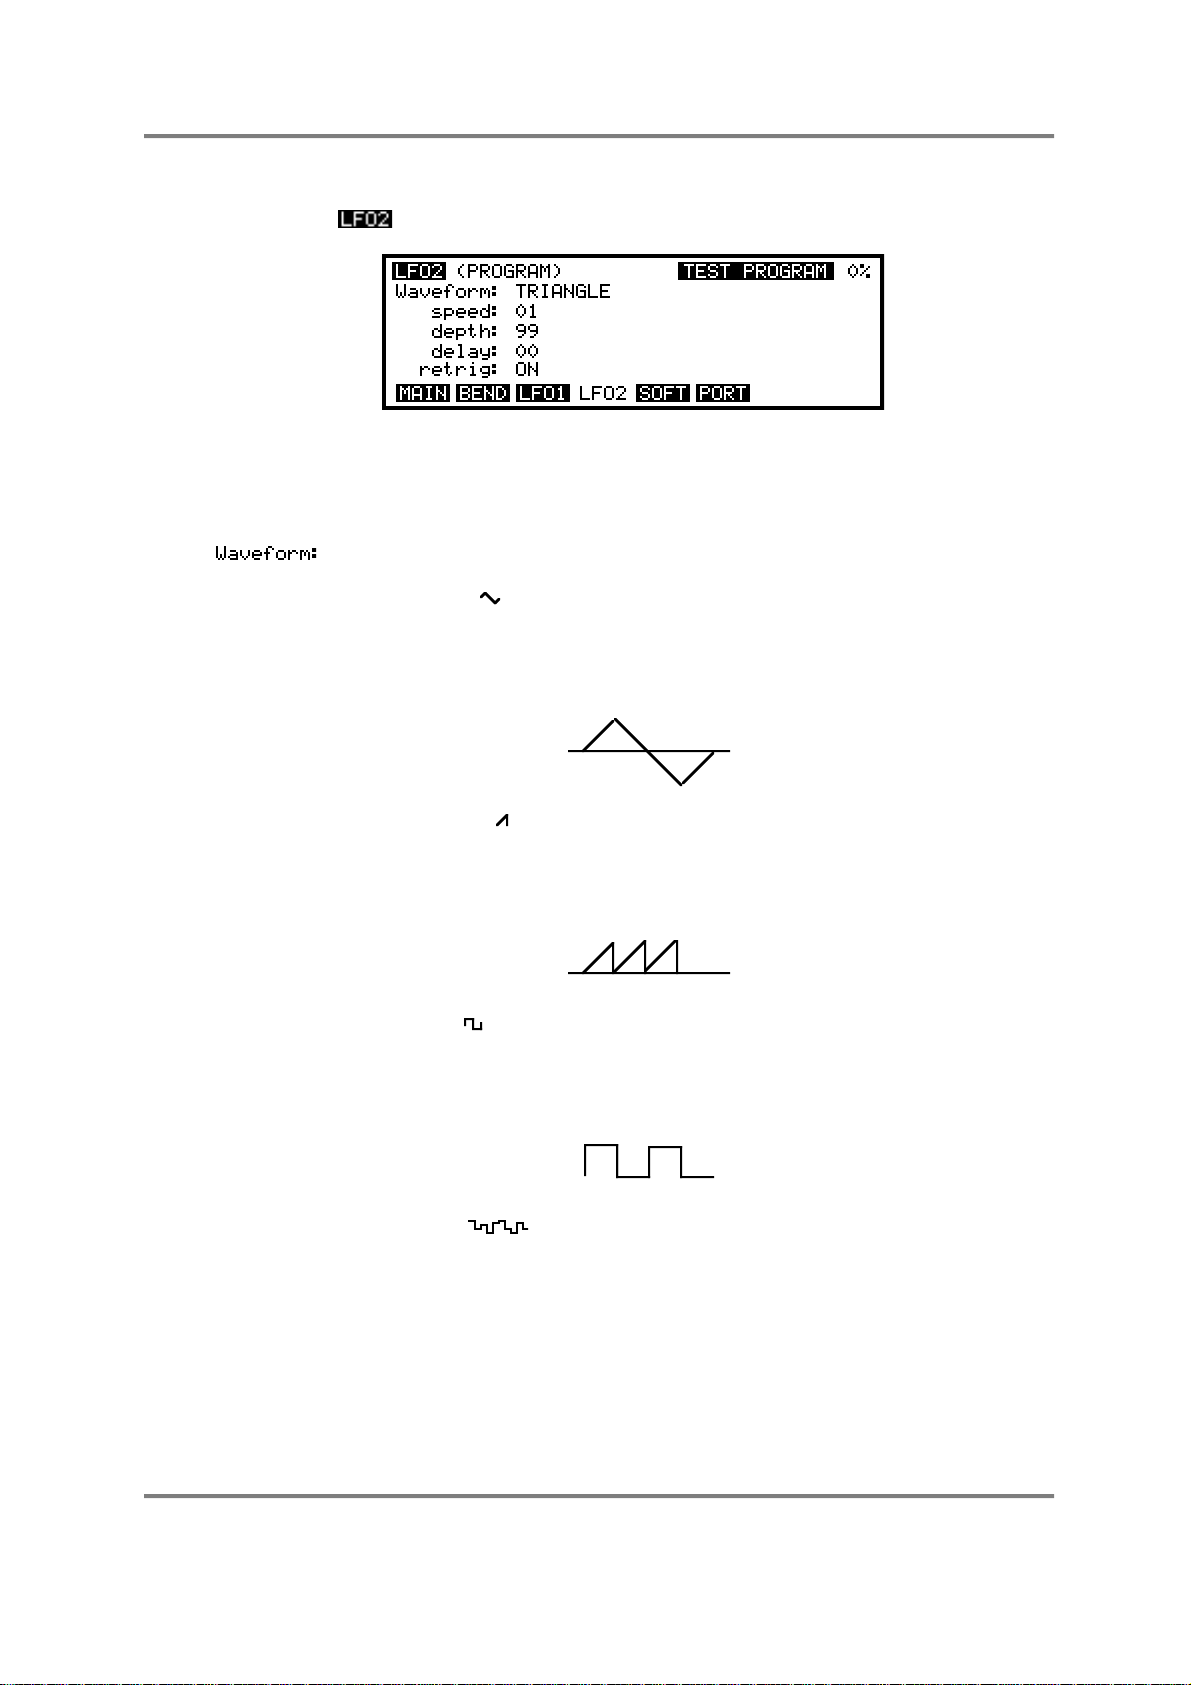
EDIT PROGRAM - SINGLE
LFO2
Pressing the key will take you to the second LFO page:
This is a simpler LFO for auxiliary modulation purposes. Whilst LFO1 is normally used for
vibrato via the modwheel or pressure, LFO2 can be used for secondary modulation
purposes such as filter sweeps, amplitude modulation, panning, etc.. As usual, the
program name is displayed in the top right hand corner. The parameters are as follows:
This selects the modulation waveform. The choices are:
TRIANGLE ( ) - This gives a rising and falling effect. At around a setting
of 75, this can be used for vibrato but can be assigned anywhere you like
and can be used for filter sweeps, panning, amplitude modulation and
slow pitch sweeps. This is a ‘bi-polar’ modulation waveform that ‘rotates’
around the note you are playing to give a natural vibrato effect.
0
SAWTOOTH ( ) - This waveform is used mostly for special effects. It rises
slowly and falls abruptly. This is a ‘uni-polar’ waveform that jumps between
the held note and the modulation level set at the destination. It can be
inverted at the modulation input stages of each destination to give
downward sweeps.
0
SQUARE ( ) - This gives stepped ‘up and down’ effect. When applied to
pitch it can be set to give trills or large octave jumps. This is a ‘uni-polar’
waveform that jumps between the held note and the modulation level set
at the destination. Like the sawtooth wave, it can be inverted at the input
stages of each destination.
0
RANDOM ( ) - This gives a totally random stepped waveform and is
suitable for special effects. Like LFO1’s RANDOM waveform, it can be
used to create the classic ‘sample and hold’ effect found on analogue
synthesisers.
However, the random waveform provided by LFO2 has some other
possibilities.
Page 78 S3000XL Operator’s Manual
Page 85
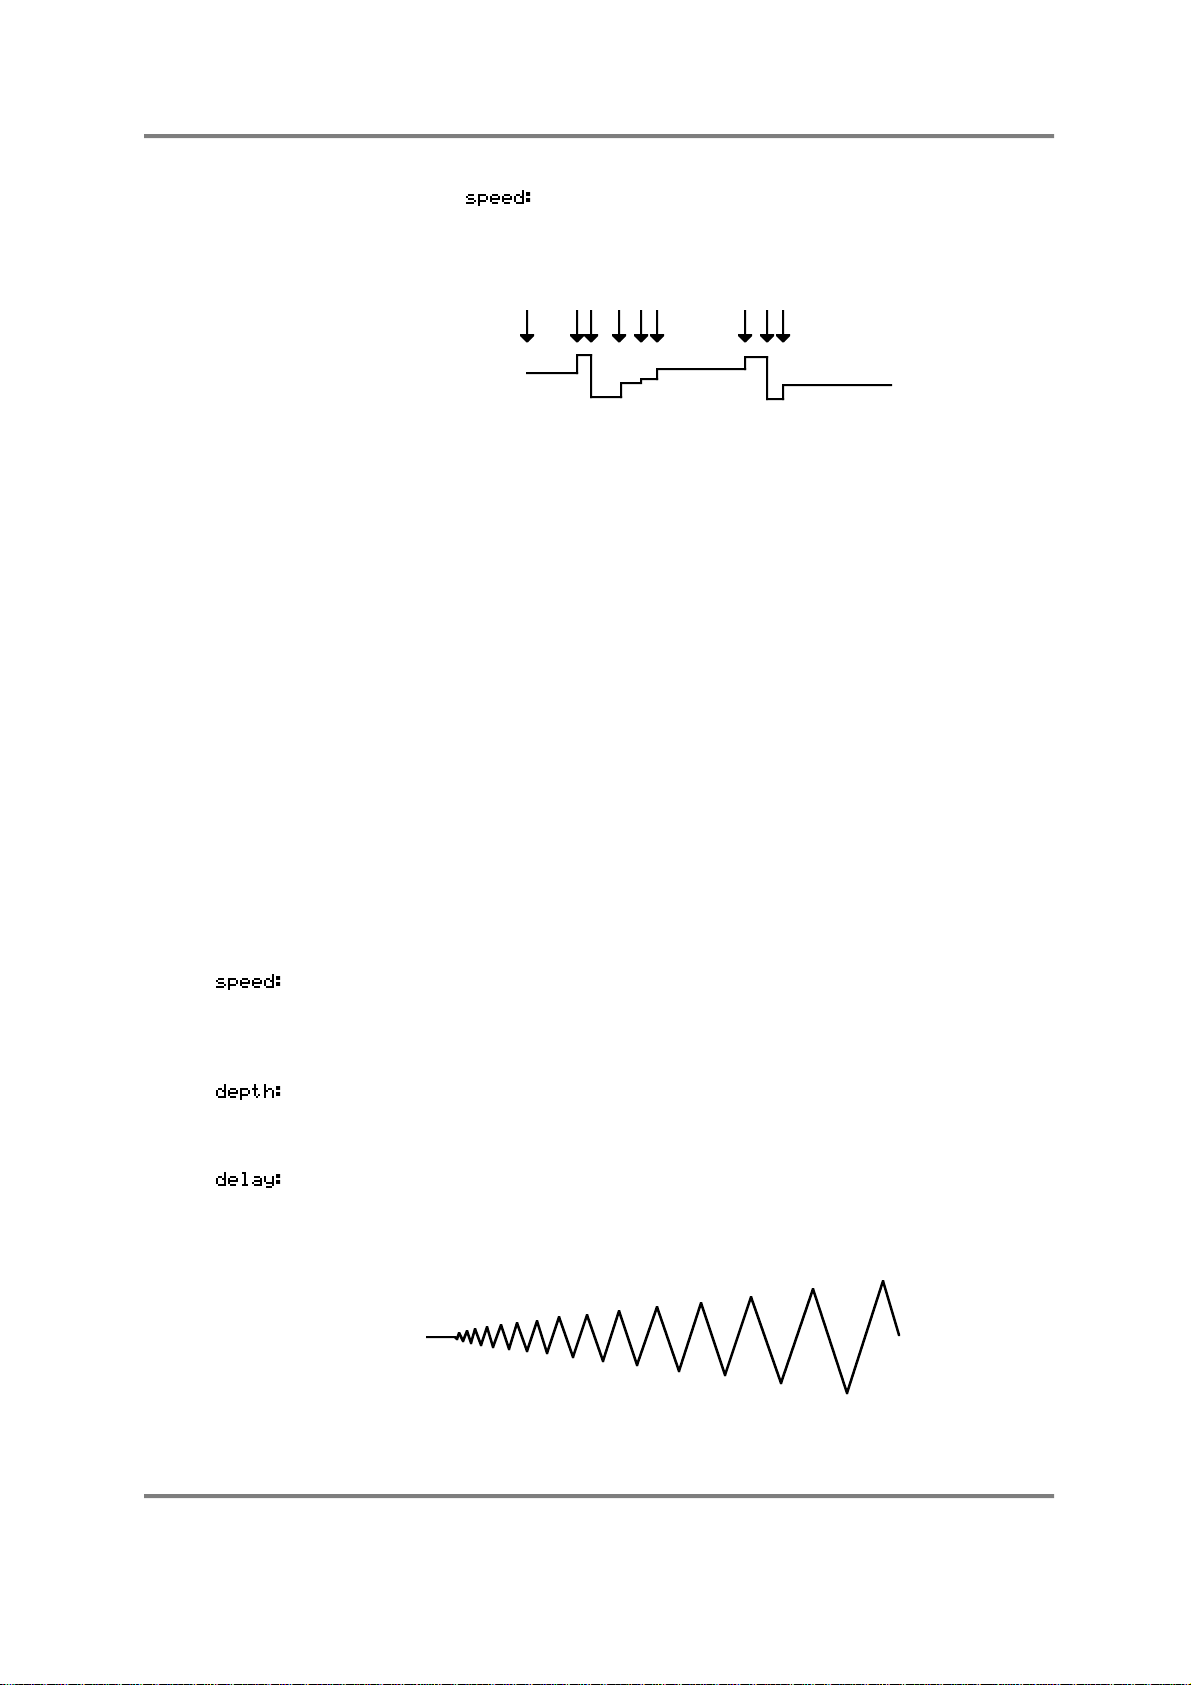
EDIT PROGRAM - SINGLE
When the parameter is set to 00, the random steps will only
change when a new note-on is received and will sustain at that level until a
new note-on is received. I.e:
MIDI NOTE ONS
By applying this LFO in this way to, say, FILTER 1, each note you play
may have a different tonal colour and this can be made into quite a
dramatic synth effect by setting quite high modulation amounts and high
resonance. With percussive sounds, this can be a very interesting rhythmic
backing for tightly sequenced arpeggios and riffs and the like. By applying
this to panning, each note will be in a different position in the stereo
image. On single note, you will get a dramatic panning effect as the sound
bounces all over the stereo image and in chords, each note will position
itself in different positions giving the impression of great depth and spread
to the sound.
However, this facility can be also used more subtly! By applying a tiny
amount of the RANDOM waveform to pitch (try a depth setting of 01),
each note may have a very tiny pitch discrepancy. In a layered string or
vocal ensemble, by applying this to just one of the layers, you can create
interesting chorus effects as each note has a slightly different detune
amount.
Similarly, when applied in small amounts, this can also be used effectively
on ‘ethnic’ sounds such as pan pipes as the ‘real thing’ is rarely perfectly in
tune from one note to the next. On a rich analogue synth sound, you can
also emulate the fact that these old synths’ tuning left a lot to be desired!
There are many possibilities which you will no doubt find for yourself.
This sets the rate of LFO1. This is variable between very slow for such
effects as auto panning and filter sweeps and fast for vibrato and other
effects. The default here is slow as it is assumed you will want to use this
LFO for such things as filter sweeps and slow panning effects, etc..
This sets the master output level for LFO2. Unlike LFO1, its default is 99
so you will instantly hear the effect of LFO2’s modulation as soon as you
apply it at any destination.
This sets the delay between a note-on occurring and the effect being
introduced. At 00 the effect will be instantaneous and at 99 the effect will
take some 5 or 6 seconds to be introduced. I.e.
NOTE ON
S3000XL Operator’s Manual Page 79
Page 86
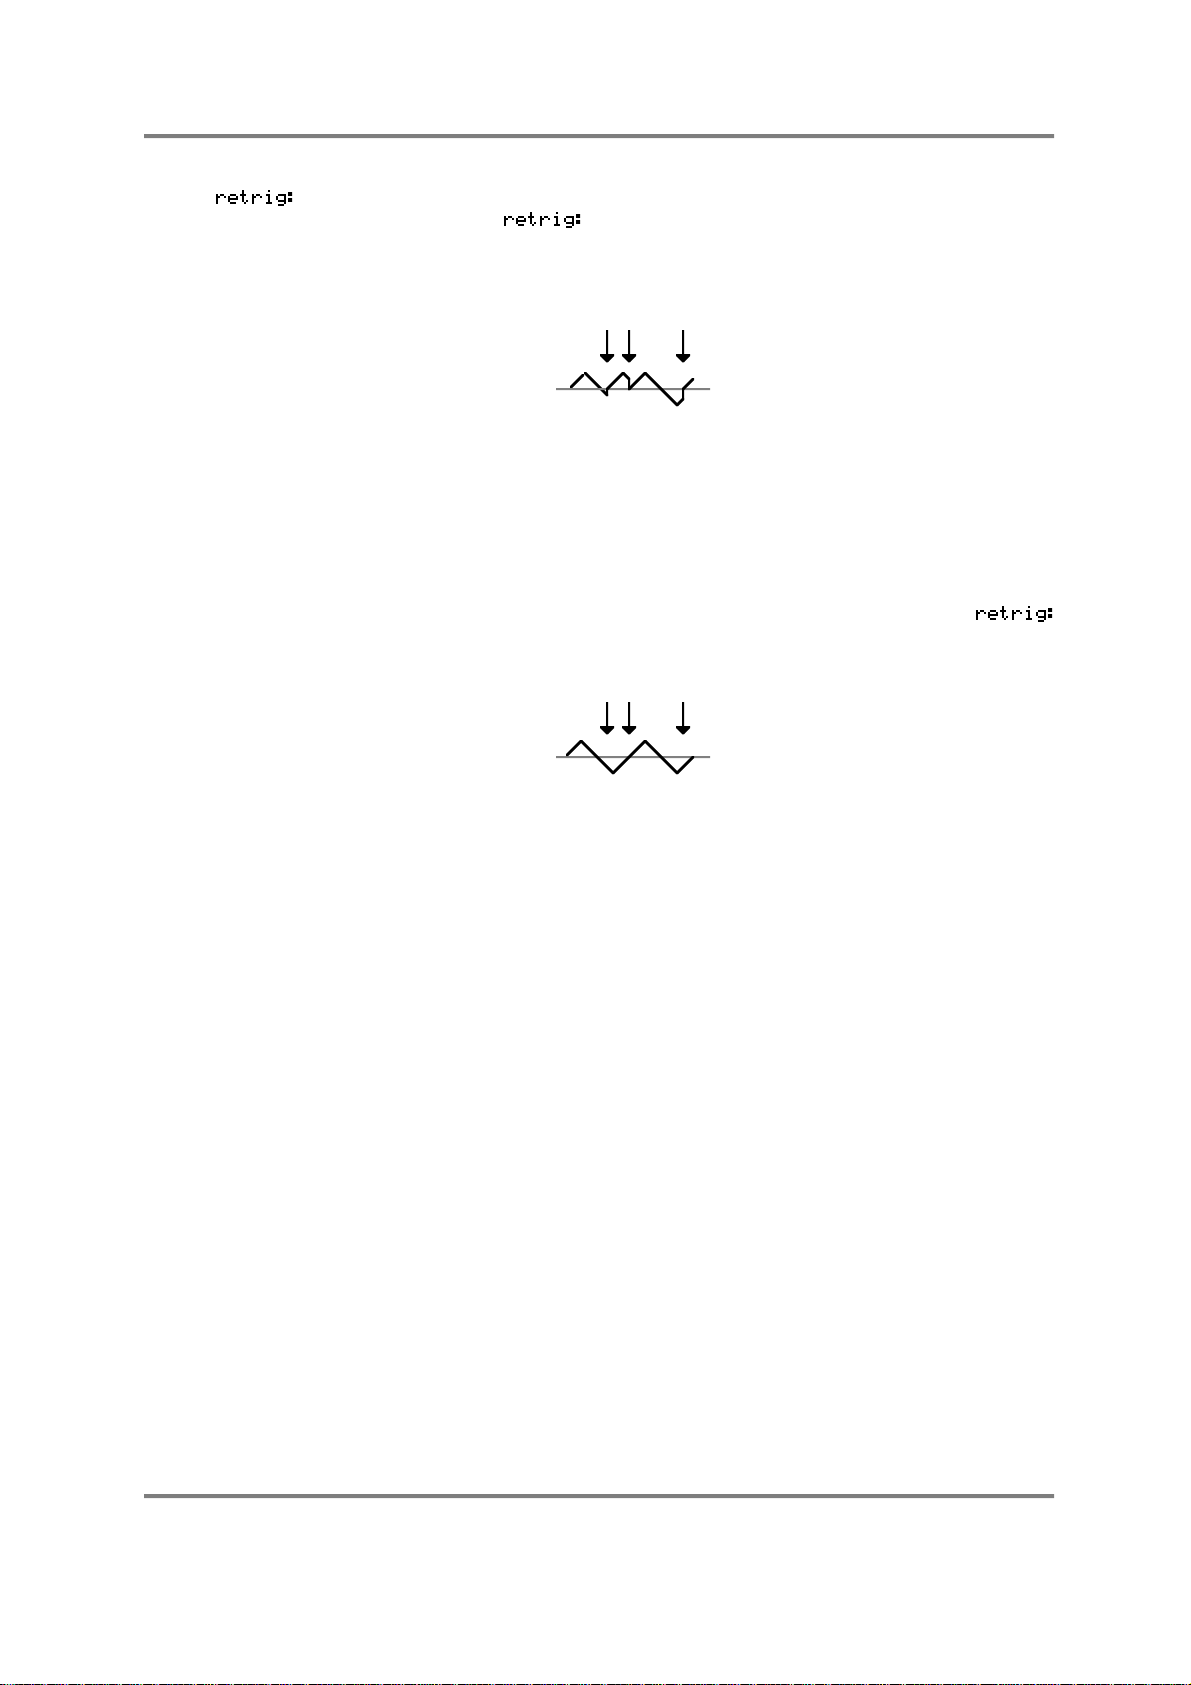
EDIT PROGRAM - SINGLE
Here, you can set whether or not LFO2 will re-trigger with every new noteon or not. With set to ON, each note you play will reset the cycle
of the selected waveform to its leading edge. For example, with the
triangle wave selected, you would get this result:
This is useful for certain types of modulation effects where you want the
effect to start at the same point in the modulation waveform for every note
you play. For example, if you are using the square wave, you may want it
to always start on the rising edge with each note you play. The same may
apply for the sawtooth and random waveforms.
However, there are occasions when you want the LFO to be free running
in the background. For example, on filter or panning sweeps where you
want the effect to be gradual as you play, you will want to switch
to OFF to get this result:
MIDI NOTE ON
MIDI NOTE ON
Here, the modulation waveform will ignore incoming note-on messages
and will be rising and falling giving you a gradual sweep through whatever
it is applied to. This is particularly useful when triangle is selected and
applied to the filter(s) as you can re-create the old filter sweep effects of
analogue synths.
There are no modulation inputs to LFO2.
You may use LFO2 for a number of things. As mentioned above, when LFO1 is tied up
doing vibrato via the modwheel, LFO2 may be used to affect things such as panning, filter
sweep and amplitude modulation. Of course, there is no reason why you shouldn’t use
LFO2 for vibrato either and mixing it with LFO1 as a source of vibrato can create some
rich ensemble textures. Many interesting things are possible when modulating LFO1 with
this LFO - at extreme settings you can make LFO1’s modulation speed up and slow down
for special sound effects or synth sounds but, if you’re trying to breathe some life into
some dead string samples, for example, you may like to use LFO2 to
LFO1 thereby affecting the vibrato very subtly so as to eliminate the inherent ‘cyclicness’
of LFO modulation. No doubt you will find variations of your own.
slightly
modulate
Page 80 S3000XL Operator’s Manual
Page 87
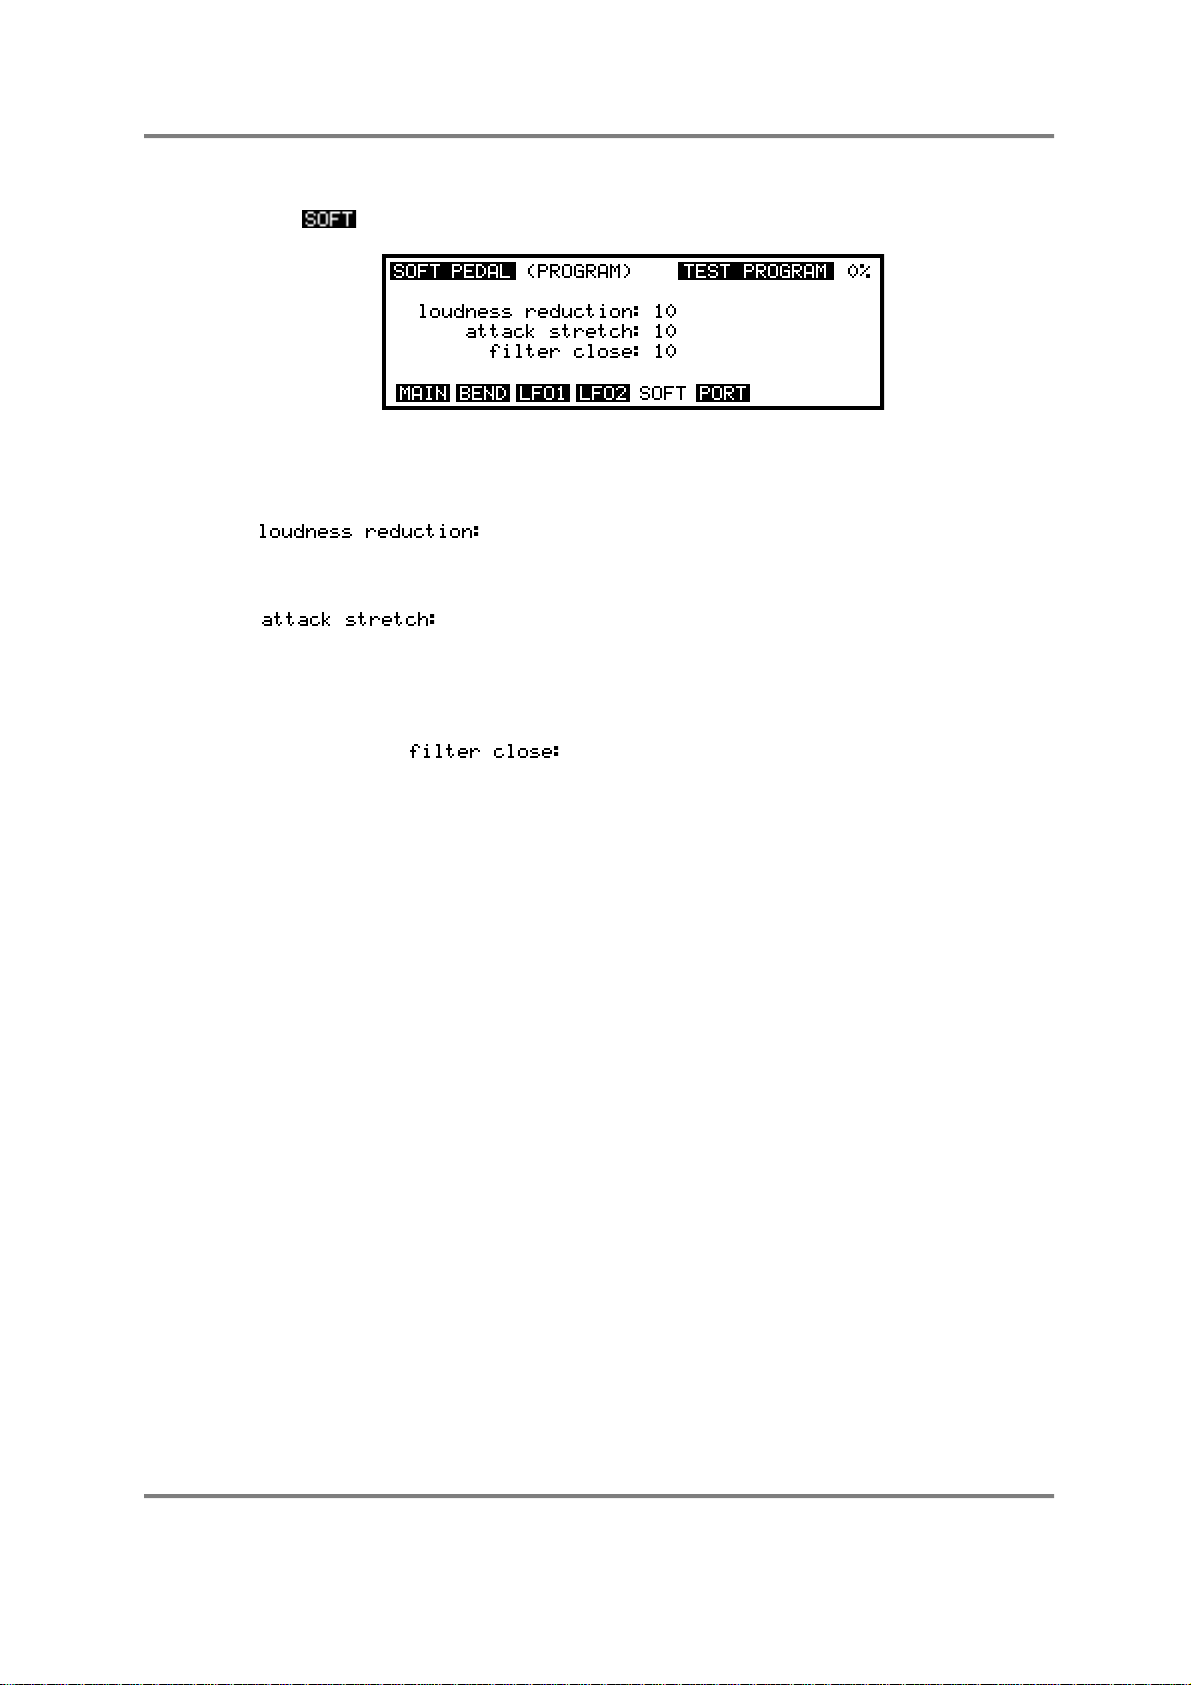
EDIT PROGRAM - SINGLE
SETTING UP THE SOFT PEDAL
Pressing will display this screen:
This final page in the modulation section allows you to set the response of the S3000XL
to the soft pedal (MIDI controller 67). This can be very useful in obtaining better
expression for piano sounds. The parameters are very simple and are as follows.
The parameter determines how the volume of the sound will be
affected when the pedal is pressed. The higher the number, the greater the amount of
volume reduction.
The parameter allows you to soften the attack of the sound and
affects the attack times of the envelope generators. Again, the higher the value, the
greater the effect. For many acoustic instruments, especially string and woodwind sounds,
when played quietly, their attack times also change slightly so this parameter can be put
to good use.
The final parameter, , determines by how much the filter cutoff frequency
will be reduced when the pedal is pressed thereby simulating the effect that acoustic
instruments generally lose some upper harmonics when played quietly.
S3000XL Operator’s Manual Page 81
Page 88
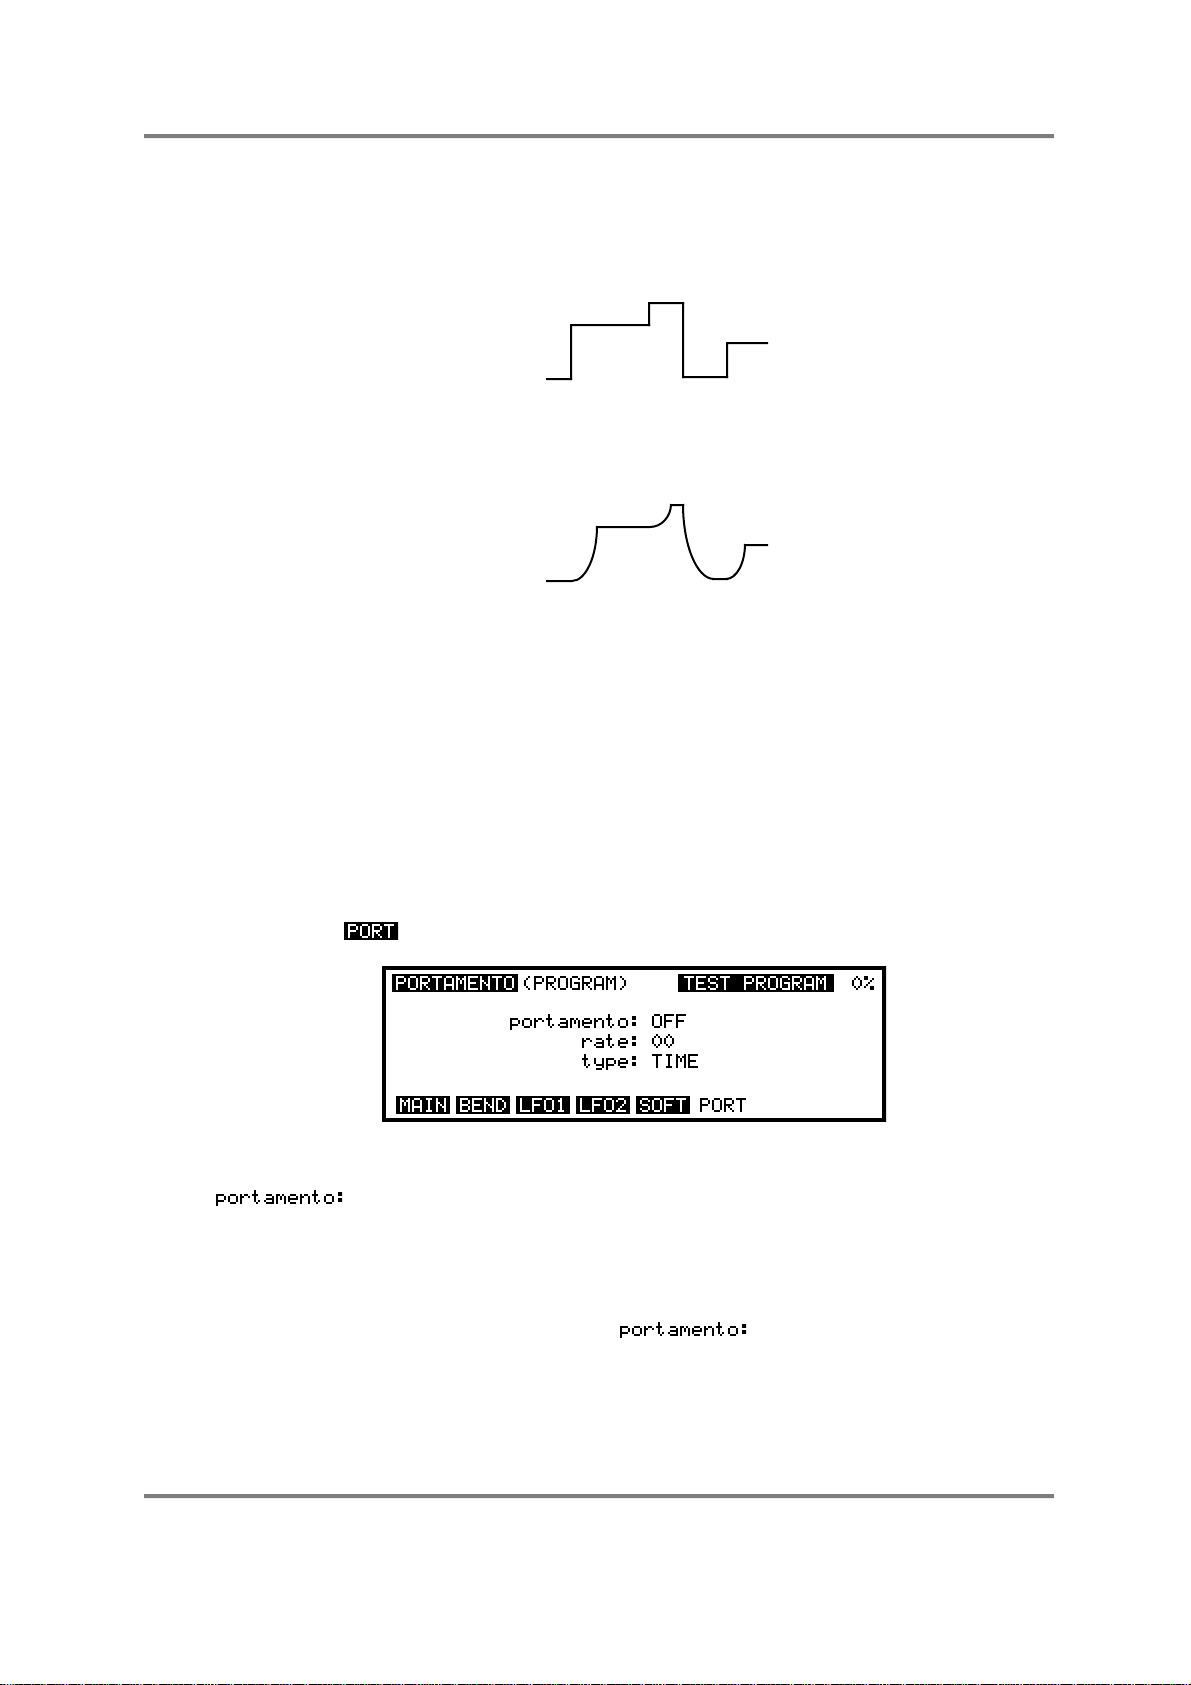
EDIT PROGRAM - SINGLE
PORTAMENTO
Portamento is a function that allows you to ‘glide’ from one note to another instead of
moving in steps as is normally the case.
As you can see, when portamento is on, each note ‘slides’ to the next and the speed with
which it slides is set by the portamento’s RATE parameter.
P
I
T
C
H
TIME
NORMAL PLAYBACK (NO PORTAMENTO)
P
I
T
C
H
TIME
WITH PORTAMENTO SWITCHED ON
The portamento effect is useful when playing acoustic sounds such as stringed
instruments that have no frets (violins, violas, etc., fretless bass) and instruments such as
trombone, penny whistle, etc.. It is also effective on vocal sounds as few, if any, singers
hit the note dead on - most slide into it. Of course, portamento was also a standard
feature on older analogue synths, particularly monophonic ones (where it was often called
GLIDE) and was responsible for the creation of some highly distinctive (although often
over-used!) synth effects.
Pressing F6 - - in any of the MOD pages will display this screen:
The parameters are:
This can be switched ON or OFF. When it is switched ON you will hear the
portamento effect as you play.
You will note that this parameter responds to the MIDI PORTAMENTO
pedal (controller #65). This pedal is like the sustain pedal - when
depressed, portamento will be switched on; when released, the effect will
be switched off. When the parameter is ON, pressing the
portamento pedal will have no effect - portamento will be on permanently.
When this parameter is set to OFF, the portamento pedal will allow you to
switch it on or off as you please. This may be useful when you wish to play
a sound normally but only apply portamento to a few notes. For example,
when playing a trombone sample, you may play normally and then switch
Page 82 S3000XL Operator’s Manual
Page 89
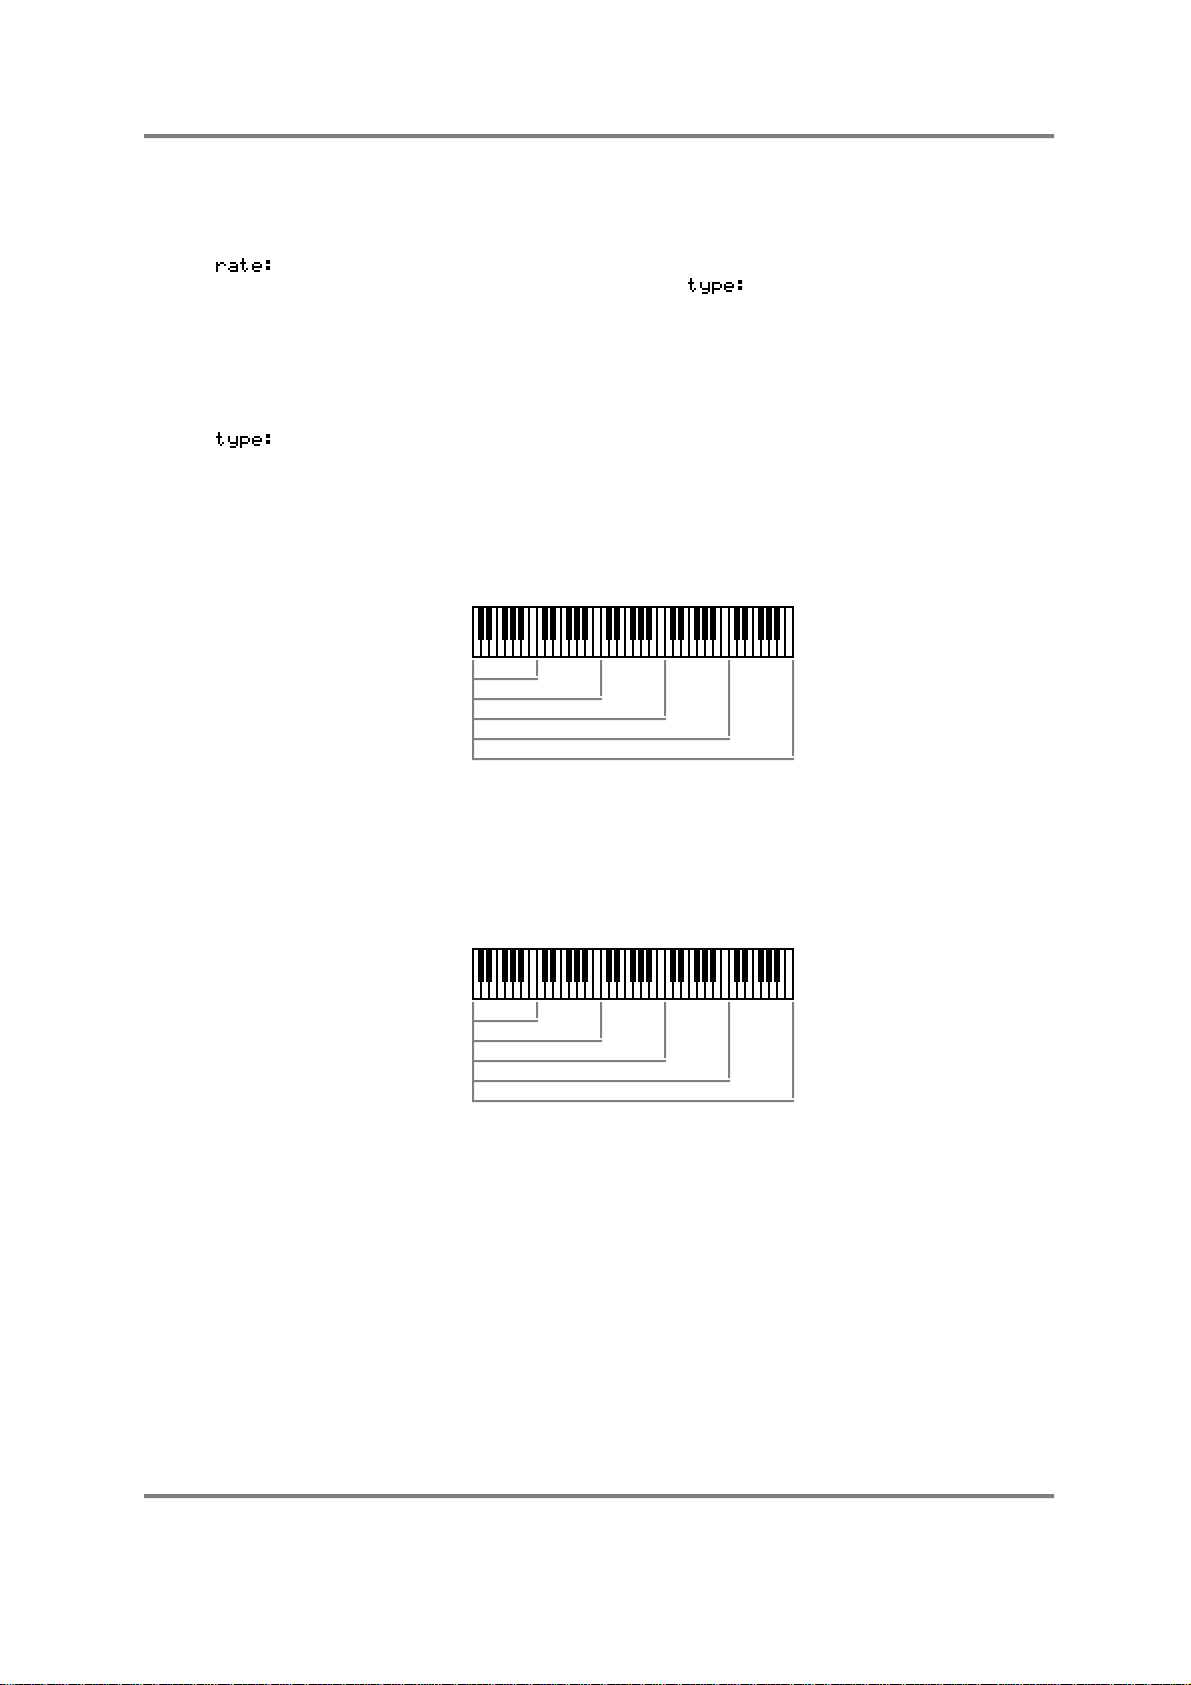
EDIT PROGRAM - SINGLE
portamento on to create the slide effect. Similarly, with fretless bass, the
portamento pedal may be used to slide notes whenever you please.
This sets the speed of the portamento. It is difficult to specify its range as
this depends on the setting of the parameter described below but
the longest portamento effect you can have is over 30 seconds. You will
note that if this parameter is set high but you play notes quickly, the
portamento effect may be so slow that your notes never hit the right
pitches! If you anticipate playing a particular sound quickly, set lower
portamento rates.
Here you may select two different portamento types, TIME and RATE.
TIME sets the portamento effect so that the speed of the effect is
constant regardless of the interval played. For example, if the rate is set to
give a glide of 1 second, it will take one second to glide up a semi-tone or
seven octaves. For example:
1 sec
1 sec
1 sec
1 sec
1 sec
When TIME is selected
When set to RATE, the speed the effect takes depends on the interval.
For example, if it takes one second to cover an octave, it will take two
seconds to cover two octaves, four seconds to cover three octaves, eight
seconds to cover four octaves, etc.. For example:
1 sec
2 secs
4 secs
8 secs
16 secs
When RATE is selected
You may use these two portamento modes to create a range of different
musical effects.
S3000XL Operator’s Manual Page 83
Page 90

EDIT PROGRAM - SINGLE
NOTES ON USING PORTAMENTO
The portamento effect can be used when playing polyphonically or monophonically.
When playing polyphonically, notes in a chord will slide up or down to the next chord
accordingly at a speed set by the and parameter. If one note in a chord is
held when a new chord is played, it will not be affected.
When playing monophonically (i.e. with MONO LEGATO switched ON), the effect is just
like that found on an old analogue monosynth and many exciting synth sounds can be
created using the portamento function that fit in perfectly with the current fashion for using
analogue synths.
Of course, when playing monophonically, the effect can be applied equally as effectively
to samples of acoustic instruments and the effect can be switched in and out using the
MIDI PORTAMENTO pedal for expressive phrasing.
The portamento effect is a PROGRAM parameter - that is, it will affect all keygroups
equally. When layering sounds in a multi, to apply portamento to some sounds and not to
others, create a program with portamento and another program without portamento and
place the programs into separate parts, assigning the same MIDI channel to those parts.
When you play, one program will hit new notes immediately whilst the other lags behind.
Of course, you may stack more than two programs on top of each other in the multi.
Alternatively, you may layer programs in this way and set different portamento rates for
each one so that they all slide around at different speeds!
Page 84 S3000XL Operator’s Manual
Page 91
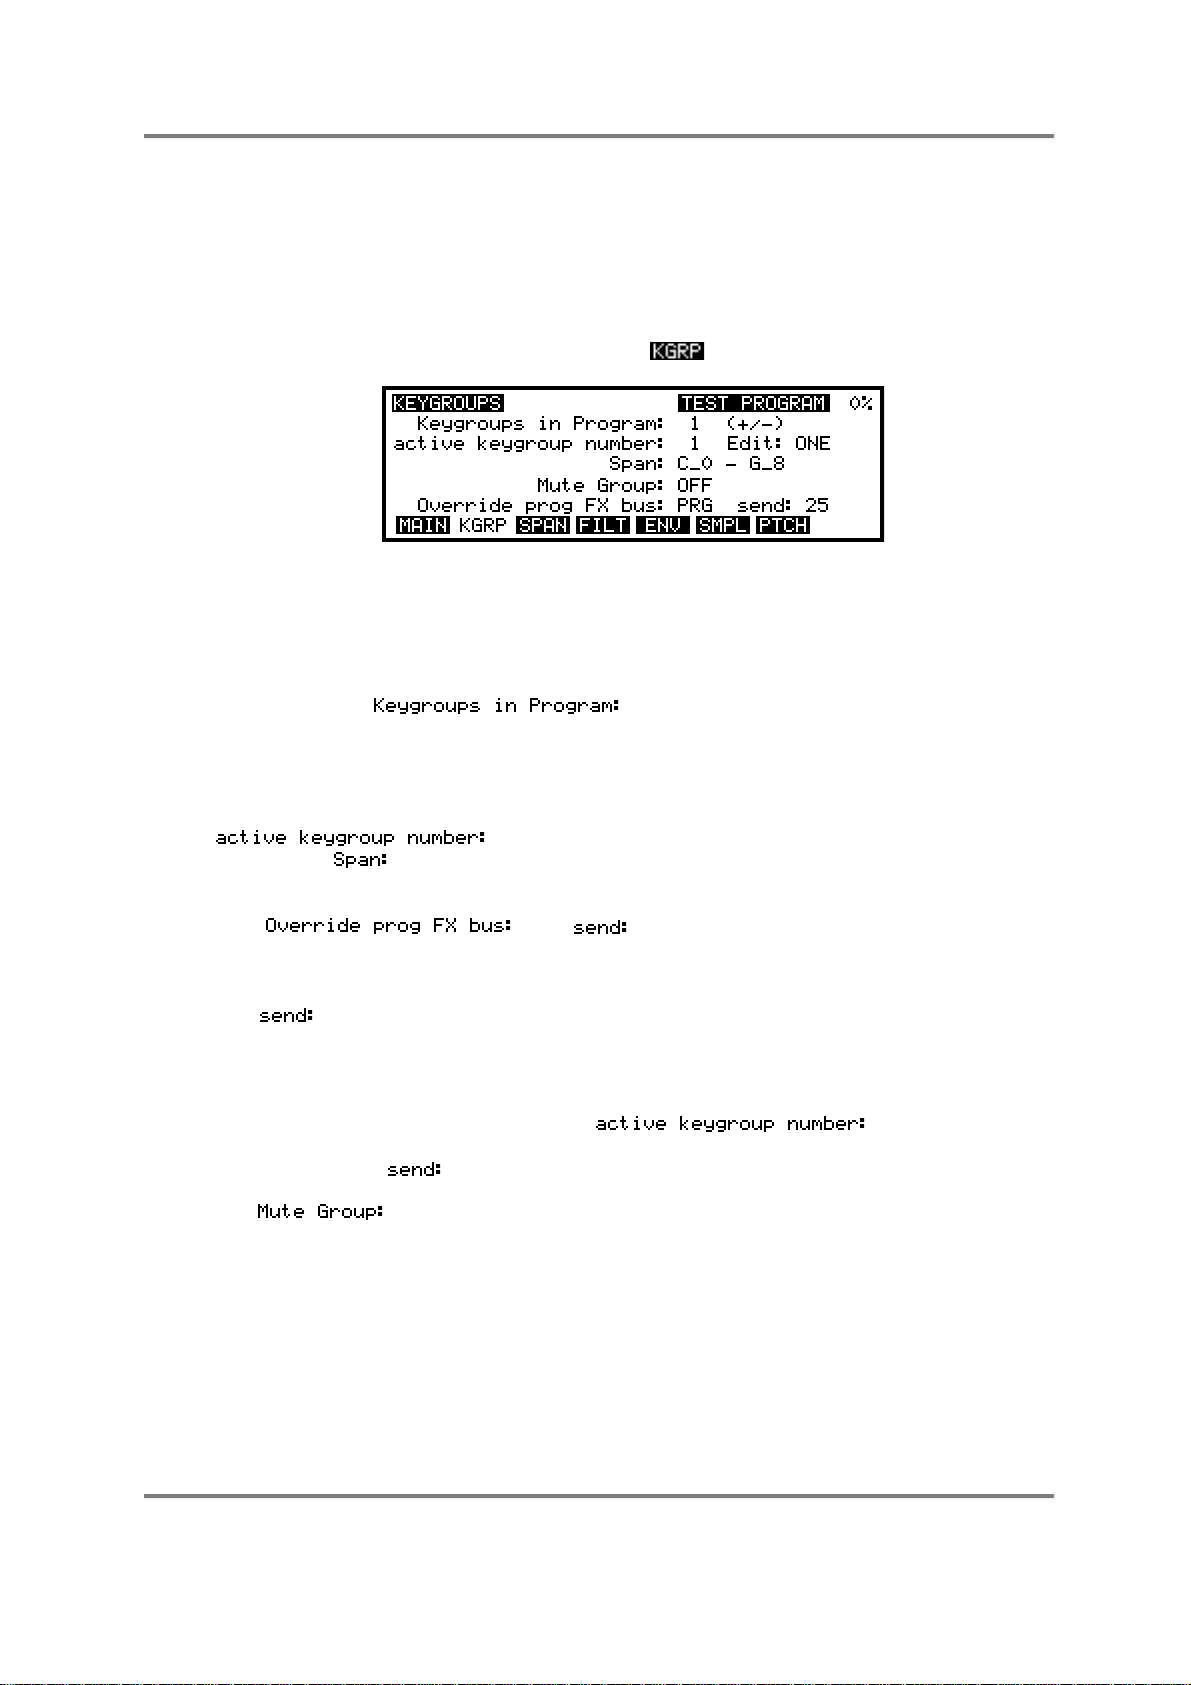
EDIT PROGRAM - SINGLE
KEYGROUP PARAMETERS - CREATING KEYGROUPS
All the previous parameter descriptions have so far been concerned with global or master
changes to the program - i.e. not keygroup specific. This next section delves deeper into
PROGRAM EDIT and examines the individual keygroup parameters. These include
keyboard mapping, sample assignment and, of course, the filters and envelope
generators.
In the main PROGRAM EDIT screen, pressing will display this screen:
This gives you access to the keygroup pages.
The primary function of this page is to create and copy keygroups although it is also
possible to set key ranges (although this is possibly best done in the SPAN page - see
later).
The parameter, , shows you how many keygroups currently
exist in the selected program. To copy keygroups, simply move the cursor to this field and
press the +/< key on the numeric keypad as many times as you need keygroups. The
amount you have copied will be shown in this field. To delete keygroups, simply press the
-/> key on the numeric keypad. If you already have some keygroups in the program and
you specifically want to copy, say, keygroup 5, move the cursor to the
field and select 5. You may also set the keygroups note
range in the field but you may prefer to use the graphically assisted SPAN page for
that.
The and parameters allow you to send individual
keygroups to the effects by overriding the main program’s effects routing. The default will
be PRG (i.e. the routing is using the program’s effects buss selection) but you may also
select OFF (i.e. the selected keygroup is not routed to the effects), FX1, FX2, RV3 or RV4.
The parameter allows you to set the amount of effect for each keygroup. In this
way, you can, for example, send individual drums in different amounts to the effects.
Furthermore, each drum could be routed to a different effect (i.e. bass drum to a tight
gated reverb, snare to a large hall, toms to a medium hall, etc.).
To set this, select the keygroup in the field (or press and
hold the EDIT key and play the appropriate note) and route that keygroup as appropriate
and set a suitable level.
The function allows you to group several keygroups together so that they
are essentially monophonic. The main reason for this is for drums where sometimes you
want a sample to stop playing when another is played.
For example, you would want a closed hi-hat to stop an open hi-hat. Similarly, you may
want an open triangle to be cut off by a closed triangle. To do this, simply assign all the
relevant keygroups to the same Mute Group. For example, if all your hi-hats are in
keygroups 3-6, assign those keygroups to, say, Mute Group 1. All other keygroups will be
unaffected but all those in mute group 1 will be mutually exclusive - that is, if one is
sounding when another is played, it will be cut.
S3000XL Operator’s Manual Page 85
Page 92

EDIT PROGRAM - SINGLE
For example:
OPEN HI-HAT
(or triangle, etc)
OPEN AND CLOSED HI-HAT WITH MUTE GROUP OFF
CLOSED HI-HAT
(or triangle, etc)
Here, you can see that the open hi-hat continues to play even though the closed hi-hat is
triggered.
OPEN HI-HAT
(or triangle, etc)
OPEN AND CLOSED HI-HAT WITH MUTE GROUP ON
CLOSED HI-HAT
(or triangle, etc)
In this example, however, the open hi-hat is shut off by the closed hi-hat thereby creating
a more natural effect.
This function may also be used to emulate the characteristics of older drum machines. On
these early drum machines, whilst they offered maybe 8 voice polyphony, each individual
drum sound was sometimes monophonic. This only became apparent when you tried to
perform a snare roll or something similar. Instead of the snare’s natural decay being
allowed to sound, the next hit would cut the previous one dead resulting in a rather
unnatural staccato effect. Of course, at the time, this was undesirable but the dictates of
musical fashion now say that this effect is quite popular in some music styles!! By
assigning your snare drum into a mute group, you may re-create this effect. For example:
SNARE DRUM ROLL WITH MUTE GROUP OFF
In this example, each snare hit is allowed to decay naturally.
SNARE DRUM ROLL WITH MUTE GROUP ON
In this example, each hit is cut short by the next one.
Page 86 S3000XL Operator’s Manual
Page 93

EDIT PROGRAM - SINGLE
On the S1000 and S1000 and in early versions of S2800, S3000 and S3200 software,
you needed to create a separate program, make it 1 voice polyphonic and assign it the
same program number as the rest of your drums. Now, you may do all this within one
program which you may find more convenient.
Another application for this function is when using the MONO LEGATO mode. When the
MONO LEGATO mode is switched ON, the program becomes monophonic. The limitation
of this, however, is when you play a mono legato run across a program that has several
multi-samples in different keygroups. For example, in a multi-sampled flute program, as
you play across the keygroups, those keygroup’s samples will not play and you may end
up with a situation where, in an extensive run downwards, you are playing a C5 flute
sample on C2. This would probably result in an unnatural timbre due to extreme
transposition of the sample.
To overcome this, by assigning all the keygroups to the same mute group, although the
program is monophonic, as you play across each keygroup, so those keygroup’s samples
will play in turn and, in the above example, you would be correctly playing the C2 sample
on C2. The downside to this, however, is that as you cross into each keygroup, so the
samples’ attack will be re-triggered. If the attack of the samples is fairly pronounced, you
may hear this but, depending on the setting of the envelope generators, this may not be
too noticeable. If, however, the samples have no pronounced attack (i.e. in the case of
raw, sampled synth waveforms), then the transition across the keygroups will be smooth.
It is up to you to decide which is best. If accurate transposition is more important than the
samples re-triggering, then you should use the mute group function in conjunction with
the MONO LEGATO mode. If, however, the samples re-triggering every time you cross
into a new keygroup not acceptable, then maybe you should use the mono legato mode
without the mute group function although you may run into problems associated with
extreme transposition of samples. If, as mentioned, the samples do not have a
pronounced attack, then a combination of mono legato and the mute group function will
give you a smooth transition across the keygroups.
The final field on this page is . This may be switched between ONE and ALL and
allows you to edit only the keygroup selected in the field
(ONE) or all keygroups (ALL).
You may select the keygroup you want to edit in the if you
wish but you may also select the keygroup in any of the keygroup pages.
TIP: A very quick way of selecting keygroups on the S3000XL is to press and hold the
EDIT key and play a note on the keygroup. This will select that note’s keygroup. For
example, in a program with five keygroups spanning C0-B1, C2-B2, C3-B3, C4-B4, C5-G8,
playing G3 will select keygroup 3 - i.e. the one spanning C3-B3. In the case where
keygroups are layered or overlap, pressing and holding EDIT and repeatedly playing the
note will select each keygroup in turn. This is a very fast way of selecting keygroups.
Pressing the key will take you back to the main PROGRAM EDIT screen and give
you access to the other global pages.
S3000XL Operator’s Manual Page 87
Page 94

EDIT PROGRAM - SINGLE
MAPPING OUT YOUR KEYGROUPS - SETTING KEYSPAN
Pressing will display this screen:
This is where you can set up the note ranges for the keygroup. You can see a graphic
representation of the keyboard to the left of the screen. As you adjust the LOW and HIGH
parameters for a keygroup, you will see its range depicted in the graphic representation of
the keyboard to the screen’s left. The notes may be represented by name or as note
number simply by pressing the SPAN soft key again.
The above screen display shows a simple program with one keygroup in it. This next
screen shows a typical program with several keygroups side by side.
The parameters are as follows:
This toggles between ONE and ALL and allows you to choose between
editing either one single keygroup or all keygroups simultaneously. You will
find this function of every keygroup page and it can be invaluable in
making up and editing programs quickly. In a complex program, you may
select ALL to do all the basic work and then switch to ONE to individually
fine tune the keygroups.
Below this field are the keygroups and their note ranges can be seen
alongside them. You may move the cursor directly down this line using the
cursor keys for quick access to a particular keygroup.
Below these two fields are shown the lowest and highest notes for the
keygroups. These may be set by moving the cursor to them and using the
DATA control to input notes or, when displaying the notes numerically, you
may type in a number from the numeric keypad. Another way to input
notes is directly from the keyboard.
By setting the soft key to ON and placing the cursor on the
low note of keygroup 1, as you play the keyboard, so the notes will be
entered. The cursor will jump to each low and high note in the list
eventually ‘wrapping round’ to rest on KG1. This is a very fast way to set
up keygroup note spans and a whole program can be set up in seconds!
NOTE: If ALL is selected in the
field, changing a value in the low or high fields will
affect ALL notes equally. Pay attention because you could seriously affect your program’s
keyspan with one slip. You will note that this does not apply when inputting notes from the
keyboard and
is on.
Page 88 S3000XL Operator’s Manual
Page 95

EDIT PROGRAM - SINGLE
This allows you to tune the keygroup up or down in semitones and cents.
The range is ±50.00.
This introduces a fixed tuning offset and can be used when layering
samples to provide a chorus effect. Unlike the TUNE parameter, this offset
is constant no matter what the played pitch of the sample is. The range is
±50.
This soft key switches on or off the facility to input notes from the
keyboard. At first, with the function being so fast and convenient, it may
seem a bit strange to want to disable it but there may be times when you
need to be able to change note ranges whilst receiving data from a
sequencer that is playing. If was on permanently, in the
situation, the sequencer would completely re-program the key ranges! This
on/off function should guard against that.
To exit this page and to access other pages, press - this will give you access to
other keygroup functions - or press to return you to the main PROGRAM EDIT page
and the master program functions.
S3000XL Operator’s Manual Page 89
Page 96
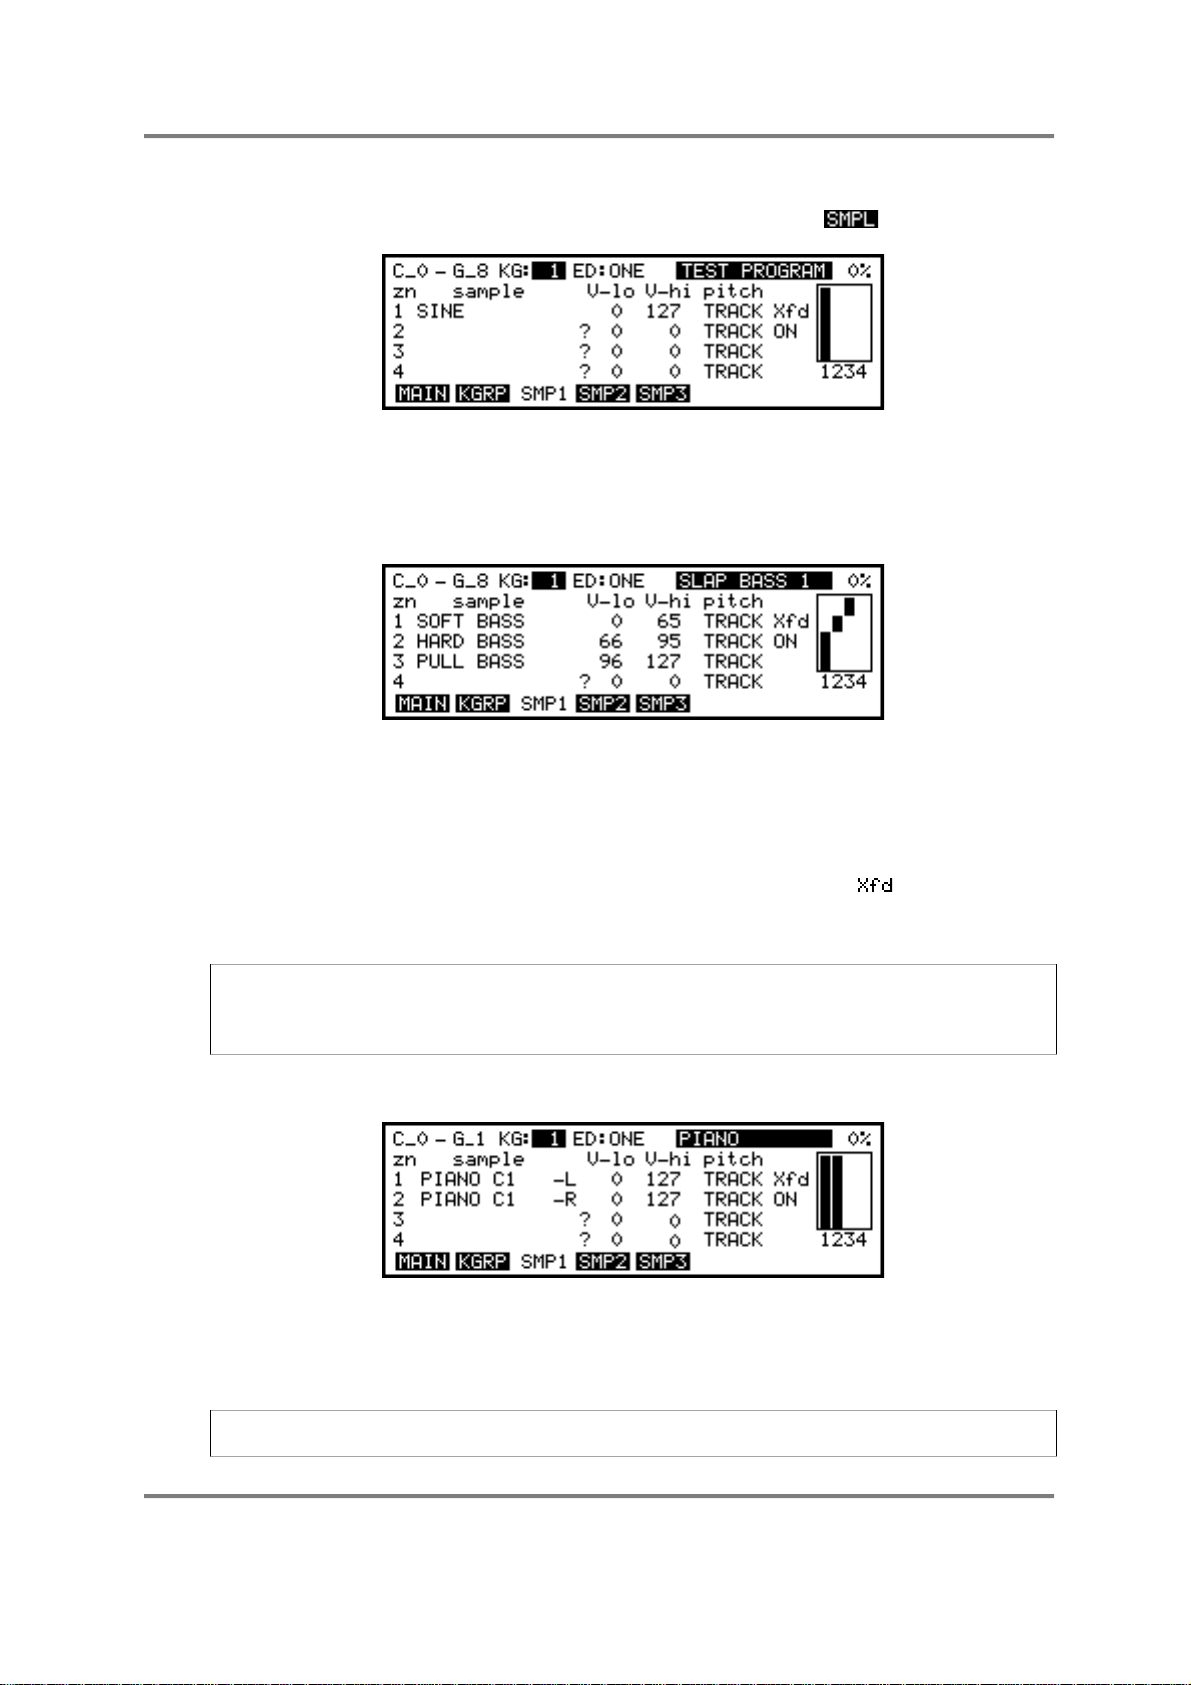
EDIT PROGRAM - SINGLE
ASSIGNING SAMPLES TO KEYGROUPS AND ZONES - SMP1
Samples are assigned to keygroups in the SMPL page. Pressing gives this display:
This is SMP1 (the first page to do with assigning samples - there are three in total). Here,
for the first time, we catch a glimpse of the zones mentioned at the start of this section. In
this example, the test program has one sample in it in zone 1. This has a velocity range of
1-127 and so will play across the entire keyboard. Compare that with this screen which
shows a typical three way velocity switch for a bass program:
Here you should be able to get a feel for the concept of ‘zones’. We have three separate
samples SOFT BASS, HARD BASS and PULL BASS and their velocity ranges are split 065, 66-95 and 96-127. You will also note the nice graphic depiction alongside it for each
of the three zones! Playing within those velocity ranges will play each sample accordingly
allowing you to emulate the many tones available from just one note of a real bass guitar.
If the velocity ranges overlapped (i.e. 0-70, 63-100 and 93-127) and (seen to the left
of the graphic display) is switched to ON, then the velocity zones will crossfade giving a
smoother response in some cases.
NOTE: If you play between two overlapping ranges (i.e. in the above example, if you play
at a velocity of 96), you will actually be playing two voices out of the possible 32. With
such generous polyphony, this shouldn’t be a problem unless you are driving the
S3000XL particularly hard.
Another way to use the zones is for stereo samples and for layering sounds. For example:
This shows the assignment for a stereo piano sample. The left and right samples are
assigned to zones 1 and 2 respectively and both given a range of 0-127. These two
zones would be panned hard left and hard right in SMP2 (see below) to give stereo
reproduction through the L/R outputs.
NOTE: For stereo samples to play in stereo, they must be in the same keygroup and set
up as shown above.
Page 90 S3000XL Operator’s Manual
Page 97
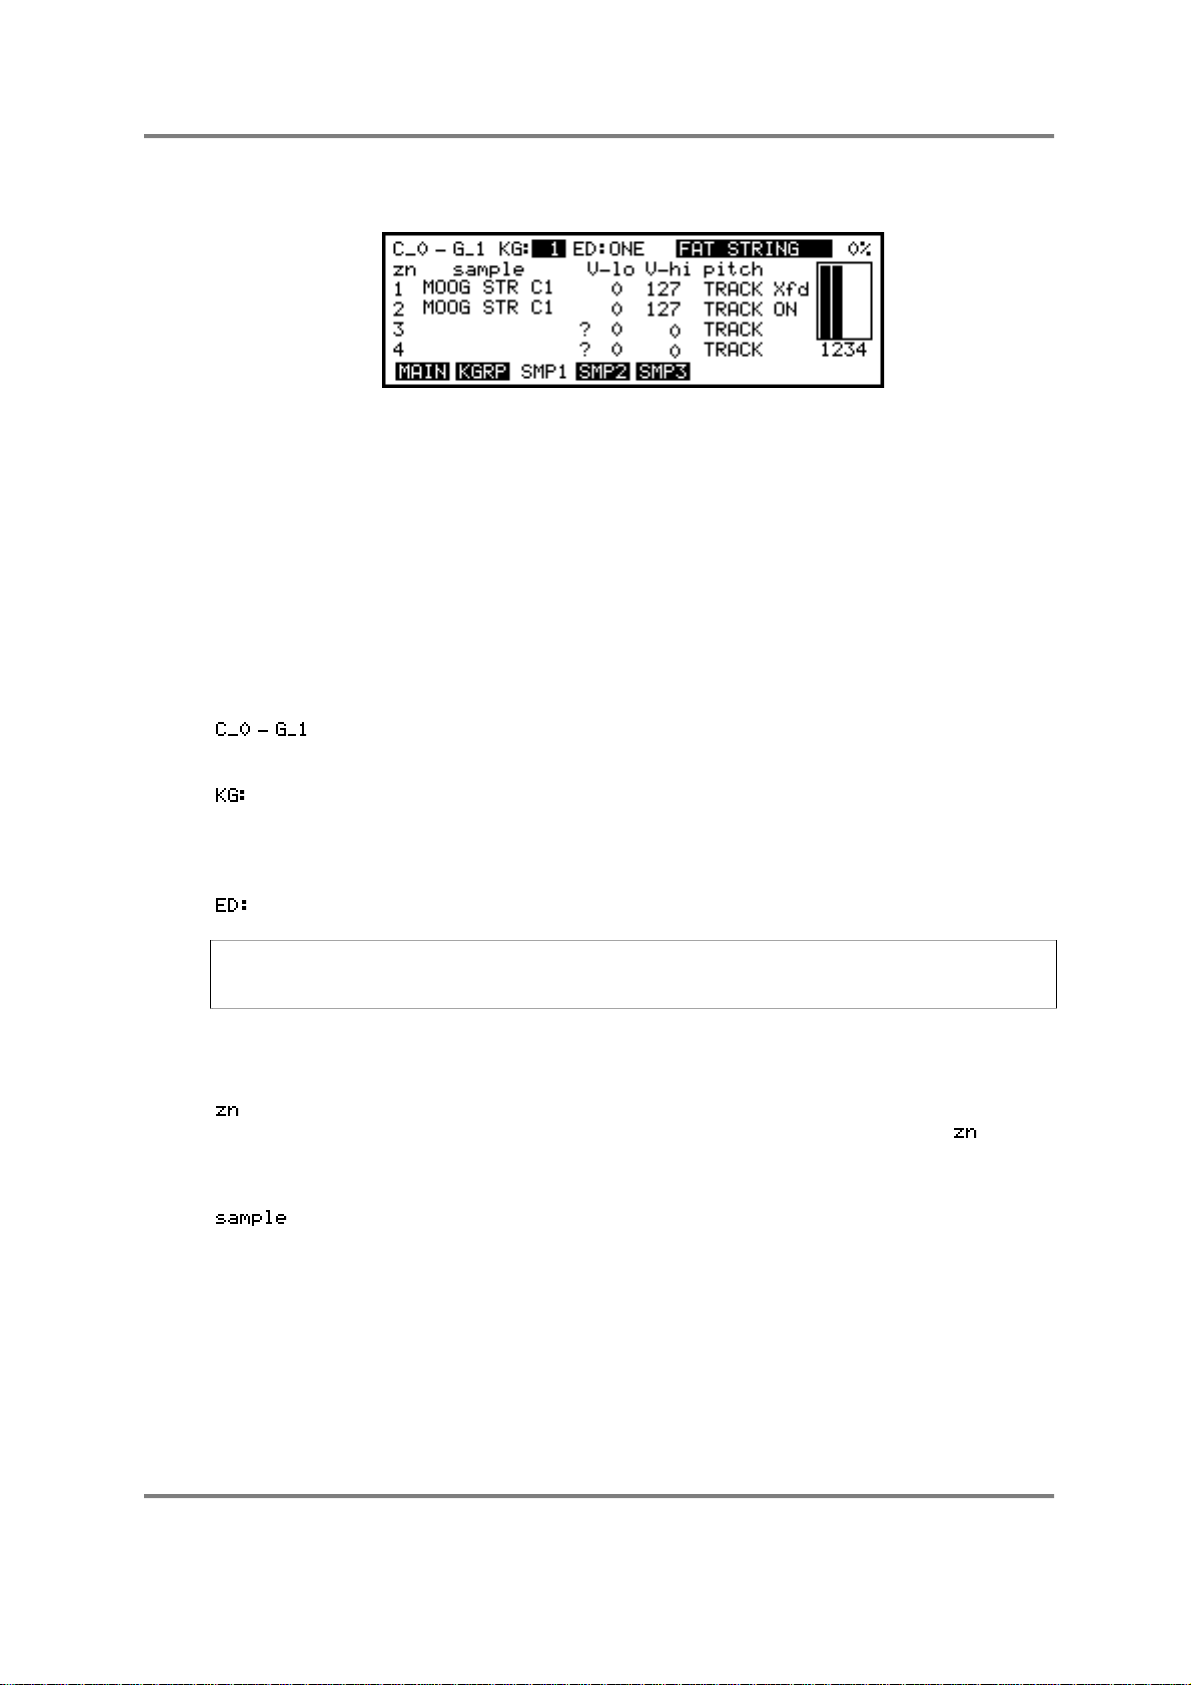
EDIT PROGRAM - SINGLE
For layering sounds, you might like to set something like the following:
Here we have assigned two identical synth samples to zones 1 and 2 and, as in the
stereo program above, both have a velocity range of 0-127. In the SMP2 page, these can
be detuned against each other and panned hard left and right to create a fat, warm,
pseudo-stereo synth sound. This is a quick way of achieving this kind of sound. Of course,
they don’t have to be identical samples - anything will do. The trick with this method is that
both samples share the same processing with the filters and envelope generators making
adjustment and editing very simple.
If you want to be more adventurous, you could use totally separate keygroups for layering
synth sound (or acoustic sounds, for that matter) and each could have different envelope
and filter characteristics.
The parameters in this page are:
This shows the current keygroup’s key range as set in the SPAN page. It
can be altered here if you wish.
This shows the currently selected keygroup and allows you to select others
using the DATA control. As always in PROGRAM EDIT, you may quickly
select a keygroup by holding the EDIT PROG select key and playing an
appropriate note on the keyboard.
Here you can select to edit ONE or aALL keygroups.
NOTE: Selecting ALL doesn’t apply to assigning samples when using the DATA control.
Only one sample is assigned and the other keygroups remain unchanged even if ALL is
selected.
Of course, as usual, the name of the current program is shown at the top right hand of
the screen.
This shows the four zones in the column below. You will notice that in all
SMP pages, as you play, a small dot appears alongside the field to
signify which zone is playing - this is useful in identifying which sample is
playing in a complex velocity switched program.
This shows the sample(s) currently assigned to the zone(s). If a sample
name is assigned but it does not exist in the S3000XL’s memory, a “?” will
appear alongside it to indicate that it is missing. To assign a sample,
simply move the cursor to this field and scroll through the available
samples in memory with the DATA control.
To delete a sample from a zone, simply move the cursor to it, press NAME
and replace the name with blanks. To erase a group of samples in the
same zone in different keygroups, do the same but with ALL selected.
S3000XL Operator’s Manual Page 91
Page 98
EDIT PROGRAM - SINGLE
USEFUL HINT FOR ASSIGNING SAMPLES! Assuming you have a lot of samples to
assign and you have made up a program with sufficient keygroups, go to keygroup 1 and
press MARK/#. Now move the cursor to the sample assign field below and select the first
sample. NOW PRESS JUMP/. - this will take you to the KG field again and select another
keygroup. Now press JUMP again to toggle you back to the sample assign field and
select your next sample, press jump, new keygroup, jump, new sample, etc.. Once you
get some practice, you can assign the samples to quite a complex program in no time at
all.
Another quick method for selecting keygroups method is to press and hold the EDIT key
and play a note on the keyboard. This will select the keygroup for that note.
Please note, that for either method, if you record (or load) you samples in the order they
are to be assigned, then the process is even quicker.
This sets the low velocity range for the zones.
This sets the high velocity range for the zones.
This allows you to select between TRACK and CONST. When TRACK is
selected, then the sample can be played across the keyboard range as
normal. When CONST is selected, then the sample(s) will play at a
constant pitch of C3.
USEFUL TIP TO DRUM SAMPLISTS! Sample all your drums on C3 in EDIT SAMPLE,
assign them to any key you like in the program and simply switch on CONST for all
keygroups. They will now play back at exactly the pitch they were sampled at. In this way,
you don’t have to worry about setting notes when sampling and then trying to match them
up in EDIT PROGRAM. Other non-pitched samples such as sound effects, breakbeats,
drum loops, etc., can be treated the same way.
As mentioned before, there is a small box to the left of the screen that displays graphically
the status of the four zones’ velocity ranges
Page 92 S3000XL Operator’s Manual
Page 99
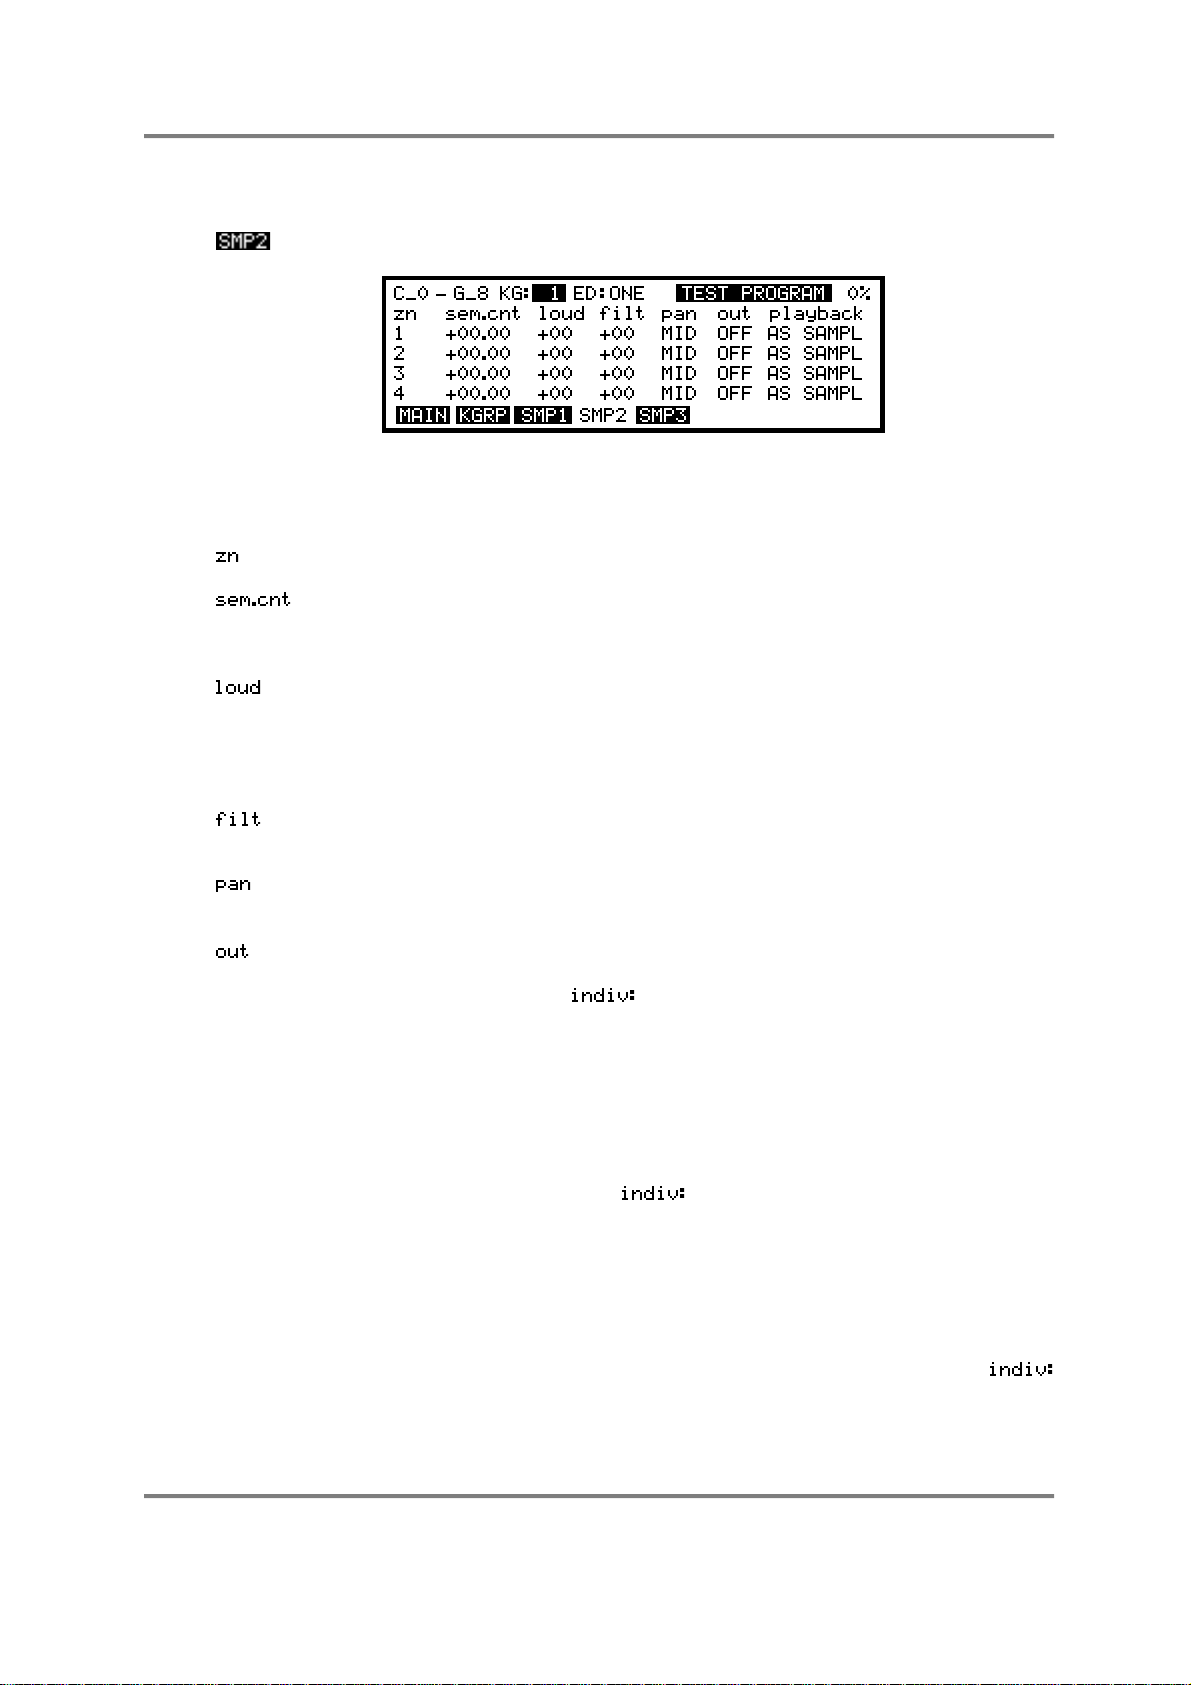
EDIT PROGRAM - SINGLE
SMP2
Once you have assigned your samples, you may go to the next sample page by pressing
. Here you may tune and pan your samples. You will get this screen:
The top line of the screen is exactly as in SMP1 and displays the currently selected
keygroup’s note range and keygroup, whether you are editing one individual keygroup or
all of them as well as the program name. The other fields are:
Again, this shows the zone number in the column below.
This column allows you to tune each sample in each zone separately. You
may tune the sample in semi tones and cents over a very wide range
(±50.00).
You can fine tune the loudness for each zone in each keygroup to
balance them up against each other. You will note that if the master
loudness parameter in the OUT page of the main PROGRAM EDIT screen
is set to 99, this control will only have effect downwards (i.e. when setting a
-value). The range is ±50.
This parameter allows you to fine tune the filter cutoff slightly to maintain a
consistent tone between keygroups. The range is ±50.
This allows you to pan each zone in each keygroup between the main L/R
outputs. The range is L50-MID-R50..
This allows you to assign each zone in each keygroup to its own output 1-
8 for separate processing on an external mixing console if you wish. This
has a relationship with field found in the OUTPUT LEVELS page.
If the whole program is assigned to an individual output, that output will be
shown here - i.e. if the program is set to appear at output 1, then 1 will be
shown for every keygroup here. You may change this per keygroup so
that some sounds come out of 1 and other keygroups appear at other
outputs. This is particularly useful on drums where you often need to mix
drums through an external mixer to add EQ, reverb, compression, etc..
Even if the main program field is set to OFF in the OUTPUT
LEVELS page, you may still route individual keygroups to separate
outputs. This may be useful in a drum program where things like toms,
cymbals and some percussion appear at the S3000XL’s stereo outputs
whilst important drums like bass drum and snare are assigned to appear
at individual outputs.
You will note that whatever the output assignment is here, the level is
taken from the master OUTPUT LEVELS page and is set at the
field.
S3000XL Operator’s Manual Page 93
Page 100

EDIT PROGRAM - SINGLE
This allows you to change the loop and playback characteristics of the
sample. Normally, these are set in EDIT SAMPLE but they may be
changed here if you wish. This will not affect the ‘raw’ samples’ loop and
playback characteristics but can be used within the context of particular
programs. This eliminates the need for copying the same sample several
times (and hence wasting memory) to achieve the same effect. The
options available to you are:
AS SAMPLE plays back the sample exactly as set up in the MORE page
in SAMPLE EDIT.
LP in R is the same as the LOOP IN RELEASE mode of the MORE page
in SAMPLE EDIT.
LP til R is the same as LOOP UNTIL RELEASE.
NO LOOPS is self-explanatory!
TO END is the same as the PLAY TO SAMPLE END selection in the
MORE page in SAMPLE EDIT.
The ability to reset the playback parameters of a sample allows you a lot
of flexibility - the same sample can be used in different ways in different
programs.
Page 94 S3000XL Operator’s Manual
 Loading...