

Page 1
User Guide
English ( 3 – 10 )
Guía del usuario
Español ( 11 – 18 )
Guide d’utilisation
Français ( 19 – 26 )
Guida per l’uso
Italiano ( 27 – 34 )
Benutzerhandbuch
Deutsch ( 35 – 42 )
Appendix
English ( 43 )
Page 2

Page 3

User Guide (English)
Introduction
Box Contents
BT100
Power Adapter
Dust Cover
(2) Dust Cover Hinges
Turntable Belt (attached to platter)
Platter
Plastic Stylus Cover
Slipmat
45 RPM Adapter
Stereo RCA Cable
USB Cable
Software Download Card
User Guide
Safety & Warranty Manual
Support
For the latest information about this product (system requirements, compatibility information, etc.) and
product registration, visit akaipro.com.
For additional product support, visit akaipro.com/support.
3
Page 4
Setup
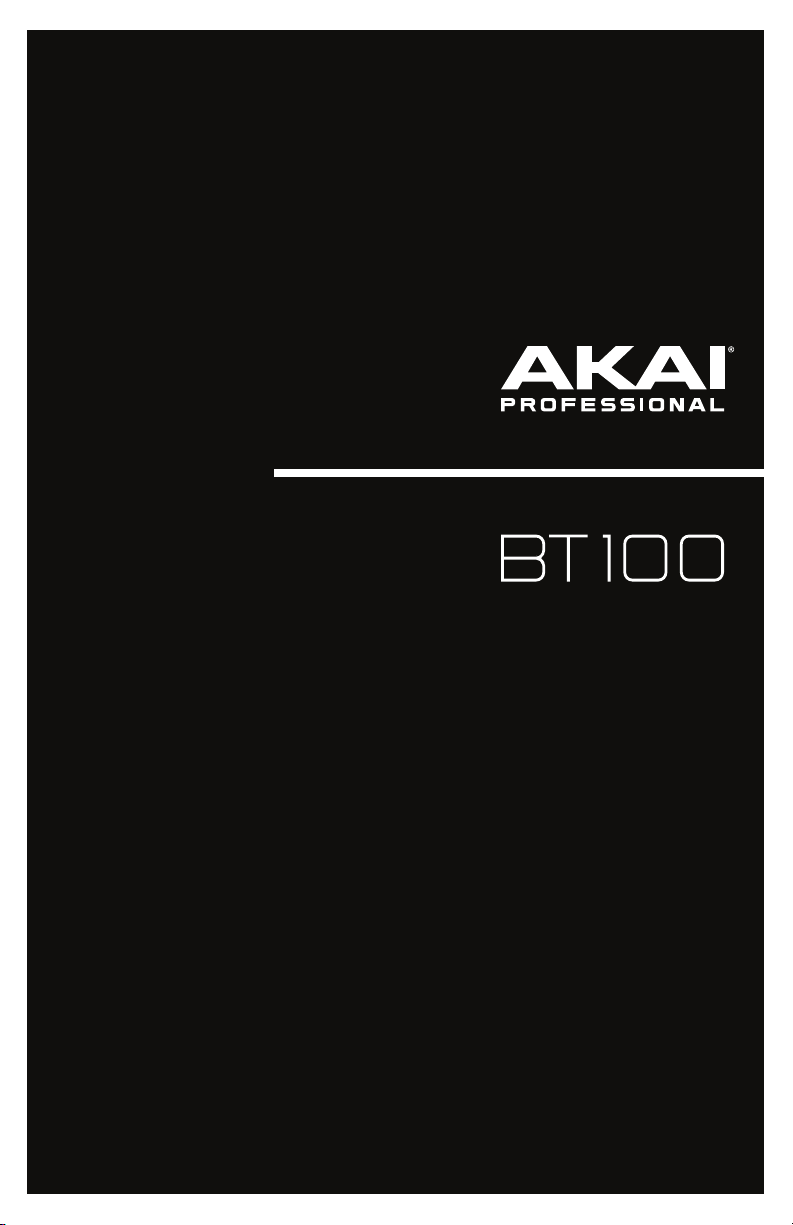
Connecting the Dust Cover to BT100
1. Insert the included hinges (found in plastic bags inside the foam packaging in the box contents) into the back
panel hinge plates.
2. Insert the dust cover into the space between the hinges to clasp the dust cover (see images below).
3. Flip up the hinges so they are in the upright position (see images below).
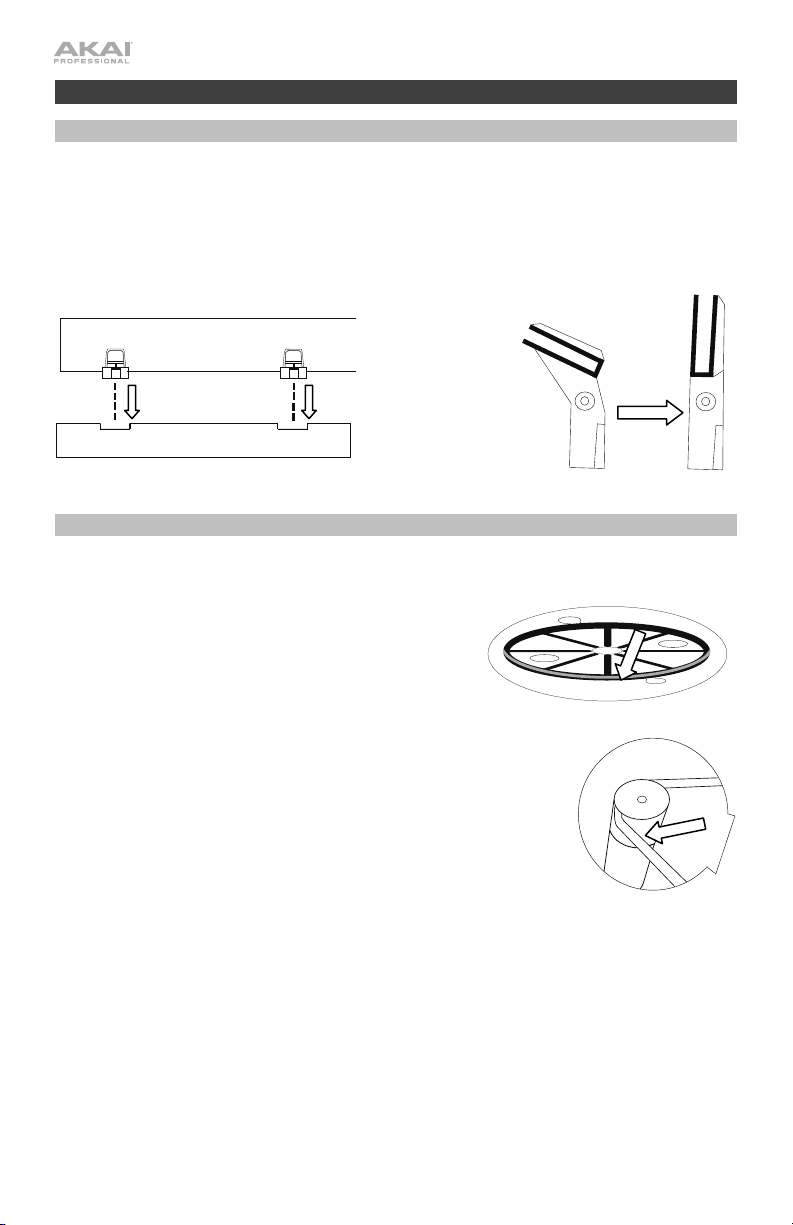
Attaching the Turntable Belt
1. Make sure the power adapter is not connected to
BT100.
2. First-Time Users: Remove the platter from the
packaging.
3. Place the platter upside-down on a flat surface and
position the belt so that it is wrapped around the
underside of the platter’s inner ring, centered
straight and free of any twists (see image on right).
4. Move your thumb through the platter’s larger belt
window and carefully lift part of the belt up. Flip over
the platter and place the belt over the groove in the
brass motor spindle, while aligning the platter back
onto the middle spindle (see image on right).
5. Connect the power adapter to the turntable and
power on the turntable.
6. To test if the platter motor spins, press Start to have
the tonearm automatically place the needle or
manually move the tonearm and place on the record.
4
Page 5
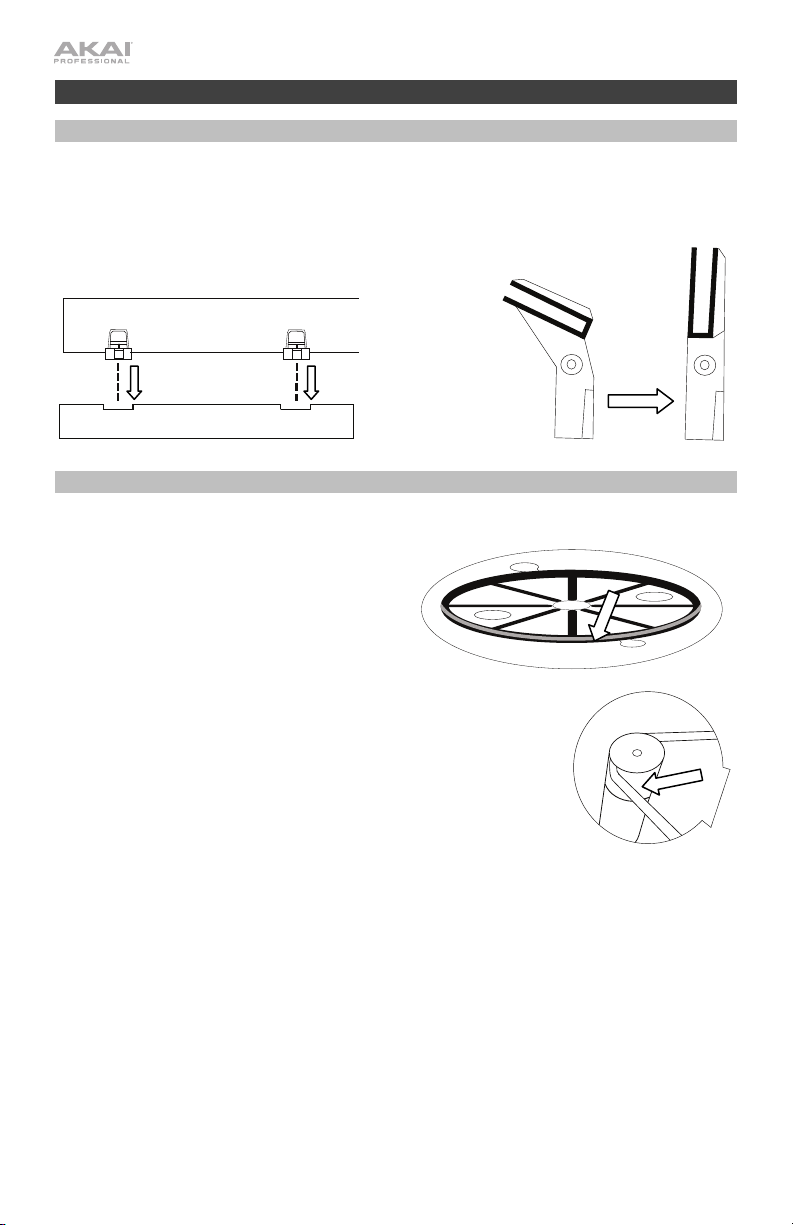
Connection Diagram
Items not listed under Introduction > Box Contents are sold separately.
Powered
Speakers
Power
Computer
5
Page 6
1
2
3
4
5
1
2
3
4
5
6
7
6
10
8
9
6
Features
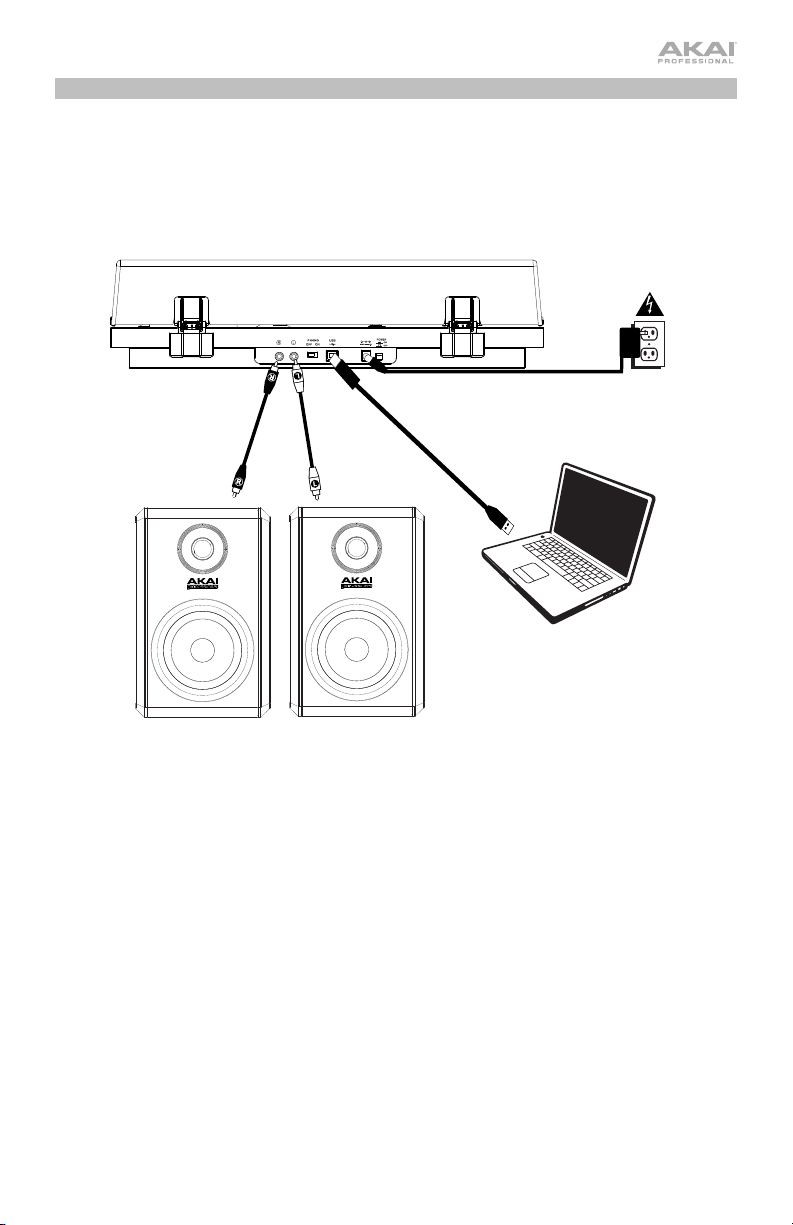
Top Panel
1. Platter: Place the slipmat here, and
then place your record on the slipmat.
2. Tonearm: The fixed tonearm can be
raised and lowered by hand, or by
using the raise / lower lever.
3. Arm Clip: This specially designed arm
clip secures the tonearm when not in
use.
4. Raise / Lower Lever: Use this to raise
and lower the tonearm on the record.
5. Counterweight: This is pre-balanced
to provide proper tracking for the
stylus.
6. 7”/12” Switch / Auto-Start/Stop:
Adjust the 7”/12” switch to select
whether you are using either a 7” or
12” record. Press Start to have the
tonearm automatically lift, swivel over
the record, and drop the needle at a
specific spot based on the 7"/12"
setting. When a record reaches the end or if Stop is pressed during playback, the tonearm will automatically
lift and return to the resting position.
7. 33/45 RPM Selector: Adjust this to select the RPM of the turntable platter based on the type of record you
are using.
8. Volume: Adjust this to control the headphone and Bluetooth output level.
9. Headphone Output: Connect headphones (sold separately) to listen to your vinyl playback.
10. Bluetooth Button: Press this button to start Bluetooth pairing. If after 5 minutes no Bluetooth speaker can be
found to pair with, the Bluetooth transmitter will become inactive and the LED will turn off. If currently
connected, press this to disconnect from a currently connected Bluetooth speaker.
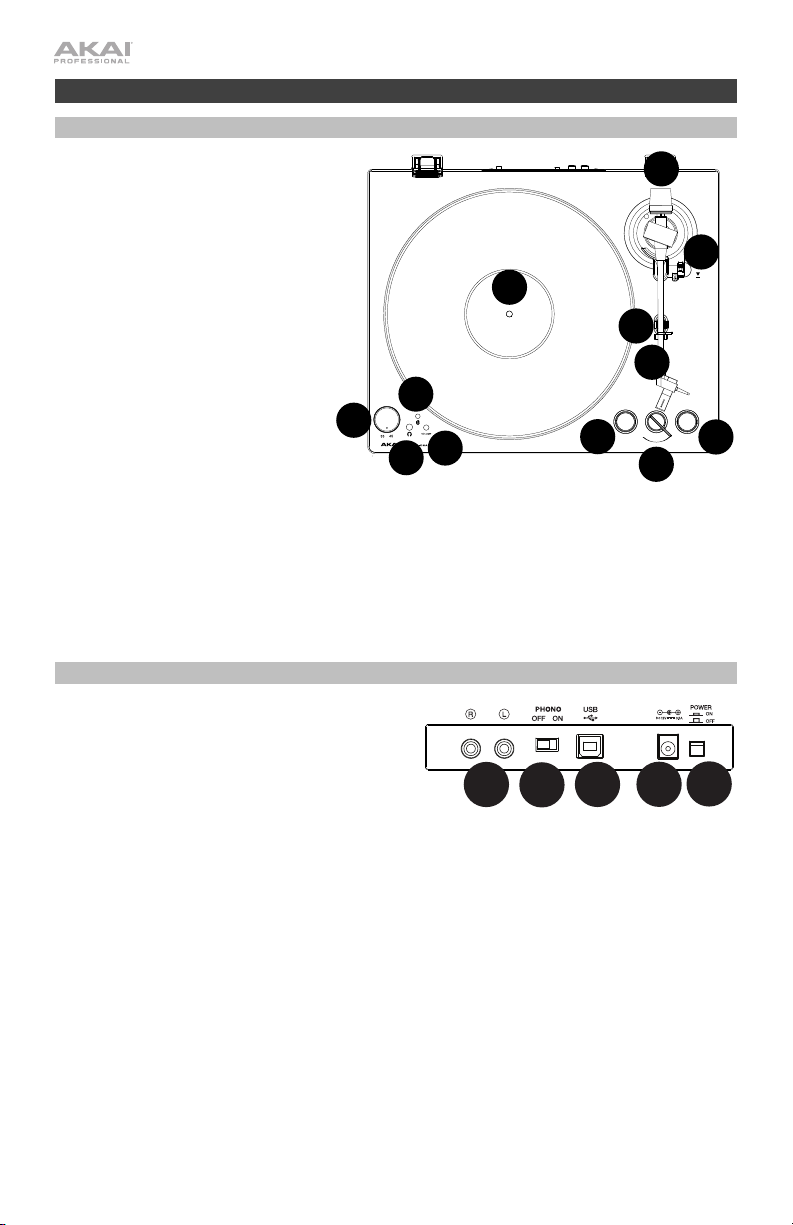
Rear Panel
1. RCA Output: The audio from a playing record is sent
to the RCA audio output.
2. Preamp On/Off: If your receiver or amplifier has no
phono inputs, switch on the preamp (on). If the
system you are using has phono inputs, set this
switch off.
3. USB Audio Output: Use the included USB cable to
connect your turntable to your computer. The USB
connection will send audio from the turntable to your
computer. Please see the Operation > Computer
Setup section of this manual for information.
4. Power Input: Use the included power adapter to
connect to wall power.
5. Power Button: Press this button to turn BT100 on/off.
6
10
STOP
START
7”
12”
Page 7

Operation
Getting Started
1. Connect the included power adapter to BT100 and use the
power switch to power on BT100.
2. Remove the needle cover from the cartridge.
3. Place the slipmat on the platter and place a record on the
slipmat. If using 45 RPM records, put the 45 RPM adapter
on the center spindle before placing the record on the
platter.
4. Use the 33/45 RPM Selector to set the platter rotation
speed (33/45) to match the type of record.
IMPORTANT: Place the included slipmat on
the platter; then place your record on the
slipmat to carefully hold your records.
IMPORTANT: Remove the plastic cartridge
cover (needle cover) before operating the
turntable.
5. Set the 7”/12” switch to match the record size that you have on the platter.
6. Press the Start button to have the unit automatically place the tonearm.
7. When the record reaches the end or if Stop is pressed during playback, the tonearm will automatically lift and
return to the resting position.
Pairing BT100 to a Bluetooth Speaker
BT100 has a Bluetooth transmitter to send audio to a Bluetooth speaker wirelessly.
1. Power on your Bluetooth speaker and ensure it is in pairing mode.
2. Power on the BT100 turntable.
3. Press and release the Bluetooth button on BT100 to start pairing to your Bluetooth device. Once BT100 is
connected to the Bluetooth speaker, the Bluetooth LED will be solid blue. Your Bluetooth speaker should also
indicate that it is paired.
Note: BT100 will connect to the closest Bluetooth speaker that is near it. If after 5 minutes no Bluetooth
speaker can be found to pair with, the Bluetooth transmitter will become inactive and the LED will turn off.
Note: Maximum range will be achieved when using devices with Bluetooth 4.0 or higher.
4. Play music on your BT100 turntable. If you are connected to a Bluetooth speaker with a play/pause button,
and do not hear audio, try pressing the play/pause button.
5. Adjust the volume on your Bluetooth speaker (if applicable) and the volume control on BT100 to control the
output level.
6. To disconnect pairing, press the Bluetooth button on BT100 or turn off Bluetooth pairing on your Bluetooth
speaker.
Note: Move other Bluetooth receivers/speakers out of range of BT100 (30 ft./9.1 m or more) or turn them off to
connect to your Bluetooth speaker.
7
Page 8

Recording
To record music to your computer, you can use EZ Vinyl/Tape Converter and a USB cable. EZ Vinyl/Tape
Converter conveniently saves your recordings to your computer. After you finish converting your vinyl, you
can then burn to CD or load onto portable media devices.
Use the included software download card to download and install the software, and follow the on-screen
instructions. See Computer Setup > Setting BT100 as the Default Recording Device before starting to
record.
1. With EZ Vinyl/Tape Converter installed on your computer, use the included USB cable to connect
BT100's USB audio output to an available USB port on your computer.
2. On your computer, open EZ Vinyl/Tape Converter by going to Start Menu All Programs (Windows) or
the Applications menu (Mac).
3. Follow the on-screen instructions to setup your recording. When prompted to play your music, move
BT100's tonearm on the record to start playback.
Note: To listen to a record while it’s playing, listen through your computer's speakers, or connect
BT100's RCA outputs to a stereo system or powered speakers.
4. When you have finished recording, raise the tonearm from the record and return it to the arm clip.
Playback
You can listen to the music on your computer through its internal speakers or through headphones
connected to it. (BT100 cannot be used as a playback device for your computer's audio.) See Computer
Setup > Setting Your Computer’s Soundcard as the Default Playback Device before playing back your
computer music.
To listen to a record while it's playing, listen through your computer's speakers, or connect BT100's RCA
outputs to a stereo system or powered speakers.
8
Page 9

Computer Setup
Setting BT100 as the Default Recording Device
• Windows XP: Click Start Menu Control Panel (or Settings Control Panel in Classic View)
Sound and Audio Devices. Click the Audio tab and under Sound recording, select USB Audio
Codec as the default device. Select Properties and click the Advanced tab to select the Default
Format, 44100 Hz or 48000 Hz.
• Windows Vista: Click Start Menu Control Panel (or Settings Control Panel in Classic View)
Hardware and Sound Sound. Click the Recording tab and select USB Audio Codec as the default
device. Select Properties and click the Advanced tab to select the Default Format, 44100 Hz or 48000
Hz.
• Windows 7: Click Start Menu Control Panel Sound. Click the Recording tab and select USB
Audio Codec as the default device. Select Properties and click the Advanced tab to select the Default
Format, 44100 Hz or 48000 Hz.
• Windows 8: From the Start Menu, click the lower-left corner of the screen to bring yourself to the
Desktop. In the bottom-right corner of the Taskbar, locate the Volume Control "Speaker" icon. Rightclick the speaker and select Playback Devices. In the Windows Sound control panel select the
Recording tab. If USB Audio Codec does not have a green "check mark" symbol next to it, right-click
it and select "Set as Default Device". Select Properties and click the Advanced tab to select the
Default Format, 44100 Hz or 48000 Hz.
• Windows 10: Click Start Menu Control Panel (or Settings Control Panel in Classic View)
Hardware and Sound Sound. In the Windows Sound control panel select the Recording tab. If
USB Audio Codec does not have a green "check mark" symbol next to it, right-click it and select "Set
as Default Device". Select Properties and click the Advanced tab to select the Default Format, 44100
Hz or 48000 Hz.
• Mac OS X 10.4-10.11: Click the upper-left "apple" icon then click System Preferences Sound.
Click the Input tab. From the menu, select USB Audio Codec as the device. Under Format, select
44100.0 Hz or 48000.0 Hz.
Setting Your Computer's Soundcard as the Default Playback Device
• Windows XP: Click Start Menu Control Panel (or Settings Control Panel in Classic View)
Sound and Audio Devices. Click the Audio tab and under Sound playback, select your computer's
soundcard as the default device.
• Windows Vista: Click Start Menu Control Panel (or Settings Control Panel in Classic View)
Hardware and Sound Sound. Click the Playback tab and select your computer's soundcard as the
default device.
• Windows 7: Click Start Menu Control Panel Sound. Click the Playback tab and select your
computer's soundcard as the default device.
• Windows 8: From the Start menu, click the lower-left corner of the screen to bring yourself to the
Desktop. In the bottom-right corner of the Taskbar, locate the Volume Control "Speaker" icon. Rightclick the speaker and select Playback Devices. The Windows Sound control panel should appear set
on the Playback tab. If your computer’s soundcard does not have a green "check mark" symbol next to
it, right-click it and select "Set as Default Device".
• Windows 10: Click Start Menu Control Panel Sound. Click the Playback tab and select your
computer's soundcard as the default device.
• Mac OS X 10.4-10.11: Click the upper-left "apple" icon then click System Preferences Sound.
Click the Output tab. From the menu, select Internal Speakers if you are using the computer's internal
speakers or select Headphones if you are using speakers or headphones attached to the computer's
1/8" headphone output.
9
Page 10

Troubleshooting
If you experience any difficulties, please refer to the troubleshooting steps below.
The turntable is powered on but the motor is not spinning:
o Ensure that the turntable belt is properly installed under the platter. See Setup > Attaching the
If you are recording to a computer:
I'm not hearing any audio when playing music:
• If you are playing music from vinyl:
• If you are playing music from your computer:
I am hearing a hum through my speaker or laptop when using the turntable:
• If you are recording to a laptop:
• If you are playing through a speaker:
My record is not playing at the correct speed; its pitch is too high or too low:
The Bluetooth speaker that I want is not pairing to BT100.
I am connected to a Bluetooth speaker but do not hear any audio.
My smartphone will not connect to BT100.
The Bluetooth LED will not stop blinking.
10
Turntable Belt for more information.
o Make sure that BT100 is powered on and that the needle is on the record.
o Make sure BT100 is selected as your computer's default recording device.
o If you are listening through your computer's speakers, make sure those speakers are selected as your
computer's default playback device. Alternatively, connect BT100’s RCA outputs to a stereo system or
powered speakers.
(Note: The RCA outputs monitor the signal coming out of the turntable, not the signal coming from your
computer.)
o Disconnect then reconnect the USB cable connecting BT100 to your computer.
o Make sure that BT100 is powered on and that the needle is on the record.
o Connect BT100's RCA outputs to a stereo system or powered speakers.
o Make sure your software music player's volume is turned up.
o Make sure your computer's volume is turned up.
o Make sure your computer's speakers are selected as your computer's default playback device.
(BT100 cannot be used as a playback device for your computer's audio.)
o Please connect the laptop to a grounded power supply (3 prong).
o Please connect to a grounded (3 prong) power supply.
o Ensure the 33/45 RPM Selector is set to the correct speed for your record.
o Turn off or move other nearby Bluetooth speakers over 30 ft. (9.1 m) so only the closest Bluetooth
speaker you want will pair.
o If you are connected to a Bluetooth speaker with a play/pause button, and do not hear audio, try
pressing the play/pause button.
o Press and release BT100’s Bluetooth
press it once more to try pairing it again.
o Turn BT100 off and then on again, and then press its Bluetooth button to try pairing it again.
o BT100 acts as a Bluetooth transmitter, sending the audio out of BT100 into other Bluetooth speakers.
BT100 cannot act as a Bluetooth receiver and play music from your smartphone over headphones or
RCA outputs.
o Once the Bluetooth button is pressed, BT100 will try to connect to nearby Bluetooth speakers for 5
minutes. To stop the blinking Bluetooth LED, power-cycle BT100.
button to disconnect it from the Bluetooth speaker, and then
Page 11

Guía del usuario (Español)
Introducción
Contenido de la caja
BT100
Adaptador de corriente
Cubierta antipolvo
(2) Bisagras de la cubierta antipolvo
Correa del giradiscos (sujeta al plato)
Plato
Cubierta de plástico de la púa
Alfombrilla antideslizante
Adaptador para 45 rpm
Cable RCA estéreo
Cable USB
Tarjeta de descarga de software
Guía del usuario
Manual sobre la seguridad y garantía
Soporte
Para obtener la información más reciente acerca de este producto (requisitos de sistema,
información de compatibilidad, etc.) y registrarlo, visite akaipro.com.
Para obtener soporte adicional del producto, visite akaipro.com/support.
11
Page 12
Instalación
Cómo fijar la cubierta antipolvo al BT100
1. Inserte las bisagras incluidas (que se encuentran en bolsas de plástico dentro del embalaje de
espuma de polietileno en los contenidos de la caja) en las placas para bisagras del panel trasero.
2. Inserte la cubierta anti polvo en el espacio entre las bisagras para encastrar la cubierta (Vea las
imágenes a continuación).
3. Voltee las bisagras de manera que queden en posición recta (Vea las imágenes a continuación).
Ajuste de la correa de transmisión
1. Asegúrese de que el adaptador de corriente no esté
conectado al BT100.
2. Usuarios primerizos: Retire el plato del embalaje.
3. Coloque el plato dado vuelta sobre una superficie plana y
coloque la correa de manera que envuelva el lado inferior
del anillo interno del plato, quedando centrada, recta y sin
ningún doblez (ver imagen a la derecha).
4. Mueva su dedo pulgar a lo largo de la ventana más grande
de la correa del plato y cuidadosamente levante parte de la
correa hacia arriba. Voltee el plato y coloque la correa
encima del surco en el eje de latón del motor, mientras
alinea el plato nuevamente sobre el eje central (vea la
imagen a la derecha).
5. Conecte el adaptador de corriente al giradiscos y
enciéndalo.
6. Para probar si el motor del plato gira, pulse Start (Inicio)
para hacer que el brazo de lectura coloque
automáticamente la aguja o muévalo manualmente y
colóquelo sobre el disco.
12
Page 13

Diagrama de conexión
Los elementos que no se enumeran en Introducción > Contenido de la caja se venden por
separado.
Suministro
eléctrico
Altavoces alimentados
Ordenador
13
Page 14

1
2
3
4
5
1
2
3
4
5
6
7
6
10
8
9
6
Características
Panel superior
1. Plato: Coloque aquí la alfombrilla
antideslizante y luego coloque su disco
sobre ella.
2. Brazo de lectura: El brazo fijo se
puede subir y bajar a mano o
utilizando la palanca de subir / bajar.
3. Clip del brazo: Este clip diseñado
especialmente fija el brazo mientras no
se usa.
4. Palanca subir/bajar: Utilícela para
levantar o bajar el brazo de lectura
sobre el disco.
5. Contrapeso: Está pre-equilibrado para
brindarle la tracción apropiada a la
púa.
6. Interruptor 7”/12” / Arranque/Parada
automática: Ajuste el interruptor de
7”/12” para indicar si está usando un
disco de 7 o de 12 pulg. Pulse Start
para hacer que el brazo de lectura se
levante automáticamente, pivotee por encima del disco y apoye la aguja en un punto específico en base al
ajuste de 7”/12”. Cuando un disco llega al final o si se pulsa Stop (Detener) durante la reproducción, el brazo
de lectura se levantará automáticamente y regresará a la posición de descanso.
7. Selector de 33 y 45 RPM: Ajústelo para seleccionar las RPM del plato del giradiscos en base al tipo de disco
que está utilizando.
8. Volumen: Ajuste esto para controlar el nivel de salida del auricular y Bluetooth.
9. Salida para auriculares: Conecte auriculares (que se venden por separado) para escuchar sus discos de
vinilo.
10. Botón Bluetooth: Pulse este botón para comenzar el apareamiento Bluetooth. Si tras 5 minutos no puede
encontrarse ningún altavoz Bluetooth con el cual aparearse, el transmisor Bluetooth se desactivará y el LED
se apagará. Si está actualmente conectado, pulse este botón para desconectarlo del altavoz Bluetooth
actualmente conectado.
Panel trasero
1. Salida RCA: El audio del disco que se está
reproduciendo se envía por la salida de audio RCA.
2. Preamplificador encendido/apagado: Si su
receptor o amplificador no tiene entradas
fonográficas, encienda el preamplificador
(encendido). Si el sistema que está utilizando tiene
entradas fonográficas, apáguelo.
3. Salida de audio USB: Use el cable USB incluido
para conectar el giradiscos a su ordenador. La conexión USB envía audio desde el giradiscos a su ordenador.
Consulte la sección Funcionamiento > Ajustes del ordenador en este manual para más información.
4. Entrada de corriente: Utilice el adaptador de corriente incluido para conectar la unidad a una toma de
corriente.
5. Botón de encendido: Pulse este botón para encender y apagar el BT100.
14
10
STOP
START
7”
12”
Page 15

Funcionamiento
Para comenzar
1. Conecte el adaptador de corriente incluido al BT100 y
utilice el interruptor de encendido para encenderlo el
BT100.
2. Retire la cubierta de la púa de la cápsula.
3. Coloque la alfombrilla sobre el plato y luego el disco
sobre la alfombrilla. Si está utilizando discos de 45 RPM,
coloque el adaptador para 45 RPM en el eje central
antes de colocar el disco en el plato.
4. Use el Selector 33/45 para ajustar la velocidad de
rotación del plato (33/45) para que coincida con el tipo
de disco.
5. Ajuste el interruptor 7”/12”
para que coincida con el tamaño del disco que tiene en el plato.
IMPORTANTE: Coloque la almohadilla
antideslizante incluida sobre el plato y coloque
su disco encima de ella para que sus discos
queden sostenidos cuidadosamente.
IMPORTANTE: Retire la cubierta plástica de la
cápsula (cubierta de la púa) antes de hacer
funcionar el giradiscos.
6. Pulse el botón Start para hacer que la unidad ubique el brazo de lectura automáticamente.
7. Cuando el disco llega al final o si se pulsa Stop (Detener) durante la reproducción, el brazo de lectura se
levantará automáticamente y regresará a la posición de descanso.
Apareamiento del BT100 con un altavoz Bluetooth
El BT100 cuenta con un transmisor Bluetooth que transmite audio a un altavoz Bluetooth de forma inalámbrica.
1. Encienda su altavoz Bluetooth y asegúrese de que se encuentre en modo de apareamiento.
2. Encienda el giradiscos BT100.
3. Pulse y suelte el botón de Bluetooth el BT100 para comenzar el apareamiento con su dispositivo Bluetooth.
Una vez conectado con el altavoz Bluetooth, el LED Bluetooth del BT100 permanecerá iluminado. Su altavoz
Bluetooth también debería indicar que está apareado.
Nota: BT100 se conectará con el altavoz Bluetooth más cercano. Si tras 5 minutos no puede encontrarse
ningún altavoz Bluetooth con el cual aparearse, el transmisor Bluetooth se desactivará y el LED se apagará.
Nota: El alcance máximo se logra cuando se utilizan dispositivos con Bluetooth 4.0 o superior.
4. Reproduzca música en su giradiscos BT100. Si está conectado con un altavoz Bluetooth con un botón
reproducir/pausa y no escucha el audio, intente pulsar dicho botón.
5. Ajuste el volumen de su altavoz Bluetooth (si aplica) y el control de volumen en el BT100 con la perilla de
volumen del BT100 para controlar el nivel de salida.
6. Para desconectar el apareamiento, pulse el botón Bluetooth en el BT100 o apague el apareamiento Bluetooth
en su Bluetooth altavoz.
Nota: Aleje otros receptores/altavoces Bluetooth fuera del alcance del BT100 (9.1 metros o más) para
desconectarlos a fin de conectar su altavoz Bluetooth.
15
Page 16

Grabación
Para grabar música en su ordenador, puede usar el EZ Vinyl/Tape Converter y un cable USB. EZ Vinyl/Tape
Converter guarda convenientemente sus grabaciones en su ordenador. Después de terminar de convertir su vinilo,
puede quemarlo en CD o cargarlo en dispositivos de medios portátiles.
Utilice la tarjeta de descarga de software incluida para descargar e instalar el software y siga las instrucciones en
pantalla. Consulte Ajustes del ordenador > Ajuste del BT100 como dispositivo de grabación predeterminado
antes de comenzar a grabar.
1. Con EZ Vinyl/Tape Converter instalado en su ordenador, use el cable USB incluido para conectar la salida de
2. En su ordenador, abra EZ Vinyl/Tape Converter yendo al menú Start All Programs (Inicio > Todos los
3. Siga las instrucciones de la pantalla para preparar su grabación. Cuando se le indique que reproduzca su
4.
Reproducción
Puede escuchar la música en su ordenador a través de su altavoz interno o de auriculares conectados a la misma.
(El BT100 no se puede usar como dispositivo de reproducción para el audio de su ordenador.) Consulte Ajustes del
ordenador > Ajuste de la placa de sonido de su ordenador como dispositivo de reproducción predeterminado
antes de reproducir la música desde su ordenador.
Para escuchar el disco mientras se reproduce, óigalo por los altavoces de su ordenador o conecte las salidas RCA
del BT100 a un sistema estéreo o altavoces alimentados.
16
audio USB del BT100 a un puerto USB disponible en su ordenador.
programas) (Windows) o al menú Applications (Aplicaciones) (Mac).
música, lleve el brazo del BT100 sobre el disco para iniciar la reproducción.
Nota: Para escuchar el disco mientras se reproduce, óigalo por los altavoces de su ordenador o conecte las
salidas RCA del BT100 a un sistema estéreo o altavoces alimentados.
Cuando termine de grabar, levante el brazo de lectura del disco y regréselo a su clip.
Page 17

Ajustes del ordenador
Ajustes del BT100 como dispositivo de grabación predeterminado
• Windows XP: Haga clic en el menú Start Control Panel (Inicio > Panel de control (o Settings Control
Panel (Configuración > Panel de control) en la vista clásica) Sound and Audio Devices (Dispositivos de
sonido y audio). Haga clic en la pestaña Audio y bajo Sound recording (Grabación de sonido), seleccione USB
Audio Codec como dispositivo predeterminado. Seleccione Properties (Propiedades) y haga clic en la pestaña
Advanced (Avanzado) para seleccionar el formato predeterminado, 44100 o 48000 Hz.
• Windows Vista: Haga clic en el menú Start Control Panel (Inicio > Panel de control) (o Settings Control
Panel) (Configuración > Panel de control) en la vista clásica) Hardware and Sound (Hardware y sonido)
Sound (Sonido). Haga clic en la pestaña Recording (Grabación) y seleccione USB Audio Codec (Códec de
audio USB) como dispositivo predeterminado. Seleccione Properties (Propiedades) y haga clic en la pestaña
Advanced (Avanzado) para seleccionar el formato predeterminado, 44100 o 48000 Hz.
• Windows 7: Haga clic en el menú Start (Inicio) Control Panel (Panel de control) Sound (Sonido). Haga
clic en la pestaña Recording (Grabación) y seleccione USB Audio Codec (Códec de audio USB) como
dispositivo predeterminado. Seleccione Properties (Propiedades) y haga clic en la pestaña Advanced
(Avanzado) para seleccionar el formato predeterminado, 44100 o 48000 Hz.
• Windows 8: Desde el menú Start (Inicio), haga clic en la esquina inferior izquierda de la pantalla para entrar al
escritorio. En la esquina inferior derecha de la barra de tareas, localice el icono del "Altavoz" de control de
volumen. Haga clic derecho en el altavoz y seleccione Playback Devices (Dispositivos de reproducción). En el
panel de control Windows Sound (Sonido de Windows), seleccione la pestaña Recording (Grabación). Si el
Codec de audio USB no tiene el símbolo de la "marca de verificación" verde junto a ella, haga clic derecho en
la misma y seleccione "Set as Default Device" (Configurar como dispositivo predeterminado). Seleccione
Properties (Propiedades) y haga clic en la pestaña Advanced (Avanzado) para seleccionar el formato
predeterminado, 44100 o 48000 Hz.
• Windows 10: Haga clic en el menú Start (Inicio) Control Panel (Panel de control) (o Settings Control
Panel [Configuración > Panel de control] en la vista clásica) Hardware and Sound (Hardware y sonido)
Sound (Sonido). En el panel de control Windows Sound (Sonido de Windows), seleccione la pestaña
Recording (Grabación). Si el Codec de audio USB no tiene el símbolo de la "marca de verificación" verde
junto a ella, haga clic derecho en la misma y seleccione "Set as Default Device" (Configurar como dispositivo
predeterminado). Seleccione Properties (Propiedades) y haga clic en la pestaña Advanced (Avanzado) para
seleccionar el formato predeterminado, 44100 o 48000 Hz.
• Mac OS X 10.4-10.11: Haga clic en el icono superior izquierdo de la "manzana" y luego en System
Preferences (Preferencias del sistema) Sound (Sonido). Haga clic en la pestaña Input (Entrada). En el menú
seleccione USB Audio Codec (Códec de audio USB) como dispositivo. En Format (Formato), seleccione
44100.0 o 48000.0 Hz.
Cómo configurar la tarjeta de sonido de su ordenador como dispositivo de reproducción
predeterminado
• Windows XP: Haga clic en el menú Start (Inicio) Control Panel (Panel de control) (o Settings [Ajustes]
Control Panel [Panel de control] en la vista clásica) Sound and Audio Devices (Dispositivos de sonido y
audio). Haga clic en la pestaña Audio y bajo Sound playback (Reproducción de sonido), seleccione la tarjeta
de sonido de su ordenador como dispositivo predeterminado.
• Windows Vista: Haga clic en el menú Start (Inicio) Control Panel (Panel de control) (o Settings Control
Panel [Configuración > Panel de control] en la vista clásica) Hardware and Sound (Hardware y sonido)
Sound (Sonido). Haga clic en la pestaña Playback (Reproducción) y seleccione la tarjeta de sonido de su
ordenador como dispositivo predeterminado.
• Windows 7: Haga clic en el menú Start (Inicio) Control Panel (Panel de control) Sound (Sonido). Haga
clic en la pestaña Playback (Reproducción) y seleccione la tarjeta de sonido de su ordenador como dispositivo
predeterminado.
• Windows 8: Desde el menú Start (Inicio), haga clic en la esquina inferior izquierda de la pantalla para entrar al
escritorio. En la esquina inferior derecha de la barra de tareas, localice el icono del "Altavoz" de control de
volumen. Haga clic derecho en el altavoz y seleccione Playback Devices (Dispositivos de reproducción). El
panel de control Windows Sound (Sonido de Windows) debe aparecer en la pestaña Playback
(Reproducción). Si la tarjeta de sonido de su ordenador no tiene el símbolo de la "marca de verificación" verde
junto a ella, haga clic derecho en la misma y seleccione "Set as Default Device" (Configurar como dispositivo
predeterminado).
• Windows 10: Haga clic en el menú Start (Inicio) Control Panel (Panel de control) Sound (Sonido). Haga
clic en la pestaña Playback (Reproducción) y seleccione la tarjeta de sonido de su ordenador como dispositivo
predeterminado.
• Mac OS X 10.4-10.11: Haga clic en el icono superior izquierdo de la "manzana" y luego en System
Preferences (Preferencias del sistema) Sound (Sonido). Haga clic en la pestaña Output (Salida). En el menú,
seleccione Internal Speakers (Altavoces internos) si va a usar los altavoces internos del ordenador o
Headphones (Auriculares) si va a usar altavoces o auriculares conectados a la salida para auriculares de 1/8"
del ordenador.
17
Page 18

Solución de problemas
Si experimenta dificultades, consulte los pasos para la solución de problemas a continuación.
El giradiscos está encendido pero el motor no gira:
Si está grabando en un ordenador:
No oigo ningún audio cuando reproduzco la música:
• Si está reproduciendo música con un disco de vinilo:
• Si está reproduciendo música con un ordenador:
Escucho un zumbido en mi altavoz u ordenador portátil cuando utilice el giradiscos:
• Si está grabando en un ordenador portátil:
• Si está reproduciendo a través de un altavoz:
Mi disco no se reproduce a la velocidad correcta. Su tono es demasiado alto o bajo:
Mi altavoz Bluetooth no se aparea con el BT100.
Mi altavoz Bluetooth no se aparea con el BT100.
Mi teléfono inteligente (smartphone) no se conecta con el giradiscos BT100.
El LED Bluetooth no para de parpadear.
o Asegúrese de que la correa del giradiscos esté instalada correctamente debajo del plato. Consulte
Instalación > Ajuste de la correa de transmission para más información.
o Asegúrese de que el BT100 esté encendido y que la púa esté sobre el disco.
o Asegúrese de que el BT100 esté seleccionado como dispositivo de grabación predeterminado.
o Si está escuchando por los altavoces del ordenador, asegúrese de que estos estén seleccionados
como dispositivo de reproducción predeterminado del mismo. Como alternativa, conecte las salidas
RCA del BT100 a un sistema estéreo o altavoces alimentados.
(Nota: Las salidas RCA monitorean la señal proveniente del giradiscos y no la señal proveniente de su
ordenador.)
o Desconecte y vuelva a conectar el cable USB entre el BT100 y el ordenador.
o Asegúrese de que el BT100 esté encendido y que la púa esté sobre el disco.
o Conecte las salidas RCA del BT100 a un sistema estéreo o altavoces alimentados.
o Asegúrese de que el volumen del reproductor de música del software esté ajustado a un valor alto.
o Asegúrese de que el volumen de su ordenador esté ajustado a un valor alto.
o Asegúrese de que los altavoces de su ordenador estén seleccionados como dispositivos de
reproducción predeterminados. (El BT100 no se puede usar como dispositivo de reproducción para el
audio de su ordenador.)
o Conecte el ordenador portátil a una fuente de corriente con conexión a tierra (3 clavijas).
o Conéctelo a una fuente de corriente con conexión a tierra (3 clavijas).
o Asegúrese de que el Selector 33/45 RPM esté colocado en la velocidad correcta para su disco.
o Apague o aleje a más de 9.1 metros otros altavoces Bluetooth cercanos de forma que el más cercano
sea el que desee aparear.
o
Si está conectado con un altavoz Bluetooth con un botón reproducir/pausa y no escucha el audio,
intente pulsar dicho botón.
o Pulse y suelte el botón de Bluetooth del BT100 para desconectarlo del altavoz Bluetooth, y luego
púlselo una vez más para intentar aparearlo nuevamente.
o Apague y vuelva a encender el BT100, y luego pulse su botón Bluetooth para intentar aparearlo
nuevamente.
o El giradiscos BT100 funciona como un transmisor Bluetooth, transmitiendo el audio desde el BT100
hacia otros altavoces Bluetooth. El BT100 no funciona como un receptor Bluetooth que reproduce
música desde su teléfono inteligente como si fuera unos auriculares o salidas RCA.
o Una vez pulsado el botón Bluetooth, el BT100 intentará conectarse con los altavoces Bluetooth
cercanos durante 5 minutos. Para detener el parpadeo del LED Bluetooth, reinicie el BT100.
18
Page 19

Guide d’utilisation (Français)
Présentation
Contenu de la boîte
BT100
Câble d’alimentation
Couvercle de protection
(2) charnières pour couvercle de protection
Courroie de la platine (fixée au plateau)
Plateau
Protège-pointe de lecture
Tapis
Adaptateur pour 45 tr/min
Câble RCA stéréo
Câble USB
Carte de téléchargement de logiciel
Guide d'utilisation
Consignes de sécurité et informations concernant la garantie
Assistance technique
Pour les toutes dernières informations concernant la configuration système requise, la
compatibilité, etc., et l’enregistrement du produit, veuillez visiter akaipro.com.
Pour de l’assistance supplémentaire, veuillez visiter akaipro.com/support.
19
Page 20

Installation
Installation du couvercle de protection
1. Insérez les charnières (qui se trouvent dans les sacs en plastique à l'intérieur de l'emballage en
mousse dans la boîte) dans les plaquettes de charnière du panneau arrière.
2. Insérez le couvercle entre les charnières afin de le fixer
3. Retournez les charnières vers le haut afin qu’elles soient droites
Installation de la courroie du plateau
1. Assurez-vous que le câble d’alimentation ne soit pas branché
à la BT100.
2. Première utilisation : Retirez la platine de son emballage.
3. Placez le plateau à l'envers sur une surface plate et placez la
courroie de sorte qu'elle soit enroulée autour du dessous de
l'anneau intérieur du plateau, centrée et droite, et exempte de
toute torsion (voir image de droite).
4. Passez le pouce à travers la plus grande ouverture du plateau
afin de soulever délicatement une partie de la courroie.
Retournez le plateau et placez la courroie au-dessus de la
cannelure de l'axe du moteur en laiton, tout en alignant le
plateau sur l'axe du milieu (voir image de droite).
5. Branchez le câble d'alimentation et allumez la platine vinyle.
6. Pour tester si le moteur du plateau tourne, appuyez sur la
touche Start afin que le bras de lecture se déplace
automatiquement sur le disque, ou encore, déplacez-le
manuellement.
20
(Voir l’image ci-dessous).
(Voir l’image ci-dessous).
Page 21

Schéma de connexion
Les articles qui ne figurent pas dans la section Présentation > Contenu de la boîte sont
vendus séparément.
Alimentation
Enceintes amplifiées
Ordinateur
21
Page 22

1
2
3
4
5
1
2
3
4
5
6
7
6
10
8
9
6
Caractéristiques
Panneau supérieur
1. Plateau : Placez le tapis fourni ici,
puis placez votre disque sur le tapis.
2. Bras de lecture : Le bras de lecture
peut être levé ou abaissé
manuellement ou en utilisant le
bouton du levier de commande.
3. Serre-bras : Ce serre-bras est
conçu spécialement afin de
maintenir en place le bras de lecture
lorsque la platine n’est pas utilisée.
4. Levier de commande du bras de
lecture : Ce levier permet de lever
ou d’abaisser le bras de lecture.
5. Contrepoids : Le contrepoids est
livré préréglé afin d’assurer un suivi
précis de la pointe de lecture.
6. 7”/12” Switch/Auto-Start/Stop :
Ce sélecteur permet de sélectionner
entre les formats de disque de
17,8 cm (7 po) et 30,5 cm (12 po).
Appuyez sur la touche Start afin que le bras de lecture se relève automatiquement et se déplace au-dessus
du disque à un endroit précis en fonction du réglage du sélecteur. Lorsque le disque atteint la fin de
l’enregistrement, ou si vous appuyez sur la touche Stop durant la lecture, le bras de lecture se relève
automatiquement et retourne sur son support.
7. Sélecteur de vitesses de lecture (33/45) : Réglez cette commande afin de sélectionner la vitesse de rotation
du plateau, selon le type de disque que vous utilisez.
8. Volume : Ce bouton permet de régler le niveau de la sortie casque et de la sortie de Bluetooth.
9. Sortie casque : Branchez un casque d'écoute (vendus séparément) pour écouter l’audio provenant du disque
vinyle.
10. Touche Bluetooth : Appuyez sur cette touche pour lancer le jumelage Bluetooth. Si après 5 minutes, aucune
enceinte Bluetooth n’est détectée, l'émetteur Bluetooth devient inactif et la DEL s'éteint. Lorsqu’une enceinte
est déjà connectée, cette touche permet de supprimer la connexion Bluetooth.
Panneau arrière
1. Sortie RCA : L'audio du disque est acheminé à la sortie
RCA.
2. Interrupteur du préamplificateur : Si votre récepteur ou
amplificateur ne dispose d’aucune entrée phono, activez
le préamplificateur (On). Si le système que vous utilisez
dispose d’entrées phono, désactivez le préamplificateur
(Off).
3. Sortie audio USB : Utilisez le câble USB inclus pour brancher la platine vinyle à un ordinateur. La connexion
USB permet d’acheminer l’audio de la platine vinyle à votre ordinateur. Veuillez consulter la section
Fonctionnement > Configuration de l’ordinateur pour plus d'informations.
4. Entrée d'alimentation : Utilisez le câble d’alimentation inclus pour brancher la platine vinyle à une prise
secteur.
5. Touche d'alimentation : Cette touche permet la mise sous et hors tension de la BT100.
22
10
STOP
START
7”
12”
Page 23

Fonctionnement
Mise en route
1. Utilisez le câble d’alimentation inclus pour brancher
l’entrée d’alimentation de la BT100 à une prise secteur
et mettez-la sous tension.
2. Retirez le protège-pointe de la pointe de lecture.
3. Placez le tapis sur le plateau puis placez votre disque
sur le tapis. Si vous utilisez un disque 45 tours, mettez
l'adaptateur 45 tr/min sur l'axe central avant de placer
le disque sur le plateau.
6. Utilisez le sélecteur 33/45 RPM afin de sélectionner la
vitesse de rotation du plateau (33/45) selon le type de disque utilisé.
7. Réglez le sélecteur 7”/12” selon le format de disque sur le plateau.
8. Appuyez sur la touche Start afin que l'appareil déplace automatiquement le bras de lecture.
9. Lorsque le disque atteint la fin de l’enregistrement, ou si vous appuyez sur la touche Stop durant la
lecture, le bras de lecture se relève automatiquement et retourne sur son support.
Jumelage de la platine vinyle BT100 à une enceinte Bluetooth
La platine vinyle BT100 dispose d’un émetteur Bluetooth afin de transmettre le signal audio sans fil vers une
enceinte Bluetooth.
1. Mettez l’enceinte Bluetooth sous tension et assurez-vous qu’elle est en mode jumelage.
2. Mettez la platine vinyle BT100 sous tension.
3. Enfoncez puis relâchez la touche Bluetooth de la platine vinyle BT100 afin de jumeler votre appareil
Bluetooth. Lorsque la platine vinyle BT100 est connectée à l’enceinte Bluetooth, la DEL Bluetooth
devient bleue. Votre enceinte Bluetooth devrait également indiquer qu’elle est connectée.
Remarque : La platine vinyle BT100 se connecte à l’enceinte Bluetooth la plus proche. Si après 5
minutes, aucune enceinte Bluetooth n’est détectée, l'émetteur Bluetooth devient inactif et la DEL
s'éteint.
Remarque : La plage maximale peut être atteinte avec l’utilisation d’appareils dotés de Bluetooth 4.0
ou de versions ultérieures.
4. Lancez la lecture de la musique sur la platine vinyle BT100. Si la platine est connectée à une enceinte
Bluetooth dotée d’une touche lecture/pause, et que vous n’entendez pas de signal audio, essayez
d'appuyer sur la touche lecture/pause.
5. Réglez le volume sur l’enceinte Bluetooth (s’il y lieu), ou le bouton Volume et le contrôle du volume sur
le BT100me de la platine BT100 afin d’ajuster le niveau de sortie.
6.
Pour supprimer la connexion, appuyez sur la touche Bluetooth de la BT100 ou désactivez le mode jumelage
Bluetooth sur l’enceinte Bluetooth.
Remarque : Déplacez les autres récepteurs/enceintes Bluetooth hors de la portée de la platine BT100
(9,1 m ou plus) ou les mettre hors tension afin de connecter votre enceinte Bluetooth.
IMPORTANT : Placez le tapis fourni sur le
plateau ; placez ensuite votre disque sur le
tapis afin de le maintenir en place.
IMPORTANT : Retirez le couvercle de
plastique de la cartouche (qui protège la
pointe de lecture) avant d’utiliser la platine.
23
Page 24

Enregistrement
Utiliser l'application EZ Vinyl/Tape Converter avec un câble USB pour enregistrer de la musique sur votre
ordinateur. Le EZ Vinyl/Tape Converter permet de sauvegarder vos enregistrements sur votre ordinateur.
Une fois la conversion du disque vinyle terminée, vous pouvez graver les fichiers sur CD ou les transférer
sur des lecteurs multimédia. Veuillez utiliser la carte de téléchargement de logiciel afin de télécharger et
d’installer le logiciel, puis suivre les instructions sur l’écran. Veuillez consulter la section Configuration de
l’ordinateur > Configuration de la BT100 comme périphérique d’enregistrement par défaut avant de
commencer à enregistrer.
1. Une fois l’application EZ Vinyl/Tape Converter installée sur votre ordinateur, connectez la sortie audio
USB de la BT100 au port USB de votre ordinateur à l’aide du câble USB fourni.
2. Sur votre ordinateur, vous pouvez lancer l’application EZ Vinyl/Tape Converter en allant dans le menu
Démarrer Tous les programmes (Windows) ou dans le menu Applications (Mac).
3. Suivez ensuite les instructions à l’écran afin de configurer l’enregistrement. Lorsque vous êtes invité à
faire jouer votre musique, déplacez le bras de lecture de la BT100 sur le disque afin de démarrer la
lecture.
Remarque : Pour écouter un disque durant la lecture, vous pouvez utiliser les haut-parleurs de votre
ordinateur, ou encore brancher les sorties RCA de la BT100 à une chaîne stéréo ou à des enceintes
amplifiées.
4. Une fois l’enregistrement terminé, soulevez le bras de lecture et remettez-le sur le serre-bras.
Lecture
Vous pouvez écouter de la musique sur votre ordinateur par l'intermédiaire de ses haut-parleurs internes ou
en branchant un casque d’écoute. (La BT100 ne peut être utilisée comme périphérique de lecture pour votre
ordinateur.) Veuillez consulter la section Configuration de l’ordinateur > Configuration de la carte son de
l’ordinateur comme périphérique de lecture audio par défaut avant de faire la lecture de la musique sur
votre ordinateur.
Pour écouter un disque durant la lecture, vous pouvez utiliser les haut-parleurs de votre ordinateur, ou
encore brancher les sorties RCA de la BT100 à une chaîne stéréo ou à des enceintes amplifiées.
24
Page 25

Configuration de l’ordinateur
Configuration la BT100 comme périphérique d’enregistrement par défaut
• Windows XP : Cliquez sur Démarrer Panneau de configuration (ou Paramètres Panneau de
configuration en Affichage classique) Sons et périphériques audio. Cliquez sur l’onglet Audio sous
Enregistrement audio et sélectionnez « USB audio codec » comme périphérique par défaut. Sélectionnez
Propriétés et cliquez sur l’onglet Advancé afin de sélectionner le format par défaut, 44 100 Hz ou 48 000 Hz.
• Windows Vista : Cliquez sur Démarrer Panneau de configuration (ou Paramètres Panneau de
configuration en Affichage classique) Matériel et audio Son. Cliquez sur l’onglet Enregistrement et
sélectionnez USB audio codec comme appareil par défaut. Sélectionnez Propriétés et cliquez sur l’onglet
Advancé afin de sélectionner le format par défaut, 44 100 Hz ou 48 000 Hz.
• Windows 7 : Cliquez sur Démarrer Panneau de configuration Son. Cliquez sur l’onglet Enregistrement
et sélectionnez USB audio codec comme appareil par défaut. Sélectionnez Propriétés et cliquez sur l’onglet
Advancé afin de sélectionner le format par défaut, 44 100 Hz ou 48 000 Hz.
• Windows 8 : Dans le menu Démarrer, cliquez sur le coin inférieur gauche de l'écran pour afficher le bureau.
Dans le coin inférieur droit de la barre des tâches, recherchez l’icône de la commande de volume « hautparleur ». Faites un clic droit sur l’icône du haut-parleur et sélectionnez Périphériques de lecture. Dans le
panneau de configuration Son Windows, sélectionnez l'onglet Enregistrement. Si USB Audio Codec ne
dispose pas d’un crochet, faites un clic droit et sélectionnez « Définir comme périphérique par défaut ».
Sélectionnez Propriétés et cliquez sur l’onglet Advancé afin de sélectionner le format par défaut, 44 100 Hz ou
48 000 Hz.
• Windows 10 : Cliquez sur Démarrer Panneau de configuration (ou Paramètres Panneau de
configuration en Affichage classique) Matériel et audio Son. Dans le panneau de configuration Son
Windows, sélectionnez l'onglet Enregistrement. Si le champs USB Audio Codec ne dispose pas d’un
crochet, faites un clic droit et sélectionnez « Définir comme périphérique par défaut ». Sélectionnez Propriétés
et cliquez sur l’onglet Advancé afin de sélectionner le format par défaut, 44 100 Hz ou 48 000 Hz.
• Mac OS X 10.4-10.11 : Cliquez sur la pomme Apple située dans le coin supérieur gauche de l’écran et
sélectionnez Préférences Système Sons. Cliquez sur l’onglet Entrée. À partir du menu, sélectionnez USB
Audio Codec comme périphérique par défaut. Sous le Format, sélectionnez 44 100 Hz ou 48 000 Hz.
Configuration de la carte son de l’ordinateur comme périphérique de lecture audio par défaut
• Windows XP : Cliquez sur Démarrer Panneau de configuration (ou Paramètres Panneau de
configuration en Affichage classique) Sons et périphériques audio. Cliquez sur l’onglet Audio et sous
Lecture audio, sélectionnez la carte son de l’ordinateur comme périphérique de lecture audio par défaut.
• Windows Vista : Cliquez sur Démarrer Panneau de configuration (ou Paramètres Panneau de
configuration en Affichage classique) Matériel et audio Son. Cliquez sur l'onglet Lecture et sélectionnez
la carte son de l’ordinateur comme périphérique de lecture audio par défaut.
• Windows 7 : Cliquez sur Démarrer Panneau de configuration Son. Cliquez sur l'onglet Lecture et
sélectionnez la carte son de l’ordinateur comme périphérique de lecture audio par défaut.
• Windows 8 : Dans le menu Démarrer, cliquez sur le coin inférieur gauche de l'écran pour afficher le bureau.
Dans le coin inférieur droit de la barre des tâches, recherchez l’icône de la commande de volume « hautparleur ». Faites un clic droit sur l’icône du haut-parleur et sélectionnez Périphériques de lecture. Le panneau
de configuration Sons Windows devrait s’afficher sur l'onglet Lecture. Si la carte son de votre ordinateur ne
dispose pas d’un crochet, faites un clic droit et sélectionnez « Définir comme périphérique par défaut ».
• Windows 10 : Cliquez sur Démarrer Panneau de configuration Son. Cliquez sur l'onglet Lecture et
sélectionnez la carte son de l’ordinateur comme périphérique de lecture audio par défaut.
• Mac OS X 10.4-10.11 : Cliquez sur la pomme Apple située dans le coin supérieur gauche de l’écran et
sélectionnez Préférences Système Sons. Cliquez sur l’onglet Sortie. À partir du menu, sélectionnez Haut-
parleurs internes si vous utilisez les haut-parleurs internes de l’ordinateur, ou sélectionnez Écouteurs si vous
utilisez des haut-parleurs ou un casque d’écoute branchés à la sortie casque 3,5 mm de votre ordinateur.
25
Page 26

Dépannage
Si vous éprouvez des difficultés, veuillez consulter les consignes de dépannage ci-dessous.
La platine vinyle est sous tension, mais le moteur ne fonctionne pas :
Si vous enregistrez sur un ordinateur :
Je n’entends pas de signal audio lors de la lecture :
• Si vous faites la lecture à partir d’un vinyle :
• Si vous faites la lecture à partir de votre ordinateur :
Il y a un bourdonnement provenant de mon enceinte ou de mon ordinateur portable lorsque j’utilise la platine
vinyle :
• Si vous enregistrez sur un ordinateur portable :
• Si vous utilisez une enceinte :
Mon disque ne joue pas à la bonne vitesse, la tonalité est trop haute ou trop basse :
L’enceinte Bluetooth que je désire utiliser ne parvient pas à se connecter à la BT100.
L’enceinte Bluetooth que je désire utiliser ne parvient pas à se connecter à la platine vinyle BT100.
Mon smartphone ne parvient pas à se connecter à la platine vinyle BT100.
La DEL Bluetooth ne cesse de clignoter.
o Assurez-vous que la courroie est correctement installée sous le plateau. Veuillez consulter la section
Installation > Installation de la courroie du plateau pour plus d'informations.
o Assurez-vous que la BT100 est sous tension et que la pointe de lecture est bien sur le disque.
o Assurez-vous que la BT100 est sélectionnée comme périphérique d'enregistrement par défaut de votre
ordinateur.
o Si vous écoutez la musique via les haut-parleurs de votre ordinateur, assurez-vous que ces haut-
parleurs sont sélectionnés comme périphérique de lecture par défaut de votre ordinateur. Vous pourriez
également brancher les sorties RCA de la BT100 à une chaîne stéréo ou à des enceintes amplifiées.
(Remarque : Les sorties RCA contrôlent le signal sortant de la platine vinyle, mais pas le signal
provenant de votre ordinateur).
o Essayez de débrancher le câble USB branché à la BT100 et à votre ordinateur, puis de le rebrancher.
o Assurez-vous que la BT100 est sous tension et que la pointe de lecture est bien sur le disque.
o Branchez les sorties RCA de la BT100 à une chaîne stéréo ou à des enceintes amplifiées.
o Assurez-vous que le niveau du volume de l’application soit assez élevé.
o Assurez-vous que le niveau du volume de l'ordinateur soit assez élevé.
o Assurez-vous que les haut-parleurs de votre ordinateur soient sélectionnés comme périphérique de
lecture par défaut de votre ordinateur.
(La BT100 ne peut être utilisée comme périphérique de lecture pour votre ordinateur.)
o Veuillez brancher l’ordinateur à un câble d’alimentation avec mise à la terre (3 broches).
o Veuillez brancher l’enceinte à un câble d’alimentation avec mise à la terre (3 broches).
o Veuillez vous assurer que le sélecteur de vitesse 33/45 RPM est réglé sur la vitesse appropriée pour
votre disque.
o Désactivez ou déplacez toutes les autres enceintes Bluetooth à plus de 9,1 m afin que seulement
l’enceinte Bluetooth que vous souhaitez utiliser puisse se jumeler à la platine.
o Si la platine est connectée à une enceinte Bluetooth dotée d’une touche lecture/pause, et que vous
n’entendez pas de signal audio, essayez d'appuyer sur la touche lecture/pause.
o Appuyez et relâchez le bouton Bluetooth de la platine BT100 pour supprimer la connexion à l’enceinte
Bluetooth, puis réappuyez une fois de plus pour relancer le processus de jumelage.
o Éteignez la platine BT100, puis rallumez-la et appuyez sur le bouton Bluetooth afin de relancer le
processus de jumelage.
o La platine vinyle BT100 agit comme un émetteur Bluetooth en transmettant son signal vers d’autres
enceintes Bluetooth. La platine vinyle BT100 ne peut agir comme récepteur et transmettre de la
musique de votre smartphone vers un casque ou les sorties RCA.
o Une fois que vous appuyez sur la touche Bluetooth, la platine vinyle BT100 tente de se connecter aux
enceintes Bluetooth à proximité pendant 5 minutes. Pour arrêter le clignotement de la DEL Bluetooth,
effectuez une remise sous tension de la platine vinyle BT100.
26
Page 27

Guida per l'uso (Italiano)
Introduzione
Contenuti della confezione
BT100
Adattatore di alimentazione
Coperchio antipolvere
(2) Cerniere per coperchio antipolvere
Cinghia del giradischi (fissata al piatto)
Piatto
Copri-puntina in plastica
Tappetino
Adattatore 45 giri
Cavo stereo RCA
Cavo USB
Scheda di download del Software
Guida per l'uso
Istruzioni di sicurezza e garanzia
Assistenza
Per le ultime informazioni in merito a questo prodotto (requisiti di sistema, informazioni sulla
compatibilità, ecc.) e per la registrazione del prodotto stesso, recarsi alla pagina akaipro.com.
Per ulteriore assistenza sul prodotto, recarsi alla pagina akaipro.com/support.
27
Page 28

Configurazione
Collegamento del coperchio antipolvere al BT100
1. Inserire le cerniere in dotazione (contenute in sacchetti di plastica all'interno del packaging in schiuma
tra i contenuti della confezione) all'interno delle apposite piastre a livello del pannello posteriore.
2. Inserire il coperchio antipolvere nello spazio compreso tra le cerniere in modo che si incastri (
le immagini sottostanti)
3. Sollevare le cerniere in modo che si trovino in posizione sollevata
(si vedano le immagini sottostanti)
si vedano
Fissaggio della cinghia del giradischi
1. Assicurarsi che l'adattatore di alimentazione non sia collegato
al BT100.
2. Utenti alle prime armi: estrarre il piatto dalla confezione.
3. Collocare il piatto, capovolto, su una superficie piana e
posizionare la cinghia in modo tale che sia avvolta attorno
alla parte inferiore dell'anello interno del piatto, centrata dritta
e libera da torsioni (si veda l'immagine a destra).
4. Far passare il pollice attraverso la finestra più grande della
cinghia e sollevare con attenzione parte della cinghia stessa.
Girare il piatto e collocare la cinghia sulla scanalatura
nell'asse in ottone del motore, allineando al tempo stesso di
nuovo il piatto sull'asse centrale (si veda l'immagine a
destra).
5. Collegare l'adattatore di alimentazione al giradischi e
accendere il giradischi stesso.
6. Per verificare se il motore del piatto gira, premere Start per
fare in modo che il braccio collochi automaticamente la
puntina, oppure spostare manualmente il braccio e
posizionarlo sul disco.
28
Page 29

Schema dei collegamenti
Elementi non elencati sotto Introduzione > Contenuti della confezione sono venduti
separatamente.
Alimentazione
Altoparlanti
Computer
29
Page 30

1
2
3
4
5
1
2
3
4
5
6
7
6
10
8
9
6
Caratteristiche
Pannello superiore
1. Piatto: collocare il tappetino a questo livello e
appoggiare il disco sul tappetino.
2. Braccio: il braccio fisso può essere alzato e
abbassato a mano, oppure servendosi della
levetta di sollevamento / abbassamento.
3. Fermabraccio: questo fermabraccio dal
design speciale fissa il braccio quando non è
in uso.
4. Levetta di sollevamento/abbassamento:
servirsi di questa levetta per alzare e
abbassare il braccio sul disco.
5. Contrappeso: è pre-bilanciato per garantire
una tracciatura corretta della puntina.
6. Interruttore 7”/12” / Auto-Start/Stop:
regolare l'interruttore 7”/12” per selezionare
l'uso di un disco da 7” o da 12”. Premere
Start per fare in modo che il braccio si sollevi
automaticamente, giri sul disco e appoggi la
puntina in un punto specifico basato sull'impostazione 7”/12”. Quando il disco arriva in fondo o viene premuto
Stop durante la riproduzione, il braccio si solleva automaticamente e torna alla posizione di riposo.
7. Selettore 33/45 giri: regolare questo comando per selezionare i giri del piatto del giradischi in base al tipo di
disco che si sta utilizzando.
8. Volume: Regolare questo comando per controllare il livello di uscita delle cuffie e Bluetooth.
9. Uscita cuffie: Collegare le cuffie (vendute separatamente) a questo livello per ascoltare la riproduzione dei
propri vinili.
10. LED Bluetooth: Questo LED lampeggia durante il collegamento a un dispositivo Bluetooth. Una volta
collegato, il LED rimarrà fisso. Il LED sarà spento quando il Bluetooth è inattivo e quando l'BT-500 è spento.
Pannello posteriore
1. Uscita RCA: l'audio proveniente da un disco
riprodotto viene inviato all'uscita audio RCA.
2. Preamp On/Off: se il ricevitore o l'amplificatore non
hanno ingressi phono, accendere il preamp (on). Se il
sistema che si sta utilizzando è dotato di ingressi
phono, impostare questo interruttore su off.
3. Uscita audio USB: servirsi del cavo USB in
dotazione per collegare il giradischi al computer. Il
collegamento USB invierà audio dal giradischi al computer. Si veda la sezione Uso > Configurazione del
computer di questo manuale per maggiori informazioni.
4. Ingresso di alimentazione: servirsi dell'adattatore di alimentazione in dotazione per il collegamento a una
presa a parete.
5. Tasto di alimentazione: premere questo tasto per accendere e spegnere il BT100.
30
10
START
STOP
7”
12”
Page 31

Uso
Primi passi
1. Collegare l'adattatore in dotazione al BT100 e servirsi
dell'interruttore di alimentazione per accendere il
BT100.
2. Rimuovere il copripuntina dalla cartuccia.
3. Collocare il tappetino sul piatto, quindi posizionare un
disco sul tappetino. Se si utilizzano dischi a 45 giri,
collocare l'adattatore 45 giri sull'asse centrale prima di
collocare il disco sul piatto.
4. Servirsi del selettore 33/45 giri per impostare la
velocità di rotazione del piatto (33/45) in modo che sia adeguata al tipo di disco.
5. Posizionare l'interruttore 7”/12” sull'impostazione corrispondente al disco presente sul piatto.
6. Premere il tasto Start per fare in modo che l'apparecchio posizioni automaticamente il braccio.
7. Quando il disco arriva in fondo o viene premuto Stop durante la riproduzione, il braccio si solleva
automaticamente e torna alla posizione di riposo.
Collegamento del BT100 a un altoparlante Bluetooth
L'BT100 dispone di un trasmettitore Bluetooth per l'invio di audio a un altoparlante Bluetooth senza fili.
1. Accendere l'altoparlante Bluetooth e assicurarsi che si trovi in modalità di collegamento.
2. Accendere il giradischi BT100.
3. Premere e rilasciare il tasto Bluetooth sull'BT100 per avviare il collegamento del dispositivo Bluetooth.
Una volta collegato l'BT100 all'altoparlante Bluetooth, il LED Bluetooth sarà blu fisso. L'altoparlante
Bluetooth dovrebbe a sua volta indicare di essere collegato.
Nota bene: l'BT100 si collegherà all'altoparlante Bluetooth più vicino. Se dopo 5 minuti non è
possibile individuare altoparlanti Bluetooth cui collegarsi, il trasmettitore Bluetooth diventerà inattivo e
il LED si spegnerà.
Nota bene: la portata massima si ottiene servendosi di dispositivi dotati di Bluetooth 4.0 o superiore.
4. Riprodurre musica sul giradischi BT100. Se si è collegati a un altoparlante Bluetooth dotato di tasto
play/pause e non si sente alcun audio, provare a premere il tasto play/pause.
5. Regolare il volume dell’altoparlante Bluetooth (se applicabile) o la manopola Volume sull’BT100 per
controllare il livello di uscita.
6. Per annullare il collegamento, premere il tasto Bluetooth sul BT100 o spegnere il dispositivo di
collegamento Bluetooth sull'altoparlante Bluetooth.
Nota bene: spostare altri ricevitori/altoparlanti Bluetooth fuori dalla portata dell'BT100 (9.1 metri o più) o
spegnerli per collegare l'altoparlante Bluetooth.
IMPORTANTE: collocare il tappetino in
dotazione sul piatto; quindi posizionare il
disco sul tappetino in modo che venga retto
in maniera accurata.
IMPORTANTE: rimuovere il cappuccio della
cartuccia (copripuntina) prima di utilizzare il
giradischi.
31
Page 32

Registrazione
Per registrare musica sul computer, è possibile utilizzare il programma EZ Vinyl/Tape Converter e un cavo
USB. L'EZ Vinyl/Tape Converter salva comodamente le registrazioni sul computer. Una volta terminato di
convertire il vinile, lo si può masterizzare su un CD o caricare su dispositivi media portatili.
Servirsi della scheda di download del software in dotazione per scaricare e installare il software e seguire le
istruzioni su schermo. Si veda Configurazione del computer > Configurazione del BT100 come
periferica di riproduzione predefinita prima di iniziare a registrare.
1. Una volta installato l'EZ Vinyl/Tape Converter sul computer, servirsi del cavo USB in dotazione per
collegare l'uscita audio USB del BT100 ad una porta USB disponibile del computer.
2. Sul computer, aprire l'EZ Vinyl/Tape Converter recandosi su Start Tutti i programmi (Windows) o sul
menu Applications (Mac).
3. Seguire le istruzioni su schermo per configurare la registrazione. Quando viene richiesto di riprodurre la
musica, muovere il braccio del BT100 sul disco per iniziare la riproduzione.
Nota bene: per ascoltare un disco mentre viene riprodotto, servirsi delle casse del computer o collegare
le uscite RCA del BT100 a un impianto stereo o ad altoparlanti.
4. Una volta terminato di registrare, alzare il braccio dal disco e riportarlo sul poggiabraccio.
Riproduzione
È possibile ascoltare la musica sul computer tramite l'altoparlante interno o tramite un paio di cuffie ad esso
collegate (Il BT100 non può essere utilizzato come dispositivo di riproduzione dell'audio del computer). Si
veda Configurazione del computer > Configurazione della scheda audio del computer come
dispositivo di riproduzione predefinito
prima di riprodurre la musica del computer.
Per ascoltare un disco mentre viene riprodotto, servirsi delle casse del computer o collegare le uscite RCA
del BT100 a un impianto stereo o ad altoparlanti.
32
Page 33

Configurazione del computer
Configurare il BT100 come dispositivo di registrazione predefinito
• Windows XP: cliccare sul Menu Start Pannello di controllo (o Impostazioni Pannello di controllo nella
vista Classica) Suoni e periferiche audio. Cliccare sulla scheda Audio e selezionare USB Audio Codec
come periferica predefinita sotto Registrazione suoni. Selezionare Proprietà e cliccare sulla scheda Avanzate
per selezionare il formato predefinito, 44100 Hz o 48000 Hz.
• Windows Vista: cliccare sul Menu Start Pannello di controllo (o Impostazioni Pannello di controllo nella
vista Classica) Hardware e suoni Suoni. Cliccare sulla scheda Registrazione e selezionare USB Audio
Codec come periferica predefinita. Selezionare Proprietà e cliccare sulla scheda Avanzate per selezionare il
formato predefinito, 44100 Hz o 48000 Hz.
• Windows 7: cliccare sul menu Start Pannello di controllo Audio. Cliccare sulla scheda Registrazione e
selezionare USB Audio Codec come periferica predefinita. Selezionare Proprietà e cliccare sulla scheda
Avanzate per selezionare il formato predefinito, 44100 Hz o 48000 Hz.
• Windows 8: nel menu Start, cliccare sull'angolo inferiore sinistro dello schermo per passare al Desktop.
Nell'angolo inferiore destro della Barra delle applicazioni, individuare l'icona "Speaker" di controllo del Volume.
Fare click col tasto destro del mouse e selezionare Dispositivi di riproduzione. Nel pannello di controllo Audio
di Windows selezionare la scheda Registrazione. Se l'USB Audio Codec non presenta un segno di spunta
verde, fare click col destro e selezionare "Imposta come dispositivo predefinito". Selezionare Proprietà e
cliccare sulla scheda Avanzate per selezionare il formato predefinito, 44100 Hz o 48000 Hz.
• Windows 10: cliccare sul menu Start Pannello di controllo (o Impostazioni Pannello di controllo nella
vista Classica) Hardware e suoni Suoni. Nel pannello di controllo Audio di Windows selezionare la
scheda Registrazione. Se l'USB Audio Codec non presenta un segno di spunta verde, fare click col destro e
selezionare "Imposta come dispositivo predefinito". Selezionare Proprietà e cliccare sulla scheda Avanzate
per selezionare il formato predefinito, 44100 Hz o 48000 Hz.
• Mac OS X 10.4-10.11: cliccare sull'icona della mela nell'angolo superiore sinistro, quindi cliccare su System
Preferences Sound. Fare clic sulla scheda “Ingresso”. Dal menu, selezionare “USB Audio Codec” come
periferica. Sotto Format, selezionare 44100.0 Hz o 48000.0 Hz.
Configurazione della scheda audio del computer come dispositivo di riproduzione predefinito
• Windows XP: cliccare sul Menu Start Pannello di controllo (o Impostazioni Pannello di controllo nella
vista Classica) Suoni e periferiche audio. Cliccare sulla scheda Audio e in Riproduzione suoni selezionare
la scheda audio del computer come periferica predefinita.
• Windows Vista: cliccare sul menu Start Pannello di controllo (o Impostazioni Pannello di controllo nella
vista Classica) Hardware e suoni Suoni. Cliccare sulla scheda Riproduzione e selezionare la scheda
audio del computer come periferica predefinita.
• Windows 7: cliccare sul menu Start Pannello di controllo Audio. Cliccare sulla scheda Riproduzione e
selezionare la scheda audio del computer come periferica predefinita.
• Windows 8: nel menu Start, cliccare sull'angolo inferiore sinistro dello schermo per passare al Desktop.
Nell'angolo inferiore destro della Barra delle applicazioni, individuare l'icona "Speaker" di controllo del Volume.
Fare click col tasto destro del mouse e selezionare Dispositivi di riproduzione. Il pannello di controllo Audio di
Windows dovrebbe comparire sulla scheda Riproduzione. Se la scheda audio del computer non presenta un
segno di spunta verde, fare click col destro e selezionare "Imposta come dispositivo predefinito"
• Windows 10: cliccare sul menu Start Pannello di controllo Audio. Cliccare sulla scheda Riproduzione e
selezionare la scheda audio del computer come periferica predefinita.
• Mac OS X 10.4-10.11: cliccare sull'icona della mela nell'angolo superiore sinistro, quindi cliccare su System
Preferences Sound. Fare clic sulla scheda “Output” (uscita). Dal menu, selezionare Altoparlanti interni se
si utilizzano gli altoparlanti interni del computer oppure selezionare Cuffie se si utilizzano altoparlanti o cuffie
collegati all'uscita da 1/8" del computer.
33
Page 34

Risoluzione di problemi
In caso di problemi, fare riferimento ai passaggi qui di seguito.
Il giradischi è acceso, ma il motore non gira:
Se si registra su un computer:
Non sento alcun audio durante la riproduzione di musica:
• Se si riproduce musica da vinile:
• Se si riproduce musica da computer:
Durante l'uso del giradischi sento un ronzio tramite l'altoparlante o il portatile.
• Se si registra su un portatile:
• Se si sta riproducendo musica con un altoparlante:
Il mio disco non suona alla giusta velocità; il pitch è troppo alto o troppo basso:
L'altoparlante Bluetooth che voglio non si collega al BT100.
L'altoparlante Bluetooth che voglio non si collega all'BT100.
Il mio smartphone non si collega al giradischi BT100.
Il LED Bluetooth non smette di lampeggiare.
o Assicurarsi che la cinghia del giradischi sia installata correttamente sotto il piatto. Si veda
Configurazione > Fissaggio della cinghia del giradischi per maggiori informazioni.
o Assicurarsi che il BT100 sia acceso e che la puntina sia sul disco.
o Assicurarsi che il BT100 sia selezionato come dispositivo di registrazione predefinito del computer.
o Se si ascolta tramite le casse del computer, assicurarsi che siano selezionate come periferica di
riproduzione predefinita del computer. Alternativamente, collegare le uscite RCA del BT100 ad un
impianto stereo o ad altoparlanti.
(Nota bene: le uscite RCA monitorano il segnale che esce dal giradischi, non quello proveniente dal
computer.)
o Scollegare e ricollegare inoltre il cavo USB che unisce il BT100 al computer.
o Assicurarsi che il BT100 sia acceso e che la puntina sia sul disco.
o Collegare le uscite RCA del BT100 ad un impianto stereo o ad altoparlanti.
o Assicurarsi che il volume del proprio lettore musicale software sia acceso.
o Assicurarsi che il volume del computer sia acceso.
o Assicurarsi che le casse del computer siano selezionate come dispositivo di riproduzione predefinito del
computer. (Il BT100 non può essere utilizzato come dispositivo di riproduzione dell'audio del computer).
o Collegare il computer ad un'alimentazione con messa a terra (3 denti).
o Collegare il dispositivo ad un'alimentazione con messa a terra (3 denti).
o Assicurarsi che il selettore 33/45 RPM sia impostato sulla velocità giusta per il disco specifico.
o Spegnere o spostare altri altoparlanti Bluetooth nelle vicinanze a oltre 9.1 metri in modo che solo
l'altoparlante Bluetooth più vicino desiderato si colleghi.
o Se si è collegati a un altoparlante Bluetooth dotato di tasto play/pause e non si sente alcun audio,
provare a premere il tasto play/pause.
o Premere e rilasciare il tasto Bluetooth dell’BT100 per scollegarlo dall’altoparlante Bluetooth, quindi
premerlo nuovamente per collegarlo ancora.
o Spegnere l’BT100 e riaccenderlo, quindi premere il tasto Bluetooth per collegarlo nuovamente.
o Il giradischi BT100 agisce da trasmettitore Bluetooth inviando l'audio dall'BT100 ad altri altoparlanti
Bluetooth. Il giradischi BT100 non può agire da ricevitore Bluetooth e riprodurre musica dallo
smartphone su cuffie o uscite RCA.
o Una volta premuto il tasto Bluetooth, l'BT100 cercherà di collegarsi agli altoparlanti Bluetooth più vicini
per 5 minuti. Per interrompere il lampeggio del LED Bluetooth riaccendere l'BT100.
34
Page 35

Benutzerhandbuch (Deutsch)
Einführung
Lieferumfang
BT100
Netzteil
Staubabdeckung
(2) Scharniere für Staubabdeckung
Plattenspielerriemen (an Plattenteller befestigt)
Plattenteller
Plastikhülle für Nadel
Slipmat
45 RPM Adapter
Stereo-Cinch-Kabel
USB-Kabel
Software-Download-Karte
Benutzerhandbuch
Sicherheitshinweise und Garantieinformationen
Kundendienst
Für die neuesten Informationen zu diesem Produkt (Systemanforderungen, Informationen zur
Kompatibilität etc.) und zur Produktregistrierung besuchen Sie akaipro.com.
Für zusätzlichen Produkt-Support besuchen Sie akaipro.com/support.
35
Page 36

Setup
Montage der Staubabdeckung am BT100
1. Setzen Sie die mitgelieferten Scharniere (in Plastiksäckchen im Inneren der Schaumstoffverpackung)
in die Scharnierplatten an der Rückseite ein.
2. Setzen Sie die Staubabdeckung in den Spalt zwischen den Scharnieren, damit sie einrasten kann
(Siehe Bilder unten).
3. Klappen Sie die Scharniere so aus, dass sie sich in der aufrechten Position befinden (Siehe Bilder
unten).
Anbringen des Plattenspielerriemens
1. Achten Sie darauf, dass das Netzteil nicht mit dem BT100
verbunden ist.
2. Einsteiger: Nehmen Sie den Plattenteller aus der
Verpackung.
3. Legen Sie den Plattenteller mit der Oberseite nach unten
auf eine ebene Fläche und positionieren Sie den Riemen
so, dass er um die Unterseite des Innenrings des
Plattentellers geschlungen, gerade zentriert und nicht
verdreht ist (siehe Bild rechts).
4. Führen Sie Ihren Daumen über das größere Riemenfenster
des Plattentellers und heben einen Teil des Riemens
vorsichtig an. Heben Sie ihn über den Plattenteller und
platzieren ihn über der Nut in der Messingmotorspindel,
während Sie den Plattenteller wieder mit der Mittelspindel
ausrichten (siehe Bild rechts).
5. Verbinden Sie Netzteil und Plattenspieler und schalten den
Plattenspieler ein.
6. Um zu testen, ob sich der Plattenspielermotor dreht,
drücken Sie Start, damit der Tonarm automatisch die
Nadel auf die Platte setzt. Wahlweise können Sie die Nadel
auch manuell auf die Platte setzen.
36
Page 37

Anschlussdiagramm
Teile, die nicht unter Einführung > Lieferumfang angegeben sind, sind separat erhältlich.
Stromversorgung
Aktivlautsprecher
Computer
37
Page 38

1
2
3
4
5
1
2
3
4
5
6
7
6
10
8
9
6
Funktionen
Oberseite
1. Plattenteller: Legen Sie die Slipmat
hier auf und legen dann Ihre Platte auf
die Slipmat.
2. Tonarm: Der fixe Tonarm kann mit der
Hand oder durch Drücken des
entsprechenden Hebels angehoben
und abgesenkt werden.
3. Arm-Clip: Dieser speziell entwickelte
Arm-Clip sichert den Tonarm, wenn er
nicht verwendet wird.
4. Hebel zum Anheben/Absenken:
Verwenden Sie diese Option, um den
Tonarm anzuheben oder auf die Platte
abzusenken.
5. Gegengewicht: Dieses Gewicht wird
bereits mit der richtigen Balance für die
Nadel ausgeliefert.
6. 7"/12" Schalter / Auto-Start/Stopp:
Verwenden Sie den 7”/12” Schalter,
um auszuwählen, ob Sie eine 7” oder
12” Platte verwenden. Wenn Sie Start drücken, wird der Tonarm automatisch angehoben und über die Platte
geschwenkt. Die Nadel wird je nach 7”/12”-Einstellung an einer bestimmten Stelle aufgesetzt. Wenn eine
Platte das Ende erreicht oder während der Wiedergabe Stopp gedrückt wird, hebt sich der Tonarm
automatisch und schwenkt zurück in die Ruheposition.
7. 33/45 RPM-Wähler: Verwenden Sie diesen Wähler, um die Drehzahl des Plattentellers je nach Plattenart
auszuwählen.
8. Lautstärk: Passen Sie dies an, um den Ausgangspegel von Kopfhörer und Bluetooth einzustellen.
9. Ausgang Kopfhöre: Schließen Sie Kopfhörer an (separat erhältlich), um Ihre Schallplatten anzuhören.
10. Bluetooth-Taste: Drücken Sie diese Taste, um die Bluetooth-Verbindung zu starten. Wenn nach 5 Minuten
keine Bluetooth-Lautsprecher für eine Verbindung gefunden werden können, wird der Bluetooth-Sender
inaktiv und die LED erlischt. Wenn die Lautsprecher derzeit verbunden sind, drücken Sie diese Taste, um
derzeit verbundenen Bluetooth-Lautsprecher zu trennen.
Rückseite
1. Cinch-Ausgang: Der Ton einer wiedergegebenen Schallplatte
wird an den Cinch-Audioausgang gesendet.
2. Vorverstärker Ein/Aus: Wenn Ihr Receiver oder Verstärker
keine Phono-Eingänge hat, schalten Sie den Vorverstärker
(ein). Wenn das von Ihnen verwendete System PhonoEingänge besitzt, stellen Sie diesen Schalter auf "aus".
3. USB-Audioausgang: Schließen Sie Ihren Plattenspieler mit
dem mitgelieferten USB-Kabel an Ihren Computer an. Die USB-Verbindung sendet das Audiosignal vom
Plattenspieler an Ihren Computer. Bitte beachten Sie den Abschnitt Betrieb > Computer-Setup in diesem
Handbuch für weitere Informationen. Das eingebaute USB Interface benötigt keine eigenen Treiber.
4. Stromversorgung: Verwenden Sie den mitgelieferten Adapter, um ihn mit einer Steckdose zu verbinden.
5. Power-Taste: Drücken Sie diese Taste, um das BT100 ein-/auszuschalten.
38
10
STOP
START
7”
12”
Page 39

Betrieb
Erste Schritte
1. Verbinden Sie das mitgelieferte Netzteil mit dem
BT100 und verwenden Sie den Netzschalter, um das
BT100 einzuschalten.
2. Entfernen Sie den Nadelschutz vom Tonabnehmer.
WICHTIG: Legen Sie die mitgelieferte FilzSlipmat auf den Plattenteller. Anschließend
legen Sie Ihre Platte auf die Slipmat, um einen
sicheren Sitz zu gewährleisten.
3. Legen Sie die Slipmat auf den Plattenteller und eine
Schallplatte auf die Slipmat. Wenn Sie 45 RPMPlatten abspielen möchten, setzen Sie zuerst den 45
RPM-Adapter auf die Spindel, bevor Sie die Platte
WICHTIG: Entfernen Sie die Plastikabdeckung
des Tonabnehmers (Nadelabdeckung) bevor
Sie den Plattenspieler verwenden.
auf den Teller legen.
4. Verwenden Sie den 33/45 RPM-Schalter, um das Tempo des Plattentellers (33/45) auf das
Plattenformat einzustellen.
5. Stellen Sie den 7"/12"-Schalter je nach Größe der aufgelegten Schallplatte ein.
6. Drücken Sie die Start-Taste, damit das Gerät den Tonarm automatisch aufsetzt.
7. Wenn eine Platte das Ende erreicht oder während der Wiedergabe Stopp gedrückt wird, hebt sich
der Tonarm automatisch und schwenkt zurück in die Ruheposition.
Den BT100 mit einem Bluetooth-Lautsprecher koppeln
Der BT100 hat einen Bluetooth-Sender, um Audiosignale drahtlos an einen Bluetooth-Lautsprecher zu
senden.
1. Schalten Sie Ihren Bluetooth-Lautsprecher ein, um sicherzustellen, dass er sich im Koppel-Modus
befindet.
2. Schalten Sie den BT100 Plattenspieler ein.
3. Drücken Sie kurz auf die Bluetooth-Taste am BT100, um eine Verbindung zu Ihrem Bluetooth-Gerät
herzustellen. Sobald der BT100 mit einem Bluetooth-Lautsprecher verbunden ist, wird die BluetoothLED durchgehend blau leuchten. Auch Ihr Bluetooth-Lautsprecher sollte anzeigen, dass er gekoppelt
wurde.
Hinweis: Ihr BT100 wird mit dem nächstgelegenen Bluetooth-Lautsprecher gekoppelt. Wenn nach 5
Minuten kein Bluetooth-Lautsprecher für eine Verbindung gefunden werden kann, wird der BluetoothSender inaktiv und die LED erlischt.
Hinweis: Die maximale Reichweite wird erzielt, wenn Sie Geräte mit Bluetooth 4.0 oder höher
verwenden.
4. Spielen Sie Musik auf Ihrem BT100 Plattenspieler. Wenn Sie mit einem Bluetooth-Lautsprecher mit
einer Wiedergabe-/Pause-Taste verbunden sind und keinen Ton hören, drücken Sie die Wiedergabe/Pause-Taste.
5. Stellen Sie die Lautstärke auf Ihrem Bluetooth-Lautsprecher (falls vorhanden) ein oder verwenden Sie
den Lautstärkeregler am BT100, um den Ausgangspegel anzupassen.
6.
Um die Verbindung zu trennen, drücken Sie die Bluetooth-Taste am BT100 oder schalten die BluetoothVerbindung auf Ihrem Bluetooth-Lautsprecher aus.
Hinweis: Bringen Sie andere Bluetooth-Empfänger/-Lautsprecher außer Reichweite des BT100 (mindestens
30’) oder schalten Sie sie ab, um eine Verbindung mit Ihrem Bluetooth-Lautsprecher herzustellen.
39
Page 40

Aufnahme
Um Musik mit Ihrem Computer aufzunehmen, können Sie EZ Vinyl/Tape Converter und ein USB-Kabel
verwenden. EZ Vinyl/Tape Converter speichert Ihre Aufnahmen auf Ihrem Computer. Nachdem Sie Ihre
Schallplatten konvertiert haben, können Sie sie auf CD brennen oder auf tragbare Mediengeräte laden.
Verwenden Sie die mitgelieferte Software-Download-Karte zum Herunterladen und Installieren der Software
und folgen Sie den Anweisungen auf dem Bildschirm. Vor der eigentlichen Aufnahme lesen Sie bitte
Computer Setup > BT100 als Standardaufnahmegerät einstellen.
1. Wenn Sie EZ Vinyl/Tape Converter auf Ihrem Computer installiert haben, verwenden Sie das
mitgelieferte USB-Kabel, um den USB-Audioausgang des BT100 mit einem freien USB-Port Ihres
Computers zu verbinden.
2. Um EZ Vinyl/Tape Converter auf Ihrem Computer zu öffnen, wählen Sie Startmenü Alle
Programme (Windows) oder das Anwendungen-Menü (Mac).
3. Befolgen Sie die Anweisungen auf dem Bildschirm, um Ihre Aufnahme vorzubereiten. Wenn Sie
aufgefordert werden, Ihre Musik zu spielen, bringen Sie den Tonarm des BT100 über die Platte und
starten die Wiedergabe.
Hinweis: Um sich eine Platte während der Wiedergabe anzuhören, können Sie die Lautsprecher Ihres
Computers verwenden oder die Cinch-Ausgänge des BT100 an eine Stereoanlage oder
Aktivlautsprecher anschließen.
4. Wenn Sie die Aufnahme beendet haben, heben Sie den Tonarm von der Platte und setzen ihn zurück
in den Arm-Clip.
Wiedergabe
Sie können die Musik auf Ihrem Computer über seine internen Lautsprecher oder über die angeschlossen
Kopfhörer hören. (BT100 kann nicht als Abspielgerät für Audiodaten Ihres Computers verwendet werden.)
Siehe Computer Setup > Einrichten Ihrer Computer-Soundkarte als Standardwiedergabegerät bevor
Sie Ihre Musik am Computer wiedergeben.
Um sich eine Platte während der Wiedergabe anzuhören, können Sie die Lautsprecher Ihres Computers
verwenden oder die Cinch-Ausgänge des BT100 an eine Stereoanlage oder Aktivlautsprecher anschließen.
40
Page 41

Computer-Setup
BT100 als Standard-Aufnahmegerät einstellen
• Windows XP: Klicken Sie auf Startmenü Systemsteuerung (oder Einstellungen Systemsteuerung in der
klassischen Ansicht) Sound und Audiogeräte. Klicken Sie auf die Registerkarte Audio unter Aufnahme und
wählen USB Audio Codec als Standard-Gerät aus. Wählen Sie Eigenschaften aus und klicken Sie auf die
Registerkarte Erweitert, um das Standardformat 44100 Hz oder 48000 Hz auszuwählen.
• Windows Vista: Klicken Sie auf Startmenü Systemsteuerung (oder Einstellungen Systemsteuerung in
der klassischen Ansicht) Hardware und Sound Ton. Klicken Sie auf die Registerkarte Aufnahme und
wählen Sie USB Audio Codec als Standard-Gerät aus. Wählen Sie Eigenschaften aus und klicken Sie auf die
Registerkarte Erweitert, um das Standardformat 44100 Hz oder 48000 Hz auszuwählen.
• Windows 7: Wählen Sie Startmenü Systemsteuerung Ton. Klicken Sie auf die Registerkarte Aufnahme
und wählen Sie USB Audio Codec als Standard-Gerät aus. Wählen Sie Eigenschaften aus und klicken Sie auf
die Registerkarte Erweitert, um das Standardformat 44100 Hz oder 48000 Hz auszuwählen.
• Windows 8: Klicken Sie im Startmenü auf die linke untere Ecke des Bildschirms, um zum Desktop zu
gelangen. Klicken Sie in der rechten unteren Ecke der Taskleiste auf das "Lautsprechersymbol". Klicken Sie mit
der rechten Maustaste auf den Lautsprecher und wählen Wiedergabegeräte. In der WindowsSystemsteuerung für Sound wählen Sie die Registerkarte Aufnahme. Wenn neben USB Audio Codec kein
grünes "Häkchen"-Symbol angezeigt wird, klicken Sie mit der rechten Maustaste auf das Gerät und wählen "Als
Standardgerät festlegen". Wählen Sie Eigenschaften aus und klicken Sie auf die Registerkarte Erweitert, um
das Standardformat 44100 Hz oder 48000 Hz auszuwählen.
• Windows 10: Klicken Sie auf Startmenü Systemsteuerung (oder Einstellungen Systemsteuerung in der
klassischen Ansicht) Hardware und Sound Ton. In der Windows-Systemsteuerung für Sound wählen Sie
die Registerkarte Aufnahme. Wenn neben USB Audio Codec kein grünes "Häkchen"-Symbol angezeigt wird,
klicken Sie mit der rechten Maustaste auf das Gerät und wählen "Als Standardgerät festlegen". Wählen Sie
Eigenschaften aus und klicken Sie auf die Registerkarte Erweitert, um das Standardformat 44100 Hz oder
48000 Hz auszuwählen.
• Mac OS X 10.4-10.11: Klicken Sie auf das obere linke "Apfel"-Symbol und klicken dann auf
Systemeinstellungen Ton. Klicken Sie auf die Registerkarte Input. Aus dem Menü wählen Sie USB Audio
Codec als Gerät. Unter Format wählen Sie 44100,0 Hz oder 48000,0 Hz.
Einrichten Ihrer Computer-Soundkarte als Standardwiedergabegerät
• Windows XP: Klicken Sie auf Startmenü Systemsteuerung (oder Einstellungen Systemsteuerung in der
klassischen Ansicht) Sound und Audiogeräte. Klicken Sie auf die Registerkarte Audio und wählen unter
Soundwiedergabe Ihre Computer-Soundkarte als Standardgerät.
• Windows Vista: Klicken Sie auf Startmenü Systemsteuerung (oder Einstellungen Systemsteuerung in
der klassischen Ansicht) Hardware und Sound Ton. Klicken Sie auf die Registerkarte Wiedergabe und
wählen Ihre Computer-Soundkarte als Standardgerät.
• Windows 7: Wählen Sie Startmenü Systemsteuerung Ton. Klicken Sie auf die Registerkarte
Wiedergabe und wählen Ihre Computer-Soundkarte als Standardgerät.
• Windows 8: Klicken Sie im Startmenü auf die linke untere Ecke des Bildschirms, um zum Desktop zu
gelangen. Klicken Sie in der rechten unteren Ecke der Taskleiste auf das "Lautsprechersymbol". Klicken Sie mit
der rechten Maustaste auf den Lautsprecher und wählen Wiedergabegeräte. Die Windows-Systemsteuerung
für Sound sollte nun unter der Registerkarte Wiedergabe aufscheinen. Wenn neben der Soundkarte Ihres
Computers kein grünes "Häkchen"-Symbol aufscheint, klicken Sie mit der rechten Maustaste auf die
Soundkarte und wählen "Als Standardgerät festlegen".
• Windows 10: Wählen Sie Startmenü Systemsteuerung Ton. Klicken Sie auf die Registerkarte
Wiedergabe und wählen Ihre Computer-Soundkarte als Standardgerät.
• Mac OS X 10.4-10.11: Klicken Sie auf das obere linke "Apfel"-Symbol und klicken dann auf
Systemeinstellungen Ton. Klicken Sie auf die Registerkarte Ausgabe. Aus diesem Menü wählen Sie
Interne Lautsprecher, wenn Sie die internen Lautsprecher des Computers verwenden oder Kopfhörer, wenn
Sie Lautsprecher oder Kopfhörer verwenden, die an den 1/8"-Kopfhörerausgang des Computers
angeschlossen sind.
41
Page 42

Fehlerbehebung
Wenn Sie irgendwelche Schwierigkeiten haben, lesen Sie die folgenden Schritte zur Fehlerbehebung.
Der Plattenspieler ist eingeschaltet, aber der Motor läuft nicht:
Wenn Sie auf einen Computer aufnehmen:
Ich kann bei der Musikwiedergabe nichts hören:
• Wenn Sie eine Vinylplatte abspielen:
• Wenn Sie Musik von Ihrem Computer spielen:
Wenn ich den Plattenspieler verwende, höre ich ein Summen durch meine Lautsprecher oder meinen Laptop:
• Wenn Sie mit einem Laptop aufnehmen:
• Wenn Sie über einen Lautsprecher spielen:
Meine Schallplatte wird nicht mit der richtigen Geschwindigkeit wiedergegeben. Die Tonlage ist zu hoch oder zu tief:
Der gewünschte Bluetooth-Lautsprecher kann keine Verbindung zum BT100 herstellen.
Der gewünschte Bluetooth-Lautsprecher kann keine Verbindung zum BT100 herstellen.
Mein Smartphone kann keine Verbindung zum BT100 Plattenspieler herstellen.
Die Bluetooth-LED wird kontinuierlich blinken.
o Stellen Sie sicher, dass der Plattentellerriemen korrekt unter dem Plattenteller montiert ist. Siehe Setup >
Anbringen des Plattenspielerriemens für weitere Informationen.
o Stellen Sie sicher, dass das BT100 eingeschaltet und die Nadel auf der Schallplatte ist.
o Stellen Sie sicher, dass das BT100 als Standardaufnahmegerät des Computers ausgewählt ist.
o Wenn Sie die Musik über die Lautsprecher Ihres Computers hören möchten, stellen Sie sicher, dass diese
Lautsprecher als Standard-Wiedergabegerät des Computers ausgewählt sind. Alternativ können Sie die CinchAusgänge des BT100 mit einer Stereoanlage oder Aktivlautsprechern verbinden.
(Hinweis: Die Cinch-Ausgänge überwachen das Signal vom Plattenspieler, nicht das Signal Ihres Computers.)
o Stecken Sie auch das USB-Kabel, das das BT100 mit Ihrem Computer verbindet, zuerst ab und anschließend
wieder ein.
o Stellen Sie sicher, dass das BT100 eingeschaltet und die Nadel auf der Schallplatte ist.
o Verbinden Sie die Cinch-Ausgänge des BT100 mit einer Stereoanlage oder mit Aktivlautsprechern.
o Achten Sie darauf, dass die Lautstärke Ihres Musik-Players aufgedreht ist.
o Stellen Sie sicher, dass die Lautstärke Ihres Computers aufgedreht ist.
o Achten Sie darauf, dass die Lautsprecher Ihres Computers als Standardwiedergabegerät des Computers
ausgewählt sind.
(BT100 kann nicht als Abspielgerät für Audio Ihres Computers verwendet werden.)
o Bitte verbinden Sie den Laptop an eine geerdete Stromquelle (3 polig).
o Bitte verbinden Sie diese mit einer geerdeten (3 poligen) Stromquelle.
o Stellen Sie sicher, dass der 33/45-Schalter für diese Schallplatte auf die entsprechende Geschwindigkeit
eingestellt ist.
o Schalten Sie in der Nähe befindliche Bluetooth-Lautsprecher aus oder verschieben Sie andere Bluetooth-
Lautsprecher mehr als 30’, so dass nur der gewünschte nächste Bluetooth-Lautsprecher gekoppelt wird.
o Wenn Sie mit einem Bluetooth-Lautsprecher mit einer Wiedergabe-/Pause-Taste verbunden sind und keinen Ton
hören, drücken Sie die Wiedergabe-/Pause-Taste.
o Drücken Sie kurz auf die Bluetooth-Taste des BT100, um das Gerät vom Bluetooth-Lautsprecher zu trennen.
Drücken Sie erneut auf diese Taste, um nocheinmal zu versuchen, eine Verbindung herzustellen.
o Schalten das BT100 aus und wieder ein. Drücken Sie anschließend die Bluetooth-Taste, um erneut zu
versuchen, eine Verbindung herzustellen.
o Der BT100 Plattenspieler agiert als Bluetooth-Sender und sendet die Audiosignale vom BT100 an andere
Bluetooth-Lautsprecher. Der BT100 Plattenspieler kann nicht als Bluetooth-Empfänger agieren und Musik von
Ihrem Smartphone über Kopfhörer oder Cinch-Ausgänge abspielen.
o Sobald die Bluetooth-Taste gedrückt wird, wird BT100 versuchen mit den nächstgelegenen Bluetooth-
Lautsprechern innerhalb von 5 Minuten eine Verbindung herzustellen. Um die blinkende Bluetooth-LED zu
stoppen, schalten Sie BT100 aus und wieder ein.
42
Page 43

Appendix (English)
Technical Specifications
Turntable Type Belt-driven
Motor Type Isolated DC motor
Speeds
S/N Ratio 64 dB (A-weighted, 20 kHz, LPF)
Output Level 2.4 mV (preamp off); 149 mV (preamp on)
Phono Preamp Gain 34 dB nominal, RIAA-equalized
Preamp
Wow and Flutter
USB Function
Replacement Stylus
Power
Output Connections
Dimensions
(width x depth x height)
Weight
Specifications are subject to change without notice.
Trademarks and Licenses
Akai Professional is a trademark of inMusic Brands, Inc., registered in the U.S. and other countries.
Pro-Linear is a trademark of Pro-Linear Electronics, Inc.
The Bluetooth word mark and logos are registered trademarks owned by Bluetooth SIG, Inc. and any use of
such marks by Akai Professional is under license.
Mac and OS X are trademarks of Apple Inc., registered in the U.S. and other countries.
Windows is a registered trademark of Microsoft Corporation in the United States and other countries.
All other product or company names are trademarks or registered trademarks of their respective owners.
33⅓ / 45 RPM
Switchable
< 0.25% (weighted) @ 3 kHz (JIS)
44.1–48 kHz (user-selectable), 16-bit; USB 1.1
Pro-Linear CR2500
12V DC, 500mA
RCA jacks
16.5” x 4.6” x 14.1”
420 x 117 x 357 mm
6.2 lbs.
2.8 kg
43
Page 44

Manual Version 1.0
 Loading...