

Page 1
English
Page 2

Table of Contents
1. Accessories ------------------------------------------------------------------------1
2. Introduction--------------------------------------------------------------------------2
3. Working Principle---------------------------------------------------------------- 3
4. Technical Specification----------------------------------------------------------4
5. Structure----------------------------------------------------------------------------5
6. Operation---------------------------------------------------------------------------6
7. Maintenance----------------------------------------------------------------------15
8. Trouble Shooting----------------------------------------------------------------18
9. Safety Cautions-----------------------------------------------------------------19
10. Special Guide Line--------------------------------------------------------------20
11. After Sale Service---------------------------------------------------------------21
12. Electric Circuit Drawing--------------------------------------------------------22
Notice: Any maintenance should be returned to the dealer or factory!
Attention: Please read this instruction carefully before use.
Page 3

Accessories
1 inner air exhaust adaptor -------------------------------------------------------1 pc
2 air exhaust duct ---------------------------------------------- --------------------1 pc
3 adaptor ------------------------------------------------------------------------------1 pc
4 mounting duct ---------------------------------------------------------------------1 pc
5 window kit --------------------------------------------------------------------------1 pc
6 cap cover ---------------------------------------------------------------------------1 pc
7 remote controller -----------------------------------------------------------------1 pc
8 instruction manual ---------------------------------------------------------------1 pc
9 water plate ----------------------------------------------------------------------- 1 pc
-1-
Page 4

Introduction
This mobile air conditioner is a new generation air conditioner which is
ideal for using in bedroom, study room, lobby, office, meeting room, warehouse
attics, sports hall and other entertainment room. Its flexibility characteristic enables
easy adjustments to desirable room temperature and humidity. Besides, the built-in
filter can remove floating dust, purify air to create a healthy working environment.
It is designed under ”novelty, practicality and convenience” principles to
satisfy the needs for convenient, efficient and mobile small size air conditioner. The
part makes the cooling special obvious. It features easy using, no need for
installation and convenient maintenance.
The unit is highly competitive to other cooler capable products. With tidy structure,
multiple functions and reasonable ventilation design, the unit minimizes noise and
power consumption.
Thank you for choosing our mobile air conditioner.
This instruction manual is for reference only and does not constitute a contract.
We reserve the right to technical change without prior notice
-2-
Page 5

Working Principle
Refrigerant with low temperature and low pressure is compressed by the
compressor to high temperature and high pressure vapour, then cools in the
condenser (This is a forced air cooling process: room air passes condenser surface,
absorbs the refrigerant's heat in the condenser by heat exchange, then the room air
warms up and the warm air is exhausted through the air exhaust duct,) to become
high pressure liquid. The liquid flows through capillary tube to lower its pressure to
become low temperature low pressure liquid. After absorbing the heat of air in the
surface of evaporator (A forced air cooling process too: room air passes evaporator
surface, its heat is absorbed by refrigerant in tube, it cools down and flows into room
to lower the room temperature). The low temperature low pressure liquid is
evaporated in the evaporator. The refrigerant becomes vapour and flows back to
compressor. Then the refrigerant vapour is compressed in compressor again. Thus
the room temperature is lowered by circulating this operation.
compressor
fan motor
cool air
(heating)
upper fan
lower fan
motor
condenser
evaporator
air flow1
capillary
tube
hot air
lower fan
air flow2(air inflow from back)
-3-
Page 6

Unit specifications:
Cooling Capacity ( Btu / h ) 12000
Dehumidifying Capacity ( L / day ) 24
Power consumption( W ) 1200
Flow Volume (m3 / h )
Sound pressure level dB(A) ≤55
Net Weight ( Kg ) 33
Technical Specification
Model AC-ZP112
480
Dimension
Body ( mm ) 738*446*377
Package ( mm ) 860*460*450
Refrigerant R407C
Note:
1. The above cooling capacity measured at ambient temperature Db 27°C/19°C
Wb 27°C/19°C. (indoor and outdoor , the same)
Db means Dry Bulb ( that is testing in dry environment)
Wb means Wet Bulb ( that is testing in wet environment)
2. Noise level is measured at the point where 1.0 meter away from the front of the
machine. In cooling mode.
3. Air exhaust duct tore down, pump work, fan power consumption is measured
when fan runs at highest speed.
4. Specification listed above is for reference only. Please see actual data printed on
the label.
-4-
Page 7
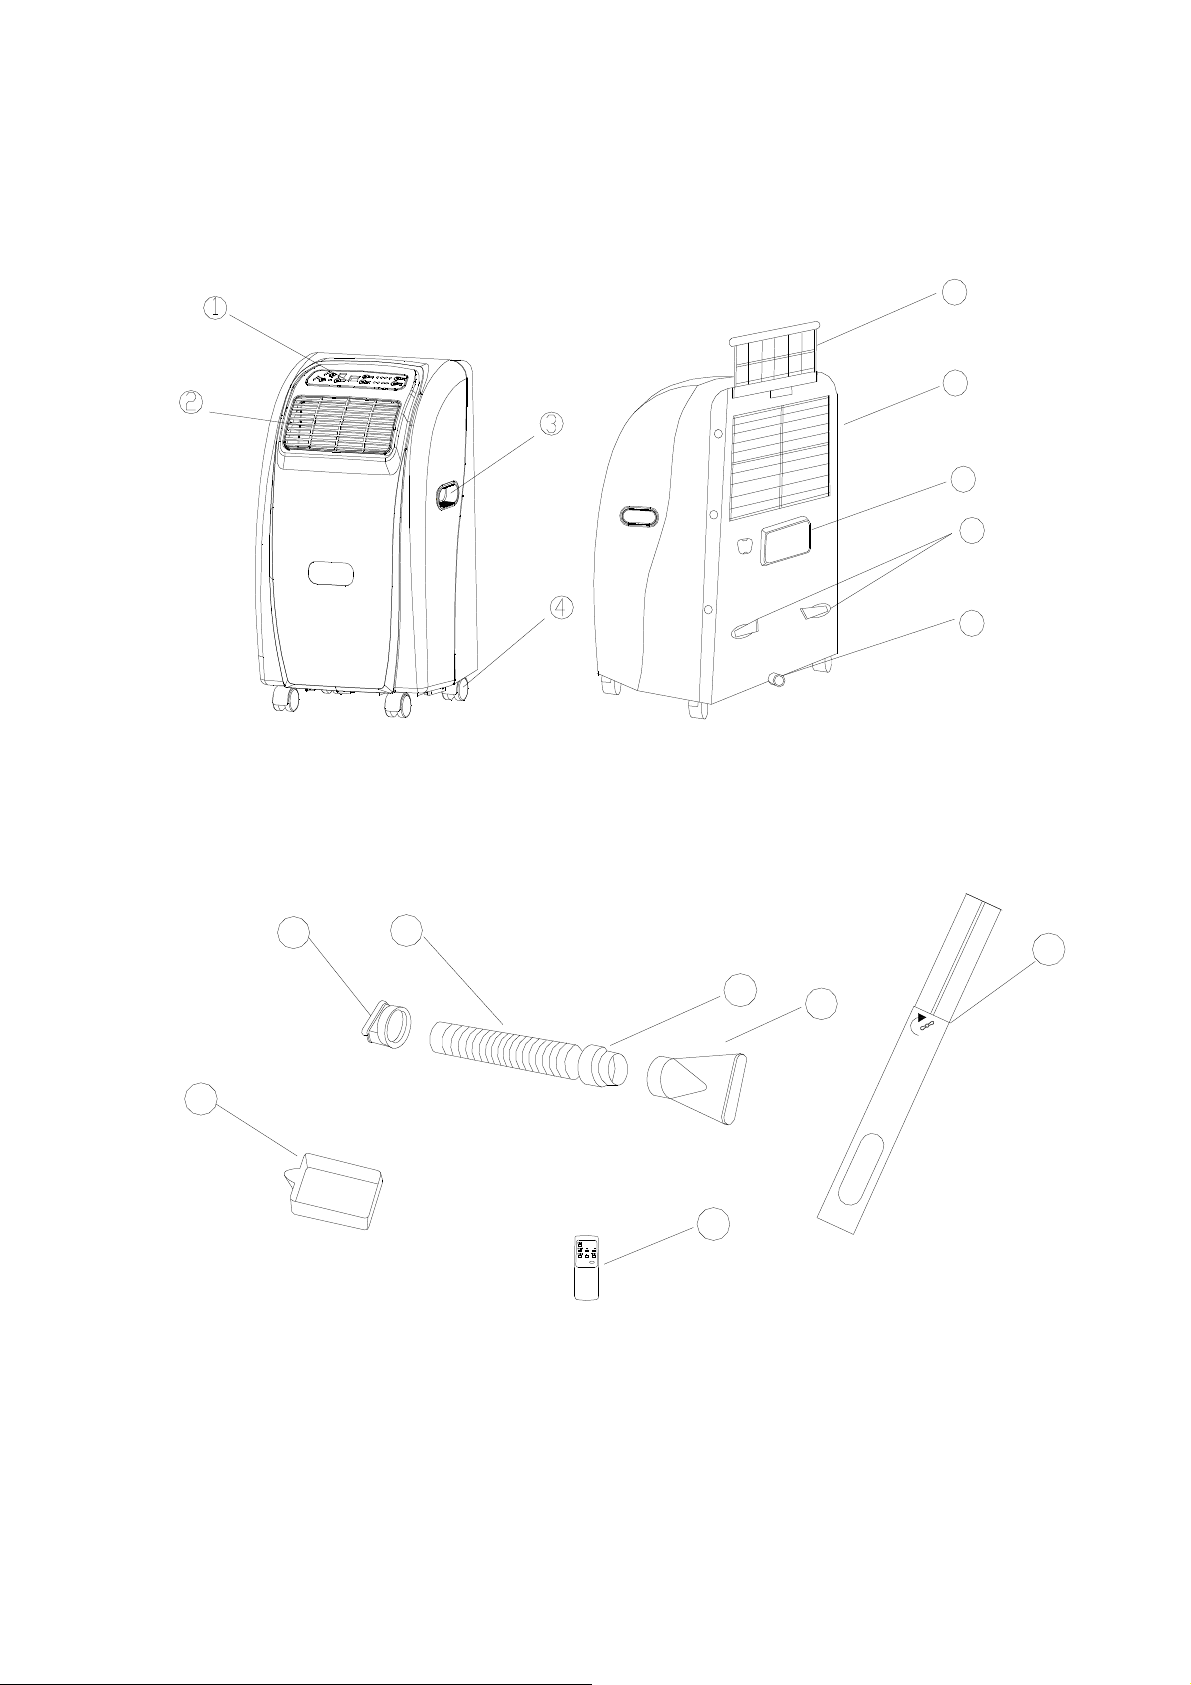
Structure
1. Control panel 2. Air outlet 3. Handle 4. Caster 5. Air filter
6. Air inlet 7. Exhaust air outlet 8. Cord Hanger 9. Water stopper
5
6
7
8
9
10. Inner air exhaust adaptor-connect with air exhaust duct (11) and exhaust air
outlet (7) 11. Air exhaust duct 12. Adaptor 13. Mounting Duct 14. Window
kit 15. Water plate 16. Remote controller
10
15
11
14
12
/°
℃
ON/OFF
16
13
-5-
Page 8

Operation
1. Control panel
2 5 3
AC-ZP112
1
7
2.On/Off switch button
Press On/Off button once the power is on, the unit will run at auto mode.
6
Press On/Off button while the unit is running, the unit stops, and timer
setting is canceled, other information (mode, set temp, and fan speed)
remain in the machine.
3. Mode button
Press Mode button, unit run mode will change at sequence of: AUTO, COOL,,
DEHUMIDIFY and To should of the LED light is bright.
4. FAN SPEED button
Press SPEED button, unit run mode will change in sequence of: HIGH, MID, LOW
and to should of the LED light is bright.
5. TEMP UP, DOWN button
Press TEMP button to adjust desired room temperature and it will display
in LED window correspondingly, the temperature adjustment range is 15°C--31°C
(60-90°F). When unit is setting at AUTO running mode, the default cooling
temperature is 23°C(68°F).
Press the TEMP UP、DOWN button at the same time,the temperature display will
be shown between °C and °F.
6. TIMER button
TIMER OFF:
When unit under running mode, press timer button to set desire OFF time,
time set from 0.5 hour to 12 hours, the timer setting will display in LED window
correspondingly
TIMER ON:
When unit is ready, press TIMER button to set desire ON time, time set
from 0.5 hour to 12 hours, the timer setting will display in LED window
correspondingly
7. SWING button
When unit under running mode, press swing button to auto adjust a right and left
direction of wind.
-6-
4
Page 9

Operation
Remote control::::
Please point the controller transmission section to the signal receiver
on the unit panel. Indicator lights on the machine control panel can display AUTO,
COOLING, FAN, DEHUMIDIFYING, SPEED, TEMPERATURE, TIMER etc
information.
Mode Button:
Pre ss once w ill
change th e unit run
mode.
Fan speed B utton:
Pre ss once can
cha nge fanspeed at
seq uence of Low ,M id
and High speed.
Swin g Button:
Ipress swin g button to
auto adjust a rig ht and left
dire ction of w ind
Temp Button:
Pres s this button "+" once
setting room te m perature
℃
℃
.
.
will incre ase 1
Pres s this button "-" once
setting room te m perature
will de c rease 1
MODE
SP EED
SW ING
+
_
O N / O F F
/ °
℃
TIMER
F
/ °
℃
F B u tto n
Every time p res s this
botton, the machine
co n trol p a n el shows the
tem pera ture in
on the conversi
Tim er Button:
Unit can be auto OFF if the
unit is under ru n n ing and
the unit is rea dy.
ON/OFF Button:
Pre ss once to
start,and press
again to stop.
°
C o r F
Corrosion,oxidation,battery-leaka
ge and any other
gradually acidic defect of this
nature will invalidate the
guarantee.
Remote control (Auto mode)
The microprocessors control the compressor and fan motor on or off according
To the room temperature to keep the room comfortable.
Please notice the anode and cathode while mounting the batteries.
MO DE
2.Press M ODE
butto n to cho ose
AU TO m od e.
SP EED
SW ING
/ °
℃
+
_
F
TIM ER
1.M ou nt batterie s
and press
ON/O FF,the system
starts to run.
-7-
Page 10

Operation
Remote control (cooling mode)
Setting temperature range 15°C—31°C(60-90°F).
When the room temperature sensor’s temperature is higher than the set
temperature, the compressor starts to run.
When the room temperature sensor’s temperature is lower than the set
temperature, the compressor stops and fan operates at original speed.
1. Press O N/O FF
button, the sys tem
starts to ru n.
2.P ress Tem p
button to set the
desired room tem p.
3.P ress M OD E
button, choose
cooling m ode.
4. Press SP EE D
button, set fan
speed.
Remote control (Fan mode)
2. P ress M ODE bu tto n,
choo se Fan mo de .
MO DE
SP EE D
SW IN G
MO DE
SP EE D
SW ING
+
_
+
/ °
℃
TIM ER
/ °
℃
F
_
TIM ER
F
1. P ress ON /O FF
button,
the system starts to ru n.
3. P ress Speed button,
choo se desire fan spe ed .
Fan mode: the compressor and lower fan motor stop, upper fan run at set
speed, in this case, temperature setting becomes invalid.
-8-
Page 11

Operation
Remote control (dehumidifying mode)
Dehumidifying mode: the compressor and lower fan are running and the upper fan
is running at low speed.
MO DE
2.Press M ODE
button to choo se
DE HU MIDIFYING
m od e.
1.Mount batteries
and press
ON/O FF,the
system starts to
run.
SP EE D
SW IN G
/ °
℃
+
_
F
TIM ER
Remote control (Timer)
MO DE
SPE ED
SW ING
℃
+
_
TIM ER
1. While the unit is under running, press
/ °
F
Timer button to set unit auto OFF time.
2. Press Timer button once, set auto
OFF time will change 0.5 hour from
0.5 hour to 12 hours.
3. When set auto OFF
time at 12 hours, pressTim er button once
more, set O FF time will be canceld.
4. When the unit is not under running,
press Timer b utton to set auto ON tim e.
5. press timer button once, set auto OFF timer will change 0.5 hour to
12 hours
6. when set auto ON timer at 12 hours, press timer button once more, set
ON time will be canceled.
The unit must connect with power supply to start to set auto ON.
-9-
Page 12

Battery Operation
Please notice the anode and cathode while mounting the batteries.
We suggest using alkaline batteries.
If the battery is to be replaced or thrown away, the batteries must
be removed and dispose of in accordance with the current laws as it
represents an environmental hazard.
Remote control inserting the batteries
1. slide the cover as shown in figure.
2. insert two new non-rechargeable batteries, being careful to place
them in the correct position(+) and (-).
3. put the cover back on, letting it slide into its original position.
4. the display will show all of the remote control’s symbols for
several seconds.
The operation of Air exhaust duct assembling
2
Air exhau st du ct
Inn er air exh au st ad aptor
1
3
4
Adaptor
M ounti n g duct
5
-10-
Page 13

Operation
Air exhaust duct
The unit is called mobile air conditioner, it is movable from one room to
another conveniently. You can use the following method to exhaust the
hot air.
1. exhaust heat from window (see figure A)
Open window for a small angle to put bend mounting duct and fit it on the
window.
m
c
0
≥
5
≥
A
≥
5
0
c
m
m
c
0
5
≥
B
2. exhaust hot air from the door (see figure B)
Open door to an appropriate angle to fit air exhaust duct outside. For the wide open
using, air exhaust duct can put on ground directly. When not
Using the unit, unassembled air exhaust duct from unit and store it carefully
-11-
Page 14
Operation
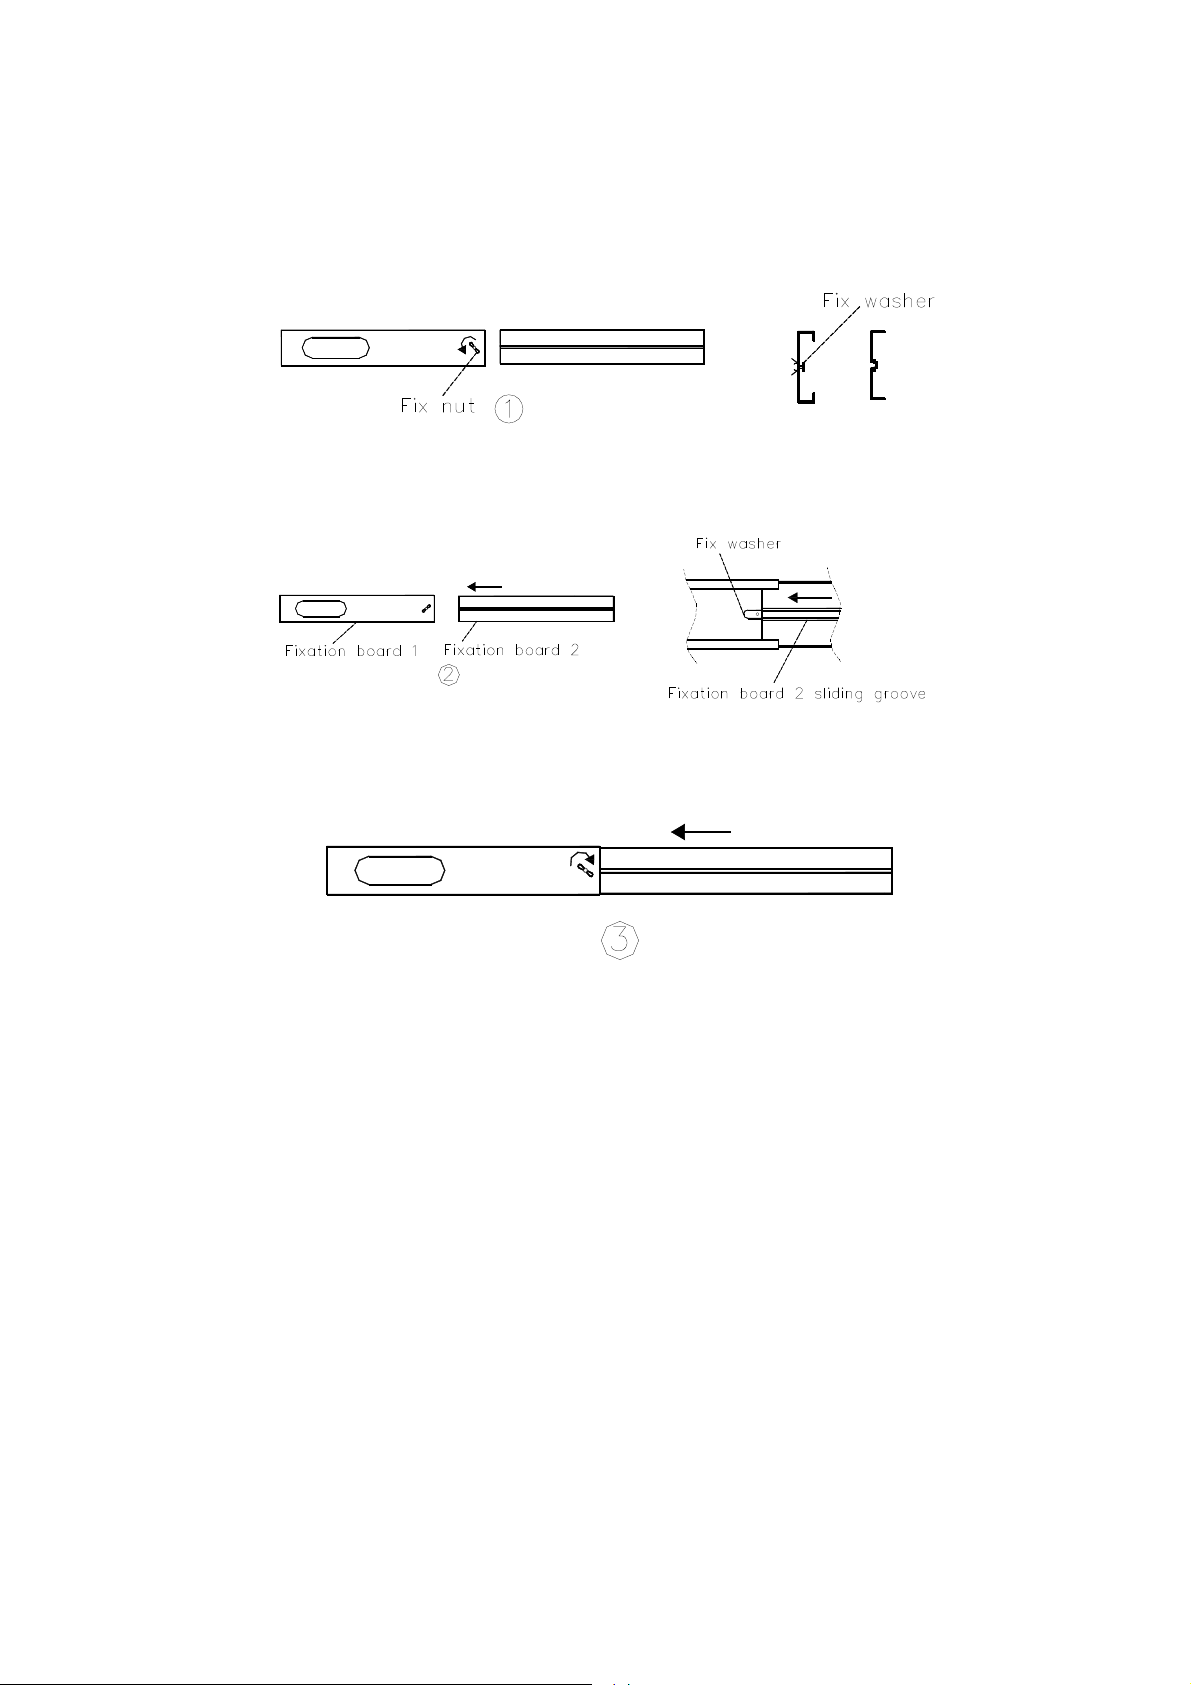
Window kit installation(Take the example with three parts of tracks.)
1. Loose nut anti clockwise and unscrew such as Fig 1.
2. adjust the washer on board 1 at the sliding groove on board 2, and then insert the
fixation board 2 in the fixation board 1 such as fig.2
3. adjust according to own window size and fix nut on the fixation board 1
clockwise such as fig.3
-12-
Page 15

Operation
Window kit installation
Your window kit has been designed to fit most standard “vertical” and
“Horizontal” window applications. However, it may be necessary for you
to improve/modify some aspects of the installation procedures for certain
types of window.(Take the example with three parts of tracks.)
Please refer to see the figures for minimum and maximum window openings.
Per pen dicu la r
win d ow
Wi nd ow S lid er K it
M in im u m :58c m
M ax im u m:1 62c m
H orizon ta l
win d ow
Wi nd ow S li der K it
M in im u m :58c m
M ax im u m :16 2cm
m
c
0
5
≥
≥
5
0
c
m
m
c
0
5
≥
≥
5
0
c
m
-13-
Page 16

Operation
Air exhaust duct connection
1. air exhaust duct can be extended from 0.5 to 1.5 meters, the unit
works more efficiently while the air exhaust duct is shorter.
2. please make sure the air exhaust duct is not distorted, or flow back
the hot air to increase the temperature of the body. If so, the unit will
stop running automatically
3. please make sure not to use other type of air exhaust duct, or over extend
the exhaust duct. Otherwise the unit working efficiency will decrease.
-14-
Page 17

Maintenance
Turn off the unit before cleaning, make sure all sockets are pulled out.
Do not use chemical solvent (like benzene) to clean the unit surface, or the
unit surface will be easily scratched, damaged, even casing could be deformed. If
the air filter is blocked with dust, the airflow volume will decrease. It is better to clean
the filter for every two months
Open the air filter
Take out the air filter cover from back air inflow vent.
Air Filter
Clean:
Wash the air filter gently with warm water, with a neutral detergent, and dry it
thoroughly in a shaped place.
Mounting:
Insert the air filter cover into air flow vent
Clean the unit surface by using little damp soft cloth, then dry it with a duster.
-15-
Page 18

Maintenance
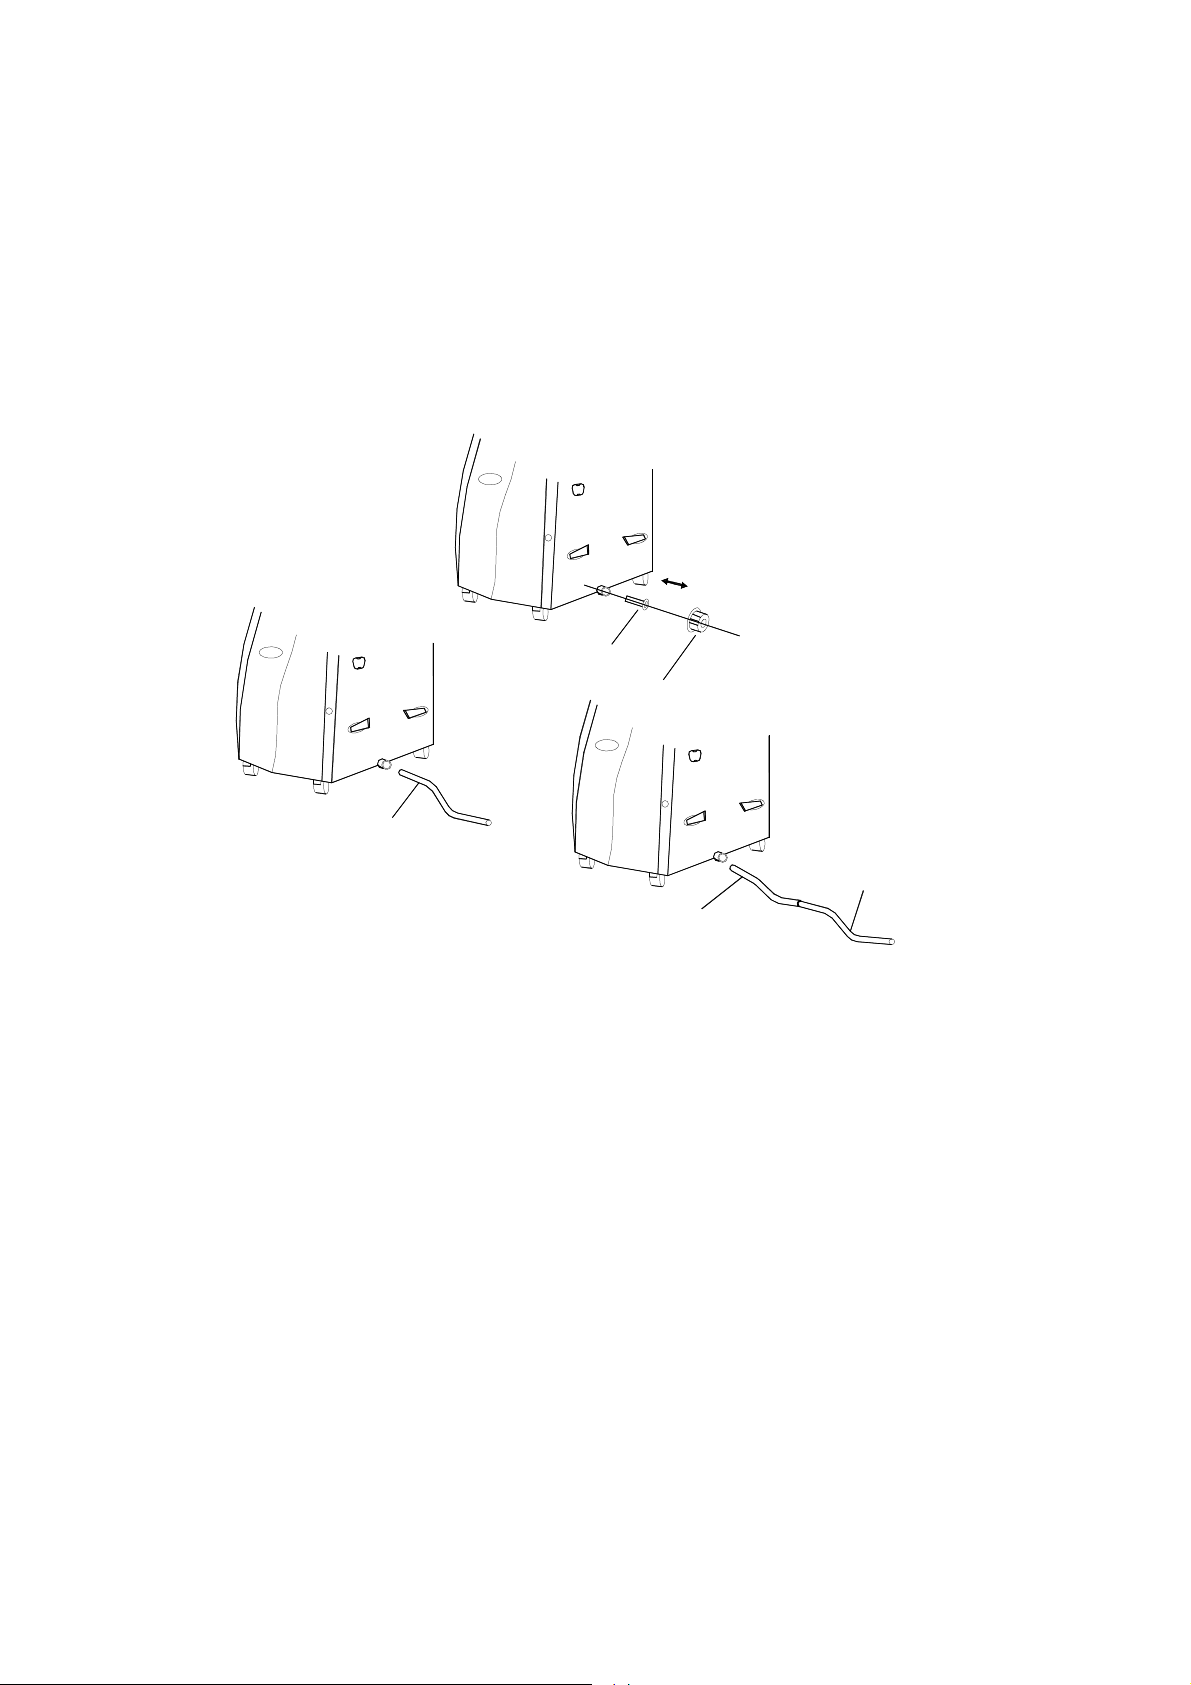
Drainage:
When unit running in cooling mode, mostly the water can be drained out through the
exhausted hose, however, if the environment is too humid, condensed water can not
completely be drained out by this way. In this case, we need to drain the water.
While water tray is full, error code “E4” will appear in display, meanwhile, the cooling
mode will stop running automatically, and fan will stop in 3 minutes accordingly as
well. If want to start cooling mode, please use the following way to empty the water
Drainage Hole
Water Plate
Rubber Plu g
Drainage K nob
A. water plate drainage
1. turn off the unit
2. horizontally place water plate underneath drainage hole;
3. disconnect drainpipe through drainage knob and rubber plug, water will
Automatically flow out;
4. when the water is empty, push rubber plug back to the drainage hole;
5. connect drainage pipe by spinning the knob;
6. restart the unit
Normally it is no need to drain the water because the unit has the water pump to
pump the condensed water from the water tray onto the condenser to evaporate the
water unless the air is too humid.
-16-
Page 19
Maintenance
B.Connect drainage
1. disconnect drainage knob and the rubber plug;
2. connect supplied drainage pipe to drainage hole, water will flow out
automatically;
3. if you want to extend drainage pipe, you can use 18mm(diameter)
plastic pipe and connect with the drainage pipe.
Ru b ber Plu g
D r ainage Kn ob
D rainage P i pe
D rainage P i pe
E xten d D r ainage Pi p e
(Di ameter :18 m m )
Important notice
1. in order to extend the life of the product, please drain all the condensed
water while not use the unit for some time;
2. the unit adapts auto drainage system; please pay attention the signals on
display when the air is too humid. (above 90% humidity)
-17-
Page 20

Trouble shooting
Before asking for repair, please check:
PROBLEMS CAUSES SUGGEST SOLUTIONS
The unit does not
work
The unit stop running
automatically
In cooling mode, no
cool air coming out;
Error code "E1" in
LED window
Error code "E2" in
LED window
Error code "E3" in
LED window
Power supply fault:
1. Not plug in;
2. Bad plug or socket;
3. Fuse broken or wire
broken;
Timer is set or room
temperature is lower
than set temperature;
Room temperature is
lower than set
temperature;
Environment
temperature sensor
is broken.
temperature sensor on
the evaporator is
broken
Cooling system
malfunction caused by
the lack of refrigerant
1. Plug in correctly;
2. Change the plug or the socket;
3. Send the unit to service center to
change the fuse ;( fuse: 3.15A
250V )
Close the TIMER or wait for it to
run automatically;
Make the setting temperature lower
than the room temperature; if it still
does not work, call the local
technician for repairing
Replace the temperature sensor
Replace the sensor
Contact the local repairing
technician directly
Error code "E4" in
LED window the red
FULL light is bright
Water tray is full in the
heating mode, but the
unit is still working
-18-
Empty water in water plate
Page 21

Safety Cautions
1. Do not use unit near gas appliance, fires or in the vicinity of flammable liquids.
2. Do not let children put their fingers into the air outlet to avoid danger.
3. Do not incline the unit more than 35° while moving the unit.
4. Do not beat or extrude unit to prevent unit broken, do not vibrate the unit.
5. Keep the unit two meters away from TV sets or radios to avoid the risk of
electromagnetic interface.
6. Do not use unit with the air outlet too close to walls or cover the outlet to avoid
overheating.
7. Do not use the unit in a very crowded room.
8. Do not use the unit directly under sunshine to avoid surface color fading.
9. Do not use the unit in water or near water to avoid leakage of electricity.
10. If the supply cord is damaged, it must be replaced by the manufacturer or its
service agent or similar qualified person in order to avoid a hazard.
11. when the room temperature is higher than 25 degrees, it is better not to use the
heating function.
-19-
Page 22

Special Guide Line
1. Do not incline the unit more than 5° degree, if so, please turn off power supply
immediately and ask for advice from your local dealer.
2. Do not spray insecticide or other chemicals to avoid deformation of plastic case.
3. The unit, due to its moving feature, it can be moved from room to room and it is
different from window type or split type air conditioner. If the unit cannot cool
down the room temperature efficiently, it is not the unit’s quality problem. The unit
can only work efficiently in certain room area. ( see technical specification )
4. In order to prolong the unit’s lifetime, please empty the water completely in the
water tray at the bottom of the unit while the unit is not going to use for a long period
of time.
5. The unit can drain water automatically. It is not necessary to use the hose to drain
the water under the cooling mode because the condenser can evaporate the
water.
6. when turning “on” or “off” the unit under the heating mode, some noise of airflow
inside the unit can be heard obviously, this is not a faulty problem, no need to
repair.
-20-
Page 23

After Sale Service
When there are problems with the unit, please stop using it and ask for help from
your local dealer or service center.
Maintenance:
After running for several seasons, there will be dust covered in the air filter.
This will reduce the airflow volume and influence the cooling efficiency of the unit.
Please clean the air filter occasionally
Delete the rest message
-21-
Page 24

Electric Circuit Drawing
-22-
Page 25
Disposal of Used Electrical & Electronic Equipment
The meaning of the symbol on the product, its accessory or packaging indicates that this
product shall not be treated as household waste. Please, dispose of this equipment at your
applicable collection point for the recycling of electrical & electronic equipments waste. In
the European Union and Other European countries which there are separate collection
systems for used electrical and electronic product. By ensuring the correct disposal of this
product, you will help prevent potentially hazardous to the environment and to human
health, which could otherwise be caused by unsuitable waste handling of this product. The
recycling of materials will help conserve natural resources. Please do not therefore dispose
of your old electrical and electronic equipment with your household waste. For more
detailed information about recycling of this product, please contact your local city office,
your household waste disposal service or the shop where you purchased the product.
For more information and warranty conditions, please visit: www.akai.eu
-23-
 Loading...