


English
Table of contents
¾ Specifications ···········································································47
¾ System Requirements······························································48
¾ USB Device Unplugging Notice················································48
¾ Getting to Know Your Digital Photo Frame·······························49
¾ How to change the Frame························································50
¾ Remote Control ········································································51
¾ Playback Mode( Viewing JPEG/AVI Files)································52
Turning on the Digital Photo Frame·································52
Viewing Images······························································53
Slide show····························································· 53
Split show······························································53
Photo Rotation ······················································54
Playing Video Clips·························································54
¾ Time Mode············································································· 55
¾ MP3 Mode··············································································· 55
¾ Setup Mode············································································· 56
¾ Card Reader·············································································58
¾ Disposal of Used Electrical & Electronic Equipment·················60
46

English
Specifications
Display: 8”TFT LCD
Supports 4:3 displays
On-screen Display English,French,German,Spanish,Italian,
Language: Dutch,Poland,Czech,Hungarian,Turkish,
Russian,Swedish,Greek,Portuguese
File formats supported: JPEG (up to 26 Mega Pixels),
Pure Motion JPEG (AVI), MP3
Expansion Slot: SD/MMC/MS/CF Card slot
Speaker: Built-in Speaker and Phone Jack
Audio Format: MP3
Internal Memory: 128MB
Interface: USB2.0 High speed
Infrared: IR Remote Control
Other Functions: Slide show with various transition effects,
Photo rotation, Alarm Clock & Calendar,
USB 2.0 Host/ Device (Mass Storage
Device)
Standard Accessories: USB Cable
Adapter (100V-240V)
Instruction Manual,Stand
Remote control
Dimension: 235x195x25 mm ( W x H x D)
Weight: 610± 5g
Power Source: Input AC 100V-240V
Output DC 9V, 2A
Power consumption: 4.5W
Standby power consumption: 2.7W
47

English
Minimum System Requirements:
Pentium 166 MHz processor or higher
Microsoft Windows 2000/XP/VISTA
Available USB port
Super VGA video card and color monitor
CD-ROM or DVD-ROM drive
64 MB RAM
200MB available HD space
Mass Storage Operating System: Windows 2000, XP,VISTA
USB Device Unplugging Notice:
To unplug the Digital Photo Frame from the computer, be sure to
stop the device beforehand. To stop the Digital Photo Frame,
please follow the steps below:
Removing the Digital Photo Frame from a PC: (For Windows
2000/XP/VISTA)
1. Click on the “
the device you want to stop (e.g. Stop USB Mass Storage
Device Drive (E:)).
2. Follow on-screen instructions to safely remove the Digital
Photo Frame.
” device icon located on the taskbar. Select
Notice:
1. The Digital Photo Frame with a SD card acts exactly like a
card reader (mass storage device) by connecting the
Digital Photo Frame to a computer via USB. (See “Card
Reader” section.)
48
p
English
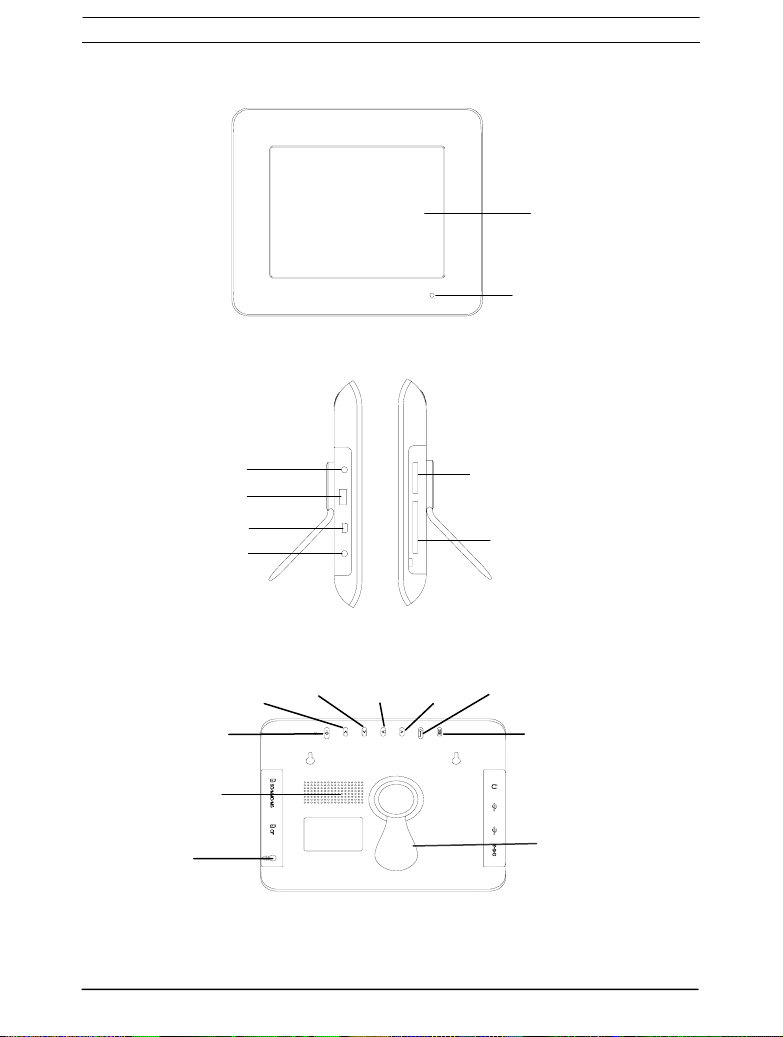
Getting to Know Your Digital Photo Frame
Earphone Jack
USB Port
Mini USB Port
DC Jack
POWER
UP
DOWN
RIGHT
LEFT
S
eaker
Button for
Frame ejection
LCD Panel
Remote Con trol
Receiver
Memory Card Port
CF Card Port
ENTER
ESC
Stand
49

English
How to change the Frame
1. Press the ejection button to take out the existing frame.(FIG1)
2. Reassemble the new frame by fitting it on the middle cover
(pay attention to the mounting direction: beside with a remote
control receiver hole.) (FIG2)
Corrosion, oxidation, battery-leakage and any other
gradually acidic defect of this nature will invalidate the guarantee.
FIG1
FIG2
50

Slide Show
py
g
English
REMOTE CONTROL
Time
Rotate
Preview
ESC
Enter
Left
Delete
Previous song
Next son
For better performance, operate the remote control
in an appropriate range as recommended below.
Horizontal Angle ≤ 45°
Effective Distance: 3m
Horizontal Angle ≤15°
Effective Distance: 5m
r nf
P
Date
Menu
4:3
Co
Up
Vol ume+
Vol ume Right
Information
Play mode
Stop
Play/Pause
°
°
51

English
Playback Mode (Viewing JPEG/AVI Files)
Notice:
1. Internal memory is optional. JPEG/A VI files saved in the internal
memory can be played in the Digital Photo Frame without a
memory card.
2. The video-playing function is optional; some Digital Photo
Frame models may be unable to play AVI files.
● Turning on the Digital Photo Frame
1. Connect the Digital Photo Frame to the DC 9V adapter.
2. To read files from a memory card, insert a memory card into the
Digital Photo Frame Memory Card Port first. If the Digital Photo
Frame is equipped with internal memory, then it is not
necessary to insert a memory card.
3. Press the “Power” button on the Digital Photo Frame to activa te i t.
4. The Digital Photo Frame will automatically recognize image or
video files saved in a memory card or in internal memory, and it
will display all image or video thumbnails.
5.1 To start viewing images or playing video clips, see the below
section “Viewing Images” or “Playing Video Clips.”
5.2 To return to the main menu, press the “ESC” button or the
“Menu” button on the remote control as shown in FIG2. To enter
the thumbnail mode again, press the “UP”, “DOWN”, “LEFT” or
“RIGHT” button ( the navigation buttons on the remote control)
to select the playback icon in the main menu and then
press the “ENTER” button.
FIG1 FIG2
52

● Viewing Images
English
1. After entering the thumbnail mode, press the “UP”, “DOWN”,
“LEFT” or “RIGHT” button( the navigation buttons on the
remote control) to select the thumbnail to view. Press the
“Enter” button to enlarge the image (Full size)
2. To view the previous image, press “LEFT” when an image is
enlarged. Press “RIGHT” to view the next one.
3. Press the Enter button repeatedly to set Full Size ,Slide show
or Split show.
4. Slideshow:
4.1.1 When in the thumbnail mode, press the “Slide” button on
the remote control to enter the slideshow mode.
4.1.2 When an image is enlarged, press the “Enter” button
repeatedly to select the slideshow. The images will
automatically one by one.
4.1.3 Stop viewing the slideshow:
Press “ESC” to stop at the current full-sized image. To
return to the thumbnail mode, press “ESC” or the
“Preview” button on the remote control.
5. Split show
5.1.1 When an image is enlarged, press the “Enter” button
repeatedly to select the Split show.
5.1.2 Operating methods of the Split show are identical to the
Slide show. The difference is size of display.
53

English
6. Photo Rotation
6.1.1 When in the thumbnail mode or in the Slide show mode,
an image can be rotated by pressing the “Rotate” button
on the remote control.
7. Press the “ESC” button to return to the previous mode or press
the “Menu” button on the remote control to return to the main
menu,
● Playing Video Clips
1. After entering the thumbnail mode, press “UP”, “DOWN”,
“LEFT” or “RIGHT”( the navigation buttons on the remote
control) to select the thumbnail to play.
2. Press “ENTER” to start playing a video clip.
3. Press “ENTER” again to pause. To continue playing, press
“ENTER.”
4. Press “ESC” once to return to the thumbnail mode. Press “ESC”
again to return to the main menu.
NOTICE: The Digital Photo Frame only supports Motion JPEG
format videos.
54

English
Time Mod e
1. Press “UP”, “DOWN”, “LEFT” or “RIGHT” to select the icon in
the main menu and then press “ENTER” to enter the T ime Mode.
2. Press “UP” or “DOWN” to select items; press “ENTER” to
confirm; Press “UP” or “DOWN” to change settings.
3. Press “ESC” to save the settings and exit.
(See the “Show Time” and the “Show Calendar” sections in
the “Setup Mode.”)
MP3 Mode
1. Press the “MP3”button on the remote control to enter the MP3
mode. Or press “UP”, “DOWN”, “LEFT” or “RIGHT” to select
the icon
the MP3 Mode.
2. Press “UP”, “DOWN”, “LEFT” or “RIGHT” to select MP3 files.
3. Press “ENTER”( or the play button on the remote control) to
play a song. Press “ENTER”( or the pause button on the
remote control) again to pause.
4. Press “ESC” to stop and return to the main menu.
in the main menu and then press “ENTER” to enter
MP3 LIST
If you had my love.mp3
Big Big World.mp3
Right here waiting.mp3
55

English
Setup Mode
1. Press “UP”, “DOWN”, “LEFT” or “RIGHT” to select the icon
in the main menu. Press “ENTER” to enter the setup
mode.
Slide Interval:.5 Sec [ENTER]: Setting
Show Time: OFF
Show Calendar: OFF
Music Repeat: ALL
Volume: 3
Language: English
Format Storage
2. Press “UP”, “DOWN”, “LEFT” or “RIGHT” to select items.
Press “ENTER” to change settings.
3. Note the following details:
--Slide Interval
5/10/30/60 seconds
--Show Time
ON/OFF
(When it is set to ON, the time will be displayed in the
playback mode accordingly. It can also be switched to
ON/OFF by pressing the “Time” button on the remote
control.)
--Show Calendar
ON/OFF
( When it is set to ON, the calendar and date that have
been set in the Time Mode will be displayed in the
playback mode. It can also be switched to ON/OFF by
pressing the “Date” button on the remote control.)
Setup
56

English
--Music Repeat
ALL/ONE/NONE
--Volume
0~9
--Language
English,French,German,Spanish,Italian,Dutch,Poland,
Czech,Hungarian,Turkish,Russian,Swedish,Greek,
Portuguese
--Format storage
Delete all internal photos?
[ENTER] Yes
[ESC] NO
It can select Yes/NO by pressing the Enter or ESC button
on the remote control.
4. To complete Setup, please press “ESC” to save the setting
and exit.
57

English
Card Reader (Mass Storage Mode)
1. Connect the Digital Photo Frame to a computer with the
supplied USB cable.
2. In Mass Storage mode, the Digital Photo Frame with a
memory card acts exactly like a Card Reader. It can be
accessed via any Windows user interface. Pictures or video
clips can be copied, moved or deleted in exactly the same
way PC files are manipulated. (See “USB Device Unplugging
Notice” section.)
Notice:
1. In the playback mode, files saved in a memory card can be
copied to internal memory by pressing the “Copy” button on
the remote control. But the function will not be effective if the
Digital Photo Frame does not equipped with internal
memory.
2. The Digital Photo Frame does not display files saved in
internal memory unless a memory card is removed. With an
inserted memory card, the Digital Photo Frame will only
capture files saved in a memory card.
58

English
Quick note:
Not to plug in the power cord in the headphone connection.
Connect the power supply to a main outlet compliance the
indications stated on the identification label located on the unit as
shown below:
DC Jack
Earphone Jack
59

English
Disposal of Used Electrical & Electronic
Equipment
The meaning of the symbol on the product, its
accessory or packaging indicates that this
product shall not be treated as household
waste. Please, dispose of this equipment at
your applicable collection point for the
recycling of electrical & electronic equipments
waste. In the European Union and Other European countries
which there are separate collection systems for used electrical
and electronic product. By ensuring the correct disposal of this
product, you will help prevent potentially hazardous to the
environment and to human health, which could otherwise be
caused by unsuitable waste handling of this product. The recycling
of materials will help conserve natural resources. Please do not
therefore dispose of your old electrical and electronic equipment
with your household waste. For more detailed information about
recycling of this product, please contact your local city office, your
household waste disposal service or the shop where you
purchased the product.
For more information and warranty conditions, please visit :
www.akai.eu
60
 Loading...