

Page 1
Digital Photo Album
ABF240
User manual
Gebruiksaanwijzing
Manuel de l’utilisateur
Manual de instrucciones
Gebrauchsanleitung
Οδηγίες χρήσεως
GB 2
NL 14
FR 26
ES 38
DE 50
EL 62
Page 2

Table of contents
1. Safety ........................................................................... 3
1.1 Intended use ....................................................................3
1.2 Labels in this manual .......................................................3
1.3 General safety instructions ..............................................3
2. Preparations for use ................................................... 4
2.1 Unpacking ........................................................................4
2.2 Package contents ............................................................4
3. Functions ..................................................................... 5
4. Operation ..................................................................... 5
4.1 Connection to computer ...................................................5
4.2 General functions .............................................................6
4.3 General setup menu operation ........................................7
4.4 Uploading fi les .................................................................9
4.5 Reset the appliance .......................................................11
5. Troubleshooting ........................................................12
6. Technical data ........................................................... 12
7. Disposal of used electrical and electronic
equipment .................................................................. 13
Copyright notice
Design and specifi cations are subject to change without notice.
2
Page 3

ABF240
Safety 1.
Intended use 1.1
The digital photo album displays photos. The clock function includes an
alarm and calendar function. Read the manual carefully before the fi rst use.
Labels in this manual 1.2
! WARNING
A warning means that injury or death is possible if the instructions
are not obeyed.
! CAUTION
A caution means that damage to the equipment is possible.
i
A note gives additional information, e.g. for a procedure.
General safety instructions 1.3
! WARNING
Do not put force on the appliance. It will damage the appliance.
! CAUTION
Do not spill any liquid on the appliance.
3
Page 4

Preparations for use 2.
Unpacking 2.1
● Unpack the appliance carefully.
● Check the contents as described below. If any item is missing, please
contact your reseller.
● Remove the labels from the front panel carefully if present.
i We recommend that you retain the original carton and packing
The following items are included in the received package:
1 Digital photo album
1 USB cable
1 Operator manual
● If any item is missing, please contact your reseller.
! CAUTION
! CAUTION
materials in case it ever becomes necessary to return your product
for service. This is the only way to safely protect the product
against damage in transit. If you do dispose of the carton and the
packing materials, please remember to recycle with due care to the
environment.
Package contents 2.2
Do not put the appliance near a heat source. This can cause
damage to the equipment.
Do not expose the appliance to direct sunlight. This can cause
damage to the equipment.
4
Page 5
ABF240
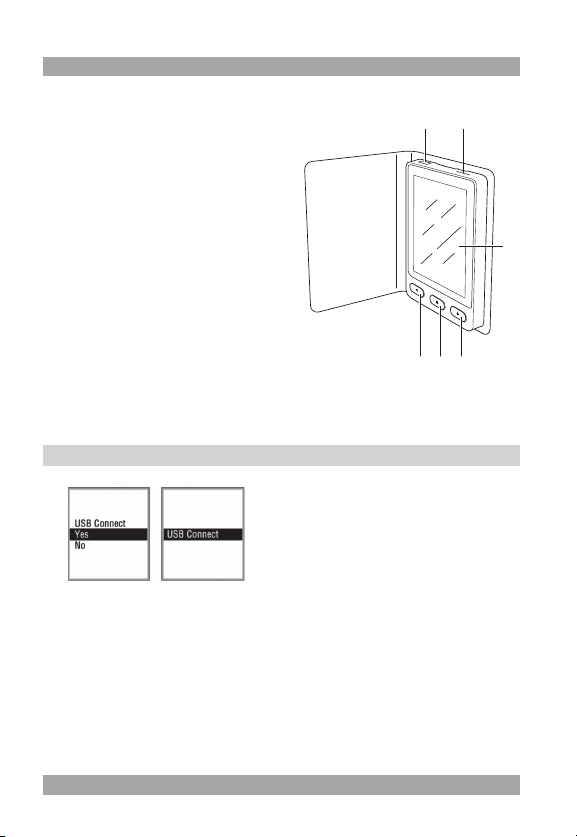
Functions 3.
1 POWER ON/MENU button
2 NEXT button
3 Display
4 Reset pin
5 USB slot
6 PREV button
5 4
3
216
Operation 4.
Connection to computer 4.1
● Connect one end of the USB cable to the USB slot (5).
● Connect the other end of the USB cable to the computer.
Battery charging
The appliance starts charging during connection with the computer. The
charge time before the fi rst use or after it has not been used for a long time is
approximately 5 hours. The average charge time during regular use is 3 hours.
For cordless use, this appliance relies on a rechargeable battery.
5
Page 6

i When the battery is almost empty, the screen displays the
message: “Low Power”.
General functions 4.2
● To switch on the appliance, press the POWER ON/MENU button (1). To
switch to stand-by mode, press and hold the POWER ON/MENU button.
● To select an item in the main menu, press the PREV button (6) or the
NEXT button (2).
● To confi rm the selection, press the POWER ON/MENU button (1).
● To return to the main menu, press the POWER ON/MENU button (1)
again.
● To switch off the appliance, select “Off” in the main menu.
i If the appliance does not contain any fi les, the screen displays the
Complete the online connection
● Press the POWER ON/MENU button (1) to enter the USB connect menu.
● To complete the connection to the computer, select “Yes”.
message: “No Photo”.
6
Page 7

ABF240
General setup menu operation 4.3
● “Display Clock”: to set the time
display. To display the time on the
bottom right side, press the PREV
button (6) or the NEXT button (2)
for 2 seconds.To cancel the time
display completely, press the
PREV button (6) or the NEXT
button (2) for two seconds.
● Calendar: to display the month
and year.
● Analogue Clock: to display the
clock in analog mode.
● Set Clock: to set the clock, the
date and the day.
● Alarm Clock: to set the alarm.
● Cancel: to return to the main
menu.
● Slide Show: to set the interval
between the slides (0-15 sec).
7
Page 8

● Auto Off: to set time period in
which the appliance is switched
on. The appliance switches off
automatically after the preset
time (0-30 min).
● Power off: to switch off the
appliance completely.
8
● Backlight: to set the Back-
light brightness (0-21).
● “Delete One”: to delete a picture.
Select “Yes” or “No”.
● “Delete All”: to delete all the
pictures. Select “Yes” or “No”.
● Cancel: to return to the previous
page in the menu.
Page 9

ABF240
● Exit: to exit the menu.
Uploading fi les 4.4
● Connect the appliance to the computer as described in the section
“Connection to computer”.
● Select “USB Connect”.
● Select “Yes” to complete the connection.
When the connection is completed, the computer shows the following window:
9
Page 10

If the pictogram is green, the appliance is connected. If the
pictogram is red, the appliance is not connected correctly.
Picture modifi cation
Button Explanation
+, - Zoom in/out on the picture.
RotateL, RotateR Rotate the picture left or right.
Clear Set the correct picture size to fi t the display. Press the
button again to return to normal picture size.
Add Add a picture to the preview album screen on the computer.
All Select all the pictures in the preview album screen on
the computer.
Delete Delete the picture.
Save Save selected picture to the computer.
SaveAll Save all pictures to the computer.
-> Start the conversion process.
Down Transfer the pictures from the preview album screen on
the computer to the appliance.
Exit Exit the program.
10
Page 11

ABF240
During the transfer of the pictures, the computer shows the following
window:
Menu window settings
To change the settings of the menu window on the computer, refer to the
table below.
Button Explanation
Setting Change the font color and background color.
Fontcolor Select the font color.
Background Select the background color.
Reset the appliance 4.5
● Pull out the Reset pin (4) from the top of the appliance.
● Insert the pin into the hole at the bottom back side of the appliance. Keep
the pin inserted for three seconds.
● Pull the pin out of the reset hole.
● Insert the pin into the top of the appliance.
11
Page 12

Trouble Action
Appliance does not switch on Recharge battery
Message “Cannot fi nd dpf mate
program” appears on screen Access the program via “My Computer”.
Appliance has a system crash Recharge battery
Reset the appliance
Technical data 6.
Parameter Value
Voltage 3,7 V
Supported media formats JPG/BMP
Battery run time 2,5 h
Screen size 2,4”
Resolution 320 x 240 pixels
Internal memory 16 MB
Weight 62 g
Troubleshooting 5.
12
Page 13

ABF240
Disposal of used electrical 7.
and electronic equipment
Z
The meaning of the symbol on the material, its accessory or packaging
indicates that this product shall not be treated as household waste. Please,
dispose of this equipment at your applicable collection point for the recycling
of electrical and electronic equipments waste. In the European Union and
Other European countries which there are separate collection systems for
used electrical and electronic product. By ensuring the correct disposal of
this product, you will help prevent potentially hazardous to the environment
and to human health, which could otherwise be caused by unsuitable waste
handling of this product. The recycling of materials will help conserve natural
resources. Please do not therefore dispose of your old electrical and
electronic equipment with your household waste.
For more detailed information about recycling of this product, please contact
your local city offi ce, your household waste disposal service or the shop
where you purchased the product.
For more information and warranty conditions, please visit: www.akai.eu
13
Page 14

Heeft u na het lezen van deze handleiding nog vragen?
Neemt u dan contact op met AKAI Benelux via:
0900-3555333
Avez-vous des questions après avoir lu ce manual?
Contactez AKAI Benelux par téléphone au :
070-355505
www.akai.eu
 Loading...