


Mini-Connect
Ethernet to USB
Installation & Operation Guide
Version 1.0
Published: March 22, 2016

Table of Contents
Notices . . . . . . . . . . . . . . . . . . . . . . . . . . . . . . . . . . . . . . . . . . . . . . . . . . . . . . . . 4
Trademarks . . . . . . . . . . . . . . . . . . . . . . . . . . . . . . . . . . . . . . . . . . . . . . . . . . . . . . . . . . . . . . . . . . . . . . . 4
Copyright . . . . . . . . . . . . . . . . . . . . . . . . . . . . . . . . . . . . . . . . . . . . . . . . . . . . . . . . . . . . . . . . . . . . . . . . . 4
Contacting Support . . . . . . . . . . . . . . . . . . . . . . . . . . . . . . . . . . . . . . . . . . . . . . . . . . . . . . . . . . . . . . . 4
Chapter 1: Introduction . . . . . . . . . . . . . . . . . . . . . . . . . . . . . . . . . . . . . . . . 5
Overview. . . . . . . . . . . . . . . . . . . . . . . . . . . . . . . . . . . . . . . . . . . . . . . . . . . . . . . . . . . . . . . . . . . . . . . . . . 5
Features . . . . . . . . . . . . . . . . . . . . . . . . . . . . . . . . . . . . . . . . . . . . . . . . . . . . . . . . . . . . . . . . . . . . . . . . . . 6
Computer Requirements . . . . . . . . . . . . . . . . . . . . . . . . . . . . . . . . . . . . . . . . . . . . . . . . . . . . . . 6
Simplified Block Diagram . . . . . . . . . . . . . . . . . . . . . . . . . . . . . . . . . . . . . . . . . . . . . . . . . . . . . . . . . . 6
I/O Connections . . . . . . . . . . . . . . . . . . . . . . . . . . . . . . . . . . . . . . . . . . . . . . . . . . . . . . . . . . . . . . . . . . . 7
Mini-Connect Configurations . . . . . . . . . . . . . . . . . . . . . . . . . . . . . . . . . . . . . . . . . . . . . . . . . . . . . . 8
Mini-Connect Installation Overview . . . . . . . . . . . . . . . . . . . . . . . . . . . . . . . . . . . . . . . . . . . . . . . . 9
Default Operational Settings . . . . . . . . . . . . . . . . . . . . . . . . . . . . . . . . . . . . . . . . . . . . . . . . . . 9
Network Configuration . . . . . . . . . . . . . . . . . . . . . . . . . . . . . . . . . . . . . . . . . . . . . . . . . . . . . . . . 9
DHCP Setup . . . . . . . . . . . . . . . . . . . . . . . . . . . . . . . . . . . . . . . . . . . . . . . . . . . . . . . . . . . . . . 9
Connecting with Network Plug and Play on a PC . . . . . . . . . . . . . . . . . . . . . . . . . . . 9
Connecting with Bonjour on Mac. . . . . . . . . . . . . . . . . . . . . . . . . . . . . . . . . . . . . . . . . . 9
Setup Using USB . . . . . . . . . . . . . . . . . . . . . . . . . . . . . . . . . . . . . . . . . . . . . . . . . . . . . . . . . 10
Network Screen (Web Browser) . . . . . . . . . . . . . . . . . . . . . . . . . . . . . . . . . . . . . . . . . . . . . . . . . . . 10
Access Screen (Web Browser Only) . . . . . . . . . . . . . . . . . . . . . . . . . . . . . . . . . . . . . . . . . . . . . . . . 11
Update Screen (Web Browser) . . . . . . . . . . . . . . . . . . . . . . . . . . . . . . . . . . . . . . . . . . . . . . . . . . . . 12
Firmware Update Procedure. . . . . . . . . . . . . . . . . . . . . . . . . . . . . . . . . . . . . . . . . . . . . . . . . . 12
Info Screen (Web Browser) . . . . . . . . . . . . . . . . . . . . . . . . . . . . . . . . . . . . . . . . . . . . . . . . . . . . . . . . 13
Mini-Converter Control via Mini-Connect. . . . . . . . . . . . . . . . . . . . . . . . . . . . . . . . . . . . . . . . . . 13
Chapter 2: eMini-Setup . . . . . . . . . . . . . . . . . . . . . . . . . . . . . . . . . . . . . . . .15
Overview. . . . . . . . . . . . . . . . . . . . . . . . . . . . . . . . . . . . . . . . . . . . . . . . . . . . . . . . . . . . . . . . . . . . . . . . . 15
Acquiring eMini-Setup. . . . . . . . . . . . . . . . . . . . . . . . . . . . . . . . . . . . . . . . . . . . . . . . . . . . . . . . . . . . 15
Mini-Connect and eMini-Setup Documentation . . . . . . . . . . . . . . . . . . . . . . . . . . . . . . . 15
Installing eMini-Setup . . . . . . . . . . . . . . . . . . . . . . . . . . . . . . . . . . . . . . . . . . . . . . . . . . . . . . . . . . . . 16
PC Installation . . . . . . . . . . . . . . . . . . . . . . . . . . . . . . . . . . . . . . . . . . . . . . . . . . . . . . . . . . . . . . . 16
Mac Installation . . . . . . . . . . . . . . . . . . . . . . . . . . . . . . . . . . . . . . . . . . . . . . . . . . . . . . . . . . . . . . 17
Running eMini-Setup . . . . . . . . . . . . . . . . . . . . . . . . . . . . . . . . . . . . . . . . . . . . . . . . . . . . . . . . . . . . . 17
PC Startup . . . . . . . . . . . . . . . . . . . . . . . . . . . . . . . . . . . . . . . . . . . . . . . . . . . . . . . . . . . . . . . . . . . 17
Mac Startup. . . . . . . . . . . . . . . . . . . . . . . . . . . . . . . . . . . . . . . . . . . . . . . . . . . . . . . . . . . . . . . . . . 17
Operating the eMini-Setup Application . . . . . . . . . . . . . . . . . . . . . . . . . . . . . . . . . . . . . . . . . . . 18
Network Tab . . . . . . . . . . . . . . . . . . . . . . . . . . . . . . . . . . . . . . . . . . . . . . . . . . . . . . . . . . . . . . . . . . . . . 19
Update Tab . . . . . . . . . . . . . . . . . . . . . . . . . . . . . . . . . . . . . . . . . . . . . . . . . . . . . . . . . . . . . . . . . . . . . . 20
Firmware Update Procedure. . . . . . . . . . . . . . . . . . . . . . . . . . . . . . . . . . . . . . . . . . . . . . . . . . 20
Info Tab . . . . . . . . . . . . . . . . . . . . . . . . . . . . . . . . . . . . . . . . . . . . . . . . . . . . . . . . . . . . . . . . . . . . . . . . . . 21
Appendix A: Mini-Connect Specifications . . . . . . . . . . . . . . . . . . . . . . .22
Supported AJA Mini-Converters. . . . . . . . . . . . . . . . . . . . . . . . . . . . . . . . . . . . . . . . . . . . . . . . . . . 22
Network Interface . . . . . . . . . . . . . . . . . . . . . . . . . . . . . . . . . . . . . . . . . . . . . . . . . . . . . . . . . . . . . . . . 22
USB Setup. . . . . . . . . . . . . . . . . . . . . . . . . . . . . . . . . . . . . . . . . . . . . . . . . . . . . . . . . . . . . . . . . . . . . . . . 22
Physical . . . . . . . . . . . . . . . . . . . . . . . . . . . . . . . . . . . . . . . . . . . . . . . . . . . . . . . . . . . . . . . . . . . . . . . . . . 22
Power . . . . . . . . . . . . . . . . . . . . . . . . . . . . . . . . . . . . . . . . . . . . . . . . . . . . . . . . . . . . . . . . . . . . . . . 22
Size. . . . . . . . . . . . . . . . . . . . . . . . . . . . . . . . . . . . . . . . . . . . . . . . . . . . . . . . . . . . . . . . . . . . . . . . . . 22
Environment. . . . . . . . . . . . . . . . . . . . . . . . . . . . . . . . . . . . . . . . . . . . . . . . . . . . . . . . . . . . . . . . . 22
Mini-Connect v1.0 www.aja.com
2

Appendix B: Safety and Compliance . . . . . . . . . . . . . . . . . . . . . . . . . . . .23
Federal Communications Commission (FCC) Compliance Notices . . . . . . . . . . . . . . . . . . 23
Class A Interference Statement . . . . . . . . . . . . . . . . . . . . . . . . . . . . . . . . . . . . . . . . . . . . . . . 23
FCC Caution . . . . . . . . . . . . . . . . . . . . . . . . . . . . . . . . . . . . . . . . . . . . . . . . . . . . . . . . . . . . . . . . . 23
Canadian ICES Statement . . . . . . . . . . . . . . . . . . . . . . . . . . . . . . . . . . . . . . . . . . . . . . . . . . . . . . . . . 23
European Union and European Free Trade Association (EFTA)
Regulatory Compliance . . . . . . . . . . . . . . . . . . . . . . . . . . . . . . . . . . . . . . . . . . . . . . . . . . . . . . . . . . . 24
Declaration of Conformity . . . . . . . . . . . . . . . . . . . . . . . . . . . . . . . . . . . . . . . . . . . . . . . . . . . . 24
Recycling Notice . . . . . . . . . . . . . . . . . . . . . . . . . . . . . . . . . . . . . . . . . . . . . . . . . . . . . . . . . . . . . 25
Korean KCC Compliance Statement . . . . . . . . . . . . . . . . . . . . . . . . . . . . . . . . . . . . . . . . . . . . . . . 25
Taiwan Compliance Statement . . . . . . . . . . . . . . . . . . . . . . . . . . . . . . . . . . . . . . . . . . . . . . . . . . . 25
Japanese Compliance Statement . . . . . . . . . . . . . . . . . . . . . . . . . . . . . . . . . . . . . . . . . . . . . . . . . 25
Translated Warning and Caution Messages. . . . . . . . . . . . . . . . . . . . . . . . . . . . . . . . . . . . . . . . 26
Before Operation Please Read These Instructions . . . . . . . . . . . . . . . . . . . . . . . . . . . . . . . . . . 26
Warranty Information . . . . . . . . . . . . . . . . . . . . . . . . . . . . . . . . . . . . . . . . .33
Limited Warranty . . . . . . . . . . . . . . . . . . . . . . . . . . . . . . . . . . . . . . . . . . . . . . . . . . . . . . . . . . . . . . . . . 33
Index. . . . . . . . . . . . . . . . . . . . . . . . . . . . . . . . . . . . . . . . . . . . . . . . . . . . . . . . .34
Mini-Connect v1.0 www.aja.com
3

Notices
Trademarks
AJA® and Because it matters.® are registered trademarks of AJA Video Systems, Inc. for use with
most AJA products. AJA™ is a trademark of AJA Video Systems, Inc. for use with recorder, router,
software and camera products. Because it matters.™ is a trademark of AJA Video Systems, Inc. for
use with camera products.
CION®, Corvid Ultra®, lo®, Ki Pro®, KONA®, KUMO®, ROI® and T-Tap® are registered trademarks of AJA
Video Systems, Inc.
AJA Control Room™, FiDO™, KiStor™, Science of the Beautiful™, TruScale™, TruZoom™, V2Analog™
and V2Digital™ are trademarks of AJA Video Systems, Inc.
AirPort, Apple, Apple logo, AppleShare, AppleTalk, FireWire, iPod, iPod touch, Mac, Macintosh and
ProRes, are registered trademarks of Apple Inc. Final Cut Pro, QuickTime and QuickTime logo are
trademarks of Apple Inc.
Avid, Avid DNxHD and Media Composer are registered trademarks of Avid Technology, Inc.
Adobe is a registered trademark of Adobe Systems Incorporated in the United States and/or other
countries.
HDMI, the HDMI logo and High-Definition Multimedia Interface are trademarks or registered
trademarks of HDMI Licensing, LLC.
DVI is a registered trademark of DDWG.
TASCAM is a registered trademark of TEAC Corporation.
Dolby and the double-D Dolby logo are registered trademarks of Dolby Laboratories Licensing
Corporation.
All other trademarks are the property of their respective holders.
Copyright
Contacting Support
Telephone: +1.530.271.3190
FAX : +1.530.271.3140
Web: http://www.aja.com
Support Email: support@aja.com
Sales Email: sales@aja.com
Copyright © 2016 AJA Video Systems, Inc. All rights reserved. All information in this
manual is subject to change without notice. No part of the document may be
reproduced or transmitted in any form, or by any means, electronic or mechanical,
including photocopying or recording, without the express written permission of AJA
Video Systems, Inc.
When calling for support, have all information at hand prior to calling. To contact AJA for
sales or support, use any of the following methods:
Mini-Connect v1.0 www.aja.com
4
Chapter 1: Introduction
Overview
Mini-Connect enables control of up to four AJA ROI USB-enabled Mini-Converters over a
single Ethernet connection. Mini-Connect integrates with your existing Ethernet network
to provide easy access using any web browser on any platform for easy configuration and
control of ROI Mini-Converters anywhere in your facility.
The Mini-Connect product consists of the hardware Mini-Connect, Mini-Connect web
erver and firmware residing on the Mini-Connect, and AJA’s eMini-Setup application
s
that runs on either Windows or Mac OSX.
Mini-Connect serves webpages permitting c
over a network. You can access Mini-Converter User Interface screens (similar to those
used by AJA’s Mini-Config application) to control each of the connected Mini-Converters.
The separate eMini-Setup application that runs on either Windows or Mac OS is used to
communicate with and configure Mini-Connect directly via USB. The eMini-Setup
application does not communicate with down stream Mini-Converters.
Mini-Connect’s network configuration (IP address, DHCP, etc.) and firmware updates can
accomplished using either the Ethernet connection or a direct USB connection and
be
AJA’s eMini-Setup application. Operational configuration of Mini-Converters connected
to Mini-Connect can be controlled via Ethernet, but their firmware cannot be updated via
Ethernet.
The eMini-Setup application is only used to setup
connect to or setup attached Mini-Converters.
ommunications and control via computer
Mini-Connect, and cannot be used to
Mini-Connect v1.0 www.aja.com
5
Features
USB
Cong
Port
Ethernet
Connector
Mini-Converter 1
USB Port 1
USB Port 2
USB Port 3
USB Port 4
Mini-Converter 2
Mini-Converter 3
Mini-Converter 4
Control
Module
USB Device
Setup
• Control all AJA ROI Mini-Converters. (ROI, ROI-HDMI, ROI-DVI, ROI-DP)
• Control and configure up to four c
• Network settings include static IP
• Network discovery using Bonjour (Mac OS
onnected Mini-Converters.
address and DHCP.
devices) and Universal Plug and Play
(Windows devices)
• Uses universal input +5V power supp
ly AJA model DWP-U-R1 (included)
•5-year warranty
Computer Requirements
Mini-Connect has been tested to work with the following operating systems:
• Windows 7, 8, 10
• Mac OSX 10.10, 10.11
and the following browsers:
• Chrome
• Safari
•Firefox
•Microsoft Edge
• Internet Explorer
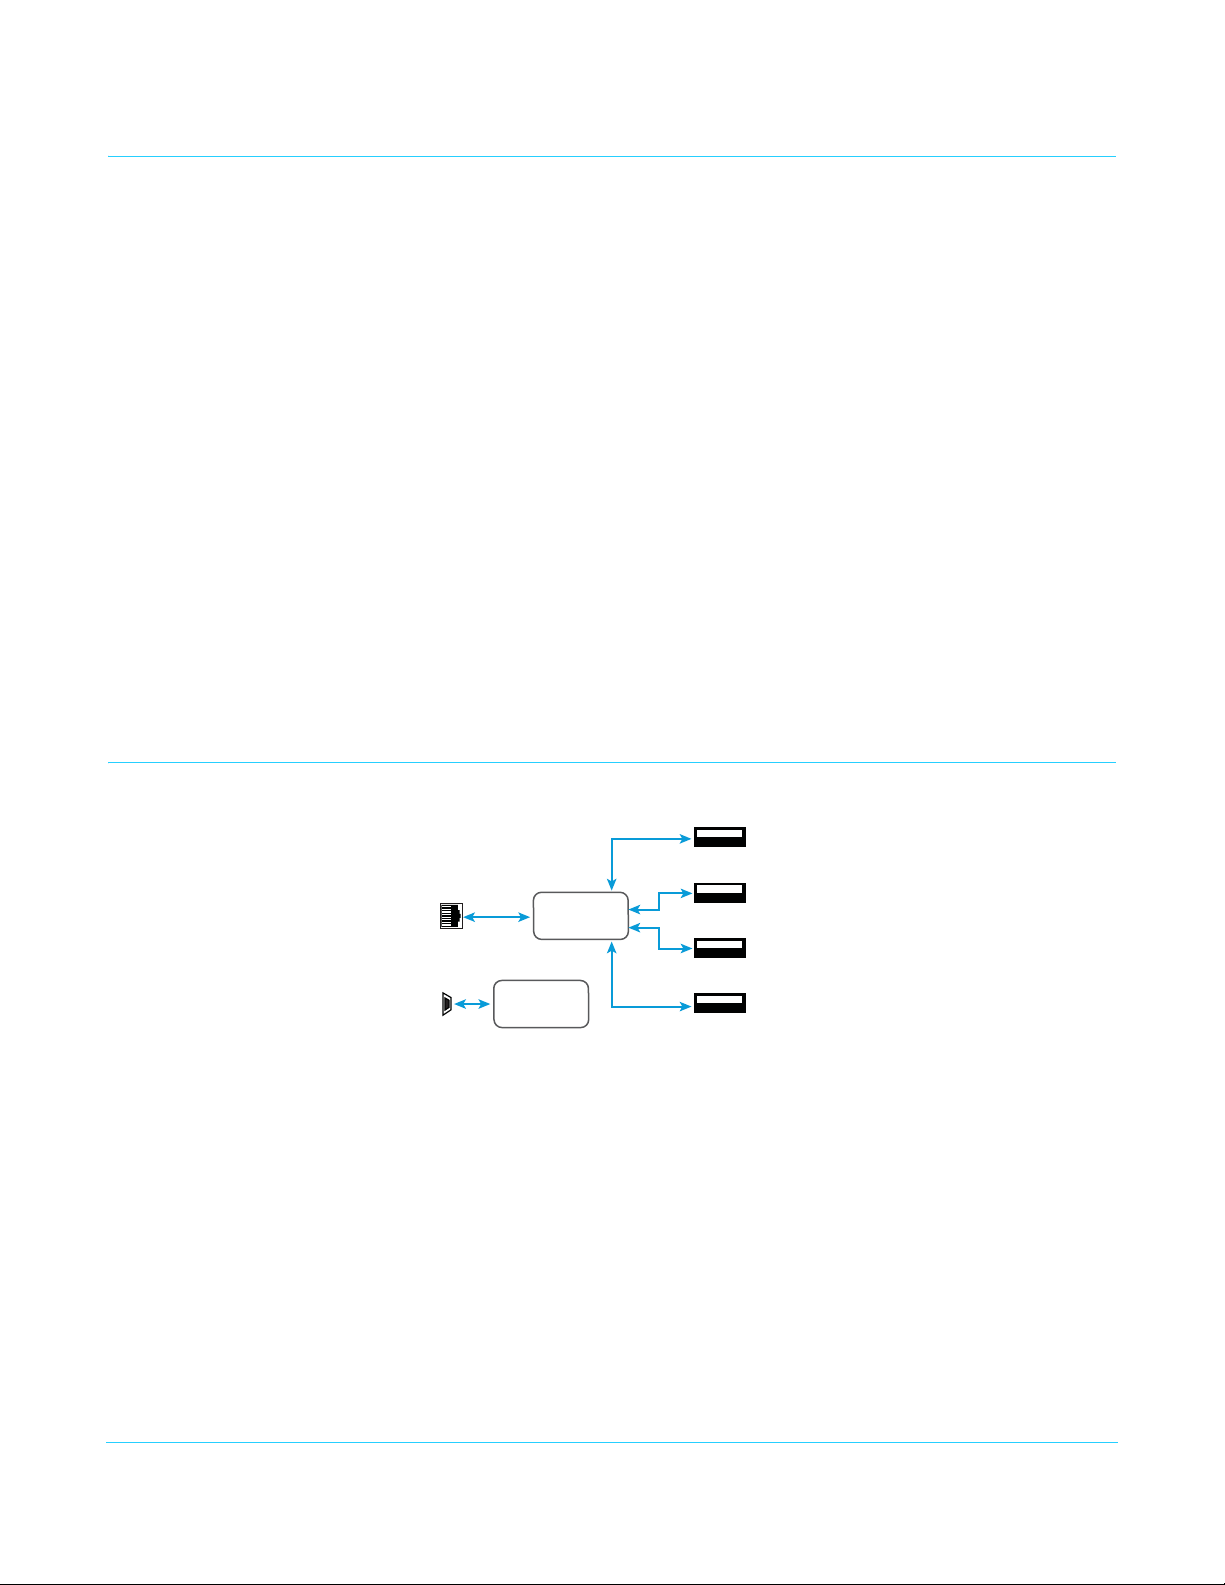
Simplified Block Diagram
Figure 1. Mini-Connect Simplified Block Diagram
6
Mini-Connect v1.0 www.aja.com
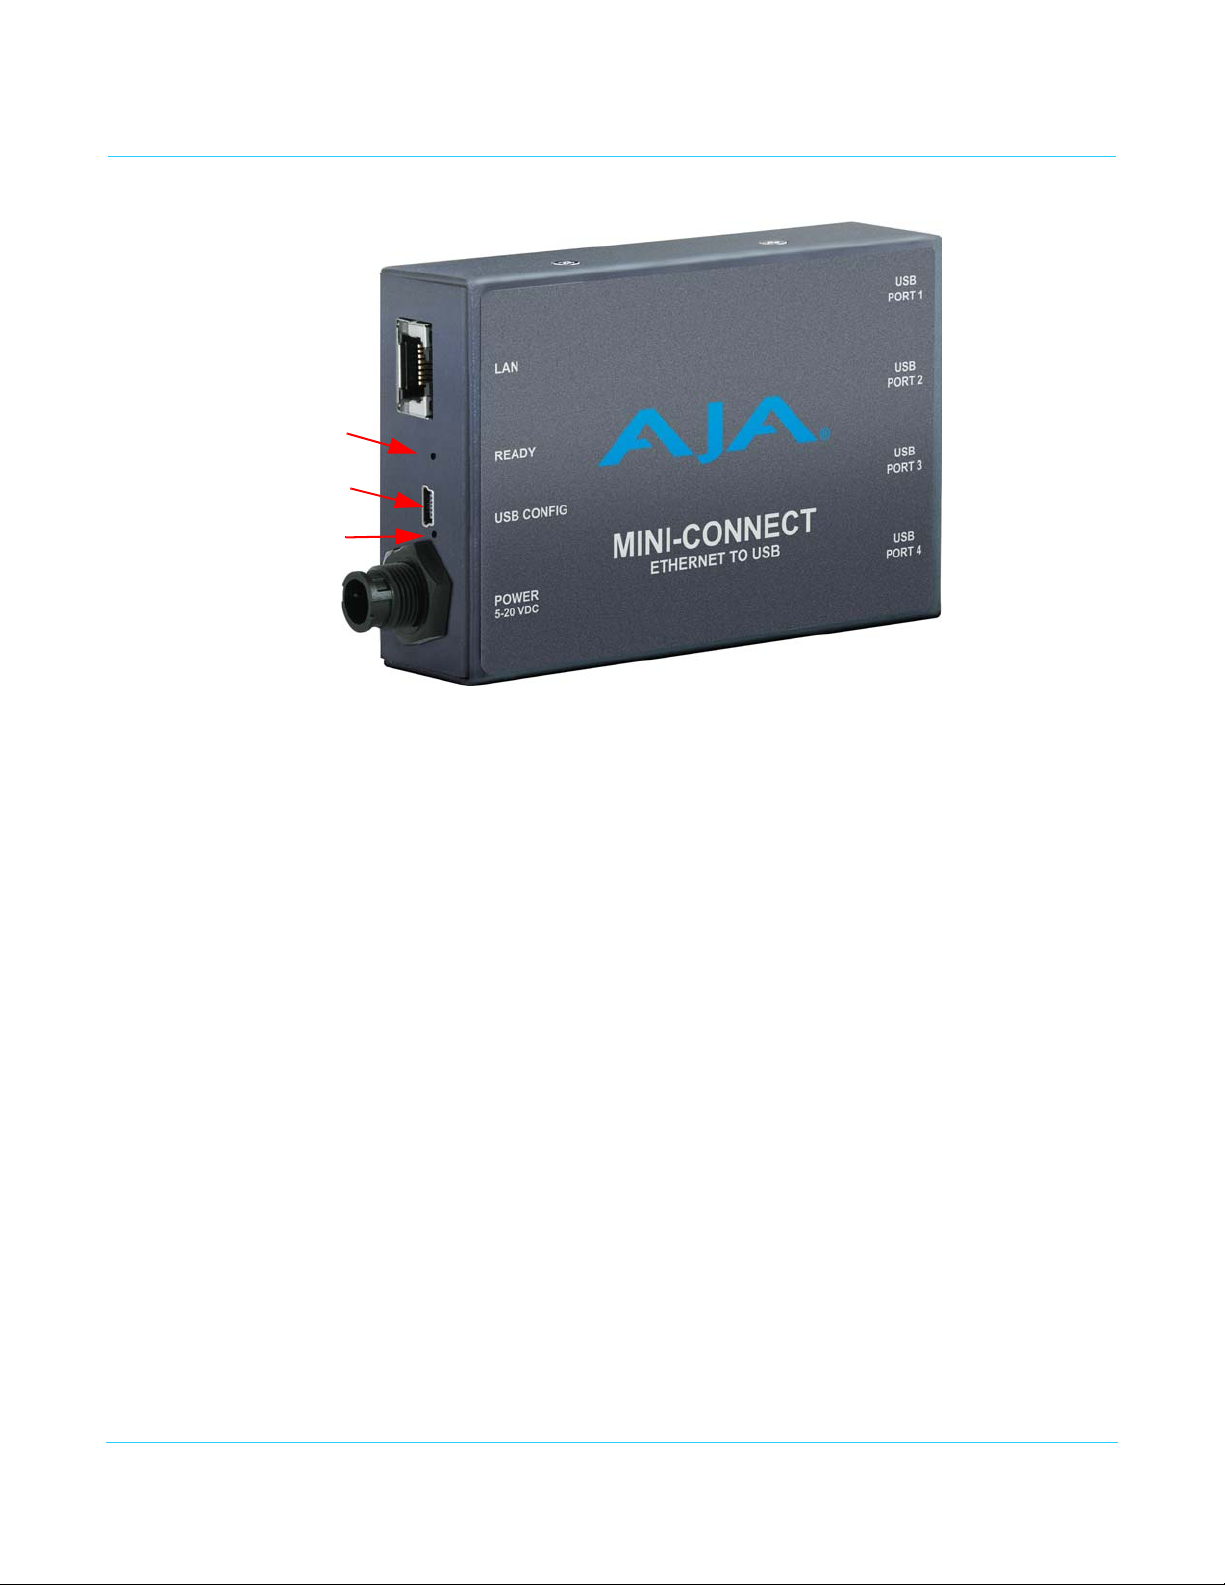
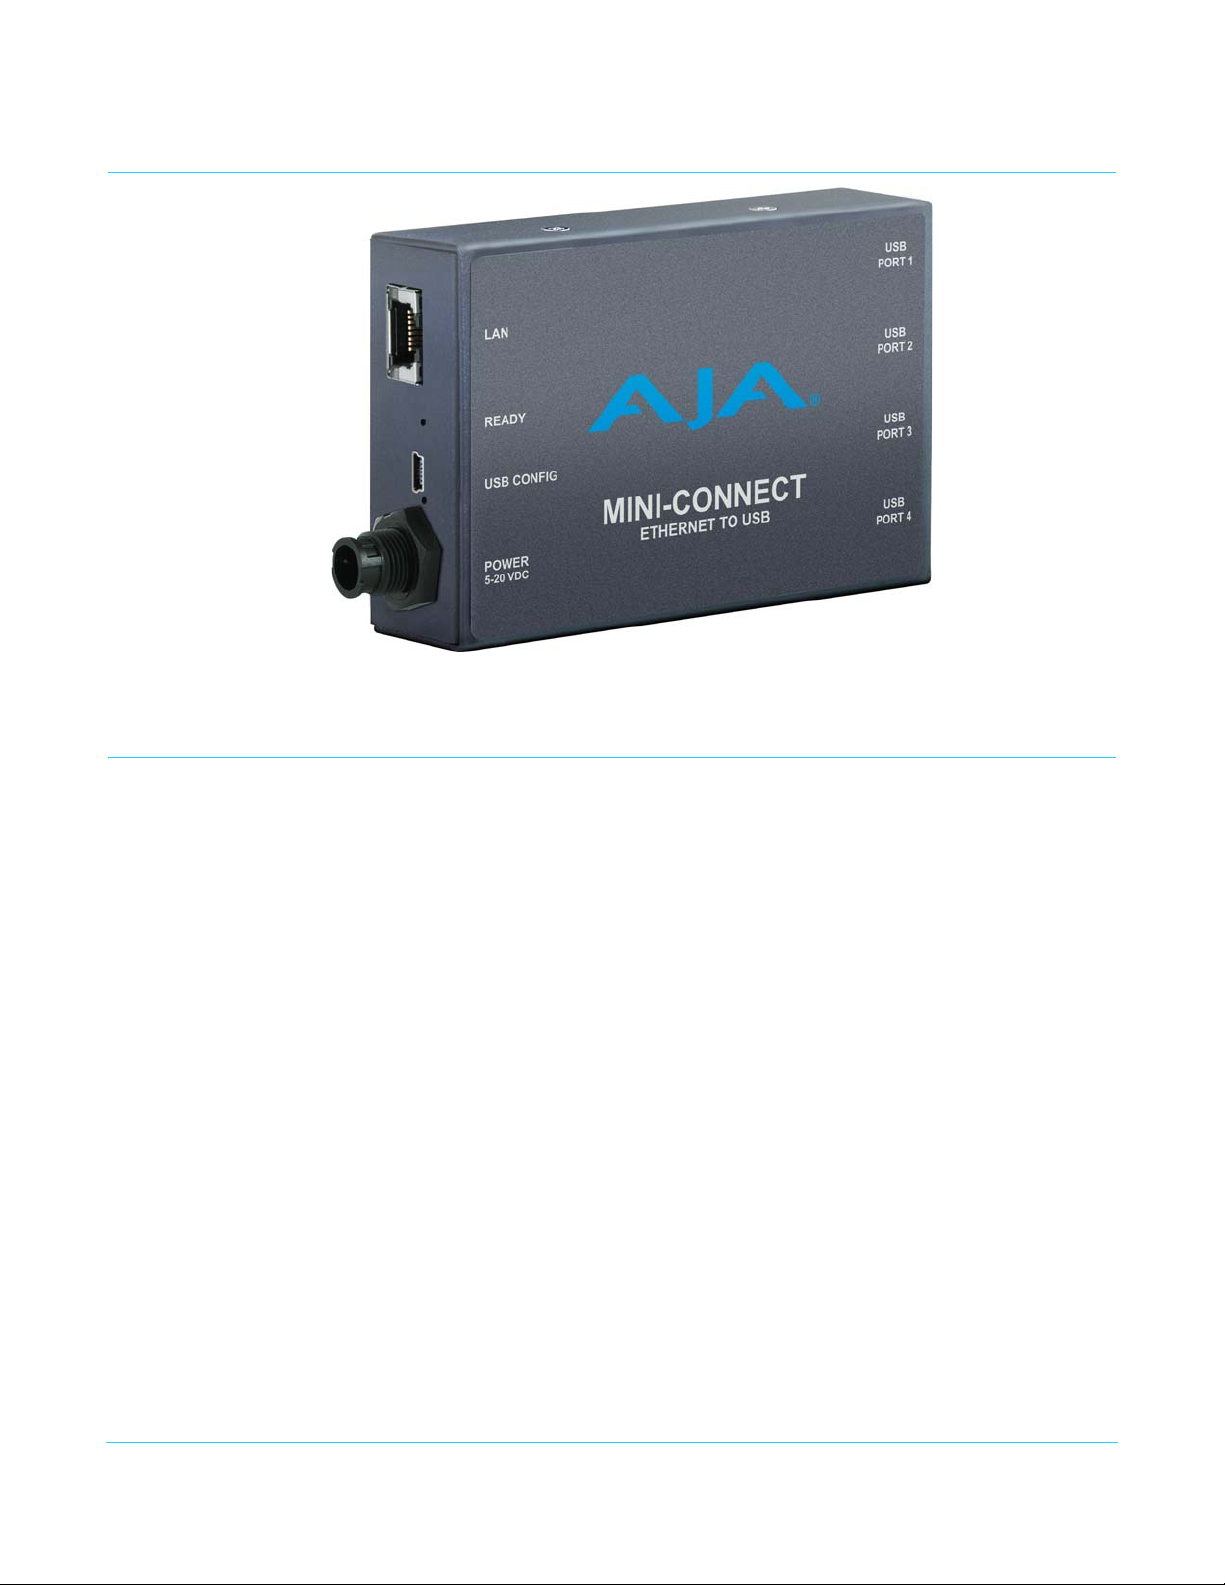
I/O Connections
Mini-Converter 1
Ethernet
Connector
USB
Configuration
Port
DC Power
Input
Power LED
Ready LED
Mini-Converter 2
Mini-Converter 3
Mini-Converter 4
Figure 2. Mini-Connect
Ethernet Connector Accepts LAN connection.
READY LED • Lights green when Mini-Connect is fully powered up and usable over the network.
• Lights amber if Mini-Connect has entered safe-boot recovery mode. In safe-boot mode
u can only configure, control, and update Mini-Connect. Attached ROIs will not
yo
appear in the WebUI.
USB Configuration Port Accepts USB mini connector for configuration by the
DC Power Input 5-20 VDC power input (AJA model DWP-U-R1 included).
USB Ports 1-4 Standard USB ports for communication to up to four AJA Mini-Converters.
eMini-Setup application.
Mini-Connect v1.0 www.aja.com
7

Mini-Connect Configurations
Computer Running
a Web Browser
USB
Ethernet
Ethernet
Facility
Network
(Mini-Converter
Conguration and
Mini-Connect Setup)
USB
Ethernet
Computer Running
a Web Browser
(Mini-Converter
Conguration and
Mini-Connect Setup)
A typical configuration for using Mini-Connect is to connect Mini-Connect to the facility
network, connect Mini-Converters to Mini-Connect with USB cabling, and connect a
computer running a web browser to the network. This allows configuration of the MiniConverters over the network, and setup of Mini-Connect via Ethernet (Figure 3).
Figure 3. Mini-Connect Example
, Ethernet Over Network
Another configuration for using Mini-Connect is to connect Mini-Connect directly to a
computer with just an Ethernet cable. Mini-Connect can then be used to configure all the
Mini-Converters, and Mini-Connect can be setup over the network (Figure 4).
Figure 4. Mini-Connect Example, Ethernet Only
Mini-Connect v1.0 www.aja.com
8
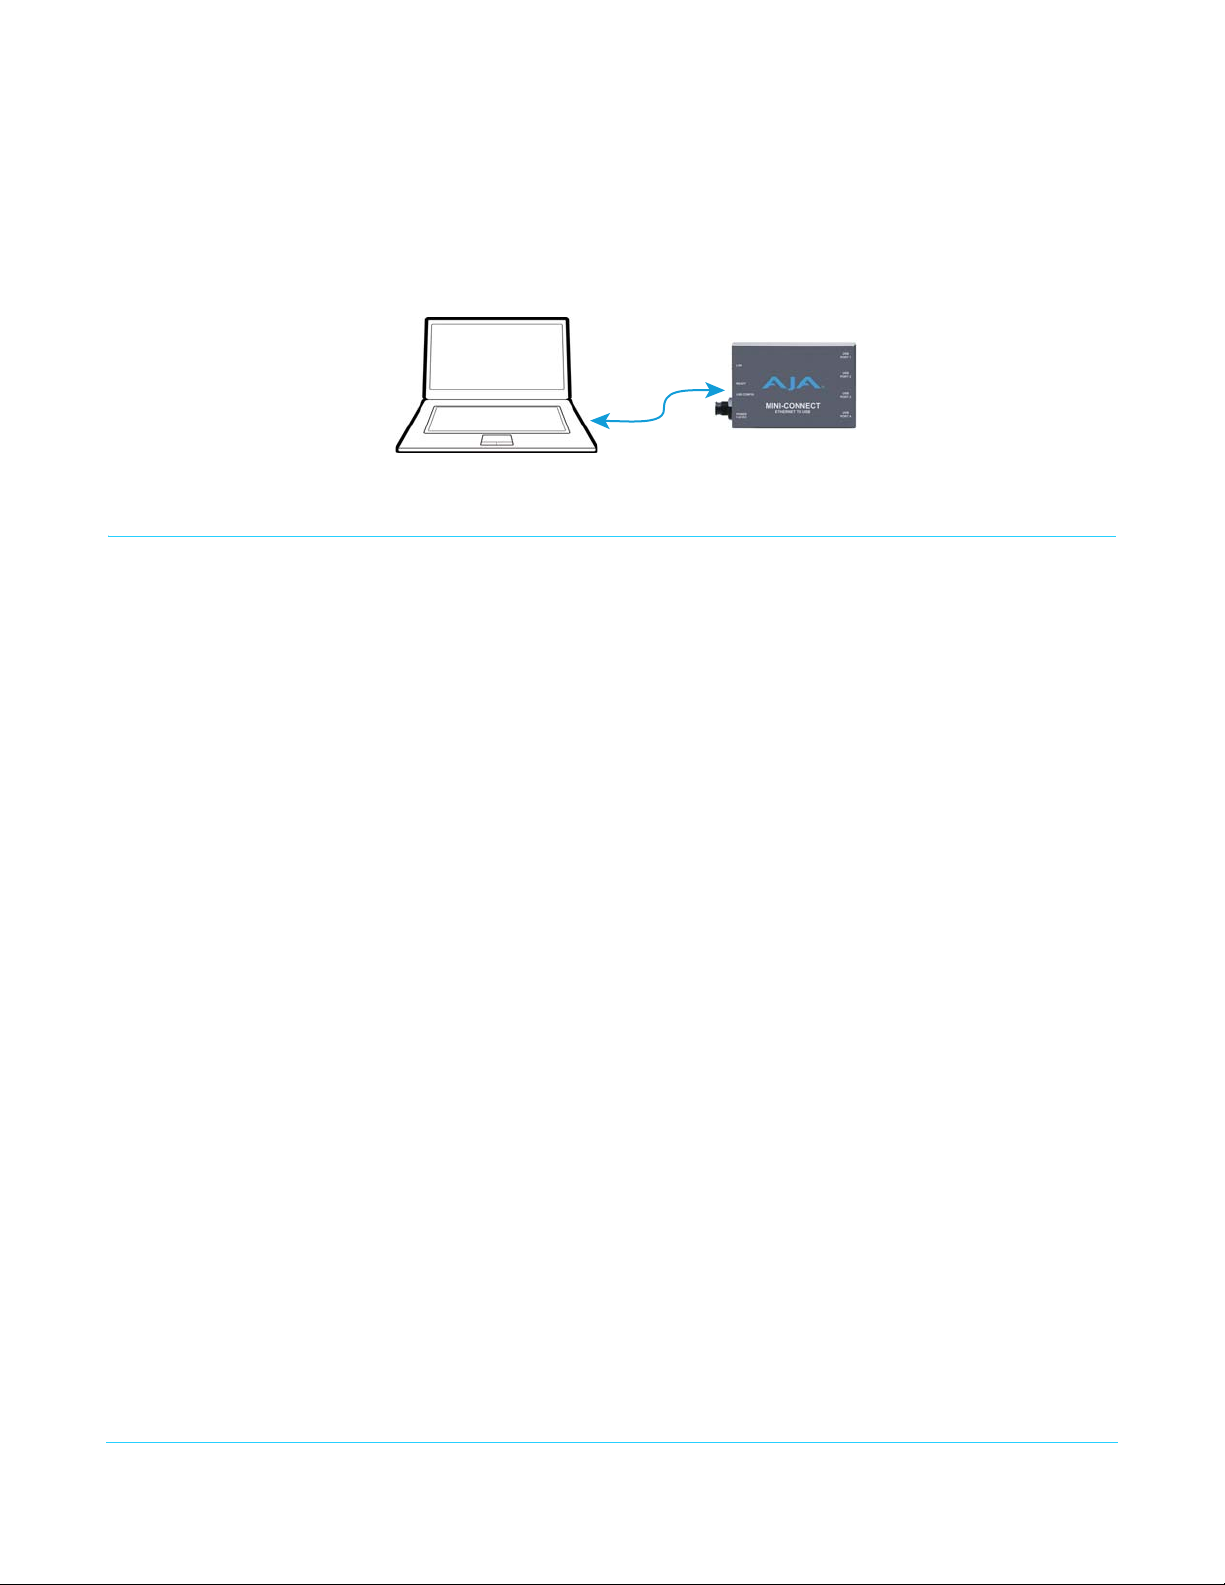
USB
(Mini-Connect
Setup Only)
Computer Running
eMini-Setup
Application
A third configuration is connecting Mini-Connect to a computer with only a USB cable.
Running the eMini-Setup application on the computer permits setting up Mini-Connect,
which can be useful for initial network configuration settings (Figure 5).
Figure 5. Mini-Connect Example, USB Only
Mini-Connect Installation Overview
Default Operational Settings
Network Configuration
Mini-Connect ships from the factory with the following configuration:
•DHCP
• UPnP Enabled
•Bonjour Enabled
This allows easy initial configuration, using DH
CP, Universal Plug and Play, or Bonjour.
Network Plug and Play
DHCP Setup Mini-Connect ships with DHCP configured. If your facility uses DHCP, you can simply
connect a network Ethernet cable to Mini-Connect, power it up, and the DHCP server will
assign it an IP address. If you or your IT staff can interrogate the network and determine
that assigned IP address, simply typing that address into a browser on a network
connected computer will give you access to Mini-Connect.
Connecting with
on a PC
Connecting with
Bonjour on Mac
On a PC running Windows, you can use UPnP to easily access Mini-Connect. For example,
in Windows 7 click on Computer, click on Network to open a window, and under Other
Devices double-click on aja-miniconnect (default), or the currently assigned name for
that specific Mini-Connect.
On Windows 7, UPnP is activated via Control Panel/Network and Internet/Network and
ring Center/Change advanced sharing settings/Turn On network discovery.
Sha
If Bonjour is enabled on your Mac web browser, you can easily access Mini-Connect from
that web browser. For Safari, the procedure to use Bonjour is:
1. Choose Safari/Preferences, click Advanced, and then select where you want Bonjour
t
o appear.
2. Click Bonjour in the Favorites bar or Bookmarks menu, and navigate to Mini-
nnect’s webpage.
Co
Mini-Connect v1.0 www.aja.com
9
Setup Using USB Mini-Connect, like all AJA Mini-Converters, does not have an information display, so you
cannot directly see what IP address it has been assigned. If you cannot determine a DHCP
assigned IP address, or wish to use a static IP address, you can use eMini-Setup to access
and configure Mini-Connect. See "Chapter 2: eMini-Setup on page 15" for more
information.
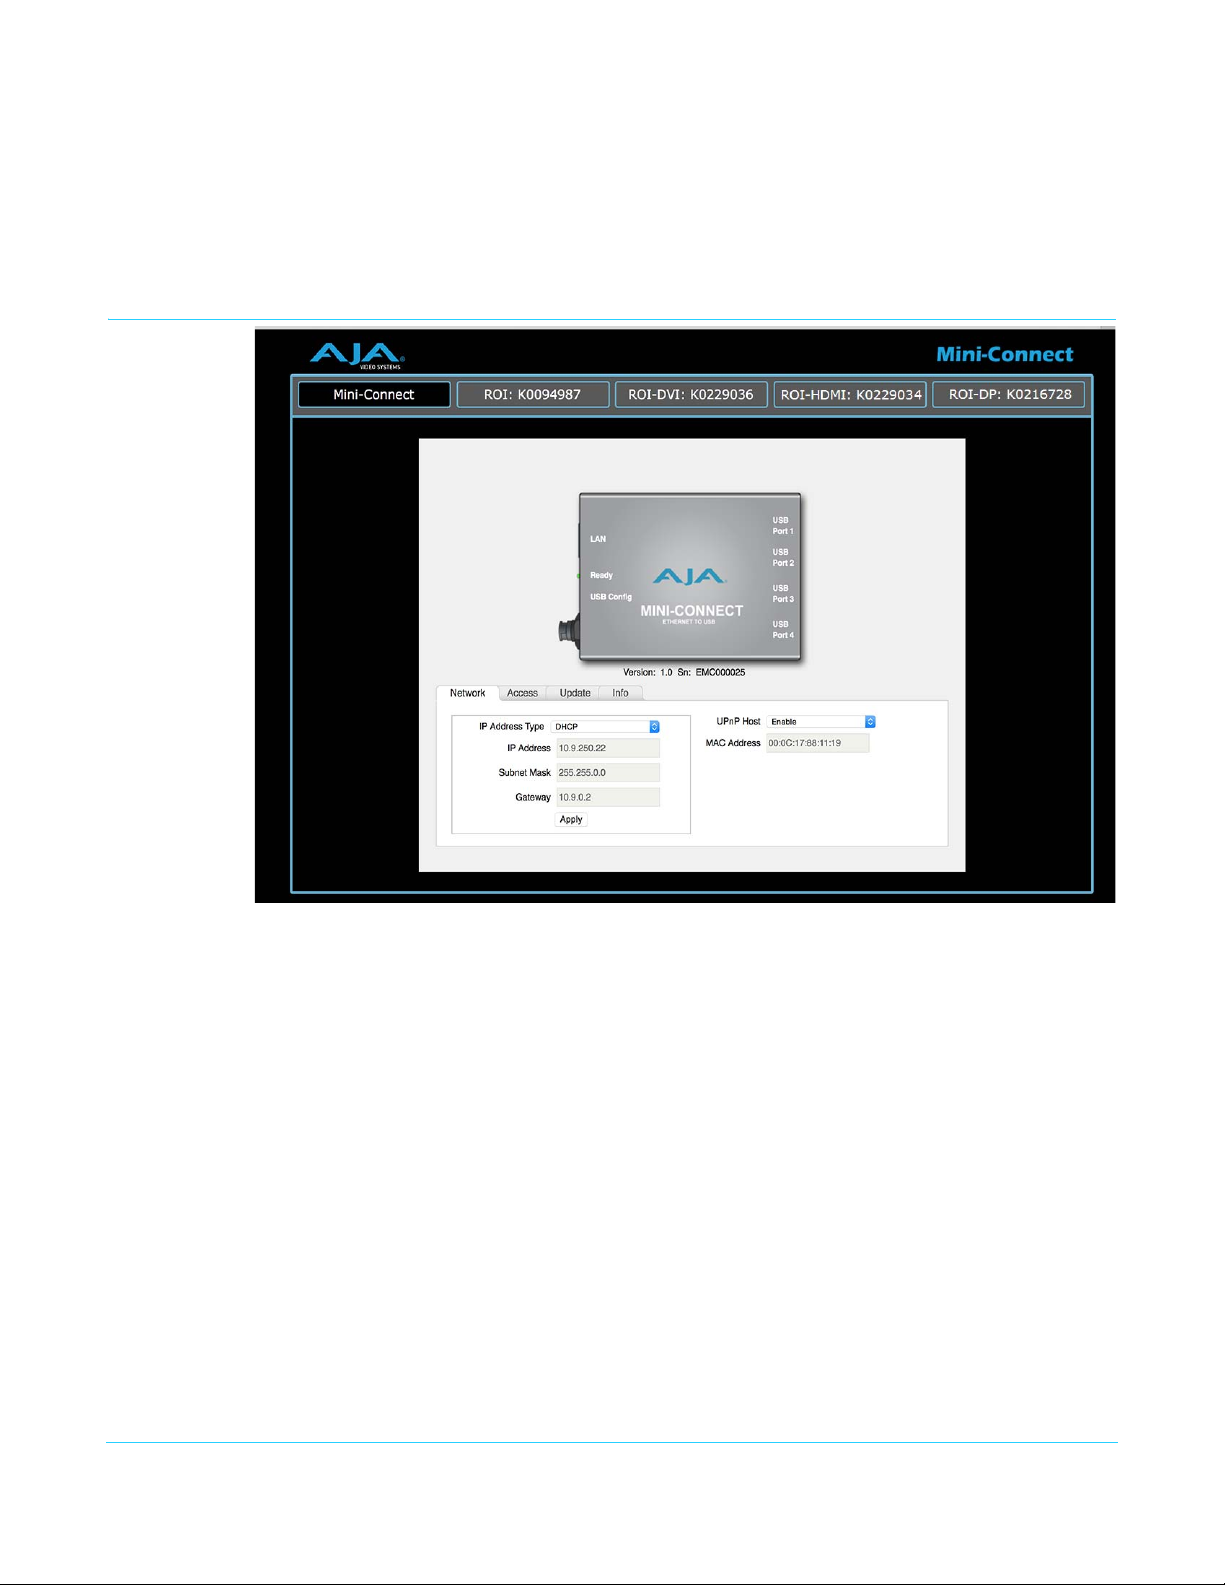
Network Screen (Web Browser)
Displayed below the graphic image are the version of firmware currently installed in
Mini-Connect, and the factory set unique serial number of your Mini-Connect. If you ever
call AJA Support for service, you may be asked for this serial number.
When connected, the default Network screen lets you change and apply network
paramet
IP Address Type Choose from DHCP or Static IP Address.
IP Address The current IP address is displayed. A different IP address can be entered.
Subnet Mask The current Subnet Mask is displayed. A different netmask can be entered.
Gateway The current Gateway address is displayed. A different IP address can be entered.
UPnP Host Choose from Enable or Disable to control whether
Windows network browsing
MAC Address: This is the permanent MAC address of Mini-Connect.
Mini-Connect v1.0 www.aja.com
ers. You must click the Apply button to initiate any IP address changes.
Mini-Connect makes itself visible for
10
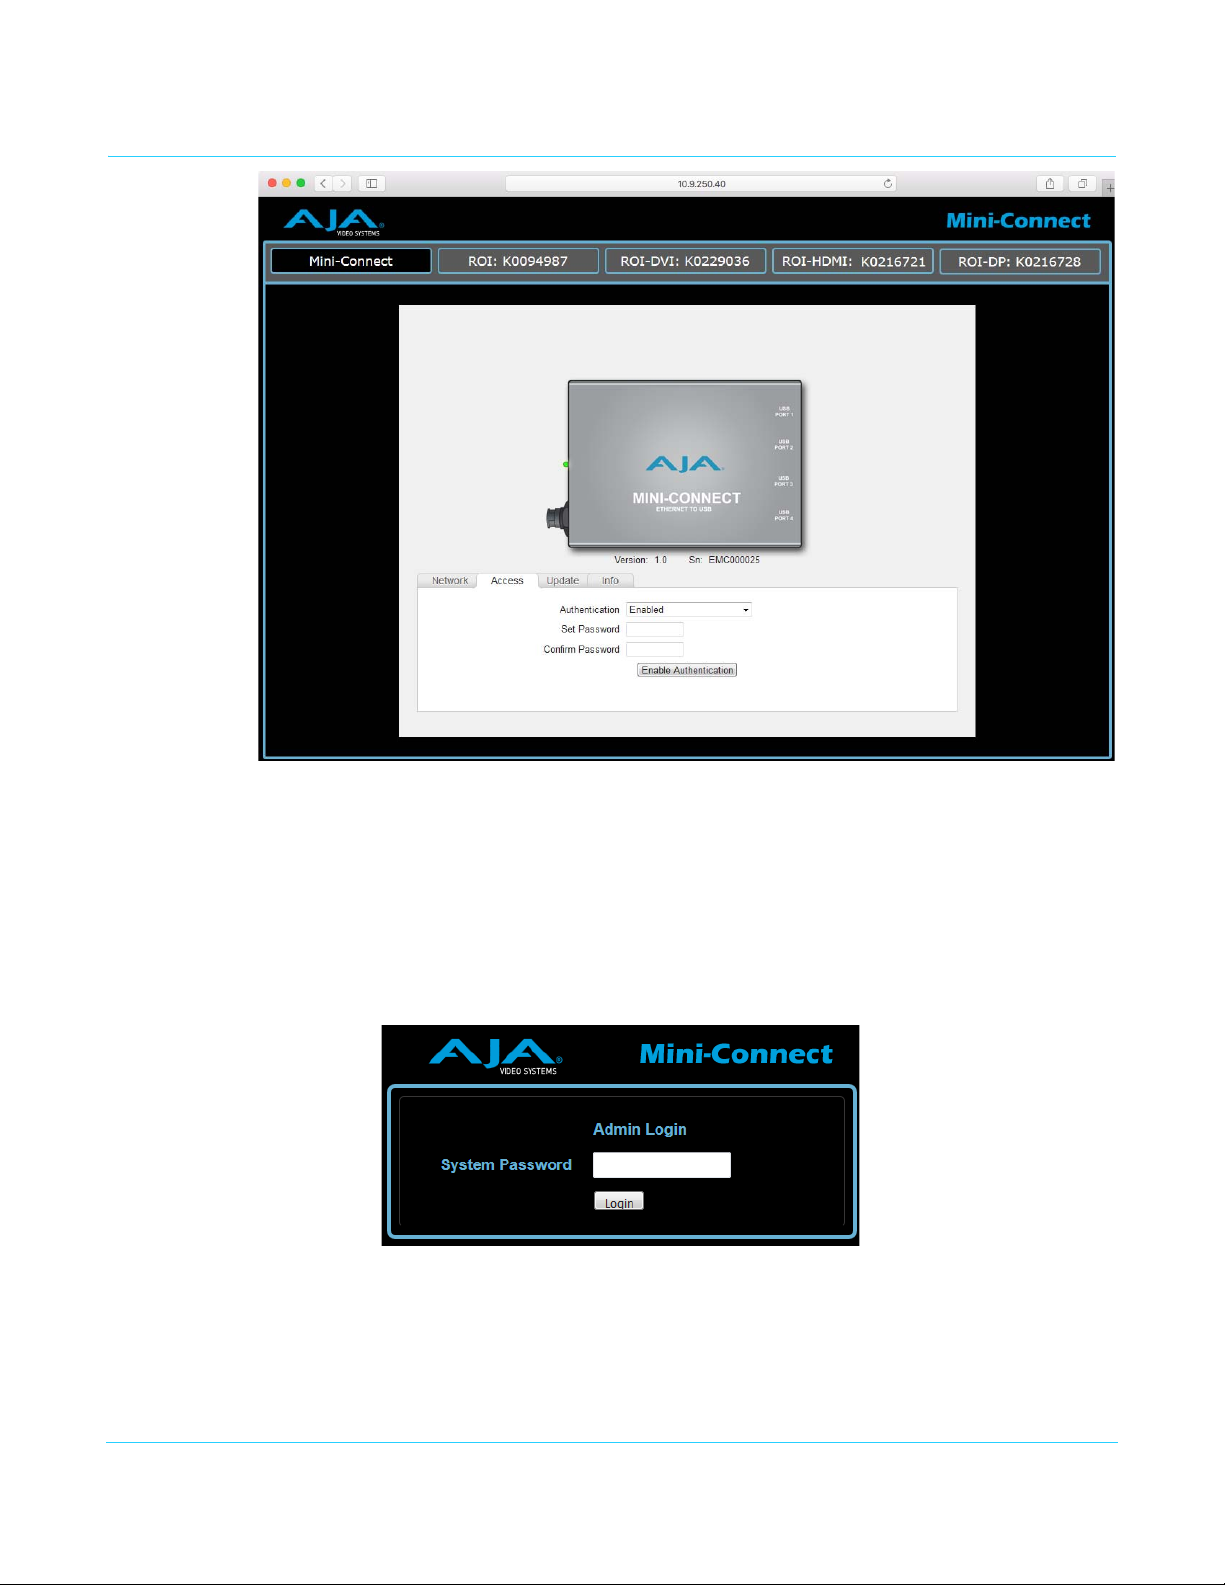
Access Screen (Web Browser Only)
One Mini-Connect screen is available only from the web browser interface. The Access
screen permits setting a password for network access to Mini-Connect (and connected
Mini-Converters).
Authentication Choose either Disabled (default) or Enabled.
Set & Confirm Password When Enabled is selected, enter and confirm the password to be used for access. Select
Disable
browser.
Figure 6. Admin Login Screen
The password can be reset using the eMini-Setup application.
NOTE: If Authentication is enabled and the login screen
eMini-Setup will not automatically redirect you to the normal user interface. The login screen
remains. To get into the webUI when authentication has been disabled, click the “login”
button with no password.
d to cancel. When Authentication is enabled, a login screen appears on the web
is displayed, turning off authentication in
Mini-Connect v1.0 www.aja.com
11
 Loading...