


www.aja.com
Installation and Operation
Guide
Because it matters.
Published: 1/10/13
1
1
ii
Trademarks
AJA®, KONA®, Ki Pro
Express™, Io HD
Apple, the Apple logo, AppleShare, AppleTalk, FireWire, iPod, iPod Touch, Mac, and
Macintosh are registered trademarks of Apple Computer, Inc. Final Cut Pro, QuickTime and
the QuickTime Logo are trademarks of Apple Computer, Inc.
All other trademarks are the property of their respective holders.
Notice
Copyright © 2013 AJA Video, Inc. All rights reserved. All information in this manual is subject
to change without notice. No part of the document may be reproduced or transmitted in
any form, or by any means, electronic or mechanical, including photocopying or recording,
without the express written permission of AJA Inc.
FCC Emission Information
This equipment has been tested and found to comply with the limits for a Class A digital
device, pursuant to Part 15 of the FCC Rules. These limits are designed to provide
reasonable protection against harmful interference when the equipment is operated in a
commercial environment. This equipment generates, uses and can radiate radio frequency
energy and, if not installed and used in accordance with the instruction manual, may cause
harmful interference to radio communications. Operation of this equipment in a residential
area is likely to cause harmful interference in which case the user will be required to correct
the interference at his own expense. Changes or modifications not expressly approved by
AJA Video can effect emission compliance and could void the user’s authority to operate
this equipment.
®,
™, Io™
®,
KUMO
, and Because It Matters™ are trademarks of AJA Video, Inc.
and XENA® and are registered trademarks of AJA Video, Inc, Io
Contacting Support
To contact AJA Video for sales or support, use any of the following methods:
Mail: 180 Litton Drive, Grass Valley, CA. 95945 USA
Telephone: +1.800.251.4224 or +1.530.271.3109
Web: http://www.aja.com/en/support/
Email: support@aja.com
When calling for support, have all information at hand prior to calling.

Limited Warranty
Io Express Installation and Operation Manual — Limited Warranty
AJA Video warrants that this product will be free from defects in materials and
workmanship for a period of three years from the date of purchase. If a product proves
to be defective during this warranty period, AJA Video, at its option, will either repair
the defective product without charge for parts and labor, or will provide a replacement
in exchange for the defective product.
In order to obtain service under this warranty, you the Customer, must notify AJA Video
of the defect before the expiration of the warranty period and make suitable
arrangements for the performance of service. The Customer shall be responsible for
packaging and shipping the defective product to a designated service center
nominated by AJA Video, with shipping charges prepaid. AJA Video shall pay for the
return of the product to the Customer if the shipment is to a location within the
country in which the AJA Video service center is located. Customer shall be responsible
for paying all shipping charges, insurance, duties, taxes, and any other charges for
products returned to any other locations.
This warranty shall not apply to any defect, failure or damage caused by improper use
or improper or inadequate maintenance and care. AJA Video shall not be obligated to
furnish service under this warranty a) to repair damage resulting from attempts by
personnel other than AJA Video representatives to install, repair or service the product,
b) to repair damage resulting from improper use or connection to incompatible
equipment, c) to repair any damage or malfunction caused by the use of non-AJA Video
parts or supplies, or d) to service a product that has been modified or integrated with
other products when the effect of such a modification or integration increases the time
or difficulty of servicing the product.
THIS WARRANTY IS GIVEN BY AJA VIDEO IN LIEU OF ANY OTHER WARRANTIES, EXPRESS
OR IMPLIED. AJA VIDEO AND ITS VENDORS DISCLAIM ANY IMPLIED WARRANTIES OF
MERCHANTABILITY OR FITNESS FOR A PARTICULAR PURPOSE. AJA VIDEO’S
RESPONSIBILITY TO REPAIR OR REPLACE DEFECTIVE PRODUCTS IS THE WHOLE AND
EXCLUSIVE REMEDY PROVIDED TO THE CUSTOMER FOR ANY INDIRECT, SPECIAL,
INCIDENTAL OR CONSEQUENTIAL DAMAGES IRRESPECTIVE OF WHETHER AJA VIDEO OR
THE VENDOR HAS ADVANCE NOTICE OF THE POSSIBILITY OF SUCH DAMAGES.
1
iii

iv

KONA LHe Plus Installation and Operation Guide — Table of Contents
Table of Contents
Trademarks . . . . . . . . . . . . . . . . . . . . . . . . . . . . . . . . . . . . . . . . . . . . . . . . . . . . . . . . . . . . . . . . . . . . . . . . . . . . . . . . . . . . . . . . . . . . ii
Notice . . . . . . . . . . . . . . . . . . . . . . . . . . . . . . . . . . . . . . . . . . . . . . . . . . . . . . . . . . . . . . . . . . . . . . . . . . . . . . . . . . . . . . . . . . . . . . . . . ii
FCC Emission Information . . . . . . . . . . . . . . . . . . . . . . . . . . . . . . . . . . . . . . . . . . . . . . . . . . . . . . . . . . . . . . . . . . . . . . . . . . . . . . ii
Contacting Support . . . . . . . . . . . . . . . . . . . . . . . . . . . . . . . . . . . . . . . . . . . . . . . . . . . . . . . . . . . . . . . . . . . . . . . . . . . . . . . . . . . . ii
Limited Warranty . . . . . . . . . . . . . . . . . . . . . . . . . . . . . . . . . . . . . . . . . . . . . . . . . . . . . . . . . . . . . . . . . . . . . . . . . . . . . . . . . . . . . .iii
Chapter 1: Introduction
Overview . . . . . . . . . . . . . . . . . . . . . . . . . . . . . . . . . . . . . . . . . . . . . . . . . . . . . . . . . . . . . . . . . . . . . . . . . . . . . . . . . . . . . . . . . . . . . . 1
Features . . . . . . . . . . . . . . . . . . . . . . . . . . . . . . . . . . . . . . . . . . . . . . . . . . . . . . . . . . . . . . . . . . . . . . . . . . . . . . . . . . . . . . . . . . . . . . . 2
Hardware . . . . . . . . . . . . . . . . . . . . . . . . . . . . . . . . . . . . . . . . . . . . . . . . . . . . . . . . . . . . . . . . . . . . . . . . . . . . . . . . . . . . . . . . . . 2
Video Formats . . . . . . . . . . . . . . . . . . . . . . . . . . . . . . . . . . . . . . . . . . . . . . . . . . . . . . . . . . . . . . . . . . . . . . . . . . . . . . . . . . . . . 2
KONA LHe Plus Audio . . . . . . . . . . . . . . . . . . . . . . . . . . . . . . . . . . . . . . . . . . . . . . . . . . . . . . . . . . . . . . . . . . . . . . . . . . . . . . 2
Software . . . . . . . . . . . . . . . . . . . . . . . . . . . . . . . . . . . . . . . . . . . . . . . . . . . . . . . . . . . . . . . . . . . . . . . . . . . . . . . . . . . . . . . . . . 3
Understanding Typical Workflows . . . . . . . . . . . . . . . . . . . . . . . . . . . . . . . . . . . . . . . . . . . . . . . . . . . . . . . . . . . . . . . . . . . . . . 4
PhotoJPEG . . . . . . . . . . . . . . . . . . . . . . . . . . . . . . . . . . . . . . . . . . . . . . . . . . . . . . . . . . . . . . . . . . . . . . . . . . . . . . . . . . . . . . . . . 4
DV (DV25). . . . . . . . . . . . . . . . . . . . . . . . . . . . . . . . . . . . . . . . . . . . . . . . . . . . . . . . . . . . . . . . . . . . . . . . . . . . . . . . . . . . . . . . . . 4
DV50 . . . . . . . . . . . . . . . . . . . . . . . . . . . . . . . . . . . . . . . . . . . . . . . . . . . . . . . . . . . . . . . . . . . . . . . . . . . . . . . . . . . . . . . . . . . . . . 4
DVCPRO HD . . . . . . . . . . . . . . . . . . . . . . . . . . . . . . . . . . . . . . . . . . . . . . . . . . . . . . . . . . . . . . . . . . . . . . . . . . . . . . . . . . . . . . . 4
HDV . . . . . . . . . . . . . . . . . . . . . . . . . . . . . . . . . . . . . . . . . . . . . . . . . . . . . . . . . . . . . . . . . . . . . . . . . . . . . . . . . . . . . . . . . . . . . . . 5
Apple ProRes 422 and Apple ProRes 422 HQ (SD or HD) . . . . . . . . . . . . . . . . . . . . . . . . . . . . . . . . . . . . . . . . . . . . . 6
Uncompressed 8-bit . . . . . . . . . . . . . . . . . . . . . . . . . . . . . . . . . . . . . . . . . . . . . . . . . . . . . . . . . . . . . . . . . . . . . . . . . . . . . . . 6
Uncompressed 10-bit . . . . . . . . . . . . . . . . . . . . . . . . . . . . . . . . . . . . . . . . . . . . . . . . . . . . . . . . . . . . . . . . . . . . . . . . . . . . . . 6
System Requirements . . . . . . . . . . . . . . . . . . . . . . . . . . . . . . . . . . . . . . . . . . . . . . . . . . . . . . . . . . . . . . . . . . . . . . . . . . . . . . . . . . 6
Cable Connections . . . . . . . . . . . . . . . . . . . . . . . . . . . . . . . . . . . . . . . . . . . . . . . . . . . . . . . . . . . . . . . . . . . . . . . . . . . . . . . . . . . . 7
Using the Breakout Cable and 3 BNCs . . . . . . . . . . . . . . . . . . . . . . . . . . . . . . . . . . . . . . . . . . . . . . . . . . . . . . . . . . . . . . 7
Using KL-box . . . . . . . . . . . . . . . . . . . . . . . . . . . . . . . . . . . . . . . . . . . . . . . . . . . . . . . . . . . . . . . . . . . . . . . . . . . . . . . . . . . . . . 8
About BNC Connectors . . . . . . . . . . . . . . . . . . . . . . . . . . . . . . . . . . . . . . . . . . . . . . . . . . . . . . . . . . . . . . . . . . . . . . . . . . . . 8
Connector Descriptions—Cables and KL-box . . . . . . . . . . . . . . . . . . . . . . . . . . . . . . . . . . . . . . . . . . . . . . . . . . . . . . . 9
In This Manual . . . . . . . . . . . . . . . . . . . . . . . . . . . . . . . . . . . . . . . . . . . . . . . . . . . . . . . . . . . . . . . . . . . . . . . . . . . . . . . . . . . . . . . . 10
1
1
Chapter 2: Installation
Installation Overview . . . . . . . . . . . . . . . . . . . . . . . . . . . . . . . . . . . . . . . . . . . . . . . . . . . . . . . . . . . . . . . . . . . . . . . . . . . . . . . . . 11
Unpacking . . . . . . . . . . . . . . . . . . . . . . . . . . . . . . . . . . . . . . . . . . . . . . . . . . . . . . . . . . . . . . . . . . . . . . . . . . . . . . . . . . . . . . . . . . . 12
Shipping Box Contents . . . . . . . . . . . . . . . . . . . . . . . . . . . . . . . . . . . . . . . . . . . . . . . . . . . . . . . . . . . . . . . . . . . . . . . . . . . 12
Installing the KONA LHe Plus Card into Mac Pro . . . . . . . . . . . . . . . . . . . . . . . . . . . . . . . . . . . . . . . . . . . . . . . . . . . . . . . . 13
Installing the KONA Card in a Windows PC . . . . . . . . . . . . . . . . . . . . . . . . . . . . . . . . . . . . . . . . . . . . . . . . . . . . . . . . . . . . 15
Cabling the System . . . . . . . . . . . . . . . . . . . . . . . . . . . . . . . . . . . . . . . . . . . . . . . . . . . . . . . . . . . . . . . . . . . . . . . . . . . . . . . . . . . 17
System Video/Audio Cable Connections . . . . . . . . . . . . . . . . . . . . . . . . . . . . . . . . . . . . . . . . . . . . . . . . . . . . . . . . . . . 17
Installing KONA LHe Plus Software . . . . . . . . . . . . . . . . . . . . . . . . . . . . . . . . . . . . . . . . . . . . . . . . . . . . . . . . . . . . . . . . . . . . 19
Mac Pro Software Installation Procedure . . . . . . . . . . . . . . . . . . . . . . . . . . . . . . . . . . . . . . . . . . . . . . . . . . . . . . . . . . . 19
Installing KONA Software for Windows . . . . . . . . . . . . . . . . . . . . . . . . . . . . . . . . . . . . . . . . . . . . . . . . . . . . . . . . . . . . 24
Re-Installation & Repair . . . . . . . . . . . . . . . . . . . . . . . . . . . . . . . . . . . . . . . . . . . . . . . . . . . . . . . . . . . . . . . . . . . . . . . . . . . 29
Updating KONA LHe Plus Firmware . . . . . . . . . . . . . . . . . . . . . . . . . . . . . . . . . . . . . . . . . . . . . . . . . . . . . . . . . . . . . . . . . . . 30
Genlock and Your System . . . . . . . . . . . . . . . . . . . . . . . . . . . . . . . . . . . . . . . . . . . . . . . . . . . . . . . . . . . . . . . . . . . . . . . . . . . . . 32
Chapter 3: Operation
Using KONA LHe Plus with Professional Video /Audio Software . . . . . . . . . . . . . . . . . . . . . . . . . . . . . . . . . . . . . . . . . 33
Using The AJA Control Panel . . . . . . . . . . . . . . . . . . . . . . . . . . . . . . . . . . . . . . . . . . . . . . . . . . . . . . . . . . . . . . . . . . . . . . . . . . 33

2
Control Panel Basics . . . . . . . . . . . . . . . . . . . . . . . . . . . . . . . . . . . . . . . . . . . . . . . . . . . . . . . . . . . . . . . . . . . . . . . . . . . . . . 33
Control Screen . . . . . . . . . . . . . . . . . . . . . . . . . . . . . . . . . . . . . . . . . . . . . . . . . . . . . . . . . . . . . . . . . . . . . . . . . . . . . . . . . . . . 37
Formats Screen . . . . . . . . . . . . . . . . . . . . . . . . . . . . . . . . . . . . . . . . . . . . . . . . . . . . . . . . . . . . . . . . . . . . . . . . . . . . . . . . . . . 39
Input Select Screen . . . . . . . . . . . . . . . . . . . . . . . . . . . . . . . . . . . . . . . . . . . . . . . . . . . . . . . . . . . . . . . . . . . . . . . . . . . . . . . 41
SDI Output Screen . . . . . . . . . . . . . . . . . . . . . . . . . . . . . . . . . . . . . . . . . . . . . . . . . . . . . . . . . . . . . . . . . . . . . . . . . . . . . . . .42
Analog Out Screen . . . . . . . . . . . . . . . . . . . . . . . . . . . . . . . . . . . . . . . . . . . . . . . . . . . . . . . . . . . . . . . . . . . . . . . . . . . . . . . . 44
Video Setup Screen . . . . . . . . . . . . . . . . . . . . . . . . . . . . . . . . . . . . . . . . . . . . . . . . . . . . . . . . . . . . . . . . . . . . . . . . . . . . . . .45
Audio Setup Screen . . . . . . . . . . . . . . . . . . . . . . . . . . . . . . . . . . . . . . . . . . . . . . . . . . . . . . . . . . . . . . . . . . . . . . . . . . . . . . . 46
Conversion Screen . . . . . . . . . . . . . . . . . . . . . . . . . . . . . . . . . . . . . . . . . . . . . . . . . . . . . . . . . . . . . . . . . . . . . . . . . . . . . . . . 47
DS Keyer Screen . . . . . . . . . . . . . . . . . . . . . . . . . . . . . . . . . . . . . . . . . . . . . . . . . . . . . . . . . . . . . . . . . . . . . . . . . . . . . . . . . . 48
Timecode Screen . . . . . . . . . . . . . . . . . . . . . . . . . . . . . . . . . . . . . . . . . . . . . . . . . . . . . . . . . . . . . . . . . . . . . . . . . . . . . . . . . 49
Presets Screen . . . . . . . . . . . . . . . . . . . . . . . . . . . . . . . . . . . . . . . . . . . . . . . . . . . . . . . . . . . . . . . . . . . . . . . . . . . . . . . . . . . . 51
Firmware Screen . . . . . . . . . . . . . . . . . . . . . . . . . . . . . . . . . . . . . . . . . . . . . . . . . . . . . . . . . . . . . . . . . . . . . . . . . . . . . . . . . . 52
Info Screen . . . . . . . . . . . . . . . . . . . . . . . . . . . . . . . . . . . . . . . . . . . . . . . . . . . . . . . . . . . . . . . . . . . . . . . . . . . . . . . . . . . . . . . 53
Who is Controlling KONA? . . . . . . . . . . . . . . . . . . . . . . . . . . . . . . . . . . . . . . . . . . . . . . . . . . . . . . . . . . . . . . . . . . . . . . . . 53
Using Multiple AJA Products . . . . . . . . . . . . . . . . . . . . . . . . . . . . . . . . . . . . . . . . . . . . . . . . . . . . . . . . . . . . . . . . . . . . . . . . . . 55
Notes on using multiple AJA Products: . . . . . . . . . . . . . . . . . . . . . . . . . . . . . . . . . . . . . . . . . . . . . . . . . . . . . . . . . . . . 55
Using 8-bit Versus 10-bit Video . . . . . . . . . . . . . . . . . . . . . . . . . . . . . . . . . . . . . . . . . . . . . . . . . . . . . . . . . . . . . . . . . . . . . . . . 56
Chapter 4: Troubleshooting
If You Run Into Problems . . . . . . . . . . . . . . . . . . . . . . . . . . . . . . . . . . . . . . . . . . . . . . . . . . . . . . . . . . . . . . . . . . . . . . . . . . . . . .57
Updating Software . . . . . . . . . . . . . . . . . . . . . . . . . . . . . . . . . . . . . . . . . . . . . . . . . . . . . . . . . . . . . . . . . . . . . . . . . . . . . . . . . . . 58
Support . . . . . . . . . . . . . . . . . . . . . . . . . . . . . . . . . . . . . . . . . . . . . . . . . . . . . . . . . . . . . . . . . . . . . . . . . . . . . . . . . . . . . . . . . . . . . . 58
Appendix A: Specifications
Video Formats . . . . . . . . . . . . . . . . . . . . . . . . . . . . . . . . . . . . . . . . . . . . . . . . . . . . . . . . . . . . . . . . . . . . . . . . . . . . . . . . . . . . . . . . 59
Video Input Digital . . . . . . . . . . . . . . . . . . . . . . . . . . . . . . . . . . . . . . . . . . . . . . . . . . . . . . . . . . . . . . . . . . . . . . . . . . . . . . . . . . . . 59
Video Input Analog . . . . . . . . . . . . . . . . . . . . . . . . . . . . . . . . . . . . . . . . . . . . . . . . . . . . . . . . . . . . . . . . . . . . . . . . . . . . . . . . . . . 59
Video Output Digital . . . . . . . . . . . . . . . . . . . . . . . . . . . . . . . . . . . . . . . . . . . . . . . . . . . . . . . . . . . . . . . . . . . . . . . . . . . . . . . . . . 59
Video Output Analog . . . . . . . . . . . . . . . . . . . . . . . . . . . . . . . . . . . . . . . . . . . . . . . . . . . . . . . . . . . . . . . . . . . . . . . . . . . . . . . . . 60
Audio Input Digital . . . . . . . . . . . . . . . . . . . . . . . . . . . . . . . . . . . . . . . . . . . . . . . . . . . . . . . . . . . . . . . . . . . . . . . . . . . . . . . . . . . 60
Audio Input Analog . . . . . . . . . . . . . . . . . . . . . . . . . . . . . . . . . . . . . . . . . . . . . . . . . . . . . . . . . . . . . . . . . . . . . . . . . . . . . . . . . . . 60
Audio Output Digital . . . . . . . . . . . . . . . . . . . . . . . . . . . . . . . . . . . . . . . . . . . . . . . . . . . . . . . . . . . . . . . . . . . . . . . . . . . . . . . . . 60
Audio Output Analog . . . . . . . . . . . . . . . . . . . . . . . . . . . . . . . . . . . . . . . . . . . . . . . . . . . . . . . . . . . . . . . . . . . . . . . . . . . . . . . . . 61
Down-Conversion . . . . . . . . . . . . . . . . . . . . . . . . . . . . . . . . . . . . . . . . . . . . . . . . . . . . . . . . . . . . . . . . . . . . . . . . . . . . . . . . . . . . 61
Machine Control . . . . . . . . . . . . . . . . . . . . . . . . . . . . . . . . . . . . . . . . . . . . . . . . . . . . . . . . . . . . . . . . . . . . . . . . . . . . . . . . . . . . . . 61
Index . . . . . . . . . . . . . . . . . . . . . . . . . . . . . . . . . . . . . . . . . . . . . . . . . . . . . . . . . . . . . . . . . . . . . . . . . . . . . . . . . . . . . . . . . . . . . . . . 63
Edge Shot Photo Here
Overview
Chapter 1: Introduction
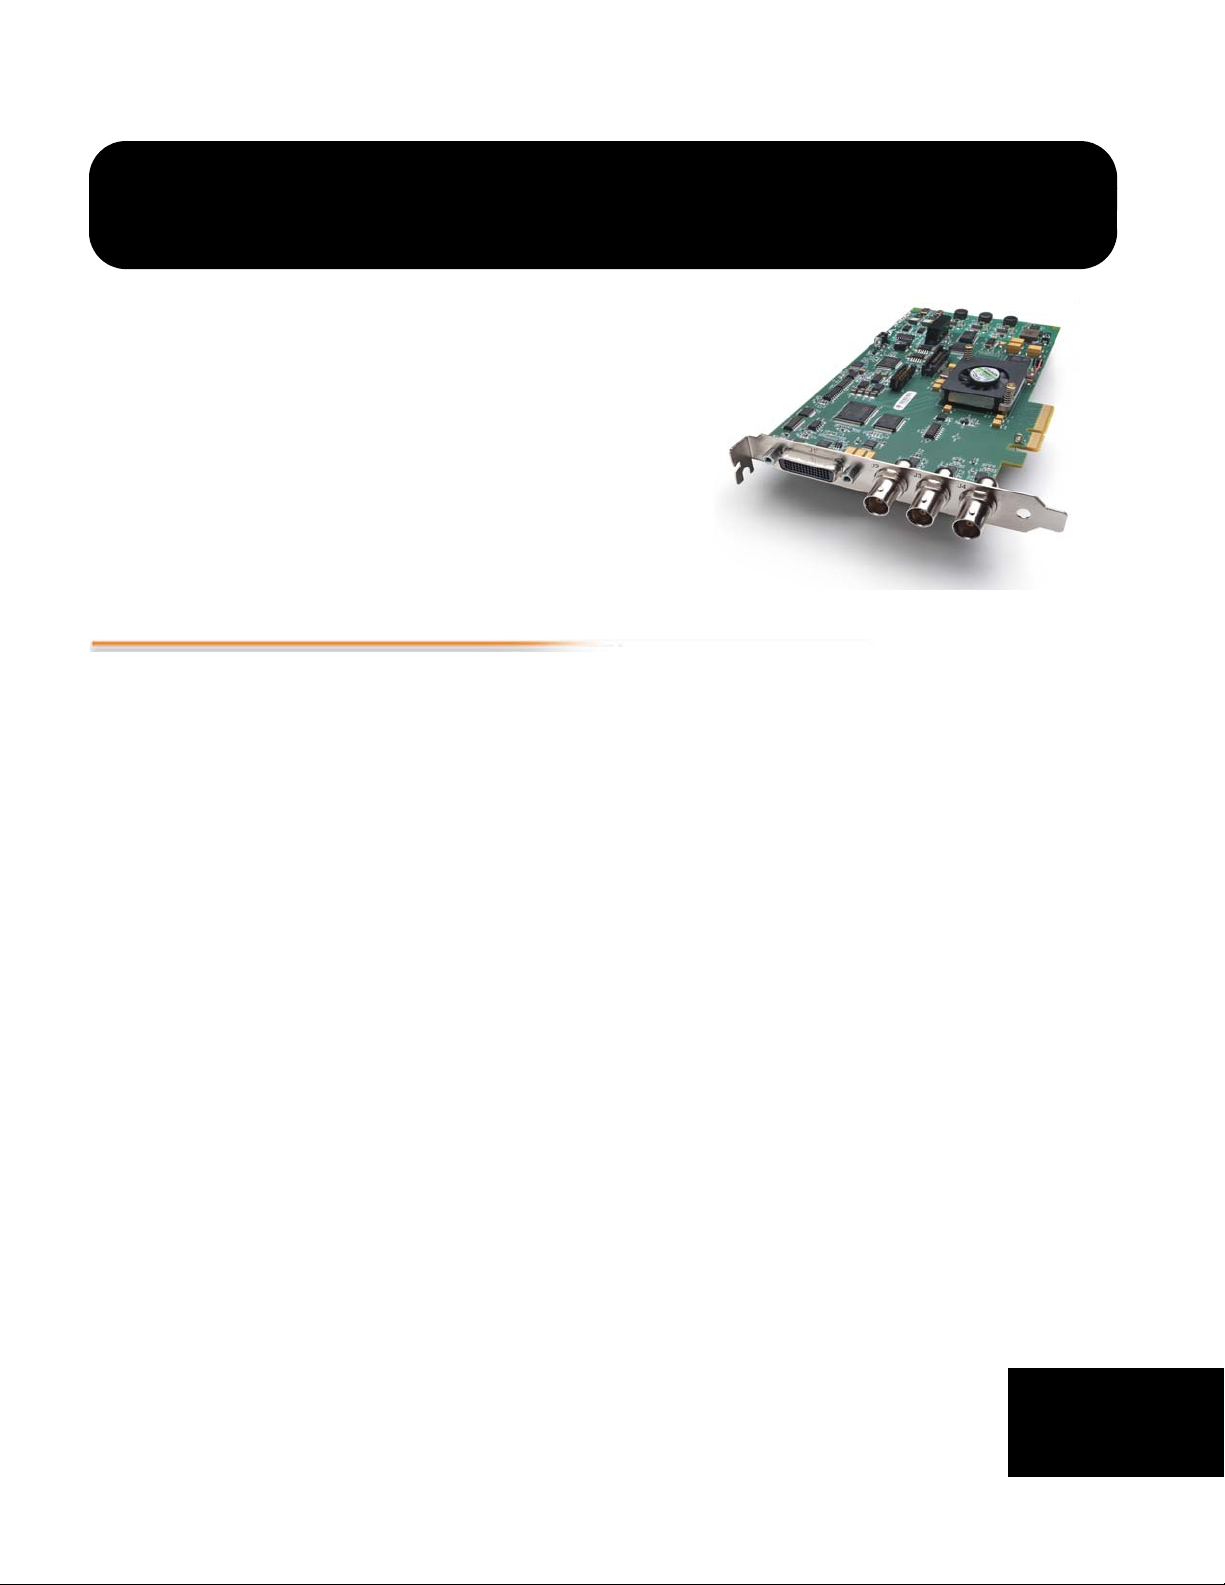
The AJA KONA LHe Plus supports both HD/SD analog and digital I/O for video and audio,
providing maximum capability for both Mac OSX and Windows 7 workstations. KONA LHe
Plus simplifies integrating analog and digital signals into a single workflow and multiple
output options to ensure you can deliver whatever formats are required.
KONA LHe Plus offers:
• 10-bit or 8-bit uncompressed video I/O
• Two-channel AES digital audio and eight-channel SDI embedded digital
audio I/O
• Analog composite, S-video or SD/HD component video I/O
• Two-channel balanced analog audio I/O
• 10-bit quality hardware down-conversion from HD to SD.
KONA LHe Plus provides improved performance with third-party applications, such as
Adobe CS6 and Avid Media Composer v6. AJA’s renowned OS X and Windows software and
application integration is included. KONA LHe Plus is also fully extensible via an optional 1RU
breakout box.
KONA LHe Plus supports DV25 and DV50 using the DVCPRO codec, and JPEG. DVCProHD,
HDV, and Apple RT Extreme are all supported—and even accelerated by onboard hardware.
1
1
1

2
Features
The KONA LHe Plus card offers a large number of unique features for optimum quality, ease
of use, and support for a wide variety of workflows and environments. KONA LHe Plus
provides flexible standard definition and high definition capture and playback, a hardware
down-converter for working in mixed SD/HD environments—and it supports both analog
and digital audio/video I/O.
Hardware • 10-bit uncompressed SD/HD QuickTime capture card
• 12-bit HD Analog Component I/O
• 12-bit SD Analog Component/Composite/S-Video I/O
• 10-bit hardware HD-to-SD down-conversion
• DVCProHD hardware acceleration
• HDV hardware acceleration
• Dynamic RT Extreme hardware acceleration
• One SDI or HD-SDI Input
• Two independent SDI/HD-SDI outputs
• 2-channel analog balanced XLR audio I/O
• 2-channel AES XLR audio I/O
• 8-channel SDI embedded audio I/O
• HD/SD genlock on analog video inputs
• RS-422 Machine Control
• compatible with most professional high-end editing applications
• Cables standard
• Optional KL-box Breakout Box—provides rack mounting and flexible
easy I/O (KL-box cabling is included with the KL-box). When ordering, specify a KL-box
for the KONA LHe Plus since it uses a unique cable.
• 3-year warranty
Video Formats For a complete list of video formats that KONA LHE Plus supports, refer to “Video Formats”
on page 59.
KONA LHe Plus
Audio
KONA LHe Plus supports two-channel 24-bit 48kHz AES audio via XLR connections, and
eight-channel embedded 24-bit 48kHz audio over the same single SDI connection as the
video. If you are using a digital deck—you’ll have the proper connections to the deck.
For analog audio, KONA LHe Plus provides two-channel balanced audio input and output. If
you purchase the optional KL-Box breakout box, you also get two-channel unbalanced
audio output (RCA jacks).
KONA LHe Plus also features AES input sample rate conversion; this feature eliminates the
requirement for audio source synchronization. Sample rate converters auto-lock to any AES
input, 32-96KHz, and then convert it to 24 bit 48KHz audio, perfectly locked to internal
KONA LHe Plus video. Sample rate conversion is done at very high quality (over 120db THD).

Software On a Mac
AJA KONA for Mac drivers are optimized for use on OS X, with applications and advanced
AJA hardware capabilities controlled easily at-a-glance in the application you're using.
KONA for Mac software integrates within the native environment where used – whether
Avid Media Composer, Apple Final Cut Pro, Adobe Creative Suite, Autodesk Smoke for
Mac, or a wide array of other Mac applications.
Supported applications include:
• Avid® Media Composer® 6, Symphony® 6, and NewsCutter® 10
• Apple Final Cut Pro X
• Adobe Creative Suite
• Autodesk Smoke® for Mac
The KONA Desktop feature allows broadcast design elements to be viewed with the
proper aspect ratio and color depth on a broadcast monitor via the KONA card. KONA
Desktop is available on the entire range of KONA cards, supporting Adobe After Effects,
Photoshop, Apple Motion, Autodesk Smoke for Mac and more. Powerful AJA utilities, Easy
Setups, and plug-ins round out the Mac environment, providing support for all popular
Mac application workflows.
On a PC
KONA for PC software allows Windows to access the hardware power of your KONA within
major editing and graphics applications. Other software vendors have also provided
integrated support for KONA in their own PC applications through direct collaboration
with AJA. Choose the right KONA card for any format you need, including DPX, Cineon,
TGA, TIFF, BMP, AVI and QuickTime. You can playback and master material, at a variety of
frame rates, on a high-resolution widescreen monitor or digital projector. Custom AJA
software allows full control over your playback, parameters are clearly laid out, including
provisions for choosing a user-specified LUT. Supplied AJA plug-ins integrate your KONA
card into a variety of graphics/visual-effects software applications to make operations
even easier to use. Using AJA plug-ins, sophisticated features appear as if they were
native to the software application user interfaces.
KONA LHe Plus Installation & Operation Guide — Features
1
3
Directly supported applications include:
• Avid® Media Composer® 6, Symphony® 6, and NewsCutter® 10
• Adobe Premiere® Pro
• Adobe After Effects®
• Adobe Photoshop®
• Sony® Vegas®
• Eyeon Fusion®
KONA LHe Plus users will also find the powerful AJA Control Panel automatically installed
with their KONA package. The AJA Control Panel provides easy I/O configuration
monitoring, audio/video source selection, conversion and control of KONA within the
overall MacOS or Windows 7 environment.
Available Utilities from AJA include: AJA Utilities: AJA TV, VTR Xchange, AJA System Test,
AJA DataCalc, AJA QTtoDPXtranslator, and AJA DPXtoQTtranslator.

4
Understanding Typical Workflows
KONA LHe Plus allows more workflow flexibility than ever before. Users can independently
select different formats for capture and storage media, while also outputting to an array of
analog and digital uncompressed formats—with all outputs active simultaneously. Capture
can range from analog, DV, or SD and HD digital uncompressed. Media can be stored on
disk as:
• offline quality at low bit rates
• on-line quality at moderate bit rates
• or with the highest quality as 8 or 10 bit uncompressed SD and HD
As quality and codecs improve, the lines between offline and online are blurring. For
example, with the Apple ProRes 422 codec, native HD editing in that codec is now possible,
providing very high quality results (true HD editing) at very low data rates.
Following are summaries of the most common codecs used in various workflows, providing
data rates and relative quality levels. Some workflows require a RAID array and some will
work using the host Apple computer's internal system drive (as noted where supported).
PhotoJPEG Data rate: approximately 1-3 MB/second standard definition or high definition—supported
by internal system drive
Quality: Very Good
The PhotoJPEG codec offers excellent compressed media for near on-line quality at low
data rates. PhotoJPEG can use full-raster 4:2:2 sampling. KONA LHe Plus allows PhotoJPEG
monitoring and output in both SD and HD and can capture from almost any HD or SD input,
directly to PhotoJPEG media.
DV (DV25) Data rate: 3.13 MB/second (megabyte/second) standard definition only—supported by
internal system drive
Quality: Good
DV is commonly input to an Apple computer via FireWire. KONA can capture directly to DV
compressed media from an uncompressed SDI source. For devices without FireWire
(IEEE1394 or i.Link) connections, this allows the user to capture to this low data rate/goodquality codec. While DV does offer good quality, it has lower chroma resolution compared
to DV50, JPEG, or uncompressed. The KONA card can convert DV projects to Uncompressed,
in real time, for monitoring and output even if the footage is not captured using the KONA
card.
DV50 Data rate: 6.26 MB/second standard definition only—supported by internal system drive
Quality: Very Good
Panasonic DV50 standard definition codec. DV50 is a 4:2:2 compressed format and has
higher chroma resolution than DV25. As with DV25, KONA can convert DV50 projects to
uncompressed, in real time, for monitoring and output. KONA can capture from its SDI
input, directly to DV50 compression.
DVCPRO HD Data rate: 12 MB/second high definition—supported by internal system drive
Quality: Excellent
KONA LHe Plus has hardware support for capture from HD-SDI to the DVCPRO HD codec.
KONA's hardware also takes some of the DVCPRO HD codec processing load off the CPU,
allowing more computer processor time for Dynamic RT.

KONA LHe Plus Installation & Operation Guide — Understanding Typical
HDV Data rate: 19 MB/second high definition720p, 25 MB/second high definition 1080i—supported
by internal system drive
Quality: Excellent
You can use KONA LHe Plus to convert HDV projects to uncompressed—in real time—for
monitoring and/or output. KONA LHe Plus can capture uncompressed from any input, directly
to HDV media. The KONA LHe Plus advanced scaling engine takes the native frame (long GOP
1440 HD) and outputs it via hardware—in real time. Precision AJA circuitry re-sizes the video to
proper 1920 x 1080, providing quick playback of HDV for monitoring and recording.
HDV captures HD images via MPEG2 compression and allows for recording the signal to a
MiniDV tape. This MPEG2 compression is similar to a DVD (although DVD is a program stream vs.
HDV’s transport stream and HDV uses a constant bit rate whereas DVDs use variable bit rates).
The issue for post production is that the HDV transport stream is based around a long-GOP
structure (group of pictures) which produces images based on information over a section of
time, via I, P and B frames; Intraframes, predicted frames and bi-directional frames. Formats that
do not use this scheme treat frames as individual units, as in the progressive formats where a
frame truly is a frame, or as interlaced frames where two fields create the image. Sometimes we
refer to these formats in contrast to MPEG formats, as I-frame formats where frames can be
easily defined as individual.
1
5
Since the fra
post-production; how can we work with the material if we must know what lies before, after and
during? Luckily, the transport stream MPEG2 can be transmitted over IEEE1394 (aka FireWire).
This means that the compressed HD material can be transferred into systems with the
appropriate hardware and software. While this seems like a simple solution for postproduction, it means that the footage must be brought into the system as a rather heavily
compressed format and that the computer must continue to work with the material as a MPEG2
transport stream, which is incredibly processor intensive for the computer.
How does the AJA KONA LHe Plus card connect to HDV and digitize material to uncompressed
HD files for editing—or at the very least, to a lightly compressed I-Frame HD format? The answer
to this is provided in a feature common to many HDV devices: analog HD output via component
video. The component connectors on JVC cameras and decks, along with Sony cameras and
decks, allows for the output of the long GOP MPEG2 data as a standard HD video format such as
720P in the JVC products—or 1080i in the Sony products.
Since the KONA LHe Plus has the ability to digitize analog HD signals, the analog component
output of the HDV devices can simply be connected to the KONA inputs. Note that HD signal
cannot be transported over composite or S-Video (Y/C) cables, so the HDV device must have an
analog component HD output. The KONA LHe Plus also has the ability to ingest analog audio, so
the analog audio outputs of the HDV devices can be sent to the KONA card as well. (Also note
that these analog audio outputs on the HDV devices are usually unbalanced RCA connections
where the KONA card uses balanced XLR style connection so some sort of audio level correction
device, such as a mixer or a stand alone active interface amplifier, should be used for accurately
attenuated audio.)
Finally, you will want to control your device. Where all of the video, audio and timecode
information moved over the FireWire cable, now you are dividing those tasks. Device control is
the most difficult to configure for HDV devices because so few HDV devices have implemented
any form of device control other than IEEE1394. The one notable exception is the JVC BR-HD50
HDV deck which has a remote serial port for RS422 protocol and device control. Check the KONA
LHe Plus support area on the AJA website for a whitepaper on HDV, which gives details on using
KONA LHe Plus with various HDV equipment.
mes of HDV have the long GOP structure to define them, herein lies the problem for
Note: direct capture into HDV media on the LHe is not possible. Direct capture into the LHe
can only be done using uncompressed, DVCPRO HD, or Pro Res. Regarding ProRes 422,
capturing HD resolution ProRes 422 from an HD source requires a Mac Pro with an Intel
Xeon processor.

6
Apple ProRes 422
and Apple ProRes
422 HQ
(SD or HD)
Uncompressed
8-bit
Data rate: Approximately 18 MB/second ProRes 422, Approximately 31 MB/second ProRes 422
HQ— supported by internal system drive or attached storage
Quality: Excellent, broadcast quality
Captured media is virtually indistinguishable from pristine uncompressed sources. Better yet,
ProRes maintains the quality during editing, surviving multiple encoding/decoding
generations without degradation. It was designed by Apple for editing, rather than as a
transmission/distribution codec as are most popular codecs. Some of the advantages include:
• Full-size 1920-by-1080 and 1280-by-720 HD resolutions.
• Full-size 720-by-486 and 720-by-576 SD resolutions.
• 4:2:2 chroma sampling. Provides precise compositing and blending at sharp saturated-
color boundaries.
• 10-bit sample depth. Preserves subtle gradients of 10-bit sources (perfect for green-
screen compositing, graphics or color correction) with no visible banding artifacts.
• I frame-only encoding. Ensures consistent quality in every frame and no artifacts from
complex motion.
• Variable bit-rate (VBR) encoding. “Smart” encoding analyzes the image and allocates
more bits to complex frames.
• Low data rate requirements make for more storage options and require less drive space
to store high quality video.
Data rate: 21 MB/second standard definition, or 100-124 MB/second high definition (see later
“Storage Capacity” chart in Chapter 1 for the various transfer rates per format)—requires SCSI,
Fibre Channel, or ATA drive array
Quality: Excellent
The native storage format for KONA LHe Plus is uncompressed media which offers the highest
quality available. Capturing in uncompressed results in no compression artifacts, and video is
sampled over the full raster at a 4:2:2 rate.
Using uncompressed maintains a higher quality in your project from capture all the way
through effects rendering. KONA LHe Plus supports capture of uncompressed through any of
its inputs, and uncompressed projects are output to all of its outputs simultaneously.
Uncompressed
10-bit
Data rate: 28 MB/second standard definition, or 133-166 MB/second high definition—
uncompressed 10-bit requires SCSI, Fibre Channel or SATA drive arrays.
Quality: Excellent, very high quality
Offering all the benefits noted previously for 8-bit uncompressed, 10-bit additionally offers
the very highest quality available. With 10-bit media video quality is second to none. For more
information on this subject, please see the topic at the end of Chapter 4: Installation and
Configuration, titled “Using 8-bit Versus 10-bit Video.'
System Requirements
AJA Video recommends that your system meet minimum hardware and software
requirements to achieve a satisfactory level of performance when operating it. System
requirements are subject to change as new versions of operating systems, QuickTime, and
workstations become available. For the most up-to-date Minimum System Requirements see
“Installation Overview” on page 11.
Cable Connections
6 BNCs (Analog Connections):
Can be Configured for
Component,
Composite,
or Y/C
Reference Input BNC
RS422
Machine Control
to VTR
(9-pin)
SDI Input BNC
SDI Output BNC
HDMI Input
HDMI Output
Y/CVBS In BNC
Pb/Y In BNC
Pr/C In BNC
Y/G/CVBS Out BNC
Pb/B/Y Out BNC
Pr/R/C Out BNC
green
blue
red
green
blue
red
Analog Audio
Channel 1 Input
Analog Audio
Channel 2 Input
Analog Audio
Channel 1 Output
Analog Audio
Channel 2 Output
AES Input
Channels 1 & 2
AES Output
Channels 1 & 2
60-pin connector
To KONA LHe Plus
Balanced Audio
Analog Video
Video/Audio
Connectors
on LHe Plus Endplate
KONA LHe Plus Installation & Operation Guide — Cable Connections
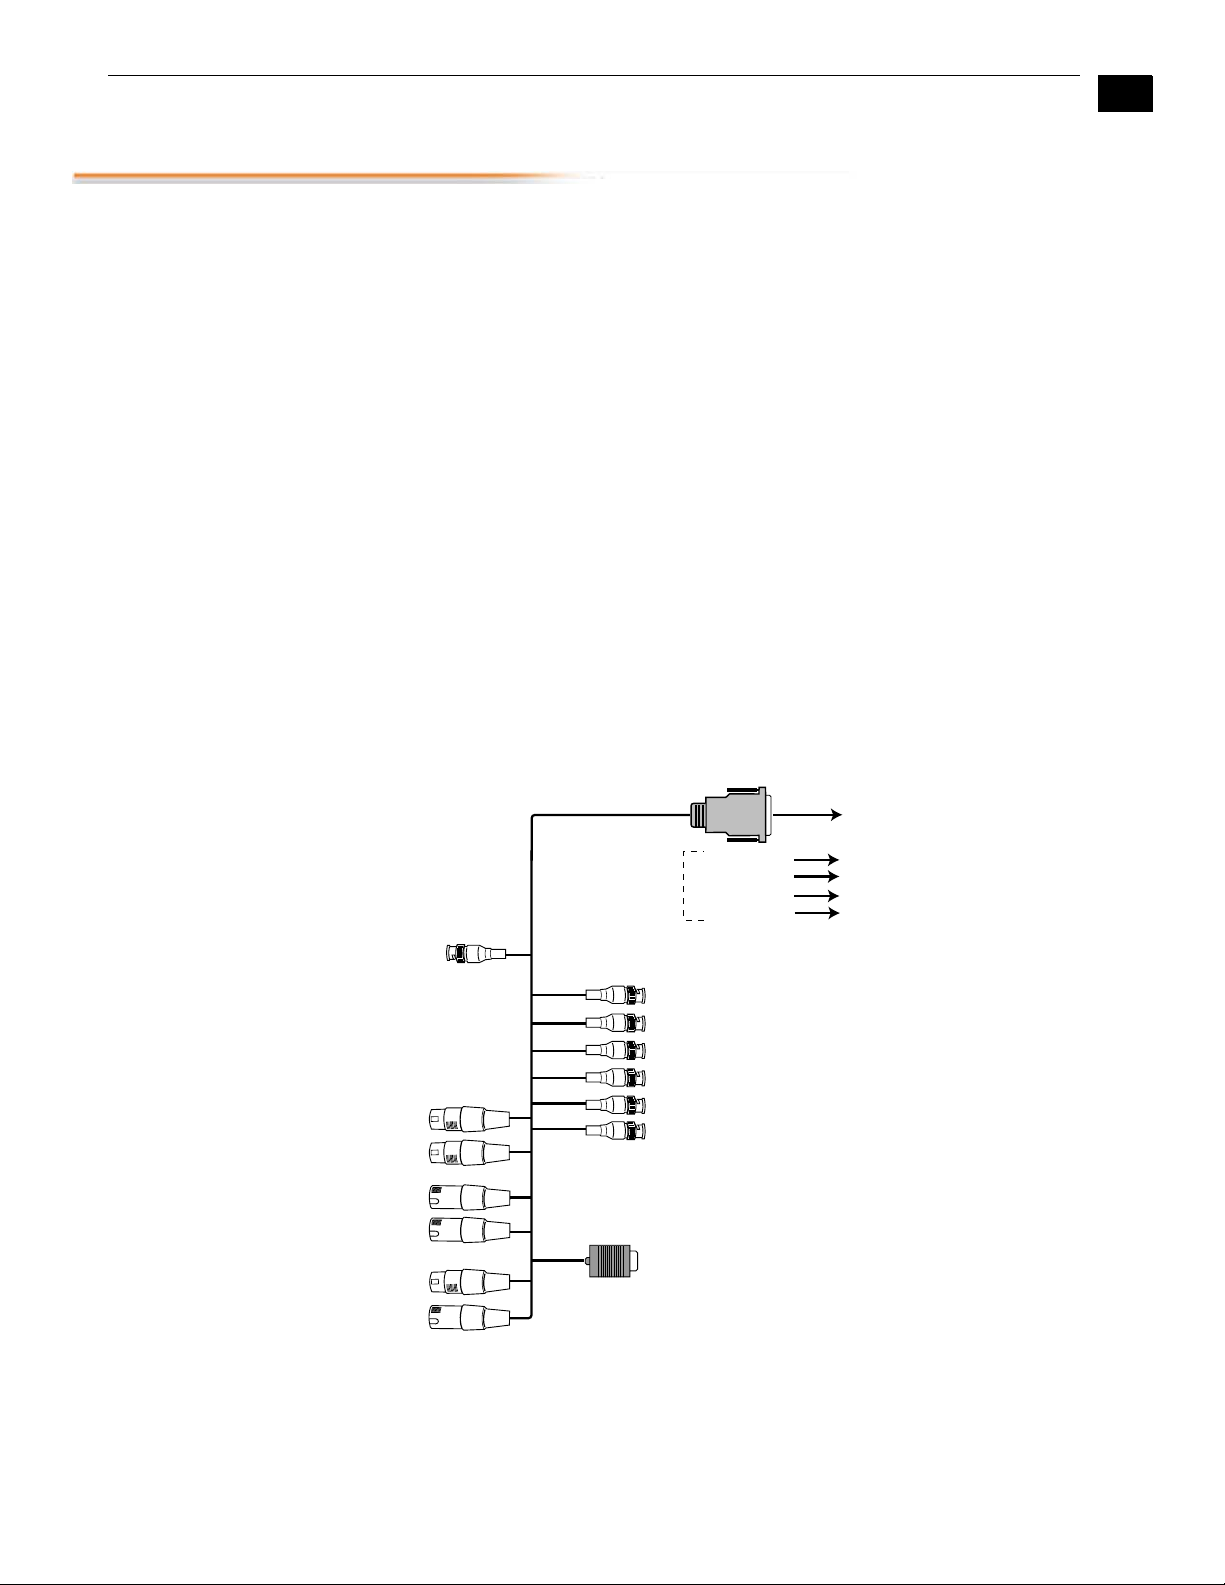
KONA LHe Plus offers unsurpassed cable connectivity for a video/audio capture card.
Connections are made via a supplied breakout cable and three BNCs on the KONA LHe Plus Card
endplate.
7
Using the Breakout
Cable and 3 BNCs
The breakout cable supports:
• Reference Input (BNC)
• Component/Composite/S Video Input (3x BNC)
• Component/Composite/S Video Output (3x BNC)
• AES In (2x XLR)
• AES Out (2x XLR)
• Balanced Audio In (2x XLR)
• Balanced Audio Out (2x XLR)
• RS-422 Machine Control (9 pin D)
The three BNCs on the KONA LHe Plus Card endplate additionally provide:
• Standard and High-definition SDI input (BNC)
• 2 SDI outputs (2x BNC, independent outputs)
1
KONA LHe Plus Breakout Cable
8
RS422
Machine
Control
External
Reference
(loop)
Analog Audio
Output
Balanced Audio In
Channels 1 & 2
Balanced Audio Out
Channels 1 & 2
Composite/
Component
Video In
Composite/
Component
Video Out
AES/EBU Audio
In and Out
In
Serial
Digital
Out
Serial
Digital
Pins (2) on BNC Connector
Align slots in
cable connector
barrel with connector
pins, then slide it over the pins
and rotate the barrel
to lock the connectors
(connector on KL-box)
together
Using KL-box The KL-box attaches to the KONA LHe Plus card via cables that attach to the back of the KL-
box. These cables are supplied with the KL-Box (one 60-pin to 60-pin, and one 3-BNC to 3BNC). When you purchase the optional KL-Box, you get two-channel unbalanced audio
output (2 RCA Jacks)—not available with the standard cable.
Note: When ordering a KL-Box, ensure that you specify one configured for the KONA LHe
Plus. The KL-Box is also available for other KONA models but may use a different cable set.
Separate AJA part numbers exist for each configuration, so ensure your dealer supplies
you with the correct one.
About BNC
Connectors
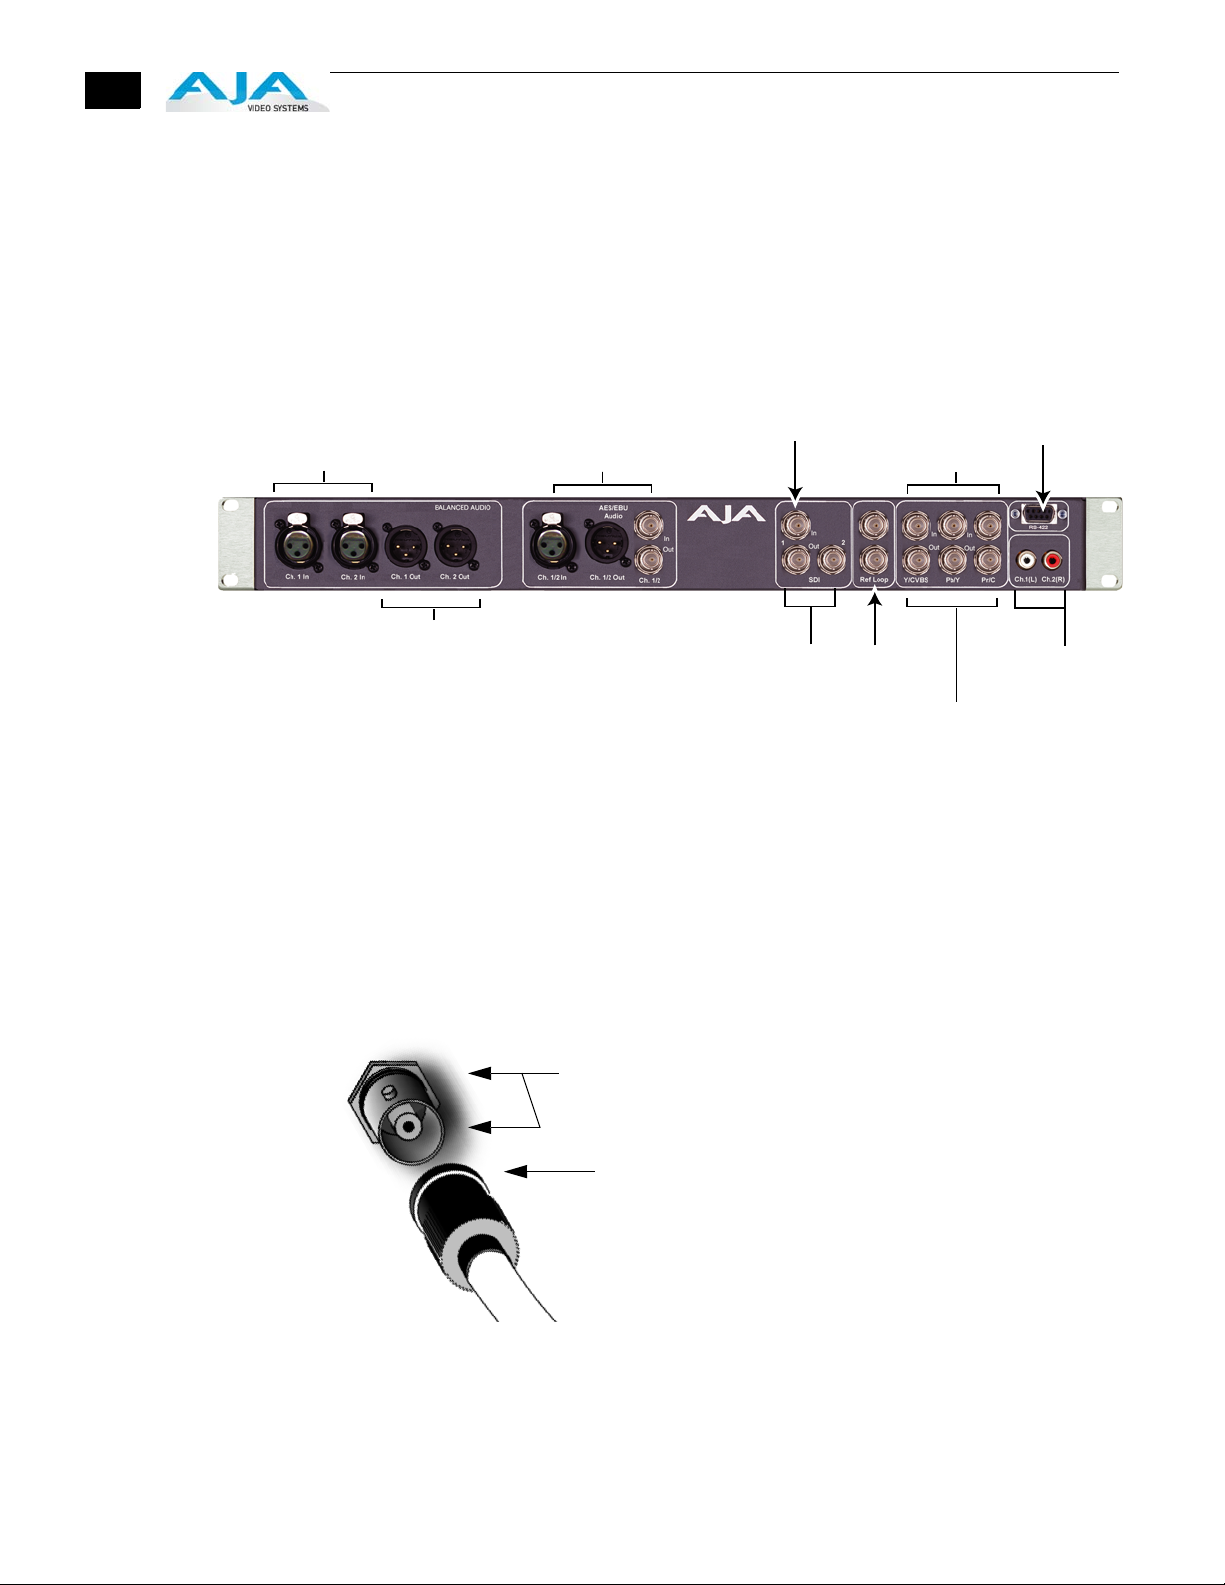
AJA KL-box Panel Connectors
Although most video professionals are used to BNC connectors, you may not have seen them
if you’ve been using primarily desktop video equipment. BNC connectors ensure a positive
connection by the act of locking the connectors together via pins in one connector that fit
into slots in the corresponding connector.
To make a BNC connection, slide the cable connector over the panel connector and then
when seated, rotate the barrel of the cable connector 90° clockwise until the connectors are
locked together. When properly locked, the cable cannot accidentally be pulled out.

KONA LHe Plus Installation & Operation Guide — Cable Connections
9
Connector
Descriptions—
Cables and KL-box
Connectors on the standard cable set are labelled as to their function for easy installation and
maintenance. Similarly, connectors on the optional KL-box are also labelled.
SDI Input and Outputs
BNC connectors are provided on the KONA LHe Plus card endplate for one SD-SDI or HD-SDI
input and two SDI outputs (independent of the input). The SDI input and outputs support video
and embedded 24-bit digital audio. Use SDI wherever possible for the best quality 10-bit
uncompressed video input, capture and output. If peripheral equipment has a variety of inputs/
outputs, look to see if it has SDI I/O, and use it where possible. Most high-end professional
broadcast equipment supports SDI (VTRs, cameras, media storage servers, etc.).
2-Channel Digital AES/EBU Audio Inputs And Outputs
One female XLR connector is provided for the channel 1 and 2 inputs, while a male XLR
connector carries channel 1 and 2 outputs. AES/EBU signals are handled internally as 24-bit
digital.The optional KL-box also provides XLR audio connections on the front panel.
Note: AES XLR connections are digital and cannot be used with analog equipment having XLR
connectors.
1
Analog 2 Channel Balanced Audio
Two sets of analog XLR connectors, one for each channel, support balanced audio connections.
Male XLRs are provided for outputs and female XLRs are provided for inputs. Balanced audio
(differential) connections provide better analog audio quality over longer cable runs. Most
professional quality VTRs and audio equipment have XLR style connectors for analog audio.
Analog audio signals are converted internally to 24-bit digital.
Analog 2 Channel Unbalanced Audio (KL-box only)
On the KL-box are two analog output connectors, one for each channel. These connectors are
RCA-style phono jacks.
RS422 Machine Control
A female DB9 connector on the breakout cable provides connection for VTRs, camcorders, disk
media servers, and other devices using RS422 SMPTE (Sony) protocol. This connector is also
present on the optional KL-box. (Connector pinout is listed in Appendix A: Specifications.)
Analog Monitor Out (Component/Composite HD/SD)
Both the standard I/O cable and the optional KL-Box feature two groups of 3 BNC connectors
(each) for input and output of component, composite and Y/C functions. The signals are
labelled on both the cable and KL-Box connectors.
Component video signals are generally higher quality than composite, but not as high quality as
serial digital (SDI).
A Note About RGB—Although RGB is used less in today’s video systems, KONA LHe Plus
supports it. However, because the KONA LHe Plus (and SMPTE SDI) native format is YPbPr,
AJA recommends the use of YPbPr whenever possible for analog monitoring. Although
component video monitors often have RGB inputs, it’s better to use YPbPr when the
monitor supports it. The YPbPr format provides “headroom” for “superwhite” and
“superblack”—and these video levels will be clipped when transcoding to RGB. Also, the
RGB/YPbPr transcoding involves a level translation that results in mathematical round-off
error. RGB can be configured in the AJA Control Panel.
A Note About YPbPr—Component Video, or YPbPr, has been given several names over time.
YUV, Y/R-Y/B-Y, and YCbCr, are just some examples. Although these various formats have
some differences in levels, they are all basically the same. KONA LHe Plus uses the modern
YPbPr terminology exclusively. KONA LHe Plus supports three different types of YPbPr:

10
In This Manual
SMPTE/EBU N10, Betacam (NTSC), and Betacam (NTSC Japan). These three formats differ
in level only and are configured in the AJA Control Panel.
Reference Video
A single BNC on the standard KONA LHe Plus cable—or two BNC connectors on KL-box (it
loops through)—allow you to synchronize KONA LHe Plus outputs to your house analog
reference video signal (or black burst). If you have a sync generator or central piece of video
equipment to use for synchronizing other video equipment in your studio, then connect its
analog composite output here. When KONA LHe Plus outputs video it uses this reference
signal to lock to. When connecting a reference video source, the locking signal should be the
same format as the Primary format selected in the AJA Control Panel. It is possible in some
circumstances to use an alternate format video signal as long as the basic frame rate is
compatible.
Chapter 1 is the introduction you’re reading, listing features, and system requirements.
Chapter 2 provides complete instructions for installing and configuring the AJA KONA LHe
Plus card. The user is guided through unpacking, installing the card into a Mac or PC, installing
KONA LHe Plus Mac or PC compatible driver software, cabling the system and then getting it
up and running. Important configuration information is also provided on video settings and
use of genlock/external reference.
Chapter 3 discusses operational aspects of KONA LHe Plus when used with the AJA Control
Panel.
Chapter 4 discusses troubleshooting problems with your system and what to do when there’s
a problem you can’t solve.
Appendix A presents a list of technical specifications for the product.
The remainder of the manual consists of an index section to help you rapidly find topics in the
manual.
Installation Overview
Chapter 2: Installation
The installation and set up of a KONA LHe Plus is very simple. All of the steps of installation
and configuration are documented in this chapter, summarized as follows:
1. Unpack the shipping box
2. If not previously installed on your Mac Pro, ensure that your third-party video editing
software is installed as detailed in its user documentation.
3. For the KONA Mac installation, AJA recommends that the card be placed in Slot 3 and
the Apple Expansion Slot Utility be configured so that the slot is running at x4 lane
speed or higher. (The choice of x4, x4, x1 and x16 is ideal.) Refer to the AJA website at:
http://www.aja.com/en/support/kona-system-configuration/
For the most up-to-date Windows system requirements for KONA, consult the AJA
website:
http://www.aja.com/en/support/kona-pc-system-configuration/
4. Install AJA KONA LHe Plus software on your computer from website download or the
supplied AJA CD-ROM.
5. Cable the system audio and video sources, VTR, audio monitor, and video monitor. If
you purchased the optional KL-box, then install it into an equipment rack or place it on
a desk and connect its two cables to the KONA LHe Plus card. If you’re instead
using the standard cable set, then use those to connect equipment.
Each of these steps are explained in greater detail in the remaining pages of this chapter.
1
1
2
12
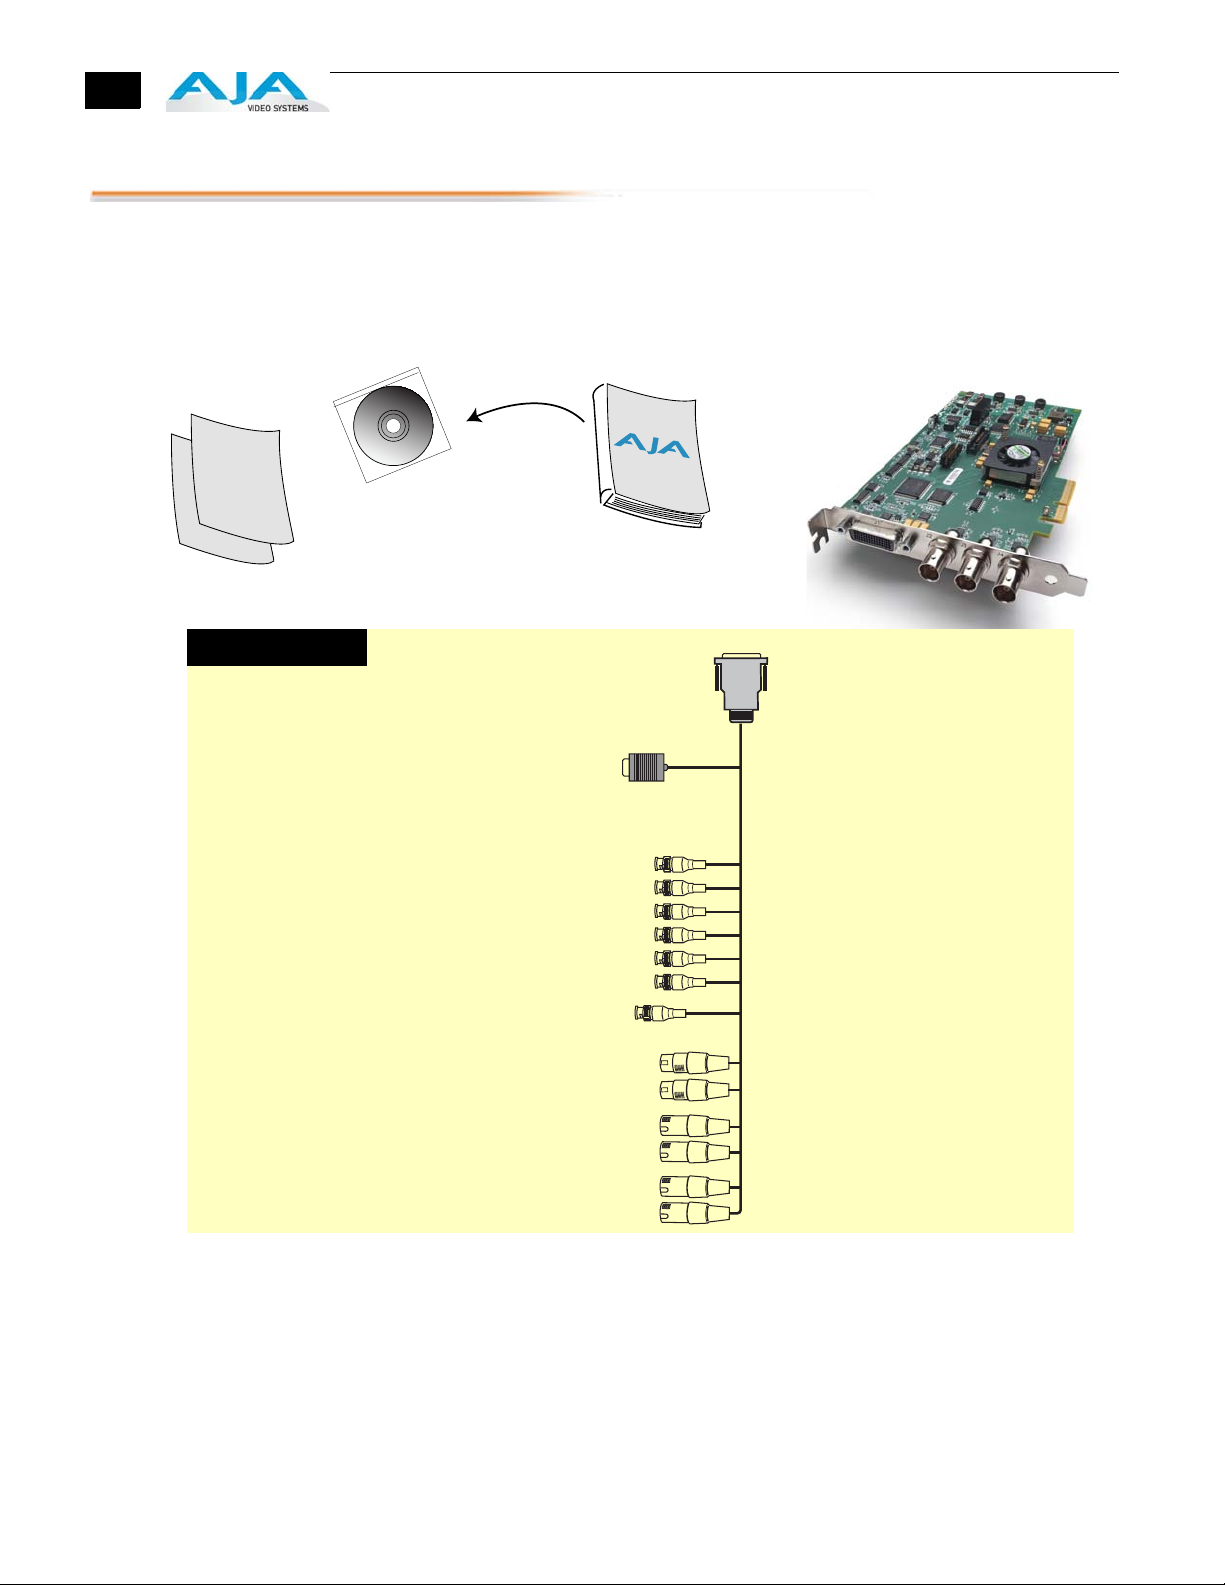
Installation Software CD
Installation and Operation Manual
in electronic form on the CD (PDF)
Read Me First Notice
and Registration Sheets
Standard Cable
AJA KONA
LHe Plus Card
RS422 Machine Control to VTR
(9-pin)
Analog Audio Channel 1 Input
Analog Audio Channel 2 Input
Analog Audio Channel 1 Output
Analog Audio Channel 2 Output
Digital AES Input Channels 1 & 2
Digital AES Output Channels 1 & 2
Multiple-pin connector
To KONA LHe Plus
Y/CVBS In BNC
Pb/Y In BNC
Pr/C In BNC
Y/G/CVBS Out BNC
Pb/B/Y Out BNC
Pr/R/C Out BNC
green
blue
red
green
blue
red
6 BNCs (Analog Connections): Can be
Congured for Component, Composite, or Y/C
Reference Input or LTC Input BNC
Balanced Audio
Analog Video
Unpacking
Shipping Box
Contents
KONA LHe Plus is shipped with a CD containing system software and an Installation and
User manual (a PDF on the CD), and a cable. If you purchased the optional KL-box breakout
box, it ships with its own set of cables and instructions for connection to the KONA LHe Plus
card.
Contents, KONA LHe Plus Shipping Box
As you unpack the shipping box(es), carefully examine the contents. Ensure you received
everything and that nothing was damaged during shipment. If you find any damage,
immediately notify the shipping service and supply them with a complete description of
the damage. AJA will repair or replace damaged items. If you find shipping damage, contact
your AJA dealer or distributor for details on how to have your KONA LHe Plus repaired or
replaced.
Note: Save packing materials and the shipping box. If you ever require service or move
your system—use the packaging materials and box for safe shipment.
KONA LHe Plus Installation & Operation Guide — Installing the KONA LHe
PCI-Express
Slots
Remove
Screw and
Cover Plate
and
Insert KONA
Card
Secure KONA
with Screw
Removed
Earlier
To I nsta ll:
1.
2.
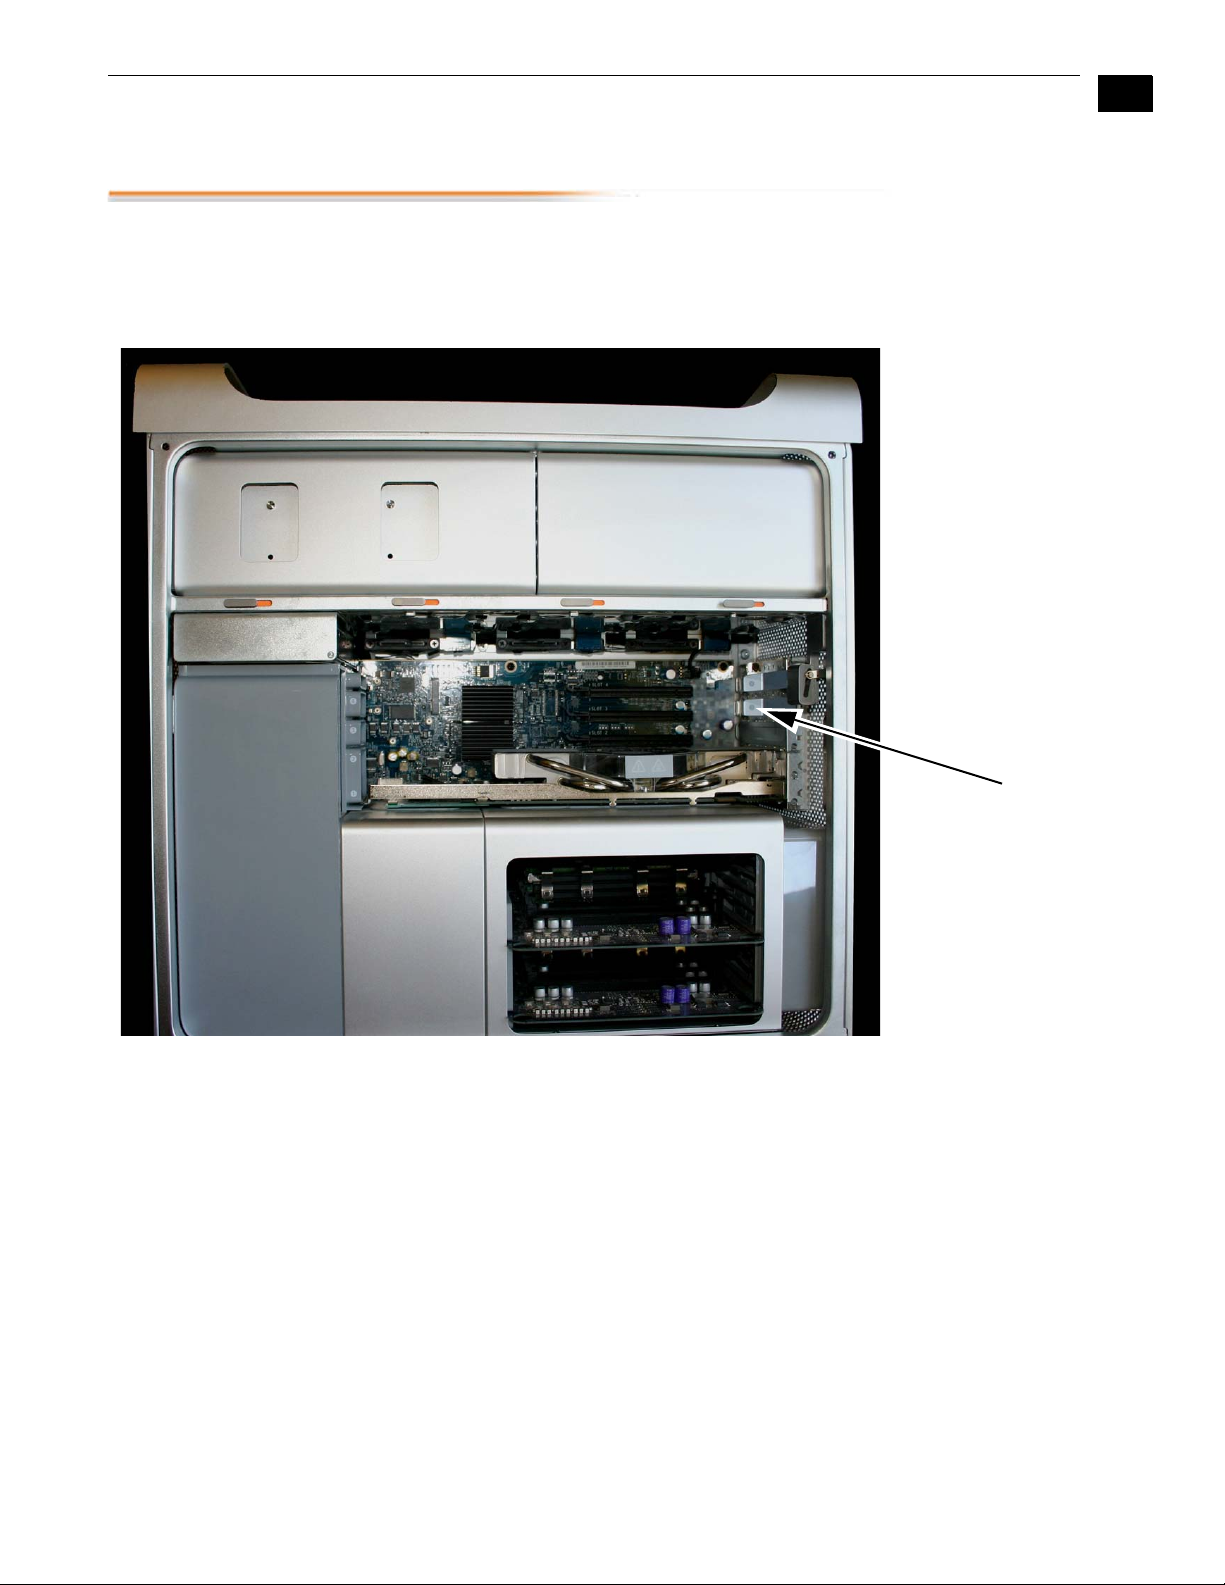
Installing the KONA LHe Plus Card into Mac Pro
1. Place the Mac Pro in a well-lit convenient area, where you will have easy access to
the chassis access door.
2. Using your hand, touch the outside of the Mac Pro to discharge any static
electricity you have. Remove the power cable from the back of the Mac.
3. Remove the access door as described in your Apple User Manual.
13
1
Mac Pro Cardcage Access
14
Slot 3 is the preferred slot
on a Mac Pro for KONA LHe Plus
PCIe card installation
PCI-Express Slots
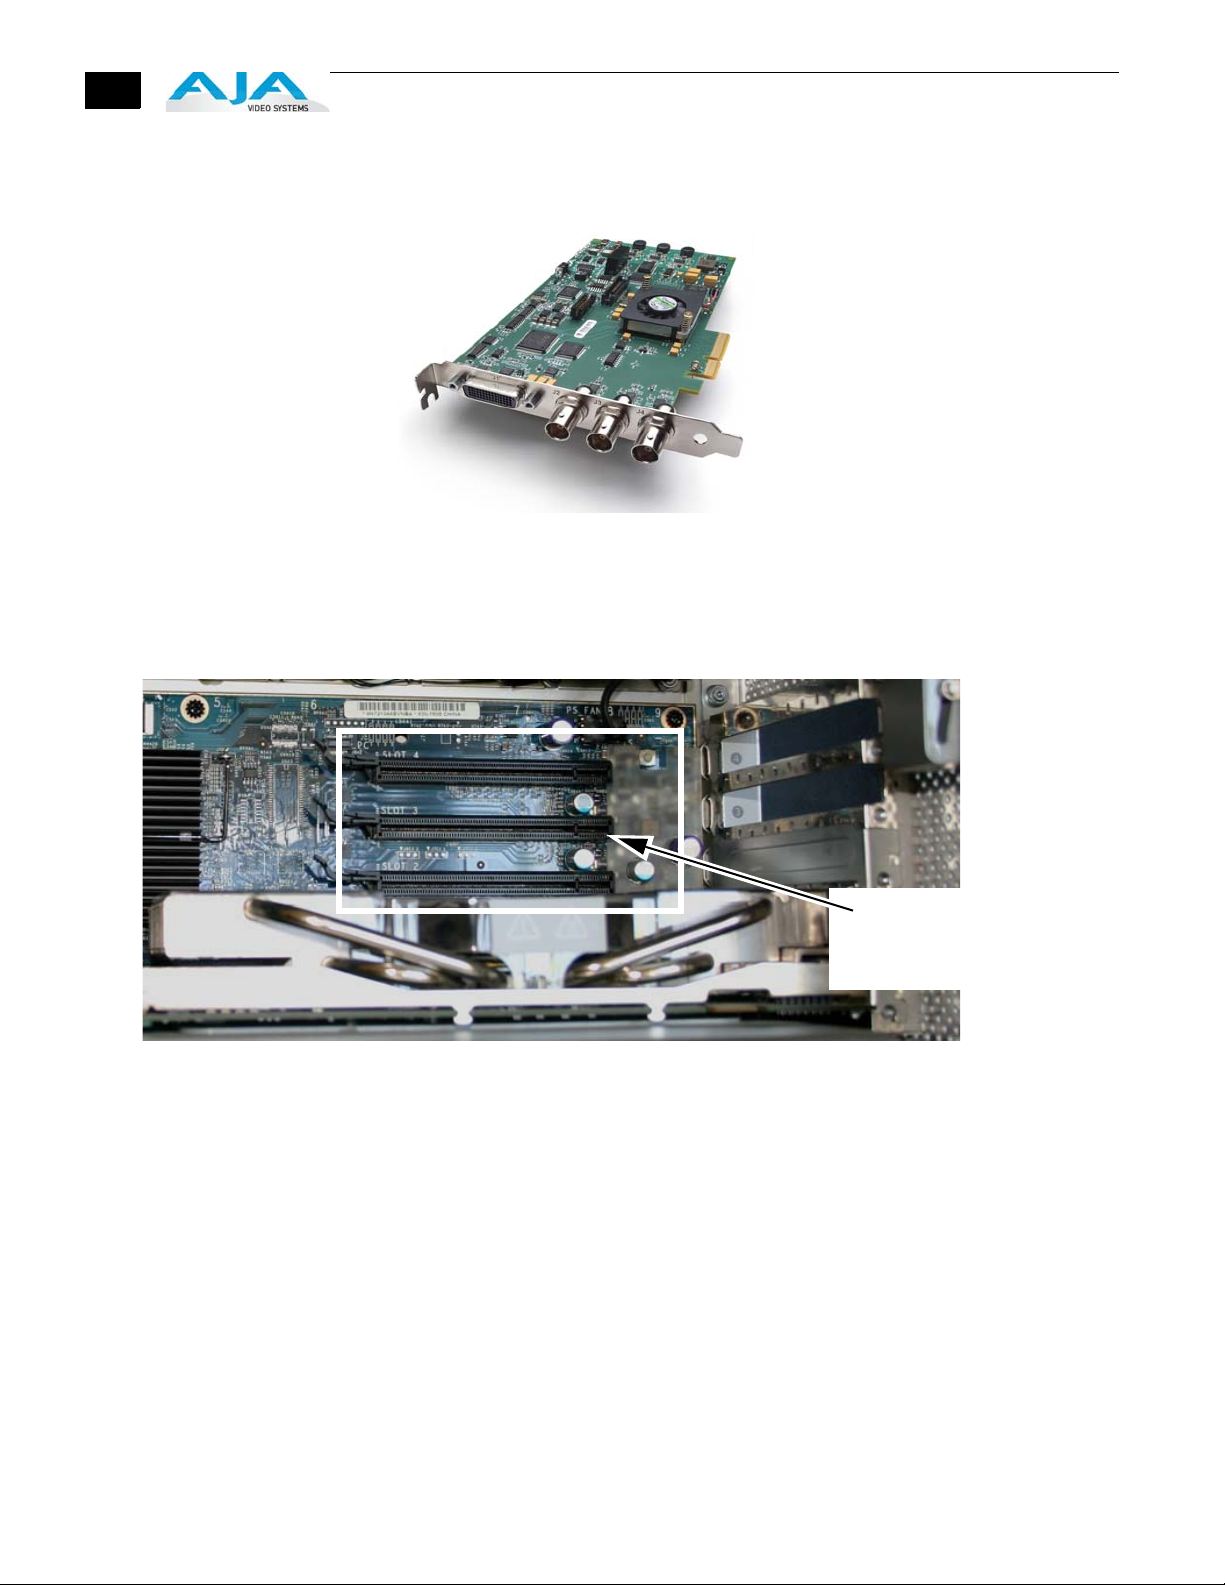
4. Remove the KONA LHe Plus card from its protective anti-static bag; place the card on
top of the bag.
KONA LHe Plus Card
5. Visually locate the PCIe slots inside the Mac chassis. The slots are numbered along
the left side. To determine which slot works best for your Mac Pro model, visit the
AJA website (see “Installation Overview” on page 11 for links). This web-page is
updated regularly to account for Apple product line changes.
Card Slots, PCIe Mac Pro shown here
6. Remove the card edge locking plate on the right side of the card cage, using a
7. Carefully insert the KONA LHe Plus card by rocking it slowly into the desired PCIe
8. Replace the card edge locking plate removed earlier, securing the two phillips
9. Replace the Mac Pro’s access door.
Phillips screwdriver (it is held in place by two captive phillips screws).
slot. Ensure the card edge aligns properly with the Mac Pro’s rear panel opening
(where the card edge locking plate was just removed) and that it is fully seated in the
slot.
screws.
KONA LHe Plus Installation & Operation Guide — Installing the KONA Card
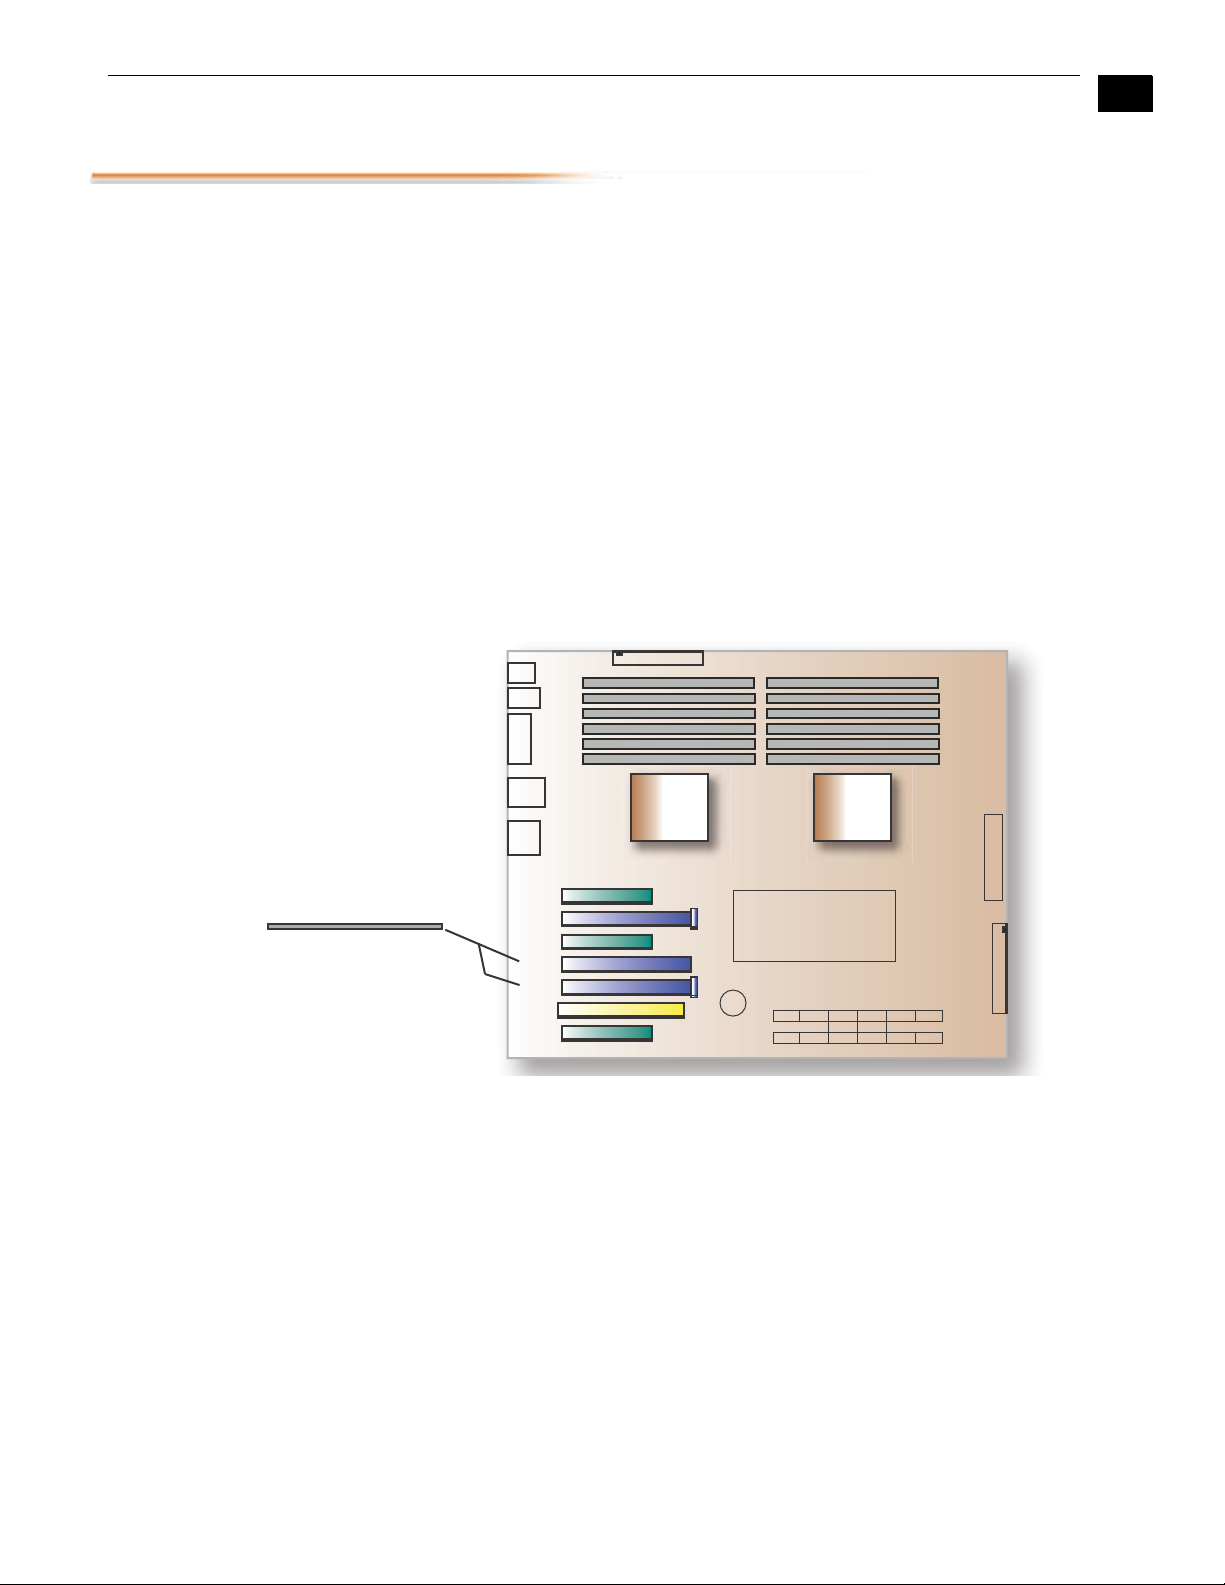
1
2
3
4
5
6
7
KONA card
HP Z800 Workstation
DIMM 6
DIMM 5
DIMM 4
DIMM 3
DIMM 2
DIMM 1
DIMM 6
DIMM 5
DIMM 4
DIMM 3
DIMM 2
DIMM 1
CPU 1 CPU 2
PCI-e 8x (4x)
PCI-e 8x (4x)
SATA 0 SATA 1 SATA 2 SATA 3
SATA 1 SATA 1
SATA 4 SATA 5
SATA 1 SATA 1 SATA 1 SATA 1 SATA 1 SATA 1
PCI-e 8x (4x)
PCI-e 16x
PCI-e 16x
PCI 33MHz
PCI-e 16x (8x)
Installing the KONA Card in a Windows PC
1. Place the PC in a well-lit convenient area, where you will have easy access to the chassis
access door.
2. Touch the outside of the PC to discharge any static electricity in your body. Remove the
power cable from the back of the PC.
3. Open the PC to gain access to the card slots as described in your Workstation User
Manual.
4. Remove the KONA card from its protective anti-static bag; place the card on top of the
bag.
5. To install the KONA card and RAID controller card (SCSI or Fibre Channel), refer to the AJA
website for the latest installation updates at the URL provided (see “Installation Overview”
on page 11 for link).
Because of hardware and software changes, AJA engineers are constantly testing and grading
workstation performance. The AJA website is your best source of up-to-date approved
workstation configurations.
Note: Always put the RAID controller and KONA on separate PCI busses. This improves
performance by reducing bus contention.
15
1
KONA Card placement in HP Z800 Motherboard
16
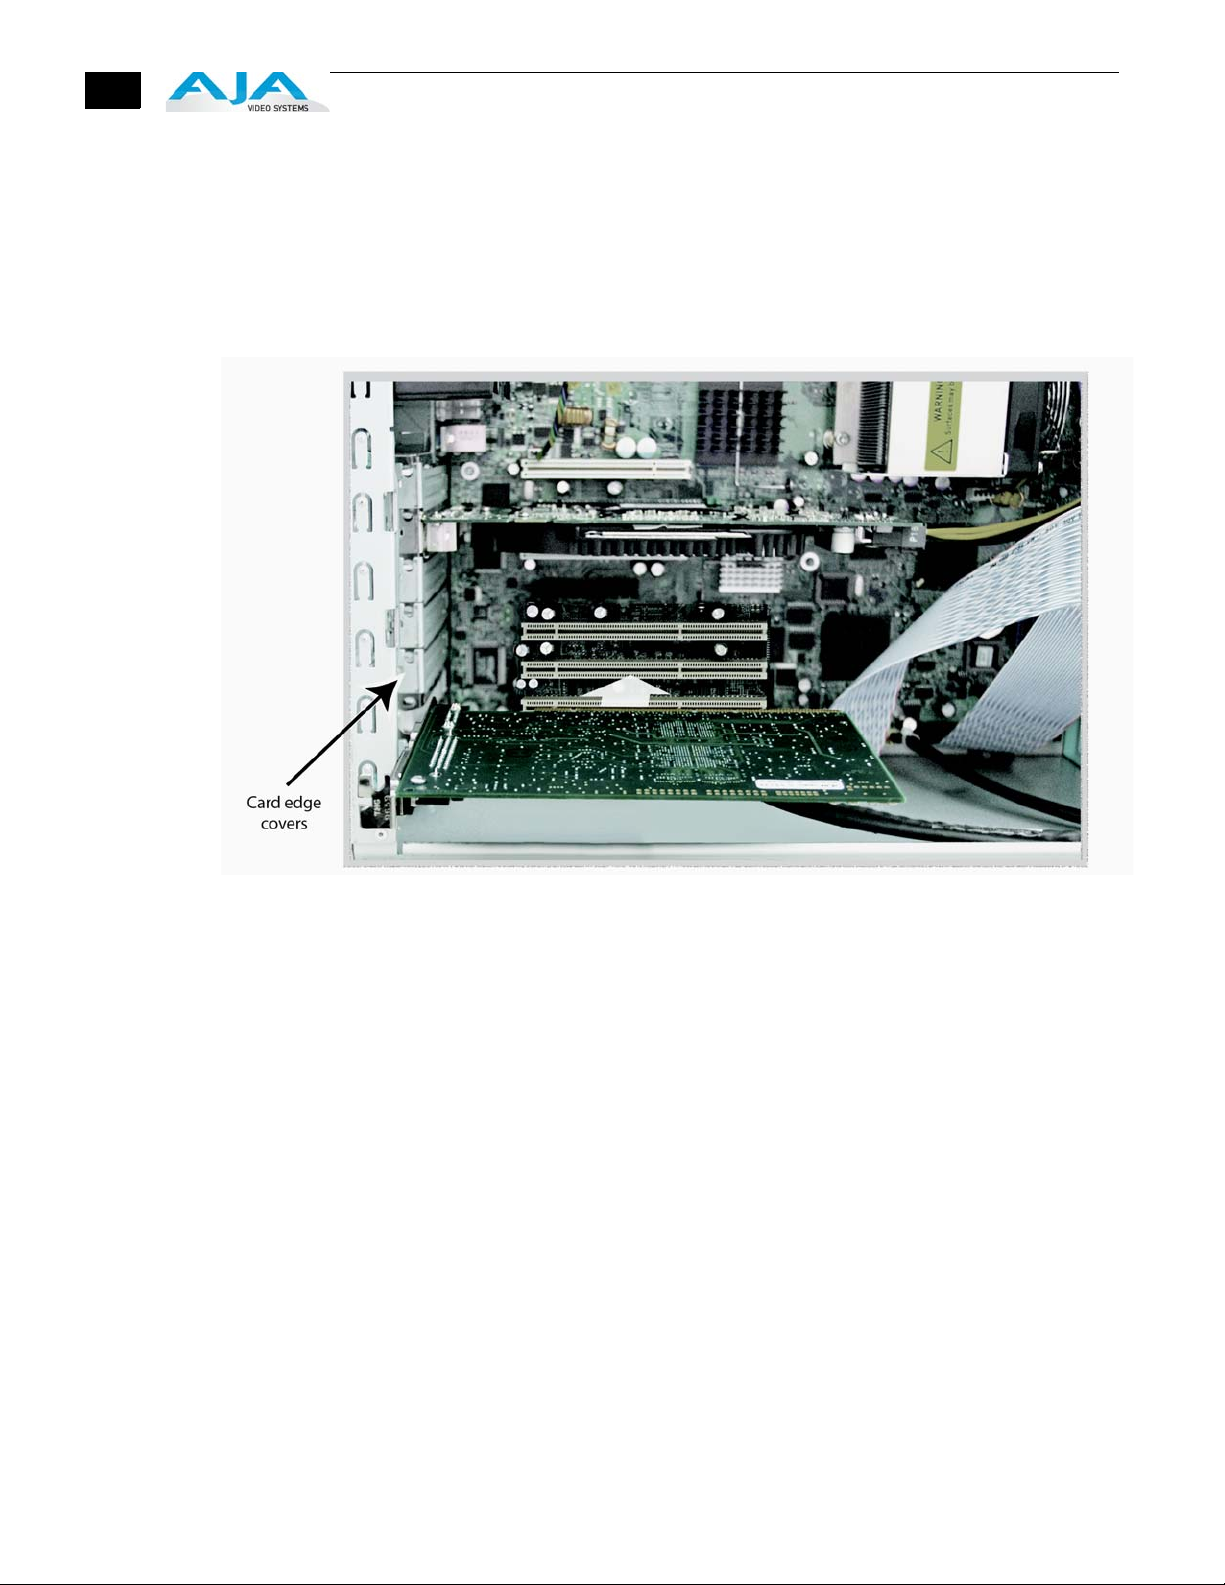
6. Open the card retainer bar on the left side of the chassis cardcage. Remove the card
edge access cover from the desired slot where you will be inserting the KONA card.
7. Holding the KONA card by the card edge plate and an outside edge, carefully insert the
KONA card by rocking it slowly into the slot. Ensure the card edge aligns properly with
the PC’s opening (where the card edge cover was just removed) and that it is fully
seated in the slot.
8. Secure the card in the slot replacing the card retainer bar.
9. Replace the PC’s panel/door removed in step 3.
Locate the correct PCIe Slot and Insert the KONA Card (typical installation shown)
 Loading...