

www.aja.com
Installation and Operation
Guide
Because it matters.
Published: 11/1/12
Quick Start Guide
Introduction
This Quick Start Guide provides a basic overview of KUMO configuration. It is not meant as a
substitute for the detailed information found in the KUMO Manual, but rather as a supplement to
that documentation. We strongly recommend that you read the full KUMO Manual provided on
CD in addition to this document to get the most out of your system.
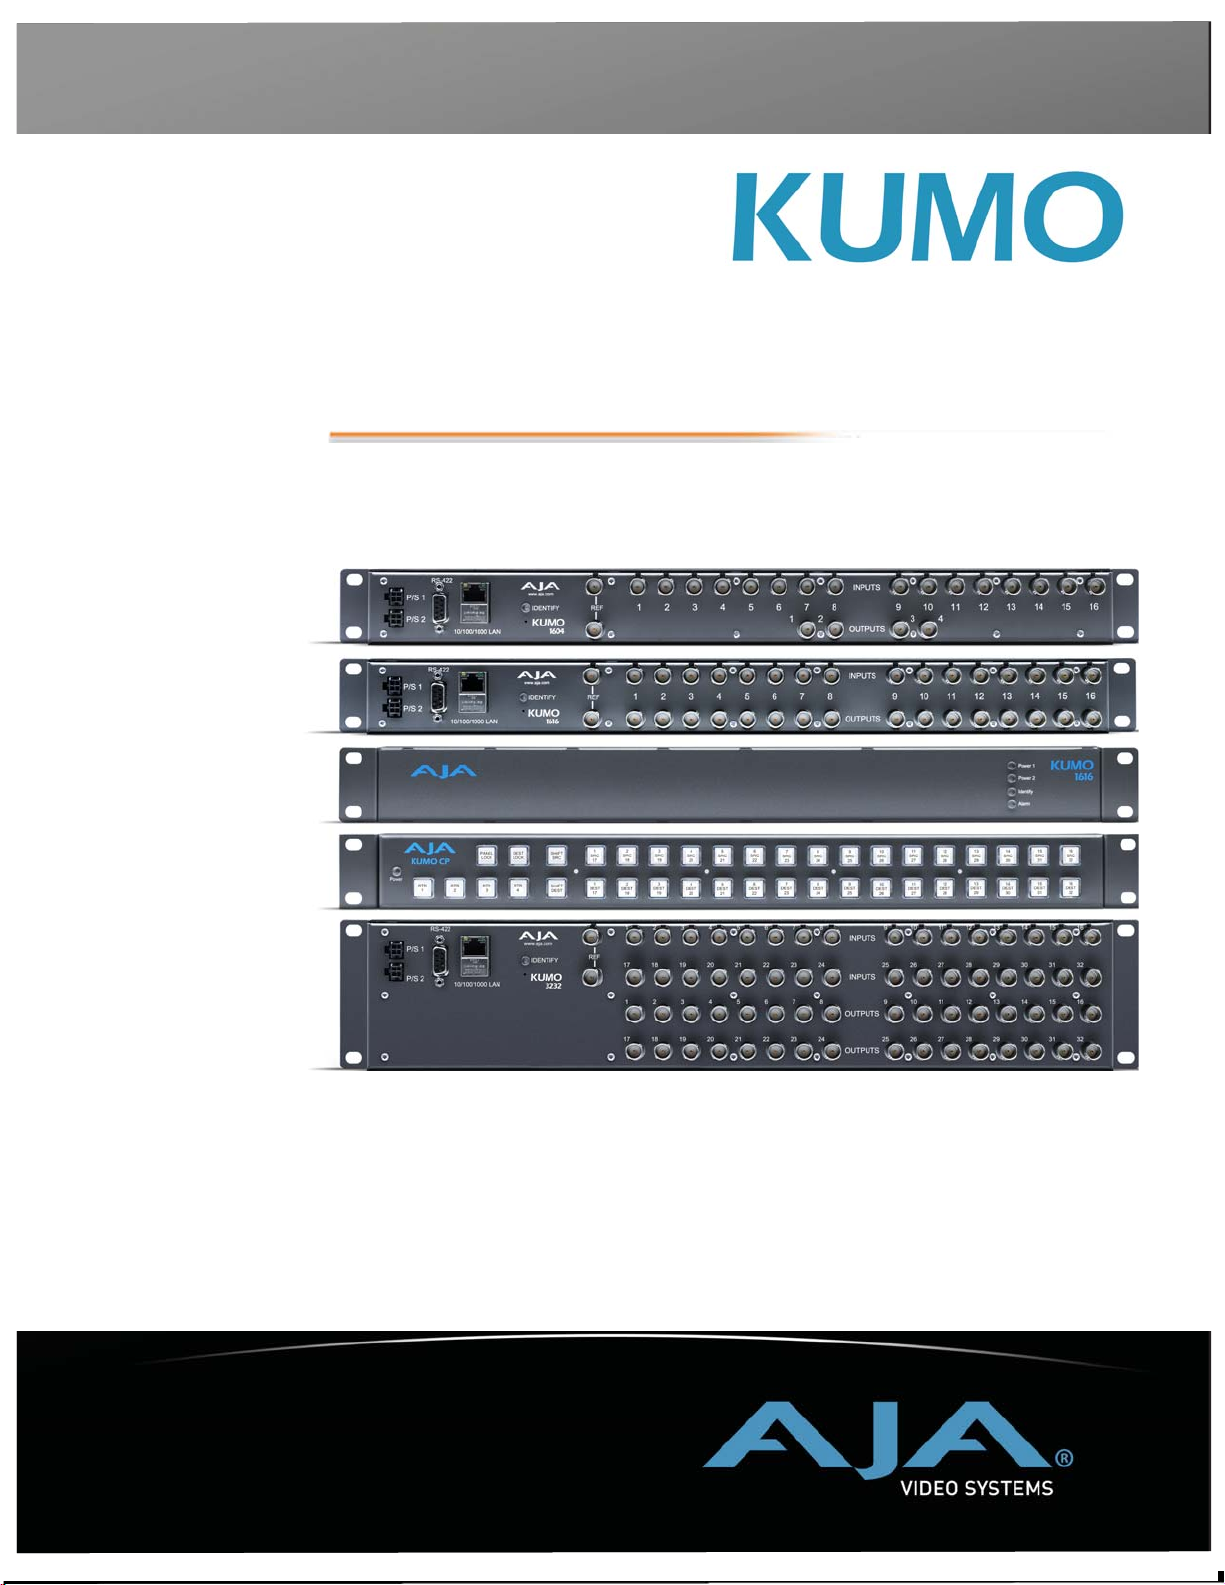
Rear Panel 1616
Rear Panel 1604
Typ ical Front Panel
Control Panel Option
Rear Panel 3232
1
1
2
KUMO Connections
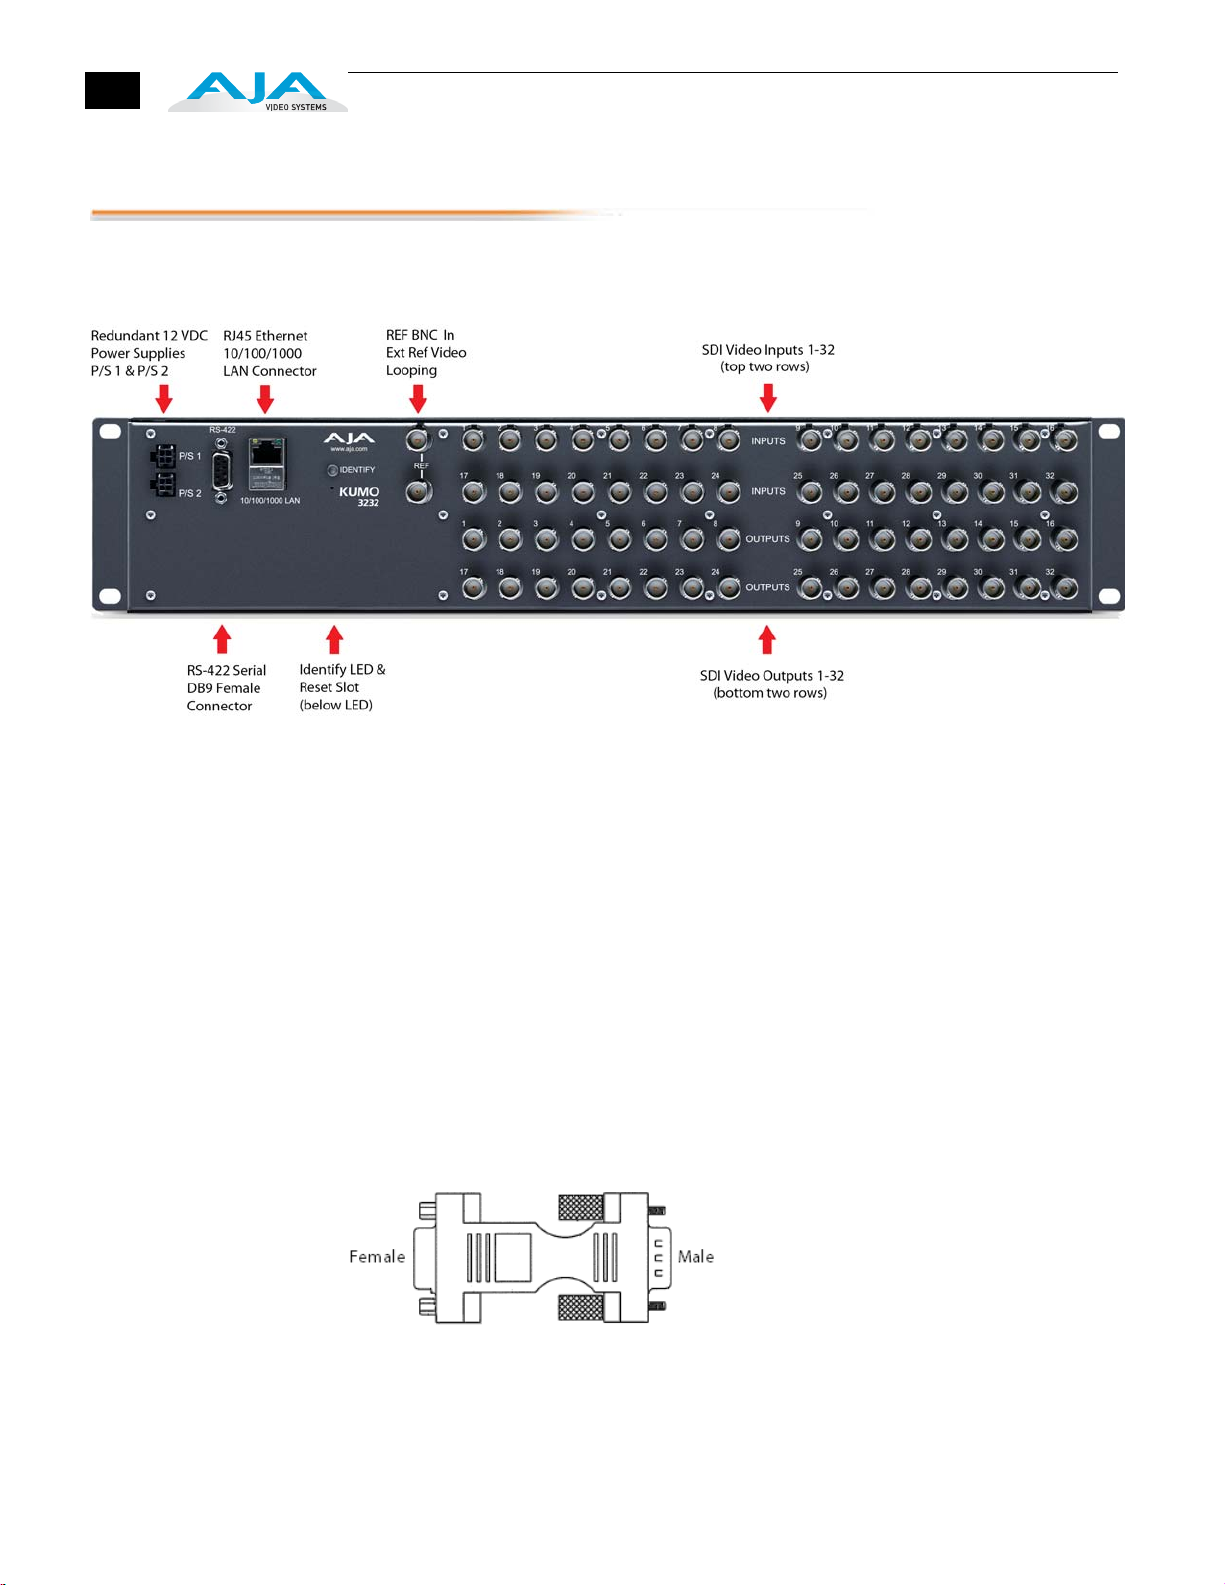
The rear panel illustration points out KUMO connections, including Power, RS-422
Serial Control, RJ45 Ethernet LAN, Reference video, and Video I/O. Each connection
is described briefly below.
P/S 1 & P/S 2 Power Connectors
RS-422 DB9 Connector
KUMO Connections (3232 shown, other models similar)
Power to the KUMO unit is supplied by a power supply brick that accepts a 110220VAC, 50/60Hz power input and supplies +12 VDC to KUMO via connector PS/1
or PS2. Only one power supply is required and may be connected to either of the
two power connectors. An optional second power supply provides power
redundancy to help protect against outages. For additional protection, connect the
two supplies to different AC branch circuits so that KUMO will remain on even if
there is a failure or open circuit breaker on one branch.
KUMO includes an RS-422 female DB9 connector for making serial connections to
other equipment. This control connection enables interoperability with other
devices, including those that use GVG Native Protocol.
Required RS-422 Adapter
An RS-422 crossover adapter is included with this KUMO router. This adapter should
be attached to the RS-422 connection on the back of the KUMO router if you plan
to use RS-422 protocols for remote control of the KUMO router.
Note: Only KUMO routers with serial numbers ending in -R0 require this adapter.
KUMO routers with serial numbers ending in -R1 do NOT require an adapter.
Connect the male end of the adapter to the KUMO unit, and lightly tighten it in
place using the knurled knobs. Connect your serial cable to the other (female) end
of the adapter.
KUMO Quickstart Guide — KUMO Setup and Control Overview
3
RJ45 Ethernet Connector
ID and Reset
REF BNC connector
Video Inputs and Outputs
The RJ45 Ethernet connector allows you to connect KUMO to an Ethernet 10/
100/1000 Ethernet LAN using CAT5 cable as explained in the section that
follows. Multiple configurations are possible, including standalone control, a
local LAN, or a WAN.
The ID LED lights when you use the web interface to identify the KUMO unit
you are controlling. The Reset button (pinhole) below the LED allows a safeboot
reset of the unit as explained in Chapter 3:
The REF BNC connector is the looping input for genlocking KUMO to your
house video signals. Apply an analog NTSC, PAL, or Tri-level sync signal to this
input. Also be sure to connect a terminator to the second connector, or if you
loop from that connector to other equipment, be sure to terminate the
connection at the other equipment.
Depending on your KUMO model, up to 32 SDI (SMPTE 259/292/296/424) video
inputs and outputs can be connected to the video input and output BNC
connectors.
KUMO Setup and Control Overview
KUMO SDI routers are easy to set up and use. Regardless of system
configuration, all KUMOs are controlled via a web browser. This can be via a
simple direct connection between a KUMO router and a PC or Mac computer—
or by a LAN connection using an Ethernet hub or switch to interconnect one or
many KUMOs for larger system configurations.
“Safeboot Reset” on page 37.
1
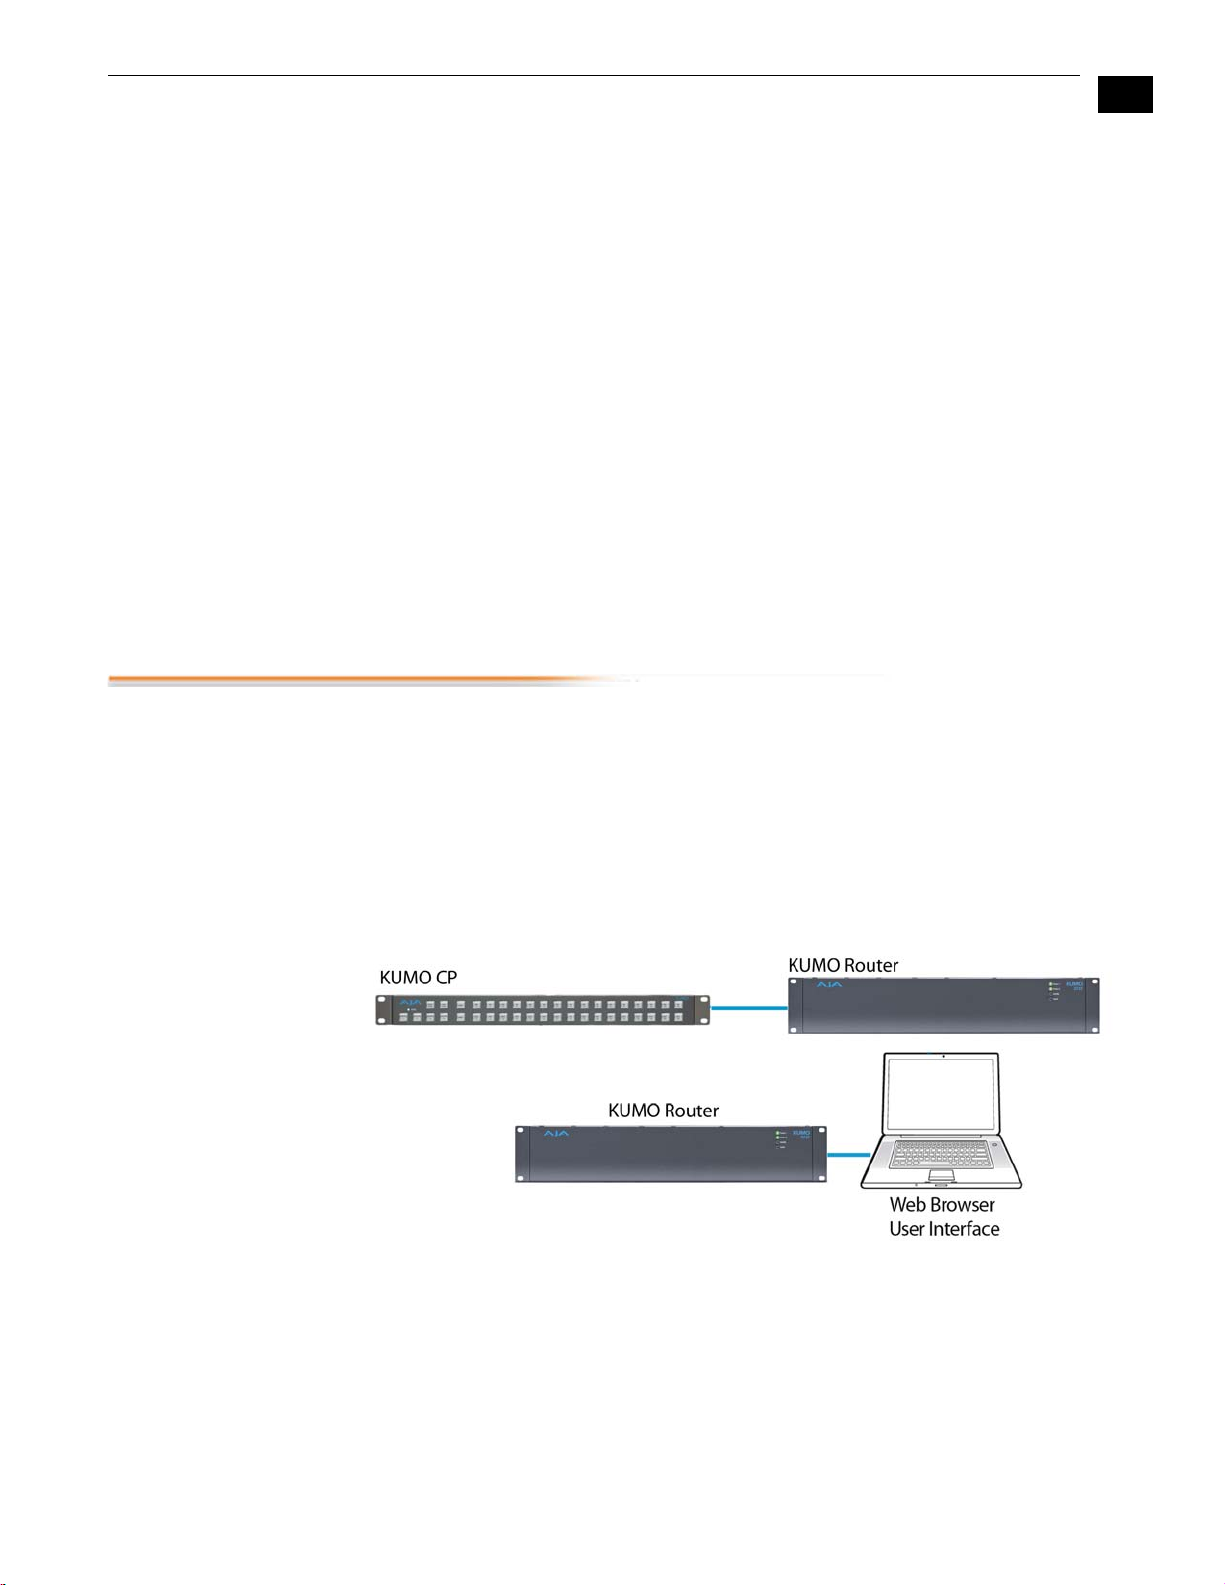
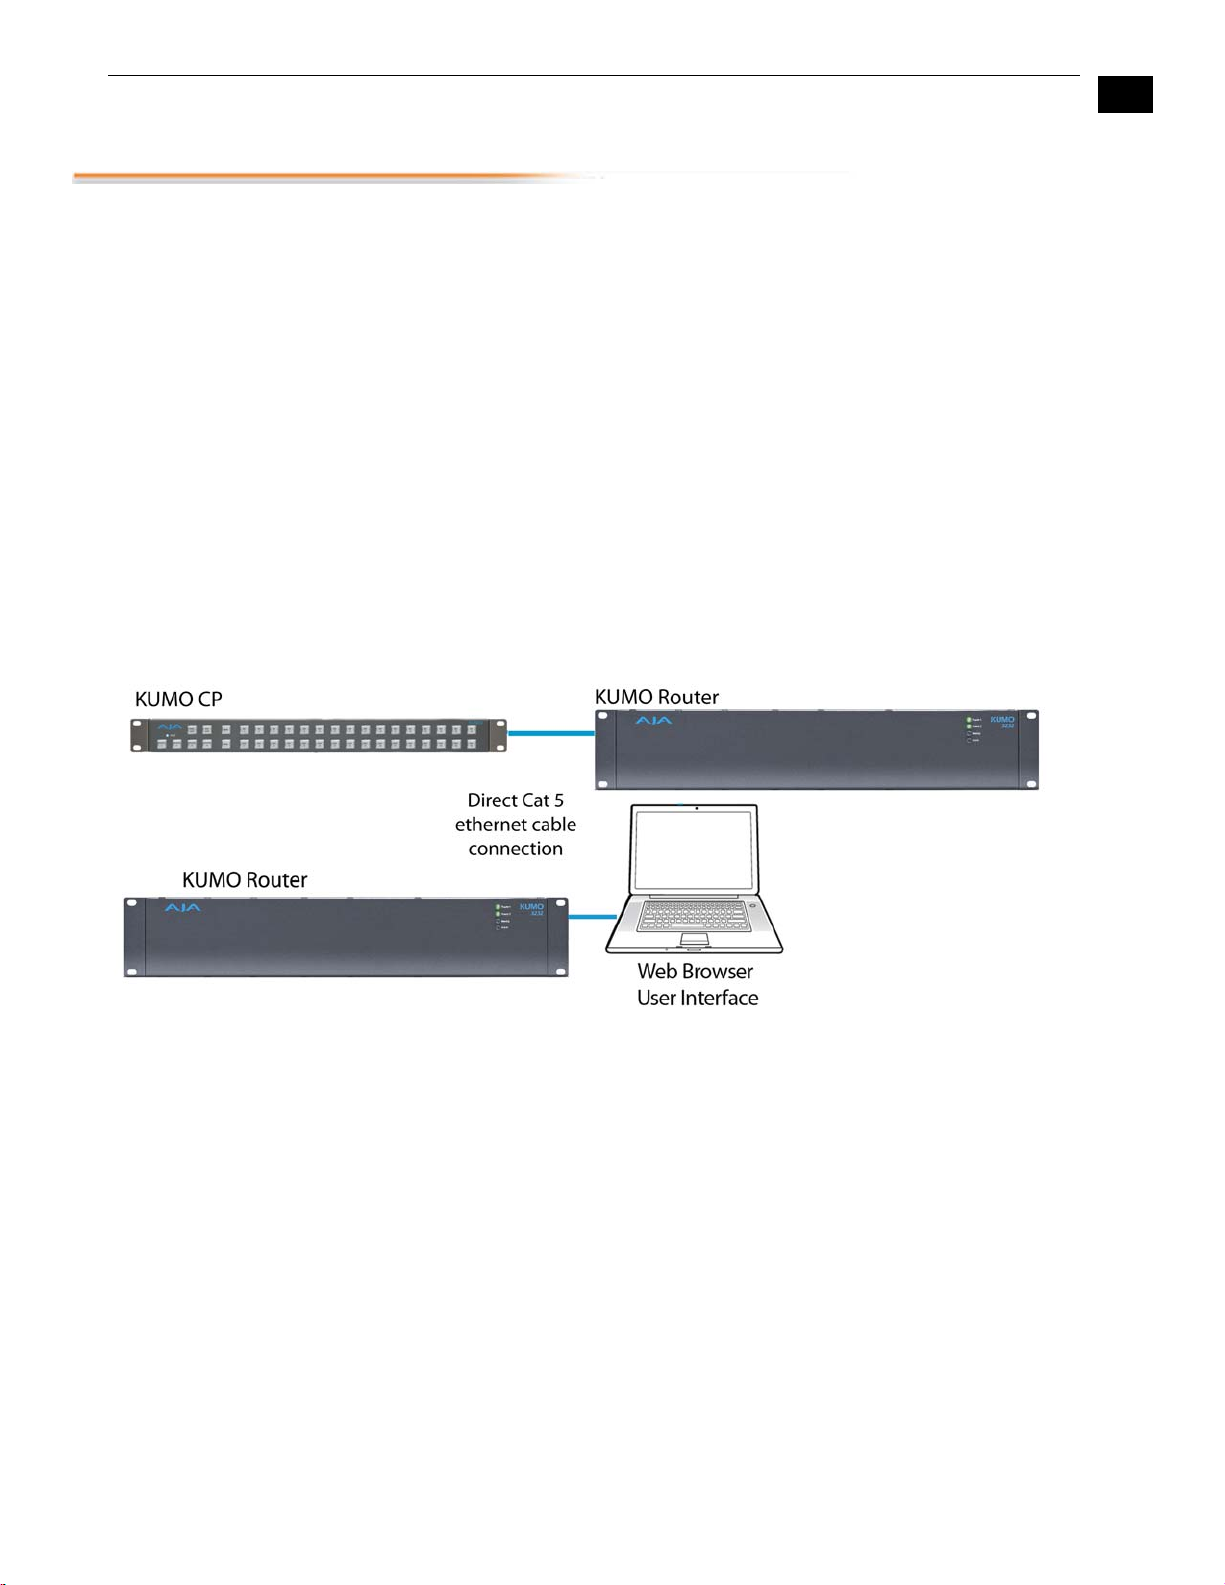
Direct Connection
In a direct connection, you simply connect a KUMO CP control panel or Mac or
PC to a KUMO using an Ethernet cable (cat 5) between the RJ45 connectors on
both devices.
KUMO Direct Connection to KUMO CP and Mac/PC Web Browser
4
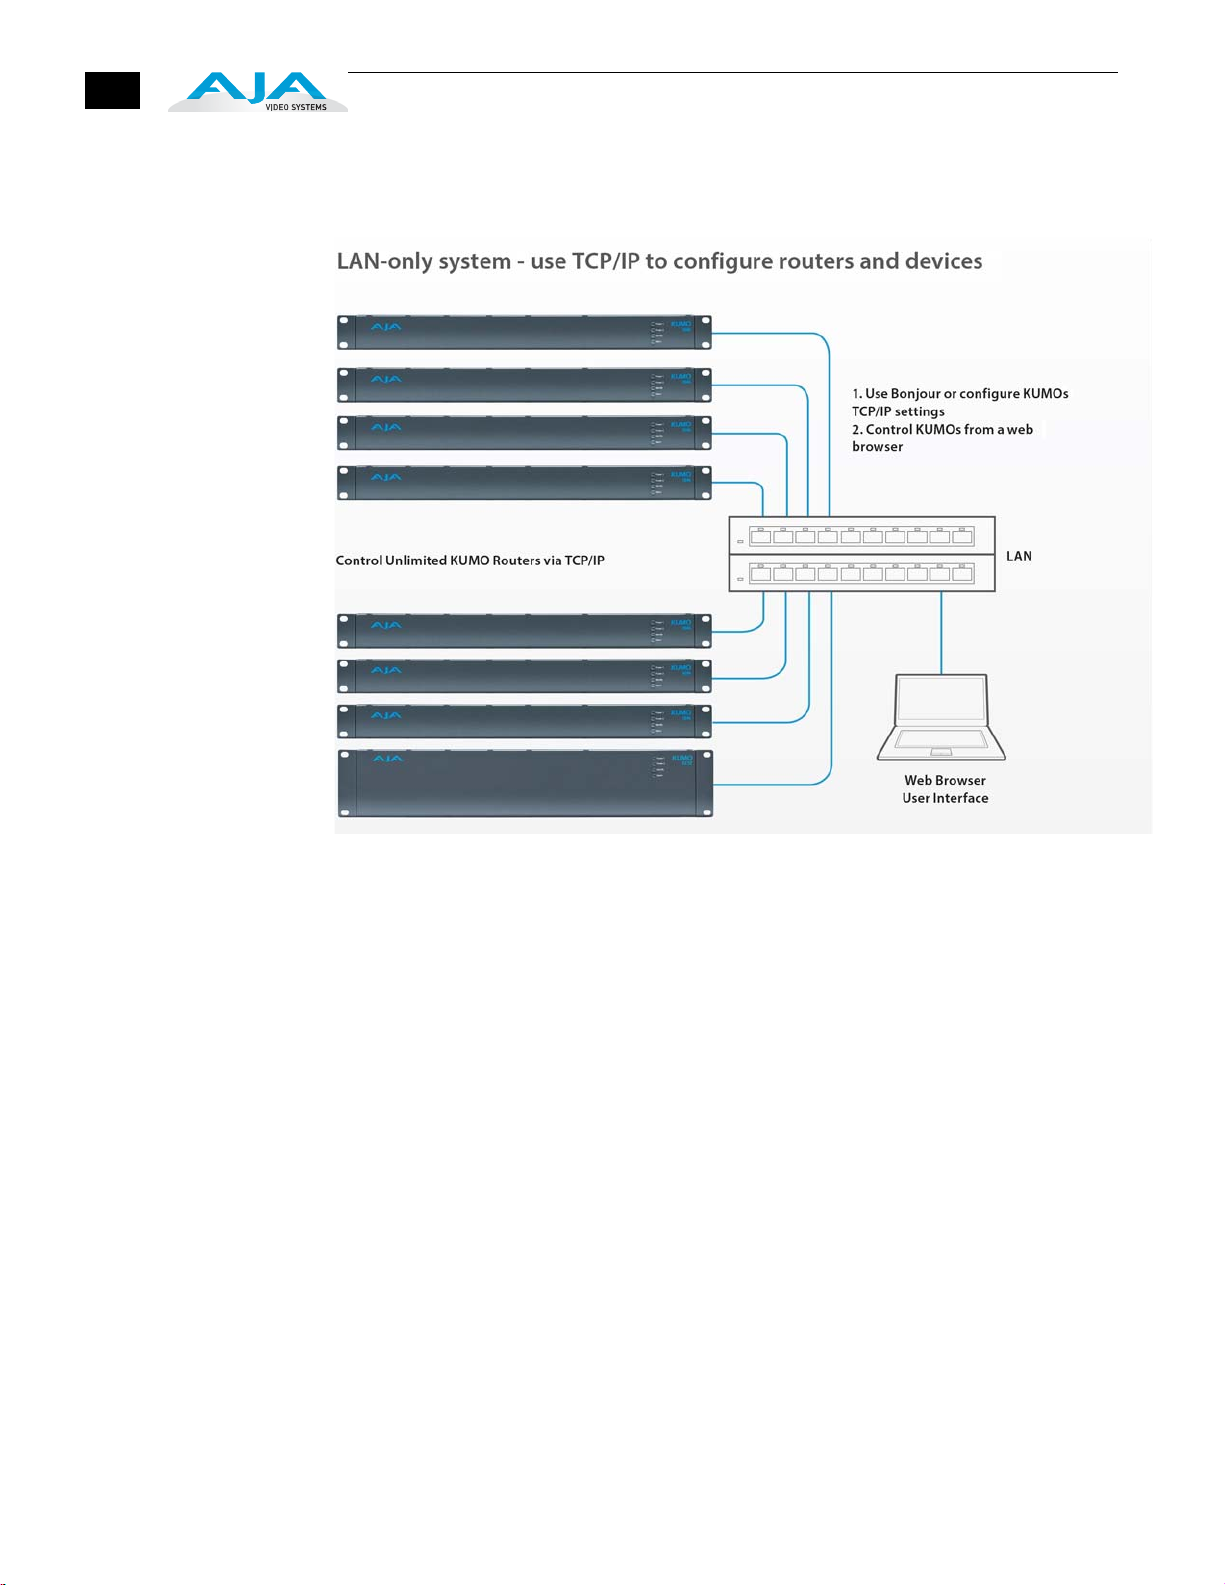
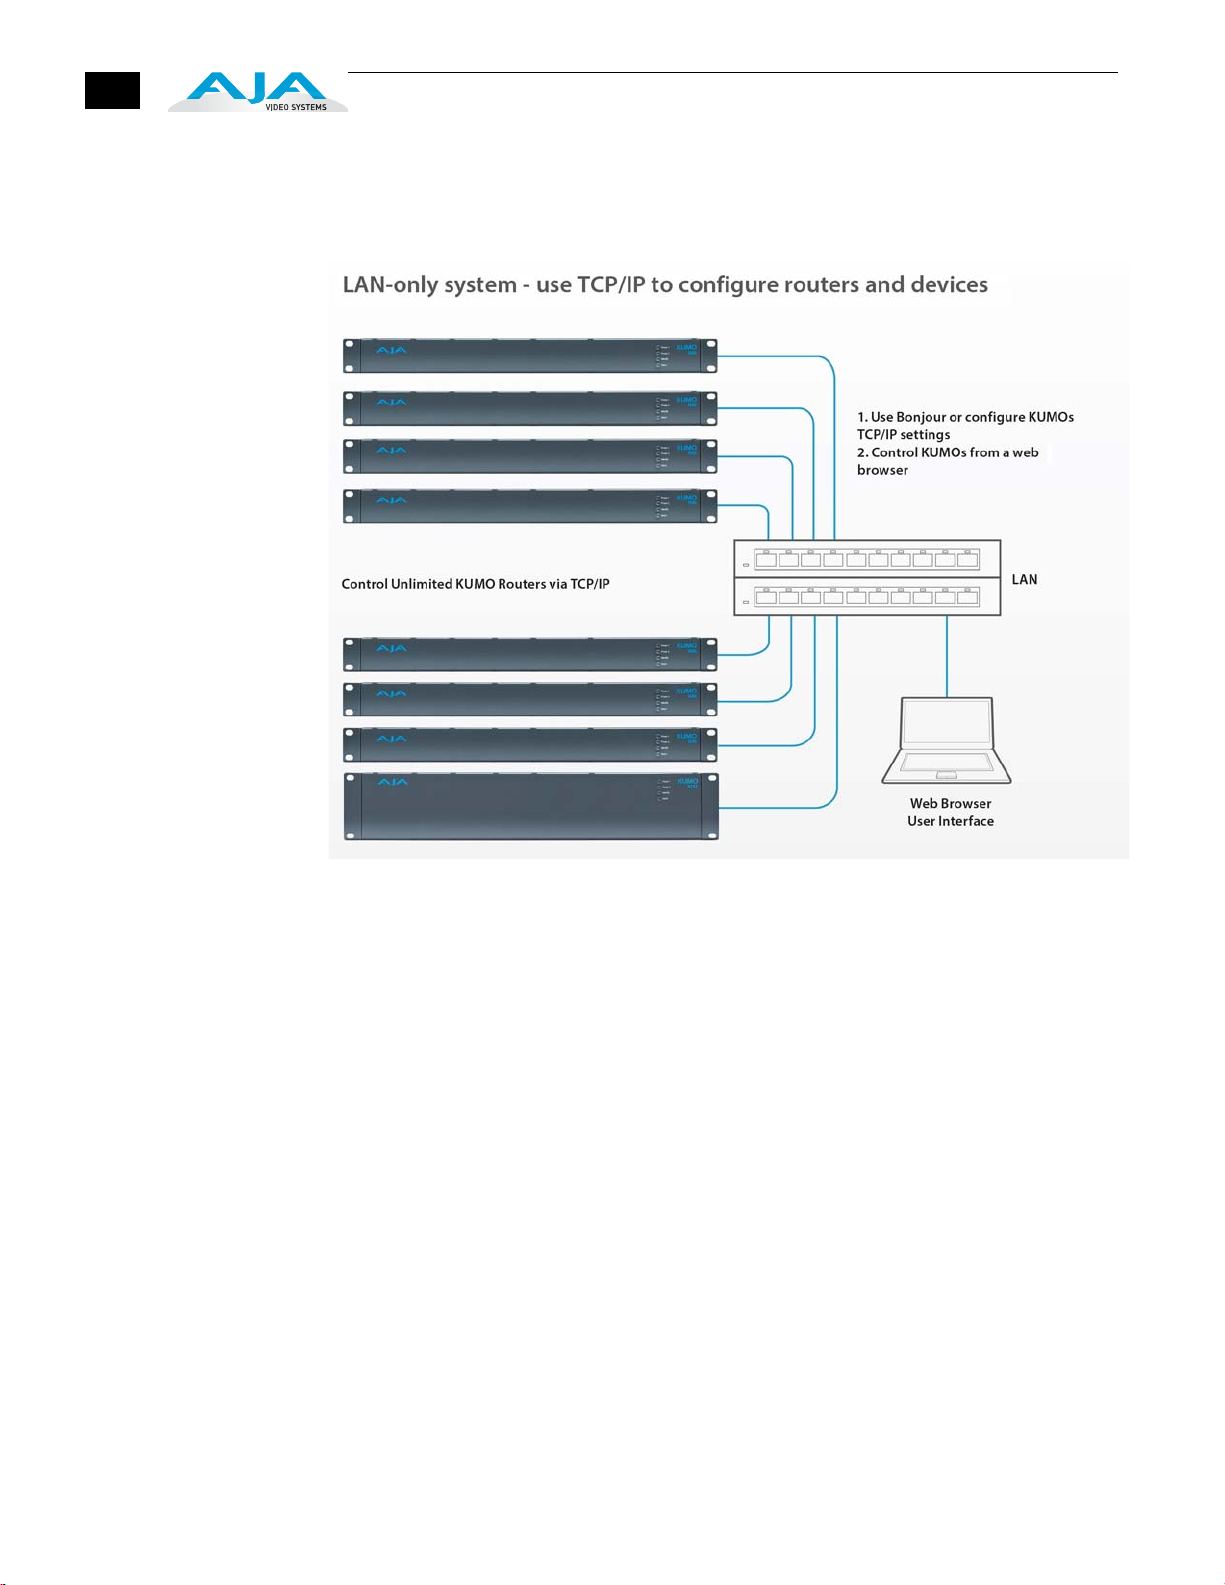
LAN Connection Using a Hub or Switch
In a LAN connection, connect one or more KUMO routers and KUMO CP routers to your
LAN or closed network using Cat. 5 Ethernet cable and an Ethernet hub or switch; then
power up the equipment.
KUMO LAN with Web Browser UI
KUMO Quick-start
KUMO Quickstart Guide — KUMO Quick-start
This Quick Start Guide provides a basic overview of KUMO configuration. It is not meant
as a substitute for the detailed information found throughout the rest of this manual,
but as a quick way to get your KUMO set up quickly and operating. We strongly
recommend that you read the full KUMO Manual to get the most out of your system.
5
KUMO Setup and Control
Direct Connection
KUMO SDI routers are easy to set up and use. Regardless of system configuration, all
KUMOs can be controlled via a web browser. This can be via a simple direct connection
between a KUMO router and a PC or Mac computer—or by a LAN connection using an
Ethernet hub or switch to interconnect one or many KUMOs for larger system
configurations.
1
The KUMO CP remote control panel option allows you to control a KUMO router
without any computer interface at all. For details, see
on page 39.
In a direct connection, you simply connect the control computer (Mac /PC) or a KUMO
CP control panel to a KUMO router using an Ethernet cable (cat 5) between the RJ45
connectors on both devices.
“KUMO Remote Control Panel”
KUMO Direct Connection to Mac/PC Web Browser or KUMO CP to KUMO
The KUMO CP Auto Configure assigns Router Select Button 1 to the attached router.
6
LAN Connection Using a Hub or Switch
In a LAN connection, connect one or more KUMO routers to your LAN or closed
network using Cat. 5 Ethernet cable and an Ethernet hub or switch; then power up
the equipment.
KUMO LAN with Web Browser UI

KUMO Quickstart Guide — KUMO Quick-start
7
QuickStart Setup and Control Methods
Regardless of Direct Connection or LAN Connection, KUMOs are controlled over a
network by connecting to KUMO’s internal webserver with a standard web browser on
a Mac or PC.þ To do this you first need to establish a network connection between the
computer and the KUMO to be controlled. There are various methods supported for
doing this depending on the operating system and/or web browser being used.
Choose one of the following quick-start procedures that best fits your environment;
each procedure is presented in step-by-step form later on these pages:
Mac OSX
• Setup and Control from a Safari Browser on Mac OSX using Bonjour
• Setup and Control from a Browser on Mac OSX using a Static IP Address
1
Windows 7
• Setup and Control from a Browser on Windows 7 using UPnP
• Setup and Control from a FireFox Browser on Windows 7 using Bonjour
• Setup and Control from a Browser on Windows 7 using a Static IP Address
Windows XP
• Setup and Control from a Browser on Windows XP using UPnP
• Setup and Control from a FireFox Browser on Windows XP using Bonjour
• Setup and Control from a Browser on Windows XP using a Static IP Address
Physical Equipment Setup
All of the above methods are explained on the following pages. Select the method that
works the best for you and your environment.
Before setting up the KUMO router(s) and KUMO CP panels, ensure you’ve got all
equipment interconnected (direct or via LAN as already discussed):
1. Connect power supplies (1 or 2 for redundancy) to KUMO(s).
2. Connect source and destination SDI equipment (this step can be deferred).
3. Direct Connection: connect a KUMO and a Mac or PC via an Ethernet Cable
LAN Connection: connect a KUMO to a hub or switch and connect a PC or Mac to
the same LAN via a hub or switch.
4. Proceed to your desired Setup and Control QuickStart method using one of the
methods on the following pages.

8
Bookmark Icon
Bonjour Collection
KUMO Routers
KUMO CP
Setup and Control from a Browser on Mac OSX
The two easiest methods of setting up and controlling a KUMO router system from a
Mac are:
• Setup and Control from a Safari Browser on Mac OSX using Bonjour
• Setup and Control from a Browser on Mac OSX using a Static IP Address
Safari Browser Using Bonjour
The Mac OSX Safari browser has Bonjour built-in, which can be used to auto-detect
and connect to a KUMO router. To do so:
1. Start Safari browser on a Macintosh connected to the KUMO network—ensure
KUMO to be controlled is powered up and connected via Ethernet (directly or
via LAN).
2. Click on the Bookmark icon (menu bar, far left) and select the Bonjour
collectionþþ
3. Double-click on the KUMO router or control panel in the Bookmarks pane.
Note: The KUMO name will be similar to: AJA KUMO1616-555 (where 1616 is the
model number and -555 is the unit’s serial #. þ
4. Once you click the KUMO router item, Safari will display the KUMO web userinterface; you can now control the router. For additional details read the KUMO
user manual on the supplied CD.
Safari Bonjour Bookmarks

KUMO Quickstart Guide — Setup and Control from a Browser on Mac OSX
9
Safari Browser— Type in KUMO Static IP Address
KUMO also offers a factory default static IP address, allowing a direct and fail-safe way
to connect via a Mac computer connected to KUMO either directly or via a LAN
connection. The default static IP address is temporary and is intended only to allow an
initial connection. Once you’ve connected using the static IP, you can then enter a
desired network configuration using KUMO's Network tab.
Note: The default static address is temporary and will be disabled the next time KUMO
restarts. Any changes in the Network configuration will be saved upon restart.
To set KUMO to its default static IP address:
1. Power up KUMO and wait for it to boot normally.
2. For a router, insert a straightened paper clip or similar device into the reset slot
on the rear (see photo that follows)—hold for six seconds and then allow KUMO
to restart.
For a KUMO CP, press and hold the two blank buttons on the panel for 5 seconds.
1
KUMO Reset Slot Location
When the KUMO router default IP is set, the Identify LED will illuminate and stay on.
When the KUMO CP default IP is set, the Source and Destination buttons will flash
alternately.
3. Configure your Mac computer to talk on the 192.168.XX.XX subnet as shown
below:
Important:
computer to normal operation after this procedure.
Go to your System Preferences>Network and select Ethernet and Configure:
Manually.
First record existing TCP-IP settings so that you can return your

10
Mac Enet Setup Screen (System Preferences -> Network)
Input the address information shown below:
• IP Address: 192.168.101.2
• Subnet Mask: 255.255.255.0
Click Apply.
4. Ensure the KUMO device to be controlled is connected to the Mac via Ethernet
(directly or via LAN).
5. Start Safari and enter 192.168.101.1 as a web address. This is the KUMO static IP
address.
6. Once connected to KUMO's web interface, reconfigure KUMO's network
parameters as desired.
7. Restore your computer to its normal network settings using the procedure and
IP Addresses you wrote down in Step 3.

KUMO Quickstart Guide — Setup and Control from a Browser on Windows 7
Click This
Double-click the KUMO name to launch your default web browser
Setup and Control from a Browser on Windows 7
The easiest methods of setting up a controlling a KUMO device from a PC running
Windows 7 are:
• Setup and Control from a Browser on Windows 7 using UPnP
• Setup and Control from a FireFox Browser on Windows 7 using Bonjour
• Setup and Control from a Browser on Windows 7 using a Static IP Address
11
Windows 7 Using UPnP (Universal Plug and Play)
If your Windows 7 PC supports UPnP protocols (most do) and UPnP service is enabled
(refer to your MicroSoft Windows documentation), you can control KUMO routers by
simply selecting one from a device list:
1. Ensure KUMO to be controlled is powered up and connected via Ethernet
(directly or via LAN).
2. Use your Windows 7 Control Panel to go to Network and Internet.
3. Select View Network computers and devices.
4. Look at the resulting device list under “Other Devices”—double click a KUMO’s
name to launch your Window 7 PC’s default browser. The browser will display the
KUMO web interface. Use it to control KUMO.
1
Windows Network Screen

12
Bonjour
logo/button
Double-click to view KUMO
Bonjour sidebar
web interface
Windows 7— FireFox Using Bonjour
Using Bonjour with Windows 7 and the FireFox browser requires installing the
“Bonjour for Windows” software—plus a FireFox plug-in.
Bonjour for Windows can be downloaded at:
http://developer.apple.com/networking/bonjour/download/
The FireFox browser plug-in (BonjourFoxy) can be download from:
www.Bonjourfoxy.net
To Connect (after installing both Bonjour and the plug-in):
1. Ensure the KUMO device tobe controlled is powered up and connected via
Ethernet to the Windows 7 PC (directly or via LAN).
2. Launch the FireFox web browser.
3. Access the Bonjour sidebar in Firefox by going to View > Sidebar >
BonjourFoxy. You can also launch the sidebar by clicking on the Bonjour logo
at the bottom right of your browser window.
Firefox Bonjour Sidebar Selection
4. Select your KUMO router or control panel from the resulting Bonjour list:
Firefox BonjourFoxy Sidebar

KUMO Quickstart Guide — Setup and Control from a Browser on Windows 7
13
Windows 7 Browser—Type in KUMO Static IP Address
KUMO also offers a factory default static IP address, allowing a direct and fail-safe way
to connect via a PC computer connected to KUMO either directly or via a LAN
connection. The default static IP address is temporary and is intended only to allow an
initial connection. Once you’ve connected using the static IP, you can then enter a
desired network configuration using KUMO's Network tab.
Note: The default static address is temporary and will be disabled the next time KUMO
restarts. Any changes in the Network configuration will be saved upon restart.
To set KUMO to its default static IP address:
1. Power up KUMO and wait for it to boot normally.
2. For a router, insert a straightened paper clip or similar device into the reset slot
on the rear (see photo that follows)—hold for six seconds and then allow KUMO
to restart.
For a KUMO CP, press and hold the two blank buttons on the panel for 5 seconds.
1
KUMO Reset Slot & KUMO CP Reset Buttons Locations
When the KUMO router default IP is set, the Identify LED will illuminate and stay on.
When the KUMO CP default IP is set, the Source and Destination buttons will flash
alternately.
3. Configure your PC computer to talk on the 192.168.XX.XX subnet as shown
below (this example is for a PC connected directly to KUMO):
Important:
TCP-IP settings so that you can return your computer to normal operation after
this procedure.
Use Control Panel to access your Local Area Network properties. In Windows 7
the path is:
Control Panel > Network and Internet > Network and Sharing Center
BEFORE altering your PC network configuration, record existing

14
Then, under “Connections” click on the Local Area Connection for the PC’s
Ethernet port.
In the resulting General dialog screen, select the Properties button.
Then on the Networking tab, select Internet Protocol Version 4 and click the
Properties button below.
Finally, click the “Use the following IP address:” radio button and enter the
following IP Address and Subnet Mask:
• IP Address: 192.168.101.2
• Subnet Mask: 255.255.255.0
Click the OK button to store the changes. Note: This step is temporary. You will
later need to restore the original settings on your computer.
4. Connect the Windows 7 PC to KUMO's RJ-45 port (either directly or through
your LAN)

KUMO Quickstart Guide — Setup and Control from a Browser on Windows
Double-Click
the KUMO Icon
5. Point your web browser to 192.168.101.1
6. Once connected to KUMO's web interface, reconfigure KUMO's network
parameters as desired.
7. Restore your computer to its normal network settings using the procedure and IP
Addresses you wrote down in Step 3.
Setup and Control from a Browser on Windows XP
The easiest methods of setting up a controlling a KUMO router from a PC running
Windows XP are:
15
Windows XP Using UPnP (Universal Plug and Play)
• Setup and Control from a Browser on Windows XP using UPnP
• Setup and Control from a FireFox Browser on Windows XP using Bonjour
• Setup and Control from a Browser on Windows XP using a Static IP Address
Windows XP PCs support UPnP protocols, though very often UPnP service is disabled as
a default. (The procedure to enable UPnP is given later in this topic.) If UPnP is enabled,
you can control KUMO routers by simply going to “My Network Places” and doubleclicking on the KUMO as follows:
1. Ensure KUMO to be controlled is powered up and connected via Ethernet
(directly or via LAN) to the Windows XP PC.
2. Go to Start > My Network Places.
3. Locate the Icon for the KUMO being controlled and double-click it.
1
4. Double clicking a KUMO’s icon launches your Window XP PC’s default browser.
The browser will display the KUMO web interface. Use it to control KUMO.
If you don’t see a KUMO icon under “Local Network” on My Network Places, ensure their
is either a direct connection or LAN connection and the KUMO is powered up. With
those requirements satisfied, if no Icon can be seen, then likely the UPnP services are
disabled. You can enable them using the following procedure.

16
Check this Box
Enabling UPnP Services in Windows XP
1. Go to Start > Control Panel, and then click Add or Remove Programs.
2. In the Add or Remove Programs dialog box, click Add/Remove Windows
Components.
3. In the Windows Components Wizard, click Networking Services and then click
the Details button below. You’ll see a Networking Services dialog: locate the
UPnP User Interface checkbox and click in it to check the box and enable UPnP
service.
4. Click the OK button and then click Next in the Windows Components Wizard.
You may need to provide your Windows XP installation CD.
5. Go to Start > My Network Places again and look for the KUMO icon as shown
previously. UPnP devices on your local network will be displayed there,
including KUMO. Whenever a KUMO is connected, a notifying icon will appear
briefly in the System Tray. When you see the icon, go to My Network Places to
find the KUMO icon and double-click it to launch KUMO’s web interface for
control and setup.

Windows XP
Bonjour
logo/button
Double-click to view KUMO
Bonjour sidebar
web interface
FireFox Using
Bonjour
KUMO Quickstart Guide — Setup and Control from a Browser on Windows
Using Bonjour with Windows XP and the FireFox browser requires installing the
“Bonjour for Windows” software—plus a FireFox plug-in called “BonjourFoxy”. Bonjour
for Windows can be downloaded at:
http://developer.apple.com/networking/bonjour/download/
The FireFox browser plug-in (BonjourFoxy) can be download from:
www.Bonjourfoxy.net
To Connect (after installing both Bonjour and the plug-in):
1. Ensure KUMO to be controlled is powered up and connected via Ethernet to the
Windows XP PC (directly or via LAN).
2. Launch the FireFox web browser.
3. Access the Bonjour sidebar in Firefox by going to View > Sidebar > BonjourFoxy.
Or click on the Bonjour logo at the bottom right of your browser window.
1
17
Windows XP Browser—Type in KUMO Static IP Address
Firefox Bonjour Sidebar Selection
4. Select your KUMO router from the resulting Bonjour list:
Firefox BonjourFoxy Sidebar
KUMO also offers a factory default static IP address, allowing a direct and fail-safe way
to connect via a PC computer connected to KUMO either directly or via a LAN
connection. The default static IP address is temporary and is intended only to allow an
initial connection. Once you’ve connected using the static IP, you can then enter a
desired network configuration using KUMO's Network tab.
Note: The default static address is temporary and will be disabled the next time KUMO
restarts. Any changes in the Network configuration will be saved upon restart.

18
To set the KUMO device to its default static IP address:
1. Power up the KUMO router or control panel and wait for it to boot normally.
2. For a router, insert a straightened paper clip or similar device into the reset slot
on the rear (see photo that follows)—hold for six seconds and then allow
KUMO to restart.
For a KUMO CP, press and hold the two blank buttons on the panel for 5
seconds.
KUMO Reset Slot Location
When the KUMO router default IP is set, the Identify LED will illuminate and stay on.
When the KUMO CP default IP is set, the Source and Destination buttons will flash
alternately.
3. Configure your PC computer to talk on the 192.168.XX.XX subnet as shown
below (this example is for a PC connected directly to KUMO):
Important:
computer to normal operation after this procedure.
Use Control Panel to access your Local Area Network properties. In Windows
XP the path is:
Start > Control Panel > Network and Internet Connections > Network
Connections
Then, under “Network Connections” locate and click on the Local Area
Connection for the PC’s Ethernet port.
First record existing TCP-IP settings so that you can return your

KUMO Quickstart Guide — Setup and Control from a Browser on Windows
1
19
In the resulting General dialog screen, select the Properties button.
Then on the Local Area Connection Properties dialog, select the Internet Protocol
item and click the Properties button below it.

20
Finally, click the “Use the following IP address:” radio button and enter the
following IP Address and Subnet Mask:
• IP Address: 192.168.101.2
• Subnet Mask: 255.255.255.0
Click the OK button to store the changes. Note: This step is temporary. You will
later need to restore the original settings on your computer.
4. Connect the Windows XP PC to KUMO's RJ-45 port (either direct or through
your LAN)
5. Point your web browser to 192.168.101.1
6. Once connected to KUMO's web interface, reconfigure KUMO's network
parameters as desired.
7. Restore your computer to its normal network settings using the procedure and
IP Addresses you wrote down in Step 3.
 Loading...