

AJA KUMO installation Guide
www.aja.com
Installation and Operation
Guide
Because it matters.
Published: 10/20/10

ii
Trademarks
Notice
Contacting Support
Limited Warranty
®
AJA
Express™, Io HD
, KONA
®
, Ki Pro
™
and Io
®,
®,
KUMO
and XENA
™
are trademarks of AJA Video, Inc. Apple, the Apple logo,
®
are registered trademarks of AJA Video, Inc, Io
AppleShare, AppleTalk, FireWire, iPod, iPod Touch, Mac, and Macintosh are registered
trademarks of Apple Computer, Inc. Final Cut Pro, QuickTime and the QuickTime Logo are
trademarks of Apple Computer, Inc. All other trademarks are the property of their
respective holders.
Copyright © 2010 AJA Video, Inc. All rights reserved. All information in this manual is subject
to change without notice. No part of the document may be reproduced or transmitted in
any form, or by any means, electronic or mechanical, including photocopying or recording,
without the express written permission of AJA Inc.
To contact AJA Video for sales or support, use any of the following methods:
Telephone: 800.251.4224 or 530.271.3190
Fax: 530.274.9442
Web: http://www.aja.com
Support Email: support@aja.com
Sales Email: sales@aja.com
AJA Video warrants that the product, will be free from defects in materials and
workmanship for a period of three years from the date of purchase. If a product proves to
be defective during this warranty period, AJA Video, at its option, will either repair the
defective product without charge for parts and labor, or will provide a replacement in
exchange for the defective product..
To obtain service under this warranty, the Customer must notify AJA Video of the defect
before expiration of the warranty period and make suitable arrangements for the
performance of service by contacting AJA Video support through the channels set forth on
the support contacts web page at http://www.aja.com/support/index.php. Except as stated,
the Customer shall bear all shipping, packing, insurance and other costs, excluding parts
and labor, to effectuate repair. Customer shall pack and ship the defective product to a
service center designated by AJA Video, with shipping charges prepaid. AJA Video shall pay
to return the product to Customer but only if to a location within the country in which the
AJA Video service center is located.
This warranty shall not apply to any defect, failure or damage caused by negligent,
inadequate or improper use, handling or maintenance. Without limiting the foregoing, AJA
Video shall not be obligated to furnish service under this warranty or repair any damage or
malfunction a) resulting from attempts by personnel other than AJA Video representatives
to install, repair or service the product, b) resulting from improper use or connection to
incompatible equipment, c) caused by the use of non-AJA Video parts or supplies, d) if the
product has been modified or integrated with other products when the effect of such a
modification or integration increases the time or difficulty of servicing the product, or (e)
resulting from being dropped or otherwise subjected to undue force, exposure to moisture
or other corrosive or conductive substances, exposure to strong magnetic fields, use with
improperly regulated power supplies, exposure to electric shock, use in temperatures
outside the specified operating range, or otherwise failing to treat the product in
accordance with the standard of care appropriate to sensitive and delicate electronic
equipment.
EXCEPT AS STATED ABOVE, AJA VIDEO AND ITS VENDORS DISCLAIM IN THEIR ENTIRETY ALL
OTHER WARRANTIES, EXPRESS OR IMPLIED, INCLUDING WITHOUT LIMITATION ALL
WARRANTIES OF MERCHANTABILITY OR FITNESS FOR A PARTICULAR PURPOSE. AJA VIDEO'S
RESPONSIBILITY TO REPAIR OR REPLACE TIMELY REPORTED DEFECTIVE PRODUCTS IS THE
WHOLE AND EXCLUSIVE REMEDY CUSTOMER IS PROVIDED.

Limitation of
Liability
KUMO Installation and Operation Manual — Limited Warranty
THE PRODUCT IS NOT INTENDED, STATED, OR WARRANTED TO OPERATE UNINTERRUPTED OR
ERROR-FREE. YOU UNDERSTAND AND ACKNOWLEDGE THAT THE PRODUCT IS NOT INTENDED
TO BE USED AS THE SOLE OR PRIMARY DATA SOURCE OR TARGET FOR CRITICAL DATA, AND THAT
IT IS YOUR RESPONSIBILITY TO IMPLEMENT REDUNDANT CAPTURE AND BACKUP SYSTEMS AS
APPROPRIATE.
UNDER NO CIRCUMSTANCES SHALL AJA VIDEO BE LIABLE IN ANY WAY FOR ANY LOST,
CORRUPTED OR DESTROYED DATA, FOOTAGE OR WORK, OR FOR ANY OTHER INDIRECT, SPECIAL,
INCIDENTAL OR CONSEQUENTIAL DAMAGES, OR FOR ANY THIRD PARTY CLAIM, IN CONNECTION
WITH THE PRODUCT, WHETHER RESULTING FROM DEFECTS IN THE PRODUCT, SOFTWARE OR
HARDWARE FAILURE, OR ANY OTHER CAUSE WHATSOEVER, EVEN IF AJA VIDEO HAS BEEN
ADVISED OF THE POSSIBLITY OF SUCH DAMAGES. AJA VIDEO's LIABILITY IN CONNECTION WITH
THIS PRODUCT SHALL UNDER NO CIRCUMSTANCES EXCEED THE PURCHASE PRICE PAID FOR THE
PRODUCT.
1
iii

iv

KUMO Installation and Operation Manual — Table of Contents
Table of Contents
Trademarks . . . . . . . . . . . . . . . . . . . . . . . . . . . . . . . . . . . . . . . . . . . . . . . . . . . . . . . . . . . . . . . . . . . . . . . . . . . . . . . . . . . . . . . . . . . . . . . . ii
Notice . . . . . . . . . . . . . . . . . . . . . . . . . . . . . . . . . . . . . . . . . . . . . . . . . . . . . . . . . . . . . . . . . . . . . . . . . . . . . . . . . . . . . . . . . . . . . . . . . . . . . ii
Contacting Support . . . . . . . . . . . . . . . . . . . . . . . . . . . . . . . . . . . . . . . . . . . . . . . . . . . . . . . . . . . . . . . . . . . . . . . . . . . . . . . . . . . . . . . . ii
Limited Warranty . . . . . . . . . . . . . . . . . . . . . . . . . . . . . . . . . . . . . . . . . . . . . . . . . . . . . . . . . . . . . . . . . . . . . . . . . . . . . . . . . . . . . . . . . . ii
Limitation of Liability . . . . . . . . . . . . . . . . . . . . . . . . . . . . . . . . . . . . . . . . . . . . . . . . . . . . . . . . . . . . . . . . . . . . . . . . . . . . . . . . . iii
Table of Contents
Chapter 1: Introduction
Overview . . . . . . . . . . . . . . . . . . . . . . . . . . . . . . . . . . . . . . . . . . . . . . . . . . . . . . . . . . . . . . . . . . . . . . . . . . . . . . . . . . . . . . . . . . . . . . . . . . 1
KUMO Features . . . . . . . . . . . . . . . . . . . . . . . . . . . . . . . . . . . . . . . . . . . . . . . . . . . . . . . . . . . . . . . . . . . . . . . . . . . . . . . . . . . . . . . . . . . . 2
KUMO Control and Monitoring . . . . . . . . . . . . . . . . . . . . . . . . . . . . . . . . . . . . . . . . . . . . . . . . . . . . . . . . . . . . . . . . . . . . . . . . . . . . . 2
Network Configuration Overview . . . . . . . . . . . . . . . . . . . . . . . . . . . . . . . . . . . . . . . . . . . . . . . . . . . . . . . . . . . . . . . . . . . . . . . . . .2
KUMO Quick-start . . . . . . . . . . . . . . . . . . . . . . . . . . . . . . . . . . . . . . . . . . . . . . . . . . . . . . . . . . . . . . . . . . . . . . . . . . . . . . . . . . . . . . . . .3
KUMO Setup and Control . . . . . . . . . . . . . . . . . . . . . . . . . . . . . . . . . . . . . . . . . . . . . . . . . . . . . . . . . . . . . . . . . . . . . . . . . . . . .3
Direct Connection . . . . . . . . . . . . . . . . . . . . . . . . . . . . . . . . . . . . . . . . . . . . . . . . . . . . . . . . . . . . . . . . . . . . . . . . . . . . . . . . . . . .3
LAN Connection Using a Hub or Switch . . . . . . . . . . . . . . . . . . . . . . . . . . . . . . . . . . . . . . . . . . . . . . . . . . . . . . . . . . . . . . . . 4
QuickStart Setup and Control Methods . . . . . . . . . . . . . . . . . . . . . . . . . . . . . . . . . . . . . . . . . . . . . . . . . . . . . . . . . . . . . . . . 5
Physical Equipment Setup . . . . . . . . . . . . . . . . . . . . . . . . . . . . . . . . . . . . . . . . . . . . . . . . . . . . . . . . . . . . . . . . . . . . . . . . . . . . . 5
Setup and Control from a Browser on Mac OSX . . . . . . . . . . . . . . . . . . . . . . . . . . . . . . . . . . . . . . . . . . . . . . . . . . . . . . . . . . . . . 6
Safari Browser Using Bonjour . . . . . . . . . . . . . . . . . . . . . . . . . . . . . . . . . . . . . . . . . . . . . . . . . . . . . . . . . . . . . . . . . . . . . . . . . . 6
Safari Browser—Type in KUMO Static IP Address . . . . . . . . . . . . . . . . . . . . . . . . . . . . . . . . . . . . . . . . . . . . . . . . . . . . . . .7
Setup and Control from a Browser on Windows 7 . . . . . . . . . . . . . . . . . . . . . . . . . . . . . . . . . . . . . . . . . . . . . . . . . . . . . . . . . . .9
Windows 7 using UPnP (Universal Plug and Play) . . . . . . . . . . . . . . . . . . . . . . . . . . . . . . . . . . . . . . . . . . . . . . . . . . . . . . . 9
Windows 7 FireFox using Bonjour . . . . . . . . . . . . . . . . . . . . . . . . . . . . . . . . . . . . . . . . . . . . . . . . . . . . . . . . . . . . . . . . . . . .10
Windows 7 Browser—Type in KUMO Static IP Address . . . . . . . . . . . . . . . . . . . . . . . . . . . . . . . . . . . . . . . . . . . . . . . .11
Setup and Control from a Browser on Windows XP . . . . . . . . . . . . . . . . . . . . . . . . . . . . . . . . . . . . . . . . . . . . . . . . . . . . . . . .14
Windows XP using UPnP (Universal Plug and Play) . . . . . . . . . . . . . . . . . . . . . . . . . . . . . . . . . . . . . . . . . . . . . . . . . . . .14
Enabling UPnP Services in Windows XP . . . . . . . . . . . . . . . . . . . . . . . . . . . . . . . . . . . . . . . . . . . . . . . . . . . . . . . . . . . .14
Windows XP FireFox using Bonjour . . . . . . . . . . . . . . . . . . . . . . . . . . . . . . . . . . . . . . . . . . . . . . . . . . . . . . . . . . . . . . . . . . .16
Windows XP Browser—Type in KUMO Static IP Address . . . . . . . . . . . . . . . . . . . . . . . . . . . . . . . . . . . . . . . . . . . . . . .17
What’s In The Box? . . . . . . . . . . . . . . . . . . . . . . . . . . . . . . . . . . . . . . . . . . . . . . . . . . . . . . . . . . . . . . . . . . . . . . . . . . . . . . . . . . . . . . . .20
In This Manual . . . . . . . . . . . . . . . . . . . . . . . . . . . . . . . . . . . . . . . . . . . . . . . . . . . . . . . . . . . . . . . . . . . . . . . . . . . . . . . . . . . . . . . . . . . .20
1
i
Chapter 2: Getting Started
Getting Started . . . . . . . . . . . . . . . . . . . . . . . . . . . . . . . . . . . . . . . . . . . . . . . . . . . . . . . . . . . . . . . . . . . . . . . . . . . . . . . . . . . . . . . . . . .21
KUMO Chassis Installation . . . . . . . . . . . . . . . . . . . . . . . . . . . . . . . . . . . . . . . . . . . . . . . . . . . . . . . . . . . . . . . . . . . . . . . . . . . . . . . .22
Where to Place KUMO . . . . . . . . . . . . . . . . . . . . . . . . . . . . . . . . . . . . . . . . . . . . . . . . . . . . . . . . . . . . . . . . . . . . . . . . . . . . . . . .22
Physical Requirements . . . . . . . . . . . . . . . . . . . . . . . . . . . . . . . . . . . . . . . . . . . . . . . . . . . . . . . . . . . . . . . . . . . . . . . . . . . . . . .22
Power Requirements . . . . . . . . . . . . . . . . . . . . . . . . . . . . . . . . . . . . . . . . . . . . . . . . . . . . . . . . . . . . . . . . . . . . . . . . . . . . . . . . .22
KUMO Control . . . . . . . . . . . . . . . . . . . . . . . . . . . . . . . . . . . . . . . . . . . . . . . . . . . . . . . . . . . . . . . . . . . . . . . . . . . . . . . . . . . . . . . . . . . .23
Typical System Control Configurations . . . . . . . . . . . . . . . . . . . . . . . . . . . . . . . . . . . . . . . . . . . . . . . . . . . . . . . . . . . . . . . . . . . .24
KUMO Standalone . . . . . . . . . . . . . . . . . . . . . . . . . . . . . . . . . . . . . . . . . . . . . . . . . . . . . . . . . . . . . . . . . . . . . . . . . . . . . . . . . . .25
Computer UI with Zeroconf or UPnP . . . . . . . . . . . . . . . . . . . . . . . . . . . . . . . . . . . . . . . . . . . . . . . . . . . . . . . . . . . . . . . . . .26
TCP-IP Network Connection . . . . . . . . . . . . . . . . . . . . . . . . . . . . . . . . . . . . . . . . . . . . . . . . . . . . . . . . . . . . . . . . . . . . . . . . . .27
Default DHCP Configuration . . . . . . . . . . . . . . . . . . . . . . . . . . . . . . . . . . . . . . . . . . . . . . . . . . . . . . . . . . . . . . . . . . . . . .27
Static IP Configuration . . . . . . . . . . . . . . . . . . . . . . . . . . . . . . . . . . . . . . . . . . . . . . . . . . . . . . . . . . . . . . . . . . . . . . . . . . . .27
Default Local IP Address . . . . . . . . . . . . . . . . . . . . . . . . . . . . . . . . . . . . . . . . . . . . . . . . . . . . . . . . . . . . . . . . . . . . . . . . . .28

ii
Chapter 3: KUMO Web Browser User Interface
Router Web Browser User Interface . . . . . . . . . . . . . . . . . . . . . . . . . . . . . . . . . . . . . . . . . . . . . . . . . . . . . . . . . . . . . . . . . . . . . . . .29
Navigation Bar Information . . . . . . . . . . . . . . . . . . . . . . . . . . . . . . . . . . . . . . . . . . . . . . . . . . . . . . . . . . . . . . . . . . . . . . . . . . .30
KUMO Home . . . . . . . . . . . . . . . . . . . . . . . . . . . . . . . . . . . . . . . . . . . . . . . . . . . . . . . . . . . . . . . . . . . . . . . . . . . . . . . . . . . . . . . . .30
Control Panel Operation . . . . . . . . . . . . . . . . . . . . . . . . . . . . . . . . . . . . . . . . . . . . . . . . . . . . . . . . . . . . . . . . . . . . . . . . . .30
Router Configuration . . . . . . . . . . . . . . . . . . . . . . . . . . . . . . . . . . . . . . . . . . . . . . . . . . . . . . . . . . . . . . . . . . . . . . . . . . . . . . . . .31
Button Settings . . . . . . . . . . . . . . . . . . . . . . . . . . . . . . . . . . . . . . . . . . . . . . . . . . . . . . . . . . . . . . . . . . . . . . . . . . . . . . . . . . .31
Lock . . . . . . . . . . . . . . . . . . . . . . . . . . . . . . . . . . . . . . . . . . . . . . . . . . . . . . . . . . . . . . . . . . . . . . . . . . . . . . . . . . . . . . . . . . . . . .31
Hide . . . . . . . . . . . . . . . . . . . . . . . . . . . . . . . . . . . . . . . . . . . . . . . . . . . . . . . . . . . . . . . . . . . . . . . . . . . . . . . . . . . . . . . . . . . . . .32
Network Setup . . . . . . . . . . . . . . . . . . . . . . . . . . . . . . . . . . . . . . . . . . . . . . . . . . . . . . . . . . . . . . . . . . . . . . . . . . . . . . . . . . . . . . .32
Firmware Updating . . . . . . . . . . . . . . . . . . . . . . . . . . . . . . . . . . . . . . . . . . . . . . . . . . . . . . . . . . . . . . . . . . . . . . . . . . . . . . . . . .32
Unpack the Software . . . . . . . . . . . . . . . . . . . . . . . . . . . . . . . . . . . . . . . . . . . . . . . . . . . . . . . . . . . . . . . . . . . . . . . . . . . . . .33
Uploading and Installing Firmware to KUMO . . . . . . . . . . . . . . . . . . . . . . . . . . . . . . . . . . . . . . . . . . . . . . . . . . . . . . .33
Safeboot Reset . . . . . . . . . . . . . . . . . . . . . . . . . . . . . . . . . . . . . . . . . . . . . . . . . . . . . . . . . . . . . . . . . . . . . . . . . . . . . . . . . . . . . . .35
KUMO Alarms . . . . . . . . . . . . . . . . . . . . . . . . . . . . . . . . . . . . . . . . . . . . . . . . . . . . . . . . . . . . . . . . . . . . . . . . . . . . . . . . . . . . . . . .35
Locating a Specific KUMO . . . . . . . . . . . . . . . . . . . . . . . . . . . . . . . . . . . . . . . . . . . . . . . . . . . . . . . . . . . . . . . . . . . . . . . . . . . .36
Chapter 4: KUMO CP Remote Control Panel
KUMO Remote Control Panel . . . . . . . . . . . . . . . . . . . . . . . . . . . . . . . . . . . . . . . . . . . . . . . . . . . . . . . . . . . . . . . . . . . . . . . . . . . . . .37
Connectors and Indicator . . . . . . . . . . . . . . . . . . . . . . . . . . . . . . . . . . . . . . . . . . . . . . . . . . . . . . . . . . . . . . . . . . . . . . . . .38
Button Key Caps . . . . . . . . . . . . . . . . . . . . . . . . . . . . . . . . . . . . . . . . . . . . . . . . . . . . . . . . . . . . . . . . . . . . . . . . . . . . . . . . . .38
Panel Function Buttons . . . . . . . . . . . . . . . . . . . . . . . . . . . . . . . . . . . . . . . . . . . . . . . . . . . . . . . . . . . . . . . . . . . . . . . . . . . . . .38
Panel Lock . . . . . . . . . . . . . . . . . . . . . . . . . . . . . . . . . . . . . . . . . . . . . . . . . . . . . . . . . . . . . . . . . . . . . . . . . . . . . . . . . . . . . . . .38
Destination Lock . . . . . . . . . . . . . . . . . . . . . . . . . . . . . . . . . . . . . . . . . . . . . . . . . . . . . . . . . . . . . . . . . . . . . . . . . . . . . . . . . .39
Router Delegation Buttons (RTR 1 - 4) . . . . . . . . . . . . . . . . . . . . . . . . . . . . . . . . . . . . . . . . . . . . . . . . . . . . . . . . . . . . . .39
Reset Buttons . . . . . . . . . . . . . . . . . . . . . . . . . . . . . . . . . . . . . . . . . . . . . . . . . . . . . . . . . . . . . . . . . . . . . . . . . . . . . . . . . . . . .39
Control Panel Browser Interface . . . . . . . . . . . . . . . . . . . . . . . . . . . . . . . . . . . . . . . . . . . . . . . . . . . . . . . . . . . . . . . . . . . . . .39
Home Page . . . . . . . . . . . . . . . . . . . . . . . . . . . . . . . . . . . . . . . . . . . . . . . . . . . . . . . . . . . . . . . . . . . . . . . . . . . . . . . . . . . . . . .40
Configuration Page . . . . . . . . . . . . . . . . . . . . . . . . . . . . . . . . . . . . . . . . . . . . . . . . . . . . . . . . . . . . . . . . . . . . . . . . . . . . . . .40
Identify Button . . . . . . . . . . . . . . . . . . . . . . . . . . . . . . . . . . . . . . . . . . . . . . . . . . . . . . . . . . . . . . . . . . . . . . . . . . . . . . . . . . .41
Appendix A: Specifications
KUMO SDI Router Specifications . . . . . . . . . . . . . . . . . . . . . . . . . . . . . . . . . . . . . . . . . . . . . . . . . . . . . . . . . . . . . . . . . . . . . . . . . .A-1
KUMO CP Specifications . . . . . . . . . . . . . . . . . . . . . . . . . . . . . . . . . . . . . . . . . . . . . . . . . . . . . . . . . . . . . . . . . . . . . . . . . . . . . . . . .A-2
Appendix B: Safety & Compliance
Index
Rear Panel
1604
Rear Panel
1616
Chapter 1: Introduction
Front Panel
Control Panel
Overview
Option
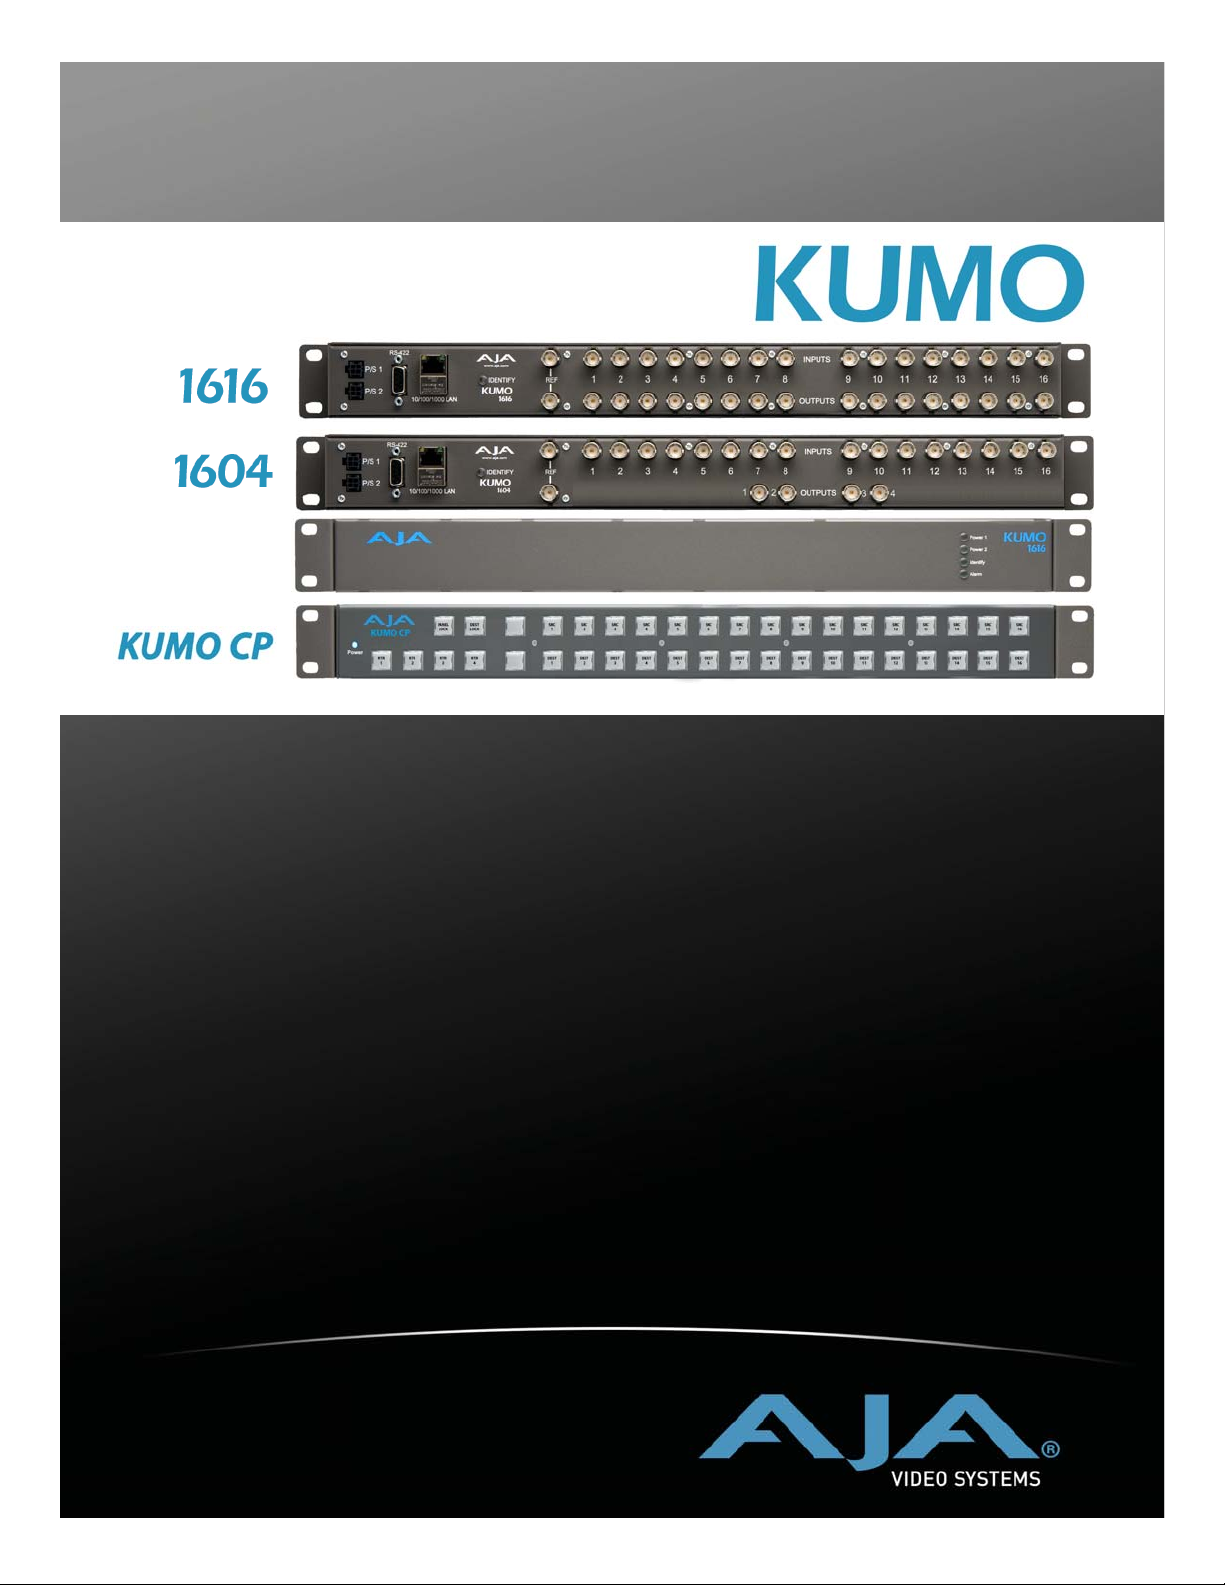
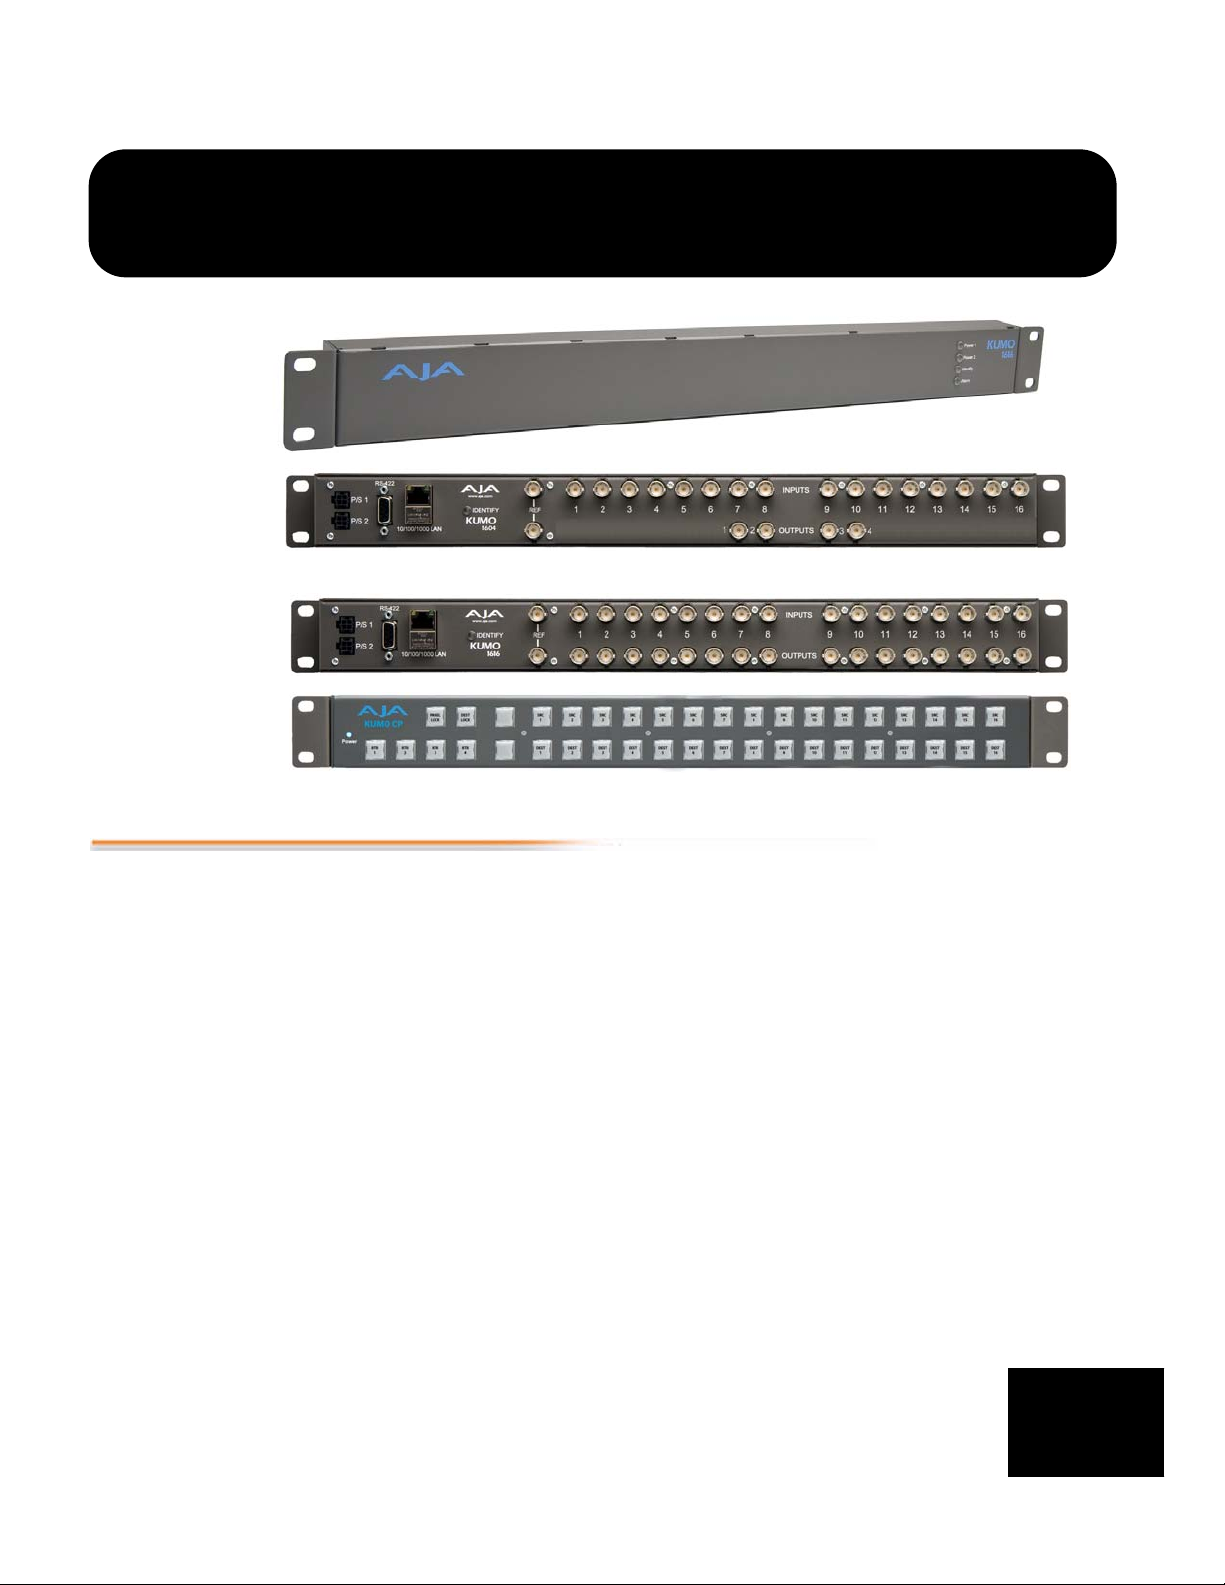
KUMO compact SDI routers are small and cost-effective, yet robust and reliable.
KUMO supports full-broadcast specifications over SDI, HD-SDI, and 3G SDI. Kumo
routers are re-clocking, non-blocking, and ready for any broadcast, production, or
post production environment. Running Embedded Linux, KUMO routers support
powerful HTTP control and monitoring. KUMO contains an internal webserver that
allows immediate installation, configuration, and operation without requiring
additional software. It offers a powerful user interface via any standard web browser.
KUMO SDI routers are available in two configurations:
•
KUMO 1604 – sixteen SDI inputs and four outputs
•
KUMO 1616 – sixteen SDI inputs and sixteen SDI outputs
Because of their compact 1RU size, KUMO SDI routers are ideal for space-sensitive
applications such as mobile sports trucks, edit suites, corporate video installations, or
live theatrical A/V rigs.
1
1
1

2
KUMO Features
The KUMO routers offer the following features for ease of use in any environment:
•
SD, HD, 3G SDI inputs and outputs via BNC, SMPTE 259M/292M/424M
•
Automatic equalization and re-clocking
•
Supports all ancillary data, including embedded audio
•
Reference via BNC, passive loop, PAL/NTSC color black or HD tri-sync
•
10/100/1000 Ethernet LAN
•
Embedded Linux OS with internal webserver for web browser control
•
HTTP Control
•
Optional pushbutton remote control panel via Ethernet
•
1RU form factor
•
Redundant Power (optional), isolated power inputs
KUMO Control and Monitoring
The KUMO router user-interface provides powerful remote setup, control, and
monitoring with:
•
Zero-configuration Bonjour Protocol and support for UPnP networking
protocols
•
Remote web browser control interface via Ethernet
•
Optional push-button remote control panel for control of up to 4 routers
assignable through the web interface
Network Configuration Overview
Networks can be:
•
Closed local area networks
•
A straight computer-to-KUMO cable
•
A straight optional control panel-to-KUMO cable (without computer interface)
•
Or for the greatest flexibility, exposed through a firewall to a broadband WAN.
KUMO’s internal HTTP networking software supports three levels of network
control described on the following pages:
•
Closed KUMO network – uses Bonjour
•
Auto Configured LAN – employs a Bonjour or UPnP enabled computer/
browser to automatically connect devices and allows KUMO web browser User
Interface (UI).
•
Standard TCP-IP network – employs DHCP or Static IP addressing and allows
the KUMO web-based UI and an unlimited number of KUMO routers and up to
16 KUMO CP control panels.
Quick-start configurations are discussed in this introductory chapter; for complete
network control and IP addressing information, see Chapter 2 .
KUMO Quick-start
KUMO Setup and
Control
Direct Connection
KUMO Installation and Operation Manual — KUMO Quick-start
This Quick Start Guide provides a basic overview of KUMO configuration. It is not
meant as a substitute for the detailed information found throughout the rest of
this manual, but as a quick way to get your KUMO set up quickly and operating.
We strongly recommend that you read the full KUMO Manual to get the most out
of your system.
KUMO SDI routers are easy to set up and use. Regardless of system configuration,
all KUMOs can be controlled via a web browser. This can be via a simple direct
connection between a KUMO router and a PC or Mac computer—or by a LAN
connection using an Ethernet hub or switch to interconnect one or many KUMOs
for larger system configurations.
The KUMO CP remote control panel option allows you to control a KUMO router
without any computer interface at all. For details, see “KUMO Remote Control
Panel” on page 37 .
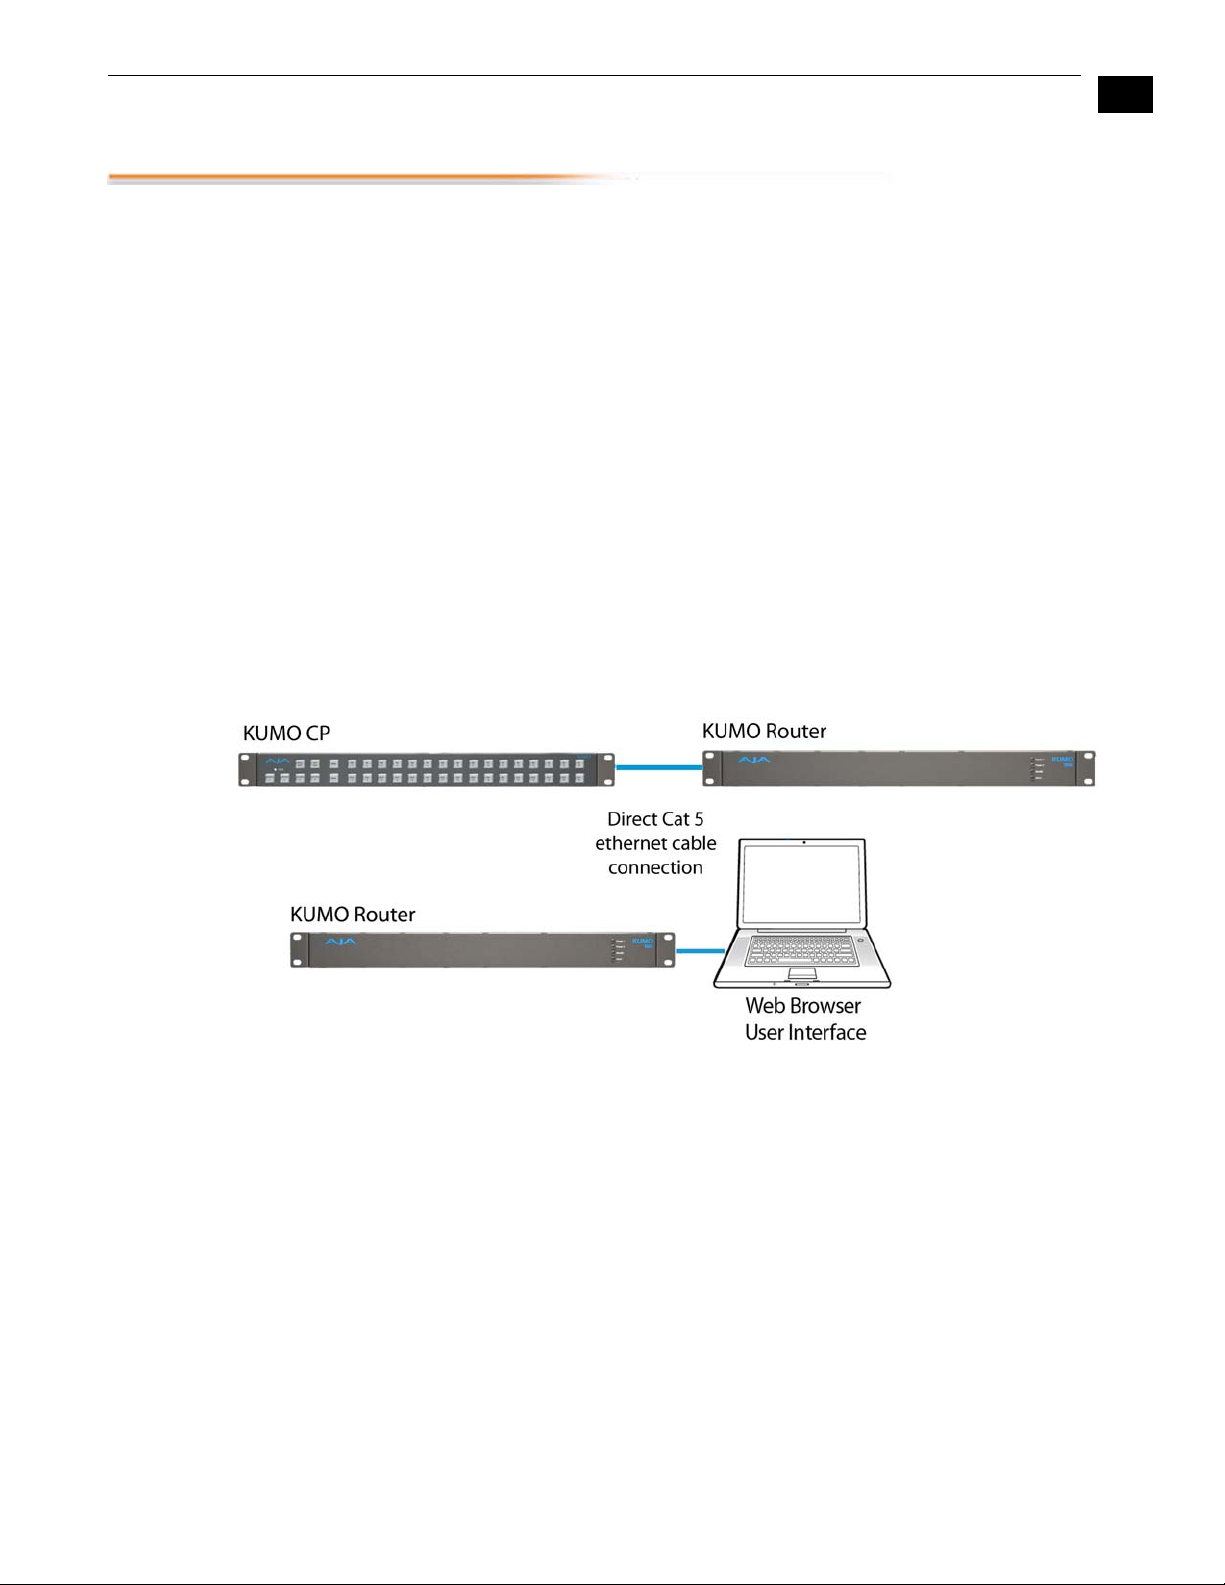
In a direct connection, you simply connect the control computer (Mac /PC) or a
KUMO CP control panel to a KUMO router using an Ethernet cable (cat 5)
between the RJ45 connectors on both devices.
1
3
KUMO Direct Connection to Mac/PC Web Browser or KUMO CP to KUMO
The KUMO CP Auto Configure assigns Router Select Button 1 to the attached
router.

4
LAN Connection
Using a Hub or
Switch
In a LAN connection, connect one or more KUMO routers to your LAN or closed
network using Cat. 5 Ethernet cable and an Ethernet hub or switch; then power up
the equipment.
KUMO LAN with Web Browser UI

1.
2.
3.
4.
QuickStart Setup
and Control
Methods
KUMO Installation and Operation Manual — KUMO Quick-start
Regardless of Direct Connection or LAN Connection , KUMOs are controlled over a
network by connecting to KUMO’s internal webserver with a standard web browser on
a Mac or PC. To do this you first need to establish a network connection between the
computer and the KUMO to be controlled. There are various methods supported for
doing this depending on the operating system and/or web browser being used.
Choose one of the following quick-start procedures that best fits your environment;
each procedure is presented in step-by-step form later on these pages:
Mac OSX
•
Setup and Control from a Safari Browser on Mac OSX using Bonjour
•
Setup and Control from a Browser on Mac OSX using a Static IP Address
1
Windows 7
•
Setup and Control from a Browser on Windows 7 using UPnP
•
Setup and Control from a FireFox Browser on Windows 7 using Bonjour
•
Setup and Control from a Browser on Windows 7 using a Static IP Address
Windows XP
5
Physical Equipment
Setup
•
Setup and Control from a Browser on Windows XP using UPnP
•
Setup and Control from a FireFox Browser on Windows XP using Bonjour
•
Setup and Control from a Browser on Windows XP using a Static IP Address
All of the above methods are explained on the following pages. Select the method that
works the best for you and your environment.
Important:
select and maintain a consistent network scheme. If a mixture of DHCP and Static IP
addresses are used, inconsistent performance can result. The most stable operation is
achieved when all IP addressing is either DHCP or Static.
Before setting up the KUMO router(s) and KUMO CP panels, ensure you’ve got all
equipment interconnected (direct or via LAN as already discussed):
Connect power supplies (1 or 2 for redundancy) to KUMO(s).
Connect source and destination SDI equipment (this step can be deferred).
Direct Connection: connect a KUMO and a Mac or PC via an Ethernet Cable
LAN Connection: connect a KUMO to a hub or switch and connect a PC or Mac to
the same LAN via a hub or switch.
Proceed to your desired Setup and Control QuickStart method using one of the
methods on the following pages.
When using KUMO in a DHCP or Static IP addressed network, it is best to
6
Setup and Control from a Browser on Mac OSX
The two easiest methods of setting up and controlling a KUMO router system from a
Mac are:
•
Setup and Control from a Safari Browser on Mac OSX using Bonjour
•
Setup and Control from a Browser on Mac OSX using a Static IP Address
1.
2.
3.
4.
Safari Browser
Using Bonjour
Bookmark Icon
Bonjour Collection
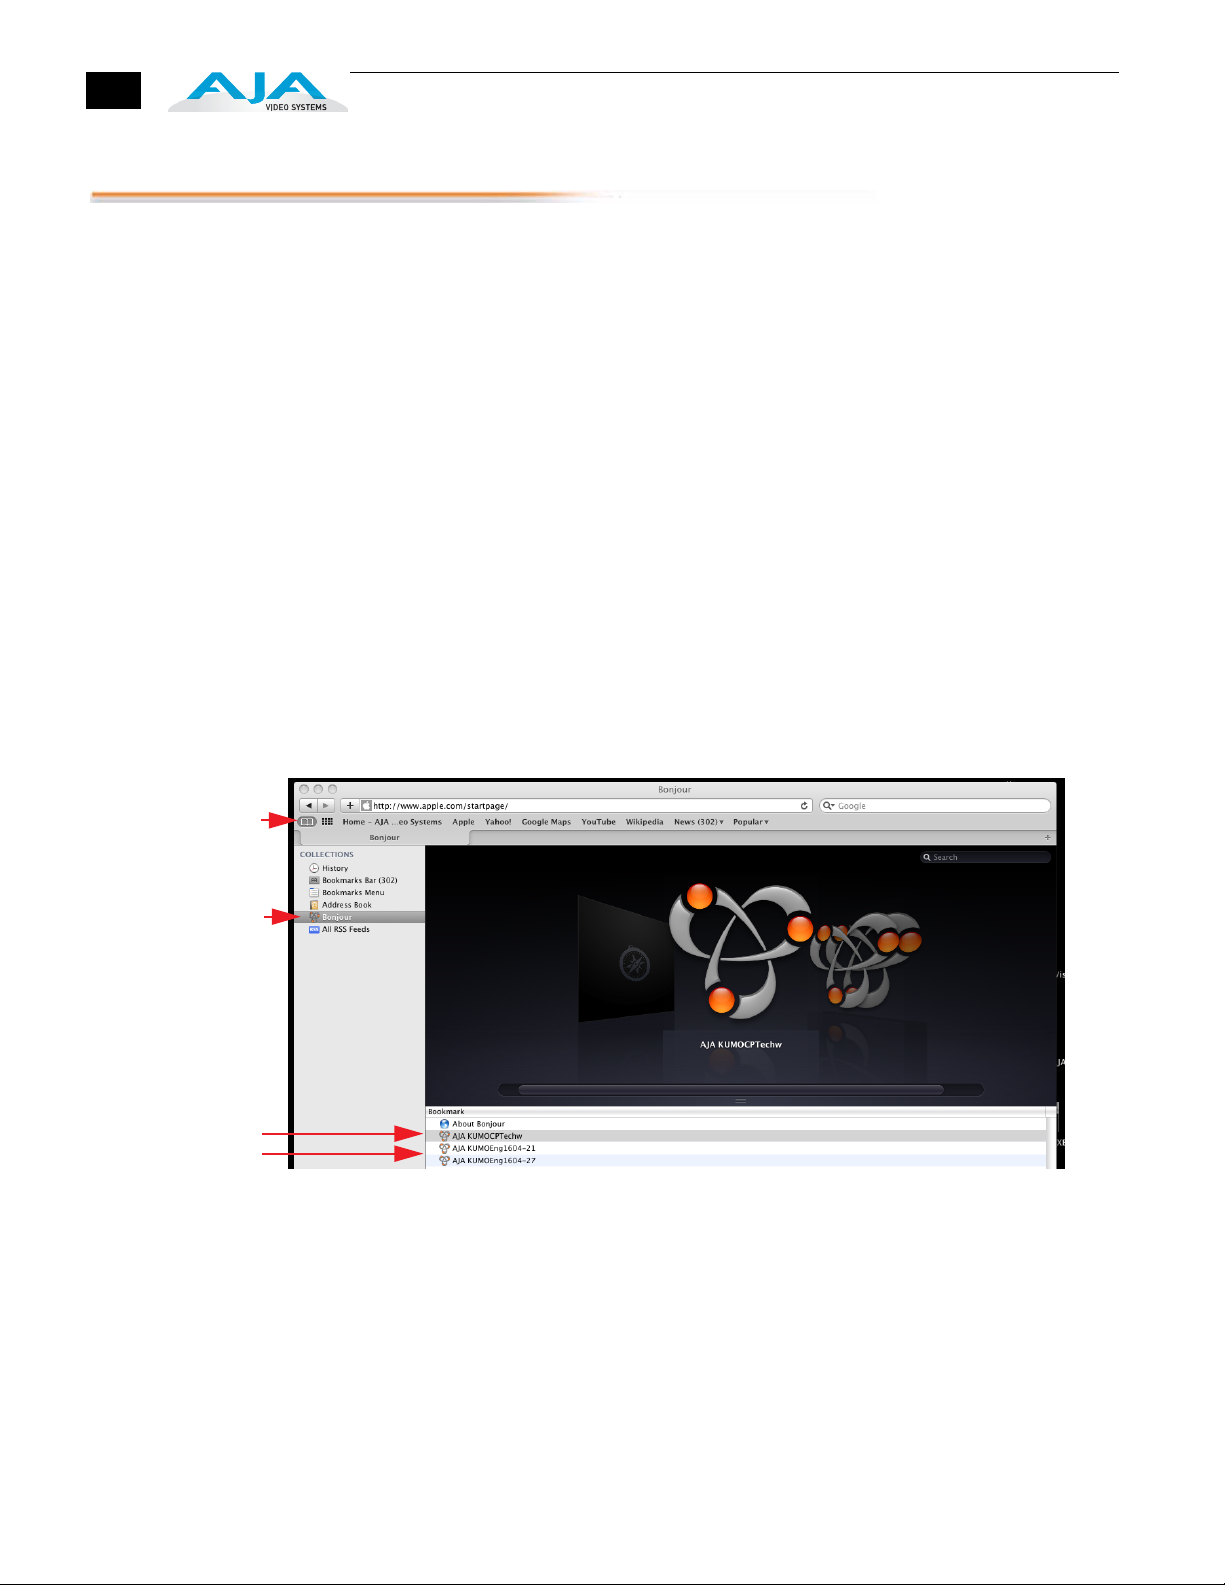
The Mac OSX Safari browser has Bonjour built-in, which can be used to auto-detect
and connect to a KUMO router. To do so:
Start Safari browser on a Macintosh connected to the KUMO network—ensure
KUMO to be controlled is powered up and connected via Ethernet (directly or
via LAN).
Click on the Bookmark icon (menu bar, far left) and select the Bonjour
collection
Double-click on the KUMO router or control panel in the Bookmarks pane.
Note: The KUMO name will be similar to: AJA KUMO1616-555 (where 1616 is the
model number and -555 is the unit’s serial #.
Once you click the KUMO router item, Safari will display the KUMO web userinterface; you can now control the router. For additional details read the KUMO
user manual on the supplied CD.
-
KUMO CP
KUMO Routers
Safari Bonjour Bookmarks
1.
2.
3.
Safari Browser—
Type in KUMO
Static IP Address
KUMO Installation and Operation Manual — Setup and Control from a
KUMO also offers a factory default static IP address, allowing a direct and fail-safe way
to connect via a Mac computer connected to KUMO either directly or via a LAN
connection. The default static IP address is temporary and is intended only to allow an
initial connection. Once you’ve connected using the static IP, you can then enter a
desired network configuration using KUMO's Network tab.
Note: The default static address is temporary and will be disabled the next time KUMO
restarts. Any changes in the Network configuration will be saved upon restart.
To set KUMO to its default static IP address:
Power up KUMO and wait for it to boot normally.
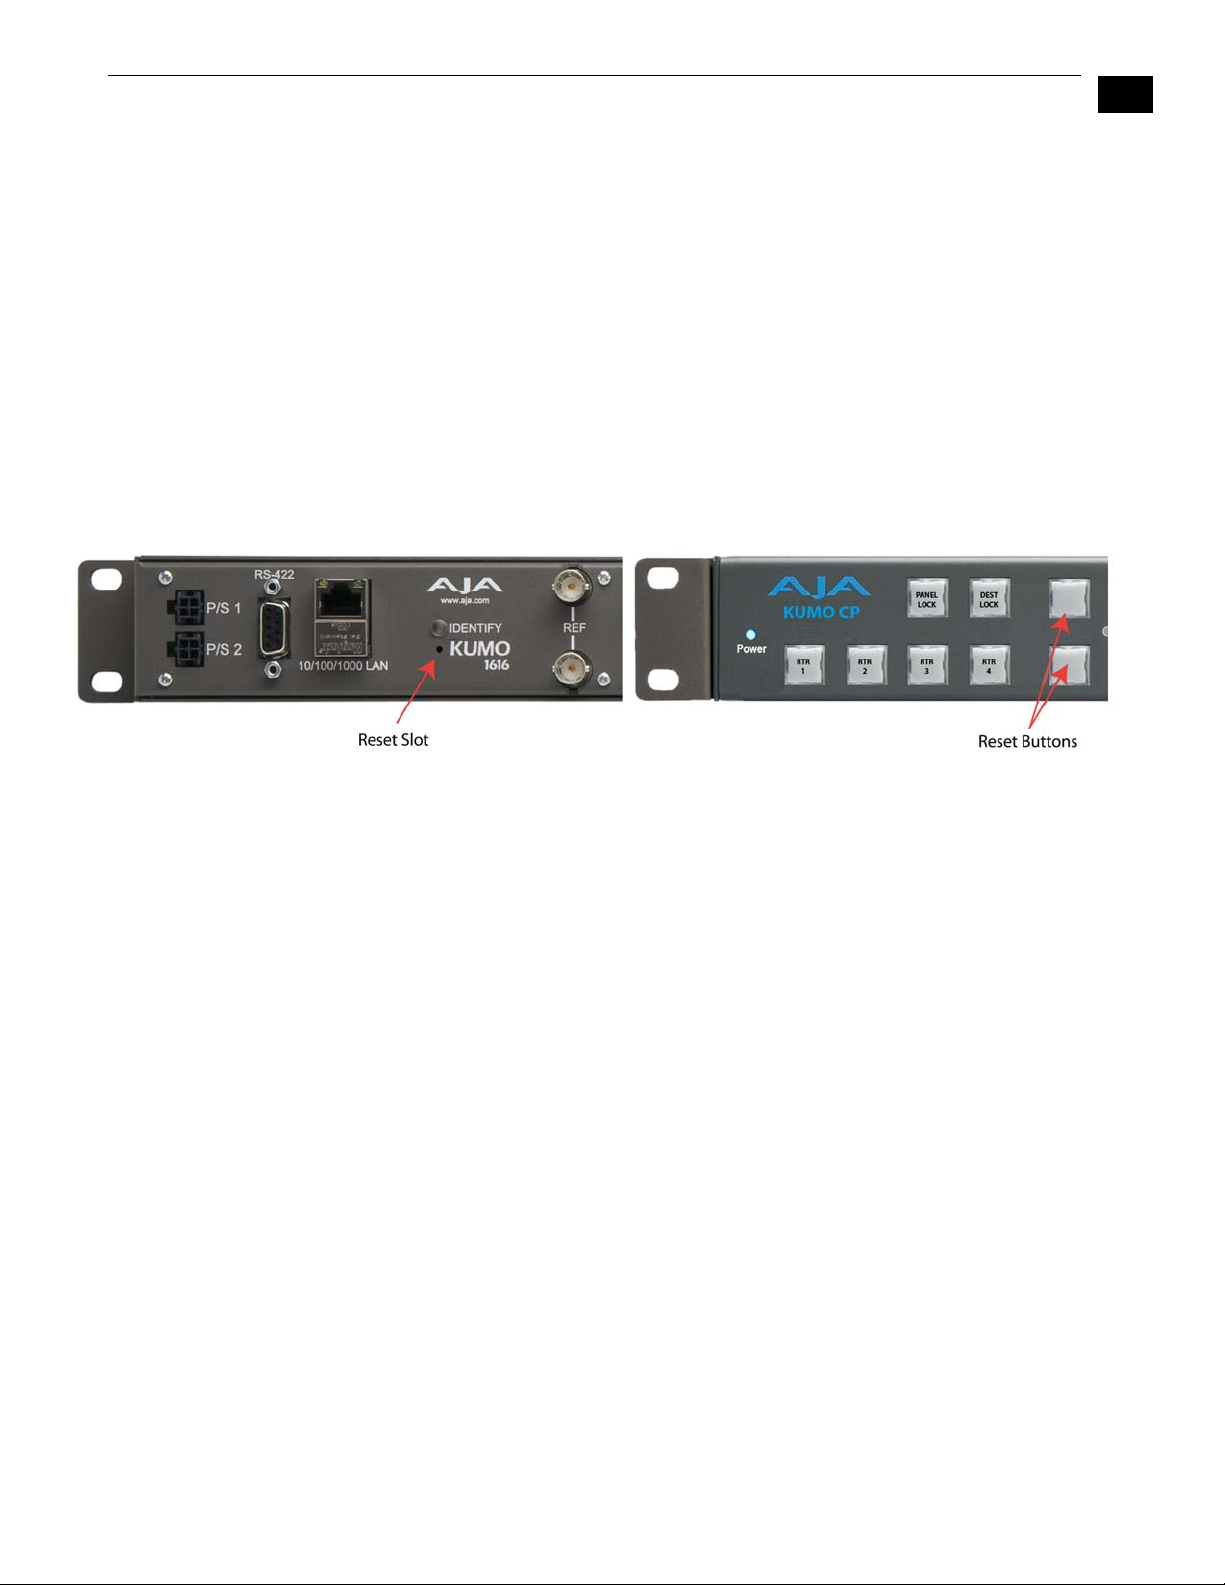
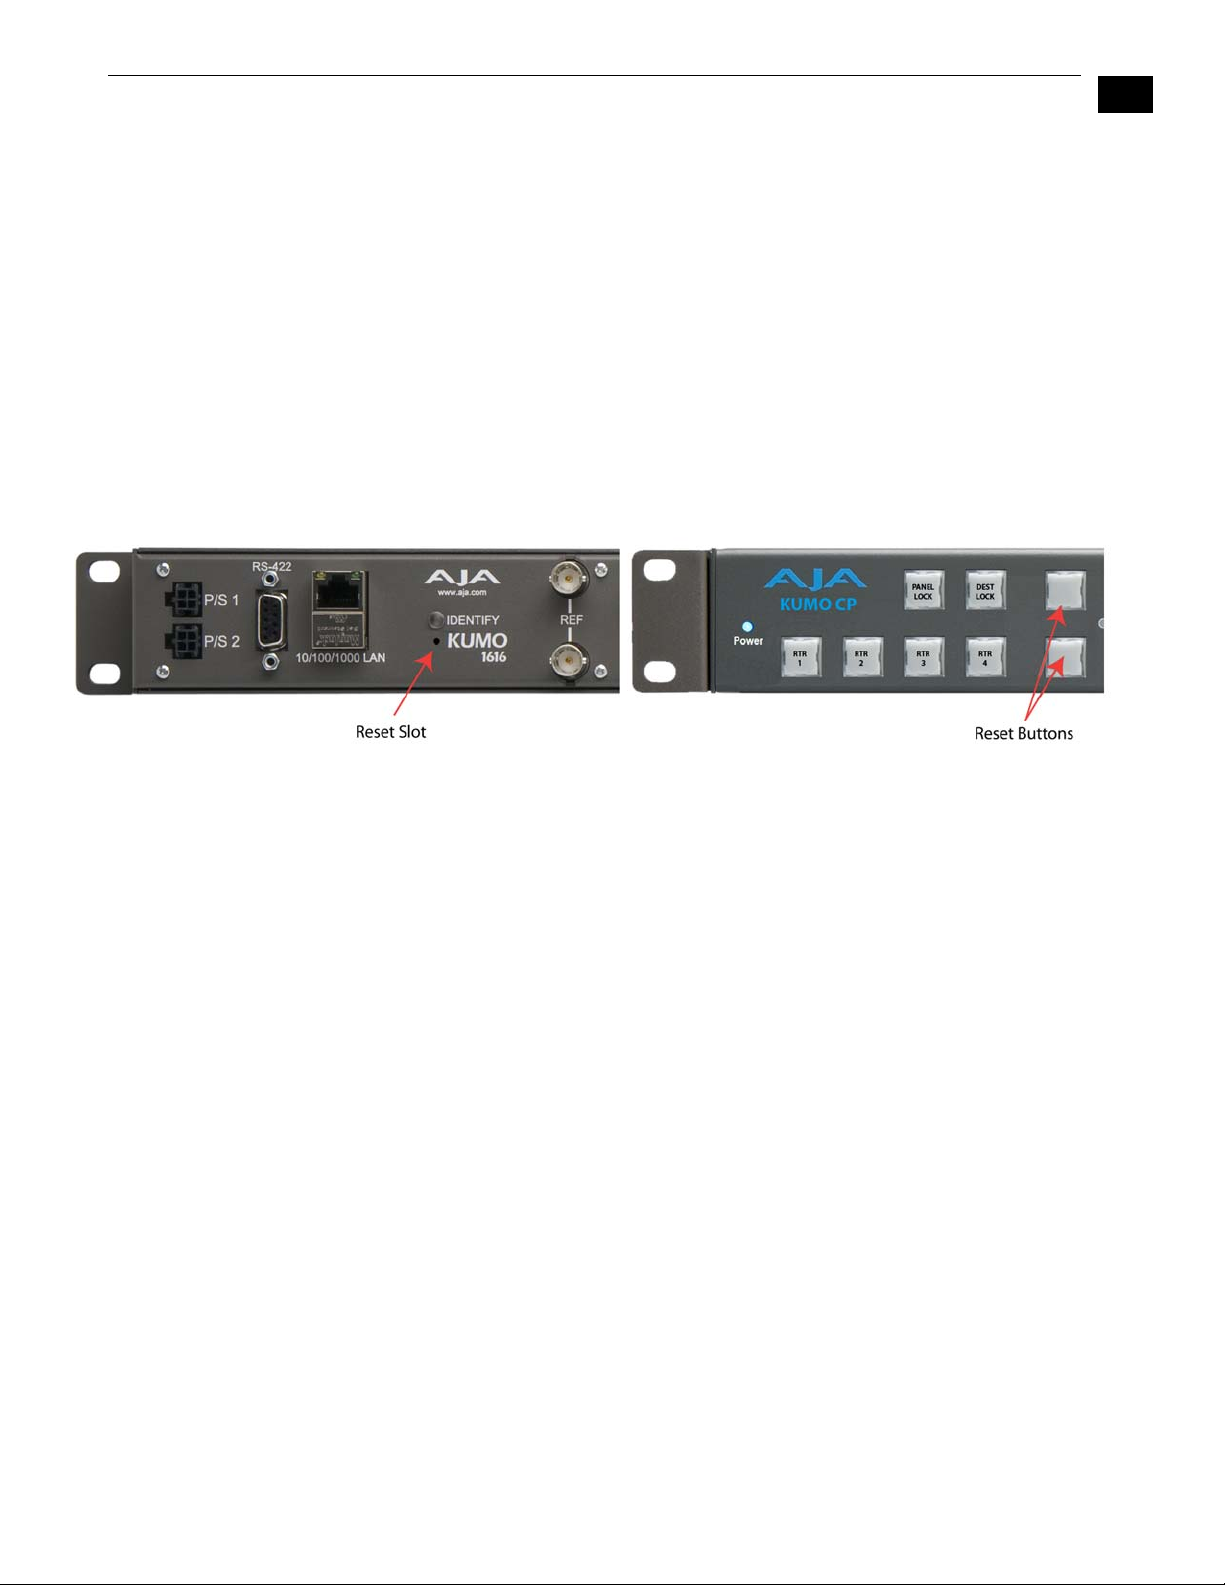
For a router, insert a straightened paper clip or similar device into the reset slot
on the rear (see photo that follows)—hold for six seconds and then allow KUMO
to restart.
For a KUMO CP, press and hold the two blank buttons on the panel for 5 seconds.
1
7
KUMO Reset Slot Location
When the KUMO router default IP is set, the Identify LED will illuminate and stay on.
When the KUMO CP default IP is set, the Source and Destination buttons will flash
alternately.
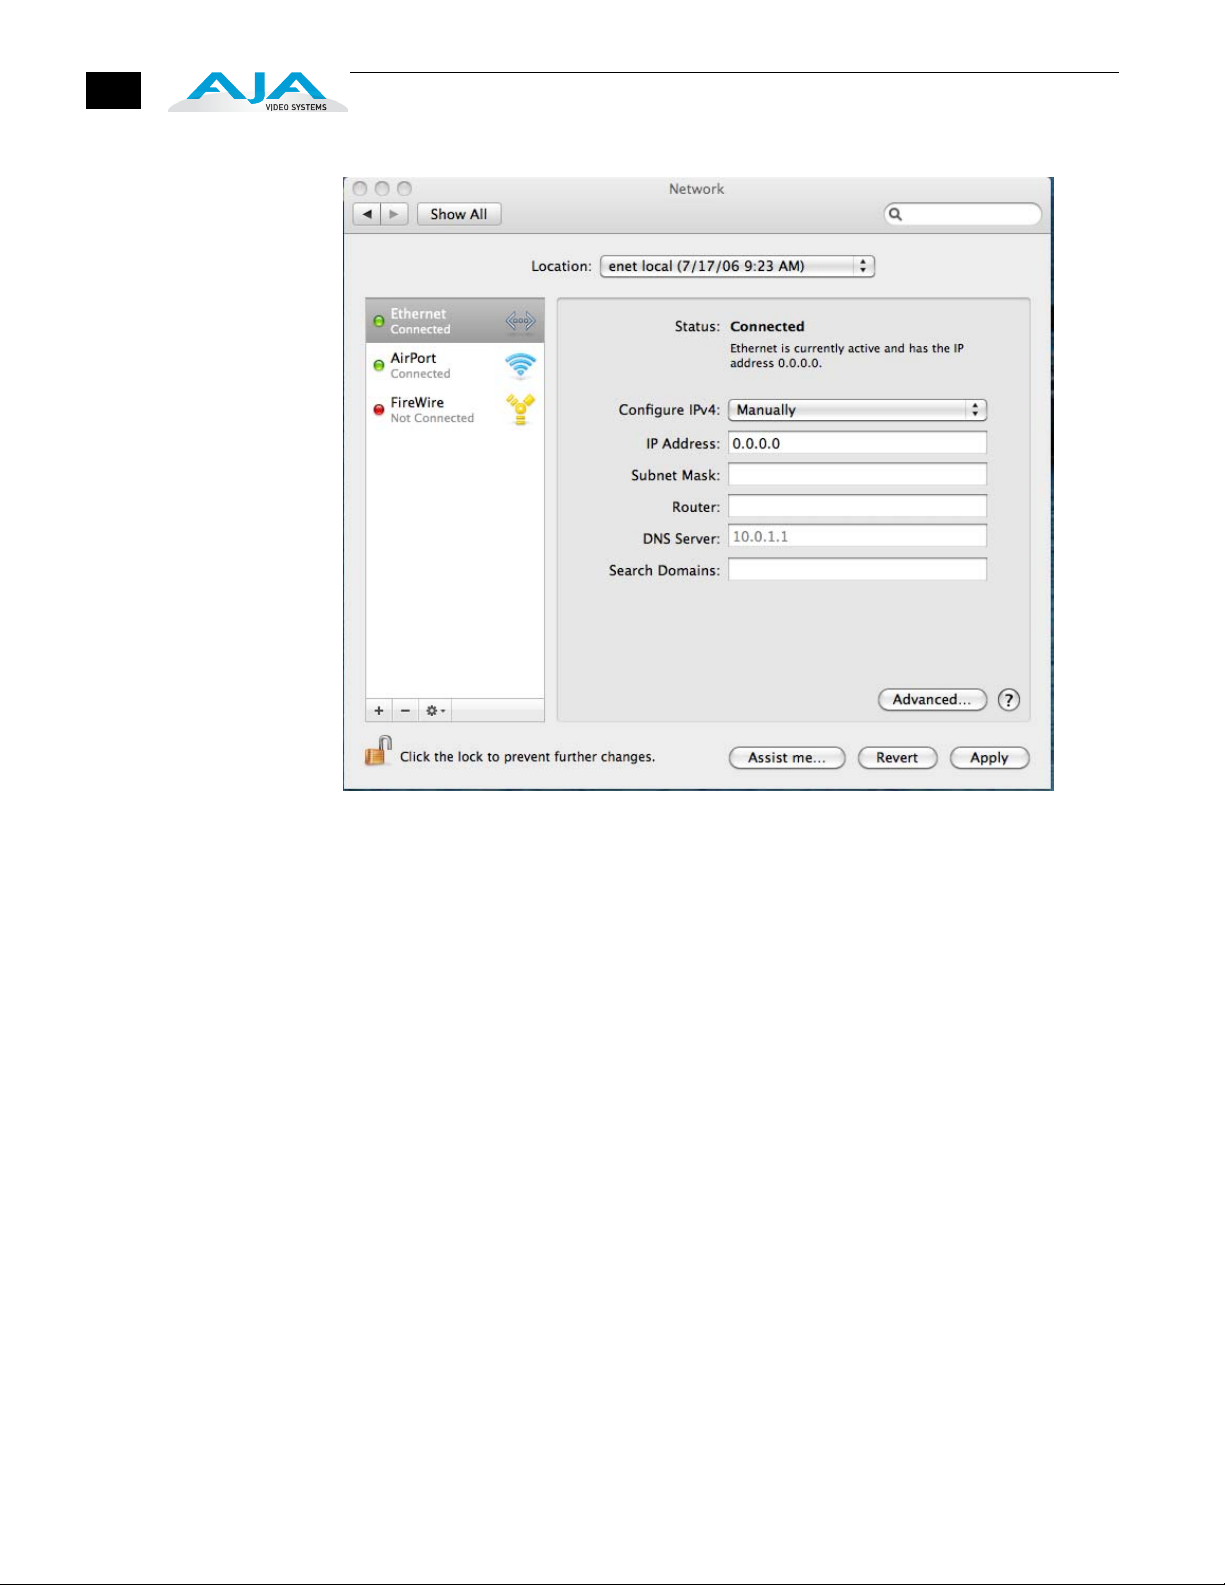
Configure your Mac computer to talk on the 192.168.XX.XX subnet as shown
below:
Important:
computer to normal operation after this procedure.
Go to your System Preferences>Network and select Ethernet and Configure:
Manually.
First record existing TCP-IP settings so that you can return your
4.
5.
6.
7.
8
Mac Enet Setup Screen (System Preferences -> Network)
Input the address information shown below:
• IP Address: 192.168.101.2
• Subnet Mask: 255.255.255.0
Click Apply.
Ensure the KUMO device to be controlled is connected to the Mac via Ethernet
(directly or via LAN).
Start Safari and enter 192.168.101.1 as a web address. This is the KUMO static IP
address.
Once connected to KUMO's web interface, reconfigure KUMO's network
parameters as desired.
Restore your computer to its normal network settings using the procedure and
IP Addresses you wrote down in Step 3.
KUMO Installation and Operation Manual — Setup and Control from a
Setup and Control from a Browser on Windows 7
The easiest methods of setting up a controlling a KUMO device from a PC running
Windows 7 are:
• Setup and Control from a Browser on Windows 7 using UPnP
• Setup and Control from a FireFox Browser on Windows 7 using Bonjour
• Setup and Control from a Browser on Windows 7 using a Static IP Address
9
Windows 7 using
UPnP (Universal
Plug and Play)
If your Windows 7 PC supports UPnP protocols (most do) and UPnP service is enabled
(refer to your MicroSoft Windows documentation), you can control KUMO routers by
simply selecting one from a device list:
1. Ensure KUMO to be controlled is powered up and connected via Ethernet
(directly or via LAN).
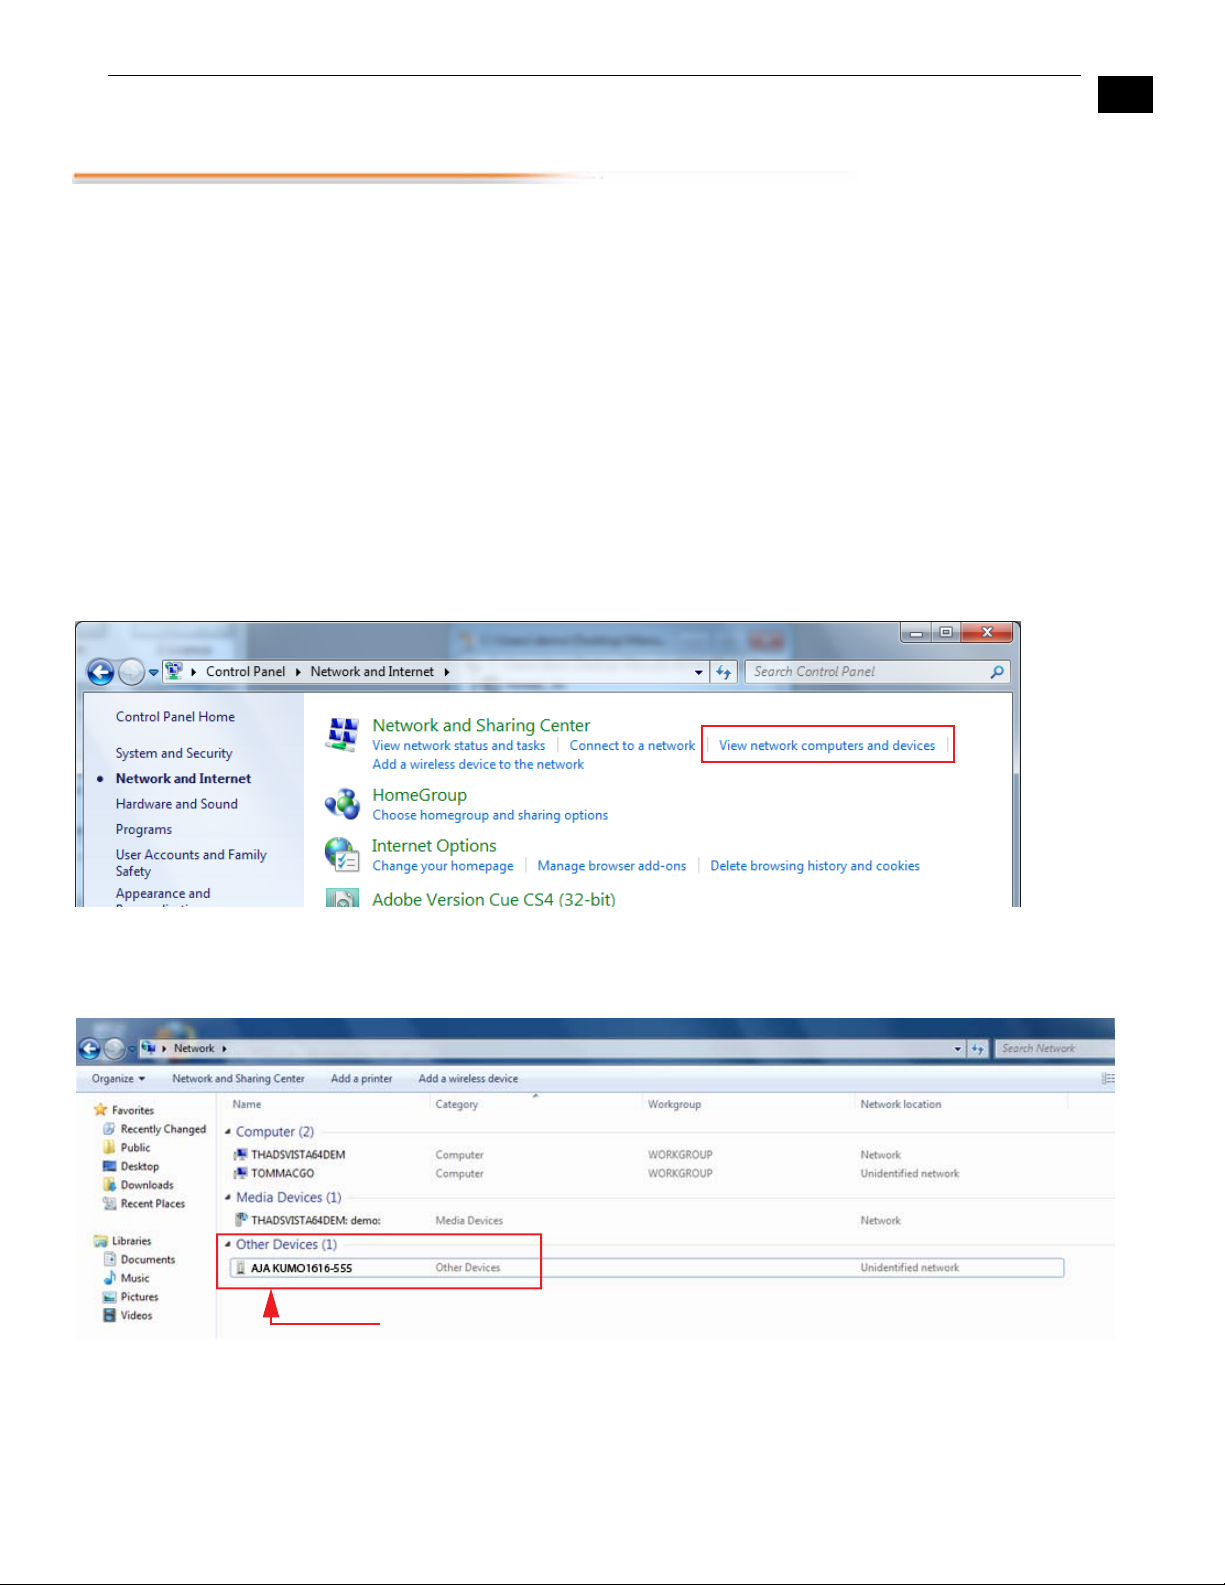
2. Use your Windows 7 Control Panel to go to Network and Internet.
3. Select View Network computers and devices.
Click This
4. Look at the resulting device list under “Other Devices”—double click a KUMO’s
name to launch your Window 7 PC’s default browser. The browser will display the
KUMO web interface. Use it to control KUMO.
1
Double-click the KUMO name to launch your default web browser
Windows Network Screen
10
Windows 7
FireFox
using Bonjour
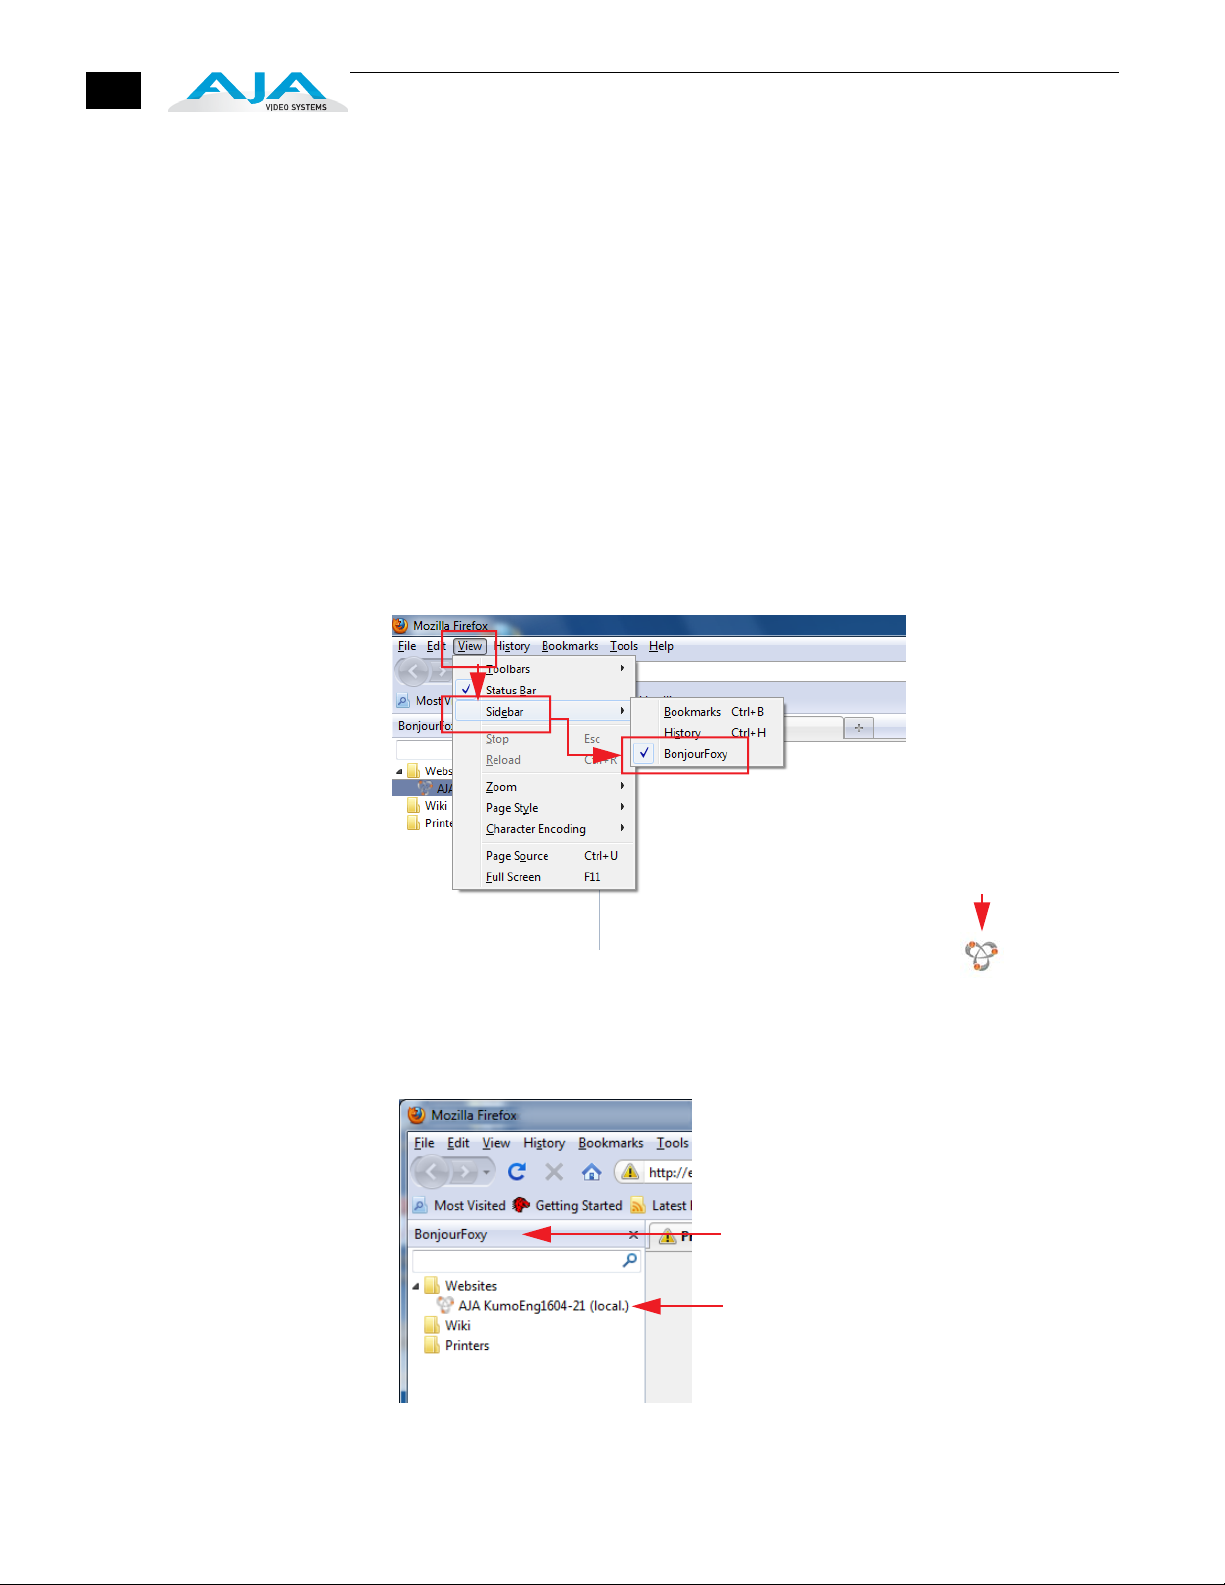
Using Bonjour with Windows 7 and the FireFox browser requires installing the
“Bonjour for Windows” software—plus a FireFox plug-in.
Bonjour for Windows can be downloaded at:
http://developer.apple.com/networking/bonjour/download/
The FireFox browser plug-in (BonjourFoxy) can be download from:
www.Bonjourfoxy.net
To Connect (after installing both Bonjour and the plug-in):
1. Ensure the KUMO device to be controlled is powered up and connected via
Ethernet to the Windows 7 PC (directly or via LAN).
2. Launch the FireFox web browser.
3. Access the Bonjour sidebar in Firefox by going to View > Sidebar > BonjourFoxy.
You can also launch the sidebar by clicking on the Bonjour logo at the bottom
right of your browser window.
Bonjour
logo/button
Firefox Bonjour Sidebar Selection
4. Select your KUMO router or control panel from the resulting Bonjour list:
Bonjour sidebar
Double-click to view KUMO
web interface
Firefox BonjourFoxy Sidebar
KUMO Installation and Operation Manual — Setup and Control from a
11
Windows 7
Browser—
Type in KUMO
Static IP Address
KUMO also offers a factory default static IP address, allowing a direct and fail-safe way
to connect via a PC computer connected to KUMO either directly or via a LAN
connection. The default static IP address is temporary and is intended only to allow an
initial connection. Once you’ve connected using the static IP, you can then enter a
desired network configuration using KUMO's Network tab.
Note: The default static address is temporary and will be disabled the next time KUMO
restarts. Any changes in the Network configuration will be saved upon restart.
To set KUMO to its default static IP address:
1. Power up KUMO and wait for it to boot normally.
2. For a router, insert a straightened paper clip or similar device into the reset slot
on the rear (see photo that follows)—hold for six seconds and then allow KUMO
to restart.
For a KUMO CP, press and hold the two blank buttons on the panel for 5 seconds.
1
KUMO Reset Slot & KUMO CP Reset Buttons Locations
When the KUMO router default IP is set, the Identify LED will illuminate and stay on.
When the KUMO CP default IP is set, the Source and Destination buttons will flash
alternately.
3. Configure your PC computer to talk on the 192.168.XX.XX subnet as shown
below (this example is for a PC connected directly to KUMO):
Important: BEFORE altering your PC network configuration, record existing TCP-IP
settings so that you can return your computer to normal operation after this
procedure.
Use Control Panel to access your Local Area Network properties. In Windows 7
the path is:
Control Panel > Network and Internet > Network and Sharing Center
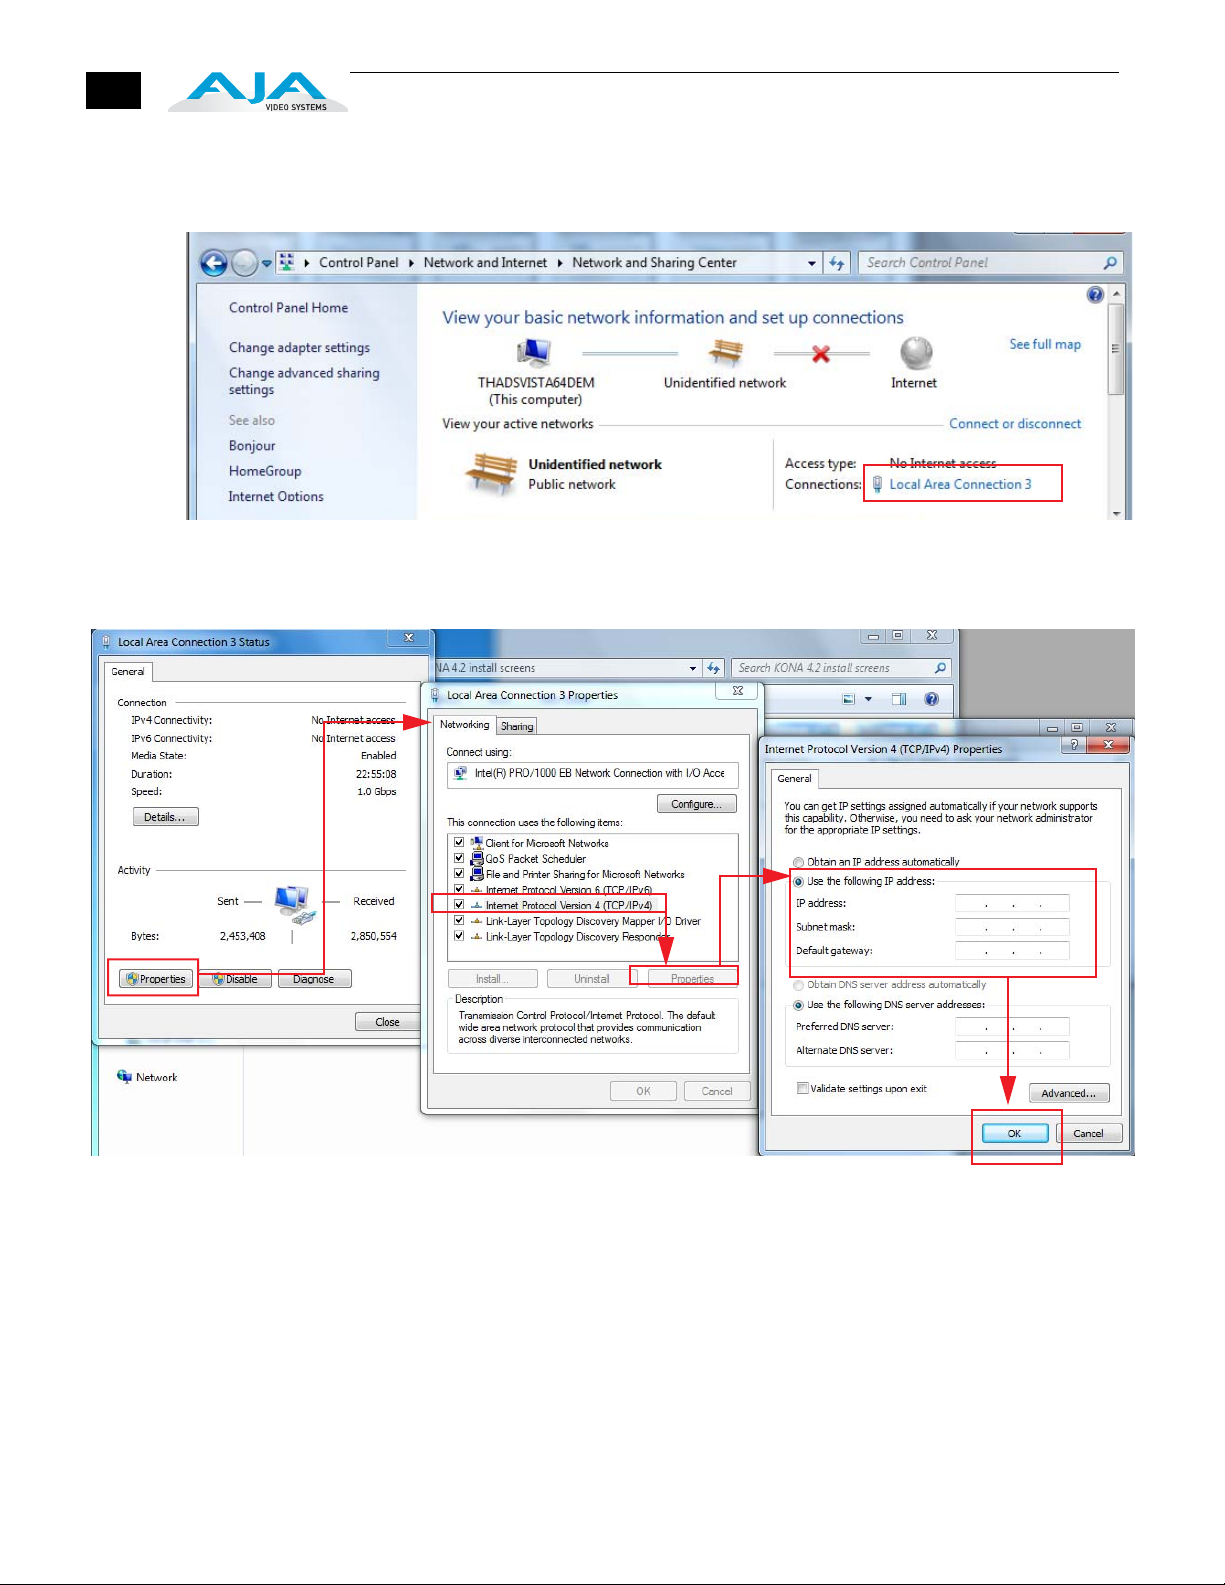
12
Then, under “Connections” click on the Local Area Connection for the PC’s
Ethernet port.
In the resulting General dialog screen, select the Properties button.
Then on the Networking tab, select Internet Protocol Version 4 and click the
Properties button below.
Finally, click the “Use the following IP address:” radio button and enter the IP
Address and Subnet Mask below:
• IP Address: 192.168.101.2

KUMO Installation and Operation Manual — Setup and Control from a
• Subnet Mask: 255.255.255.0
Click the OK button to store the changes.
Note: The previous step is temporary. You will later need to restore the original
settings on your computer.
4. Connect the Windows 7 PC to KUMO's RJ-45 port (either direct or through your
LAN)
5. Point your web browser to 192.168.101.1
6. Once connected to KUMO's web interface, reconfigure KUMO's network
parameters as desired.
7. Restore your computer to its normal network settings using the procedure and
IP Addresses you wrote down in Step 3.
1
13
 Loading...