

AJA KONA 3 installation Guide

www.aja.com
Installation and Operation
Guide
Because it matters.
Published: 5/27/11

ii
Trademarks
®
AJA
, KONA
Express™, Io HD
AppleShare, AppleTalk, FireWire, iPod, iPod Touch, Mac, and Macintosh are registered
trademarks of Apple Computer, Inc. Final Cut Pro, QuickTime and the QuickTime Logo are
trademarks of Apple Computer, Inc. All other trademarks are the property of their
respective holders.
Notice
Copyright © 2011 AJA Video, Inc. All rights reserved. All information in this manual is subject
to change without notice. No part of the document may be reproduced or transmitted in
any form, or by any means, electronic or mechanical, including photocopying or recording,
without the express written permission of AJA Inc.
Contacting Support
To contact AJA Video for sales or support, use any of the following methods:
Telephone: 800.251.4224 or 530.271.3190
Fax: 530.274.9442
Web: http://www.aja.com
Support Email: support@aja.com
Sales Email: sales@aja.com
FCC Emission Information
This equipment has been tested and found to comply with the limits for a Class A digital
device, pursuant to Part 15 of the FCC Rules. These limits are designed to provide
reasonable protection against harmful interference when the equipment is operated in a
commercial environment. This equipment generates, uses and can radiate radio frequency
energy and, if not installed and used in accordance with the instruction manual, may cause
harmful interference to radio communications. Operation of this equipment in a residential
area is likely to cause harmful interference in which case the user will be required to correct
the interference at his own expense. Changes or modifications not expressly approved by
AJA Video can effect emission compliance and could void the user’s authority to operate
this equipment.
®
, Ki Pro
™
and Io
®,
®,
KUMO
and XENA
™
are trademarks of AJA Video, Inc. Apple, the Apple logo,
®
are registered trademarks of AJA Video, Inc, Io
Limited Warranty
AJA Video warrants that this product will be free from defects in materials and
workmanship for a period of three years from the date of purchase. If a product proves to be
defective during this warranty period, AJA Video, at its option, will either repair the
defective product without charge for parts and labor, or will provide a replacement in
exchange for the defective product.
In order to obtain service under this warranty, you the Customer, must notify AJA Video of
the defect before the expiration of the warranty period and make suitable arrangements for
the performance of service. The Customer shall be responsible for packaging and shipping
the defective product to a designated service center nominated by AJA Video, with
shipping charges prepaid. AJA Video shall pay for the return of the product to the Customer
if the shipment is to a location within the country in which the AJA Video service center is
located. Customer shall be responsible for paying all shipping charges, insurance, duties,
taxes, and any other charges for products returned to any other locations.

KONA 3 Installation and Operation Manual — Limited Warranty
This warranty shall not apply to any defect, failure or damage caused by improper use
or improper or inadequate maintenance and care. AJA Video shall not be obligated to
furnish service under this warranty a) to repair damage resulting from attempts by
personnel other than AJA Video representatives to install, repair or service the product,
b) to repair damage resulting from improper use or connection to incompatible
equipment, c) to repair any damage or malfunction caused by the use of non-AJA Video
parts or supplies, or d) to service a product that has been modified or integrated with
other products when the effect of such a modification or integration increases the time
or difficulty of servicing the product.
THIS WARRANTY IS GIVEN BY AJA VIDEO IN LIEU OF ANY OTHER WARRANTIES, EXPRESS
OR IMPLIED. AJA VIDEO AND ITS VENDORS DISCLAIM ANY IMPLIED WARRANTIES OF
MERCHANTABILITY OR FITNESS FOR A PARTICULAR PURPOSE. AJA VIDEO’S
RESPONSIBILITY TO REPAIR OR REPLACE DEFECTIVE PRODUCTS IS THE WHOLE AND
EXCLUSIVE REMEDY PROVIDED TO THE CUSTOMER FOR ANY INDIRECT, SPECIAL,
INCIDENTAL OR CONSEQUENTIAL DAMAGES IRRESPECTIVE OF WHETHER AJA VIDEO OR
THE VENDOR HAS ADVANCE NOTICE OF THE POSSIBILITY OF SUCH DAMAGES.
1
iii

iv

KONA 3 Installation and Operation Manual — Table of Contents
Table of Contents
Trademarks . . . . . . . . . . . . . . . . . . . . . . . . . . . . . . . . . . . . . . . . . . . . . . . . . . . . . . . . . . . . . . . . . . . . . . . . . . . . . . . . . . . . . . . . . . . . . . . . ii
Notice . . . . . . . . . . . . . . . . . . . . . . . . . . . . . . . . . . . . . . . . . . . . . . . . . . . . . . . . . . . . . . . . . . . . . . . . . . . . . . . . . . . . . . . . . . . . . . . . . . . . . ii
Contacting Support . . . . . . . . . . . . . . . . . . . . . . . . . . . . . . . . . . . . . . . . . . . . . . . . . . . . . . . . . . . . . . . . . . . . . . . . . . . . . . . . . . . . . . . . ii
FCC Emission Information . . . . . . . . . . . . . . . . . . . . . . . . . . . . . . . . . . . . . . . . . . . . . . . . . . . . . . . . . . . . . . . . . . . . . . . . . . . . . . . . . . ii
Limited Warranty . . . . . . . . . . . . . . . . . . . . . . . . . . . . . . . . . . . . . . . . . . . . . . . . . . . . . . . . . . . . . . . . . . . . . . . . . . . . . . . . . . . . . . . . . . ii
Chapter 1: Introduction
Overview . . . . . . . . . . . . . . . . . . . . . . . . . . . . . . . . . . . . . . . . . . . . . . . . . . . . . . . . . . . . . . . . . . . . . . . . . . . . . . . . . . . . . . . . . . . . . . . . . . 1
Features . . . . . . . . . . . . . . . . . . . . . . . . . . . . . . . . . . . . . . . . . . . . . . . . . . . . . . . . . . . . . . . . . . . . . . . . . . . . . . . . . . . . . . . . . . . . . . . . . . . 2
Hardware . . . . . . . . . . . . . . . . . . . . . . . . . . . . . . . . . . . . . . . . . . . . . . . . . . . . . . . . . . . . . . . . . . . . . . . . . . . . . . . . . . . . . . . . . . . . . 2
Broadcast-Quality Conversion . . . . . . . . . . . . . . . . . . . . . . . . . . . . . . . . . . . . . . . . . . . . . . . . . . . . . . . . . . . . . . . . . . . . . .2
KONA 3 Audio . . . . . . . . . . . . . . . . . . . . . . . . . . . . . . . . . . . . . . . . . . . . . . . . . . . . . . . . . . . . . . . . . . . . . . . . . . . . . . . . . . . . . 3
Dual Link . . . . . . . . . . . . . . . . . . . . . . . . . . . . . . . . . . . . . . . . . . . . . . . . . . . . . . . . . . . . . . . . . . . . . . . . . . . . . . . . . . . . . . . . . . 3
2K Workflow Support . . . . . . . . . . . . . . . . . . . . . . . . . . . . . . . . . . . . . . . . . . . . . . . . . . . . . . . . . . . . . . . . . . . . . . . . . . . . . . 3
Hardware-based Acceleration . . . . . . . . . . . . . . . . . . . . . . . . . . . . . . . . . . . . . . . . . . . . . . . . . . . . . . . . . . . . . . . . . . . . . . 3
Internal HD/SD Hardware Downstream Keyer . . . . . . . . . . . . . . . . . . . . . . . . . . . . . . . . . . . . . . . . . . . . . . . . . . . . . . . 4
Software . . . . . . . . . . . . . . . . . . . . . . . . . . . . . . . . . . . . . . . . . . . . . . . . . . . . . . . . . . . . . . . . . . . . . . . . . . . . . . . . . . . . . . . . . . . . . . 4
KONA 3 Supports Final Cut Multi-cam Feature . . . . . . . . . . . . . . . . . . . . . . . . . . . . . . . . . . . . . . . . . . . . . . . . . . . . . . 5
What’s In The Box? . . . . . . . . . . . . . . . . . . . . . . . . . . . . . . . . . . . . . . . . . . . . . . . . . . . . . . . . . . . . . . . . . . . . . . . . . . . . . . . . . . . . . . . . . 5
System Requirements . . . . . . . . . . . . . . . . . . . . . . . . . . . . . . . . . . . . . . . . . . . . . . . . . . . . . . . . . . . . . . . . . . . . . . . . . . . . . . . . . . . . . . 6
Minimum and Recommended System and Software Requirements . . . . . . . . . . . . . . . . . . . . . . . . . . . . . . . . . . . . .7
Understanding Disk Storage Methods . . . . . . . . . . . . . . . . . . . . . . . . . . . . . . . . . . . . . . . . . . . . . . . . . . . . . . . . . . . . . . . . . 7
About RAIDs . . . . . . . . . . . . . . . . . . . . . . . . . . . . . . . . . . . . . . . . . . . . . . . . . . . . . . . . . . . . . . . . . . . . . . . . . . . . . . . . . . . . . . . 8
Software For Striping . . . . . . . . . . . . . . . . . . . . . . . . . . . . . . . . . . . . . . . . . . . . . . . . . . . . . . . . . . . . . . . . . . . . . . . . . . . . . .8
Storage Example: AJA KONA 3 and Xserve RAID . . . . . . . . . . . . . . . . . . . . . . . . . . . . . . . . . . . . . . . . . . . . . . . . . . . . . 9
Storage Example: AJA KONA 3 for Dual Link HD and 2K resolutions . . . . . . . . . . . . . . . . . . . . . . . . . . . . . . . . .10
Storage capacity . . . . . . . . . . . . . . . . . . . . . . . . . . . . . . . . . . . . . . . . . . . . . . . . . . . . . . . . . . . . . . . . . . . . . . . . . . . . . . . . . .10
Cable Connections . . . . . . . . . . . . . . . . . . . . . . . . . . . . . . . . . . . . . . . . . . . . . . . . . . . . . . . . . . . . . . . . . . . . . . . . . . . . . . . . . . . . . . .11
Using the Standard Cables . . . . . . . . . . . . . . . . . . . . . . . . . . . . . . . . . . . . . . . . . . . . . . . . . . . . . . . . . . . . . . . . . . . . . . . . . . .11
Using The Breakout Box . . . . . . . . . . . . . . . . . . . . . . . . . . . . . . . . . . . . . . . . . . . . . . . . . . . . . . . . . . . . . . . . . . . . . . . . . . . . . .12
About BNC and Mini-Connectors . . . . . . . . . . . . . . . . . . . . . . . . . . . . . . . . . . . . . . . . . . . . . . . . . . . . . . . . . . . . . . . . . . . . .12
Connector Descriptions—Cables and K3-Box . . . . . . . . . . . . . . . . . . . . . . . . . . . . . . . . . . . . . . . . . . . . . . . . . . . . . . . . .13
8 Channel Digital AES/EBU Audio Inputs And Outputs . . . . . . . . . . . . . . . . . . . . . . . . . . . . . . . . . . . . . . . . . . . . . .13
Analog 2 Channel Unbalanced Audio (Breakout Box only) . . . . . . . . . . . . . . . . . . . . . . . . . . . . . . . . . . . . . . . . . .13
RS422 Machine Control . . . . . . . . . . . . . . . . . . . . . . . . . . . . . . . . . . . . . . . . . . . . . . . . . . . . . . . . . . . . . . . . . . . . . . . . . . .13
SDI Input and Outputs . . . . . . . . . . . . . . . . . . . . . . . . . . . . . . . . . . . . . . . . . . . . . . . . . . . . . . . . . . . . . . . . . . . . . . . . . . . .13
Analog Monitor Out (Component HD or SD or SD Composite + Y/C) . . . . . . . . . . . . . . . . . . . . . . . . . . . . . . . .13
Reference Video . . . . . . . . . . . . . . . . . . . . . . . . . . . . . . . . . . . . . . . . . . . . . . . . . . . . . . . . . . . . . . . . . . . . . . . . . . . . . . . . . .14
In This Manual . . . . . . . . . . . . . . . . . . . . . . . . . . . . . . . . . . . . . . . . . . . . . . . . . . . . . . . . . . . . . . . . . . . . . . . . . . . . . . . . . . . . . . . . . . . .15
1
1

2
Chapter 2: Getting Started—Workflow
KONA 3 And Your Workflow . . . . . . . . . . . . . . . . . . . . . . . . . . . . . . . . . . . . . . . . . . . . . . . . . . . . . . . . . . . . . . . . . . . . . . . . . . . . . . .17
Understanding Typical Workflows . . . . . . . . . . . . . . . . . . . . . . . . . . . . . . . . . . . . . . . . . . . . . . . . . . . . . . . . . . . . . . . . . . . . . . . . .18
PhotoJPEG . . . . . . . . . . . . . . . . . . . . . . . . . . . . . . . . . . . . . . . . . . . . . . . . . . . . . . . . . . . . . . . . . . . . . . . . . . . . . . . . . . . . . . . . . . .19
DV (DV25) . . . . . . . . . . . . . . . . . . . . . . . . . . . . . . . . . . . . . . . . . . . . . . . . . . . . . . . . . . . . . . . . . . . . . . . . . . . . . . . . . . . . . . . . . . .19
DV50 . . . . . . . . . . . . . . . . . . . . . . . . . . . . . . . . . . . . . . . . . . . . . . . . . . . . . . . . . . . . . . . . . . . . . . . . . . . . . . . . . . . . . . . . . . . . . . . .19
DVCPRO HD . . . . . . . . . . . . . . . . . . . . . . . . . . . . . . . . . . . . . . . . . . . . . . . . . . . . . . . . . . . . . . . . . . . . . . . . . . . . . . . . . . . . . . . . .20
HDV . . . . . . . . . . . . . . . . . . . . . . . . . . . . . . . . . . . . . . . . . . . . . . . . . . . . . . . . . . . . . . . . . . . . . . . . . . . . . . . . . . . . . . . . . . . . . . . . .20
Uncompressed 8-bit 4:2:2 (SD or HD) . . . . . . . . . . . . . . . . . . . . . . . . . . . . . . . . . . . . . . . . . . . . . . . . . . . . . . . . . . . . . . . . .20
Uncompressed 10-bit 4:2:2 . . . . . . . . . . . . . . . . . . . . . . . . . . . . . . . . . . . . . . . . . . . . . . . . . . . . . . . . . . . . . . . . . . . . . . . . . . .20
AJA Kona 10-bit Log RGB and RGB Codecs . . . . . . . . . . . . . . . . . . . . . . . . . . . . . . . . . . . . . . . . . . . . . . . . . . . . . . . . . . . .20
AJA Kona 10-bit Log RGB and RGB Codecs as related to a 2K Workflow . . . . . . . . . . . . . . . . . . . . . . . . . . . . . . . . .21
Apple ProRes 422 and Apple ProRes 422 HQ (SD or HD) . . . . . . . . . . . . . . . . . . . . . . . . . . . . . . . . . . . . . . . . . . . . . . .21
Workflow General Notes . . . . . . . . . . . . . . . . . . . . . . . . . . . . . . . . . . . . . . . . . . . . . . . . . . . . . . . . . . . . . . . . . . . . . . . . . . . . . . . . . .21
HD Offline Scenario #1 . . . . . . . . . . . . . . . . . . . . . . . . . . . . . . . . . . . . . . . . . . . . . . . . . . . . . . . . . . . . . . . . . . . . . . . . . . . . . . .21
HD Offline Scenario #2 . . . . . . . . . . . . . . . . . . . . . . . . . . . . . . . . . . . . . . . . . . . . . . . . . . . . . . . . . . . . . . . . . . . . . . . . . . . . . . .22
Mixing and Matching Formats in Final Cut . . . . . . . . . . . . . . . . . . . . . . . . . . . . . . . . . . . . . . . . . . . . . . . . . . . . . . . . . . . .22
2K Workflows . . . . . . . . . . . . . . . . . . . . . . . . . . . . . . . . . . . . . . . . . . . . . . . . . . . . . . . . . . . . . . . . . . . . . . . . . . . . . . . . . . . . . . . .22
AJA KONA 3 Workflow Support For RED . . . . . . . . . . . . . . . . . . . . . . . . . . . . . . . . . . . . . . . . . . . . . . . . . . . . . . . . . . . . . . .25
Double Speed Transfer for KONA 3 and Sony HDCAM SR . . . . . . . . . . . . . . . . . . . . . . . . . . . . . . . . . . . . . . . . . . . . . .30
Color Accurate Playback of ProRes4444 Video when using Final Cut Pro and the AJA KONA 3 . . . . . . . . . . .32
Stereoscopic Output . . . . . . . . . . . . . . . . . . . . . . . . . . . . . . . . . . . . . . . . . . . . . . . . . . . . . . . . . . . . . . . . . . . . . . . . . . . . . . . . .33
Chapter 3: Installation & Configuration
Installation Overview . . . . . . . . . . . . . . . . . . . . . . . . . . . . . . . . . . . . . . . . . . . . . . . . . . . . . . . . . . . . . . . . . . . . . . . . . . . . . . . . . . . . .39
Unpacking . . . . . . . . . . . . . . . . . . . . . . . . . . . . . . . . . . . . . . . . . . . . . . . . . . . . . . . . . . . . . . . . . . . . . . . . . . . . . . . . . . . . . . . . . . . . . . .40
Shipping Box Contents . . . . . . . . . . . . . . . . . . . . . . . . . . . . . . . . . . . . . . . . . . . . . . . . . . . . . . . . . . . . . . . . . . . . . . . . . . . . . . .40
Installing the KONA 3 Card into a MacPro or G5 . . . . . . . . . . . . . . . . . . . . . . . . . . . . . . . . . . . . . . . . . . . . . . . . . . . . . . . . . . . .41
Cabling the System . . . . . . . . . . . . . . . . . . . . . . . . . . . . . . . . . . . . . . . . . . . . . . . . . . . . . . . . . . . . . . . . . . . . . . . . . . . . . . . . . . . . . . .43
System Video/Audio Cable Connections . . . . . . . . . . . . . . . . . . . . . . . . . . . . . . . . . . . . . . . . . . . . . . . . . . . . . . . . . . . . . .43
Typical System . . . . . . . . . . . . . . . . . . . . . . . . . . . . . . . . . . . . . . . . . . . . . . . . . . . . . . . . . . . . . . . . . . . . . . . . . . . . . . . . . . . .44
Installing KONA 3 Software . . . . . . . . . . . . . . . . . . . . . . . . . . . . . . . . . . . . . . . . . . . . . . . . . . . . . . . . . . . . . . . . . . . . . . . . . . . . . . . .46
Software Installation Procedure . . . . . . . . . . . . . . . . . . . . . . . . . . . . . . . . . . . . . . . . . . . . . . . . . . . . . . . . . . . . . . . . . . . . . .46
Updating KONA 3 Firmware . . . . . . . . . . . . . . . . . . . . . . . . . . . . . . . . . . . . . . . . . . . . . . . . . . . . . . . . . . . . . . . . . . . . . . . . . . . . . . .50
Reverting to an Earlier Firmware Version . . . . . . . . . . . . . . . . . . . . . . . . . . . . . . . . . . . . . . . . . . . . . . . . . . . . . . . . . . . . . .52
Genlock and Your System . . . . . . . . . . . . . . . . . . . . . . . . . . . . . . . . . . . . . . . . . . . . . . . . . . . . . . . . . . . . . . . . . . . . . . . . . . . . . . . . .52
Using Final Cut Pro & Other Software
Final Cut Pro . . . . . . . . . . . . . . . . . . . . . . . . . . . . . . . . . . . . . . . . . . . . . . . . . . . . . . . . . . . . . . . . . . . . . . . . . . . . . . . . . . . . . . . . . . . . . .53
Using The KONA 3 Control Panel . . . . . . . . . . . . . . . . . . . . . . . . . . . . . . . . . . . . . . . . . . . . . . . . . . . . . . . . . . . . . . . . . . . . . . . . . .53
Control Panel Basics . . . . . . . . . . . . . . . . . . . . . . . . . . . . . . . . . . . . . . . . . . . . . . . . . . . . . . . . . . . . . . . . . . . . . . . . . . . . . . . . . .54
Control Tab Screen . . . . . . . . . . . . . . . . . . . . . . . . . . . . . . . . . . . . . . . . . . . . . . . . . . . . . . . . . . . . . . . . . . . . . . . . . . . . . . . . . . .58
Control Tab Screen Settings . . . . . . . . . . . . . . . . . . . . . . . . . . . . . . . . . . . . . . . . . . . . . . . . . . . . . . . . . . . . . . . . . . . . . . .58
Format Tab Screen . . . . . . . . . . . . . . . . . . . . . . . . . . . . . . . . . . . . . . . . . . . . . . . . . . . . . . . . . . . . . . . . . . . . . . . . . . . . . . . . . . .61
Format Tab Screen Settings . . . . . . . . . . . . . . . . . . . . . . . . . . . . . . . . . . . . . . . . . . . . . . . . . . . . . . . . . . . . . . . . . . . . . . .62
Input Select Tab Screen . . . . . . . . . . . . . . . . . . . . . . . . . . . . . . . . . . . . . . . . . . . . . . . . . . . . . . . . . . . . . . . . . . . . . . . . . . . . . .68
Input Select Tab Screen Settings . . . . . . . . . . . . . . . . . . . . . . . . . . . . . . . . . . . . . . . . . . . . . . . . . . . . . . . . . . . . . . . . . .68
SDI Out Tab Screen . . . . . . . . . . . . . . . . . . . . . . . . . . . . . . . . . . . . . . . . . . . . . . . . . . . . . . . . . . . . . . . . . . . . . . . . . . . . . . . . . . .70
SDI Out Tab Screen Settings . . . . . . . . . . . . . . . . . . . . . . . . . . . . . . . . . . . . . . . . . . . . . . . . . . . . . . . . . . . . . . . . . . . . . . .70

KONA 3 Installation and Operation Manual — Table of Contents
Analog Out Tab Screen . . . . . . . . . . . . . . . . . . . . . . . . . . . . . . . . . . . . . . . . . . . . . . . . . . . . . . . . . . . . . . . . . . . . . . . . . . . . . . .73
Analog Out Tab Screen Settings . . . . . . . . . . . . . . . . . . . . . . . . . . . . . . . . . . . . . . . . . . . . . . . . . . . . . . . . . . . . . . . . . . .73
Video Setup Tab Screen . . . . . . . . . . . . . . . . . . . . . . . . . . . . . . . . . . . . . . . . . . . . . . . . . . . . . . . . . . . . . . . . . . . . . . . . . . . . . .74
Setup Tab Screen Settings . . . . . . . . . . . . . . . . . . . . . . . . . . . . . . . . . . . . . . . . . . . . . . . . . . . . . . . . . . . . . . . . . . . . . . . .74
Audio Setup Tab Screen . . . . . . . . . . . . . . . . . . . . . . . . . . . . . . . . . . . . . . . . . . . . . . . . . . . . . . . . . . . . . . . . . . . . . . . . . . . . . .75
Audio Setup Tab Screen Settings . . . . . . . . . . . . . . . . . . . . . . . . . . . . . . . . . . . . . . . . . . . . . . . . . . . . . . . . . . . . . . . . . .75
Conversion Tab Screen . . . . . . . . . . . . . . . . . . . . . . . . . . . . . . . . . . . . . . . . . . . . . . . . . . . . . . . . . . . . . . . . . . . . . . . . . . . . . . .76
Conversion Tab Screen Settings . . . . . . . . . . . . . . . . . . . . . . . . . . . . . . . . . . . . . . . . . . . . . . . . . . . . . . . . . . . . . . . . . . .76
2K Crop Tab Screen . . . . . . . . . . . . . . . . . . . . . . . . . . . . . . . . . . . . . . . . . . . . . . . . . . . . . . . . . . . . . . . . . . . . . . . . . . . . . . . . . .79
DS Keyer Tab Screen . . . . . . . . . . . . . . . . . . . . . . . . . . . . . . . . . . . . . . . . . . . . . . . . . . . . . . . . . . . . . . . . . . . . . . . . . . . . . . . . .82
Timecode Tab Screen . . . . . . . . . . . . . . . . . . . . . . . . . . . . . . . . . . . . . . . . . . . . . . . . . . . . . . . . . . . . . . . . . . . . . . . . . . . . . . . .85
Timecode Tab Screen Settings . . . . . . . . . . . . . . . . . . . . . . . . . . . . . . . . . . . . . . . . . . . . . . . . . . . . . . . . . . . . . . . . . . . .85
Timelapse Tab Screen . . . . . . . . . . . . . . . . . . . . . . . . . . . . . . . . . . . . . . . . . . . . . . . . . . . . . . . . . . . . . . . . . . . . . . . . . . . . . . . .87
Info Tab Screen . . . . . . . . . . . . . . . . . . . . . . . . . . . . . . . . . . . . . . . . . . . . . . . . . . . . . . . . . . . . . . . . . . . . . . . . . . . . . . . . . . . . . .88
Saving Your Control Panel Presets . . . . . . . . . . . . . . . . . . . . . . . . . . . . . . . . . . . . . . . . . . . . . . . . . . . . . . . . . . . . . . . . . . . .88
Who is Controlling KONA? . . . . . . . . . . . . . . . . . . . . . . . . . . . . . . . . . . . . . . . . . . . . . . . . . . . . . . . . . . . . . . . . . . . . . . . . . . . .89
QuickTime Application Format Selection . . . . . . . . . . . . . . . . . . . . . . . . . . . . . . . . . . . . . . . . . . . . . . . . . . . . . . . . . .89
Control Recommendations . . . . . . . . . . . . . . . . . . . . . . . . . . . . . . . . . . . . . . . . . . . . . . . . . . . . . . . . . . . . . . . . . . . . . . . .89
Using Multiple AJA Products . . . . . . . . . . . . . . . . . . . . . . . . . . . . . . . . . . . . . . . . . . . . . . . . . . . . . . . . . . . . . . . . . . . . . . . . . . . . . .90
Notes on using multiple AJA Products: . . . . . . . . . . . . . . . . . . . . . . . . . . . . . . . . . . . . . . . . . . . . . . . . . . . . . . . . . . . . . . . .91
Easy Setups for Typical Uses . . . . . . . . . . . . . . . . . . . . . . . . . . . . . . . . . . . . . . . . . . . . . . . . . . . . . . . . . . . . . . . . . . . . . . . . . . . . . . .91
Easy Setups Menu . . . . . . . . . . . . . . . . . . . . . . . . . . . . . . . . . . . . . . . . . . . . . . . . . . . . . . . . . . . . . . . . . . . . . . . . . . . . . . . . . . . .91
Easy Setups For Use With KONA 3 . . . . . . . . . . . . . . . . . . . . . . . . . . . . . . . . . . . . . . . . . . . . . . . . . . . . . . . . . . . . . . . . .93
Audio/Video Settings Menu . . . . . . . . . . . . . . . . . . . . . . . . . . . . . . . . . . . . . . . . . . . . . . . . . . . . . . . . . . . . . . . . . . . . . . . . . .93
To Create A New Easy Setup . . . . . . . . . . . . . . . . . . . . . . . . . . . . . . . . . . . . . . . . . . . . . . . . . . . . . . . . . . . . . . . . . . . . . . .94
The Sequence Presets Window . . . . . . . . . . . . . . . . . . . . . . . . . . . . . . . . . . . . . . . . . . . . . . . . . . . . . . . . . . . . . . . . . . . .96
Checking the System with a Simple Test Project of Bars and Tone . . . . . . . . . . . . . . . . . . . . . . . . . . . . . . . . . . . . . . . . 101
Using 8-bit Versus 10-bit Video . . . . . . . . . . . . . . . . . . . . . . . . . . . . . . . . . . . . . . . . . . . . . . . . . . . . . . . . . . . . . . . . . . . . . . . . . . 104
1
3
Chapter 5: Troubleshooting
If You Run Into Problems . . . . . . . . . . . . . . . . . . . . . . . . . . . . . . . . . . . . . . . . . . . . . . . . . . . . . . . . . . . . . . . . . . . . . . . . . . . . . . . . 105
Updating Software . . . . . . . . . . . . . . . . . . . . . . . . . . . . . . . . . . . . . . . . . . . . . . . . . . . . . . . . . . . . . . . . . . . . . . . . . . . . . . . . . . . . . 106
Support . . . . . . . . . . . . . . . . . . . . . . . . . . . . . . . . . . . . . . . . . . . . . . . . . . . . . . . . . . . . . . . . . . . . . . . . . . . . . . . . . . . . . . . . . . . . . . . . 106
Apple Resources . . . . . . . . . . . . . . . . . . . . . . . . . . . . . . . . . . . . . . . . . . . . . . . . . . . . . . . . . . . . . . . . . . . . . . . . . . . . . . . . . . . 107
Appendix A: Specifications
Video Input . . . . . . . . . . . . . . . . . . . . . . . . . . . . . . . . . . . . . . . . . . . . . . . . . . . . . . . . . . . . . . . . . . . . . . . . . . . . . . . . . . . . . . . . . . . . . 109
Video Formats . . . . . . . . . . . . . . . . . . . . . . . . . . . . . . . . . . . . . . . . . . . . . . . . . . . . . . . . . . . . . . . . . . . . . . . . . . . . . . . . . . . . . . . . . . 109
Video Output . . . . . . . . . . . . . . . . . . . . . . . . . . . . . . . . . . . . . . . . . . . . . . . . . . . . . . . . . . . . . . . . . . . . . . . . . . . . . . . . . . . . . . . . . . . 109
Audio . . . . . . . . . . . . . . . . . . . . . . . . . . . . . . . . . . . . . . . . . . . . . . . . . . . . . . . . . . . . . . . . . . . . . . . . . . . . . . . . . . . . . . . . . . . . . . . . . . 110
Up-Conversion . . . . . . . . . . . . . . . . . . . . . . . . . . . . . . . . . . . . . . . . . . . . . . . . . . . . . . . . . . . . . . . . . . . . . . . . . . . . . . . . . . . . . . . . . 110
Down-Conversion . . . . . . . . . . . . . . . . . . . . . . . . . . . . . . . . . . . . . . . . . . . . . . . . . . . . . . . . . . . . . . . . . . . . . . . . . . . . . . . . . . . . . . 110
Cross-Conversion . . . . . . . . . . . . . . . . . . . . . . . . . . . . . . . . . . . . . . . . . . . . . . . . . . . . . . . . . . . . . . . . . . . . . . . . . . . . . . . . . . . . . . . 110
SD to SD Aspect Ratio Conversion . . . . . . . . . . . . . . . . . . . . . . . . . . . . . . . . . . . . . . . . . . . . . . . . . . . . . . . . . . . . . . . . . . . . . . . 110
Reference Input . . . . . . . . . . . . . . . . . . . . . . . . . . . . . . . . . . . . . . . . . . . . . . . . . . . . . . . . . . . . . . . . . . . . . . . . . . . . . . . . . . . . . . . . 110
Machine Control . . . . . . . . . . . . . . . . . . . . . . . . . . . . . . . . . . . . . . . . . . . . . . . . . . . . . . . . . . . . . . . . . . . . . . . . . . . . . . . . . . . . . . . . 111

4
Appendix B: Glossary
Appendix C: Working with 2K Workflows
Index

Chapter 1: Introduction
Overview
The AJA KONA 3 brings the highest quality to SD, HD, Dual Link HD and 2K film
resolutions to Apple PCI-Express and PCI-X computers. The KONA 3 offers
unsurpassed 10-bit broadcast quality serial digital video input/output, 8 channel
digital AES/EBU audio input/output as well as 16-channel embedded audio,
hardware based upconversion from SD to HD, hardware based downconversion from
HD to SD and HD to HD crossconversion between 720 and1080 HD formats,
DVCProHD and HDV hardware scaling support. KONA 3 is designed to be the
ultimate capture and playback card. AJA provided software utilities and applications
deliver leading features for broadcasters and filmmakers.
As a state-of-the-art PCI-Express card, KONA 3 plugs into a PCI-Express slot on Apple's
est MacPro PCI-Express slot enabled computers. A PCI-X version of the card for
lat
legacy G5 computers with a PCI-X 133Mhz slot is also offered (KONA 3X). The card
comes supplied with software that allows it to work seamlessly with Final Cut Pro and
other QuickTime based applications to provide a professional broadcast quality
editing suite, corporate/industrial video center, or high-powered desktop video
setup - or anything in between. Included with the KONA 3 is a cable set that can be
connected to a variety of SD, HD, Dual Link HD and 2K capable equipment. For even
easier connectivity, an optional K3-Box rack mountable breakout box can also be
purchased - it ships with it's own multi-pin cable and is connected to the Kona 3 card
with this capable and the multi-connector SDI cable provided with the card.This
manual covers the installation and operation of the KONA 3, the optional K3-Box and
how to use the card in conjunction with Final Cut Pro and other software
applications.
1
1
1

2
Features
•
•
•
•
•
•
•
•
•
•
•
•
•
•
•
•
•
•
The KONA 3 card offers a large number of unique features for optimum quality,
ease of use, and support for a wide variety of post production workflows.
Hardware
SD-SDI, HD-SDI, Dual Link HD-SDI, and HSDL inputs
2K support that includes 2048x1556 and 2048x1080 formats
x4 Lane PCI-Express Bus Interface (or PCI-X 133Mhz)
DVCProHD hardware scaling acceleration
HDV hardware scaling acceleration
Final Cut Pro Dynamic RT Extreme hardware acceleration
Broadcast quality hardware based 10-bit upconversion
Broadcast quality hardware based 10-bit downconversion
Broadcast quality hardware based 10-bit crossconversion (1080 to 720 and
720 to 1080)
Broadcast quality hardware based 10-bit SD aspect ratio conversion
(anamorphic to letterbox, etc.)
12-bit HD component analog video and SD analog component or composite
and s-video output
10-bit HD/SD Video+Key Output
HD/SD Hardware Downstream Keyer
8 channel 24-bit, 48kHz or 96kHz digital AES/EBU audio
16 channels of SDI embedded digital audio
RS-422 control via 9 pin
Genlock input with optional looping capability via the K3- Box (terminated on
the supplied breakout cable)
Standard 2 meter length connection cables
Broadcast-Quality Conversion
KONA 3 features hardware based full 10-bit broadcast quality motion adaptive SD
to HD upconversion, HD to SD downconversion and HD to HD crossconversion. The
quality of the conversion features found in the KONA 3 is virtually identical to AJA's
award winning stand-alone converter products used throughout the post
production market. The KONA 3 built-in upconverter uses a a full 10-bit path, fully
motion adaptive de-interlacing, and large multi-point digital interpolators.
Downconversion uses large multi-point digital interpolators, anti-alias filtering and
interpolation.
Crossconversion is high-quality hardware-based, providing capability to streamline
dailies and off
functions are in hardware on the card, they are available full time, all the time—
with no CPU load. Such conversions are useful for cost effective monitoring,
making standard definition dubs of an HD project, or upconverting from a
standard definition FCP project to an HD deliverable.
ers true broadcast picture quality in realtime. Because these

KONA 3 Installation and Operation Manual — Features
KONA 3 Audio
KONA 3 supports 8 channels of 24-bit 48kHz or 96kHz AES digital audio via XLR
(balanced 110 ohm) connectors (using the supplied breakout cable) or XLR and
BNC (unbalanced 75 ohm) connectors (when the optional K3-Box breakout box is
used.) KONA 3 also supports 16 channels of embedded 24-bit 48kHz digital audio
over the same SDI connection as the video. If you are using a Digital Betacam VTR,
HDCam VTR, DVCPro VTR, D5 VTR or HDCam SR VTR—you'll have the proper
audio connections for interfacing with the VTR.
KONA 3 support for 8 AES digital audio via XLR or BNC features AES input sample
r
ate conversion; this feature eliminates the requirement for audio source
synchronization. Sample rate converters auto-lock to any AES input, 32-96kHz,
and then convert it to 24-bit 48 or 96kHz audio, perfectly locked to internal KONA
3 video. Sample rate conversion is done at very high quality (over 120db THD).
1
Dual Link
KONA 3 supports Dual Link HD-SDI (4:4:4). This emerging technology is found in
Sony's HDCamSR product line as well as Thomson Grass Valley's Viper Filmstream
camera. KONA 3 supports the ingest and output of SMPTE-372M compliant 4:4:4
RGB video at 10-bit.
3
2K Workflow Support
The KONA 3 2K path offers potentially significant cost and labor savings over a
tape-based approach to 2K workflow. In a unique development for customers on
the Apple platform, users can go straight from telecine to disk with 2K media and
eliminate steps requiring the use of tape stock and then the digitizing of those
tapes for the nonlinear editor. 2K telecine to KONA 3 saves time and steps in the
process by directly and simultaneously creating 2K DPX files and 2K QuickTime
reference movies. Material can be played out at 2K via HSDL (High Speed Data
Link), offering further synergy with other 2K products, such as projectors or DDRs,
currently available in the market.
Additionally, KONA 3 allows 2K files to be viewed on HD 1080PsF supported
video monit
material. This 1080 HD playout can be down-converted to SD in real time, giving
the 2K DI pipeline a powerful solution for multi-format video playout of 2K
material.
By generating 2K DPX files during the digitize phase, different parts of the
ocess, for example-delivery of full-resolution media for shots intended for
pr
visual effects-can be done much earlier. Offline editing can be done in Final Cut
Pro and because of the flexibility of Final Cut Pro and QuickTime, even a 2K online
is possible.
ors, lowering the price barrier for recording to tape and viewing 2K
Hardware-based Acceleration
Final Cut Pro users will likely notice the DVCPROHD, HDV, and Apple RT Extreme
hardware acceleration provided by KONA 3. This hardware acceleration was
developed in close cooperation with Apple. How does KONA 3 accelerate
DVCPROHD, HDV, and Apple RT Effects? A precision hardware scalar in KONA 3
does what the Apple computer's processor would otherwise have to do, scale
less than full raster HD (DVCProHD and HDV) to full raster size, thus speeding up
the system considerably—and doing this scaling at full 10-bit broadcast quality.
KONA 3 also has hardware support when capturing from HD-SDI to the
roHD codec. With KONA 3, any HD source can be captured using the
DVCP
DVCPROHD codec-giving you online HD quality at remarkably low data rates.

•
•
•
•
•
4
This feature allows HD to be used where only SD would have been considered due
to drive capacity or drive performance constraints. KONA 3 even supports the
DVCPROHD codec with up or down conversion-allowing projects to be
downconverted to SD, or even upconverted to the DVCPROHD codec on ingest.
When using the Final Cut Pro HDV codec, the KONA 3 advanced scaling engine
tak
es the native frame (long GOP 1440 HD) and outputs it via hardware-in real time.
Precision AJA circuitry re-sizes the video to full raster 1920 x 1080, providing
instantaneous playback of HDV captured by Final Cut Pro for both monitoring and
recording.
Unlike the DV25 format, which can preview in realtime natively via Final Cut Pro,
the MPEG struc
provide real time monitoring and playback to both HD and SD monitors and decks
via the realtime hardware scaler and down-converter on board.
In addition to speeding up Final Cut Pro Dynamic RT by using the KONA scalar,
multiple frame size RT (1/4 size, 1/2 size, full size)—a Final Cut Pro feature—also
benefits from KONA 3. The frame count and image size are dynamically changed
during file playback, so you don't get the “un-rendered” message in Final Cut Pro.
The KONA 3 scalar handles the dynamic multiple frame sizes seamlessly, so that the
Dynamic RT you see on the Mac monitor is the same as that shown on your
professional broadcast monitor.
ture of HDV is much more complex. Fortunately, KONA 3 can
Software
Internal HD/SD Hardware Downstream Keyer
Available for the first time on any QuickTime capture card is a powerful hardware
keyer that can place graphic files with an alpha channel over video in, a selectable
matte, or the contents of the card's framebuffer from a software application (AJA
Kona TV / Apple's Final Cut Pro / AJA's VTR Xchange). Key a bug or text over picture
and avoid what might normally be a lengthy software render. In addition to
working with these software applications, you can also key video that has an alpha
channel over video input or a matte. For example, you could load a QuickTime clip
that has an alpha-channel - a flying logo generated in the Animation codec - into
KONA TV and then place it over live video coming into the card and then passing
both on to a VTR for recording or broadcast.
KONA 3 Control Panel for audio/video source selection, conversion and
control of KONA 3 within the overall MacOS environment (Macintosh Desktop,
Input Pass-through, etc.)
AJA QuickTime™ Drivers for tightly integrated hardware/software operation
Support for Apple Final Cut Pro™ (application software not included)
Support for After Effects, Combustion, Motion, and other application
application software not included.
AJA Utilities: KONA TV, VTR Xchange, KONA System Test, AJA Data Rate
Calculator, KONA QTtoDPXtranslator, and KONA DPXtoQTtranslator.
AJA’s KONA 3 software and hardware were developed for use with Final Cut Pro for
po
werful integrated video/audio capture, editing, and video production. With a
MacPro or Apple G5, FCP, and KONA 3, you have the ultimate system for standard
definition—and high definition—video production and DI work. Software is
supplied on CD, including the KONA 3 Control Panel, drivers for the card itself, and
all files necessary for Final Cut Pro and other application support.

•
•
•
•
•
•
What’s In The Box?
KONA 3 Installation and Operation Manual — What’s In The Box?
KONA 3 Supports Final Cut Multi-cam Feature
Final Cut Pro 5 and later provides multi-cam playout-and KONA 3 supports it. With
KONA hardware and a sufficient storage solution, you can handle up to 16 sources in
real time. Each stream of video is captured individually and then ganged together in
Final Cut Pro for a multi-cam editing workflow. The KONA 3 hardware plays the multicam clips out to professional broadcast monitors or decks, via SDI, HD-SDI or via analog
video. Up to 16 sources can be viewed in real time via the KONA (4-up, 6-up, 9-up, 16up, etc.) -or each individual source can be viewed as it is selected via Final Cut Pro.
When you unpack your AJA KONA 3, you’ll find the following components:
1
AJA KONA 3 Software and Documentation CD-ROM—this CD contains the
software installer to place KONA 3 drivers and the Control Panel on an Apple Mac.
Due to the pace of innovation, it is best to install the latest driver version from the
AJA website: http://www.aja.com/support/konaNEW/kona-3-3x.php
Install the software as discussed in this manual in Chapter 3: Installation and
Configuration. The CD also contains a wide variety of useful information, including
this manual you’re reading (PDF format).
KONA 3 4-Lane PCI-Express card (or KONA 3X if you ordered the PCI-X version).
Cable, KONA 3 SDI In/Out—mini-connectors on the card (technically called “1.0/
2.3 connectors”) connect to full-size BNCs for ease of use and compatibility with
professional equipment.
5
Cable, AES XLR digital audio connectors, RS422, and Reference Input.
Read Me First Notice, Registration sheet, and any other late-breaking news and/or
errata related to KONA 3.
Please save all packaging for shipping the KONA 3 should you wish to do so when
mo
ving or sending it in for service.
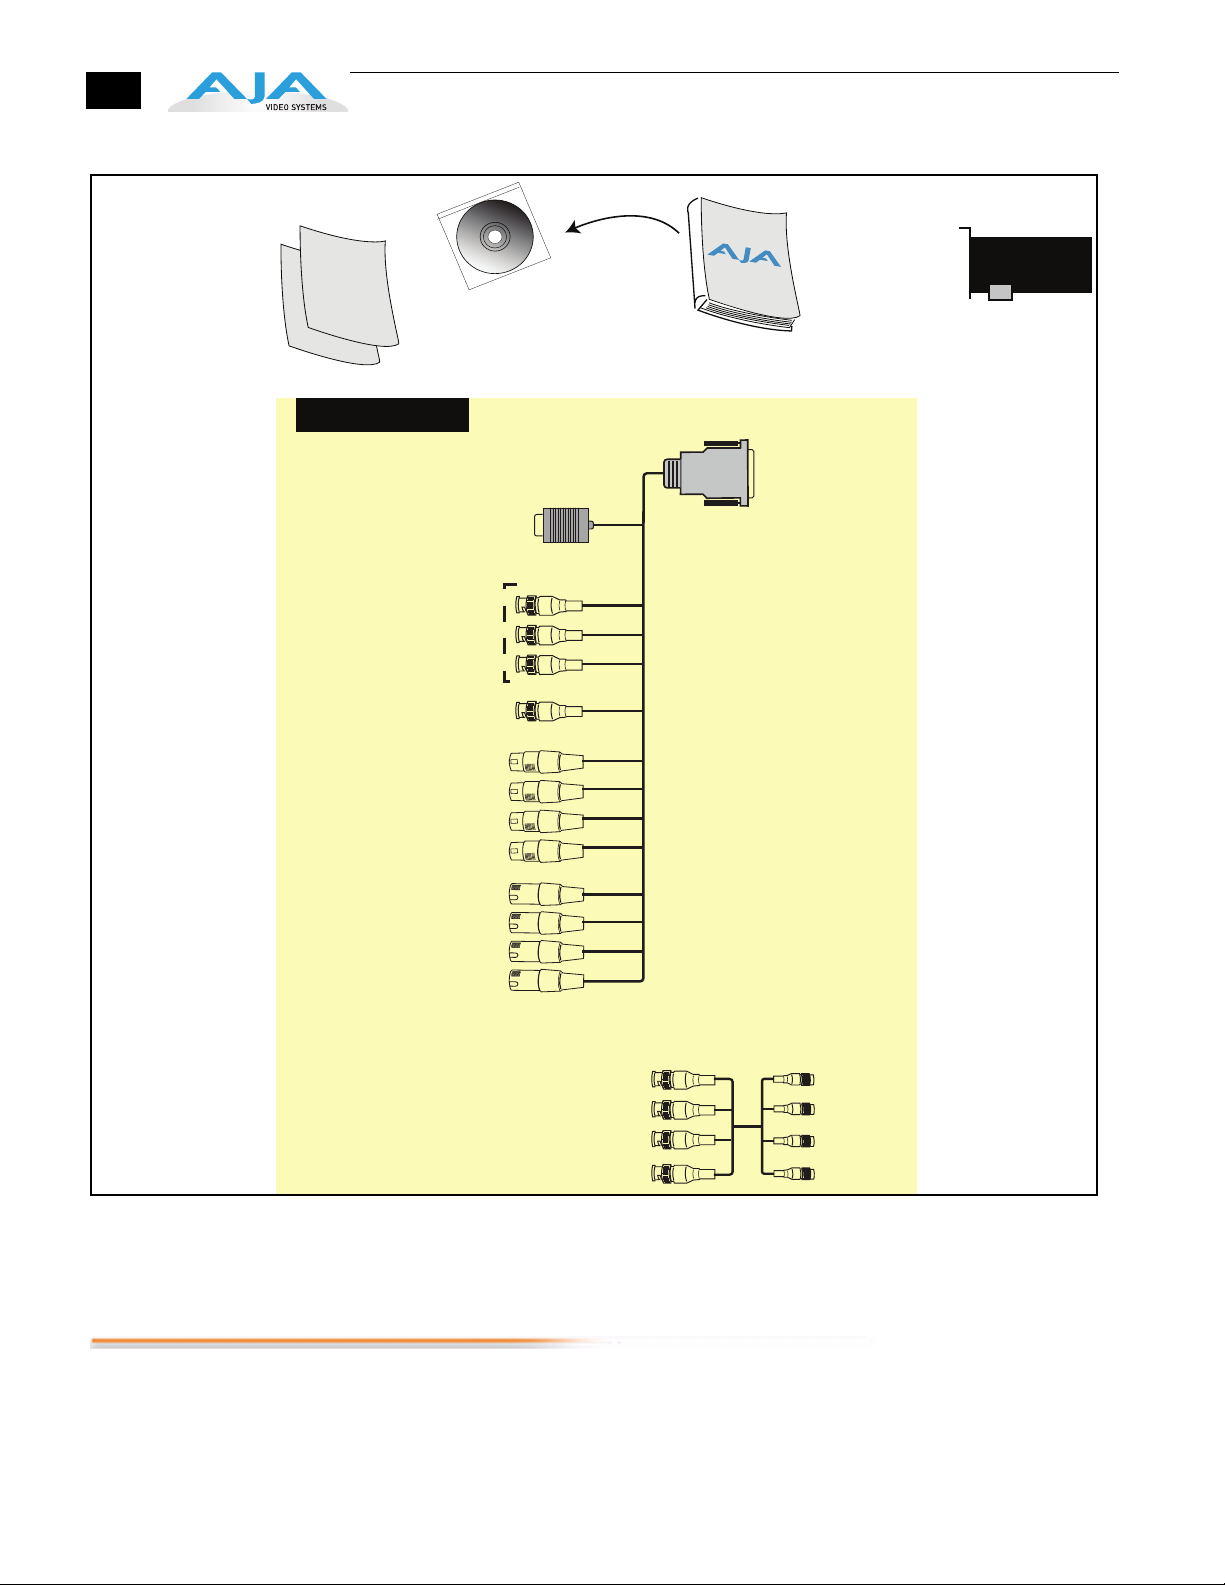
6
AJA KONA 3
PCI-Express
Card
Installation Software CD
Read Me First Notice
and Registration Sheet
Installation and Operation Manual
in electronic form on the CD (PDF)
Standard Cable Set
Machine Control
3 BNCs (Analog Out Connections):
In SD Can be Configured for
In HD Can Only Be Component
(2 channels/connector)
(2 channels/connector)
Component,
Composite,
or S-Video
Reference Input BNC
Audio Output XLRs
Channels 1-8
Audio Input XLRs
Channels 1-8
BNC/XLR-cable
RS422
(9-pin)
KONA 3 Shipping Box Contents
System Requirements
AJA Video recommends that your system meet minimum hardware and software
requirements to achieve a satisfactory level of performance when operating it. Here,
we provide minimum and recommended requirements and then discuss disk storage
issues that should be understood for proper system configuration.
SDI Out1/Link A BNC
SDI Out2/Link B BNC
SDI In1/Link A BNC
SDI In2/Link B BNC
SDI cable
4-mini BNCs
to 4 standard
BNCs

Minimum and Recommended System and Software Requirements
KONA 3 Installation and Operation Manual — System Requirements
The following table outlines the system hardware and software needed.
Item Recommended
Recommended Kona Driver for
Mac OSX and Final Cut Pro:
Note: always consult the release
notes for the AJA software
version you are running
(included with installer)
acintosh Tower:
M
FCP 7.0.x - KONA driver version 8.0 (Snow Leopard and Leopard OS
c
ompatible version)
FCP 7.0.x - KONA driver version 7.5.1 (Snow Leopard and Leopard
OS c
ompatible version)
FCP 7.0.x - KONA driver version 7.1 (Snow Leopard and Leopard OS
c
ompatible version)
FCP 7.0.x - KONA driver version 7.0 (Snow Leopard and Leopard OS
c
ompatible version)
FCP 7.0.x - KONA driver version 6.5 (Leopard OS compatible
v
ersion)
FCP 6.0.x - KONA driver version 6.0.3 (Leopard and Tiger OS
c
ompatible version)
For the latest appropriate match for your software and hardware,
visit:
http://www.aja.com/support/konaNEW/kona-3-3x.php
Recommended KONA 3 System: Apple Mac Pro, 2GHz or better,
4GB of ram or greater for uncompressed HD. Use of a Fibre
Channel, SCSI, SAS or other high bandwidth disk array for
uncompressed SD/HD/2K storage.
1
7
Internal Storage (SATA inside
Mac):
External Storage:
Note: see St
that follows later in this Chapter
orage Methods topic
Minimum KONA 3 System: Power Mac G5 (dual) PCI-Express, 2GHz
with 2GB RAM minimum for uncompressed SD or 4GB RAM for
uncompressed HD. Ensure your Macintosh has a PCI-Express slot
for compatibility. Use a Fibre Channel or SCSI external RAID for
uncompressed SD/HD storage.
Recommended KONA 3X System: Apple Xserve 3 GHz Quad Xeon
or Power Mac G5 (dual) 2.5 GHz or better with minimum of 2GB
RAM for uncompressed SD or 4GB RAM for uncompressed HD.
PCI-X slot required (later G5s have these slots)
M
inimum KONA 3X System: Apple Power Mac G5 (dual) 2GHz
with a minimum of 2GB RAM for uncompressed SD or 4GB RAM for
uncompressed HD. PCI-X slot required (later G5s have these slots)
Slot Placement: Visit our website and view this regularly updated
slot placement document:
http://www.aja.com/support/kona/kona-system-configuration.php
Best suited for compressed SD/HD formats only
Ideally a RAID configuration with Fibre Channel or SCSI connection
to the Mac via qualified host bus adapter
Understanding Disk Storage Methods
The KONA 3 card, an Apple PCI-Express Power Mac, and Final Cut Pro, together offer an
unprecedented level of features and performance for audio/video post production
applications. However, to ensure performance and quality, the disk storage system
used with the Apple computer must be able to meet the demands of the media.
For uncompressed SD, AJA recommends that at a minimum, the disk storage system
must be able t
o provide and maintain a consistent 50 MB/sec transfer rate from the
Apple computer to disk (read/write). There are a variety of system configurations and
peripherals that can provide this level of performance.

•
•
•
8
For uncompressed single link HD, AJA recommends that at a minimum, the disk
storage system must be able to provide and maintain a consistent 200 MB/sec
transfer rate from the Apple computer to disk (read/write). There are a variety of
system configurations and peripherals that can provide this level of performance.
For uncompressed dual link HD and 2K, AJA recommends that at a minimum, the disk
storage system must be able to provide and maintain in excess of 300 MB/sec
transfer rate from the Apple computer to disk (read/write). There are a variety of
system configurations and peripherals that can provide this level of performance.
KONA 3 users wishing to configure a storage for a system should also be aware that
raw benchmark numbers alone do not necessarily reflect the performance of a drive
solution. Other factors, such as drive seek time and controller cache can also affect
performance especially with regard to the bandwidth requirements of SD, HD, dual
link HD and 2K files.
About RAIDs
Redundant Array of Independent Disks, or RAID, is a group of hard drives that
appears to the host computer as a single high-speed storage unit. RAID systems
enable you to increase storage capacity and get the performance, reliability, and data
protection needed for video production, that would otherwise not be possible from
a single hard drive. Drives inside the RAID array operate simultaneously, increasing
overall throughput. RAID configurations can be comprised of:
Striping data across multiple drives for storage performance (RAID 0).
Mirroring for redundancy (RAID 1).
Parity for data protection (such as RAID 5).
Most RAID configurations, or RAID levels, combine these to provide a balance of
pr
otection and performance.
Striping divides a logical drive into data blocks, or stripes, that are distributed across
ay of physical drives. Striping a set of disks improves storage performance
an arr
because each drive operates concurrently. However, striping alone, known as RAID
level 0, offers no data protection.
Mirroring involves writing identical copies of all data to a pair of physical drives. This
esults in very high data reliability: If one drive fails, the data is still available on the
r
remaining disk drive. However, it also results in a storage efficiency of only 50
percent, because two physical drives are required to achieve a single drive's capacity.
Mirroring alone is known as RAID level 1.
Parity provides data protection without requiring complete duplication of the drive
ontents. In the event of a drive failure, parity information can be used with data on
c
surviving drives to reconstruct the contents of a failed drive. Parity data can be stored
on a dedicated drive, as in RAID 3, or distributed across an array of drives, as in RAID 5.
Parity provides much greater storage efficiency than mirroring-up to 85 percent for a
set of seven drives.
Software For Striping
AJA recommends the Disk Utility software provided by Apple with OS X for creating
and striping RAIDs, including 3rd-party, SCSI and Fibre Channel RAIDs. This easy to
use utility can be found in Macintosh HD/Applications/Utilities , where “ Macintosh HD ”
is the name of the system drive.

KONA 3 Installation and Operation Manual — System Requirements
Storage Example: AJA KONA 3 and Xserve RAID
For an optimum disk storage configuration with Final Cut Pro and the AJA KONA 3 —
working with compressed media to uncompressed single link HD media—Apple's
Xserve RAID is an effective storage device when properly configured. Apple's Xserve
RAID holds up to 14 drive modules (resulting terabytes of storage) in a rackmountoptimized 3U enclosure. Each 7200-RPM hard drive connects to a dedicated ATA/100
drive channel, eliminating a traditional source of bottlenecks and maximizing the 2Gb/
s Fibre Channel host connection(s). Populated with all 14 drive modules and using
512MB cache for each controller, the XServe RAID can support the ingest and playback
of all formats up to and including uncompressed single link HD. Dual Link HD and 2K
formats are not supported on a single XServe RAID.
Note: When cr
with OS X, an ideal configuration is RAID 50: in other words, the internal Xserve
RAID drives are set up as RAID 5 via the RAID Admin application; the Xserve RAID
then shows up in Disk Utility as two drives (regardless of the number of internal
drives) which must be configured together as RAID 0. Apple calls this configuration
“RAID 50.”
When considering any high-performance disk storage system, AJA recommends
w
orking with a qualified reseller in order to configure storage appropriate for your
needs.
eating and striping an Xserve RAID with the Apple Disk Utility provided
1
9

10
•
•
•
Storage Example: AJA KONA 3 for Dual Link HD and 2K resolutions
AJA can recommend the following examples of drive configurations to support
certain specified video and digital film resolutions and their associated bandwidth
requirements. If a particular drive array or manufacturer is not listed, it may simply be
because AJA has no experience with the company or a particular unit. This guide
simply offers examples that AJA has used with success when working with the
specified formats listed. With any device, actual results may vary from unit to unit and
proper configuration of the drive array and any ancillary items such as host bus
adapters, software drivers and cabling is assumed.
Supports 2K, Dual Link HD, Single Link HD, SD:
G-Technology, Inc. GSPEED-XL (4Gb Fibre Channel)
Unit must be fully populated and with a minimum 512MB cache per controller.
InforTrend EonStor A16F-G2422 (4Gb Fibre Channel)
Unit must be fully populated and with a minimum 512MB cache per controller.
Any drive array with comparable specifications to the above examples; 16 or
more SATA drives with 4Gb fibre channel connectivity to host and 512MB cache
per controller.
Storage capacity
No matter which storage system you choose, pick one that can scale to meet your
needs over time. Ideally, you should be able to increase storage capacity or switch to
a RAID level offering increased data protection in the future. Balance current and
future storage needs with your budget and choose accordingly.
Note: All of the following numbers are approximations based on 2 channels of
48kHz audio. More audio channels can increase data rates. AJA also provides a
freeware application called the AJA Data Rate Calculator that can be used to help
determine the amount of storage space and bandwidth requirements needed for
a selected format, frame rate, audio setting and compression. The AJA Data Rate
Calculator is also included with version 3.3 and higher of the Kona driver and can
be found in the AJA Utilities folder which installs in the Applications folder of the
Mac OS. The AJA Data Rate Calculator application can also be downloaded from
the AJA website and used on any OSX computer.
KONA 3 Installation and Operation Manual — Cable Connections
FORMAT
SD Formats
10-bit 4:2:2 SD (NTSC/PAL) 28 101
8-bit 4:2:2 SD (NTSC/PAL) 21 76
DV50(NTSC/PAL) 7 27
DV25(NTSC/PAL) 3.6 14
Photo JPEG SD (NTSC/PAL) 2.5 9
HD Formats
10-bit 4:2:2 1080i 59.94Hz/29.97fps 166 597
8-bit 4:2:2 1080i 59.94Hz/29.97fps 124 448
10-bit 4:2:2 1080i 50Hz/25fps 138 498
8-bit 4:2:2 1080i 50Hz/25fps 104 373
10-bit 4:2:2 1080PsF 23.98Hz/fps 133 478
8-bit 4:2:2 1080PsF 23.98Hz/fps 100 358
10-bit 4:2:2 720P 59.94Hz or fps 133 478
8-bit 4:2:2 720P 59.94Hz or fps 100 358
10-bit 4:4:4 1080PsF 23.98Hz/fps 199 717
10-bit 4:4:4 1080PsF 25Hz/fps 207 746
8-bit 4:2:2 1080i 59.94Hz/29.97fps 124 448
8-bit 4:2:2 1080i 50Hz/25fps 104 373
8-bit 4:2:2 1080PsF 23.98Hz/fps 100 358
8-bit 4:2:2 720P 59.94Hz or fps 100 358
2K Formats
10-bit 4:4:4 2048x1556PsF 23.98fps 306 1100
10-bit 4:4:4 2048x1080PsF 23.98fps 212 764
MB = MegaBytes
GB = GigaBytes
Data Rate in MB/
sec
Storage
Requirement in
GB/Hour
11
1
Cable Connections
Using the Standard Cables
When KONA 3 is installed in an Apple desktop computer, it connects to the outside
world via either the standard cable set supplied with the board, or the optional K3-Box
Breakout Box (using the cables and directions supplied with it). Use the cables or the
optional Breakout Box to connect your VTR, input and output sources, and external
reference video (genlock).
KONA 3 offers you complete I/O connectivity choices. One cable provides AES/EBU
digital XLR connections and analog monitoring video connections. The other cable has
4 mini-connectors on one end, and 4 BNCs on the other, and provides SDI connections
for both single link and dual-link SD/HD SDI/HSDL connections. Cable connections are
marked on both the KONA 3 card endplate and on the cable connectors for easy
identification.
12
Using The Breakout Box
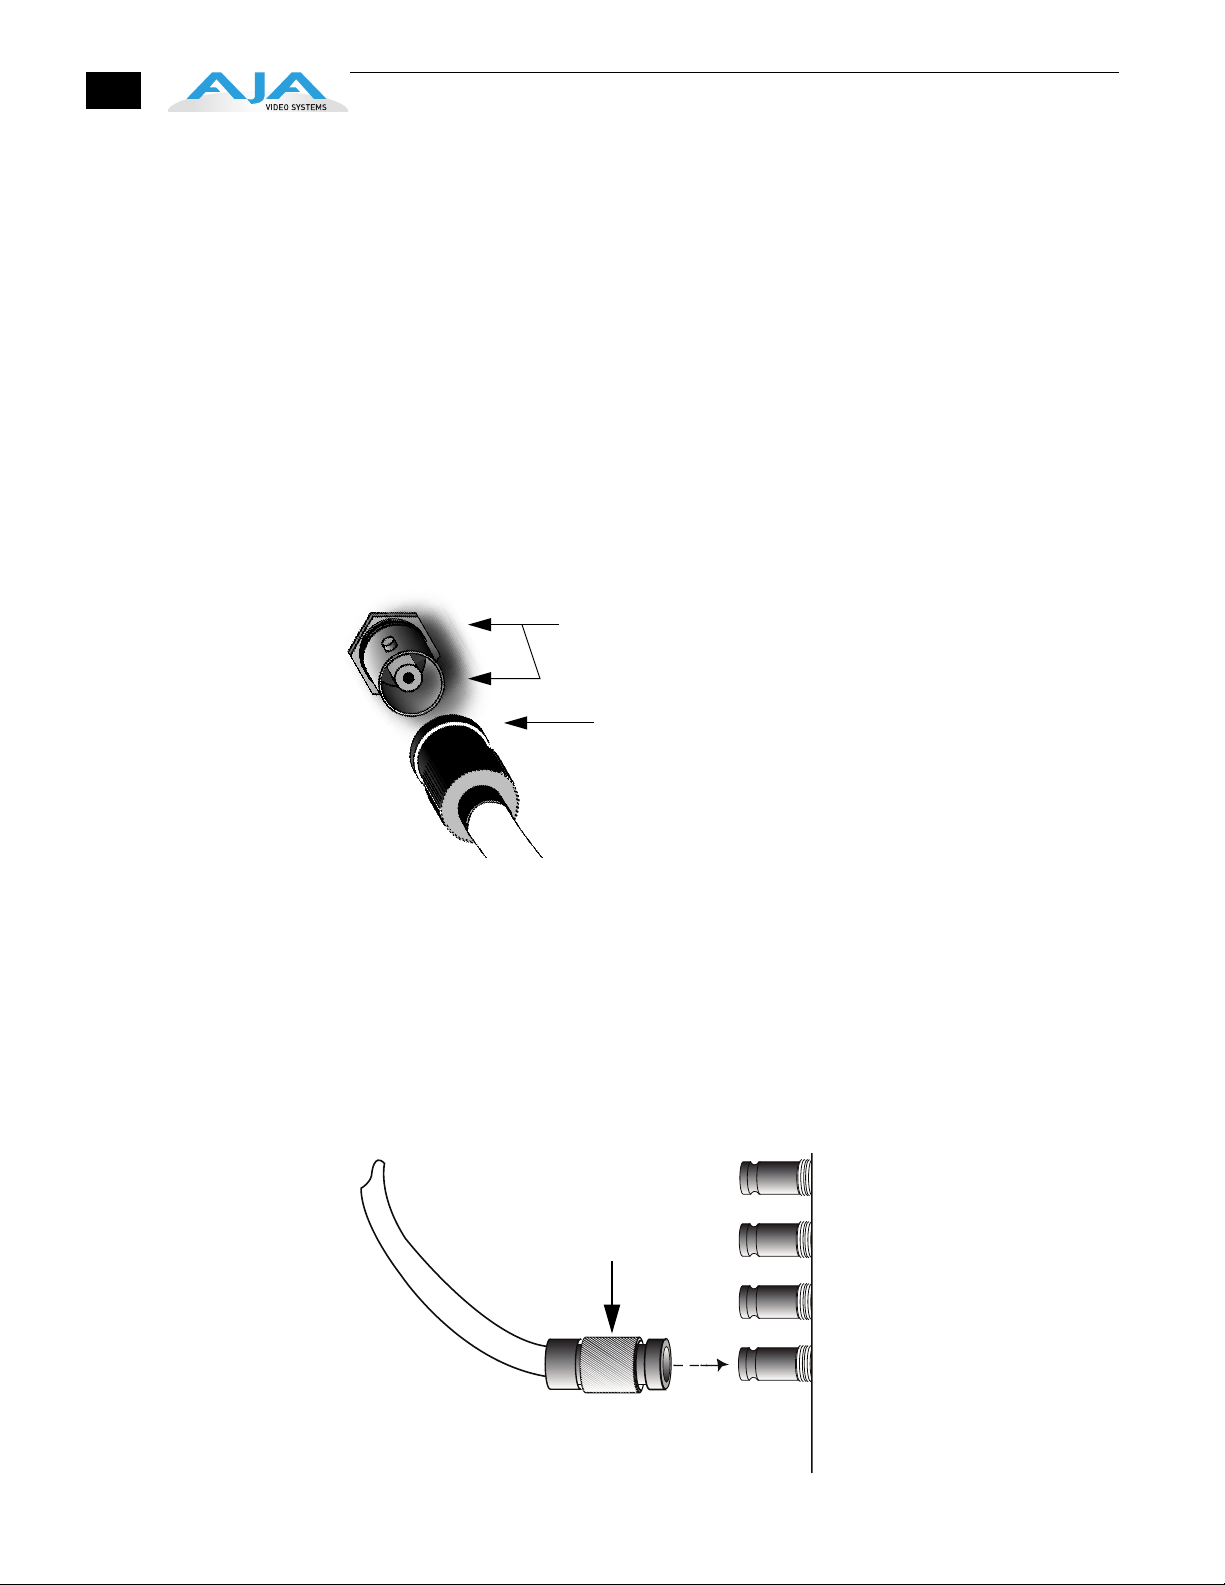
About BNC and Mini-Connectors
The KONA 3 Breakout Box attaches to the KONA 3 card via cables supplied with it that
attach to the back of the Box.
For additional functionality, the K3-Box Breakout Box provides some features not
esent in the standard break-out cables: simultaneous XLR and BNC AES output, 2
pr
channel RCA analog audio monitoring, and looping BNC Genlock reference
connectors.
Although most video professionals are used to BNC connectors, you may not have
seen them if you've been using primarily prosumer video equipment. BNC
connectors ensure a positive connection by the act of locking the connectors
together via pins in one connector that fit into slots in the corresponding connector.
To make a BNC connection, slide the cable connector over the panel connector and
then when seat
ed, rotate the barrel of the cable connector 90˚ clockwise until the
connectors are locked together. When properly locked, the cable cannot accidentally
be pulled out.
Pins (2) on BNC Connector
(connector on K3-Box)
Align slots in
cable connector
barrel with connector
pins, then slide it over the pins
and rotate the barrel
to lock the connectors
together
The four mini-connectors found on the KONA 3 endplate are not common to most
video equipment but off
er small size, ease-of-use, and high reliability. (The
connectors are also called “mini-BNCs” and “1.0/2.3 Connectors”.)
To make a connection with these connectors simply push the cable mini-connector
ont
o the endplate mini-connector. It will lock in place when fully seated.
To remove a mini-connector, just grasp the knurled barrel on the connector and pull
the c
onnector off.
Note: D
o not try to remove the mini-connector by pulling on the cable itself as this
action will not remove the connector—but can stress the cable.
Knurled Barrel:
Pull back to release
connector.
4 Mini-connectors
on KONA 3 PC Board
endplate

KONA 3 Installation and Operation Manual — Cable Connections
13
Connector Descriptions— Cables and K3-Box
Connectors on the standard cable set are labelled as to their function for easy
installation and maintenance. Similarly, connectors on the optional Breakout Box are
also labelled.
8 Channel Digital AES/EBU Audio Inputs And Outputs
When using the standard cables, XLR connections are provided for digital AES/EBU
audio input/output. Four female XLR connectors are provided for audio input and four
male for audio output. Each XLR carries two channels. XLR connectors are labelled as to
input/output and channels.
The optional Breakout Box provides both BNC and XLR audio connections on the front
panel.
Note: XLR c
XLR connectors.
onnections are digital and cannot be used with analog equipment having
1
Analog 2 Channel Unbalanced Audio (Breakout Box only)
On the optional K3-Box are two analog output connectors, one for each channel. These
connectors are RCA-style phono jacks.
RS422 Machine Control
A DB9 connector provides connection to VTRs, digital disk recorders, and other devices
using RS422 device protocol. For the breakout cable the connection is male and for the
breakout box the connector is female. (Connector pinout is listed in Appendix A:
Specifications.)
SDI Input and Outputs
Mini-connectors are provided for two SDI inputs and two SDI outputs for single or duallink. A cable with four Mini-connectors on one end and four BNCs on the other end is
provided for connecting equipment to the SDI inputs and outputs. This cable is also
used to interconnect between the KONA 3 board to the optional K3-Breakout Box.
KONA 3 has up to 4 video outputs in SD and up to 3 outputs in HD—2 SDI outputs that
are used for both high-definition and standard-definition (SD/HD-SDI), and an analog
video output (configuration of this three BNC cluster is discussed later with regards to
component, composite and Y/C). Each of the three outputs is independently
switchable between HD and SD. For example, if you are working in HD, you can have
simultaneous HD-SDI, SD-SDI, and HD-component analog output.
SDI inputs and outputs support video as well as 16-channels of embedded 24-bit
digital audio
video input, capture and output. If peripheral equipment has a variety of inputs/
outputs, look to see if it has SDI I/O, and use it where possible. Most high-end
professional broadcast equipment supports SDI (VTRs, cameras, media storage servers,
etc.).
Note: In the past manufac
high-definition SDI because the circuits were different. On KONA 3 we use the same
connectors for both HD and SD-SDI (both input and output) due to our dual rate
chipset which supports both HD and SD.
. Use SDI wherever possible for the best quality 10-bit uncompressed
turers have used separate I/O connections for standard- and
Analog Monitor Out (Component HD or SD or SD Composite + Y/C)
KONA 3 features 12-bit component video output for both HD and SD. The analog
component output can be configured in a variety of ways; as a component, composite
or Y/C signal. This flexibility allows, for example, the use of an inexpensive analog inputonly monitor for both HD or SD viewing. Since the three BNC connectors share

14
component, composite and Y/C functions, output of component is exclusive while
composite and Y/C can be output simultaneously. For Y/C monitoring an adapter
cable from dual BNC for Y/C to S-Video mini-DIN style connector is required. For
analog monitoring, a component video signal is generally regarded as higher quality
for monitoring than a composite signal.
Note:
A Note About YPbPr—Component Video, or YPbPr, has been given several
names over time. YUV, Y/R-Y/B-Y, and YCbCr, are just some examples. Although
these various formats have some differences in levels, they are all basically the
same. KONA 3 uses the modern YPbPr terminology exclusively. KONA 3 supports
three different types of YPbPr: SMPTE/EBU N10, Betacam (NTSC), and Betacam
(NTSC Japan). These three formats differ in level only and are configured in the
KONA 3 Control Panel.
Note:
A Note About RGB—Although RGB is used less in today’s video systems,
KONA 3 supports it for A/V Monitor output. However, because KONA 3’s (and
SMPTE SDI’s) native format is YPbPr, AJA recommends the use of YPbPr whenever
possible for analog monitoring. Although component video monitors often have
RGB inputs, it’s better to use YPbPr when the monitor supports it. The YPbPr
format provides “headroom” for “superwhite” and “superblack”—and these video
levels will be clipped when transcoding to RGB. Also, the RGB/YPbPr transcoding
involves a level translation that results in mathematical round-off error. RGB can
be configured in the KONA 3 Control Panel.
Reference Video
A single BNC connector is standard on the KONA 3 cable (self terminating). Two BNC
connectors are standard on the breakout box (these provide loop through: if ref is
not looped out, a 75 ohm terminator should be used for the loop out connector).
Reference allows you to synchronize KONA 3 outputs to your house analog reference
video signal (or black burst). If you have a sync generator or central piece of video
equipment to use for synchronizing other video equipment in your studio, then
connect its analog composite output to the KONA 3 reference input. When KONA 3
outputs video it uses this reference signal to lock to. When connecting a reference
video source, the locking signal should be the same format in Hz (1080i29.97, 625i25,
etc.) as the Primary format selected in the KONA 3 Control Panel. It is possible in some
circumstances to use an alternate format video signal as long as the basic frame rate
is compatible (for example, using a 525i29.97 genlock signal to lock a system running
1080i29.97)—if the Hz coincide.

In This Manual
KONA 3 Installation and Operation Manual — In This Manual
Chapter 1 is the introduction you’re reading, listing features, box contents, and system
requirements.
Chapter 2 gets you started with using KONA 3 in a typical video environment. Typical
w
orkflows for SD, HD, Dual Link HD, and 2K are discussed.
Chapter 3 provides complete instructions for installing and configuring the AJA KONA
3 car
d. The user is guided through unpacking, installing the card into a Mac tower,
installing KONA 3 Mac Software, cabling the system and then getting it up and running.
Important configuration information is also provided on video settings and use of
genlock/external reference.
Chapter 4 discusses operational aspects of KONA 3 when used with Final Cut Pro.
Chapter 5 discusses troubleshooting problems with your system and what to do when
ther
e’s a problem you can’t solve.
Appendix A presents a list of technical specifications for the product.
Appendix B gives a glossary of technical terms and acronyms used in the manual.
Appendix C discusses the operational aspects of using 2K workflows with KONA 3.
1
15
The remainder of the manual consists of appendices listing specifications and an index
sec
tion to help you rapidly find topics in the manual.

16
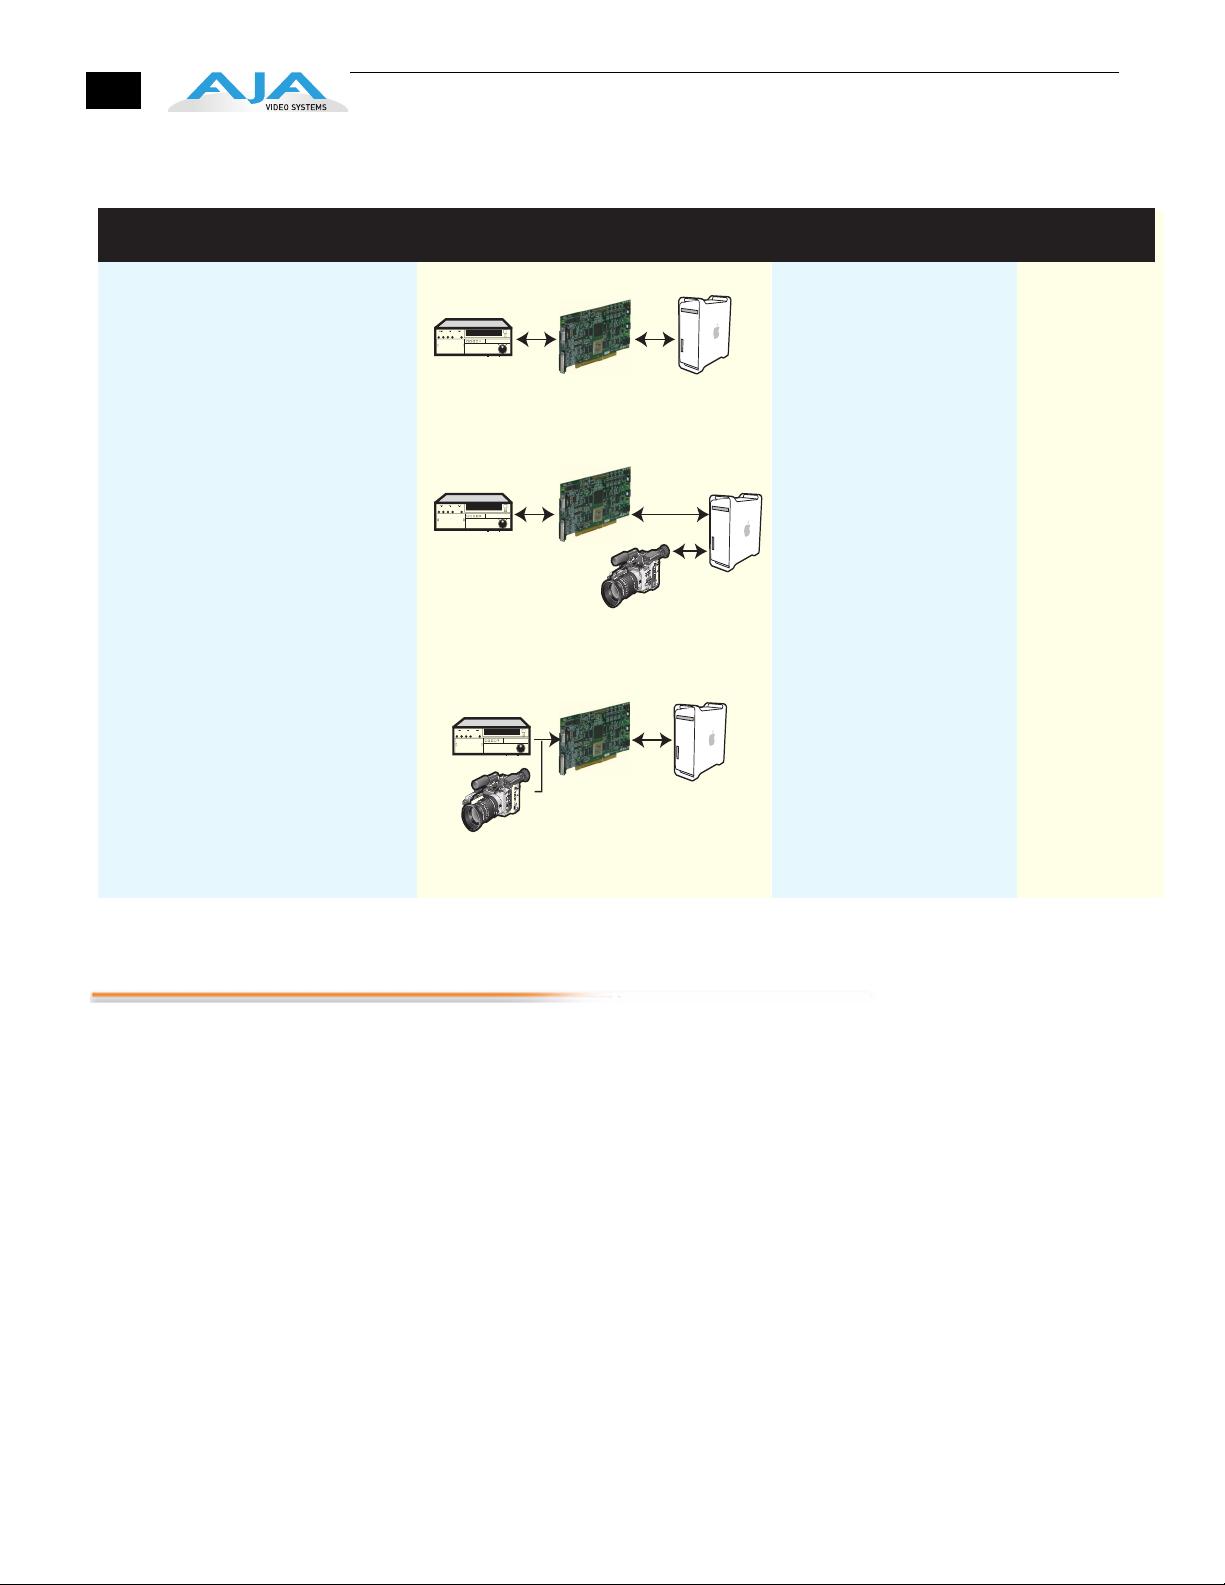
KONA 3 And Your Workflow
There are a lot of ways to think about audio/video workflows. Your setup might be
categorized as corporate video, professional broadcast, or desktop video. Or the
workflow might be categorized by the type of equipment used rather than the
nature of work produced-many systems these days are a mixture of equipment from
high-end professional to desktop video. This chapter tries to show how Final Cut Pro
and KONA 3 can help fit into whatever workflow you currently have and make it more
efficient.
Chapter 2: Getting Started
A Workflow Scenarios diagram on the following page shows types of equipment,
ted by VTR source, and the type of workflow attributes KONA 3 applications
sor
support. After the diagram, we also discuss some typical applications.
2
1
1
18
Source Deck Type(s)
Digital SD or HD
Examples: Digibeta, DV50, DVCPROHD,
HDCAM, and DVcam
Digital capture via Firewire with Output via AJA
KONA 3
Example: HDV
Without even using a deck; use the video monitor
as a second Mac monitor. The KONA 3
desktop lets you drag graphics from
programs like Adobe Photoshop from
the computer display to the video monitor. You
paint full frame and live onto a broadcast monitor.
Output virtually anything to video—ideal for
animators and compositors.
Workflow Attributes
Applications
KONA 3 captures and outputs
SDI video (SD or HD) with embedded
audio. Use high-quality AES/EBU
and/or embedded 8-channel audio
output.
Using standard desktop video
techniques, video/audio is captured
directly from a camcorder or deck.
KONA 3 is used for playing back
captured media and editing/mastering
to tape or DVD using Final Cut 4.5HD
and other tools such as After Effects,
Combustion, Apple Motion, etc.
Using Final Cut Pro, work with
a wide range of old and new SD and
HD sources, including
dual-rate and dual-link, and then also
use desktop graphics and video
software for creative power and
flexibility.
Pro Broadcast
Corporate/Industrial
On-site Editing
Desktop Video
Corporate/Industrial
On-site Editing
Pro Broadcast
Post-production
Animation
Compositing
Workflow Scenarios
Understanding Typical Workflows
KONA 3 and Final Cut Pro allow more workflow flexibility than ever before in post
production. Users can select a variety of formats, frame rates and codecs for
capture and editorial manipulation. KONA 3 hardware has a full array of connectors
for interfacing with VTRs, DDRs and other devices—with all outputs active
simultaneously. Capture can range from compressed DV to uncompressed dual link
HD and even 2K. Media can be stored on disk as:
• offline quality at low bit rates
• on-line quality at moderate bit rates
• or with the highest quality 8- or 10-bit uncompressed quality
As quality and codecs improve, the lines between offline and online are blurring.
F
or example, with the DVCPRO HD codec introduced in FCP HD (v.4.5), native HD
editing in the codec became possible, providing very high quality results (true HD
editing) at very low data rates, in some cases as lower than 6 MB sec. Compare this
to 100MB/sec and higher for uncompressed HD formats, and you can immediately
see the benefits.
Following are summaries of the most common workflows, listing data rates and
elative quality levels. Some workflows require a RAID array and some will work
r

KONA 3 Installation and Operation Manual — Understanding Typical Workflows
using the host Apple computer's internal system drive—it's noted where this is
supported in the following discussions.
PhotoJPEG Data rate: approximately 1-3 MB+/second standard definition or high
definition—supported by internal system drive
19
Quality: V
The PhotoJPEG codec offers an excellent compressed media choice for near online qualit
Final Cut Pro allows you to adjust the quality using a slider. To be able to
effectively encode to PhotoJPEG when capturing HD, the quality slider should
not be set past 35% for HD. The quality slider can be set higher for SD formats.
KONA 3 allows for PhotoJPEG monitoring and/or output in both SD and HD.
KONA 3 can capture from almost any HD or SD input, directly to PhotoJPEG
media.
ery Good
y at low data rates. PhotoJPEG can use the full-raster at 4:2:2 sampling.
1
DV (DV25) Data rate: 3+ MB/second (megabyte/second) standard definition only—
supported by internal system drive
Quality: Good
DV is commonly input to an Apple computer via FireWire. KONA 3 can capture
dir
ectly to DV compressed media from an uncompressed SDI source. For devices
that may not have FireWire (IEEE1394 or i.Link) connections, this allows the user
to capture to this low data rate, yet good quality codec. While DV does offer good
quality, it has lower chroma resolution when compared to DV50, JPEG, or
uncompressed. The KONA 3 can be used to convert DV projects to
uncompressed-in real time-for monitoring and/or output even if you haven't
captured the footage using the KONA 3.
DV50 Data rate: 6+ MB/second standard definition only—supported by internal system
drive
Quality: V
Like DV25, Final Cut Pro also supports the Panasonic DV50 standard definition
c
odec. DV50 is a 4:2:2 compressed format and therefore has higher chroma
resolution when compared to DV25. Also like DV25, you can use KONA 3 to
convert DV50 projects to uncompressed—in real time—for monitoring and/or
output. KONA 3 can capture from its SDI input, directly to DV50 compression.
ery Good

20
DVCPRO HD Data rate: 6 to 14 MB/second high definition—supported by internal system drive
Quality: Ex
KONA 3 has hardware support that allows capture from HD-SDI to the DVCPRO HD
c
odec. KONA 3's hardware also takes a portion of the DVCPRO HD codec
processing load off the CPU, allowing more computer processor time for Dynamic
RT effects in Final Cut Pro.
cellent
HDV Data rate: 2+ MB/second high definition—supported by internal system drive
Uncompressed 8-bit 4:2:2 (SD or HD)
Quality:
While the structure of HDV (Long GOP MPEG2) makes it nearly impossible to ingest
in r
time on playback-for monitoring and/or output.
Data rate: 21 MB/sec for standard definition or 100 to 125 MB/sec for high
definition—external storage recommended
Quality: Ex
Capturing in uncompressed results in clearly defined video, at full raster size and
4:2:2 chr
all the way through effects rendering. Final Cut Pro supports RT with
uncompressed media using RT Extreme. KONA 3 supports capture of
uncompressed through its SDI input. Uncompressed media can output via all of
the KONA 3 outputs simultaneously.
Very Good to Excellent
ealtime, you can use KONA 3 to convert HDV projects to uncompressed-in real
cellent, broadcast quality
oma sampling. Using uncompressed maintains high quality from capture
Uncompressed 10-bit 4:2:2
AJA Kona 10-bit Log RGB and RGB Codecs
Data rate: 28 MB/second standard definition, or 133-166 MB/second high definition
Quality: Excellent, broadcast quality
Offering all the benefits noted previously for 8-bit uncompressed, 10-bit
additionally off
With Uncompressed 10-bit 4:2:2 media, video quality is second to none-at any
price point - for non-linear post production. For more information on this subject,
please see the topic at the end of Chapter 4: Installation and Configuration, titled
“Using 8-bit Versus 10-bit Video.”
Data rate: 200 to 300+ MB/sec - high definition and 2K
Quality: Ex
Offering all the benefits noted previously for 10-bit uncompressed 4:2:2, Dual Link
4:4:4 video uses 2 HD-SDI channels t
luminance. The term “4:4:4” refers to the ratio of sampling frequencies used to
define the RGB components of a video signal. In this ratio, the red, green and blue
components receive equal specificity, providing increased quality over 4:2:2 where
chroma sub-sampling occurs. 4:4:4 is particularly useful for film related digital
intermediate work as well as the highest level compositing and color correction.
ers higher color specificity for compositing and color correction.
cellent, highest quality available
o provide full color resolution as well as

KONA 3 Installation and Operation Manual — Workflow General Notes
21
AJA Kona 10-bit Log
RGB and RGB
Codecs as related to
a 2K Workflow
Apple ProRes 422 and Apple ProRes 422 HQ (SD or HD)
Data rate: For 2048x1556 2K:
• When seen as a QuickTime movie at 23.98fps with a raster of 2048x1556, the data rate
is 300MB/second (approximately).
• When seen as a single frame DPX file with a 2048x1556 raster, the size is roughly
12+MB/fr
• 2K uncompressed media necessitates the use of high-performance SCSI
or F
Quality: Ex
Data rate: Approximately 18 MB/second ProRes 422, Approximately 31 MB/second
ProRes 422 HQ— supported by internal system drive or attached storage
Quality: Ex
Captured media is virtually indistinguishable from pristine uncompressed sources.
Bett
decoding generations without degradation. It was designed by Apple for editing,
rather than as a transmission/distribution codec as are most popular codecs. Some of
the advantages include:
• Full-size 1920-by-1080 and 1280-by-720 HD resolutions.
• Full-size 720-by-486 and 720-by-576 SD resolutions.
• 4:2:2 chroma sampling. Provides precise compositing and blending at sharp
satur
ame.
ibre Channel drive arrays.
cellent, with additional cost and labor savings over traditional 2K workflows.
1
cellent, broadcast quality
er yet, ProRes maintains the quality during editing, surviving multiple encoding/
ated-color boundaries.
• 10-bit sample depth. Preserves subtle gradients of 10-bit sources (perfect for greenscr
een compositing, graphics or color correction) with no visible banding artifacts.
• I frame-only encoding. Ensures consistent quality in every frame and no artifacts from
c
omplex motion.
• Variable bit rate (VBR) encoding. “Smart” encoding analyzes the image and allocates
mor
• Low data rate requirements make for more storage options and require less drive
spac
Workflow General Notes
The previously discussed codecs (DVCPRO HD, PhotoJPEG, DVCPRO 50, etc.) are used in
different ways based on project characteristics. Some codecs create very high quality
offline files at low data rates for projects that will ultimately be delivered as
uncompressed via an offline/online process; other projects may use these compressed
formats to create final masters. AJA provides Final Cut Pro Easy Setups for settings that
can be used in a “capture once-use in many steps” type of process. For example, you
might use offline files for editing, digital dailies for review from a digital projector,
location footage viewing and editorial performed on laptops - even creating screening
cuts of the project for approval and audience testing-all from one QuickTime file using
the DVCPro HD codec. Some examples of these scenario workflows are given following.
e bits to complex frames.
e to store high quality video.

22
HD Offline
Scenario #1
A popular way to edit long form content, such as feature films shot at 24fps film (or
23.98) is to take the telecine to HD tape masters, or the HD field masters (typically at
23.98fps) and then capture using the KONA 3 to a compressed format. An interesting
and very high quality option would be to use the DVCPRO HD codec to capture from
whatever deck you are using for your HD masters (typically HDcam or D5). This allows
for offline files that in the 1080PsF 23.98 format are under 12MB/sec. and in the 720p
raster are under 6MB/sec. This size and processing efficiency for the codec allows for
the use of multiple layers of RT effects and color correction in the Final Cut Pro
Dynamic RT environment. A choice of viewing quality (draft or high quality modes)
can be selected depending on how much RT is required and the speed of your Apple
computers processors. In addition to the low data rates, another advantage is that
your offline files are in the same timebase as your original master tapes, greatly
simplifying the online editing and finishing process.
A more traditional way (still supported by the KONA 3 using the on-board down-
on
version option, and Cinema Tools software) is to down-convert your HD masters
c
to an SD format (DVCam for example, at 29.97fps non-drop frame). This allows for
traditional lower cost SD monitoring equipment to be used, but results in the
changing of the editorial time base of your media for your offline editing, which then
must be dealt with via a somewhat complex series of software steps. Keeping your
files in the same timebase allows for a much simpler offline/online process,
particularly when dealing with 24p HD media. For 29.97 (59.94) HD projects, the
complexity of the changing time base is eliminated, but the same rules apply. In this
case, using the 1080i DVCPRO HD setting for your offline gives you great quality
results at data rates about half the size of SD uncompressed files for offline-all the
while allowing editorial to be performed in a high quality compressed HD format.
HD Offline
Scenario #2
Mixing and Matching Formats in Final Cut
The DV codec has been a staple of Final Cut Pro since the application's inception,
providing a well-suited offline editing workflow that has proven to work fine for
many projects. Similar to the process described above with the newer DVCPRO HD
codec, this codec can be used to capture from your HD tapes at the native frame rates
of those tapes (23.98fps). While not as high quality as DVCPRO HD, the files sizes can
be even smaller-less than 3 MB/sec -and are usually more than adequate for offline
purposes.
In Final Cut Pro, the best editorial results come from working with one format
consistently per timeline. For example, if you capture HDV files and then capture 10bit uncompressed files, you'll have to rerender one or the other when using the two
types on the same Final Cut sequence (the timeline where media is edited into a
project). You could even capture 8-bit uncompressed and DV, and then place them
both on a PhotoJPEG timeline and end up having to render them both.
Therefore, it makes sense to capture media into your system at the highest quality
you'll expec
for mastering. Otherwise a well thought out online/offline workflow should be
mapped out before starting a project. Luckily, the KONA 3 card allows users to
capture to a common codec easily with its hardware based upconversion,
downconversion and crossconversion capabilities.
For example, if a 720P 59.94 DVCProHD master were desired, and the source material
was standar
59.94fps and HDCam tapes at 29.97fps, all of these tapes could be digitized to the
common codec of DVCProHD at 720P 59.94.
t to use in Final Cut to eliminate rerendering and ensure the best results
d definition Digital Betacam tapes at 29.97fps
, DVCProHD tapes at
 Loading...