

Ki Pro Ultra Plus
File Based Recorder/Player
Installation and Operation Guide
Version 4.0
Published October 23, 2018

Notices
Trademarks
Copyright
AJA® and Because it matters.® are registered trademarks of AJA Video Systems, Inc.
for use with most AJA products. AJA™ is a trademark of AJA Video Systems, Inc. for
use with recorder, router, software and camera products. Because it matters.™ is a
trademark of AJA Video Systems, Inc. for use with camera products.
CION®, Corvid Ultra®, lo®, Ki Pro®, KONA®, KUMO®, ROI® and T-Tap® are registered
trademarks of AJA Video Systems, Inc.
AJA Control Room™, KiStor™, Science of the Beautiful™, TruScale™, TruZoom™,
V2Analog™ and V2Digital™ are trademarks of AJA Video Systems, Inc.
All other trademarks are the property of their respective owners.
Copyright © 2018 AJA Video Systems, Inc. All rights reserved. All information in
this manual is subject to change without notice. No part of the document may be
reproduced or transmitted in any form, or by any means, electronic or mechanical,
including photocopying or recording, without the express written permission of AJA
Video Systems, Inc.
Contacting AJA Support
When calling for support, have all information at hand prior to calling. To contact AJA
for sales or support, use any of the following methods:
Telephone +1.530.271. 3190
FAX +1.530.271. 3140
Web https://www.aja.com
Support Email support@aja.com
Sales Email sales@aja.com
Ki Pro Ultra Plus File Based Recorder/Player v4.0 2 www.aja.com

Contents
Notices . . . . . . . . . . . . . . . . . . . . . . . . . . . . . . . . . . . . . .2
Trademarks . . . . . . . . . . . . . . . . . . . . . . . . . . . . . . . . . . . . . . . . . . . 2
Copyright . . . . . . . . . . . . . . . . . . . . . . . . . . . . . . . . . . . . . . . . . . . . 2
Contacting AJA Support . . . . . . . . . . . . . . . . . . . . . . . . . . . . . . . . . . . 2
Chapter 1 – Introduction . . . . . . . . . . . . . . . . . . . . . . . . . . . 5
Overview. . . . . . . . . . . . . . . . . . . . . . . . . . . . . . . . . . . . . . . . . . . . . 5
Features . . . . . . . . . . . . . . . . . . . . . . . . . . . . . . . . . . . . . . . . . . . . . 5
Multi-Channel HD Recording . . . . . . . . . . . . . . . . . . . . . . . . . . . . . . 5
Ki Protect . . . . . . . . . . . . . . . . . . . . . . . . . . . . . . . . . . . . . . . . . . . 6
Hardware . . . . . . . . . . . . . . . . . . . . . . . . . . . . . . . . . . . . . . . . . . . 6
Software . . . . . . . . . . . . . . . . . . . . . . . . . . . . . . . . . . . . . . . . . . . 7
Media Formatting Requirements . . . . . . . . . . . . . . . . . . . . . . . . . . . . . 7
Ki Pro Ultra Plus Options . . . . . . . . . . . . . . . . . . . . . . . . . . . . . . . . . . . 7
AJA Pak Media . . . . . . . . . . . . . . . . . . . . . . . . . . . . . . . . . . . . . . . .7
AJA Pak-Adapt-CFast. . . . . . . . . . . . . . . . . . . . . . . . . . . . . . . . . . . .7
AJA Pak-Adapt-eSATA . . . . . . . . . . . . . . . . . . . . . . . . . . . . . . . . . . . 8
AJA Pak Dock . . . . . . . . . . . . . . . . . . . . . . . . . . . . . . . . . . . . . . . . 8
AJA Fiber Modules . . . . . . . . . . . . . . . . . . . . . . . . . . . . . . . . . . . . . 8
KPU-Shelf . . . . . . . . . . . . . . . . . . . . . . . . . . . . . . . . . . . . . . . . . . .9
Apple ProRes 422 and Apple ProRes 444 Advantages . . . . . . . . . . . . . . . . 9
Avid DNxHD/HR Advantages . . . . . . . . . . . . . . . . . . . . . . . . . . . . . . . . 9
In This Manual . . . . . . . . . . . . . . . . . . . . . . . . . . . . . . . . . . . . . . . . 10
Chapter 2 – Ki Pro Ultra Plus at a Glance. . . . . . . . . . . . . . . . . 11
Front Panel Controls. . . . . . . . . . . . . . . . . . . . . . . . . . . . . . . . . . . . . 11
Front Panel . . . . . . . . . . . . . . . . . . . . . . . . . . . . . . . . . . . . . . . . . 11
Rear Panel Connectors . . . . . . . . . . . . . . . . . . . . . . . . . . . . . . . . . . . 14
Connections . . . . . . . . . . . . . . . . . . . . . . . . . . . . . . . . . . . . . . . . 15
Power Connector . . . . . . . . . . . . . . . . . . . . . . . . . . . . . . . . . . . . . . 17
Storage . . . . . . . . . . . . . . . . . . . . . . . . . . . . . . . . . . . . . . . . . . . . . 18
Formatting Media . . . . . . . . . . . . . . . . . . . . . . . . . . . . . . . . . . . . 18
Using Pak Media with Final Cut Pro and Premier Pro . . . . . . . . . . . . . . 18
Using Ki Pro Ultra Plus Media with Avid Media Composer . . . . . . . . . . . 19
Closed Captioning Support . . . . . . . . . . . . . . . . . . . . . . . . . . . . . . . . 19
Chapter 3 – Ki Pro Ultra Plus Installation. . . . . . . . . . . . . . . . .20
Overview. . . . . . . . . . . . . . . . . . . . . . . . . . . . . . . . . . . . . . . . . . . . 20
What’s In The Box? . . . . . . . . . . . . . . . . . . . . . . . . . . . . . . . . . . . . . . 20
Applying Power. . . . . . . . . . . . . . . . . . . . . . . . . . . . . . . . . . . . . . 20
Remote Network Control . . . . . . . . . . . . . . . . . . . . . . . . . . . . . . . . . 22
Network Connections . . . . . . . . . . . . . . . . . . . . . . . . . . . . . . . . . . 22
TCP/IP Information You’ll Need . . . . . . . . . . . . . . . . . . . . . . . . . . . . 22
Networking via DHCP . . . . . . . . . . . . . . . . . . . . . . . . . . . . . . . . . . 23
Networking Ki Pro Ultra Plus using a Static IP Address . . . . . . . . . . . . . 23
Networking Ki Pro Ultra Plus Using the Factory Default IP . . . . . . . . . . . 25
Controlling Ki Pro Ultra Plus From a Web Browser . . . . . . . . . . . . . . . . 25
Installing Optional SFP I/O Modules. . . . . . . . . . . . . . . . . . . . . . . . . . . 25
Chapter 4 – Front Panel Operation . . . . . . . . . . . . . . . . . . . . 27
Overview. . . . . . . . . . . . . . . . . . . . . . . . . . . . . . . . . . . . . . . . . . . . 27
Control Panel Operation . . . . . . . . . . . . . . . . . . . . . . . . . . . . . . . . 27
User Control Knob Functions . . . . . . . . . . . . . . . . . . . . . . . . . . . . . 27
Overlay Display Content . . . . . . . . . . . . . . . . . . . . . . . . . . . . . . . . 28
Transport Mode (default) . . . . . . . . . . . . . . . . . . . . . . . . . . . . . . . . . 30
Recording a Clip. . . . . . . . . . . . . . . . . . . . . . . . . . . . . . . . . . . . . . 31
Playing Back a Clip . . . . . . . . . . . . . . . . . . . . . . . . . . . . . . . . . . . . 33
Deleting Clips . . . . . . . . . . . . . . . . . . . . . . . . . . . . . . . . . . . . . . . 33
Status Menus . . . . . . . . . . . . . . . . . . . . . . . . . . . . . . . . . . . . . . . . . 34
Ki Pro Ultra Plus File Based Recorder/Player v4.0 3 www.aja.com

Media Menus . . . . . . . . . . . . . . . . . . . . . . . . . . . . . . . . . . . . . . . . . 36
Media Menu Parameters . . . . . . . . . . . . . . . . . . . . . . . . . . . . . . . . 37
Custom Clip Naming. . . . . . . . . . . . . . . . . . . . . . . . . . . . . . . . . . . 43
Cong Menus . . . . . . . . . . . . . . . . . . . . . . . . . . . . . . . . . . . . . . . . . 46
Cong Menu Parameters . . . . . . . . . . . . . . . . . . . . . . . . . . . . . . . . 46
Signal Routing Examples. . . . . . . . . . . . . . . . . . . . . . . . . . . . . . . . . . 63
Chapter 5 – Browser Remote Control . . . . . . . . . . . . . . . . . . 65
Overview. . . . . . . . . . . . . . . . . . . . . . . . . . . . . . . . . . . . . . . . . . . . 65
Operations Unique to the Web UI . . . . . . . . . . . . . . . . . . . . . . . . . . . . 69
Playing, Jogging and Selecting Clips . . . . . . . . . . . . . . . . . . . . . . . . 69
Playlists . . . . . . . . . . . . . . . . . . . . . . . . . . . . . . . . . . . . . . . . . . . 70
Gang Recording. . . . . . . . . . . . . . . . . . . . . . . . . . . . . . . . . . . . . . 71
Data Transfer via LAN . . . . . . . . . . . . . . . . . . . . . . . . . . . . . . . . . . 73
Presets. . . . . . . . . . . . . . . . . . . . . . . . . . . . . . . . . . . . . . . . . . . . 75
Updating Firmware. . . . . . . . . . . . . . . . . . . . . . . . . . . . . . . . . . . . 76
Chapter 6 – Ki Pro Ultra Plus Accessories . . . . . . . . . . . . . . . . 78
Overview. . . . . . . . . . . . . . . . . . . . . . . . . . . . . . . . . . . . . . . . . . . . 78
Ki Pro Ultra Plus Handle . . . . . . . . . . . . . . . . . . . . . . . . . . . . . . . . . . 78
Ki Pro Ultra Plus Shelf . . . . . . . . . . . . . . . . . . . . . . . . . . . . . . . . . . . . 79
Ki Pro Ultra Plus SFP Modules . . . . . . . . . . . . . . . . . . . . . . . . . . . . . . . 79
Appendix A – Specications . . . . . . . . . . . . . . . . . . . . . . . . 80
Appendix B – Safety and Compliance . . . . . . . . . . . . . . . . . . 87
Warranty and Liability Information . . . . . . . . . . . . . . . . . . . .96
Limited Warranty on Hardware. . . . . . . . . . . . . . . . . . . . . . . . . . . . . . 96
Limitation of Liability . . . . . . . . . . . . . . . . . . . . . . . . . . . . . . . . . . . . 97
Governing Law and Language; Your Rights. . . . . . . . . . . . . . . . . . . . . . 97
Index. . . . . . . . . . . . . . . . . . . . . . . . . . . . . . . . . . . . . . .98
Ki Pro Ultra Plus File Based Recorder/Player v4.0 4 www.aja.com
Chapter 1 – Introduction
Overview
Ki Pro Ultra Plus is a Multi-Channel Apple ProRes recorder offering up to
4-Channels of simultaneous HD recording, or in Single-Channel mode a 4K/
UltraHD/2K/HD Apple ProRes® or Avid DNxHD® MXF recorder and player.
Ki Pro Ultra Plus supports the latest connectivity, as well as large raster high frame
rate workflows, including 4K 60p.
3G-SDI, fiber and full HDMI 2.0 digital video connectivity and a wealth of analog
and digital audio connectivity answers any project’s demand for efficient,
powerful and flexible workflows.
Designed to be either portable or rackmountable with half rack wide 2RU high
dimensions, it’s well suited for use in studio/truck environments in addition to
on-set and even digital signage applications. The Ki Pro Ultra Plus is designed to
meet the growing demand for 4K and UltraHD capable recorder products with
full support for current HD projects.
Ki Pro Ultra Plus enables manageable large raster workflows with the efficiencies
of Apple ProRes, supporting a broad range of video formats and frame rates
recorded directly to AJA’s proven and reliable Pak Media, offering the lowest cost
per GB available today.
Next generation pristine UltraHD 60p and 4K 60p recording in Apple ProRes HQ is
offered utilizing Pak 2000, Pak 1000, Pak 512(R1), and Pak 256 (R1/R2) SSD media,
complete with full rollover capabilities from drive to drive. This ensures long
recording times for the most demanding projects.
Smooth slow motion playback can be obtained easily with full control via the
RS-422 serial connection or through the simple and intuitive on unit menu system
and through the Ki Pro Ultra Plus’ web interface.
Menus and images are beautifully rendered on a new high resolution LCD display
enabling detailed playback and monitoring in all environments.
Features
Multi-Channel HD Recording
Record 1, 2, 3 or 4-Channels of beautiful HD up to 1080p 50/60 in Apple ProRes
simultaneously with Ki Pro Ultra Plus. Simplify your multi-camera productions by
running up to four cameras per Ki Pro Ultra Plus and save power, space, time and
effort on set, in the studio and when setting up OB trucks.
IM PORTA NT: The Ki Pro Ultra Plus recording inputs must be genlocked together, or multi-
channel recording and monitoring failures may occur.
Ki Pro Ultra Plus File Based Recorder/Player v4.0 5 www.aja.com

IM PORTA NT: Multi-channel recording is only supported on Pak 2000, Pak 1000,
Ki Protect
Ki Pro Ultra Plus even allows independent profile support per channel in MultiChannel mode; for example, select high resolution Apple ProRes HQ for high
quality finishing and use a second input to record Apple ProRes (Proxy) for an
efficient editing pipeline.
Starting with input 1, add channels as needed in order when utilizing like raster
size and frame rate, and record your HD Apple ProRes files on the same AJA Pak
Media. Ki Pro Ultra Plus even allows rollover to a second Pak Media for hours of
uninterrupted multi-channel recording.
Pak512(R1) and Pak 256 (R1/R2) media.
Ki Pro Ultra Plus includes Ki Protect, a feature that helps to ensure data integrity
if a media drive is accidentally removed or loses power during recording. The Ki
Protect feature automatically pre-allocates recording space on the media drive for
video, audio and timecode when the record button is pressed. Whilst recording,
the file header is then continuously updated every time new data is written.
That way, the only loss that should be incurred is the last few frames that were in
transit to the media drive to be recorded when the operation was interrupted.
Frames that are already recorded will be preserved and are recoverable, providing
greater piece-of-mind on set and in the studio.
Hardware
• Up to 4-Channels of simultaneous HD recording (Pak 2000/Pak 1000/
Pak512(R1)/Pak 256 (R1/R2) only)
• Apple ProRes 444 (XQ), Apple ProRes 444, Apple ProRes 422, Apple ProRes 422
(HQ), Apple ProRes 422 (LT), and Apple ProRes 422 (Proxy)—4K/UltraHD, 2K,
HD implemented in hardware
• Avid DNxHR HQX, Avid DNxHR SQ, and Avid DNxHR LB—implemented in
hardware
• Avid DNxHD HQX, Avid DNxHD SQ, and Avid DNxHD LB—implemented in
hardware
• MXF with OP1A support for DNxHD encoded les, bringing true Avid MXF
compatibility for HD workows
• 3G-SDI input (4x BNC connectors)
• 3G-SDI output (4x BNC connectors)
• 3G-SDI Fiber input (4x LC connectors) (optional)
• 3G-SDI Fiber output (4x LC connectors) (optional)
• HD-SDI monitor output (1x BNC connector)
• HDMI Input v2.0 (up to 4K 60p 4:2:2 YCbCr or 4:4:4 RGB)
• HDMI Output v2.0 (up to 4K 60p 4:2:2 YCbCr or 4:4:4 RGB)
• 8-ch AES Audio Input (1/2x DB-25 TASCAM pinout)
• 8-ch AES Audio Output (1/2x DB-25 TASCAM pinout)
• 8-ch Analog Audio Input (1x DB-25 TASCAM pinout)
• 8-ch Analog Audio Output (1x DB-25 TASCAM pinout)
• LTC Input (1x BNC connector)
• LTC Output (1x BNC connector)
• Reference Loop (2x BNC connectors)
• RCA Audio output (2x mono RCA connectors)
• Headphone jack (1x 3.5mm Jack)
• 10/100/1000 Ethernet LAN (1x RJ-45 connector)
• RS-422 Machine control (1x DB9)
Ki Pro Ultra Plus File Based Recorder/Player v4.0 6 www.aja.com

• 1280 x 720p TFT LCD display (for UI information and condence monitoring)
• Dual 12 Volt AC/DC power (2x 4-pin XLR connectors)
Software
• Internal web server for remote control conguration via LAN
• Both HFS+ and ExFAT le systems supported
• Continuous rollover record only limited by the size of your media
• Capture and playback of CEA 708 Closed Captioning data as QuickTime movie
tracks
• Download and upload of les via LAN
• 20 Preset registers for storing and recalling system preset congurations
• Alarms to alert users to conditions that may need attention
Media Formatting Requirements
The Ki Pro Ultra Plus records and plays Apple Quicktime ProRes 444, Apple ProRes
422 and DNxHD files to/from SSD media.
Files can be stored on the media using the HFS+ file system. This makes the
media readable on any Mac OS computer natively (using the associated media
reader) and PCs using 3rd-party software that can read HFS+ formatted drives
(MediaFour’s MacDrive for example).
Ki Pro Ultra Plus can also store files on media using the ExFAT file system, for
native PC operation.
Ki Pro Ultra Plus Options
AJA Pak Media
Ki Pro Ultra Plus lets you record edit-friendly 4K, 2K, or HD files directly to
removable AJA Pak Media. Once removed from the Ki Pro Ultra Plus, the Pak
Media can be inserted in the AJA Pak Dock which connects directly to your
computer via Thunderbolt or USB 3.0, allowing you to rapidly transfer ProRes or
DNxHD files that are ready for use immediately in your non-linear editing system.
NOTE: When you order your Pak Media you can choose the formatting, either HFS+ or
ExFAT.
AJA Pak Options
The Pak 256, Pak 512, Pak 1000, and Pak 2000 options are high-capacity Solid
State Drives encased in a protective housing with rugged connection engineered
to handle the rigors of repeated use in the field.
NOTE: The newer Pak 256 (R1/R2) and Pak 512 (R1), and the Pak 1000 and Pak 2000
media support recording all formats and frame rates up to and including 4K/
UltraHD 50, 59.94,60 at ProRes 422 (HQ). Legacy Pak 256(R0) and Pak 512(R0)
media have slightly lower capabilities, and are able to record up to 4K/UltraHD 30
at ProRes 422.
AJA Pak-Adapt-CFast
Pak-Adapt-CFast allows you to use CFast media you provide with Ki Pro Ultra Plus.
Ki Pro Ultra Plus File Based Recorder/Player v4.0 7 www.aja.com

Simply insert the CFast card and once the green LED is lit, your media is mounted
and can be formatted. Formatting CFast media may take up to 60 seconds to
complete. You’re then able to record direct to your media. For long recording
times, AJA recommends Pak 512, Pak 1000 and Pak 2000 media.
Qualified CFast Media
Although most types of CFast media will mount, only qualified media will provide
proven performance. AJA does not prevent the user from using unqualified
media and as such does not recommend the usage of any other media than that
listed below. AJA Video does not take any responsibility for any loss of data by
using unqualified media.
For a current listing of all CFast media qualified by AJA, see the Qualified Media
Guide at:
https://www.aja.com/en/products/pak#support
AJA Pak-Adapt-eSATA
Pak-Adapt-eSATA is a Pak Media sized eSATA adapter that lets you attach qualified
RAID or single volume storage to Ki Pro Ultra Plus and use that media as a record
drive. Simply connect a high quality eSATA cable to the Pak-Adapt-eSATA port,
and once the green LED is lit your media is mounted. You can then record direct
to that media.
Qualified eSATA Media
Pak-Adapt-eSATA requires qualified media to ensure the best results. Although
most types of RAID and single volume drives will mount, only qualified media
provides proven performance. AJA does not prevent the use of unqualified
media, but does not recommend using any devices other than those listed below.
AJA only supports customers using qualified RAID enclosures, high quality
cables and approved drives. AJA does not take responsibility for any loss of data
resulting from the use of unqualified media.
IM PORTA NT: The ‘Rollover’ functionality of Ki Pro Ultra Plus is not supported between
multiple Pak-Adapt-eSATAs, or between Pak Media and Pak-Adapt-eSATA, due to
the longer mount times required by larger volumes.
IM PORTA NT: Multi-channel recording is only supported on Pak1000, Pak512 R1 and
Pak256 R1 media.
For a current listing of all eSATA media qualified by AJA, see:
https://www.aja.com/en/products/pak#support
AJA Pak Dock
The AJA Pak Dock option is an external media reader with Thunderbolt™ and USB
3.0 connections for fast transfer of media to a host computer.
AJA Fiber Modules
Fully integrated fiber inputs and outputs means Ki Pro Ultra Plus can be
integrated directly to a dedicated fiber network alongside many other fiber
products.
See https://www.aja.com/software/configurator for an online tool you can use to
select compatible SFP modules.
Ki Pro Ultra Plus File Based Recorder/Player v4.0 8 www.aja.com

KPU-Shelf
Ki Pro Ultra Plus can be mounted side by side using the optional KPU-Shelf for
rackmount applications. Using the four channel HD recording capability and
front panel quad display, two rack mounted Ki Pro Ultra Plus units can record and
monitor eight HD signals in only two rack units of space.
Apple ProRes 422 and Apple ProRes 444 Advantages
Captured media using Apple ProRes 422 or Apple ProRes 444 is virtually
indistinguishable from uncompressed HD/2K/4K sources. Better yet, Apple ProRes
maintains the quality during editing, surviving multiple encoding/decoding
generations without degradation. It was designed by Apple specifically for
editing. Some of the advantages include:
• Resolution support for 4096-by-2160 (4K), 3840-by-2160 (UltraHD), 2048-by1080 (2K), 1920-by-1080 (HD), and 1280-by-720 (HD).
• 4:2:2 or 4:4:4 chroma sampling. Provides precise compositing and blending at
sharp saturated-color boundaries.
• 10/12-bit sample depth. Preserves subtle gradients of 10/12-bit sources
(perfect for green-screen compositing, graphics or color correction) with no
visible banding artifacts.
• Intra-frame encoding. Ensures consistent quality in every frame and no
artifacts from complex motion.
• Variable bit-rate (VBR) encoding. “Smart” encoding analyzes the image and
allocates more bits to complex frames.
• Low data rate requirements make for more storage options and require less
drive space to store high quality video.
Avid DNxHD/HR Advantages
Quality using Avid DNxHD and DNxHR is excellent— high quality encoding
without high bandwidth requirements. Avid DNxHD and DNxHR were designed
for non-linear post-production and broadcast to withstand multi-generational
processing.
• Full-size 4K, UltraHD, 1920-by-1080 and 1280-by-720 resolutions.
• 4:2:2 chroma sampling.
• 10-bit sample depth (DNxHR HQX or DNxHD HQX), or 8-bit.
NOTE: Ki Pro Ultra Plus can accept 12-bit inputs but processes and encodes at 10-bit.
• Every frame of encoding is independent.
• Constant bit-rate (CBR) encoding.
• Low data rate requirements.
Ki Pro Ultra Plus File Based Recorder/Player v4.0 9 www.aja.com
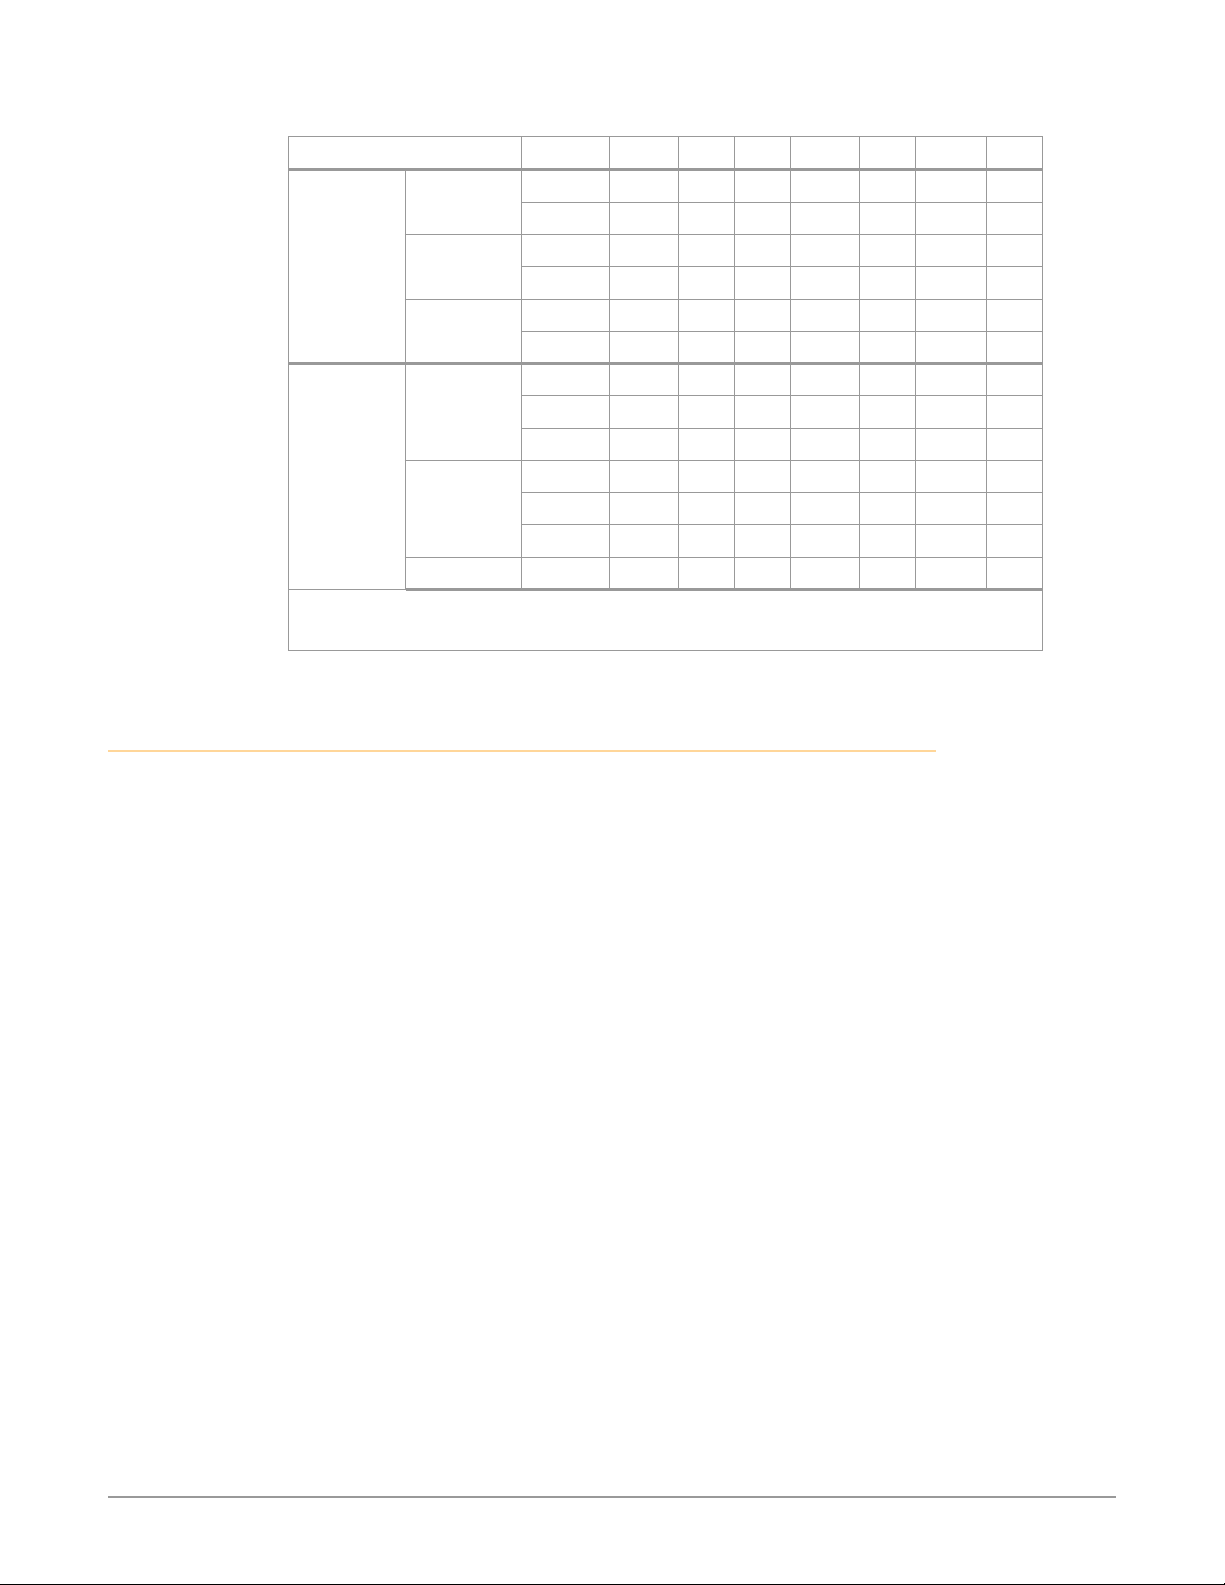
Table 1. Data Rates (Mb/sec) for DNxHR and DNxHD Formats
Codec Format 23.98 24 25 29.97 50 59.94 60
DNxHR HQX 4K 711 711 741 880
UHD 666 666 695 833
SQ 4K 470 470 490 587
UHD 441 441 459 551
LB 4K 146 146 152 183
UHD 137 137 143 171
DNxHD HQX 1080p 175 175 185 220 365 440 440
1080i 185 220 220
720p 175 220 220
SQ 1080p 115 115 120 145 240 290 290
1080i 120 145 145
720p 115 145 145
LB 1080p 36 36 36 45 75 90 90
NOTE: Blank format/frame rate combinations are not currently supported.
NOTE: 4K, UltraHD, and SD video encoding using Avid DNxHD is not currently supported.
In This Manual
Chapter 1 is the introduction you’re reading, provides an overview of hardware
and software features and options.
Chapter 2 gets you started with Ki Pro Ultra Plus, introducing the front panel
controls and rear connector features.
Chapter 3 gives detailed installation information.
Chapter 4 provides complete instructions for operating the Ki Pro Ultra Plus from
the front-panel controls and LCD display.
Chapter 5 discusses remote web browser control of Ki Pro Ultra Plus via Ethernet.
Chapter 6 provides details of AJA accessories available.
Appendix A lists specifications.
Appendix B provides safety and compliance information.
Warranty Information & Index complete the manual.
Ki Pro Ultra Plus File Based Recorder/Player v4.0 10 www.aja.com
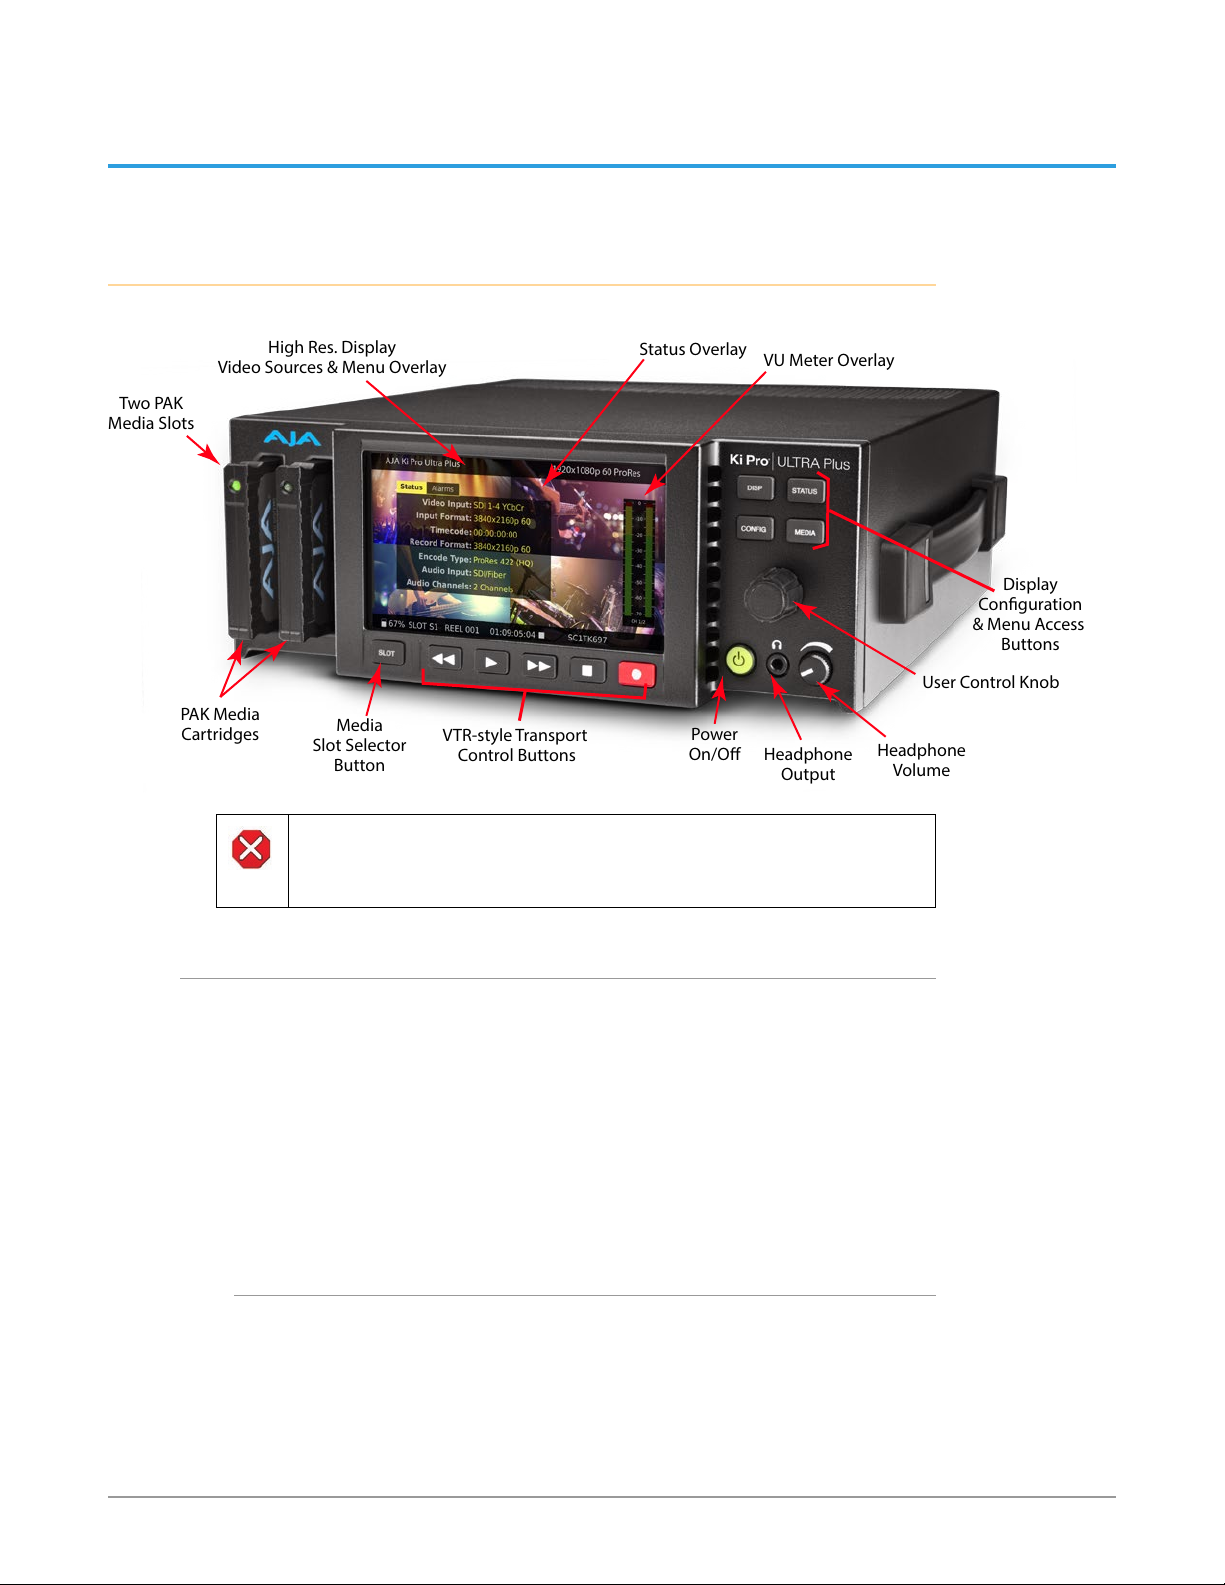
Two PAK
Media Slots
User Control Knob
Headphone
Output
Status Overlay
PAK Media
Cartridges
Media
Slot Selector
Button
Power
On/O
VTR-style Transport
Control Buttons
VU Meter Overlay
Display
Conguration
& Menu Access
Buttons
Headphone
Volume
High Res. Display
Video Sources & Menu Overlay
Chapter 2 – Ki Pro Ultra Plus at a Glance
Front Panel Controls
Figure 1. Ki Pro Ultra Plus Operator Side Controls
Caution! The AJA Ki Pro Ultra Plus contains a lithium battery soldered in
place permanently (it is not user replaceable). If you ever dispose of the
Ki Pro Ultra Plus, ensure you follow local regulations for safe disposal. The lithium
battery shall not be exposed to excessive heat, such as sunlight or re.
Front Panel
The Ki Pro Ultra Plus front panel includes:
• Power buton
• Two Pak Media slots and a Slot Selector button
• Transport controls
• Menu selection buttons
Power ON/OFF Button
Ki Pro Ultra Plus File Based Recorder/Player v4.0 11 www.aja.com
• Headphone volume control and headphone jack
• Multi-purpose User Control Knob for jog and selection functions
• Large 1280 x 720 TFT LCD display with Video Monitor and Menu/Status
Overlays
Controls system power ON/OFF and shows when power is ON (when illuminated)
or OFF.
NOTE: When power is first applied to Ki Pro Ultra Plus, the unit powers up immediately
(without pressing the button). This facilitates a quick return to operation if there is
a power interruption.
NOTE: Upon power up with both slots populated, Slot 1 is the initial storage system
accessed by Ki Pro Ultra Plus.
In normal operation to turn power on, press the button once. It isn’t necessary
to press hard—it’s a “soft” button sensed by the processor inside. Pressing the
button will begin power-up and display start-up progress on the alphanumeric
display.
To power down, press and hold the power button down for 3 seconds while the
display counts down. This process prevents accidental power-off during normal
operation. You can abort the power-down process by simply removing your
finger from the power button before the 3 seconds have elapsed.
SLOT Button
The SLOT button serves two purposes. It selects which media slot is accessed
by the system (either Slot 1 or 2) and is used to unmount the currently selected
media. When the Pak card LED is extinguished, it is unmounted and can be
removed.
Caution! Always use the SLOT button to unmount media or it may be damaged
when removed.
Caution! Pushing the slot button cycles between unmounting media and selecting
media. This function is only active when in transport STOP mode. If it is not
highlighted, press the stop button. After you select a slot, the system returns to
the last selected clip and timecode for that slot. If the media has been changed
since the slot was last selected (media physically removed or replaced), the “rst”
clip on the media will be “cued” to its start point. If inserted media has any issues,
additional prompts may be displayed as appropriate such as: “Warning: Backup
and Reformat” or “Warning: Media Unformatted.
Caution! Removing media with the Slot LED highlighted, or while ashing, can
result in corrupted media or potential damage to the media.
Transport Control Buttons
The transport buttons are always active.
STOP - The square symbol STOP button has a dual function. When playing back
a clip (PLAY, FFWD, or REV) the first push of STOP acts as a “pause” mode: the
playback is paused, the current point of the clip is displayed, and the STOP
button flashes. A second push of STOP completely stops the playback and
directs Ki Pro Ultra Plus' outputs into an “E to E” mode (the currently selected
inputs bypass to the outputs). To determine at a glance if the STOP button is
in a “pause” mode, note that the stop button will flash if media playback is
paused. The STOP button is fully illuminated in “stop” mode.
PLAY > - Press PLAY to begin forward playback of the current clip at normal
speed.
RECORD- Press the round red RECORD button to begin recording. Once in
RECORD mode, all other transport buttons are locked-out except the STOP
button.
FFWD >> - Press FFWD to begin fast playback of the current clip at 2x speed.
Successive pushes increase the speed to 4x, 8x, and 16x. (Pushing the button
after 16x speed is reached has no further effect.) When fast-forwarding, audio
is muted.
REV << - Press REV when not highlighted to begin playback of the current clip in
reverse at 1x speed. Successive pushes increase the speed to 2x, 4x, 8x, and
16x. (Pushing the button after 16x speed is reached has no further effect.)
When playing in reverse, audio is muted for all speeds.
Ki Pro Ultra Plus File Based Recorder/Player v4.0 12 www.aja.com

DISP Button
Use the display button to toggle video overlay display modes. Sequential presses
of the button step through these display modes:
1. No overlay – display is video monitor only
2. Top and bottom status overlay
3. Top and bottom status overlay plus VU meters
The display button can be used to hide the Config or Status overlay if it is active.
User Control Knob
The User Control Knob on the right side of the Ki Pro Ultra Plus front panel is used
to scroll through and select menu items. After scrolling to, and high-lighting a
menu item of interest, push the knob to select. To pop out of a selected menu
item, use the rotator knob to highlight EXIT and push the knob to return to the
top level.
When not in a configuration mode and media is mounted with clips available,
you can use the selection knob to scroll through the clips. Press the knob once to
enable JOG mode to step through the clip a frame at a time.
STATUS Button
When it is not highlighted, you can press the STATUS button to display the status
overlay. Status includes video input, format, record format, and audio setup
information. Once selected, the selector knob can be rotated to display either
the Status or ALARM tab. If any ALARMS or WARNINGS are active, they will be
displayed under the ALARMS tab.
When it is highlighted, pressing the STATUS button hides the Status overlay.
A blinking Status button indicates Alarms are present. Press the STATUS button to
immediately display the ALARM tab.
NOTE: When necessary, you can initiate a “safeboot” of the Ki Pro Ultra Plus to factory
presets by holding in the STATUS button while powering up.
CONFIG Button
When it is not highlighted, you can press CONFIG to access the Ki Pro Ultra Plus
configuration menu overlay. If the transport is active—video is playing or
being recorded—you will be prompted to stop the transport before entering
configuration mode. Use the User Control Knob to respond to system prompts
by rotating and pushing to select. Once in configuration mode the User Control
Knob can be rotated to scroll the menu system. Push the User Control Knob to
enter a selected menu, scroll through the selections, push to select a setting. To
leave a menu, scroll to Exit and press the knob.
MEDIA Button
When it is not highlighted, you can press the MEDIA button to enter the Media
menu. Pressing MEDIA when it is highlighted will turn Off the Media menu
(returning to the default Transport menu). The Media menu can only be entered
from the transport STOP mode. The Media menu remembers which parameter
it is set to when exited and will return to that same parameter when the menu is
re-entered.
Head Phone Volume Knob
To adjust headphone listening level, press the knob inward and the knob will
then pop out for easy adjustment.
Ki Pro Ultra Plus File Based Recorder/Player v4.0 13 www.aja.com

Displays and Indicators
Alphanumeric and Graphics LCD Display
This display shows menus, status, alerts and other information. Some words in
the menus may be truncated to fit the display limits. The LCD displays not only
UI information, but also a scaled version of the incoming signal or playback of
recordings. When the monitoring outputs are set to crop a signal to 1920x1080, a
graticule is applied to the scaled image on the LCD to alert the user.
VU Meters
A video overlay is provided on the LCD to display audio VU meters. Meters are
color-coded to report signal strength:
• Green - audio source signal level is in the “safe” area (no clipping). Vertically,
the green LEDs also show the signal strength, so you can see if the signal level
is low. Generally, it’s preferred to have the signal near the top of the green or
even occasionally peaking into the yellow LEDs.
• Yellow - audio source signal levels are at the peak edge of the safe area before
clipping will occur.
• Red - audio source amplitude is too hot and the signal is clipping at its signal
peaks. You should reduce the input gain at its source (camera, mixer or source
equipment supplying the signal).
Slot LED Status Indicator
These LED 1 and 2 states indicate the status of the media slots, S1 and S2:
• LED highlighted/on: selected media
• LED not highlighted/o: inactive media, okay to eject or no media inserted
• LED ashing: recording in progress
On power up, slot S1 is the initial selection.
Head Phone Jack
1/8” (3.5mm) miniature stereo TRS connection for standard stereo headphones.
Rear Panel Connectors
The functions of Ki Pro Ultra Plus' inputs and outputs depend on the operational
mode. Ki Pro Ultra Plus' active input (the one to be recorded) is selected by front
panel or web browser control. Ki Pro Ultra Plus' outputs are active all the time.
Ki Pro Ultra Plus File Based Recorder/Player v4.0 14 www.aja.com
Video
Reference
(looping)
Linear
Time
Code
I/O
Redundant DC
Power Supply
Inputs
SDI Inputs 1-4
SDI Outputs 1-4
HDMI
input
HDMI
Output
Ethernet
LAN
RS-422
Machine
Control
Analog
Audio
Input
(25-pin)
Analog
Audio
Output
(25-pin)
Digital
Audio
I/O
(25-pin)
Analog Audio
Monitor Out
SDI Monitor Out
SDI Fiber I/O
Inputs 1-4
Outputs 1-4
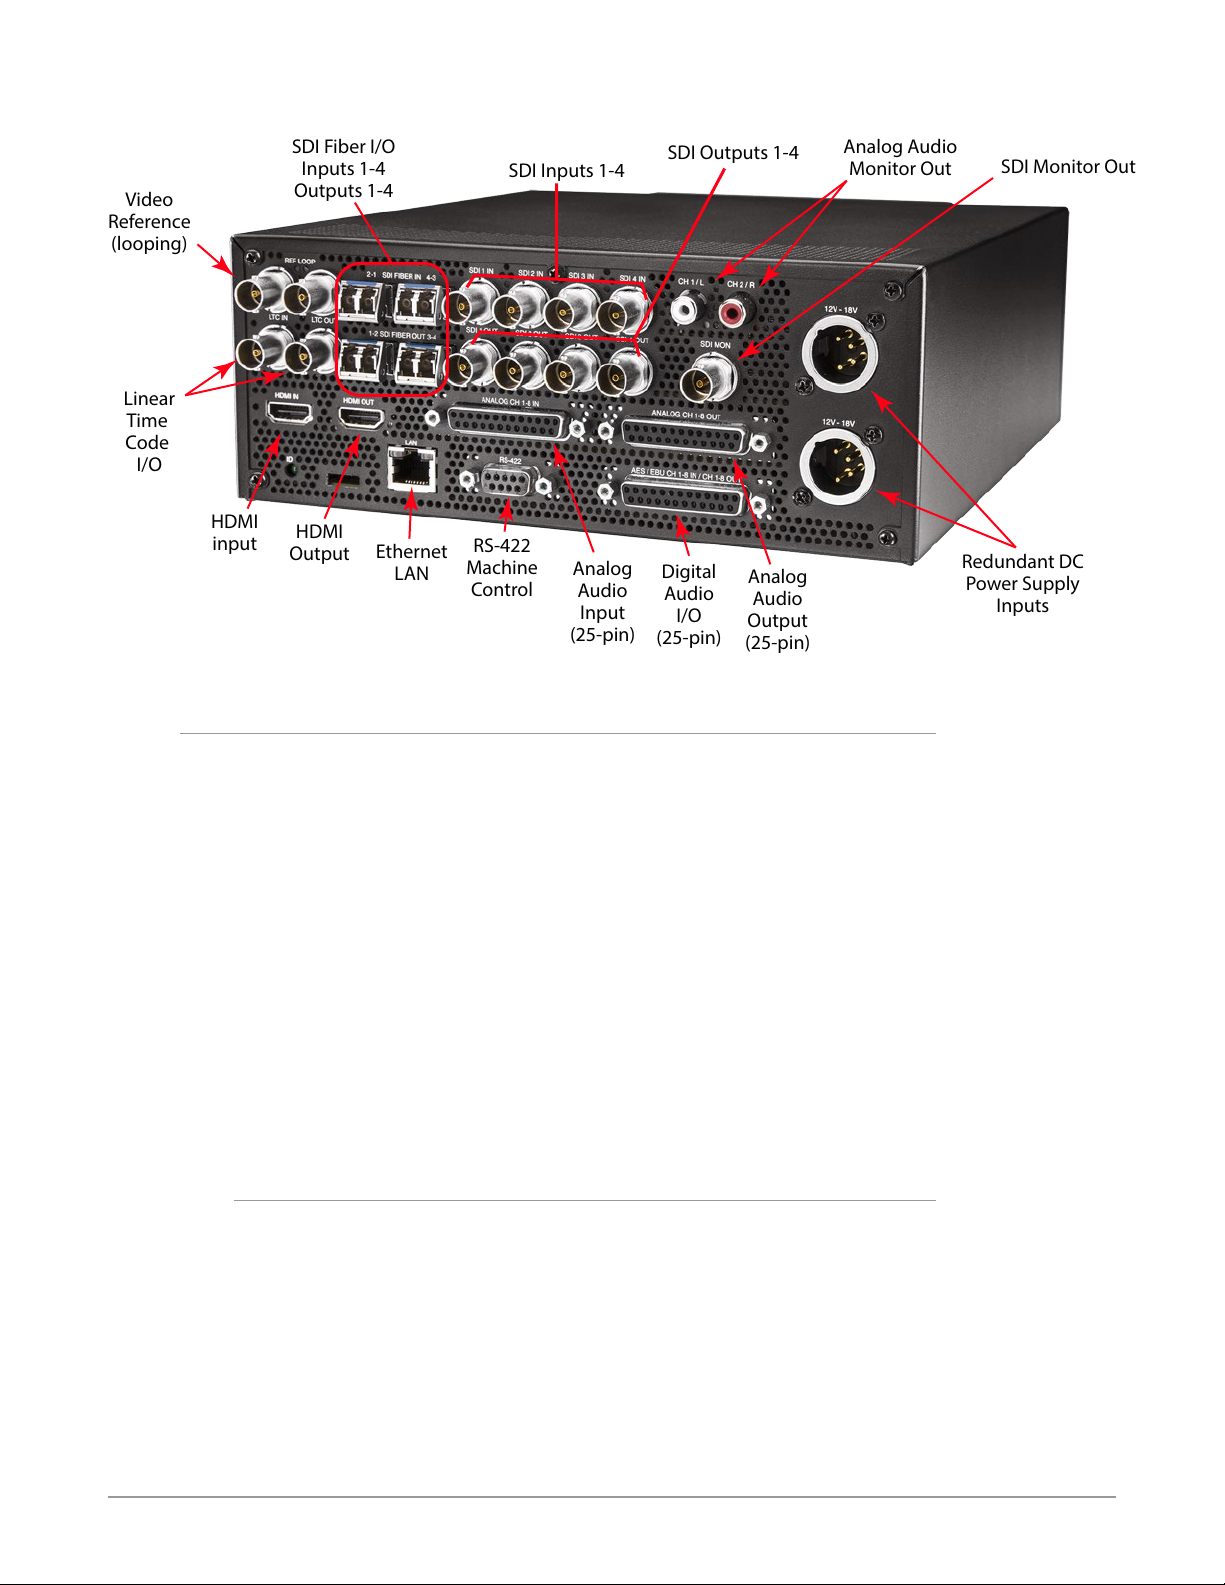
Figure 2. Ki Pro Ultra Plus Connectors
Connections
• Reference video loop for connection to a stable source of genlock video or
sync
• LTC Input and Output (2x BNC)
• HDMI v1.4b & v2.0 compatible input and output up to 4K/UltraHD 50/59.94/60
4:2:2 YCbCr or 4:4:4 RGB with up to 8-channel embedded audio
• 10/100/1000 Ethernet LAN
• Dual-channel Fiber Inputs 1-4/Outputs 1-4
• HD/3G-SDI Inputs and Outputs 1-4, with up to 16-channel embedded audio
(8x BNC)
• HD-SDI Monitor Output (1 BNC) with embedded audio.
• Balanced 8-channel Analog Audio Input via one DB-25 TASCAM pinout
• Balanced 8-channel Analog Audio Output via one DB-25 TASCAM pinout
Ref Loop
Ki Pro Ultra Plus File Based Recorder/Player v4.0 15 www.aja.com
• AES EBU 8-channel Audio Input and Output via one DB-25 TASCAM pinout
• RS-422 DB-9 Machine Control Interface (Sony 9 Pin protocol)
• Dual Mono Analog Audio Output via 2 RCA Connectors
The Reference Loop BNCs accept an output timing reference signal. The reference
can be analog SD blackburst or HD tri-level sync. Examples of permissible
reference video input signals:
• 525 Color Black
• 625 Color Black
• 1080i Tri-level Sync
• 720p Tri-level Sync
The 2 BNCs are a passive loop: one BNC is for the Input, and the remaining BNC
can be connected to another piece of equipment in the reference chain or
terminated.

NOTE: For proper operation the input reference signal must be stable and properly
terminated using a 75-ohm terminator on either the unused loop connector
or the last piece of downstream equipment to which the reference video is
connected.
LTC Timecode I/O
Two BNCs provide connections to the house LTC timecode generator or source.
Connections are high impedance. One BNC is for input and the other for output.
SFP In/Out (optional)
Four duplex SFP cages (two input, two output) accept optional SFP modules. All
Ki Pro Ultra Plus’s SFP I/O ports support up to 3G SDI operation.
SDI Inputs and Outputs
Eight BNC connectors (four inputs and four outputs) are provided supporting
HD/3G-SDI video and embedded 24-bit digital audio. Using two or four BNC links
allows input and output of UltraHD/4K video.
NOTE: Which audio channels are embedded to the SDI Outputs is determined by the
audio embedding settings being used for the Ki Pro Ultra Plus audio input, or the
audio channels of the clip being played back.
SDI Monitor Out
One SDI Monitor Out connector provides for monitoring compatible video and
multi-channel embedded audio.
Analog Audio Monitor Output
Two RCA connectors provide line level analog audio output, carrying the same
signal sent to the front panel headphone output.
HDMI Input and Output
Two HDMI connectors (one input and one output) support HDMI video and
multi-channel embedded audio, and use standard HDMI cables. HDCP is not
supported on the input or output.
NOTE: Which audio channels are embedded to the HDMI Output is determined by the
audio embedding settings being used for the Ki Pro Ultra Plus audio input, or the
audio channels of the clip being played back.
HDMI formats supported
• 720p 50, 59.94, 60
• 1080i 25, 29.97, 30
• 1080p 23.98, 24, 25, 29.97, 30, 50, 59.94, 60
• 2Kx1080p 23.98, 24, 25, 29.97, 30, 50, 59.94, 60
• Ultra HD (3840x2160p) 23.98, 24, 25, 29.97, 30, 50*, 59.94*, 60*
• 4K (4096x2160p) 23.98, 24, 25, 29.97, 30, 50*, 59.94*, 60*
NOTE: When using the Ki Pro Ultra Plus HDMI connection and attaching it to any HDMI
audio or video accessory, you must use a ferrite-beaded HDMI cable, HH-28F-06,
between the HDMI output port of the Ki Pro Ultra Plus and the HDMI accessory to
maintain regulatory compliance.
Ki Pro Ultra Plus File Based Recorder/Player v4.0 16 www.aja.com
Ethernet
An RJ-45 connector provides a 10/100/1000 Ethernet port for connecting
Ki Pro Ultra Plus directly to a computer or Ethernet hub or switch for connecting
to a LAN. Ki Pro Ultra Plus is compatible with CAT-5 straight-through or cross-over
Ethernet cables, automatically detecting which is used. Once connected and
properly configured, Ki Pro Ultra Plus can then be controlled by a web browser on
the LAN.
8-Channel Balanced Analog Audio I/O
Two DB-25 TASCAM pinout, one input and one output, provide 8-channel
balanced audio. Audio is high-quality 24-bit A/D input and D/A output at 48kHz.
Level adjustments are made via software. Software level adjustments for analog
audio (parameter 4.1) apply to balanced audio.
AES Digital Audio I/O
AES digital audio connections consist of one DB-25 TASCAM pinout for 8 channels
of input and 8 channels of output.
RS-422 Connector
Ki Pro Ultra Plus offers a 9-pin serial port that may be used with compatible
RS-422 devices.
IM PORTA NT: Not all RS-422 devices have been tested with Ki Pro Ultra Plus, so AJA cannot
definitively say which devices may or may not communicate as expected with
Ki Pro Ultra Plus when operated under RS-422 remote control. To see which
devices or nonlinear editors have been tested operating under RS-422 control,
refer to the latest Ki Pro Ultra Plus Release Notes document.
For details on using RS-422 machine control setup, see "35.2 Remote Control" on
page 57.
Power Connector
On the back of Ki Pro Ultra Plus are two standard 4-pin male XLR connectors
for supplying 12-Volt DC power to the unit. You can use either the supplied AC
Adapter or furnish your own battery source. Since the connector is an industry
standard pinout, choices are varied and flexible. Many 3rd party vendors offer
products using this standardized power connector.
• Pin 1: -
• Pin 4: +
• Pins 2 and 3: not used
Caution! Ki Pro Ultra Plus has no user-serviceable parts. To remove power from
the unit, remove the 4-pin XLR power connector to ensure disconnection. Refer
all servicing to qualified service personnel. Servicing is required when the device
has been damaged in any way, such as power-supply cord or plug is damaged,
liquid has been spilled or objects have fallen into the device, the device has been
exposed to rain or moisture, does not operate normally, or has been dropped
Ki Pro Ultra Plus File Based Recorder/Player v4.0 17 www.aja.com

Storage
Formatting Media
Ki Pro Ultra Plus Plus can record to Pak Media, a form of removable SSD media.
The media is formatted either as HFS+ (native to the Mac OS file system,) or ExFAT
(suitable for PCs. Using the Pak Dock, Pak Media with the correct formatting can
be directly mounted on a Mac or PC for immediate editing and file access.
Caution! Failure to properly mount or dismount media, or an unexpected loss of
power while recording, can result in an unrecoverable data loss.
Pak Media is provided pre-formatted. However, you may want to format media
that has already been used, or name media and format it during your shoot. To
format Pak Media, the media must be inserted into a Media Slot. Once the media
is mounted:
1. Press the MEDIA button.
2. Rotate the User Interface Control Knob until you see the menu parameter
16.0 File System Formatting:
3. Push in the User Interface Control Knob.
4. Rotate the User Interface Control Knob to choose the type of le system
formatting (HFS+ or ExFAT).
5. Push in the User Interface Control Knob.
6. Rotate the User Interface Control Knob until you see the menu parameter
16.2 Format Media:
7. Push in the User Interface Control Knob.
8. Rotate the User Interface Control Knob until “OK” appears. Push in on the
User Interface Control Knob.
9. Press and hold in the User Interface Control Knob and formatting will begin.
You may select any other key to abort the format operation should you
inadvertently enter this menu parameter. The confirmation process used for
formatting media helps you avoid accidentally formatting media.
WARN ING: Once you have formatted media, you will not be able to recover
recordings that were previously made on the media. Always be sure that any
media you format has been properly backed up prior to formatting
Ki Pro Ultra Plus will display formatting progress and will display a completion
confirmation when done. Press any key to clear the completion prompt.
Using Pak Media with Final Cut Pro and Premier Pro
When Ki Pro Ultra Plus media is removed and connected to a computer via the
AJA Pak Dock, the media will mount as a normal HFS+ or ExFAT file system. The
Reel NAME parameter is the name of the media that will appear when the media
is mounted.
Once the media is mounted, each clip recorded by Ki Pro Ultra Plus will be a file
on its file system, which (depending on the file type) can be opened directly in
non-linear editors such as Final Cut Pro, Adobe Premiere Pro, etc. Compatible clips
will be instantly ready to edit because they were recorded as ProRes or DNxHD
QuickTime files, or as native DNxHD files.
Ki Pro Ultra Plus File Based Recorder/Player v4.0 18 www.aja.com

Using Ki Pro Ultra Plus Media with Avid Media Composer
Ki Pro Ultra Plus can create native DNxHD files, and can also create DNxHD
QuickTime wrapper files. Native DNxHD files on Pak Media can be accessed,
opened and edited directly in Avid Media Composer without transcoding.
To use the Avid DNxHD QuickTime files produced by Ki Pro Ultra Plus in Avid
Media Composer, AJA recommends using the "Link to AMA File(s)" feature
provided in Avid Media Composer.
NOTE: While Ki Pro Ultra Plus QuickTime files can be directly accessed from Avid Media
Composer via AMA for editorial, AJA advises transferring/copying media to a
local drive or disk array for editing.
NOTE: Avid DNxHD QuickTime files produced on the Ki Pro Ultra Plus are designed
for use with Avid Media Composer. While these QuickTime files can be read
in a variety of other non-linear edit systems (when the appropriate Avid
QuickTime codec package has been installed), AJA cannot verify the behavior or
performance of DNxHD QuickTime files in these other non-linear edit systems.
Closed Captioning Support
In Single Channel mode, Ki Pro Ultra Plus supports the capture and playback of
CEA-708 Closed Captioning data as QuickTime movie tracks. Ki Pro Ultra Plus
extracts CEA-708 (including 608 within 708) packets contained in the vertical
ANC data which is embedded in the SDI input (BNC or Fiber) signal. The packets
are processed and inserted into a QuickTime track (CLCP) as part of the recorded
QuickTime container. This track is created automatically if the CEA-708 packets are
present in the VANC of the input SDI signal. No user configuration is required.
On playback, Ki Pro Ultra Plus will process the QuickTime container file, process
the CLCP track if present and insert/embed closed captioning data on the SDI 1
output (BNC or Fiber) VANC.
When in EtoE or record mode, the Ki Pro Ultra Plus Status display indicates when
closed captioning data is present on the input signal. In playback mode, the
Status display indicates if CC data is being inserted.
Closed captioning is not supported on the Ki Pro Ultra Plus HDMI inputs/outputs,
or the SDI monitor output, or when operating in Multi Channel mode.
Ki Pro Ultra Plus File Based Recorder/Player v4.0 19 www.aja.com
Chapter 3 – Ki Pro Ultra Plus Installation
Overview
This section describes set up and installation of Ki Pro Ultra Plus. Choices you will
make include how Ki Pro Ultra Plus will be controlled (front panel or Ethernet and
web-browser) and the physical system requirements for your application.
Caution! Do not install near any heat sources such as radiators, heat registers,
stoves, or other apparatus (including amplifiers) that produce heat
Caution! Do not block any ventilation openings. Install in accordance with the
manufacturer’s instructions.
What’s In The Box?
When you unpack your Ki Pro Ultra Plus, you’ll find the following components:
• Ki Pro Ultra Plus Recorder
• AC Adapter 110/220 with industry standard 4-pin XLR connector for powering
the Ki Pro Ultra Plus. A standard North American line cord with 3-prong plug is
included.
• Handle Installation Kit
Please save all packaging for shipping the Ki Pro Ultra Plus should you need to do
so.
Applying Power
The following Warnings are provided as good practices and should always be
considered when Ki Pro Ultra Plus is used in a desktop application.
Caution! Do not defeat the safety purpose of the polarized or grounding-type plug.
A polarized plug has two blades with one wider than the other. A grounding type
plug has two blades and a third grounding prong. The wide blade or the third
prong are provided for your safety. If the provided plug does not fit into your
outlet, consult an electrician for replacement of the obsolete outlet.
Caution! Since the Mains plug is used as the disconnection for the device, it must
remain readily accessible and operable.
Caution! Protect the power cord from being walked on or pinched particularly at
plugs, convenience receptacles, and the point where they exit from the device..
Caution! Unplug this device during lightning storms or when unused for long
periods of time.
Ki Pro Ultra Plus File Based Recorder/Player v4.0 20 www.aja.com
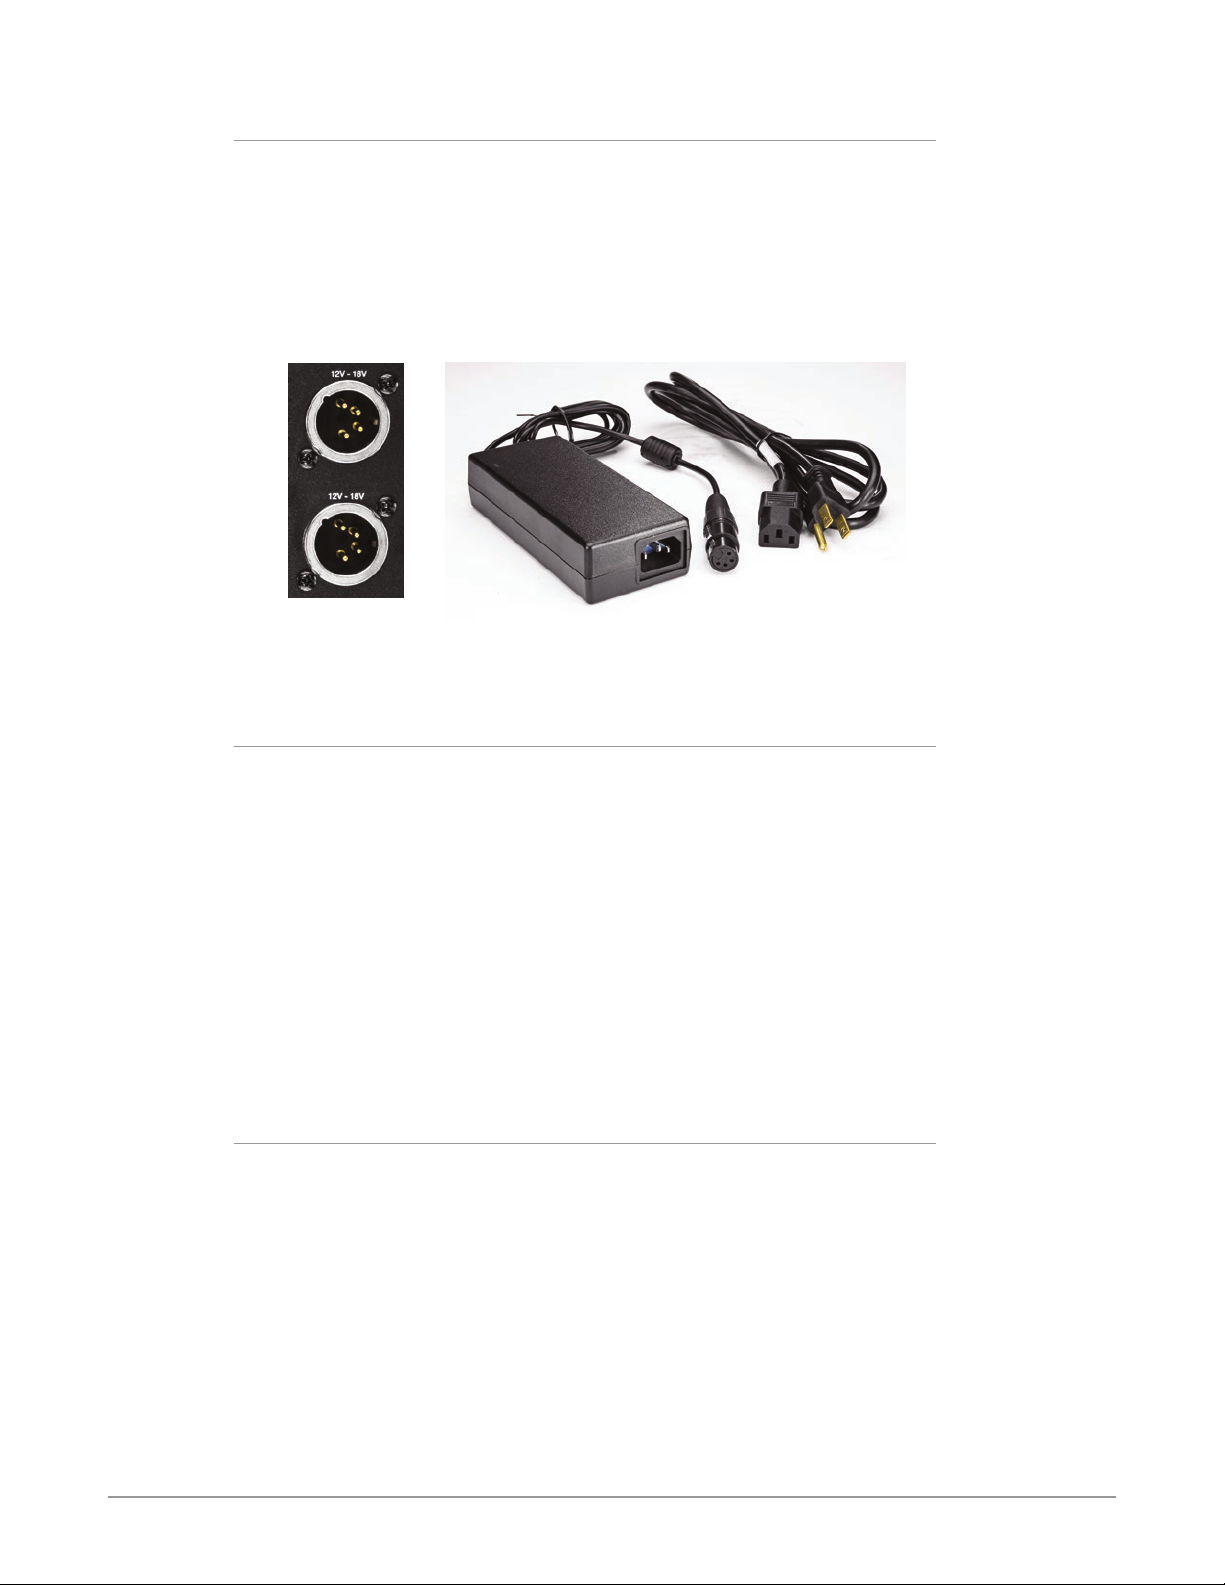
Using AC Power
To begin using Ki Pro Ultra Plus, plug the 4-pin XLR on the supplied AC adapter
into the XLR power socket on the rear of Ki Pro Ultra Plus. Then plug the AC
adapter line cord into 110 VAC or 230 VAC (the supply is auto sensing). Two power
supplies can be used for redundancy.
NOTE: When connected to power, Ki Pro Ultra Plus will immediately begin the power-up
procedure. This automatic start-up allows the unit to return to operation as soon
as an unexpected power interruption is corrected.
Figure 3. Ki Pro Ultra Plus Power Supply Connections
4-pin XLR
Power Sockets
DC Supply
Line
Cord
Using DC Power
To run Ki Pro Ultra Plus on DC power, plug a 3rd-party industry standard 12 Volt
battery pack with a 4-pin female XLR connector into the power connector on rear
of the Ki Pro Ultra Plus. The battery should be capable of supplying a sustained
3.3 A (as is supplied by the AC Adapter provided). Battery packs are available from
a variety of sources.
NOTE: To operate Ki Pro Ultra Plus properly, batteries should not have voltage lower
than 12 volts and should not have voltage that exceeds 18 volts.
Ki Pro Ultra Plus is a low-wattage device so many batteries can power it for several
hours at a time. Ki Pro Ultra Plus displays a “Low Battery” warning prompt to
help you stop recording before battery failure. We also recommend the use of
batteries with metering or remaining power indications. When possible, for very
long recordings, use the supplied AC power supply instead of battery power. Two
power supplies can be used for redundancy
Ki Protect Recording Integrity
The Ki Protect feature helps to ensure data integrity if a media drive is accidentally
removed or loses power during recording. If a recording is interrupted, the only
data loss should be the last few frames that were in transit to the media drive
to be recorded. Frames that are already recorded will be preserved and are
recoverable.
Ki Pro Ultra Plus File Based Recorder/Player v4.0 21 www.aja.com
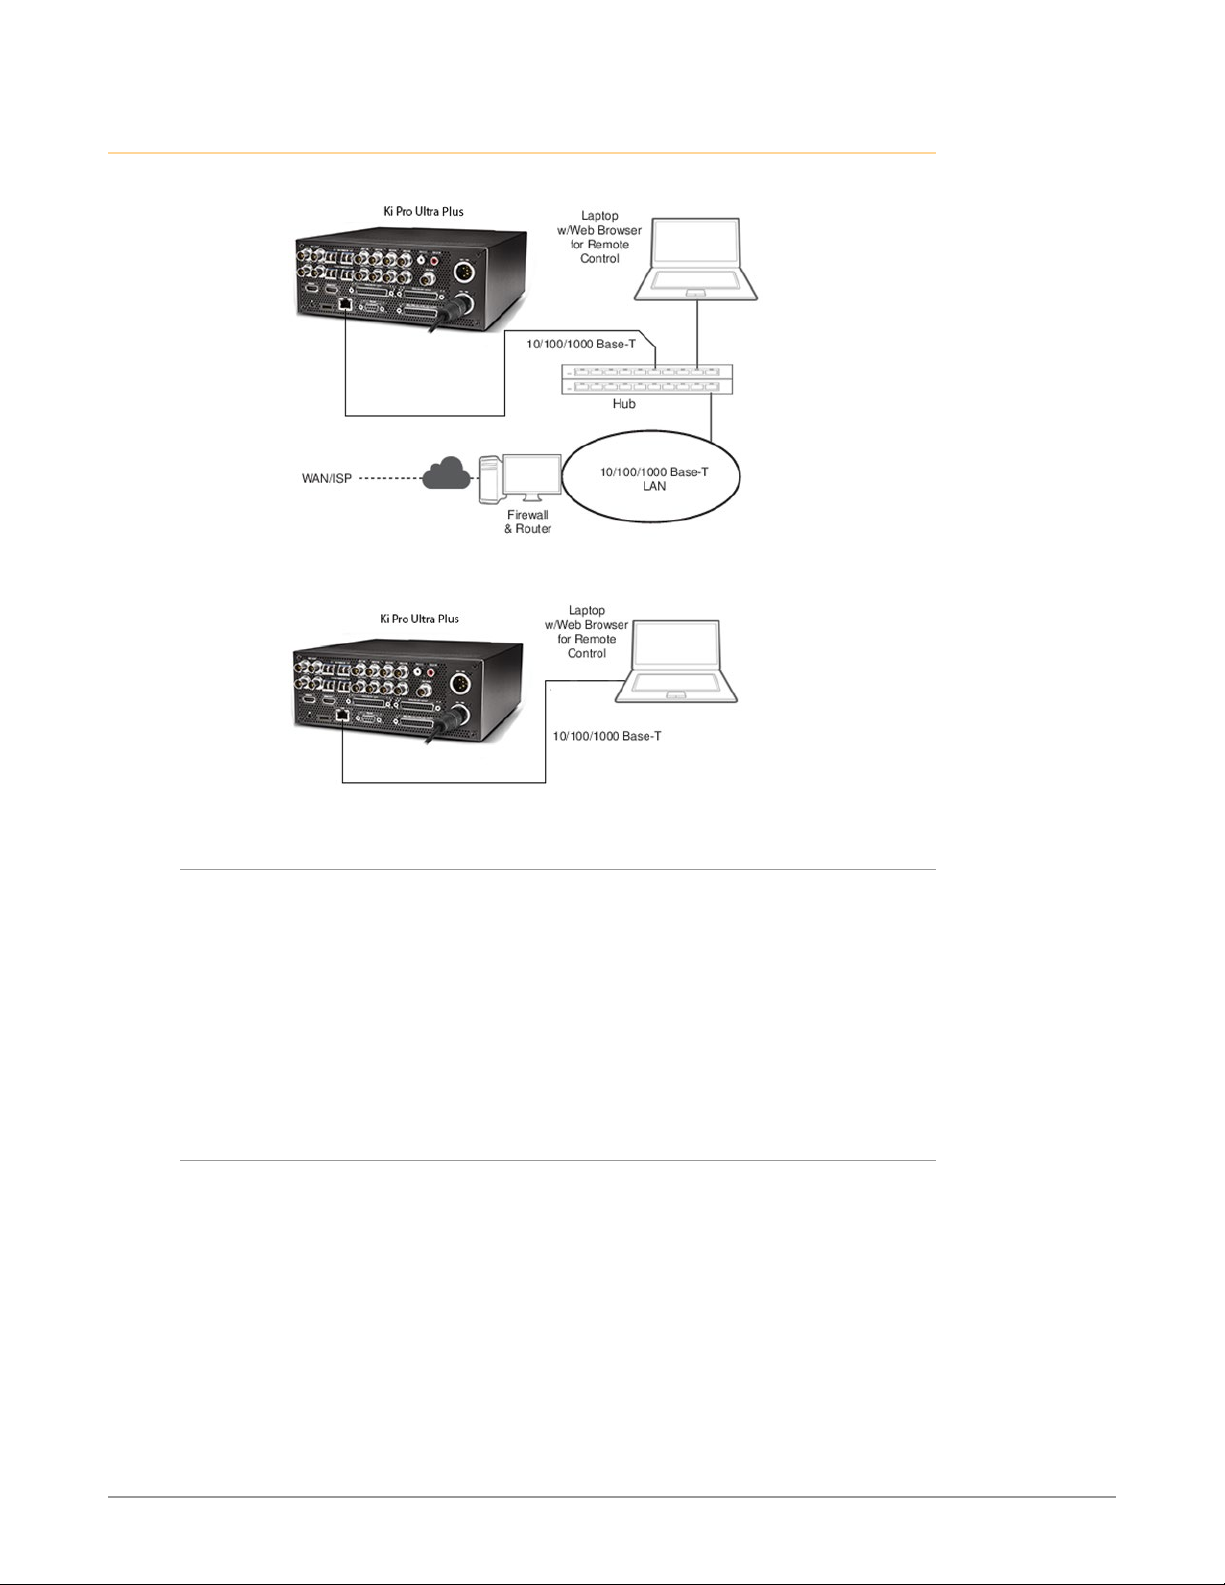
Remote Network Control
Figure 4. Ki Pro Ultra Plus LAN Connection Example
Figure 5. Ki Pro Ultra Plus Direct Ethernet Connection Example
Network Connections
Ki Pro Ultra Plus can be networked to a computer using a single CAT-5 Ethernet
cable (straight or cross-over) or using an Ethernet 10/100/1000 local area network
(LAN) connection to the Ethernet RJ-45 connector.
If connecting via a LAN, connect the Ki Pro Ultra Plus' Ethernet connector to a LAN
hub or switch. A LAN is a shared network that includes other Ethernet devices all
attached via a hub or digital switch. LANs may be divided into zones, and devices
on a LAN may have fixed or dynamically assigned (DHCP) IP addresses. Before
connecting Ki Pro Ultra Plus to the LAN, talk to your network administrator to find
out how they want it connected (static IP or DHCP).
TCP/IP Information You’ll Need
If your LAN has a DHCP server that assigns IP addresses dynamically, you
don’t have to configure anything (Ki Pro Ultra Plus defaults to DHCP). If your IT
administrator prefers an assigned IP address that is fixed (called a “static IP”),
get the IP address and you will enter it in the “IP Config parameter.” If your LAN
requires static IP addresses, also ask your IT administrator for the Subnet Mask
and default gateway IP address (your LAN’s internet router). DHCP or via a static IP
addressing are discussed in the following two topics.
Ki Pro Ultra Plus File Based Recorder/Player v4.0 22 www.aja.com
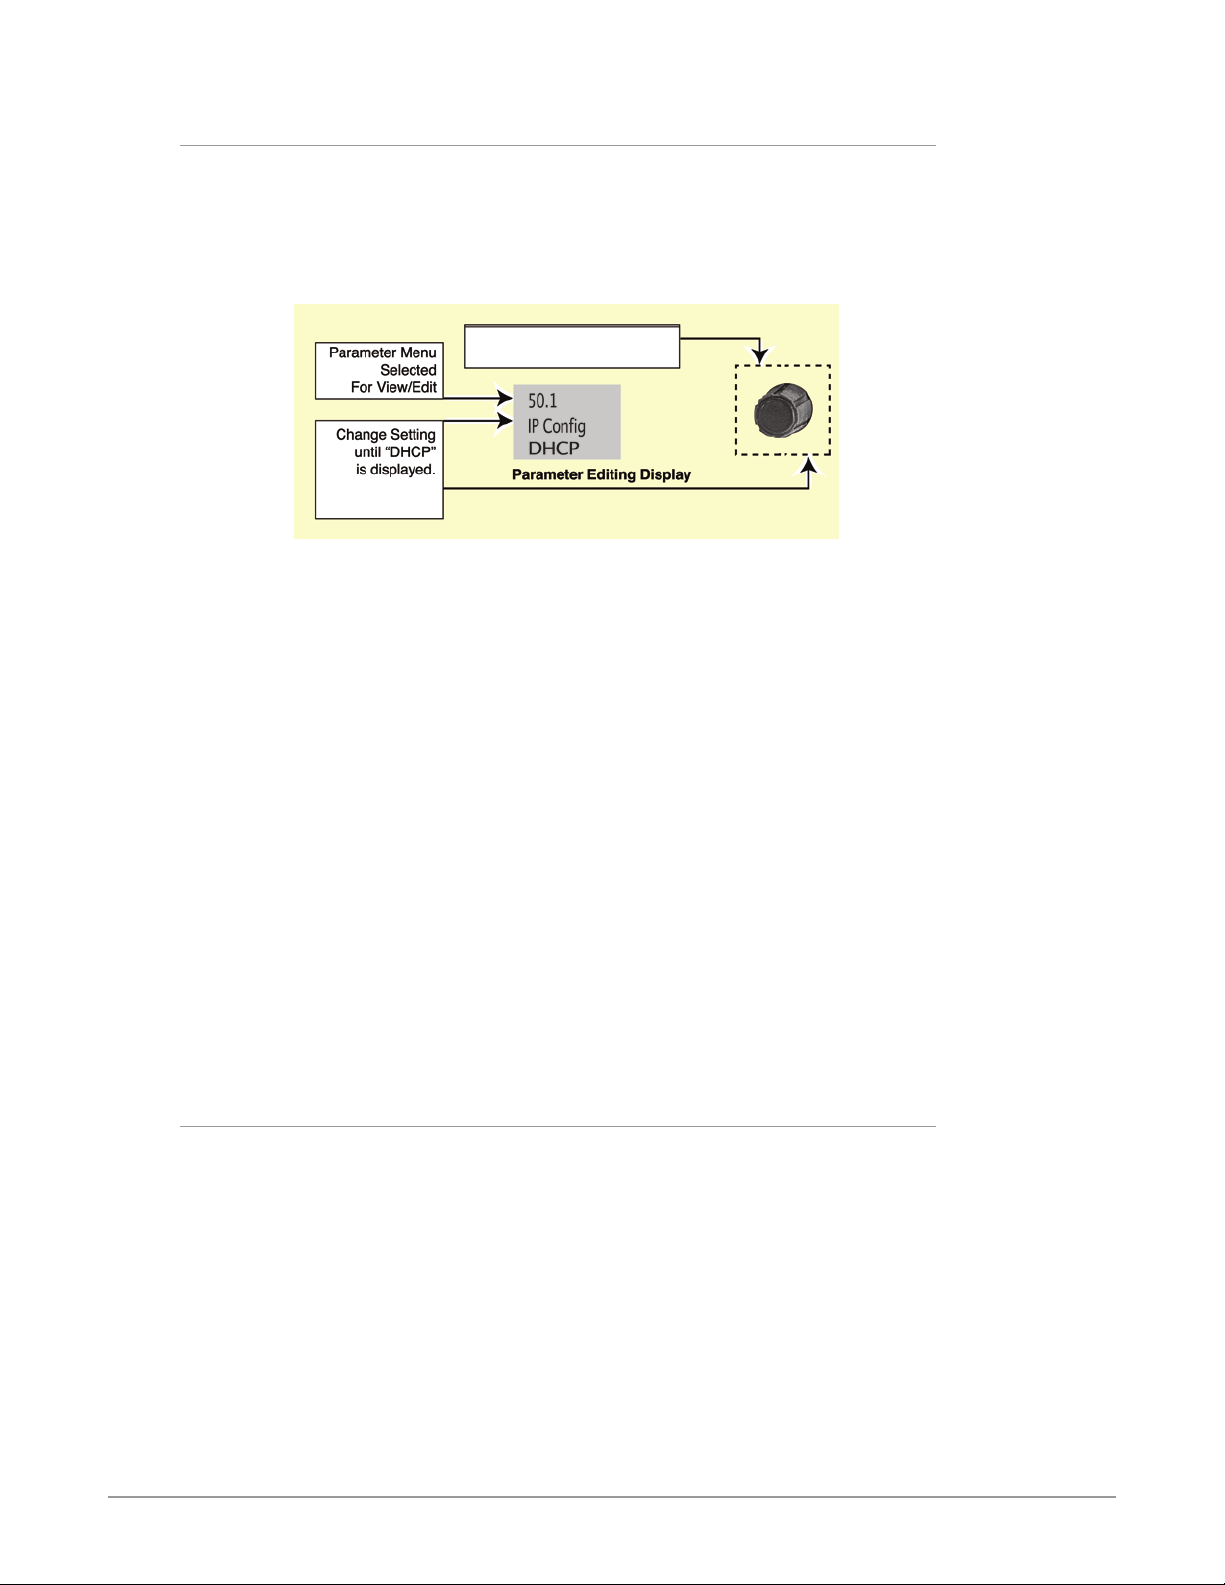
Networking via DHCP
The default configuration (from the factory) automatically looks for a DHCP server
to issue an IP address. As long as your network has a DHCP server (usually part of
your router), you need to do nothing other than plug the Ki Pro Ultra Plus into the
net. If you need to manually select DHCP, use the User Control Knob to navigate
to the parameter50.1 IP Config, press the knob to activate the menu list, scroll to
DHCP and press the knob again to select it.
Here are the steps to communicate with Ki Pro Ultra Plus after choosing the DHCP
selection:
1. Use the User Control Knob to navigate to parameter 50.2. Make note of the
DHCP supplied IP address shown to enter in your browser (Step 2).
2. With your laptop or desktop computer DHCP enabled and connected to the
same LAN, type the IP address from step 1 into the browser address bar. You
should now see Ki Pro Ultra Plus' browser status screen.
If Ki Pro Ultra Plus cannot get an address from the DHCP server, it will
automatically drop back to a preset factory IP address of 192.168.0.2. If this
happens, you can follow the steps below:
1. Set the computer’s Ethernet IP address to 192.168.0.n (where n is not 2).
2. Set the computer’s Subnet mask to 255.255.255.0 (most computers default
to the proper netmask when the address is set).
3. Run a browser on the computer and type 192.168.0.2 (the factory fallback IP
address). You should now see Ki Pro Ultra Plus' browser status screen.
NOTE: If Ki Pro Ultra Plus fails to find a DHCP server via its network connection, it will fall
back to using the factory default static IP of 192.168.0.2—or whatever IP address
you’ve previously defined. AJA recommends you define a Static IP address with
parameter 50.2 so you’ll be prepared in the event your DHCP server fails.
Use the User Control Knob to
navigate to Cong item 50.1
Networking Ki Pro Ultra Plus using a Static IP Address
To set a static IP address for Ki Pro Ultra Plus, you’ll have to make some simple
Parameter menu selections. The illustration below shows the four menu
selections you need to make, while entering the information provided to you by
your IT administrator (as discussed earlier).
Ki Pro Ultra Plus File Based Recorder/Player v4.0 23 www.aja.com
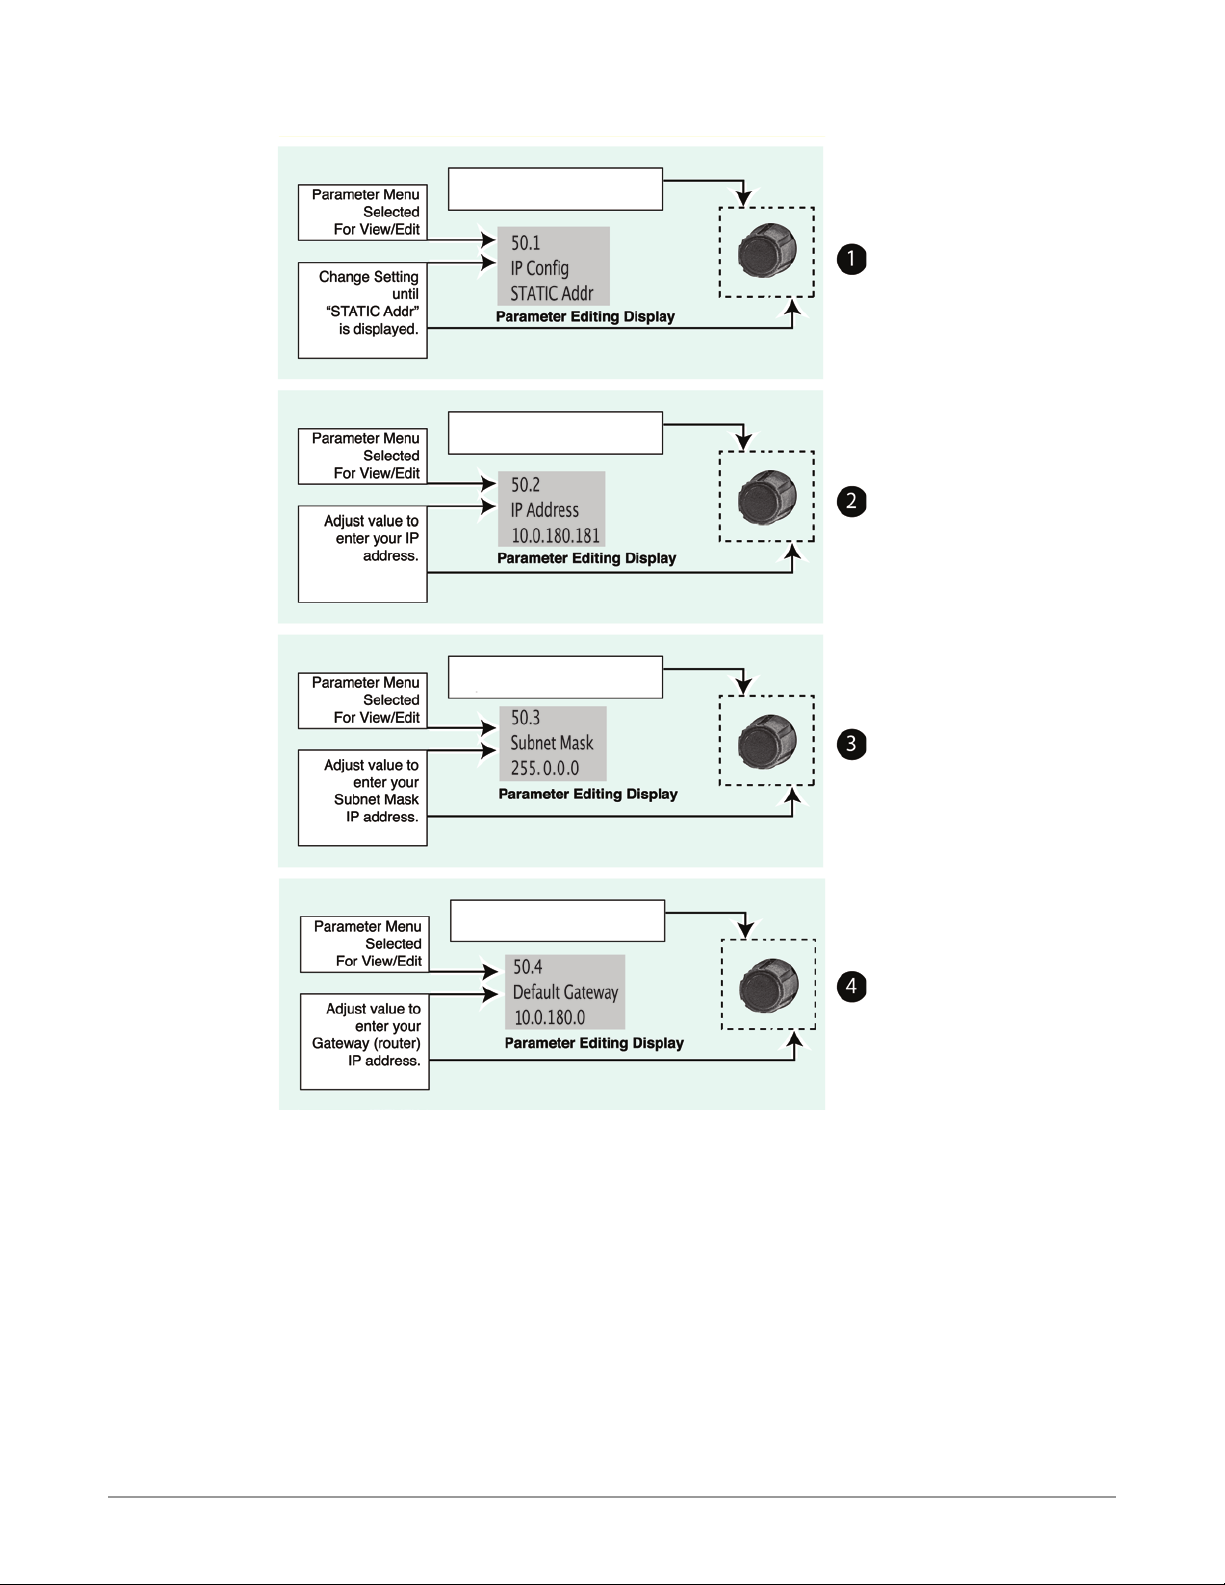
Use the User Control Knob to
navigate to Cong item 50.1
Figure 6. Configuring Ki Pro Ultra Plus with a Static IP Address
Use the User Control Knob to
navigate to Cong item 50.1
Use the User Control Knob to
navigate to Cong item 50.2
Use the User Control Knob to
navigate to Cong item 50.3
Use the User Control Knob to
navigate to Cong item 50.4
NOTE: For parameters 50.2, 50.3, and 50.4, you will be setting IP addresses using the User
Control Knob and the Alphanumeric Keypad. Then you will click on SAVE to keep
your entries.
Ki Pro Ultra Plus File Based Recorder/Player v4.0 24 www.aja.com
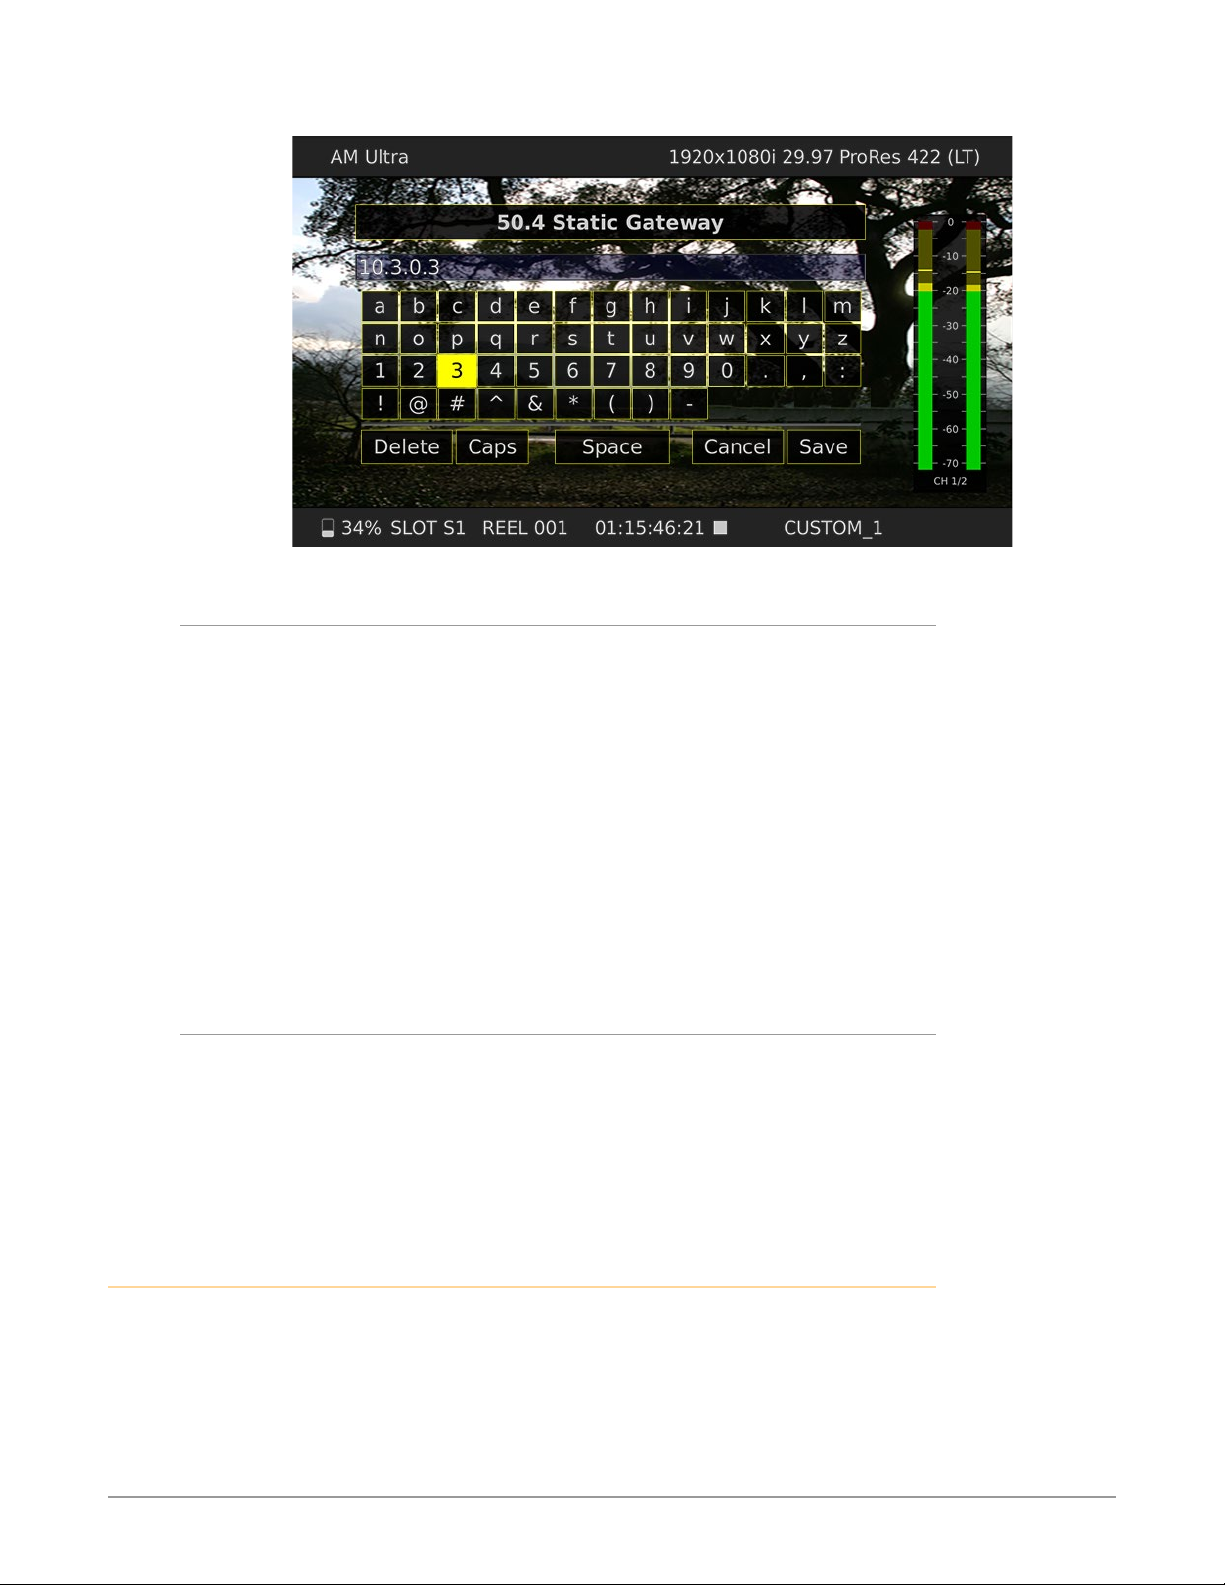
Figure 7. Ki Pro Ultra Plus User Interface Alphanumeric Keypad
Networking Ki Pro Ultra Plus Using the Factory Default IP
If you don’t want to use DHCP to network Ki Pro Ultra Plus and also don’t want
to set your own static IP address, you can simply use a Default setting to use a
factory setting of 10.65.74.65. This is useful for quickly connecting directly to a
laptop or computer. Here are the steps to set this up:
1. Use the User Control Knob to navigate to parameter “50.1 IP Cong”, push
the knob to enter the menu, then scroll to select “Default”.
2. Set your laptop or desktop computer Ethernet IP address to 10.m.n.m
(where m is not 65 and n is not 74).
3. Also on the computer, set the Subnet mask to 255.0.0.0 (most PCs default
to the proper netmask when the address is set—so you may not have to
change it).
4. Run a browser on the computer and type 10.65.74.65 (the Default factory IP
address). You should now see Ki Pro Ultra Plus' browser status screen.
Controlling Ki Pro Ultra Plus From a Web Browser
To control Ki Pro Ultra Plus from a web browser on a network attached computer,
you must enter Ki Pro Ultra Plus' IP address as a URL in the browser. For example,
if Ki Pro Ultra Plus' IP address were 10.0.6.31, you would then type into the web
browser: http://10.0.6.31
This topic is explained in greater detail in "Chapter 5 Browser Remote Control" on
page 65
Installing Optional SFP I/O Modules
The optional AJA SFP I/O modules are purchased separately from the
Ki Pro Ultra Plus. Install the optional SFP I/O modules by inserting them
into the rectangular cages on the back panel with the electrical connectors
facing downward. Press gently but firmly until the modules seat in the inside
connectors.
Ki Pro Ultra Plus File Based Recorder/Player v4.0 25 www.aja.com

You must remove any connected fiber or coaxial cables from the SFP modules
before you remove the modules from the Ki Pro Ultra Plus. Pull down the SFP
lever to free the module before you withdraw the module from the cage.
For additional installation and operation details, see the instructions provided
with the SFP modules.
Ki Pro Ultra Plus File Based Recorder/Player v4.0 26 www.aja.com

Chapter 4 – Front Panel Operation
Overview
There are two ways to control Ki Pro Ultra Plus—from the front panel or remotely
from a web browser connected via the Ethernet RJ-45 connector. This chapter
discusses controlling Ki Pro Ultra Plus from its front panel. See "Chapter 5 Browser
Remote Control" on page 65 for information about web browser operation.
Control Panel Operation
There are two basic front panel modes:
• Transport (default mode) - PLAY, STOP, FFWD, REV, REC. These functions are
active at all times. By default the unit starts in a “record standby” or “transport
idle” state.
• Display - when you press the display button, an overlay is placed on the LCD
screen. When you push one of the remaining menu buttons (Status, Cong, or
Media) Ki Pro Ultra Plus will display:
• Status/Alarm reports
• Conguration menus
• Media formatting operations
Display Button Sequence
Press the Display button twice to bring up audio VU meters. Pressing a third time
brings up the last menu selected. Press again to turn the overlay off.
User Control Knob Functions
Transport Mode Operations
Transport mode is the default mode—it controls basic functions of PLAY, STOP,
FFWD, REV, etc. In the Transport mode, you can turn the User Control Knob to
cycle through the clips in the currently selected storage slot and push the knob in
once to enter JOG mode which allows single-stepping through frames of the clip
forward or backward.
Ki Pro Ultra Plus File Based Recorder/Player v4.0 27 www.aja.com

Display Mode Operations
Control
In Status, Config, and Media modes, you use the User Control Knob to scroll
through menu items (rotating) and make selections (pressing the knob).
Figure 8. Ki Pro Ultra Plus User Control Knob
Overlay Display Content
User
Knob
Initial Overlay
The figure below shows the initial overlay display with video content behind.
Figure 9. Initial Display Overlay with Clip Displayed
Top Line
Displays the current clip format information.
Bottom Line
Displays:
• Percentage of media capacity available
• Current media Slot number
• Current reel number
• Timecode for the clip being recorded or played
• Current clip name
Ki Pro Ultra Plus File Based Recorder/Player v4.0 28 www.aja.com
The three Display modes accessed via the STATUS, CONFIG, and MEDIA buttons
are described below.
Status Display
In the Status menu, the User Control Knob will toggle between the two tabs:
Status and Alarms. These are Read-Only displays.
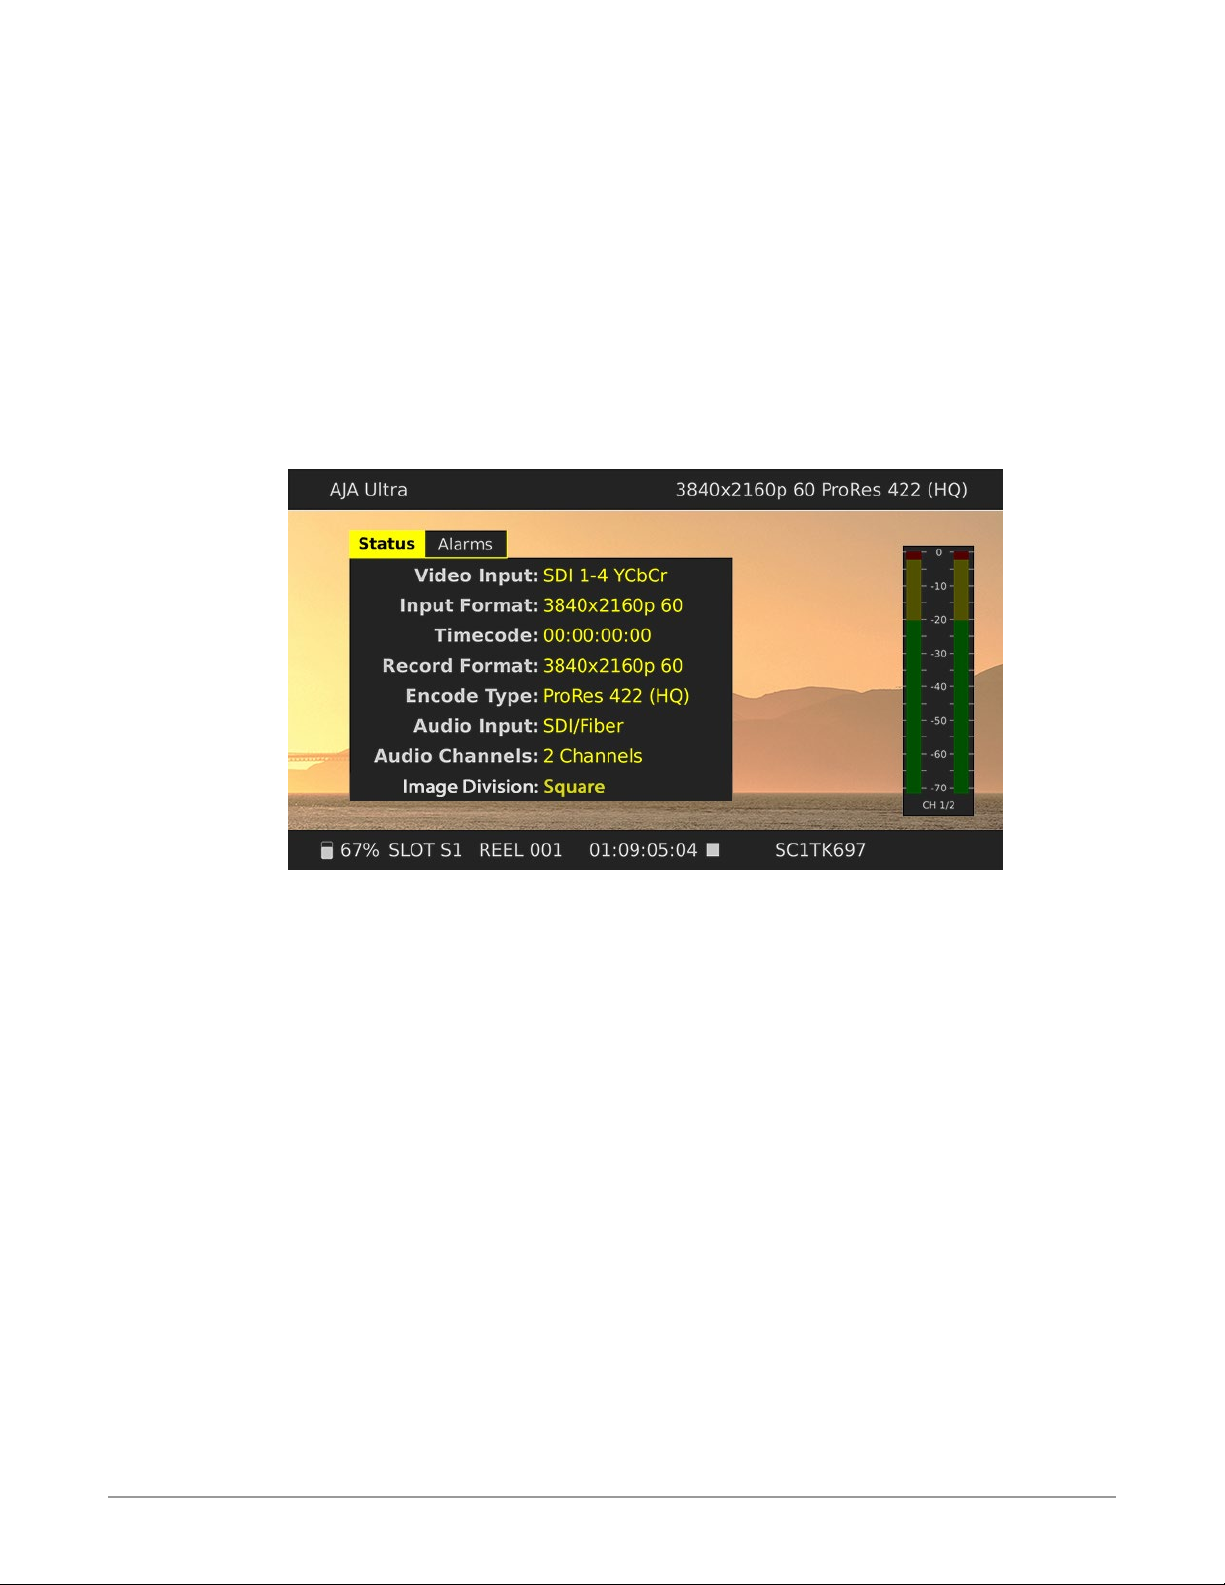
The Status page shows the status of recording or playing including:
• Input type and format
• Timecode settings for recording (set in Cong parameter 8.0)
• Recording Format and Encoding type
• Audio Input and number of Channels
The following figure shows the display for the Status menu. Note that the Display
button has been pressed twice to include the VU meters.
Figure 10. Status Overlay Display
Config and Media Displays
In the Config and Media menus, the User Control Knob scrolls through various
adjustable parameters, and pressing the knob activates menu field for scrolling
through the choices (yellow outline indicates the field is active). When entering
a menu, the system remembers and returns to the last selected parameter. The
following figure shows the displays for the Config and Media menus.
Ki Pro Ultra Plus File Based Recorder/Player v4.0 29 www.aja.com
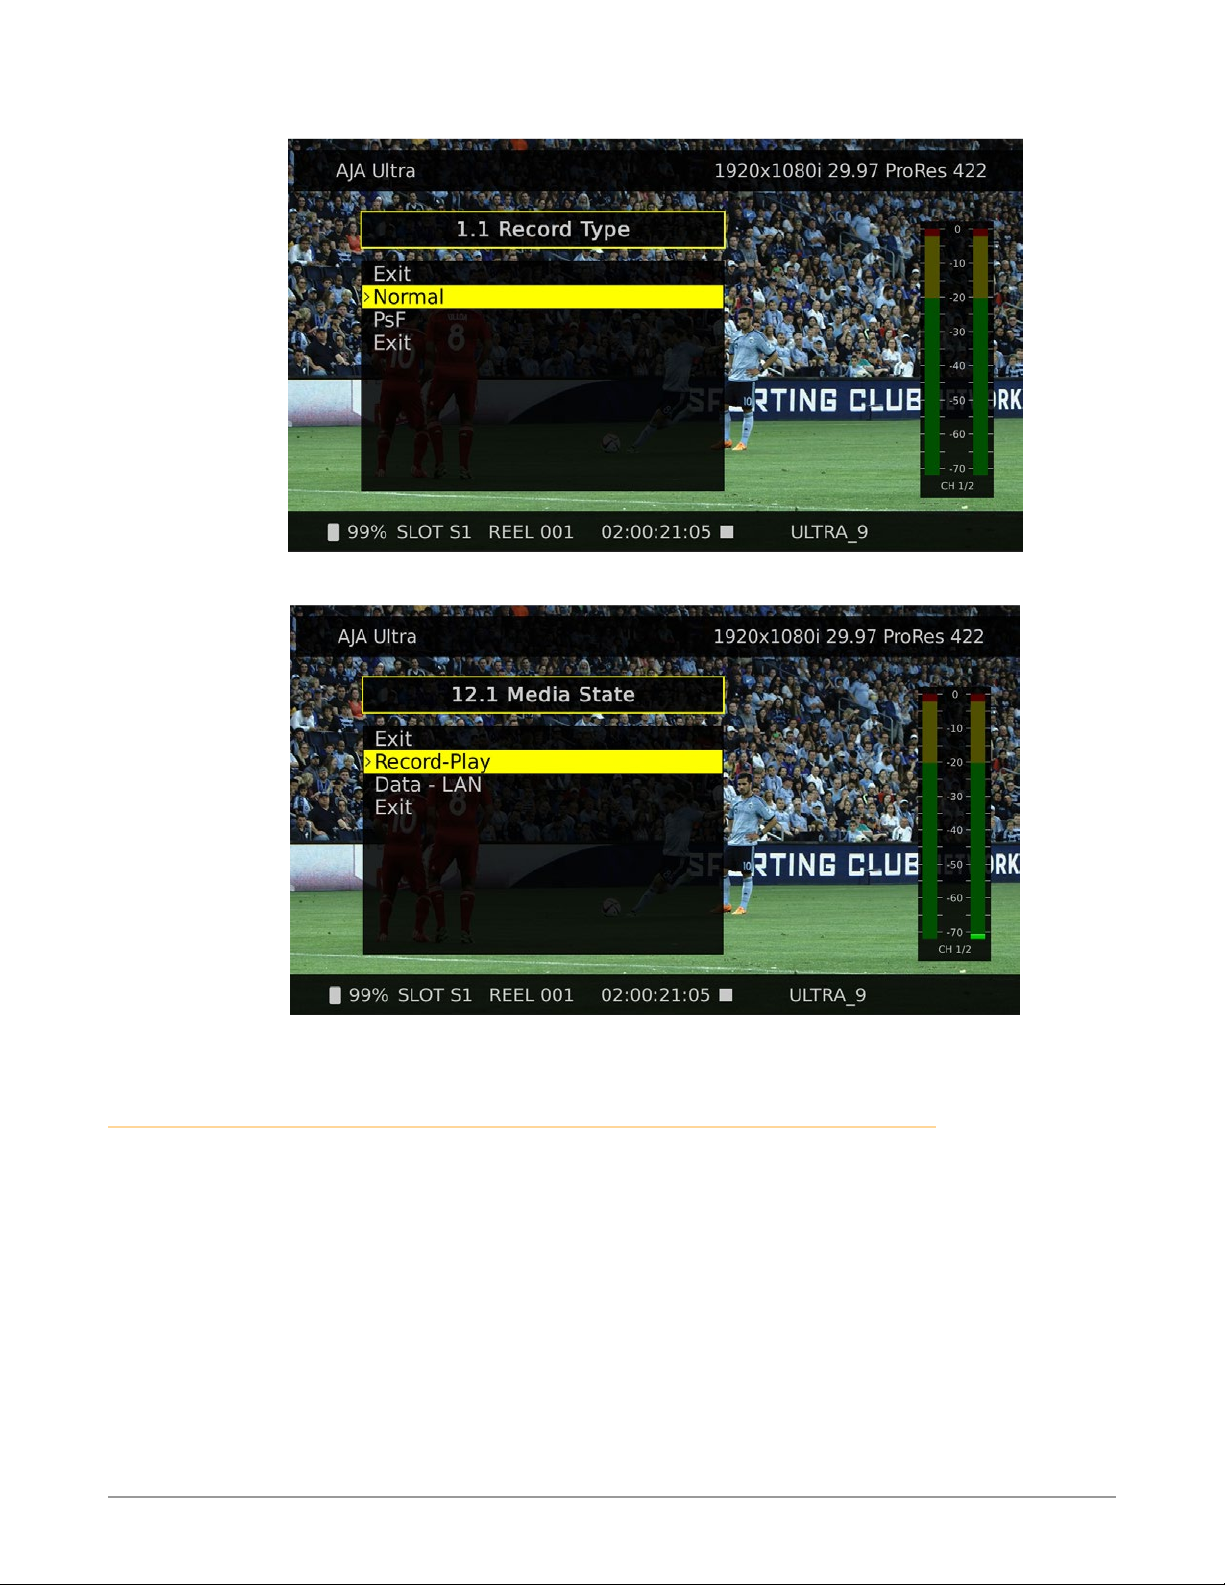
Figure 11. Config Menu, Record Type
Figure 12. Media Menu, Media State
Transport Mode (default)
Transport mode is the default mode for Ki Pro Ultra Plus operation. Transport
functions are always functional except during some basic configuration
operations as noted below. When you power up Ki Pro Ultra Plus, the first level
overlay display will provide information for any clip that previously was recorded
and it can be played.
The display shows settings you’ve made in the Media menus. You’ll always know
you are in Transport mode when the MENU buttons (STATUS, CONFIG, or MEDIA)
are not highlighted —if one is highlighted, then you are in that menu.
When in the Idle mode (not playing or recording), you can access the Config and
Media set-up menus to adjust various parameters that determine Ki Pro Ultra Plus'
operation.
Ki Pro Ultra Plus File Based Recorder/Player v4.0 30 www.aja.com
 Loading...