

AJA IoXT User Manual [en, de, es, fr, it]

®
Installation & Operation Guide
Version 10.4
Published: August 27, 2013

Table of Contents
Notices . . . . . . . . . . . . . . . . . . . . . . . . . . . . . . . . . . . . . . . . . . . . . . . . . . . . . . . . 4
Trademarks . . . . . . . . . . . . . . . . . . . . . . . . . . . . . . . . . . . . . . . . . . . . . . . . . . . . . . . . . . . . . . . . . . . . . . . 4
Copyright . . . . . . . . . . . . . . . . . . . . . . . . . . . . . . . . . . . . . . . . . . . . . . . . . . . . . . . . . . . . . . . . . . . . . . . . . 4
Contacting Support . . . . . . . . . . . . . . . . . . . . . . . . . . . . . . . . . . . . . . . . . . . . . . . . . . . . . . . . . . . . . . . 4
Chapter 1: Introduction . . . . . . . . . . . . . . . . . . . . . . . . . . . . . . . . . . . . . . . . 5
Overview. . . . . . . . . . . . . . . . . . . . . . . . . . . . . . . . . . . . . . . . . . . . . . . . . . . . . . . . . . . . . . . . . . . . . . . . . . 5
Features: . . . . . . . . . . . . . . . . . . . . . . . . . . . . . . . . . . . . . . . . . . . . . . . . . . . . . . . . . . . . . . . . . . . . . 5
Broadcast-Quality Conversion . . . . . . . . . . . . . . . . . . . . . . . . . . . . . . . . . . . . . . . . . . . . . . . . . 6
Io XT Audio . . . . . . . . . . . . . . . . . . . . . . . . . . . . . . . . . . . . . . . . . . . . . . . . . . . . . . . . . . . . . . . . . . . 7
Dual Link . . . . . . . . . . . . . . . . . . . . . . . . . . . . . . . . . . . . . . . . . . . . . . . . . . . . . . . . . . . . . . . . . . . . . 7
Hardware-based Acceleration . . . . . . . . . . . . . . . . . . . . . . . . . . . . . . . . . . . . . . . . . . . . . . . . . 7
AJA Software . . . . . . . . . . . . . . . . . . . . . . . . . . . . . . . . . . . . . . . . . . . . . . . . . . . . . . . . . . . . . . . . . 7
System Requirements . . . . . . . . . . . . . . . . . . . . . . . . . . . . . . . . . . . . . . . . . . . . . . . . . . . . . . . . . . . . . 8
What’s In The Box? . . . . . . . . . . . . . . . . . . . . . . . . . . . . . . . . . . . . . . . . . . . . . . . . . . . . . . . . . . . . . . . . 8
Cable Connections . . . . . . . . . . . . . . . . . . . . . . . . . . . . . . . . . . . . . . . . . . . . . . . . . . . . . . . . . . . . . . . . 9
Connector Descriptions . . . . . . . . . . . . . . . . . . . . . . . . . . . . . . . . . . . . . . . . . . . . . . . . . . . . . . . 9
In This Manual. . . . . . . . . . . . . . . . . . . . . . . . . . . . . . . . . . . . . . . . . . . . . . . . . . . . . . . . . . . . . . . . . . . . 10
Chapter 2: Installation. . . . . . . . . . . . . . . . . . . . . . . . . . . . . . . . . . . . . . . . .11
Installation Overview . . . . . . . . . . . . . . . . . . . . . . . . . . . . . . . . . . . . . . . . . . . . . . . . . . . . . . . . . . . . . 11
Connecting to your Computer . . . . . . . . . . . . . . . . . . . . . . . . . . . . . . . . . . . . . . . . . . . . . . . . . . . . 12
Cabling the System . . . . . . . . . . . . . . . . . . . . . . . . . . . . . . . . . . . . . . . . . . . . . . . . . . . . . . . . . . . . . . . 12
Typical System . . . . . . . . . . . . . . . . . . . . . . . . . . . . . . . . . . . . . . . . . . . . . . . . . . . . . . . . . . . . . . . 12
Installing Io XT Software . . . . . . . . . . . . . . . . . . . . . . . . . . . . . . . . . . . . . . . . . . . . . . . . . . . . . . . . . . 14
Macintosh Software Installation . . . . . . . . . . . . . . . . . . . . . . . . . . . . . . . . . . . . . . . . . . . . . . 14
Windows Software Installation . . . . . . . . . . . . . . . . . . . . . . . . . . . . . . . . . . . . . . . . . . . . . . . 20
Re-Installation & Repair. . . . . . . . . . . . . . . . . . . . . . . . . . . . . . . . . . . . . . . . . . . . . . . . . . . . . . . 24
Genlock and Your System . . . . . . . . . . . . . . . . . . . . . . . . . . . . . . . . . . . . . . . . . . . . . . . . . . . . . . . . 24
Chapter 3: Operation . . . . . . . . . . . . . . . . . . . . . . . . . . . . . . . . . . . . . . . . . .25
Using Io XT with Professional Video /Audio Software . . . . . . . . . . . . . . . . . . . . . . . . . . . . . . 25
AJA Control Panel Overview . . . . . . . . . . . . . . . . . . . . . . . . . . . . . . . . . . . . . . . . . . . . . . . . . . . . . . 25
Block Diagram Screen . . . . . . . . . . . . . . . . . . . . . . . . . . . . . . . . . . . . . . . . . . . . . . . . . . . . . . . . 26
Control Panel Operation . . . . . . . . . . . . . . . . . . . . . . . . . . . . . . . . . . . . . . . . . . . . . . . . . . . . . . . . . . 30
Control Screen . . . . . . . . . . . . . . . . . . . . . . . . . . . . . . . . . . . . . . . . . . . . . . . . . . . . . . . . . . . . . . . 30
Format Screen . . . . . . . . . . . . . . . . . . . . . . . . . . . . . . . . . . . . . . . . . . . . . . . . . . . . . . . . . . . . . . . 32
Input Select Screen. . . . . . . . . . . . . . . . . . . . . . . . . . . . . . . . . . . . . . . . . . . . . . . . . . . . . . . . . . . 35
SDI Output Screen . . . . . . . . . . . . . . . . . . . . . . . . . . . . . . . . . . . . . . . . . . . . . . . . . . . . . . . . . . . 36
HDMI Screen . . . . . . . . . . . . . . . . . . . . . . . . . . . . . . . . . . . . . . . . . . . . . . . . . . . . . . . . . . . . . . . . . 38
Analog Out Screen . . . . . . . . . . . . . . . . . . . . . . . . . . . . . . . . . . . . . . . . . . . . . . . . . . . . . . . . . . . 39
Video Setup Screen . . . . . . . . . . . . . . . . . . . . . . . . . . . . . . . . . . . . . . . . . . . . . . . . . . . . . . . . . . 40
Audio Setup Screen . . . . . . . . . . . . . . . . . . . . . . . . . . . . . . . . . . . . . . . . . . . . . . . . . . . . . . . . . . 41
Conversion Screen (Mac OS only) . . . . . . . . . . . . . . . . . . . . . . . . . . . . . . . . . . . . . . . . . . . . . 42
DS Keyer Screen. . . . . . . . . . . . . . . . . . . . . . . . . . . . . . . . . . . . . . . . . . . . . . . . . . . . . . . . . . . . . . 44
Timecode Screen. . . . . . . . . . . . . . . . . . . . . . . . . . . . . . . . . . . . . . . . . . . . . . . . . . . . . . . . . . . . . 45
Presets Screen . . . . . . . . . . . . . . . . . . . . . . . . . . . . . . . . . . . . . . . . . . . . . . . . . . . . . . . . . . . . . . . 47
Firmware Screen . . . . . . . . . . . . . . . . . . . . . . . . . . . . . . . . . . . . . . . . . . . . . . . . . . . . . . . . . . . . . 48
Info Screen . . . . . . . . . . . . . . . . . . . . . . . . . . . . . . . . . . . . . . . . . . . . . . . . . . . . . . . . . . . . . . . . . . 49
Io XT v10.4 www.aja.com
2

Chapter 4: Troubleshooting . . . . . . . . . . . . . . . . . . . . . . . . . . . . . . . . . . .50
If You Run Into Problems . . . . . . . . . . . . . . . . . . . . . . . . . . . . . . . . . . . . . . . . . . . . . . . . . . . . . . . . . 50
Updating Software . . . . . . . . . . . . . . . . . . . . . . . . . . . . . . . . . . . . . . . . . . . . . . . . . . . . . . . . . . . . . . . 50
Support . . . . . . . . . . . . . . . . . . . . . . . . . . . . . . . . . . . . . . . . . . . . . . . . . . . . . . . . . . . . . . . . . . . . . . . . . . 51
Appendix A: Specifications . . . . . . . . . . . . . . . . . . . . . . . . . . . . . . . . . . . . 52
Video Formats. . . . . . . . . . . . . . . . . . . . . . . . . . . . . . . . . . . . . . . . . . . . . . . . . . . . . . . . . . . . . . . . . . . . 52
Video Input . . . . . . . . . . . . . . . . . . . . . . . . . . . . . . . . . . . . . . . . . . . . . . . . . . . . . . . . . . . . . . . . . . . . . . 52
Video Output Digital . . . . . . . . . . . . . . . . . . . . . . . . . . . . . . . . . . . . . . . . . . . . . . . . . . . . . . . . . . . . . 52
Video Output Analog . . . . . . . . . . . . . . . . . . . . . . . . . . . . . . . . . . . . . . . . . . . . . . . . . . . . . . . . . . . . . 52
Audio Input Digital . . . . . . . . . . . . . . . . . . . . . . . . . . . . . . . . . . . . . . . . . . . . . . . . . . . . . . . . . . . . . . . 53
Audio Output Digital . . . . . . . . . . . . . . . . . . . . . . . . . . . . . . . . . . . . . . . . . . . . . . . . . . . . . . . . . . . . . 53
Audio Output Analog. . . . . . . . . . . . . . . . . . . . . . . . . . . . . . . . . . . . . . . . . . . . . . . . . . . . . . . . . . . . . 53
Downstream Keyer . . . . . . . . . . . . . . . . . . . . . . . . . . . . . . . . . . . . . . . . . . . . . . . . . . . . . . . . . . . . . . . 53
Up-Conversion . . . . . . . . . . . . . . . . . . . . . . . . . . . . . . . . . . . . . . . . . . . . . . . . . . . . . . . . . . . . . . . . . . . 53
Down-conversion . . . . . . . . . . . . . . . . . . . . . . . . . . . . . . . . . . . . . . . . . . . . . . . . . . . . . . . . . . . . . . . . 53
Cross-conversion . . . . . . . . . . . . . . . . . . . . . . . . . . . . . . . . . . . . . . . . . . . . . . . . . . . . . . . . . . . . . . . . . 54
SD to SD aspect ratio conversion . . . . . . . . . . . . . . . . . . . . . . . . . . . . . . . . . . . . . . . . . . . . . . . . . . 54
Reference Input or LTC Input . . . . . . . . . . . . . . . . . . . . . . . . . . . . . . . . . . . . . . . . . . . . . . . . . . . . . 54
Machine Control . . . . . . . . . . . . . . . . . . . . . . . . . . . . . . . . . . . . . . . . . . . . . . . . . . . . . . . . . . . . . . . . . 54
Appendix B: Safety and Compliance . . . . . . . . . . . . . . . . . . . . . . . . . . . . 55
Federal Communications Commission (FCC) Compliance Notices . . . . . . . . . . . . . . . . . . 55
Class A Interference Statement . . . . . . . . . . . . . . . . . . . . . . . . . . . . . . . . . . . . . . . . . . . . . . . 55
FCC Caution . . . . . . . . . . . . . . . . . . . . . . . . . . . . . . . . . . . . . . . . . . . . . . . . . . . . . . . . . . . . . . . . . 55
Canadian ICES Statement . . . . . . . . . . . . . . . . . . . . . . . . . . . . . . . . . . . . . . . . . . . . . . . . . . . . . . . . . 55
European Union and European Free Trade Association (EFTA)
Regulatory Compliance. . . . . . . . . . . . . . . . . . . . . . . . . . . . . . . . . . . . . . . . . . . . . . . . . . . . . . . . . . . 56
Declaration of Conformity . . . . . . . . . . . . . . . . . . . . . . . . . . . . . . . . . . . . . . . . . . . . . . . . . . . . 56
Korean Compliance Statement. . . . . . . . . . . . . . . . . . . . . . . . . . . . . . . . . . . . . . . . . . . . . . . . . . . . 57
Taiwan Compliance Statement . . . . . . . . . . . . . . . . . . . . . . . . . . . . . . . . . . . . . . . . . . . . . . . . . . . 57
Japanese Compliance Statement . . . . . . . . . . . . . . . . . . . . . . . . . . . . . . . . . . . . . . . . . . . . . . . . . 58
Translated caution statements, warning conventions and warning messages. . . . . . . 58
Before operating your AJA unit, read the instructions in this document . . . . . . . . . . . . 58
Warranty and Liability Information. . . . . . . . . . . . . . . . . . . . . . . . . . . . . 66
Limited Warranty . . . . . . . . . . . . . . . . . . . . . . . . . . . . . . . . . . . . . . . . . . . . . . . . . . . . . . . . . . . . . . . . . 66
Limitation of Liability . . . . . . . . . . . . . . . . . . . . . . . . . . . . . . . . . . . . . . . . . . . . . . . . . . . . . . . . . . . . . 67
Index. . . . . . . . . . . . . . . . . . . . . . . . . . . . . . . . . . . . . . . . . . . . . . . . . . . . . . . . .68
Io XT v10.4 www.aja.com
3

Notices
Trademarks
Copyright
Contacting Support
Tel ep hon e: +1.800.251.4224 or +1.530.271.3190
Web: http://www.aja.com/en/support/
AJA®, KONA®, Ki Pro®, KUMO® and XENA® are registered trademarks of AJA Video, Inc.,
Ki Pro Mini™, Io Express™, Io HD
AirPort, Apple, the Apple logo, AppleShare, AppleTalk, FireWire, iPod, iPod Touch, Mac,
and Macintosh are registered trademarks of Apple Computer, Inc. Final Cut Pro,
QuickTime and the QuickTime Logo are trademarks of Apple Computer, Inc. Avid, Avid
Media Composer and Avid DNxHD are trademarks of Avid Technology, Inc. All other
trademarks are the property of their respective holders.
Copyright © 2013 AJA Video, Inc. All rights reserved. All information in this manual is
subject to change without notice. No part of the document may be reproduced or
transmitted in any form, or by any means, electronic or mechanical, including
photocopying or recording, without the express written permission of AJA Inc.
When calling for support, have all information at hand prior to calling.
To contact AJA Video for sales or support, use any of the following methods:
™
, Io™ and “Work. Flow.” are trademarks of AJA Video, Inc.
Support Email: support@.aja.com
Sales Email: sales@aja.com
Io XT v10.4 www.aja.com
4
Chapter 1: Introduction
Overview
AJA's Io XT provides professional-grade I/O for high-end computers using a Thunderbolt
interface with 10Gbps available bandwidth. Io XT is the ideal portable companion for
lightning-fast video capture, playback and up/down/cross conversion. Designed for
today’s workflows, Io XT provides a new interface for video Pro's working with 10-bit
uncompressed, Apple ProRes 422, Apple ProRes 422 (HQ), XDCAM HD, DVCPRO HD,
stereoscopic 3D workflows, and more.
Features:
Io XT connects with a single Thunderbolt cable and provides a second Thunderbolt
connector for storage, making it perfect for on set, or in the edit suite.
Based on the KONA 3G hardware, Io XT provides 3G/Dual-link/HD/SD-SDI, Component
Analog, and HDMI connectivity. The AJA Mac driver delivers extensive codec and media
support within all professional 3rd-party Video applications.
Io XT's 10-bit hardware conversion capability paired with a Thunderbolt RAID System
creates a super-fast editing system, portable enough to fit in a backpack—with desktop
level power.
• Two Thunderbolt ports (supports pass-through/”daisy-chaining”)
• Two SD-SDI, HD-SDI, and 3G HD-SDI inputs and outputs
• Single link SDI 4:2:2 or 4:4:4; Dual-link SDI 4:4:4
• HDMI Input and Output (including output for stereoscopic monitoring to consumer 3D
displays)
• Analog component/composite output, 10-bit
• Broadcast quality hardware-based 10-bit up-conversion
• Broadcast quality hardware-based 10-bit down-conversion
• Broadcast quality hardware-based 10-bit cross-conversion (1080 to 720 and 720
to1080)
• DVCProHD hardware scaling acceleration
• HDV hardware scaling acceleration
Io XT v10.4 www.aja.com
5

• Dynamic RT Extreme hardware acceleration
• Broadcast quality hardware-based 10-bit SD aspect ratio conversion (anamorphic to
letterbox, etc.)
• 16-Channel Embedded SDI audio
• Eight channels analog audio output (using Tascam-style DB25-type cable)
• Front panel LED VU meters and Headphone output w/level control
• Reference In/LTC In (selectable)
•LTC Output
• RS-422 control via 9-pin
• Rugged Chassis, Small Size
• 12V DC, 4-pin XLR Power (AC adapter included)
Broadcast-Quality Conversion
About Primary &
Secondary Video
Formats
NOTE: In some cases the application you use with the Io XT will automatically set the Primary
Io XT features hardware-based full 10-bit broadcast quality motion adaptive SD to HD
up-conversion, HD to SD down-conversion and HD to HD cross-conversion.
The quality of the conversion features found in the Io XT is virtually identical to AJA's
award winning stand-alone converter products used throughout the post production
market. The Io XT built-in up converter uses a a full 10-bit path, fully motion adaptive deinterlacing, and large multi-point digital interpolators. Down-conversion uses large
multi-point digital interpolators, anti-alias filtering and interpolation.
Cross-conversion is high-quality hardware-based, providing capability to streamline
dailies and offers true broadcast picture quality in realtime. Because these functions are
in hardware, they are available full time, all the time—with no CPU load. Such
conversions are useful for cost effective monitoring, making standard definition dubs of
an HD project, or up-converting from a standard definition project to an HD deliverable.
In Io XT operation, the Primary Format is the media format written to disk and used in
your project. The Secondary format is that which may be input for capture or output from
Io XT to VTRs or other devices. Down-conversion may be applied to an input or on
output.
The Primary Format menu allows you to select the video format used in your current
project.
Format, overriding the user’s selected primary format in the AJA Control Panel.
Conversion is performed based on the Primary or Secondary Format settings.
Io XT can down-convert the input format (when designated as a Secondary Format
input) to the selected Primary Format. Or you can set a Secondary Format output that will
be a down-conversion of the Primary Format.
NOTE: When converting an Input to the Primary Format, select the Secondary Format option that
has (I), for input only, appended to it. Conversely, when converting an Output from the
Primary Format, you must select an output signal with (O) for output only.
Convert Mode
Io XT v10.4 www.aja.com
Convert Mode allows selection of a mode for conversion between High-definition and
Standard-definition formats. The choices offered depend on the AJA capture device
present and the Primary and Secondary format chosen. Io XT supports up-, down-, and
cross- conversion plus SD-to-SD aspect ratio conversions.
All conversions use AJA 10-bit hardware inside the Io XT.
6

For example, to do a down-conversion on an HD input:
Set the Primary Format as an SD format
Select the correct HD format with an (I) input designation for the Secondary Format, then
Choose a “– Secondary” Video Input type
Down-conversion display mode choices that may be available include:
• Anamorphic: full-screen
• Letterbox: image is reduced with black top and bottom added to image area with the
aspect ratio preserved
• Crop: image is cropped horizontally to fit new screen size
This parameter applies to using the Ki Pro Rack to transfer data.
Video Formats
Io XT Audio
Dual Link
Hardware-based Acceleration
For a complete list of supported video formats, see “Video Formats” on page 52.
Io XT provides up to 16 channels of SDI embedded audio. The front panel has a mini TRS
headphone output with a lockable level control knob.
For analog audio output monitoring, Io XT provides a DB25 connector with eight
channels of audio to be used with industry standard Tascam-style audio breakout cables.
The front panel has an eight-channel VU meter display to monitor output levels.
Io XT supports Dual Link HD-SDI (4:4:4). Io XT supports the ingest and output of SMPTE372M compliant 4:4:4 RGB video and high-bandwidth 4:2:2 1080p 50, 1080p 59.94, and
1080p 60 at 10-bit.
Io XT offers DVCPROHD, HDV, and Apple RT Extreme hardware acceleration. This is how
Io XT accelerates DVCPROHD, HDV, and Apple RT Effects:
A precision hardware scalar in Io XT does what the Apple computer's processor
would otherwise have to do—scaling of less than full-raster HD (DVCProHD and
HDV) to full-raster size. This speeds up the system while scaling at full 10-bit
broadcast quality.
The Io XT advanced scaling engine takes the native frame (long GOP 1440 HD) and
outputs it via hardware-in real time. Precision AJA circuitry re- sizes the video to fullraster 1920 x 1080, providing instantaneous playback of HDV captured for both
monitoring and recording.
Io XT can provide real time monitoring and playback to both HD and SD monitors and
decks via the realtime hardware scaler and down-converter on board.
AJA Software
Io XT v10.4 www.aja.com
AJA’s Io XT software and hardware were developed for powerful integrated video/audio
capture, editing, and production with a variety of 3rd-party software. With an
Io XT and qualified Thunderbolt-enabled computer, you have the ultimate system for
standard and high definition production, post-production, broadcast, and streaming
work. AJA software is available for download at the AJA website.
• AJA QuickTime™ drivers for tightly integrated hardware/software operation.
7

• AJA Control Panel for source selection and controlling Io XT within either Mac or
Windows environment, Input Pass through, and more. AJA Control Panel uses a block
diagram to show visually what is happening inside Io XT.
• Supports popular 3rd-party Professional Video Applications from Adobe, Avid, Apple,
Telestream, and more.
NOTE: For a complete software compatibility list, see the AJA website link:
System Requirements
For best performance AJA recommends:
• OS 10.7.5/10.8.4 or later
• Windows 7/8 With all updates
• 2.5GHz dual core i5 or better
• 2.0 GHz quad core i7 or better
• 4GB RAM Minimum, 8GB Recommended
See Software Vendor system requirements for GPU recommendations and additional
hardware requirements and recommendations.
http://www.aja.com/en/category/edit/compatibility
What’s In The Box?
As you unpack the shipping box(es), carefully examine the contents. Ensure you received
everything and that nothing was damaged during shipment. If you find any damage,
immediately notify the shipping service and supply them with a complete description of
the damage. AJA will repair or replace damaged items. If you find shipping damage,
contact your AJA dealer or distributor for details on how to have your Io XT repaired or
replaced.
Save packing materials and the shipping box. If you ever require service or move your
system—use the packaging materials and box for safe shipment.
Figure 1. Io X Shipping Box Contents
Io XT v10.4 www.aja.com
8

Cable Connections
When you unpack your AJA Io XT, you’ll find the following components:
•Io XT
• 12V power adapter and power cord
• Read Me First Notice—Contains late-breaking news and/or errata related to Io XT and
the documentation.
• Registration Sheet—allows you to register your Io XT by mail or online (details
provided).
Io XT connections are made directly to the unit’s rear connector plate. Eight audio output
channels are available through the Tascam-style DB25 connector.
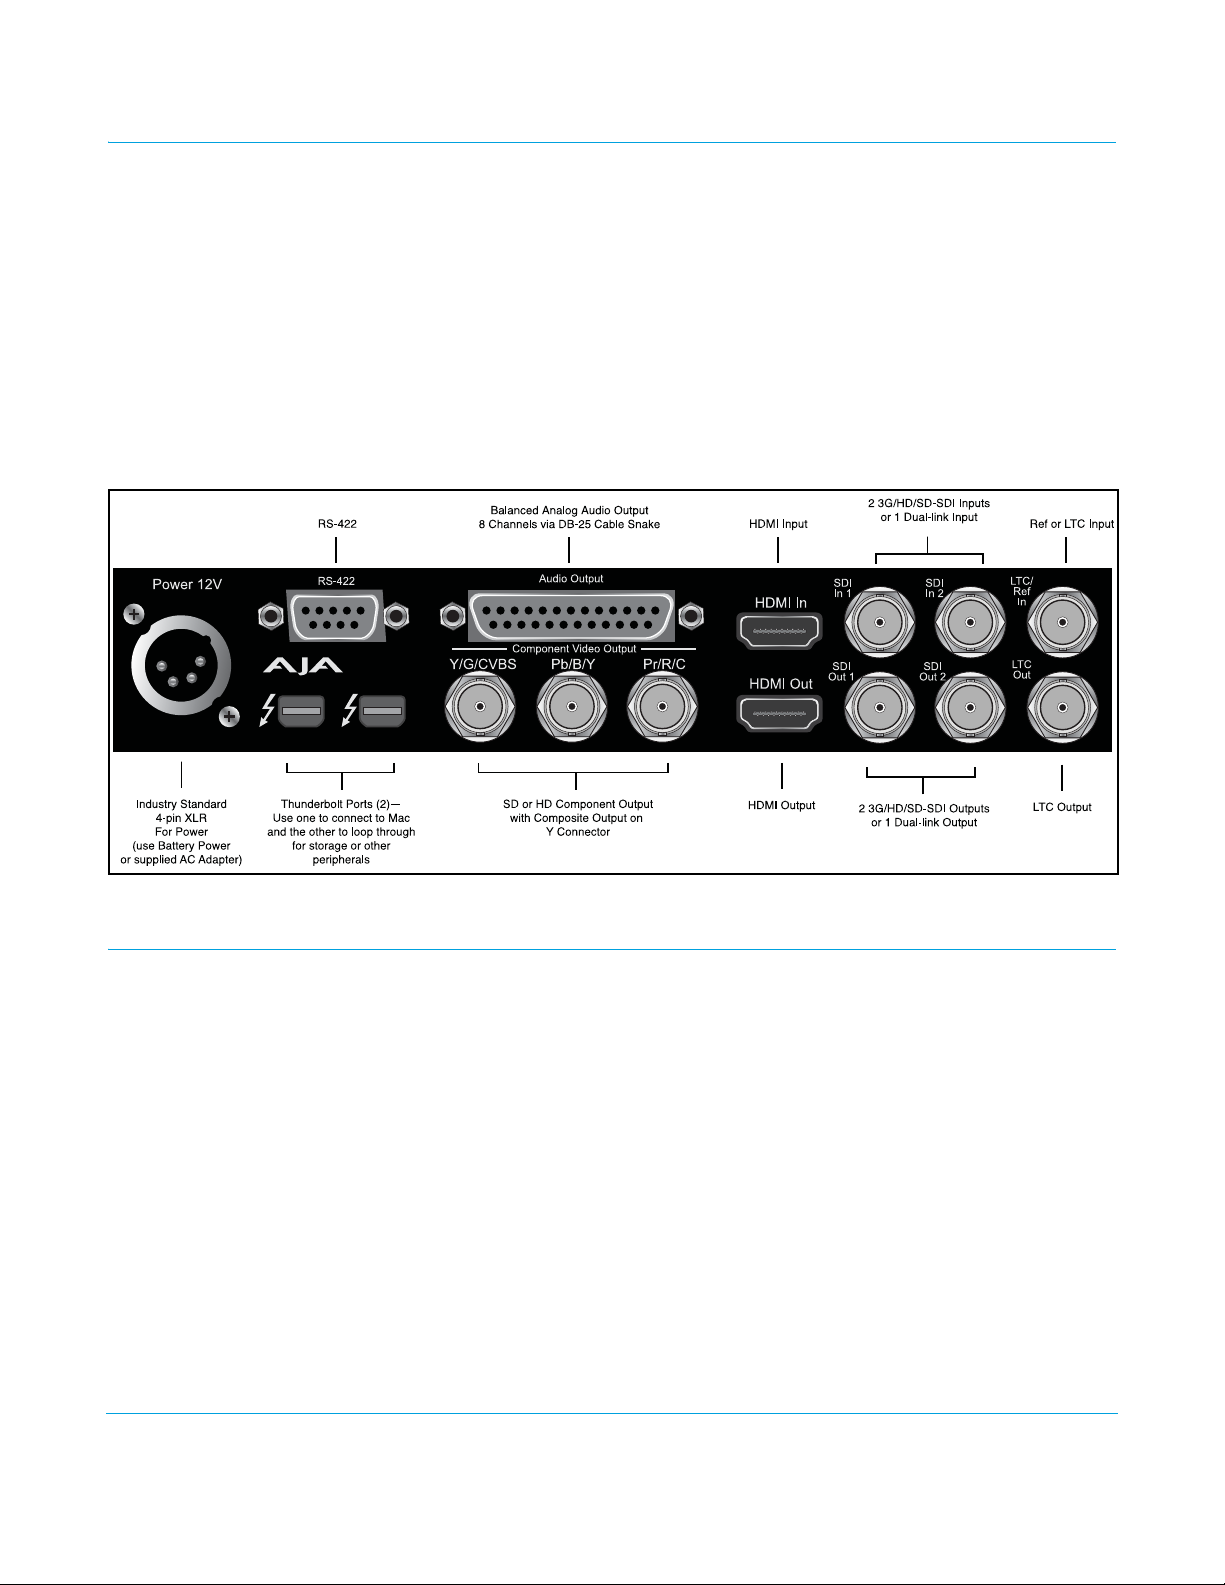
Figure 2. Io XT Connectors
Connector
The following section describes the connectors offered on the Io XT chassis.
Descriptions
HD/SD SDI Input and
Output
HDMI Input and Output
Io XT v10.4 www.aja.com
BNC connectors are provided on Io XT for two HD/SD-SDI inputs and two HD/SD-SDI
outputs. The input and output support video and embedded 24-bit digital audio. Use SDI
wherever possible for the best quality 10-bit uncompressed video input, capture and
output. If peripheral equipment has a variety of inputs/outputs, look to see if it has SDI I/
O, and use it where possible. Most high-end professional broadcast equipment supports
SDI (VTRs, cameras, media storage servers, etc.).
Two HDMI connectors on the Io XT provide input and output of HDMI video and multichannel embedded audio. HDMI v1.3a capability at 30 bits per pixel allows full support of
the latest 10-bit monitors.
HDCP is not suppor ted on either input or output. Io XT HDMI output does not have HDCP,
and input sources having HDCP are not supported. The HDMI input is designed to
support long cable runs—up to 100 ft. when using 22 or 24AWG HDMI cable, or up to 50
ft. using 28 or 30AWG HDMI cable. The HDMI output supports standard HDMI cables
only.
9

The AJA Control Panel allows selection and adjustment of some HDMI parameters; please
see Chapter 3—for more information on Control Panel operation.
RS422 Machine Control
Component Video
Output
A Note About YPbPr: Component Video, or YPbPr, has been given several names over time. YUV, Y/R-Y/B-Y, and
Reference Video and
LTC In pu t
A female DE-9 connector on Io XT provides connection for VTRs, camcorders, disk media
servers, and other devices using RS422 SMPTE (Sony) protocol. (Connector pinout is
listed in Appendix A, see “Machine Control” on page 54.)
Io XT features a group of 3 BNC connectors for output of component, composite and
Y/C functions. The signals are labeled on the BNC connectors on the rear panel of Io XT.
YCbCr, are just some examples. Although these various formats have some differences in
levels, they are all basically the same. Io XT uses the modern YPbPr terminology exclusively. Io
XT supports three different types of YPbPr: SMPTE/EBU N10, Betacam (NTSC), and Betacam
(NTSC Japan). These three formats differ in level only and are configured via the AJA Control
Panel.
Two BNC connectors on Io XT provide reference Input and Output. The Reference Video
input can also be used for LTC input. The selection of Reference (sync) or LTC is set using
the Io XT Control Panel.
In Video Pass-through mode, these connectors are effectively loop-through. Supplying
reference signal to the Reference input allows you to synchronize Io XT outputs to your
house analog reference video signal (or black burst). If you have a sync generator or
central piece of video equipment to use for synchronizing other video equipment in your
studio, then connect its analog composite output here. When Io XT outputs video, it uses
this reference signal for locking. When connecting a reference video source, the locking
signal should be the same format as the Primary format selected in the Io XT Control
Panel. It is possible in some circumstances to use an alternate format video signal as long
as the basic frame rate is compatible.
In This Manual
Chapter 1 Is the introduction you’re reading, listing features, box contents, and system
requirements.
Chapter 2 Provides complete instructions for installing and configuring the AJA Io XT. The user is
guided through unpacking, cabling the Io XT, installing Io XT Mac Software, then getting
it up and running. Important configuration information is also provided on video settings
and use of genlock/external reference.
Chapter 3 Discusses operational aspects of Io XT and how to work with 3rd-party software.
Appendix 4 Discusses troubleshooting problems with your system and what to do when there’s a
problem you can’t solve.
Appendix A Presents a list of technical specifications for the product.
Appendix B Provides important Safety and Compliance information.
The balance of the book provides Warranty information and an Index.
Io XT v10.4 www.aja.com
10

Chapter 2: Installation
Installation Overview
The installation and set up of an Io XT is very simple. The steps of installation and
configuration are outlined here and each of these steps are explained in greater detail on
the remaining pages of this chapter:
1. Unpack the shipping box (see " What’s In The Box? on page 8".)
2. If not previously installed on your Thunderbolt equipped computer, ensure that
appropriate application software is installed as detailed in its user documentation.
3. For latest System Compatibility and Software Version information for Io XT visit:
http://www.aja.com/en/products/io-xt/#/overview
4. Install the latest AJA Io XT software on your computer from the AJA website:
http://www.aja.com/en/products/io-xt/#support
Start by installing the Io XT driver package with AJA Control Panel and then finally install
any AJA plug-ins for 3rd-party software.
5. Connect a Thunderbolt cable between the computer and the Io XT.
6. Power the Io XT (AC supply or battery) and turn on the unit using the power button
on the front.
7. Cable the system audio and video sources, VTR, audio monitor,
and video monitor.
8. When you run the AJA Control Panel, you’ll notice that the Io XT is auto-discovered as
long as it is properly cabled and powered up.
9. Please read the AJA Control Panel operation section of this manual. (The latest
version can be downloaded from the support page provided in step 4 above.)
Io XT v10.4 www.aja.com
11
Connecting to your Computer
1. With your computer off, connect a Thunderbolt cable to one of the two Thunderbolt
ports
2. Connect the other Thunderbolt port to storage or other desired peripherals.
3. For power either:
• Assemble the Power Adapter and cable and connect to the Io XT 12V Power
connector and to AC supply
• Or connect a 12 volt battery using an XLR connector (not included).
4. Connect your desired Video I/O, Audio monitoring, reference, and machine control
cables. (Refer to Cabling the System following.)
5. Turn on Io XT using the front power switch.
Figure 3. Io XT Connections
Cabling the System
Typical System
Io XT v10.4 www.aja.com
Your system may differ depending on VTRs, audio monitoring, and video monitoring.
1. If desired, connect your house reference sync to the Io XT Ref/LTC connector (BNC).
The second Io XT Ref Loop connector (if used in Pass through mode) can be
connected to the VTR or terminated with a 75-ohm terminator. If instead using LTC
timecode input, connect to the Ref/LTC input.
2. Connect an HDMI Video Monitor to the Io XT HDMI Out connector. Or instead, use the
Component Analog Video Out BNC connectors to go to an analog monitor.
3. Connect a 9-pin DE-9 machine control cable between your VTR’s RS422 control port
and the Io XT RS-422 machine control connector.
4. Connect two SDI cables between Io XT and your digital VTR (Digital Betacam etc.):
one from Io XT SDI In to the VTR SDI Out, and one from Io XT SDI Out to the VTR SDI In.
The Io XT SDI connections have embedded audio so the VTR must be configured
accordingly.
12

5. Use a Tascam-style audio breakout cable to connect stereo output for audio
monitoring.
Figure 4. Typical Thunderbolt Compatible Laptop System Connections
Io XT v10.4 www.aja.com
13
Installing Io XT Software
Go to the AJA website and download the latest Io XT driver software containing the AJA
Control Panel application. While there, also download any AJA plug-ins for 3rd-party
applications (such as Adobe and Avid). All of these software installers can be found here:
System software updates may occasionally become available to AJA Io XT owners on our
website (www.aja.com). We recommend checking occasionally for both software
updates and additional product information.
NOTE: If your computer has previously had another video capture or multimedia device installed,
ensure you uninstall any related software before installing Io XT This will prevent any
hardware or software conflicts.
If you add Io XT supported applications at a later date and have not previously installed
the appropriate drivers, you must run the install program again selecting the appropriate
application support software to be installed.
Macintosh Software Installation
http://www.aja.com/en/support/downloads/
NOTE: If you have trouble installing Io XT software, turn off any virus protection and security
Mountain Lion OS and
Gatekeeper:
software that you may have installed on your computer and try again.
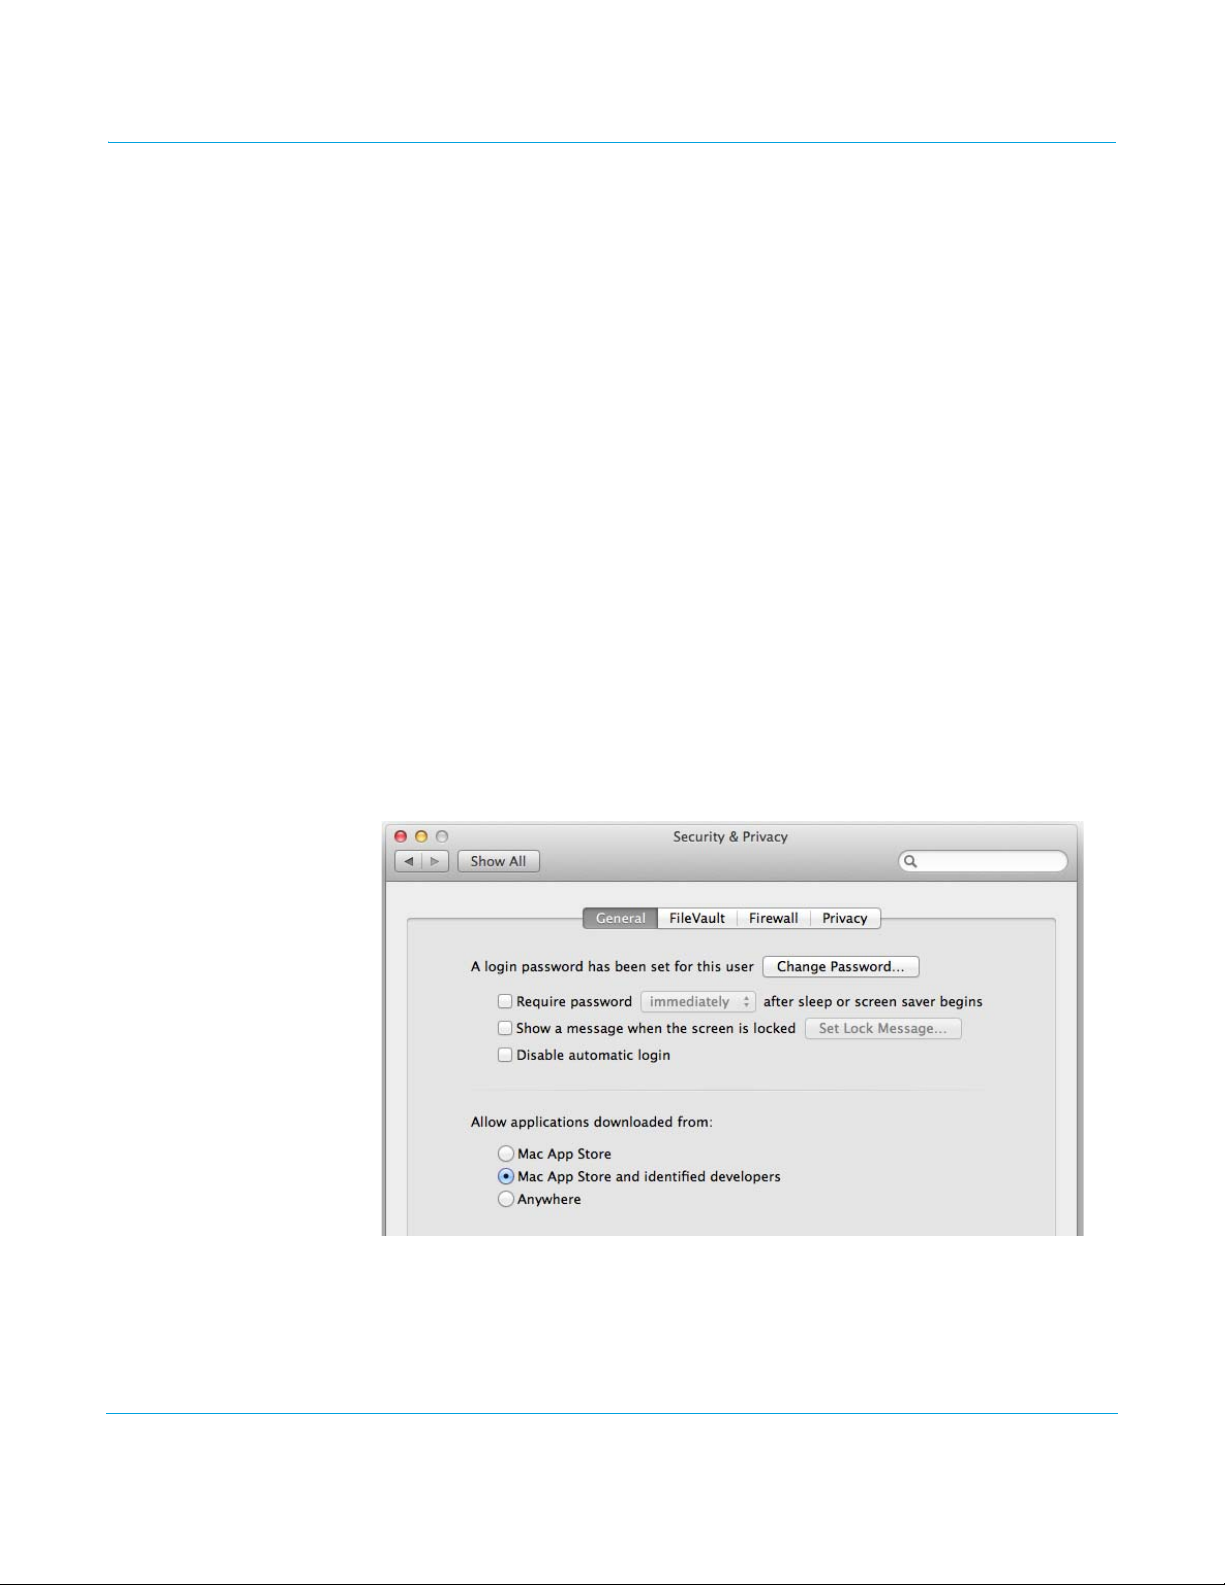
With the addition of Gatekeeper functionality in Mac OS Mountain Lion, you should go to
System Preferences>Security & Privacy and choose to allow “Mac App Store and identified
developers.”
Figure 5. Mac Security & Privacy Gatekeeper Setting
Io XT v10.4 www.aja.com
14

1. Locate Io XT software downloaded from AJA.
2. Double-click the package to log on and begin software installation. Start by installing
the Io XT driver package with AJA Control Panel and then finally install any AJA plugins for 3rd-party software.
NOTE: The system will respond by asking you to authenticate who you are as currently defined on
your OS X user profile. Enter the proper name and password at the Authenticate prompt; if
you have multiple users defined, ensure that you log on as a user with administrator-level
authority.
Figure 6. Log On Authenticate Prompt
3. Click on the Install Software button after entering a valid user and password.
4. The installer will launch and you’ll see a series of installer screens.
5. On the following pages, we show the series of screens you’ll see when installing the
Io XT driver software package.
6. When you launch the installer, you’ll see a series of installer screens.
Io XT v10.4 www.aja.com
15
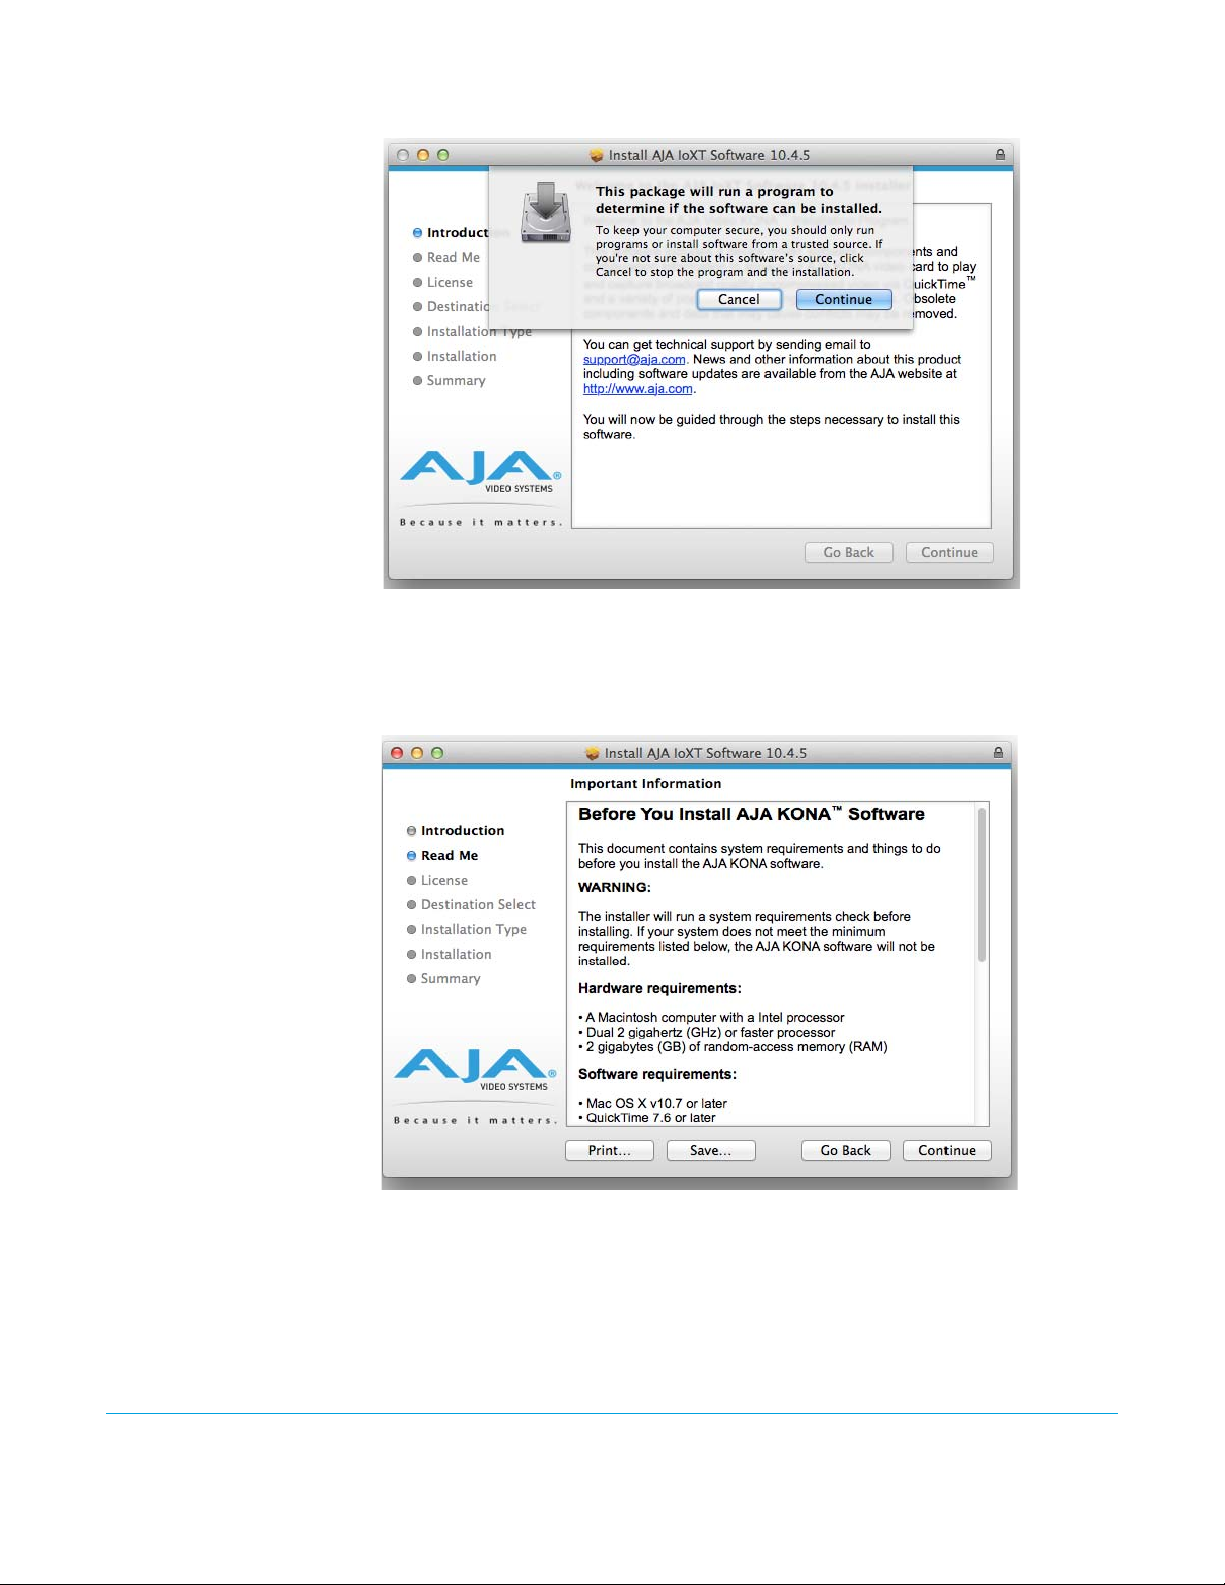
Figure 7. Initial Installer Screen
7. Click Continue to begin installation.
8. The next screen lets you know that the installer will check your Mac to ensure it has
the hardware and software resources required (“System Requirements” on page 8).
Figure 8. System Check Installer Screen
Io XT v10.4 www.aja.com
16
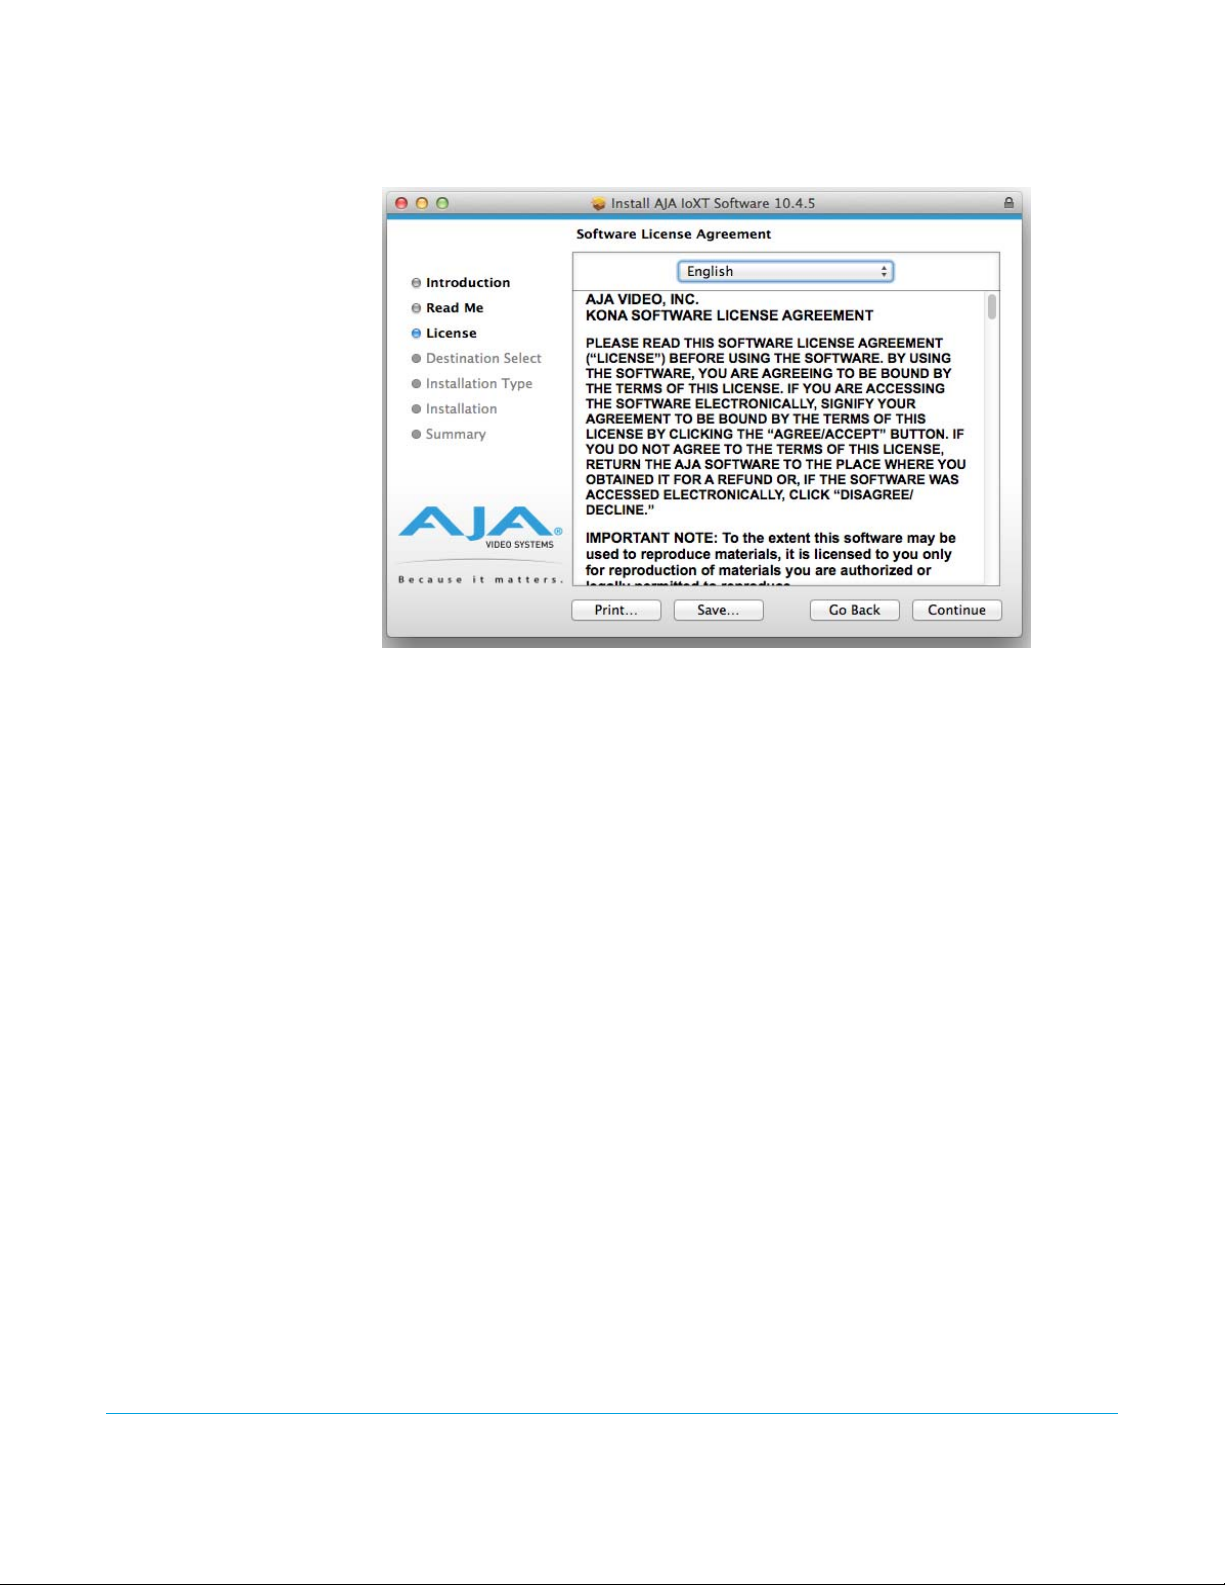
9. Read and agree to the Software License Agreement.
Figure 9. Io XT Software License Agreement Screen
10. The next screen shows all the available drives on the Mac Pro. Click on the drive that
contains your system files (Apple default is “Macintosh HD”). A green arrow will point
to the drive you’ve selected. Click the Continue button to proceed with installation.
11. At the next screen, select the “Io XT Setups” checkbox. Check any Easy Setups that
you want to use (or all of them) and then click the Continue button to place the
software on the drive you previously selected. Some 3rd-party applications provide
native setups so you can uncheck the “IoXT Setups” checkbox before clicking
Continue.
Io XT v10.4 www.aja.com
17

Figure 10. Installer Screen, Select Easy Setups to be Installed
12. The installer tells you how much room the installation will take and prompts you to
click Install to begin (or go back). Click the Install button to proceed.
Figure 11. Installer Screen, Space Reminder
13. Next, the system will display a reminder that you’ll have to Restart the Mac after
installation concludes. Click Continue Installation.
Io XT v10.4 www.aja.com
18

Figure 12. Installer Screen, Reminder about Restarting
14. The installer runs and puts all the necessary Io XT drivers and software on the desired
hard drive. When it has completed installation, a final screen will be displayed
announcing that “software was successfully installed.”
Figure 13. Installation Success and Restart Message
15. Click the Restart button to complete the installation procedure. The system will
perform software restart.
Io XT v10.4 www.aja.com
19

16. After installing the Io XT system driver package, install the AJA Control Panel package
in the same fashion, following each screen and continuing to the next until
installation completes.
17. Finally, install any AJA plug-ins required for 3rd-party software. You can download
these from the AJA website:
http://www.aja.com/en/products/io-xt/#support
18. For example, if you wish to use the Io XT with Adobe Premiere or Adobe After Effects,
you would go the AJA website Io XT support page (URL above) and download the
“AJA Adobe Plug-ins for Creative Cloud”. These plug-ins come with complete
documentation on how to use them.
Windows Software Installation
NOTE: If you have trouble installing AJA Windows Software, turn off any virus protection and
Install Wizard
NOTE: The Windows installation requires separate download and installation of application plugins
Locate the AJA Windows Software download file and follow the procedure below to
install the required software on the host system.
security software that you have installed on your computer and try again.
Open the AJA Windows Software download package.
The AJA Windows Software installation program will launch and extract the necessary
Io XT drivers, AJA Control Panel Software, for installation on the desired hard drive.
for AVID, Adobe, Eyeon Fusion, and Telestream Wirecast plugins. (See the web-link above.)
Figure 14. Install Wizard Welcome
When you see the Welcome page, click “Next” to view the AJA Windows Software license
agreement.
Io XT v10.4 www.aja.com
20

Figure 15. License Agreement
Read the Windows Software license agreement and click “Yes” to accept. You will be
asked to choose the type of installation you would like to perform. Click on the Custom
button to see the installation options.
The default selections include AJA Drivers for KONA cards, Io Express/XT, and T-TAP.
Software not installed is marked with a red X.
You may choose to perform a Custom installation to select the specific software
necessary for your applications. If you use the entire collection, use the “Complete”
installation.
NOTE: By default, AJA ASIO drivers are not installed. (If you will be using the Voice-over feature in
Adobe Premiere Pro, you will need to click on the pulldown menu and include them in the
installation. For more information on using ASIO drivers, refer to the AJA Adobe Plugins
Installation and Operation Guide.
Io XT v10.4 www.aja.com
21
 Loading...