

AJA Hi5-3G User Manual

www.aja.com
Installation and Operation
Guide
Because it matters.
Hi5-3G
3G/Dual-link/HD/SD-SDI to HDMI 1.3a
Video and Audio Converter
Published: 12/20/10

2
Trademarks
®
AJA
, KONA
trademarks of AJA Video, Inc. HDMI, the HDMI logo and High-Definition Multimedia Interface are
trademarks or registered trademarks of HDMI Licensing LLC. DVI is a registered trademark of DDWG.
All other trademarks are the property of their respective holders.
Notice
Copyright © 2010 AJA Video, Inc. All rights reserved. All information in this manual is subject to
change without notice. No part of the document may be reproduced or transmitted in any form, or by
any means, electronic or mechanical, including photocopying or recording, without the express
written permission of AJA Inc.
FCC Emission Information
This equipment has been tested and found to comply with the limits for a Class A digital device,
pursuant to Part 15 of the FCC Rules. These limits are designed to provide reasonable protection
against harmful interference when the equipment is operated in a commercial environment. This
equipment generates, uses and can radiate radio frequency energy and, if not installed and used in
accordance with the instruction manual, may cause harmful interference to radio communications.
Operation of this equipment in a residential area is likely to cause harmful interference in which case
the user will be required to correct the interference at his own expense. Changes or modifications not
expressly approved by AJA Video can effect emission compliance and could void the user’s authority
to operate this equipment.
®
, Ki Pro® and XENA
®
are registered trademarks of AJA Video, Inc. Io HD
™
and Io
™
are
Contacting Support
Limited Warranty
To contact AJA Video for sales or support, use any of the following methods:
180 Litton Drive, Grass Valley, CA. 95945 USA
Telephone: 800.251.4224 or 530.274.2048
Fax: 530.274.9442
Web: http://www.aja.com
Support Email: support@aja.com
Sales Email: sales@aja.com
When calling for support, have all information at hand prior to calling.
AJA Video warrants that this product will be free from defects in materials and workmanship for a period of five
years from the date of purchase. If a product proves to be defective during this warranty period, AJA Video, at its
option, will either repair the defective product without charge for parts and labor, or will provide a replacement in
exchange for the defective product.
In order to obtain service under this warranty, you the Customer, must notify AJA Video of the defect before the
expiration of the warranty period and make suitable arrangements for the performance of service. The Customer
shall be responsible for packaging and shipping the defective product to a designated service center nominated
by AJA Video, with shipping charges prepaid. AJA Video shall pay for the return of the product to the Customer if
the shipment is to a location within the country in which the AJA Video service center is located. Customer shall be
responsible for paying all shipping charges, insurance, duties, taxes, and any other charges for products returned
to any other locations.
This warranty shall not apply to any defect, failure or damage caused by improper use or improper or inadequate
maintenance and care. AJA Video shall not be obligated to furnish service under this warranty a) to repair damage
resulting from attempts by personnel other than AJA Video representatives to install, repair or service the product,
b) to repair damage resulting from improper use or connection to incompatible equipment, c) to repair any
damage or malfunction caused by the use of non-AJA Video parts or supplies, or d) to service a product that has
been modified or integrated with other products when the effect of such a modification or integration increases
the time or difficulty of servicing the product.
THIS WARRANTY IS GIVEN BY AJA VIDEO IN LIEU OF ANY OTHER WARRANTIES, EXPRESS OR IMPLIED. AJA VIDEO
AND ITS VENDORS DISCLAIM ANY IMPLIED WARRANTIES OF MERCHANTABILITY OR FITNESS FOR A PARTICULAR
PURPOSE. AJA VIDEO’S RESPONSIBILITY TO REPAIR OR REPLACE DEFECTIVE PRODUCTS IS THE WHOLE AND
EXCLUSIVE REMEDY PROVIDED TO THE CUSTOMER FOR ANY INDIRECT, SPECIAL, INCIDENTAL OR CONSEQUENTIAL
DAMAGES IRRESPECTIVE OF WHETHER AJA VIDEO OR THE VENDOR HAS ADVANCE NOTICE OF THE POSSIBILITY OF
SUCH DAMAGES.
•
•
•
•
•
•
•
•
Introduction
Features
AJA Hi5-3G 3G/HD/SD-SDI to HDMI 1.3a Video and Audio Converter
The Hi5-3G converts 3G-SDI, dual or single link HD-SDI, or SD-SDI to HDMI v1.3a
for driving HDMI monitors. HDMI v1.3a capability at 30 bits per pixel allows full
support of the latest 10 bit monitors. Audio is supported in the HDMI output
allowing a convenient single cable audio/video connection. The Hi5-3G
provides 2 Channel RCA style audio outputs for separate audio monitoring if
needed. USB connectivity allows for easy PC/Mac setup and field upgrades.
3G/HD/SD-SDI to HDMI
1
SMPTE425M-AB input
Full HDMI 1.3a support including:
- Deep Color 30- and 36-bit video per pixel (24-bit also supported)
- 2 or 8 channels of embedded audio
Additional 2 channel RCA analog audio output (User assignable channels)
Setup via PC/Mac using USB port and supplied USB cable (USB
configuration software application supplied on CD)
3
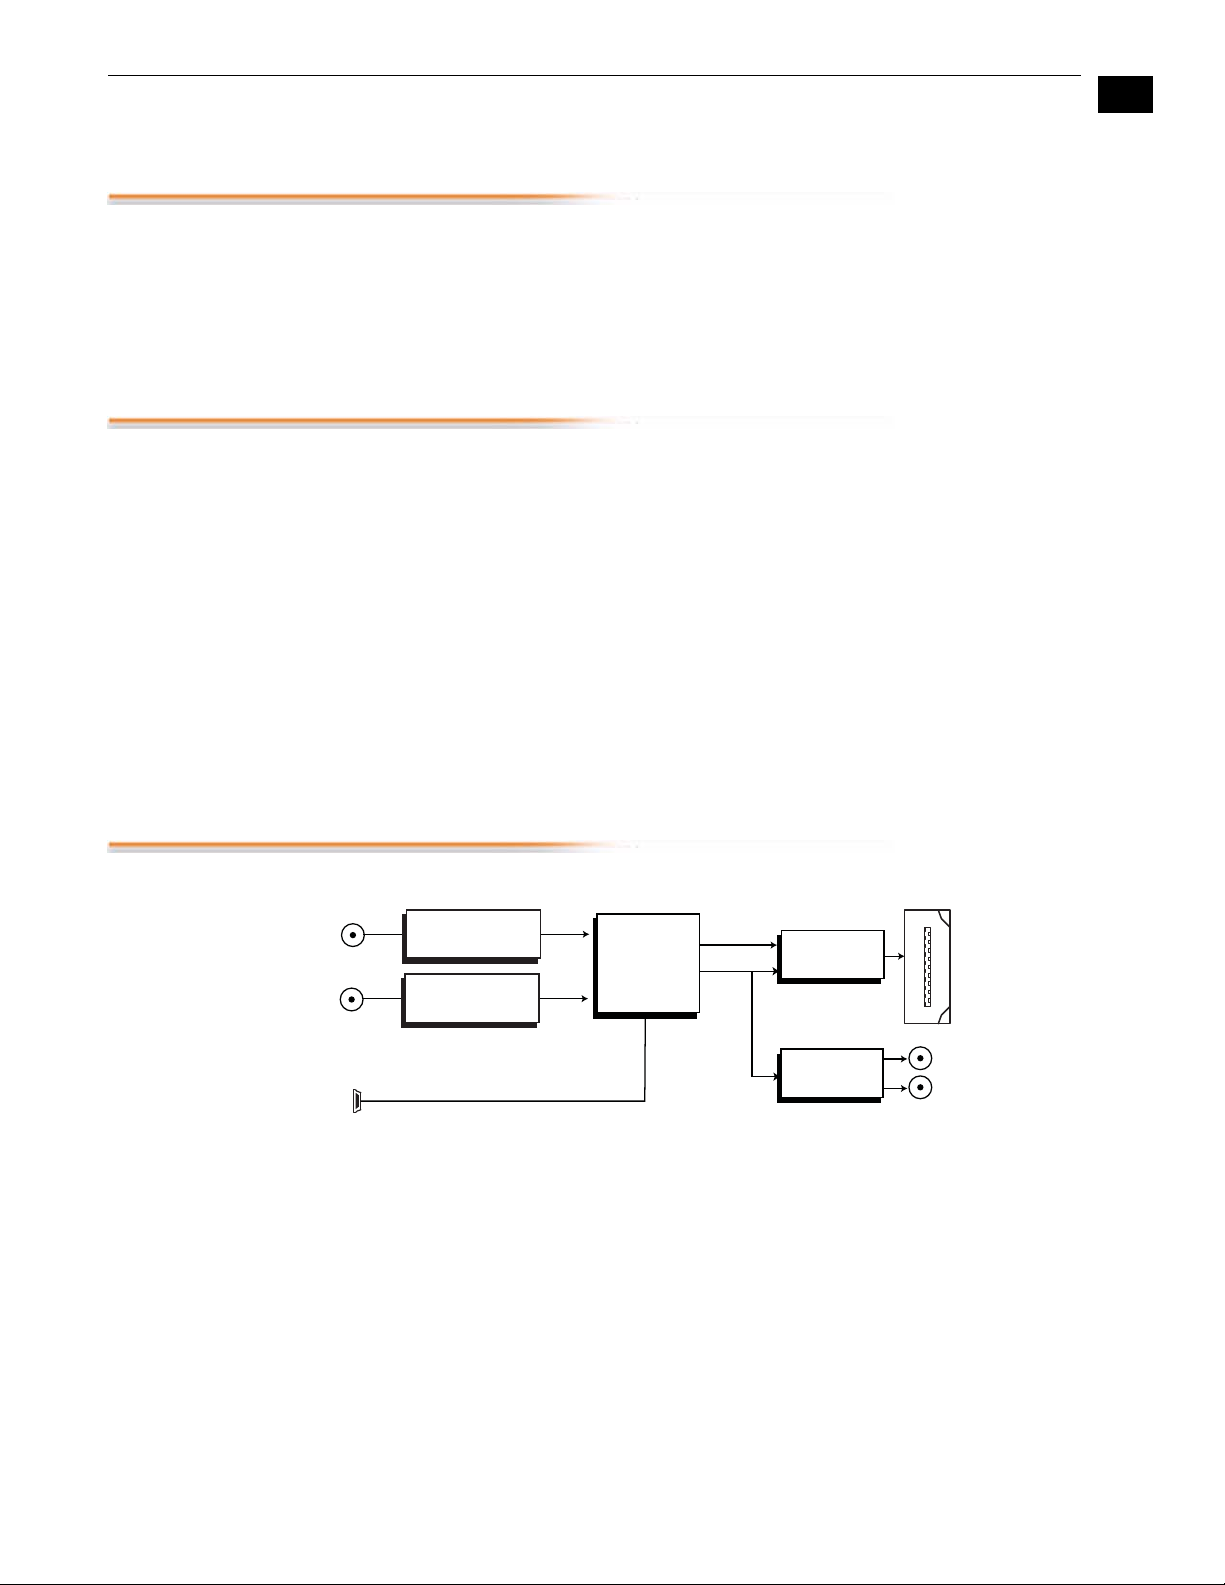
Block Diagram
SD-SDI, HD-SDI, or 3G-SDI
SDI Link A
SD-SDI or HD-SDI
SDI Link B
USB Port
(connect to PC or Mac)
Selects 8 o 10-bit Video
and other Functions
HDMI cable supplied
Uses 5V power (supply sold separately)
5 year warranty
SDI Receiver
SDI Receiver
SDI
Processing
Video
Audio
Hi5-3G Converter, Simplified Block Diagram
HDMI
Transmitter
Audio
D/A
HDMI Output
with Embedded
Audio
2-Channel
Analog Audio
Monitor Output
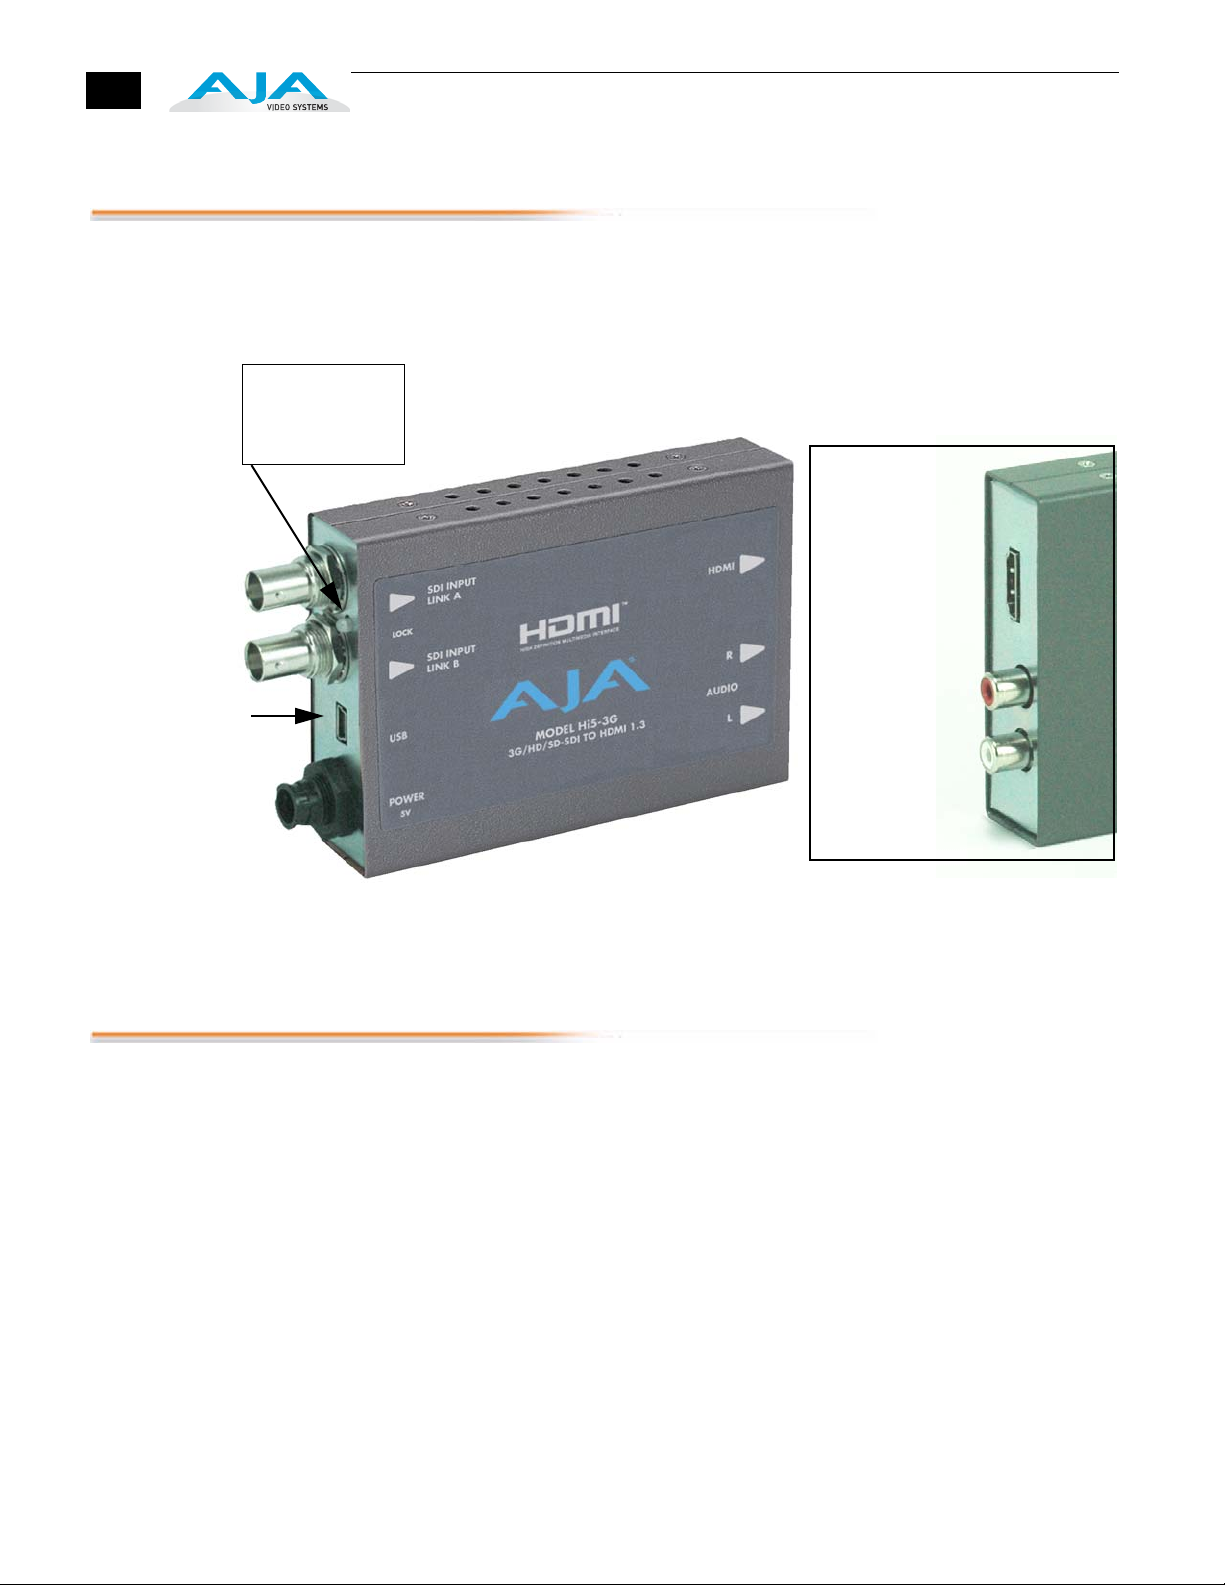
4
I/O Connections
LOCK LED
Green: Lock to SD
Red: Lock to HD/
Dual Link
Amber: Lock to 3G
3G, HD, SD-SDI
Input BNC
Link A
1.
2.
3.
4.
5.
HDMI Connector
Output
HD, SD-SDI
Input BNC
Link B
USB
Por t
+ 5VDC
Power
Input
Installation
2 Channel
Unbalanced
Analog
Audio
(RCA Jacks)
Right Side View
Hi5-3G Converter
Typically, Hi5-3G installation consists of the following steps:
Ensure the Hi5-3G is disconnected from power.
Connect video equipment to the convertor BNCs and HDMI connector.
Connect audio equipment to RCA connectors (optional)
Apply +5VDC power to the converter (AJA power supply model DWP or
DWP-U).
The Hi5-3G will now run using the default factory settings. If you wish to
alter the factory settings, you’ll need to install the AJA Mini Config software
(supplied on CD) on a computer, attach the Hi5-3G via USB to the
computer, and then make your changes. This process is detailed on the
following pages.
AJA Hi5-3G 3G/HD/SD-SDI to HDMI 1.3a Video and Audio Converter
USB Control and Setup—Using AJA Mini Config
The Hi5-3G can usually be used right out of the box for most applications since it is
designed to recognize inputs and perform standard actions automatically by default.
However you can also manually configure the Hi5-3G using a supplied software
application for PCs and Macs called “Mini Config.” This same application can be used to
update software on the Hi5-3G in the event newer software is released by AJA.
Installing Mini
Config on a Mac
Installing Mini
Config on a PC
To install the application on a Mac, simply insert the CD supplied with
the Mini-Converter into the computer, drag the “AJA Mini Config”
application for your platform (Mac or PC) to your desktop or an
applications folder.
Note:
models will not work with Mini Config).
Macintosh computers must be Intel-based (G5, G4 and earlier
5
1
To install the application on
a Windows PC, simply insert
the CD supplied with the
Mini-Converter into the
computer, locate the
“MiniInstaller” application,
and then double-click it.
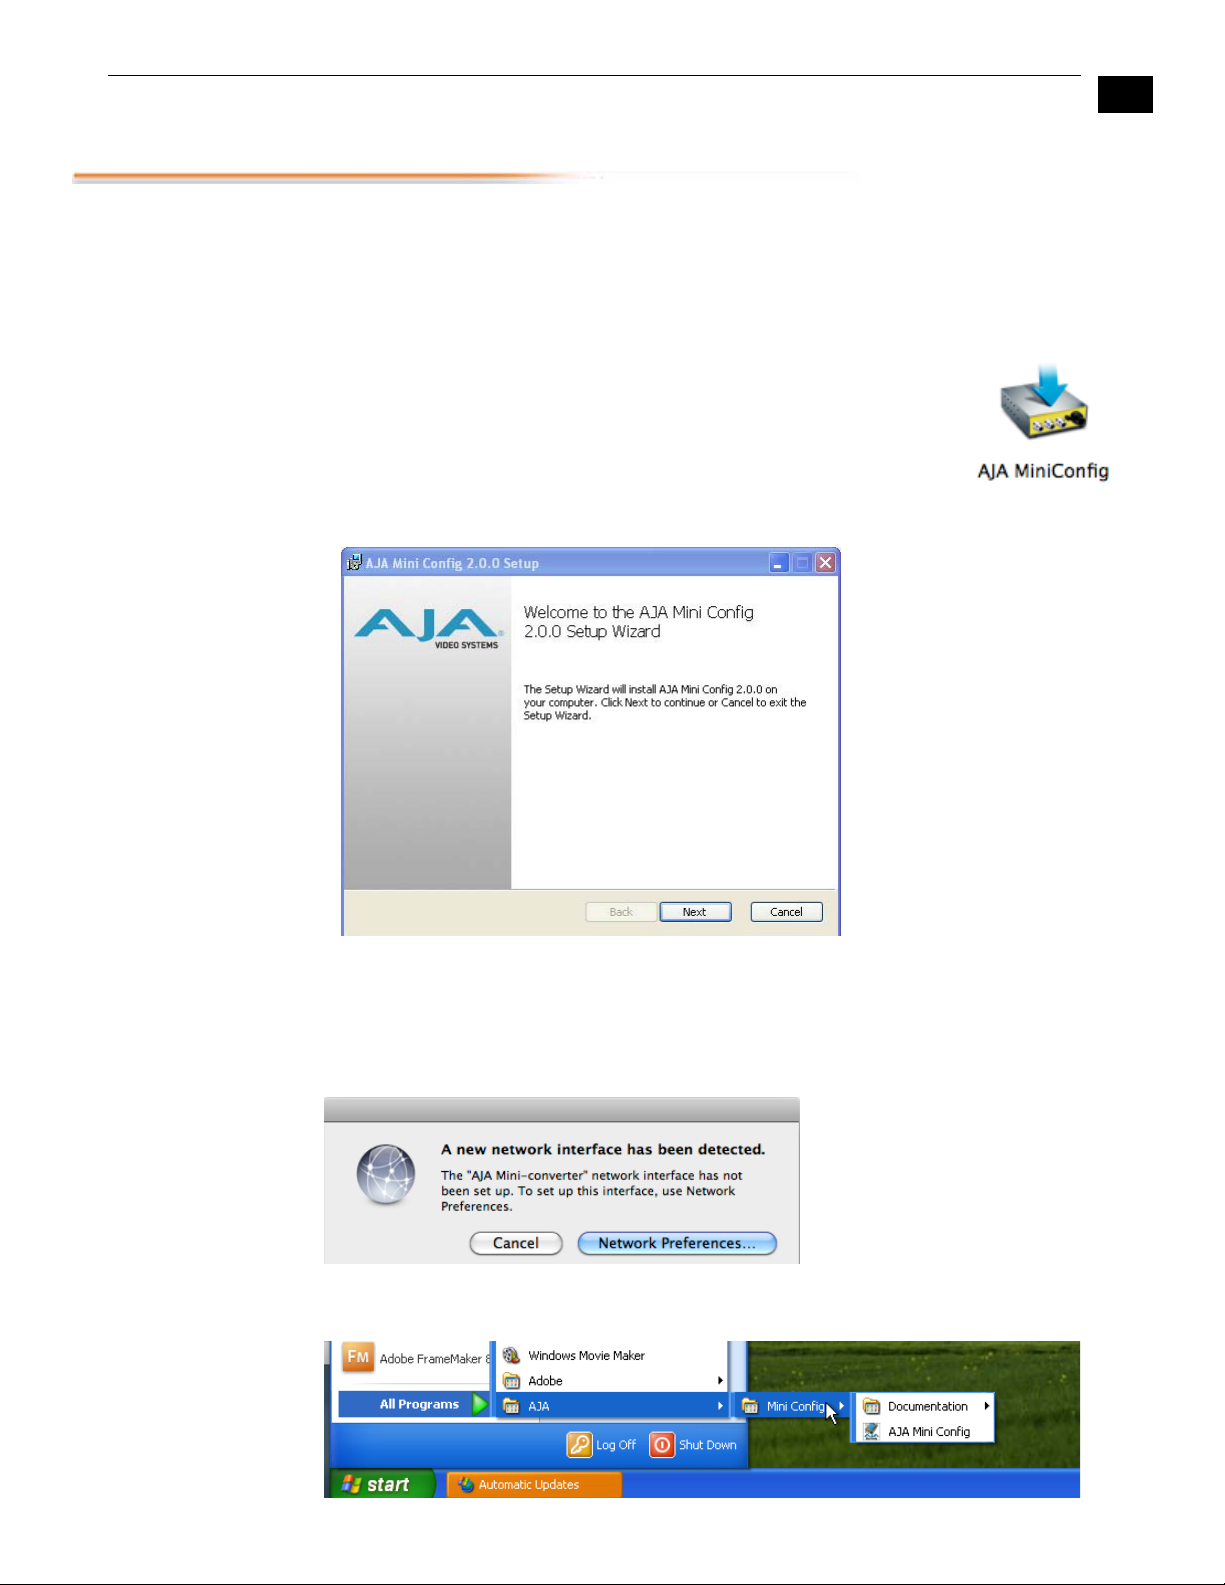
Running Mini
Config
A Setup Wizard will guide
you through the installation.
Just click Next to begin.
Answer all questions in the subsequent dialogues; when you’re done, you will be able
to locate the Mini Config application in the AJA folder in the Programs listing.
Connect a Hi5-3G Mini-Converter to the PC or Mac via the supplied USB cable. Connect
power to the Mini-Converter (DWP or DWP-U recommended).
Note:
Mini-Converter is connected
to the USB port, you may see
an alert like that shown
following. If you do, press
Cancel—this alert can be
ignored.
To run Mini Config on a PC, find the AJA Mini Config in the program list and locate the
AJA Mini Config application.
On a Mac, when the

6
To run Mini Config on a Mac, double-click the Applications folder and locate the AJA
Mini Config application. Double-click the AJA Mini Config application to launch it.
Once AJA Mini Config is running (PC or Mac), it looks pretty much the same,
regardless of the platform.
A File menu at the top of the Mini Config application menu bar allows you to Save the
current state of the Mini-Converter—with all the settings you’ve made—to a file for
later recall. This allows you to set up the converter for different applications, storing
each (with Save) to a unique name for easy recall later—using the Open menu item. A
Revert to Factory Settings menu item similarly allows you to change the settings back
to AJA’s factory defaults. An Edit menu allows you to cut and paste values to/from
fields, just as in other applications.
Operating Mini
Config
When the application is running, you’ll see a simple graphical interface for viewing
settings and updating software. This user interface consists of an information area at
the top that shows the available Mini-Converters attached to the computer via USB
(in this case your Hi5-3G), with a graphical rendering of the selected Mini-Converter
showing all the BNCs and connectors and their current state.
Colored text by connectors provides and indication of signal type and what the Hi53G is doing. Text in blue shows the values automatically selected, while text in black
shows values that you have manually selected. Text in red shows that Hi5-3G is not
detecting a signal or cannot negotiate with the attached device (even if can’t detect
an output device, it still shows the signal it is outputting).
Note:
device as well as input signals. For improved accuracy and reliability, you should
configure the Mini-Converter only when the target output device is attached and
input signals are supplied at the inputs.
Screens are virtually the same on both PC and Mac, with subtle differences that
reflect the general look of the platform environment.
Mini Config can manage multiple AJA Mini-Converters connected via USB—even
when they are of differing types. However it only connects to one at a time. You can
choose which Mini-Converter you wish to control using the pulldown menu in the
upper right hand corner. If you want to configure and update multiple MiniConverters in parallel, you can do it by running multiple instances of the Mini Config
application and have each control a different Mini-Converter.
configuration settings in red will change based on the attached output
 Loading...