

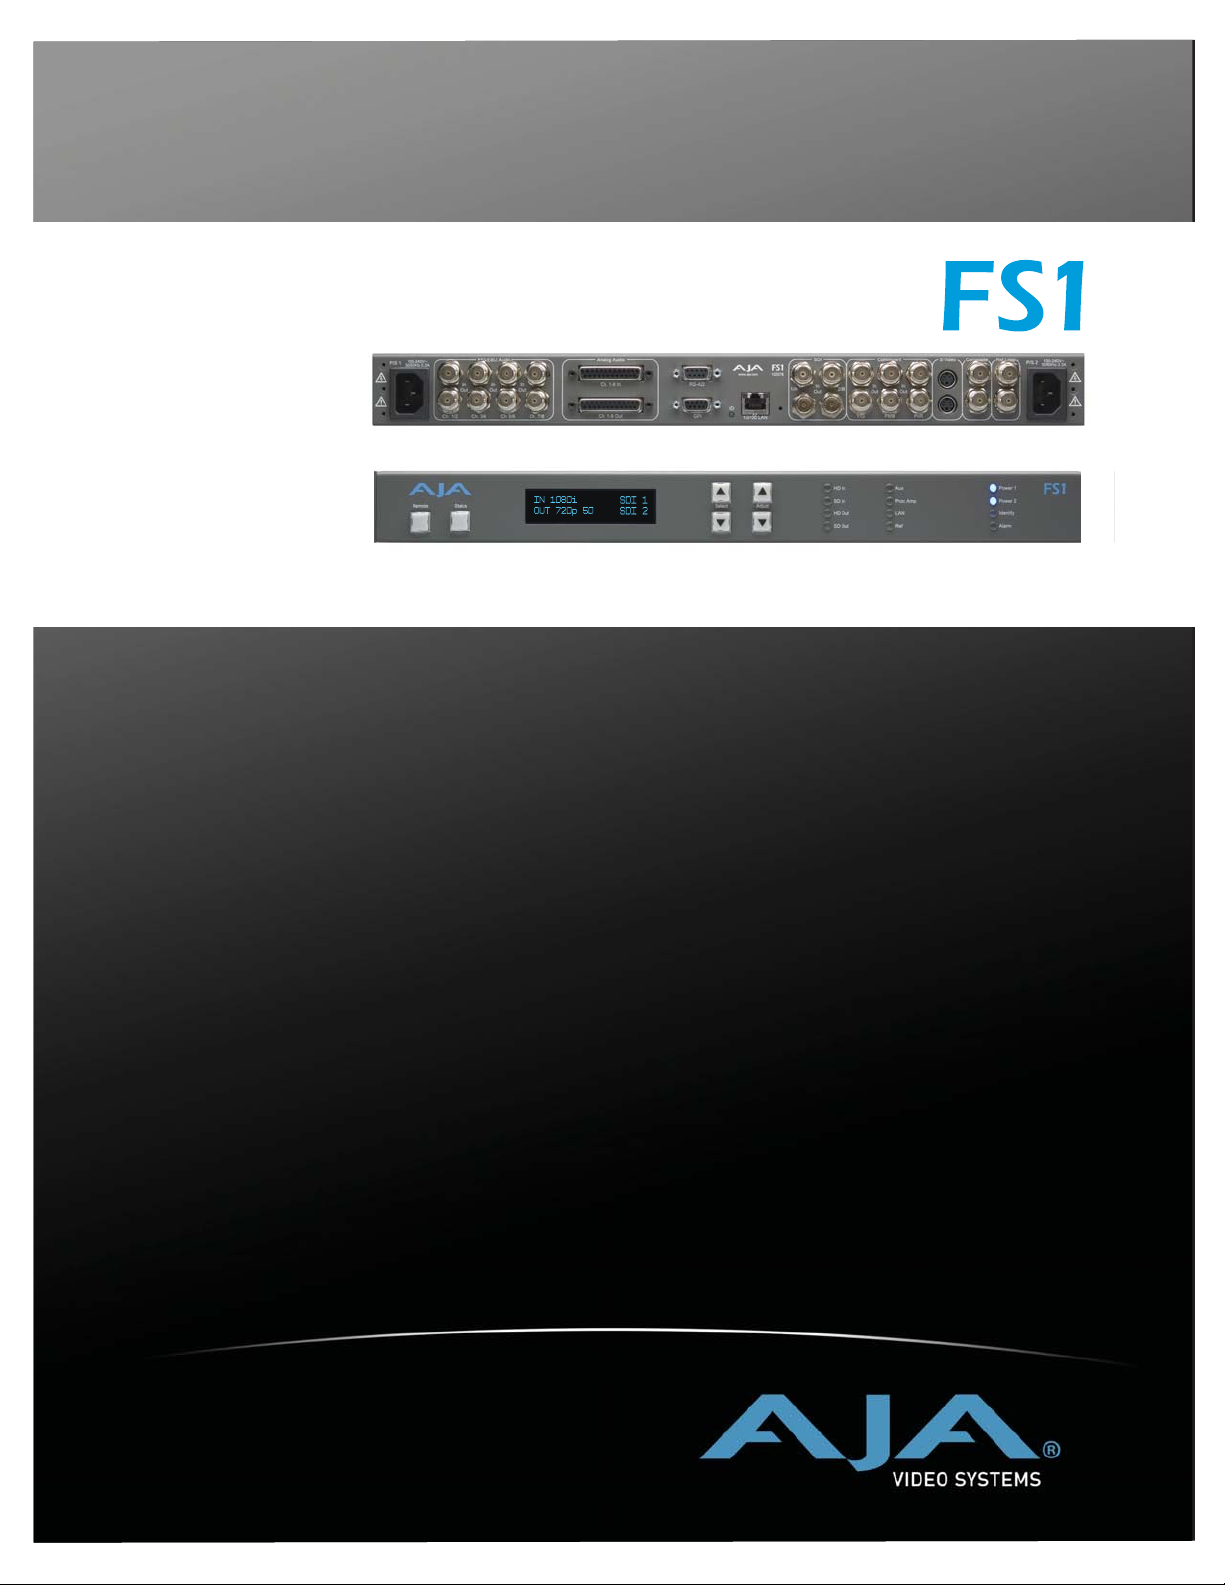
www.aja.com
Published: 2/16/2011
Software Version 2.2.0.47
Installation and Operation
Guide
Because it matters.

ii
Trademarks
AJA®, KONA®, Ki Pro®, KUMO®, and XENA® are registered trademarks of AJA Video, Inc.
Io Express™, Io HD™ and Io™ are trademarks of AJA Video, Inc. Apple, the Apple logo,
AppleShare, AppleTalk, FireWire, iPod, iPod Touch, Mac, and Macintosh are registered
trademarks of Apple Computer, Inc. Final Cut Pro, QuickTime and the QuickTime Logo are
trademarks of Apple Computer, Inc. All other trademarks are the property of their respective
holders.
Notice
Copyright © 2011 AJA Video, Inc. All rights reserved. All information in this manual is subject to
change without notice. No part of the document may be reproduced or transmitted in any form,
or by any means, electronic or mechanical, including photocopying or recording, without the
express written permission of AJA Inc.
FCC Emission Information
Contacting Support
This equipment has been tested and found to comply with the limits for a Class A digital device,
pursuant to Part 15 of the FCC Rules. These limits are designed to provide reasonable protection
against harmful interference when the equipment is operated in a commercial environment. This
equipment generates, uses and can radiate radio frequency energy and, if not installed and used in
accordance with the instruction manual, may cause harmful interference to radio
communications. Operation of this equipment in a residential area is likely to cause harmful
interference in which case the user will be required to correct the interference at his own expense.
Changes or modifications not expressly approved by AJA Video can effect emission compliance
and could void the user’s authority to operate this equipment.
To contact AJA Video for sales or support, use any of the following methods:
180 Litton Drive, Grass Valley, CA. 95945 USA
Telephone: +1.800.251.4224 or +1.530.274.2048
Fax: +1.530.274.9442
Web: http://www.aja.com
Support Email: support@aja.com
Sales Email: sales@aja.com

Limited Warranty
FS1 Installation and Operation Manual — Limited Warranty
AJA Video warrants that this product will be free from defects in materials and workmanship
for a period of five years from the date of purchase. If a product proves to be defective during
this warranty period, AJA Video, at its option, will either repair the defective product without
charge for parts and labor, or will provide a replacement in exchange for the defective product.
In order to obtain service under this warranty, you the Customer, must notify AJA Video of
the defect before the expiration of the warranty period and make suitable arrangements for the
performance of service. The Customer shall be responsible for packaging and shipping the
defective product to a designated service center nominated by AJA Video, with shipping
charges prepaid. AJA Video shall pay for the return of the product to the Customer if the
shipment is to a location within the country in which the AJA Video service center is located.
Customer shall be responsible for paying all shipping charges, insurance, duties, taxes, and
any other charges for products returned to any other locations.
This warranty shall not apply to any defect, failure or damage caused by improper use or
improper or inadequate maintenance and care. AJA Video shall not be obligated to furnish
service under this warranty a) to repair damage resulting from attempts by personnel other
than AJA Video representatives to install, repair or service the product, b) to repair damage
resulting from improper use or connection to incompatible equipment, c) to repair any
damage or malfunction caused by the use of non-AJA Video parts or supplies, or d) to service
a product that has been modified or integrated with other products when the effect of such a
modification or integration increases the time or difficulty of servicing the product.
THIS WARRANTY IS GIVEN BY AJA VIDEO IN LIEU OF ANY OTHER
WARRANTIES, EXPRESS OR IMPLIED. AJA VIDEO AND ITS VENDORS
DISCLAIM ANY IMPLIED WARRANTIES OF MERCHANTABILITY OR FITNESS
FOR A PARTICULAR PURPOSE. AJA VIDEO’S RESPONSIBILITY TO REPAIR OR
REPLACE DEFECTIVE PRODUCTS IS THE WHOLE AND EXCLUSIVE REMEDY
PROVIDED TO THE CUSTOMER FOR ANY INDIRECT, SPECIAL, INCIDENTAL
OR CONSEQUENTIAL DAMAGES IRRESPECTIVE OF WHETHER AJA VIDEO OR
THE VENDOR HAS ADVANCE NOTICE OF THE POSSIBILITY OF SUCH
DAMAGES.
1
iii
Important Safety Information
Hazard!
This symbol, when used in the manual, indicates a serious health hazard with
risk of injury or death.
Warning!
This symbol, when used in the manual, indicates a serious risk or threat to
personal safety.
Caution!
This symbol, when used in the manual, indicates important safety and
compliance information.

iv

FS1 Installation and Operation Manual — Table of Contents
Table of Contents
Trademarks . . . . . . . . . . . . . . . . . . . . . . . . . . . . . . . . . . . . . . . . . . . . . . . . . . . . . . . . . . . . . . . . . . ii
Notice . . . . . . . . . . . . . . . . . . . . . . . . . . . . . . . . . . . . . . . . . . . . . . . . . . . . . . . . . . . . . . . . . . . . . . ii
FCC Emission Information . . . . . . . . . . . . . . . . . . . . . . . . . . . . . . . . . . . . . . . . . . . . . . . . . . . . . . ii
Contacting Support . . . . . . . . . . . . . . . . . . . . . . . . . . . . . . . . . . . . . . . . . . . . . . . . . . . . . . . . . . . . ii
Limited Warranty . . . . . . . . . . . . . . . . . . . . . . . . . . . . . . . . . . . . . . . . . . . . . . . . . . . . . . . . . . . . . iii
Important Safety Information . . . . . . . . . . . . . . . . . . . . . . . . . . . . . . . . . . . . . . . . . . . . . . . . . . . . iii
Table of Contents . . . . . . . . . . . . . . . . . . . . . . . . . . . . . . . . . . . . . . . . . . . . . . . . . . . . . . . . . . . . . . v
Chapter 1:
Introduction. . . . . . . . . . . . . . . . . . . . . . . . . . . . . . . . . . . . . . . . . . . . . . . . . . . . . . . . . . .1
Overview . . . . . . . . . . . . . . . . . . . . . . . . . . . . . . . . . . . . . . . . . . . . . . . . . . . . . . . . . . . . . . . . . . . . . 1
Features . . . . . . . . . . . . . . . . . . . . . . . . . . . . . . . . . . . . . . . . . . . . . . . . . . . . . . . . . . . . . . . . . . . . . . 1
FS1 Front Panel Control . . . . . . . . . . . . . . . . . . . . . . . . . . . . . . . . . . . . . . . . . . . . . . . . . . . . . . . . . 2
Remote Web Browser Control . . . . . . . . . . . . . . . . . . . . . . . . . . . . . . . . . . . . . . . . . . . . . . . . . . . . . 3
SNMP Interface . . . . . . . . . . . . . . . . . . . . . . . . . . . . . . . . . . . . . . . . . . . . . . . . . . . . . . . . . . . . . . . . 3
Block Diagram. . . . . . . . . . . . . . . . . . . . . . . . . . . . . . . . . . . . . . . . . . . . . . . . . . . . . . . . . . . . . . . . . 3
Block Diagram Description . . . . . . . . . . . . . . . . . . . . . . . . . . . . . . . . . . . . . . . . . . . . . . . . . . . . 3
What’s In The Box? . . . . . . . . . . . . . . . . . . . . . . . . . . . . . . . . . . . . . . . . . . . . . . . . . . . . . . . . . . . . . 4
In This Manual . . . . . . . . . . . . . . . . . . . . . . . . . . . . . . . . . . . . . . . . . . . . . . . . . . . . . . . . . . . . . . . . 5
1
v
Chapter 2:
Controls and Indicators . . . . . . . . . . . . . . . . . . . . . . . . . . . . . . . . . . . . . . . . . . . . . . . . .7
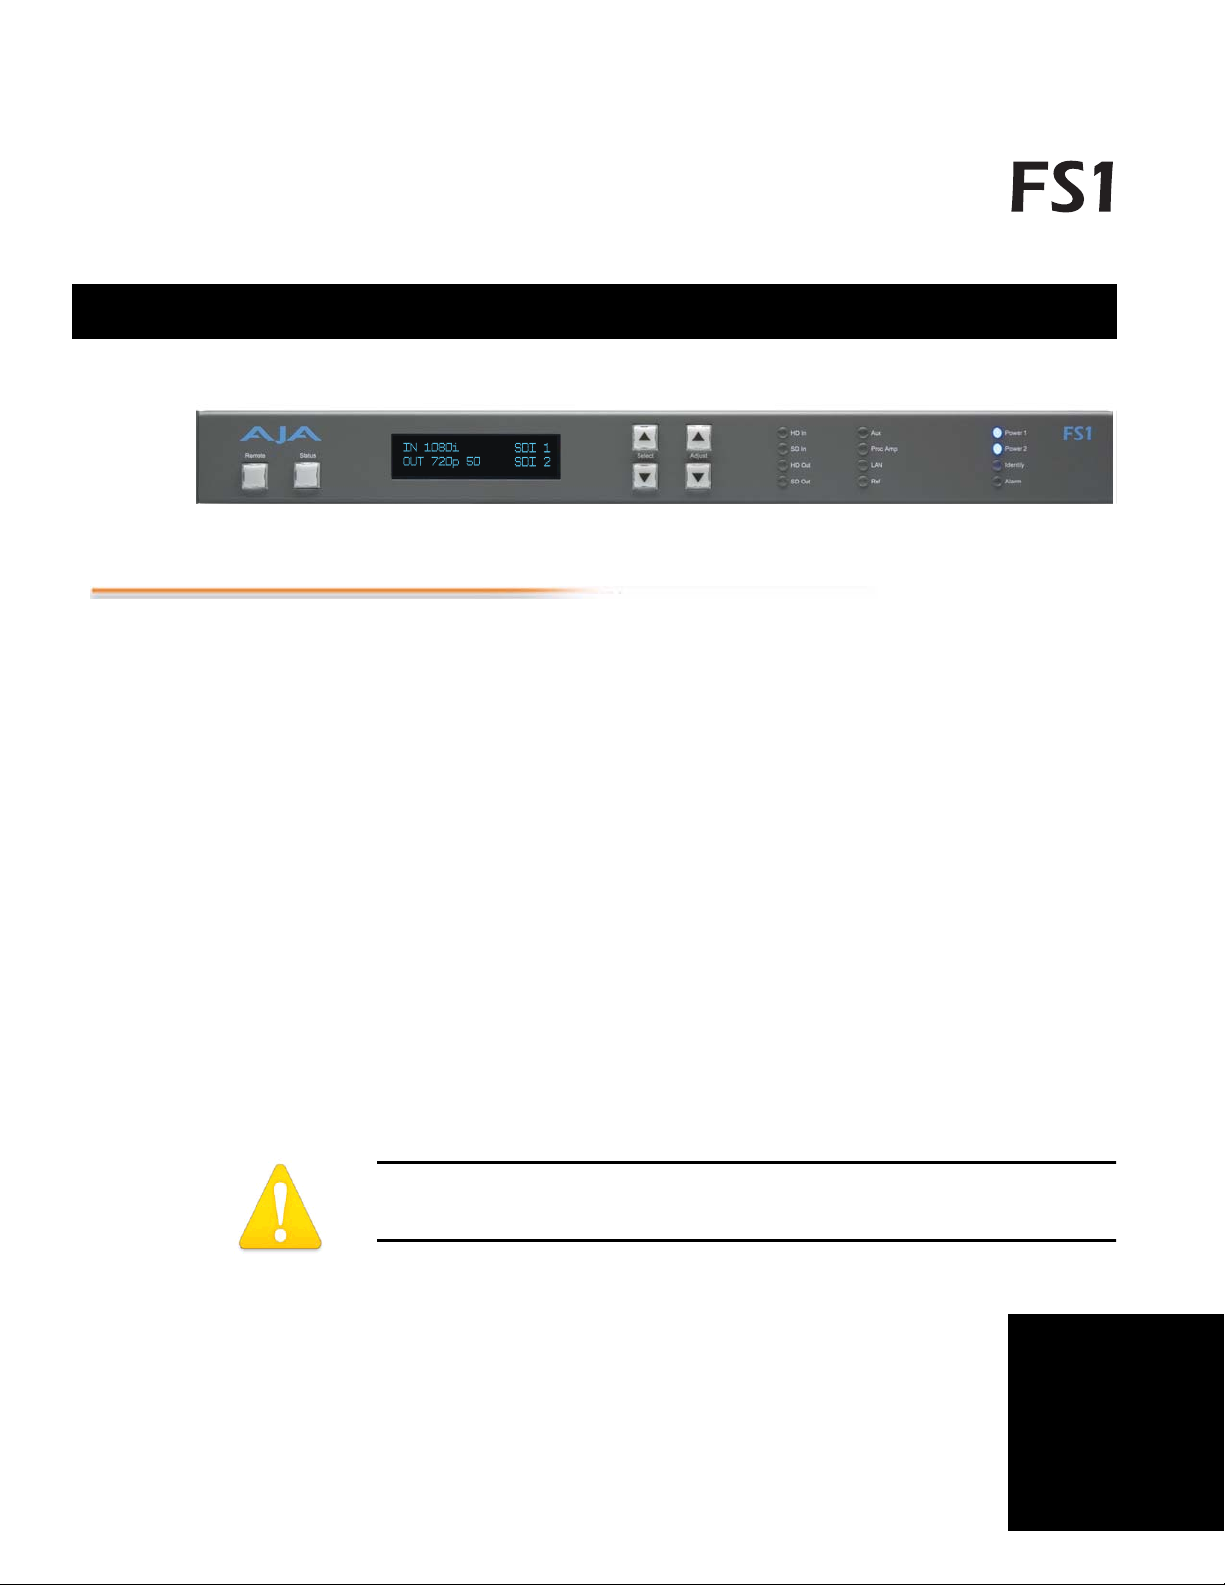
Controls and Indicators . . . . . . . . . . . . . . . . . . . . . . . . . . . . . . . . . . . . . . . . . . . . . . . . . . . . . . . . . . 7
Front Panel . . . . . . . . . . . . . . . . . . . . . . . . . . . . . . . . . . . . . . . . . . . . . . . . . . . . . . . . . . . . . . . . . . . 8
Alphanumeric Display . . . . . . . . . . . . . . . . . . . . . . . . . . . . . . . . . . . . . . . . . . . . . . . . . . . . . . . . 8
Status Display . . . . . . . . . . . . . . . . . . . . . . . . . . . . . . . . . . . . . . . . . . . . . . . . . . . . . . . . . . . . . . 9
Controlling the FS1—Using the Select and Adjust Buttons . . . . . . . . . . . . . . . . . . . . . . . . . . . 10
Remote Control . . . . . . . . . . . . . . . . . . . . . . . . . . . . . . . . . . . . . . . . . . . . . . . . . . . . . . . . . . . . 11
Indicator Descriptions . . . . . . . . . . . . . . . . . . . . . . . . . . . . . . . . . . . . . . . . . . . . . . . . . . . . . . . 11
Activity Indicators . . . . . . . . . . . . . . . . . . . . . . . . . . . . . . . . . . . . . . . . . . . . . . . . . . . . . . . 11
Power and Status Indicators . . . . . . . . . . . . . . . . . . . . . . . . . . . . . . . . . . . . . . . . . . . . . . . . 12
About Video and Format Compatibility. . . . . . . . . . . . . . . . . . . . . . . . . . . . . . . . . . . . . . . . . . 13
Rear Panel . . . . . . . . . . . . . . . . . . . . . . . . . . . . . . . . . . . . . . . . . . . . . . . . . . . . . . . . . . . . . . . . . . . 14
About Inputs and Outputs. . . . . . . . . . . . . . . . . . . . . . . . . . . . . . . . . . . . . . . . . . . . . . . . . . . . 14
Connectors. . . . . . . . . . . . . . . . . . . . . . . . . . . . . . . . . . . . . . . . . . . . . . . . . . . . . . . . . . . . . . . . . . . 14
Connector Descriptions . . . . . . . . . . . . . . . . . . . . . . . . . . . . . . . . . . . . . . . . . . . . . . . . . . . . . . 15
8 Channel AES/EBU Audio Inputs And Outputs . . . . . . . . . . . . . . . . . . . . . . . . . . . . . . . 15
Analog 8 Channel Audio . . . . . . . . . . . . . . . . . . . . . . . . . . . . . . . . . . . . . . . . . . . . . . . . . . 15
RS-422 Port. . . . . . . . . . . . . . . . . . . . . . . . . . . . . . . . . . . . . . . . . . . . . . . . . . . . . . . . . . . . 15
GPI . . . . . . . . . . . . . . . . . . . . . . . . . . . . . . . . . . . . . . . . . . . . . . . . . . . . . . . . . . . . . . . . . . 16
LAN. . . . . . . . . . . . . . . . . . . . . . . . . . . . . . . . . . . . . . . . . . . . . . . . . . . . . . . . . . . . . . . . . . 16
Component (YPbPr/RGB). . . . . . . . . . . . . . . . . . . . . . . . . . . . . . . . . . . . . . . . . . . . . . . . . 16
S-Video (Y/C) . . . . . . . . . . . . . . . . . . . . . . . . . . . . . . . . . . . . . . . . . . . . . . . . . . . . . . . . . . 16
Composite NTSC/PAL . . . . . . . . . . . . . . . . . . . . . . . . . . . . . . . . . . . . . . . . . . . . . . . . . . . 17

vi
Reference Video (looping). . . . . . . . . . . . . . . . . . . . . . . . . . . . . . . . . . . . . . . . . . . . . . . . . 17
Examples of permissible reference video signals: . . . . . . . . . . . . . . . . . . . . . . . . . . . . . . . . 17
Chapter 3:
Installation & Configuration . . . . . . . . . . . . . . . . . . . . . . . . . . . . . . . . . . . . . . . . . . . . 19
Installation Overview . . . . . . . . . . . . . . . . . . . . . . . . . . . . . . . . . . . . . . . . . . . . . . . . . . . . . . . . . . 19
Unpacking . . . . . . . . . . . . . . . . . . . . . . . . . . . . . . . . . . . . . . . . . . . . . . . . . . . . . . . . . . . . . . . . . . 22
Shipping Box Contents . . . . . . . . . . . . . . . . . . . . . . . . . . . . . . . . . . . . . . . . . . . . . . . . . . . . . . 22
Mounting the FS1 Chassis . . . . . . . . . . . . . . . . . . . . . . . . . . . . . . . . . . . . . . . . . . . . . . . . . . . . . . 23
Physical Requirements . . . . . . . . . . . . . . . . . . . . . . . . . . . . . . . . . . . . . . . . . . . . . . . . . . . . . . 23
Chassis Dimensions. . . . . . . . . . . . . . . . . . . . . . . . . . . . . . . . . . . . . . . . . . . . . . . . . . . . . . 23
Connecting to a Network . . . . . . . . . . . . . . . . . . . . . . . . . . . . . . . . . . . . . . . . . . . . . . . . . . . . . . . 23
TCP/IP Information You’ll Need . . . . . . . . . . . . . . . . . . . . . . . . . . . . . . . . . . . . . . . . . . . . . . 23
Networking the FS1 via DHCP . . . . . . . . . . . . . . . . . . . . . . . . . . . . . . . . . . . . . . . . . . . . . . . 24
Networking the FS1 using a Static IP Address. . . . . . . . . . . . . . . . . . . . . . . . . . . . . . . . . . . . . 25
Networking the FS1 using the Factory Default IP. . . . . . . . . . . . . . . . . . . . . . . . . . . . . . . . . . 26
Using Ping to Test the Network Connection . . . . . . . . . . . . . . . . . . . . . . . . . . . . . . . . . . . . . . . . 26
Mac Ping Procedure . . . . . . . . . . . . . . . . . . . . . . . . . . . . . . . . . . . . . . . . . . . . . . . . . . . . . . . . 26
Windows PC Ping Procedure . . . . . . . . . . . . . . . . . . . . . . . . . . . . . . . . . . . . . . . . . . . . . . . . . 26
Controlling with a Web Browser. . . . . . . . . . . . . . . . . . . . . . . . . . . . . . . . . . . . . . . . . . . . . . . . . . 27
Installing The Latest Software . . . . . . . . . . . . . . . . . . . . . . . . . . . . . . . . . . . . . . . . . . . . . . . . . . . . 27
Download the Latest FS1 Software . . . . . . . . . . . . . . . . . . . . . . . . . . . . . . . . . . . . . . . . . . . . . 27
Unpack the Software. . . . . . . . . . . . . . . . . . . . . . . . . . . . . . . . . . . . . . . . . . . . . . . . . . . . . . . . 27
Uploading and Installing the Software to the FS1 . . . . . . . . . . . . . . . . . . . . . . . . . . . . . . . . . . 28
GPI Connections . . . . . . . . . . . . . . . . . . . . . . . . . . . . . . . . . . . . . . . . . . . . . . . . . . . . . . . . . . . . . 29
Cabling the System . . . . . . . . . . . . . . . . . . . . . . . . . . . . . . . . . . . . . . . . . . . . . . . . . . . . . . . . . . . 29
Where to Place the FS1 . . . . . . . . . . . . . . . . . . . . . . . . . . . . . . . . . . . . . . . . . . . . . . . . . . . . . 29
Power Requirements . . . . . . . . . . . . . . . . . . . . . . . . . . . . . . . . . . . . . . . . . . . . . . . . . . . . . . . . 30
System Video/Audio Cable Connections. . . . . . . . . . . . . . . . . . . . . . . . . . . . . . . . . . . . . . . . . 30
FS1 Audio Level Choices—Pro or Consumer . . . . . . . . . . . . . . . . . . . . . . . . . . . . . . . . . . . . . 31
How Do Audio Level Settings Relate to Nominal Levels? . . . . . . . . . . . . . . . . . . . . . . . . . 31
Chapter 4:
Parameter Menus . . . . . . . . . . . . . . . . . . . . . . . . . . . . . . . . . . . . . . . . . . . . . . . . . . . . . 33
Controlling the FS1 via Front Panel Parameter Menus . . . . . . . . . . . . . . . . . . . . . . . . . . . . . . . . . 33
1.1 Output Format . . . . . . . . . . . . . . . . . . . . . . . . . . . . . . . . . . . . . . . . . . . . . . . . . . . . . . . . . . . . 35
1.2 SDI 2 Out Format . . . . . . . . . . . . . . . . . . . . . . . . . . . . . . . . . . . . . . . . . . . . . . . . . . . . . . . . . 35
1.3 Component Out . . . . . . . . . . . . . . . . . . . . . . . . . . . . . . . . . . . . . . . . . . . . . . . . . . . . . . . . . . . 36
2.1 Video Input . . . . . . . . . . . . . . . . . . . . . . . . . . . . . . . . . . . . . . . . . . . . . . . . . . . . . . . . . . . . . . 36
2.2 Audio Input . . . . . . . . . . . . . . . . . . . . . . . . . . . . . . . . . . . . . . . . . . . . . . . . . . . . . . . . . . . . . . 37
2.11 Audio Map Ch1 . . . . . . . . . . . . . . . . . . . . . . . . . . . . . . . . . . . . . . . . . . . . . . . . . . . . . . . . . . 38
2.12 Audio Map Ch2 . . . . . . . . . . . . . . . . . . . . . . . . . . . . . . . . . . . . . . . . . . . . . . . . . . . . . . . . . . 39
2.13 Audio Map Ch3 . . . . . . . . . . . . . . . . . . . . . . . . . . . . . . . . . . . . . . . . . . . . . . . . . . . . . . . . . . 39
2.14 Audio Map Ch4 . . . . . . . . . . . . . . . . . . . . . . . . . . . . . . . . . . . . . . . . . . . . . . . . . . . . . . . . . . 39
2.15 Audio Map Ch5 . . . . . . . . . . . . . . . . . . . . . . . . . . . . . . . . . . . . . . . . . . . . . . . . . . . . . . . . . . 39

FS1 Installation and Operation Manual — Table of Contents
2.16 Audio Map Ch6. . . . . . . . . . . . . . . . . . . . . . . . . . . . . . . . . . . . . . . . . . . . . . . . . . . . . . . . . . . 39
2.17 Audio Map Ch7. . . . . . . . . . . . . . . . . . . . . . . . . . . . . . . . . . . . . . . . . . . . . . . . . . . . . . . . . . . 39
2.18 Audio Map Ch8. . . . . . . . . . . . . . . . . . . . . . . . . . . . . . . . . . . . . . . . . . . . . . . . . . . . . . . . . . . 39
2.21 Audio Map Ch 1/2. . . . . . . . . . . . . . . . . . . . . . . . . . . . . . . . . . . . . . . . . . . . . . . . . . . . . . . . . 40
2.22 Audio Map Ch 3/4. . . . . . . . . . . . . . . . . . . . . . . . . . . . . . . . . . . . . . . . . . . . . . . . . . . . . . . . . 40
2.23 Audio Map Ch 5/6. . . . . . . . . . . . . . . . . . . . . . . . . . . . . . . . . . . . . . . . . . . . . . . . . . . . . . . . . 40
2.24 Audio Map Ch 7/8. . . . . . . . . . . . . . . . . . . . . . . . . . . . . . . . . . . . . . . . . . . . . . . . . . . . . . . . . 41
3.1 Component In Format. . . . . . . . . . . . . . . . . . . . . . . . . . . . . . . . . . . . . . . . . . . . . . . . . . . . . . . 41
3.2 Component Out Format . . . . . . . . . . . . . . . . . . . . . . . . . . . . . . . . . . . . . . . . . . . . . . . . . . . . . 41
3.3 Frame Rate. . . . . . . . . . . . . . . . . . . . . . . . . . . . . . . . . . . . . . . . . . . . . . . . . . . . . . . . . . . . . . . . 41
3.4 NTSC Standard . . . . . . . . . . . . . . . . . . . . . . . . . . . . . . . . . . . . . . . . . . . . . . . . . . . . . . . . . . . . 42
4.1 Analog Audio Std. . . . . . . . . . . . . . . . . . . . . . . . . . . . . . . . . . . . . . . . . . . . . . . . . . . . . . . . . . . 42
1
4.2 Audio Delay (mS) . . . . . . . . . . . . . . . . . . . . . . . . . . . . . . . . . . . . . . . . . . . . . . . . . . . . . . . . . . 42
4.3 Embed Audio Out . . . . . . . . . . . . . . . . . . . . . . . . . . . . . . . . . . . . . . . . . . . . . . . . . . . . . . . . . . 43
4.4 Sample Rate Convert . . . . . . . . . . . . . . . . . . . . . . . . . . . . . . . . . . . . . . . . . . . . . . . . . . . . . . . . 43
4.5 Audio Follow Video. . . . . . . . . . . . . . . . . . . . . . . . . . . . . . . . . . . . . . . . . . . . . . . . . . . . . . . . . 44
4.6 AFV Memory. . . . . . . . . . . . . . . . . . . . . . . . . . . . . . . . . . . . . . . . . . . . . . . . . . . . . . . . . . . . . . 44
5.1 Upconvert Mode . . . . . . . . . . . . . . . . . . . . . . . . . . . . . . . . . . . . . . . . . . . . . . . . . . . . . . . . . . . 45
5.2 Downconvert Mode. . . . . . . . . . . . . . . . . . . . . . . . . . . . . . . . . . . . . . . . . . . . . . . . . . . . . . . . . 46
5.3 SD Aspect Ratio Convert . . . . . . . . . . . . . . . . . . . . . . . . . . . . . . . . . . . . . . . . . . . . . . . . . . . . . 48
5.5 Downconvert AFD Default . . . . . . . . . . . . . . . . . . . . . . . . . . . . . . . . . . . . . . . . . . . . . . . . . . . 49
5.6 AFD Out SDI 1. . . . . . . . . . . . . . . . . . . . . . . . . . . . . . . . . . . . . . . . . . . . . . . . . . . . . . . . . . . . 50
5.7 AFD Out SDI 2. . . . . . . . . . . . . . . . . . . . . . . . . . . . . . . . . . . . . . . . . . . . . . . . . . . . . . . . . . . . 50
6.1 Genlock Source . . . . . . . . . . . . . . . . . . . . . . . . . . . . . . . . . . . . . . . . . . . . . . . . . . . . . . . . . . . . 51
6.2 Output Timing H . . . . . . . . . . . . . . . . . . . . . . . . . . . . . . . . . . . . . . . . . . . . . . . . . . . . . . . . . . 51
6.3 Output Timing V . . . . . . . . . . . . . . . . . . . . . . . . . . . . . . . . . . . . . . . . . . . . . . . . . . . . . . . . . . 51
6.4 Analog Output Fine (Horizontal Timing) . . . . . . . . . . . . . . . . . . . . . . . . . . . . . . . . . . . . . . . . 52
7.1 Sidebar Keyer. . . . . . . . . . . . . . . . . . . . . . . . . . . . . . . . . . . . . . . . . . . . . . . . . . . . . . . . . . . . . . 52
7.2 Sidebar Edge . . . . . . . . . . . . . . . . . . . . . . . . . . . . . . . . . . . . . . . . . . . . . . . . . . . . . . . . . . . . . . 53
10.1 Proc Amp. . . . . . . . . . . . . . . . . . . . . . . . . . . . . . . . . . . . . . . . . . . . . . . . . . . . . . . . . . . . . . . . 53
10.2 Proc Amp Gain . . . . . . . . . . . . . . . . . . . . . . . . . . . . . . . . . . . . . . . . . . . . . . . . . . . . . . . . . . . 54
10.3 Proc Amp Black . . . . . . . . . . . . . . . . . . . . . . . . . . . . . . . . . . . . . . . . . . . . . . . . . . . . . . . . . . . 54
10.4 Proc Amp Hue. . . . . . . . . . . . . . . . . . . . . . . . . . . . . . . . . . . . . . . . . . . . . . . . . . . . . . . . . . . . 54
10.5 Proc Amp Sat. . . . . . . . . . . . . . . . . . . . . . . . . . . . . . . . . . . . . . . . . . . . . . . . . . . . . . . . . . . . . 54
11.1 Loss of Input . . . . . . . . . . . . . . . . . . . . . . . . . . . . . . . . . . . . . . . . . . . . . . . . . . . . . . . . . . . . . 55
20.0 Audio Output Levels . . . . . . . . . . . . . . . . . . . . . . . . . . . . . . . . . . . . . . . . . . . . . . . . . . . . . . . 55
20.1 Audio Level Ch1 . . . . . . . . . . . . . . . . . . . . . . . . . . . . . . . . . . . . . . . . . . . . . . . . . . . . . . . . . . 55
20.2 Audio Level Ch2 . . . . . . . . . . . . . . . . . . . . . . . . . . . . . . . . . . . . . . . . . . . . . . . . . . . . . . . . . . 56
20.3 Audio Level Ch3 . . . . . . . . . . . . . . . . . . . . . . . . . . . . . . . . . . . . . . . . . . . . . . . . . . . . . . . . . . 56
20.4 Audio Level Ch4 . . . . . . . . . . . . . . . . . . . . . . . . . . . . . . . . . . . . . . . . . . . . . . . . . . . . . . . . . . 56
20.5 Audio Level Ch5 . . . . . . . . . . . . . . . . . . . . . . . . . . . . . . . . . . . . . . . . . . . . . . . . . . . . . . . . . . 56
20.6 Audio Level Ch6 . . . . . . . . . . . . . . . . . . . . . . . . . . . . . . . . . . . . . . . . . . . . . . . . . . . . . . . . . . 56
20.7 Audio Level Ch7 . . . . . . . . . . . . . . . . . . . . . . . . . . . . . . . . . . . . . . . . . . . . . . . . . . . . . . . . . . 56
20.8 Audio Level Ch8 . . . . . . . . . . . . . . . . . . . . . . . . . . . . . . . . . . . . . . . . . . . . . . . . . . . . . . . . . . 56
21.0 Audio Output Phase . . . . . . . . . . . . . . . . . . . . . . . . . . . . . . . . . . . . . . . . . . . . . . . . . . . . . . . 57
21.1 Audio Phase Ch1 . . . . . . . . . . . . . . . . . . . . . . . . . . . . . . . . . . . . . . . . . . . . . . . . . . . . . . . . . . 57
vii

viii
21.2 Audio Phase Ch2 . . . . . . . . . . . . . . . . . . . . . . . . . . . . . . . . . . . . . . . . . . . . . . . . . . . . . . . . . 57
21.3 Audio Phase Ch3 . . . . . . . . . . . . . . . . . . . . . . . . . . . . . . . . . . . . . . . . . . . . . . . . . . . . . . . . . 57
21.4 Audio Phase Ch4 . . . . . . . . . . . . . . . . . . . . . . . . . . . . . . . . . . . . . . . . . . . . . . . . . . . . . . . . . 57
21.5 Audio Phase Ch5 . . . . . . . . . . . . . . . . . . . . . . . . . . . . . . . . . . . . . . . . . . . . . . . . . . . . . . . . . 58
21.6 Audio Phase Ch6 . . . . . . . . . . . . . . . . . . . . . . . . . . . . . . . . . . . . . . . . . . . . . . . . . . . . . . . . . 58
21.7 Audio Phase Ch7 . . . . . . . . . . . . . . . . . . . . . . . . . . . . . . . . . . . . . . . . . . . . . . . . . . . . . . . . . 58
21.8 Audio Phase Ch8 . . . . . . . . . . . . . . . . . . . . . . . . . . . . . . . . . . . . . . . . . . . . . . . . . . . . . . . . . 58
30.1 Closed Captioning Translator . . . . . . . . . . . . . . . . . . . . . . . . . . . . . . . . . . . . . . . . . . . . . . . . 58
31.1 Upconvert Line 21 . . . . . . . . . . . . . . . . . . . . . . . . . . . . . . . . . . . . . . . . . . . . . . . . . . . . . . . . 60
35.1 Remote Control . . . . . . . . . . . . . . . . . . . . . . . . . . . . . . . . . . . . . . . . . . . . . . . . . . . . . . . . . . 60
35.3 Authentication . . . . . . . . . . . . . . . . . . . . . . . . . . . . . . . . . . . . . . . . . . . . . . . . . . . . . . . . . . . 61
36.1 GPI IN 1 Response . . . . . . . . . . . . . . . . . . . . . . . . . . . . . . . . . . . . . . . . . . . . . . . . . . . . . . . . 62
36.2 GPI IN 2 Response . . . . . . . . . . . . . . . . . . . . . . . . . . . . . . . . . . . . . . . . . . . . . . . . . . . . . . . . 63
37.1 GPI 1 OUT . . . . . . . . . . . . . . . . . . . . . . . . . . . . . . . . . . . . . . . . . . . . . . . . . . . . . . . . . . . . . 64
37.2 GPI 2 OUT . . . . . . . . . . . . . . . . . . . . . . . . . . . . . . . . . . . . . . . . . . . . . . . . . . . . . . . . . . . . . 64
40.1 Freeze Output. . . . . . . . . . . . . . . . . . . . . . . . . . . . . . . . . . . . . . . . . . . . . . . . . . . . . . . . . . . . 65
41.2 Video SG . . . . . . . . . . . . . . . . . . . . . . . . . . . . . . . . . . . . . . . . . . . . . . . . . . . . . . . . . . . . . . . 65
41.3 Audio SG . . . . . . . . . . . . . . . . . . . . . . . . . . . . . . . . . . . . . . . . . . . . . . . . . . . . . . . . . . . . . . . 65
50.1 IP Config . . . . . . . . . . . . . . . . . . . . . . . . . . . . . . . . . . . . . . . . . . . . . . . . . . . . . . . . . . . . . . . 66
50.2 IP Address. . . . . . . . . . . . . . . . . . . . . . . . . . . . . . . . . . . . . . . . . . . . . . . . . . . . . . . . . . . . . . . 66
50.3 Subnet Mask . . . . . . . . . . . . . . . . . . . . . . . . . . . . . . . . . . . . . . . . . . . . . . . . . . . . . . . . . . . . . 67
50.4 Default Gateway . . . . . . . . . . . . . . . . . . . . . . . . . . . . . . . . . . . . . . . . . . . . . . . . . . . . . . . . . . 67
50.5 System Name . . . . . . . . . . . . . . . . . . . . . . . . . . . . . . . . . . . . . . . . . . . . . . . . . . . . . . . . . . . . 68
50.6 MAC Address . . . . . . . . . . . . . . . . . . . . . . . . . . . . . . . . . . . . . . . . . . . . . . . . . . . . . . . . . . . . 68
51.1 SNMP Enable. . . . . . . . . . . . . . . . . . . . . . . . . . . . . . . . . . . . . . . . . . . . . . . . . . . . . . . . . . . . 69
51.2 SNMP Trap Destination 1 . . . . . . . . . . . . . . . . . . . . . . . . . . . . . . . . . . . . . . . . . . . . . . . . . . 69
51.3 SNMP Trap Port 1 . . . . . . . . . . . . . . . . . . . . . . . . . . . . . . . . . . . . . . . . . . . . . . . . . . . . . . . . 70
51.4 SNMP Trap Destination 2 . . . . . . . . . . . . . . . . . . . . . . . . . . . . . . . . . . . . . . . . . . . . . . . . . . 70
51.5 SNMP Trap Port 2 . . . . . . . . . . . . . . . . . . . . . . . . . . . . . . . . . . . . . . . . . . . . . . . . . . . . . . . . 71
60.1 Power Supply Alarm . . . . . . . . . . . . . . . . . . . . . . . . . . . . . . . . . . . . . . . . . . . . . . . . . . . . . . . 71
60.2 Format Alarm . . . . . . . . . . . . . . . . . . . . . . . . . . . . . . . . . . . . . . . . . . . . . . . . . . . . . . . . . . . . 72
60.3 Reference Alarm . . . . . . . . . . . . . . . . . . . . . . . . . . . . . . . . . . . . . . . . . . . . . . . . . . . . . . . . . . 72
70.1 Screen Saver . . . . . . . . . . . . . . . . . . . . . . . . . . . . . . . . . . . . . . . . . . . . . . . . . . . . . . . . . . . . . 73
70.2 Display Intensity . . . . . . . . . . . . . . . . . . . . . . . . . . . . . . . . . . . . . . . . . . . . . . . . . . . . . . . . . . 73
80.1 Serial Number. . . . . . . . . . . . . . . . . . . . . . . . . . . . . . . . . . . . . . . . . . . . . . . . . . . . . . . . . . . . 73
80.2 Software Version . . . . . . . . . . . . . . . . . . . . . . . . . . . . . . . . . . . . . . . . . . . . . . . . . . . . . . . . . . 73
90.0 Reboot . . . . . . . . . . . . . . . . . . . . . . . . . . . . . . . . . . . . . . . . . . . . . . . . . . . . . . . . . . . . . . . . . 73
91.1 Preset Recall . . . . . . . . . . . . . . . . . . . . . . . . . . . . . . . . . . . . . . . . . . . . . . . . . . . . . . . . . . . . . 74
92.1 Preset Save . . . . . . . . . . . . . . . . . . . . . . . . . . . . . . . . . . . . . . . . . . . . . . . . . . . . . . . . . . . . . . 74
Parameters Not Stored . . . . . . . . . . . . . . . . . . . . . . . . . . . . . . . . . . . . . . . . . . . . . . . . . . . . . . 74
99.0 Factory Settings. . . . . . . . . . . . . . . . . . . . . . . . . . . . . . . . . . . . . . . . . . . . . . . . . . . . . . . . . . . 75
Chapter 5:
Browser Remote Control. . . . . . . . . . . . . . . . . . . . . . . . . . . . . . . . . . . . . . . . . . . . . . . 77
Remote FS1 Control Via a Web Browser . . . . . . . . . . . . . . . . . . . . . . . . . . . . . . . . . . . . . . . . . . . 77

FS1 Installation and Operation Manual — Table of Contents
General Screen Information . . . . . . . . . . . . . . . . . . . . . . . . . . . . . . . . . . . . . . . . . . . . . . . . . . . 78
Controlling Multiple FS1s . . . . . . . . . . . . . . . . . . . . . . . . . . . . . . . . . . . . . . . . . . . . . . . . . . . . 78
Resetting Values To Factory Settings . . . . . . . . . . . . . . . . . . . . . . . . . . . . . . . . . . . . . . . . . . . . 79
Audio and Video I/O Screen . . . . . . . . . . . . . . . . . . . . . . . . . . . . . . . . . . . . . . . . . . . . . . . . . . 79
Audio Control Screen . . . . . . . . . . . . . . . . . . . . . . . . . . . . . . . . . . . . . . . . . . . . . . . . . . . . . . . 83
Convert Mode Screen . . . . . . . . . . . . . . . . . . . . . . . . . . . . . . . . . . . . . . . . . . . . . . . . . . . . . . . 85
Genlock Control Screen. . . . . . . . . . . . . . . . . . . . . . . . . . . . . . . . . . . . . . . . . . . . . . . . . . . . . . 88
ProcAmp Control Screen . . . . . . . . . . . . . . . . . . . . . . . . . . . . . . . . . . . . . . . . . . . . . . . . . . . . . 89
Caption Screen. . . . . . . . . . . . . . . . . . . . . . . . . . . . . . . . . . . . . . . . . . . . . . . . . . . . . . . . . . . . . 90
Presets Screen. . . . . . . . . . . . . . . . . . . . . . . . . . . . . . . . . . . . . . . . . . . . . . . . . . . . . . . . . . . . . . 91
Miscellaneous Screen . . . . . . . . . . . . . . . . . . . . . . . . . . . . . . . . . . . . . . . . . . . . . . . . . . . . . . . . 93
Test Signals Screen. . . . . . . . . . . . . . . . . . . . . . . . . . . . . . . . . . . . . . . . . . . . . . . . . . . . . . . . . . 99
1
Network Screen . . . . . . . . . . . . . . . . . . . . . . . . . . . . . . . . . . . . . . . . . . . . . . . . . . . . . . . . . . . 100
SNMP Screen . . . . . . . . . . . . . . . . . . . . . . . . . . . . . . . . . . . . . . . . . . . . . . . . . . . . . . . . . . . . 102
Update Firmware . . . . . . . . . . . . . . . . . . . . . . . . . . . . . . . . . . . . . . . . . . . . . . . . . . . . . . . . . . 102
Chapter 6:
SNMP . . . . . . . . . . . . . . . . . . . . . . . . . . . . . . . . . . . . . . . . . . . . . . . . . . . . . . . . . . . . . .103
FS1 Simple Network Management Protocol . . . . . . . . . . . . . . . . . . . . . . . . . . . . . . . . . . . . . . . . 103
ix
Appendix A:
Specifications . . . . . . . . . . . . . . . . . . . . . . . . . . . . . . . . . . . . . . . . . . . . . . . . . . . . . .105
Formats . . . . . . . . . . . . . . . . . . . . . . . . . . . . . . . . . . . . . . . . . . . . . . . . . . . . . . . . . . . . . . . . . . . . 105
Video Inputs and Outputs . . . . . . . . . . . . . . . . . . . . . . . . . . . . . . . . . . . . . . . . . . . . . . . . . . . . . 105
Video A/D, D/A . . . . . . . . . . . . . . . . . . . . . . . . . . . . . . . . . . . . . . . . . . . . . . . . . . . . . . . . . . . . . 105
Audio Inputs and Outputs . . . . . . . . . . . . . . . . . . . . . . . . . . . . . . . . . . . . . . . . . . . . . . . . . . . . . 105
Audio levels . . . . . . . . . . . . . . . . . . . . . . . . . . . . . . . . . . . . . . . . . . . . . . . . . . . . . . . . . . . . . . . . . 105
LAN . . . . . . . . . . . . . . . . . . . . . . . . . . . . . . . . . . . . . . . . . . . . . . . . . . . . . . . . . . . . . . . . . . . . . . 105
RS422 . . . . . . . . . . . . . . . . . . . . . . . . . . . . . . . . . . . . . . . . . . . . . . . . . . . . . . . . . . . . . . . . . . . . . 106
GPI . . . . . . . . . . . . . . . . . . . . . . . . . . . . . . . . . . . . . . . . . . . . . . . . . . . . . . . . . . . . . . . . . . . . . . . 106
Physical . . . . . . . . . . . . . . . . . . . . . . . . . . . . . . . . . . . . . . . . . . . . . . . . . . . . . . . . . . . . . . . . . . . . 106
Power . . . . . . . . . . . . . . . . . . . . . . . . . . . . . . . . . . . . . . . . . . . . . . . . . . . . . . . . . . . . . . . . . . . . . 106
Appendix B:
GPI Connector Pinout . . . . . . . . . . . . . . . . . . . . . . . . . . . . . . . . . . . . . . . . . . . . . . . .107
GPI Connections . . . . . . . . . . . . . . . . . . . . . . . . . . . . . . . . . . . . . . . . . . . . . . . . . . . . . . . . . . . . 107
Appendix C:
Analog Audio Connector Pinout . . . . . . . . . . . . . . . . . . . . . . . . . . . . . . . . . . . . . . .109
Analog Audio Connections . . . . . . . . . . . . . . . . . . . . . . . . . . . . . . . . . . . . . . . . . . . . . . . . . . . . . 109
Appendix D:
Safety & Compliance . . . . . . . . . . . . . . . . . . . . . . . . . . . . . . . . . . . . . . . . . . . . . . . . .111
Federal Communications Commission (FCC) Compliance Notices . . . . . . . . . . . . . . . . . . . . . . 111
Class A Interference Statement . . . . . . . . . . . . . . . . . . . . . . . . . . . . . . . . . . . . . . . . . . . . . . . 111
FCC Caution . . . . . . . . . . . . . . . . . . . . . . . . . . . . . . . . . . . . . . . . . . . . . . . . . . . . . . . . . . . . 111

x
Canadian ICES Statement . . . . . . . . . . . . . . . . . . . . . . . . . . . . . . . . . . . . . . . . . . . . . . . . . . . . . .111
European Union and European Free Trade Association (EFTA)
Regulatory Compliance . . . . . . . . . . . . . . . . . . . . . . . . . . . . . . . . . . . . . . . . . . . . . . . . . . . . . . . .112
Declaration of Conformity . . . . . . . . . . . . . . . . . . . . . . . . . . . . . . . . . . . . . . . . . . . . . . . . . . .112
Korea KCC Compliance Statement . . . . . . . . . . . . . . . . . . . . . . . . . . . . . . . . . . . . . . . . . . . . . . .113
Taiwan Compliance Statement . . . . . . . . . . . . . . . . . . . . . . . . . . . . . . . . . . . . . . . . . . . . . . . . . .113
Japanese Compliance Statement . . . . . . . . . . . . . . . . . . . . . . . . . . . . . . . . . . . . . . . . . . . . . . . . .113
Translated Caution Statements, Warning Conventions and Warning Messages . . . . . . . . . . . . .113
Before Operating Your FS1 Unit, Please Read the Instructions in This Document . . . . . . . . . . .114
Appendix E:
Glossary . . . . . . . . . . . . . . . . . . . . . . . . . . . . . . . . . . . . . . . . . . . . . . . . . . . . . . . . . . . 119
Reference Terms . . . . . . . . . . . . . . . . . . . . . . . . . . . . . . . . . . . . . . . . . . . . . . . . . . . . . . . . . . . . .119
Index . . . . . . . . . . . . . . . . . . . . . . . . . . . . . . . . . . . . . . . . . . . . . . . . . . . . . . . . . . . . . . 123
SD
SD
HD
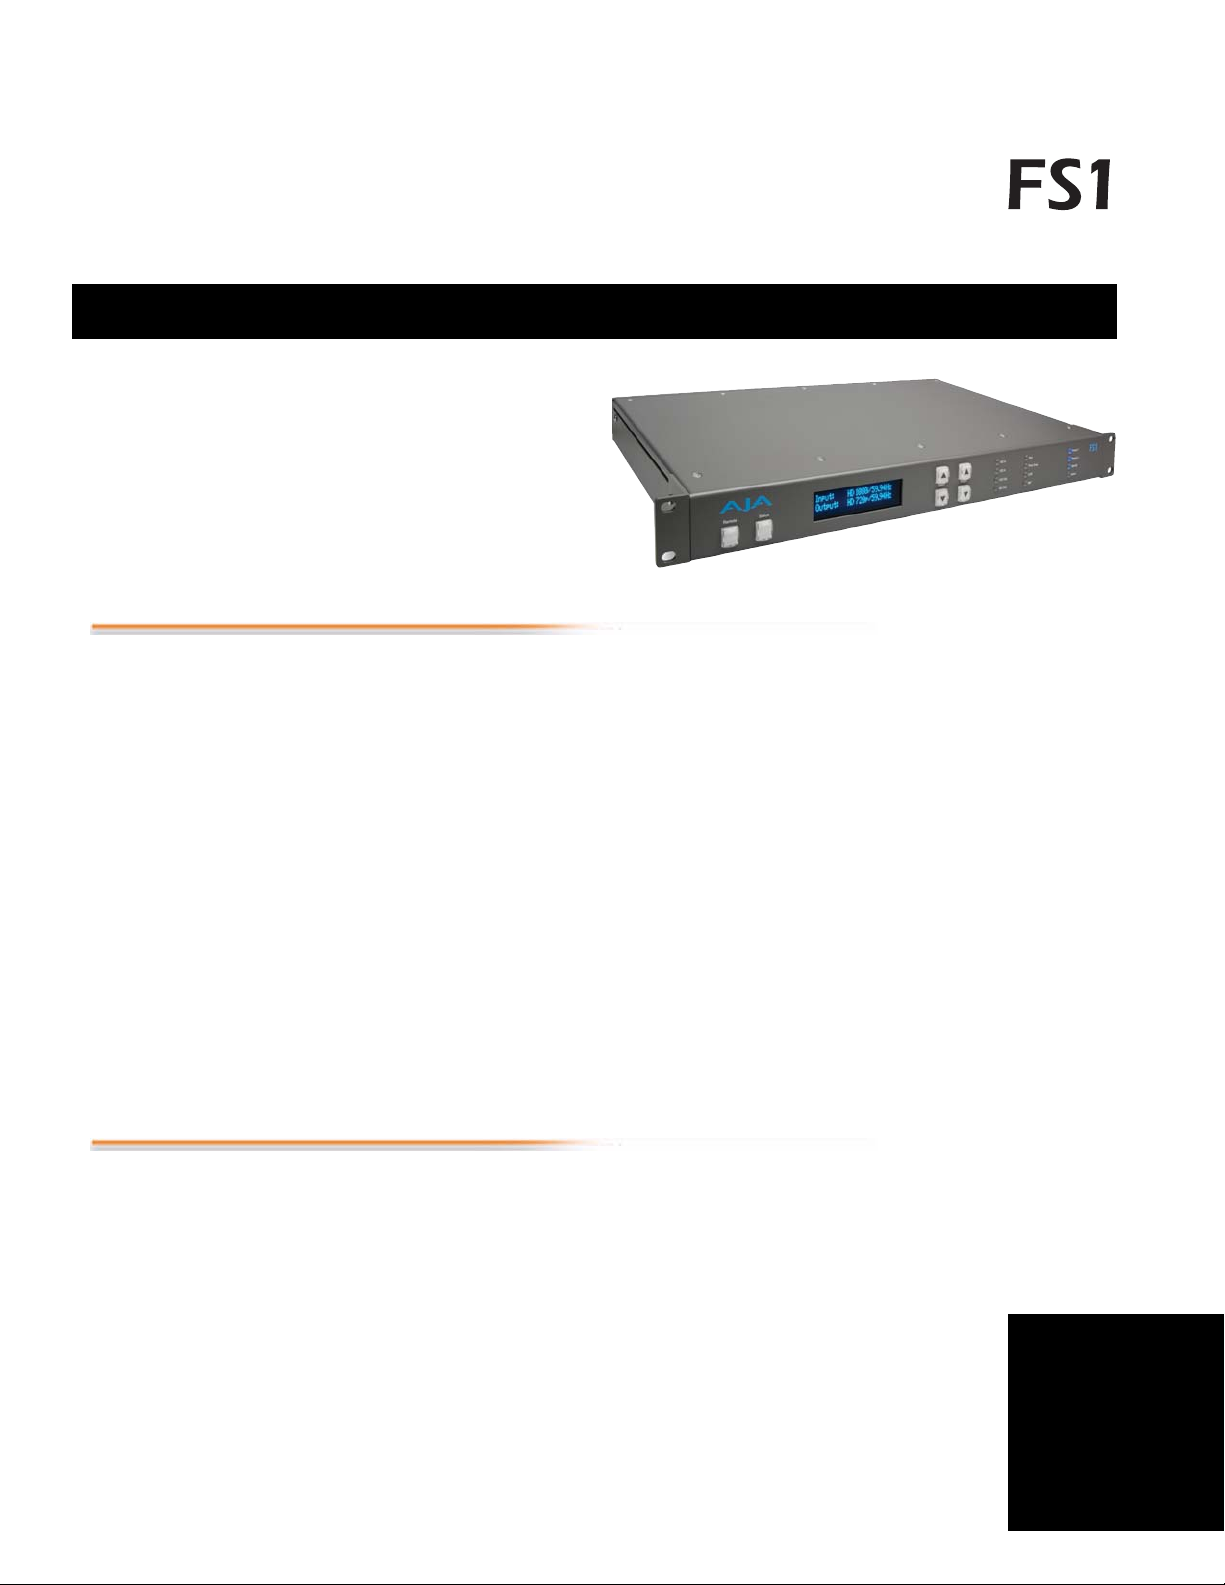
Chapter 1:
Introduction
Overview
Features
Featuring a flexible architecture, the FS1 Universal SD/HD Audio/Video Frame
Synchronizer and Converter simultaneously works with both HD and SD video—
all in full 10-bit broadcast quality video and 24-bit audio. The FS1 supports
virtually any input or output, analog or digital, HD or SD:
Converts up or down between SD and HD, and provides simultaneous HD
•
and SD outputs.
•
Cross-converts between HD formats with simultaneous output of both
formats.
•
Supports audio as 8-channel AES, balanced analog, or embedded audio with
full flexibility.
Handles closed captioning and closed captioning conversion between SD and
•
HD formats.
•
Offers network ready, web-based remote control.
The FS1 product offers a large number of unique features for connectivity, control,
and ease of use in any environment:
•
Universal HD/SD audio/video frame synchronizer and converter
HD up/down conversion
•
SD aspect ratio conversion
•
HD cross conversion (720p/1080i)
•
Up/down/cross-converting with both the input and converted
•
formats on SD/HD SDI outputs (both synchronized)
1
1
1

2
•
HD cross-converting with simultaneous downconverted SDI output
•
AFD support
•
Dual HD/SD SDI inputs and outputs
•
Component analog HD/SD input and output
•
Composite/S-Video input and output with TBC
•
8-channel AES and balanced analog audio inputs and outputs
•
16-channel embedded audio passed to SDI outputs
•
Audio mapping and control with AFV (audio follows video)—
16 channels of embedded audio can be mapped to any 8
•
Storage of 10 preset system configurations in memory or external files
•
Fully redundant power supplies standard
•
10/100 LAN with SNMP, embedded web server for remote control, and
VTECS™ open protocol
•
Video Proc Amp
•
Closed caption support—including SD-to-HD upconversion
•
Chassis styling optimized for use in a wide variety of machine rooms with
simple panel and remote web browser user interfaces
•
Front panel alphanumeric and graphical display shows input and output
settings, and is also used for parameter viewing/editing
•
LED status indicators for at-a-glance system monitoring
•
Two GPI inputs and outputs, TTL, isolated
•
Sidebar Keyer
•
5-year international warranty with unlimited technical support
FS1 Front Panel Control
FS1 operation can be monitored and changed in a number of ways:
•
Front panel control
•
Remote web browser via Ethernet
•
VTECS protocol via Ethernet
SNMP monitoring (Simple Network Management Protocol)
•
Feature sets in each of the control methods vary, although the front panel and web
browser interfaces offer many of the same features.
The front panel offers the most direct control of the device, which is ideal for
machine rooms or wherever quick changes and status checks must be made.
Chapter 2, Controls and Indicators describes front and rear panel features in detail.

FS1 Installation and Operation Manual — Remote Web Browser Control
Remote Web Browser Control
The FS1 internally contains an optimized web server that allows remote
monitoring and parameter setting via a network-attached computer running a
web-browser.
From a network-connected computer you can communicate with one or more
FS1 devices, even getting them to identify themselves via LEDs on the front and
rear panel (front:
Networks can be closed local area networks, a straight computer-to-FS1 cable,
or for greatest flexibility, exposed through a firewall to a broadband WAN.
The FS1 uses a standard RJ45 LAN connector, but internally the connection is
intelligent and communicates via standard “straight-through” CAT 5 ethernet
cables or null-modem (cross-over) cables with no configuration or strapping.
Note:
control. Other browsers may work, but AJA cannot guarantee operation.
The browser GUI operation and features are discussed in Chapter 5.
Firefox and Internet Explorer 7 are the supported web browsers for FS1
SNMP Interface
Identify
3
, rear: ID).
1
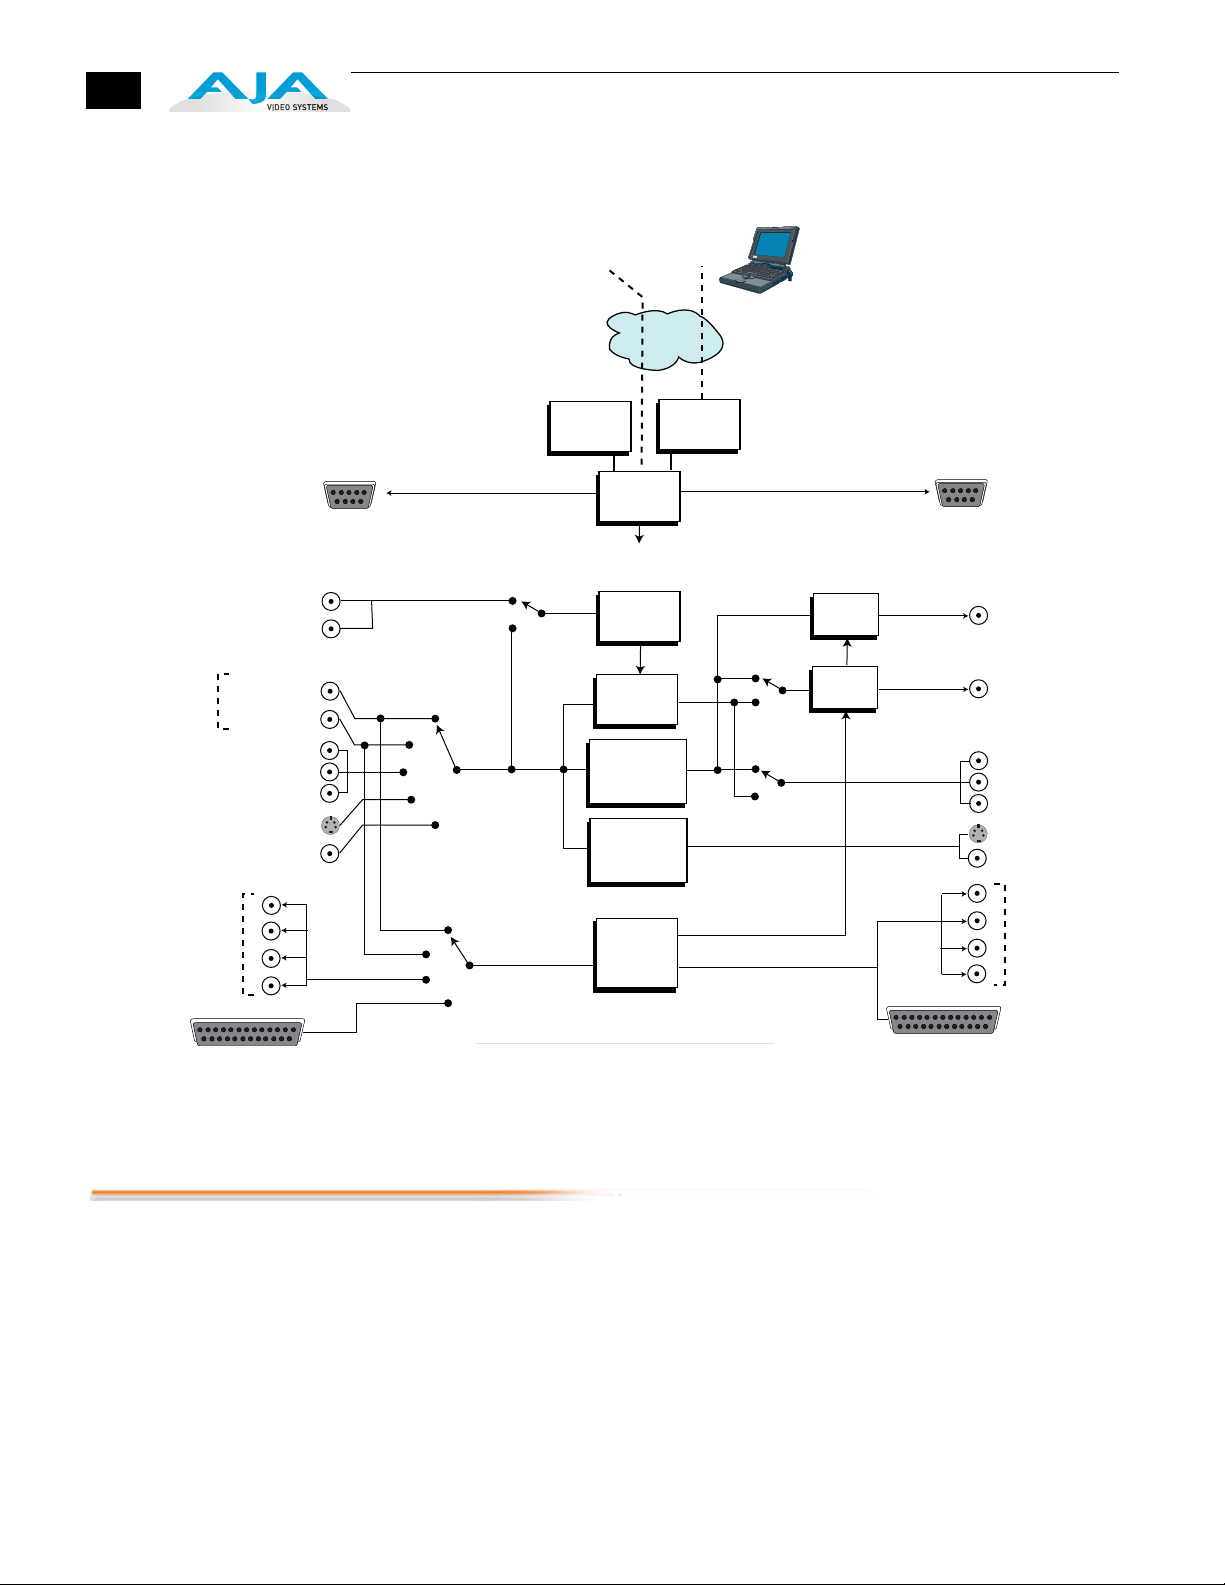
Block Diagram
Block Diagram Description
SNMP offers remote network monitoring of alarm conditions. SNMP support
is described in Chapter 6 .
The FS1 features a very flexible architecture that allows simultaneous HD/SD
operation. There are three separate frame synchronizers in the FS1: a full up/
down/cross-converting synchronizer, a downconverting synchronizer, and a
standard HD/SD non-converting synchronizer. This architecture allows the
following functions:
•
HD cross-converting with simultaneous downconverted SDI output
•
Up/down/cross-converting with both the input and converted formats on
SD/HD SDI outputs (both synchronized)
•
Up/down/cross-converting with dual SD/HD-SDI outputs
Composite and S-Video outputs are always active (dedicated down-
•
converter for HD inputs)
For example, the FS1 can input 720p, and output both cross-converted 1080i
HD-SDI and down-converted 525i SDI (or 1080i in and 720p and 525i out).
The FS1 also allows the user to set the output format, and the conversion will be
automatic depending on what the input is. The FS1’s output format can also be
controlled by using the reference input (follows the reference input format).
4
w/Embedded Audio
Not supported in
the current version
GPI
Inputs
(2)
Ref
Loop
SD-SDI In or
HD-SDI In (#1)
SD-SDI In or
HD-SDI In (#2)
Component YPbPr or
RGB In
S-Video In
Composite In
the current version
Ref
Input
Video
Select
SNMP
Control
via Command
Not supported in
Front
Panel
Control
Line
FS1
CPU
Genlock
Framesync
Up/Down/Cross
Converter,
Framesync,
1
ARC
Down
Converter,
Framesync,
1
ARC
Remote Web
Browser
Control
Embedded
Web
Server
LAN or
WAN
Ethernet
Connection
Norm
Bypass
Norm
Bypass
Audio
Embed
Audio
Embed
Not supported in
the current version
GPI
Outputs
(2)
SD-SDI Out or
HD-SDI Out (#1)
SD-SDI Out or
HD-SDI Out (#2)
Component YPbPr or
RGB Out
S-Video Out
Composite Out
AES/EBU digital
Audio
8-channels
(1 pair per BNC)
Input
Analog Audio
Input
8-channels
(Tascam-style cable)
What ’ s In The Box?
SDI 1
SDI 2
AES/EBU
Analog
Audio
Select
Audio
Processor
Notes:
ARC1 = Aspect Ratio Converter
AES/EBU digital
Audio
8-channels
(1 pair per BNC)
Output
Analog Audio
Output
8-channels
(Tascam-style cable)
FS1 Simplified Block Diagram
When you unpack your AJA FS1 chassis, you’ll find the following components:
•
AJA FS1 Chassis
• AC Power cords (2)
• The manual you’re reading (on CD)
• Optional: Late-breaking News or Read-Me-First notices (where applicable,
AJA may include additional bulletins related to your product and software)
Please save all packaging for shipping the FS1 should you wish to do so when
moving or sending it in for service.
FS1 Installation and Operation Manual — In This Manual
1
AC Power Cords (2)
5
In This Manual
FS1 Shipping Box Contents
Chapter 1 Introduction presents the overview you’re reading, listing features, box
contents, and requirements.
Chapter 2 Controls and Indicators discusses the FS1 front and rear panel controls,
connections, and indicators. Illustrations point out the various connectors and
indicators with text discussions of each.
Chapter 3 Installation and Configuration provides complete instructions for
installing and configuring the FS1 panel, from unpacking, cabling the system and
then getting it up and running.
Chapter 4 Parameter Menus gets you started with setting up and using the FS1 via
its front panel controls. Discussed are the Parameter Menu and the Select and Adjust
buttons used to view and edit settings.
Chapter 5 Browser Remote Control discusses controlling the FS1 remotely via a
network-attached computer with a web browser.
Chapter 6 SNMP discusses FS1 support of SNMP.
Appendix A Specifications presents technical specifications for the product.
Appendix B GPI Connector Pinout presents a GPI connector pinout.
Appendix C Analog Audio Connector Pinout shows a Tascam connector pinout.
Appendix D Safety Compliance lists important regulatory and safety information.
Appendix E Glossary defines essential terms that apply to the product.

6
Controls and Indicators
When installing the AJA FS1 chassis, you’ll make media cable connections to a
variety of equipment. After installation, the front panel indicators will be useful in
monitoring what is happening on the system as well as troubleshooting problems
that can occur. Becoming familiar with the FS1 front and rear panels will simplify
installation, setup, and operation of the system. Use of the web browser user
interface and Remote Control Panel option are described in a Chapter 5.
On the following pages are front and rear panel illustrations with notations that
summarize all of the connectors and indicators. Detailed descriptions of each of the
connectors and indicators follow afterward.
Chapter 2:
Controls and Indicators
Full installation instructions are provided in Chapter 3 later in this manual.
Note: The AJA FS1 should be plugged into 3-prong 100-240 VAC power before
you make connections to other equipment. The AC cords provide a path to ground
for accidental static discharge to protect system equipment. The FS1 has two fully
independent and redundant power supplies and will operate with one or both AC
power cords plugged into the unit. However, fault-tolerance exists only if both
power supplies are connected and plugged into separate branch circuits. Then if
power is lost on a branch or a supply, the FS1 will continue to operate on the
remaining circuit and power supply.
Warning: To meet safety regulations for leakage current and to achieve full
redundancy, connect the FS1 dual power supplies to separate branch circuits.
1
2
1
8
Front Panel
Control Menu
Buttons
menu
Status
Button
changes the
display to the
Status Mode
and cycles
through status
and screensaver
displays
Remote
Button
displays remote
status (color of
button) and
brings up the
remote control
Alphanumeric Display
Alphanumeric Display
has two modes:
Status (displays status
information) and
Control (for viewing and
changing functions/
parameters)
Select Buttons
scroll through
and select
parameters
Adjust Buttons
change or
adjust the value
of the selected
parameter
Activity
Indicator
LEDs:
• HD In
• SD In
• HD Out
• SD Out
• Aux
• Proc Amp
• LAN
• Ref
Power and Status
Indicator
LEDs:
• Power 1
• Power 2
• Identify
• Alarm
AJA FS1 Front Panel Indicators
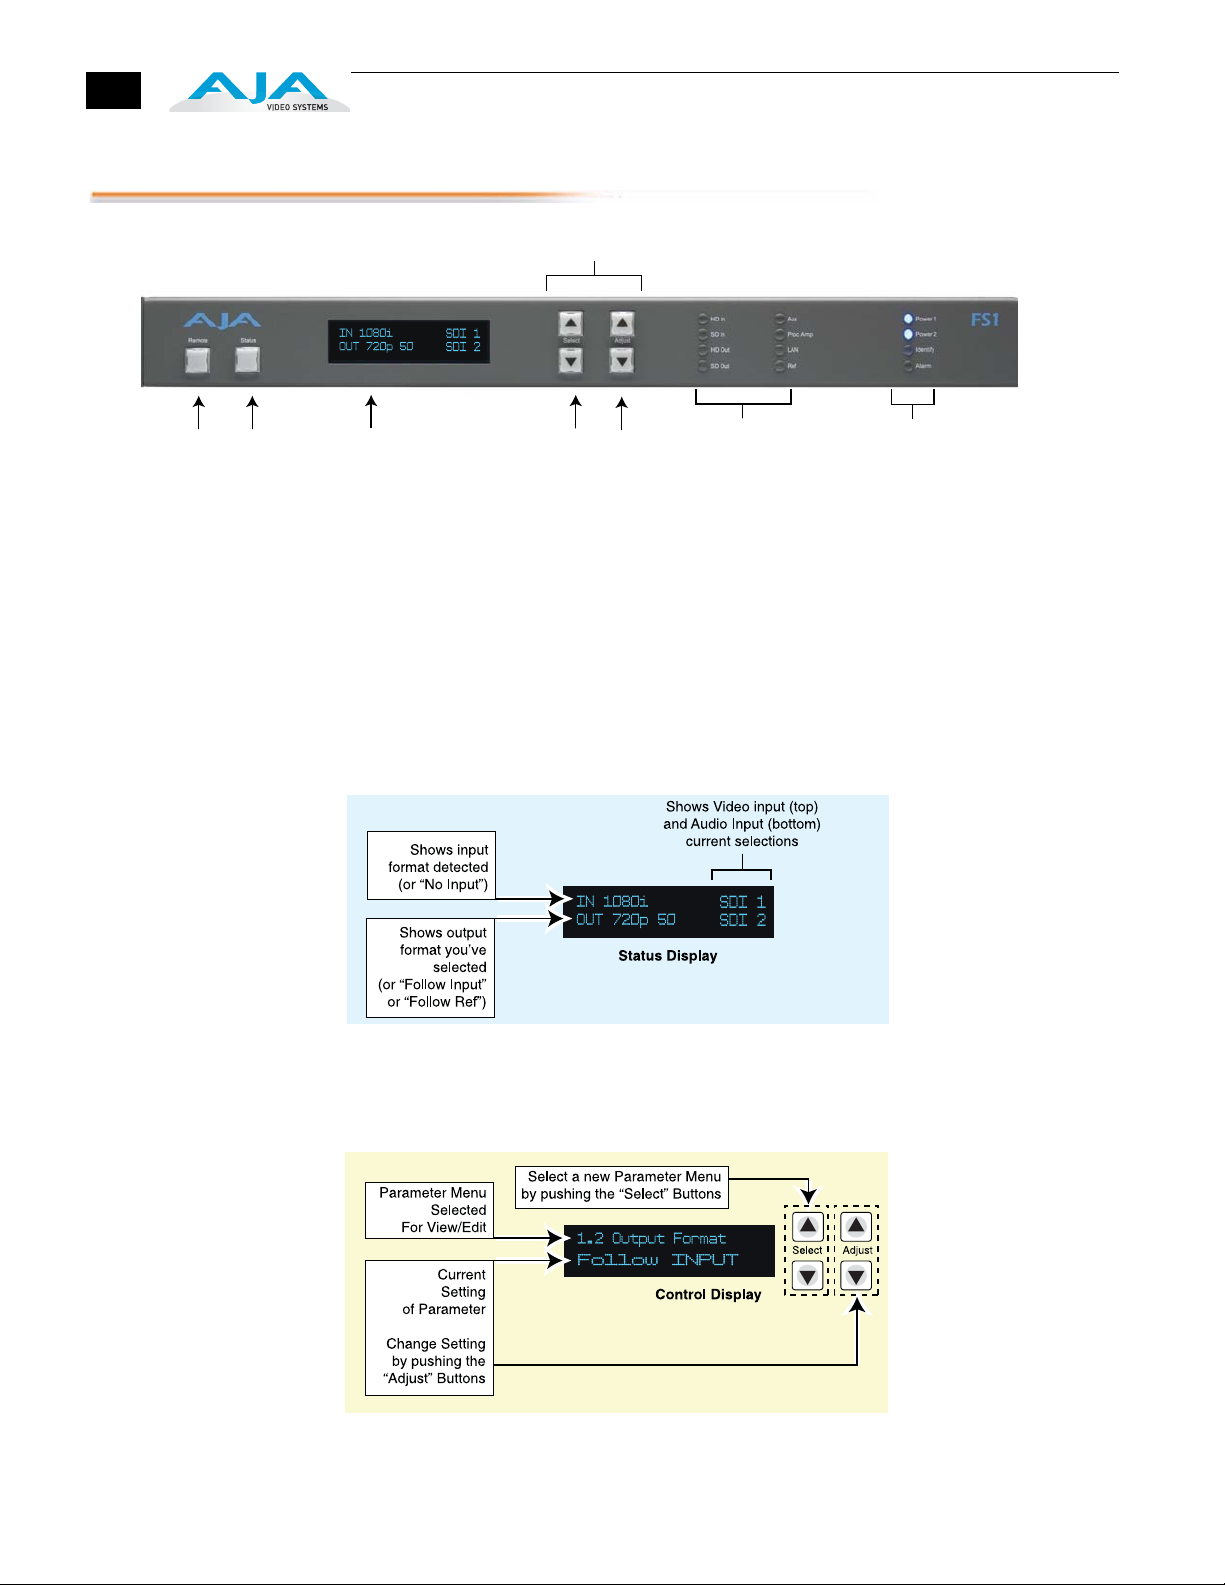
The alphanumeric display has two modes:
Status: Displays current machine status and/or error conditions. The status
display is enabled when you push the Status button.
Control: The control mode displays the menu structure for selecting and
changing/adjusting machine functions and parameters. The display changes
from status to control mode when you press a Select or Adjust button.
When the FS1 is powered up, the display will show an AJA logo and then the
status display.

FS1 Installation and Operation Manual — Front Panel
Status Display Pressing the Status button under the AJA logo pages through the eight status
displays. Normally, you'll be viewing the main status screen shown in a previous
illustration. It’s the default screen at powerup. Information contained in the
status display shows the current primary settings for the FS1:
• Input Format (upper left)
• Output Format (lower left)
• Selected Video Input setting (upper right)
• Selected Audio Input setting (lower right)
9
Input Format Video Input setting
Output Format Audio Input setting
1
For example, if set up to do a cross-convert from 1080i59.94 to 720p59.94
using embedded audio in and out, the display would look as follows:
IN 1080i59.94 SDI 1
OUT 720p59.94 SDI 1
If the selected input has no valid signal present, the FS1 displays IN No Input.
Note: If the input is incompatible with the chosen output format, the default
status screen will display the actual format, such as IN 525i 59.94. The video
format status screen, however, would be the default status screen at that point
(since the Alarm LED would be on), and it would display IN Incompat.
The other seven status displays are listed and described below:
The video format status screen shows the status of the active video input, the
output format, the genlock source, and the format of the reference signal (if
applicable). For example, if the Output Format is set to Follow REF, but
there is no valid reference signal present, the Output Format section of the
video format status screen will read OUT No Ref.
The sidebar status screen shows the main input format, sidebar input format,
output format, and sidebar input select. Any incompatibilities between
these formats are shown as Incompat.
The sidebar input screen always shows the detected formats of the main input
and the sidebar input—to help resolve incompatibilities.
The power/temperature status screen displays power supply and temperature
status. If a power supply is unplugged or an error is detected, the display top
line reads PS 1 OFF, PS 2 OFF, PS 1 Error, or PS 2 Error, respectively.
(When Power Supply Alarm filter (60.1) is set to Suppress; the display still
reads Power OK even if a power supply is unplugged.) If the FS1 internal
temperature threshold is exceeded, the display lower line reads
OVERHEATED and video output may be compromised. If the front panel
Alarm LED is lit, the reason should be evident if you check the video format
and power/temperature status screens.

10
The close-captioning status screen shows whether closed caption data is present on
the selected video input.
The AJA logo is displayed when no button activity occurs for 60 minutes.
The FS1’s System Name has been previously defined (how to enter/edit it is
described in Chapter 4, Parameter Menus, System Name 50.5).
Controlling the
FS1 Using the
Select and Adjust
Buttons
The FS1's control system is designed to be easy to use and remember. All
functions in the menu system are numbered for easy reference. Two pairs of up/
down buttons named Select and Adjust provide control. Pressing any of these four
buttons immediately puts the FS1 into control mode:
Select
Adjust
To operate the FS1, use the Select buttons to select a function or parameter. Then
use the Adjust buttons to adjust the selected function or parameter.
The control display has two lines:
Parameter Number and Name
Current Parameter Setting
The top line contains a numbered and named FS1 parameter and or function.
The lower line contains the current setting.
The parameter Select buttons select a parameter to view or modify.
Pressing a parameter Adjust button changes the current parameter's value to a new
one from the FS1's list of choices—repeating the list if you continue to press
Adjust or adjusting a numerical value up or down. The exact choices displayed
will vary depending on the parameter. Adjustment choices made with the
Adjust buttons take effect immediately (except 1.1 Output Format which has a
1/2 second delay). In most cases, changed parameters will be stored into the
FS1’s non-volatile memory after the parameter remains unchanged for 3
seconds. Exceptions are the IP Address, IP Config, Subnet Mask and all SNMP
parameters; for these you must exit the selection to activate changes.
Holding down a Select or Adjust button continuously changes the choices
automatically with acceleration if applicable.
Pressing either a Select or an Adjust button while on the Status or Screen Saver
displays changes the display to the last remembered control menu.
Holding down both the Adjust (up) and Adjust (down) buttons—at the same time
will set that parameter back to its factory default value.
For some parameters, once the parameter is selected, the first Adjust button
pressed begins the editing. The top Select button then can be used to choose
the position (left to right) within the parameter being edited.

FS1 Installation and Operation Manual — Front Panel
Holding down both the Select buttons at the same time returns the front panel menu to
parameter 1.1 Output Format. If you are editing an octet, string or other
parameter that requires a commit action (like editing a blinking IP address) and
you press both Select buttons, the edit will terminate (will not take effect and will
not be saved). On the other hand, if you are editing menu items that normally
take effect as they are edited (e.g. procamp gain), the edited value will take effect.
Note: Parameter displays and adjustment choices and values are described in detail
in Chapter 4.
Remote Control Pressing the Remote button once results in a display showing how the FS1 is being
controlled. Pressing the button again cycles the display through all control options:
1
LOCAL+REMOTE: Control is from the panel buttons, a web browser, or remote
panel (VTECS). The Remote button glows white.
REMOTE ONLY: Control of the FS1 is from a web browser on a network attached
computer or a remote control panel via the VTECS protocol (except for the
remote control function). The Remote button glows red.
LOCAL ONLY: FS1 control is only allowed from the front panel buttons (except for
the remote control function). The Remote button glows green.
11
Indicator Descriptions
Indicators on the front panel are multi-state LEDs that light when a condition is
present. The following indicators are conveniently arranged in groups to show specific
subjects; these LEDs are also discussed on the following pages.
• Activity LEDs
• Power and Status LEDs
Activity Indicators
HD In—Shows that an active HD signal is detected at the previously selected input.
SD In—Shows that an active SD signal is detected at the previously selected input.
HD Out—Shows that an HD signal is being output.
SD Out—Shows that an SD signal is being output.
Aux—This LED is ON whenever a GPI input trigger is active if that GPI affects the
internal state of the FS1. If the associated GPI In parameter (36.1 GPI In 1
Response or 36.2 GPI In 2 Response) is set to No action, the LED stays OFF.
Proc Amp—Shows that the ProcAmp values are different from the factory nominal
values. If lit, the video passing through the FS1 is being altered according to
changes in ProcAmp parameter settings (it’s no longer at unity).
LAN—This LED will flash once whenever the FS1 is being controlled by a web
browser input or remote panel. Web browser actions that do not affect the
internal state of the FS1 will not cause the LED to blink.
Ref—Shows that the FS1 has an external reference video source applied to the Ref
connector.

12
Power and Status Indicators
Power 1—Shows that the FS1 #1 power supply is connected to AC mains power via
its power cord and is operational. Both the Power 1 and Power 2 LEDs must be
lit to ensure redundant power is available.
Power 2—Shows that the FS1 #2 power supply is connected to AC mains power via
its power cord and is operational.
Identify and ID—These two LEDs (one on the front panel and one on the rear) will
blink when directed to do so via the FS1’s Web browser interface Identify
button. This action is useful for identifying which FS1 you’re controlling when
there are multiple FS1 units in a machine room being controlled by a laptop or
computer. In the browser, simply click Identify and then watch for one of the
FS1s Identify LEDs to blink. The Identify LED on the front panel and ID LED
on the rear panel perform the exact same function. No matter which side of a
rack you’re facing, you’ll be able to see one of the LEDs.
Alarm—If This LED is illuminated, press the Status button to see a description of
the alarm event detected.
The Alarm LED may be lit because of a hardware failure, because of video
incompatibilities, or because of genlock loss. (Any of these conditions may be
filtered out using the Alarm Filters parameters.)
Note: Only having one power cord connected to the FS1 will cause the alarm
LED to light—this may be filtered with the Alarm Filters parameters.
Video incompatibilities may be deduced from the “Alarm Status” screen. When the
Alarm LED is lit, press the front panel Status button to go directly to the “Alarm
Status” screen.
Video incompatibilities that the FS1 may detect include:
Video Incompatibility Detected Alarm Status screen will show
6.1 Genlock Source is set to “Reference”, but
Reference signal format is not compatible with
selected Output Format.
6.1 Genlock Source is set to “Reference”, and
selected Output Format is compatible with detected
Reference format, but Input signal format is not
compatible with detected Reference format.
Input signal is not compatible with selected Output
Format.
Alarm Status screen shows:
“IN..... GEN Ref “
“OUT.... REF Incompat”
Example: if Reference and Output
formats are 525, but Input is 625,
Alarm Status screen shows:
“IN Incompat GEN Ref “
“OUT 525i 59 REF 525i 59 “
Alarm Status screen shows:
“IN Incompat “
“OUT 525i 59
Reference signal events that the FS1 may detect include:
Reference Alarm Event Alarm Status screen will show
6.1 Genlock Source is set to “Reference”, but no
Reference signal is detected.
Alarm Status screen shows:
“IN..... GEN Ref”
“OUT.... REF No Ref”

FS1 Installation and Operation Manual — Front Panel
Reference Alarm Event Alarm Status screen will show
13
About Video and Format Compatibility
1.1 Output Format is set to “Reference”, but no
Reference signal is detected.
Alarm Status screen shows:
“IN..... GEN Ref”
“OUT.... REF No Ref”
Sidebar incompatibility events that the FS1 may detect include:
Sidebar incompatibility Event Alarm Status screen will show
Sidebar format incompatible with output format Alarm Status screen shows:
“IN..... SB Incompat”
“OUT.... SB ...”
Main input format incompatible with Sidebar keyer Alarm Status screen shows:
“IN Incompat SB...”
“OUT.... SB...”
Sidebar Input Select incompatible with Main Input
Select (both Analog inputs)
Alarm Status screen shows:
“IN.... SB Incompat”
“OUT.... SB Incompat”
1
The table below shows at a glance all the conversions (and straight-through modes)
possible for given input formats. In the case of interlace formats the table lists the field
rate; for progressive formats the table lists the frame rate.
Input Possible Output Formats
525i59.94 525i59.94 720p59.94 1080i59.94
720p59.94 525i59.94 720p59.94 1080i59.94
1080i59.94 525i59.94 720p59.94 1080i59.94
1080pSF23.98 1080pSF23.981 1080i59.94 525i59.94
625i50 625i50 1080i50 720p50
720p50 625i50 1080i50 720p50
1080i50 625i50 1080i50 720p50
1080pSF24 1080pSF24 1080i60
1080i60 1080i60 720p60
720p60 720p60 1080i60
1
When the main output (SDI 1) is not 1080pSF23.98, bypass mode will not be
available.
Notes:
1. In the case of 1080pSF/23.98 input—and when 1080i59.94 (or 525) is
selected as an output format, the FS1 automatically adds 3:2 pulldown to get the
correct frame rate. Similarly, in the case of 1080pSF/24 input, FS1 automatically
adds 3:2 pulldown to get the correct frame rate.
2. When passing 24 or 60 framerate video, the standard definition outputs will
not output valid video (the FS1 is not a framerate converter).
14
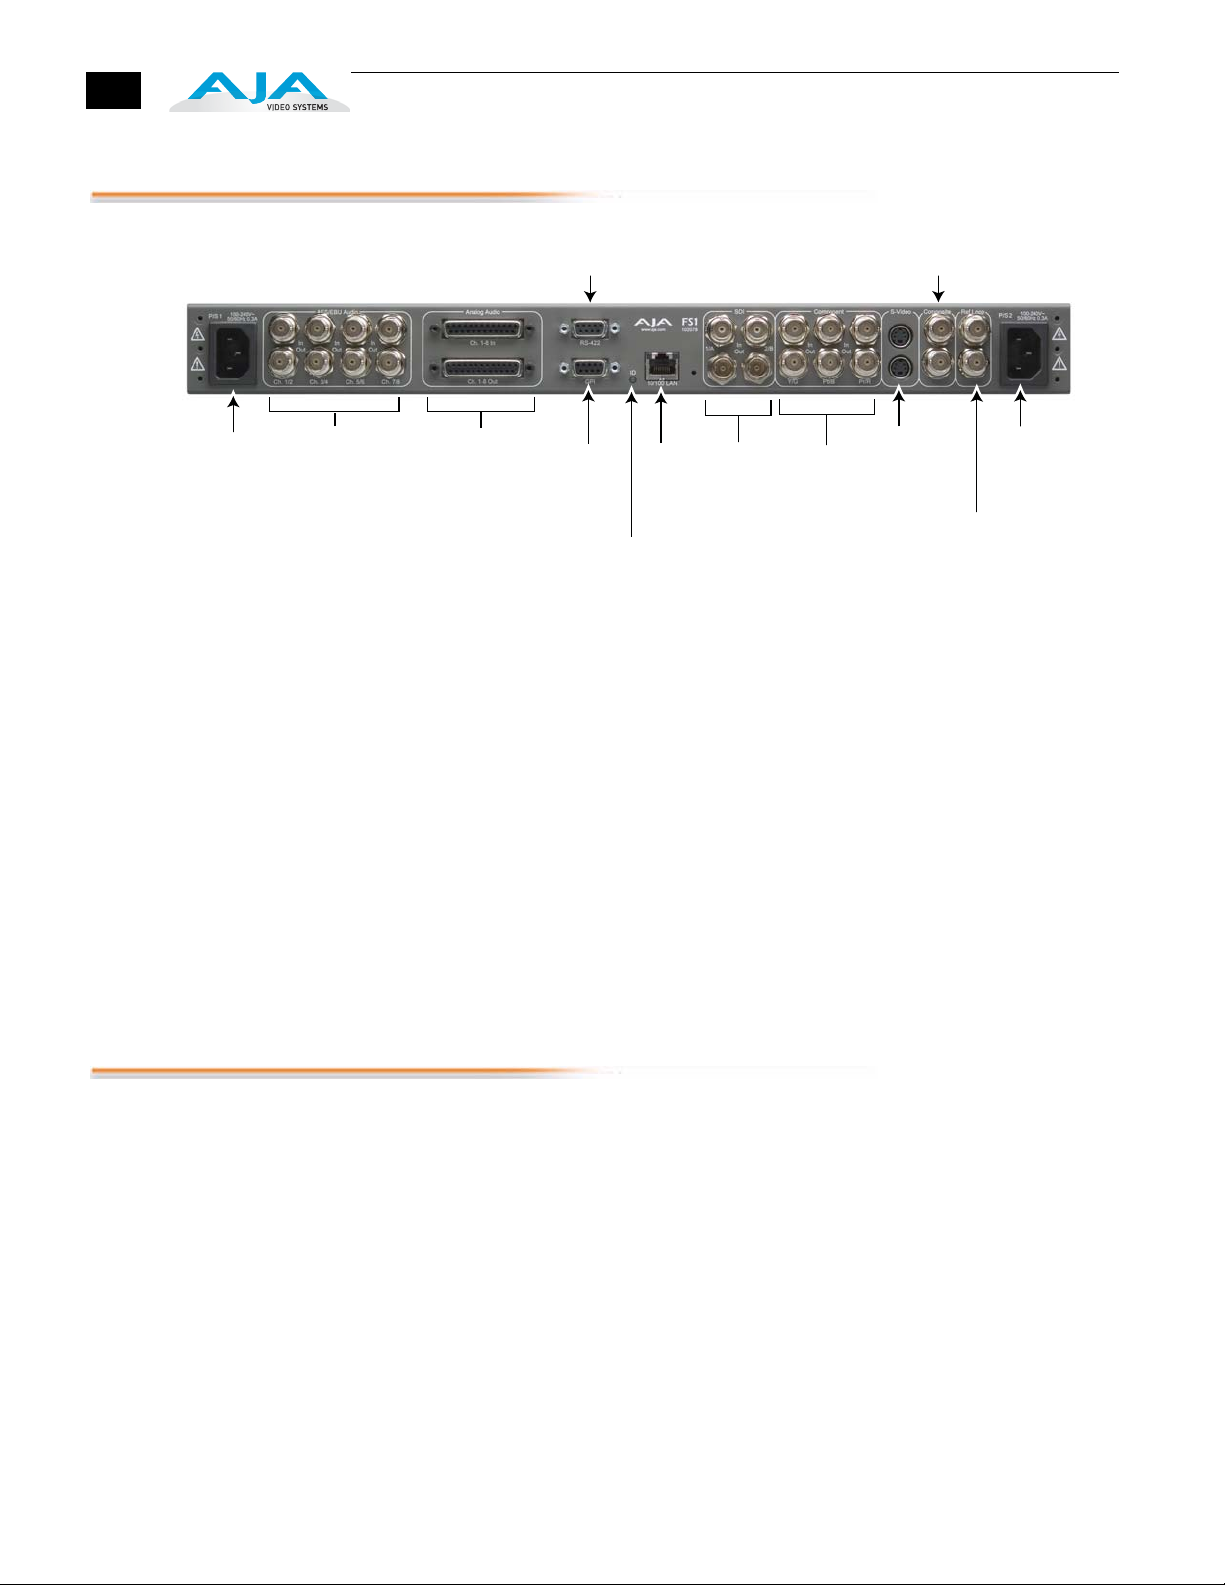
Rear Panel
RS422
DB9 Connector
(Reserved for Future Use)
Composite
In/Out
AC Power Supply
Socket #1
Autosensing
100 to 240VAC, 0.3A
50/60Hz
Channels 1 through 8
About Inputs and Outputs
AES/EBU Digital
Audio In/Out
Analog Audio In/Out
Channels 1 through 8
(uses Tascam-style
cable)
GPI
9-pin
Connector
10/100
RJ45
Ethernet
LAN
Connector
ID (Identify)
LED
Serial
Digital
In/Out
(SD-SDI
HD-SDI)
Component
YPbPr and
RGB In/Out
S-Video
In/Out
External
Reference
with LoopThrough
The functions of the FS1 Inputs and Outputs depend on the operational mode.
The operational steps are simple:
1. Select an output format.
2. Select the desired input.
All outputs are active all the time. If you select an output format first and then the
input source, the FS1 automatically performs up/down/cross conversion.
Audio embedding/disembedding is also automatic, according to the parameter
settings you’ve selected. For example, even though the input selected might be HDSDI with embedded audio, the analog audio output connectors will output proper
analog audio that has been disembedded from the serial digital stream.
Please study Chapter 4 Parameter Menus, for a full understanding of all the possible
FS1 settings.
AC Power Supply
Socket #2
Autosensing
100 to 240VAC, 0.3A
50/60Hz
Connectors
Connectors on the rear panel are arranged in groups for easy installation and
maintenance:
• P/S 1 and P/S 2—AC power connectors, each 3-pin (with Ground), one for
each independent power supply. Each power supply is autosensing from 100 to
240VAC at 50/60Hz. Only one has to be connected for FS1 operation, but
redundant operation is available only if both connectors are plugged into AC
power.
• AES/EBU Audio—8 digital channels in and out, two pairs per BNC.
• Analog Audio Ch.1-8 In/Out—8 channels of analog audio in and out via a
DB25 TASCAM-style cable (not supplied).
• GPI—connector providing dual isolated TTL compatible inputs and outputs.
The functions of each are selectable in software.

FS1 Installation and Operation Manual — Connectors
• 10/100 LAN—RJ45 Ethernet connector.
• SDI In/Out—digital video with embedded audio. There are two input and two
output BNC connectors. The outputs are active all the time, although you must
specify the output format (and thus whether any conversion takes place). SDI 2
can follow the input (“bypass”)—see description on the following page.
• Component In/Out YPbPr/RGB—video, 3 BNCs for input, and 3 BNCs for
output. Component can follow the input (“bypass”)—see the description on the
following page.
• S-Video In/Out (Y/C)—one 4-pinmini-DIN for input, and one 4-pin mini-DIN
for output—see the description on the following page.
• Composite In/Out —NTSC/ PAL video, 1 BNC for input, and 1 BNC for
1
output—see the description on the following page.
• Ref Loop—reference video (looping), 2 BNCs.
• RS-422—DE-9 connector reserved for future use.
Each of these groups of connectors are discussed on the following pages.
15
Connector Descriptions
8 Channel AES/EBU Audio Inputs And Outputs
One BNC is provided for each of four pairs of
channels, both on the input and output: 1/2, 3/4,
5/6, and 7/8.
AES/EBU signals are handled by the FS1
internally as 24-bit digital.
Analog 8 Channel Audio
The two DB25 connectors, one for input and one
for output, support a TASCAM-style cable snake for
balanced 8-channel audio. Analog audio signals are
converted internally to 24-bit digital
audio inputs
and outputs.
RS-422 Port
This DE-9 connector is reserved for future use.
16
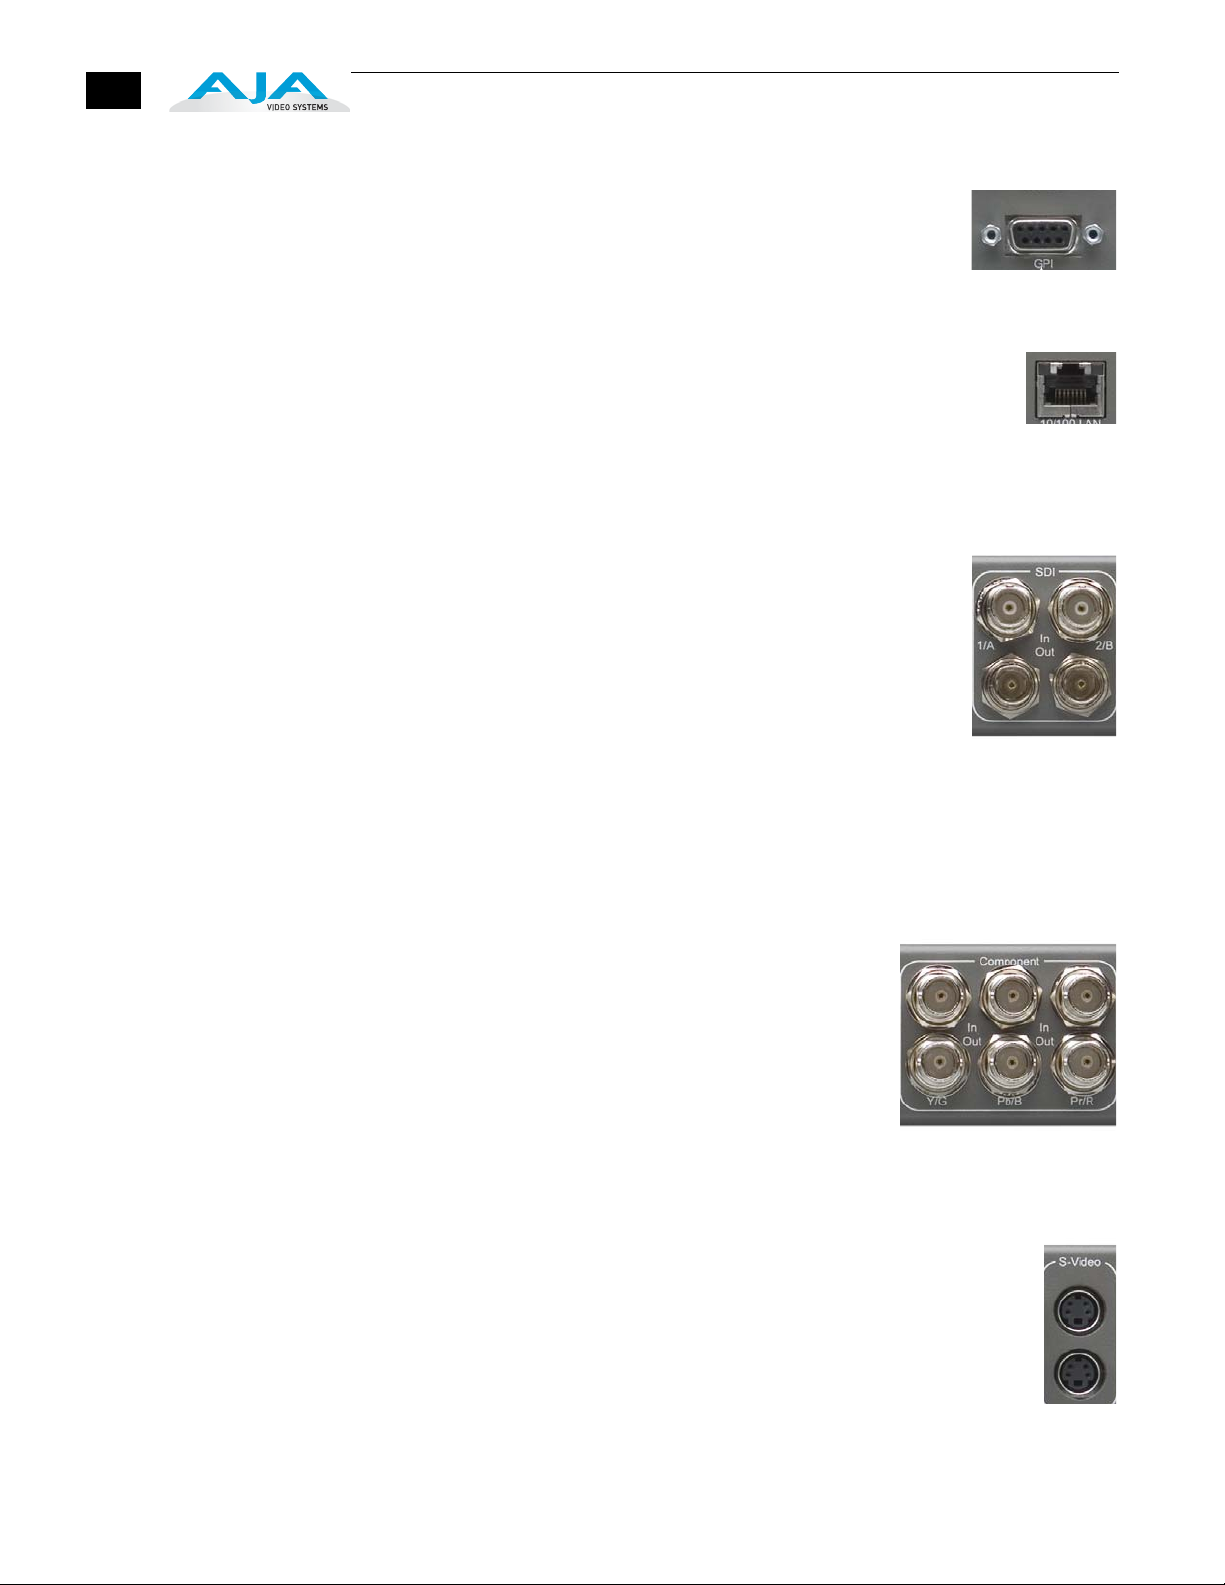
GPI
A female DE-9 connector provides connection to external
equipment or circuits via an isolated TTL-compatible interface.
Appendix B contains a pinout and specifications for the GPI
connector.
LAN
An RJ45 connector provides a 10/100 Ethernet port for connection
directly to a computer or Ethernet hub or switch for connecting to a
LAN.
The FS1is compatible with CAT-5 straight-through or cross-over Ethernet cables,
automatically detecting which is used.
SDI Input and Outputs
BNC connectors are provided for two SDI inputs and two SDI
outputs. SDI video connections include embedded audio In/Out
(depending on your parameter settings).
The outputs are active all the time, although you must specify the
output format (and thus whether any automatic conversion takes
place). For example, with an SD-SDI input selected, you could set
the SDI 1 output to HD 720p for an upconvert, and then set the
SDI 2 output to “Follow Input” (bypass) to output the SD-SDI at
the same format/framerate as the input.
SDI provides the best quality 10-bit video input and output. If peripheral
equipment has a variety of inputs/outputs, use SDI I/O if it is available.
Component (YPbPr/RGB)
Connect SD or HD component YPbPr or RGB video
cables from a VTR, camera, or other source to the three
input BNCs. Then connect the YPbPr or RGB output
BNCs to your destination component device.
Component video signals are A/D (input) and D/A
(output) converted (10-bit). Like the SDI 2 output,
Component can be set to Bypass (follow input). Output is
affected by the 5.3 Aspect Ratio and 1.3 Component Out
parameter settings (see Chapter 4 for discussion of these parameters).
S-Video (Y/C)
S-Video input and output female 4-pin mini-DINs provide for connection
of desktop video/prosumer level equipment, including camcorders, VCRs/
VTRs, and monitors, to name a few. Use high quality shielded S-Video
cables when making connections.
S-video signals are converted internally to 10-bit digital. Output is affected
by 5.3 Aspect Ratio and 1.3 Component Out parameter settings (see Chapter
4 for discussion of these parameters).

FS1 Installation and Operation Manual — Connectors
Composite NTSC/PAL
BNC connectors support composite NTSC or PAL standard definition
input and output. Connect an NTSC or PAL composite video cable from a
VTR, Camera, or other source to the Composite In BNC. Then connect the
Composite Out BNC to a destination composite video device.
Composite video signals are 10-bit A/D (input) and D/A (output)
converted. Output is affected by 5.3 Aspect Ratio and 1.3 Component Out parameter
settings (see Chapter 4 for discussion of these parameters).
Reference Video (looping)
These two BNC connectors allow you to synchronize FS1 outputs to your
1
house reference video signal (blackburst or composite sync for SD, or Trilevel for HD). If you have a sync generator or video equipment source to use
for synchronizing other video equipment in your studio, connect its
composite output here. When the FS1 outputs video, it locks to this
reference signal. Reference video does not need to be the same format as the
video input/outputs, but it must have the same vertical rate (for example,
1080i Tri-level reference video will work for 525 video input and output).
17
Examples of permissible reference video signals:
• 525 Color Black
• 625 Color Black
• 1080i Tri-level Sync
• 720p Tri-Level Sync

18
Installation Overview
The installation and set up of an FS1 is very simple. Plug both AC supply cords into
AC mains power (separate branch circuits for redundancy), connect the LAN
connector to a LAN, WAN or local computer with a web-browser, and then connect
source and destination video and audio equipment.
Chapter 3:
Installation & Configuration
Hazard Warning!
High Voltage. This situation or condition can cause injury due to electric shock.
Warning!
Do not open the chassis. There are no user-serviceable parts inside. Opening the chassis
will void the warranty unless performed by an AJA service center or licensed facility.
Warning!
Disconnect the external AC power supply line cord(s) from the mains power before
moving the unit.
Warning!
Do not defeat the safety purpose of the polarized or grounding-type plug. A polarized
plug has two blades with one wider than the other. A grounding type plug has two
blades and a third grounding prong. The wide blade or the third prong are provided for
your safety. If the provided plug does not fit into your outlet, consult an electrician for
replacement of the obsolete outlet.
Warning!
Since the Mains plug is used as the disconnection for the device, it must remain readily
accessible and operable.
Warning!
Protect the power cord from being walked on or pinched
particularly at plugs, convenience receptacles, and the point
where they exit from the device.
1
3
1

20
Warning!
To meet safety regulations for leakage current, connect the FS1 dual power supplies
to separate branch circuits.
Warning!
Refer all servicing to qualified service personnel. Servicing is required when the
device has been damaged in any wav, such as power-supply cord or plug is damaged,
liquid has been spilled or objects have fallen into the device, the device has been
exposed to rain or moisture, does not operate normally, or has been dropped.
All of the steps of installation and configuration are documented in this chapter,
summarized as follows:
1. Unpack the shipping box, removing the FS1 and two power cords.
2. Connect the FS1 to power, connecting the two power cords to mains AC.
If you plan to use remote control of the FS1, ensure you have an
Ethernet cable routed to where the FS1 will be placed. It can be
connected over a LAN or attached directly to a locally attached
computer. Ensure that the computer (whether communicating over a
LAN or directly to the FS1 Ethernet port) has a web browser installed.
If the FS1 will be attached to a LAN, talk to your IT administrator and
obtain the details about how to configure the FS1 (DHCP or static IP,
explained in this chapter).
The following figure shows typical LAN connections, although your
installation may differ.
3. If connecting to a network, configure the FS1 IP CONFIG, IP ADDR,
IP MASK, and IP GATEWAY parameters according to the information
obtained from your IT administrator in the last step. Connect it to the
LAN. From a network attached computer or one directly connected to
the FS1, “ping” the FS1 (explained later in this chapter).
4. Mount the physical chassis as desired: front rack, rear rack, or
deskmount. If you are mounting multiple FS1 units, try to place them
visually in the same area so if you communicate with them via a
network attached computer, you can use the FS1’s Identify feature to
turn ON the corresponding LED of the FS1 you’re communicating with.
5. Cable the system audio and video sources, VTR(s), monitors, and audio
equipment.

FS1 Installation and Operation Manual — Installation Overview
Laptop
w/Web Browser
for FS1 Remote
Control
21
10/100Base-T
WAN/ISP
Firewall
& Router
1
Hub
10/100 Base-T
LAN
FS1 Network Example, Two FS1s on a LAN, with Laptop for Remote Control

22
Unpacking
Shipping Box Contents
An FS1 chassis is shipped with two AC power cords, a user manual CD, and any
late-breaking news bulletins (if applicable). Chassis rackmount brackets are
provided as part of the chassis with screws.
AC Power Cords (2)
AJA FS1 Panel Chassis
Box Contents
As you unpack the shipping box, carefully examine the contents. Ensure you
received everything and that nothing was damaged during shipment. If you find
any damage, immediately notify the shipping service and supply them with a
complete description of the damage. AJA will repair or replace damaged items.
If you find shipping damage, contact your AJA dealer or distributor for details on
how to have your FS1 repaired or replaced.
Note: Save packing materials and the shipping box. If you ever require service or
move your system—use the packaging materials and box for safe shipment.

Mounting the FS1 Chassis
FS1 Installation and Operation Manual — Mounting the FS1 Chassis
23
Physical Requirements
You can locate your chassis in two ways:
• Rackmounting—attach the FS1 (rear or front mounted) to a standard 19-inch
wide equipment rack. The chassis occupies only one vertical rack unit.
• Desktop—lay it on a horizontal flat surface.
Chassis Dimensions
When planning the equipment location, consider the chassis dimensions:
Height—1 rack unit, 1.75 inches (4.445 cm)
Depth—12 inches (30.48 cm)
Width—17.25 inches (43.8 cm)
Connecting to a Network
You can network the FS1 directly to a laptop or other desktop computer using a single
Ethernet cable (straight or cross-over), or connect it to a local area network (LAN). In
either case, the FS1 connects via its 10/100Base-TX Ethernet connector. A LAN is a
shared network that includes other Ethernet devices all attached via a hub or digital
switch. LANs may be divided into zones separated by software or hardware routers.
Routers may also be used to connect the LAN to an outside wide area network
(WAN) such as the internet.
1
TCP/IP Information
You ll Need
Devices on a LAN have IP addresses which may be fixed and permanent, or
dynamically assigned by the network (DHCP). When attaching the FS1 to a LAN,
talk to your network administrator to find out how they want it connected (static IP
or DHCP). Your IT department will be able to supply the information you need to
install the FS1 on a LAN.
If your LAN has a DHCP server that assigns IP addresses dynamically, then you don’t
have to configure anything (the FS1 defaults to DHCP). If for some reason your IT
administrator prefers an assigned IP address that is fixed (static IP), then get the IP
address—you’ll be entering it in the “IP CONFIG parameter” of the FS1. If your
LAN requires static IP addresses, also ask your IT administrator for the Subnet Mask
and default gateway IP address (your LAN’s internet router). The following two topics
discuss two different ways to set up the FS1: via DHCP or via a static IP address.

24
Networking the FS1 via DHCP
The FS1 default configuration (from the factory) automatically looks for a DHCP
server to issue an IP address. So, as long as your network has a DHCP server
(usually part of your router), all you need to do is plug the FS1 into the network.
Network configuration happens automatically.
If you prefer to manually select DHCP, use the Select buttons to navigate to
parameter 50.1 IP CONFIG, and use the Adjust buttons to select DHCP. That’s it!
Here are the steps to communicate with the FS1 after choosing the DHCP
selection:
1. Use the Select buttons to navigate to parameter 50.2. Note on a piece of
paper the DHCP-supplied IP address shown.
2. With your laptop or desktop computer connected to the same LAN as the
FS1 and DHCP enabled, type the IP address you noted in step 1 into the
browser address bar. You should now see the FS1’s browser status screen.
If the FS1 cannot get an address from the DHCP server on the LAN while the FS1
is set to DHCP via parameter 50.1, the FS1 will automatically drop back to a preset
factory IP address of 192.168.0.2. In this instance you can follow these alternate
steps to communicate with the FS1:
1. Set the computer’s Ethernet IP address to 192.168.0.n (where n is not 2).
2. Set the computer’s Subnet mask to 255.255.255.0 (most PCs default to the
proper netmask when the address is set).
3. Run a browser on the computer and type “192.168.0.2” (the factory
fallback IP address). You should now see the FS1’s browser status screen.
Note: If the FS1 fails to find a DHCP server via its network connection, it will fall
back to using the factory default static IP of 192.168.0.2—or whatever IP address
you’ve previously defined. AJA recommends you define a Static IP address with
parameter 50.2 so you’ll be prepared in the event your DHCP server fails.

FS1 Installation and Operation Manual — Connecting to a Network
25
Networking the FS1 using a Static IP Address
To set a static IP address for the FS1’s IP address, you’ll need to make some simple
Parameter Menu selections. The illustration below shows the four menu selections
you need to make while entering the information provided to you by your IT
administrator.
1
Note: for parameters 50.2,
50.3, and 50.4, you will be
setting IP addresses that
consist of “octets” separated
by a period (i.e., 90.0.180.0).
For these parameters, the
Select
button selects the
octet and then the
buttons select the desired
number. Pressing Select
again advances to the next
octet. At the final octet, the
address will flash—pressing
Select at that point confirms
the setting.
Adjust
Configuring the FS1 with a Static IP Address

26
Networking the FS1 using the Factory Default IP
If you don’t want to use DHCP to network the FS1 and also don’t want to set your
own static IP address, you can simply use a Default setting to use a factory setting of
10.65.74.65. This might be useful for an application where you directly connect a
laptop or computer to the FS1 and want to get your networking connection
operating quickly. Here are the steps to set up this method of communication:
1. Use the Select buttons to navigate to parameter 50.1 IP CONFIG, and then
use the Adjust buttons to select Default.
2. Set your laptop or desktop computer Ethernet IP address to 10.m.n.m
(where m is not 65 and n is not 74).
3. Also on the computer, set the Subnet mask to 255.0.0.0 (most PCs default
to the proper netmask when the address is set, so you may not have to do
anything here).
4. Run a browser on the computer and type “10.65.74.65” (the Default
factory IP address). You should now see the FS1’s browser status screen.
Using Ping to Test the Network Connection
After setting the IP address and other TCP/IP settings and connecting the FS1’s
Ethernet connection to a LAN or directly to a computer, ping the FS1 to ensure
that you have a valid connection. Simply run the Ping utility from a Mac OS X or
Windows PC computer attached directly or on the same LAN as the FS1:
Mac Ping Procedure
Windows PC Ping Procedure
1. Find the Applications Folder, and then find the Utilities Folder inside of
the Applications Folder.
2. Locate the “Terminal” utility application and double-click it.
3. On the FS1, go to parameter menu 50.2 and read the IP address.
4. At the terminal prompt, enter “ping” and the IP address noted in step 3.
For example: ping 192.168.0.2
5. If successful, the ping utility will respond that packets were sent, received
and how long it took. For example:
64 bytes from 192.168.0.2: icmp_seq=0 ttl=64 time=0.590 ms
6. If unsuccessful, check the FS1 network settings and resolve the problem
with your IT administrator.
1. From the Start button, select the All Programs menu.
2. Select Accessories/Command Prompt from the All Programs list.
3. On the FS1, go to parameter menu 50.2 and read the IP address.
4. From the Command Prompt utility’s prompt, enter “ping” and the IP
address noted in step 3. For example: ping 192.168.0.2
5. If successful, the ping utility will respond that packets were sent, received
and how long it took. For example:
64 bytes from 192.168.0.2: icmp_seq=0 ttl=64 time=0.590 ms
6. If unsuccessful, check the FS1 network settings and resolve the problem
with your IT administrator.

FS1 Installation and Operation Manual — Controlling with a Web Browser
Controlling with a Web Browser
To control the FS1 from a web browser on a network attached computer, enter the
FS1 IP address as a URL in the browser. For example, if the FS1 IP address were
“90.0.6.31”, you would then type into the web browser: http://90.0.6.31. This topic
is explained in greater detail in Chapter 5: Browser Remote Control.
Note: The webUI (GUI) will keep up with (most) network changes (IP address and
netmask) initiated at the GUI. On the other hand, the webUI may not reconnect to
the FS1 when network changes are initiated at the FS1 Front Panel. The browser may
or may not time out and display "Disconnected". To manually reestablish the webUI
connection, type in the new address, if the IP address has changed, or click the Refresh
button on the web browser.
Installing The Latest Software
Although the FS1 comes from the factory pre-installed with software, it may not be as
up-to-date as software posted on our AJA website. This topic describes the steps
required to upgrade the software in your AJA FS1.
27
1
Download the Latest FS1 Software
Unpack the Software
Current and past releases of FS1 software are available on the World Wide Web from
AJA's website. To get the software, point your browser to:
http://www.aja.com/support/converters/converters-fs1.php
This link is also available at the bottom of the Update Firmware screen (discussed later
in this chapter). Once you’re at the update page, you can select FS1 software files to
download to your Mac or PC for upgrading your local FS1 machine.
FS1 software update files are “ZIP” files that you can open with a number of standard
and third party uncompressor applications. The software image that you’ll install on
the FS1 is a file with a name like fs1_ver_2.2.0.10.bin or similar.
Note: Depending on your PC or Mac operating system settings, the “.bin” extension
may not be visible to you in a file directory.

28
Uploading and Installing the Software to the FS1
Click
First
Uploading and installing the software update requires a PC or Mac that can “see”
the FS1 via its ethernet connection. Follow this procedure to install the software:
1. Click the Update Firmware link at the bottom of the navigation box on the
left-hand side of any FS1 web page.
Browse
Button
2. Click the Browse... button to select the downloaded file. For example:
fs1_ver_2.2.0.10.bin contained in the zipfile downloaded from AJA.
3. Click the OK button in the dialog box that appears, asking if you want to
upload the firmware. The file you select uploads to the FS1.
4. Click the Commit Uploaded Firmware button to commit the firmware to
FS1 flash memory, or click Cancel to abandon the update. Wait for the
procedure to complete—it will take only a few minutes.
5. Click the Restart FS1 With New Firmware button to restart your FS1.
6. After restarting, the FS1 is running the new software and your existing
FS1 configuration prior to the upgrade is preserved. Check the FS1 web
page again to make sure the software version is displayed at the top of all
FS1 web screens. If not, run the update steps again.
Notes:
On some browsers, the Retry page may appear even though the upgrade was
successful. If this occurs, refresh the web page and check for the version number
at the top of the page, indicating the upgrade was successful. If the old version
appears, click Retry. Occasionally, it may be necessary to clear the browser
history and re-enter the address before the browser connects with the FS1.
If there is a power outage or glitch during the software download, the FS1 will
boot the older software version and you can restart the upgrade process. The FS1
has been designed with a safety feature where an internal “safe” copy of the
previous software is retained in the event the updating process fails.

GPI Connections
FS1 Installation and Operation Manual — GPI Connections
29
5 4 3 2 1
9 8 7 6
Pin Function
1 - GPI Input 1
2 - GPI Input 2
3 - GPI Output 1
4 - GPI Output 2
5 - Chassis Ground
Pin Function
6 - I/O Ground 1
7 - I/O Ground 2
8 - I/O Ground 1
9 - I/O Ground 2
1
GPI Connector Pinout
The GPI inputs and outputs are electrically isolated from the power and ground on
the FS1 frame. There are two inputs and two outputs. Electrical isolation is provided
for up to two pieces of external equipment. The following guidelines apply to the two
GPI inputs and outputs:
• Input 1 and Output 1 share a common isolated ground on pins 6 & 8 (I/O
Ground 1).
• Input 2 and Output 2 share a common isolated ground on pins 7 & 9 (I/O
Ground 2).
• Pin 5, local chassis ground, may only be used as a reference when isolation is not
required.
• Both GPI inputs are internally pulled high through a 10K ohm resistor to an
• Both GPI outputs are 5V TTL compatible, sourcing up to 6mA and sinking up
Cabling the System
Where to Place the FS1
Observe these precautions when placing your FS1:
• Plan adequate space for cable routing from the back of the chassis. Ensure that
• When rack mounting or stacking multiple FS1 chassis, ensure there is adequate
Note: FS1 units earlier than serial number 2F0482 should not be stacked more than
two together; later units can be stacked vertically without limit as long as there is
adequate cool air supply around the FS1 vents.
isolated 5V supply, so that a relay contact closure or any device sinking at least
0.4 mA to ground will register a logic low.
to 4mA each.
cable connectors are not stressed and that cables are not bent or crimped.
airspace for cooling around the FS1 units. Note the location of cooling vents on
all equipment next to the FS1 and ensure none are obstructed.

30
Power Requirements
• Input Voltage—Chassis: autosensing 100VAC to 240VAC, 50/60Hz,
fully redundant with both power supplies diode isolated
• Power Consumption—25 Watts
Hazard Warning!
High Voltage. This situation or condition can cause injury due to electric shock.
Warning!
Do not open the chassis. There are no user-serviceable parts inside. Opening the chassis
will void the warranty unless performed by an AJA service center or licensed facility.
Warning!
Disconnect the external AC power supply line cord(s) from the mains power before
moving the unit.
Warning!
Do not defeat the safety purpose of the polarized or grounding-type plug. A polarized
plug has two blades with one wider than the other. A grounding type plug has two
blades and a third grounding prong. The wide blade or the third prong are provided for
your safety. If the provided plug does not fit into your outlet, consult an electrician for
replacement of the obsolete outlet.
Warning!
Since the Mains plug is used as the disconnection for the device, it must remain readily
accessible and operable.
System Video/ Audio Cable Connections
Warning!
Protect the power cord from being walked on or pinched
particularly at plugs, convenience receptacles, and the point
where they exit from the device.
Warning!
To meet safety regulations for leakage current, connect the FS1 dual power supplies to
separate branch circuits.
Warning!
Refer all servicing to qualified service personnel. Servicing is required when the device
has been damaged in any wav, such as power-supply cord or plug is damaged, liquid has
been spilled or objects have fallen into the device, the device has been exposed to rain or
moisture, does not operate normally, or has been dropped.
When installing your system, you’ll make video and audio input/output
connections. These connectors are explained individually in Chapter 2.

FS1 Installation and Operation Manual — Cabling the System
31
FS1 Audio Level
Choices Pro or
Consumer
FS1 Audio Setting Meaning
+24 dBu analog = 0 dBFS SMPTE standard With digital audio at maximum possible level
+18 dBu analog = 0 dBFS EBU standard With digital audio at maximum possible level
+15 dBu analog = 0 dBFS With digital audio at maximum possible level
Since the FS1 handles both digital and analog audio and can convert between the two,
it provides settings via the Parameter Menus and the remote web browser that allow
you to control the relationship between audio level in analog versus the same audio
level in the digital domain. The FS1 offers four settings to accommodate these
different audio relationships in both professional and consumer audio applications.
The audio levels listed in the following table are defined in reference to 0 dBFS (where
FS = full scale), which is the maximum level that can be represented digitally.
Note: the measurements mentioned here are made using a 1kHz sine wave.
FS1 Professional Audio Level Settings
1
(before clipping), the expected analog audio
input level is +24 dBu, and the output will be
scaled to this level.
(before clipping), the expected analog audio
input level is +18 dBu, and the output will be
scaled to this level.
(before clipping), the expected analog audio
input level is +15 dBu, and the output will be
scaled to this level.
FS1 Consumer Audio Level Setting
FS1 Audio Setting Meaning
+12 dBu analog = 0 dBFS. With digital audio at maximum level (before
clipping), the analog audio input level will be
+12 dBu, and the output will be scaled to
this level.
These levels are provided for consumer
equipment that outputs audio at levels lower
than the professional levels.
Note: In the consumer audio world, units are
often given in terms of dBV, so +12.2dBu is
equivalent to +10dBV. The standard
operating level then corresponds to -10dBV
(-7.8dBu). The "+12dBu" FS1 setting
provides consumer audio levels with
headroom.
How Do Audio Level Settings Relate to Nominal Levels?
Most users refer to audio levels at the Standard Operating Level for the U.S. and
Alignment Level for the EU—a level not at maximum level, but rather at some lower
point to allow headroom for audio to become louder without clipping.
In the U.S. most users use +4 dBu as their Standard Operating Level. This
corresponds to -20dBFS in the digital domain (20 dB of headroom, per SMPTE

32
RP-155), so the +24 dBu setting on the FS1 provides proper headroom levels for
digital and analog audio.
Most users in the EU use 0dBu as their Alignment Level. This corresponds to
-18dBFS in the digital domain (18 dB of headroom per EBU R68).
Correspondingly, the +18dBu setting on the FS1 provides for this relationship.
Alternatively, the FS1 +15 dBu setting provides safe headroom levels corresponding
to some German professional audio equipment.

Parameter Menus
Controlling the FS1 via Front Panel Parameter Menus
There are three ways to control the FS1: (1) remotely from a web browser, (2) using
a remote control panel, and (3) using the front panel Select/Adjust buttons and
Parameter Menus. This chapter deals with the latter—the most direct and allinclusive way to configure an FS1.
Chapter 4:
In Chapter 2 we discussed the panel controls overall, so ensure you’ve read and
understand that material first. In this chapter we discuss each of the Parameter
Menus and their use.
In each parameter screen the parameter number and name appear on the top line of
the display, and the parameter settings are shown on the bottom line of the display;
remember, the current setting is what is shown.
As mentioned in Chapter 2, you enter the parameter menus whenever you press the
Select or Adjust buttons. Here is the general format of the Parameter Menu display:
Parameter Number and Name
Current Parameter Setting
4
1
1

34
Pressing either a parameter Select or parameter Adjust button while on the Status
or Screen Saver displays changes the display to the last remembered Parameter
Adjust menu. If you’re already viewing a Parameter Menu, pressing
a Select or Adjust button causes a change to the next item.
Select
Adjust
The parameter Select buttons to the right of the display select a parameter to view
or modify.
Pressing one of the parameter Adjust buttons changes the current parameter’s value
to a new one from the FS1’s list of choices—repeating the list if you continue to
press Adjust—or adjusting a numerical value up or down. The exact choices
displayed will vary depending on the parameter. Most adjustment choices made
with the Adjust buttons take effect immediately and will be subsequently stored
into the FS1s non-volatile memory if they remain unchanged for 3 seconds.
If a Select or Adjust button is held down continuously, the changes will begin to
happen automatically with acceleration, if applicable.
Pressing either a Select or Adjust button while on the Status or Screen Saver
displays changes the display to the last remembered Control Menu.
Holding down both the Adjust (up) and Adjust (down) buttons at the same time
will set that parameter back to its factory default value.
The remaining topical headings in this chapter list all of the Parameter Menus by
number and name. The number shows the order in the menu navigation system:
pressing the up or down Select button shifts you numerically up or down in the
order of their assigned parameter numbers. The name is what you’ll see in the
Parameter Menu display (for example, the first heading listed here is “1.1 Output
Format” which is exactly what you’ll see in the top line of the display when
viewing this parameter).

FS1 Installation and Operation Manual — 1.1 Output Format
1.1 Output Format
This parameter defines the SDI 1 output format. Depending on other settings, it may
also apply to SDI 2 and the Component Video output.
1.1 Output Format Description of Choices
Parameter Adjustments:
Follow Input
HD 720p <hd_rate1>
HD 1080i <hd_rate1>
HD 1080psf <hd_rate2>
(Default)
Follow Ref
SD <sd_rate>
Follow the format of the selected input.
Follow the format of the reference video input (Ref).
Select standard definition (available SD rates are listed choices).
Select HD 720p (available rates are listed choices).
Select HD 1080i (available rates are listed choices).
Select HD 1080psf (available rates are listed choices).
Notes:
1. Available rates that listed here depend on what has been chosen in the 3.3
Frame Rates parameter setting.
2. If the parameter 1.1 Output Format is set to Follow Ref, and the 6.1 Genlock
Source is set to Input, and the 2.1 Video Input is set to select one of the analog
inputs, then the output format will follow the input format rather than the
format of the signal on the Ref BNC as might be expected. (This combination
of settings effectively disconnects the Ref BNC.)
35
1
3. Changing the Output Format selection automatically selects new values for
H & V timing parameters (6.2 Output Timing H, 6.3 Output Timing and
6.4 Analog Output Fine). Each Output Format selection remembers its own H
& V timing settings.
1.2 SDI 2 Out Format
This parameter defines the output format on the SDI 2 BNC connector.
1.2 SDI 2 Output Format Description of Choices
Parameter Adjustments:
Normal
Bypass (Follow Input)
(Default)
Standard Def
SDI 2 output follows the
are the same format).
SDI 2 output follows the format of the selected input.
The output from Downconverter 2 (see block diagram in Chapter 1) is always
standard definition.
Notes:
1. The output from Downconverter 2 (see block diagram in Chapter 1) is always
standard definition.
2. Bypass mode is not offered in these cases (3:2 Pulldown):
1080pSF/23.98 Input / 1080i/59.94 Output
1080pSF/23.98 Input / 525i/59.94 Output
1080pSF/24 Input / 1080i/60 Output
In these cases, Bypass mode behaves like Normal mode—the output is the
same format as the main SDI1 output.
1.1 Output Format
parameter selection (both SDI outputs

36
1.3 Component Out
This parameter defines the output format of the Component Video Output BNC
connectors (Composite Out is a function of Input Format and the 1.3 Component
Out parameter setting).
1.3 Component Output Description of Choices
Parameter Adjustments:
Normal
Bypass (Follow Input)
(Default)
Component output follows the
Component output follows the format of the selected input.
Notes:
The signal type of the Component output (RGB versus YPbPr) is defined in another
Bypass
1080i60 (3:2 pulldown mode).
parameter (
mode does not work when the input is 1080pSF24 and output is
3.2 Component OUT Format
1.1 Output Format
).
parameter selection.
Standard Def
2.1 Video Input
The output from Downconverter 2 (see block diagram in
standard definition.
Chapter 1
) is always
Notes:
1. Bypass applies to all analog outputs (Component, Composite, and S-Video).
When 1.3 Component Out is set to Bypass, Input signal format is 525i/59.94,
and 5.3 SD Aspect Ratio is set to anything other than Off, the Composite Out
and S-Video outputs will also bypass the Aspect Ratio Converter.
2. Setting parameter 1.3 Component Out to Bypass causes Composite Out to
bypass aspect ratio conversion (parameter 5.3).
3. As in 1.2 SDI2 Out, Bypass mode is not offered in these cases (3:2 Pulldown):
1080pSF/23.98 Input / 1080i/59.94 Output
1080pSF/23.98 Input / 525i/59.94 Output
1080pSF/24 Input / 1080i/60 Output
In these cases, Bypass mode behaves like Normal mode—the output is the same
format as the main SDI1 output.
This parameter performs input video source selection for the FS1. Multiple input
sources may be present at all the connectors on the FS1 rear panel, but the active
input source routed through the FS1 will be the one selected here.
2.1 Video Input Description of Choices
Parameter Adjustments:
SDI 1
(Default)
SDI 2
Composite
S-Video
Component
Select SDI 1 connector as the input source.
Select SDI 2 connector as the input source.
Select the Composite connector as the input source.
Select the S-Video connector as the input source.
Select the Component connector as the input source.

FS1 Installation and Operation Manual — 2.2 Audio Input
Notes:
1. Changing the Video Input selection automatically selects new values for Proc Amp
parameters (10.1 through 10.5). Each video source remembers its own Proc Amp
settings. This is referred to as Source Memory.
2. If 4.5 Audio Follow Video is set to On, then changing the Video Input selection will
also automatically select new values for all audio parameters associated with Audio
Follow Video (see the list provided in the description of parameter 4.5 Audio Follow
Video). Audio Source Memory is enabled only when 4.5 Audio Follow Video is set
to On.
37
2.2 Audio Input
This parameter performsinput audio source selection for the FS1. Multiple input
sources may be present at all the connectors on the FS1 rear panel, but the active
input source routed through the FS1 will be the one selected here.
2.2 Audio Input Description of Choices
Parameter Adjustments:
Stereo Map
Channel Map
Embed SDI 1
Embed SDI 2
AES unbal
(Default)
Analog
Select stereo inputs according to
channel pair (4 pair total) can be mapped to 16 different choices.
For 8 channels of embedded audio out, select and map inputs according to
Map
parameters 2.11 through 2.18. Any of the 16 embedded channels can be
mapped to one of the 48 possible choices.
Use the embedded audio from the SDI 1 connector as the input source.
Use the embedded audio from the SDI 2 connector as the input source.
Select the AES/EBU digital audio connectors (8-ch) as the audio input source.
Select the Analog audio connector (DB25, 8-ch) as the audio input source.
Note: If parameter 4.5 Audio Follow Video is set to On, then Audio Input selection is
independently kept for each separate input: SDI 1, SDI 2, Composite, S-Video, and
Component. If Audio Follow Video is set to Off, then another Audio Input selection is
used.
Audio Map
1
parameters 2.21 through 2.24. Any
Audio

38
2.11 Audio Map Ch1
This parameter is used with parameter 2.2—when Channel Map is selected—to
specify the source of the audio output on channel 1. Possible choices (48 in all) are:
2.11 Audio Map Ch1 Description of Choices
Parameter Adjustments:
AES Ch 1
(default)
AES Ch 2
AES Ch 3
AES Ch 4
AES Ch 5
AES Ch 6
AES Ch 7
AES Ch 8
Analog Ch 1
Analog Ch 2
Analog Ch 3
Analog Ch 4
Analog Ch 5
Analog Ch 6
Analog Ch 7
Analog Ch 8
SDI 1 Ch 1
SDI 1 Ch 2
SDI 1 Ch 3
SDI 1 Ch 4
SDI 1 Ch 5
SDI 1 Ch 6
SDI 1 Ch 7
SDI 1 Ch 8
SDI 2 Ch 1
SDI 2 Ch 2
SDI 2 Ch 3
SDI 2 Ch 4
SDI 2 Ch 5
SDI 2 Ch 6
SDI 2 Ch 7
SDI 2 Ch 8
SDI 1 Ch 9
SDI 1 Ch 10
SDI 1 Ch 11
SDI 1 Ch 12
SDI 1 Ch 13
SDI 1 Ch 14
SDI 1 Ch 15
SDI 1 Ch 16
SDI 2 Ch 9
SDI 2 Ch 10
SDI 2 Ch 11
SDI 2 Ch 12
SDI 2 Ch 13
SDI 2 Ch 14
SDI 2 Ch 15
SDI 2 Ch 16
Mute
Selects AES channel 1 and maps it to Channel 1 audio out.
Selects AES channel 2 and maps it to Channel 1 audio out.
Selects AES channel 3 and maps it to Channel 1 audio out.
Selects AES channel 4 and maps it to Channel 1 audio out.
Selects AES channel 5 and maps it to Channel 1 audio out.
Selects AES channel 6 and maps it to Channel 1 audio out.
Selects AES channel 7 and maps it to Channel 1 audio out.
Selects AES channel 8 and maps it to Channel 1 audio out.
Selects Analog Channel 1 and maps it to Channel 1 audio out.
Selects Analog Channel 2 and maps it to Channel 1 audio out.
Selects Analog Channel 3 and maps it to Channel 1 audio out.
Selects Analog Channel 4 and maps it to Channel 1 audio out.
Selects Analog Channel 5 and maps it to Channel 1 audio out.
Selects Analog Channel 6 and maps it to Channel 1 audio out.
Selects Analog Channel 7 and maps it to Channel 1 audio out.
Selects Analog Channel 8 and maps it to Channel 1 audio out.
Selects the SDI 1 Channel 1 and maps it to Channel 1 audio out.
Selects the SDI 1 Channel 2 and maps it to Channel 1 audio out.
Selects the SDI 1 Channel 3 and maps it to Channel 1 audio out.
Selects the SDI 1 Channel 4 and maps it to Channel 1 audio out.
Selects the SDI 1 Channel 5 and maps it to Channel 1 audio out.
Selects the SDI 1 Channel 6 and maps it to Channel 1 audio out.
Selects the SDI 1 Channel 7 and maps it to Channel 1 audio out.
Selects the SDI 1 Channel 8 and maps it to Channel 1 audio out.
Selects the SDI 2 Channel 1 and maps it to Channel 1 audio out.
Selects the SDI 2 Channel 2 and maps it to Channel 1 audio out.
Selects the SDI 2 Channel 3 and maps it to Channel 1 audio out.
Selects the SDI 2 Channel 4 and maps it to Channel 1 audio out.
Selects the SDI 2 Channel 5 and maps it to Channel 1 audio out.
Selects the SDI 2 Channel 6 and maps it to Channel 1 audio out.
Selects the SDI 2 Channel 7 and maps it to Channel 1 audio out.
Selects the SDI 2 Channel 8 and maps it to Channel 1 audio out.
Selects the SDI 1 Channel 9 and maps it to Channel 1 audio out.
Selects the SDI 1 Channel 10 and maps it to Channel 1 audio out.
Selects the SDI 1 Channel 11 and maps it to Channel 1 audio out.
Selects the SDI 1 Channel 12 and maps it to Channel 1 audio out.
Selects the SDI 1 Channel 13 and maps it to Channel 1 audio out.
Selects the SDI 1 Channel 14 and maps it to Channel 1 audio out.
Selects the SDI 1 Channel 15 and maps it to Channel 1 audio out.
Selects the SDI 1 Channel 16 and maps it to Channel 1 audio out.
Selects the SDI 2 Channel 9 and maps it to Channel 1 audio out.
Selects the SDI 2 Channel 10 and maps it to Channel 1 audio out.
Selects the SDI 2 Channel 11 and maps it to Channel 1 audio out.
Selects the SDI 2 Channel 12 and maps it to Channel 1 audio out.
Selects the SDI 2 Channel 13 and maps it to Channel 1 audio out.
Selects the SDI 2 Channel 14 and maps it to Channel 1 audio out.
Selects the SDI 2 Channel 15 and maps it to Channel 1 audio out.
Selects the SDI 2 Channel 16 and maps it to Channel 1 audio out.
Mute Channel 1 (no audio)

2.12 Audio Map Ch2
FS1 Installation and Operation Manual — 2.12 Audio Map Ch2
Note: If parameter 4.5 Audio Follow Video is set to On, then Audio Map Ch1
selection is independently kept for each separate input: SDI 1, SDI 2, Composite, S-
Video, and Component. If Audio Follow Video is set to Off, then another Audio Map
Ch1 selection is used. This note applies to Parameters 2.11 through 2.18.
This parameter is used with parameter 2.2—when Channel Map is selected—to
specify the source of the audio output on channel 2. Possible choices are the same as
parameter 2.11. Default = AES Ch 2.
39
2.13 Audio Map Ch3
2.14 Audio Map Ch4
2.15 Audio Map Ch5
2.16 Audio Map Ch6
1
This parameter is used with parameter 2.2—when Channel Map is selected—to
specify the source of the audio output on channel 3. Possible choices are the same as
parameter 2.11. Default = AES Ch 3.
This parameter is used with parameter 2.2—when Channel Map is selected—to
specify the source of the audio output on channel 4. Possible choices are the same as
parameter 2.11. Default = AES Ch 4.
This parameter is used with parameter 2.2—when Channel Map is selected—to
specify the source of the audio output on channel 5. Possible choices are the same as
parameter 2.11. Default = AES Ch 5.
This parameter is used with parameter 2.2—when Channel Map is selected—to
specify the source of the audio output on channel 6. Possible choices are the same as
parameter 2.11. Default = AES Ch 6.
2.17 Audio Map Ch7
2.18 Audio Map Ch8
This parameter is used with parameter 2.2—when Channel Map is selected—to
specify the source of the audio output on channel 7. Possible choices are the same as
parameter 2.11. Default = AES Ch 7.
This parameter is used with parameter 2.2—when Channel Map is selected—to
specify the source of the audio output on channel 8. Possible choices are the same as
parameter 2.11. Default = AES Ch 8.

40
2.21 Audio Map Ch 1/2
This parameter is used with parameter 2.2—when Stereo Map is selected—to specify
the source of the channel pair for audio output channels 1 and 2. Possible choices
(24 in all) are:
2.21 Audio Map Ch1/2 Description of Choices
Parameter Adjustments:
AES Ch 1/2
(default)
AES Ch 3/4
AES Ch 5/6
AES Ch 7/8
Analog Ch 1/2
Analog Ch 3/4
Analog Ch 5/6
Analog Ch 7/8
SDI 1 Ch 1/2
SDI 1 Ch 3/4
SDI 1 Ch 5/6
SDI 1 Ch 7/8
SDI 2 Ch 1/2
SDI 2 Ch 3/4
SDI 2 Ch 5/6
SDI 2 Ch 7/8
SDI 1 Ch 9/10
SDI 1 Ch 11/12
SDI 1 Ch 13/14
SDI 1 Ch 15/16
SDI 2 Ch 9/10
SDI 2 Ch 11/12
SDI 2 Ch 13/14
SDI 2 Ch 15/16
Mute
Selects AES Channels 1/2, and maps them to Channel 1/2 audio out.
Selects AES Channels 3/4, and maps them to Channel 1/2 audio out.
Selects AES Channels 5/6, and maps them to Channel 1/2 audio out.
Selects AES Channels 7/8, and maps them to Channel 1/2 audio out.
Selects Analog Channels 1/2, and maps them to Channel 1/2 audio out.
Selects Analog Channels 3/4, and maps them to Channel 1/2 audio out.
Selects Analog Channels 5/6, and maps them to Channel 1/2 audio out.
Selects Analog Channels 7/8, and maps them to Channel 1/2 audio out.
Selects SDI 1 Channels 1/2, and maps them to Channel 1/2 audio out.
Selects SDI 1 Channels 3/4, and maps them to Channel 1/2 audio out.
Selects SDI 1 Channels 5/6, and maps them to Channel 1/2 audio out.
Selects SDI 1 Channels 7/8, and maps them to Channel 1/2 audio out.
Selects SDI 2 Channels 1/2, and maps them to Channel 1/2 audio out.
Selects SDI 2 Channels 3/4, and maps them to Channel 1/2 audio out.
Selects SDI 2 Channels 5/6, and maps them to Channel 1/2 audio out.
Selects SDI 2 Channels 7/8, and maps them to Channel 1/2 audio out.
Selects SDI 1 Channels 9/10, and maps them to Channel 1/2 audio out.
Selects SDI 1 Channels 11/12, and maps them to Channel 1/2 audio out.
Selects SDI 1 Channels 13/14, and maps them to Channel 1/2 audio out.
Selects SDI 1 Channels 15/16, and maps them to Channel 1/2 audio out.
Selects SDI 2 Channels 9/10, and maps them to Channel 1/2 audio out.
Selects SDI 2 Channels 11/12, and maps them to Channel 1/2 audio out.
Selects SDI 2 Channels 13/14, and maps them to Channel 1/2 audio out.
Selects SDI 2 Channels 15/16, and maps them to Channel 1/2 audio out.
Mute Channel pair 1/2 (no audio)
Note: If parameter 4.5 Audio Follow Video is set to On, then Audio Map Ch1/2
selection is independently kept for each separate input: SDI 1, SDI 2, Composite,
S-Video, and Component. If Audio Follow Video is set to Off, then another Audio
Map Ch1/2 selection is used. This note applies to Parameters 2.21 through 2.24.
2.22 Audio Map Ch 3/4
This parameter is used with parameter 2.2—when Stereo Map is selected—to specify
the source of the channel pair for audio output channels 3 and 4. Possible choices
are the same as parameter 2.21. Default = AES Ch 3/4.
2.23 Audio Map Ch 5/6

FS1 Installation and Operation Manual — 2.24 Audio Map Ch 7/8
This parameter is used with parameter 2.2—when Stereo Map is selected—to specify
the source of the channel pair for audio output channels 5 and 6. Possible choices are
the same as parameter 2.21. Default = AES Ch 5/6.
2.24 Audio Map Ch 7/8
This parameter is used with parameter 2.2—when Stereo Map is selected—to specify
the source of the channel pair for audio output channels 7 and 8. Possible choices are
the same as parameter 2.21. Default = AES Ch 7/8.
3.1 Component In Format
This parameter configures the format of the Component video input.
3.1 Component In Description of Choices
Parameter Adjustments:
Beta YPbPr
SMPTE YPbPr
(Default)
Configure the Component video input source as Beta YPbPr (standard definition). If
the selected Component video source is HD, this will default to SMPTE YPbPr.
Configure the Component video input source as SMPTE YPbPr.
41
1
3.2 Component Out Format
This parameter configures the format of the Component video output.
3.2 Component Out Description of Choices
Parameter Adjustments:
Beta YPbPr
SMPTE YPbPr
(Default)
RGB
Configure the Component video output as Beta YPbPr (standard definition). If the
Component video is HD, this will default to SMPTE YPbPr.
Configure the Component video output as SMPTE YPbPr.
Configure the Component video output as RGB.
3.3 Frame Rate
This parameter selects the HD video frame rate associated with the video standard.
3.3 Frame Rate Description of Choices
Parameter Adjustments:
59.94/23.98
(Default)
60/24
50/25
Select the
Select the
Select the
59.94/23.98
60/24”
item if your desired rate is either 60 or 24.
50/25
item if your desired rate is either 50 or 25 (PAL).
item if your desired rate is either 59.94
or
23.98.
Note: Changing the Frame Rates selection automatically selects a new value for 1.1
Output Format. Each Frame Rates selection remembers its own Output Format
settings.

42
3.4 NTSC Standard
This parameter selects the NTSC video standard.
3.4 NTSC Standard Description of Choices
Parameter Adjustments:
NTSC
(Default)
NTSC Japan
Select NTSC for North America NTSC standard.
Select NTSC Japan for Japan’s NTSC standard.
4.1 Analog Audio Std
This parameter sets the analog audio input and output level of the FS1 with
reference to full scale digital, from consumer levels (+12 dBu) all the way to
professional (+24 dBu).
4.1 Analog Audio Std Description of Choices
Parameter Adjustments:
+24 dBu
(Default)
+18 dBu
+15 dBu
+12 dBu
Select +24 dBu as the expected analog audio level.
Select +18 dBu as the expected analog audio level.
Select +15 dBu as the expected analog audio level.
Select +12 dBu as the expected analog audio level.
Maximum amplitude (0 dBFS)
Note: Audio levels are discussed at the end of Chapter 3 (FS1 Audio Level Choices—
Pro or Consumer).
4.2 Audio Delay (mS)
This parameter allows you to adjust the delay to compensate for video timing issues
(delay/latency). Pressing the Adjust buttons changes the delay from -16 to 256 ms
(the default is zero delay).
4.2 Audio Delay (mS) Description of Choices
Parameter Adjustments:
Variable Adjustment range increments from -16 to 256ms.
Default
= 0 (synchronized to Video Out).
Note: If parameter 4.5 Audio Follow Video is set to On, then the Audio Delay
selection is independently kept for each separate input: SDI 1, SDI 2, Composite, S-
Video, and Component. If Audio Follow Video is set to Off, then another Audio Delay
selection is used.

FS1 Installation and Operation Manual — 4.3 Embed Audio Out
4.3 Embed Audio Out
This parameter allows you to enable or disable audio output. SDI Embedded Audio
output may be On, Muted (embedded silence) or turned Off (no embedded audio).
Analog and AES audio outputs are not affected by 4.3 (they’re left On).
4.3 Embed Audio Out Description of Choices
Parameter Adjustments:
On (
Default)
Mute
Embedded audio will be passed.
Off
Do not pass embedded audio packets to the SDI outputs.
FS1 outputs SDI embedded audio packets containing silence.
4.4 Sample Rate Convert
This parameter controls audio sample rate conversion on input audio. On is the
default (audio is rate-converted and synced with video) and Off is a setting for use
when Dolby
unaltered. Normally, set this to On (default). Set it to Off only if the following are
both
true:
®
5.1 and similar schemes need to be preserved and the audio data passed
43
1
1. You want to pass digital encoded audio from either embedded or AES into
embedded and/or AES out.
2. You have the embedded or AES input genlocked to the FS1 output. In other words,
the encoded audio will not survive the frame-sync function (dropping or repeating
frames) so it needs to be set to lock to the input. You can lock to a reference only if
that reference is driving both the FS1 and the upstream source of the embedded or
AES input to the FS1.
Note: If parameter 4.5 Audio Follow Video is set to On, the Sample Rate Convert
selection is independently kept for each separate input: SDI 1, SDI 2, Composite, S-
Video, and Component. If Audio Follow Video is set to Off, another Sample Rate Convert
selection is used.
4.4 Sample Rate Conversion Description of Choices
Parameter Adjustments:
On
(Default)
Normal operation. The FS1 performs audio sample rate conversion and keeps the
video and audio synchronized.
Off
The FS1 does not sample rate convert the audio, leaving embedded audio as is,
useful for Dolby¤ 5.1 embedded audio and other applications.

44
4.5 Audio Follow Video
This parameter determines whether audio settings are remembered for each video
input.
Audio Follow Video
parameters:
applies to these
• 2.2 Audio Input
• 2.11—2.18 Audio Map
• 2.21—2.24 Audio Map (Stereo)
• 4.2 Audio Delay
• 4.4 Sample Rate Convert
• 20.0 Audio Output Levels
• 20.1—20.8 Audio Level Ch (n)
• 21.0 Audio Output Phase
• 21.1—21.8 Audio Phase Ch (n)
Note: Turning
results in the loss of the above settings. When AFV is
turned
On
, the source-memory settings are written
over the current settings. Turning AFV
not restore the original settings, but instead will result
in the source memory settings remaining in effect
until edited again.
4.5 Audio Follow Video Description of Choices
Parameter Adjustments:
Off
Audio Follow Video
(Default)
On
(AFV) On
Off
again will
Normal operation. Audio settings must be made separately from any video settings;
they are not associated automatically.
The FS1 remembers the saved audio settings associated with the currently
selected input. Whenever an input is selected, the corresponding audio settings will
be recalled.
This allows you to set up specific audio settings for the different video inputs (i.e.,
perhaps the SDI 1 has a specific embedded audio channel mapping while the
component video input might always use AES audio input).
Audio Follow Video
to these parameters:
• 4.1 Analog Audio Std
• 4.3 Embed Audio Out
does not apply
4.6 AFV Memory
Selecting this parameter and then pressing the up-arrow Adjust button saves the
current audio settings to source-memory for the currently selected video input.

FS1 Installation and Operation Manual — 5.1 Upconvert Mode
5.1 Upconvert Mode
This parameter selects the type of upconversion performed on the incoming selected
SD source input. See the following illustration for visual representations of the
upconversions.
5.1 Upconvert Mode Description of Choices
Parameter Adjustments:
14x9 Pillar
Full Screen
Wide Zoom
4x3 Pillar
(Default)
LB to Full
Results in 4x3 image in center of screen, with black sidebars.
Results in 14x9 image, zoomed slightly to fill a 14x9 image with black sidebars.
Anamorphic full screen display.
Image is zoomed to fit the full screen (letterbox).
Using a combination of zoom and stretch, the image is sized to fit a 16x9 screen
(this can introduce a small aspect ratio change).
Upconvert Illustrations—FS1
4:3 Upconverts To These displays on 16:9
45
1
4
Full Screen
3
4:3 Pillar
LB to Full
14:9 Pillar
16
9
Upconvert Illustrations
Wide Zoom

46
5.2 Downconvert Mode
This parameter selects the type of downconversion performed on the incoming
selected HD source input. See the following Downconvert Illustration for
downconversion examples.
5.2 Downconvert Mode Description of Choices
Parameter Adjustments:
Letterbox
(Default)
Crop
Anamorphic
14:9
Auto AFD
Image is reduced with black top and bottom added to image area, with the aspect
ratio preserved.
Image is cropped to fit new screen size.
HD image is converted to full-screen SD with a 16x9 aspect ratio (anamorphic).
Image is reduced slightly with aspect ratio preserved. Black is added top and
bottom, and the left and right sides are cropped.
Automatically selects the best downconvert mode based on the input video's Active
Format Description (AFD) code. If the input video is not carrying an AFD VANC
code, the downconverter defaults to the mode specified in parameter menu
Downconvert AFD Default
5.5
.
Note: Active Format Description (AFD) codes are carried in the vertical ancillary
(VANC) portion of HD SDI video signals, specified in SMPTE 2016 as
follows: “AFD information is intended to guide DTV receivers and/or intermediate
professional video equipment regarding the display of video of one aspect ratio on a
display of another aspect ratio.”
In the FS1 downconverter, the AFD code on the video input can be used to
guide the downconverter in choosing which mode to use to best display the
important content of the input 16:9 HD video on the 4:3 SD output. For
example, if the input AFD code is 10 (Full Frame), it means that the input video
has important picture information throughout the full 16:9 frame, so the
downconverter should use Letterbox mode to be sure none of the content is
cropped off. An AFD code of 9 (Pillarbox) says that the input video only has
content within the center 4:3 area of the picture (usually because it originally
came from an upconverted SD signal) so the downconverter Crop mode would
be the best choice. There are 16 possible HD AFD codes, of which 8 are in
common use. The FS1 does not process or use SD AFD codes.
FS1 AFD processing (passing, removing, and re-inserting) occurs based on the
setting of parameters 5.2, 5.5, 5.6 and 5.7.

FS1 Installation and Operation Manual — 5.2 Downconvert Mode
16
9
Downconvert Illustrations—FS1
Anamorphic
Letterbox
4
3
16:9 Downconverts To These displays on 4:3
Crop
14:9
1
47
Downconvert Illustrations

48
5.3 SD Aspect Ratio Convert
This parameter selects an SD-to-SD aspect conversion mode for converting between
normal 4:3 SD video and either 16:9 Anamorphic SD video or Letterbox SD video.
(In Europe 16:9 Anamorphic video is also known as “wide screen” video.) See the
following illustration for aspect ratio conversion visual examples.
5.3 SD Aspect Ratio Convert Description of Choices
Parameter Adjustments:
Off
(Default)
Letterbox
H Crop
Pillarbox
V Crop
14:9
Turns aspect ratio conversion
Converts 16:9 Anamorphic video to Letterbox video.
Converts 16:9 Anamorphic video to 4:3 Standard video
(crops left and right edges of video).
Converts 4:3 Standard video to 16:9 Anamorphic video.
Converts Letterbox video to 16:9 Anamorphic video.
Converts 16:9 Anamorphic video to 14:9 Cropped video.
Off.
SD Aspect Ratio Conversion Illustrations—FS1
4:3 Converts To These displays on 4:3
4
3
Off
(no conversion)
Letterbox
H Crop
Pillarbox
SD Aspect Ratio Conversions
V Crop
14:9

FS1 Installation and Operation Manual — 5.5 Downconvert AFD Default
5.5 Downconvert AFD Default
This parameter selects how the FS1 will operate when parameter 5.2 Downconvert
Mode has been set to Auto AFD and no AFD codes are detected at the selected input
source (i.e., selects which default downconversion to use when no AFD is present).
5.5 Downcvt AFD Dflt Description of Choices
Parameter Adjustments:
Hold Last
(Default)
Letterbox
14x9
Anamorphic
Crop
Use the last AFD code detected and continue to use its aspect ratio selection until a
new AFD code is detected again in the SDI meta data.
When an AFD code isn’t present, switch the downconverter mode to Letterbox.
When an AFD code isn’t present, switch the downconverter mode to 14x9.
When an AFD code isn’t present, switch the downconverter mode to Anamorphic.
When an AFD code isn’t present, switch the downconverter mode to Crop.
49
1

50
5.6 AFD Out SDI 1
This parameter menu determines whether the FS1 inserts a SMPTE 2016 Active
Format Descriptor (AFD) packet into the SDI 1 output video. The inserted AFD
code does not affect FS1 up/down/cross conversion, but it may affect downstream
video processing if the signal is downconverted.
Note: AFD codes are only inserted into HD video outputs.
5.6 AFD Out SDI1 Description of Choices
Parameter Adjustments:
OFF
(Default)
Auto
>16:9
Full Frame
Pillarbox
Letterbox
14:9
4:3 Alt 14:9
16:9 Alt 14:9
16:9 Alt 4:3
The FS1 does not insert an AFD code into the output. If the video input has an AFD
code and the FS1 is not up/down/cross-converting it, the input AFD code will be
passed through to the output.
If the FS1 is not upconverting or downconverting the input video, the input AFD
code is passed through. If there is no AFD code on the input video, a “Full Frame”
(8) code is inserted. If the FS1 is upconverting, the appropriate AFD code will be
chosen based on the upconvert mode.
The FS1 always inserts a “Box > 16:9 (center)” AFD code (4), which indicates that
the HD image has an aspect ratio greater than 16:9 as a vertically centered
letterbox within the 16:9 frame.
The FS1 always inserts a “Full Frame” AFD code (8), which indicates that the HD
image is full frame, with an aspect ratio that is 16:9.
The FS1 always inserts a “4:3 (center)” AFD code (9), which indicates that the HD
image has a 4:3 aspect ratio as a horizontally center pillarbox image within the
16:9 frame.
The FS1 always inserts a “16:9 (with complete 16:9 image protected)” AFD code
(10), which indicates that the HD image is full frame, with a 16:9 aspect ratio and
all image areas are protected.
The FS1 always inserts a “14:9 (center)” AFD code (11), which indicates that the
HD image has a 14:9 aspect ratio as a horizontally centered pillarbox within the
16:9 frame.
The FS1 always inserts a “4:3 (with alternate 14:9 center)” AFD code (13), which
indicates that the HD image has a 4:3 aspect ratio and with an alternative 14:9
centered pillarbox image within the 16:9 frame.
The FS1 always inserts a “16:9 (with alternative 14:9 center” AFD
code (14), which indicates that the HD image has a 16:9 aspect ratio with an
alternative 14:9 center within the 16:9 frame.
The FS1 always inserts a “16:9 (with alternative 4:3 center)” AFD code (15), which
indicates that the HD image has a 16:9 aspect ratio with an alternative 4:3 center
within the 16:9 frame.
5.7 AFD Out SDI 2
This parameter menu determines whether the FS1 inserts a SMPTE 2016 Active
Format Descriptor (AFD) packet into the SDI 2 output video. The inserted AFD
code does not affect FS1 up/down/cross conversion, but it may affect downstream
video processing if the signal is downconverted.
Parameter selections are the same as for parameter 5.6 (AFD Out SDI 1).

FS1 Installation and Operation Manual — 6.1 Genlock Source
6.1 Genlock Source
This parameter selects the reference video source used for genlocking, either
automatically or explicitly.
6.1 Genlock Source Description of Choices
Parameter Adjustments:
Reference
(Default)
Input
Free run
Use the signal on the
Use the signal on the currently selected input as the genlock source.
Free run mode (FS1 syncs to its own timebase, not locked to an external source).
6.2 Output Timing H
This parameter adjusts horizontal output timing with reference to the genlock source
already selected. When adjusting the horizontal timing (H), this parameter specifies a
number of pixels to offset, from zero to full line width.
6.2 Output Timing H Description of Choices
Ref
connector as the genlock source.
51
1
Parameter Adjustments:
Variable Adjustment range increments from 0 to the width of the line in pixels. This could be
720, 1280, or 1920, depending on the format already chosen.
Default: 0
Note: Independent horizontal and vertical timing values are kept for all available
output formats.
6.3 Output Timing V
This parameter adjusts vertical output timing with reference to the genlock source
already selected. When adjusting the vertical timing (V), this parameter specifies a
number of lines to offset, moving the screen up to a half a frame up or down.
6.3 Output Timing V Description of Choices
Parameter Adjustments:
Variable Adjustment range increments from half a frame up to a half a frame down in single
line increments (where the frame size could be 525, 625, 750, or 1125,
depending on the format already chosen).
Default: 0

52
6.4 Analog Output Fine (Horizontal Timing)
Further adjusts the horizontal output timing of the analog output (only) in finer
increments than 6.2 (above)—in this case by sub-pixels. Each adjustment of this
control, from 0 to 127 adjusts the analog output timing by 1/128th of a pixel. Like
6.2, horizontal output timing is adjusted with reference to the Ref video selected.
6.4 Analog Output Fine Description of Choices
Parameter Adjustments:
Variable Adjustment range increments from 0 to 127, with each increment moving the timing
by 1/128th of a pixel.
Default: 0
7.1 Sidebar Keyer
This parameter turns the Sidebar Keyer On or Off, and selects its source. When
turned On, the FS1 Sidebar Keyer takes a standard definition signal from the
selected input source (parameter 2.1), upconverts it, and then adds HD sidebars
from the source selected here in parameter 7.1.
The sidebars keyed over the FS1’s source video (2.1) will each have a width as
specified in parameter 7.2. Sidebar video is useful when upconverting standard
definition video in 4:3 Pillar mode, as the sidebar takes the place of the black on the
sides of the 4:3 aspect ratio picture.
The input selected here (7.1) for the Sidebar must be an HD signal, and it must be
the same format as that selected for parameter 1.1 Output Format.
Notes:
1. It is normal for SD sources used for the sidebar fill to sometimes have
asymmetrical edges (if SD video isn’t cropped to “real video”). This can be seen
in some cases where digital video was digitized from analog.
2. The Composite and S-Video inputs are not available as the sidebar source since
they only support SD.
The Component input may be used as a sidebar input source for 7.1—but only if the
main input selected by 2.1 is not Composite or S-Video. (There is only one A/D
converter in the FS1, and it cannot be used for both inputs simultaneously.)
7.1 Sidebar Keyer Description of Choices
Parameter Adjustments:
default
)
OFF (
SDI 1
SDI 2
Component
Turn the Sidebar Keyer off.
Turn the Sidebar Keyer on and route the video from the SDI 1 input into it.
Turn the Sidebar Keyer on and route the video from the SDI 2 input into it.
Turn the Sidebar Keyer on and route the video from the Component analog input
into it.

7.2 Sidebar Edge
FS1 Installation and Operation Manual — 7.2 Sidebar Edge
This parameter selects the width of the sidebars when turned on via parameter 7.1.
Sidebar Keyer. The video selected in 7.1 will appear on the right and left of the active
video input (selected in 2.1). Sidebar Edge can be set to -128 through +128. A value of
“0” produces a 4:3 center. Positive values produce wider sidebars (and a narrower
center).
Alarm conditions occur if conflicting video formats are selected, such as the following:
• Selecting different formats for 1.1 Output Format, 7.1 Sidebar Keyer input
format, and the main 2.1 Video Input format
• Selecting analog inputs for both the main input and the sidebar input
• Setting 7.1 Sidebar Keyer to On while in Follow Input mode (since the sidebar
1
keyer requires that the main input be upconverted).
When a sidebar-related Alarm condition appears, the sidebars will not appear on the
video output. The Status menu displays sidebar (SB) status information to help you
find the cause of the conflict.
53
7.2 Sidebar Edge Description of Choices
Parameter Adjustments:
NORMAL (
-128 to +128 (Variable)
default
)
Selects a 4:3 aspect ratio center picture (2.1 selected input source) with sidebars
keyed to fill the screen on the left and right from the Sidebar Keyer source
selected by parameter
Using the
+128 to expand or shrink the sidebars. Selecting a larger value causes the
center picture to become narrower while the sidebars expand.
Adjust
buttons, step through and select a width value from -128 through
10.1 Proc Amp
This parameter turns the Proc Amp On and Off. When it is On, you can set additional
parameters (10.1 to 10.5) to control video gain, black level, hue, and saturation.
Note: Proc Amp parameter settings are independently kept for each separate input:
SDI 1, SDI 2, Composite, S-Video, and Component.
10.1 Proc Amp Description of Choices
Parameter Adjustments:
On
Turn Proc Amp On.
Off (
default
)
Turn Proc Amp
Off
.
7.1
.

54
10.2 Proc Amp Gain
This parameter adjusts the video gain from black to 1.5 times luma in steps of .01,
each time an Adjust button is pressed.
10.2 Proc Amp Gain Description of Choices
Parameter Adjustments:
Variable Adjustment range increments from zero to 1.5 in .01 steps.
Default (unity):
1.0
10.3 Proc Amp Black
This parameter adjusts the video black level from -20 IRE to +20 IRE in .5 steps,
each time an Adjust button is pressed.
10.3 Proc Amp Black Description of Choices
Parameter Adjustments:
Variable Adjustment range increments from -20 IRE to +20 IRE in .5 steps.
Default (unity):
0 IRE
10.4 Proc Amp Hue
This parameter adjusts the video color hue through 360 degrees (color wheel). Steps
increment or decrement 1 degree each time an Adjust button is pressed.
10.4 Proc Amp Hue Description of Choices
Parameter Adjustments:
Variable Adjustment range increments from -180 to +180 in steps of 1 degree.
Default (unity):
0 degrees
10.5 Proc Amp Sat
This parameter adjusts the video color saturation from black and white to 1.5 times
chroma in steps of .01, each time an Adjust button is pressed.
10.5 Proc Amp SAT Description of Choices
Parameter Adjustments:
Variable Adjustment range increments from 0 (black & white) to 1.5 (Chroma) in steps of .01.
Default:
1.0

FS1 Installation and Operation Manual — 11.1 Loss of Input
11.1 Loss of Input
This parameter selects the automatic action that occurs if the video input is lost. The
Black selection (default) cuts the video to black. The Freeze selection freezes video on
the last available frame.
Note: Freeze on Loss of Input works only for SDI inputs. If a selected analog input
is lost while Freeze is enabled, the output will not be valid video.
11.5 Loss of Input Description of Choices
55
Parameter Adjustments:
Black (
Freeze
default
Freezes on the last available video frame if input is lost.
)
Switches to black if input video is lost.
20.0 Audio Output Levels
This parameter enables or disables individual audio output level adjustment of the
eight FS1 audio output channels. When Adjust is selected, parameters 20.1 through
20.8 are then used to select the output levels for each separate channel.
d
20.0 Audio Output Levels Description of Choices
Parameter Adjustments:
Unity (
default
)
Disable audio output level adjustments.
Adjust
Enable audio output level adjustments for the eight audio channels.
Note: If parameter 4.5 Audio Follow Video is set to On, then Audio Output Levels
selection is independently kept for each separate input: SDI 1, SDI 2, Composite, S-
Video, and Component. If Audio Follow Video is set to Off then another Audio Output
Levels selection is used. This note applies to parameters 20.0 through 20.8.
1
20.1 Audio Level Ch1
This parameter adjusts the audio level of audio channel 1 ± 18dB in steps of 0.5 dB.
20.1 Audio Level Ch1 Description of Choices
Parameter Adjustments:
Variable Adjustment of audio level – 18dB range in steps of .5dB.
Default:
Note: If parameter 4.5 Audio Follow Video is set to On, then Audio Level Ch1
selection is independently kept for each separate input: SDI 1, SDI 2, Composite, S-
Video, and Component. If Audio Follow Video is set to Off, then another Audio Level
Ch1 selection is used. This note applies to parameters 20.1 through 20.8.
+0dB

56
20.2 Audio Level Ch2
This parameter adjusts the audio level of audio channel 2 ± 18dB in steps of 0.5 dB.
Parameter adjustments are the same as for 20.1.
20.3 Audio Level Ch3
This parameter adjusts the audio level of audio channel 3 ± 18dB in steps of 0.5 dB.
Parameter adjustments are the same as for 20.1.
20.4 Audio Level Ch4
This parameter adjusts the audio level of audio channel 4 ± 18dB in steps of 0.5 dB.
Parameter adjustments are the same as for 20.1.
20.5 Audio Level Ch5
This parameter adjusts the audio level of audio channel 5 ± 18dB in steps of 0.5 dB.
Parameter adjustments are the same as for 20.1.
20.6 Audio Level Ch6
This parameter adjusts the audio level of audio channel 6 ± 18dB in steps of 0.5 dB.
Parameter adjustments are the same as for 20.1.
20.7 Audio Level Ch7
This parameter adjusts the audio level of audio channel 7 ± 18dB in steps of 0.5 dB.
Parameter adjustments are the same as for 20.1.
20.8 Audio Level Ch8
This parameter adjusts the audio level of audio channel 8 ± 18dB in steps of 0.5 dB.
Parameter adjustments are the same as for 20.1.

FS1 Installation and Operation Manual — 21.0 Audio Output Phase
21.0 Audio Output Phase
This parameter enables or disables individual audio phase adjustment of the eight FS1
audio output channels. When Adjust is selected, parameters 21.1 through 21.8 are
then used to adjust phase for the eight channels.
21.0 Audio Output Phase Description of Choices
Parameter Adjustments:
Normal (
default
Adjust
)
Disable audio phase adjustments.
Enable audio phase adjustments for the eight audio channels.
57
Note: If parameter 4.5 Audio Follow Video is set to On, then Audio Output Phase
selection is independently kept for each separate input: SDI 1, SDI 2, Composite, S-
Video, and Component. If Audio Follow Video is set to Off, then another Audio Output
Phase selection is used. This note applies to Parameters 21.0 through 21.8.
21.1 Audio Phase Ch1
This parameter selects whether audio phase is normal (same as passed from the input)
or inverted on channel 1.
21.1 Audio Phase Ch1 Description of Choices
Parameter Adjustments:
Normal (
default
)
Phase is unaltered as it passes from the input to the output.
Invert
Phase is inverted as it passes from the input to output. (This may be useful to
correct analog audio signals that are incorrectly wired, placing audio out of
phase at input.)
Note: If parameter 4.5 Audio Follow Video is set to On, then Audio Phase Ch1
selection is independently kept for each separate input: SDI 1, SDI 2, Composite, S-
Video, and Component. If Audio Follow Video is set to Off, then another Audio Phase
Ch1 selection is used. This note applies to parameters 21.1 through 21.8.
1
21.2 Audio Phase Ch2
This parameter selects whether audio phase is normal (same as passed from the input)
or inverted on channel 2. Parameter adjustments are the same as 21.1.
21.3 Audio Phase Ch3
This parameter selects whether audio phase is normal (same as passed from the input)
or inverted on channel 3. Parameter adjustments are the same as 21.1.
21.4 Audio Phase Ch4
This parameter selects whether audio phase is normal (same as passed from the input)
or inverted on channel 4. Parameter adjustments are the same as 21.1.

58
21.5 Audio Phase Ch5
This parameter selects whether audio phase is normal (same as passed from the
input) or inverted on channel 5. Parameter adjustments are the same as 21.1.
21.6 Audio Phase Ch6
This parameter selects whether audio phase is normal (same as passed from the
input) or inverted on channel 6. Parameter adjustments are the same as 21.1.
21.7 Audio Phase Ch7
This parameter selects whether audio phase is normal (same as passed from the
input) or inverted on channel 7. Parameter adjustments are the same as 21.1.
21.8 Audio Phase Ch8
This parameter selects whether audio phase is normal (same as passed from the
input) or inverted on channel 8. Parameter adjustments are the same as 21.1.
30.1 Closed Captioning Translator
30.1 Caption Xlator Description of Choices
Parameter Adjustments:
On
When set to On and using the UpConverter, the FS1 will automatically translate
incoming line 21 captions to CEA-708 format and insert the VANC packets into
the converted HD video stream. This is a complete translation from CEA-608
format to CEA-708 format (including the embedded SD captions).
When set to On and using the Downconverters, the FS1 will automatically
intercept and reformat the SD caption data in the incoming CEA-708 VANC
packets, and output it on line 21 of the standard definition outputs.
Off
(Default)
When
Off
, translation is not performed.

FS1 Installation and Operation Manual — 30.1 Closed Captioning Translator
FS1 Captioning Conversion
Output
Input
SD 525i59.94
HD 720p59.94 3
HD1080i59.94 3
HD1080pSF23.98 3
SD
525i59.94
1
HD HD HD
2
4
5
-
1080pSF23.98720p59.94 1080i59.94
2
5
4
-
n/a
n/a
n/a
4
59
SD HD HD
625i50 720p50 1080i50
-- -
-- -
-- -
1
Input
SD 625i50
HD 720p50
HD1080i50
Output
Key
1 - Line 21 (CEA-608) passthrough
2 - Line 21 (CEA-608) to SMPTE-334 (CEA-708) upconversion
3 - SMPTE-334 (CEA-708) to Line 21 (CEA-608) downconversion
4 - SMPTE-334 (CEA-708) passthrough
5 - SMPTE-334 (CEA-708) reframing for change in frame rate
In standard definition video (525i59.94), closed captioning data is encoded and sent
on line 21 of both fields, using a format defined by the Consumer Electronics
Association standard, CEA-608. This is traditionally called “line 21", “SD”, or “608”
captioning, and is used for analog composite, analog component, and serial digital
(SDI) video.
In high definition video, closed captioning is encoded and sent as Vertical Ancillary
(VANC) packets in SDI video, using a format defined by the Consumer Electronics
Association standard CEA-708 (there is no equivalent for analog HD video). This is
traditionally called “HD,” “DTV,” or “708” captioning. The data formatting and
encoding for 708 captions is very different from the data contained in 608 (SD)
captioning, reflecting the added features and capabilities available with the CEA-708
standard.
The FS1 UpConverter automatically translates incoming line 21 captions to CEA708 format and inserts the VANC packets into the converted HD video stream. This
is a complete translation from CEA-608 format to CEA-708 format (including the
embedded SD captions).
The FS1 DownConverters automatically intercept and reformat the SD caption data
in the incoming CEA-708 VANC packets, and output it on line 21 of the standard
definition outputs.
To pass closed captioning data to the outputs, parameter 31.1 UC Line 21 must also
be set to Pass. The FS1 CrossConverters will reformat and pass any incoming CEA708 VANC packets for the output frame rate.

60
31.1 Upconvert Line 21
31.1 Upconvert Line 21 Description of Choices
Parameter Adjustments:
Blank
(Default)
Pass
Auto blank
In UpConvert or SD Aspect Ratio Convert modes, this setting blanks input video
Line 21
Passes input video Line 21 to the converter and to the outputs.
The FS1 looks for Line 21 caption data on the video input. If present, Line 21 is
blanked before video conversion occurs. If no caption data is found, Line 21
passes to the converter.
before
conversion. This is used to blank Line 21 caption data.
35.1 Remote Control
This parameter determines how the FS1 panel responds to controls locally from the
front panel and from a network attached computer with a web browser (or both).
The selected mode is indicated by the color of the Remote button. (Note: the Remote
button and other front panel buttons and indicators are described in Chapter 2.)
35.1 Remote Control Description of Choices
Parameter Adjustments:
LOCAL + REMOTE
REMOTE ONLY
(Default)
LOCAL ONLY
Allow FS1 control from the front panel, a remote control panel, or a network-
attached browser. Selection lights the
Allow FS1 control only from a network attached browser or remote control panel.
Selection lights the
Allow FS1 control only from the front panel (browsers cannot change parameters)
Selection lights the
Remote
Remote
button
button
Remote
red
.
green
.
button
white
.

FS1 Installation and Operation Manual — 35.3 Authentication
35.3 Authentication
This parameter determines whether password authentication is required in order to
make FS1 changes.
35.3 Authentication Description of Choices
Parameter Adjustments:
Disabled
(Default)
Basic
No authentication.
User's browser prompts for a username/password for access to the FS1.
61
Notes:
1. AJA recommends using the Disabled setting, unless it is absolutely necessary to use
the Basic setting, since the authentication used is only as good as the underlying
network security. This is due to the password being sent across the network in clear
text. Security follows the “basic” authentication defined in RFC2617, which can be
read at this URL: http://www.ietf.org/rfc/rfc2617.txt
2. The default value is Disabled. It will be reset by a two-button hold down factory
reset, which will change this parameter back to Disabled; the single up button
factory reset will not (see parameter 99.0 for information).
3. Changing Authentication to Disabled will also reset the System Password parameter
to the default password, which is “password”.
4. If you select Basic without first setting the password (via web), the default
password will be used. See parameter 99.0 for more about the password.
5. After you select Basic, a password is required for webUI (browser) access to the
FS1. Passwords cannot be entered at the front panel but must be entered via web
browser. Your browser will prompt for a username/password. The FS1 ignores any
supplied username and uses only the password during authentication. If your are
prompted for a password more than once, please re-enter the proper password each
time.
6. In the web browser, changing this parameter will show/hide the controls for setting
the password.
7. If you are prompted for a password before you can set a new password, enter the
default, which is “password”. (Enabling the feature turns it on immediately,
requiring authentication for all traffic to/from the FS1.)
1

62
36.1 GPI IN 1 Response
The setting of this parameter determines what happens when a GPI trigger is
received at the FS1’s first GPI input (pin 1 on DE-9). A GPI Trigger is defined as a
TTL low voltage level (0 to 0.8V with respect to its isolated ground pin). The GPI
interface pinout and specifications are discussed in Appendix B.
36.1 GPI IN 1 Response Description of Choices
Parameter Adjustments:
No Action
(Default)
Freeze
SDI1 In
SDI2 In
Composite In
S-Video In
Component In
UC 14x9 Pillar
UC Fullscrn
UC LB to Full
UC Wide Zoom
UC 4x3 Pillar
DC Letterbox
DC Crop
DC Anamorph
DC 14x9
DC Auto AFD
ARC Off
ARC Lettrbox
ARC H Crop
ARC Pillarbox
ARC V Crop
ARC 14x9
Recall Pst 1
Recall Pst 2
Recall Pst 3
Recall Pst 4
Recall Pst 5
Recall Pst 6
Recall Pst 7
Recall Pst 8
Recall Pst 9
Recall Pst 10
Selections below will occur when a GPI trigger is received at pin#1 and the
corresponding parameter response is chosen (left column).
FS1 performs no action if a GPI trigger is received at pin 1.
FS1 freezes the current video frame at its outputs if a GPI trigger is received at
pin 1. The freezing of the frame will stop when the GPI trigger is released.
FS1 selects SDI1 as the video input if a GPI trigger is received at pin 1.
FS1 selects SDI2 as the video input if a GPI trigger is received at pin 1.
FS1 selects Composite In as the video input if a GPI trigger is received at pin 1.
FS1 selects S-Video In as the video input if a GPI trigger is received at pin 1.
FS1 selects Component In as the video input if a GPI trigger is received at pin 1.
When either SDI1 In, SDI2 In, Composite In, S-Video In, or Component In are
selected, the input video source selected will remain selected even after the GPI
trigger is released (deactivated).
FS1 performs upconversion of SD source to 14x9 pillarbox (see parameter 5.1).
FS1 performs upconversion of SD source to full screen (see parameter 5.1).
FS1 performs upconversion of SD source from letterbox to full (see parameter 5.1).
FS1 performs upconversion of SD source to a wide zoom (see parameter 5.1).
FS1 performs upconversion of SD source to 4x3 pillarbox (see parameter 5.1).
FS1 downconverts HD source to letterbox picture (see parameter 5.2).
FS1 downconverts HD source to cropped 4x3 picture (see parameter 5.2).
FS1 downconverts HD source to anamorphic picture (see parameter 5.2).
FS1 downconverts HD source to 14x9 picture (see parameter 5.2).
FS1 downconverts HD source, selecting the best downconvert mode based on the
input video's Active Format Description (AFD) code (see parameter 5.2).
FS1 SD to SD aspect ratio conversion is turned off (see parameter 5.3).
Converts 16:9 anamorphic video to letterbox video (see parameter 5.3).
Converts 16:9 anamorphic video to 4:3 standard video
(crops left and right edges of video—see parameter 5.3).
Converts 4:3 standard video to 16:9 anamorphic video (see parameter 5.3).
Converts letterbox video to 16:9 anamorphic video (see parameter 5.3).
Converts 16:9 anamorphic video to 14:9 cropped video (see parameter 5.3).
FS1 recalls Preset 1
FS1 recalls Preset 2
FS1 recalls Preset 3
FS1 recalls Preset 4
FS1 recalls Preset 5
FS1 recalls Preset 6
FS1 recalls Preset 7
FS1 recalls Preset 8
FS1 recalls Preset 9
FS1 recalls Preset 10

FS1 Installation and Operation Manual — 36.2 GPI IN 2 Response
36.2 GPI IN 2 Response
The setting of this parameter determines what happens when a GPI trigger is received
at the FS1’s second GPI input (pin 2 on DE-9).
36.2 GPI IN 2 Response Description of Choices
63
Parameter Adjustments:
No Action
(Default)
Freeze
SDI1 In
SDI2 In
Composite In
S-Video In
Component In
UC 14x9 Pillar
UC Fullscrn
UC LB to Full
UC Wide Zoom
UC 4x3 Pillar
DC Letterbox
DC Crop
DC Anamorph
DC 14x9
DC Auto AFD
ARC Off
ARC Lettrbox
ARC H Crop
ARC Pillarbox
ARC V Crop
ARC 14x9
Recall Pst 1
Recall Pst 2
Recall Pst 3
Recall Pst 4
Recall Pst 5
Recall Pst 6
Recall Pst 7
Recall Pst 8
Recall Pst 9
Recall Pst 10
Selections below will occur when a GPI trigger is received at pin 2 and the
corresponding parameter response is chosen (left column).
FS1 performs no action if a GPI trigger is received at pin 2.
FS1 freezes the current video frame at its outputs if a GPI trigger is received at
pin 2. The freezing of the frame will stop when the GPI trigger is released.
FS1 selects SDI1 as the video input if a GPI trigger is received at pin 2.
FS1 selects SDI2 as the video input if a GPI trigger is received at pin 2.
FS1 selects Composite In as the video input if a GPI trigger is received at pin 2.
FS1 selects S-Video In as the video input if a GPI trigger is received at pin 2.
FS1 selects Component In as the video input if a GPI trigger is received at pin 2.
When either SDI1 In, SDI2 In, Composite In, S-Video In, or Component In are
selected, the input video source selected will remain selected even after the GPI
trigger is released (deactivated).
FS1 performs upconversion of SD source to 14x9 pillarbox (see parameter 5.1).
FS1 performs upconversion of SD source to full screen (see parameter 5.1).
FS1 performs upconversion of SD source from letterbox to full (see parameter 5.1).
FS1 performs upconversion of SD source to a wide zoom (see parameter 5.1).
FS1 performs upconversion of SD source to 4x3 pillarbox (see parameter 5.1).
FS1 downconverts HD source to letterbox picture (see parameter 5.2).
FS1 downconverts HD source to cropped 4x3 picture (see parameter 5.2).
FS1 downconverts HD source to anamorphic picture (see parameter 5.2).
FS1 downconverts HD source to 14x9 picture (see parameter 5.2).
FS1 downconverts HD source, selecting the best downconvert mode based on the
input video's Active Format Description (AFD) code (see parameter 5.2).
FS1 SD to SD aspect ratio conversion is turned off (see parameter 5.3).
Converts 16:9 anamorphic video to letterbox video (see parameter 5.3).
Converts 16:9 anamorphic video to 4:3 standard video
(crops left and right edges of video—see parameter 5.3).
Converts 4:3 standard video to 16:9 anamorphic video (see parameter 5.3).
Converts letterbox video to 16:9 anamorphic video (see parameter 5.3).
Converts 16:9 anamorphic video to 14:9 cropped video (see parameter 5.3).
FS1 recalls Preset 1
FS1 recalls Preset 2
FS1 recalls Preset 3
FS1 recalls Preset 4
FS1 recalls Preset 5
FS1 recalls Preset 6
FS1 recalls Preset 7
FS1 recalls Preset 8
FS1 recalls Preset 9
FS1 recalls Preset 10
1

64
37.1 GPI 1 OUT
The setting of this parameter determines what (if any) FS1 event will generate a GPI
trigger output at GPI 1, pin 3 on DE-9.
37.1 GPI 1 OUT Description of Choices
Parameter Adjustments:
No Action
(Default)
Alarm
No Video
No Ref
Vid In SDI1
Vid In SDI2
Vid In Cmpst
Vid In S-Vid
Vid In Cmpnt
FS1 does not trigger a GPI 1 output trigger regardless of event.
FS1 generates a GPI 1 output trigger on pin 3 if an internal alarm condition occurs.
FS1 generates a GPI 1 output trigger on pin 3 if no video is detected at its selected
input.
FS1 generates a GPI 1 output trigger on pin 3 if no video is detected at its
video input.
FS1 generates a GPI 1 output trigger on pin 3 if SDI1 is selected as the main video
input.
FS1 generates a GPI 1 output trigger on pin 3 if SDI2 is selected as the main video
input.
FS1 generates a GPI 1 output trigger on pin 3 if Composite is selected as the main
video input.
FS1 generates a GPI 1 output trigger on pin 3 if S-Video is selected as the main
video input.
FS1 generates a GPI 1 output trigger on pin 3 if Component is selected as the main
video input.
Ref
37.2 GPI 2 OUT
The setting of this parameter determines what (if any) FS1 event will generate a GPI
trigger output at GPI 2, pin 4 on DE-9.
39.1 GPI 2 OUT Description of Choices
Parameter Adjustments:
No Action
(Default)
Alarm
No Video
No Ref
Vid In SDI1
Vid In SDI2
Vid In Cmpst
Vid In S-Vid
Vid In Cmpnt
FS1 does not trigger a GPI 2 output trigger regardless of event.
FS1 generates a GPI 2 output trigger on pin 4 if an internal alarm condition occurs.
FS1 generates a GPI 2 output trigger on pin 4 if no video is detected at its selected
input.
FS1 generates a GPI 2 output trigger on pin 4 if no video is detected at its
video input.
FS1 generates a GPI 2 output trigger on pin 4 if SDI1 is selected as the main video
input.
FS1 generates a GPI 2 output trigger on pin 4 if SDI2 is selected as the main video
input.
FS1 generates a GPI 2 output trigger on pin 4 if Composite is selected as the main
video input.
FS1 generates a GPI 2 output trigger on pin 4 if S-Video is selected as the main
video input.
FS1 generates a GPI 2 output trigger on pin 4 if Component is selected as the main
video input.
Ref

FS1 Installation and Operation Manual — 40.1 Freeze Output
40.1 Freeze Output
This parameter tells the FS1 to freeze the current video frame on all outputs. This may
be useful either for testing or in case of loss of the input source.
40.1 Freeze Output Description of Choices
Parameter Adjustments:
Off
(Default)
Normal operation. The FS1 outputs video from the input.
On
The FS1 captures and freezes the most current video frame and displays it on the
outputs as long as this parameter is set to On.
Note: The freeze feature can be controlled not only by the front-panel and web
browser interface, but also by a GPI input. When a GPI input is causing the freeze
condition, the AUX lamp will be lit on the front-panel.
41.2 Video SG
This parameter determines the video test signal output from the FS1’s internal test
signal generator. The parameter is used with parameter 41.1 to determine the type of
video test signal output by the FS1.
65
1
41.2 Video SG Description of Choices
Video Test Signal:
OFF (default)
Black
75% Bars
100% Bars
Select the video test signal output:
Turn test signal output OFF.
Video test signal output is color black.
Video test signal output is 75% color bars. This 75% amplitude,100% saturation
test signal is useful to check low frequency response and video tilt as well as the
performance of video clamping.
Video test signal output is 100% color bars. This 100% white full field bars test
signal is helpful to check chroma amplitude versus overall video level.
41.3 Audio SG
This parameter determines the audio signal output from the FS1’s internal test signal
generator.
41.3 Audio SG Description of Choices
Video Test Signal:
OFF (default)
Silence
1 kHz
Select the audio test signal output:
Turn audio test signal output OFF.
Output an audio test signal containing silence only.
Output a standard 1 kHz test signal tone.

66
50.1 IP Config
This parameter determines the type of TCP/IP network configuration used by the
FS1. (Networking is discussed in Chapter 3, “Network Connection.”
Note: With parameters 50.1, 50.2 and 50.3, there is no timeout when editing—
changes made in these menus will be saved and activated when the menu is exited.
50.1 IP Config Description of Choices
Parameter Adjustments:
DHCP
(Default)
Static Addr
Default Addr
Select automatic IP address assignment from DHCP server on LAN.
Note: if the FS1 cannot find a DHCP server to communicate with, it will fail over to
the static IP address.
Assign a static IP address manually (parameters 50.2, 50.3, and 50.4 will have to
be entered to accomplish this).
Use the factory default static IP address: 10.65.74.65
50.2 IP Address
This parameter determines the static IP address used by the FS1 for TCP/IP
networking. (Networking is discussed in Chapter 3, “Network Connection.”
50.2 IP Address Description of Choices
Parameter Adjustments:
variable Using the
have one). If direct connecting to a computer, enter a legal IP address that you’ll
also enter in the computer’s web browser. This is only needed for Static IP
configurations.
If 50.1 is set to
static IP address. If 50.1 is set to
10.65.74.65
Adjust
buttons, enter an IP address compatible with your LAN (if you
DHCP
and there is a DHCP failure, then the IP address is set to the
Note: For parameters 50.2, 50.3, and 50.4, you will be setting IP addresses that
consist of “octets” separated by a period (e.g., 90.0.181.0). When editing these, the
Select button selects the octet and the Adjust buttons set the number.
Pressing the Select up arrow button again advances to the next octet. At the final
octet, the address will flash. Pressing the Select up arrow button again confirms the
setting.
When these parameters are edited, you can abort the editing process by backing out
(press the Select down arrow button repeatedly until the edit passes the first octet).
You’ll notice that after completing the edit on the last octet, the display will blink—
this is an indication that the edited IP address is about to be saved. You can save the
edited IP address (press the Select arrow up button to save) or choose not to save by
pressing the Select down arrow button.
Default Addr,
the default static IP address is:

FS1 Installation and Operation Manual — 50.3 Subnet Mask
50.3 Subnet Mask
This parameter determines the subnet mask used by the FS1 for TCP/IP networking.
(Networking is discussed in Chapter 3, “Network Connection.”
50.3 Subnet Mask Description of Choices
Parameter Adjustments:
variable Using the adjust buttons, enter a subnet mask compatible with your LAN (if you
have one). This is only needed for Static IP configurations.
If 50.1 is set to DHCP, the Subnet Mask is set by the DHCP server and cannot be
changed by the user.
If 50.1 is set to
Default Addr,
Please read the “Note” about editing IP addresses in parameter 50.2 as it also applies
to parameters 50.3 and 50.4.
50.4 Default Gateway
This parameter determines the gateway or router used on your LAN for TCP/IP
networking. (Networking is discussed in Chapter 3, “Network Connection.”
the default
Subnet Mask
is: 255.0.0.0
67
1
Note: Without a properly configured default gateway (whether you have a router/
gateway or not), the FS1 will be unable to see other FS1s on the network, although
you may still be able to control this FS1 via a web browser. Also, without a proper
gateway defined, the discovery feature “Available FS1s—Click to Refresh” on the
Network web page will not work correctly and list other FS1s on the network.
50.4 Default Gateway Description of Choices
Parameter Adjustments:
variable Using the
have one).
Default:
Adjust
buttons, enter the IP address for your LAN’s gateway/router (if you
192.168.0.1
Please read the “Note” about editing IP addresses in parameter 50.2 as it also applies
to parameters 50.3 and 50.4.

68
50.5 System Name
This parameter defines a unique name for the FS1. This same name is used both
when displaying systems via the web interface and for display on the FS1’s screen
saver (if System Name is chosen in parameter 70.1 Screen Saver).
To eliminate trailing characters in order to shorten an existing system name,
overwrite them with '-', and then press the top Select button twice to save the
changes and exit. Press the bottom Select button to go back to the system name to
verify your entry. Spaces may not be entered in the system name via the front panel.
If spaces in the system name are required, the name must be entered from the web
browser.
50.5 System Name Description of Choices
Parameter Adjustments:
variable Using the
The top
button steps back to the previous character. The
the choices for each character. The character currently being changed flashes.
The character set allowed is: '-', '.', A through Z (uppercase) and a through z
(lowercase). To save the name, press the top
end of the name and advance to the next item.
Default:
Select
Select
aja-fs1
and
button advances to the next character, and the bottom
Adjust
buttons, enter a name for the FS1, up to 20 characters.
Adjust
buttons scroll through
Select
button until you reach the
Select
50.6 MAC Address
Selecting this parameter allows you to view the FS1 MAC address. The MAC
address is a unique value associated with the FS1’s internal network adapter. MAC
addresses are also known as hardware addresses or physical addresses. MAC
addresses uniquely identify an Ethernet adapter on a LAN.
MAC address format: MM:MM:MM:SS:SS:SS
The value is 12-digit hexadecimal, where the first half identifies the manufacturer
and the second half identifies the unique serial number.

51.1 SNMP Enable
FS1 Installation and Operation Manual — 51.1 SNMP Enable
This parameter turns ON and OFF all SNMP messaging between the FS1 and an
external client. Refer to Chapter 6 for a description of SNMP and how the FS1
supports it. When SNMP is enabled, one or more of 4 alarms may be sent by the FS1
as a trap message:
• Power supply failure or disconnection: fs1PSAlarm (see parameter 60.1)
• Reference video: fs1REFAlarm (see parameter 60.3)
• Format: fs1FMTAlarm (see parameter 60.2)
69
• Temperature of FS1 is over limit (internally): fs1OVRAlarm
51.1 SNMP Enable Description of Choices
Parameter Adjustments:
Disable
(Default)
Enable 1
Enable Both
When set to
When set to
(parameter
When set to
1 and 2 (parameters
Disable
Enable 1
51.2
Enable Both
) and as defined in the MIB.
Note: With SNMP parameters 51.1 through 51.6, there is no timeout when
editing—changes made while in these menus will be saved and activated when the
menu is exited. For example, changing from Disable to Enable 1 does not turn SNMP
on. You must exit the 51.1 SNMP Enable parameter menu in order to turn SNMP on.
51.2 SNMP Trap Destination 1
This parameter determines the SNMP Trap Destination IP address where trap
messages issued by the FS1 will be sent.
51.2 SNMP Trap Dest 1 Description of Choices
1
, the FS1 will not issue SNMP trap messages.
, the FS1 issues SNMP trap messages to Trap Destination 1
, the FS1 issues SNMP trap messages to Trap Destination
51.2
and
51.4
) and as defined in the MIB.
Parameter Adjustments:
variable Using the
When the SNMP Trap Destination IP addresses are edited, you can abort the editing
process by backing out (press the Select down arrow button repeatedly until the edit
passes the first octet). You’ll notice that after completing the edit on the last octet, the
display will blink—this is an indication that the edited IP address is about to be saved.
You can save the edited IP address by pressing the Select up arrow to save or choose
not to save by pressing the Select down arrow button.
Adjust
buttons, enter the IP address of the destination where SNMP
command messages (called “traps”) will be sent. This is usually an SNMP client
somewhere on your LAN.
Default:
192.168.0.3

70
51.3 SNMP Trap Port 1
This parameter determines the SNMP Trap Port used for sending destination #1
trap messages. UDP Port 162 is the default used for SNMP trap messages. However,
if this port is being used by another protocol or service, you can change the setting
by modifying this parameter.
51.3 SNMP Trap Port 1 Description of Choices
Parameter Adjustments:
variable Using the
Default:
Adjust
162
buttons, select a UDP port for sending FS1 trap messages.
Note: The SNMP Trap Port number does not blink when changed (as does the
Trap Destination IP address); if you change the port number and exit the parameter
(moving to another parameter), the port will change immediately as edited.
51.4 SNMP Trap Destination 2
This parameter determines the secondary SNMP Trap Destination IP address where
trap messages issued by the FS1 will be sent (if desired).
51.4 SNMP Trap Dest 2 Description of Choices
Parameter Adjustments:
variable Using the
command messages (called “traps”) will be sent. This is usually an SNMP client
somewhere on your LAN.
Default:
Adjust
buttons, enter the IP address of the destination where SNMP
192.168.0.3
When the SNMP Trap Destination IP addresses are edited, you can abort the editing
process by backing out (press the Select down arrow button repeatedly until the edit
passes the first octet). You’ll notice that after completing the edit on the last octet,
the display will blink—this is an indication that the edited IP address is about to be
saved. You can save the edited IP address by pressing the Select up arrow to save or
choose not to save by pressing the Select down arrow button.

FS1 Installation and Operation Manual — 51.5 SNMP Trap Port 2
51.5 SNMP Trap Port 2
This parameter determines the SNMP Trap Port used for sending destination #2 trap
messages. UDP Port 162 is the default used for SNMP trap messages. However, if this
port is being used by another protocol or service, you can change the setting by
modifying this parameter.
51.5 SNMP Trap Port 2 Description of Choices
Parameter Adjustments:
variable Using the
Default:
Adjust
162
buttons, select a UDP port for sending FS1 trap messages.
Note: The SNMP Trap Port number does not blink when changed (as does the Trap
Destination IP address); if you change the port number and exit the parameter
(moving to another parameter), the port will change immediately as edited.
60.1 Power Supply Alarm
This parameter controls how the FS1 alarm responds to power supply failures. The
default (Normal) is that the alarm will be triggered anytime either of the internal
power supplies fails or is disconnected from a power source (becomes unplugged). If
the FS1 will only be connected to one power cord, you can suppress this alarm.
71
1
60.1 Pwr Supply Alarm Description of Choices
Parameter Adjustments:
Normal
(default)
Suppress
Alarm triggers if either internal power supply experiences a failure or is
disconnected from mains power.
Alarm will not be triggered by a power supply failure or disconnection from power.

72
60.2 Format Alarm
When set to Normal (default), an alarm will be triggered whenever the format of the
selected input video signal is incompatible with the selected output format (refer to
the matrix of inputs and compatibilities presented in Chapter 2). If you want the
FS1 alarm to only trigger on hardware failures, you can suppress the Format Alarm.
60.2 Format Alarm Description of Choices
Parameter Adjustments:
Normal
(default)
Alarm triggers if the format of the selected input video signal is incompatible with
the selected output format.
Suppress
Alarm will not be triggered by a format incompatibility.
60.3 Reference Alarm
This parameter controls how the FS1 responds to various reference video signal
conditions. When set to Normal, the alarm will trigger when:
1. The reference signal is incompatible with the selected output format or is not
detected at all.
2. The reference signal is required, due either to 1.1 Output format set to “Follow
Ref” or 6.1 Genlock Source set to “Reference.”
If you want the FS1 alarm to only trigger on hardware failures, you can suppress the
Format Alarm.
60.3 Reference Alarm Description of Choices
Parameter Adjustments:
Normal
(default)
Suppress
The alarm triggers if the reference is missing or incompatible with the selected
output format.
Alarms are not triggered if the reference is missing or incompatible with the output.

FS1 Installation and Operation Manual — 70.1 Screen Saver
70.1 Screen Saver
When set to AJA Logo, a rolling AJA logo screen saver will appear on the
alphanumeric display after 60 minutes of inactivity—defined as no button presses on
the front panel. If disabled, the display just becomes dim. When the Screen Saver is
on, the Status button will return the display to the last Status display, or any Select or
Adjust button will return the display to the last parameter menu.
70.1 Screen Saver Description of Choices
Parameter Adjustments:
AJA Logo
(Default)
System Name
Disabled
Display horizontally rolling AJA logo after 60 minutes of button inactivity.
Display the FS1 system name (defined in parameter
Dim display after 60 minutes of button inactivity.
70.2 Display Intensity
This parameter determines the brightness of the alphanumeric display and front panel
LEDs.
50.5
73
).
1
70.2 Display Intensity Description of Choices
Parameter Adjustments:
variable Using the
activity indicator LEDs in steps from 1 (dim) to 8 (brightest).
Default: 6
Adjust
buttons, you can dim or brighten the alphanumeric display and
80.1 Serial Number
This parameter displays the FS1’s unique serial number.
80.2 Software Version
This parameter displays the FS1’s software version level.
90.0 Reboot
This parameter reboots the FS1:
1. Use the Select buttons to scroll to parameter 90.0 Reboot.
2. Press the top Adjust button to advance to the [UP to Confirm] menu field. (Press any
other button to cancel.)
3. Press the top Adjust button again to advance to the [Both=Reboot] menu field.
4. Press both Adjust buttons at the same time to reboot.
The display shows [Rebooting], goes dark momentarily, and then shows the percentage
of progress as the system reboots. Rebooting takes a couple of minutes.

74
91.1 Preset Recall
This parameter recalls an FS1 Preset Configuration from memory. Ten named
presets are available
(1–10).
To recall an FS1 configuration stored in a preset:
1. Use the Select buttons to scroll to parameter 91.1 Preset Recall.
2. Use the Adjust buttons to select a preset (default=1).
3. Press the top Select button to advance to the [UP=Recall] menu field. (Press the
bottom Select button to cancel.)
4. Press the top Adjust button to recall the selected preset.
The display shows [Recalling] and the FS1 reconfigures to the recalled settings. The
display then shows [Recalled].
Caution: When you press Adjust to recall a configuration, the recalled
configuration immediately replaces the system’s existing configuration. All previous
settings are lost unless you have previously stored them in another preset or a file.
92.1 Preset Save
Parameters Not Stored
This parameter stores the current FS1 configuration to a Preset Configuration.
There are ten available presets
(1–10).
To store the current FS1 configuration:
1. Use the Select buttons to scroll to parameter 92.1 Preset Save.
2. Use the Adjust buttons to select a preset (default=1).
3. Press the top Select button to advance to the [UP=Save] menu field. (Press the
bottom Select button to cancel.)
4. Press the top Adjust button to save the configuration to the selected preset.
The display shows [Saving] and the FS1 stores the current configuration into the
preset and displays [Saved]. Presets cannot be named from the front panel. To
change a preset name, refer to the web interface Presets Screen description in Chapter
5. The FS1 displays the same name on the front panel and the web interface.
Only editable parameters are saved into presets. Example non-editable parameters
that are
not saved include 50.6 MAC Address, 80.1 Serial Number, and 80.2 SW
Version, as well as “trigger” parameters, such as 90.0 Reboot, 91.1 Preset Recall, 92.1
Preset Save, and 99.0 Factory Settings.

FS1 Installation and Operation Manual — 99.0 Factory Settings
Additionally, editable parameters in the following list are not stored:
• 35.1 Remote Control • 51.2 SNMP Trap Dest 1
• 35.3 Password • 51.3 SNMP TrapPort 1
• 40.1 Freeze Output • 51.4 SNMP Trap Dest 2
• 50.1 IP Config • 51.5 SNMP Trap Port 2
• 50.2 IP Address • 60.1 Pwr Supply Alarm
• 50.3 Subnet Mask • 60.2 Format Alarm
75
99.0 Factory Settings
Selecting this parameter and then pressing the Adjust (up) button recalls the FS1’s
factory default settings.
Recalling factory defaults using only the Adjust (up) button does not affect the
following parameter settings. To apply defaults to these parameters, hold down both
the Adjust (up) and Adjust (down) buttons at the same time.
• 50.4 Default Gateway • 60.3 Reference Alarm
• 50.5 System Name • 70.1 Screen Saver
• 51.1 SNMP Enable • 70.2 Display Intens
1
Caution: Selecting this parameter and recalling factory defaults will overwrite the
current settings (except for the settings listed below). Existing settings will be lost.
• 35.3 Password • 51.4 SNMP Trap Dest 2
• 50.1 IP Config • 51.5 SNMP Trap Port 2
• 50.2 IP Address • 60.1 Pwr Supply Alarm
• 50.3 Subnet Mask • 60.2 Format Alarm
• 50.4 Default Gateway • 60.3 Reference Alarm
• 51.1 SNMP Enable • 70.1 Screen Saver
• 51.2 SNMP Trap Dest 1 • 70.2 Display Intens
• 51.3 SNMP TrapPort 1
Note: To set a single parameter to its factory default value, go to that parameter's
“Adjust” menu, and hold down both
the Adjust (up) and Adjust (down) buttons at the
same time.

76

Browser Remote Control
Remote FS1 Control Via a Web Browser
An optimized web server inside the FS1 allows you to remotely monitor and adjust
parameter settings via a network-attached computer running a web-browser. The
network can be a closed local area network, a straight computer-to-FS1 cable, or
even exposed through a firewall to a broadband WAN (not generally recommended
since anyone on the internet can then access the FS1). The LAN connection on the
FS1 uses a standard RJ45 connector, but internally it’s intelligent and communicates
via standard “straight-through” CAT 5 ethernet cables or null-modem (cross-over)
cables without configuration or strapping.
Note: Firefox and Internet Explorer 7 are supported as web browsers for FS1
control. Other browser software may work, but AJA cannot guarantee operation.
To access the FS1, enter its IP address in the web browser. The IP address is
defined in parameter 50.2 of the FS1’s Network parameter menus—please note that
parameters 50.1 through 50.4 must all be configured correctly to access the FS1 on
your network. If the FS1 is using DHCP (the default), you can find the IP address
by pressing the Status button on the FS1 front panel until the Network Status display
is shown or you can go to parameter 50.2 and read it there. When the FS1 is
shipped from the AJA factory, the FS1 defaults to DHCP operation.
Chapter 5:
If 50.1 is set to DHCP, and the DHCP server on the network fails to grant an IP
address, the FS1 will fall back to the IP address set in STATIC ADDR (50.2).
If 50.1 is set to Default Addr, the factory default static IP address is: 10.65.74.65.
So, if 50.1 is set to Default Addr, you would type the following in the web browser:
http://10.65.74.65 to see the FS1 web interface Main Status screen.
5
1
FS1 Web Interface, Main Status Screen
1

78
General Screen Information
All FS1 web screens have certain areas in common. On the left of each screen is a
navigational list of the available FS1 screens. Click any of these items to jump to that
screen. At the top of each screen you’ll also find a heading showing the connection status
and IP address in addition the FS1’s serial number and software version. This latter
information is useful if you ever have to call AJA Technical Support to discuss a problem
or get help. In the middle of each screen are menu choices and information pertaining
to the subject matter of that screen (i.e., the Audio and Video I/O screen has choices
about audio and video).
FS1 web screens closely mirror the parameter menus displayed on its front panel. In
each of the screens presented on the following pages, we’ll list the parameter menu
numbers that are related. Also, to make things easier for you to reference, we’ll list the
definitions redundantly here so you don’t have to flip back and forth between chapters.
FS1 S/N, software version, and connection status
List of screens:
Click a screen name to
display the screen
Controlling Multiple FS1s
Pull-down menu choices
FS1 Web Interface, Main Status Screen
From the Network screen, you can see at-a-glance all of the FS1 devices present on the
same local LAN as the current FS1 you are controlling. At the bottom of the screen
under Available FS1s—Click to Refresh, the system names of all FS1s on the LAN are
listed. Clicking on any of these will bring up the Status screen of that FS1. Note: the
FS1 you control may be running a different software version, so screens may look
different. As a rule, it’s wise to have all your FS1 devices running the most current
software and the same version. Also, you must have a properly configured default
gateway to see the FS1s.
Note: If the Default Gateway (parameter 50.4) is not configured properly, other FS1s
will not be visible here. If it displays No FS1’s found, check the gateway setting.

FS1 Installation and Operation Manual — Remote FS1 Control Via a Web
79
Resetting Values To Factory Settings
Audio and Video I/O Screen
FS1 web browser screens feature many user controls that can be reset to factory values by
simply “right-clicking” on the control, whether it be a drop-down menu or adjustable
“spinner” control. When you right-click a control, the browser will display a Reset to
Factory message that will cause the parameter to be reset.
Note: This only works with computers that allow right-clicking. Some models/brands of
computers and laptops may not permit this operation.
To perform a global reset of the FS1 to factory settings, go to the Miscellaneous screen and
click on the button at the bottom labelled Reset all FS1 parameters to Factory Values. (This
functions the same as the FS1 front panel parameter 99.0—another way to reset to factory
values.)
1
The Audio and Video I/O screen sets the audio and video input and output formats as
well as other related parameters.
FS1 Web Interface, Audio and Video I/O Screen
Input Format—Information only field that displays the format the FS1 has detected at the
Output Format (1.1)
Follow Input (default)
Follow Ref
SD <sd_rate>
HD 720p <hd_rate1>
HD 1080i <hd_rate1>
HD 1080psf <hd_rate2>
selected input.
Output follows the format of the selected input.
Ref
Output follows the format of the reference video input (
Output is standard definition (available SD rates are listed choices).
Output is HD 720p (available rates are listed choices).
Output is HD 1080i (available rates are listed choices).
Output is HD 1080psf (available rates are listed choices).
).

80
Video In (2.1)
SDI 1 (default)
SDI 2
Composite
S-Video
Component
NTSC Standard (3.4)
NTSC (default)
NTSC Japan
Audio In (2.2)
Embed Auto
(Follows Video Input select)
Embed SDI 1
Embed SDI 2
AES unbal (default)
Analog
Frame Rate (3.3)
Select
SDI 1
connector as the input source.
SDI 2
Select
Select the
Select the
Select the
Select
Select
Use the embedded audio from the currently selected Video Input (SDI 1 or 2) as the input
source. (This defaults to SDI 1 if Video In is not SDI.)
Use the embedded audio from the
Use the embedded audio from the
Select thedigital
Select the
connector as the input source.
Composite
S-Video
Component
NTSC
for US NTSC standard.
NTSC Japan
Analog Audio
connector as the input source.
connector as the input source.
connector as the input source.
for the Japanese NTSC standard.
AES/EBU Audio
connector (DB25, 8-ch) as the audio input source.
SDI 1
connector as the input source.
SDI 2
connector as the input source.
connectors (8-ch) as the audio input source.
59.94/23.98 (default)
60/24
50/25
Component In (3.1)
Beta YPbPr
SMPTE YPbPr (default)
Component Out (3.2) Signal Type
Beta YPbPr
SMPTE YPbPr (default)
RGB
Analog Audio Standard (4.1)
+24 dBu (default)
+18 dBu
+15 dBu
+12 dBu
Select the
Select the
Select the
Configure the
selected
Configure the
Configure the
Component video is HD, this will default to SMPTE YPbPr.
Configure the
Configure the
Select +24 dBu as the analog audio level.
Select +18 dBu as the analog audio level.
Select +15 dBu as the analog audio level.
Select +12 dBu as the analog audio level.
59.94/23.98
60/24
50/25
Component
Component
Component
Component
Component
Component
item if your desired rate is either 59.94 or 23.98.
item if your desired rate is either 60 or 24.
item if your desired rate is either 50 or 25 (PAL).
video input source as Beta YPbPr (standard definition). If the
video source is HD, this will default to SMPTE YPbPr.
video input source as SMPTE YPbPr.
video output as Beta YPbPr (standard definition). If the
video output as SMPTE YPbPr.
video output as RGB.
Maximum amplitude (0 dBFS)

FS1 Installation and Operation Manual — Remote FS1 Control Via a Web
Embed Audio Out (4.3)
81
On (default)
Mute
Embedded audio will be passed.
Off
Do not pass embedded audio packets to the SDI outputs.
FS1 outputs SDI embedded audio packets containing silence.
Freeze Output (40.1)
Off (default)OnNormal operation. The FS1 outputs video from the input.
The FS1 captures and freezes the most current video frame and displays it on the outputs as
long as this parameter is set to On.
SDI 2 Output (1.2)
Normal (default)
Bypass
Standard Def
SDI 2
output follows the
the same)
SDI 2
output follows the format of the selected input
The output from Downconverter 2 (see block diagram in
definition.
1.1 Output Format
parameter selection (both
Component Output (1.3)
Normal (default)
Bypass
Standard Def
Component
Component
Note: Bypass mode does not work when the input is 1080pSF24 and output is 1080i60 (3:2)
pulldown mode.
Note 2: The signal type of the component output is defined in another selection,
Out
The output from Downconverter 2 (see block diagram in
definition.
output follows the
output follows the format of the selected input.
, above in the screen (also parameter 3.2 from the parameter display)
1.1 Output Format
Chapter 1
parameter selection.
Chapter 1
) is always standard
) is always standard
1
SDI 1
and
SDI 2
Component
are
Audio Follow Video (4.5)—This parameter determines whether audio settings are
remembered for each video input.
Off (default)OnNormal operation. Audio settings must be made separately from any video settings; they
Audio Follow Video
parameters:
are not associated automatically.
The FS1 remembers the audio settings associated with the currently selected input.
Whenever an input is selected, the corresponding audio settings will be recalled. This
allows you to set up specific audio settings for the different video inputs (i.e., perhaps
the
SDI 1
video input might always use AES audio input).
input has a specific embedded audio channel mapping while the component
applies to these
Audio Follow Video
does not apply
to these parameters:
• 2.2 Audio Input
• 2.11—2.18 Audio Map
• 4.1 Analog Audio Std
• 4.3 Audio Out
• 2.21—2.24 Audio Map (Stereo)
• 4.2 Audio Delay
• 4.4 Sample Rate Convert
• 20.0 Audio Output Levels
• 20.1—20.8 Audio Level Ch (n)
• 21.0 Audio Output Phase
• 21.1—21.8 Audio Phase Ch (n)

82
The Audio Follow Video control is also on the Audio Control screen.
Side Bar Keyer Source (7.1)
Off (default)
SDI 1
SDI 2
Component
Turns the Sidebar Keyer
Turns the Sidebar Keyer
Turns the Sidebar Keyer
Turns the Sidebar Keyer
Sidebar keyer. (The FS1 input source selected by parameter
Composite
or
S-Video
Off
.
On
and selects
On
and selects
On
and selects
when
Component
SDI 1
as the HD input source for the Sidebar keyer.
SDI 2
as the HD input source for the Sidebar keyer.
Component In
is chosen as the Sidebar Keyer source.)
as the HD input source for the
2.1
cannot be either
Side Bar Edge (7.2)—Specify a value to widen or narrow the sidebar keyer. There are
two ways to enter a value:
• Click and drag the slider.
• Click on the numeric value above the slider, enter a new value, and press Enter to
commit the changed value.
0
Produces a 4:3 centered picture.
+1 to +128
-128 to -1
Produces wider sidebars (larger number = larger sidebars).
Produces narrower sidebars (smaller number = smaller sidebars).
Note: Please read the discussions in Chapter 4, Parameter Menus, for 7.1 Sidebar Keyer
and 7.2 Sidebar Edge for complete information on use of the Sidebar keyer.
Loss of Input (11.1)—Select the automatic action that occurs if the video input is lost.
The Freeze selection freezes video on the last available frame. The Black selection
(default) cuts the video to black.
Note: Freeze on Loss of Input works only for SDI inputs. If a selected analog input is
lost while Freeze is enabled, the output will not be valid video.
Black (default)
Freeze
Select to replace a lost video input with black video.
Select to replace a lost video input with the last available video frame.

FS1 Installation and Operation Manual — Remote FS1 Control Via a Web
83
Audio Control Screen
This screen offers settings for a variety of audio-related functions:
• Turning AFV on and off.
• Saving AFV settings for any selected video input.
• Changing channel adjustments (level and phase).
The actual appearance of this page can change, reflecting Audio Output choices. For
example, if the Level control is not set to Unity, then controls will appear allowing you to
set the levels of the eight channels. All of the sliders on this page provide two ways to enter
a value:
• Click and drag the slider.
• Click on the numeric value above the slider, enter a new value, and press Enter to
1
commit the changed value.
FS1 Web Interface, Audio Control Screen

84
Audio Follow Video (4.5)—This parameter determines whether audio settings are
remembered for each video input.
Off (default)OnNormal operation. Audio settings must be made separately from any video settings; they
are not associated automatically.
The FS1 remembers the audio settings associated with the currently selected input.
Whenever an input is selected, the corresponding audio settings will be recalled.
This allows you to set up specific audio settings for the different video inputs (i.e., perhaps
the SDI 1 has a specific embedded audio channel mapping while the component video
input might always use AES audio input).
Audio Follow Video
parameters:
Save AFV Settings for Video Input (4.6 AFV Memory)—Selecting a video input and then
clicking on the Save AFV Settings... button saves the current audio settings and
adjustments to source-memory for that video input.
Audio Out Level (20.1)—Enables or disables individual audio output level adjustment
of the eight FS1 audio output channels.
Unity (default)
Adjust
Audio Out Phase (21.0)—Enables or disables individual audio phase adjustment of the
eight FS1 audio output channels.
Normal (default)
Adjust
applies to these
• 2.2 Audio Input
• 2.11—2.18 Audio Map
Audio Follow Video
to these parameters:
• 4.1 Analog Audio Std
• 4.3 Audio Out
does not apply
• 2.21—2.24 Audio Map (Stereo)
• 4.2 Audio Delay
• 4.4 Sample Rate Convert
• 20.0 Audio Output Levels
• 20.1—20.8 Audio Level Ch (n)
• 21.0 Audio Output Phase
• 21.1—21.8 Audio Phase Ch (n)
Disable audio output level adjustments.
Enable audio output level adjustments for the eight audio channels. When set to
controls are provided for adjusting the eight channels ± 18dB in steps of 0.5 dB
Disable audio phase adjustments.
Enable audio phase adjustments for the eight audio channels. When set to
Normal
or
are provided for setting each of the eight channels to
Inverted
Adjust
phase.
Adjust
,
, controls
Source (Audio Input 2.2)—Defines the input audio source selection for the FS1.
Multiple input sources may be present at all the connectors on the FS1 rear panel,
but the active input source routed through the FS1 will be the one selected here.
This same control is also present in the Audio and Video I/O screen.
Note: If you select either Stereo Map or Channel Map, controls will appear allowing
you to map input sources for each of the eight channels or pairs of channels (stereo).

Stereo Map
Channel Map
Embed SDI 1
Embed SDI 2
AES unbal
On (default)
FS1 Installation and Operation Manual — Remote FS1 Control Via a Web
For the 8 channels of embedded audio out, select stereo inputs according to
parameters 2.21 through 2.24. Any channel pair (4 pair total) can be mapped to 24
different choices.
For the 8 channels of embedded audio out, select and map inputs according to
parameters 2.11 through 2.18. Any of the 16 embedded channels can be mapped to
one of the 48 possible choices.
Use the embedded audio from the
Use the embedded audio from the
(Default)
Analog
Select the digital
Select the
Analog Audio
Sample Rate Convert (4.4)
Normal operation. The FS1 performs audio sample rate conversion and keeps the video and
audio synchronized.
Off
The FS1 does not sample rate convert the audio, leaving embedded audio as is, useful for
¤
5.1 embedded audio and other applications.
Dolby
SDI 1
connector as the input source
SDI 2
connector as the input source
AES/EBU Audio
connector (DB25, 8-ch) as the audio input source
connectors (8-ch) as the audio input source
Audio Map
1
Audio Map
85
Convert Mode Screen
Normally, set this to On (default). Set it to Off only if the following are both
true:
1. You want to pass digital encoded audio from either embedded or AES into embedded
and/or AES out.
2. You have the embedded or AES input genlocked to the FS1 output. In other words, the
encoded audio will not survive the frame-sync function (dropping or repeating frames),
so it needs to be set to lock to the input. You can lock to a reference only if that
reference is driving both the FS1 and the upstream source of the embedded or AES
input to the FS1.
Audio Delay, ms (4.2)—This slider allows you to adjust the delay to compensate for video
timing issues (delay/latency). This slider changes the delay from -16 to 256 ms (the
default is zero delay).
This screen offers settings for the FS1 upconverter, downconverter, and SD Aspect Ratio
converters.
FS1 Web Interface, Convert Mode Screen

86
Upconvert Mode (5.1)
4x3 Pillar
14x9 Pillar (default)
Full Screen
LB to Full
Wide Zoom
Downconvert Mode (5.2)
Letterbox (default)
Crop
Anamorphic
14x9
Auto AFD
SD Aspect Ratio (5.3)
Off (default)
Letterbox
H Crop
Pillarbox
V Crop
14x9
Results in 4x3 image in center of screen with black sidebars.
Results in 14x9 image, zoomed slightly to fill a 14x9 image with black sidebars.
Anamorphic full screen display.
Image is zoomed to fit the full screen (letterbox).
Using a combination of zoom and stretch, the image is sized to fit a 16x9 screen (this can
introduce a small aspect ratio change).
Image is reduced and aspect ratio preserved with black top and bottom added to image area.
Image is cropped to fit new screen size.
HD image is converted to full-screen SD with a 16x9 aspect ratio (anamorphic).
Image is reduced slightly with aspect ratio preserved. Black is added top and bottom, and
the left and right sides are cropped.
Automatically selects the best downconvert mode based on the input video's Active Format
Description (AFD) code. If the input video is not carrying an AFD VANC code, the
downconverter defaults to the mode specified in parameter menu 5.5 (“Downconvert AFD
Default”).
Turns aspect ratio conversion
Anamorphic converted to
Anamorphic 16:9 screen cropped to 4:3 screen.
Converts standard 4:3 screen to
Transforms an SD Letterbox image to an anamorphic image.
Converts 16:9 Anamorphic video to
Off
.
Letterbox
Pillarbox
16:9 to 4:3.
(black sidebars) as an anamorphic screen.
14:9
Cropped video.
Hold Last
Anamorphic
Downconvert AFD Default (5.5)
(Default)
Letterbox
14x9
Crop
Use the last AFD code detected and continue to use its aspect ratio selection until a new
AFD code is detected again in the SDI meta data.
When an AFD code isn’t present, switch the downconverter mode to
When an AFD code isn’t present, switch the downconverter mode to
When an AFD code isn’t present, switch the downconverter mode to
When an AFD code isn’t present, switch the downconverter mode to
Letterbox
14x9
Anamorphic
Crop
.
.
.
.

AFD Out SDI1 (5.6)
Off
(Default)
Auto
>16:9
Full Frame
Pillarbox
Letterbox
4:3 Alt 14:9
16:9 Alt 14:9
16:9 Alt 4:3
The FS1 does not insert an AFD code into the output. If the video input has an AFD code
If the FS1 is not upconverting or downconverting the input video, the input AFD code is
The FS1 always inserts a “Box >
The FS1 always inserts a “Full Frame” AFD code (8), which indicates that the HD image is
The FS1 always inserts a “4:3 (center)” AFD code (9), which indicates that the HD image has
The FS1 always inserts a “16:9 (with complete 16:9 image protected)” AFD code (10), which
14:9
The FS1 always inserts a “14:9 (center)” AFD code (11), which indicates that the HD image
The FS1 always inserts a “4:3 (with alternate 14:9 center)” AFD code (13), which indicates
The FS1 always inserts a “16:9 (with alternative 14:9 center” AFD code (14), which indicates
The FS1 always inserts a “16:9 (with alternative 4:3 center)” AFD code (15), which indicates
FS1 Installation and Operation Manual — Remote FS1 Control Via a Web
and the FS1 is not up/down/cross converting it, the input AFD code will be passed
through to the output.
passed through. If there is no AFD code on the input video, a “Full Frame” (8) code is
inserted. If the FS1 is upconverting, the appropriate AFD code will be chosen based on
the upconvert mode.
16:9
image has an aspect ratio greater than 16:9 as a vertically centered letterbox within the
16:9 frame.
full frame, with an aspect ratio that is 16:9.
a 4:3 aspect ratio as a horizontally center pillarbox image within the 16:9 frame.
indicates that the HD image is full frame, with a 16:9 aspect ratio and all image areas are
protected.
has a 14:9 aspect ratio as a horizontally centered pillarbox within the 16:9 frame.
that the HD image has a 4:3 aspect ratio and with an alternative 14:9 centered pillarbox
image within the 16:9 frame.
that the HD image has a 16:9 aspect ratio with an alternative 14:9 center within the 16:9
frame.
that the HD image has a 16:9 aspect ratio with an alternative 4:3 center within the 16:9
frame.
(center)” AFD code (4), which indicates that the HD
1
87
AFD Out SDI2 (5.7)
Parameter selections are the same as for AFD Out SDI1.

88
Genlock Control Screen
This screen selects the type of genlock source and then allows fine adjustment of the
horizontal and vertical timing, and audio delay—relative to the source selected. There
are two ways to enter a value:
• Click and drag the slider.
• Click on the numeric value above the slider, enter a new value and press Enter to
commit the changed value.
FS1 Web Interface, Genlock Control Screen
Genlock Source Select (6.1)
Reference (default)
Input
Free run
Horizontal Output Timing, pixels (6.2)—This slider adjusts horizontal output timing
relative to the reference video already selected. When adjusting the horizontal
timing (H), this value specifies a number of pixels to offset, from zero to full line
width.
Horizontal Output Fine Timing—Further adjusts the horizontal analog output timing
(only) in finer increments than 6.2 (above)—in this case by sub-pixels. Each
adjustment of the control, from 0 to 127 adjusts the timing by 1/128th of a pixel.
Note: This fine timing control only affects the analog outputs.
Vertical Output Timing, lines (6.3)—This slider adjusts vertical output timing relative to
the reference video already selected. When adjusting the vertical timing (V), this
value specifies a number of lines to offset, moving the screen up to a half a frame up
or down.
Use the
Use the currently selected input as the genlock source
Free run mode (FS1 syncs to its own timebase, not locked to an external source)
Ref
connector as the genlock source

FS1 Installation and Operation Manual — Remote FS1 Control Via a Web
89
ProcAmp Control Screen
This screen selects whether the Processing Amplifier (ProcAmp) is On or Off, and if On,
allows adjustment of gain, blacklevel, hue and saturation via slider controls.
1
FS1 Web Interface, ProcAmp Control Screen
Video In—Selecting a value results in the ProcAmp screen showing the current ProcAmp
settings for that specific input as well as changing the FS1’s input to the one chosen.
Note: ProcAmp controls (Parameters 10.1 through 10.5) are independently kept for
each separate input: SDI 1, SDI 2, Composite, S-Video, and Component.
ProcAmp Enable (10.1)
On
The Processing Amplifier is turned On and all settings are applied to the currently selected
input source
Off (default)
Turns the Processing Amplifier
Off
—video is passed unaltered.
All—Resets all Proc Amp settings to Unity, regardless of their current settings.
Gain (10.2)—Slider changes video gain from black to 1.5 times luma in steps of .01
Blacklevel (10.3)—Slider adjusts video black level from -20 IRE to +20 IRE in .5 steps.
Hue (10.4)—Slider adjusts video color hue through 360 degrees (color wheel). Slider can
adjust in increments/decrements of 1 degree or more.
Saturation (10.5)—Slider adjusts video color saturation from black & white to 1.5 times
chroma in steps as small as .01.

90
Caption Screen This screen controls how the FS1 handles closed captioning ancillary data and whether
it and VITC timecode are passed to the outputs or blanked.
Caption Translator (30.1)—When set to On and using the Upconverter, the FS1 will
automatically translate incoming line 21 captions to CEA-708 format and insert the
VANC packets into the converted HD video stream. This is a complete translation
from CEA-608 format to CEA-708 format (including the embedded SD captions).
When set to On and using the downconverters, the FS1 will automatically intercept
and reformat the SD caption data in the incoming CEA-708 VANC packets, and
output it on line 21 of the standard definition outputs.
When Off, translation is not performed.
Upconvert Line 21 (31.1)
Blank (default)
Pass
Auto blank
In
UpConvert
before
Passes input video Line 21 to the converter and to the outputs.
The FS1 looks for Line 21 caption data on the video input. If present, Line 21 is blanked
before video conversion occurs. If no caption data is found, Line 21 passes to the
converter.
or
SD Aspect Ratio Convert
conversion. This is used to blank Line 21 caption data.
modes, this setting blanks input video Line 21
Captioning Status—This field is a read-only informational display that shows whether
Closed Caption data is present on the currently selected video input.
FS1 Web Interface, Caption Screen
 Loading...