

Page 1

COMPACT DISC STEREO SYSTEM
SISTEMA ESTEREO CON REPRODUCTOR DE DISCOS
COMPACTOS
CHAINE STEREO AVEC LEQEUR DE DISQUES COMPAGS
XR-M70
OPERATING INSTRUaiONS
№
For assistance and information,
call toll free 1-800-BUY-AIWA.
MANUAL DE INSTRUCCIONES
MODE D'EMPLOI
En (English)
E (Español)
F (Erançais)
88-CLB-913-01
98041OAYK-H-6
(United States and Puerto Rico)
_n COMPACT
DIGITAL AUDIO
Page 2
ENGLISH
WARNING
TO REDUCE THE RISK OF FIRE OR ELECTRIC
SHOCK, DO NOT EXPOSE THIS APPLIANCE TO
RAIN OR MOISTURE.
CAUTION
RISK OF ELECTRIC SHOCK
DO NOT OPEN
“CAUTIONTO REDUCE THE RISK OF
ELECTRIC SHOCK,
DO NOT REMOVE COVER (OR BACK).
NO USER-SERVICEABLE PARTS INSIDE.
REFER SERVICING TO QUALIFIED
SERVICE PERSONNEL.”
Explanation of Graphical Symbols;
The lightning flash with arrowhead symbol,
within an equilateral triangle, is intended to
alert the user to the presence of uninsulated
"dangerous voltage" within the product’s en
closure that may be of sufficient magnitude to
constitute a risk of electric shock to persons.
The exclamation point within an equilateral
triangle is intended to alert the user to the
presence of important operating and mainte
nance (servicing) instructions in the literature
accompanying the appliance.
PRECAUTIONS
Read the Operating Instructions carefully and completely before
operating the unit. Be sure to keep the Operating Instructions for
future reference. All warnings and cautions in the Operating
Instructions and on the unit should be strictly followed, as well as
the safety suggestions below.
Installation
1 Water and moisture — Do not use this unit near water, such
as near a bathtub, washbowl, swimming pool, or the like.
2 Heat — Do not use this unit near sources of heat, including
heating vents, stoves, or other appliances that generate heat.
It also should not be placed in temperatures less than 5°C
(41 °F) or greater than 35°C (95°F).
3 Mounting surface — Place the unit on a flat, even surface.
4 Ventilation—The uhit should be situated with adequate space
around it so that proper heat ventilation is assured. Allow 10 cm
(4 in.) clearance from the rear and the top of the unit, and 5 cm
(2 in.) from the each side.
- Do not place the unit on a bed, rug, or similar surface that may
block the ventilation openings.
- Do not install the unit in a bookcase, cabinet, or airtight rack
where ventilation may be impeded.
5 Objects and liquid entry — Take care that objects or liquids
do not get inside the unit through the ventilation openings.
6 Carts and stands — When placed or
mounted on a stand or cart, the unit should
be moved with care.
Quick stops, excessive force, and uneven
surfaces may cause fhe unit or cart to
overturn or fall.
7 Condensation — Moisture may form on the CD pickup lens
when:
- The unit is moved from a cold spot to a warm spot
- The heating system has just been turned on
- The unit is used in a very humid room
- The unit is cooled by an air conditioner
When this unit has condensation inside, it may not function
normally. Should this occur, leave the uhit for a few hours, then
try to operate again.
8 Wall or ceiling mounting — The unit should not be mounted
on a wall or ceiling, unless specified in fhe Operafing Insfructions.
Electric Power
1 Power sources — Connect this unit only to power sources
specified in the Operating Instructions, and as marked on the
unit.
2 Polarization — As a safety feature, some units are equipped
with polarized AC power plugs which can only be inserted one
way into a power outlet. If it is difficult or Impossible to insert the
AC power plug Into an outlet, turn the plug over and try again.
If it still does not easily insert into the outlet, please call a
qualified service technician to service or replace the outlet. To
avoid defeating the safety feature of the polarized plug, do not
force if info a power ouflef.
3 AC power cord
- When disconnecting the power cord, pull out by the plug. Do
not pull the cord itself.
- Never handle the power plug with wet hands, as this could
result in fire or shock.
- Power cord should be roufed fo avoid being severely bent,
pinched, or walked upon. Pay particular attention to the cord
from the unit to the power socket.
- Avoid overloading AC power plugs and extension cords
beyond their capacity, as this could result in fire or shock.
4 Extension cord — To help prevent electric shock, do not use
a polarized AC power plug with an extension cord, receptacle,
or other outlet unless the polarized plug can be completely
inserted to prevent exposure of the blades of the plug.
5 When not in use—Disconnect the AC power cord from the AC
outlet If the unit will not be used for several months or more.
When the cord Is plugged In, a small amount of current
continues to flow fo the unit, even when the power is turned off.
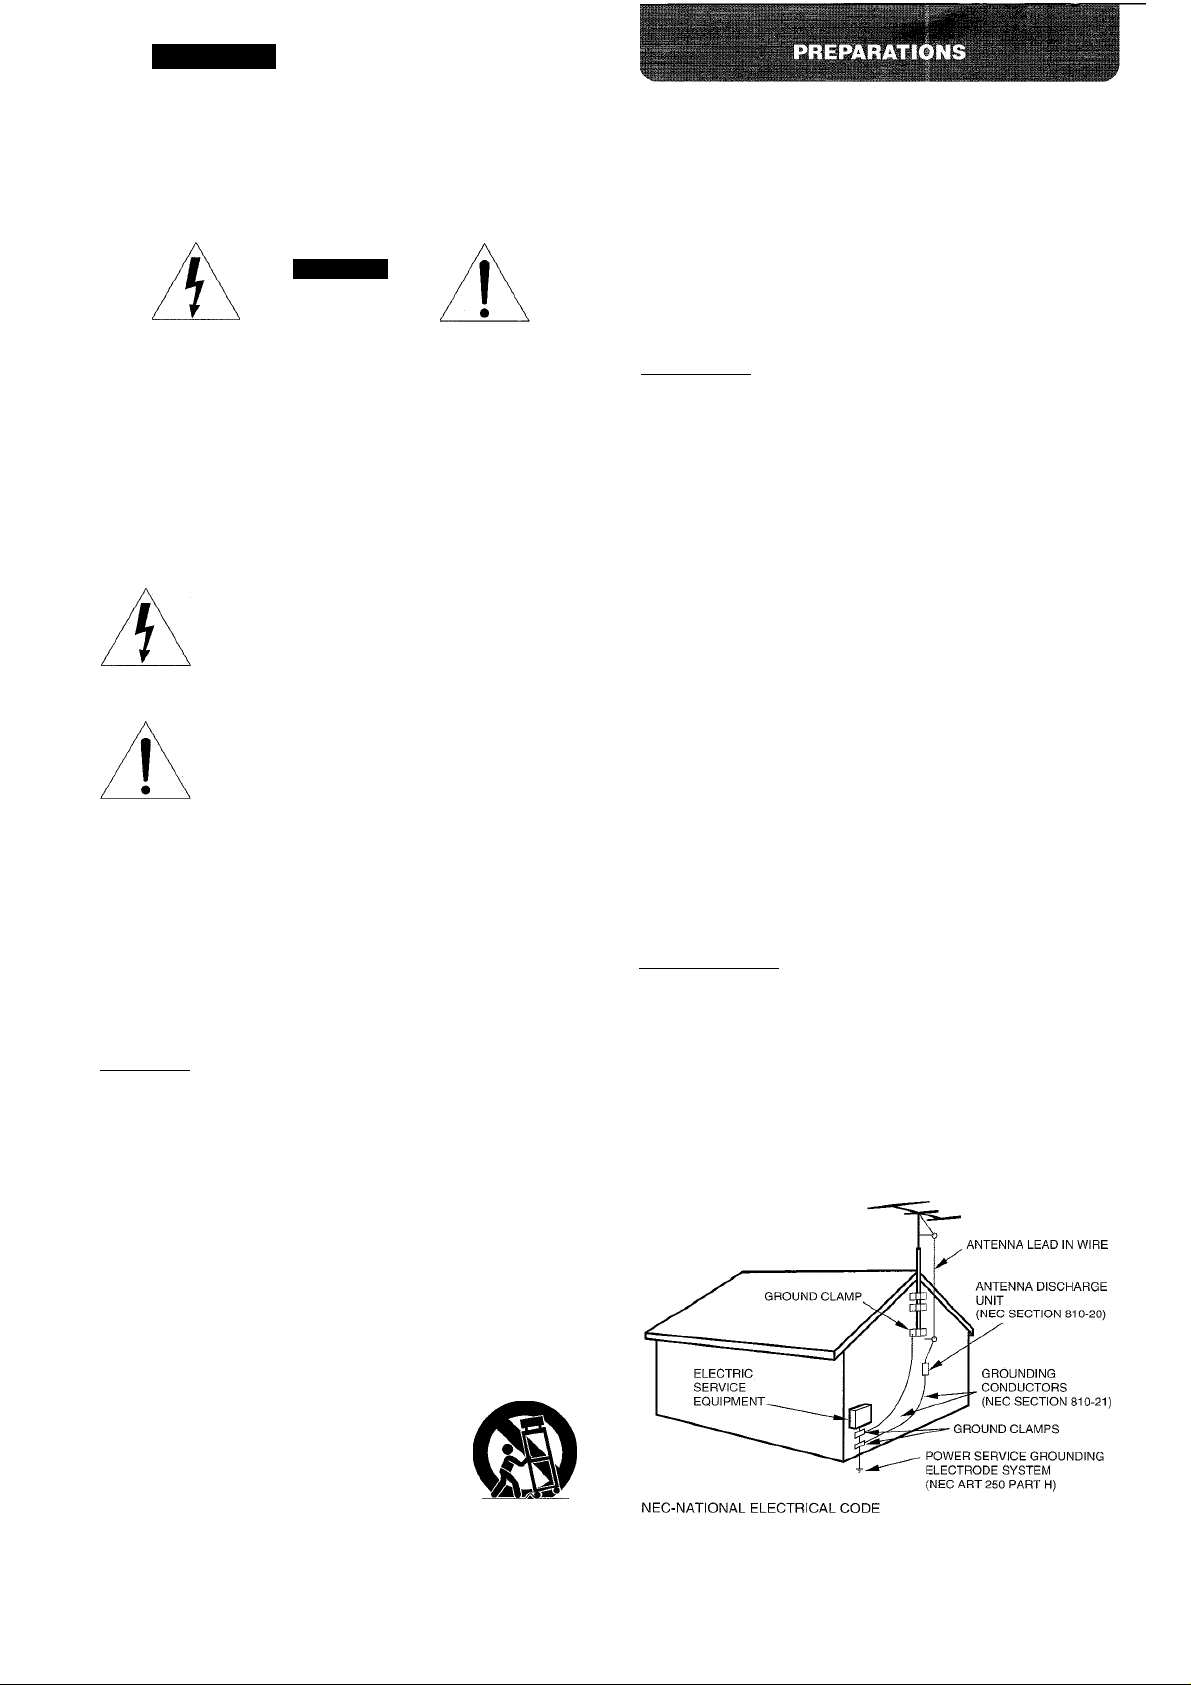
Outdoor Antenna
1 Power lines — When connecting an outdoor antenna, make
sure it is located away from power lines.
2 Outdoor antenna grounding — Be sure the antenna system
is properly grounded to provide protection against unexpected
voltage surges or static electricity build-up. Article 810 of the
National Electrical Code, ANSI/NFPA 70, provides information
on proper grounding of the mast, supporting structure, and the
lead-in wire to the antenna discharge unit, as well as the size
of the grounding unit, connection to grounding terminals, and
requirements for grounding terminals.
Antenna Grounding According to the Nationai Eiectricai Code
2 ENGLISH
Page 3

Maintenance
Clean the unit only as recommended in the Operating
Instructions.
Damage Requiring Service
Have the units serviced by a qualified service technician if:
The AC power cord or plug has been damaged
■■ Foreign objects or liquid have gotten inside the unit
■■ The unit has been exposed to rain or water
The unit does not seem to operate normally
■■ The unit exhibits a marked change in performance
■■ The unit has been dropped, or the cabinet has been damaged
DO NOT ATTEMPT TO SERVICE THE UNIT YOURSELF.
Congratulations on your purchase of an Aiwa Stereo System.
To optimize the performance of this system, please take the time
to read through these Operating Instructions and become familiar
wifh fhe operating procedures.
TABLE OF CONTENTS
PREPARATIONS
PRECAUTIONS
CONNECTIONS.....................................................................4 Q
BEFORE OPERATION
SETTING THE CLOCK..........................................................7 OC
SOUND LU
------------------------------------------------------------------------------------- DC
ADJUSTING THE SOUND.....................................................8 °-
.....................................................................
..........................................................
RADIO RECEPTION_________________________
MANUAL TUNING
PRESETTING STATIONS................................................10
CD PLAYING
OPERATION....................................................................11
.............................................................
_______________________________
(/)
2 Z
6 t
g
_
9
Check your system and accessories
CD player unit
Tuner/amplifier unit
AM antenna
Speakers (L,R)
Remote control
FM antenna
TIMER
OTHER CONNECTIONS
_____________________________________
TIMER PLAY
SETTING THE SLEEP TIMER
....................................................................
........................................
13
14
______________________
CONNECTING OPTIONAL EQUIPMENT........................14
LISTENING TO EXTERNAL SOURCES
RECORDING THE SOUND USING EXTERNAL
EQUIPMENT
..............................................................
.........................
15
15
GENERAL__________________________________
CARE AND MAINTENANCE
TROUBLESHOOTING GUIDE.........................................16
SPECIFICATIONS............................................................17
PARTS INDEX..................................................................18
PRINCIPLE OF AlWA'S FRONT 180” SPEAKER
SYSTEM
......................................................................
...........................................
16
19
Operating Instructions, etc.
Owner’s record
Foryour convenience, record the model number and serial number
(you will find them on the rear of your set) in the space provided
below. Please refer to them when you contact your Aiwa dealer in
case of difficulty.
Model No. Serial No. (Lot No.)
XR-M70U
ENGLISH 3
Page 4
CONNECTIONS
Before connecting the AC cord
The rated voltage of your system shown on the rear panel Is 120
V AC. Check that the rated voltage matches your local voltage.
IMPORTANT
• Connect the speakers, antennas, and all optional equipment
first. Then connect the AC cord in the end.
• There are no differences between the front speakers. Both
speakers can be connected as L (Left) or R (Right).
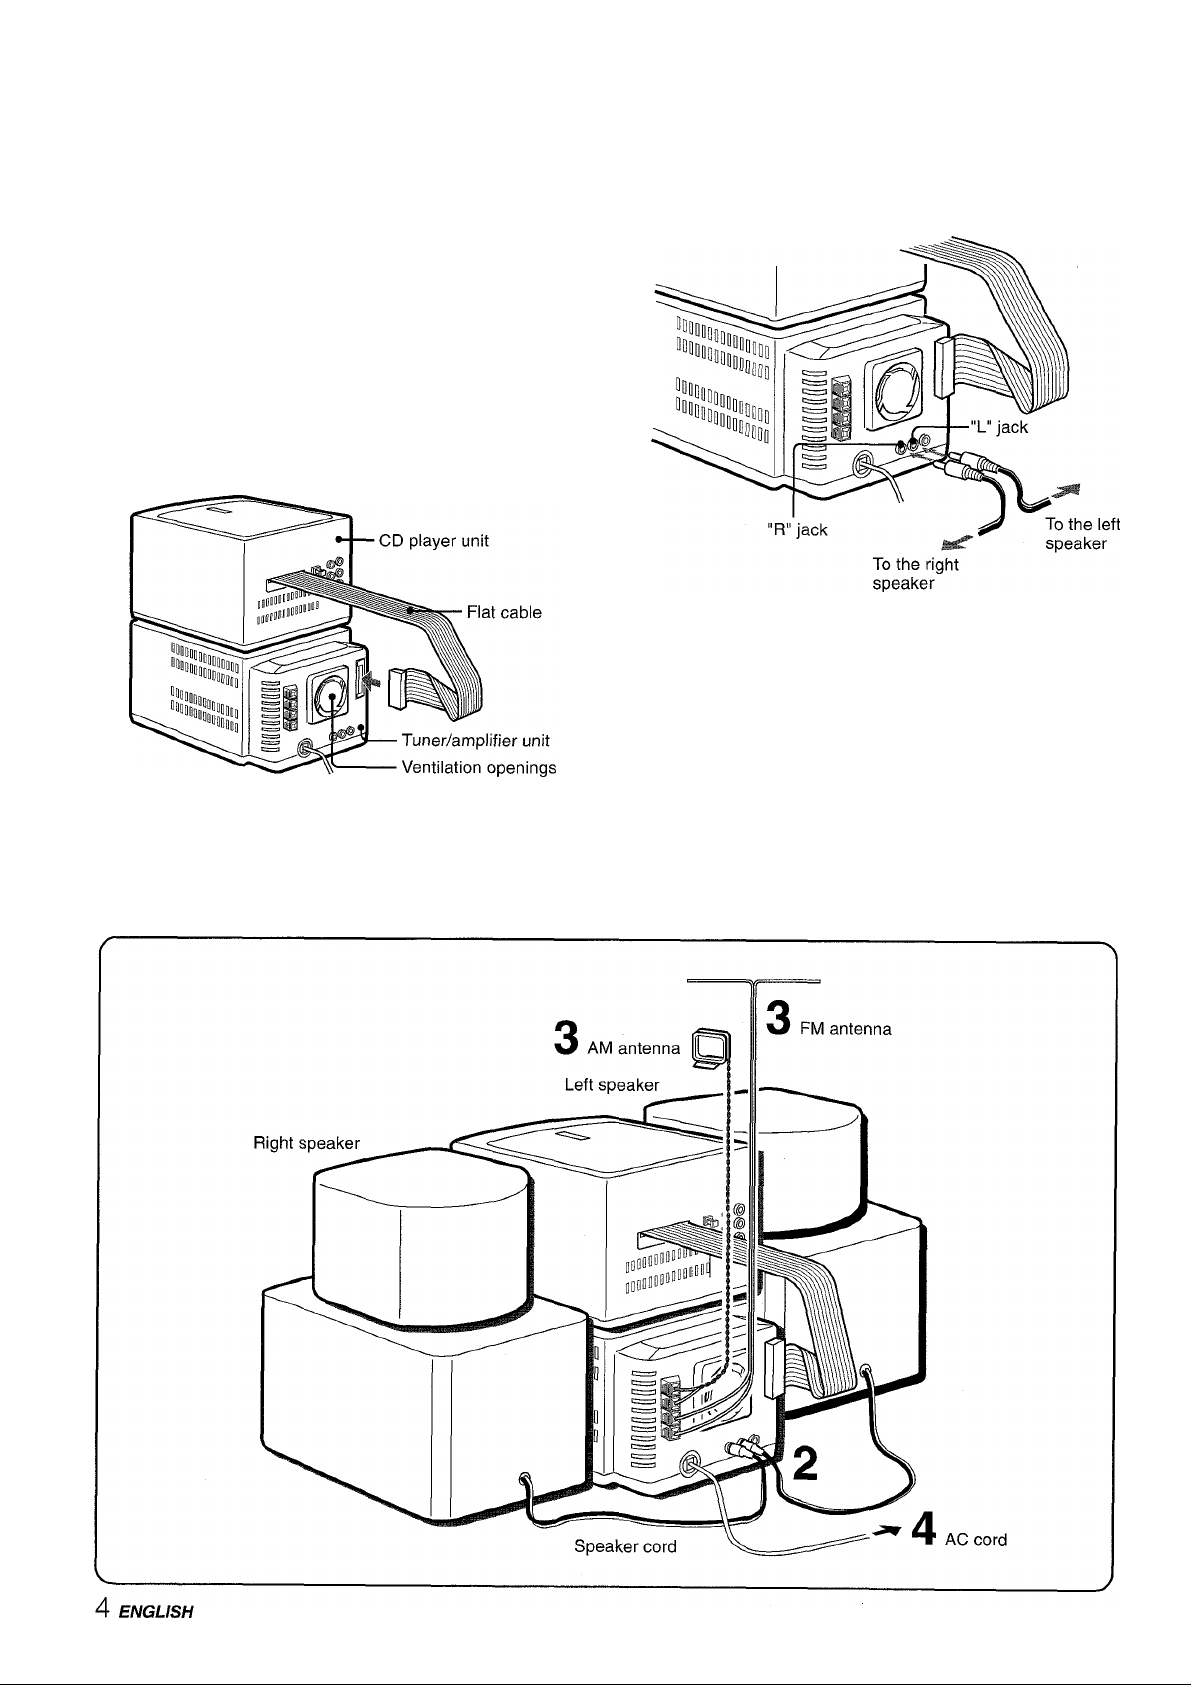
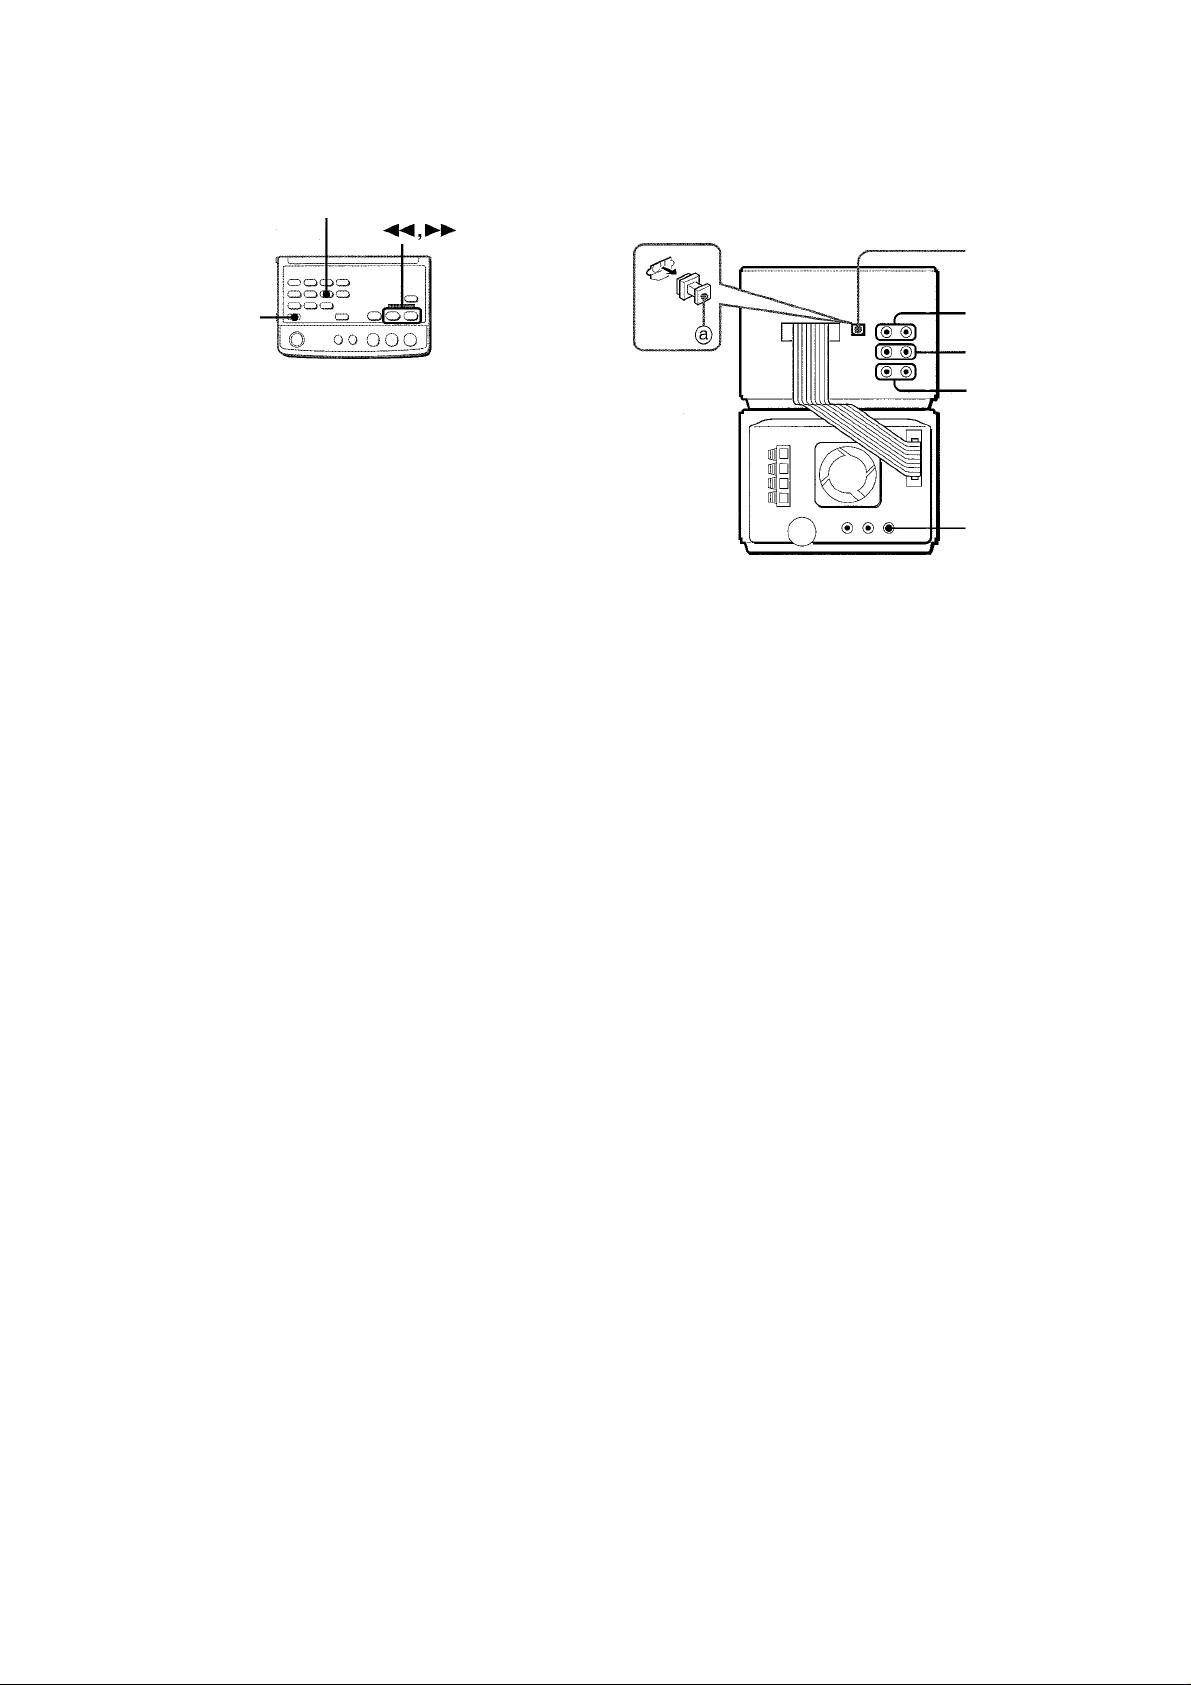
7 Place the CD player unit on top of the tuner/
amplifier unit and piug in the connector of the
flat cable as shown below.
Note that the connector can be plugged in in only one direction
with the flat cable facing right.
2 Connect the speaker cords to the tuner/amplifier
unit.
The speaker cord from the right speaker should be connected
to the "R" jack and the cord from the left speaker to the "L"
jack.
After plugging in the connector, allow adequate clearance
between the flat cable and the ventilation openings.
Page 5
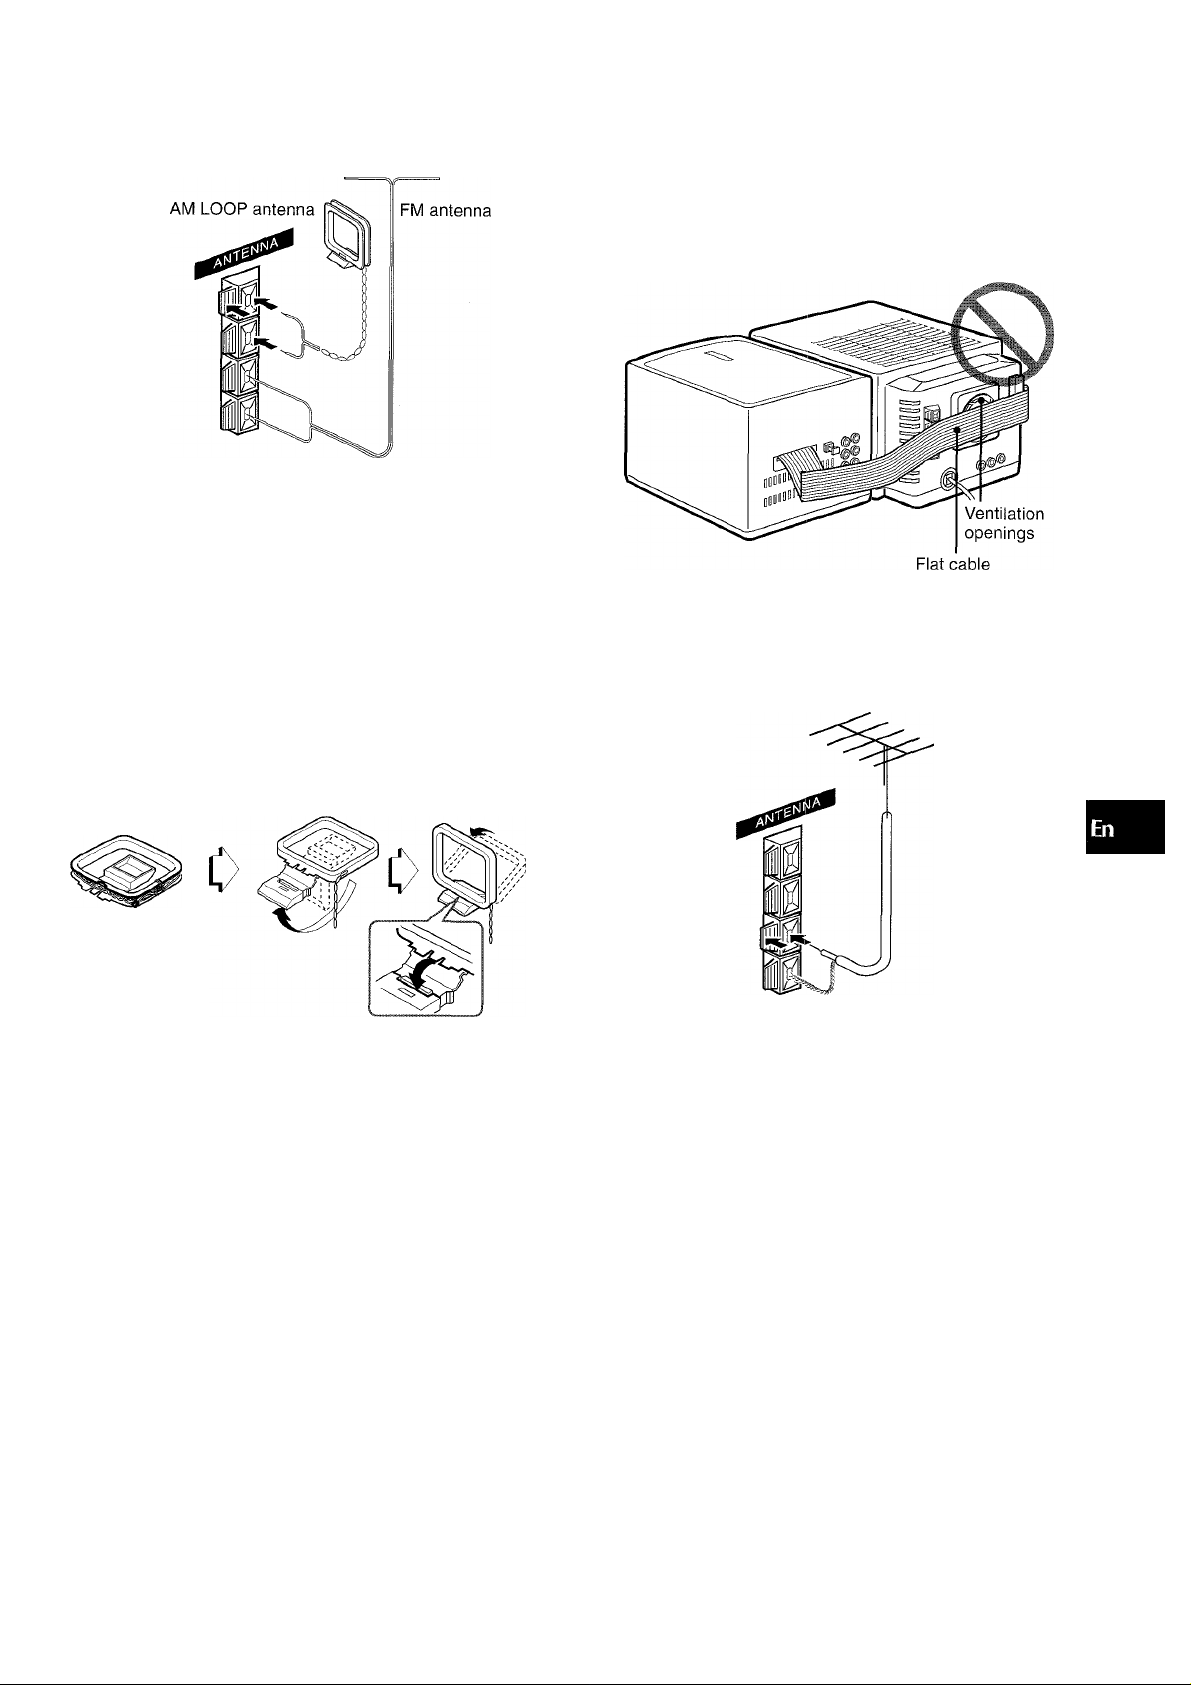
3 Connect the supplied antennas.
Connect the FM antenna to the FM 75 Q. terminals and the
AM antenna to the AM LOOP terminals.
4 Connect the AC cord to an AC outlet.
When the AC cord is connected for the first time, the display
window demonstrates the functions of the system. When the
power is turned on, the demonstration display is overridden by
the operation display. When the power is turned off, the
demonstration mode is restored.
To cancel the demonstration
Press the DEMO button.
To activate, press the DEMO button again.
PLACING THE TWO UNITS SIDE BY SIDE
You may also place the CD player and the tuner/amplifier units
side by side according to your preference.
In this case, make sure that the flat cable does not obstruct the
ventilation openings, as shown below.
Always leave adequate clearance between the flat cable and
the ventilation openings.
CONNECTING AN OUTDOOR ANTENNA
For better FM reception, use of an outdoor antenna is
recommended.
Connect the outdoor antenna to the FM 75 a terminals.
(0
z
g
QC
2
111
cc
0.
To stand the AM antenna on a surface
Fix the daw to the slot.
To position the antennas FM feeder antenna:
Extend this antenna horizontally in a T-shape and fix its ends to
the wall.
AM ioop antenna:
Position to find the best direction.
• Do not connect any speakers to the system other than the
supplied ones.
• Do not leave objects generating magnetism near the speakers.
• Do not bring the FM antenna near metal objects or curtain rails.
• Do not bring the AM antenna near other optional equipment,
the stereo system itself, the AC cord or speaker cords, since
noise will be picked up.
• Do not unwind the AM antenna wire.
•
To connect other optional equipment -» page 14.
ENGLISH 5
Page 6
BEFORE OPERATION
PHONES
POWER
TUNER/
BAND
USING THE CONTROL PANEL
POWER
Turning on the power
Press the POWER button.
Pressing the ► button or the TUNER/BAND button turns the
power on and starts play of the corresponding source (Direct
Play Function).
Furthermore, ejecting the control panel (see the right column)
while the power is off also turns the power on.
After use
Press the POWER button to turn off the power. The display
changes to the clock.
Using the headphones
Connect headphones to the PHONES jack with a stereo mini
plug (03.5 mm, Vb inch).
No sound is output from the speakers while the headphones are
plugged in.
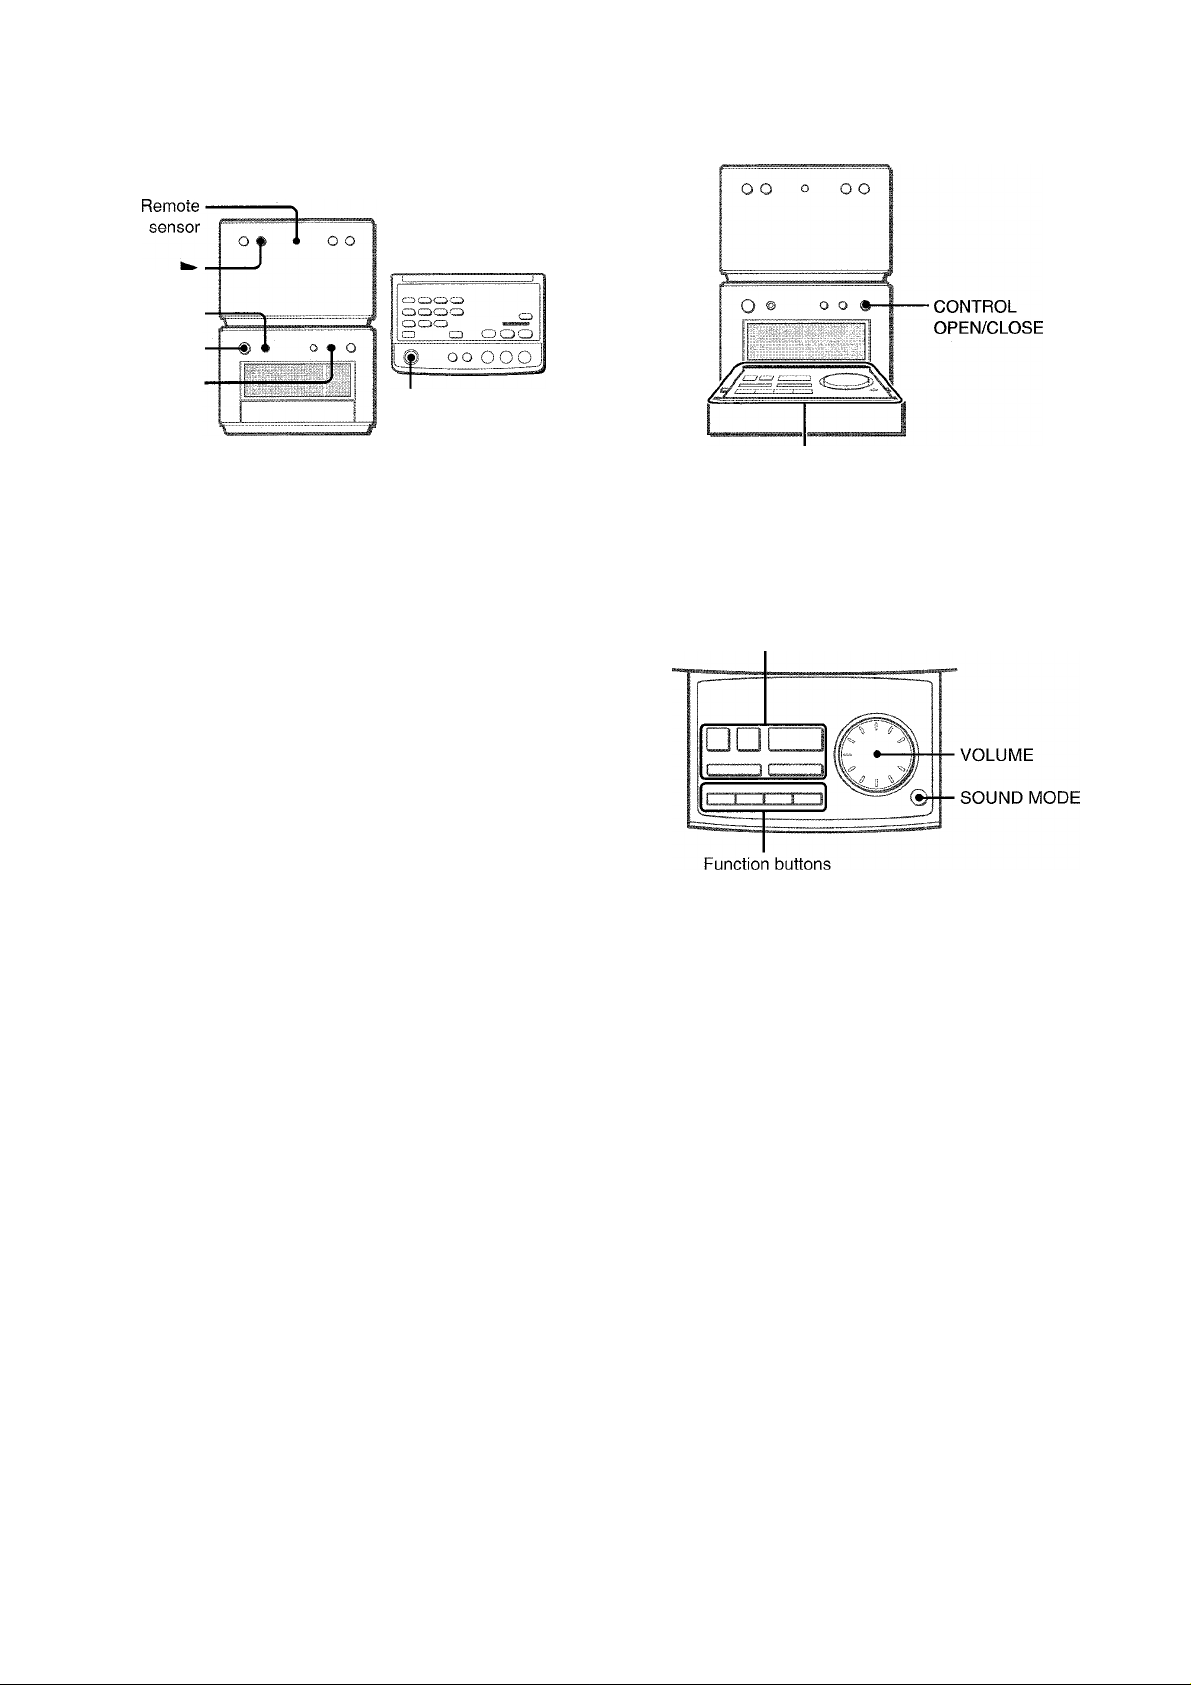
Control panel
To eject the control panel
Press the CONTROL OPEN/CLOSE button when the power is
turned on or off. The control panel will pop out.
To close the control panel, press the button again.
Buttons on the control panel
Control buttons
The function buttons select the source to be played.
The control buttons allow you to control the playback of a CD,
and tune in to a desired broadcasting station.
There are also a button and a control used to make adjustments
to the volume level and sound quality to suit your preferences
on the control panel.
6 ENGLISH
The ► button on the CD player unit immediately starts CD
playback; i.e., pressing the button starts playback regardless of
the source currently selected.
Page 7
USING THE REMOTE CONTROL
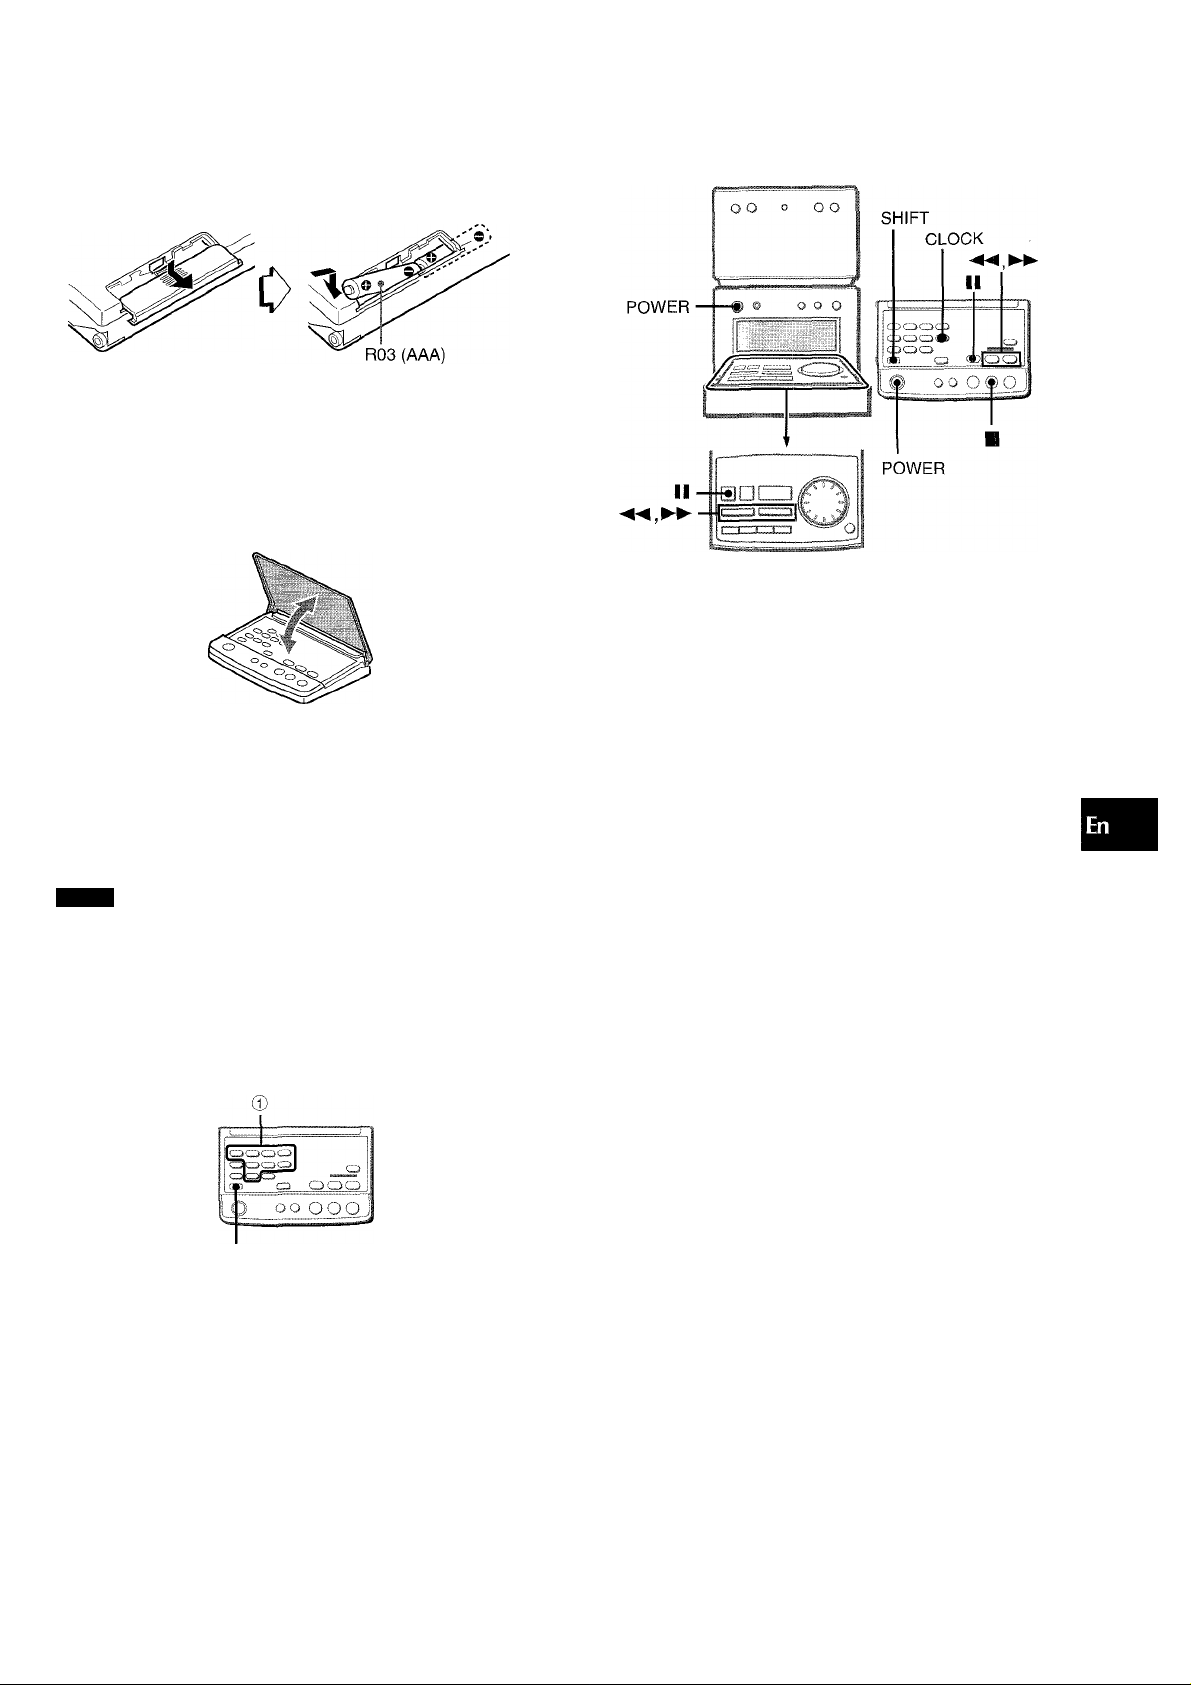
Inserting batteries
Detach the battery cover on the rear of the remote control and
insert two R03 (size AAA) batteries.
When to replace the batteries
The maximum operational distance between the remote control
and the sensor on the CD player unit should be approximately 5
meters (16 feet). When this distance decreases, replace the
batteries with new ones.
Opening and ciosing the top cover
SETTiNG THE CLOCK
1 Press the POWER button to turn on the power.
2 Press the CLOCK button while pressing the
SHIFT button on the remote control.
3 Within 4 seconds, press the II button.
The hour flashes.
0)
z
o
cc
g
lU
cc
0.
When to use the remote control
Some operations can be performed using the buttons on the
remote control only, while others can be performed using the
buttons on the two main units as well as on the remote control.
This instructions manual clearly describes the buttons available
for each operation.
NOTE
■ If the unit is not going to be used for an extended period of
time, remove the batteries to prevent possible electrolyte
leakage.
’ The remote control may not operate correctly when:
- The line of sight between the remote control and the remote
sensor (see the illustration on the previous page) is exposed
to intense light, such as direct sunlight.
- Other remote controls are used nearby (television, etc.)
SHIFT
To use the SHIFT button
Buttons ® have two different functions. One of the functions is
indicated on the button, and the other on the plate above the
button.
To use the function on the button, simply press the button.
To use the function on the plate above the button, press the
button while pressing the SHIFT button.
n h/t I i /W///
/■■' II I C-U u
To switch to the 24-hour standard, press the ■ button.
To restore the 12-hour standard, press the ■ button again.
4 Press the
or
button to designate the
hour.
5 Press the II button to set the hour.
The hour stops flashing and the minute starts flashing.
6 Press the ◄◄ or button to designate the
minute.
7 Press the II button to set the minute and
complete the setting.
The minufe stops flashing on the display and the clock starts
from 00 seconds.
To display the current time
Press the CLOCK button while pressing the SHIFT button on
the remote control. The time is displayed for 4 seconds.
If the clock display flashes while the power is off
This is caused by a power interruption. The current time needs
to be reset.
If power is interrupted for more than approximately 12 hours, all
settings stored in memory after purchase need to be reset.
ENGLISH 7
Page 8
I
ADJUSTING THE SOUND
GEQ
CDCDCZ>C
Cd" Q
D ooo
c ^ooo
VOLUME
VOLUME
SOUND MODE
ADJUSTING THE VOLUME
Turn the VOLUME control on the control panel, or press the VOLUME buttons on the remote control.
The volume level is shown on the display for 4 seconds. It can
be set from MIN (minimum) to 49, and then MAX (maximum).
The volume is memorized even after the power is turned off.
However, if the power is turned off when the volume is set to
more than 25, it is automatically set to 25 the next time the power
is turned on.
ENHANCINGTHETREBLE SOUND
The BBE system enhances the clarity of high-frequency sound.
Press the SOUND MODE button repeatedly until "BBE" appears
on the display. Then, turn the VOLUME control right or left to
select one of the three levels, or the off position within 4 seconds.
(OFF)
[bbT
HP iiiiilJ:ii:l£BE.«Mi JiijiBE................................
..
Low frequency sound may be distorted when the T-BASS system
is used for a disc in which low frequency sound is originally
emphasized. In this case, cancel the T-BASS system.
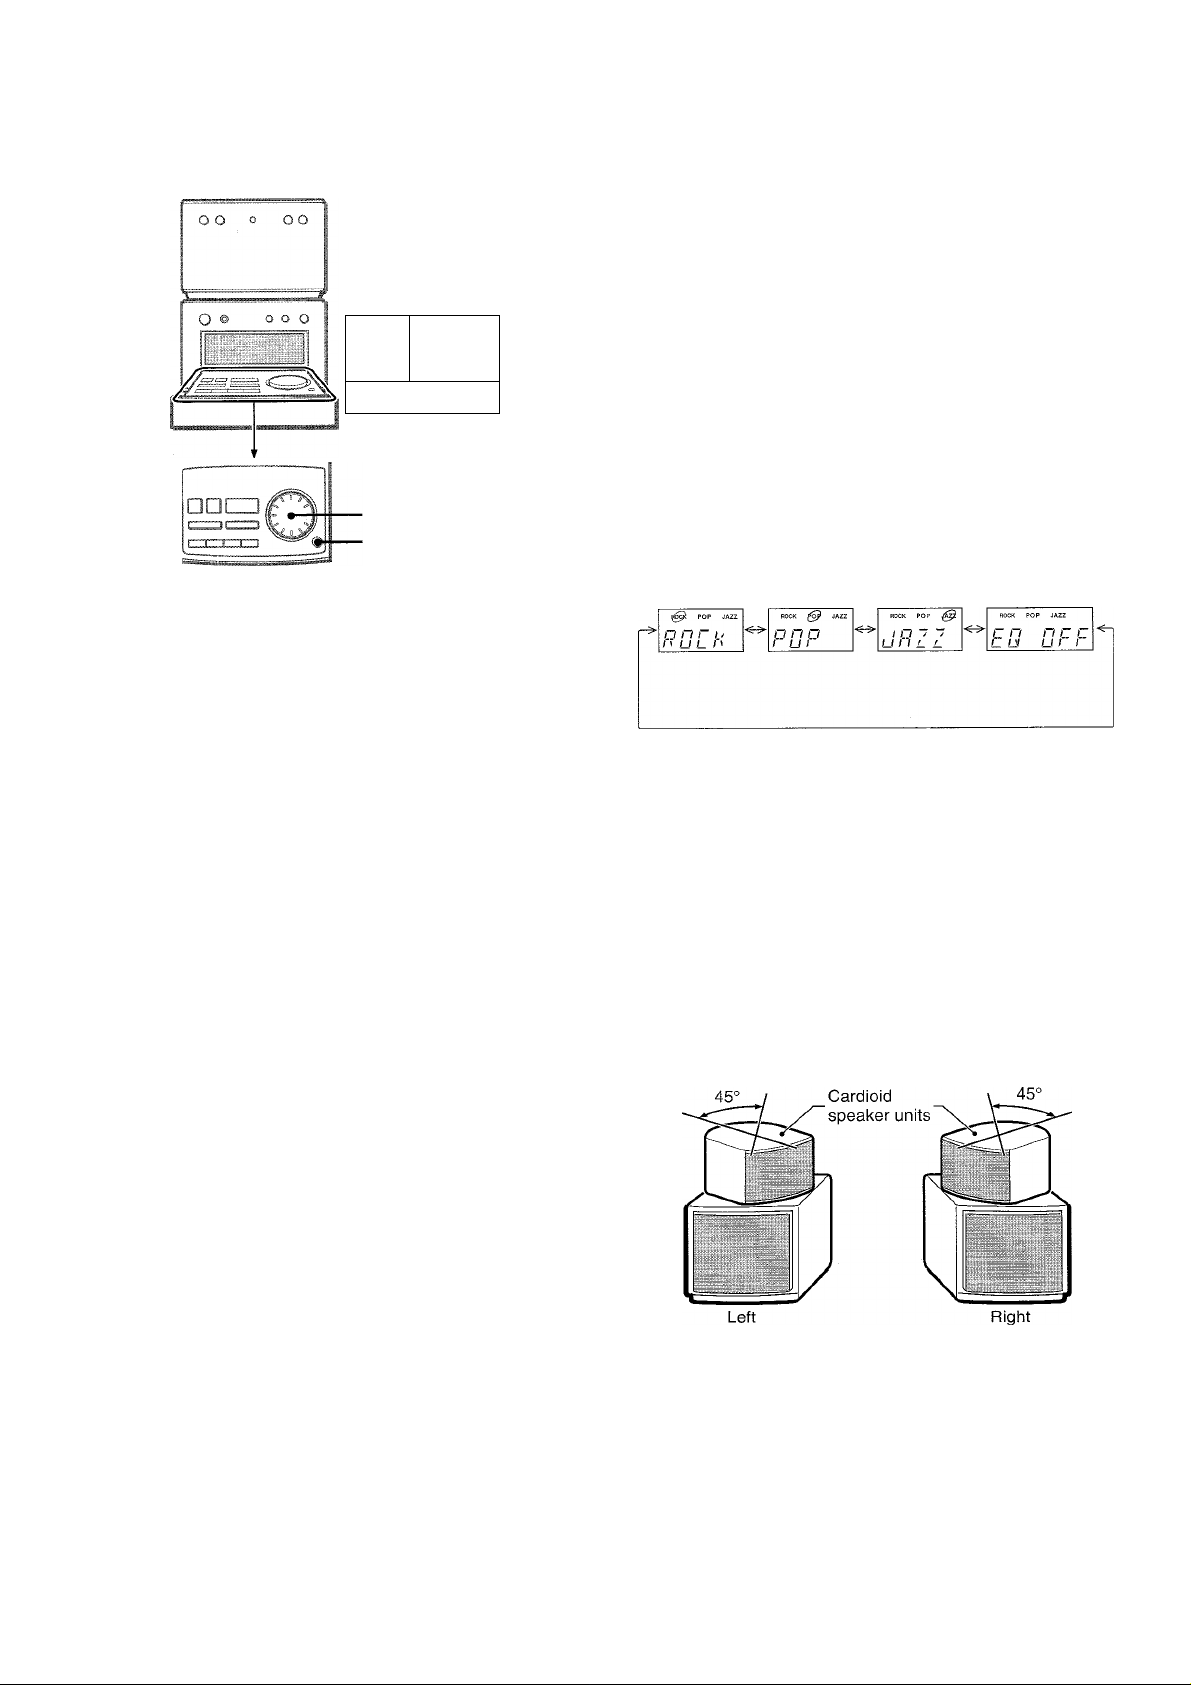
EQ (EQUALIZER)
This unit provides the following three different kinds.
ROCK: Powerful sound emphasizing treble and bass
POP: More presence in the vocals and midrange
JAZZ: Accented lower frequencies for jazz-type music
Press the SOUND MODE button repeatedly until "EQ OFF"
appears on the display. Then, turn the VOLUME control right
or left to select one of the three, or the off position within 4
seconds.
POP
n n r /./
/' U L /'
When using the remote control, press the GEQ button repeatedly.
SOUND ADJUSTMENT DURING
RECORDING
The output volume and tone of the speakers or headphones
may be freely varied without affecting the level of fhe recording.
INCREASING THE WIDTH OF THE OPTIMUM LISTENING AREA
Turn the cardioid speaker units of the left and right speaker
system until they stop as shown below, so that they are pointed
inward at angles of 45°.
U L.
±1 Jj L
ENHANCING THE BASS SOUND
The T-BASS system enhances the realism of low-frequency
sound.
Press the SOUND MODE button repeatedly until "T-BASS"
appears on the display. Then, turn the VOLUME control right
or left to select one of the three levels, or the off position within
4 seconds.
(OFF)
[FBASS ^ [T-BASS ^ [FBASS
.....................
Qrr:7.7.r.n]
J
........
...............
II]
R
8 ENGLISH
Thus the speaker system can be used as Aiwa’s Front 180°
Speaker System, which provides superb sound balance from a
listening angle much wider than that of conventional speaker
system.
For more detailed information about the Front 180° Speaker
System, please refer to page 19.
When the cardioid speaker units are turned so that they point
forward, they provide clear sounds with high-frequency sound
emphasized a bit, if you listen at a point located on the center
line between the left and right speakers.
Page 9

MANUAL TUNING
O O O O O
TUNER/-
BAND
0 (
J
1 o
SHIFT
( I
MODE TUNER
TUNER/
BAND
When an FM stereo broadcast contains noise
Press the MODE TUNER button while pressing the SHIFT button
on the remote control.
"MONO" appears on the display.
Noise is reduced, although reception is monaural.
/ AW
/ / (
To restore stereo reception, repeat the above again.
To change the AM tuning interval
The default setting of the AM tuning interval is 10 kHz/step. If
you use this unit in an area where the frequency allocation system
is 9 kHz/step, change the tuning interval.
Press the POWER button while pressing the TUNER/BAND
button.
To reset the interval, repeat this procedure.
U U I'I I'I
_l U U U .-. M.
13
O
CO
g
UJ
O
LU
QC
g
Q
<
cr
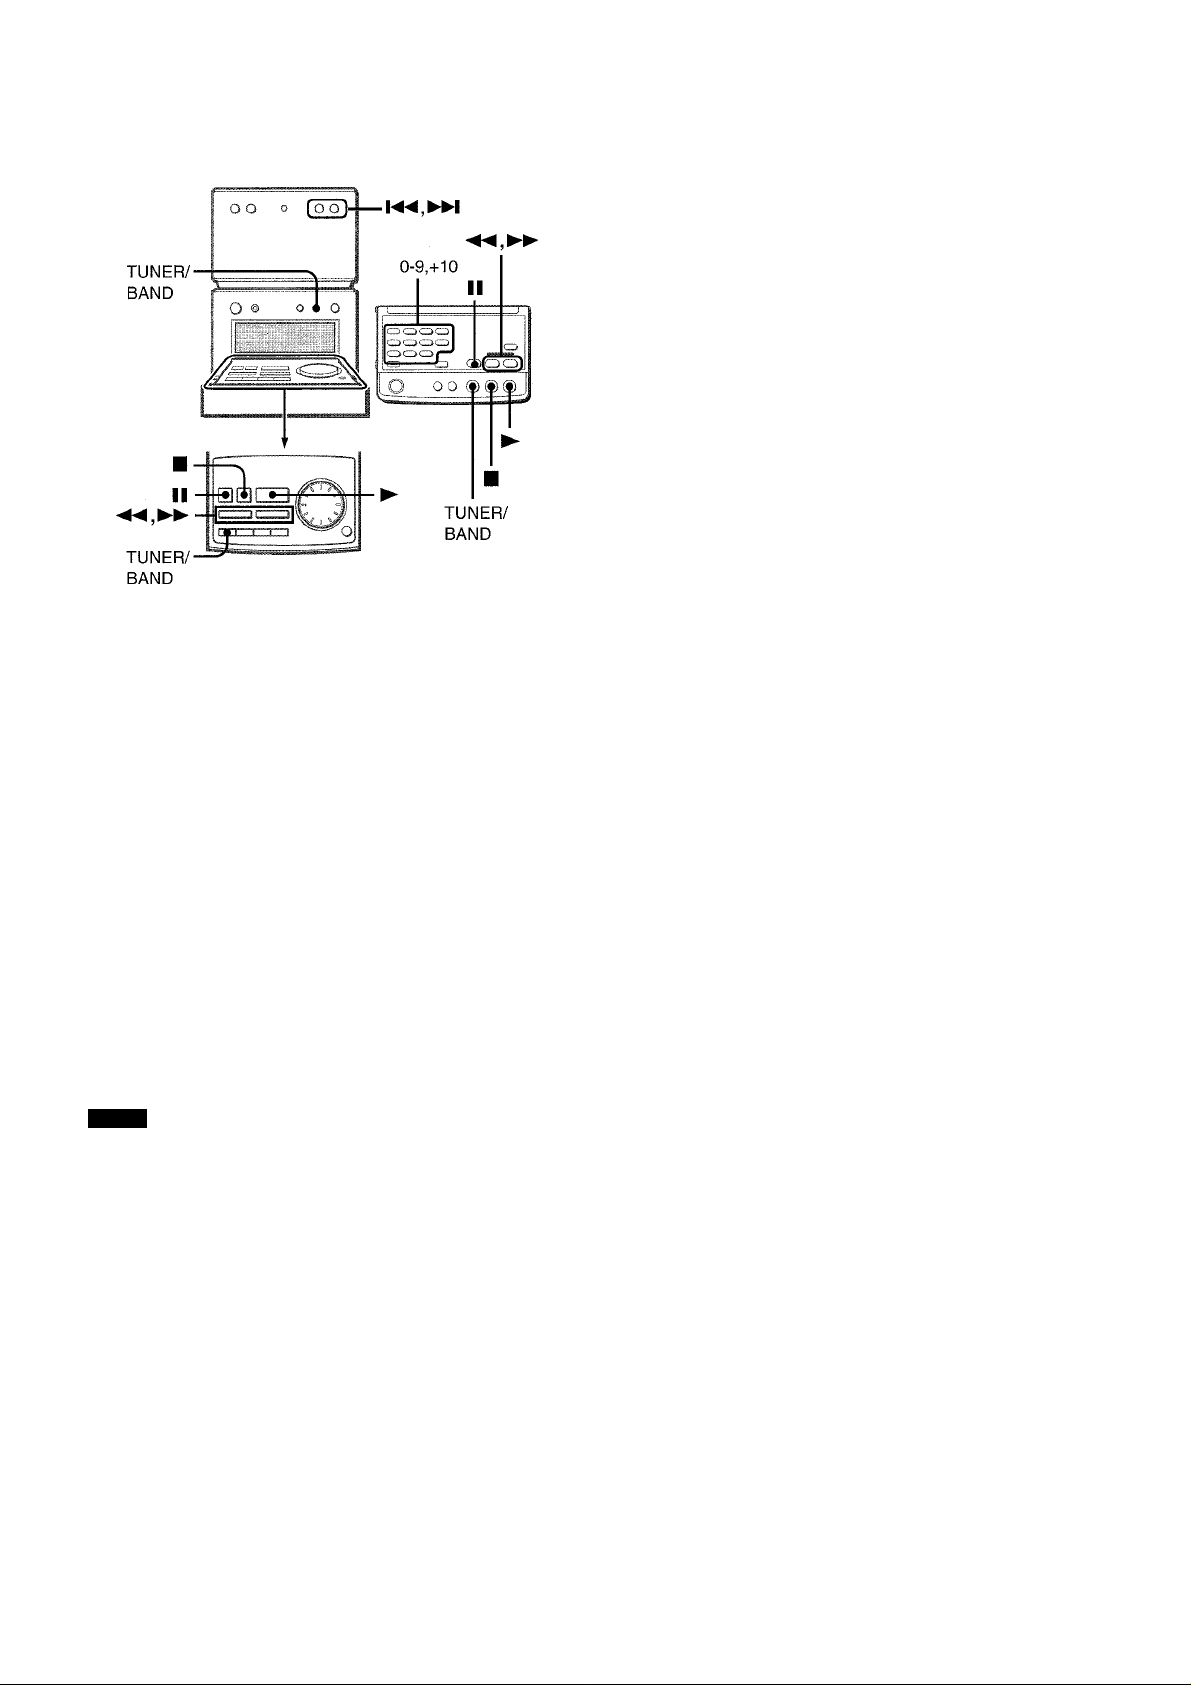
1 Press the TUNER/BAND button repeatedly to
select the desired band.
AM
If the power is turned off, the previously tuned station will be
played (Direct Play Function).
2 Press the or ►M button (or the ◄◄ / ►►
button) to select a station.
Each time the button is pressed, the frequency changes.
When a station is received, "TUNE" is displayed for a moment.
During FM stereo reception, ((i®D) is displayed.
[«(rs)))
I
/„ AW
I I I
To search for a station quickly (Auto Search)
Keep the or ►M button (or the MM / ►► button) pressed
until the tuner starts searching for a station. After tuning in to a
station, the search stops.
To stop the Auto Search manually, press the or button
(or the MM / ►► button).
• The Auto Search may not stop at stations with very weak
signals.
I I I I I jI I Jl
J UU U -
When the AM tuning interval is changed, all preset stations (see
"PRESETTING STATIONS") are cleared. The preset stations
have to be set again.
ENGLISH 9
Page 10
PRESETTING STATIONS
The unit can store a total of 32 preset stations. When a station
is stored, a preset number is assigned to the station. Use the
preset number to tune in to a preset station directiy.
1 Press theTUNER/BAND button to select a band.
Then, press the or ►>! button (or the ◄◄ /
button) to select a station.
PRESET NUMBER TUNING
1 Press theTUNER/BAND button to select a band.
2 Press the numbered buttons on the remote
control to select a preset number.
Exampie:
To seiect preset number 15, press the +10 and 5 buttons.
To seiect preset number 10, press the +10 and 0 buttons.
Another method to tune in to a preset station
Press the TUNER/BAND button to seiect a band.
Then press the ► button.
Each time the button is pressed, the station with the next higher
number is seiected.
To clear a preset station
Seiect the preset number of the station to be cleared. Then, press
the ■ button, and press the II button within 4 seconds.
The preset numbers of ali other stations in the band with higher
numbers are aiso decreased by one.
2 Press the II button to store the station.
A station is assigned a preset number, beginning from 1 in
consecutive order for each band.
Preset number
L l<'l
I I I
\) I n UiA
J U lU ILI MH.
Frequency
3 Repeat steps 1 and 2.
NOTE
Each band can oniy store a maximum of 16 preset stations.
1 0 ENGLISH
Page 11
M
OPERATION
^OPEN/-
CLOSE
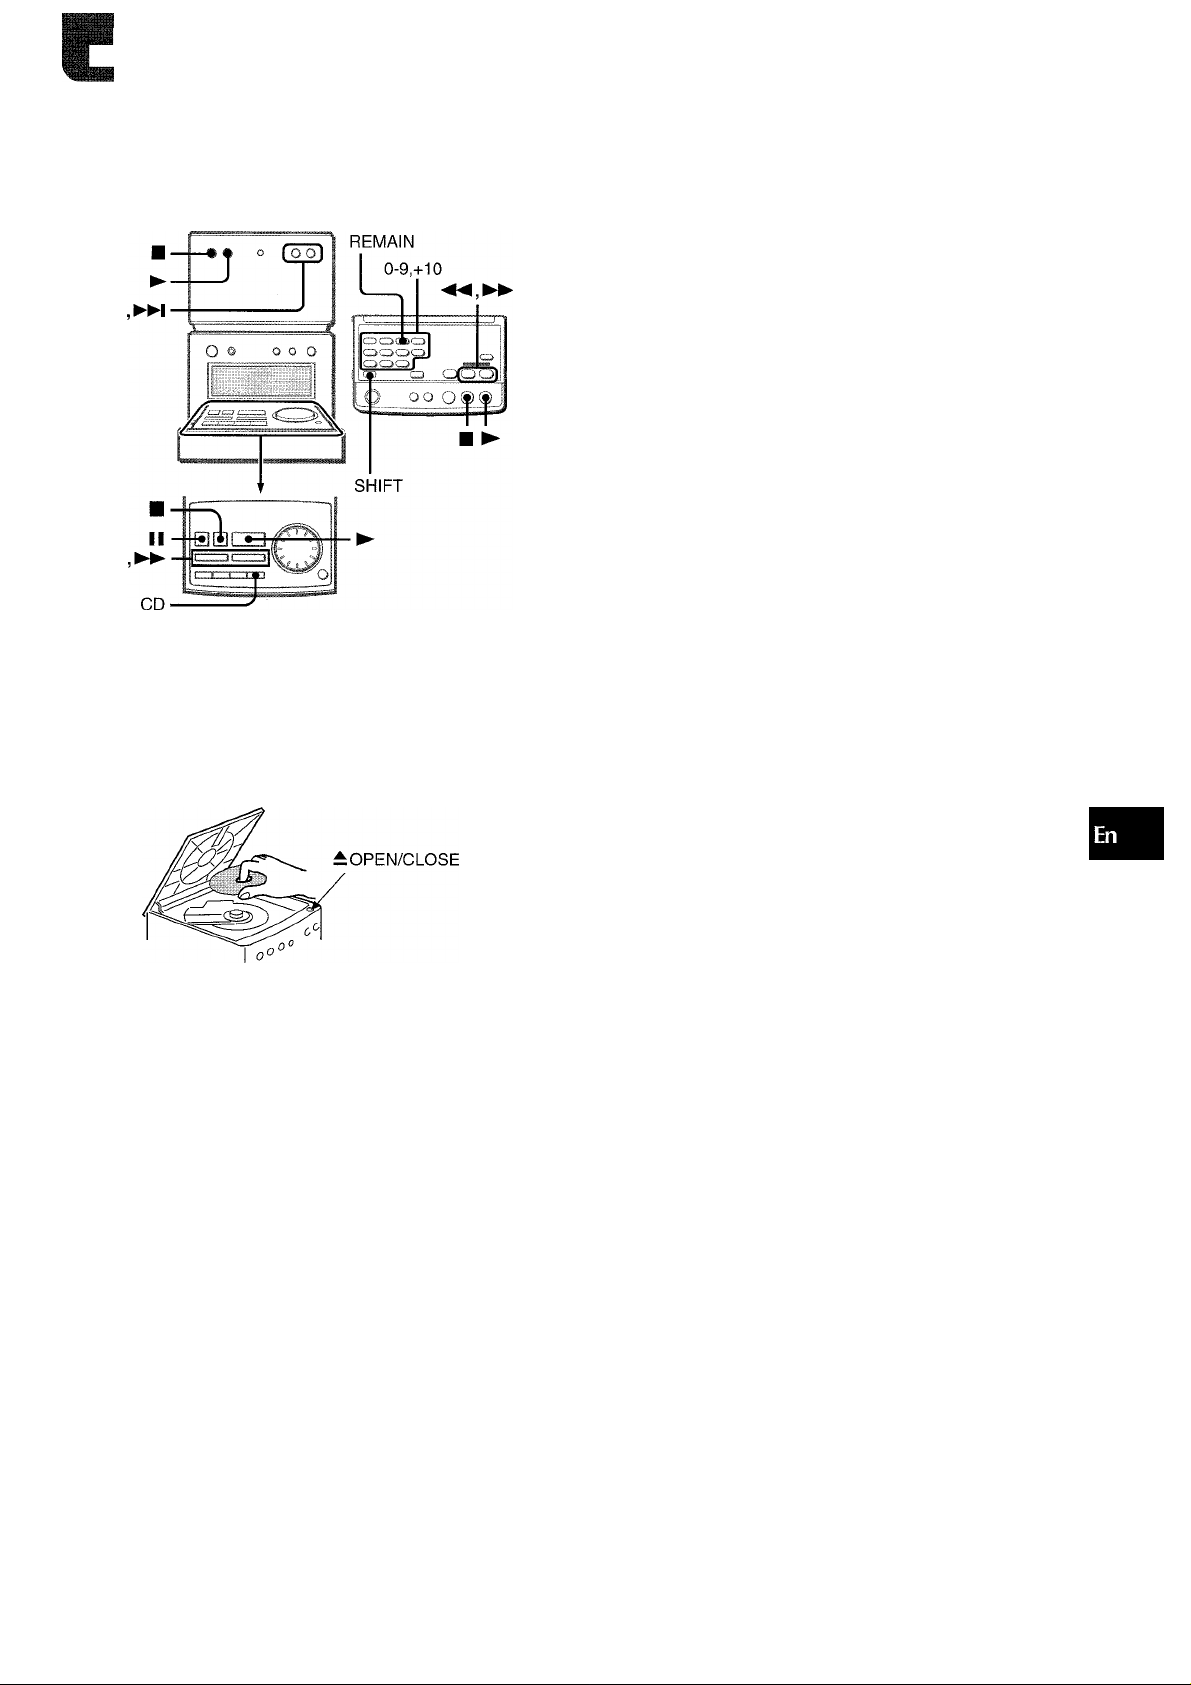
LOADING A DISC
To stop play, press the the ■ button.
To pause play, press the III button. To resume play, press again.
To search for a particular point during playback, keep the
or button (or the ◄◄ / ►► button) pressed and release
the button at the desired point.
To skip to the beginning of a track during playback, press
the or button (or the ◄◄ / ►► button) repeatedly.
The system skips forward through the tracks with the ►M button,
and skips back with the button.
To remove the disc, stop play and press the OPEN/CLOSE
button.
Other method to start play
Press the CD button on the control panel, load a disc, and then
press the ► button.
Display window in stop mode
Music calendar (only the first
16 tracks are displayed)
T
/ ///
I LI
Total number of tracks Total playing time
.„u u u u
I
> I U- I J
o
CC Q.
O O
qo
<
oc
1 Press the ± OPEN/CLOSE button to open the
disc compartment cover.
2 Load a disc with the iabel side up.
3 Press the ± OPEN/CLOSE button again to close
the disc compartment cover.
Caution
Be sure not to put your fingers in the disc compartment while
the disc compartment cover is closing.
PLAYING A DISC
Load a disc.
Press the ^ button on the front panel.
Play of the loaded CD begins with the first track immediately,
regardless of the music source currently being selected.
Eye catcher
To start play when the power is off (Direct Play
Function)
Press the ► button on the front panel. The power is turned on
and play of the loaded disc begins.
To check the remaining time
Press the REMAIN button while pressing the SHIFT button on
the remote control during play. The amount of time remaining
until all tracks finish playing is displayed. To restore the play
time display, repeat the above.
Selecting a track with the remote control
Press the numberd buttons and the +10 button to select a track.
Example:
To select the 25th track, press the +10, +10 and 5 buttons.
To select the 10th track, press the +10 and 0 buttons.
The selected track starts to play and play continues to the end
of that disc.
• Do not use irregular shape CDs (example: heart-shaped,
octagonal ones). It may result in malfunction.
• Do not load more than one compact disc in the disc
compartment.
/ T
/ / /■
Number of track Elapsed playing time
being played
The eye catcher rotates while the disc is being played.
l^l- I I
in. I I
ENGLISH 1 1
Page 12

PROGRAMMED PLAY
Up to 32 tracks can be programmed from the inserted disc.
Use the remote control.
1 Press the PRGM button while pressing the SHiFT
button in stop mode.
"PRGM" appears on the display.
RANDOM PLAY
All the tracks on the disc can be played randomly.
Press the RANDOM button while pressing the SHIFT
button on the remote control.
"RANDOM" lights up on the display.
To cancel random play, repeat the above.
NOTE
• Even if the ◄◄ button is pressed, a previously played track
cannot be skipped. The unit returns to the beginning of the
current track only.
• When you select a track with the numbered buttons on the
remote control during the random play mode, the selected track
starts to play and the random play mode is canceled.
REPEAT PLAY
A single track or all tracks can be played back repeatedly.
While pressing the SHIFT button, press the REPEAT
button repeatedly on the remote control.
lights up when single track repeat play is selected, and
"C*." lights up when all tracks repeat play is selected.
To cancel repeat play, repeat the above.
To repeat random play
First activate the random play mode by pressing the RANDOM
button while pressing the SHIFT button on the remote control.
Then press the REPEAT button while pressing the SHIFT button
so that lights up.
r Ti
L ±1
I Jl lyl I jI
UU U
2 Press the numbered buttons and the +10 button
to program a track.
Example:
To select the 12th track, press the +10 and 2 buttons.
To select the 20th track, press the +10, +10 and 0 buttons.
Selected track
number Program number
I I
I ' .I,/../
I < > \\l
9^
Total number of
selected tracks
3 Repeat step 2 to program other tracks.
4 Press the ^ button to start play.
To repeat programmed play
After programming the desired tracks, press the REPEAT button
repeatedly while pressing the SHIFT button on the remote control
so that "0+-" lights up.
Then start programmed play.
l/f
U
L. L
I. I
Total playing time of
the selected tracks
12 ENGLISH
To check the program
Each time the ►► button is pressed in stop mode, a track
number and program number will be displayed.
To clear the program
Press the ■ button in stop mode.
To add tracks to the program
Before playing, repeat step 2. The track will be programmed
after the last track.
To change the programmed tracks
Clear the program and repeat all the steps again.
During programmed play, the REMAIN, RANDOM, and
numbered buttons do not function.
Page 13

TIMER PLAY
TIMER II
SHIFT-
POWER
The unit can be turned on at a specified time every day with the
built-in timer.
Make sure the clock is set correctly. (See page 7.)
Use the remote control.
1 Press theTIMER button repeatedly while pressing
the SHIFT button on the remote control to display
©.
/ I hA I I I A I A
till I OU U
2 Within 4 seconds, press the 11 button.
The hour flashes.
/ I UA
I I I I
if you do not press the II button within 4 seconds, another
operation may start.
a
I II A I A
I CU U
5 Select the duration for the timer-activated period
with the ◄◄ or ►► button, and press the II
button.
I />//
/■■ I t
The duration for the timer-activated period can be set between
5 and 240 minutes in 5-minute steps.
I i A
n I' I
6 Prepare the source.
To listen to a CD, load the disc.
To listen to a radio broadcast, select the desired band and
tune in to a station.
To listen to the connected equipment, set the timer of the
connected source (with an external timer) and prepare it for
play.
7 Press the POWER button to turn the system off
after adjusting the volume and tone.
■ © remains on the display after the power is turned off (timer
standby mode).
7 hA I I A- I
U I
I I I
When the timer-on time is reached, the system turns on and
begins play with the selected source,
if the volume level was set to more than 25 when the power
was turned off, it is automatically set to 25 when the unit turns
on by the timer.
To check the specified time and source
Press the TIMER button while pressing the SHIFT button on the
remote control. The selected source name, the timer-on time
and the duration for the timer-activated period are displayed for
4 seconds.
I I' I. "I s
O
z
o
CJ
3 Designate the hour of the timer-on time by
pressing the ◄◄ or ►► button, and press the
II button. Repeat to designate the minute of the
timer-on time.
4 Press the ◄◄ or ►► button to select a source
for timer play, then press the II button.
To listen to a radio broadcast, select "FM" or "AM."
You can change the band later at step 6.
To listen to the equipment connected to theTAPE IN jacks,
select "TAPE."
To listen to the equipment connected to the AUX IN jacks,
select "AUX."
To cancel timer standby mode temporarily
Press the TIMER button repeatedly while pressing the SHIFT
button on the remote control so that "NO TIMER" is displayed
on the display.
To restore the timer standby mode, press again to display ®.
Using the unit whiie the timer is set
You can use the unit normally after setting the timer.
Before turning off the power, repeat step 6 to prepare the source,
and adjust the volume and tone.
NOTE
’ Timer play will not begin unless the power is turned off.
' Connected equipment cannot be turned on and off by the buiit-
in timer of this unit. Use an external timer.
ENGLISH 1 3
Page 14
SETTING THE SLEEP TIMER
SLEEP
CONNECTING OPTIONAL EQUIPMENT
■CD DIGITAL OUT
(OPTICAL)
SHIFT
The unit can be turned off automatically at a specified time.
Use the remote control.
1 Press the SLEEP button while pressing the SHiFT
button on the remote controi.
t I I I I I I ni
1 I r r I II U
2 Within 4 seconds, press the ◄◄ or ►► button
to specify the time until the power is turned off.
Each time the button is pressed, the time changes between 5
and 240 minutes in 5-minute steps.
r / /- r n
II I II
To check the time remaining until the power is turned
off
Press the SLEEP button once while pressing the SHIFT button
on the remote control. The remaining time is displayed for 4
seconds.
To cancel the sleep timer
Press the SLEEP button twice while pressing the SHIFT button
on the remote control so that "NO SLEEP" in displayed.
- Hi
I u
Specified time
■TAPE IN
■AUX IN
■LINE OUT
■SUPER
WOOFER
Refer to the operating instructions of the connected equipment
for details.
• The connecting cords are not supplied. Obtain the necessary
connecting cords.
• Consult your local Aiwa dealer for optional equipment.
TAPE IN JACKS
This system can input analog sound signals from a tape deck
through these jacks.
Use a cable with RCA phono plugs to connect a tape deck.
When using tape deck to record the sound of this system, connect
the tape deck to the LINE OUT jacks (see pege 15).
AUXIN JACKS
This system can input analog sound signals through these jacks.
Use a cable with RCA phono plugs to connect audio equipment
(turntables, LD players, VCRs, TV, etc.).
Connect the red plug to the R jack, and the white plug to the L
jack.
1 4 ENGLISH
When connecting a turntable
Use an Aiwa turntable equipped with a built-in equalizer amplifier.
CD DIGITAL OUT (OPTICAL) JACK
This system can output CD digital sound signals through this
jack. Use an optical cable to connect digital audio equipment
(digital amplifier, DAT deck, MD recorder, etc.).
Remove the dust cap @ from the CD DIGITAL OUT (OPTICAL)
jack. Then, connect an optical cable plug to the CD DIGITAL
OUT (OPTICAL) jack.
When the CD DIGITAL OUT (OPTICAL) jack is not being
used
Attach the supplied dust cap.
Page 15
LINE OUT JACKS
This system can output analog sound signals for all functions
through these jacks.
Use a cable with RCA phono plugs to connect audio equipment.
Do not connect equipment to the LINE OUT jacks and AUX IN
jacks simultaneously.
Otherwise, noise is generated and mulfunctions may occur.
SUPERWOOFER <1 JACK
Connect an optional powered sub woofer with a built-in-amplifier
to the jack.
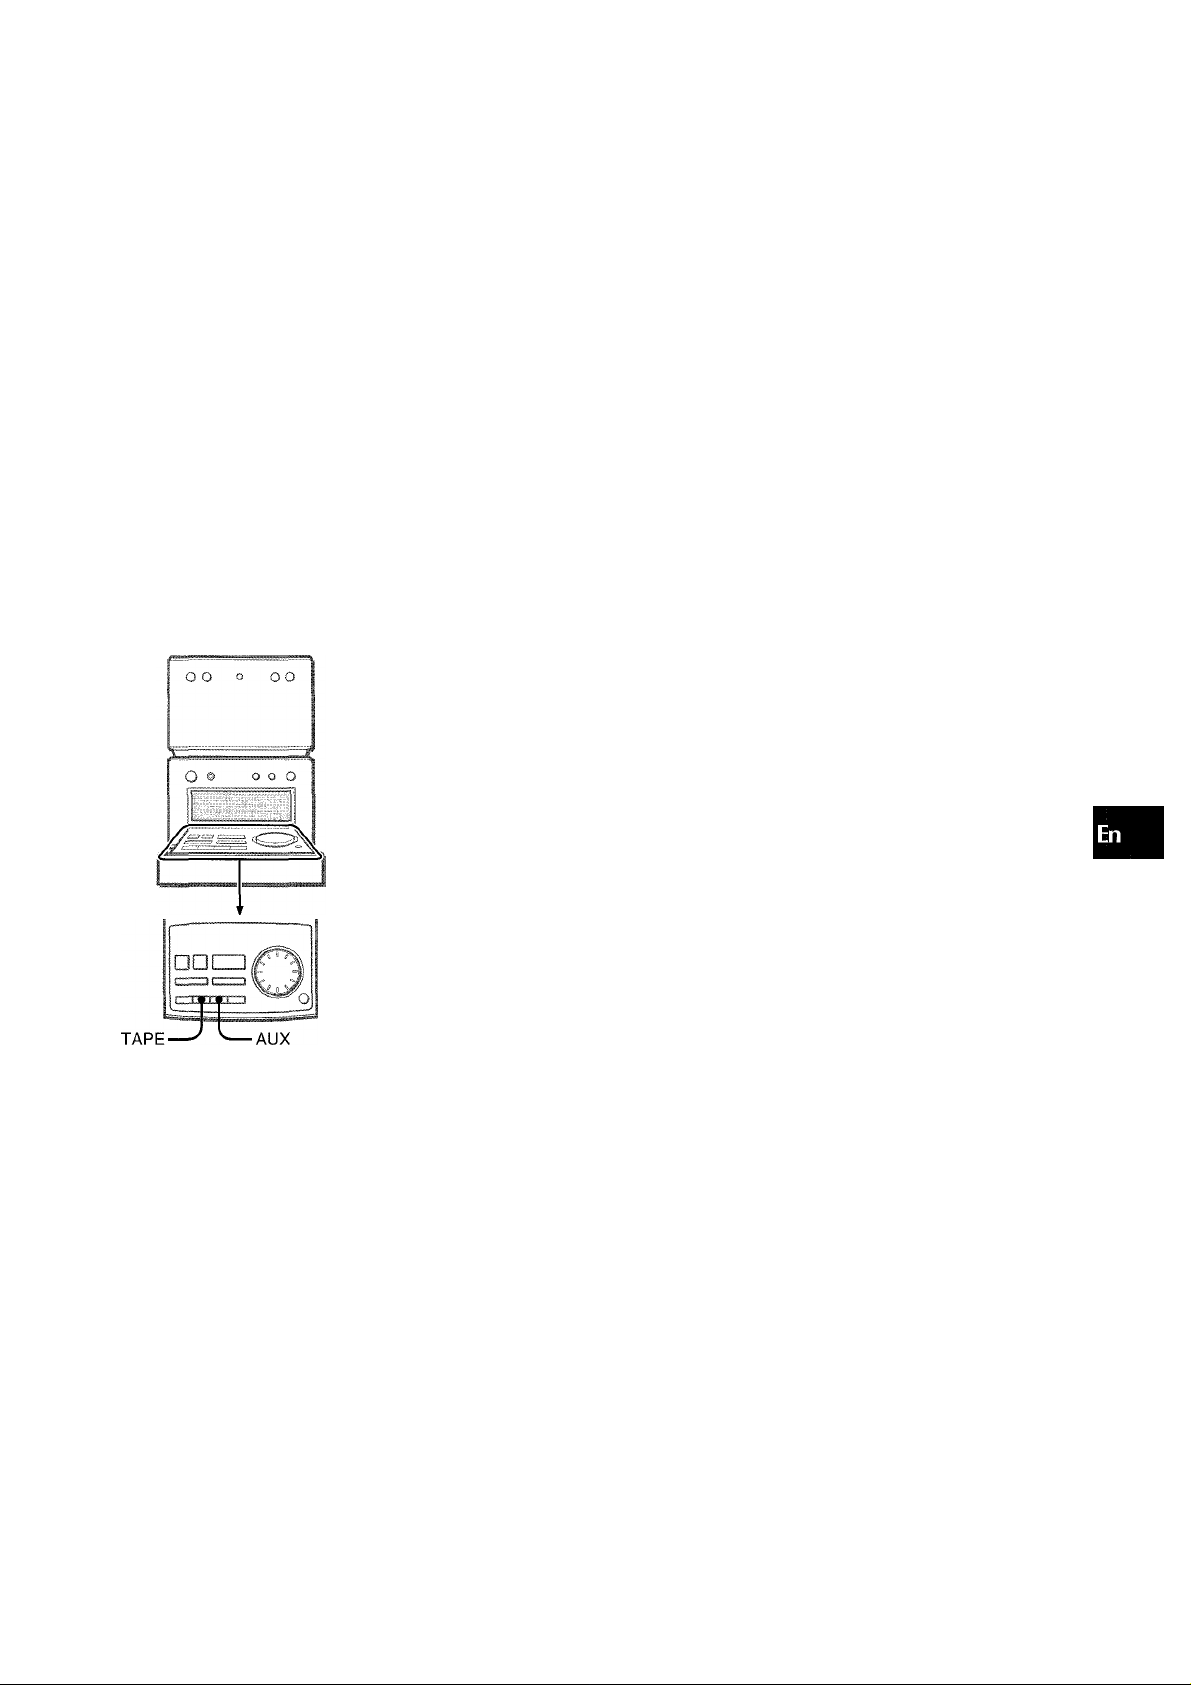
LISTENING TO EXTERNAL SOURCES
RECORDING THE SOUND USING EXTERNAL EQUIPMENT
To record the CD sound on an MD
Connect an MD recorder to the CD DIGITAL OUT (OPTICAL)
jack.
Play back the CD to be recorded and start recording on the
connected MD recorder.
To record the sound on a cassette tape
Connect a cassette deck to the LINE OUT jacks.
Play back the source to be recorded (CD or radio) and start
recording on the connected cassette deck.
aim
1-0
Ui
z
o
0
oc
m
1
TAPE/AUX
O w JL J
O 'J'J ooo
To play equipment connected to the TAPE IN jacks, press the
TAPE button on the control panel.
To play equipment connected to the AUX IN jacks, press the
AUX button on the control panel.
When using the remote control, press the TAPE/AUX button
repeatedly until “TAPE" or "AUX" is displayed.
ENGLISH 1 5
Page 16
I
CARE AND MAINTENANCE
Occasional care and maintenance of the unit and the software
are needed to optimize the performance of your unit.
To clean the cabinet
Use a soft and dry cloth.
If the surfaces are extremely dirty, use a soft cloth lightly
moistened with mild detergent solution. Do not use strong
solvents, such as alcohol, benzine or thinner as these could
damage the finish of the unit.
Care of the units
• Do not give the units a strong shock ie. drop or hit.
• Do not use the units close to a strong magnetic field such as a
television. Doing so may cause malfunctions.
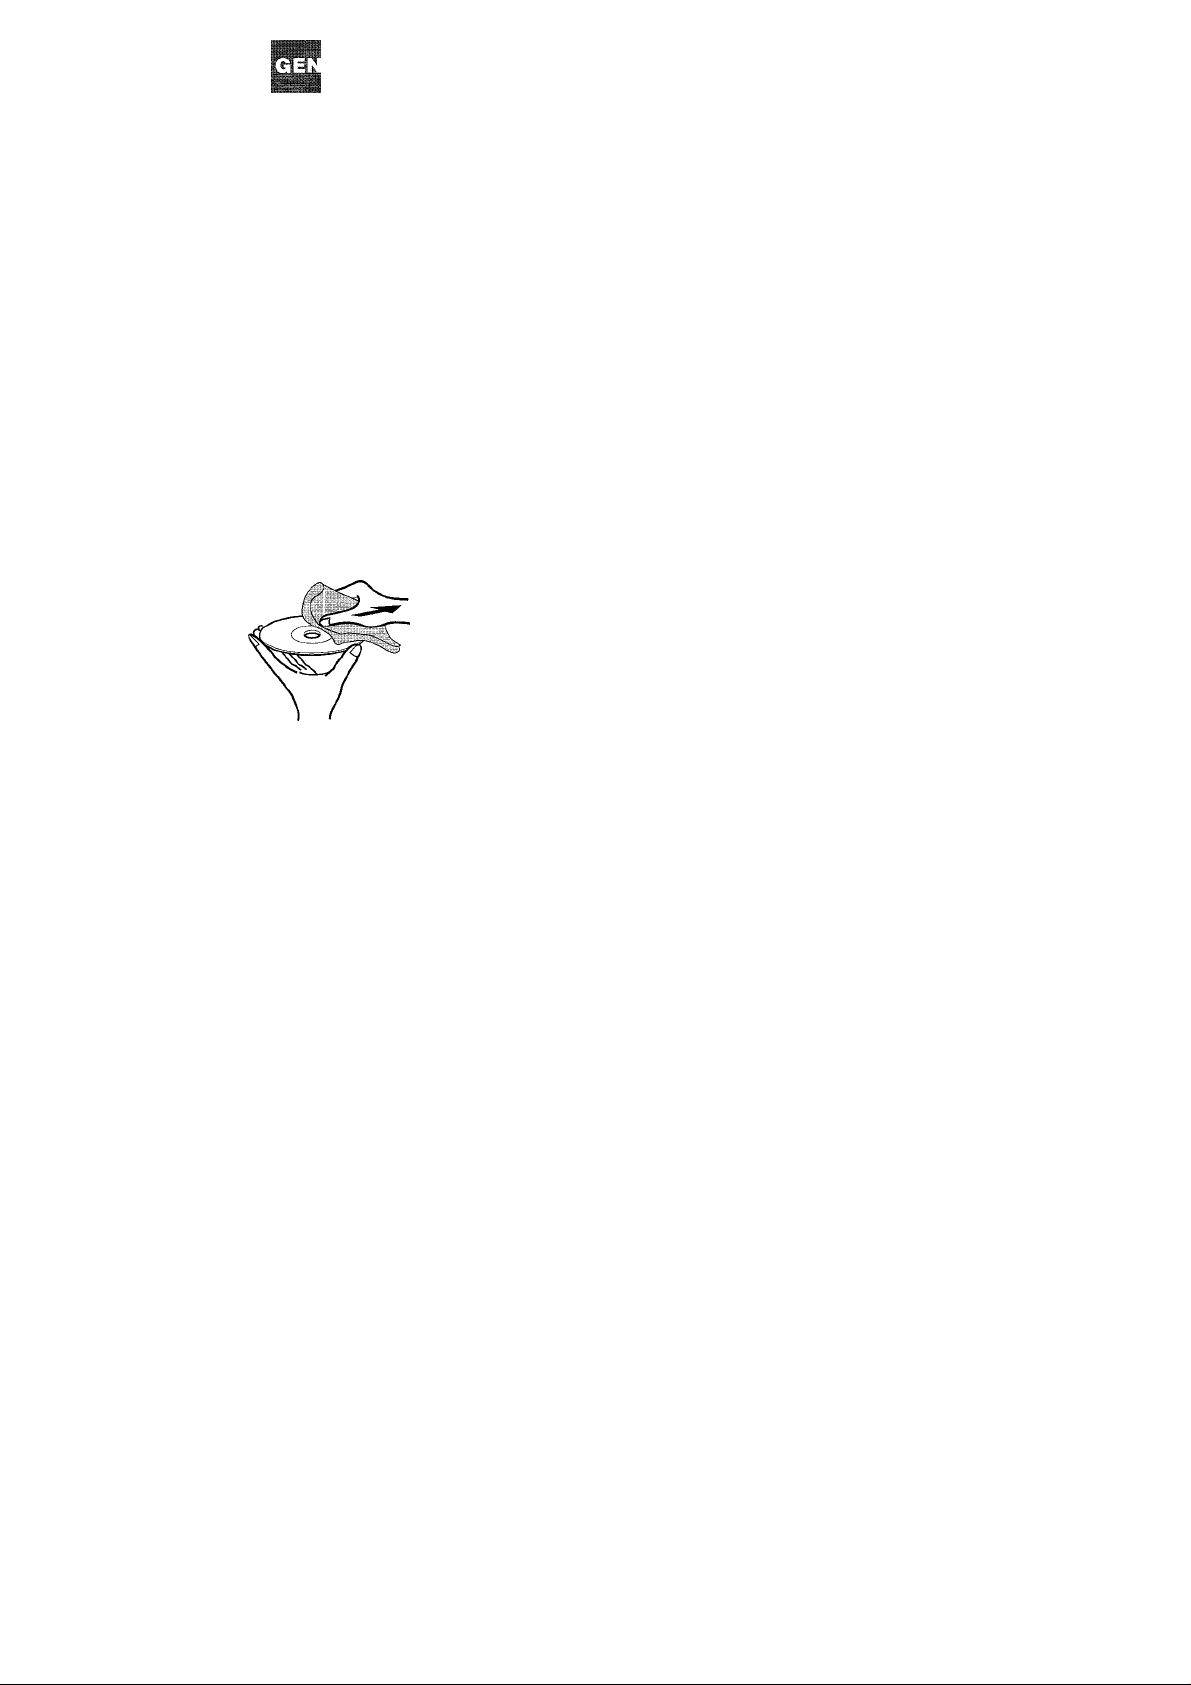
Care of CDs
• When a disc becomes dirty, wipe the disc from the center out
with a cleaning cloth.
’ After playing a disc, store the disc in its case. Do not leave the
disc in places that are hot or humid.
TROUBLESHOOTING GUIDE
If the unit fails to perform as described in these Operating
Instructions, check the following guide.
GENERAL
There is no sound.
• Is the AC cord connected properly?
• Is there a bad connection? (-» page 4)
• Was an incorrect function button pressed?
Sound is emitted from one speaker only.
• Is the other speaker disconnected?
Sound becomes inaudible suddenly.
-> The protection circuit was activated due to an internal heat
build-up. Turn off the power, make sure there is sufficient
clearance behind the ventilation openings on the rear, and
leave the system until it cools down.
An erroneous display or a malfunction occurs, or an error
message appears.
-► Reset the system as stated below.
TUNER SECTION
There is constant, wave-like static.
• Is the antenna connected properly? (-> page 5)
• Is the signal weak?
-► Connect an outdoor antenna.
The reception contains noise interferences or the sound is
distorted.
• Is the system picking up external noise or multipath distortion?
-► Change the orientation of the antenna.
Move the system away from other electrical appliances.
CD PLAYER SECTION The CD player does not play.
• Is the disc correctly inserted? (-► page 11)
• Is the disc dirty? (-► page 16)
• Is the lens affected by condensation?
-* Wait approximately one hour and try again.
To reset
If an unusual condition occurs in the display window, reset the
system as follows.
1 Press the POWER button to turn off the power.
2 Press the POWER button to turn the power back on while
pressing the ■ button. Everything stored in memory after
purchase is canceled.
If the power cannot be turned off in step 1 because of a
malfunction, reset by disconnecting the AC cord and repeat step
2.
1 6 ENGLISH
Page 17

SPECIFICATIONS
MAIN UNITS FM tuner section
Tuning range
Usable sensitivity (IMF)
Antenna terminals
AM tuner section
Tuning range
Usable sensitivity
Antenna
Amplifier section
Power output
Total harmonic distortion
Inputs
Outputs
87.5 MHz to 108 MHz
13.2 dBf
75 ohms (unbalanced)
530 kHz to 1710 kHz (10 kHz
step)
531 kHz to 1602 kHz (9 kHz step)
350 pV/m
Loop antenna
16 watts per channel, Min.
RMS at 8 ohms, from 60 Hz to
20 kHz, with no more than 1%
Total Harmonic Distortion
0.1 % (10 W, 1 kHz, 8 ohms, DIN
AUDIO)
TAPE IN: 500 mV
AUX IN: 500 mV
SUPER WOOFER: 1.7 V
SPEAKERS: accept speakers of
8 ohms or more
LINE OUT: 340 mV
PHONES (stereo minijack):
accepts headphones of 32 ohms
or more
BUU SYSTEM
The word "BBE" and the "BBE symbol" are trademarks of BBE
Sound, Inc.
Under license from BBE sound, Inc.
COPYRIGHT
Please check the laws on copyright relating to recordings from
discs, radio or external tape for the country in which the machine
is being used.
NOTE
This equipment has been tested and found to comply with the
limits for a Class B digital device, pursuant to Part 15 of the FCC
Rules. These limits are designed to provide reasonable
protection against harmful interference in a residential Installation.
This equipment generates, uses, and can radiate radio frequency
energy and, if not installed and used in accordance with the
instructions, may cause harmful Interference to radio
communications. However, there is no guarantee that
interference will not occur in a particular installation. If this
equipment does cause harmful interference to radio or television
reception, which can be determined by turning the equipment
off and on, the user is encouraged to try to correct the interference
by one or more of the following measures:
- Reorient or relocate the receiving antenna.
- Increase the separation between the equipment and
receiver.
- Connect the equipment into an outlet on circuit different from
that to which the receiver is connected.
- Consult the dealer or an experienced radlo/TV technician
for help.
<
tr.
Ш
z
Ш
(5
Compact disc player section
Laser
D-A converter
Slgnal-to-nolse ratio
Harmonic distortion
Wow and flutter
SPEAKER SYSTEM
Cabinet type
Speakers
Impedance
Output sound pressure level
Dimensions (W x H x D)
Weight
General
Power requirements
Power consumption
Dimensions
(W X H X D)
Weight
Semiconductor laser {X = 780 nm)
1 bit dual
85 dB (1 kHz, 0 dB)
0.05 % (1 kHz, 0 dB)
Unmeasurable
2 way, bass reflex (magnetic
shielded type)
Main speaker:
100 mm (4 Inches) cone type
Cardloid Speaker:
60 mm (2 % inches) cone type
8 ohms
87 dB/W/m
144 X 202 X 185 mm
(5 W X 8 X 7 Vb inches)
1.8 kg (3 lb. 15 oz)
120 VAC, 60 Hz
40 W
CD player unit
144 X 101.5 X 176.1 mm
(5 W X 4 X 7 Inches)
Tuner/ampllfler unit
144 X 101.5 X 208 mm
(5 W X 4 X 8 '/4 inches)
CD player unit
0.88 kg (1 lb. 15oz)
Tuner/amplifier unit
2.4 kg (5 lb. 5 oz)
CAUTION
Modifications or adjustments to this product, which are not
expressly approved by the manufacturer, may void the user’s
right or authority to operate this product.
Specifications and external appearance are subject to change
without notice.
ENGLISH 1 7
Page 18

PARTS INDEX
Instructions about each part on the main unit or remote control
are indicated on the pages shown below.
± OPEN/CLOSE (11)
¡◄◄.►►ISKIP (9,10,11)
DEMO (5)
TUNER/BAND (9,10)
CONTROL OPEN/CLOSE (6)
RANDOM (12)
REPEAT (12)
0-9,+10(10,11,12)
MODE TUNER (9)
SHIFT (7)
GEO (8)
POWER (7)
VOLUME (8)
REMAIN (11)
PRGM (12)
VOLUME (8)
SOUND MODE (8)
r
TIMER (13)
SLEEP (14)
y_^CLOCK (7)
TAPE/AUX (15)
►/TUNING DOWN/UP
(7,9,10,11,13,14)
IISET (7,10,13)
►PLAY(11,12)
■ STOP (10,11,12)
TUNER/BAND (9)
1 8 ENGLISH
Page 19

‘Pnùtcifde
Sfoeaâeft Sefûtem
Aiwa’s Front 180’ Speaker System provides excellent sound
balance for true stereo reproduction from any listening angle.
In stereo sound reproductions systems up to now, the listening
area where the optimal stereo effect is obtained has been
extremely narrow. This is due to the following reasons.
As shown in Figure 2, a conventional stereo system has speakers
on the front panel of the speaker system, pointing forward. It is
designed for listening in a location directly in front of the front
speaker panel.
In this case, as shown in Figure 2, a listener at point located
on the center line between the right and left speakers, hears the
voice of a singer coming from the center front. Instrumental
sounds are distributed evenly between both speakers for an
optimal stereo effect.
At point ®, however, located off fhe center line between the
speakers, the distance from the left speaker to the listener is
greater than the distance from the right speaker. Sound from
the left speaker appears to be faint, and sound from the right
speaker appears to be loud. Sound is perceived as coming from
the speaker with the greater volume, so that the singer’s voice
appears to shift toward the right speaker. The normally balanced
instrumental sounds also appear to come primarily from the right
speaker.
Moreover, since the directivity of speakers increases with higher
frequencies, high-frequency sounds from the left speaker
become even harder to hear, increasing the impression of
imbalance. For these reasons, the listening area which provides
even sound balance and the optimal stereo effect is limited to
the narrow area shown in Figure 2-@.
Figure 1 Front 180° speaker system
Figure 2 Stereo effect with a conventional speaker
system
Main unit
Left
speaker
■ Right
speaker
<
cc
lU
z
UJ
o
To solve this problem, Aiwa has developed unidirectional
speakers for this new speaker system featuring cardioid directivity
for frequencies of 1 kFIz or less. These speakers are pointed
inward at angles of 45° (see Figure 1). Driven by left and right
stereo sound signals, these speakers act to increase the width
of the optimum listening area (see Figure 3). Because of their
cardioid directivity and the 45° angle of their main speaker axis,
they provide enhanced sound reproduction at point ® in Figure
3. The left speaker is pointed toward the listener, and the right
speaker is pointed away from the listener, so that the directivity
of the speakers compensates for the differences in perceived
volume caused by the differences in disfance to the listener.
Therefore, the sound of a singer’s voice is perceived as coming
from a point midway between the speakers, and instrumental
sounds are distributed evenly.
@ Center listening point: Balanced sound heard from left
and right speakers
® Off-center listening point: Right speaker sounds louder than
Sound pressure level
|: Stereo listening area
left speaker
Figure 3 Stereo effect with Aiwa Front 180°
speaker system
True stereo sound can be heard at point ® as well as point @.
Main unit
Left
speaker
Right
speaker
Sound pressure level
: Stereo listening area of new speakers
ENGLISH 1 9
Page 20

I
PREPARACIONE
ADVERTENCIA
PARA REDUCIR EL RIESGO DE INCENDIOS O
DESCARGAS ELÉCTRICAS, NO EXPONGA ESTE
APARATO A LA LLUVIA NI A LA HUMEDAD.
CAUTION
RISK OF ELECTRIC SHOCK
DO NOT OPEN
“CAUTION:TO REDUCE THE RISK OF
ELECTRIC SHOCK,
DO NOT REMOVE COVER (OR BACK).
NO USER-SERVICEABLE PARTS INSIDE.
REFER SERVICING TO QUALIFIED
SERVICE PERSONNEL.”
Explicación de los símbolos gráficos:
El símbolo del rayo con punta de flecha dentro de
un triángulo equilátero tiene como fin alertar al
usuario de la presencia de un “voltaje peligroso”
sin aislar en el interior de la estructura de la
unidad y que puede tener la magnitud suficiente
como para constituir un riesgo de descarga
eléctrica para las personas.
El signo de exclamación situado en el interior de
un triángulo equilátero tiene como fin alertar al
usuario de la presencia de instrucciones de
operación y mantenimiento (servicio) importantes
en la documentación que acompaña al aparato.
PRECAUCIONES
Lea cuidadosamente y en su enteridad el Manual de Instrucciones
antes de utilizar la unidad. Asegúrese de guardar el Manual de
Instrucciones para utilizarlo como referencia en el futuro. Deberán
cumplirse estrictamente todas las advertencias y precauciones del
Manual de Instrucciones y de la unidad, así como las sugerencias de
seguridad mencionadas a continuación.
Instalación
1 Agua y humedad — No utilice esta unidad cerca del agua, como
al lado de una bañera, lavabo, una piscina, o similar.
2 Calor—No utilice esta unidad cerca de fuentes de calor, incluyendo
salidas de aire caliente, estufas u otros aparatos que generen
calor. Tampoco deberá someterse a temperaturas inferiores a 5°C
ni superiores a 35°C.
3 Superficie de montaje — Sitúe la unidad sobre una superficie
plana y nivelada.
4 Ventilación — La unidad deberá situarse en un lugar en el cual
exista suficiente holgura a su alrededor para poder garantizar una
ventilación adecuada. Deje una holgura de 10 cm desde la parte
posterior y superior de la unidad y 5 cm desde cada lado a cualquier
otro objeto.
- No ponga la unidad sobre una cama, una alfombra o superficies
similares que puedan obstruir las aberturas de ventilación.
- No instale la unidad en una librería, mueble o estantería cerrada
herméticamente donde la ventilación no sea la adecuada.
5 Entrada de objetos y líquidos — Tenga cuidado de que objetos
y líquidos no entren en la unidad a través de las aberturas de
ventilación.
6 Estantes fijos y con ruedas — Cuando
coloque o monte la unidad en un estante fijo o
con ruedas, tenga mucho cuidado al moverla
a otro lugar.
Las paradas repentinas, la fuerza excesiva y
las superficies irregulares pueden hacer que
la unidad o el estante con ruedas dé vuelta o
se caiga.
ESPAÑOL
7 Condensación — Puede formarse condensación en la lente del
fonocaptor del reproductor de discos compactos cuando:
- La unidad pase de un lugar frío a uno caliente.
- El sistema de calefacción se acabe de encender.
- La unidad se utilice en una habitación muy húmeda.
- La unidad se enfríe mediante aire acondicionado.
Esta unidad puede no funcionar debidamente cuando se forme
condensación en su interior. En este caso, deje en reposo la unidad
unas pocas horas y repita de nuevo la operación.
8 Montaje en pared o techo — No ha de montarse la unidad en una
pared ni en el techo, a menos que se especifique lo contrario en el
Manual de Instrucciones.
Energía Eléctrica
1 Fuentes de alimentación—Conecte solamente esta unidad a las
fuentes de alimentación especificadas en el Manual de Instrucciones
y como está marcado en la unidad.
2 Polaridad —Comomedidadeseguridad,algunasunidadesestán
equipadas con enchufes de alimentación de CA que únicamente
pueden ser insertados de una forma en la toma de corriente. Si es
difícil o imposible insertar el enchufe CA en la toma, dé la vuelta al
enchufe e inténtelo de nuevo. Si aún no resulta posible insertarlo
en la toma, le rogamos que se dirija a un técnico de sen/icio
cualificado para que inspeccione o cambie la toma. Para evitar
obviar la función de seguridad del enchufe polarizado, no lo fuerce
hacia el interior de la toma.
3 Cable de alimentación de CA
- Cuando desconecte el cable de alimentación, tire del enchufe. No
tire del propio cable.
- Nunca manipule el enchufe con las manos mojadas ya que
podría producirse un incendio o una descarga eléctrica.
- Los cables de alimentación deberán colocarse de forma que no
queden muy doblados, prensados y que nadie pueda pisarlos.
Preste especial atención al cable que va de la unidad a la toma
de corriente.
- Evite sobrecargar los enchufes de CA y los cables de extensión
más allá de su capacidad porque esto podría causar un incendio
o una descarga eléctrica.
4 Cable de extensión — Para evitar una descarga eléctrica, no
utilice un enchufe polarizado de CA con un cable de extensión,
receptáculo u otra toma de corriente a menos que el enchufe
polarizado pueda ser completamente insertado para prevenir la
exposición de las clavijas del enchufe.
5 Periodos de no uti iización—Desconecte el cable de alimentación
de CA o el cable de batería del automóvil si la unidad no va a ser
utilizada durante varios meses o más. Cuando el cable de
alimentación esté conectado, por la unidad continuará circulando
una pequeña cantidad de corriente, aunque la alimentación esté
desconectada.
Antena Exterior
1 Líneas de alimentación — Cuando conecte una antena exterior,
asegúrese de que está ubicada lejos de otros cables de alimentación.
2 Toma a tierra de la antena exterior — Asegúrese de que el
sistema de la antena tenga una correcta toma a tierra para ofrecer
protección contra inesperadas sacudidas de tensión descargas de
voltaje inesperadas o acumulación de electricidad estática. El
artículo 810 del National Electrical Code, ANSI-NFPA70, provee
información sobre la forma adecuada de realizar una toma a tierra
del poste, de la estructura de soporte y del cable conductor a la
unidad de descarga de la antena, así como sobre el tamaño de la
unidad de la toma a tierra, conexiones a las terminales de la toma
a tierra y requisitos de las terminales de la toma a tierra.
Puesta a tierra de la antena según el Codigo Eléctrico Nacional
CABLE DE BAJADA
DE LA ANTENA
UNIDAD DE DESCARGA
DE LA ANTENA
(NEC,SECCION 810-20)
CONDUCTORES DE
PUESTA A TIERRA
(NEC,SECCION 810-21)
ABRAZADERAS DE
PUESTA A TIERRA
SISTEMA DE ELECTRODO DE PUESTA
A TIERRA DEL SERVICIO ELECTRICO
NEC(CODIGO ELECTRICO NACIONAL)
(NEC,ARTICULO 250,PARTE H)
Page 21

Mantenimiento
Limpie la unidad sólo como se recomienda en el Manual de
Instrucciones.
Paños que necesitan ser reparados
Solicite que un técnico cualificado en reparaciones realice
servicio en las unidades si:
- El cable de alimentación de CA o su enchufe están
estropeados.
- Objetos extraños o líquido han entrado en la unidad.
- La unidad ha estado expuesta a la lluvia o al agua.
- La unidad no parece funcionar normalmente.
- La unidad muestra un cambio considerable en su
funcionamiento.
- La unidad se ha caído o la caja se ha estropeado.
NO TRATE DE REPARAR LA UNIDAD USTED MISMO.
INDICE
PREPARACIONES
PRECAUCIONES..................................................................2 ^
CONEXIONES.......................................................................4 O
ANTES DE LA OPERACIÓN
AJUSTE DEL RELOJ
SONIDO
RECEPCIÓN DE RADIO
___________________________________________
AJUSTE DEL SONIDO
SINTONIZACIÓN MANUAL...............................................9
PREAJUSTE DE EMISORAS..........................................10
__________________________________
................................................
...........................................................
.........................................................
______________________________
^
6 ü
7 <
^
8 £
^temíettcdo^ ai Státema
Enhorabuena por haber adquirido un sistema estéreo Aiwa.
Para optimizar la función de este sistema, por favor tómese el
tiempo para leer estas Manual de Instrucciones y familiarícese
con los procedimientos de operación.
Verifique su sistema y los accesorios
Unidad reproductora de
discos compactos Altavoces (l,D)
Unidad de radio/
amplificador Mando a distancia
REPRODUCCIÓN DE DISCO COMPACTO
OPERACIÓN....................................................................11
TEMPORIZADOR____________________________________
REPRODUCCIÓN CON EL TEMPORIZADOR
CONFIGURACIÓN DEL TEMPORIZADOR
DE APAGADO............................................................14
OTRAS CONEXIONES
CONEXIÓN DE EQUIPO OPCIONAL
ESCUCHAR FUENTES EXTERNAS...............................15
GRABACIÓN DE SONIDO UTILIZANDO
EQUIPO EXTERNO
GENERAL
CUIDADOS Y MANTENIMIENTO....................................16
SOLUCIÓN A PEQUEÑOS PROBLEMAS......................16
ESPECIFICACIONES..
ÍNDICE DE LAS PARTES................................................18
PRINCIPIOS DEL SISTEMA DE ALTAVOCES
_________________________________________
FRONTALES DE 180° DE AIWA...............................19
_______________________________
...................................................
....................................................
_______________
...............
.............................
13
14
15
17
Antena AM
Manual de Instrucciones, etc.
Registro del propietario
Para su conveniencia, anote el número del modelo y de serie (los
encontrará en la parte trasera del aparato) en el espacio propuesto
más abajo. Por favor refiérase a ellos cuando contacte con su
distribuidor Aiwa en caso de alguna dificultad.
№ Modelo
XR-M70U
№ de Serie (№ de Lote)
Antena FM
ESPAÑOL 3
Page 22

CONEXIONES
Antes de conectar el cable de alimentación de CA
La tensión nominal de su unidad, indicada en el panel posterior,
es de 120 V CA. Compruebe que esta tensión coincide con la
de ia red local.
IMPORTANTE
• Conecte primero los altavoces, antenas y todos los demás
equipos opcionales. Luego conecte el cable de alimentación
de CA al final.
• No existen diferencias entre los altavoces frontales. Ambos
altavoces pueden ser conectados como L (izquierdo) o R
(derecho).
1 Coloque la unidad reproductora de discos
compactos sobre la unidad radio/amplificador y
conecte el conector del cable plano como se
indica en la ilustración.
Observe que el conector puede enchufarse sólo en una
dirección con el cable plano mirando a la derecha.
2 Conecte los cables de altavoz a la unidad de
radio/amplificador.
El cable del altavoz derecho debe conectarse a la toma "R" y
el cable del altavoz izquierdo a la toma “L".
Después de enchufar el conector, deje una separación adecuada entre el cable plano y las aberturas de ventilación.
Page 23

3 Conecte las antenas suministradas.
Conecte la antena de FM a las terminales de FM de 75 y la
antena de AM a las terminales de AM LOOP.
4 Conecte el cable de CA a una toma de CA.
Cuando se conecta el cable de CA por primera vez la pantalla
demuestra las funciones del sistema. Cuando se activa la
alimentación, la visuaiización de la demostración deja paso a la
visualización de la operación. Cuando se desconecta la
alimentación, se restaura el modo de demostración.
Para cancelar la demostración
Pulse el botón DEMO.
Para activarla, pulse de nuevo el botón DEMO.
Para poner la antena de AM sobre una superficie
Fije el gancho en la ranura.
COLOCAR LAS DOS UNIDADES UNA AL LADO DE OTRA
También puede colocar las unidades del reproductor de discos
compactos y de radio/amplificador una al lado de la otra. Usted
elige.
En este caso, cerciórese de que el cable no obstruye las
aberturas de ventilación, como se muestra más adelante.
Deje siempre una separación adecuada entre el cable plano y
las aberturas de ventilación.
Para obtener la mejor recepción de FM se recomienda utilizar
una antena exterior.
Conecte la antena exterior a las terminales FM de 75 Q..
(/)
UJ
z
g
cr
2
LU
OC
Q.
Para posicionar las antenas
Antena de entrada de señal de FM;
Extienda esta antena hohzontalmente en forma de T y fije los
extremos a la pared.
Antena de cuadro de AM:
Colóqueia de forma que encuentre la mejor dirección.
,
• No conecte altavoces a la unidad distintos a los que se han
suministrado.
• No deje objetos que generen magnetismo cerca de los
altavoces.
• No ponga la antena de FM cerca de objetos metálicos o rieles
de cortinas.
• No ponga la antena de AM cerca de otros equipos opcionales,
el propio sistema estéreo, el cable de alimentación de CA o
los cables de los altavoces, ya que se captarán ruidos.
• No desbobine el cable de la antena de AM.
Para conectar otro equipo opcional -► página 14.
ESPAÑOL 5
Page 24

ANTES DE LA OPERACION
Sensor
remoto
uso DEL PANEL DE CONTROL
CDOOC3
PHONES
POWER
TUNER/
BAND
Para encender la unidad
Pulse el botón POWER.
Al pulsar el botón ► o el botón TUNER/BAND se enciende el
aparato y comienza la reproducción de la fuente correspondiente
(Función de Reproducción Directa).
Además realizar una eyección en el panel de control (véase la
columna derecha) mientras el aparato está apagado también lo
enciende.
Después del uso
Pulse el botón POWER para desconectar la alimentación. La
pantalla pasará a ser la del reloj.
Uso de los auriculares
Conecte los auriculares a la toma PHONES con un miniconector
estéreo (03,5 mm).
Mientras los auriculares estén conectados no saldrá sonido de
los altavoces.
OOOO „
CDCDO —
oo ooo
POWER
C3 OQQ
■ CONTROL
OPEN/CLOSE
Panel de control
Para expulsar el panel de control
Pulse el botón CONTROL OPEN/CLOSE cuando la alimentación
esté activada o desactivada. El panel de control saldrá
expulsado.
Para cerrar el panel de control, pulse el botón otra vez.
Botones del panel de control
Botones de control
Los botones de función seleccionan la fuente a reproducir.
Los botones de control le permiten controlar la reproducción de
un disco compacto y sintonizar con la emisora de radio deseada.
También existe un botón y un control en el panel de control que
se utilizan para realizar ajustes al nivel del volumen y la calidad
del sonido y ajustarlos a sus preferencias.
NOTA
El botón ► de la unidad reproductora de discos compactos inicia
inmediatamente la reproducción del CD; es decir, pulsando el
botón comienza la reproducción sin importar qué fuente esté
seleccionada en ese momento.
6 ESPAÑOL
Page 25

uso DEL MANDO A DISTANCIA
Inserción de pilas
Quite la tapa de las pilas, ubicada en la parte trasera del mando
a distancia, e inserte dos pilas de tamaño R03 (tamaño AAA).
Cuándo reemplazar las pilas
La distancia máxima de operación entre el mando a distancia y
el sensor de la unidad reproductora de discos compactos debería
ser de 5 metros aproximadamente. Cuando disminuya esta
distancia, reemplace las pilas por otras nuevas.
Cómo abrir y cerrar la tapa superior
AJUSTE DEL RELOJ
SHIFT
CLOCK
in
POWER
Ì' Ì t I
I I ) ílDiQQÍ
® o o o ® o
POWER
1 Pulse el botón POWER para conectar la
alimentación.
2 Puise el botón CLOCK mientras puisa el botón
SHIFT del mando a distancia.
.......
U)
LU
z
o
u
<
cc
s
lU
oc
Q.
Utilización del mando a distancia
Algunas operaciones sólo pueden llevarse a cabo utilizando sólo
los botones del mando a distancia, mientras que otras pueden
realizarse utilizando los botones de las dos unidades principales
así como los del mando a distancia.
Este manual de instrucciones describe claramente los botones
disponibles para cada operación.
• SI la unidad no va a utilizarse durante un largo periodo de
tiempo, extraiga las pilas para evitar una posible fuga
electrolítica.
• El mando a distancia puede no funcionar correctamente cuando:
- La línea de visión entre el mando a distancia y el sensor
remoto (vea la ilustración de la página anterior) sea expuesta
a una luz intensa como la luz directa del sol.
- Otros mandos a distancia (de un televisor, etc.) estén siendo
utilizados cerca de esta unidad.
SHIFT
Uso del botón SHIFT
Los botones ® tienen dos funciones distintas. Una de las
funciones esfá indicada en el botón mismo y la otra en la placa
que hay sobre el botón.
Para usar la función del botón, simplemente púlselo.
Para usar la función de la placa que hay sobre el botón, pulse el
botón al mismo tiempo que pulsa el botón SHIFT.
3 Antes de que transcurran 4 segundos, pulse el
botón
La hora parpadeará.
Para cambiar al estándar de 24 horas, pulse el botón ■.
nuevo el botón ■.
II.
I I
I II >1 m
I L -U U
u /.w
Para volver a restaurar el estándar de 12 horas, pulse de
4 Pulse el botón ◄◄ o ►► para designar la hora.
5 Pulse el botón
La hora deja de parpadear y el minutero comienza a
parpadear.
II
para establecer la hora.
6 Pulse el botón ◄◄ o ►► para designar el minuto.
7 Puise el botón
II
para establecer los minutos y
completar el ajuste de hora.
Ei minutero deja de parpadear en ia pantaiia y ei reloj
comienza desde 00 segundos.
Para visualizar la hora actual
Puise ei botón CLOCK mientras pulsa el botón SHIFT del mando
a distancia. La hora se muestra durante 4 segundos.
Si la pantalla del reloj parpadea mientras la alimentación está desconectada
Esto se debe a una interrupción en ei suministro de alimentación.
Deberá resetearse la hora actual.
Si ia alimentación se interrumpe durante más de unas 12 horas,
deberán resetearse todos los ajustes almacenados en la
memoria después de haber adquirido ia unidad.
ESPAÑOL 1
Page 26

íC,-:*-:-
¡Шф
J
AJUSTE DEL SONIDO
GEQ
■ЗЭСЗОС Э
оооф
ОСЛО
CD SÉO ООО
^ O O O
VOLUME
VOLUME
SOUND MODE
AJUSTE DEL VOLUMEN
Gire el dial selector VOLUME del panel de control, o pulse los botones de VOLUME del mando a distancia.
El nivel del volumen será mostrado en la pantalla durante 4
segundos. Puede establecerse desde MIN (mínimo) a 49, y
después a MAX (máximo).
El volumen permanecerá en la memoria aún cuando la unidad
sea apagada. Sin embargo, si se apaga la unidad habiendo
establecido el volumen en más de 25, cuando encienda la unidad
de nuevo se ajustará automáticamente a 25.
CD
NOTA
Los sonidos de baja frecuencia pueden distorsionarse cuando
se usa el sistema T-BASS para un disco en el cual el sonido de
baja frecuencia original esté realzado. En este caso, cancele el
sistema T-BASS.
EQ (ECUALIZADOR)
Esta unidad ofrece ios tres tipos distintos siguientes.
ROCK: Sonido potente que realza los agudos y los graves.
POP: Más presencia de voces y en la gama de registro medio.
JAZZ: Frecuencias inferiores acentuadas para música tipo jazz.
Pulse el botón SOUND MODE repetidamente hasta que
aparezca "EQ OFF" en la pantalla, después, gire control
VOLUME hacia derecha o izquierda para seleccionar uno de
los tres niveles, o la posición desactivada, antes de 4 segundos.
U I I I
I ' и L
Al utilizar el mando a distancia, pulse el botón GEQ repetidamente.
AJUSTE DEL SONIDO DURANTE LA
GRABACIÓN
REALZAR SONIDOS AGUDOS
El sistema BBE mejora la claridad del sonido de altas
frecuencias. Pulse el botón SOUND MODE repetidamente
hasta que aparezca "BBE" en la pantalla. Después, gire control
VOLUME hacia derecha o izquierda para seleccionar uno de
los tres niveles, o la posición desactivada, antes de 4 segundos.
(OFF)
[m1 ^:jí[bbe III inj;
Т/ Ti Г
jTi II O
r[BBE
............
ÍL-L......<JJ
..................................
IHj
REALZAR SONIDOS GRAVES
El sistema T-BASS mejora el realismo del sonido de bajas
frecuencias.
Pulse el botón SOUND MODE repetidamente hasta que
aparezca "T-BASS" en la pantalla. Después, gire control
VOLUME hacia derecha o izquierda para seleccionar uno de
los tres niveles, o la posición desactivada, en 4 segundos.
(OFF)
(TbÂSS ^ ^ [FBASS ^ ^ J (i±: [T^BASS .
mi]
La salida de volumen y tono de los altavoces o auriculares puede
variarse libremente sin afectar al nivel de la grabación.
CÓMO AUMENTAR LA AMPLITUD DEL ÁREA ÓPTIMA DE AUDICIÓN
Gire los altavoces cardioides del sistema de altavoces derecho e
izquierdo hasta que se detengan al llegar al tope como se puede
apreciar en la siguiente ilustración. Estos altavoces deberían
terminar apuntando hacia adentro en un ángulo de 45°.
De esta manera el sistema de altavoces puede utilizarse como
el Sistema de Altavoces Frontales de 180° de Aiwa, el cual le
proporciona un equilibrio acústico excelente desde un punto de
audioión mucho más amplio que el sistema de altavoces
convencionales.
Si desea conocer más datos sobre el Sistema de Altavoces
Frontales de 180° de Aiwa, consulte la página 19.
8 ESPAÑOL
T Ti n Г Г
< ■■ п п 1 1
NOTA
Cuando ios altavoces cardioides se giran de modo que apunten
hacia adelante, proveen unos sonidos nítidos de alta frecuencia
y enfatizados ligeramente, si escucha desde un punto situado en
la línea central existente entre los altavoces derecho e izquierdo.
Page 27

RECEPCION DE RAD
SINTONIZACION MANUAL
1 Pulse el botón TUNER/BAND repetidamente para
seleccionar la banda deseada.
FM AM^
Cuando una emisión en FM estéreo contenga ruido
Pulse el botón MODE TUNER mientras pulsa el botón SFIIFT
del mando a distancia.
“MONO" aparecerá en la pantalla.
El ruido se reduce aunque la recepción sea monoaural.
MONO
I
h/l
!..
I I
Para restaurar la recepción estéreo, repita de nuevo lo anterior.
Para cambiar el intervalo de sintonización de AM
El ajuste por omisión del intervalo de sintonización de AM es de
10 khlz/paso. Si utiliza esta unidad en una zona en la cual el
sistema de asignación de frecuencias sea de 9 khlz/paso, cambie
el intervalo de sintonización.
Pulse el botón POWER mientras pulsa el botón TUNER/BAND.
Para resetear el intervalo, repita este procedimiento.
Cuando se cambie el intervalo de sintonización de AM, (consulte
"PREAJUSTE DE EMISORAS"), se borrarán todas las
presintonías. Las presintonías tendrán que ajustarse de nuevo.
I II I Iti IjI
_l IJ.IJU u
O
Q
<
OC
O UJ
qQ
O'i
(O o
Q.
UJ
O
lU
cc
Si la alimentación está desconectada se recibirá la emisora
previamente sintonizada (Función de Reproducción Directa).
2 Pulse el botón o (o el botón ◄◄ / ►►)
para seleccionar una emisora.
Cada vez que se pulsa un botón, cambia la frecuencia.
Cuando se recibe una emisora, aparece "TUNE" en pantalla
por un momento.
Durante la recepción de FM en estéreo, aparece (li®H) en
pantalla.
I
I hJi
I I I
Para buscar rápidamente una emisora (Búsqueda
Automática)
Mantenga pulsado el botón o ►W (o el botón ◄◄ / ►►)
hasta que el sintonizador empiece a buscar una emisora.
Después de sintonizar una emisora, se detendrá la búsqueda.
Para detener manualmente la Búsqueda Automática, pulse el
botón o (o el botón ◄◄ / ►►).
• La Búsqueda Automática puede no detenerse en estaciones
cuyas señales sean muy débiles.
I I I I I ti IjI
D Ü U LI,
ESPAÑOL
Page 28

PREAJUSTE DE EMISORAS
La unidad puede memorizar un total de 32 emisoras. Cuando
se memoriza una emisora, a esa emisora se le asignará un
número de preajuste. Utilice el número de preajuste para
sintonizar directamente una presintonía.
1 Pulse el botón TUNER/BAND para seleccionar
una banda. Presione después el botón o ^>1
(o el botón / »-) para seleccionar una
emisora.
SINTONIZACION MEDIANTE NUMERO DE PREAJUSTE
1 Puise el botón TUNER/BAND para seleccionar
una banda.
2 Pulse los botones numéricos del mando a
distancia para seleccionar un número de
preajuste.
Ejemplo:
Para seleccionar el número de preajuste 15, pulse los botones
+10 y 5.
Para seleccionar el número de preajuste 10, pulse los botones
+10 y 0.
Otro método para sintonizar una presintonía
Pulse el botón TUNER/BAND para seleccionar una banda.
Tras ello pulse el botón ►.
Cada vez que se pulse el botón, se selecciona la emisora con el
siguiente número más alto.
Para borrar una presintonía.
Seleccione el número de presintonía de la emisora que desee
borrar. Tras ello, pulse el botón ■ y el botón II antes de que
transcurran 4 segundos.
Los números de presintonía del resto de las emisoras con
numeraciones más altas disminuyen en una unidad.
2 Puise el botón II para memorizar la emisora.
A las emisoras de cada banda se les asigna un número de
preajuste en orden consecutivo empezando por el 1.
Número de presintonía
i. /Ȓ U U i'i l'i
I II -IUUU-
Frecuencia
3 Repita ios pasos 1 y 2.
NOTA
Cada banda puede almacenar un total máximo de 16
presintonías.
10 ESPAÑOL
Page 29

REPRODUCCION DE DISCO COMPACTO
OPERACION
^OPEN/-
CLOSE
INTRODUCCION DE UN DISCO
1 Pulse el botón ± OPEN/CLOSE para abrir la tapa
del compartimento del disco.
2 Introduzca un disco con el lado de la etiqueta
mirando hacía arriba.
Para detener la reproducción, pulse el botón ■.
Para hacer una pausa pulse el botón II. Para reanudar la
reproducción, púlselo de nuevo.
Para buscar un punto particular durante la reproducción,
mantenga pulsado el botón o (o el botón / ►►)
y suéltelo en el punto deseado.
Para saitar hasta el principio de una pista durante la
reproducción, pulse repetidamente el botón o (o el
botón ◄◄ / ►►). El sistema salta hacia adelante con el botón
►►I y hacia atrás con el !◄◄.
Para extraer el disco, detenga la reproducción y pulse el botón
± OPEN/CLOSE.
Otros métodos para comenzar la reproducción
Pulse el botón CD del panel de control, introduzca un disco, y
seguidamente pulse el botón ►.
Pantalla de vísualización en modo de parada
Calendario músical (sólo se
visualizarán las primeras 16 pistas)
/ U
I u
Número total de pistas Tiempo de reproducción total
Comenzar la reproducción cuando la alimentación esté
desconectada (Función de reproducción directa)
Pulse el botón ► panel frontal. Se conecta la alimentación y
comienza la reproducción del disco introducido.
I I n-l I n
I O'i I
■9^
“S
3 Pulse el botón ± OPEN/CLOSE otra vez para
cerrar la tapa del compartimento del disco.
Precaución
Asegúrese de no poner los dedos en el compartimento de)
disco mientras la tapa del mismo se está cerrando.
REPRODUCCION DE UN DISCO
Introduzca un disco.
Pulse el botón ^ del panel frontal.
Inmediatamente se inicia la reproducción del CD introducido
comenzando por la primera pista, sin importar qué fuente de
música se esté seleccionado en estos momentos.
Indicador
I
Para comprobar el tiempo restante
Pulse el botón REMAIN mientras pulsa el botón SHIFT del mando
a distancia durante la reproducción. Se mostrará el tiempo que
falta hasta que se termine la reproducción de todas las pistas.
Para restaurar la visualización del tiempo de reproducción, repita
lo anterior.
Selección de una pista con el mando a distancia
Pulse los botones numerados y el botón +10 para seleccionar
una pista.
Ejemplo:
Para seleccionar la pista 25, pulse los botones +10, +10 y 5.
Para seleccionar la pista 10, pulse los botones +10 y 0.
La pista seleccionada comienza a sonar y la reproducción
continúa hasta el final del disco.
• No utilice discos compactos con forma Irregular (ejemplo; con
forma de corazón, octogonales, etc.). Podría dar lugar a un
funcionamiento defectuoso.
’ No introduzca más de un disco compacto en el compartimento
de discos.
til I /I
I I r
Número de pista Tiempo de reproducción
que se está transcurrido
reproduciendo
El indicador gira mientras se está reproduciendo el disco.
./'(■ I I.
ESPAÑOL 1 1
Page 30

RANDOM 0-9.+10
REPEAT
aftK»
C3CDO
} oo o
PRGM
C3^| )
qqI
Ql “
►►
ft
SHIFT ■ ►
REPRODUCCIÓN ALEATORIA
Todas las pistas del disco pueden reproducirse de forma
aleatoria.
Pulse el botón RANDOM mientras pulsa el botón
SHIFT del mando a distancia.
"RANDOM" aparece en la pantalla.
Para cancelar la reproducción aleatoria, repita lo anterior.
■Aunque se pulse el botón ◄◄ una pista previamente
reproducida no podrá ser omitida. La unidad volverá solamente
al principio de la pista actual.
■ Cuando selecciona una pista con los botones numerados del
mando a distancia durante el modo de reproducción aleatoria,
la pista seleccionada comienza a sonar y se cancela el modo
aleatorio.
REPRODUCCION PROGRAMADA
Se podrán programar hasta 32 pistas del disco introducido.
Utilice el mando a distancia.
7 Pulse el botón PRGM mientras pulsa el botón
SHIFT en el modo de parada.
"PRGM" aparece en la pantalla.
&
r Ti
/_ J.I
Pulse los botones numerados y el botón +10 para
programar una pista.
Ejemplo;
Para seleccionar la pista 12, pulse los botones +10 y 2.
Para seleccionar la pista 20, pulse los botones +10, +10 y 0.
Número de pista
seleccionado Número programa
I ~ .iiO .. i~i I
II / / in I
I jI I 4 I 4
UU U
O
REPRODUCCION REPETIDA
Una o todas las pistas pueden ser reproducidas repetidamente.
Al pulsar el botón SHIFT, pulse el botón REPEAT
repetidamente en el mando a distancia.
"C+.1" aparece en pantalla cuando se selecciona la repetición
de reproducción de una única pista y "C>-" aparece cuando se
selecciona la reproducción repetida de todas las pistas.
Para cancelar la reproducción repetida, repita lo anterior.
Repetición de reproducción aleatoria
Active en primer lugar el modo de reproducción aleatoria
pulsando el botón RANDOM mientras pulsa simultáneamente
el botón SHIFT del mando a distancia. Seguidamente pulse el
botón REPEAT mientras pulsa el botón SHIFT para que "C>-" se
ilumine.
11 I
: I. I I
Número total de pistas
seleccionadas
Tiempo total de reproducción
de las pistas seleccionadas
3 Repita el paso 2 para programar otras pistas.
4 Pulse el botón ^ para comenzar la reproducción.
Para repetir la reproducción programada
Después de programar las pistas deseadas, pulse el botón
REPEAT repetidamente mientras pulsa el botón SHIFT del
mando a distancia de manera que aparezca en pantalla.
Después comience la reproducción programada.
Para comprobar el programa
Cada vez que se pulsa el botón ►► en modo de parada, se
mostrará un número de pista y número de programa.
Para borrar el programa
Pulse el botón ■ en modo de parada.
Para añadir pistas al programa
Antes de la reproducción, repita el paso 2. La pista se programará
después de la última pista.
12 ESPAÑOL
Para cambiar pistas programadas
Borre el programa y repita todos los pasos otra vez.
mn
Durante la reproducción programada, los botones numerados y
los botones REMAIN, RANDOM, no funcionan.
Page 31

EMPORIZADOR
i
J
REPRODUCCION CON
TEMPORIZADOR
TIMER II
SHIFT
La unidad puede activarse a una hora específica cada día con
el temporizador integrado.
Cerciórese de que el reloj está ajustado a la hora correcta.
(Véase la página 7).
Use el mando a distancia.
1 Pulse el botón TIMER repetidamente mientras
puisa el botón SHIFT del mando a distancia hasta
que © aparezca en pantalla.
5 Seleccione la duración para el periodo activado
por temporizador con el botón o y pulse
el botón 11.
h/t
!..
I I
I
La duración para el periodo activado por temporizador puede
establecerse entre 5 y 240 minutos en pasos de 5 minutos.
I / W
Ü U
6 Prepare la fuente y la fuente.
Para escuchar un disco compacto, inserte el disco.
Para escuchar una emisión de radio, seleccione la banda
deseada y sintonícela.
Para escuchar equipo conectado, configure el temporizador
de la fuente conectada (mediante un temporizador externo)
y prepárelo para la reproducción.
7 Pulse el botón POWER para apagar el sistema
después de ajustar el volumen y el tono.
© permanece en la pantalla después de apagar la
alimentación (modo de standby del temporizador).
□
U
LÜ ce
“I
o.
LU
tr
/ / U I I I /1 I /!
lili I "
i_ ./M u
2 Antes de que transcurran 4 segundos, pulse el
botón II.
La hora parpadeará.
I I h^l
lili
Si no pulsa el botón II antes de que transcurran 4 segundos,
podría comenzar otra operación.
I I I é! /W
I l_ -u u
3 Designe la hora de la activación del temporizador
pulsando el botón ◄◄ o y pulse el botón
II. Repita la operación para designar los minutos
de la activación del temporizador.
4 Pulse el botón ◄◄ o ►► para seleccionar una
fuente para la reproducción con temporizador y
tras ello presione el botón II.
Para escuchar una emsión radiofónica, seleccione "FM" o
"AM".
Puede cambiar la emisora posteriormente, en el paso 6.
Para escuchar equipo conectado a las tomas TAPE IN,
seleccione "TAPE".
Para escuchar equipo conectado a ias tomas AUX IN,
seleccione "AUX".
U I
I I IAWI
Cuando se alcanza la hora de activación del temporizador,
el sistema se enciende y comienza la reproducción de la
fuente seleccionada.
Si el nivel de volumen se había ajustado a más de 25 cuando
se apagó la alimentación, automáticamente se ajusta a 25
cuando el temporizador enciende la unidad.
Para comprobar la fuente y hora especificados
Pulse el botón TIMER mientras pulsa el botón SHIFT del mando
a distancia. El nombre de la fuente seleccionada, la hora de
activación del temporizador y la duración del periodo activado
por temporizador aparecen en pantalla durante 4 segundos.
Para cancelar temporalmente el modo de espera del temporizador
Pulse el botón TIMER repetidamente mientras pulsa el botón
SHIFT del mando a distancia hasta que "NO TIMER" aparezca
en la pantalla.
Para restaurar el modo de espera del temporizador, pulse de
nuevo para que se vea 0.
Uso de la unidad mientras el temporizador está configurado
Puede utilizar la unidad con normalidad después de haber
ajustado el temporizador.
Antes de apagar la alimentación, repita el paso 6 para preparar
la fuente y la fuente de grabación, y ajuste el volumen y el tono.
' La reproducción con temporizador no comenzará a menos que
la alimentación esté apagada.
' El temporizador integrado de esta unidad no puede apagar y
encender el equipo conectado. Utilice un temporizador externo.
I III- II
I u-D D
ESPAÑOL 13
Page 32

OTRAS CONEXIONES
CONFIGURACION DEL
TEMPORIZADOR DE APAGADO
SLEEP
■CD C3C JC3
SHIFT-
oo OOO
U
La unidad puede apagarse automáticamente a una hora
especificada.
Use el mando a distancia.
1 Pulse el botón SLEEP mientras pulsa el botón
SHIFT del mando a distancia.
-1 re o
_f /_ /_ L /
CD
C I~I
U U
CONEXION DE EQUIPO OPCIONAL
-CD DIGITAL OUT
(OPTICAL)
■TAPE IN
■AUX IN
■LINE OUT
■SUPER
WOOFER
Para más detalles consulte las instrucciones de operación del
equipo conectado.
• Los cables conectores no se suministran. Obtenga los cables
conectores necesarios.
•Si desea adquirir equipo opcional, consulte con su
concesionario local de Aiwa.
2 Antes de que transcurran 4 segundos, pulse el
botón ◄◄ o ►► para especificar la hora hasta
la cual la alimentación estará apagada.
Cada vez que se pulsa el botón, la hora cambia entre 5 y 240
minutos en pasos de 5 minutos.
I L. L. U I I 'I
J L L L I I U
Tiempo especificado
Para comprobar el tiempo restante hasta que se
apague la alimentación
Pulse el botón SLEEP una vez mientras pulsa el botón SHIFT
del mando a distancia. El tiempo restante aparece en pantalla
durante 4 segundos.
Para cancelar el temporizador de apagado
Pulse el botón SLEEP dos veces mientras pulsa el botón SHIFT
del mando a distancia hasta que aparezca “NO SLEEP" en
pantalla.
TOMAS TAPE IN
Este sistema puede introducir señales de sonido analógicas a
través de estas tomas desde la pletina de una cinta.
Utilice un cable con conectores RCA para conectar la pletina de
una cinta.
NOTA
Cuando use la pletina de una cinta para grabar el sonido
proveniente de este sistema, conecte la pletina de la cinta a las
tomas LINE OUT (véase página 15).
TOMAS AUX IN
En este sistema pueden introducirse señales de sonido
analógicas a través de estas tomas.
Utilice un cable con conectores RCA para conectar equipo de
audio (giradiscos, reproductores de discos láser, VCRs, TV, etc.).
Conecte el conector rojo a la toma R y el conectar blanco a la
toma L.
Al conectar un giradiscos
Utilice un giradiscos Aiwa equipado con un amplificador
ecualizador integrado.
TOMA CD DIGITAL OUT (OPTICAL)
14 ESPAÑOL
Este sistema puede es capaz de proporcionar una salida digital
a través de esta toma. Use un cable óptico para conectar equipo
audio digital (como p. ej. un amplificador digital, una platina DAT,
una grabadora de minidiscos, etc).
Quite la caperuza antipolvo (D de la toma CD DIGITAL OUT
(OPTICAL). Tras ello, conecte un conector óptico a la toma CD
DIGITAL OUT (OPTICAL).
Cuando no se utilice la toma CD DIGITAL OUT (OPTICAL).
Vuelva a colocar la caperuza antipolvo.
Page 33

TOMAS LINE OUT
Este sistema puede dar salida a señales de sonido analógicas
para todas las funciones a través de estas tomas.
Utilice un cable con conectores RCA para conectar el equipo de
audio.
No conecte equipo a las tomas UNE OUT y AUX IN
simultáneamente.
De lo contrario, se genera ruido y pueden darse funcionamientos
defectuosos.
TOMA PARA REALZADOR DE GRAVES ^
Conecte un realzador de graves con alimentación opcional a la
toma con amplificador incorporado.
ESCUCHAR FUENTES EXTERNAS
GRABACION DE SONIDO UTILIZANDO EQUIPO EXTERNO
Para grabar un disco compacto en un minidísco
Conecte la grabadora de minidiscos a la toma CD DIGITAL OUT
(OPTICAL).
Realice la reproducción del disco compacto que desee grabar e
inicie la grabación en la grabadora de minidiscos conectada.
Para grabar en una cinta
Conecte un aparato con pletina de cintas a las tomas LINE OUT.
Realice la reproducción del sonido a grabar (CD o radio) e inicie
la reproducción en la unidad con pletina de cintas.
t/)
n|
So
o
TAPE/AUX
Para reproducir equipo conectado a las tomas TAPE IN, pulse
el botón TAPE del panel de control.
Para reproducir equipo conectado a las tomas AUX IN, pulse el
botón AUX del panel de control.
Cuando utilice el mando a distancia, pulse el botón TAPE/AUX
repetidamente hasta que aparezca "TAPE" o "AUX" en pantalla.
ESPAÑOL 15
Page 34

I
CUIDADOS Y MANTENIMIENTO
Para optimizar ei rendimiento de su unidad se requieren unos
cuidados y un mantenimiento ocasionaies de la unidad y dei
software.
Para limpiar ia caja
Utilice un paño seco y suave.
Si ias superficies están extremadamente sucias, utilice un paño
suave iigeramente humedecido con una solución de detergente
suave. No utilice disolventes fuertes, tales como alcohol, bencina
o diluyante ya que éstos podrían dañar el acabado de la unidad.
Cuidado de las unidades
• No someta a las unidades a fuertes sacudidas, como, por
ejemplo, golpes o caídas.
• No utilice las unidades cerca de un campo magnético fuerte
como el de un televisor. El hacerlo así puede ocasionar
funcionamientos defectuosos.
Cuidado de los discos compactos
• Cuando se ensucie un disco, limpíelo pasando un paño de
limpieza desde el centro hacia afuera.
• Después de reproducir un disco, guárdelo en su caja. No deje
los discos en lugares calientes o húmedos.
SOLUCION A PEQUEÑOS PROBLEMAS
Si la unidad no funciona como se describe en este Manual de
Instrucciones, compruebe ia guía siguiente:
GENERALIDADES No hay sonido.
• ¿Está bien conectado ei cable de alimentación de CA?
• ¿Hay alguna conexión mal hecha? (-* página 4)
• ¿Se ha pulsado algún botón de funciones incorrecto?
Sólo sale sonido de un altavoz.
• ¿Está el otro altavoz desconectado?
El sonido deja de ser audible de repente.
-> Se ha activado el circuito de protección debido a una
acumulación interna de calor. Apague el aparato, cerciónese
de que existe suficiente holgura detrás de las aberturas de
ventilación de la parte trasera y no vuelva a poner en marcha
el sistema hasta que se enfríe.
Ocurre un error en la pantalla o un mal funcionamiento, o
aparece un mensaje de error.
-> Ajuste de nuevo la unidad como se menciona más adelante.
SECCIÓN DEL SINTONIZADOR
Hay un ruido de estática constante en forma de onda.
• ¿Está conectada correctamente la antena? (-» página 5)
• ¿Es débil la señal?
-► Conecte una antena exterior.
La recepción contiene interferencias o el sonido está
distorsionado.
• ¿Capta el sistema ruidos externos o distorsión de múltiples
trayectorias?
Cambie la orientación de la antena.
-> Separe la unidad de otros aparatos eléctricos.
SECCIÓN DEL REPRODUCTOR DE DISCOS
COMPACTOS
El reproductor de discos compactos no puede reproducir.
• ¿Está bien insertado el disco? (-» página 11)
• ¿Está sucio el disco? (-> página 16)
• ¿Afecta la condensación a la lente?
-► Espere una hora aproximadamente y pruebe otra vez.
Reajuste
Si se diera una condición inusual en la pantalla de visualización,
vuelva a ajustar el sistema de la siguiente manera.
1 Pulse el botón POWER para apagar la alimentación.
2 Pulse el botón POWER para volver a conectar la
alimentación mientras pulsa el botón ■. Todo lo almacenado
en memoria después de la compra se borra.
Si no puede apagarse la alimentación en el paso 1 debido a un
funcionamiento defectuoso, reajuste desconectando el cable de
CA y repita el paso 2.
16 ESPAÑOL
Page 35

ESPECIFICACIONES
UNIDADES PRINCIPALES
Sección de
sintonizador de FM
Rango de sintonización
Sensibilidad útil (IMF)
Terminales de antena
Sección de sintonizador de AM
Rango de sintonización
Sensibilidad utiiizable
Antena
Sección del amplificador
Salida de potencia
Distorsión Total Armónica
Entradas
Salidas
Sección de reproducción de discos compactos
Láser
Convertidor D-A
Relación señal a ruido
Distorsión armónica
Fluctuación y trémolo
87,5 MHz a 108 MHz
13,2 dBf
75 ohmios (desequilibrados)
530 kHz to 1710 kHz (pasos de
10 kHz )
531 kHz to 1602 kHz (pasos de 9
kHz)
350 pV/m
Antena de cuadro
16 watios por canal, Mín.
RMS a 8 ohmios, desde 60 Hz a
20 kHz, con no más del 1% de
Distorsión Total Armónica
0,1%(10W, 1 kHz, 8 ohmios, DIN
AUDIO)
TAPE IN: 500 mV
AUX IN: 500 mV
SUPER WOOFER: 1,7 V
SPEAKERS: acepta altavoces de
8 ohmios o más
UNE OUT: 340 mV
PHONES (minitoma estéreo):
acepta auriculares de 32 ohmios
o más
Láser semiconductor {X = 780 nm)
Dual 1 bit
85 dB (1 kHz, 0 dB)
0,05 % (1 kHz, 0 dB)
Inmensurable
uuu SYSTEM
La palabra "BBE" y el "símbolo BBE"
de BBE Sound, Inc.
Bajo licencia de BBE Sound, Inc.
son marcas registradas
COPYRIGHT
Le rogamos que compruebe las leyes sobre derechos de autor
en relación a grabaciones de discos, radio o cintas externas del
país en el que se esté utilizando la máquina.
NOTA
Este equipo ha sido puesto a prueba y se encontró que cumple
con los límites para un aparato de la Clase B digital, según la
Parte 15 de las Regulaciones FCC. Estos límites están diseñados
para proveer una protección razonable contra interferencias
perjudiciales en una instalación residencial.
Este equipo genera, usa y puede radiar energía radiofrecuencia!
y, en caso de no ser usado e instalado de acuerdo con las
instrucciones, podría causar interferencia nociva a la
radiocomunicación. Sin embargo, no existen garantías de que
la interferencia no ocurrirá en una instalación en particular. Si
este equipo ilega a causar una interferencia perjudicial a la
recepción de televisión o radio, la cual puede determinarse
encendiéndose o apagándose la unidad, se aconseja al usuario
que trate de corregir la interferencia adoptando una o más de
las siguientes medidas:
- Reoriente o recoloque la antena de recepción.
- Incremente la distancia de separación entre el equipo y el
receptor.
- Conecte el equipo a una toma o a un circuito distinto de
aquél en que conectó el receptor.
- Consulte con el distribuidor o un técnico de radio/TV con
experiencia si necesita ayuda.
PRECAUCIÓN
Los ajustes o modificaciones hechos a este producto, que no
hayan sido aprobados expresamente por el fabricante, pueden
anular el derecho o autoridad de operar este producto.
<
cr
Ш
z
Ш
C5
SISTEMA DE ALTAVOCES
Tipo caja
Altavoces
Impedancia
Nivel de presión sonido de salida
Dimensiones (AnxAx P)
Peso
2 vías, reflejo de bajos (tipo
protegido contra el magnetismo)
Altavoz de graves:
100 mm tipo cono
Altavoz de agudos:
60 mm tipo cono
8 ohmios
87 dB/W/m
144 X 202 X 185 mm
1,8 kg
General
Requisitos de alimentación
Consumo de potencia
Dimensiones
(An X A X P)
Peso
Las especificaciones y la apariencia externa pueden ser
sometidos a cambios sin previo aviso.
120 VAC, 60 Hz
40 W
Unidad reproductora de CDs
144 X 101,5 X 176,1 mm
Unidad sintonizador/amplificador
144 X 101,5 X 208 mm
Unidad reproductora de CDs
0,88 kg
Unidad sintonizador/amplificador
2,4 kg
ESPAÑOL 1 7
Page 36

ÍNDICE DE LAS PARTES
Las instrucciones acerca de cada parte de ia unidad principal o
del mando a distancia se indican en las páginas que se muestran
abajo.
± OPEN/CLOSE (11)
¡◄◄.►►ISKIP (9,10,11)
DEMO (5)
TUNER/BAND (9,10)
CONTROL OPEN/CLOSE (6)
RANDOM (12)
REPEAT (12)
0-9,+10(10,11.12)
MODE TUNER (9)
SHIFT (7)
GEO (8)
POWER (7)
VOLUME (8)
REMAIN (11)
PRGM (12)
VOLUME (8)
SOUND MODE (8)
TIMER (13)
SLEEP (14)
V_CLOCK (7)
TAPE/AUX (15)
ATUNING DOWN/UP
(7,9,10,11,13,14)
IISET (7,10,13)
►PLAY(11,12)
■ STOP (10,11,12)
TUNER/BAND (9)
18 ESPAÑOL
Page 37

dei Sùitemei de
^pn^^ttaiei de Ì^O °
El Sistema de Altavoces Frontales de 180’ de Aiwa suministra
un equilibrio excelente del sonido para poder obtener una
reproducción verdaderamente estéreo desde cualquier ángulo
de audición.
En los sistemas de reproducción estéreo del sonido utilizados
hasta la actualidad, el área de audición en la que se obtiene el
efecto estéreo óptimo ha sido extremadamente reducida. Elio
es debido a varias razones.
Como se observa en la Figura 2, un sistema estéreo
convencional tiene los altavoces en el panel delantero del
sistema, apuntando hacia adelante. Está diseñado para escuchar
en un lugar situado directamente delante del panel de altavoces.
En estos casos, como se muestra en la Figura 2, quien escuche
desde el punto ®, situado en la línea central situada entre los
altavoces derecho e izquierdo, oirá la voz del cantante desde la
parte delantera central. Los sonidos instrumentales se
distribuyen de manera equilibrada entre ambos altavoces para
lograr un efecto estéreo óptimo.
Sin embargo, en el punto ®, situado fuera de la línea central
entre los altavoces, la distancia desde el altavoz izquierdo ai
receptor es mayor que la distancia desde el altavoz derecho. El
sonido proveniente del altavoz izquierdo parece ser débil, y el
sonido del altavoz derecho parece ser demasiado fuerte. El
sonido se percibe como si viniera del altavoz con gran volumen,
de modo que la voz del cantante parece desplazarse hacia el
altavoz derecho. Los sonidos instrumentales normalmente
equilibrados también parecen provenir primordialmente desde
el altavoz derecho.
Además, dado que el direccionamiento de los altavoces aumenta
cuando se dan mayores frecuencias, los sonidos de alta
frecuencia provenientes del altavoz izquierdo son más difíciles
de oír, lo cual incrementa la impresión de desequilibrio. Por estas
razones, el área de audición que provee un equilibrio en el sonido
y un efecto estéreo óptimo queda limitada a la estrecha banda
delimitada en la Figura 2-@.
Para resolver este problema, Aiwa ha desarrollado altavoces
unidireccionales para este nuevo sistema que le ofrecen un
direccionamiento cardioide en frecuencias de 1 kFIz o inferiores
a éstas. Estos altavoces apuntan hacia el interior en ángulos de
45" (véase la Figura 1). Accionados por las señales de sonido
estéreo de la derecha e izquierda, estos altavoces actúan
aumentando la anchura del área óptima de audición (véase la
Figura 3). Gracias a su área óptima de audición y el ángulo de
45” en su eje del altavoz principal suministran una reproducción
realzada del sonido en el punto ® en la Figura 3. El altavoz
izquierdo apunta hacia el receptor y el altavoz derecho apunta
alejándose de él, de modo que el direccionamiento de los
altavoces compensa las diferencias en volumen percibido
ocasionadas por las diferencias en la distancia con el receptor.
Por lo tanto, el sonido de la voz de un cantante se percibe como
si proviniera de un punto entre los altavoces, y los sonidos
instrumentales se distribuyen equilibradamente.
Figura 1 Sistema de aitavoces deianteros de 180°
Figura 2
Efecto estéreo con un sistema de
aitavoces convencionai
Unidad principal
Altavoz
izquierdo
@ Punto central de audición: El sonido equilibrado se escucha
desde los altavoces izquierdo y
derecho
® Punto de audición descentrado: El altavoz derecho suena más
alto que el altavoz izquierdo
Nivel de presión de sonido
: Área de audición en estéreo
Altavoz
derecho
Figura 3 Efecto estéreo con ei sistema de
aitavoces Aiwa de 180°
Tanto en el punto ® como en el ® puede oírse un sonido estéreo
verdadero.
Unidad principal
Altavoz
derecho
<
Œ
UJ
z
liJ
o
Nivel de presión de sonido
: Área de audición en estéreo de los nuevos altavoces
ESPAÑOL 19
Page 38

I
FRANÇAIS
AVERTISSEMENT
AFIN DE RÉDUIRE TOUT RISQUE D’INCENDIE OU DE
DÉCHARGE ÉLECTRIQUE, VEILLEZ À CE QUE CET
APPAREIL SOITÀ L’ABRI DE LA PLUIE ET DE L’HUMIDITÉ.
CAUTION
RISK OF ELECTRIC SHOCK
DO NOT OPEN
“CAUTION:TO REDUCE THE RISK OF
ELECTRIC SHOCK,
DO NOT REMOVE COVER (OR BACK).
NO USER-SERVICEABLE PARTS INSIDE.
REFER SERVICING TO QUALIFIED
SERVICE PERSONNEL.”
Explication des Symboles:
L’éclair se terminant par une flèche dans un
triangle équilatéral prévient l’utilisateur de la
présence d’une “tension dangereuse” non
insolée à l’intérieur du coffret de l’appareil, qui
peut être d’un niveau suffisant pour constituer
un risque de décharge électrique.
Le point d’exclamation dans un triangle
équilatéral prévient l’utilisateur qu’il y a des
instructions importantes concernant le
fonctionnement et l’entretien (la maintenance)
dans la documentation jointe à l’appareil.
PRECAUTIONS
Lisez bien attentivement et complètement ces Instructions
d’utilisation avant de vous sen/ir de votre appareil. Mettez ces
instructions de côté pour pouvoir les consulter dans l’avenir.
Toutes les précautions et tous les avertissements donnés dans ce
manuel et sur l’appareil doivent être strictement suivis de même
que les suggestions relatives à la sécurité indiquées ci-dessous.
Installation
1 Eau et humidité - N’utilisez pas cet appareil à proximité d’une
source d’eau comme une baignoire, un lavabo, une piscine ou
d’autres endroits semblables.
2 Chaleur- N’utilisez pas cet appareil à proximité d’une source de
chaleur, comme les ouvertures de chauffage, les poêles ou
d’autres appareils émettant de la chaleur. Il ne faut pas non plus
le placer dans un endroit où la température est Inférieure à 5°C
ou supérieure à 35°C.
3 Surface de montage - Posez l’appareil sur une surface plane
et lisse.
4 Ventilation - Veillez à ce qu’il y ait suffisamment d’espace
autour de l’appareil afin qu’il y ait une bonne ventilation de la
chaleur. Laissez un espace de 10 cm à l’arrière et au-dessus de
l’appareil et un espace de 5 cm de chaque côté.
- Ne placez pas l’appareil sur un lit, un tapis ou une surface
semblable qui pourrait bloquer les orifices de ventilation.
- N’installez pas l’appareil dans une bibliothèque, dans une
armoire ou sur une étagère fermée où la ventilation pourrait
être insuffisante.
5 Pénétration d’objets et de liquide - Veillez à ce qu’aucun objet
ou liquide ne pénètre dans l’appareil par les orifices de ventila
tion.
6 Chariots et supports - Déplacez l’appareil
avec précaution lorsqu’il est posé sur un
chariot ou un support.
Des arrêts brusques, l’utilisation d’une trop
grande force et des surfaces inégales
pourraient renverser le chariot ou l’appareil
ou le faire tomber.
2 FRANÇAIS
7 Condensation - De la condensation peut se former sur la lentille
de la tête de lecture des disques compacts lorsque:
- on déplace l’appareil d’un endroit froid à un endroit chaud
- le chauffage vient d’être allumé
- l’appareil est dans une pièce très humide
- l’appareil est dans une pièce refroidie par climatisation
S’il y a de la condensation à l’intérieur de l’appareil, il risque de ne
pas bien fonctionner. Dans ce cas, laissez l’appareil pendant
quelques heures puis essayez de l’utiliser à nouveau.
8 Installation au mur ou au plafond - Cet appareil ne doit pas être
monté sur un mur ou sur un plafond, à moins que les instructions
d’utilisation ne le précisent.
Alimentation électrique
1 Sources d’alimentation - Connectez cet appareil uniquement
aux sources d’alimentation spécifiées dans ces instructions
d’utilisation et indiquées sur l’appareil.
2 Polarisation - Par mesure de sécurité, certains appareils sont
munis de fiches polarisées d’alimentation secteur qui ne peuvent
être insérées que d’une seule façon dans une prise de courant. S’il
est difficile, voire impossible, d’insérer la fiche d’alimentation
secteur dans une prise de courant, retournez la prise et essayez
de nouveau. Si vous avez toujours des difficultés à l’insérer dans
la prise de courant, faites appel à un technicien qualifié pour
réparer ou remplacer la prise. N’essayez pas d’outrepasser l’aspect
de sécurité de la fiche polarisée en forçant pour l’insérer dans une
prise de courant.
3 Cordon secteur
- Pour débrancher le cordon d’alimentation, tirez sur la fiche. Ne
tirez pas sur le cordon.
- Ne touchez jamais la fiche d’alimentation avec des mains
mouillées car cela pourrait présenter des risques d’incendie ou
de décharge électrique.
- Le cordon d’alimentation doit être acheminé de manière à éviter
qu’il soit plié, pincé ou foulé au pied. Faites particulièrement
attention au cordon reliant l’appareil à la prise de courant.
- Évitez de surcharger les fiches d’alimentation secteur et les
rallonges au-delà de leur capacité nominale, ce qui pourrait
présenter un risque d’incendie ou de décharge électrique.
4 Rallonge - Afin d’empêcher tout risque de décharge électrique,
n’utilisez pas de fiche polarisée d’alimentation secteur avec une
rallonge ou une prise de courant quelconque à moins que la fiche
polarisée puisse être complètement insérée de manière à ce que
les broches de la fiche ne soient pas exposées.
5 Quand l’appareil n’est pas utilisé - Débranchez le cordon
d’alimentation secteur ou le cordon d’alimentation par batterie de
voiture si l’appareil ne doit pas être utilisé pendant plusieurs mois
ou pendant une période plus longue. Lorsque le cordon est
branché, un courant de faible intensité continue de s’écouler dans
l’appareil, même si ce dernier est éteint.
Antenne extérieure
1 Lignes de transport d’énergie - Lorsque vous installez une
antenne extérieure, veillez à ce qu’elle soit éloignée de toute ligne
de transport d’énergie.
2 Mise à la terre de l’antenne extérieure - Veillez à ce que le
système de l’antenne soit bien mis à la terre afin de fournir une
protection en cas de surtensions soudaines ou en cas d’une
accumulation d’électricité statique. L’article 810 du Code Électrique
National (NEC) ANSI/NFPA 70, fournit des informations sur la
mise à la terre correcte du mât, de la structure de support et du fil
d’amenée allanf à l’unité de décharge de l’antenne, ainsi que sur
la taille de l’unité de mise à la terre, la connexion aux bornes de
mise à la terre et les caractéristiques des bornes de mise à la terre.
Mise à la terre d'une antenne selon le code national
d'éiectricité(NEC)
FiL DE DESCENTE D'ANTENNE
UNITE DE DECHARGE
D'ANTENNE
(NEC SECTION 810-20)
CONDUCTEURS DE
MISE A LA TERRE
(NEC SECTION 810-21)
COLLIERS DE MISE A LA TERRE
_ ELECTRODE DE MISE A LA TERRE DE
LA LIGNE D'AMENEE DE COURANT
NEC: CODE NATIONAL D'ELECTRICITE
(NEC ARTICLE 250 PARTIE H)
Page 39

Entretien
Nettoyez l’appareil en suivant scrupuleusement les
recommandations faites dans ces instructions d’utilisation.
Dommages Nécessitant des Réparations
Faites appel uniquement à un technicien qualifié pour faire
réparer l’appareil si:
- le cordon ou la fiche d’alimentation sont endommagés
- des corps étrangers ou du liquide ont pénétré à l’intérieur de
l’appareil
- l’appareil a été exposé à de la pluie ou à de l’humidité
- l’appareil ne semble pas fonctionner normalement
- la performance de l’appareil a changé de manière sensible
- l’appareil est tombé ou son coffret a été endommagé
N’ESSAYEZ PAS DE RÉPARER L’APPAREIL VOUS-MÊME.
/4cua^ (jw(A ^éew/^e«tue
Nous vous félicitons d’avoir acheté une Chaîne Stéréo Aiwa.
Afin d’optimiser le bon fonctionnement de cette chaîne, prenez le
tempsde bien lire ces Instructions d’UtlIisatlon et de vousfamiliariser
avec les méthodes d’utilisation.
Vérifiez votre chaîne et ses accessoires
Unité du lecteur de disques Haut-parleurs
compacts (Gauche et Droit)
TABLE DES MATIERES
PREPARATIONS____________________________________
PRÉCAUTIONS
CONNEXIONS
AVANT L’UTILISATION..................................................... 6 t
RÉGLAGE DE L’HORLOGE
SON ui
------------------------------------------------------------------------------------- DC
RÉGLAGE DU SON...........................................................8
RÉCEPTION RADIO
ACCORD MANUEL............................................................9
PRÉRÉGLAGE DES STATIONS
LECTURE DE DISQUES COMPACTS
UTILISATION...................................................................11
MINUTERIE
LECTURE PAR LA MINUTERIE
RÉGLAGE DE LA MINUTERIE DE SOMMEIL
AUTRES CONNEXIONS
CONNEXION D’UN APPAREIL OPTIONNEL
ÉCOUTE DE SOURCES EXTERNES
ENREGISTREMENT DU SON AU MOYEN D’UN
APPAREIL OPTIONEE
...................................................................2 Z
.......................................................................
.................................................
_________________________________
.....................................
10
___________________
________________________________________
.....................................
...............
13
14
______________________________
.................
.............................
..............................................
14
15
15
4 O
7 CC
t
Unité du syntoniseur/
amplificateur
O 0
Antenne AM
Mode d’emploi etc.
O O 0
1 1
_r
Télécommande
Antenne FM
Registre du propriétaire
Inscrivez dans les cases ci-dessous le numéro du modèle et le
numéro de série de votre chaîne (qui sont indiqués sur le dos de
celle-ci). Vous les aurez ainsi sous la main si vous avez besoin de
contacter votre distributeur Aiwa en cas de difficulté.
GÉNÉRALITÉS
_____________________________________
SOINS ET ENTRETIEN....................................................16
GUIDE DE DÉPISTAGE DES DÉFAUTS
........................
SPÉCIFICATIONS............................................................17
INDEX...............................................................................18
PRINCIPES DU SYSTÈME DE HAUT-PARLEURS
FRONTAUX DE 180° DE AIWA.................................19
16
Modèle Numéro
XR-M70U
Numéro de Série (N- de lot.)
FRANÇAIS
Page 40

CONNEXIONS
Avant de connecter le cordon secteur
La tension nominale indiquée sur le panneau arrière de votre
appareil est de 120 V C.A. Vérifiez si cette tension nominale
correspond bien à la tension locale.
IMPORTANT
• Connectez les haut-parleurs, les antennes et tout le matériel
facultatif. Finissez par connecter le cordon secteur.
• Il n’y a pas de différences entre les haut-parleurs de devant
qui peuvent être tous deux connectés aussi bien comme hautparleur L (gauche) que comme haut-parleur R (droit).
1 Placez l’unité du lecteur de disques compacts
au dessus de l’unité du syntoniseur/amplificateur
et branchez au connecteur du câble plat comme
décrit ci-dessous.
Remarquez que le connecteur ne peut être branché que dans
une seule direction avec le câble plat tourné vers la gauche.
2 Connectez les cordons des haut-parleurs au
syntoniseur/amplificateur.
Il faut connecter le cordon du haut-parleur droit à la prise "R"
et le cordon du haut-parleur gauche à la prise "L".
Après avoir branché au connecteur, laissez une marge de
sécurité entre le câble plat et les ouvertures de ventilation.
Page 41

3 Connectez les antennes fournies.
Connectez l’antenne FM aux bornes FM 75 il l’antenne AM
aux bornes AM LOOP.
4 Branchez le cordon secteur sur une prise de
courant.
La première fois que le cordon secteur est branché, la fenêtre
de l’affichage montre les fonctions de la chaîne. Lorsque
l’appareil est allumé, cet affichage de démonstration est remplacé
par l’affichage de fonctionnemenf. Lorsque l’appareil est éteint,
le mode de démonstration est rétabli.
Pour annuler la démonstration
Appuyez sur la touche DEMO.
Pour l’activer, appuyez de nouveau sur la touche DEMO.
POSE DES DEUX UNITÉS CÔTE À CÔTE
Il est également possible placer les unités lecteur de disques
compacts et de la radio/amplificateur côte à côte selon votre
choix.
Dans ce cas, assurez-vous que les câbles plats n’obstruent pas
les ouvertures de ventilation, comme décrit ci-dessous.
Laissez toujours une marge de sécurité entre le câble plat et les
ouvertures de ventilation.
CONNEXION D’UNE ANTENNE EXTÉRIEURE
Pour obtenir une meilleure réception FM, il est recommandé
d’utiliser une antenne extérieure.
Connectez l’antenne extérieure aux bornes FM 75 il.
-LU
en
Z
O
QC
2
CC
Pour installer l’antenne AM sur une surface
Fixez la griffe dans la rainure.
Pour placer les antennes Antenne d’alimentation FM :
Étendez cette antenne horizontalement en forme de T et fixez
ses extrémités au mur.
Antenne cadre AM :
Orientez cette antenne afin d’obtenir la meilleure réception
possible.
REMARQUE
• Ne connectez pas à la chaîne d’autres haut-parleurs que ceux
qui ont été fournis.
• Ne laissez pas près des haut-parleurs des objets produisant
un champs magnétique.
• Ne mettez pas l’antenne FM à proximité d’objets métalliques
ni de tringles à rideaux.
• Ne mettez pas l’antenne AM à proximité d’aucun autre matériel
optionnel, de la chaîne stéréo elle-même, du cordon secteur
ou des cordons des haut-parleurs, ce qui pourrait capter des
parasites.
• Ne déroulez pas le fil de l’antenne AM.
Pour connecter tout autre appareil optionnel page 14.
FRANÇAIS 5
Page 42

AVANT L’UTILISATION
UTILISATION DU PANNEAU DE CONTRÔLE
OQOC3
CDCDO _
CD
______
CD OOP
oo
POWER
CD
OO
Allumage de l'appareil
Appuyez sur la touche POWER.
L’appareil s’allume et la lecture de la source correspondante
commence en appuyant sur la touche ► ou la touche TUNER/
BAND (Fonction de Lecture Directe).
Vous pouvez également allumer l’appareil en effectuant une
éjection sur le panneau de contrôle (voir la colonne de droite)
pendant que celui-ci est éteint.
Après l’utilisation
Appuyez sur la touche POWER pour éteindre l’appareil.
L’affichage passe à l’indication de l’heure.
Utilisation du casque d’écoute
Connectez le casque d’écoute à la prise PHONES au moyen
d’une mini-fiche stéréo (03,5 mm).
Aucun son ne sort des haut-parleurs lorsque le casque d’écoute
est branché.
■ CONTROL
OPEN/CLOSE
Panneau de contrôle
Pour éjecter le panneau de contrôle
Appuyez sur la touche CONTROL OPEN/CLOSE l’appareil étant
allumé ou éteint. Le panneau de contrôle sera éjecté.
Pour fermer le panneau de contrôle, appuyez de nouveau sur la
touche.
Touches sur le panneau de contrôle
Touches de contrôle
Les touches de fonction sélectionnent la source à lire.
Les touches de contrôle vous permettent de contrôler la lecture
d’un disque compact et de capter l'émission de radio souhaitée.
Il existe également une touche et une commande sur le panneau
de contrôle qui peuvent s'utiliser pour faire des réglages du
niveau de volume et de la qualité du son selon vos préférences.
' La touches ► sur l’unité du lecteur de disques compacts fait
immédiatement commencer la lecture de disques compacts;
c'est à dire, en appuyant sur ces touches la lecture commence
indépendamment de la source sélectionnée.
6 FRANÇAIS
Page 43

UTILISATION DE LA TÉLÉCOMMANDE
Insertion des piles
Retirez le couvercle situé au dos de la télécommande et insérez
deux piles R03 (taille AAA).
Quand remplacer les piles
La distance opérationnelle maximum entre la télécommande et
le capteur de l’unité du lecteur de disques compact/enregistreur
de minidisques doit être environ de 5 mètres. Lorsque la distance
diminue, remplacez les plies.
Ouverture et fermeture du couvercle supérieur
RÉGLAGE DE L’HORLOGE
POWER
1 Appuyez sur la touche POWER pour allumer
l’appareil.
2 Appuyez sur la touche CLOCK tout en appuyant
sur la touche SHIFT de la télécommande.
-lU
O
K
g
ce
Q.
(/}
Z
Utilisation de la télécommade
Quelques opérations ne peuvent s’exécuter qu’en utilisant les
touches de la télécommande, tandis que d’autres peuvent
s’exécuter en utilisant aussi bien les touches des deux unités
principales.
Le manuel d’instructions décrit clairement les touches disponibles
pour chaque opération.
REMARQUE
Si l’appareil ne va pas être utilisé pendant un certain temps,
enlevez les piles pour empêcher toute fuite d’électrolyte.
- Il est possible que la télécommande ne fonctionne pas
correctement lorsque:
- La ligne de visée entre la télécommande et le capteur (voir
l’illustration de la page précédente) est exposée à une lumière
intense comme les rayons du soleil.
- D’autres télécommandes sont utilisées à proximité (télévision,
etc.)
Utilisation de la touche SHIFT
Les touches ® ont deux fonctions différentes. Une de ces
fonctions est indiquée sur la touche et l’autre est indiquée sur la
plaque au-dessus de la touche.
Pour utiliser la fonction indiquée sur la touche, appuyez
simplement sur la touche.
Pour utiliser la fonction indiquée sur la plaque au-dessus de la
touche, appuyez sur la touche tout en appuyant sur la touche
SHIFT.
3 Dans les 4 secondes qui suivent, appuyez sur la
touche
L’heure clignote.
Pour passer au format de 24 heures, appuyez sur la touche ■.
Pour retourner au formatée 12 heures, appuyez de nouveau
sur la touche ■.
4 Appuyez sur la touche
II.
IIU I 11^1 IjI
n II I r. U U
ou ►► pour régler
l’heure.
5 Appuyez sur la touche
L'heure s’arrête de clignoter et les minutes commencent à
clignoter.
6 Appuyez sur la touche ◄◄ ou
II
pour enregistrer l’heure.
pour régler
les minutes.
7 Appuyez sur la touche
II
pour enregistrer ies
minutes et terminer le réglage.
Les minutes s’arrêtent de clignoter sur l’affichage et l’horloge
démarre à 00 secondes.
Pour afficher l’heure
Appuyez sur la touche CLOCK tout en appuyant sur la touche
SHIFT sur la télécommande. Lheure est affichée pendant 4
secondes.
Si l’affichage de l’horloge clignote alors que l’appareil est éteint
Cela est dû à une coupure de courant. Il faut de nouveau régler
l’heure.
Si la coupure de courant dure plus de 12 heures environ, tous
les préréglages mémorisés depuis l’achat de l’appareil doivent
être refaits.
FRANÇAIS 1
Page 44

I
REGLAGE DU SON
REGLAGE DU VOLUME
Tournez le cadran VOLUME sur le panneau de contrôle,
ou appuyez sur les touches de réglage VOLUME sur la
télécommande.
Le niveau du volume est affiché pendant 4 secondes. Vous
pouvez le régler entre MIN (minimum) et 49, puis MAX
(maximum).
Le volume reste mémorisé après avoir éteint l’appareil.
Cependant, si le volume est réglé à plus de 25 au moment
d’éteindre l’appareil, celui-ci est automatiquement réglé à 25
lorsque l’appareil est rallumé.
ACCENTUATION DES AIGUS
Le système BBE accentue la clarté des sons à fréquences
aigües. Appuyez plusieurs fois sur la touche SOUND MODE
jusqu’à ce que “BBE” apparaissent sur l’affichage. Puis tournez
le cadran VOLUME vers la droite ou vers la gauche pour
sélectionner un des trois niveaux ou la position “off” dans les 4
secondes qui suivent.
[BBE “□jîdp ■■■ inj
.......................
T/ r
Il I
...............
te;
J [BBE... Ill IHJ
c
Il peut se proauire une distorsion du son à basses fréquences
iorsque le système T-BASS est utilisé pour un disque dont le
son à basses fréquences était accentué à l’origine. Dans ce cas,
annuler le système T-BASS.
EQ (ÉGALISEUR)
Cet appareil permet d’obtenir les trois courbes d’égalisation suivantes.
ROCKiSon puissant renforçant les sons aigus et les sons graves
POP: Plus de présence aux fréquences vocales et à mi-gamme
JAZZ: Fréquences plus basses accentuées pour la musique
de type jazz
Appuyez plusieurs fois sur la touche SOUND MODE jusqu’à
ce que “EQ OFF” apparaisse sur l’affichage. Puis tournez le
cadran VOLUME vers la droite ou vers la gauche pour
sélectionner un des trois types d’égalisation ou la position “off”
dans les 4 secondes qui suivent.
I I I 11
I' I I I
Si vous utilisez la télécommande, appuyez plusieurs fois sur la
touche GEQ.
11
I '
RÉGLAGE DU SON PENDANT L’ENREGISTREMENT
Vous pouvez modifier à votre gré le volume et le son sortant des
haut-parleurs ou du casque d’écoute sans affecter le niveau de
l’enregistrement.
COMMENT AUGMENTER L'AMPLITUDE DE LA SURFACE D'AUDITION OPTIMALE
Tournez les haut-parleurs cardioïdes du système de haut-parleurs
droit et gauche jusqu'à ce qu'ils atteignent le point limite de rotation
comme indiqué dans l'illustration suivante. Ces haut-parleurs
devront être tournés vers l'intérieur en formant un angle de 45°.
ACCENTUATION DES GRAVES
Le système T-BASS accentue le réalisme du son à basses
fréquences.
Appuyez plusieurs fois sur la touche SOUND MODE jusqu’à
ce que “T-BASS” apparaisse sur l’affichage. Puis tournez le
cadran VOLUME vers la droite ou vers la gauche pour
sélectionner un des trois niveaux ou la position “off” dans les 4
secondes qui suivent.
[T-BASS ;zzr [T;BASS ^ [T^BASs
.....
... ....
........ .
.
I
..........
.
“ Tl n r r
I ±1 n J J
8 FRANÇAIS
Vous pouvez donc utiliser le système de haut-parleurs comme
le Système de Haut-Parleurs Frontaux de 180° de Aiwa qui vous
fournit un excellent équilibre acoustique à partir d'un point d'audition
beaucoup plus ample que le système de haut-parleurs conventionnel.
Pour plus de détails sur le Système de Haut-Parleurs Frontaux
de 180° de Aiwa, veuillez consulter la page 19.
REMARQUE
Lorsque les haut-parleurs cardioïdes sont tournés de façon qu'ils
pointent vers l'avant, ils fournissent des sons clairs de haute
fréquence et légèrement emphatisés, si vous écoutez placé dans
un point qui se trouve dans la ligne centrale entre les haut-
parleurs droit et gauche.
Page 45

I
ACCORD MANUEL
TUNER/
BAND
TUNER/
BAND
MODE TUNER
TUNER/
BAND
1 Appuyez plusieurs fois sur la touche TUNER/
BAND pour sélectionner la bande souhaitée.
‘FM^AM
Si l’appareil est éteint, la station captée précédemment sera
reçue (Fonction de Lecture Directe).
Lorsqu’une émission FM stéréo contient du bruit
Appuyez sur la touche MODE TUNER tout en appuyant sur la
touche SHIFT sur la télécommande.
“MONO” apparaît sur l’affichage.
Le bruit est réduit mais la réception est monophonique.
/i/f
/ I
Pour rétablir la réception stéréo, répétez le procédé antérieur.
Pour changer l’intervaile d’accord AM
Le réglage par défaut de l’intervalle AM est de 10 klHz/pas. Si
vous utilisez cet appareil dans un endroit où le système
d’allocation des fréquences est de 9 kHz/pas, changez l’intervalle
d’accord.
Appuyez sur la touche POWER tout en appuyant sur la touche
TUNER/BAND.
Pour ramener l’intervalle à sa valeur initiale, répétez cette
opération. \
Lorsque l’intervalle d’accord AM est changé, toutes les stations
préréglées (voir “PRÉRÉGLAGE DES STATIONS”) sont
effacées. Les stations préréglées doivent être réglées de
nouveau.
! t ! t ! >t IjI
I n.l'l I' I .
■liJ
ce
O
i5
<
II
lU
O
2 Appuyez sur la touche ou (ou la touche
-<◄ / ►►) pour sélectionner une station.
Chaque fois que vous appuyez sur cette touche, la fréquence
change.
Lorsqu’une station est reçue, “TUNE” est affiché pendant un
moment.
Pendant une réception FM stéréo, l(i®i)) est affiché.
I h A
r I I
Pour rechercher une station rapidement (Recherche
Automatique)
Maintenez enfoncée la touche ou ►►I (ou la touche ◄◄ /
►►) jusqu’à ce que le syntoniseur commence à rechercher une
station. Une fois la station captée, la recherche s’arrête.
Pour arrêter manuellement la Recherche Automatique, appuyez
sur la touche ou (ou la touche ◄◄ / ►►).
• Il est possible que la Recherche Automatique ne s’arrête pas
aux stations émettant des signaux très faibles.
I I I I I A I A
"I U U ILS ■.
FRANÇAIS 9
Page 46

PREREGLAGE DES STATIONS
ACCORD SUR LES NUMEROS
PRÉRÉGLÉS
1 Appuyez sur la touche TUNER/BAND pour
sélectionner une bande.
TUNER/
BAND
TUNER/
BAND
L'appareil peut mémoirser un total de 32 stations préréglées.
Lorsqu’une station est mémorisée, un numéro de préréglage
est attribué à cette station. Utilisez ce numéro de préréglage
pour capter directement cette station.
0-9,+10
cdcdocdI
O OO (*
-------------
II
TUNER/
BAND
QD>
UÏL
1 Appuyez sur la touche TUNER/BAND pour
sélectionner une bande et appuyez sur la touche
ou »i (ou la touche ◄◄ / ►►) pour
sélectionner une station.
2 Appuyez sur la touche II pour mémoriser la
station.
Un numéro de préréglage est attribué à la station, en
commençant par 1 et en progressant par ordre croissant pour
chaque bande.
Numéro de préréglage
2 Appuyez sur les touches numériques sur la
télécommande pour sélectionner un numéro de
préréglage.
Exemple:
Pour sélectionner le numéro préréglé 15, appuyez sur les
touches +10 et 5.
Pour sélectionner le numéro préréglé 10, appuyez sur les
touches +10 et 0.
Autre façon de sélectionner une station préréglée
Appuyez sur la touche TUNER/BAND pour sélectionner une
bande.
Puis appuyez sur la touche ►.
Chaque fois que vous appuyez sur cette touche, la station
préréglée avec le numéro suivant est sélectionnée.
Pour effacer une station préréglée
Sélectionnez le numéro préréglé de la station à effacer. Puis
appuyez sur la touche ■ et sur la touche 11 dans les 4 secondes
qui suivent.
Les numéros préréglés plus élevés de toutes les autres stations
dans la bande diminuent également d’une unité.
.
....
...............................................................
U
I I
SB'33^
Fréquence
3 Répétez les opérations 1 et 2.
Chaque bande peut mémoriser uniquement un maximum de 16
stations préréglées.
10 FRANÇAIS
Page 47

LECTURE DE DISQUES COMPACT
UTILISATION
éOPEN/-
CLOSE
CHARGEMENT D’UN DISQUE
Pour arrêter la lecture, appuyez sur la touche ■.
Pour interrompre temporairement la lecture, appuyez sur la
touche II. Pour continuer la lecture, appuyez de nouveau sur
cette touche.
Pour rechercher un point particulier pendant la lecture,
maintenez enfoncée la touche ou (ou la touche ◄◄
/ ►►) et relâchez la touche à l’endroit désiré.
Pour passer au début d’une plage en cours de la lecture,
appuyez plusieurs fois sur la touche ou (ou la touche
◄◄ / ►►). L’appareil saute les plages en avant avec la touche
►M, et en arrière avec la touche !◄◄.
Pour enlever le disque, arrêtez la lecture et appuyez sur la
touche ± OPEN/CLOSE.
Autres méthodes pour commencer la lecture
Appuyez sur la touche CD sur le panneau de contrôle, insérez
un disque puis appuyez sur la touche ►.
Fenêtre d’affichage dans le mode d’arrêt
Répertoire des plages (seules les
16 premières plages sont affichées)
$9
I nt
( U
y I ni I O
I U- I _f,
il
2ii3
lU UJ
CJ
Eo
CO
H-
g
tr-
ü
1 Appuyez sur la touche ^ OPEN/CLOSE pour
ouvrir le compartiment du disque.
2 Placez un disque avec ia face portant l’étiquette
vers ie haut.
3 Appuyez de nouveau sur ia touche é. OPEN/
CLOSE pour refermer le compartiment du disque.
Attention
Prenez soin de ne pas mettre les doigts dans le compartiment
du disque pendand la fermeture de celui-ci.
LECTURE D’UN DISQUE
Insérez un disque.
Appuyez sur la touche ^ sur le panneau frontal.
La lecture du disque compact inséré commence immédiatement
par la première plage, indépendemment de la source musicale
sélectionnée.
Icône de disque
I
Nombre total de plages Temps total de lecture
Pour commencer la lecture lorsque l’appareil est éteint (Fonction de Lecture Directe)
Appuyez sur la touche ► sur le panneau frontal. L’appareil
s’allume et la lecture du disque inséré commence.
Pour vérifier le temps qui reste
En cours de lecture, appuyez sur la touche REMAIN tout en
appuyant sur la touche SHIFT sur la télécommande. Le temps
qui reste avant la fin de la lecture de toutes les plages est affiché.
Pour rétablir l’affichage du temps de lecture, répétez ie procédé
antérieur.
Sélection d’une plage avec la télécommande
Appuyez sur les touches numériques et sur ia touche -rlO pour
sélectionner une plage.
Exemple:
Pour sélectionner la 25ème plage, appuyez sur les touches -i-l 0,
+10 et 5.
Pour sélectionner la 10ème plage, appuyez sur les touches +10
et 0.
La lecture de la plage sélectionnée commence et se poursuit
jusqu’à la fin du disque.
• N’utilisez pas de disques compacts ayant une forme irrégulière
(exemple: ceux en losange, octogonaux). Cela peut
occasionner une panne.
• Ne placez pas plus d’un disque compact à la fois dans le
compartiment.
&
/ //■
U
....“f
Temps
I I
1
1 ' :
1 1 1
Numéro de la
plage en cours
de lecture
L’icône de disque tourne pendant la lecture du disque.
FRANÇAIS 1 1
Page 48

RANDOM 0-9,+10
LECTURE PROGRAMMÉE
Il est possible de programmer jusqu’à 32 plages du disque inséré.
Utilisez la télécommande.
1 Appuyez sur la touche PRGM tout en appuyant
sur la touche SHIFT dans le mode d’arrêt.
“PRGM” Clignote alors sur l’affichage.
SHIFT
LECTURE ALEATOIRE
Toutes les plages du disque peuvent être lues de façon aléatoire.
Appuyez sur la touche RANDOM tout en appuyant
sur la touche SHIFT sur la télécommande.
“RANDOM” s’allume sur l’affichage.
Pour annuler la lecture aléatoire, répétez le procédé antérieur.
REMARQUE
• Même en appuyant sur la touche ◄◄, Il n’est pas possible de
sauter à une plage que vous avez écoutée précédemment.
L’appareil retourne uniquement au début de la plage en cours
de lecture.
♦ Si dans le mode de lecture aléatoire vous sélectionnez une
plage avec les touches numériques sur la télécommande, la
lecture des plages sélectionnées commence et le mode de
lecture aléatoire est annulé.
LECTURE RÉPÉTÉE
Il est possible d’écouter à plusieurs reprises une plage
individuelle ou toutes les plages.
Tout en appuyant sur la touche SHIFT, appuyez
plusieurs fois sur la touche REPEAT sur la
télécommande.
“‘^1” s’allume quand la lecture d'une seule plage est
sélectionnée, et “C*.” s’allume quand la lecture répétée de toutes
les plages est sélectionnée.
Pour annuler la lecture répétée, répétez le procédé antérieur.
Pour répéter la lecture aléatoire
Activez tout d’abord le mode de lecture aléatoire en appuyant
sur la touche RANDOM tout en appuyant simultanément sur la
touche SHIFT sur la télécommande. Appuyez ensuite sur la
touche REPEAT tout en appuyant sur la touche SHIFT afin
d’allumer
(0
I II
I- jj
2 Appuyez sur les touches numériques et sur la
touche +10 pour programmer une plage.
Exemple:
Pour sélectionner la 12ème plage, appuyez sur les touches
+10 et 2.
Pour sélectionner la 20ème plage, appuyez sur les touches
+10,+10 et 0.
Numéro de la
plage sélectionnée Numéro du programme
I I II
I I r r
I
I.
Nombre total de plages Temps total de lecture des
sélectionnées plages sélectionnées
3 Répétez l’opération 2 pour programmer d’autres
plages.
4 Appuyez sur la touche ► pour commencer la
lecture.
Pour répéter la lecture programmée
Après avoir programmées les plages désirées, appuyez plusieurs
fois sur la touche REPEAT tout en appuyant sur la touche SHIFT
sur la télécommande afin que s'allume.
Puis faites commencer la lecture programmée.
O
l/l IjI !4
I' l.l' I I' I
14 !
U I
L L. I
—I l I-
12 FRANÇAIS
Pour vérifier le programme
Chaque fois que vous appuyez sur la touche ►► dans le mode
d’arrêt, un numéro de plage et un numéro de programme s’affichent.
Pour effacer le programme
Appuyez sur la touche ■ dans le mode d’arrêt.
Pour ajouter des plages au programme
Avant la lecture, répétez l’opération 2. La plage sera programmée
à la suite de la dernière plage.
Pour changer les plages programmées
Effacez le programme et répétez toutes les opérations.
Lors de la lecture programmée, les touches REMAIN, RANDOM,
et les touches numériques ne fonctionnent pas.
Page 49

t
LECTURE PAR LA MINUTERIE
TIMER II
SHIFT-
POWER
L’appareil peut être allumé chaque jour à une heure spécifiée
grâce à la minuterie incorporée.
Assurez-vous que l’horloge est réglée correctement. (Consultez
la page 7.)
Utilisez la télécommande.
1 Appuyez plusieurs fois sur ia touche TiMER tout
en appuyant sur la touche SHIFT sur la
télécommande pour afficher ©.
/ / A4 I I I // / 4
I I I I I r.lLS U
2 Dans les 4 secondes qui suivent, appuyez sur la
touche II.
L’heure clignote.
//A4 / //4/4
! Il ! I C U U
Si vous n’appuyez pas sur la touche II dans les 4 secondes
qui suivent, une autre opération peut commencer.
3 Réglez l’heure d’allumage par la minuterie en
appuyant sur la touche ◄◄ ou ►► button, et
appuyez sur la touche 11. Répétez cette opération
pour régler les minutes.
4 Appuyez sur la touche ou ►► pour
sélectionner une source pour la lecture par la
minuterie, puis appuyez sur la touche II.
Pour écouter une émission de radio, sélectionnez "FM" ou
"AM".
Vous pouvez changer de bande plus tard dans l'opération 6.
Pour écouter un appareil connecté aux prises TAPE IN,
sélectionnez "TAPE".
Pour écouter un appareil connecté aux prises AUX IN,
sélectionnez "AUX".
5 Séiectionnez la durée de la période d’activation
de l’appareil avec les touches ◄◄ ou puis
appuyez sur la touche II.
!..
I
I I
La durée d’activation de l’appareil peut être réglée entre 5 et
240 minutes par pas de 5 minutes.
r m
ü U
6 Préparez la source.
Pour écouter un disque compact, chargez un disque.
Pour écouter une émission de radio, sélectionnez la bande
souhaitée et réglez une station.
Pour écouter un appareil connecté, enregistrez la minuterie
de la source connectée (avec une minuterie externe) et
préparez-la pour la lecture.
7 Appuyez sur la touche POWER pour éteindre
i’appareil après avoir régié le volume du son de
la tonalité.
® reste affiché après l’extinction de l’appareil (minuterie dans
le mode d’attente).
U /'V
I I I I
Quand l’heure d’allumage par la minuterie est atteinte,
l’appareil s’allume et la lecture de la source sélectionnée
commence.
Si le niveau du volume était réglé à plus de 25 au moment
d’éteindre l’appareil, il sera réglé automatiquement à 25 en
rallumant l’appareil par ia minuterie.
Pour vérifier l’heure et la source spécifiées
Appuyez sur ia touche TIMER tout en appuyant sur la touche
SHIFT sur la télécommande. Le nom de la source sélectionnée,
l’heure d’allumage et ia durée de la période d’activation
s’affichent pendant 4 secondes.
Pour annuler temporairement le mode d’attente de la minuterie
Appuyez plusieurs fois sur la touche TIMER tout en appuyant
sur la touche SHIFT sur la télécommande afin que “NO TIMER”
s’affiche.
Pour réfablir le mode d’attente de la minuterie, appuyez de
nouveau sur cette touche pour afficher ®.
Pour utiliser l’appareil alors que la minuterie est réglée
Vous pouvez utilisez l’appareil normalement après avoir réglé la
minuterie.
Avant d’éteindre l’appareil, répétez l’opération 6 pour préparer
la source et la source d’enregistrement, puis réglez le volume et
la tonalité.
REMARQUE
' La lecture par la minuterie ne commencera que si l’appareil
est éteint.
' Il est impossible d’allumer et d’éteindre les appareils connectés
au moyen de la minuterie incorporée dans cet appareil. Utilisez
une minuterie extérieure.
I n - r
I U J D
(J
g
O
ü
CA LU
UJgOi-
Qi;
Ujli
O
UJ
QC
3
I—
O
UJ
FRANÇAIS 13
Page 50

(
___
_-__jL^_'.._‘_'-.-....:.'‘-
.................
•..’
.................................
.■ ..*
............■..............
■ ....■
...........................
REGLAGE DE LA MINUTERIE DE
SOMMEIL
SLEEP
^ O Ciìììì^
SHIFT-
0 0 OOO
L’appareil peut être éteint automatiquement à une heure
spécifiée.
Utilisez la télécommande.
1 Appuyez sur la touche SLEEP tout en appuyant
sur la touche SHIFT sur la télécommande.
filili !.. it!
J L L L I U U
2 Dans les 4 secondes qui suivent, appuyez sur ia
touche ◄◄ ou ►► pour spécifier le temps
pendant lequel l’appareil doit rester éteint.
Chaque fois que vous appuyez sur cette touche, l’heure
change entre 5 et 240 minutes par pas de 5 minutes.
CONNEXION D’UN APPAREIL OPTIONNEL
■CD DIGITAL OUT
(OPTICAL)
■TAPE IN
■AUXIN
■LINE OUT
•SUPER
WOOFER
Consultez les instructions d’utilisation de l’appareil connecté pour
avoir plus de détails.
• Les cordons de raccordement ne sont pas fournis. Procurezvous les cordons de raccordement adéquats.
• Renseignez-vous auprès de votre distributeur Aiwa pour
connaître les appareils optionnels disponibles.
PRISES TAPE IN
C’est appareil peut recevoir des signaux sonores analogiques
d’entrée par ces prises à partir de la platine.
Utilisez un câble à fiche phono RCA pour connecter la platine.
I I I I I I I lyl
J i_ c c r / U
Temps specifiqué
Pour vérifier ie temps qui reste avant que i’appareil
soit éteint
Appuyez une fois sur la touche SLEEP tout en appuyant sur la
touche SHIFT sur la télécommande. Le temps restant est affiché
pendant 4 secondes.
Pour annuler la minuterie de sommeil
Appuyez deux fois sur la touche SLEEP tout en appuyant sur la
touche SHIFT sur la télécommande afin que “NO SLEEP” soit
affiché.
REMARQUE
Si vous utilisez la platine pour enregistrer ie son provenant de
cet appareil, connectez la platine aux prises LINE OUT (voir page
15).
PRISES AUX IN
C’est appareil peut recevoir des signaux sonores analogiques
d’entrée par ces prises.
Utilisez un câble à fiche phono RCA pour connecter un appareil
audio (tourne-disque, lecteurs de musique laser, magnétoscope,
TV, etc.).
Connectez la fiche rouge à la prise R et la fiche blanche à la
prise L. -
Connexion d’un tourne-disque
Utilisez un tourne-disque Aiwa muni d’un amplificateur égaliseur
incorporé.
PRISE CD DIGITAL OUT (OPTICAL)
Ce système est capable de fournir une sortie digitale par cette
prise. Utilisez un cordon optique pour connecter un appareil audio
digital (comme, par example, un amplificateur digital, une platine
DAT, un enregistreur de minidisques, etc).
Retirez le couvercle anti-poussière (D de la prise CD DIGITAL
OUT (OPTICAL). Après, connectez un connecteur optique à la
prise CD DIGITAL OUT (OPTICAL).
14 FRANÇAIS
Lorsque la prise CD DIGITAL OUT (OPTICAL) n'est pas utilisée.
Replacez à nouveau le couvercle anti-poussière.
Page 51

PRISES “LINE OUT”
Par ces prises, l’appareil peut émettre des signaux sonores
analogiques pour toutes les fonctions.
Utilisez un câble pourvu de fiches phono RCA afin de connecter
les appareils audio.
REMARQUE
Ne connectez pas d’appareil aux prises LINE OUT et prises AUX
IN simultanément.
Sinon cela peut produire un mauvais fonctionnement et des
parasites.
PRISE SUPERWOOFER <1
Connectez à cette prise un sub woofer alimenté optionnel muni
d’un amplificateur incorporé.
ÉCOUTE DE SOURCES EXTERNES
ENREGISTREMENT DU SON AU MOYEN D'UN APPAREIL OPTIONEL
Pour enregistrer un disque compacte dans un minidisque
Connectez l'enregistreur de minidisques à la prise CD DIGITAL
OUT (OPTICAL).
Réalisez la lecture du disque compacte que vous souhaitez
enregistrer et commencez l'enregistrement dans l'enregistreur
de minidisques connecté.
Pour enregistrer dans une cassette
Connectez un appareil avec platine cassette aux prises LINE
OUT.
Réalisez la lecture de la source à enregistrer (CD ou radio) et
commencez l'enregistrement dans l'appareil avec platine
cassette.
CO
O
SÜLJ
oc Z
lUZ
tzco
I«
s UJ
o:
Z
<
TAPE/AUX
O ® O O
O uü ouo
Pour écouter un appareil connecté aux prises TAPE IN, appuyez
plusieurs fois sur la touche TAPE sur le panneau de contrôle.
Pour écouter un appareil connecté aux prises AUX IN, appuyez
plusieurs fois sur la touche AUX sur le panneau de contrôle.
Si vous utilisez la télécommande, appuyez plusieurs fois sur la
touche TAPE/AUX jusqu’à ce que “TAPE” ou “AUX” s’affiche.
FRANÇAIS 15
Page 52

I
SOINS ET ENTRETIEN
Vous devez effectuer un entretien périodique de votre chaîne et
du iogiciei afin d’optimiser ieur bon fonctionnement.
Pour nettoyer le coffret
Utiiisez un chiffon doux et sec.
Si ies surfaces sont extrêment saies, utilisez un chiffon doux
légèrement humecté d’une solution de détergent doux. N’utilisez
pas de solvants forts tels que l’alcool, de la benzine ou du diluant
car ils pourraient endommager la finition de l’appareil.
Soin de l’appareil
• Ne soumettez pas l’appareil à des chocs.
• N’utilisez pas l’appareil près d’un champ magnétique tel qu’un
téléviseur. Cela pourrait provoquer une panne.
Soin des disques compacts
• Lorsqu’un disque est sale, essuyez-le avec un chiffon de
nettoyage, en partant du centre et en allant vers l’extérieur.
' Après avoir écouté un disque, rangez-ie dans sa boîte. Ne le
laissez pas dans un endroit chaud ou humide.
GUIDE DE DEPISTAGE DES DÉFAUTS
Si l’appareil ne fonctionne pas comme décrit dans ces
Instructions d’utilisation, consultez le guide ci-dessous.
GÉNÉRALITÉS lln’y a pas de son.
• Le cordon secteur est-il connecté correctement?
• Y a-t-il une mauvaise connexion? (-► page 4)
• Avez-vous appuyé sur une touche de fonction incorrecte?
Le son ne sort que d’un seul haut-parleur.
• L’autre haut-parleur est-il déconnecté?
Le son devient inaudible brusquement
-> Le circuit de protection s’est activé dû à un réchauffement
interne. Éteignez l’appareil, assurez-vous qu’il y a assez
d’espace derrière les ouvertures de ventilation et laissez le
système jusqu’à ce qu’il refroidisse.
Un affichage incorrect ou un mauvais fonctionnement se
produisent, ou un message d'erreur s'affiche.
-> Remettez l’appareil à zéro en procédant comme indiqué ci-
dessous.
PARTIE SYNTONISEUR
Il y a des parasites électrostatiques constants en forme
d’ondes.
• L’antenne est-elle connectée correctement? (-> page 5)
• Le signal est-il faible?
-► Connectez une antenne extérieure.
La réception comporte des parasites ou il y a une distorsion
du son.
• La chaîne capte-t-elle des parasites externes ou une distorsion
par trajet multiple?
-» Changez l’orientation de l’antenne.
-» Éloignez l’appareil d’autres appareils électriques.
PARTIE LECTEUR DE DISQUES COMPACTS Le lecteur de disques compacts ne fonctionne pas.
• Le disque est-il inséré correctement? {-> page 11)
• Le disque est-il sale? (-> page 16)
• La lentille de lecture est-elle affectée par de la condensation?
-» Attendez environ une heure et essayez de nouveau.
Pour remettre l’appareil à zéro
Si une anomalie se produit dans la fenêtre d’affichage, remettez
l’appareil à zéro en procédant de la manière suivante.
1 Appuyez sur la touche POWER pour éteindre l’appareil.
2 Appuyez sur la touche POWER pour rallumer l’appareil tout
en appuyant sur la touche ■ . Toutes les données
mémorisées depuis l’achat sont effacées.
S’il est impossible d’éteindre l’appareil comme indiqué dans le
paragraphe 1 à cause d’une anomalie, remettez l’appareil à zéro
en débranchant le cordon secteur et effectuez l’opération 2.
16 FRANÇAIS
Page 53

SPECIFICATIONS
UNITES PRINCIPALES
Parité syntoniseur FM
Gamme d’accord
Sensibilité utilisable (IHF)
Bornes d’antenne
Partie syntoniseur AM
Gamme d’accord
Sensibilité utilisable
Antenne
Partie amplificateur
Puissance de sortie
Distorsion harmonique totale
Entrées
Sorties
87,5 MHz à 108 MHz
13,2 dBf
75 ohms (asymétriques)
530 kHz à 1710 kHz
(par pas de 10 kHz)
531 kHz à 1602 kHz
(par pas de 9 kHz)
350 pV/m
Antenne cadre
16 watts par canal
RMS à 8 ohms, de 60 Hz à 20
kHz, avec pas plus de 1% de
Distorsion Harmonique Totale
0,1 % (10 W, 1 kHz, 8 ohms, DIN
AUDIO)
TAPE IN: 500 mV
AUX IN: 500 mV
SUPER WOOFER: 1,7 V
SPEAKERS: acceptent des hautparleurs de 8 ohms ou plus
LINE OUT: 340 mV
PHONES (mini-prise stéréo):
accepte un casque d’écoute de 32
ohms ou plus
imis SYSTEM
L’appellation “BBE” et le symbole “BBE” sont des marques de
fabrique de BBE Sound, Inc.
Sous licence de BBE sound. Inc.
DROITS D’AUTEUR
Veuillez vérifier les lois sur les droits d’auteur relatives à
l’enregistrement de disques, de programmes de radio ou de
cassettes dans le pays lequel l’appareil est utilisé.
REMARQUE
Cet appareil a été testé et s’est avéré respecter les limites
établies pour un appareil numérique de classe B, selon la Section
15 des réglements FCC. Ces limites ont pour but de fournir une
protection raisonnable contre toute interférence nuisible dans
une installation résidentielle.
Cet appareil émet, utilise et peut rayonner de l’énergie haute
fréquence. S’il n’est pas installé et utilisé conformément aux
instructions données, il peut produire une interférence nuisible
aux communications radio. Cependnt, il n’est pas garanti
qu’aucune interférence nen se produira dans une installation
particulière. Si cet appareil cause une interférence nuisible à la
réception de signaux radio et de télévision, ce qu’on peut
déterminer en éteignant et en rallumant l’appareil, nous vous
recommandons d’essayer de corriger cette interférence en
prenant une ou plusieurs des mesures suivantes:
- Réorientez l’antenne de réception ou changez-la de place.
- Augmentez la distance séparant l’appareil et le récepteur.
- Connectez l’appareil à une prise de courant sur un circuit
différent de celui auquel le récepteur est connecté.
- Consultez le distributeur ou un technicien de radio/TV
expérimenté pour leur demander conseil.
(Л
H
-I
<
cc
-Ш
Z
■Ш
O
Partie lecteur de disques compacts
Laser
Dénumériseur
Rapport signal/bruit
Distorsion harmonique
Pleurage et scintillement
SYSTÈME DE HAUT-PARLEUR
Enceinte
Haut-parleurs
Impédance
Niveau de pression du son
de sortie
Dimensions (L x H x P)
Poids
Spécifications générales
Alimentation requise
Puissance consommée
Dimensions (L
Poids
x H x P)
Laser à semi-conducteur
{X = 780 nm)
1 bit dual
85 dB (1 kHz, 0 dB)
0,05 % (1 kHz, 0 dB)
Non mesurables
À 2 voies, à basse réflexe (type à
blindage magnétique)
Haut-parleur de graves:
100 mm type conique
Haut-parleur d’aigus:
60 mm type conique
8 ohms
87 dB/W/m
144 X 202 X 185 mm
1,8 kg
120 VGA, 60 Hz
40 W
Unité du lecteur de disques
compacts
144x 101,5x176,1 mm
Unité du syntoniseur/amplificateur
144 x 101,5 x 208 mm
Unité du lecteur de disques
compacts
0,88 kg
Unité du syntoniseur/amplificateur
2,4 kg
ATTENTION
Toute modification ou réglage fait sur cet appareil, qui n’est pas
approuvé expressément par le fabricant, peut annuler les de
l’utilisateur à se servir de ce produit.
Les spécifications et l’aspect extérieur de cet appareil peuvent
être sujets à des modifications sans préavis.
FRANÇAIS 17
Page 54

INDEX
Vous trouverez dans les pages indiquées ci-après les instructions
concernant chaque fonction sur l’unité principale ou sur la
télécommande.
I STOP (11)
►CD PLAY (6,11
PHONES (6) ■
POWER (6,7)
(ÔO) O
I O O I-
± OPEN/CLOSE (11)
f
l◄◄,►►ISKIP (9,10,11)
DEMO (5)
TUNER/BAND (9,10)
CONTROL OPEN/CLOSE (6)
IISET (7,10,11)
■ CLEAR (10,11)
►PRESET (10,11)
►►/TUNING DOWN/UP
(7,9,10,11)
TUNER/BAND(9,10)
TAPE (15)
.AUX (15)
'CD (11)
RANDOM (12)
REPEAT (12)
0-9, -r-10 (10,11,12)
MODE TUNER (9)
SHIFT (7)
GEO (8)
POWER (7)
VOLUME (8)
REMAIN (11)
PRGM (12)
VOLUME (8)
SOUND MODE (8)
TIMER (13)
SLEEP (14)
v^CLOCK (7)
TAPE/AUX (15)
-/TUNING DOWN/UP
(7,9,10,11,13,14)
IISET (7,10,13)
► PLAY(11,12)
■ STOP (10,11,12)
TUNER/BAND (9)
18 FRANÇAIS
Page 55

dec Stfütème de ^acct~
‘Pcmieufci ^pn/Mtaccxdc î^0°de/4cc(A<!c
Figure 1 Système de haut-parleurs frontaux de 180°
Le Système de Haut-Parleurs Frontaux de 180’ de Aiwa fournit
un excellent équilibre du son afin d’obtenir une reproduction
stéréo réelle à partir de n’importe quel angle d’écoute.
Jusqu’à présent parmi les systèmes de reproduction de son
stéréo, la surface d’écoute où l’on obtenait l’effet stéréo optimal
a été extrêment réduite. Ceci est dû pour les raisons suivantes.
Comme l’indique la Figure 2, sur un système stéréo
conventionnel, les haut-parleurs sur le panneau frontal du
système se trouvent dirigés vers l’avant. Ainsi dessiné pour
écouter d’un endroit situé droit devant le panneau central des
haut-parleurs.
Dans ces cas-là, comme l’indique la Figure 2, un auditeur situé
au point @ sur la ligne centrale entre le haut-parleur de droite et
celui de gauche, entendra la voix du chanteur provenant d’en
face. Les sons instrumentaux sont également distribués entre
les deux haut-parleurs afin d’obtenir un effet stéréo optimal.
Cependant, au point ®, situé en dehors de la ligne centrale
entre les haut-parleurs, la distance entre le haut-parleur de
gauche et l’auditeur est plus grande que la distance entre le
haut-parleur de droite. Le son provenant du haut-parleur de
gauche semble plus faible et celui provenant du haut-parleur de
droite semble trop fort. Le son est perçu comme s’il provenait
du haut-parleur à un volume important, de telle façon que la
voix du chanteur semble se déplacer vers le haut-parleur de
droite.
De plus, étant donné que la directionnalité des haut-parleurs
augmente avec de plus hautes fréquences, les sons à haute
fréquence provenant du haut-parleur de gauche sont plus
difficiles à entendre, ce qui augmente l’impression de
déséquilibre. C’est pour ces raisons que la surface d’écoute qui
fournit un équilibre entre le son et un effet stéréo optimal est
limitée à la bande étroite délimitée sur la Figure 2-@.
Afin de résoudre ce problème, Aiwa a développé des hautparleurs unidirectionnels pour ce nouveau système qui vous offre
une directionnalité cardioide dans des fréquences de 1 kFlz ou
inférieures à celles-ci. Ces haut-parleurs sont dirigés vers
l’intérieur sur des angles de 45” (consultez la Figure 1 ). Actionnés
par les signaux sonores stéréo de droite et de gauche, ces hautparleurs agissent en augmentant la largeur de la surface
optimale d’écoute (consultez Figure 3). Grâce à leur surface
optimale d’écoute et à l’angle de 45" de l’axe du haut-parleur
principal, ils fournissent une reproduction du son accentuée sur
le point ® de la Figure 3. Le haut-parleur de gauche est dirigé
vers l’auditeur et le haut-parleur de droite est dirigé comme
s’éloignant de lui, de manière à ce que la directionnalité des
haut-parleurs compense les différences de perception du volume,
occasionnées par les différences de distance entre l’auditeur.
C’est pourquoi le son de la voix d’un chanteur est perçue comme
si elle provenait d’un unique point entre les haut-parleurs et les
sons instrumentaux se distribuent de manière équilibrée.
Figure 2
Effet stéréo avec un système de hautparleurs conventionnel
Unité principale
Hautparleur
gauche
@ Point central d’écoute
® Point d’écoute décentré :
Niveau de pression du son
: Surface d’écoute en stéréo
Le son équilibré qui s’entend des
haut-parleurs de droite et de
gauche
Le haut-parleur de droite s’entend
plus fort que celui de gauche
Hautparleur
droit
Figure 3 Effet stéréo avec le système de haut-
parleurs Aiwa de 180°
Il est possible d’entendre un véritable son stéréo aussi bien à
partir du point ® que du point @.
Unité principale
Hautparleur
gauche
Hautparleur
droit
(/}
■Ш
-I
<
cc
-Ш
Z
'Ш
ü
Niveau de pression du son
Surface d’écoute en stéréo des nouveaux haut-parleurs
FRANÇAIS 19
Page 56

Printed in China
AIWA CO.,LTD.
 Loading...