

Page 1
For assistance and information,
OPERATING INSTRUaiONS
MANUAL DE INSTRUCCIONES
MODE D'EMPLOI
8Z-NB8-913-01
981120AYK-H-U-9
call toll free 1-800-BUY-AIWA.
(United States and Puerto Rico)
DIGITAL AUDIO
Page 2

ENGLISH
WARNING
TO REDUCE THE RISK OF FIRE OR ELECTRIC
SHOCK, DO NOT EXPOSE THIS APPLIANCE TO
RAIN OR MOISTURE.
CAUTION
RISK OF ELECTRIC SHOCK
DO NOT OPEN
“CAUTION:TO REDUCE THE RISK OF
ELECTRIC SHOCK,
DO NOT REMOVE COVER (OR BACK).
NO USER-SERVICEABLE PARTS INSIDE.
REFER SERVICING TO QUALIFIED
SERVICE PERSONNEL.”
Explanation of Graphical Symbols:
The lightning flash with arrowhead symbol,
within an equilateral triangle, is intended to
alert the user to the presence of uninsulated
"dangerous voltage" within the product’s en
closure that may be of sufficient magnitude to
constitute a risk of electric shock to persons.
The exclamation point within an equilateral
triangle is intended to alert the user to the
presence of important operating and mainte
nance (servicing) instructions in the literature
accompanying the appliance.
7 Condensation - Moisture may form on the CD pickup lens
when:
- The unit is moved from a cold spot to a warm spot
- The heating system has just been turned on
- The unit is used in a very humid room
- The unit is cooled by an air conditioner
When this unit has condensation inside, it may not function
normally. Should this occur, leave the unit for a few hours, then
try to operate again.
8 Wall or ceiling mounting-The unit should not be mounted on
a wall or ceiling, unless specified in the Operating Instructions.
Electric Power
1 Power sources - Connect this unit only to power sources
specified in the Operating Instructions, and as marked on the
unit.
2 Polarization - As a safety feature, some units are equipped
with polarized AC power plugs which can only be inserted one
way into a power outlet. If it is difficult or impossible to insert the
AC power plug into an outlet, turn the plug over and try again.
If it still does not easily insert into the outlet, please call a
qualified service technician to service or replace the outlet. To
avoid defeating the safety feature of the polarized plug, do not
force it into a power outlet.
3 AC power cord
- When disconnecting the AC power cord, pull it out by the AC
power plug. Do not pull the cord itself.
- Never handle the AC power plug with wet hands, as this could
result in fire or shock.
- Power cords should be routed fo avoid being severely bent,
pinched, or walked upon. Pay particular attention to the cord
from the unit to the power socket.
- Avoid overloading AC power plugs and extension cords
beyond their capacity, as this could result in fire or shock.
4 Extension cord - To help prevent electric shock, do not use a
polarized AC power plug with an extension cord, receptacle, or
other outlet unless the polarized plug can be completely in
serted to prevent exposure of the blades of the plug.
5 When not in use - Unplug the AC power cord from the AC
outlet if the unit will not be used for several months or more.
When the cord is plugged in, a small amount of current
continues to flow fo the unit, even when the power is turned off.
Read the Operating Instructions carefully and completely before
operating the unit. Be sure to keep the Operating Instructions for
fufure reference. All warnings and cautions in the Operating
Instructions and on the unit should be strictly followed, as well as
the safety suggestions below.
Installation
1 Water and moisture - Do not use this unit near water, such as
near a bathtub, washbowl, swimming pool, or the like.
Heat - Do not use this unit near sources of heat, including
heating vents, stoves, or other appliances that generate heat.
It also should not be placed in temperatures less than 5"C
(41 "F) or greater than 35”C (95“F).
Mounting surface - Place the unit on a flat, even surface.
Ventilation - The unit should be situated with adequate space
around it so that proper heat ventilation is assured. Allow 10 cm
(4 in.) clearance from the rear and the top of the unit, and 5 cm
(2 in.) from the each side.
- Do not place the unit on a bed, rug, or similar surface that may
block the ventilation openings.
- Do not install the unit in a bookcase, cabinet, or airtight rack
where ventilation may be impeded.
Objects and liquid entry-Take care that objects or liquids do
not get inside the unit through the ventilation openings.
Carts and stands - When placed or
mounted on a stand or cart, the unit
should be moved with care.
Quick stops, excessive force, and un
even surfaces may cause the unit or
cart to overturn or fall.
Outdoor Antenna
1
Power lines - When connecting an outdoor antenna, make
sure it is located away from power lines.
Outdoor antenna grounding - Be sure the antenna system is
properly grounded to provide protection against unexpected
voltage surges or static electricity build-up. Article 810 of the
National Electrical Code, ANSI/NFPA 70, provides information
on proper grounding of the mast, supporting structure, and the
lead-in wire to the antenna discharge unit, as well as the size
of the grounding unit, connection to grounding terminals, and
requirements for grounding terminals.
Antenna Grounding According to the National Electrical Code
ENGLISH
Page 3
Maintenance
Cleain the unit only as recommended in the Operating Instructions.
Damage Requiring Service
Have the units serviced by a qualified service technician if:
- The AC power cord or plug has been damaged
- Foreign objects or liquid have gotten inside the unit
- The unit has been exposed to rain or water
- The unit does not seem to operate normally
- The unit exhibits a marked change in performance
- The unit has been dropped, or the cabinet has been damaged
DO NOT ATTEMPT TO SERVICE THE UNIT YOURSELF.
Owner’s record
Foryourconvenience, record the model numberand serial number
(you will find them on the rear of your set) in the space provided
below. Please refer to them when you contact your Aiwa dealer in
cas€i of difficulty.
Model No. Serial No. (Lot No.)
CX-NH330MDU
SX-WNH330
PRECAUTIONS........................................................................2
PREPARATIONS
CONNECTIONS
REMOTE CONTROL................................................................6
BEFORE OPERATION.............................................................6
SOIJND
_______________________________________
AUDIO ADJUSTMENTS
________________________________
.......................................................................
......................................................... 7
4
RADIO RECEPTION______________________________
MANUAL TUNING....................................................................8
PRESETTING STATIONS........................................................9
TAPE PLAYBACK
BASIC OPERATIONS
CONTINUOUS PLAY.......................................................... 11
CD PLAYING
BASIC OPERATIONS
RANDOM/REPEAT PLAY
PROGRAMMED PLAY.......................................................... 13
_______________________________
...........................................................
10
___________________________________
..........................................................
.....................................................
12
13
MD PLAYING___________________________________
BASIC OPERATIONS
RANDOM/REPEAT PLAY
PROGRAMMED PLAY.......................................................... 15
TAPE RECORDING
BASIC RECORDING..............................................................16
DUBBING THE WHOLE TAPE
Al EDIT RECORDING............................................................ 18
PROGRAMMED EDIT RECORDING.................................... 19
..........................................................
.....................................................
14
15
______________________________
.............................................
17
MD EDIT_____________________________________
REGISTERING THE DISC TITLE AND TRACK TITLE.... 27
DIVIDING A TRACK...............................................................28
COMBINING TWO TRACKS
CHANGING THE ORDER OF THE TRACKS
ERASING TRACKS................................................................30
CLOCK AND TIMER
SETTING THE CLOCK........................................................ 31
SETTING THE TIMER PLAYBACK
AND TIMER RECORDING...............................................31
SLEEP TIMER........................................................................32
OTHER INFORMATION
DISPLAY INFORMATION
ADJUSTING THE DISPLAY WINDOW BRIGHTNESS
(DIMMER)......................................................................... 34
SETTING POWER ECONOMIZING MODE...........................34
OTHER CONNECTIONS
CONNECTING OPTIONAL EQUIPMENT..............................35
LISTENING TO EXTERNAL SOURCES
...
.............................................
........................
___________________________
_________________________
....................................................
33
________________________
...............................
29
29
36
GENERAL____________________________________
CARE AND MAINTENANCE..................................................37
SPECIFICATIONS..................................................................38
TROUBLESHOOTING GUIDE
MD GUIDE MESSAGES
PARTS INDEX.......................................................................41
...............................................
........................................................
39
40
MD RECORDING________________________________
RiECORDING AWHOLE CD
RECORDING ONLY ONE TRACK....................................... 20
AUTO FIRST TRACKS RECORDING OF CDS................. 21
PROGRAMMED RECORDING OF CDS
RiECORDING THREE CDS CONTINUOUSLY
RIECORDING FROM A TAPE, THE RADIO OR
CONNECTED EQUIPMENT
EXTENDED RECORDING
SIMULTANEOUS RECORDING TO TAPE AND MD
FROM CD..........................................................................25
WHAT IS AN MD (MINI DISC)?...................................................26
..................................................
..............................
...................
.............................................
.....................................................
20
21
22
23
24
ENGLISH
Page 4

PREPARATIONS
Check your accessories
ips,
°c '
Of j
1 Connect the right and left speakers to the main
unit.
(i) Connect the right speaker cord with twisted cables to
SPEAKERS LOW FREQRterminals, and left to SPEAKERS
LOW FREQ L terminals.
vj;
Remote control AM loop antenna
Operating instructions, etc.
Before connecting the AC cord
The rated voltage of your unit shown on the rear panel is 120 V
AC. Check that the rated voltage matches your local voltage.
iWIPORTANT
• Connect the speakers, antennas, and all optional equipment
first. Then connect the AC cord in the end.
• There are no differences between the front speakers. Both
speakers can be connected as L (Left) or R (Right).
FM antenna
The speaker cord with the white stripe should be connected
to O terminal and the black cord to © terminal.
@ Connect the right speaker cord with RCA pin plug to
SPEAKERS HIGH FREQ R terminal, and left to SPEAKERS
HIGH FREQ L terminals.
4 ENGLISH
Page 5
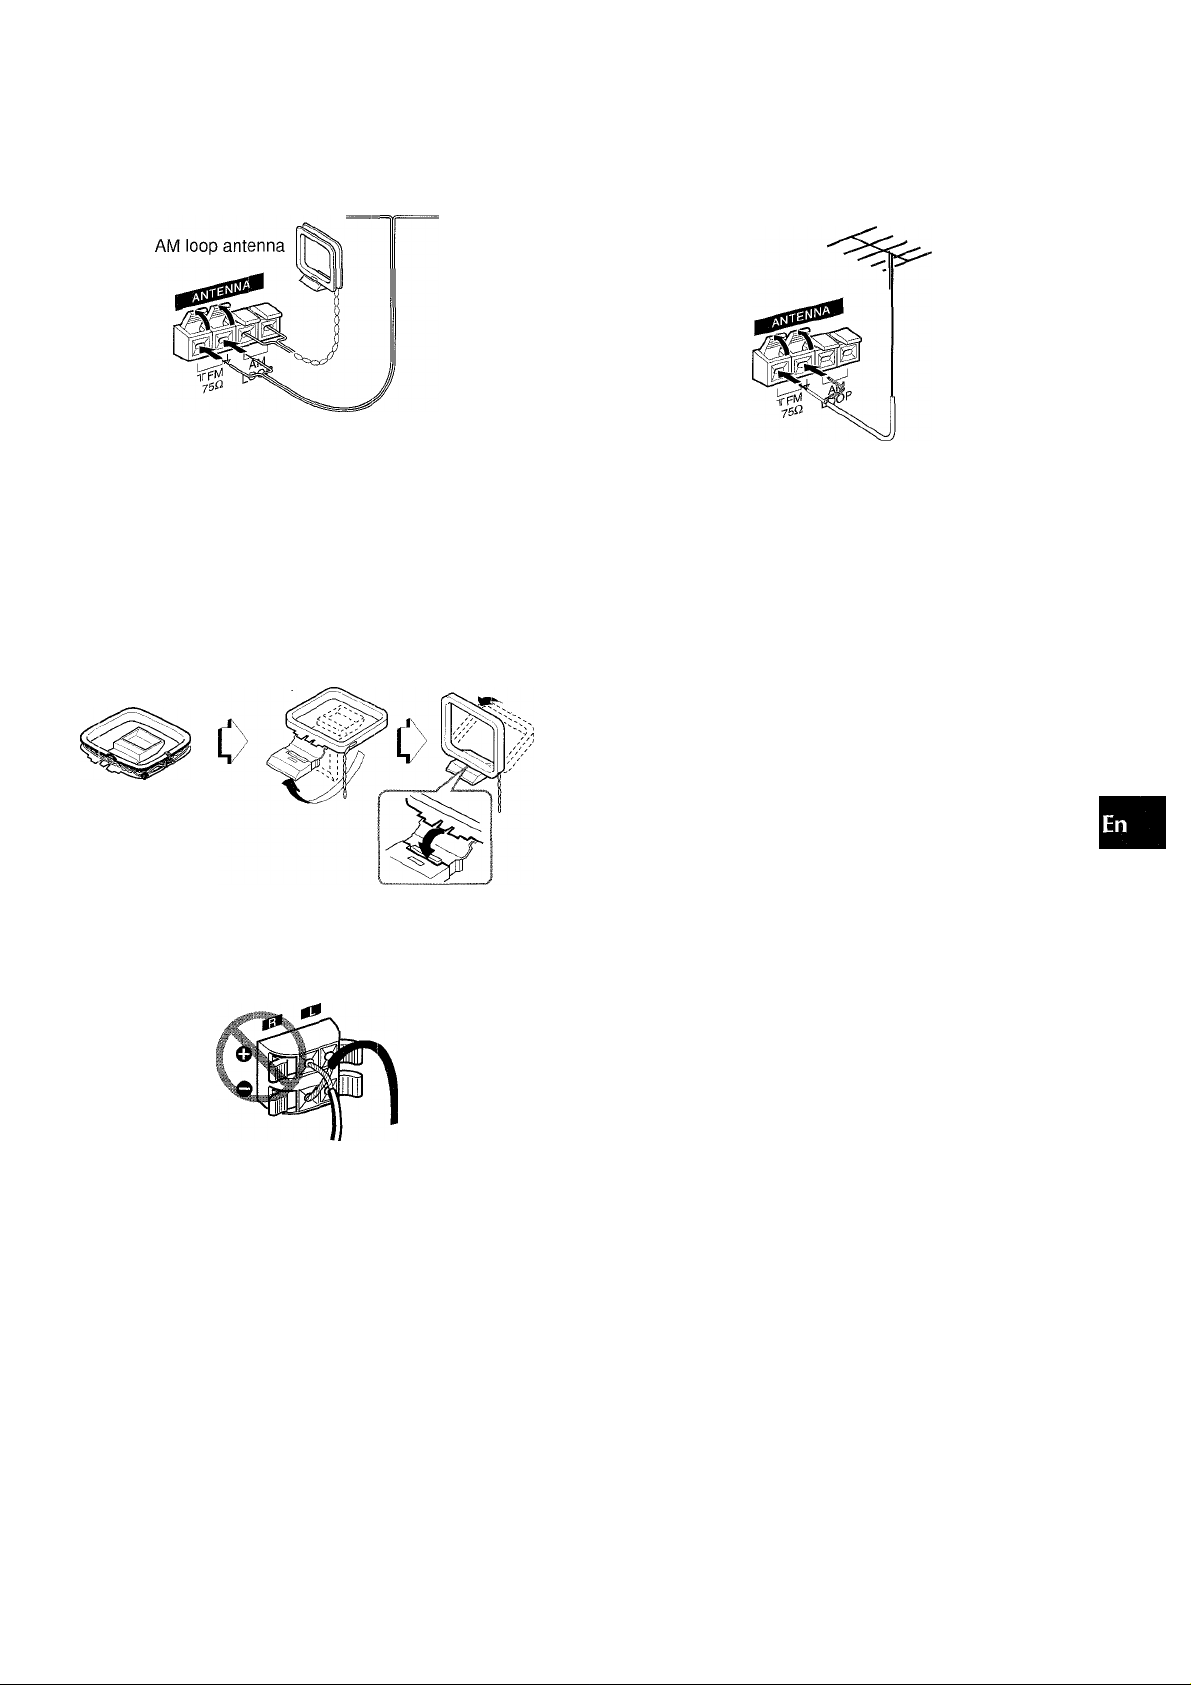
2 Connect the supplied antennas.
Connect the FM antenna to FWI 75 Q terminals and the AM
loop antenna to AM LOOP terminals.
FM antenna
3 Connect the AC cord to an AC outlet.
CONNECTING AN OUTDOOR ANTENNA
For better FM reception, use of an outdoor antenna is q
recommended. —
Connect the outdoor antenna to FM 75 Q. terminals. ^
K
s
u
Q.
To position the antennas
FM feeder antenna:
Extend this antenna horizontally in a T-shape and fix its ends to
the wall.
AM loop antenna:
Position for the best reception.
To stand the AM loop antenna on a surface
Fix the daw to the slot.
Be sure to connect the speaker cords correctly. Improper
connections can cause short circuits in SPEAKERS LOW
FREQ terminals.
To connect other optional equipment -» page 35.
Do not leave objects generating magnetism near the speakers,
as these objects may be damaged.
' Do not bring the FM antenna near metal objects or curtain rails.
Do not bring the AM loop antenna near other optional
equipment, the stereo system itself, the AC cord or speaker
cords, since noise will be picked up.
• Do not unwind the AM loop antenna wire.
ENGLISH b
Page 6
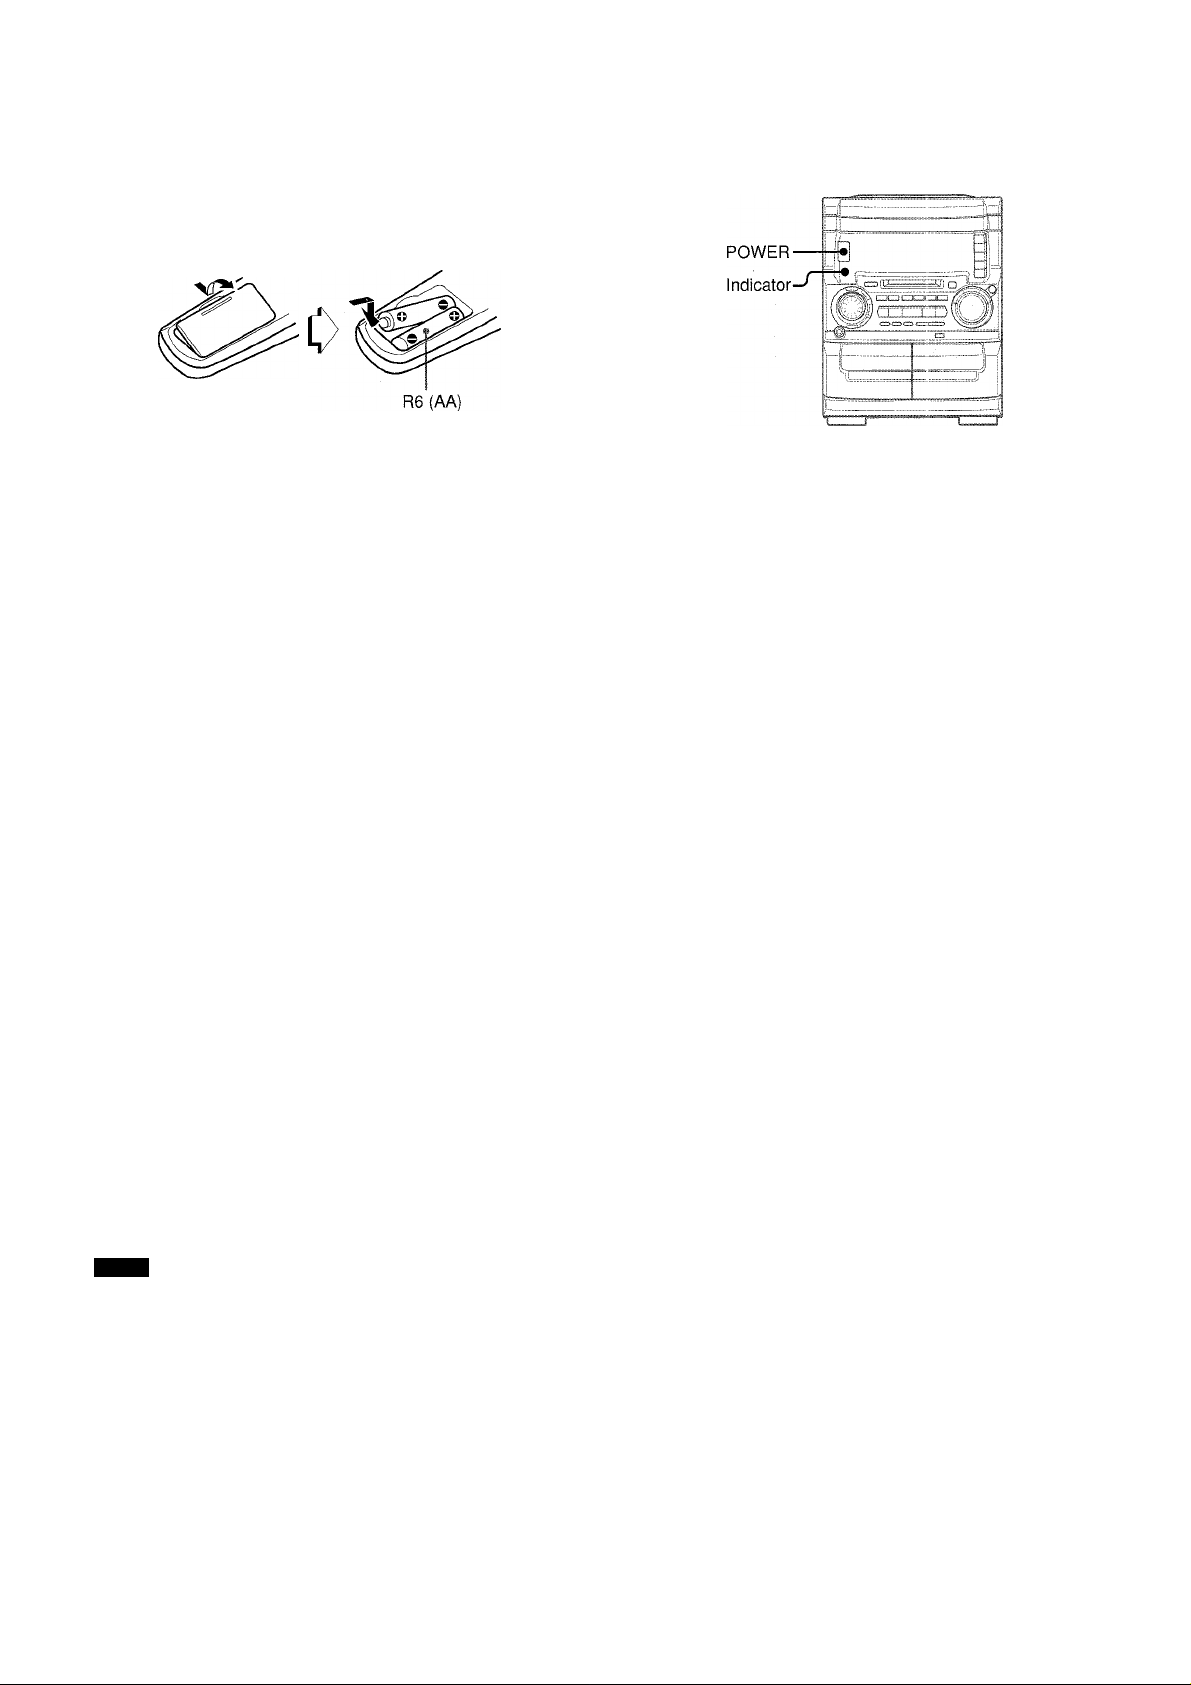
Inserting batteries
Detach the battery cover on the rear of the remote control and
insert two R6 (size AA) batteries.
When to replace the batteries
The maximum operational distance between the remote control
and the sensor on the main unit should be approximately 5 meters
(16 feet). When this distance decreases, replace the batteries
with new ones.
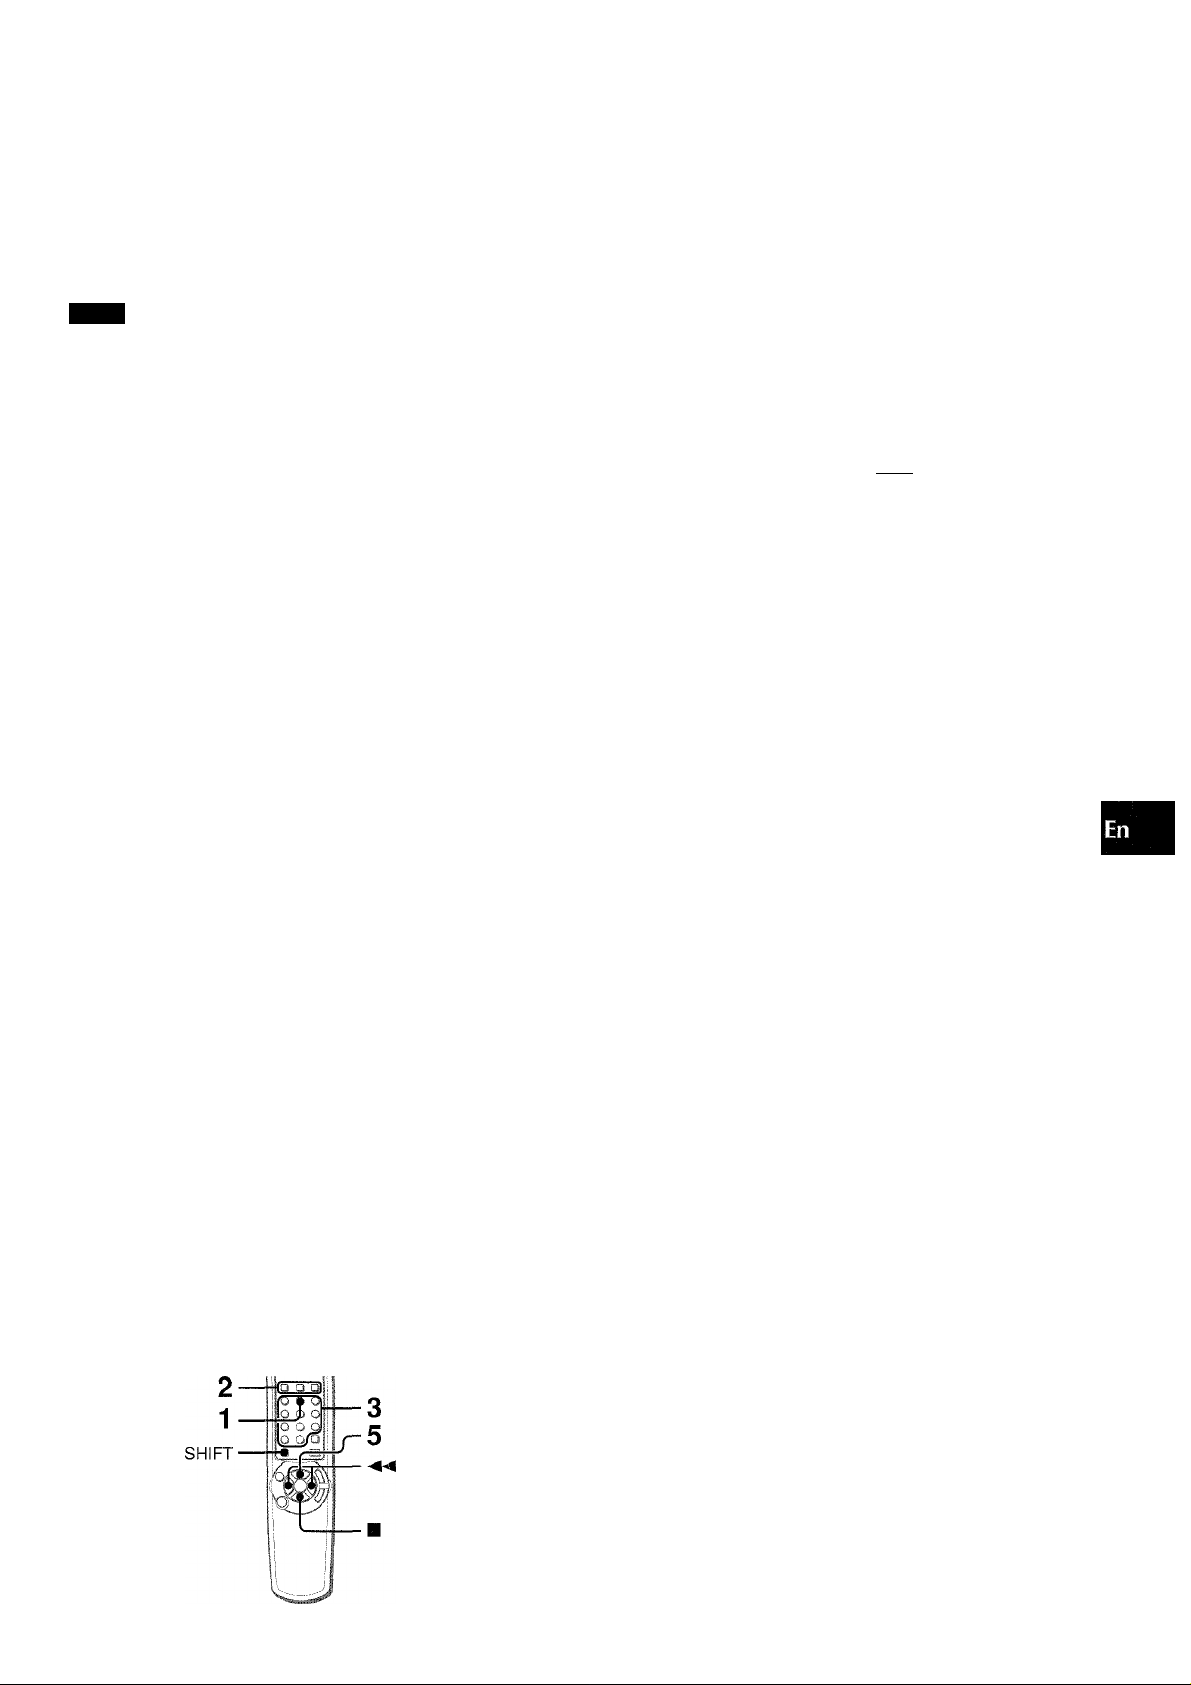
To use the remote control
• Buttons on the remote control with the same names as those
on the main unit can be used instead. There are operations
performed by both the main unit and the remote control, but
there also exist operations performed by the remote control
only.
Read this manual for each operation and the buttons that can
be used.
• Some buttons on the remote control have two different functions.
To use the function on the button, simply press the button. To
use the function on the plate above or below the button, press
the button while pressing SHIFT.
ra
C 0
o
. o J u II
<0 ^
If
SHIFT-
To turn the unit on
Press POWER.
To turn the unit off
Press POWER again.
If the power is turned off after the clock is set
The red indicator below the power button lights to indicate that
power is supplied. Nothing is displayed on the display window
(setting when you purchase the unit).
To turn off the CD compartment light
Press the ■ button while pressing the CD button. Repeat the
same operation to restore the light.
To turn off the MD compartment light
Press the ■ button while pressing the MD button. Repeat the
same operation to restore the light.
153^
When you purchase this unit, the power economizing mode
is set to ON.
If the tape, CD, and MD are stopped and there is no audio
input from any connected external equipment for 10 minutes,
the power shuts off. To set the power economizing mode to
OFF, see page 34.
To use FUNCTION on the remote control
FUNCTION substitutes for the function buttons (TAPE (1, 2),
TUNER (FM, AM), AUX, D-IN, CD, MD) on the main unit.
Each time FUNCTION is pressed, the next function is selected
cyclically. When tapes are inserted in both decks, both decks
can be selected with FUNCTION.
NOTE
■ If the unit is not going to be used for an extended period of
time, remove the batteries to prevent possible electrolyte
leakage.
■ The remote control may not operate correctly when:
- The line of sight between the remote control and the remote
sensor inside the display window is exposed to intense light,
such as direct sunlight
- Other remote controls are used nearby (those of a television,
etc.)
6 ENGLISH
CONCERNING THE DISPLAY WINDOW'S DEMO DISPLAY
When the power cord is plugged into an electrical outlet for the
first time after purchase, a demo display will appear in the display
window. When the power is turned on, the demo display will end.
When the power is turned off, the demo display will appear again.
Until the clock is set, the demo display will appear whenever the
power is turned off.
When the clock is set
Normally, the demo display will not appear,
if is pressed when the power is off, the demo display will
appear. To end the demo display, press ◄►. (For setting the
clock, see page 31.)
After the power is turned on
Display of source and volume level flashes for 4 seconds while
the unit is being powered on.
During this period, the unit cannot be operated.
Page 7

SOUND
■GEQ
44— T-BASS
,Ei
VOL
■SHIFT
ROCK/POP/CLASSIC
VOLUME
Turn VOLUME on the main unit, or press VOL on the remote
control.
The volume level is displayed as a number from 0 to 49 followed
by MAX.
The volume level is automatically set to 20 when the power is
turned off while the volume level is set to 21 or more.
Q SURROUND SYSTEM
The Q SURROUND system built into this unit uses only two
speakers at the left and right to create an atmosphere that sound
as if you are surrounded by two front speakers and two rear
speakers.
Press Q SURROUND on the main unit to light up "Q
SURROUND" in the display window.
Displayed for 4 seconds.
;■ ■■
......
i 1r; ;
Lights.
To cancel the Q SURROUND effect
Press Q SURROUND again.
’ The Q SURROUND system does not work in monaural mode.
■ Setting of T-BASS, graphic equalizer or Q SURROUND has
no effect on tape recording or MD recording.
V>
Z
0
g
a
1
UJ
cc
a.
a
z
o
o
V)
SUFFER T-BASS SYSTEM
The T-BASS system enhances the realism of low-frequency
sound.
Press T-BASS.
Each time it is pressed, the level changes. Select one of the
three levels, or the off position to suit your preference.
I
(OFF)
To s€!lect with the remote control
Press T-BASS while pressing SHIFT.
Low frequency sound may be distorted when the T-BASS system
is used for a disc or tape in which low frequency sound is originally
emphasized. In this case, cancel the T-BASS system.
GRAPHIC EQUALIZER
This unit provides the following three different equalization curves.
ROCK: Powerful sound emphasizing treble and bass
POP: More presence in the vocals and midrange
CLASSIC: Enriched sound with heavy bass and fine treble
Press ROCK, POP or CLASSIC.
The selected equalization mode is displayed for 4 seconds.
Lights.
Displayed for 4 seconds.
ROCK
To cancel the selected mode
Press the selected button again. "GEQ OFF" is displayed for 4
seconds.
To select with the remote control
Press GEQ repeatedly while pressing SHIFT.The GEQ mode is
displayed cyclically as follows.
ROCK POP-
CLASSIC
GEQ OFF -
(cancel)
Using the headphones
Connect headphones to PHONES jack with a stereo standard
plug (oG.3 mm, 'Ainch).
No sound is output from the speakers while the headphones are
plugged in.
Sound adjustment during recording
The output volume and tone of the speakers or headphones may
be freely varied without affecting the recording.
ENGLISH 7
Page 8
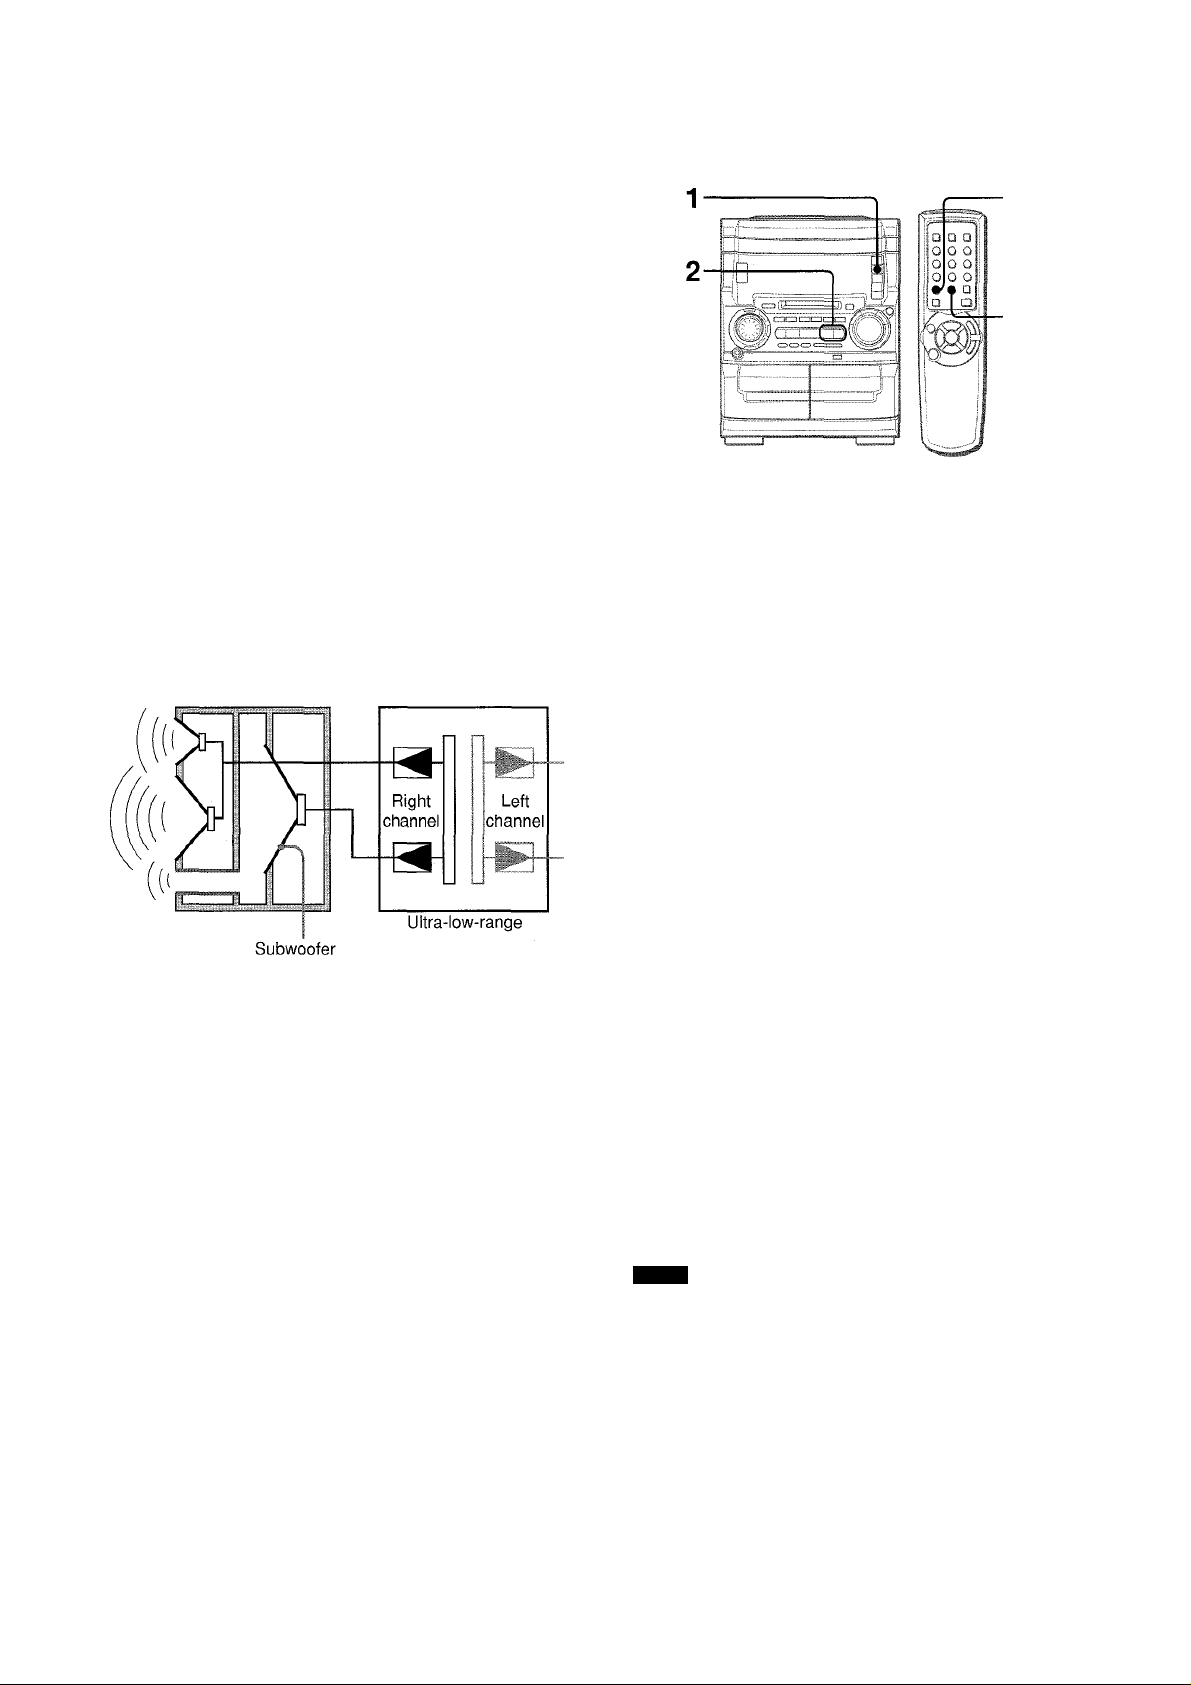
MULTI-AMPLIFIER SYSTEM
To provide reinforcement for the ultra-low frequencies, in addition
to the Left/Right 2-channel amplifier used to reproduce mid-tohigh-range frequencies, this system incorporates a second L/R
2-channel amplifier just for reproduction of ultra-low frequencies
- making it, in effect, a 4-amplifier system. By utilizing discrete
amplifiers for mid-to-high frequencies and low frequencies, highquality sonic reproduction that is virtually free from distortion can
be realized.
BUILT-IN SUBWOOFER SYSTEM
The built-in subwoofer system has a separate subwoofer cavity
area that is part of the loudspeaker cabinet structure, which acts
as a sonic filter to cut distortion components. (In the Multi
Amplifier system, the ultra-low frequency signals transmitted from
fheir own independent amplifier are reproduced in this area.)
This separate construction gives a clear, rich definition to bass
reproduction and it can realize clear, well-defined mid-to-high
frequency signals. And AlWA's built-in subwoofer system
incorporates a subwoofer capable of powerful, satisfying bass
performance with true stereo separation.
Right speaker
Mid-to-high-range
RADIO RECEPTION
1 Press TUNER BAND repeatedly to select the
desired band.
FM AM
C
Press ◄◄ or ►► to select a station.
Each time the button is pressed, the frequency changes.
When a station is received, "TUNE" is displayed.
During FM stereo reception, (itc©i)l ¡s displayed.
MONO
TUNER
BAND
F'M "rLiRÉ
To search for a station quickly (Auto Search)
Keep the « or ►► button pressed until the tuner starts
searching for a station. After tuning in a station, the search stops.
To stop the Auto Search manually, press the ◄◄ or ►► button.
• The Auto Search may not stop at stations with very weak signals.
When an FM stereo broadcast contains noise
Press MONO TUNER on the remote control repeatedly while
pressing SHIFT so that "MONO" lights up on the display.
Noise is reduced, although reception is monaural.
To restore stereo reception, press this button until "MONO"
disappears.
To change the AM tuning interval
The default setting of the AM tuning interval is 10 kHz/step. If
you use this unit in an area where the frequency allocation system
is 9 kHz/step, change the tuning interval.
Press POWER while pressing
To reset the interval, repeat this procedure.
NOTE
When the AM tuning interval is changed, all preset stations are
cleared. The preset stations have to be set again.
8 ENGLISH
Page 9

PRESET STATION TUNING
— Numbered
■ItT - buttons
-BAND
o.
The unit can store a total of 32 preset stations. When a station is
stored, a preset number is assigned to the station. Use the preset
number to tune in a preset station directly.
1 Press TUNER BAND button to select a band, and
press ◄◄ or ►►► to select a station.
2 Press II to store the station.
A station is assigned a preset number for each band in
consecutive order beginning from 1.
Presef number
1 Press TUNER BAND to select a band.
2 Press ◄►or turn MULTI JOG.
Each time the button is pressed, the next ascending preset
number is selected.
Tuning by preset number
1 Press BAND on the remote control while pressing SHIFT to
select a band. (Or, use TUNER BAND on the main unit.)
2 Press the numbered buttons on the remote control to select a
preset number:
Example:
To select preset number 10, press the +10 and 0 buttons.
To select preset number 15, press the +10 and 5 buttons.
To clear a preset station
Select the preset number of the station to be cleared. Then,
pressB, and press II within 4 seconds.
The preset numbers of all other stations in the band with higher
numbers are also decreased by one.
NOTE
If there is a long period of power failure or disconnecfion of AC
cord, the presetting of the stations is canceled. In this case, preset
again.
Q
2
3
o
o
u
K
a
<
DC
p-p-i
Frequency
F^epeat steps 1 and 2.
The next station will not be stored if a tofal of 32 preset stations
have already been stored.
If you try prestting more than 32 stations, ”PRST FULL" is
displayed.
ENGLISH 9
Page 10
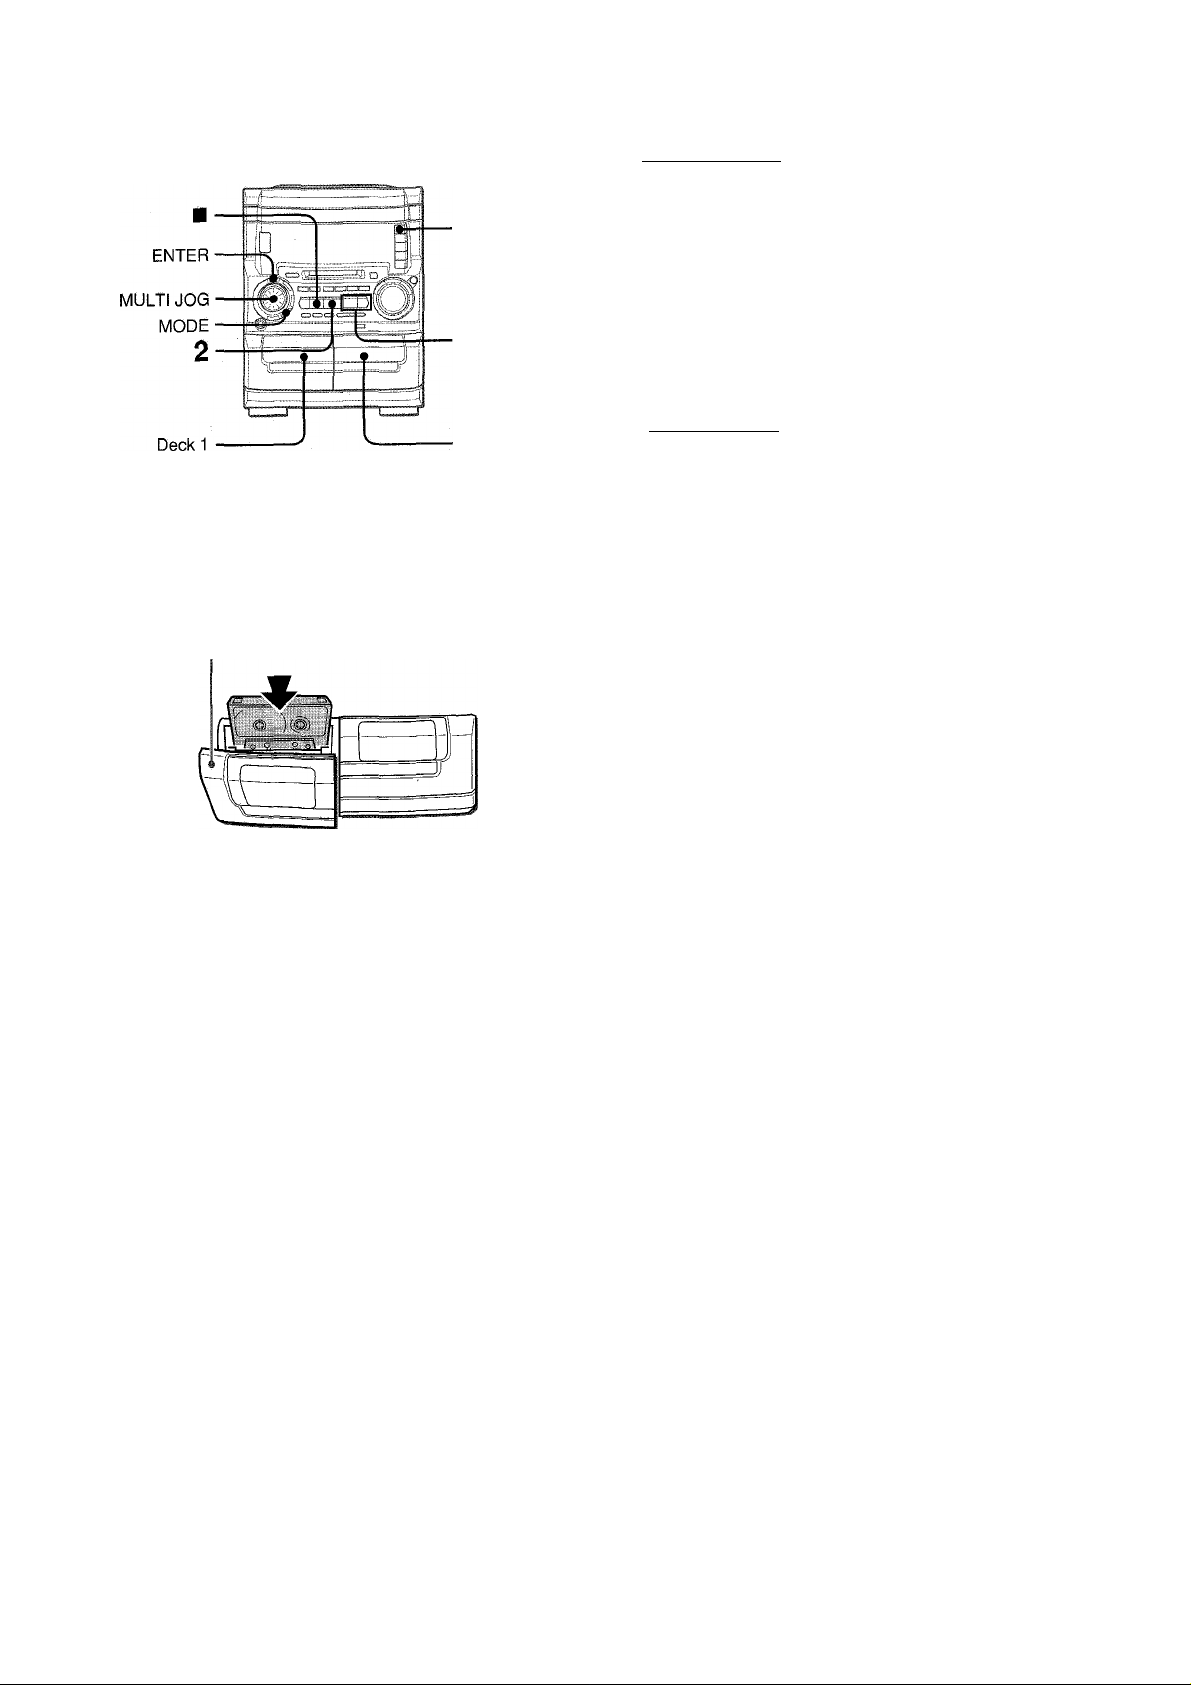
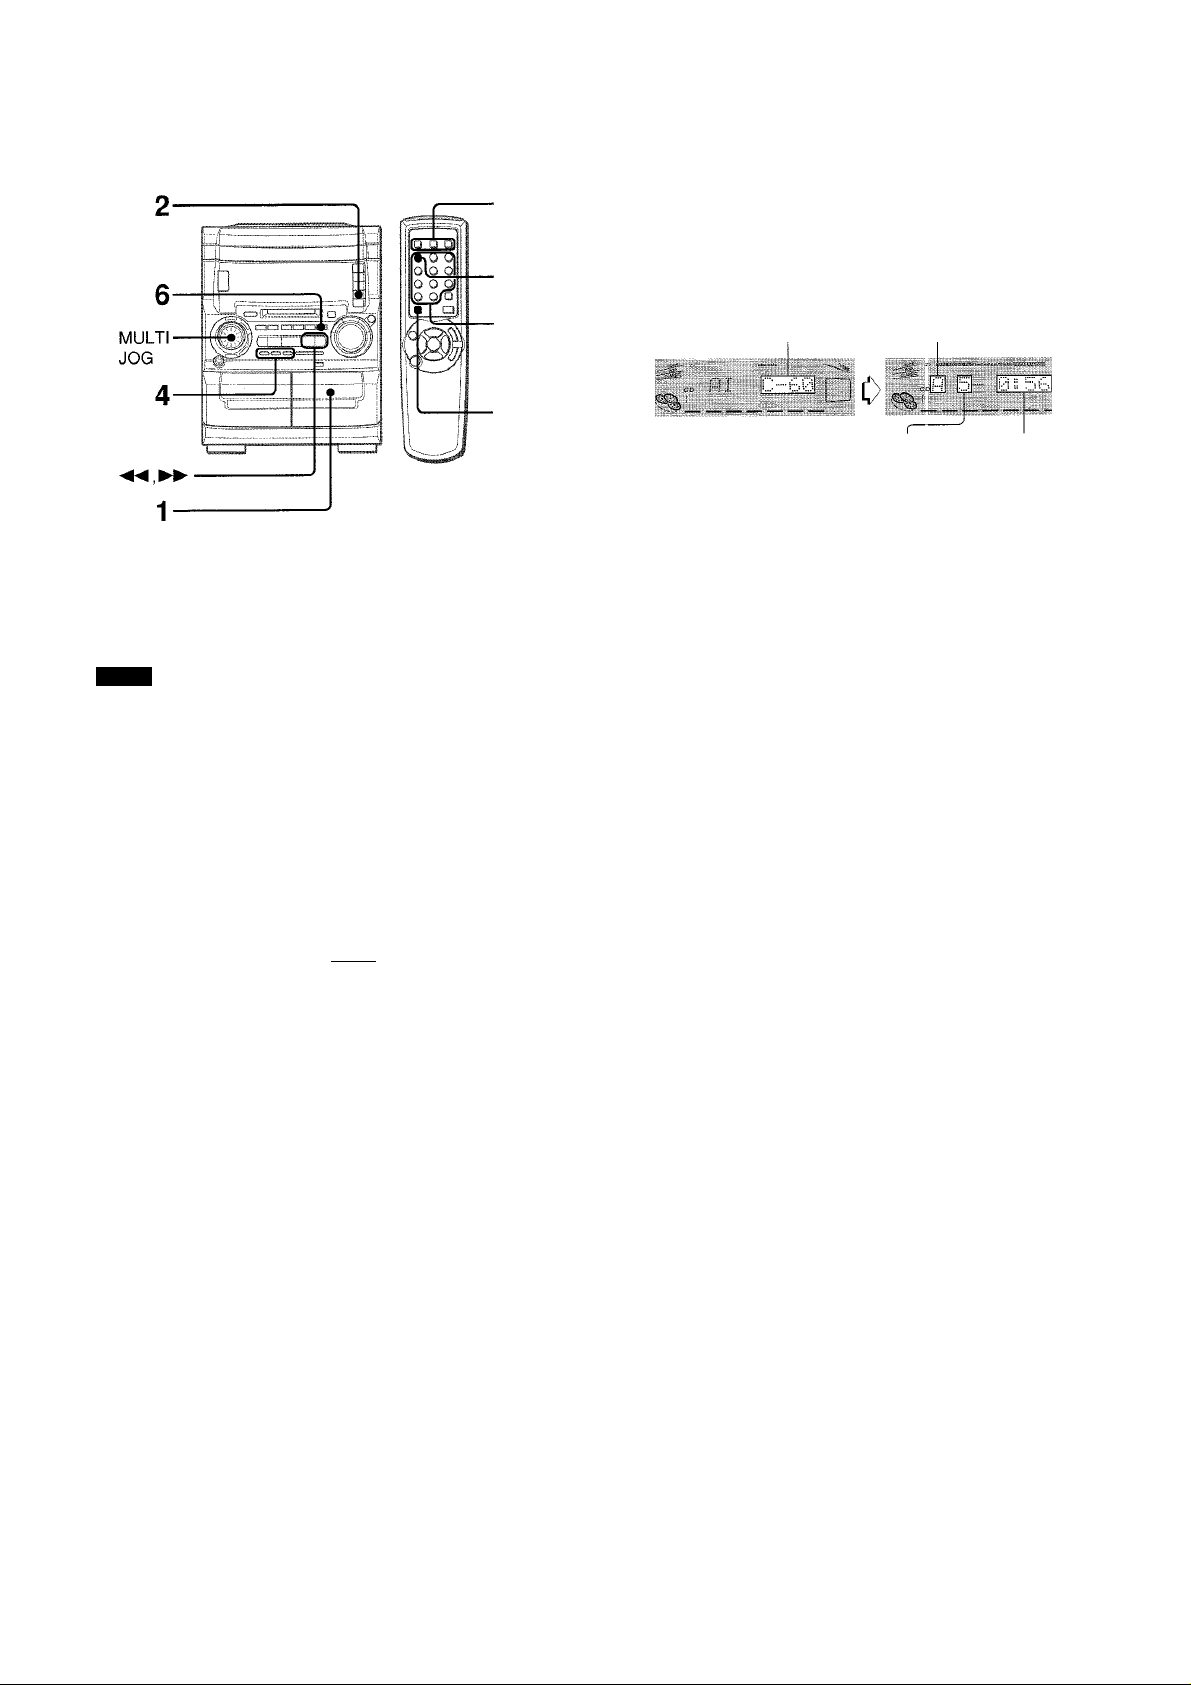
TAPE PLAYBACK
To select a reverse mode (deck 2 only)
Press MODE repeatedly until "Deck 2 MODE?" is displayed.
Within 10 seconds, press ENTER, then turn MULTI JOG to
select the reverse mode.
REJj M Z >
Deck 2
• On deck 1, tapes are always played back on both sides.
• On deck 2, you can select a reverse mode to play back one or
both sides.
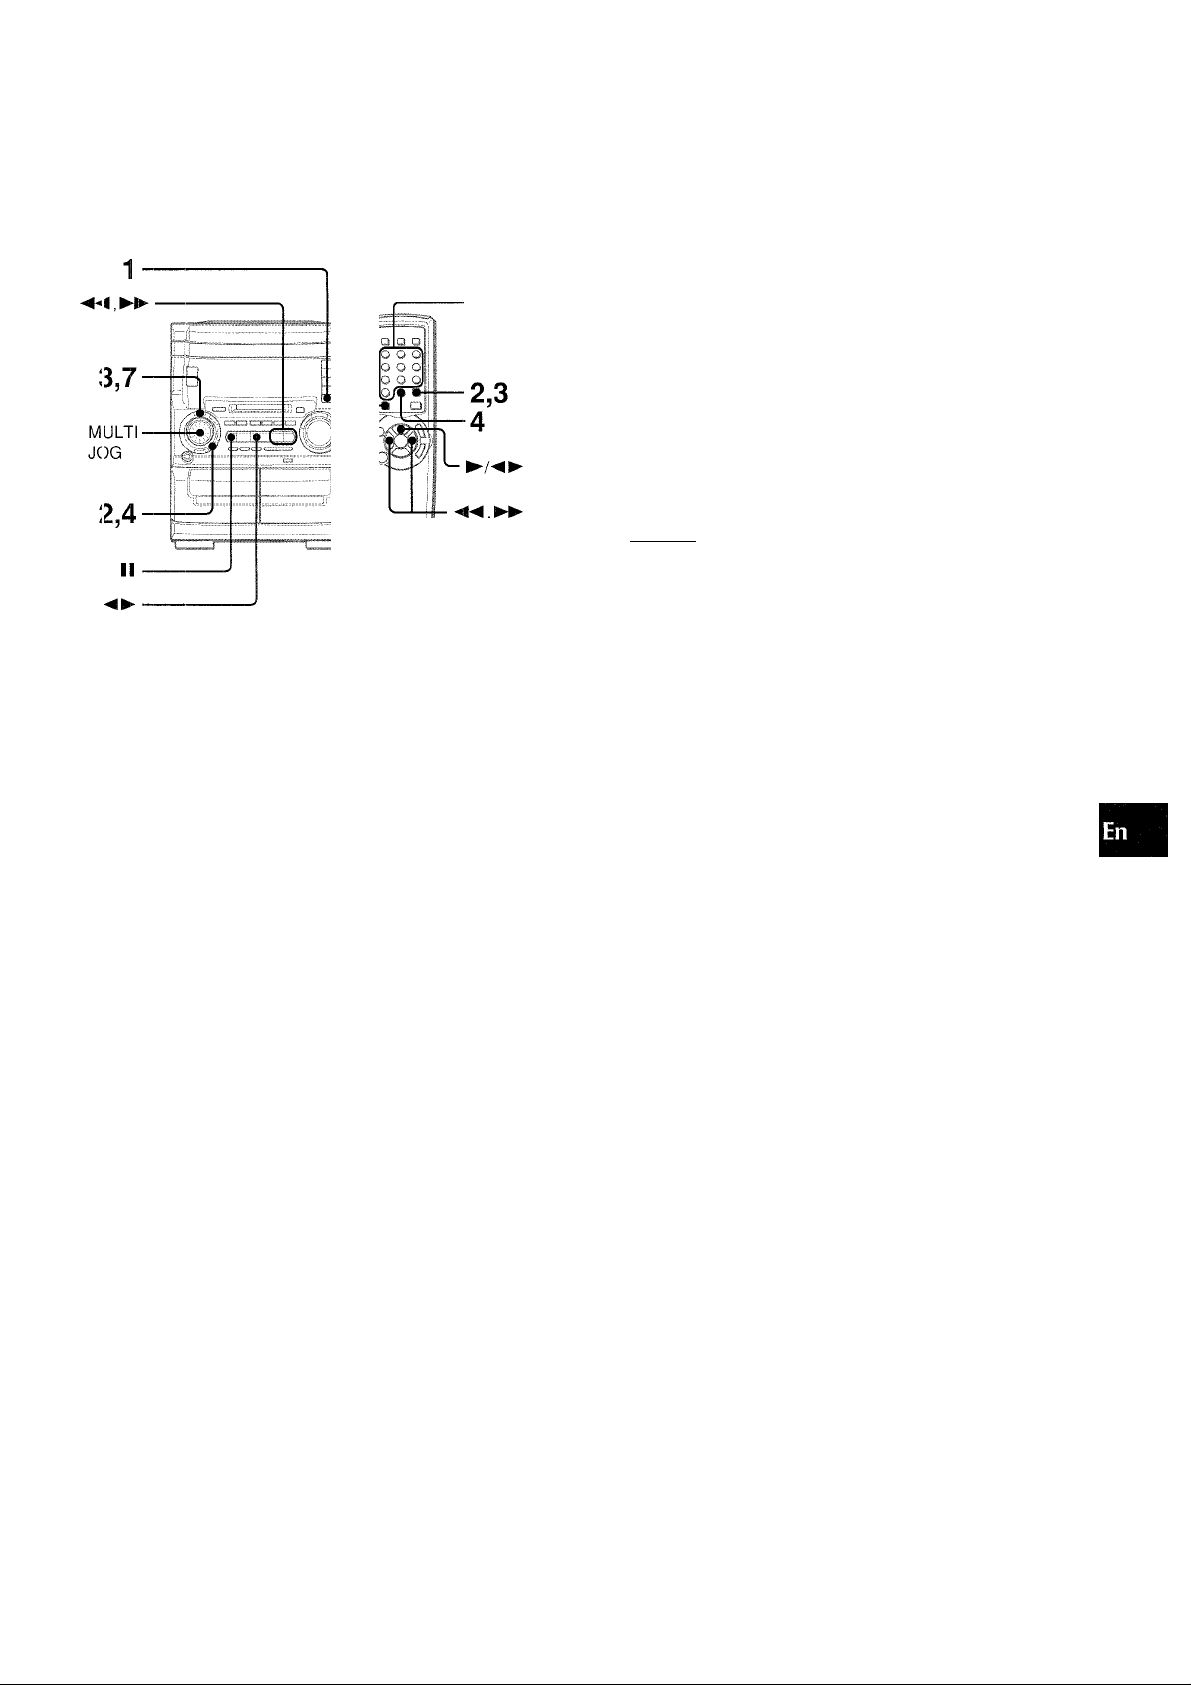
1 Press TAPE and press ± EJECT to open the
cassette holder.
A EJECT
Insert a tape with the exposed side down. Push the cassette
holder to close.
2 Press ◄►to start play.
[iiZ:
To play one side only, select "1".
To play from front side to reverse side once only, select "Z)".
To play both sides repeatedly, select "Cl)".
3 Within 10 seconds, press ENTER again.
When tapes are loaded in both decks
Press TAPE DECK 1/2 first to select a deck.
The selected deck number is displayed.
To stop play, press ■.
To pause play (deck 2 only), press II. To resume play, press
again.
To fast forward or rewind, press ◄◄ or ►►. Then press ■
to stop the tape.
To start piay when the power is off (Direct Play Function)
When the tape is loaded, press TAPE DECK 1/2. The power is
turned on and play of the inserted tape begins.
To set the tape counter to 0000
Press ■ in stop mode.
The counter is also set to 0000 when the cassette holder is
opened.
□
Playback side indicator
T'FZi. '6600
Playing deck number Tape counter
► : The front side is being played (forward).
◄ : The back side is being played (reverse).
Types of tape
This unit was designed for optimal playback of Type I (normal)
tapes.
Type II tapes can also be played back in this unit. When playing
back a Type II tape, turn MULTI JOG to display "SOFT" in the
display window. This will set the optimum playback sound for
Type II tapes. However, "SOFT" playback will be canceled if the
graphic equalizer is selected (page 7), the unit is switched to a
different audio source, the cassette holder is opened, or when
the power is turned off.
1 0 ENGLISH
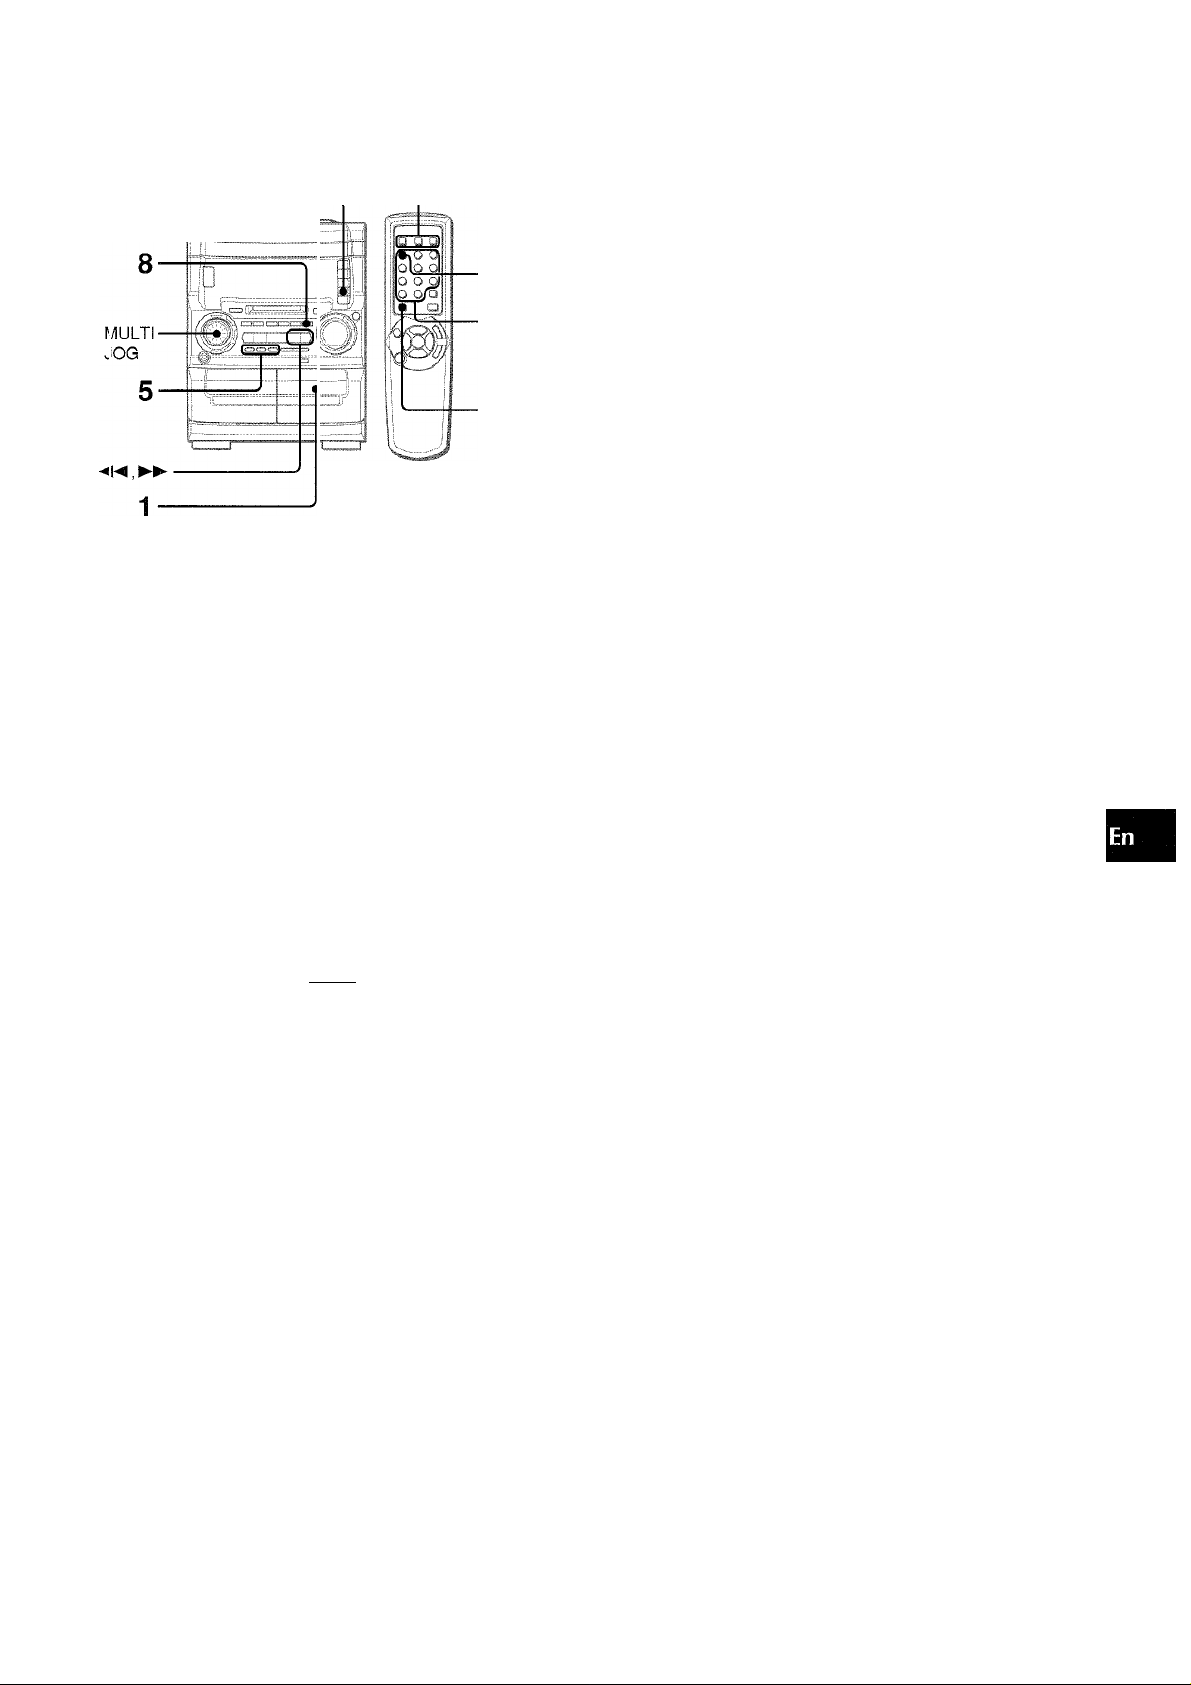
Page 11
ENTER
MULTI JOG
After playback on one deck finishes, the tape in the other deck
will start to play without interruption.
1 Insert tapes into deck 1 and deck 2.
2 F>ress TAPE DECK1/2 to select the deck to be
played back first.
3 Set the reverse mode to "Z5".
1 Press MODE repeatedly until "Deck 2 MODE?" is
displayed.
2 Within 10 seconds, press ENTER, then select "TO" with
MULTI JOG.
3 Within 10 seconds, press ENTER again.
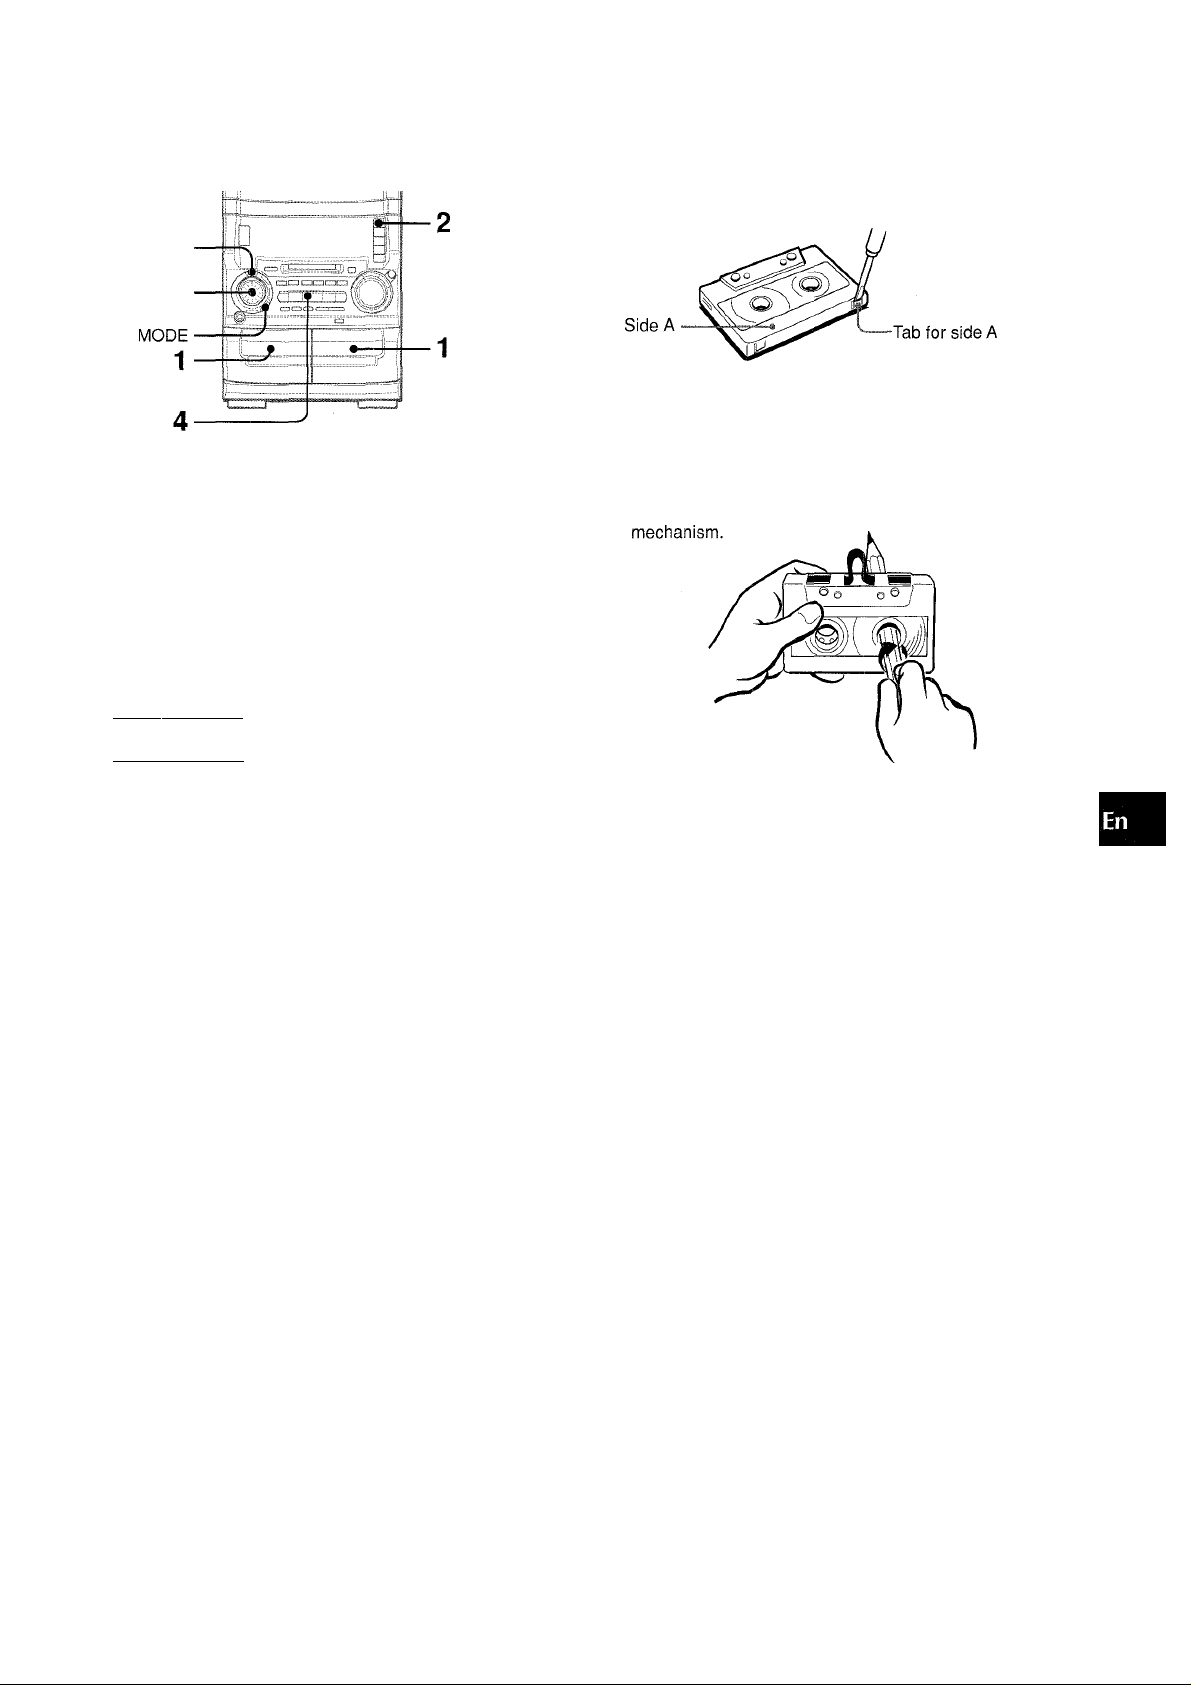
About cassette tapes
• To prevent accidental erasure, break off the plastic tabs
on the cassette tape after recording with a screwdriver or
other pointed tool.
To record on the tape again, cover the tab openings with
adhesive tape, etc.
‘ 120-minute or longer tapes are extremely thin and easily
deformed or damaged. They are not recommended.
Take up any slack in the tape with a pencil or similar tool
before use. Slack tape may break or jam in the
iC
Q
<
n
ij
0.
Ul
'll’
4 Press ◄►to start playback.
Playback continues until ■ is pressed.
ENGLISH 1 1
Page 12
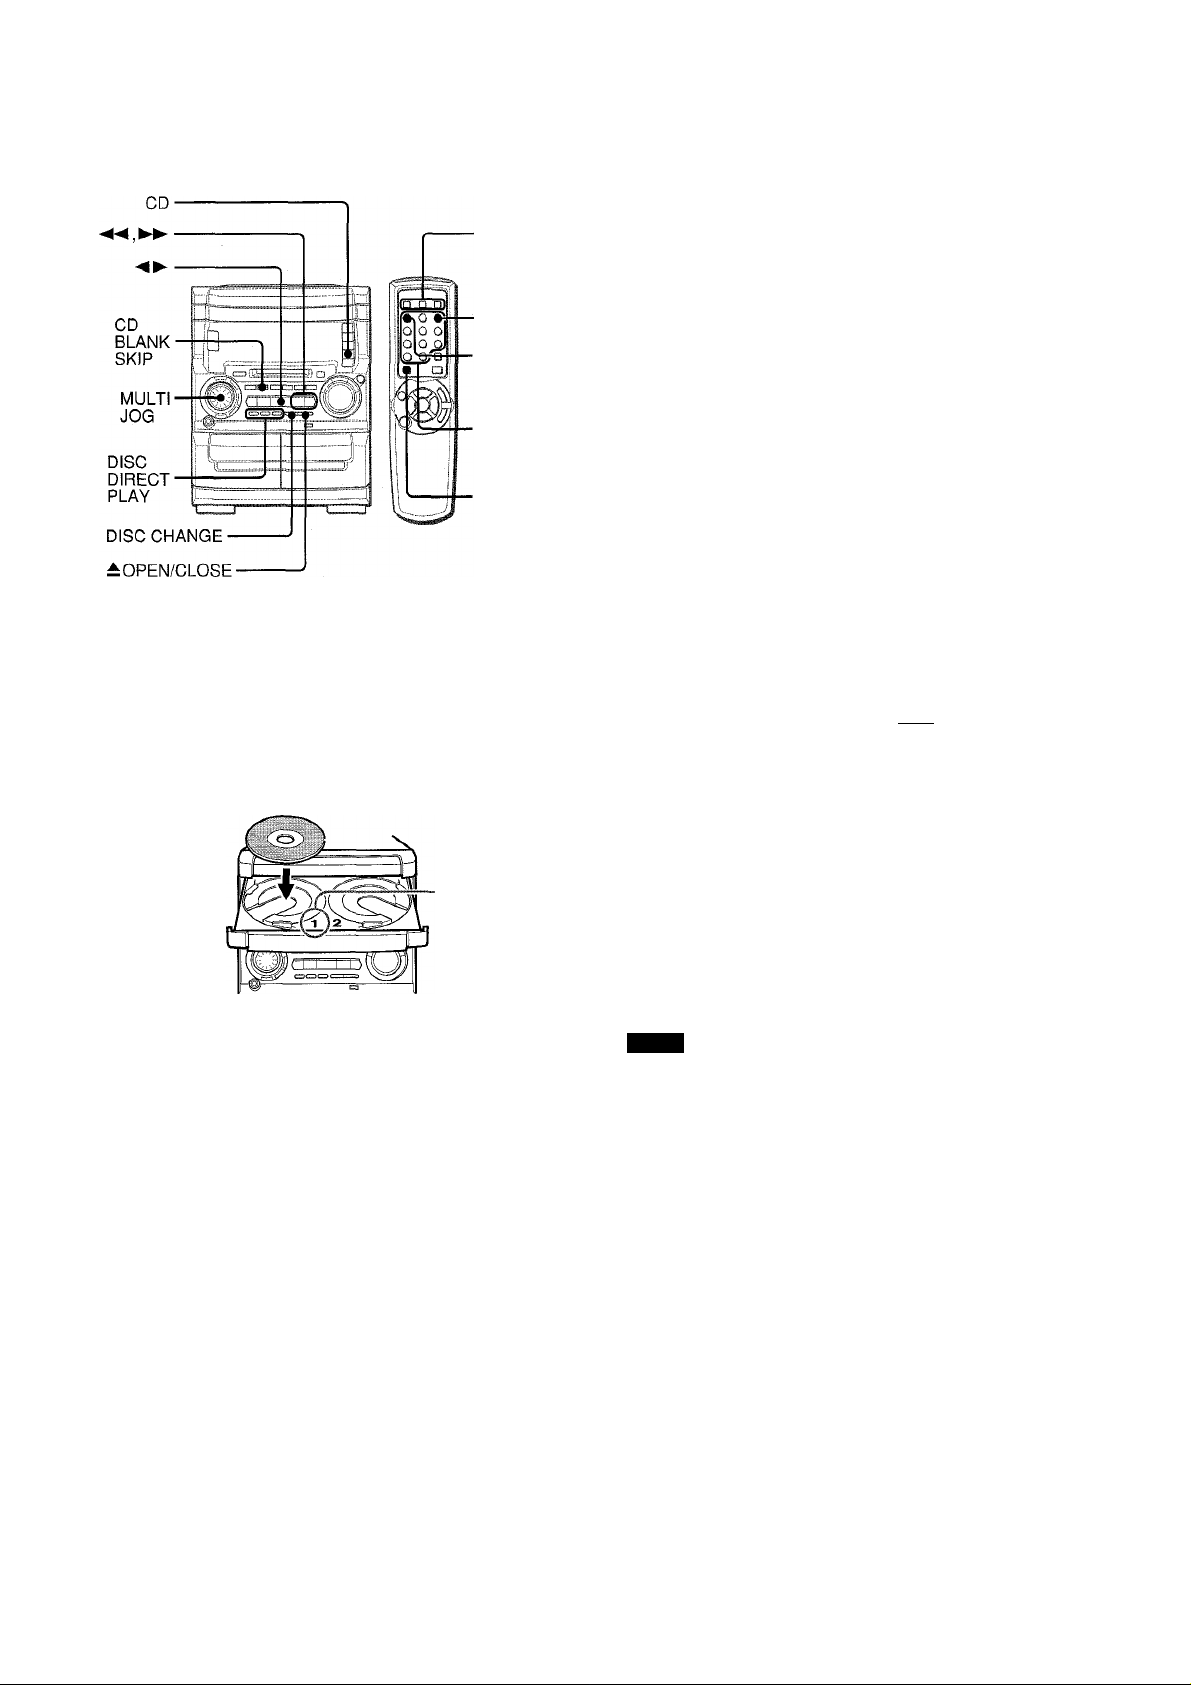
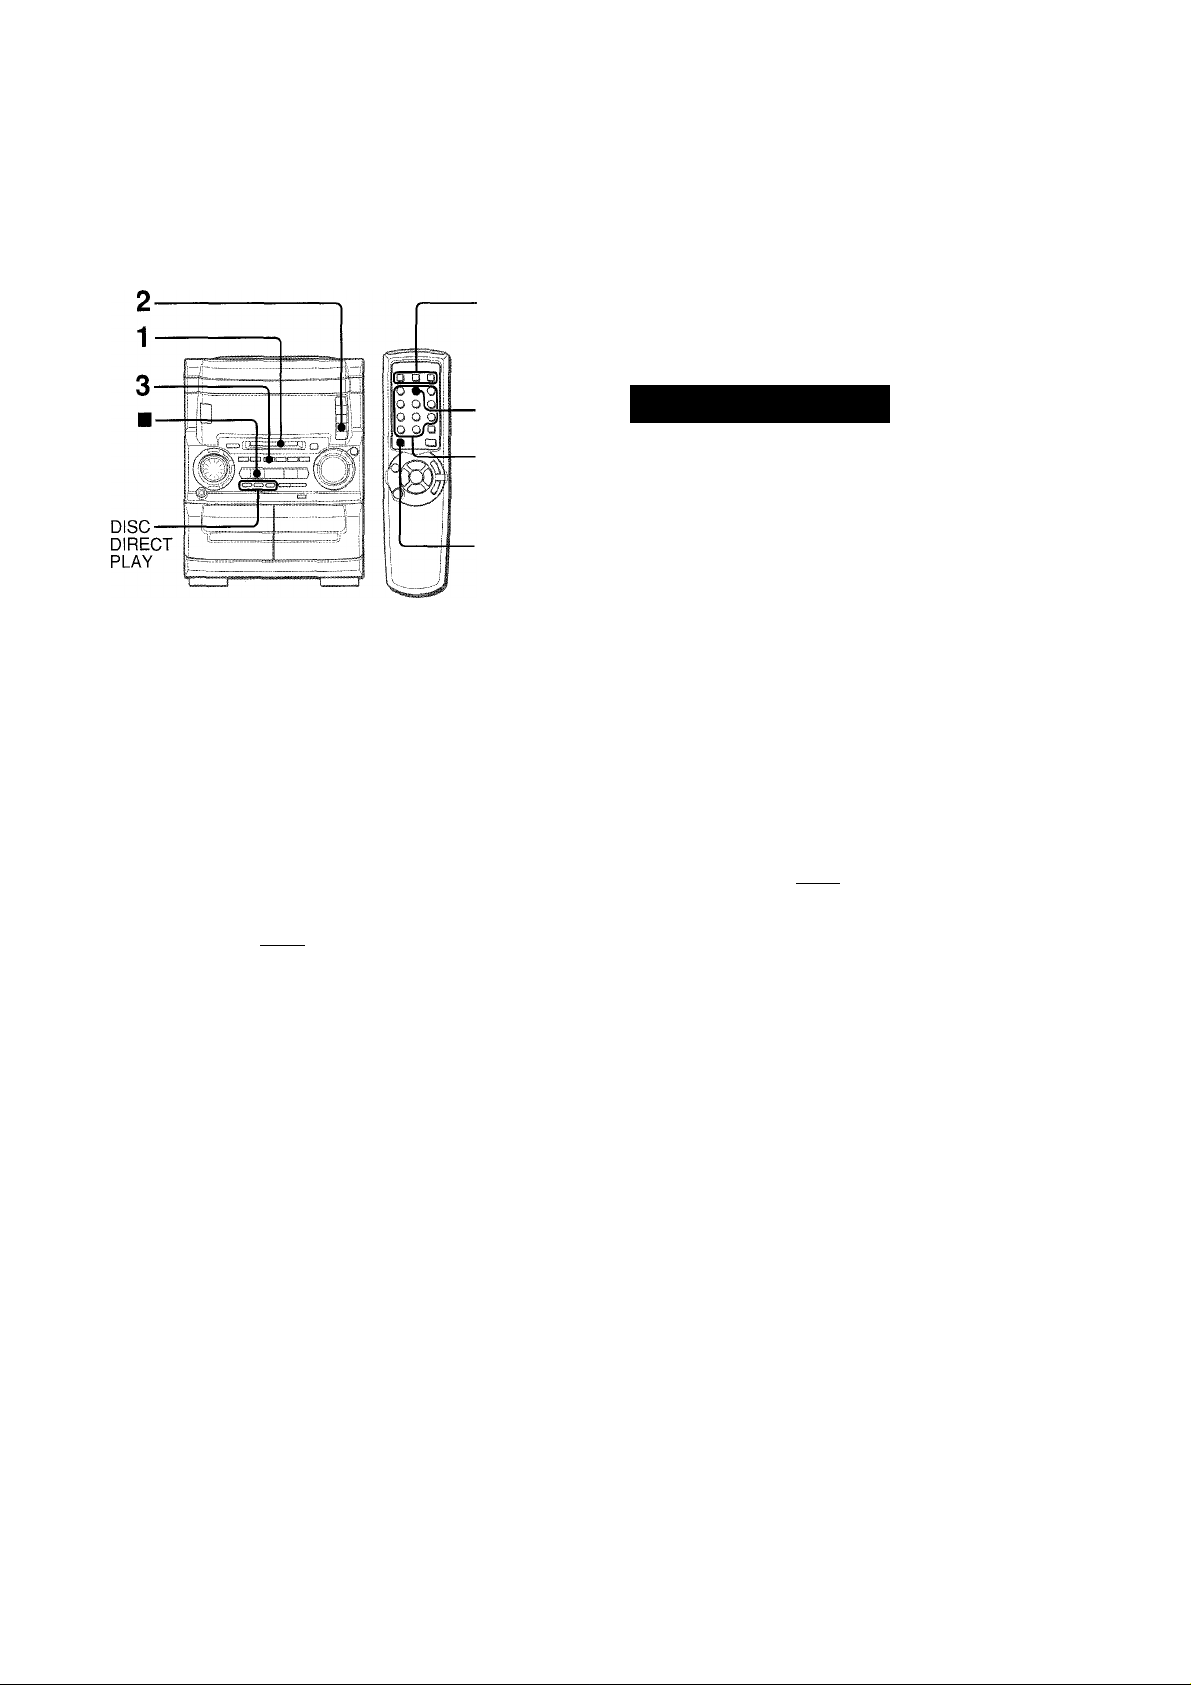
CD PLAYING
DISC
DIRECT
PLAY
RANDOM/
REPEAT
■ CD EDIT/
CHECK
■ Numbered
buttons
■ SHIFT
To play one disc only, press DISC DIRECT PLAY 1-3.
The selected disc is played once.
To stop play, press ■.
To pause play, press II. To resume play, press again.
To search for a particular point during piayback or in pause
mode, keep ◄◄ or ►► pressed and release it at the desired
point.
To skip to the beginning of a track, press ◄◄ or ►►
repeatedly or turn MULTI JOG until the desired track is displayed.
To remove discs, press — OPEN/CLOSE.
To Start play when the power Is off (Direct Play Function)
Press CD when the disc (s) is (are) loaded. The power is turned
on and play of the loaded disc(s) begins.
When A OPEN/CLOSE is pressed, the power is also turned on.
To check the remaining time
During CD piayback or in pause mode, press DISPLAY on the
unit or press CD EDIT/CHECK on the remote controi while
pressing SHIFT. The amount of time remaining untii all tracks
finish playing is displayed. To restore the elapsed playing time
display, repeat the above.
LOADING DISCS
Press CD, then press ± OPEN/CLOSE to open the disc
compartment. Load disc(s) with the label side up.
To play one or two discs, place the discs on tray 1 and 2.
To play three discs, press DISC CHANGE to rotate the trays
after placing two discs. Place the third disc on tray 3.
Close the disc compartment by pressing £ OPEN/CLOSE.
Disc tray
number
Track number (displayed
Total number of tracks
10iv53:;3i
Disc tray number
up to the 20th track)
Total playing time
Selecting a track directly with the remote control
1 Press DISC DIRECT PLAY 1-3 to select a disc tray number.
2 Press numbered buttons 0-9, and +10 to select a track.
Example:
To select the 25th track, press +10 twice and 5.
To select the 10th track, press +10 and 0.
The selected track starts to play and playback continues to
the end of that disc.
If you press +10, press next numbered button within 4 seconds.
Replacing discs during play
While one diso is playing, the other discs can be replaced without
interrupting play.
1 Press DISC CHANGE.
2 Remove the discs and replace with other discs.
3 Press ± OPEN/CLOSE to close the disc compartment.
NOTE
• When loading an 8-cm (3-inch) disc, put it on the inner circle of
the tray.
• Do not place more than one compact disc on one disc tray.
• Do not tilt the unit with discs loaded. Doing so may cause
malfunctions.
• Do not use irregular shape CDs (example: heart-shaped,
octagonal ones). It may result in malfunctions.
PLAYING DISCS
Load discs.
To play all discs in the disc compartment, press
Play begins with the disc on tray 1.
Track number Track number being
being played played flashes.
t! •*“! \v::
;■ : ;; .• . : Wh'i
Disc tray number for
diso being played
Elapsed playing time of
the track being played
1 2 ENGLISH
BLANK SKIP PLAY
The silent portions between the tracks recorded on a CD can be
skipped during playback.
• Blank skip play may not function with some CDs.
1 Press CD BLANK SKIP.
"CD BLANK SKIP ON" will flow from right to left in the display
window and small dot will appear in the display window.
Small dot
1 0T:58 :: 3Í
Page 13
2 Start playback.
If the last of the track fades out (ends with the sound gradually
decreasing), the fadeout portion also will be skipped.
To return to normal playback
Press CD BLANK SKIP again, and the dot in the display window
will disappear.
NOTE
Be sure to deactivate the blank skip function when performing Al
EDIT recording (pagel8), PROGRAMMED EDIT recording
(pagel 9), or the recording of programmed playback (pagel 3).
Use Ihe remote control.
Use the remote control.
1 Press PRGM while pressing SHIFT in stop mode.
"PRGM" lights up.
“PRGM”
.......
i'-i;; P®'-
2 Press DISC DIRECT PLAY 1-3 to select a disc. 3 Press numbered buttons 0-9 and +10 to program
a track.
Example:
To select the 25th track, press +10 twice and 5.
To select the 10th track, press +10 and 0.
Total number of
Selected track number
programmed tracks
O
z
Q.
Q
O
RANDOM play
Ail the tracks on the selected disc or all the discs can be played
randomly.
• You cannot perform random play of the programmed tracks.
REPEAT play
A single disc or all the discs can be played repeatedly.
• You can also repeat the programmed tracks.
Press RANDOM/REPEAT repeatedly while pressing
SHiFT.
Each time it is pressed, the function is selected cyclically.
I—► ® RANDOM play —'■& i-itrta i piay —i
I— Cancel
® "RANDOM" lights up on the display.
@ "Ci" lights up on the display.
® "RANDOM" and "Q»" light up on the display.
To play all discs, press to start play.
To play a single disc, press DISC DIRECT PLAY 1-3.
During random play, the following operations are not possible:
- to select the tracks directly with the numbered buttons.
The random play will be canceled.
- to skip to the previously played track with ◄◄ or MULTI JOG.
C ?)
RANDOM/REPEAT play—I
@ REPEAT play ■
Selected disc
number
all f-
Program
number
£%■
Total playing time of
programmed tracks
4 Repeat steps 2 and 3 to program other tracks. 5 Press ◄►to start play.
To check the program
Each time or ►► is pressed in stop mode, a track number
and a program number will be displayed.
To clear the program
Press ■ in stop mode. The program will be also cleared when
you open the disc compartment.
To add tracks to the program
Repeat steps 2 and 3 in stop mode. The track will be programmed
after the last track.
• If you attempt to program more than 30 tracks, "PRGM FULL"
is displayed.
To change the programmed tracks
You cannot change the order of programmed tracks. Clear the
program by pressing ■ and repeat all the steps again.
To play the programmed tracks repeatedly
After programming the tracks, press RANDOM/REPEAT
repeatedly while pressing SHIFT until "Q-" appears on the
display.
Up to 30 tracks can be programmed from any of the inserted
discs.
• During programmed play, you cannot select the tracks directly
with the numbered buttons. "Can't USE" will be displayed.
• In the following cases, the total playing time of programmed
tracks is displayed which means you cannot check the
total playing time of programmed tracks, but the programmed
tracks are still registered in memory.
- the total playing time of programmed tracks exceeds 99 minutes
59 seconds.
- you selected a track having a track number more than 30.
ENGLISH 1 3
Page 14
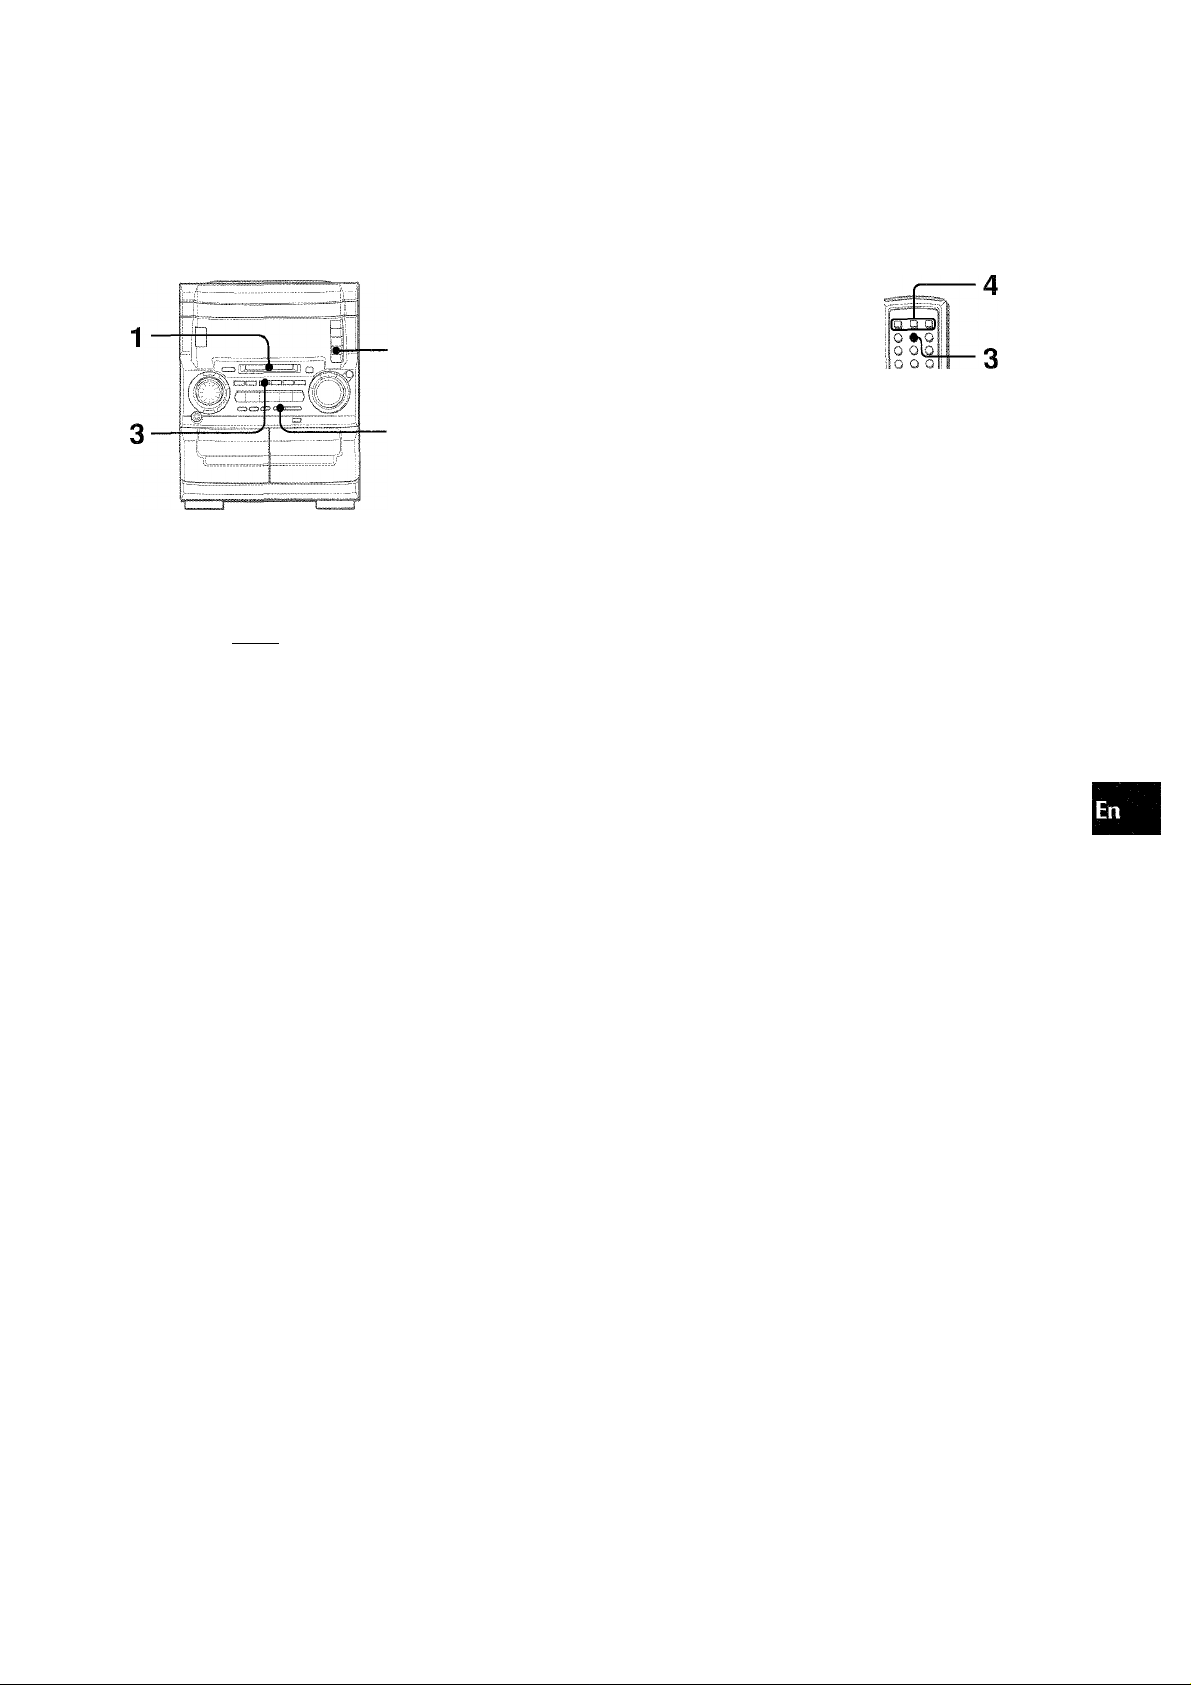
MD PLAYING
■ CD EDIT/
CHECK
■PRGM
■ RANDOM/
REPEAT
Numbered
buttons
SHIFT
To stop play, press ■.
To pause play, press II. To resume play, press again.
To search for a particular point during playback or in pause
mode, keep ◄◄ or ►► pressed and release the button at the
desired point.
To skip to the beginning of a track, press ◄◄ or ►►
repeatedly or turn MULTI JOG until the desired track is displayed.
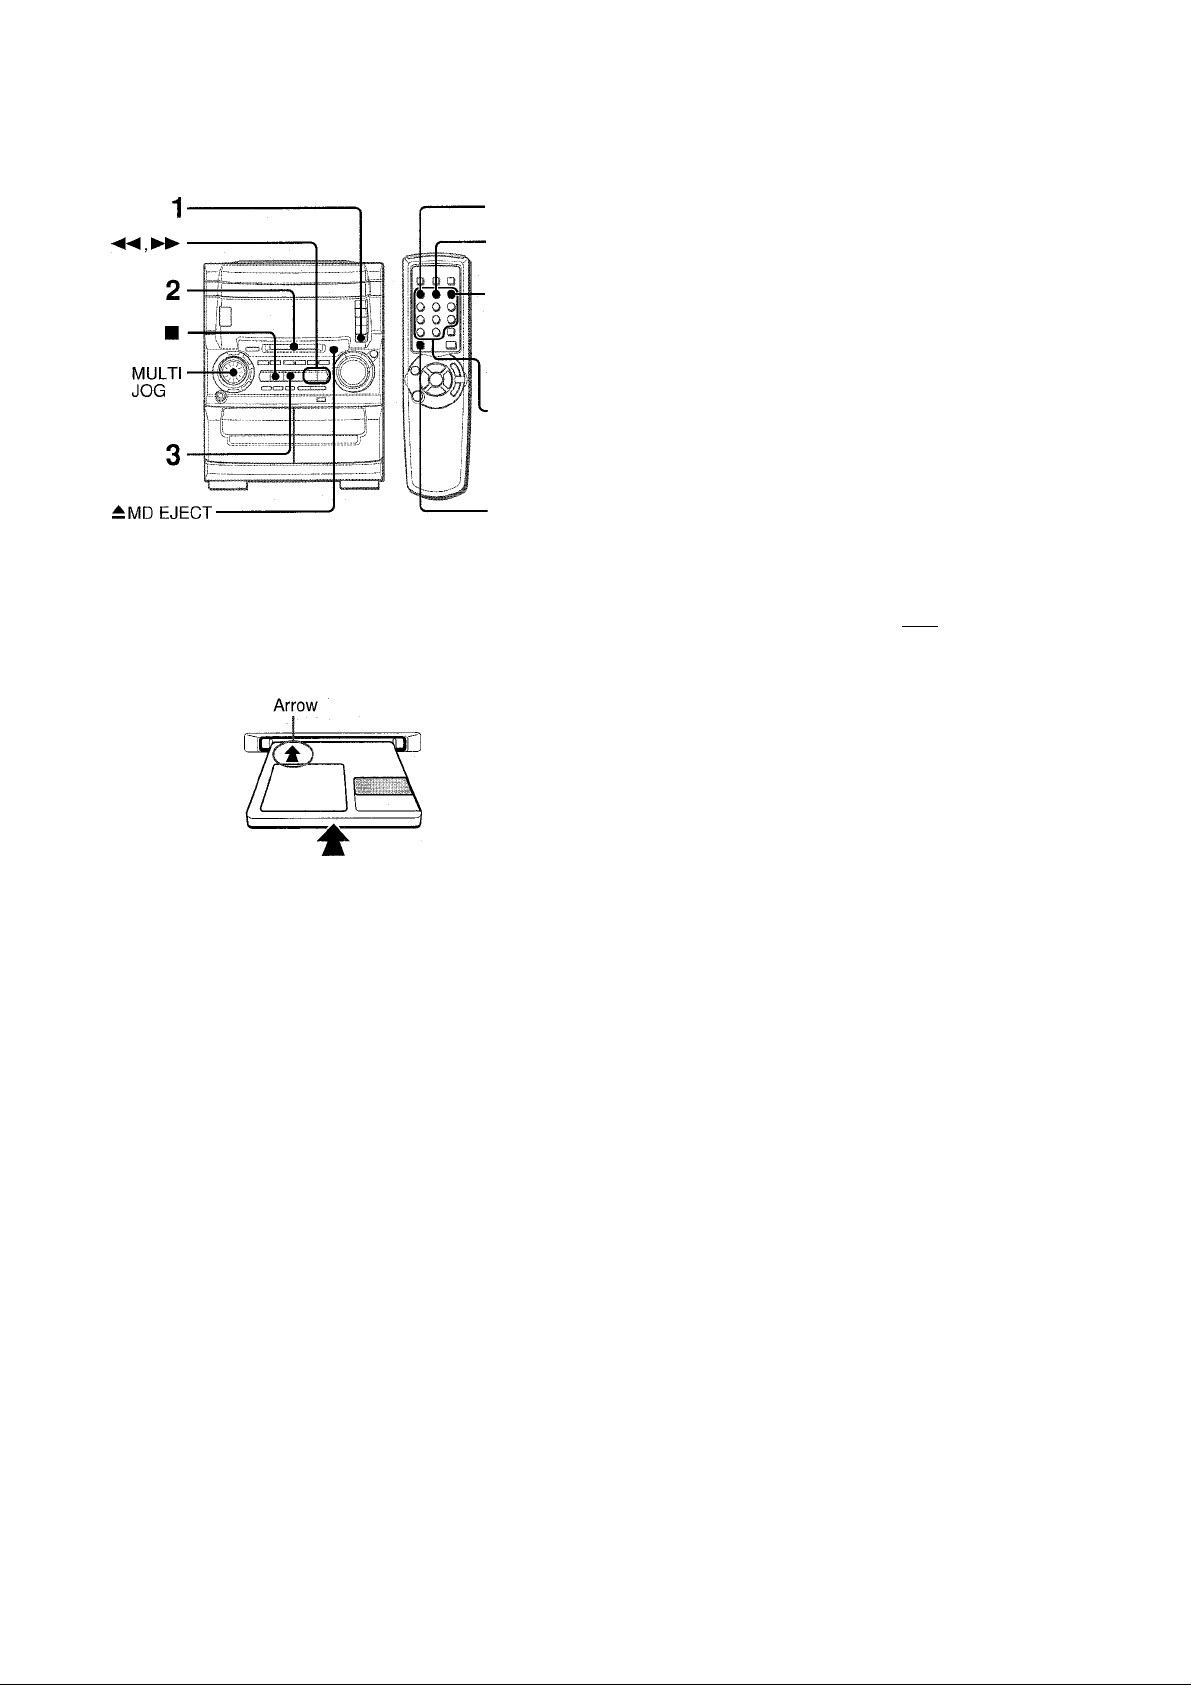
To eject a disc, press ± MD EJECT and pull the disc out.
Even when the power is off, press ^ MD EJECT to eject a disc.
Then, the power is turned on, and the disc will be ejected.
Do not hold the disc while ejecting it, otherwise a disc cannot be
inserted the next time. If this happens, turn off the power and
disconnect the AC power cord. Then connect it again.
To start play when the power is off (Direct play function)
Press MD when the disc is loaded. The power is turned on and
play of the inserted disc begins.
1 Press MD.
2 Insert a disc into the disc drive with the label side
up and in the direction of the arrow.
"TOC READ" is displayed while the unit reads the data on the
inserted disc. Then the information contained in the disc is
displayed.
Display in stop mode
Total number Track number
of tracks (displayed up to the 20th track)
Total playing time
3 Press
Play begins.
Display in playback mode
Track number
being played
Track number being
played flashes.
To select a track directly with the remote control
Press numbered buttons 0-9 and +10.
Example:
To select the 25th track, press +10 twice and 5.
To select the 10th track, press +10 and 0.
If you press +10, press next numbered button within 4 seconds.
To play a disc at double speed
Keep pressed for 2 seconds during playback.
To cancel double speed playback, press ◄►, ◄◄, ►►, or ■.
To check the remaining time
During MD playback or in pause mode, press DISPLAY on the
main unit or press CD EDIT/CHECK on the remote control while
pressing SHIFT. The amount of time remaining until all tracks
finish playing is displayed. To restore the playing time display,
repeat the above.
• During random or programmed play, the remaining time is not
displayed.
To check the track title
During MD playback or in pause mode, press DISPLAY on the
main unit. The title of a track being played is displayed. If the
track title is not registered, the track number is displayed. To
restore the playing time display, press DISPLAY repeatedly.
To check the disc title
In stop mode, press DISPLAY on the main unit. The title of a
disc is displayed. If the disc title is not registered, "No Title" is
displayed. To restore the total playing time display, press
DISPLAY again.
14 ENGLISH
; ! : •••:• :: .■ ;• : Wk!!!-;"
Elapsed playing time of the track being played
Do not attempt to insert an MD when the power is tunrned off.
Doing so may cause malfunction.
Nothing other than an MD should be inserted into the disc drive.
Otherwise the disc may become scratched, causing a
malfunction or safety hazard such as an electric shock.
Do not attempt to insert another MD while a disc is already
inside the drive.
Do not tilt the unit with a disc inserted. Doing so may cause
malfunction.
Page 15
Use the remote control.
Use the remote control.
RANDOM play
All the tracks on the Inserted disc can be played randomly.
• You cannot perform random play of the programmed tracks.
REPEAT play
All the tracks on the inserted disc can be played repeatedly.
• You can also repeat the programmed tracks.
Press RANDOWI/REPEAT repeatedly while pressing
SHIFT.
Each time it is pressed, the function can be selected cyclically
as below.
I—► 33 RANDOM play —>■ rgj HtrtAi piay —i
'— Cancel Cs; RANDOM/REPEAT play
(D "RANDOM" lights up on the display.
(?) "C».'' lights up on the display.
(3j "RANDOM" and "C*." light up on the display.
Cg) REPEAT play ■
Ci- “RANDOM”
! : ::
•i lliSHilHl
: irtbridlr
------
'
1 Press PRGM while pressing SHIFT in stop mode.
"PRGM" lights up.
“PRGM”
1.3;; i- ii -l
2 Press numbered button 0-9 and +10 to program
a track.
Example:
To select the 25th track, press +10 twice and 5.
To select the 10th track, press +10 and 0.
Selected track Total number of
number programmed tracks
i;
S Il2r2:;5
!
Program number
Total playing time of
programmed tracks
3 Repeat step 2 to program other tracks. 4 Press ◄►to start play.
To check the program
Each time ◄◄ or ►► is pressed in stop mode, a track number
and a program number will be displayed.
<7
Z
5
a
a
s
During random play, the following operations are not possible:
- to select the tracks directly with the numbered buttons.
The random play will be canceled.
- to skip to the previously played track with ◄◄ or MULTI JOG.
Up to 30 tracks can be programmed from the inserted disc.
2
4
To clear the program
Press ■ in stop mode. When the disc is removed, the program
is also cleared.
To add tracks to the program
Repeat step 2 in stop mode. The track will be programmed after
the last track.
• If you attempt to program more than 30 tracks, "PRGM FULL"
is displayed.
To change the programmed tracks
You cannot change the order of programmed tracks. Clear the
program by pressing ■ and repeat all the steps again.
NOTE
During programmed play, you cannot select the tracks directly
with the numbered buttons. "Can't USE" will be displayed.
ENGLISH 1 5
Page 16
TAPE RECORDING
This section explains how to record from a tape, the tuner, CD
player, MD player or external equipment.
Preparation
Use Type I (normal) tapes only.
1 Insert the tape to be recorded on into deck 2.
Insert the tape with the side to be recorded on facing out
from the unit.
• Set the tape to the point where recording will start with
or and stop the tape with ■.
4 Press • TAPE REC/REC MUTE to start recording.
When the selected function Is CD or MD, playback and
recording start simultaneously.
To record from a connected source, begin the playback of
that source.
To stop recording, press ■.
When recording from a CD or an MD, press ■ again to stop
playback of a CD or an MD.
To pause recording, press II. (Applicable when the source Is
TUNER or AUX/D-IN.) To resume recording, press again.
Sound adjustment during recording
The output volume and tone of the speakers or headphones may
be freely varied without affecting the recording.
Setting of T-BASS, graphic equalizer or Q SURROUND has no
effect on recording.
To record desired tracks of a CD or an MD
Select tracks to be recorded by programmed play (page 13,15),
and start recording.
In this case, set the blank skip play function to OFF (page 12).
INSERTING BLANK SPACES
4-second blank spaces can be inserted at the desired point during
recording. (Applicable when the source is TUNER or AUX/D-IN.)
1 Press • TAPE REC/REC MUTE during recording or while
in recording pause mode.
'hfetdJsrgil" on the display flashes for 4 seconds and the
tape runs without recording. After 4 seconds, the deck enters
the recording pause mode.
2 Press II to resume recording.
Select the reverse mode using MODE, ENTER and MULTI JOG (page 10).
To record on one side only, select "T".
To record on both sides, select "T3” or
When recording from a tape, the reverse mode Is automatically
set to "Z". Note that recording will be done on one side of the
tape only.
• When reoording from the rear of the tape, the tape stops at
the end of recording of the rear side, even if the reverse
mode is set to "ZT or "CZy.
Press one of the function buttons and prepare
the source to be recorded.
To record from a tape, insert the tape into deck 1, and press
TAPE DECK 1/2 to display "TPI”. Set the tape to the point
where recording will start with ◄►, ◄◄ or ►>-, and stop
the tape with ■.
To record from a CD, pross CD and load the CD(s). Then,
select a track to be recorded first with ◄◄, ►► or MULTI
JOG.
To record from an MD, press MD and insert an MD. Then,
select a track to be recorded first with ◄◄, ►► or MULTI
JOG.
To record from a radio broadcast, press TUNER BAND and
tune in to a station.
To record from a connected source;
• To record from a source equipment connected to DIGITAL
IN jacks on the rear, press AUX/D-IN repeatedly until "D-IN"
appears on the display. (The recording is not made in digital.)
• To record from a source equipment connected to VIDEO/
AUX jacks on the rear, press AUX/D-IN repeatedly until
"AUX” appears on the display.
To insert a blank space of less than 4 seconds, press #
TAPE REC/REC MUTE again while is flashing.
To insert blank spaces of more than 4 seconds, after the deck
enters recording pause mode, press • TAPE REC/REC MUTE
again. Each time the button is pressed, a 4-second blank space
is added.
TO ERASE RECORDING
1 Insert the tape to be erased in the deck 2. 2 Press TAPE to display "TP2" on the display window. 3 Set the tape to the point where erasing will start with
or and stop the tape with ■.
4 Press #TAPE REC/REC MUTE to start erasing.
1 6 ENGLISH
Page 17

1
3
This function aiiows you to make exact copies of the original
tape.
• Usei Type I (normal) tapes only.
• Prepare a tape of the same length as that of the original tape,
or c, tape longer than the original.
• Dubbing does not start from a point halfway in the tape.
3 Press TAPE SYNC DUB to start recording.
• The reverse mode is automatically set to (recording on
both sides).
• While recording, any of the buttons other than ■ are
disabled.
n| T i-.iH
The tapes are rewound to the beginning of the front sides,
and recording starts.
To stop dubbing
Press ■.
u
a,
<
(3
z
a
oc
o
u
bl
oe
1 P ress TAPE.
2 Insert the original tape into deck 1 and the tape
to be recorded on into deck 2.
Tape for playback Tape for recording
Deck 2
Insert each tape with the side to be played back or recorded on
facing out from the unit.
ENGLISH 1 /
Page 18
DISC
DIRECT
PLAY
3
5
■ SHIFT
The Al edit function enables CD recording without worrying about
tape length and track length. When a CD is inserted, the unit
automatically calculates the total track length. If necessary, the
track order is rearranged so that no track is cut short.
(Al: Artificial Intelligence)
NOTE
• Use Type I (normal) tapes only.
• Al edit recording will not start from a point halfway into the
tape. The tape must be recorded from the beginning of either
side.
• Set the blank skip play function to OFF ( page 12).
7 Insert the tape into deck 2.
Insert the tape with the side to be recorded on first facing out
from the unit.
2 Press CD and load the CD(s).
3 Press CD EDIT/CHECK once on the remote
control while pressing SHIFT.
"Al" is displayed.
Press numbered buttons 0-9 on the remote
control to designate the tape length.
10 to 99 minutes can be specified.
Example: When using a 60-minute tape, press 6 and 0.
In a few seconds, the microcomputer programs the tracks to
be recorded on each side of the tape.
• ◄◄ and ►► , or MULTI JOG on the main unit are also
available to designate the tape length.
Tape side A
Tape length
Total number of programmed
tracks on side A
(front side)
Programmed
tracks for side A
Remaining time
of side A
6 Press • TAPE REC/REC MUTE to start recording
on the front side.
The tape is rewound to the beginning of the front side, the
lead segment is played through for 10 seconds, and recording
starts. When recording on the front (side A) ends, recording
on the back (side B) starts.
To stop recording
Press ■. Recording and CD play stop simultaneously.
To clear the edit program
Press ■ twice in stop mode to return to the display of total playing
time.
To check the order of the programmed track numbers
Before recording, press CD EDIT/CHECK on the remote control
while pressing SHIFT to select side A or B, and press
repeatedly.
Tape side
l
Track number Program number
__
"T
M> IP
..............
Г
01
J
i":
fir
When "PRGM" is displayed, press EDIT/CHECK while
pressing SHIFT again.
....
4 Press DISC DIRECT PLAY 1-3 to select a disc.
1 8 ENGLISH
To add tracks from other discs to the edit program
If there is any time remaining on the tape after step 5, you can
add tracks from other discs in the CD compartment.
1 Press EDIT/CHECK on the remote control while pressing
SHIFT to select side A or B.
2 Press DISC DIRECT PLAY 1-3 to select a CD.
3 Press numbered buttons 0-9 and +10 on the remote control
to select tracks. "PRGM" lights up.
A track whose playing time is longer than the remaining time
cannot be programmed.
4 Repeat steps 2 and 3 to add more tracks.
Time on cassette tapes and editing time
The actual cassette recording time is usually a little longer than
the specified recording time printed on the label. This unit can
program tracks to use the extra time. When the total recording
time is a little longer than the tape’s specified recording time
after editing, the display shows the extra time (without a minus
mark), instead of the time remaining on the tape (with the minus
mark).
The Al edit function cannot be used with discs containing 31
tracks or more. "TR OVER" will be displayed.
Page 19
DISC
DIRECT
PLAY
3,7
SHIFT
6 Repeat step 5 for the rest of the tracks for side A.
A track whose playing time is longer than the remaining time
cannot be programmed.
Selected track Program
number number
■L hi
Selected disc number
Remaining time of side A
I
Total number of
programmed tracks
..............
7 Press CD EDIT/CHECK on the remote control
while pressing SHIFT to select side B and
program the tracks for side B.
After confirming "B” on the display, repeat step 5.
a
z
5
a
o
u
111
ec
ill
IL
Programmed edit function enables CD recording while checking
the remaining time on each side of the tape as the tracks are
prog -ammed.
’ Th(i programmed edit recording will not start from a point
halfway in the tape. The tape must be recorded from the
beginning of either side.
■ Set the blank skip play function to OFF ( page 12).
■ Yol can record up to 30 tracks by programmed edit function.
■ You can set up to 30th track numbers by programmed edit
fun:tion.
1 Insert the tape for recording into deck 2.
Insert the tape with the side to be recorded on first facing out
from the unit.
2 Press CD and load the CD(s).
3 Press CD EDIT/CHECK twice on the remote
control while pressing SHIFT.
"F’RGM" lights up.
Tape side B
I
___
Maximum recording time for side B
.
______
J
B > 00
8 Press # TAPE REC/REC MUTE to Start recording.
The tape is rewound to the beginning of the front side, the
lead segment is played through for 10 seconds, and recording
starts. When recording on the front (side A) ends, recording
on the back (side B) starts.
To stop recording
Press ■. Recording and CD play stop simultaneously.
To check the order of the programmed track numbers
Before recording, press ►► repeatedly.
Tape side
L_
■::Q> 1 P
Program number
......
01
PRGN 0
When "Al” is displayed, press EDIT/CHECK while pressing
SHIFT again.
..........
00
4 Press numbered buttons 0-9 on the remote
control to designate the tape length.
10 to 99 minutes can be specified.
• ◄◄ and ►►, or MULTI JOG on the main unit are also
iivailable to designate the tape length.
5 Press DISC DIRECT PLAY 1-3 to select a CD.
Then, press numbered buttons 0-9 and +10 to
program a track.
Track number
To change the program of each side
Press EDIT/CHECK on the remote control while pressing SHIFT
to select side A or B, and press ■ to clear the program of the
selected side. Then program the tracks again.
To clear the edit program
Press ■ once in stop mode to return to the normal display.
ENGLISH 1 9
Page 20
MD RECORDING
The sound of the CD does not decline in quality on the recording,
and recording can be done easily with the CD ► MD button.
DISC
DIRECT
PLAY
■PRGM
■ Numbered
buttons
■SHIFT
1 Insert a recordable MD into the disc drive with
the label side up and in the direction of the arrow.
• Insert an MD only when the unit is turned on.
Registering index marks automaticaiiy
The track order information in the original CD will be copied as
the index marks.
To record on a previously recorded MD
If there is an unrecorded section left on the MD, the new recording
automatically starts from where the previous recording finished.
If you want to start recording from the beginning of a previously
recorded MD, erase the previous recording completely. (See
page 30.)
RECORDING ONL
1
j
Arrow mark
2 Press CD and load a CD to be recorded on tray 1.
3 Press CD ► MD once to start recording.
"► MDdirect" is displayed and recording begins.
¿Cl
:i...r;et
s,
During recording, display changes to the elapsed playing time.
When the last track of the CD finishes playing, the recording
stops automaticaiiy.
When the recording finishes, "TOC EDIT" is displayed and
the data concerning the contents of the recording are
registered.
Digital recording is performed by pressing CD^MD. For
analog recording, see page 22.
To check the remaining recordabie time of the MD before
recording starts
Press MD, then press CD EDiT/CHECK on the remote control
while pressing SHIFT. Or, press one of the function buttons except
MD, then press DISPLAY on the main unit. The remaining
recordable time is displayed for 4 seconds.
To stop recording halfway
Press ■. The recording stops and TOC data is registered.
To stop playing the CD, press ■ again.
1 Insert a recordable MD into the disc drive with
the label side up and in the direction of the arrow.
2 Press CD and piay the track of the CD to be
recorded.
3 Press CD ► MD once to start recording.
CD playing returns to the beginning of the current playing
track and recording begins.
When the selected track of the CD finishes playing, the
recording stops automatically and the CD playback continues
to the next track. To stop playing the CD, press ■.
When the recording finishes, "TOC EDIT" is displayed and
the data concerning the contents of the recording are
registered.
• The index mark is registered automatically at the beginning
of the track.
■ While "TOC EDIT" is displayed, do not disconnect the AC cord
or shake the unit. Otherwise, the TOC data is not registered
properly.
' During recording with CD ► MD, II cannot be used.
' Nothing other than an MD should be inserted into the disc drive.
Otherwise the disc may become scratched, causing a
malfunction or safety hazard such as an electric shock.
' Do not attempt to insert another MD while an MD is already
inside the disc drive.
■ Do not tilt the unit with a disc inserted. Doing so may cause
malfunction.
■ In digital recording, if there is a blank section lasting more than
4 seconds, only 4 seconds of blank section may be recorded.
(An index mark is registered automatioally when the next sound
signal is input thereafter.)
20 ENGLISH
Page 21
i
Only the first tracks of the CDs on the trays are recorded
continuously. You can keep recording continuously without
interruption, if you press DISC CHANGE to replace the CDs
during recording.
■DISC
CHANGE
1 Insert a recordable MD into the disc drive with
ttie label side up and in the direction of the arrow.
2 Press CD and load the CDs to be recorded.
3 Press CD ► MD twice to start recording.
"I*- MDsingle" is displayed and recording begins with the first
track of the CD on tray 1.
Up to 30 tracks can be programmed and recorded from any ol g;
the inserted CDs. For programming, see page 13. Cf
o
2
1
SHIFT
1 Insert a recordable MD into the disc drive with
the label side up and in the direction of the arrow.
2 Press CD and load CDs.
3 Press PRGM on the remote control while pressing
SHIFT.
"PRGM" is displayed.
lU
cc
§
'/m- MD:;;;. :l. i-Viri ]. e
To replace CDs during recording, press DiSC CHANGE
and replace with other CDs. Then, press DiSC CHANGE to
close the disc compartment.
When recording finishes, "TOC EDIT" is displayed and the
data concerning the contents of the recording are registered.
• The index mark is registered automatically at the beginning
of the track.
• When you perform the "auto first tracks recording", cancel
random, repeat or programmed play of CD (page 13).
' When "LONG CD" is displayed, playing time to record of the
CD is longer than remaining recordable time of the MD. Then,
replace the MD and press CD ► MD again. You can record
Vi/ithin the limits of remaining recordable time of the MD.
Display Information during recording
When DISPLAY is pressed repeatedly during recording, the
display changes as follows.
Track number and
elapsed playing
time of the CD
Remaining time of the CD
“PRGM”
4 Press DISC DIRECT PLAY 1-3 to select a CD.
Then, press numbered buttons 0-9 and +10 on
the remote control to program a track.
Total number of
Selected track number
*
i'lv IF'.-ail
«■tL
Selected disc Program number
number
programmed tracks
^ .
Total playing time of
programmed tracks
5 Repeat step 4 to program other tracks.
6 Press CD ► MD to start recording.
Recording begins.
When the programmed tracks finish playing, the recording
stops automatically.
When the recording finishes, "TOC EDIT" is displayed and
the data concerning the contents of the recording are
registered.
• The index mark is registered automatically at the beginning
of each track in the programmed order.
h- Track number of the MD
being recorded and
elapsed recording time
For further information, see page 33
Remaining recordable
time of the MD
ENGLISH 21
Page 22

RECORDING THREE CDS CONTINUOUSLY
# MD REC is used for recording. In this case, the sound of the
CD is carried toward the MD as analog signals.
1
2
1 Insert a recordable MD into the disc drive with
the label side up and in the direction of the arrow.
2 Press CD and ioad the CDs on the trays.
3 Press MODE twice.
"Mark MODE?" is displayed for 10 seconds.
To add Index marks during recording
Press ENTER at the desired point during recording.
Or, press MDTITLE/ENTER on the remote controi while pressing
SHIFT.
Recording level
This unit sets the recording level automatically.
There may be a case where index marks are not registered
accurately even if the "AUTO MARK" is selected.
' You can not register index marks without registering track
numbers.
' If you pause recording, the track number does not increase.
"‘i j'**' sif-.r-cir’
c-.. Nark
■ • ■• aHHBE
4 Within 10 seconds, press ENTER and turn MULTI
JOG to select an index mark mode.
To register index marks automaticaiiy at the beginning
of each track, select "Mark:AUTO?".
To register index marks every 5 minutes, select
"Mark:TIME?".
To register without index marks, select "Mark:OFF?".
5 Within 10 seconds, press ENTER.
Selected mark mode
ill
....
ill........................................
It
31
6 Press • MD REC.
The unit enters the standby mode. Wait until "CD" is displayed.
7 Press II to start recording.
Recording begins.
When all the CDs on the trays finish playing, the recording
stops automatically.
To stop recording
Press ■.
When the recording finishes, "TOC EDIT" is displayed and
the data concerning the contents of the recording are
registered.
AUTO MARK (Auto mark) function
- When recording from a CD with CD ► MD, the index mark
information recorded on the CD is copied as it is.
4th
track
4th
track
4th
track 1
I
Blank
3rd
track
3rd
track
i
3rd
track
CD
Recording (MD)
When recording CDs or other sources with 9 MD REC, if there
is a blank section lasting more than 2 seconds, an index mark
is automatically registered when a sound signal is input in the
following time.
Sound source
Recording (MD)
2nd
track
2nd
track
▲: Index mark
2nd
1 track
Index mark
22 ENGLISH
Page 23
4,5
MULTI JOG ■
3
7
6 Press • MD REC.
Unit enters the standby mode. Wait until the source name to
be recorded is displayed.
O
z
5
oc
o
O'"
7 Press II to start recording.
1
To record from a connected equipment, set the equipment to
playback mode.
8 Press ■ to stop recording.
When the recording finishes, "TOC EDIT" is displayed and
the data concerning the contents of the recording are
registered.
o
III
DC
O
S
8
1 Inisert a recordable MD into the disc drive with
the label side up and in the direction of the arrow.
2 Press one of the function buttons and prepare
thi5 source to be recorded.
• To record from a tape, press TAPE and insert a tape.
• To record from the radio, press TUNER BAND and tune in
a station.
• To record from a source equipment connected to
DiGiTAL iN jack on the rear, press AUX/D-iN repeatedly
until "D-IN" appears on the display.
• To record from a source equipment connected to VÌDEO/
AUX jacks on the rear, press AUX/D-iN repeatedly until
"ytUX" appears on the display.
3 Press MODE twice.
"M ark MODE?" is displayed for 10 seconds.
c na A O D b a
4 Within 10 seconds, press ENTER and turn MULTI
JOG to select an index mark mode.
To register index marks automaticaliy at the beginning
of sach track, select "Mark;AUTO?".
To register index marks every 5 minutes, select
"MarkiTIME?".
To register without index marks, select "Mark:OFF?".
5 Within 10 seconds, press ENTER.
To add index marks during recording
Press ENTER at the desired point during recording.
Or, press MDTiTLE/ENTER on the remote control while pressing
SHIFT.
' There may be a case where index marks are not registered
accurately even if the AUTO MARK is selected.
' You cannot register index marks without registering track
numbers.
' If you pause recording, the track number does not increase.
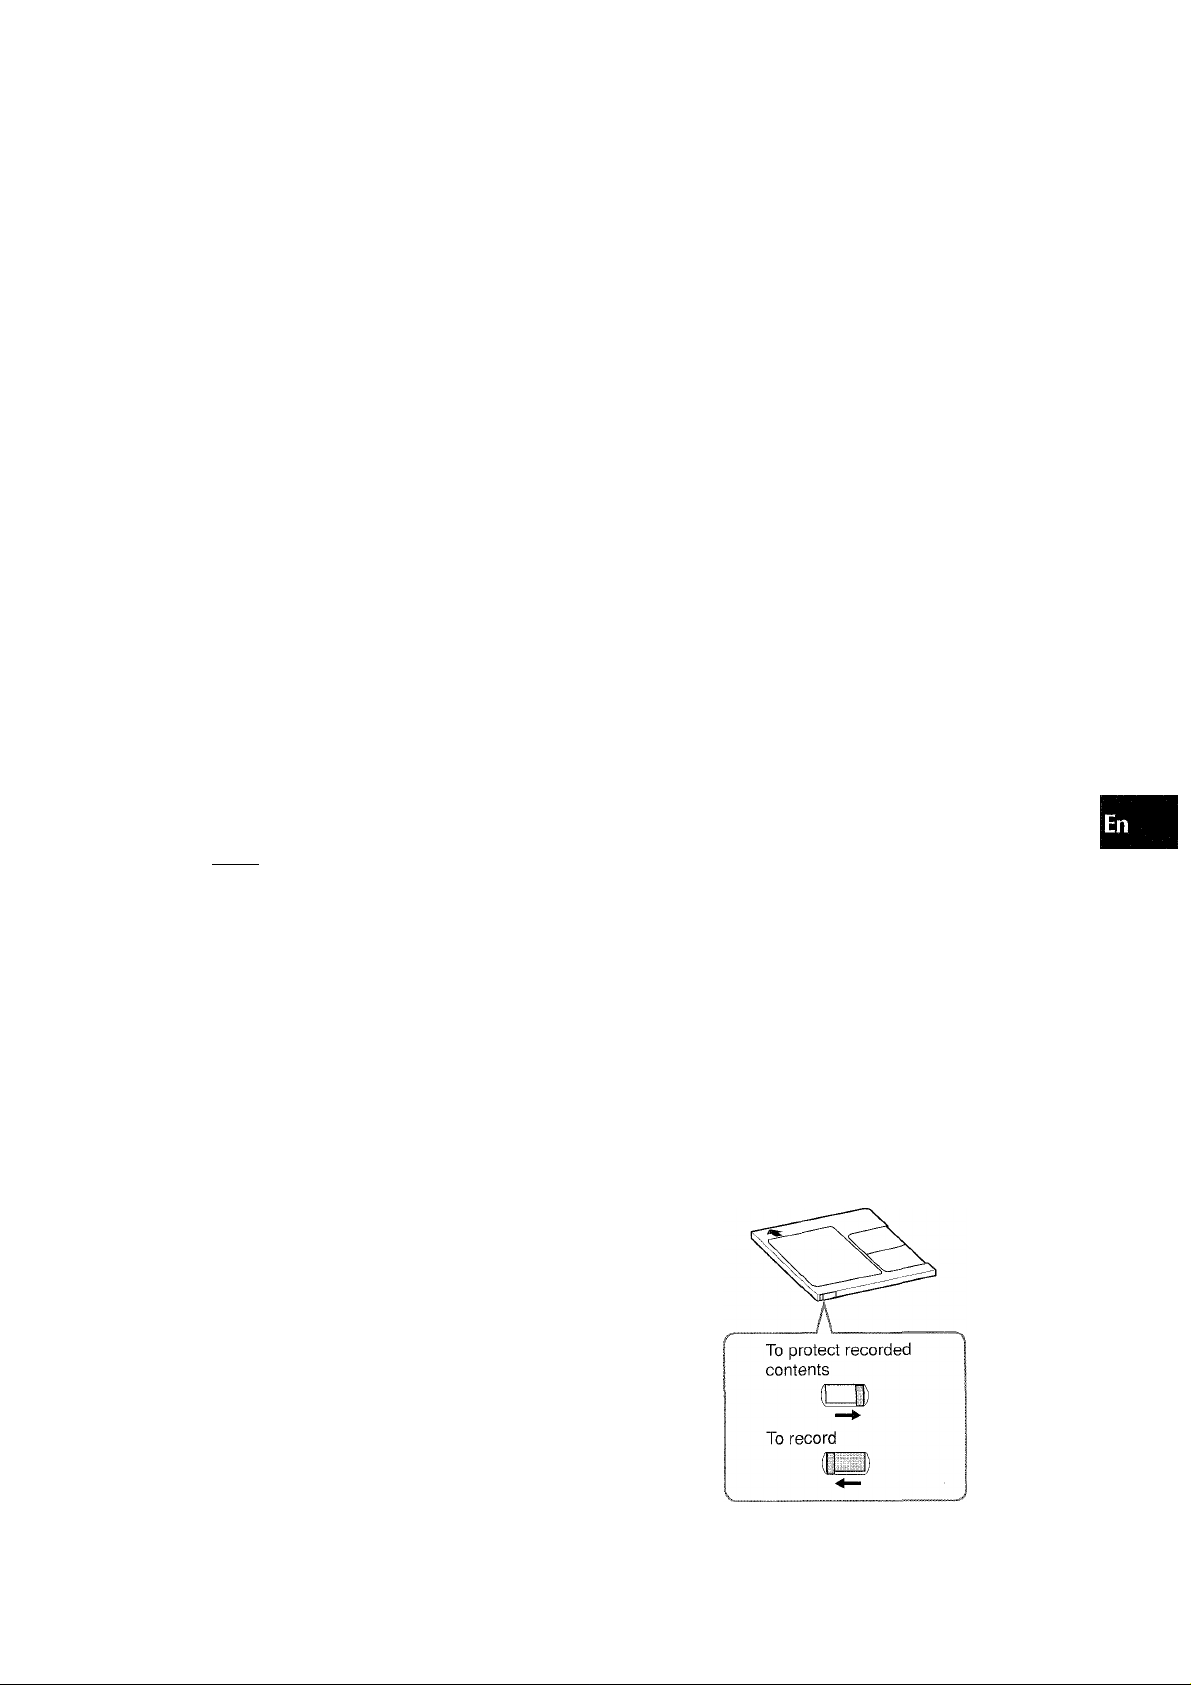
To prevent accidental erasure of recorded material
Slide the record-protect tab as shown below.
Slide the tab so that it is completely locked.
Selected mark mode
r \
If a recording is attempted when the tab is set to the protected
position, "Protected" appears on the display. Slide the recordprotect tab to the original position.
ENGLISH 23
Page 24
8 Within 10 seconds, press ENTER.
EXTENDED RECDRDING-llfONXm
Twice as long as the time printed on the MD can be obtained by
using the monaural recording mode. In this case, the recording
sound will be monaural.
mUDIHE
9 Press • MD REC.
The unit enters the standby mode. Wait until the source name
to be recorded is displayed.
1
10 Press II to start recording.
To record from a connected equipment, set the equipment
to playback mode.
11 Press ■ to stop recording.
When the recording tinishes, "TOC EDIT" is displayed and
the data concerning the contents of the recording are
registered.
To add index marks during recording
Press ENTER at the desired point during recording.
1 Insert a recordable MD into the disc drive with
the label side up and in the direction of the arrow.
2 Press one of the function buttons and prepare
the source to be recorded.
• To record from a tape, press TAPE and insert a tape.
• To record from the radio, press TUNER BAND and tune in
to a station.
• To record from a source equipment connected to
DiGiTAL iN jack on the rear, press AUX/D-iN repeatedly
until "D-IN" appears on the display. (Digital recording)
• To record from a source equipment connected to VÌDEO/
AUX jacks on the rear, press AUX/D-iN repeatedly until
"AUX" appears on the display. (Analog recording)
To cancei monaurai recording
Press MODE three times to display "Rec MODE?", then within
10 seconds press ENTER. "RecSTEREO?"is displayed. Then
within 10 seconds press ENTER.The flashing indication "MONO"
goes off.
Monaural recording is also canceled by changing the audio
source using a function button.
3 Press MODE three times.
"Ree MODE?" is displayed for 10 seconds.
Rec NODE'
4 Within 10 seconds, press ENTER and turn MULTI
JOG so that "Rec MONO?" Is displayed.
5 Within 10 seconds, press ENTER.
"MONO" flashes on the display.
6 Press MODE twice.
"Mark MODE?" is displayed for 10 seconds.
7 Within 10 seconds, press ENTER and turn MULTI
JOG to select an index mark mode.
To register index marks automaticaiiy at the beginning
of each track, select "Mark:AUTO?".
To register index marks every 5 minutes, select
"MarkTIME?".
To register without index marks, select "MarkiOFF?".
24 ENGLISH
Page 25
4
3
• To 'ecord on a previously recorded MD, the new recording
automatically starts from where the previous recording finished.
• Set the tape to the point where recording will start.
• Yol can select the reverse mode (recording on one side or
recording on both sides).
If you select the recording on both sides, during the time of
changing tape side, the CD playback continues.
When the CD playback ends
Recording to MD and tape ends automatically.
At the end of recording of the MD or tape
When the MD is recorded to the end, but the tape is still
recordable, the recording continues.
When the tape is recorded to the end, but the MD is still
recordable, the recording continues.
When both the MD and tape are recorded to the end and if CD
playback still continues, stop it with ■.
To stop recording, press ■.
Press ■ again to stop CD playback.
When more than two CDs are loaded, start playback of the
desired CD by pressing DISC DIRECT PLAY (1 - 3), and stop
playback. Then, start the operation from step 2.
(3
z
5
a
o
u
Id
oe
a
1 Insert a CD on tray 1.
Up to three CDs are inserted,
rescorded.
but only one CD can be
2 Insert an MD to be recorded on with the label side
up and in the direction of the arrow.
3 Insert a tape to be recorded on into the deck 2. 4 Set the tape to the point where recording will start
with ■« or and stop the tape with ■.
5 Select the reverse mode using MODE, ENTER and
MULTI JOG (page 10).
Tc record on one side only, select "Z".
Tc record on both sides, select "ZT or "CD".
• When recording from the rear of the tape, the tape stops at
the end of recording of the rear side, even if the reverse
mode is set to "ZT or "CZy.
6 Press CD ► MD/TAPE.
When the CD playback begins, recording to MD and tape starts
simultaneously.
• If a tape is not loaded on the deck 2 or an MD is not loaded,
CD MD/TAPE does not function.
ENGLISH 25
Page 26
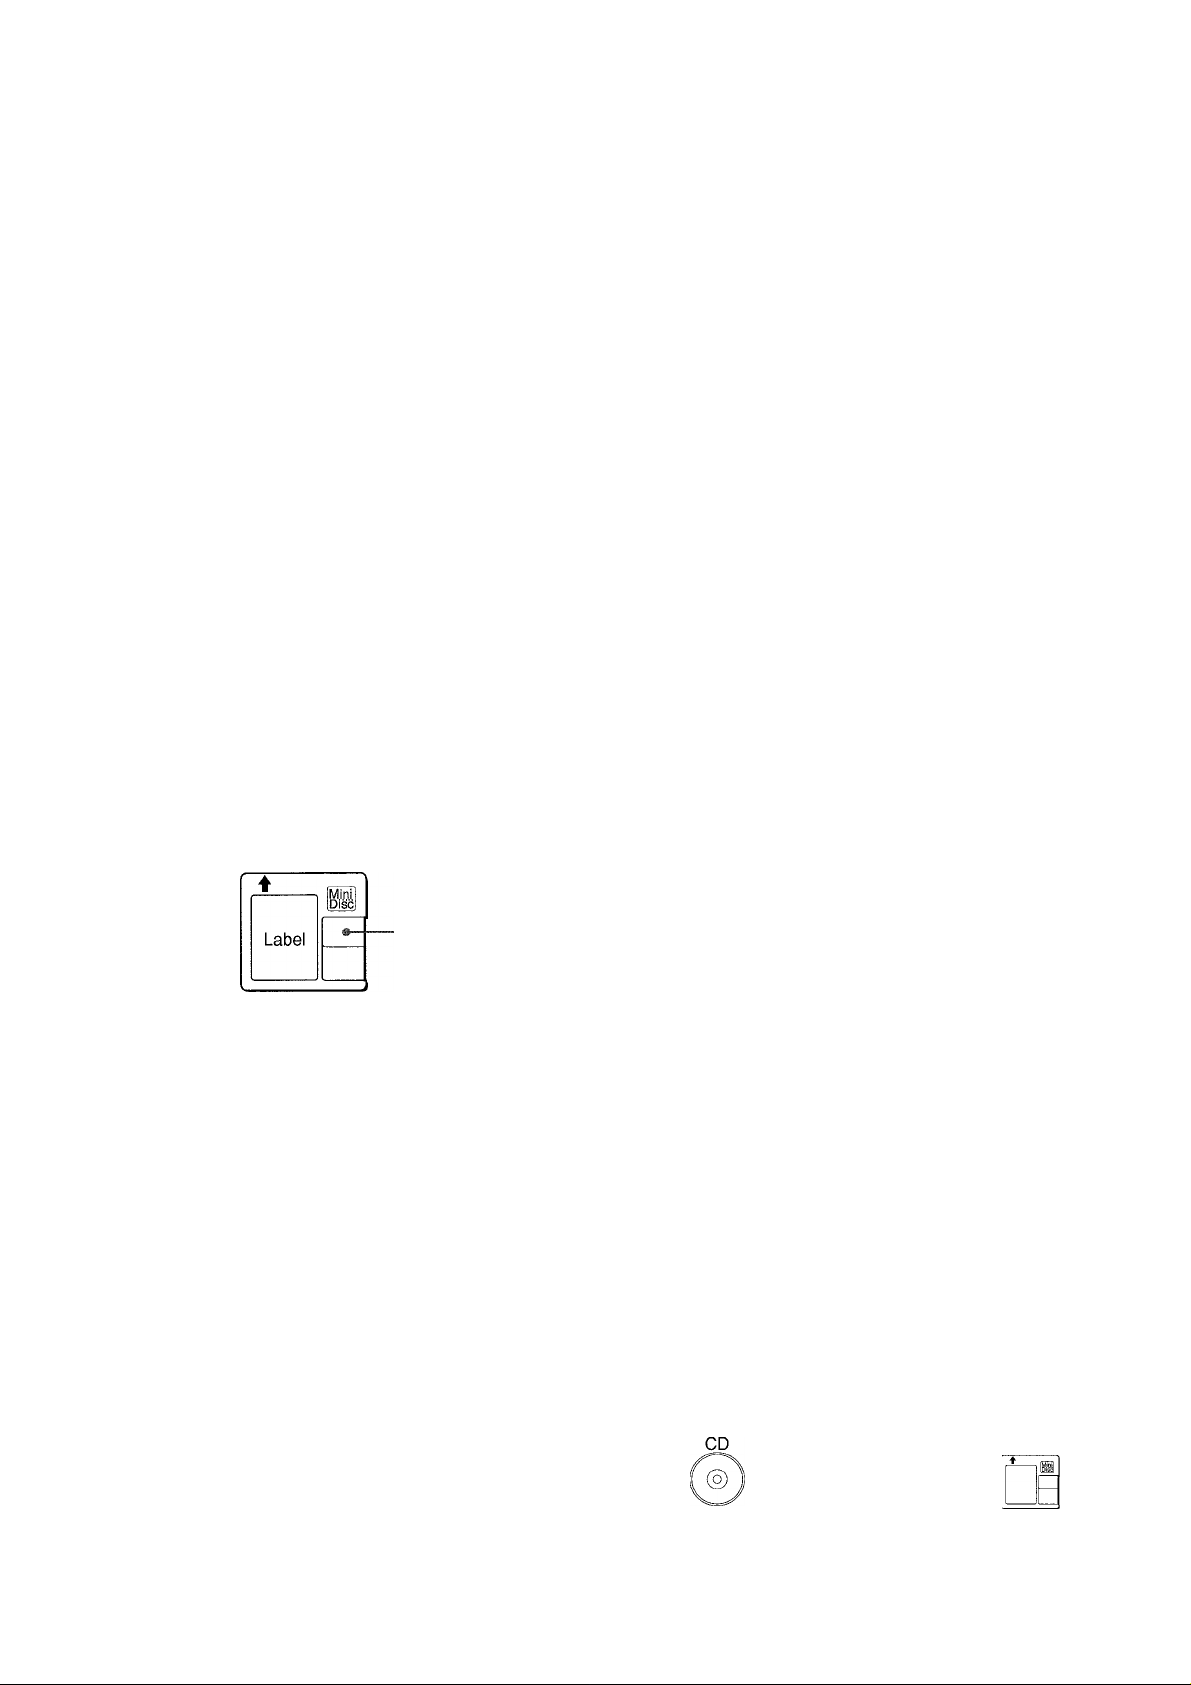
WHAT IS AN MD (MINI DISC)?
THE LIMITATIONS OF MD
An MD is only 64 mm (2% inches) in diameter, about half the
size of a conventional CD. But an MD can be used to store and
playback a full 74 minutes of'data such as a CD. Unlike a CD, an
MD comes in a plastic cartridge, so that it can be handled with
ease. The cartridge also protects the disc inside from shocks,
dust and scratches. Unlike cassette tapes, which can become
stretched or tangled, an MD is an excellent durable media.
TYPE OF MD
There are two types of MDs: "Optical discs" and "Magneto-optical
discs". Both types use laser beams and optical pick-up technology
to read recorded data during playback.
Optical discs
These are playback only discs. Like CDs, they are used as
prerecorded music discs. You cannot record or edit them.
The shutter covers
Label
Recordable MO*^ discs
These are recordable discs which can be recorded on again and
again, like cassette tapes. The recording method called magneto
optical technology employs a laser and magnetism to record
signals. Therefore, the quality of recorded sound does not
deteriorate even after many playbacks and recordings.
*' MO: An abbreviation of Magneto Optical
the opening only
on the non-labeled
side of the MD.
The shutter covers
the opening on both
sides of the MD.
Recording on the MD is performed differently from that of a
cassette tape or a DAT. Therefore, the MD system is subject to
the following restrictions.
"TOC* Full" is displayed even if the recording time does
not reach the maximum recordable time of the disc (60minute or 74-minute)
"TOC Full" is displayed when 254 tracks are already recorded
on a disc, without respect to the recording time.
*TOC: An abbreviation of Table Of Contents.
"TOC Full" is displayed even if a disc is not fully recorded
on
If there are lots of emphasis data in a particular track, the unit
handles the data as index codes, and tracks are counted, in
addition, without respect to the time and number of tracks.
The remaining time on a disc is not increased even after
some short tracks have been erased
When the remaining time on a disc is displayed, it may not be
increased even after erasing short tracks because the sections
less than eight seconds are not counted.
Certain tracks cannot be joined (the COMBINE function doés not function)
• Tracks created by editing may not be joined.
• It is not possible to combine a track recorded in monaural and
a track recorded in stereo.
The total of the recorded time and the remaining time on
a disc does not match the maximum recordable time of
the disc (60-minute or 74-minute)
Recording is performed in a minimum unit of one cluster (two
seconds). Even if the recorded section is shorter than two
seconds, a two-second space is needed in recording. Therefore,
the available time becomes shorter.
Track numbers may not be registered properly
When recording from a CD with CD ► MD, small tracks may be
created depending on the contents of a CD.
When using the AUTO MARK function, track numbers may not
be registered properly depending on the contents of the CD.
Ultra compact size made possible by ATRAC*^ technology
A newly developed digital audio compression technology called
the ATRAC system automatically extracts only the frequencies
that are actually audible to the human ear and cuts the
frequencies which are inaudible. This compresses the amount
of data to be recorded to 1/5 of the normal amount. The ATRAC
system is based upon studies carried out in the field of auditory
psychology and does not impair the quality of the audible sound.
ATRAC: An abbreviation of Adaptive TRansform Acoustic Coding
Quick random access
One of the great features of the MD is that you can search for
desired tracks quickly. There are also quick and easy functions
for random playback, in which the order of the tracks can be
rearranged at random, and for renumbering tracks enabling them
to be played in any order.
26 ENGLISH
Digital inputs may not be acceptable
When digital recording is attempted from recorded material with
copyrights, digital dubbing cannot be performed to a recordable
MD from another MD recorded in digital because of the built-in
record restriction function which complies with the SCMS*
standard.
• SCMS (Serial Copy Management System) is the standard to
restrict single digital dubbing between digital audio systems
thus protecting copyrights.
Mini Disc
(prerecorded sound source) Digital dubbing
Recording through
analog inputs
Page 27
MD EDIT
You oan register the titles of the discs and tracks according to
the CD which you made the recording from. Personal messages
also can be registered.
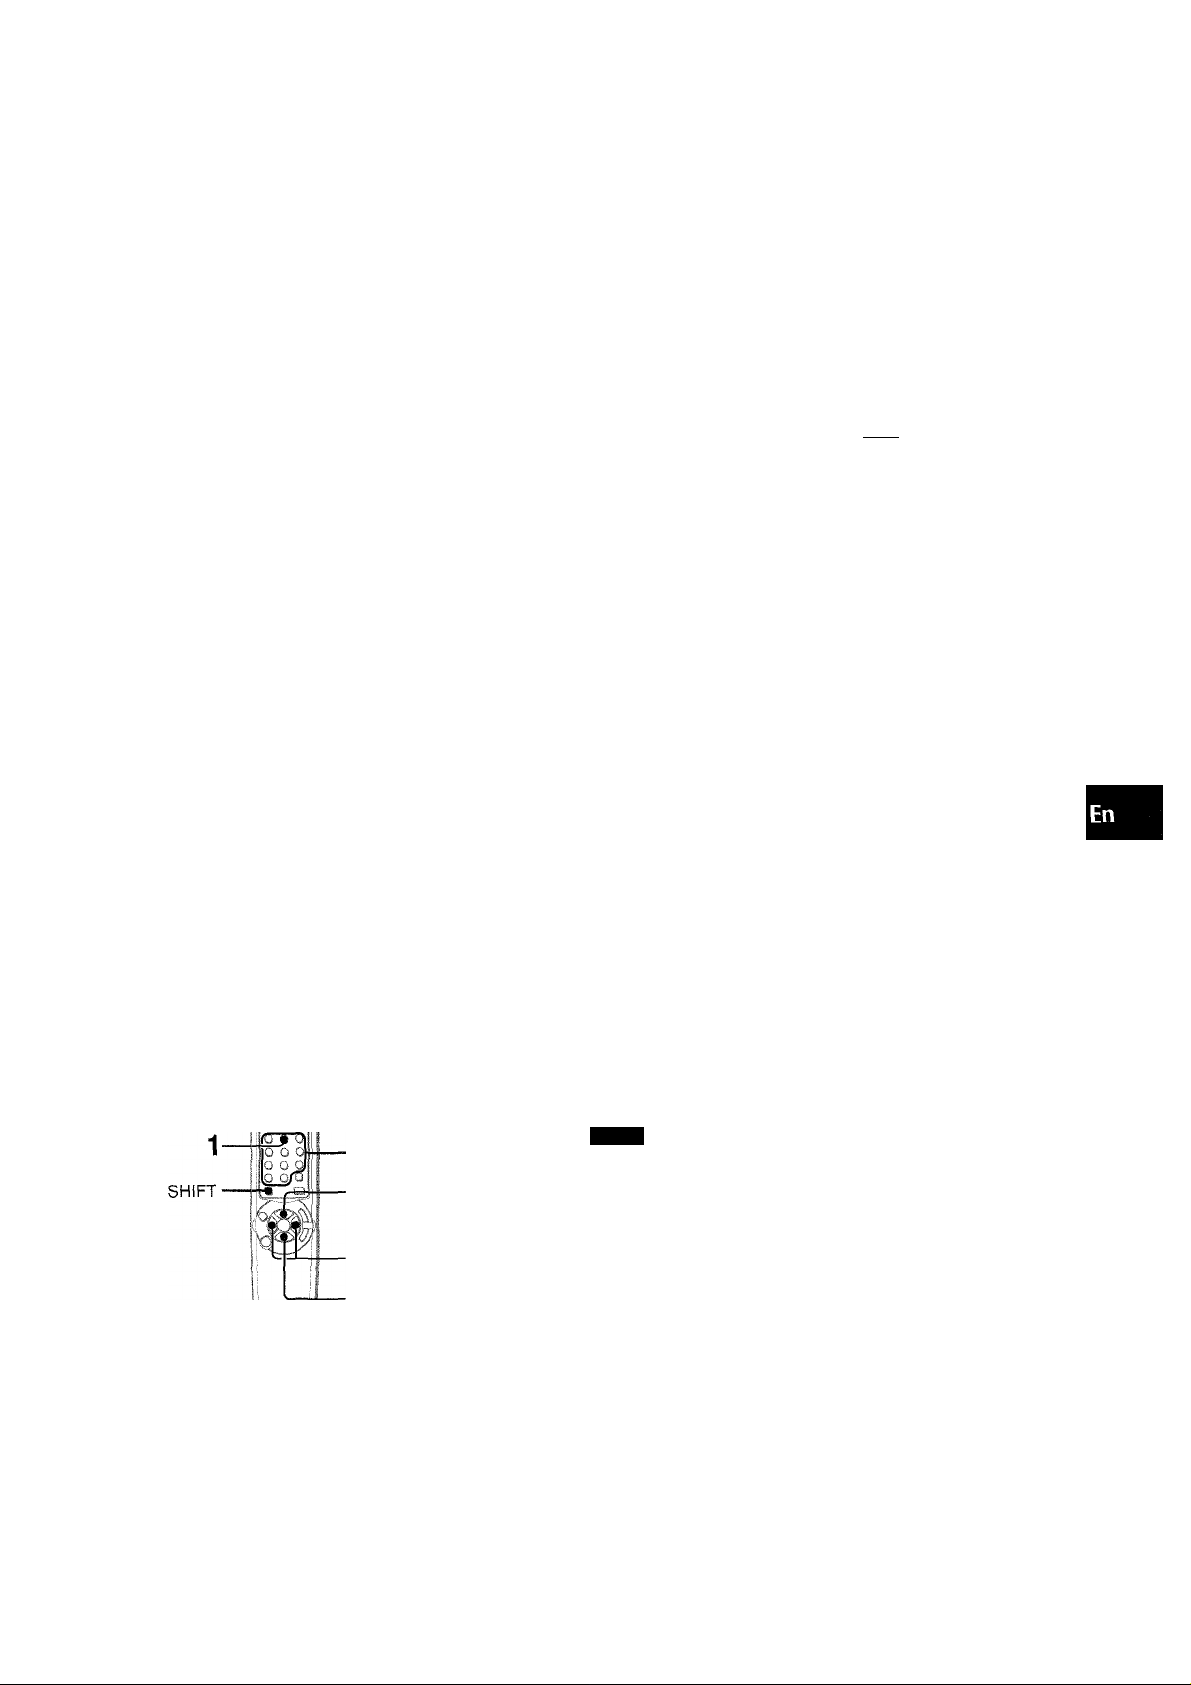
SHIFT
Character
buttons
3 Within 10 seconds, press ENTER on the main unit
or press MDTITLE/ENTER on the remote controi
whiie pressing SHiFT.
The unit turns into character entry mode.
4 Seiect the kind of character: capital letters, small
letters or numbers/symbols.
On the main unit
Press MODE repeatedly.
On the remote control
Press +10/MODE repeatedly.
iilii
|-*" Capiti:al letters A-*-Small letters a*-►Numbers/symbols 0
' "a" is not displayed with the remote control. Display "A" to
enter small letters.
O
z
Q
E
O
O
Ui
E
□
s
H
Q
u
Q
S
1 Press MD and insert an MD to register the titles.
2 a) To register the disc title
On the main unit
In stop mode, press MODE.
On the remote control
In stop mode, press MDTITLE/ENTER.
"[)isc Title?" is displayed.
■ D1 S:;;: 'T' ;i. t- ]. 0
b) To register the track title
On the main unit
Salect a track to register the title with
JOG, then press MODE.
On the remote control
Salectatrack to register the title with numbered buttons, press
MDTITLE/ENTER.
When the 3rd track is selected
►► or MULTI
3ivT :i. tie-’
5 Enter characters.
On the main unit
Turn MULTI JOG to select a desired character, and press
►► to decide.
On the remote control
Press the character buttons (page 28) several times to select
a desired character, and press to decide.
Qli^
0- Hii^'
Press ►► after you have selected a character. The next
character can be entered.
■y V
Press
"i 3
6 Repeat steps 4 and 5 to enter all the characters
(up to 50 characters).
Note that the total number of characters that can be entered
for one disc is approximately 1,700.
7 Press ENTER on the main unit.
Or, press MD TITLE/ENTER on the remote control while
pressing SHIFT.
When ± EJECT is pressed to eject a disc, "TOC EDIT" is
displayed and the data concerning the contents of the editing
are registered.
‘ 0.
• While "TOC EDIT" is displayed, do not disconnect the AC cord
or shake the unit. Otherwise, the TOC data is not recorded
properly and the edited contents on a disc cannot be played.
• A disc can not be edited:
- wnen a prerecorded disc is inserted ("PB Disc" is displayed).
- when the record-protect tab on an inserted disc is moved to
the protected position ("Protected" is displayed).
- during random play (the random play will be canceled).
- during programmed play ("Can’t Edit" will be displayed).
8 Remove the MD.
ENGLISH 2 /
Page 28
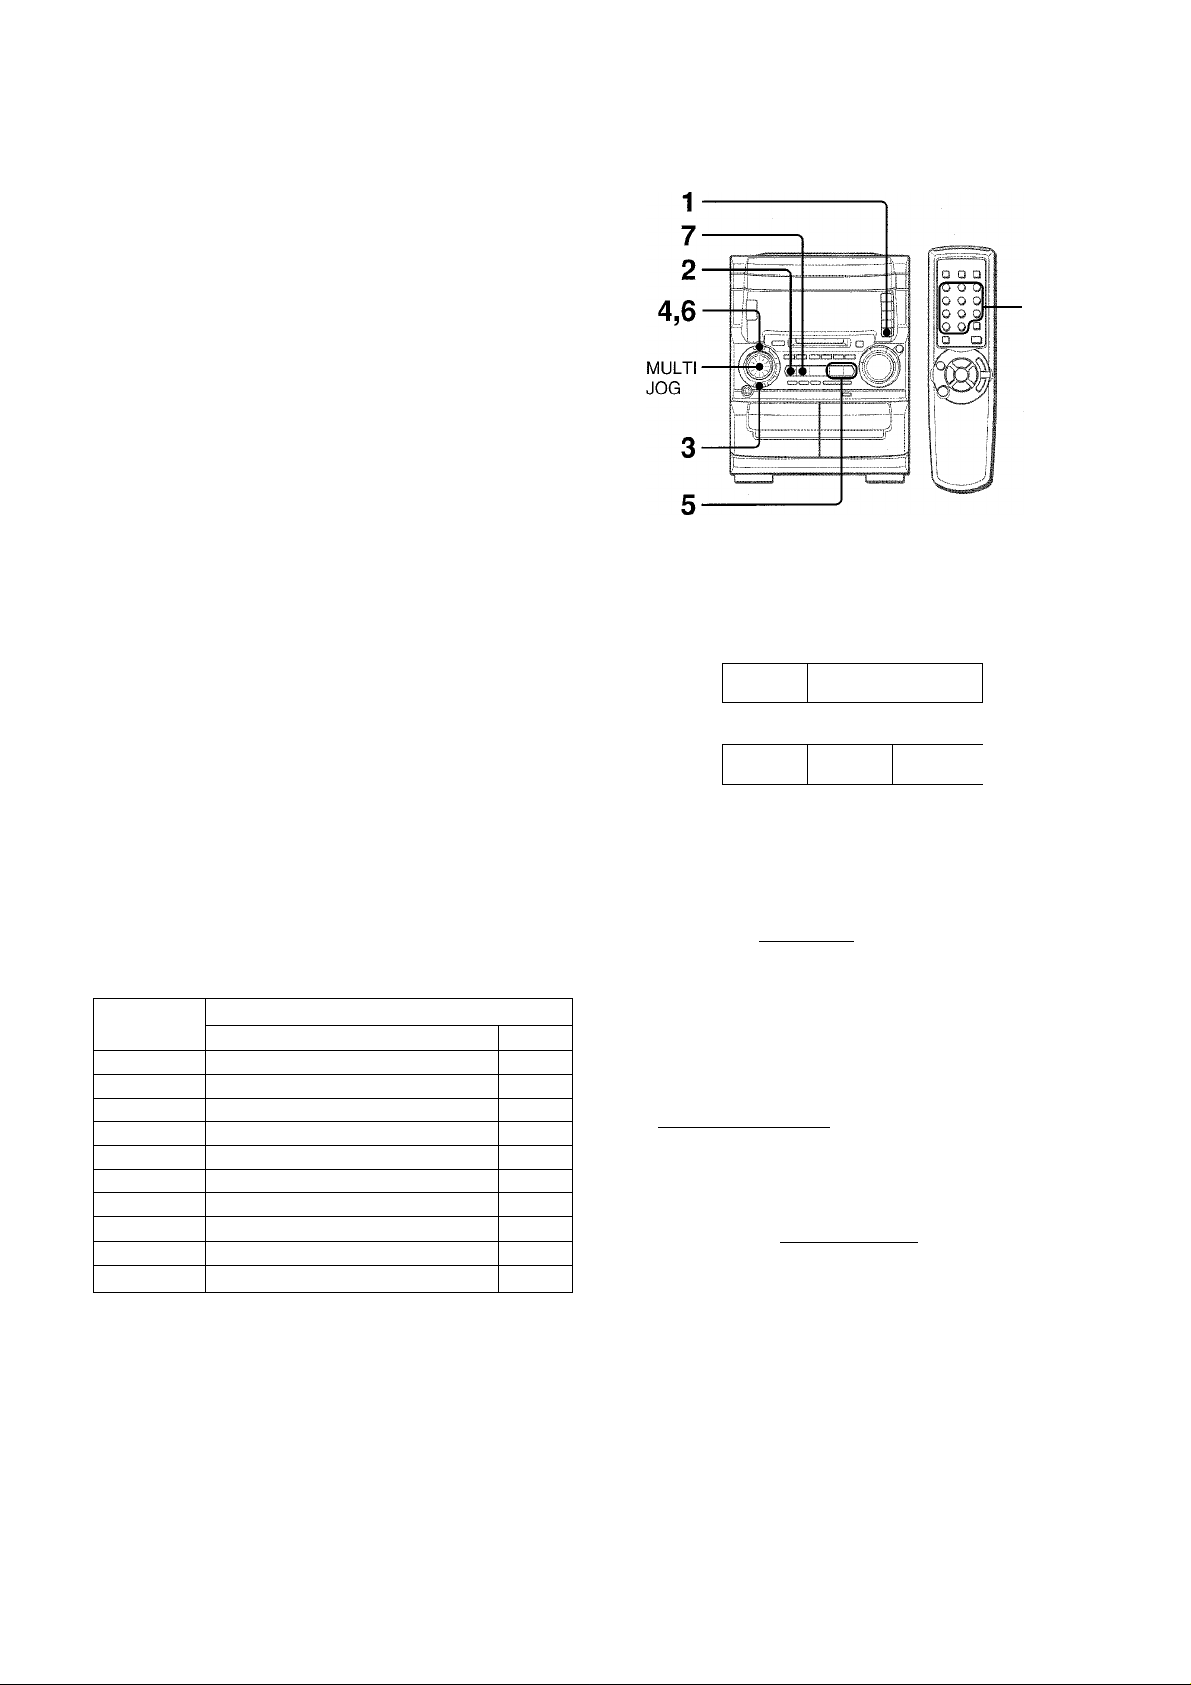
To change a character during entering
Press ◄◄ or ►► repeatedly until the character to be changed
flashes. Then enter the desired character again.
To delete characters
Press ◄◄ or ►► repeatedly until the character to be deleted
flashes. Then press II.
I
To insert a space between the characters
Press ◄◄ or ►► repeatedly until the part to be entered as a
space flashes. Then press ◄►on the main unit (or ►/◄► on
the remote control).
To add a character between two characters
First, insert a space between two characters. Then change the
space to the desired character by entering it.
These characters can be used
Capital letters: □ (space) ABCDEFGHIJKLMNOPQR
STUVWXYZ
Small letters: □ (space) abcdefghijkimnopqrstuvw
X y z
Numbers and symbols: □ (space) 01 23456789! "#$%&
’()* + ,- ./ :;< = >?@__'
If the unit is left for one minute at steps 4 and 5, the character
entry mode is canceled.
If you enter a track title during playback of the track, the playback
of the track is repeated until the entering finishes.
Characters assigned to buttons on the remote control
To enter character with the remote control, select the kind of
character, then press repeatedly the button to which the desired
character is assigned until the desired character is displayed.
■ Numbered
buttons
You can divide a track into two parts by registering an index
mark.
Example:
To divide the third track into two parts at 2 minutes 30 seconds
r
-----
2 minutes 30 seconds
2nd
track
2nd
track
3rd
track
Srditrack
4th
track 1
1 Press MD and insert an MD.
2 During piayback of the track to divide, press II
at the point to be divided.
Playback enters playback pause mode.
3 Press EDIT repeatedly until "Divide" is displayed.
"Divide 3?" is displayed.
Buttons on the
remote control
"1"
"2"
„3"
"4"
"5" JKLjkl 5
"6" MNOmno
"7"
"8"
"9"
"0" 0
ABCabc
DEFdef 3
GHIghi
PQRSpqrs
TUVtuv 8
WXYZwxyz 9
Assigned characters
„0^"
1
2
4
6
7
.p- D :i. Y-’ :i. Lib;;;’
I”-
4 Within 10 seconds, press ENTER.
A3-second part from the point pressed II is played repeatedly.
5 Adjust the point to be divided with ►► or
MULTI JOG referring to the playback sound.
6 Press ENTER within a minute.
The index mark is registered and the track number advances
by one. At the same time, all the succeeding track numbers
advance by one.
7 Press ■ .
Playback stops.
When ± MD EJECT is pressed to eject a disc, "TOC EDIT"
is displayed and the data concerning the contents of the editing
are registered.
' A track cannot be divided in the following cases:
- when an inserted disc already contains 254 tracks.
- when elapsed time is displayed as 0:00.
' If the track is titled, the tilte will be registered to the first half of
the divided track.
28 ENGLISH
Page 29
4,5
4,6
H
5
u
Q
s
MULTI
JOG
You c:an combine two tracks by erasing the index mark in between.
Example:
To combine the 2nd track and the 3rd track by erasing the
index mark at the beginning of the 3rd track
1st
track
1st
track
2nd 3rd
track track
2nd
track
1 Press MD and insert an MD.
2 Select the latter track of the two tracks that you
want to combine with MULTI JOG or the
numbered buttons 0-9 and +10 on the remote
control.
Example: To combine the 2nd track and the 3rd track, select
the 3rd track.
3 Press EDIT repeatedly until "Combine?" is
displayed.
Example: "Combine ?" is displayed when EDIT is pressed
during piayback of the 3rd track.
2,5
3
You can change the order of tracks after completing a recording.
The order does not go back to the original order even when the
power turns off.
Example:
To move the 3rd track to the 1st position
1st
track
c B
1 Press MD and insert an MD.
2 Select the track that you want to move with MULTI
JOG or the numbered buttons 0-9 and +10 on the
remote control.
Example: To move the 3rd track, select the 3rd track
3 Press EDIT repeatedly until "Move" is displayed.
2nd
track
B
3rd
track
4 V\Nthin 10 seconds, press ENTER.
5 Within 10 seconds, press ENTER again.
Tlie index mark of the selected track disappears and the 2nd
track and the 3rd track are combined. At the same time, all
the succeeding track numbers move down by one.
When ^ MD EJECT is pressed to eject a disc, "TOC EDIT"
is displayed and the data concerning the contents of the editing
are registered.
If th(j tracks are titled
If both of the tracks are titled, the title of the lower number track
remains.
If on y one track of the tracks to be combined is titled, this title
remains.
You cannot combine a track recorded in monaural and a track
recorded in stereo ("Can't Edit" will be displayed).
4 Within 10 seconds, press ENTER.
5 Turn MULTI JOG to select the desired track
number to move the track to.
Example: To move the 3rd track to the 1 st position
■, "TIi:. ■■ !-:i-
......................
-ii •
6 Within 10 seconds, press ENTER.
The order of tracks is changed.
When A MD EJECT is pressed to eject a disc, "TOC EDIT"
is displayed and the data concerning the contents of the editing
are registered.
ENGLISH 29
Page 30
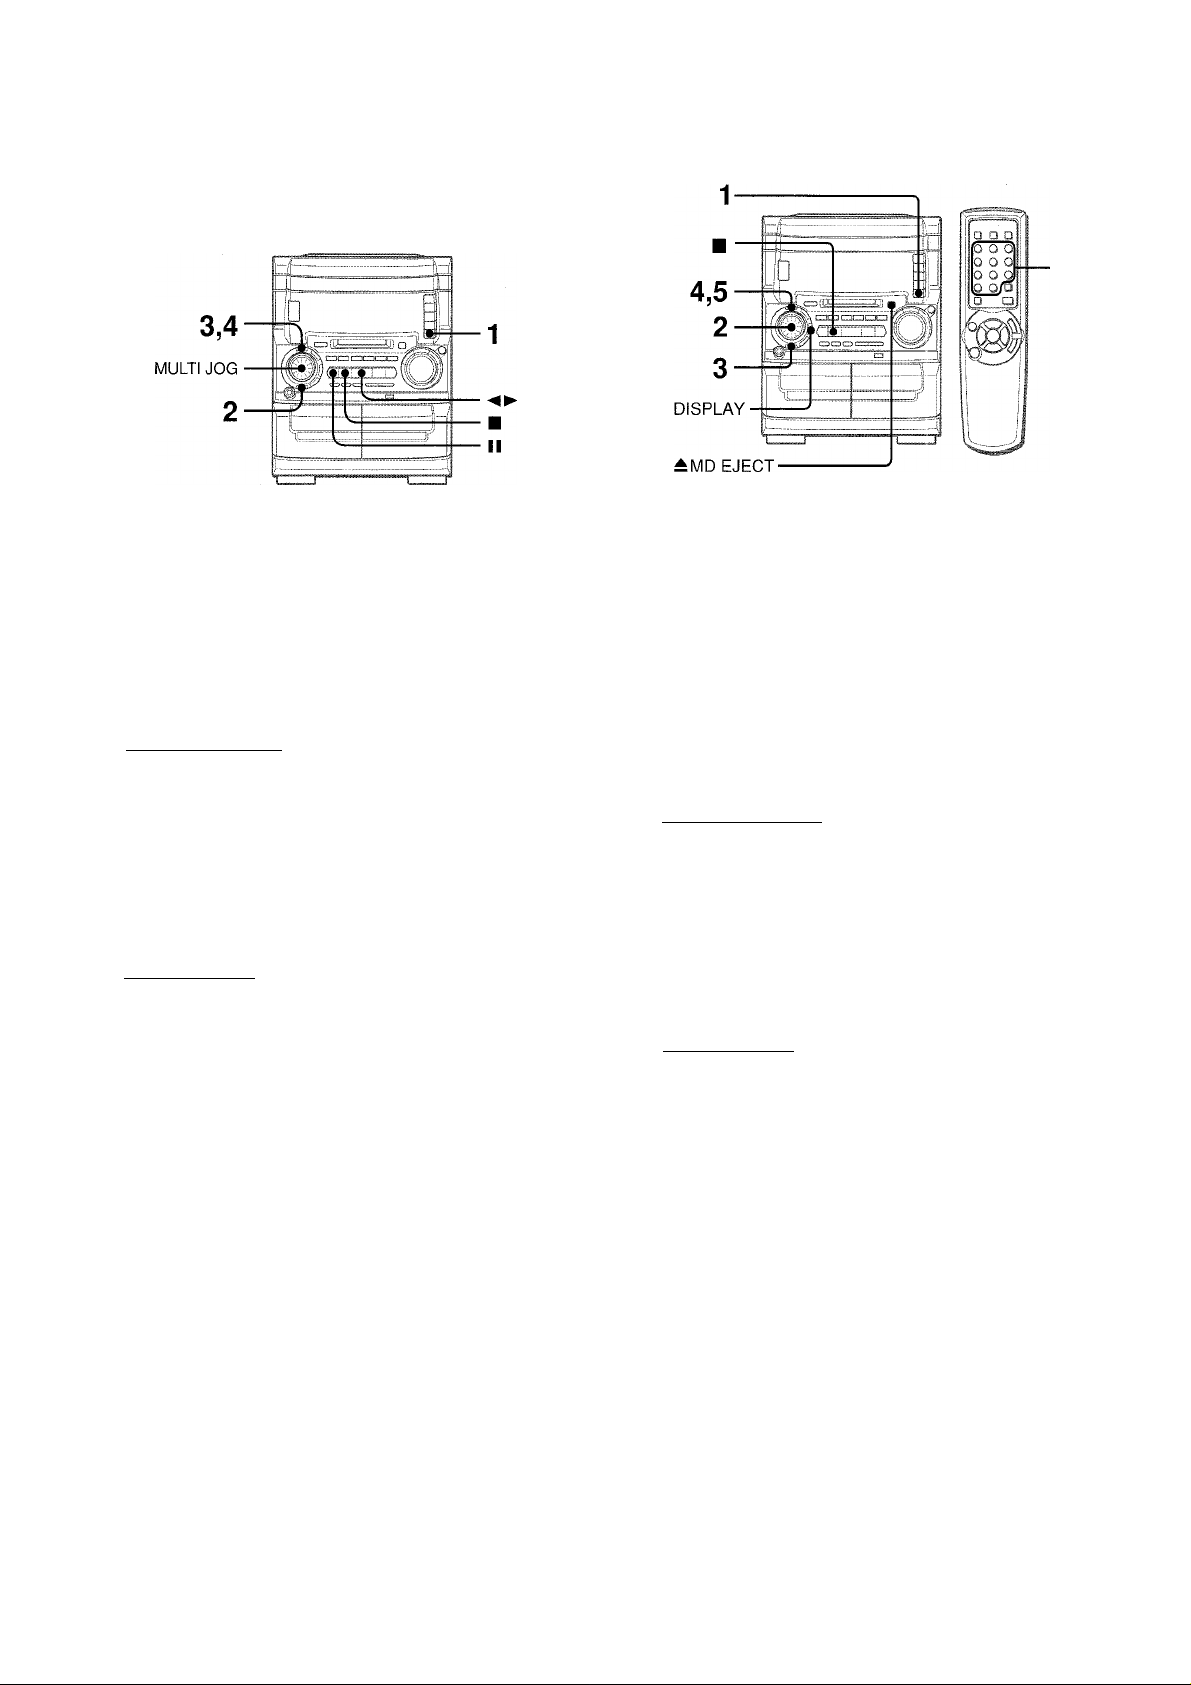
ERASING ALL TRACKS ON A DISC
ERASING A SINGLE TRACK
1 Press MD and insert an MD.
2 Press EDIT in stop mode repeatedly until "Erase
All?" is displayed.
hr"’I'i .1 1 '
3 Within 10 seconds, press ENTER.
If you erase ail the tracks, you cannot retrieve them again.
Make sure to check that it is all right to erase all tracks.
' Eras0?P 11 \
To cancel, press ■.
4 Within 1 minute, press ENTER again.
"TOC EDIT" is displayed and all tracks on the inserted disc
are erased. Then, "TOC EDIT" disappears, and "Blank Disc"
is displayed.
1 Press MD and insert an MD.
2 Select the track that you want to erase with MULTI
JOG or the numbered buttons 0-9 and +10 on the
remote control.
3 Press EDIT repeatedly until "Erase" is displayed.
Example: To erase the 3rd track
raMo
4 Within 10 seconds, press ENTER.
If you erase a track, you cannot retrieve it again. Make sure
to check that it is all right to erase the track.
3 ' Erase?
To cancel, press ■.
5 Within 1 minute, press ENTER again.
The selected track is erased and all the succeeding track
numbers also move down by one.
When "TOC EDIT" is displayed, the data concerning the
contents of the editing are registered.
30 ENGLISH
Page 31

CLOCK AND TIMER
3
2-
a
UJ
j; '^ii— ^
A^i'i—- SHIFT
□
1,4
a
s
a
z
II
Press CLOCK on the remote control while
pressing SHIFT. (You may press II when the
power is off.)
The clock is displayed for 4 seconds.
When the power cord is plugged into an electrical outlet for
the first time after purchase or when the clock setting is
canceled due to a power failure, the entire clock display
flashes.
The unit can be turned on at a specified time every day with the
built-in timer.
First, make sure the clock is set correctly.
1 Select the source.
Press one of the function buttons to select a source for
rllM J.
Tc display the 24-hour standard, press
restore the 12-hour standard.
Press ■ again to
While the clock is displayed (within 4 seconds),
set the time.
Turn MULTI .JOG to the right to advance the time and turn it
to the left to move the time back. The speed with which the
time changes varies according to how fast you turn MULTI
JOG. You can also press ◄◄ or Holding these buttons
down will vary the time in 30-minute units.
playback or recording.
For timer playback of a tape, select the deck 1 or 2 with TAPE
DECK 1/2.
2 Press TIMER repeatedly, or press TIMER on the
remote control while pressing SHIFT repeatedly
to select the timer piayback or the timer
recording.
Time and audio source display flash alternately
SHIFT
POWER
oi
OH
u
o
3 Press ENTER or II.
The clock display disappears.
If the power had been turned on,
reappear.
To view the clock when another display is in the dispiay window
Press CLOCK on the remote control while pressing SHIFT. The
time is displayed for 4 seconds and then the original display
reappears.
However, the clock cannot be displayed during recording.
If the clock display flashes
if the display flashes when the clock is displayed, it indicates
that the clock had been stopped due to a power failure or the
removal of the power cord. The current time needs to be reset.
the original display will
Timer piayback: © is displayed.
Timer recording: © and "REC" are displayed.
Within 6 seconds, begin setting the timer-on time.
Turn MULTI JOG to the right to advance the time and turn it
to the left to move the time back. The speed with which the
time changes varies acceding to how fast you turn MULTI
JOG. You can also press ◄◄ or ►►. Holding these buttons
down will vary the time in 30-minute units.
Timer-on time
i■■iN
For timer playback
ENTER or II, then skip to step 5.
For timer recording : When the timer-on time is set, go to
step 4.
: When the timer-on time is set, press
Pi
ENGLISH 31
Page 32

4 For timer recording, seiect the recording
destination.
To record on an MD, press MD.
To record on a tape, press TAPE.
Example: For recording the radio (FM) to an MD, "FM ►
MD" is dispiayed.
When the recording destination is seiected, press ENTER or
II
5 Within 4 seconds, set the duration for the timer-
activated period.
Turn MULTI JOG or press ◄◄ and ►► to set the duration.
The duration can be set between 5 and 240 minutes in 5-
minute units.
;■■ ■■ i:. ! "V
I " i ■ I j!" i ■ 11.. ' !•.;.!
Timer-activated period
When the duration is set, press ENTER or II. (if no button is
pressed, the chosen duration is automaticaolly set after 4
seconds.)
• Timer piayback and timer recording wiii not begin uniess the
power is turned off.
• if you use the unit whiie the timer is set, check again the
preparation of the source for timer piayback or recording and
the setting of volume before turning off the power.
To check the timer setting
Press TIMER on the main unit, or press TIMER on the remote
control while pressing SHIFT.
The selected source, the timer-on time, and the duration for the
timer-activated period will be displayed for 4 seconds.
To change the timer setting
Set the timer again from fhe beginning.
To cancel the timer standby mode
Press TIMER of the main unit, or press TIMER on the remote
control repeatedly while pressing SHIFT so that "© OFF"
appears.
6 Adjust the volume.
The source sound will be audible at the volume set here when
the power goes on at the set time.
However, when power economizing mode (page 34) has been
turned on, the volume for timer recording will be 0 (minimum
level).
7 Prepare the source.
For timer playback of a tape, insert a tape to a deck selected
in step 1.
For timer playback of a CD or MD, insert a CD or MD.
For timer playback/recording of the tuner, press TUNER
BAND to select FM or AM and tune in the desired station.
For timer playback/recording of the equipment connected
to the VIDEO/AUX jacks or DIGITAL IN jack, set the timer
of the equipment so that playback begins at the same time.
8 For timer recording, prepare a recordable MD or
tape.
For MD recording, insert a recordable MD.
For tape recording, insert a recordable tape into the deck 2,
and select reverse mode (page 10).
9 Press POWER to turn off the unit.
Timer functions.
©, or © and "REG" are displayed (when the power
economizing mode is set to OFF).
• If the volume level is set to 21 or higher, however, it will
automatically be set to 20 when the power is turned on.
• You can change the source that was selected in step 1 by
pressing one of the función buttons before pressing ENTER
or II in step 3.
You can turn off the unit automatically at any desired time within
4 hours.
1 Press SLEEP on the remote control while
pressing SHIFT.
SLEEP
2 Within 4 seconds, press ◄◄ or ►► , or turn
MULTI JOG to select the timer-activated period.
The duration can be set between 5 and 240 minutes in 5-
minute units.
To check the timer-activated period
Press SLEEP on the remote control once while pressing SHIFT.
The duration of the timer-activated period appears for 4 seconds.
To cancel the sleep timer
Press SLEEP on the remote control twice while pressing SHIFT.
"SLEEP OFF" will be displayed for 4 seconds.
32 ENGLISH
Page 33

OTHI-R INFORMATION
If you press DISPLAY on the main unit, or press CD EDIT/
CHECK on the remote control while pressing SHIFT, the display
changes as follows.
WHEN THE SOUND SOURCE IS AN MD
During playback or pause mode
(1) Track title
(2) MD - 32:37
(Remaining time of playback)
C
z
■F *5:
O «
01"
WHEN THE SOUND SOURCE IS A CD
During playback or pause mode (when no recordable MD
is ioaded)
r* 3' CD 1 Tr 3:42
(Efiapsed playing time)
I- /2) CD -36:15
(Remaining time of playback)
• During random play or programmed play, remaining time of
playback is not displayed.
During piayback or pause mode (when recordabie MD is
ioaded)
(T CD 1 Tr 3:42
(Elapsed playing time)
3 CD -36:15
(Remaining time of playback)
.3, MD Rem - 52:38*
(Recordable time of MD: displayed for 4 seconds)
* Displayed only when being operated with the DISPLAY buttoh on the
main unit.
C3) MD 1 Tr 3:42
(Elapsed playing time)
• During random play or programmed play, remaining time of
playback is not displayed.
• Track title is displayed only by pressing DISPLAY on the main
unit.
• When the track title is not registered, track number is displayed.
During stop mode
^ (i.) MD title
(?) MD Rem - 59:06
(Recordable time of MD: displayed for 4 sesonds)
- (3) MD9Tr 14:54
(Total playing time)
' MD title is displayed only by pressing DISPLAY on the main
unit.
When the MD title is not registered, "No Title" is displayed.
DURING MANUAL RECORDING FROM
TAPE, TUNER, OR CONNECTED SOURCE
TOMD
During random play or programmed play, remaining time of
playback is not displayed.
• You can change the display, only by pressing DISPLAY on the
main unit.
z
o
U1 <
xs
Hffi
Co
DURING PROGRAMMED RECORDING
FROM CD TO MD
You can change the display only by pressing DISPLAY on the
main unit.
-► (i; CD 1 Tr 1:23
(CD track number and elapsed time)
(E MD —36:15
(Recordable time of MD)
- 3/ MDlOTr 1:27
(MD track number in recording and elapsed time)
© AUX
(sound source)
(2) MD -15:14
(Recordable time of MD)
© MD 12Tr 2:58
(MD track number in recording and elapsed time)
ENGLISH 33
Page 34

The display window brightness can be adjusted to the tollowing
four levels: "DIM-OFF", "DIMMER 1", "DIMMER 2", and
"DIMMERS".
"DIM-OFF" is the brightest level.
When "DIMMER 3" is selected, the display is darkest, the
illumination of CD tray and slot of MD disc drive goes out, and
the spectrum analyzer does not move.
Setting this unit to power economizing mode reduces power
consumption as follows.
• When the power shuts off, all indications of the display window
are turned off.
(Even the clock is not displayed. When the AC cord is connected
to the AC outlet, only the red indicator below the POWER button
lights. Note, however, that the demo display will appear unless
the clock of the unit is set. For the demo display, see page 6.)
• If the tape, CD, and MD are stopped and there is no audio
input from any connected external equipment for 10 minutes,
the power shuts off.
• When the power turns on by timer recording (page 31), the
display window brightness level is set to "DIMMER 3", all button
lamps are off, and the volume is set to the minimum level.
• The display window brightens only when the unit is being
operated. When the unit has not been operated for 10 seconds,
the brightness level switches to the level chosen by the "DIM
MODE" setting.
(If the brightness level is set to "DIM-OFF", the brightness does
not change. When the level is "DIMMER 3", the button lamps
are also turned off.)
1 Press ECO.
"ECO MODE?" is displayed.
1 Press ECO.
"ECO MODE?" is displayed.
2 Within 4 seconds, turn MULTI JOG to display "DIM
MODE?".
Din NÜDE
3 Within 4 seconds, press ENTER.
Selected brightness is displayed.
4 Within 4 seconds, turn MULTI JOG to select your
desired brightness.
DIM-OFF
C
DIMMER 3
After 4 seconds, the brightness level selected will be set
automatically.
Or, it you press ENTER within 4 seconds, the brightness level
selected will be set.
DIMMER 1
DIMMER 2
..ECO MiJDE
2 Within 4 seconds, press ENTER.
The current power-economizing mode status will be displayed.
If the power-economizing mode is OFF: ECO OFF
If the power-economizing mode is ON: ECO ON
3 Within 4 seconds, turn MULTI JOG to switch the
power-economizing mode on or off.
Example: When "ON" is selected
----
,
...ECL
After 4 seconds, the power-economizing mode selected will be
set automatically.
Or, if you press ENTER within 4 seconds, the power-economizing
mode selected will be set.
Standby power consumption
If the power-economizing mode is OFF: 24 W
If the power-economizing mode is ON: 1.3 W
34 ENGLISH
1
After timer recording (page 31) with the power-economizing mode
set to ON, if you turn on the power, the display window brightness
level is set to "DIMMER 3", all button lamps are off, and the
volume is set to the minimum level. If necessary, adjust the
volume and the display window brightness level again.
Page 35

OTHER CONNECTIONS
■ CD DIGITAL
OUT
(OPTICAL)
■ VIDEO/AUX
SURROUND
SPEAKERS
Refer to the operating instructions of the connected equipment
for details.
• The connecting cords are not supplied. Obtain the necessary
connecting cords.
• Consult your local Aiwa dealer for optional equipment.
DIGITAL IN (OPTICAL) JACK
This unit can input digital sound signals through this jack.
This unit has a built-in sampling frequency rate converter, which
converts the sampling frequency rates that are different from the
MD sampling frequency rate (BS/CS tuner or DAT (32 kHz or 48
kHz), and other digital signals) into a sampling frequency rate
that can be recorded on an MD (44.1 kHz).
Use an optical cable to connect digital audio source equipment
(DAT deck, MD player, etc.).
Remove the dust cap .a) from DIGITALIN (OPTICAL) jack. Then,
connect an optical cable plug to DIGITAL IN (OPTICAL) jack.
L
(0
{0
s;
“E
Ui <
XS!
Oo
u,
(A
Z
o
lU I-
XU
put
OX
o
o
o
z
VIDEO/AUX JACKS
This unit can input analog sound signals through these jacks.
Use a cable with RCA phono plugs to connect audio equipment
(turntables, LD players, MD players, VCRs, TV, etc.).
Connect the red plug to the R jack, and the white plug to the L
jack.
When connecting a turntable
Use an Aiwa turntable equipped with a built-in equalizer amplifier.
CD DIGITAL OUT (OPTICAL) JACK
This unit can output CD digital sound signals through this jack.
Use an optical cable to connect digital audio equipment (digital
amplifier, DAT deck, MD recorder, etc.).
Remove the dust cap @ from CD DIGITAL OUT (OPTICAL) jack.
Then, connect an optical cable plug to CD DIGITAL OUT
(OPTICAL) jack.
When DIGITAL IN (OPTICAL) jack is not being used
Attach the supplied dust cap.
SURROUND SPEAKERS JACKS
Connect optional surround speakers with 8 to 16 ohms
impedance to the jacks.
When CD DIGITAL OUT (OPTICAL) jack is not being used
Attach the supplied dust cap.
Because this unit complies with the SCMS standard (page 26),
digital MD recordings made with this unit cannot be recorded
again via digital input to other digital devices.
Digital dubbing of MD recordings made with this unit from an
external satellite/cable receiver, however, may be possible
depending on the type of the tuner being used.
ENGLISH 35
Page 36

LISTENING TO EXTERNAL SOURC
POWER
TO PLAY AN EQUIPMENT CONNECTED TO THEVIDEO/AUX JACKS
1 Press AUX/D-IN repeatedly until "AUX" appears
on the display.
2 Play the connected equipment.
To change a source name in the display
When AUX/D-IN is pressed, "AUX" is displayed initially. It can
be changed to "VIDEO" or "TV".
With the power on, press POWER while pressing AUX/D-IN.
Repeat the procedure to select one of the names.
TO PLAY AN EQUIPMENT CONNECTED TO THE DIGITAL IN JACK
1 Press AUX/D-IN repeatedly until "D-IN” appears
on the display.
2 Play the connected equipment.
It you load an MD disc during playback of the equipment
connected to the DIGITAL IN jack, the playback sound is not
heard while reading of the TOC data.
To adjust the volume level of the equipment connected
to the VIDEO/AUX jacks
Press AUX/D-IN to call up the "AUX" indication, then press •
or ►► repeatedly.
36 ENGLISH
Page 37

GENERAL.
Occasional care and maintenance of the unit and the software
are needed to optimize the performance of your unit.
To clean the cabinet
Use a soft and dry cloth.
If the surfaces are extremely dirty, use a soft doth lightly
moistened with mild detergent solution. Do not use strong
solvents, such as alcohol, benzine or thinner as these could
damage the finish of the unit.
To clean the heads and tape paths
After every 10 hours of use, clean the heads and tape paths with
a head cleaning cassette or cotton swab moistened with cleaning
fluid or denatured alcohol. (These cleaning kits are commercially
available.)
When cleaning viiith a cotton swab, wipe the recording/playback
head, erasure head (deck 2 only), capstans, and pinchrollers.
Care of tapes
• Store tapes in their cases after use.
• Do not leave tapes near magnets, motors, television sets, or
any source of magnetism. This will downgrade the sound quality
and cause noise.
• Do not expose tapes to direct sunlight, or leave them in a car
parked in direct sunlight.
Care of MDs
Since MDs come in a cartridge which protects the discs inside
from fingerprints and dust, you do not have to be overly careful
when handling them. However, soiled or damaged cartridges can
lead to malfunctions in the unit. Observe the following tips when
handling MDs.
• Keep a cartridge in the attached case.
• Do not open the shutter of the cartridge to touch the disc directly.
If the disc inside becomes soiled, it is very difficult to clean.
The cartridge can also be damaged.
• Close the shutter if it opens while handling or ejecting a disc.
Otherwise dust may enter or a disc may become scratched.
Disc shutter
s:
i“!
Q
O
fiC
Ui
z
u
a
After cleaning the heads and tape paths with a liquid head
cleaning cassette or a moistened swab, wait until the cleaned
parts are completely dry before inserting the tapes.
To demagnetize the heads
The heads may become magnetized after long-term use. This
may narrow the output range of recorded tapes and increase
noise. After 20 to 30 hours use, demagnetize the heads with
any commercially available demagnetizer.
Care of CDs
• When a CD becomes dirty, wipe the CD from the center out
with a cleaning cloth.
After playing a CD, store the CD in its case. Do not leave the
CD in places that are hot or humid.
ENGLISH 37
Page 38

Main unit CX-NH330MD
FM tuner section
Tuning range
Usable sensitivity (IHF)
Antenna terminals
AM tuner section
Tuning range
Usable sensitivity Antenna
Amplifier section
Mid-high frequency amplifier
Power output*
Total harmonic distortion
Low frequency amplifier
Power output*
Total harmonic distortion
without connecting to the SURROUND SPEAKERS
Inputs
Outputs
Compact disc player section
Laser
D-A converter
Signal-to-noise ratio
Harmonic distortion
Wow and flutter
MD recorder section
Scanning method
Recording system
Rotation speed
Samnllna frequency
No. of channels
A-D, D-A converter
Frequency
Wow and flutter
87.5 MHz to 108 MHz
16.8 dBf
75 ohms (unbalanced)
530 kHz to 1710 kHz (10 kHz step)
531 kHz to 1602 kHz (9 kHz step)
350 pV/m
Loop antenna
10 watts per channel, Min.
RMS at 8 ohms, from 200 Hz to
20 kHz, with no more than 1%
Total Harmonic Distortion
0.06 % (8 W, 1 kHz, 8 ohms, DIN
AUDIO)
30 watts per channel, Min.
RMS at 4 ohms, from 50 Hz to
200 Hz, with no more than 1%
Total Harmonic Distortion
0.06 % (20 W, 135 Hz, 4 ohms, DIN
AUDIO)
VIDEO/AUX: 310 mV
DIGITAL IN
SPEAKERS:
LOW FREQ: accept speakers of 4
ohms
HIGH FREQ: accept speakers of 8
ohms
SURROUND SPEAKERS: accept
speakers of 8 to 16 ohms
PHONES (stereo jack): accepts
headphones of 32 ohms or more
CD DIGITAL OUT (OPTICAL) jack
Semiconductor laser {X = 780 nm)
1 bit dual
85dB(1 kHz, OdB)
0.05 % (1 kHz, 0 dB)
Unmeasurable
Non-contact optical scanner
(Semiconductor laser application)
Magnetic polarity modulation
overwrite system
Approx. 400 - 900 rpm (CLV)
44.1 kHz
Stereo: 2 channels
Monaural: 1 channel
1-bit
20 to 20000 Hz +0.5 - -1.5 dB
Unmeasurable
General
Power requirements
Power consumption
Standby power consumption
120 VAC, 60 Hz
130 W
1.3 W (power-economizing mode
set to ON)
Dimensions of main unit
(W X H X D)
260 X 329.5 X 354.5 mm
(10 V4 X 13 X 14 in.)
Weight of main unit
8.6 kg (18lb5oz.)
Speaker system SX-WNH330
Cabinet type
3 way, built-in subwoofer (magnetic
shielded type)
Speakers
Subwoofer:
160 mm cone type
Full range:
100 mm cone type
Super tweeter;
20 mm ceramic type
Impedance
LOW FREQ: 4 ohms
HIGH FREQ: 8 ohms
Output sound pressure level
Dimensions (W x H x D)
Weight
87 dB/W/m
240 X 324 X 270 mm
4.8 kg
Specifications and external appearance are subject to change without
notice.
•US AND FOREIGN PATENTS LICENSED FROM DOLBY
LABORATORIES LICENSING CORPORATION.
COPYRIGHT
Please check the laws on copyright relating to recordings from
discs, radio or external tape for the country in which the machine
is being used.
NOTE
This equipment has been tested and found to comply with the
limits for a Class B digital device, pursuant to Part 15 of the FCC
Rules. These limits are designed to provide reasonable protection
against harmful interference in a residential installation.
This equipment generates, uses, and can radiate radio frequency
energy and, if not installed and used in accordance with the
instructions, may cause harmful interference to radio
communications. However, there is no guarantee that interference
will not occur in a particular installation. If this equipment does
cause harmful interference to radio or television reception, which
can be determined by turning the equipment off and on, the user
is encouraged to try to correct the interference by one or more of
the following measures:
- Reorient or relocate the receiving antenna.
- Increase the separation between the equipment and receiver.
- Connect the equipment into an outlet on circuit different from
that to which the receiver is connected.
- Consult the dealer or an experienced radio/TV technician
for help.
CAUTION
Modifications or adjustments to this product, which are not
expressly approved by the manufacturer, may void the user's
right or authority to operate this product.
Cassette deck section
Track format
Frequency response
Recording system
Heads
38 ENGLISH
4 tracks, 2 channels stereo
50 Hz to 15000 Hz
AC bias
Deck 1: Playback head x 1
Deck 2:Recording/playback head
x 1, erase head x 1
Page 39

if the unit fails to perform as described in these Operating
instructions, check the following guide.
GENERAL
There is no sound.
• Is the AC cord connected properly?
• Is there a bad connection? (-► page 4)
• There may be a short circuit in the speaker terminals.
Disconnect the AC cord, then correct the speaker
connections.
• Was an incorrect function button pressed?
The display window becomes dark.
• Timer recording is performed when the power economizing
mode is set to ON.
Adjust the brightness of the display window(-> page 34).
Sound is emitted from one speaker only.
• Is the other speaker disconnected?
An erroneous display or a malfunction occurs.
-» Reset the unit as stated below.
The indication of the display window moves when the
power is off.
• The demo display functions.
-r Press ◄►. The demo display goes off.
The power shuts off though you do not turn off the power.
• The power economizing mode is set to ON.
If fhe tape, CD, and MD are stopped and there is no audio
input from any connected external equipment for f 0 minutes,
the power shuts off automatically.
Set the power economizing mode to OFF (-♦ page 34).
TUNER SECTION
There is constant, wave-like static.
• is the antenna connected properly? (-» page 5)
• Is the signal weak?
-» Connect an outdoor antenna.
The reception contains noise interferences or the sound
is distorted.
• is the system picking up external noise or multipath distortion?
-■> Change the orientation of the antenna.
-> Move the unit away from other electrical appliances.
CASSETTE DECK SECTION
The tape does not run.
• Is deck 2 in pause mode? (-► page 10)
The sound is off-balance or not adequately high.
• Is the playback head dirty? (-► page 37)
Recording Is not possible.
• Is the erasure prevention tab on the tape broken off? (-> page
11)
• Is the recording head dirty? (-* page 37)
Erasure is not possible.
• Is the erasure head dirty? (-» page 37)
• Is a metal tape or Cr02 tape being used?
High frequency sound is not emitted.
• Is the recording/playback head dirty? (-> page 37)
CD PLAYER SECTION
The CD player does not play.
• Is the disc correctly inserted? (-► page 12)
• Is the disc dirty? (-* page 37)
• Is the lens affected by condensation?
-► Wait for a few hours and try again.
MD RECORDER SECTION
The MD recorder can not be operated.
• Is there a disc inside the unit?
—> Insert a disc.
• Is the lens affected by condensation?
-* Wait for a few hours and try again.
Sound is noisy.
• Is the unit placed close to an object with a strong magnetic
field such as a television?
-* Move the unit away from the television.
Sound is intermittent.
• Is the unit placed on an unstable surface with a lot of vibration?
-► Place the unit on a stable surface with no vibration.
Recording is not possible.
• Is CD ► MD pressed when attempting to record from a source
other than a CD?
• Is a prerecorded disc inserted?
Change to a recordable disc.
• Is the disc protected by the record-protected tab on the disc?
(-» page 23)
SC
üi
2
u
O
To reset
If an unusual condition occurs in the display window or the
cassette decks, reset the unit as follows.
1 Press POWER to turn off the power.
2 Press POWER to turn the power back on while pressing ■.
Everything stored in memory after purchase is cancelled, and
a demo display will appear.
3 Press POWER again to turn on the power.
If the power cannot be turned off in step 1 because of a malfunction,
reset by disconnecting the AC cord, and connect it again. Then
carry out step 2.
If the unit cannot be turned on
Disconnect the power cord from the AC outlet, wait for a few
seconds, and re-connect the power cord to the AC outlet. Then
try to turn the unit on again.
ENGLISH 39
Page 40

Message
Cause
Solution
Blank Disc
Can't Edit
Protected
Disc Error
Disc Fuli
Temp Over
Emergency
Nothing is recorded on the disc.
Tracks are too short to be joined.
The combine function was used while playing
back the first track.
The divide function was used at the beginning of
the track.
The combine function was used to join a track
recorded in monaural with a track recorded in
stereo.
The disc is record-protected.
The disc is damaged by scratches.
The TOC data is not proper.
There is not enough time remaining on the disc to
record.
The temperature of the unit is too high.
The surrounding temperature is too high or too
low.
The unit operates abnormally due to a scratched
disc or a strong shock.
—
See “THE LIMITATIONS OF MD” on page 26.
Slide the record-protect tab on the disc. (See page
23.)
Replace the disc.
Replace the disc with another recordable disc.
Leave the unit in a cool place for a while before
operating it again.
Operate the unit at moderate room temperature.
Replace the disc. Do not subject the disc to a
strong shock.
PB Disc
TOC Full
Mecha Err
Can't Copy
No Signal
MD Error A trouble occurs in the MD unit.
UTOC Err TOC data is not registered correctly due to a
LONG CD
There is an attempt to record or edit a
prerecorded music disc (optical disc).
There are too many tracks or emphasis data to be
recorded or edited, or there is no room on the
disc.
Error occurs in the loading mechanism.
(All functions concerning to MD will be disabled.)
Dubbing is prohibited by the SCMS standard.
The digital connecting cord (optical) is not plugged
in properly.
strong shock during recording TOC edit or TOC
reading.
The playing time of CD to record is longer than
the recordable remaining time of MD.
Replace the disc with a recordable one.
Erase tracks to reduce tracks.
Turn the power off and disconnect the AC cord
once. Then connect the AC cord, and turn the unit
on again.
If you cannot still remove an MD, nonsuit your looal
Aiwa dealer.
—
Plug it in properly.
Check that the connected equipment is in playback
mode, or it is connected properly.
Refer to your local Aiwa dealer.
Replace the disc.
Do not subject the disc to a strong shock during
TOC reading or TOC recording.
Replace the disc. (Press again CD ► MD to record
to the end of the recordable remaining time.)
40 ENGLISH
Page 41

0
o
O
©
©
.j
<
©
0
0
©
D ^
a
Ml
2
ui
(3
©
r-
©
©
0
0
©
©
Name
O Display
© ECO..................................................34
CD BLANK SKIP.............................12
© CD ► MD/TAPE SYNC REC .. 25
©POWER............................................. 6,36
© MULTI JOG
ENTER............................................ 10,11,16,22-25,27-30
TIMER
DISPLAY.........................................21,33
MODE
EDIT ..............................................28-30
© PHONES
© IISET
■ CLEAR
◄ ►PRESET
TUNING^^ DOWN/^^UP 8-9,12-16,18,19,25,27,
O MD drive........................................14,20-25
© CD ► MD SYNC REC
• MD REC......................................22-24
TAPE SYNC DUB
• TAPE REC/REC MUTE
......................................
.............................................
.............................................
..........................................
................................................
........................................
.................................
.....................
...........................
..............
Page
10,11,12,14,16,18-19,22
25,27-30
31,32
10,11,16,22-25
7
9,10,12,14,16,22-24,28
6,9,10-20,23-25,39
6,9,10-16
28,31-32
20-21
17
16,18-19
Name Page
©Q SURROUND
© DISC DIRECT PLAY 1/2/3
DISC CHANGE...............................12,21
^OPEN/CLOSE
© DISC DIRECT PLAY 1/2/3
® SHIFT...............................................6,7,9,12-15,18-21,27,31
©TUNING^^DOWN/^^UP
IISET
■ CLEAR
►/◄►PRESET
©POWER.............................................31,32
® 1/CD EDIT/CHECK
2/PGRM
3/RANDOM/REPEAT
4/GEQ.............................................7
51
6/T-BASS........................................7
7/TIMER.........................................
8/SLEEP
9/CLOCK
O/MONO TUNER
+10/BAND/MODE...........................8-9
® MDTITLE/ENTER
.................................
...............
......
.......................
...............
....................
..............................................
........................................
.............................
..........................................
.........................................
........................................
..........................
.....................
...........................
............................
7
12,13,18-21
12
12,13,18-21
32
8-9,12-16,18-19,27,28
9,10
15
9,10
12,14,18-19
13,15
13,15
31-32
32
31
8
27
® ^MD EJECT......................................14
® Function (source) buttons .... 8-12,14,16-24,27-31,36
©T-BASS
© ROCK, POP, CLASSIC....................7
.............................................
VOLUME
.........................................
7
7
© FUNCTION......................................
® VOL (A, V)........................................7
6
ENGLISH 41
Page 42

ESPAÑOLI
ADVERTENCIA
PARA REDUCIR EL RIESGO DE INCENDIOS O
SACUDIDAS ELECTRICAS, NO EXPONGA ESTE
APARATO A LA LLUVIA NI A LA HUMEDAD.
CAUTION
RISK OF ELECTRIC SHOCK
DO NOT OPEN
“CAUTIONiTO REDUCE THE RISK OF
ELECTRIC SHOCK,
DO NOT REMOVE COVER (OR BACK).
NO USER-SERVICEABLE PARTS INSIDE.
REFER SERVICING TO QUALIFIED
SERVICE PERSONNEL.”
Explicación de los símbolos gráficos
El símbolo de un rayo con una flecha en la
punta, dentro de un triángulo equilátero es una
alerta al usuario de ia existencia de un "voitaje
peligroso" sin aisiar en el interior dei aparato
que puede ser io suficientemente fuerte como
para provocar sacudidas eiéctricas en ias
personas.
El signo de exciamación en el triángulo
equilátero es una alerta al usuario de ia
existencia de instrucciones de funcionamiento
y de mantenimiento (servicio) importantes en
ios manuales que vienen con ei aparato.
Lea cuidadosa y completamente el manual de instrucciones antes
de utilizar la unidad. Asegúrese de guardar el manual de
instrucciones para utilizarlo como referencia en el futuro. Todas
las advertencias y precauciones del manual de instrucciones y de
la unidad deberán cumplirse estrictamente, así como también las
sugerencias de seguridad mencionadas más abajo.
Instalación
1 Agua y humedad - No utilice esta unidad cerca del agua
como, por ejemplo, cerca de una bañadera, una palangana,
una piscina o algo similar.
2 Calor - No utilice esta unidad cerca de fuentes de calor,
incluyendo salidas de aire caliente, estufas u otros aparatos
que generen calor. No deberá colocarse tampoco en lugares
donde la temperatura sea inferior a 5°C o superior a 35“C.
3 Superficie de montaje- Ponga la unidad sobre una superficie
piana y nivelada.
4 Ventilación - La unidad deberá situarse donde tenga suficiente
espacio libre a su alrededor para que la ventilación apropiada
quede asegurada. Deje un espacio libre de 10 cm para la parte
posterior y superior de la unidad y 5 cm para cada lado.
- No ponga la unidad sobre una cama, una alfombra o superficies
similares que podrán tapar las aberturas de ventilación.
- No instale la unidad en una librería, mueble o estantería
cerrada herméticamente donde la ventilación no sea adecuada
5 Entrada de objetos y líquidos - Tenga cuidado de que
objetos y líquidos no entren en la unidad por las aberturas de
ventilación.
6 Carros de mano y soportes-Cuando
ponga o monte la unidad en un soporte
o carro de mano, ésta deberá moverse
con mucho cuidado. Las paradas
repentinas, la fuerza excesiva y las
superficies irregulares pueden hacer
que la unidad o el carro de mano se dé
vuelta o se caiga.
2 ESPAÑOL
7 Condensación - En la lente del fonocaptor del reproductor de
discos compactos tal vez se forme condensación cuando:
- La unidad se pase de un lugar frío a uno caliente
- El sistema de calefacción se acabe de encender.
- La unidad se utilice en una habitación muy húmeda.
- La unidad se enfríe mediante un acondicionador de aire.
Esta unidad tal vez funcione mal cuando tenga condensación
en su interior. En este caso, deje en reposo la unidad durante
unas pocas horas y repita de nuevo la operación.
8 Montaje en pared o techo - la unidad no se deberá montar en
luna pared ni en el techo, a menos que se especifique lo
contrario en ei manual de instrucciones.
Energía eléctrica
1 Fuentes de alimentación - Conecte esta unidad sólo a las
fuentes de alimentación especificadas en el manual de
instrucciones, y como está marcado en la unidad.
2 Polarización - Para su seguridad, algunos aparatos tienen
clavijas de alimentación de CA que sólo pueden enchufarse en
un sentido en el tomacorriente. si fuera muy difícil por no decir
imposible de enchufarlo en el tomacorriente, pruebe a hacerlo
girando la clavija de alimentación. Si todavía tiene problemas,
llame a un técnico en reparaciones cualificado para que le
cambie el tomacorriente. No elimine esta seguridad de la
clavija de alimentación polarizada enchufándolo a la fuerza en
el tomacorriente.
3 Cable eléctrico de CA
- Cuando desconecte el cable eléctrico de CA, sujete la clavija
de alimentación de CA y tire de ella. No tire del propio cable.
- Nunca maneje la clavija de alimentación de CA con ias manos
mojadas porque podría producirse un incendio o una sacudida
eléctrica.
- Los cables de alimentación deberán colocarse de forma que
no sean doblados excesivamente, pellizcados o pisados.
Tenga mucho cuidado con el cable que va de la unidad a la
toma de corriente.
- Evite sobrecargar las tomas de CA y los cables de extensión
más allá de su capacidad porque esto podrá causar un
incendio o una sacudida eléctrica.
4 Cable de extensión - Para evitar una sacudida eléctrica, no
utilice un enchufe de CA polarizado con un cable de exfensión,
divisor u ofro fomacorrienfe excepto uno en el que pueda
enchufar completamente para evitar la exposición parcial de
las patas del enchufe.
5 Períodos de no utilización - Desenchufe la clavija de
alimentación de CA del tomacorriente de CA si la unidad no va
a ser utilizada durante varios meses o más. Cuando el cable
eléctrico esté conectado, por la unidad continuará circulando
una pequeña cantidad de corriente, aunque la alimentación
esté desconectada.
Antena exterior
1 Líneas eléctricas - Cuando conecte una antena exterior,
asegúrese de instalarla lejos de las líneas eléctricas.
2 Tierra de la antena exterior- Asegúrese de que el sistema de
antena está bien conectado a tierra para protegerlo contra
sobretensión o acumulación de electricidad estática. El artículo
810 del Código de Electricidad Nacional, ANSI/NFPA 70
contiene información sobre una correcta conexión a tierra del
mástil, estructura de soporte y el cable conductor a la unidad
de descarga de la antena, así como el tamaño de la tierra,
conexión a los terminales de tierra y requisitos sobre los
terminales de tierra.
Puesta a tierra de la antena según el Codigo Eléctrico Nacional
CABLE DE BAJADA
DE LA ANTENA
UNIDAD DE DESCARGA
DE LA ANTENA
(NEC,SECCION 810-20)
CONDUCTORES DE
PUESTA ATIERRA
(NEC,SECCION 810-21)
ABRAZADERAS DE
PUESTA A TIERRA
SISTEMA DE ELECTRODO DE PUESTA
A TIERRA DEL SERVICIO ELECTRICO
NEC(CODIGO ELECTRICO NACIONAL)
(NEC,ARTICULO 250,PARTE H)
Page 43

Mantenimiento
Limpie la unidad sólo como se recomienda en el manual de
instrucciones.
Daños que necesitan ser reparados
Haga que un técnico en reparaciones cualificado le repare las
unidades si:
- El cable de alimentación de CA o su clavija está estropeado.
- Objetos extraños o líquidos han entrado en la unidad.
- La unidad ha estado expuesta a la lluvia o al agua.
- La unidad no parece funcionar normalmente.
- La unidad muestra un cambio considerable en sus prestaciones.
- La unidad se ha caído o la caja se ha estropeado.
NO TRATE DE REPARAR LA UNIDAD USTED MISMO.
Registro dei propietario
Para su conveniencia, registre el número de modelo y número de
serie (en la parte trasera de su aparato) en el espacio a continuación.
Consúltelos cuando llame a su tienda de Aiwa en caso de tener
problemas.
№ de modelo № de serie (№ de lote)
CX-NH330MDU
SX-WNH330
PRECAUCiOiNES
PREPARATIVOS
CONEXiONES..........................................................................4
CONTROL REMOTO
ANTES DE LA OPERACION....................................................6
....................................................................
2
_______________________________
...............................................................
6
SONIDO______________________________________
AJUSTES DE AUDIO
RECEPCION DE LA RADIO
SINTONIZACION MANUAL......................................................8
PREAJUSTES DE EMISORAS................................................9
REPRODUCCION DE CINTAS
OPERACIONES BASICAS.................................................... 10
REPRODUCCION CONTINUA............................................. 11
...............................................................
______________________
____________________
7
REPRODUCCION DE DISCOS COMPACTOS
OPERACIONES BASICAS.................................................... 12
REPRODUCCION ALEATORIA/REPETICION DE
REPRODUCCION............................................................ 13
REPRODUCCION PROGRAMADA...................................... 13
REPRODUCCION DE MINIDISCOS
OPERACIONES BASICAS.................................................... 14
REPRODUCCION ALEATORIA/REPETICION DE
REPRODUCCION............................................................ 15
REPRODUCCION PROGRAMADA...................................... 15
________________
GRABACION DE LA CINTA_______________________
GRABACION BASICA
COPIADO DE TODA LA CINTA
GRABACION CON EDICION Al
GRABACION CON EDICION PROGRAMADA
GRABACION DE MINIDISCOS
GRABACION DE TODO UN DISCO COMPACTO
GRABACION DE UNA SOLA CANCION
GRABACION AUTOMATICA DE LAS PRIMERAS
CANCIONES DE LOS DISCOS COMPACTOS................21
GRABACION PROGRAMADA DE DISCOS
COMPACTOS.................................................................. 21
...........................................................
............................................
............................................
.....................
____________________
................
...............................
16
17
18
19
20
20
GRABACION CONTINUA DE TRES DISCOS
COMPACTOS CONTINUAMENTE...................................22
GRABACION DE UNA CINTA, LA RADIO O EQUIPO
CONECTADO
GRABACION EXTENDIDA.....................................................24
GRABACION SIMULTANEA EN LA CINTA Y UN
MINIDISCO DE LOS DISCOS COMPACTOS..................25
¿QUE ES UN MD (MINIDISCO)?................................................26
EDICION DE MINIDISCOS
REGISTRO DE TITULOS DE DISCOS Y
TITULOS DE CANCIONES ..............................................27
DIVISION DE UNA CANCION................................................28
COMBINACION DE DOS CANCIONES
CAMBIO DEL ORDEN DE LAS CANCIONES
BORRADO DE CANCIONES.................................................30
RELOJ Y TEMPORIZADOR
PUESTA EN HORA DEL RELOJ ..........................................31
AJUSTE DE LA REPRODUCCION CONTEMPORIZADOR
Y GRABACION CONTEMPORIZADOR...........................31
TEMPORIZADOR PARA DORMIR
OTRA INFORMACION
INFORMACION DE LA PANTALLA
AJUSTE DE REDUCCION DEL BRILLO DE LA
PANTALLA (DE INTENSIDAD)........................................ 34
AJUSTE DEL MODO DE AHORRO DE ENERGIA................ 34
OTRAS CONEXIONES
CONEXION DE UN EQUIPO OPCIONAL..............................35
ESCUCHA DE FUENTES DE SONIDO EXTERNAS
GENERALIDADES
CUIDADO Y MANTENIMIENTO..
ESPECIFICACIONES
GUIA PARA LA SOLUCION DE PROBLEMAS
MENSAJES GUIA DE MINIDISCOS..................................... 40
INDICE DE LAS PARTES......................................................41
...................................................................
_______________________
................................
.......................
______________________
........................................
__________________________
.......................................
__________________________
............
_____________________________
..........................................
............................................................
.....................
23
29
29
32
33
37
38
39
36
ESPAÑOL
Page 44

PREPARATIVOS
Verifique sus accesorios
Conecte los cables de altavoces derecho e izquierdo a la unidad principal.
® Conecte ei cable de altavoz derecho a los terminales
SPEAKERS LOW FREQ R y el izquierdo a ios terminales
SPEAKERS LOW FREQ L.
vj
Control remoto Antena de cuadro AM
Manual de instrucciones, etc.
Antes de conectar el cable eléctrico de CA
La tensión nominal de su unidad, mostrada en el panel trasero
es una CA de 120 V. Compruebe que la tensión nominal sea la
misma que la empleada en su localidad.
IMPORTANTE
• Conecte primero los altavoces, las antenas y todos los demás
equipos opcionales. Después conecte el cable eléctrico de CA.
• Los altavoces delanteros son iguales. Puede conectarlos como
L (izq.) o R (der.) indistintamente.
Antena de FM
El cable de altavoz con la franja blanca debe conectarse al
terminal O y el cable negro al terminal O.
CD Conecte el cable de altavoz derecho con enchufe de patilla
RCA al terminal SPEAKERS HIGH FREQ R y el izquierdo
a los terminales SPEAKERS HIGH FREQ L.
4 ESPAÑOL
1
de CA
Cable eléctrico de CA
Page 45

2 Conecte las antenas suministradas.
Conecte la antena de FM a los terminales FM 75 Í2 y la antena
de AM a los terminales AWl LOOP.
Antena de cuadro AM
Antena de FM
3 Conecte ei cable eléctrico de CA a un
tomacorriente de CA.
CONEXION DE UNA ANTENA EXTERIOR
Se recomienda utilizar una antena exterior para mejorar la ®
recepción de FM. p
Conecte la antena exterior a los terminales FM 75 í2. <
OC
1
ilii
-fiC'
(L
Para posicionar las antenas
Antena de cabe alimentador de FM:
Extienda horizontalmente esta antena en T y fije las puntas a la
pared.
Antena de cuadro AM:
Muévala a la posición en la que se escuche mejor.
Para que se pare la antena de cuadro AM sobre una
superficie
Fije el gancho en la ranura.
' Asegúrese de conectar correctamente los cables de altavoz.
Una conexión mal hecha puede provocar un cortocircuito entre
los terminales SPEAKERS LOW FREQ.
Para conectar otro equipo opcional -♦ página 35.
' No deje cerca de ios altavoces objetos que puedan generar un
campo magnético ya que estos objetos pueden dañarse.
‘ No instale la antena de FM cerca de objetos de metal o rieles
de cortinas.
' No acerque la antena de cuadro AM cerca de otros equipos
opcionales, el propio sistema estéreo, el cable eléctrico de CA
o los cables de altavoces porque provocarán interferencias en
las ondas captadas.
' No saque el cable interior de la antena de cuadro AM.
ESPAÑOL 5
Page 46

Colocación de las pilas
Abra la tapa del portapilas en la parte trasera del control remoto
y coloque dos pilas R6 (tamaño AA).
La distancia de control máxima entre el control remoto y el sensor
de la unidad principal debe ser de aproximadamente 5 metros.
Cambie las pilas por otras nuevas cuando disminuya esta
distancia.
Uso del control remoto
• Los botones del control remoto que tienen los mismos nombres
que los de la unidad principal pueden utilizarse para las mismas
funciones. Hay operaciones que pueden hacerse en la unidad
principal y en el control remoto pero también existen
operaciones que sólo pueden hacerse en el control remoto.
Lea este manual para cada operación y los botones que pueden
utilizarse.
• Algunos botones del control remoto tienen dos funciones
diferentes. Para utilizar la función en el botón, simplemente
pulse el botón. Para utilizar la función en la placa encima o
debajo del botón, pulse el botón mientras pulsa SHIFT.
SHIFT
Para encender la unidad Pulse POWER.
Para apagar la unidad
Pulse nuevamente POWER.
Si se apaga ia unidad cuando se pone la hora del reloj
El indicador rojo debajo del interruptor principal se enciende para
indicar que está encendido. No aparece nada en la pantalla.
(Ajuste al comprar la unidad.)
Para apagar la luz del compartimiento de CD
Pulse el botón ■ mientras pulsa el botón CD. Repita el mismo
procedimiento para volver a encender la luz.
Para apagar la luz del compartimiento de MD
Pulse el botón ■ mientras pulsa el botón MD. Repita el mismo
procedimiento para volver a encender la luz.
Cuando compra la unidad, viene con el modo de ahorro de
energía activado.
Si se para la cinta, disco compacto y minidisco y no hay
entrada de audio de ninguno de los equipos externos
conectados durante 10 minutos, se apaga el aparato. Para
desactivar el modo de ahorro de energía, consulte la página
34.
Para utilizar la FUNCTION en el control remoto
La FUNCTION sustituye los botones de función (TAPE (1, 2),
TUNER (FM, AM), AUX, D-IN, CD, MD) de la unidad principal.
Cada vez que pulse FUNCTION, se selecciona la siguiente
función en orden cíclico. Cuando se colocan cintas en ambas
platinas, se pueden seleccionar ambas platinas con FUNCTION.
NOTA
• Si la unidad no va a ser utilizada durante un larao período de
tiempo, quite las pilas para evitar una posible fuga de electrólito.
• El control remoto no puede funcionar correctamente cuando:
- La línea de visión entre el control remoto y el sensor de
señales en el interior de la pantalla está expuesto a una luz
intensa como, por ejemplo, ia luz solar directa.
- Se utilizan otros controles remotos cerca (el de un televisor,
etc.)
6 ESPAÑOL
SOBRE LAS INDICACIONES DE LA
PANTALLA DE DEMOSTRACION
Cuando se conecta el cable eléctrico de CA la pantalla produce
indicaciones de demostración. Cuando se enciende la unidad,
la indicación de demostración termina. Cuando se apaga, vuelve
a aparecer la indicación de demostración. La indicación de
demostración aparece cada vez que apague la unidad hasta
que ponga la hora del reloj.
Cuando se pone la hora del reloj
Normalmente no aparece la indicación de demostración.
Si se pulsa con la unidad apagada, aparece la indicación
de demostración. Para terminar la demostración pulse
(Para la puesta en hora del reloj, consulte la página 31.)
Después de encender
La indicación de fuente y nivel de volumen destellan durante 4
segundos al encender la unidad.
No puede hacer funcionar la unidad durante este período.
Page 47

■GEQ
I .* . (►^T-BASS
SISTEMA AMBIENTAL Q
El sistema Q SURROUND integrado en esta unidad utiliza sólo
dos altavoces izquierdo y derecho para crear un ambiente con
sonidos como si estuviera rodeado de dos altavoces delanteros
y dos altavoces traseros.
Pulse Q SURROUND en la unidad principal para que se encienda
"Q SURROUND" en la pantalla.
(A
0
>
1
e
í
ly
m
VOL
■SHIFT
ROCK/POP/CLASSIC
VOLUME
Gire el VOLUME de la unidad principal o pulse VOL del control remoto.
Ei nivel del volumen aparece como un número del 0 a 49 seguido
de MAX.
El nivel del volumen se ajusta automáticamente a 20 cuando
desconecte la alimentación estando el nivel de volumen ajustado
a 21 o más.
SISTEMA DE SUPER GRAVES!
El sistema T-BASS realza el realismo del sonido de baja
frecuencia.
Pulse T-BASS.
El nivel cambia cada vez que se pulse ei botón. Seleccione uno
de ios tres niveles o la posición de cancelación, según sus
preferencias.
Aparece durante 4 segundos.
,Q.SUR ür-i
Se enciende.
Para cancelar el efecto Q SURROUND
Vuelva a pulsar O SURROUND.
NOTA
El sistema Q SURROUND no funciona en monoaural.
Los ajustes T-BASS, ecualizador gráfico o Q SURROUND no
tienen efecto sobre la grabación de cinta o la grabación de
minidiscos.
ECUALIZADOR GRAFICO
Esta unidad proporciona las siguientes tres diferentes curvas
de ecualización.
ROCK: Sonidos poderosos con realce de agudos y graves
POP: Más presencia en las voces y en la gama de registro medio
CLASSIC: Sonido rico con graves profundos y agudos finos
Pulse ROCK, POP o CLASSIC.
El modo de ecualización seleccionado aparece durante 4
segundos.
o
ea
o
M
CD
(OFF)
Para seleccionar con el control remoto Pulse T-BASS mientras pulsa SHIFT.
NOTA
El sonido de baja frecuencia puede distorsionarse cuando se
utiliza el sistema T-BASS con un disco cuyo sonido haya sido
realzado originalmente. En este caso, cancele el sistema TBASS.
Se enciende. Aparece durante 4 segundos.
ROCK
Para cancelar el modo seleccionado
Pulse el botón seleccionado nuevamente. Aparece "GEQ OFF"
durante 4 segundos.
Para seleccionar con el control remoto
Pulse GEQ varias veces mientras pulsa SHIFT. El modo GEQ
aparece cíclicamente en el siguiente orden.
ROCK POP-
Utilización de los auriculares
Conecte auriculares a la toma PHONES con el enchufe estéreo
estándar (0 6,3 mm).
Cuando están conectados los auriculares no saldrá sonido por los
altavoces.
Ajuste del sonido durante la grabación
El tono y volumen de salida de los altavoces o auriculares podrá
cambiarse libremente sin que se altere la grabación.
CLASSIC -► GEO OFF—I
(cancelación)
ESPAÑOL 7
Page 48

RECEPCION DE LA RADIO
SISTEMA DE AMPLIFICADOR MULTIPLE
Para dar realce a las frecuencias ultra bajas además del
amplificador de 2 canales izquierdo/derecho utilizado para
reproducir las frecuencias en las gamas media a alta este sistema
incluye un segundo amplificador de 2 canales izq./der. sólo para
reproducción de las frecuencias ultra graves - para tener, en la
práctica, un sistema de 4 amplificadores. Utilizando los
amplificadores discretos para las frecuencias media a alta y las
frecuencias bajas, pueden reproducirse sonidos de alta calidad
virtualmente libres de distorsión.
SISTEMA DE ALTAVOZ PARA
SUPERGRAVES INTEGRADO
El sistema de altavoz para supergraves integrado tiene una zona
de cavidad de altavoz para supergraves independiente que es
parte de la estructura de la caja de altavoces y que actúa como
filtro sónico para cortar los componentes de distorsión. (En el
sistema de amplificador múltiple, las señales de frecuencias
ultragraves transmitidas por su propio amplificador independiente
se reproducen en esta región.) Esta estructura independiente
puede producir señales nítidas con una definición rica de las
reproducción de graves con frecuencias medias a altas nítidas
y bien definidas. Y el sistema de supergraves integrado de AIWA
integra un altavoz para supergraves capaz de satisfacer las
presfaciones de graves potentes con verdadera separación
estéreo.
fifil
! I, i f a 1 „
------
MONO
TUNER
Q P
O O
O o
o o
o
t
u
-BAND
1 Pulse TUNER BAND varias veces hasta
seleccionar la banda deseada.
FM
AM
C
Pulse ◄◄ o ►► para seleccionar una emisora.
Cada vez que pulse el botón, la frecuencia cambiará.
Cuando sintonice una emisora, aparece "TUNE".
Durante la recepción de EM estéreo, aparece
flCTx
FM Ti...ir-ÍE
I
Altavoz derecho
supergraves
Gama media a alta
Para buscar rápidamente una emisora (búsqueda
automática)
Mantenga pulsado el botón ◄◄ o ►► hasta que el sintonizador
empiece a buscar una emisora. Después de sintonizarse una
emisora, la búsqueda parará.
Para parar manualmente la búsqueda automática, pulse el botón
◄◄ o
• La búsqueda automática puede no pararse en emisoras cuyas
señales sean muy débiles.
Cuando la emisora de FM estéreo tiene ruidos
Pulse MONOTUNER en el control remoto varias veces mientras
pulsa SHIFT hasta que se encienda "MONO" en la pantalla.
Se reduce el ruido aunque se escucha en monoaural.
Para volver a la recepción en estéreo, pulse el botón para que
se apague "MONO".
Para cambiar el intervalo de sintonización en AM
El ajuste por omisión de fábrica del intervalo de sintonización
AM es de 10 kHz/paso. Si utiliza esta unidad en lugares donde
el sistema de distribución de frecuencias está en 9 kHz/paso,
cambie el intervalo de sintonización.
Pulse POWER mientras pulsa
Para volver al intervalo anterior, repita este procedimiento.
8 ESPAÑOL
Cuando cambie el intervalo de sintonización en AM, todas las
emisoras preajustadas desaparecerán. Deberá preajustar las
emisoras nuevamente.
Page 49

-Botones
_fí'
o
Esta unidad puede memorizar un total de 32 emisoras de
preajuste. Cuando se memoriza una emisora, recibe un número
de preajuste. Utilice el número preajustados para sintonizar
directamente una emisora preajustada.
N '^V'\
numerados
-BAND
1 Pulse el botónTUNER BAND para seleccionar una
banda y pulse ◄◄ o ►► para seleccionar una
emisora.
2 Pulse II para memorizar una emisora.
Las emisoras reciben números preajustados empezando por
el 1 en orden consecutivo para cada banda.
Número preajustado
SINTONIZACION DE EMISORAS PREAJUSTADAS
1 PulseTUNER BAND para seleccionar una banda.
2 Pulse o gire MULTI JOG.
Cada vez que pulse el botón se selecciona el siguiente número
preajustado en orden ascendente.
Sintonización mediante número preajustado
1 Pulse BAND en el control remoto mientras pulsa SHiFT para
seleccionar una banda. (O utilice TUNER BAND en la unidad
principal.)
2 Pulse los botones numerados en el control remoto para
seleccionar un número preajustado.
Ejemplo;
Para seleccionar el número preajustado 10, pulse los botones
+10 y 0.
Para seleccionar el número preajustado 15, pulse los botones
+10y 5.
Para borrar una emisora prefijada
Seleccione el número preajustado a borrar. Luego pulse ■ y
pulse II antes de que pasen 4 segundos.
Los números preajustados de todas las demás emisoras en la
banda con números más alto disminuyen también en uno.
Si hubo un corte eléctrico largo o se ha desenchufado el cable
eléctrico de CA, se borrarán las emisoras preajustadas. En este
caso vuelva a preajustar.
0
Q
1
O
(A
111
Q
:z2
OQ
o<
IL “
lU <
U-l
lU
l£
F'M
+■!
Frecuencia
Repita los pasos 1 y 2.
La siguiente emisora no se memorizará si ya se han
memorizado un total de 32 emisoras preajustadas,
si trata de preajustar más de 32 emisoras, aparece "PRST
FULL".
ESPAÑOL 9
Page 50

REPRODUCCION DE
CINTAS
Platina 2
• En la platina 1, las cintas se reproducen siempre de los dos
lados.
• En la platina 2 se puede seleccionar el modo de inversión para
reproducir uno o ambos lados.
1 Pulse TAPE y pulse ± EJECT para abrir el
compartimiento de casetes.
± EJECT
Para seleccionar un modo de inversión (sólo platina 2)
1 Pulse MODE varias veces hasta que aparezca "Deck 2
MODE?".
2 Antes de 10 segundos, pulse ENTER y gire MULTI JOG para
seleccionar el modo de inversión.
RE.U N
Para reproducir un solo lado, seleccione "Z".
Para reproducir del lado delantero al lado trasero una sola
vez, seleccione "ü)".
Para reproducir ambos lados repetidamente, seleccione
"CZO".
3 Antes de 10 segundos, vuelva a pulsar ENTER.
Cuando se colocan cintas en ambas platinas
Pulse primero TAPE DECK 1/2 para seleccionar una platina.
Aparece el número de la platina seleccionada.
Para parar la reproducción, pulse ■.
Para hacer una pausa en la reproducción (sólo platina 2),
pulse II. Para seguir reproduciendo, vuelva a pulsar.
Para el avance rápido o rebobinado, pulse ◄◄ o Pulse
■ para parar la cinta.
Coloque una cinta con el lado abierto hacia abajo. Pulse el
compartimiento de casetes para cerrarlo.
2 Pulse para empezar a reproducir.
Indicador de lado reproducido
T’Pl 0000
Número de platina que se Contador de cinta
está reproduciendo
► : Se reproduce el lado delantero (avance).
◄ : Se reproduce el lado trasero (retroceso).
Tipos de cinta
Esta unidad fue diseñada para una reproducción óptima con
cintas de tipo I (normal).
Para empezar la reproducción con la unidad apagada
(función de reproducción directa)
Cuando la cinta está colocada, pulse TAPE DECK 1/2. Se
conecta la alimentación y empieza la reproducción de la cinta
colocada.
Para ajustar el contador de cinta al 0000
Pulse ■ en el modo de parada.
El contador también vuelve al 0000 cuando se abre el
compartimiento de casetes.
NOTA
Las cintas de tipo II también pueden reproducirse en esta unidad.
Cuando reproduzca cintas de tipo II, gire el MULTI JOG hasta
que aparezca "SOFT" en la pantalla. Con esto el sonido de
reproducción será óptimo para las cintas de tipo II. Sin embargo
la reproducción "SOFT" se cancelará si se selecciona el
ecualizador gráfico (página 7), la unidad se conmuta a una fuente
de audio diferente, se abre el compartimiento de casetes o
cuando se apaga la unidad.
1 0 ESPAÑOL
Page 51

Sobre las cintas de casete
• Para evitar un borrado por accidente, rompa las
lengüetas de plástico en el casete después de grabar,
con un destornillador u otra herramienta puntiaguda.
ÜH
ENTER■
]
MULTI JOG ■
MODE ■
1
4
Después de que termina ia reproducción en una platina la cinta
de la otra platina empieza a reproducirse sin interrupción.
1 Coloque cintas en la platina 1 y platina 2.
2 Pulse TAPE DECK 1/2 para seleccionar ia platina
que se reproduce primero.
3 Seleccione el modo de inversión "Z5".
1 Pulse MODE varias veces hasta que aparezca "Deck 2
MODE?"
2 Antes de 10 segundos, pulse ENTER y seleccione "T)"
con MULTI JOG.
3 Antes de 10 segundos, pulse nuevamente ENTER.
4 Pulse para empezar a reproducir.
La reproducción continúa hasta pulsar ■.
j
Lengüeta dei
lado A
Para volver a grabar en la cinta, cubra el orificio de la
lengüeta con cinta adhesiva, etc.
■ Las cintas de 120 minutos o más son muy finas y se
deforman o dañan fácilmente. No se recomienda su uso.
• Eliimine la flojedad de la cinta con un lápiz o herramienta
similar antes de su uso. La cinta floja puede romperse o
atascarse en el mecanismo.
o«
EC U1
(L a
111
GE
ESPAÑOL 1 1
Page 52

REPRODUCCION DE
DISCOS COMPACTOS
DISC
■ DIRECT
PLAY
■ RANDOM/
REPEAT
■ CD EDIT/
CHECK
■ Bostones
numerados
■SHIFT
COLOCACION DE DISCOS
Pulse CD y luego pulse ± OPEN/CLOSE para abrir el
compartimiento de los discos. Coloque el/los disco(s)
con el lado de la etiqueta hacia arriba.
Para reproducir uno o dos discos, coloque los discos en las
bandejas 1 y 2.
Para reproducir tres discos, pulse DISC CHANCE para hacer
girar las bandejas después de colocar dos discos. Ponga luego
el tercer disco en la bandeja 3.
Cierre el compartimiento de los discos pulsando — OPEN/
GLOSE.
Número de la
Número de canción (aparece
Número total de canciones |a 20® canción)
Para reproducir sólo un disco, pulse DISC DIRECT PLAY1-3.
El disco seleccionado se reproduce una vez.
Para parar la reproducción, pulse ■.
Para hacer una pausa en la reproducción, pulse el botón II.
Para reanudar la reproducción, púlselo de nuevo.
Para buscar un punto particular durante la reproducción o
en el modo de pausa, mantenga pulsado ◄◄ o ►► y suéltelo
en el punto deseado.
Para saltar hasta el principio de una canción, pulse o
varias veces o gire MULTI JOG hasta que aparezca la
canción deseada.
Para quitar los discos, pulse ^ OPEN/CLOSE.
Para empezar la reproducción con la unidad apagada
(función de reproducción directa)
Pulse CD cuando el/los dlsco(s) está(n) cargado(s). Se enciende
la unidad y empieza la reproducción del/los dlsco(s) colocado(s).
El aparato también se conectará cuando pulse £ OPEN/CLOSE.
Para comprobar el tiempo remanente
Pulse DISPLAY en la unidad durante la reproducción del disco
compacto o en el modo de pausa o pulse CD EDIT/CHECK en
el control remoto mientras pulsa SHIFT. Aparecerá el tiempo
remanente hasta que todas las canciones terminen de
reproducirse. Para reponer la pantalla del tiempo de reproducción
transcurrido, repita el procedimiento anterior.
Selección de una canción directamente con el control
remoto
1 Pulse DISC DIRECT PLAY 1-3 para seleccionar un número
de bandeja de disco.
2 Pulse los botones numerados 0-9 y -t-IO para seleccionar una
canción.
Ejemplo:
Para seleccionar la canción número 25, pulse ■f 10 dos veces
y 5.
Para seleccionar la canción número 10, pulse +10 y 0.
La canción seleccionada empieza a reproducirse y la
reproducción continuará hasta el final de ese disco.
NOTA
Si pulsa +10, pulse el siguiente botón numerado antes de 4
segundos.
Cambio de discos durante la reproducción
Mientras se reproduce un disco, ios otros discos podrán
cambiarse sin interrumpir la reproducción.
1 Pulse DISC CHANGE.
2 Quite los discos y ponga otros.
3 Pulse ± OPEN/CLOSE para cerrar el compartimiento de ios
discos.
■; í;:;;:;;;: ■; ni-Fmi
'
..................................
Número de canción
del disco
Tiempo de
reproducción total
REPRODUCCION DE DISCOS
Coloque los discos.
Para reproducir todos los discos del compartimiento de
discos, pulse
La reproducción empieza por el disco en la bandeja 1.
Número de la canción que Número de la canción que se
se está reproduciendo está reproduciendo destella.
Número de bandeja de disco para el
disco que se está reproduciendo
1 2 ESPAÑOL
Tiempo de reproducción
transcurrido de la canción
que se está reproduciendo
• Cuando coloque un disco de 8 cm, póngalo en el círculo interior
de la bandeja.
• No coloque más de un disco compacto en la misma bandeja
de discos.
• No incline la unidad con discos adentro. Puede provocar un
mal funcionamiento.
• No utilice discos compactos de formas no normales (por
ejemplo: con forma de corazón, octogonales). Puede provocar
un mal funcionamiento.
REPRODUCCION CON SALTO DE BLANCOS
Los silencios entre las canciones grabadas en un disco compacto
pueden saltarse durante la reproducción.
• El salto de blancos puede no funcionar con algunos discos
compactos.
1 Pulse CD BLANK SKIP.
La frase "CD BLANK SKIP ON" avanza de derecha a izquierda
en a pantalla y aparece un punto pequeño en la pantalla.
Punto pequeño
I
tn'QIOSSl
10 !)■::: y\.
PBQSic;
Page 53

2 Empiece a reproducir.
Si la última de las canciones se esfuma (termina desapareciendo
gradualmente el sentido) la parte con esfumado también se
salteará.
Para volver a la reproducción normal
Pulse nuevamente CD BLANK SKIP y desaparecerá el punto
en la pantalla.
^ }-► í
Asegúrese de desactivar la función de salto de blancos cuando
se hace la grabación Al EDIT (página 18), grabación con
EDICION PROGRAMADA (página 19) o la grabación de
reproducción programada (página 13).
Utilice el control remoto.
Reproducción aleatoria
Todas las canciones del disco seleccionado o de todos los discos
podrán reproducirse aleatoriamente.
• No se puede hacer una reproducción aleatoria de las canciones
programadas.
Repetición de reproducción
Un solo disco o todos ellos podrán reproducirse repetidamente.
• Se pueden repetir también las canciones programadas.
Puise RANDOM/REPEAT varias veces mientras se pulsa
SHIFT.
Cada vez que lo pulse la función podrá ser seleccionada
cíclicamente.
I—► © Reproducción aleatoria —►
'— Cancelación — ® Repetición aleatoria de reproducción
© "RANDOM" se enciende en la pantalla.
®
Repetición de reproducción —i
--------------------
'
(I) "C>-" se enciende en la pantalla.
© "RANDOM" y "C»." se encienden en la pantalla.
Para reproducir todos los discos, pulse ◄ ► para empezar a
reproducir.
Para reproducir un solo disco, pulse DISC DIRECT PLAY 1-3.
Durante la reproducción aleatoria no son posibles las siguientes
operaciones:
- selección directa de las canciones con los botones numerados.
La reproducción aleatoria se cancelará.
- saltar a la canción reproducida previamente con ◄◄ o MULTI
JOG.
Se podrá programar un máximo de 30 canciones de cualquiera
de los discos colocados.
utilice el control remoto.
1 Pulise PRGM mientras pulsa SHIFT en los modos
de parada.
Se enciende "PRGM".
“PRGM”
I
•■■i ;; i - il - i
2 Pulse DISC DIRECT PLAY 1-3 para seleccionar
un disco.
3 Pulse los botones numerados 0-9 y +10 para
programar una canción.
Ejemplo:
Para seleccionar ia canción número 25, pulse +10 dos veces
y 5.
Para seleccionar ia canción número 10, pulse +10 y 0.
Número de canción
seleccionada
Número total de
canciones programadas
.............I....................
ll i ~1
.
I
I
Número de
disco
seleccionado
Número de
programa
4 Repita los pasos 2 y 3 para programar otras
canciones.
5 Pulse para empezar a reproducir.
Para comprobar el programa
Cada vez que pulse ◄◄ o ►► en el modo de parada, aparece
un número de canción y un número de programa en la pantalla.
Para borrar el programa
Pulse II en el modo de parada. El pregrama también se borra
cuando abra el compartimiento de los discos.
Para añadir canciones al programa
Repita los pasos 2 y 3 en el modo de parada. La canción se
programará después de la última canción programada.
• Si trata de programar más de 30 canciones, aparece "PRGM
FULL".
Para cambiar las canciones programadas
No se puede cambiar el orden de las canciones programadas.
Borre el programa pulsando ■ y repita todos ios pasos de
programación.
Para reproducir repetidamente las canciones
programadas
Después de programar las canciones, pulse RANDOM/REPEAT
varias veces mientras pulsa SHIFT hasta que aparezca en
la pantalla.
Tiempo de reproducción total
de las canciones
programadas
w
LJ
s: u
Sg
Os
»o
Es
o«
cc o
CL o
UJ en
• Durante la reproducción programada, no podrá seleccionar las
3
5
canciones directamente con los botones numerados. Aparecerá
"Can't USE".
- En los siguientes casos el tiempo de reproducción total de las
canciones seleccionadas aparece comoque significa que
no puede verificar el tiempo de reproducción total de las
canciones seleccionadas pero las canciones programadas
siguen registradas en la memoria.
- el tiempo de reproducción total de las canciones seleccionadas
supera 99 minutos 59 segundos
- se ha seleccionado una canción que tiene un número de
canción de más de 30. ~ a o
ESPAÑOL 1 ó
Page 54

REPRODUCCION
DE MiNIDISCOS
■ CD EDIT/
CHECK
■PRGM
■ RANDOM/
REPEAT
Para parar la reproducción, pulse ■.
Para hacer una pausa en la reproducción, pulse II. Para
reanudar la reproducción, pulse de nuevo.
Para buscar un punto particular durante la reproducción o
en el modo de pausa, mantenga pulsado ■« o ►► y suelte
el botón en el punto deseado.
Para saltar hasta el principio de una canción, pulse ◄◄ o
►► varias veces o gire MULTI JOG hasta que aparezca la
canción deseada.
Para expulsar un disco, pulse £ MD EJECT y saque ei disco.
Aunque la unidad está apagada, pulse £ MD EJECT para sacar
un disco.
Se enciende la unidad y el disco saldrá expulsado.
Bostones
numerados
SHIFT
1 Pulse MD.
2 Coloque el disco en el compartimiento de disco
con ia etiqueta hacia arriba y en ei sentido de la
flecha.
Aparece "TOC READ" cuando la unidad está leyendo los
datos del disco colocado. La información del disco aparece
en la pantalla.
Flecha
ffy
Pantalla en el modo de parada
Número total de canciones hasta la 20- canción)
3 Pulse
Empieza a reproducir.
Pantalla en el modo de reproducción
Número de la canción que Número de la canción que se
se está reproduciendo está reproduciendo destella.
Número de canción (aparece sólo
■: • ! ... !... ! ; !í .* •! iif-.i. :!-i
! : !• . ! !"*! !S ! ! !
...........................................................................
Tiempo de reproducción total
ii "
NOTA
No sujete el disco mientras lo está expulsando, de lo contrario
no podrá colocar un disco la siguiente vez. En este caso, apague
la unidad y desenchufe el cable eléctrico de CA. Vuelva a hacer
las conexiones.
Para empezar la reproducción con la unidad apagada
(función de reproducción directa)
Pulse ei botón MD. cuando hay un disco colocado. Se enciende
la unidad y empieza a reproducir el disco colocado.
Para seleccionar una canción directamente con el control
remoto
Pulse los botones numerados 0-9 y +10.
Ejemplo:
Para seleccionar la canción número 25, pulse +10 dos veces
y 5.
Para seleccionar la canción número 10, pulse +10 y 0,
Si pulsa +10 pulse el siguiente botón numerado antes de 4
segundos.
Para reproducir un disco al doble de la velocidad normal
Mantenga pulsado durante 2 segundos durante la
reproducción.
Para cancelar la reproducción a doble velocidad, pulse
o I.
Para comprobar el tiempo remanente
Durante la reproducción del mlnidisco o en el modo de pausa,
pulse DISPLAY en la unidad principal o pulse CD EDIT/CHECK
en el control remoto mientras pulsa SHIFT. Aparecerá el tiempo
remanente hasta que todas las canciones terminen de
reproducirse. Para reponer la pantalla del tiempo de
reproducción, repita el procedimiento anterior.
• Durante la reproducción aleatoria o programada, no aparece
el tiempo remanente.
Para comprobar el título de la canción
Durante la reproducción del minidisco o en el modo de pausa,
pulse DISPLAY en la unidad principal. Aparecerá el título de la
canción que se está reproduciendo. Si no se ha registrado el
título de la canción, aparece el número de ia canción.
Para que aparezca nuevamente el tiempo de reproducción, pulse
DISPLAY varias veces.
Para comprobar el título del disco
En el modo de parada, pulse DISPLAY en la unidad principal.
Aparece el título de un disco. Si no se ha registrado el título del
disco, aparece ”No Title”. Para que aparezca nuevamente el
tiempo de reproducción total, pulse nuevamente DISPLAY.
Tiempo de reproducción transcurrido de la
canción que se está reproduciendo
1 4 ESPAÑOL
NOTA
' No trate de colocar un minidisco con la unidad apagada. Puede
provocar un mal funcionamiento.
' No coloque otra cosa que no sea un minidisco en el
compartimiento del disco. De lo contrario el disco puede rayarse
provocando un mal funcionamiento o peligro para su seguridad,
por ejemplo una sacudida eléctrica.
' No trate de colocar otro minidisco cuando ya se ha colocado
un disco en el compartimiento.
' No incline la unidad con un disco adentro. Esto puede provocar
un mal funcionamiento.
Page 55

utilice el control remoto.
Reproducción aleatoria
Todas las canciones del disco podrán reproducirse
aleatoriamente.
• No se puede hacer una reproducción aleatoria de canciones
programadas.
Utilice el control remoto.
1 Pulse PRGM mientras pulsa SHIFT en los modos
de parada.
Se enciende "PRGM".
“PRGM”
p-i i; i-ii '-i
zm
O o
50
o!»
:3Q
51
CCS
£li u
GCO
Repetición de reproducción
Todas las canciones del disco colocado pueden reproducirse
repetidamente.
• También puede repetir las canciones programadas.
Pulse RANDOM/REPEAT varias veces mientras pulsa SHIFT.
Cada vez que lo pulse la función podrá ser seleccionada
cíclicamente.
r-fr ® Reproducción aleatoria —► @ Repetición de reproducción —i
'— Cancelación — (?) Repetición aleatoria de reproducción
® "RANDOM" se enciende en la pantalla.
® "Ci," se enciende en ia pantalla.
CÓ- "RANDOM" y "C*." se encienden en la pantalla
“RANDOM”
: ... :... : : ::
,u@B]ai;i
onis
----
'
NCKTA
Durante la reproducción aleatoria no son posibles las siguientes
operaciones:
- selección directa de las canciones con los botones numerados.
La reprodüooión aleatoria se cancelará.
- saltar a la canción reproducida previamente con ◄◄ o MULTI
JOG.
2 Pulse los botones numerados 0-9 y +10 para
programar una canción.
Ejemplo:
Para seleccionar la canción número 25, pulse +10 dos veces
y 5.
Para seleccionar la canción número 10, pulse +10 y 0.
Número de canción
seleccionada
Número total de
canciones ^programadas
i;
Número de programa
Tiempo de reproducción total
de las canciones programadas
3 Repita el paso 2 para programar otras canciones.
4 Pulse para empezar a reproducir.
Para comprobar el programa
Cada vez que pulse ◄◄ o ►► en el modo de parada, aparece
un número de canción y un número de programa en la pantalla.
Para borrar el programa
Pulse II en el modo de parada. El programa también se borra
al sacar el disco.
Para añadir canciones al programa
Repita el paso 2 en el modo de parada. La canción se programará
después de la última canción programada.
• Si trata de programar más de 30 canciones, aparece "PRGM
FULL".
Se podrá programar un máximo de 30 canciones del disco
colocado.
2
4
Para cambiar las canciones programadas
No se puede cambiar el orden de las canciones programadas.
Borre el programa pulsando ■ y repita todos los pasos de
programación.
Durante la reproducción programada, no podrá seleccionar las
canciones directamente con los botones numerados. Aparecerá
"Can't USE".
ESPAÑOL 15
Page 56

GRABACION DE
LA CINTA
Esta sección describe la forma de grabar de una cinta, el
sintonizador, tocadiscos de discos láser o de minidiscos o de un
equipo externo.
3
MULTI
JOG
MODE
4
• Para grabar de una fuente con el equipo conectado a las
tomas VIDEO/AUX en la parte trasera como fuente, pulse
AUX/D-IN varias veces hasta que aparezca "AUX” en la
pantalla.
4 Pulse • TAPE REC/REC MUTE para empezar a
grabar.
Cuando la función seleccionada es un disco compacto o
minidisco, la reproducción y la grabación empiezan
simultáneamente.
Para grabar de una fuente conectada, empiece a reproducir
dicha fuente.
Para parar la grabación, pulse ■.
Cuando grabe de un disco compacto o un minidisco, pulse
nuevamente ■ para parar la reproducción de un disco compacto
o minidisco.
Para hacer una pausa de grabación, pulse II. (Funciona
cuando la fuente es TUNER o AUX/D-IN.) Vuelva a pulsar para
seguir grabando.
Preparativos
Utilice sólo cintas de tipo I (normales).
1 Coloque la cinta a grabar en la platina 2.
Coloque la cinta con el lado a grabar hacia el exterior de
la unidad.
• Bobine la cinta hasta el punto donde desea empezar a grabar
con ◄◄ o y pare la cinta con ■.
Seleccione el modo de inversión utilizando
MODE, ENTER y MULTI JOG (página 10).
Para grabar un solo lado, seleccione "Z”.
Para grabar ambos lados, seleccione "Zy o "CI5".
Cuando grabe de una cinta, se ajusta automáticamente el
modo de inversión a "Z". Tenga en cuenta que la grabación
se hará en un solo lado de la cinta.
• Cuando se graba del lado trasero de la cinta, la cinta se
para al final de la grabación del lado trasero. Incluso cuando
se ajusta el modo de inversión a "Zy o "CD".
Pulse uno de los botones de función y prepare la
fuente a grabar.
Para grabar de una cinta, coloque la cinta en la platina 1 y
pulse TAPE DECK 1/2 para que aparezca "TP1". Bobine la
cinta al punto donde desea empezar a grabar con ◄◄
o ►► y pare la cinta con ■.
Para grabar de un disco compacto, pulse CD y coloque el/
los disco(s) compacto(s). Luego seleccione una canción a
grabar primero con ►► o MULTI JOG.
Para grabar de un minidisco, pulse MD y coloque un
minidisco. Luego seleccione una canción a grabar primero
con o MULTI JOG.
Para grabar de una emisora de radio, pulse TUNER BAND
y sintonice una emisora.
Para grabar de una fuente conectada;
• Para grabar de una fuente con equipo conectado a las tomas
DIGITAL IN en la parte trasera, pulse AUX/D-IN varias veces
hasta que aparezca "D-IN" en la pantalla. (La grabación no
se hace de forma digital.)
Ajuste de sonido durante la grabación
El volumen de salida y tono de los altavoces o auriculares puede
modificarse libremente sin afectar la grabación.
Los ajustes de T-BASS, ecualizador gráfico o Q SURROUND
no tienen efecto sobre la grabación.
Para grabar las canciones deseadas de un disco
compacto o minidisco
Seleccione las canciones a grabar con la reproducción
programada (página 13, 15) y empiece a grabar.
En este caso, desactive la función de reproducción con salto de
blancos (página 12).
COLOCACION DE ESPACIOS EN BLANCO
Se pueden agregar espacios en blanco de 4 segundos en el
punto deseado durante la grabación. (Funciona cuando la fuente
es TUNER o AUX/D-IN.)
1 Pulse • TAPE REC/REC MUTE durante la grabación o
cuando está en el modo de pausa de grabación.
El "hiadJsláa" de la pantalla destella durante 4 segundos y
la cinta avanza sin grabar. Después de 4 segundos la platina
entra en el modo de pausa de grabación.
2 Pulse II para seguir grabando.
Para colocar un espacio en blanco de menos de 4 segundos,
pulse nuevamente • TAPE REC/REC MUTE cuando está
destellando "fcfetglJglJrt".
Para colocar espacios en blanco de más de 4 segundos,
después de que la platina entra en el modo de pausa de
grabación, pulse nuevamente • TAPE REC/REC MUTE. Cada
vez que se pulsa el botón se agrega un espacio en blanco de 4
segundos.
PARA BORRAR LA GRABACION
1 Coloque la cinta a borrar en la platina 2. 2 Pulse TAPE para que aparezca "TP2" en la pantalla. 3 Bobina la cinta hasta el punto donde desea empezar el
borrado con ◄◄ o ►► y pare la cinta con ■.
4 Pulse • TAPE REC/REC MUTE para empezar a borrar.
1 6 ESPAÑOL
Page 57

1
3
Esta función permite hacer una copia exacta de la cinta original.
NOTA
• Utilice sólo cintas de tipo I (normal).
• Prepare una cinta de la misma longitud que la cinta original o
una cinta más larga que el original.
• El copiado no puede empezar de un punto en el medio de la
cinta.
3 PuiseTAPE SYNC DUB para empezar a grabar.
• Se selecciona automáticamente el modo de inversión "15"
(grabación en ambos lados).
• Durante la grabación se desactivan todos los botones
excepto ■.
DLíBB ING
Las cintas se rebobinan al principio de los lados delanteros y
empieza la grabación.
Para parar la copia
Pulse II.
<
«I
LJ
a
ssg
»2
£Q
K
0
1 Pulse TAPE.
2 Coloque la cinta original en la platina 1 y la cinta
a grabar en ia platina 2.
Cinta para reproducir Cinta para grabar
-Platina 2
Coloque cada cinta con el lado a reproducir o grabar hacia fuera
de la unidad.
ESPAÑOL 1 /
Page 58

DISC
DIRECT
PLAY
3
5
Pulse los botones numerados 0-9 en el control remoto para determinar la longitud de la cinta.
Se pueden especificar entre 10 y 99 minutos.
Ejemplo: Cuando utilice una cinta de 60 minutos, pulse 6 y 0,
En unos segundos, la microcomputadora programa las
canciones a grabar en cada lado de la cinta.
. y ►► o MULTI JOG de la unidad principal también
están disponibles para determinar la longitud de la cinta.
Lado A de la cinta Canciones
Longitud de la cinta
(lado delantero) programadas para
I
l,
el lado A
I
■SHIFT
La función de edición Al permite grabar un disco compacto sin
preocuparse por la longitud de la cinta y longitud de la canción.
Cuando se coloca un disco compacto, la unidad calcula
automáticamente la longitud total de la canción. Si fuera
necesario, se cambia el orden de las canciones para que no
quede una canción cortada por la mitad.
(Al: Inteligencia Artificial)
• Utilice sólo cintas de tipo I (normal).
• La grabación con edición Al no puede empezar desde un punto
en el medio de la cinta. La cinta debe grabarse desde el principio
de uno de los lados.
• Desactive la función de reproducción con salto de blancos
(página 12).
1 Coloque la cinta en la platina 2.
Coloque la cinta con el lado a grabar primero hacia el exterior
de la unidad.
2 Pulse CD y coloque el/los disco(s) compacto(s). 3 Pulse CD EDIT/CHECK una vez en el control
remoto mientras pulsa SHIFT.
Aparece "Al".
... M I
Cuando aparece "PRGM", pulse EDIT/CHECK mientras
vuelve a pulsar SHIFT.
4 Pulse DISC DIRECT PLAY 1-3 para seleccionar
un disco.
Número total de canciones
programadas para el lado A
Tiempo remanente del
lado A
6 Pulse • TAPE REC/REC MUTE para empezar a
grabar en el lado delantero.
La cinta se rebobina al principio del lado delantero, se
reproduce la punta durante 10 segundos y empieza a grabar.
Cuando se termina de grabar el lado delantero (lado A),
empieza la grabación en el lado trasero (lado B).
Para parar la grabación
Pulse ■. La grabación y reproducción de disco compacto se
paran simultánemente.
Para borrar el programa de edición
Pulse ■ dos veces en el modo de parada para volver a la pantalla
del tiempo de reproducción total.
Para verificar el orden de los números de canciones
programadas
Antes de grabar, pulse CD EDIT/CHECK en el control remoto
mientras pulsa SHIFT para seleccionar el lado A o B y pulse ►►
varias veces.
Lado de la cinta Número de canción Número de programa
Para agregar canciones de otros discos para el programa
de edición
Si hay tiempo remanente en la cinta después del paso 5, puede
agregar canciones de otros discos en el compartimiento de los
discos compactos.
1 Pulse EDIT/CHECK en el control remoto mientras pulsa
SHIFT para seleccionar el lado A o B.
2 Pulse DISC DIRECT PLAY 1-3 para seleccionar un disco
compacto.
3 Pulse los botones numerados 0-9 y +10 en el control remoto
para seleccionar canciones. Se enciende "PRGM".
No se puede programar una canción cuyo tiempo de
reproducción sea más largo que el tiempo remanente.
4 Repita los pasos 2 y 3 para agregar más canciones.
Tiempo en ia cintas de casete y tiempo de edición
El tiempo de grabación real del casete es normalmente un poco
más largo que el tiempo de grabación especificado impreso en
la etiqueta. Esta unidad puede programar canciones para utilizar
ese tiempo adicional. Cuando el tiempo de grabación total sea
ligeramente más largo que el tiempo de grabación especificado
después de la edición, la pantalla muestra ese tiempo adicional
(sin un signo de menos), en lugar del tiempo remanente en ia
cinta (con el signo de menos).
L
Ü
;i.p.01
J
r
18 ESPAÑOL
NOTA
La función de edición Al no puede utilizarse con discos que
tengan 31 canciones o más. Aparecerá "TR OVER".
Page 59

MULTI
JOG
, ►►
6 Repita el paso 5 para el resto de las canciones
del lado A.
No puede programarse una canción cuyo tiempo de
reproducción es más largo que el tiempo remanente.
Seleccione el número Tiempo remanente
2
DISC
DIRECT
PLAY
8
de canción Número de programa en el lado A
"" .:=<W> 131
■
__________
É
^
________________
I
.......
:l.í;:m: 2S1 /.
iü
a
gs
<
te
o
Número total de canciones
programadas
Máximo tiempo de
grabación para el lado B
T'
SHIFT
Número de disco
seleccionado
Pulse CD EDIT/CHECK en el control remoto
mientras pulsa SHIFT para seleccionar el lado B
y programe las canciones para el lado B.
Después de confirmar "B" en la pantalla, repita el paso 5.
Lado B de la cinta
i j
La función de edición programa permite grabar discos compactos
mientras verifica el tiempo remanente en cada lado de la cinta a
medida que
se programan las canciones.
NOTA
” La grabación con edición programada no puede empezar en
un punto en el medio de la cinta. La cinta debe grabarse desde
el principio de uno de los lados.
• Desactive la función de reproducción con salto de blancos
(página 12).
' Se pueden grabar hasta 30 canciones con la función de edición
programada.
• Se pueden programar números de canción hasta la 30ava.
con la función de edición programada.
1 Coloque la cinta para grabar en la platina 2.
Coloque la cinta con el lado a grabar primero hacia el exterior
de la unidad.
2 Pulse CD y coloque el/los disco(s) compacto(s).
3 Pulse CD EDIT/CHECK dos veces en el control
remoto mientras pulsa SHIFT.
Se enciende "PRGM".
■
.............
pi;-:G|v|
; i
...
3-;h-
8 Pulse • TAPE REC/REC MUTE para empezar a
grabar.
La cinta se rebobina al principio del lado delantero, se
reproduce el segmento de la punta guia durante 10 segundos
y empieza a grabar. Cuando se termina la grabación en el
lado delantero (lado A), empieza la grabación del lado trasero
(lado B).
Para parar la grabación
Pulse ■. La grabación y la reproducción del disco compacto se
detienen simultáneamente.
Para verificar ei orden de los números de canciones
programadas
Antes de grabar, pulse ►► varias veces.
Lado de la cinta
L
H> IF'
.............
Número de programa
____
)
01
Cuando aparece "Al"
nuevamente SHIFT.
pulse EDIT/CHECK mientras pulsa
Pulse los botones numerados 0-9 en el control
remoto para determinar la longitud de la cinta.
Se pueden especificar entre 10 y 99 minutos.
• También puede utilizar ◄◄ y ►► o MULTI JOG en la unidad
principal para determinar la longitud de la cinta.
Pulse DISC DIRECT PLAY 1-3 para seleccionar
un disco compacto. Luego pulse los botones
numerados 0-9 y +10 para programar una
canción.
Número de canción
Para cambiar el programa de cada lado
Pulse CD EDIT/CHECK en el control remoto mientras pulsa
SHIFT para seleccionar el lado A o B y pulse ■ para borrar el
programa del lado seleccionado. Luego pulse nuevamente las
canciones.
Para borrar el programa el programa de edición
Pulse ■ una vez en el modo de parada para volver a la pantalla
normal.
ESPAÑOL 1 9
Page 60

GRABACION DE
MINIDISCOS
El sonido del disco compacto no pierde calidad en la grabación
y la grabación puede hacerse fácilmente con el botón CD ►
MD.
DISC
DIRECT
PLAY
■PRGM
■ Botones
numerados
■SHIFT
1 Coloque un minidisco grabable en la ranura del
disco con el lado de la etiqueta hacia arriba y en
el sentido de la flecha.
• Coloque un minidisco sólo con la unidad encendida.
Marca de flecha
Registro automático de ias marcas de índice
La información de orden de las canciones en ei disco compacto
original se copiará como marcas de índice.
Para grabar en un minidisco que ya está grabado
Si hay una sección sin grabar en el minidisco, la nueva grabación
empieza automáticamente desde el final de la grabación hecha
previamente. Si desea empezar a grabar desde el principio de
un minidisco ya grabado, borre completamente la grabación
anterior. (Consulte la página 30.)
GRABACION DE UNA SOLA CANCION
1 Coloque un minidisco grabable en la ranura del
disco con el lado de la etiqueta hacia arriba y en
el sentido de ia flecha.
2 Pulse CD y coloque un disco compacto a grabar
en la bandeja 1.
3 Pulse CD ^ MD una vez para empezar a grabar.
Aparece "► MDdirect" y empieza la grabación.
i reci
Durante la grabación, la pantalla cambia a la del tiempo de
reproducción transcurrido. Cuando la última canción del disco
compacto termina de reproducir, la grabación se detiene
automáticamente.
Cuando termina la grabación, aparece "TOC EDIT" y los datos
de contenido de la grabación quedan registrados.
La grabación digital se hace pulsando CD^MD. Para la
grabación analógica, vea la página 22.
Para verificar ei tiempo grababie remanente dei minidisco
antes de empezar a grabar
Pulse MD y pulse CD EDiT/CHECK en el control remoto mientras
pulsa SHIFT. O pulse uno de los botones de función excepto
MD y pulse DISPLAY en la unidad principal. El tiempo de
grabación remanente aparece durante 4 segundos.
Para parar la grabación en ei medio
Pulse ■. Se detiene la grabación y se registran los datos TOC.
Para parar la reproducción del disco compacto, vuelva a pulsar
20 ESPAÑOL
li]
2 Pulse CD y reproduzca la canción del disco
compacto a grabar.
3 Puise CD ^ MD una vez para empezar a grabar.
La reproducción del disco compacto vuelve al principio de la
canción que se está reproduciendo y empieza a grabar.
Cuando la canción seleccionada del disco compacto termina
de reproducirse, se para automáticamente la grabación y la
reproducción del disco compacto sigue a la siguiente canción.
Para parar la reproducción del disco compacto, pulse ■.
Cuando termina la grabación, aparece "TOC EDIT" y se
registra el índice de la grabación.
• La marca de índice se registra automáticamente al principio
de la canción.
NOTA
" Mientras aparece "TOC EDIT" no desconecte el cable de CAo
mueva la unidad. De lo contrario los datos TOC pueden no
registrarse correctamente.
- Durante la grabación con CD ► WID, no puede utilizar II.
• No coloque otra cosa que no sea un minidisco en la ranura del
disco. El disco puede rayarse provocando un mal
funcionamiento o peligro para su seguridad, como una sacudida
eléctrica.
■ No trate de colocar otro minidisco cuando hay un minidisco ya
instalado en el compartimiento del disco.
■ No incline la unidad con un disco colocado. Puede provocar un
mal funcionamiento.
■ En la grabación digital, si hay una sección en blanco de más
de 4 segundos, sólo se graban 4 segundos de espacio en
blanco. (Se registra automáticamente una señal de índice
cuando entra la siguiente señal de sonido a continuación.)
Page 61

lU
zO
Sólo las primeras canciones de los discos compactos colocados
en las bandejas podrán grabarse continuamente. Pulsando el
botón DISC CHANCE para cambiar los discos compactos
durante la grabación podrá seguir grabando continuamente sin
interrupción.
1
o ; '
t_
1 Coloque un iminidisco grabable en la ranura del
disco con el lado de la etiqueta hacia arriba y en
el sentido de ia fiecha.
2 Puise CD y reproduzca ia canción del disco
compacto a grabar.
3 Pulse CD ► MD dos veces para empezar a grabar.
Aparece "► MDsingle" y empieza ia grabación con la primera
canción del disco compacto en la bandeja 1.
■DISC
CHANGE
Se pueden programar y grabar en un minidisco ha;
canciones. Para la programación, consulte la página 13.
30
2
1
3
SHIFT
1 Coloque un minidisco grabable en ia ranura del
disco con el lado de la etiqueta hacia arriba y en
ei sentido de ia flecha.
2 Pulse CD y coloque discos compactos.
3 Pulse PRGM en el control remoto mientras puisa
SHIFT.
Aparece "PRGM”.
<i
5|
ciiS
<5
P'ID;:::- i!. i 0
Para cambiar discos compactos durante la grabación,
pulse DISC CHANCE y cambie por otros discos compactos.
Pulse DISlC CHANCE para cerrar el compartimiento.
Cuando termina la grabación, aparece 'TOC EDIT" y se
registran los datos correspondientes al índice de la grabación.
• La marca de índice se registra automáticamente ai principio
de la canción.
• Cuando haga la "grabación automática de las primeras
canciones de discos compactos", cancele los modos
aleatorio, repetición de reproducción o reproducción
programada (página 13).
• Cuando aparece "LONG CD" el tiempo de reproducción para
grabar ei disco compacto es mayor que ei tiempo grabable
remanente del minidisco. Cambie ei minidisco y vuelva a
pulsar CD ► MD. Se puede grabar dentro de los límites de
tiempo grabable remanente del minidisco.
Información Indicada durante la grabación
Cuando se pulsa DISPLAY varias veces durante la grabación,
la pantalla cambia de la siguiente forma.
Número de canción —
y tiempo transcurrido
del disco compacto
Tiempo remanente del —
disco compacto
“PRGM”
i:-'! ;;
4 Pulse DISC DIRECT PLAY 1-3 para seleccionar
un disco compacto. Luego puise los botones
numerados 0-9 y -t-10 en el control remoto para
programar una canción.
Número de canción
seleccionado
lp..„
ITIIp
__
__
Número total de
canciones programadas
itilsí
□
I
Número de
disco
seleccionado
Número de
programa
5 Repita ei paso 4 para programar otras canciones.
Tiempo de reproducción total
de las canciones
programadas
6 Pulse CD ^ MD para empezar a grabar.
Empieza a grabar.
Cuando se terminan de reproducir las canciones
programadas, se para automáticamente la grabación.
Cuando termina la grabación, aparece "TOC EDIT" y se
registran los datos correspondientes al índice de la grabación.
• La marca de índice se registra automáticamente al principio
de la canción en el orden programado.
- Número de canción del
minidisco que se está
grabando y tiempo de
grabación transcurrido
Para más detalles, consulte la página 33.
Tiempo grabable —
remanente del minidisco
ESPAÑOL 21
Page 62

GRABACION CONTINUA OE TRES OISCOS COMPACTOS CONTINUAMENT
Para agregar marcas de índice durante la grabación
Pulse ENTER en el punto deseado durante la grabación.
O pulse MDTITLE/ENTER en el control remoto mientras pulsa
SHIFT.
Se utiliza • WID REC para la grabación. En este caso, el sonido
del disco compacto se lleva hacia el minidisco como señales
analógioas.
1
1 Coloque un minidisco grabable en la ranura del
disco con el lado de la etiqueta hacia arriba y en
el sentido de la flecha.
2 Pulse CD y coloque discos compactos en las
bandejas.
3 Pulse MODE dos veces.
Aparece "Mark MODE?" durante 10 segundos.
Nivel de grabación
Esta unidad ajusta automáticamente el nivel de grabación
NOTA
' Puede darse el caso de que no se registren precisamente las
marcas de índice incluso cuando se ha seleccionado "AUTO
MARK".
No puede registrar marcas de índice sin registrar ios números
de oanción.
Si se haoe una pausa de la grabación, el número de canción
no aumenta.
Ci. MflDF ■ SlKíi'!?
4 Antes de 10 segundos, pulse ENTER y gire MULTI
JOG para seleccionar un modo de marca de
índice.
Para registrar automáticamente marcas de índice al
principio de cada canción, seleccione "Mark:AUTO?".
Para registrar marcas de índice cada 5 minutos, seleccione
"Mark:TIME?".
Para registrar sin las marcas de índice, seleccione "Mark:
OFF?".
5 Antes de 10 segundos, pulse ENTER.
Modo de marca seleccionado
F. 101^58-f::;; i
6 Pulse • MD REC.
La unidad entra en el modo de espera y espera hasta que
aparezca “CD".
7 Pulse II para empezar a grabar.
Empieza a grabar.
Cuando todos los discos compactos en las bandejas terminan
de reproducirse, la grabación se detiene automáticamente.
Para parar la grabación
Pulse ■.
Cuando termina la grabación, aparece "TOC EDIT" y se
registran los datos correspondientes al índice de la grabación.
Función AUTO MARK (marca automática)
- Cuando grabe de un disco oompacto con CD ► MD, la
información de marca de índice grabada en el disco compacto
se copia tal cual.
Disco compacto
Grabación
(minidisco)
' A: Marca de índice
Cuando grabe discos compactos u otras fuentes con • MD
REC, si hay una sección en blanco de más de 2 segundos, se
registra automáticamente una marca de índice registrada
cuando entra una señal de sonido en el siguiente intervalo
Fuente de sonido
Grabación (minidisco)
2a
canción
2§
canción
A A A
2i
canción
. : Marca de índice
Blanco
A
3"
canción
3^
canción
J ii
3^
canción
4a
canción
4a
canción
4s
canción
22 ESPAÑOL
Page 63

4,5
MULTI JOG
3
7
-----
Ì4#l
6 Puise • MD REC.
La unidad entra en el modo de espera y espera hasta que
aparezca el nombre de la fuente a grabar.
7 Pulse II para empezar a grabar.
Para reproducir de un equipo conectado, prepare el equipo
al modo de reproducción.
8 Pulse ■ para parar la reproducción.
Cuando termina la grabación, aparece "TOC EDIT" y se
registran los datos correspondientes al índice de la grabación.
Ul
zO
<1
8|
DCS
O
8
1 ColoqiJie un minídisco grabadle en la ranura del
disco con el lado de la etiqueta hacia arriba y en
el sentido de la flecha.
2 Pulse uno de los botones de función y prepare ia
fuente a grabar.
• Para grabar de una cinta, pulse TAPE y coloque una cinta.
• Para g rabar de la radio, pulse TUNER BAND y sintonice
una emisora.
• Para grabar de una fuente con el equipo conectado a la
toma DIGITAL IN en la parte trasera, pulse AUX/D-IN
rarias veces hasta que aparezca "DJN" en la pantalla.
• Para grabar de una fuente con el equipo conectado a la
toma VIDEO/AUX en la parte trasera, pulse AUX/D-IN
varias veces hasta que aparezca "AUX" en la pantalla.
3 Puise IPyiODE dos veces.
Aparece "Mark MODE?" durante 10 segundos.
::í(Cií
Para agregar marcas de índice durante la grabación
Pulse ENTER en el punto deseado durante la grabación.
O pulse MDTITLE/ENTER en el control remoto mientras pulsa
SHIFT.
' Puede darse el caso de que no se registren precisamente las
marcas de índice incluso cuando se ha seleccionado AUTO
MARK.
No puede registrar marcas de índice sin registrar los números
de canción.
Si se hace una pausa de la grabación, el número de canción
no aumenta.
4 Antes de 10 segundos, pulse ENTER y gire MULTI
JOG para seleccionar un modo de marca de
índice.
Para registrar automáticamente marcas de índice al
principio de cada canción, seleccione "Mark:AUTO?"
Para registrar marcas de índice cada 5 minutos, seleccione
"MarkTIME?".
Para registrar sin las marcas de índice, seleccione "Mark:
OFF?".
5 Antes de 10 segundos, pulse ENTER.
Modo de marca seleccionado
i ...
Para evitar un borrado por accidente del material
grabado
Deslice la lengüeta para proteger la grabación, como se indica
a continuación.
Deslice la lengüeta hasta que quede fijo.
Si se trata de grabar cuando la lengüeta está en la posición
de protección, aparece "Protected" en la pantalla. Deslice la
lengüeta de protección contra grabaciones a su posición
original.
ESPAÑOL 23
Page 64

Se puede hacer una grabación con el doble del tiempo impreso
en el minidisco utilizando el modo de grabación monoaural. En
este caso la grabación se escuchará en monoaurai.
1
1 Coloque un minidisco grababie en la ranura del
disco con el lado de la etiqueta hacia arriba y en
el sentido de la flecha.
2 Pulse uno de los botones de función y prepare la
fuente a grabar.
• Para grabar de una cinta, pulse TAPE y coloque una cinta.
• Para grabar de la radio, pulse TUNER BAND y sintonice
una emisora.
• Para grabar de una fuente con el equipo conectado a la
toma DIGITAL IN en la parte trasera, pulse AUX/D-IN
varias veces hasta que aparezca "D-IN" en la pantalla.
(Grabación digital)
‘ Para grabar de una fuente con el equipo conectado a la
toma VIDEO/AUX en la parte trasera, pulse AUX/D-IN
varias veces hasta que aparezca "AUX" en la pantalla.
(Grabación analógica)
8 Antes de 10 segundos, pulse ENTER.
9 Pulse • MD REC.
La unidad entra en el modo de espera y espera hasta que
aparezca el nombre de la fuente a grabar.
10
Pulse II para empezar a grabar.
Para reproducir de un equipo conectado, prepare el equipo
al modo de reproducción.
11
Pulse ■ para parar la reproducción.
Cuando termina la grabación, aparece "TOC EDIT" y se
registran los datos correspondientes al Indice de ia
grabación.
Para agregar marcas de índice durante la grabación
Pulse ENTER en el punto deseado durante la grabación.
Para cancelar la grabación monoaural
Pulse MODE tres veces para que aparezca "Rec MODE?” y antes
de 10 segundos pulse ENTER. Aparece "RecSTEREO?". Luego
antes de 10 segundos pulse ENTER. La indicación "MONO" que
destella se apaga.
La grabación monoaural también se cancela cambiando la fuente
de audio con el botón de función.
3 Pulse MODE tres veces.
Aparece "Rec MODE?" durante 10 segundos.
C-- Rec MODE"
4 Antes de 10 segundos, pulse ENTER y gire MULTI
JOG hasta que aparezca "Rec MONO?".
5 Antes de 10 segundos, pulse ENTER.
Destella "MONO" en la pantalla.
6 Pulse MODE dos veces.
Aparece "Mark MODE?" durante 10 segundos.
7 Antes de 10 segundos, pulse ENTER y gire MULTI
JOG para seleccionar un modo de marca de
índice.
Para registrar automáticamente marcas de índice al
principio de cada canción, seleccione "MarkiAUTO?".
Para registrar marcas de índice cada 5 minutos, seleccione
"Mark:TIME?".
Para registrar sin las marcas de índice, seleccione "Mark:
OFF?".
24 ESPAÑOL
Page 65

Cuando termina la reproducción del disco compacto
Termina automáticamente la grabación en el minidisco y en la
cinta.
UJ
QüA
zo
Al final de la grabación del minidisco o cinta
Cuando se graba el minidisco hasta el final pero la cinta todavía
tiene espacio para grabar, la grabación continua.
Cuando la cinta se graba hasta el final pero el minidisco todavía
tiene espacio para grabar, la grabación continúa.
Cuando tanto el minidisco como la cinta se graban hasta el final
y si el disco compacto se siguen reproduciendo, pare con ■.
Para parar la grabación, pulse ■.
Pulse nuevamente ■ para parar la reproducción del disco
4
compacto.
Ss
l|
K S
a
3
• Para grabar en un minidisco ya grabado, la nueva grabación
empieza automáticamente donde terminó la última grabación.
• Coloque i-i cinta en el punto donde va a empezar a grabar.
• Puede seleccionar el modo de inversión (grabación de un lado
o grabación de ambos lados).
Si selecciona la grabación en ambos lados, la reproducción del
disco compacto continúa durante el tiempo que la cinta cambia
de lado.
1 Coloque un disco compacto en la bandeja 1.
Se pueden colocar hasta tres discos compactos pero se puede
grabar sólo un disco compacto.
2 Coloque un minidisco a grabar con el lado con la
etiqueta hacia arriba y en el sentido de la flecha.
3 Coloque una cinta a grabar en la platina 2.
4 Coloque la cinta al punto donde se va a empezar
a grabar con ◄◄ o ►► y pare la cinta con
III.
5 Seleccione el modo de inversión utilizando
MODE, ENTER y MULTI JOG (página 10).
Para grabar sólo un lado, seleccione "Z".
Para grabar en ambos lados, seleccione "Zy o "CZ)".
• Cuando grabe del lado trasero de la cinta, la cinta se para
al final de la grabación del lado trasero, aunque se haya
seleccionado el modo de inversión o "CD".
NOTA
Cuando hay más de dos discos compactos cargados, empiece
a reproducir el disco compacto deseado pulsando DISC DIRECT
PLAY (1 - 3) y pare la reproducción. Empiece la operación desde
el paso 2.
6 Pulse CD ► MD/TAPE.
Cuando empieza la reproducción del disco compacto,
empiezci simultáneamente la grabación en el minidisco y en
la cinta.
• Si no se ha colocado una cinta en la platina 2 y no se ha
colocado un minidisco, no funciona CD ► MD/TAPE.
ESPAÑOL 25
Page 66

¿QUE ES UN MD (MINIDISCO)?
LIMITACIONES DEL MINIDISCO
Un minidisco tiene soiamente 64 mm de diámetro, ia mitad
aproximadamente de un disco compacto convencionai. Pero un
minidisco se puede utilizar para grabar y reproducir 74 minutos
de datos taies como ios de un disco compacto. A diferencia de
un disco compacto, ei minidisco viene en un cartucho de plástico,
por lo que puede ser manejado con mucha facilidad. El cartucho
también sirve de protección al disco de su interior contra los
golpes, el polvo y los arañazos. A diferencia de las cintas de
casefe que pueden alargarse y enredarse, un minidisco es un
medio de duración excelente.
TIPO DE MINIDISCO
Hay dos tipos de minidisco: "discos ópticos" y "discos
magnetoópticos". Ambos tipos utilizan rayos láser y tecnología
de fonocaptor óptico para leer datos grabados durante la
reproducción.
Discos ópticos
Estos son discos de reproducción soiamente. Como los discos
compactos, se utilizan como discos de música pregrabados.
Estos discos no se pueden grabar ni editar.
El obturador cubre
ia abertura sólo del
lado sin etiqueta
del minidisco.
La grabación de un minidisco se realiza de forma diferente a la
de una cinta de casete audiodigital. Por lo tanto el sistema de
minidisco está sujeto a las restricciones siguientes.
Aparece "TOC* Full" aunque el tiempo de grabación no
ha alcanzado su tiempo de grabación máximo en el disco
(60 ó 74 minutos)
Aparece "TOC Full" cuando se han grabado ya 254 canciones
en un disco, sin tenerse en cuenta el tiempo de grabación.
*TOC: Un acrónimo de Table Of Contents (índice)
Aparece "TOC Full" aunque el disco no esté
completamente grabado.
Si hay muchos datos de énfasis en una canción particular, el
aparato manejará los datos como códigos de índice io que hará
aumentar el número de canciones, sin tenerse en cuenta el
tiempo y número de canciones.
El tiempo remanente en un disco no aumenta aunque se
borren algunas canciones breves.
Cuando aparezca el tiempo remanente en un disco, éste no
aumentará aunque se borren canciones breves, porque las
secciones de menos de ocho segundos no se cuentan.
No se pueden unir algunas canciones (no funciona el
COMBINE).
• Las canciones creadas mediante edición no se pueden unir.
• No es posible combinar una canción grabada en monoaural y
una canción grabada en estéreo.
Discos grabables MO*^
Estos son discos grabables que pueden ser grabados una y otra
vez como las cintas de casete. Ei método de grabación llamada
magnetoóptico emplea un láser y magnetismo para grabar
señales. Por lo tanto la calidad del sonido grabado no se
deteriorará aunque se hagan muchas reproducciones y
grabaciones.
|Mini¡
jDiscI
Etiqueta
El obturador cubre la
abertura de ambas
caras del minidisco.
*' MO: Un acrónimo de Magneto Optico
Modo de tamaño ultracompacto gracias a ia tecnología
ATRAC*^
Una tecnología de compresión de audio digital de reciente
desarrollo, llamada sistema ATRAC, extrae automáticamente
sólo las frecuencias que oye el oído humano y corta aquéllas
que no se pueden oír. Esto comprime la cantidad de datos que
van a ser grabados a Vs del volumen normal. El sistema ATRAC
se basa en estudios llevados a cabo en el campo de la psicología
auditiva y no altera la calidad dei sonido audible.
ATRAC: un acrónimo de Adaptive TRansform Acoustic Coding
(codificación acústica de transformación adaptable)
La suma total del tiempo grabado y del tiempo remanente
de un disco no coincide con el tiempo de grabación
máximo del disco (60 ó 74 minutos).
La grabación se realiza mediante la unidad mínima de un grupo
(dos segundos). Aunque la sección grabada sea inferior a dos
segundos, para hacer la grabación se necesita un espacio de
dos segundos. Por lo tanto el tiempo disponible se reduce.
Los números de las canciones pueden no registrase
correctamente.
Cuando se grabe un disco compacto con el botón CD ► MD, tal
vez se formen canciones pequeñas según el tipo de contenido
del disco compacto.
Cuando utilice la función AUTO MARK, los números de canción
pueden no registrarse correctamente según el contenido del
disco compaoto.
Las entradas digitales tal vez no sean aceptadas.
Cuando se intenta realizar grabaciones digitales de materiales
protegidos por derechos de autor, la copia digital no podrá
realizarse de un minidisco digital a otro minidisco debido a la
activación de la función de restricción de grabación incorporada
que cumple con las normas SCMS*.
• SCMS (sistema de gestión de copiado en serie) es la norma
que restringe el copiado digital entre sistemas de audio digital
y protege los derechos de los autores.
(fuente de sonido pregrabado)
Minidisco
Copiado digital
Acceso aleatorio rápido
Una de las cosas estupendas que ofrece el minidisco es la de
poder buscar rápidamente las canciones deseadas. También hay
funciones rápidas y sencillas para la reproducción aleatoria en
la que el orden de las canciones se puede cambiar de forma
aleatoria y para cambiar el número de las canciones y poder
reproducirlas en cualquier orden.
26 ESPAÑOL
Disco
compacto
Grabación a través de
entradas analógicas
Page 67

EOlCiOINI DE
MIIMIDISCOS
3 Antes de 10 segundos, pulse ENTER en la unidad
principal o pulse MDTITLE/ENTER en el control
remoto mientras pulsa SHIFT.
La unidad se conmuta al modo de entrada de caracteres.
U
Q tfí
zo
Podrá registrar los títulos de los discos y de las canciones según
el disco compacto del que haga la grabación. También se podrán
registrar mensajes personales.
1
SHIFT
Botones de
carácter
1 Pulse M D y coloque un minidisco para registrar
los títulos.
2 a) Parai registrar el título del disco
En la unidad principal
En el modo de parada, pulse MODE.
En el control remoto
En el modo de parada, pulse MDTITLE/ENTER.
Aparece "Disc Title?".
4 Seleccione el tipo de carácter: mayúsculas,
minúsculas o números/símbolos.
En la unidad principal Pulse MODE varias veces.
En el control remoto Pulse +10/MODE varias veces.
: :
I
Mayúsculas A—►Minúsculas a*—►Números/símbolos 0
i
J
* "a" no aparece con el control remoto. Haga aparece "A"
para entrar las minúsculas.
Entre los caracteres.
En la unidad principal
Gire MULTI JOG para seleccionar un carácter deseado y
pulse ►► para decidir.
En el control remoto
Pulse los botones de carácter (página 28) varias veces para
seleccionar un carácter deseado y pulse ►► para determinar.
CQ Z
ccS
o
U Vi
QO
is
U —
WS
c-DiscTitlf
if
b) Para registrar el título de la canción
En la unidad principal
Seleccione una canción para registrar el título con
o MULTI JOG y pulse MODE.
En el control remoto
Seleccione una canción para registrar los títulos con los
botones numerados, pulse MDTITLE/ENTER.
Cuando se selecciona la 3a. canción.
3t:T ;i. i I
• Mientras aparece "TOC EDIT" no desconecte el cable eléctrico
de CA ni sacuda el aparato. De lo contrario los datos TOC no
se grabarán correctamente y el contenido editado de un disco
no podrá ser reproducido.
■ Un disco no podrá ser editado:
- cuando se coloque un disco pregrabado. (Aparece "PB Disc".)
- cuando la lengüeta de protección de grabaciones de un disco
colocado está en la posición de protección. (Aparece
"Protected".)
- durante la reproducción aleatoria (se cancelará la
reproducción aleatoria).
- durante la reproducción programada. (Aparece "Can't Edit".)
0
Pulse
T iii;i
:
r. ■■ .u
: :■■■■
Pulse ►► después de
el siguiente carácter.
O
eleccionar un carácter. Puede entrar
6 Repita los pasos 4 y 5 para entrar todos los
caracteres (hasta 50 caracteres).
Tenga en cuenta que el número total de caracteres que puede
entrar para un disco es de aproximadamente 1.700.
7 Pulse ENTER en la unidad principal.
O pulse MDTITLE/ENTER en el control remoto mientras pulsa
SHIFT.
Cuando se pulsa ± EJECT para expulsar un disco, aparece
"TOC EDIT" y los datos de contenido de la edición quedan
registrados.
8 Saque el minidisco.
ESPAÑOL 27
Page 68

Para cambiar un carácter durante la entrada
Pulse ◄◄ o ►► varias veces hasta que el carácter a cambiar
destella. Registre el carácter deseado.
Para borrar caracteres
Pulse ◄◄ o varias veces hasta que el carácter a borrar
destella. Luego pulse II.
Para colocar un espacio entre caracteres
Pulse ◄◄ o varias veces hasta que la parte a entrar como
espacio destella. Luego pulse en la unidad principal (o ►/
◄ ► en el control remoto).
Para agregar un carácter entre dos caracteres
Primero coloque un espacio entre dos caracteres. Luego cambie
el espacio por el carácter deseado, registrándolo.
Se pueden utilizar estos caracteres
Mayúsculas:D (espacio) ABCDEFGHIJKLMNOPQR
STUVWXYZ
Minúsculas: □ (espacio) abcdefghijkimnopqrstuvw
X y z
Números y símbolos: □ (espacio) 01 23456789l"#$%&
' Si se deja un minuto en los pasos 4 y 5, se cancela el modo de
registro de caracteres.
' Si se registra un título de canción mientras reproduce una
canción, la canción se reproduce repetidamente hasta terminar
de registrar el título.
DIVISION DE UNA CANCION
• Botones
numerados
Podrá dividir una canción en dos partes registrando una marca
de índice.
Ejemplo:
Para dividir la tercera canción en dos partes a ios 2 minutos
30 segundos
(
-----
2 minutos 30 segundos
2®
canción
2S
canción canción
3^’-
3' cu"t ó '
43
canción
Caracteres asignados a los botones en el control remoto
Para registrar caracteres con el control remoto, seleccione el
tipo de carácter y pulse repetidamente el botón en el que se ha
asignado el carácter deseado hasta que éste aparezca.
Botones en el
control remoto
"1"
"2" ABCabc
"3" DEEdef
"4"
"5" JKLjkl
"6" MNOmno
„7„
"8"
"9"
"0"
"A^"
-
GHIghi
PQRSpqrs
TUVtuv
WXYZwxyz
Caracteres asignados
1
2
3
4
5
6
7
8
9
0
1 Pulse MD y coloque un minidisco.
2 Durante ia reproducción de la canción a dividir,
pulse II en el punto donde desea dividir la
canción.
La reproducción entra en el modo de pausa.
3 Pulse EDIT varias veces hasta que aparezca
"Divide".
Aparece "Divide 3?".
Di V i de
: 0BtSf0EÍ
4 Antes de 10 segundos, pulse ENTER.
Una parte de 3 segundos del punto donde se pulsó II
reproduce repetidamente.
se
5 Ajuste el punto a dividir con ►► o MULTI
JOG consultando el sonido a reproducir.
6 Pulse ENTER antes de un minuto.
La marca de índice queda registrada y los números de canción
avanzan en una unidad. Al mismo tiempo, todas las canciones
a continuación también avanzarán en uno.
7 Pulse ■ .
Se para la reproducción.
Cuando se pulsa — MD EJECT para expulsar un disco,
aparece "TOC EDIT" y se registran los datos correspondientes
al contenido de la edición.
28 ESPAÑOL
No se puede dividir una canción en los siguientes casos:
- cuando el disco colocado ya tiene 254 canciones.
- cuando el tiempo transcurrido aparece como 0 :00.
Si la canción tenía un título antes de la división, el título se
registrará para ia primera de las dos canciones divididas.
Page 69

4,5
MULTI
JOG
------
111 V)
oo
is
si
4,6
^
2,5
ulS
3
Podrá combinar dos canciones borrando la marca de índice entre
ellas.
Ejemplo:
Para combinar la 2 ^ y 3® canción borrando la marca de índice
que se encuentra al comienzo de la 3- canción.
canción
canción
2"
canción
2«
canción
3" t,|
canción 1 1^
1 Pulse MD y coloque un minidisco.
2 Seleccione la última de ias dos canciones que
desea combinar con el MULTI JOG o utilizando
ios botones numerados 0-9 y +10 en el control
remoto.
Ejemplo: Para combinar la 2® y 3® canción, seleccione la 3^
canción.
3 Pulse EDIT varias veces hasta que aparezca
"Combine?".
Ejemplo; Aparece "Combine ?" cuando se pulsa EDIT durante
la reproducción de la 3" canción.
4 Antes de 10 segundos, pulse ENTER.
Después de completar una grabación podrá cambiar el orden
de las canciones.
El orden no cambiará el original aunque se desconecte la
alimentación.
Ejemplo:
Para mover la 3® canción a la posición
23
canción
A
.
-------------------------
B
3^
canción
c
n
c A B
1 Pulse MD y coloque un minidisco.
2 Seleccione la canción que desea mover con
MULTI JOG o los botones numerados 0-9 y +10
en el control remoto.
Ejemplo: Para mover la 3^ canción, seleccione la 3® canción.
3 Pulse EDIT varias veces hasta que aparezca
"Move".
’ : : : : :
hIÍÍ
5 Antes de 10 segundos, vuelva a pulsar ENTER.
La marca de índice de la canción selecciona desaparece y
quedan combinadas la 2® y 3® canción. Ai mismo tiempo, todos
los números de canción a continuación de ese número
diminuyen en una unidad.
Cuando se pulsa — MD EJECT para expulsar un disco,
aparece "TOC EDIT" y se registran los datos correspondientes
al contenido de la edición.
Si las canciones tienen títuio
Si ambas canciones tenían título, se mantiene el títuio del número
más bajo.
Si sólo unst de las canciones combinadas tenía un título, se
mantiene ese título.
No se puede combinar una canción grabada en monoaural y
una canción grabada en estéreo. (Aparecerá "Can't Edit".)
4 Antes de 10 segundos, pulse ENTER.
5 Gire MULTI JOG para seleccionar el número de
canción deseado al que desea mover la canción.
Ejemplo: Para mover la 3® canción a la posición.
|l ’g«r
' plnnoiri;
6 Antes de 10 segundos, pulse ENTER.
Se ha cambiado el orden de las canciones.
Cuando se pulsa £ MD EJECT para expulsar un disco,
aparece "TOC EDIT" y se registran los datos correspondientes
al contenido de la edición.
ESPAÑOL 29
Page 70

BORRADO DETODAS LAS CANCIONES DE UN DISCO
3,4
MULTI JOG ■
BORRADO DE UNA SOLA CANCION
2
■
II
1 Pulse MD y coloque un minidisco.
2 Pulse EDIT en el modo de parada varias veces
hasta que aparezca "Erase All?".
:¡-Erase Pii 1/5
3 Antes de 10 segundos, pulse ENTER.
Si borra todas las canciones, no podrá recuperarlas.
Asegúrese de que desea borrar todas las canciones.
Puise ■ para canceiar.
4 Antes de 1 minuto, pulse de nuevo ENTER.
Aparece ''TOO EDiT" y se borran toda ias canciones dei disco
coiocado. Desaparece "TOO EDiT" y aparece "Blank Disc".
1 Pulse MD y coloque un minidisco.
2 Seleccione la canción que desea borrar con
MULTI JOG o los botones numerados 0-9 y +10
en el control remoto.
3 Pulse EDIT varias veces hasta que aparezca
"Erase".
Ejemplo; Para borrar ia 3^ canción.
4 Antes de 10 segundos, pulse ENTER.
Si borra una canción no podrá recuperarla. Asegúrese de que
desea borrar la canción.
Pulse ■ para cancelar.
5 Antes de 1 minuto, pulse de nuevo ENTER.
La canción seleccionada se borra y todos los números de
canciones posteriores disminuyen en una unidad.
Cuando aparece "TOC EDIT" se registran los datos
correspondientes ai contenido de la edición.
30 ESPAÑOL
Page 71

REiLOJ Y
TEMPORIZADOR
Ui (fí
ao
-iMWii-
1
3^
2 - ^ m
II
n'
Pulse CLOCK en el control remoto mientras pulsa
SHIFT. (Puede pulsar II cuando la unidad está
apagada.)
Eli reloj aparece durante 4 segundos.
Cuando se enchufa el cable eléctrico por primera vez después
de la compra o cuando se cancela la hora del reloj debido a
un corte eléctrico, destellan todos los datos del reloj.
i'iF'l 1.
F'ara mostrar con el formato de 24 horas, pulse ■. Pulse ■
nuevamente para volver al formato de 12 horas.
i-'U-i
2 Cuando aparece la hora del reloj (antes de 4
segundos), ajuste la hora.
C3ire MULTI JOG hacia la derecha para avanzar la hora y
gire hacia la izquierda para retroceder la hora. La velocidad
a la que cambia la hora depende de lo rápido que gire MULTI
JOG. También puede pulsar ◄◄ o ►►. Mantenga pulsados
estos botones para cambiar la hora en unidades de 30
minutos.
SHIFT
1,4
- SHIFT
POWER
La unidad puede encenderse a la hora especificada todos los
días gracias al temporizador incorporado.
Compruebe primero que el reloj está puesto en hora.
1 Seleccione la fuente.
Pulse uno de los botones de función para seleccionar una
fuente para reproducir o grabar.
Para la reproducción con temporizador de una cinta,
seleccione platina 1 o 2 con TAPE DECK 1/2.
2 Pulse TIMER varias veces o pulse TIMER en el
control remoto mientras pulsa SHIFT varias veces
para seleccionar la reproducción con
temporizador o la grabación con temporizador.
La indicación de ia hora y fuente de audio destellan
alternadamente I
¡5
UIS
cc
>5
-S N
3|
UJ o
H
o
“s
w
3 Pulse lENTER o II.
Desaparece la hora.
Si se ha encendido la unidad, volverá la indicación original.
Para ver la hora cuando hay otra indicación en la pantalla
Pulse CLOCK en el control remoto mientras pulsa SHIFT. La
hora aparece durante 4 segundos y después vuelve a aparecer
la indicación original.
Sin embargo no puede ver la hora durante la grabación.
Si destellan las indicaciones en el reloj
Si la indicación destella cuando aparece la hora, se ha parado
el reloj debido a un corte eléctrico o porque se ha
desenchufado el cable eléctrico. La hora tendrá que ponerse
de nuevo.
ÍH PM1 n.-\
Reproducción con temporizador: aparece ©.
Grabación con temporizador: aparecen © y "REC".
Antes de 6 segundos, empiece a ajustar la hora
de encendido con temporizador.
Gire MULTI JOG hacia la derecha para avanzar la hora y
gire hacia la izquierda para retroceder la hora, la velocidad a
la que cambia la hora depende de lo rápido que gire MULTI
JOG. También puede pulsar ◄◄ o ►►. Mantenga pulsados
estos botones para que el tiempo cambie a intervalos de 30
minutos.
Tiempo de encendido del temporizador
hN 8:; 20
Para la reproducción con temporizador: Cuando se ajusta
la hora de encendido con temporizador, pulse ENTER o II y
salte al paso 5.
Para la grabación con temporizador: Cuando se ajusta la
hora de encendido con temporizador, vaya al paso 4.
ESPAÑOL 31
Page 72

4 Para la grabación con temporizador, seleccione
el destino de la grabación.
Para grabar en un minidisco, pulse MD.
Para grabar en una cinta, pulse TAPE.
Ejemplo: Para grabar la radio (FM) en un minidisco, aparece
"FM ► MD".
Cuando se selecciona el destino de la grabación, pulse
ENTERO II.
5 Antes de 4 segundos, ajuste la duración del
período de activación de temporizador.
Gire MULTIJOG o pulse ◄◄ y ►► para ajustar la duración.
La duración se puede programar a entre 5 y 240 minutos en
intervalos de 5 minutos.
• La reproducción y grabación con temporizador no empezará a
menos que desconecte la alimentación.
• Si se utiliza la unidad con el temporizador programado, verifique
nuevamente la preparaoión de la fuente para la reproducción
o grabación con temporizador y el ajuste de volumen antes de
apagar la unidad.
Para comprobar la programación del temporizador
Pulse TIMER en la unidad principal o pulse TIMER en el control
remoto mientras pulsa SHIFT.
La fuente seleccionada, la hora de encendido del temporizador
y la duración del período de activación por temporizador
aparecerán durante 4 segundos.
Para cambiar la programación del temporizador
Programe el temporizador desde el principio.
FMIMID 30
Período de activación de
temporizador.
Cuando se ha programado la duración, pulse ENTER olí.
(Si no se pulsa ningún botón, la duración queda programada
automáticamente después de 4 segundos.)
6 Ajuste el volumen.
El sonido de la fuente se puede escuchar al volumen
programado aquí cuando se enciende a la hora programada.
Sin embargo, cuando se ha seleccionado el modo de ahorro
de energía (página 34) el volumen de la grabación con
temporizador estará en 0 (nivel mínimo).
7 Prepare la fuente.
Para la reproducción con temporizador de una cinta,
coloque una cinta en la platina seleccionada en el paso 1.
Para la reproducción con temporizador de un disco
compacto o minidisco, coloque un disco compacto o
minidisco.
Para la reproducción/grabación del sintonizador, pulse
TUNER BAND para seleccionar FM o AM y sintonice la
emisora deseada.
Para la reproducción/grabación con temporizador del
equipo conectado a las tomas VIDEO/AUX o toma DIGITAL
IN, ajuste el temporizador del equipo para que la reproducción
empiece al mismo tiempo.
8 Para la grabación con temporizador, prepare un
minidisco o cinta que pueda grabar.
Para la grabación en un minidisco, coloque un minidisco
que pueda grabar.
Para la grabación con cinta, coloque una cinta que pueda
grabar en la platina 2 y seleccione el modo de inversión
(página 10).
9 Pulse POWER para desconectar la unidad.
Funciones de temporizador.
Aparece © o © y "REC" (cuando el modo de ahorro de
energía está desactivado).
• Si el nivel de volumen está en 21 o más alto, sin embargo,
se ajustará automáticamente a 20 cuando encienda la
unidad.
• Puede cambiar la fuente seleccionada en el paso 1 pulsando
uno de los botones de función antes de pulsar ENTER o II
en el paso 3.
Para cancelar el modo de espera del temporizador
Pulse TIMER de la unidad principal o pulse TIMER en el control
remoto varias veces mientras pulsa SHIFT para que aparezca
"© OFF".
TEMPORIZADOR PARA DORMIR
El aparato puede desconectar automáticamente después de
transcurrido un tiempo especificado dentro de 4 horas.
1 Pulse SLEEP en el control remoto mientras pulsa
SHIFT.
SLEEP 00
2 Antes de 4 segundos, pulse ◄◄ o ►► o gire
MULTI JOG para seleccionar el tiempo tras el cual
se apagará la unidad.
La duración puede seleccionarse entre 5 y 240 minutos en
intervalos de 5 minutos.
Para comprobar el período de activación por temporizador
Pulse SLEEP en el control remoto mientras pulsa SHIFT, la
duración del período activado por temporizador aparece durante
4 segundos.
Para cancelar el temporizador para dormir
Pulse SLEEP dos veces en el control remoto mientras pulsa
SHIFT.
Aparece "SLEEP OFF" durante 4 segundos.
32 ESPAÑOL
Page 73

OTFIIA INIFORMACION
Si pulsa DISPLAY en la unidad principal o pulsa CD EDIT/
CHECK en el control remoto mientras pulsa SHIFT, la pantalla
cambia de la siguiente forma.
CUANDO LA FUENTE DE SONIDO ES UN
DISCO COMPACTO
Durante la reproducción o modo de pausa (cuando no
se ha colocado un minidisco grababie)
© CD 1 Tr 3:42
(Tiempo de reproducoión transourrido)
I— /2) CD
(Tiempo de reproducción remanente)
• Durante la reproducción aleatoria o reproducción programada,
no aparece el tiempo de reproducción remanente.
Durante ia reproducción o modo de pausa (cuando se ha colocado un minidisco grababie)
© CD 1 Tr 3:42
(Tiempo de reproducción transcurrido)
® CD -36:15
(Tiempo de reproducción remanente)
I— © MD Fiem - 52:38*
(Tiempo de grabación posible en el minidisco: aparece
durante 4 segundos)
* Aparece sólo cuando se utiliza el botón DISPLAY de la unidad principal.
• Durante la reproducción aleatoria o reproducción programada,
no aparece el tiempo de reproducción remanente.
-36:15
CUANDO LA FUENTE DE SONIDO ES UN
MINIDISCO
Durante la reproducción o modo de pausa
® Título de la canción
® MD - 32:37
(Tiempo de reproducción remanente)
® MD 1 Tr 3:42
(Tiempo de reproducción transcurrido)
• Durante la reproducción aleatoria o reproducción programada,
no aparece el tiempo de reproducción remanente.
• El titulo de la canción aparece sólo ouando se pulsa DISPLAY
en la unidad principal.
• Cuando el título de la canción no está registrado, aparece el
número de canción.
Durante el modo de parada
-r © Título del minidisco
@ MD Rem - 59:06
(Tiempo de grabación posible en el minidisco: aparece
durante 4 segundos)
- © MD 9 Tr 14:54
(Tiempo de reproducción total)
El título del minidisco aparece sólo cuando pulse DISPLAY en
la unidad principal.
Cuando el título del minidisco no está registrado, aparece "No
Title".
DURANTE LA GRABACION MANUAL DE LA
CINTA, SINTONIZADOR O FUENTE
CONECTADA AL MINIDISCO
GC
> <
-9N
Si
“I
UJ
I-
O
O
Z
li.
z
DURANTE LA GRABACION PROGRAMADA
DEL DISCO COMPACTO AL MINIDISCO
Se puede cambiar la pantalla sólo cuando se pulsa DISPLAY
en la unidad principal.
® CD 1 Tr 1:23
(Número de canción en el disco compacto y tiempo
transcurrido)
Cg) MD -36:15
(Tiempo de grabación posible en el minidisco)
— Ct MDlOTr 1:27
(Número de canción en el minidisco en la grabación y
tiempo transcurrido)
• Se puede cambiar la indicación sólo cuando se pulsa DISF*LAY
en la unidad principal.
'© AUX
(fuente de sonido)
@ MD -15:14
(Tiempo de grabación posible en el minidisco)
© MD 12Tr 2:58
(Número de canción del minidisco en la grabación y
tiempo transcurrido)
ESPAÑOL 33
Page 74

Puede ajustarse el brillo de la pantalla en los siguientes cuatro
niveles: "DIM-OFF", "DIMMER 1", "DIMMER 2" y "DIMMER 3".
"DIM-OEE" es el nivel más brillante.
Cuando se selecciona "DIMMER 3", la pantalla es más ocurra,
se apaga la iluminación de la bandeja de discos compactos y la
ranura del minidisco y no se mueve el analizador de espectro.
Ajuste eta unidad al modo de ahorro de energía para reducir el
consumo eléctrico de la siguiente forma.
• Cuando se apaga la unidad, todas las indicaciones de la pantalla
se apagan.
(No aparece ni siquiera el reloj. Cuando se conecta el cable
eléctrico de CA en el tomacorriente de CA, sólo se enciende el
indicador rojo debajo del botón POWER. Tenga encuentra que
la indicación de demostración aparecerá a menos que se haya
puesto en hora el reloj. Para las indicaciones de demostración
conmute la página 6.)
• Si la cinta, disco compacto y minidisco se han parado y no hay
entrada de audio del equipo externo conectado durante 10
minutos, se apaga la unidad.
• Cuando se enciende la unidad con la grabación por
temporizador (página 31), el nivel de brillo de la pantalla está
en "DIMMER 3", todas las luces de la pantalla están apagadas
y el volumen está en el mínimo.
• La pantalla se vuelve más brillante sólo cuando se hace
funcionar la unidad. Cuando o se utiliza la unidad durante 10
segundos, el nivel de brillo se conmuta ai nivel elegido por el
ajuste "DIM MODE".
(Si el nivel de brillo está en "DIM-OFF", el brillo no cambia.
Cuando el nivel está en "DIMMER 3" las luces de los botones
también se apagan.)
1 Pulse ECO.
Aparece "ECO MODE?".
2 Antes de 4 segundos, gire MULTI JOG para que
aparezca "DIM MODE?".
JJTM MODE
3 Antes de 4 segundos, pulse ENTER.
Aparece el brillo seleccionado.
4 Antes de 4 segundos, gire MULTI JOG para
seleccionar su brillo deseado.
DIM-OFF
c
DIMMER 3
Después de 4 segundos, el nivel de brillo seleccionado se
ajustará automáticamente.
O si pulsa ENTER antes de 4 segundos, se ajusta el nivel de
brillo seleccionado.
DIMMER 1
DIMMER 2
a
1 Pulse ECO.
Aparece "ECO MODE?".
MODE
2 Antes de 4 segundos, pulse ENTER.
Aparece el estado del modo de ahorro de energía actual.
Si el modo de ahorro de energía está desactivado: ECO OFE
Si el modo de ahorro de energía está activado: ECO ON
3 Antes de 4 segundos, gire MULTI JOG para activar
o desactivar ei modo de ahorro de energía.
Ejemplo; Cuando se selecciona "ON".
-ECQJlF-í
Después de 4 segundos, el modo de ahorro de energía
seleccionado queda programado automáticamente.
O si pulsa ENTER antes de 4 segundos, ei modo de ahorro de
energía seleccionado se programará.
34 ESPAÑOL
Consumo eléctrico en espera
Si el modo de ahorro de energía está desactivado: 24 W
SI el modo de ahorro de energía está activado: 1,3 W
Después de que la grabación con temporizador (página 31) con
el modo de ahorro de energía está en ON, si se enciende la
unidad, el nivel de brillo de la pantalla está en "DIMMER 3",
todas las luces de los botones están apagados y el volumen
está en el mínimo. Si fuera necesario, vuelva a ajustar el volumen
y el nivel de brillo de la pantalla.
Page 75

Puede ajustarse el brillo de la pantalla en los siguientes cuatro
niveles: "DIM-OFF", "DIMMER 1", "DIMMER 2" y "DIMMER 3".
"DIM-OEE" es el nivel más brillante.
Cuando se selecciona "DIMMER 3", la pantalla es más ocurra,
se apaga la iluminación de la bandeja de discos compactos y la
ranura del minidisco y no se mueve el analizador de espectro.
Ajuste eta unidad al modo de ahorro de energía para reducir el
consumo eléctrico de la siguiente forma.
• Cuando se apaga la unidad, todas las indicaciones de la pantalla
se apagan.
(No aparece ni siquiera el reloj. Cuando se conecta el cable
eléctrico de CA en el tomacorriente de CA, sólo se enciende el
indicador rojo debajo del botón POWER. Tenga encuentra que
la indicación de demostración aparecerá a menos que se haya
puesto en hora el reloj. Para las indicaciones de demostración
conmute la página 6.)
• Si la cinta, disco compacto y minidisco se han parado y no hay
entrada de audio del equipo externo conectado durante 10
minutos, se apaga la unidad.
• Cuando se enciende la unidad con la grabación por
temporizador (página 31), el nivel de brillo de la pantalla está
en "DIMMER 3", todas las luces de la pantalla están apagadas
y el volumen está en el mínimo.
• La pantalla se vuelve más brillante sólo cuando se hace
funcionar la unidad. Cuando o se utiliza la unidad durante 10
segundos, el nivel de brillo se conmuta ai nivel elegido por el
ajuste "DIM MODE".
(Si el nivel de brillo está en "DIM-OFF", el brillo no cambia.
Cuando el nivel está en "DIMMER 3" las luces de los botones
también se apagan.)
1 Pulse ECO.
Aparece "ECO MODE?".
2 Antes de 4 segundos, gire MULTI JOG para que
aparezca "DIM MODE?".
JJIN nuDE”-^^
3 Antes de 4 segundos, pulse ENTER.
Aparece el brillo seleccionado.
4 Antes de 4 segundos, gire MULTI JOG para
seleccionar su brillo deseado.
DIM-OFF
c
DIMMER 3
Después de 4 segundos, el nivel de brillo seleccionado se
ajustará automáticamente.
O si pulsa ENTER antes de 4 segundos, se ajusta el nivel de
brillo seleccionado.
DIMMER 1
DIMMER 2
a
1 Pulse ECO.
Aparece "ECO MODE?".
MODE .-!r I
Antes de 4 segundos, pulse ENTER.
Aparece el estado del modo de ahorro de energía actual.
Si el modo de ahorro de energía está desactivado: ECO OFE
Si el modo de ahorro de energía está activado: ECO ON
Antes de 4 segundos, gire MULTI JOG para activar
o desactivar ei modo de ahorro de energía.
Ejemplo; Cuando se selecciona "ON".
Después de 4 segundos, el modo de ahorro de energía
seleccionado queda programado automáticamente.
O si pulsa ENTER antes de 4 segundos, ei modo de ahorro de
energía seleccionado se programará.
34 ESPAÑOL
Consumo eléctrico en espera
Si el modo de ahorro de energía está desactivado: 24 W
SI el modo de ahorro de energía está activado: 1,3 W
Después de que la grabación con temporizador (página 31) con
el modo de ahorro de energía está en ON, si se enciende la
unidad, el nivel de brillo de la pantalla está en "DIMMER 3",
todas las luces de los botones están apagados y el volumen
está en el mínimo. Si fuera necesario, vuelva a ajustar el volumen
y el nivel de brillo de la pantalla.
Page 76

ESCUCHA DE FUEN
SONIDO EXTERNA
PARA REPRODUCIR UN EQUIPO CONECTADO A LA TOMA DIGITAL IN
1 Pulse AUX/D-IN varias veces hasta que aparezca
"D-IN" en la pantalla.
POWER ■
PARA REPRODUCIR UN EQUIPO
CONECTADO A LAS TOMAS VIDEO/AUX
7 Pulse AUX/D-IN varias veces hasta que aparezca
"AUX" en la pantalla.
2 Reproduzca el equipo conectado.
Para cambiar el nombre de la fuente en la pantalla
Cuando pulse AUX/D-IN, aparece primero "AUX". Se puede
cambiar a "VIDEO" o "TV".
Con la unidad encendida, pulse POWER mientras pulsa AUX/
D-IN. Repita el procedimiento para seleccionar uno de los
nombres.
2 Reproduzca el equipo conectado.
NOTA
Si se coloca un minidisco durante ia reproducción del equipo
conectado a la toma DIGITAL IN, el sonido reproducido no se
escuchará mientras se ieen ios datos TOO.
Para ajustar el nivel de volumen del equipo conectado a
las tomas VIDEO/AUX
Pulse AUX/D-IN para llamar la indicación "AUX" y pulse ◄◄ o
repetidamente.
36 ESPAÑOL
Page 77

GENERALIDADES
El mantenimiento y el cuidado ocasional de la unidad y del
software resultan necesarios para optimizar las prestaciones de
la unidad.
Para limpiar la caja
Utilice un paño blanco y seco.
Si las superficies están muy sucias, utilice un paño suave
humedecido un poco en una solución detergente suave. No utilice
disolventes fuertes tales como alcohol, bencina o diluyante
porque éstos podrían estropear el acabado del aparato.
Para limpiar las cabezas y trayecto de la cinta
Cada 10 horas de uso, limpie las cabezas y trayecto de la cinta
con un casete de limpieza de cabezas o algodón empapado en
un líquido de limpieza o alcohol desnaturalizado. (Estos juegos
de limpieza se pueden adquirir en las tiendas de audio.)
Cuando limpie con un algodón, limpie la cabeza de grabación/
reproducción, cabeza de borrado (sólo platina 2), cabrestantes,
y rodillos.
Cuidado de fas cintas
• Guarde las cintas en sus cajas después de utilizarlas.
• No deje las cintas cerca de imanes, motores, aparatos de TV
o fuentes de magnetismo. Esto afectará la calidad del sonido
y se escucharán ruidos.
• No exponga las cintas a los rayos del sol o deje en un coche
estacionado bajo los rayos del sol.
Cuidados de los minidiscos
Como los minidiscos vienen en cartuchos que los protegen de
las huellas dactilares y el polvo, no tendrá que preocuparse
demasiado de ellos. Sin embargo, los cartuchos sucios o
estropeados pueden hacer que el aparato funcione mal. Tenga
en cuenta las sugerencias siguientes cuando maneje los
minidiscos.
• Guarde el cartucho en su caja.
• No abra el obturador del cartucho para tocar directamente el
disco. Resulta muy difícil limpiar el disco de interior del cartucho
si éste se ensucia. Y además puede estropearse el cartucho.
• Cierre el obturador si éste se abre al manejar o expulsar el
disco. Si no, puede entrar polvo en el interior o el disco puede
rayarse.
Obturador del disco
Ul
X
111
Z
O
Ü
M
<
E
H
o
(ñ
Ul
Q
<
Q
□
<
E
Ul
Z
Ul
o
Después de limpiar las cabezas y trayecto de la cinta con un
líquido de limpieza de cabezas de casete o algodón empapado,
espere hasta que las partes limpiadas se sequen completamente
antes de colocar cintas.
Para desimantar las cabezas
Las cabezas pueden imantarse después de un uso prolongado.
Esto puede disminuir la gama de salida de las cintas grabadas y
aumentar el ruido. Después de un uso cada 20 a 30 horas,
demagnetice las cabezas con un desimantador de venta en los
comercios.
Cuidados de ios discos compactos
■ Cuando un disco compacto esté sucio, limpíelo pasando un
paño de limpieza desde el centro hacia afuera.
" Después de reproducir un disco compacto, guárdelo en su caja.
No deje los discos compactos en lugares calientes o húmedos.
ESPAÑOL 37
Page 78

Unidad principal CX-NH330MD
Sección del sintonizador de FM
Gama de sintonización 87,5 MHz a 108 MHz
Sensibilidad útil (IHF) 16,8 dBf
Terminales de antena 75 ohmios (desequilibrada)
Sección del sintonizador de AM
Gama de sintonización 530 kHz a 1710 kHz (pasos de 10
kHz)
531 kHz a 1602 kHz (pasos de 9
kHz)
Sensibilidad útii 350 pV/m
Antena Antena de cuadro
Sección del amplificador
Amplificador de frecuencias medias-altas
Potencia de saiida* 10 vatios por canal, Min. RMS a 8
ohmios, de 200 Hz a 20 kHz, con
no más de 1% de distorsión
armónica total
Distorsión armónica total 0,06% (8 W, 1 kHz, 8 ohmios, DIN
AUDIO)
Amplificador de baja frecuencia
Potencia de salida* 30 vatios por canal, Min. RMS a 4
ohmios, de 50 Hz a 200 Hz, con
no más de 1% de distorsión
armónica total
Distorsión armónica total 0,06% (20 W, 135 Hz, 4 ohmios,
DIN AUDIO)
Entradas VIDEO/AUX: 310 mV
* sin conectar los SURROUND SPEAKERS
DIGITAL IN
Salidas SPEAKERS:
LOW FREQ: acepta altavoces de
4 ohmios
HIGH FREQ: acepta altavoces de
8 ohmios
SURROUND SPEAKERS: acepta
altavoces de 8 a 16 ohmios
PHONES: (toma estéreo): acepta
auriculares de 32 ohmios o más
Toma CD DIGITAL OUT
(OPTICAL)
Sección del tocadiscos de discos compactos
Láser Láser semiconductor (X = 780 nm)
Convertidor D-A 1 bit doble
Relación señal a ruido 85 dB (1 kHz, 0 dB)
Distorsión armónica 0,05% (1 kHz, 0 dB)
Fiuctuación y trémolo No se puede medir
Sección de grabadora de
Método de exploración
minidiscos
Escáner óptico sin contacto
(Aplicación de láser de
semiconductor)
Sistema de grabación
Sistema de sobreescritura de
modulación de polaridad
magnética
Velocidad de rotación
Frecuencia de maestreo
Número de canales
Aprox. 400 - 900 rpm (CLV)
44,1 kHz
Estéreo: 2 canales
Monoaural: 1 canal
Convertidor A-D, D-A
Frecuencia
Fluctuación y trémolo
1-bit
20 a 20000 Hz +0,5/-1,5 dB
No se puede medir
Sección de platina de casetes
Formato de pista
Respuesta de frecuencia
Sistema de grabación
Cabezas
4 pistas, 2 canales estéreo
50 Hz a 15000 Hz
Polarización CA
Platina 1 : Cabeza de reproducción
X 1
Platina 2: Cabeza de grabación/
reproducción x 1, cabeza
38 ESPAÑOL
de borrado x 1
Generalidades
Especificaciones eléctricas 120 V CA, 60 Hz
Consumo eléctrico 130 W
Consumo en espera 1,3 W (con el modo de ahorro de
energía en ON)
Dimensiones del aparato principal
(An. X Al. X Prof.) 260 X 329,5 x 354,5 mm
Peso del aparato principal 8 ,6 kg
Sistema de altavoces SX-WNH330
Tipo de caja
3 vías, altavoz de graves
secundario integrado (tipo
blindaje antimagnético)
Altavoces
Altavoz para supergraves:
tipo cónico de 160 mm
Altavoz de gama total:
Tipo cónico de 100 mm
Altavoz para superagudos:
Tipo cerámico de 20 mm
Impedancia
LOW FREO: 4 ohmios
HIGH FREO:
8 ohmios
Nivel de presión acústica de salida 87 dB/W/m
Dimensiones (An. x Al. x Prof.) 240 x 324 x 270 mm
Peso 4,8 kg
Las especificaciones y la apariencia exterior están sujetas a cambios
sin previo aviso.
•LAS PATENTES EE.UU. Y EXTRANJERAS HAN SIDO
OTORGADAS POR DOLBY LABORATORIES LICENSING
CORPORATION
DERECHOS DE AUTOR
Consulte las leyes de los derechos de autor relacionadas con
las grabaciones de discos, programas de radio o cintas externas
del país en el que se utilice la unidad.
NOTA
Este equipo ha sido probado y se ha determinado que cumple
con los límites de la Clase B de aparatos digitales de acuerdo
con la Parte 15 de las Reglas de la ECO. Estos límites fueron
diseñados para dar una protección razonable contra interferencia
molesta en una instalación residencial.
Este equipo genera, utiliza y puede irradiar energía de las
frecuencias de radio y, si no se instala y utiliza de acuerdo con
las instrucciones, puede provocar interferencias molestas a las
comunicaciones de radio. Sin embargo, no hay ninguna garantía
de que no se produzcan interferencias en una determinada
instalación. Si el equipo provoca interferencias molestas para la
recepción de radio o TV, que pueden determinarse encendiendo
y apagando el equipo, el usuario debe tratar de corregir esta
interferencia mediante uno o más de los siguientes métodos:
- Cambie la orientación o instale en otro lugar la antena
receptora.
- Aumente la distancia entre el equipo y el receptor.
- Conecte el equipo a un tomacorriente con un circuito
diferente del tomacorriente en el que está conectado el
receptor.
- Consulte con su tienda o un técnico con experiencia en radio/
TV.
PRECAUCION
Las modificaciones o ajustes de este producto, no aprobadas a
título expreso por el fabricante pueden hacer perder el derecho
del usuario o autoridad para hacer funcionar el producto.
Page 79

Si el aparato no funciona como se describe en este manuai de
instrucciones, haga las inspeccione de la guía siguiente.
GENERALIDADES
No hay sonido.
• ¿Está bien conectado el cable eléctrico de CA?
» ¿Hay alguna conexión mal hecha? (-► página 4)
» Puede haber un cortocircuito en los terminales de los altavoces.
-► Desconecte el cable eléctrico de CA y corrija las conexiones
de los altavoces.
• ¿Se ha pulsado un botón de función equivocado?
La pantalla se vuelve oscura.
’ La grabación con temporizador se hace cuando el modo de
ahorro de energía está activado.
-► Ajuste el brillo de la pantalla (-» página 34).
Sólo sale sonido de un altavoz.
” ¿Está el otro altavoz desconectado?
Se produce una Indicación errónea o un mal
funcionamiento.
-I- Vuelva a ajustar la unidad como se indica más abajo.
La Indicación de pantalla se mueve cuando está apagado.
O Está funcionando la demostración.
-r Pulse Se apaga la indicación de demostración.
La unidad se apaga aunque no haya presionado el
interruptor.
« El modo de ahorro de energía está activado.
• Si ia cinta, disco compacto y minidisco están parados y no hay
entrada de audio de un equipo externo conectado durante 1 0
minutos, se apaga automáticamente.
Desactive el modo de ahorro de energía (-> página 34).
SECCION DEL SINTONIZADOR
Hay un ruido de estática tipo olas, constante.
" ¿Se ha conectado correctamente la antena? (-* página 5)
" ¿La señal está débil?
—► Conecte una antena externa.
La recepción contiene ruidos de interferencia o el sonido
está distorsionado.
•• ¿El sistema capta ruidos externos o distorsión de pasos
múltiples?
-► Cambie el sentido de la antena.
-► Aleje esta unidad de otros aparatos eléctricos.
SECCION DE LA PLATINA DE CASETES
La cinta no funciona.
• ¿Está la platina 2 en el modo de pausa? (-» página 10)
El sonido se escucha desbalanceado o no es lo
suficientemente alto.
• ¿Está sucia la cabeza de reproducción? (-» página 37)
No se puede grabar.
• ¿Se ha roto la lengüeta para evitar el borrado? (-► página 11)
• ¿Está sucia la cabeza de grabación? (-► página 37)
No se puede borrar.
• ¿Está sucia la cabeza de borrado? (-► página 37)
• ¿Se está utilizando una cinta de metal o cinta de cromo?
No se escuchan los sonidos de alta frecuencia.
• ¿Está sucia la cabeza de grabación/reproducción? (-► página
37)
SECCION DEL TOCADISCOS DE DISCOS COMPACTOS
El tocadiscos de discos compactos no reproduce.
• ¿Está bien colocado el disco? (-» página 12)
• ¿Está sucio el disco? (-► página 37)
• ¿Afecta la condensación a la lente?
-* Espere unas horas y pruebe otra vez
SECCION DE LA GRABADORA DE MINIDISCOS
La grabadora de minldiscos no funciona.
• ¿Hay un disco en el interior de la unidad?
-* Coloque un disco.
• ¿Afecta la condensación la lente?
-* Espere una hora aproximadamente y pruebe otra vez.
El sonido tiene ruidos.
• ¿Está la unidad cerca de un objeto con un campo magnético
intenso tal como un televisor?
-*■ Aleje el aparato del televisor.
El sonido es intermitente.
• ¿Está el aparato sobre una superficie inestable que vibra
mucho?
-> Ponga el aparato sobre una superficie estable que no vibre.
No es posible grabar.
• ¿Se ha pulsado CD MD al intentar grabar de una fuente
que no es un disco compacto?
• ¿Se ha colocado un disco pregarabado?
-r Ponga un disco que se pueda grabar.
• ¿Está el disco protegido por la lengüeta de protección de
grabaciones del disco? {-* página 23)
Si no puede encender la unidad
Desconecte el cable eléctrico del tomacorriente de CA, espere
unos segundos y vuelva a conectar el cable eléctrico al
tomacorriente de CA. Pruebe a encender la unidad otra vez.
iñ
111
Q
<
Q
<
K
lil
z
Ul
o
Para reajustar
Si se produce alguna condición extraña en la pantalla o platinas
de casete, reajuste la unidad de la forma siguiente:
1 Pulse POWER para apagar la unidad.
2 Pulse POWER para encender la unidad mientras pulsa ■
Todo lo que haya memorizado después de haber adquirido
el aparato se borrará, y aparecerán las indicaciones de
demostración.
3 Vuelva a pulsar POWER para encender el aparato.
Si no puede apagar la unidad en el paso 1 debido a un mal
funcionamiento, reajuste desconectando el cable eléctrico de CA
y vuelva a conectar. Luego repita el paso 2.
ESPAÑOL 39
Page 80

MENSAJES GUIA DE MINIDiSC
Mensaje
Blank Disc (Disco virgen)
Can't Edit (No se puede
editar)
Protected (Protegido)
Disc Error (Error de disco) El disco está dañado con rayas.
Disc Full (disco lleno) No hay suficiente tiempo remanente en el disco
Temp Over (Temperatura
alta)
Emergency (Emergencia) La unidad funciona mal porque hay rayas en el
PB Disc (Disco pregrabado) Se trata de grabar o editar un disco con música
No hay nada grabado en el disco.
Las canciones son demasiado cortas para ser
unidas
La función de combinación se utilizó mientras se
reproducía la primera canción.
La función de división se utilizó al comienzo de la
canción.
La función de combinación se utilizó para unir una
canción grabada en monoaural con una canción
grabada en estéreo
El disco está protegido contra grabaciones. Deslice la lengüeta de protección contra
Los datos TOC no son los correctos.
para grabar.
La temperatura del aparato está demasiado alta. Deje la unidad en un lugar fresco durante un rato
La temperatura ambiental está demasiado alta o
demasiado baja.
disco 0 el aparato ha recibido un golpe fuerte.
pregrabada (disco óptico).
Causa
Solución
—
Consulte "LIMITACIONES DEL MINIDISCO" en la
página 26.
grabaciones del disco (Consulte la página 23.)
Cambie el disco.
Cambie el disco por otro disco que pueda
grabarse.
antes de volver a utilizarla.
Utilice la unidad con temperaturas moderadas en ia
habitación.
Cambie ei disco. No exponga el aparato a golpes
fuertes.
Cambie por un disco grabable
TOC Full (Indice lleno)
Mecha Err (Error mecánico)
Can't Copy (No puede
copiar)
No Signal (No hay señal)
MD Error (Error de
minidisco)
UTOC Err (Error en índice) Los datos TOC no se registraron correctamente
LONG CD (DISC LARGO)
Flay demasiadas canciones o datos de énfasis y
no puede grabar ni editar, o no queda espacio en
el disco.
Se produce un error en ei mecanismo de carga.
(Se desactivarán todas las funciones del
minidisco.)
La grabación está prohibida por la norma SCMS.
Ei cable de conexión digital (óptico) no está bien
enchufado.
Se produjo un problema en la unidad de
minidiscos.
porque se recibió un goipo fuerte durante ia
grabación de edición TOC o lectura de TOC.
El tiempo de reproducción del disco compacto a
grabar es más largo que el tiempo grabable
remanente en el minidisco.
Borre canciones para reducir el número.
Apague la unidad y desconecte el cable eléctrico
de CA. Vuelva a conectar y encienda la unidad.
Si sigue sin poder sacar un minidisco, consulte con
su concesionario de Aiwa local.
—
Enchufe correctamente.
Compruebe que el equipo conectado está en el
modo de reproducción o que está bien conectado.
Llame a su concesionario de Aiwa.
Cambie el disco.
No e?^ponga e! disco a un golpe fuerte durante la
lectura de TOC o la grabación de TOC.
Cambie el disco. (Pulse nuevamente CD ► MD
para grabar hasta el final del tiempo grabable
remanente.)
40 ESPAÑOL
Page 81

o
0
©
©
(B
©
(fí
lU
o
<
Q
□
<
cc
UJ
z
Ul
<3
Nombre
Página
O IPanitalla
0 ECO.............................................34
CD BLANK SKIP
© CD ► MD/TAPE SYNC
REC.....................................
0 POWER ,
© MULTI JOG
ENTER............................................ 10,11,16,22-25,27-30
TIMER
............................................
DISPLAY
MODE
.............................................
EDIT
...............................................
0 PHONES
O IIISET
TUNING-4^D0WN/^>-UP
0 Ranura de minidisco....................14,20-25
© CD ► MD SYNC REC.....................20-21
TAPE SYNC DUB
® ±mo EJECT..................................14
® Botones de función (fuente).... 8-12,14,16-24,27-31,36
..........................................
■ CLEAR
◄ ►PRESET
• MD REC
•TAPE REC/REC MUTE
............................
......................................
........................................
.....................................
........................................
.................................
...............
.......................................
...........................
................
12
25
6,36
10,11,12,14,16,18-19,22
25,27-30
31,32
21,33
10,11,16,22-25
28-30
7
9,10,12,14,16,22-24,28
6,9,10-20,23-25,39
6,9,10-16
8-9,12-16,18,19,25,27,
28,31-32
22-24
17
16,18-19
Nombre Página
©Q SURROUND
© Disc DiRECT PLAY 1/2/3....... 12,13,18-21
Disc CHANGE
^OPEN/CLOSE.................................12
© Disc DIRECT PLAY 1/2/3....... 12,13,18-21
® SHIFT
©TUNING^^DOWN/^^UP..... 8-9,12-16,18-19,27,28
IISET
■ CLEAR....................................... 15
►/◄►PRESET................................9,10
© POWER
@ 1/CD EDIT/CHECK
2/PGRM
3/RANDOM/REPEAT
4/GEQ
....................................
.............................. 12,21
.............................................. 6,7,9,12-15,18-21,27,31
.................................................
........................................... 31,32
.............................
......................................... 13,15
......................
.................................................
7
32
9,10
12,14,18-19
13,15
7
51
6/T-BASS
7/TIMER.............................................31-32
8/SLEEP
9/CLOCK
O/MONO TUNER
+10/BAND/MODE
® MDTITLE/ENTER................................ 27
@ FUNCTION.......................................... 6
® VOL (A, V)
...........................................
.............................................
............................................
..............................
.............................
...........................................
7
32
31
8
8-9
7
©T-BASS
© ROCK, POP, CLASSiC....................7
.............................................
VOLUME.........................................7
7
ESPAÑOL 41
Page 82

FRANÇAIS I
AVERTISSEMENT
POUR REDUIRE LE RISQUE D'INCENDIE OU DE
DECHARGE ELECTRIQUE, NE PAS EXPOSER CET
APPAREIL A LA PLUIE OU A L’HUMIDITE.
CAUTION
RISK OF ELECTRIC SHOCK
DO NOT OPEN
“CAUTION:TO REDUCE THE RISK OF
ELECTRIC SHOCK,
DO NOT REMOVE COVER (OR BACK).
NO USER-SERVICEABLE PARTS INSIDE.
REFER SERVICING TO QUALIFIED
SERVICE PERSONNEL."
Explication des symboies graphiques:
Le signe de l'éclair fléché dans un triangle
équilatéral est destiné à avertir l'utilisateur de
ia présence d'une "tension dangereuse" non
isolée dans le coffret de l'appareil qui pourrait
être d'une ampleur suffisante pour constituer
un risque de décharge électrique à des
personnes.
Le point d'exclamation dans un triangle
équilatéral est destiné à avertir l'utilisateur de
la présence d'instructions importantes
concernant lefonctionnement et la maintenance
(entretien) dans la documentation
accompagnant l'appareil.
Lisez attentivement et entièrement ce mode d'emploi avant de
faire fonctionner l'appareil. Conservez-le pour toute référence
ultérieure. Tous les avertissements et précautions dans le Mode
d'emploi et sur l'appareil doivent être suivis à la lettre, ainsi que les
suggestions pour la sécurité ci-après.
Installation
1 Eau et humidité - N'utilisez pas cet appareil près de l'eau, par
exemple près d'une baignoire, d'un lavabo, d'une piscine ou
similaire.
2 Chaleur - N'utilisez pas cet appareil près d'une source de
chaleur, comme la sortie d'un appareil de chauffage, un poêle,
ou d'autres appareils générateurs de chaleur. Cet appareil ne
doit pas être soumis à des températures inférieures à 5°C ou
supérieures à 35°C.
3 Surface de montage - Placez cet appareil sur une surface
plate et uniforme.
4 Ventilation - Ménagez un espace suffisant autour de l'appareil
pour assurer une bonne ventilation. Laissez 10 cm à l'arrière et
sur le dessus de l'appareil, et 5 cm de chaque côté.
- Ne placez pas l'appareil sur un lit, un tapis, ou une surface
similaire qui pourrait bloquer les orifices de ventilation.
- N'installez pas l'appareil dans une étagère, une armoire ou un
meuble complètement fermé où l'aération serait insuffisante.
5 Pénétration d'objets et de liquide - Evitez la pénétration de
tout objet ou liquide dans l'appareil par les ouvertures de
ventilation.
6 Chariots et supports-Quand l'appareil
est placé sur un support ou un chariot,
il doit être déplacé avec soin.
Des arrêts brutaux, une force excessive
et des surfaces inégales peuvent
provoquer le renversement ou la chute
de l'appareil.
2 FRANÇAIS
7 Condensation - De l'humidité peut se former sur la lentille de
lecture du CD quand:
- L'appareil est déplacé d'un endroit froid à un endroit chaud.
- Le chauffage vient juste d'être allumé.
- L'appareil est utilisé dans une pièce humide.
- L'appareil est refroidi par un climatiseur.
Quand il y a condensation dans l'appareil, il ne fonctionne pas
normalement. Dans ce cas, laissez l'appareil tel quel quelques
heures avant d'essayer à nouveau de le faire fonctionner.
8 Montage mural ou au plafond - Cet appareil ne doit pas être
monté au mur ou au plafond, sauf indication contraire dans le
Mode d'emploi.
Alimentation
1 Sources d'alimentation - Raccordez cet appareil à une des
sources électriques spécifiées dans le Mode d'emploi, et
comme indiqué sur l'appareil.
2 Polarisation - Comme caractéristique de sécurité, certains
appareils sont pourvus de fiches secteur polarisées pouvant
s'insérer seuiementdans un sens dans une prised'alimentation.
S'il est difficile ou impossible d'insérer une fiche secteur dans
une prise, tournez-la et essayez à nouveau. Si l'insertion dans
la prise reste difficile, demandez à un technicien de service
qualifié de réparer ou de remplacer la prise. N'essayez pas
d'insérer de force la fiche polarisée dans la prise; sa
caractéristique de sécurité serait ruinée.
3 Cordon d'alimentation secteur
- En déconnectant le cordon d'alimentation secteur, saisissez
la fiche. Ne tirez pas sur le cordon lui-même.
- Ne saisissez jamais la fiche d'alimentation secteur avec des
mains mouillées, cela pourrait provoquer un incendie ou une
décharge électrique.
- Les cordons d'alimentation doivent être acheminés de manière
à éviter qu'ils soient pliés, pincés ou piétinés. Faites très
attention au cordon allant de l'appareil à la prised'alimentation.
- Evitez de surcharger les prises d'alimentation et les rallonges,
cela pourrait provoquer un incendie ou une décharge
électrique.
4 Rallonge - Pour éviter toute décharge électrique, n'utilisez
une fiche d'alimentation polarisée avec une rallonge, une prise
ou une autre sortie que si la fiche polarisée peut être insérée
complètement en ne laissant aucune lame exposée.
5 Quand l'appareil n'est pas utilisé - Débranchez le cordon
d'alimentation de la prise secteur si l'appareil doit rester inutilisé
pendant plusieurs mois ou plus. Quand le cordon est inséré, un
peu de courant passe dans l'appareil même quand l'alimentation
est coupée.
Antenne extérieure
1 Lignes d'alimentation - A la connexion à une antenne
extérieure, vérifiez qu'elle est éloignée des lignesd'alimentation.
2 Mise à la masse de l'antenne extérieure - Vérifiez que le
système d'antenne est correctement mis à la masse pour
assurer une protection efficace contre les surtensions imprévues
ou l'accumulation d'électricité statique. L'Article 810 du Code
national de l'électricité (NEC, Etats-Unis), ANSI/NFPA 70,
fournit des informations sur la mise à la masse correcte du mât,
de la structure de soutien et du fil de descente d'antenne à
l'unité de décharge d'antenne, ainsi que sur la taille de l'unité
de mise à la masse, la connexion aux bornes de mise à la
masse et les exigences pour les bornes de mise à la masse.
Mise à ia terre d'une antenne selon le code national
d’électrlclté(NEC)
IL DE DESCENTE D'ANTENNE
UNITE DE DECHARGE
D'ANTENNE
(NEC SECTION 810-20)
CONDUCTEURS DE
MISE A LA TERRE
(NEC SECTION 810-21)
COLLIERS DE MISE A LA TERRE
ELECTRODE DE MISE A LA TERRE DE
LA LIGNE D'AMENEE DE COURANT
NEC: CODE NATIONAL D’ELECTRICITE
(NEC ARTICLE 250 PARTIE H)
Page 83

Entretien
Nettoyez l'appareil seulement comme indiqué dans ce Mode
d'emplci.
Dommages exigeant une réparation
'•aites réparer l'appareil par un réparateur qualifié si:
Le cordon ou la prise d'alimentation sont endommagés.
■ Un matériau étranger ou du liquide a pénétré dans l'appareil.
■■ L'appareii a été exposé à la pluie ou à l'eau.
L'appareil ne semble pas fonctionner correctement.
L'appareil présente un changement de performance important.
L'appareil est tombé, ou le coffret a été endommagé.
'M'ESSAYEZ PAS DE REPARER L'APPAREIL VOUS-MEME.
Enregistrement du propriétaire
Pour la commodité, inscrivez le numéro du modèle et le numéro
de série (marqués à l'arrière de l'appareil) dans l'espace cidessous. Veuillez les indiquer quand vous contactez un revendeur
.Aiwa en cas de problème.
N” des modèle № de série (№ de lot)
CX-NH330MDU
SX-V/NH330
PRECAUTIONS........................................................................2
PREPARATIFS
RACCORDEMENTS.................................................................4
TELECOMMANDE....................................................................6
AVANT LA MISE EN SERVICE
SON
_________________________________________
REGLAGES AUDIO..................................................................7
RECEPTION RADIO
ACCORD MANUEL...................................................................8
PRE REGLAGE DE STATIONS...............................................9
LECTURE DE CASSETTE
OPERATIONS DE BASE........................................................10
LECTURE CONTINUE.......................................................... 11
LECTURE DE CD
OPERATIONS DE BASE....................................................... 12
LECTURE ALEATOIRE/REPETEE....................................... 13
LECTURE PROGRAMMEE................................................... 13
LECTURE DE MD
OPERATIONS DE BASE....................................................... 14
LECTURE ALEATOIRE/REPETEE....................................... 15
LECTURE PROGRAMMEE................................................... 15
ENREGISTREMENT SUR CASSETTE
ENREGISTREMENT DE BASE
COPIE DE TOUTE UNE CASSETTE.................................... 17
ENREGISTREMENT AVEC MONTAGE Al........................... 18
ENREGISTREMENT D'UN MONTAGE
PROGRAMME
ENREGISTREMENT SUR UN MD
ENREGISTREMENT DE TOUT UN CD................................ 20
ENREGISTREMENT D'UNE SEULE PISTE
ENREGISTREMENT AUTOMATIQUE DES
PREMIERES PISTES DE CD
ENREGISTREMENT PROGRAMME DE CD
ENREGISTREMENT DE TROIS CD EN CONTINU
ENREGISTREMENT DEPUIS UNE BANDE, LA RADIO
OU UN APPAREIL RACCORDE.......................................23
________________________________
...............................................
____________________________
_______________________
______________________________
______________________________
______________
............................................
.................................................................
_________________
.........................
..........................................
........................
..............
16
19
20
21
21
22
ENREGISTREMENT PROLONGE.........................................24
ENREGISTREMENT SIMULTANE SUR CASSETTE ET
MD DEPUIS UN CD...................................................... 25
QU'EST-CE QU'UN MINIDISQUE?.............................................26
6
MONTAGE DE MD
CONSIGNATION DE TITRES DE DISQUES ET DE
PISTES.......................................................................
DIVISION D'UNE PISTE..................................................
COMBINAISON DE DEUX PISTES.................................
CHANGEMENT DE L'ORDRE DES PISTES
EFFACEMENT DE PISTES.............................................
..................
27
28
29
29
30
HORLOGE ET MINUTERIE
REGLAGE DE L'HORLOGE..................................................
REGLAGE DE LA LECTURE ET DE
L'ENREGISTREMENT TEMPORISES.............................31
MINUTERIE DE SOMMEIL
..................................................
31
32
AUTRES INFORMATIONS
INFORMATIONS AFFICHEES...............................................33
AJUSTEMENT DE LA LUMINOSITE DE L'AFFICHEUR
(DIMMER)..........................................................................34
REGLAGE DU MODE ECONOMIE D'ENERGIE
...................
34
AUTRES RACCORDEMENTS
RACCORDEMENT D'UN APPAREIL EN OPTION .
ECOUTE DE SOURCES EXTERNES...........................
35
36
GENERALITES
ENTRETIEN ET MAINTENANCE .
SPECIFICATIONS.............................
GUIDE DE DEPANNAGE
MESSAGES GUIDES MD
NOMENCLATURE..................................................................41
.................
.................
37
38
39
40
FRANÇAIS 3
Page 84

PREPARATIFS
ENTS
Vérifiez ia présence des accessoires.
O 0
O O
O , O
Télécommande
Mode d’emploi, etc.
Avant de raccorder ie cordon d'aiimentation secteur
La tension nominale de l'appareil indiquée sur le panneau arrière
est de 120 V c.a. Vérifiez qu'elle correspond à la tension secteur
locale.
iMPORTANT
• Raccordez d'abord les enceintes, les antennes et tous les autres
appareils en option, puis le cordon d'alimentation secteur en
dernier.
• Il n'y a pas de différence entre les enceintes avant. Elles peuvent
être raccordées indifféremment aux prises L (gauche) et R
(droite).
Antenne-cadre AM
1 Raccordez les enceintes droite et gauche à
l'appareil.
.1 Raccordez le cordon d’antenne droit avec des câbles torsadés
aux bornes SPEAKERS LOW FREQ R, et le gauche aux
bornes SPEAKERS LOW FREQ L.
Le cordon d'enceinte à rayure blanche doit être raccordé à la
borne O et le noir à la borne ©.
'i Raccordez le cordon de l’enceinte droite avec fiche à broches
RCA à la borne SPEAKERS HIGH FREQ R, et celui de
l'enceinte gauche aux bornes SPEAKERS HIGH FREQ L.
4 FRANÇAIS
1
torsadés
Cordon d’alimentation secteur
Page 85

Raccordez les antennes fournies.
Raccordez l'antenne FM aux bornes FM 75 O et l'antenne
AM aux bornes AM LOOP.
Antenne-cadre AM
Antenne FM
3 Raccordez le cordon d'alimentation secteur à une
prise secteur.
Pour positionner les antennes
Antenne FM:
Etendez cette antenne horizontalement en forme de T et fixez
son extrémité au mur.
Antenne-cadre AM:
Positionnez-la de manière à obtenir la meilleure réception
possible.
Pour fixer l'antenne-cadre AM sur une surface
Fixez 'ergot dans la fente.
RACCORDEMENT D'UNE ANTENNE
EXTERIEURE
L'emploi d'une antenne extérieure est recommandé pour
améliorer la réception.
Raccordez l'antenne extérieure aux bornes FM 75 Q.
Pour raccorder un autre appareil en option -» page 35.
w
OC
t
t'ilL
«
m
REMARQUE
Raccordez correctement les cordons d'antenne. Des
raccordements incorrects peuvent provoquer des courts-circuits
aux bornes SPEAKERS LOW FREQ.
’ Ne laissez pas des objets à fort magnétisme près des enceintes,
ils pourraient être endommagés.
' N'approchez pas l'antenne FM d'objets métalliques ou de
tringles de rideaux.
' N'approchez pas l'antenne-cadre AM d'un autre appareil, de ia
chaîne stéréo elle-même, du cordon d'alimentation secteur ou
des cordons d'enceinte, car elle pourrait ramasser du bruit.
' Ne déroulez pas le fil de l'antenne-cadre AM.
FRANÇAIS 5
Page 86

TELECOM
Insertion des piles
Détachez le couvercle du logement des piles au dos de la
télécommande et Insérez deux piles R6 (format AA).
1
AVANT LA MISE EN SERVICE
POWER
Témoin
U
La portée maximale de la télécommande, à savoir la distance
entre la télécommande et le capteur de l'appareil, est d'environ
5 mètres. Remplacez les piles quand la portée diminue.
Utilisation de la télécommande
• Les touches de la télécommande de même nom que celles sur
l'appareil peuvent être utilisées à leur place. Certaines
opérations se tont à la tels à l'appareil et avec la télécommande,
et d'autres seulement avec la télécommande.
Usez les Indloatlons de ce manuel pour chaque opération et
les touches utilisables.
• Certaines touches sur la télécommande ont deux fonctions.
Pressez simplement la touche pour utiliser la fonction indiquée
dessus. Pressez la touche en maintenant SHIFT enfoncé pour
utiliser la fonction sur la plaque au-dessus ou au-dessous de
la touche.
SHIFT
Pour mettre sous tension
Appuyez sur POWER.
Pour mettre hors tension
Appuyez à nouveau sur POWER.
Si l'appareil est mis hors tension après ie régiage de i'horloge
Le témoin rouge sous l'interrupteur d'alimentation s'allume pour
indiquer que l'appareil est alimenté. Rien n'apparaît sur l'afficheur
(réglage à l'achat de l'appareil).
Pour éteindre l'éclairage du logement de CD
Pressez la touche ■ en maintenant la touche CD enfoncée.
Répétez cette opération pour rétablir l'éclairage.
Pour éteindre l'éclairage du logement de MD
Pressez la touche
Répétez cette opération pour rétablir l'éclairage.
REMARQUE
A l'achat de l'appareil, le mode économie d'énergie est activé
(ON).
Si la cassette, le CD et le MD sont arrêtés et qu'il n'y a d'entrée
audio d’aucun appareil extérieur pendant 10 minutes,
l'alimentation se coupe. Voir la page 34 pour la désactivation
du mode économie d'énergie.
I
en maintenant la touche MD enfoncée.
Pour utiliser FUNCTION sur la télécommande
FUNCTION remplace les touches de fonction (TAPE (1, 2),
TUNER (FM, AM), AUX, D-IN, CD, MD) sur l'appareil.
Chaque pression de FUNCTION sélectionne cyoiiquement la
fonction suivante. Quand des cassettes sont insérées dans les
deux platines, les deux platines peuvent être sélectionnées avec
FUNCTION.
REMARQU
‘ Si la télécommande doit rester Inutilisée pendant une période
prolongée, retIrez-en les piles pour éviter tout risque de fuite
d’électrolyte.
' La télécommande peut ne pas fonctionner correctement quand:
- La ligne de vision entre la télécommande et le capteur sur
l'afficheur est exposée à une lumière intense, par exemple
en plein soleil.
- D'autres télécommandes sont utilisées à proximité
(télécommande de téléviseur, etc.).
6 FRANÇAIS
AFFICHAGE DE DEMONSTRATION DE L'AFFICHEUR
A la première insertion du cordon d'alimentation dans une prise
secteur après l'achat, un affichage de démonstration apparaîtra
sur l'afficheur. A la mise sous tension, l'affichage de démonstration
s'arrêtera. Il réapparaîtra à la mise hors tension. Il apparaîtra à
chaque mise hors tension tant que l'horloge ne sera pas réglée.
Quand l'horloge est réglée
Normalement, l'affichage de démonstration n'apparaîtra pas.
Si est pressé quand l’appareil est hors tension, l'affichage
de démonstration apparaîtra. Pressez pour arrêter
l'affichage de démonstration. (Voir la page 31 pour le réglage de
l'horloge.)
Après la mise sous tension
L'affichage du niveau de la source et du volume clignote pendant
4 secondes à la mise sous tension de l'appareil.
L'appareil est inopérable pendant ce temps.
Page 87

T-BASS
SON
■GEQ
■ T-BASS
SYSTEME Q SURROUND
Le système Q SURROUND intégré à cet appareil utilise
uniquement deux enceintes à droite et à gauche pour créer une
atmosphère qui vous donne l'impression d'être entouré de deux
enceintes avant et deux enceintes arrière.
Appuyez sur Q SURROUND sur l'appareil pour allumer "Q
SURROUND" sur l'afficheur.
w
U
cc
g
U
cc
CL
VOL
SHIFT
QSURROUND■
VOLUME
----------
ROCK/POP/CLASSiC
VOLUME
Tourncîz VOLUME sur l'appareil, ou bien appuyez sur VOL sur la télécommande.
Le niveau du volume s'affiche sous forme de nombre entre 0 et
49, suivi de MAX.
Le niveau du volume est automatiquement réglé à 20 à la mise
hors tension, quand il est réglé à 21 ou plus.
SYSTEME SUPER T-BASS
Le système T-BASS augmente le réalisme du son de basses
fréquences.
Appuyez sur T-BASS.
A chaque pression, le niveau change. Sélectionnez l'un des trois
niveaux, ou la position hors service (OFF) selon vos préférences.
r
1
WWww,
Affiché pendant 4 secondes.
Q
.
S U h! ÜÏ -!
S'allume.
Pour annuler l'effet Q SURROUND
Appuyez à nouveau sur Q SURROUND.
REMARQUE
Le système Q SURROUND ne fonctionne pas en mode
monaural.
Le réglage de T-BASS, de l'égaliseur graphique et de Q
SURROUND est sans effet sur l'enregistrement sur cassette
ou sur MD.
EGALISEUR GRAPHIQUE
Cet appareil offre trois différents types de courbe d'égalisation.
ROCK: Son puissant avec aigu et grave accentués
POP: Plus grande présence des voix et du registre medium
CLASSIC: Son enrichi avec grave puissant et aigu subtil
Appuyez sur ROCK, POP ou CLASSIC.
Le mode d'égalisation sélectionné est affiché pendant 4
secondes.
S'allume. Affiché pendant 4 secondes.
O
M
(OFF)
Ml
Pour sélectionner avec la télécommande
Appuyez sur T-BASS en maintenant SHIFT enfoncé.
REMARQUE
Le son de basses fréquences peut être déformé quand le système
T-BASS est utilisé pour un disque ou une cassette à sons de
basses fréquences amplifiés à l'origine. Dans ce cas, annulez le
système T-BASS.
F: U CK
Pour annuler le mode sélectionné
Appuyez à nouveau sur la touche sélectionnée. "GEQ OFF"
s'affiche pendant 4 secondes.
Pour sélectionner avec la télécommande
Appuyez plusieurs fois sur GEQ en maintenant SHIFT enfoncé.
Le mode GEQ s'affiche cycliquement comme suit.
ROCK
Utilisation d'écouteurs
Raccordez les écouteurs à fiche standard stéréo (06,3 mm) à la
prise
Aucun son ne sort des enceintes quand des écouteurs sont
raccordés.
Ajustement du son pendant l'enregistrement
Le volume et la tonalité de sortie des enceintes ou des écouteurs
peuvent être ajustés sans aucun effet sur l'enregistremient.
PHONES.
POP CLASSIC GEO OFF
(annulé)
FRANÇAIS 7
Page 88

RECEPTION RADIO
SYSTEME MULTI-AMPLIFICATEUR
Renforce les fréquences ultra-basses. Outre l'amplificateur deux
canaux gauche/drolte utilisé pour produire des fréquences
moyenne à haute, ce système Incorpore un second amplificateur
2 canaux L/R uniquement pour la reproduction des fréquences
ultra-basses, ce qui en fait en réalité un système à 4
amplificateurs. L'emploi d'amplificateurs discrets pour les
fréquences moyennes à hautes permet d'éliminer virtuellement
toute distorsion et de réaliser une reproduction sonore de haute
qualité.
SYSTEME DE HAUT-PARLEUR D'EXTREME
GRAVE INTEGRE
Le système de haut-parleur d'extrême grave intégré a une zone
cavité de haut-parleur d'extrême grave séparée qui fait partie de
la structure du coffret du haut-parleur, et agit oomme filtre sonique
pour couper les composants déformés. (Dans le système Multiamplificateur, les signaux de fréquences ultra-basses transmis
par leur amplificateur indépendant sont reproduits dans cette
zone.) Cette construction séparée prooure une définition nette
et riche à la reproduction des sons graves et réalise des signaux
de fréquences moyennes à hautes clairs et bien définis. Le
système de haut-parleur d'extrême grave intégré d'AIWA
incorpore un haut-parleur d'extrême grave capable de produire
des graves suffisamment puissants avec une véritable séparation
stéréo.
Haut-parleur de
moyennes à hautes
Enceinte droite
fréquences
ACCORD MAN
MONO
TUNER
BAND
1 Appuyez plusieurs fois sur TUNER BAND pour
sélectionner ia bande souhaitée.
FM AM
J
2 Appuyez sur ◄◄ ou ►► pour sélectionner une
station.
A chaque pression, la fréquence change.
Au captage d'une station, "TUNE" s'affiche.
Pendant la réception stéréo FM, ((i®il) s'affiche.
FM 'ТинР
Recherche rapide d'une station (Recherche
automatique)
Maintenez la touche ◄◄ ou ►► pressée jusqu'à ce que le tuner
commence à chercher une station. Après l'accord d'une station,
la recherche s'arrête. Pour arrêter manuellement la recherche
automatique, appuyez sur la touche ◄◄ ou
• La recherche automatique peut ne pas s'arrêter à des stations
à signaux très faibles.
Quand un programme FM stéréo contient du bruit
Appuyez plusieurs fois sur MONOTUNER sur la télécommande
en maintenant SHIFT enfoncé de sorte que "MONO" s'allume
dans l'afficheur.
Le bruit est réduit, mais la réception est monaurale.
Pour revenir en réception stéréo, appuyez sur cette touche
jusqu'à ce que "MONO" disparaisse.
Modification de l'intervalle d'accord AM
Le réglage par défaut de l'intervalle d'accord AM est 10 kHz/
pas. Modifiez i'intervaile d'accord pour utiliser cet appareil dans
une 2one où !o système d'affoetation des tt'équenee est de 0
kHz/pas.
Appuyez sur POWER en maintenant enfoncé.
Répéter cette procédure pour revenir à l'ancien pas.
REMARQUE
Toutes les stations préréglées sont supprimées au changement
d'intervalle d'accord AM. Le préréglage doit être refait.
8 FRANÇAIS
Page 89

1
2
, . _ —Touches
; numériques
^ ' BAND
O'
Get appareil peut mémoriser un total de 32 stations préréglées.
Chaque station mémorisée est dotée d'un numéro de préréglage.
Utilisez ce numéro pour accorder directement une station
préréglée.
1 Appuyez surTUNER BAND pour sélectionner une
bande, puis sur ◄◄ ou ►► pour sélectionner
une station.
2 Appuyez sur II pour mémoriser une station.
Un numéro de préréglage est attribué à chaque station sur
chaque bande, par ordre consécutif commençant par 1.
Numéro de préréglage
ACCORD D'UNE STATION PREREGLEE
7 Appuyez surTUNER BAND pour sélectionner une
bande.
2 Appuyez sur ou tournez MULTI JOG.
Chaque pression de la touche sélectionnera le numéro de
préréglage ascendant suivant.
Accord par numéro de préréglage
1 Appuyez sur BAND sur la télécommande en maintenant
SHIFT pressé pour sélectionner une bande. (Ou bien utilisez
TUNER BAND sur l'appareil.)
2 Appuyez sur les touches numériques de la télécommande
pour sélectionner un numéro de prérégiage.
Exemple;
Appuyez sur les touches +10 et 0 pour sélectionner le numéro
de préréglage 10.
Appuyez sur les touches +10 et 5 pour sélectionner le numéro
de préréglage 15.
Suppression d'une station prérégiée
Sélectionnez le numéro de préréglage de la station à supprimer.
Puis, appuyez sur ■ et pressez II dans les 4 secondes.
Les numéros de préréglage de toutes les autres stations de cette
bande de numéro plus élevé seront diminués de un.
En cas de panne de courant ou de déconnexion du cordon
d'alimentation de longue durée, les stations préréglées seront
supprimées. Dans ce cas, refaites le préréglage.
Z
O
W
Q
<
X
Z
O
H
a.
ui
U
UJ
K
Fil
'•■A
Fréquence
3 Répétez les étapes 1 et 2.
La station suivante ne sera pas mémorisée si 32 stations ont
déjà été préréglées.
Si vous essayez de prérégler plus de 32 stations, "PRST
PULL" s'affichera.
FRANÇAIS 9
Page 90

LECTURE DE CASSETTE
ML
• Sur la platine 1, les deux faces des cassettes sont toujours
lues.
• Sur la platine 2, vous pouvez sélectionner le mode d'inversion
pour lire une face de la cassette ou les deux.
EB AS E
Platine 2
1 Appuyez surTAPE puis sur ± EJECT pour ouvrir
le logement de cassette.
± EJECT
Pour sélectionner le mode de lecture inverse (platine 2
seuiement)
1 Appuyez plusieurs fois sur MODE jusqu'à ce que "Deck 2
MODE?" s'affiche.
2 Dans les 10 secondes, appuyez sur ENTER, puis tournez
MULTI JOG pour sélectionner le mode inverse.
----
çgi—
fi ra’n
~i ~
Pour lire seulement une face, sélectionnez "1".
Pour lire la face avant et la face arrière une fois, sélectionnez
"Zr.
Pour lire répétitivement les deux faces, sélectionnez "C15".
3 Dans les 10 secondes, appuyez à nouveau sur ENTER.
Quand des cassettes sont chargées dans les deux
platines
Appuyez d'abord sur TAPE DECK 1/2 pour sélectionner une
platine.
Le numéro de la platine sélectionnée s'affiche.
Pour arrêter la lecture, appuyez sur ■.
Pour interrompre temporairement la lecture (platine 2
seulement), appuyez sur II. Pour reprendre la lecture, appuyez
à nouveau.
Pour avancer ou reculer rapidement, appuyez sur ◄◄ ou
Puis appuyez sur ■ pour arrêter la cassette.
Insérez une cassette, le côté exposé dirigé vers le bas. Appuyez
sur le logement de cassette pour le refermer.
2 Appuyez sur pour démarrer la lecture.
Indicateur de face lue
T'FM 0000
Numéro de platine
lectrice
► : La face avant est lue (en avant).
◄ : La face arrière est lue (en arrière).
Types de cassette
Cet appareil est conçu pour la lecture optimale des cassettes de
type I (normal).
REMARQU
Les cassettes de type II sont aussi lisibles sur cet appareil. A la
lecture d'une telle cassette, tournez MULTI JOG pour afficher
"SOFT" sur l'afficheur pour obtenir un son optimum. Mais "SOFT"
sera annulé si l'égaliseur graphique (page 7) est sélectionné, si
l'appareil est commuté à une autre source audio, si le logement
de cassette est ouvert ou si l'appareil est mis hors tension.
Compteur de bande
3
Pour démarrer la lecture quand l'appareil est hors tension (fonction de lecture directe)
Quand une cassette est chargée, appuyez surTAPE DECK 1/2.
L'appareil se met sous tension et la lecture de la cassette insérée
démarre.
Pour régler le compteur de bande à 0000
Appuyez sur ■ en mode d'arrêt.
Le compteur est également remis à 0000 à l'ouverture du
logement de cassette.
1 0 FRANÇAIS
Page 91

ENTER■
1
MULTI JOG ■
MODE ■
1
Après la fin de la lecture dans une platine, la lecture de la cassette
dans l'autre platine continue sans Interruption.
1 Insérez des cassettes dans les platines 1 et 2.
2 Appuyez sur TAPE DECK 1/2 pour sélectionner
la première platine de lecture.
3 Réglez au mode d'inversion "Z5".
1 Appuyez plusieurs fols sur MODE jusqu'à l'affichage de
"Deck 2 MODE?".
2 Dans les 10 secondes, appuyez sur ENTER, puis
sélectionnez "Z.y avec MULTI JOG.
3 Dans les 10 secondes, appuyez à nouveau sur ENTER.
A propos des cassettes
• Pour éviter tout effacement accidentel, briser les
languettes en plastique de la cassette après
l'enregistrement avec un tournevis ou un autre outil pointu.
Languette de la face A
Pour enregistrer à nouveau sur la cassette, couvrir
l'ouverture laissée par la languette avec du ruban adhésif
etc.
' Les cassettes de 120 minutes ou plus ont une bande
extrêmement fine qui se déforme ou s'endomrnage
facilement. Leur emploi n'est pas recommandé.
' Tendez bien la bande avec un crayon ou un autre outil
similaire avant rutilisation. Une bande détendue peut
casser ou s'emmêler dans le mécanisme.
Ul
I
I-
Ul
(/)
(A
<
U
111
Û
111
IC
D
H
ü
Ul
4 Appuyez sur pour démarrer la lecture.
La lecture continue jusqu'à la pression de ■.
FRANÇAIS 1 1
Page 92

LECTURE DE CD
S DE BASE
DISC
DIRECT
PLAY
■ RANDOM/
REPEAT
■ CD EDIT/
CHECK
■ Touches
numérigues
■ SHIFT
CHARGEMENT DE DISQUES
Appuyez sur CD, puis sur é. OPEN/CLOSE pour ouvrir ie
iogement à disques. Chargez un ou des disques,
i'étiquette dirigée vers ie haut.
Pour lire un ou deux disques, placez des disques sur les
plateaux 1 et 2.
Pour lire trois disques, appuyez sur DISC CHANGE pour
tourner les plateaux après l'insertion de deux disques. Placez le
troisième disque sur le plateau 3.
Refermez le logement des disques en appuyant sur ± OPEN/
CLOSE.
Numéro de
plateau à
D disque
Numéro de piste (affiché
Nombre total de pistes jusqu'à la 20'' piste)
Ì0Tr58;i3Ì
Numéro de plateau à disque Temps de lecture total
LECTURE DE DISQUES
Pour lire seulement un disque, appuyez sur DISC DIRECT
PLAY 1-3.
Le disque sélectionné est lu une fois.
Pour arrêter la lecture, appuyez sur ■.
Pour interrompre temporairement la lecture (pause), appuyez
sur II. Appuyez une seconde fois pour la reprendre.
Pour localiser un point particulier pendant la lecture ou en
mode pause, maintenez ◄◄ ou ►► pressé et relâchez au point
souhaité.
Pour sauter au début d'une piste, appuyez plusieurs fois sur
◄◄ ou ou bien tournez MULTI JOG jusqu'à l'affichage de
la piste souhaitée.
Pour retirer un disque, appuyez sur ±, OPEN/CLOSE.
Pour démarrer la lecture quand l'appareil est hors tension
(fonction de lecture directe)
Appuyez sur CD quand un ou des disques sont chargés.
L'appareil est mis sous tension et la lecture du ou des disques
chargés démarre.
L'appareil est également mis sous tension à la pression de ±
OPEN/CLOSE.
Pour contrôler le temps restant
Pendant la lecture d'un CD ou en mode pause, appuyez sur
DISPLAY sur l'appareil ou appuyez sur CD EDIT/CHECK sur la
télécommande en maintenant SHIFT enfoncé. Le temps restant
jusqu'à la fin de toutes les pistes s'affiche. Répétez ces étapes
pour revenir à l'affichage du temps écoulé.
Sélection d'une piste directement avec la télécommande
1 Appuyez sur DISC DIRECT PLAY 1-3 pour sélectionner un
numéro de plateau à disque.
2 Appuyez sur les touches numérotées 0-9 et +10 pour
sélectionner une piste.
Exemple;
Pour sélectionner la piste 25, appuyez deux fois sur +10 puis
5.
Pour sélectionner la piste 10, appuyez sur +10 et 0,
La lecture de la piste sélectionnée démarre et la lecture
continue jusqu'à la fin du disque.
REMARQUE
Si vous appuyez sur +10, appuyez sur la touche numérotée
suivante dans les 4 secondes.
Remplacement des disques pendant la lecture
Il est possible sans interrompre la lecture d'un disque de
remplacer les autres disques sur les plateaux.
1 Appuyez sur DISC CHANGE.
2 Retirez les disques et remplacez-les par d'autres.
3 Appuyez sur ± OPEN/CLOSE pour refermer le logemenf à
disques.
REMARQUES
■ Pour insérer un disque de 8 cm, placez-le sur le cercle interne
du plateau.
- Placez seulement un disque compact sur un plateau.
' N'inclinez pas l'appareil quand des disques sont chargés. Cela
pourrait causer un mauvais fonctionnement.
’ N'utilisez pas de CD de forme irrégulière (exemples; CD en
forme de cœur, othogonal etc.). Cela pourrait causer un mauvais
fonctionnement.
Chargez des disques.
Pour lire tous les disques dans le logement à disques,
appuyez sur
La lecture démarre par le disque sur le plateau 1.
Numéro de la piste en cours en Le numéro de la piste en
lecture
Numéro du plateau du Temps écoulé de la piste
disque en cours de lecture en cours de lecture
cours de lecture clignote.
1 2 FRANÇAIS
SAUT DES ESPACES VIERGES
Les espaces vierges entre les pistes enregistrées sur un CD
peuvent être sautées pendant la lecture.
• Le saut des espaces vierges peut ne pas fonctionner avec
certains CD.
1 Appuyez sur CD BLANK SKIP.
"CD BLANK SKIP ON" passera de droite à gauche sur
l'afficheur et un petit point apparaîtra sur l'afficheur.
Petit point
101:58;; 3i
Page 93

2 Arrêtez la lecture.
Si le son de la dernière partie d'une piste s'atténue
orogressivement (fade-out), cette partie sera également sautée.
Pour revenir en lecture normale
.Appuyez à nouveau sur CD BLANK SKIP, le point sur l'afficheur
disparaîtra.
Désactivez le saut des espaces vierges lors d'une lecture Al EDIT
{page 18), d'un enregistrement PROGRAMMED EDIT (page 19)
ou de l'enregistrement d'une lecture programmée (page 13).
Utilisez la télécommande.
ï Appuyez sur PRGM tout en maintenant SHIFT
enfoncé en mode d'arrêt.
"PRGM" s'allume.
2 Appuyez sur DISC DIRECT PLAY 1-3 pour
sélectionner un disque.
3 Appuyez sur les touches numériques 0-9 et +10
pour programmer une piste.
Exemple;
Utilisez la télécommande.
Lecture RANDOWI
Toutes les pistes du disque sélectionné ou de tous les disques
peuvent être lues de manière aléatoire.
" La lecture aléatoire de pistes programmées est impossible.
Lecture REPEAT
Un disque ou tous les disques peuvent être lus de manière
répétée.
” '\/ous pouvez également répéter des pistes programmées.
Appuyez plusieurs fois sur RANDOM/REPEAT pendant
la pression de SHIFT.
A chaque pression, la fonction sera sélectionnée cycliquement.
Pour sélectionner la piste 25, appuyez deux fois sur +10 puis
sur 5.
Pour sélectionner la piste 10, appuyez sur +10 puis 0.
Numéro de la piste
sélectionnée
Numéro du Numéro de
disque programmation
sélectionné
4 Répétez les étapes 2 et 3 pour programmer
d'autres pistes.
5 Appuyez sur pour démarrer la lecture.
j3 Lecture RANDOM-
Annulé
Jy "RANDOM" s'allume sur l'afficheur.
/2/ "Ci." s'allume sur l'afficheur.
3, "RANDOM” et "Ci." s'allument sur l'afficheur.
Pour lire tous les disques,
lecture.
Pour lire un seul disque,
13.
Les opérations suivantes sont impossibles pendant la lecture
aléatoire:
sélection directe d'une piste aux touches numériques. La lecture
aléatoire serait annulée.
saut à la piste précédemment sélectionnée avec ◄◄ ou MULTI
JOG.
® Lecture RANDOM/REPEAT-
appuyez sur pour démarrer la
appuyez sur
(¿) Lecture REPEAT
DISC DIRECT PLAY 1
□
Pour contrôler un programme
A chaque pression de ◄◄ ou ►► en mode d'arrêt, un numéro
de piste et un numéro de programmation s'afficheront.
Pour annuler un programme
Appuyez sur ■ en mode d'arrêt. Le programme sera également
annulé à l'ouverture du logement à disques.
Pour ajouter des pistes à un programme
Répétez les étapes 2 et 3 en mode d'arrêt. La piste sera
programmée comme dernière piste.
• Si vous essayez de programmer plus de 30 pistes, "PRGM
FULL" s'affichera.
Pour modifier les pistes programmées
L'ordre des pistes programmées ne peut pas être modifié.
Annulez le programme en appuyant sur ■, puis répétez à
nouveau toutes les étapes.
litiV
“PRGM”
;
Nombre total de pistes
programmées
■
Temps de lecture total des
pistes programmées
Û
U
LU
a
LU
c:
3
h
u
Ul
Vous pouvez programmer jusqu'à 30 pistes des disques insérés.
5
Pour lire des pistes programmées de manière répétée
Après la programmation des pistes, appuyez plusieurs fois sur
RANDOM/REPEAT en maintenant SHIFT enfoncé jusqu'à ce
que "'Lt-" apparaisse sur l'afficheur.
liti
• Pendant la lecture programmée, vous ne pouvez pas
sélectionner directement les pistes aux touches numériques.
"Can't USE" s'affichera.
• Dans les cas suivants, le temps de lecture total des pistes
programmées est affiché ce qui signifie que vous ne
pouvez pas contrôler le temps de lecture total des pistes
programmées, mais elles restent mémorisées.
- le temps total de lecture des pistes programmées dépasse 99
minutes 59 secondes.
- vous avez sélectionné une piste à numéro supérieur à 30.
FRANÇAIS 1 3
Page 94

LECTURE DE MD
DE BASE
■ CD EDIT/
CHECK
■PRGM
• RANDOM/
REPEAT
Touches
numérigues
SHIFT
1 Appuyez sur MD.
2 Insérez un disque dans lecteur de disque dans ie
sens de la flèche, l'étiquette dirigée vers le haut.
"TOC READ" s'affiche pendant que l'appareil lit les données
sur le disque inséré, et les informations contenues dans le
disque sont affichées.
Flèche
Affichage en mode d'arrêt
Numéro de piste (affiché
Nombre total de pistes jusqu'à la piste 20)
'11^
3 Appuyez sur
La lecture démarre.
Affichage en mode de lecture
Numéro de la piste lue
■f ... si!” ;■■■; :t "I” ÎÔBS
.1. .si!, s
;■
■...!
O
Temps total de lecture
Le numéro de la piste
lue clignote.
.• ;■ s JMÎjnr;-
■
.........
\i
Temps de lecture écoulé sur la
piste en cours de lecture
Pour arrêter la lecture, appuyez sur ■.
Pour interrompre temporairement la lecture, appuyez sur II.
Pour reprendre la lecture, appuyez à nouveau.
Pour localiser un point particulier pendant la lecture ou en
mode pause, maintenez ◄◄ ou ►► pressé et relâchez la
press on au point souhaité.
Pour sauter au début d'une piste, appuyez plusieurs fois sur
◄◄ ou ►► ou tournez MULTI JOG jusqu'à ce que la piste
souhaitée s'affiche.
Pour éjecter un disque, appuyez sur ^ MD EJECT et retirez
le disque.
Même quand l'appareil est hors tension, il est possible de presser
£ MD EJECT pour éjecter un disque. Alors l'appareil se mettra
sous tension et le disque sera éjecté.
REMARQUE
Ne saisissez pas un disque pendant son éjection, sinon l'insertion
d'un disque sera impossible la fois suivante. Si cela arrive, mettez
l'appareil hors tension et déconnectez le cordon d'alimentation
secteur. Puis rebranchez-le.
Pour démarrer la lecture quand l'appareil est hors tension
(fonction de lecture directe)
Appuyez sur MD quand un disque est chargé. L'appareil se met
sous tension et la lecture du disque inséré démarre.
Pour sélectionner une piste directement avec la
télécommande
Appuyez les touches numérigues 0-9 et +10
E}(emple:
Pour sélectionner la piste 25, appuyez deux fois sur +10 puis
sur 5.
Pour sélectionner la piste 10, appuyez sur +10 puis 0.
REMARQUE
Si vous appuyez sur +10, appuyez sur une touche numérique
dans les 4 secondes.
Pour lire un disque à vitesse double
Maintenez pressé 2 secondes pendant la lecture.
Pour annuler la lecture à vitesse double, appuyez sur
ou ■.
contrôler le temps de lecture restant
Pour
ant la lecture d'un MD ou en mode pause, appuyez sur
Pend.
LAY sur l'appareil, ou bien sur CD EDIT/CHECK sur la
DISP
mmande en maintenant SHIFT enfoncé. Le temps restant
téléco
à la fin de la lecture de toutes les pistes s'affiche,
jusqu
temps restant n'est pas affiché pendant la lecture aléatoire
• Le
programmée.
ou
contrôler le titre d'une piste
Pour
ant la lecture d'un MD ou en mode pause, appuyez sur
Pend
LAY sur l'appareil. Le titre de la piste en cours de lecture
DISP
he. Si aucun titre n'est enregistré, le numéro de piste
s'affic!
he. Pour revenir à l'affichage du temps de lecture, appuyez
s'affici
urs fois sur DISPLAY.
plusiei
Pour
contrôler le titre d'un disque
ode d'arrêt, appuyez sur DISPLAY sur l'appareil. Le titre
En m
du disque s'affiche. Si aucun titre n'est enregistré, "No Title"
s'affiche. Pour revenir à l'affichage du temps de lecture total,
appuyez à nouveau sur DISPLAY.
REMARQUE
• N'essayez pas d'insérer un MD quand l'appareil est hors tension.
Cela pourrait causer un mauvais fonctionnement.
■ Seul un disque MD peut être inséré dans le lecteur de disque.
Sinon le disque pourrait être rayé, causant un mauvais
fonctionnement ou un problème de sécurité tel que décharge
électrique.
- N'essayez pas d'insérer un MD alors qu'un autre MD est déjà
en filace dans le lecteur.
• N'inclinez pas l'appareil quand un disque est inséré. Cela
pourrait causer un mauvais fonctionnement.
1 4 FRANÇAIS
Page 95

Utilisez la téiécommande.
Lecture RANDOM
Toutes les pistes du disque inséré peuvent être lues de manière
aléatoire.
• La lecture aléatoire de pistes programmées est impossible.
Lecture REPEAT
Toutes les pistes du disque inséré peuvent être lues de manière
répétée.
• Vous pouvez également répéter des pistes programmées.
Appuyez plusieurs fois sur RANDOM/REPEAT pendant
la pression de SHIFT.
A chaque pression, la fonction sera sélectionnée cycliquement.
•- Ci) Lecture RANDOM—► ® Lecture REPEAT
[
- Annulé — (3) Lecture RANDOM/REPEAT —
Cf) "RANDOM" s'allume sur l'afficheur.
C?) "OL" s'allume sur l'afficheur.
)3; "RANDOM" et "C>." s'allument sur l'afficheur.
“RANDOM”
□
Utilisez la télécommande.
1 Appuyez sur PRGM tout en maintenant SHIFT
enfoncé en mode d'arrêt.
"PRGM" s'allume.
“PRGM”
........
i"1 i'"i
2 Appuyez sur les touches numériques 0-9 et +10
pour programmer une piste.
Exemple:
Pour sélectionner la piste 25, appuyez deux fois sur +10 puis
sur 5.
Pour sélectionner la piste 10, appuyez sur +10 puis 0.
Numéro de la piste
sélectionnée
Numéro de programmation
Nombre total de pistes
programmées
1
■:r
Temps de lecture total
des pistes programmées
.................
È à2lT7cl 2--:
Q
S
ui
O
111
K
3
H
U
U1
■ : ... !...^ : ::
Les opérations suivantes sont impossibles pendant la lecture
aléatoire:
- sélection direote d'une piste aux touches numériques. La lecture
aléatoire serait annulée.
- saut cà la piste précédemment sélectionnée avec ◄◄ ou MULTI
JOG.
Vous pouvez programmer jusqu'à 30 pistes des disques insérés.
2
4
3 Répétez l'étape 2 pour programmer d'autres
pistes.
4 Appuyez sur pour démarrer la lecture.
Pour contrôler un programme
A chaque pression de ou ►► en mode d'arrêt, un numéro
de piste et un numéro de programmation s'afficheront.
Pour annuler un programme
Appuyez sur ■ en mode d'arrêt. Le programme sera également
annulé au retrait du disque.
Pour ajouter des pistes à un programme
Répétez l'étape 2 en mode d'arrêt. La piste sera programmée
comme dernière piste.
• Si vous essayez de programmer plus de 30 pistes, "PRGM
FULL" s'affichera.
Pour modifier les pistes programmées
L'ordre des pistes programmées ne peut pas être modifié.
Annulez le programme en appuyant sur ■, puis répétez à
nouveau toutes les étapes.
Pendant la lecture programmée, vous ne pouvez pas sélectionner
directement les pistes aux touches numériques. "Can't USE"
s'affichera.
FRANÇAIS 1 5
Page 96

ENREGISTREMENT SUR CASSETTE
Cette section explique comment enregistrer depuis une cassette,
le tuner, le lecteur de CD, le lecteur de MD ou un appareil
extérieur.
MODE
Préparatifs
Utilisez uniquement une cassette de type I (normal).
1 Insérez une cassette à enregistrer dans la platine
2.
Insérer la cassette avec la face à enregistrer dirigée vers
l'extérieur.
• Faites défiler la bande jusqu'à l'emplacement où
l'enregistrement doit commencer avec ◄►, ◄◄ ou
puis arrêtez la bande avec H.
4 Appuyez sur • TAPE REC/REC MUTE pour
démarrer l'enregistrement.
Quand la fonction sélectionnée est CD ou MD, la lecture et
l'enregistrement démarrent simultanément.
Pour enregistrer depuis une source raccordée, démarrez la
lecture de la source.
Pour arrêter l'enregistrement, appuyez sur ■.
A l'enregistrement depuis un CD ou un MD, appuyez à nouveau
sur ■ pour arrêter la lecture du CD ou MD.
Pour interrompre temporairement i'enregistrement, appuyez
sur II. (Applicable quand la source est TUNER ou AUX/D-IN.)
Pour reprendre l'enregistrement, appuyez à nouveau.
Ajustement sonore pendant l'enregistrement
Le volume de sortie et la qualité sonore aux enceintes ou
écouteurs peuvent être ajustés sans affecter l'enregistrement.
Le réglage de T-BASS, de l'égaliseur graphique ou de Q
SURROUND est sans effet sur l'enregistrement.
Pour enregistrer des pistes souhaitées d'un CD ou MD
Sélectionnez les pistes à enregistrer par lecture programmée
(page 13, 15), et démarrez l'enregistrement.
Dans ce cas, réglez la fonction saut des espaces vierges à OFF
(page 12).
INSERTION D'ESPACES VIERGES
2 Sélectionnez le mode d'inversion en utilisant
MODE, ENTER et MULTI JOG (page 10).
Pour enregistrer sur une seule face, sélectionnez "X".
Pour enregistrer sur les deux faces, sélectionnez "T5" ou
"CD".
A l'enregistrement depuis une cassette, le mode d'inversion
est automatiquement réglé à "Z". Notez que l'enregistrement
se fera seulement sur une face de la cassette.
• A l'enregistrement sur la face arrière, la cassette s'arrête à
la fin de l'enregistrement sur la face arrière, même si le mode
d'inversion est réglé à "D" ou "CD".
3 Appuyez sur les touches de fonction et préparez
la source à enregistrer.
Pour enregistrer depuis une cassette, insérez la cassette
dans la platine 1, et appuyez sur TAPE DECK 1 /2 pour afficher
"TPI". Réglez la bande à l'emplacement où l'enregistrement
doit commencer avec ■« ou ►►, et arrêtez la bande
avec ■.
Pour enregistrer depuis un CD, appuyez sur CD et chargez
le ou les CD. Puis, sélectionnez la piste à enregistrer d'abord
avec ◄◄, ►► ou MULTI JOG.
Pour enregistrer depuis MD, appuyez sur MD et insérez un
MD. Puis, sélectionnez la piste à enregistrer d'abord avec
ou MULTi JOG.
Pour enregistrer une émission de radio, appuyez sur
TUNER BAND et accordez une station.
Pour enregistrer depuis une source raccordée:
• Pour enregistrer depuis un appareil de source raccordé aux
prises DIGITAL IN à l'arrière, appuyez plusieurs fois sur AUX/
D-IN jusqu'à ce que "D-IN" s’affiche. (L'enregistrement se
fait en numérique.)
• Pour enregistrer depuis un appareil de source raccordé aux
prises VIDEO/AUX à l'arrière, appuyez plusieurs fois sur
AUX/D-IN jusqu'à ce que "AUX" s'affiche.
1 6 FRANÇAIS
Des espaces vierges de 4 secondes peuvent être insérés aux
emplacements souhaités pendant l'enregistrement. (Applicable
quand la source est TUNER ou AUX/D-IN.)
1 Appuyez sur • TAPE REC/REC MUTE pendant
l'enregistrement ou en mode pause d'enregistrement.
"fciMdJîldü" clignote sur l'afficheur pendant 4 secondes et la
bande défile sans enregistrement. Au bout de 4 secondes, la
platine passe en mode pause d'enregistrement.
2 Appuyez sur II pour reprendre l'enregistrement.
Pour insérer un espace vierge de moins de 4 secondes,
appuyez à nouveau sur • TAPE REC/REC MUTE pendant le
clignotement de "fcfeTd Jtfga".
Pour insérer un espace vierge de plus de 4 secondes, après
le passage en mode pause d'enregistrement de la platine,
appuyez à nouveau sur • TAPE REC/REC MUTE. Chaque
pression de la touche ajoutera un espace vierge de 4 secondes.
EFFACEMENT D'UN ENREGISTREMENT
1 Insérez la cassette à effacer dans la platine 2. 2 Appuyez sur TAPE pour afficher "TP2" sur l'afficheur. 3 Réglez la cassette à l'emplacement où l'effacement doit
commencer avec ◄◄ ou et arrêtez la bande
avec ■.
4 Appuyez sur • TAPE REC/REC MUTE pour arrêter
l'effacement.
Page 97

Cette fonction vous permet de faire des copies parfaites de la
cassette originale.
' Utilisez uniquement des cassettes de type I (normal).
' Préparez une cassette de la même longueur que la cassette
originale, ou plus longue.
' La copie ne commencera pas depuis un emplacement au milieu
de la bande.
3 Appuyez sur TAPE SYNC DUB pour démarrer
l'enregistrement.
• Le mode d'inversion est automatiquement réglé à "T)"
(enregistrement sur les deux faces).
• Pendant l'enregistrement, toutes les touches autres que H
sont invalidées.
j: l-iG
Les cassettes sont rebobinées jusqu'au début de la face avant,
et l'enregistrement démarre.
Pour arrêter la copie
Appuyez sur ■.
LU
I
H
111
w
tf)
<
U
te
3
tf)
t
z
111
s
111
cc
h"
M
ô
111
DC
Z
111
1 Appuyez sur TAPE.
2 Insérez la cassette originale dans la platine 1 et
la cassette à enregistrer dans la platine 2.
Cassette de lecture l'enregistrement
Insérez chaque cassette avec la face à lire ou à enregistrer vers
l'extérieur.
Cassette pour
Platine 2
FRANÇAIS 1 7
Page 98

MULTI
JOG
DISC
DIRECT
PLAY
Appuyez sur les touches numériques 0-9 sur la
télécommande pour désigner la longueur de la
cassette.
10 à 99 minutes peuvent être spécifiées.
Exemple: A l'emploi d'une cassette de 60 minutes, appuyez
sur 6 et 0. En quelques secondes, le micro-ordinateur
programme les pistes à enregistrer sur chaque face de la
cassette.
• ◄◄ et ou MULTI JOG sur l'appareil peuvent aussi
être utilisés pour désigner la longueur de la cassette.
Longueur de
la cassette
Bande face A Pistes programmées
(avant) pour la face A
SHIFT
La fonction montage Al permet l'enregistrement d'un CD sans
avoir à s'inquiéter de la longueur de la bande et de la longueur
des pistes. Quand un CD est inséré, l'appareil calcule
automatiquement la longueur totale des pistes. Si nécessaire,
l'ordre des pistes est réorganisé de sorte qu'aucune piste ne
soit coupée.
(Al; Intelligence artificielle)
REMARQU
• Utilisez uniquement des cassettes de type I (normal).
• L'enregistrement en montage Al ne commencera pas en milieu
de cassette. La cassette doit être enregistrée depuis le début
d'une face.
• Réglez la fonction lecture avec saut des espaces vierges à
OFF (page 12).
1 Insérez la cassette dans la platine 2.
Insérez la cassette avec la face à enregisfrer en premier vers
l'exférieur.
2 Appuyez sur CD et chargez un ou des CD.
3 Appuyez une fois sur CD EDIT/CHECK sur la
télécommande tout en pressant SHIFT.
"Al" s'affiche.
f;
......
H I
V.
Quand "PRGM" s'affiche, appuyez sur EDIT/CHECK tout en
pressant à nouveau SHIFT.
ñPi
4 Appuyez sur DISC DIRECT PLAY 1-3 pour
sélectionner un disque.
...
... 1-1.1.
Nombre total de pistes
programmées sur la face A
n
Temps restant
sur la face A
6 Appuyez sur • TAPE REC/REC MUTE pour
démarrer l'enregistrement sur la face avant.
La bande esf rebobinée jusqu'au débuf de la face avanf,
l'amorce est lue pendant 10 secondes, puis l'enregistrement
démarre. A la fin de l'enregistrement sur la face avant (A),
l'enregistrement sur la face arrière (B) démarre.
Pour arrêter l'enregistrement
Appuyez sur ■. L'enregistrement et la lecture du CD s'arrêtent
simultanément.
Pour supprimer un programme de montage
Appuyez deux fois sur ■ en mode d'arrêt pour revenir au temps
de lecture total.
Pour contrôler l'ordre des numéros de piste programmés
Avant l'enregistrement, appuyez sur CD EDIT/CHECK sur la
télécommande tout en pressant SHIFT pour sélectionner la face
A ou B, puis appuyez plusieurs fois sur
Face de la cassette Numéro de piste Numéro de programme
J
H> iP
..................
Pour ajouter des pistes d'autres disques au programme
de montage
S'il reste du temps sur la cassette après l'étape 5, vous pouvez
ajouter des pistes d'autres disques dans le logement à CD.
1 Appuyez sur EDIT/CHECK sur la télécommande tout en
pressant SHIFT pour sélectionner la face A ou B.
2 Appuyez sur DISC DIRECT PLAY 1-3 pour sélectionner un
CD.
3 Appuyez sur les touches numérotées 0-9 et +10 de la
téléoommande pour sélectionner les pistes. "PRGM" s'allume.
Une piste à temps de lecture plus long que le temps restant
ne pourra pas être programmée.
4 Répétez les étapes 2 et 3 pour ajouter plus de pistes.
Temps sur les cassettes et temps de montage
Le temps d'enregistrement réel des cassettes est ordinairement
un peu plus court que le temps d'enregistrement spécifié sur
l'étiquette. Cet appareil peut programmer des pistes pour utiliser
le temps en surplus. Quand le temps d'enregistrement total est
un peu plus long que le temps d'enregistrement spécifié de la
cassette après le montage, l'afficheur indique le temps en surplus
(sans signe négatif), au lieu du temps restant sur la cassette
(avec un signe négatif).
01
1 8 FRANÇAIS
La fonction de montage Al n'est pas utilisable avec des disques
contenant 31 pistes ou plus. "TR QVER" s'affichera.
Page 99

La fonction de montage programmé permet l'enregistrement d'un
CD tout en contrôlant le temps restant sur les deux faces de la
cassettes à la programmation des pistes.
• L'enregistrement d'un montage programmé ne démarrera pas
d'un emplacement au milieu de la bande. La cassette doit être
enregistrée depuis le début de l'une des faces.
• Réglez la fonction lecture avec saut des espaces vierges à
OFF (page 12).
• Vous pouvez enregistrer jusqu'à 30 pistes avec la fonction
montage programmé.
• Vous pouvez implanter jusqu'à 30 numéros de piste avec la
fonction montage programmé.
6 Répétez l'étape 5 pour les autres pistes pour la
face A.
Une piste dont le temps de lecture est plus long que le temps
restant ne peut pas être programmée.
Numéro de piste Numéro de
sélectionné programme
I
Temps restant de la face A
I
.I
«
__________
Numéro du disque
sélectionné
Appuyez sur CD EDIT/CHECK sur la
télécommande en pressant SHIFT pour
sélectionner la face B et programmez les pistes
pour la face B.
Après la confirmation de "B" sur l'afficheur, répétez l'étape 5.
Face B de la cassette maximum de la face B
I
____
I;;;;
.......
8 Appuyez sur • TAPIE REC/REC MUTE pour
démarrer l'enregistrement.
La bande est rebobinée jusqu'au début de la face avant,
l'amorce est lue pendant 10 secondes et l'enregistrement
démarre. A la fin de l'enregistrement sur ia face avant (A),
l'enregistrement sur la face arrière (B) démarre.
Nombre total de pistes
programmées
Temps d'enregistrement
_____
;; IJi j
J
Zui
SH
UJ llJ
KM
!2g
K 3
Z«»
U
1 Insérez la cassette pour l'enregistrement dans la
platine 2.
Insérez la cassette avec la face à enregistrer en premier vers
l'extérieur.
2 Appuyez sur CD et chargerz un ou des CD.
3 Appuyez deux fois sur CD EDIT/CHECK sur la
télécommande en pressant SHIFT.
"PRGM" s'allume.
: PRGpl
Quand "Al" est affiché, appuyez à nouveau sur EDIT/CHECK
en pressant SHIFT.
4 Appuyez sur les touches numérotées 0-9 de la
télécommande pour désigner la longueur de la
cassette.
10 à 99 minutes peuvent être spécifiées.
• ◄^et ►►, ou MULTI JOG sur l'appareil sont aussi
disponibles pour désigner la longueur de ia cassette.
5 Appuyez sur DISC DIRECT PLAY 1-3 pour
sélectionner un CD.
Puis appuyez sur les touches numériques 0-9 et
+10 pour programmer une piste.
Pour arrêter l'enregistrement
Appuyez sur ■. L'enregistrement et la lecture de CD s'arrêtent
simultanément.
Pour contrôler l'ordre des numéros des pistes programmées
Avant l'enregistrement, appuyez plusieurs fois sur
Face de la cassette
l
_____
Numéro programmé
_____
I
01
Numéro de piste
Pour modifier le programme sur chaque face
Appuyez sur EDIT/CHECK de la télécommande en pressant
SHIFT pour sélectionner la face A ou B, puis appuyez sur H
pour supprimer le programme de la face sélectionnée. Ensuite
reprogrammez les pistes.
Pour supprimer un programme de montage
Appuyez une fois sur ■ en mode d'arrêt pour revenir à i'affichage
normal.
FRANÇAIS 1 9
Page 100

ENREGISTREMENT
SUR UN MD
La qualité du son d'un CD ne diminue pas à l'enregistrement, et
l'enregistrement est possible facilement avec la touche CD ►
MD.
. DISC
DIRECT
PLAY
■PRGM
■ Touches
numériques
■SHIFT
1 Insérez un MD enregistrable dans le lecteur de
disque dans le sens de la flèche, l'étiquette dirigée
vers le haut.
• Insérez un MD seulement quand l'appareil est sous tension.
Consignation automatique de marques index
L'information sur l'ordre des pistes sur le CD original sera copiée
sous forme de marques index.
Pour enregistrer sur un MD partiellement enregistré
S'il reste une partie non enregistrée sur le MD, le nouvel
enregistrement démarrera automatiquement de l'emplacement
où l'enregistrement précédent s'est arrêté. Si vous souhaitez
enregistrer depuis le début d'un MD partiellement enregistré,
effacez entièrement l'enregistrement précédent. (Voir page 30.)
Flèche
km:
2 Appuyez sur CD et chargez le CD à enregistrer
sur le plateau 1.
3 Appuyez une fois sur CD ► MD pour démarrer
l'enregistrement.
"► MDdirect" s'affiche et l'enregistrement démarre.
rect
Pendant l'enregistrement, l'affichage passe au temps de
lecture écoulé.
Quand la lecture de la dernière piste du CD se termine,
l'enregistrement s'arrête automatiquement.
Quand l'enregistrement se termine, "TQC EDIT" s'affiche et
les dohnées du contenu de l'enregistrement sont enregistrées.
L'enregistrement numérique s'effectue en appuyant sur
CD^MD. Pour l'enregistrement analogique, voir la page 22.
Pour contrôler le temps d'enregistrement restant du MD
avant de démarrer l'enregistrement
Appuyez sur MD, puis sur CD EDIT/CHECK sur la télécommande
tout en pressant SHIFT. Ou bien appuyez sur les touches de
fonction sauf MD, puis sur DISPLAY sur l'appareil. Le temps
d'enregistrement restant s'affiche pendant 4 secondes.
Pour arrêter l'enregistrement en cours
Appuyez sur ■. L'enregistrement s'arrête et les données TOC
sont consignées.
Pour arrêter la lecture du CD, appuyez à nouveau sur ■.
1 Insérez un MD enregistrable dans le lecteur de
disque dans le sens de la flèche, l'étiquette dirigée
vers le haut.
2 Appuyez sur CD et lisez la piste du CD à
enregistrer.
3 Appuyez une fois sur CD ► MD pour démarrer
l'enregistrement.
La lecture du CD revient au début de la piste en cours de
lecture et l'enregistrement démarre.
A la fin de la lecture de la piste sélectionnée du CD,
l'enregistrement s'arrête automatiquement et la lecture de la
piste suivante du CD commence. Pour arrêter la lecture de
CD, appuyez sur ■.
A la fin de l'enregistrement, "TQC EDIT" s'affiche et le contenu
de l'enregistrement est consigné.
• Une marque index est automatiquement enregistrée au
début de la piste.
' Pendant l'affichage de "TQC EDIT", ne débranchez pas le
cordon d'alimentation secteur et ne secouez pas l'appareil.
Sinon, les données TOC no seront pas consignées
correctement.
' Pendant l'enregistrement avec CD ► MD, Il est inutilisable.
' Insérez uniquement un MD dans le lecteur de disque. Sinon le
disque pourrait être rayé, causant un mauvais fonctionnement
ou un problème de sécurité, tel que décharge électrique.
■ N'essayez pas d'insérer un autre MD quand un MD est déjà en
place.
' N'inclinez pas l'appareil quand un disque est inséré. Cela
pourrait causer un mauvais fonctionnement.
■ En enregistrement numérique, s'il y a un espace vierge de plus
de 4 secondes, il se peut que seules 4 secondes d'espace
vierge soient enregistrées. (Une marque index est
automatiquement consignée à l'entrée d'un signal sonore
suivante.)
20 FRANÇAIS
 Loading...