

Page 1
DVD Stereo
OPERATING INSTRUCTIONS
En (English)
System
XR-DV700
U
For assistance and information
(United States and Puerto Rico)
8B-CQA-903-01
010420ACK-U-M
MANUAL DE INSTRUCCIONES
MODE D'EMPLOI
E (Español)
F (Français)
Page 2
PRECAUTION
Read these Operating Instructions carefully and completely
before operating the unit. All precautions on this booklet
and on the unit should be strictly followed.
Keep the Operating Instructions for future reference.
WARNING
En
To reduce the risk of fire or electric shock, do not expose
this appliance to rain or moisture.
CAUTION
RISK OF ELECTRIC SHOCK
DO NOT OPEN
“CAUTION:TO REDUCE THE RISK OF
ELECTRIC SHOCK,
DO NOT REMOVE COVER (OR BACK).
NO USER-SERVICEABLE PARTS INSIDE.
REFER SERVICING TO QUALIFIED
SERVICE PERSONNEL.”
Explanation of Graphical Symbols:
The lightning flash with arrowhead
symbol, within an equilateral triangle, is
intended to alert the user to the presence
of uninsulated “dangerous voltage” within
the product’s enclosure that may be of
sufficient magnitude to constitute a risk
of electric shock to persons.
The exclamation point within an
equilateral triangle is intended to alert the
user to the presence of important
operating and maintenance (servicing)
instructions in the literature
accompanying the appliance.
Warning
To prevent electric shock or injury, these safety instructions
should be followed in the installation, use and servicing the
unit.
Installation
Attachments — Do not use attachments not recommended
by the unit manufacturer as they may result in the risk of fire,
electric shock or injury to persons.
Water and Moisture — Do not use this unit near water for example, near a bathtub, washbowl, kitchen sink, or laundry
tub, in a wet basement, or near a swimming pool, and the
like.
Heat — Do not use this unit near sources of heat, including
heating vents, stoves, or other appliances that generate heat.
It also should not be placed in temperatures less than 5˚C
(41˚F) or greater than 35˚C (95˚F ).
Mounting surface — Place the unit on a flat, even surface.
Accessories — Do not place this unit on an unstable cart,
stand, tripod, bracket, or table. The unit may fall, causing
serious injury to a child or an adult, and serious damage to
the appliance. Use only with a cart, stand, tripod, bracket, or
table recommended by the manufacturer, or sold with the unit.
Any mounting of the appliance should follow the
manufacturer’s instructions, and should use a mounting
accessory recommended by the manufacturer.
Portable cart — An appliance and cart
combination should be moved with care.
PORTABLE CART
WARNING
Quick stops, excessive force, and uneven
surfaces may cause the appliance and cart
combination to overturn.
S3125A
Ventilation — The unit should be situated with adequate
space around it so that proper heat ventilation is assured.
Allow 15 cm clearance from the rear and the top of the unit,
and 5 cm from the each side.
Slots and openings in the cabinet and the back or bottom are
provided for ventilation, and to ensure reliable operation of
the unit and to protect it from overheating, these openings
must not be blocked or covered. The openings should never
be blocked by placing the unit on a bed, sofa, rug or other
similar surface. (This unit should never by placed near or over
a radiator or heat register.) This unit should not be placed in a
built-in installation such as a bookcase unless proper
ventilation is provided.
Object and Liquid Entry — Never push objects of any
kind into this unit through the cabinet slots as they may touch
dangerous voltage points or short-circuit parts that could result
in a fire or electric shock. Never spill liquid of any kind on the
unit.
Wall or ceiling mounting — The unit should not be
mounted on a wall or ceiling, unless specified in the Operating
Instructions.
Electric Power
Power Sources — This unit should be operated only from
the type of power source indicated on the marking label. If
you are not sure of the type of power supply to your home,
consult your appliance dealer or local power company. To
operate unit on battery power, or other sources, refer to the
operating instructions.
Grounding or Polarization — This unit is provided with a
polarized alternating-current line plug (a plug having one blade
wider than the other). This plug will fit into the power outlet
only one way. This is a safety feature. If you are unable to
insert the plug fully into the outlet, try reversing the plug. If
the plug should still fail to fit, contact your electrician to replace
your obsolete outlet. Do not defeat the safety purpose of the
polarized plug.
Power-Cord Protection -— Power-supply cords should
be routed so that they are not likely to be walked on or pinched
by items placed upon or against them, paying particular
attention to cords at plugs, convenience receptacles, and the
point where they exit from the product.
2
Page 3
Overloading — Do not allow anything to rest on the power
cord. Do not overload wall outlets and extension cords as
this can result in fire or electric shock. Do not locate this unit
where the cord will be abused by persons walking on it.
Outdoor Antenna
Power lines — An outside antenna system should not be
located in the vicinity of overhead power lines or other electric
light or power circuits, or where it can fall into such power
lines or circuits. When installing an outside antenna system,
extreme care should be taken to keep from touching such
power lines or circuits as contact with them might be fatal.
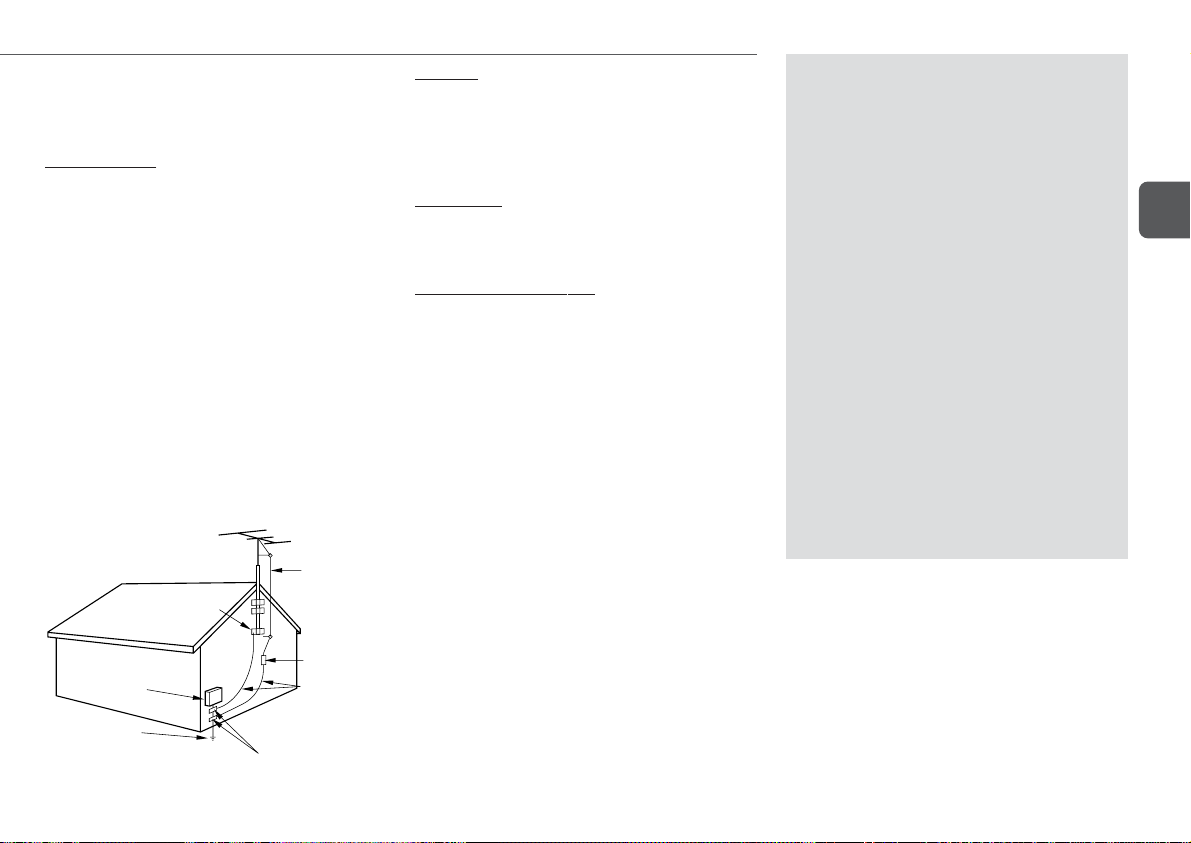
Outdoor Antenna Grounding — If an outside antenna or
cable system is connected to the unit, be sure the antenna or
cable system is grounded so as to provide some protection
against voltage surges and built-up static charges. Section
810 of the National Electrical Code, ANSI/NFPA No.70,
provides information with regard to proper grounding of the
mast and supporting structure, grounding of the lead-in wire
to an antenna discharge unit, size of grounding conductors,
location of antenna-discharge unit, connection to grounding
electrodes, and requirements for the grounding electrode. See
the figure.
Antenna Grounding According
to the National Electrical Code
GROUND CLAMP
ELECTRIC
SERVICE
EQUIPMENT
POWER SERVICE
GROUNDING
ELECTRODE SYSTEM
(NEC ART 250 PART H)
NEC-NATIONAL ELECTRICAL CODE
ANTENNA
LEAD IN
WIRE
ANTENNA
DISCHARGE
UNIT
(NEC SECTION
810-20)
GROUNDING
CONDUCTORS
(NEC SECTION
810-21)
GROUND CLAMPS
Lightning
For added protection for this unit receiver during a lightning
storm, or when it is left unattended and unused for long periods
of time, unplug it from the wall outlet and disconnect the
antenna or cable system. This will prevent damage to the unit
due to lightning and powerline surges.
Maintenance
Cleaning — Unplug this unit from the wall outlet before
cleaning. Do not use liquid cleaners or aerosol cleaners. Use
a damp cloth for cleaning.
Damage Requiring Service
Unplug this unit from the wall outlet and refer servicing to
qualified service personnel under the following conditions:
1)When the power cord or plug is damaged or frayed.
2)If the liquid has been spilled into the unit.
3)If the unit has been exposed to rain or water.
4)If the unit does not operate normally by following the
operating instructions. Adjust only those controls that are
covered by the operating instructions as improper
adjustment of other controls may result in damage and will
often require extensive work by a qualified technician to
restore the unit to normal operation.
5)If the unit has been dropped or the cabinet has been
damaged.
6)When the unit exhibits a distinct change in performance this indicates a need for service.
Do not attempt to service this unit yourself as opening or
removing covers may expose you to dangerous voltage or
other hazards. Refer all servicing to qualified service personnel.
Replacement Parts — When replacement parts are
required, be sure the service technician has used replacement
parts specified by the manufacturer or having the same
characteristics as the original part. Unauthorized substitutions
may result in fire, electric shock or other hazards.
Safety Check — Upon the completion of any service or
repairs to this unit, ask the service technician to perform safety
checks to determine that the unit is in proper operating
condition.
TABLE OF CONTENTS
PRECAUTION ...................................... 2
PREPARATION .................................... 5
PARTS AND CONTROLS ......................... 8
ADJUSTMENT BEFORE OPERATION ......... 12
PLAYING DISCS
PREPARATORY INFORMATION ......... 14
BASIC PLAYBACK ........................ 15
SELECTING TRACKS/CHAPTERS ....... 17
OTHER PLAYBACK MODES ..................
DVD FEATURES ........................... 20
STATUS DISPLAY ......................... 22
DOLBY AND DTS SURROUND ................ 23
RADIO ............................................ 25
SOUND ........................................... 27
TIMER ............................................ 28
EXTERNAL EQUIPMENT ....................... 30
CUSTOMIZING DVD SETUP ................... 31
REFERENCE ..................................... 38
En
18
3
Page 4
OWNER'S RECORD
Record the model number and serial number of your set
(found at the rear of your set) below. Refer to them when
contacting your Aiwa dealer.
Model No. _____________________________
En
Serial No. _____________________________
System and accessories
XR-DV700
CX-LDV700 DVD stereo system
SX-L700 Five Surround speaker system (front speakers,
surround speakers, center speaker)
TS-LW700 Subwoofer
Remote control
Lithium battery (CR2025)
FM antenna, AM antenna
Connecting cord (DIN 8-pin)
Video connecting cord
Front speakers cord (approx. 4 m / 13 ft.) × 2
Surround speaker cord (with plugs, approx. 8 m / 26 ft.) × 2
The red plug is for the right channel and the white plug is for
the left channel.
Center speaker cord (with an orange plug, approx. 3 m /
10 ft.) × 1
Pedestal × 2
4
Page 5
PREPARATION
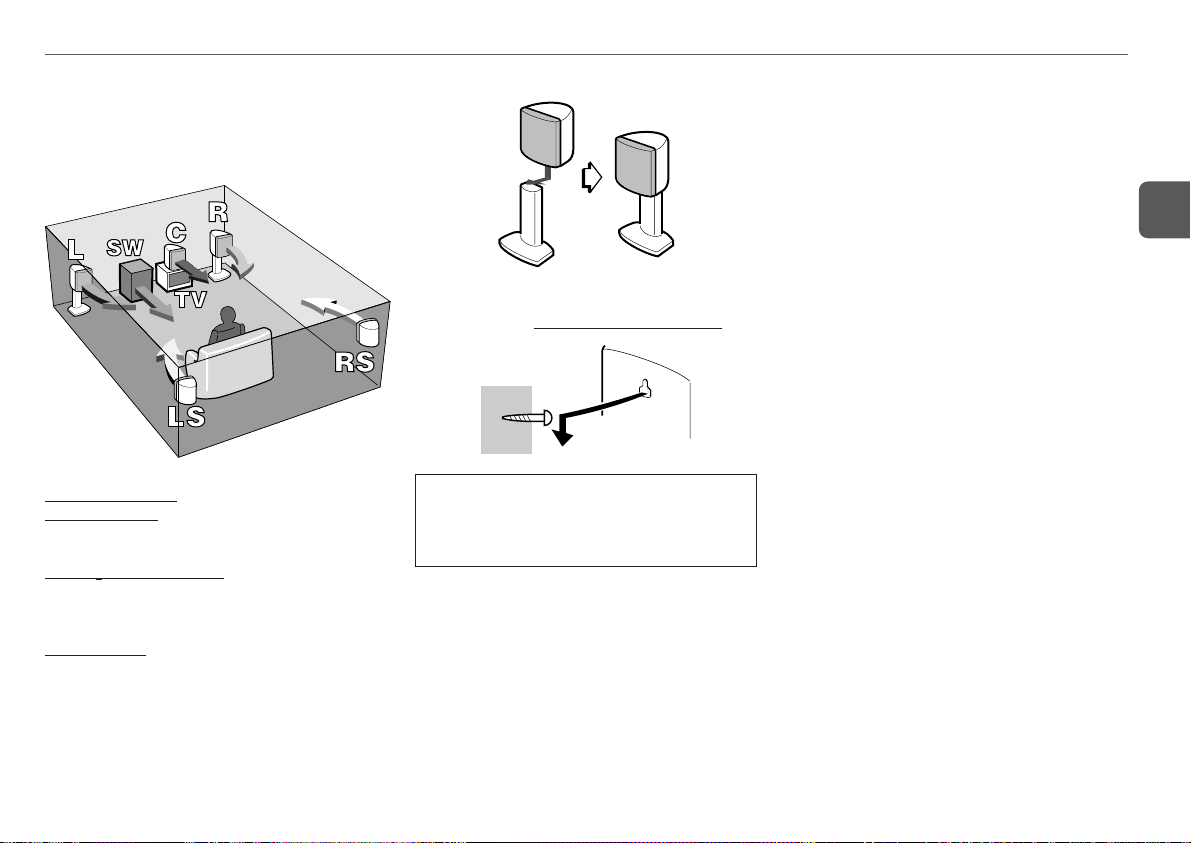
Placement
Place the speakers in their proper position. All speakers for a
full 5.1-channel home theater come supplied with your DVD
system.
To attach the front speaker to the pedestal
To mount the surround speakers on the wall
Mount each speaker
on a spot that can hold its weight.
Placing the main unit
Allow 15 cm (6 in.) clearance from the top of the unit for
movement of the disc compartment lid.
Attaching the anti-skid patches
To prevent the surround and center speakers from slipping,
attach the supplied anti-skid patches to the bottom of the
speakers. Use 3 patches for each of these speakers.
En
L&R: Front speakers (marked "FRONT")
C: Center speaker (marked "CENTER")
Place it in the center of the two front speakers, possibly on or
below the TV set.
LS&RS: Surround speakers (marked "REAR")
Place them directly to the side of or slightly behind the listening
area. Align them horizontally, preferably about 1 meter (3 feet)
above ear height.
SW: Subwoofer
Place it on the floor close to a wall or in a corner of the room.
AIWA disclaims any responsibility for injury to persons
or other accidents caused by not fitting the surround
speakers properly or if the place of the installation is not
suitable.
•Either of the two front speakers can be used as the right or
the left one; likewise for the surround speakers.
•Do not place the left and right front speakers close to the TV
set, as doing so may cause picture noise.
•Sound output from the center and the surround speakers is
only available when the Dolby or the DTS surround system
is activated with the appropriate setting.
5
Page 6
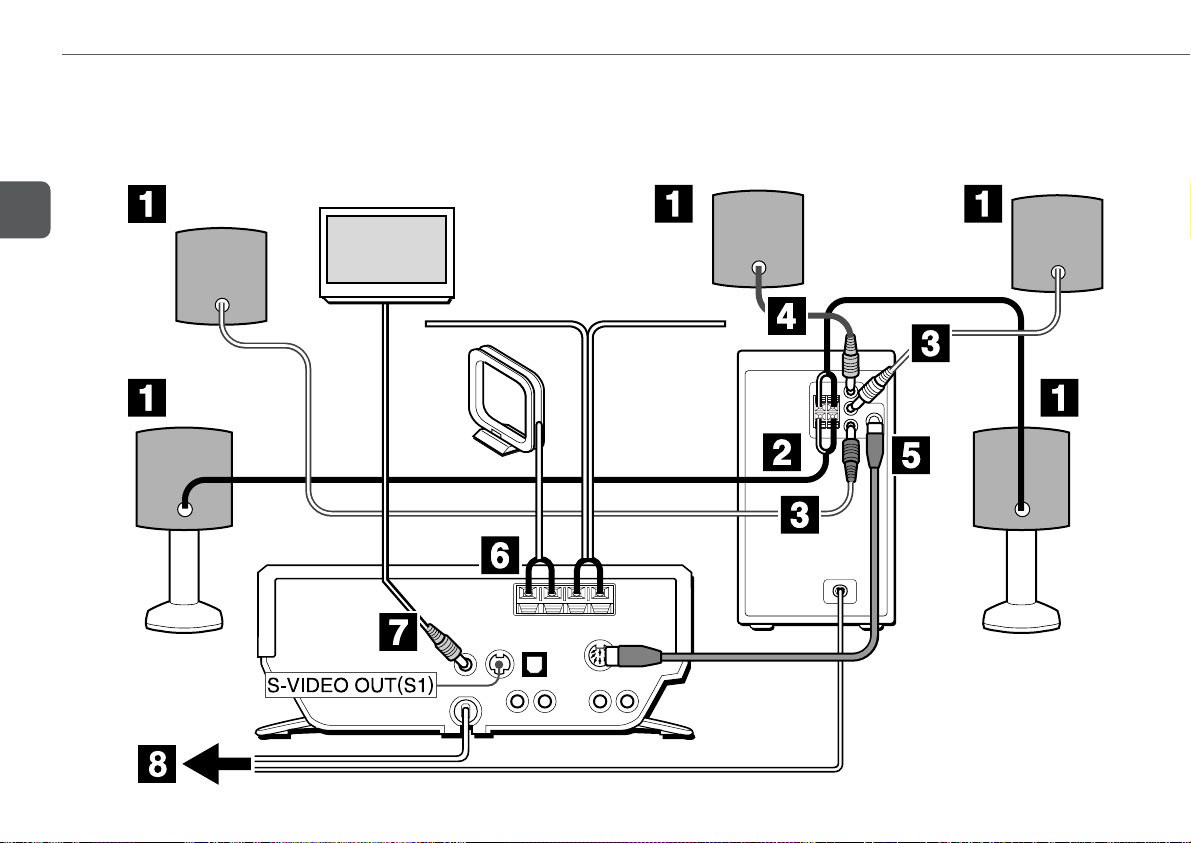
Connection
Plug in the AC power cord to the AC power outlet after all other
connections are made.
En Surround speaker
Front
speaker
TV set
Center speaker
Subwoofer
Surround speaker
Front
speaker
6
Page 7
1
Connect the bare ends of each speaker cord to
the corresponding speaker.
Be sure to use the correct cord for each speaker.
-
Front speaker cords have bare leads at both ends
(approx. 4 m / 13 ft.).
-
Surround speaker cords are the longer cords with a plug
at one end (approx. 8 m / 26 ft.).
The red plug is for the right channel and the white plug
is for the left channel.
-
Center speaker cord is the short cord with an orange
plug at one end (approx. 3 m / 10 ft.).
The copper-colored cords go to the 0 terminal of each
speaker.
2
Connect the cords from the front speakers to the
appropriate terminals on the subwoofer.
- Right front speaker: FRONT R terminals
- Left front speaker: FRONT L terminals
The copper-colored cords go to the 0 terminals.
3
Connect the cords from the surround speakers
to the appropriate jacks on the subwoofer.
- Right surround speaker: SURROUND R jack (red)
- Left surround speaker: SURROUND L jack (white)
4
Connect the cord from the center speaker to the
CENTER jack (orange) on the subwoofer.
5
Connect the subwoofer to the main unit.
Connect the FROM CX-LDV700U jack of the subwoofer
to the TO TS-LW700U jack with the supplied connecting
cord (DIN 8-pin).
•Do not connect other equipment to the TO TS-LW700U
jack because this is used exclusively for the supplied
subwoofer.
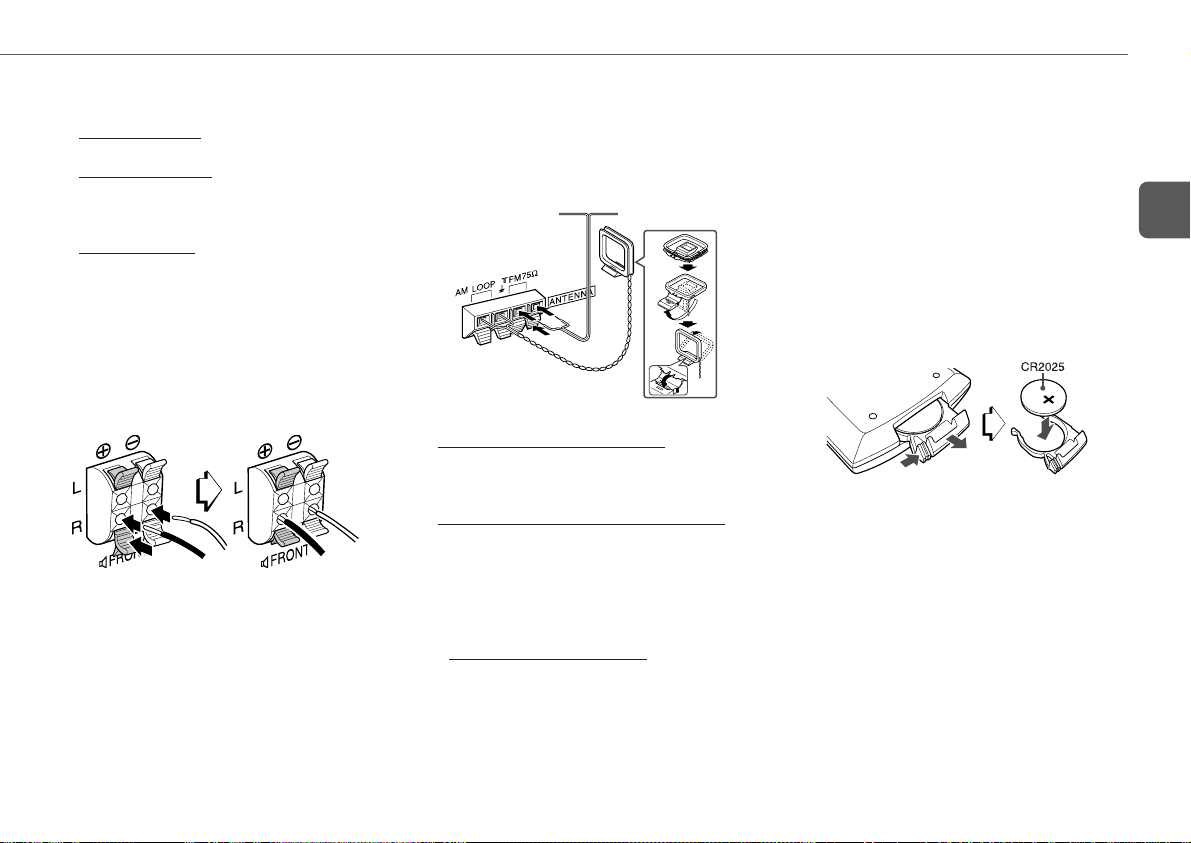
6
Connect the supplied antennas.
Connect the FM antenna to the FM 75 Ω terminals and
the AM antenna to the AM LOOP terminals.
FM antenna
AM antenna
7
Connect the television set.
If your TV set has an S-video input jack:
Connect the S-VIDEO OUT (S1) jack of this unit and the
S-video input jack of your TV with an optional S-video
connecting cord.
If your TV set does not have an S-video input jack:
Connect the VIDEO OUT jack of this unit and the video
input jack of your TV with the supplied video connecting
cord (the one with plugs at both ends).
Refer also to the Operating Instructions of your TV set.
The illustration shows the connection to the VIDEO OUT
jack.
•
If your TV set is a wide-screen set: you need to adjust
the TV aspect setting later (see “TV Aspect”, page 33).
•Do not use more than one connection to connect your
TV.
8
Connect the power supply.
Plug in the AC power cords of the main unit and the
subwoofer to AC outlets.
The automatic demonstration will run on the display while
the power is turned off.
To deactivate the automatic demonstration, press DEMO/
ECO. The clock will flash on the display. For setting the
clock, see page 13.
•Do not short-circuit the 0 and 9 speaker cord leads.
•Do not leave objects generating magnetism or objects
affected by magnetism near the speakers.
Remote control
While sliding the latch, pull out the battery holder from the
bottom of the remote control. Place the supplied battery on
the battery holder with correct polarity. Finally, insert the holder
back into position.
•Replace the battery with a new one when the operational
distance between the remote control and main unit becomes
shorter.
•Remove the battery if the unit is not going to be used for an
extended period of time.
•The remote control may not operate if it is used under intense
sunlight or if its line of sight is obstructed.
Caution!
•Do not keep the battery near metallic objects such as rings,
bracelets, and keys. It may cause the battery to short circuit.
•After removing the battery, be sure to keep it out of reach of
children. In case it is swallowed, consult a doctor
immediately.
En
7
Page 8
PARTS AND CONTROLS
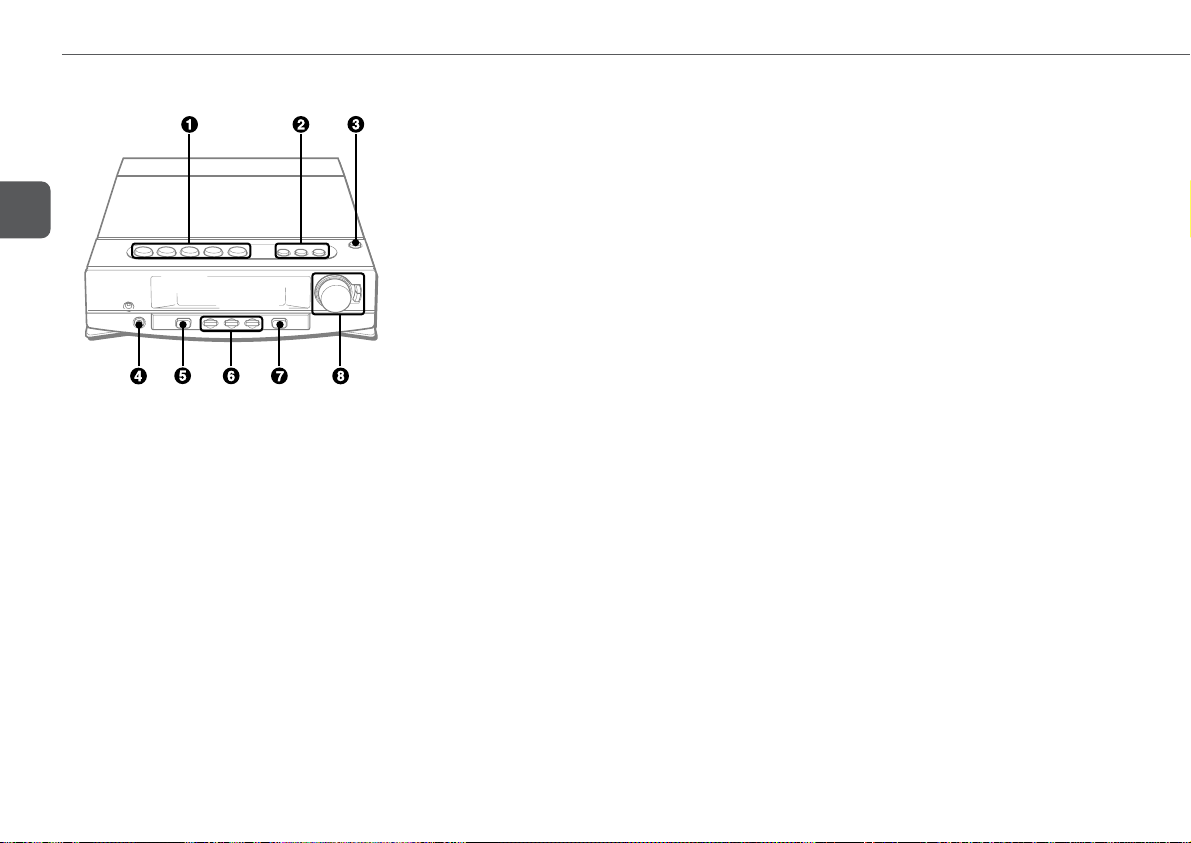
Main unit: front
En
1 aSET
Disc: pauses playback.
Radio: stores the received station to preset.
sCLEAR
Disc: stops playback.
Radio: clears a station preset.
cPRESET
Disc: starts playback.
Radio: tunes into a preset station.
frDOWN, gtUP
Disc: skips to a previous or a succeeding chapter/track
when pressed, searches a title/track in fast forward or
fast reverse playback when held down.
Radio: manually tunes down or up within the band.
2 TUNER/BAND
Selects radio function and the radio band.
AUX
Selects AUX function.
DVD/CD
Selects DVD/CD function.
3 zOPEN/CLOSE
Opens and closes the disc compartment.
4 PHONES jack
Plug in here an optional headphones set with a stereo
mini plug (ø3.5 mm,
5 POWER 6STANDBY/ON
Switches the unit on and off (standby).
6 DEMO/ECO
When the unit is turned off: selects ECO mode, DEMO
mode or displays the clock.
When the unit is turned on: selects DEMO mode.
DISPLAY
Disc: displays the title/chapter/track number being played
and remaining time of play.
Radio: displays the frequency of the tuned station.
COLOR
Selects the display color.
7 SURROUND
Turns on the Dolby or DTS decoder. Press repeatedly to
select a listening mode.
1
/8 in.). Speaker output is canceled.
8 VOLUME/MUL TI JOG
Adjusts the volume.
Changes the menu item selection in the MODE setting.
MODE
Adjusts various mode and sound settings. Press
repeatedly to select among T-BASS, BASS, TREBLE,
SLEEP and TIMER.
ENTER
Enters the item selected with MULTI JOG.
8
Page 9
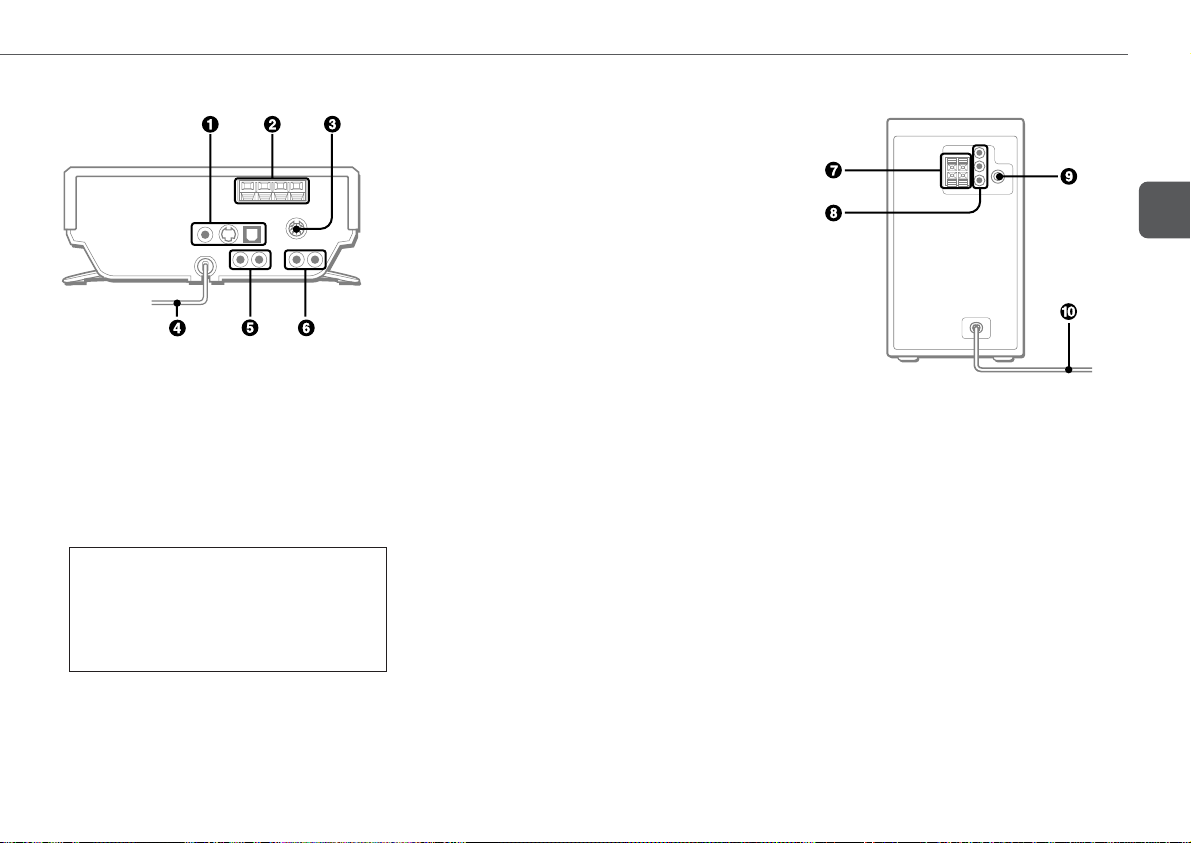
Main unit: rear
1 VIDEO OUT jack
Outputs standard (composite) video signals.
S-VIDEO OUT (S1) jack
Outputs S-VIDEO signals.
DIGITAL OUT (OPTICAL) jack
Outputs digital audio signals to external digital
equipment. Keep the jack covered with the supplied dust
cap when it is not being used.
CAUTION
NEVER play a multichannel Dolby Digital or a DTS
source through external digital equipment without a
Dolby Digital or a DTS decoder, respectively. Doing
so will generate high level noise which may be
harmful to your ears and damage the speakers.
2 AM LOOP, FM 75 Ω terminals
Plug in the supplied AM and FM antennas here.
3 TO TS-L W700U jack
Connect the supplied powered subwoofer here.
4 AC power cord
5 LINE OUT jacks
Outputs analog sound signals to external equipment.
6 AUX jacks
Accepts analog sound signals from external equipment.
Subwoofer
En
7 FRONT 3 terminals
Connect the supplied front speakers here.
8 CENTER 3 jack (orange)
Connect the center speaker here.
SURROUND 3 jacks (red or white)
Connect the surround speakers here.
9 FROM CX-LDV700U jack
Connect the main unit here with the supplied connecting
cord (DIN 8-pin).
0 AC power cord
9
Page 10
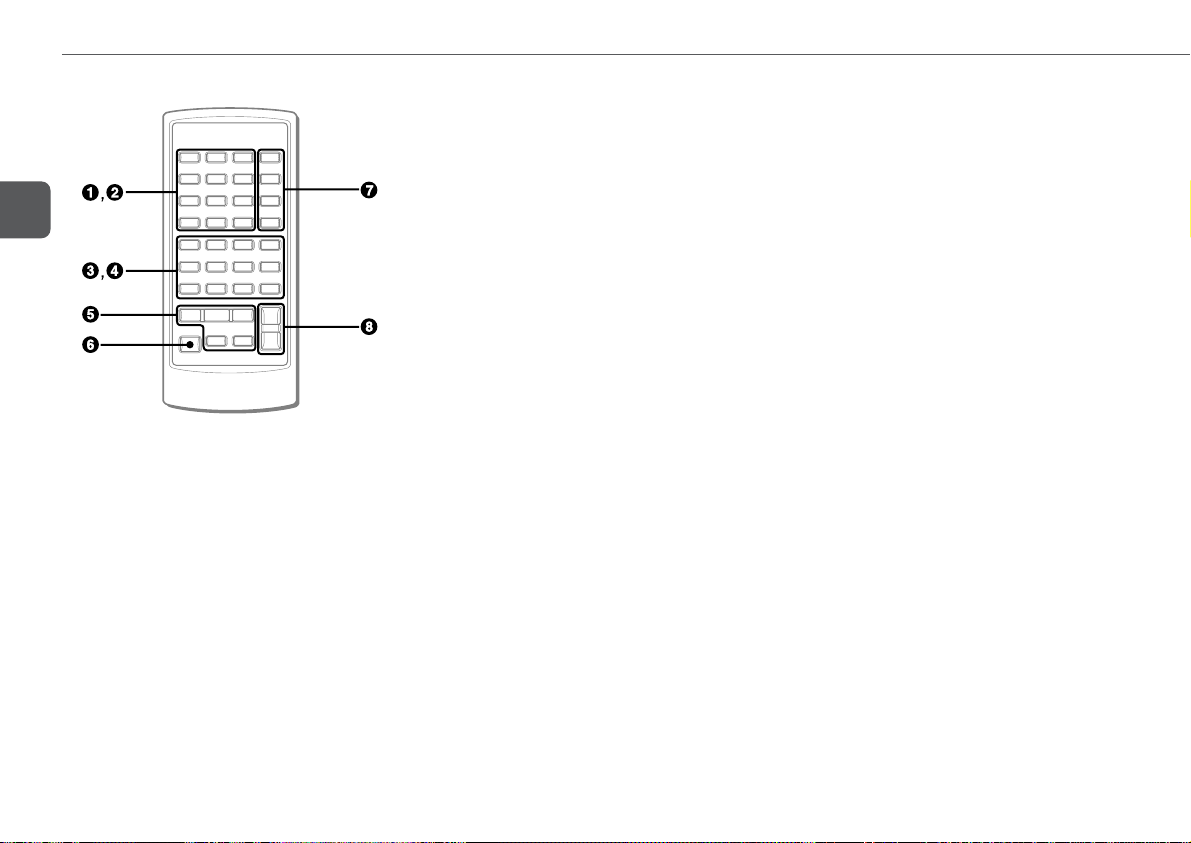
Remote control
En
Buttons with same or similar names with the main unit basically
have the same function.
1 0-9, +10
Disc: selects a title/chapter/track of the specified number.
Selects a menu item for VCDs with PBC.
Radio: tunes in to the station with the specified preset
number.
C
Clears the Mark memory, etc.
2
The numbered buttons take on these functions when pressed
together with SHIFT
AUDIO SELECT
Changes audio tracks (DVDs) or channels (VCDs).
SUB TITLE SELECT
Changes the subtitle language (DVDs only).
:
10
SUB TITLE ON/OFF
Switches the subtitle on and off (DVDs only).
T-SEARCH
Enters the time search mode to locate a point in the disc
by specifying the title number, chapter number or the
playback time (DVDs only).
MARK
Enters the Mark mode to mark a point in the disc or to
start playback from a marked point (DVDs only).
ANGLE
Selects the angle to view the scene (DVDs only).
REPEAT
Enters repeat playback mode.
RANDOM/PRGM
Enters random or programmed playback mode (CDs and
VCDs).
PBC
Switches PBC(Playback Control) on and off for VCDs.
TIMER
Enters timer setting mode.
SLEEP
Enters sleep-timer setting mode.
CLOCK
Enters clock adjustment mode.
3 T-BASS
Emphasizes low frequency sound.
TITLE
Displays the title menu for DVDs.
vVBb
Changes the menu item selection.
ENTER
Enter the selected item.
MENU
Displays the menu for DVDs.
SETUP
During stop: enters the setup menu.
During playback: changes the playback time display of a
disc.
SURROUND
RETURN
Returns to the previous menu screen. Displays the menu
for VCDs.
SHIFT
Hold down when pressing a numbered button to change
its function to that printed above the number.
•e.g., "Press SHIFT+TIMER on the remote control"
means to hold down SHIFT and press 0/TIMER to use
the button for the timer function.
4
The following buttons take on these functions when pressed
together with SHIFT
MONO TUNER
Switches between stereo or monaural FM reception.
ZOOM
Enlarge the picture (DVDs only).
:
Page 11
CENTER(+, -)
Adjusts the sound level of the center speaker for Dolby
and DTS surround.
REAR(+, -)
Adjusts the sound level of the surround speakers for
Dolby and DTS surround.
MAN/SEL (Manual/Select)
Enters speaker level and delay time setting mode.
5 f/rDOWN
cPRESET
g/tUP
aSET
sCLEAR
6 POWER
7 TUNER BAND
AUX
DVD/CD
ON SCREEN DISPLAY
Displays disc playback status on the TV screen.
8 VOLUME (N,M)
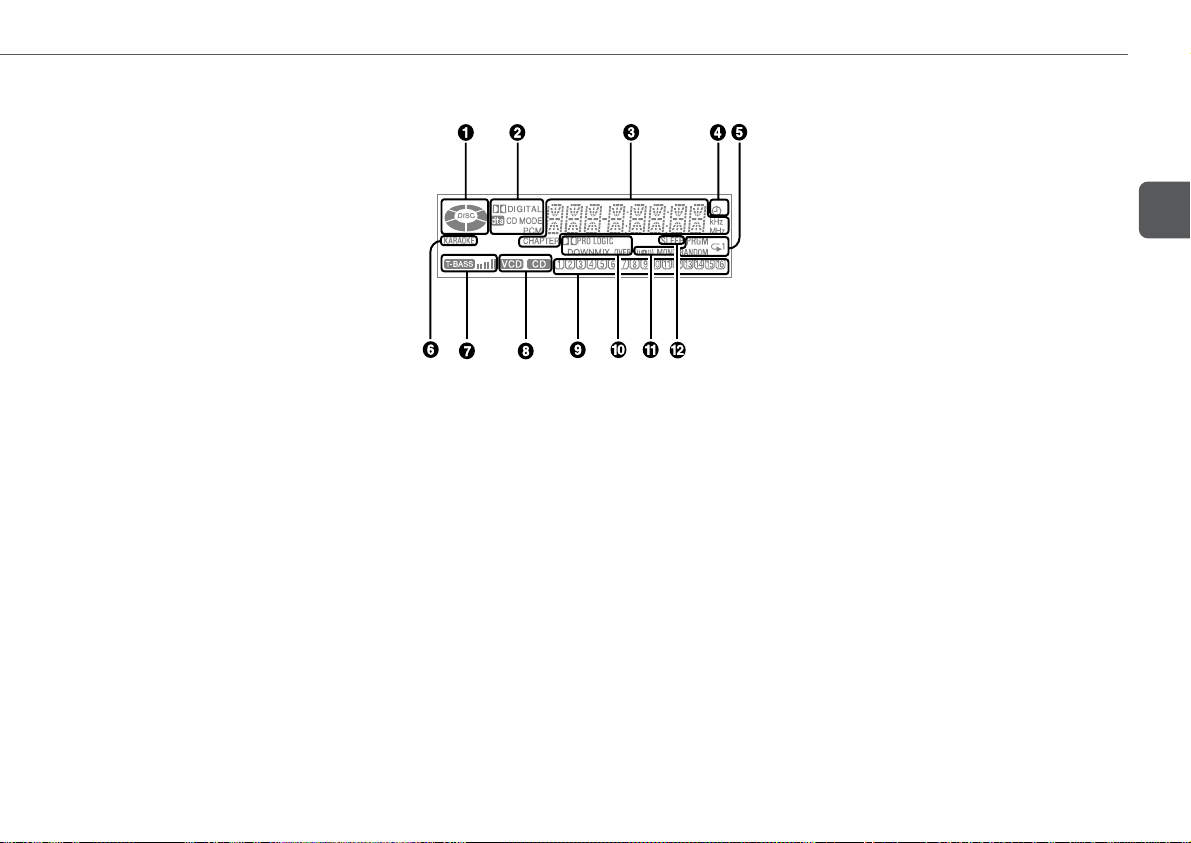
Display window
1 Disc indicators
Rotates during playback. Lights up during stop.
"DISC" lights up while the disc is loaded.
2 Audio signal type indicators
Indicates the signal type of the current audio track.
3 Main display
Shows general information such as the active function,
current adjustment mode, title/chapter/track number,
elapsed time, radio frequency, or the time.
4 5 indicator
Lights up when the timer function is active.
5 Playback mode indicators
Lights up to show the programmed, repeat, and random
playback modes.
6 KARAOKE indicator
Lights up when playing Dolby Digital karaoke disc.
7 T-BASS level indicators
Displays the T-BASS level.
8 Disc type indicators
Indicates the type of current disc (CD or VCD).
9 Track/preset number indicator
Displays the track number of CD or VCD and preset
number of radio. The current track/preset number flashes.
0 Output type indicators
The surround playback mode indicators ("DOWNMIX"
and "hPRO LOGIC") indicate the surround output type
in which the source is actually being played.
The "OVER" level indicator lights up when external input
level from the AUX jacks is too high.
! MONO/1(stereo) indicators
Indicates the type of radio reception.
@ SLEEP indicator
Lights up when the sleep function is active.
En
11
Page 12

ADJUSTMENTS BEFORE OPERATION
En
When power economizing mode is activated
When the unit turns off, "ECO MODE" is displayed for 4
seconds, and everything on the display clears.
Only the red indicator on the POWER button lights to show
that power is being supplied to the unit.
Standby power consumption
When power economizing mode is activated: 0.7 W
When power economizing mode is deactivated: 9 W
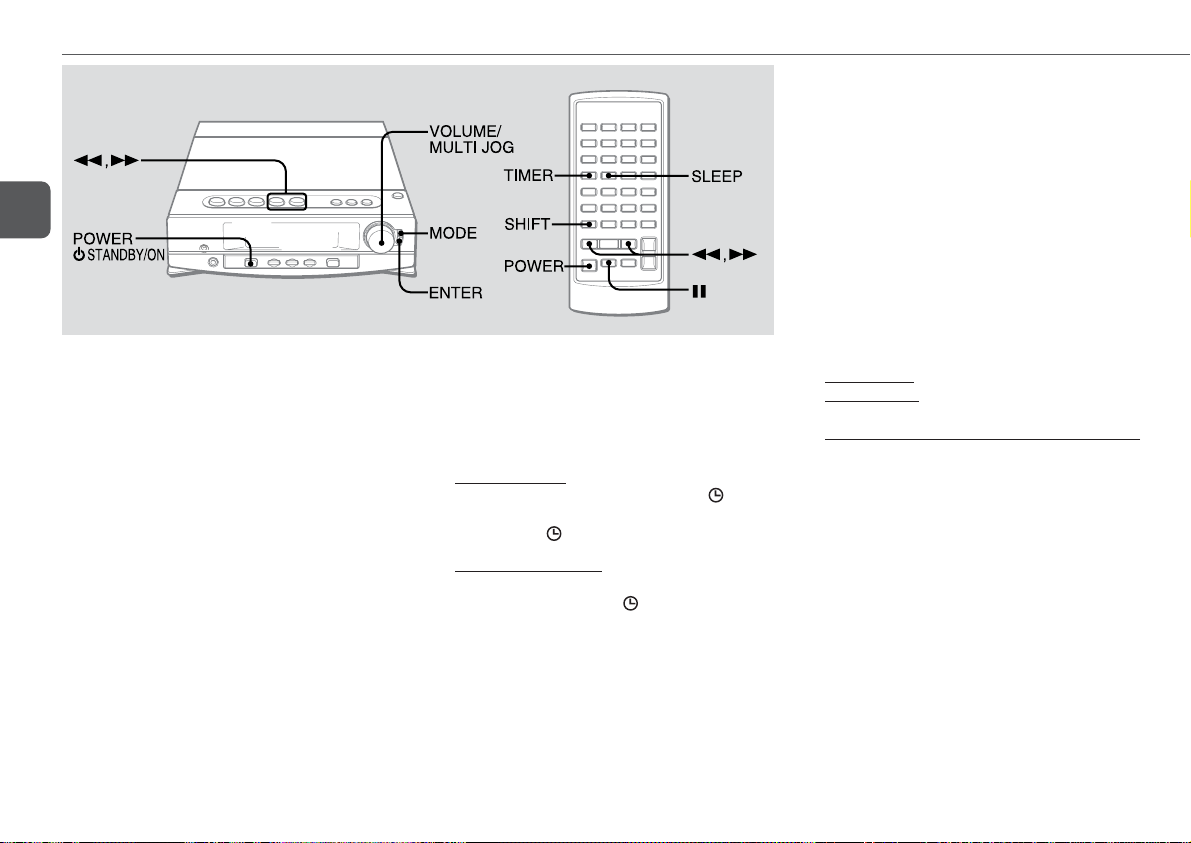
Power
Press POWER 6STANDBY/ON (POWER on the
remote control) to turn the unit on and off.
Volume
Turn VOLUME/MULTI JOG, or press VOLUME
N,M on the remote control.
Adjust from 0 (minimum) to 30 and MAX (maximum).
•Volume level setting is retained during power-off standby.
If the unit is turned off with the volume set to 21 or more, it
is automatically turned down to 20 the next time the unit is
turned on.
12
DEMO
If the clock has not been set,
when the unit is turned off.
To deactivate the DEMO
While "DEMO" is displayed, press DEMO/ECO. The clock
flashes. For setting the clock, see page 13.
"DEMO"
appears on the display
ECO mode
Reduces power consumption with the following operations.
After clock is set, this unit allows you to regulate its power
consumption by displaying nothing on the display while the
power is off. This is called power economizing mode.
Press DEMO/ECO while the unit is turned off.
Each press of this button changes the display status as follows:
1 Demo display (power economizing mode canceled)
2 Power economizing mode
3 Clock display (power economizing mode canceled)
Pressing a or ENTER turns on the backlight for 4
seconds.
Page 13

Changing the display color
The display color can be selected from among the preset colors
(Select color mode). 12 type of colors has already preset and
5 type of colors can be adjusted to your taste. In addition, the
display color can be selected for each function. (Function color
mode).
Adjust the preset colors
1
Press COLOR to display "SEL-COLOR" while the
power is on.
2
Within 4 seconds, turn VOLUME/MULTI JOG until
"COLOR M 1" to "COLOR M 5" is displayed.
3
Within 4 seconds, press COLOR.
"50_50_50" is displayed and the left "50" flashes.
4
Press DISPLAY repeatedly to select the color to
be adjusted.
- Left "50": adjust amber color.
- Center "50": adjust green color.
- Right "50": adjust blue color.
The selected item flashes.
5
Turn VOLUME/MULTI JOG to adjust the color.
The level can be adjusted from "00" to "50". "50" is
the brightest level.
6
Repeat steps 4 and 5 to set the desired color.
7
Press ENTER.
"SET-COLOR" is displayed.
•If power is interrupted for more than approximately 12 hours,
all settings stored in memory after purchase need to be reset.
•If you select "00" in each color, it displays no color on the
display.
•The display color may not change when you adjust only
one of the colors.
Select color mode
1
Press COLOR to display "SEL-COLOR" while the
power is on.
2
Within 4 seconds, turn VOLUME/MULTI JOG to
select the color.
The selected color is automatically set after 4 seconds. It
is also set when pressing ENTER within 4 seconds. In
this case, "SET-COLOR" is displayed.
Function color mode
1
Hold down COLOR until "-F-COLOR" is displayed.
2
Within 4 seconds, turn VOLUME/MULTI JOG to
select the source.
The source name and color number flashes on the display.
3
Press ENTER.
The source name stops flashing.
4
Turn VOLUME/MULTI JOG to select the color.
5
Press ENTER.
"SET-COLOR" is displayed and the color number stops
flashing.
6
Repeat steps 2 to 5 to set the colors for other
sources.
Changing the color mode
1
Hold down COLOR until "ON COLOR" and "OFF
COLOR" flash alternately.
"ON COLOR" and "OFF COLOR" flash after "-F-
COLOR" is displayed.
- ON COLOR: function color mode
- OFF COLOR: select color mode
2
Release COLOR while the desired mode flashes.
Setting the clock
1
Press SHIFT+CLOCK on the remote control.
When the unit is turned off, you can also press a or
ENTER.
2
Press f or g to set the time.
Each press changes the time in 1-minute steps.
Holding these buttons down will vary the time in 10-minute
units.
If f or g is not pressed within 4 seconds, setting
is canceled.
•You can also turn VOLUME/MULTI JOG to the right to
advance the time and to the left to move the time back.
The speed with which the time changes varies according
to how fast you turn VOLUME/MULTI JOG.
3
Press a or ENTER.
The time display stops flashing and the clock starts from
00 seconds.
To display the time while the power is on
Press SHIFT+CLOCK on the remote control.
The time will be displayed for 4 seconds.
To switch to the 24-hour standard
Display the time and press s within 4 seconds.
With each press, the clock alternates between 12- and 24hour standard time.
Tip:
In the 12-hour standard, "AM12:00" indicates midnight and
"PM12:00" noon.
If the clock display flashes when the unit is turned
off
There has been a power interruption. Reset the clock.
En
13
Page 14

PLAYING DISCS—PREPARATORY INFORMATION
Read the following information before playing discs.
Supported disc formats
This unit plays discs with the following logos.
DVDs
(12 cm disc)
En
Video CDs (VCDs)
(8 cm disc/12 cm disc)
Audio CDs
(8 cm disc/12 cm disc)
•The unit may not play a CD-R/RW disc recorded on personal
computers or certain kinds of CD-R/RW recorders.
•Do not attach adhesive label, etc. to either side of a CD-R/
RW disc, as doing so may cause malfunction.
•Do not load an unrecorded CD-R/RW disc. The disc may be
damaged.
•Do not use irregular-shaped CDs.
Color system for DVDs and VCDs
This unit conforms to the NTSC color system.
If the VCD of PAL color system is played, sometimes the
picture is distorted.
DVD region code
This unit is designed and manufactured for playback of region
“1” encoded DVD software. Region code appears on most
DVD labels to indicate which type of player can play the disc.
•A DVD without a “1” or “ALL” on its disc label cannot be
played on this unit. If you try to play such a disc, the message
“REGIONAL CODE VIOLATION” will appear on the TV screen.
•Some DVDs may not be properly labeled with a region code,
although they may in fact be region encoded and thus limited
in its playback area.
Software dependent features of DVDs
and VCDs
Since playback operations of DVDs and video CDs may be
intentionally fixed by software manufacturers, some playback
features of this player may not be available. For example, some
DVDs may not allow the pressing of STOP, r, t, or
other buttons at certain points in the disc. “
the TV screen if you press a button that cannot be used.
Refer to the instructions supplied with the disc.
Subdivision of discs
Title (DVD only)
Largest subdivision of a DVD; a movie for video software, or
an album for audio software.
Chapter (DVD only)
Sections within a title. A title is usually made up of several
chapters.
Track (audio CD and VCD only)
Sections within an audio or video CD.
Scene (VCD with PBC only)
Sections within a VCD with the PBC function. Scenes are
displayed in tiles on the menu screen, each with a scene
number for easy selection.
” appears on
Types of VCDs
Video CDs equipped with PBC (Version 2.0)
PBC (PlayBack Control) allows you to select and play back
tracks via menu operations. High-resolution stills can also
be played back if available.
Video CDs not equipped with PBC (Version 1.1)
These older types of VCDs are operated in the same way as
audio CDs.
•In some cases, you may want to play back VCDs equipped
with PBC with the PBC feature off. This is because some
disc playback features can only be used for VCDs without
PBC. See "Disabling PBC", page 16.
Copyright protection
It is forbidden by law to copy, broadcast, show, broadcast via
cable, play in public, or rent copyright material without
permission.
Copy protection signals are included in some DVD and VCD
discs.
If video recording equipment is connected directly or
indirectly to the video output of this unit, picture noise may
appear when playing back such discs. Recording of such discs
made on a VCR will also have picture noise.
This product incorporates copyright protection technology that
is protected by method claims of certain U.S. patents and other
intellectual property rights owned by Macrovision Corporation
and other rights owners. Use of this copyright protection
technology must be authorized by Macrovision Corporation,
and is intended for home and other limited viewing uses only,
unless otherwise authorized by Macrovision Corporation.
Reverse engineering or disassembly is prohibited.
14
Page 15

PLAYING DISCS—BASIC PLAYBACK
Basic playback operation common to DVDs, audio CDs, and
video CDs are described in this section.
Check your TV connection first
•Make sure the TV set is connected and its input source is
selected properly.
•Various guide displays of the current operation are available
on the TV screen. To view them, make sure you have “Guide
Message ON” in the Setup menu (see “Guide Message”,
page 32).
•You can select the language for the guide message out of 3
available languages (see “Menu Language”, page 32).
Playing discs
1
Press DVD/CD.
2
Press z OPEN/CLOSE to open the disc
compartment.
Place a disc with the label side up. Then close the disc
compartment.
Pivot
•Do not open or close the disc compartment forcibly by hand.
If "LID ERR" is displayed, unplug the AC power cord and
contact your AIWA dealer.
•Do not place more than one disc.
•Do not tilt the unit with a disc loaded.
•Do not touch the pickup lens. If it is soiled, discs may not
be played normally.
To remove the disc
Press z OPEN/CLOSE in stop mode to open the disc
compartment. Then pull out the disc while pressing the center
pivot.
To play DTS audio CDs
Hold down SURROUND to select "DTS MODE". "
MODE" lights up. Otherwise, high-level noise will be
produced which may harm both your hearing and the unit.
If "PCM CD" and the elapsed playback time
indication appear alternately in the display
You are trying to play a regular (PCM) audio CD when the
unit is in the DTS mode. Hold down SURROUND to select
"PCM MODE".
CD
En
zOPEN/CLOSE
3
Press c.
For a DVD, or a VCD with PBC, playback starts
automatically when the disc is loaded.
15
Page 16

Playing back with the software
specific menu (DVDs and VCDs only)
This unit supports the menu interface of DVDs, and VCDs with
PBC. The menu screen may be displayed automatically when
the disc is loaded.
Use the remote control.
En
DVDs
1
Press vVBb to select your desired program.
2
Press ENTER to begin playback.
To display the menu
Press TITLE or MENU during playback or stop.
VCDs
To select a program from the menu
Press the number button(s) to select your desired
program.
To display the menu
Press RETURN.
•For some DVDs you can select the menu language out of
the ones available. See “Disc Menu”, page 33.
•Contents and operation of the software specific menu vary
with the disc. Follow the instructions on the disc and on the
menu screen.
Stopping and pausing
To stop playback
Press s.
Playback stops. The unit remembers the point at which
playback stopped.
To resume playback from the point where it stopped
Press c.
“RESUME” appears on the TV display and playback starts
where it last stopped (Resume function).
To clear the point to be resumed
Press s again during stop.
“RESUME OFF” appears on the TV display. The resume
memory is cleared, and playback starts at the beginning of
the disc when c is pressed.
Notes on the resume function
•The point to be resumed is also cleared when the disc tray
is opened, the current disc is switched, the power is turned
off, or the function is switched.
•The resume function is not available for PBC playback of
VCDs. To turn off PBC, see “Disabling PBC” below.
To pause playback
Press a.
To resume playback, press c.
Disabling PBC (VCD only)
Press SHIFT+PBC on the remote control.
"PBC" disappears from the display, and the menu playback
feature is disabled.
•With PBC disabled, VCDs are played just like audio CDs.
This allows you, for example, to use repeat playback and
programmed playback for VCDs with PBC.
•If PBC is pressed during playback, playback stops.
•See also “Types of VCDs”, page 14.
16
Page 17

PLAYING DISCS—SELECTING TRACKS/CHAPTERS
Skipping
Press f or g repeatedly during playback.
- With each press of g, the disc position skips to the
beginning of the succeeding tracks (CDs/VCDs) or chapters
(DVDs).
- With each press of f, the disc position skips back first
to the beginning of the current track, then to the previous
tracks (CDs/VCDs) or chapters (DVDs).
•Skipping may be disabled on some DVDs.
En
Basic operations to locate a desired point are described here.
DVDs can also be searched by other methods (see "Playing
discs—DVD features", page 20).
Direct selection (CDs and VCDs only)
Select a track directly by entering the track number on the
remote control.
Press the numbered buttons for the desired track.
Example:
To play track 12, press +10, 2.
To play track 20, press +10, +10, 0.
Playback begins at the beginning of the selected track and
continutes to the end of the disc.
•For VCDs with PBC, turn off PBC first (see "Disabling PBC",
page 16).
Fast forward/reverse playback
Hold down f or g during playback.
- DVDs: “fx 2” or “gx 2” is displayed on the TV
screen.
- CDs and VCDs: “fx 5” or “gx 5” is displayed on
the TV screen.
To change playback speed
Hold down f or g repeatedly.
- DVD: playback speed changes among double speed, 8 times
and 32 times.
- CDs and VCDs: playback speed alternates between 5 times
and 16 times.
To return to normal playback
Press c.
•There is no audio during fast playback (DVDs and VCDs).
•Fast playback speed is the value for a disc with an average
bit rate.
17
Page 18

PLAYING DISCS—OTHER PLAYBACK MODES
En
Frame advance (DVDs and VCDs only)
1
Press a to pause playback.
2
Press a repeatedly to advance frames.
To return to normal playback
Press c.
•There is no audio during frame advance.
Slow playback (DVDs and VCDs only)
1
Press a to pause playback.
2
Hold down f or g.
To change the slow forward playback speed
Hold down g repeatedly.
The slow playback speed changes among 1/30, 1/15 and
1/5.
•Only 1/15 speed is available for slow reverse playback.
To return to normal playback
Press c.
•There is no audio during slow playback.
Repeat playback
DVDs
Press SHIFT+REPEAT repeatedly on the remote
control during playback.
With each press, the repeat playback mode changes as follows:
- CHAPTER: repeats the current chapter.
- TITLE: repeats the current title.
- OFF: cancels repeat mode (normal playback)
"[" appears on the unit's display when the unit is in the
title repeat mode and "[ 1" appears in the chapter repeat
mode.
CD and VCDs
1
Press SHIFT+REPEAT repeatedly on the remote
control.
With each press, the repeat playback mode changes as
follows:
- ALL: repeats all tracks on a disc.
- TRACK: repeats the current track.
- OFF: cancels repeat mode (normal playback)
"[" appears on the unit's display when the unit is in
the all repeat mode and "[ 1" appears in the track repeat
mode.
2
Press c to start playback.
•For VCDs with PBC, turn off PBC first (see "Disabling PBC",
page 16).
To cancel repeat playback
Press SHIFT+REPEAT on the remote control repeatedly until
"[" disappears on the unit’s display.
To repeat playback of selected tracks
Program the tracks with the programmed playback function,
and then press SHIFT+REPEAT to repeat playback of the
programmed tracks.
18
Page 19

Programmed playback (CDs and VCDs
only)
Up to 30 tracks can be played back in the order of selection.
1
Press SHIFT+RANDOM/PRGM on the remote
control in stop mode.
“PROGRAM” appears on the TV screen and "PRGM"
flashes on the unit’s display.
2
Press the numbered button(s) on the remote
control for the track to be played first.
To select track 12, press +10, 2.
To select track 20, press +10, +10, 0.
3
Repeat step 2 to program other tracks.
4
Press c to start playback.
The programmed tracks are played back in the order of
entry.
When programmed playback is complete or when s is
pressed to stop playback, the program display reappears.
•For VCDs with PBC, turn off PBC first (see "Disabling PBC",
page 16).
•During programmed playback, you cannot select a track with
the numbered buttons.
•If the total playing time of the program exceeds 99 minutes
and 59 seconds, the playing time is displayed as
"- -:- -".
To stop programmed playback
Press s.
At this point, the program is not cleared. Pressing c will
restart programmed playback from the first programmed track.
To clear the program
Press s again during stop.
•The program is also cleared when the disc tray is opened,
the function is switched or the power is turned off.
To check the program
Press g during stop.
With each press, the program number and the track number
are shown progressively on the unit’s display.
To add tracks to the program
Repeat step 2 in stop mode. The new tracks are added to the
end of the program .
To skip tracks
Press f or g repeatedly during playback.
Playback skips to the previous or the succeeding track(s)
within the program.
Random playback (CDs and VCDs
only)
Tracks can be played back randomly.
1
Press SHIFT+RANDOM/PRGM repeatedly on the
remote control to display "RANDOM" on the
unit's display.
“RANDOM” appears on the TV screen.
2
Press c to start playback.
To cancel random playback
Press SHIFT+RANDOM/PRGM once on the remote control.
“OFF” appears on the TV screen and "RANDOM" disappears
on the unit’s display.
•For VCDs with PBC, turn off PBC first (see "Disabling PBC",
page 16).
Changing audio channels (VCDs)
Use this function when playing Karaoke VCDs or VCDs with
different sound tracks in the left and right channels.
Press SHIFT+AUDIO SELECT repeatedly during
playback.
With each press, the audio channel changes as follows:
- Lch: left audio channel is output from both front speakers
- Rch: right audio channel is output from both front
speakers
- STEREO: normal stereo playback
•It is impossible to connect a microphone to this unit and
sing along to music sources.
•
Audio tracks of DVDs can also be switched. See "Changing
audio tracks", page 21.
En
19
Page 20

PLAYING DISCS—DVD FEATURES
En
Features unique to DVDs, such as marking, searching, and
switching of angles, subtitles, and audio tracks are described
here.
Marking
Mark points in a DVD to be recalled later. You can mark up to 5
discs, each with up to 5 points.
1
Press SHIFT+MARK while playing back the
desired point.
“ ” appears on the TV screen and the unit enters the mark
mode. The current mark memory is highlighted by the
cursor.
2
Press Bb if needed to move the cursor to the
desired mark memory.
A numbered mark memory is occupied. An asterisk
appears on a vacant one.
3
Press ENTER.
The current point is marked in the mark memory.
4
Press SHIFT+MARK again to exit the mark mode.
20
To recall a marked point
1 Press SHIFT+MARK to enter the mark mode.
2 Press Bb to move the cursor or press a number button
for the memory (1 - 5) to select the desired mark memory.
3 Press ENTER or c.
Playback starts from the recalled point.
To clear a marked point
1 Press SHIFT+MARK to enter the mark mode.
2 Press Bb to move the cursor or press a number button
for the memory (1 - 5) to select the desired mark memory.
3 Press C.
4 Press SHIFT+MARK again to exit the mark mode.
•A marked point is recalled with the subtitle and audio
language setting at the time it was marked, regardless of
possible later changes to the setting.
•When the 6th DVD disc is inserted, the mark data for the
oldest disc is overwritten by the disc information of the new
disc and deleted, even when a new point is not memorized.
Title search
Specify the playback location of a DVD by the title number.
1
Press SHIFT+T-SEARCH.
2
Press the numbered button(s) for the desired title
number, or press vV to change the displayed
title number.
Example:
To play title number 2, press 2.
To clear the number, press C.
3
Press ENTER or c.
Playback begins from the specified title.
•If you specify a title number which does not exist on the
disc, the
valid title number.
symbol is displayed. Repeat from step 1 with a
Chapter search
Specify the playback location of a DVD by the chapter number.
1
Press SHIFT+T-SEARCH twice.
2
Press the numbered button(s) for the desired
chapter number, or press vV to change the
displayed chapter number.
Example:
To play chapter number 7, press 7.
To play chapter number 20, press +10, +10, 0.
To clear the number, press C.
If needed, press Bb to move the cursor to or from the
title number.
3
Press ENTER or c.
Playback begins from the specified chapter.
•If you specify a chapter number which does not exist in the
title, the
valid chapter number.
symbol is displayed. Repeat from step 1 with a
Page 21

Time search
Locate a point in the title by specifying the time from its
beginning.
1
Press SHIFT+T-SEARCH 3 times while the resume
function is activated or during playback.
2
Press the numbered buttons to enter the time for
the desired point.
Example:
To specify 1:17:30 (1 hour 17 minutes 30 seconds), press
1, 1, 7, 3 and 0.
To specify 0:08:07 (8 minutes 7 seconds), press 8, 0 and
7.
To clear the numbers, press C repeatedly.
3
Press ENTER or c.
Playback begins from the specified location.
•If you specify a time greater than the length of the title, the
symbol is displayed. Repeat from step 1 with a valid
time.
Note on searching
•Title, chapter, and time search will not work with discs that
do not support the search function.
Changing angles
Select the angle to view a scene when playing back DVDs shot
with multiangles.
Press SHIFT+ANGLE repeatedly to select a viewing
angle.
With each press, the angle will change. The current angle
number and the number of available angles are displayed on
the TV.
•If you press SHIFT+ANGLE when playing back a scene or a
disc without multiple viewing angles, the
displayed.
symbol is
Changing subtitles
Display the subtitles on the screen when playing DVDs which
contain them. Subtitle language can be changed if more than
one is available.
Press SHIFT+SUB TITLE ON / OFF during playback.
The subtitles will be displayed.The current subtitle number
and the number of available subtitles are displayed on the TV.
To change the subtitle language
Press SHIFT+SUB TITLE SELECT to select the desired subtitle
language.
To turn off the subtitles
Press SHIFT+SUB TITLE ON / OFF again.
•If you press SHIFT+SUB TITLE ON / OFF when playing a
disc without subtitles, the
•The subtitle language can be changed only if the disc
contains more than one subtitle language.
•Some discs have subtitles on by default and does not allow
you to remove them.
•The subtitle language first displayed is specified by the
subtitle setting (see “Subtitle Language”, page 33).
symbol is displayed.
Changing audio tracks
Some DVDs have more than one audio tracks, for example,
soundtracks in different languages, or different sound mixes of
the same recording. You can change the audio track when
playing such discs.
Press SHIFT+AUDIO SELECT during playback.
Each time you press the button, the audio track will change.
The current audio track number and the number of available
audio tracks are displayed on the TV.
•The audio track can be changed only if the disc contains
multiple audio tracks. The number of available audio tracks
varies with the disc.
•The audio track language first played is specified by the
audio language setting (see “Audio Language”, page 32).
Listening Karaoke DVD discs
Press SHIFT+AUDIO SELECT repeatedly during playback to
select your desired Karaoke track.
•It is impossible to connect a microphone to this unit and
sing along to music sources.
Zoom
Press SHIFT+ZOOM during playback.
The picture around the center of the screen is enlarged to
approximately 4 times.
To move the enlarged picture
Press vVBb.
To return to the center of the picture, press C.
To cancel zoom
Press SHIFT+ZOOM again.
En
21
Page 22

PLAYING DISCS—STATUS DISPLAY
On the TV
Press ON SCREEN DISPLAY repeatedly.
Various playback status information appear on the TV screen
along with icons that indicate the type of information.
Common to all types of discs
En
Audio and video CDs only
Various disc playback status information can be displayed on
the unit's display and on the TV screen.
On the unit’s display
Press SETUP repeatedly during playback.
DISPLAY on the unit is also available.
With each press, the playback time display changes as follows:
Audio and Video CDs
- Number and elapsed time of current track
- Number and remaining time of current track
- Elapsed time of disc
- Remaining time of disc
DVDs
- Number and elapsed time of current title
- Number and remaining time of current title
- Number and elapsed time of current chapter
- Number and remaining time of current chapter
•Playback time information cannot be changed during
random playback.
•In some discs, playback time information may not be
displayed correctly during programmed playback.
•Playback time information display is not available for VCDs
with PBC.
22
shows the elapsed playing time during playback; total
playing time or the playback resume point during stop
shows the repeat mode status
shows the track number
shows the program/ random playback mode status
shows if PBC is on or off (VCD only)
DVDs only
shows the title number and the chapter number
shows the type of audio track
h
D: Dolby Digital signal. The numbers below
indicate the number of front and rear audio channels.
For example,
“2/0” = [Conventional stereo] two front channels (left
and right) and no rear channel
“3/2.1” [5.1-channel surround] = three front channels
(left, right and center), two rear channels (left rear and
right rear) and LFE (Low Frequency Effects).
dts: DTS signal.
LPCM: Linear PCM signal. The sampling frequency
and the D/A conversion bits are displayed below, such
as “48k-16b”.
KARAOKE: Karaoke signal. The currently active vocal
track is displayed below, such as “VOCAL 1 + 2”.
MPEG: MPEG audio signal.
shows the current angle number out of the available
number of angles
shows the current subtitle number out of the available
number of subtitles
shows the occupied mark memory numbers
Page 23

DOLBY AND DTS SURROUND
This unit comes equipped with a Dolby Digital/Pro Logic decoder
and a DTS decoder. With the full 5.1-channel speaker system
supplied, Dolby and DTS surround sources can be played back
in full scale home theater sound.
Dolby and DTS surround
Dolby Digital and DTS are two different digital encoding
systems of audio signals.
Both Dolby Digital and DTS, in their full configuration, can
have a total of “5.1” discrete channels: left, center and right
front channels, separate left and right surround channels, plus
a low-frequency effects (LFE) channel, counted as “0.1”
channel.
Dolby Digital and DTS tracks may also come in 1 or 2 channels
(monaural or stereo, respectively), or in fact, any number of
channels within the limit. Sources with 3 or more channels
will be refered to hereon as a
Dolby Digital software is marked with the
DTS software is marked with the
multichannel
source.
logo.
logo.
Dolby Pro Logic is an analog audio encoding system with
four independent channels: left, center, right, and surround.
These four channels are coded into the two tracks of a
conventional analog stereo source.
Dolby Pro Logic software is marked with the
Hlogo.
•Make sure all supplied speakers are placed and connected
properly (pages 5 to 7).
•Make sure your TV is connected properly and the appropriate
input is selected.
Playing surround sources
1
Press DVD/CD and play the Dolby or the DTS
surround disc.
DVDs may contain several audio tracks. If necessary, press
SHIFT+AUDIO SELECT to select the desired playback
track.
2
Press SURROUND.
The Dolby or the DTS decoder is enabled, depending on
the source, and the source is played with the surround
effect in the “NORMAL” listening mode.
The surround playback mode indicators light up according
to the signal type and other conditions (see “Surround
playback mode indication”, page 24).
To play audio from external video equipment in
surround sound
1 Press AUX and play the surround video source on the
external equipment.
2 Press SURROUND.
To cancel surround playback
Press SURROUND repeatedly until “OFF” is displayed.
To adjust the sound level of the speakers during
playback
See “To adjust the speaker level balance without the test
signal”, page 24.
•Dolby Digital, DTS, or the Dolby Pro Logic surround system
is canceled when the headphones are plugged in.
•Dolby or DTS Surround sound can only be obtained when
playing back a disc recorded in the respective system.
•To play DTS audio CDs, see "Playing discs", page 15.
En
23
Page 24

Additional Dolby and DTS surround
listening modes
In addition to the NORMAL mode, this unit is also equipped
with the PHANTOM and the 3 STEREO modes.
•These modes are to be used when either the center speaker
unit or the surround speaker units are not available, and
En
therefore, not be needed under the normal use of this DVD
system.
To change the listening mode
Press SURROUND repeatedly until the desired listening mode
is displayed. With each press, the listening mode changes as
follows:
-
NORMAL
-
PHANTOM: select this mode when no center speaker is
connected. The center channel signals are output
through the left and right speakers.
-
3 STEREO: select this mode when no surround speakers
are connected. The rear channel signals are output
through the front speakers.
-
OFF: select this mode when neither the center nor the
surround speakers are connected.Multichannel Dolby
Digital or DTS sources are played back in a 2-channel
downmix.
Surround playback mode indication
The surround playback mode indicators light up on the display
to show the actual surround playback mode.
-“hDIGITAL” shows that a multichannel Dolby Digital
source is played back in surround sound.
-“hPRO LOGIC” shows that either a 2-channel source
or a multichannel Dolby Pro Logic source is played back
in surround sound.
-“DOWNMIX” shows that a multichannel source is played
back in a 2-channel downmix.
Adjusting speaker level
For optimum performance, the sound level of all available
channels should be adjusted to suit your listening environment.
The left and right front speakers create the stereo effect.
The center speaker helps achieve precise sound positioning
over a broad sound field.
The surround speakers enhance the “depth” of the sound field.
Adjusting with the test signal
The unit is equipped with a built-in test signal generator for
easy balance adjustment of the channels.
1
Press SURROUND repeatedly to select the mode
for your speaker configuration.
- For playback with the supplied speakers, select
"NORMAL".
2
Hold down SHIFT+MAN/SEL on the remote
control until "L" flashes in the display.
The test signal travels through the channels one by one.
Indication for the currently adjustable channel flashes in
the display:
- L: left front speaker
- C: center speaker
- R: right front speaker
- RS: right surround speaker
- LS: left surround speaker
3
Press f or g on the remote control to
adjust the sound level.
- Left and right front speakers: press f to shift the
balance to the left and g to shift to the right.
-
Center and the surround speakers: press f to de-
emphasize the channel and g to emphasize the
channel.
Adjust the sound level so that the test signal from each
channel is heard with the same loudness.
•The channel will not change while you are adjusting the
sound level.
•A clicking sound might be heard with the test signal during
level adjustment. This is not a malfunction.
To stop speaker level adjustment
Press s or MAN/SEL.
To adjust the speaker level without the test signal
1 Play the surround source.
2 Press SURROUND repeatedly to select the mode for your
speaker configuration.
3 Press SHIFT+MAN/SEL repeatedly on the remote control
until "L/R" is displayed.
4 Press f or g on the remote control to adjust the
sound level of the front speakers.
5 Repeat steps 3 and 4 to adjust the sound level of the other
speakers (S-W: subwoofer, C, RS, or LS).
•SHIFT+CENTER +/- and SHIFT+REAR +/- buttons are also
available for the level adjustment of these channels. LS and
RS channels cannot be adjusted separately with the REAR
buttons.
•Speaker level adjustment is available only for speakers that
are activated.
•Speaker level setting is common to Dolby Digital, DTS, and
Dolby Pro Logic.
24
Page 25

Adjusting delay time
Sounds from the surround speakers and the center speaker are
reproduced a split second after the front speakers for the effect
of depth.
1
Play the surround source.
- Delay time adjustment of the center channel is available
only when playing Dolby Digital or DTS multichannel
sources.
2
Press SURROUND repeatedly to select the mode
for the speaker configuration.
3
Press SHIFT+MAN/SEL repeatedly on the remote
control to select delay time to adjust.
-C _MS: delay time setting for center speaker
-S _MS: delay time setting for surround speakers
4
Press f or g on the remote control to
adjust the delay time.
Center speaker: adjust the delay time so that screen dialogs
are heard clearly and naturally, between 0 ms
(milliseconds) and 5 ms in 1 ms steps. The default is
"C 0MS" (no delay).
Surround speakers
Dolby Digital/DTS: adjust between 0 and 15 ms in 5 ms
steps. The default is "S 5MS".
Dolby Pro Logic: adjust to 15 ms, 20 ms or 30 ms. The
default is "S 20MS".
•Delay time setting in Dolby Digital/DTS affects that of Dolby
Pro Logic, and vice versa.
•Delay time adjustment is available only for speakers that
are activated.
RADIO
Manual tuning
1
Press TUNER/BAND repeatedly to select a band.
The unit switches to the radio from any other function and
alternates between FM and AM.
2
Press fDOWN or g UP to tune in to a
station.
"TUNE" is displayed when a station is tuned in.
"1" lights up for FM stereo reception.
To search for a station automatically (Auto Search)
Hold down fDOWN or gUP.
The unit searches for a station up or down the band and stops
at reception.
To stop the search manually, press fDOWN or gUP.
•Auto Search may not stop at stations with weak signals.
Preset tuning
Preset your favorite stations and tune them in directly.
Presetting stations
1
Press TUNER/BAND to select the band.
2
Press fDOWN or gUP to tune in to the
desired station.
3
Press aSET to store the station.
The preset number, beginning from "1", appears on the
display.
4
Repeat step 1 to 3 to preset other stations.
•You cannot store more than a total of 32 preset stations.
"FULL" is displayed.
•If power is interrupted for more than approximately 12 hours,
all settings stored in memory after purchase need to be reset.
En
25
Page 26

Tuning in to preset stations
On the unit
1
Press TUNER/BAND to select the band.
2
Press cPRESET repeatedly.
With each press, the station with the succeeding preset
En
number is tuned in.
On the remote control
1
Press TUNER/BAND to select the band.
2
Press the numbered button(s) for the preset
number of your desired station.
-To select preset number 20, press +10, +10 and 0.
-To select preset number 15, press +10 and 5.
cPRESET is also available.
To clear a preset station
1Tune in to the station by preset tuning.
2 Press sCLEAR, then press aSET within 4 seconds.
Preset numbers of preset stations in the band with higher
numbers decrease by one.
Adjustments
Antennas
Keep antennas away from metallic objects, electrical equipment
and cords.
FM antenna: Extend fully in a T-shape. If receiving condition
is poor, connect optional outdoor antenna to FM 75 Ω
terminal. Be sure to connect the shield braid of the antenna
to the 2 terminal.
AM antenna: Rotate to find best reception.
To switch to monaural FM reception
Press SHIFT+MONO TUNER on the remote control. With each
press, "MONO" and "STEREO" are displayed alternately
on the display.
•When FM stereo reception is poor, switching to monaural
reduces noise.
To switch the AM tuning interval
Hold down TUNER/BAND and press POWER on the unit. With
each press, the AM tuning interval alternates between 9 kHz/
step and 10 kHz/step.
•The default is 10 kHz/step. Change it only when using the
unit in a 9 kHz/step area. Switching AM tuning interval clears
all the station presets.
26
Page 27

SOUND
T-BASS
Emphasizes low frequencies for a powerful sound.
On the main unit
1
Press MODE repeatedly to display "T-BASS".
2
Within 7 seconds, turn VOLUME/MULTI JOG to
select one of the three emphasis levels or the off
position.
On the remote control
Press T-BASS repeatedly to select one of the three
emphasis levels or the off position.
•If the sound becomes distorted with the T-BASS effect, cancel
the effect.
BASS
Adjusts the bass level.
1
Press MODE repeatedly to display "BASS".
2
Within 7 seconds, turn VOLUME/MULTI JOG to
adjust the bass level.
The bass level can be adjusted from "–5" to "+5".
•If the sound becomes distorted with the BASS effect, cancel
the effect.
TREBLE
Adjusts the treble level.
1
Press MODE repeatedly to display "TREBLE".
2
Within 7 seconds, turn VOLUME/MULTI JOG to
adjust the treble level.
The treble level can be adjusted from "–5" to "+5".
•If the sound becomes distorted with the TREBLE effect,
cancel the effect.
Adjusting left/right speaker balance
1
Press SHIFT+MAN/SEL repeatedly on the remote
control until "L/R" is displayed.
2
Press f or g on the remote control to
adjust the balance.
Press within 4 seconds.
•When surround playback is activated, level adjustment of
other speaker channels is available as well. See "Adjusting
speaker level", page 24.
En
27
Page 28
TIMER
En
Sleep timer
Turns off the unit automatically after a specified time.
1
Press MODE repeatedly to display "SLEEP".
On the remote control, press SHIFT+SLEEP.
2
Press f or g repeatedly to set the sleep
timer duration.
With each press, the timer duration changes in 5-minute
steps between 5 to 240 minutes. If there is no button input
while "SLEEP" is displayed, the current setting is entered
automatically.
The unit turns off after the selected time.
•VOLUME/MULTI JOG is also available in place of f
or g.
To check the remaining time until the unit turns off
Press MODE repeatedly (press SHIFT+SLEEP on the remote
control). The remaining time is displayed for 7 seconds.
To cancel the sleep timer
Follow steps 1 and 2 above (press SHIFT+SLEEP twice on
the remote control) so that "SLEEPoFF" is displayed.
Timer playback
Turns on the unit at a specified time for the specified duration.
Make sure the clock is set correctly.
1
Select the desired playback source.
2
On the main unit
1 Press MODE repeatedly to display "
2Within 7 seconds, turn VOLUME/MULTI JOG
to display "
On the remote control
Press SHIFT+TIMER.
"5" indicator lights up and " PLAY" appears on the
display. The timer-on time and the source name along
with the timer-activated duration appear alternately on the
display.
3
Within 4 seconds, press ENTER (a on the remote
control).
The timer-on time and the source name along with the
timer-activated duration appear alternately on the display.
PLAY".
".
4
Press f or g to set the timer-on time, then
press ENTER or a.
5
Press f or g to set the timer-activated
duration, then press ENTER or a.
With each press, the timer-activated duration changes in
5-minute steps between 5 to 240 minutes.
If there is no button input for 4 seconds, the current setting
is entered automatically.
•VOLUME/MULTI JOG is also available in place of f
or g.
6
Adjust the volume and tone for timer playback.
If the volume level is set to 21 or higher, it is automatically
turned down to 20 when the unit is turned on by the timer.
7
Prepare the source.
To play the disc, insert a disc.
To play the radio, select the band and tune in the desired
station.
To play external equipment connected to the AUX jacks,
set an external timer for the equipment so that playback
begins at the same time.
8
Press POWER 6STANDBY/ON to turn the unit
off.
"5" remains on the display to indicate the timer standby
mode (when ECO mode is deactivated).
At timer-on time, the unit turns on and plays the selected
source. After the specified timer-activated duration, the
unit turns off again.
•Timer playback will not begin unless the unit is turned off
first.
•Connected equipment cannot be turned on or off by the builtin timer of this unit. Use an external timer.
28
Page 29

To check the timer setting
Press SHIFT+TIMER on the remote control.
The timer-on time, the source and the timer-activated duration
are displayed for a while.
To change the timer setting
Reset the timer again.
To turn off the timer
On the main unit
Press MODE repeatedly to display " PLAY" and turn
VOLUME/MULTI JOG to display "
ENTER. "5" disappears from the display.
On the remote control
Press SHIFT+TIMER repeatedly until " OFF" is displayed.
"5" disappears from the display.
Tip:
Your timer setting is retained even if the timer is turned off.
Next time the timer is turned on, you can change your previous
setting, or simply use the same setting again.
OFF". Then press
En
29
Page 30

EXTERNAL EQUIPMENT
Connection besides those described in section "Preparation"
are described here.
•See section "Parts and controls" for illustration.
•Connecting cords for optional equipment are not supplied.
•Refer also to the operating instructions of the connected
equipment.
•Consult your local Aiwa dealer for optional equipment.
En
AUX jacks
Accepts analog audio signal input from connected
equipment.
Connect to the line output jacks of VCRs, LD players,
turntables, etc. with an optional audio connecting
cord with RCA phono plugs (red plug to R jack, white
plug to L jack).
•By connecting the audio output of a VCR, you can play sound
tracks of Dolby Pro Logic videos through this system in
surround sound. See section "Dolby and DTS surround".
•When connecting a turntable, use one equipped with a builtin equalizer amplifier.
To select input to these jacks
Press AUX.
To change input level
1 Press AUX.
2Press fDOWN or gUP repeatedly.
The input level changes from "MIN" to "6" and "MAX".
•When the "OVER" level indicator lights up on the display,
the input level is too high. Turn down the input level.
LINE OUT jacks
Outputs analog audio signals to connected
equipment.
Connect to the line input jacks of audio equipment
with an optional audio connecting cord with RCA
phono plugs (red plug to R jack, white plug to L jack).
•Do not connect the same equipment to the LINE OUT jacks
and AUX jacks of this unit. Noise will be generated by a
signal loop which may damage the equipment.
•Connecting the LINE OUT jacks to a TV may cause noise on
this unit, depending on the TV. Disconnect the LINE OUT
jacks in such cases.
•When playing DTS CDs in the DTS mode, noise may be
output at the begininng of playback.
•When playing/recording the DTS source through the
equipment connected to the LINE OUT jacks, cancel the
surround playback (See page 23).
DIGITAL OUT (OPTICAL) jack
Outputs digital audio signals to connected
equipment.
Connect to the optical input jacks of digital audio
equipment with an optional optical cord.
•Remove the dust cap a from the jack before connection.
Reattach the cap when the jack is not used.
CAUTION!! When connecting to digital equipment
without a Dolby Digital or a DTS decoder
NEVER play a multichannel Dolby Digital source through
connected digital equipment without a Dolby Digital
decoder.
Similarly,
NEVER play a multichannel DTS source through
connected digital equipment without a DTS decoder.
Doing so will generate high level noise which may be
harmful to your ears and damage the speakers.
•When recording a VCD through this jack, track numbers
are not copied and one long track will be made.
•When a disc with 96 kHz sampling frequency rate is played
back, output from the DIGITAL OUT (OPTICAL) jack is
automatically converted to 48 kHz.
30
Page 31

CUSTOMIZING DVD SETUP
Various TV/DVD settings can be changed as needed or preferred.
•The language in which this menu is displayed can be
selected from three available languages (see “Menu
Language”, page 32). The menu in English is used here for
explanation.
Overview of the Setup Menu
There are 4 major menu items that can be adjusted:
On-screen Menu
•Sets the on-screen guide display on or off.
•Selects a background color for the TV screen.
•Selects the language for this setup menu and the on-screen
guide messages.
Disc Languages
Selects the preferred audio soundtrack language, subtitle
language, and menu language for DVD playback.
TV Aspect
Sets the aspect ratio of the video signal sent to your connected
TV set.
Ratings
Sets the rating limit of DVDs allowed to play back on this unit
when playing discs with restriction level encoding.
The default “TV Aspect” setting has to be changed
are connecting to a 16:9 (wide) ratio TV set
if you
.
Any other setting can be changed or kept as is, according
to your preferences.
Basic menu operation
Basic operation of the SETUP MENU is described here.
1
Press DVD/CD and press SETUP while the player
is stopped.
The “SETUP MENU” screen is displayed.
SETUP MENU
Choose The Item ik
1
On-screen Menu
2
Disc Languages
3
TV Aspect
4
Ratings
ENTER : Choose item SETUP : Completion
2
Press vV to move the cursor (the yellowhighlighted area) to the setting to be changed.
3
Press ENTER.
The menu screen for the item you selected will be
displayed.
4
Press vV to move the cursor to the desired
setting.
5
Press ENTER to enter your selection.
The selected setting is entered and the display returns to
the main setup screen of step 1.
For some settings, however, the screen will display a more
detailed menu. Follow the directions shown on the screen.
6
Press SETUP to exit the setup menu.
To return to the previous screen
Press RETURN.
To exit the setup menu
Press SETUP.
4 : 3 LB
Level 8
En
31
Page 32

To confirm your setting
1 Follow steps 1 to 4 above to display the setting you want to
confirm.
2Press SETUP to exit the setup menu without making
changes.
•If you pressed RETURN or SETUP before pressing ENTER
to enter your selection, you return to the previous screen or
En
exit the setup menu, respectively, without entering your
selection. If you are uncertain of your present setup, follow
the steps above to confirm your setting.
•Your setting is not saved in the unit's memory until you
press POWER to turn off the power. If the unit suffers a power
interruption before it is turned off with POWER, setting will
revert to the previous one when the unit is turned on the
next time.
•While the setup screen is displayed, you will not be able to
perform other operations on the DVD player. Press SETUP
again to exit the setup screen first.
•Setup is canceled if the disc compartment is opened.
On-Screen menu
Set or select the on-screen guide display, background color for
the TV screen, and the language for this setup menu and the
on-screen guides.
On-screen Menu
Choose The Item ik
1
Guide Message
2
Background
3
Menu Language
ENTER : Choose item
SETUP : Completion
Guide Message
Sets whether or not to show the on-screen guide display at
the upper right corner of the TV screen.
The default is “ON”.
1
Select “On-screen Menu” in the “SETUP MENU”
and press ENTER.
2
Select “Guide Message” and press ENTER.
3
Select the desired setting and press ENTER.
4
Press RETURN to return to the previous screen
or press SETUP to exit the setup menu.
Background
Sets the background color of the TV screen while stopped.
The default is “Wallpaper”.
1
Select “On-screen Menu” in the “SETUP MENU”
and press ENTER.
2
Select “Background” and press ENTER.
3
Select the desired setting and press ENTER.
4
Press RETURN to return to the previous screen
or press SETUP to exit the setup menu.
O N
English
RETURN : Previous menu
Menu Language
Selects the language in which this setup menu and the onscreen guide messages are displayed.
The default is “English”.
1
Select “On-screen Menu” in the “SETUP MENU”
and press ENTER.
2
Select “Menu Language”and press ENTER.
3
Select the desired language and press ENTER.
4
Press RETURN to return to the previous screen
or press SETUP to exit the setup menu.
Disc Languages
Selects the preferred audio sound track language, subtitle
language and menu screen language for DVD playback.
Disc Languages
Choose The Item ik
1
Audio Language
2
Subtitle Language
3
Disc Menu
ENTER : Choose item
SETUP : Completion
Audio Language
The default is “Original”.
1
Select “Disc Languages” in the “SETUP MENU”
and press ENTER.
2
Select “Audio language” and press ENTER.
Original
Auto
English
RETURN : Previous menu
32
Page 33

3
Select the desired language and press ENTER.
- “Original”: plays discs in the language specified as the
default on the disc.
Go to step 5.
- “English”, “French”, “Spanish”: plays discs in the
selected language.
-
“Others”: language code setting screen appears to select
any other preferred language.
4
If “Others” is selected in step 3, enter a four-digit
Go to step 5
.
Go to step 4.
language code with vV and numbered buttons,
and press ENTER.
Refer to the list of language codes on page 35.
To move the cursor, use Bb.
5
Press RETURN to return to the previous screen
or press SETUP to exit the setup menu.
•If your preferred language does not exist on the disc, the
disc’s default language will be used.
•To manually change the audio tracks, see “Changing audio
tracks”, page 21.
Subtitle Language
The default is “Auto”.
1
Select “Disc Languages” in the “SETUP MENU”
and press ENTER.
2
Select “Subtitle Language” and press ENTER.
3
Select the desired language and press ENTER.
- “Auto”: automatically displays subtitles in the language
specified in the "Audio Language" setting when needed;
ex) when the "Audio Language" is set to English, no
subtitles are displayed if current audio track is in English;
if the audio track is in any other language, English
subtitles are displayed.
-
“English”, “French”, “Spanish”: shows subtitles in the
selected language.
-
“Others”: language code screen appears to select any
other language. See step 4 of “Audio Language” setting.
4
Press RETURN to return to the previous screen
or press SETUP to exit the setup menu.
•If your preferred language does not exist on the disc, the
disc’s default language will be used.
•To turn subtitles on or off, or to manually change the
displayed subtitle language, see “Changing subtitles”, page
21.
Disc Menu
The default is “English”.
1
Select “Disc Languages” in the “SETUP MENU”
and press ENTER.
2
Select “Disc Menu” and press ENTER.
3
Select the desired language and press ENTER.
- “English”, “French”, “Spanish”: shows the disc menu
in the selected language.
-
“Others”: language code screen appears to select any
other language.See step 4 of “Audio Language” setting.
4
Press RETURN to return to the previous screen
or press SETUP to exit the setup menu.
•If your preferred language does not exist on the disc, the
disc’s default language will be used.
•For the operation of the disc menu, see “Playing back with
the software specific menu”, page 16.
TV Aspect
Sets the aspect ratio of the video signal sent to your connected
TV set.
TV Aspect
Choose The Item ik
12NORMAL TV
WIDE TV
ENTER : Choose item
SETUP : Completion
4 : 3
16 : 9
RETURN : Previous menu
The default is “4:3 LB (letterbox)”.
If you are connecting to a 16:9 (wide) ratio TV set, change the
setting to “Wide TV”.
NORMAL TV
1
Select “TV Aspect” in the “SETUP MENU” and
press ENTER.
2
Select “NORMAL TV 4:3” and press ENTER.
3
Select the preferred setting when playing a disc
recorded in wide format, and press ENTER.
- “LETTER BOX”
The width of the picture is fit to the TV screen so that no
part of the picture is cut off.
-
“PAN & SCAN”
The left and/or the right portions of each scene are cut
off as specified by the manufacturer, and the picture is
diplayed at full screen height.
4
Press SETUP to exit the setup menu.
•The preference setting for the 4:3 representation of wide
format software is only effective when playing a disc offering
such a choice. Such a disc may be labeled as "16:9 LB PS",
where LB stands for "Letter Box" and PS for "Pan & Scan".
Other discs, such as those labeled "16:9 LB" or "16:9 PS",
are played according to the disc's setting, regardless of your
preference.
33
En
Page 34

WIDE TV
1
Select “TV Aspect” in the “SETUP MENU” and
press ENTER.
2
Select “WIDE TV 16:9” and press ENTER.
3
Press SETUP to exit the setup menu.
En
Ratings
Sets the rating limit to play discs with restriction level encoding.
Rating Limit
Choose The Item ik
Level
8
7
6
5
4
3
2
1
(for Adult)
(for Family)
RETURN : Previous menu
Level
Level
Level
Level
Level
Level
Level
ENTER : Choose item
SETUP : Completion
Setting the rating
The default is “Level 8”.
1
Select “Ratings” in the “SETUP MENU” and press
ENTER.
2
Select your desired level and press ENTER.
The smaller the number, the higher the level of restriction.
For example, setting the rating level to 1 will restrict
playback of all discs with a rating level from 2 to 8, either
by cutting certain scenes or disabling playback altogether,
depending on the disc. Check your disc for details.
3
Select the country code for your country.
The country code needs to be set correctly, since the rating
system differs with the country.
When “Other Country” is selected in the country code,
the display changes to accept 4-digit numbers. Input a 4digit country code shown on page 36 in the same way as
the input of the language code (page 33).
34
4
Press ENTER.
The password entry screen is displayed.
5
Use the numbered buttons and vV to enter a
four-digit password, and press ENTER.
Confirm your password.
Do not forget your password!
If you forgot your password, reset the DVD setup (see
“Resetting DVD setup”, page 38) and re-set all settings
again, including the “Ratings” setting.
6
After confirming the password, press ENTER
again.
7
Press SETUP to exit the setup menu.
Changing the setting
Once the ratings settings have been set, you first need to enter
the password to change them.
1
Select “Ratings” in the “SETUP MENU” and press
ENTER.
2
Input your four-digit password and press ENTER.
3
Select the setting to be changed and press
ENTER.
“Unlock Player” resets the rating level, country and
password setting to default.
4
If you chose “Unlock player”, the message “The
player is unlocked” appears on the display. Press
ENTER.
For other settings, change to your desired setting
and press ENTER.
5
Press RETURN to return to the previous screen
or press SETUP to exit the setup menu.
Page 35

LANGUAGE CODES
Code Language Code Language Code Language Code Language
3738 Abkhazian
3737 Afar
3742 Afrikaans
5553 Albanian
3749 Amharic
3754 Arabic
4461 Armenian
3755 Assamese
3760 Aymara
3762 Azerbaijani
3837 Bashkir
4157 Basque
3850 Bengali; Bangla
4062 Bhutani
3844 Bihari
3854 Breton
3843 Bulgarian
4961 Burmese
3841 Byelorussian
4749 Cambodian
3937 Catalan
6244 Chinese
3951 Corsican
4454 Croatian
3955 Czech
4037 Danish
5048 Dutch
4150 English
4151 Esperanto
4156 Estonian
4251 Faroese
Use these numbers to specify the language in the “Disc Languages” setting (page 32).
4246 Fiji
4845 Finnish
4254 French
4261 Frisian
4348 Galician
4737 Georgian
4041 German
4148 Greek
4748 Greenlandic
4350 Guarani
4357 Gujarati
4437 Hausa
4559 Hebrew
4445 Hindi
4457 Hungarian
4555 Icelandic
4550 Indonesian
4537 Interlingua
4337 Irish
4556 Italian
4637 Japanese
4659 Javanese
4750 Kannada
4755 Kashmiri
4747 Kazakh
4761 Kirghiz
4751 Korean
4757 Kurdish
4851 Laothian
4837 Latin
4858 Latvian; Lettish
4850 Lingala
4856 Lithuanian
4947 Macedonian
4943 Malagasy
4955 Malay
4948 Malayalam
4956 Maltese
4945 Maori
4954 Marathi
4951 Moldavian
4950 Mongolian
5037 Nauru
5041 Nepali
5051 Norwegian
5154 Oriya
5255 Pashto; Pushto
4237 Persian
5248 Polish
5256 Portuguese
5237 Punjabi
5357 Quechua
5449 Rhaeto-Romance
5451 Romanian
5457 Russian
5549 Samoan
5537 Sanskrit
4340 Scots Gaelic
5554 Serbian
5544 Serbo-Croatian
5550 Shona
5540 Sindhi
5545 Singhalese
5547 Slovak
5548 Slovenian
5551 Somali
4155 Spanish
5557 Sundanese
5559 Swahili
5558 Swedish
5648 Tagalog
5643 Tajik
5637 Tamil
5656 Tatar
5641 Telugu
5644 Thai
3851 Tibetan
5645 Tigrinya
5651 Tonga
5654 Turkish
5647 Turkmen
5659 Twi
5747 Ukrainian
5754 Urdu
5762 Uzbek
5845 Vietnamese
5851 Volapük
3961 Welsh
5951 Wolof
6044 Xhosa
4645 Yiddish
6151 Yoruba
6257 Zulu
En
35
Page 36

COUNTRY CODES
Code Country Code Country Code Country Code Country
6570 AFGHANISTAN
6576 ALBANIA
6890 ALGERIA
6583 AMERICAN SAMOA
6568 ANDORRA
6579 ANGOLA
En
6573 ANGUILLA
6581 ANTARCTICA
6571 ANTIGUA AND BARBUDA
6582 ARGENTINA
6577 ARMENIA
6587 ARUBA
6585 AUSTRALIA
6584 AUSTRIA
6590 AZERBAIJAN
6683 BAHAMAS
6672 BAHRAIN
6668 BANGLADESH
6666 BARBADOS
6689 BELARUS
6669 BELGIUM
6690 BELIZE
6674 BENIN
6677 BERMUDA
6684 BHUTAN
6679 BOLIVIA
6665 BOSNIA AND HERZEGOVINA
6687 BOTSWANA
6686 BOUVET ISLAND
6682 BRAZIL
7379
BRITISH INDIAN OCEAN TERRITORY
Use these numbers to specify the country in the “Ratings” setting (page 34).
6678 BRUNEI DARUSSALAM
6671 BULGARIA
6670 BURKINA FASO
6673 BURUNDI
7572 CAMBODIA
6777 CAMEROON
6765 CANADA
6786 CAPE VERDE
7589 CAYMAN ISLANDS
6770 CENTRAL AFRICAN REPUBLIC
8468 CHAD
6776 CHILE
6778 CHINA
6788 CHRISTMAS ISLAND
6767 COCOS (KEELING) ISLAND
6779 COLOMBIA
7577 COMOROS
6771 CONGO
6775 COOK ISLANDS
6782 COSTA RICA
6773 COTE D’IVOIRE
7282 CROATIA
6785 CUBA
6789 CYPRUS
6790 CZECH REPUBLIC
6875 DENMARK
6874 DJIBOUTI
6877 DOMINICA
6879 DOMINICAN REPUBLIC
8480 EAST TIMOR
6967 ECUADOR
6971 EGYPT
8386 EL SALVADOR
7181 EQUATORIAL GUINEA
6982 ERITREA
6969 ESTONIA
6984 ETHIOPIA
7075
7079 FAROE ISLANDS
7074 FIJI
7073 FINLAND
7082 FRANCE
7088 FRANCE, METROPOLITAN
7170 FRENCH GUIANA
8070 FRENCH POLYNESIA
8470
7165 GABON
7177 GAMBIA
7169 GEORGIA
6869 GERMANY
7172 GHANA
7173 GIBRALTAR
7182 GREECE
7176 GREENLAND
7168 GRENADA
7180 GUADELOUPE
7185 GUAM
7184 GUATEMALA
7178 GUINEA
7187 GUNEA-BISSAU
7189 GUYANA
7284 HAITI
FALKLAND ISLANDS (MALVINAS)
FRENCH SOUTHERN TERRITORIES
7277
HEARD ISLAND AND MCDONALD ISLANDS
7278 HONDURAS
7275 HONG KONG
7285 HUNGARY
7383 ICELAND
7378 INDIA
7368 INDONESIA
7382 IRAN (ISLAMIC REPUBLIC OF)
7381 IRAQ
7369 IRELAND
7376 ISRAEL
7384 ITALY
7477 JAMAICA
7480 JAPAN
7479 JORDAN
7590 KAZAKHSTAN
7569 KENYA
7573 KIRIBATI
7580
KOREA,DEMOCRATIC PEOPLE’S REPUBLIC OF
7582 KOREA, REPUBLIC OF
7587 KUWAIT
7571 KYRGYZSTAN
7665
LAO PEOPLE’S DEMOCRATIC REPUBLIC
7686 LATVIA
7666 LEBANON
7683 LESOTHO
7682 LIBERIA
7689 LIBYAN ARAB JAMAHIRIYA
7673 LIECHTENSTEIN
7684 LITHUANIA
7685 LUXEMBOURG
36
Page 37

Code Country Code Country Code Country
7779 MACAU
7771 MADAGASCAR
7787 MALAWI
7789 MALAYSIA
7786 MALDIVES
7776 MALI
7784 MALTA
7772 MARSHALL ISLANDS
7781 MARTINIQUE
7782 MAURITANIA
7785 MAURITIUS
8984 MAYOTTE
7788 MEXICO
7077
MICRONESIA (FEDERATED STATES OF)
7768 MOLDOVA, REPUBLIC OF
7767 MONACO
7778 MONGOLIA
7783 MONTSERRAT
7765 MOROCCO
7790 MOZAMBIQUE
7777 MYANMAR
7865 NAMIBIA
7882 NAURU
7880 NEPAL
7876 NETHERLANDS
6578 NETHERLANDS ANTILLES
7867 NEW CALEDONIA
7890 NEW ZEALAND
7873 NICARAGUA
7869 NIGER
7871 NIGERIA
7885 NIUE
7870 NORFOLK ISLAND
7780 NORTHERN MARIANA ISLANDS
7879 NORWAY
7977 OMAN
8075 PAKISTAN
8087 PALAU
8065 PANAMA
8071 PAPUA NEW GUINEA
8089 PARAGUAY
8069 PERU
8072 PHILIPPINES
8078 PITCAIRN
8076 POLAND
8084 PORTUGAL
8082 PUERTO RICO
8165 QATAR
8269 REUNION
8279 ROMANIA
8285 RUSSIAN FEDERATION
8287 RWANDA
8372 SAINT HELENA
7578 SAINT KITTS AND NEVIS
7667 SAINT LUCIA
8077 SAINT PIERRE AND MIQUELON
8667
SAINT VINCENT AND THE GRENADINES
8783 SAMOA
8377 SAN MARINO
8384 SAO TOME AND PRINCIPE
8365 SAUDI ARABIA
8378 SENEGAL
8367 SEYCHELLES
8376 SIERRA LEONE
8371 SINGAPORE
8375 SLOVAKIA
8373 SLOVENIA
8366 SOLOMON ISLANDS
8379 SOMALIA
9065 SOUTH AFRICA
7183
SOUTH GEORGIA AND THE SOUTH SANDWICH ISLANDS
6983 SPAIN
7675 SRI LANKA
8368 SUDAN
8382 SURINAME
8374 SVALBARD AND JAN MEYEN
8390 SWAZILAND
8369 SWEDEN
6772 SWITZERLAND
8389 SYRIAN ARAB REPUBLIC
8487 TAIWAN, PROVINCE OF CHINA
8474 TAJIKISTAN
8490 TANZANIA, UNITED REPUBLIC OF
8472 THAILAND
8471 TOGO
8475 TOKELAU
8479 TONGA
8484 TRINIDAD AND TOBAGO
8478 TUNISIA
8482 TURKEY
8477 TURKMENISTAN
8467 TURKS AND CACOS ISLANDS
8486 TUVALU
Code Country
8571 UGANDA
8565 UKRAINE
6569 UNITED ARAB EMIRATES
7166 UNITED KINGDOM
8583 UNITED STATES
8577
UNITED STATES MINOR OUTLYING ISLANDS
8589 URUGUAY
8590 UZBEKISTAN
8685 VANUATU
8665
VATICAN CITY STATE (HOLY STATE)
8669 VENEZUELA
8678 VIET NAM
8671 VIRGIN ISLANDS (BRITISH)
8673 VIRGIN ISLANDS (U.S.)
8770 WALLIS AND FUTUNA ISLANDS
6972 WESTERN SAHARA
8969 YEMEN
8985 YUGOSLAVIA
9082 ZAIRE
9077 ZAMBIA
9087 ZIMBABWE
En
37
Page 38

REFERENCE
Care and maintenance
Occasional care and maintenance of the unit and the software
are needed to optimize the performance of your unit.
To clean the cabinet
Use a soft and dry cloth. If the unit surfaces are extremely
dirty, use a soft cloth lightly moistened with mild detergent
solution. Do not use strong solvents such as alcohol, benzine
En
or thinner.
Care of Discs
When a disc becomes dirty, wipe it from the center out with a
cleaning cloth. After playing a disc, store it in its case. Do not
keep it in hot or humid places.
Troubleshooting
If your unit fails to perform properly, check the following guide
and the relevant sections of the Operating Instructions.
There is no sound.
•Check speakers and AC power connection.
The unit shuts off suddenly.
•Possibly a short circuit in the speaker terminals. Disconnect
the AC power cord from the AC power outlet and re-connect
the speaker cords correctly.
The unit blacks out when the unit is turned off.
•Check your ECO mode setting.
Erroneous display.
•Reset the unit.
Poor radio reception.
•Check antenna connection. Adjust the antenna to find the
best reception.
•Move unit and antenna away from other electric appliances
and cords.
The disc plays poorly (general).
•Check if the disc is correctly loaded.
•Check if the disc is not dirty.
•Check if the pickup lens is not affected by condensation. If
so, wait approximately one hour and try again.
The disc plays poorly (DVDs).
•Check that the disc's rating level does not exceed your
setting.
•Check that the disc is a NTSC color system disc.
• Check that the unit is not connected to a video deck, through
a selector switch, or to a TV set with a built-in video deck.
Picture noise may appear due to the DVD copy protection
scheme. Turn off the power or disconnect these equipment.
•The picture quality may be poorer compared to normal
playback during pause, frame advance, fast forward or fast
reverse.
•Many DVD features, such as menu, subtitles, multi-audio,
multi-angle, and rating are dependent on the DVD software
itself. Check the instructions of your disc.
•If a multichannel source does not seem to be played with
the full surround effect, check the type of your source (page
22), selected audio track (page 21), and selected listening
mode (page 23 and 24).
Resetting the unit
If the display window gets mangled, reset the unit as follows:
1Press POWER to turn off the power.
If the power cannot be turned off, disconnect the AC power
cord, then plug it in again.
2 Hold down s and press POWER.
Everything stored in memory after purchase is cleared.
Resetting DVD setup
If trouble concerning DVD playback is not fixed with the
troubleshooting tips mentioned above, or if you want to reset
the DVD setup to default for any other reason, reset as follows:
1 Press DVD/CD.
2 Press s to stop disc playback.
3 Hold down ENTER and press s. Release when "CLEAR"
appears on the unit's display.
The power turns off automatically in a few seconds.
4 Press POWER to turn the power back on.
All your setup menu setting is cleared to default. All mark
data are erased.
38
Page 39

Specifications
MAIN UNIT CX-LDV700
TUNER
FM tuning range 87.5 MHz to 108 MHz
FM usable sensitivity (IHF) 13.2 dBf
FM antenna terminals 75 ohms (unbalanced)
AM tuning range 530 kHz to 1710 kHz (10 kHz step)
AM usable sensitivity 350 µV/m
AM antenna Loop antenna
DISC PLAYER
Laser Semiconductor laser (DVD video
Signal-to-noise ratio 90 dB (1 kHz, 0 dB)
Harmonic distortion 0.05 % (1 kHz, 0 dB)
Signal format NTSC color system
S-VIDEO OUT (S1) Y output: 1 Vp-p (75 ohms,
VIDEO OUT Video composite output, 1 Vp-p (75
Operating conditions 5°C to 35°C (41°F to 95°F)
GENERAL
Input
Output TO TS-LW700U: Din 8-pin
Power requirements 120 V AC, 60 Hz
Power consumption 25 W
Standby power consumption ECO ON: 0.7 W
Dimensions (W x H x D) 249 x 92 x 289 mm
Weight 3.6 kg (7 lbs 15 oz)
531 kHz to 1602 kHz (9 kHz step)
discs λ = 650 nm, CDs λ = 780 nm)
unbalanced)
C output: 0.286 Vp-p
ohms, unbalanced), one RCA jack
AUX: 400 mV
LINE OUT: 300 mV, 1 kohm
DIGITAL OUT (OPTICAL)
PHONES: 32 ohms or more
ECO OFF: 9 W
(9 7/8 x 3 5/8 x 11 1/2 in.)
SUB WOOFER TS-LW700
Input FROM CX-LDV700U: DIN 8-pin
Output FRONT: IMP. 8 ohms
CENTER: IMP. 8 ohms
SURROUND: IMP. 8 ohms
Power output Front:
30 W + 30 W (40 Hz - 20 kHz, THD
less than 1 %, 8 ohms)
37 W + 37 W (1 kHz, THD 10 %, 8
ohms)
Rear (Surround):
30 W + 30 W (40 Hz - 20 kHz, THD
less than 1 %, 8 ohms)
37 W + 37 W (1 kHz, THD 10 %, 8
ohms)
Center:
30 W (40 Hz - 20 kHz, THD less than
1 %, 8 ohms)
37 W (1 kHz, THD 10 %, 8 ohms)
Subwoofer:
55 W (40 Hz - 200 Hz, THD less than
1 %, 6 ohms)
68 W (60 Hz, THD 10 %, 6 ohms)
Speaker type Bass reflex type, (Magnetic shielded)
Speaker unit 160 mm (6 3/8 in.)
Frequency response 40 Hz - 200 Hz
Power requirements 120 V AC, 60 Hz
Power consumption 170 W
Dimensions (W x H x D) 220 x 383 x 450 mm
(8 3/4 x 15 1/8 x 17 3/4 in.)
Weight 12 kg (26 lb. 7 oz)
FIVE SURROUND SPEAKERS SYSTEM SX-L700
(Front, surround and center speakers)
Speaker system 1 way (magnetic shielded*)
Speaker units 80 mm (3 1/4 in.) cone
Impedance Front: 8 ohms
Surround: 8 ohms
Center: 8 ohms
Dimensions (W x H x D) 100 x 220 x 115 mm
(4 x 8 3/4 x 4 5/8 in.) (with pedestal)
100 x 110 x 115 mm
(4 x 4 3/8 x 4 5/8 in.) (without
pedestal)
Weight 0.55 kg (1 lbs 3 oz)
Accessories: Wall mounting screws (5)
Anti-skid patches (9)
* The surround speakers are not magnetic shielded.
Specifications and external appearance are subject to change
without notice.
DOLBY DIGITAL/DOLBY PRO LOGIC
Manufactured under license from Dolby Laboratories.
"Dolby", "Pro Logic" and the double-D symbol are trademarks
of Dobly Laboratories. Confidential unpublished works.
1992-1997 Dolby Laboratories. All rights reserved.
DTS
Manufactured under license from Digital Theater Systems, Inc.
US Pat. No. 5,451,942 and other worldwide patents issued
and pending. “DTS” and “DTS Digital Surround” are
trademarks of Digital Theater Systems, Inc. 1996 Digital
Theater systems, Inc. All rights reserved.
En
39
Page 40

NOTE
This equipment has been tested and found to comply with the
limits for a Class B digital device, pursuant to Part 15 of the
FCC Rules. These limits are designed to provide reasonable
protection against harmful interference in a residential
installation.
This equipment generates, uses, and can radiate radio frequency
energy and, if not installed and used in accordance with the
instructions, may cause harmful interference to radio
communications. However, there is no guarantee that
interference will not occur in a particular installation. If this
equipment does cause harmful interference to radio or television
reception, which can be determined by turning the equipment
off and on, the user is encouraged to try to correct the
interference by one or more of the following measures:
- Reorient or relocate the receiving antenna.
-Increase the separation between the equipment and receiver.
-Connect the equipment into an outlet on circuit different from
that to which the receiver is connected.
- Consult the dealer or an experienced radio/TV technician for
help.
CAUTION
Modifications or adjustments to this product, which are not
expressly approved by the manufacturer, may void the user’s
right or authority to operate this product.
For assistance and information
(United States and Puerto Rico)
Printed in Malaysia
 Loading...