

Page 1

DVD STEREO SYSTEM
SISTEMA ESTEREO DVD
CHAINE STEREO AVEC LECTEUR DE DVD
XR-DV3M
OPERA TING INSTRUCTIONS
MANUAL DE INSTRUCCIONES
MODE D’EMPLOI
En (English)
For assistance and information,
call toll free 1-800-BUY-AIWA.
(United States and Puerto Rico)
E (Español)
F (Français)
8A-CQ0-903-01
000220AYK-H-0
U
Page 2
XR-DV3M
Correction
Please read the incorrect description in the “DOWN MIX
TYPE” section (page 44) of the Operating Instructions as
follows:
Incorrect
“Down Mix Type” selects the type of signal output from the
LINE OUT jacks.
This setting is effective only when a Dolby Digital decoder or
an amplifier with a built-in Dolby Digital decoder is connected
to the LINE OUT jacks.
The default setting is “Surround Mode”.
Correct
“Down Mix Type” selects the type of signal output from the
LINE OUT jacks.
This setting is effective only when a Dolby Prologic decoder or
an amplifier having surround function is connected to the
LINE OUT jacks.
The default setting is “Surround Mode”.
There are some incorrect values in the “SPECIFICATIONS”.
Incorrect
Main unit
Dimensions 260 × 324 × 355 mm
(W × H × D) (10 1/4 × 12 7/8 × 14 in.)
Weight 9.8 kg (21 lbs 10 oz.)
Correct
Main unit
Dimensions With the built-in monitor standing upright
(W × H × D) 170 × 357 × 311.5 mm
(6 3/4 × 14 1/8 × 12 3/8 in. )
With the built-in monitor closed
170 × 210 × 311.5 mm
(6 3/4 × 8 3/8 × 12 3/8 in.)
Weight 5.1 kg (11 lbs 4 oz)
Corrección Correction
Cambie la descripción incorrecta en la sección “TIPO DE
SONIDO DE AUDICIÓN” (página 44) del manual de
instrucciones de la siguiente forma:
Incorrecto
“Down Mix Type” selecciona el tipo de salida de señal de las
tomas LINE OUT.
Este valor es efectivo solamente cuando hay conectado un
decodificador Dolby Digital o un amplificador con Dolby Digital
incorporado a las tomas LINE OUT.
El ajuste predeterminado es “Surround Mode”.
Correcto
“Down Mix Type” selecciona el tipo de salida de señal de las
tomas LINE OUT.
Este ajuste es efectivo solamente cuando hay conectado un
decodificador Dolby Prologic o un amplificador con función
surround a las tomas LINE OUT.
El ajuste predeterminado es “Surround Mode”.
En las “ESPECIFICACIONES” hay algunos valores
incorrectos.
Incorrecto
Unidad principal
Dimensiones 260 × 324 × 355 mm
(An × Al × Lg)
Peso 9,8 kg
Correcto
Unidad principal
Dimensiones Con el monitor integrado levantado
(An × Al × Lg) 170 × 357 × 311,5 mm
Con el monitor integrado cerrado
170 × 210 × 311,5 mm
Peso 5,1 kg
Veuillez corriger la description incorrecte de la section “TYPE
DOWN MIX” (page 44) du Mode d’emploi comme suit:
Incorrect
“Down Mix Type” (type down mix) sélectionne le type de
signal de sortie des prises LINE OUT.
Ce réglage est effectif seulement quand un décodeur Dolby
Digital ou un amplificateur avec décodeur Dolby Digital
intégré est raccordé aux prises LINE OUT.
Le réglage par défaut est “Surround Mode”.
Correct
“Down Mix Type” (type down mix) sélectionne le type de
signal de sortie des prises LINE OUT.
Ce réglage est effectif seulement quand un décodeur Dolby
Prologic ou un amplificateur à fonction surround est raccordé
aux prises LINE OUT.
Le réglage par défaut est “Surround Mode”.
Quelques erreurs se sont glissées dan les
“SPÉCIFICATIONS”.
Incorrect
Unité principale
Dimensions 260 × 324 × 355 mm
(L × H × P)
Poids 9,8 kg
Correct
Unité principale
Dimensions Avec l’écran intégré à la ver ticale
(L × H × P) 170 × 357 × 311,5 mm
Avec l’écran intégré fermé
170 × 210 × 311,5 mm
Poids 5,1 kg
Anti-distortion function
When a scratched or dirty disc is played, data on the disc may
not be read correctly and the picture may be distorted during
skip, search or repeat play.
In this case, the unit’s anti-distortion function is activated so
that the distortion is reduced to the minimum level, and normal
play automatically resumes.
Printed in Japan
Función antidistorsión
Cuando se reproduce un disco rayado o sucio, los datos en el
disco pueden no leerse correctamente y la imagen puede
quedar distorsionada durante el salto, búsqueda o
reproducción repetida.
En este caso, se activa la función antidistorsión de la unidad
de tal forma que la distorsión se reduce a su nivel de mínimo
y continúa automáticamente la reproducción normal.
Fonction anti-déformation
A la lecture d’un disque rayé ou sale, les données du disque
peuvent ne pas être lues correctement et l’image déformée
pendant la lecture avec sauts, de recherche ou répétée.
Dans ce cas, la fonction anti-déformation de l’appareil s’active
pour réduire la déformation au minimum, et la lecture normale
reprend automatiquement.
8A-CQ0-922-01
0004A
Page 3

XR-DV3M
NOTE
English
When connecting external equipment to the AUDIO IN/VIDEO
IN jacks on the front panel of the unit
Use the supplied audio/video connecting cord to avoid electromagnetic
radiation.
• Be sure to connect the plugs with the ferrite core to the jacks on this
unit.
• Do not remove the ferrite core from the connecting cord.
NOTA
Español
Quando conecte un equipo externo a las tomas AUDIO IN/
VIDEO IN en el panel delantero de esta unidad
Utilice el cable de conexión de audio/video suministrado para evitar la
radiación electromagnética.
• Asegúrese de conectar los enchufes con el núcleo de ferrita en las
tomas de esta unidad.
• No desmonte el núcleo de ferrita del cable de conexión.
REMARQUE
Français
Raccordement d’un équipement extérieur aux prises AUDIO
IN/VIDEO IN du panneau avant de l’appareil
Utilisez le cordon de raccordement audio/vidéo fourni pour éviter le
rayonnement électromagnétique.
• Raccordez bien les fiches avec noyau de ferrite aux prises de cet
appareil.
• Ne retirez pas le noyau de ferrite du cordon de raccordement.
Printed in Japan
8A-CQ0-921-01
0004A
Page 4
ENGLISH
WARNING
TO REDUCE THE RISK OF FIRE OR ELECTRIC
SHOCK, DO NOT EXPOSE THIS APPLIANCE T O RAIN
OR MOISTURE.
CAUTION
RISK OF ELECTRIC SHOCK
DO NOT OPEN
“CAUTION:TO REDUCE THE RISK OF
ELECTRIC SHOCK,
DO NOT REMOVE COVER (OR BACK).
NO USER-SERVICEABLE PARTS INSIDE.
REFER SERVICING TO QUALIFIED
SERVICE PERSONNEL.”
Explanation of Graphical Symbols:
The lightning flash with arrowhead symbol,
within an equilateral triangle, is intended to alert
the user to the presence of uninsulated
"dangerous voltage" within the product's
enclosure that may be of sufficient magnitude
to constitute a risk of electric shock to persons.
The exclamation point within an equilateral
triangle is intended to alert the user to the
presence of important operating and
maintenance (servicing) instructions in the
literature accompanying the appliance.
PRECAUTIONS
Read the Operating Instructions carefully and completely before
operating the unit. Be sure to keep the Operating Instructions for
future reference. All warnings and cautions in the Operating
Instructions and on the unit should be strictly followed, as well as
the safety suggestions below.
Installation
1 Water and Moisture - Do not use this unit near water , such as
near a bathtub, washbowl, swimming pool, or the like.
2 Heat - Do not use this unit near sources of heat, including
heating vents, stoves, or other appliances that generate heat.
It also should not be placed in temperatures less than 5˚C (41˚F)
or greater than 35˚C (95˚F ).
3 Mounting surface - Place the unit on a flat, even surface.
4 Ventilation - The unit should be situated with adequate space
around it so that proper heat ventilation is assured. Allow 10
cm (4 in.) clearance from the rear and the top of the unit, and 5
cm (2 in.) from each side.
- Do not place the unit on a bed, rug, or similar surface that
may block the ventilation openings.
- Do not install the unit in a bookcase, cabinet, or airtight rack
where ventilation may be impeded.
5 Objects and liquid entry - Take care that objects or liquids do
not get inside the unit through the ventilation openings.
6 Carts and stands - When placed or
mounted on a stand or cart, the unit
should be moved with care.
Quick stops, excessive force, and
uneven surf aces may cause the unit and
cart to overturn or fall.
7 Condensation - Moisture may form on the CD pickup lens
when:
- The unit is moved from a cold spot to a warm spot
- The heating system has just been turned on
- The unit is used in a very humid room
- The unit is cooled by an air conditioner
When this unit has condensation inside, it may not function
normally. Should this occur, leave the unit for a few hours,
then try to operate again.
8 Wall or ceiling mounting - The unit should not be mounted
on a wall or ceiling, unless specified in the Operating
Instructions.
2
ENGLISH
Electric Power
1 Power Sources - Connect this unit only to power sources
specified in the Operating Instructions, and as marked on the
unit.
2 Polarization - As a safety feature, some units are equipped
with polarized AC power plugs which can only be inserted one
way into a power outlet. If it is difficult or impossible to insert
the AC power plug into an outlet, turn the plug over and tr y
again. If it still does not easily insert into the outlet, please call
a qualified service technician to service or replace the outlet.
To avoid defeating the safety feature of the polarized plug, do
not force it into a power outlet.
3 AC power cord
- When disconnecting the AC power cord, pull it out b y the A C
power plug. Do not pull the cord itself.
- Never handle the A C power plug with wet hands, as this could
result in fire or shock.
- Power cords should be routed to avoid being severely bent,
pinched, or walked upon. P a y particular attention to the cord
from the unit to the power socket.
- Avoid overloading AC outlets and extension cords beyond
their capacity, as this could result in fire or shock.
Page 5
4 Extension cord - To help pre vent electric shock, do not use a
polarized AC power plug with an e xtension cord, receptacle, or
other outlet unless the polarized plug can be completely
inserted to prevent exposure of the blades of the plug.
5 When not in use - Unplug the AC power cord from the AC
outlet if the unit will not be used for several months or more.
When the cord is plugged in, a small amount of current
continues to flow to the unit, even when the power is turned
off.
Owner's record
For your conv enience, record the model number and serial number
(you will find them on the rear of your set) in the space provided
below . Please ref er to them when y ou contact your Aiwa dealer in
case of difficulty.
Model No. Serial No. (Lot No.)
XR-D V3MU
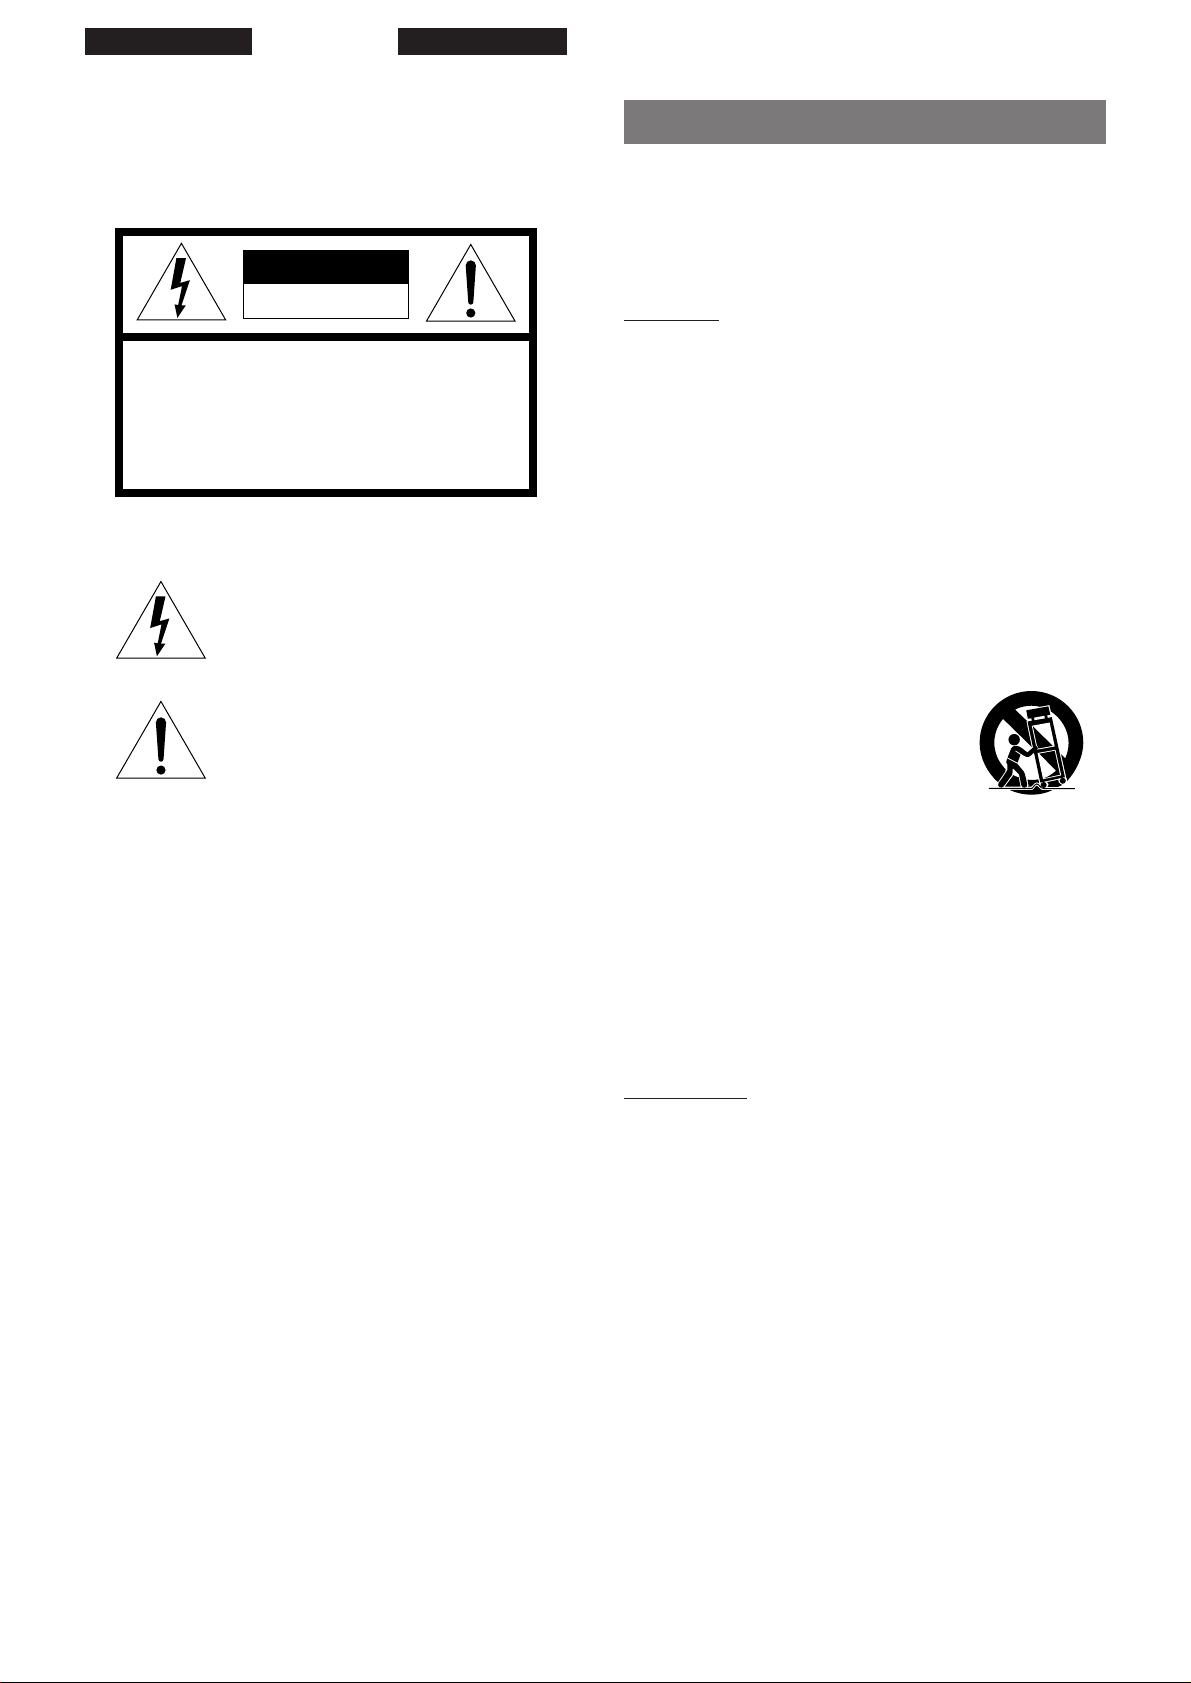
Outdoor Antenna
1 Power lines - When connecting an outdoor antenna, make sure
it is located away from power lines.
2 Outdoor antenna grounding - Be sure the antenna system is
properly grounded to provide protection against unexpected
voltage surges or static electricity build-up. Article 810 of the
National Electrical Code, ANSI/NFPA 70, provides information
on proper grounding of the mast, supporting structure, and the
lead-in wire to the antenna discharge unit, as well as the size
of the grounding unit, connection to grounding terminals, and
requirements for grounding terminals.
Antenna Grounding According to the National Electrical Code
ANTENNA LEAD IN WIRE
GROUND CLAMP
ELECTRIC
SERVICE
EQUIPMENT
NEC-NATIONAL ELECTRICAL CODE
ANTENNA DISCHARGE
UNIT
(NEC SECTION 810-20)
GROUNDING
CONDUCTORS
(NEC SECTION 810-21)
GROUND CLAMPS
POWER SERVICE GROUNDING
ELECTRODE SYSTEM
(NEC ART 250 PART H)
Precautions on the built-in monitor
• In general, any TFT screen is prone to burn-up (dark spots*
become visible in bright pictures) if it is subject to very bright
(high intensity) pictures or characters for extended periods of
time. Hence, it is recommended not to use the unit with a high
brightness setting or with CDs with very bright pictures, for
extended periods of time. This may cause damage to the TFT.
For the same reason, it is also recommended when playing audio
CDs, for extended periods of time, to keep the TFT off.
* A small number of bright or dark dots may appear on the monitor
screen. This is common in Active Matrix display technology
and is not an indication of malfunction or defect.
• Do not hit or scratch the monitor screen with pointed tips.
En
Maintenance
Clean the unit only as recommended in the Operating Instructions.
Damage Requiring Service
Have the unit serviced by a qualified service technician if:
- The AC power cord or plug has been damaged
- Foreign objects or liquid have gotten inside the unit
- The unit has been exposed to rain or water
- The unit does not seem to operate normally
- The unit exhibits a marked change in performance
- The unit has been dropped, or the cabinet has been damaged
DO NOT ATTEMPT TO SERVICE THE UNIT YOURSELF.
NOTE
This equipment has been tested and found to comply with
the limits for a Class B digital device, pursuant to Part 15 of
the FCC Rules. These limits are designed to provide
reasonable protection against harmful interference in a
residential installation.
This equipment generates, uses, and can radiate radio
frequency energy and, if not installed and used in accordance
with the instructions, may cause harmful interference to radio
communications. However, there is no guarantee that
interference will not occur in a particular installation. If this
equipment does cause harmful interference to radio or
television reception, which can be determined by turning the
equipment off and on, the user is encouraged to try to correct
the interference by one or more of the following measures:
- Reorient or relocate the receiving antenna.
- Increase the separation between the equipment and
receiver.
- Connect the equipment into an outlet on circuit different
from that to which the receiver is connected.
- Consult the dealer or an experienced radio/TV technician
for help.
CAUTION
Modifications or adjustments to this product, which are not
expressly approved b y the manufacturer , may v oid the user's
right or authority to operate this product.
ENGLISH
3
Page 6

TABLE OF CONTENTS
PREPARATIONS
FEATURES ......................................................................... 5
BEFORE USE ..................................................................... 5
CONNECTIONS...................................................................6
REMOTE CONTROL ...........................................................8
BEFORE OPERA TION........................................................ 8
USING THE MONITOR........................................................9
USING THE CURSOR KEY ................................................ 9
DIMMING THE DISPLAY WINDOW BRIGHTNESS
(DIMMER) .....................................................................10
SETTING THE POWER ECONOMIZING MODE ..............10
SOUND
AUDIO ADJUSTMENTS .................................................... 11
AUDIO CD OPERATIONS
BASIC OPERA TIONS ........................................................12
SELECTING A TRACK.......................................................13
RANDOM/REPEA T PLA Y ..................................................14
PROGRAMMED PLA Y.......................................................15
CHANGING THE DISPLAY INFORMATION ......................16
DVD/VCD OPERATIONS
BASIC OPERA TIONS ........................................................18
SELECTING A TRACK.......................................................19
FRAME ADV ANCE AND SLO W PLA Y...............................21
RANDOM/REPEA T PLA Y ..................................................21
PROGRAMMED PLAY (VCD ONL Y) .................................24
CHANGING THE DISPLAY INFORMATION ......................25
ADJUSTING THE MONITOR PICTURE ............................27
MARKING AND SEARHING ..............................................28
SPECIAL DVD FEA TURES................................................30
RADIO RECEPTION
MANUAL TUNING..............................................................32
PRESETTING ST ATIONS..................................................33
KARAOKE
MICROPHONE MIXING.....................................................34
VOCAL F ADER/MULTIPLEX FUNCTIONS .......................34
KEY CONTROL FUNCTION..............................................35
USING DVD KARAOKE DISCS .........................................35
CLOCK AND TIMER
SETTING THE CLOCK ......................................................36
SETTING THE SLEEP TIMER ...........................................36
SETTING THE TIMER ........................................................37
OTHER CONNECTIONS
CONNECTING OPTIONAL EQUIPMENT .........................38
LISTENING T O EXTERNAL SOURCES............................39
VIEWING PICTURES OF EXTERNAL SOURCE ..............39
CUSTOMIZING DVD SETUP
OVERVIEW OF THE SETUP MENU..................................40
BASIC OPERATIONS........................................................40
ON-SCREEN MENU ..........................................................41
DISC LANGUAGES ...........................................................42
AUDIO OUTPUT SETTING ...............................................43
TV ASPECT .......................................................................45
RATINGS ...........................................................................46
PBC....................................................................................47
DISC RESUME ..................................................................47
COUNTRY CODES............................................................48
LANGUAGE CODES .........................................................50
GENERAL
CARE AND MAINTENANCE.............................................51
TROUBLESHOOTING.......................................................52
SPECIFICATIONS .............................................................53
PARTS INDEX.................................................... Back cover
4
ENGLISH
Page 7
PREPARATIONS
FEATURES
Thank you for purchasing this Aiwa DVD/CD stereo system.
Your XR-DV3M is capable of playing DVDs (Digital Video Discs),
VCDs (Video CDs), audio CDs, as well as the radio.
❏ DVD provides a completely new dimension in video
entertainment.
• With the multi-language function* you can select an audio
soundtrack in up to 8 languages, and subtitles in up to 32
languages.
• With the multi-angle function* you can select a viewing angle
of scenes shot from multiple camera angles and recorded on
the disc.
• With the parental lock function* you can prevent play of
specified discs unsuitable for certain audiences.
* All these functions are dependent on the DVD software.
• The 96 kHz/24 bit linear PCM sound provides quality audio
superior to that of audio CDs.
❏ DOLBY PRO LOGIC
This unit is also equipped with output jacks to be connected to a
Dolby Digital decoder, a digital amplifier with a b uilt-in Dolby Digital
decoder, or a digital amplifier with a bulit-in DTS decoder , allowing
you to enjoy astonishingly realistic home theater sound when
playing video software recorded in Dolby Digital Surround or DTSencoded discs.
BEFORE USE
Please read the following before operating this unit.
COLOR SYSTEM FOR DVDS AND VCDS
This unit is designed for the NTSC color systems only.
DVD discs and video CDs are recorded either in the PAL or the
NTSC color system.
Select only DVDs and video CDs recorded in the NTSC color
system.
SOFTWARE DEPENDENT FEATURES OF
DVDS AND VCDS
Some play operations of D VDs and video CDs may be intentionally
fixed by software man ufacturers. As this unit plays D VDs and video
CDs according to disc contents designed by the software
manufacturer , some play f eatures of this unit may not be av ailable,
while other functions may be added.
Refer to the instructions supplied with the DVDs and video CDs.
Some DVDs made for business purposes may not be played on
this unit.
REGION CODE OF THE DISC PLAYER
AND DVDS
The DVD pla yer of this unit is designed and manuf actured f or play
of region "1" encoded DVD software. Region code labels appear
on the labels of some DVD discs to indicate which type of player
can play those discs. Unless "1" or "ALL" appears on the DVD
disc label, a disc cannot be played on this unit. If you try to play
such a disc, the message "REGIONAL CODE VIOLATION" will
appear.
Some DVD discs may not have a region code label even though
their play is prohibited by area limits.
PREPARATIONS
En
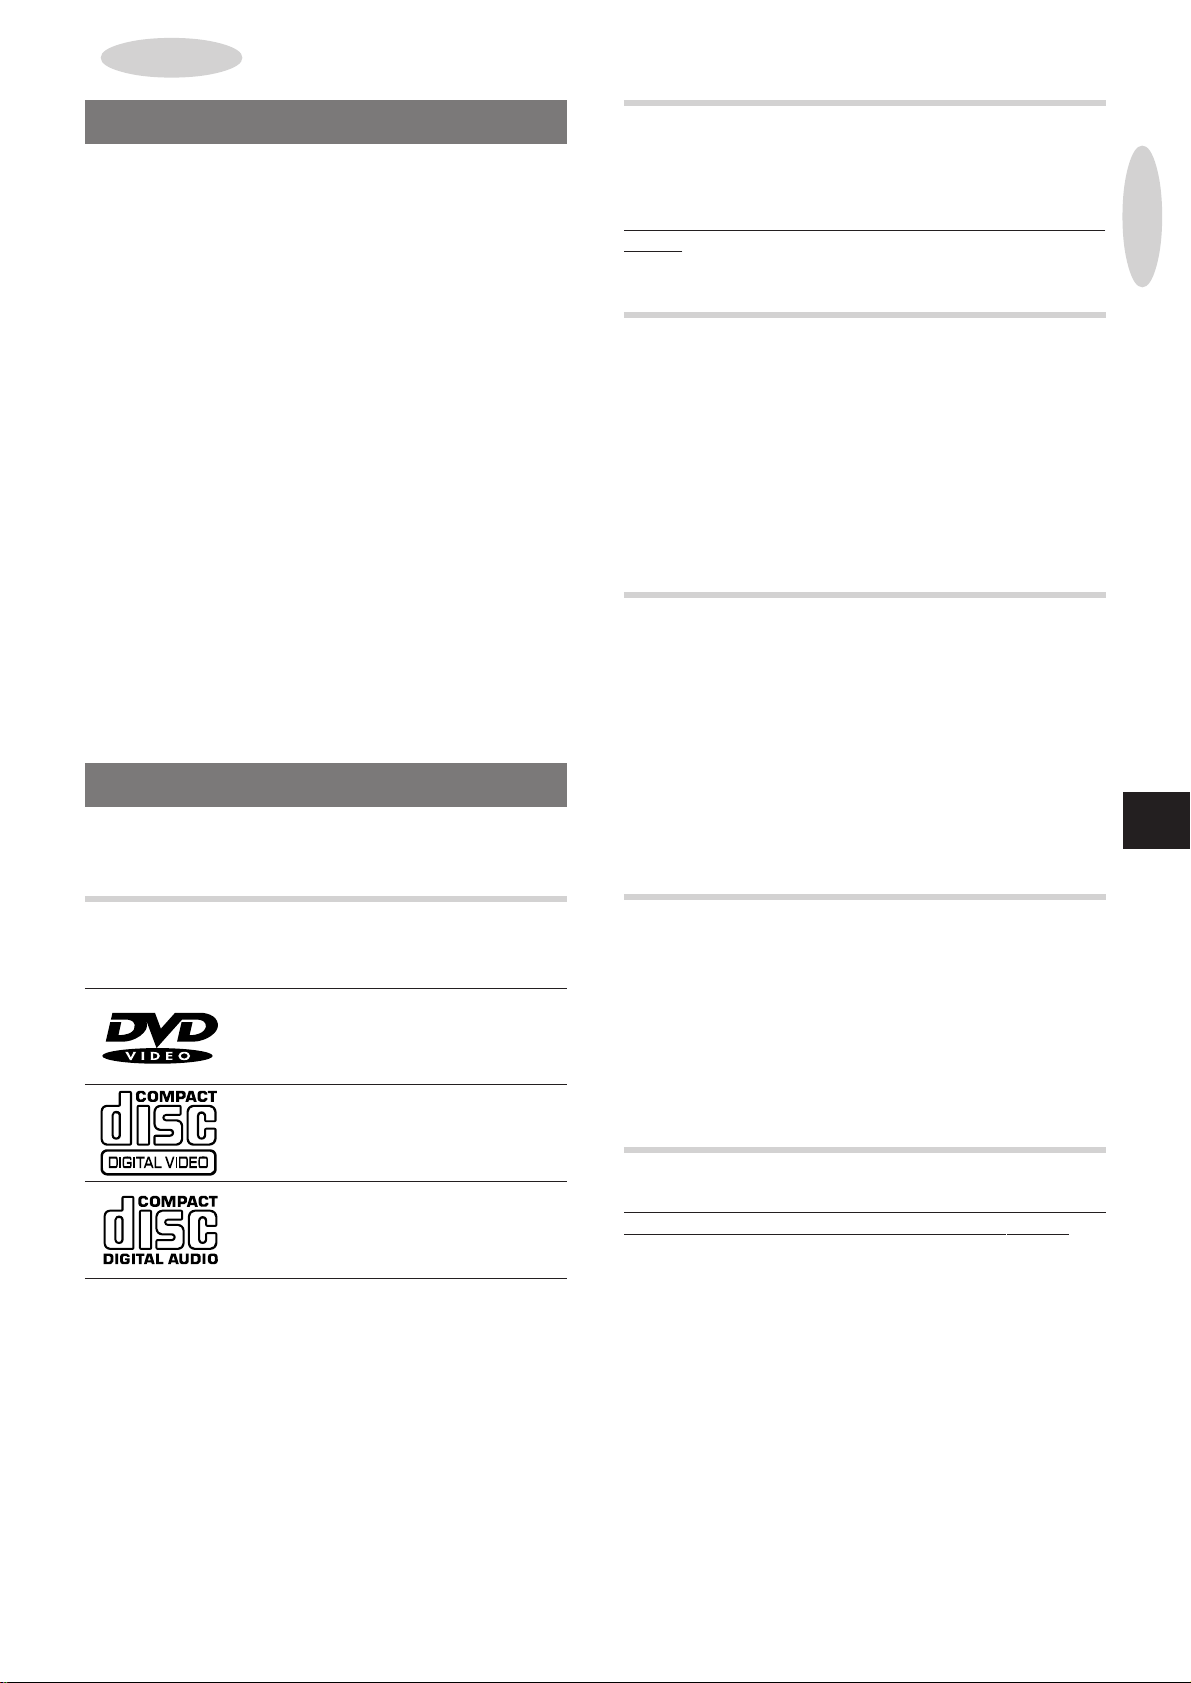
SUPPORTED DISC FORMATS
This unit can play discs with the following logos.
DVDs
(8 cm disc/12 cm disc)
Video CDs (VCDs)
(8 cm disc/12 cm disc)
Audio CDs
(8 cm disc/12 cm disc)
• This unit cannot play other types of discs such as CD-Is, CDROMs, PHOTO CDs or Aluminum-lined discs.
• Do not use irregular shape discs such as heart-shaped or
octagonal ones. It may damage both the unit and the disc.
• For the types of video CDs, see "TYPES OF VIDEO CDS", page
17.
NOTE ON PLAYING DTS-ENCODED DISCS
To enjoy DTS Digital SurroundTM play, an external 5.1 channel
DTS Digital Surround
the digital output of this unit.
When playing audio CDs that are DTS-encoded, excessiv e noise
will be exhibited from the speakers connected to the decoder. To
avoid possible damage to the audio system, the consumer should
turn down the volume before pla ying such discs, adjust the volume
gradually, and keep the volume level low.
TM
decoder system must be connected to
COPYRIGHT PROTECTION
It is forbidden by la w to copy, broadcast, show, broadcast via cable,
play in public, or rent copyright material without permission.
This unit features the copy protection function developed by
Macrovision. Copy protection signals are included in some DVD
and VCD discs. If you record such discs on a VCR, picture noise
will appear during recording and play.
This product incorporates copyright protection technology that is
protected by method claims of certain U.S. patents and other
intellectual property rights owned by Macrovision Corporation and
other rights owners. Use of this copyright protection technology
must be authorized by Macrovision Corporation, and is intended
for home and other limited viewing uses only unless otherwise
authorized by Macrovision Corporation. Reverse engineering or
disassembly is prohibited.
ENGLISH
5
Page 8
CONNECTIONS
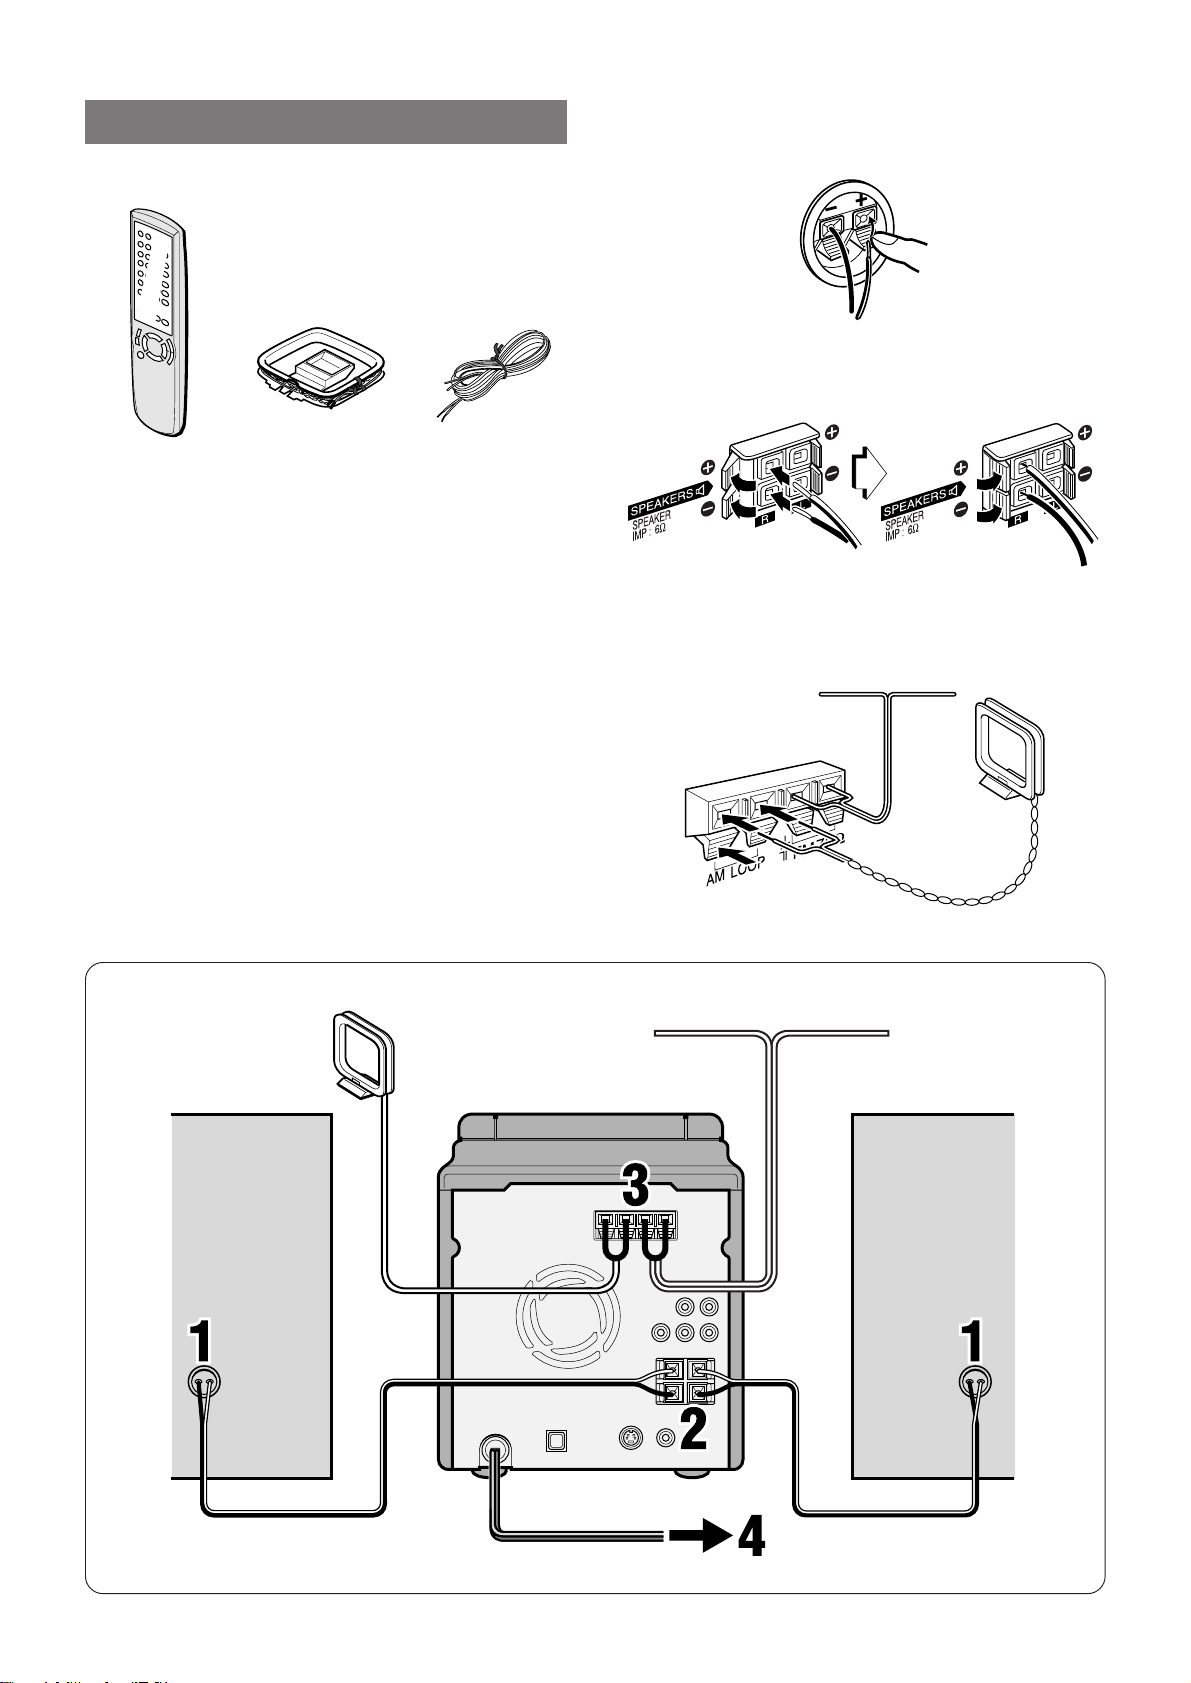
Check your accessories
Remote control AM loop antenna FM antenna
Operating Instructions, etc.
Before connecting the AC cord
The rated voltage of your unit shown on the rear panel is 120 V
AC. Check that the rated voltage matches your local voltage.
IMPORTANT
• Connect the speakers, antennas, and all optional equipment first.
Finally, connect the AC cord.
• There are no differences between the two speaker units. Both
speakers can be connected as L (left) or R (right).
1
Connect the speaker cords to the speakers.
Connect the cords with the white stripes to ) terminals and
the other cords to ( terminals.
2
Connect the speaker cords to the main unit.
The cords with the white stripes should be connected to the 0
terminals and the other cords to the 9 terminals.
3
Connect the supplied antennas.
Connect the FM antenna to the FM 75 Ω terminals and the AM
antenna to the AM LOOP terminals.
FM antenna
AM antenna
6
ENGLISH
Page 9

4
Connect the AC cord to an AC outlet.
Concerning the demo display
When the AC cord is plugged into an AC outlet for the first time
after purchase, a demo display will appear in the displa y window.
When the power is turned on, the demo display will end. When
the power is turned off, the demo display will appear again.
Until the clock is set, the demo display will appear whenever the
power is turned off. (For setting the clock, see page 36.)
NOTE
• To connect an external TV set, see page 38.
• To see the demo display after setting the clock, press DEMO/
ECO while the power is off. T o terminate the demo displa y , press
DEMO/ECO again.
To stand the AM antenna on a surface
Fix the claw to the slot.
CONNECTING AN OUTDOOR ANTENNA
For better FM reception, use of an outdoor antenna is
recommended.
Connect the outdoor antenna to the FM 75 Ω terminals.
PREPARATIONS
To connect other optional equipment ➞ page 38.
To position the antennas
FM feeder antenna:
Extend this antenna horizontally in a T-shape and fix its ends to
the wall.
AM loop antenna:
Position to find the best direction.
NOTE
• Be sure to connect the speaker cords correctly. Improper
connections can cause short circuits in SPEAKERS terminals.
• Do not connect any speakers to the unit other than the supplied
ones.
• Do not leave objects generating magnetism near the speakers.
• Do not bring the FM antenna near metal objects or curtain rails.
• Do not bring the AM antenna near other optional equipment, the
stereo system itself, the AC cord or speaker cords, since noise
will be picked up.
• Do not unwind the AM antenna wire.
En
ENGLISH
7
Page 10
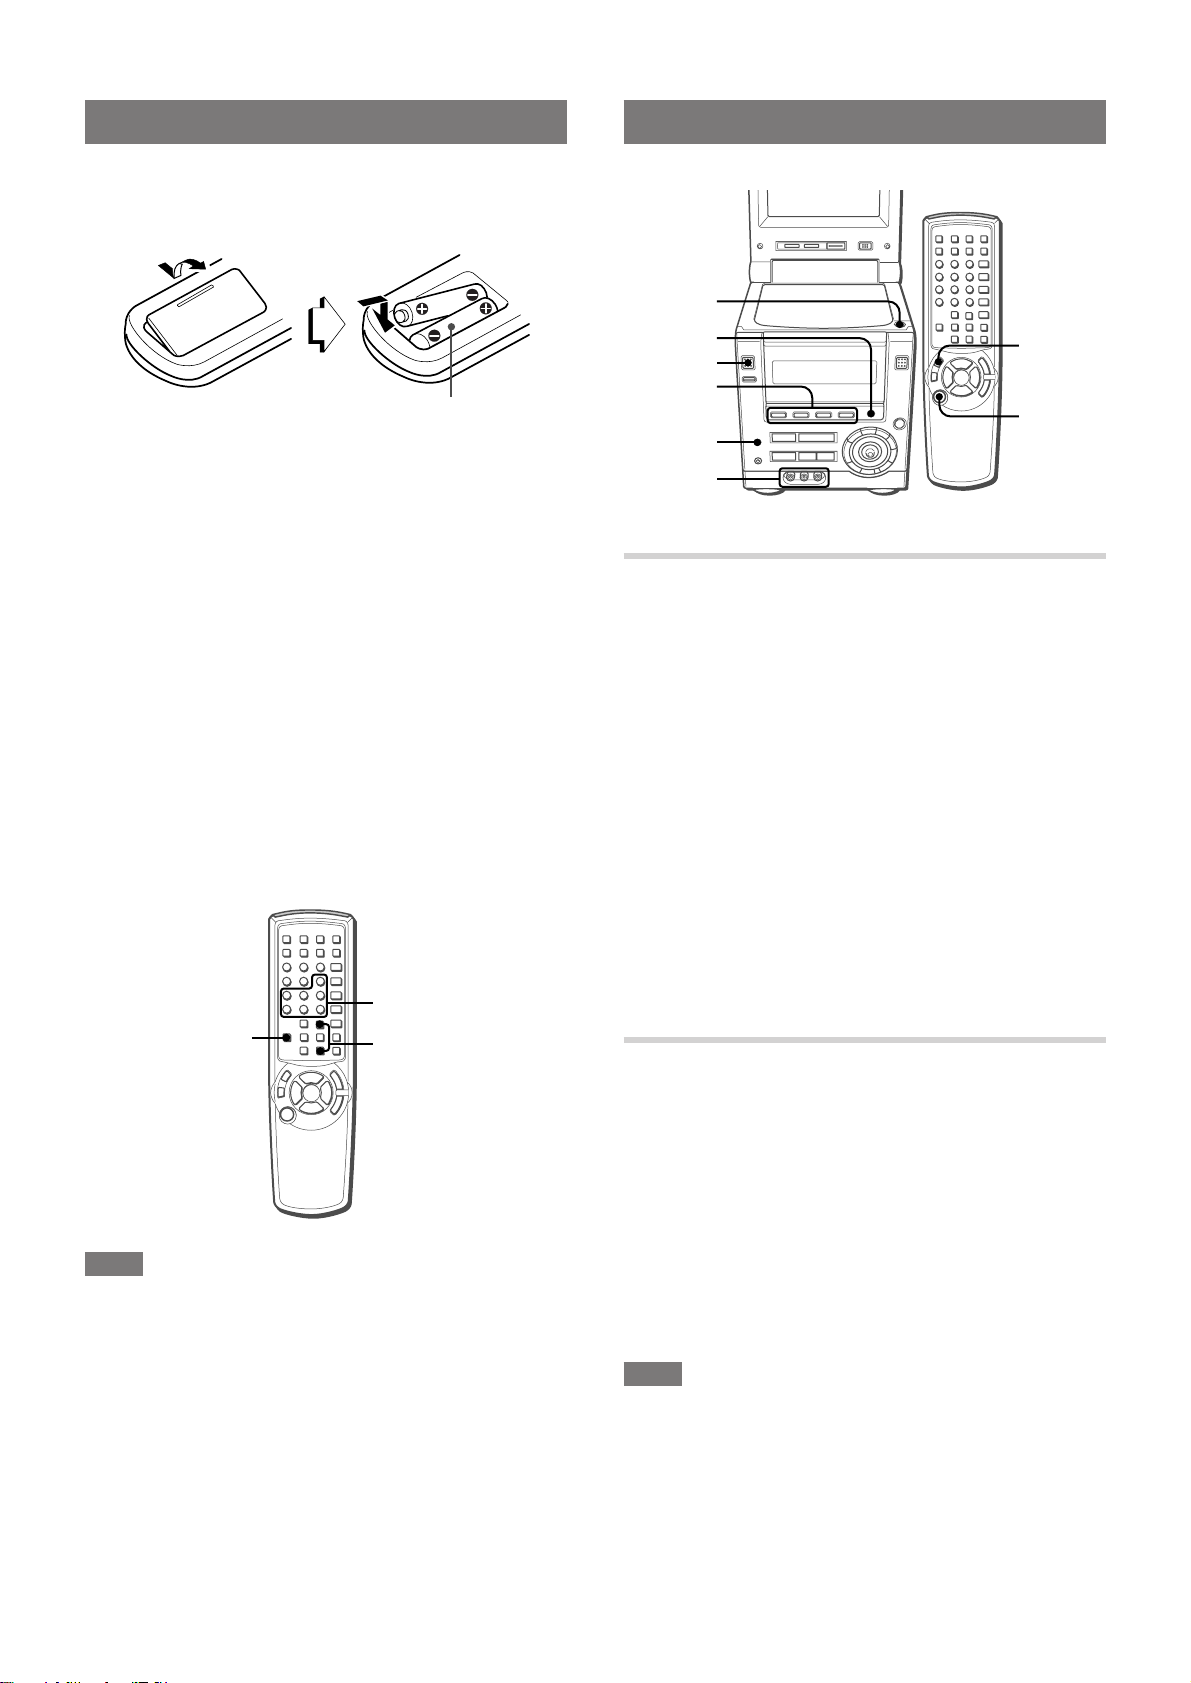
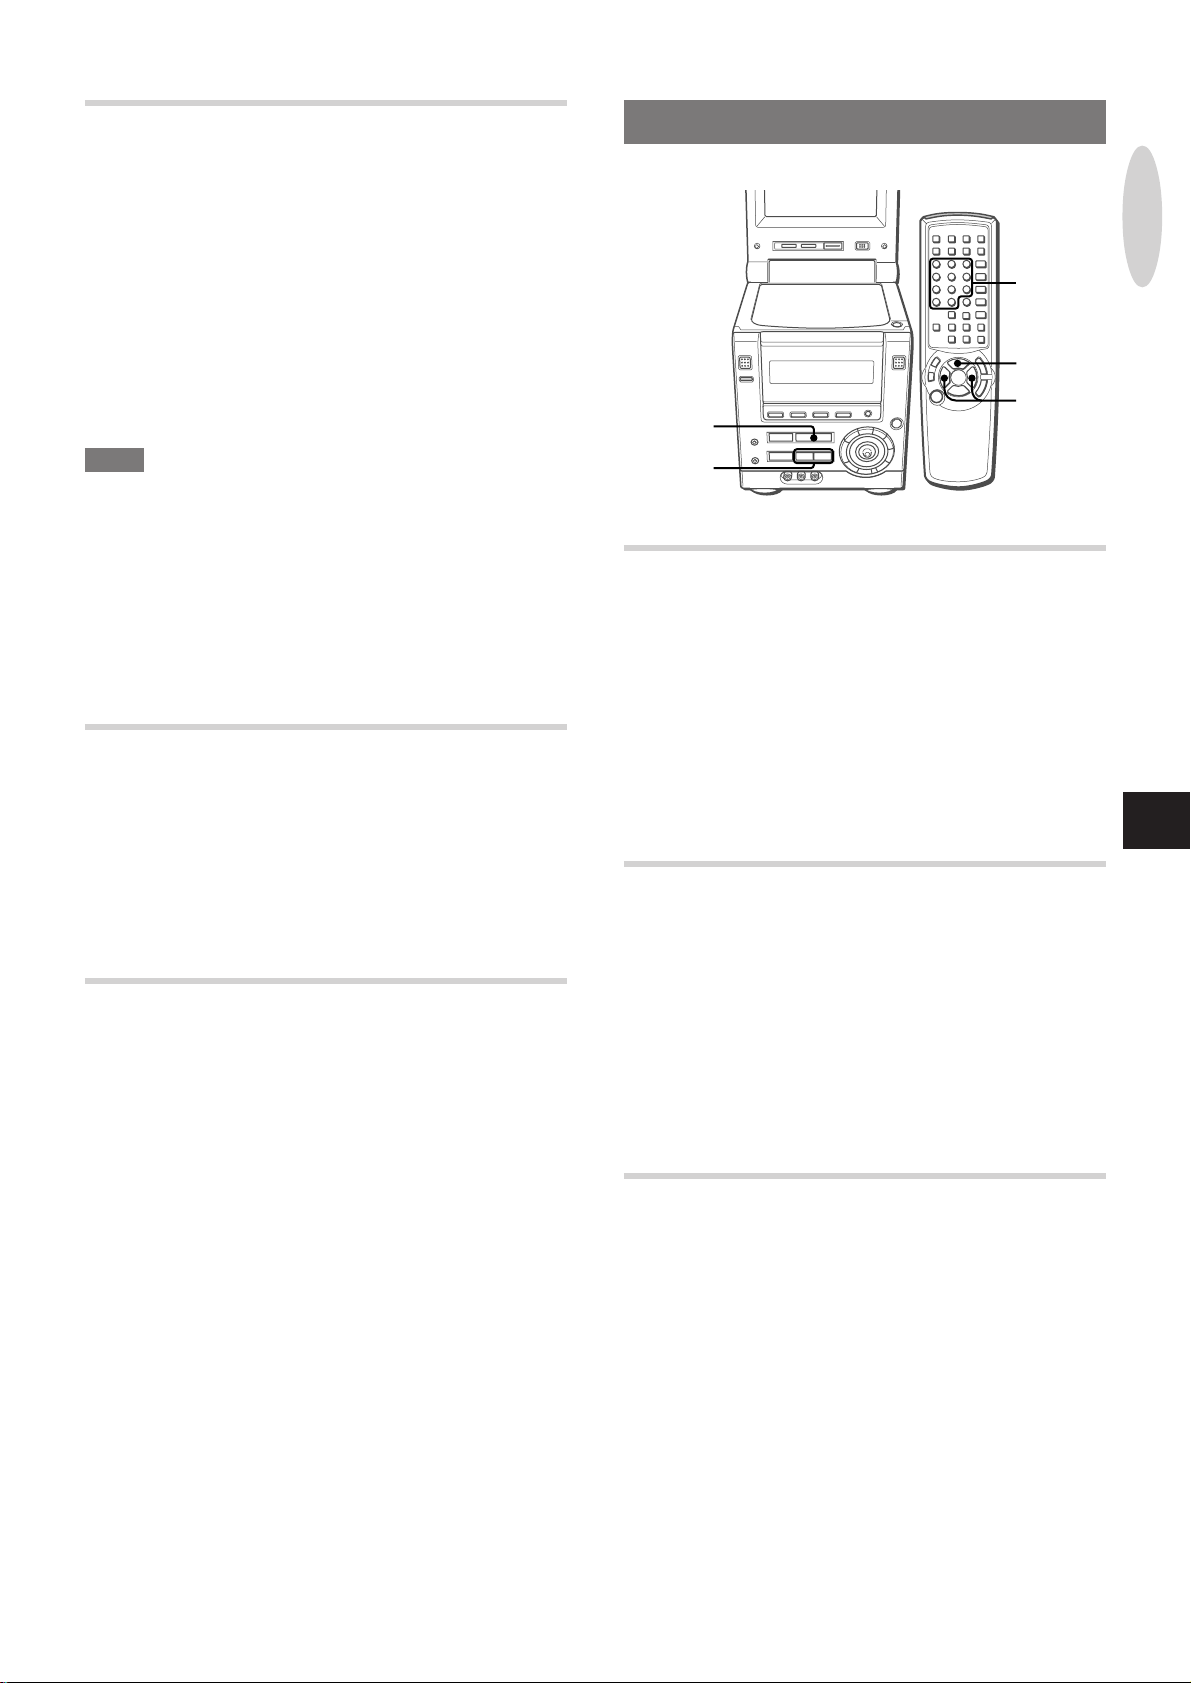
REMOTE CONTROL
Inserting batteries
Detach the battery cover on the rear of the remote control and
insert two R6 (size AA) batteries.
R6 (size AA)
When to replace the batteries
The maximum operational distance between the remote control
and the sensor on the main unit should be approximately 5 meters
(16 feet). When this distance decreases, replace the batteries
with new ones.
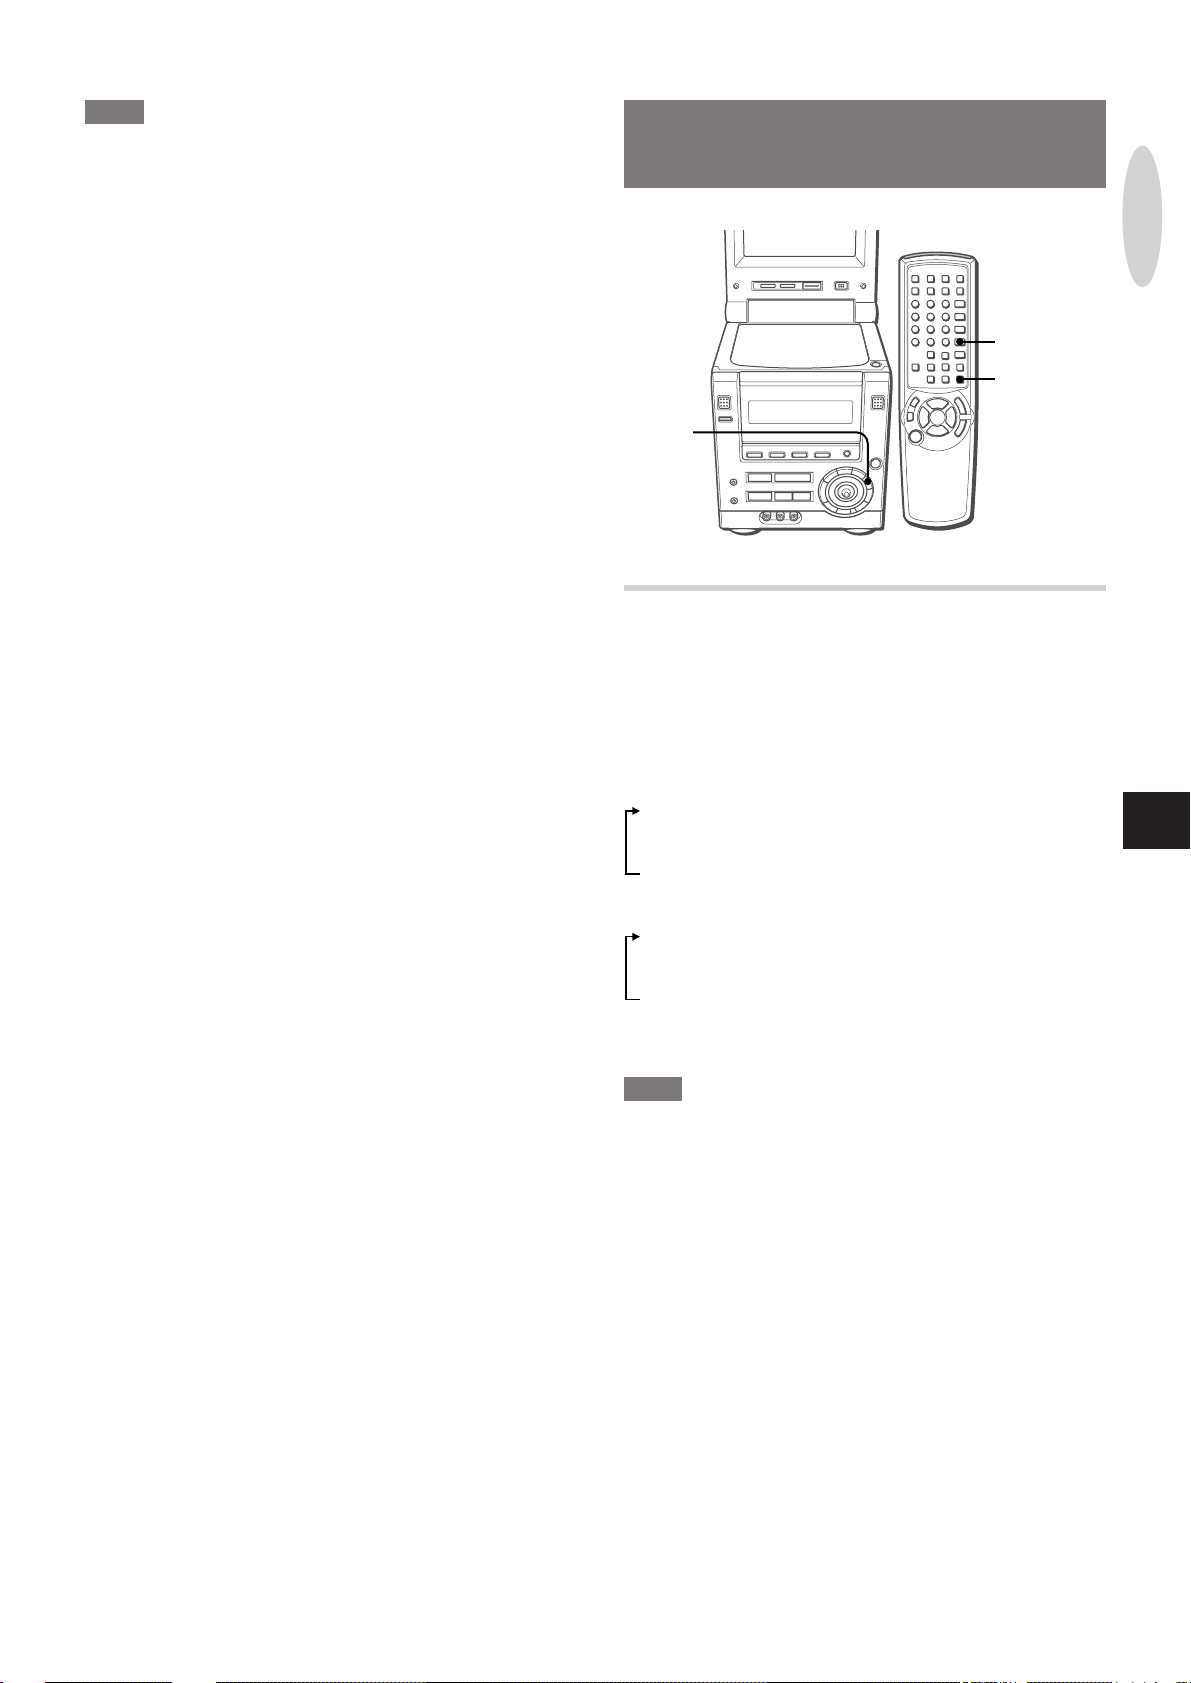
BEFORE OPERATION
zOPEN/
CLOSE
ILLUMINA TION
POWER
TUNER/BAND,
VIDEO, AUX,
DVD/CD
PHONES
AUDIO IN,
VIDEO IN
FUNCTION
POWER
Using the remote control
Some operations can be performed using the buttons on the
remote control only, or those on the main unit only, while others
can be performed using the buttons on the main unit as well as on
the remote control. This instructions manual clearly describes
the buttons available for each operation.
c/d on the remote control
The function is the same as that of c on the main unit.
Using the SHIFT button
T o use the 6 to 0, +10 and C buttons as the PBC, MONO TUNER,
BAND, KARAOKE, TIMER, SLEEP, and CLOCK buttons, press
the button while pressing the SHIFT button.
Also, to use the i/k buttons as the MONITOR ANGLE buttons,
press the button while pressing the SHIFT button.
6-0,+10,C
SHIFT
i/k
TO TURN THE POWER ON
Press one of the following buttons:
POWER on the main unit or on the remote control
TUNER/BAND:
The unit is turned on and tuned in to the previously received radio
station.
DVD/CD:
The unit is turned on and the loaded disc (CD, DVD* or VCD)
begins to play.
* If "Disc Resume" in the setup menu is set to ON (see "DISC
RESUME", page 47) and the unit is turned off while "RESUME"
is displayed on the display, DVD play will not start.
zOPEN/CLOSE:
The unit is turned on and the disc door opens.
Pressing VIDEO or AUX also turns the unit on.
To turn the power off
Press POWER.
SELECTING A FUNCTION
This unit is equipped with a disc player (to play DVDs, CDs and
VCDs) and a radio as internal sound sources. In addition, this unit
can play input from external equipment via the AUDIO IN and
VIDEO IN jacks on the front side of the unit, and the AUX IN jac ks
on the rear of the unit.
To play the desired sound source, you need to select it as the
active function first.
NOTE
• If the remote control is not going to be used for an extended
period of time, remove the batteries to prev ent possible electrolyte
leakage.
• The remote control may not operate correctly when:
- The line of sight between the remote control and the remote
sensor (located under the display window) is exposed to intense
light, such as direct sunlight
- Other remote controls are used nearby (those of a television,
etc.)
8
ENGLISH
To select a function
Press the appropriate function button on the main unit (TUNER/
BAND, VIDEO, AUX or DVD/CD), or press FUNCTION repeatedly
on the remote control.
NOTE
When you switch to the TUNER function from the D VD/CD function,
it may take up to 10 seconds before the sound actually switches
to the tuner.
Page 11
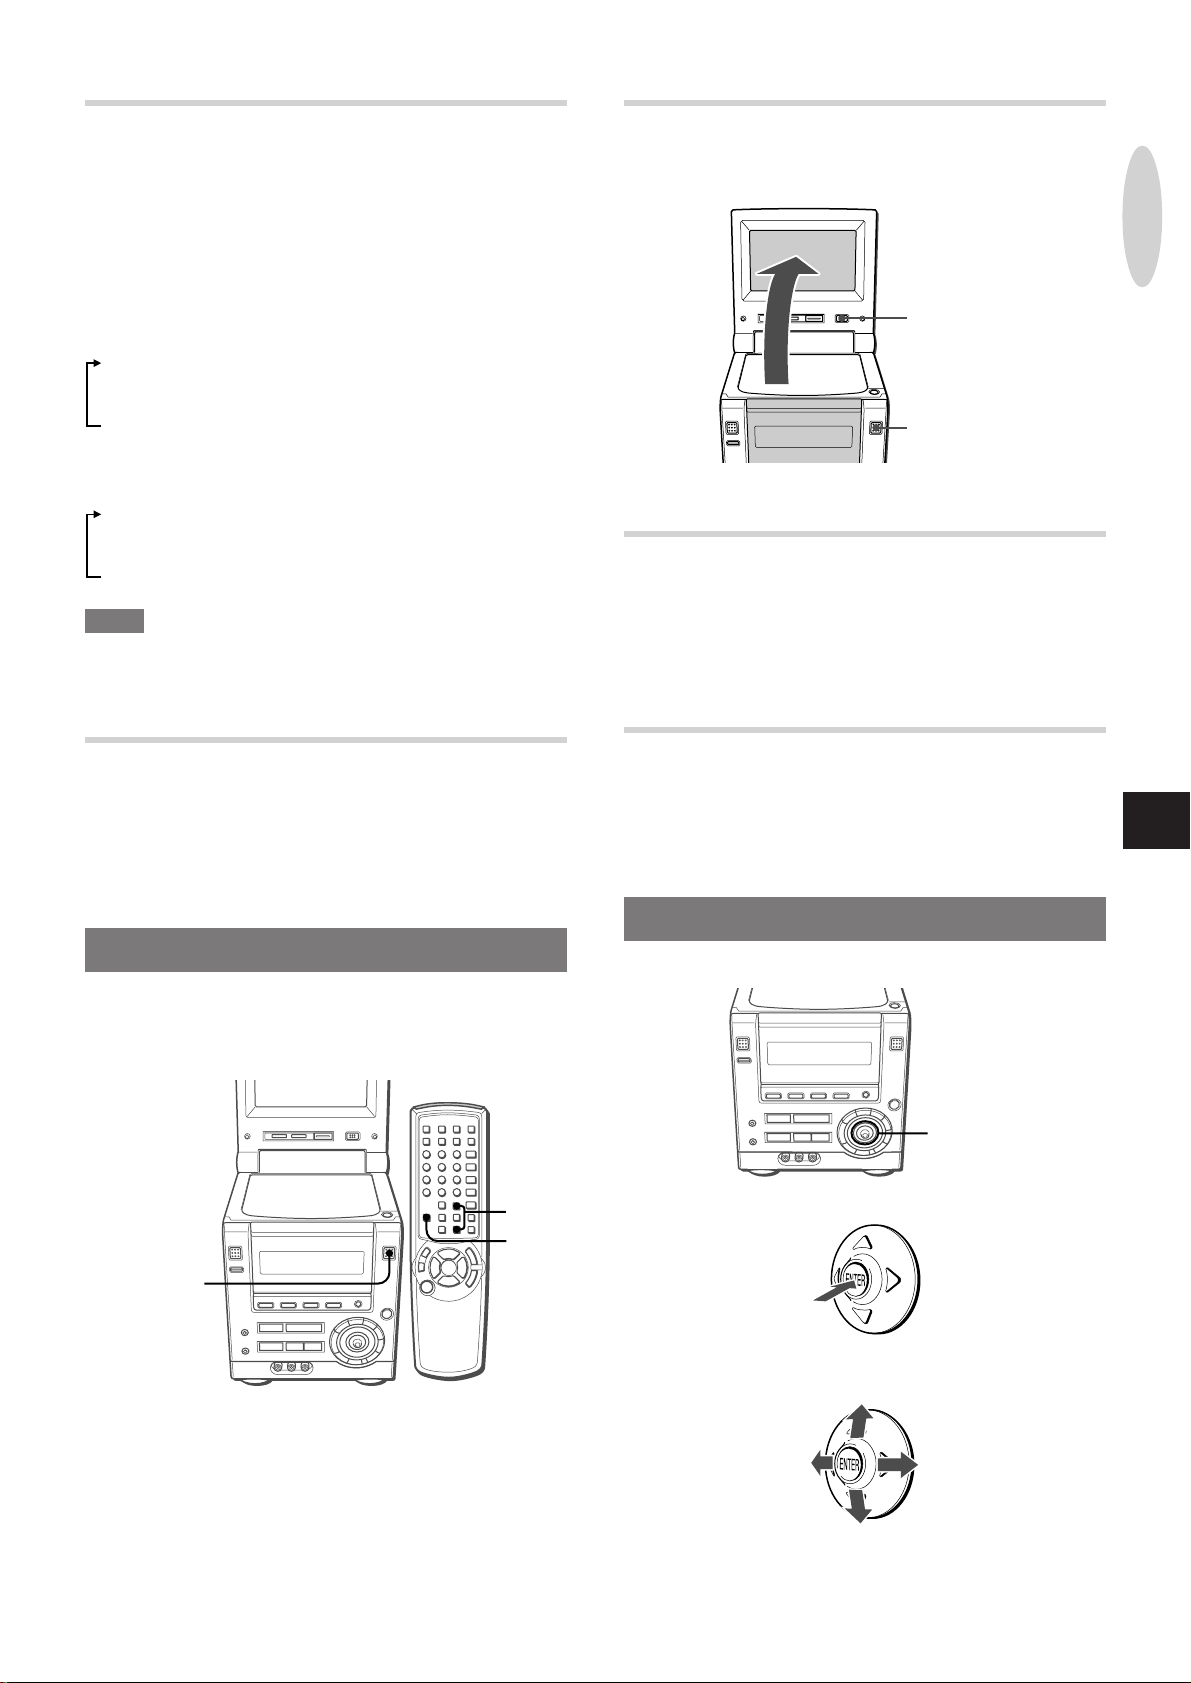
TURNING ON/OFF THE ILLUMINATION
MONITOR
ON/OFF
MONITOR
OPEN/CLOSE
OPENING THE MONITOR
The unit has illumination lights around the function buttons and
the VOLUME control.
The illumination lights can be turned on in one of the three different
colors.
While the power is on, press ILLUMINA TION repeatedly .
This turns on/off the illumination and changes its color in the
following order:
Illumination around the currently selected function button
1 Lights in blue
2 Lights in orange
3 Lights in purple
4 Turns off
Illumination around the other function buttons and the VOLUME
control
1 Lights in orange
2 Lights in purple
3 Lights in blue
4 Turns off
NOTE
T urning on/off the illumination lights is not possible during the demo
display or when the display brightness is set to "DIMMER 3" (page
10).
Press MONITOR OPEN/CLOSE.
Alternatively , press i while pressing SHIFT on the remote control.
PREPARATIONS
To close the monitor, press MONITOR OPEN/CLOSE again.
CHANGING THE ANGLE OF THE
MONITOR
Press i or k while pressing SHIFT on the remote control to
change the monitor angle, so that the best viewing angle is
obtained.
USING HEADPHONES
Connect headphones with a stereo mini plug (ø3.5 mm, 1/8 inch)
to PHONES.
No sound is heard from the speakers while the headphones are
plugged in.
USING THE MONITOR
This unit is equipped with a built-in monitor. The monitor allows
you to view pictures of DVDs and VCDs without connecting an
external TV set to the unit.
i/k
SHIFT
MONITOR
OPEN/CLOSE
TURNING ON/OFF THE MONITOR
Press MONITOR ON/OFF to turn on or off the monitor.
• The monitor is automatically turned off when TUNER/BAND or
AUX is pressed.
USING THE CURSOR KEY
CURSOR
T o use the CURSOR ke y as the ENTER button, press it as f ollows:
En
To use it as the cursor key (i/k/j/l), move the center knob to
the desired direction.
ENGLISH
9
Page 12
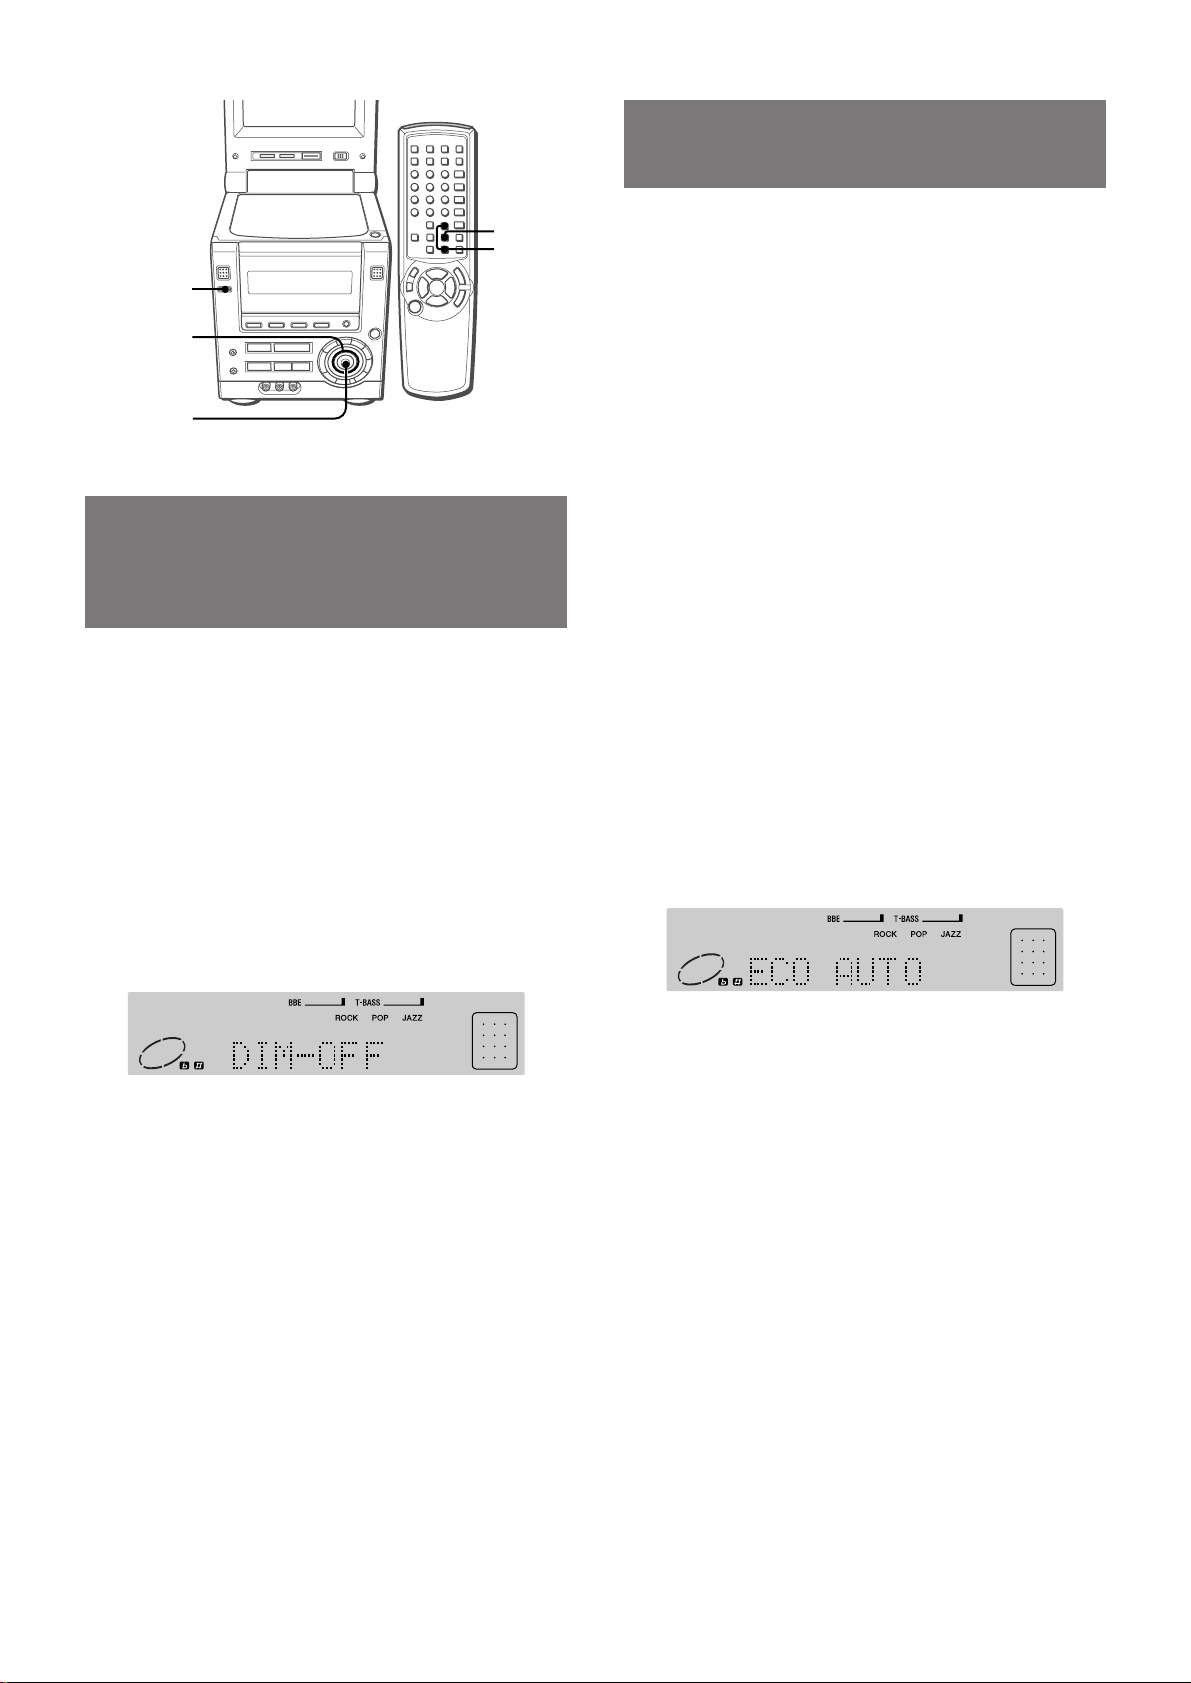
SETTING POWER
ECONOMIZING MODE
ENTER
i/k
DEMO/ECO
CURSOR
ENTER
DIMMING THE DISPLAY
WINDOW BRIGHTNESS
(DIMMER)
The display window brightness can be adjusted to the following
four lev els: "DIM-OFF", "DIMMER 1", "DIMMER 2", and "DIMMER
3".
"DIM-OFF" is the brightest level.
When "DIMMER 3" is selected the display is darkest, and the
illumination lights around the function buttons and the VOLUME
control also go off.
1
While the power is turned on, press DEMO/ECO
twice.
"DIM MODE" is displayed.
Setting the unit to power economizing mode reduces power
consumption.
When the power economizing mode is set to ON or AUT O
• When the power shuts off, all indications of the display window
including the clock are turned off.
• The display window brightens only when the unit is being
operated. When the unit has not been operated for 10 seconds,
the brightness switches to the level chosen b y the "DIM MODE"
setting. (If the brightness is set to "DIM-OFF", the brightness
does not change.
When the power economizing mode is set to AUT O
In addition to the above:
• If the disc is stopped and there is no audio input from any
connected equipment for 10 minutes, the power shuts off . (When
listening to the radio, however, the power does not shut off
automatically.)
1
While the power is turned on, press DEMO/ECO.
"ECO MODE" is displayed.
2
Within 4 seconds, press ENTER.
The current power economizing mode status is displayed.
If the power economizing mode is OFF : ECO OFF
If the power economizing mode is ON : ECO ON
If the power economizing mode is AUTO : ECO AUTO
3
Within 4 seconds, move CURSOR i or k
repeatedly to select the desired brightness.
Alternatively, press i or k on the remote control.
Example: When "AUTO" is selected
2
Within 4 seconds, press ENTER.
The currently selected brightness is displayed.
Example: When "DIM-OFF" is selected
3
Within 4 seconds, move CURSOR i or k
repeatedly to select the desired brightness.
Alternatively, press i or k on the remote control.
4
Within 4 seconds, press ENTER.
4
Within 4 seconds, press ENTER.
Standby power consumption
When the power economizing mode is OFF : 20 W
When the power economizing mode is ON or AUTO : 2.0 W
10
ENGLISH
Page 13
SOUND
AUDIO ADJUSTMENTS
Q SURROUND
Q SURROUND
VOLUME
ENTER
MODE
CURSOR
VOLUME
T urn VOLUME on the main unit or press VOL N/M on the
remote control.
The volume level is displayed as a number from 0 to 49 followed
by MAX.
If the power is turned off while the volume level is set to 21 or
more, it will automatically be set to 20 when the power is turned
on the next time.
VOLN/M
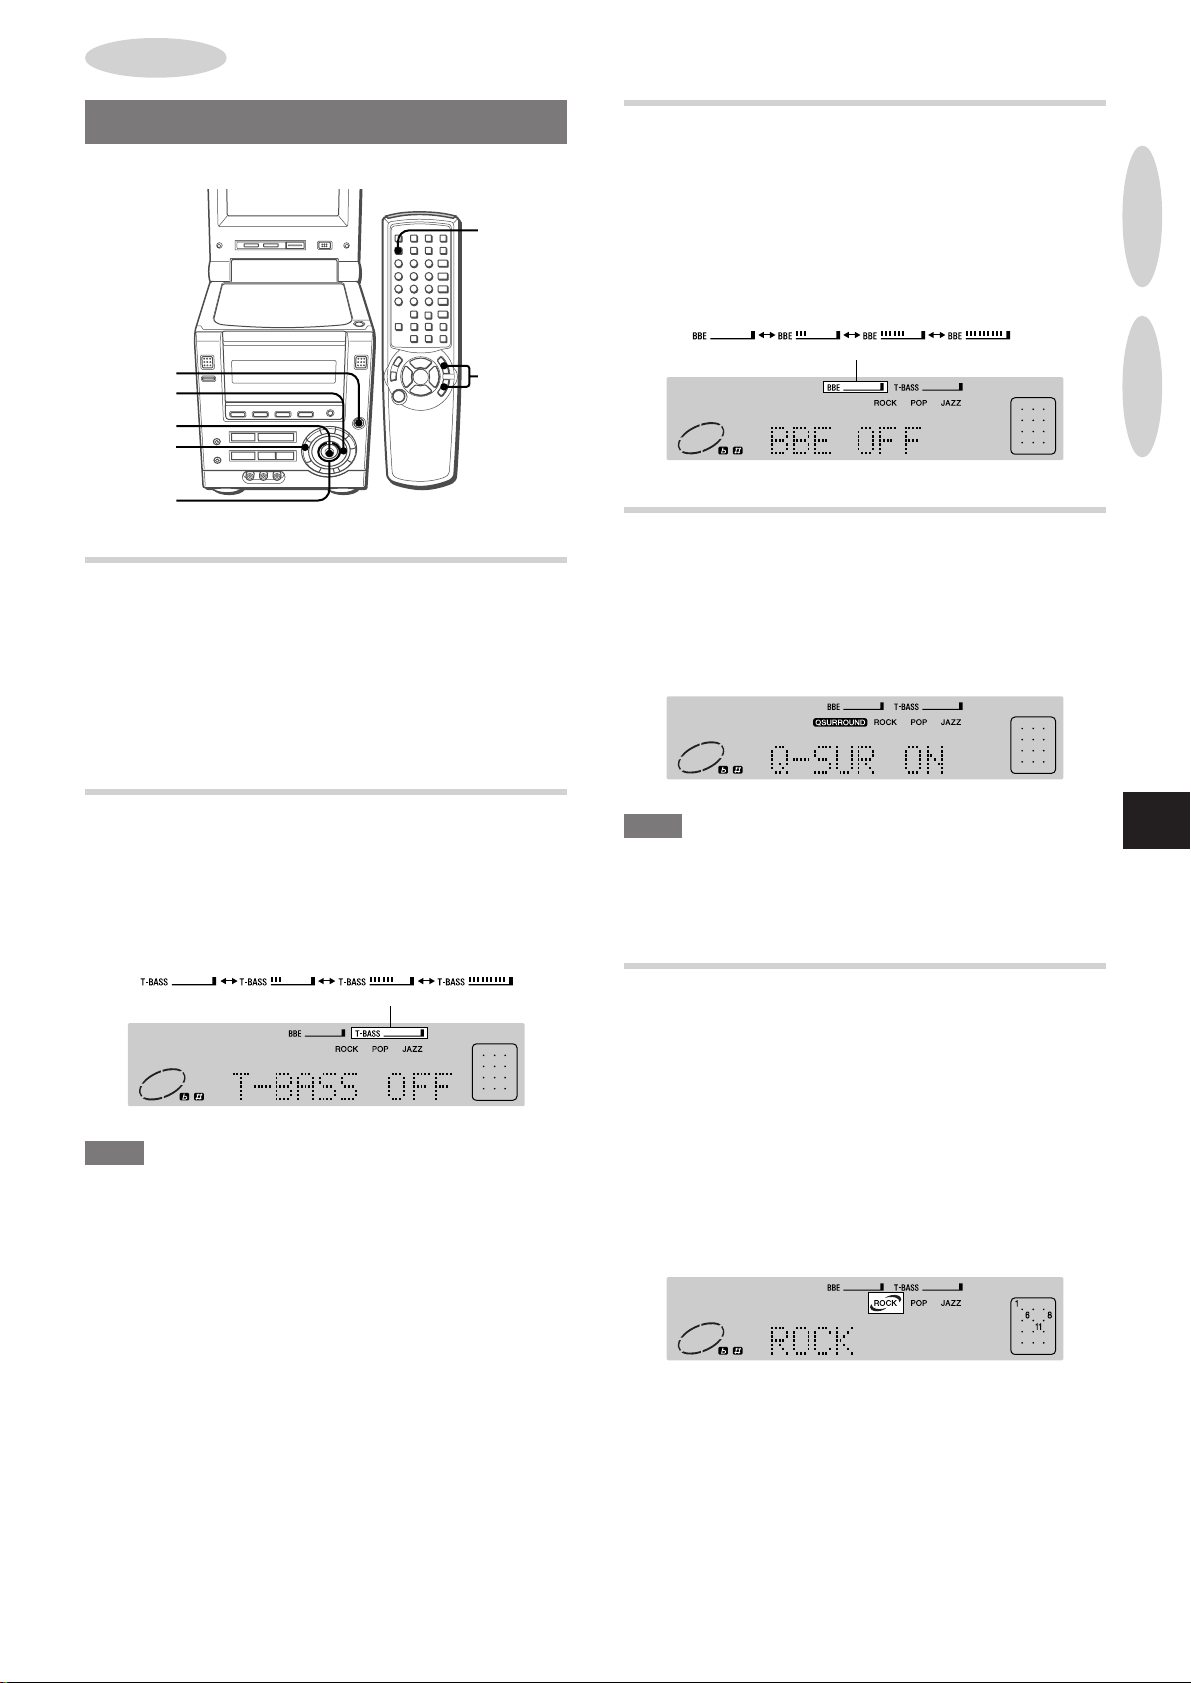
ENHANCING THE TREBLE SOUND
The BBE system enhances the clarity of high-frequency sound.
1 Press MODE repeatedly until "BBE" is displayed.
Alternatively, press MODE once and move CURSOR j or l
until "BBE" is selected.
2 Within 6 seconds, move CURSOR i or k.
You can select one of the three levels or the off position.
The BBE level does not change cyclically.
(OFF)
Q SURROUND SYSTEM
The Q surround system built into this unit uses only two speakers
at the left and right to create an atmosphere that sounds as if you
are surrounded by two front speakers and two rear speakers.
Press Q SURROUND to turn on or off the Q surround system.
Example: When the Q surround system is turned on
PREPARATIONSSOUND
SUPER T -BASS SYSTEM
The T-BASS system enhances the realism of low-frequency sound.
1 Press MODE once so that "T-BASS" is displayed.
2 Within 6 seconds, move CURSOR i or k.
You can select one of the three levels or the off position.
The T-BASS level does not change cyclically.
(OFF)
NOTE
Low frequency sound may be distorted when the T-BASS system
is used for a disc in which low frequency sound is originally
emphasized. In this case, cancel the T-BASS system.
NOTE
• The Q SURROUND system does not work in monaural mode.
• At higher volumes, turning Q SURROUND on may cause sound
distortion. In this case, turn the volume down, or turn off the Q
SURROUND system.
GRAPHIC EQUALIZER
This unit provides the following three diff erent equalization curves.
ROCK: Powerful sound emphasizing treble and bass
POP: More presence in the vocals and midrange
JAZZ: Accented lower frequencies f or jazz-type m usic
1 Press MODE repeatedly until "EQ OFF" or the currently
selected mode is displayed.
Alternatively, press MODE once and move CURSOR j or l
until "EQ OFF" or the currently selected mode is displayed.
2 Within 6 seconds, move CURSOR i or k to select the
desired equalization curve.
Example: When "ROCK" is selected
En
T o cancel the equalization mode
Repeat the above and select "EQ OFF".
ENGLISH
11
Page 14
AUDIO CD
OPERATIONS
BASIC OPERATIONS
For disc formats supported on this unit, see page 5.
zOPEN/
CLOSE
MONITOR
OPEN/CLOSE
DVD/CD
c
s
a
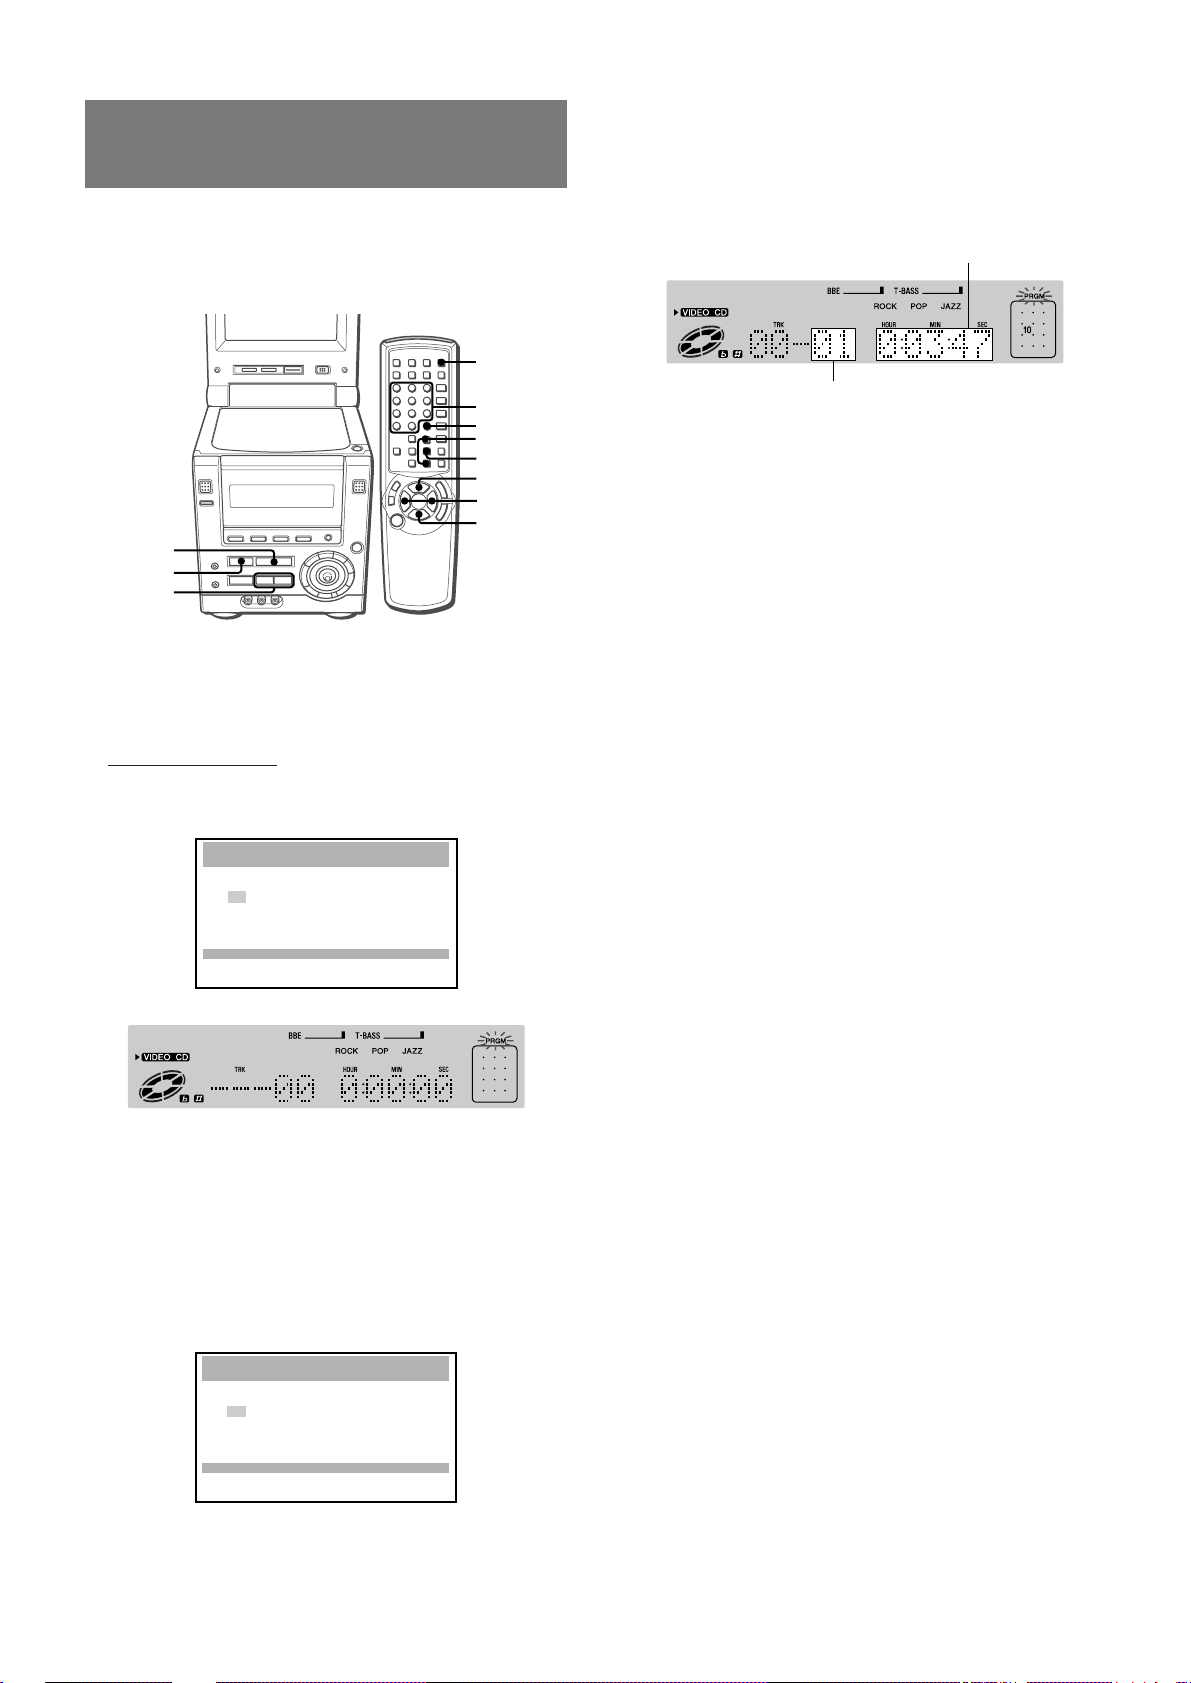
LOADING A DISC
1
Press DVD/CD.
2
If the monitor is closed, press MONITOR OPEN/
CLOSE to open it.
3
Press zOPEN/CLOSE to open the disc door.
4
Load a disc with the label side up.
c/d
s
a
NOTE
• Do not place more than one compact disc in the disc
compartment.
• Do not use irregular shape CDs (example: heart-shaped,
octagonal ones). It may result in malfunction.
• Do not touch the pickup lens. If it is soiled, a CD may not be
played normally.
PLA YING A DISC
1
Load the disc.
2
Press c.
Play begins with the first track.
Number of track
being played
Elapsed playing
time
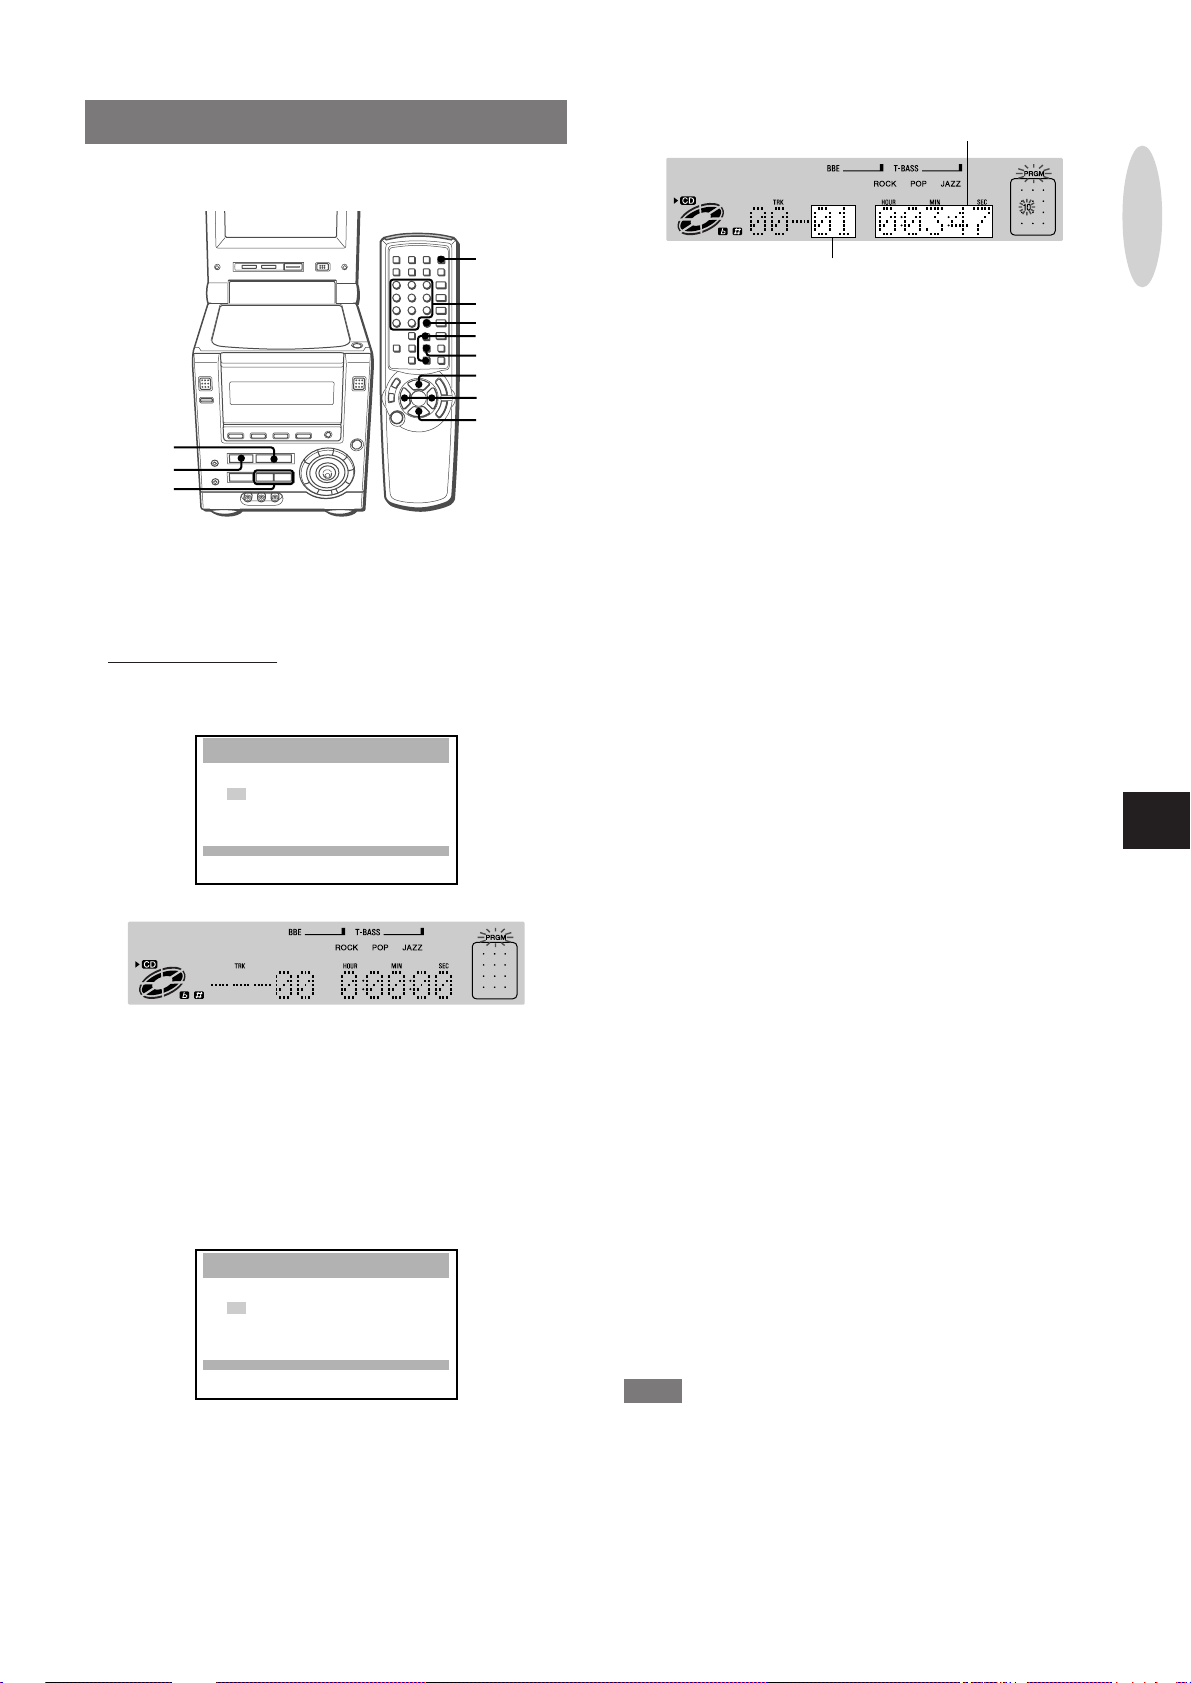
INFORMATION DISPLAYED ON THE
MONITOR SCREEN
Various guide displays of the current CD operation are shown on
the upper right corner of the monitor screen.
Also, you can turn on the playing status information on the left
side of the monitor screen.
5
Press zOPEN/CLOSE to close the disc door.
When an audio CD is loaded, a display such as the following
appears:
Lights up
Total number of tracks Total playing time
Also, if the monitor is turned on, "CD PLAYER MODE" is
displayed on the monitor screen.
To close both the disc door and the monitor, press MONITOR
OPEN/CLOSE instead of zOPEN/CLOSE.
Music calender (only the first
20 tracks are displayed)
10
TRACK
0 : 26 : 03
STEREO
OFF
Playing status information
• To vie w the guide displays, make sure y ou have "Guide Message
ON" in the Setup menu (see "GUIDE MESSAGE", page 41).
• To turn on the playing status information, use ON SCREEN
DISPLAY on the remote control (for details, see "DISPLAYING
PLAYING STATUS ON THE MONITOR SCREEN", page 16).
Guide
display
12
ENGLISH
Page 15
r,t
r,t
c
c/d
0-9,+10
STOPPING AND PAUSING
To stop play
Press s.
Play stops. The unit remembers the point at which play stopped.
("RESUME" appears on the display.)
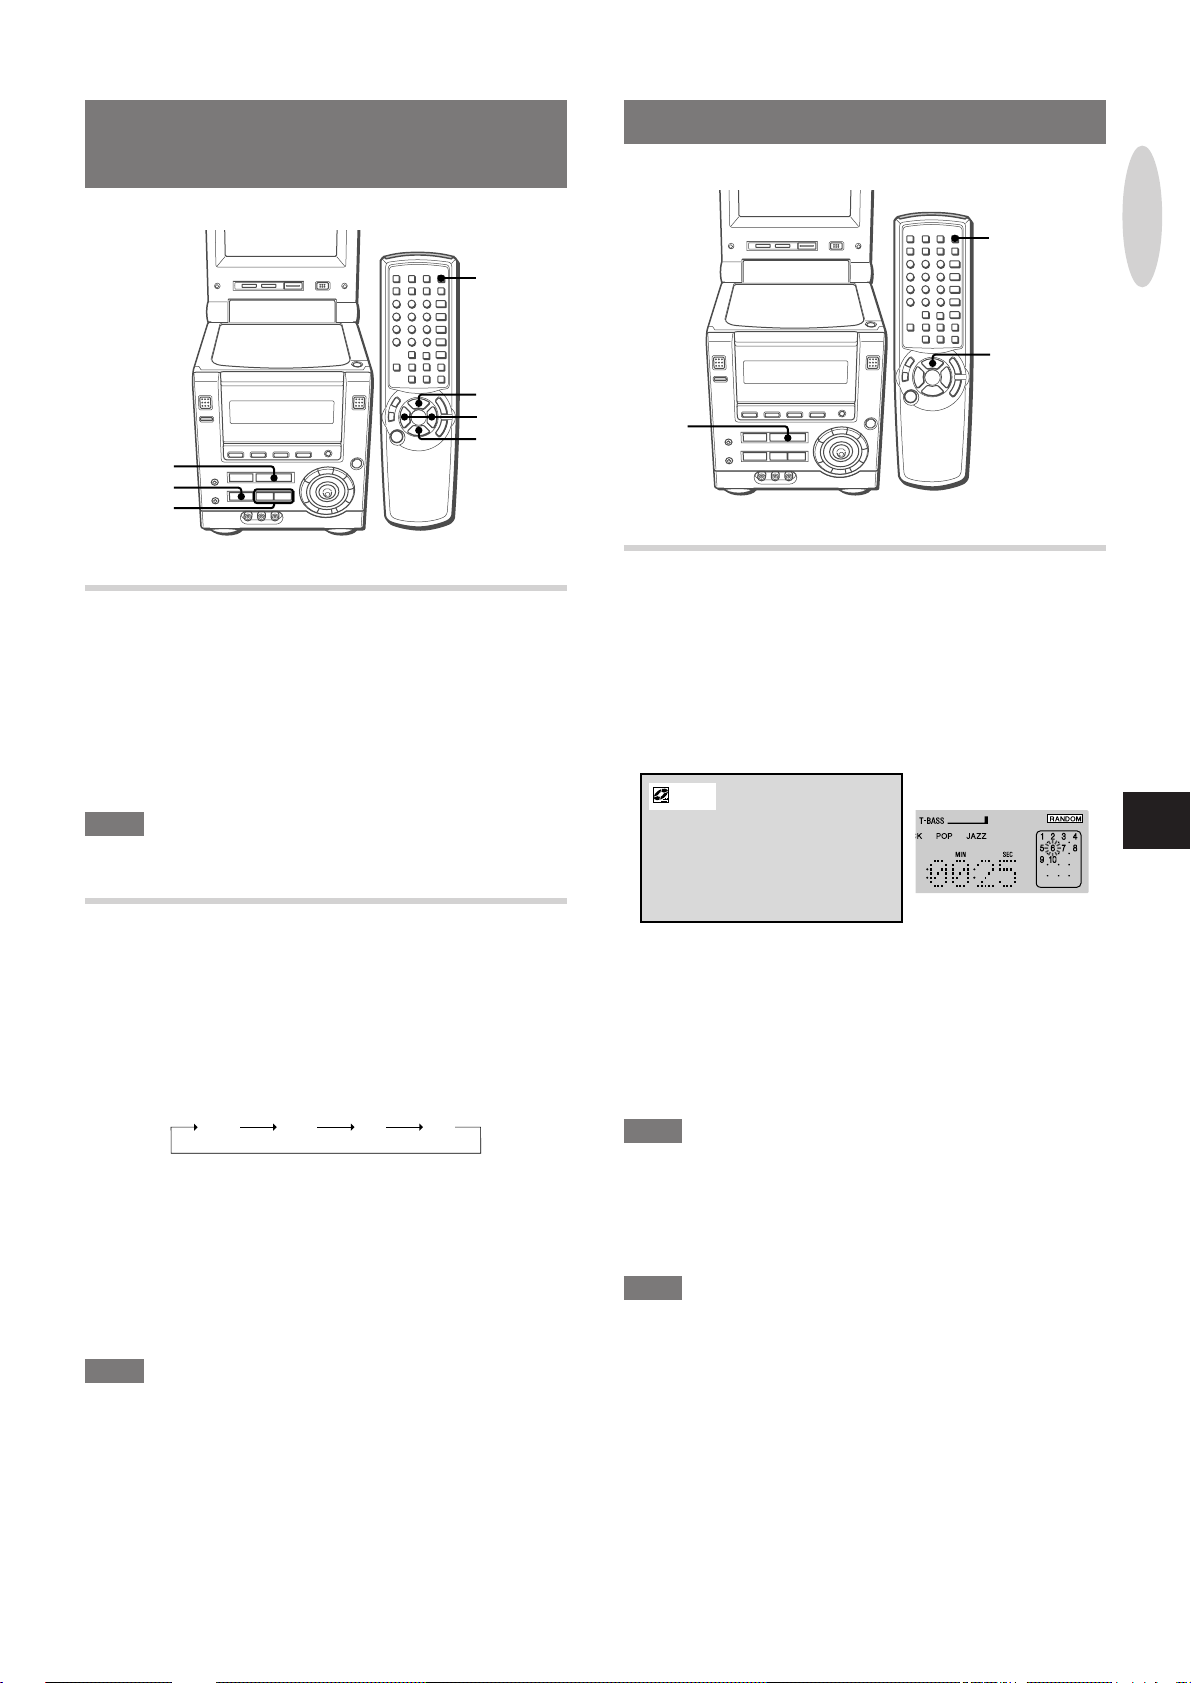
SELECTING A TRACK
To resume play from the point where it stopped
Press c.
To clear the point to be resumed
Press s again in stop mode.
"RESUME" disappears on the display. The resume memory is
cleared, and play starts with the first track when c is pressed the
next time.
NOTE
• Under the default setting, the point to be resumed is also cleared
when the disc door is opened, the power is turned off, or the
function is switched.
• Set up can be changed so that the resume memory is retained
even after the conditions described above. (See "DISC
RESUME", page 47).
To pause play
Press a.
To resume play, press c.
MARKING AND SEARCHING
Marking
You can mark any point in a CD and start play from there.
For details, see "MARKING", page 28.
SELECTING A TRACK WITH THE REMOTE
CONTROL
A track can be selected directly by entering the track number on
the remote control, either during play or in stop mode.
Press the numbered buttons for the desired track.
Example:
To play track 12, press +10, 2.
To play track 20, press +10, +10, 0.
Play begins at the beginning of the selected track and continues
to the end of the disc.
AUDIO CD
OPERATIONS
En
Searching
Y ou can locate a desired point on the CD b y using the time search
function, i.e., by specifying the time from the beginning of the CD .
For details, see "TIME SEARCH", page 29.
REMOVING THE DISC
Stop play, and press zOPEN/CLOSE.
The disc door opens so that the loaded disc can be removed.
After removing the disc, press zOPEN/CLOSE again to close
the disc door.
FAST FORWARD/REVERSE PLAY
Hold down r or t during play or in pause mode
until the guide display such as "g x 5" appears.
The disc is played 5 times faster than the normal speed.
To return to normal play, press c.
To change the playing speed
During fast forward/reverse play, hold down r or t until the
guide display appears.
This operation switches the playing speed between 5 times and
16 times.
SKIPPING
Press r or t.
With each press of t, the disc position skips to the succeeding
track.
When r is pressed once, the disc position skips back to the
beginning of the current track.
When r is pressed twice or more, the disc position skips back
to the previous track(s).
ENGLISH
13
Page 16
TRACK
A-B
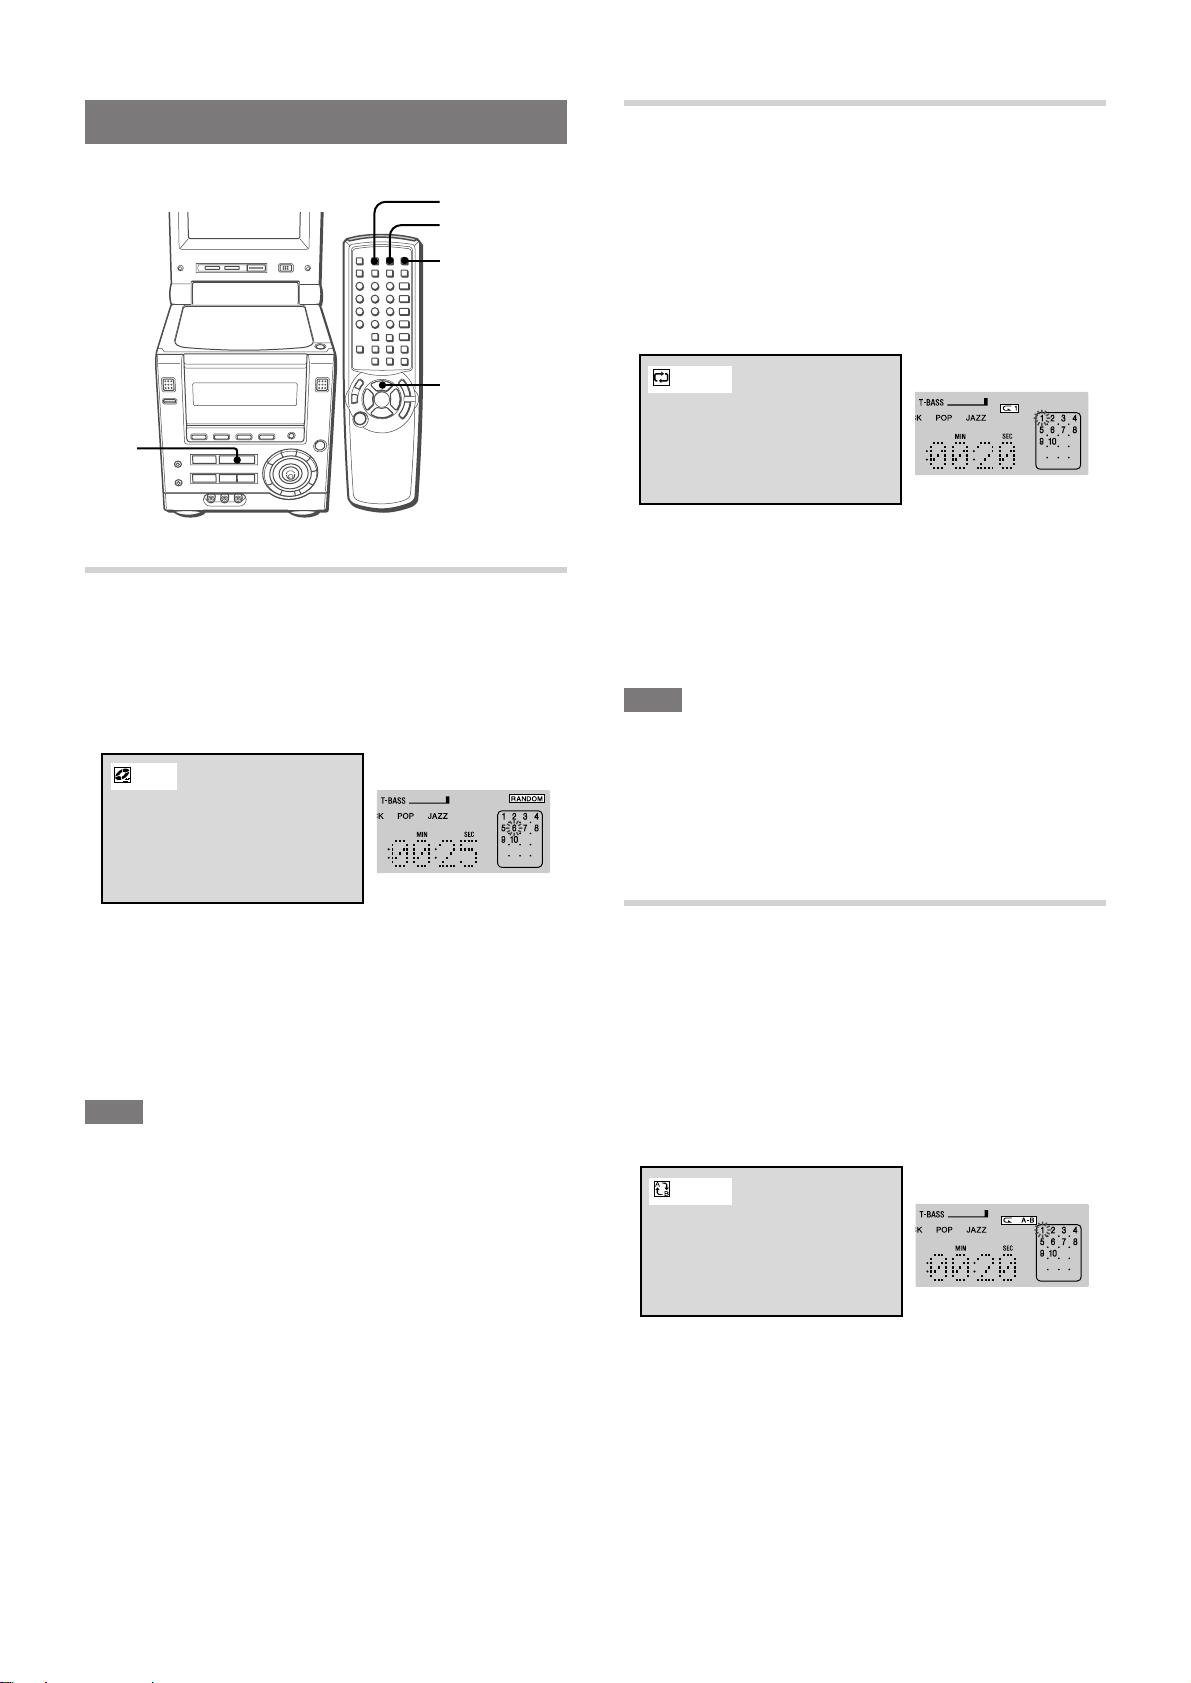
RANDOM/REPEAT PLAY
REPEAT PLAY
One or all the tracks can be played repeatedly.
A-B REPEAT
REPEAT
PRGM/
RANDOM
c/d
c
RANDOM PLAY
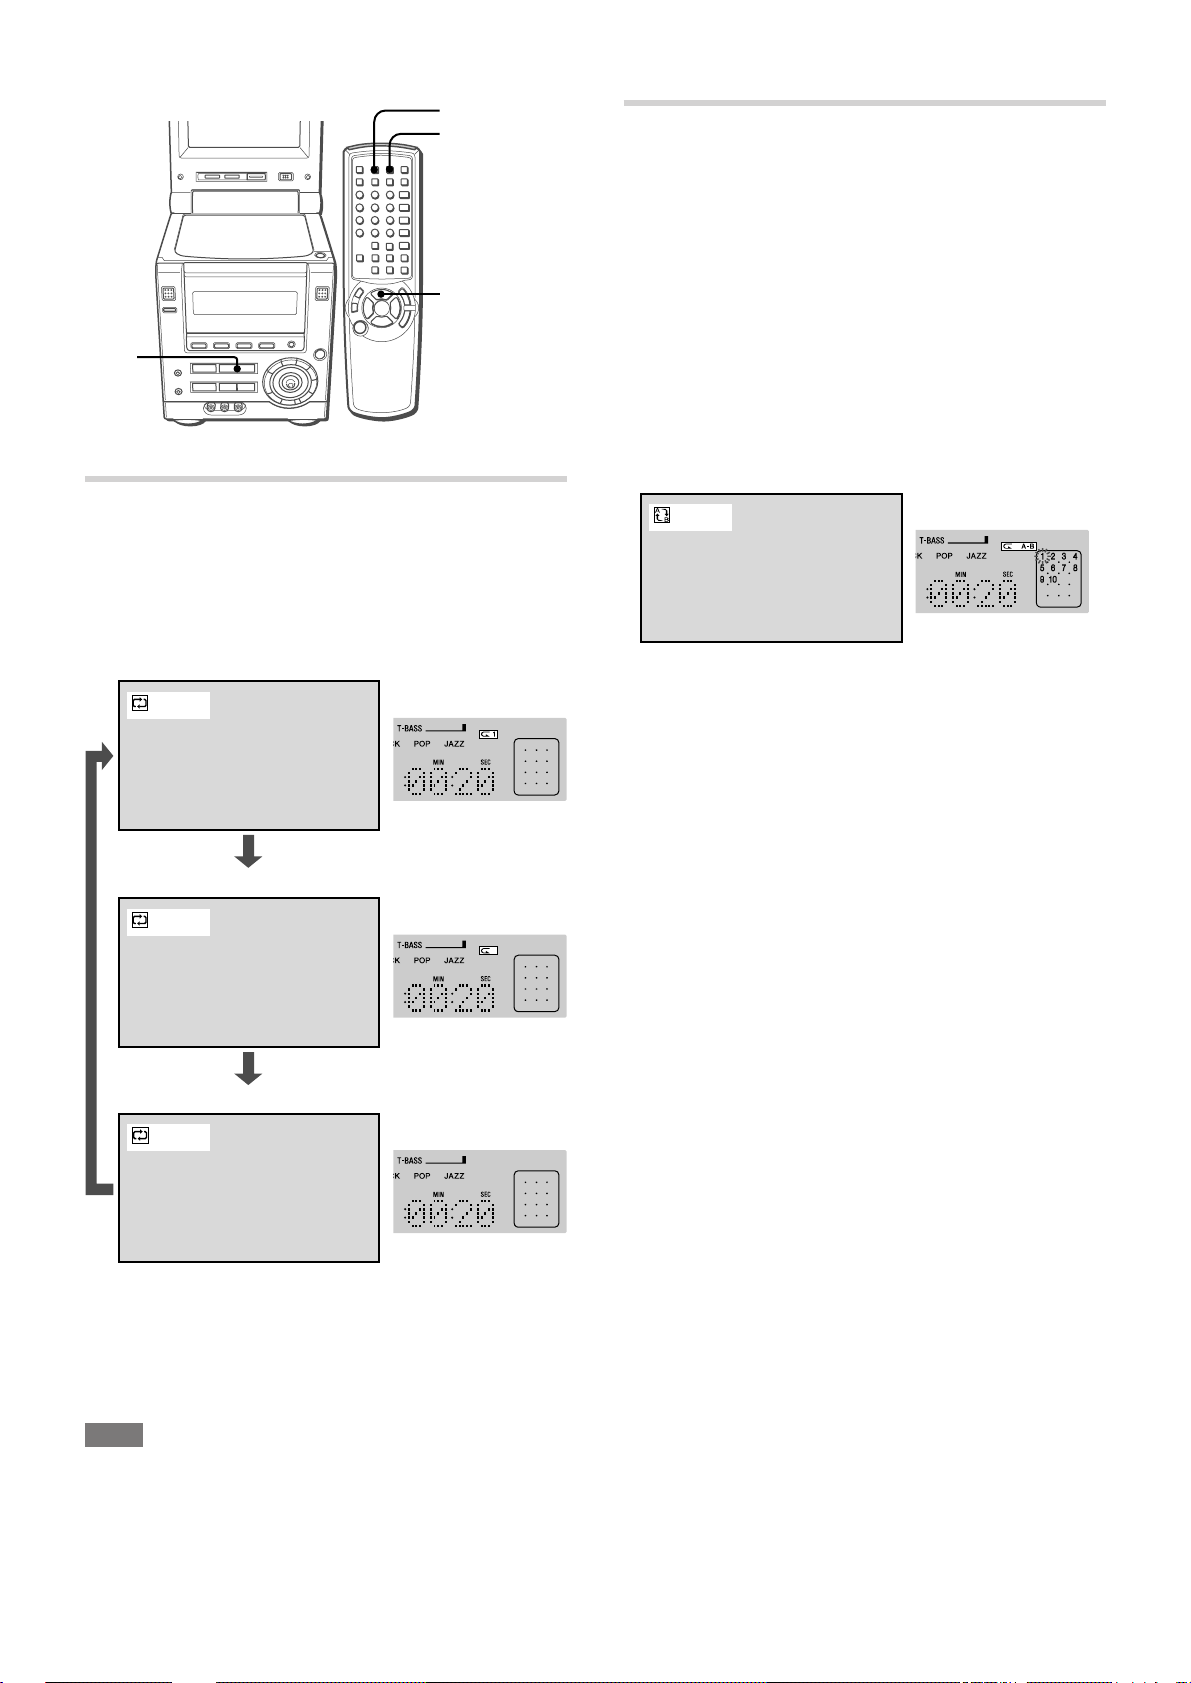
All the tracks on the disc can be played randomly.
1
Press PRGM/RANDOM on the remote control
repeatedly so that "RANDOM" appears.
Monitor screen:
RANDOM
Display:
Press REPEA T on the remote control repeatedly to displa y
"p" or "p1".
To repeat the current track only, select "p1".
("TRACK" appears on the monitor screen.)
To repeat all the tracks, select "p".
("ALL" appears on the monitor screen.)
Monitor screen:
Display:
To cancel repeat play
Press REPEAT on the remote control repeatedly to turn off "p1".
To repeat play of selected track(s) in a disc
Program the track(s) with the programmed play function, start
programmed play, and then press REPEAT to repeat play of the
programmed tracks (see "PROGRAMMED PLAY", page 15).
NOTE
• To repeat random pla y, first activate the random play mode , then
press REPEAT to display "p".
• If the random play mode is activated during one track repeat or
all tracks repeat play mode, the repeat play mode will be
canceled.
• Direct selection of the tracks with the numbered button cancels
the "p1" play mode.
2
Press c to start play.
Tracks on the disc are played in random order.
To cancel random play
Press PRGM/RANDOM on the remote control repeatedly so that
"RANDOM" disappears on the display and the normal display
reappears.
NOTE
• Even if r is pressed, a previously played track cannot be
skipped. The unit returns to the beginning of the current track
only.
• Direct selection of the tracks with the numbered button is not
possible during the random play mode.
A-B REPEAT PLAY
You can select a portion to be repeated.
1
During play, press A-B REPEAT at the starting
point of the portion you want to repeat.
2
Press A-B REPEA T again at the ending point of the
portion you want to repeat.
The unit returns to point A and play the portion between A and
B repeatedly.
Monitor screen:
Display:
To cancel A-B repeat play
Press A-B REPEAT again.
"OFF" appears on the monitor screen.
14
ENGLISH
Page 17
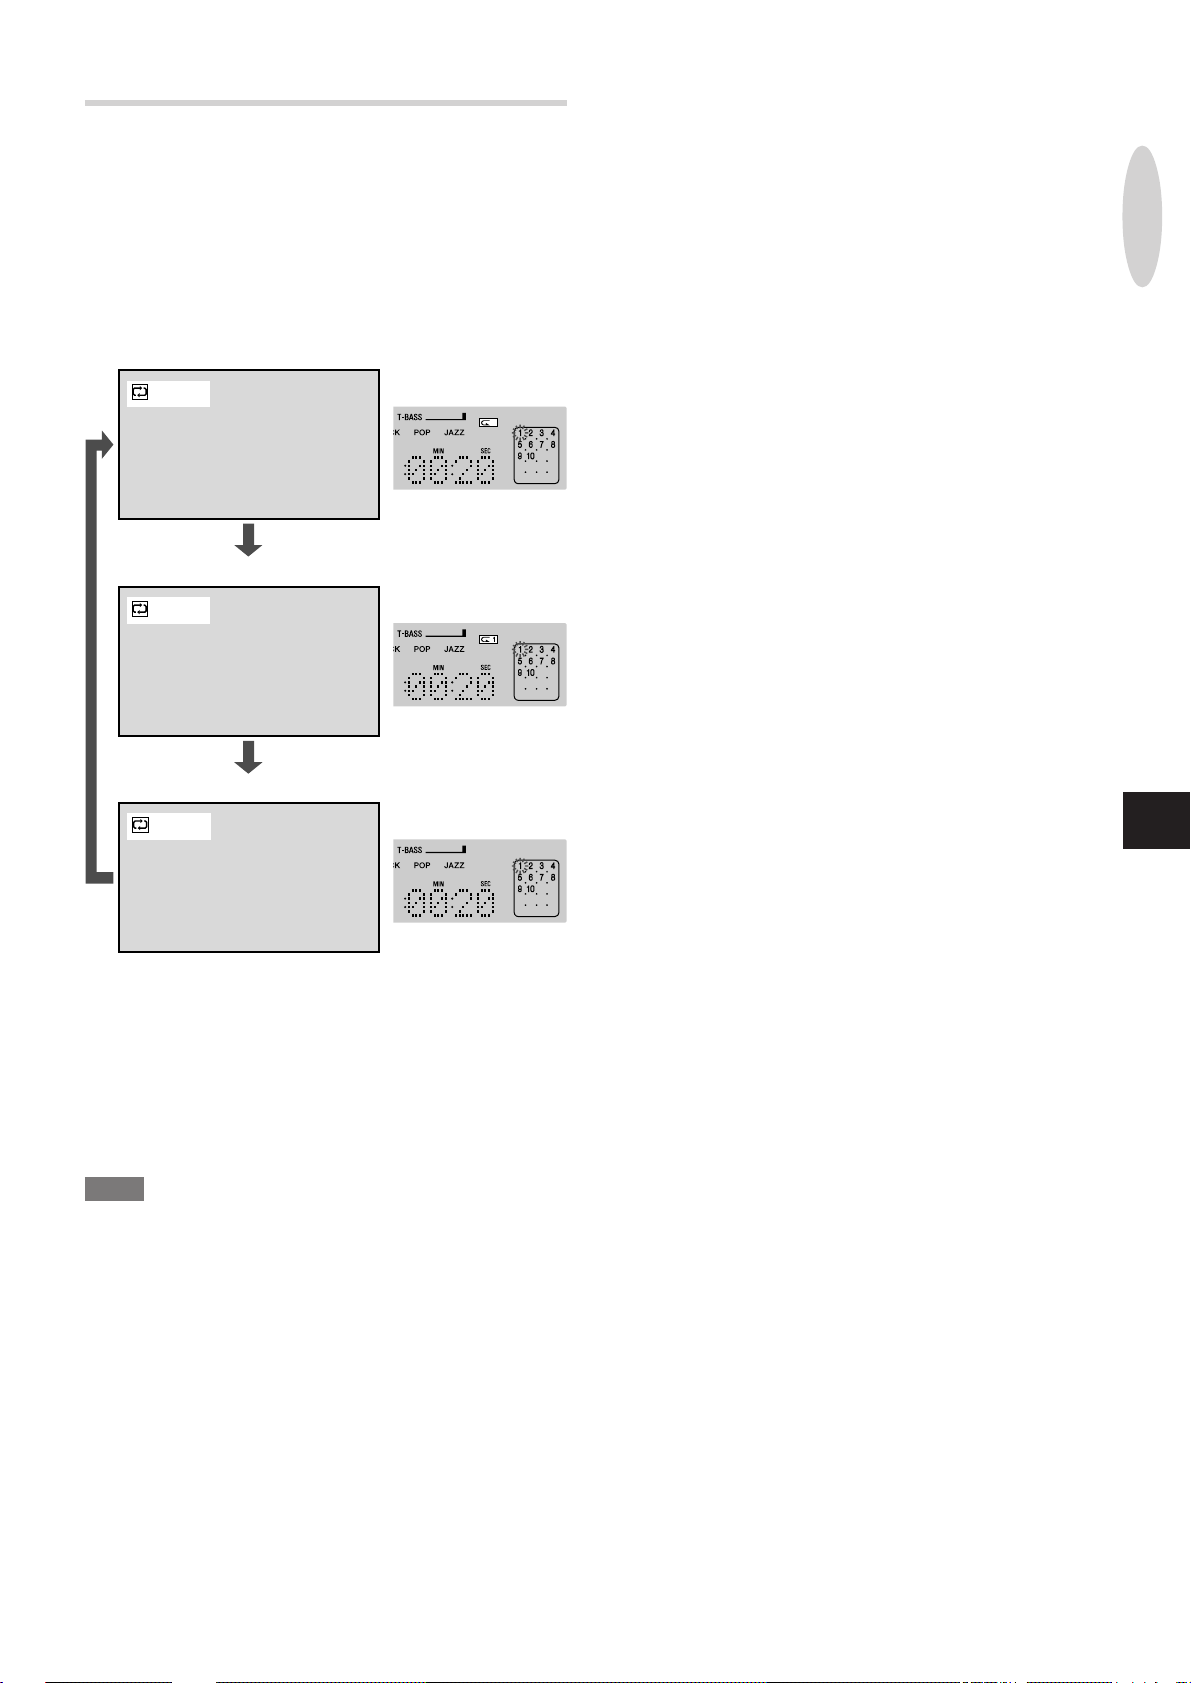
PROGRAMMED PLAY
Up to 32 tracks can be programmed from the loaded disc.
Total playing time of
programmed tracks
PRGM/
RANDOM
0-9,+10
C
i/k
ENTER
c/d
r,t
s
c
s
r,t
1
Press PRGM/RANDOM on the remote control once
in stop mode.
"PROGRAM" appears on the monitor screen and
"PRGM" flashes on the display.
2
Within 5 seconds, press ENTER.
The program screen is displayed on the monitor screen and
the display.
Monitor screen:
PROGRAM
SELECT TRACK
EDIT PROGRAM
UP
i
00
k
DOWN
TOTAL TRACK TIME
ik
**
**
**
**
**
**
**
**
**
**
**
**
**
**
**
**
0 0 0 : 00 : 00
ENTER:MEMORY
PROGRAM:EXIT
CANCEL:CLEAR
Display:
**
**
**
**
**
**
**
**
c
**
**
**
**
**
**
**
**
:PLAY
Total number of
programmed tracks
If you entered a wrong number
Press C.
The last programmed number is canceled. Then enter the
correct number.
5
Repeat steps 3 and 4 to program other tracks.
6
Press c to start play .
To cancel programmed play
Press PRGM/RANDOM twice.
"OFF" is displayed on the monitor screen. Programmed play is
canceled, and the unit continues to play the current and all
succeeding tracks in the disc.
To stop programmed play
Press s.
The unit remembers the point at which play stopped, and resumes
programmed play from this point when c is pressed.
To clear the point to be resumed
Press s once again after stopping programmed play.
The resume memory is cleared, and plays from the first
programmed track when c is pressed.
To clear the program
Press s twice after stopping programmed play.
The program will also be cleared when the disc door is opened.
To continue programming a new set of tracks , press ENTER and
repeat from step 3.
AUDIO CD
OPERATIONS
En
3
Press the numbered button(s) or i/k on the
remote control to select the track to be pla yed first.
Using the numbered buttons:
To select track 12, press +10, 2.
To select track 20, press +10, +10 and 0.
Using i/k:
Press i for a larger track number and k for a smaller track
number.
Monitor screen:
PROGRAM
SELECT TRACK
4
Press ENTER.
The selected track number is listed in order on the monitor
screen, and lights up on the display.
The number of programmed tracks and the total pla ying time is
also indicated at the bottom of the monitor screen.
EDIT PROGRAM
UP
i
10
k
DOWN
TOTAL TRACK TIME
ik
**
**
**
**
**
**
**
**
**
**
**
**
**
**
**
**
0 0 0 : 00 : 00
ENTER:MEMORY
PROGRAM:EXIT
CANCEL:CLEAR
**
**
**
**
**
**
**
**
c
**
**
**
**
**
**
**
**
:PLAY
To check the program
Call up the program screen on the monitor screen.
Alternatively, press t in stop mode.
With each press, the program number and the track number are
shown progressively on the displa y.
To add a track to the program
Before playing, repeat steps 1 to 4. The tr ack will be programmed
after the last track.
To delete a track from the program
1 Press PRGM/RANDOM repeatedly so that "PROGRAM"
appears on the monitor screen. Then press ENTER within 5
seconds.
2 Press C.
The last track in the program is deleted.
To cancel the programmed play mode
Press PRGM/RANDOM twice.
NOTE
• Direct selection of a track with the numbered buttons cancels
the programmed play mode.
• If random play mode is activated during programmed play, the
programmed play mode is canceled.
• Y ou cannot program more than 32 tracks . (Even if you attempt to
program a track after programming 32 tracks, the track is not
programmed but the 32 tracks already selected remain in the
program.)
ENGLISH
15
Page 18
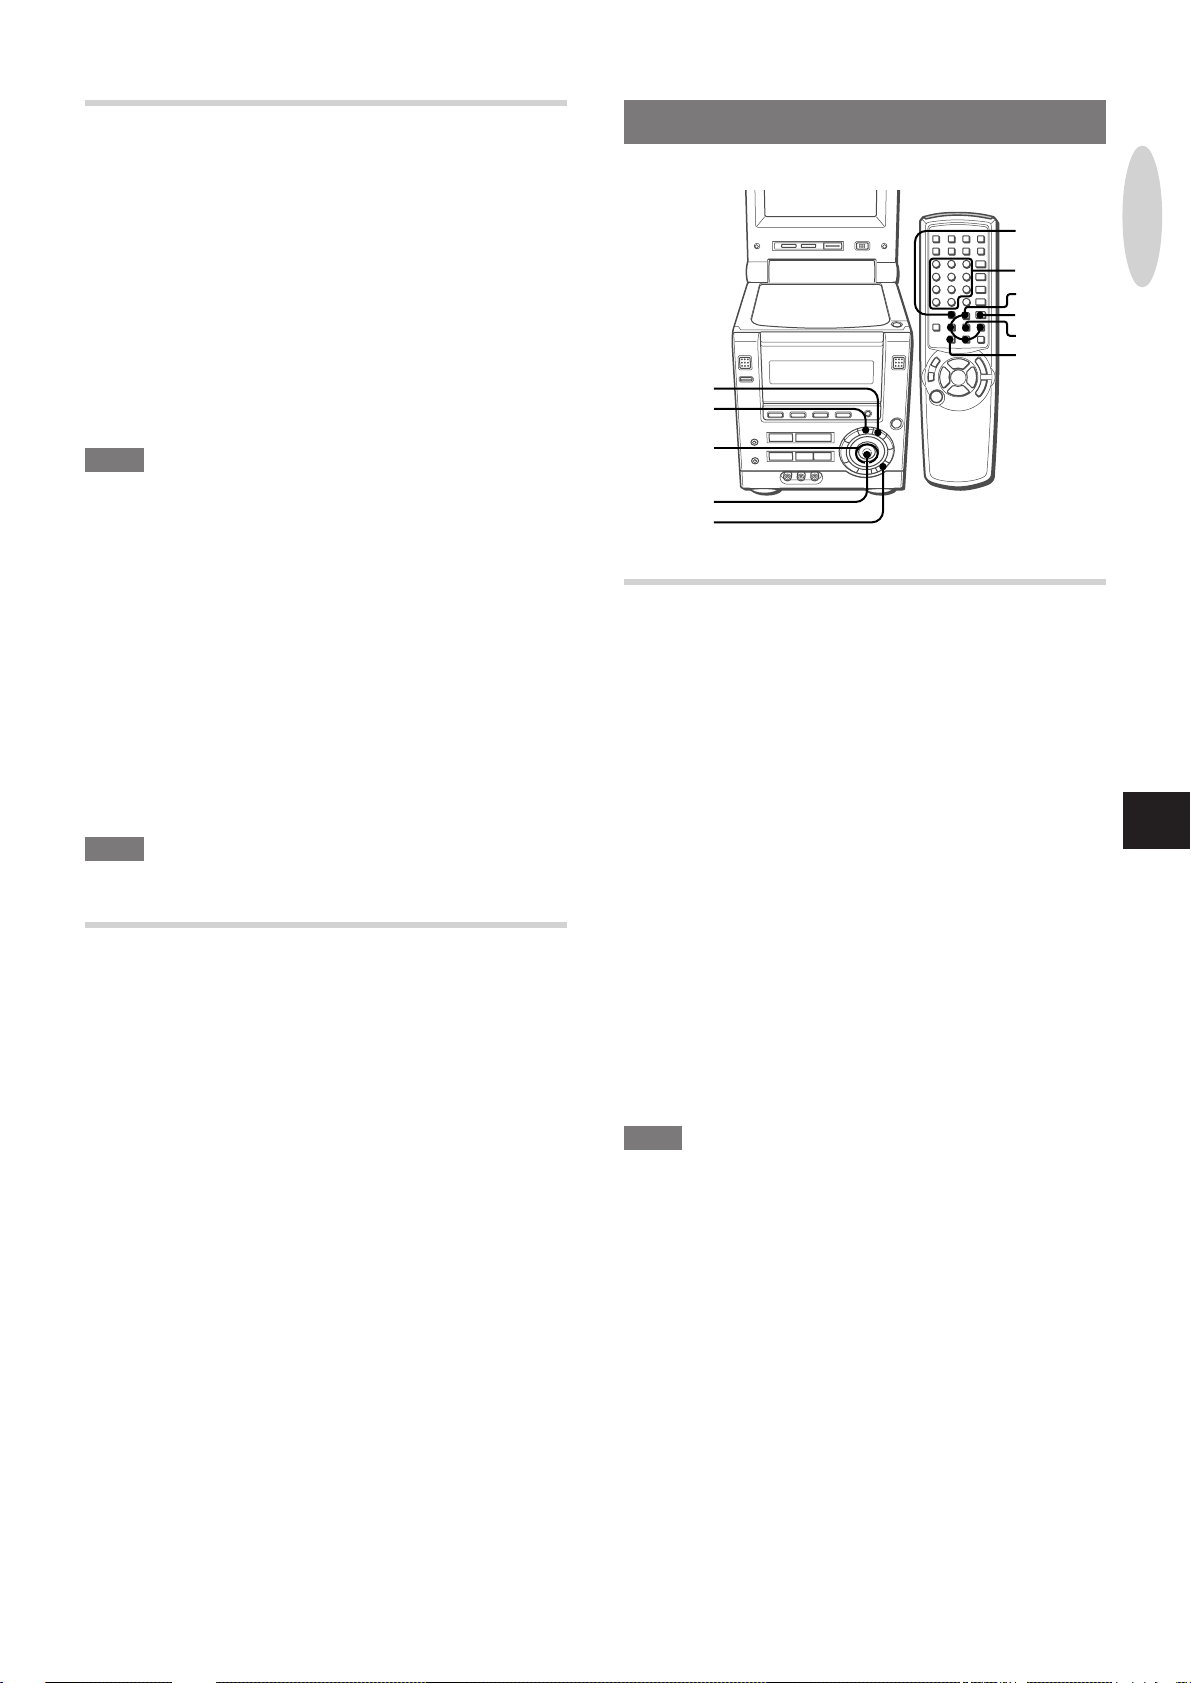
CHANGING THE DISPLAY
INFORMATION
DISPLAYING PLAYING STATUS ON THE
MONITOR SCREEN
General playing status can be displayed on the monitor screen.
Press ON SCREEN DISPLAY repeatedly.
With each press, the display on the monitor screen changes as
follows:
ON SCREEN
DISPLAY
SET UP
SET UP
CHANGING THE PLA YING TIME
INFORMATION ON THE DISPLAY
Press SET UP repeatedly during play.
With each press, the display changes as follows:
1 Elapsed time of the current track
2 Remaining time of the current track
3 Elapsed time of the disc*
4 Remaining time of the disc*
* Elapsed time or remaining time of the program during
programmed play
NOTE
During random play, you cannot change the playing time
information.
1
2
3
4
1
2
5
6
7
10
TRACK
0 : 26 : 03
STEREO
OFF
10
TRACK
0 : 26 : 03
OFF
OFF
12345
Cancel (Normal display)
T10 C20
T 1 : 26 : 03
OFF
A–B
1 2 3 4 5
1 shows the track number being played.
shows the total number of tracks on the disc or the
point to be resumed in stop mode.
16
ENGLISH
2
3
4
5
6
7
shows the same information as the time information
on the display.
shows the audio information.
shows the play mode.
shows the repeat play mode.
shows the A-B repeat mode.
shows the memorized mark points information.
Page 19

DVD/VCD
OPERATIONS
The descriptions in this section apply to both DVDs and video
CDs unless otherwise noted.
DISC-RELA TED TERMS
Title (DVD only)
A title is the longest section of a picture or a musical piece on a
DVD; a movie for a picture piece on video software, or an album
for a musical piece on audio software.
Each title is assigned a title number enabling you to locate the title
you want.
Chapter (DVD only)
Chapters are sections of a picture or a musical piece that are
smaller than titles.
A title is composed of several chapters. Each chapter is assigned
a chapter number, enabling you to locate the chapter you want.
Depending on the disc, there may be no chapters recorded.
Track (audio CD and VCD only)
Tracks are sections of a picture or a musical piece on a video CD
or an audio CD.
Each track is assigned a track number, enabling you to locate the
track you want.
Scene
On a video CD with PBC (PlayBack Control) functions, moving
pictures and still pictures are divided into sections called "Scenes".
Each scene is displayed in the menu screen and assigned a scene
number, enabling you to locate the scene you want.
A scene is composed of one or several tracks.
TYPES OF VIDEO CDS
There are two types of video CDs.
Video CDs equipped with PBC (Version 2.0)
PBC (PlayBack Control) allo ws you to interact with the system via
menus, search functions or other typical computer-like operations.
Still pictures of high resolution can also be played, if they are
included in the disc.
Video CDs not equipped with PBC (Version 1.1)
Operated in the same way as audio CDs, these discs allo w you to
play video pictures as well as sound, but they are not equipped
with PBC.
In some cases, you may want to play VCDs equipped with PBC
with the PBC feature off. This is because some disc playing features
can only be used for VCDs without PBC. See "PLAYING A VCD
WITHOUT USING PLAYBACK CONTROL", page 20.
AUDIO CD
OPERATIONS
DVD/VCD
OPERATIONS
En
ENGLISH
17
Page 20

BASIC OPERATIONS
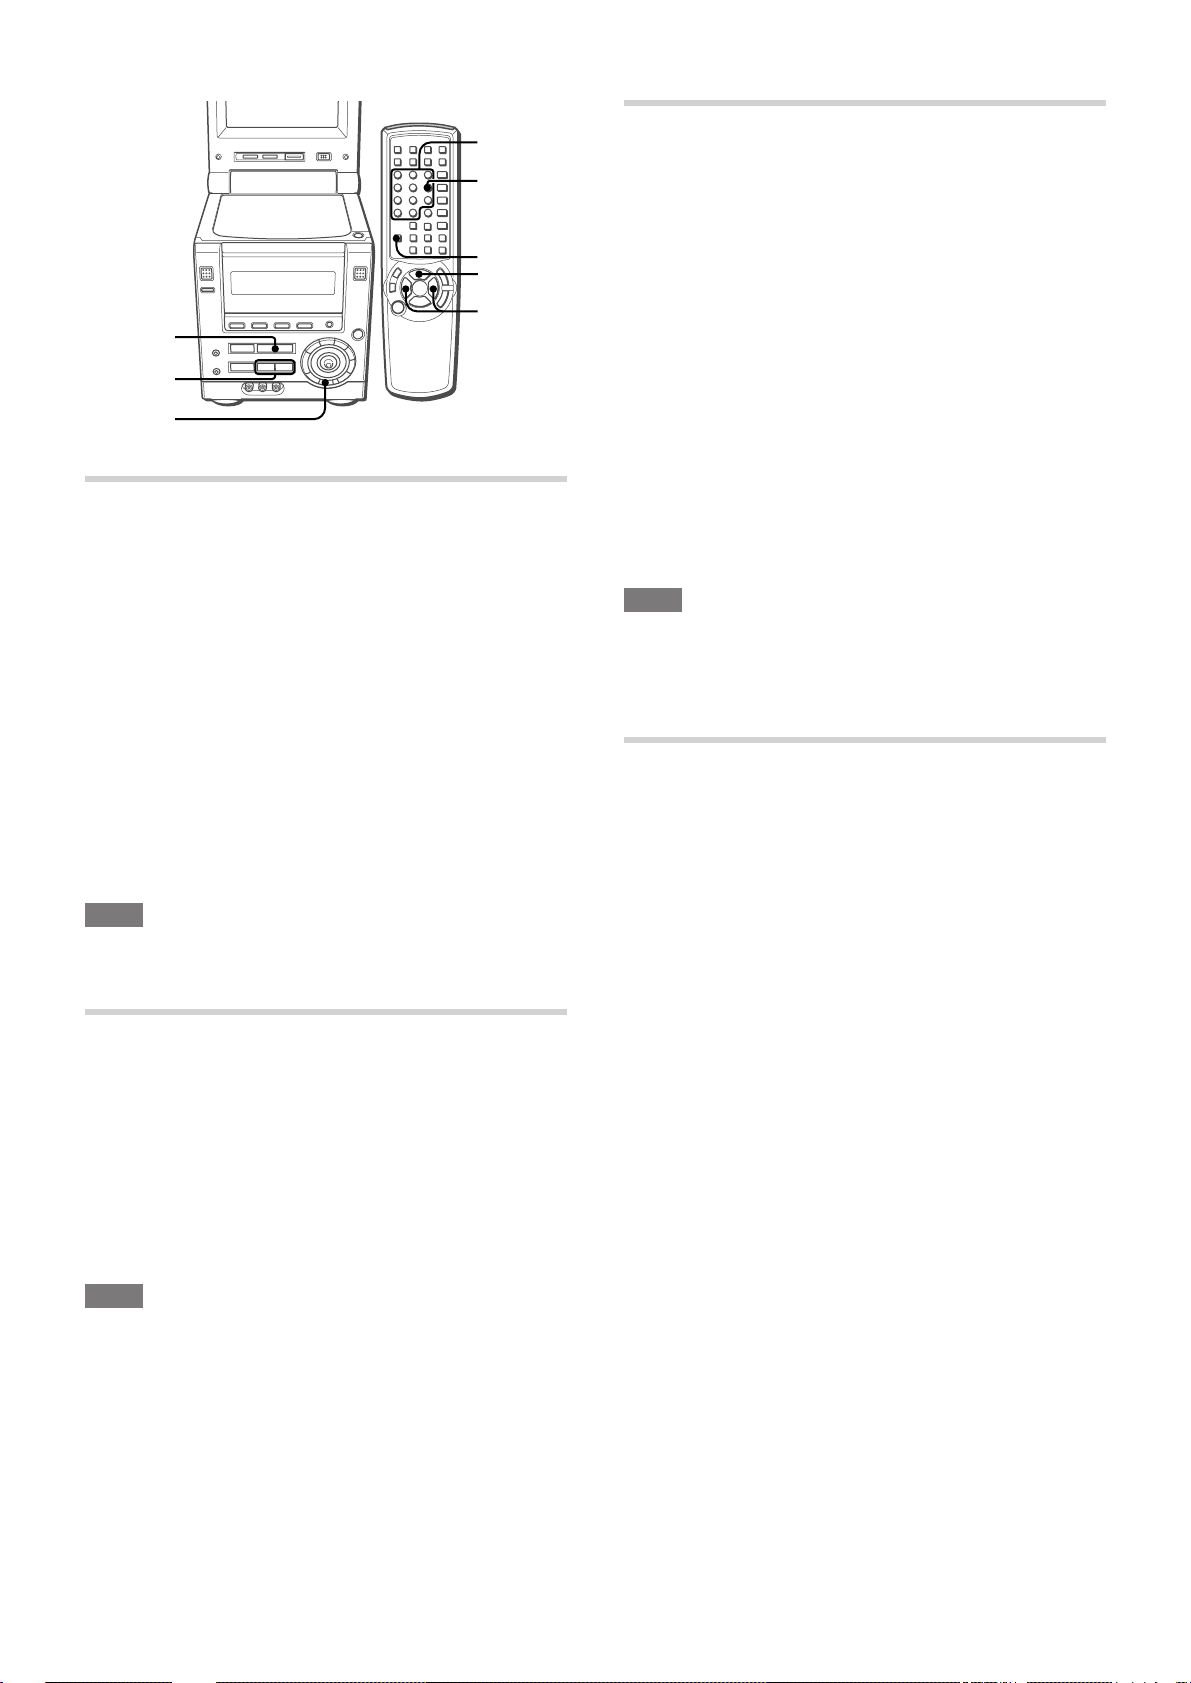
For disc formats supported on this unit, see page 5.
MONITOR
ON/OFF
zOPEN/
CLOSE
MONITOR
OPEN/CLOSE
DVD/CD
c
s
a
LOADING A DISC
1
Press DVD/CD.
2
If the monitor is closed, press MONITOR OPEN/
CLOSE to open it.
3
Press zOPEN/CLOSE to open the disc door.
4
Load a disc with the label side up.
c/d
s
a
PLAYING A DISC
1
Load the disc.
2
Press c.
For a DVD or a VCD with the PBC function, you do not need
to press c. Play starts automatically when the disc is loaded.
DVD:
Lights up
Number of title
being played
Video CD (without the PBC function):
Number of track
being played
NOTE
Some D VDs or VCDs ma y automatically displa y the menu screen
after first loading the disc. See "USING THE SOFTWARE
SPECIFIC MENU", page 19.
Elapsed playing
time
Elapsed playing
time
5
Press zOPEN/CLOSE to close the disc door.
When a VCD without the PBC function is loaded, a display
such as the following appears.
Lights up
Total number of tracks Total playing time
When a DVD or a VCD with the PBC function is loaded, play
starts automatically.
If the monitor is turned off, press MONITOR ON/OFF to turn
on the monitor.
NOTE
• Do not place more than one disc in the disc compartment.
• Do not use irregular shape discs (example: heart-shaped,
octagonal ones). It may result in malfunction.
• Do not touch the pickup lens. If it is soiled, a disc may not be
played normally.
• The "NTSC" indication lights up on the display to show that this
unit can input the NTSC color system video signal, and outputs
the NTSC color system video signal.
INFORMATION DISPLAYED ON THE
MONITOR SCREEN
Various guide displays of the current CD operation are shown on
the upper right corner of the monitor screen.
Also, you can turn on the playing status information on the left
side of the monitor screen.
10
TRACK
0 : 24 : 55
STEREO
OFF
OFF
Playing status information
• To vie w the guide displays, make sure y ou have "Guide Message
ON" in the Setup menu (see "GUIDE MESSAGE", page 41).
• To turn on the playing status information, use ON SCREEN
DISPLAY on the remote control (for details, see "DISPLAYING
PLAYING STATUS ON THE MONITOR SCREEN", page 26).
Guide
display
18
ENGLISH
Page 21
STOPPING AND PAUSING
To stop play
Press s.
Play stops. The unit remembers the point at which play stopped.
("RESUME" appears on the display.)
T o resume play from the point where it stopped
Press c.
T o clear the point to be resumed
Press s again in stop mode.
"RESUME" disappears on the display. The resume memory is
cleared, and play starts from the beginning of the disc when c is
pressed the next time.
SELECTING A TRACK
TITLE
MENU
TITLE
0-9,+10
i/k/j/l
MENU
ENTER
vRETURN
DVD/VCD
OPERATIONS
NOTE
• Under the default setting, the point to be resumed is also cleared
when the disc door is opened, the power is turned off, or the
function is switched.
• For DVDs, the point to be resumed is cleared when "TV Aspect"
setting is changed. (See "TV ASPECT", page 45.)
• Set up can be changed so that the resume memory is retained
even after the conditions described above. (See "DISC
RESUME", page 47).
• The resume function is not available for a VCD with the PBC
function turned on. To turn off PBC, see "PLAYING A VCD
WITHOUT USING PLA YBACK CONTROL", page 20, and "PBC",
page 47.
To pause play
Press a.
To resume play, press c.
NOTE
For DVDs, pressing ENTER also starts or resumes play.
REMOVING THE DISC
Stop play, and press zOPEN/CLOSE.
The disc door opens so that the loaded disc can be removed.
After removing the disc, press zOPEN/CLOSE again to close
the disc door.
CURSOR
ENTER
vRETURN
USING THE SOFTWARE SPECIFIC MENU
This unit supports menu interfaces that are contained in some
DVD or VCD software. For DVDs or VCDs with such menus, the
menu screen may automatically be display ed on the monitor screen
after first loading the disc.
DVDs
1
Move CURSOR on the main unit i, k, j, or l,
or press i/k/j/l on the remote control to select
your desired program.
2
Press ENTER to start play.
To display the menu
Press TITLE or MENU.
VCDs with the PBC function
Press the numbered buttons on the remote control
to select your desired program.
To display the menu
Press vRETURN.
En
NOTE
The contents and operation of the software specific menu vary
with the disc. F ollow the instructions on the disc and on the menu
screen.
ENGLISH
19
Page 22
0-9,+10
PBC
SHIFT
c/d
r,t
c
r,t
PBC
FAST FORWARD/REVERSE PLAY
Hold down r or t during play until the guide
display such as "g x 2" appears.
The DVD is played 2 times faster than the normal speed.
The VCD is played 5 times faster than the normal speed.
To return to normal play, press c.
To change the playing speed
During fast forward/re v erse play, hold do wn r or t until the
guide display appears.
For DVDs, this operation switches the playing speed between 2
times, 8 times and 32 times.
For VCDs, this operation switches the playing speed between 5
times and 16 times.
T o return to normal play
Press c.
NOTE
• There is no audio during fast forward/reverse play.
• Fast forward and reverse pla y are not possible with certain D VDs.
SKIPPING
Press r or t during play.
PLAYING A VCD WITHOUT USING
PLAYBACK CONTROL (PBC)
With PBC (PlayBack Control), pla y of VCDs is controlled from the
menu display on the monitor screen, and the menu displa y appears
automatically after play of each selection.
You can, howev er, choose to set PBC off , and play the entire VCD
without returning to the menu display, just like audio CDs.
This, for e xample, allows you to use repeat and prog rammed pla y
for VCDs with PBC.
For more information on PBC, see "TYPES OF VIDEO CDS",
page 17.
1
Load the VCD.
2
Press PBC on the main unit during play or in stop
mode.
Alternatively, press PBC while pressing SHIFT on the remote
control.
"PBC" disappears from the display, and the play using menu is
disabled.
NOTE
• If PBC is pressed while pressing SHIFT during play, play stops
before the PBC mode changes.
• You can set the unit’s preference whether to play VCDs with
PBC or not. See "PBC", page 47.
SELECTING A TRACK WITH THE REMOTE
CONTROL (VCD ONLY)
A track can be selected directly by entering the track number on
the remote control, either during play or in stop mode.
T o use this f eature with VCDs that support PBC, turn off PBC first
(see "PLA YING A VCD WITHOUT USING PLA YBA CK CONTROL"
on this page).
Press the numbered buttons for the desired track.
Example:
To play track 12, press +10, 2.
To play track 20, press +10, +10, 0.
Play begins at the beginning of the selected track and continutes
to the end of the disc.
With each press of t, the disc position skips to the succeeding
track.
When r is pressed once, the disc position skips back to the
beginning of the current track/chapter.
When r is pressed twice or more, the disc position skips back
to the previous track(s)/chapter(s).
NOTE
Skipping is not possible with certain DVDs.
20
ENGLISH
Page 23
FRAME ADVANCE AND SLOW
PLAY
PRGM/
RANDOM
c/d
r,t
s
c
a
r,t
RANDOM/REPEAT PLAY
c
RANDOM PLAY (VCD ONLY)
PRGM/
RANDOM
c/d
DVD/VCD
OPERATIONS
FRAME ADVANCE
1
Press a to pause play.
2
Press a repeatedly to advance frames.
Each time you press the button, the picture advances one fr ame.
To return to normal play
Press c.
NOTE
There is no audio during frame advance.
SLOW PLAY
1
Press a to pause play.
2
Hold down r or t.
The track is played slowly.
To change the slow forward playing speed
Each time t is held down, the pla ying speed changes as follows:
1/30 1/15 1/5 1/2
To change the slow reverse playing speed
For DVDs, the playing speed alternates between 1/15 and 1/2
speed each time r is held down. Only 1/15 speed is available
for VCDs.
To return to normal play
Press c.
All the tracks on the disc can be played randomly.
To use this feature with VCDs that support PBC, turn off PBC first
(see "PLAYING A VCD WITHOUT USING PLAYBACK
CONTROL", page 20).
1
Press PRGM/RANDOM on the remote control
repeatedly so that "RANDOM" appears.
Monitor screen:
RANDOM
2
Press c to start play.
Tracks on the disc are played back in random order.
To cancel random play
Press PRGM/RANDOM on the remote control repeatedly so that
"RANDOM" disappears on the display and the normal display
reappears.
NOTE
• Even if r is pressed, a previously played track cannot be
skipped. The unit returns to the beginning of the current track
only.
• Direct selection of the tracks with the numbered button is not
possible during the random play mode.
NOTE
During random play you cannot skip back to the pre viously play ed
track with r.
Display:
En
NOTE
There is no audio during slow play.
ENGLISH
21
Page 24
c
A-B
A-B REPEAT
REPEAT
c/d
A-B REPEAT PLAY (DVD AND VCD)
You can select a portion to be repeated.
The portion to be repeated may not span a track boundary, but
must be within a single track.
T o use this f eature with VCDs that support PBC, turn off PBC first
(see "PLAYING A VCD WITHOUT USING PLAYBACK
CONTROL", page 20).
1
During play, press A-B REPEAT at the starting
point of the portion you want to repeat.
2
Press A-B REPEAT again at the ending point of
the portion you want to repeat.
The unit returns to point A and play the portion between A and
B repeatedly.
REPEAT PLAY (DVD)
Press REPEAT repeatedly on the remote control
during play.
With each press, the repeat play mode changes:
CHAPTER: Repeats the current chapter.
Monitor screen:
CHAPTER
TITLE: Repeats the current title.
TITLE
Display:
Monitor screen:
Display:
To cancel A-B repeat play
Press A-B REPEAT again during play.
"OFF" appears on the monitor screen.
OFF: Cancel repeat mode. (Normal play)
OFF
To cancel repeat play
Press REPEAT on the remote control again until the repeat
indication disappears in the display.
Normal play mode resumes.
NOTE
Repeat play is not possible with certain DVDs.
22
ENGLISH
Page 25
REPEAT PLAY (VCD)
T o use this f eature with VCDs that support PBC, turn off PBC first
(see "PLAYING A VCD WITHOUT USING PLAYBACK
CONTROL", page 20).
Press REPEAT repeatedly on the remote control
during play.
With each press, the Repeat play mode changes:
ALL: Repeats all tracks on the disc.
Monitor screen:
DVD/VCD
OPERATIONS
ALL
TRACK: Repeats the current track.
TRACK
OFF: Cancels repeat mode. (Normal play)
OFF
Display:
En
When "ALL" is selected, tracks on the disc are play ed repeatedly.
When "TRACK" is selected, the current track is pla yed repeatedly .
To repeat play of selected track(s) in a disc
Program the track(s) with the programmed play function, start
programmed play, and then press REPEAT to repeat play of the
programmed tracks (see "PROGRAMMED PLAY (VCD ONLY)",
page 24.
NOTE
• To repeat random pla y, first activate the random play mode, then
press REPEAT to display "p".
• If the random play mode is activated during one track repeat or
all tracks repeat play mode, the repeat play mode will be
canceled.
• Direct selection of the tracks with the numbered button cancels
the "p1" play mode.
ENGLISH
23
Page 26
PROGRAMMED PLAY (VCD
ONLY)
Up to 32 tracks can be programmed from the loaded disc.
T o use this f eature with VCDs that support PBC, turn off PBC first
(see "PLAYING A VCD WITHOUT USING PLAYBACK
CONTROL", page 20).
PRGM/
RANDOM
0-9,+10
C
i/k
ENTER
c/d
r,t
s
c
s
r,t
1
Press PRGM/RANDOM on the remote control once
in stop mode.
"PROGRAM" appears on the monitor screen and
"PRGM" flashes on the display.
2
Within 5 seconds, press ENTER.
The program screen is displayed on the monitor screen and
the display.
Monitor screen:
PROGRAM
SELECT TRACK
EDIT PROGRAM
UP
i
00
k
DOWN
TOTAL TRACK TIME
ik
**
**
**
**
**
**
**
**
**
**
**
**
**
**
**
**
0 0 0 : 00 : 00
ENTER:MEMORY
PROGRAM:EXIT
CANCEL:CLEAR
Display:
**
**
**
**
**
**
**
**
c
**
**
**
**
**
**
**
**
:PLAY
4
Press ENTER.
The selected track number is listed in order on the monitor
screen, and lights up on the display.
The number of programmed tracks and the total playing time
are also indicated at the bottom of the monitor screen.
Total playing time of
programmed tracks
Total number of
programmed tracks
If you entered a wrong number
Press C.
The last programmed number is canceled. Then enter the
correct number.
5
Repeat steps 3 and 4 to program other tracks.
6
Press c to start play.
To cancel programmed play
Press PRGM/RANDOM twice.
"OFF" is displayed on the monitor screen. Programmed play is
canceled, and the unit continues to play the current and all
succeeding tracks in the disc.
To stop programmed play
Press s.
The unit remembers the point at which play stopped, and resumes
programmed play from this point when c is pressed.
To clear the point to be resumed
Press s once again after stopping programmed play.
The resume memory is cleared, and plays from the first
programmed track when c is pressed.
To clear the program
Press s twice after stopping programmed play.
The program will also be cleared when the disc door is opened,
the function is changed, and the unit is turned off.
To continue programming a new set of tracks, press ENTER and
repeat from step 3.
3
Press the numbered button(s) or i/k on the
remote control to select the track to be pla yed first.
Using the numbered buttons:
To select track 12, press +10, 2.
To select track 20, press +10, +10 and 0.
Using i/k:
Press i for a larger track number and k for a smaller track
number.
Monitor screen:
24
ENGLISH
PROGRAM
SELECT TRACK
EDIT PROGRAM
UP
i
10
k
DOWN
TOTAL TRACK TIME
ik
**
**
**
**
**
**
**
**
**
**
**
**
**
**
**
**
0 0 0 : 00 : 00
ENTER:MEMORY
PROGRAM:EXIT
CANCEL:CLEAR
**
**
**
**
**
**
**
**
c
**
**
**
**
**
**
**
**
:PLAY
To check the program
Call up the program screen on the monitor screen.
To close the program screen, press PRGM/RANDOM twice.
Alternatively, press t in stop mode.
With each press, the program number and the track number are
shown progressively on the displa y.
To add a track to the program
Before playing, repeat steps 1 to 4. The trac k will be programmed
after the last track.
To delete a track from the program
1 Press PRGM/RANDOM repeatedly so that "PROGRAM"
appears on the monitor screen. Then press ENTER within 5
seconds.
2 Press C.
The last track in the program is deleted.
Page 27
SET UP
ON SCREEN
DISPLAY
SET UP
NOTE
• During programmed play, direct selection of a track with the
numbered buttons will cancel the programmed play mode.
• If random play mode is activated during programmed play, the
programmed play mode is canceled.
• You cannot prog ram more than 32 tracks . (Ev en if you attempt to
program a track after programming 32 tracks, the track is not
programmed but the 32 tracks already selected remain in the
program.)
CHANGING THE DISPLAY
INFORMATION
DVD/VCD
OPERATIONS
CHANGING THE PLA YING TIME
INFORMATION ON THE DISPLAY
Playing time information on the unit’s display can be changed.
Press SET UP repeatedly during play.
With each press, the display changes as follows:
DVDs
1 Elapsed time of the current title ("TITLE")
2 Remaining time of the current title ("TITLE")
3 Elapsed time of the current chapter ("CHP")
4 Remaining time of the current chapter ("CHP")
VCDs
1 Elapsed time of the current track
2 Remaining time of the current track
3 Elapsed time of the disc*
4 Remaining time of the disc*
* Elapsed time or remaining time of the program during
programmed play
NOTE
• During random play, you cannot change the playing time
information.
• When PBC is on, the playing time information for VCDs is not
displayed.
En
ENGLISH
25
Page 28
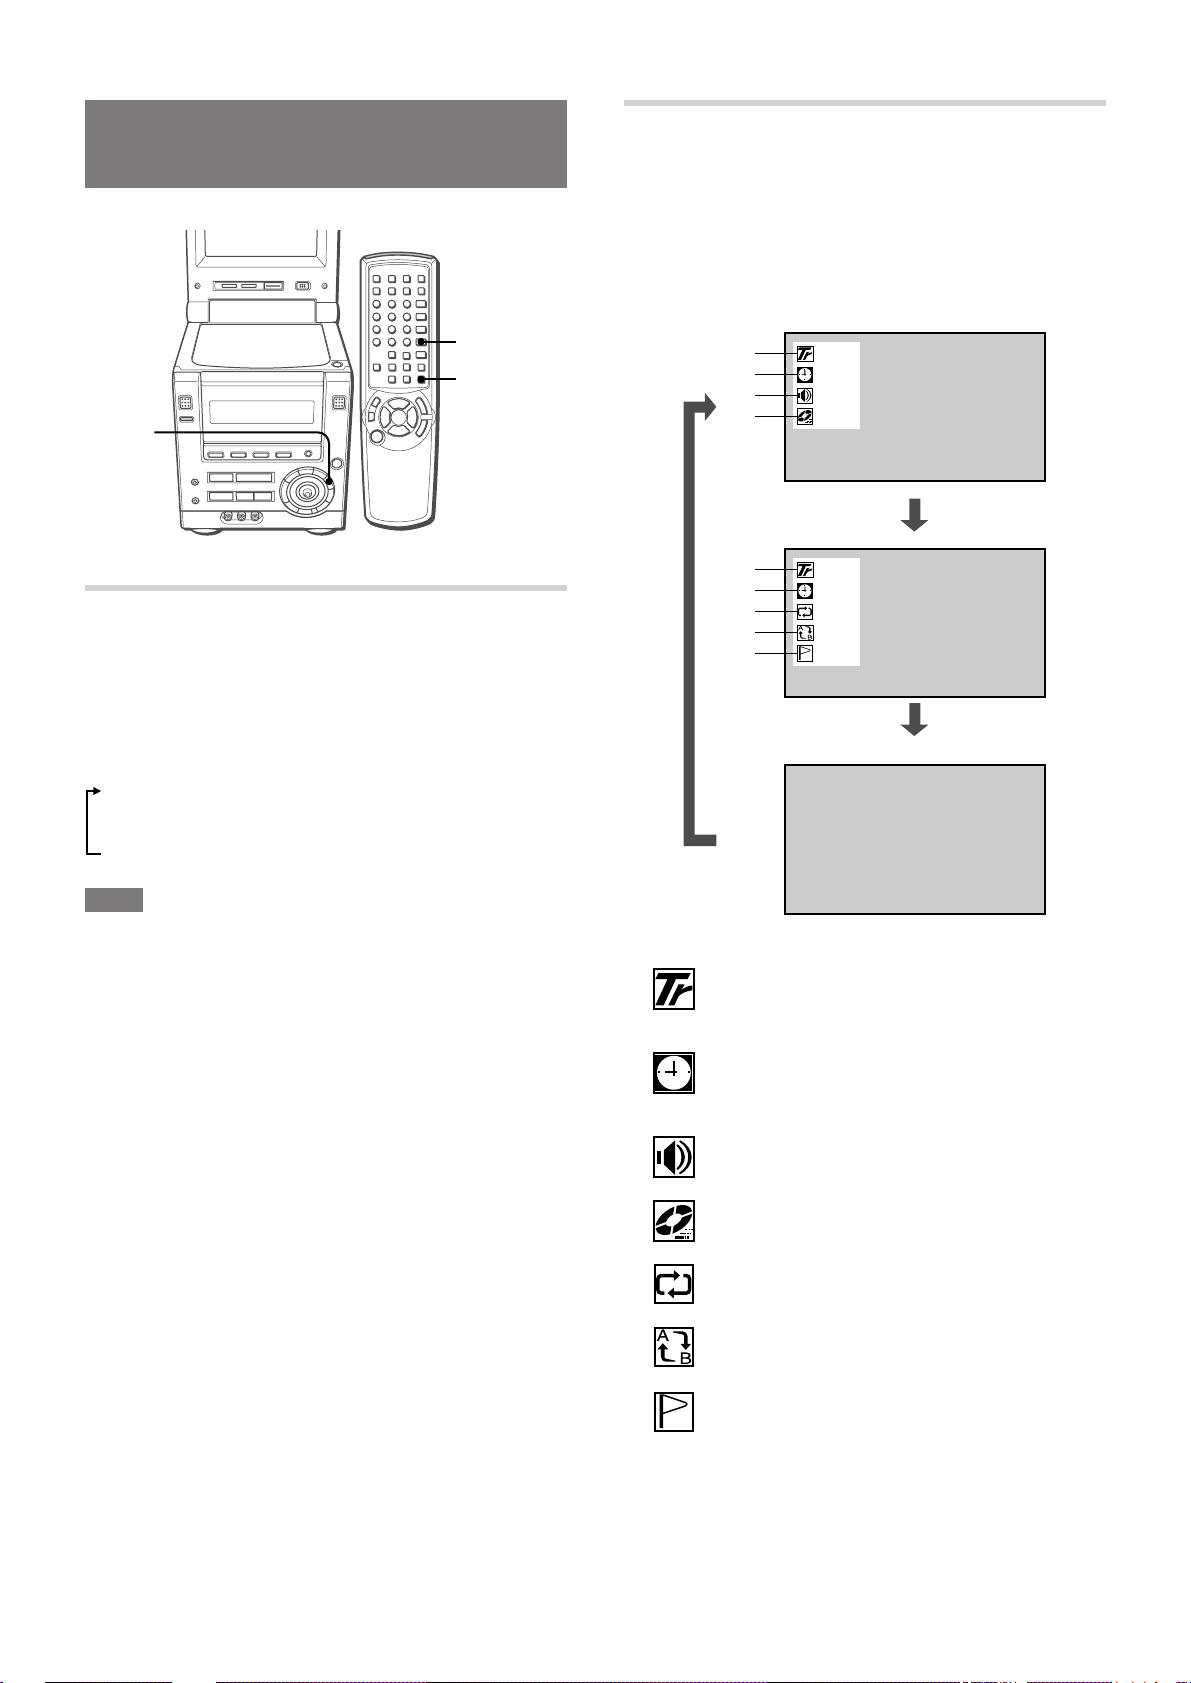
DISPLAYING PLAYING STATUS ON THE
T10 C20
T 1 : 26 : 03
A–B
OFF
1 2 3 4 5
T10 C20
OFF
OFF
12345
10
TRACK
0 : 26 : 03
TRACK
1 : 28 : 03
OFF
STEREO
OFF
1
2
6
7
1
2
3
4
5
8
MONITOR SCREEN
General playing status can be displayed on the monitor screen.
Press ON SCREEN DISPLAY repeatedly.
When playing a DVD
With each press, the display on the monitor screen changes as
follows:
When playing a VCD
With each press, the display on the monitor screen changes as
follows:
1
2
3
4
5
1
2
6
7
8
T10 C20
TITLE
1 : 26 : 03
1/8 KARAOKE
JP VOCAL1+2
1/8
32 / 32 OFF
JP
T10 C20
TITLE
1 : 26 : 03
OFF
OFF
12345
Cancel (Normal display)
T10 C20
T 1 : 26 : 03
OFF
A–B
1 2 3 4 5
1 shows the title number and the chapter number, or
"MENU" during menu display.
Cancel (Normal display)
1 shows the track number being played.
shows the total number of tracks on the disc or the
point to be resumed in stop mode. (only when PBC is
turned off.)
2
shows the same information as the time information
on the display.
3
shows the audio information.
2
3
4
5
6
7
8
26
shows the same information as the time information
on the display.
shows the audio information.
shows the angle information.
shows the subtitle information.
shows the repeat play mode.
shows the A-B repeat mode.
shows the memorized mark points information.
ENGLISH
4
5
6
7
8
shows the play mode.
shows if PBC is on or off.
shows the repeat play mode.
shows the A-B repeat mode.
shows the memorized mark points information.
Page 29
ADJUSTING THE MONITOR
PICTURE
ADJUSTING THE ASPECT
With this item, you can select how to display the con ventional size
(4:3) picture on the wide screen of this unit’s monitor.
Y ou can adjust the quality and aspect of the picture on the monitor
screen.
PICTURE
ADJUST–/+
PICTURE MODE
OPERATION
1
Press PICTURE MODE repeatedly to select the
item to be adjusted until it appears on the monitor
screen.
Example: To adjust the brightness
Item to be
adjusted*
Current setting
Select one of the following aspect modes, then press PICTURE
ADJUST + or – to select the desired aspect.
NORMAL
Displays the conv entional size picture with the original proportion
(4:3), with black bands at the left and right of the screen.
Original picture: On the monitor screen:
WIDE
Enlarges the conventional size picture in the horizontal direction.
The picture is stretched in the horizontal direction more at the left
and right portions of the screen than at the center of the screen.
Original picture: On the monitor screen:
CINEMA 1
Enlarges the conventional size picture in both the horizontal and
vertical directions. The upper and lower portions are cut off.
Original picture: On the monitor screen:
DVD/VCD
OPERATIONS
En
Item to be adjusted
* When the selected function is VIDEO, the item to be adjusted
is not displayed on the monitor screen. Make adjustment using
the display window.
2
Within 3 seconds, press PICTURE ADJUST + or –
to make adjustments.
ADJUSTING THE BRIGHTNESS
Select "BRIGHT" (or "BRT"), then press PICTURE ADJUST – for
darker picture, and PICTURE ADJUST + for brighter picture.
ADJUSTING THE COLOR
Select "COLOR", then press PICTURE ADJUST – to decrease
the color intensity , and PICTURE ADJUST + to increase it.
ADJUSTING THE TINT
Select "TINT", then press PICTURE ADJUST – to make lighter
colors more reddish, and PICTURE ADJUST + to make them
more greenish.
DIMMING THE SCREEN
Select "DIMMER" (or "DIM"), then press PICTURE ADJUST – to
make the monitor screen darder, and PICTURE ADJUST + to
make it brighter.
CINEMA 2
Enlarges the conventional size picture in both the horizontal and
vertical directions in the same manner as "CINEMA 1", but the
picture is shifted up vertically so that the lower portion of the picture
is not cut off. This mode is convenient when there are
superimposed texts on the lower portion of the picture.
Original picture: On the monitor screen:
NOTE
When playing a disc containing wide size (16:9) picture, select
either "WIDE" or "NORMAL". The picture will be played in the
most suitable mode automatically according to the disc.
You can intentionally select "CINEMA 1" or "CINEMA 2". (If
"CINEMA 1" or "CINEMA 2" is selected, the picture may be
distorted depending on the disc.)
ENGLISH
27
Page 30
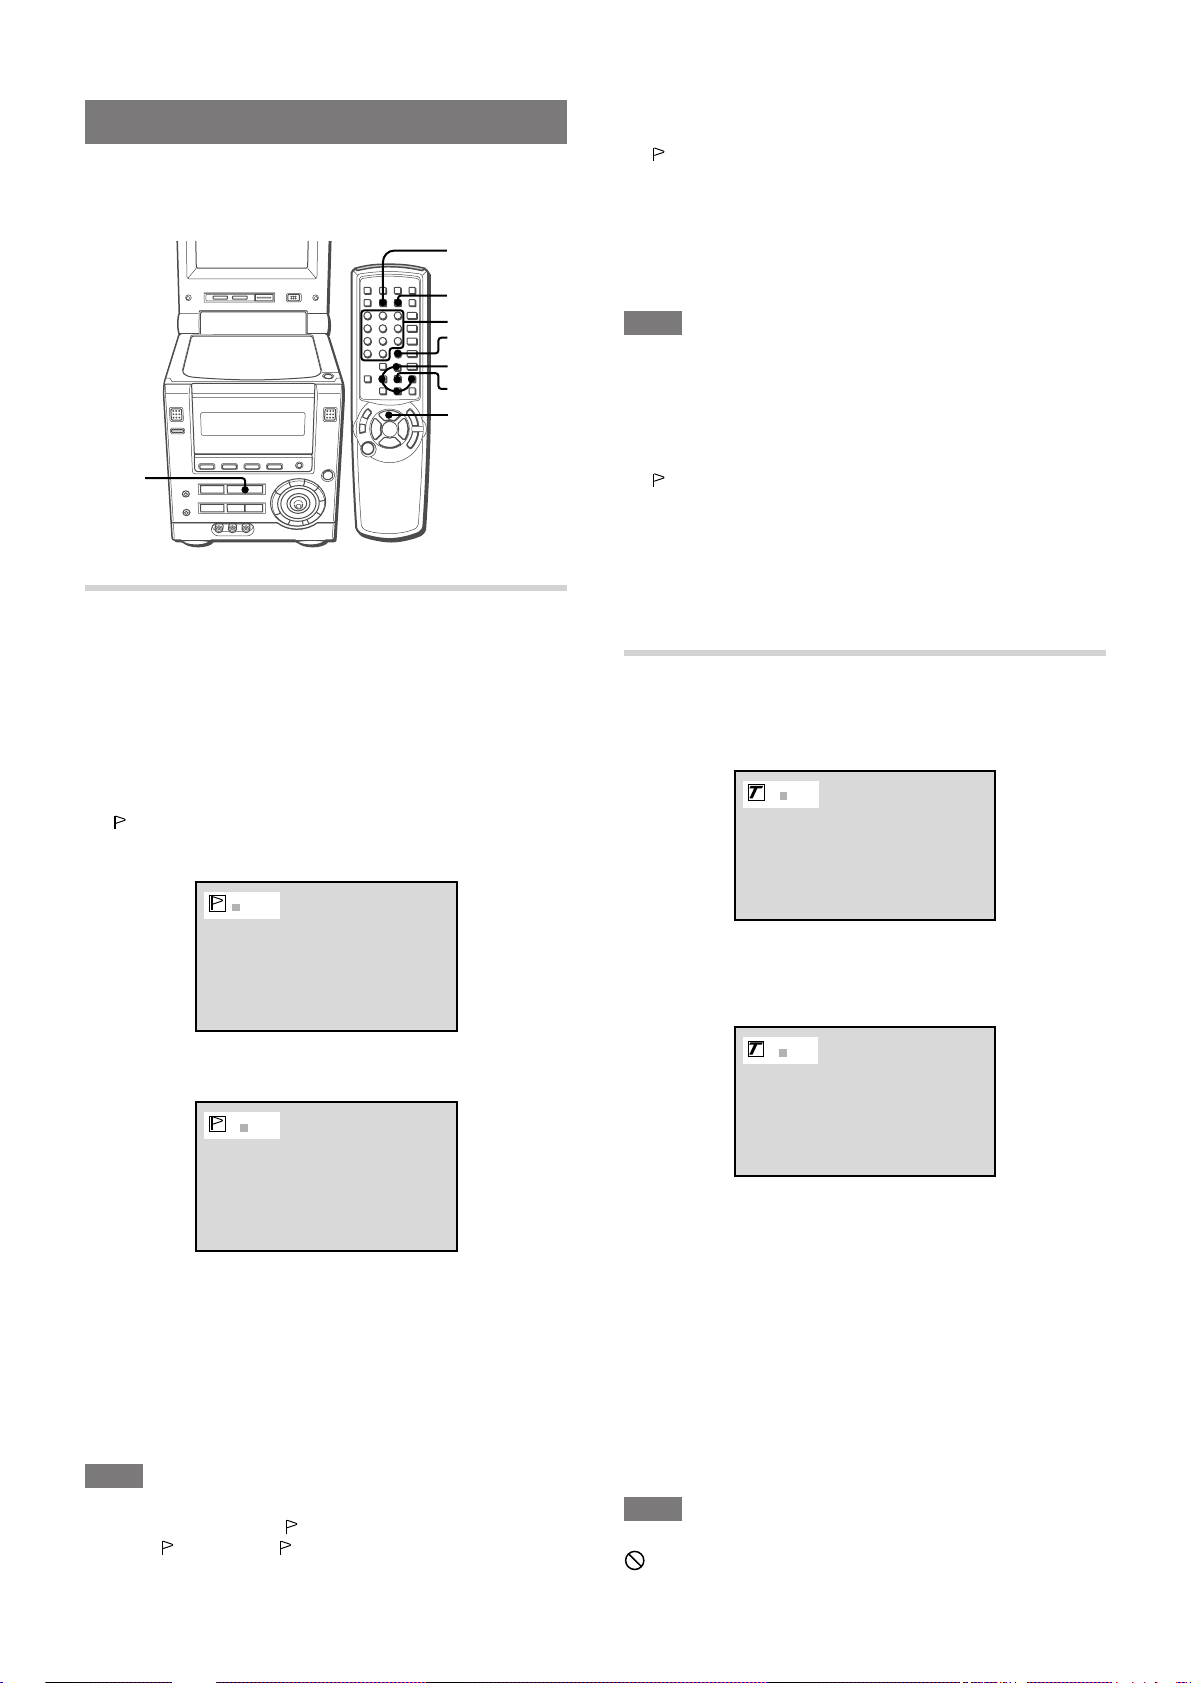
MARKING AND SEARCHING
You can mark any point in a disc and start play from there.
Using search functions, you can easily locate a desired point on a
disc.
T-SEARCH
MARK
0-9,+10
C
i/k/j/l
ENTER
c/d
c
MARKING
You can mark up to 5 DVDs, each with up to 5 points.
Also, you can mark up to a total of 10 audio CDs and video CDs,
each with up to 5 points.
1
Play the disc and locate the desired point to mark.
You can use functions such as "FAST FORWARD/REWIND",
"SKIPPING" or "SEARCH" to locate your desired point.
2
Press MARK.
" " appears on the monitor screen and the unit enters the Mark
mode. The current Mark memory number is highlighted by the
cursor.
To play from a marked point
1 Press MARK.
" appears on the monitor screen and the unit enters the Mark
"
mode.
2 Press j or l to move the cursor, or press a corresponding
number button (1 - 5), to select the desired Mark memory
number.
3 Press ENTER or c.
Play starts from the marked point.
NOTE
When play is started from a marked point, the "Audio Language"
and "Subtitle Language" are set to the ones selected when the
point was marked.
To clear a marked point
1 Press MARK.
"
" appears on the monitor screen and the unit enters the Mark
mode.
2 Press j or l to move the cursor or press a corresponding
number button (1 - 5) to select the desired Mark memory
number.
3 Press C.
The Mark memory is cleared.
TITLE SEARCH (DVD ONLY)
You can specify the playing location of a DVD by the title number.
1
Press T -SEARCH.
T1
*****
3
Press ENTER or c.
The current location is marked in the Mark memory.
1
***
4
Press MARK again to exit the Mark mode.
To mark other points
1 Follow steps 1 and 2 of "MARKING" above.
2 Press j or l to move the cursor, or press a correspording
number button (1-5), to select the desired Mark memory position
(
).
*
3 Follow steps 3 and 4 of "MARKING" above.
NOTE
If the title search, chapter search or time search function is used
to locate the desired point, "
to call up "
used.)
". (F or D VDs, " " also clears when the skip function is
" clears. If this happens, press MARK
2
Press the numbered buttons to enter the desired
title number.
T2
Example:
To play title number 2, press 2.
To play title number 10, press +10.
You can also use i or k to change the selected track number
on the monitor screen.
If you entered a wrong number
Press C to remove the number you entered. Then enter the
correct number.
3
Press ENTER or c.
Play begins at the specified title.
NOTE
If you specify a title number which does not exist on the disc, the
symbol is displayed. In this case, repeat from step 1 with a
valid title number.
28
ENGLISH
Page 31

CHAPTER SEARCH (DVD ONLY)
TIME SEARCH
You can specify the playing location of a DVD by the chapter
number.
1
Press T -SEARCH twice.
T2 C1
2
Press the numbered buttons to enter the desired
chapter number.
T2 C
17
Example:
To play chapter number 17, press +10, 7.
With discs that support display of elapsed time, you can locate a
point in the disc by specifying the time from the beginning of this
disc.
For DVDs, you can locate a point in a title by specifying the time
from the beginning of the title. (The time search can be used only
within a title.)
1
For DVDs: Press T-SEARCH 3 times.
For audio CDs and VCDs: Press T -SEARCH twice.
00:00:00
2
Press the numbered buttons to enter the time of
the desired location.
01:17: 30
DVD/VCD
OPERATIONS
You can also use i or k to change the selected track number
on the monitor screen.
If you entered a wrong number
Press C to remove the number you entered. Then enter the
correct number.
3
Press ENTER or c.
Play begins at the specified chapter.
NOTE
If you specify a chapter number which does not exist on the disc ,
the symbol is displayed. In this case , repeat from step 1 with a
valid chapter number.
Example:
T o specify 1:17:30 (1 hour 17 min utes 30 seconds), press 1, 1,
7, 3 and 0.
To specify 0:08:07 (8 minutes 7 seconds), press 8, 0 and 7.
If you entered wrong numbers
Press C repeatedly to remov e the numbers you entered. Then
enter the correct numbers.
3
Press ENTER or c.
Play begins at the specified location.
NOTE
• If you specify a time greater than the length of the disc, the
symbol is displayed. In this case, repeat from step 1 with a valid
time.
• Time search may not work with some discs even if they support
the display of elapsed time.
En
ENGLISH
29
Page 32

1/4
2/4
4/4
3/4
SPECIAL DVD FEATURES
Special featues for playing DVDs are described here.
CHANGING THE ANGLE (DVD ONLY)
When playing DVDs shot with multi-angles, you can select the
angle to view the scene.
ZOOM
ANGLE
SUBTITLE ON/OFF
SUBTITLE SELECT
AUDIO SELECT
C
i/k/j/l
ZOOM FUNCTION (DVD ONLY)
Press ZOOM on the remote control during play.
The picture around the center of the screen is enlarged to
approximately 4 times.
To move the enlarged picture
Press i/k/j/l.
(You can also use CURSOR on the main unit.)
To return to the center of the picture, press C.
Press ANGLE repeatedl y to select a viewing angle.
With each press, the angle will change.
1 out of 4 available
angles for the scene.
NOTE
If you press
multiple viewing angles, the
ANGLE when playing a scene or a disc without
symbol is displayed.
To cancel zoom
Press ZOOM again.
30
ENGLISH
Page 33

SUBTITLES (DVD ONLY)
CHANGING AUDIO TRACKS (DVD ONLY)
You can display the subtitles on the screen when playing DVDs
which contain them. You can also change the subtitle language if
more than one is available.
Press SUBTITLE ON/OFF during play.
The subtitles will be displayed.
1/3 ON
EN
He’s having a great run today, Jim.
To turn off the subtitles
Press SUBTITLE ON/OFF again.
NOTE
• If you press SUBTITLE ON/OFF when playing a disc without
subtitles, the
symbol is displayed.
• Some discs have subtitles on by default. With such discs,
SUBTITLE ON/OFF may not allow you to clear the subtitle
display.
To change the subtitle language
Press SUBTITLE SELECT to select the desired subtitle language .
1 out of 3 available subtitle
lanugages
1/3 ON
EN
He’s having a great run today, Jim.
1/3 OFF
2/3 ONEN2/3 ON
JA
3/3 ON
EN
Some DVDs ha ve more than one audio tracks, such as soundtr acks
in different languages. You can change the audio track when playing
such discs.
For selection of audio tracks f or Kar aoke DVD discs, see "USING
DVD KARAOKE DISCS", page 35.
Press AUDIO SELECT during play.
Each time you press the button, the audio track will change.
1/2
JA
2/2
EN
NOTE
• The audio track can be changed only if the disc contains multiple
audio tracks. The number of available audio tracks varies with
the disc.
• The audio track language first played is specified by the audio
language setting and can be changed (see "AUDIO LANGU AGE",
page 42). If the preferred audio track language is not available
on the disc, the disc will determine which audio track language
is played.
DVD/VCD
OPERATIONS
En
NOTE
• The subtitle language can be changed only if the disc contains
more than one subtitle language. The number of av ailable subtitle
languages varies with the disc.
• The subtitle language first displayed is specified by the subtitle
setting and can be changed (see "SUBTITLE LANGUAGE", page
42). If the preferred subtitle language is not available on the
disc, the disc will determine which subtitles are shown.
• It may take some discs a few moments after you press SUBTITLE
SELECT until the new subtitles are displayed.
ENGLISH
31
Page 34

RADIO
RECEPTION
MANUAL TUNING
MONO TUNER
BAND
POWER
TUNER/
BAND
r,t
1
Press TUNER/BAND repeatedly to select the
desired band.
FM AM
SHIFT
r,t
When an FM stereo broadcast contains noise
Press MONO TUNER while pressing SHIFT on the remote control
so that "MONO" appears on the display.
Noise is reduced, although reception is monaural.
To restore stereo reception, repeat the above so that "MONO"
disappears.
To change the AM tuning interval
The default setting of the AM tuning interval is 10 kHz/step. If y ou
use this unit in an area where the frequency allocation system is 9
kHz/step, change the tuning interval.
Press POWER while pressing TUNER/BAND.
To reset the interval, repeat this procedure.
NOTE
When the AM tuning interval is changed, all preset stations are
cleared. The preset stations have to be set again.
When TUNER/BAND is pressed while the power is off, the
power is turned on directly.
To select a band with the remote control
Press BAND while pressing SHIFT.
NOTE
• When you switch to the tuner function from the DVD/CD
function while "READING" flashes on the display, it may take
up to 10 seconds before the sound actually switches to the
tuner.
• When you switch to the tuner function, the monitor is
automatically turned off.
2
Press r or t to select a station.
Each time the button is pressed, the frequency changes.
When a station is received, "TUNE" is displayed f or 2 seconds.
During FM stereo reception, 1 is displayed.
1
To search for a station quickly (Auto Search)
Keep r or t pressed until the frequency starts to change
rapidly. After tuning in to a station, the search stops.
To stop the Auto Search manually, press r or t.
• The Auto Search may not stop at stations with very weak signals.
32
ENGLISH
Page 35

PRESETTING STATIONS
0-9,+10
BAND
SHIFT
TUNER/
BAND
c
s
a
r,t
The unit can store up to a total of 32 preset stations. When a
station is stored, a preset number is assigned to the station. Use
the preset number to tune in to a preset station directly.
1
Press TUNER/BAND to select a band, and press
r or t to select a station.
2
Press a to store the station.
A preset number beginning from 1 in consecutive order for each
band is assigned to the station.
Preset number
r,t
s
a
PRESET NUMBER TUNING
Use the remote control to select the preset number directly.
1
Press BAND while pressing SHIFT to select a band.
2
Press numbered buttons 0-9 and +10 to select a
preset number .
Example:
To select preset number 20, press +10, +10 and 0.
To select preset number 15, press +10 and 5.
Selecting a preset number on the main unit
Press TUNER/BAND to select a band. Then, press c repeatedly.
Each time c is pressed, the next ascending number is selected.
To clear a preset station
Select the preset number of the station to be cleared. Then, press
s, and press a within 4 seconds.
The preset numbers of all other stations in the band with higher
numbers are also decreased by one.
RADIO
RECEPTION
3
Repeat steps 1 and 2.
The next station will not be stored if a total of 32 preset stations
for all the bands have already been stored.
NOTE
"FULL" is displayed if you attempt to store more than 32 preset
stations.
En
ENGLISH
33
Page 36

KARAOKE
MICROPHONE MIXING
KARAOKE
ENTER
SHIFT
CURSOR
MODE
MIC
ENTER
A microphone (not supplied) can be connected to this unit, allowing
you to sing along to music sources.
Use a microphone with a mini plug (ø3.5 mm,
1
Connect your microphone to the MIC jack.
2
Press one of the function buttons to select the
source to be mixed, and play the source.
3
Adjust the volume and tone of the source.
4
Adjust the microphone volume.
Press MODE repeatedly until "MIC" is displayed, and within 6
seconds, move CURSOR i or k to adjust the microphone
volume.
The microphone volume can be set to "OFF" (the microphone
is turned off), 1 to 6, and "MAX" (maximum).
5
Adjust the echo volume.
Press MODE repeatedly until "ECHO" is displayed, and within
6 seconds, move CURSOR i or k to adjust the echo volume.
The echo volume can be set to "OFF" (the echo effect is turned
off), 1 to 6, and "MAX" (maximum).
1
/8 inch).
VOCAL FADER/MULTIPLEX
FUNCTIONS
This unit can use discs as Karaoke sources.
Use the vocal fader function for ordinary discs.
Use the multiplex function for Karaoke multi-audio CDs.
NOTE
T o use D VD Karaoke discs , see "USING D VD KARAOKE DISCS",
page 35.
1
Press MODE repeatedly until "VF OFF" is displayed.
2
Within 6 seconds, mo ve CURSOR i or k to select
the vocal fader or multiplex function.
Moving CURSOR i changes the function cyclically as follows ,
and moving it k, vice versa:
1 VF OFF (no vocal fader)
2 VF (vocal fader activated)
3 Auto-VF (automatic vocal fader)
When there is a sound input from the microphone, the
unit turns to the VF mode. When there is no sound input
from the microphone, it switches to the VF OFF mode
automatically.
4 MPX-Lch/Rch
(multiplex function - left/right channel)
When "MPX-Lch" is selected, only the sound on the
left channel is heard.
When "MPX-Rch" is selected, only the sound on the
right channel is heard.
T o change the channel, press ENTER while "MPX-Lch"
or "MPX-Rch" is displayed.
5 Auto-MPX (automatic multiplex function)
Normally, the m ultiplex function is turned off. When the
sound input level from the microphone becomes a
certain value, the unit turns to the MPX-Lch or MPXRch mode.
Note on the "Auto-VF" and "Auto-MPX"mode
Y ou can change the period of time until the unit turns automatically
to the VF mode or to the MPX mode.
While "Auto-VF" or "Auto-MPX" is displayed, press ENTER so
that "FAST" or "SLOW" is displayed.
Select "F AST" so that the unit turns to the VF mode or MPX mode
within a shorter period of time .
Select "SLOW" so that the unit turns to the VF mode or MPX
mode within a longer period of time.
When not using the microphone
Set the microphone volume to "OFF" and remove the microphone
from the MIC jack.
NOTE
• If a microphone is held too near the speakers, a howling sound
may be produced. In this case , hold the microphone a w a y from
the speakers, or decrease the microphone volume.
• If sound through the microphone is extremely loud, it may be
distorted. In this case, decrease the microphone volume.
• The microphone and echo volume are set to "OFF" when the
function is changed or the unit is turned off.
Recommended microphones
The use of unidirectional type microphones is recommended to
prevent howling. Contact your local AIWA dealer for details.
34
ENGLISH
To operate with the remote control
Press KARAOKE repeatedly while pressing SHIFT to select the
vocal fader or multiplex function.
NOTE
• The Karaoke functions may not operate correctly with the
following kinds of discs.
- Those with monaural sound
- Those recorded with strong echoes
- Those with the vocal part recorded on the right or left side of
the sound width
• While the Karaoke function is on, the sound is output as monaural.
• The vocal fader function is set to "VF OFF" when the function is
changed or the unit is turned off.
Page 37

AUDIO SELECT
KEY CONTROL FUNCTION
The key of the playbac k sound can be adjusted in 4 steps upward
(+ 1 to +4) or downward (– 1 to –4). The interval of each step is a
half tone.
USING DVD KARAOKE DISCS
Press MODE repeatedly until “KEY” is displayed, and within 6
seconds, move CURSOR i or k.
NOTE
The key is set to "±0" when the function is changed or the unit is
turned off.
1
Follow the steps for "MICROPHONE MIXING" to
prepare the sound source and the microphone.
2
Press AUDIO SELECT repeatedly during play to
select the karaoke audio.
With each press, the active audio channel changes among
those available.
Example: A disc has 2 audio trac ks (tr ack 1 and tr ack 2), and
track 1 has 2 vocal channels.
1/2 KARAOKE
KARAOKE
En
1/2 KARAOKE
VOCAL1
1/2 KARAOKE
VOCAL2
1/2 KARAOKE
VOCAL1+2
2/2 h
The available audio channels diff er with the karaoke disc. Ref er
to the instructions on the disc for details.
ENGLISH
35
Page 38
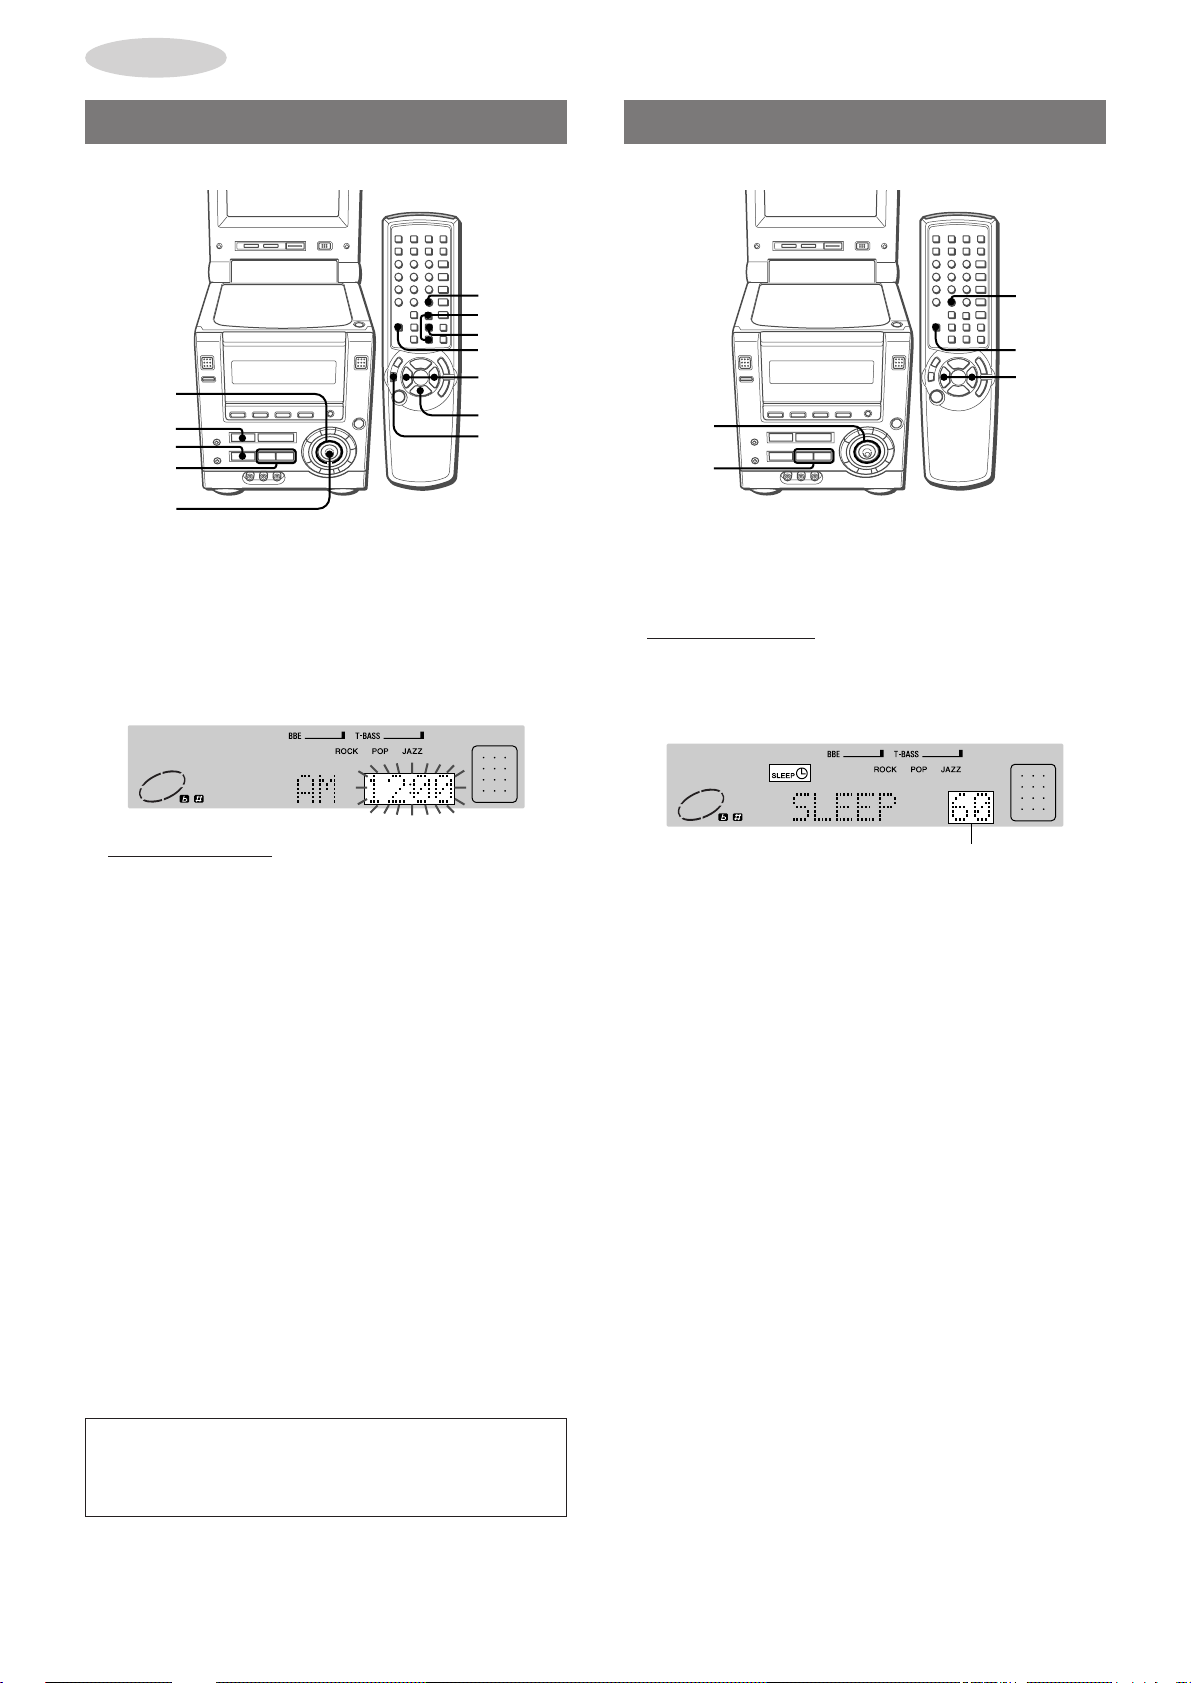
CLOCK
r,t
SLEEP
SHIFT
r,t
CURSOR
AND TIMER
SETTING THE CLOCK
CLOCK
i/k
ENTER
SHIFT
CURSOR
s
a
r,t
ENTER
1
Press a or ENTER while the power is off.
Alternatively, press CLOCK while pressing SHIFT while the
power is on or off.
The clock is displayed. (Or the clock becomes brighter.)
When the power cord is plugged into an AC outlet for the first
time after purchase or when the clock setting is canceled due
to a power failure, the entire clock display flashes.
r,t
s
a
SETTING THE SLEEP TIMER
The unit can be turned off automatically at a specified time.
1
Press SLEEP while pressing SHIFT.
Alternatively, press MODE on the main unit repeatedly until
"SLEEP" is displayed.
2
Within 4 seconds, press r or t to specify
the time until the power is turned off.
Alternatively, move CURSOR on the main unit i or k.
The time changes between 5 and 240 minutes in 5-minute
steps.
2
Within 4 seconds, start setting the time.
Press r or t.
Alternatively , move CURSOR on the main unit i or k, or press
i/k on the remote control.
Holding these buttons down will vary the time in 10-minute units.
3
Press a or ENTER.
The clock starts from 00 seconds.
When the clock is set for the first time after purchase
Everything on the display will clear.
This is because the power economizing mode is activated, and is
not a malfunction.
The power economizing mode can be canceled. See page 10 for
details.
To view the clock when another display is in the display
Press CLOCK while pressing SHIFT on the remote control. The
time is displayed for 4 seconds and then the original display
reappears.
To switch to the 24-hour standard
Press CLOCK while pressing SHIFT on the remote control, and
then press s within 4 seconds.
Repeat the same procedure to restore the 12-hour standard.
In the 12-hour standard, "AM 12:00" indicates midnight and "PM
12:00" indicates noon.
Specified time
T o check the time remaining until the power is turned off
Press SLEEP once while pressing SHIFT. The remaining time is
displayed for 4 seconds.
To cancel the sleep timer
Press SLEEP twice while pressing SHIFT so that "SLEEP OFF"
appears on the display.
When operating on the main unit, press MODE repeatedly until
"SLEEP" is displayed. Then move CURSOR i or k so that
"SLEEP OFF" is displayed.
If the clock display flashes
If the display flashes when the clock is display ed, it indicates
that the clock has stopped due to a power failure or the remo val
of the power cord. The current time needs to be reset.
36
ENGLISH
Page 39

SETTING THE TIMER
TIMER
i/k
ENTER
POWER
CURSOR
MODE
a
r,t
ENTER
The unit can be turned on at a specified time every day with the
built-in timer.
Preparation
Make sure the clock is set correctly.
1
Press one of the function buttons to select a
source.
If TUNER/BAND is pressed, you will select the band and the
station later in step 8.
2
Press TIMER repeatedl y while pressing SHIFT on
the remote control until and "TIMER PLAY"
appears on the display.
Alternatively, press MODE on the main unit repeatedly until
"TIMER OFF" is displayed, then move CURSOR i or k so
that "TIMER PLAY" appears.
SHIFT
r,t
POWER
a
6
Within 4 seconds, press ENTER or a.
7
Adjust the volume.
The source sound will play at the volume level set in this step
when the power is turned on by the timer.
If the volume level is set to 21 or higher, however, it will
automatically be set to 20 when the power is turned on.
8
Prepare the source.
To pla y a disc, load the disc to be pla yed.
To listen to the radio, select the band and tune in to a station.
T o play the external equipment, set the timer of the connected
equipment (with an external timer) and prepare for the play.
9
Press POWER to turn off the power.
When the timer-on time is reached, the unit turns on and begins
play with the selected source.
To check the timer setting
Press TIMER while pressing SHIFT on the remote control.
The selected source, the timer-on time, and the duration for the
timer-activated period will be displayed for 4 seconds.
To change any of the previous setting
Set the timer again from the beginning.
To cancel the timer standby mode temporarily
Press TIMER repeatedly while pressing SHIFT on the remote
control so that
To restore the timer standby mode, press again to display
When operating on the main unit, press MODE repeatedly until
"TIMER PLA Y" is display ed. Then move CURSOR i or k so that
"TIMER OFF" is displayed, and then press ENTER.
Using the unit while the timer is set
You can use the unit normally after setting the timer.
Before turning off the power, carry out steps 7 and 8.
NOTE
• Timer playback will not begin unless the power is turned off.
• Connected equipment cannot be turned on and off by the builtin timer of this unit. Use an external timer.
• To perf orm timer play on a DVD, set "Disc Resume" to OFF (see
"DISC RESUME", page 47).
• Timer play cannot be done with certain DVDs.
disappears and “TIMER OFF" appears.
.
CLOCK
AND TIMER
En
3
Within 4 seconds, press ENTER or a.
Time and audio source name flash alternately.
4
Press r or t to set the timer-on time, then
press ENTER or a.
Holding r or t do wn will vary the time in 10-minute units.
Alternatively, move CURSOR on the main unit i or k.
5
Within 4 seconds, press r or t to select the
duration for the timer-activated period.
Alternatively, move CURSOR on the main unit i or k.
The duration can be set between 5 and 240 minutes in 5-minute
steps.
Timer-activated period
ENGLISH
37
Page 40

OTHER
CONNECTIONS
CONNECTING OPTIONAL
EQUIPMENT
AUDIO IN
VIDEO IN
SUPER WOOFER
AUX IN
LINE OUT
S-VIDEO OUT
VIDEO OUT
DIGITAL AUDIO OUT
(OPTICAL)
Refer to the operating instructions of the connected equipment
for details.
• The connecting cords are not supplied. Obtain the necessary
connecting cords.
• Consult your local AIWA dealer for optional equipment.
S-VIDEO OUT JACK
S-video signals can be output through this jack.
Use an S-video cable to connect to the S-video input jack of video
equipment (VCRs, TV, etc.).
NOTE
• When an external TV is connected, do not place the TV near the
unit; otherwise the sound and picture of the unit ma y be distorted.
• Be sure to connect the S-VIDEO OUT jack directly to a TV set,
not through a VCR or other video equipment. Otherwise, the
picture noise may appear when playing copy protected DVDs.
DIGITAL AUDIO OUT (OPTICAL) JACK
Digital sound signals can be output from the disc player through
this jack. Use an optical cable to connect digital audio equipment
(DAT deck, MD recorder, etc.).
Remove the dust cap a from the DIGITAL AUDIO OUT
(OPTICAL) jack. Then, connect an optical cable plug to the
DIGITAL AUDIO OUT (OPTICAL) jack.
When the DIGIT AL AUDIO OUT (OPTICAL) jac k is not being
used
Attach the supplied dust cap.
AUDIO IN JACKS (FRONT)
AUX IN JACKS (REAR)
Analog sound signals can be input through these jacks.
Use a cable with RCA phono plugs to connect audio equipment
(turntables, LD players, MD players, VCRs, TV, etc.).
Connect the red plug to the R (right) jack, and the white plug to
the L (left) jack.
When connecting a turntable
Use an AIWA turntable equipped with a built-in equalizer amplifier .
VIDEO IN JACK
Video signals can be input through this jack.
Use a cable with RCA phono plugs to connect to the video output
jack of video equipment (VCRs, LD players, etc.).
LINE OUT JACKS
Analog sound signals can be output through these jacks.
Use a cable with RCA phono plugs to connect audio equipment.
Connect the red plug to the LINE OUT R (right) jack, and the
white plug to the LINE OUT L (left) jack.
VIDEO OUT JACK
Video signals can be output through this jack.
Use a cable with RCA phono plugs to connect to the video input
jack of video equipment (VCRs, TV, etc.).
When connecting an MD recorder
When connecting an MD recorder using the DIGIT AL AUDIO OUT
(OPTICAL) jack, make sure to set the "Digital Stream" to "Down
Mix PCM" (see "AUDIO OUTPUT SETTING", page 43).
• Recording onto an MD may not be done successfully with certain
discs.
Notes on connecting to external amplifiers
This unit supports play of discs recorded with the Dolby Digital
system and the DTS Digital Surround system.
T o play in the Dolb y Digital system, this unit needs to be connected
to a Dolby Digital decoder unit or an amplifier equipped with a
Dolby Digital decoder via the DIGITAL AUDIO OUT (OPTICAL)
jack.
To play in the DTS Digital Surround system, this unit needs to be
connected to a DTS decoder unit or an amplifier equipped with a
DTS decoder via the DIGITAL AUDIO OUT (OPTICAL) jack.
When connecting to such decoder or a decoder-equipped amplifier,
the audio output setting must be changed appropriately in the
DVD setup (see "AUDIO OUTPUT SETTING", page 43).
CAUTION ON CONNECTING EQUIPMENT TO THE DIGITAL
AUDIO OUT (OPTICAL) JACK
If the audio output setting of the D VD setup is not set appropriately
to your configuration, merely attempting to play a D VD ma y cause
a high level of noise which could harm your ears and damage the
speakers.
Carefully read and follow instructions for "AUDIO OUTPUT
SETTING", page 43.
If you are not connecting to Dolby Digital or DTS decoders or
decoder-equipped amplifiers, or if you are not connecting to
external amplifiers at all, you do not need to change the default
audio output setting.
38
3 SUPER WOOFER JACK
Connect an optional powered sub woofer with a built-in amplifier
to the jack.
ENGLISH
Page 41

LISTENING TO EXTERNAL
VIEWING PICTURES OF
SOURCES
VIDEO AUX
TO PLAY THE EQUIPMENT CONNECTED
TO THE AUDIO IN JACKS
1
Press VIDEO.
"VIDEO" appears on the display.
2
Play the connected equipment.
EXTERNAL SOURCE
MOITOR ON/OFF
VIDEO
T o vie w pictures play ed on equipment connected to the VIDEO IN
jack, using the monitor screen of this unit, proceed as follows:
1
Press VIDEO.
"VIDEO" appears on the display.
2
Open the monitor and press MONITOR ON/OFF
to turn the monitor on, if it has been turned off.
3
Play the connected equipment.
OTHER
CONNECTIONS
NOTE
When connecting monaural sound source, connect the sound
source to either the AUDIO IN L (left channel) or AUDIO IN R
(right channel) jack. The sound will be heard only from the speaker
unit corresponding to the jack used.
TO PLAY THE EQUIPMENT CONNECTED
TO THE AUX IN JACKS
1
Press AUX.
"AUX" appears on the display.
2
Play the connected equipment.
To adjust the volume level of the connected equipment
To adjust the volume level of the equipment connected to the
AUDIO IN jacks, press VIDEO, then press r or t repeatedly .
T o adjust the volume le vel of the equipment connected to the AUX
IN jacks, press AUX, then press r or t repeatedly.
The volume level can be adjusted in 8 steps from MIN (minim um)
to MAX (maximum).
NOTE
To listen to the sound played by the external source, connect it
also to the AUDIO IN jacks of this unit.
En
ENGLISH
39
Page 42

CUSTOMIZING
ENTER
DVD/CD
SET UP
i/k
ENTER
SET UP
vRETURN
vRETURN
CURSOR
(i/k)
DVD SETUP
Various default settings related to the disc player, the built-in
monitor screen and the external TV screen can be changed as
needed or preferred.
OVERVIEW OF THE SETUP
MENU
There are 7 major menu items that can be adjusted. Their function
are as follows:
1 On-screen Menu (page 41)
• Sets the on-screen guide display on or off.
• Selects a background color for the monitor screen.
2 Disc Languages (page 42)
Selects the preferred audio soundtrack language, subtitle
language and menu screen language for DVD play.
3 Audio Output Setting (page 43)
Adjusts the type of signal output from the DIGIT AL AUDIO OUT
(OPTICAL) jack and the LINE OUT jacks.
4 TV Aspect (page 45)
Sets the aspect ratio of the video signal sent to the connected
TV set.
5 Ratings (page 46)
Sets the rating limit of DVDs allowed to play on this unit when
playing discs with restriction level encoding.
With discs that include scenes with excessive violence, for
example, this setting can be used either to automatically cut
such scenes or to disable play altogether, depending on the
disc.
6 PBC (page 47)
Sets your preferred setting to turn the PBC (PlayBack Control)
function for video CDs on or off.
7 Disc Resume (page 47)
Sets whether the disc resume memory is retained after power
off, opening of the disc door, or switching of the function.
The "Audio Output Setting" and the "TV Aspect" setting need
to be set specifically to match your configuration of connected
equipment.
• Changing the default "Digital Stream" and "dts Output" settings
under "Audio Output Setting" may be needed
connecting an external decoder or amplifier
If not, do not change its default setting.
• The default "TV Aspect" setting has to be changed
connected TV has a conventional size screen (4:3)
Any other setting can be changed or kept as is, according to
your preferences.
only if you are
.
if the
.
BASIC OPERATIONS
1
Press DVD/CD.
If the loaded disc starts to play, stop it.
2
Press SET UP.
The setup screen is displayed.
SETUP MENU
Choice The Item ik
1
On-screen Menu
2
Disc Languages
3
Audio Output Setting
4
TV Aspect
5
Ratings
6
P B C
7
Disc Resume
ENTER : Choice item SETUP : Completion
3
Use i /k to move the cursor (the yellowhighlighted area) to the setting to be changed.
4
Press ENTER.
The menu screen for the item you selected will be displayed.
5
Use i/k to mo ve the cursor to the desired setting.
6
Press ENTER to enter your selection.
The selected setting will be saved, and the display retur ns to
the main setup screen of step 2.
For some settings, however, the screen will display a more
detailed menu. Follow the directions shown on the screen.
7
Press SET UP to exit the setup menu.
To return to the previous screen
Press vRETURN.
To exit the setup menu
Press SET UP.
To confirm your setting
1 Follow steps 1 to 4 above to display the setting you want to
confirm.
2 Press SET UP to exit the setup menu without making changes.
16 : 9 S1/S2
Level 8
O N
O F F
40
ENGLISH
NOTE
• If you press vRETURN or SET UP before pressing ENTER to
enter your selection, you return to the previous screen or exit
the setup menu, respectively, without saving your selection.
• Opening the disc door exits the setup menu without saving your
selection.
Page 43

ON-SCREEN MENU
There are 2 items you can set.
BA CKGROUND
"Background" sets the background color of the monitor screen or
the connected TV screen in stop mode.
The default setting is "Wallpaper".
GUIDE MESSAGE
"Guide Message" sets whether or not to show the on-screen guide
display at the upper right side of the monitor screen or the
connected TV screen.
The default setting is "ON".
1 Select "On-screen Menu" by using i/k in the setup menu.
Then press ENTER.
2 Use i/k to move the cursor to "Guide Message".
On-screen Menu
Choice The Item ik
12Guide Message
Background
ENTER : Choice item
SETUP : Completion
3 Press ENTER.
4 Use i/k to move the cursor to the desired setting.
Guide Message
Choice The Item ik
12Guide Message
Guide Message
ENTER : Choice item
SETUP : Completion
5 Press ENTER.
Your entry is saved.
6 Press vRETURN to return to the previous screen, or press
SET UP to exit the setup menu.
O N
Wall Paper
RETURN : Previous menu
O N
O F F
RETURN : Previous menu
1 Select "On-screen Menu" by using i/k in the setup menu.
Then press ENTER.
2 Use i/k to move the cursor to "Background".
On-screen Menu
Choice The Item ik
12Guide Message
Background
ENTER : Choice item
SETUP : Completion
O N
Wall Paper
RETURN : Previous menu
3 Press ENTER.
4 Use i/k to move the cursor to the desired setting.
Background
Choice The Item ik
1
Wall Paper
2
Black
3
Blue
4
Green
5
Yellow
6
Orange
7
Magenta
ENTER : Choice item
SETUP : Completion
RETURN : Previous menu
5 Press ENTER.
Your entry is saved.
6 Press vRETURN to return to the previous screen, or press
SET UP to exit the setup menu.
DVD SETUP
CUSTOMIZING
En
ENGLISH
41
Page 44

DISC LANGUAGES
"Disc Languages" selects the preferred audio soundtrack
language, subtitle language and menu screen language for DVD
play.
AUDIO LANGUAGE
The default setting is "Original".
1 Select "Disc Languages" by using i/k in the setup menu.
Then press ENTER.
2 Use i/k to move the cursor to select "Audio Language".
Disc Languages
Choice The Item ik
1
Audio Language
2
Subtitle Language
3
Disc Menu
ENTER : Choice item
SETUP : Completion
3 Press ENTER.
4 Use i/k to move the cursor to the desired language and
press ENTER.
Audio Languages
Choice The Item ik
1
Original
2
English
3
Japanese
4
Others
ENTER : Choice item
SETUP : Completion
Original: Pla y discs in the language specified as the default
on the disc.
English: Play discs in English.
Japanese: Play discs in Japanese.
Others: Language code setting screen appears.
5.
5 When "Others" is selected in step 4, enter a four-digit
language code by using i/k and numbered buttons.
Please refer to the list of language codes on page 50.
Others
Input Language Code
Language Code
ik
jl
0 ~ 9 Code input
ENTER : Confirm
SETUP : Completion
To move the cursor, use j or l.
6 Press ENTER.
Your entry is saved.
7 Press vRETURN to return to the previous screen, or press
SET UP to exit the setup menu.
Original
Auto
English
RETURN : Previous menu
RETURN : Previous menu
Go to step 7.
Go to step 7
– – – –
Number UP/DOWN
Move the digit cursor
RETURN : Previous menu
.
Go to step 7.
Go to step
SUBTITLE LANGUAGE
The default setting is "Auto".
1 Select "Disc Languages" by using i/k in the setup menu.
Then press ENTER.
2 Use i/k to move the cursor to "Subtitle Language".
Disc Languages
Choice The Item ik
1
Audio Language
2
Subtitle Language
3
Disc Menu
ENTER : Choice item
SETUP : Completion
3 Press ENTER.
4 Use i/k to move the cursor to the desired language and
press ENTER.
Subtitle Languages
Choice The Item ik
1
Auto
2
English
3
Japanese
4
Others
ENTER : Choice item
SETUP : Completion
Auto: When "Audio Language" is set to "Original":
Subtitles will be displayed in the disc's default
subtitle language.
When "Audio Language" is set to a specific
language:
• If the specified audio language exists on the disc,
the sound will be heard in this language and no
subtitles will be displayed.
• If the specified audio language does not exist on
the disc, subtitles will be displayed in the specified
language.
Example: When "Audio Language" is set to
"English"
• If there is English audio track on the disc, sound
will be heard in English and no subtitles will be
displayed.
• If there is no English audio track on the disc,
sound will be heard in the disc's original language
and English subtitles will be displayed.
English: English subtitles will be displayed.
Japanese: Japanese subtitles will be displayed.
Others: Language code setting screen appears. The
procedure for setting the language code is the
same as for "Audio Language" setting. Refer to
the steps 5 and 6 of "Audio Language" setting.
5 Press vRETURN to return to the previous screen, or press
SET UP to exit the setup menu.
If your preferred language does not exist on the disc, the disc’s
default language will be used.
Original
Auto
English
RETURN : Previous menu
RETURN : Previous menu
If your preferred language does not exist on the disc, the disc’s
default language will be used.
42
ENGLISH
Page 45

DISC MENU
The default setting is "English".
1 Select "Disc Languages" by using i/k in the setup menu.
Then press ENTER.
2 Use i/k to move the cursor to "Disc Menu".
Disc Languages
Choice The Item ik
1
Audio Language
2
Subtitle Language
3
Disc Menu
Original
Auto
English
AUDIO OUTPUT SETTING
"Audio Output Setting" adjusts the type of signal output from the
DIGITAL AUDIO OUT (OPTICAL) jack and the LINE OUT jacks.
Changing the default "Digital Stream" and "dts Output" settings in
"Audio Output Setting" may be needed
an external decoder or amplifier
If so, set up according to the type of connected equipment.
If not, do not change their default settings.
only if you are connecting
.
DVD SETUP
CUSTOMIZING
ENTER : Choice item
SETUP : Completion
RETURN : Previous menu
3 Press ENTER.
4 Use i/k to move the cursor to the desired language and
press ENTER.
Disc Menu
Choice The Item ik
1
English
2
Japanese
3
Others
ENTER : Choice item
SETUP : Completion
RETURN : Previous menu
English: Show the Disc menu in English.
Japanese: Show the Disc menu in Japanese.
Others: Language code setting screen appears. The
procedure for setting the language code is the
same as for "Audio Language" setting. Refer to
the steps 5 and 6 of "Audio Language" setting.
5 Press vRETURN to return to the previous screen, or press
SET UP to exit the setup menu.
If your preferred language does not exist on the disc, the disc’s
default language will be used.
DIGITAL STREAM
"Digital Stream" sets the type of digital output from the DIGITAL
AUDIO OUT (OPTICAL) jack of this unit.
The default setting is "Down Mix PCM".
1 Select "Audio Output Setting" by using i/k in the setup
menu. Then press ENTER.
2 Use i/k to move the cursor to "Digital Stream".
Audio Output Setting
Choice The Item ik
1
Digital Stream
2
dts Output
3
Down Mix Type
ENTER : Choice item
SETUP : Completion
3 Press ENTER.
4 Use i/k to move the cursor to the setting suited to your
configuration.
Digital Stream
Choice The Item ik
12Down Mix PCM
DOLBY DIGITAL
ENTER : Choice item
SETUP : Completion
Down Mix PCM
Select this option if the unit is connected via a fiber optical
cable to
a digital amplifier without a built-in Dolby Digital decoder
or an MD recorder.
Down Mix PCM
OFF
Stereo
RETURN : Previous menu
RETURN : Previous menu
En
DOLBY DIGITAL
Select this option if the unit is connected to a Dolby Digital
decoder, or to an amplifier with a built-in Dolb y Digital decoder,
with a digital fiber optical cable.
5 Press ENTER.
Your entry is saved.
6 Press vRETURN to return to the previous screen, or press
SET UP to exit the setup menu.
CAUTION
If the AV amplifier is not equipped with a Dolby Digital
decoder, do not select "DOLBY DIGITAL" in the "Audio
Output Setting" when connecting the AV amplifier with
an optical connecting cord.
Merely attempting to play a DVD may cause a high level of
noise which could be harmful to your ears and damage the
speakers. In such a case, be sure to select "Down Mix PCM".
ENGLISH
43
Page 46

DTS OUTPUT
"dts Output" sets the dts output as to whether the connected
amplifier contains a DTS decoder or not.
The default setting is "dts OFF".
1 Select "Audio Output Setting" by using i/k in the setup
menu. Then press ENTER.
2 Use i/k to move the cursor to "dts Output".
Audio Output Setting
Choice The Item ik
1
Digital Stream
2
dts Output
3
Down Mix Type
ENTER : Choice item
SETUP : Completion
3 Press ENTER.
4 Use i/k to move the cursor to the setting suited to your
configuration.
dts Output
Choice The Item ik
12dts
dts
ENTER : Choice item
SETUP : Completion
dts ON
Select this option if the unit is connected to an amplifier with a
DTS decoder.
dts OFF
Select this option if the unit is connected to an amplifier without
a DTS decoder.
5 Press ENTER.
Your entry is saved.
6 Press vRETURN to return to the previous screen, or press
SET UP to exit the setup menu.
Down Mix PCM
OFF
Surround
RETURN : Previous menu
ON
OFF
RETURN : Previous menu
DOWN MIX TYPE
"Down Mix Type" selects the type of signal output from the LINE
OUT jacks.
This setting is effective only when a Dolby Digital decoder or an
amplifier with a built-in Dolby Digital decoder is connected to the
LINE OUT jacks.
The default setting is "Surround Mode".
1 Select "Audio Output Setting" by using i/k in the setup
menu. Then press ENTER.
2 Use i/k to move the cursor to "Down Mix Type".
Audio Output Setting
Choice The Item ik
1
Digital Stream
2
dts Output
3
Down Mix Type
ENTER : Choice item
SETUP : Completion
3 Press ENTER.
4 Use i/k to move the cursor to the setting suited to your
preference.
Down Mix Type
Choice The Item ik
12Stereo Mode
Surround Mode
ENTER : Choice item
SETUP : Completion
Stereo Mode
Select this option to listen to the sound in normal stereo effect.
Surround Mode
Select this option to listen to the sound with surround effect.
5 Press ENTER.
Your entry is saved.
6 Press vRETURN to return to the previous screen, or press
SET UP to exit the setup menu.
Down Mix PCM
OFF
Surround
RETURN : Previous menu
RETURN : Previous menu
CAUTION
If the AV amplifier is not equipped with a DTS decoder,
do not select "dts ON" in the "dts Output" when
connecting the AV amplifier with an optical connecting
cord.
Merely attempting to play a DVD may cause a high level of
noise which could be harmful to your ears and damage the
speakers. In such a case, be sure to select "dts OFF".
NOTE
When playing a disc that supports the DTS Digital Surround while
"dts Output" is set to "dts ON", no sound will be heard from the
unit's speakers and the headphones connected to the PHONES
jack.
44
ENGLISH
Page 47

TV ASPECT
"TV Aspect" sets the aspect of the video signal output to the
connected TV set.
There are 2 options.
The default setting is "16:9 (WIDE TV):S1".
If connected TV has a wide screen (16:9), you need to change
the default setting. Refer to " WIDE TV".
If connected TV has a conventional size screen (4:3), refer to
"NORMAL TV". Change setting if preferred.
WIDE TV
1 Select "TV Aspect" by using i/k in the setup menu. Then
press ENTER.
2 Use i/k to move the cursor to "WIDE TV 16:9".
TV Aspect
Choice The Item ik
12NORMAL TV
WIDE TV
ENTER : Choice item
SETUP : Completion
3 Press ENTER.
4 Use i/k to move the cursor to the suitable setting.
TV Aspect
Choice The Item ik
12Forcibry S-Video Output to S1
Automatically Selected to S1 / S2
Choice the Output S-Video mode
ENTER : Choice item
SETUP : Completion
Forcibly S-Video Output to S1
Select this option when connecting to
not support S2.
4 : 3
16 : 9
RETURN : Previous menu
16 : 9
RETURN : Previous menu
a wide TV which does
NORMAL TV
1 Select "TV Aspect" by using i/k in the setup menu. Then
press ENTER.
2 Use i/k to move the cursor to "NORMAL TV 4:3".
TV Aspect
Choice The Item ik
12NORMAL TV
WIDE TV
ENTER : Choice item
SETUP : Completion
3 Press ENTER.
4 Use i/k to move the cursor to the suitable setting.
TV Aspect 4 : 3
Choice The Item ik
12LETTER BOX
PAN & SCAN
Choice the TV Mode
ENTER : Choice item
SETUP : Completion
LETTER BOX
Media recorded in wide (16:9) format will be played in "letterbo x"
style, with black bands at the top and bottom of the screen.
PAN & SCAN
Media recorded in wide (16:9) format will be played at the full
screen height, with the left and right portions cut off, for media
which contains pan-scan encoding. Other media will be pla yed
in "letterbox" style.
4 : 3
16 : 9
RETURN : Previous menu
RETURN : Previous menu
DVD SETUP
CUSTOMIZING
En
Automatically Selected to S1/S2
Select this option when connecting to
a wide TV which supports
S2. The long-wide ratio is automatically changed according to
a disc played.
5 Press ENTER.
Your entry is saved.
6 Press SET UP to exit the setup menu.
NOTE
The display will not change to wide ratio if your TV set is not
connected via the S-VIDEO OUT jack.
5 Press ENTER.
Your entry is saved.
6 Press SET UP to exit the setup menu.
ENGLISH
45
Page 48

RA TINGS
"Ratings" sets the rating limit allowed to playbac k on this unit when
playing discs with restriction level encoding.
SETTING THE RATING
The default setting is "Lev el 8".
6 Use the numbered buttons and j/l to enter a four-digit
password.
7 Press ENTER.
Confirm your password.
Confirmation of the Password
The Player is Locked
Remember the Password
PASSWORD
Press ENTER button
1 2 3 4
1 Select "Ratings" by using i/k in the setup menu. Then
press ENTER.
2 Use i/k to move the cursor to the level you w ould like to
set.
The smaller the number, the higher the level of restriction.
For instance, setting the rating level to 1 will restrict play of all
discs with a rating level from 2 to 8, either by cutting cer tain
scenes or disabling play altogether, depending on the disc.
Check your disc for details.
Rating
Choice The Item ik
Level
8
7
6
5
4
3
2
1
No Limit (for Adult)
Max Limit (for Family)
RETURN : Previous menu
Level
Level
Level
Level
Level
Level
Level
ENTER : Choice item
SETUP : Completion
3 Press ENTER.
4 Use i/k to move the cursor to select the country code.
Country Code
Choice The Item ik
1
USA
2
CHINA
3
GERMANY
4
UNITED KINGDOM
5
JAPAN
6
Other Country
ENTER : Choice item
SETUP : Completion
RETURN : Previous menu
The country code needs to be set correctly, since the rating
system differs with the country.
When "Other Country" is selected in the country code, the
display changes to accept 4-digit numbers. Input a 4-digit
country code shown on page 48 in the same way as the input
of the language code (page 42).
NOTE
The country code is different from the language code stated
before.
Example: country code for "United States" is "8583".
5 Press ENTER.
A password entry screen is displayed.
PASSWORD
Enter the Password
PASSWORD
ik
jl
0 ~ 9 Code input
ENTER : Confirm
SETUP : Completion
– – – –
Number UP/DOWN
Move The digit cursor
RETURN : Previous menu
Do not forget the password you set!
If you forget your password
Reset the setup menu settings. (See "TO RESET THE SETUP
MENU", page 52.) Then set all the settings again including the
"Ratings" setting.
8 After confirming the password, press ENTER again.
Your entry is saved.
9 Press SET UP to exit the setup menu.
CHANGING THE SETTINGS
1 Select "Ratings" by using i/k in the setup menu. Then
press ENTER.
2 Input four-digit password and press ENTER.
3 Select an item.
Ratings
Choice The Item ik
1
Unlock Player
2
Change Password
3
Change Level
4
Setting of the Country Code
ENTER : Choice item
SETUP : Completion
Unlock Player:
Resets "Ratings" to "Level 8" (no restriction).
Change Password:
Changes the password setting.
Change Level:
Changes the "Ratings" level setting.
Setting of the Country Code:
Changes the country code setting.
4 Press ENTER.
5 Change the contents you want to set, and press ENTER.
6 Press ENTER.
Confirm your password.
Confirmation of the Password
The Player is Locked
Remember the Password
PASSWORD
7 Press ENTER.
The contents are saved.
8 Press vRETURN to return to the previous screen, or press
SET UP to exit the setup menu.
RETURN : Previous menu
Go to step 7.
Go to step 4.
Go to step 4.
Perform steps 4, 5 and 8.
1 2 3 4
Press ENTER button
46
ENGLISH
Page 49

PBC
DISC RESUME
"PBC" sets your preferred setting to turn the PBC (PlayBack
Control) function for video CDs on or off.
The default setting is "ON".
1 Select "PBC" by using i/k in the setup menu. Then press
ENTER.
2 Use i/k to move the cursor to "ON" or "OFF".
PBC
Choice The Item ik
12P B C
P B C
ENTER : Choice item
SETUP : Completion
O N
O F F
RETURN : Previous menu
3 Press ENTER.
Your entry is saved.
4 Press SET UP to exit the setup menu.
"Disc Resume" sets whether the disc resume memory is retained
after power off, opening of the disc door , or switching of the function.
After these operations, play starts either from the previous stopped
point (ON), or from the beginning of the disc (OFF).
Note that setting "Disc Resume" to OFF does not turn off the
resume play feature itself. For the resume function, see
"STOPPING AND PAUSING", page 19.
The default setting is "OFF".
1 Select "Disc Resume" by using i/k in the setup menu.
Then press ENTER.
2 Use i/k to move the cursor to "ON" or "OFF".
Disc Resume
Choice The Item ik
12Disc Resume
Disc Resume
ENTER : Choice item
SETUP : Completion
O N
O F F
RETURN : Previous menu
3 Press ENTER.
Your entry is saved.
4 Press SET UP to exit the setup menu.
When "Disc Resume" is set to ON
When a disc is loaded, the unit checks whether it holds the resume
memory data for the disc. If so, "RESUME" is displayed on the
screen before the unit enters the stop mode.
In this condition, play starts from the previous stopped point by
pressing c.
To star t play from the beginning temporarily while "Disc
Resume" is set to ON
Press s in stop mode and then press c to start play. "RESUME
OFF" is displayed in this case.
DVD SETUP
CUSTOMIZING
En
NOTE
• The unit maintains the resume data of up to 5 DVDs and up to a
total of 10 audio CDs and video CDs.
• When the 6th DVD disc or the 11th audio CD or video CD is
inserted, the resume data for the oldest disc is overwritten by
the disc information of the new disc and deleted, even when
"Disc Resume" is set to ON.
ENGLISH
47
Page 50

COUNTRY CODES
Use these numbers to specify the country in the "Ratings" setting (page 46).
Code
6570
6576
6890
6583
6568
6579
6573
6581
6571
6582
6577
6587
6585
6584
6590
6683
6672
6668
6666
6689
6669
6690
6674
6677
6684
6679
6665
6687
6686
6682
7379
6678
6671
6670
6673
7572
6777
6765
6786
7589
6770
8468
Country
AFGHANISTAN
ALBANIA
ALGERIA
AMERICAN SAMOA
ANDORRA
ANGOLA
ANGUILLA
ANTARCTICA
ANTIGUA AND
BARBUDA
ARGENTINA
ARMENIA
ARUBA
AUSTRALIA
AUSTRIA
AZERBAIJAN
BAHAMAS
BAHRAIN
BANGLADESH
BARBADOS
BELARUS
BELGIUM
BELIZE
BENIN
BERMUDA
BHUTAN
BOLIVIA
BOSNIA AND
HERZEGOVINA
BOTSWANA
BOUVET ISLAND
BRAZIL
BRITISH INDIAN OCEAN
TERRITORY
BRUNEI DARUSSALAM
BULGARIA
BURKINA FASO
BURUNDI
CAMBODIA
CAMEROON
CANADA
CAPE VERDE
CAYMAN ISLANDS
CENTRAL AFRICAN
REPUBLIC
CHAD
Code
6776
6778
6788
6767
6779
7577
6771
6775
6782
6773
7282
6785
6789
6790
6875
6874
6877
6879
8480
6967
6971
8386
7181
6982
6969
6984
7075
7079
7074
7073
7082
7088
7170
8070
8470
7165
7177
7169
6869
7172
7173
7182
Country
CHILE
CHINA
CHRISTMAS ISLAND
COCOS (KEELING)
ISLAND
COLOMBIA
COMOROS
CONGO
COOK ISLANDS
COSTA RICA
COTE D'IVOIRE
CROATIA
CUBA
CYPRUS
CZECH REPUBLIC
DENMARK
DJIBOUTI
DOMINICA
DOMINICAN REPUBLIC
EAST TIMOR
ECUADOR
EGYPT
EL SALVADOR
EQUATORIAL GUINEA
ERITREA
ESTONIA
ETHIOPIA
FALKLAND ISLANDS
(MALVINAS)
FAROE ISLANDS
FIJI
FINLAND
FRANCE
FRANCE,
METROPOLITAN
FRENCH GUIANA
FRENCH POLYNESIA
FRENCH SOUTHERN
TERRITORIES
GABON
GAMBIA
GEORGIA
GERMANY
GHANA
GIBRALTAR
GREECE
Code
7176
7168
7180
7185
7184
7178
7187
7189
7284
7277
7278
7275
7285
7383
7378
7368
7382
7381
7369
7376
7384
7477
7480
7479
7590
7569
7573
7580
7582
7587
7571
7665
7686
7666
7683
7682
7689
7673
7684
7685
7779
7771
Country
GREENLAND
GRENADA
GUADELOUPE
GUAM
GUATEMALA
GUINEA
GUNEA-BISSAU
GUYANA
HAITI
HEARD ISLAND AND
MCDONALD ISLANDS
HONDURAS
HONG KONG
HUNGARY
ICELAND
INDIA
INDONESIA
IRAN (ISLAMIC
REPUBLIC OF)
IRAQ
IRELAND
ISRAEL
ITALY
JAMAICA
JAPAN
JORDAN
KAZAKHSTAN
KENYA
KIRIBATI
KOREA,DEMOCRATIC
PEOPLE'S REPUBLIC OF
KOREA, REPUBLIC OF
KUWAIT
KYRGYZSTAN
LAO PEOPLE’S
DEMOCRATIC REPUBLIC
LATVIA
LEBANON
LESOTHO
LIBERIA
LIBYAN ARAB
JAMAHIRIYA
LIECHTENSTEIN
LITHUANIA
LUXEMBOURG
MACAU
MADAGASCAR
48
ENGLISH
Page 51

Code
7787
7789
7786
7776
7784
7772
7781
7782
7785
8984
7788
7077
7768
7767
7778
7783
7765
7790
7777
7865
7882
7880
7876
6578
7867
7890
7873
7869
7871
7885
7870
7780
7879
7977
8075
8087
8065
8071
8089
8069
8072
8078
Country
MALAWI
MALAYSIA
MALDIVES
MALI
MALTA
MARSHALL ISLANDS
MARTINIQUE
MAURITANIA
MAURITIUS
MAYOTTE
MEXICO
MICRONESIA
(FEDERATED STATES OF)
MOLDOVA, REPUBLIC
OF
MONACO
MONGOLIA
MONTSERRAT
MOROCCO
MOZAMBIQUE
MYANMAR
NAMIBIA
NAURU
NEPAL
NETHERLANDS
NETHERLANDS
ANTILLES
NEW CALEDONIA
NEW ZEALAND
NICARAGUA
NIGER
NIGERIA
NIUE
NORFOLK ISLAND
NORTHERN MARIANA
ISLANDS
NORWAY
OMAN
PAKISTAN
PALAU
PANAMA
PAPUA NEW GUINEA
PARAGUAY
PERU
PHILIPPINES
PITCAIRN
Code
8076
8084
8082
8165
8269
8279
8285
8287
8372
7578
7667
8077
8667
8783
8377
8384
8365
8378
8367
8376
8371
8375
8373
8366
8379
9065
7183
6983
7675
8368
8382
8374
8390
8369
6772
8389
8487
8474
8490
8472
8471
8475
Country
POLAND
PORTUGAL
PUERTO RICO
QATAR
REUNION
ROMANIA
RUSSIAN FEDERATION
RWANDA
SAINT HELENA
SAINT KITTS AND NEVIS
SAINT LUCIA
SAINT PIERRE AND
MIQUELON
SAINT VINCENT AND
THE GRENADINES
SAMOA
SAN MARINO
SAO TOME AND
PRINCIPE
SAUDI ARABIA
SENEGAL
SEYCHELLIES
SIERRA LEONE
SINGAPORE
SLOVAKIA
SLOVENIA
SOLOMON ISLANDS
SOMALIA
SOUTH AFRICA
SOUTH GEORGIA AND
THE SOUTH SANDWICH
ISLANDS
SPAIN
SRI LANKA
SUDAN
SURINAME
SVALBARD AND JAN
MEYEN
SWAZILAND
SWEDEN
SWITZERLAND
SYRIAN ARAB
REPUBLIC
TAIWAN, PROVINCE OF
CHINA
TAJIKISTAN
TANZANIA, UNITED
REPUBLIC OF
THAILAND
TOGO
TOKELAU
Code
8479
8484
8478
8482
8477
8467
8486
8571
8565
6569
7166
8583
8577
8589
8590
8685
8665
8669
8678
8671
8673
8770
6972
8969
8985
9082
9077
9087
Country
TONGA
TRINIDAD AND TOBAGO
TUNISIA
TURKEY
TURKMENISTAN
TURKS AND CACOS
ISLANDS
TUVALU
UGANDA
UKRAINE
UNITED ARAB
EMIRATES
UNITED KINGDOM
UNITED STATES
UNITED STATES MINOR
OUTLYING ISLANDS
URUGUAY
UZBEKISTAN
VANUATU
VATICAN CITY STATE
(HOLY STATE)
VENEZUELA
VIET NAM
VIRGIN ISLANDS
(BRITISH)
VIRGIN ISLANDS (U.S.)
WALLIS AND FUTUNA
ISLANDS
WESTERN SAHARA
YEMEN
YUGOSLAVIA
ZAIRE
ZAMBIA
ZIMBABWE
DVD SETUP
CUSTOMIZING
En
ENGLISH
49
Page 52

LANGUAGE CODES
Use these numbers to specify the language in the "Disc Languages" setting (page 42).
Code
3737
3738
3742
3749
3754
3755
3760
3762
3837
3841
3843
3844
3850
3851
3854
3937
3951
3955
3961
4037
4041
4062
4148
4150
4151
4155
4156
4157
4237
4845
4246
4251
4254
4261
4337
4340
4348
4350
4357
4437
4445
4454
Language
Afar
Abkhazian
Afrikaans
Amharic
Arabic
Assamese
Aymara
Azerbaijani
Bashkir
Byelorussian
Bulgarian
Bihari
Bengali; Bangla
Tibetan
Breton
Catalan
Corsican
Czech
Welsh
Danish
German
Bhutani
Greek
English
Esperanto
Spanish
Estonian
Basque
Persian
Finnish
Fiji
Faroese
French
Frisian
Irish
Scots Gaelic
Galician
Guarani
Gujarati
Hausa
Hindi
Croatian
Code
4457
4461
4537
4550
4555
4556
4559
4637
4645
4659
4737
4747
4748
4749
4750
4751
4755
4757
4761
4837
4850
4851
4856
4858
4943
4945
4947
4948
4950
4951
4954
4955
4956
4961
5037
5041
5048
5051
5154
5237
5248
5255
Language
Hungarian
Armenian
Interlingua
Indonesian
Icelandic
Italian
Hebrew
Japanese
Yiddish
Javanese
Georgian
Kazakh
Greenlandic
Cambodian
Kannada
Korean
Kashmiri
Kurdish
Kirghiz
Latin
Lingala
Laothian
Lithuanian
Latvian; Lettish
Malagasy
Maori
Macedonian
Malayalam
Mongolian
Moldavian
Marathi
Malay
Maltese
Burmese
Nauru
Nepali
Dutch
Norwegian
Oriya
Punjabi
Polish
Pashto; Pushto
Code
5256
5357
5449
5451
5457
5537
5540
5544
5545
5547
5548
5549
5550
5551
5553
5554
5557
5558
5559
5637
5641
5643
5644
5645
5647
5648
5651
5654
5656
5659
5747
5754
5762
5845
5851
5951
6044
6151
6244
6257
Language
Portuguese
Quechua
Rhaeto-Romance
Romanian
Russian
Sanskrit
Sindhi
Serbo-Croatian
Singhalese
Slovak
Slovenian
Samoan
Shona
Somali
Albanian
Serbian
Sundanese
Swedish
Swahili
Tamil
Telugu
Tajik
Thai
Tigrinya
Turkmen
Tagalog
Tonga
Turkish
Tatar
Twi
Ukrainian
Urdu
Uzbek
Vietnamese
Volapük
Wolof
Xhosa
Yoruba
Chinese
Zulu
50
ENGLISH
Page 53

GENERAL
CARE AND MAINTENANCE
Occasional care and maintenance of the unit and the software
are needed to optimize the performance of your unit.
THE UNIT
Shipping the unit
The original shipping carton and packing materials come in handy.
For maximum protection, re-pack the unit as it was originally
packed at the factory.
Where to set the unit
The picture and sound of a nearby TV, VCR or radio may be
distorted during DVD play . In this case , position the unit awa y from
the TV, radio or VCR, or turn off the unit after removing the disc.
Keeping the surface clean
Do not use volatile liquids, such as insecticide spray, near the
player. Do not leave rubber or plastic products in contact with the
unit for a long period of time. They will leav e marks on the surface.
To clean the cabinet
Use a soft, dry cloth. If the surfaces are e xtremely dirty , use a soft
cloth lightly moistened with a mild detergent solution. Do not use
strong solvents, such as alcohol, benzene or thinner, as these
might damage the surface of the unit.
DISCS
Handling discs
Do not touch the playback side of a disc.
Hold discs by the edges so that fingerprints will not get on the
surface.
Do not stick paper or tape on a disc.
Care of discs
• When a disc becomes dir ty, wipe the disc from the center out
with a cleaning cloth.
• Do not use strong solvents such as alcohol, benzene, thinner,
commercially available cleaners or anti-static spr ay intended f or
analog records.
• After playing a disc, store the disc in its case. Do not leave the
disc in places that are hot or humid.
DVD SETUP
CUSTOMIZING
GENERAL
To obtain a clear picture
This DVD stereo system is a high-tech, precision device. If the
optical pick-up lens and disc drive parts are dirty or worn down,
the picture quality will be poor. Regular inspection and maintenance
are recommended after every 1,000 hours of use. (This depends
on the operating environment.)
For details, please contact your AIWA dealer.
En
ENGLISH
51
Page 54

TROUBLESHOOTING
If the unit fails to perform as described in these Operating
Instructions, check the following guide.
GENERAL
There is no picture.
• Is the monitor turned on? (➞ page 9)
• When attempting to view the picture on an e xternal TV screen, is
the TV set correctly connected? (➞ page 38)
• Is the video input selection set correctly on the TV set?
There is no sound.
• Is the AC cord connected properly? (➞ page 6)
• Was an incorrect function button pressed? (➞ page 8)
• Is the volume set properly? Do you have headphones plugged
in?
• There will be no audio dur ing the following DVD play modes:
slow play, Frame Advance, fast forward and fast reverse.
The output sound is not stereo.
• Is the Karaoke function turned on? (➞ page 34)
An erroneous display or a malfunction occurs.
➞ Reset the unit as stated below.
The power is not turned on.
➞ Disconnect the AC cord, and connect it again in a few seconds.
The remote control does not work or works poorly.
• Are the remote control batteries installed correctly? (➞ page 8)
• Is the remote control too far from the main unit? Is there
something in the way?
• Are the remote control batteries getting weak?
• Is the main unit in sunlight or strong fluorescent light?
• Are you correctly holding down SHIFT when needed?
DISC PLAYER SECTION
The disc does not play or plays poorly.
• Is the disc correctly placed? (➞ pages 12, 18)
• Is your desired disc selected properly?
• Is the disc dirty? (➞ page 51)
• Is the lens affected by condensation?
➞ Wait aproximately one hour and try again.
• Are you trying to use a disc that cannot be played, such as a
CD-ROM? (➞ page 5)
• [DVD only] Does the disc exceed the specified rating level?
(➞ page 46)
• [DVD and VCD only] Is the disc recorded in the NTSC color
system?
➞ Use a NTSC color system disc. If a specific disc cannot be
played with the unit while other NTSC color system discs can
be played, the specific disc may not be recorded in the NTSC
standard.
• [DVD only] Is the unit connected through a video deck, through
a selector switch, or to a TV set with a built-in video deck?
➞ The picture may be bad when used with some television sets
or projectors, due to the DVD copy protection scheme.
The picture quality may also suffer if the unit is connected
through a selector switch with other video equipment. Try
turning off the power to the other video equipment.
➞ The picture quality may be somewhat poor when paused,
during Frame Advance, fast forward or fast reverse. This is
normal.
The DVD does not play according to your preferences.
• Check your set up. (➞ page 40)
• Many DVD features, such as the menu, subtitles, multi-audio,
multi-angle, rating functions, are dependent on the D VD software
itself. Check the instructions for your disc.
TUNER SECTION
There is constant, wave-like static.
• Is the antenna connected properly? (➞ page 6)
• Is the signal weak?
➞ Connect an outdoor antenna.
The reception contains noise interferences or the sound is
distorted.
• Is the system picking up external noise or multipath distortion?
➞ Change the orientation of the antenna.
➞ Move the unit away from other electrical appliances.
TO RESET THE UNIT
If an unusual condition occurs in the display window, reset the
unit as follows.
1 Press POWER to turn off the power.
2 Press POWER while pressing s. Ev erything stored in memory
after purchase is canceled.
If the power cannot be turned off in step 1 because of a malfunction,
reset by disconnecting the AC cord, and connect it again. Then
carry out step 2.
TO RESET THE SETUP MENU
If you forget your password for the DVD rating level setting, or if
you want to reset the setup menu settings to the def ault values for
any other reason, proceed as follows:
1 Press DVD/CD.
Wait until "READING" disappears.
2 Press ILLUMINATION while pressing DVD/CD until
"CLEAR" is displayed on the display.
3 Press POWER to turn off the power.
4 Press POWER again to turn the power back on.
52
ENGLISH
Page 55

SPECIFICATIONS
Main unit
FM tuner section
Tuning range 87.5 MHz to 108 MHz
Usable sensivity (IHF) 13.2 dBf
Antenna 75 ohms (unbalanced)
AM tuner section
Tuning range 530 kHz to 1710 kHz (10 kHz
step)
531 kHz to 1602 kHz (9 kHz step)
Usable sensitivity 350 µV/m
Antenna Loop antenna
Amplifier section
Power output 12 W + 12 W (65 Hz – 20 kHz,
THD 1%, 6 ohms)
15 W + 15 W (1 kHz, THD 10%,
6 ohms)
Total harmonic distortion 0.15 % (10 W , 1 kHz, 6 ohms, DIN
AUDIO)
Inputs VIDEO IN: 400 mV, adjustable
AUX IN: 400 mV, adjustable
MIC: 1.4 mV (47 k ohms)
Outputs PHONES (stereo jack): accepts
headphones of 32 ohms or more
DIGITAL OUT (OPTICAL):
Disc player section
Signal format NTSC
Supported discs DVD video discs
12 cm (single-sided single-layer,
single-sided double-layer , doublesided-double layer)
8 cm (single-sided single-layer,
single-sided double-layer , doublesided-double layer)
Compact discs (CD-DA, video
CD)
12 cm and 8 cm discs
S2 video output Y output: 1 Vp-p (75 ohms, sync
negative)
C output: 0.286 Vp-p
Video output Video composit output
1 Vp-p (75 ohms, sync negative)
One RCA jack
Operating conditions 5˚C to 35˚C (41˚F to 95˚F)
Speaker system
Cabinet type 2-way, bass reflex (magnetic
shielded type)
Speakers Woofer:
100 mm cone type
Tweeter
25 mm balanced dome type
Impedance 6 ohms
Output sound pressure level 87 dB/W/m
Dimensions 120 × 210 × 182 mm
(W × H × D) (4
Weight 1.7 kg (2 lbs 9 oz.)
Specifications and external appearance are subject to change
without notice.
The word "BBE" and the "BBE symbol" are trademarks of BBE
Sound, Inc.
Under license from BBE Sound, Inc.
3
/4 × 83/8 × 71/4 in.)
DOLBY PRO LOGIC
Manufactured under license from Dolby Laboratories Licensing
Corporation.
"DOLBY" and "PRO LOGIC" are trademarks of Dolby Laboratories
Licensing Corporation.
COPYRIGHT
Please check the laws on copyright relating to recordings from
discs, radios or external tapes for the country in which the machine
is being used.
• Manufactured under license from Dolby Laboratories. "Dolby",
"Pro Logic" and the double-D symbol are trademarks of Dolby
Laboratories. Confidential unpublished works. ©1992-1997
Dolby Laboratories. All rights reserved.
• Manufactured under license from Digital Theater Systems, Inc.
US Pat. No. 5,451,942 and other worldwide patents issued and
pending. "DTS" and "DTS Digital Surround" are trademarks of
Digital Theater Systems, Inc. ©1996 Digital Theater systems,
Inc. All rights reserved.
GENERAL
En
Monitor section
Display 5.8-inch Active Matrix TFT LCD
color display
General
Power requirements 120 V AC, 60 Hz
Power consumption 80 W
Dimensions 260 × 324 × 355 mm
(W × H × D) (10
Weight 9.8 kg (21 lbs 10 oz.)
1
/4 × 127/8 × 14 in.)
ENGLISH
53
Page 56

ESPAÑOL
ADVERTENCIA
PARA REDUCIR EL RIESGO DE INCENDIOS O
SACUDIDAS ELÉCTRICAS, NO EXPONGA ESTE
APARATO A LA LLUVIA NI A LA HUMED AD.
CAUTION
RISK OF ELECTRIC SHOCK
DO NOT OPEN
“PRECAUCION:PARA REDUCIR EL RIESGO
DE QUE SE PRODUZCAN SACUDIDAS
ELECTRICAS, NO QUITE LA CUBIERTA
(O PANEL POSTERIOR).
EN EL INTERIOR NO HAY PIEZAS QUE
DEBA REPARAR EL USUARIO.
SOLICITE LAS REPARACIONES AL
PERSONAL DE SERVICIO CAPACITADO.”
Explicación de los símbolos gráficos:
El símbolo del rayo con punta de flecha, en el
interior de un triángulo equilátero, tiene la
finalidad de avisar al usuario de la presencia
de "tensiones peligrosas" sin aislar en el
interior del producto que podrían ser de
suficiente magnitud como para constituir un
riesgo de sacudida eléctrica para las personas.
El signo de exclamación en el interior de un
triángulo equilátero tiene la finalidad de avisar
al usuario de la presencia de instrucciones de
operación y mantenimiento (reparación) en el
material impreso que acompaña al aparato.
PRECAUCIONES
Lea detenidamente este manual de instrucciones antes de utilizar
la unidad. Asegúrese de guardar el manual para futur as consultas.
T odas las adv ertencias y precauciones incluidas en el manual de
instrucciones y que haya impresas o estampadas en la unidad,
así como las sugerencias de seguridad que se ofrecen a
continuación, deben respetarse estrictamente.
Instalación
1 Agua y humedad - No utilice esta unidad cerca del agua, por
ejemplo, en las proximidades de una bañera, fregadero,
piscina, etc.
2 Calor - No utilice esta unidad cerca de fuentes de calor,
incluidas las salidas de aire caliente, estufas u otros aparatos
que generan calor. Tampoco debe utilizarse a temperaturas
inferiores a 5˚C o superiores a 35˚C.
3 Superficie de montaje - Coloque la unidad sobre una
superficie plana y nivelada.
4 Ventilación - La unidad debe situarse con suficiente espacio
a su alrededor para asegurar una correcta ventilación de calor .
Deje una separación de 10 cm desde las partes posterior y
superior de la unidad y de 5 cm desde cada lado.
- No sitúe la unidad sobre una cama, una alfombra o superficies
similares que podrán tapar las aberturas de ventilación.
- No instale la unidad en una librería, mueble o estantería
cerrada herméticamente donde la ventilación pueda ser
obstruida.
5 Entrada de objetos y líquidos - Tenga cuidado para que
objetos y líquidos no entren en la unidad por las aberturas de
ventilación.
6 Carros de mano y soportes - Cuando
ponga o monte la unidad en un soporte
o carrito de mano, ésta deberá moverse
con mucho cuidado.
Las paradas repentinas, la fuerza
excesiva y las superficies irregulares
pueden hacer que la unidad o el carrito
de mano vuelque o se caiga.
7 Condensación - En la lente de lectura del reproductor de
discos compactos tal vez se forme condensación cuando:
- La unidad se pase de un lugar frío a uno caliente
- El sistema de calefacción se acabe de encender
- La unidad se utilice en una habitación muy húmeda
- La unidad se enfríe mediante un acondicionador de aire
Cuando esta unidad tenga humedad en su interior, tal vez no
funcione con normalidad. En este caso, deje en reposo la
unidad durante unas pocas horas y repita de nuevo la
operación.
8 Montaje en pared o techo - La unidad no se deberá montar
en una pared ni en el techo, a menos que se especifique lo
contrario en el manual de instrucciones.
2
ESPAÑOL
Energía eléctrica
1 Fuentes de alimentación - Conecte esta unidad sólo a las
fuentes de alimentación especificadas en el manual de
instrucciones, y como está marcado en la unidad.
2 Polarización - Como medida de seguridad, algunas unidades
llevan enchufes polarizados de corriente alterna (CA) que sólo
pueden enchufarse en una toma de corriente en un sentido. Si
encuentra difícil o imposible enchufar el enchufe de corriente
alterna a la toma, dé la vuelta al enchufe e inténtelo de nuevo.
Si aún así le resulta difícil enchufarlo a la toma, póngase en
contacto con un técnico cualificado de servicio para que revise
o repare la toma. Para evitar ignorar la medida de seguridad
del enchufe polarizado, no lo fuerce para meterlo en la toma.
Page 57

3 Cable eléctrico de CA
- Cuando desconecte el cable eléctrico de CA, sujete el enchufe
de alimentación de CA y tire de él. No estire del propio cab le.
- Nunca maneje el enchufe de alimentación de CA con las
manos mojadas porque podría producirse un incendio o una
sacudida eléctrica.
- Los cables de alimentación deberían colocarse de modo que
no queden muy doblados, ni atrapados, ni nadie pueda
caminar sobre ellos. Preste una especial atención al cable
que va de la unidad a la toma de corriente.
- Evite sobrecargar las tomas de CA y los cables de extensión
más allá de su capacidad porque ello podría provocar un
incendio o una sacudida eléctrica.
4 Cables de extensión - Para evitar descargas eléctricas, no
utilice un enchufe de CA polarizado con un cable de extensión,
receptáculo u otro tipo de toma a menos que enchufe polarizado
pueda enchufarse totalmente para evitar que las clavijas del
enchufe queden expuestas.
5 Períodos de no utilización - Desenchufe el enchufe de
alimentación de CA de la toma de corriente de CA si la unidad
no va a ser utilizada durante varios meses o más. Cuando el
cable eléctrico esté conectado, continuará circulando por la
unidad una pequeña cantidad de corriente, pese a estar
apagada.
Antena exterior
1 Líneas de alimentación eléctrica - Al instalar una antena
exterior, tenga mucho cuidado para colocarla lejos de líneas
de alimentación eléctrica.
2 T oma a tierra de las antenas exteriores - Asegúrese de que
el sistema de la antena tiene una buena toma a tierra para
proteger contra picos de tensión inesperados o acumulación
de electricidad estática. La Sección 810 del Código Eléctrico
Nacional (NEC), ANSI/NFP A Nº 70, ofrece inf ormación relativa
a la correcta toma a tierra del mástil, estructura de soporte, la
toma a tierra del cable de entrada a una unidad de descarga
de la antena, así como del tamaño de la unidad de toma a
tierra, la conexión a las terminales de toma a tierra y los
requisitos de las terminales de toma a tierra.
Registro del propietario
Para su conveniencia, registre el número del modelo y apunte el
número de serie (los encontrará en la parte trasera de la unidad)
en la caja de abajo. Le rogamos que los tenga a mano siempre
que se ponga a en contacto con su vendedor de productos Aiwa
en caso de que tenga alguna dificultad.
Nº de modelo Nº de serie (Nº de lote)
XR-DV3MU
Precauciones a tomar con el monitor incorporado
• En general, todas las pantallas TFT tienden a sufrir quemaduras
(puntos negros * que aparecen de forma visible en las imágenes
brillantes) si se somete a la visualización de imágenes o
caracteres muy brillantes (de alta intensidad) durante largos
períodos de tiempo. Por ello, se recomienda no utilizar la unidad
a unos valores de brillo alto o con discos compactos que tengan
imágenes muy brillantes durante largos períodos de tiempo.
Hacerlo puede dañar al TFT. P or la misma razón, se recomienda
mantener la pantalla TFT apagada también al reproducir discos
compactos de audio durante largos períodos de tiempo.
* T al vez v ea aparecer algunos puntos brillantes u oscuros en la
pantalla del monitor. Esto es normal en la tecnología de
visualización de matriz activa y no es indicación de la existencia
de un mal funcionamiento o defecto.
• No pegue golpes ni raye la pantalla del monitor con puntas
afiladas.
E
Puesta a tierra de la antena según el Codigo Eléctrico Nacional
CABLE DE BAJADA
DE LA ANTENA
ABRAZADERA DE
PUESTA A TIERRA
EQUIPO DEL
SERVICIO
ELECTRICO
NEC(CODIGO ELECTRICO NACIONAL)
SISTEMA DE ELECTRODO DE PUESTA
A TIERRA DEL SERVICIO ELECTRICO
(NEC,ARTICULO 250,PARTE H)
UNIDAD DE DESCARGA
DE LA ANTENA
(NEC,SECCION 810-20)
CONDUCTORES DE
PUESTA A TIERRA
(NEC,SECCION 810-21)
ABRAZADERAS DE
PUESTA A TIERRA
Mantenimiento
Limpie la unidad sólo como se recomienda en el manual de
instrucciones
Daños que necesitan servicio
Solicite que un técnico en reparaciones cualificado le repare la
unidad si:
- El cable de alimentación de CA o su clavija está estropeado
- Objetos extraños o líquidos han entrado en la unidad
- La unidad ha estado expuesta a la lluvia o al agua
- La unidad no parece funcionar normalmente
- La unidad muestra un cambio considerable en sus prestaciones
- La unidad se ha caído o la caja se ha estropeado
NO TRATE DE REPARAR LA UNIDAD USTED MISMO.
NOTA
Este equipo se ha testado, comprobándose que cumple con
los límites de aparato digital de Clase B de acuerdo con la
Sección 15 de las Normas FCC. Estos límites se han
diseñado para suministrar un nivel de protección razonable
contra las interferencias dañinas en una instalación
residencial.
Este equipo genera, usa y puede radiar radiofrecuencias y,
si no se instala o se usa de acuerdo con las instrucciones,
puede causar interferencias perjudiciales a las
comunicaciones por radio. No obstante, no existe ninguna
garantía de que no existan interferencias en una instalación
particular. Si este equipo causa interferencias perjudiciales
a la recepción de señales de radio o de televisión, lo cual
puede determinarse encendiendo y apagando el aparato,
recomendamos al usuario que intente corregir la interferencia
llevando a cabo una de las siguientes medidas:
- Reoriente o recoloque la antena receptora.
- Aumente la separación entre el equipo y el receptor.
- Conecte el equipo a una toma de corriente en un circuito
diferente al que está conectado el receptor.
- Consulte a su vendedor o a un técnico experimentado en
instalaciones de radio/televisión.
PRECAUCIÓN
Las modificaciones o ajustes que se realicen a este producto
y que no estén aprobados expresamente por el fabricante
pueden invalidar el derecho o autoridad del usuario de operar
este producto.
ESPAÑOL
3
Page 58

ÍNDICE
PREPARATIVOS
CARACTERÍSTICAS ........................................................... 5
ANTES DEL USO ................................................................5
CONEXIONES .....................................................................6
MANDO A DISTANCIA ........................................................8
ANTES DE LA OPERACIÓN...............................................8
CÓMO USAR EL MONITOR ...............................................9
CÓMO USAR LA TECLA CURSOR ................................... 9
OSCURECIMIENTO DEL BRILLO DE LA PANTALLA
(DIMMER) .....................................................................10
MODO DE AHORRO DE ENERGÍA..................................10
SONIDO
AJUSTES DE AUDIO ........................................................11
OPERACIONES DE AUDIO CD
OPERACIONES BÁSICAS................................................12
SELECCIÓN DE UNA PISTA ............................................13
REPRODUCCIÓN ALEATORIA/REPETIDA .....................14
REPRODUCCIÓN PROGRAMADA ..................................15
CÓMO CAMBIAR LA INFORMACIÓN DE
LA PANTALLA..............................................................16
OPERACIONES CON DVD/VCD
OPERACIONES BÁSICAS................................................18
SELECCIÓN DE UNA PISTA ............................................19
AVANCE DE FOTOGRAMAS Y REPRODUCCIÓN A
CÁMARA LENTA .........................................................21
REPRODUCCIÓN ALEATORIA/REPETIDA .....................21
REPRODUCCIÓN PROGRAMADA (SÓLO VCD) ............24
CÓMO CAMBIAR LA INFORMACIÓN DE
LA PANTALLA..............................................................25
AJUSTES A LA IMAGEN DEL MONITOR ........................27
MARCAS Y BÚSQUEDA ...................................................28
FUNCIONES ESPECIALES DE UN DVD..........................30
RECEPCIÓN DE LA RADIO
SINTONIZA CIÓN MANUAL ...............................................32
PRESINTONIZACIÓN DE EMISORAS..............................33
KARAOKE
MEZCLA MICROFÓNICA..................................................34
FUNCIONES DE DESVANECIMIENTO DE VOZ/
MULTIPLEX ..................................................................34
FUNCIÓN DE CONTROL CON TECLA.............................35
CÓMO USAR DISCOS DVD DE KARAOKE.....................35
RELOJ Y TEMPORIZADOR
AJUSTE DEL RELOJ ........................................................36
AJUSTE DEL TEMPORIZADOR DE APAGADO ..............36
AJUSTE DEL TEMPORIZADOR .......................................37
OTRAS CONEXIONES
CONEXIÓN DE UN EQUIPO OPCIONAL .........................38
AUDICIÓN DE FUENTES DE SONIDO EXTERNAS ........39
VISUALIZACIÓN DE IMÁGENES PROVENIENTES
DE UNA FUENTE EXTERNA.......................................39
CÓMO PERSONALIZAR LA CONFIGURACIÓN DEL
DVD
MENÚ DE CONFIGURACIÓN: GENERALIDADES ..........40
OPERACIONES BÁSICAS................................................40
MENÚ EN PANTALLA.......................................................41
IDIOMAS DE LOS DISCOS...............................................42
CONFIGURACIÓN DE LA SALIDA DE AUDIO ................43
ASPECTO DE LA IMAGEN EN EL TELEVISOR ..............45
LÍMITE DE TOLERANCIA DE VISIONADO
A MENORES ................................................................46
CONTROL DE LA REPRODUCCIÓN ...............................47
REANUDACIÓN DE LA REPRODUCCIÓN
DE DISCOS ..................................................................47
CÓDIGOS DE PAÍSES ......................................................48
CÓDIGOS DE IDIOMA ......................................................50
GENERALIDADES
CUIDADOS Y MANTENIMIENTO ......................................51
SOLUCIÓN DE PEQUEÑOS PROBLEMAS .....................52
ESPECIFICACIONES ........................................................53
INDICE DE LAS PARTES.............................Contraportada
4
ESPAÑOL
Page 59

PREPARATIVOS
CARACTERÍSTICAS
Seleccione solamente D VDs y discos compactos de vídeo grabados
con el sistema de color NTSC.
Gracias por haber adquirido este sistema estéreo DVD/CD de Aiw a.
Su XR-DV3M puede reproducir DVDs (discos de vídeo digital),
VCDs (discos compactos de vídeo), discos compactos de audio,
así como programas de radio.
❏ DVD proporciona una dimensión completamente nueva
en entretenimiento de vídeo.
• Con la función multi-idioma* es posible seleccionar una pista
de sonido de audio en un máximo de 8 idiomas, y subtítulos en
un máximo de 32 idiomas.
• Con la función multi-ángulo* es posible seleccionar el ángulo
de visualización que desee de las escenas que haya grabadas
en el disco y que estén filmadas desde distintos ángulos.
• Con la función de bloqueo paterno*, es posible impedir la
reproducción de determinados discos inadecuados para ciertos
espectadores.
* Todas estas funciones dependen del software que se utilice en
el DVD.
• El sonido lineal PCM de 96 kHz/24 bits proporciona una calidad
de audio superior a la de los discos compactos de audio.
❏ DOLBY PRO LOGIC
Esta unidad lleva incorporadas tomas de salida que pueden
conectarse a un decodificador Dolby Digital, a un amplificador digital
con decodificador Dolby Digital incorporado, o a un amplificador
digital con un decodificador DTS incorporado, permitiéndole disfrutar
así de un sonido de cine en casa sorprendentemente realista cuando
reproduzca software de vídeo grabado en discos con Dolby Digital
Surround o con codificación DTS.
ANTES DEL USO
Lea lo siguiente antes de emplear esta unidad.
FUNCIONES DEPENDIENTES DEL
SOFTWARE DE LOS DVDs Y VCDs
Es posible que ciertas operaciones de reproducción de los DVDs y
discos compactos de vídeo puedan haber sido determinadas a
propósito por los fabricantes del software. Como esta unidad
reproduce DVDs y discos compactos de vídeo según el contenido
del disco diseñado por el fabricante del software, algunas funciones
de reproducción de esta unidad tal vez no se encuentren
disponibles, mientras que, por otra parte, tal vez se hayan añadido
algunas funciones.
Consulte las instrucciones suministradas con los DVDs y discos
compactos de vídeo.
Es posible que ciertos DVDs fabricados con finalidades de uso
comercial no puedan reproducirse en esta unidad.
CÓDIGO DE REGIÓN DEL
REPRODUCTOR DE DISCOS Y DE LOS
DVDs
El reproductor DVD de esta unidad está diseñado y fabricado para
la reproducción de software DVD codificado con código de región
"1". Las etiquetas del código de región aparecen en las etiquetas
de algunos discos DVD para indicar qué tipo de reproductor puede
reproducir esos discos. En esta unidad no podrán reproducirse
discos que no tengan "1" o "ALL" en su etiqueta. Si usted intenta
reproducir un disco sin esas marcas, verá aparecer en la pantalla
el mensaje "REGIONAL CODE VIOLATION".
Es posible que algunos discos DVD no presenten ninguna etiqueta
de código de región, aunque su reproducción esté prohibida por
límites de zona.
PREPARATIVOS
FORMATOS DE DISCOS COMPATIBLES
Esta unidad sólo puede reproducir.
DVDs
(discos de 8 cm/discos de 12 cm)
Discos compactos de vídeo (VCDs)
(discos de 8 cm/discos de 12 cm)
Discos compactos de audio
(discos de 8 cm/discos de 12 cm)
• Esta unidad no puede reproducir otros tipos de discos tales como
CD-Is, CD-ROMs, PHO TO CDs o discos re vestidos de aluminio .
• No use discos que tengan una forma irregular, como por ejemplo
con forma romboidal u octogonal. Éstos pueden estropear la
unidad y dañarse ellos mismos.
• Para los tipos de discos compactos de vídeo que pueden
emplearse, consulte la página "TIPOS DE DISCOS
COMPACTOS DE VIDEO" en la página 17.
SISTEMA DE COLOR PARA DVDs Y VCDs
Esta unidad está diseñada solamente para los sistemas
de color NTSC.
Los discos DVD y discos compactos de vídeo están grabados con
el sistema de color PAL o NTSC.
NOTA SOBRE LA REPRODUCCIÓN DE
DISCOS CODIFICADOS CON DTS
Para disfrutar de la reproducción DTS Digital Surround™, deberá
conectarse un sistema decodificador externo DTS Digital
Surround™ de 5,1 canales a la salida digital de esta unidad.
Cuando se reproduzcan discos compactos de audio que estén
codificados con DTS, los altavoces conectados a la unidad
producirán un nivel ruido excesivo. Para evitar posibles daños al
sistema de audio, el usuario debería bajar el volumen antes de
reproducir esos discos, ajustarlo gradualmente y mantenerlo a un
nivel bajo.
PROTECCIÓN DE LOS DERECHOS DE
AUTOR (COPYRIGHT)
La ley prohibe la copia, la transmisión, la exhibición, la tr ansmisión
por cable, la reproducción en público y el alquiler de material con
copyright sin permiso del autor.
Esta unidad dispone de la función de protección contra copia
desarrollada por Macrovision. Algunos discos DVD y VCD disponen
de señales de protección contra copia. Si usted graba esos discos
en una vídeograbadora, aparecerán distorsiones de imagen durante
la grabación y la reproducción.
Este producto incorpora tecnología de protección del copyright que
está protegida por ciertas patentes de los EE.UU. y otros derechos
de la propiedad intelectual de Macrovision Corporation y otros
propietarios de derechos. El empleo de esta tecnología de
protección del copyright debe contar con la autorización de
Macrovision Corporation, y es únicamente para uso doméstico y
otros usos limitados excepto cuando Macrovision Corporation
autorice lo contrario. La ingeniería inversa o el desmontaje están
prohibidos.
E
ESPAÑOL
5
Page 60

CONEXIONES
Verifique sus accesorios
Mando a distancia Antena de cuadro AM Antena de FM
Manual de instrucciones, etc.
Antes de conectar el cable de alimentación de CA
La tensión nominal de su unidad, mostrada en el panel trasero,
es de 120 V CA. Asegúrese de que la tensión nominal coincida
con la tensión empleada en su localidad.
1
Conecte los cables de los altavoces a los
altavoces.
Conecte los cables que tienen las bandas blancas a las
terminales ) y los otros cables a las terminales (.
2
Conecte los cables de los altavoces a la unidad
principal.
Los cables que tienen las bandas blancas deberían conectarse
a las terminales 0 y los otros cables a las terminales 9.
IMPORTANTE
• Conecte primero los altavoces, las antenas y todos los demás
equipos opcionales. Finalmente, conecte el cable de CA.
• No hay diferencias entre las dos unidades de altavoces. Ambos
pueden conectarse como L (izquierdo) o R (derecho).
3
Conecte las antenas que se suministran.
Conecte la antena FM a las terminales FM 75 Ω y la antena
AM a los terminales AM LOOP.
Antena de FM
Antena
de AM
6
ESPAÑOL
Page 61
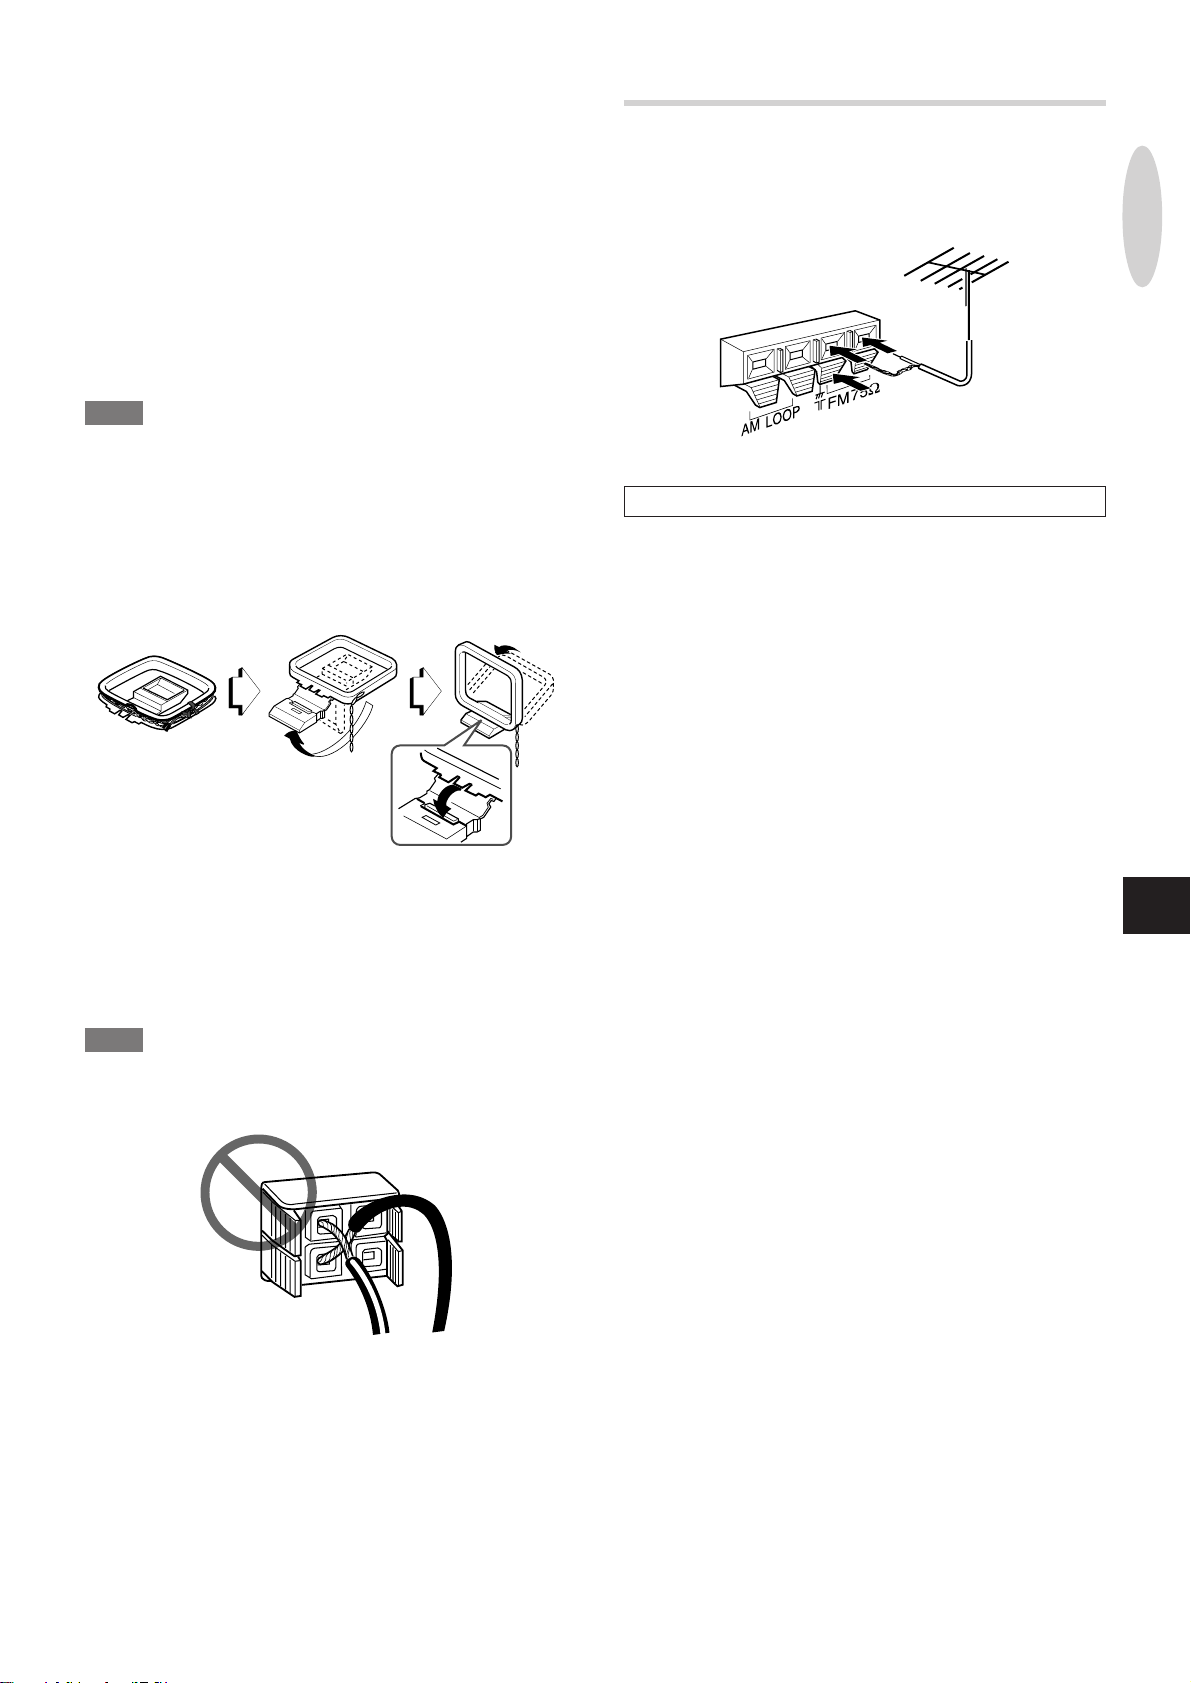
4
Conecte el cable de CA a una toma de corriente
CA.
CONEXIÓN DE UNA ANTENA EXTERIOR
Pantalla de demostración
Cuando el cable de alimentación se enchufe a una toma de
alimentación de CA por primera vez después de la adquisición de
la unidad, verá aparecer una pantalla de demostración en la
ventana de visualización. Cuando se encienda la unidad, la
pantalla de demostración terminará. Cuando se apague la unidad,
la pantalla de demostración aparecerá de nuevo.
La pantalla de demostración aparecerá siempre que se apague
la unidad hasta que se ajuste el reloj. (Consulte la página 36 si
necesita más información sobre cómo ajustar el reloj.)
NOTA
• Para conectar un aparato de televisión externo, consulte la
página 38.
• Si desea ver la pantalla de demostración después de haber
ajustado el reloj, pulse DEMO/ECO mientras la unidad está
apagada. Para hacer que termine la pantalla de demostración,
pulse DEMO/ECO de nuevo.
Cómo colocar la antena AM sobre una superficie
Fije el gancho a la ranura.
Para obtener la mejor recepción de FM se recomienda utilizar
una antena exterior.
Conecte la antena exterior a las terminales FM 75 Ω.
PREPARATIVOS
Para conectar otro equipo opcional ➞ página 38.
Cómo posicionar las antenas
Antena de alimentación de la señal de FM:
Extienda horizontalmente esta antena formando una T y fije sus
extremos a la pared.
Antena de cuadro AM:
Colóquela para encontrar la mejor dirección.
NOTA
• Asegúrese de conectar correctamente los cables de los
altavoces. Las conexiones mal hechas podrían causar
cortocircuitos en las terminales SPEAKERS.
• No conecte ningún altavoz a la unidad excepto los que se
suministran.
• No deje objetos que generen magnetismo cerca de los altavoces,
ya que puede dañar los objetos.
• No acerque la antena FM a objetos metálicos ni a raíles de
cortinas.
• No acerque la antena de cuadro AM a otros equipos opcionales,
al sistema estéreo en sí, al cable de CA o a los cables de los
altavoces porque se escucharán ruidos.
• No desenrolle el cable de la antena de cuadro AM.
E
ESPAÑOL
7
Page 62

MANDO A DISTANCIA
Cómo insertar las baterías
Abra la tapa de la parte trasera del mando a distancia y coloque
dos baterías R6 (tamaño AA).
R6 (tamaño AA)
Cuándo reemplazar las baterías
La distancia máxima de operación entre el mando a distancia y el
sensor de la unidad principal deberá ser de aproximadamente 5
metros. Cuando disminuy a esta distancia, reemplace las baterías
por otras nuevas.
ANTES DE LA OPERACIÓN
zOPEN/
CLOSE
ILLUMINA TION
POWER
TUNER/BAND,
VIDEO, AUX,
DVD/CD
PHONES
AUDIO IN,
VIDEO IN
FUNCTION
POWER
Utilización del mando a distancia
Algunas operaciones pueden realizarse utilizando solamente los
botones del mando a distancia o los de la unidad principal,
mientras que otras funciones pueden llevarse a cabo haciendo
uso de los botones de la unidad principal o los del mando a
distancia. Este manual de instrucciones describe los botones de
los que dispone para cada operación.
c/d en el mando a distancia
La función es la misma que la de c de la unidad principal.
Uso de la tecla SHIFT
Para usar los botones del 6 al 0, +10 y C, además de los botones
PBC, MONO TUNER, BAND, KARAOKE, TIMER, SLEEP y
CLOCK pulse el botón mientras pulsa la tecla SHIFT.
Además, para usar los botones i/k como botones MONITOR
ANGLE, pulse le botón mientras pulsa la tecla SHIFT.
6-0,+10,C
SHIFT
NOTA
• Si no va a utilizarse la unidad durante un largo período de tiempo,
saque las baterías para evitar posibles escapes de electrólito.
• El mando a distancia puede no funcionar correctamente cuando:
- La línea de visión entre el mando a distancia y el sensor remoto
(situado en el interior de la ventana de visualización) sea
expuesta a una luz intensa, como por ejemplo, la luz solar
directa
- Se utilicen otros mandos a distancia cerca (los de un televisor,
etc.)
i/k
CÓMO ENCENDER LA UNIDAD
Pulse uno de los botones siguientes:
POWER en la unidad principal o en el mando a distancia.
TUNER/BAND:
La unidad se enciende, sintonizándose la emisora de radio
anteriormente recibida.
DVD/CD:
La unidad se enciende, comenzando a reproducirse el disco que
haya cargado (CD, DVD* o VCD).
* Si "Disc Resume" en el menú de configuración está puesto en
ON (consulte "REANUDACIÓN DE LA REPRODUCCIÓN DE
DISCOS" en la página 47) y se apaga la unidad mientras
"RESUME" aparece en pantalla, el DVD no comenzará la
reproducción.
zOPEN/CLOSE:
La unidad se enciende y la puerta del disco se abre.
Si pulsa VIDEO o AUX, la unidad también se encenderá.
Cómo apagar la unidad
Pulse POWER.
SELECCIÓN DE UNA FUNCIÓN
Esta unidad está equipada con un reproductor de discos (para
reproducir DVDs, discos compactos y VCDs), y una radio como
fuentes de sonido internas. Además, esta unidad puede reproducir
la entrada de un equipo externo conectado a través de las tomas
AUDIO IN y VIDEO IN situadas en la parte delantera de la unidad
y las tomas AUX IN situadas en la parte trasera de la unidad.
Para reproducir la fuente de sonido deseada, tendrá que
seleccionarla primero como función activa.
Cómo seleccionar una función
Pulse el botón de función apropiado en la unidad principal
(TUNER/BAND, VIDEO, AUX o DVD/CD) o pulse FUNCTION
repetidamente en el mando a distancia.
NOTA
Cuando cambie de la función DVD/CD a la función TUNER, el
sonido puede tardar unos 10 segundos en llegar al sintonizador.
8
ESPAÑOL
Page 63

CÓMO ENCENDER/APAGAR LA
MONITOR
ON/OFF
MONITOR
OPEN/CLOSE
ILUMINACIÓN
Esta unidad tiene luces de iluminación situadas alrededor de los
botones de función y el control VOLUME.
Estas luces de iluminación pueden encenderse en tres colores
distintos.
CÓMO ABRIR EL MONITOR
Pulse MONITOR OPEN/CLOSE.
Alternativamente, pulse i mientras pulsa la tecla SHIFT del
mando a distancia.
Con la unidad encendida, pulse ILLUMINATION
repetidamente.
Esto hará que se encienda/apague la iluminación y que cambie
su color siguiendo este orden:
Iluminación que rodea el botón de función seleccionado
en este momento
1 Se enciende en azul
2 Se enciende en naranja
3 Se enciende en púrpura
4 Se apaga
La iluminación que rodea a los otros botones de función
y al control VOLUME
1 Se enciende en naranja
2 Se enciende en púrpura
3 Se enciende en azul
4 Se apaga
NOTA
No se pueden encender/apagar las luces de iluminación durante
la pantalla de demostración o cuando el brillo de la pantalla esté
ajustado en "DIMMER 3" (página 10).
CÓMO USAR LOS AURICULARES
PREPARATIVOS
Para cerrar el monitor , pulse MONIT OR OPEN/CLOSE de nuev o.
CÓMO CAMBIAR EL ÁNGULO DEL
MONITOR
Pulse i o k mientras pulsa la tecla SHIFT del mando a distancia
para cambiar el ángulo del monitor y obtener así el mejor ángulo
de visionado.
CÓMO ENCENDER/APAGAR EL MONITOR
Pulse MONITOR ON/OFF para encender o apagar el monitor.
• El monitor se apaga automáticamente cuando se pulsa TUNER/
BAND o AUX.
Conecte los auriculares con un miniconector estéreo (ø3,5 mm)
a la toma PHONES.
No oirá ningún sonido de los altavoces mientras los auriculares
estén conectados.
CÓMO USAR EL MONITOR
Esta unidad lleva incorporado un monitor . Este monitor le permite
visionar imágenes de DVDs y de VCDs sin tener que conectar un
aparato de televisión externo a la unidad.
i/k
SHIFT
MONITOR
OPEN/CLOSE
CÓMO USAR LA TECLA
E
CURSOR
CURSOR
Para usar la tecla CURSOR como botón ENTER, púlselo así:
Para usarlo como cursor (i/k/j/l), mueva el botón central en
la dirección deseada.
ESPAÑOL
9
Page 64

ENTER
i/k
DEMO/ECO
CURSOR
ENTER
OSCURECIMIENTO DEL BRILLO
DE LA PANTALLA (DIMMER)
El brillo de la ventana de visualización puede ajustarse en los
cuatro niveles siguientes: "DIM-OFF", "DIMMER 1", "DIMMER 2"
y "DIMMER 3".
"DIM-OFF" es el nivel más brillante.
Cuando se seleccione "DIMMER 3", la pantalla estará en su nivel
más oscuro y las luces de iluminación que rodean a los botones
de función y al control VOLUME también se apagarán.
1
Con la unidad encendida, pulse DEMO/ECO dos
veces.
Verá aparecer "DIM MODE" en pantalla.
2
Antes de que pasen 4 segundos, pulse ENTER.
Aparecerá en pantalla el brillo seleccionado en este momento.
Ejemplo: Al seleccionar "DIM-OFF" verá
MODO DE AHORRO DE ENERGÍA
Poner esta unidad en modo de ahorro de energía reducirá el
consumo energético.
Cuando el modo de ahorro de energía esté en ON o en
AUTO
• Cuando la unidad se apague, todas las indicaciones de la
ventana de visualización se apagarán, incluyendo la del reloj.
• La ventana de visualización sólo se abrillantará cuando esté
poniendo la unidad en funcionamiento. Cuando no se opere
ninguna función de la unidad durante 10 segundos, el nivel de
brillo cambiará al nivel escogido por la configuración "DIM
MODE". (Si el nivel de brillo está configurado a "DIM-OFF", el
brillo no cambiará.)
Cuando el modo de ahorro de energía está configurado
en AUTO
Además de lo anteriormente mencionado:
• Si se detiene el disco compacto y no hay entrada de audio de
ningún equipo externo conectado durante 10 minutos, la unidad
se apagará. (Durante la recepción de la radio, sin embargo, la
unidad no se apaga automáticamente.)
1
Con la unidad encendida, pulse DEMO/ECO.
Verá aparecer "ECO MODE" en pantalla.
2
Antes de que pasen 4 segundos, pulse ENTER.
Aparecerá en pantalla el estado actual del modo de ahorro de
energía.
Si el modo de ahorro de energía está configurado en OFF:
ECO OFF
Si el modo de ahorro de energía está configurado en ON: ECO
ON
Si el modo de ahorro de energía está configurado en AUTO:
ECO AUTO
3
Antes de que pasen 4 segundos, m ueva CURSOR
i o k repetidamente para seleccionar el brillo
que desee.
Alternativamente, pulse i o k en el mando a distancia.
Ejemplo: Al seleccionar "AUTO" verá
3
Antes de que pasen 4 segundos, m ueva CURSOR
i o k repetidamente para seleccionar el brillo
que desee.
Alternativamente, pulse i o k en el mando a distancia.
4
Antes de que pasen 4 segundos, pulse ENTER.
10
ESPAÑOL
4
Antes de que pasen 4 segundos, pulse ENTER.
Consumo energético en modo de standby
Si el modo de ahorro de energía está configurado en OFF: 20 W
Si el modo de ahorro de energía está configurado en ON o AUT O:
2,0 W
Page 65

SONIDO
AJUSTES DE AUDIO
Q SURROUND
Q SURROUND
VOLUME
ENTER
MODE
CURSOR
VOLUMEN
Gire VOLUME en la unidad principal o pulse VOL N/M en
el mando a distancia.
El nivel de volumen aparece en pantalla en forma de número que
va del 0 al 49, seguido de MAX.
Si se apaga la unidad mientras el nivel del volumen está a un
nivel de 21 o más, se ajustará automáticamente a 20 cuando
vuelva a encenderse la unidad.
VOLN/M
CÓMO REALZAR LOS AGUDOS
El sistema BBE realza la claridad del sonido de altas frecuencias.
1 Pulse MODE repetidamente hasta que "BBE" aparezca en
pantalla.
Alternativamente, pulse MODE una vez y mueva el CURSOR
j o l hasta seleccionar "BBE".
2 Antes de que pasen 6 segundos, m uev a CURSOR i o k.
Puede seleccionar uno de los tres niveles o la posición de
apagado.
El nivel BBE no cambia cíclicamente.
(OFF)
SISTEMA Q SURROUND
El sistema Q surround que lleva incorporado esta unidad utiliza
sólo dos altavoces a la derecha y a la izquierda para crear una
atmósfera que suena como si estuviese rodeado por dos altavoces
delanteros y dos traseros.
Pulse Q SURROUND para activar o desactivar el sistema Q
surround.
Ejemplo: Cuando el sistema Q surround esté activado verá
PREPARATIVOSSONIDO
SISTEMA SUPER T-BASS
El sistema T-BASS realza el realismo del sonido de frecuencias
bajas.
1 Pulse MODE una vez para que "T-BASS" aparezca en
pantalla.
2 Antes de que pasen 6 segundos, mueva CURSOR i o k.
Puede seleccionar uno de los tres niveles o la posición de
apagado.
El nivel T-BASS no cambia cíclicamente.
(OFF)
NOTA
El sonido de baja frecuencia puede distorsionarse cuando se utilice
el sistema T-BASS con un disco cuyo sonido haya sido realzado
originalmente. En este caso, cancele el sistema T-BASS.
NOTA
• El sistema Q SURROUND no funciona en modo monofónico.
• En volúmenes más altos, activar Q SURROUND puede causar
distorsiones de sonido. En estos casos, baje el volumen o
desactive el sistema Q SURROUND.
ECUALIZADOR GRÁFICO
Esta unidad cuenta con las tres siguientes curvas de ecualización.
ROCK: Sonidos potentes con realce de agudos y graves
POP: Mayor presencia de voces y gamas de registro medio
JAZZ: Frecuencias bajas acentuadas para música tipo jazz
1 Pulse MODE repetidamente hasta que "EQ OFF" o el modo
seleccionado actualmente aparezca en pantalla.
Alternativamente, pulse MODE una vez y mueva CURSOR j
o l hasta que "EQ OFF" o el modo seleccionado en ese
momento aparezcan en pantalla.
2 Antes de que pasen 6 segundos, mueva CURSOR i o k
para seleccionar la curva de ecualización deseada.
Ejemplo: Cuando se seleccione "ROCK" verá
E
Cómo cancelar el modo de ecualización
Repita las instrucciones anteriores y seleccione "EQ OFF".
ESPAÑOL
11
Page 66

OPERACIONES
DE AUDIO CD
OPERACIONES BÁSICAS
Para conocer los formatos de los discos compatibles con esta
unidad, consulte la página 5.
zOPEN/
CLOSE
MONITOR
OPEN/CLOSE
DVD/CD
c
s
a
CÓMO CARGAR UN DISCO
1
Pulse DVD/CD.
2
Si el monitor está cerrado, pulse MONIT OR OPEN/
CLOSE para abrirlo.
3
Pulse z OPEN/CLOSE para abrir el
compartimento del disco.
4
Cargue un disco con el lado de la etiqueta hacia
arriba.
c/d
s
a
NOTA
• No ponga más de un disco compacto en una bandeja del disco.
• No use discos compactos que tengan una forma irregular, (por
ejemplo romboidales u octogonales). Pueden ocasionar un mal
funcionamiento.
• No toque la lente óptica de lectura . Si se ensucia, posiblemente
no pueda reproducirse un disco compacto con normalidad.
REPRODUCCIÓN DE UN DISCO
1
Cargue el disco.
2
Pulse c.
La reproducción comienza por la primera pista.
Número de la pista
en reproducción
Tiempo de reproducción
transcurrido
INFORMACIÓN MOSTRADA EN LA
PANTALLA DEL MONITOR
En la esquina superior derecha de la pantalla del monitor se
muestran varias visualizaciones de guía de la operación del disco
compacto actual.
Además, puede activar la información del estado de la
reproducción de la parte izquierda de la pantalla del monitor.
10
TRACK
0 : 26 : 03
STEREO
OFF
Visualización
de guía
5
Pulse z OPEN/CLOSE para cerrar el
compartimento del disco.
Cuando se cargue un disco compacto de audio, verá aparecer
una visualización en pantalla como la siguiente:
Calendario musical (sólo se
Se ilumina
Número total de pistas Tiempo total de reproducción
Además, si se enciende el monitor, "CD PLAYER MODE"
aparecerá en pantalla del monitor.
Para cerrar tanto la puerta del disco como la del monitor, pulse
MONITOR OPEN/CLOSE en lugar de zOPEN/CLOSE.
visualizan las primeras 20 pistas)
Información del estado de la reproducción
• Para visualizar las pantallas de guía, asegúrese de que tiene
"Guide Message ON" en el menú de configuración (consulte
"MENSAJES GUÍA", página 41).
• Para activar la información del estado de la reproducción, use
ON SCREEN DISPLAY en el mando a distancia (si necesita
más detalles, consulte "CÓMO VISUALIZAR EL ESTADO DE
LA REPRODUCCIÓN EN LA PANT ALLA DEL MONITOR" en la
página 16).
12
ESPAÑOL
Page 67

r,t
r,t
c
c/d
0-9,+10
P ARADA Y PAUSA
Cómo detener la reproducción
Pulse s.
La reproducción se detiene. La unidad recuerda el punto en el
que se detuvo la reproducción.
("RESUME" aparece en la pantalla.)
SELECCIÓN DE UNA PISTA
Cómo reanudar la reproducción desde el punto donde se
detuvo
Pulse c.
Cómo borrar el punto de reanudación
Pulse de nuevo s en modo de parada.
"RESUME" desaparecerá de la pantalla. La memoria del punto
de reanudación se borrará, y la reproducción se iniciará por la
primera pista cuando se pulse c la siguiente vez.
NOTA
• Cuando se usan los valores por defecto, el punto de reanudación
también se borra cuando se abre el compartimento del disco,
se apaga la unidad o se cambia de función.
• La configuración puede cambiarse para que la memoria del punto
de reanudación se mantenga incluso después de producirse
las condiciones descritas anteriormente. (Consulte
"REANUDACIÓN DE LA REPRODUCCIÓN DE DISCOS" en la
página 47).
Cómo realizar una pausa
Pulse a.
Para proseguir con la reproducción, pulse c.
MARCAS Y BÚSQUEDA
Marcas
Puede marcar cualquier punto de un disco compacto e iniciar la
reproducción desde ahí.
Si desea más detalles, consulte "MARCAS" en la página 28.
Búsqueda
Puede localizar un punto concreto en un disco compacto utilizando
la función de búsqueda con tiempo, por ejemplo especificando el
tiempo que transcurre desde el inicio del disco compacto.
Si desea más detalles, consulte "BÚSQUEDA POR TIEMPO" en
la página 29.
SELECCIÓN DIRECTA DE UNA PISTA
CON EL MANDO A DISTANCIA
AIntroduciendo el número de la pista en el mando a distancia se
puede seleccionar directamente una pista, bien durante el modo
de reproducción o de pausa.
Pulse los botones numerados de la pista deseada.
Ejemplo:
Para reproducir la pista nº 12, pulse +10, 2.
Para reproducir la pista nº 20, pulse +10, +10, 0.
La reproducción comienza desde el principio de la pista
seleccionada y continúa hasta el final del disco.
REPRODUCCIÓN EN AVANCE/
RETROCESO RÁPIDO
Mantenga pulsados r o t durante la
reproducción o en modo de pausa hasta que vea
aparecer una guía de visualización como "gx 5".
El disco se reproducirá 5 veces más rápido de lo normal.
Para regresar a la reproducción normal, pulse c.
DE AUDIO CD
OPERACIONES
E
EXTRACCIÓN DE DISCOS
Detenga la reproducción y pulse zOPEN/CLOSE.
El compartimento del disco se abre para poder extraer el disco
que hay cargado.
Una vez que haya extraído el disco, pulse zOPEN/CLOSE de
nuevo para cerrar el compartimento del disco.
Cómo cambiar a la velocidad de reproducción normal
Durante la reproducción rápida hacia adelante/rebobinado,
mantenga pulsados r o t asta que la guía de visualización
aparezca.
Esta operación cambia la velocidad de reproducción entre 5 y 16
veces.
SAL T O
Pulse r o t.
Con cada pulsación del botón t, la posición del disco salta a
la pista siguiente.
Cuando se pulse r una vez, la posición del disco regresará al
principio de la pista actual.
Cuando se pulse r dos veces o más, la posición del disco
regresará a la o las pistas anteriores.
ESPAÑOL
13
Page 68

TRACK
A-B
REPRODUCCIÓN ALEATORIA/
REPETIDA
A-B REPEAT
REPEAT
PRGM/
RANDOM
c/d
c
REPRODUCCIÓN REPETIDA
Pueden reproducirse repetidamente una o todas las pistas.
Pulse repetidamente REPEAT en el mando a
distancia para que "p" o "p1" aparezcan en
pantalla.
Para repetir solamente la pista actual, seleccione "p1".
(Verá aparecer "TRACK" en la pantalla del monitor.)
Para repetir todas las pistas, seleccione "p".
(Verá aparecer "ALL" en la pantalla del monitor.)
Pantalla del monitor:
Pantalla de visualización:
Cómo cancelar la reproducción repetida
Pulse repetidamente REPEAT en el mando a distancia para
desactivar "p1".
REPRODUCCIÓN ALEATORIA
Puede reproducir aleatoriamente todas las pistas del disco.
1
Pulse repetidamente PRGM/RANDOM en el
mando a distancia para que "RANDOM" aparezca
en pantalla.
Pantalla del monitor:
RANDOM
2
Pulse c para iniciar la reproducción.
Se reproducirán de modo aleatorio las pistas del disco.
Cómo cancelar la reproducción aleatoria
Pulse repetidamente PRGM/RANDOM en el mando a distancia
de manera que "RANDOM" desaparezca de la pantalla de
visualización y reaparezca la pantalla normal.
NOTA
• No puede saltarse una pista anteriormente reproducida aunque
se pulse r. La unidad sólo regresa al pr incipio de la pista
actual.
• La selección directa de pistas con los botones numerados no
es posible durante el modo de reproducción aleatorio.
Pantalla de visualización:
Cómo repetir la reproducción de la o las pistas
seleccionadas de un disco
Programe la o las pistas con la función de reproducción
programada, inicie la reproducción programada y , a contin uación,
pulse REPEAT para repetir la reproducción de las pistas
programadas (consulte "REPRODUCCIÓN PROGRAMADA" en
la página 15).
NOTA
• Para repetir la reproducción aleatoria, active primero el modo
de reproducción aleatoria y , a continuación, pulse REPEA T para
que "p" aparezca en pantalla.
• Si se activa el modo de reproducción aleatoria durante la
repetición de una pista o durante el modo de reproducción
repetida de todas las pistas, se cancelará el modo de
reproducción repetida.
• Seleccionar directamente las pistas con los botones numerados
cancelará el modo de reproducción "p1".
REPRODUCCIÓN REPETIDA A-B
Puede seleccionar la repetición de una porción.
1
Durante la reproducción, pulse A-B REPEAT al
inicio del punto de la porción que desee repetir.
2
Pulse A-B REPEAT de nuevo al final del punto de
la porción que desee repetir.
La unidad regresará al punto A y reproducirá repetidamente la
porción entre A y B.
Pantalla del monitor:
14
Pantalla de visualización:
Cómo cancelar la reproducción repetida A-B
Pulse A-B REPEAT de nuevo.
Verá aparecer "OFF" en la pantalla del monitor.
ESPAÑOL
Page 69

REPRODUCCIÓN PROGRAMADA
Se puede programar un máximo de 32 pistas del disco que hay a
cargado.
Tiempo total de reproducción
de las pistas programadas
PRGM/
RANDOM
0-9,+10
C
i/k
ENTER
c/d
r,t
s
c
s
r,t
1
En modo de parada, pulse una vez PRGM/
RANDOM en el mando a distancia.
Verá aparecer "PROGRAM" en la pantalla del monitor y
"PRGM" aparecerá en la pantalla de visualización.
2
Pulse ENTER antes de que pasen 5 segundos.
Verá aparecer la pantalla del programa en la pantalla del
monitor y en la pantalla de visualización.
Pantalla del monitor:
PROGRAM
SELECT TRACK
EDIT PROGRAM
UP
i
00
k
DOWN
TOTAL TRACK TIME
ik
**
**
**
**
**
**
**
**
**
**
**
**
**
**
**
**
0 0 0 : 00 : 00
ENTER:MEMORY
PROGRAM:EXIT
CANCEL:CLEAR
**
**
**
**
**
**
**
**
c
Pantalla de visualización:
**
**
**
**
**
**
**
**
:PLAY
Número total de pistas
programadas
Si introdujo un número equivocado
Pulse C.
Se cancelará el último número programado. A continuación,
introduzca el número correcto.
5
Repita los pasos 3 y 4 para programar otras pistas.
6
Pulse c para iniciar la reproducción.
Cómo cancelar la reproducción programada
Pulse PRGM/RANDOM dos veces.
Verá aparecer "OFF" en la pantalla del monitor. Se cancelará la
reproducción programada y la unidad continuará reproduciendo
la pista actual y todas las pistas posteriores del disco.
Cómo detener la reproducción programada
Pulse s.
La unidad recuerda el punto en el que se detuvo la reproducción,
reanudándose la reproducción programada desde ese punto
cuando se pulse c.
Cómo borrar el punto desde el que va a reanudarse la
reproducción
Pulse s una vez más después de detenerse la reproducción
programada.
Se borra la memoria del punto de reanudación, comenzando la
reproducción desde la primera pista programada cuando se pulsa
c.
Cómo borrar el programa
Pulse s dos veces después de haberse detenido la reproducción
programada.
También se borrará el programa cuando abra la puerta del disco.
Para continuar programando un nuevo grupo de pistas, pulse
ENTER y repita la operación desde el paso 3.
DE AUDIO CD
OPERACIONES
E
3
Pulse el o los botones numerados o i/k en el
mando a distancia para seleccionar la pista que
va a ser reproducida en primer lugar.
Con los botones numerados:
Para seleccionar la pista nº 12, pulse +10, 2.
Para seleccionar la pista nº 20, pulse +10, +10, 0.
Con i/k:
Pulse i para seleccionar un número de pista superior y k
para un número de pista inferior.
4
Pulse ENTER.
El número de la pista seleccionado se lista en orden en la
pantalla del monitor, y se ilumina en la pantalla de visualización.
El número de las pistas programadas y el tiempo total de
reproducción se indican también en la parte inferior de la
pantalla del monitor.
Pantalla del monitor:
PROGRAM
SELECT TRACK
EDIT PROGRAM
UP
i
10
k
DOWN
TOTAL TRACK TIME
**
**
**
**
**
**
**
**
**
**
**
**
**
**
**
**
0 0 0 : 00 : 00
ENTER:MEMORY
CANCEL:CLEAR
ik
**
**
**
**
**
**
**
**
**
**
**
**
**
**
**
**
PROGRAM:EXIT
c
:PLAY
Cómo verificar el programa
Llame la pantalla del programa a la pantalla del monitor.
Alternativamente, pulse t en modo de parada.
Con cada pulsación, se muestran progresivamente el número del
programa y el número de la pista en la pantalla de visualización.
Cómo añadir una pista al programa
Antes de iniciar la reproducción, repita los pasos 1-4. La pista se
programará después de la última pista.
Cómo borrar una pista del programa
1 Pulse repetidamente PRGM/RANDOM para que aparezca
"PROGRAM" en la pantalla del monitor. A continuación, pulse
ENTER antes de que pasen 5 segundos.
2 Pulse C.
Se borrar la última pista del programa.
Cómo cancelar el modo de reproducción programada
Pulse PRGM/RANDOM dos veces.
NOTA
• Seleccionar directamente las pistas con los botones numerados
cancelará el modo de reproducción.
• Si se activa el modo de reproducción aleatoria durante la
reproducción programada, se cancelará el modo de reproducción
programada.
• No se pueden programar más de 32 pistas. (Incluso si intenta
programar una pista después de programar 32 pistas, no se
programará la pista, sino que las 32 pistas ya seleccionadas
permanecerán en el programa.)
ESPAÑOL
15
Page 70

CÓMO CAMBIAR LA
INFORMACIÓN DE LA
PANTALLA
SET UP
ON SCREEN
DISPLAY
SET UP
CÓMO VISUALIZAR EL ESTADO DE LA
REPRODUCCIÓN EN LA PANTALLA DEL
MONITOR
El estado general de la reproducción puede visualizarse en la
pantalla del monitor.
Pulse repetidamente ON SCREEN DISPLAY.
Con cada pulsación, la visualización en la pantalla del monitor
cambia siguiendo este orden:
1
2
3
4
10
TRACK
0 : 26 : 03
STEREO
OFF
CAMBIO DE LA INFORMACIÓN DEL
TIEMPO DE REPRODUCCIÓN EN LA
PANTALLA DE VISUALIZACIÓN
Pulse repetidamente SET UP durante la
reproducción.
Con cada pulsación, la pantalla cambia siguiendo este orden:
1 Tiempo transcurrido de la pista actual
2 Tiempo restante de la pista actual
3 Tiempo transcurrido del disco*
4 Tiempo restante del disco*
* Tiempo transcurrido o restante del programa durante la
reproducción programada.
NOTA
Durante la reproducción aleatoria no se puede cambiar la
información del tiempo de reproducción.
1
2
5
6
7
10
TRACK
0 : 26 : 03
OFF
OFF
12345
Cancelar (visualización normal)
T10 C20
T 1 : 26 : 03
OFF
A–B
1 2 3 4 5
1 muestra el número de pista en reproducción.
muestra el número total de pistas del disco o el punto
desde el que ha de reiniciarse en modo de parada.
2
muestra la misma información que la información de
la hora en la pantalla.
3
muestra la información de audio.
16
ESPAÑOL
4
5
6
7
muestra el modo de reproducción.
muestra el modo de reproducción repetida.
muestra el modo de repetición A-B.
muestra la información de los puntos de marca
memorizada.
Page 71

OPERACIONES
CON DVD/VCD
Las descripciones de esta sección aplican tanto a los DVDs como
a los discos compactos de vídeo, a menos que se indique lo
contrario.
TÉRMINOS RELACIONADOS CON LOS
DISCOS
Título (sólo DVD)
Un título es la sección más larga de una película o de un tema
musical de un DVD, de una película de imágenes en software de
vídeo, o un álbum de música en software de audio.
A cada título se le asigna un número para permitirle localizarlo
con facilidad.
Capítulo (sólo DVD)
Los capítulos son secciones de una película o de un tema musical
menores que los títulos.
Un título se compone de varios capítulos. A cada capítulo se le
asigna un número para permitirle localizarlo con facilidad. Algunos
discos no tienen capítulos grabados.
Pista (sólo disco compacto de audio y VCD)
Las pistas son secciones de una película o de un tema musical
en un disco compacto de vídeo o un disco compacto de audio.
A cada pista se le asigna un número para permitirle localizarla
con facilidad.
TIPOS DE DISCOS COMPACTOS DE
VÍDEO
Hay dos tipos de discos compactos de vídeo.
Discos compactos de vídeo equipados con PBC (versión
2.0)
PBC (PlayBack Control: control de la reproducción en inglés) le
permite realizar operaciones interactivas con el sistema mediante
menús, funciones de búsqueda u otras operaciones típicas
similares a las de las computadoras. También es posible reproducir
imágenes fijas de alta resolución, si el disco dispone de ellas.
Discos compactos de vídeo sin PBC (versión 1.1)
Se utilizan de la misma forma que los discos compactos de audio
y estos discos le permiten reproducir imágenes de vídeo y sonido
aunque no disponen de funciones PBC.
En algunos casos, tal vez desee reproducir VCDs que tengan
PBC pero con la función PBC desactivada. Esto se debe a que
sólo se puede hacer uso de algunas funciones de reproducción
de discos VCDs sin PBC. Consulte "REPRODUCCIÓN DE UN
VCD SIN USAR EL CONTROL DE LA REPRODUCCIÓN (PBC)"
en la página 20.
DE AUDIO CD
OPERACIONES
CON DVD/VCD
OPERACIONES
Escena
En un disco compacto de vídeo con funciones PBC (control de
reproducción), las imágenes en movimiento y las fijas se dividen
en secciones denominadas "escenas". Cada escena se muestra
en la pantalla de menús y se le asigna un número, que permite
localizar la escena que se desee.
Una escena está compuesta de una o varias pistas.
E
ESPAÑOL
17
Page 72

OPERACIONES BÁSICAS
Si necesita más datos sobre los formatos de discos compatibles
con esta unidad, consulte la página 5.
MONITOR
ON/OFF
zOPEN/
CLOSE
MONITOR
OPEN/CLOSE
DVD/CD
c
s
a
CÓMO CARGAR UN DISCO
c/d
s
a
• No toque la lente óptica de lectura. Si se ensucia, posiblemente
no pueda reproducirse un disco compacto con normalidad.
• La indicación NTSC se ilumina en la pantalla para mostrar que
en esta unidad se pueden introducir señales de vídeo en el
sistema en color NTSC, y que pueden extraerse señales de
vídeo en el sistema de color NTSC.
REPRODUCCIÓN DE UN DISCO
1
Cargue el disco.
2
Pulse c.
En el caso de un DVD o de un VCD con función PBC, no
necesitará pulsar c . La reproducción comenzará
automáticamente cuando el disco se cargue.
DVD:
Se ilumina
1
Pulse DVD/CD.
2
Si el monitor está cerrado, pulse MONIT OR OPEN/
CLOSE para abrirlo.
3
Pulse z OPEN/CLOSE para abrir el
compartimento del disco.
4
Cargue un disco con el lado de la etiqueta hacia
arriba.
5
Pulse z OPEN/CLOSE para cerrar el
compartimento del disco.
Cuando se cargue un VCD sin función PBC, verá aparecer
una visualización en pantalla como la siguiente:
Se ilumina
Número total de pistas
Tiempo total de reproducción
Número del título
en reproducción
Disco compacto de vídeo (sin la función PBC):
Número de la pista
en reproducción
NOTA
Algunos DVDs o VCDs pueden visualizar automáticamente la
pantalla del menú después de sarar el primer disco. Consulte "USO
DEL MENÚ ESPECÍFICO DE SOFTWARE" en la página 19.
Tiempo de reproducción
transcurrido
Tiempo de reproducción
transcurrido
INFORMACIÓN MOSTRADA EN LA
PANTALLA DEL MONITOR
En la esquina superior derecha de la pantalla del monitor se
muestran varias visualizaciones de guía de la operación del disco
compacto actual.
Además, puede activar la información del estado de la
reproducción de la parte izquierda de la pantalla del monitor.
10
TRACK
0 : 24 : 55
STEREO
OFF
OFF
Visualización
de guía
Cuando se cargue un DVD o un VCD con la función PBC, la
reproducción comenzará automáticamente.
Si el monitor está apagado, pulse MONITOR ON/OFF para
encenderlo.
NOTA
• No ponga más de un disco compacto en una bandeja del disco.
• No use discos compactos que tengan una forma irregular, (por
ejemplo romboidales u octogonales). Pueden ocasionar un mal
funcionamiento.
18
ESPAÑOL
Información del estado de la reproducción
• Para visualizar las pantallas de guía, asegúrese de que tiene
"Guide Message ON" en el menú de configuración (consulte
"MENSAJES GUÍA", página 41).
• Para activar la información del estado de la reproducción, use
ON SCREEN DISPLAY en el mando a distancia (si necesita
más detalles, consulte "CÓMO VISUALIZAR EL ESTADO DE
LA REPRODUCCIÓN EN LA PANT ALLA DEL MONITOR" en la
página 26).
Page 73

P ARADA Y PAUSA
Cómo detener la reproducción
Pulse s.
La reproducción se detiene. La unidad recuerda el punto en el
que se detuvo la reproducción.
("RESUME" aparece en la pantalla.)
Cómo reanudar la reproducción desde el punto donde se
detuvo
Pulse c.
Cómo borrar el punto de reanudación
Pulse de nuevo s en modo de parada.
"RESUME" desaparecerá de la pantalla. La memoria del punto
de reanudación se borrará, y la reproducción se iniciará desde el
principio del disco cuando se pulse c la siguiente vez.
SELECCIÓN DE UNA PISTA
TITLE
MENU
CURSOR
TITLE
0-9,+10
i/k/j/l
MENU
ENTER
vRETURN
CON DVD/VCD
OPERACIONES
NOTA
• Cuando se usan los valores por defecto, el punto de reanudación
también se borra cuando se abre el compartimento del disco,
se apaga la unidad o se cambia de función.
• En el caso de los DVDs, el punto de reanudación se borra cuando
el valor TV Aspect se cambie. (Consulte "ASPECTO DE LA
IMAGEN EN EL TELEVISOR" en la página 45).
• La configuración puede cambiarse para que la memoria del punto
de reanudación se mantenga incluso después de producirse
las condiciones descritas anteriormente. (Consulte
"REANUDACIÓN DE LA REPRODUCCIÓN DE DISCOS" en la
página 47).
• La función de reanudación no se encuentra disponible para
VCDs que tengan la función PBC activada. Para desactivar la
función PBC, consulte "REPRODUCCIÓN DE UN VCD SIN
USAR EL CONTROL DE LA REPRODUCCIÓN (PBC)", en la
página 20, y "CONTROL DE LA REPRODUCCIÓN", en la página
47.
Cómo pausar la reproducción
Pulse a.
Para proseguir con la reproducción, pulse c.
NOTA
En el caso de los DVDs, pulse ENTER para iniciar o reanudar
también la reproducción.
ENTER
vRETURN
USO DEL MENÚ ESPECÍFICO DE
SOFTWARE
Esta unidad soporta las distintas interfaces de menús que se
encuentran en algunos softwares de DVD o VCD. Para DVDs o
VCDs con tales menús, la pantalla de menús tal vez se visualice
automáticamente en la pantalla del monitor después de introducir
primero el disco.
DVDs
1
Mueva CURSOR en la unidad principal i, k, j o
l o pulse i/k/j/l en el mando a distancia para
seleccionar su programa deseado.
2
Pulse ENTER para comenzar la reproducción.
Cómo visualizar el menú
Pulse TITLE o MENU.
VCDs con función PBC
Pulse los botones numerados del mando a distancia
para seleccionar su programa deseado.
E
EXTRACCIÓN DE DISCOS
Detenga la reproducción y pulse zOPEN/CLOSE.
El compartimento del disco se abre para poder extraer el disco
que hay cargado.
Una vez que haya extraído el disco, pulse zOPEN/CLOSE de
nuevo para cerrar el compartimento del disco.
Cómo visualizar el menú
Pulse vRETURN.
NOTA
El contenido y la operación del menú específico del software varían
con los discos. Siga las instrucciones del disco y de la pantalla de
menús.
ESPAÑOL
19
Page 74

0-9,+10
PBC
SHIFT
c/d
r,t
c
r,t
PBC
REPRODUCCIÓN EN AVANCE/
RETROCESO RAPIDO
Mantenga pulsados r o t durante la
reproducción hasta que vea aparecer una guía de
visualización como "gx 2" .
El DVD se reproducirá 2 veces más rápido de lo normal.
El VCD se reproducirá 5 veces más rápido de lo normal.
Para regresar a la reproducción normal, pulse c.
Cómo cambiar a la velocidad de reproducción normal
Durante la reproducción rápida hacia adelante/rebobinado,
mantenga pulsados r o t asta que la guía de visualización
aparezca.
En el caso de los DVDs, esta operación hace que cambie la
velocidad de reproducción entre 2, 8 y 32 veces.
En el caso de los VCDs, esta operación hace que cambie la
velocidad de reproducción entre 5 y 16 veces.
Cómo volver a la reproducción normal
Pulse c.
NOTA
• No hay audio durante la reproducción en avance/retroceso
rápidos.
• No es posible el avance ni el retroceso rápidos con ciertos DVDs.
REPRODUCCIÓN DE UN VCD SIN USAR
EL CONTROL DE LA REPRODUCCIÓN
Con PBC (PlayBack Control: control de la reproducción en inglés),
la reproducción de los VCDs se controla desde la pantalla de
visualización de menús de la pantalla del monitor y la pantalla del
menú aparece automáticamente después de la reproducción de
cada selección.
Sin embargo, se puede desactivar el PBC y reproducir todo el
VCD sin volver a la pantalla de visualización de menús, como
sucede en los discos compactos de audio.
Esto, por ejemplo, le permite utilizar la reproducción programada
y la reproducción repetida con VCDs que tengan PBC.
Si desea más información sobre el PBC, consulte "TIPOS DE
DISCOS COMPACTOS DE VÍDEO" en la página 17.
1
Cargue el VCD.
2
Pulse PBC en la unidad principal durante la
reproducción o en modo de parada.
Alternativamente, pulse PBC mientras pulsa la tecla SHIFT
en el mando a distancia.
"PBC" desaparece de la pantalla de visualización, y se
desactiva la función de reproducción con menús.
NOTA
• Si se pulsa PBC mientras se pulsa la tecla SHIFT durante la
reproducción, ésta se detiene antes de que cambie el modo
PBC.
• Podrá ajustar las preferencias de la unidad para que reproduzca
VCDs con PBC o sin él. Consulte "CONTROL DE LA
REPRODUCCIÓN", página 47.
SELECCIÓN DIRECTA DE UNA PISTA
CON EL MANDO A DISTANCIA (SÓLO
VCD)
Introduciendo el número de la pista en el mando a distancia se
puede seleccionar directamente una pista, bien durante el modo
de reproducción o de pausa.
Para utilizar esta función con VCDs que soporten PBC, desactive
primero el PBC (consulte "REPRODUCCIÓN DE UN VCD SIN
USAR EL CONTROL DE LA REPRODUCCIÓN" en esta misma
página).
SAL T OS
Pulse r o t o durante la reproducción.
Cada vez que pulse t, la posición del disco salta a la pista
siguiente.
Cuando se presiona r una vez, la posición del disco regresa
al comienzo de la pista/capítulo actual.
Cuando r se pulse dos o más veces, la posición del disco
retrocederá a la(s) pista(s)/capítulo(s) anteriores.
NOTA
No es posible saltar pistas al utilizar ciertos DVDs.
20
ESPAÑOL
Pulse los botones numerados para seleccionar la
pista deseada.
Ejemplo:
Para reproducir la pista nº 12, pulse +10, 2.
Para reproducir la pista nº 20, pulse +10, +10, 0.
La reproducción comienza desde el principio de la pista
seleccionada y continúa hasta el final del disco.
Page 75

AVANCE DE FOTOGRAMAS Y
REPRODUCCIÓN ALEATORIA/
REPRODUCCIÓN A CÁMARA
LENTA
PRGM/
RANDOM
c/d
r,t
s
c
a
r,t
AVANCE DE FOTOGRAMAS
1
Pulse a para hacer una pausa en la reproducción.
2
Pulse a repetidamente para avanzar fotogramas.
Cada vez que pulse el botón, la reproducción avanzará un
fotograma.
Cómo regresar a la reproducción normal
Pulse c.
REPETIDA
PRGM/
RANDOM
c/d
c
REPRODUCCIÓN ALEATORIA (SÓLO
VCD)
Se pueden reproducir aleatoriamente todas las pistas del disco.
Para poder usar esta función con VCDs compatibles con PBC,
desactive primero el PBC (consulte "REPRODUCCIÓN DE UN
VCD SIN USAR EL CONTROL DE LA REPRODUCCIÓN" en la
página 20).
1
Pulse repetidamente PRGM/RANDOM en el
mando a distancia hasta que "RANDOM" aparezca
en pantalla.
CON DVD/VCD
OPERACIONES
NOTA
Durante el avance de fotogramas no se reproduce sonido.
REPRODUCCIÓN A CÁMARA LENTA
1
Pulse a para hacer una pausa en la reproducción.
2
Mantenga pulsados r o t.
La pista se reproduce lentamente.
Cómo cambiar la velocidad de reproducción a cámara
lenta en avance
Cada vez que se pulse t, la velocidad de reproducción cambia
de la forma siguiente:
1/30 1/15 1/5 1/2
Cómo cambiar la velocidad de reproducción a cámara
lenta en retroceso
En el caso de los DVDs, la velocidad de reproducción cambia
alternativamente entre 1/15 y 1/2 cada vez que pulse r. En el
caso de los VCDs sólo se encuentra disponible la velocidad de
1/15.
Cómo regresar a la reproducción normal
Pulse c.
Pantalla del monitor:
RANDOM
2
Pulse c para iniciar la reproducción.
Se reproducirán las pistas del disco aleatoriamente.
Cómo cancelar la reproducción aleatoria
Pulse repetidamente PRGM/RANDOM en el mando a distancia
hasta que desaparezca "RANDOM" de la pantalla y aparezca de
nuevo la pantalla normal.
NOTA
• Aunque pulse r, no podrá saltarse una pista reproducida
anteriormente. La unidad sólo regresará al principio de la pista
actual.
• La selección directa de pistas con los botones numerados no
es posible durante el modo de reproducción aleatoria.
NOTA
Durante la reproducción aleatoria no podrá saltarse la pista
anteriormente reproducida con r.
Pantalla de visualización:
E
NOTA
Durante la reproducción a cámara lenta no se reproduce sonido.
ESPAÑOL
21
Page 76

A-B REPEAT
A-B
REPEAT
c/d
REPRODUCCIÓN REPETIDA A-B (DVD Y
VCD)
Puede seleccionar la porción que desee repetir.
La porción que desee repetir no debe sobrepasar los límites de
una pista, sino que ha de estar dentro de una pista.
Para poder usar esta función con VCDs compatibles con PBC,
desactive primero el PBC (consulte "REPRODUCCIÓN DE UN
VCD SIN USAR EL CONTROL DE LA REPRODUCCIÓN" en la
página 20).
c
REPRODUCCIÓN REPETIDA (DVD)
Pulse repetidamente REPEAT en el mando a
distancia durante la reproducción.
El modo de reproducción repetida cambia con cada pulsación del
botón.
CHAPTER: Repite el capítulo actual.
Pantalla del monitor:
CHAPTER
TITLE: Repite el título actual.
Pantalla de
visualización:
1
Durante la reproducción, pulse A-B REPEAT al
inicio del punto de la porción que desee repetir.
2
Pulse A-B REPEAT de nuevo al final del punto de
la porción que desee repetir.
La unidad regresará al punto A y reproducirá repetidamente la
porción entre A y B.
Pantalla del monitor:
Cómo cancelar la reproducción repetida A-B
Pulse A-B REPEAT de nuevo durante la reproducción.
Verá aparecer "OFF" en la pantalla del monitor.
Pantalla de
visualización:
TITLE
OFF: Se cancela el modo de repetición. (Reproducción normal)
OFF
Cómo cancelar la reproducción repetida
Pulse de nuevo REPEAT en el mando a distancia hasta que
desaparezca la indicación de repetición de la pantalla de
visualización.
La unidad vuelve a la reproducción normal.
NOTA
No es posible realizar la reproducción repetida con ciertos DVDs.
22
ESPAÑOL
Page 77

REPRODUCCIÓN REPETIDA (VCD)
Para poder usar esta función con VCDs compatibles con PBC,
desactive primero el PBC (consulte "REPRODUCCIÓN DE UN
VCD SIN USAR EL CONTROL DE LA REPRODUCCIÓN (PBC)"
en la página 20).
Pulse repetidamente REPEAT en el mando a
distancia durante la reproducción.
El modo de reproducción repetida cambia con cada pulsación del
botón.
ALL: Repite todas las pistas del disco.
Pantalla del monitor:
ALL
TRACK: Repite la pista actual.
TRACK
Pantalla de
visualización:
CON DVD/VCD
OPERACIONES
Se
OFF:
Cuando se seleccione "ALL", se reproducirán repetidamente las
pistas del disco.
Cuando se seleccione "TRACK", se reproducirá repetidamente
la pista actual.
cancela el modo de repetición. (Reproducción normal)
OFF
Cómo repetir la reproducción de la o las pistas de un disco
Programe la o las pistas con la función de reproducción
programada, inicie la reproducción programada y , a contin uación,
pulse REPEAT para repetir la reproducción de las pistas
programadas (consulte "REPRODUCCIÓN PROGRAMADA
(SÓLO VCD)" en la página 24.
NOTA
• Para repetir la reproducción aleatoria, active primero el modo
de reproducción aleatoria y , a continuación, pulse REPEA T para
que "p" aparezca en pantalla.
• Si el modo de reproducción aleatoria se activa durante la
repetición de una pista o de todas las pistas, se cancelará el
modo de reproducción repetida.
• Seleccionar directamente las pistas con los botones numerados
cancelará el modo de reproducción "p1".
E
ESPAÑOL
23
Page 78

REPRODUCCIÓN PROGRAMADA
(SÓLO VCD)
Se puede programar un máximo de 32 pistas del disco que haya
cargado.
Para poder usar esta función con VCDs compatibles con PBC,
desactive primero el PBC (consulte "REPRODUCCIÓN DE UN
VCD SIN USAR EL CONTROL DE LA REPRODUCCIÓN (PBC)"
en la página 20).
4
Pulse ENTER.
El número de la pista seleccionado se lista en orden en la
pantalla del monitor, y se ilumina en la pantalla de visualización.
El número de las pistas programadas y el tiempo total de
reproducción se indican también en la parte inferior de la
pantalla del monitor.
Tiempo total de reproducción
de las pistas programadas
PRGM/
RANDOM
0-9,+10
C
i/k
ENTER
c/d
r,t
s
c
s
r,t
1
En modo de parada, pulse una vez PRGM/
RANDOM en el mando a distancia.
Verá aparecer "PROGRAM" en la pantalla del monitor y
"PRGM" parpadeará en la pantalla de visualización.
2
Antes de que pasen 5 segundos, pulse ENTER.
Verá aparecer la pantalla del programa en la pantalla del
monitor y en la pantalla de visualización.
Pantalla del monitor:
PROGRAM
SELECT TRACK
EDIT PROGRAM
UP
i
00
k
DOWN
TOTAL TRACK TIME
ik
**
**
**
**
**
**
**
**
**
**
**
**
**
**
**
**
0 0 0 : 00 : 00
ENTER:MEMORY
PROGRAM:EXIT
CANCEL:CLEAR
**
**
**
**
**
**
**
**
c
**
**
**
**
**
**
**
**
:PLAY
Pantalla de visualización:
3
Pulse el o los botones numerados o i/k en el
mando a distancia para seleccionar la pista que
va a ser reproducida en primer lugar.
Con los botones numerados:
Para seleccionar la pista nº 12, pulse +10, 2.
Para seleccionar la pista nº 20, pulse +10, +10, 0.
Con i/k:
Pulse i para seleccionar un número de pista superior y k
para un número de pista inferior.
Pantalla del monitor:
24
ESPAÑOL
PROGRAM
SELECT TRACK
EDIT PROGRAM
UP
i
10
k
DOWN
TOTAL TRACK TIME
ik
**
**
**
**
**
**
**
**
**
**
**
**
**
**
**
**
0 0 0 : 00 : 00
ENTER:MEMORY
PROGRAM:EXIT
CANCEL:CLEAR
**
**
**
**
**
**
**
**
c
**
**
**
**
**
**
**
**
:PLAY
Número total de pistas
programadas
Si introdujo un número equivocado
Pulse C.
Se cancelará el último número programado. A continuación,
introduzca el número correcto.
5
Repita los pasos 3 y 4 para programar otras pistas.
6
Pulse c para iniciar la reproducción.
Cómo cancelar la reproducción programada
Pulse PRGM/RANDOM dos veces.
Verá aparecer "OFF" en la pantalla del monitor. Se cancelará la
reproducción programada y la unidad continuará reproduciendo
la pista actual y todas las pistas posteriores del disco.
Cómo detener la reproducción programada
Pulse s.
La unidad recuerda el punto en el que se detuvo la reproducción,
reanudándose la reproducción programada desde ese punto
cuando se pulse c.
Cómo borrar el punto desde el que va a reanudarse la
reproducción
Pulse s una vez más después de detenerse la reproducción
programada.
Se borra la memoria del punto de reanudación, comenzando la
reproducción desde la primera pista programada cuando se pulsa
c.
Cómo borrar el programa
Pulse s dos veces después de haberse detenido la reproducción
programada.
El programa se borrará también si se abre la puerta del
compartimento de discos, se cambia la función y la unidad se apaga.
Para continuar programando un nuevo grupo de pistas, pulse
ENTER y repita la operación desde el paso 3.
Cómo verificar el programa
Llame la pantalla del programa a la pantalla del monitor.
Para cerrar la pantalla del programa, pulse PRGM/RANDOM dos
veces.
Alternativamente, pulse t en modo de parada.
Con cada pulsación, se muestran progresivamente el número del
programa y el número de la pista en la pantalla de visualización.
Cómo añadir una pista al programa
Antes de iniciar la reproducción, repita los pasos 1-4. La pista se
programará después de la última pista.
Cómo borrar una pista del programa
1 Pulse repetidamente PRGM/RANDOM para que aparezca
"PROGRAM" en la pantalla del monitor. A continuación, pulse
ENTER antes de que pasen 5 segundos.
2 Pulse C.
Se borrará la última pista del programa.
Page 79

SET UP
ON SCREEN
DISPLAY
SET UP
NOTA
• Durante la reproducción programada, la selección directa de
una pista con los botones numerados cancelará el modo de
reproducción programado.
• Si se activa el modo de reproducción aleatoria durante la
reproducción programada, se cancelará el modo de reproducción
programada.
• No se pueden programar más de 32 pistas. (Incluso si intenta
programar una pista después de programar 32 pistas, no se
programará la pista, sino que las 32 pistas ya seleccionadas
permanecerán en el programa.)
CÓMO CAMBIAR LA
INFORMACIÓN DE LA
PANTALLA
CAMBIO DE LA INFORMACIÓN DEL
TIEMPO DE REPRODUCCIÓN EN LA
PANTALLA DE VISUALIZACIÓN
CON DVD/VCD
OPERACIONES
Puede cambiar la información del tiempo de reproducción de la
pantalla de visualización.
Pulse repetidamente SET UP durante la
reproducción.
Con cada pulsación, la pantalla cambia siguiendo este orden:
DVDs
1 Tiempo transcurrido del título actual ("TITLE")
2 Tiempo restante del título actual ("TITLE")
3 Tiempo transcurrido del capítulo actual ("CHP")
4 Tiempo restante del capítulo actual ("CHP")
VCDs
1 Tiempo transcurrido de la pista actual
2 Tiempo restante de la pista actual
3 Tiempo transcurrido del disco*
4 Tiempo restante del disco*
* Tiempo transcurrido o restante del programa durante la
reproducción programada.
NOTA
• Durante la reproducción aleatoria no se puede cambiar la
información del tiempo de reproducción.
• Cuando el PBC está activado, la información del tiempo de
reproducción de los VCDs no aparece en pantalla.
E
ESPAÑOL
25
Page 80

CÓMO VISUALIZAR EL ESTADO DE LA
T10 C20
T 1 : 26 : 03
A–B
OFF
1 2 3 4 5
T10 C20
OFF
OFF
12345
10
TRACK
0 : 26 : 03
TRACK
1 : 28 : 03
OFF
STEREO
OFF
1
2
6
7
1
2
3
4
5
8
REPRODUCCIÓN EN LA PANTALLA DEL
MONITOR
El estado general de la reproducción puede visualizarse en la
pantalla del monitor.
Pulse repetidamente ON SCREEN DISPLAY.
Al reproducir un DVD
Con cada pulsación, la visualización en la pantalla del monitor
cambia siguiendo este orden:
Al reproducir un VCD
Con cada pulsación, la visualización en la pantalla del monitor
cambia siguiendo este orden:
1
2
3
4
5
1
2
6
7
8
T10 C20
TITLE
1 : 26 : 03
1/8 KARAOKE
JP VOCAL1+2
1/8
32 / 32 OFF
JP
T10 C20
TITLE
1 : 26 : 03
OFF
OFF
12345
Cancelación (Pantalla normal)
T10 C20
T 1 : 26 : 03
OFF
A–B
1 2 3 4 5
Cancelación (Pantalla normal)
1 muestra el número de pista en reproducción.
muestra el número total de pistas del disco o el punto
desde el que ha de reiniciarse en modo de parada.
(sólo cuando se ha desactivado el PBC).
2
muestra la misma información que la información de
la hora en la pantalla.
3
muestra información sobre el sonido.
1 muestra el número del título y el número del capítulo,
o "MENU" durante la visualización del menú.
2
3
4
5
6
7
8
muestra la misma información que la información de
la hora en la pantalla.
muestra la información sobre el sonido.
muestra información sobre el ángulo.
muestra información sobre los subtítulos.
muestra el modo de repetición de la reproducción.
muestra el modo de repetición A-B.
muestra información acerca de los puntos de marcas
memorizadas.
26
ESPAÑOL
4
5
6
7
8
muestra el modo de reproducción.
muestra si el PBC está activado o desactivado.
muestra el modo de repetición de la reproducción.
muestra el modo de repetición A-B.
muestra información acerca de los puntos de marcas
memorizadas.
Page 81

AJUSTES A LA IMAGEN DEL
MONITOR
Puede ajustar la calidad y el aspecto de la imagen en la pantalla
del monitor.
PICTURE
ADJUST–/+
OPERACIÓN
1
Pulse repetidamente PICTURE MODE para
seleccionar la característica que desea ajustar
cuando ésta aparezca en la pantalla del monitor.
Ejemplo: Para ajustar el brillo
PICTURE MODE
CÓMO AJUSTAR EL ASPECTO
Con esta característica, podrá seleccionar cómo visualizar una
imagen de tamaño convencional (4:3) en pantalla larga en el
monitor de esta unidad.
Seleccione uno de los modos de aspecto siguientes y, a
continuación, pulse PICTURE ADJUST + o – para seleccionar el
aspecto deseado.
NORMAL
Visualiza una imagen de tamaño convencional con la proporción
original (4:3) con bandas negras en la parte izquierda y derecha
de la pantalla.
Imagen original: En la pantalla del monitor:
WIDE
Alarga la imagen de tamaño convencional en dirección horizontal.
La imagen se alarga en dirección horizontal más por las porciones
izquierda y derecha de la pantalla que en el centro.
Imagen original: En la pantalla del monitor:
CON DVD/VCD
OPERACIONES
Característica
a ajustar*
Valor actual
Característica a ajustar
* Cuando la función seleccionada es VIDEO, la característica
a ajustar no aparece en la pantalla del monitor.
Realice el ajuste utilizando la ventana de visualización.
2
Antes de que pasen 3 segundos, pulse PICTURE
ADJUST + o – para realizar los ajustes.
AJUSTE DEL BRILLO
Seleccione "BRIGHT" (o "BRT") y , a continuación, pulse PICTURE
ADJUST – para obtener una imagen más oscura y PICTURE
ADJUST + para obtener una imagen más brillante.
AJUSTE DEL COLOR
Seleccione "COLOR" y , a continuación, pulse PICTURE ADJUST
– para hacer disminuir la intensidad del color y PICTURE ADJUST
+ para aumentarlo.
CINEMA 1
Alarga la imagen de tamaño convencional tanto en dirección
horizontal como vertical. Las porciones superior e inferior
aparecerán cortadas.
Imagen original: En la pantalla del monitor:
CINEMA 2
Alarga la imagen de tamaño convencional tanto en dirección
horizontal como vertical del mismo modo que en "CINEMA 1",
pero la imagen se desplaza verticalmente de modo que la porción
inferior de la imagen no se corta. Este modo resulta útil cuando
hay texto superimpuesto en la parte inferior de la imagen.
Imagen original: En la pantalla del monitor:
E
AJUSTE DEL TINTADO
Seleccione "TINT" y, a continuación, pulse PICTURE ADJUST –
para que los colores claros en enrojezcan y PICTURE ADJUST
+ para que aparezcan más verdes.
OSCURECER LA PANTALLA
Seleccione "DIMMER" (o "DIM") y , a continuación, pulse PICTURE
ADJUST – para que la pantalla del monitor aparezca más oscura
y PICTURE ADJUST + para hacerla más brillante.
NOTA
Cuando esté reproduciendo un disco que contenga imágenes
en tamaño ancho (16:9), seleccione "WIDE" o "NORMAL". La
imagen se reproducirá en el modo que resulte más adecuado
automáticamente de acuerdo con el disco.
También puede seleccionar "CINEMA 1" o "CINEMA 2" si así lo
desea. (Si se selecciona CINEMA 1 o CINEMA 2, la imagen
puede resultar distorsionada, dependiendo del disco.)
ESPAÑOL
27
Page 82

MARCAS Y BÚSQUEDA
Puede marcar cualquier punto en un disco e iniciar la reproducción
desde ahí.
Usando las funciones de búsqueda, puede localizar con facilidad
el punto deseado del disco.
T-SEARCH
MARK
0-9,+10
C
i/k/j/l
ENTER
c/d
c
MARCAS
Puede marcar hasta 5 DVDs, cada uno con hasta 5 puntos.
Además, puede marcar hasta un total de 10 discos compactos
de audio y discos compactos de vídeo, cada uno con hasta 5
puntos.
1
Reproduzca el disco y localice el punto deseado
para marcar.
Podrá usar funciones tales como "REPRODUCCIÓN EN
AVANCE/RETROCESO RÁPIDO", "SALTO" o "BÚSQUEDA"
para localizar el punto deseado.
2
Pulse MARK.
" " aparece en la pantalla del monitor y la unidad entra en el
modo de marcas. El cursor ilumina el número de la memoria
de marcas.
NOTA
Si se utiliza la función de búsqueda de título, búsqueda de capítulo
o por tiempo para localizar el punto deseado, "
esto sucediera, pulse MARK para que "
(En el caso de los DVDs, "
de salto).
" se borra también al utilizar la función
" se borrará. Si
" aparezca en pantalla.
Cómo reproducir desde un punto marcado
1 Pulse MARK.
"
" aparece en la pantalla del monitor y la unidad entra en el
modo de marcas.
2 Pulse j o l para mov er el cursor , o pulse el botón numerado
correspondiente (1- 5) para seleccionar el número de memoria
de marcas deseado.
3 Pulse ENTER o c.
Se inicia la reproducción desde el punto marcado.
NOTA
Cuando se inicie la reproducción desde un punto marcado, "Audio
Language" y "Subtitle Language" se configurarán de acuerdo con
los seleccionados en el momento de marcar el punto.
Cómo borrar un punto marcado
1 Pulse MARK.
"
" aparece en la pantalla del monitor y la unidad entra en el
modo de marcas.
2 Pulse j o l para mov er el cursor , o pulse el botón numerado
correspondiente (1- 5) para seleccionar el número de memoria
de marcas deseado.
3 Pulse C.
La memoria de marcas se borra.
BÚSQUEDA DE TÍTULOS (SÓLO DVD)
Puede especificar la ubicación de la reproducción de un DVD
mediante el número del título.
1
Pulse T -SEARCH.
T1
*****
3
Pulse ENTER o c.
La ubicación actual se marca en la memoria de marcas.
1
***
4
Pulse de nuevo MARK para salir del modo de
marcas.
Cómo marcar otros puntos
1 Siga los pasos 1 y 2 de "MARCAS", descritos anteriormente.
2 Pulse j o l para mover el cursor o pulse el botón numerado
correspondiente (1- 5) para seleccionar la posición de memoria
de marcas deseada (
3 Siga los pasos 3 y 4 de "MARCAS", descritos anteriormente.
).
*
2
Pulse los botones numerados para introducir el
título deseado.
T2
Ejemplo:
Para reproducir el título nº 2, pulse 2.
Para reproducir el título nº 10, pulse +10.
También puede usar i o k para cambiar el número de pista
seleccionado en la pantalla del monitor.
Si introdujo un número equivocado
Pulse C para eliminar el número introducido. A continuación,
introduzca el número correcto.
3
Pulse ENTER o c.
Se inicia la reproducción por el título especificado.
NOTA
Si especifica un número de título que no existe en el disco, el
símbolo
desde el paso 1 con un número de título válido.
aparecerá en pantalla. En este caso, repita de nuevo
28
ESPAÑOL
Page 83

BÚSQUEDA DE CAPÍTULO (SÓLO DVD)
BÚSQUEDA POR TIEMPO
Puede especificar la ubicación de reproducción de un DVD
mediante números de capítulo.
1
Pulse 2 veces T-SEARCH.
T2 C1
2
Pulse los botones numerados para introducir el
número de capítulo deseado.
T2 C
17
Ejemplo:
Para reproducir el capítulo nº 17, pulse +10, 7.
Con discos que permiten visualizar el tiempo transcurrido, podrá
localizar un punto del disco especificando el tiempo desde el
comienzo de ese disco.
En el caso de los DVDs, puede localizar un punto de un título
especificando la hora transcurrida desde el principio del título.
(La búsqueda por tiempo puede usarse sólo en el interior de un
título).
1
Para DVDs: Pulse T-SEARCH 3 veces.
Para discos compactos de audio y VCDs: Pulse TSEARCH dos veces.
00:00:00
2
Pulse los botones numerados para introducir el
tiempo de la ubicación deseada.
01:17: 30
CON DVD/VCD
OPERACIONES
También puede usar i o k para cambiar el número de la
pista seleccionado en la pantalla del monitor.
Si introdujo un número equivocado
Pulse C para borrar el número que introdujo. Introduzca a
continuación el número correcto.
3
Pulse ENTER o c.
Se inicia la reproducción desde el capítulo especificado.
NOTA
Si especifica un número de capítulo que no existe en el disco, el
símbolo aparecerá en pantalla. En este caso, repita desde el
paso 1 con un número de capítulo válido.
Ejemplo:
Para especificar 1:17:30 (1 hora 17 minutos 30 segundos),
pulse 1, 1, 7, 3 y 0.
Para especificar 0:08:07 (8 minutos 7 segundos), pulse 8, 0 y
7.
Si introdujo números equivocados
Pulse repetidamente C para borrar los números que introdujo.
A continuación, introduzca los números correctos.
3
Pulse ENTER o c.
Se inicia la reproducción desde la ubicación especificada.
NOTA
• Si especificó un tiempo superior al de la duración del disco, el
símbolo aparecerá en pantalla. En este caso, repita desde
el paso 1 con un tiempo válido.
• La búsqueda por tiempo tal vez no funcione con algunos discos
aunque admitan la visualización del tiempo transcurrido.
E
ESPAÑOL
29
Page 84

1/4
2/4
4/4
3/4
FUNCIONES ESPECIALES DE
UN DVD
CAMBIO DE ÁNGULO (SÓLO DVD)
Cuando reproduzca DVDs filmados con múltiples ángulos, podrá
seleccionar el ángulo desde el que desea ver la escena.
A continuación describimos las funciones especiales para la
reproducción de DVDs.
ZOOM
ANGLE
SUBTITLE ON/OFF
SUBTITLE SELECT
AUDIO SELECT
C
i/k/j/l
FUNCIÓN DE ZOOM (SÓLO DVD)
Pulse ZOOM en el mando a distancia durante la
reproducción.
La imagen alrededor del centro de la pantalla aumenta su tamaño
4 veces aproximadamente.
Pulse repetidamente ANGLE para seleccionar un
ángulo de visión.
El ángulo cambiará con cada pulsación.
1 ángulo de los 4
disponibles de la escena.
NOTA
Si pulsa
múltiples ángulos de visión, el símbolo
ANGLE cuando reproduce una escena o un disco sin
aparecerá en pantalla.
Cómo mover la imagen aumentada
Pulse i/k/j/l.
(Puede utilizar también CURSOR en la unidad principal.)
Para volver al centro de la imagen, pulse C.
Cómo cancelar el zoom
Pulse ZOOM de nuevo.
30
ESPAÑOL
Page 85

SUBTÍTULOS (SÓLO DVD)
Puede visualizar los subtítulos en la pantalla cuando reproduzca
DVDs que los tengan. También puede cambiar el idioma de los
subtítulos si hay más de uno disponible.
Pulse SUBTITLE ON/OFF durante la reproducción.
Los subtítulos se visualizarán.
1/3 ON
EN
1/3 OFF
CAMBIO DE PISTAS DE AUDIO (SÓLO
DVD)
Algunos DVDs tienen más de una pista de audio como, por
ejemplo, pistas de sonido en idiomas diferentes. Usted podrá
cambiar las pistas de audio cuando reproduzca este tipo de discos.
Para seleccionar pistas de audio para discos DVD de karaoke,
consulte "CÓMO USAR DISCOS DVD DE KARAOKE" en la
página 35.
Pulse AUDIO SELECT durante la reproducción.
Cada vez que pulse el botón, la pista de audio cambiará.
CON DVD/VCD
OPERACIONES
He’s having a great run today, Jim.
Cómo apagar los subtítulos
Pulse de nuevo SUBTITLE ON/OFF.
NOTA
• Si pulsa SUBTITLE ON/OFF cuando reproduce un disco sin
subtítulos, el símbolo
aparecerá en pantalla.
• Algunos discos tienen subtítulos que se visualizan de forma
predeterminada. Con este tipo de discos SUBTITLE ON/OFF
tal vez no le permita anular la visualización de subtítulos.
Cómo cambiar el idioma de los subtítulos
Pulse SUBTITLE SELECT para seleccionar el idioma de los
subtítulos deseado.
1 de los 3 idiomas disponibles
para los subtítulos
1/3 ON
EN
He’s having a great run today, Jim.
2/3 ONEN2/3 ON
JA
3/3 ON
EN
1/2
JA
2/2
EN
NOTA
• La pista de audio sólo puede cambiarse si el disco contiene
múltiples pistas de audio. El número de pistas de audio disponible
cambia según el disco.
• El idioma de la pista de audio que se reproduce primero se
especifica mediante el ajuste del idioma de audio y puede ser
cambiado (consulte "IDIOMAS DEL AUDIO" en la página 42).
Si el idioma preferido de la pista de audio no se encuentra en el
disco, el disco determinará qué idioma de pista de audio va a
ser reproducido.
E
NOTA
• El idioma de los subtítulos sólo puede cambiarse si el disco
tiene más de un idioma de subtítulos. El número de idiomas de
subtítulos disponible varía según el disco.
• El idioma de los subtítulos que aparece primero en pantalla se
especifica mediante el ajuste de subtítulos y puede cambiarlo
(consulte "IDIOMAS DE LOS SUBTÍTULOS" en la página 42).
Si el idioma de subtítulos preferido no se encuentra en el disco,
el disco determinará qué subtítulos van a ser mostrados.
• Algunos discos tardarán algunos momentos en mostrar los
subtítulos nuevos después de pulsar SUBTITLE SELECT.
ESPAÑOL
31
Page 86

RECEPCIÓN DE
LA RADIO
SINTONIZACIÓN MANUAL
MONO TUNER
BAND
POWER
TUNER/
BAND
r,t
1
Pulse repetidamente TUNER/BAND para
seleccionar la banda deseada.
FM AM
SHIFT
r,t
Cuando una emisión radiofónica en FM tenga ruido
Pulse MONO TUNER mientras pulsa la tecla SHIFT del mando a
distancia para que "MONO" aparezca en pantalla.
El ruido se reducirá, pero la recepción será mono.
Para reponer la recepción estéreo, repita esta procedimiento para
que desaparezca "MONO".
Cómo cambiar un intervalo de sintonización de AM
El ajuste por defecto del intervalo de sintonización de AM es de
10 kHz/incremento. Si utiliza esta unidad en un área donde el
sistema de asignación de frecuencia sea de 9 kHz/incremento,
cambie el intervalo de sintonización.
Pulse POWER mientr as pulsa TUNER/B AND.
Para resetear el intervalo, repita este procedimiento.
NOTA
Cuando se cambie el intervalo de sintonización de AM, todas las
presintonías se borrarán. Deberá presintonizarlas de nuevo.
Cuando se pulse TUNER/BAND con la unidad apagada, ésta
se encenderá directamente.
Cómo seleccionar una banda con el mando a distancia
Pulse BAND mientras pulsa SHIFT.
NOTA
• Cuando cambie de la función DVD/CD a la función del
sintonizador de radio, el sonido del sintonizador mientras
"READING" parpadea en la pantalla, tal vez transcurran hasta
10 segundos antes de que el sonido pase a ser el del
sintonizador.
• Cuando cambie a la función del sintonizador, el monitor se
apagará automáticamente.
2
Pulse r o t para seleccionar una emisora.
La frecuencia cambia con cada pulsación del botón.
Cuando se reciba una emisora, "TUNE" se visualizará durante
2 segundos.
Durante la recepción estéreo por FM se visualizará 1.
1
Cómo buscar rápidamente una emisora (Autobúsqueda)
Mantenga pulsado r o t hasta que la frecuencia empiece
a cambiar rápidamente. Después de sintonizar una emisora, la
búsqueda se detendrá.
Para detener manualmente la búsqueda automática, pulse r
o t.
• La autobúsqueda quizá no pare en emisoras cuyas señales sean
muy débiles.
32
ESPAÑOL
Page 87

PRESINTONIZACIÓN DE
EMISORAS
0-9,+10
BAND
SHIFT
TUNER/
BAND
c
s
a
r,t
La unidad puede almacenar un total de 32 emisoras. Cuando
almacene una emisora, a esa emisora se le asignará un número
de presintonización. Utilice el número de presintonización para
sintonizar directamente una presintonía.
1
Pulse TUNER/B AND para seleccionar una banda,
y pulse r o t para seleccionar una emisora.
r,t
s
a
SINTONIZACIÓN MEDIANTE
PRESINTONÍAS
Utilice el mando a distancia para seleccionar directamente el
número presintonía.
1
Pulse BAND mientras pulsa la tecla SHIFT para
seleccionar una banda.
2
Pulse los botones numerados 0-9 y +10 para
seleccionar un número de presintonía.
Ejemplo:
Para seleccionar la presintonía nº 20, pulse +10, +10 y 0.
Para seleccionar la presintonía nº 15, pulse +10 y 5.
Selección de una presintonía en la unidad principal
Pulse TUNER/BAND para seleccionar una banda. A continuación,
pulse repetidamente c.
Cada vez que se pulse c, se seleccionará el siguiente número
más alto.
Cómo borrar una presintonía
Seleccione el número de presintonía de la emisora que desee
borrar. A contin uación, pulse s, y pulse a a antes de que pasen
4 segundos.
Los números de presintonía superiores de todas las demás
emisoras de la banda disminuirán también en uno.
RECEPCIÓN
DE LA RADIO
2
Pulse a para almacenar la emisora.
A las emisoras de cada banda se les asigna un número de
presintonización en orden consecutivo empezando por el 1.
Número de presintonía
3
Repita los pasos 1 y 2.
La siguiente emisora no se almacenará si ya se ha almacenado
un total de 32 presintonías entre todas las bandas.
NOTA
"FULL" aparece en pantalla si intenta almacenar más de 32
presintonías.
E
ESPAÑOL
33
Page 88
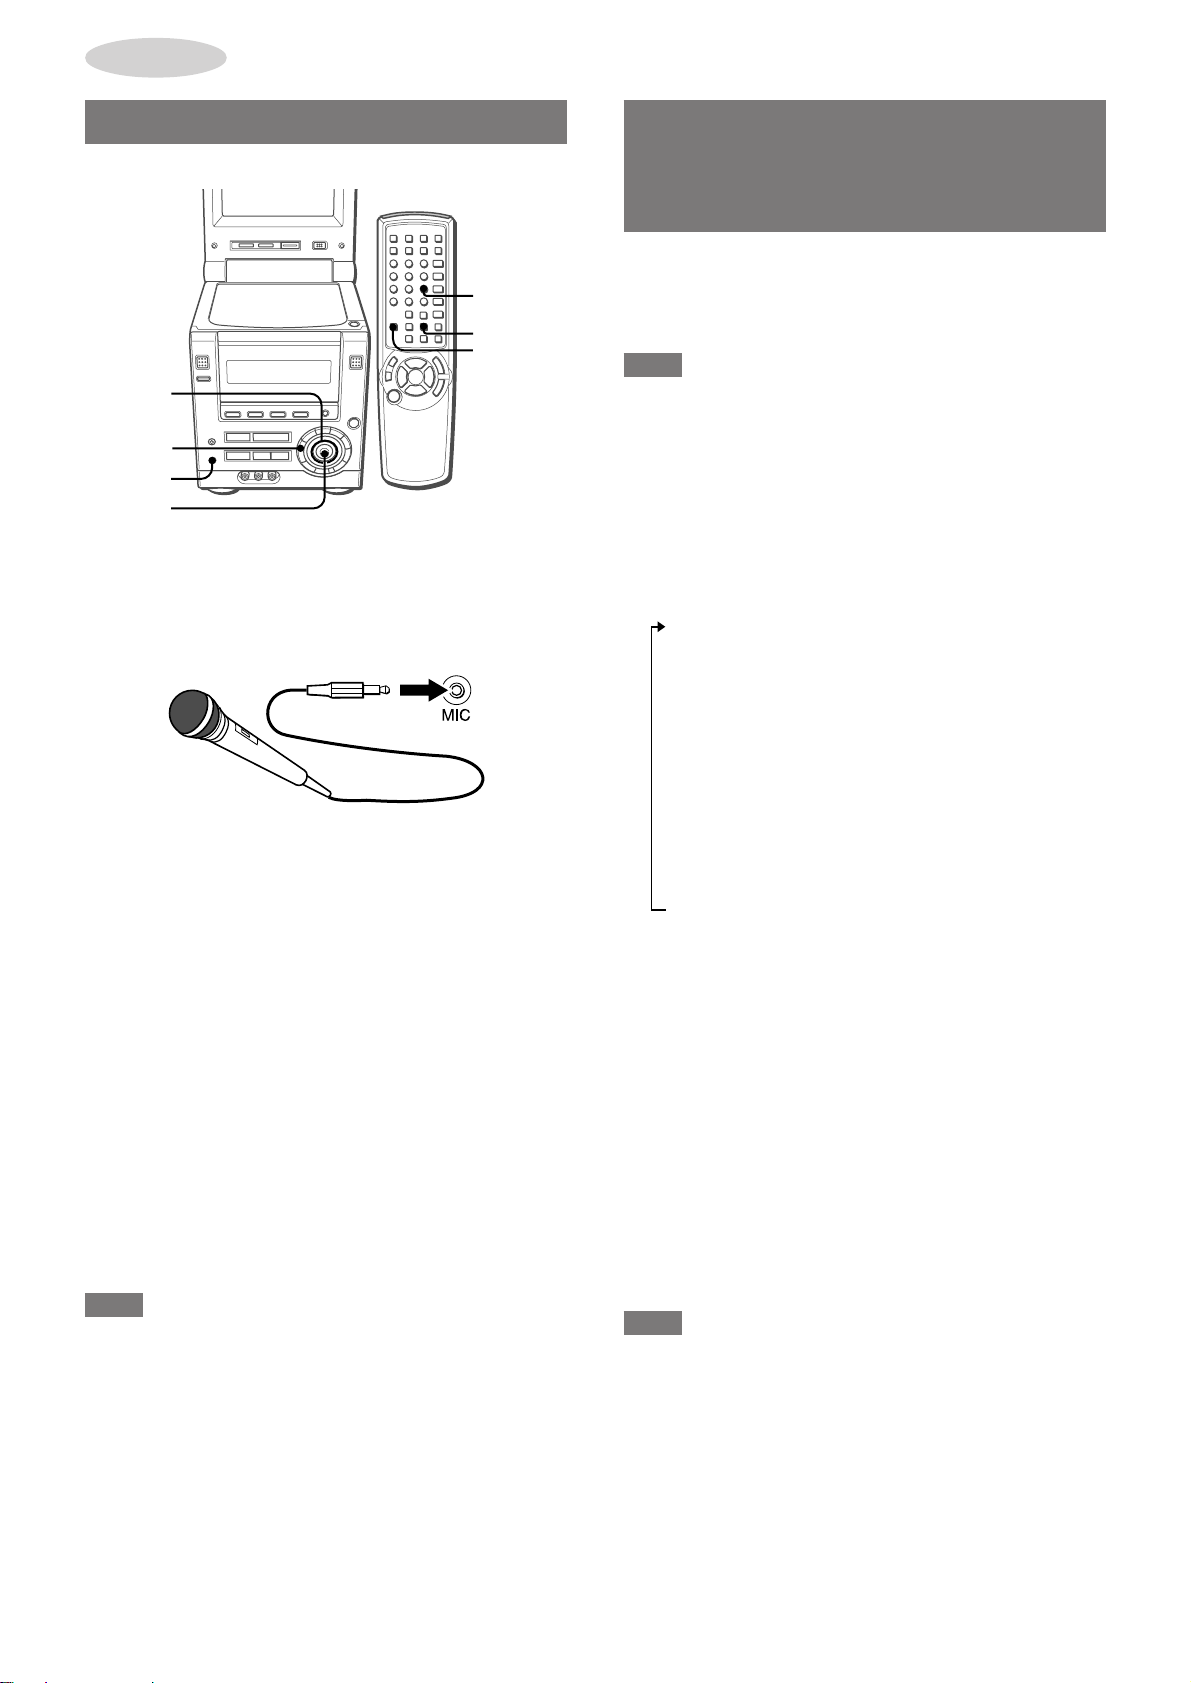
KARAOKE
MEZCLA MICROFÓNICA
KARAOKE
ENTER
SHIFT
CURSOR
MODE
MIC
ENTER
A esta unidad se podrá conectar un micrófono (no suministrado),
para que pueda cantar acompañado por la reproducción de fuente
musicales.
Utilice un micrófono con miniclavija (ø3,5 mm).
1
Conecte su micrófono a la toma MIC.
2
Pulse uno de los botones de función para
seleccionar la fuente de sonido que vaya a ser
mezclada y, a continuación, reprodúzcala.
3
Ajuste el volumen y el tono de la fuente de sonido.
4
Ajuste el volumen del micrófono.
Pulse repetidamente MODE hasta que "MIC" aparezca en
pantalla y antes de que pasen 6 segundos, mueva CURSOR
i o k para ajustar el volumen del micrófono.
El volumen del micrófono puede ajustarse a "OFF" (micrófono
apagado), de 1 a 6 y a "MAX" (máximo).
5
Ajuste el volumen del eco.
Pulse repetidamente MODE hasta que "ECHO" aparezca en
pantalla y, antes de que pasen 6 segundos, mueva CURSOR
i o k para ajustar el volumen del eco.
El volumen del eco puede ajustarse a "OFF" (efecto echo
desactivado), de 1 a 6 y a "MAX" (máximo).
FUNCIONES DE
DESVANECIMIENTO DE VOZ/
MULTIPLEX
Esta unidad puede utilizar disco como fuentes de karaoke.
Utilice la función de desvanecimiento de voz para discos normales.
Utilice la función múltiplex para discos compactos multiaudio de
karaoke.
NOTA
Para utilizar discos DVD de karaoke, consulte "CÓMO USAR
DISCOS DVD DE KARAOKE" en la página 35.
1
Pulse repetidamente MODE hasta que "VF OFF"
aparezca en pantalla.
2
Antes de que pasen 6 segundos, m ueva CURSOR
i o k para seleccionar la función de
desvanecimiento de voz o la función multiplex.
Mover CURSOR i cambia la función cíclicamente de la
manera siguiente y viceversa si lo mueve k:
1 VF OFF (sin desvanecimiento de voz)
2 VF (desvanecimiento de voz activado)
3 Auto-VF (desvanecimiento de voz automático)
Cuando haya una entrada de sonido del micrófono,
la unidad activará el modo VF. Cuando no haya
ninguna entrada de sonido desde el micrófono,
cambiará al modo VF OFF automáticamente.
4 MPX-Lch/Rch (función multiplex - canal izquierdo/
derecho)
Cuando se seleccione "MPX-Lch", sólo se oirá sonido
desde el canal izquierdo.
Cuando se seleccione "MPX-Rch", sólo se oirá sonido
desde el canal derecho.
Para cambiar el canal, pulse ENTER mientras "MPXLch" o "MPX-Rch" aparecen en pantalla.
5 Auto-MPX (función de multiplex automático)
Normalmente, la función multiplex está desactivada.
Cuando el nivel de entrada de sonido del micrófono
alcanza cierto valor, la unidad cambia al modo
MPX-Lch o MPX-Rch.
Nota acerca del modo "Auto-VF" y del "Auto-MPX"
Puede cambiar el período de tiempo hasta que la unidad cambia
automáticamente al modo VF o al modo MPX.
Mientras "Auto-VF" o "Auto-MPX" aparezcan en pantalla, pulse
ENTER para que "FAST" o "SLOW" aparezcan en pantalla.
Seleccione "F AST" de modo que la unidad cambie al modo VF o
al modo MPX en un período de tiempo más breve.
Seleccione "SLOW" de modo que la unidad cambie al modo VF o
al modo MPX en un período de tiempo más largo.
Cuando no se utilice el micrófono
Ponga el volumen del micrófono a "OFF" y saque el micrófono de
la toma MIC.
NOTA
• Si el micrófono se acerca demasiado a los altavoces, quizá se
produzcan chirridos. En estos casos, separe el micrófono de
los altavoces o disminuya el volumen del micrófono.
• Si el sonido del micrófono es extremadamente alto, quizá se
distorsione. En este caso, disminuya el volumen del micrófono.
• El volumen del micrófono y del eco se ponen en OFF cuando se
cambia la función o la unidad se apaga.
Micrófonos recomendados
Se recomienda utilizar micrófonos tipo unidireccional para evitar
chirridos. Póngase en contacto con su vendedor de productos
AIWA para si necesita más detalles.
34
ESPAÑOL
Cómo operar con el mando a distancia
Pulse repetidamente KARAOKE mientras pulsa la tecla SHIFT
para seleccionar la función de desvanecimiento de voz o la función
multiplex.
NOTA
• Las funciones de karaoke tal vez no funcionen correctamente
con los siguientes tipos de discos.
- Los grabados con sonido mono
- Los grabados con ecos fuertes
- Los grabados con la parte vocal grabada en la banda de sonido
derecho o izquierdo.
• Mientras la función karaoke esté activada, la salida de sonido
será monofónica.
• La función de desvanecimiento de voz se pone en "VF OFF"
cuando la función se cambia o la unidad se apaga.
Page 89

AUDIO SELECT
FUNCIÓN DE CONTROL CON
CÓMO USAR DISCOS DVD DE
TECLA
La clave del sonido de reproducción puede ajustarse en
incrementos de 4 hacia arriba (+1 a +4) o hacia abajo (–1 a –4).
El intervalo de cada incremento es un medio tono.
Pulse repetidamente MODE hasta que "KEY" aparezca en pantalla
y antes de que pasen 6 segundos, mueva CURSOR i o k.
NOTA
La clave se pone en "±0" cuando la función se cambia o la unidad
se apaga.
KARAOKE
1
Siga los pasos de "MEZCLA MICROFÓNICA" para
preparar la fuente de sonido y el micrófono.
2
Pulse repetidamente AUDIO SELECT durante la
reproducción para seleccionar el audio de
karaoke.
Con cada pulsación, el canal de audio activo cambia entre los
que se encuentren disponibles.
KARAOKE
Ejemplo: Un disco con 2 pistas de audio (pistas 1 y 2), y la
pista 1 tiene 2 canales de voz.
1/2 KARAOKE
1/2 KARAOKE
VOCAL1
1/2 KARAOKE
VOCAL2
1/2 KARAOKE
VOCAL1+2
2/2 h
E
Los canales de audio disponibles cambian según el disco de
karaoke. Consulte las instrucciones del disco si necesita más
detalles.
ESPAÑOL
35
Page 90

RELOJ Y
r,t
SLEEP
SHIFT
r,t
CURSOR
TEMPORIZADOR
AJUSTE DEL RELOJ
CLOCK
i/k
ENTER
SHIFT
CURSOR
s
a
r,t
ENTER
1
Pulse a o ENTER mientras la unidad está
apagada.
Alternativamente, pulse CLOCK mientras pulsa la tecla SHIFT
con la unidad encendida o apagada.
Verá aparecer el reloj en pantalla. (O el reloj aparecerá más
brillante.)
r,t
s
a
Si parpadea la visualización del reloj
Si parpadea la visualización cuando se visualiza el reloj, esto
indica que el reloj se ha detenido debido a un fallo en la
alimentación o a la desconexión del cable de alimentación.
Deberá volver a ajustar la hora actual.
AJUSTE DEL TEMPORIZADOR
DE APAGADO
Cuando se encienda el cable de alimentación en la toma de
corriente CA por primera vez después de la adquisición de la
unidad o cuando la configuración del reloj se cancele debido a
un fallo en la alimentación, toda la pantalla del reloj parpadeará.
2
Antes de que pasen 4 segundos, comience a
ajustar la hora.
Pulse r o t.
Alternativamente, mueva CURSOR en la unidad principal i o
k, o pulse i/k en el mando a distancia.
Mantener pulsados estos botones hará que la hora varía en
unidades de 10 minutos.
3
Pulse a o ENTER.
El reloj comienza a contar desde los 00 segundos.
Cuando el reloj se ajuste por primera vez después de la
adquisición de la unidad
Se borrará todo lo que haya en la pantalla.
Esto se debe a que el modo de ahorro de energía está activado.
No se trata de un mal funcionamiento.
El modo de ahorro de energía puede cancelarse. Consulte la
página 10 si necesita más detalles.
Cómo visualizar el reloj cuando aparezca visualizada otra
pantalla
Pulse CLOCK mientras pulsa la tecla SHIFT del mando a
distancia. La hora aparecerá durante 4 segundos y, a continuación,
la pantalla original reaparecerá.
La unidad se puede apagar automáticamente a la hora
especificada.
1
Pulse SLEEP mientras pulsa la tecla SHIFT.
Alternativamente, pulse MODE en la unidad principal
repetidamente hasta que "SLEEP" aparezca en pantalla.
2
Antes de que pasen 4 segundos, pulse r o t
para especificar el tiempo después del cual se
apagará la unidad.
Alternativamente, mueva CURSOR en la unidad principal i o
k.
La hora cambia entre 5 y 240 minutos en incrementos de 5
minutos.
Hora especificada
Cómo comprobar el tiempo restante hasta que se apague
la unidad
Pulse una vez SLEEP mientras pulsa la tecla SHIFT. El tiempo
restante se visualizará durante 4 segundos.
Cómo cancelar el temporizador para de apagado
Pulse dos veces SLEEP mientras pulsa la tecla SHIFT de modo
que "SLEEP OFF" aparezca en la pantalla de visualización.
Cuando esté operando la unidad desde la unidad principal, pulse
MODE repetidamente hasta que "SLEEP"aparezca en pantalla.
A continuación, mueva CURSOR i o k para que "SLEEP OFF"
aparezca en pantalla.
Cómo cambiar al estándar de 24 horas
Pulse CLOCK mientras pulsa SHIFT en el mando a distancia y, a
continuación pulse s pasen 4 segundos.
Repita el mismo procedimiento para regresar al modo de 12 horas.
En el estándar de 12 horas, "AM 12:00" indica la medianoche y
"PM 12:00" indica el mediodía.
36
ESPAÑOL
Page 91

AJUSTE DEL TEMPORIZADOR
TIMER
i/k
ENTER
POWER
CURSOR
MODE
a
r,t
ENTER
La unidad puede encenderse a la hora especificada todos los
días gracias al temporizador incorporado.
Preparación
Asegúrese de que la hora del reloj sea correcta.
1
Pulse uno de los botones de función para
seleccionar una fuente.
Si se pulsa TUNER/BAND, la banda y la emisora tendrán que
seleccionarse más tarde, en el paso 8.
2
Pulse repetidamente TIMER mientras pulsa la tecla
SHIFT en el mando a distancia hasta que y
"TIMER PLAY" aparezcan en la pantalla de
visualización.
Alternativamente, pulse repetidamente MODE en la unidad
principal hasta que "TIMER OFF" aparezca en pantalla y, a
continuación, mueva CURSOR i o k de modo que aparezca
"TIMER PLAY".
3
Antes de que pasen 4 segundos, pulse ENTER o
a.
El nombre de la fuente de audio y de la hora parpadean
alternadamente.
4
Pulse r o t para configurar la hora de
activación del temporizador y, a continuación,
pulse ENTER o a.
Mantener r o t pulsados hará que varíe la hora en
unidades de 10 minutos.
Alternativamente, mueva CURSOR en la unidad principal i o
k.
5
Antes de que pasen 4 segundos, pulse r o
t para seleccionar la duración del período de
activación del temporizador.
Alternativamente, mueva CURSOR en la unidad principal i o
k.
La duración puede ajustarse entre 5 y 240 minutos en
incrementos de 5 minutos.
SHIFT
r,t
POWER
a
Período activado por el temporizador
6
Antes de que pasen 4 segundos, pulse ENTER o
a.
7
Ajuste el volumen.
El sonido de la fuente se reproducirá al nivel de sonido ajustado
en este paso cuando la unidad sea encendida por el
temporizador.
Sin embargo, si el nivel del sonido se ajusta a 21 o más, éste
se ajustará automáticamente a 20 cuando se encienda la
unidad.
8
Prepare la fuente.
Para reproducir un disco, cargue el disco que desee
reproducir.
Para escuchar la radio, seleccione la banda y sintonice la
emisora.
Para reproducir equipo externo, configure el temporizador
del equipo conectado (con un temporizador externo) y prepare
la reproducción.
9
Pulse POWER para apagar la unidad.
Cuando llegue la hora de activación del temporizador, la unidad
se encenderá y comenzará la reproducción de la fuente
seleccionada.
Cómo comprobar el ajuste del temporizador
Pulse TIMER mientras pulsa la tecla SHIFT en el mando a
distancia.
La fuente seleccionada, la hora de activación del temporizador y
la duración del período de activación del temporizador aparecerán
en pantalla durante 4 segundos.
Cómo cambiar cualquiera de los ajustes anteriores
Configure de nuevo el temporizador desde el principio.
Cómo cancelar temporalmente el modo de standby del
temporizador
Pulse repetidamente TIMER mientras pulsa la tecla SHIFT en el
mando a distancia para que
aparezca en pantalla.
Para regresar al modo de espera del temporizador, púlselo de
nuevo para que
Cuando esté operando la unidad desde la unidad principal, pulse
MODE repetidamente hasta que "TIMER PLAY" aparezca en
pantalla. A continuación, mueva CURSOR i o k para que
"TIMER OFF" aparezca en pantalla y, a continuación pulse
ENTER.
Utilización de la unidad mientras esté ajustado el
temporizador
Podrá utilizar normalmente la unidad después de ajustar el
temporizador.
Antes de apagarla, lleve a cabo los pasos 7 y 8.
NOTA
• La reproducción y la grabación con temporizador no comenzarán
si no se apaga la unidad.
• El equipo conectado no se podrá encender ni apagar con el
temporizador incorporado de esta unidad. Utilice en este caso
un temporizador externo.
• Para realizar una reproducción con temporizador en un DVD,
ponga Disc Resume en OFF (consulte "REANUDACIÓN DE LA
REPRODUCCIÓN DE DISCOS" en la página 47).
• La reproducción con temporizador no puede realizarse con
ciertos DVDs.
aparezca en pantalla.
desaparezca y "TIMER OFF"
RELOJ Y
TEMPORIZADOR
E
ESPAÑOL
37
Page 92

OTRAS
CONEXIONES
CONEXIÓN DE UN EQUIPO
OPCIONAL
AUDIO IN
VIDEO IN
SUPER WOOFER
AUX IN
LINE OUT
S-VIDEO OUT
VIDEO OUT
DIGITAL AUDIO OUT
(OPTICAL)
Consulte el manual de instrucciones del equipo conectado si
necesita más detalles.
• Los cables de conexión no se suministran. Deberá adquirir los
cables de conexión necesarios por separado.
• Consulte a su vendedor de productos AIWA local si necesita
equipo opcional.
TOMAS AUDIO IN (DELANTERAS)
TOMAS AUX IN (TRASERAS)
En esta unidad se pueden introducir señales de sonido analógico
a través de estas tomas.
Utilice un cable con fonoconectores RCA para conectar equipo
de audio (giradiscos, reproductores de discos láser, reproductores
de minidiscos, vídeograbadoras, televisores, etc.).
Conecte el fonoconector rojo a la toma R (derecha) y el blanco a
la toma L (izquierdo).
Cuando conecte un giradiscos
Utilice un giradiscos AIWA equipado con amplificador ecualizador
incorporado.
TOMA VIDEO IN
A través de esta toma pueden introducirse señales de vídeo.
Utilice fonoconectores RCA para conectar la toma de salida de
vídeo del equipo de vídeo (vídeograbadora, reproductores de
discos láser, etc.).
TOMA S-VIDEO OUT
A través de esta toma pueden extraerse señales de S-video.
Utilice un cable de S-video para conectar a la toma de entrada de
S-video del equipo de vídeo (vídeograbadoras, televisor, etc.).
NOTA
• Cuando tenga conectado un televisor externo, no coloque el
televisor cerca de la unidad, ya que de lo contrario el sonido y la
imagen de la unidad pueden sufrir distorsiones.
• Asegúrese de que conecta la toma S-VIDEO OUT directamente
al televisor , no a través de una vídeogr abadora u otro equipo de
vídeo. de lo contrario, pueden aparecer distorsiones en las
imágenes al reproducir DVDs con protección en la reproducción.
TOMA DIGITAL AUDIO OUT (OPTICAL)
A través de esta toma pueden extraerse señales de sonido digital
del reproductor de discos a través de esta toma. Utilice un cable
óptico para conectar equipo de audio digital (platina de cinta
audiodigital, grabadora de minidiscos, etc.).
Quite la caperuza anti-polvo a de la toma DIGIT AL A UDIO OUT
(OPTICAL). A continuación, conecte la clavija del cable óptico a
la toma DIGITAL AUDIO OUT (OPTICAL).
Cuando no se utilice la toma DIGITAL AUDIO OUT
(OPTICAL)
Coloque la caperuza anti-polvo suministrada.
Al conectar una grabadora de minidiscos
Cuando conecte una grabadora de minidiscos utilizando la toma
DIGITAL AUDIO OUT (OPTICAL), asegúrese de configurar
"Digital Stream" en "Down Mix PCM" (consulte
"CONFIGURACIÓN DE LA SALIDA DE A UDIO" en la página 43).
• Tal vez no sea posible grabar a un minidisco con ciertos tipos
de discos.
Notas acerca de la conexión a amplificadores externos
Esta unidad puede reproducir discos grabados con el sistema
Dolby Digital y el sistema DTS Digital Surround.
Para reproducir discos grabados con el sistema Dolby Digital,
esta unidad necesita ser conectada a un decodificador Dolby
Digital o a un amplificador equipado con un decodificador Dolby
Digital a través de la toma DIGITAL AUDIO OUT (OPTICAL).
Para reproducir discos grabados con el sistema DTS Digital
Surround, esta unidad necesita ser conectada a un decodificador
DTS o a un amplificador equipado con un decodificador DTS a
través de la toma DIGITAL AUDIO OUT (OPTICAL).
Cuando haga la conexión a este tipo de decodificador o a un
amplificador equipado con decodificador, el ajuste de la salida de
audio deberá cambiarse correctamente al hacer la configuración
del DVD (consulte "CONFIGURA CIÓN DE LA SALIDA DE A UDIO"
en la página 43).
TOMAS LINE OUT
En esta unidad se pueden extraerse señales de sonido analógico
a través de estas tomas.
Utilice un cable con fonoconectores RCA para conectar equipo
de audio.
Conecte el fonoconector rojo a la toma LINE OUT R (derecho) y
el fonoconector blanco a la toma LINE OUT L (izquierda).
TOMA VIDEO OUT
A través de esta toma pueden extraerse señales de vídeo.
Utilice fonoconectores RCA para conectar la toma de salida de
vídeo del equipo de vídeo (vídeograbadora, televisor, etc.).
38
ESPAÑOL
PRECAUCIONES AL CONECTAR EL EQUIPO A LA TOMA
DIGITAL AUDIO OUT (OPTICAL)
Si el ajuste de la salida de audio de la configuración del DVD no
es apropiado en su caso, tratar de reproducir un DVD puede
producir un nivel alto de ruido que podría ocasionar lesiones
auditivas que podrían dañar sus oídos y estropear los altavoces.
Lea y siga cuidadosamente las instrucciones de
"CONFIGURACIÓN DE LA SALIDA DE AUDIO" de la página 43.
Si no se está conectando a decodificadores Dolby Digital o DTS
ni a amplificadores equipados con decodificador, o si no se está
conectando a amplificadores externos, no necesitará cambiar el
ajuste de salida de audio establecido por defecto en fábrica.
TOMA 3 SUPER WOOFER
Puede conectar un realzador de graves opcional con amplificador
incorporado a esta toma.
Page 93

AUDICIÓN DE FUENTES DE
VISUALIZACIÓN DE IMÁGENES
SONIDO EXTERNAS
VIDEO AUX
CÓMO REPRODUCIR EQUIPO
CONECTADO A LAS TOMAS AUDIO IN
1
Pulse VIDEO.
Verá aparecer "VIDEO" en la pantalla de visualización.
2
Inicie la reproducción del equipo conectado.
NOTA
Cuando conecte una fuente de sonido monofónica, conéctela bien
a la toma AUDIO IN L (canal izquierdo) o AUDIO IN R (canal
derecho). El sonido sólo se oirá de la unidad de altavoz
correspondiente a la toma utilizada.
PROVENIENTES DE UNA
FUENTE EXTERNA
MOITOR ON/OFF
VIDEO
Para visualizar imágenes reproducidas en el equipo conectado a
la toma VIDEO IN, pero utilizando la pantalla del monitor de esta
unidad, siga estas instrucciones:
1
Pulse VIDEO.
Verá aparecer "VIDEO" en la pantalla de visualización.
2
Abra el monitor y pulse MONITOR ON/OFF para
encender el monitor si estaba apagado.
3
Inicie la reproducción del equipo conectado.
NOTA
Para escuchar el sonido reproducido por la fuente externa,
conéctelo también a las tomas AUDIO IN de esta unidad.
OTRAS
CONEXIONES
E
CÓMO REPRODUCIR EQUIPO
CONECTADO A LAS TOMAS AUX IN
1
Pulse AUX.
Verá aparecer "AUX" en la pantalla de visualización.
2
Inicie la reproducción del equipo conectado.
Cómo ajustar el nivel de volumen del equipo conectado
Para ajustar el nivel de volumen del equipo conectado a las tomas
AUDIO IN, pulse VIDEO y, a continuación, pulse r o t
repetidamente.
Para ajustar el nivel de volumen del equipo conectado a las tomas
AUX IN, pulse AUX y, a continuación, pulse r o t
repetidamente.
El nivel de volumen puede ajustarse en 8 pasos, desde MIN
(mínimo) a MAX (máxímo).
ESPAÑOL
39
Page 94

CÓMO PERSONALIZAR LA
ENTER
DVD/CD
SET UP
i/k
ENTER
SET UP
vRETURN
vRETURN
CURSOR
(i/k)
CONFIGURACIÓN DEL DVD
Pueden cambiarse según se necesiten o se prefiera varios de los
valores por defecto relacionados con el reproductor de discos, la
pantalla del monitor incorporada y la pantalla del televisor externa.
MENÚ DE CONFIGURACIÓN:
GENERALIDADES
Siete son las características principales del menú que pueden
ajustarse. Su función es la siguiente:
1
Menú en pantalla (página 41)
• Activa o desactiva la guía en pantalla.
• Selecciona el color de fondo de la pantalla del monitor.
2
Idiomas de los discos (página 42)
Selecciona el idioma preferido para la banda de sonido, el
idioma del subtítulo y el idioma de la pantalla de menú para la
reproducción del DVD.
3
Configuración de la salida de audio (página 43)
Ajusta el tipo de salida de señal de la toma DIGITAL AUDIO
OUT (OPTICAL) y de las tomas LINE OUT.
4
Aspecto de la imagen en el televisor (página 45)
Configura la relación del aspecto de la señal de vídeo enviada
al televisor conectado.
5
Límite de tolerancia de visionado a menores
(página 46)
Establece el límite de tolerancia de visionado a menores para
los DVDs que se reproducirán en esta unidad cuando se
reproduzcan discos con codificación de nivel de restricción.
Cuando los discos incluyan escenas con un nivel excesivo de
violencia, por ejemplo, este valor podrá utilizarse para cortar
esas escenas o para desactivar la reproducción, dependiendo
del disco.
6
Control de la reproducción (página 47)
Establece su valor preferido (activado o desactivado) para la
función PBC (Playback Control) para los discos compactos de
vídeo.
7
Reanudación de la reproducción de discos
(página 47)
Configura si la memoria de reanudación de la reproducción de
discos se guardará después de haber apagado la unidad, haber
abierto la puerta del compartimento de discos, o de haber
cambiado de función.
Los valores "Audio Output Setting" y el "TV Aspect" necesitan
ser configurados específicamente para que se adecuen a la
configuración de su equipo conectado.
• Puede ser necesario cambiar los valores por defecto "Digital
Stream" (Banda digital) y "dts Output" de la opción "Audio Output
Setting" (Configuración de la salida de audio)
un decodificador o amplificador externos
En caso contrario, no cambie su valor por defecto.
• El valor por defecto de TV Aspect (Aspecto del televisor) deberá
cambiarse
si el tamaño de la pantalla del televisor es el
convencional (4:3).
Todos los demás valores pueden cambiarse o dejarse como
están, según prefiera.
sólo si va a conectar
.
OPERACIONES BÁSICAS
1
Pulse DVD/CD.
Si se inicia la reproducción del disco que hay cargado,
deténgalo.
2
Pulse SET UP.
Verá aparecer la pantalla de configuración.
SETUP MENU
Choice The Item ik
1
On-screen Menu
2
Disc Languages
3
Audio Output Setting
4
TV Aspect
5
Ratings
6
P B C
7
Disc Resume
ENTER : Choice item SETUP : Completion
3
Use i/k para mover el cursor (área resaltada
amarilla) al ajuste que desee cambiar.
4
Pulse ENTER.
La pantalla de menús para el elemento que usted seleccione
aparecerá en pantalla.
5
Use i/k para mover el cursor al ajuste que desee.
6
Pulse ENTER para introducir su selección.
Se guardará el ajuste seleccionado, y la pantalla de
visualización volverá a ser la de la pantalla de configuración
principal del paso 2.
Sin embargo, para algunos ajustes, en la pantalla aparecerá
un menú más detallado. Siga las instrucciones mostradas en
la pantalla.
7
Pulse SET UP para salir del menú de
configuración.
Cómo regresar a la pantalla anterior
Pulse vRETURN.
Cómo salir del menú de configuración
Pulse SET UP.
Cómo confirmar su ajuste
1 Siga los pasos 1 a 4 anteriores para que el ajuste que desee
confirmar aparezca en pantalla.
2 Pulse SET UP para salir del menú de configuración sin hacer
ningún cambio.
16 : 9 S1/S2
Level 8
O N
O F F
40
ESPAÑOL
NOTA
• Si pulsa vRETURN o SET UP antes de pulsar ENTER para
introducir su selección, regresará a la pantalla anterior o saldrá
del menú de configuración, respectivamente, sin guardar su
selección.
• Abrir la puerta del compartimento del disco provocará la salida
del menú de configuración sin guardar su selección.
Page 95

MENÚ EN PANTALLA
Hay 2 elementos que usted puede ajustar.
FONDO
"Background" establece el color de f ondo de la pantalla del monitor
o de la pantalla del televisor conectada durante el modo de parada.
El ajuste predeterminado es "Wallpaper" (Papel).
MENSAJES GUÍA
"Guide Message" establece si la visualización de guía en pantalla
va a mostrarse o no en el lado superior derecho de la pantalla del
monitor o de la pantalla del televisor conectada.
El ajuste predeterminado es "ON".
1 Seleccione "On-screen Menu" empleando i/k en el menú
de configuración. A continuación, pulse ENTER.
2 Use i/k para mover el cursor a "Guide Message".
On-screen Menu
Choice The Item ik
12Guide Message
Background
ENTER : Choice item
SETUP : Completion
3 Pulse ENTER.
4 Use i/k para mover el cursor a la configuración que
desee.
Guide Message
Choice The Item ik
12Guide Message
Guide Message
O N
Wall Paper
RETURN : Previous menu
O N
O F F
1 Seleccione "On-screen Menu" empleando i/k en el menú
de configuración. A continuación, pulse ENTER.
2 Use i/k para mover el cursor a "Background".
On-screen Menu
Choice The Item ik
12Guide Message
Background
ENTER : Choice item
SETUP : Completion
O N
Wall Paper
RETURN : Previous menu
3 Pulse ENTER.
4 Use i/k para mover el cursor a la configuración que
desee.
Background
Choice The Item ik
1
Wall Paper
2
Black
3
Blue
4
Green
5
Yellow
6
Orange
7
Magenta
ENTER : Choice item
SETUP : Completion
RETURN : Previous menu
5 Pulse ENTER.
Se guarda el valor que haya seleccionado.
6 Pulse vRETURN para regresar a la pantalla anterior o
pulse SET UP para salir del menú de configuración.
CÓMO PERSONALIZAR LA
CONFIGURACIÓN DEL DVD
ENTER : Choice item
SETUP : Completion
RETURN : Previous menu
5 Pulse ENTER.
Se guarda el valor que haya seleccionado.
6 Pulse vRETURN para regresar a la pantalla anterior o
pulse SET UP para salir del menú de configuración.
E
ESPAÑOL
41
Page 96

IDIOMAS DE LOS DISCOS
"Disc Languages" selecciona el idioma preferido de las pistas de
sonido, el idioma de los subtítulos y el idioma de la pantalla de
menús en la reproducción de DVDs.
IDIOMA DEL AUDIO
El ajuste predeterminado es "Original".
1 Seleccione "Disc Languages" usando i/k en el menú de
configuración. A continuación, pulse ENTER.
2 Use i/k para mover el cursor para seleccionar "Audio
Language".
Disc Languages
Choice The Item ik
1
Audio Language
2
Subtitle Language
3
Disc Menu
ENTER : Choice item
SETUP : Completion
3 Pulse ENTER.
4 Use i/k para mover el cursor al idioma deseado y pulse
ENTER.
Audio Languages
Choice The Item ik
1
Original
2
English
3
Japanese
4
Others
ENTER : Choice item
SETUP : Completion
Original: Reproducir discos en el idioma especificado por
defecto en el disco.
English: Reproducir discos en inglés.
Japanese: Reproducir discos en japonés.
Others: Aparecerá la pantalla del código de idioma.
al paso 5.
5 Cuando se seleccione "Others" en el paso 4, introduzca
un código de idioma de cuatro dígitos usando i/k y los
botones numerados.
Consulte la lista de códigos de idioma de la página 50.
Others
Input Language Code
Language Code
ik
jl
0 ~ 9 Code input
ENTER : Confirm
SETUP : Completion
Para mover el cursor, use j o l.
6 Pulse ENTER.
Se guarda el valor que haya seleccionado.
7 Pulse vRETURN para regresar a la pantalla anterior o
pulse SET UP para salir de la pantalla de configuración.
Original
Auto
English
RETURN : Previous menu
RETURN : Previous menu
Vaya al paso 7.
– – – –
Number UP/DOWN
Move the digit cursor
RETURN : Previous menu
Vaya al paso 7.
Vaya al paso 7.
Vaya
IDIOMAS DE LOS SUBTÍTULOS
El ajuste predeterminado es "Auto".
1 Seleccione "Disc Languages" usando i/k en el menú de
configuración. A continuación, pulse ENTER.
2 Use i/k para mover el cursor para seleccionar "Subtitle
Language".
Disc Languages
Choice The Item ik
1
Audio Language
2
Subtitle Language
3
Disc Menu
ENTER : Choice item
SETUP : Completion
3 Pulse ENTER.
4 Use i/k para mover el cursor al idioma deseado y pulse
ENTER.
Subtitle Languages
Choice The Item ik
1
Auto
2
English
3
Japanese
4
Others
ENTER : Choice item
SETUP : Completion
Auto: Cuando "Audio Language" esté configurado en
"Original":
Los subtítulos se visualizarán en el idioma
predeterminado para los subtítulos del disco.
Cuando "Audio Language" esté configurado a un
idioma específico:
• Si existe el idioma de audio especificado en el
disco, el sonido se oirá en ese idioma y no
aparecerá ningún subtítulo.
• Si el idioma de audio especificado no existe en
el disco, los subtítulos aparecerán en el idioma
especificado.
Ejemplo: Cuando "Audio Language" esté
configurado en "English" (inglés)
• Si existe una pista de audio en inglés en el disco,
el sonido se oirá en inglés sin que aparezca
ningún subtítulo.
• Si no hay ninguna pista de audio en inglés en el
disco, el sonido se oirá en el idioma original del
disco, apareciendo los subtítulos en inglés.
English: Aparecerán subtítulos en inglés.
Japanese: Aparecerán subtítulos en japonés.
Others: Aparecerá la pantalla de ajuste de códigos de
idiomas. El procedimiento de ajuste de código de
idioma es el mismo que el de ajuste de "Audio
Language". Consulte los pasos 5 y 6 del ajuste de
"Audio Language".
5 Pulse vRETURN para regresar a la pantalla anterior o
pulse SET UP para salir de la pantalla de configuración.
Si su idioma preferido no existe en el disco, se empleará el idioma
predeterminado del disco.
Original
Auto
English
RETURN : Previous menu
RETURN : Previous menu
Si su idioma preferido no existe en el disco, se empleará el idioma
predeterminado del disco.
42
ESPAÑOL
Page 97

MENÚ DE DISCOS
El ajuste predeterminado es "English".
1 Seleccione "Disc Languages" usando i/k en el menú de
configuración. A continuación, pulse ENTER.
2 Use i/k para mover el cursor para seleccionar "Disc
Menu".
Disc Languages
Choice The Item ik
1
Audio Language
2
Subtitle Language
3
Disc Menu
ENTER : Choice item
SETUP : Completion
3 Pulse ENTER.
4 Use i/k para mover el cursor al idioma deseado y pulse
ENTER.
Disc Menu
Choice The Item ik
1
English
2
Japanese
3
Others
ENTER : Choice item
SETUP : Completion
English: Muestra el menú de discos en inglés.
Japanese: Muestra el menú de discos en japonés.
Others: Aparecerá la pantalla de ajuste de códigos de
idiomas. El procedimiento de ajuste de código de
idioma es el mismo que el de ajuste de "Audio
Language". Consulte los pasos 5 y 6 del ajuste de
"Audio Language".
5 Pulse vRETURN para regresar a la pantalla anterior o
pulse SET UP para salir de la pantalla de configuración.
Original
Auto
English
RETURN : Previous menu
RETURN : Previous menu
2 Use i/k para mover el cursor para seleccionar "Digital
Stream".
Audio Output Setting
Choice The Item ik
1
Digital Stream
2
dts Output
3
Down Mix Type
ENTER : Choice item
SETUP : Completion
Down Mix PCM
OFF
Stereo
RETURN : Previous menu
3 Pulse ENTER.
4 Use i/k para mover el cursor al valor que más se ajuste
a su configuración.
Digital Stream
Choice The Item ik
12Down Mix PCM
DOLBY DIGITAL
ENTER : Choice item
SETUP : Completion
RETURN : Previous menu
Down Mix PCM (Mezcla PCM)
Seleccione esta opción si la unidad está conectada mediante
un cable de fibra óptica
a un amplificador digital que no
disponga de decodificador Dolby Digital incorporado o una
grabadora de minidiscos..
DOLBY DIGITAL
Seleccione esta opción si la unidad está conectada a un
decodificador Dolby Digital, o a un amplificador con un
decodificador Dolby Digital incorporado, mediante un cable de
fibra óptica digital.
5 Pulse ENTER.
Se guarda el valor que haya seleccionado.
6 Pulse vRETURN para regresar a la pantalla anterior o
pulse SET UP para salir de la pantalla de configuración.
CÓMO PERSONALIZAR LA
CONFIGURACIÓN DEL DVD
Si su idioma preferido no existe en el disco, se empleará el idioma
predeterminado del disco.
CONFIGURACIÓN DE LA
SALIDA DE AUDIO
"Audio Output Setting" ajusta el tipo de salida de la señal
procedente de la toma DIGIT AL AUDIO OUT (OPTICAL) y de las
tomas LINE OUT.
Puede ser necesario cambiar los valores por defecto "Digital
Stream" (Banda digital) y "dts Output" de la opción "Audio Output
Setting" (Configuración de la salida de audio)
un decodificador o amplificador externos
En este caso, realice la configuración según el tipo de equipo
conectado.
En caso contrario, no cambie el ajuste predeterminado.
BANDA DIGITAL
"Digital Stream" ajusta el tipo de salida digital de la toma DIGIT AL
AUDIO OUT (OPTICAL) de esta unidad.
El ajuste por predeterminado es "Down Mix PCM".
sólo si va a conectar
.
PRECAUCIÓN
Si el amplificador de AV no dispone de decodificador
Dolby Digital, no seleccione
"
Output Setting
cuando conecte dicho amplificador con
"
DOLBY DIGIT AL" en "Audio
un cable óptico de conexión.
Si intenta reproducir un disco DVD, puede producirse un alto
nivel de ruido que podría ocasionarle lesiones auditivas y
estropear los altavoces. En tal caso, asegúrese de seleccionar
"Down Mix PCM".
E
1 Seleccione "Audio Output Setting" usando i/k en el menú
de configuración. A continuación, pulse ENTER.
ESPAÑOL
43
Page 98

SALIDA DTS
"dts Output" establece la salida dts según el amplificador
conectado disponga de decodificador DTS o no.
El ajuste predeterminado es "dts OFF".
1 Seleccione "Audio Output Setting" usando i/k en el menú
de configuración. A continuación, pulse ENTER.
2 Use i/k para mover el cursor para seleccionar "dts
Output".
Audio Output Setting
Choice The Item ik
1
Digital Stream
2
dts Output
3
Down Mix Type
ENTER : Choice item
SETUP : Completion
3 Pulse ENTER.
4 Use i/k para mover el cursor al valor que más se ajuste
a su configuración.
dts Output
Choice The Item ik
12dts
dts
ENTER : Choice item
SETUP : Completion
dts ON (dts activado)
Seleccione esta opción si la unidad está conectada a un
amplificador que disponga de decodificador DTS.
dts OFF (dts desactivado)
Seleccione esta opción si la unidad está conectada a un
amplificador que no disponga de decodificador DTS.
5 Pulse ENTER.
Se guarda el valor que haya seleccionado.
6 Pulse vRETURN para regresar a la pantalla anterior o
pulse SET UP para salir de la pantalla de configuración.
PRECAUCIÓN
Si el amplificador de AV no dispone de decodificador DTS,
no seleccione "dts ON" en "dts Output" cuando conecte
dicho amplificador con un cable óptico de conexión.
Si intenta reproducir un disco DVD, puede producirse un alto
nivel de ruido que podría ocasionarle lesiones auditivas y
estropear los altavoces. En tal caso, asegúrese de seleccionar
"dts OFF".
Down Mix PCM
OFF
Surround
RETURN : Previous menu
ON
OFF
RETURN : Previous menu
TIPO DE SONIDO DE AUDICIÓN
"Down Mix Type" selecciona el tipo de salida de señal de las tomas
LINE OUT.
Este valor es efectivo solamente cuando hay conectado un
decodificador Dolby Digital o un amplificador con Dolby Digital
incorporado a las tomas LINE OUT.
El ajuste predeterminado es "Surround Mode".
1 Seleccione "Audio Output Setting" usando i/k en el menú
de configuración. A continuación, pulse ENTER.
2 Use i/k para mover el cursor para seleccionar "Down
Mix Type".
Audio Output Setting
Choice The Item ik
1
Digital Stream
2
dts Output
3
Down Mix Type
ENTER : Choice item
SETUP : Completion
3 Pulse ENTER.
4 Use i/k para mover el cursor al valor que más se ajuste
a su preferencia.
Down Mix Type
Choice The Item ik
12Stereo Mode
Surround Mode
ENTER : Choice item
SETUP : Completion
Stereo Mode (Modo estéreo)
Seleccione esta opción para escuchar el sonido con un efecto
estéreo normal.
Surround Mode (Modo Surround)
Seleccione esta opción para escuchar el sonido con efecto
surround.
5 Pulse ENTER.
Se guarda el valor que haya seleccionado.
6 Pulse vRETURN para regresar a la pantalla anterior o
pulse SET UP para salir de la pantalla de configuración.
Down Mix PCM
OFF
Surround
RETURN : Previous menu
RETURN : Previous menu
NOTA
Cuando reproduzca un disco compatible con DTS Digital Surround
mientras "dts Output" está configurado a "dts ON", no se oirá
sonido de ningún altavoz de la unidad ni de los auriculares
conectados a la toma PHONES.
44
ESPAÑOL
Page 99

ASPECTO DE LA IMAGEN EN EL
TELEVISOR
"TV Aspect" configura el aspecto de la salida de la señal de vídeo
a su televisor.
Hay 2 opciones.
El ajuste predeterminado es "16:9 (WIDE TV):S1".
Si su televisor tiene una pantalla panorámica (16:9), necesitará
cambiar el ajuste predeterminado. Consulte "TV PANORÁMICA".
Si su televisor tiene una pantalla de tamaño convencional
(4:3), consulte "TV NORMAL". Es preferible cambiar de ajuste.
TV PANORÁMICA
1 Seleccione "TV Aspect" usando i/k en el menú de
configuración. A continuación, pulse ENTER.
2 Use i/k para mover el cursor a "WIDE TV 16:9".
TV Aspect
Choice The Item ik
12NORMAL TV
WIDE TV
ENTER : Choice item
SETUP : Completion
3 Pulse ENTER.
4 Use i/k para mover el cursor al ajuste adecuado.
TV Aspect
Choice The Item ik
12Forcibry S-Video Output to S1
Automatically Selected to S1 / S2
Choice the Output S-Video mode
ENTER : Choice item
SETUP : Completion
Forcibly S-Video Output to S1 (Forzar salida S-Video a S1)
Seleccione esta opción cuando conecte a
compatible con S2.
4 : 3
16 : 9
RETURN : Previous menu
16 : 9
RETURN : Previous menu
un televisor no
TV NORMAL
1 Seleccione "TV Aspect" usando i/k en el menú de
configuración. A continuación, pulse ENTER.
2 Use i/k para mover el cursor a "NORMAL TV 4:3".
TV Aspect
Choice The Item ik
12NORMAL TV
WIDE TV
ENTER : Choice item
SETUP : Completion
3 Pulse ENTER.
4 Use i/k para mover el cursor al ajuste adecuado.
TV Aspect 4 : 3
Choice The Item ik
12LETTER BOX
PAN & SCAN
Choice the TV Mode
ENTER : Choice item
SETUP : Completion
LETTER BOX (Buzón)
Los materiales grabados en formato panorámico (16:9) se
reproducirán en estilo "buzón", con bandas negras en las partes
superior e inferior de la pantalla.
PAN & SCAN (Panoramizar y escanear)
Los materiales grabados en formato panorámico (16:9) se
reproducirán en la altura completa de la pantalla, con las partes
derecha e izquierda cortadas (materiales que contengan
codificación pan-scan). Los otros materiales se reproducirán
en estilo "buzón".
4 : 3
16 : 9
RETURN : Previous menu
RETURN : Previous menu
CÓMO PERSONALIZAR LA
CONFIGURACIÓN DEL DVD
E
Automatically Selected to S1/S2 (Seleccionado
automáticamente a S1/S2)
Seleccione esta opción cuando conecte a
un televisor
compatible con S2. La relación longitud-anchura cambia
automáticamente de acuerdo con el disco que se esté
reproduciendo.
5 Pulse ENTER.
Se guarda el valor que haya seleccionado.
6 Pulse SET UP para salir de la pantalla de configuración.
NOTA
La pantalla no cambiará al formato panorámico si su televisor no
está conectado a través de la toma S-VIDEO OUT.
5 Pulse ENTER.
Se guarda el valor que haya seleccionado.
6 Pulse SET UP para salir de la pantalla de configuración.
ESPAÑOL
45
Page 100

LÍMITE DE TOLERANCIA DE
VISIONADO A MENORES
"Ratings" ajusta el límite de clasificación permitido para reproducir
en esta unidad discos con codificación de nivel de restricción.
CÓMO AJUSTAR EL LÍMITE DE
TOLERANCIA
El ajuste predeterminado es "Level 8" (Nivel 8).
1 Seleccione "Ratings" usando i /k en el menú de
configuración. A continuación, pulse ENTER.
2 Use i/k para mover el cursor al nivel que le gustaría
establecer.
A menor sea el número, más alto será el nivel de restricción.
Por ejemplo, al ajustar el nivel de clasificación en 1 se prohibirá
la reproducción de todos los discos con un nivel de clasificación
entre el 2 y el 8, bien cortando algunas escenas o desactivando
completamente la reproducción, dependiendo del disco.
Compruebe su disco si necesita más detalles.
Rating
Choice The Item ik
Level
8
7
6
5
4
3
2
1
ik
jl
0 ~ 9 Code input
No Limit (for Adult)
Max Limit (for Family)
RETURN : Previous menu
RETURN : Previous menu
– – – –
Number UP/DOWN
Move The digit cursor
RETURN : Previous menu
Level
Level
Level
Level
Level
Level
Level
ENTER : Choice item
SETUP : Completion
3 Pulse ENTER.
4 Use i/k para mover el cursor y seleccionar el código de
país.
Country Code
Choice The Item ik
1
USA
2
CHINA
3
GERMANY
4
UNITED KINGDOM
5
JAPAN
6
Other Country
ENTER : Choice item
SETUP : Completion
El código del país necesita seleccionarse correctamente porque
el sistema de clasificación y tolerancia de visionado para los
menores varía de país a país.
Cuando seleccione "Other Country" (Otro país) como código
de país, la pantalla de visualización cambiará para aceptar
números de 4 dígitos. Introduzca el código de país de 4 dígitos,
mostrado en la página 48 de la misma forma que se introduce
el código de idioma (página 42).
NOTA
El código de país es diferente del código de idioma mencionado
anteriormente.
Ejemplo: el código de país para los "Estados Unidos" es
"8583".
5 Pulse ENTER.
Se visualiza una pantalla de introducción de contraseña.
PASSWORD
Enter the Password
PASSWORD
ENTER : Confirm
SETUP : Completion
6 Use los botones numerados y j/l para introducir una
contraseña de cuatro dígitos.
7 Pulse ENTER.
Confirme su contraseña.
Confirmation of the Password
The Player is Locked
Remember the Password
PASSWORD
Press ENTER button
1 2 3 4
¡No olvide su contraseña!
Si olvida la contraseña
Resetee los valores del menú de configuración. (Consulte
"CÓMO REAJUSTAR EL MENÚ DE CONFIGURACIÓN" en
la página 52). A continuación, reajuste de nuevo todos los
valores incluyendo el v alor de "Ratings".
8 Después de confirmar la contraseña, pulse de nuevo
ENTER.
Se guarda el valor que haya seleccionado.
9 Pulse SET UP para salir del menú de configuración.
CÓMO CAMBIAR LOS AJUSTES
1 Seleccione "Ratings" usando i /k en el menú de
configuración. A continuación, pulse ENTER.
2 Introduzca una contraseña de cuatro dígitos y pulse
ENTER.
3 Seleccione un elemento:
Ratings
Choice The Item ik
1
Unlock Player
2
Change Password
3
Change Level
4
Setting of the Country Code
ENTER : Choice item
SETUP : Completion
Unlock Player (Desbloquear reproductor):
cambia el valor de Ratings al Nivel 8 (sin restricción).
paso 7.
Change Password (Cambio de contraseña):
Cambia el valor de contraseña.
Change Level (Cambio de nivel):
Cambia el valor del nivel en Ratings.
Setting of the country code (Ajuste del código de país):
Cambia el valor del código del país.
5 y 8.
4 Pulse ENTER.
5 Cambie el contenido que desee ajustar, y pulse ENTER.
6 Pulse ENTER.
Confirme su contraseña.
Confirmation of the Password
The Player is Locked
Remember the Password
PASSWORD
7 Pulse ENTER.
El contenido se guarda.
8 Pulse vRETURN para volver a la pantalla anterior o pulse
SET UP para salir del menú de configuración.
RETURN : Previous menu
Vaya al
Vaya al paso 4.
Vaya al paso 4.
Lleve a cabo los pasos 4,
1 2 3 4
Press ENTER button
46
ESPAÑOL
 Loading...