

Page 1

TV-F2400U
TV-F2000U
COLOR TELEVISION
TELEVISOR EN COLOR
TELEVISEUR COULEUR
OPERATING INSTRUCTIONS
INSTRUCCIONES DE MANEJO
MODE D’EMPLOI
For Assistance And Information
Call Toll Free 1-800-BUY-AIWA
(United States and Puerto Rico)
ENGLISH
ESPAÑOL
FRANÇAIS
Page 2
TV-F2400U
TV-F2000U
QUICK START GUIDE
Welcome
Thank you for purchasing this AIWA product.
When you unpack your TV for the first time,
follow the procedures 1 to 4 below for set up.
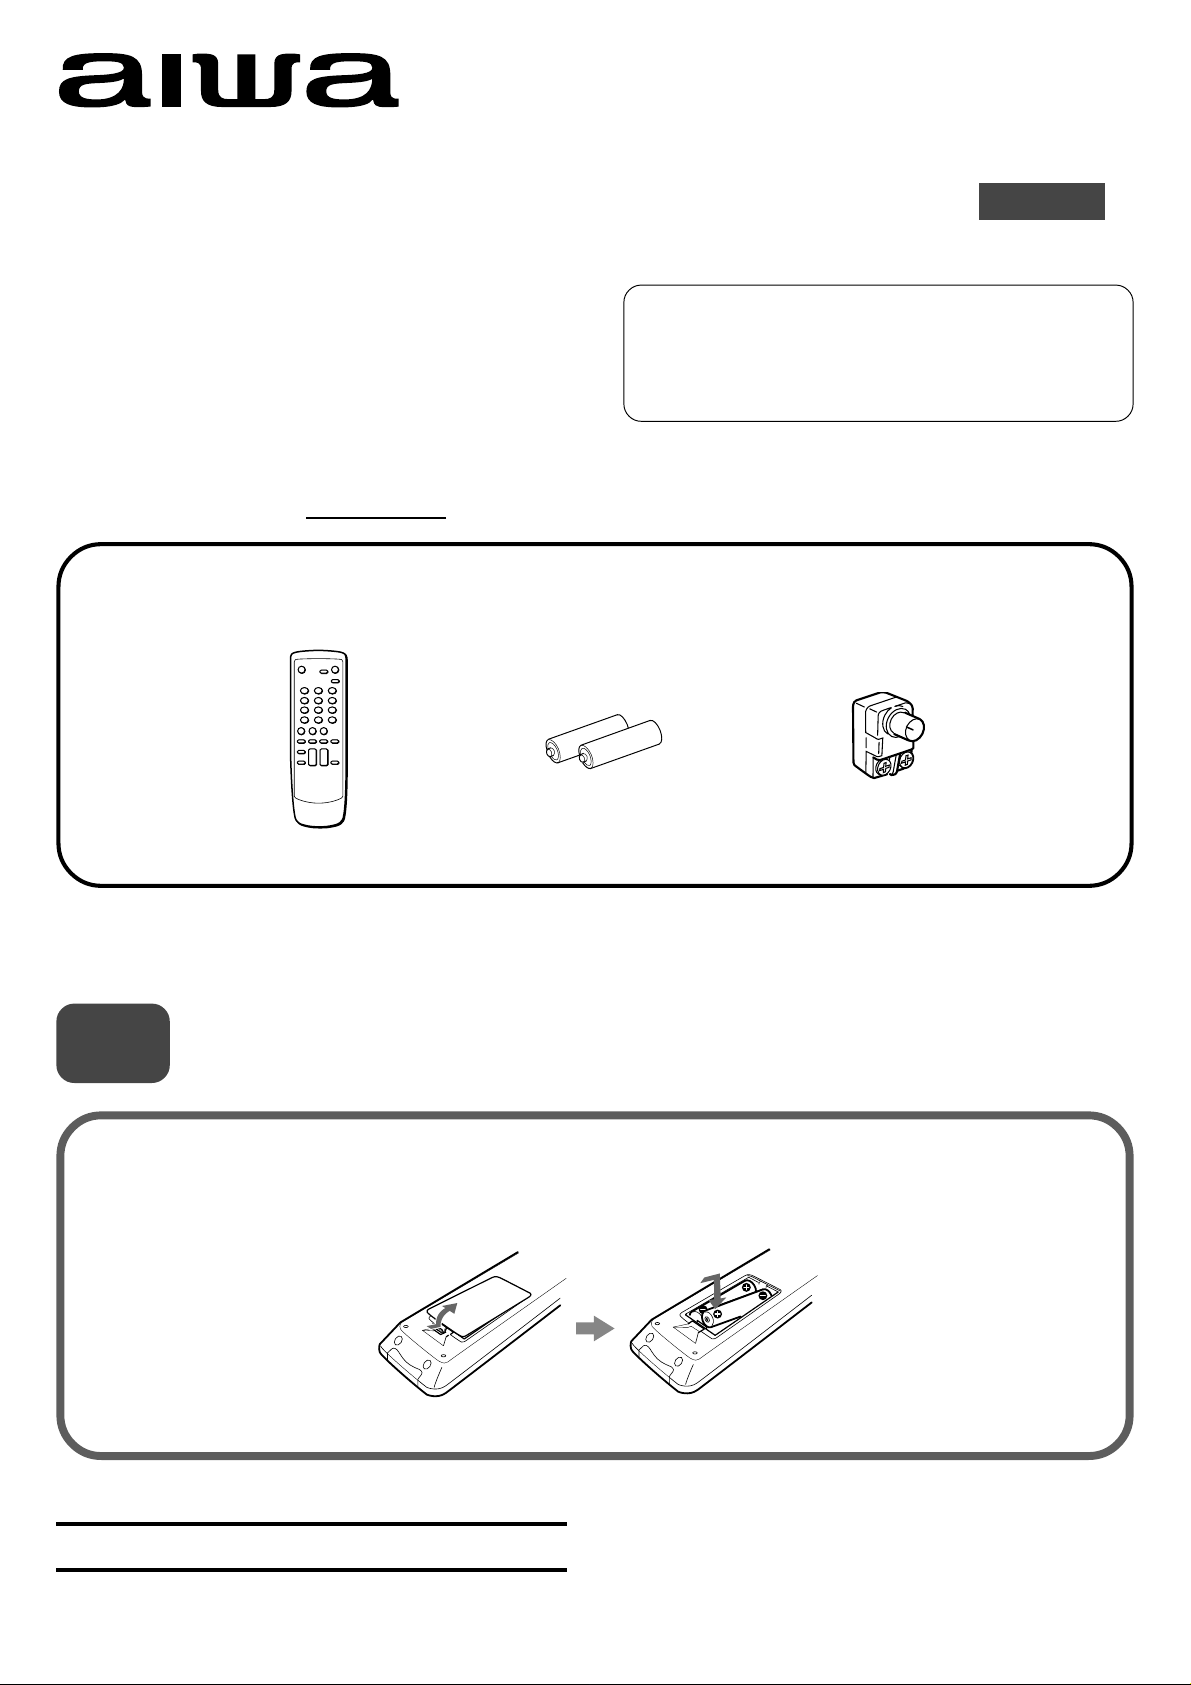
You will find these accessories in the package box.
Remote control (1)
Batteries (2)
For Assistance And Inf ormation
Call Toll Free 1-800-BUY-AIWA
(United States and Puerto Rico)
ENGLISH
Antenna adaptor (1)
Please read all of the informations and warnings on page 1 and 2 of the operating instructions before installing and/or
operating your TV.
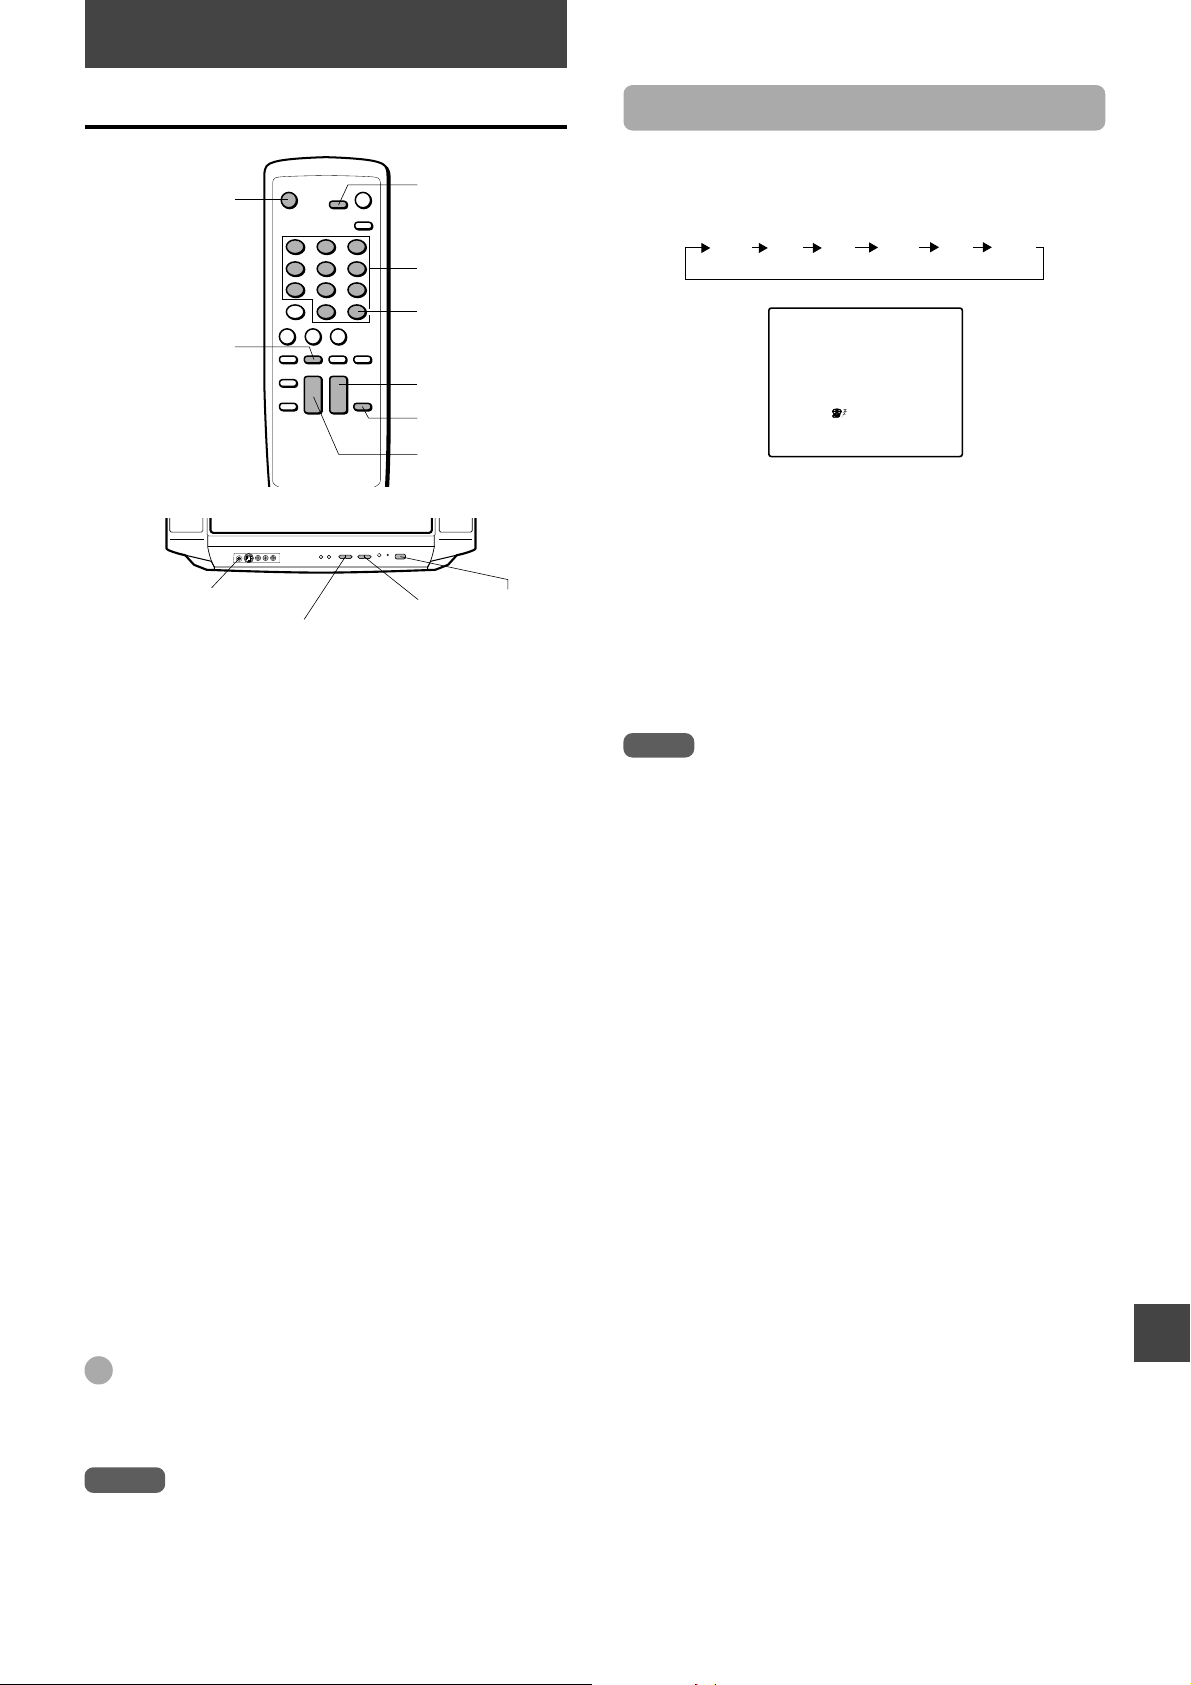
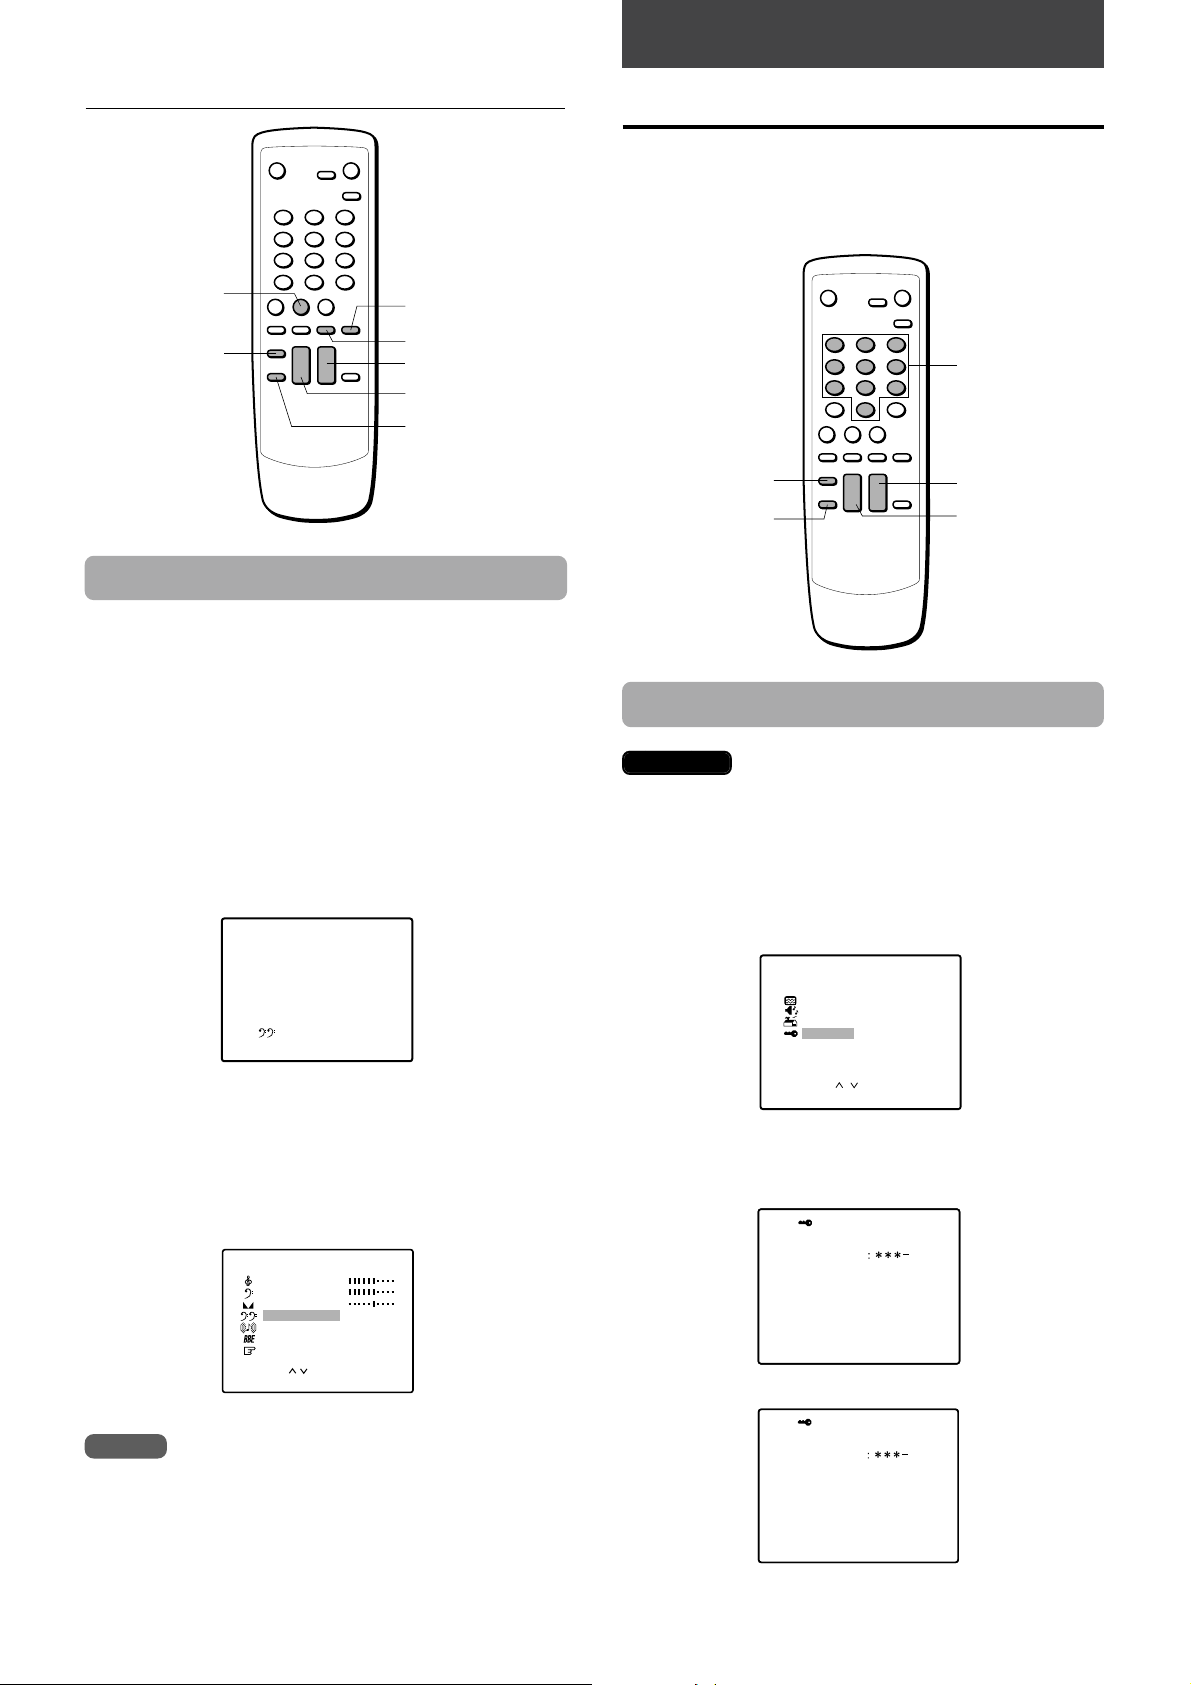
1
Insert two R6(size AA) batteries (supplied) with the correct
polarity, as indicated inside the battery compartment.
Installing Batteries in the Remote Control
8A-JE5-902-01
991228ATN-Y9
AIWA CO., LTD
Printed in Malaysia
1
Page 3
2
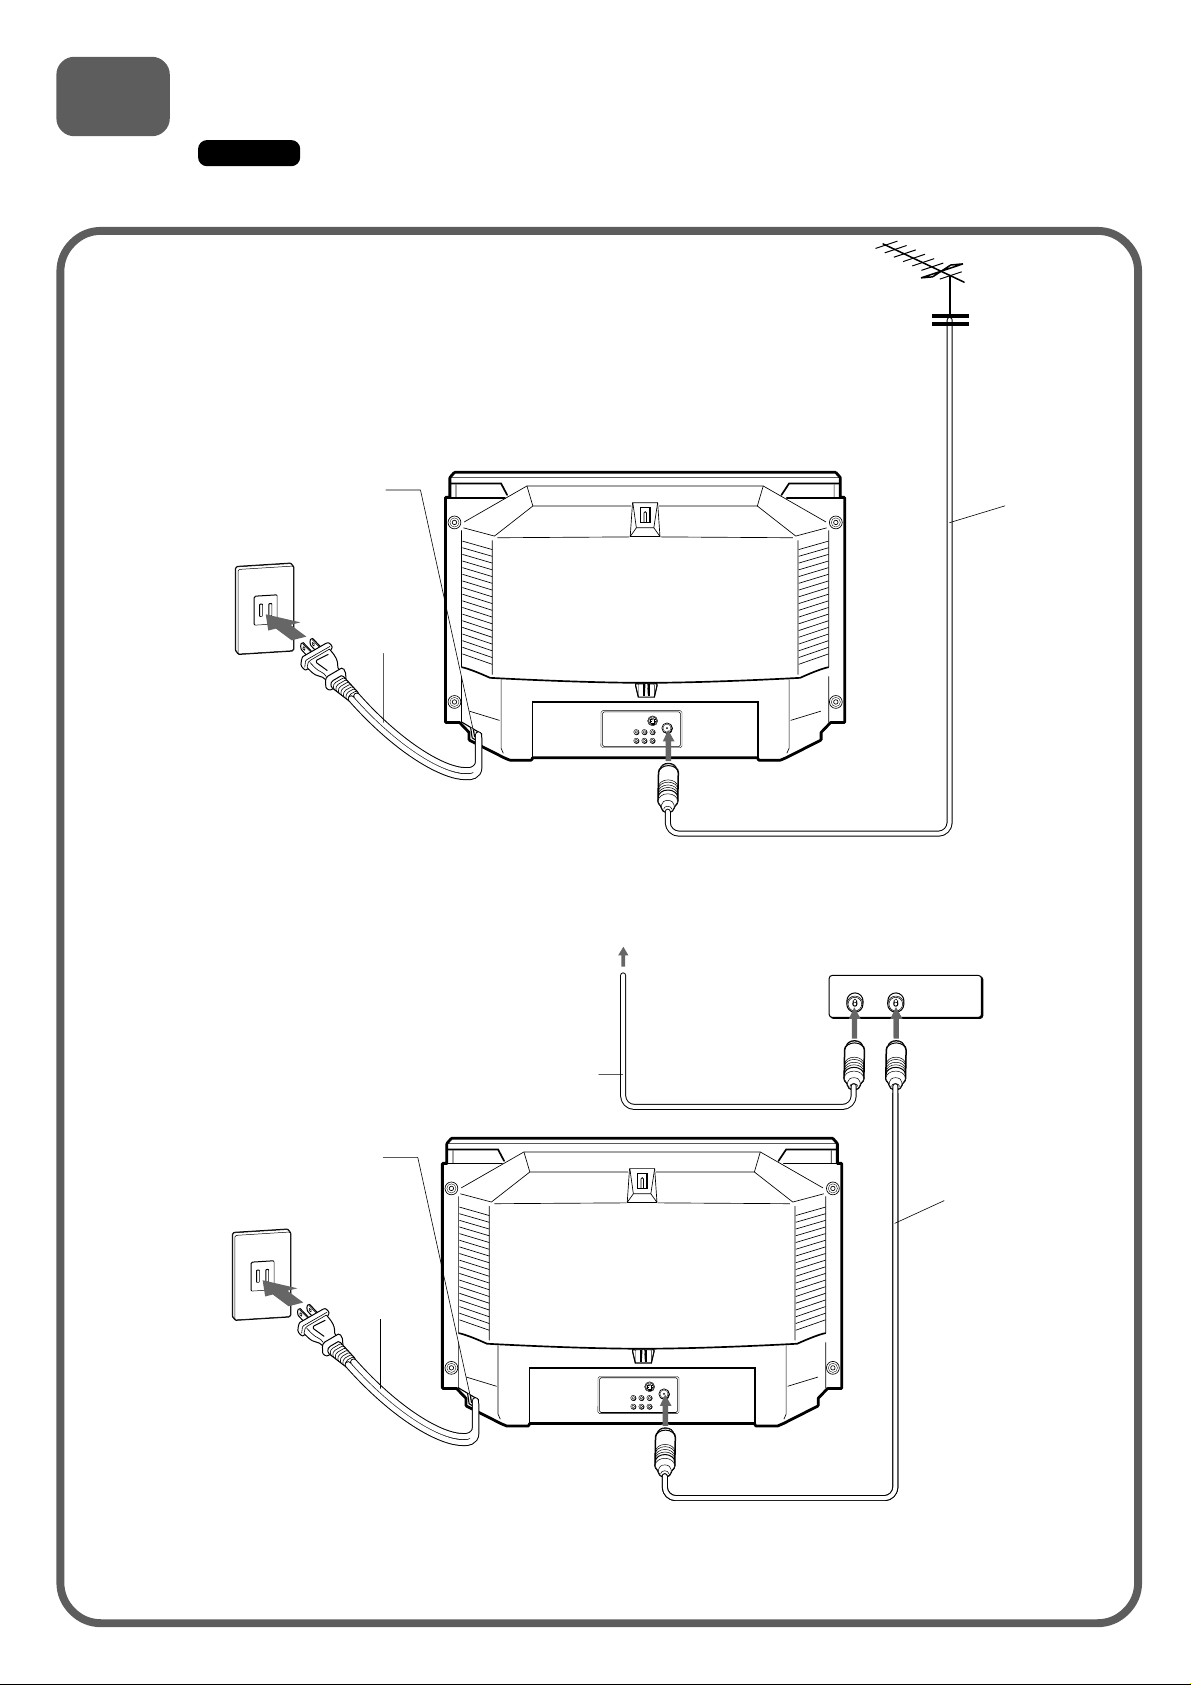
Connecting The Antenna (or CATV)-TV
Caution
Connect the AC cord to the AC outlet after all of the connections are complete.
Basic connections
AC cord hook
(TV-F2000 only)
AC outlet
1 Connect the TV antenna cable
(not supplied) to the ANTENNA
connector on the TV.
TV-F2000
75 ohm
coaxial cable
(not supplied)
AC cord
2 Connect the AC cord to the
AC outlet.
When you are using TV-F2000, connect the AC
cord after passing it through the AC cord hook on
the rear.
CATV connections
1 Connect the cable from the CATV
system to the input connector on
the CATV converter.
75 ohm coaxial cable
(not supplied)
TV-F2000
AC cord hook
(TV-F2000 only)
AC outlet
AC cord
CATV System
OUTIN
CATV converter
(not supplied)
75 ohm coaxial cable
(not supplied)
3 Connect the AC cord to the
AC outlet.
When you are using TV-F2000, connect the AC cord
after passing it through the AC cord hook on the rear.
To connect a CATV system without using a CATV converter
Connect the cable from CATV to the ANTENNA connector on the TV in step 1 above.
2
2 Connect the output
connector on the
converter to the
ANTENNA connector
on the TV.
Page 4
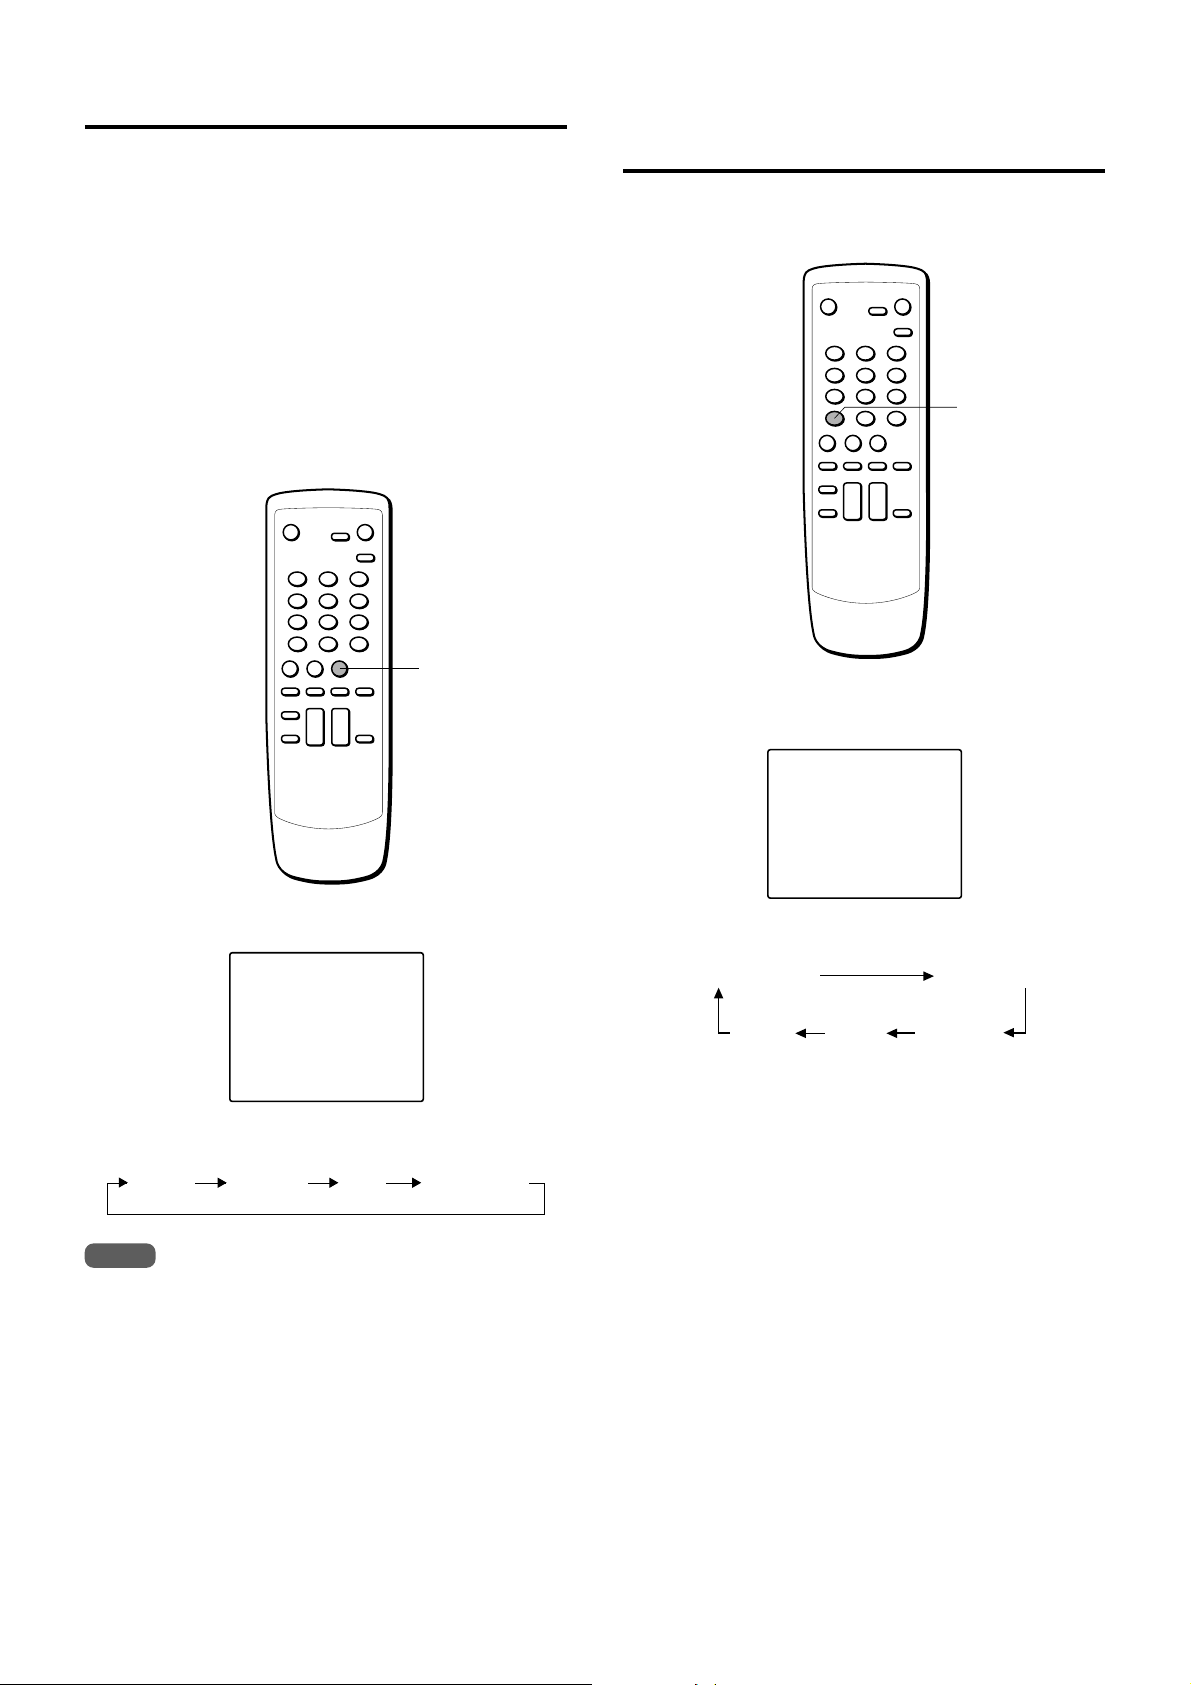
3
VOLUME
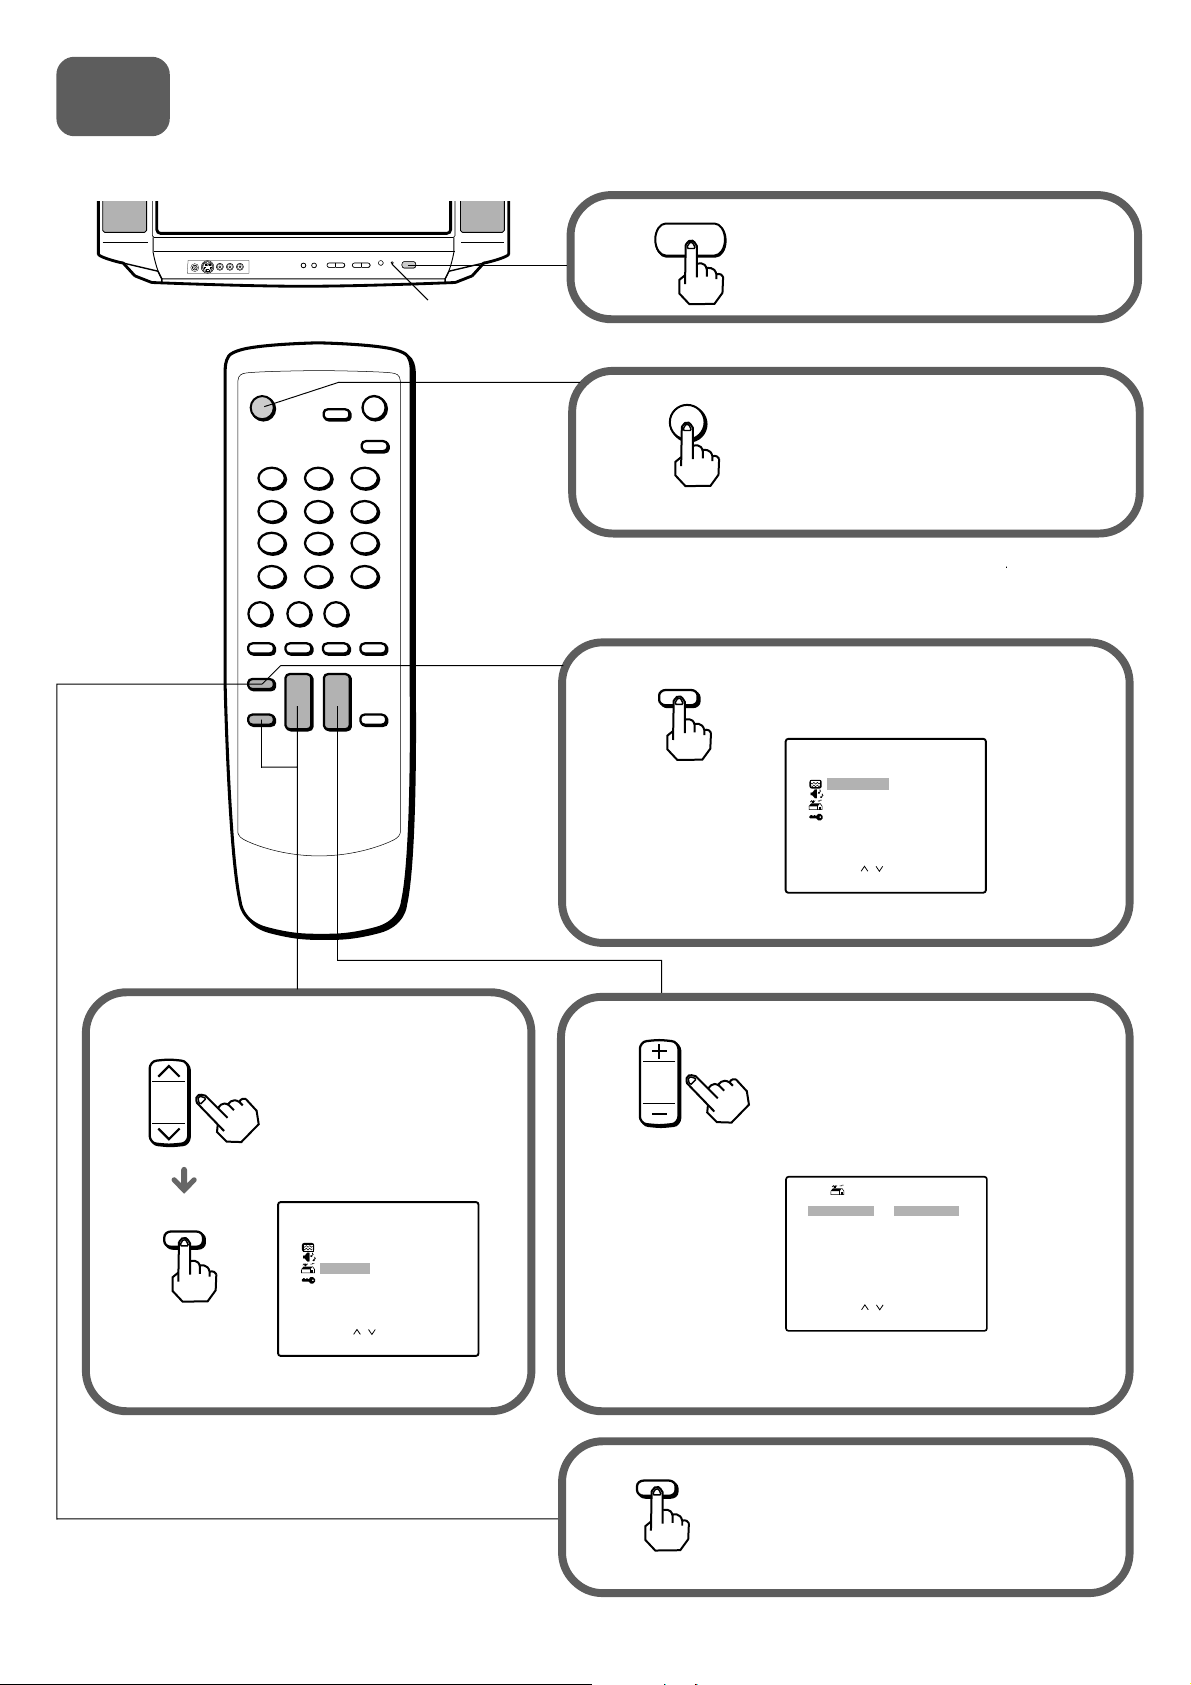
Setting the language
The on-screen menu can display three languages: English, Spanish or French.
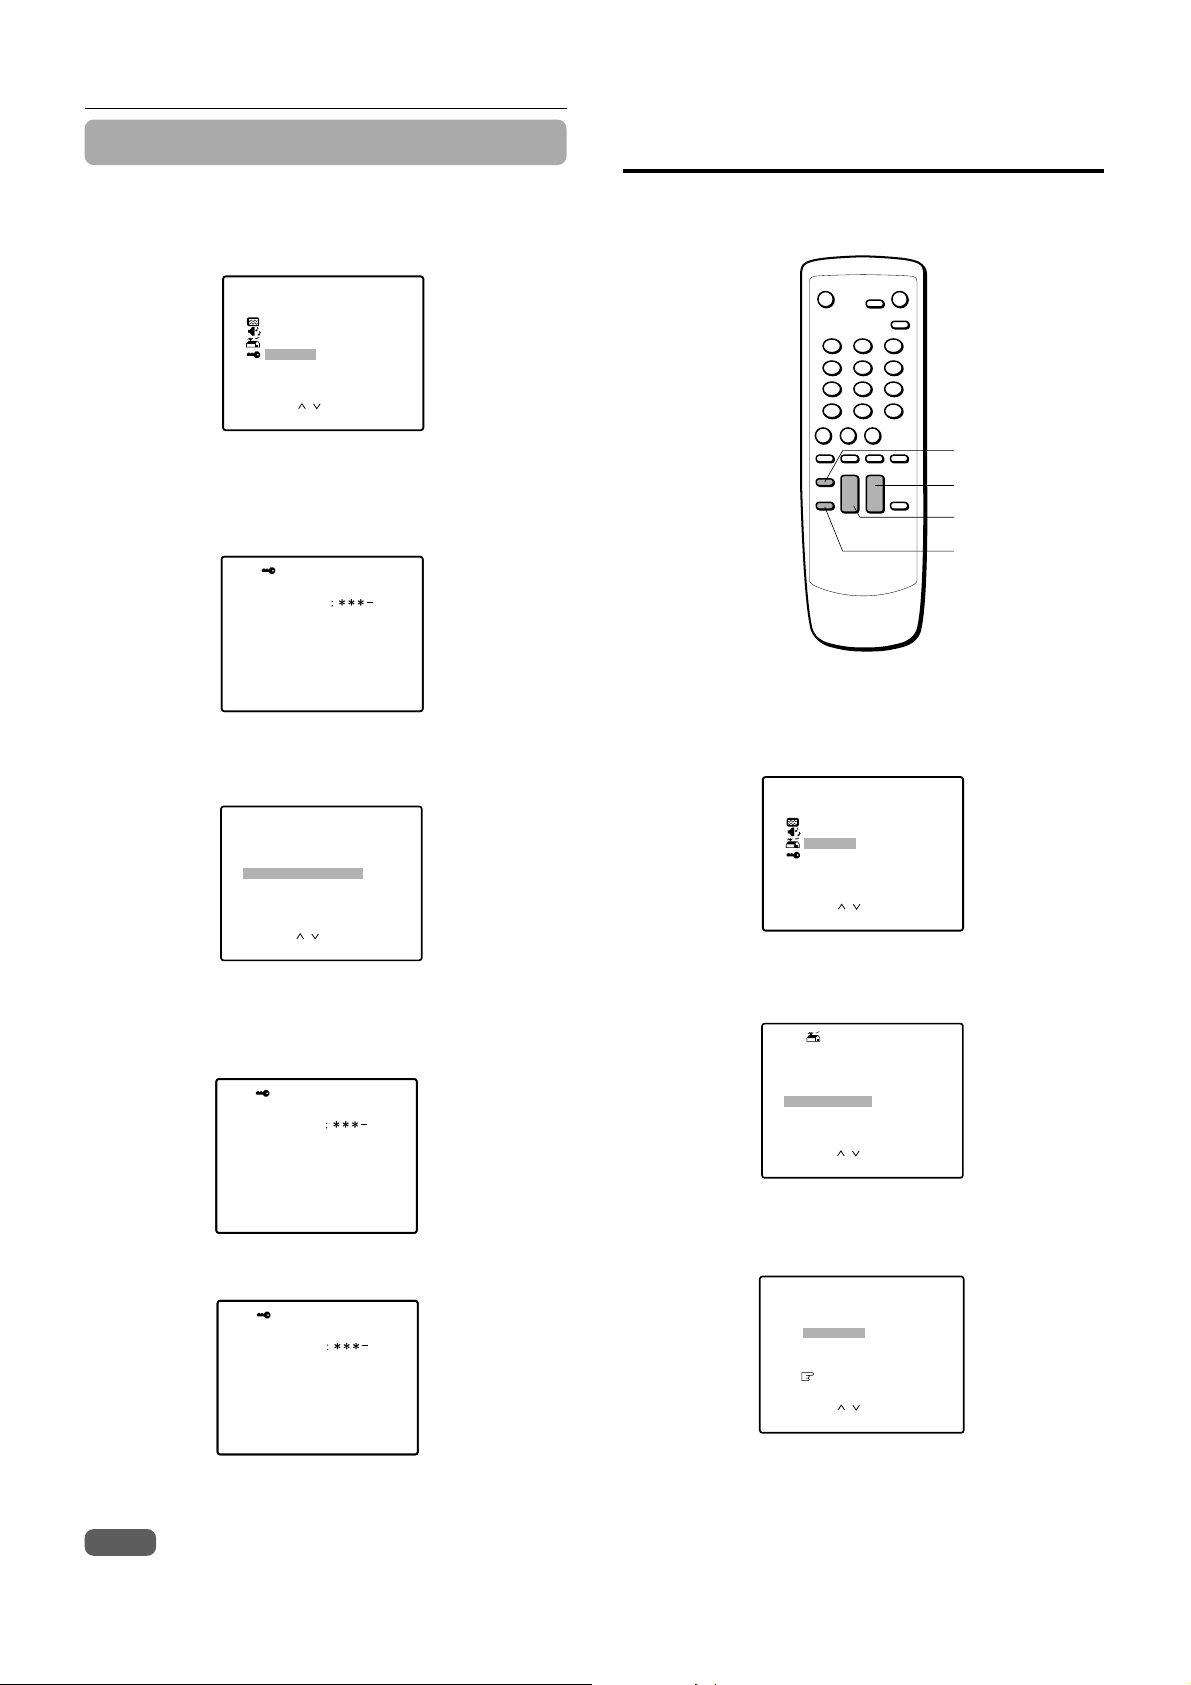
POWER
1
6 STANDBY indicator
Press POWER on the TV.
The 6 STANDBY indicator lights.
3
2
POWER
MENU
Press POWER on the remote
control to turn on the TV.
The 6 STANDBY indicator turns off.
Press MENU .
MENU
P CTURE
I
SOUND
SET UP
V CH I P
/
OK : ENTERSELECT:
EX T : MENUI
4
CHANNEL
ENTER
Press CHANNEL N
or M to select SET UP,
then press ENTER.
The selected item is
displayed in red.
MENU
P CTURE
I
SOUND
SET UP
V CH I P
/
OK : ENTERSELECT:
EX T : MENUI
5
6
MENU
+
Press VOLUME
or
–
to display
the desired language.
Each time you press the button, the
on-screen display language
changes.
SET UP
/
: ENGL I SH
: CABLE
EX T : MENUI
LANGUAGE
ANTENNA
AUTO SEARCH
ADD/ ERASE
CH CAPTI ON
SELECT:
CHANGE: –/+
Press MENU to return to the
normal screen.
3
Page 5
4
CHANNEL
CHANNEL
Setting the channels
Before starting
Make sure the TV is in TV mode.
1
2
MENU
CHANNEL
VOLUME
Press MENU. And press
CHANNEL N or M to select
SET UP, then press ENTER.
MENU
P CTURE
I
SOUND
ENTER
Press CHANNEL N or M to
select ANTENNA, then press
VOLUME + or
CABLE.
SET UP
V CH I P
/
–
SET UP
LANGUAGE
ANTENNA
AUTO SEARCH
ADD/ ERASE
CH CAPTI ON
OK : ENTERSELECT:
EX T : MENUI
to select TV or
: ENGL I SH
: CABLE
3
ENTER
SELECT:
CHANGE : – /+
/
EX T : MENUI
Press CHANNEL N or M to
select AUTO SEARCH, then press
ENTER.
All available channels are tuned.
After tuning, the first located channel
appears on the TV screen.
SET UP
LANGUAGE
ANTENNA
AUTO SEARCH
ADD/ ERASE
CH CAPTI ON
AUTO SEARCH
: ENGL I SH
: CABLE
/
OK : ENTERSELECT:
EX T : MENUI
SEARCH I NG
CABLE1 2 5
EX T : MENUI
4
Page 6
ENGLISH
Warning
To reduce the risk of fire or electric shock, do not
expose this appliance to rain or moisture.
CAUTION
RISK OF ELECTRIC SHOCK
DO NOT OPEN
“CAUTION:TO REDUCE THE RISK OF
ELECTRIC SHOCK,
DO NOT REMOVE COVER (OR BACK).
NO USER-SERVICEABLE PARTS INSIDE.
REFER SERVICING TO QUALIFIED
SERVICE PERSONNEL.”
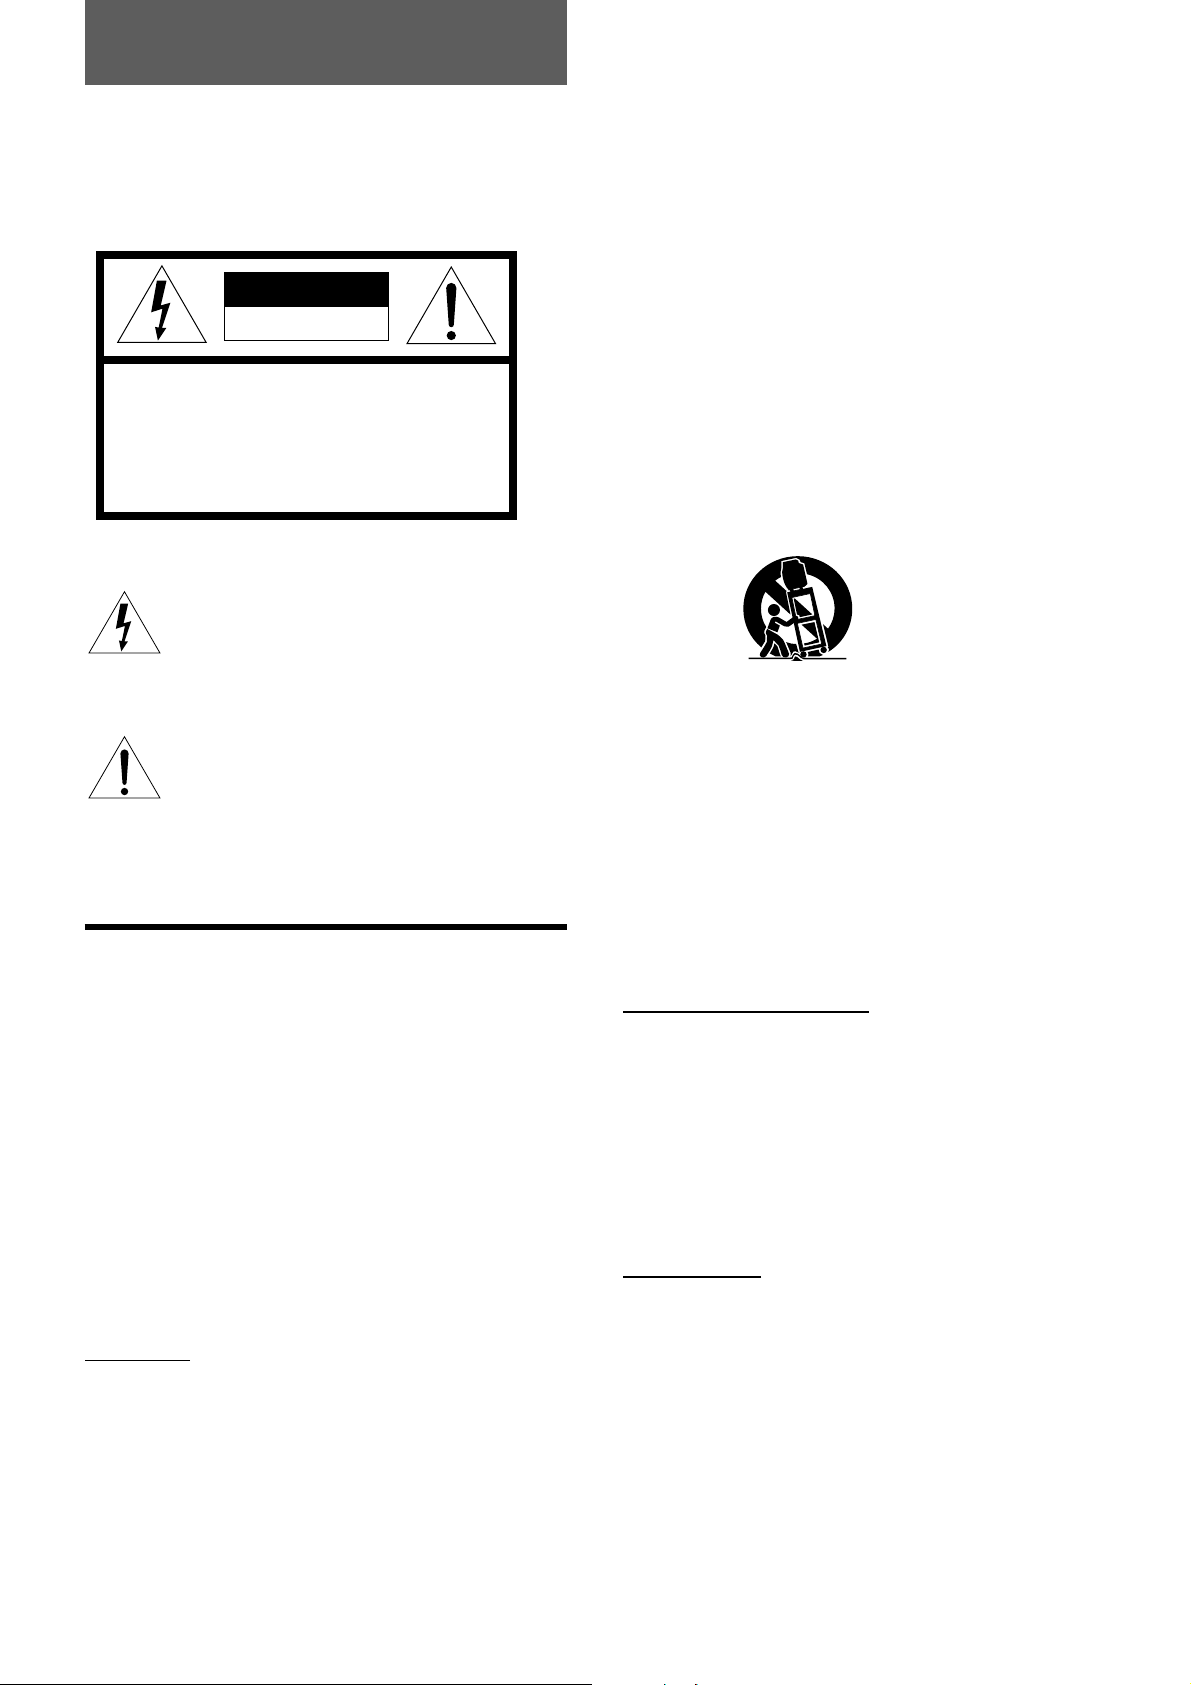
Explanation of Graphical Symbols
The lightning flash with arrowhead symbol
within an equilateral triangle, is intended to alert
the user to the presence of uninsulated
“dangerous voltage” within the products
enclosure that may be of sufficient magnitude
to constitute a risk of electric shock to person.
The exclamation point within an equilateral
triangle is intended to alert the user to the
presence of important operating and
maintenance (servicing) instruction in the
literature accompanying the appliance.
Heat - Do not use this unit near sources of heat, including
heating vents, stoves, or other appliances that generate
heat. It also should not be placed in temperatures less than
5˚C (41˚F) or greater than 40˚C (104˚F ).
Mounting surface - Place the unit on a flat, even surface.
Accessories - Do not place the unit on an unstable cart,
stand, tripod, bracket, or table. The unit may fall causing
serious injury to persons and serious damage to the
appliance. Use only with a cart, stand, tripod, bracket, or
table recommended by the manufacture, or sold with the
unit. When mounting the appliance, follow the
manufacturer’s instructions. When mounting the unit, use
accessories recommended by the manufacturer.
Portable cart - An appliance and cart combination should
be moved with care. Quick stops, excessive force, and
uneven surfaces may cause the appliance and cart
combination to overturn.
PORTABLE CART WARNING
S3126A
Ventilation - The unit should be situated with adequate
space around it so that proper heat ventilation is assured.
Allow 10 cm clearance from the rear and the top of the unit,
and 5 cm from the each side.
Slots and openings in the cabinet and the back or bottom
are provided for ventilation, and to ensure reliable operation
of the unit and to protect it from overheating, these openings
must not be blocked or covered. The openings should never
be blocked by placing the unit on a bed, sofa, rug or other
similar surface. (This unit should never be placed near or
over a radiator or heat register.) This unit should not be
placed in a built-in installation such as a bookcase unless
proper ventilation is provided.
IMPORTANT SAFETY
INSTRUCTIONS
Read the operating instructions carefully and completely
before operating the unit. Be sure to keep the operating
instructions for future reference. All warnings and cautions
in the operating instructions and on the unit should be
strictly followed, as well as the safety suggestions below.
Warning
To prevent electric shock or other injuries, follow all the
safety instructions when installing, operating and servicing
the unit.
Installation
Attachments - Do not use attachments that have not been
recommended by the manufacturer because doing so may
result in the risk of fire, electric shock or other injuries.
Water and Moisture - Do not use this unit near water - for
example, near a bathtub, washbowl, kitchen sink, or laundry
tub, in a wet basement, or near a swimming pool, and the
like.
Weight and heavy objects
The unit should be moved with care by two or more people
as the weight balance is not even. Do not place heavy
objects on the unit.
Object and Liquid Entry - Never push objects of any kind
into the unit through the cabinet slots because they may
contact dangerous voltage points or short-circuit parts and
cause fire or electric shock. Never spill liquid of any kind on
the unit. Do not put a vase or the like with water inside on
this unit.
Electric Power
Power Sources - This unit should be operated only from
the type of power source indicated on the marking label. If
you are not sure of the type of power supply to your home,
consult your appliance dealer or local power company. To
operate unit on battery power, or other sources, refer to the
operating instructions.
Grounding or Polarization - This unit is provided with a
polarized alternating-current line plug (a plug having one
blade wider than the other). This plug will fit into the power
outlet only one way. This is a safety feature. If you are
unable to insert the plug fully into the outlet, try reversing the
plug. If the plug should still fail to fit, contact your electrician
to replace your obsolete outlet. Do not defeat the safety
purpose of the polarized plug.
1
ENGLISH
Page 7

Power-cord Protection - The unit is provided with an
attachment plug with overload protection. This is a safety
feature. See operating instructions for replacement or
resetting of protective device. If replacement of the plug is
required, be sure the service technician has used a
replacement plug specified by the manufacturer that has the
same overload protection as the original plug.
Overloading - Do not allow anything to rest on the power
cord. Do not overload wall outlets and extension cords
because this can result in fire or electric shock. Do not place
the unit in an area where people will walk on the cord.
Outdoor Antenna
Power lines - An outside antenna system should not be
located in the vicinity of overhead power lines or other
electric light or power circuits, or where it can fall onto such
power lines or circuits. When installing an outside antenna
system, extreme care should be taken to avoid touching
power lines or circuits because contact with them may be
fatal.
Outdoor Antenna Grounding - If an outside antenna or
cable system is connected to the unit, be sure the antenna
or cable system is grounded so as to provide some
protection against voltage surges and built-up static
charges. Section 810 of the National Electrical Code, ANSI/
NFPA No.70, provides information with regard to proper
grounding of the mast and supporting structure, grounding
of the lead-in wire to an antenna discharge unit, size of
grounding conductors, location of antenna-discharge unit,
connection to grounding electrodes, and requirements for
the grounding electrode. See the figure.
Damage Requiring Service
Unplug the unit from the wall outlet and refer servicing to
qualified service personnel under the following conditions:
1) When the power cord or plug is damaged or frayed.
2) If liquid has been spilled into the unit.
3) If the unit has been exposed to rain or water.
4) If the unit does not operate normally when following
the operating instructions. Adjust only those controls
that are covered by the operating instructions because
improper adjustment of other controls may result in
damage to the unit and will often require extensive
work by a qualified technician to restore the unit to
normal operation.
5) If the unit has been dropped or the cabinet has been
damaged.
6) When the unit exhibits a distinct change in
performance - this indicates a need for service.
Do not attempt to service the unit yourself because opening
or removing covers may expose you to high voltage or other
hazards. Refer all servicing to qualified service personnel.
Replacement Parts - When replacement parts are required,
be sure the service technician has used replacement parts
specified by the manufacturer or having the same
characteristics as the original part. Unauthorized
substitutions may result in fire, electric shock or other
hazards.
Safety Check - After completion of any service or repairs to
the unit, ask the service technician to perform a safety
check to ensure that the unit is in proper operating
condition.
Antenna Grounding According to the National Electrical Cord
ANTENNA LEAD IN WIRE
GROUND CLAMP
ELECTRIC
SERVICE
EQUIPMENT
NEC-NATIONAL ELECTRICAL CODE
ANTENNA DISCHARGE
UNIT
(NEC SECTION 810-20)
GROUNDING
CONDUCTORS
(NEC SECTION 810-21)
GROUND CLAMPS
POWER SERVICE GROUNDING
ELECTRODE SYSTEM
(NEC ART 250 PART H)
Lightning
For added protection during a lightning storm, or when left
unattended and unused for long periods of time, unplug the
unit from the wall outlet and disconnect the antenna or cable
system. This will prevent damage to the unit due to lightning
and powerline surges.
Maintenance
Cleaning - Unplug the unit from the wall outlet before
cleaning. Do not use liquid cleaners or aerosol cleaners.
Use a damp cloth for cleaning.
Note to CATV system installer:
This reminder is provided to call the CATV system installer’s
attention to Article 820-40 of the NEC that provides
guidelines for proper grounding and, in particular, specifies
that the cable ground should be connected to the grounding
system of the building, as close to the point of cable entry as
practical.
OWNER’S RECORD
For your convenience, record the model number and
serial number (you will find them on the rear of your set)
in the space provided below. Please refer to them when
you contact your AIWA dealer in case of difficulty.
Model No.
Serial No.
ENGLISH
2
Page 8
Welcome
Thank you for purchasing this AIWA
product. To optimize the performance of
this unit, please read through this
operating instructions carefully.
Table of contents
Main features of this
TV
V-chip
An age limitation can be set to prevent
children from viewing or listening to
violent scenes or programs with adult
content. This unit corresponds to
“TV-RATING” and “MPAA RATING.”
Video Enhancer
This unit provides 4 modes as the multi
video enhancer: NORMAL, CINEMA,
GAME, and DIMMER.
Sound Enhancer
This unit provides 3 modes as the sound
enhancer: SUPER BASS, Q SURROUND
and BBE.
MTS (Multichannel TV
Sound) broadcast
You can receive the stereo and bilingual
TV programs which are broadcasted in
the United States.
Closed Caption
The subtitles can be displayed on the
screen when a broadcast corresponding
to closed caption is received.
Preparation
Connecting the antenna......................................4
Preparing the remote control ..............................8
Setting the language...........................................8
Setting the channels ...........................................9
Basic operations
Watching a TV program....................................10
Selecting the MTS mode...................................11
Selecting the closed captions mode .................11
Selecting the AV mode .....................................12
Adjusting the picture .........................................13
Adjusting the sound ..........................................14
Other functions
Setting the V-chip..............................................15
Registering a broadcasting station name..........17
On-screen display.............................................18
Watching a video or other equipment ...............19
Additional information
Troubleshooting ................................................19
Care and maintenance......................................20
This equipment has been tested and found to comply with
the limits for a Class B digital device, pursuant to Part 15
of the FCC Rules. These limits are designed to provide
reasonable protection against harmful interference in a
residential installation.
This equipment generates, uses, and can radiate radio
frequency energy and, if not installed and used in
accordance with the instructions, may cause harmful
interference to radio communications. However, there is
no guarantee that interference will not occur in a particular
installation. If this equipment does cause harmful
interference to radio or television reception, which can be
determined by turning the equipment off and on, the user
is encouraged to try to correct the interference by one or
more of the following measures:
Specifications....................................................20
Parts and controls.............................................21
- Reorient or relocate the receiving antenna.
- Increase the separation between the equipment and
receiver.
- Connect the equipment into an outlet on a circuit
different from that to which the receiver is connected.
- Consult the dealer or an experienced radio/TV
technical for help.
Note
Modifications or adjustment to this product, which are not
expressly approved by the manufacturer, may void the
user’s right authority to operate this product.
3
ENGLISH
Page 9
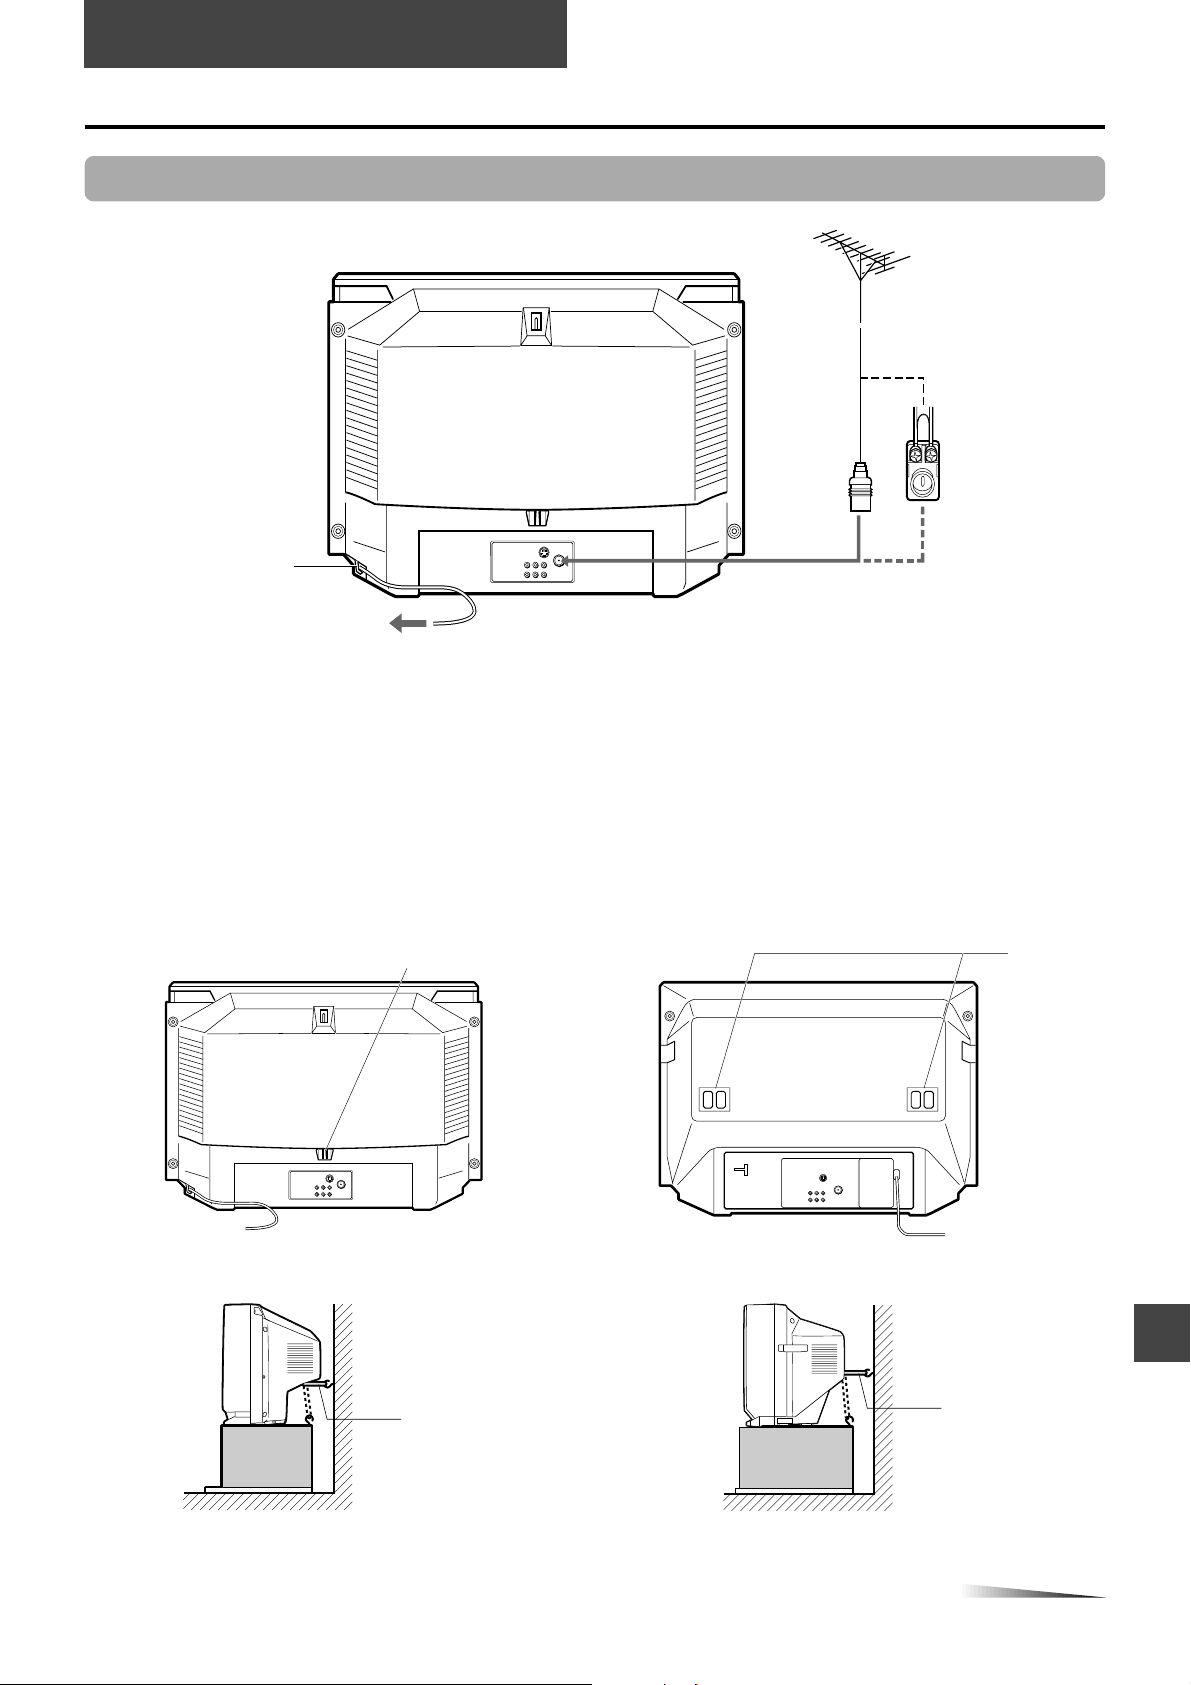
PREPARATION
Connecting the antenna
Basic connections
TV-F2000
75-ohm
coaxial cable
(not supplied)
1
300-ohm twin-lead cable
(not supplied)
Antenna adaptor
(supplied)
AC cord hook
(TV-F2000 only)
To ANTENNA connector
2 To AC outlet
1
Connect the antenna cable to the ANTENNA connector on the TV.
If the cable is a round-type 75-ohm coaxial cable, connect it directly to the ANTENNA connector.
If the cable is a flat-type 300-ohm twin-lead cable, connect it to the antenna adaptor (supplied), and connect the adaptor to
the ANTENNA connector.
2
Connect the AC cord to the AC wall outlet.
When you are using TV-F2000, connect the AC cord after passing it through the AC cord hook on the rear.
To prevent the unit from falling during earthquakes, etc.,
Fix the unit even to a wall or pillar with the security hook located on the rear using the strong twine or wire.
TV-F2000
Security hook
TV-F2400
Security hook
Strong twine
or wire
(not supplied)
Strong twine
or wire
(not supplied)
CONTINUE
ENGLISH
4
Page 10
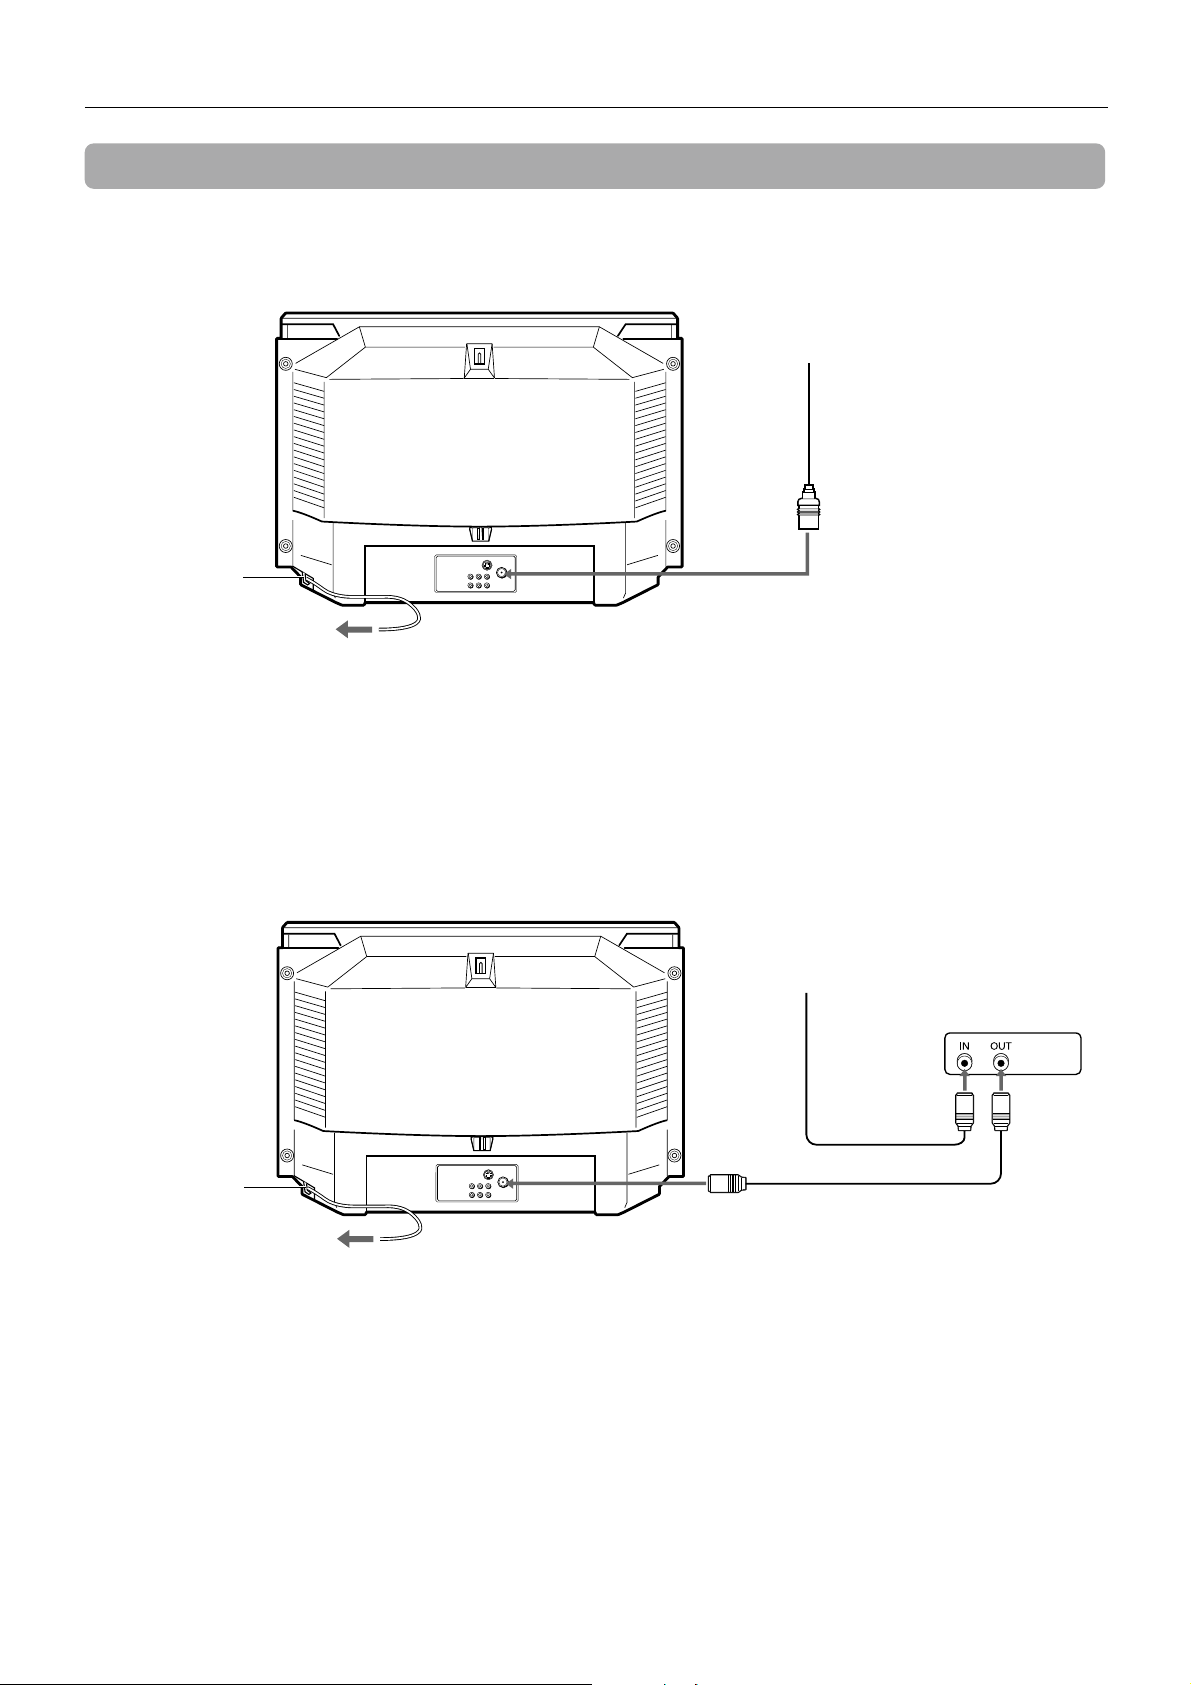
Connecting the antenna (continued)
CATV connections
To connect a CATV system without using a CATV converter
TV-F2000
CATV system
1
75-ohm coaxial cable
(not supplied)
AC cord hook
(TV-F2000 only)
To AC outlet
2
Connect the cable from the CATV system to the ANTENNA connector on the TV.
1
2
Connect the AC cord to the AC wall outlet.
When you are using TV-F2000, connect the AC cord after passing it through the AC cord hook on the rear.
To ANTENNA connector
To connect a CATV system using a CATV converter
TV-F2000
CATV system
75-ohm
coaxial cable
(not supplied)
1
CATV converter
(not supplied)
AC cord hook
(TV-F2000 only)
To AC outlet
3
1
Connect the cable from the CATV system to the input connector on the CATV converter.
2
Connect the output connector on the converter to the ANTENNA connector on the TV.
3
Connect the AC cord to the AC wall outlet.
When you are using TV-F2000, connect the AC cord after passing it through the AC cord hook on the rear.
ENGLISH
5
To ANTENNA
connector
75-ohm coaxial cable
(not supplied)
2
Page 11
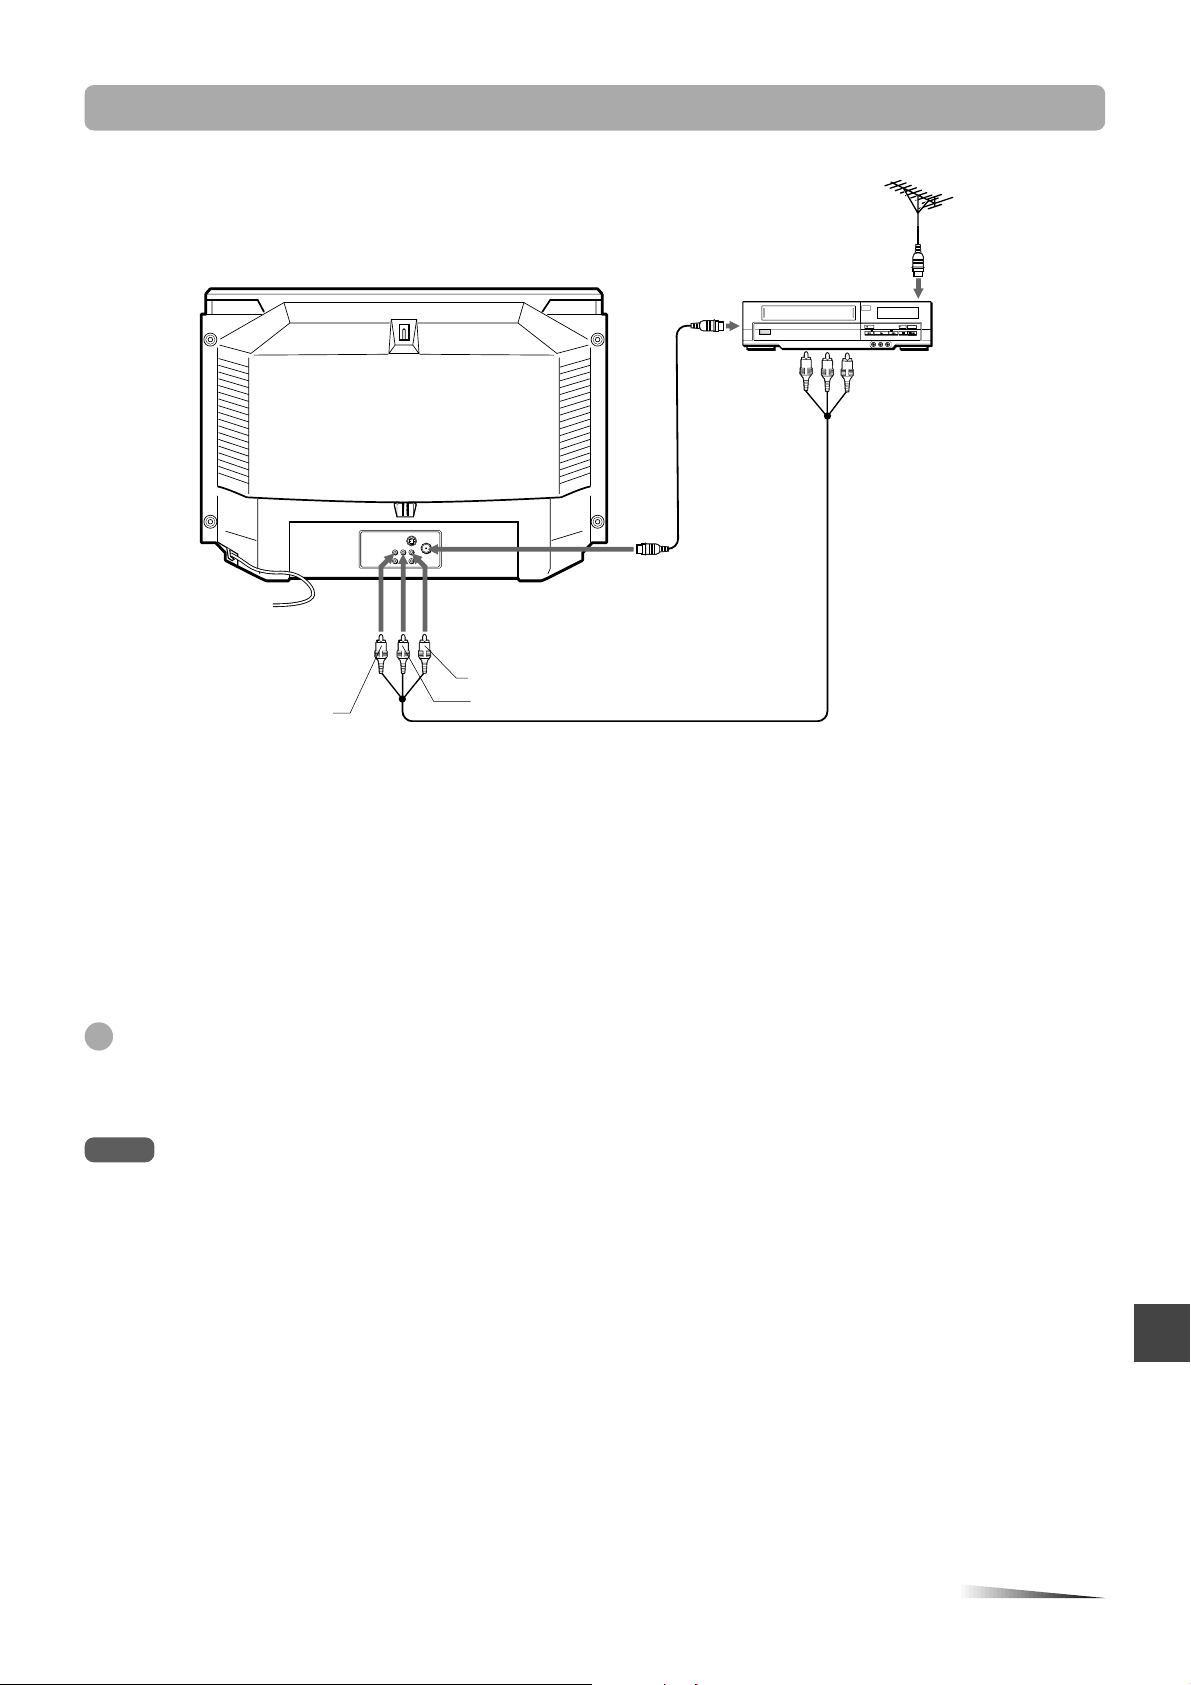
Connecting a VCR or other equipment
TV-F2000
To VIDEO 1 INPUT
AUDIO L (MONO)/R jacks
Red
To VIDEO 1 INPUT
VIDEO jack
Yellow
White
To antenna output
connector
2
75-ohm coaxial
cable
(not supplied)
To ANTENNA
conector
1
To audio/video
output jacks
Audio/video
cable
(not supplied)
To antenna input
connector
Remove the antenna cable from the TV and connect it to the antenna input connector on the VCR.
1
2
Connect the optional antenna cable to the antenna output connector on the VCR and to the ANTENNA
connector on the TV.
You can connect the TV and the VCR with the optional audio/video cable.
To watch video
Refer to “Watching a video or other equipment” on page 19.
Tips
• If the VCR is a monaural type, connect one of the audio plugs only to the AUDIO L (MONO) jack.
• If the VCR has a S-video output jack, you can connect the optional S-video cable to the S-video output jack on the VCR and to the
VIDEO 1 INPUT S-VIDEO jack on the TV. In this case, you do not need to connect the cable to the VIDEO jack.
Note
For details on how to connect the VCR to the TV, consult the individual owner’s manual for the VCR.
CONTINUE
ENGLISH
6
Page 12
Connecting the antenna (continued)
To connect a video camera or a game
machine
It is convenient to use VIDEO 2 IN AUDIO L (MONO)/R/
VIDEO jacks on the front.
To VIDEO 2 IN
VIDEO jack
Yellow
White
To VIDEO 2 IN AUDIO
L (MONO)/R jacks
Red
To connect to a stereo system
This connection improves the sound quality.
Connect the OUTPUT AUDIO L / R jacks on the TV to the
audio input jacks on the stereo system with the optional
audio cable.
To OUTPUT
AUDIO L / R jacks
Audio/video cable
(not supplied)
To audio/video
output jacks
or
Video camera (Player)
Game machine
To watch a video camera or game machine
Refer to “Watching a video or other equipment” on page 19.
Red
White
Audio cable
(not supplied)
To audio input jacks
Stereo system
Tip
If the other equipment has a S-video output jack, you can
connect the optional S-video cable to the S-video output jack on
the VCR and to the VIDEO 2 INPUT S-VIDEO jack on the TV.
In this case, you do not need to connect the cable to the VIDEO
jack.
7
ENGLISH
Page 13
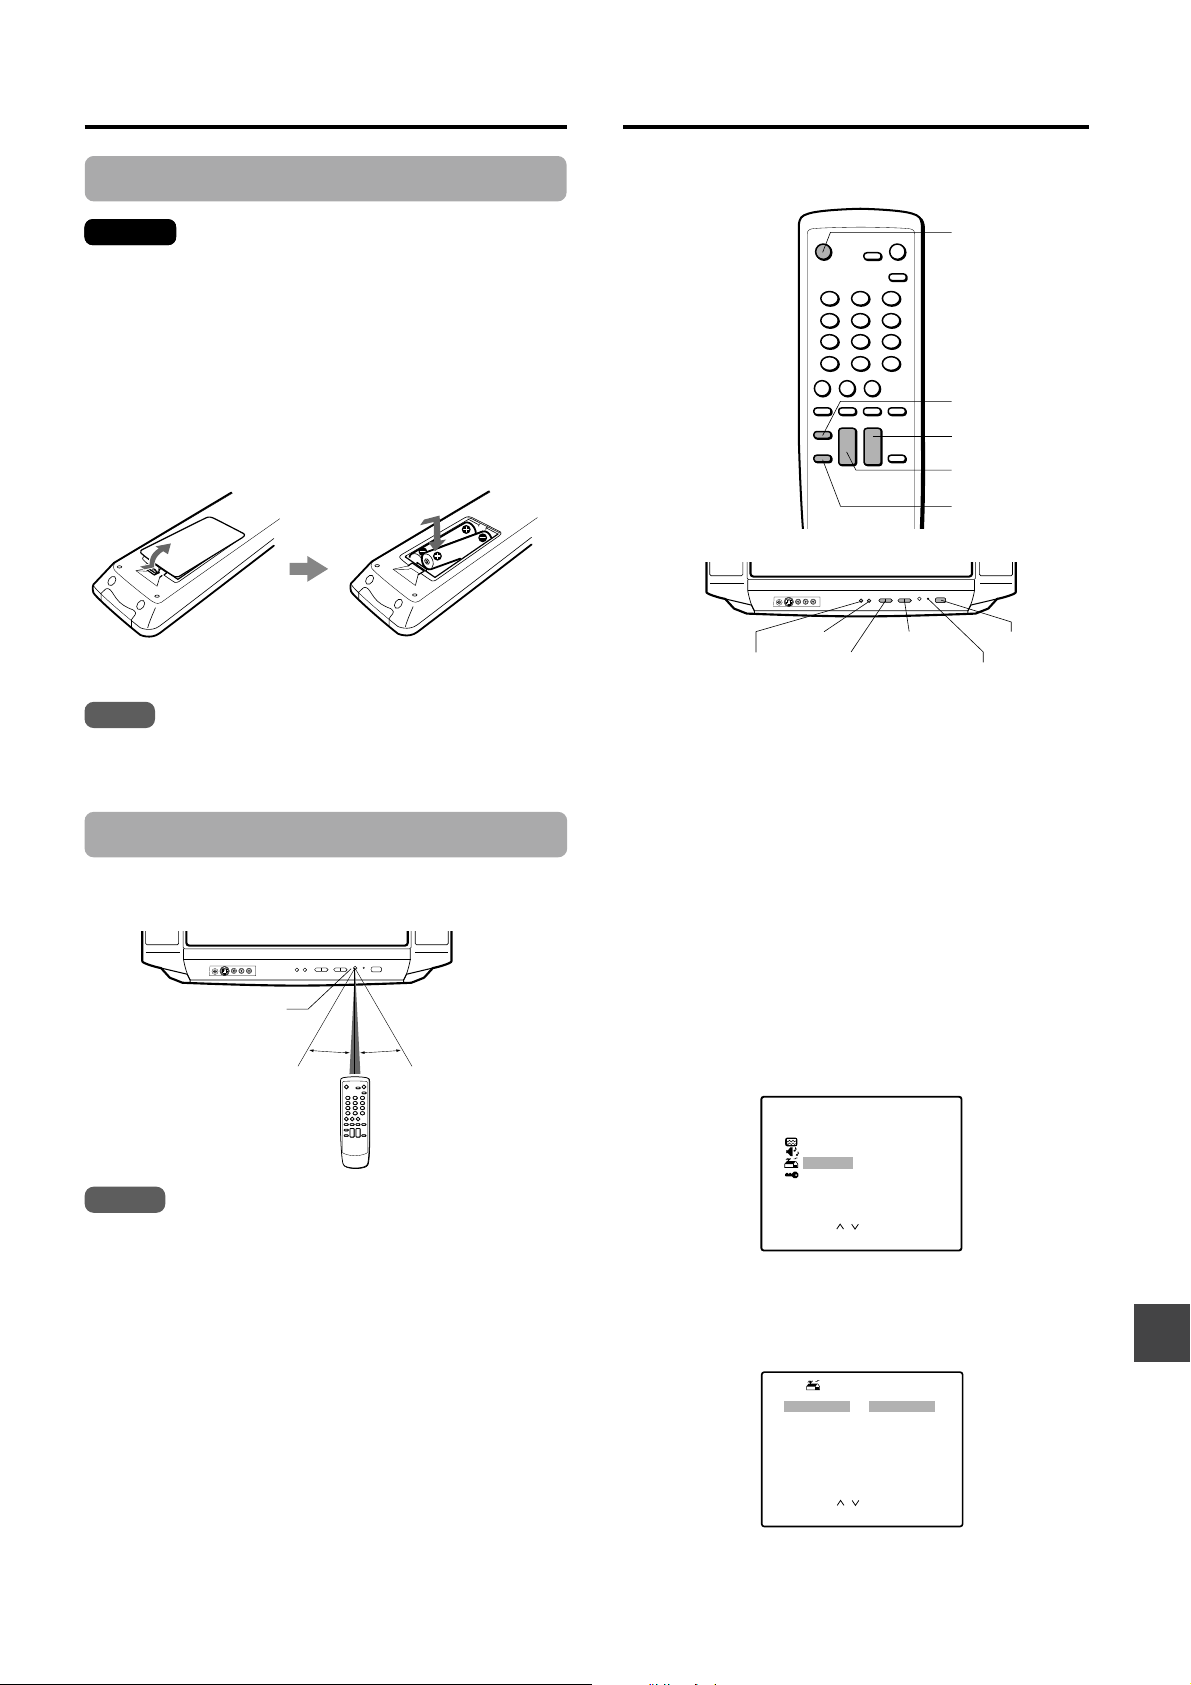
Preparing the remote control
Setting the language
Inserting the batteries
Caution
To prevent damage from leakage or explosion, follow
the descriptions below.
• Insert the two supplied R6 (size AA) batteries with the
0 and 9 marks correctly as illustrated.
• Do not mix old batteries with new ones or different
types of batteries.
• Do not throw the batteries into a fire, apply heat to
them or take them apart.
• Do not carry the batteries with keys or other metallic
objects.
Note
Remove the batteries when they have no more power, or when
you do not use the remote control for a long period of time.
The on-screen menu can display three languages:
English, Spanish and French.
POWER
MENU
VOLUME +/–
CHANNEL N/M
ENTER
MENU
TV/VIDEO/
ENTER
1
Press POWER on the TV.
VOLUME
+
/–
CHANNEL
N/M
POWER
6 STANDBY
indicator
The STANDBY indicator on the TV lights in red.
Using the remote control
Point the remote control toward the remote sensor.
Remote sensor
7m
30˚ 30˚
Notes
•
The remote control may not operate when there is any
obstruction between the remote control and the remote sensor.
• Strong ambient light sources such as a fluorescent lamp or
direct sunlight may cause unreliable operation.
• Using a TV with the same type of infrared remote control
facing the same direction may cause incorrect operation.
• The maximum distance for effective control between the
remote control and the remote sensor is 7 meters.
Although you can use the remote control within an angle of up
•
to 30 degrees in any direction from directly in front of the remote
sensor, we recommend a narrower angle for stable operation.
2
Press POWER on the remote control to turn on
the TV.
The 6 STANDBY indicator turns off.
You can also turn on the TV with CHANNEL N or M
on the TV.
3
Press MENU.
Press CHANNEL N or M to select SET UP,
4
then press ENTER.
The selected item is displayed in red.
You can also use TV/VIDEO/ENTER on the TV instead
of ENTER on the remote control.
MENU
P CTURE
I
SOUND
SET UP
V CH I P
/
OK : ENTERSELECT:
EX T : MENUI
5
Press VOLUME + or – to display the desired
language.
Each time you press the button, the on-screen display
language changes.
SET UP
LANGUAGE
ANTENNA
AUTO SEARCH
ADD/ ERASE
CH CAPTI ON
: ENGL I SH
: CABLE
SELECT:
CHANGE: –/+
6
Press MENU to return to the normal screen.
/
EX T : MENUI
ENGLISH
8
Page 14
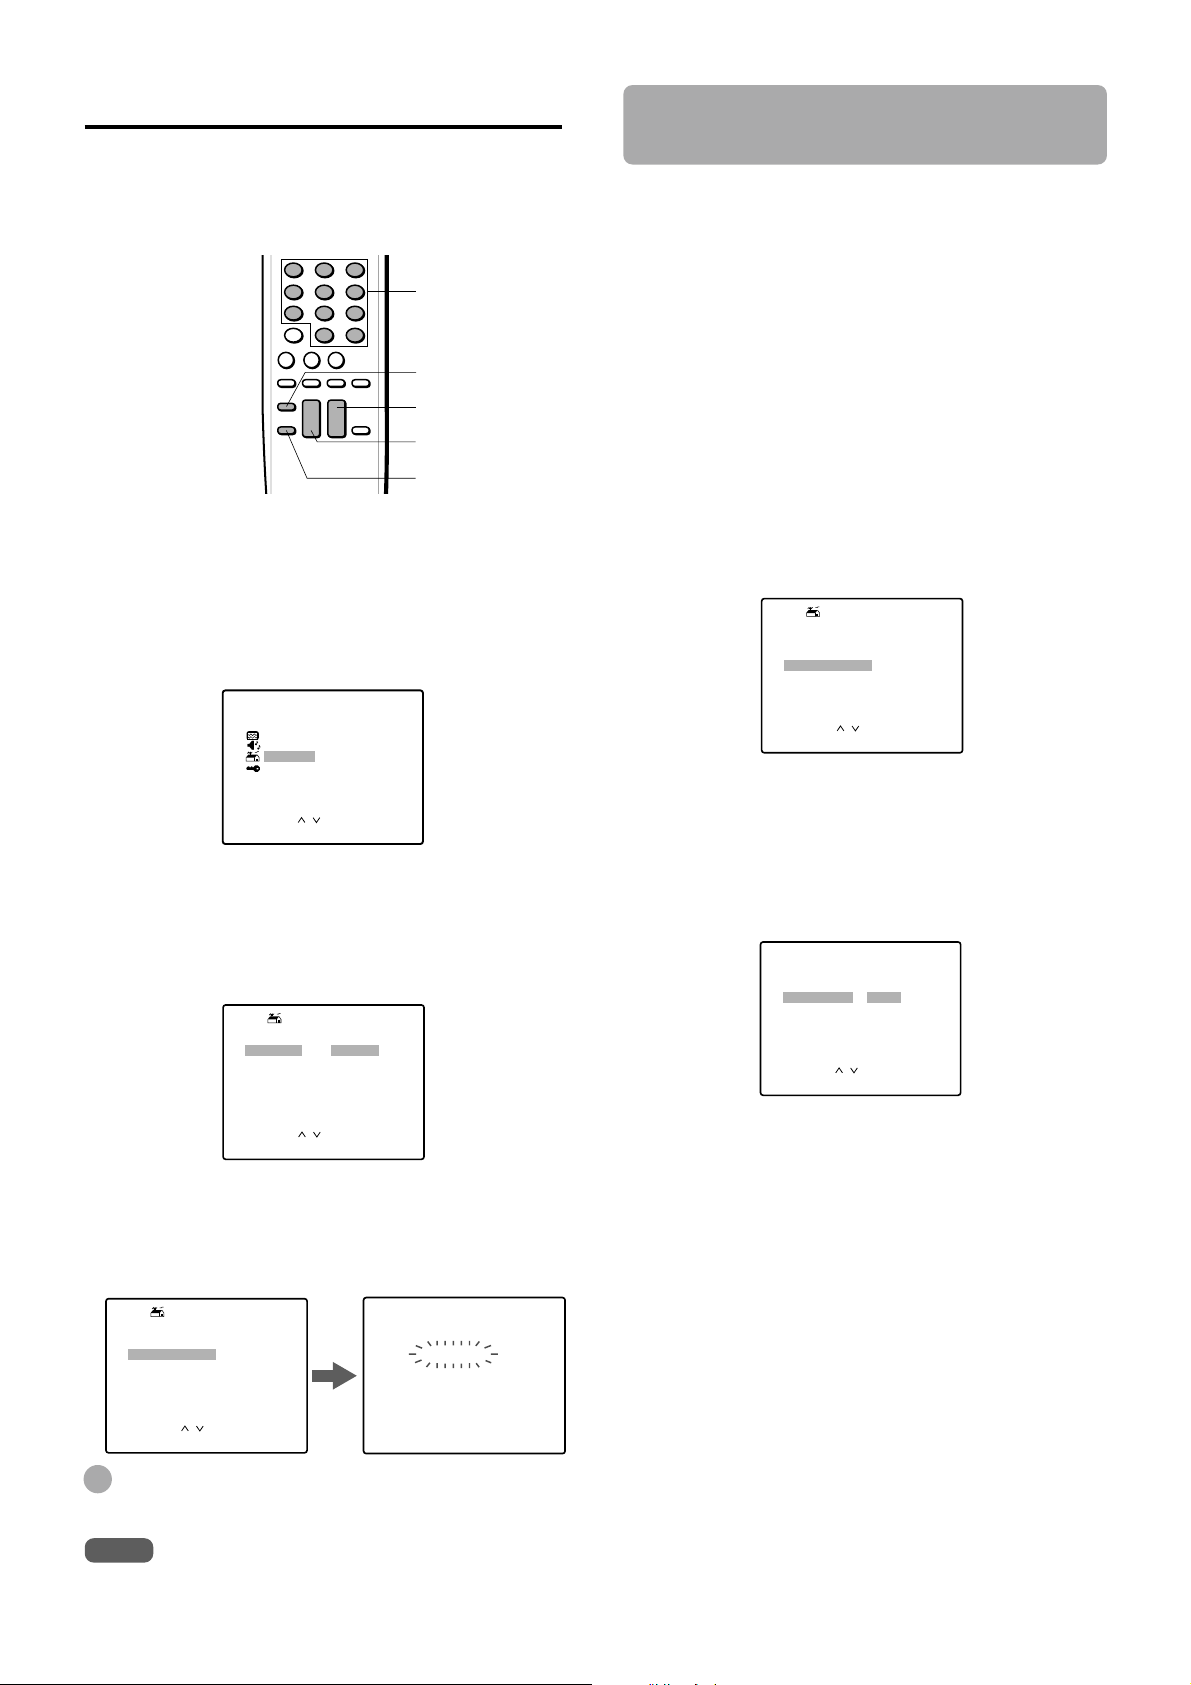
Setting the channels
ADD/ ERASE
CABLE125
ADD/ ERASE
: ADD
EX T : MENUI
SELECT:
CHANGE : – /+
/
Adding or erasing the channels
Before Auto Search, this unit can receive all channels in
your area by pressing CHANNEL N/M repeatedly. After
Auto Search, you can skip the channels which are not
preset with CHANNEL N/M.
Number
buttons
MENU
VOLUME +/–
CHANNEL N/M
ENTER
Before starting
Make sure the TV is in TV mode.
Press MENU.
1
Press CHANNEL N or M to select SET UP,
2
then press ENTER.
The selected item is displayed in red.
MENU
P CTURE
I
SOUND
SET UP
V CH I P
/
OK : ENTERSELECT:
EX T : MENUI
Press CHANNEL N or M to select
3
ANTENNA, then press VOLUME + or – to select
CABLE or TV.
CABLE : the CATV according to the connections to the
TV : the program from VHF/UHF antenna
ANTENNA connector
SET UP
LANGUAGE
ANTENNA
AUTO SEARCH
ADD/ ERASE
CH CAPTI ON
: ENGL I SH
: CABLE
manually
If the Auto Search does not set the channels correctly, add
them manually for watching TV programs. Also, you can
erase the unnecessary channels.
1
Select the channel number to be erased or
added using the number buttons.
Press the buttons as follows:
Example
To select the channel 7, press 0 then 7.
To select the channel 77, press 7 then 7.
To select the channel 107, press +100, 0 then 7.
2
Press MENU.
3
Press CHANNEL N or M to select SET UP,
then press ENTER.
Press CHANNEL N or M to select ADD/
4
ERASE, then press ENTER.
SET UP
LANGUAGE
ANTENNA
AUTO SEARCH
ADD/ ERASE
CH CAPTI ON
5
Press VOLUME + or – to erase or add a
selected channel.
• When the selected channel is already set, ADD
appears. When it is not set, ERASE appears.
• When you add or erase channels, the picture does not
change until you change the channel on the normal
screen.
/
: ENGL I SH
: CABLE
OK : ENTERSELECT:
EX T : MENUI
4
To interrupt the Auto Search, press MENU.
Once you conduct the Auto Search, the previous settings will
be canceled.
9
SELECT:
CHANGE : – /+
/
EX T : MENUI
Press CHANNEL N or M to select AUTO
SEARCH, then press ENTER.
All available channels in your area are scanned and
stored in the memory of the TV.
After scanning, the first located channel appears on the
screen.
SET UP
LANGUAGE
ANTENNA
AUTO SEARCH
ADD/ ERASE
CH CAPTI ON
/
: ENGL I SH
: CABLE
OK : ENTERSELECT:
EX T : MENUI
AUTO SEARCH
SEARCH I NG
CABLE1 2 5
EX T : MENUI
Tip
Note
ENGLISH
If you want to erase or add another channel,
6
press CHANNEL N or M to select CABLE
(or TV,) then press VOLUME + or – to select the
channel number to be erased or added. And
press CHANNEL N or M to select ADD/
ERASE, then press VOLUME + or – to erase or
add.
Press MENU to return to the normal screen.
7
Page 15
BASIC OPERATIONS
SLEEP 30
Watching a TV program
POWER
PREV.CH
PHONES \ jack
VOLUME +/–
1
Press POWER on the remote control to turn on
the TV.
If POWER on the TV is not pressed, you cannot operate
the TV even by pressing POWER on the remote control.
2
Press CHANNEL
N or M
number buttons to select the channel number.
When you use the number buttons, press the button as
follows:
Example
To select the channel 7, press 0 then 7.
To select the channel 77, press 7 then 7.
To select the channel 107, press +100, 0 then 7.
3
Press VOLUME + or – to adjust the volume.
SLEEP
Number buttons
+100
VOLUME +/–
MUTE
CHANNEL
CHANNEL
N/M
repeatedly or the
N/M
POWER
Setting the sleep timer
Press SLEEP repeatedly to select the number of
minutes after which to turn off.
The minutes change up to 120 minutes as follows.
OFF 15 30 60 90 120
After the set amount of time has elapsed, the TV turns to the
standby mode.
To check the remaining sleep time
Press SLEEP once. The remaining time appears on the
screen.
To cancel the sleep timer
Press SLEEP repeatedly until “SLEEP OFF” appears.
Note
The remaining time appears automatically 5 minutes and 1
minute before the TV turns off.
For example, 5 minutes before turning off, “SLEEP 5” appears.
To turn off the TV
Press POWER on the remote control.
The 6 STANDBY indicator on the TV lights.
You can turn the TV on or set the TV to the standby mode
by pressing POWER on the remote control.
Press POWER on the TV to turn the main power off.
To mute the volume
Press MUTE. “MUTE” appears for a few seconds.
To restore the volume, press MUTE or VOLUME + or –.
To recall a previous channel
Press PREV. CH to switch back and forth between the
current channel and the previous one.
Tip
To listen through the headphones, insert the headphones (not
supplied) with a stereo mini plug into the PHONES \ jack on
the front. The sound from the TV speaker is muted.
Notes
• The TV automatically turns to the standby mode
approximately 15 minutes after a television station has
stopped broadcasting.
• In standby mode, CHANNEL
turn on the power.
N or M
on the TV also can
ENGLISH
10
Page 16
Selecting the MTS mode
CAPTION OFF
CAPTION 1
TEXT 1 CAPTION 2TEXT 2
CAPTION 1
Selecting the closed captions
This unit is equipped with the MTS (Multi-channel TV
Sound) system which will greatly enhance TV viewing by
bringing you programs with high fidelity stereo sound. MTS
also provides for an extra channel called SAP (Second
Audio Program) which broadcasters can use to transmit a
second language for bilingual transmissions or some other
sound track.
When the channel is changed, one of the following message
is displayed at the top of the right side of the screen
according to the type of broadcast.
Stereo broadcast: STEREO is displayed in yellow.
Stereo/SAP broadcast: STEREO/SAP is displayed in yellow
and red.
SAP broadcast: SAP is displayed in red.
Monaural broadcast: Nothing is displayed.
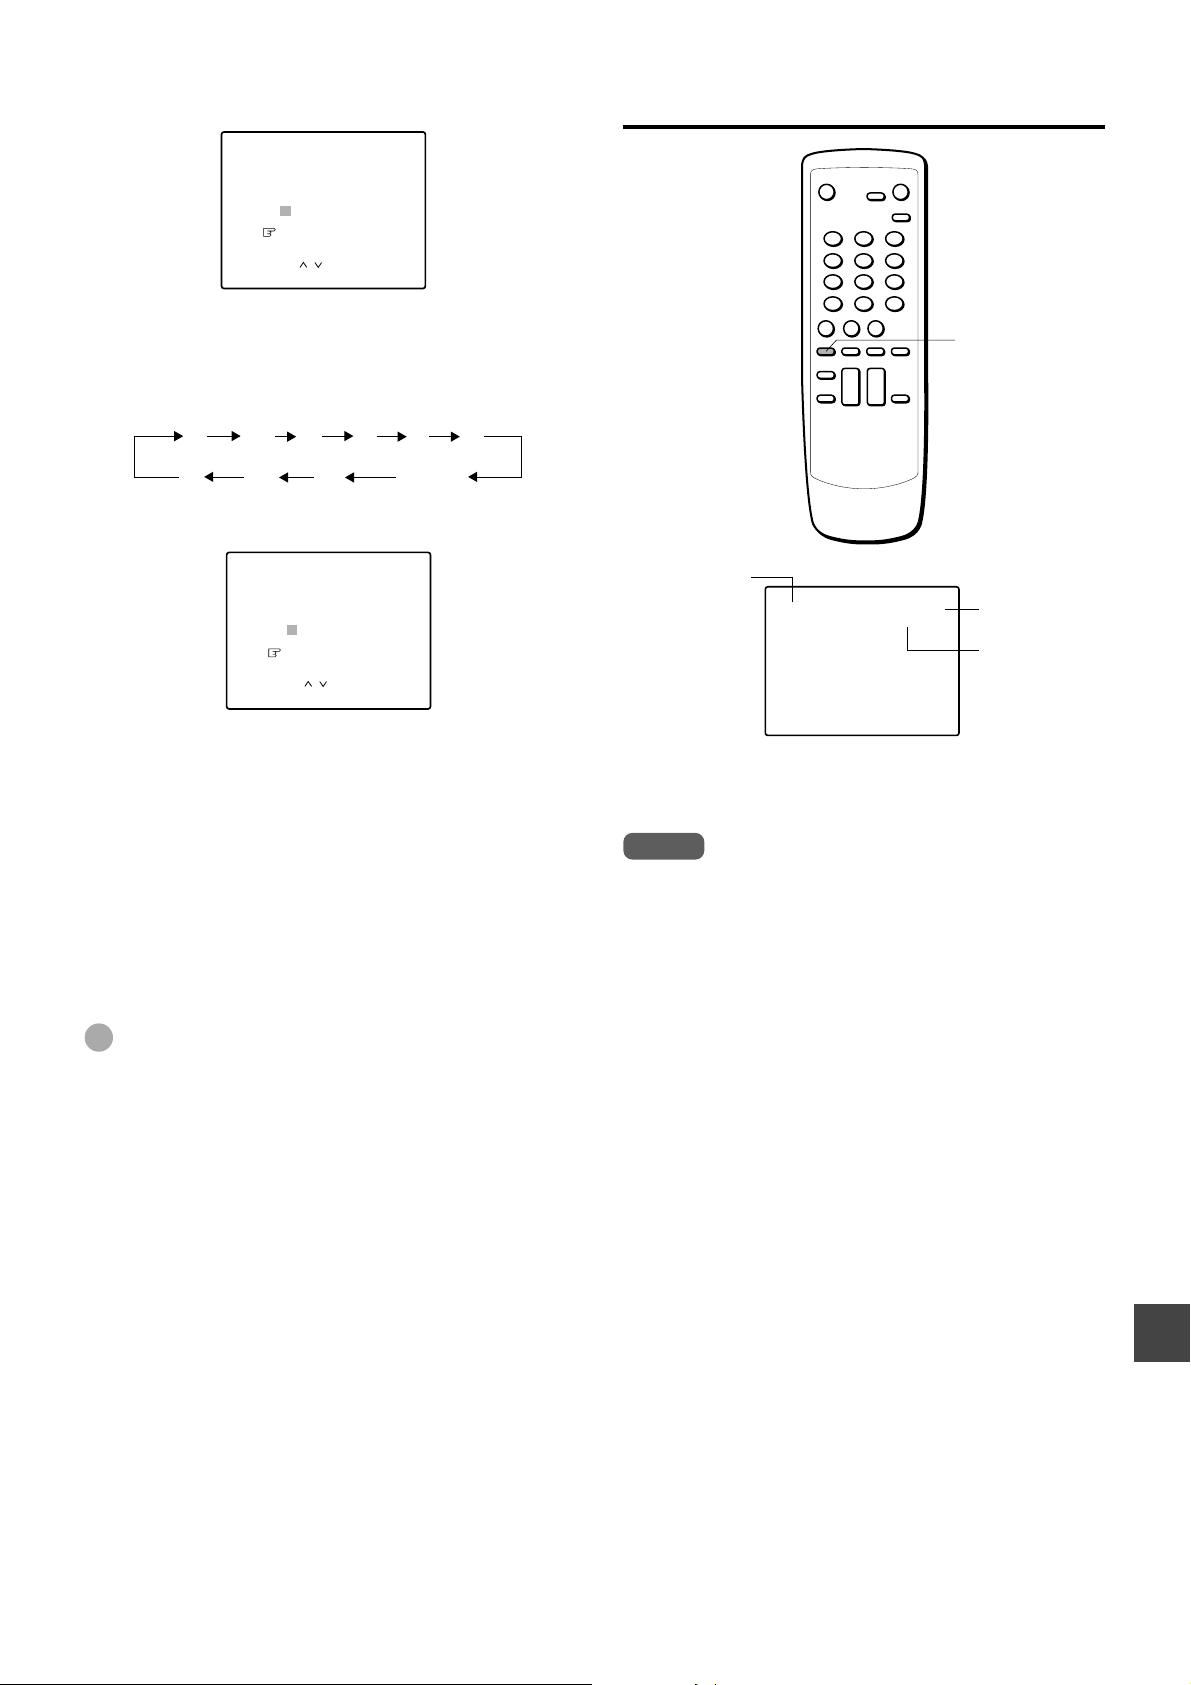
MTS
mode
This unit can decode and display closed captioned
television programs.
CAPTION
Press CAPTION repeatedly to select the caption
mode.
Press MTS repeatedly to selct the MTS mode.
MONO/SAP
The display changes as follows:
MONO STEREO SAP MONO/SAP
Note
When MTS is pressed, selectable items are displayed in green
and not selectable ones are displayed in red according to the
type of broadcast.
The display changes as follows:
Captions:
This closed caption mode displays text on the screen in
English or another language. Generally, closed captions in
English are transmitted on CAPTION 1 and closed captions
in other languages are transmitted on CAPTION 2.
Full Screen Text:
The text closed caption mode TEXT 1, TEXT2 will usually
fill the screen with a programming schedule or other
information.
11
ENGLISH
Page 17
Notes
NORMAL
• After selecting a closed caption mode, it will stay in effect
until it is changed, even if the channel is changed.
• If the captions signal is lost due to a commercial or a break
in the signal, the captions will reappear when the signal is
received again.
• When selecting closed captions, the captioning might be
delayed momentarily.
• If the channels are changed, the captions might be delayed
momentarily.
• If using an indoor antenna or if TV reception is very poor, the
closed caption decoder text may not appear. In this case,
adjust the antenna for better reception or use an outdoor
antenna.
• When activating the closed captioned decoder, there will be
a short delay before the closed captioned text appears on
the screen.
• The captions will appear in places on the screen where they
will least interfere with the picture, usually on the bottom of
the screen. News programs will usually show three-line
closed captions which scroll onto the screen. Most other
shows provide two or three lined captions placed near the
character who is speaking so the viewer can follow the
dialogue.
• If no caption signal is received, no captions will appear, but
the television will remain in the caption mode.
• Misspellings or unusual characters may occasionally appear
during closed captioning. This is normal with closed
captioning, entered live. These transmissions do not allow
time for editing.
• Some cable systems and copy protection systems may
interfere with the closed captioned signal.
• Words in italics or underlined describe titles, words in foreign
languages or words requiring emphasis. Words that are sung
usually appear enclosed by musical notes.
• For television programs broadcasting with closed captions,
look in your TV guide for the closed captions symbol (CC).
Selecting the AV mode
This unit provides 4 modes as the multi video enhancer.
NORMAL: Normal setting
CINEMA: Setting for watching films
GAME: Setting where it causes less eyestrain
DIMMER: Setting where the surrounding is darker
AV MODE
Press AV MODE repeatedly to select the AV mode.
The display changes as follows:
NORMAL CINEMA GAME DIMMER
Note
Even if you change the AV mode, the sound quality does not
change.
ENGLISH
12
Page 18
CHANGE : –/
+
EXIT : MENU
ADJUST
BR I GHT
– +
Adjusting the picture
5
Press VOLUME + or – to adjust the setting.
You can adjust the picture settings for each AV mode.
MENU
VOLUME +/–
CHANNEL N/
ENTER
Press MENU.
1
2
Press CHANNEL
N or M
to select PICTURE,
then press ENTER.
MENU
P CTURE
I
SOUND
SET UP
V CH I P
/
OK : ENTERSELECT:
EX T : MENUI
M
Item
Decreasing the
Increasing the bars
bars
BRIGHT
CONTRAST
makes the picture
darker
lowers the contrast
makes the picture
brighter
enhances the
contrast
SHARP
COLOR
Item
TINT
makes the picture
softer
lowers the intensity
and brilliance of the
color
Movement to the
left
makes lighter colors
redder
makes the picture
clearer
enhances the
intensity and
brilliance of the color
Movement to the
right
makes lighter colors
greener
After 2 seconds from releasing the button, the display
returns to step 4.
Press CHANNEL
3
N or M
to select the top
line, then press VOLUME + or – to select the AV
mode to adjust.
D MMER
I
BR GHT
I
CONTRAST
SHARP
COLOR
T NT
I
RESET
/
EX T : MENUI
N or M
to select the item to
4
Press CHANNEL
SELECT:
CHANGE : – /+
adjust.
D MMER
I
BR GHT
I
CONTRAST
SHARP
COLOR
T NT
I
RESET
SELECT:
CHANGE : – /+
/
EX T : MENUI
6
To adjust the other item, complete steps 3
through 5.
7
Press MENU to return to the normal screen.
Tip
To reset all the items of the selected AV mode to its initial
setting, select RESET in step 4, then press ENTER.
ENGLISH
13
Page 19

Adjusting the sound
4
Press VOLUME + or – to adjust the setting.
You can adjust the settings for treble sound, bass sound
and the balance (Left/Right) of the sound.
MENU
Press MENU.
1
Press CHANNEL N or M to select SOUND,
2
VOLUME +/–
CHANNEL N/M
ENTER
then press ENTER.
MENU
P CTURE
I
SOUND
SET UP
V CH I P
/
OK : ENTERSELECT:
EX T : MENUI
Item
TREBLE
BASS
Item
BALANCE
Decreasing the bars
makes the treble sound
weaker
makes the bass sound
weaker
Movement to L
makes the output level of
right speaker lower
ADJUST
BASS
– +
CHANGE:-/+ EXIT : MENU
Increasing the bars
makes the treble sound
stronger
makes the bass sound
stronger
Movement to R
makes the output level of
left speaker lower
After a few seconds from releasing the button, the
display returns to step 3.
5
To adjust the other item, complete steps 3 and 4.
6
Press MENU to return to the normal screen.
Tip
To reset all the items to its initial setting, select RESET in step
3, then press ENTER.
Note
Due to the combination among TREBLE, BASS, SUPER BASS
or BBE, the sound may be distorted. In this case, turn down the
levels of sound adjustment functions above.
3
Press CHANNEL N or M to select the item
to adjust.
TREBLE
BASS
BALANCE
SUPER BASS
Q SURROUND : OFF
BBE
RESET
SELECT:
CHANGE : – /+
: OFF
: OFF
/
EX T : MENUI
CONTINUE
ENGLISH
14
Page 20
OTHER FUNCTIONS
Adjusting the sound (continued)
SURROUND
MENU
BBE
S-BASS
VOLUME +/–
CHANNEL N/M
ENTER
Enjoying special sound effect
Your TV provides 3 modes of sound enhancer : SUPER
BASS, Q SURROUND, and BBE.
Setting the V-chip
An age limitation can be set to prevent children from viewing
or listening to violent scenes or programs with adult content.
This unit corresponds to “TV-RATING” and “MPAA RATING.”
To use the V-chip function, register a password at first.
Number
buttons
MENU
ENTER
VOLUME +/–
CHANNEL N/M
SUPER BASS enhances the bass sound.
Q SURROUND uses only two speakers at the left and right
to create an atmosphere that sounds as if you are
surrounded by two front speakers and two rear speakers.
BBE system enhances the clarity of high-frequency sound.
To operate with the single button
To turn on SUPER BASS, Q SURROUND or BBE, press SBASS, SURROUND or BBE. Each press changes on/off.
SUPER BASS ON
To operate on the SOUND menu
Press MENU. And press CHANNEL N or M to select
SOUND, then press ENTER. And press CHANNEL
N or M to select SUPER BASS, Q SURROUND or
BBE, then press VOLUME + or – to display ON.
TREBLE
BASS
BALANCE
SUPER BASS
Q SURROUND
BBE :OFF
RESET
SELECT :
CHANGE : –/
Notes
• The Q SURROUND system does not work for monaural
sources.
• Turning Q SURROUND on may cause sound distortion.
/
+
:ON
:OFF
EXIT : MENU
Registering the password
Important
You cannot set the V-chip if you forget the password.
We recommend you write down the password and keep
it in a safe place in case you forget it.
Press MENU.
1
2
Press CHANNEL N or M to select V CHIP,
then press ENTER.
MENU
P CTURE
I
SOUND
SET UP
V CH I P
/
OK : ENTERSELECT:
EX T : MENUI
Enter the password (4 digits) using the number
3
buttons (0-9).
“*” appears instead of the number.
V CH I P
NEW
PASSWORD
INPUT : 0–9
Enter the same password again for the safety.
4
CONFIRM
PASSWORD
EXIT : MENU
V CH I P
15
ENGLISH
INPUT : 0–9
The V chip menu appears.
EXIT : MENU
Page 21

Setting the V-chip
1
In the V-chip menu, press CHANNEL N or
M to select TV RATING, then press VOLUME
+
or – to display the desired setting.
• When the following programs are received, they are
protected from display according to the selected
setting.
OFF: TV RATING is not set.
TV-Y: Suitable for children of all ages
TV-Y7: Suitable for children 7 and older
TV-G: All audiences
TV-PG: Parental guidance suggested
TV-14: Inappropriate for under 14
TV-MA: Mature audiences
• TV RATING sub menu may appear according to the
selected setting. If the sub menu appears, go to step 2.
If not, go to step 3.
3
Press CHANNEL N or M to select MPAA
RATING, then press VOLUME + or – to display
the desired setting.
When the following movies are received, they are
protected from display according to the selected setting.
OFF: MPAA RATING is not set.
G: No age limitation
PG: Movies not proper for children
PG-13: Movies not proper for children of 13 years old
and younger
R: Movies those can be seen by children under
17 years old with their parents
NC-17: Movies forbidden children under 17 years old
X: Movies for adults
V CHIP
TV RATING
MPAA RATING
CHANGE PASSWORD
: OFF
: TV-Y
: PG-13
V CHIP
TV RATING
MPAA RATING
CHANGE PASSWORD
SELECT:
CHANGE : – /+
2
Press CHANNEL N or M to select the sub
: OFF
: OFF
: OFF
/
EX T : MENUI
menu item, then press VOLUME + or – to
display ON or OFF.
• When TV-Y7 is selected, the items below appear.
V CHIP
TV RATING
FANTASY VIOLENCE
MPAA RATING
CHANGE PASSWORD
SELECT:
CHANGE : – /+
• When TV-PG or TV-14 is selected, the items below
appear.
V CHIP
TV RATING
VI OLENCE
SEXUAL SITUATIONS
ADULT LANGUAGE
SEXUAL DIALOG
MPAA RATING
CHANGE PASSWORD
SELECT:
CHANGE : – /+
• When TV-MA is selected, the items below appear.
V CHIP
TV RATING
VI OLENCE
SEXUAL SITUATIONS
ADULT LANGUAGE
MPAA RATING
CHANGE PASSWORD
SELECT:
CHANGE : – /+
: OFF
: TV-Y7
: ON
: OFF
/
EX T : MENUI
: OFF
: TV-PG
: ON
: ON
: ON
: ON
: OFF
/
EX T : MENUI
: OFF
: TV-MA
: ON
: ON
: ON
: OFF
/
EX T : MENUI
SELECT:
CHANGE : – /+
4
Press CHANNEL N or M to select V CHIP,
/
EX T : MENUI
then press VOLUME + or – to display ON.
V CHIP
TV RATING
MPAA RATING
CHANGE PASSWORD
SELECT:
CHANGE : – /+
5
Press MENU to return to the normal screen.
Note
If no button is pressed for 15 seconds, the normal screen
returns.
: ON
: TV-Y
: PG-13
/
EX T : MENUI
To use the TV after the TV is protected
When the program applied to the V-chip setting is received,
“PROTECT BY V CHIP” is displayed.
<PROTECT BY V CHIP>
IF YOU CANCEL PROTECT,
AND INPUT PASSWORD.
PASSWORD
INPUT : 0–9
Enter the password. When the password is right, the protect
will be canceled.
CABLE125
TV-PG
The rating of a
receiving program
CONTINUE
ENGLISH
16
Page 22
Setting the V-chip (continued)
CH CAPTION
CABLE125
RESET
– – – –
EX T : MENUI
SELECT:
CHANGE : – /+
/
Registering a broadcasting
Changing the password
1
Press MENU.
2
Press CHANNEL N or M to select V CHIP,
then press ENTER.
MENU
P CTURE
I
SOUND
SET UP
V CH I P
/
OK : ENTERSELECT:
EX T : MENUI
Enter the password using the number buttons
3
(0-9).
“*” appears instead of the number.
V CH I P
PASSWORD
/
V CH I P
EXIT : MENU
: ON
: TV-Y
: PG-13
OK : ENTERSELECT:
EX T : MENUI
INPUT : 0~9
4
Press CHANNEL N or M to select CHANGE
PASSWORD, then press ENTER.
V CHIP
TV RATING
MPAA RATING
CHANGE PASSWORD
Enter the new password using the number
5
buttons (0-9).
“*” appears instead of the number.
NEW
PASSWORD
station name
You can register a broadcasting station name for each
channel.
MENU
VOLUME +/–
CHANNEL N/M
ENTER
1
Press MENU.
2
Press CHANNEL N or M to select SET UP,
then press ENTER.
MENU
P CTURE
I
SOUND
SET UP
V CH I P
/
OK : ENTERSELECT:
EX T : MENUI
3
Press CHANNEL N or M to select CH
CAPTION, then press ENTER.
SET UP
LANGUAGE
ANTENNA
AUTO SEARCH
ADD/ ERASE
CH CAPTI ON
/
: ENGL I SH
: CABLE
OK : ENTERSELECT:
EX T : MENUI
INPUT : 0~9
Enter the same password again for the safety.
6
CONFIRM
PASSWORD
INPUT : 0~9
7
Press MENU to return to the normal screen.
Note
If no button is pressed for 15 seconds, the normal screen
returns.
ENGLISH
17
EXIT : MENU
V CH I P
EXIT : MENU
4
Press VOLUME + or – to select the channel
number you want to register a name.
Page 23
5
Press CHANNEL M to select the bar display.
CH CAPTION
CABLE125
– – – –
RESET
SELECT:
CHANGE : – /+
6
Press VOLUME + to display the desired letter,
/
EX T : MENUI
then press CHANNEL M .
Each press of VOLUME+ changes the display as
follows:
.....
A
Z&/ –
On-screen display
DISPLAY
9
.....
0 (space)
Press VOLUME – to change the display in reverse order.
CH CAPTION
CABLE125
N
– – –
RESET
SELECT:
CHANGE : – /+
7
Repeat steps 5 and 6 to enter a broadcasting
/
EX T : MENUI
station name.
You can enter up to 4 letters.
To enter another broadcasting station name,
8
press CHANNEL M to move the cursor (red
area) to the channel number, then repeat steps
4 through 7.
You can enter up to 30 stations. When 30 stations are
already registered, “FULL” appears instead of “----.”
9
Press MENU to return to the normal screen.
Tip
To cancel all letters in steps 6 and 7, press CHANNEL N or
M to select RESET, then press ENTER.
Broadcasting
station name
CABLE125NBC
STEREO/SAP
Channel number/
VIDEO indicator
Audio input
To change the on-screen function display
Press DISPLAY. Each press turns the display on/off.
Notes
• If no button is pressed for 8 seconds, the on-screen display
automatically turns off.
• The broadcasting station name appears only when the
station name is registered.
• Audio input indicator does not appear when the TV is in
VIDEO1 and VIDEO2 mode.
ENGLISH
18
Page 24

ADDITIONAL INFORMATION
Watching a video or other
equipment
TV/VIDEO
GAME
Number buttons
TV/VIDEO/ENTER
Troubleshooting
If the unit does not seem to operate properly, read the
instructions again, then check the following guide.
There is no picture or sound.
The unit is in VIDEO input mode.
There is no sound.
Increase the volume level.
There is poor or no color.
Adjust the color setting.
The remote control does not operate.
Replace both batteries with new ones.
Clicking noise sounds.
Unavoidable expansion or contraction of cabinet due to
temperature changes. This is not a problem.
Press TV/VIDEO on the remote control or TV/
1
VIDEO/ENTER on the TV to display “VIDEO 1”
or “VIDEO 2” for a few seconds.
VIDEO 1: input from the VIDEO 1 INPUT AUDIO/VIDEO
jacks on the rear
VIDEO 2: input from the VIDEO 2 IN AUDIO/VIDEO
jacks on the front
Set the VCR or other equipment to playback.
2
To return to the TV program
Press TV/VIDEO on the remote control or TV/VIDEO/ENTER
on the TV repeatedly until the TV program appears. Also,
you can return to the TV program by selecting the channel
number directly with the number buttons.
To switch the GAME position directly
Press GAME to select the AV mode to GAME. The TV
input mode changes to VIDEO 2 automatically. And the
screen becomes to the adquate size for games.
When connecting to the AIWA VCR with
the ONE-TOUCH PLAYBACK
When ONE-TOUCH PLAYBACK or OTPB on the remote
control of VCR is pressed, this unit automatically turns on
and is in the VIDEO 1 mode. However, this function does
not operate in the following cases:
• ONE-TOUCH PLAYBACK on the VCR is pressed.
• The TV and VCR is not placed in the place where they
can receive the signal from the remote control
simultaneously.
Note
For details on how to use the VCR, consult the individual
owner’s manual for the VCR.
ENGLISH
19
Page 25

Care and maintenance
Specifications
To clean the cabinet
Wipe with a soft dry cloth.
If the surfaces are extremely dirty, use a soft cloth lightly
moistened with mild detergent solution. Do not use strong
solvents, such as alcohol, benzine or thinner as these could
damage the finish of the unit.
Do not stick a seal or an adhesive label
Do not stick a seal or an adhesive label on the surface for a
long time. The finish of the unit may be damaged or come
off.
When noises are heard from the radio or other audio/
video equipment
Separate the equipment from this unit.
Braun tube
If the surface is dirty, wipe with a soft dry cloth.
When you touch the Braun tube, sometimes you feel week
electricity. This is the static electricity, and it does not
damage you.
Tuner System Frequency synthesized tuner
TV System NTSC-M
Channel Coverage VHF: 2 to 13
UHF: 14 to 69
CATV: 5A, A-1 to A-5, A to W,
W+1 to W+84
Program Memory 181
Antenna Input 75 ohms, unbalanced
Picture Tube TV-F2400: 24 in
TV-F2000: 20 in
Screen Size TV-F2400:
478 (W) × 359 (H) mm
(18
7/8 × 141/4 in.)
598 mm (diagonal) (23
TV-F2000:
406 (W) × 305 (H) mm
(16 × 12
508 mm (diagonal) (20 in.)
Video Input 1 Vp-p 75 ohms
Audio Input 0.5 Vrms., 33 k ohms more
Speaker 120 × 60 mm (4
Operating Voltage 120 V AC, 60 Hz
Power consumption TV-F2400: 125 W
TV-F2000: 100 W
Phones Jack Stereo-mini jack
Operating temperature5˚C – 40˚C
Operating Humidity 35% – 80%
Dimensions TV-F2400:
690 (W) × 506 (H) × 485 (D) mm
TV-F2000:
610 (W) × 440 (H) × 485 (D) mm
Weight TV-F2400: 33.7 kg (74.14 lbs.)
TV-F2000: 24.1 kg (53.02 lbs.)
Accessories Remote control (1)
Batteries (R6/size AA) (2)
Antenna adaptor (1)
3/4 × 2 3/8 in.)
(27
1/4 × 20 × 19
1
(24
/8 × 17
5/8 in.)
1/8 in.)
3/8 × 19
1/8 in.)
1/8 in.)
• Design and specifications are subject to change without
notice for the purpose of performance improvement.
• The illustrations in this operating instructions are for the
TV-F2000.
ENGLISH
20
Page 26

Parts and controls
Front panel
PHONES \ jack
VIDEO 2 IN S-VIDEO/AUDIO
L(MONO)/R/VIDEO jacks
TV/VIDEO/ENTER button
MENU button
Rear panel (TV-F2000)
AC cord hook
AC cord
POWER button
6 STANDBY indicator
Remote sensor
CHANNEL N/M buttons
VOLUME +/– buttons
Security hook
VIDEO 1 INPUT S-VIDEO/AUDIO
L(MONO)/R/VIDEO jacks
ANTENNA jack
OUTPUT AUDIO L/R/VIDEO jacks
Rear panel (TV-F2400)
VIDEO 1 INPUT S-VIDEO/AUDIO
L(MONO)/R/VIDEO jacks
OUTPUT AUDIO L/R/VIDEO jacks
ENGLISH
21
Security hook
ANTENNA jack
AC cord
Page 27

Remote control
POWER button
SLEEP button
TV/VIDEO button
GAME button
Number buttons
CAPTION button
SURROUND button
AV MODE button
DISPLAY button
PREV. CH button
MENU button
ENTER button
+100 button
MTS button
BBE button
S-BASS button
VOLUME +/– button
MUTE button
CHANNEL N/M button
ENGLISH
22
Page 28

For Assistance and Information,
Call Toll Free 1-800-BUY-AIWA
(United States and Puerto Rico)
8A-JE5-901-01
000323BTN-Y9
Printed in Malaysia
Page 29

TV-F2400U
TV-F2000U
GUIA DE INICIO RAPIDO
Bienvenido
Muchas gracias por haber adquirido este producto AIWA.
Cuando desembale su televisor por primera
vez, siga los procedimientos 1 a 4 siguientes
para prepararlo.
En el cartón de embalaje encontrará los siguientes accesorios.
Controlador remoto (1)
Pilas (2)
Para servicio e información
Llame gratis al 1-800-BUY-AIWA
(Estados Unidos y Puerto Rico)
Adaptador de antena (1)
ESPAÑOL
Le rogamos que lea la información de las páginas 1 y 2 antes de instalar o poner en funcionamiento su televisor.
1
Coloque dos pilas R6 (tamaño AA) (suministradas) con las
polaridades correctamente alineadas, como se indica en el
compartimento de las pilas.
Instalación de las pilas en el Controlador Remoto
8A-JE5-903-01
991228ATN-Y9
AIWA CO., LTD
Impreso en Malaysia
1
Page 30

2
Conexión de la antena (o sistema de cablevisión) - Televisor
Precaución
Conecte el cable de alimentación de CA al tomacorriente de CA después de haber finalizado todas las
conexiones.
Conexiones básicas
Gancho del cable
de CA
(sólo TV-F2000)
Tomacorriente de CA
Cable de CA
1 Conecte el cable de la antena
de televisión (no suministrado)
al conector ANTENNA del
televisor.
TV-F2000
Cable coaxial
de 75 ohmios
(no suministrado)
2 Conecte el cable de
CA al tomacorriente de
CA.
Si utiliza el TV-F2000, conecte
el cable de CA después de
pasarlo por el gancho para cable
de CA de la parte posterior.
Conexiones de cablevisión
1 Conecte el cable proveniente del
sistema de cablevisión a la
entrada del convertidor de
cablevisión.
Cable coaxial de 75
ohmios (no suministrado)
Gancho del cable
de CA
(sólo TV-F2000)
Tomacorriente de CA
TV-F2000
Sistema de cablevisión
OUTIN
Convertidor de
cablevisión (no
suministrado)
Cable coaxial
de 75 ohmios
(no suministrado)
Cable de AC
3 Conecte el cable de
CA al tomacorriente de CA.
Si utiliza el TV-F2000, conecte
el cable de CA después de pasarlo
por el gancho para cable de CA de
la parte posterior.
2 Conecte la salida del
convertidor al
conector ANTENNA
del televisor.
Para conectar un sistema de cablevisión sin utilizar convertidor de cablevisión
Conecte el cable de cablevisión al conector ANTENNA del televisor en el paso 1 anterior.
2
Page 31

3
VOLUME
Selección de idioma
El menú en pantalla podrá visualizarse en los tres idiomas siguientes: inglés, español o
francés.
POWER
1
Indicador 6 STANDBY
Presione POWER en el televisor.
El indicador 6 STANDBY se ilumina.
3
2
POWER
MENU
Presione POWER en el control
remoto para encender el televisor.
La indicación 6 STANDBY se
desactiva.
Presione MENU .
MENU
P CTURE
I
SOUND
SET UP
V CH I P
/
OK : ENTERSELECT:
EX T : MENUI
4
CHANNEL
ENTER
Presione
N o M para seleccionar
SET UP y después presione
ENTER
El elemento seleccionado
aparecerá en color rojo.
CHANNEL
.
MENU
P CTURE
I
SOUND
SET UP
V CH I P
/
OK : ENTERSELECT:
EX T : MENUI
5
6
MENU
+
Presione VOLUME
visualizar el idioma deseado.
Cada vez que presione el botón, el
idioma visualizado en pantalla
cambiará.
Presione MENU para volver
a la pantalla normal.
o
–
para
3
Page 32

4
CHANNEL
CHANNEL
Sintonización de los canales
Antes de empezar
Asegúrese de que el televisor se encuentra en el modo TV.
1
2
MENU
CHANNEL
VOLUME
Presione MENU y, a continuación,
CHANNEL N o M para
seleccionar PREFIJAR, después,
presione ENTER.
ENTER
Presione
para seleccionar ANTENA y, a
continuación, presione
+
o
CHANNEL
N o M
VOLUME
–
para seleccionar TV o CABLE.
3
ENTER
Presione
seleccionar BUSQUEDA AUTOMATICA
y, a continuación, presione
Se sintonizarán todos los canales
disponibles.
Después de sintonizados, el primer
canal localizado aparecerá en la
pantalla del televisor.
CHANNEL
N o M para
ENTER
.
4
Page 33

ESPAÑOL
Advertencia
Para reducir el riesgo de incendios o descargas
eléctricas, no exponga esta unidad a la lluvia ni a la
humedad.
CAUTION
RISK OF ELECTRIC SHOCK
DO NOT OPEN
“PRECAUCION: PARA REDUCIR EL RIESGO
“CAUTION:TO REDUCE THE RISK OF
DE QUE SE PRODUZCAN SACUDIDAS
ELECTRICAS, NO QUITE LA CUBIERTA
DO NOT REMOVE COVER (OR BACK).
EN EL INTERIOR NO HAY PIEZAS QUE
NO USER-SERVICEABLE PARTS INSIDE.
REFER SERVICING TO QUALIFIED
PERSONAL DE SERVICIO CAPACITADO.”
Explicación de los símbolos
El símbolo del rayo con la punta de flecha en el
interior del triángulo equilátero tiene la finalidad
de avisar al usuario de la presencia de
“tensiones peligrosas” sin aislar en el interior
del producto que podrían ser de suficiente
magnitud como para constituir un riesgo de
sacudida eléctrica para las personas.
El signo de exclamación en el interior de un
triángulo equilátero tiene la finalidad de avisar
al usuario de la presencia de instrucciones
importantes de operación y mantenimiento
dentro del material impreso que acompaña al
aparato.
INSTRUCCIONES
ELECTRIC SHOCK,
(O PANEL POSTERIOR).
DEBA REPARAR EL USUARIO.
SOLICITE LAS REPARACIONES AL
SERVICE PERSONNEL.”
Superficie de montaje - Coloque la unidad sobre una
superficie plana y nivelada.
Accesorios - No sitúe esta unidad sobre un carro, soporte,
trípode o mesa inestable. La unidad podría caerse y
producir daños graves a un niño o adulto y al propio
aparato. Utilícela sólo con un carro, soporte, trípode o mesa
recomendado por el fabricante o comercializado junto con la
unidad. Cualquier montaje de la unidad debe respetar las
instrucciones del fabricante y debe emplear un accesorio de
montaje recomendado por el mismo.
Carro portátil - Las combinaciones de aparato y carro
deben trasladarse con cuidado. Podrían volcar si se
someten a paradas bruscas, fuerza excesiva o superficies
desniveladas.
ADVERTENCIA SOBRE CARROS PORTÁTILES
S3126A
Ventilación - La unidad debe situarse con suficiente
espacio a su alrededor para asegurar una correcta
ventilación de calor. Deje una separación de 10 cm desde
las partes posterior y superior de la unidad y de 5 cm desde
cada lado.
Las ranuras y aperturas de la carcasa y de las partes
posterior e inferior se proporcionan para asegurar la
ventilación, el funcionamiento fiable de la unidad y para
protegerla contra sobrecalentamientos. Dichas aperturas no
deben bloquearse ni taparse. No coloque la unidad sobre
una cama, alfombra o superficie similar que podría bloquear
estos orificios. (Esta unidad nunca debe colocarse cerca de
un radiador o salida de aire caliente). No incluya la unidad
en una instalación incorporada, como una librería, a menos
que proporcione una ventilación adecuada.
IMPORTANTES DE
SEGURIDAD
Lea las Instrucciones de manejo detenidamente antes de
utilizar la unidad. Asegúrese de conservar dichas
instrucciones para futuras consultas. Todas las
advertencias y precauciones incluidas en las Instrucciones
de manejo e impresas en la unidad, así como las
sugerencias de seguridad que se ofrecen a continuación,
deben respetarse estrictamente.
Advertencia
Para evitar sacudidas eléctricas o lesiones de otro tipo, siga
todas las instrucciones de seguridad al instalar, manejar y
realizar el mantenimiento de la unidad.
Instalación
Aditamentos - No utilice aditamentos no recomendados
por el fabricante de la unidad, ya que pueden constituir un
riesgo de incendios, descargas eléctricas o daños
personales.
Agua y humedad - No utilice esta unidad cerca del agua,
por ejemplo, en las proximidades de una bañera, lavabo,
pila de cocina o piscina, en un sótano húmedo, etc.
Calor - No emplee esta unidad cerca de fuentes de calor,
incluidas las salidas de aire caliente, estufas u otros
aparatos que generan calor. Tampoco debe utilizarse a
temperaturas inferiores a 5°C (41°F) o superiores a 40°C
(104°F).
1
Peso y objetos pesados
La unidad debe moverse con cuidado entre dos o más
personas, puesto que la distribución del peso no es
uniforme. No coloque objetos pesados sobre la unidad.
Introducción de objetos y de líquidos - Nunca introduzca
ningún tipo de objeto en la unidad a través de las ranuras
del mueble ya que podrían hacer contacto con puntos de
tensión peligrosa o hacer cortocircuito ocasionando así
incendio o sacudidas eléctricas. Nunca rocíe ni derrame
líquido de ningún tipo sobre la unidad. No coloque jarrones
o similares con agua en su interior sobre esta unidad.
Energía eléctrica
Fuentes de alimentación - Esta unidad sólo debe utilizarse
con el tipo de fuente de alimentación indicado en su
etiqueta. Si no está seguro del tipo de fuente de
alimentación conectado a su hogar, consulte a su proveedor
de electrodomésticos o a la compañía eléctrica local. Para
utilizar la unidad con pilas u otras fuentes de alimentación,
consulte las instrucciones de manejo.
Puesta a tierra o polarización - Esta unidad cuenta con un
enchufe polarizado de corriente alterna (un enchufe en el
que una clavija es más grande que la otra). Dicho enchufe
sólo encaja en el tomacorriente de una manera. Se trata de
un dispositivo de seguridad. Si no consigue insertar el
enchufe completamente en el tomacorriente, inténtelo al
revés. Si todavía no cabe, consulte a un electricista para
proceder a la sustitución del tomacorriente obsoleto. No
malogre la función de seguridad del enchufe polarizado.
Lea las Instrucciones de manejo detenidamente antes de
utilizar la unidad.
ESPAÑOL
Page 34

Protección del cable de alimentación - La unidad está
provista de un enchufe con protección contra sobrecargas.
Se trata de un dispositivo de seguridad. Consulte las
instrucciones de manejo para obtener información sobre la
sustitución o restauración de este dispositivo protector. Si
es necesario sustituir el enchufe, asegúrese de que el
técnico de servicio utilice una pieza de recambio
especificada por el fabricante o que cuente con la misma
protección contra sobrecargas que el enchufe original.
Sobrecargas - No permita que nada se apoye sobre el
cable de alimentación. No sobrecargue los tomacorrientes
de pared ni los cables de extensión ya que esto puede
ocasionar incendios o sacudidas eléctricas. No ponga la
unidad en un lugar donde pueda pisarse el cable.
Antena exterior
Líneas eléctricas - Un sistema de antena exterior no debe
situarse cerca de líneas eléctricas aéreas ni otros circuitos
eléctricos o de alumbrado, ni en lugares donde pueda
caerse sobre líneas o circuitos de este tipo. Al instalar un
sistema de antena exterior, es necesario ejercer sumo
cuidado para no tocar líneas o circuitos eléctricos, ya que el
contacto con ellos puede producir la muerte.
Puesta a tierra de antenas exteriores - Si conecta un
sistema de antena exterior o de cablevisión a la unidad,
asegúrese de conectar a tierra la antena o el sistema de
cablevisión para ofrecer alguna protección contra las
sobretensiones y la acumulación de cargas estáticas. La
Sección 810 del Código Eléctrico Nacional (NEC), ANSI/
NFPA No. 70, ofrece información relativa a la correcta
conexión a tierra del mástil y la estructura de soporte, la
puesta a tierra del cable de entrada a una unidad de
descarga de antena, el tamaño de los conductores de
puesta a tierra, la ubicación de la unidad de descarga de
antena, la conexión a los electrodos de puesta a tierra y los
requisitos para el electrodo de puesta a tierra. Consulte la
siguiente figura.
Antenna Grounding According to the National Electrical Cord
Puesta a tierra de una antena, según el Código Eléctrico Nacional
ANTENNA LEAD IN WIRE
HILO DE ENTRADA DE
ANTENA
UNIDAD DE DESCARGA
CABRAZADERA DE
GROUND CLAMP
TIERRA
ANTENNA DISCHARGE
UNIT
DE ANTENNA (SECCIÓN
(NEC SECTION 810-20)
810-20 DEL NEC)
Daños que requieren servicio
Desenchufe la unidad del tomacorriente de la pared y acuda
a personal de servicio especializado en las siguientes
situaciones:
1) Si el cable de alimentación o el enchufe está dañado o
deshilachado.
2) Si se ha derramado líquido dentro de la unidad.
3) Si la unidad ha sido expuesta al agua o a la humedad.
4) Si la unidad no funciona normalmente al seguir las
instrucciones de manejo. Ajuste sólo aquellos
controles que se indican en las instrucciones, ya que
un ajuste incorrecto de los demás controles puede
producir daños y en muchos casos requeriría un
trabajo extenso por parte de un técnico para restaurar
el funcionamiento normal de la unidad.
5) Si la unidad se ha caído o la carcasa ha sufrido daños.
6) Cuando la unidad presenta un cambio brusco en su
funcionamiento, ello indica la necesidad de acudir al
servicio técnico.
No intente reparar la unidad usted mismo, ya que puede
verse expuesto a tensiones peligrosas u otros peligros si
abre o retira la carcasa. Para cualquier reparación u
operación de mantenimiento, acuda a personal de servicio
especializado.
Piezas de recambio - En caso de que se requieran piezas
de recambio, asegúrese de que el técnico haya utilizado las
piezas especificadas por el fabricante o con las mismas
características que la pieza original. Las sustituciones no
autorizadas pueden provocar incendios, descargas
eléctricas u otros peligros.
Comprobación de seguridad - Después de cualquier
intervención de mantenimiento o de reparación pida al
técnico del servicio que realice una comprobación de
seguridad para asegurarse de que la unidad está en
perfectas condiciones de funcionamiento.
Nota al instalador del sistema de cablevisión
Le recordamos al instalador del sistema de cablevisión que
el Artículo 820-40 del NEC ofrece normas para una correcta
puesta a tierra y, en particular, especifica que la puesta a
tierra del sistema de cablevisión debe conectarse al sistema
de puesta a tierra del edificio, tan cerca del punto de
entrada del cable como resulte práctico.
EQUIPOS DE
ELECTRIC
LA RED
SERVICE
ELÉCTRICA
EQUIPMENT
CÓDIGO ELÉCTRICO NACIONAL
NEC-NATIONAL ELECTRICAL CODE
CONDUCTOS DE PUESTA
GROUNDING
A TIERRA (SECCIÓN
CONDUCTORS
810-21 DEL NEC)
(NEC SECTION 810-21)
ABRAZADERAS DE
GROUND CLAMPS
TIERRA
POWER SERVICE GROUNDING
SISTEMA DE ELECTRODOS DE
ELECTRODE SYSTEM
PUESTA A TIERRA DE LA RED
(NEC ART 250 PART H)
ELÉCTRICA
(ART. 250, SECCION H NEC)
Rayos
Como protección adicional para el receptor de esta unidad
durante las tormentas eléctricas, o antes de dejarla
desatendida y sin utilizar durante un periodo prolongado,
desenchúfela del tomacorriente de la pared y desconecte la
antena o el sistema de cablevisión. Ello evitará daños a la
unidad causados por rayos y sobretensiones.
Mantenimiento
Limpieza - Desenchufe la unidad del tomacorriente de la
pared antes de limpiarla. No emplee productos de limpieza
líquidos ni aerosoles. Utilice un paño húmedo para la
limpieza.
REGISTRO DEL PROPIETARIO
Por motivos de conveniencia, anote el número de modelo y
el número de serie (se encuentran en el panel posterior de
la unidad) en el espacio ofrecido a continuación. Refiérase
a ellos cuando se ponga en contacto con su proveedor
AIWA en caso de dificultad.
Número de modelo
Número de serie
ESPAÑOL
2
Page 35

¡Bienvenido!
Muchas gracias por la adquisición de
este producto AIWA. Para sacar el
máximo partido a esta unidad, lea
atentamente este manual.
Índice
Características
principales de este
televisor
V-chip
Es posible establecer un límite de edad
para evitar que los niños vean y oigan
escenas violentas, imágenes para
adultos, etc. Esta unidad corresponde a
“CLASSIFIQUE TV” y “CLASIF
PELICULA”.
Potenciador de vídeo
Esta unidad proporciona 4 modos de
potenciación de vídeo múltiple:
NORMAL, CINE, GAME y OSCURO.
Potenciador de sonido
Esta unidad proporciona 3 modos de
potenciación de sonido: SUPER BASS,
Q SURROUND y BBE.
Emisión MTS (Sonido de TV
multicanal)
Usted podrá recibir los programas de
televisión en estéreo y bilingües emitidos
en los Estados Unidos.
Subtítulos
Los subtítulos podrán visualizarse en la
pantalla al recibir una emisión con
subtítulos.
Preparativos
Conexión de la antena........................................4
Preparación del controlador remoto....................8
Selección de idioma............................................8
Sintonización de los canales...............................9
Operaciones básicas
Visualización de programas de televisión.........10
Selección del modo MTS..................................11
Selección del modo de subtítulos .....................11
Selección del modo de AV................................12
Ajuste de la imagen ..........................................13
Ajuste del sonido...............................................14
Otras funciones
Ajuste del V-chip...............................................15
Registro de nombres de emisora......................17
Visualización en pantalla ..................................18
Visualización de vídeo o desde otros
equipos...........................................................19
Información adicional
Solución de problemas .....................................19
Cuidados y mantenimiento ...............................20
Especificaciones ...............................................20
Este equipo ha sido probado y se ha encontrado que
cumple con los límites para dispositivos digitales de clase
B, de acuerdo con la Parte 15 de las normas de la FCC.
Estos límites han sido diseñados para proporcionar una
protección razonable contra interferencias perjudiciales en
una instalación residencial.
Este equipo genera, utiliza y puede radiar energía de
radiofrecuencia y, si no se instala y utiliza de acuerdo con
las instrucciones, puede causar interferencias
perjudiciales en las radiocomunicaciones. Sin embargo,
no existe ninguna garantía de que tales interferencias no
se produzcan en una instalación en particular. Si este
equipo causa interferencias perjudiciales, lo que podrá
determinarse desconectando y volviendo a conectar su
alimentación, se ruega que el usuario corrija las
interferencias tomando una o más de las medidas
siguientes:
3
ESPAÑOL
Índice de partes y controles..............................21
- Reorientación o reubicación de la antena receptora.
- Aumento de la separación entre el equipo y el receptor.
- Conexión del equipo a un tomacorriente diferente al
utilizado por el receptor.
- Solicitud de ayuda al proveedor o a un técnico de radio/
televisión experimentado.
Nota
Las modificaciones o ajustes de este producto, que no se
hayan aprobado expresamente por el fabricante, pueden
anular el derecho del usuario a utilizarlo.
Page 36

PREPARATIVOS
Conexión de la antena
Conexiones básicas
TV-F2000
Cable coaxial
de 75 ohmios
(no
suministrado)
Cable bifilar de 300
ohmios (no
suministrado)
Adaptador de antena
(suministrado)
Gancho para el
cable de CA
(sólo TV-F2000)
1
A conector ANTENNA
2 A un tomacorriente de CA
1
Conecte el cable de antena al conector ANTENNA del televisor.
Si el cable es de tipo coaxial redondo de 75 ohmios, conéctelo directamente al conector ANTENNA.
Si el cable es de tipo bifilar plano de 300 ohmios, conéctelo al adaptador de antena (suministrado) y conecte el adaptador al
conector ANTENNA.
Conecte el cable de CA al tomacorriente de CA.
2
Si utiliza el TV-F2000, conecte el cable de CA después de pasarlo por el gancho para el cable de CA de la parte posterior.
Para evitar que la unidad se caiga durante terremotos, etc.
Fije la unidad nivelada a la pared o a un pilar con el gancho de seguridad situado en la parte trasera mediante una cuerda o un
cable resistente.
TV-F2000
Gancho de seguridad
TV-F2400
Gancho de
seguridad
Cuerda o cordel
resistente
(no suministrado)
Cuerda o cordel
resistente
(no suministrado)
CONTINUA
CONTINUE
ESPAÑOL
4
Page 37

Conexión de la antena (continuación)
Conexiones de cablevisión
Para conectar un sistema de cablevisión sin convertidor de cablevisión
TV-F2000
Sistema de cablevisión
Cable coaxial de 75 ohmios
(no suministrado)
1
Gancho para el
cable de CA
(sólo TV-F2000)
Al tomacorriente de CA
2
A conector ANTENNA
Conecte el cable del sistema de cablevisión al conector ANTENNA del televisor.
1
2
Conecte el cable de CA al tomacorriente de CA.
Si utiliza el TV-F2000, conecte el cable de CA después de pasarlo por el gancho para el cable de CA de la parte posterior.
Para conectar un sistema de cablevisión con convertidor de cablevisión
TV-F2000
Gancho para el
cable de CA
(sólo TV-F2000)
3
Al tomacorriente de CA
Sistema de cablevisión
Cable coaxial
de 75 ohmios
(no
suministrado)
A conector
ANTENNA
1
Cable coaxial de 75 ohmios
(no suministrado)
Convertidor de
cablevisión (no
suministrado)
2
1
Conecte el cable del sistema de cablevisión al conector de entrada del convertidor.
2
Conecte el conector de salida del convertidor al conector ANTENNA del televisor.
3
Conecte el cable de CA al tomacorriente de CA.
Si utiliza el TV-F2000, conecte el cable de CA después de pasarlo por el gancho para el cable de CA de la parte posterior.
5
ESPAÑOL
Page 38

Conexión de una videograbadora u otro equipo
TV-F2000
Al conector de salida
de la antena
1
A las tomas de salida
de audio/vídeo
2
Cable coaxial de
75 ohmios
(no suministrado)
A toma VIDEO 1
A tomas VIDEO 1 INPUT
AUDIO L (MONO)/R
Rojo
1
Retire el cable de antena del televisor y conéctelo al conector de entrada de antena de la
INPUT VIDEO
Amarillo
Blanco
A conector ANTENNA
videograbadora.
Cable de
audio/vídeo
(no suministrado)
Conector de entrada
de la antena
2
Conecte el cable de antena opcional al conector de salida de antena de la videograbadora y al conector
ANTENNA del televisor.
Es posible conectar el televisor y la videograbadora con el cable de audio/vídeo opcional.
Para ver imágenes de video
Consulte “Visualización de video o desde otros equipos” en la página 19.
Consejos
• Si la videograbadora es de tipo monofónico, conecte uno de los enchufes de audio sólo a la toma AUDIO L (MONO).
• Si la videograbadora dispone de toma de salida de S video, podrá conectar el cable opcional de S video a dicha toma de la
videograbadora y a la toma VIDEO 1 INPUT S-VIDEO del televisor. En este caso, no es preciso conectar el cable a la toma VIDEO.
Nota
Para obtener más información sobre cómo conectar la videograbadora al televisor, consulte la documentación de la videograbadora.
CONTINUA
CONTINUE
ESPAÑOL
6
Page 39

Conexión de la antena (continuación)
Para conectar una videocámara o consola
de juegos
Resulta cómodo utilizar las tomas VIDEO 2 IN AUDIO L
(MONO)/R/VIDEO de la parte frontal.
A toma VIDEO 2
IN VIDEO
Amarillo
Blanco
Cable de audio/video
(no suministrado)
A tomas VIDEO 2 IN
AUDIO L (MONO)/R
Rojo
Para conectarla a un sistema estéreo
Esta conexión mejora la calidad del sonido.
Conecte las tomas OUTPUT AUDIO L / R del televisor a las
tomas de entrada de audio del sistema estéreo con el cable
de audio opcional.
A tomas OUTPUT
AUDIO L / R
Rojo
Blanco
Cable de audio
(no suministrado)
Videocámara
(Reproductor)
o
A las tomas de salida
de audio/vídeo
Consola de juegos
Para ver las imágenes de una
videocámara o consola de juegos
Consulte “Visualización de vídeo o desde otros equipos” en
la página 19.
Consejo
Si el otro equipo dispone de toma de salida de S video, podrá
conectar el cable opcional de S video a dicha toma de la
videograbadora y a la toma VIDEO 2 INPUT S-VIDEO del
televisor. En este caso, no es preciso conectar el cable a la
toma VIDEO.
A tomas de entrada
de audio
Sistema estéreo
7
ESPAÑOL
Page 40

Preparación del controlador
Selección de idioma
remoto
Inserción de las pilas
Precaución
Para evitar posibles daños por fugas o explosiones,
siga las instrucciones que se ofrecen a continuación.
• Inserte las dos pilas R6 (tamaño AA) suministradas,
haciendo coincidir las marcas 0 y 9 correctamente,
tal como se muestra en la ilustración.
• No mezcle una pila nueva con otra vieja, ni pilas de
tipos diferentes.
• Las pilas no deben tirarse al fuego, aplicarles calor ni
desmontarlas.
• No transporte las pilas junto con llaves u otros objetos
metálicos.
El menú en pantalla podrá visualizarse tres idiomas
siguientes: inglés, español y francés.
POWER
MENU
VOLUME +/–
CHANNEL N/M
ENTER
TV/VIDEO/
ENTER
MENU
VOLUME
+
/–
CHANNEL
N/M
POWER
Indicador
6 STANDBY
Nota
Extraiga las pilas cuando se agoten, o cuando no vaya a utilizar
el controlador remoto durante mucho tiempo.
Uso del controlador remoto
Apunte el controlador remoto hacia el sensor de control
remoto.
Sensor de
control remoto
Notas
• El controlador remoto no funcionará correctamente si hay
alguna obstrucción entre el controlador y el sensor de
control remoto.
• Las fuentes de iluminación intensa, como una lámpara
fluorescente o la luz solar directa, pueden causar un
funcionamiento poco fiable.
• La utilización de un televisor con el mismo tipo de controlador
remoto de rayos infrarrojos, orientado en la misma dirección,
puede provocar un funcionamiento incorrecto.
• El alcance máximo para un control efectivo entre el
controlador remoto y el sensor de control remoto es de 7
metros.
• Aunque el controlador remoto podrá utilizarse dentro de un
ángulo de hasta 30 grados en cualquier dirección desde un
punto justo delante del sensor remoto, recomendamos un
ángulo más estrecho para asegurar un funcionamiento
estable.
7m
30˚ 30˚
1
Presione POWER en el televisor.
El indicador STANDBY del televisor se ilumina en rojo.
2
Presione POWER en el controlador remoto
para encender el televisor.
El indicador 6 STANDBY se desactiva.
También puede encender el televisor con CHANNEL
N o M del mismo.
Presione MENU.
3
Presione CHANNEL N o M para seleccionar
4
SET UP y luego presione ENTER.
El idioma seleccionado aparece en color rojo.
También puede utilizar TV/VIDEO/ENTER en el televisor
en lugar de ENTER en el controlador remoto.
MENU
P CTURE
I
SOUND
SET UP
V CH I P
/
OK : ENTERSELECT:
EX T : MENUI
5
Presione VOLUME + o – para visualizar el
idioma deseado.
Cada vez que presione el botón, cambiará el idioma del
menú en pantalla.
Presione MENU para volver a la pantalla
6
normal.
ESPAÑOL
8
Page 41

Sintonización de los canales
Adición o borrado manual de canales
Antes de realizar una búsqueda automática (Auto Search),
presione CHANNEL N/M repetidas veces para que esta
unidad reciba todos los canales de la zona. Después de una
búsqueda automática, puede omitir los canales que no se
hayan sintonizado con CHANNEL N/M.
Botones
numéricos
MENU
VOLUME +/–
CHANNEL N/M
ENTER
Antes de comenzar
Asegúrese de que el televisor está puesto en el modo TV.
1
Presione MENU.
Presione CHANNEL N o M para seleccionar
2
PREFIJAR y luego presione ENTER.
El elemento seleccionado aparece en color rojo.
Si la búsqueda automática de canales no los sintoniza
correctamente, añada los canales manualmente para
visualizar programas de televisión. También podrá borrar
todos los canales innecesarios.
1
Seleccione el número de canal que desea
borrar o añadir utilizando los botones
numéricos.
Presione los botones como se indica:
Ejemplo
Para seleccionar el canal 7, presione 0 y luego 7.
Para seleccionar el canal 77, presione 7 y luego 7.
Para seleccionar el canal 107, presione +100, 0 y
luego 7.
2
Presione MENU.
3
Presione CHANNEL N o M para seleccionar
PREFIJAR y luego presione ENTER.
Presione CHANNEL N o M para seleccionar
4
AÑADIR/BORRAR y luego presione ENTER.
Presione CHANNEL N o M para seleccionar
3
ANTENA y luego presione VOLUME + o – para
seleccionar CABLE o TV.
CABLE : cablevisión, según las conexiones al conector
TV : el programa procedente de la antena de VHF/UHF.
Presione CHANNEL N o M para seleccionar
4
BUSQUEDA AUTOMATICA y luego presione
ENTER.
Todos los canales disponibles en la zona se exploran y
se almacenan en la memoria del televisor.
Después de la exploración, el primer canal localizado
aparece en la pantalla.
ANTENNA.
5
Presione VOLUME + o – para borrar o añadir un
canal seleccionado.
• Si el canal seleccionado ya está sintonizado, aparece
AÑADIR. En caso contrario, aparece BORRAR.
• Al añadir o borrar canales, la imagen no cambiará
hasta que cambie el canal en la pantalla normal.
6
Si desea borrar o añadir otro canal, presione
CHANNEL N o M para seleccionar
CABLE(o TV,) luego presione VOLUME + o –
para seleccionar el número de canal que se
desea borrar o añadir. Y presione CHANNEL
N o M para seleccionar AÑADIR/BORRAR,
luego presione VOLUME + o – para borrar o
añadir.
Presione MENU para volver a la pantalla
7
normal.
Consejo
Para interrumpir la búsqueda automática, presione MENU.
Nota
Una vez efectuada la búsqueda automática, se cancelarán los
ajustes anteriores.
9
ESPAÑOL
Page 42

OPERACIONES BÁSICAS
SLEEP 30
Visualización de programas
de televisión
POWER
PREV. CH
Toma PHONES \
CHANNEL N/M
VOLUME +/–
SLEEP
Botones
numéricos
+100
VOLUME +/–
MUTE
CHANNEL N/M
POWER
Consejo
Para escuchar el sonido mediante los auriculares, inserte unos
(no suministrados) con minienchufe estéreo en la toma
PHONES \ de la parte frontal. El altavoz del televisor no
emitirá sonido.
Notas
• El televisor se ajusta de forma automática en el modo de
espera aproximadamente 15 minutos después de que una
emisora de televisión haya dejado de trasmitir.
• En el modo de espera, también es posible activar la
alimentación con CHANNEL N/M del televisor.
Programación del temporizador de
desconexión automática
Presione SLEEP repetidas veces para seleccionar
el número de minutos que deben transcurrir antes
de que se desconecte la unidad.
Los minutos cambian hasta 120 como sigue.
NO 15 30 60 90 120
1
Presione POWER en el controlador remoto
para encender el televisor.
Si no presiona POWER en el televisor, no podrá
emplear éste aunque presione POWER en el
controlador remoto.
Presione CHANNEL N o M repetidas veces
2
o los botones numéricos para seleccionar el
número de canal.
Si utiliza los botones numéricos, presiónelos de la
siguiente forma:
Ejemplo
Para seleccionar el canal 7, presione 0 y luego 7.
Para seleccionar el canal 77, presione 7 y luego 7.
Para seleccionar el canal 107, presione +100, 0 y
luego 7.
Presione VOLUME + o – para ajustar el
3
volumen.
Para apagar el televisor
Presione POWER en el controlador remoto.
El indicador 6 STANDBY del televisor se ilumina.
Es posible encender el televisor o ajustarlo en el modo de
espera presionando POWER en el controlador remoto.
Presione POWER en el televisor para desactivar la
alimentación principal.
Transcurrido el tiempo programado, el televisor pasa al
modo de espera.
Para comprobar el tiempo restante antes
de la desconexión
Presione SLEEP una vez. El tiempo restante aparece en la
pantalla.
Para cancelar el temporizador de
desconexión automática
Presione SLEEP repetidas veces hasta que aparezca
“SLEEP NO”.
Nota
El tiempo restante aparece automáticamente 5 minutos y 1
minuto antes de la desconexión del televisor.
Por ejemplo, 5 minutos antes de la desconexión, aparece
“SLEEP 5”.
Para cancelar el sonido
Presione MUTE. “MUTE” aparece durante unos segundos.
Para restaurarlo, presione MUTE o VOLUME + o –.
Para recuperar un canal anterior
Presione PREV. CH para la conmutación anterior y
posterior entre el canal activo y el anterior.
ESPAÑOL
10
Page 43

CAPTION OFF
CAPTION 1
TEXT 1 CAPTION 2TEXT 2
Selección del modo MTS
CAPTION 1
Selección del modo de
Esta unidad está equipada con el sistema MTS (sonido de
televisión multicanal), lo cual mejora considerablemente la
calidad de la experiencia televisiva al ofrecer programas
con sonido estéreo de alta fidelidad. MTS también
proporciona un canal adicional llamado SAP (segundo
programa de audio) que las emisoras pueden utilizar para
transmitir un segundo idioma para las transmisiones
bilingües, o bien otra pista de sonido.
Cuando cambie el canal, se mostrará uno de los mensajes
siguientes en la parte superior derecha de la pantalla de
acuerdo con el tipo de transmisión.
Transmisión estéreo: se muestra STEREO en color
amarillo.
Transmisión estéreo/SAP: se muestra STEREO/SAP en
color amarillo y rojo.
Transmisión SAP: se muestra SAP en color rojo.
Transmisión monoaural: no se muestra nada.
MTS
subtítulos
La unidad puede descodificar y mostrar los subtítulos de los
programas de televisión.
CAPTION
Presione CAPTION repetidas veces para
seleccionar el modo de subtítulos.
Presione MTS repetidas veces para seleccionar el
modo MTS.
MONO/SAP
La indicación cambia de la siguiente forma:
MONO ESTEREO SAP MONO/SAP
Nota
Cuando presione MTS, los elementos que se pueden
seleccionar se mostrarán en color verde y los que no se
pueden seleccionar se mostrarán en color rojo de acuerdo con
el tipo de transmisión.
La indicación cambia de la siguiente forma:
CAPTION NO
Subtítulos:
Este modo de subtítulos muestra el texto en la pantalla en
inglés o en otro idioma. En general, los subtítulos en inglés
se transmiten en CAPTION 1 y los subtítulos en otros
idiomas se transmiten en CAPTION 2.
Texto de pantalla completa:
El modo de subtítulos TEXT 1, TEXT 2 generalmente llena
la pantalla con horarios de programación u otra información.
11
ESPAÑOL
Page 44

Notas
NORMAL
• Tras seleccionar un modo de subtítulos, éste permanecerá
en vigor hasta que lo cambie el usuario, incluso después de
cambiar el canal.
• Si la señal de subtítulos se pierde debido a un anuncio
publicitario o una interrupción de la señal, los subtítulos
volverán a aparecer en cuanto se recupere la señal.
• Al seleccionar subtítulos, es posible que éstos demoren un
momento.
• Si los canales se cambian, es posible que se produzca una
breve demora en los subtítulos.
• Si utiliza una antena interior o si la recepción es muy mala,
es posible que no aparezca el texto del descodificador de
subtítulos. En este caso, ajuste la antena para mejorar la
recepción o emplee una antena exterior.
• Al activar el descodificador de subtítulos, el texto de los
subtítulos tardará un momento en aparecer en pantalla.
• Los subtítulos aparecerán en los puntos de la pantalla
donde menos interfieran con la imagen, generalmente en la
parte inferior. Los programas de noticias suelen mostrar
subtítulos de tres líneas que se desplazan por la pantalla. La
mayor parte de los programas muestran subtítulos de dos o
tres líneas, situados cerca del personaje que habla para que
el espectador pueda seguir el diálogo.
• Si no se recibe ninguna señal de subtítulos, éstos no
aparecerán pero el televisor permanecerá en el modo de
subtítulos.
• De vez en cuando, es posible que aparezcan errores
ortográficos o caracteres extraños en los subtítulos. Esto es
normal cuando los subtítulos se introducen en directo. Estas
transmisiones no dejan tiempo para la edición.
• Algunos sistemas de cablevisión y de protección contra
copia pueden interferir con la señal de subtítulos.
• Las palabras en cursiva o subrayadas son títulos, palabras
extranjeras o palabras que requieren más énfasis. Las letras
de las canciones suelen aparecer entre notas musicales.
• Para localizar los programas de televisión que se emiten con
subtítulos, busque el símbolo CC (closed captions =
subtítulos) en su guía de programación televisiva.
Selección del modo de AV
Esta unidad proporciona 4 modos de potenciación de vídeo
múltiple.
NORMAL: Ajuste normal
CINE: Ajuste para la visualización de películas
GAME: Ajuste para minimizar la fatiga ocular
OSCURO: Ajuste donde el entorno es más oscuro
AV MODE
Presione AV MODE repetidas veces para
seleccionar el modo de AV.
La indicación cambiará de la siguiente forma:
NORMAL CINE GAME OSCURO
Nota
Incluso si cambia el modo de AV, no cambiará la calidad de
sonido.
ESPAÑOL
12
Page 45

Ajuste de la imagen
5
Presione VOLUME + o – para ajustar el
elemento.
Se pueden establecer los ajustes de imagen para cada
modo AV.
MENU
VOLUME +/–
CHANNEL N/
ENTER
1
Presione MENU.
Presione CHANNEL
2
N o M
para seleccionar
IMAGEN y luego presione ENTER.
M
Elemento
BRILLO
CONTRASTE
NITIDEZ
COLOR
Elemento
MATIZ
Al disminuir las
barras
la imagen se vuelve
más oscura
se reduce el
contraste
se suaviza la
imagen
se reducen la
intensidad y el brillo
del color
Movimiento hacia
la izquierda
los colores más
luminosos
adquieren un tono
más rojizo
Al incrementar las
barras
la imagen se vuelve
más brillante
aumenta el contraste
aumenta la nitidez
incrementan la
intensidad y el brillo
del color
Movimiento hacia
la derecha
los colores más
luminosos adquieren
un tono más verdoso
Presione CHANNEL
3
N o M
para seleccionar
la línea superior y, a continuación, presione
VOLUME + o – para seleccionar el modo de AV
que desee ajustar.
4
Presione CHANNEL
N o M
para seleccionar
el elemento que desee ajustar.
Después de 2 segundos de liberar el botón, la indicación
vuelve al paso 4.
6
Para ajustar el otro elemento, realice los pasos
3 a 5.
7
Presione MENU para volver a la pantalla
normal.
Consejo
Para recuperar el valor inicial de todos los elementos del modo
AV seleccionado, seleccione RESET en el paso 4 y presione
ENTER.
13
ESPAÑOL
Page 46

Ajuste del sonido
4
Presione VOLUME + o – para ajustar el valor.
Es posible ajustar los valores de agudos, graves y equilibrio
(izquierdo/derecho) del sonido.
MENU
Presione MENU.
1
Presione CHANNEL N o M para seleccionar
2
VOLUME +/–
CHANNEL N/M
ENTER
SONID y, a continuación, presione ENTER.
MENU
IMAGEN
SON I D
PREF I JAR
V C H I P
/
OK : ENTERSELECCION:
SALIDA : MENU
Elemento
AGUDOS
GRAVES
Elemento
BALANCE
Al disminuir las barras
disminuye el nivel de los
agudos
disminuye el nivel de los
graves
Desplazamiento hacia L
(izquierda)
disminuye el nivel de
salida del altavoz derecho
ADJUSTE
GRAVES
– +
CAMBIAR:-/+ SALIDA : MENU
Al aumentar las barras
aumenta el nivel de los
agudos
aumenta el nivel de los
graves
Desplazamiento hacia R
(derecha)
disminuye el nivel de salida
del altavoz izquierdo
Transcurridos unos segundos después de dejar de
presionar el botón, la indicación volverá a ser la del paso
3.
5
Para ajustar el otro elemento, realice los pasos
3 y 4.
6
Presione MENU para recuperar la pantalla
normal.
Consejo
Para restaurar el valor inicial de todos los elementos,
seleccione RESET en el paso 3 y, a continuación, presione
ENTER.
3
Presione CHANNEL N o M para seleccionar
el elemento que desee ajustar.
AGUDOS
GRAVES
BALANCE
SUPER BASS
Q SURROUND : NO
BBE
RESET
SELECCION:
CAMBIAR: – /+
: NO
: NO
/
SALIDA : MENU
Nota
La combinación entre TREBLE, BASS, SUPER BASS, o BBE
puede distorsionar el sonido. En este caso, disminuya los
niveles de las funciones de ajuste de sonido anteriores.
CONTINUA
ESPAÑOL
14
Page 47

OTRAS FUNCIONES
Ajuste del sonido (continuación)
SURROUND
MENU
BBE
S-BASS
VOLUME +/–
CHANNEL N/M
ENTER
Uso del efecto de sonido especial
El televisor dispone de 3 modos de potenciación de sonido:
SUPER BASS, Q SURROUND y BBE.
Ajuste del V-chip
Puede establecerse una limitación de edad para evitar que
los niños vean u oigan escenas violentas o programas de
contenido para adultos. Esta unidad corresponde a
“CLASIFIQUE TV” y “CLASIF PELICULA”.
Para utilizar la función de V-chip, en primer lugar hay que
registrar una contraseña.
Botones numéricos
MENU
ENTER
VOLUME +/–
CHANNEL N/M
SUPER BASS potencia los graves.
Q SURROUND emplea solamente dos altavoces a la
izquierda y la derecha, y crea una atmósfera tal que se
obtiene la sensación de estar rodeado por dos altavoces
frontales y dos posteriores.
El sistema BBE potencia la claridad del sonido de alta
frecuencia.
Para realizar la operación con un solo
botón
Para activar SUPER BASS, Q SURROUND o BBE,
presione S-BASS, SURROUND o BBE. Cada vez que
presione el botón, el modo se activará y se desactivará.
SUPER BASS S I
Para realizar la operación mediante el
menú SONIDO
Presione MENU. Presione CHANNEL N o M para
seleccionar SONID y, a continuación, presione ENTER.
Presione CHANNEL N o M para seleccionar SUPER
BASS, Q SURROUND o BBE y, a continuación, presione
VOLUME + o – para que aparezca SI.
Registro de la contraseña
Importante
No es posible ajustar el V-chip si olvida la
contraseña. Recomendamos que anote la
contraseña y la guarde en un lugar seguro por si
acaso.
1
Presione MENU.
2
Presione CHANNEL N o M para seleccionar
V CHIP y luego presione ENTER.
Introduzca la contraseña (4 dígitos) mediante
3
los botones numéricos (0-9).
Aparece “*” en lugar del número.
AGUDOS
GRAVES
BALANCE
SUPER BASS
Q SURROUND
BBE :NO
RESET
SELECCION:
CAMB I AR : –/
:S I
:NO
/
SALIDA : MENU
+
Notas
• El sistema Q SURROUND no funciona para fuentes
monofónicas.
• La activación de Q SURROUND puede producir distorsiones
de sonido.
ESPAÑOL
15
4
Introduzca de nuevo la misma contraseña para
verificarla.
Aparece el menú V chip.
Page 48

Ajuste del V-chip
1
En el menú V-chip, presione CHANNEL N o
M para seleccionar CLASIFIQUE TV y luego
presione VOLUME + o – para mostrar el ajuste
deseado.
• Cuando se reciban los siguientes tipos de programas,
su visualización se impedirá o se permitirá en función
del ajuste seleccionado.
NO: CLASIFIQUE TV no está activado.
TV-Y: Adecuado para niños de todas las edades
TV-Y7: Adecuado para niños de 7 años en adelante
TV-G: Todos los públicos
TV-PG: Se sugiere supervisión paterna
TV-14: Inapropiado para menores de 14 años
TV-MA: Personas adultas
• El submenú CLASIFIQUE TV puede aparecer según el
ajuste seleccionado. Si aparece el submenú, siga al
paso 2, si no aparece, siga al paso 3.
2
Presione CHANNEL N o M para seleccionar
el elemento CLASIFIQUE TV y luego presione
VOLUME + o – para mostrar SI u NO.
• Cuando TV-Y7 se encuentra seleccionado, aparecen
los siguientes elementos.
3
Presione CHANNEL N o M para
seleccionar CLASIF PELICULA y luego
presione VOLUME + o – para mostrar el ajuste
deseado.
Cuando se reciban los siguientes tipos de películas, su
visualización se impedirá de acuerdo con los ajustes
seleccionados.
NO: CLASIF PELICULA no está activado.
G: películas sin límite de edad.
PG: Películas inapropiadas para niños.
PG-13: Películas inapropiadas para niños de 13 años
o menos.
R: Películas que los niños menores de 17 años
pueden ver acompañados de sus padres.
NC-17: Películas prohibidas para los niños menores
de 17 años.
X: Películas para adultos.
Presione CHANNEL N o M para seleccionar
4
V CHIP y luego presione VOLUME + o – para
mostrar SI.
• Cuando TV-PG o TV-14 está seleccionado, aparecen
los siguientes elementos.
• Cuando TV-MA se encuentra seleccionado, aparecen
los siguientes elementos.
Presione MENU para volver a la pantalla
5
normal.
Nota
Si no presiona ningún botón durante 15 segundos, aparecerá la
pantalla normal.
Para utilizar el televisor después de
activar la protección
Cuando se reciba un programa al que se aplica el ajuste del
V-chip, aparecerá la indicación “PROHIBIDO POR V CHIP”.
CABLE125
<PROHIBIDO POR V CHIP>
SI ANULA PROTECTION
PONER CLAVE.
CLAVE :
ENTRAR : 0 9
Introduzca la contraseña. Si la introduce correctamente, la
protección se cancelará.
TV-PG
Indicación de
clasificación de
programa de
emisión
CONTINUA
ESPAÑOL
16
Page 49

Ajuste del V-chip (continuación)
Registro de nombres de
Cambio de la contraseña
1
Presione MENU.
2
Presione CHANNEL N o M para seleccionar
V CHIP y luego presione ENTER.
3
Introduzca la contraseña mediante los botones
numéricos (0-9).
Aparece “*” en lugar del número.
4
Presione CHANNEL N o M para seleccionar
CAMBIAR CLAVE y luego presione ENTER.
emisora
Es posible registrar un nombre de emisora para cada canal.
MENU
VOLUME +/–
CHANNEL N/M
ENTER
1
Presione MENU.
2
Presione CHANNEL N o M para seleccionar
PREFIJAR y luego presione ENTER.
Introduzca la nueva contraseña mediante los
5
botones numéricos (0-9).
Aparece “*” en lugar del número.
Introduzca la misma contraseña de nuevo para
6
verificarla.
7
Presione MENU para volver a la pantalla
normal.
Nota
Si no presiona ningún botón durante 15 segundos, aparecerá la
pantalla normal.
3
Presione CHANNEL N o M para seleccionar
ETIQUETA y luego presione ENTER.
4
Presione VOLUME + o – para seleccionar el
numero de canal para el que desee registrar un
nombre.
17
ESPAÑOL
Page 50

5
Presione CHANNEL M para seleccionar la
indicación de barra.
6
Presione VOLUME + para mostrar la letra
deseada y luego presione CHANNEL M.
Cada vez que presione VOLUME +, la indicación
cambiará de la siguiente forma:
.....
A
Z & / –
Visualización en pantalla
DISPLAY
9
Presione VOLUME – para cambiar la indicación en
orden inverso.
7
Repita los pasos 5 y 6 para introducir un
.....
0 (espacio)
nombre de emisora.
Puede introducir hasta 4 letras.
8
Para introducir otro nombre de emisora,
presione CHANNEL M para seleccionar el
número de canal y, a continuación, repita los
pasos 4 a 7.
Es posible introducir hasta 30 emisoras. Una vez
registradas 30 emisoras, aparece “LLENO” en lugar de
“- - - -”.
9
Presione MENU para volver a la pantalla
normal.
Nombre de la
emisora
Número de canal/
indicador VIDEO
Entrada de
audio
Para cambiar la visualización en pantalla
Presione DISPLAY. Cada pulsación activa o desactiva la
visualización en pantalla.
Notas
• Si no pulsa ningún botón durante 8 segundos, la indicación
en pantalla se desactivará automáticamente.
• El nombre de la emisora aparecerá solamente si se ha
registrado.
• El indicador de entrada de audio no aparece cuando el
televisor se encuentra en el modo VIDEO 1 y VIDEO 2.
Consejo
Para cancelar todas las letras en los pasos 6 y 7, presione
CHANNEL N o M para seleccionar RESET y luego
presione ENTER.
ESPAÑOL
18
Page 51

INFORMACIÓN ADICIONAL
Visualización de vídeo o
desde otros equipos
TV/VIDEO
GAME
Botones
numéricos
TV/VIDEO/ENTER
Solución de problemas
Si la unidad parece no funcionar adecuadamente, lea de
nuevo las instrucciones y después compruebe la tabla
siguiente.
No hay imagen o sonido.
La unidad se encuentra en el modo de entrada VIDEO.
Sin sonido.
Aumente el volumen de sonido.
El color es malo o no hay color.
Ajuste el parámetro de color.
El controlador remoto no funciona.
Sustituya ambas pilas por otras nuevas.
Se oyen chasquidos.
Se trata de una expansión o contracción inevitable de la
carcasa debido a cambios de temperatura. No es un
problema.
1
Presione TV/VIDEO en el controlador remoto o
TV/VIDEO/ENTER en el televisor para mostrar
“VIDEO 1” o “VIDEO 2” durante algunos
segundos.
VIDEO 1: entrada desde las tomas VIDEO 1 INPUT
VIDEO 2: entrada desde las tomas VIDEO 2 IN AUDIO/
2
Ponga la videograbadora u otro equipo en
modo de reproducción.
AUDIO/VIDEO de la parte posterior.
VIDEO de la parte frontal.
Para volver al programa de televisión
Presione TV/VIDEO en el controlador remoto o TV/VIDEO/
ENTER en el televisor repetidamente hasta que aparezca el
programa de televisión. También puede volver al programa
seleccionando el número de canal directamente con los
botones numéricos.
Para cambiar a la posición GAME
directamente
Presione GAME para poner el modo AV en GAME. El modo
de entrada del televisor cambiará automáticamente a
VIDEO 2, el tamaño de la pantalla será el más apropiado.
Al conectar la videograbadora AIWA con
ONE-TOUCH PLAYBACK (reproducción
con una sola pulsación)
Cuando se presiona ONE-TOUCH PLAYBACK u OTPB en
el controlador remoto de la videograbadora, esta unidad se
enciende automáticamente en el modo VIDEO 1. Sin
embargo, esta función no puede utilizarse en los siguientes
casos:
• Si se ha presionado ONE-TOUCH PLAYBACK u OTPB en
el controlador remoto de la videograbadora.
• El televisor y la videograbadora no se han colocado de
forma que puedan recibir la señal del controlador remoto
de forma simultánea.
Nota
Para obtener información detallada sobre el uso de la
videograbadora, consulte el manual de la misma.
ESPAÑOL
19
Page 52

Cuidados y mantenimiento
Especificaciones
Para limpiar el exterior
Límpielo con un paño seco y suave.
Si las superficies están muy sucias, utilice un paño suave
ligeramente humedecido con una solución detergente poco
concentrada. No utilice disolventes fuertes, como alcohol,
bencina o diluyentes, ya que podrían dañar el acabado de
la unidad.
No pegue sellos ni etiquetas adhesivas
No pegue sellos ni etiquetas adhesivas en la superficie
durante mucho tiempo, ya que el acabado de la unidad
puede dañarse.
Si se oyen ruidos procedentes de la radio o de otro
equipo de audio/video
Aleje el equipo de esta unidad.
Tubo Braun
Si la superficie está sucia, límpiela con un paño seco y
suave.
Si toca el tubo Braun, notará ocasionalmente una pequeña
descarga eléctrica. Se trata de electricidad estática y no le
producirá ningún daño.
Sistema de sintonizador
Sistema de televisión
Cobertura de canales
Memoria de programa
Entrada de antena 75 ohmios, desequilibrada
Tubo de imagen TV-F2400: 24 pulg.
Tamaño de la pantalla
Entrada de vídeo 1 Vp-p 75 ohmios
Entrada de audio 0,5 Vrms., 33 k ohmios más
Altavoz 120 × 60 mm (4
Tensión de funcionamiento
Consumo de energíaTV-F2400: 125 W
Toma de teléfono Minitoma estéreo
Temperatura de funcionamiento
Humedad de funcionamiento
Dimensiones TV-F2400:
Peso TV-F2400: 33,7 kg (74,14 lbs.)
Accesorios Controlador remoto (1)
Sintonizador de frecuencia sintetizada
NTSC-M
VHF: 2 a 13
UHF: 14 to 69
Cablevisión: 5A, A-1 a A-5,
A a W, W+1 a W+84
181
TV-F2000: 20 pulg.
TV-F2400:
478 (An) × 359 (Al) mm
598mm (diagonal) (23
TV-F2000:
406 (An) × 305 (Al) mm
508 mm (diagonal) (20 pulg.)
120 V CA, 60 Hz
TV-F2000: 100 W
5˚C – 40˚C (41°F – 104°F)
35% – 80%
690
TV-F2000:
610
TV-F2000: 24,1 kg (53,02 lbs.)
Pilas (R6/tamaño AA) (2)
Adaptador de antena (1)
7
/8 × 141/4 pulg.)
(18
(16 x 12 1/8 pulg.)
3
/4 × 23/8 pulg.)
(An) ×
506
(Al) ×
(Al) ×
485
485
(271/4 × 20 × 191/8 pulg.)
(An) ×
440
1
/8 × 173/8 × 191/8 pulg.)
(24
5
/8 pulg.)
(Prf) mm
(Prf) mm
• El diseño y las especificaciones están sujetos a cambios
sin previo aviso por motivos de mejora del rendimiento.
• Las ilustraciones de estas instrucciones de uso son para
el TV-F2000.
ESPAÑOL
20
Page 53

Índice de partes y controles
Panel frontal
Toma PHONES \
Tomas VIDEO 2 IN S-VIDEO/
AUDIO L (MONO)/R/VIDEO
Botón TV/VIDEO/ENTER
Botón MENU
Panel posterior (TV-F2000)
Gancho para el cable de CA
Cable de CA
Botón POWER
Indicador 6 STANDBY
Sensor de control remoto
Botónes CHANNEL N/M
Botónes VOLUME +/–
Gancho para seguridad
Tomas VIDEO 1 INPUT S-VIDEO/
AUDIO L (MONO)/R/VIDEO
Toma ANTENNA
Tomas OUTPUT AUDIO L/R/
VIDEO
Panel posterior (TV-F2400)
Tomas VIDEO 1 INPUT S-VIDEO/
AUDIO L (MONO)/R/VIDEO
Tomas OUTPUT AUDIO L/R/VIDEO
ESPAÑOL
21
Gancho para el cable de CA
Toma ANTENNA
Cable de CA
Page 54

Controlador remoto
Botón POWER
Botón SLEEP
Botón TV/VIDEO
Botón GAME
Botones numéricos
Botón CAPTION
Botón SURROUND
Botón AV MODE
Botón DISPLAY
Botón PREV. CH
Botón MENU
Botón ENTER
Botón +100
Botón MTS
Botón BBE
Botón S-BASS
Botón VOLUME +/–
Botón MUTE
Botón CHANNEL N/M
ESPAÑOL
22
Page 55

TV-F2400U
TV-F2000U
SOMMAIRE DES OPERATIONS
Félicitations!
Nous vous remercions d’avoir fait l’acquisition de ce
produit AIWA.
Si vous déballez votre téléviseur pour la
première fois, veuillez effectuer les opérations
à 4 ci-dessous pour l’installation.
Vous trouverez les accessoires dans le carton d’emballage.
Télécommande (1)
1
Piles (2)
En cas de problème et pour tout renseignement
Composez le numéro gratuit
1-800-BUY-AIWA
(Etats-Unis et Puerto Rico)
Adaptateur d’antenne (1)
FRANÇAIS
Lisez attentivement les informations des pages 1 et 2 du mode d’emploi avant d’installer ou d’utiliser votre téléviseur.
1
Insérez deux piles R6 (AA) (fournies) en respectant la
polarité indiquée dans le compartiment à piles.
Installation des piles dans la télécommande
1
Page 56

2
Raccordement de l’antenne du téléviseur (ou réseau câblé)
Attention
Branchez le cordon d’alimentation sur une prise murale (secteur) quand toutes les autres connexions
ont été établies.
Raccordements de base
Crochet du cordon
d’alimentation
(TV-F2000 uniquement)
Prise secteur
Cordon
d’alimentation
1 Raccordez le câble d’antenne
de télévision (non fourni) au
connecteur ANTENNA du
téléviseur.
TV-F2000
Câble coaxial de
75 ohms (non
fourni)
2 Branchez le cordon
d’alimentation dans une
prise secteur.
Si vous utilisez le modèle
TV-F2000, branchez le cordon
d’alimentation après l’avoir fait
passer par le crochet situé à
l’arrière de l’appareil.
Raccordement au réseau câblé (CATV)
1 Raccordez le câble du système de
télédistribution au connecteur
d’entrée du convertisseur CATV.
Câble coaxial de 75
ohms (non fourni)
Crochet du cordon
d’alimentation
(TV-F2000 uniquement)
Prise secteur
TV-F2000
Système CATV
OUTIN
Convertisseur
CATV (non fourni)
Câble coaxial de 75
ohms (non fourni)
Cordon
d’alimentation
3 Branchez le cordon
d’alimentation dans une
prise secteur.
Si vous utilisez le modèle
TV-F2000, branchez le cordon
d’alimentation après l’avoir fait
passer par le crochet situé à
l’arrière de l’appareil.
Pour se raccorder à un réseau câblé sans convertisseur CATV
Raccordez le câble du réseau câblé au connecteur ANTENNA du téléviseur à l’étape 1 ci-dessus.
2
2 Raccordez le
connecteur de sortie
du convertisseur au
connecteur ANTENNA
du téléviseur.
Page 57

3
MENU
POWER
REGLAGE
LANGUE
ANTENNE
RECHERCHE AUTOMAT IQUE
AJOUTE/EFFACE
NOM DU CANA L
: FRANÇAIS
: CABLE
CHANGER : –/
+
CHOISIR :
F I N : MEN U
VOLUME
Sélection de la langue d’affichage
Les menus peuvent être affichés dans l’une des trois langues suivantes : anglais,
espagnol ou français.
POWER
1
Indicateur 6 STANDBY
Appuyez sur le bouton POWER du
téléviseur.
L’indicateur 6 STANDBY s’allume.
2 Appuyez sur la touche POWER de
la télécommande pour mettre le
téléviseur sous tension.
L’indicateur 6 STANDBY s’éteint.
4
CHANNEL
ENTER
Appuyez sur
CHANNEL N ou
M pour sélectionner
SET UP et appuyez
ensuite sur ENTER.
Le paramètre sélectionné
s’affiche en rouge.
MENU
P CTURE
I
SOUND
SET UP
V CH I P
5
3
MENU
Appuyez sur MENU.
MENU
P CTURE
I
SOUND
SET UP
V CH I P
/
OK : ENTERSELECT:
EX T : MENUI
+
Appuyez sur VOLUME
ou
–
pour afficher la langue désirée.
Chaque fois que vous appuyez sur
cette touche, la langue d’affichage
des menus change.
/
OK : ENTERSELECT:
EX T : MENUI
6
Appuyez sur MENU pour
revenir à l’écran normal.
3
Page 58

4
Préréglage des chaînes de télévision
Avant de commencer
Assurez-vous que le téléviseur est en mode TV.
1
2
MENU
CHANNEL
CHANNEL
VOLUME
Appuyez sur MENU. Appuyez
ensuite sur CHANNEL N ou M
pour sélectionner REGLAGE et
appuyez ensuite sur ENTER.
MENU
MAGE
I
SON
ENTER
REGLAGE
V CH I P
CHOI SIR :
OK : ENTER
F I N : MENU
Appuyez sur CHANNEL N ou
M pour sélectionner ANTENNE et
appuyez ensuite sur VOLUME
+
–
ou
pour sélectionner TV ou
CABLE.
REGLAGE
LANGUE
ANTENNE
RECHERCHE AUTOMAT IQUE
AJOUTE/EFFACE
NOM DU CAN AL
: FRANÇAIS
: CABLE
3
CHANNEL
ENTER
CHOISIR :
CHANGER : –/
+
F I N : MEN U
Appuyez sur CHANNEL NouM
pour sélectionner RECHERCHE
AUTOMATIQUE et appuyez ensuite
sur ENTER.
Toutes les chaînes captables sont
explorées.
Après le balayage des chaînes, la
première chaîne localisée apparaît sur
l’écran du téléviseur.
REGLAGE
LANGUE
ANTENNE
RECHERCHE AUTOMAT IQUE
AJOUTE/EFFACE
NOM DU CAN AL
CHOISIR :
RECHERCHE AUTOMATIQUE
: FRANÇAIS
: CABLE
OK : ENTER
F I N : MEN U
RECHERCHE
CABLE1 2 5
4
F I N : MENU
Page 59

FRANÇAIS
Avertissement
Pour réduire le risque d’incendie ou d’électrocution,
ne pas exposer cet appareil à la pluie ou à l’humidité.
CAUTION
RISK OF ELECTRIC SHOCK
DO NOT OPEN
“ATTENTION: POUR REDUIRE LE RISQUE
“CAUTION:TO REDUCE THE RISK OF
DE CHOC ELECTRIQUE, NE PAS ENLEVER
DO NOT REMOVE COVER (OR BACK).
CET APPAREIL NE CONTIENT PAS DE
NO USER-SERVICEABLE PARTS INSIDE.
PIECES REPARABLES PAR L’UTILISATEUR.
REFER SERVICING TO QUALIFIED
POUR TOUTE REPARATION, S’ADRESSER
Explication des symboles graphiques :
Un éclair fléché inscrit dans un triangle
équilatéral est destiné à alerter l’utilisateur de la
présence à l’intérieur de l’appareil d’une
“tension dangereuse” non isolée d’une
puissance suffisante pour constituer un risque
d’électrocution pour les personnes.
Un point d’exclamation inscrit dans un triangle
équilatéral est destiné à avertir l’utilisateur de la
présence d’instructions d’utilisation (et
d’entretien) importantes dans la documentation
fournie avec l’appareil.
INSTRUCTIONS DE
SECURITE
IMPORTANTES
ELECTRIC SHOCK,
LE COUVERCLE (NI LE DOS).
A UNE PERSONNE QUALIFIEE.”
SERVICE PERSONNEL.”
Lieu d’installation - Placez l’appareil sur une surface plane
et de niveau.
Accessoires - Ne placez pas l’appareil sur un chariot, un
support, un trépied, un montant ou une table instable.
L’appareil risque de tomber et de causer de graves
blessures, voire d’être gravement endommagé. Utilisez
uniquement les modèles de chariot, de support, de trépied,
de montant ou de table préconisés par le fabricant ou
vendus avec l’appareil. Le montage de l’appareil doit être
exécuté conformément aux instructions du fabricant et aux
moyens des accessoires préconisés par celui-ci.
Chariot mobile - Lorsque l’appareil est placé ou installé sur
un support ou dans un chariot, déplacez l’appareil avec
précautions. Les arrêts brutaux, les forces excessives et les
surfaces irrégulières risquent en effet de le faire basculer ou
tomber.
AVERTISSEMENT POUR LES CHARIOTS MOBILES
S3126A
Ventilation - L’appareil doit être situé dans un environnement
approprié qui assure une ventilation périphérique correcte.
Laissez un espace dégagé d’environ 10 cm à l’arrière et audessus de l’appareil et de 5 cm sur les côtés.
Les fentes et les ouvertures pratiquées dans le châssis ainsi
qu’à l’arrière et sur le dessous servent à la ventilation de
l’appareil et à en garantir un fonctionnement irréprochable en
le protégeant contre toute surchauffe interne. Veillez par
conséquent à ne pas obstruer ni à recouvrir ces ouvertures.
Les ouvertures ne peuvent en aucun cas être obstruées en
plaçant l’appareil sur un lit, un sofa, une couverture ou sur
toute autre surface similaire qui risquerait d’obstruer les ouïes
de ventilation. (Cet appareil ne peut jamais être placé à côté
ou sur un radiateur ou un appareil de chauffage.) Cet appareil
ne peut être installé dans un meuble encastré comme une
bibliothèque, à moins qu’une bonne ventilation y soit assurée.
Veuillez lire attentivement le présent mode d’emploi dans
son intégralité avant de faire fonctionner l’appareil.
Conservez-le ensuite soigneusement pour toute référence
ultérieure. Vous devez vous conformer strictement à toutes
les mises en garde et à tous les avertissements figurant sur
l’appareil et dans le mode d’emploi ainsi qu’aux précautions
de sécurité précisées ci-dessous.
Avertissement
Pour prévenir toute décharge électrique ou autre blessure,
conformez-vous aux présentes instructions de sécurité
pendant l’installation, l’utilisation et l’entretien de cet
appareil.
Installation
Fixations - N’utilisez pas de fixations qui ne sont pas
recommandées par le fabricant de l’appareil, car cela peut
résulter en un risque d’incendie, de décharge électrique ou
de blessures.
Eau et humidité - Ne pas utiliser cet appareil près d’une
source d’eau, par exemple, une baignoire, une cuvette, un
évier ou une bassine, ni dans un sous-sol humide, près
d’une piscine, etc.
Chaleur - N’utilisez pas cet appareil à proximité de sources
de chaleur et notamment de conduits d’air chaud, de
cuisinières ou de tout autre appareil générant de la chaleur.
Il ne peut pas non plus être exposé à des températures
inférieures à 5°C (41°F) ou supérieures à 40°C (104°F).
FRANÇAIS
1
Poids et objets lourds
L’appareil doit être déplacé avec précaution par plusieurs
personnes car la répartition des masses en son sein n’est
pas régulière. Ne placez pas l’objets lourds sur l’appareil.
Pénétration d’objets et de liquides - N’introduisez aucun
objet à l’intérieur de l’appareil par les ouïes de ventilation
parce qu’il risque d’entrer en contact avec des composants
sous haute tension et de court-circuiter des composants,
entraînant ainsi un incendie ou une décharge électrique.
Ne jamais répandre de liquide sur l’appareil. Ne placez pas
un vase ou tout autre objet contenant de l’eau sur l’appareil.
Alimentation
Sources d’alimentation - Faites uniquement fonctionner cet
appareil sur l’une des sources d’alimentation spécifiées sur
l’étiquette signalétique. Si vous n’êtes pas certain du type de
la source d’alimentation locale, consultez le revendeur de
votre appareil ou votre compagnie de distribution d’électricité.
Pour faire fonctionner l’appareil sur piles ou sur d’autres
sources d’alimentation, reportez-vous au mode d’emploi.
Mise à la terre ou polarisation - Cet appareil est équipé
d’une fiche d’alimentation à courant alternatif polarisée
(dotée d’une lame plus large que l’autre). Cette fiche ne
peut être introduite que dans un sens dans la prise murale
(secteur). Il s’agit d’une mesure de sécurité. S’il s’avère
difficile d’introduire complètement la fiche d’alimentation
dans la prise secteur, retournez la fiche et réessayez. Si
vous ne parvenez toujours pas à l’enficher correctement,
demandez à votre électricien de remplacer votre prise
murale d’un modèle dépassé. Ne tentez pas de contourner
la sécurité de cette fiche polarisée.
Page 60

Protection du cordon d’alimentation - Pour des raisons
de sécurité, cet appareil a une fiche de protection contre les
surcharges électriques. Voir le mode d’emploi pour le
remplacement ou la réactivation du dispositif de protection.
Si la fiche doit être remplacée, assurez-vous que le
technicien de service l’a remplacée par la fiche spécifiée par
le fabricant. Cette fiche doit avoir la même capacité de
protection que la fiche originale.
Surcharge - Ne posez jamais aucun objet sur le cordon
d’alimentation. Evitez de surcharger les prises murales et
les prolongateurs, car vous risquez de provoquer un
incendie ou une décharge électrique. Ne placez pas
l’appareil dans un endroit où son cordon risque d’être
piétiné.
Antenne externe
Lignes électriques - Un système d’antenne extérieure ne
peut être installé à proximité de lignes à haute tension, de
luminaires électriques ou de circuits d’alimentation, ou
encore là où il risque de tomber sur des lignes électriques
ou des circuits d’alimentation. Lorsque vous installez un
système d’antenne extérieure, veillez tout particulièrement à
ne pas entrer en contact avec de telles lignes électriques ou
circuits d’alimentation, ce qui présente un danger de mort.
Mise à la terre de l’antenne extérieure - Si un système
d’antenne ou un réseau câblé est raccordé à l’appareil,
veillez à ce que le système d’antenne soit correctement mis
à la terre de façon à éviter tout dégât dû à une crête de
tension imprévisible ou à l’accumulation d’électricité
statique. L’article 810 du code national électrique, ANSI/
NFPA n° 70, fournit des informations sur la mise à la terre
adéquate du mât, de la structure portante et du fil de terre
vers une unité de décharge de l’antenne, la section des
conducteurs de mise à la terre, l’emplacement de l’unité de
décharge de l’antenne, le raccordement aux électrodes de
mise à la terre et les spécifications des bornes de mise à la
terre. Reportez-vous également à l’illustration.
Antenna Grounding According to the National Electrical Cord
Mise à la terre de l’antenne conformément au code national électrique
ANTENNA LEAD IN WIRE
FIL D’ANTENNE
UNITE DE DECHARGE
CONNEXIONS DE
GROUND CLAMP
MISE A LA TERRE
ANTENNA DISCHARGE
UNIT
D’ANTENNE
(NEC SECTION 810-20)
(SECTION 810-20 NEC)
En cas de panne
Débranchez l’appareil de la prise murale et faites-le
contrôler par un technicien d’entretien qualifié si:
1) Le cordon ou la fiche d’alimentation est endommagé
ou effiloché ;
2) Un liquide a été renversé sur l’appareil ;
3) L’appareil a été exposé à la pluie ou à l’humidité ;
4) L’appareil semble ne pas fonctionner normalement
lorsque vous appliquez les instructions d’utilisation.
Ajustez uniquement les commandes décrites dans le
mode d’emploi, car un réglage incorrect d’autres
commandes peut causer des dommages à l’appareil
qui nécessiteront généralement une intervention en
profondeur d’un technicien d’entretien qualifié pour
restaurer ses conditions de fonctionnement normales ;
5) L’appareil est tombé ou si châssis a été endommagé ;
6) Les performances de l’appareil se sont sensiblement
modifiées- indiquant par là la nécessité d’un entretien.
Ne tentez pas de réparer l’appareil vous-même, car une
ouverture du châssis ou la dépose des couvercles risque de
vous exposer à des tensions élevées ou à d’autres risques.
Pour toute réparation faites appel à un professionnel.
Pièces de rechange - Lorsque des pièces de rechange
sont indispensables, assurez-vous que le technicien utilise
effectivement les pièces de rechange spécifiées par le
fabricant ou présentant les mêmes spécifications que les
pièces d’origine. Toute substitution non autorisée peut
entraîner un risque d’incendie, de décharge électrique ou
tout autre danger.
Contrôle de sécurité - A l’issue de toute intervention
d’entretien ou de réparation de l’appareil, demandez au
technicien d’exécuter les contrôles de sécurité pour
déterminer si l’appareil présente les conditions d’utilisation
prescrites.
Remarque pour l’installateur du système CATV:
La présente remarque est destinée à attirer l’attention des
installateurs des systèmes CATV sur l’article 820-40 du
NEC qui stipule les instructions relatives à une mise à la
terre adéquate. Il prévoit plus particulièrement que le câble
de mise à la terre doit être raccordé au circuit de terre du
bâtiment aussi près que possible de l’entrée du câble.
BOITIER DE
ELECTRIC
SERVICE
DISTRIBUTION
EQUIPMENT
ELECTRIQUE
CODE NATIONAL ELECTRIQUE (NEC)
NEC-NATIONAL ELECTRICAL CODE
CONDUCTEURS DE
GROUNDING
MISE A LA TERR
CONDUCTORS
(SECTION 810-21 NEC)
(NEC SECTION 810-21)
CONNEXIONS DE MISE A LA
GROUND CLAMPS
TERRE
POWER SERVICE GROUNDING
ELECTRODES DE MISE A LA
ELECTRODE SYSTEM
TERRE
(NEC ART 250 PART H)
(ART. 250, SECTION H NEC)
Foudre
Par mesure de sécurité supplémentaire, durant les orages
accompagnés de foudre ou lorsque vous prévoyez de ne
pas utiliser l’appareil pendant une période prolongée,
débranchez-le de la prise murale et déconnectez l’antenne
ou le câble de télédistribution. L’appareil ne risquera pas
d’être endommagé par la foudre ou des pointes d’énergie.
Entretien
Nettoyage - Débranchez l’appareil de la prise murale avant
de procéder à son nettoyage. N’utilisez pas de nettoyants
liquides ou en aérosol. Utilisez un chiffon légèrement
humide.
REFERENCES UTILISATEUR
Pour votre facilité, inscrivez la désignation du modèle et
le numéro de série de cet appareil (qui se trouvent à
l’arrière) dans les cases ci-dessous. Signalez ces
références lorsque vous prenez contact avec votre
revendeur Aiwa en cas de problème.
Numéro du modèle
Numéro de série
FRANÇAIS
2
Page 61

Félicitations
Nous vous remercions d’avoir fait
l’acquisition de ce produit Aiwa. Pour
optimiser les performances de cet
appareil, nous vous invitons à lire
attentivement le présent mode d’emploi.
Table des matières
Principales
caractéristiques de
ce téléviseur
Puce V
Vous pouvez programmer une limitation
suivant l’âge afin d’empêcher que des
enfants regardent ou entendent des
scènes de violence et des programmes
pour adultes. Cet appareil est conforme
à “CLASS.PROG.TV” et “CLASS.FILM”.
Optimiseur vidéo
Cet appareil intègre quatre modes
d’optimisation vidéo: NORMAL,
CINEMA, GAME et SOMBRE.
Accentuation audio
Cet appareil comporte 3 modes
d’accentuation audio : SUPER BASS, Q
SURROUND et BBE.
Diffusion MTS (son télévisé
multicanal)
Vous pouvez capter les émissions
télévisées stéréo et bilingues diffusées
aux Etats-Unis.
Sous-titres
Les sous-titres peuvent être affichés sur
l’écran lorsque vous captez une
émission compatible.
Préparation
Raccordement de l’antenne................................4
Préparation de la télécommande........................8
Sélection de la langue d’affichage ......................8
Sélection des chaînes.........................................9
Opérations de base
Regarder une émission de télévision................10
Sélection du mode MTS....................................11
Sélection du mode de sous-titres......................11
Sélection du mode AV ......................................12
Réglage de l’image ...........................................13
Réglage du son.................................................14
Autres fonctions
Réglage de la puce V........................................15
Enregistrement du nom d’une station de
télévision ........................................................17
Affichage des indicateurs..................................18
Regarder une source vidéo ou autre ................19
Informations complémentaires
Dépannage .......................................................19
Soin et entretien................................................20
Spécifications....................................................20
Cet appareil a été testé et jugé conforme aux limites des
appareils numériques de Classe B, conformément au
chapitre 15 du règlement FCC. Ces limites sont conçues
pour assurer une protection raisonnable contre les
interférences néfastes lorsque l’appareil est utilisé dans
un environnement résidentiel.
Cet appareil génère, utilise et peut émettre des
radiofréquences et, s’il n’est pas installé et utilisé
conformément au mode d’emploi, il peut provoquer des
interférences dans les communications radio. Il n’est
cependant pas possible de garantir que des interférences
ne se produiront pas dans une installation privée. Si cet
appareil génère des interférences néfastes dans la
réception des ondes radio ou télévisées, ce que l’on peut
facilement contrôler en mettant l’appareil successivement
sous et hors tension, l’utilisateur est invité à tenter de
remédier aux interférences en appliquant l’une des
mesures suivantes :
FRANÇAIS
3
Composants et commandes .............................21
-Réorientez ou installez l’antenne de réception à un autre
endroit.
- Eloignez davantage l’appareil du récepteur.
- Branchez l’appareil sur une prise secteur raccordée à un
circuit d’alimentation différent de la prise sur laquelle le
récepteur est branché.
- Consultez votre revendeur ou faites appel à un
technicien radio/télévision.
Remarque
Toute modification ou tout réglage de cet appareil non
expressément approuvé par le fabricant peut invalider le
droit de l’utilisateur à employer cet appareil.
Page 62

PREPARATION
Raccordement de l’antenne
Raccordements de base
TV-F2000
Câble coaxial
de 75 ohms
(non fourni)
Câble bifilaire de
300 ohms (non fourni)
Adaptateur d’antenne
(fourni)
Crochet du cordon
d’alimentation
(TV-F2000 uniquement)
Vers une prise secteur
2
1
Raccordez le câble d’antenne au connecteur ANTENNA du téléviseur.
Si le câble est un câble coaxial rond de 75 ohms, raccordez-le directement au connecteur ANTENNA.
Si le câble est un câble bifilaire plat de 300 ohms, raccordez-le à l’adaptateur d’antenne (fourni), et raccordez ensuite
l’adaptateur au connecteur ANTENNA.
Branchez le cordon d’alimentation dans une prise secteur.
2
Si vous utilisez le modèle TV-F2000, branchez le cordon d’alimentation après l’avoir fait passer par le crochet situé à
l’arrière de l’appareil.
Vers le connecteur ANTENNA
1
Pour prévenir toute chute de l’appareil durant les tremblements de terre, etc.,
Fixez l’appareil à un mur ou à une colonne en attachant un câble torsadé ou du fil de fer résistant au crochet de sécurité situé à
l’arrière.
TV-F2000
Crochet de sécurité
TV-F2400
Crochet de
sécurité
Ficelle ou câble résistant
(non fourni)
Ficelle ou câble
résistant
(non fourni)
CONTINUE
SUITE
FRANÇAIS
4
Page 63

Raccordement de l’antenne (suite)
Raccordements CATV
Pour raccorder un système CATV sans utiliser de convertisseur CATV
TV-F2000
Système CATV
Câble coaxial de
75 ohms (non fourni)
1
Crochet du cordon
d’alimentation
(TV-F2000 uniquement)
Vers une prise murale
2
1
Raccordez le câble du système CATV au connecteur ANTENNA du téléviseur.
Vers le connecteur ANTENNA
Branchez le cordon d’alimentation dans une prise secteur.
2
Si vous utilisez le modèle TV-F2000, branchez le cordon d’alimentation après l’avoir fait passer par le crochet situé à
l’arrière de l’appareil.
Pour raccorder un système CATV avec un convertisseur CATV
TV-F2000
Système CATV
Convertisseur
CATV (non fourni)
Câble coaxial
de 75 ohms
(non fourni)
Crochet du cordon
d’alimentation
(TV-F2000 uniquement)
Vers une prise murale
3
1
Raccordez le câble du système CATV au connecteur d’entrée du convertisseur CATV.
Vers le connecteur
ANTENNA
1
Câble coaxial de
75 ohms (non fourni)
2
2
Raccordez le connecteur de sortie du convertisseur au connecteur ANTENNA du téléviseur.
3
Branchez le cordon d’alimentation dans une prise secteur.
Si vous utilisez le modèle TV-F2000, branchez le cordon d’alimentation après l’avoir fait passer par le crochet situé à
l’arrière de l’appareil.
FRANÇAIS
5
Page 64

Raccordement d’un magnétoscope ou d’un autre appareil
TV-F2000
Vers le connecteur de
sortie d’antenne
1
Vers les prises de
sortie audio/vidéo
Vers le connecteur
d’entrée d’antenne
2
Câble coaxial
de 75 ohms
(non fourni)
Vers la prise VIDEO
Vers les prises VIDEO 1
INPUT AUDIO L (MONO)/R
Rouge
Débranchez le câble d’antenne du téléviseur et raccordez-le au connecteur d’entrée d’antenne du
1
1 INPUT VIDEO
Jaune
Blanc
Vers le connecteur
ANTENNA
magnétoscope.
Câble audio/vidéo
(non fourni)
Raccordez le câble d’antenne en option au connecteur de sortie d’antenne du magnétoscope et au
2
connecteur ANTENNA du téléviseur.
Vous pouvez raccorder le téléviseur et le magnétoscope à l’aide du câble audio/vidéo en option.
Pour regarder une vidéo
Reportez-vous à la section “Regarder une source vidéo ou autre”, page 19.
Conseils
• Si votre magnétoscope est de type monaural, raccordez uniquement l’une des fiches audio à la prise AUDIO L (MONO).
• Si le magnétoscope est doté d’une prise de sortie S-VIDEO, vous pouvez raccorder le câble S-VIDEO en option à la prise de sortie
S-VIDEO du magnétoscope et à la prise VIDEO 1 INPUT S-VIDEO du téléviseur. Dans ce cas, vous ne devez pas raccorder le
câble à la prise VIDEO.
Remarque
Pour plus de détails sur le raccordement du magnétoscope au téléviseur, consultez le mode d’emploi qui accompagne le magnétoscope.
SUITE
CONTINUE
FRANÇAIS
6
Page 65

Raccordement de l’antenne (suite)
Pour raccorder une caméra vidéo ou une
console de jeux vidéo
Il est plus pratique d’utiliser les prises VIDEO 2 IN AUDIO L
(MONO)/R/VIDEO à l’avant.
Vers les prises
VIDEO 2 IN
VIDEO
Jaune
Blanc
Câble audio/video
(non fourni)
Vers les prises VIDEO 2
IN AUDIO L (MONO)/R
Rouge
Pour raccorder une chaîne stéréo
Ce raccordement améliore la qualité audio.
Raccordez les prises OUTPUT AUDIO L / R du téléviseur
aux prises d’entrée audio de la chaîne stéréo au moyen
d’un câble audio en option.
Vers les prises
OUTPUT AUDIO L / R
Rouge
Blanc
Câble audio (non fourni)
Vers les prises de
sortie audio/vidéo
ou
Caméra vidéo (lecteur)
Console de jeux
Pour regarder les images d’un
camescope ou d’un console de jeux
Reportez-vous à la section “Regarder une source vidéo ou
autre”, page 19.
Conseil
Si l’autre équipement est doté d’une prise de sortie S-VIDEO,
vous pouvez raccorder le câble S-VIDEO en option à la prise de
sortie S-VIDEO du magnétoscope et à la prise VIDEO 2 INPUT
S-VIDEO du téléviseur. Dans ce cas, vous ne devez pas
raccorder le câble à la prise VIDEO.
Vers les prises
d’entrée audio
Chaîne stéréo
7
FRANÇAIS
Page 66

Préparation de la télécommande
REGLAGE
LANGUE
ANTENNE
RECHERCHE AUTOMAT IQUE
AJOUTE/EFFACE
NOM DU CANA L
: FRANÇAIS
: CABLE
CHANGER : –/
+
CHOISIR :
F I N : MEN U
Sélection de la langue d’affichage
Introduction des piles
Attention
Pour prévenir tout dommage causé par une fuite ou une
explosion des piles, conformez-vous aux instructions
suivantes.
• Introduisez deux piles R6 (AA) en faisant correspondre
les pôles 0 et 9 comme illustré.
• Ne mélangez pas une pile neuve et une pile usagée ou
des piles de types différents.
• Ne jetez pas les piles au feu, ne les soumettez pas à de
la chaleur et ne les démontez pas.
• Ne transportez pas les piles avec des clés ou d’autres
objets métalliques.
Remarque
Retirez les piles lorsqu’elles sont épuisées ou si vous prévoyez
de ne pas utiliser la télécommande pendant une période
prolongée.
Utilisation de la télécommande
Dirigez la télécommande vers le capteur de télécommande.
Les écrans de menu peuvent être affichés dans trois
langues suivantes : Anglais, Français ou Espagnol.
POWER
MENU
VOLUME +/–
CHANNEL N/M
ENTER
MENU
TV/VIDEO/
ENTER
1
Appuyez sur la touche POWER du téléviseur.
VOLUME
+
/–
CHANNEL
N/M
POWER
Indicateur
6 STANDBY
L’indicateur STANDBY du téléviseur s’allume en rouge.
2
Appuyez sur la touche POWER de la
télécommande pour mettre le téléviseur sous
tension.
L’indicateur 6 STANDBY s’éteint.
Vous pouvez également mettre le téléviseur sous
tension à l’aide des touches CHANNEL N ou M
situées sur le téléviseur.
3
Appuyez sur MENU.
Remarques
• Il se peut que la télécommande soit inopérante lorsqu’il y a
un obstacle entre la télécommande et le capteur de
télécommande.
• De puissantes sources lumineuses comme une lampe
fluorescente ou le rayonnement direct du soleil peuvent
perturber le bon fonctionnement de la télécommande.
• L’utilisation d’un téléviseur employant le même type de
télécommande infrarouge et orienté dans la même direction
peut entraîner un fonctionnement incorrect.
• La portée de commande efficace maximale entre la
télécommande et le capteur de télécommande est de 7 mètres.
• Bien que vous puissiez utiliser la télécommande sous un
angle de 30 degrés dans quelque direction que ce soit de
l’avant du capteur de télécommande, nous conseillons un
angle plus réduit de manière à assurer un fonctionnement
plus efficace.
Capteur de
télécommande
7m
30˚ 30˚
4
Appuyez sur CHANNEL N ou M pour
sélectionner SET UP et appuyez ensuite sur
ENTER.
Le paramètre sélectionné s’affiche en rouge.
Vous pouvez également utiliser la touche TV/VIDEO/
ENTER du téléviseur au lieu de la touche ENTER de la
télécommande.
MENU
P CTURE
I
SOUND
SET UP
V CH I P
/
OK : ENTERSELECT:
EX T : MENUI
5
Appuyez sur la touche VOLUME + ou – pour
afficher la langue désirée.
Chaque fois que vous appuyez sur cette touche, la
langue d’affichage à l’écran change.
6
Appuyez sur MENU pour revenir à l’écran
normal.
FRANÇAIS
8
Page 67

Sélection des chaînes
AJOUTE/EFFACE
CABLE125
AJOUTE/EFFACE
: AJOUTE
CHANGER : –/
+
CHOISIR:
FIN : MENU
REGLAGE
LANGUE
ANTENNE
RECHERCHE AUTOMAT IQUE
AJOUTE/E F F ACE
NOM DU CA N A L
: FRANÇAIS
: CABLE
CH O I S I R :
F I N : MEN U
OK : ENTER
Ajout ou suppression manuel de
Avant la recherche automatique, cet appareil peut recevoir
toutes les chaînes captables dans votre zone géographique en
appuyant plusieurs fois de suite sur la touche CHANNEL N/
M. Après la recherche automatique, vous pouvez omettre les
chaînes qui ne sont pas présélectionnées à l’aide des touches
CHANNEL N/M.
Touches
numériques
MENU
VOLUME +/–
CHANNEL N/M
ENTER
Avant de commencer…
Vérifiez que le téléviseur est en mode TV.
Appuyez sur MENU.
1
Appuyez sur CHANNEL N ou M pour
2
sélectionner REGLAGE et appuyez ensuite sur
ENTER.
Le paramètre sélectionné s’affiche en rouge.
MENU
MAGE
I
SON
REGLAGE
V CH I P
chaînes
Si la fonction de recherche automatique ne programme pas
correctement les chaînes, vous pouvez ajouter des chaînes
manuellement pour regarder des émissions télévisées.
Vous pouvez également supprimer les chaînes jugées
inutiles.
1
A l’aide des touches numériques, sélectionnez
le numéro de canal à effacer ou ajouter.
Appuyez sur les touches de la manière suivante:
Exemple
Pour sélectionner le canal 7, appuyez sur 0, puis sur 7.
Pour sélectionner le canal 77, appuyez sur 7, puis sur 7.
Pour sélectionner le canal 107, appuyez sur +100, sur 0,
puis sur 7.
2
Appuyez sur MENU.
Appuyez sur CHANNEL N ou M pour
3
sélectionner REGLAGE et appuyez ensuite sur
ENTER.
4
Appuyez sur CHANNEL N ou M pour
sélectionner AJOUTE/EFFACE et appuyez
ensuite sur ENTER.
CHO I SIR :
Appuyez sur CHANNEL N ou M pour
3
OK : ENTER
F I N : MENU
sélectionner ANTENNE et appuyez ensuite sur
VOLUME + ou – pour sélectionner CABLE ou TV.
CABLE : système CATV en fonction des connexions au
TV : émissions captées via l’antenne VHF/UHF
4
Appuyez sur CHANNEL N ou M pour
connecteur ANTENNA
REGLAGE
LANGUE
ANTENNE
RECHERCHE AUTOMAT IQUE
AJOUTE/EFFACE
NOM DU CAN AL
CHOISIR :
CHANGER : –/
: FRANÇAIS
: CABLE
+
F I N : MEN U
sélectionner RECHERCHE AUTOMATIQUE et
appuyez ensuite sur ENTER.
Toutes les chaînes captables dans votre zone géographique
sont explorées et enregistrées dans la mémoire du téléviseur.
Lorsque l’exploration des chaînes est terminée, la première
chaîne localisée apparaît à l’écran.
REGLAGE
LANGUE
ANTENNE
RECHERCHE AUTOMAT IQUE
AJOUTE/E F F ACE
NOM DU CA N A L
CH O I S I R :
: FRANÇAIS
: CABLE
OK : ENTER
F I N : MEN U
RECHERCHE AUTOMATIQUE
RECHERCHE
CABLE1 2 5
F I N : MENU
5
Appuyez sur VOLUME + ou – pour supprimer
ou ajouter une chaîne sélectionnée.
• Si la chaîne sélectionnée est déjà programmée,
l’indication AJOUTE apparaît. Si elle ne l’est pas
encore, l’indication EFFACE apparaît.
• Lorsque vous ajoutez ou que vous supprimez une
chaîne, l’image ne change pas tant que vous ne
changez pas la chaîne affichée à l’écran.
6
Si vous souhaitez effacer ou ajouter un autre
canal, appuyez sur CHANNEL N ou M pour
sélectionner CABLE (ou TV), puis appuyez sur
VOLUME + ou – pour sélectionner le numéro
du canal à effacer ou ajouter. Appuyez ensuite
sur CHANNELN ou M pour sélectionner
AJOUTE/EFFACE, puis sur VOLUME + ou –
pour effacer ou ajouter le canal.
7
Appuyez sur MENU pour revenir à l’écran
normal.
Conseil
Pour interrompre la recherche automatique, appuyez sur MENU.
Remarque
Si vous activez la fonction de recherche automatique, les réglages
précédents sont effacés.
FRANÇAIS
9
Page 68

OPERATIONS DE BASE
SLEEP 30
Regarder une émission de
télévision
POWER
PREV. CH
Prise PHONES \
VOLUME +/–
CHANNEL
SLEEP
Touches
numériques
+100
VOLUME +/–
MUTE
CHANNEL
N/M
POWER
N/M
Conseil
Pour écouter le son par l’intermédiaire d’un casque audio ou
d’écouteurs, insérez la mini fiche du casque audio ou des écouteurs
(non fournis) dans la prise PHONES \. Le son émis par le hautparleur du téléviseur est alors coupé.
Remarques
• Le téléviseur passe automatiquement en mode de veille
environ 15 minutes après la fin de l’émission des
programmes d’une chaîne de télévision.
• En mode de veille, le fait d’appuyer sur les touches
N/M
CHANNEL
remettre le téléviseur sous tension.
du téléviseur a également pour effet de
Réglage du programmateur
d’extinction
Appuyez plusieurs fois de suite sur SLEEP pour
sélectionner le nombre de minutes au bout duquel
le téléviseur se mettra hors tension.
Les minutes changent de la manière suivante jusqu’à
atteindre 120 minutes.
NON 15 30 60 90 120
1
Appuyez sur la touche POWER de la
télécommande pour mettre le téléviseur sous
tension.
Si la touche POWER du téléviseur n’est pas enclenchée,
vous ne pouvez pas faire fonctionner le téléviseur même
en appuyant sur la touche POWER de la télécommande.
2
Appuyez plusieurs fois de suite sur CHANNEL
N ou M ou sur les touches numériques
pour sélectionner le numéro de chaîne.
Si vous utilisez les touches numériques, appuyez sur les
touches selon la séquence suivante:
Exemple
Pour sélectionner la chaîne 7, appuyez sur 0 et puis sur
7.
Pour sélectionner la chaîne 77, appuyez sur 7 et puis
sur 7.
Pour sélectionner la chaîne 107, appuyez sur +100, 0 et
puis sur 7.
3
Appuyez sur VOLUME + ou – pour régler le
volume.
Pour mettre le téléviseur hors tension
Appuyez sur la touche POWER de la télécommande.
L’indicateur 6 STANDBY du téléviseur s’allume.
Vous pouvez mettre le téléviseur sous tension ou le faire
passer en mode de veille en appuyant sur la touche
POWER de la télécommande.
Appuyez sur la touche POWER du téléviseur pour couper
complètement le téléviseur de la source d’alimentation.
Après expiration de la durée définie, le téléviseur passe en
mode de veille.
Pour vérifier la durée restante
Appuyez sur SLEEP. La durée restante apparaît à l’écran.
Pour désactiver le programmateur
d’extinction
Appuyez plusieurs fois de suite sur SLEEP jusqu’à ce que
l’indication “SLEEP NON” apparaisse.
Remarque
La durée restante s’affiche automatiquement 5 minutes et
ensuite 1 minute avant la mise hors tension du téléviseur.
Par exemple, l’indication “SLEEP 5” s’affiche 5 minutes avant
que le téléviseur se mette hors tension.
Pour couper le son
Appuyez sur MUTE. L’indication “MUTE” apparaît pendant
quelques secondes.
Pour restaurer le son, appuyez sur MUTE ou sur VOLUME
+ ou –.
Pour rappeler une chaîne précédente
Appuyez sur PREV. CH pour basculer entre le canal actuel
et le précédent.
FRANÇAIS
10
Page 69

Sélection du mode MTS
CAPTION OFF
CAPTION 1
TEXT 1 CAPTION 2TEXT 2
CAPTION 1
Sélection du mode de sous-
Cet appareil est équipé du système MTS de son multicanal
destiné à souligner les plaisirs d’utilisation en
accompagnant les émissions de télévision d’un son stéréo
de haute fidélité. Le système MTS intègre également un
canal d’émission audio secondaire (SAP) que les stations
de télévision peuvent employer pour retransmettre des
émissions bilingues ou pour une autre piste audio.
Lorsque vous changez de chaîne, l’un des messages
suivants s’affiche en haut et à droite de l’écran en fonction
du type d’émission.
Emission stéréo : STEREO s’affiche en jaune.
Emission stéréo/SAP : STEREO/SAP s’affiche en jaune et
en rouge.
Emission SAP : SAP s’affiche en rouge.
Emission mono : Rien ne s’affiche.
MTS
titres
Cet appareil peut décoder et afficher les émissions de
télévision sous-titrées.
CAPTION
Appuyez plusieurs fois de suite sur CAPTION
pour sélectionner le mode de sous-titres.
Appuyez plusieurs fois de suite sur MTS pour
sélectionner le mode MTS.
MONO/SAP
L’affichage change selon la séquence suivante :
MONO STEREO SAP MONO/SAP
Remarque
Lorsque vous appuyez sur MTS, les paramètres que vous
pouvez sélectionner s’affichent en vert, et ceux qui ne peuvent
être sélectionnés s’affichent en rouge en fonction du type
d’émission.
L’affichage change selon la séquence suivante:
CAPTION NON
Sous-titres:
Le mode de sous-titres affiche à l’écran du texte en anglais
ou dans une autre langue. En général, les sous-titres en
anglais sont transmis via CAPTION 1 et les sous-titres dans
les autres langues via CAPTION 2.
Texte plein écran:
Le mode de sous-titres TEXT 1, TEXT 2 remplit en général
l’écran avec un menu de programmation ou d’autres
informations.
11
FRANÇAIS
Page 70

Remarques
NORMAL
• Après avoir été sélectionné, le mode de sous-titres reste
activé jusqu’à ce qu’il soit modifié, même si vous changez de
chaîne.
• Si le signal de sous-titres est perdu à cause d’une publicité
ou d’une coupure, les sous-titres réapparaissent dès que le
signal est rétabli.
• Lorsque vous sélectionnez les sous-titres, il se peut que leur
affichage soit brièvement décalé.
• Lorsque vous changez de chaîne, il se peut que l’affichage
des sous-titres soit brièvement décalé.
• Si vous utilisez une antenne intérieure ou si la réception
télévisée est de qualité médiocre, il se peut que le texte du
décodeur de sous-titres n’apparaisse pas. Dans ce cas,
ajustez l’antenne pour optimiser la qualité de réception ou
utilisez une antenne extérieure.
• Lorsque vous activez le décodeur de sous-titres, il y a un
léger décalage avant que les sous-titres apparaissent à
l’écran.
• Les sous-titres apparaissent à l’écran là où ils interfèrent le
moins avec l’image, généralement dans le bas de l’écran.
Les émissions d’information affichent généralement trois
lignes de sous-titres qui défilent sur l’écran. La plupart des
autres émissions affichent deux ou trois lignes de sous-titres
situés près de la personne en train de parler afin que le
téléspectateur puisse suivre la conversation.
• Si aucun signal de sous-titres n’est reçu, aucun sous-titre
n’apparaît, mais le téléviseur reste malgré tout en mode de
sous-titres.
• Des fautes de frappe ou des caractères anormaux peuvent
occasionnellement apparaître dans les sous-titres. C’est
normal dans le cas des sous-titres dactylographiés au vol.
Ces retransmissions ne laissent pas suffisamment de temps
pour les corrections.
• Certains systèmes de télédistribution et de protection contre
la copie peuvent interférer avec le signal de sous-titres.
• Les mots en italiques ou soulignés indiquent des titres, des
mots en langues étrangères ou encore des mots requérant
une certaine emphase. Les mots chantés apparaissent
généralement accompagnés de notes de musique.
• Les émissions de télévision diffusées avec des sous-titres
sont signalées par le symbole CC dans votre guide des
programmes de télévision.
Sélection du mode AV
Cet appareil intègre quatre modes d’optimisation vidéo.
NORMAL: Affichage normal
CINEMA: Pour visionner des films
GAME: Pour réduire la fatigue oculaire
SOMBRE: Lorsque le téléviseur se trouve dans un
environnement sombre
AV MODE
Appuyez plusieurs fois de suite sur AV MODE
pour sélectionner le mode AV.
L’affichage change selon la séquence suivante:
NORMAL CINEMA GAME SOMBRE
Remarque
Même si vous changez le mode AV, la qualité sonore ne
change pas.
FRANÇAIS
12
Page 71

Réglage de l’image
CHANGER : –/
+
F I N : MENU
ADJUSTER
CLAIR
– +
Appuyez sur VOLUME + ou – pour ajuster le
5
réglage.
Vous pouvez ajuster les réglages de l’image pour chaque
mode AV.
MENU
VOLUME +/–
CHANNEL N/
ENTER
1
Appuyez sur MENU.
2
Appuyez sur CHANNEL
N ou M
pour
sélectionner IMAGE et appuyez ensuite sur
ENTER.
MENU
MAGEI
SON
REGLAGE
V CH I P
CHOI SIR :
Appuyez sur CHANNEL N ou M pour
3
OK : ENTER
F I N : MENU
sélectionner la ligne supérieure, puis appuyez
sur VOLUME + ou – pour sélectionner le mode
AV à régler.
M
Paramètre
CLAIR
CONTRASTE
NET
COULEUR
Une diminution
des barres
rend l’image plus
sombre
atténue le contraste
rend l’image plus
douce
réduit l’intensité et
l’éclat des couleurs
Une augmentation
des barres
rend l’image plus
lumineuse
renforce le contraste
rend l’image plus
nette
renforce l’intensité
et l’éclat des
couleurs
Paramètre
TEINTE
Déplacement vers
la gauche
rend les couleurs
plus claires plus
rougeâtres
Déplacement vers
la droite
rend les couleurs
plus claires plus
verdâtres
Deux secondes après avoir relâché la touche, l’affichage
revient à l’étape 4.
6
Pour ajuster un autre paramètre, exécutez les
étapes 3 à 5.
Appuyez sur MENU pour revenir à l’écran
7
normal.
Appuyez sur CHANNEL
4
sélectionner le paramètre à régler.
FRANÇAIS
13
SOMBRE
CLA R
I
CONTRASTE
NET
COUL E U R
TE INTE
RE I N I T IAL I SER
CHOISIR :
CHANGER : –/
SOMBRE
CLA R
I
CONTRASTE
NET
COUL E U R
TE INTE
RE I N I T IAL I SER
CHOISIR :
CHANGER : –/
+
F I N :MENU
N ou M
+
F I N :MENU
Conseil
Pour restaurer tous les paramètres du mode AV à leurs valeurs
par défauts, sélectionnez REINITIALISER à l’étape 4 et
appuyez ensuite sur ENTER.
pour
Page 72

Réglage du son
Appuyez sur VOLUME + ou – pour ajuster le
4
réglage.
Vous pouvez ajuster le réglage des aiguës, des graves et
de la balance (gauche/droite) du son.
MENU
Appuyez sur MENU.
1
2
Appuyez sur CHANNEL N ou M pour
VOLUME +/–
CHANNEL N/M
ENTER
sélectionner SON et appuyez ensuite sur
ENTER.
MENU
I MAGE
SON
REGLAGE
V CH I P
/
OK : ENTERCHO I S I R:
F I N : MENU
3
Appuyez sur CHANNEL N ou M pour
sélectionner le paramètre à régler.
Paramètre
AIGU
GRAVE
Paramètre
BALANCE
Diminution des barres
atténue les aiguës
atténue les graves
Déplacement vers L
diminue le niveau de sortie
du haut-parleur droit
ADJUSTER
GRAVE
– +
CHANGER:-/+ F I N : MENU
Augmentation des barres
accentue les aiguës
accentue les graves
Déplacement vers R
diminue le niveau de sortie
du haut-parleur gauche
Quelques secondes après avoir relâché la touche,
l’affichage revient à l’étape 3.
Pour ajuster un autre paramètre, exécutez les
5
étapes 3 et 4.
Appuyez sur MENU pour revenir à l’écran
6
normal.
Conseil
Pour restaurer tous les paramètres à leur valeur par défaut,
sélectionnez REINITIALISER à l’étape 3 et appuyez ensuite sur
ENTER.
Remarque
Il se peut que le son comporte des distorsions en conséquence
de la combinaison de TREBLE, BASS, SUPER BASS, ou BBE.
Dans ce cas, baissez le volume ou le niveau des fonctions de
réglage du son ci-dessus.
A I GU
GRAVE
BALANCE
SUPER BASS
Q SURROUND : NON
BBE
RE I N I T I AL I SER
CHO I S I R:
CHANGER : – /+
/
: NON
: NON
F I N : MENU
CONTINUE
SUITE
FRANÇAIS
14
Page 73

AUTRES FONCTIONS
Réglage du son (suite)
SURROUND
MENU
BBE
S-BASS
VOLUME +/–
CHANNEL N/M
ENTER
Exploitation des effets audio
spéciaux
Votre téléviseur comporte 3 modes d’accentuation audio :
SUPER BASS, Q SURROUND et BBE.
SUPER BASS accentue les graves.
Q SURROUND utilise uniquement deux haut-parleurs à
gauche et à droite pour créer une atmosphère donnant
l’impression que vous êtes entouré de deux haut-parleurs
frontaux et de deux haut-parleurs arrière.
Le système BBE renforce la clarté des sons de haute
fréquence.
Réglage de la puce V
Une limite d’âge peut être définie pour empêcher les enfants
de regarder ou d’écouter des scènes ou des programmes
violents destinés aux adultes. Cet appareil est conforme à
“CLASS.PROG.TV” et “CLASS.FILM”.
Pour pouvoir utiliser la fonction de puce V, vous devez
d’abord enregistrer un mot de passe.
Touches
numériques
MENU
ENTER
Enregistrement du mot de passe
Important
Vous ne pouvez pas activer la puce V si vous
oubliez votre mot de passe. Nous vous
conseillons de l’écrire à un endroit sûr pour le cas
où vous l’oublieriez.
VOLUME +/–
CHANNEL N/M
Utilisation de la touche unique
Pour activer SUPER BASS, Q SURROUND ou BBE,
appuyez sur S-BASS, SURROUND ou BBE. Chaque
pression commute l’activation/désactivation.
SUPER BASS OU I
Pour exploiter le menu SON
Appuyez sur MENU. Appuyez ensuite sur CHANNEL N
ou M pour sélectionner SON et après sur ENTER. Puis
appuyez sur CHANNEL N ou M pour sélectionner
SUPER BASS, Q SURROUND ou BBE et ensuite sur
VOLUME + ou – pour afficher OUI.
A I GU
GRAVE
BALANCE
SUPER BASS
Q SURROUND
BBE :NON
RE I N I T I AL I SER
CHO I S I R:
CHANGER : – /+
Remarques
• Le système Q SURROUND est inopérant avec les sources
monaurales.
• L’activation de Q SURROUND peut provoquer une distorsion
du son.
FRANÇAIS
15
/
:OU I
:NON
F I N : MENU
Appuyez sur MENU.
1
2
Appuyez sur CHANNEL N ou M pour
sélectionner V CHIP et appuyez ensuite sur
ENTER.
MENU
MAGEI
SON
REGLAGE
V CH I P
CHO I SIR :
Introduisez le mot de passe (4 chiffres) à l’aide
3
OK : ENTER
F I N : MENU
des touches numériques (0-9).
“∗” apparaît au lieu des chiffres.
V CHIP
NOUVEAU
MOT DE PASSE
0–9
FIN : MENU
ENTRER :
4
Réintroduisez le même mot de passe par
mesure de sécurité.
V CHIP
CONFIRMER
MOT DE PASSE
0–9
FIN : MENU
ENTRER :
Activation de la puce V CHIP.
Page 74

Réglage de la puce V
Dans le menu Vchip, appuyez sur
1
CHANNEL N ou M pour sélectionner
CLASS.PROG.TV et appuyez ensuite sur
VOLUME + ou – pour afficher le réglage voulu.
• Les émissions captées ensuite sont protégées contre
l’affichage suivant le réglage sélectionné.
NON: CLASS.PROG.TV non activé
TV-Y: Emissions pour tous les enfants
TV-Y7: Emissions pour les enfants de 7 ans et plus
TV-G: Emissions pour tous les publics
TV-PG: Autorisation parentale souhaitée
TV-14: Emissions inadéquates pour les enfants de
moins de 14 ans
TV-MA: Emissions interdites aux personnes de moins
de 17 ans
• Le sous-menu CLASS.PROG. TV peut s’afficher en
fonction de la sélection opérée. Si le sous-menu
apparaît, passez à l’étape 2. Dans le cas contraire,
passez à l’étape 3.
Appuyez sur CHANNEL N ou M pour
3
sélectionner CLASS.FILM et appuyez ensuite
sur VOLUME + ou – pour afficher le réglage
voulu.
Les films suivants sont protégés contre l’affichage en
fonction du réglage sélectionné.
NON: CLASS.FILM non activé
G : Films pour tout âge.
PG: Films inadaptés aux enfants
PG-13: Films inadaptés aux enfants de 13 ans ou
moins
R: Films adaptés aux enfants de moins de 17
ans accompagnés de leurs parents
NC-17: Films interdits aux enfants de moins de 17
ans
X: Films pour adultes
Appuyez sur CHANNEL N ou M pour
4
sélectionner V CHIP et appuyez ensuite sur
VOLUME + ou – pour afficher OUI.
2
Appuyez sur CHANNEL N ou M pour
sélectionner un paramètre CLASS.PROG.TV et
appuyez ensuite sur VOLUME + ou – pour
afficher OUI ou NON.
• Si vous avez sélectionné TV-Y7, les paramètres cidessous apparaissent.
• Si vous avez sélectionné TV-PG ou TV-14, les
paramètres ci-dessous apparaissent.
• Si vous avez sélectionné TV-MA, les paramètres cidessous apparaissent.
Appuyez sur MENU pour revenir à l’écran
5
normal.
Remarque
Si vous n’appuyez sur aucune touche pendant 15 secondes,
l’écran normal est affiché de nouveau.
Pour utiliser le téléviseur après avoir
activé la protection
Lors de la réception d’une émission protégée à l’aide de la
fonction de puce V, le message “PROTECTION-PUCE V”
apparaît.
CABLE125
<PROTECTION-PUCE V>
SI VOUS ANNULER
LA PROTECTION ENTRER
MOT DE PASSE.
MOT DE PASSE :
ENTRER : 0 – 9
TV-PG
Ecran de classement des
émissions de
télédiffusion
Introduisez le mot de passe. Si le mot de passe est correct,
la protection est désactivée.
CONTINUE
SUITE
FRANÇAIS
16
Page 75

Réglage de la puce V (suite)
REGLAGE
LANGUE
ANTENNE
RECHERCHE AUTOMAT IQUE
AJOUTE/EFFACE
NOM DU CANA L
FRANÇAIS
: CABLE
CHOISIR :
F I N : MEN U
OK : ENTER
MENU
MAGEI
REGLAGE
OK : ENTER
CHOI SIR :
F I N : MENU
V CH I P
SON
Enregistrement du nom d’une
Modification du mot de passe
Appuyez sur MENU.
1
Appuyez sur CHANNEL N ou M pour
2
sélectionner V CHIP et appuyez ensuite sur
ENTER.
MENU
MAGEI
SON
REGLAGE
V CH I P
CHOI SIR :
Introduisez le mot de passe à l’aide des
3
touches numériques (0-9).
“*” apparaît au lieu des chiffres.
4
Appuyez sur CHANNEL N ou M pour
sélectionner CHANGE.MOT DE PASSE et
appuyez ensuite sur ENTER.
OK : ENTER
F I N : MENU
station de télévision
Vous pouvez enregistrer le nom d’une station de télévision
pour chaque chaîne captée.
MENU
VOLUME +/–
CHANNEL N/M
ENTER
1
Appuyez sur MENU.
Appuyez sur CHANNEL N ou M pour
2
sélectionner REGLAGE et appuyez ensuite sur
ENTER.
Introduisez le nouveau mot de passe à l’aide
5
des touches numériques (0-9).
“*” apparaît au lieu des chiffres.
Réintroduisez le même mot de passe par
6
mesure de sécurité.
V CHIP
CONFIRMER
MOT DE PASSE
0–9
FIN : MENU
ENTRER :
7
Appuyez sur MENU pour revenir à l’écran normal.
Remarque
Si vous n’appuyez sur aucune touche pendant 15 secondes,
l’écran normal est affiché de nouveau.
FRANÇAIS
17
Appuyez sur CHANNEL N ou M pour
3
sélectionner NOM DU CANAL et appuyez ensuite
sur ENTER.
Appuyez sur VOLUME + ou – pour sélectionner
4
la numéro de chaîne pour laquelle vous voulez
enregistrer un nom.
NOM DU CANAL
CABLE1 25
– – – –
REINITIALISER
CHOI SIR :
CH ANGER : –/
+
F I N : MENU
Page 76

5
Appuyez sur CHANNEL M pour sélectionner
l’affichage de la barre.
NOM DU CANAL
CABLE125
– – – –
REI NIT I ALISER
CHOI SIR :
CH ANGER : –/
+
F I N : MENU
Affichage des indicateurs
6
Appuyez sur VOLUME + pour afficher la lettre
voulue et appuyez ensuite sur CHANNEL M.
Chaque fois que vous appuyez sur la touche VOLUME +,
l’affichage change selon la séquence suivante:
.....
A
9
.....
Z&/ –
0(espace)
Appuyez sur VOLUME – pour changer l’affichage dans
l’ordre inverse.
NOM DU CANAL
CABLE125
N – – –
REI NIT I ALISER
CHOI SIR :
CH ANGER : –/
7
Répétez les étapes 5 et 6 pour introduire le
+
F I N : MENU
nom d’une station de diffusion.
Vous pouvez introduire 4 lettres.
8
Pour entrer le nom d’une autre station, appuyez
sur CHANNEL M pour sélectionner le numéro
du canal, puis répétez les étapes 4 à 7.
Vous pouvez mémoriser un maximum de 30 stations.
Lorsque les 30 stations sont mémorisées, “PLEIN”
apparaît à la place de “- - - -”.
DISPLAY
Nom de la
station de
télévision
CABLE125NBC
STEREO/SAP
Numéro de la
chaine Indicateur
VIDEO
Entrée audio
Pour changer l’affichage des indicateurs
Appuyez sur DISPLAY. Chaque pression commute change
les indicateurs affiches (oui/non).
Remarques
• Si aucune touche n’est actionnée dans un délai de 8
secondes, le menu disparaît automatiquement.
• Le nom de la station de diffusion n’apparaît que s’il a été
enregistré.
• L’indicateur d’entrée audio n’apparaît pas lorsque le
téléviseur est en mode VIDEO 1 et VIDEO 2.
Appuyez sur MENU pour revenir à l’écran
9
normal.
Conseil
Pour annuler toutes les lettres aux étapes 6 et 7, appuyez sur
CHANNEL N ou M pour sélectionner REINITIALISER et
appuyez ensuite sur ENTER.
FRANÇAIS
18
Page 77

INFORMATIONS COMPLEMENTAIRES
Regarder une source vidéo ou
autre
TV/VIDEO
GAME
Touches
numériques
TV/VIDEO/ENTER
Dépannage
Si l’appareil semble ne pas fonctionner correctement, relisez
les instructions d’utilisation et consultez ensuite le guide de
dépannage suivant.
Il n’y a pas d’image ni de son.
L’appareil est en mode d’entrée VIDEO.
Absence de son.
Augmentez le niveau du volume.
Les couleurs sont médiocres ou absentes.
Ajustez le réglage de la couleur.
La télécommande est inopérante.
Remplacez les piles de la télécommande.
Des déclics sont audibles.
Il s’agit des phénomènes inévitables de dilatation et de
contraction du châssis sous l’effet des variations de la
température ambiante. Il ne s’agit pas d’un
dysfonctionnement.
1
Appuyez sur la touche TV/VIDEO de la
télécommande ou sur la touche TV/VIDEO/
ENTER du téléviseur pour afficher “VIDEO1” ou
“VIDEO2” pendant quelques secondes.
VIDEO 1: entrée via les prises VIDEO 1 INPUT AUDIO/
VIDEO 2: entrée via les prises VIDEO 2 IN AUDIO/
Activez le magnétoscope ou un autre appareil
2
VIDEO à l’arrière
VIDEO à l’avant
en mode de lecture.
Pour revenir à l’émission télévisée
Appuyez plusieurs fois de suite sur la touche TV/VIDEO de
la télécommande ou sur la touche TV/VIDEO/ENTER du
téléviseur jusqu’à ce que l’émission télévisée apparaisse.
Vous pouvez également revenir à l’émission télévisée en
sélectionnant directement le numéro de la chaîne à l’aide
des touches numériques.
Pour commuter directement la position
GAME
Appuyez sur GAME pour régler le mode AV sur GAME. Le
mode d’entrée TV passe automatiquement à VIDEO 2 et
l’écran adopte le format le mieux approprié.
Si vous raccordez le téléviseur à un
magnétoscope AIWA à fonction ONETOUCH PLAYBACK
Lorsque vous appuyez sur la touche ONE-TOUCH
PLAYBACK ou OTPB de la télécommande du
magnétoscope, cet appareil se met automatiquement sous
tension en mode VIDEO 1. Cette fonction est cependant
inopérante dans les cas suivants :
• Vous avez appuyé sur la touche ONE-TOUCH PLAYBACK
du magnétoscope.
• Le téléviseur et le magnétoscope ne sont pas installés à
un endroit où ils peuvent capter simultanément le signal de
la télécommande.
Remarque
Pour plus de détails sur l’utilisation du magnétoscope, consultez
le manuel d’utilisation qui accompagne le magnétoscope.
FRANÇAIS
19
Page 78

Soin et entretien
Spécifications
Pour nettoyer le châssis
Utilisez un chiffon doux et sec pour frotter.
Si les surfaces sont extrêmement sales, utilisez un chiffon
doux humecté d’une solution détergente douce. N’utilisez
pas de solvants agressifs, tels que l’alcool, le benzène ou
du diluant, car ils risquent ne ternir le fini du châssis.
Ne collez pas d’autocollant ou d’étiquette adhésive
Ne collez pas d’autocollant ou d’étiquette adhésive sur la
surface pendant une période prolongée.
Le fini du châssis risque d’être abîmé ou de se ternir.
Lorsque vous entendez des bruits provenant de la radio
ou d’un autre équipement audio/vidéo
Eloignez cet équipement de l’appareil
Tube Braun
Si la surface est sale, nettoyez-la avec un chiffon sec et
doux.
Si vous touchez le tube Braun, il peut arriver que vous
sentiez un faible courant électrique. Il s’agit d’électricité
statique et il n’y a aucun risque pour vous.
Syntoniseur Syntoniseur à fréquence synthétisée
Système de télévision
NTSC-M
Couverture des chaînes
VHF: 2 à 13
UHF: 14 à 69
CATV: 5A, A-1 à A-5, A à W,
W+1 à W+84
Mémoire de programmes
181
Entrée d’antenne 75 ohms, asymétrique
Tube image TV-F2400: 24 po.
TV-F2000: 20 po.
Taille de l’écran TV-F2400:
478 (L) × 359 (H) mm
598 mm (diagonale) (23
7
(18
/8 × 141/4 po.)
5
/8 po.)
TV-F2000:
406 (L) × 305 (H) mm
(16 × 12
1
/8 po.)
508 mm (diagonale) (20 po.)
Entrée vidéo 1 Vp-p 75 ohms
Entrée audio 0,5 Vrms., plus de 33 k ohms
Haut-parleur 120 × 60 mm (4
3
/4 × 23/8 po.)
Tension de service 120 Téléviseur CA, 60 Hz
Consommation électrique
TV-F2400: 125 W
TV-F2000: 100 W
Prise phono Miniprise stéréo
Température de service
5˚C à 40˚C (41°F à 104°F)
Humidité de service 35% à 80%
Dimensions TV-F2400:
690 (L) × 506 (H) × 485 (P) mm
1
(27
/4 × 20 × 191/8 po.)
TV-F2000:
610 (L) × 440 (H) × 485 (P) mm
1
(24
/8 × 173/8 × 191/8 po.)
Poids TV-F2400: 33,7 kg (74,14 lbs.)
TV-F2000: 24,1 kg (53,02 lbs.)
Accessoires Télécommande (1)
Batteries (R6/size AA) (2)
Adaptateur d’antenne (1)
• Dans le cadre de l’amélioration des performances de nos
produits, la conception et les spécifications sont sujettes à
modifications sans préavis.
• Les figures du présent mode d’emploi illustrent le
TV-F2000.
FRANÇAIS
20
Page 79

Composants et commandes
Panneau frontal
Prise PHONES \
Prises VIDEO 2 IN S-VIDEO/
AUDIO L (MONO)/R/VIDEO
Touche TV/VIDEO/ENTER
Touche MENU
Panneau arrière (TV-F2000)
Crochet du cordon
d’alimentation
Cordon d’alimentation
Touche POWER
Indicateur 6 STANDBY
Capteur de télécommande
Touches CHANNEL N/M
Touches VOLUME +/–
Crochet de sécurité
Prises VIDEO 1 INPUT S-VIDEO/
AUDIO L (MONO)/R/VIDEO
Prise ANTENNA
Prises OUTPUT AUDIO L/R/VIDEO
Panneau arrière (TV-F2400)
Prises VIDEO 1 INPUT S-VIDEO/
AUDIO L (MONO)/R/VIDEO
Prises OUTPUT AUDIO L/R/VIDEO
FRANÇAIS
21
Crochet de sécurité
Prise ANTENNA
Cordon d’alimentation
Page 80

Télécommande
Touche POWER
Touche SLEEP
Touche TV/VIDEO
Touche GAME
Touches numériques
Touche CAPTION
Touche SURROUND
Touche AV MODE
Touche DISPLAY
Touche PREV. CH
Touche MENU
Touche ENTER
Touche +100
Touche MTS
Touche BBE
Touche S-BASS
Touche VOLUME +/–
Touche MUTE
Touche CHANNEL N/M
FRANÇAIS
22
 Loading...