Speaker System Built-in: 100 x 4 ohm 4 inches cone type
Power Output: Power output options: 3.5W+3.5W (1KHz 10% T.H.D@ 4 Ohm) 5W+5W(100 -15 Kv less than 1% THD)
Cassette Deck: 4 Tracks two channel stereo using normal tape range of 50Hz to 12500hz with abias recording and magnet erase system
Compact Disc Player: Light source differs semiconductor laser type:A=780nm; a one bit dual D A converter; measurable wow and flutter.
Power Requirements: 60hz,120v AC
Power Consumption: minimum of 22 watts not exceeding
Compact Disc Player Dimension: 160x236.2x209.8mm (6° x 9° x 81/4 in.)
Compact Disc Player Unit Weight: 2.60kg (5lbs 12oz)
The Weight sold each speaker: Each speaker weighs 1.1(kgs) or 2lbs7oz
Frequently Asked Questions
Q: What is the procedure for turning on the device?
A: The first step is to press the POWER button.
Q: I don't know how to play a CD. What can be done?
A: For starters, try pressing the OPEN mark on the disc chamber and loading the CD with the label side facing upward and finally pressing the PLAY button.
Q: No sound is coming out of the system. What can I do?
A: Many people do not check whether A.C. power cord is plugged in correctly and also the function button pressed is appropriate.
Q: Is it possible to use stereo with other devices?
A: Indeed, let’s say the stereo system consists of AUX jacks through additional equipment could be connected.
Q: There is no signal on the screen. What can be done to set time in the device?
A: When the power is off, we can set the current hour and minutes by pressing the SET button.
Q: What if my CD player is not working at all?
A: Check whether the disc is inserted properly and clean, or whether a lens is damp due to condensation.
Q: How do I record from tuner or CD player?
A: So, turn on the source, put the tape into the recorder with the side to be recorded up, then press the RECORD key and function key at the same time.
Q: How can I increase or decrease the volume?
A: The volume levels can be adjusted by choosing the VOLUME control button, which can be pressed either in a downward or upward direction. A downward movement will decrease the volume while employing an upward movement will increase the overall sound.
Q: What should be done if the timer is not functioning properly?
A: It's important to check and confirm whether the clock is configured correctly, if not, the time needs to be reset.
Q: How can I clean the cassette deck heads?
A: Employ a cleaning cassette for the heads, or use a cotton bud soaked in cleaning fluids on the erase or recording/playback heads.
User Manual
Page 1
For assistance and information,
call toll free 1-800-BUY-AIWA.
(United States and Puerto Rico)
CL6-903-01
1220 AYK-H-6
dlriiit
DIGITAL AUDIO
Page 2
WARNING
TO REDUCETHE RISK OF FIRE OR ELECTRIC
SHOCK,DO NOT EXPOSETHIS APPLIANCETO
RAIN OR MOISTURE.
.
●
RISK OF ELECTRIC SHOCK
A
“CAUTION:TO REDUCE THE RISK OF
.
DO NOT REMOVE COVER (OR BACK).
NO USER-SERVICEABLEPARTS INSIDE.
REFER SERVICING TO QUALIFIED
SERVICE PERSONNEL.”
Explanationof GraphicalSymbols:
A
●
A
DO NOT OPEN
~A
ELECTRIC SHOCK,
The lightning flash with arrowheadsymbol,
within an equilateraltriangle, is intended to
alert the user to the presence of uninsulated
“dangerous voltage” within the product’s enclosure that may be of sufficient magnitude to
constitute a risk of electric shock to persons.
The exclamationpoint within an equilateral
triangle is intended to alert the user to the
presence of important operating and maintenance (servicing) instructions in the literature
accompanyingthe appliance.
●
PRECAUTIONS
Read the Operating Instructions carefully and completely before
operating the unit, Be sure to keep the Operating Instructions for
future reference.All warnings and cautions in the Operating
Instructions and on the unit should be strictly followed, as well as
the safety suggestions below.
Installation
1
Water and moisture — Do not use this unit near water, such
as near a bathtub, washbowl, swimming pool, or the like.
2
Heat — Do not use this unit near sources of heat, including
heating vents, stoves, or other appliances that generate heat.
It also should not be placed in temperaturesless than 5°C
(41 “F) or greater than 35°C (95”F),
Mounting surface — Place the unit on a flat, even surface.
3
4
Ventilation—Theunit should be situated with adequate space
around it so that proper heat ventilation is assured. Allow 10cm
(4 in.) clearance from the rear and the top of the unit, and 5 cm
(2 in.) from the each side.
- Do not place the unit on abed, rug, orsimilarsurfacethat may
block the ventilation openings.
Do not install the unit in a bookcase, cabinet, or airtight rack
where ventilation may be impeded.
5
Objects and liquid entry — Take care that objects or liquids
do not get inside the unit through the ventilation oDeninW.
6
Carts and stands — When- placed ormounted on a stand or cart, the unit should
be moved with care.
Quick stops, excessive force, and uneven
surfaces may cause the unit or cart to
overturn or fall,
●3
@
AL*
7 Condensation— Moisture may form on the CD pickup lens
when:
- The unit is moved from a cold spot to a warm spot
- The heating system has just been turned on
- The unit is used in a very humid room
The unit is cooled by an air conditioner
When this unit has condensationinside, it may not function
normally. Should this occur, leave the unit for a few hours, then
try to operate again.
8 Wall or ceiling mounting — The unit should not be mounted
on a wall or ceiling, unless specified in the Operating instructions.
Electric Power
1
Power sources — Connect this unit only to power sources
specified in the Operating Instructions, and as marked on the
unit.
2
Polarization — As a safety feature, some units are equipped
with polarized AC power plugs which can only be inserted one
way into a power outlet. If it is difficult or impossible to insert the
AC power plug into an outlet, turn the plug over and try again.
If it still does not easily insert into the outlet, please call a
qualified service technician to service or replace the outlet. To
avoid defeating the safety feature of the polarized plug, do not
force it into a power outlet.
3
AC
power cord
- When disconnectingthe AC power cord, pull it out by the AC
power plug. Do not pull the cord itself.
- Never handle the AC power plug with wet hands, asthiscould
result in fire or shock.
Power cord should be routed to avoid being severely bent,
pinched, or walked upon. Pay particular attention to the cord
from the unit to the power socket.
- Avoid overloadingAC power plugs and extensioncords
beyond their capacity, as this could result in fire or shock.
4
Extension cord — To help prevent electric shock, do not use
a polarized AC power plug with an extension cord, receptacle,
or other outlet unless the polarized plug can be completely
inserted to prevent exposure of the blades of the plug,
5
When not in use— Disconnect the AC power cord from the AC
outlet if the unit will not be used for several months or more.
When the cord is plugged in, a small amount of current
continues to flow to the unit, even when the power is turned off.
Outdoor Antenna
1 Power lines — When connecting an outdoor antenna, make
sure it is located away from power lines.
2 Outdoor antenna grounding — Be sure the antenna system
is properly grounded to provide protection against unexpected
voltage surges or static electricity build-up.Article 810 of the
National Electrical Code, ANS1/NFPA 70, provides information
on proper grounding of the mast, supporting structure, and the
lead-in wire to the antenna discharge unit, as well as the size
of the grounding unit, connection to grounding terminals, and
requirementsfor grounding terminals.
Antenna GroundingAccordingto the National Electrical Code
(NEC ART 250 PART H)
NEC-NATIONALELECTRICALCODE
)
ENGLISH
1
Page 3
w&wk4?&u&?bw@s@tk?#%
TABLE OF CONTENTS
Congratulationson your purchase of an Aiwa Stereo System.
To optimize the performance of this system, please take the time
to read through these Operating Instructions and become familiar
with the operating procedures.
SETTING THE CLOCK ........................................................ 9
SETTING THE TIMER ......................................................... 9
SETTING THE SLEEP TIMER .......................................... 10
Owner’s record
Foryourconvenience,record the model number and serial number
(you will find them on the rear of your set) in the space provided
below. Please refer to them when you contact your Aiwa dealer in
case of difficulty.
Model No.
Serial No. (Lot No.)
\ Lcx-150u/Lcx-151u I
To
stand the AM antennaon a surface
Fix the claw to the slot.
OTHER CONNECTIONS
CONNECTINGOPTIONALEQUIPMENT
........................ 11
m
GENERAL
CARE AND MAINTENANCE............................................ 11
PARTS INDEX ................................................... Back cover
I
Connecting an outdoor antenna
For betterFM reception,use of an outdoorantennais
recommended.
Connect the outdoor antenna to the FM 75 Q terminals.
0
ENGLISH
2
Page 4
CONNECTIONS
Before connectingthe AC cord
The rated voltage of your unit shown on the rear panel is
120 V AC, Check that the rated voltage matches your local
voltage.
IMPORTANT
● Connect the speakers, antennas, and all optional equipment
first. Then connect the AC cord in the end.
● There are no differencesbetween the front speakers.Both
speakers can be connected as L (Left) or R (Right).
1
Connectthe speakercords to the main unit.
The cords with the white stripes should be connected to the
~ terminals and the other cords to the O terminals.
2
Connectthe suppliedantennas.
Connect the FM antenna to the upper one of the FM ;75 Q
terminals and the AM antenna to the AM LOOP terminals.
II
FM antenna
AM
antenna
3 Connectthe AC cord to an AC outlet.
To position the antennas
FM antenna:
Extend this antenna and change the direction and angle to find
the best reception.
AM antenna:
Position to find the best direction.
m
Do not short-circuit the 0 and
speaker cord leads; otherwise the
sound may become inaudible.If
this happens, disconnectthe AC
cord from the AC outlet and reconnectthespeakercord
correctly.Connectthen the AC
cord and turn the unit on again.
m
● Do not leave objects generating magnetism near the speakers.
● Do not bring the FM antenna near metal objects or curtalln rails.
● Do not bring the AM antenna near other optional equip m~ent,
the stereo system itself, the AC cord or speaker cords, since
O
noise will be picked up.
“ Do not unwind the AM antenna wire.
To connectother optionalequipment+page 11.
antenna
3
3 ENGLISH
Page 5
BEFOREOPERATION
ADJUSTINGTHE SOUND
POWER -
1> -----.–--+
PHONES -
To turn the unit on
Press the POWER button.
After use
Press the POWER button to turn off the power.The display
changes to the clock.
Using the headphones
Connect headphonesto the PHONES jack with a stereo mini
plug (03,5 mm, 1/8inch).
No sound is output from the speakers while the headphonesare
plugged in.
REMOTE CONTROL
insertingbatteriesinto the remote control
Detach the battery cover on the rear of the remote control and
insert two R6 (size AA) batteries.
3-MODE
EQUALIZER
GEQ
VOLUME
@
t=
ADJUSTING THE VOLUME
Press the VOLUMEcontrol,
Press the upper side to increase the volume, and the lower side
to decrease it.
The volume level is shown on the display for 4 seconds. It can
be set from O (minimum) to 30, and then MAX (maximum).
The volume remains memorizedeven after the power is turned
off. However, if the power is turned off when the volume is set to
more than 20, it is automaticallyset to 20 the next time the power
is turned on.
GRAPHIC EQUALIZER
Press one of the 3-MODEEQUALIZERbuttons.
ROCK/POP/JAZZ
m
R6(AA)
When to replace the batteries
The maximum operationaldistance between the remote control
and the sensor on the main unit should be approximately5 meters
(16 feet). When this distance decreases,replace the batteries
with new ones.
m
. If the unit is not going to be used for an extended period of
time, remove the batteriesto preventpossibleelectrolyte
leakage.
. The remote control may not operate correctly when:
The line of sight between the remote control and the remote
sensor (located in the POWER button) is exposed to intense
light, such as direct sunlight
- Other remote controls are used nearby (television, etc.)
ROCK:Powerful sound emphasizingtreble and bass.
POP:
JAZZ:
To cancel the selectedmode
Press the selected button again.
When using the remote control
Press the GEQ button until the desired equalizationmode is
displayed.
The equalizationmode changes to ROCK, POP, JAZZ or no
equalizationcyclically.
More presence in the vocals and midrange.
Sound enriched with heavy bass and fine treble.
SOUND ADJUSTMENTDURING
RECORDING
The output volume and tone of the speakers or headphones
may be freely varied without affecting the level of the recording.
ENGLISH
4
Page 6
PLAYINGA CD
Display in stop mode
Music calender (only
Total rdavina time
,,”
I
Total number of tracks
To
start play when the power is off (Direct Play
the first 16 tracks are
displayed)
Function)
Press the ➤11 button. The power is turned on and play
loaded disc beains.
If other than Cb play is selected with the power on, one press of
the
➤11 button selects the CD function and starts play.
of the
LOADING A DISC
PresstheOPENmarktoopenthedisc
compartment.Load a disc with the label
side up
and close the disc compartment.
PLAYING A DISC
Load a disc.
Press the >1 I button.
Play begins with the first track.
Elapsed playing time
To select a
Press the numbered buttons and the +1 Obutton to select a track.
Example:
To select the 25th track, press the +1 O, +1 O and 5 buttons.
To select the 10th track, press the +1 O and O buttons.
The selected track starts to play and play cantinues to the end
of that disc.
track with the remote control
m
. Do not use irregularshape CDs (example:heart-shaped,
octagonal ones). It may result in malfunction.
● Do not place more than one compactdisc in the disc
compartment.
● Do not try to open the disc compartmentduring play.
Number of track being played
To stop play, press the
To pause play, press the >11 button. To resume play, press
again.
To search for a particularpoint during playback, keep the
1+ or
➤>1 button pressed and release the button at the desired
point.
To skip to the beginningof a track during playback, press
the l<< or PPI button repeatedly.
■ button.
5 ENGLISH
Page 7
RANDOM PLAY
All the tracks on the disc can be played randomly.
Press the RANDOMbutton on the remote control in
stop
mode to display “RAN”.
Press the ➤1I button to start play.
To cancel random play, press the RANDOMbutton again in
stop mode.
m
● Even if the ~<button is pressed, a previouslyplayed track
cannot be skipped. The unit returns to the beginningof the
current track only.
● When you select a track with the numberedbuttons on the
remote control during the random play mode, the selected track
starts to play and the random play mode is cancelled.
REPEAT PLAY
One track, all the tracks or programmedtracks can be played
repeatedly.
Press the REPEAT button to display “REPEAT1 “ or
“REPEATALL”.
To repeat the current track only, display “REPEAT 1”,
To repeat all the tracks, display “REPEAT ALU.
To cancel repeat play, press the REPEATbutton to turn
off “REPEAT”.
To repeat the desired tracks only, program the tracks and press
the REPEAT button to display “REPEAT ALL”.
Press the numberedbuttonsand +10 button to
2
programtrack.
Example:
To select the 12th track, press the +1 O and 2 buttons.
To select the 20th track, press the +1 O, +1 O and O buttons.
Program number
Total number of selected tracks
3
Repeat step 2 to program other tracks.
Press the PI 1 button to start play.
4
To check the program
Each time the
mode, a track number and program number will be displayed.
To clear the program
Press the~buttonin stop mode.
➤FI button on the main unit is pressed in stop
I
PROGRAMMEDPLAY
Up to 30 tracks can be programmedfrom the inserted disc.
c1
..—..-
u
Use the remote control.
7 Press the SET button in stop mode.
“M” flashes on the display.
To add tracks to the program
Before playing, repeat step 2. The track will be programmed
after the last track.
To change the programmedtracks
Clear the program and repeat all the steps again.
m
● During programmedplay, the following operationscannot be
performed,
– Random play
- One-track repeat (REPEAT 1)
● If the programmedtime is more than 99:59 minutes, or the
disc track number 31 or above is programmed,the display
shows --:-- as the total playing time.
m
ENGLISH
6
Page 8
MANUALTUNING
PRESETTINGSTATIONS
TUNER
MODE
1
Press the BAND button repeatedly to select the
desired band.
m
2
Press the Wor Mbutton to select a station.
Each time the button is pressed, the frequency changes.
When a station is tuned in, “TUNE” is displayed for a moment.
During FM stereo reception, “STEREO”is displayed.
‘——————l
The unit can store a total of 32 preset stations.When a station
is stored, a preset number is assigned to the station.Use the
preset number to tune into a preset station directly.
Press the BAND button to select a band. Then,
1
P-SCAN
0–9,+1 o
press the l++ or >>1 button to select a station.
Press the SET button to store the station.
2
A station is assigned a preset number, beginningfrom 1 in
consecutiveorder for each band.
mFrequency
To play a tuned station when
the power is off (Direct
Play Function)
Press the BAND button. The power is turned on and the tuned
stations is played.
To search for a station quickly (Auto Search)
Keep the 14or FPI button presseduntil the tuner starts
searching for a station. After tuning in to a station, the search
stops.
To stop the Auto Search manually, press the Wor -button.
● The Auto Search may not stop at stations with very weak
signals.
When an FM stereo broadcastcontainsnoise
Press the TUNER MODE button on the remote control.
“MONO” appears on the display.
Noise is reduced, although reception is monaural.
To restore stereo reception, repeat the above again.
To change the AM tuning interval
The default setting of the AM tuning interval is 10 kHz/step.If
you use this unit in an area where the frequency allocation system
is 9 kHz/step, change the tuning interval.
Press the POWER button while pressing the BAND button.
To reset the interval, repeat this procedure.
When the AM tuning interval is changed, all preset stations (see
Each band can only store a maximum of 16 preset stations.
To listen to preset stations
Use the remote control to select the preset number directly.
1 Press the BAND button to select a band.
2 Press the numbered buttons to select a preset number.
Example:
To select preset number 15, press the +1 O and 5 buttons.
To select preset number 10, press the +1 O and O buttons.
When operatingon the main unit, press the
repeatedly.
Each time the button is pressed, the next higher number is
selected.
To clear
Select the preset number of the station to be cleared. Then, press
the SET button, and press the Fll button within 4 seconds while
the frequency flashes.
The preset numbers of all other stations in the band with higher
numbers are also decreased by one.
To scan preset stations
Press the P-SCAN button on the remote control until “P.SCAN”’
is displayed.The preset stations are received in order for 5
seconds each. The preset number flashes during reception.
To stop scanning, press the VOLUME button.
a preset station
■ button
7 ENGLISH
Page 9
PLAYINGA TAPE
u,
Use only type I (normal) tapes
RECORDING
This section explains how to record from the tuner, CD player or
other external equipment.
‘AND—————l
7 Press the WA button to open the cassette holder
and insert a tape with the exposed side down.
Push the cassette holder to close it.
2 Press the F button.
TAPE function is selected and play begins.
Only the side facing out from the unit can be played back.
To stop play, press the WAbutton.
To pause play, press the II button. To resume play, press again,
To fast forward or rewind, press the ++ or _button in stop
mode. Then press the W4button to stop the tape.
To start play when the
Function)
Press the P button.The power is turned on and play of the
inserted tape begins.
power is off (Direct Play
Preparation
. Wind up the tape to the point recording starts.
“ Note that recording is done on only one side of the tape.
● Use only type I (normal) tapes.
Insert the tape to be recorded on into the deck.
1
Insert the tape with the side to be recorded on facing out
from the unit and the exposed side down.
Get the source ready for recording.
2
To record from a CD, p~ess the -11button and load the
disc.
To record from a radio broadcast, press the BAND button
and tune in to a station.
To record from a connected source, press the AUX button
and prepare the source for play.
3 Press the 0 button to start recording.
The b button is messed simultaneously.
When the selected function is CD, playback and recording
start simultaneously.
When the selected function is AUX, start playback manually.
To stop recording, press the WAbutton.
To pause recording, press the II button. To resume recording,
press again.
When the tape reaches its end, the tape stops and the
is released, During CD recording, CD play pauses automatically.
Change the tape and press the
automaticallyresume.
● button, then CD play will
● button
m
About cassettetapes
o
120-minuteor longer tapes are extremelythin and easily
deformed or damaged. They are not recommended.
. Take up any slack in the tape with a pencil o’r similar tool before
use. Slack tape may break or jam in the mechanism.
To record the selectedtracks of the CD
Program the tracks (see “PROGRAMMEDPLAY”) and press the
. button.
COPYRIGHT
Please check the laws on copyright relating to recordings from
discs, radio or external tape for the country in which the machine
is being used.
ENGLISH
8
Page 10
SETTINGTHE CLOCK
<—
m—
SETTINGTHE TIMER
-m
When the AC cord is connected for the first time, the time on the
display flashes.
Set the time as follows
1
Press the SET button.
The hour flashes.
2
Press the 1<+ or ➤>[ button to designate
hour.
Press the SET button to set the hour.
3
The hour stops flashing and the minute starts flashing.
Press the l++or ➤>1 button to designate
4
minute.
Press the SET button to set the minute and
5
complete setting.
The minute stops flashing on the display and the clock starts
from 00 seconds.
To correct the current time
Press the POWER button to turn the unit off and press the SET
button. Then, carry out steps 1 to 5 above.
while the power is off.
the
the
1
c).
.——----
‘
u
The unit can be turned on at a specified time with the built-in
timer.
Preparation
Make sure the clock is set correctly.
Press the TIMER button on the remote control to
1
display 0, and press the SET button within z
seconds.
O
is displayed,and the hour flashes.
m
If you do not press the SET button within 2 seconds, another
operation may start.
Designatethe hour of the timer-ontime by
2
pressing the 1<+ or FPI button, and press the
SET button. Repeat to designatethe minute of
the timer-on time.
Select the duration for the timer-activatedperiod
3
with the l-or➤>1 button and press the SET
button.
To display the current time
Keep the
time is displayed for 4 seconds,
To switch to the 24-hourstandard
While the power is on, keep the
is displayed and then press the REPEAT button within 4 seconds.
Repeat the same procedure to restore the 12-hour standard.
If the clock display flashes while the power is off
This is caused by a power interruption,The current time needs
to be reset,
If power is interrupted for more than approximately12 hours, all
settings stored in memory after purchase need to be reset.
■ button pressed until the clock is displayed.The
❑ button pressed until the clock
9 ENGLISH
The duration for the timer-activatedperiod can be set between
5 and 240 minutes in 5-minute steps.
Prepare the source.
4
To listen to a CD, press the -11 button and load the disc.
To listen to the radio, press the BAND button and tune in to
a station.
Press the POWER button to turn the unit off after
5
adjusting the volume.
@
remains on the display after the power is turned off (timer
standby mode).
When the timer-on time is reached, the unit turns on and
begins play with the selected source.
● You cannot set the volume level to 21 or higher,
Page 11
To check the specified time
Press the TIMER button on the remote control.The timer-on
time flashes for 2 seconds.However, the duration for the timeractivated period will not be displayed.
SETTINGTHE SLEEPTIMER
‘To cancel timer standby
Press the TIMER button on the remote control twice to turn off
0.
Using the unit while the timer is set
You can use the unit normally after setting the timer.
Before turning off the power, repeat step 4 to prepare the source,
and adjust the volume.
mode temporarily
m
“ Timer playback will not begin unless the power is turned off.
● Connected equipment cannot be turned on and off by the built-
in timer of this unit, Use an external timer.
● When power is interrupted, ~ display disappears and the clock
flashes. Reset the clock and set the timer again.
1
2
The unit can be turned off automaticallyat a specified time.
Use the remote control
1
Press the SLEEP button.
Within 4 seconds, press the +4or >Fbutton
2
to specify the time ‘until the power is turned off.
Each time the button is pressed, the time changes between 5
and 240 minutes in 5-minute steps.
To check the time remaining until the power is turned
off
Press the SLEEP button once. The remaining time is displayed
for 4 seconds.
To cancel the sleep timer
Press the SLEEP button twice so that “SLEEP” on the display
disappears.
m
If the unit is turned off during tape playback, the P button is
kept pressed. Press the
■/4 button to release the b button.
ENGLISH
10
Page 12
CONNECTINGOPTIONAL
CARE AND MAINTENANCE
EQUIPMENT
CONNECTINGTO AUX JACKS
Sound signals can be input to this unit through the AUX jacks.
Use a cable with RCA phono plugs to connectequipment
(turntables, LD players with analog output jacks,
players, VCRs, TVs, etc.).
Connect the red plug to the R jack, and the white plug to the
jack.
Refer to the operatinginstructionsof the connectedequipment
for details.
. The connecting cords are not supplied. Obtain the necessary
connecting cords.
● Consult your local Aiwa dealer for recommendedequipment.
DAT decks, MD
Occasionalcare and maintenanceof the unit and the software
are needed to optimize the performanceof your unit.
To clean the cabinet
Use a soft and dry cloth.
If the surfacesare extremelydirty, use a soft cloth lightly
moistenedwith mild detergentsolution.Do not use strong
solvents, such as alcohol, benzine or thinner as these could
damage the finish of the unit.
To clean
After every 10 hours
with a head cleaning cassette or cotton swab moistenedwith
cleaning fluid or denaturedalcohol. (These cleaning kits are
commerciallyavailable.)
When cleaning with a cotton swab, wipe the recording/playback
head, erasure head, capstan, and pinchroller.
the heads and tape paths
of use, clean the heads and tape paths
Erasure head
Cotton swab
an
L
(
L
Pinchroller
When connectinga turntable
Use an Aiwa turnable equipped with a built-in equalizer amplifier.
LISTENING TO EXTERNAL SOURCES
To play equipmentconnectedto the AUX jacks, press the AUX
button and start play.
“AUX” appears on the display.
After cleaning the heads and tape paths with a head cleaning
cassette or a moistenedswab, wait until the cleaned parts are
completely dry before inserting the tapes.
Care of discs
● When a disc becomes dirty, wipe the disc from the center out
with a cleaning cloth.
. After playing a disc, store the disc in its case. Do not leave the
disc in places that are hot or humid.
Care of tapes
● Store tapes in their cases after use.
. Do not leave tapes near magnets, motors, television sets, or
any source of magnetism.This will downgradethe sound
quality and cause noise.
● Do not expose tapes to direct sunlight, or leave them in a car
parked in direct sunlight.
1 I ENGLISH
Page 13
SPECIFICATIONSTROUBLESHOOTINGGUIDE
Main unit
FM
tuner section
Tuning range
Antenna terminals
AM tuner section
Tuning range
Antenna
Amplifiersection
Power output
87.5 MHz
75 ohms (unbalanced)
530 kHz to 1710 kHz (10 kHz
step)
531 kHz to 1602 kHz (9 kHz step)
Loop antenna
5W+5W(1kHz, T.H.D. 10%,4
ohms)
3.5 W+ 3.5 W(100–15kHz,
T.H. D. less than 1 %, 4 ohms)
Magnet erase
Recording/playbackhead x 1
Erase head x 1
Compact disc player section
LaserSemiconductor laser (Z= 780 nm)D-A converter1 bit dual
Wow and flutterUnmeasurable
Speaker system
Speakers
Dimensions (W x H x D)
Weight
100 mm (4 in,) cone type, 4 ohms
150 x 236.2 x 210.5 mm
(6x
93/8 x 83/~in.)
1,1 kg (2 Ibs 7
OZ.)
GeneraI
Power requirements120 VAC, 60 HZ
Power consumption
Dimensions of main unit
(W XHXD)
Weight of main unit
Specificationsand external appearanceare subject to change
without notice.
22 w
160 x 236.2 x 209.3 mm
(63/8 X 9’/8 x 81/4 in.)
2.6 kg (5 Ibs 12
OZ.)
NOTE
This equipmenthas been tested and found to comply with the
limits for a Class B digital device, pursuant to Part 15 of the FCC
Rules. These limits are designed to provide reasonable protection
against harmful interferencein a residential installation.
This equipment generates, uses, and can radiate radio frequency
energy and, if not installed and used in accordancewith the
instructions,may cause harmful interference to radio communications. Howeverj there is no guaranteethat interferencewill
not occur in a particular installation. If this equipment does cause
harmful interferenceto radio or television reception, which can
be determinedby turning the equipmentoff and on, the user is
encouragedto try to correct the interferenceby one or more of
the following measures:
Reorient or relocate the receiving antenna.
- Increase the separation between the equipment and receiver.
- Connect the equipment into an outlet on circuit different from
that to which the receiver is connected.
- Consult the dealer or an experiencedradio/TV technician
for help.
CAUTION
Modificationsor adjustmentsto this product, which are not
expressly approved by the manufacturer,may void the user’s
right or authority to operate this product.
If the unit fails to performas describedin these Operating
Instructions,check the following guide.
GENERAL
There is no sound.
. Is the AC cord connected properly?
● Is there a bad connection?(+ page 3)
● Was an incorrect function button pressed?
The sound becomesinaudible.
● There may be a short circuit in the speaker terminals.
+ Disconnect the AC cord from the AC outlet and re-connect
the speaker cords correctly, Then connect the AC cord and
turn the unit on again.
Sound is emitted from one speaker only.
● Is the other speaker disconnected?
TUNER SECTION
There is constant,wave-likestatic.
o Is the antenna connected properly? (+ page 3)
The receptioncontainsnoise interferencesor the
sound is distorted.
● Is the system picking up external noise or multipath distortion?
+ Change the orientationof the antenna.
A Move the unit away from other electrical appliances.
CASSETTE DECK SECTION
The tape does not run.
the deck in pause mode? (~ page 8)
“ Is
The sound is off-balanceor not adequatelyhigh.
● Is the playback head dirty? (+ page 11)
Recordingis not possible.
● If the tab on a cassette broken off, cover the hole with adhesive
tape,
Side A
\ (a>
e
● Is the recording head dirty? (+ page 11)
Erasureis not possible.
● Is the erasure head dirty? (+ page 11)
● Is a Cr02 or metal tape being used?
High frequencysound is not emitted.
● Is the recording/playbackhead dirty? (+ page 11)
CD PLAYER SECTION
The CD player does not play.
● Is the disc correctly loaded ? (+ page 5)
● Is the disc dirty? (+ page 11)
● Is the lens affected by condensation?
+ Wait approximatelyone hour and try again
CLOCK AND TIMER SECTION
Timer setting is not possible.
● Does the clock flash on the display ?
+ Reset the clock. (+ page 9)
‘<@*
4
Tab for side A
To reset
If an unusual conditionoccurs in the display windowor the
cassette decks, reset the unit as follow.
1 Press the POWER button to turn off the power.
2 Press the POWER button to turn the power back on while
pressing the
purchase is canceled.
If the power cannot be turnedoff in step 1 becauseof a
malfunction,reset by disconnectingthe AC cord and repeat step
7 Condensation— Puede formarse condensationen la Iente del
fonocaptor del reproductor de discos compactos cuando:
- La unidad pase de un Iugar frio a uno caliente.
El sistema de calefaccion se acabe de encender.
- La unidad se utilice en una habitation muy hfimeda.
- La unidad se enfrie mediante aire acondicionado.
Esta unidad puede no funcionar debidamente cuando se forme
condensation en su interior. En este case, deje en reposo la unidad
unas pocas horas y repita de nuevo la operation.
8 Montaje en pared o techo — No ha de montarse la unidad en una
pared ni en el techo, a menos que se especifique 10contrario en el
Manual de Instrucciones.
“CAUTION:TO REDUCE THE RISK OF
ELECTRIC SHOCK,
DO NOT REMOVE COVER (OR BACK).
NO USER-SERVICEABLEPARTS INSIDE.
REFER SERVICING TO QUALIFIED
SERVICE PERSONNEL.”
Explicationde Ios simbolos graficos:
El simbolo del rayo con punts de flecha dentro
de un triangulo equilatero tiene como fin alertar
al usuario de la presenciade un “voltaje peligroso”
sin aislar en el interior de la estructura de la
A
●
Z!!!!J
unidad y que puede tener la magnitud suficiente
como para constituir un riesgo de descarga
electrica para Ias personas.
El signode exclamacihsituado en el interiorde
un triangulo equilatero tiene como fin alerfar al
usuario de la presencia de instrucciones de
operation y mantenimiento (servicio) importances
en la documentationque acompafla al aparato.
PRECAUCIONES
Lea cuidadosamentey en su enteridad el Manual de Instrucciones
antes de utilizar la unidad, Asegfirese de guardar el Manual de
Instrucciones para utilizarlo como referencia en el future. Deberan
cumplirse estrictamente todas Ias advertencias y precauciones del
Manual de Instrucciones y de la unidad, asi como Ias sugerencias de
seguridad mencionadas a continuation.
Instalacion
1
Agua y humedad — No utilice esta unidad cerca del agua, como
al Iado de una bar7era, Iavabo, una piscina, o similar.
2
Calor— No utilice esta unidad cercadefuentes decalor, incluyendo
salidas de aire caliente, estufas u otros aparatos que generen
calor. Tampoco debera someterse a temperatures inferiors a 5°C
ni superiorsa 35°C.
3
Superficie de montaje — Sitfie la unidad sobre una superficie
plana y nivelada.
4
Ventilation — La unidad debera situarse en un Iugar en el cual
exista suficiente holgura a su alrededor para poder garantizar una
ventilation adecuada. Deje una holgura de 10 cm desde la parte
posterior ysuperiorde launidad y5cmdesdecadaladoacualquier
otro objeto.
- No ponga la unidad sobre una cama, una alfombra o superficies
similares que puedan obstruir Ias aberturas de ventilation.
No instale la unidad en una Iibreria, mueble o estanterfa cerrada
hermeticamente donde la ventilation no sea la adecuada.
5
Entrada de objetos y Iiquidos — Tenga cuidado de que objetos
y Ifquidos no entren en la unidad a traves de Ias aberturas de
ventilation,
6
Estantes fijos y con ruedas — Cuando
coloque o monte la unidad en un estante fijo o
con ruedas, tenga mucho cuidado al moverla
a otro Iugar.
Las paradas repentinas, la fuerza excesiva y
Ias superficies irregularspueden hater que
la unidad o el estante con ruedas de vuelta o
se caiga.
● L
AA*
3
m
Eneraia Electrica
1
Fuentes de alimentacion — Conecte solamente esta unidad a Ias
fuentesde alimentacion especificadas en el Manual de Instrucciones
y como esta marcado en la unidad,
2
Polaridad —Como medidade seguridad, algunas unidades estan
equipadas con enchufes de alimentacion de CA que unicamente
pueden ser insertados de una forma en la toma de corriente. Si es
dificil o imposible insertar el enchufe CA en la toma, de la vuelta al
enchufe e intentelo de nuevo. Si atin no resulta posible insertarlo
en la toma, Ie rogamos que se dirija a un tecnico de servicio
cualificado para que inspeccione o cambie la toma. Para evitar
obviar la funcion de seguridad del enchufe polarizado, no 10fuerce
hacia el interior de la toma.
3
Cable de alimentacion de CA
- Cuando desconecte el cable de alimentacion, tire del enchufe. No
tire del propio cable.
- Nunca manipule et enchufe con Ias manes mojadas ya que
podria producirse un incendio o una descarga electrica.
- Los cables de alimentacion deberan colocarse de forma que no
queden muy doblados, prensados y que nadie pueda pisarlos.
Preste especial atencion al cable que va de la unidad a la toma
de corriente.
- Evite sobrecargar Ios enchufes de CA y Ios cables de extension
mas alla de su capacidad porque esto podria causar un incendio
o una descarga electrica.
4
Cable de extension — Para evitar una descarga electrica, no
utilice un enchufe polarizado de CA con un cable de extension,
receptaculo u otra toma de corriente a menos que e! enchufe
polarizado pueda ser completamenteinsertado para prevenir la
exposition de Ias clavijas del enchufe.
Periodos de no utilization— Desconecte el cablede alimentacion
5
de CA si la unidad novaaser utilizadadurante varies meses o mas.
Cuando el cable de alimentacion este conectado, por la unidad
continuara circulando una pequefia cantidad de corriente, aunque
la alimentacion este desconectada.
Antena Exterior
1 Lineas de alimentacion — Cuando conecte una antena exterior,
2 Toma a tierra de la antena exterior — Asegtirese de que el
sistema de la antena tenga una corrects toma a tierra para ofrecer
protection contra inesperadas sacudidas de tension descargas de
voltaje inesperadas o acumulacion de electricidad estatica. El
artfculo 810 del National Electrical Code, ANSI-N FPA70, provee
information sobre la forma adecuada de realizar una toma a tierra
del poste, de la estructura de soporte y del cable conductor a la
unidad de descarga de la antena, asf como sobre el tamafio de la
unidad de la toma a tierra, conexiones a Ias terminalsde la toma
a tierra y requisites de Ias terminalsde la toma a tierra.
Toma a tierra de acuerdo con el National Electrical Code (Codigo National de Electricidad)
,CABLE CONDUCTOR DE LA ANTENA
l-t
NEC CODIGO ELECTRICO NACIONAL
1
ESPANOL
Page 15
Enhorabuenapor haber adquirido un sistema estereo Aiwa.
Para optimizar la funcion de este sistema, por favor tomese el
tiempo para leer estas Manual de Instruccionesy familiaricese
con Ios procedimientosde operation.
Verifique su sistema y accesorios
LCX-I 50/LCX-l 51
Sistema estereo con reproductor
de discos compactos
AJUSTE DEL RELOJ ......................................................... 9
AJUSTE DEL TEMPORIZADOR........................................9
AJUSTE DEL TEMPORIZADORDE APAGADO .............10
7
Registro del propietario
Para su conveniencia,anote el numero del modelo y de serie
(Ios encontraraen la parte trasera del aparato) en el espacio
propuesto mas abajo. Por favor refierase a ellos cuando contacto
con su distribuidorAiwa en caso de alguna dificultad.
Ng. Modelo
LCX-I 50 U/LCX-l 51 U
N~. Serie (N~. Lote)
Para poner la antena de AM sobre una superficie
Fije el gancho en la ranura.
OTRAS CONEXIONES
CONEX16N DE UN EQUIPO OPCIONAL
........................11
GENERALIDADES
CUIDADO Y MANTENIMIENTO ........................................ 11
GUIA PARA LA SOLUCION DE PROBLEMAS ...............12
~NDICE DE LAS PARTES .............................
Conexion de una antena exteriori
Para obtener la mejor recepcion de FM se recomiendautilizar
una antena exterior.
Conecte la antena exterior a Ias terminalsFM 75 Q
f.hnapzigina
m
ESPAfiOL
2
Page 16
CONEXIONES
Antes de conectar el cable de alimentacionde CA
La tension nominal de su unidad indicada en el panel posterior es
de 120V CA. Compruebe que esta tension coincide con la de la red
local.
2
Conecte Ias antenas suministradas.
Conecte la antena de FM a Ias terminalsFM 75 Q y la antena
de AM a Ias terminalsde AM LOOP.
Antena de FM
Antena de AM
IMPORTANTE
Conecte primero Ios altavoces, antenas y todos Ios demas equipos
.
opcionales. Luego conecte el cable de alimentacion.
● No existen diferenciasentre Ios altavoces frontal es. Ambos
altavoces pueden ser conectados como L (izquierdo) o R (derecho).
1
ConecteIos cablesdel altavoza la unidad
principal.
Los cables con Ias franjas blancas deberan conectarse a Ias
terminals0 y Ios otros cables a Ias terminates O.
No realice un cortocircuito entre Ios
cables 0 y O de [OS altavoces ya
que el sonido puede ser inaudible.
Si esto ocurriese,desconecteel
cable de CA de la toma y reconecte
el cable del altavoz correctamente.
Conecte entonces el cable de CA y
encienda la unidad de nuevo.
D
~
L
..-’
J
~ Conecte el cable de alimentacionde C.A. a una
toma C.A
Para posicionar Ias antenas.
Antena FM:
Extienda esta antena y cambie la direccion y el angulo de forma
que encuentre la mejor recepcion.
Antena AM:
Coloquela de manera que encuentre la mejor direccion.
m
o No deje objetosque generenmagnetismcerca de Ios
altavoces.
. No ponga la antena de FM cerca de objetos metalicos o rieles
de cortinas.
● No ponga la antena deAM cerca de otros equipos opcionales,
el propio sistema estereo, el cable de alimentacionde CA o
Ios cables de Ios altavoces, ya que se captaran ruidos.
● No desbobineel cable de la antena de AM.
Para conectar otro equipo optional + pagina 11.
3 ESPAliOL
1AI+”,,,.- J,..,. al-.,.
1
Altavoz izquierdo
cable del altavoz
2 Antena FM
2AntenaAM
“L
n
*Cable de CA
Page 17
ANTESDE LA OPERACION
AJUSTEDEL SONIDO
POWER
PHONES
Para encender la unidad
Presione el boton POWER.
Despues del uso
Presione el boton POWER para desconectarla alimentacion.
La pantalla pasara a ser la del reloj.
Uso de Ios auriculares
Conecte Ios auricuiares a la toma PHONES con un miniconector
estereo (a3.5 mm).
Mientras Ios auricularesesten conectadosno saldra sonido de
10s altavoces.
3-MODE
EQUALIZER
GEQ
VOLUME
AJUSTE DEL VOLUMEN
Presione el control VOLUME.
Presione el Iado mas alto para aumentar el volumen y el Iado
mas bajo para disminuirlo.
El nivel del volumense muestraen la pantalladurante4
segundos. Puede configurarsede O (minimo) a 30 y hasta MAX
(maximo).
El volumen permanece en memoria incluso despues de apagar
el aparato, No obstante, si se apaga cuando el volumen esta
configuradoa mas de 20, se configuraraautomaticamenteen
20 la proxima vez que se encienda el aparato.
CONTROL REMOTO
Insertion de Ias baterias en el control remoto
Quite la tapa de Ias baterias, ubicada en la parte trasera del
control remoto, e inserte dos baterias de R6 (tamaiio AA).
R6(AA)
Cuando reemplazar Ias baterias
La distancia maxima de operationentre el control remoto y el
sensor de sehales de la unidad principal deberia ser de 5 metros
aproximadamente.Cuando disminuya esta distancia, reemplace
Ias baterias por otras nuevas.
● Si la unidad no va a ser utilizada durante un Iargo periodo,
quite Ias baterias para evitar posibles fugas de electrolito.
● El control remoto quiza no funcione correctamentecuando:
- La Iinea de vision entre el control remoto y el sensor remoto
(situado en el boton POWER)quede expuestaa una Iuz
intensa como la Iuz directs del sol.
- Otros controles remotos (de un televisor, etc.) esten siendo
utilizados cerca de esta unidad.
ECUALIZADORGRAFICO
Presione uno de Ios botones 3-MODE EQUALIZER.
ROCK/POP/JAZZ
ROCK: Sonido potente que realza Ios agudos y Ios graves.
POP:Mas presencia de votes y en la gama de registro medio.
JAZZ:Sonido enriquecido con Ios graves fuertes y Ios agudos
fines.
Para cancelarel modo seleccionado
Presione de nuevo el boton seleccionado.
Utilizandoel control remoto
Presione el boton GEQ hasta que se visualiceel modo de
ecualizaciondeseado.
El modo de ecualizacioncambia ciclicamentea ROCK, POP,
JAZZ o a ninguna ecualizacion.
AJUSTE DEL SONIDO DURANTE LA
GRABACION“
La salida de volumeny tono de Ios altavoceso auriculares
pueden variarse Iibremente sin afectar al nivel de la grabacion.
ESPANOL
4
Page 18
REPRODUCTIONDE UN DISCO
COMPACTO
Pantalla en modo de parada.
Tiempo de
reproductiontotal
Calendariode musics
(solo se visualizaranIas
primeras 16 pistas)
INTRODUCTIONDE UN DISCO
PresionelamarcaOPENparaabrirel
cc)mpartimiento del disco. Introduzca un disco con
el Iado de la etiquetahacia arribay cierreel
cc+mpartimiento del disco.
Numero total de pistas
I
Para iniciar la reproductioncuando la alimentacion
este desconectada(Funcion de ReproductionDirects)
Presioneel boton➤11 La alimentacionse conectaray
comenzarala reproductiondel disco introducido.
Si se ha seleccionadouna reproductionque no sea la del CD
con el aparato encendido, presionandouna vez el boton
seleccionarala funcion de CD, iniciandosela reproduction.
➤11 se
Seleccion de una pista con el control remoto
Presione Ios botones numericos y el boton +1 O para seleccionar
una pista.
Ejemplo:
Para seleccionarla pista n’ 25, presione Ios botones +1 O, +1 O y
5.
Para seleccionarla pista n~ 10, presione Ios botolles +1 Oy O.
La pista seleccionada empezara a reproducirse y la reproduction
continuara hasta que termine el disco.
o No utilice CDs de forma irregular (p. ej.: en forma de rombo u
octogonales).Pueden ocasionar un mal funcionarniento.
o No cargue mas de un disco compacto en el compartimientode
discos.
“ No intente abrir el compartimientode Ios discos durante la
reproduction.
RIEPRODUCCIONDE UN DISCO
Introduzca un disco.
Presione el boton ➤I 1.
inicia la reproductioncomenzandopor la primera pista.
Se
Tiempo de reproductiontranscurrido
I
Numero de la pista que esta siendo reproducida.
Para detener la reproduction,presione el boton
Para hater una pausa en la reproduction, presione el boton
➤11. Para reanudar la reproduction, pulselo de nuevo.
Para buscar un punto particular durante la reproduction,
ma.ntenga pulsado el boton l<< 0 ➤Pl y sueltelo en el punto
deseado.
Para saltar hasta el principio de una pista durante la
reproduction,
presione repetidamenteel boton 140➤M.
■ .
5 ESPANOL
Page 19
REPRODUCTIONALEATORIA
Todas Ias pistas del disco puedenreproducirsede forma
aleatoria,
Presione el boton RANDOM del control remoto en el
modo de parada para que se visualice “RAN”.
Presione el boton PII para iniciar la reproduction,
Para cancelarla reproductionaleatoria,Presione de nuevo
el boton RANDOM en el modo de parada.
● Aunque se presioneel boton 1<<, una pista previamente
reproducida no podra ser omitida. La unidad solamente volvera
al principio de la pista actual.
“ Cuando seleccione una pista con Ios botones numerados del
control remoto durante la reproductionaleatoria, comenzara
a reproducirse la pista seleccionada,cancelandoseasi el modo
de reproductionaleatoria.
REPETITIONDE LA REPRODUCTION
Pueden ser reproducidasrepetidamenteuna pista, todas Ias
pistas o Ias pistas programadas.
Presioneel botonREPEAT
0 “REPEAT ALL”.
Para repetir solamente la pista actual, haga aparecer en pantalla
“REPEAT l“.
Para repetir todas Ias pistas,haga apareceren pantalla
“REPEATALL”.
Para cancelar la repetition,presione el boton REPEAT
para eliminar “REPEAT” de la pantalla.
Para repetir solamente Ias pistas deseadas,
pistas y presioneel boton REPEATpara que se visualice
“REPEAT ALL”.
para visualizer “REPEAT 1”
programeIas
REPRODUCTIONPROGRAMADA
Se podranprogramarun maximode 30 pistas del disco
introducido.
2
Presione Ios botones numericos y el boton +10
para programar una pista.
Ejemplo:
Para seleccionarla pista n~ 12, presione Ios botones +1 O,
y 2,
Para seleccionarla pista n~ 20, presione Ios botones +1 O,
+loyo.
Ntimero de programa
Numero total de pistas seleccionadas
3
Repita el paso 2 para programar otras pistas
4
Presioneelboton
reproduction.
Para comprobar el programa
Cada vez que se presione en modo de parada el boton ➤M de
la unidad principal, se
ntimero de programa.
Para borrar el programa
Presione el boton ■ en el modo de parada.
Para anadirpistasal programa
Antes de reproducer, repita el paso 2. La pista se programara
despues de la ultima pista.
Para cambiar Ias pistas programadas
Borre el programa y repita todos Ios pasos de programacion.
visualizaranun numero de pista y un
➤11parainiciarla
n
c)
..... ....
u
Use el control remoto.
1 Presione el boton SET en modo de parada.
“M” parpadearaen la pantalla.
m
● Durante la reproductionprogramadano se pueden realizar
Ias siguientes operaciones.
– Reproductionaleatoria
– Repetitionde una pista (REPEAT 1)
. Si el tiempo programado es superior a 99:59 minutes, o se ha
programadola pista numero 31 0 superiordel disco,
visualizara--:-- como tiempo total de reproduction.
se
ESPANOL
6
Page 20
SINTONIZACIONMANUAL
2-
[:
——
..-_-..,
PREAJUSTEDE EMISORAS
TUNER
MODE
1
Presioneel boton BAND re~etidamente~ara
seleccionarla banda deseada.
n’
Presione el boton [<4 o FMpara seleccionar
2
una emisora.
Cada vez que presione el boton, la frecuencia cambiara,
Cuando se reciba una emisora, se visualizara “TUNE” durante
un memento.
Durante la recepcion estereo en FM, se visualizara “STEREO”.
Para reproducer una emisora previamente sintonizada
cuando el aparato este apagado (Funcion de
ReproductionDirects)
Presione el boton BAND. Se encendera el aparato y se escuchara
la emisora previamente sintonizada,
Para buscar rapidamenteuna emisora (Busqueda
Automatic)
Mantenga pulsado el boton 1+ o WI hasta que el sintonizador
empiece a buscar una emisora. Despues de sintonizar una emisora,
se detendra la btisqueda.
Para detener manualmente la BkquedaAutomatic,presione el
boton 1+< o HI,
o La Bkqueda Automatica puede no detenerse en estaciones cuyas
sefiales scan muy debiles,
Cuando una emision en FM estereo contenga ruido
Presione el boton TUNER MODE del control remoto.
“MONO” aparecera en la pantalla.
El ruido se reduce aunque la recepcion sea monoaural.
Para restaurar la recepcion estereo, presione de nuevo Ios botones.
La unidad puede memorizar un total de 32 emisoras. Cuando se
memoriza una emisora, a esa emisora se Ie asignara un ntimero de
preajuste, Ufilice el numero de preajuste para sintonizar directamente
una emisora preajustada.
7 Presioneel boton BAND para seleccionaruna
banda y presioneel boton1+<o ➤Fl para
seleccionaruna emisora.
2 Presioneel boton SET para almacenar la emisora.
A Ias emisoras de cada banda se Ies asigna un ntimero de
preajuste en orden consecutive empezando por el 1.
Frecuencia
n
I
Ntimero de preajuste
3 Repita IOS pasos 1 y 2.
m
Cada banda solo puede almacenar un maximo de 16 emisoras
preajustadas
Para escuchar emisoras preajustadas
Utilice el control remoto para seleccionar directamente e[ n~mero
de preajuste.
1 Presione el boton TUNER para seleccionar una banda.
2 Presione IOSbotones numericos para seleccionar
preajustado.
Ejemplo:
Para seleccionar la pista n’ 15, presione Ios botones +1 Oy 5.
Para seleccionar la pista ng 10, presione Ios botones +1 O y 0,
Cuando este operandodesde la unidad principal,presione
el boton
Cada vez que se presione el boton, se seleccionara la emisora
con el
■ repetidamente.
nfimeroinmediatamentesuperior,
un numero
Para cambiar el intervalo de sintonizacionde AM
El ajuste por omisi6n del intervalo de sintonizacion de Afvl es de 10
kHz/paso. Si utiliza esta unidad en una zona en la cual el sistema
de asignacion de frecuencias sea de 9 kHz/paso, cambie el intervalo
de sintonizacion.
Presione el boton POWER mientras presiona el boton BAND.
Para resetear el intervalo, repita este procedimiento.
m
Cuando se cambie el intervalo de sintonizacionde AM, (vease
“PI+EAJIJSTEDE EMISORAS”), se borraran todas Ias emisoras
preajustadas. Las emisoras preajustadas tendran que ajustarse de
nuevo,
7 ESPAiiOL
Para borrar una emisora preajustada
Seleccione el nbmero de memorizationde la emisora que desee
borrar. Tras ello, presione el boton SET y el boton
que transcurran 4 segundos mientras parpadea la frecuencia.
Los nfimerosde preajustedel resto de Ias emisorascon
numeraciones mas altas disminuyen en una unidad.
➤11 antes de
Para escanear Ias emisoras memorizadas
Presione el boton P-SCAN del control remoto hasta que se visualice
“P-SCAN”, Se reciben en orden Ias emisoras memorizadas durante
5 segundos cada una de ellas. El ntimero preajustado parpadea
durante la recepcion.
Para detener el escaneo , presione el boton VOLUME,
Page 21
REPRODUCTIONDE UNA CINTA
U,B+
2
L-II
Use unicamentecintas tipo I (normal)
12Presione el boton 9/4para abrir el portacasete
e introduzca una cinta con el Iado expuesto hacia
abajo. Empuje el portacasetepara cerrarlo.
GRABACION
Esta seccion explica como grabar desde la radio, el reproductor
de CDs o desde un equipo externo.
3
Preparation
o Bobine la cinta hasta el punto desde el cual va a comenzar la
grabacion.
● Observe que la grabacion se realiza en una sola cara de la
cinta.
o Use solamente cintas de tipo
I (normal).
■ ✏✝
Presione el boton F.
Se selecciona la funcion TAPE y la reproductioncomenzara.
Solo se puede reproducer la cara que mira hacia afuera del
aparato,
Para detener la reproduction,presione el boton W4.
Para hater una pausa en la reproduction,presione el boton
II. Para reanudar la reproduction,presionelo otra vez.
Para avanzar rapidamenteo rebobinar, presione el boton +4
o
➤> en el modo de parada. Luego presione el boton WA
para detener la cinta.
Para iniciar la reproductioncuando la alimentacion
este desconectada(Funcionde ReproductionDirects)
Presione el boton F. La alimentacionse conectara y comenzara
la reproductionde la cinta insertada,
1
Inserte la cinta que vaya a grabar en la pletina.
lntroduzca la cinta con el Iado en que va a grabar primero
mirandohacia el exteriorde la unidad y con el Iado
expuesto hacia abajo.
2
Tenga preparada la fuente de sonido de la que
vaya a grabar.
Para grabar de un disco compacto, presione el boton ~11
e introduzca el disco.
Para grabar de una emision radiofonica,presione el boton
BAND y sintonice la emisora.
Para arabar de una fuente de sonido conectada, mesione
el bot~n AUX y prepare la reproduction.
Presione el boton ● para iniciar la grabacion.
3
Presione simultaneamenteel boton >. Cuando la funcion
seleccionadasea CD, la reproductiony la grabacion
empezaransimultaneamente.
Cuando la funcion seleccionadasea AUX, inicie manualmente
la reproductiondel equipo conectado.
Para detener la grabacion,presione el boton WA,
Para hater una pausa en la grabacion, presione el boton II.
Al Ilegar al final de la cinta, la cinta se para y el boton 0 se
suelta. Durante la grabacion de un CD, la reproductiondel CD
se detiene automaticamente.
. Las cintas de 120 minuteso mas son extremadamentefinas
y se deforman o estropean facilmente.No son recomendadas.
● Tense la cinta con un Iapiz o herramientasimilar antes de
utilizarla.Una cinta floja puede romperse o atascarseen el
mecanismo,
Consulte Ias Ieyes de Ios derechos de autor relacionadascon
Ias grabaciones de discos, programas de radio o cintas externas
del pais en el que se utilice la unidad.
● .
ESPANOL
8
Page 22
AJUSTEDEL RELOJ
AJUSTEDEL TEMPORIZADOR
w
Cuando se conecta por primers vez el cable de alimentacionde
Corriente Alterna, la hors parpadea en la pantalla.
Configurela hors como siguemientrasla alimentacion
este desconectada.
1 Presione el boton SET.
Vera parpadearla hors
Presione el boton 1++ o ➤FI para establecer la
2
hors.
Presione el boton SET para fijar la hors.
3
Vera como la hors deja de parpadear y empieza a hacerlo el
minute,
Presione el boton 1++ o F>l para establecer el
4
minute.
Presione el boton SET para establecer el minuto
5
y completar la configuration.
El minuto parade parpadear en la pantalla y el reloj comienza
desde 00 segundos,
Para corregirla hors actual
Presione el boton POWER para apagar la unidad y presione el
boton SET, Tras ello, Ileve a cabo [OS pasos 1 a 5 anteriores,
La unidad puede encendersecada dia automaticamenteen el
mementoque se Ie especifiquegraciasal tempo rizador
incorporado.
Preparation
Asegurese de que el reloj este en la hors corrects,
1
Presione el boton TIMER en el control
remoto
para que aparezca en pantalla O y presione el
boton SET antes de que transcurran2 seaundos.
Se visualiza O y la hors parpadea.
m
Si no presionael boton a antes de que transcurran2
segundos, puede comenzar otra operation.
2
Establezca la hors de activation del temporizador
presionando el boton 14+ o ➤>1 y el boton SET.
Repita la misma operationpara establecerel
minuto de la hors de activation del temporizador.
3
Seleccione la duration del periodo de activation
del temporizadorutilizando el boton 1++ o FB4
y presione el boton SET.
Para visualizerla hors actual
Mantenga presionado el boton H hasta que se visualice el reloj.
Se visualizarala hors durante 4 segundos.
Para cambiaral modo de 24 horas
Mientras la unidad esta conectada,mantengapresionadoel
boton
■ hasta que el reloj se visualicey presione el boton
REPEAT antes de que transcurran 4 segundos, Repita el mismo
procedimientopara regresar al modo de 12 horas.
Si la pantalladel reloj parpadeamientrasla unidad
esta encendida.
Esto se debe a una interruptionen el suministro de alimentacion.
Debera resetearse la hors actual.
Si la alimentacionse interrumpedurantemas de 12 horas,
deberan resetearse todos Ios ajustes realizados en la memoria
tras haber adquirido la unidad.
9 ESPANOL
Puede establecersela duration del per~odo de activation del
temporizadorentre 5 y 240 minutes en incrementsde 5
minutes,
4
Preparela fuentede entrada.
Para escucharun CD, presione el boton -11e introduzca
un disco.
Para escucharla radio, presione el boton BAND y sintonice
una emisora.
Presioneel botonPOWERpara apagarla unidad
5
despuesde haberajustadoel volumen.
~ permaneceraen la pantalla despues de apagar (modo de
temporizador en standby).
Una vez alcanzado el tiempo de activation del temporizador, la
unidad se encendera y comenzara la reproductionde la fuente
de entrada seleccionada.
● No es posible configurar el nivel de volumen a 21 0 mas,
Page 23
Comprobaciondel tiempo especificado
Presioneel boton TIMER en el control remoto. Parpadeara
durante 2 segundos la hors de activationdel temporizador.No
se indicara, sin embargo, la durationdel per~odo de activation.
Para cancelarel modo de standbydei temporizador
temporalmente
Presione dos veces el boton TIMER en el control remoto para
apagar 0.
AJUSTEDEL TEMPORIZADORDE
APAGADO
Como usar la unidad mientrasel temporizadoresta
puesto
Puede utilizar la unidad con toda normalidad despues de haber
establecidoel temporizador.Antes de apagar la unidad, repita
el paso 4 para preparar la fuente de entrada y ajuste el volumen
y el tono.
. No comenzara la reproductioncon temporizadora menos que
este apagado el encendido.
● No puedeencendersey apagarseel equipoconectado
mediante el temporizadorincorporadode esta unidad. Use un
temporizadorexterno.
● Cuandose interrumpela alimentacion,la pantalla@
desaparecey parpadea el reloj. Resetee el reloj y configure
de nuevo el temporizador.
1
2
La unidad puede apagarse automaticamenteen el memento que
se Ie especifique.
Use el control remoto.
7 Presione el boton SLEEP.
2 Antes de aue transcurran4 seaundospresione
et boton +o >para especificarel tiempo
que ha de transcurrirpara que se apague el
aparato.
El tiempo cambia entre 5 y 240 minutes en incrementsde 5
Para comprobarel tiempo restantehasta el apagado
Presioneuna vez el boton SLEEP. Se visualizarael tiempo
restante durante 4 segundos.
Para cancelarel temporizadorde apagado
Presione dos veces el boton SLEEP para que desaparezca
“SLEEP” de la pantalla.
m
Si la unidad esta apagada durante la Iectura de una cinta, el
boton F se mantiene presionado.Presione el boton WA para
que se suelte el boton >.
ESPANOL10
Page 24
CONEXIONDE UN EQUIPO
CUIDADOY MANTENIMIENTO
OPCIONAL
CONEXIONA TOMAS AUX
Esta unidad puede introducirse ser?ales de sonido a traves de tomas
AUX.
Use un cable con fonoconectoresRCA para conectar equipo
(tocadiscos, reproductoresde discos laser con tomas de salida
analoga, platinas DAT, reproductores MD, VCRs, TV, etc. )
Conecte el conector rojo a la toma R y el conector blanco a la toma
L.
Consulte el Manual de Instrucciones del equipo conectado para
obtener mas detalles.
. No se suministrancables de conexion.Debe adquirirlospor
separado.
QConsulte con su centro Aiwa local si desea obtener equipo optional.
El mantenimiento y cuidado ocasional de la unidad y del software
resultan necesarios para optimizar el funcionamiento de su unidad.
Para Iimpiar la caja
Utilice un pafio suave y seco.
Su Ias superficiesestan muy sucias, utilice un pafro suave
Iigeramente humedecido en una solution de detergence suave. No
utilice disolventes fuertes tales como alcohol, bencina o diluyente
ya que estos podr[an estropear al acabado de la unidad,
Para Iimpiar Ios cabezalesy Ios puntos por donde
pasa la cinta
Despues de cada 10 horas de USO,Iimpie Ios cabezales y Ios puntos
por donde pasa la cinta con un casete Iimpiacabezas o con un palillo
con algodon humedecido con un Iiquido Iimpiador o con alcohol
desnaturalizado.(Estos juegos de Iimpieza pueden ser obtenidos
en comercios.)
Cuando Iimpie con un bastoncillo con algodon, Iimpie el cabezal de
grabaci6nkeproduccion,el cabezal de borrado cabrestante rodillos.
Cabezal de
[
borrado
Cabezal dealgodon
I
Bastoncillo con
estante
Rodillo de toma
Cuando conecteun tocadiscos
Utilice un tocadiscos Aiwa provisto de amplificador con ecualizador
incorporado.
AUDICION DE FUENTES DE SONIDO
EXTERNAS
AUX
Para reproducer equipo conectado a Ias tomas AUX, presione el boton
AUX e inicie la reproducci6n. “AUX” aparecera en la pantalla.
Despues de Iimpiar Ios cabezales y Ios puntos por donde pasa la
cinta con un casete IimpiacabezasIiquido o con un palillo con
algodon htimedo, espere a que Ias partes que ha Iimpiado se hayan
secado completamente antes de introducer una cinta.
Cuidadode Ios discos
oCuando un disco este sucio, Ifmpielo pasando un paflo de Iimpieza
desde el centro hacia afuera.
. Despues de reproducer un disco, guardelo en su caja. No deje Ios
discos en Iugares calientes o humedos.
Cuidadode Ias cintas
. Guarde Ias cintas en sus cajas despues de utilizarlas.
● No deje Iascintas cerca de imanes, motores, televisors o cualquier
otra fuente de magnetism.Ello reducira la calidad del sonido y
causara ruidos.
. No exponga cintas a la Iuz directs del sol, ni Ias deje en el interior
de un automovil estacionado baio la Iuz directs del sol.
i I ESPANOL
Page 25
ESPECIFICACIONES
GUiA PARA LA SOLUCIONDE
Unidad principal
Seccion
Gama de sintonizacion
Terminalsde antena
Secciondel sintonizadorde AM
Gama de sintonizacion
Antena
Secciondei amplificador
Potencia de salida
Seccionplatina de casete
Formato de pista
Respuesta de frecuencia
Sistema de grabacion
Sistema de borrado
Cabezales
Seccionreproductorde discos compactos
Laser
Convertidor D-A
Wow y flutter
Sistemade altavoces
Altavoces
Dimensioned(An x Al x Lg)
Peso
del sintonizador de FM
87,5 MHz a 108 MHz
75 ohmios (asimetricos)
530 kHz a 1710 kHz (increments
de 10 kHz)
531 kHz a 1602 kHz
(incrementsde 9 kHz)
Antena de cuadro
5 W + 5 W (1 kHz, D.A.T. 10 ‘/o, 4
ohmios)
3,5 W + 3,5 W (100 - 15kHz,
D.A.T. menos de 1%, 4 ohmios)
4 pistas, 2 canales estereo,
Cinta normal 50 Hz -12500 Hz
Polarization de CA
Borrado magnetico
Cabeza de grabacion/
reproduction x 1
Cabeza de borrado x 1
Laser de semiconductor(1 =
780nm)
1 bit dual
Inmensurable
100 mm tipo conico, 4 ohmios
150 x 236,2 x 210,5 mm
1,1 kg
PROBLEMAS
Si la unidad no funciona como se describe en este Manual de
Instrucciones, compruebe la gu[a siguiente:
GENERALIDADES
No hay sonido
. LEsta bien conectado el cable de alimentacion de CA?
. LHay alguna conexion mal hecha? (-+ pagina 3)
. LSe ha presionado un boton de funcion incorrect?
El sonido es inaudible.
● Puede haber un cortocircuito en Ios bornes de Ios altavoces.
+ Desconecte el cable de C.A. de la salida CA. y reconecte Ios cables
del altavoz correctamente, Conecte el cable de C.A. y encienda a
unidad otra vez.
Solo sale sonido de un altavoz
. LEsta el otro
SECCION DEL SINTONIZADOR
Hay un ruido de estatica constante en forma de onda.
. LEsta conectada correctamente la antena? (+ pagina 3).
La recepcion contiene interferenciaso el sonido esta
distorsionado
. ~Capta el sistema ruidos externos o distortion de multiples trayectorias?
+ Cambie la orientation de la antena,
+ Separe la unidad de otros aparatos electricos.
SECCION DE LA PLETINA
La cinta no se mueve.
. ~Esta la pletina en el modo de pausa? (+ pagina 8)
El sonido es asimetricoo no alcanza el volumen
suficiente
. ~Esta sucio el cabezal de reproduction? (+ pagina 11).Noes posible grabar.
. Si se ha roto la Iengtieta de la cinta, tape el hueco con cinta adhesiva.
altavoz desconectado?
Generalidades
Alimentacion
Consumo
Dimensionedde la unidad
principal (An x Al x Lg)
Peso de la unidad principal
Las especificaciones y el aspecto exterior estan sujetos a cambios sin
previo aviso.
120 V CA, 60 HZ
22 w
160 x 236,2 x 209,3 mm
2,6 kg
NOTA
Este equipo se ha comprobadoy determinadoque cumple con Ios Kmites
de dispositivo digital de clase
FCC. Estos Ifmites se han diseriado para ofrecer una protection
razonable frente a interferencias dafiinas en instalaciones residenciales.
Este equipo genera, utiliza y puede irradiar energia de radio frecuencia
y, si no se instala y utiliza de acuerdo con Ias instrucciones, puede
provocar interferencias dafiinas a comunicaciones de radio. Sin embargo,
no hay garant[a de que dichas interferencias no se daran en una
instalacion en particular.Si este equipo causa interferencias a la
recepcion de radio o television, 10que puede averiguarse encendiendo
y apagando el aparato, animamos al usuario a corregir la interferencia
con una o varias de estas medidas:
- Reoriente o recoloque la antena receptors.
Aumente la separation entre el equipo y el receptor.
- Conecte el equipo a una toma de circuito distinto del que esta
conectadoel receptor.
Pida ayuda al distribuidoro a
B, segtin la parte 15 de Ias Normas de la
un tecnico de Radio/TV.
PRECAUTION
Las modificaciones o ajustes realizados a este producto sin aprobacion
express y por escrito por parte del fabricate pueden anular el derecho
o autoridad del usuario para emplear este producto.
. LEsta sucio el cabezal de grabacion? (+ pagina 11).
Noes posible borrar la grabacion.o LEsta sucio el cabezal de borrado? (+ pagina 11).
. ~Esta utilizando una cinta de CrOz o de metal?
No se emite sonido de alta frecuencia.
. LEsta sucio el cabezal de grabacion/reproduction?(pagina + 11).
SECCION DEL REPRODUCTORDE DISCOS COMPACTOS
El reproductorde discos compactosno puede reproducer.
. LEsta bien insertado el disco? (+ pagina 5).
. ~Esta sucio el disco? (+ pagina 11).
. LAfecta la condensation a la lente?
+ Espere una hors aproximadamente y pruebe otra vez.
SECCION DEL RELOJ Y DEL TEMPORIZADOR
Noes posible configurar el temporizador.
. LParpadea el reloj en la pantalla?
+ Resetee el reloj. (+ pagina 9)
Para resetear la unidad
Si se produce alguna condicion extrafia en la pantalla o en las platinas,
reajuste la unidad de la forma siguiente:
1 Presione el boton POWER para desconectar la alimentacion.
2 Presione el boton POWER para volver a conectar la alimentaci6n
mientras pulsa el boton
almacenado en la memoria despues de haber adquirido la unidad.
Si no puede desconectarse la alimentacion en el paso 1 debido a algun
mal funcionamiento,resetee la unidad desconectando el cable de
alimentacion de CA y repita el paso 2.
■ . Se borrara todo 10que haya sido
ESPANOL
12
Page 26
AVERTISSEMENT
AFIN DE REDUIRE TOUT RISQUE D’INCENDIEOUDE
DECHARGEELECTRIQUE,vEILLE.Z A CE QUE cET
APPAREILSOITAL’ABRI DE LA PLUIE ETDE L’HUMIDITE.
●
RISK OF ELECTRIC SHOCK
A
DO NOT OPEN
~A
●
7 Condensation – De la condensation peut se former sur la Ientille
de la t&e de lecture des disques compacts Iorsque:
– on deplace I’appareil d’un endroit froid a un endroit chaud ;
– Ie chauffage vient d’6tre allume ;
– I’appareil est clans une piece tres humide ;
– I’appareil est clans une piece refroidie par climatisation ;
S’il y ade Iacondensation a I’interieurde I’appareil, il risque de ne
pas bien fonctionner. Dans ce cas, laissez I’appareil pendant
quelques heures puis essayez de I’utiliser a nouveau.
8 Installation au mur ou au plafond – Cet appareil ne dc)itpas 6tre
monte sur un mur ou sur un plafond, a moins que Ies instructions
d’utilisation ne Ie precisent.
“CAUTION:TO REDUCE THE RISK OF
ELECTRIC SHOCK,
DO NOT REMOVE COVER (OR BACK).
NO USER-SERVICEABLEPARTS INSIDE.
REFER SERVICING TO QUALIFIED
SERVICE PERSONNEL.”
Explicationdes symboles:
L’eclair se terminant par une fleche clans un
triangle equilateral previent I’utilisateur de la
presence d’une “tension dangereuse” non isolee
a I’interieur du coffret de I’appareil, qui peut &re
A
●
A
d’un niveau suffisant pour constituerun risquede
decharge electrique.
Le point d’exclamation clans untriangle equilateral
previent I’utilisateur qu’il y a des instructions
importances concernantIe fonctionnementet
I’entretien (la maintenance) clans la documentation jointe a I’appareil.
PRECAUTIONS
Lisez bien attentivement et completement ces instructions d’utilisation
avant de vous servir de votre appareil. Mettez ces instructions de cde
pour pouvoir Ies consulter clans I’avenir. Toutes Ies precautions et
tous Ies avertissementsdonnes clans ce manuel et sur I’appareil
doivent ~tre strictement suivis de m~me que Iessuggestions relatives
a la securite indiquees ci-dessous.
Alimentationelectriaue
1
Sources d’alimentation – Connectez cet appareil uniquement
aux sources d’alimentationspecifiersclans ces instructions
d’utilisation et indiquees sur I’appareil.
2
Polarisation – Par mesure de securite, certains appareils sent
munis de fiches polarisees d’alimentation secteur qui ne peuvent
&re insereesque d’uneseulefa~onclans uneprisedecourant.S’il
est difficile, voire impossible, d’inserer la fiche d’alimentation
secteur clans une prise de courant, retournez la prise et essayez
de nouveau. Si vous avez toujours des difficulties a I’inserer ldans
la prise de courant, faites appel a un technician qualifie pour
reparerou remplacer laprise. N’essayez pasd’outrepasser l’aspect
de securite de la fiche polarisee en forqant pour I’inserer clans une
prise de courant,
Cordon secteur
3
Pour debrancher Ie cordon d’alimentation, tirez sur la fiche’. Ne
tirez pas sur Ie cordon.
- Ne touchez jamais la fiche d’alimentationavec des mains
mouillees car cela pourrait presenter des risques d’incendie ou
de decharge electrique.
- Le cordon d’alimentafion doit &re achemine de maniere a eviter
qu’il soit plie, pince ou foule au pied. Faites particulierernent
attention au cordon reliant I’appareil a la prise de courant.
- Evitez de surchargeIes fiches d’alimentationsecteur el le.S
rallonges au-dela de Ieur capacite nominale, ce qui pourrait
presenter un risque d’incendie ou de decharge blectrique.
4
Rallonge – Afin d’emp~cher tout risque de decharge electrique,
n’utilisez pas de fiche polarisee d’alimentation secteur avec une
rallonge ou une prise de courant quelconque a moins que Iafiche
polarisee puisse &re completement inseree de maniere a ce que
Ies broches de la fiche ne soient pas exposees.
5
Quand I’appareil n’est pas utilise – Debranchez Ie cordon
d’alimentation secteur si I’appareil ne doit pas &re utilise pendant
plusieurs mois ou pendant une periode plus Iongue. Lorsque Ie
cordon est branche, un courant de faible intensite continue de
s’ecouler clans I’appareil, m6me si ce dernier est eteint.
installation
1
Eau et humidite – N’utilisez pas cet appareil a proximite d’une
source d’eau comme une baignoire, un Iavabo, une piscine ou
d’autres endroits sembiables.
2
Chaleur– N’utilisez pas cet appareil a proximite d’une source de
chaleur, comme Ies overturesde chauffage, Ies pobles ou
d’autres appareils emettant de la chaleur. II ne faut pas non plus
Ie placerdans un endroit oti Iatemperature est inferieure a5°C ou
superieure a 35”C.
3
Surface de montage – Posez I’appareil sur une surface plane et
Iisse.
4
Ventilation-Veillezace qu’il y ait suffisamment d’espace autour
de I’appareil afin qu’il y ait une bonne ventilation de la chaleur.
Laissez un espace de 10 cm a I’arriere et au-dessus de I’appareil
et un espace de 5 cm de chaque cde.
- Ne placez pas I’appareil sur un lit, un tapis ou une surface
semblable qui pourrait bloquer Ies orifices de ventilation.
– N’installez pas I’appareil clans une bibliotheque,clans une
armoire ou sur une etagere fermee oh la ventilation pourrait i?4re
insuffisante.
Penetration d’objets et de Iiquide – Veillez a ce qu’aucun objet
5
ou Iiquide ne penetre clans I’appareil par Ies orifices de ventilation.
6
Chariots et supports – Deplacez I’appareil
avec precaution Iorsqu’il est pose sur un
chariot ou un support.
Des arr~ts brusques, I’utilisation d’une trop
grande force et des surfacesinegales
pourraient renverser Ie chariot ou I’appareil
ou Ie faire tomber.
*L
m
AA*
Antenneexterieure
1
Lignes de transport d’energie – Lorsque vous installez une
antenne exterieure, veillez acequ’elle soit eloigneedetouteIigne
de transport d’energie.
2
Mise a la terre de I’antenne exterieure– Veillez a ce que Ie
systeme de I’antenne soit bien mis a la terre afin de fournir une
protection en cas de surtensions soudaines ou en cas d’une
accumulation d’electricity statique. L’article 810 du Code Electrique
National (NEC) ANSUNFPA 70, fournit des informationsw la
mise a la terre correcte du m~t, de la structure de support et CIUfil
d’amenee allant a I’unite de decharge de I’antenne, ainsi que sur
la taille de I’unite de mise a la terre, la connexion aux bornes de
mise a Iaterre et Ies caracteristiques des bornes de mise ~ la terre.
Misea laterrede I’sntenne
sekm Ie Code Electricrue Nstional
A
)
: FRAN~AIS
Page 27
A%wwaa44wi&&tH2e#aa
Nous vous felicitous d’avoir achete une chalne stereo AlWA.
Afin d’optimiser Ie bon fonctionnementde cette chalne, prenez Ie
temps de bien [ire ces instructions d’utilisation et devousfamiliariser
avec Ies methodes d’utilisation.
Inscrivez clans Ies cases ci-dessous Ie numero du modele et Ie
numero de serie de votre chaine (qui sent indiques sur Ie dos de
celle-ci). Vous Ies aurez ainsi sous la main si vous avez besoin de
contacter votre distributeur AIWA en cas de difficult.
/ Modele NQ
I Ng de Serie (N” de lot)I
] Lcx-150u/Lcx-151uI
Pour installerI’antenneAM sur une surface
Fixez la griffe clans la rainure.
-
GENERALITIES
SOINS ET ENTRETIEN...............................s.....................ll
Pour obtenir une meilleurereceptionFM, il est recommande
d’utiliser une antenne exterieure.
Connectez I’antenne exterieure aux bornes FM 75 Q.
FRANQAIS
2
Page 28
CONNEXIONS
Avant de connecterIe cordon secteur
La tension nominale indiquee sur Ie panneau arriere de votre
appareil est de 120V C.A. Verifiez si cette tension nominale
correspond bien a la tension locale.
IMPORTANT
● Connectez tout d’abord Ies haut-parleurs, Ies antennes et tout Ie
materiel facultatif. Finissez par connecter Ie cordon secteur.
o II n’y a pas de differencesentre Ies haut-parleursavant qui
peuvent ~tre tous deux connectes aussi bien comme haut-parleur
gauche que comme haut-parleur droit.
7 Connectez Ies cordons des haut-parleurs a I’unite
principal.
II
faut connecter Ies cordons a rayures blanches aux bornes ~
et Ies autres cordons aux bornes O.
2
Connectez Ies antennes fournies.
Connectez l’antenne FM aux bornes ‘FM 75 Q et I’antenne AM
aux bornes ‘AM LOOP’.
Antenne FM
Antenne AM
3
BranchezIe cordon secteur sur une prise de
courant.
Pour placer Ies antennes
Antenne
Etendez cette antenne et changez la direction et I’angle afin
d’obtenir la meilleure reception possible.
Antenne AM:
Orientez-la afin d’obtenir la meilleure reception possible.
FM:
~
N’effectuezpas de court-circuit
avec Ies cordons des haut-parleurs
0 et
e puisqueIe son serait
inaudible.Si cela se produisait,
debranchez Ie cordon secteur de sa
priseet
correctement.Branchez Ie cordon
d’alimentationet
I’appareil.
rebranchez-le
rallumez
1Hau
~
. Ne laissez pas pres des haut-parleurs des objets produisant un
champ magnetique.
. Ne mettez pas I’antenne FM a proximit~ d’objets metalliques ni
de tringles a rideau.
. Ne mettez pas I’antenne AM a proximit~ d’aucun autre materiel
optionnel, de la cha~ne stereo elle-m6me, du cordon secteur ou
des cordons des haut-parleurs,ce qui pourrait capter des
parasites.
o Ne deroulez pas Ie fil de I’antenne AM.
Pour connectertout autre appareiloptionnel+
consultezla page 11.
ntenne
AM
I
~ FRAN~AIS
haut-parleurs
Cordon secteur
3
——.
Page 29
AVANT LWTILISATION
REGLAGEDU SON
POWER
PHONES
Pour allumer I’appareil
Appuyez sur la touche POWER.
Apres I’utilisation:
Appuyezsur la touchePOWERpour eteindreI’appareil.
L’affichage passe a I’indicationde I’heure,
Utilisationdu casque d’ecoute
ConnectezIe casque d’ecoute a la prise PHONES au moyen
d’une mini-fiche stereo (03,5 mm).
Aucun son ne sort des haut-parleursIorsque Ie casque d’ecoute
est branche.
3-MODE
EQUALIZER
GEQ
VOLUME
~(~~‘ I
..—___.__—.
1
..__
—
-.
II
RkGLAGEDU VOLUME
Appuyezsur la commandeVOLUME.
Appuyez sur Ie cbte Ie plus haut pour augmenterIe volume e[
sur Ie plus bas pour Ie baisser.
Le niveau du volumeest affiche sur I’affichagependant4.
secondes, Vous pouvez Ie regler entre O (minimum) et 30, puis
sur MAX (maximum).
Le volumereste memoriseapres que I’appareilest eteint,
Cependant,si I’appareil est eteint quand Ie volume est regle 21
plus de 20, celui-ci est regle automatiquementa 20 Iorsque
I’appareil Gst rallume,
TELECOMMANDE
Insertiondes piles clans la telecommande.
Retirez Ie couvercle au dos de la telecommandeet inserez deux
piles R6 (de taille AA).
R6(AA)
Quand changerIes piles
II est possiblede faire fonctionnerla telecommandea une
distance maximum d’environ 5 metres du capteur situe sur I’unite
principal.Lorsquecette distancecommencea diminuer,
remplacez Ies piles par des neuves.
. Si la telecommandene va pas 6tre utilisee pendant un certain
temps, enlevez Ies piles a I’interieur pour emp6cher toute fuite
d’electrolyte.
● II se peut que la telecommandene fonctionne pas correctement
si:
La iigne de visee entre la telecommandeet Ie capteur situe
en haut a gauche du panneau frontal (voir I’illustrationclans
Ie paragraphintitule “AVANT L’UTILISATION”)est exposee
a une Iumiere intense comme Ies rayons du soleil
- D’autres telecommandessent utilisees a proximite (television
etc.).
EGALISEURGRAPHICWE
Appuyezsur I’une des touches3- MODE EQIJALIZIER.
ROCK/POP/JAZZ
ROCK: Son puissant renforgantIes sons aigus et Ies sons
graves.
POP:Plus de presenceaux frequenciesvocaleset aux
frequencies a mi-garnme.
JAZZ:Son enrichipar des gravesintenseset des aigus
subtiles.
Pour annuler un mode selectionne
Appuyez de nouveau sur la touche selectionnee.
Si vous utilisez la telecommande
Appuyez sur la touche GEQ jusqu’a ce que Ie mode ci’egalisatiorl
desire s’affiche.
Le mode d’egalisationchange cycliquementa ROCK, POP, JAZZ
ou a aucune egalisation.
REGLAGE DU SON PENDANT
L’ENREGISTREMENT
Vous pouvez modifier a votre gre Ie volume et Ie son sortant des
haut-parleursou du casque d’ecoute saris affecter Ie niveau de
I’enregistrement.
FiifAN~AIS
4
Page 30
LECTURED’UN DISQUE
COMPACT
‘“”~
Affichageen mode d’arlret.
Temps total de lecture
Flepertoire des pistes
(seules Ies 16 premieres
pistes sent affichbes)
0–9,+10
REPEAT
l!!’
❑
II
!clllfi
RANDOM
CHARGEMENTDU DISQUE
Appuyezsur la touchede positonOPEN afin
cf’ouvrir Ie compartmentdu disque.Placezun
disqr.ie avec la face portant I’etiquette tournee vers
le haut puis refermez Ie compartment.
Nombre total de pistes
Pour commencerla lecture lorsque I’appareilest eteilnt
(Fonctionde lecture directe).
Appuyez sur la touche Fill. Lappareils’allume et la lecture du
disque insere commence.
Si vous avez selectionneune fonction autre que celle de lecture
de disques compacts I’appareil etant ailume, en appuyimtune
fois sur la touche Pllla selection de la fonction de compacts
disques est faite et la lecture commencera.
Selectiond’une piste avec la telecommande
Appuyez sur Ies touches numeriqueset sur la touche +1 O pour
s61ectionner une piste.
Exemple:
Pour selectionnerla 25eme piste, appuyez sur Ies touches +’1O,
+10 et 5.
Pour selectionnerla 1Oeme piste, appuyez sur Ies touches +1 O
et O.
La lecture de la piste selectionneecommenceet se poursuit
jusqu’a la fin du disque.
● N’utilisez pas de CDs de fagon irregulir%e (comme par exemple
ceux en Iosanges ou oclagonaux)pouvant occasionnerainsi
un mauvais fonctionnement.
● Ne placez pas plus d’un disque compactA la fois clans Ie
compartment.
● N’essayez pas d’ouvrir k?compartmentdu disque pendant la
lecture.
LECTURE D’UN DISQUE
Inserez un disque.
Appuyezsur la touche}11.
La lecture de la premiere piste commence.
Temps de lecture ecoule
Numero de la piste en tours de lecture
Pour arreter la lecture, appuyez sur la touche W.
Pour interrompretemporairementla lecture, appuyez sur la
touche
➤11. Pour continuer la lecture, appuyez de nouveau sur
cette touche.
Pour chercherun pointparticulieren toursde lecture,
maintenezappuyeela touchel<+ou
moment voulu.
Pour passerau debut d’unepiste en toursde lecture,
appuyez plusieurs fois sur la touche 1<< ou
➤H et l~chez-laau
➤F1.
5 FRAN~AIS
Page 31
LECTURE ALEATOIRE
Toutes Ies pistes sur Ie disque peuvent~tre Iues de fagon
aleatoire.
Appuyezsur la touche RANDOMde la telecommande
en mode arret afin que s’affiche“RAN”.
Appuyez sur la touche }11 pour que la lecture commence.
Pour annuler la lecture aleatoire,Appuyez de nouveau sur la
touche RANDOM en mode d’arr@t.
mzmm
o M6me en appuyantsur la touche 1<<, il ne vous est pas
possiblede sauterune piste que vous avez ecoutee
precedemment.L’appareil retourne uniquementau debut de
la piste en tours de lecture.
“ Quandvous selectionnezune pisteavec Ies touches
numericluessur la telecommandependantle reproduction
aleatoire, la reproductionde la piste selectionneecommence
et la lecture aleatoire s’annule.
2
Appuyez sur Ies touches nurm!riques et sur la
touche +1O pour programmeruine piste.
Exemple :
Pour selectionnerla 12eme piste, appuyez sur Ies touches
+10 et 2.
Pour selectionnerla 20eme piste, appuyez deux fois sur la
touche +1O et une fois !sur la touche O.
Numero du programme
I
LECTIJRE REPETEE
La lecture repetee d’une piste, de toutes Ies pistes ou des pistes
programrneesest possible.
Appuyei!sur la toucheREPEATafin que “REPEAT1”
ou “’REPEATALL” s’affiche.
Pour rep6ter uniquementla piste actuelle, affichez “REPEAT 1”
Pour rep&er toutes Ies pistes, faites apparaltre“REPEAT ALL”
sur I’affichage.
Pour annuler la lecture repetee,appuyezsur la touche
REPEAT afin d’eteindre“REPEAT”.
Pour repeter uniquementIes pistes desirees,programmez
Ies pistes puis appuyez sur la touche REPEAT afin d’afficher
“REPEATALL”.
LECT(JRE PROGRAMMED
II est possible de programmerjusqu’a 30 pistes sur Ie disque
insere.
Nombre total de
pistes selectionnees
Repetez I’operation 2 pour programmer d’autres
3
pistes.
4
Appuyez sur la touche Fllpour corrmencerla
lecture.
Pour verifier Ie programme
Chaque fois que vous appuyez sur la touche
principalclans Ie mode d’arr6t, un nulmero de piste et un
numero de programmmesent affiches.
Pour effacer Ie programme
Appuyez sur la touche
Pour ajouter des pistes au programme
Avant la lecture, repetez I’operation 2. La piste sera programmed
apres la derniere piste.
Pour changerIes pistesprogrammers
Effacez Ie p~ogramrne et repetez toutes Ies operations.
● Pendant la lecture programmed,vous ne pouvez pas effectuer
Ies operations suivantes.
– Lecture aleatoire
– Repetition d’une piste (REPEAT 1)
o Si Ie temps programme est superieur a 99:59, ou bien Ie numero
31 ou anterieur de la piste du disque est programme, l’affichage
indiquera --:-- comme temps total de lecture.
❑ clans Ie mode d’arr~t.
➤Pl sur l’unite
Utilisez la telecommande.
1 Appuyez sur la touche SET en mode arret.
“M” clignote sur I’affichage
FRAN~AIS
6
Page 32
ACCORDMANUEL
‘——————7
PREREGLAGEDES STATIONS
TUNER
MODE
1
Appuyez plusieurs fois sur la touche BAND afin
cle selectionnerla bande desiree.
FMdAM
r
2
Appuyezsur la touche
1
—
1++ ou WIafin de
selectionnerune station.
Chaque fois que vous appuyez
change.
Lorsqu’une station est re~ue, “TUNE” s’affiche pour un instant,
Pendant une reception FM stereo, “STEREO” est affiche.
Pour ecouter une station captee alors ctue l’aDDareil
est eteint (Fonctionde LectureDirectei“ “
Appuyez sur Iatouche BAND. L’appareil s’allume et la station captee
peut s’ecouter.
Pour rechercherune station rapidement(Recherche
automatique)
Maintenez la touche 144 ou
syntoniseur commence a rechercher une station. Une fois la station
capt6e, la recherche s’arrete.
Pour arr&er manuellement la recherche automatique, appuyez sur
la tol.Iche 1<< ou
. II est possible que la recherche automatique “Auto Search” ne
s’arr&e pas aux stations emettant des signaux tres faibles.
Lor:;qu’uneemissionFM stereo contientdu bruit
Appuyez sur la touche TUNER MODE de la telecommande.
“MONO” est a[ors affiche.
Le bruit est reduit mais la reception est monophonique.
Pour revenir a une reception stereo, appuyez de nouveau sur Ies
touches.
Pour changerI’intervalled’accordAM
Le r<:glage par defaut de I’intervalle d’accord AM est 10 kHz/pas. Si
vous utilisez cet appareil clans un endroit oh Ie systeme deallocation
des frequencies est de 9 kHz/pas, vous devez changer I’intervalle
d’accord.
Appuyez sur la touche POWER tout en appuyant sur la touche BAND.
Pour retablir I’intervalle, repetez ce precede.
➤>l.
sur la touche, la frequence
➤>1 enfoncee jusqu’a ce que Ie
L’appareil peut memoriser au maximum 32 stations prereglees,
Lorsqu’une station est mbmorisee, un numero de prereglage est
attribue a cette station. Utilisez ce numero de prereglage pour capter
directement cette station.
7 Appuyez sur la touche BAND pour selectionner
une bande, puis appuyez sur la touche 1<<1
OLI
➤*1 pour selectionnerune station.
2 Appuyez sur la touche SET pour memorisew la
station.
Un numero de prereglage est attribu6 a la station, en commen~ant
par 1 et en progressant par ordre croissant pour chaque bande,
ElFrequence
II
Numero preregle
3 Repetez Ies operations1 et 2.
~
Chaque bande peut memoriser au maximum 16 stations prereglees,
Pour ecouter des stationsprereglees
Utilisez la telecommande pour selectionner directement Ie nulnercl
preregle.
1
Appuyez sur la touche BAND pour selectionner une bande.
2
Appuyez sur Ies touches numeriques pour selectionner UIII
numero preregle.
Exemples :
Pour selectionner Ie numero preregle15, appuyez sur Ies touches,
+10, et 5.
Pour selectionner Ie numero preregle 10, appuyez sur Ies touches
+lOet O.
Si vous effectuezIes operationssur I’unite principal,
appuyez a plusieurs reprises sur la touche
Chaquefois que vous appuyezsur cette touche,vous
selectionnez Ie numero suivant.
Pour effacer une station prereg16e:
Selectionnez Ie numero preregle de la station a effacer. Appl~yez
ensuite sur la touche SET et appuyez sur la touche
secondes qui suivent pendant que la frequence clignote,
Les numeros preregles de toutes Ies autres stations clans la bande
designees par des numeros plus eleves sent diminues
■.
➤11 clans Ies 4
d’une unite.
EZZZXZ3
Lorsque I’intervalle d’accord AM est change, toutes Ies stations
prert?glees(voir Ie paragraphintitule“PREREGLAGEDES
STA1-IONS”) sent effacees. Les stations prereglees doivent 6tre
reglees de nouveau.
7 FRAN~AIS
Pour scannerIes stationspreregllees
Appuyez sur la touche P-SCAN de la telecommandejusqu’a ce
qu’apparaisse “P.SCAN” sur I’affichage. I.es stations prereglees sent
re~ues clans I’ordre pendant 5 secondes. Le numero preregle clignote
pendant la reception.
Pour arr~ter de scanner, appuyez sur la touche VOLUME.
Page 33
LECTURED’UNECASSETTE
-1
L[l
Utilisez uniquement des cassettes type I (normal).
ENREGISTREMENT
Cette section explique comment effectuer un enregistrementen
utilisant Ie syntoniseur,Ie Iecteur de disques compacts ou un
appareil externe
12Appuyezsur la toucheWApour ouvrirIe
cornpartirnentde la cassettepuis inserezla
cassette avec Ie tote ouvert vers Ie has. Poussez
sur Ie compartmentde la cassettepour Ie
referlmer.
●
@@l
~ll.o00,,)
s
A~wwezsur la touche P.
V~;s ;vezselectionnela fonctionTAPE et la lecture
commencera.La lecture se fera uniquement sur Ie ctite tourne
vers l’exterieur,
Pour arr6ter la lecture, appuyer sur la touche WA.
Pour interrompretemporairementla lecture, appuyez sur la
touche 11. Pour reprendre la lecture, appuyez de nouveau sur cette
touche.
Pour faire avancer la bande rapidement ou pour la rebobiner,
appuyez sur la touche <+ou >-clans Ie mode d’arr~t. Puis
appuyez sur la touche WA pour arreter la cassette.
Pour commencerla lecture Iorsque I’appareilest eteint
(Foncticm de lecture directe)
Appuyez sur Iatouche -. L’appareil se met en marche et la lecture
de la cassette inseree commence.
■ /&
1~
Preparation
. Si;uez la cassette au point ou commence I’enregistrement.
● Remarquez que I’enregistrementne s’effectue que d’un cdte de
la cassette.
. N’utilisez que des cassettes du type I (normal).
Inserezla cassettesur Iaquellevous voulez
1
enregistrer clans la platine.
Inserez la cassette avec Ie c6te sur Iequel vous voulez
enregistrer en premier tourne vers I’exterieur et Ie c&e ouverf
tourne vers Ie has.
2
Ayez la source pr&e pour I’erm?gistrement.
Pour enregistrer un disque compact, appuyez sur la touche
-11et inserez Ie disque.
Pour enregistrer une emission de radio, appuyez sur Iatouche
BAND et reglez Ie syntoniseur sur une station.
Pour enregistrer a partir de la source connectee, appuyez
sur la touche AUX et appr~tez-vous a cornmencer la lecture.
3
Appuyezsur la touche● pour commencer
I’enregistrement.
Vous appuyez sur la touche > simultanement.
Lorsquela fonctionselectionneeest CD, la lectureel
I’enregistrementcommencent simultan6ment.
Lorsque la fonction selectionnee est AU)(, faites commencer la
lecture manuellement.
Pour arreter I’enregistrement,appuyez sur la touche WA.
Pour interrompreI’enregistrementtemporairement,appuyez
sur la touche Il.
Lorsque la cassette est arrivee jusqu’au bout, la cassette
s’arr&e et la touche
disque compact, la lecture du disque s’arr&e automatiquement.
Changez de cassette et appuyez sur la touche
disque compact reprendra automatiquement.
● se rel~che. Pendant I’enregistrementd’un
●, la lecture du
Au sujet des cassettes
. La banlde magnetique des cassettes de 120 minutes ou plus
est extr~mement fine et elle se deforme ou s’ablme facilement. II
n’est pas recommande d’utiliser ce type de cassettes.
. Rattralpez Ie jeu clans la bande avec un crayon ou un outil
similaire avant d’utiliser la cassette. Une bande magnetique Iache
risque de se casser ou se coincer clans Ie mecanisme.
Pour enregistrerIes pistes selectionneesdu disque
compact.
Veuillez verifier Ies Iois sur Ie copyright relatives a I’enregistremeni
de disques, de programmed de radio ou de cassettes clans Ie
pays clans Iequel I’appareil est utilise.
FRA/V~AIS
8
Page 34
RfGLAGEDEL’HORLOGE
REGLAGEDE LA MINUTERIE
I
1
La Ipremiere fois que Ie cordon secteur est branche,I’heure
clignote sur I’affichage.
Reglez I’heure comme suit pendant que I’appareil est eteint.
1
Appuyez sur la touche SET.
L’heure clignote.
2
Appuyez sur la touche l<<ou ➤>1 pour regler
I’heure.
3
Appuyezsur la toucheSET pour enregistrer
I“heure.
L’heure s’arr~te de clignoter et Ies minutes commencenta
clignoter.
4
Appuyez
sur la touche l<+ ou ➤FI pour regler
Ies minutes.
5
Appuyez sur la touche SET pour enregistrerIes
nninutes et terminer Ie reglage.
Les minutes s’arr~tent de clignoter sur I’affichage et I’horloge
demarre a 00 secondes.
Pour corrigerI’heure actuelle
Appuyez sur la touche POWER pour eteindre I’appareilpuis
appuyez sur la touche SET. Executez Ies operations anterieures
dela5.
L’appareil peut 6tre allume chaque jour a une heure specifiee
grace a la minuterie incorporee.
Preparation
Assurez-vousque I’horloge est reglee a la bonne heure.
1
Appuyez sur la toucheTIMEIR de la telecommande
afin que s’affiche @ puis appuyez sur la touche
SET avant de Iaisser ~asser 2 secondes.
O
est alors affiche et I’heure clignote.
~
Si vous n’appuyez pas sur la touche SET clans Ies 2 secondes
qui suivent, il est possible qu’une autre operation commence.
2
Reglez I’heure d’allumagepar la minuterieen
appuyantla toucheK+wFFI,puis sur la
touche SET. Repetez cette operation afin de regler
Ies minutesde I’heured’allumagepar la
minuterie.
3
Selectionnezla duree de la periode deactivation
de I’appareil par la minuterie avec la touche 11441
ou *Iet appuyez sur la tcmche SET.
Pow afficherI’heure
Maintenezappuyeela touche
s’aff~che. !-’heure s’affichera pendant 4 secondes.
Poarr passer au format de 24 heures
Pendant que I’appareil est allume, maintenez appuyee la touche
■ jusqu’ace que I’horloge
■ ju.squ’a ce que I’heure s’affiche puis appuyez sur la touche
REPEAT avant de Iaisser passer 4 secondes. Repetez la m6me
opbration pour retourner au format de 12 heures.
Si I’affichagede I’horloge
est bteint
Cela est dO a une coupure de courant. II faut de nouveau regler
l’heLlr(3.
Si la coupure de courant dure plus de 12 heures environ, tous
Ies prereglagesmemorises depuis I’achat de I’appareil doivent
@tre refaits.
clignote alors que I’appareil
9 FRAN~AIS
Vous pouvezregler la duree de la, perioded’activatiolnde
I’appareil par la minuterie entre 5 et 240 minutes, par pas de 5
minutes.
Preparez la source.
4
Pour ecouter un disque compact, appuyez sur la touche
-11et placez Ie disque.
Pour ecouter la radio, appuyez sur la touche BAND et calptez
la station.
Appuyez sur la touche POWER afin d’6teinldre!
5
I’appareil apres avoir regle Ie volume.
@
reste affiche apres I’extinction de I’appareil (minuterie clans
Ie mode d’attente).
Quand I’heure d’allumagepar la minuterieest atteinte,
I’appareil s’allume et commence21emettre Ies sons venant
de la source selectionnee.
“ II n’est pas possible de regler Ie niveau du volume a 21 ou
plus.
Page 35
Pour vtirifier I’heure speclflee
Appuyez surlatoucheTIMER sur Iatelecommande.L’heure
d’allumagepar la minuterie clignote pendant 2 secondes.
Cependant, laduree delaperiodedeactivation par laminuterie
ne sera pas affichee,
Pour arlnuler temporairementIe mode d’attentede la
minutwie
Appuyez deux fois sur la touche TIMER sur la telecommande
pour eteindre 0.
Pour utiliser l’appareilalors
Vous pouvez utiliser I’appareil normalementapres avoir regle la
minuterie.
Avant d’6teindre I’appareil, repetez I’operation 4 afin de preparer
la source, puis regler Ie volume.
● La lecture commandeepar la minuterie en commenceraque
si I’appareil est eteint.
● II impossibled’allumeret d’eteindreIes appareils connectes
au moyen de la minuterie incorporee clans cet appareil. Utilisez
une minuterie externe.
● Si Ie courant est interrompu,I’affichage @ disparalt et I’horloge
clignote, Regler de nouveau I’horloge et et la minuterie.
,...
que la minuterie est reglee
REGLAGEDE LA MINLITERIEDE
SOMMEIL
1
2
L’appareilpeut ~tre eteint automatiquernenta un moment
specifie.
Utilisez la telecommande
1 Appuyez sur la touche SLEEP.
*
2 Avant de Iaisser ~asser 4 secon~appuyez sur
la touche -ou FE afin de specifier Ie temps
pendant Iequel I’appareil doit nester eteint.
Chaque fois que vous appuyez sur latolJche, Ie temps change
entre 5 et 240 minutes, par pas de 5 minutes.
Temps specifie
Pour verifier Ie temps qui reste avant
eteint
Appuyez une fois sur la touche SLEEP. Le temps restant s’affiche
pendant 4 secondes.
Pour annuler la minuteriede sommeil
Appuyez deux fois sur la touche SLEEP. “SLEEP” disparalt alors
de I’affichage.
Si I’appareil est eteint pendant la lecture cle cassette, la touche
> reste enfoncee. Appuyez sur la touche WA pour rel~cher’ la
touche >.
que I’appareil soit
FRANQAIS
10
Page 36
CIDNNEXIOND’UN APPAREIL
SOINSET ENTRETIEN
OPTIONNEL
C(3NNEXION A DES PRISES AUX
I
Cet ~appareil peut emettre des signaux sonores a travers Ies prises
AUX.
Utilisez un c~ble a fiche phono RCA pour connecter un appareil
(tourne-disque,Iecteur de disques laser avec prises de sortie
analogiques,platines de bandes audionumeriques,Iecteurs MD,
magnetoscopes, T.V., etc.).
Connectez la fiche rouge a la prise droite et la fiche blanche a la
prise gauche.
Consultez [es instructions d’utilisation de I’appareil connecte pour
avoir plus de details.
o Les cordons de raccordement ne sent pas fournis. Procurez-vous
Ies cordons de raccordement adequats.
. Renseignez-vousaupres de votre distributeur Aiwa local pour
connaltre Ies appareils optionnels disponibles.
Vous devez effectuer un entretien periodique de votre chalne Iet dLl
Iogiciel afin d’optimiser Ieur bon fonctionnernent.
Pour nettoyerIe coffret
Utilisez un chiffon doux et sec.
Si Ies surfaces sent extr~mement sales, utilisez un chiffon doux
Iegerement humecte d’une solution de detergent doux. N’utilisez
pas de solvants forts tels que de I’alcool, de la benzine ou du diluanit
car ils pourraient endommager la finition de I’appareil.
Pour nettoyerIes tetes de lecture et Ies voies de
defilementla bande
Toutes Ies dix heures d’utilisation, nettoyez Ies t~tes et Ies voies de
defilement de la bande en utilisant une cassette de nettoyage cw un
coton-tige imbibe de produit de nettoyage ou d’alcool denature. (’VOUS
pouvez vous procurer des kits de nettoyage clans Ie commerce).
Si vous utilisez un coton-tige pour Ie nettoyage, essuyez la t&e
d’enregistrement/delecture, la t&e d’effacement , Ies cabestans et
Ies galets presseurs.
1
Galet presseur
Conlnexion d’un tourne-disque
Utilisez un tourne-disqueAiwa muni d’un amplificateuregaliseur
incorpore.
ECOUTE DE SOURCES EXTERNES
Pour la lecture d’un appareil optionnel connecte aux prises AUX,
appuyez sur la touche AUX et faites commencer la lecture. “AUX”
apparaitra sur I’affichage.
Apres avoir nettoye Ies tales et Ies voies de defilement de la bande
a I’aide dune cassette de nettoyage CIUd’un coton-tige humide,
attendez que Ies parties nettoyees soient completementseches
avant d’inserer une cassette.
Soin des disques
● Lorsqu’un disque est sale, essuyez-le avec un chiffon de nettoyage,
en partant du centre et en allant vers I’exterieur.
oApres avoir ecoute un disque, rangez-le clans sa bolte. Ne laissez
Dimensions de I’unite
principally (Lx H x P)
Poids de I’unite principal
Les specifications et I’aspect exterieur de cet appareil peuvent Gtre
modifies saris preavis.
NOTICE
Cet appareil a ete teste et juge conforme aux normes des appareils
numeriques de Classe B, conformement au chapitre
FCC. Ces normes sent conques pour assurer une protection raisonnable
contre Ies interferences radioelectriques Iorsque I’appareil est utilise clans
un environnement residential. Cet appareil genere, utilise et peut emettre
des radiofrequences et, s’il n’est pas installe et utilise conformement au
mode d’emploi,il peut provoquerdes interferencesclans Ies
communications radio. II n’est cependant pas possible de garantir que
des interferences ne se produiront pas clans une installation privee. Si
cet appareil genere des interferences nefastes clans la reception des
ondes radio ou televises, ce que I’on pout facilement contr61eren mettant
I’appareil successivement sous et hors tension, I’utilisateur est invite a
tenter de remedier aux interferences en appliquant I’une des mesures
suivantes:
Reoriented ou installez I’antenne de reception a un autre entroit.
Eloignez davantageI’appareil du recepteur.
BrallchezI’appareilsur une prise secteur raccordeea
d’allmentation different de la prise sur Iaquelle Ie recepteur est
branche.
Consultez votre revendeur ou faites appel a un technician radio/
TV.
ATTENTION
Tout modification ou reglage de cet appareil qui n’est pas explicitement
agree par Ie fabricant peut entra!ner la nullite du droit de I’utilisateur a
exploiter cet appareil.
00 mm type conique, 4 ohms
50 x 236,2 x 210,5 mm
,1 kg
22 w
160 x 236,2 x 209,3 mm
2,6 kg
15 du reglement
un circuit
D~FAUTS
Si I’appareil ne fonctionne pas comme decrit clans ces instructions
d’utilisation, consulfez Ie guide ci-dessous.
GENERALITIES
II n’y a pas de son
o Le cordon secteur est-il connecte correctement?
. Y a-t-ii une mauvaise connexion ? (+ page 3)
GAvez-vous appuye sur une touche de fonction incorrect?
Le son est inaudible.
. II y a peut-&re un court-circuit clans Ies bornes des haut-parleurs.
+ Debranchez Ie cordon secteur de la prise puis rebranchez Ies
cordons des haut-parleurs correctemellt. Branchez alors Ie
cordon secteur et rallumez I’appareil.
son ne sort que d’un seul haut-parleur
Le
● Lautre haut-parleur est-il deconnecte?
PARTIE SYNTONISEUR
II y a des parasiteselectrostatiquesconstantsen forme
d’ondes
o L’antenne est-elle connectee correctement ? (+ page 3)
La receptioncomportedes parasitesou il y a une
distortiondu son
. La cha~ne capte-t-elle des parasites externes ou une distortion
par trajet multiple?
+ Changez I’orientation de I’antenne,
+ Eloignez I’appareil d’autres appareils electriques
PARTIE PLATINECASSETTE
La bande ne defile pas
o La platine cassette est-elle clans Ie mode PAUSE? (+ page 8)
Le son n’est pas @quilibre ou pas assez haut
. La t&e de lecture est-elle sale? (+ page 11)
L’enregistrementest impossible
● Si la pastille de la cassette s’est cassee, recouvrez la cavite avec
une bande adhesive.
Face A
. La t&e d’enregistrementest-elle sale? (-+ page 11)
L’effacement est impossible
La t&e d’effacement est-elle sale? (+ page 11)
o
o Une cassette au metal ou Cr02 a-t-elle ete utilisee?
● La t&e d’enregistrement/delecture est-elle sale? (+ page 11)
PARTIE LECTEURDE DISQUESCOMPACTS
Le Iecteur de disques compactsne marche pas
. Le disque est-il insere correctement ? (+ page 5)
. Le disque est-il sale? (+ page 11)
o La Ientille de lecture est-elle affectee par de la condensation?
-+ Attendez environ une heure et essayez de nouveau.
PARTIE HORLOGEET MINUTERIE
II est impossiblede regler la minuterie,
o !-’horloge clignote-t-elle sur I’affichage?
+ Retablissez I’horloge. (Consultez page 9)
Pour remettreI’appareila zero
Si une anomalie se produit clans la fenetre d’affichage ou clans la
platine cassette, remettez I’appareil a zero en procedant de la
manit%e suivante.
1 Appuyez sur la touche POWER pour eteindre I’appareil.
2 Appuyez sur la touche POWER pour rallumer I’appareil tout en
appuyant sur la touche
depuis I’achat sent effacees.
S’il est impossible d’eteindre I’appareil comme indique clans Ie
paragraph1 a cause d’une anomalie, remettez I’appareil a zero en
debranchant Ie cordon secteur et effectuez I’operation 2.
0‘<qG
\ <Q-J
4
e
Pastille pour la face A
■. Toutes Ies donnees memoris6es
r%ANQA/S~
.
m
2
Page 38
Page 39
Page 40
PARTS INDEX
The parts on the main unit and remote control are listed in
alphabeticalorder with the pages on the right side.Refer to
each page for instructionsabout each part.
INDICEDE LAS PARTES
Las partes de la unidad principal y del control remoto se indican
en orden alfabeticocon sus paginas correspondientesen la
columns de la derecha. ConsuIte cada pagina para conocer Ias
instruccionesrelacionadascon cada parte.
NOMENCLATURE
Les instructions concernant chaque partie de I’appareil principal
et de la telecommalldese trouvent aux pages indiquees ci-contre.
Les noms des pari,ies sent indiques clans I’ordre alphabetique.
For assistance and information,
Printed in China
44-03 I 7- I
AIWA CO., LT13.
Loading...
+ hidden pages
You need points to download manuals.
1 point = 1 manual.
You can buy points or you can get point for every manual you upload.


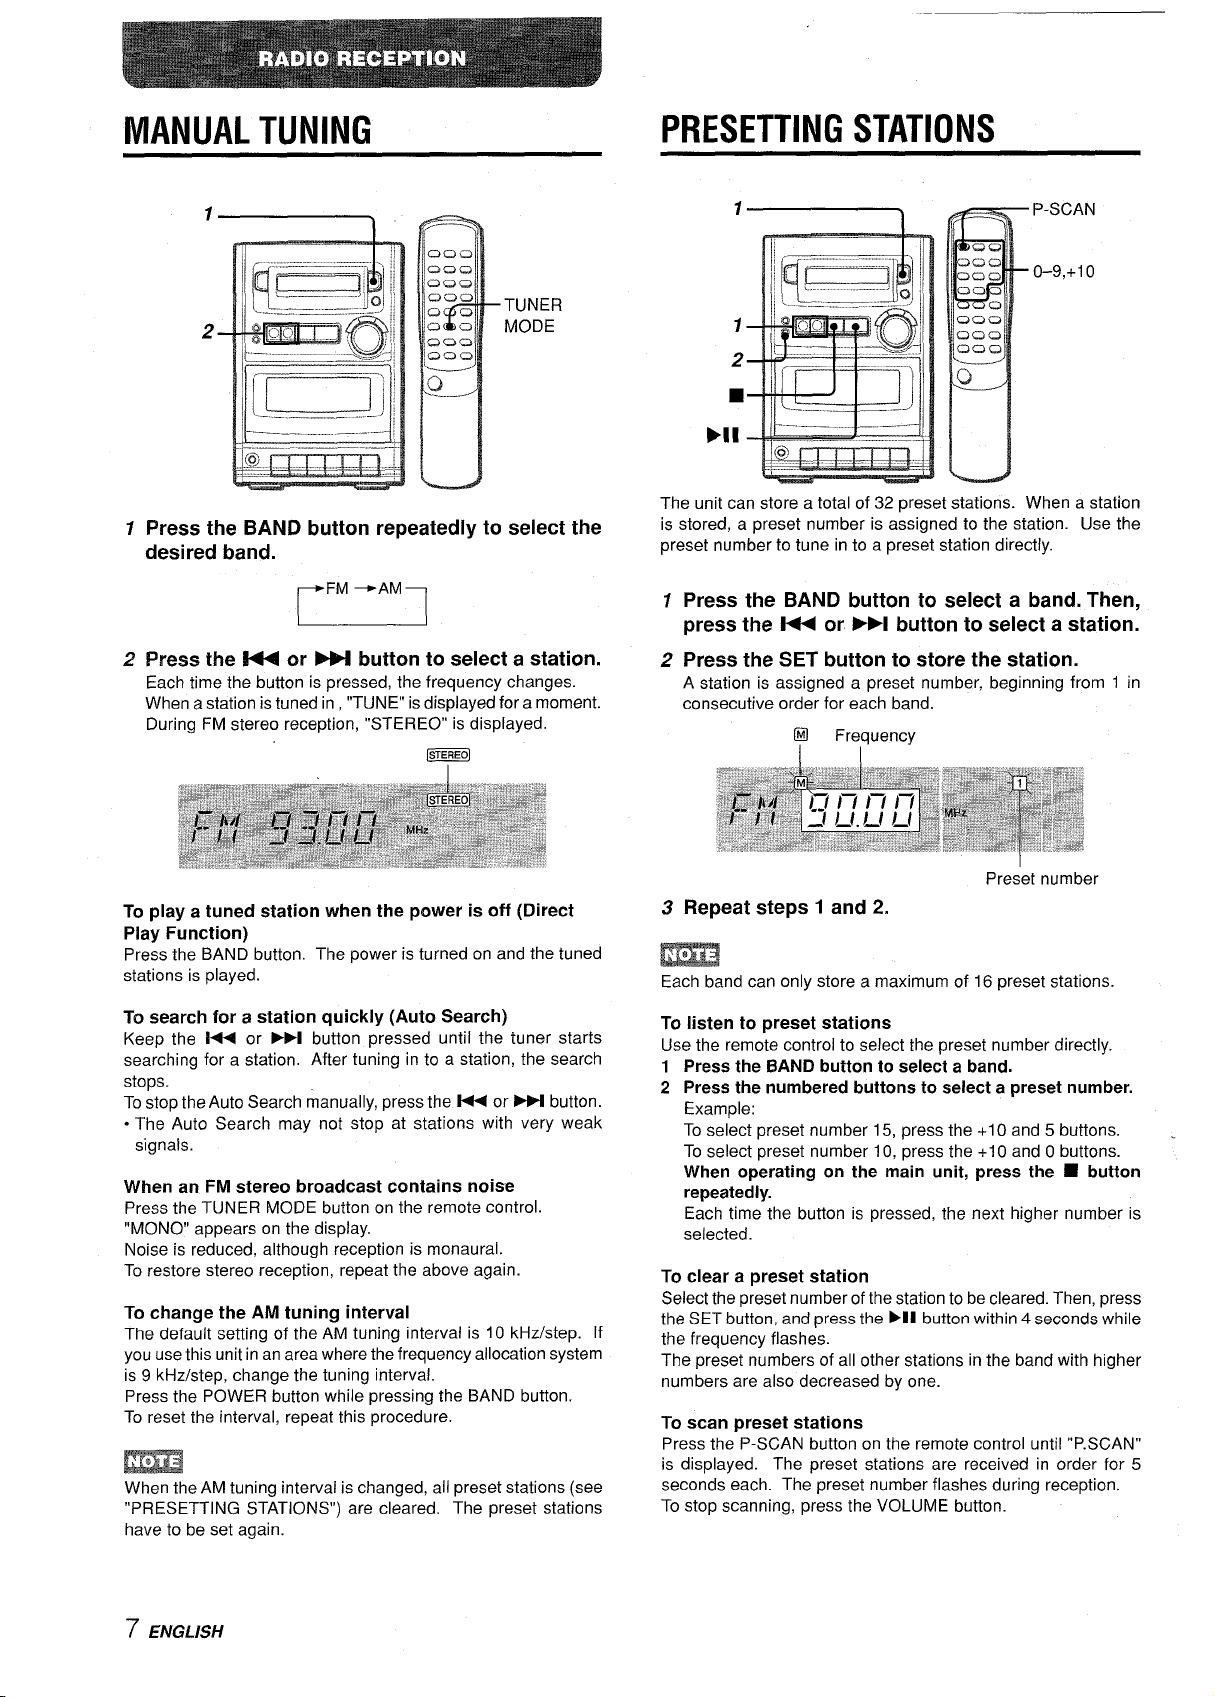


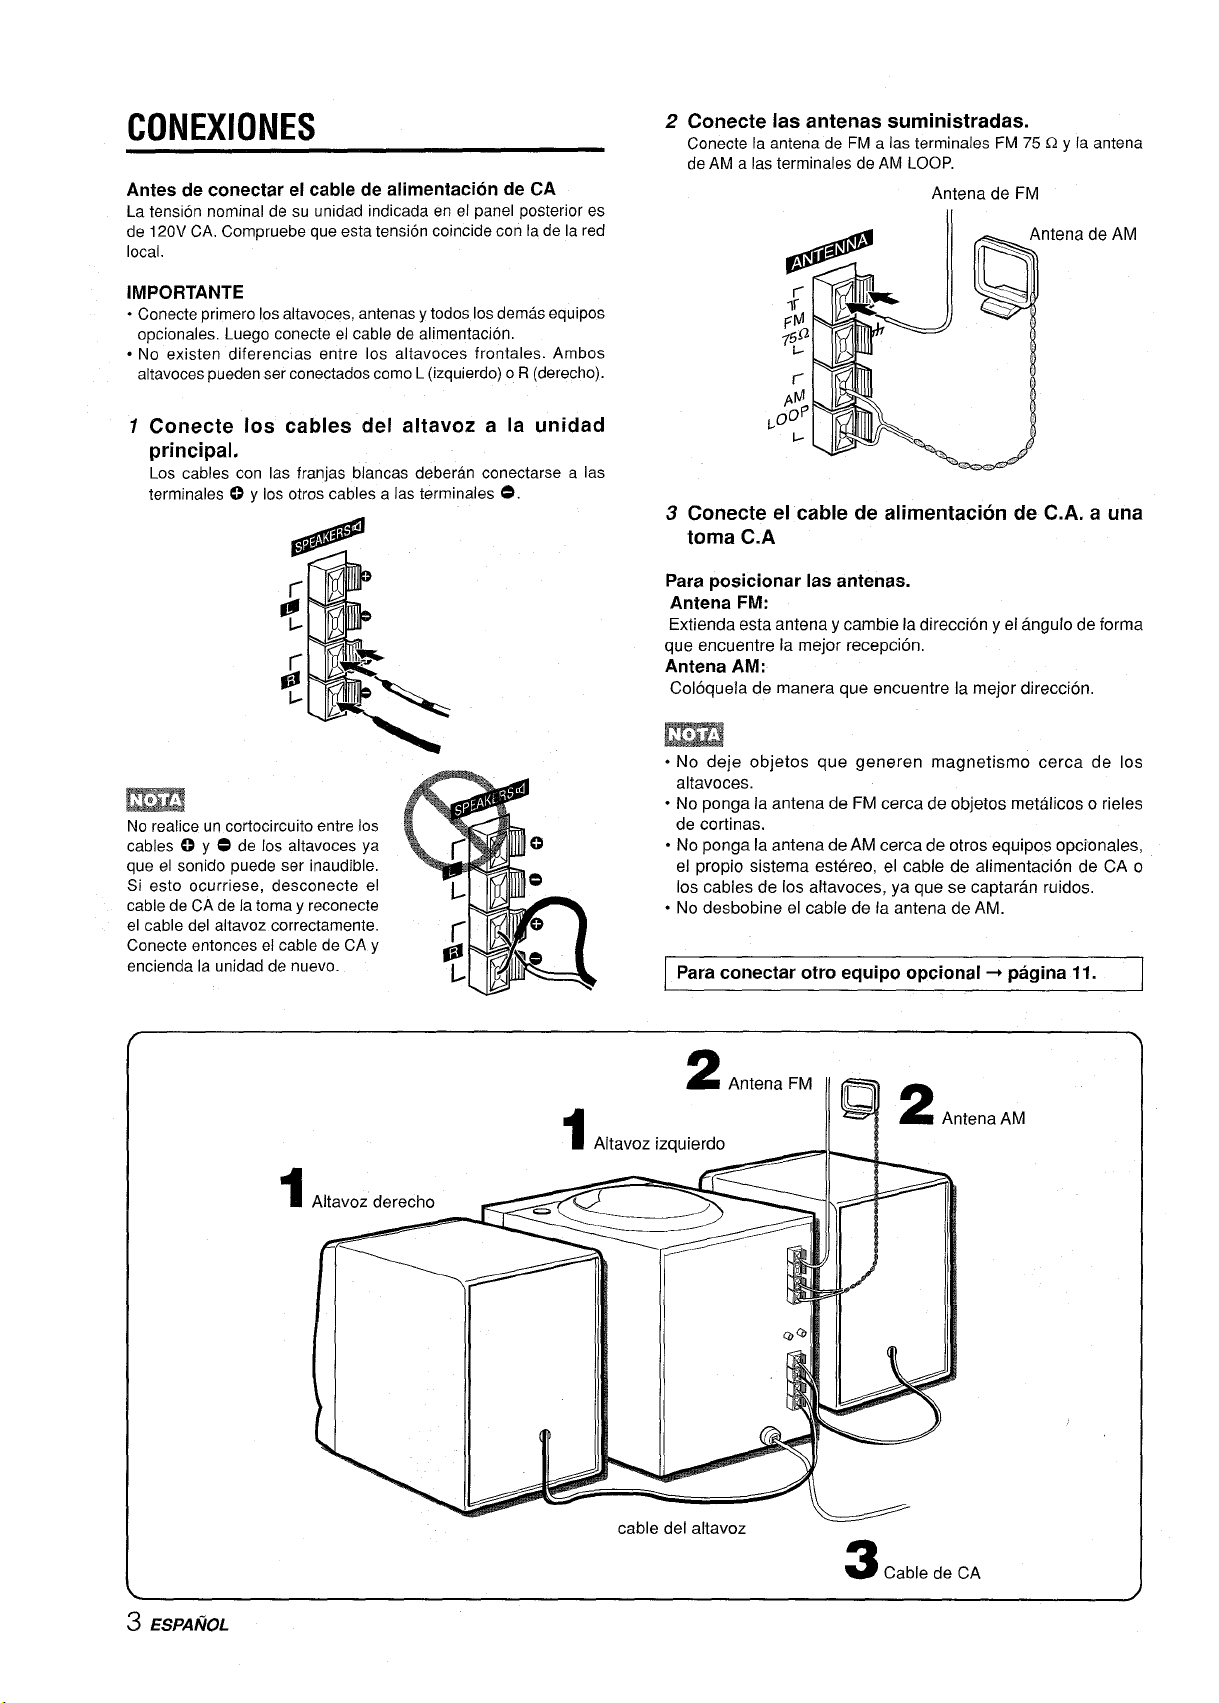
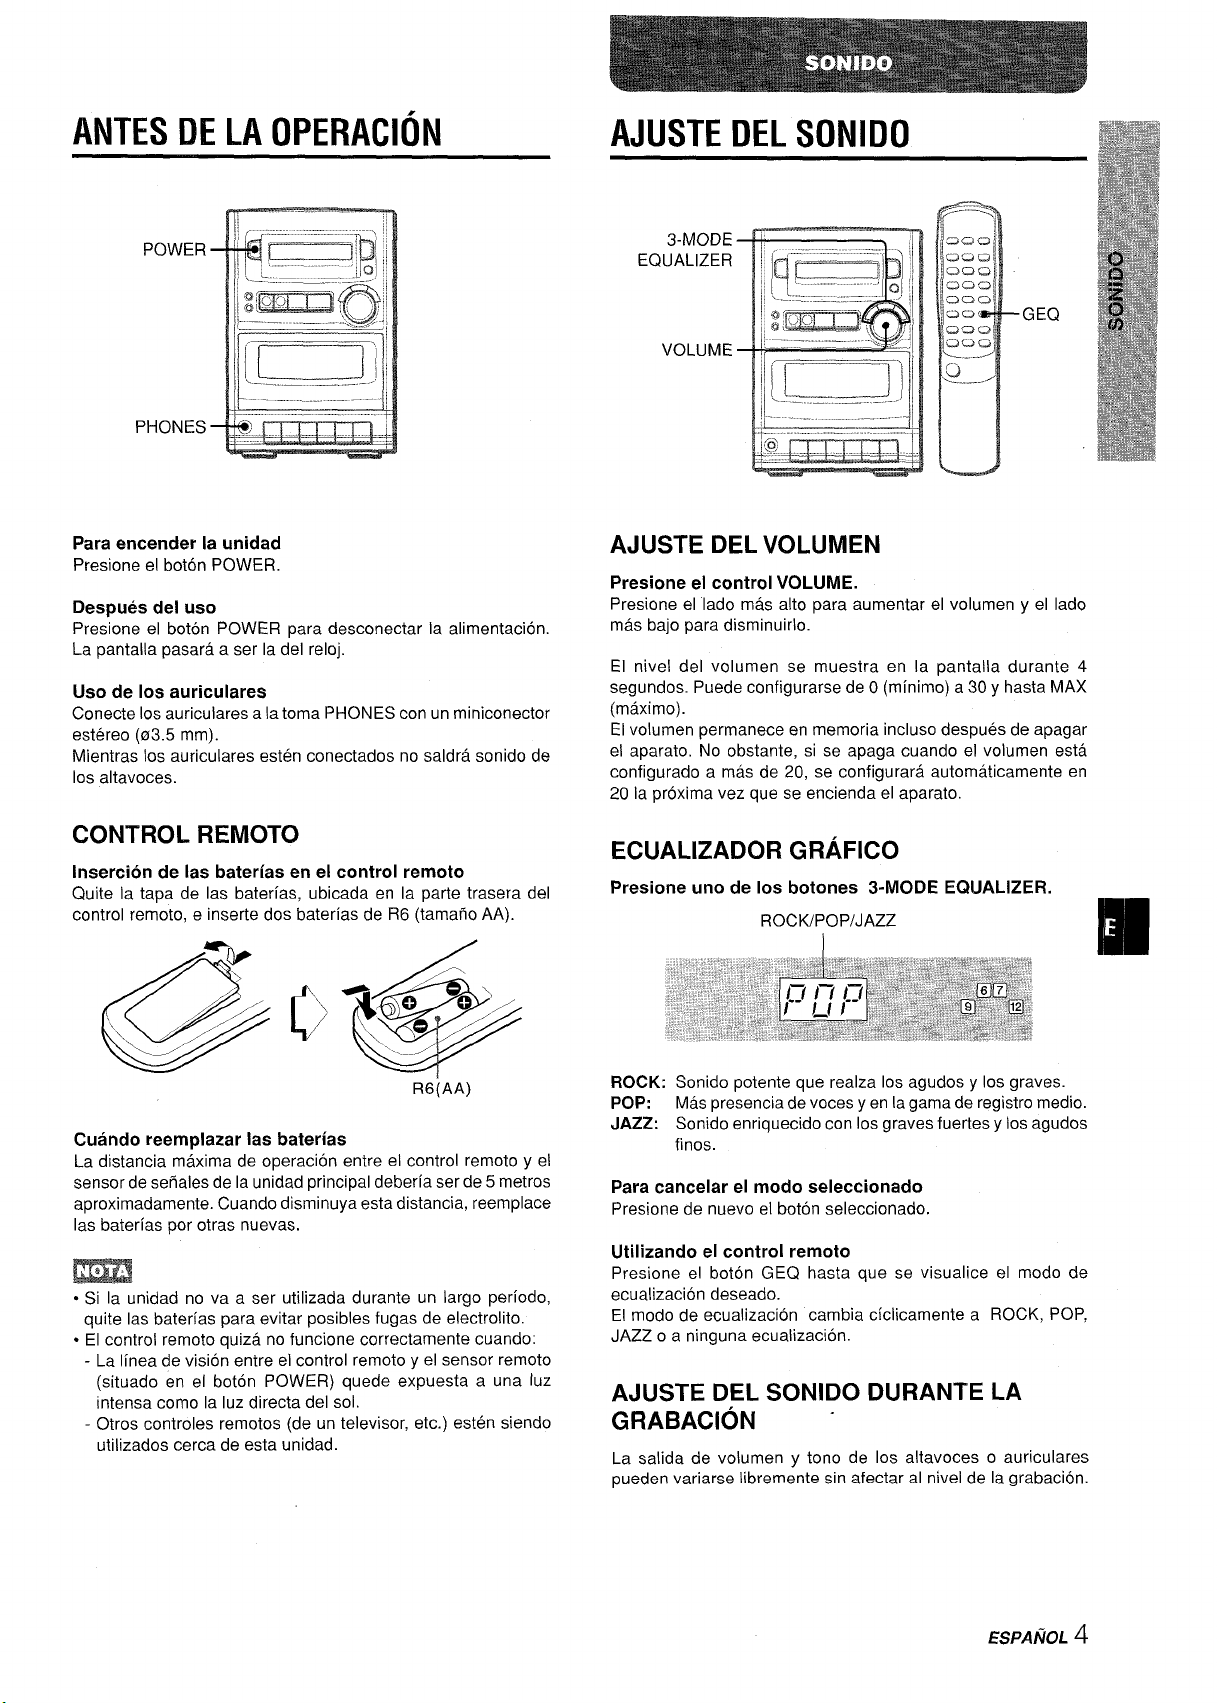


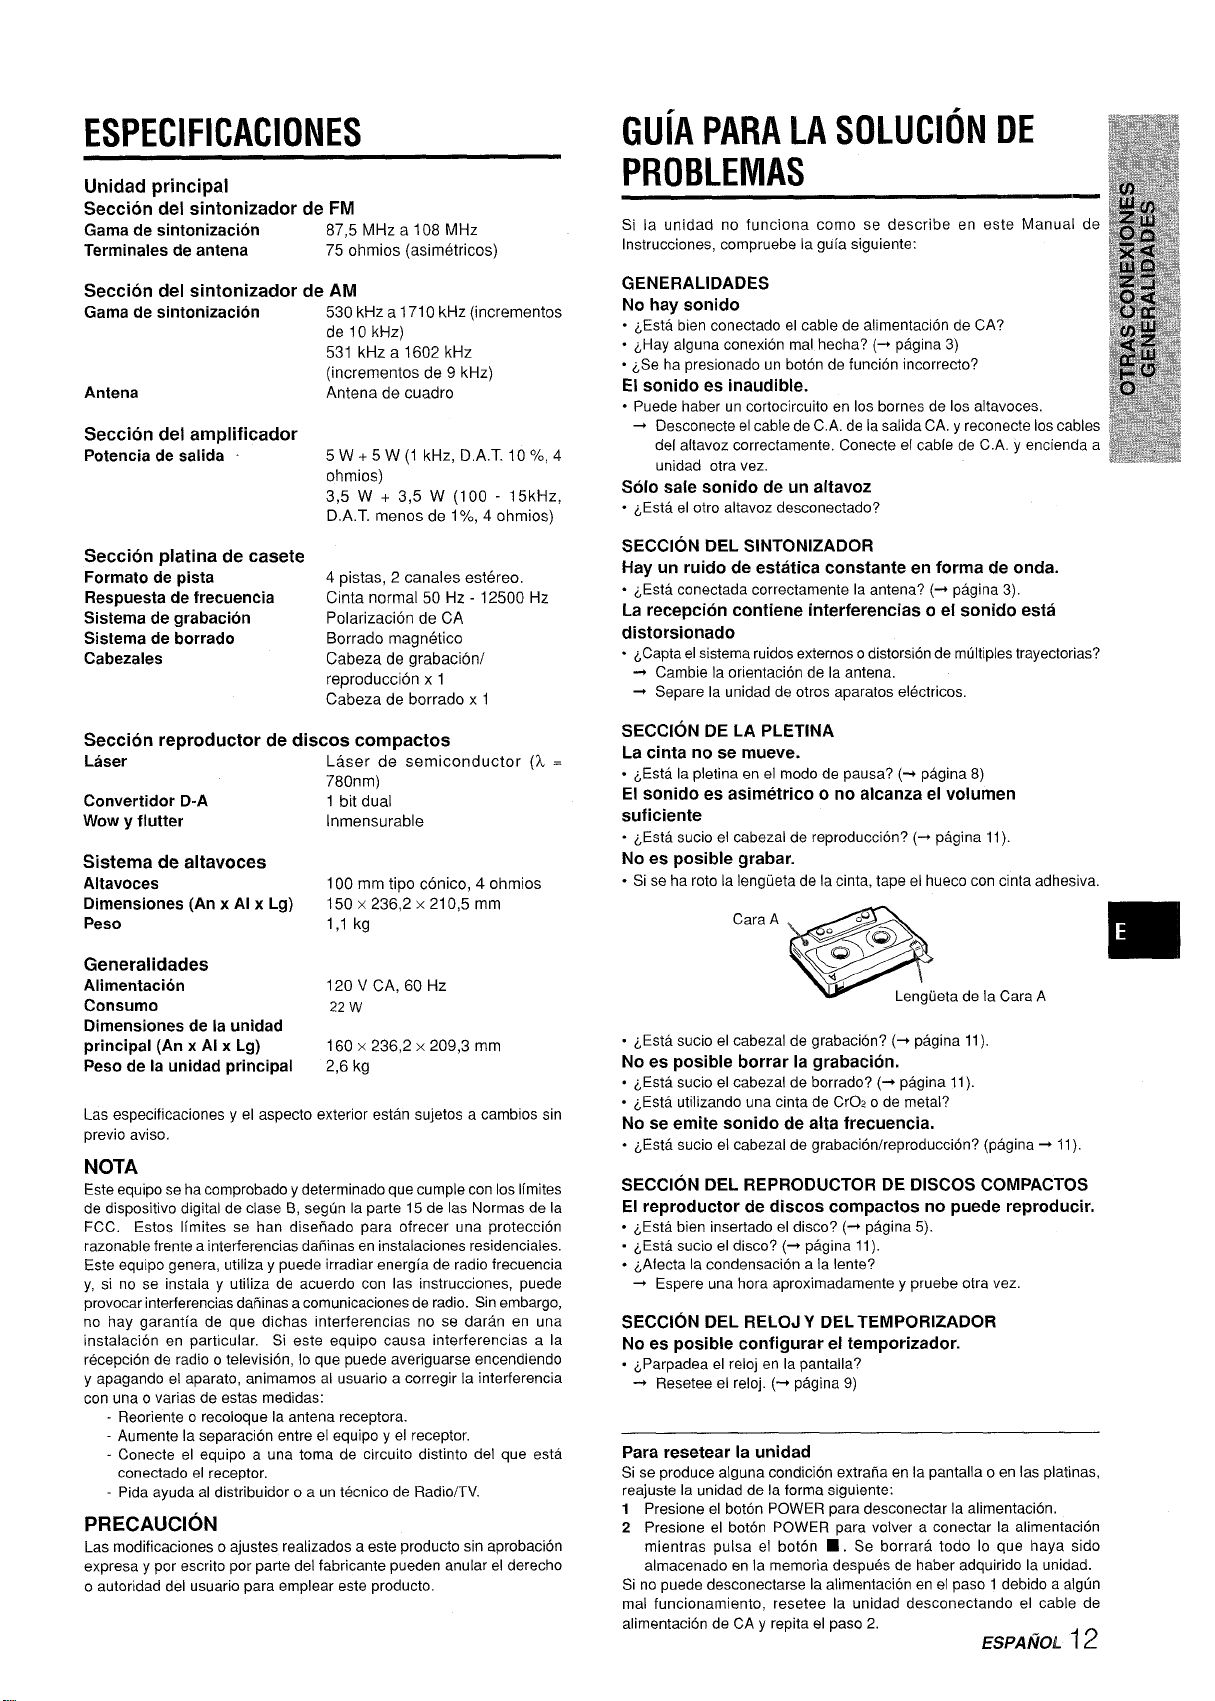
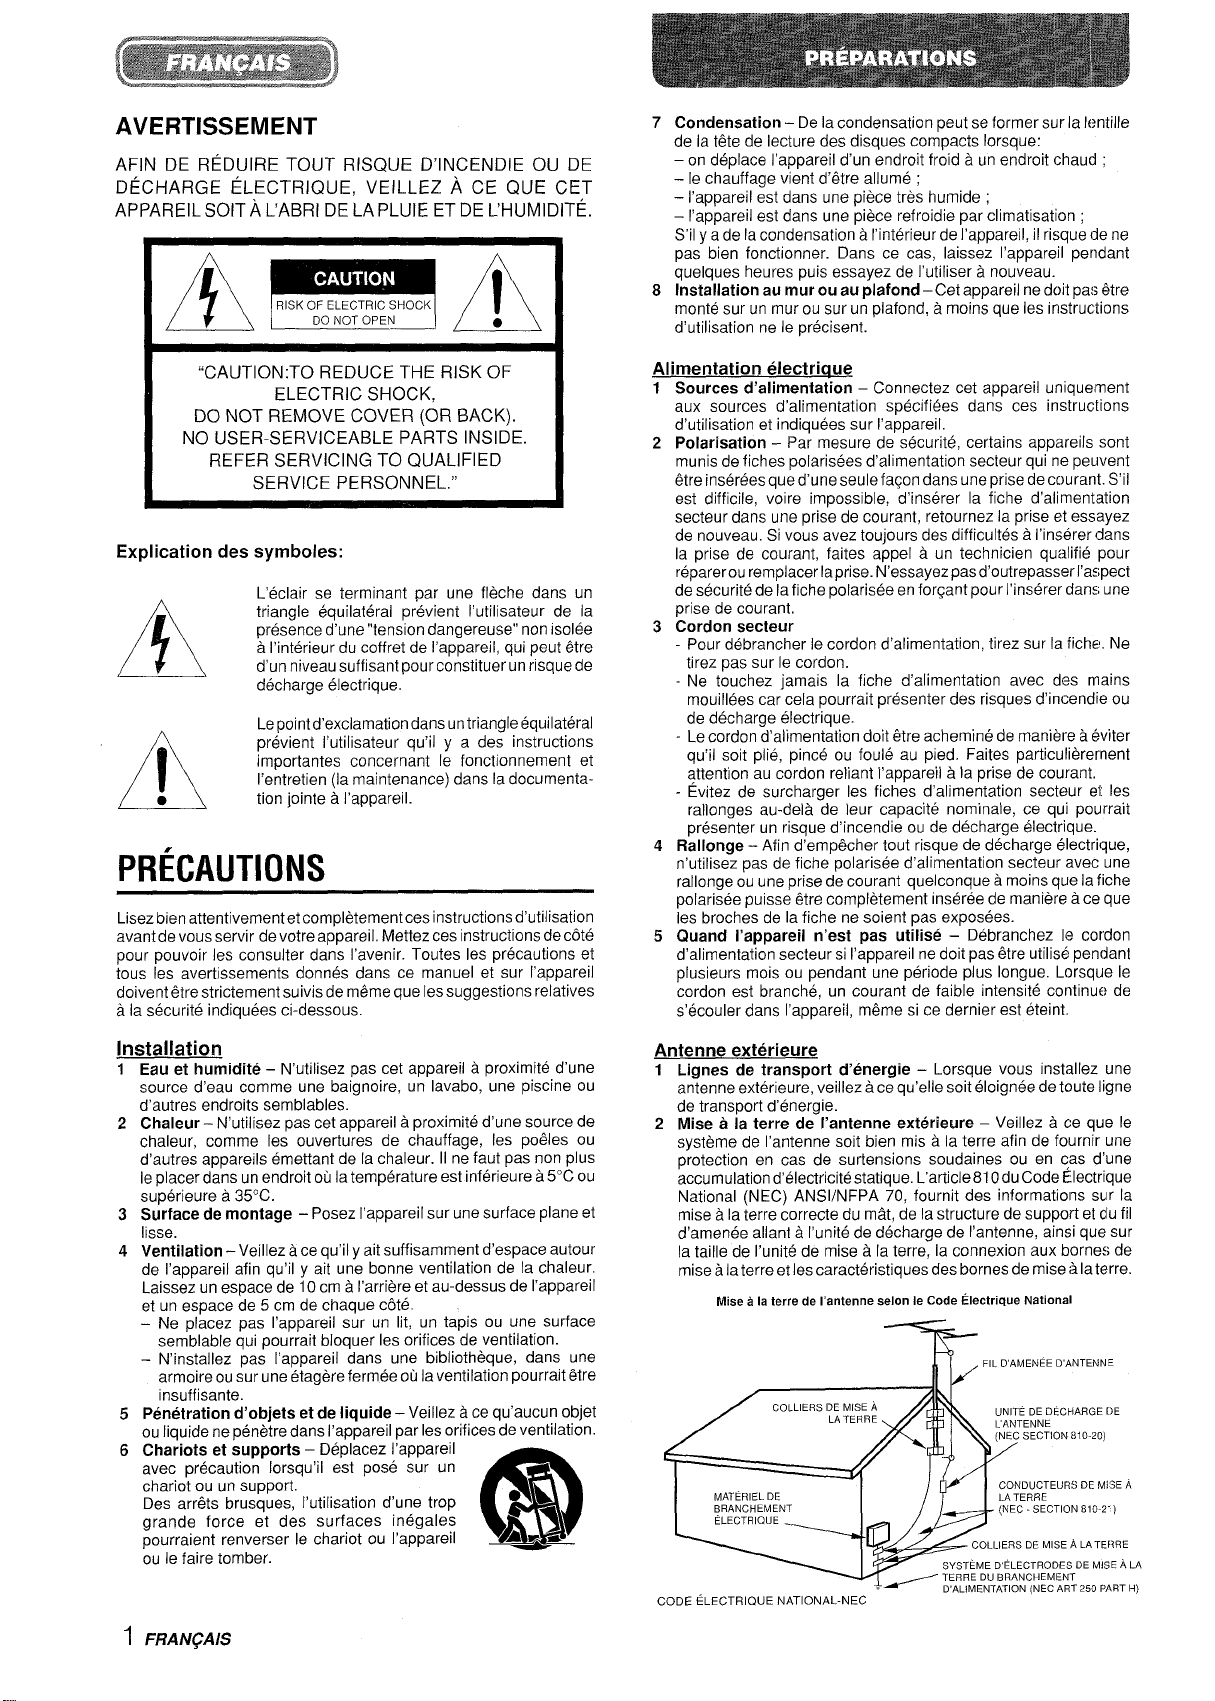


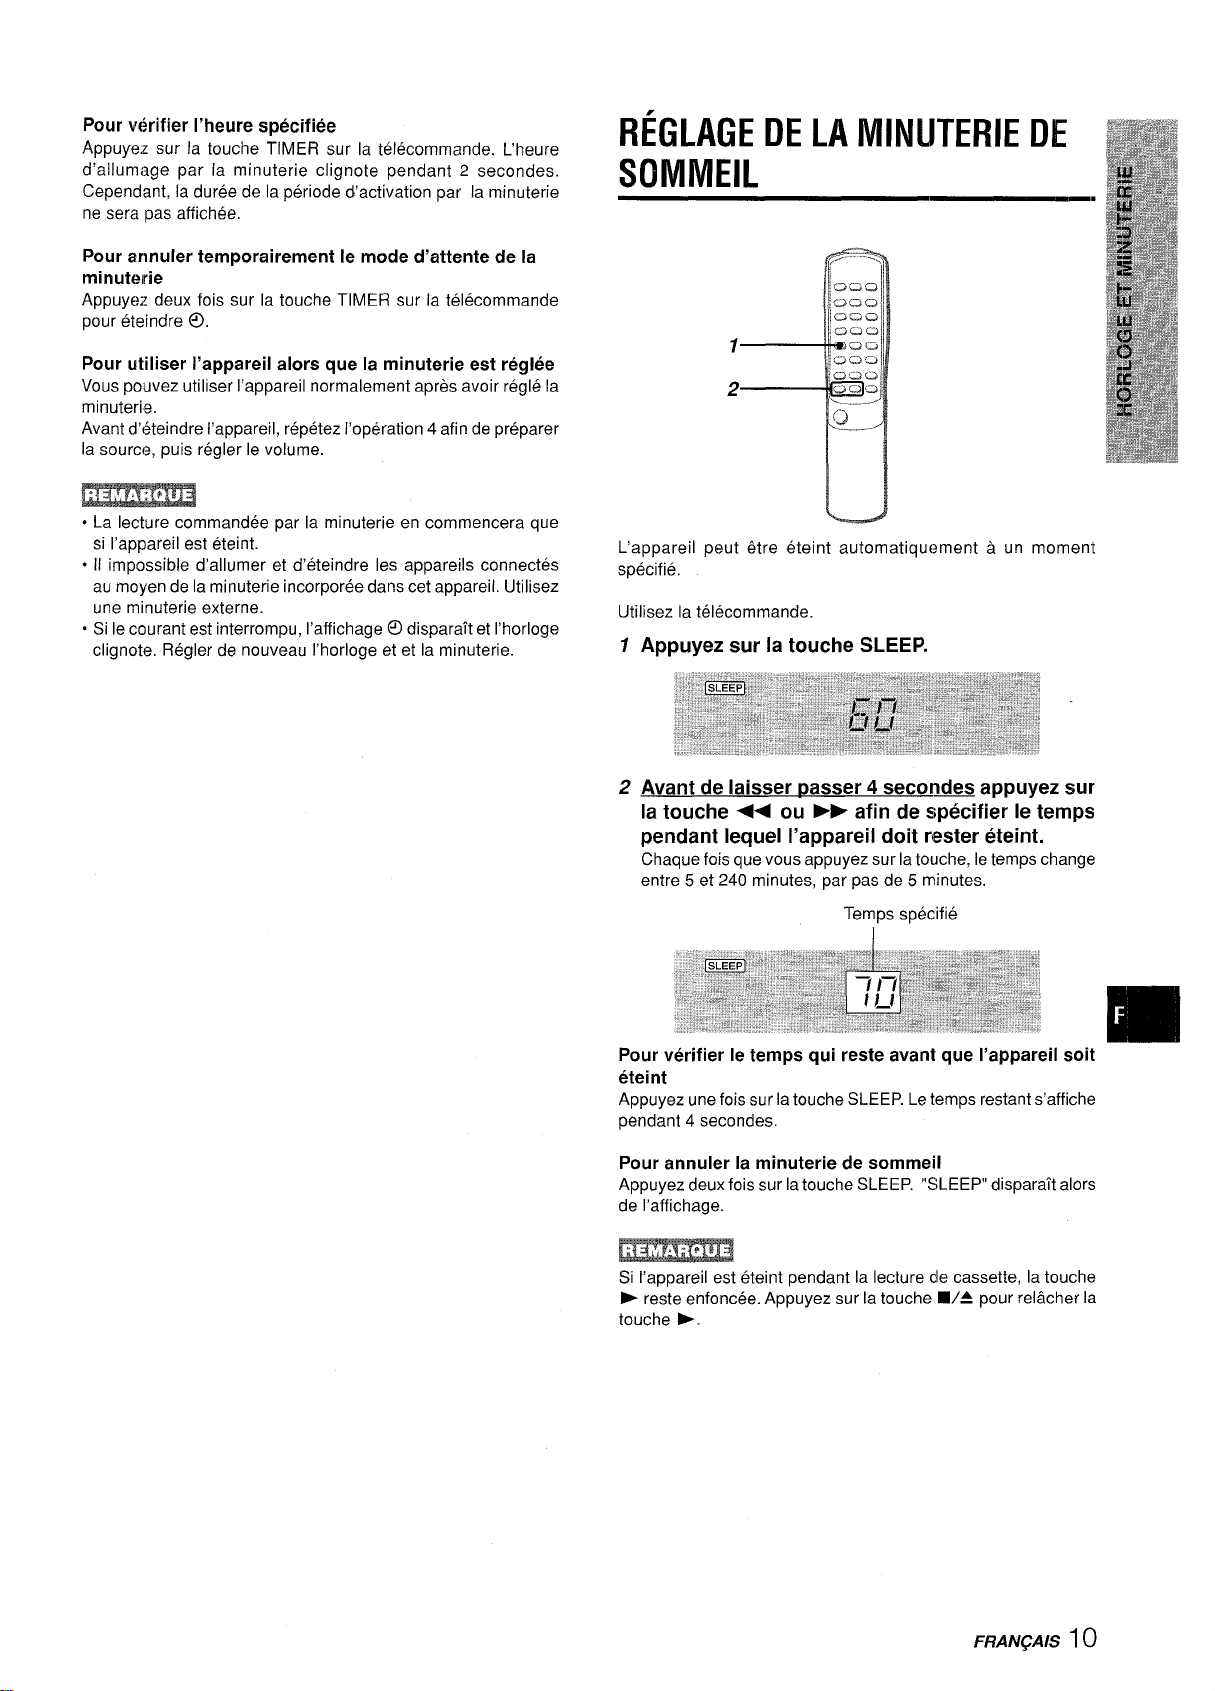
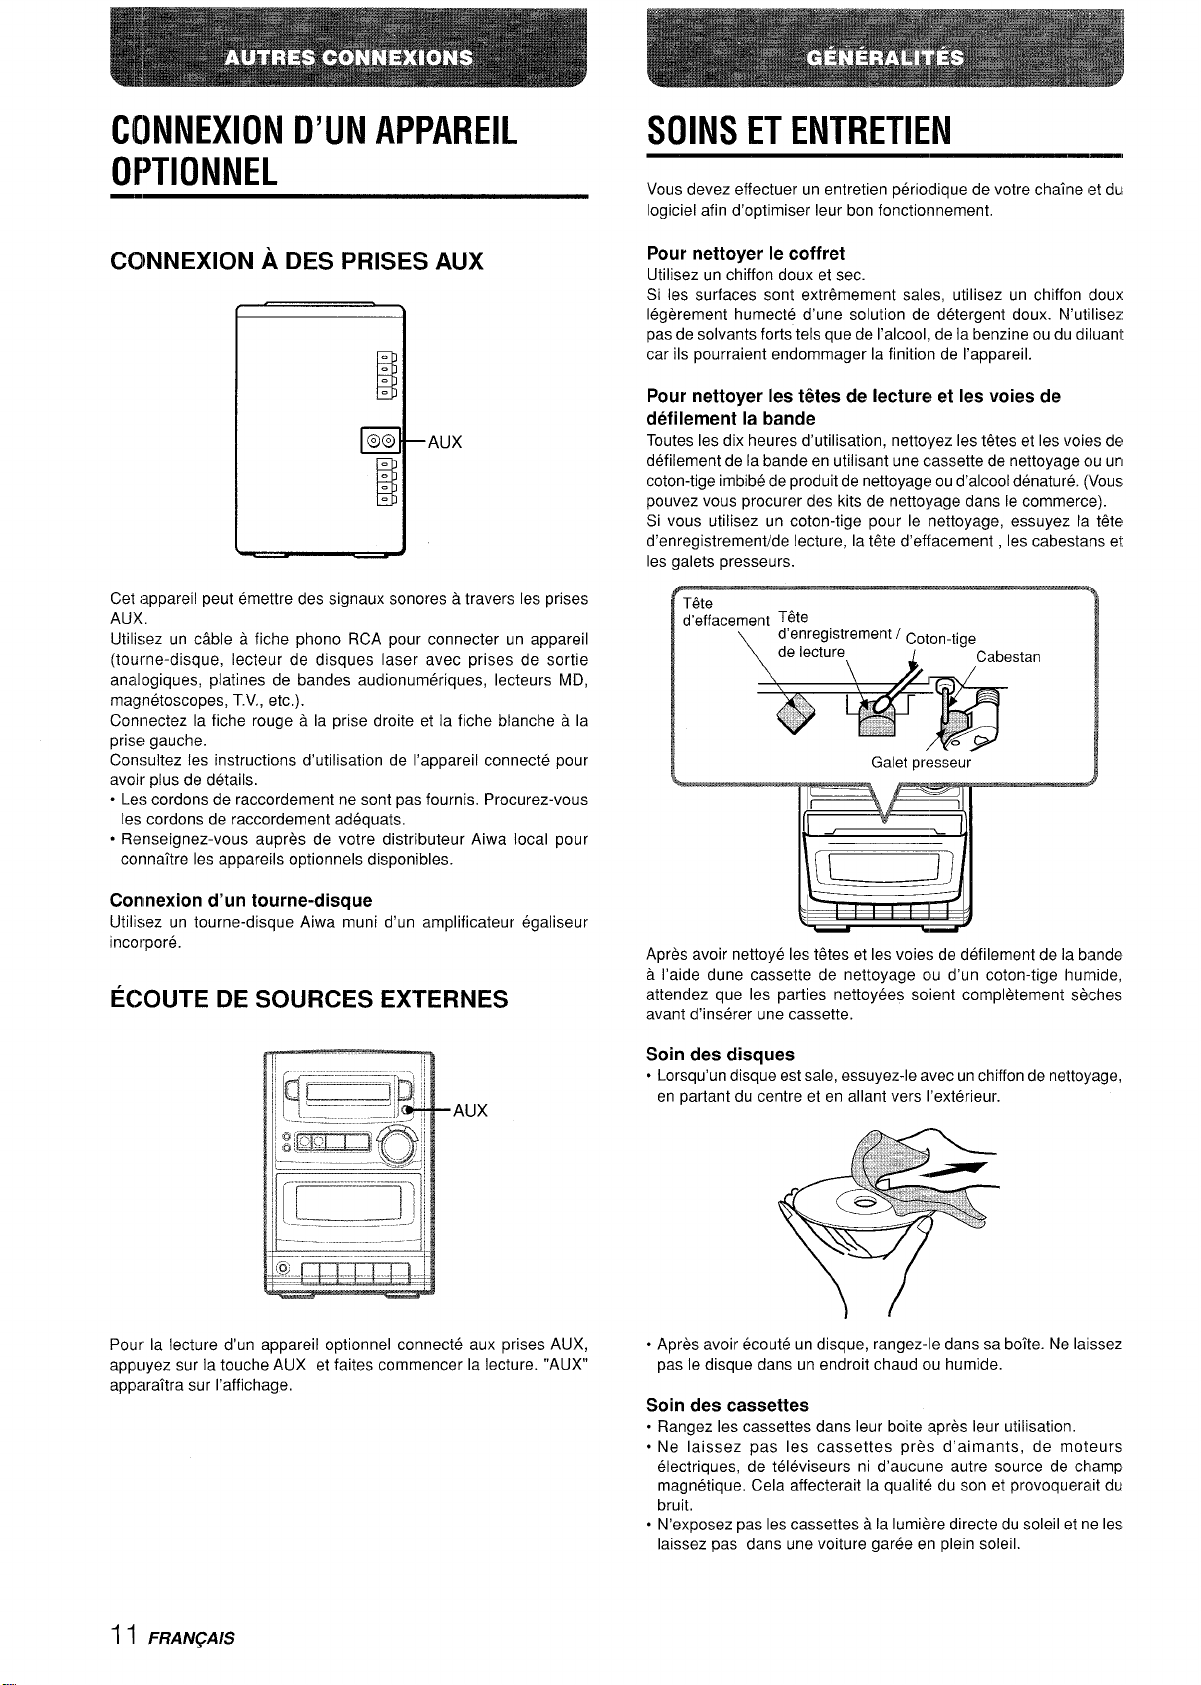


 Loading...