

Page 1

HV-FX9000U
STEREO VIDEO CASSETTE RECORDER
VIDEOGRABADORA ESTEREOFONICA
ENREGISTREUR À CASSETTES VIDÉO STÉRÉO
OPERATING INSTRUCTIONS
INSTRUCCIONES DE MANEJO
MODE D’EMPLOI
For Assistance And Information
Call Toll Free 1-800-BUY-AIWA
(United States and Puerto Rico)
ENGLISH
ESPAÑOL
FRANÇAIS
Page 2
QUICK START GUIDE
HV-FX9000U
Welcome
Thank you for purchasing this AIWA product.
When you unpack your video cassette recorder
for the first time, follow the procedures 1 to
below for set up.
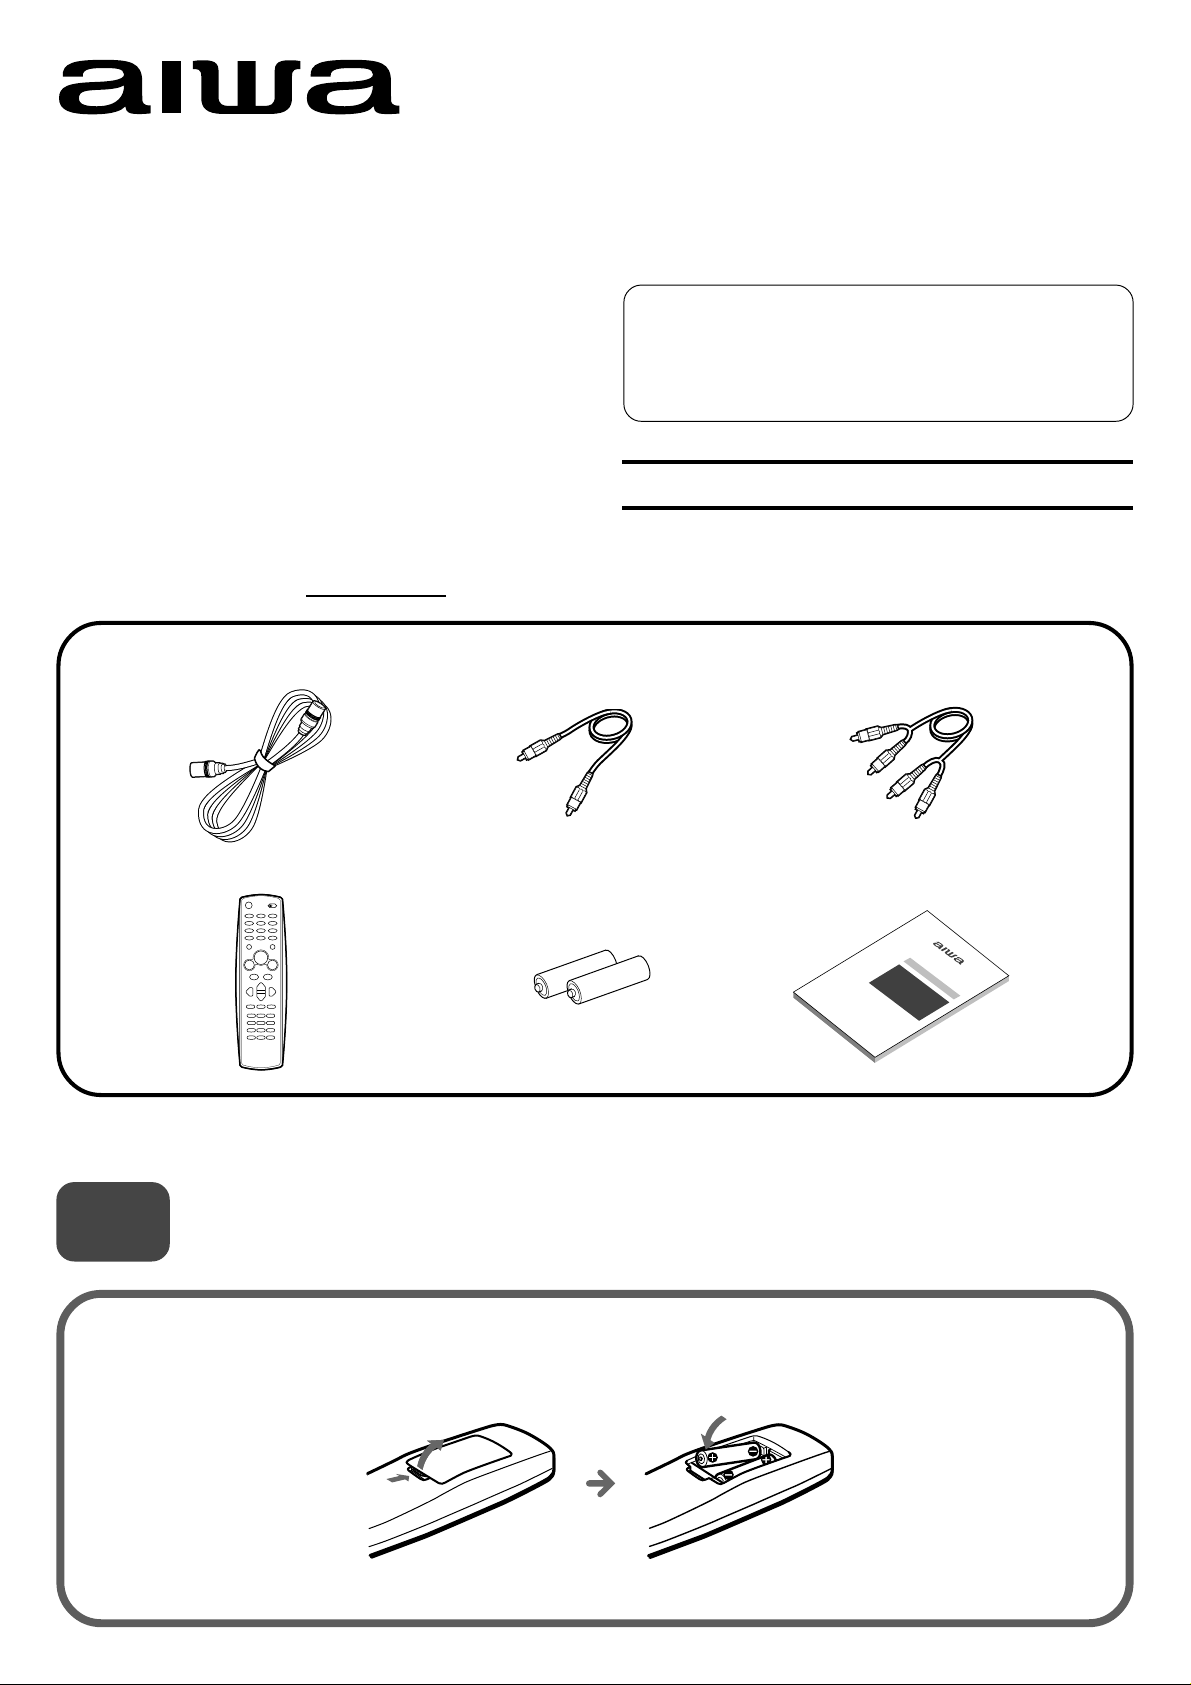
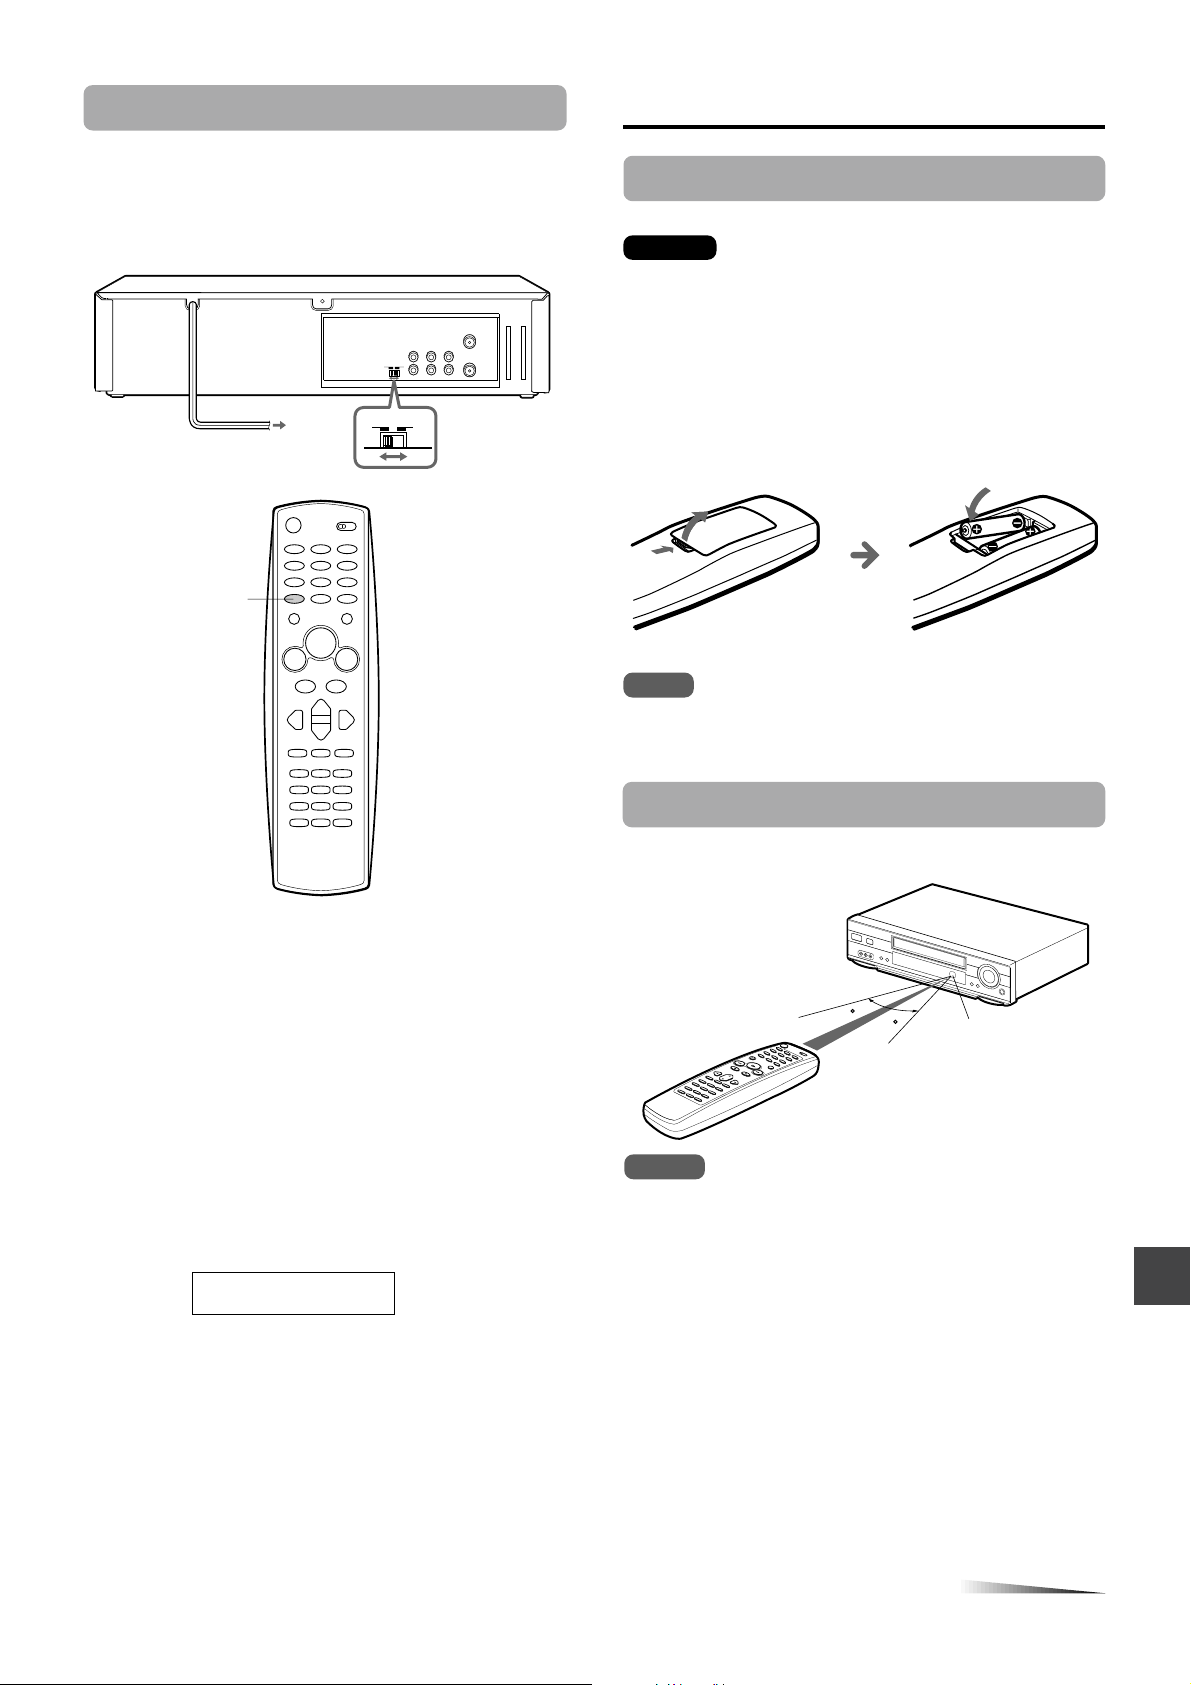
You will find these accessories in the package box.
Remote control (1)
5
Video cable (1)Antenna cable (1)
For Assistance And Inf ormation
Call Toll Free 1-800-BUY-AIWA
8A-JFC-902-01
000114ATO-YX
(United States and Puerto Rico)
AIWA CO., LTD
Printed in Korea
Audio cable (1)
Operating instructions (1)Batteries (2)
Please read the various informations on page 1 and 2 of Operating Instructions before installing or operating your
VCR.
1
Insert two R03 (size AAA) batteries (supplied) with the
correct polarity, as indicated inside the battery
compartment.
Installing Batteries in the Remote Control
1
Page 3
2
AERIAL
(VHF/UHF)
RF OUT
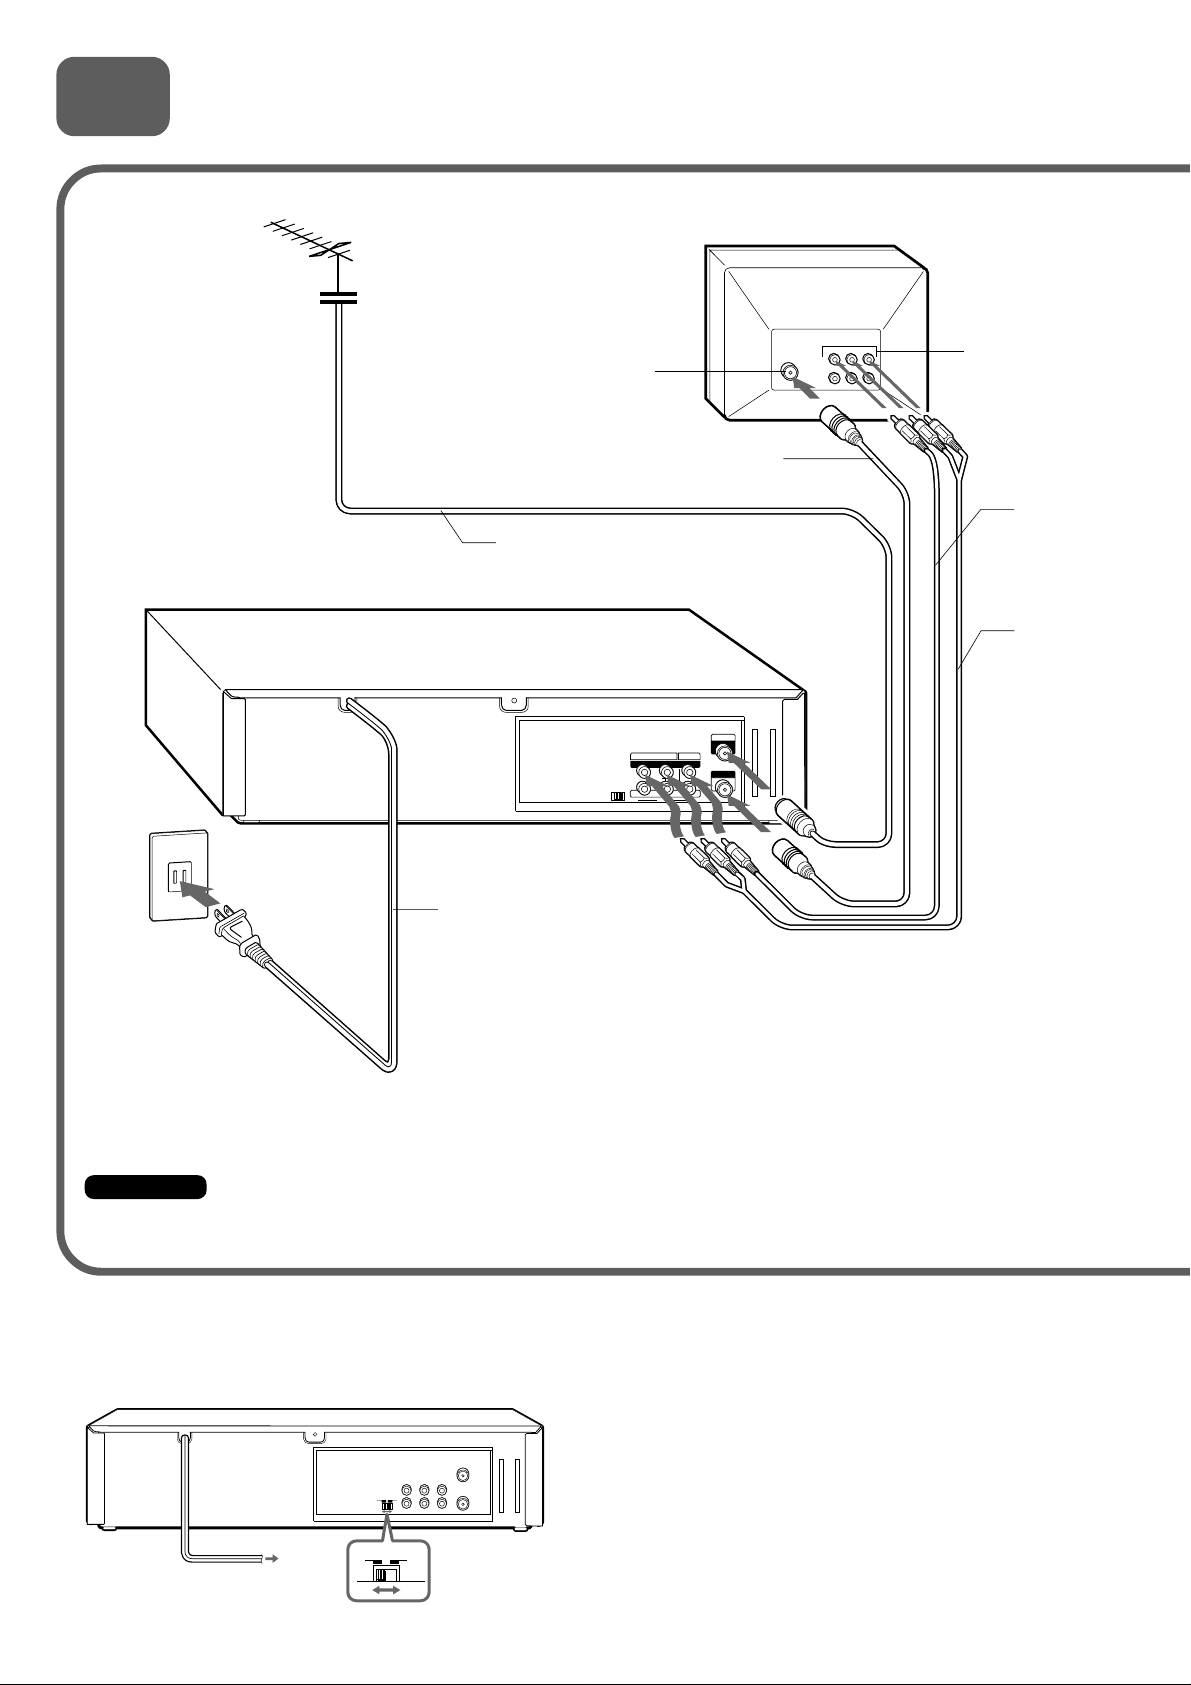
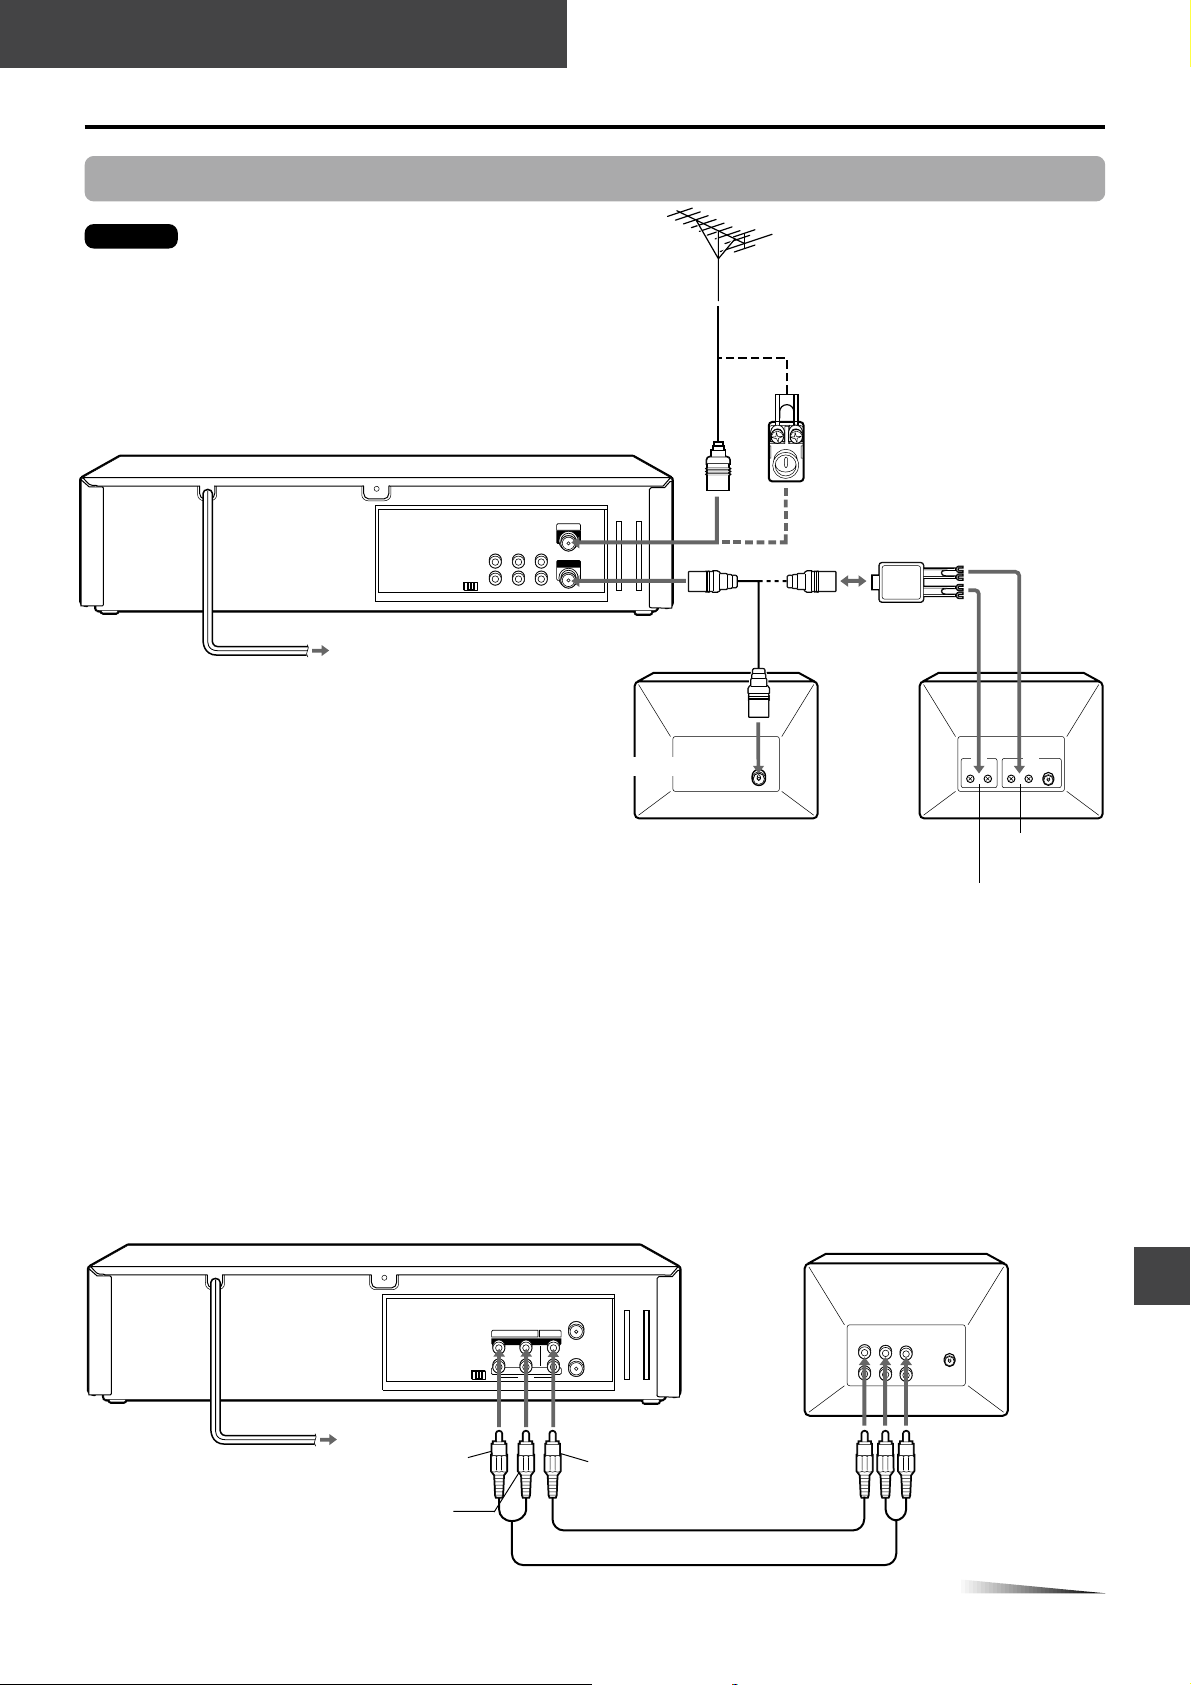
Connecting Antenna (or CATV)-VCR-TV
Basic connections
TV
2 Connect the VCR with the
supplied antenna cable to the
TV's antenna input connector.
1 Connect the TV
antenna cable (not
supplied) to the
VCR.
AC outlet
Antenna input
connector
TV antenna cable (not supplied)
AC cord
Antenna cable
(supplied)
R AUDIO L
VIDEO
OUT OUT
(MONO)
IN IN
LINE 1
AERIAL
(VHF/UHF)
RF OUT
Audio/video
input jacks
Video cable
(supplied)
Audio cable
(supplied)
3 If your TV has audio/video
input jacks, connect the VCR
and TV using the supplied
4 Connect the AC cord
of the VCR to the AC
outlet.
Important
Connect the AC cord to the AC outlet after all of the connections are complete.
When the TV is connected to OUT TO TV using only an antenna cable
Set the channel selector to 3CH or 4CH, not employed for broadcasts, and select the same channel on the TV.
To select a desired TV channel on the TV
Turn the TV and VCR on, and press TV/VCR to turn off
VCR in the display window, or turn off this VCR.
3CH
3CH 4CH
4CH
(VHF/UHF)
AERIAL
RF OUT
audio and video cables.
2
Page 4

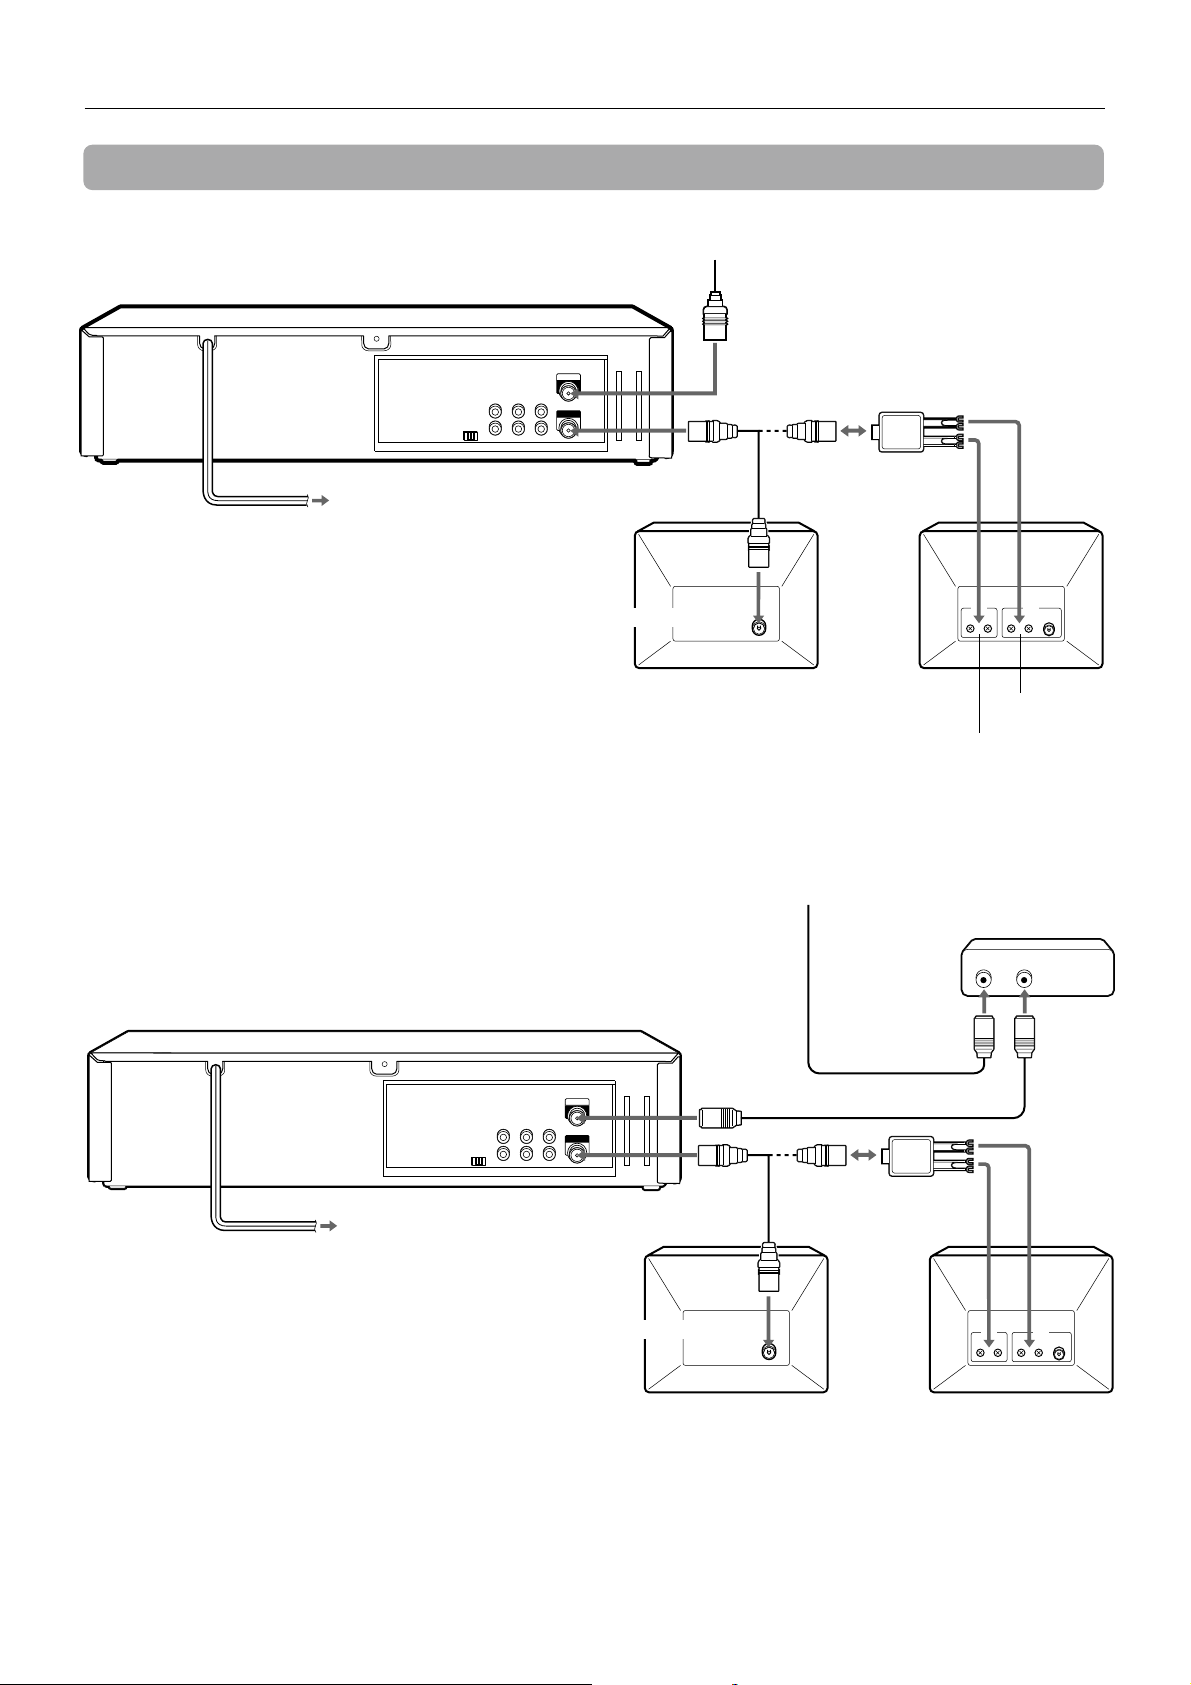
CATV connections
CATV System
CATV converter
(not supplied)
OUTIN
Antenna input
connector
3 Connect the VCR with the supplied
antenna cable to the TV's antenna input
connector.
TV
Audio/video
input jacks
CATV cable
(not supplied)
1 Connect the cable from the CATV system
to the input on the CATV converter.
AC outlet
AC cord
5 Connect the AC cord of
the VCR or the VCR to
the AC outlet.
2 Connect the output on the
converter to ANT IN on the VCR
with a coaxial cable (not supplied).
VIDEO
AERIAL
(VHF/UHF)
RF OUT
R AUDIO L
OUT OUT
(MONO)
IN IN
4 If your TV has audio/video input
jacks, connect the VCR and TV
using the supplied audio and
video cables.
Antenna cable
(supplied)
Video cable
(supplied)
Audio cable
(supplied)
To connect a CATV system without using a CATV converter
Connect the cable from the CATV system to ANT IN on the VCR in step 1 above.
To see a TV program or video program selected on the VCR
Turn the TV and VCR on, and press TV/VCR to display VCR in the display
window.
VCR
3
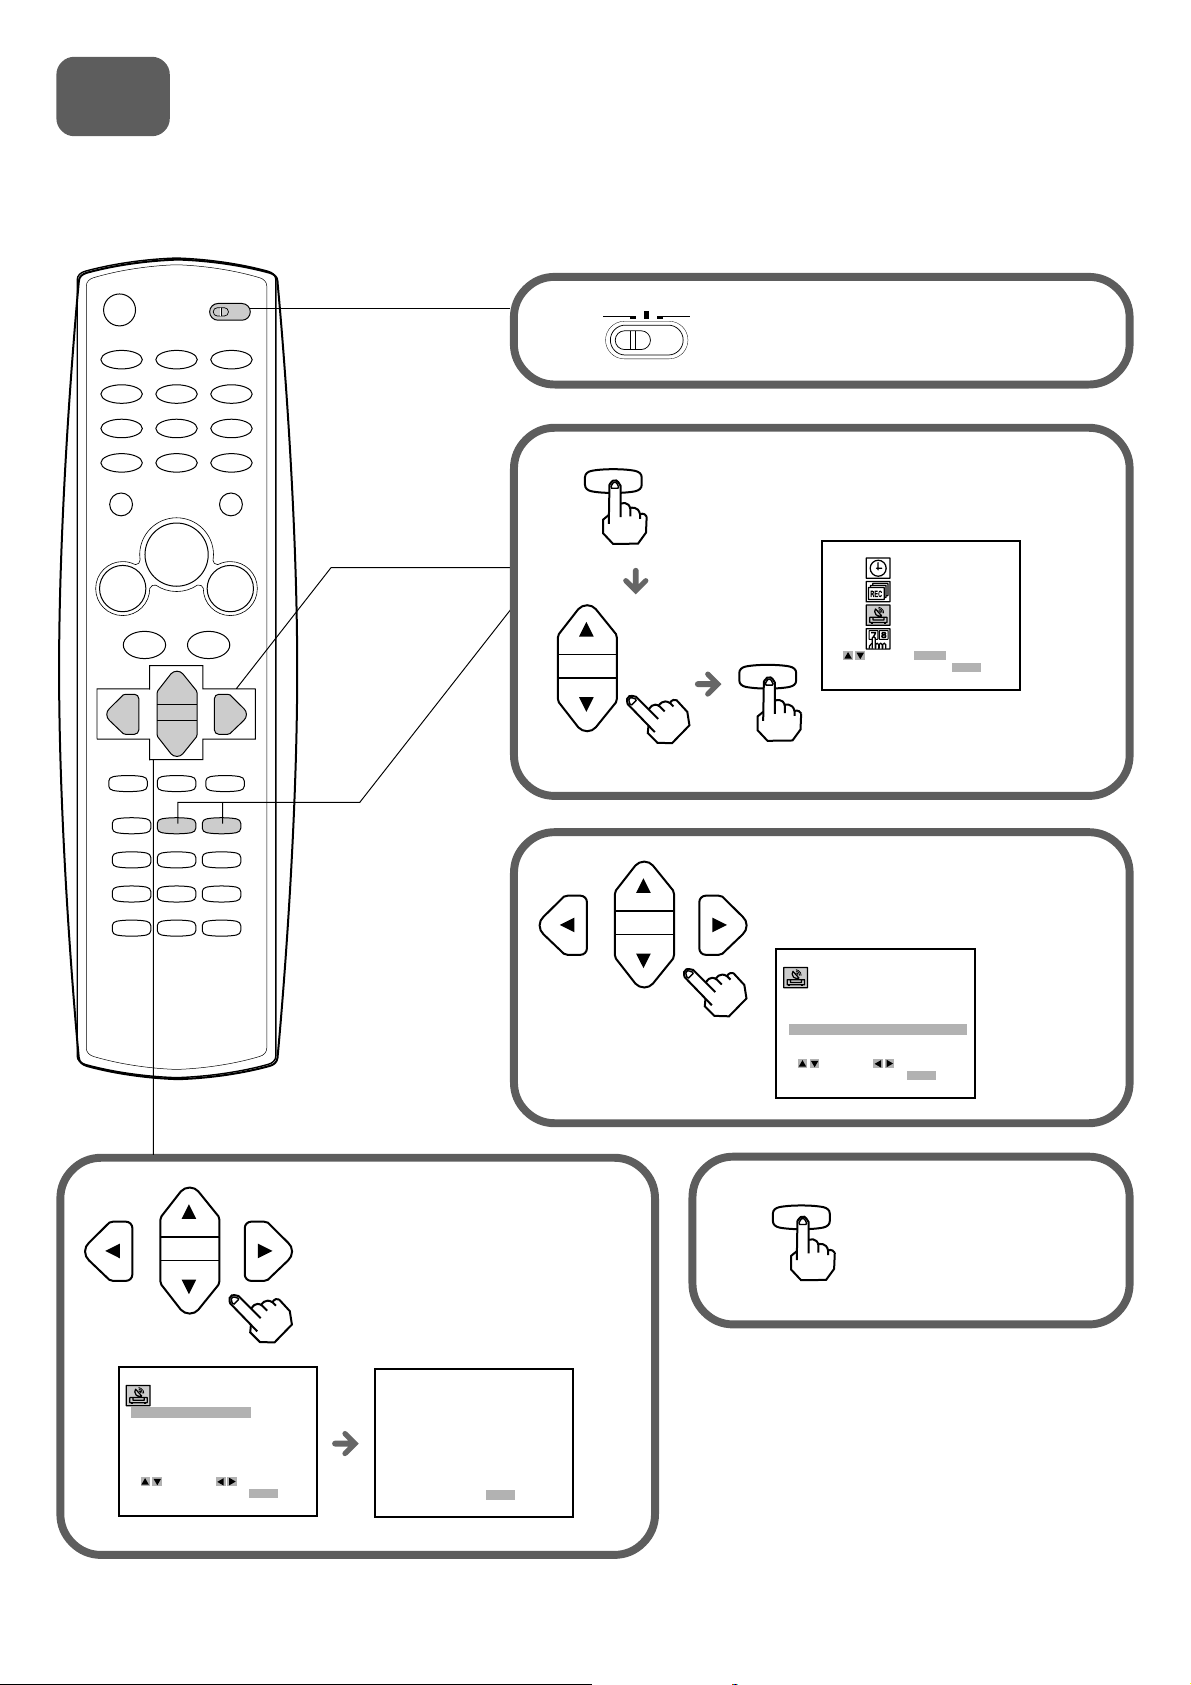
Page 5
3
FUNCTION OSD : ON
HI-FI
STEREO
STEREO
LANGUAGE SELECT : ENGLISHLANGUAGE SELECT : ENGLISH
AUDIO MODE :
BROADCAST TYPE :
AUDIO OUTPUT :
CHANNEL MAPPING
SELECT ADJUST
TO EXIT PRESS
MENU
LANGUAGE SELECT : ENGLISH
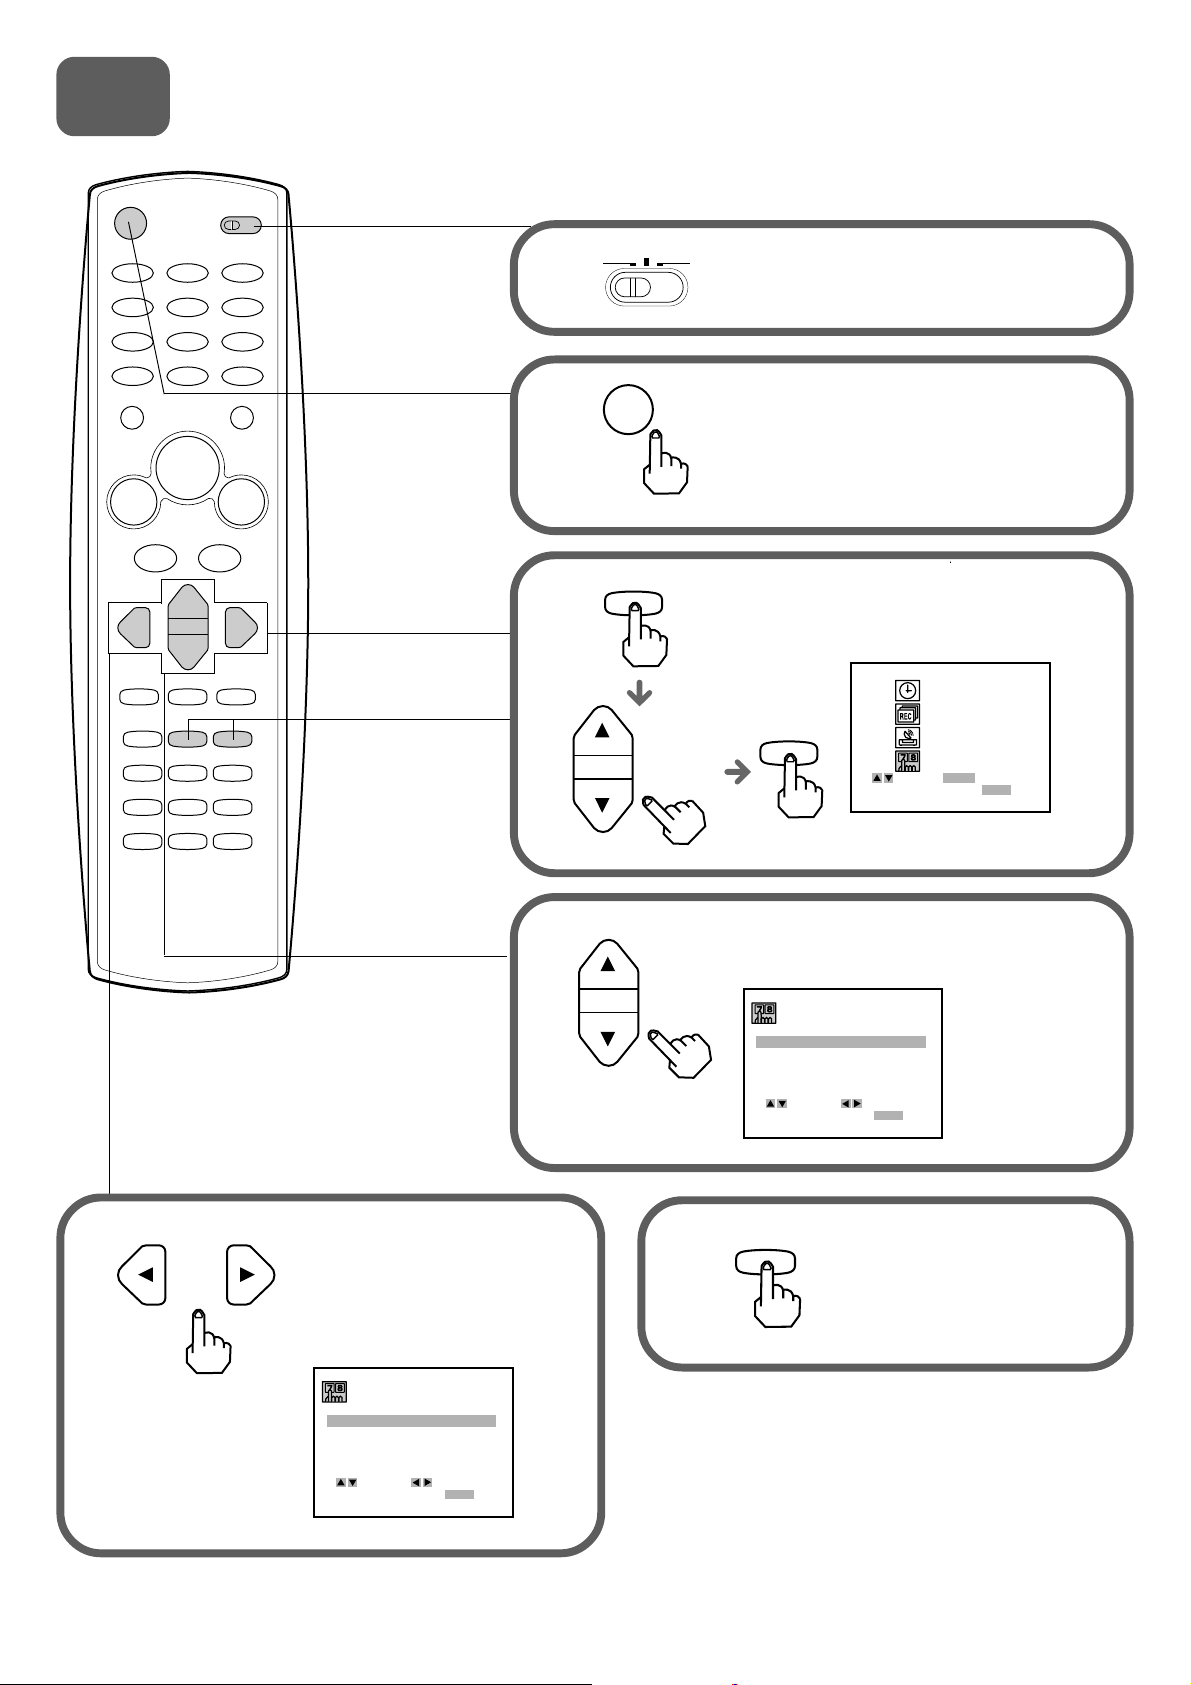
Setting the language
The on-screen menu can display any of three languages,
English, Spanish and French.
VCR TV
1
CATV/DBS
Set the VCR/CATV/DBS/TV
selector to VCR.
3
2
4
MENU
POWER
Press POWER to turn on the VCR.
Press MENU, and press
i or k to select SETUP,
then press ENTER/DISPLAY.
CLOCK
PROGRAM
ENTER
TUNING
SETUP
ENTER
SELECT ENTER
TO EXIT PRESS
MENU
Press i or k to select LANGUAGE
SELECT.
5
or
Press j or l to display the
desired language.
Each time the language
changes, the on-screen
display language changes.
FUNCTION OSD : ON
LANGUAGE SELECT : ENGLISH
AUDIO MODE :
BROADCAST TYPE :
AUDIO OUTPUT :
CHANNEL MAPPING
SELECT ADJUST
TO EXIT PRESS
STEREO
STEREO
MENU
HI-FI
4
6
MENU
Press MENU to return to
the normal screen.
Page 6
4
CLOCK
PROGRAM
TUNING
SETUP
SELECT ENTER
TO EXIT PRESS
ENTER
MENU
MONTH : MONTH : JUNEJUNE
DAY : 1 THU
YEAR : 2000
TIME
: 12 : 00 AM
AUTO CLOCK SET : OFF
SELECT ADJUST
TO EXIT PRESS
MENU
: 10 : 30 AM
MONTH : JUNE
DAY : 17 SAT
YEAR : 2000
TIME
: 10 : 30 AM
AUTO CLOCK SET : ONAUTO CLOCK SET : ON
SELECT ADJUST
TO EXIT PRESS
MENU
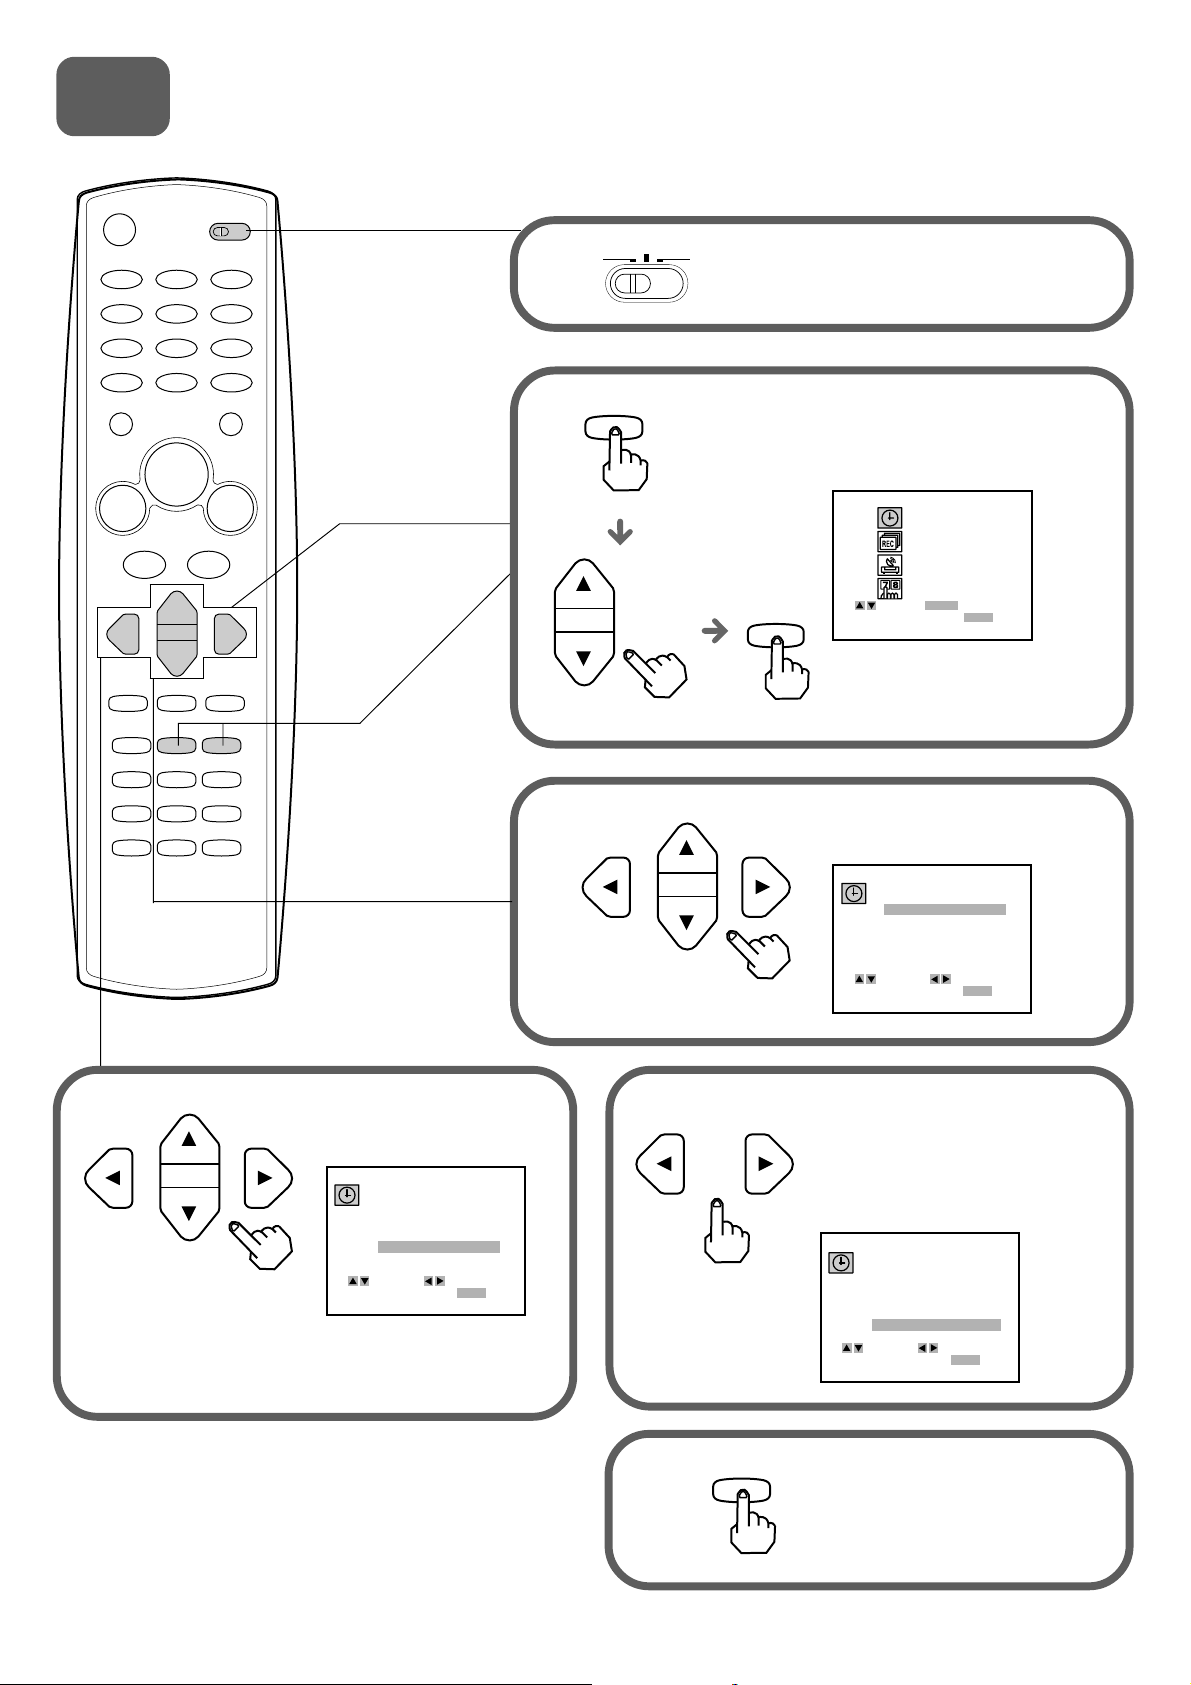
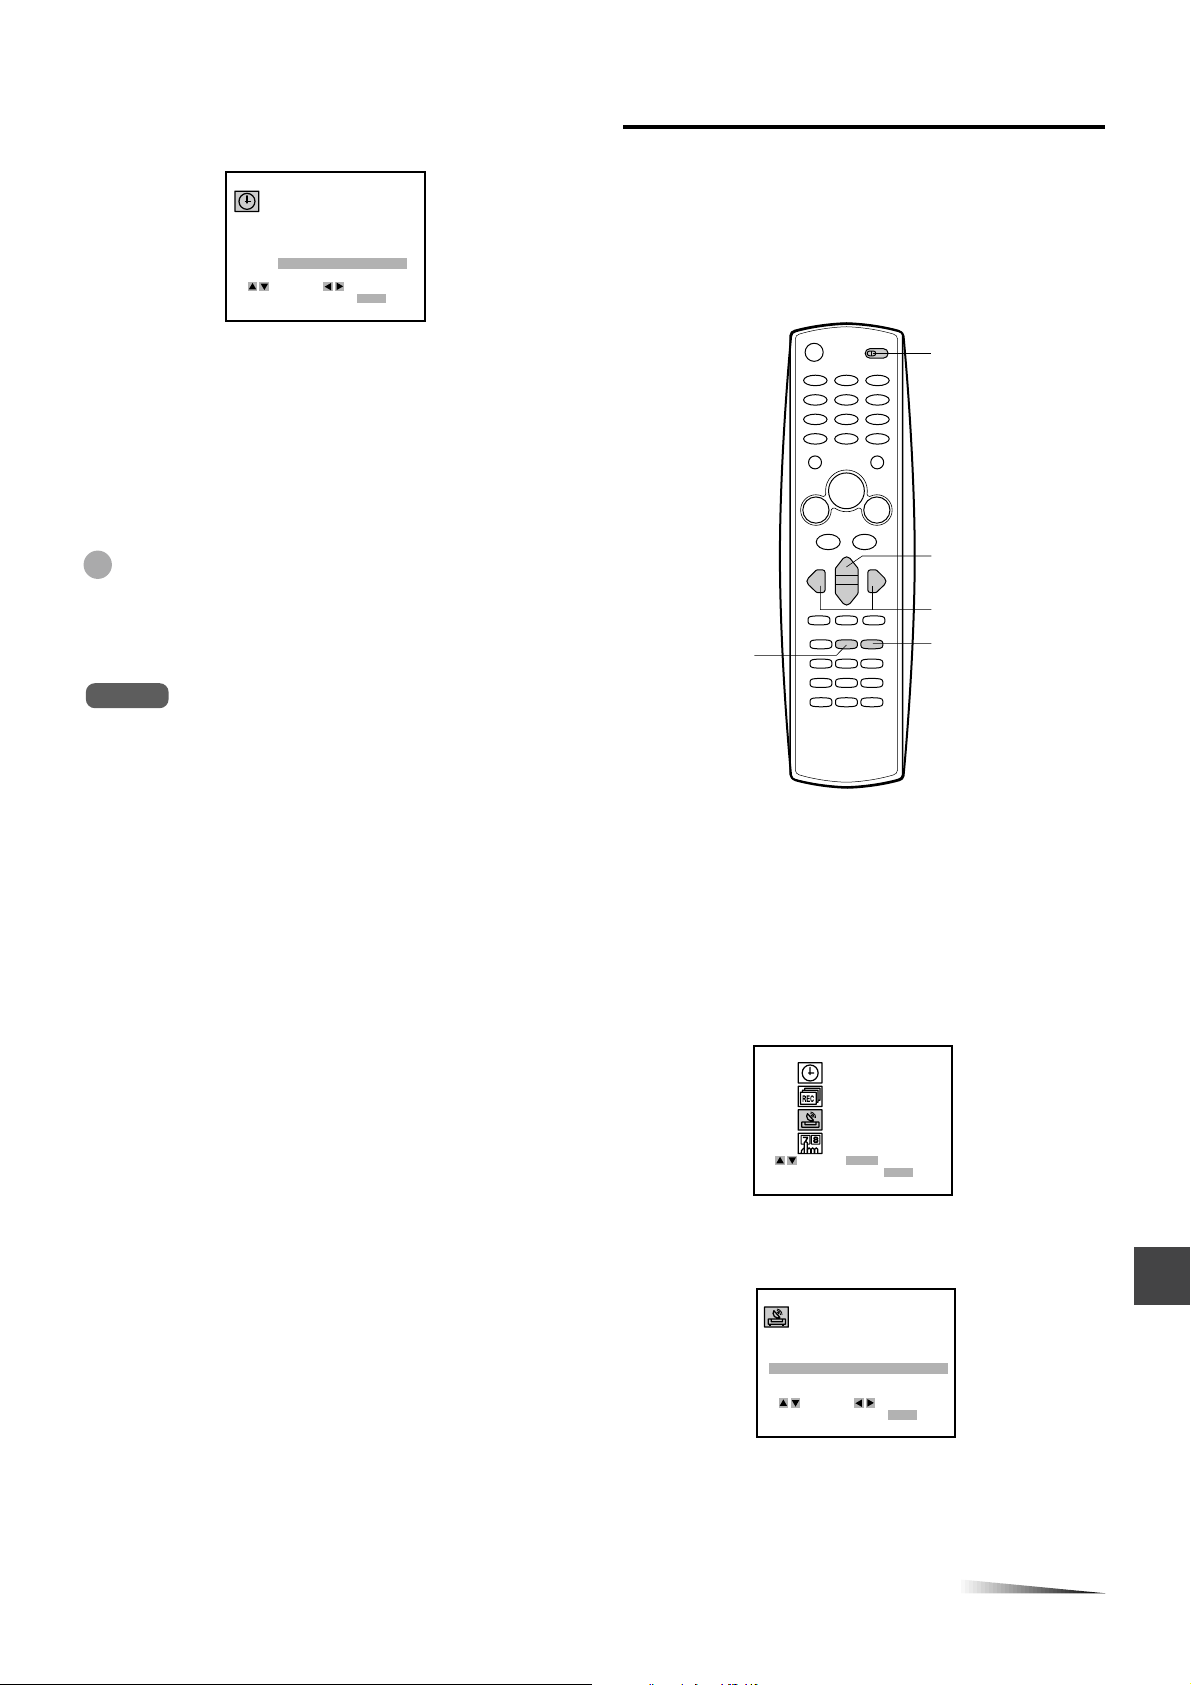
Setting the Clock
You must set the date and time for timer recordings.
CATV/DBS
VCR TV
1
Set the VCR/CATV/DBS/TV
selector to VCR.
2
3
MENU
Press MENU, and press i or
k to select CLOCK, then press
ENTER/DISPLAY.
ENTER
Press j or l to set MONTH,
then press k.
4
Press and hold j or l to
change the setting rapidly.
Set DAY, YEAR and
TIME as in step 3.
MONTH : JUNE
DAY : 17 SAT
YEAR : 2000
TIME
: 10 : 30 AM
AUTO CLOCK SET : OFF
SELECT ADJUST
TO EXIT PRESS
MENU
5
5
6
or
MENU
Press j or l to set AUTO
CLOCK SET to ON.
The VCR automatically corrects
the clock setting once you set
AUTO CLOCK SET to ON.
Press MENU to start the clock.
The normal screen returns.
Page 7
CLOCK
PROGRAM
TUNING
SETUP
SELECT ENTER
TO EXIT PRESS
ENTER
MENU
5
AUTO CHANNEL SET
TUNING BAND :
CH. ADD / DEL :
SOURCE SELECT : TUNERSOURCE SELECT : TUNER
SELECT ADJUST
TO EXIT PRESS
MENU
AUTO CHANNEL SETAUTO CHANNEL SET
TUNING BAND :
CH. ADD / DEL :
SOURCE SELECT :
SELECT ADJUST
TO EXIT PRESS
MENU
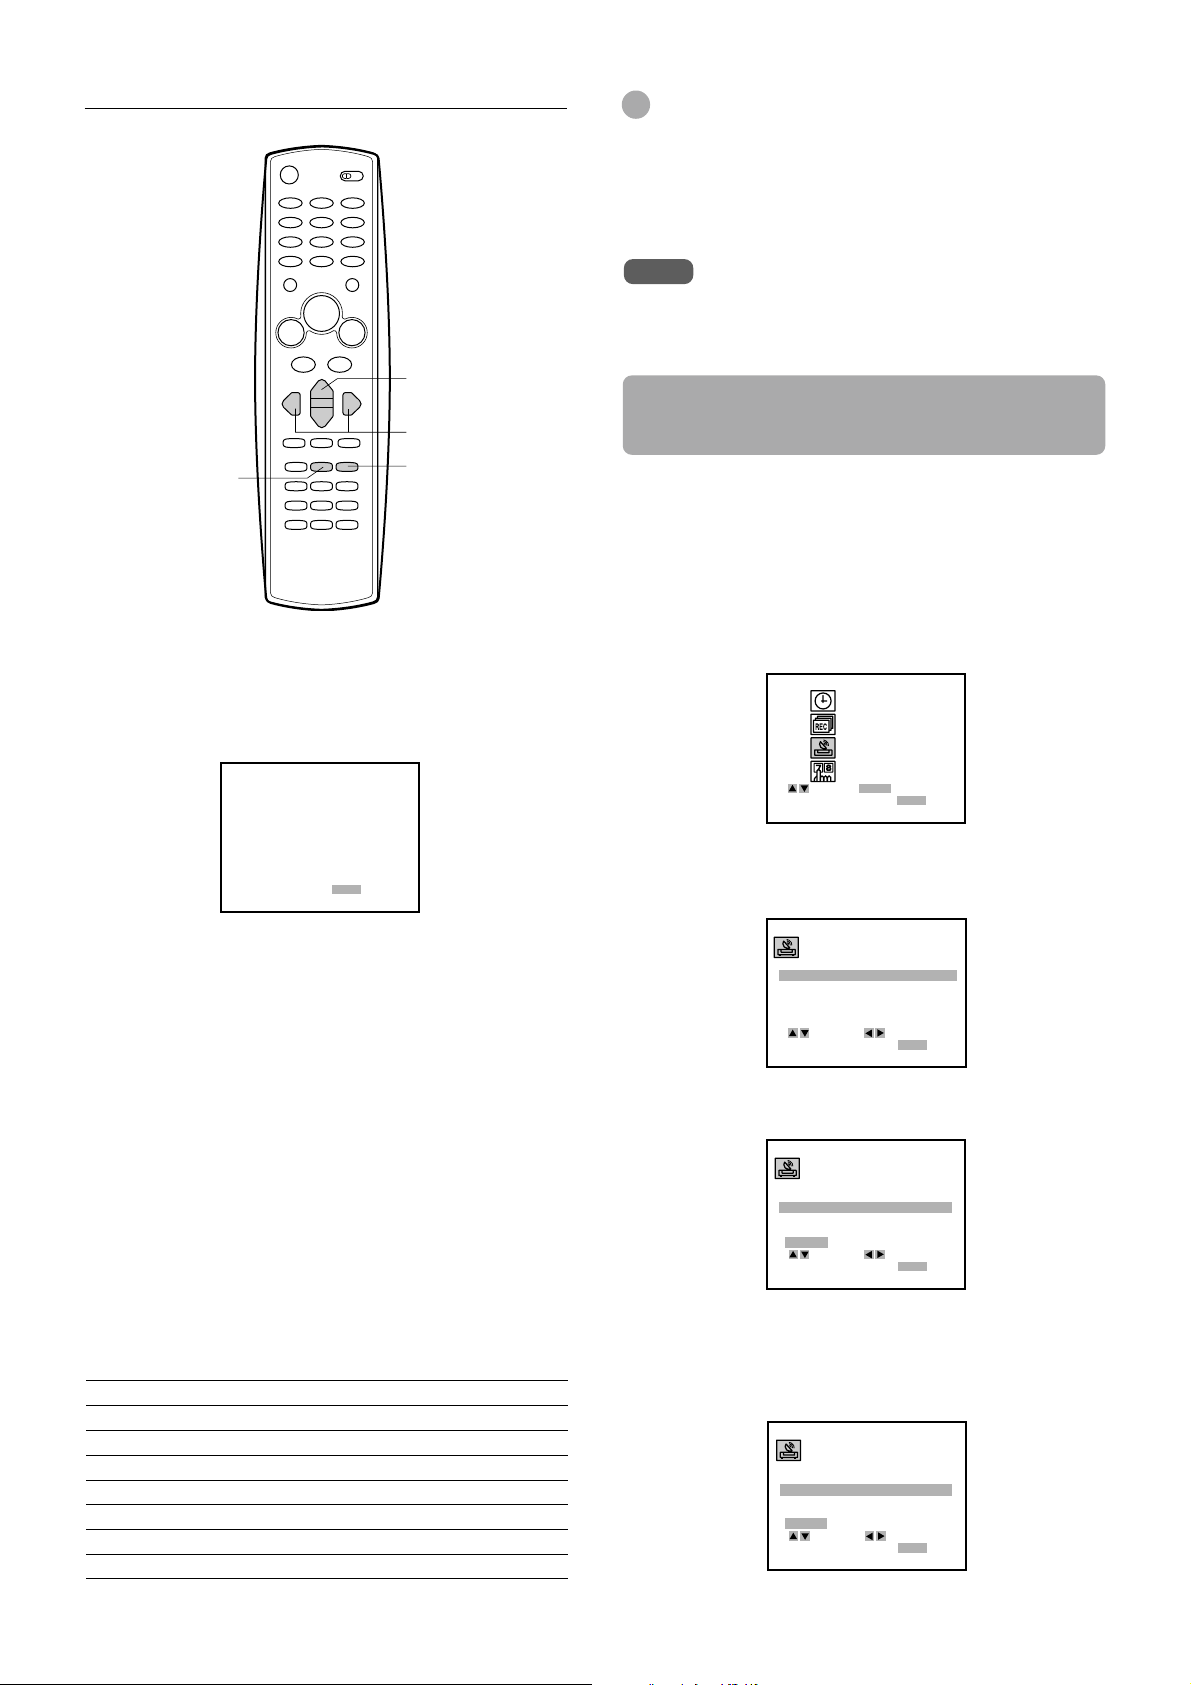
Setting the VCR channels
Before starting
Make sure the VCR channel is not selected "LINE 1" or "LINE 2."
CATV/DBS
VCR TV
1
Set the VCR/CATV/DBS/TV
selector to VCR.
2
3
MENU
Press MENU, press i or k to
select TUNING, then press
ENTER/DISPLAY.
ENTER
Press i or k to select SOURCE
SELECT, then press j or l to
display TUNER.
4
Press i or k to select AUTO
CHANNNEL SET, then press j or l.
All available channels are tuned.
After tuning, the previous screen
returns.
AUTO CHANNEL SET
PROCEEDING
CHANNEL 11
TO EXIT PRESS
MENU
6
5
MENU
Press MENU to return to
the normal screen.
Page 8

Page 9

Page 10
ENGLISH
Warning
To reduce the risk of fire or electric shock, do not
expose this appliance to rain or moisture.
CAUTION
RISK OF ELECTRIC SHOCK
DO NOT OPEN
“CAUTION:TO REDUCE THE RISK OF
ELECTRIC SHOCK,
DO NOT REMOVE COVER (OR BACK).
NO USER-SERVICEABLE PARTS INSIDE.
REFER SERVICING TO QUALIFIED
SERVICE PERSONNEL.”
Explanation of Graphical Symbols
The lightning flash with arrowhead symbol
within an equilateral triangle, is intended to alert
the user to the presence of uninsulated
"dangerous voltage" within the products
enclosure that may be of sufficient magnitude
to constitute a risk of electric shock to person.
The exclamation point within an equilateral
triangle is intended to alert the user to the
presence of important operating and
maintenance (servicing) instruction in the
literature accompanying the appliance.
IMPORTANT SAFETY
INSTRUCTIONS
Read the Operating Instructions carefully and completely
before operating the unit. Be sure to keep the Operating
Instructions for future reference. All warnings and cautions in
the Operating
Instructions and on the unit should be strictly followed, as
well as the safety suggestions below.
Warning
To prevent electric shock or injury, these safety instructions
should be followed in the installation, use and servicing the
unit.
Installation
Attachments - Do not use attachments not recommended
by the unit manufacturer as they may result in the risk of fire,
electric shock or injury to persons.
Water and Moisture - Do not use this unit near water - for
example, near a bathtub, washbowl, kitchen sink, or laundry
tub, in a wet basement, or near a swimming pool, and the
like.
Heat - Do not use this unit near sources of heat, including
heating vents, stoves, or other appliances that generate
heat. It also should not be placed in temperatures less than
5˚C (41˚F) or greater than 35˚C (95˚F ).
Mounting surface - Place the unit on a flat, even surface.
Accessories - Do not place this unit on an unstable cart,
stand, tripod, bracket, or table. The unit may fall, causing
serious injury to a child or an adult, and serious damage to
the appliance. Use only with a cart, stand, tripod, bracket,
or table recommended by the manufacturer, or sold with the
unit. Any mounting of the appliance should follow the
manufacturer’s instructions, and should use a mounting
accessory recommended by the manufacturer.
Portable cart - An appliance and cart combination should
be moved with care. Quick stops, excessive force, and
uneven surfaces may cause the appliance and cart
combination to overturn.
PORTABLE CART WARNING
S3125A
Ventilation - The unit should be situated with adequate
space around it so that proper heat ventilation is assured.
Allow 10 cm clearance from the rear and the top of the unit,
and 5 cm from the each side.
Slots and openings in the cabinet and the back or bottom
are provided for ventilation, and to ensure reliable operation
of the unit and to protect it from overheating, these openings
must not be blocked or covered. The openings should never
be blocked by placing the unit on a bed, sofa, rug or other
similar surface. (This unit should never by placed near or
over a radiator or heat register.) This unit should not be
placed in a built-in installation such as a bookcase unless
proper ventilation is provided.
Object and Liquid Entry - Never push objects of any kind
into this unit through the cabinet slots as they may touch
dangerous voltage points or short-circuit parts that could
result in a fire or electric shock. Never spill liquid of any kind
on the unit.
Electric Power
Power Sources - This unit should be operated only from
the type of power source indicated on the marking label. If
you are not sure of the type of power supply to your home,
consult your appliance dealer or local power company. To
operate unit on battery power, or other sources, refer to the
operating instructions.
Grounding or Polarization - This unit is provided with a
polarized alternating-current line plug (a plug having one
blade wider than the other). This plug will fit into the power
outlet only one way. This is a safety feature. If you are
unable to insert the plug fully into the outlet, try reversing the
plug. If the plug should still fail to fit, contact your electrician
to replace your obsolete outlet. Do not defeat the safety
purpose of the polarized plug.
1
ENGLISH
Page 11
Power-Cord Protection - This unit is provided with an
attachment plug having overload protection. This is a safety
feature. See operating instructions for replacement or
resetting of protective device. If replacement of the plug is
required, be sure the service technician has used a
replacement plug specified by the manufacturer that has the
same overload protection as the original plug.
Overloading - Do not allow anything to reset on the power
cord. Do not overload wall outlets and extension cords as
this can result in fire or electric shock. Do not locate this unit
where the cord will be abused by persons walking on it.
Outdoor Antenna
Power lines - An outside antenna system should not be
located in the vicinity of overhead power lines or other
electric light or power circuits, or where it can fall into such
power lines or circuits. When installing an outside antenna
system, extreme care should be taken to keep from
touching such power lines or circuits as contact with them
might be fatal.
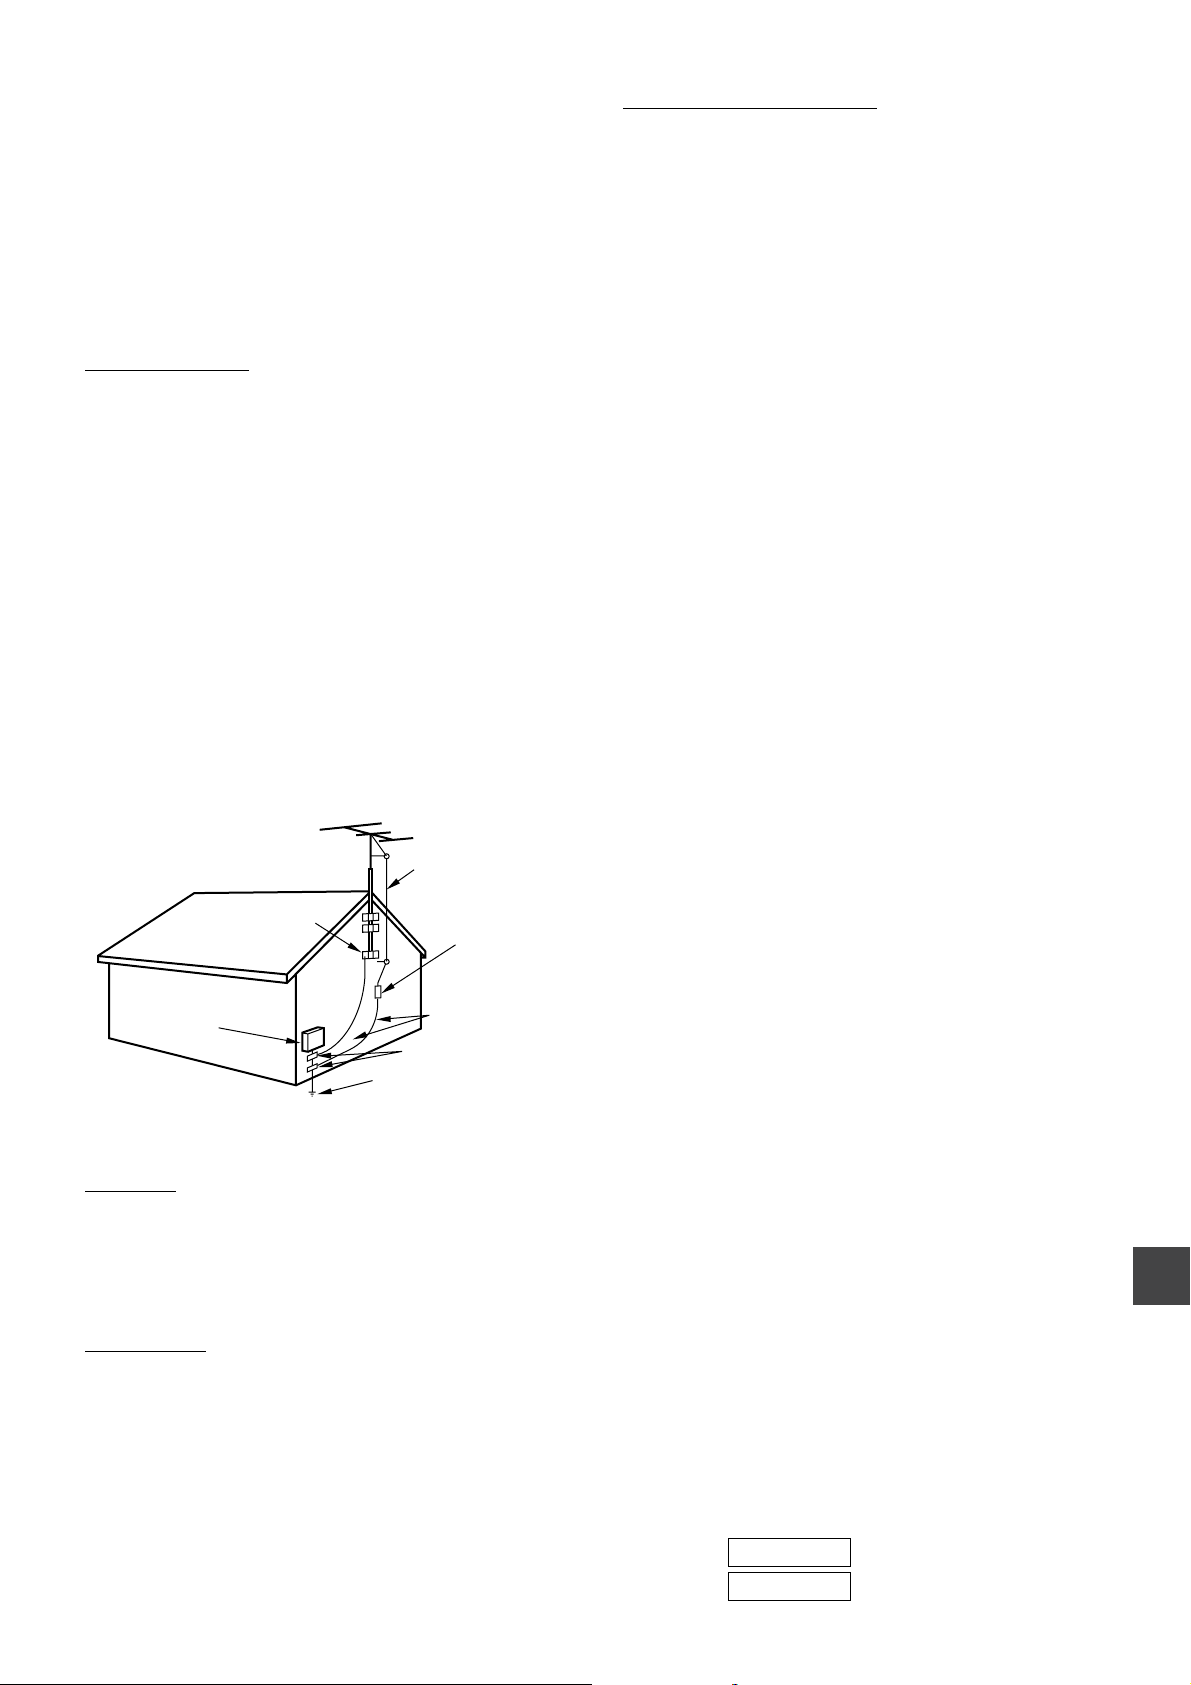
Outdoor Antenna Grounding - If an outside antenna or
cable system is connected to the unit, be sure the antenna
or cable system is grounded so as to provide some
protection against voltage surges and built-up static
charges. Section 810 of the National Electrical Code, ANSI/
NFPA No.70, provides information with regard to proper
grounding of the mast and supporting structure, grounding
of the lead-in wire to an antenna discharge unit, size of
grounding conductors, location of antenna-discharge unit,
connection to grounding electrodes, and requirements for
the grounding electrode. See the figure.
Antenna Grounding According to the National Electrical Cord
ANTENNA LEAD IN WIRE
GROUND CLAMP
ANTENNA DISCHARGE
UNIT
(NEC SECTION 810-20)
Damage Requiring Service
Unplug this unit from the wall outlet and refer servicing to
qualified service personnel under the following conditions:
1) When the power cord or plug is damaged or frayed.
2) If the liquid has been spilled into the unit.
3) If the unit has been exposed to rain or water.
4) If the unit does not operate normally by following the
operating instructions. Adjust only those controls that
are covered by the operating instructions as improper
adjustment of other controls may result in damage
and will often require extensive work by a qualified
technician to restore the unit to normal operation.
5) If the unit has been dropped or the cabinet has been
damaged.
6) When the unit exhibits a distinct change in
performance - this indicates a need for service.
Do not attempt to service this unit yourself as opening or
removing covers may expose you to dangerous voltage or
other hazards. Refer all servicing to qualified service
personnel.
Replacement Parts - When replacement parts are required,
be sure the service technician has used replacement parts
specified by the manufacturer or having the same
characteristics as the original part. Unauthorized
substitutions may result in fire, electric shock or other
hazards.
Safety Check - Upon the completion of any service or
repairs to this unit, ask the service technician to perform
safety checks to determine that the unit is in proper
operating condition.
Note to CATV system installer:
This reminder is provided to call the CATV system installer’s
attention to Article 820-40 of the NEC that provides
guidelines for proper grounding and, in particular, specifies
that the cable ground should be connected to the grounding
system of the building, as close to the point of cable entry as
practical.
ELECTRIC
SERVICE
EQUIPMENT
NEC-NATIONAL ELECTRICAL CODE
GROUNDING
CONDUCTORS
(NEC SECTION 810-21)
GROUND CLAMPS
POWER SERVICE GROUNDING
ELECTRODE SYSTEM
(NEC ART 250 PART H)
Lightning
For added protection for this unit receiver during a lightning
storm, or when it is left unattended and unused for long
periods of time, unplug it from the wall outlet and disconnect
the antenna or cable system. This will prevent damage to
the unit due to lightning and powerline surges.
Maintenance
Cleaning - Unplug this unit from the wall outlet before
cleaning. Do not use liquid cleaners or aerosol cleaners.
Use a damp cloth for cleaning.
OWNER'S RECORD
For your convenience, record the model number and
serial number (you will find them on the rear of your set)
in the space provided below. Please refer to them when
you contact your AIWA dealer in case of difficulty.
Model No.
Serial No.
ENGLISH
2
Page 12
Welcome
Thank you for purchasing this AIWA
product. To optimise the performance of
this unit, please read through this
manual carefully.
Table of contents
Main features of this
VCR
VCR Plus+ system and
One-Touch Playback
You can easily set the timer with the
VCR Plus+ system.
The recorded TV programs can be
played back quickly with One-Touch
Playback.
MTS (Multi-channel TV
Sound) broadcast
You can receive, record and play back
stereo and bilingual TV programs.
MBR (Multi Brand Remote
control)
The remote control can control the TVs
of many manufacturers and CATV/DBS
converters.
Auto Set-Up
You can easily finish the VCR settings of
the TV channels at once.
Preparation
Connecting the VCR ...........................................4
Preparing the remote control ..............................8
Setting the language.........................................11
Setting the clock................................................11
Setting the VCR channels.................................12
Checking the channel set-up to use
VCR Plus+ system............................................14
Playback
Playing back a tape...........................................16
Various search functions...................................17
Recording
Recording a TV program...................................19
Recording with Instant Timer Recording...........20
Setting the timer with VCR Plus+ system .........21
Setting the timer manually ................................23
Dubbing.............................................................24
VCR Plus+ and PlusCode are registered
trademarks of Gemstar Development
Corporation.
The VCR Plus+ system is manufactured
under license from Gemstar Development
Corporation.
Other functions
Multichannel TV Sound (MTS) and Hi-Fi audio
sound system....................................................25
On-screen display.............................................27
Additional information
Troubleshooting ................................................28
Specifications....................................................29
Parts and controls.............................................30
3
ENGLISH
Page 13
PREPARATION
Connecting the VCR
Basic connections
Caution
All connections should be made with both your VCR
and TV unplugged from the Power supply.
75-ohm
coaxial cable
(not supplied)
300-ohm twin-lead cable
(not supplied)
Antenna adaptor
(not supplied)
AERIAL
(VHF/UHF)
RF OUT
3
AC cord
Disconnect the antenna cable from your TV and connect it to the AERIAL
1
To AC outlet
To antenna connector
1
Antenna cable
(supplied)
connector on this VCR.
If the cable is a round-type 75-ohm coaxial cable, connect it directly to the AERIAL
connector.
If the cable is a flat-type 300-ohm twin-lead cable, connect it to the antenna adaptor
(not supplied), and connect the adaptor to the AERIAL connector.
Connect the supplied antenna cable to the RF OUT connector on the VCR
2
and the antenna connector on your TV.
If your TV has a 300-ohm antenna connector, use an antenna splitter (not supplied).
3
Connect the AC cord to the AC outlet.
2
TV TV
Antenna splitter (not supplied)
VU
To VHF antenna
terminal
To UHF antenna terminal
VHFUHF
75-ohm300-ohm
To Connect a TV using the audio and video cables
If your TV has audio/video input jacks, you can connect the VCR and TV using the supplied
audio and video cables.
This connection improves the picture and sound quality.
R AUDIO L
VIDEO
OUT OUT
(MONO)
IN IN
LINE 1
To video
input jack
White
Red
Yellow
Video cable (supplied)
Audio cable (supplied)
To audio
input jacks
CONTINUE
ENGLISH
4
Page 14
Connecting the VCR (continued)
CATV connections
To connect a CATV system without using a CATV converter
CATV system
75-ohm coaxial cable
(not supplied)
AERIAL
(VHF/UHF)
RF OUT
3
AC cord
Connect the cable from the CATV system to the AERIAL connector on this
1
To AC outlet
To antenna connector
1
Antenna cable
(supplied)
VCR.
Connect the supplied antenna cable to the RF OUT connector on the VCR
2
and the antenna connector on your TV.
If your TV has a 300-ohm antenna connector, use an antenna splitter (not supplied).
Connect the AC cord to the AC outlet.
3
To connect a CATV system using a CATV converter
2
TV TV
CATV system
Antenna splitter (not supplied)
VU
To VHF antenna
terminal
To UHF antenna terminal
CATV converter
(not supplied)
VHFUHF
75-ohm300-ohm
75-ohm
coaxial cable
(not supplied)
AERIAL
(VHF/UHF)
RF OUT
4
AC cord
1
Connect the cable from the CATV system to the input connector on the CATV converter.
2
Connect the output connector on the converter to the AERIAL connector on this VCR.
3
Connect the supplied antenna cable to the RF OUT connector on the VCR and the antenna
To AC outlet
To antenna connector
Antenna cable
(supplied)
1
75-ohm coaxial cable
(not supplied)
3
Antenna splitter
(not supplied)
TV
connector on your TV.
If your TV has a 300-ohm antenna connector, use an antenna splitter (not supplied).
4
Connect the AC cord to the AC outlet.
OUTIN
2
VU
TV
VHFUHF
75-ohm300-ohm
5
ENGLISH
Page 15
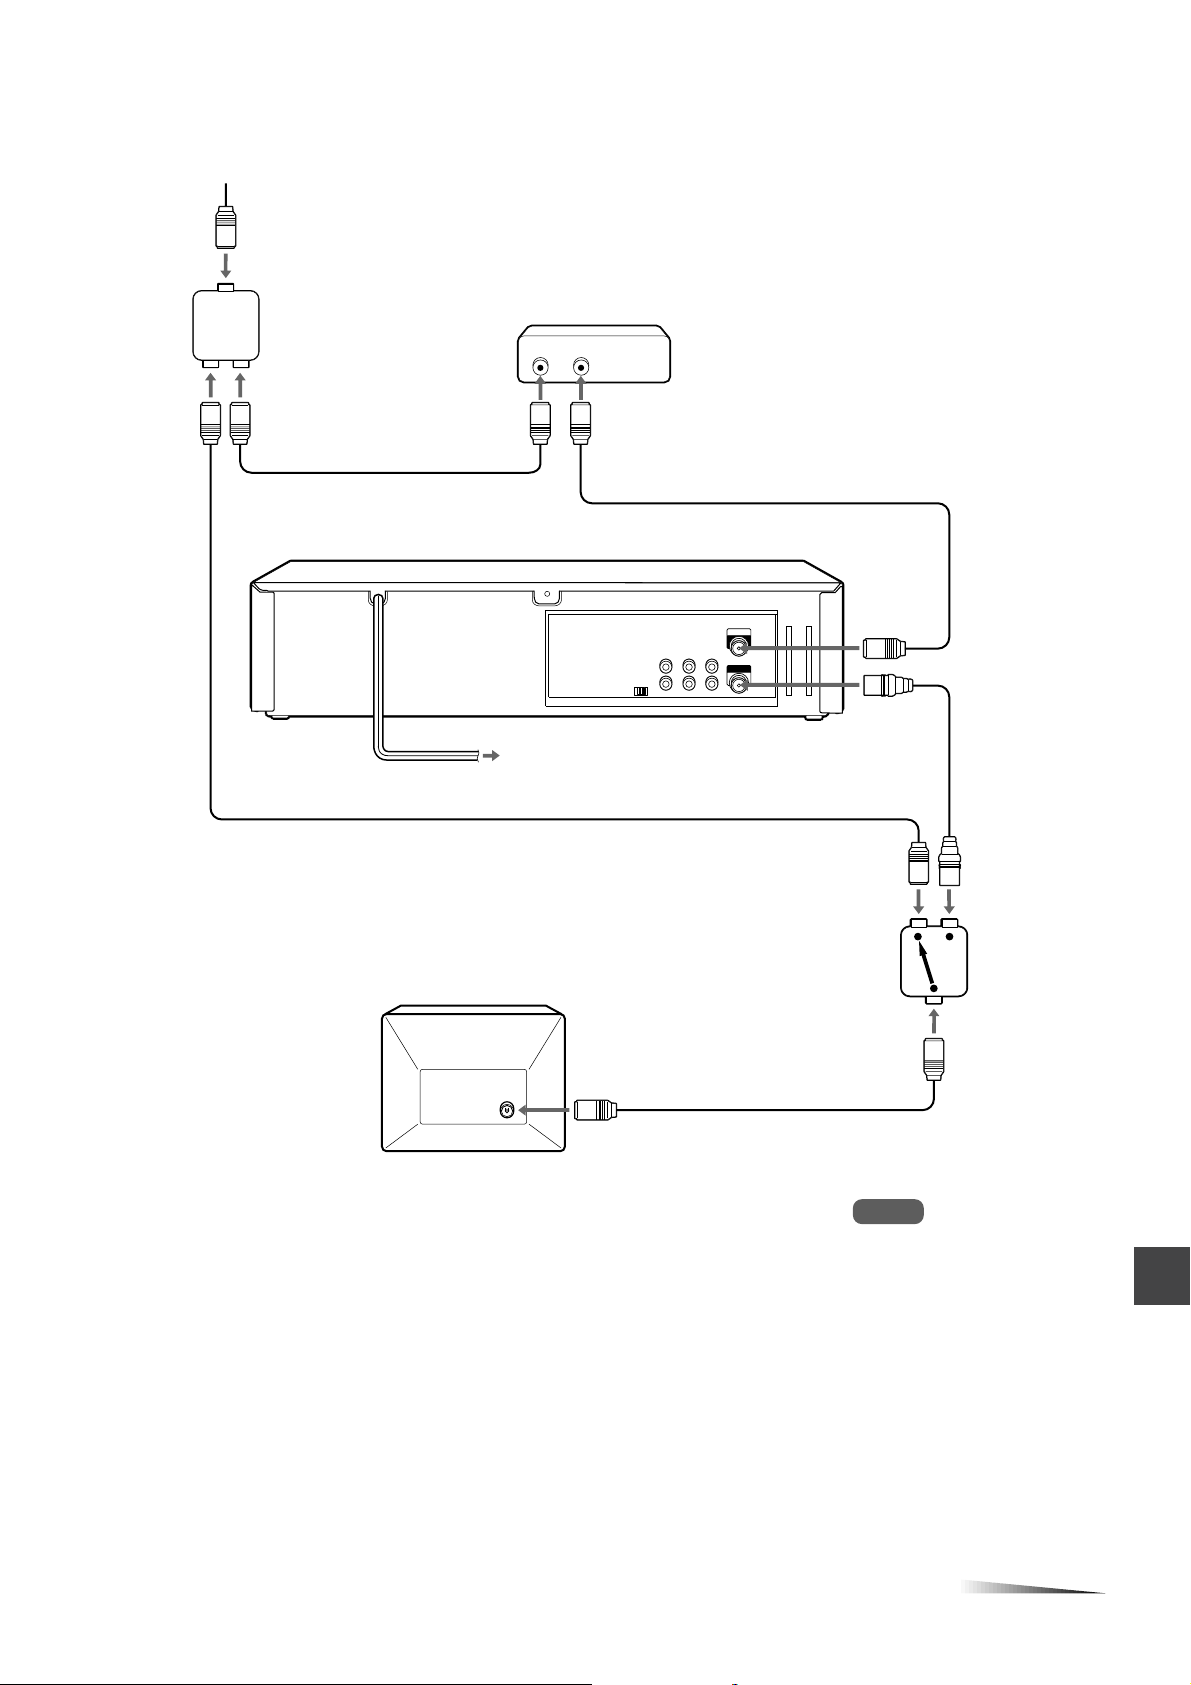
To connect a CATV system using a CATV converter and 2-way splitter
CATV system
1
2-way splitter
(not supplied)
75-ohm coaxial cable
(not supplied)
2
CATV converter
2
6
AC cord
75-ohm coaxial cable (not supplied)
To AC outlet
OUTIN
75-ohm coaxial cable (not supplied)
3
AERIAL
(VHF/UHF)
RF OUT
4
Antenna cable
(supplied)
TV
To antenna connector
75-ohm coaxial cable (not supplied)
5
Connect the cable from the CATV system to the 2-way splitter.
1
Connect one of the output connector of the splitter to the input connector
2
of the CATV converter, and the other to the A/B switch.
Connect the output on the converter to the AERIAL connector on this
3
VCR.
Connect the RF OUT connector on this VCR to the A/B switch using the
4
supplied antenna cable.
Connect the A/B switch to the antenna connector on your TV.
5
Connect the AC cord to the AC outlet.
6
A/B switch
(not supplied)
Note
When you use a CATV converter,
refer to the Instructions of it.
CONTINUE
ENGLISH
6
Page 16
Connecting the VCR (continued)
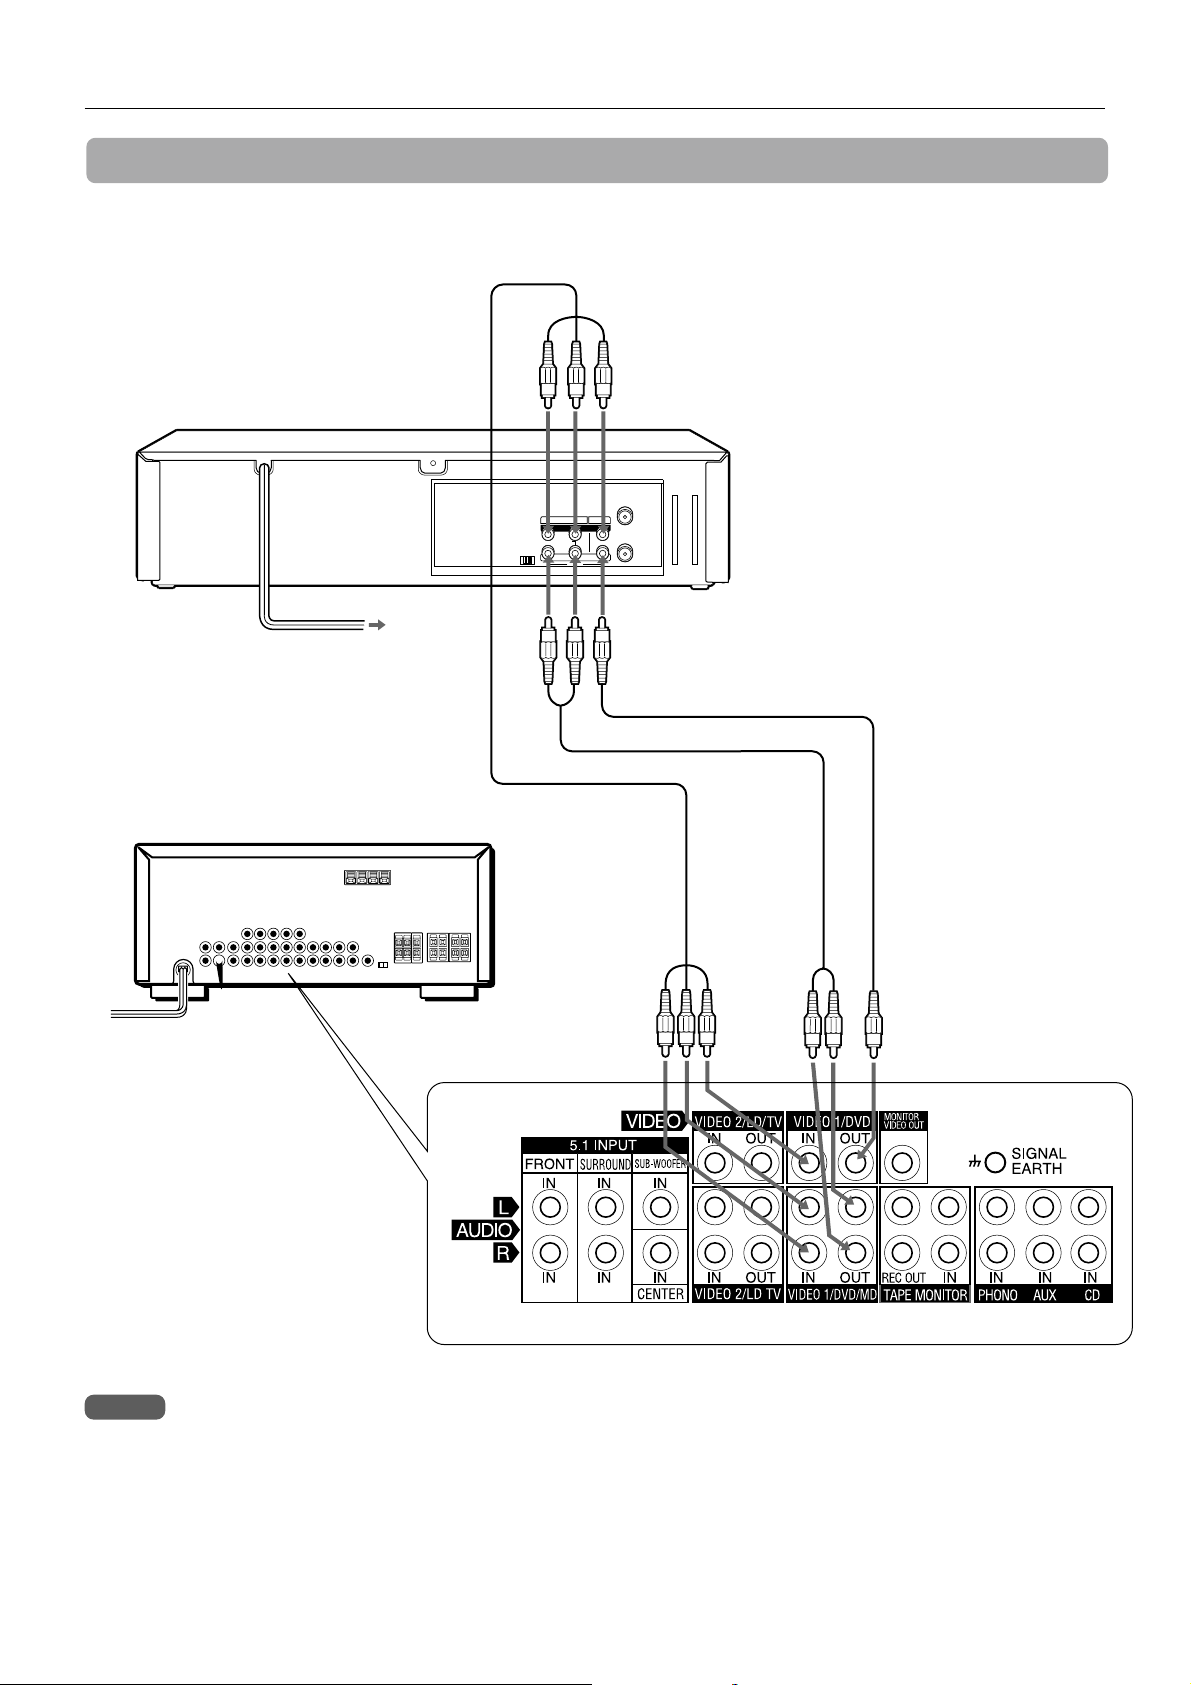
Additional connections
To connect an AV receiver
R AUDIO L
OUT OUT
(MONO)
IN IN
VIDEO
LINE 1
AV receiver
Video cable (supplied)
Audio cable (supplied)
Video/audio cable
(not supplied)
Notes
• To receive an AM band radio broadcast on the AV receiver, turn off the VCR.
• Install the AM antenna of the AV receiver in a location that avoids interference, as far away from
the VCR as possible.
• Depending on the AV receiver, it’s rear panel may not be the same as above. Please refer to the
Operating Instructions of the AV receiver.
ENGLISH
7
Page 17
VCR reception setting
30
30
Preparing the remote control
When using the VCR, the signal passes from the antenna to
the VCR and then out to the TV. Before you use the VCR, a
video output channel must be set on your TV.
AERIAL
(VHF/UHF)
RF OUT
TV/VCR
3CH
3CH 4CH
4CH
Inserting the batteries
Caution
To prevent damage from leakage or explosion, follow
the descriptions below.
• Insert two supplied R03 (size AAA) batteries with the
0 and 9 marks correctly as illustrated.
• Do not mix old batteries with new ones or different
types of batteries.
• Do not throw the batteries into a fire, apply heat to
them or take them apart.
• Do not carry the batteries with keys or other metallic
objects.
Note
Remove the batteries when they have no more power, or when
you do not use the remote control for a long period of time.
When a TV is connected with an antenna
cable
When the TV is connected to the RF OUT connector using a
supplied antenna cable, set the channel selector at the rear
to 3 CH or 4 CH, not employed for broadcasts, and select
the same channel on the TV.
(For watching the VCR, set channel 3 ch or 4 ch on the TV.)
To select a desired TV channel on the TV
Turn the TV on and turn off this VCR.
To see a TV program or video program selected on the
VCR
Turn the TV and VCR on, and press TV/VCR to display
VCR in the display window.
VCR
When a TV is connected with audio and
video cables
When the TV is connected using the supplied audio and
video cables, turn the TV and VCR on, and select the video
input mode on the TV.
Using the remote control
Point the remote control toward remote sensor.
5 m
Remote sensor
7 m
Notes
• The remote control may not operate when there is any
obstruction between the remote control and remote sensor.
• Strong ambient light sources such as a fluorescent lamp or
direct sunlight may cause unreliable operation.
• Using a TV with the same type of infrared remote control
facing the same direction may cause incorrect operation.
• The maximum distance for effective control between the
remote control and remote sensor is 7 meters. When the
maximum operable distance becomes shorter, replace both
batteries with new ones.
• Although you can use the remote control within an angle of
up to 30 degrees in any direction from directly in front of
remote sensor, we recommend a narrower angle for stable
operation.
CONTINUE
ENGLISH
8
Page 18
Preparing the remote control (continued)
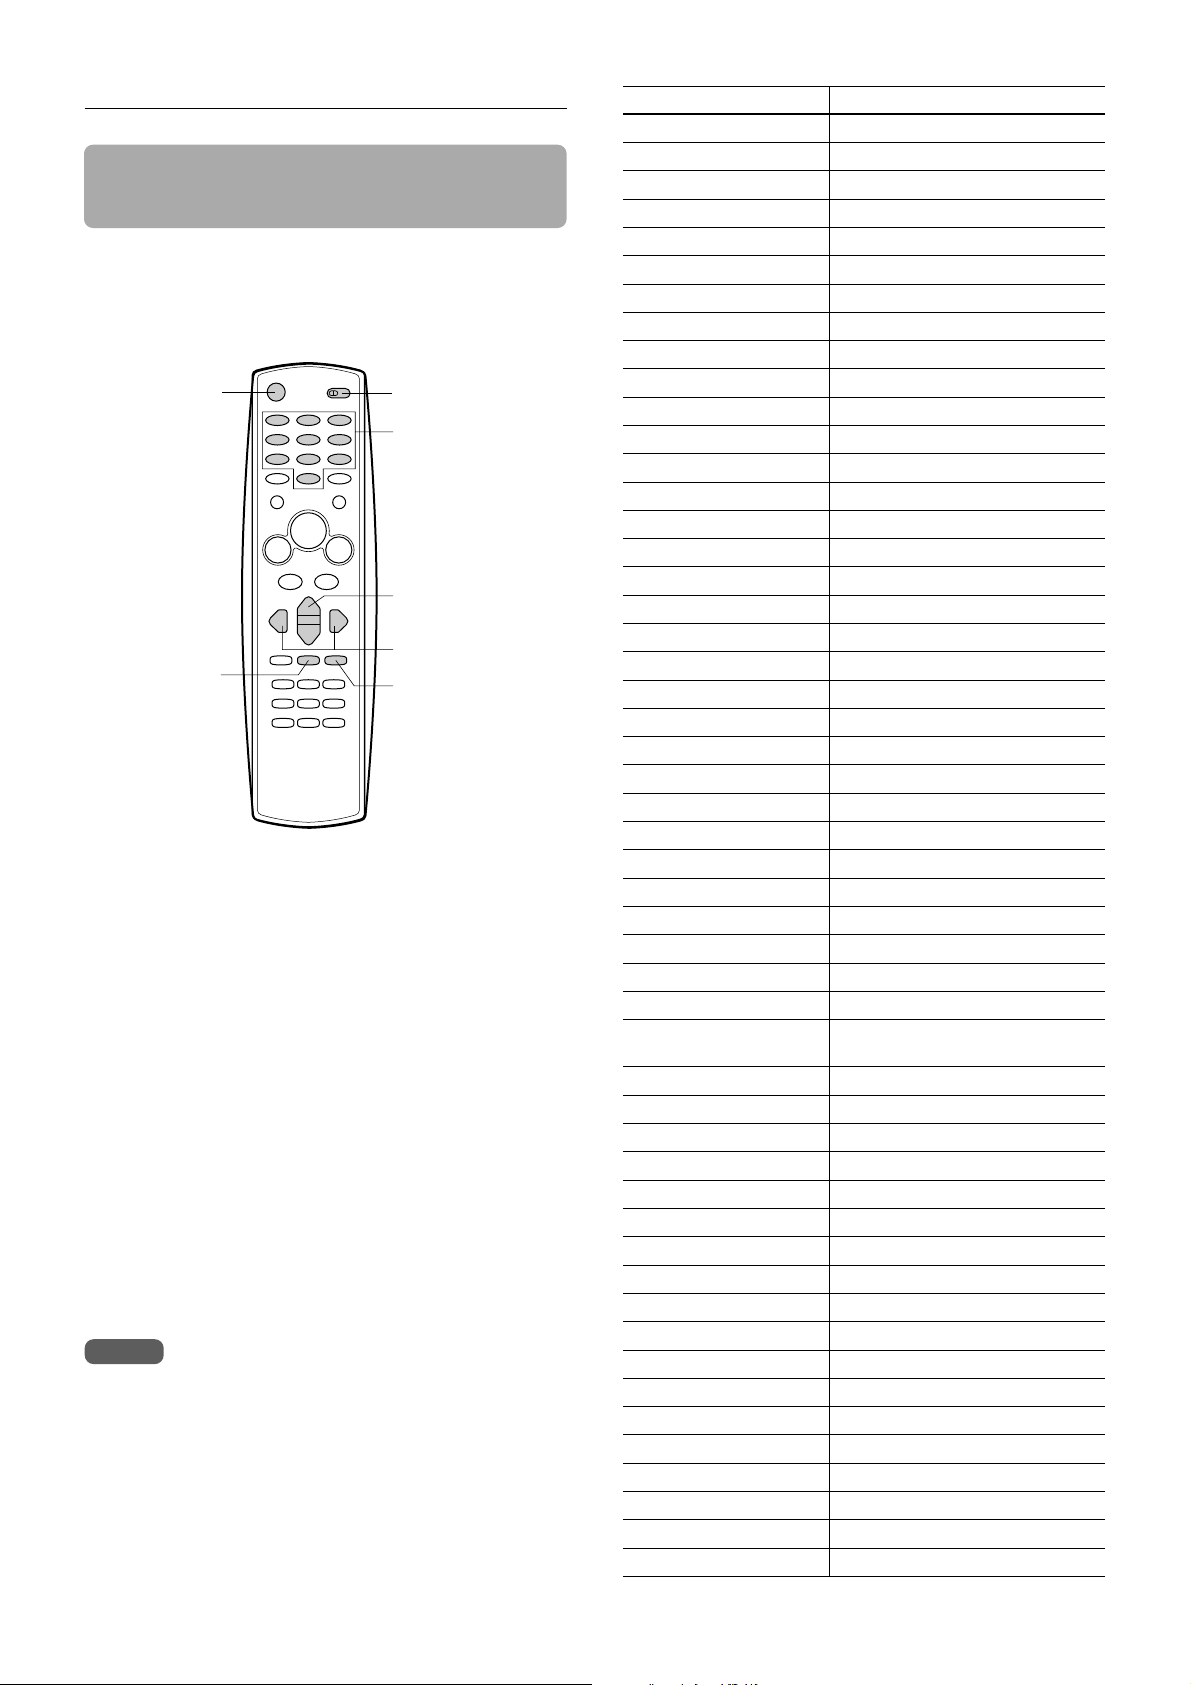
Controlling the TVs and CATVs
CATV/DBSes
The remote control can control the TVs of many
manufacturers and CATV/DBS converters. To control such
TVs and CATV/DBS converters, set the manufacturer’s
code number shown in the table on the right.
POWER
MUTE
Set the VCR/CATV/DBS/TV selector to TV or
1
CATV/DBS.
While holding TV PRESET, press the number
2
buttons to set the code number referring to the
table on the right.
Some manufacturers have more than one code number.
If the remote control does not operate with the TV or
CATV/DBS after setting the code number, try another
number.
To control the TV
POWER, CHANNEL i, k, VOL. +, –, MUTE, TV/VCR and
the number buttons on the remote control are activated.
To control the CATV/DBS
POWER, CHANNEL i, k and the number buttons on the
remote control are activated.
Notes
• Due to the variety of codes used by manufacturers, AIWA
cannot guarantee that the MBR remote control will operate
with every model of the brands listed.
• The number buttons can be used only for channel selection,
but they may not function correctly with some TV models
and CATV/DBS converters.
VCR/CATV/
DBS/TV
Number buttons
CHANNEL i/k
VOL. +/–
TV PRESET
TV manufacturer Code number
ADMIRAL 16, 33, 37, 44, 45
AIWA 70
AKAI 01
AMARK 09
AOC 01
BELL & HOWELL 33
BROKSONIC 18, 19
CANDLE 51
CCE 07
CENTURION 08
CINERAL 43
CITIZEN 49, 50, 51, 52, 53, 54, 55
CORONADO 09
CROWN 09
CURTIS MATHES 01, 03, 08, 33, 37, 44
DAEWOO 16, 38, 39, 40, 41, 42, 43
DAYTRON 01, 08
EMERSON 01, 09, 16, 17, 18, 19
FISHER 28, 29
FUNAI 46, 47
GENERAL ELECTRIC 03, 10, 11, 13, 35, 37, 44
GRADIENTE 01, 56, 57, 63, 67
HITACHI 09, 14, 15, 43
JC PENNEY 01, 08, 10, 27, 35
JVC 20, 21, 63, 67
KIOTE 43
KMC 09
KTV 01, 08, 09, 31
LG (GOLDSTAR) 01, 07, 08, 09, 35, 39, 40
LODGENET 33
LOGIK 33
LXI 09, 24, 25, 26, 27, 28, 29
MAGNAVOX 01, 02, 04, 05, 06, 07, 08, 09,
20, 34, 35, 43, 51, 61, 62, 65
MAJESTIC 33
MARANTZ 01, 32
MEMOREX 33
MGA/MITSUBISHI 01, 08, 32, 34
MONTGOMERY WARD 01, 06, 08, 09, 23, 24, 32, 33, 34
NEC 01, 08
NOBLEX 07
PACKARD BELL 43
PANASONIC 07, 11, 13, 25, 35, 36
PHILCO 01, 06, 07, 08, 09, 15, 38, 43, 58
PHILIPS 06, 07, 43, 61, 62, 65
PIONEER 30
PORTLAND 09
PROSCAN 03, 37, 44
QUASAR 11, 13
RADIO SHACK 16, 17, 23
RCA 01, 03, 37, 44
REALISTIC 16, 17, 23
9
ENGLISH
Page 19
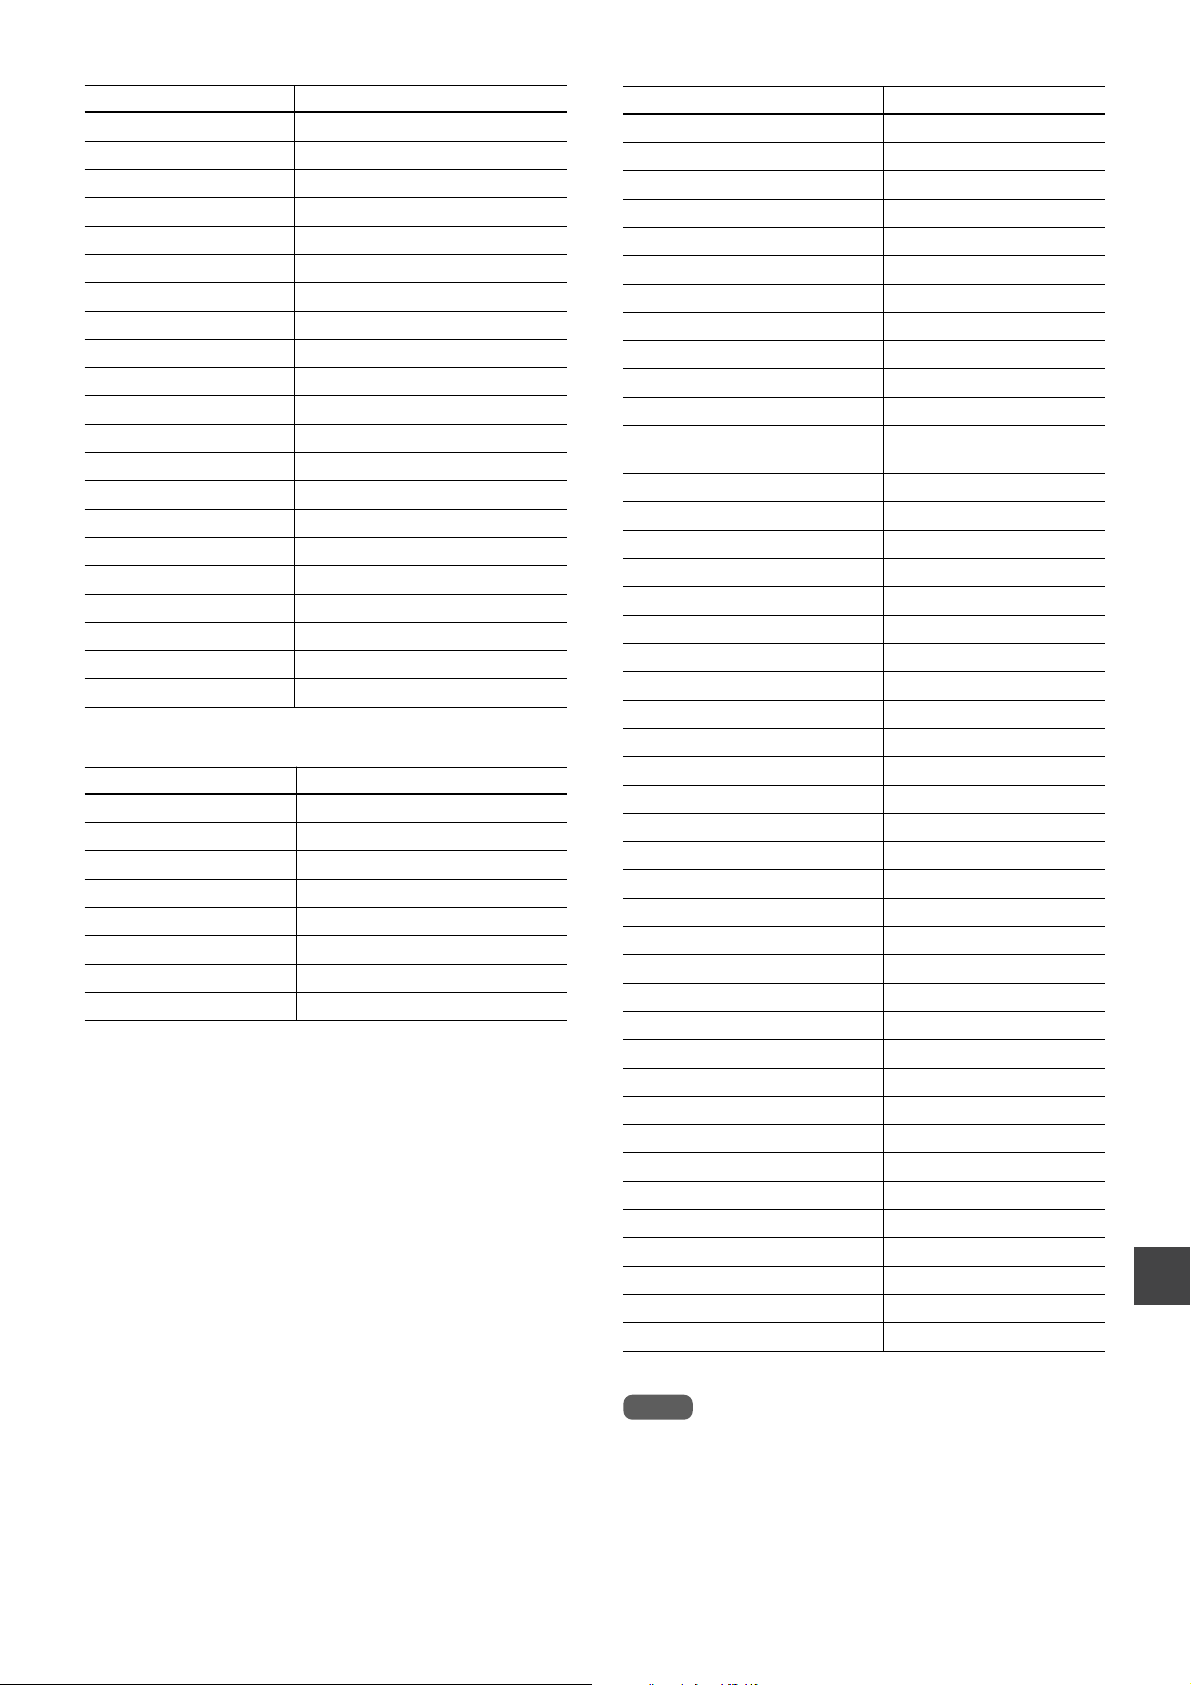
TV manufacturer Code number
SAMPO 08
SAMSUNG 01, 08, 09, 25, 68
SANYO 28, 29
SCOTT 01, 08
SEARS 09, 25, 26, 27, 28, 29
SEMP 64
SHARP 09, 22, 23, 24, 60, 66
SIGNATURE 2000 01, 06, 08, 09, 10, 23, 24, 33, 34
SONY 12, 62
SOUNDESIGN 51
SYLVANIA 01, 04, 05, 06, 07, 08, 35, 51
SYMPHONIC 46, 47
TATUNG 11
TEKNIKA 07, 09, 16, 33, 51
TELERENT 09, 33
THOMSON 69
TORX 08
TOSHIBA 01, 25, 26, 27, 64
WARDS 01, 06, 08, 09, 10, 33, 34
XR1000 48
ZENITH 02, 33, 59
DBS manufacturer Code number
DIRECTV 66
EASTERN 57
GRADIENTE SKY 56
JERROLD 60, 61, 65
RCA 50
SCIENTIFIC ATLANTA 58, 63, 64
SONY 49
TOCOM 58, 59, 62
CATV converter manufacturer Code number
ALLEGRO 46
ARCHER 39
CABLEVIEW 39
CITIZEN 39
CURTIS MATHES 15
EAGLE 24, 25, 28
GEMINI 04, 05, 22, 23
GENERAL ELECTRIC 43
GENERAL INSTRUMENT 04, 05, 07, 09
GOBRAND 39
HAMLIN 33, 34, 35
JERROLD 04, 06, 07, 08, 09, 10, 17,
39
KALE VISION 29
MACOM 03, 40, 41
MAGNAVOX 24, 25, 28, 29, 36, 37
NSC 38
OAK 11, 12, 44
PANASONIC 13, 19, 21
PARAGON 01
PHILIPS 24, 25, 26, 27, 28
PIONEER 13, 14
PULSER 39
RCA 13, 50
REGAL 28
REGENCY 32
SAMSUNG 04, 13, 29
SCIENTIFIC ATLANTA 10, 15, 16, 45, 48
SLMARX 04, 13
SONY 49
SPRUCER 04, 13, 19
STANDARD COMPONENTS 29
STARGATE 04, 05, 13
TELEVIEW 04, 13, 39
TEXSCAN 31
TOCOM 12, 17, 18, 19, 38
UNIDEN 20
UNIKA 39
UNIVERSAL 46, 47
VID TECH 30
VIDEO WAY 01, 42
VIEWSTAR 24, 25, 28
ZENITH 01, 02, 03
ZENITH HT-2000 01
Note
Some TV or CATV/DBS converter manufacturers may not be
listed above.
ENGLISH
10
Page 20
Setting the language
CLOCK
PROGRAM
TUNING
SETUP
SELECT ENTER
TO EXIT PRESS
ENTER
MENU
LANGUAGE SELECT : ENGLISH
LANGUAGE SELECT : ENGLISH
MONTH : MONTH : JUNEJUNE
DAY : 1 THU
YEAR : 2000
TIME
: 12 : 00 AM
AUTO CLOCK SET : OFF
SELECT ADJUST
TO EXIT PRESS
MENU
MONTH : JUNE
DAY : 17 SAT
YEAR : 2000
TIME
: 10 : 30 AM : 10 : 30 AM
AUTO CLOCK SET : OFF
SELECT ADJUST
TO EXIT PRESS
MENU
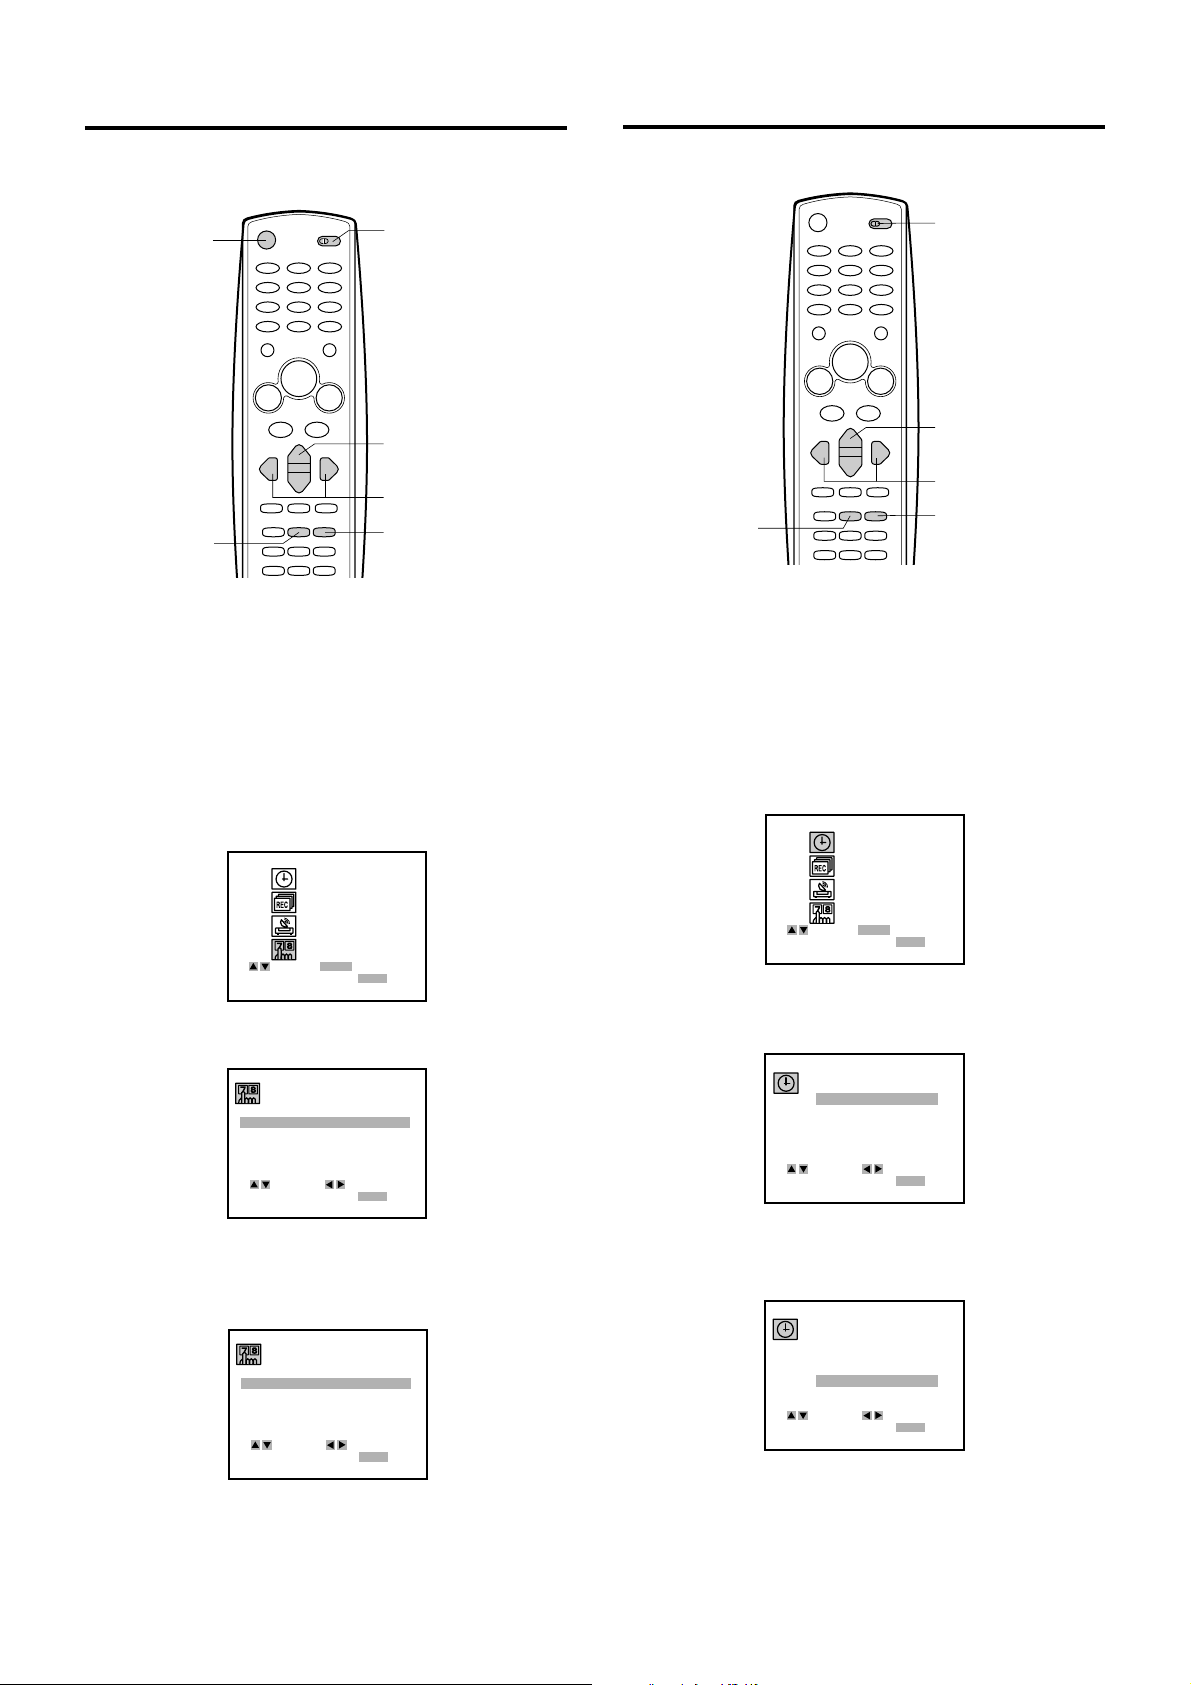
Setting the clock
The on-screen menu can display any of three languages,
English, Spanish and French.
POWER
ENTER/
DISPLAY
VCR/CATV/
DBS/TV
i/k
j/l
MENU
Before starting
Set the VCR/CATV/DBS/TV selector to VCR.
Press POWER to turn on the VCR.
1
You must set the date and time for timer recordings.
VCR/CATV/
DBS/TV
i/k
j/l
ENTER/
MENU
DISPLAY
Before starting
Set the VCR/CATV/DBS/TV selector to VCR.
1
Press MENU.
Press MENU.
2
Press i or k to select SETUP, then press
3
ENTER/DISPLAY.
CLOCK
PROGRAM
TUNING
SETUP
ENTER
SELECT ENTER
TO EXIT PRESS
Press i or k to select LANGUAGE SELECT.
4
FUNCTION OSD : ON
LANGUAGE SELECT : ENGLISH
AUDIO MODE :
BROADCAST TYPE :
AUDIO OUTPUT :
CHANNEL MAPPING
SELECT ADJUST
TO EXIT PRESS
Press j or l to display the desired language.
5
Each time the language changes, the on-screen display
language changes.
MENU
HI-FI
STEREO
STEREO
MENU
Press i or k to select CLOCK, then press
2
ENTER/DISPLAY.
3
Press j or l to set MONTH, then press k.
The day of the week will automatically appear.
4
Set DAY, YEAR and TIME as in step 3.
Press and hold j or l to change the setting rapidly.
6
Press MENU to return to the normal screen.
11
ENGLISH
FUNCTION OSD : ON
LANGUAGE SELECT : ENGLISH
AUDIO MODE :
BROADCAST TYPE :
AUDIO OUTPUT :
CHANNEL MAPPING
SELECT ADJUST
TO EXIT PRESS
STEREO
STEREO
MENU
HI-FI
Page 21
CLOCK
PROGRAM
TUNING
SETUP
SELECT ENTER
TO EXIT PRESS
ENTER
MENU
5
AUTO CLOCK SET : ON
SOURCE SELECT : TUNER
Press j or lto set AUTO CLOCK SET to ON.
The VCR automatically corrects the clock setting once
you set AUTO CLOCK SET to ON.
MONTH : JUNE
DAY : 17 SAT
YEAR : 2000
TIME
: 10 : 30 AM
AUTO CLOCK SET : ON
SELECT ADJUST
TO EXIT PRESS
MENU
Setting the VCR channels
Before Auto Channel Memory, this VCR can receive all
channels in your area by pressing the CHANNEL i or k
button repeatedly. After Auto Channel Memory, you can skip
the channels which are not preset with the CHANNEL i or
k button.
6
Press MENU to start the clock.
The normal screen returns.
To correct the digits while setting
Before pressing MENU in step 6, press i to select the item
you want to correct. Reset the digits using the j or l
button.
Tip
When the power supply is interrupted for more than 60 minutes
or the AC cord is disconnected from the AC wall outlet, the
clock setting is cleared. In this case, you have to set the clock
again.
Notes
• The date can be set from A.D.2000 to A.D.2099.
• AUTO CLOCK functions when
- the VCR’s power is turned off.
- the channel of a broadcaster that offers AUTO CLOCK
service is preset.
VCR/CATV/
DBS/TV
CHANNEL i/k
j/l
ENTER/
DISPLAY
MENU
Before starting
• Set the VCR/CATV/DBS/TV selector to VCR.
• Make sure the VCR channel is not selected “LINE1” or
“LINE2”.
Press MENU.
1
Press i or k to select TUNING, then press
2
ENTER/DISPLAY.
3
Press i or k to select SOURCE SELECT, then
press j or l to display TUNER.
AUTO CHANNEL SET
TUNING BAND :
CH. ADD / DEL :TVCH.14 ADD
SOURCE SELECT : TUNER
SELECT ADJUST
TO EXIT PRESS
MENU
CONTINUE
ENGLISH
12
Page 22
CLOCK
PROGRAM
TUNING
SETUP
SELECT ENTER
TO EXIT PRESS
ENTER
MENU
AUTO CHANNEL SET
TUNING BAND : CATVTUNING BAND : CATV
CH. ADD / DEL :
SOURCE SELECT :
CH.23 ADD
TUNER
SELECT ADJUST
TO EXIT PRESS
MENU
AUTO CHANNEL SET
TUNING BAND :
CH. ADD / DEL : CH. 23 ADDCH. ADD / DEL : CH. 23 ADD
SOURCE SELECT :
CATV
TUNER
SELECT ADJUST
TO EXIT PRESS
MENU
ENTER ADD / DELETE
AUTO CHANNEL SET
TUNING BAND :
CH. ADD / DEL : CH. 25 DELCH. ADD / DEL : CH. 25 DEL
SOURCE SELECT :
CATV
TUNER
SELECT ADJUST
ENTER ADD / DELETE
TO EXIT PRESS
MENU
Setting the VCR channels (continued)
i/k
j/l
ENTER/
DISPLAY
4
Press i or k to select AUTO CHANNEL SET,
MENU
then press j or l.
All available channels in your area are scanned and
stored in the memory of the VCR.
After scanning, the TV screen in step 3 appears.
Tips
• When you perform the Auto Channel Set, the VCR
automatically selects the band (TV or CATV) in which there
are more channels to be preset. To check the band, press k
to select TUNING BAND in the TUNING menu.
• In the display window, “c” is for a CATV channel and “ch” is
for a TV channel.
Note
Once you conduct Auto Channel Set, the previous settings will
be canceled.
Adding or erasing VCR channels
manually
If Auto Channel Set does not set the VCR channel, add
them manually for recording TV programs.
You can also erase the unnecessary VCR channels.
1
Press MENU.
2
Press i or k to select TUNING, then press
ENTER/DISPLAY.
Press MENU to return to the normal screen.
5
If “C” flashes in the display window after
Auto Channel Set
Check the antenna connections and repeat the above
procedure from step 1.
If you still cannot receive the channels, set the VCR
channels manually. See “Adding or erasing VCR channels
manually”.
(Presetting the VCR channels is necessary for recording TV
programs.)
CATV channels
CATV systems use letters and numerals to designate
channels. The table below shows the channel numbers of
the CATV system and the corresponding channel number
displayed on this VCR. For more information on available
channels in your area, consult your local CATV company.
Channels displayed on this VCR CATV channels
ENGLISH
13
AUTO CHANNEL SET
PROCEEDING
CHANNEL 11
TO EXIT PRESS
MENU
01 5A
02 to 13 2 to 13
14 to 36 A to W
37 to 94 W+1 to W+58
95 to 99 A-5 to A-1
100 to 124 W+59 to W+83
125 W+84
3
Press i or k to select TUNING BAND, then
press j or l to display TV or CATV.
4
Press i or k to select CH. ADD/DEL .
Press j or l to select the channel to be
5
erased or added.
When the selected channel has already been set, ADD
appears. When it has not been set, DEL appears.
Page 23

6
Press ENTER/DISPLAY to add or erase the
channel.
If you add the selected channel, “c” or “ch” lights for a
few seconds in the display window. If you erase the
channel, “c” or “ch” flashes for a few seconds in the
display window.
7
If you want to add or erase other channels,
repeat steps 5 and 6.
Press MENU to return to the normal screen.
8
Tip
In the display window, “c” is for a CATV channel and “ch” is for
a TV channel.
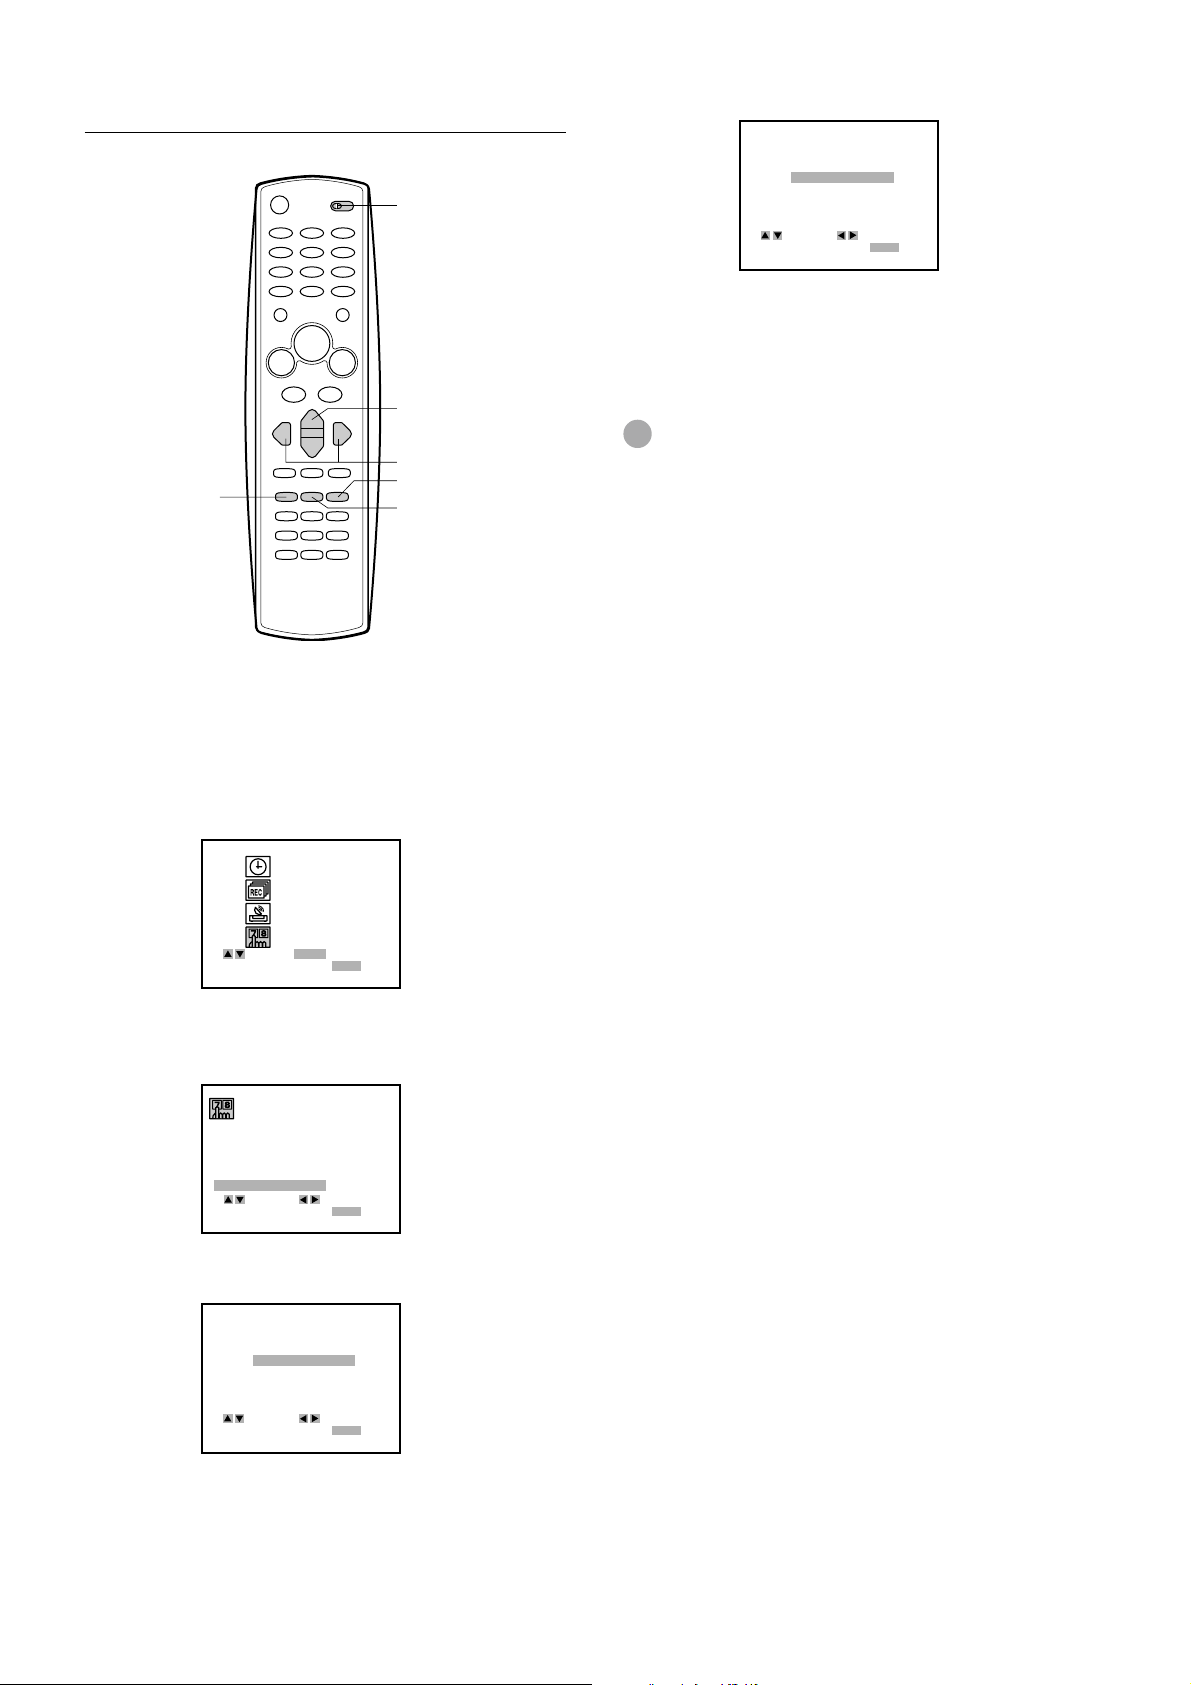
Checking the channel set-up
to use VCR Plus+ system
To set the timer using VCR Plus+ system, you have to
check whether the VCR channel numbers match the guide
channels which are assigned to the TV stations.
If they do not match, the VCR Plus+ system does not
function correctly. In this case, coordinate the number.
For example
For each channel your VCR receives, use the channel line
up chart to check that the channel numbers match. For
example, SHOWTIME is listed in the channel line up chart
(under the VCR Plus+ Code) as channel 38, your VCR
receives SHOWTIME on channel 14, you need to coordinate
these numbers by locating guide channel 38 (under GUIDE
CH). Next enter your SHOWTIME channel 14 (under
CHANNEL) .
Continue this process until all channels match.
Sample Channel Line Up Chart
TV Station
WCBS New York CBS 02 02
WNBC New York NBC 04 04
WNYW New York NYW 05 05
WABC New York ABC 07 07
A&E
BET
CNBC
CSPAN
DSC Discovery Channel 37 63
DIS Disney Channel 53 27
MAX Cinemax 45 15
SHO Showtime 38 14
USA USA Network 44 40
• Channel Guide listings are available in your local TV Guide
and Newspaper.
Arts & Entertainment
Black Entertainment
Consumer News & Business
Government Business
VCR Plus+
Code
39 44
57 23
23 16
28 54
Local Cable Company
Channel Number
CONTINUE
ENGLISH
14
Page 24
Checking the channel set-up to use VCR Plus+
38 – – –
GUIDE CH CHANNEL
37 – – –
38 14
39 – – –
40 – – –
41 – – –
42 – – –
CHANNEL MAPPING
SELECT ADJUST
TO EXIT PRESS
MENU
CHANNEL MAPPING
system (continued)
VCR/CATV/
DBS/TV
i/k
j/l
CLEAR
MENU
ENTER/
DISPLAY
Press j or l to display CHANNEL “14.”
5
Repeat steps 4 and 5 until all necessary
6
channel numbers are set.
7
Press MENU to return to the normal screen.
Tip
To cancel the CHANNEL setting, press CLEAR in step 5.
Before starting
Set the VCR/CATV/DBS/TV selector to VCR.
Press MENU.
1
Press i or k to select SETUP, then press
2
ENTER/DISPLAY.
CLOCK
PROGRAM
TUNING
SETUP
ENTER
SELECT ENTER
TO EXIT PRESS
Press i or k to select CHANNEL MAPPING,
3
MENU
then press j or l.
FUNCTION OSD : ON
LANGUAGE SELECT : ENGLISH
AUDIO MODE :
BROADCAST TYPE :
AUDIO OUTPUT :
CHANNEL MAPPING
SELECT ADJUST
TO EXIT PRESS
HI-FI
STEREO
STEREO
MENU
Press i or k to select GUIDE CH “38.”
4
15
ENGLISH
CHANNEL MAPPING
GUIDE CH CHANNEL
37 – – –
38 – – –
39 – – –
40 – – –
41 – – –
42 – – –
SELECT ADJUST
TO EXIT PRESS
MENU
Page 25
PLAYBACK
Playing back a tape
POWER
CPLAY
fREW/[
aPAUSE/STILL
SLOW
A-TR
Before starting
• Turn on your TV and set it for the VCR reception.
• Set the VCR/CATV/DBS/TV selector to VCR.
Insert a cassette.
1
• The power turns on automatically.
• Playback starts immediately if the erasure prevention
tab has been removed from the cassette.
2
Press C PLAY to start playback.
To stop playback
Press s STOP.
Notes
• When the tape reaches the end during playback, fastforward, forward search, index search, AD-skip or slow
motion playback, the VCR automatically rewinds the tape to
the beginning, ejects the cassette, and turns the power off
(Auto rewind function).
• The VCR selects the tape speed, SP, LP or EP,
automatically.
• When a cassette is inserted, the clock display in the display
window changes to the tape counter display.
• You can play frame-by-frame during still by pressing
a PAUSE/STILL.
VCR/CATV/
DBS/TV
zEJECT
gF FWD/]
sSTOP
TRACKING +/-
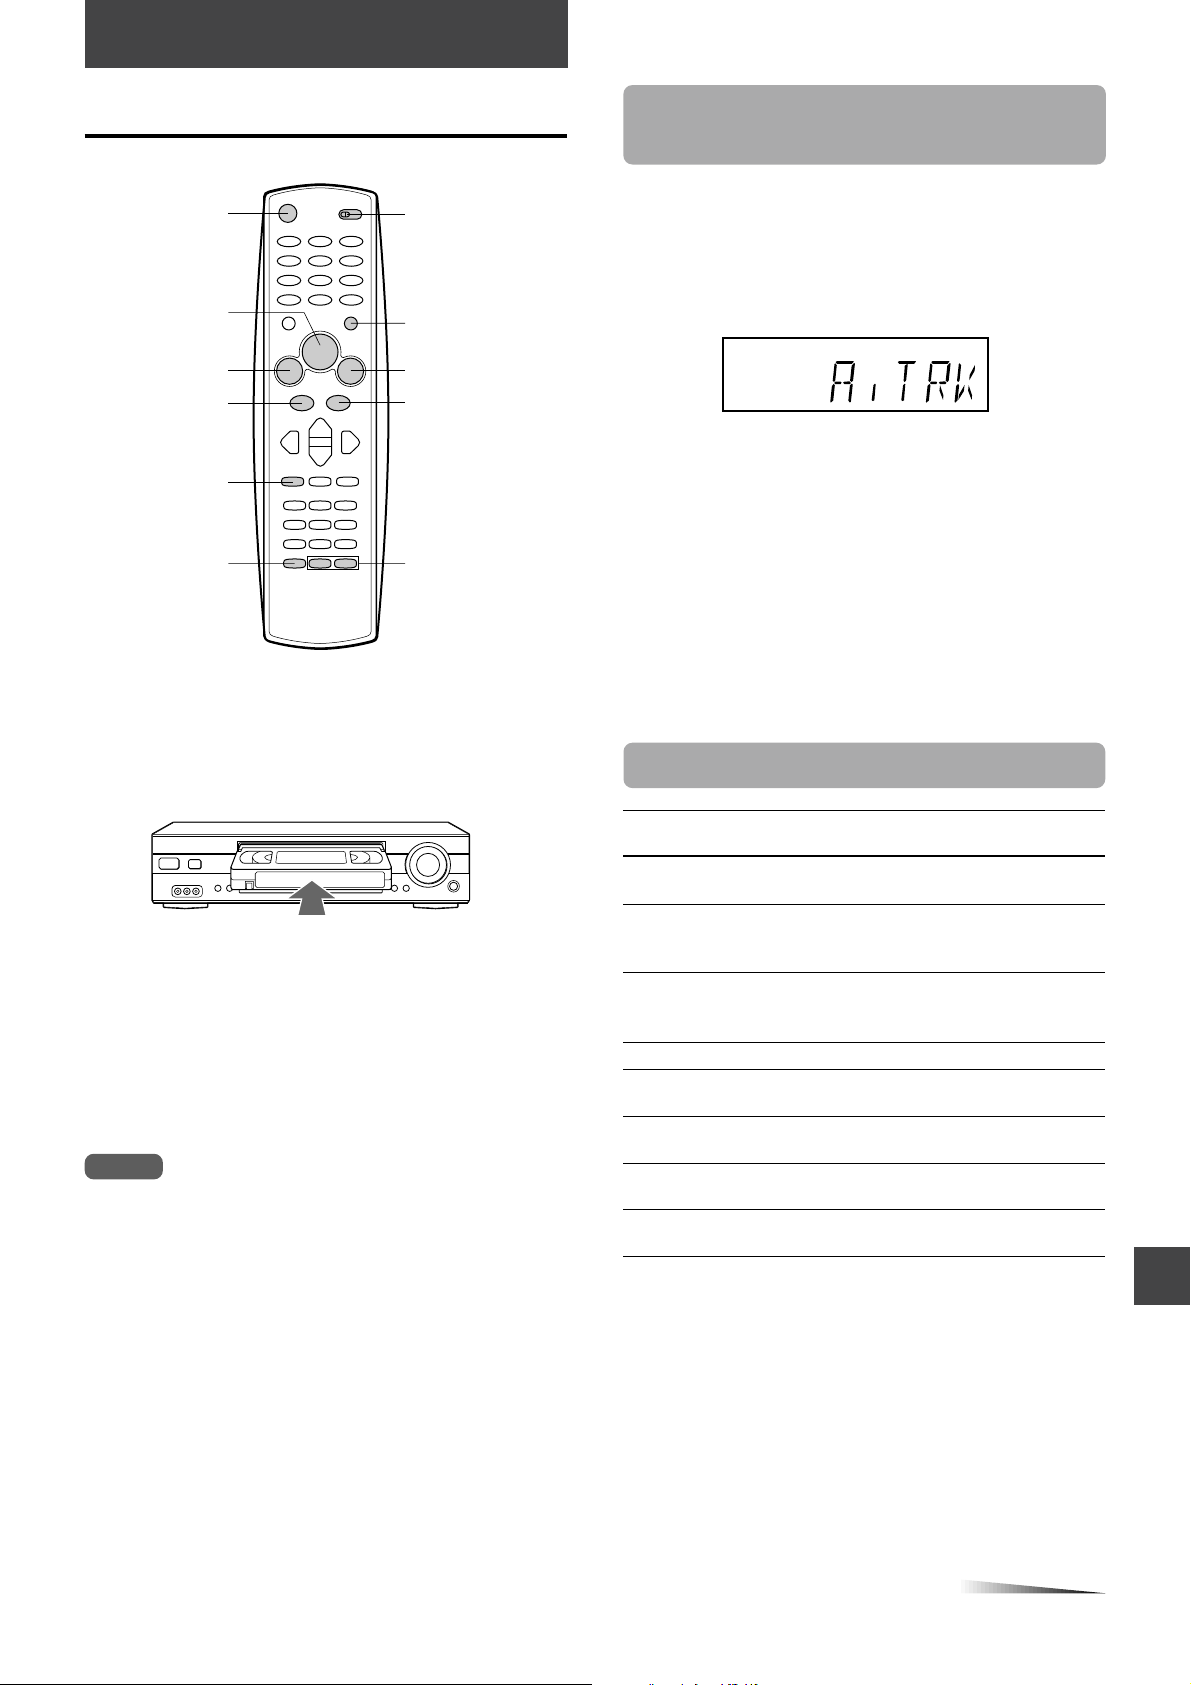
If you cannot get a clear playback
picture
Although the VCR adjusts the tracking automatically, you
may need to adjust the tracking manually if the tape quality
is too poor.
While the VCR is adjusting the tracking automatically,
“A. TRK” (Automatic Tracking) flashes in the display
window. It goes off after the adjustment is complete.
TIMER VCR REM BILSAP ST
REC
SP LP EP
If the picture and the sound have noise, try manual tracking.
M
Hi-Fi
To adjust the tracking manually
During playback, press TRACKING +, – on the remote
control, CHANNEL N or M on the VCR repeatedly until
you get the best possible picture. (Automatic Tracking is
canceled.)
To return to the automatic tracking
Press A-TR.
Additional functions
To
Make a picture still
Fast-forward the
tape
Rewind the tape
Eject the cassette
Search forward at
high speed
Search reverse at
high speed
Play back at slow
speed
Play frame-by-
frame
Press
a PAUSE/STILL
during playback
g F FWD/]
during stop
f REW/[
during stop
z EJECT
g F FWD/]
during playback
f REW/[
during playback
SLOW during
playback
a PAUSE/STILL
repeatedly during still
To return to the
original mode
Press
C PLAY
Press
s STOP.
Press
s STOP.
—
Press
C PLAY.
Press
C PLAY.
Press
C PLAY.
Press
C PLAY.
CONTINUE
ENGLISH
16
Page 26
Playing back a tape (continued)
Various search functions
POWER
zEJECT
fREW/[
aPAUSE/STILL
gF FWD/]
CHANNEL i/k
AD-SKIP
TRACKING +/-
To watch the picture of a tape during fastforward or rewind — Skip search
Hold down g F FWD/] or f REW/[ during fastforward or rewind. The VCR switches forward or reverse
search.
Release the button to return to fast-forward or rewind mode.
To skip an advertisement
Press AD-SKIP during playback. The VCR searches forward
approximately 30 seconds of the recorded time.
Each press changes the recorded time of forward search in
30 seconds increments to a maximum of 3 minutes.
After forward search, VCR returns to the normal playback.
During AD-skip, the counter does not register blank portions
with no recorded signal.
To turn off the VCR automatically after
rewinding
Press POWER during rewind. REW flashes on the TV screen.
The VCR turns the power off after rewinding the tape to the
beginning.
Tips
• If you press z EJECT while the power is off, the VCR
automatically turns the power on, ejects the cassette, and
turns the power off.
• You can adjust unstable pictures by pressing the TRACKING
+ or – button repeatedly during still.
• Depending on the tape, noise lines may appear or color may
fade during still and slow motion playback. You can remove
the noise lines by pressing the TRACKING +, – on the remote
control, CHANNEL N or M on the VCR repeatedly.
• Noise lines may appear or color may fade during forward,
and reverse searches. You can remove the lines by pressing
the TRACKING + or – button repeatedly.
VCR/CATV/
DBS/TV
Number
buttons
CPLAY
fREW/[
SLOW
ENTER/DISPLAY
CLEAR
ZERO {
REC.END
SEARCH
gF FWD/]
sSTOP
CHANNEL i/k
VISS
TRACKING +/-
Before starting
Set the VCR/CATV/DBS/TV selector to VCR.
Rewinding or fast-forwarding to a
specific point — Zero Return
Press CLEAR at the point you want to locate
1
later.
• The tape counter in the display window resets to
“0:00:00.”
• If the clock display appears in the display window,
press ENTER/DISPLAY repeatedly.
M
VCR REM BILSAP ST
TIMER
REC
LP EP
SP
After playback or recording, press s STOP,
2
then ZERO {.
The tape automatically stops when the tape counter
returns to about “0:00:00.”
Tip
You can also see the tape counter in the TV screen. Press
ENTER/DISPLAY repeatedly until the tape counter appears.
Notes
• When you insert a cassette, the tape counter is reset to
“0:00:00.”
• The tape counter not work while playing unrecorded portions
of a tape.
Hi-Fi
Notes
• If a still picture lasts for more than 5 minutes, the VCR will
automatically enter stop mode to protect the tape.
• If forward, reverse searches and slow motion playback last
for 3 minutes, the VCR will automatically enter playback
mode to protect the tape.
• The sound will be muted during forward, reverse searches
and still.
ENGLISH
17
Page 27
Searching with the index function
REC. END SEARCH
recordedrecorded
blankblank
Press REC.END SEARCH
Rewind (after
fast -forwarding
for four secons)
Stop
recorded
blank
Press REC.END SEARCH
Fast-forward
Stop
later recordedlater recorded
blankblank
Previous recorded
— Index Search
The VCR automatically marks an index signal on the tape
each time recording starts. You can use these signals to find
the beginning of any recording.
Press VISS during playback or stop.
1
Press the number buttons (up to 99) to select
2
the index number.
When selecting the numbers less than 10, press 0 to
enter tens digit and then press the buttons 1 through 9 to
enter ones digit.
VISS 03
Index number
3
Press g F FWD/] (for succeeding
programs) or f REW/[ (for preceding
programs).
The VCR starts searching.
Playback starts automatically from the beginning of the
specified recording.
FF or REW appears.
FF
SP
Notes
• You can also use the display window to check the index
number you specified. “VISS” and the index number will
appear in the display window.
• The index signal should be at least 1 minute apart in SP
mode, 2 minutes apart in LP mode, and 3 minutes apart in
EP mode. Otherwise, the VCR cannot detect them properly.
• The index signal may not be detected on damaged or worn
out tapes.
• The index signal at the beginning of a recorded tape may not
be detected.
• The index signal may not be detected if it is extremely close
to the point where the search began.
• The current tape speed indicator appears during searching.
This does not indicate the tape speed of the tape you are using.
Searching the end of the recorded
program — REC. End Search
You can fast-foward/rewind the tape at the end of the
recorded program automatically.
Before starting
Set the VCR/CATV/DBS/TV selector to VCR.
Press REC. END SEARCH during stop.
The unit starts searching.
Searching stops automatically after fast-fowarding or
rewinding as below;
Fast-foward
To search the next index signal
continuously
Press VISS during playback or stop. Then press
g F FWD/] or f REW/[. When the next index
signal is found, playback starts automatically. After 5
seconds, the VCR goes to fast-forward or rewind.
At the desired scene, press C PLAY to return to the normal
playback.
V. SEARCH 03
FF
SP
V. SCAN 00
Rewind
recorded
recorded blank
Fast-forward
Press REC.END SEARCH
blank
Stop
To stop REC.End Search
Press s STOP.
Notes
• When the tape does not have blank space, searching
stops at the end of the tape.
• If from the point where REC. End Search begins there is
less than 5 minutes of recorded tape left in SP mode, 10
minutes in LP mode or 15 minutes in EP mode, REC. End
Search may not work completely.
• If a tape has been recorded over in a different mode, either
SP or LP mode, then REC. End Search may not work
completely.
ENGLISH
18
Page 28
RECORDING
Recording a TV program
VCR /CATV/DBS/ TV
Number
buttons
TV/VCR
wREC/ITR
aPAUSE/STILL
OTPB
0/INPUT
sSTOP
Press CHANNEL i or k on the remote control,
3
CHANNEL N or M on the VCR, or number
buttons to select the channel to record.
If you use the number buttons, it will take a few seconds
after you have pressed the buttons for the channel to
change.
4
Press w REC/ITR to start recording.
“V.MARK” flashes on the TV screen when marking an
index signal.
To stop recording
Press s STOP.
CHANNEL i/k
SPEED
CHANNEL
N/M
Before starting
• Turn on your TV and see it for the VCR reception.
• Set the VCR /CATV/DBS/ TV selector to VCR.
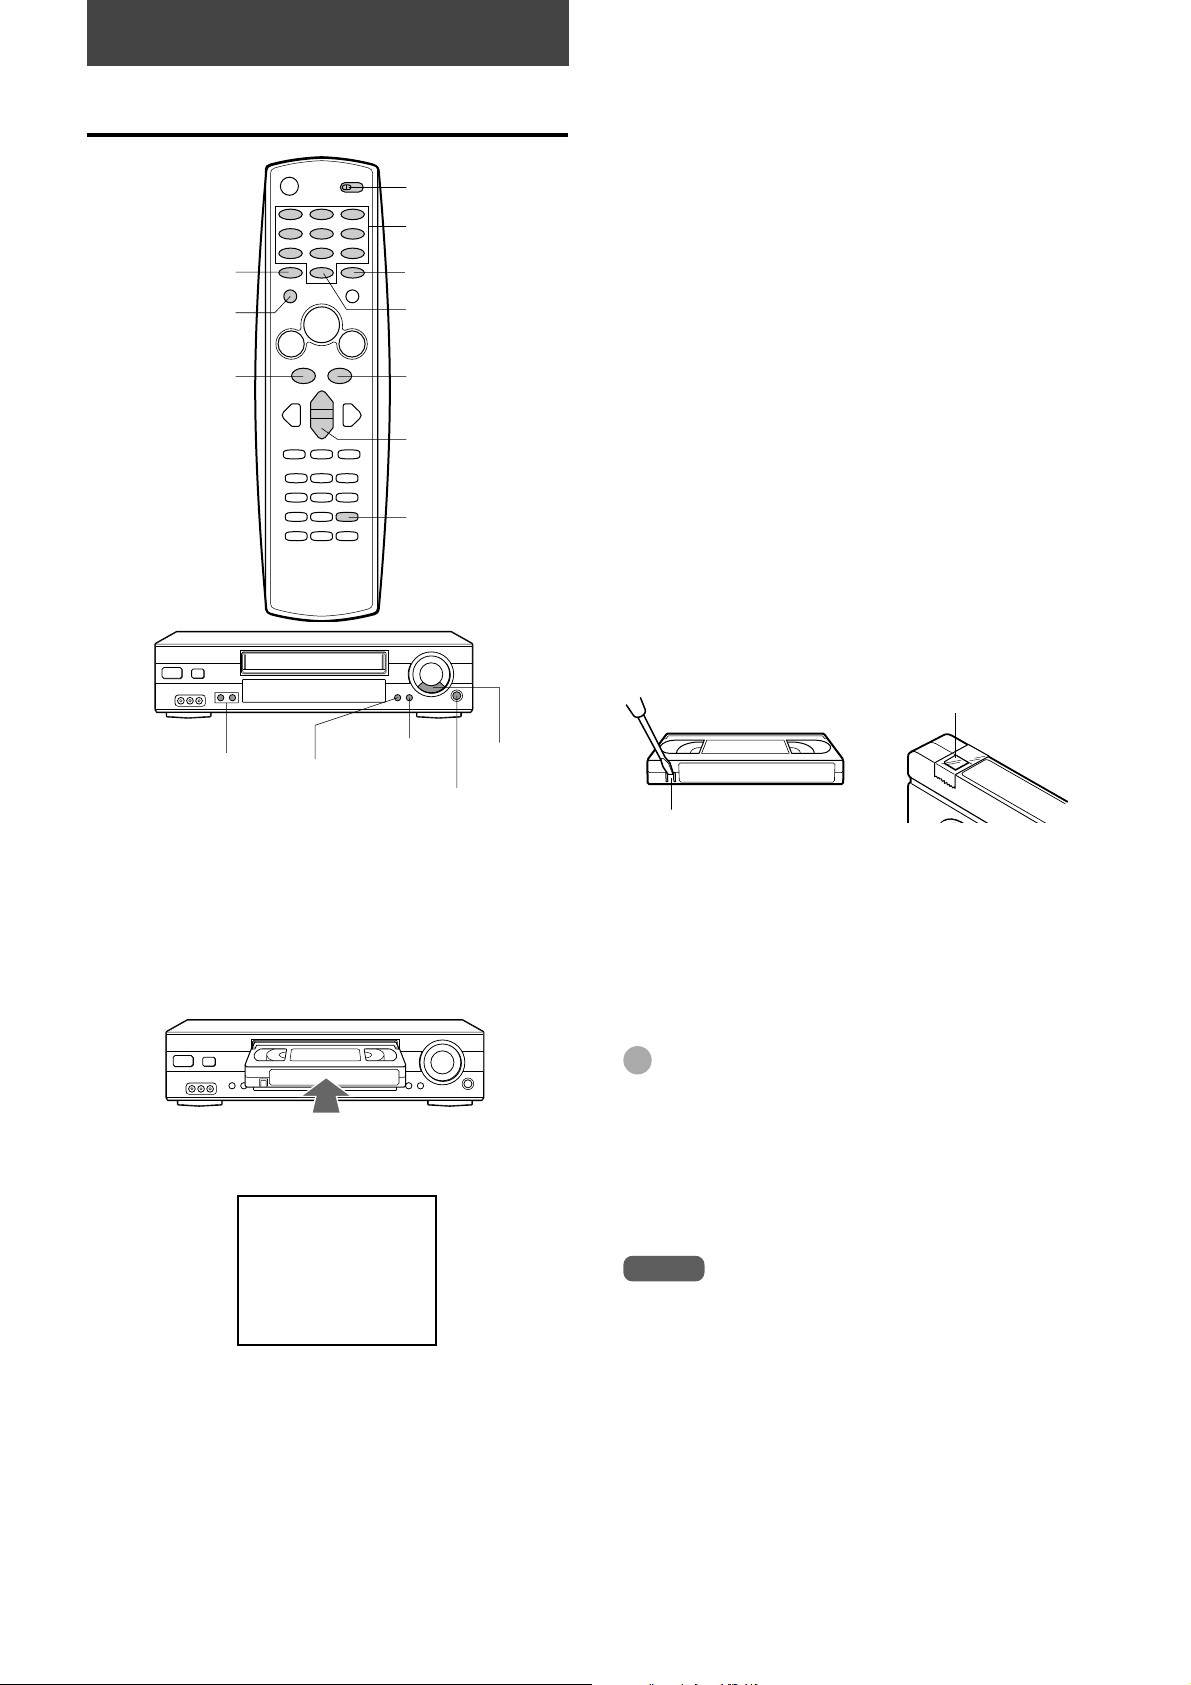
Insert a cassette with its erasure prevention tab
1
wREC/ITR
aPAUSE/
STILL
ONE-TOUCH PLAY BACK
sSTOP
in place.
The power turns on automatically.
To pause recording
Press a PAUSE/STILL. “RECP” appears on the TV screen.
To resume recording, press a PAUSE/STILL again.
To prevent an accidental recording
Break off the erasure prevention tab on the back edge of the
cassette.
To record over the tape again, cover the gap with adhesive
tape.
Adhesive tape
Erasure prevention tab
To watch another TV program while
recording
Press TV/VCR after starting the recording so that “VCR” in
the display window disappears. Then select another channel
on the TV.
To monitor the recording, set the channel on the TV to that
of the CHANNEL selector, and press TV/VCR again.
Press SPEED to select the tape speed, SP or
2
EP.
STOP
SP
EP provides three times as much recording time as SP,
although SP produces better picture and audio sounds.
ENGLISH
19
Tips
• If you want to record the program through the line input,
press 0/INPUT,CHANNEL i, k on the remote control,
CHANNEL N or M on the VCR continuously to display
“LINE1” (from AUDIO/VIDEO IN jacks at the rear) or “LINE2”
(from the AUDIO/VIDEO IN jacks in the front) in the display
window in step 3.
• To start recording during playback, press a PAUSE/STILL,
and w REC/ITR, then a PAUSE/STILL.
Notes
• If you try to record on a cassette without its erasure
prevention tab, the VCR will eject the cassette.
• If recording pause lasts for more than 5 minutes, the VCR
will automatically enter stop mode to protect the tape.
• When using the 0/INPUT button to select the input channel,
press 0/INPUT twice.
• The channel cannot be changed during recording.
Page 29
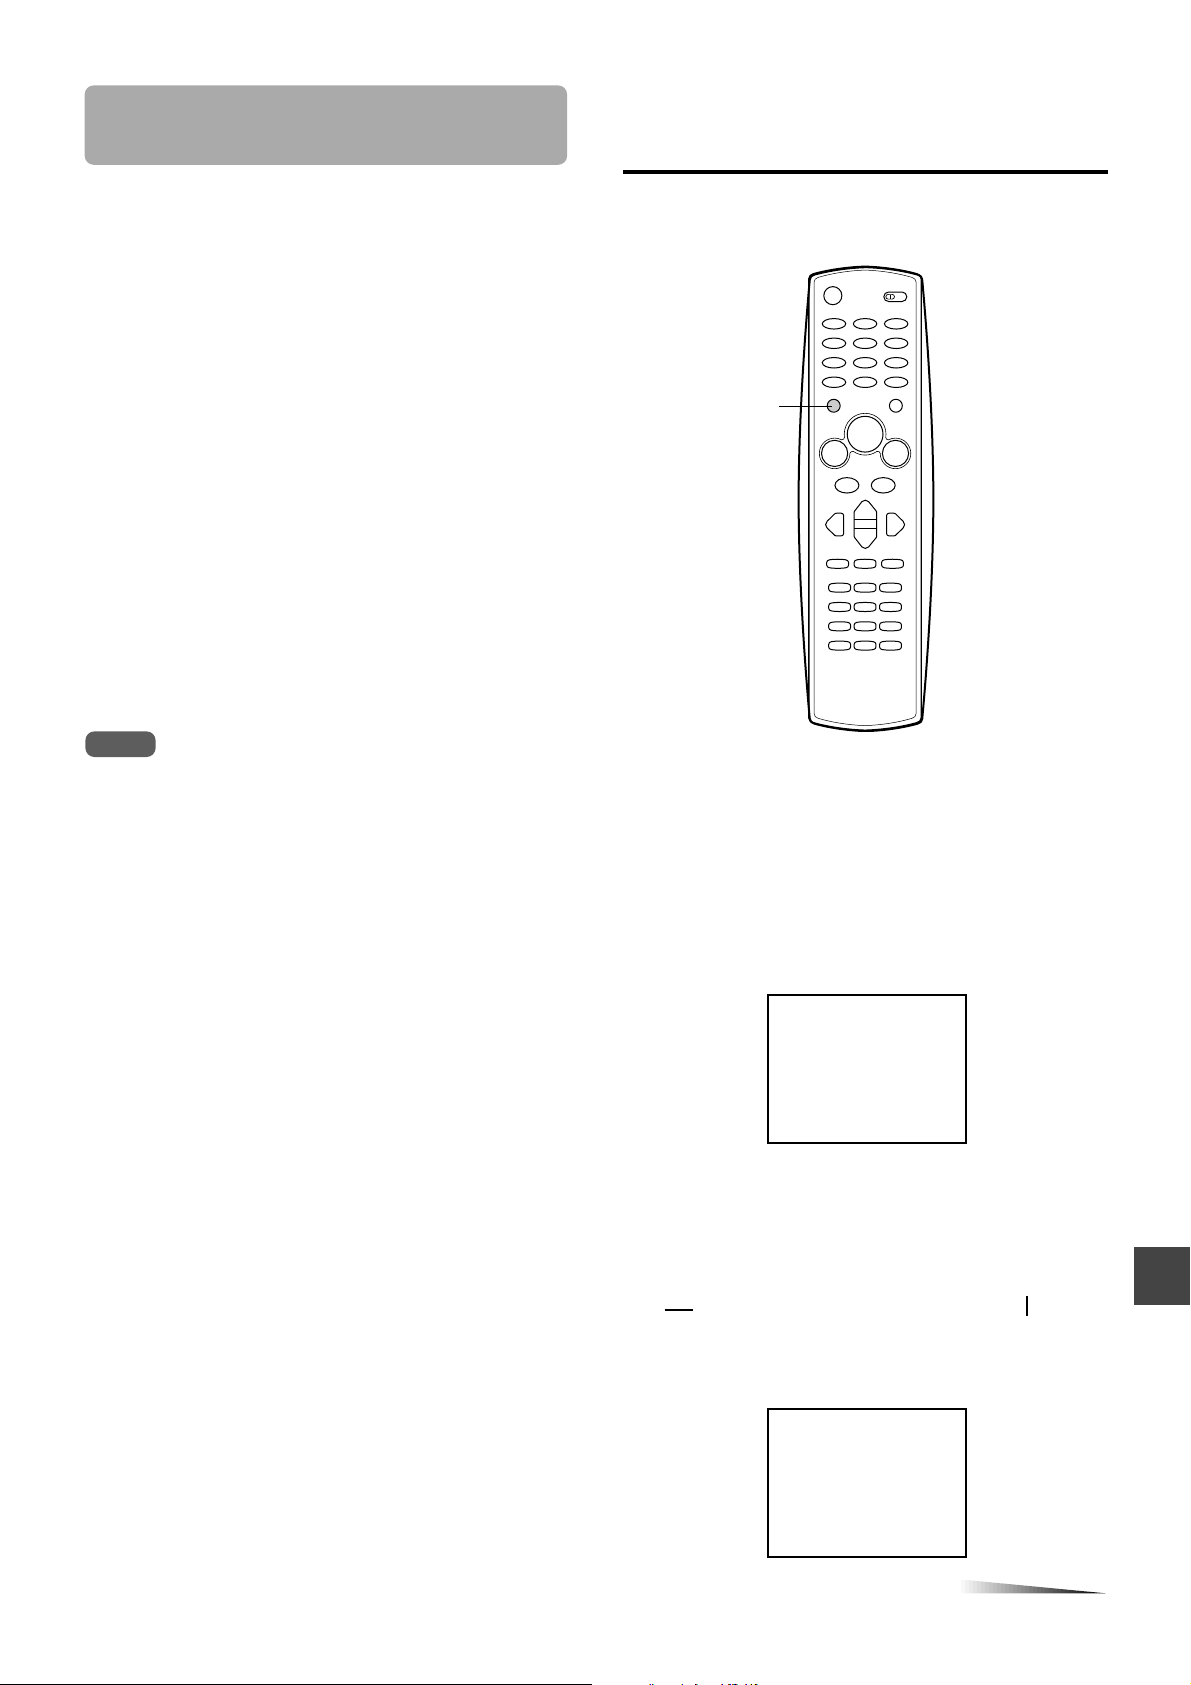
Playing back the portion you just
INSTANT TIMER RECORD
CHANNEL 10 CATV
SPEED EP
START NOW
LENGTH 0H30M
INSTANT TIMER RECORD
CHANNEL 10 CATV
SPEED EP
START NOW
LENGTH 1H30M
Recording with Instant Timer
recorded — One-Touch Playback
Using One-Touch playback after VCR Plus+ system (page
21) or manual timer (page 23) recording is convenient. You
can make timer recordings and play back only the portion
you just recorded with the timer by pressing a single button
later.
1
Stop recording (when recording without timer).
The ONE-TOUCH PLAY BACK button on the VCR
lights.
If another operation button is pressed after you stop
recording, One-Touch Playback will be canceled.
Press ONE-TOUCH PLAY BACK on the VCR or
2
OTPB on the remote control.
The tape rewinds to the start of the recorded portion and
playback begins.
When you set the timer for more than two
timer programs
The VCR starts playing back from the earliest one when you
use One-Touch Playback.
To find the beginning of the second (or later) program, use
Index Search (page 18.)
Recording
You can immediately start recording the current channel for
a specified time with Instant Timer Recording.
wREC/ITR
Note
One-Touch Playback does not work for recordings of less than
30 seconds.
Before starting
• Insert a cassette with its erasure prevention tab in place.
Make sure the tape is longer than the recording time.
• Turn on the VCR and TV, and set the TV for VCR
reception.
• Select the channel position to record and tape speed.
Press w REC/ITR twice.
1
• The VCR starts recording, and Instant Timer Recording
information appears on the TV screen.
•“TIMER” appears in the display window.
Within five seconds, press w REC/ITR
2
repeatedly to set the recording duration.
Each press changes the recording duration on the TV
screen in the following way:
0H30M b 1H00M b 1H30M b ..... b 8H30M
B
0H00M (Regular recording) B 9H00M B
When the recording time indicator in the display window
counts down to “0H00M,” recording stops and the VCR
turns off.
CONTINUE
ENGLISH
20
Page 30
Recording with Instant Timer Recording
VCR PLUS+ PROGRAM
ENTER VCR PLUSCODE
236543 –
TO CLEAR PRESS
TO ENTER PRESS
TO EXIT PRESS
CLEARCLEAR
ENTERENTER
PLUS+PLUS+
(continued)
Setting the timer with VCR
Plus+ system
POWER
wREC/ITR
sSTOPaPAUSE/STILL
To stop, pause, or turn off the power
while recording
Press s STOP, a PAUSE/STILL or POWER.
You can greatly simplify timer recordings with VCR Plus+
system. Just enter the PlusCode, a number assigned to
each TV program, and the VCR will set the timer recording
automatically. You can find PlusCodes in most TV guide
magazines.
You can set up to 8 programs.
POWER
CLEAR
VCR PLUS+
VCR /CATV/
DBS/ TV
Number
buttons
j/l
i/k
ENTER/DISPLAY
MENU
To extend the recording duration while
recording
Press w REC/ITR until the new duration you want appears.
Tip
When the regular recording is resumed by pressing w REC/ITR
repeatedly to display “0H00M,” Instant Timer Recording is
canceled.
Note
When the tape reaches the end during Instant Timer Recording,
“TIMER” flashes in the display window and the VCR turns the
power off.
Before starting
• Check that the VCR clock is set correctly.
• Check that the VCR channel numbers match the guide
channels which assigned to the TV stations.
• Insert a cassette with its erasure prevention tab in place.
Make sure the tape is longer than the recording time.
• Turn on the VCR and the TV and set the TV for VCR
reception.
• Set the VCR/CATV/DBS/TV selector to VCR.
• If the CATV converter is used for the timer recording,
check that the CATV (or satellite) converter is turned on
and the channel you want to record is selected.
Press VCR PLUS+.
1
Enter the PlusCode of the TV program you
2
want to record using the number buttons.
If you make a mistake, press CLEAR to cancel.
ENGLISH
21
Page 31

Press ENTER/DISPLAY.
PROGRAM
: SP
: ONCE
3
• The timer information appears on the TV screen.
• If you want to extend the recording time, see “To
extend the recording time” below.
If the program overlaps another
The overlapped portions will be deleted. The program which
has a lower program number has priority over the
succeeding as illustrated.
PROGRAM
MONTH : JULY
DAY : 7 FRI
START : 6 : 30 AM
STOP
CHANNEL
SPEED
REPEAT
TO ERASE PRESS
TO EXIT PRESS
Press i or k to select SPEED, then press j
4
1
: 7 : 30 AM
: 41 TV
: AUTO
: ONCE
CLEAR
MENU
or l to select the tape speed, SP, EP or AUTO.
If you select AUTO, the VCR determines remaining tape
length and switches the speed from SP to EP, if
necessary, to complete recording the program.
PROGRAM 1
MONTH : JULY
DAY : 7 FRI
START : 6 : 30 AM
STOP
: 7 : 30 AM
CHANNEL
: 41 TV
SPEED
: SP
REPEAT
SELECT ADJUST
TO EXIT PRESS
5
Press i or k to select REPEAT, then press j
: ONCE
MENU
or l to select ONCE, WEEKLY or DAILY.
ONCE: for a single program
WEEKLY: for a weekly program such as every Friday
DAILY: for a daily program from Monday to Friday
PROGRAM 1
MONTH : JULY
DAY : 7 FRI
START : 6 : 30 AM
STOP
: 7 : 30 AM
CHANNEL
: 41 TV
SPEED
: AUTO
REPEAT
SELECT ADJUST
TO EXIT PRESS
: ONCE
MENU
8:00 9:00 10:00 11:00
Program 1
Program 2
Deleted Parts
Program 3
Actual
recorded
portions
Prog.1 Prog.2 Prog.3
To cancel the program
Press MENU and select PROGRAM by pressing the i or
k button. And press j or l to display the program you
want to cancel, then press CLEAR to cancel.
Tips
• If “FULLY PROGRAMMED” flashes and the setting of
PROGRAM 1 appears. 8 programs are already set. Cancel
an unnecessary program.
• To confirm the settings, select PROGRAM in the menu.
Then press j or l to display the settings of each program.
Press MENU to return to the normal screen.
Notes
• When the power supply is interrupted for more than 60
minutes, the preset program is cleared. In this case, you
have to set the timer again.
• The VCR may not work correctly when you use a T-210
tape, even if you select AUTO in step 4.
• When the tape reaches the end during timer recording,
“TIMER” flashes in the display window.
• If you make an irregular setting, “ERROR CODE” flashes on
the TV screen.
If you want to set another program, repeat from
6
step 1.
Press MENU to return to the normal screen.
7
Press POWER to turn off the VCR.
8
• “TIMER” appears in the display window, and the VCR
stands by for timer recording.
• If the cassette-in indicator flashes, a cassette is not
inserted. If the cassette-in indicator flashes and the
cassette is ejected, the cassette’s erasure prevention
tab is removed.
To extend the recording time
After step 3, press i or k to select STOP, then press j or
l to change the end time.
ENGLISH
22
Page 32

Setting the timer manually
MONTH : JULY
: 7 : 30 PM
MONTH : JULY
PROGRAM 1
DAY : 3 MON
START : 6 : 00 PM
STOP
: 7 : 30 PM
CHANNEL
: 4 CATV : 4 CATV
SPEED
: AUTO
REPEAT
: ONCE
TO EXIT PRESS
MENU
SELECT ADJUST
MONTH : JULY
PROGRAM 1
DAY : 3 MON
START : 6 : 00 PM
STOP
: 7 : 30 PM
CHANNEL
: 4 CATV
SPEED
: SP
REPEAT
: ONCE : ONCE
TO EXIT PRESS
MENU
SELECT ADJUST
If you cannot use VCR Plus+ system, you can set the timer
manually.
You can set up to 8 programs within one year of the current
date.
5
Press i or k to select CHANNEL, press j or
l to set the VCR channel number.
If you have connected the CATV using the CATV
converter, set the CHANNEL to match the cable box
output channel (usually CH3 or 4). Change the channel
on the CATV converter instead of the VCR.
POWER
VCR /CATV/
DBS/ TV
j/l
i/k
CLEAR
ENTER/DISPLAY
MENU
Before starting
• Check that the VCR clock is set correctly.
• Insert a cassette with its erasure prevention tab in place.
• Set the VCR/CATV/DBS/TV selector to VCR.
• If the CATV converter is used for the timer recording,
check that the CATV (or satellite) converter is turned on
and the channel you want to record is selected.
Press MENU.
1
2
Press i or k to select PROGRAM, then press
ENTER/DISPLAY.
CLOCK
PROGRAM
TUNING
SETUP
ENTER
SELECT ENTER
TO EXIT PRESS
Press i or k to select MONTH, then press j
3
MENU
or l to set the month.
Press and hold j or l to change the setting rapidly.
PROGRAM 1
MONTH : JULY
DAY :
START :
STOP
:
CHANNEL
:
SPEED
:
REPEAT
SELECT ADJUST
TO EXIT PRESS
Set DAY, START time and STOP time as in step
4
:
MENU
3.
PROGRAM 1
ENGLISH
23
MONTH :
DAY : 3 MON
START : 6 : 00 PM
STOP
CHANNEL
SPEED
REPEAT
SELECT ADJUST
TO EXIT PRESS
JULY
: 7 : 30 PM
:
:
:
MENU
Set SPEED and REPEAT as in step 3.
6
For details of SPEED and REPEAT, see “Setting the
timer with VCR Plus+ system” on page 21.
If you want to set another program, press k to
7
select PROGRAM, then press j or l to
display another program number. And repeat
steps 3 through 7.
Press MENU to return to the normal screen.
8
Press POWER to turn off the VCR.
9
• “TIMER” appears in the display window, and the VCR
stands by for timer recording.
• If the cassette-in indicator flashes, a cassette is not
inserted. If the cassette-in indicator flashes and the
cassette is ejected, the cassette’s erasure prevention
tab is removed.
To correct the data while setting
Press i or k until the item you want to correct highlights,
then press j or l to set the correct data.
To cancel the program
Select PROGRAM in the menu. And press j or l to
display the program you want to cancel, then press CLEAR
to cancel.
Tips
• If “FULLY PROGRAMMED” flashes and the setting of
PROGRAM 1 appears. 8 programs are already set. Cancel
an unnecessary program.
• To confirm the settings, select PROGRAM in the menu.
Then press j or l to display the settings of each program.
Press MENU to return to the normal screen.
• If you want to record the program through the line input, press
j or l to display “LINE1” (from the AUDIO/VIDEO IN jacks
at the rear) or “LINE2” (from the AUDIO/VIDEO IN jacks in the
front) in step 5 instead of the VCR channel number.
Notes
• When the power supply is interrupted for more than 60
minutes, the preset program is cleared. In this case, you
have to set the timer again.
• When the tape reaches the end during timer recording,
“TIMER” flashes in the display window.
• The VCR may not work correctly when you use a T-210
tape, even if you select AUTO in step 6.
Page 33

AERIAL
(VHF/UHF)
RF OUT
Dubbing
Connecting with another VCR
(Front)
VIDEO IN
jack
Yellow
LINE 2
AUDIO IN L/R jacks
Red
White
Audio/video cable
(not supplied)
HV-FX9000 (Recorder)
or
To audio/video output jacks
or
To audio/video
output jacks
LINE 1
AUDIO IN L
(MONO)/R jacks
Red
Another VCR (Player)
(Rear)
VIDEO IN jack
Yellow
White
Important
When you record a video signal output
from this VCR onto another VCR,
the on-screen display. Otherwise, the
indicators displayed on the TV screen will
be recorded on the tape.
turn off
Operation
wREC/ITR
aPAUSE/
STILL
0/INPUT
CHANNEL
i/k
Video camera (Player)
Tips
• If the other VCR is monaural type, connect one of the audio plugs only to AUDIO IN
L (MONO) at the rear.
• If you use this VCR for playback, connect the AUDIO/VIDEO OUT jacks on this VCR
and the audio/video input jacks on the recording VCR.
Note
If both units are; turned on, made by AIWA, and located near each other, do not use
the remote control. Use the buttons on the VCR instead.
Before starting
Select the tape speed.
1
Insert a pre-recorded source cassette into another (playback) VCR.
2
Insert a blank cassette with its erasure prevention tab in place
into your HV-FX9000 (recording) VCR.
Press 0/INPUT repeatedly to display “LINE1” (rear) or “LINE2”
3
(front) on the TV screen.
You can also use the CHANNNEL i or k button.
4
Press w REC/ITR and a PAUSE/STILL on the recording VCR.
The recording VCR is in recording pause mode.
5
Set the other VCR to playback.
Press w REC/ITR or a PAUSE/STILL on the recording VCR.
6
Dubbing begins.
ENGLISH
24
Page 34

OTHER FUNCTIONS
CLOCK
PROGRAM
TUNING
SETUP
SELECT ENTER
TO EXIT PRESS
ENTER
MENU
FUNCTION OSD : ON
HI-FI
STEREOSTEREO
STEREO
LANGUAGE SELECT : ENGLISH
AUDIO MODE :
BROADCAST TYPE :BROADCAST TYPE :
AUDIO OUTPUT :
CHANNEL MAPPING
SELECT ADJUST
TO EXIT PRESS
MENU
Multichannel TV Sound
(MTS) and Hi-Fi audio sound
system
VCR /CATV/
DBS/ TV
Number
buttons
wREC/ITR
CPLAY
j/l
CHANNEL i/k
ENTER/DISPLAY
MENU
Recording the Hi-Fi audio
The regular audio signal and Hi-Fi audio signal are
automatically recorded if the TV program is broadcasted in
stereo. No special setting is required for Hi-Fi audio
recording.
Recording the sound of the MTS
Broadcast
Before starting
• Insert a cassette and select the tape speed.
• Set the VCR/CATV/DBS/TV selector to VCR.
1
Press MENU.
Press i or k to select SETUP, then press
2
ENTER/DISPLAY.
Multichannel TV Sound (MTS)
This VCR is equipped with the MTS (Multi-channel TV
Sound) system which decodes stereo and SAP (Second
Audio Program) broadcasting signals. It also decodes the
stereo TV sound of the local CATV system if it satisfies the
assigned cable frequencies and EIA-recommended MTS
stereo/bilingual TV sound system.
It can record and play back the audio signal in the VHS Hi-Fi
audio sound system.
Second Audio Program (SAP)
This VCR can record and play back a Second Audio
Program (SAP) for the second language or additional
information. Usually primary language is recorded on the
primary sound channel, and the second language or
additional information on the SAP channel.
Audio track system
This VCR records a regular monaural audio signal on the
normal audio track, and stereo Hi-Fi audio signal on the HiFi audio track.
If you use a VCR equipped with the VHS Hi-Fi audio sound
system to play back the tape recorded on this VCR, you can
enjoy stereo Hi-Fi sound or bilingual program. If you use a
VCR not equipped with the VHS Hi-Fi audio sound system,
only a regular audio sound recorded on a normal audio track
is played back.
Press i or k to select BROADCAST TYPE.
3
Press j or l to select the desired system.
4
STEREO: for recording the stereo sound
SAP: for recording the SAP program
MONO: for recording the monaural sound
Press MENU to return to the normal screen.
5
Press CHANNEL i, k or number buttons to
6
select the channel to record.
STEREO and/or SAP appears on the TV screen
depending upon the receiving program.
Press w REC/ITR.
7
Recording begins.
Monaural sound
Hi-Fi sound and video signals
ENGLISH
25
<Tape structure>
Normal audio track
Hi-Fi audio track
Page 35

Recorded and output signals of the MTS
STEREO
AUDIO OUTPUT :
HI-FI
AUDIO MODE :
broadcast
TV
screen
MONO
STEREO
SAP
STEREO/
SAP
Broadcast
Mono
Stereo
Mono+SAP
Stereo+SAP
BROADCAST
TYPE
STEREO Mono Mono Mono Mono
SAP Mono Mono Mono Mono
MONO Mono Mono Mono Mono
STEREO Right Mono
SAP Right Mono
MONO Mono Mono Mono Mono
STEREO Mono Mono Mono Mono
SAP SAP SAP SAP SAP
MONO Mono Mono Mono Mono
STEREO Right Mono
SAP SAP SAP SAP SAP
MONO Mono Mono Mono Mono
Recorded signal
Hi-Fi Normal
track track LEFT RIGHT
Left/
channel
Left/
channel
Left/
channel
Note
You can also use the display window to check the broadcast
type.
When the VCR receives the stereo broadcast, ST appears.
When the VCR receives the SAP broadcast, SAP appears.
When the VCR receives the Bilingual broadcast, BIL appears.
Signal output
from AUDIO
OUT
Left Right
channel channel
Left Right
channel channel
Left Right
channel channel
Playing back a MTS-program
recorded tape
Before starting
Set the VCR/CATV/DBS/TV selector to VCR.
1
Press MENU.
Press j or l to select the audio output mode.
4
STEREO: The stereo sound is heard.
LEFT: The left channel sound is heard from both
channels.
RIGHT: The right channel sound is heard from both
channels.
Press i or k to select AUDIO MODE.
5
FUNCTION OSD : ON
LANGUAGE SELECT : ENGLISH
AUDIO MODE :
BROADCAST TYPE :
AUDIO OUTPUT :
CHANNEL MAPPING
SELECT ADJUST
TO EXIT PRESS
6
Press j or l to select HI-FI.
STEREO
STEREO
MENU
HI-FI
HI-FI: The sound on the Hi-Fi audio track is played
back.
NORMAL: The sound on the normal audio track is
played back.
Press MENU to return to the normal screen.
7
Insert a cassette.
8
9
Press C PLAY.
Playback begins.
Output signals
The signals output from the AUDIO OUT jacks and RF OUT
to TV connector on the rear panel are as shown below.
LEFT
Left
channel
Left
channel
Right
channel
Mono
AUDIO OUT
RIGHT
Right
channel
Left
channel
Right
channel
Mono
RF OUT
Mono
Left
channel
Right
channel
Mono
AUDIO
OUTPUT
STEREO
LEFT
RIGHT
–
AUDIO
MODE
HI-FI
HI-FI
HI-FI
NORMAL
2
3
Press i or k to select SETUP, then press
ENTER/DISPLAY.
CLOCK
PROGRAM
TUNING
SETUP
ENTER
SELECT ENTER
TO EXIT PRESS
MENU
Press i or k to select AUDIO OUTPUT.
FUNCTION OSD : ON
LANGUAGE SELECT : ENGLISH
AUDIO MODE :
BROADCAST TYPE :
AUDIO OUTPUT :
CHANNEL MAPPING
SELECT ADJUST
TO EXIT PRESS
HI-FI
STEREO
STEREO
MENU
Tips
• If AUDIO OUTPUT is set to STEREO while playing a
prerecorded SAP BILINGUAL audio program, the primary
language LEFT and the secondary language RIGHT will be
heard simultaneously. For SAP BILINGUAL playback, do not
use STEREO setting. Select RIGHT setting.
• If the VCR is connected to the TV through the antenna cable,
the audio portion of a stereo or SAP BILINGUAL prerecorded
tape will be heard in monaural. Set AUDIO OUTPUT to
select the desired portion when playing back a SAP
BILINGUAL tape. For stereo or SAP BILINGUAL playback,
use the connections given on stereo playback.
Notes
• When you play a tape recorded in mono, the sound is always
played back in mono regardless of the AUDIO MODE
setting.
• The AUDIO MODE setting automatically returns to HI-FI
when a cassette is ejected.
ENGLISH
26
Page 36

On-screen display
CLOCK
PROGRAM
TUNING
SETUP
SELECT ENTER
TO EXIT PRESS
ENTER
MENU
FUNCTION OSD : ON
FUNCTION OSD : OFF
VCR /CATV/
DBS/ TV
Notes
• The tape counter and the remaining tape length indicator
appear only when a cassette is inserted. Also, the remaining
tape length indicator appears after any tape operation.
• The remaining tape length indicator may not be displayed
correctly depending on the condition of the tape. There may
be errors within plus or minus 2 minutes in SP mode and 6
minutes in EP mode.
To turn the on-screen display off
i/k
j/l
ENTER/DISPLAY
MENU
Identifying the on-screen display
items
Hi-Fi indicator
Operation mode
Current date
STOP HI-FI CH 4
JUN 17, SAT 2:15 PM
STEREOSP
Channel number
Broadcast typeTape speed
Current time/tape
counter/
remaining tape
length
Caution
When you record a video signal output from this VCR onto
another VCR,
turn off the on-screen display. Otherwise, the
indicators displayed on the TV screen will be recorded on
the tape.
Before starting
Set the VCR/CATV/DBS/TV selector to VCR.
1
Press MENU.
2
Press i or k to select SETUP, then press
ENTER/DISPLAY.
3
Press i or k to select FUNCTION OSD.
FUNCTION OSD : ON
LANGUAGE SELECT :
AUDIO MODE :
BROADCAST TYPE :
AUDIO OUTPUT :
CHANNEL MAPPING
SELECT ADJUST
TO EXIT PRESS
ENGLISH
HI-FI
STEREO
STEREO
MENU
Changing the on-screen function
display
Press ENTER/DISPLAY. Each press changes the on-screen
function display as follows:
One press
STOP
SP
JUN 17, SAT
After 3 seconds
Press ENTER.
ENGLISH
27
CH 4
STEREO
2:15 PM
2:15 PM
All indicators are turned off.
Two presses
STOP
SP
After 3 seconds
Press ENTER.
CH 4
STEREO
0:35:40
STOP
SP
STEREO
REM 1:15
After 3 seconds
Three presses
0:35:40 REM 1:15
Press ENTER.
CH 4
4
Press j or l to display OFF.
FUNCTION OSD : OFF
LANGUAGE SELECT :
AUDIO MODE :
BROADCAST TYPE :
AUDIO OUTPUT :
CHANNEL MAPPING
SELECT ADJUST
TO EXIT PRESS
Press MENU to return to the normal screen.
5
ENGLISH
HI-FI
STEREO
STEREO
MENU
Tips
• Even if you set FUNCTION OSD to OFF, you can check the
clock, tape counter and the remaining tape length in the
display window by pressing ENTER/DISPLAY repeatedly.
• Even if you set FUNCTION OSD to OFF, the indications of
Zero Return, VISS and REC. End Search appears on the TV
screen.
Page 37

ADDITIONAL INFORMATION
Troubleshooting
If the unit does not seem to operate properly, read the
instructions again, then check the information below.
The POWER button does not operate.
Make sure the AC cord is connected securely.
The playback picture is noisy.
• Make sure the TV is set to the video channel or video
input.
• Adjust the tracking manually when the tape quality is poor.
• Although the unit cleans the video heads automatically,
dirt may be accumulated after a long period of use. Clean
the video heads with a commercially available video head
cleaning tape.
• Make sure all the connections with the VCR are correct
and secure.
There is no playback picture.
Set the TV to the video channel or video input.
TV reception is noisy or there is no TV reception.
• Connect the VCR to the antenna and TV correctly and
securely.
• Move the VCR away from the TV set.
Note on moisture condensation
Moisture may condense inside the unit and cause damage
to the unit and tape when the unit is moved from a cold to a
warm place, after heating a cold room, or under conditions of
high humidity. If any of the above conditions apply, place the
unit in a well-ventilated area and wait for about two hours
until the unit is warmed to room temperature and the
moisture evaporates completely before operating the unit.
Tape operation buttons do not work while the power is
on and the cassette is inserted.
Moisture condensation may have occurred. Wait for about
two hours until moisture evaporates completely before you
operate the VCR.
Abnormal operation has occurred.
External interference may have affected the internal
microprocessor.
Disconnect the AC cord from the AC outlet. Then connect it
again.
The remote control does not operate.
• Replace both batteries with new ones.
• Make sure the VCR/CATV/CBS/TV selector on the remote
is set to VCR.
There is no sound.
Connect the VCR correctly and securely.
The timer does not operate.
• Set the VCR clock correctly.
• Check that the VCR channel numbers match the guide
channels which assigned to the TV stations.
There is no sound and picture from an input source.
You may have selected the wrong input. Press CHANNEL
i, k, 0/INPUT on the remote, CHANNEL N or M on
the VCR until you select the correct input source.
(e.g. You must select “LINE2” when you connect an input
source to the AUDIO/VIDEO IN jacks on the front panel.)
ENGLISH
28
Page 38

Specifications
Video recording system
Rotary 2 head helical scanning system
Video head Double azimuth 4 head
Tuner system Frequency synthesized tuner
TV system M
Video signal system NTSC color signal,
Usable cassettes 525 lines, 60 fields
VHS video cassette
Recording/Playback time
SP: 3.5 hours with T-210 tape
LP: 7 hours with T-210 tape (playback only)
EP: 10.5 hours with T-210 tape
Tape speed SP: 33.35 mm/sec
LP: 16.67 mm/sec
EP: 11.12 mm/sec
Fast-forward/Rewind time
less than 180 seconds with T-120 tape
Channel coverage VHF: 2 to 13
UHF: 14 to 69
CATV: 5A, A-5 to A-1, A to W, W+84
RF output VHF channel 3 or 4 (switchable), 66 dBµ
Video input 1.0 Vp-p, 75 ohm, unbalanced
Video output 1.0 Vp-p, 75 ohm, unbalanced
Horizontal resolution 230 lines (at SP)
Video S/N 43 dB (at SP)
Audio track 3 tracks (Hi-Fi sound 2 tracks, Normal
sound 1 track)
Audio input –6 dBs, 47 K ohm
Audio output –6 dBs, less than 4.7 K ohm
Audio frequency response
normal:100 Hz - 10 K Hz (at SP)
Hi-Fi: 20 Hz - 20 K Hz (at SP)
Audio S/N normal:more than 43 dB (at SP)
Hi-Fi: more than 70 dB (at SP)
Hi-Fi dynamic range more than 85 dB (at SP)
Operating temperature 5°C to 35°C
Power requirements 120 V AC, 60 Hz
Power consumption 15 W
TYP 3W (stand by mode)
Dimensions 430 (W) × 102 (H) × 283 (D) mm
(17 × 41/8 × 111/4 in.)
Weight 3.9 Kg (8.58 lbs.)
Supplied accessories Antenna cable (1)
Batteries (2)
Remote control (1)
Audio cable (1)
Video cable (1)
Design and specifications are subject to change without notice for
the purpose of performance improvement.
This equipment has been tested and found to comply with
the limits for a Class B digital device, pursuant to Part 15
of the FCC Rules. These limits are designed to provide
reasonable protection against harmful interference in a
residential installation.
This equipment generates, uses, and can radiate radio
frequency energy and, if not installed and used in
accordance with the instructions, may cause harmful
interference to radio communications. However, there is
no guarantee that interference will not occur in a particular
installation. If this equipment does cause harmful
interference to radio or television reception, which can be
determined by turning the equipment off and on, the user
is encouraged to try to correct the interference by one or
more of the following measures:
ENGLISH
29
- Reorient or relocate the receiving antenna.
- Increase the separation between the equipment and
receiver.
- Connect the equipment into an outlet on a circuit different
from that to which the receiver is connected.
- Consult the dealer or an experienced radio/TV technical
for help.
Caution
Modifications or adjustment to this product, which are not
expressly approved by the manufacturer, may void the
user's right authority to operate this product.
Page 39

Index to parts and controls
Front panel
Cassette compartment
z EJECT button
POWER button
LINE 2 VIDEO IN/
AUDIO IN L/R
jacks
CHANNEL N/M
buttons
Display window
Display window
fREW
(Rewind)/[ button
C PLAY button
gF FWD (Fast-
forward)/] button
= ONE-TOUCH
PLAY BACK button
s STOP button
a PAUSE/STILL button
w REC (Recording)/ITR
(Instant Timer Recording)
button
Remote sensor
VCR indicator
Timer indicator
REC (Recording) indicator
Tape speed indicator
Cassette-in indicator
TIMER VCR ST
REC
SAPREM
SP LP EP
Hi-Fi
Remaining tape length indicator
SAP (Second Audio Program)
indicator
Hi-Fi indicator
lights up when a Hi-Fi sound is
being reproduced
ST (Stereo) indicator
Clock/Tape counter/Tape
operation indication
CONTINUE
ENGLISH
30
Page 40

Index to parts and controls (continued)
Rear panel
AC cord
Remote control with the front cover opened
POWER button
Number buttons
TV/VCR button
w REC (Recording)/ITR (Instant Timer
Recording) button
AUDIO OUT R/L/ VIDEO
OUT jacks
AERIAL connector
L
RF OUT connector
LINE 1
AUDIO IN R/L (MONO)/
VIDEO IN jacks
Channel selector
VCR/ CATV/DBS/ TV selector
0/INPUT button
OTPB (One-Touch playback)
button
z EJECT button
C PLAY button
f REW (rewind)/[ button
a PAUSE/STILL button
j/VOL. - button
SLOW button
MUTE button
CLEAR button
ZERO { button
VCR PLUS+
buttons
A-TR (Automatic Tracking)
button
g F FWD (Fast-forward)/]
button
s STOP button
+
–
OK
i
CHANNEL i/k buttons
l/VOL. + button
TV PRESET button
ENTER/DISPLAY button
MENU button
AD (Advertisement)-SKIP
button
VISS button
SPEED button
REC. END SEARCH button
TRACKING +/- buttons
31
ENGLISH
Page 41

ENGLISH
Page 42

For Assistance and Information,
Call Toll Free 1-800-BUY-AIWA
(United States and Puerto Rico)
8A-JFC-901-01
000113ATO-YX
Printed in Korea
Page 43

HV-FX9000U
GUIA DE REFERENCIA RAPIDA
Bienvenido
Muchas gracias por haber adquirido este producto AIWA.
Cuando desembale su videograbadora por
primera vez, siga los procedimientos 1 a
siguientes para prepararla.
En el cartón de embalaje encontrará los siguientes accesorios.
Controlador remoto (1)
5
Para servicio e información,
Llame gratis al 1-800-BUY-AIWA
(Estados Unidos y Puerto Rico)
AIWA CO., LTD
8A-JFC-903-01
000115ATO-YX
Instrucciones de manejo (1)Pilas (2)
Printed in Korea
Cable de audio (1)Cable de vídeo (1)Cable de antena (1)
Lea la información de las páginas 1 y 2 del manual de instrucciones antes de instalar o utilizar la videograbadora.
1
Coloque dos pilas R03 (tamaño AAA) (suministradas) con
las polaridades correctamente alineadas, como se indica en
el compartimento de las pilas.
Instalación de las pilas en el controlador remoto
1
Page 44

Conexión de la antena (o sistema de cablevisión) -
AERIAL
(VHF/UHF)
RF OUT
2
Conexiones básicas
Videograbadora - Televisor
1 Conecte el cable de la
antena de televisión (no
suministrado) a la
videograbadora.
Tomacorriente de CA
2 Conecte la videograbadora
con el cable de antena
suministrado al conector de
entrada de antena del
televisor.
Conector de entrada
de antena
Cable de antena (suministrado)
Cable de antena de televisión
(no suministrado)
R AUDIO L
OUT OUT
(MONO)
IN IN
LINE 1
Televisor
VIDEO
(VHF/UHF)
Tomas de
entrada de
audio/vídeo
Cable de vídeo
(suministrado)
Cable de audio
(suministrado)
AERIAL
RF OUT
Cable de CA
3 Si su televisor tiene tomas de
4 Conecte el cable de
alimentación de CA de la
videograbadora a una
toma de la red.
Importante
Conecte el cable de alimentación de CA al tomacorriente de CA después de haber finalizado todas las
conexiones.
Cuando conecte el televisor a OUT TO TV utilizando un cable de antena
Ponga el selector de canales en 3CH o 4CH, el canal no utilizado para teledifusión, y seleccione el mismo canal en el
televisor.
Para seleccionar el canal deseado en el
televisor
Encienda el televisor y la videograbadora, y presione TV/
VCR para que VCR desaparezca del visualizador, o
apague esta videograbadora.
3CH
3CH 4CH
4CH
(VHF/UHF)
AERIAL
RF OUT
entrada de audio/vídeo, conecte
la videograbadora y el televisor
utilizando los cables de audio y
vídeo suministrados.
2
Page 45

Conexiones a un sistema de cablevisión
A sistema de cablevisión
Convertidor de cablevisión
(no suministrado)
Conector de
entrada de antena
OUTIN
3 Conecte la videograbadora con el cable de
antena suministrado al conector de
entrada de antena del televisor.
Televisor
Tomas de
entrada de
audio/vídeo
Cable de
cablevisión
(no suministrado)
2 Conecte la salida del convertidor a la
entrada ANT IN de la videograbadora
con un cable coaxial (no suministrado).
1 Conecte el cable proveniente del sistema de cablevisión
a la entrada del convertidor de cablevisión.
Tomacorriente
de CA
Cable de CA
5 Conecte el cable de
alimentación de CA de la
videograbadora a una
toma de la red.
VIDEO
AERIAL
(VHF/UHF)
RF OUT
R AUDIO L
OUT OUT
(MONO)
IN IN
4 Si el televisor dispone de tomas
de entrada de audio/vídeo,
conecte la videograbadora y el
televisor con los cables de audio
y vídeo suministrados.
Cable de antena
(suministrado)
Cable de vídeo
(suministrado)
Cable de audio
(suministrado)
Para conectar un sistema de cablevisión sin utilizar convertidor de cablevisión
Conecte el cable del sistema de cablevisión a la entrada ANT IN de la videograbadora en el anterior paso 1.
Para contemplar un programa de televisión o de vídeo
seleccionado en la videograbadora
Conecte la alimentación del televisor y de la videograbadora, y presione TV/
VCR para visualizar VCR en el visualizador.
VCR
3
Page 46

3
FUNCTION OSD : ON
HI-FI
STEREO
STEREO
LANGUAGE SELECT : ENGLISHLANGUAGE SELECT : ENGLISH
AUDIO MODE :
BROADCAST TYPE :
AUDIO OUTPUT :
CHANNEL MAPPING
SELECT ADJUST
TO EXIT PRESS
MENU
IDIOMA : ESPAÑOL
Selección de idioma
El menú en pantalla podrá visualizarse en uno de los tres
idiomas siguientes: inglés, español, y francés.
CATV/DBS
1
VCR TV
Ajuste el selector VCR/CATV/DBS/TV
en VCR.
2
3
4
MENU
or
POWER
Presione POWER para conectar la
alimentación de la videograbadora.
Presione MENU y después i o k para
seleccionar SETUP. A continuación,
presione ENTER/DISPLAY.
CLOCK
ENTER
PROGRAM
TUNING
SETUP
ENTER
SELECT ENTER
TO EXIT PRESS
MENU
Presione i o k para seleccionar
LANGUAGE SELECT (idioma).
56
or
Presione
j o l
para hacer
que se visualice el idioma
deseado.
Cada ves que cambie el
idioma, el idioma visualizado
en pantalla cambiará.
HI-FI
ESTEREO
ESTEREO
SI
FUNCION DESPLEGADA :
IDIOMA : ESPAÑOL
MODO DE AUDIO :
TIP / TRANS :
SALIDA DE AUDIO :
MAPA DE CANALES
SELEC. AJUSTAR
MENU
PULSE PARA SALIR.
4
MENU
Presione MENU para
volver a la pantalla
normal.
Page 47

4
RELOJ
PROGRAMA
SINTONIZAR
AJUSTAR
SELEC. EJECUTAR
PULSE PARA SALIR.
ENTER
MENU
MES : JUNIOMES : JUNIO
DIA : 1 LUN
AÑO : 2000
HORA
: 12 : 00 AM
AUTOM. AJUSTADO : NO
SELEC. AJUSTAR
PULSE PARA SALIR.
MENU
MES : JUNIO
DIA : 17 SAB
AÑO : 2000
HORA
: 10 : 30 AM
AUTOM. AJUSTADO : SI
SELEC. AJUSTAR
PULSE PARA SALIR.
MENU
: 10 : 30 AM
Ajuste del reloj
Para realizar grabaciones con el temporizador, tendrá que
ajustar la fecha y la hora.
CATV/DBS
VCR TV
1
Ajuste el selector VCR/CATV/DBS/TV
en VCR.
2
3
MENU
Presione MENU y después
i o k para seleccionar
RELOJ. A continuación,
presione ENTER/DISPLAY.
ENTER
Presione j o l para ajustar
MES, y después presione k.
45
Mantenga presionado j
o l para que el ajuste
cambie rápidamente.
Ajuste DIA, AÑO y HORA
como en el paso 3.
MES : JUNIO
DIA : 17 SAB
AÑO : 2000
HORA
: 10 : 30 AM
AUTOM. AJUSTADO : NO
SELEC. AJUSTAR
MENU
PULSE PARA SALIR.
5
6
or
MENU
Presione j o l para ajustar
AUTOM. AJUSTADO en SI.
La videograbadora corregirá
automáticamente el ajuste del reloj
después de que usted haya
ajustado AUTOM. AJUSTADO a
SI.
Presione MENU par poner en
funcionamiento el reloj.
Reaparecerá la pantalla normal.
Page 48

5
AUTO PROGRAMACION
BANDA SINTONIZADA :
MEM / BORRAR :
SELEC / FUENTE : SIN.SELEC / FUENTE : SIN.
SELEC. EJECUTAR
PULSE PARA SALIR.
ENTER
MENU
AUTO PROGRAMACIONAUTO PROGRAMACION
BANDA SINTONIZADA :
MEM / BORRAR :
SELEC / FUENTE :
SELEC. AJUSTAR
PULSE PARA SALIR.
MENU
Sintonización de los canales de la videograbadora
Antes de comenzar
Compruebe que no ha seleccionado el canal de la videograbadora en “LINE1” o “LINE2”.
CATV/DBS
VCR TV
1
Ajuste el selector VCR/CATV/DBS/TV
en VCR.
2
3
MENU
Presione MENU, presione i o k
para seleccionar SINTONIZAR, y
después presione ENTER/DISPLAY.
RELOJ
PROGRAMA
ENTER
PULSE PARA SALIR.
SINTONIZAR
AJUSTAR
ENTER
SELEC. EJECUTAR
MENU
Presione i o k para seleccionar
SELEC/FUENTE, y después presione
j o l para hacer que se visualice
SIN.
4
Presione i o k para seleccionar
AUTO PROGRAMACION, y
después presione j o l.
Se sintonizarán todos los canales
disponibles.
Tras la sintonización, vuelve a
aparecer la pantalla anterior.
MEMORIA AUTOMATICA
DE CANALES
PROCESANDO
CANAL 11
MENU
PULSE PARA SALIR.
6
5
MENU
Presione MENU para
volver a la pantalla
normal.
Page 49

ESPAÑOL
Advertencia
Para reducir el riesgo de incendios o descargas
eléctricas, no exponga esta unidad a la lluvia ni a la
humedad.
CAUTION
RISK OF ELECTRIC SHOCK
DO NOT OPEN
“CAUTION:TO REDUCE THE RISK OF
ELECTRIC SHOCK,
DO NOT REMOVE COVER (OR BACK).
NO USER-SERVICEABLE PARTS INSIDE.
REFER SERVICING TO QUALIFIED
SERVICE PERSONNEL.”
Explicación de los símbolos
El símbolo del rayo con la punta de flecha en el
interior del triángulo equilátero tiene la finalidad
de avisar al usuario de la presencia de
“tensiones peligrosas” sin aislar en el interior
del producto que podrían ser de suficiente
magnitud como para constituir un riesgo de
sacudida eléctrica para las personas.
El signo de exclamación en el interior de un
triángulo equilátero tiene la finalidad de avisar
al usuario de la presencia de instrucciones
importantes de operación y mantenimiento
dentro del material impreso que acompaña al
aparato.
INSTRUCCIONES
IMPORTANTES DE
SEGURIDAD
Calor - No emplee esta unidad cerca de fuentes de calor,
incluidas las salidas de aire caliente, estufas u otros
aparatos que generan calor. Tampoco debe utilizarse a
temperaturas inferiores a 5°C (41°F) o superiores a 35°C
(95°F).
Superficie de montaje - Coloque la unidad sobre una
superficie plana y nivelada.
Accesorios - No sitúe esta unidad sobre un carro, soporte,
trípode o mesa inestable. La unidad podría caerse y
producir daños graves a un niño o adulto y al propio
aparato. Utilícela sólo con un carro, soporte, trípode o mesa
recomendada por el fabricante o comercializada junto con la
unidad. Cualquier montaje de la unidad debe respetar las
instrucciones del fabricante y debe emplear un accesorio de
montaje recomendado por el mismo.
Carro portátil - Las combinaciones de aparato y carro
deben trasladarse con cuidado. Podrían volcar si se
someten a paradas bruscas, fuerza excesiva o superficies
desniveladas.
ADVERTENCIA SOBRE CARROS PORTÁTILES
S3125A
Ventilación - La unidad debe situarse con suficiente
espacio a su alrededor para asegurar una correcta
ventilación de calor. Deje una separación de 10 cm desde
las partes posterior y superior de la unidad y de 5 cm desde
cada lado.
Las aberturas y ranuras que hay en la parte posterior y en
la base de la carcasa son para fines de ventilación. Para
que la unidad funcione debidamente y no se recaliente,
estas aberturas no deben quedar bloqueadas ni cubiertas.
Jamás se debe colocar la unidad sobre una cama, un sofá,
una esterilla ni cualquier otra superficie que pueda bloquear
esas aberturas. (Esta unidad no debe colocarse nunca
sobre un radiador o registro de calor ni en sus
inmediaciones.) Esta unidad no debe colocarse dentro de
una estructura, como por ejemplo una biblioteca, a menos
que se haya previsto la ventilación necesaria.
Lea las Instrucciones de manejo detenidamente antes de
utilizar la unidad. Asegúrese de conservar dichas
instrucciones para futuras consultas. Todas las advertencias
y precauciones incluidas en las Instrucciones de manejo e
impresas en la unidad, así como las sugerencias de
seguridad que se ofrecen a continuación, deben respetarse
estrictamente.
Advertencia
Para evitar riesgos de choque eléctrico o de lesiones
personales, deben seguirse estas instrucciones para la
instalación, el uso y el mantenimiento de la unidad.
Instalación
Aditamentos - No utilice aditamentos no recomendados por
el fabricante de la unidad, ya que pueden constituir un riesgo
de incendios, descargas eléctricas o daños personales.
Agua y humedad - No utilice esta unidad cerca del agua,
por ejemplo, en las proximidades de una bañera, lavabo, pila
de cocina o piscina, en un sótano húmedo, etc.
ESPAÑOL
1
Entrada de objetos y líquidos - Nunca introduzca ningún
objeto a través de las ranuras de la unidad, ya que podrían
tocar partes que conducen corriente o provocar
cortocircuitos que conducirían a incendios, descargas
eléctricas o averías de la unidad. No derrame líquidos de
ningún tipo sobre la unidad.
Energía eléctrica
Fuentes de alimentación - Esta unidad sólo debe utilizarse
con el tipo de fuente de alimentación indicado en su
etiqueta. Si no está seguro del tipo de fuente de
alimentación conectado a su hogar, consulte a su proveedor
de electrodomésticos o a la compañía eléctrica local. Para
utilizar la unidad con pilas u otras fuentes de alimentación,
consulte las instrucciones de manejo.
Puesta a tierra o polarización - Esta unidad cuenta con un
enchufe polarizado de corriente alterna (un enchufe en el
que una clavija es más grande que la otra). Dicho enchufe
sólo encaja en el tomacorriente de una manera. Se trata de
un dispositivo de seguridad. Si no consigue insertar el
enchufe completamente en el tomacorriente, inténtelo al
revés. Si todavía no cabe, consulte a un electricista para
proceder a la sustitución del tomacorriente obsoleto. No
desaproveche el enchufe polarizado de seguridad.
Page 50

Protección del cable de alimentación - Los cables de
alimentación deben situarse en lugares donde no es
probable que se pisen ni se queden atrapados por otros
objetos. Es necesario prestar especial atención a los cables
junto a los enchufes, tomacorrientes y en su punto de salida
del aparato.
Sobrecargas - No deje que nada se apoye sobre el cable
de alimentación. No sobrecargue las tomas murales ni los
cables prolongadores, ya que pueden producirse incendios
o descargas eléctricas. No sitúe esta unidad en un lugar
donde la gente pueda pisar el cable.
Antena exterior
Líneas eléctricas - Un sistema de antena exterior no debe
situarse cerca de líneas eléctricas aéreas ni otros circuitos
eléctricos o de alumbrado, ni en lugares donde pueda
caerse sobre líneas o circuitos de este tipo. Al instalar un
sistema de antena exterior, es necesario ejercer sumo
cuidado para no tocar líneas o circuitos eléctricos, ya que el
contacto con ellos puede producir la muerte.
Puesta a tierra de antenas exteriores - Si conecta un
sistema de antena exterior o de cablevisión a la unidad,
asegúrese de conectar a tierra la antena o el sistema de
cablevisión para ofrecer alguna protección contra las
sobretensiones y la acumulación de cargas estáticas. La
Sección 810 del Código Eléctrico Nacional (NEC), ANSI/
NFPA No. 70, ofrece información relativa a la correcta
conexión a tierra del mástil y la estructura de soporte, la
puesta a tierra del cable de entrada a una unidad de
descarga de antena, el tamaño de los conductos de puesta
a tierra, la ubicación de la unidad de descarga de antena, la
conexión a los electrodos de puesta a tierra y los requisitos
para el electrodo de puesta a tierra. Consulte la siguiente
figura.
Antenna Grounding According to the National Electrical Cord
Puesta a tierra de una antena, según el Código Eléctrico Nacional
Daños que requieren servicio
Desenchufe la unidad del tomacorriente de la pared y acuda
a personal de servicio especializado en las siguientes
situaciones:
1) Si el enchufe o cable de alimentación está dañado o
deshilachado.
2) Si se ha derramado líquido dentro de la unidad.
3) Si la unidad ha sido expuesta al agua o a la humedad.
4) Si la unidad no funciona normalmente al seguir las
instrucciones de manejo. Ajuste sólo aquellos
controles que se indican en las instrucciones, ya que
un ajuste incorrecto de los demás controles puede
producir daños y en muchos casos requeriría un
trabajo extenso por parte de un técnico para restaurar
el funcionamiento normal de la unidad.
5) Si la unidad se ha caído o la carcasa ha sufrido daños.
6) Cuando la unidad presenta un cambio brusco en su
funcionamiento, ello indica la necesidad de acudir al
servicio técnico.
No intente hacer ninguna reparación ya que el hecho de
abrir o retirar las cubiertas puede exponerle a un voltaje
peligroso o a otros riesgos. Para cualquier reparación acuda
a personal de servicio técnicos cualificado.
Piezas de recambio - En caso de que se requieren piezas
de recambio, asegúrese de que el técnico haya utilizado las
piezas especificadas por el fabricante o con las mismas
características que la pieza original. Las sustituciones no
autorizadas pueden provocar incendios, descargas
eléctricas u otros peligros.
Comprobación de seguridad - Después de realizarse
cualquier reparación o trabajo de mantenimiento en la
unidad, solicite al técnico que realice algunas
comprobaciones de seguridad para verificar que la unidad
funciona correctamente.
ANTENNA LEAD IN WIRE
HILO DE ENTRADA DE
ANTENA
UNIDAD DE DESCARGA
ABRAZADERA DE
GROUND CLAMP
TIERRA
EQUIPOS DE
ELECTRIC
LA RED
SERVICE
EQUIPMENT
ELÉCTRICA
CÓDIGO ELÉCTRICO NACIONAL
NEC-NATIONAL ELECTRICAL CODE
ANTENNA DISCHARGE
UNIT
DE ANTENNA (SECCIÓN
(NEC SECTION 810-20)
810-20 DEL NEC)
CONDUCTOS DE PUESTA
A TIERRA (SECCIÓN
GROUNDING
810-21 DEL NEC)
CONDUCTORS
ABRAZADERAS DE
(NEC SECTION 810-21)
TIERRA
CONNEXIONS DE MISE A LA
GROUND CLAMPS
TERRE
SISTEMA DE ELECTRODOS DE
POWER SERVICE GROUNDING
ELECTRODE SYSTEM
PUESTA A TIERRA DE LA RED
(NEC ART 250 PART H)
ELÉCTRICA
(ART. 250, SECTION H NEC)
Rayos
Como protección adicional para el receptor de esta unidad
durante las tormentas eléctricas, o antes de dejarla
desatendida y sin utilizar durante un periodo prolongado,
desenchúfela del tomacorriente de la pared y desconecte la
antena o el sistema de cablevisión. Ello evitará daños a la
unidad causados por rayos y sobretensiones.
Mantenimiento
Limpieza - Desenchufe la unidad del tomacorriente de la
pared antes de limpiarla. No emplee productos de limpieza
líquidos ni aerosoles. Utilice un paño húmedo para la
limpieza.
Nota al instalador del sistema de cablevisión
Le recordamos al instalador del sistema de cablevisión que
el Artículo 820-40 del NEC ofrece normas para una correcta
puesta a tierra y, en particular, especifica que la puesta a
tierra del sistema de cablevisión debe conectarse al sistema
de puesta a tierra del edificio, tan cerca del punto de
entrada del cable como resulte práctico.
REGISTRO DEL PROPIETARIO
Por motivos de conveniencia, anote el número de
modelo y el número de serie (se encuentran en el panel
posterior de la unidad) en el espacio ofrecido a
continuación. Refiérase a ellos cuando se ponga en
contacto con su proveedor AIWA en caso de dificultad.
Número de modelo
Número de serie
ESPAÑOL
2
Page 51

¡Bienvenido¡
Muchas gracias por la adquisición de
este producto AIWA. Para sacar el
máximo partido a esta unidad, lea
atentamente este manual.
Indice
Características
principales de esta
videograbadora
Sistema VCR Plus+ y
reproducción instantánea
Usted podrá programar fácilmente el
temporizador con el sistema VCR Plus+.
Los programas de televisión grabados
podrán reproducirse rápidamente
utilizando la reproducción instantánea
con un botón.
Emisión MTS (Sonido de TV
multicanal)
Usted podrá recibir, grabar y reproducir
programas de TV en estéreo y bilingüe.
Controlador remoto
multimarca (MBR)
Este controlador remoto podrá gobernar
televisores y convertidores para
cablevisión/DBS de muchos fabricantes.
Preparativos
Conexión de la videograbadora..........................4
Preparación del controlador remoto....................8
Selección de idioma..........................................11
Ajuste del reloj ..................................................11
Memorización de los canales de la
videograbadora.................................................12
Comprobación del ajuste de canales para
utilizar el sistema VCR Plus+............................14
Reproducción
Reproducción de una cinta ...............................16
Diversas funciones de búsqueda......................17
Grabación
Grabación de un programa de televisión..........19
Grabación con el temporizador instantáneo .....20
Programación del temporizador con
Configuración automática
Usted podrá realizar fácil e
instantáneamente los ajustes de los
canales de televisión de la
videograbadora.
VCR Plus+ y PlusCode son marcas
comerciales registradas de Gemstar
Development Corporation.
El sistema VCR Plus+ es fabricado bajo
licencia de Gemstar Development
Corporation.
VCR Plus+ ........................................................21
Ajuste manual del temporizador .......................23
Copia.................................................................24
Otras funciones
Sistema de sonido de TV multicanal (MTS) y
sonido de audio Hi-Fi........................................25
Visualización en pantalla ..................................27
Información adicional
Solución de problemas .....................................28
Especificaciones ...............................................29
Componentes y controles .................................30
3
ESPAÑOL
Page 52

PREPARATIVOS
Conexión de la videograbadora
Conexiones básicas
Precaución
Todas las conexiones deben realizarse con la
videograbadora y el televisor desconectados de la
fuente de alimentación.
Cable coaxial de
75 ohmios (no
suministrado)
AERIAL
(VHF/UHF)
RF OUT
3
Cable de CA
Desconecte el cable de antena del televisor y conéctelo al conector AERIAL de
1
A una toma de CA
Al conector de antena
1
Cable de antena
(suministrado)
Cable bifilar plano de 300
ohmios (no suministrado)
2
Televisor
esta videograbadora.
Si el cable es coaxial de 75 ohmios de tipo redondo, conéctelo directamente al conector AERIAL.
Si el cable es bifilar de 300 ohmios de tipo plano, conéctelo al adaptador de antena (no
suministrado), y conecte el adaptador al conector AERIAL.
Adaptador de
antena (no
suministrado)
Separador de antenas
(no suministrado)
VU
Al terminal de antena UHF
Televisor
VHFUHF
75-ohm300-ohm
Al terminal de
antena VHF
Conecte el cable de antena suministrado al conector RF OUT de la videograbadora
2
y al conector de antena del televisor.
Si su televisor tiene un conector de antena de 300 ohmios, utilice un separador de antenas (no
suministrado).
3
Conecte el cable de CA a una toma de CA.
Para conectar un televisor utilizando los cables de audio y de vídeo
Si su televisor tiene tomas de entrada de audio/vídeo, podrá conectar la videograbadora y el televisor
utilizando los cables de audio y de vídeo suministrados.
Esta conexión mejora la calidad de la imagen y el sonido.
R AUDIO L
VIDEO
OUT OUT
(MONO)
IN IN
LINE 1
Amarillo
Rojo
Blanco
Cable de vídeo (suministrado)
Cable de audio (suministrado)
A toma de entrada
de video
Tomas de entrada
de audio
CONTINUE
CONTINUACION
ESPAÑOL
4
Page 53

Conexión de la videograbadora (continuación)
Conexiones a un sistema de cablevisión
Para conectar un sistema de cablevisión sin utilizar convertidor de cablevisión
Sistema de cablevisión
Cable coaxial de 75 ohmios
(no suministrado)
AERIAL
(VHF/UHF)
RF OUT
3
Cable de CA
1
Conecte el cable del sistema de cablevisión al conector AERIAL de esta
A una toma de CA
Al conector de antena
1
Cable de antena
(suministrado)
2
Televisor
videograbadora.
2
Conecte el cable de antena suministrado al conector RF OUT de la
videograbadora y al conector de antena del televisor.
Si su televisor tiene un conector de antena de 300 ohmios, utilice un separador de antenas
(no suministrado).
Conecte el cable de CA a una toma de CA.
3
Para conectar un sistema de cablevisión utilizando un convertidor
de cablevisión
Sistema de cablevisión
Separador de antenas
(no suministrado)
VU
Televisor
VHFUHF
Al terminal de
antena VHF
Al terminal de antena UHF
Convertidor de
cablevisión
(no suministrado)
75-ohm300-ohm
Cable coaxial de
75 ohmios
(no suministrado)
AERIAL
(VHF/UHF)
RF OUT
4
Cable de CA
1
Conecte el cable del sistema de cablevisión a la entrada del convertidor de cablevisión.
Conecte la salida del convertidor al conector AERIAL de esta videograbadora.
2
3
Conecte el cable de antena suministrado al conector RF OUT de la videograbadora y al conector de
A una toma de CA
Cable de antena
(suministrado)
Al conector de antena
1
Cable coaxial de 75 ohmios
(no suministrado)
3
Separador de antenas (no suministrado)
Televisor
VU
antena del televisor.
Si su televisor tiene un conector de antena de 300 ohmios, utilice un separador de antenas (no suministrado).
Conecte el cable de CA a una toma de CA.
4
ESPAÑOL
5
OUTIN
2
Televisor
VHFUHF
75-ohm300-ohm
Page 54

Para conectar un sistema de cablevisión utilizando un convertidor de cablevisión y un
divisor bidireccional
Sistema de cablevisión
1
Convertidor de
Divisor
bidireccional
(no
suministrado)
cablevisión
OUTIN
2
Cable coaxial de 75 ohmios
(no suministrado)
Cable coaxial de 75 ohmios (no suministrado)
3
AERIAL
(VHF/UHF)
RF OUT
2
Conecte el cable del sistema de cablevisión al divisor bidireccional.
1
Conecte una de las salidas del divisor a la entrada del convertidor de
2
cablevisión, y la otra al conmutador A/B.
6
Cable de CA
Cable coaxial de 75 ohmios (no suministrado)
Televisor
A una toma de CA
Al conector de antena
Cable coaxial de 75 ohmios (no suministrado)
5
4
Cable de antena
(suministrado)
Conmutador A/B
(no suministrado)
Nota
Cuando utilice un convertidor de
cablevisión, consulte sus
instrucciones.
Conecte la salida del convertidor al conector AERIAL de esta
3
videograbadora.
Conecte el conector RF OUT de esta videograbadora al conmutador A/B
4
con el cable de antena suministrado.
5
Conecte el conmutador A/B al conector de antena de su televisor.
6
Conecte el cable de CA a una toma de CA.
CONTINUE
CONTINUACION
ESPAÑOL
6
Page 55

Conexión de la videograbadora (continuación)
Conexiones adicionales
Para conectar un receptor de audio/vídeo
R AUDIO L
OUT OUT
(MONO)
IN IN
VIDEO
LINE 1
Receptor de audio/vídeo
Cable de vídeo (suministrado)
Cable de audio (suministrado)
Cable de audio/vídeo
(no suministrado)
Notas
• Para recibir una banda de radiodifusión en el receptor de audio/vídeo, desconecte la
alimentación de la videograbadora.
• Instale la antena de AM del receptor de audio/video en un lugar que evite las interferencias, lo
más alejada posible de la videograbadora.
• Es posible que el panel posterior no sea idéntico al que se muestra anteriormente; ello
depender á del receptor de audio/vídeo. Consulte las Instrucciones de manejo de dicho
receptor.
ESPAÑOL
7
Page 56

Ajuste para recepción de la
Preparación del controlador
grabadora
Si utiliza la videograbadora, la señal pasará de la antena a
dicha videograbadora y después al televisor. Antes de
utilizar la videograbadora, es preciso ajustar un canal de
salida de video en el televisor.
AERIAL
(VHF/UHF)
RF OUT
TV/VCR
3CH
3CH 4CH
4CH
remoto
Inserción de las pilas
Precauciones
Para evitar que se produzca una explosión o fugas,
siga las instrucciones que se indican a continuación.
• Inserte las dos pilas R03 (tamaño AAA) suministradas
con sus polaridades 0 y 9 correctamente alineadas
tal como se muestra en la ilustración.
• No utlice una pila agotada y una pila nueva juntas, ni
mezcle distintos tipos de pilas.
• No arroje las pilas al fuego, no las acerce a una fuente
de calor ni las desmonte.
• No las lleve junto con las llaves u otros objetos metálicos.
Si conecta un televisor con un cable de
antena
Si conecta el televisor al conector RF OUT con un cable de
antena suministrado, ajuste el selector de canales de la
parte posterior en 3 CH o 4 CH (no utilizado para
emisiones), y seleccione el mismo canal en el televisor.
(Para ver las imágenes de la videograbadora, ajuste el
canal 3 ch o 4 ch en el televisor.)
Para seleccionar el canal deseado en el televisor
Encienda el televisor y apague esta videograbadora.
Para contemplar un programa de televisión o de vídeo
seleccionado en la videograbadora
Conecte la alimentación del televisor y de la
videograbadora, y presione TV/VCR para hacer que
aparezca VCR en el visualizador.
VCR
Si conecta un televisor con cables de
audio y vídeo
Si conecta el televisor con los cables de audio y vídeo
suministrados, encienda el televisor y la videograbadora, y
seleccione el modo de entrada de vídeo en dicho televisor.
Nota
Extraiga las pilas cuando se agoten, o cuando no vaya a utilizar
el controlador remoto durante mucho tiempo.
Utilización del controlador remoto
Apunte con el controlador remoto hacia el sensor de control
remote.
5 m
30
30
Sensor de control remoto
7 m
Notas
• El controlador remoto puede no funcionar si existe un
obstáculo entre éste y el sensor de control remoto.
• Las fuentes de iluminación intensa, como una lámpara
fluorescente o la luz solar directa, pueden causar un
funcionamiento poco fiable.
• La utilización de un televisor con el mismo tipo de
controlador remoto de rayos infrarrojos, en la misma
dirección, puede provocar el funcionamiento incorrecto.
• El alcance máximo para el control efectivo entre el
controlador remoto y el sensor de control remote es de 7
metros.
Cuando se acorte la distancia máxima de operación,
reemplace las pilas por otras nuevas.
• Aunque el controlador remoto podrá utilizarse dentro de un
ángulo de hasta 30 grados en cualquier sentido del centro
de el sensor de control remote, para obtener un
funcionamiento estable, recomendamos un ángulo más
estrecho.
CONTINUE
CONTINUACION
ESPAÑOL
8
Page 57

Preparación del controlador remoto (continuación)
Control de televisores y
convertidores de cablevisión/DBS
El controlador remoto puede controlar televisores de un gran
número de fabricantes, así como convertidores de cablevisión/
DBS. Para gobernar tales televisores y convertidores para
cablevisión, introduzca los números de código de los
fabricantes mostrados en la tabla de la derecha.
POWER
MUTE
Ponga el selector VCR/CATV/DBS/TV en TV o
1
CATV/DBS.
2
Manteniendo presionado TV PRESET, presione
los botones numéricos correspondientes al
número de código que desee introducir
consultando la tabla de la derecha.
Algunos fabricantes poseen más de un número de código.
Si el controlador remoto no puede gobernar el televisor o el
sistema de cablevisión/DBS después de haber introducido
el número de código, pruebe otro número.
Para gobernar el televisor
Usted podrá utilizar los botones POWER, CHANNEL i, k,
VOL. +, –, MUTE, TV/VCR, y los botones numéricos del
controlador remoto.
Para gobernar el sistema de cablevisión/
DBS
Usted podrá utilizar los botones POWER, CHANNEL i, k
y los botones numéricos del controlador remoto.
Notas
• Debido a la gran variedad de códigos utilizados por los
fabricantes, AIWA no puede garantizar el que el controlador
remoto MBR gobierne todos los modelos de la lista de
fabricantes ofrecida.
• Los botones numéricos solamente podrá utilizarse para la
selección de canales, pero puede ser que no funcionen
correctamente dependiendo del televisores y convertidores
para cablevisión/DBS.
ESPAÑOL
9
VCR/CATV/
DBS/TV
Botones
numéricos
CHANNEL i/k
VOL. +/–
TV PRESET
Fabricante de televisor Número de código
ADMIRAL 16, 33, 37, 44, 45
AIWA 70
AKAI 01
AMARK 09
AOC 01
BELL & HOWELL 33
BROKSONIC 18, 19
CANDLE 51
CCE 07
CENTURION 08
CINERAL 43
CITIZEN 49, 50, 51, 52, 53, 54, 55
CORONADO 09
CROWN 09
CURTIS MATHES 01, 03, 08, 33, 37, 44
DAEWOO 16, 38, 39, 40, 41, 42, 43
DAYTRON 01, 08
EMERSON 01, 09, 16, 17, 18, 19
FISHER 28, 29
FUNAI 46, 47
GENERAL ELECTRIC 03, 10, 11, 13, 35, 37, 44
GRADIENTE 01, 56, 57, 63, 67
HITACHI 09, 14, 15, 43
JC PENNEY 01, 08, 10, 27, 35
JVC 20, 21, 63, 67
KIOTE 43
KMC 09
KTV 01, 08, 09, 31
LG (GOLDSTAR) 01, 07, 08, 09, 35, 39, 40
LODGENET 33
LOGIK 33
LXI 09, 24, 25, 26, 27, 28, 29
MAGNAVOX 01, 02, 04, 05, 06, 07, 08, 09,
20, 34, 35, 43, 51, 61, 62, 65
MAJESTIC 33
MARANTZ 01, 32
MEMOREX 33
MGA/MITSUBISHI 01, 08, 32, 34
MONTGOMERY WARD 01, 06, 08, 09, 23, 24, 32, 33, 34
NEC 01, 08
NOBLEX 07
PACKARD BELL 43
PANASONIC 07, 11, 13, 25, 35, 36
PHILCO 01, 06, 07, 08, 09, 15, 38, 43, 58
PHILIPS 06, 07, 43, 61, 62, 65
PIONEER 30
PORTLAND 09
PROSCAN 03, 37, 44
QUASAR 11, 13
RADIO SHACK 16, 17, 23
RCA 01, 03, 37, 44
REALISTIC 16, 17, 23
Page 58

Fabricante de televisor Número de código
SAMPO 08
SAMSUNG 01, 08, 09, 25, 68
SANYO 28, 29
SCOTT 01, 08
SEARS 09, 25, 26, 27, 28, 29
SEMP 64
SHARP 09, 22, 23, 24, 60, 66
SIGNATURE 2000 01, 06, 08, 09, 10, 23, 24, 33, 34
SONY 12, 62
SOUNDESIGN 51
SYLVANIA 01, 04, 05, 06, 07, 08, 35, 51
SYMPHONIC 46, 47
TATUNG 11
TEKNIKA 07, 09, 16, 33, 51
TELERENT 09, 33
YHOMSON 69
TORX 08
TOSHIBA 01, 25, 26, 27, 64
WARDS 01, 06, 08, 09, 10, 33, 34
XR1000 48
ZENITH 02, 33, 59
Fabrieante de DBS Número de código
DIRECTV 66
EASTERN 57
GRADIENTE SKY 56
JERROLD 60, 61, 65
RCA 50
SCIENTIFIC ATLANTA 58, 63, 64
SONY 49
TOCOM 58, 59, 62
Fabricante de convertidor de Número de código
cablevisión
ALLEGRO 46
ARCHER 39
CABLEVIEW 39
CITIZEN 39
CURTIS MATHES 15
EAGLE 24, 25, 28
GEMINI 04, 05, 22, 23
GENERAL ELECTRIC 43
GENERAL INSTRUMENT 04, 05, 07, 09
GOBRAND 39
HAMLIN 33, 34, 35
JERROLD 04, 06, 07, 08, 09, 10, 17,
39
KALE VISION 29
MACOM 03, 40, 41
MAGNAVOX 24, 25, 28, 29, 36, 37
NSC 38
OAK 11, 12, 44
PANASONIC 13, 19, 21
PARAGON 01
PHILIPS 24, 25, 26, 27, 28
PIONEER 13, 14
PULSER 39
RCA 13, 50
REGAL 28
REGENCY 32
SAMSUNG 04, 13, 29
SCIENTIFIC ATLANTA 10, 15, 16, 45, 48
SLMARX 04, 13
SONY 49
SPRUCER 04, 13, 19
STANDARD COMPONENTS 29
STARGATE 04, 05, 13
TELEVIEW 04, 13, 39
TEXSCAN 31
TOCOM 12, 17, 18, 19, 38
UNIDEN 20
UNIKA 39
UNIVERSAL 46, 47
VID TECH 30
VIDEO WAY 01, 42
VIEWSTAR 24, 25, 28
ZENITH 01, 02, 03
ZENITH HT-2000 01
Nota
Es posible que algunos fabricantes de televisores y
convertidores/DBS para cablevisión no estén en la lista de
arriba.
ESPAÑOL
10
Page 59

Selección de idioma
RELOJ
PROGRAMA
SINTONIZAR
AJUSTAR
SELEC. EJECUTAR
PULSE PARA SALIR.
ENTER
MENU
LANGUAGE SELECT : ENGLISH
MES : ENERMES : ENER
DIA : 1 SAB
AÑO : 2000
HORA
: 12 : 00 AM
AUTOM. AJUSTADO : NO
SELEC. AJUSTAR
PULSE PARA SALIR.
MENU
MES : JUNIO
DIA : 17 SAB
AÑO : 2000
HORA
: 10 : 30 AM : 10 : 30 AM
AUTOM. AJUSTADO : NO
SELEC. AJUSTAR
PULSE PARA SALIR.
MENU
IDIOMA :
ESPAÑOL
Ajuste del reloj
El menú en pantalla podrá visualizarse en uno de los tres
idiomas siguientes: inglés, español, y francés.
POWER
ENTER/
DISPLAY
VCR/CATV/
DBS/TV
i/k
j/l
MENU
Antes de comenzar
Ajuste el selector VCR/CATV/DBS/TV en VCR.
1
Presione POWER para conectar la alimentación
de la videograbadora.
2
Presione MENU.
3
Presione i o k para seleccionar SETUP
(ajustar), y después presione ENTER/DISPLAY.
Para realizar grabaciones con el temporizador, tendrá que
ajustar la fecha y la hora.
VCR/CATV/
DBS/TV
i/k
j/l
ENTER/
MENU
DISPLAY
Antes de comenzar
Ajuste el selector VCR/CATV/DBS/TV en VCR.
1
Presione MENU.
2
Presione i o k para seleccionar RELOJ, y
después presione ENTER/DISPLAY.
CLOCK
PROGRAM
TUNING
SETUP
ENTER
SELECT ENTER
TO EXIT PRESS
4
Presione i o k para seleccionar LANGUAGE
MENU
SELECT (idioma).
FUNCTION OSD : ON
LANGUAGE SELECT : ENGLISH
AUDIO MODE :
BROADCAST TYPE :
AUDIO OUTPUT :
CHANNEL MAPPING
SELECT ADJUST
TO EXIT PRESS
5
Presione j o l para visualizar el idioma
HI-FI
STEREO
STEREO
MENU
deseado.
Cambie el idioma, el idioma de visualización en pantalla
cambiará.
FUNCION DESPLEGADA :
IDIOMA :
MODO DE AUDIO :
TIP / TRANS :
SALIDA DE AUDIO :
MAPA DE CANALES
SELEC. AJUSTAR
MENU
PULSE PARA SALIR.
ESPAÑOL
HI–FI
ESTEREO
ESTEREO
SI
3
Presione j o l para ajustar MES, y después
presione k.
El día de la semana aparecerá automáticamente.
4
Ajuste DIA, AÑO, y HORA como en el paso 3.
Para cambiar rápidamente el ajuste, mantenga
presionado j o l.
Presione MENU para volver a la pantalla
6
normal.
ESPAÑOL
11
Page 60

5
RELOJ
PROGRAMA
SINTONIZAR
AJUSTAR
SELEC. EJECUTAR
PULSE PARA SALIR.
ENTER
MENU
AUTO PROGRAMACION
BANDA SINTONIZADA :
MEM / BORRAR :TVCAN.14 MEM
SELEC / FUENTE : SELEC / FUENTE : SIN. SIN.
SELEC. AJUSTAR
PULSE PARA SALIR.
MENU
Presione j o l para ajustar AUTOM.
AJUSTADO en SI.
La videograbadora corrige el reloj automáticamente una
vez ajustado AUTOM. AJUSTADO en SI.
MES : JUNIO
DIA : 17 SAB
AÑO : 2000
HORA
: 10 : 30 AM
AUTOM. AJUSTADO : SI
SELEC. AJUSTAR
MENU
PULSE PARA SALIR.
Memorización de los canales
de la videograbadora
Antes de utilizar la memoria automática de canales, esta
videograbadora puede recibir todos los canales de su zona
presionando el botón CHANNEL i o k varias veces.
Después de utilizar la memoria automática de canales,
puede omitir los canales que no estén memorizados con el
botón CHANNEL i o k.
6
Presione MENU para poner en funcionamiento
el reloj.
Volverá a aparecer la pantalla normal.
Para corregir los dígitos durante el ajuste
Antes de presionar MENU en el paso 6, presione i para
seleccionar el elemento que desee corregir. Vuelva a
ajustar los dígitos con el botón j o l.
Sugerencia
Si la fuente de alimentación se interrumpe durante más de 60
minutos o si el cable de CA se desconecta de la toma mural de
CA, el ajuste del reloj se borrará. En este caso, deberá ajustar
el reloj de nuevo.
Notas
• La fecha podrá ajustarse de 2000 a 2099 A.D.
• AUTOM. AJUSTADO funcionará cuando
- desconecte la alimentación de la videograbadora.
- preajuste el canal de la emisora que ofrezca el servicio
AUTOM. AJUSTADO.
VCR/CATV/
DBS/TV
i/k
j/l
ENTER/
DISPLAY
MENU
Antes de comenzar
• Ajuste el selector VCR/CATV/DBS/TV en VCR.
• Compruebe que no ha seleccionado el canal de la
videograbadora en “LINE1” o “LINE2”.
1
Presione MENU.
2
Presione i o k para seleccionar SINTONIZAR,
y después presione ENTER/DISPLAY.
3
Presione i o k para seleccionar
SELEC/FUENTE, y después presione j o l
para hacer que se visualice SIN.
CONTINUE
CONTINUACION
ESPAÑOL
12
Page 61

RELOJ
PROGRAMA
SINTONIZAR
AJUSTAR
SELEC. EJECUTAR
PULSE PARA SALIR.
ENTER
MENU
Memorización de los canales de la videograbadora
AUTO PROGRAMACION
BANDA SINTONIZADA : CATVBANDA SINTONIZADA : CATV
MEM / BORRAR :
SELEC / FUENTE :
PULSE PARA SALIR.
MENU
SIN.
CAN.23 MEM
SELEC. AJUSTAR
(continuación)
i/k
j/l
ENTER/
DISPLAY
4
Presione i o k para seleccionar AUTO
MENU
PROGRAMATION, y después presione j o l .
Los canales disponibles en su zona se explorarán y
almacenarán en la memoria de la videograbadora.
Después de la exploración, aparece la pantalla del
televisor del paso 3.
Canales de cablevisión
Los sistemas de cablevisión utilizan letras y números para
designar los canales. En la tabla siguiente se muestran los
números de canal del sistema de cablevisión y los números
de canales correspondientes visualizados en esta
videograbadora. Para más información sobre los canales
disponibles en su zona, consulte a la compañía de
cablevisión local.
Canales visualizados en esta Canales de
videograbadora cablevisión
01 5A
02 a 13 2 a 13
14 a 36 A a W
37 a 94 W+1 a W+58
95 a 99 A-5 a A-1
100 a 124 W+59 a W+83
125 W+84
Sugerencias
• Cuando realice el almacenamiento automático de canales,
la videograbadora seleccionará automáticamente la banda
(TV o CATV) en la que haya más canales para almacenar.
Para comprobar la banda, presione k para seleccionar
BANDA SINTONIZADA en el menú SINTONIZAR.
• En el visor, “c” corresponde al canal de cablevisión y “ch”, al
canal de televisión.
Nota
Después de haber realizado el almacenamiento automático de
canales, los ajustes anteriores se cancelarán.
MEMORIA AUTOMATICA
DE CANALES
PROCESANDO
CANAL 11
MENU
PULSE PARA SALIR.
5
Para volver a la pantalla normal, presione
MENU.
Si en el visualizador parpadea “C”
después del almacenamiento automático
de canales
Compruebe las conexiones de las antenas y repita el
procedimiento anterior desde el paso 1.
Si todavía no puede recibir canales, ajuste manualmente la
videograbadora. Consulte “Adición o borrado manual de
canales de la videograbadora”.
(Para grabar programas de televisión, tendrá que
memorizar los canales en la videograbadora.)
Adición o borrado manual de
canales de la videograbadora
Si el almacenamiento automático de canales no sintoniza
correctamente los canales de la videograbadora, añádalos
manualmente para grabar programas de televisión.
Además, usted también podrá borrar de la videograbadora
los canales que no necesite.
1
Presione MENU.
Presione i o k para seleccionar SINTONIZAR,
2
y después presione ENTER/DISPLAY.
Presione i o k para seleccionar BANDA
3
SINTONIZADA, y después presione j o l para
hacer que se visualice TV o CATV.
13
ESPAÑOL
Page 62

4
MEM / BORRAR :
CAN. 25 BOR
MEM / BORRAR :
CAN. 23 MEM
Presione i o k para seleccionar MEM/
BORRAR.
Comprobación del ajuste de
canales para utilizar el sistema
AUTO PROGRAMACION
BANDA SINTONIZADA :
MEM / BORRAR :
SELEC / FUENTE :
ENTER MEM / BORRAR
SELEC. AJUSTAR
MENU
PULSE PARA SALIR.
5
Presione j o l para seleccionar el canal que
CATV
CAN. 23 MEM
SIN.
quiera borrar o añadir.
Si el canal seleccionado ya se ha ajustado, aparecerá
MEM. Si no se ha ajustado, aparecerá BOR.
AUTO PROGRAMACION
BANDA SINTONIZADA :
MEM / BORRAR :
SELEC / FUENTE :
ENTER MEM / BORRAR
SELEC. AJUSTAR
MENU
PULSE PARA SALIR.
6
Presione ENTER/DISPLAY para anãdir o borrar
CATV
CAN. 25 BOR
SIN.
el canal.
Si añade el canal seleccionado, “c” o “ch ” se iluminará
durante unos segundos en el visualizador. Si borra el
canal, “c” o “ch” parpadeará durante unos segundos en
el visualizador.
7
Si desea añadir o borrar otro canal, repita los
pasos 5 y 6.
8
Presione MENU para volver a la pantalla
normal.
Sugerencia
En el visor, “c” corresponde al canal de cablevisión y “ch”, al
canal de televisión.
VCR Plus+
Para programar el temporizador utilizando VCR Plus+,
tendrá que comprobar si los números de los canales de la
videograbadora coinciden con los canales guía asignados a
las emisoras de televisión. Si no coinciden, la función VCR
Plus+ no trabajará correctamente. En este caso, coordine
los números.
Por ejemplo
Para cada canal que reciba su videograbadora, utilice la
tabla de canales para comprobar si los números de canales
coinciden. Por ejemplo, SHOWTIME está en la tabla de
canales (debajo de Código VCR Plus+) como canal 38, y si
su videograbadora recibe SHOWTIME en el canal 14,
tendrá que coordinar estos números localizando el canal
guía 38 (debajo de GUIA CANALES). A continuación,
introduzca su canal SHOWTIME 14 (debajo de CANAL).
Continúe este proceso hasta que coincidan todos los
canales.
Tabla de canales de muestra
Emisoras de televisión
Código
VCR Plus+
WCBS New York CBS 02 02
WNBC New York NBC 04 04
WNYW New York NYW 05 05
WABC New York ABC 07 07
A&E
BET
CNBC
CSPAN
Arts & Entertainment
Black Entertainment
Consumer News & Business
Government Business
DSC Discovery Channel 37 63
DIS Disney Channel 53 27
MAX Cinemax 45 15
SHO Showtime 38 14
USA USA Network 44 40
• Las listas guía de canales podrá verlas en guías de
televisión o en periódicos locales.
Número de canal de la
compañiá de
cablevisión local
39 44
57 23
23 16
28 54
CONTINUE
CONTINUACION
ESPAÑOL
14
Page 63

38
– – –
GUIDA CANALES CANAL
37
3838
39
40
41
42
– – –
14
– – –
– – –
– – –
– – –
MAPA DE CANALES
SELEC. ADJUSTAR
PULSE PARA SALIR.
MENU
Comprobación de canales para utilizar VCR Plus+
MAPA DE CANALES
(continuación)
VCR/CATV/
DBS/TV
i/k
j/l
CLEAR
MENU
ENTER/
DISPLAY
Presione j o l para hacer que se visualice
5
CANAL “14”.
Repita los pasos 4 y 5 hasta haber introducido
6
todos los números de canales.
7
Presione MENU para volver a la pantalla
normal.
Sugerencia
Para cancelar el ajuste de CANAL, presione CLEAR en el paso
5.
Antes de comenzar
Ajuste el selector VCR/CATV/DBS/TV en VCR.
1
Presione MENU.
Presione i o k para seleccionar AJUSTAR, y
2
después presione ENTER/DISPLAY.
RELOJ
PROGRAMA
SINTONIZAR
AJUSTAR
ENTER
SELEC. EJECUTAR
MENU
PULSE PARA SALIR.
3
Presione i o k para seleccionar MAPA DE
CANALES, y después presione j o l.
FUNCION DESPLEGADA :
IDIOMA :
MODO DE AUDIO :
TIP / TRANS :
SALIDA DE AUDIO :
MAPA DE CANALES
SELEC. AJUSTAR
MENU
PULSE PARA SALIR.
ESPAÑOL
HI–FI
ESTEREO
ESTEREO
SI
Presione i o k para seleccionar GUIA
4
CANALES “38”.
15
ESPAÑOL
MAPA DE CANALES
GUIDA CANALES CANAL
37
38
39
40
41
42
SELEC. ADJUSTAR
MENU
PULSE PARA SALIR.
– – –
– – –
– – –
– – –
– – –
– – –
Page 64

REPRODUCCION
REPRODUCCION
Reproducción de una cinta
POWER
CPLAY
fREW/[
aPAUSE/STILL
SLOW
A-TR
VCR/CATV/
DBS/TV
zEJECT
gF FWD/]
sSTOP
TRACKING +/-
Si no puede obtener imágenes de
reproducción claras
Aunque la videograbadora ajusta automáticamente la
alineación, es posible que usted necesite ajustarla
manualmente si la calidad de la cinta es mala.
Mientras la videograbadora ajusta la alineación
automáticamente, “A. TRK” (alineación automática)
parpadea en el visualizador. Desaparecerá una vez
finalizado el ajuste.
TIMER VCR REM BILSAP ST
REC
SP LP EP
Si la imagen y el sonido presentan ruido, intente la
alineación manual.
M
Para ajustar manualmente la alineación
Durante la reproducción, presione TRACKING +, – en el
control remoto y CHANNEL i o k en la videograbadora
repetidamente hasta obtener la mejor imagen posible. (La
alineación automática se cancelará.)
Para volver a la manualmente la alineación
Presione A-TR.
Hi-Fi
Antes de comenzar
• Encienda el televisor y ajústelo en el modo de recepción
de videograbadora.
• Ajuste el selector VCR/CATV/DBS/TV en VCR.
Inserte un videocasete.
1
• La alimentación se conectará automáticamente.
• Si su videocasete tiene quitada la lengüeta de
protección contra el borrado, la reproducción
comenzará inmediatamente.
2
Para iniciar la reproducción, presione C PLAY.
Para parar la reproducción
Presione sSTOP.
Notas
• Si la cinta llega al final durante la reproducción, el avance
rápido, la búsqueda progresiva, la búsqueda de índices, ADskip o el modo de cámara lenta, la videograbadora la
rebobinará automáticamente hasta el principio, expulsará el
videocasete y desactivará la alimentación (función de
rebobinado automrático).
• La videograbadora seleccionará automáticamente la
velocidad de cinta SP, LP, o EP.
• Al insertar un videocasete, la indicación de reloj del
visualizador cambiará a la indicación de contador de cinta.
• Es posible realizar la reproducción fotograma por fotograma
durante el modo de imagen fija presionando a PAUSE/
STILL.
Funciones adicionales
Para
Congelar una
imagen
Avanzar
rápidamente la cinta
Rebobinar la cinta
Extraer el
videocasete
Buscar
progresivamente a
gran velocidad
Buscar
regresivamente a
gran velocidad
Reproducir a
velocidad lenta
Reproducir
fotograma por
fotograma
Presione
a PAUSE/STILL
durante la reproducción
g F FWD/] durante
el modo de parada
f REW/[ durante el
modo de parada
z EJECT
g F FWD/] durante
la reproducción
f REW/[ durante
la reproducción
SLOW durante la
reproducción
a PAUSE/STILL varias
veces durante el modo
de imagen fija
Para volver
al modo
original
Presione
C PLAY.
Presione
s STOP.
Presione
s STOP.
—
Presione
C PLAY.
Presione
CPLAY.
Presione
CPLAY.
Presione
CPLAY.
CONTINUE
CONTINUACION
ESPAÑOL
16
Page 65

Reproducción de una cinta (continuación)
Diversas funciones de
POWER
zEJECT
fREW/[
aPAUSE/STILL
gF FWD/]
CHANNEL i/k
AD-SKIP
TRACKING +/-
Para ver la imagen de una cinta durante el
avance rápido o el rebobinado
— Búsqueda con omisión
Mantenga presionado g F FWD/] o f REW/[
durante el avance rápido o el rebobinado. La videograbadora
cambiará entre la búsqueda progresiva o regresiva.
Deje de presionar el botón para volver al modo de avance
rápido o rebobinado.
Para saltar un anuncio
Presione AD-SKIP durante la reproducción. La
videograbadora buscará progresivamente durante unos 30
segundos de tiempo de grabación. Con cada presión, el
tiempo grabado de búsqueda progresiva aumentará en
incrementos 30 segundos hasta un máximo de 3 minutos.
búsqueda
VCR/CATV/
DBS/TV
Botones
numéricos
CPLAY
fREW/[
SLOW
ENTER/DISPLAY
CLEAR
ZERO {
REC.END
SEARCH
Antes de comenzar
Ajuste el selector VCR/CATV/DBS/TV en VCR.
Rebobinado o avance rápido hacia
un punto determinado — Retorno a
cero
gF FWD/]
sSTOP
CHANNEL i/k
VISS
TRACKING +/-
Después de la búsqueda progresiva, la videograbadora
volverá a la reproducción normal.
Durante la función Omisión de publicidad, el contador no
registra los fragmentos en blanco sin señales grabadas.
Para desconectar el aparato
automáticamente después del rebobinado
Pulse POWER durante el rebobinado. REW parpadeará en
la pantalla del TV.
El vídeo se desactivará una vez se haya rebobinado la cinta
hasta el principio.
Sugerencias
• Si presiona z EJECT de la videograbadora con la
alimentación desconectada, ésta se conectará
automáticamente, la videograbadora expulsará el
videocasete, y la alimentación se desconectará.
• Es posible ajustar las imágenes inestables presionando el botón
TRACKING + o – varias veces durante el modo de imagen fija.
• Dependiendo de la cinta que utilice, pueden aparecer líneas
de ruido o el color puede desaparecer durante la
reproducción a cámara lenta. Puede desplazar las líneas de
ruido presionando TRACKING +, – en el control remoto y
CHANNEL N o M en la videograbadora varias veces.
• Pueden aparecer líneas de ruido o el color puede
desaparecer durante los modos de búsqueda progresiva o
regresiva. Las líneas pueden desplazarse presionando el
botón TRACKING + o – varias veces.
Notas
• Si una imagen fija dura más de 5 minutos, la videograbadora
entrará automáticamente en el modo de parada para
proteger la cinta.
• Si los modos de búsqueda progresiva, regresiva y de
reproducción a cámara lenta duran 3 minutos, la
videograbadora entrará automáticamente en el modo de
reproducción para proteger la cinta.
• El sonido se desactivará durante los modos de búsqueda
progresiva y regresiva, y de imagen fija.
Pulse CLEAR en el punto que quiere buscar
1
posteriormente.
• El contador de cinta del visor muestra “0:00:00”.
• Si el contador de cinta no aparece en el visor, pulse
OK/CLK/CNT repetidamente.
M
VCR REM BILSAP ST
TIMER
REC
LP EP
SP
Después de reproducir o grabar, pulse
2
Hi-Fi
s STOP y, a continuación, ZERO {.
La cinta se detiene automáticamente cuando el contador
de cinta llega a “0:00:00”.
Sugerencia
También puede ver el contador de cinta en la pantalla del TV.
Pulse ENTER/DISPLAY repetidamente hasta que aparezca el
contador de cinta.
Notas
• Al introducir un videocasete, el contador de cinta se cambia
a “0:00:00”.
• El contador de cinta no funciona mientras se reproducen
fragmentos sin grabar de una cinta.
17
ESPAÑOL
Page 66

Búsqueda con la función de índice
BUSQUEDA FIN. GRAB.
grabado
blanco
grabado posteriormente
— Búsqueda de señales de índice
La videograbadora marcará automáticamente una señal de
índice en la cinta cada vez que inicie una grabación. Usted
podrá utilizar estas señales de índice para buscar el
comienzo de cualquier grabación.
1
Presione VISS durante la reproducción o el
modo de parada.
Presione los botones numéricos para
2
seleccionar el número de índice (hasta 99).
Para seleccionar números inferiores a 10, presione 0
para introducir el dígito de las decenas y después los
botones 1 a 9 para introducir el dígito de las unidades.
VISS 03
Número de índice
Notas
• Usted podrá utilizar también el visualizador para comprobar
el número de índice que haya especificado. “VISS” y el
número de índice aparecerán en el visualizador.
• Es posible que las señales de índice deberán estar
separadas por lo menos 1 minuto en el modo SP, 2 minutos
en el modo LP, y 3 minutos en el EP. De lo contrario, la
videograbadora no podría detectarlas adecuadamente.
• Es posible que las señales de índice no se detecten en
cintas dañadas o gastadas.
• Es posible que las señales de índice no se detecten al
principio de una cinta grabada.
• La señal de índice puede no detectarse si está demasiado
cerca del punto en el que inició la búsqueda.
• Durante la búsqueda se visualizará el indicador de velocidad
actual de la cinta. Éste no señalará la velocidad de la cinta
que esté utilizando.
Búsqueda del final del programa grabado
— Búsqueda de imágenes finales
Es posible avanzar la cinta rápidamente o rebobinarla al
final del programa grabado de forma automática.
Antes de comenzar
Ajuste el selector VCR/CATV/DBS/TV en VCR.
Presione REC.END SEARCH durante el mode de parada.
La unidad comenzará a buscar.
3
Presione g F FWD/] (para programas
posteriores) o f REW/[ (para programas
anteriores).
La reproducción se iniciará automáticamente desde el
comienzo de la grabación especificada.
Aparecerá FF o REW.
FF
SP
V. SEARCH 03
Para buscar continuamente la señal de
índice siguiente
Presione VISS durante la reproducción o el modo de
parada. A continuación presione g F FWD/] o
f REW/[. Al encontrarse la siguiente señal de índice, la
reproducción se inicia automáticamente.
Después de 5 segundos, la videograbadora pasará al modo
de avance rápido o de rebobinado.
En la escena deseada, presione C PLAY para volver a la
reproducción normal.
FF
SP
La búsqueda se detendrá automáticamente tras el avance
rápido o el rebobinado como se muestra a continuación.
Avance rápido
grabado
grabado blanco
Avance rápido
Presione REC.END SEARCH
anteriormente grabado
grabado posteriormente
grabado posteriormente
Avance rápido
Presione REC.END SEARCH
Rebobinado
grabadograbado
Rebobinado (tras
Parada
avanzar rápidamente
durante cuatro segundos)
Parada
blancoblanco
Presione REC.END SEARCH
blanco
Parada
blancoblanco
V. SCAN 00
Para detener la búsqueda de imágenes finales
Presione sSTOP.
Notas
• Si la cinta no contiene espacios en blanco, la búsqueda se
detendrá al final de dicha cinta.
• Si la búsqueda es inferior a 5 minutos en el modo SP, a 10 minutos
en el modo LP o a 15 en el modo EP, es posible que la búsqueda
de imágenes finales de grabación no funcione completamente.
• Si utiliza una cinta con programas previamente grabados en
el modo SP y LP, es posible que la búsqueda de imágenes
finales de grabación no funcione completamente.
ESPAÑOL
18
Page 67

GRABACION
Grabación de un programa de
televisión
VCR /CATV/DBS/ TV
Botones
numéricos
TV/VCR
wREC/ITR
aPAUSE/STILL
OTPB
0/INPUT
sSTOP
CHANNEL i/k
SPEED
3
Presione CHANNEL + o - en el controlador
remoto, CHANNEL N o M en la
videograbadora o los botones numéricos para
seleccionar el canal que desee grabar.
Si utiliza los botones numéricos, el canal tardará unos
segundos en cambiar después de presionar los botones.
4
Presione w REC/ITR para comenzar a grabar.
“V.MARK” parpadea en la pantalla del televisor al
marcarse una señal de índice.
Para parar la grabación
Presione s STOP.
Para realizar una pausa en la grabación
Presione a PAUSE/STILL. La pantalla del televisor
mostrará “RECP”.
Para reanudar la grabación, vuelva a presionar a PAUSE/
STILL.
Para evitar la grabación accidental
Rompa la lengüeta de protección contra el borrado del
borde posterior del videocasete.
Para volver a grabar en este videocasete, cubra el orificio
con cinta adhesiva.
CHANNEL
N/M
Antes de comenzar
• Encienda el televisor y ajústelo en el modo de recepción
de videograbadora.
• Ajuste el selector VCR/CATV/DBS/TV en VCR.
Inserte un videocasete con la lengüeta de
1
wREC/ITR
aPAUSE/
STILL
ONE-TOUCH PLAY BACK
sSTOP
protección contra el borrado intacta.
La alimentación se conectará automáticamente.
Presione SPEED para seleccionar la velocidad
2
de la cinta, SP o EP.
Cinta adhesiva
Lengüeta de protección contra el borrado
Para contemplar otro programa de
televisión durante la grabación
Si su televisor está conectado solamente con un cable de
antena, presione TV/VCR después de haber iniciado la
grabación de forma desaparezca “VCR” del visualizador.
Después seleccione otro canal en el televisor.
Para controlar la grabación, ajuste el canal en el televisor
en el del selector CHANNEL, y presione TV/VCR de nuevo.
Sugerencias
• Si desea grabar el programa a través de la entrada de línea,
presione 0/INPUT,CHANNEL i, k en el controlador
remoto, CHANNEL N o M en la videograbadora de
forma continua para que aparezca “LINE1” (de las tomas
AUDIO/VIDEO IN de la parte posterior) o “LINE2” (de las
tomas AUDIO/VIDEO IN de la parte frontal) en el
visualizador en el paso 3.
• Para comenzar a grabar durante la reproducción, presione
a PAUSE/STILL y w REC/ITR y, a continuación,
a PAUSE/STILL.
STOP
SP
EP proporciona tres veces el tiempo de grabación que
SP, si bien SP ofrece mejores imágenes y sonidos.
ESPAÑOL
19
Notas
• Si intenta grabar en un videocasete que no tenga su
lengüeta de protección contra el borrado, la videograbadora
expulsará el videocasete.
• Si la grabación en pausa dura más de 5 minutos, la
videograbadora entrará automáticamente en el modo de
parada para proteger la cinta.
• Si utiliza el botón 0/INPUT para seleccionar el canal de
entrada, presione 0/INPUT dos veces.
• No es posible cambiar de canal durante la grabación.
Page 68

Reproducción de la parte recién
GRABACION RAPIDA
POR TIEMPO
CANAL 10 CATV
VEL. EP
INICIO AHORA
TIEMPO 0H30M
GRABACION RAPIDA
POR TIEMPO
CANAL 10 CATV
VEL. EP
INICIO AHORA
TIEMPO 1H30M
Grabación con el
grabada — Reproducción
instantánea
El uso de la reproducción presionando un solo botón
después del sistema VCR Plus+ (consulte la página 21) o
del temporizador (consulte la página 23) resulta muy
cómodo. Usted podrá grabar con el temporizador y
reproducir solamente la parte recién grabada con el mismo
presionando después un solo botón.
1
Pare la grabación (cuando grabe sin
temporizador).
El botón ONE-TOUCH PLAY BACK de la
videograbadora se ilumina.
Si presiona otro botón de operación después de parar la
grabación, la reproducción instantánea se cancelará.
2
Presione ONE-TOUCH PLAY BACK en la
videograbadora o OTPB en el controlador
remoto.
La cinta se rebobinará hasta el comienzo de la parte
grabada y se iniciará la reproducción.
Cuando haya introducido más de dos
programas en el temporizador
Cuando utilice la función de reproducción instantánea, la
videograbadora iniciará la reproducción desde el primer
programa.
Para buscar el comienzo del segundo programa (u otro
posterior), utilice la función de búsqueda de señales de
índice (consulte la página 18).
Nota
La función de reproducción instantánea no funcionará para
grabaciones de menos de 30 segundos.
temporizador instantáneo
Usted podra comenzar a grabar instantáneamente el canal
que esté viendo durante un tiempo especificado con el
temporizador grabación instantáneo.
wREC/ITR
Antes de comenzar
• Inserte un videocasete con la lengüeta de protección
contra el borrado intacta. Asegúrese de que la cinta sea
de mayor duración que el tiempo de grabación.
• Encienda la videograbadora y el televisor, y ajuste éste en
el modo de recepción de videograbadora.
• Seleccione la posición del canal para grabar y la velocidad
de cinta.
1
Presione dos veces w REC/ITR.
• La videograbadora iniciará la grabación, y en la
pantalla del televisor aparecerá la información sobre la
grabación con el temporizador instantáneo.
• En el visualizador aparecerá “TIMER”.
Presione repetidamente w REC/ITR antes de cinco
2
segundos para fijar la duración de la grabación.
Cada vez que presione, la duración de la grabación
cambiará en la pantalla del televisor de la forma siguiente:
0H30M b 1H00M b 1H30M b ..... b 8H30M
B
0H00M (Grabación normal) B 9H00M
Cuando el indicador de tiempo de grabación del
visualizador cuente regresivamente hasta “0H00M”, la
grabación se parará y la alimentación de la
videograbadora se desconectará.
CONTINUE
CONTINUACION
B
ESPAÑOL
20
Page 69

Grabación con el temporizador instantáneo
PROGRAMA VCR PLUS+
ENTRE VCR PLUSCODE
236543 –
PULSE PARA BORRAR.
PULSE PARA ENTRE
PULSE PARA SALIR.
CLEARCLEAR
ENTERENTER
PLUS+PLUS+
(continuación)
Programación del
temporizador con VCR Plus+
POWER
wREC/ITR
aPAUSE/STILL
sSTOP
Para parar, hacer una pausa, o
desconectar la alimentación durante la
grabación
Presione s STOP, a PAUSE/STILL o POWER.
Usted podrá simplificar notablemente las grabaciones con el
temporizador utilizando VCR Plus+.
Introduzca simplemente el código Plus, un número
asignado a cada programa de televisión, y la
videograbadora programará automáticamente el
temporizador para la grabación. Usted podrá encontrar el
código Plus en la mayoría de las revistas con guía de
programas de televisión.
Usted podrá introducir hasta 8 programas.
POWER
CLEAR
VCR PLUS+
VCR /CATV/
DBS/ TV
Botones
numéricos
j/l
i/k
ENTER/DISPLAY
MENU
Para prolongar el tiempo de grabación
durante la ésta
Presione w REC/ITR hasta que aparezca la nueva
duración que desee.
Sugerencia
Cuando reanude la grabación normal presionando
repetidanente w REC/ITR para hacer que se visualice
“0H00M”, se cancelará la grabación con el temporizador
instantáneo.
Nota
Si la cinta llega al final durante la grabación con el
temporizador instantáneo, “TIMER” parpadeará en el
visualizador y la videograbadora desactivará la alimentación.
Antes de comenzar
• Compruebe si el reloj de la videograbadora está
correctamente ajustado.
• Compruebe si los números de canales de la
videograbadora coinciden con los canales guía asignados
a las emisoras de televisión.
• Inserte un videocasete con lengüeta de protección contra
el borrado intacta.
Compruebe que la longitud de la cinta es superior al
tiempo de grabación.
• Encienda la videograbadora y el televisor, y ajuste éste en
el modo de recepción de videograbadora.
• Ajuste el selector VCR/CATV/DBS/TV en VCR.
• Si se utiliza el convertidor de cablevisión para la grabación
con temporizador, compruebe que el convertidor de
cablevisión (o satélite) esté activado y que el canal que
desee grabar esté seleccionado.
Presione VCR PLUS+.
1
Introduzca el código Plus del programa que
2
desee grabar utilizando los botones numéricos.
Si ha cometido un error, presione CLEAR para cancelar
la operación.
ESPAÑOL
21
Page 70

Presione ENTER/DISPLAY.
PROGRAMA 1
: SP
: NORMAL
3
• En la pantalla del televisor aparecerá la información
sobre el temporizador.
• Si desea ampliar el tiempo de grabación, consulte
“Para prolongar el tiempo de grabación” más adelante.
PROGRAMA 1
MES : JULIO
DIA : 7 VIE
INICIO : 6 : 30 AM
TERMINAR
CANAL
VEL.
REPETIR
PULSE PARA BORRAR
PULSE PARA SALIR.
4
Presione i o k para seleccionar VEL., y
: 41 TV
: AUTO
CLEAR
MENU
: 7 : 30 AM
: NORMAL
después presione j o l para seleccionar la
velocidad de cinta, SP, EP o AUTO.
Si selecciona AUTO, la videograbadora determinará la
duración restante de la cinta y cambiará la velocidad a
SP o EP, si es necesario, a fin de poder grabar todo el
programa.
Si un programa se superpone sobre otro
Las partes superpuestas se borrarán. El programa de
número inferior tendrá prioridad sobre los demás, como se
muestra en la ilustración.
8:00 9:00 10:00 11:00
Programa 1
Programa 2
Partes borradas
Programa 3
Partes
realmente
grabadas
Prog.1 Prog.2 Prog.3
Para cancelar un programa
Presione MENU y seleccione PROGRAMA presionando el
botón i o k. Y presione j o l para que aparezca el
programa que desee cancelar. A continuación, presione
CLEAR para cancelarlo.
PROGRAMA 1
MES : JULIO
DIA : 7 VIE
INICIO : 6 : 30 AM
TERMINAR
CANAL
VEL.
REPETIR
SELEC. AJUSTAR
PULSE PARA SALIR.
Presione i o k para seleccionar REPETIR, y
5
: 41 TV
: SP
MENU
: 7 : 30 AM
: NORMAL
después presione j o l para seleccionar
NORMAL, SEMANAL, o DIARIA.
NORMAL: para un solo programa
SEMANAL: para un programa semanal, como cada lunes
DIARIA: para un programa diario de lunes a viernes
PROGRAMA 1
MES : JULIO
DIA : 7 VIE
INICIO : 6 : 30 AM
TERMINAR
CANAL
VEL.
REPETIR
SELEC. AJUSTAR
PULSE PARA SALIR.
Si desea introducir otro programa, repita la
6
: 41 TV
: AUTO
MENU
: 7 : 30 AM
: NORMAL
opeación desde el paso 1.
Presione MENU para volver a la pantalla
7
normal.
Sugerencias
• Si parpadea “PROGRAMACION CARGADA” y aparece el
ajuste de PROGRAMA 1, ya habrá introducido 8 programas.
Borre un programa innecesario.
• Para confirmar los ajustes, seleccione PROGRAMA en el
menú. Después presione j o l para hacer que se
visualicen los ajustes de cada programa. Para volver a la
pantalla normal, presione MENU.
Notas
• Si la alimentación se interrumpe durante más de 60 minutos,
los programas almacenados se borrarán. En este caso,
tendrá que volver a programar el temporizador.
• Es posible que la videograbadora no funcione correctamente
al utilizar cintas T-210, aunque seleccione AUTO en el paso
4.
• Cuando finalice la cinta durante la grabación con el
temporizador instantáneo, en el visualizador parpadeará
“TIMER”.
• Si realiza un ajuste inadecuado, “ERROR CODE”
parpadeará en la pantalla del televisor.
Presione POWER para desconectar la
8
alimentación de la videograbadora.
• En el visualizador aparecerá “TIMER”, y la
videograbadora pasará al modo de espera de la
grabación con temporizador.
• Si el indicador de videocasete insertado parpadea,
significa que no hay ningún videocasete insertado. Si
el indicador de videocasete insertado parpadea y el
videocasete se expulsa, significa que éste no dispone
de lengüeta de protección contra el borrado.
Para prolongar el tiempo de grabación
Después del paso 3, presione i o k para seleccionar
TERMINAR, y después presione j o l para cambiar la
hora de finalización.
ESPAÑOL
22
Page 71

Ajuste manual del temporizador
MES
: JULIO
: 7 : 30 PM
MES : JULIO
PROGRAMA 1
DIA : 3 LUN
INICIO : 6 : 00 PM
TERMINAR
: 7 : 30 PM
CANAL
: 4 CATV: 4 CATV
VEL.
: AUTO
REPETIR
: NORMAL
SELEC. AJUSTAR
PULSE PARA SALIR.
MENU
MES : JULIO
PROGRAMA 1
DIA : 3 LUN
INICIO : 6 : 00 PM
TERMINAR
: 7 : 30 PM
CANAL
: 4 CATV
VEL.
: SP
REPETIR
: NORMAL : NORMAL
SELEC. AJUSTAR
PULSE PARA SALIR.
MENU
Si no puede utilizar VCR Plus+, tendrá que programar
manualmente el temporizador.
Usted podrá introducir hasta 8 programas para grabar en el
lapso de un mes a partir de la fecha actual.
Presione i o k para seleccionar CANAL, y
5
después presione j o l para introducir el
número del canal de la videograbadora.
Si ha conectado un convertidor de cablevisión, ajuste
CANAL al canal de salida de dicho convertidor
(normalmente 3 o 4). Cambie el canal del convertidor
de cablevisión en vez del de la videograbadora.
POWER
VCR /CATV/
DBS/ TV
j/l
i/k
CLEAR
ENTER/DISPLAY
MENU
Antes de comenzar
• Compruebe si el reloj de la videograbadora está
correctamente ajustado.
• Inserte un videocasete con la lengüeta de protección
contra el borrado intacta.
• Ajuste el selector VCR/CATV/DBS/TV en VCR.
• Si se utiliza el convertidor de cablevisión para la grabación
con temporizador, compruebe que el convertidor de
cablevisión (o satélite) esté activado y que el canal que
desee grabar esté seleccionado.
1
Presione MENU.
2
Presione i o k para seleccionar PROGRAMA,
y después presione ENTER/DISPLAY.
Ajuste VEL. y REPETIR como en el paso 3.
6
Con respecto a los detalles sobre VEL y REPETIR,
consulte “Programación del temporizador con VCR
Plus+” de la página 21.
Si desea introducir otro programa, presione k
7
para seleccionar PROGRAMA, presione j o l
para hacer que se visualice otro número de
programa, y repita los pasos 3 a 7.
8
Para volver a la pantalla normal, presione MENU.
Para desconectar la alimentación de la
9
videograbadora, presione POWER.
• En el visualizador aparecerá “TIMER”, y la videograbadora
pasará al modo de espera de la grabación con temporizador.
• Si el indicador de videocasete insertado parpadea,
significa que no hay ningún videocasete insertado. Si
el indicador de videocasete insertado parpadea y el
videocasete se expulsa, significa que éste no dispone
de lengüeta de protección contra el borrado.
3
Presione i o k para seleccionar MES y
después presione j o l.
Para cambiar rápidamente el ajuste, mantenga
presionado j o l.
Ajuste el DIA, la hora de INICIO, y la hora de
4
TERMINAR como en el paso 3.
23
ESPAÑOL
RELOJ
PROGRAMA
SINTONIZAR
AJUSTAR
ENTER
SELEC. EJECUTAR
MENU
PULSE PARA SALIR.
PROGRAMA 1
MES
DIA :
INICIO :
TERMINAR
CANAL
VEL.
REPETIR
SELEC. AJUSTAR
PULSE PARA SALIR.
PROGRAMA 1
MES : JULIO
DIA : 3 DOM
INICIO : 6 : 00 PM
TERMINAR
CANAL
VEL.
REPETIR
SELEC. AJUSTAR
PULSE PARA SALIR.
MENU
MENU
: JULIO
:
:
:
:
: 7 : 30 PM
:
:
:
Para corregir los datos durante la programación
Presione i o k hasta que se resalte el ítem que desee corregir,
y después presione j o l para introducir los datos correctos.
Para cancelar un programa
Seleccione PROGRAMA en el menú. A continuación,
presione j o l para hacer que se visualice el programa que
desee borrar, y por último presione CLEAR para cancelarlo.
Sugerencias
• Si parpadea “PROGRAMACION CARGADA” y aparece el
ajuste de PROGRAMA 1, ya habrá introducido 8 programas.
Borre un programa innecesario.
• Para confirmar los ajustes, seleccione PROGRAMA en el
menú. Después presione j o l para hacer que se
visualicen los ajustes de cada programa. Para volver a la
pantalla normal, presione MENU.
• Si desea grabar el programa a través de la entrada de línea,
presione j o l para hacer que se visualice “LINE1” (para las
tomas AUDIO/VIDEO IN del panel posterior) o “LINE2” (para
las tomas AUDIO/VIDEO IN del panel frontal) en el paso 5 en
vez de introducir el número de canal de la videograbadora.
Notas
• Si la alimentación se interrumpe durante más de 60 minutos,
los programas almacenados se borrarán. En este caso,
tendrá que volver a programar el temporizador.
• Cuando finalice la cinta durante la grabación con el temporizador
instantáneo, en el visualizador parpadeará “TIMER”.
• Es posible que la videograbadora no funcione correctamente
al utilizar cintas T-210 o VHS-C, aunque seleccione AUTO
en el paso 6.
Page 72

Copia
Conexión a otra videograbadora
(Panel frontal)
A toma de
entrada
VIDEO IN
Amarillo
Cable de audio/vídeo
(no suministrado)
LINE 2
Tomas de entrada AUDIO IN L/R
Rojo
Blanco
HV-FX9000 (Para grabación)
O
A las tomas de salida
de audio/vídeo
O
A las tomas de salida
de audio/vídeo
(Panel posterior)
LINE 1
Tomas de entrada
AUDIO IN R/L
(MONO)
Rojo
Otra videograbadora
(Para reproducción)
AERIAL
(VHF/UHF)
RF OUT
A toma de entrada
VIDEO IN
Amarillo
Blanco
importante
Cuando grabe una salida de señal de
audio desde esta videograbadora en
otra videograbadora,
visualización en pantalla. De lo
contrario, los indicadores visualizados
en la pantalla del televisor se grabarán
en la cinta.
desactive la
Operación
wREC/ITR
aPAUSE/
STILL
0/INPUT
CHANNEL
i/k
Videocámara
(Para reproducción)
Sugerencias
• Si la otra videograbadora es de tipo monoaural, conecte solamente una de las
tomas de audio a AUDIO IN L (MONO) del panel posterior.
• Si desea utilizar esta videograbadora para reproducción, conecte las tomas AUDIO/
VIDEO OUT de la misma y las tomas de entrada de audio/vídeo de la
videograbadora para grabación.
Nota
Si ambas unidades son AIWA, su alimentación está conectada, y se encuentran cerca entre
sí, no utilice el controlador remoto. En vez de ello, use los botones de las videograbadoras.
Antes de comenzar
Seleccione la velocidad de la cinta.
1
Inserte el videocasete fuente grabado en la otra videograbadora
(para reproducción).
Inserte un videocasete en blanco con su lengüeta de protección contra
2
el borrado intacta en su videograbadora HV-FX9000 (para grabación).
Presione 0/INPUT varias veces para que aparezca “LINE1”
3
(posterior) o “LINE2” (frontal) en la pantalla del televisor.
También puede utilizar el botón CHANNEL i o k.
4
Presione w REC/ITR y a PAUSE/STILL en la videograbadora
para grabación.
La videograbadora para grabación entra en el modo de pausa de grabación.
Ajuste la otra videograbadora para reproducción.
5
Se iniciará la duplicación.
Presione w REC/ITR o a PAUSE/STILL en la videograbadora
6
para grabación.
ESPAÑOL
24
Page 73

RELOJ
PROGRAMA
SINTONIZAR
AJUSTAR
SELEC. EJECUTAR
PULSE PARA SALIR.
ENTER
MENU
OTRAS FUNCIONES
FUNCION DESPLEGADA :
IDIOMA :
MODO DE AUDIO :
TIP / TRANS : TIP / TRANS : ESTEREOESTEREO
SALIDA DE AUDIO :
SI
ESPAÑOL
HI–FI
ESTEREO
MAPA DE CANALES
SELEC. AJUSTAR
PULSE PARA SALIR.
MENU
Sistema de sonido de TV
multicanal (MTS) y sonido de
audio Hi-Fi
VCR /CATV/
DBS/ TV
Botones
numéricos
wREC/ITR
CPLAY
j/l
CHANNEL i/k
ENTER/DISPLAY
MENU
Grabación de audio Hi-Fi
Si el programa se emite en estéreo, la señal de audio
normal y la señal de audio Hi-Fi se grabarán
automáticamente. Para grabar la señal de audio Hi-Fi no es
necesario hacer ningún ajuste especial.
Grabación del sonido de emisiones
MTS
Antes de comenzar
• Inserte un videocasete y seleccione la velocidad de la
cinta.
• Ajuste el selector VCR/CATV/DBS/TV en VCR.
1
Presione MENU.
2
Presione i o k para seleccionar AJUSTAR, y
después presione ENTER/DISPLAY.
Sonido de TV multicanal (MTS)
Esta videograbadora está equipada con un sistema MTS
(Sonido de TV multicanal) que descodifica las señales de
las emisiones en estéreo y SAP (Programa de audio
secundario). También descodificará el sonido estéreo del
sistema de cablevisión local si satisface las frecuencias de
cable asignadas y el sistema de sonido de TV estéreo/
bilingüe MTS recomendado por EIA.
Puede grabar y reproducir señales de audio en el sistema
de sonido VHS Hi-Fi.
Programa de audio secundario (SAP)
Esta videograbadora puede grabar y reproducir un
programa de audio secundario (SAP) para el segundo
idioma o información adicional. Por lo general, el idioma
principal se graba en el canal de sonido principal, y el
segundo idioma o información adicional en el canal SAP.
Sistema de pistas de audio
Esta videograbadora graba una señal de audio monoaural
normal en la pista de audio normal, y la señal de audio
estéreo Hi-Fi en la pista de audio de Hi-Fi.
Si para reproducir una cinta grabada con esta
videograbadora utiliza una videograbadora equipada con
sistema de sonido de audio Hi-Fi, podrá disfrutar del sonido
estéreo Hi-Fi o programa bilingüe. Si utiliza una
videograbadora que no esté equipada con sistema de
sonido de audio Hi-Fi, solamente se podrá reproducir el
sonido de audio normal grabado en la pista de audio
normal.
3
Presione i o k para seleccionar TIP/TRANS.
4
Presione j o l para seleccionar el sistema
deseado.
ESTEREO: para grabar sonido estéreo
SAP: para grabar un programa SAP
MONO: para grabar sonido monoaural
5
Presione MENU para volver a la pantalla
normal.
6
Presione CHANNEL i, k o los botones
númericos para seleccionar el canal que quiera
grabar.
Dependiendo del programa recibido, en la pantalla del
visualizador aparecerá “STEREO” (estereo) y/o “SAP”.
7
Presione w REC/ITR.
Comenzará la grabación.
Sonido monoaural
Señales de vídeo y sonido Hi-Fi
25
ESPAÑOL
<Estructura de la cinta>
Pista de audio normal
Pista de audio Hi-Fi
Page 74

Señales de grabación y de salida de
FUNCION DESPLEGADA :
IDIOMA :
MODO DE AUDIO : HI – FIMODO DE AUDIO : HI – FI
TIP / TRANS :
SALIDA DE AUDIO :
MAPA DE CANALES
SI
ESPAÑOL
ESTEREO
ESTEREO
SELEC. AJUSTAR
PULSE PARA SALIR.
MENU
SALIDA DE AUDIO : ESTEREO
emisiones MTS
Pantalla
del
televisor
MONO
STEREO
SAP
STEREO/
SAP
Emisión
Mono
Estéreo
Mono+SAP
Estéreo+SAP
TIP/TRANS
ESTEREO
SAP
MONO
ESTEREO
SAP
MONO
ESTEREO
SAP
MONO
ESTEREO
SAP
MONO
Señal grabada
Pista
Pista
Hi-Fi
normal
Mono
Mono
Mono
Mono
Mono
Mono
Canal
izquierdo/
Mono
derecho
Canal
izquierdo/
Mono
derecho
Mono
Mono
Mono
Mono
SAP
SAP
Mono
Mono
Canal
izquierdo/
Mono
derecho
SAP
SAP
Mono
Mono
Señal de
salida desde
AUDIO OUT
LEFT
Mono
Mono
Mono
Canal
izquierdo
Canal
izquierdo
Mono
Mono
SAP
Mono
Canal
izquierdo
SAP
Mono
RIGHT
Mono
Mono
Mono
Canal
derecho
Canal
derecho
Mono
Mono
SAP
Mono
Canal
derecho
SAP
Mono
4
Presione j o l para seleccionar el modo de
salida de audio.
ESTEREO:Se escuchará el sonido estéreo.
IZQ.: El sonido del canal izquierdo se escuchará a
través ambos canales.
DER.: El sonido del canal derecho se escuchará a
través ambos canales.
5
Presione i o k para seleccionar MODO DE
AUDIO.
Presione j o l para seleccionar HI-FI.
6
HI-FI: Se reproducirá el sonido de la pista de audio
Hi-Fi.
NORMAL: Se reproducirá el sonido de la pista de audio
normal.
Presione MENU para volver a la pantalla normal.
7
Nota
Usted también podrá utilizar el visualizador par comprobar el
tipo de emisión.
Cuando la videograbadora reciba una emisión estéreo,
aparecerá ST.
Cuando reciba una emisión SAP, aparecerá SAP.
Cuando la videograbadora recibe la emisión bilingüe, aparece BIL.
Reproducción de un programa MTS
grabado en una cinta
Antes de comenzar
Ajuste el selector VCR/CATV/DBS/TV en VCR.
1
Presione MENU.
Presiona i o k para seleccionar AJUSTAR, y
2
después presione ENTER/DISPLAY.
3
Presione i o k para seleccionar SALIDA DE
AUDIO.
SELEC. EJECUTAR
MENU
PULSE PARA SALIR.
FUNCION DESPLEGADA :
IDIOMA :
MODO DE AUDIO :
TIP / TRANS :
SALIDA DE AUDIO : ESTEREO
MAPA DE CANALES
SELEC. AJUSTAR
MENU
PULSE PARA SALIR.
RELOJ
PROGRAMA
SINTONIZAR
AJUSTAR
ENTER
ESPAÑOL
HI–FI
ESTEREO
Inserte un videocasete.
8
Presione C PLAY.
9
Comenzará la reproducción.
Señales de salida
La salida de señales a través de las tomas AUDIO OUT y
RF OUT del panel posterior es como se muestra a
continuación.
SALIDA
DE AUDIO
ESTEREO
IZQ.
DER.
–
MODO DE
AUDIO
HI-FI
HI-FI
HI-FI
NORMAL
Sugerencias
• Si SALIDA DE AUDIO está ajustada a ESTEREO mientras
se esté reproduciendo un programa de audio SAP
BILINGUAL pregrabado, el idioma principal IZQ. y el idioma
secundario DER. se escucharán simultáneamente. Para la
reproducción SAP BILINGUAL, no utilice el ajuste
ESTEREO. Seleccione el ajuste DER.
• Si la videograbadora está conectada al televisor a través del
cable de antena, la parte de audio de una cinta pregrabada
en estéreo o SAP BILINGUAL se escuchará en sonido
monoaural. Cuando reproduzca una cinta SAP BILINGUAL,
ajuste SALIDA DE AUDIO para seleccionar la parte
SI
deseada. Para reproducción en estéreo o SAP BILINGUAL,
utilice las conexiones indicadas para la reproducción en
estéreo.
Notas
• Cuando reproduzca una cinta grabada en modo monoaural,
el sonido reproducido será siempre monoaural
independientemente del ajuste de MODO DE AUDIO.
• Cuando extraiga el videocasete, el ajuste de AUDIO MODE
volverá automáticamente a HI-FI.
AUDIO OUT
LEFT
Canal
izquierdo
Canal
izquierdo
Canal
derecho
Mono
RIGHT
Canal
derecho
Canal
izquierdo
Canal
derecho
Mono
RF OUT
Mono
Canal
izquierdo
Canal
derecho
Mono
ESPAÑOL
26
Page 75

Visualización en pantalla
RELOJ
PROGRAMA
SINTONIZAR
AJUSTAR
SELEC. EJECUTAR
PULSE PARA SALIR.
ENTER
MENU
FUNCION DESPLEGADA : SIFUNCION DESPLEGADA : SI
IDIOMA :
MODO DE AUDIO :
TIP / TRANS :
SALIDA DE AUDIO :
MAPA DE CANALES
ESPAÑOL
HI–FI
ESTEREO
ESTEREO
SELEC. AJUSTAR
PULSE PARA SALIR.
MENU
FUNCION DESPLEGADA : NOFUNCION DESPLEGADA : NO
IDIOMA :
MODO DE AUDIO :
TIP / TRANS :
SALIDA DE AUDIO :
MAPA DE CANALES
ESPAÑOL
HI–FI
ESTEREO
ESTEREO
SELEC. AJUSTAR
PULSE PARA SALIR.
MENU
VCR/CATV/
DBS/ TV
Notas
• El contador de la cinta y el indicador de duración restante de
la cinta solamente aparecerán cuando haya insertado un
videocasete. Además, el indicador de duración restante de
la cinta aparecerá después de cualquier operación de la
cinta.
• El indicador de duración restante de la cinta puede no
visualizarse correctamente dependiendo de las condiciones
de la cinta. En el modo SP puede existir un error de más o
menos 2 minutos, y de 6 minutos en el modo EP.
Para desactivar la visualización en
i/k
j/l
ENTER/DISPLAY
MENU
Identificación de los elementos
visualizados en la pantalla
Indicador de
alta fidelidad
Modo de
operación
Velocidad de
la cinta
Fecha actual
STOP HI-FI CH 4
JUN 17, SAB 2:15 PM
STEREOSP
Número de canal
Tipo de emisión
Hora actual/
contador de la
cinta/duración
restante de la cinta
pantalla
Precaución
Cuando grabe una salida de señal de audio desde esta
videograbadora en otra videograbadora,
visualización en pantalla. De lo contrario, los indicadores
visualizados en la pantalla del televisor se grabarán en la
cinta.
Antes de comenzar
Ajuste el selector TV VCR/DBS/CATV en VCR.
1
Presione MENU.
Presione i o k para seleccionar AJUSTAR, y
2
después presione ENTER/DISPLAY.
Presione i o k para seleccionar FUNCION
3
DESPLEGADA.
desactive la
Para cambiar la visualización de la
función de visualización en
pantalla
Presione ENTER/DISPLAY. Cada vez que lo presione, la
visualización de la función de visualización en pantalla
cambiará de la forma siguiente:
Una presión
STOP
SP
JUN 17, SAB
Después de 3 segundos
Presione ENTER.
27
Desaparecerán todos los indicadores.
ESPAÑOL
CH 4
STEREO
2:15 PM
2:15 PM
Dos presiones
STOP
SP
CH 4
STEREO STEREO
0:35:40
Tres presiones
STOP
SP
REM 1:15
CH 4
Después de 3 segundos Después de 3 segundos
0:35:40 REM 1:15
Presione ENTER.
Presione ENTER.
Presione j o l para hacer que se visualice NO.
4
Presione MENU para volver a la pantalla normal.
5
Sugerencias
• Aunque haya ajustado FUNCION DESPLEGADA a NO,
podrá comprobar el reloj, el contador de la cinta, y la
duración restante de la cinta en el visualizador presionando
repetidamente ENTER/DISPLAY.
• Aunque ajuste FUNCION DESPLEGADA en NO, las
indicaciones de retorno a cero, VISS y Búsqueda de
imágenes finales aparecen en la pantalla del televisor.
Page 76

INFORMACION ADICIONAL
Solución de problemas
Si esta unidad parece no funcionar adecuadamente, lea de
nuevo las instrucciones, y después compruebe la tabla
siguiente.
El botón POWER no funciona.
Compruebe si el cable de CA está conectado con
seguridad.
Las imágenes reproducidas tienen ruido.
• Compruebe si el televisor está sintonizado al canal de
vídeo o a la entrada de vídeo.
• Ajuste manualmente la alineación cuando las condiciones
de la cinta sean malas.
• Aunque la unidad limpia automáticamente las cabezas de
vídeo, es posible que se acumule suciedad después de
mucho tiempo de utilización. Limpie las cabezas de vídeo
con un casete limpiador de cabezas adquirido en un
establecimiento del ramo.
• Compruebe si todas las conexiones con la videograbadora
están realizadas correctamente y con seguridad.
No hay imágenes de reproducción.
Ajuste el televisor al canal para vídeo o a la entrada de
vídeo.
Nota sobre la condensación de humedad
Si traslada la unidad de un lugar frío a otro cálido, después
de haber calentado la sala, o en condiciones de gran
humedad, es posible que se condense humedad en el
interior de la misma y que pueda dañarla. En cualquiera de
estas condiciones, coloque la unidad en un área bien
ventilada y espere unas dos horas hasta que se caliente a
la temperatura de la sala y la humedad se haya evaporado
completamente, antes de volver a utilizarla.
La recepción de televisión es ruidosa o no hay
recepción.
• Conecte la videograbadora a la antena y al televisor
correctamente y con seguridad.
• Aleje la videograbadora del televisor.
Los botones de operación no responden cuando la
alimentación está conectada y hay un videocasete
insertado.
Es posible que se haya condensado humedad. Espere unas
dos horas hasta que se evapore completamente la
humedad antes de utilizar la videograbadora.
Se ha producido una operación anormal.
Es posible que interferencias externas hayan afectado al
microprocesador interno.
Desconecte el cable de CA de la toma de CA. Después
vuelva a conectarlo.
El controlador remoto no funciona.
• Reemplace las pilas por otras nuevas.
• Cerciórese de que el selector VCR/CATV/DBS/TV esté en
VCR.
No hay sonido.
Conecte la videograbadora correctamente y con seguridad.
El temporizador no funciona.
• Ajuste correctamente el reloj de la videograbadora.
• Compruebe si los números de canales de la
videograbadora coinciden con los canales guía asignados
a las emisoras de televisión.
No hay sonido procedente de la fuente de entrada.
Es posible que haya seleccionado una entrada incorrecta.
Presione CHANNEL i, k, 0/INPUT en el control remoto y
CHANNEL N o M en la videograbadora hasta que
seleccione la fuente de entrada correcta. (P. ej., es posible
seleccionar “LINE2 ” si conecta una fuente de entrada a las
tomas AUDIO/VIDEO IN del panel frontal.)
ESPAÑOL
28
Page 77

Especificaciones
Sistema de vídeo grabación
Sistema de exploración helicoidal con 2
cabezas giratorias
Cabezas de vídeo 4 cabezas de acimut doble
Sistema de sintonizador
Sintonizador de frecuencia sintetizada
Sistema de televisiónM
Sistema de señal de vídeo
Señal de color NTSC,
Videocasetes utilizables
525 líneas, 60 campos
Videocasetes VHS
Tiempo de grabación/reproducción
SP: 3,5 horas con cinta T-210
LP: 7 horas con cinta T-210
(Reproducción solamente)
EP: 10,5 horas con cinta T-210
Velocidad de la cinta SP: 33,35 mm/seg
LP: 16,67 mm/seg
EP: 11,12 mm/seg
Tiempo de avance rápido/rebobinado
menos de 180 segundos con una cinta
T-120
Cobertura de canales VHF: 2 a 13
UHF: 14 a 69
CATV: 5A, 2 a 13, A a W, W+1 a W+58,
A-5 a A-1, W+59 a W+84
Salida de RF Canal 3 o 4 de VHF (conmutable), 66 dBµ
Entrada de vídeo 1,0 Vp-p, 75 ohm, desequilibrada
Salida de vídeo 1,0 Vp-p, 75 ohm, desequilibrada
Definición horizontal 230 líneas
Relación de señal/ruido de vídeo
43 dB (en SP)
Pistas de audio 3 pistas (2 pistas de sonido de alta fidelidad
y 1 pista de sonido normal)
Entrada de vídeo –6 dBs, 47 K ohm
Salida de audio –6 dBs, menos de 4.7 K ohm
Respuesta en frecuencia de audio
normal: 100 Hz – 10 K Hz (en SP)
Hi-Fi: 20 Hz – 20 K Hz (en SP)
Relación señal-ruido de audio
normal: más de 43 dB (en SP)
Hi-Fi: más de 70 dB (en SP)
Gama dinámica hi-fi más de 85 dB (en SP)
Temperatura de funcionamiento
5˚C a 35˚C
Alimentación 120 V CA, 60 Hz
Consumo 15 vatios
TYP 3W (modo de espera)
Dimensiones 430 (An) × 102 (Al) × 283 (Prf) mm
(17 × 41/8 × 111/4 in.)
Peso 3,9 kg (8.58 lbs)
Accesorios Cable de antena (1)
Pilas (2)
Controlador remoto (1)
Cable de audio (1)
Cable de vídeo (1)
El diseño y las especificaciones están sujetos a cambio sin previo
aviso por motivos de mejora del rendimiento.
Este equipo ha sido probado y se ha encontrado que
cumple con los límites para dispositivos digitales de clase
B, de acuerdo con la Parte 15 de las normas de la FCC.
Estos límites han sido diseñados para proporcionar una
protección razonable contra interferencias perjudiciales en
una instalación residencial.
Este equipo genera, utiliza y puede radiar energía de
radiofrecuencia y, si no se instala y utiliza de acuerdo con
las instrucciones, puede causar interferencias
perjudiciales en las radiocomunicaciones. Sin embargo,
no existe ninguna garantía de que tales interferencias no
se produzcan en una instalación en particular. Si este
equipo causa interferencias perjudiciales, lo que podrá
determinarse desconectando y volviendo a conectar su
alimentación, se ruega que el usuario corrija las
interferencias tomando una o más de las medidas
siguientes:
ESPAÑOL
29
- Reorientación o reubicación de la antena receptora.
- Aumento de la separación entre el equipo y el receptor.
- Conexión del equipo a un tomacorriente diferente al
utilizado por el receptor.
- Solicitud de ayuda al proveedor o a un técnico de radio/
televisión experimentado.
Precaución
Las modificaciones o ajustes de este producto, que no se
hayan aprobado expresamente por el fabricante, pueden
anular el derecho del usuario a utilizarlo.
Page 78

Componentes y controles
Panel frontal
Compartimento del videocasete
Botón de extracción del
videocasete (z EJECT)
Botón de alimentación
(POWER)
Tomas de línea 2/entrada
de audio del canal izquierdo/
derecho/vídeo (LINE2
VIDEO/AUDIO IN L/R)
Botones de selección
ascendente/descendente de
canales (CHANNEL N/M)
Visualizador
Botón de rebobinado
(f REW/[)
Botón de reproducción
(C PLAY)
Botón de avance
(g F FWD/])
Botón de reproducción instantánea
(= ONE-TOUCH PLAY BACK)
Botón de parada (s STOP)
Botón de parada/imagen fija
(a PAUSE/STILL)
Botón de grabación/
temporizador instantáneo
(w REC/ITR)
Sensor de control remoto
Visualizdor
Indicador de videograbadora
(VCR)
Indicador del temporizador
Indicador REC (grabación)
Indicador de velocidad de cinta
Indicador de videocasete
insertado
TIMER VCR ST
REC
SAPREM
SP LP EP
Hi-Fi
Indicador de duración
restante de la cinta
Indicador de programa de
audio secundario (SAP)
Indicador de alta fidelidad (Hi-Fi) se
ilumina al reproducir sonido de alta
fidelidad
Indicador de sonido estéreo
(ST)
Indicador de reloj/contador de la
cinta/operación de la cinta
ESPAÑOL
30
Page 79

Panel posterior
Entrada de CA
Salida de audio (canales
izquierdo/dereche)/vídeo (AUDIO
OUT R/L/VIDEO OUT)
Conector de antene (AERIAL)
L
Controlador remoto con la tapa delantera abierta
Botón de alimentación (POWER)
Botones numéricos
Botón selector de televisión/
videograbadora (TV/VCR)
Botón de grabación/temporizador
instantáneo (w REC/ITR)
Conector de antene (RF OUT)
Tomas de línea 1/entrada de audio
(canales izquierdo/dereche)/vídeo
(LINE 1 AUDIO IN R/L (MONO)
VIDEO IN)
Selector de canal
Selector de videograbadora/cablevisión/
televisor (VCR/CATV/TV)
Botones de 0/INPUT
Botón OTPB
(reproducción presionando un solo botón)
Botón de extracción del videocasete
(z EJECT)
Botón de reproducción (C PLAY)
Botón de rebobinado (f REW)/
búsqueda regresiva ([)
Botón de pausa/imagen fija (a PAUSE/STILL)
Botones de volumen (j/VOL. -)
Botón de reproducción a cámara lenta
(SLOW)
Botón de silenciamiento (MUTE)
Botón de cancelación (CLEAR)
Botón de ZERO {
Botón de VCR PLUS+
Botón A-TR (alineación automática)
Botón de avance rápido/búsqueda
progresiva (g F FWD/])
Botón de parada (s STOP)
Botones de canales
+
–
OK
i
(CHANNEL i/k)
Botones de volumen (l/VOL. +)
Botón de reposición del contador
(TV PRESET)
Botón de ajuste (ENTER/DISPLAY)
Botón de menú (MENU)
Botón AD (anuncios comerciales)-SKIP
Botón de búsqueda de señales de índice
(VISS)
Botón de velocidad de la cinta (SPEED)
Botón de REC. END SEARCH
Botones de alineación (TRACKING +/-)
31
ESPAÑOL
Page 80

ESPAÑOL
Page 81

HV-FX9000U
SOMMAIRE DES OPÉRATIONS
Bienvenue
Merci pour l’achat de cet appareil AIWA.
Si vous déballez votre magnétoscope pour la
première fois, veuillez effectuer les opérations
à 5 ci-dessous pour l’installation.
Vous trouverez les accessoires suivants dans le carton d’emballage.
Télécommande (1)
1
En cas de problème et pour tout renseignement
Composez le numéro gratuit
1-800-BUY-AIWA
(Etats-Unis et Puerto Rico)
Câble audio (1)Câble vidéo (1)Câble d’antenne (1)
Mode d’emploi (1)Piles (2)
Veuillez lire attentivement les informations figurant page 1 et page 2 du mode d’emploi avant d’installer ou d’utiliser
votre magnétoscope.
1
Insérez les deux piles fournies R03 (format AAA) en
respectant la polarité indiquée dans le porte-piles.
Mise en place des piles dans la télécommande
1
Page 82

Raccordement de l’antenne (ou du réseau câblé), du
AERIAL
(VHF/UHF)
RF OUT
2
Raccordements de base
magnétoscope et du téléviseur
1 Raccordez le câble
d’antenne TV (non fourni)
au magnétoscope.
2 Raccordez le magnétoscope au
connecteur d’entrée de
l’antenne du téléviseur à l’aide
du câble d’antenne fourni.
Connecteur d’entrée de
l’antenne
Câble d’antenne
(fourni)
Câble d’antenne TV (non fourni)
Téléviseur
Prises d’entrée
audio/vidéo
Câble vidéo
(fourni)
Câble audio
(fourni)
AERIAL
VIDEO
(VHF/UHF)
RF OUT
LINE 1
Prise secteur
Cordon d’alimentation
R AUDIO L
OUT OUT
(MONO)
IN IN
3 Si votre téléviseur est muni de
4 Raccordez le cordon
d’alimentation secteur du
magnétoscope à la prise
secteur.
Importante
Raccordez le cordon d’alimentation secteur à la prise secteur quand toutes les autres connexions ont été faites.
Quand le téléviseur est raccordé à OUT TO TV avec seulement un câble d’antenne
Réglez le sélecteur de canal sur 3CH ou 4CH, le canal non utilisé pour la réception, et sélectionnez le même canal sur
le téléviseur.
prises d’entrée audio/vidéo,
raccordez le magnétoscope et le
téléviseur avec les câbles audio
et vidéo fournis.
3CH
3CH 4CH
4CH
(VHF/UHF)
Pour sélectionner le canal souhaité sur le
AERIAL
RF OUT
téléviseur
Allumez le téléviseur et le magnétoscope et appuyez sur
TV/VCR pour effacer VCR de l’afficheur ou mettez ce
magnétoscope hors tension.
2
Page 83

Raccordements avec le réseau câblé
Réseau câblé
3 Raccordez le magnétoscope au connecteur
d’entrée de l’antenne du téléviseur à l’aide
du câble d’antenne fourni.
Convertisseur
(non fourni)
OUTIN
Câblé
(non fourni)
1 Raccordez le câble du réseau câblé à
l’entrée du convertisseur.
Prise secteur
Connecteur
d’entrée de l’antenne
2 Raccordez la sortie du
convertisseur à ANT IN du
magnétoscope avec un câble coaxial
(non fourni).
VIDEO
AERIAL
(VHF/UHF)
RF OUT
R AUDIO L
OUT OUT
(MONO)
IN IN
Téléviseur
Prises
d’entrée
audio/vidéo
Câble d’antenne
(fourni)
Câble vidéo
(fourni)
Câble audio
(fourni)
Cordon d’alimentation
4 Si votre téléviseur est muni de
prises d’entrée audio/vidéo,
5 Raccordez le cordon
d’alimentation secteur
du magnétoscope à la
prise secteur.
Pour raccorder le magnétoscope au réseau câblé sans convertisseur
Raccordez le câble du réseau câblé à ANT IN du magnétoscope à l’étape 1 ci-dessus.
Pour regarder un programme TV ou vidéo sélectionné sur le
magnétoscope
Allumez le téléviseur et le magnétoscope, puis appuyez sur TV/VCR pour faire
apparaître VCR sur l’afficheur.
raccordez le magnétoscope et le
téléviseur à l’aide des câbles
audio et vidéo fournis.
VCR
3
Page 84

3
FUNCTION OSD :
LANGUAGE SELECT : ENGLISHLANGUAGE SELECT : ENGLISH
AUDIO MODE :
BROADCAST TYPE :
AUDIO OUTPUT :
CHANNEL MAPPING
SELECT ADJUST
TO EXIT PRESS
MENU
CHOIX LANGAGE : FRANÇAIS
Sélection de la langue
Le menu peut être affiché à l’écran dans une des trois
langues suivantes : Anglais, espagnol et français.
VCR TV
1
CATV/DBS
Réglez le sélecteur VCR/CATV/DBS/
TV sur VCR.
2
3
4
MENU
POWER
Appuyez sur POWER pour allumer
le magnétoscope.
Appuyez sur MENU, puis sur i ou k
pour sélectionner SETUP (installation),
puis appuyez sur ENTER/DISPLAY.
CLOCK
ENTER
PROGRAM
TUNING
SETUP
ENTER
SELECT ENTER
TO EXIT PRESS
MENU
Appuyez sur i ou k pour
sélectionner LANGUAGE SELECT
(choix langage).
56
or
Appuyez sur j ou l pour
afficher la langue souhaitée.
Chaque fois que la langue
change, la langue de
l’affichage sur écran change
elle aussi.
FONCTION OSD : MARCHE
CHOIX LANGAGE : FRANÇAIS
MODE AUDIO :
TYPE DE DIFFUSION :
SORTIE AUDIO :
CONFIGURATION CANAUX
CHOISIR AJUSTER
POUR SORTIR PRESSER
HI-FI
STEREO
STEREO
MENU
4
MENU
Appuyez sur MENU
pour revenir à l’écran
normal.
Page 85

4
HORLOGE
PROGRAMME
SYNTONISATION
INSTALLATION
CHOISIR CONFIRMER
POUR SORTIR PRESSER
ENTER
MENU
MOIS : JUIN
JOUR : 17 SAM
ANNÉE : 2000
HEURE
: 10 : 30 AM
RÉGLAGE AUTO : MARRÉGLAGE AUTO : MAR
CHOISIR AJUSTER
POUR SORTIR PRESSER
MENU
: 10 : 30 AM
MOIS : JUINMOIS : JUIN
JOUR : 1 JEU
ANNÉE : 2000
HEURE
: 12 : 00 AM
RÉGLAGE AUTO : ARR
CHOISIR AJUSTER
POUR SORTIR PRESSER
MENU
Réglage de l’horloge
Vous devez régler la date et l’heure pour les
enregistrements programmés.
VCR TV
1
CATV/DBS
Réglez le sélecteur VCR/CATV/DBS/
TV sur VCR.
2
3
MENU
Appuyez sur MENU, puis sur
i ou k pour sélectionner
HORLOGE, puis appuyez sur
ENTER/DISPLAY.
ENTER
Appuyez sur j ou l pour régler
MOIS, puis appuyez sur k.
45
Appuyez sur j ou l et
maintenez cette touche
enfoncée pour modifier
rapidement le réglage.
Réglez JOUR, ANNÉE
et HEURE comme à
l’étape 3.
MOIS : JUIN
JOUR : 17 SAM
ANNÉE : 2000
HEURE
: 10 : 30 AM
RÉGLAGE AUTO : ARR
CHOISIR AJUSTER
POUR SORTIR PRESSER
MENU
5
6
or
MENU
Appuyez sur j ou l pour régler
RÉGLAGE AUTO sur MAR.
Le magnétoscope corrige le
réglage de l’horloge
automatiquement une fois que
vous avez réglé RÉGLAGE AUTO
sur MAR.
Appuyez sur MENU pour
faire démarrer l’horloge.
L’écran normal réapparaît.
Page 86

5
SYNTONISATION AUTO.
BANDE SYNTONISATION :
CANAL AJOUT / EFF. :
SÉLECTION SOURCE : TUNERLECTION SOURCE : TUNER
CHOISIR AJUSTER
POUR SORTIR PRESSER
MENU
SYNTONISATION AUTO.SYNTONISATION AUTO.
BANDE SYNTONISATION :
CANAL AJOUT / EFF. :
SÉLECTION SOURCE :
CHOISIR AJUSTER
POUR SORTIR PRESSER
MENU
Préréglage des canaux
Préparatifs
Vérifiez que le canal de magnétoscope n’est pas sélectionnsur LINE1 ou LINE2.
CATV/DBS
VCR TV
1
Réglez le sélecteur VCR/CATV/DBS/
TV sur VCR.
2
3
MENU
Appuyez sur MENU, puis sur i
ou k pour sélectionner
SYNTONISATION. Appuyez
ensuite sur ENTER/DISPLAY.
HORLOGE
PROGRAMME
ENTER
POUR SORTIR PRESSER
SYNTONISATION
INSTALLATION
ENTER
CHOISIR CONFIRMER
MENU
Appuyez sur i ou k pour
sélectionner SÉLECTION SOURCE,
puis sur j ou l pour afficher
TUNER.
4
Appuyez sur i ou k pour
sélectionner SYNTONISATION
AUTO, puis appuyez sur j ou l.
Tous les canaux disponibles sont
balayés et mémorisés. Après la
syntonisation, l’écran précédent
apparaît.
DIRECTIVES POUR
SYNTONISATION AUTO.
CANAL 11
POUR SORTIR PRESSER
MENU
6
5
MENU
Appuyez sur MENU
pour revenir à l’écran
normal.
Page 87

FRANÇAIS
Avertissement
Pour prévenir tout risque d’incendie ou
d’électrocution, garder cet appareil à l’abri de la pluie
et de l’humidité.
CAUTION
RISK OF ELECTRIC SHOCK
DO NOT OPEN
“CAUTION:TO REDUCE THE RISK OF
ELECTRIC SHOCK,
DO NOT REMOVE COVER (OR BACK).
NO USER-SERVICEABLE PARTS INSIDE.
REFER SERVICING TO QUALIFIED
SERVICE PERSONNEL.”
Explication des symboles graphiques :
Un éclair fléché inscrit dans un triangle
équilatéral est destiné à alerter l’utilisateur de la
présence à l’intérieur de l’appareil d’une
“tension dangereuse” non isolée d’une
puissance suffisante pour constituer un risque
d’électrocution pour les personnes.
Un point d’exclamation inscrit dans un triangle
équilatéral est destiné à avertir l’utilisateur de la
présence d’instructions d’utilisation (et
d’entretien) importantes dans la documentation
fournie avec l’appareil.
INSTRUCTIONS DE
SECURITE IMPORTANTES
Veuillez lire attentivement le présent mode d’emploi dans
son intégralité avant de faire fonctionner l’appareil.
Conservez-le ensuite soigneusement pour toute référence
ultérieure. Vous devez vous conformer strictement à toutes
les mises en garde et à tous les avertissements figurant sur
l’appareil et dans le mode d’emploi ainsi qu’aux précautions
de sécurité précisées ci-dessous.
Avertissement
Pour éviter d’être électrocuté ou blessé, respectez
scrupuleusement ces consignes de sécurité lors de
l’installation, de l’utilisation et de l’entretien de l’appareil.
Installation
Fixations - N’utilisez pas de fixations qui ne sont pas
préconisées par le fabricant de l’appareil, car cela peut
résulter en un risque d’incendie, de décharge électrique ou
de blessures.
Eau et humidité - N’utilisez pas cet appareil à proximité
d’eau comme d’une baignoire, d’un lavabo, d’un évier, d’une
piscine, etc.
1
FRANÇAIS
Chaleur - N’utilisez pas cet appareil à proximité de sources
de chaleur et notamment de conduits d’air chaud, de
cuisinières ou de tout autre appareil générant de la chaleur.
Il ne peut pas non plus être exposé à des températures
inférieures à 5 °C (41 °F) ou supérieures à 35 °C (95°F).
Lieu d’installation - Placez l’appareil sur une surface plane
et de niveau.
Accessoires - Ne placez pas cet appareil sur un chariot, un
support,un trépied, un montant ou une table instable.
L’appareil risque de tomber et de causer de graves
blessures à des enfants ou à des adultes, voire d’être
gravement endommagé. Utilisez uniquement les modèles
de chariot, de support, de trépied, de montant ou de table
préconisés par le fabricant ou vendus avec l’appareil. Le
montage de l’appareil doit être exécuté conformément aux
instructions du fabricant et au moyen des accessoires de
montage préconisés par le fabricant.
Chariot mobile - Lorsque l’appareil est placé ou installé sur
un support ou dans un chariot, déplacez l’appareil avec
précautions. Les arrêts brutaux, les forces excessives et les
surfaces irrégulières risquent en effet de le faire basculer ou
tomber.
AVERTISSEMENT POUR LES CHARIOTS MOBILES
S3125A
Ventilation - L’appareil doit être situé dans un
environnement approprié qui assure une ventilation
périphérique correcte. Laissez un espace dégagé d’environ
10 cm à l’arrière et au-dessus de l’appareil et de 5 cm sur
les côtés.
Les fentes et ouvertures pratiquées dans le boîtier ainsi qu’à
l’arrière et sur le dessous de celui-ci sont destinées à en
assurer la ventilation ainsi que le bon fonctionnement de
l’appareil et à protéger celui-ci contre les surchauffes. Ces
ouvertures ne doivent jamais être obstruées ou recouvertes,
que ce soit, par exemple, en posant l’appareil sur un lit, un
canapé, un tapis, ou toute autre surface. (L’appareil ne doit
jamais être placé à proximité ou par-dessus un radiateur ou
un poêle.) L’appareil ne doit pas non plus être encastré,
notamment dans une bibliothèque, s’il ne dispose pas d’une
ventilation adéquate.
Pénétration d’objets et de liquides - N’introduisez aucun
objet à l’intérieur de cet appareil par les ouïes de ventilation
parce qu’il risque d’entrer en contact avec des composants
sous haute tension et de court-circuiter des composants et,
de ce fait, de provoquer un incendie ou une décharge
électrique. Veillez à ne renverser aucun liquide sur
l’appareil.
Alimentation
Sources d’alimentation - Faites uniquement fonctionner
cet appareil sur l’une des sources d’alimentation spécifiées
sur l’étiquette signalétique. Si vous n’êtes pas certain du
type de la source d’alimentation locale, consultez le
revendeur de votre appareil ou votre compagnie de
distribution d’électricité. Pour faire fonctionner l’appareil sur
piles ou sur d’autres sources d’alimentation, reportez-vous
au mode d’emploi.
Mise à la terre ou polarisation - Cet appareil est équipé
d’une fiche d’alimentation à courant alternatif
polarisée(dotée d’une lame plus large que l’autre). Cette
fiche ne peut être introduite que dans un sens dans la prise
murale (secteur). Il s’agit d’une mesure de sécurité. S’il
s’avère difficile d’introduire complètement la fiche
d’alimentation dans la prise secteur, retournez la fiche et
réessayez. Si vous ne parvenez toujours pas à l’enficher
Page 88

correctement, demandez à votre électricien de remplacer
votre prise murale d’un modèle dépassé. Ne tentez pas de
contourner la sécurité de cette fiche polarisée.
Protection du cordon d’alimentation - Les cordons
d’alimentation doivent être cheminés de façon à ce que l’on
ne marche pas dessus et à ce qu’ils ne soient pas coincés
par des objets placés juste àc(tm)té. Soyez plus
particulièrement attentif au cordon reliant l’appareil à la prise
d’alimentation secteur, à la proximité des prises et à
l’endroit où il quitte l’appareil.
Surcharge - Ne déposez jamais aucun objet sur le cordon
d’alimentation. Ne surchargez pas les prises murales et les
câbles prolongateurs, car vous risquez sinon de provoquer
un incendie ou des décharges électriques. Installez
l’appareil à un endroit où il ne risque pas d’être piétiné.
Antenne externe
Foudre - Par mesure de sécurité supplémentaire pour cet
appareil récepteur durant les orages accompagnés de
foudre, ou lorsque vous prévoyez de ne pas l’utiliser
pendant une période prolongée, débranchez-le de la prise
murale et déconnectez l’antenne ou le câble de
télédistribution. Vous éviterez ainsi les dommages à
l’appareil résultant de la foudre et des crêtes de tension.
Mise à la terre de l’antenne extérieure - Veillez à ce que
le système d’antenne soit correctement mis à la terre de
façon à éviter tout dégât dû à une crête de tension
imprévisible ou à l’accumulation d’électricité statique.
L’article 810 du code national électrique, ANSI/NFPA n° 70,
fournit des informations sur la mise à la terre adéquate du
mât, de la structure portante et du fil de terre vers une unité
de décharge de l’antenne, la section des conducteurs de
mise à la terre, l’emplacement de l’unité de décharge de
l’antenne, le raccordement aux électrodes de mise à la terre
et les spécifications des bornes de mise à la terre.
Reportez-vous également à l’illustration.
Antenna Grounding According to the National Electrical Cord
Mise à la terre de l’antenne conformément au code nationalélectrique
ANTENNA LEAD IN WIRE
FIL D’ANTENNE
UNITE DE DECHARGE
CONNEXIONS DE
GROUND CLAMP
MISE A LA TERRE
ANTENNA DISCHARGE
D’ANTENNE
UNIT
(NEC SECTION 810-20)
(SECTION 810-20 NEC)
En Cas De Panne
Débranchez l’appareil de la prise murale et faites-le
contrôler par un technicien d’entretien qualifié si :
1) le cordon ou la fiche d’alimentation est endommagé ou
effilochée ;
2) un liquide a été renversé sur l’appareil;
3) l’appareil a été exposé à la pluie ou à l’humidité ;
4) l’appareil semble ne pas fonctionner normalement
alors que vous appliquez les instructions d’utilisation.
Ajustez uniquement les commandes décrites dans le
mode d’emploi parce qu’un réglage incorrect d’autres
commandes peut causer des dommages qui
nécessiteront généralement une intervention en
profondeur d’un technicien d’entretien qualifié pour
restaurer les conditions de fonctionnement normales
de l’appareil;
5) l’appareil est tombé ou si le châssis en a été
endommagé;
6) les performances de l’appareil se sont sensiblement
modifiées -indiquant par là la nécessité d’un entretien.
N’essayez pas de réparer vous-même l’appareil, car
l’ouverture ou le retrait des capots peut vous exposer à des
tensions dangereuses ou à d’autres risques. Confiez
toujours les réparations à un technicien qualifié.
Pièces de rechange - Lorsque des pièces de rechange
sont indispensables, assurez-vous que le technicien utilise
effectivement les pièces de rechange spécifiées par le
fabricant ou présentant les mêmes spécifications que les
pièces d’origine. Toute substitution non autorisée peut
entraîner un risque d’incendie, de décharge électrique ou
tout autre danger.
Contrôle de sécurité - A l’issue de toute intervention
d’entretien ou de réparation de cet appareil, demandez au
technicien d’exécuter les contrôles de sécurité afin de
déterminer si l’appareil présente les conditions d’utilisation
prescrites.
Remarque pour l’installateur du système CATV:
La présente remarque est destinée à attirer l’attention des
installateurs des systèmes CATV sur l’article 820-40 du
NEC qui stipule les instructions relatives à une mise à la
terre adéquate. Il prévoit plus particulièrement que le câble
de mise à la terre doit être raccordé au circuit de terre du
bâtiment aussi près que possible de l’entrée du câble.
BOITIER DE
ELECTRIC
DISTRIBUTION
SERVICE
EQUIPMENT
ELECTRIQUE
CODE NATIONAL ELECTRIQUE (NEC)
NEC-NATIONAL ELECTRICAL CODE
CONDUCTEURS DE
GROUNDING
MISE A LA TERR
CONDUCTORS
(SECTION 810-21 NEC)
(NEC SECTION 810-21)
CONNEXIONS DE MISE A LA
GROUND CLAMPS
TERRE
ELECTRODES DE MISE A LA
POWER SERVICE GROUNDING
ELECTRODE SYSTEM
TERRE
(NEC ART 250 PART H)
(ART. 250, SECTION H NEC)
Foudre
Pour une protection renforcée de cet appareil récepteur
durant un orage accompagné de foudre, ou lorsqu’il est
laissé inutilisé et sans surveillance pendant une période
prolongée, débranchez-le de la prise murale (secteur) et
déconnectez l’antenne ou le système de câble. Vous évitez
ainsi tout risque de dommage dû à la foudre et aux
surtensions de ligne.
Entretien
Nettoyage - Débranchez l’appareil de la prise murale avant
de procéder à son nettoyage. N’utilisez pas de nettoyants
liquides ou en aérosol. Utilisez un chiffon légèrement
humide.
REFERENCES UTILISATEUR
Pour votre facilité, consignez la désignation du modèle
et le numéro de série de cet appareil (qui se trouvent à
l’arrière) dans les cases ci-dessous. Signalez ces
références lorsque vous prenez contact avec votre
revendeur Aiwa en cas de problème.
Numéro du modèle
Numéro de série
FRANÇAIS
2
Page 89

Bienvenue
Merci pour l’achat de cet appareil AIWA.
Pour tirer le meilleur profit de cet
appareil, veuillez lire attentivement ce
mode d’emploi.
Table des matières
Principales
caractéristiques de
ce magnétoscope
Système VCR Plus+ et
lecture monotouche
Le réglage de la minuterie est simplifié
par le système VCR Plus+.
Les programmes de télévision
enregistrés avec la minuterie peuvent
être immédiatement reproduits par
pression sur une touche (lecture
monotouche).
Programmes MTS (Son de
TV multiplex)
Vous pouvez recevoir, enregistrer et
reproduire des programmes de télévision
stéréo ou bilingues.
MBR (Télécommande
multimarque)
La télécommande peut contrôler les
téléviseurs de plusieurs fabricants et des
convertisseurs pour réseau câblé/DBS.
Mémorisation automatique
Le réglage des canaux de télévision peu
être facilement et immédiatement
effectué.
Préparatifs
Raccordement du magnétoscope.......................4
Préparation de la télécommande........................8
Sélection de la langue.......................................11
Réglage de l’horloge.........................................11
Préréglage des canaux .....................................12
Vérification de la configuration des canaux pour
utiliser le système VCR Plus+...........................14
Lecture
Lecture d’une cassette......................................16
Diverses fonctions de recherche.......................17
Enregistrement
Enregistrement d’un programme de
télévision...........................................................19
Enregistrement instantané................................20
Utilisation du système VCR Plus+ pour
l’enregistrement programmé .............................21
Réglage manuel du programmateur .................23
Doublage...........................................................24
Autres fonctions
Son TV multiplex (MTS) et système
VCR Plus+ et PlusCode sont des
marques déposées de Gemstar
Development Corporation.
Le système VCR Plus+ est fabriqué
sous licence de Gemstar Development
Corporation.
audio Hi-Fi.........................................................25
Affichage sur écran...........................................27
Informations complémentaires
En cas de panne ...............................................28
Spécifications....................................................29
Composants et commandes .............................30
3
FRANÇAIS
Page 90

PRÉPARATIFS
Raccordement du magnétoscope
Raccordements de base
Attention
Pour effectuer tous les raccordements, débranchez le
magnétoscope et le téléviseur de l’alimentation électrique.
Câble coaxial
75 ohms
(non fourni)
Câble bifilaire 300 ohms
(non fourni)
Adaptateur d’antenne
(non fourni)
AERIAL
(VHF/UHF)
RF OUT
3
Cordon d’alimentation
secteur
Débranchez le câble d’antenne du téléviseur et raccordez-le au connecteur
1
à la prise secteur
à la borne d’antenne
1
Câble d’antenne
(fourni)
AERIAL sur le panneau arrière du magnétoscope.
Si le câble est un câble coaxial 75 ohms de type circulaire, raccordez-le directement au
connecteur AERIAL.
S’il s’agit d’un câble jumelé 300 ohms de type plat, raccordez-le à l’adaptateur d’antenne
(non fourni) et raccordez l’adaptateur au connecteur AERIAL.
Raccordez le câble d’antenne fourni au connecteur RF OUT du
2
magnétoscope et le connecteur d’antenne au téléviseur.
Si votre téléviseur est muni d’une borne d’antenne 300 ohms, utilisez un diviseur
d’antenne (non fourni).
3
Raccordez le cordon d’alimentation à la prise secteur.
2
Téléviseur Téléviseur
Diviseur d’antenne (non fourni)
VU
VHFUHF
75-ohm300-ohm
à la borne
d’antenne VHF
à la borne d’antenne UHF
Pour raccorder un téléviseur avec les câbles audio/vidéo
Si votre téléviseur est muni de prises d’entrée audio/vidéo, vous pourrez raccorder le
magnétoscope et le téléviseur avec les câbles audio/vidéo fournis.
Ce raccordement améliore la qualité du son et de l’image.
R AUDIO L
VIDEO
OUT OUT
(MONO)
IN IN
LINE 1
Jaune
Rouge
Blanc
Câble vidéo (fourni)
Câble audio (fourni)
Vers prise
d’entrée vidéo
aux prises d’entrée
audio
CONTINUE
SUITE
FRANÇAIS
4
Page 91

Raccordement du magnétoscope (suite)
Raccordement au réseau câblé
Pour raccorder le magnétoscope au réseau câblé sans convertisseur
Réseau câblé
Câble coaxial 75 ohms
(non fourni)
AERIAL
(VHF/UHF)
RF OUT
3
Cordon d’alimentation
secteur
1
Raccordez le câble du système CATV au connecteur AERIAL de ce
à la prise secteur
à la borne d’antenne
1
Câble d’antenne
(fourni)
2
Téléviseur Téléviseur
magnétoscope.
Raccordez le câble d’antenne fourni au connecteur RF OUT du magnétoscope
2
et le connecteur d’antenne au téléviseur.
Si votre téléviseur est muni d’une borne d’antenne 300 ohms, utilisez un diviseur d’antenne
(non fourni).
3
Raccordez le cordon d’alimentation à la prise secteur.
Pour raccorder le magnétoscope au réseau câblé
Réseau câblé
avec un convertisseur
Diviseur d’antenne (non fourni)
VU
VHFUHF
75-ohm300-ohm
à la borne
d’antenne VHF
à la borne d’antenne UHF
Convertisseur
(non fourni)
Câble coaxial
75 ohms
(non fourni)
AERIAL
(VHF/UHF)
RF OUT
4
Cordon d’alimentation
secteur
1
Raccordez le câble du réseau câblé à l’entrée du convertisseur.
Raccordez la sortie du convertisseur au connecteur AERIAL de ce magnétoscope.
2
Raccordez le câble d’antenne fourni au connecteur RF OUT du magnétoscope et le connecteur
3
à la prise secteur
Câble d’antenne
(fourni)
à la borne d’antenne
3
Téléviseur
1
Câble coaxial 75 ohms
(non fourni)
Diviseur d’antenne (non fourni)
VU
d’antenne au téléviseur.
Si votre téléviseur est muni d’une borne d’antenne 300 ohms, utilisez un diviseur d’antenne (non fourni).
4
Raccordez le cordon d’alimentation à la prise secteur.
5
FRANÇAIS
OUTIN
2
VHFUHF
Téléviseur
75-ohm300-ohm
Page 92

Pour raccorder le magnétoscope au réseau câblé avec un convertisseur et un diviseur 2
voies
Réseau câblé
1
Diviseur 2 voies
(non fourni)
Convertisseur
OUTIN
2
Câble coaxial 75 ohms
(non fourni)
Câble coaxial 75 ohms (non fourni)
3
AERIAL
(VHF/UHF)
RF OUT
4
2
6
Cordon d’alimentation
secteur
Câble coaxial 75 ohms (non fourni)
à la prise secteur
Câble d’antenne
(fourni)
Téléviseur
à la borne d’antenne
Câble coaxial 75 ohms (non fourni)
5
1
Raccordez le câble du réseau câblé au diviseur 2 voies.
2
Raccordez une sortie du diviseur à l’entrée du convertisseur et l’autre
sortie au commutateur A/B.
Raccordez la sortie du convertisseur au connecteur AERIAL de ce
3
magnétoscope.
Raccordez le connecteur RF OUT de ce magnétoscope au commutateur
4
A/B à l’aide du câble d’antenne fourni.
5
Raccordez le commutateur A/B à la borne d’antenne du téléviseur.
Raccordez le cordon d’alimentation à la prise secteur.
6
Commutateur A/B
(non fourni)
Remarque
Lors de l’utilisation d’un
convertisseur CATV, reportez-vous
aux instructions appropriées.
CONTINUE
SUITE
FRANÇAIS
6
Page 93

Raccordement du magnétoscope (suite)
Raccordements supplémentaires
Pour raccorder un ampli-tuner audiovisuel
R AUDIO L
OUT OUT
(MONO)
IN IN
LINE 1
VIDEO
Ampli-tuner audiovisuel
Câble vidéo (fourni)
Câble audio (fourni)
Câble vidéo/audio
(non fourni)
Remarques
• Pour recevoir une émission radio de la gamme AM sur l’ampli-tuner audiovisuel, mettez le
magnétoscope hors tension.
• Installez l’antenne AM du récepteur AV en un endroit sans interférences, aussi loin que
possible du magnétoscope.
• En fonction de votre récepteur AV, le panneau arrière pourra être différent de celui illustré cidessus. Veuillez vous reporter au mode d’emploi de votre appareil.
7
FRANÇAIS
Page 94

Réglage de la réception vidéo
30
30
Préparation de la
Lors de l’utilisation du magnétoscope, le signal circule entre
l’antenne et le magnétoscope puis vers le téléviseur. Avant
d’utiliser le magnétoscope, un canal de sortie vidéo doit être
réglé sur le téléviseur.
AERIAL
(VHF/UHF)
RF OUT
TV/VCR
3CH
3CH 4CH
4CH
télécommande
Mise en place des piles
Attention
Pour éviter tout dommage résultant d’une fuite des
piles ou une explosion, conformez-vous aux
instructions suivantes.
• Introduisez les deux piles R03 (AAA) fournies en en
respectant la polarité 0 et 9 comme illustré.
• Ne mélangez pas une pile neuve et une pile usagée ou
des piles de types différents.
• Ne jetez pas les piles au feu, ne les soumettez pas à de
fortes chaleurs et ne les démontez pas.
• Ne transportez pas les piles avec des clés ou d’autres
objets métalliques.
Remarque
Enlevez les piles quand elles sont usées, ou si vous ne
comptez pas utiliser la télécommande pendant un certain
temps.
Lorsqu’un téléviseur est raccordé par un
câble d’antenne
Lorsque le téléviseur est raccordé au connecteur RF OUT à
l’aide du câble d’antenne fourni, réglez le sélecteur de canal
du panneau arrière sur 3 CH ou 4 CH (canal non utilisé pour
la réception des émissions de télévision), puis sélectionnez
le même canal sur le téléviseur.
(Pour visionner le magnétoscope, réglez le canal 3 ch ou
4 ch sur le téléviseur.)
Pour sélectionner un canal TV sur le téléviseur
Mettez le téléviseur sous tension et ce magnétoscope hors
tension.
Pour regarder le programme de télévision ou vidéo
sélectionné sur le magnétoscope
Allumez le téléviseur et le magnétoscope, puis appuyez sur
TV/VCR pour faire apparaître VCR sur l’afficheur.
VCR
Lorsqu’un téléviseur est raccordé avec
des câbles audio et vidéo
Lorsqu’un téléviseur est raccordé avec des câbles audio et
vidéo fournis, mettez le magnétoscope et le téléviseur sous
tension et sélectionnez le mode d’entrée vidéo sur le
téléviseur.
Utilisation de la télécommande
Dirigez la télécommande vers le capteur Capteur de
télécommande.
5 m
Capteur de télécommande
7 m
Remarques
• La télécommande risque de ne pas fonctionner s’il y a des
obstacles entre la télécommande et le capteur.
• Une lumière ambiante très puissante, comme une lampe
fluorescente ou la lumière directe du soleil, peut perturber le
bon fonctionnement de la télécommande.
• Si vous utilisez pour votre téléviseur le même type de
télécommande infrarouge et la pointez dans la même
direction, le bon fonctionnement du magnétoscope risque
d’être perturbé.
• La distance maximale de fonctionnement entre la
télécommande et le capteur est de 7 mètres. Quand la
distance maximale permettant un bon fonctionnement
diminue, remplacez les deux piles par des neuves.
• Vous pouvez utiliser la télécommande dans un angle de 30˚
de part et d’autre du capteur, mais un angle plus petit est
recommandé pour garantir un fonctionnement stable.
CONTINUE
SUITE
FRANÇAIS
8
Page 95

Preparation de la télécommande (suite)
Commande des téléviseurs et des
systèmes CATV/DBS
La télécommande peut piloter des téléviseurs de
nombreuses marques et des convertisseurs CATV/DBS.
Pour pouvoir faire fonctionner votre téléviseur et votre
convertisseur, enregistrez sur la télécommande le code du
fabricant indiqué sur le tableau à droite.
POWER
MUTE
Réglez le sélecteur VCR/CATV/DBS/TV sur TV
1
ou CATV/DBS.
Tout en maintenant TV PRESET enfoncée,
2
appuyez sur les touches numériques pour
régler le code indiqué sur le tableau à droite.
Certains marques ont plus d’un code. Si la
télécommande ne fontionne pas avec le téléviseur ou le
convertisseur/DBS après le réglage du code, essayez un
autre code.
Pour la commande à distance du
téléviseur
Les touches POWER, CHANNEL i, k, VOL. +, –, MUTE,
TV/VCR ainsi que les touches numériques de la
télécommande peuvent être utilisées.
Pour la commande à distance du
convertisseur/DBS
Les touches POWER, CHANNEL i, k, ainsi que les
touches numériques de la télécommande peuvent être
utilisées.
Remarques
• Étant donné la variété des codes utilisés par les fabricants,
AIWA ne peut pas garantir que la télécommande MBR
parviendra à piloter tous les modèles des marques
indiquées.
• Les touches numériques peuvent être utilisées seulement
pour la sélection du canal, mais il est possible qu’elles ne
fonctionnent pas correctement avec certains téléviseurs et
convertisseur/DBS.
VCR/CATV/DBS/TV
Touches
numériques
CHANNEL i/k
VOL. +/–
TV PRESET
Fabricant de téléviseur Code
ADMIRAL 16, 33, 37, 44, 45
AIWA 70
AKAI 01
AMARK 09
AOC 01
BELL & HOWELL 33
BROKSONIC 18, 19
CANDLE 51
CCE 07
CENTURION 08
CINERAL 43
CITIZEN 49, 50, 51, 52, 53, 54, 55
CORONADO 09
CROWN 09
CURTIS MATHES 01, 03, 08, 33, 37, 44
DAEWOO 16, 38, 39, 40, 41, 42, 43
DAYTRON 01, 08
EMERSON 01, 09, 16, 17, 18, 19
FISHER 28, 29
FUNAI 46, 47
GENERAL ELECTRIC 03, 10, 11, 13, 35, 37, 44
GRADIENTE 01, 56, 57, 63, 67
HITACHI 09, 14, 15, 43
JC PENNEY 01, 08, 10, 27, 35
JVC 20, 21, 63, 67
KIOTE 43
KMC 09
KTV 01, 08, 09, 31
LG (GOLDSTAR) 01, 07, 08, 09, 35, 39, 40
LODGENET 33
LOGIK 33
LXI 09, 24, 25, 26, 27, 28, 29
MAGNAVOX 01, 02, 04, 05, 06, 07, 08, 09,
20, 34, 35, 43, 51, 61, 62, 65
MAJESTIC 33
MARANTZ 01, 32
MEMOREX 33
MGA/MITSUBISHI 01, 08, 32, 34
MONTGOMERY WARD 01, 06, 08, 09, 23, 24, 32, 33, 34
NEC 01, 08
NOBLEX 07
PACKARD BELL 43
PANASONIC 07, 11, 13, 25, 35, 36
PHILCO 01, 06, 07, 08, 09, 15, 38, 43, 58
PHILIPS 06, 07, 43, 61, 62, 65
PIONEER 30
PORTLAND 09
PROSCAN 03, 37, 44
QUASAR 11, 13
RADIO SHACK 16, 17, 23
RCA 01, 03, 37, 44
REALISTIC 16, 17, 23
9
FRANÇAIS
Page 96

Fabricant de TV
SAMPO 08
SAMSUNG 01, 08, 09, 25, 68
SANYO 28, 29
SCOTT 01, 08
SEARS 09, 25, 26, 27, 28, 29
SEMP 64
SHARP 09, 22, 23, 24, 60, 66
SIGNATURE 2000 01, 06, 08, 09, 10, 23, 24, 33, 34
SONY 12, 62
SOUNDESIGN 51
SYLVANIA 01, 04, 05, 06, 07, 08, 35, 51
SYMPHONIC 46, 47
TATUNG 11
TEKNIKA 07, 09, 16, 33, 51
TELERENT 09, 33
YHOMSON 69
TORX 08
TOSHIBA 01, 25, 26, 27, 64
WARDS 01, 06, 08, 09, 10, 33, 34
XR1000 48
ZENITH 02, 33, 59
Fabricant de DBS Code
DIRECTV 66
EASTERN 57
GRADIENTE SKY 56
JERROLD 60, 61, 65
RCA 50
SCIENTIFIC ATLANTA 58, 63, 64
SONY 49
TOCOM 58, 59, 62
Code
Fabricant de cnvertisseur Code
ALLEGRO 46
ARCHER 39
CABLEVIEW 39
CITIZEN 39
CURTIS MATHES 15
EAGLE 24, 25, 28
GEMINI 04, 05, 22, 23
GENERAL ELECTRIC 43
GENERAL INSTRUMENT 04, 05, 07, 09
GOBRAND 39
HAMLIN 33, 34, 35
JERROLD 04, 06, 07, 08, 09, 10, 17,
39
KALE VISION 29
MACOM 03, 40, 41
MAGNAVOX 24, 25, 28, 29, 36, 37
NSC 38
OAK 11, 12, 44
PANASONIC 13, 19, 21
PARAGON 01
PHILIPS 24, 25, 26, 27, 28
PIONEER 13, 14
PULSER 39
RCA 13, 50
REGAL 28
REGENCY 32
SAMSUNG 04, 13, 29
SCIENTIFIC ATLANTA 10, 15, 16, 45, 48
SLMARX 04, 13
SONY 49
SPRUCER 04, 13, 19
STANDARD COMPONENTS 29
STARGATE 04, 05, 13
TELEVIEW 04, 13, 39
TEXSCAN 31
TOCOM 12, 17, 18, 19, 38
UNIDEN 20
UNIKA 39
UNIVERSAL 46, 47
VID TECH 30
VIDEO WAY 01, 42
VIEWSTAR 24, 25, 28
ZENITH 01, 02, 03
ZENITH HT-2000 01
Remarque
Certains téléviseurs ou décodeurs/DBS pour réseau câblé
peuvent ne pas figurer dans la liste.
FRANÇAIS
10
Page 97

Sélection de la langue
LANGUAGE SELECT : ENGLISH
CHOIX LANGAGE : FRANÇAIS
HORLOGE
PROGRAMME
SYNTONISATION
INSTALLATION
CHOISIR CONFIRMER
POUR SORTIR PRESSER
ENTER
MENU
MOIS : JUINMOIS : JUIN
JOUR : 1 JEU
ANNÉE : 2000
HEURE
: 12 : 00 AM
RÉGLAGE AUTO : ARR
CHOISIR AJUSTER
POUR SORTIR PRESSER
MENU
MOIS : JUIN
JOUR : 17 SAM
ANNÉE : 2000
HEURE
: 10 : 30 AM : 10 : 30 AM
RÉGLAGE AUTO : ARR
CHOISIR AJUSTER
POUR SORTIR PRESSER
MENU
Réglage de l’horloge
Le menu peut être affiché dans l’une des trois langues
suivantes: Anglais, espagnol ou français.
POWER
ENTER/
DISPLAY
VCR/CATV/
DBS/TV
i/k
j/l
MENU
Avant de commencer
Réglez le sélecteur VCR/CATV/DBS/TV sur VCR.
1
Appuyez sur POWER pour allumer le
magnétoscope.
Vous devez régler la date et l’heure pour les
enregistrements programmés.
VCR/CATV/
DBS/TV
i/k
j/l
ENTER/
MENU
DISPLAY
Avant de commencer
Réglez le sélecteur VCR/CATV/DBS/TV sur VCR.
Appuyez sur MENU.
2
3
Appuyez sur i ou k pour sélectionner SETUP,
(installation) puis appuyez sur ENTER/DISPLAY.
CLOCK
PROGRAM
TUNING
SETUP
ENTER
SELECT ENTER
TO EXIT PRESS
4
Appuyez sur i ou k pour sélectionner
MENU
LANGUAGE SELECT (choix langage).
FUNCTION OSD : ON
LANGUAGE SELECT : ENGLISH
AUDIO MODE :
BROADCAST TYPE :
AUDIO OUTPUT :
CHANNEL MAPPING
SELECT ADJUST
TO EXIT PRESS
5
Appuyez sur j ou l pour afficher la langue
STEREO
STEREO
MENU
HI-FI
souhaitée.
Chaque fois que la langue change, la langue de
l’affichage sur écran change elle aussi.
FONCTION OSD :
CHOIX LANGAGE : FRANÇAIS
MODE AUDIO :
TYPE DE DIFFUSION :
SORTTE AUDIO :
CONFIGURATION CANAUX
CHOISIR AJUSTER
POUR SORTIR PRESSER
MARCHE
HI-FI
STEREO
STEREO
MENU
1
Appuyez sur MENU.
2
Appuyez sur i ou k pour sélectionner
HORLOGE, puis appuyez sur ENTER/DISPLAY.
Appuyez sur j ou l pour régler le mois
3
(MOIS), puis appuyez sur k.
Le jour de la semaine apparaît automatiquement.
4
Réglez la date (JOUR), l’année (ANNÉE), l’heure
(HEURE) comme à l’étape 3.
Appuyez sur j ou l tout en maintenant la pression
pour changer le réglage rapidement.
Appuyez sur MENU pour revenir à l’écran
6
normal.
11
FRANÇAIS
Page 98

Appuyez sur la touche j ou l pour régler
HORLOGE
PROGRAMME
SYNTONISATION
INSTALLATION
CHOISIR CONFIRMER
POUR SORTIR PRESSER
ENTER
MENU
SYNTONISATION AUTO.
BANDE SYNTONISATION :
CANAL AJOUT / EFF. :
SÉLECTION SOURCE : TUNERSÉLECTION SOURCE : TUNER
CHOISIR AJUSTER
POUR SORTIR PRESSER
MENU
RÉGLAGE AUTO : MAR
5
RÉGLAGE AUTO sur MAR.
Une fois RÉGLAGE AUTO réglé sur MAR, le
magnétoscope corrige automatiquement le réglage
d’horloge.
MOIS : JUIN
JOUR : 17 SAM
ANNÉE : 2000
HEURE
: 10 : 30 AM
RÉGLAGE AUTO : MAR
CHOISIR AJUSTER
POUR SORTIR PRESSER
Appuyez sur MENU pour faire démarrer
6
MENU
l’horloge.
L’écran normal réapparaît.
Pour corriger les chiffres pendant le
réglage
Avant d’appuyer sur MENU à l’étape 6, appuyez sur la
touche i pour sélectionner l’élément à corriger.
Réinitialisez les nombres à l’aide de la touche j ou l.
Conseil
Lorsque l’alimentation est coupée pendant plus de 60 minutes
ou que le cordon d’alimentation est débranché de la prise
murale, le réglage de l’heure est effacé. Dans ce cas, vous
devez à nouveau procéder au réglage de l’horloge.
Préréglage des canaux
Avant d’exécuter une recherche automatique, ce
magnétoscope peut recevoir tous les canaux de votre
région en appuyant plusieurs fois sur la touche CHANNEL
i ou k. Une fois que les canaux ont été mémorisés
automatiquement, vous pouvez ignorer ceux qui ne sont pas
présélectionnés avec la touche CHANNEL i ou k.
VCR/CATV/
DBS/TV
i/k
j/l
ENTER/
DISPLAY
MENU
Remarques
• La date peut être réglée pour les années 2000 à 2099.
• RÉGLAGE AUTO fonctionne quand
- l’alimentation du magnétoscope est coupée.
- le canal de la station offrant le service RÉGLAGE AUTO
est préréglé.
Préparatifs
• Réglez le sélecteur VCR/CATV/DBS/TV sur VCR.
• Vérifiez que le canal de magnétoscope n’est pas
sélectionné sur “LINE1” ou “LINE2”.
1
Appuyez sur MENU.
2
Appuyez sur i ou k pour sélectionner
SYNTONISATION, puis appuyez sur ENTER/
DISPLAY.
Appuyez sur i ou k pour sélectionner
3
SÉLECTION SOURCE, puis appuyez sur
j ou l pour afficher TUNER.
CONTINUE
SUITE
FRANÇAIS
12
Page 99

Préréglage des canaux (suite)
HORLOGE
PROGRAMME
SYNTONISATION
INSTALLATION
CHOISIR CONFIRMER
POUR SORTIR PRESSER
ENTER
MENU
SYNTONISATION AUTO.
BANDE SYNTONISATION : CATVBANDE SYNTONISATION : CATV
CANAL AJOUT / EFF. :
SÉLECTION SOURCE :
23 AJO
TUNER
CHOISIR AJUSTER
POUR SORTIR PRESSER
MENU
i/k
j/l
ENTER/
DISPLAY
Appuyez sur i ou k pour sélectionner
4
MENU
SYNTONISATION AUTO, puis appuyez sur
j ou l.
Tous les canaux disponibles dans votre région sont
balayés et mémorisés dans le magnétoscope.
Après la recherche, l’écran du téléviseur de l’étape 3
apparaît.
DIRECTIVES POUR
SYNTONISATION AUTO.
CANAL 11
Canaux affichés sur le Canaux du réseau
magnétoscope câblé
01 5A
02 à 13 2 à 13
14 à 36 A à W
37 à 94 W+1 à W+58
95 à 99 A-5 à A-1
100 à 124 W+59 à W+83
125 W+84
Conseils
• Quand vous effectuez le réglage automatique des canaux
(syntonisation auto), le magnétoscope sélectionne
automatiquement la bande (TV ou CATV) sur laquelle se
trouve le plus grand nombre de canaux à prérégler. Pour
vérifier la fréquence, appuyez sur la touche k pour
sélectionner BANDE SYNTONISATION dans le menu
SYNTONISATION.
• Dans la fenêtre d’affichage. “c” correspond à une chaîne
CATV et “ch” à une chaîne TV.
Remarque
Quand vous aurez terminé le réglage automatique des canaux,
les réglages précédents seront effacés.
Addition ou effacement manuels de
canaux
Si le préréglage automatique des canaux ne permet pas
d’enregistrer les canaux correctement, ajoutez ces derniers
manuellement pour l’enregistrement des programmes de
télévision. Vous pouvez aussi effacer les canaux qui ne sont
pas nécessaires.
POUR SORTIR PRESSER
Appuyez sur MENU pour revenir à l’écran
5
MENU
normal.
Si “C” clignote sur l’afficheur après le
préréglage automatique des canaux
Vérifiez les raccordements d’antennes et recommencez à
partir de l’étape 1.
Si vous ne pouvez toujours pas recevoir les canaux, réglez
les canaux manuellement sur le magnétoscope. Voir
“Addition ou effacement manuels de canaux”.
(Le préréglage des canaux est nécessaire pour enregistrer
des programmes de télévision.)
Canaux du réseau câblé
Le réseau câblé utilise des lettres et des nombres pour
désigner les canaux. Le tableau ci-dessous indique les
numéros de canaux du réseau câblé et le numéro de canal
correspondant affiché sur cet appareil. Pour des
informations détaillées sur les canaux disponibles dans
votre région, adressez-vous à l’exploitant local du réseau
câblé.
1
Appuyez sur MENU.
2
Appuyez sur i ou k pour sélectionner
SYNTONISATION, puis appuyez sur ENTER/
DISPLAY.
3
Appuyez sur i ou k pour sélectionner BANDE
SYNTONISATION, puis appuyez sur j ou l
pour afficher TV ou CATV.
13
FRANÇAIS
Page 100

Appuyez sur i ou k pour sélectionner CANAL
CANAL AJOUT / EFF. : 23
AJO
ENTER
CANAL AJOUT / EFF. : 25 EFF
ENTER
4
AJOUT/EFF.
Vérification de la
configuration des canaux pour
SYNTONISATION AUTO.
BANDE SYNTONISATION :
CANAL AJOUT / EFF. : 23
SOURCE SELECT :
ENTER
AJOUT / EFFACEMENT
CHOISIR AJUSTER
POUR SORTIR PRESSER
Appuyez sur j ou l pour sélectionner le canal
5
CATV
AJO
TUNER
MENU
à effacer ou ajouter.
Une fois le canal sélectionné réglé AJO apparaît. S’il
n’est pas régl EFF apparaît.
SYNTONISATION AUTO.
BANDE SYNTONISATION :
CANAL AJOUT / EFF. : 25 EFF
SOURCE SELECT :
AJOUT / EFFACEMENT
ENTER
CHOISIR AJUSTER
POUR SORTIR PRESSER
Appuyez sur ENTER/DISPLAY pour ajouter ou
6
CATV
TUNER
MENU
pour effacer le canal.
Si vous ajoutez le canal sélectionné, “c” ou “ch” s’allume
pendant quelques secondes dans la fenêtre d’affichage.
Si vous effacez le canal sélectionné, “c” ou “ch” clignote
pendant quelques secondes dans la fenêtre d’affichage.
7
Si vous souhaitez ajouter ou effacer un autre
canal, répétez les étapes 5 et 6.
8
Appuyez sur MENU pour revenir à l’écran
normal.
Conseils
Dans la fenêtre d’affichage. “c” correspond à une chaîne CATV
et “ch” à une chaîne TV.
utiliser le système VCR Plus+
Avant de programmer des enregistrements à l’aide du
système VCR Plus+, vous devez vérifier si les numéros des
canaux préréglés correspondent aux canaux guides qui sont
affectés aux canaux de télévision. Si ce n’est pas le cas, le
système VCR Plus+ ne fonctionnera pas correctement.
Dans ce cas, vous devrez assigner des numéros aux
canaux guides correspondants.
Par exemple
Pour chaque canal que le magnétoscope reçoit, utilisez la
liste des canaux pour vérifier si les numéros correspondent.
Ainsi, SHOWTIME est indiqué dans la liste des canaux
(sous les codes de canaux VCR Plus+) par le canal 38.
Votre magnétoscope reçoit SHOWTIME sur le canal 14.
Vous devez coordonner ces numéros en localisant le canal
guide 38 (sous GUIDE CANAL). Ensuite entrez le canal 14
pour le canal SHOWTIME (sous CANAL).
Continuez ainsi jusqu’à ce que tous les canaux soient
configurés.
Exemple de guide de canaux
Canaux de télévision
Code VCR
Plus+
WCBS New York CBS 02 02
WNBC New York NBC 04 04
WNYW New York NYW 05 05
WABC New York ABC 07 07
A&E
BET
CNBC
CSPAN
Arts & Entertainment
Black Entertainment
Consumer News & Business
Government Business
39 44
57 23
23 16
28 54
DSC Discovery Channel 37 63
DIS Disney Channel 53 27
MAX Cinemax 45 15
SHO Showtime 38 14
USA USA Network 44 40
• Vous pourrez trouver les listes de codes de canaux dans
votre guide de programmes TV et votre quotidien local.
Numéro de canal du
distributeur local
CONTINUE
SUITE
FRANÇAIS
14
 Loading...