

Page 1

3-253-939-11(1)
_
_
Portable
MiniDisc Recorder
Operating Instructions
Recorder Operation ____________________________
Software Operation _____________________________
page 9
page 42
AM-NX1
©2003 Sony Corporation
Page 2

WARNING
To prevent fire or shock hazard, do
not expose the unit to rain or
moisture.
Do not install the appliance in a
confined space, such as a bookcase or
built-in cabinet.
To prevent fire, do not cover the
ventilation of the apparatus with news
papers, table clot hs, curtains, etc. And
don’t place lighted candles on the
apparatus.
To prevent fire or shock hazard, do not
place objects filled with liquids, such as
vases, on the apparatus.
Certain countries may regulate disposal of
the battery used to power t his product.
Please consult with your local authority.
Caution
The use of optical instruments with this
product will incre as e eye hazard.
CAUTION
RADIATION WHEN OPEN
AVOID EXPOSURE TO BEAM
— INVISIBLE LASER
Information
IN NO EVENT SHALL SELLER BE
LIABLE FOR ANY DIRECT,
INCIDENTAL OR
CONSEQUENTIAL DAMAGES OF
ANY NATURE, OR LOSSES OR
EXPENSES RESULTING FROM
ANY DEFECTIVE PRODUCT OR
THE USE OF ANY PRODUCT.
The validity of the CE marking is
restricted to only th ose countries where i t
is legally enforced, mainly in the
countries EEA (European Economic
Area).
• SonicStage, O p enMG and the Ope nMG
logo, MagicG at e M emory Stick and the
MagicGate Memory Stick logo,
Memory Stick and the Memory Stick
logo, Net MD and the Net MD logo,
ATRAC, ATRAC3 and ATRAC3 plus
are trademarks of Sony Corporation.
• Microsoft, Windows, Windows NT and
Windows Media are trademarks or
registered trademarks of Microsoft
Corporation in the United States and /or
other countr i es.
• IBM and PC/AT are registered
trademarks of Inter national Business
Machines Corporation.
• Macintosh is a tra demark of Apple
Computer, Inc. in the United States and/
or other countries.
• Pentium is a registered trademark of
Intel Corporation.
• All other trademarks and registered
trademarks ar e trademarks or registered
trademarks of their respective holders.
• ™ and ® marks are omitted in this
manual.
2
Page 3

Notice for users
On the supplied software
• Copyright laws prohibit reproducing the
software or the manual accompanying it
in whole or in part, or renting the
software without the permission of the
copyright holder.
• In no event will SONY be liable for any
financial damage, or loss of profits,
including claims made by third parties,
arising out of the use of the software
supplied with this recorder.
• In the event a problem occurs with this
software as a result of defective
manufacturing, SONY will replace it.
However, SONY bears no other
responsibility.
• The software provided with this
recorder cannot be used with equipment
other than that which is so designated.
• Please note that, due to continued efforts
to improve quality, the software
specifications may be changed without
notice.
• Operation of this reco rder with soft ware
other than that provided is not covered
by the warranty.
Program © 2001, 2002, 2003 Sony
Corporation
Documentatio n © 2003 Sony Corporation
3
Page 4

Table of contents
Recorder Operation
Looking at controls ............................. ............10
Getting started ...............................................13
Playing an MD right away! ..............................16
Various ways of playback ..............................18
Viewing various informat ion ..................... .... ... ...................... .... ... .......18
Selecting the play mode ........................................................................18
Playing a track repeatedly (Repeat Play) .............................. ... .... ...19
Listening to tracks in a desired sequence (Program Play) ..............19
Adjusting the sound (Virtual-Surround • Digital Sound Equalizer) .....20
Varying the virtual sound to create different acoustics (Virtual-
Selecting the sound quality (Digital Sound Equalizer) ..................20
Changing playback speed (Digital Speed Control) ...............................21
Using the group function ................................23
What is the group function? ..................................................................23
Using the group function when play in g .................................. .... ..........23
Playing a track in group play ..........................................................23
Selecting the play mode for group play (Group Play Mo de ) .........24
Repeat play for the selected group play mode
Playing groups in a desired sequence (Group Program Play) ........24
Surround) .........................................................................20
(Group Repeat Play) ........................................................24
4
Page 5

Other operations .............................................25
Useful settings ............................... ... .... ...................... ... ...................... .25
How to use the menu items .............................. .... ..................... .... .26
Turning off the beep sound ............................................................ 26
Preserving battery power (Power Save Mode) .............................. 26
Starting the playback quickly (Qu ick Mod e ) ................. ................27
Protecting your hearing (EAR GUARD) .......................................27
Turning on/off the backlight ..........................................................28
Storing the settings for individua l discs
(Playback Information Memory) .................................... 28
List of menus .......................... ..................... .... .... ..................... .... .29
Power sources ................................................30
Battery life ................... ..................... .... .... ..................... .... .... ........ 30
Additional information ....................................31
Precautions ...........................................................................................31
Specifications ....................................................................................... 34
Troubleshooting and explanations ................35
Troubleshooting ................................................................................... 35
While charging ............................................................................... 35
While playing ................................................................................. 36
While using group function ...........................................................37
Others .............................................................................................37
Messages .............................................................................................. 39
Explanations ......................................................................................... 40
5
Page 6

Software Operation
What is a Net MD? ..........................................43
Basic Operations ............................................44
Basic operational flow using the Net MD ............ ...................... ... .......44
Providing the required system environment .........................................45
System requirements ......................................................................45
Installing the software onto your computer ..........................................46
Before installing the software .........................................................46
Installing SonicStage Ver.1.5 .........................................................47
Connecting the Net MD to your computer ...........................................49
Storing audio data to your computer .....................................................50
Starting SonicStage ........................................................................50
Recording audio CDs to the hard disk drive ..................................51
Labeling audio data ........................................................................53
Transferring aud io data from your com puter to the
Net MD (Check-out) .................. .... ... .... ...................... ... .... ..............54
Checking out audio files to the Net MD .........................................54
Listening to an MD ............................. ...................... ... ...................... ...57
Listening to an MD with the Net MD connected to the
Listening to an MD with the Net MD disconnected from the
computer ..........................................................................57
computer ..........................................................................57
Advanced operations ......................................58
Using other functions! ............................... .... ..................... .... .... ..........58
Using the SonicStage onlin e help .......................... ...................... ...58
6
Page 7

Other information ...........................................60
Settings and Precautions ...................................................................... 60
Settings according to OS ........................... ... ...................... .... ... ..... 60
For users with OpenMG Jukebox, SonicStage, SonicStage Premium,
or SonicStage Si mple Burner ins talled on
their computer .................................................................62
Note on hard disk drive space ........................................................63
Notes on system suspend/hibernation mode ..................................63
Backing up the audio data ..................... ...................... ... ................63
Uninstalling the SonicStage software ..................................................64
For Windows XP users ..................................................................6 4
For Windows Millennium Edition/Windows 98 Second Edition
For Windows 2000 users ...............................................................65
Troubleshooting ................................................................................... 66
If your computer does not recognize the Net MD ......................... 68
If the installation was not successful ............................................. 68
Information and explanatio ns ................................. .... ... ...................... .70
Net MD FAQ ................................................................................. 70
On copyright protection ....................................... ..................... .... .71
Glossary ...............................................................................................73
Index ..................................................................................................... 75
users ................................................................................ 64
7
Page 8

Before using this product
_
_
This manual explains the recorder operations and the installation and basic use of the
supplied SonicSta ge software. For details on the various operations, refer to the pages
indicated below.
When using the recorder
Recorder Operation (pages 9 to 40)
Pages 9 to 40 in t his man ua l e xp la in t he use of t he Net MD a s an or di na ry
MiniDisc recorder.
3-253-939-11(1)
Portable
MiniDisc Recorder
Operating Instructions
page9
Recorder Operation ____________________________
page42
Software Operation _____________________________
Troubleshooting and explanations (page 35)
This section shows the troubles you may find while using the recorder,
and their solutions.
AM-NX1
©2003 Sony Corporation
When using the Net MD (the recorder) connected to your
computer
Software Operation (pages 42 to 74)
Pages 42 to 74 in this manual explain the instal la tion and basic operations of the suppli ed
SonicStage software. Refer to these pages for details.
Other information (page 60)
This section shows the tr oubles you may find while using the SonicStage software, and
their solutions. It al so has the list of frequently asked questions and answers .
SonicStage Ver. 1.5 Help
This is an online help that you can view on your computer
screen.
Refer to online help for details on the use of the software . To
display the help window, see page 58.
Notes on the “Software Operation” section
• The displayed items in the illustrations that appe ar in this section may differ from the actual items
displayed by the software.
• Explanations in this section assume familiarity with basic Windows operations. For details on the use
of your computer and the operating system, please refer to the respective manuals.
• Explanations in this section cover general Net M D pro duc ts. For th is rea son, some explanations (and
some illustrations) may not be applicable to your Net MD. Please refer to the operating instructions of
your Net MD as well.
8
Page 9
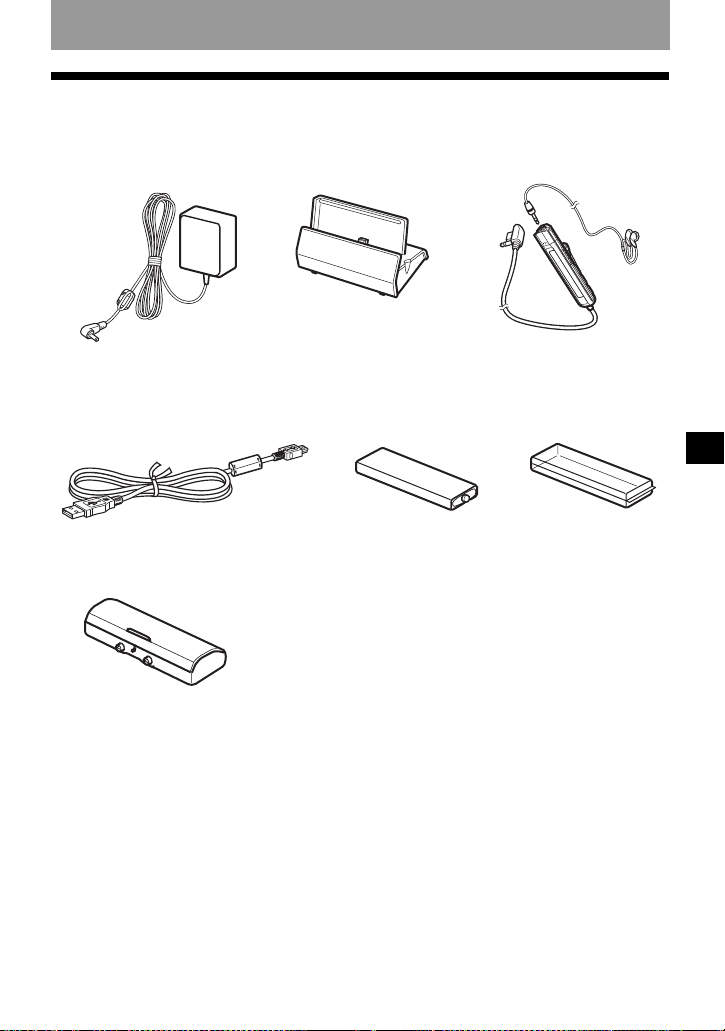
Checking the supplied accessories
AC power adaptor (1) Battery charging sta nd (1) Headphones/earphones
Dedicated US B cable (1)
Dry battery case (1)
NH-14WM Nickel metal
hydride rechargea bl e
battery (1)
with a remote control (1)
Battery carrying
case (1)
Recorder Operation
CD-ROM (SonicStage Ver. 1.5) (1)*
Carrying pouc h (1)
∗ Do not play a CD-ROM on an audio CD player.
9
Page 10
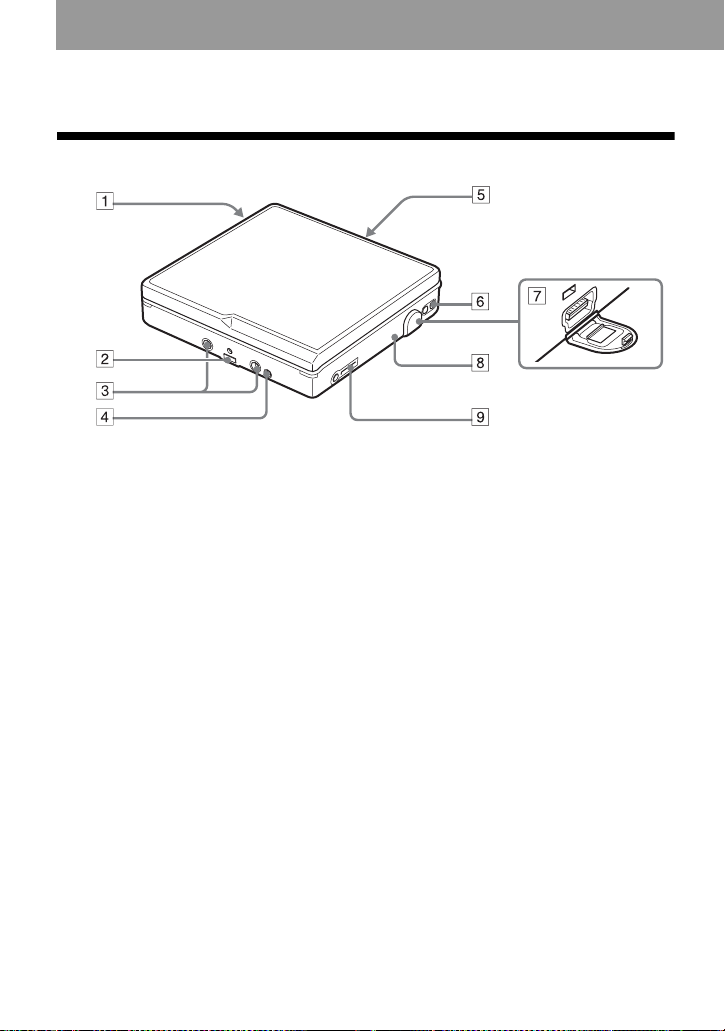
Looking at controls
The recorder
A Battery compartment
B Terminals for attaching a battery
charging stand
C Terminals for attaching a dry battery
case
D DC IN 3V jack
E OPEN switch
F Handstrap hole
Use the hole to attach your own strap.
G Dedicated USB cable connecting jack
H CHARGE/DATA indicator
I i (headphones/earphones) jack
10
Page 11

The headphones/earphones with a remote control
A Volume contro l (VOL+, –)
Turn to adjust the volume.
B x (stop) button
C NX/ENTER button: play, pause,
enter
D Dis pl ay window
E (group) +, –
F >: FF
.: REW
G Clip
H HOLD switch
Slide the switch in the directio n of the
arrow (a yellow mark appears) to
disable the buttons o n th e remote
control. To prevent the buttons from
being accidentally operated when you
carry the recorder, use this function.
I SOUND button
J DISPLAY button
K P MODE/ button
11
Page 12
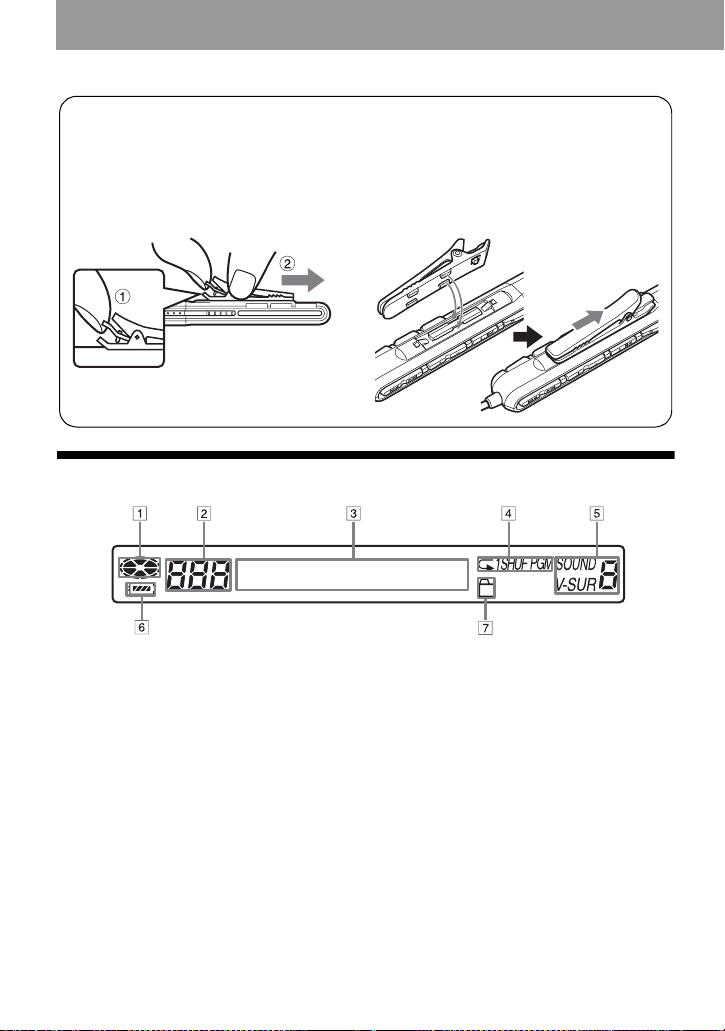
Using the clip for the remote control
It may be hard for you to read th e indications in the display if the remote control is attach e d
upside down with the clip in its c urrent position. In this case, attach the clip in the opposite
direction as shown below.
1 Remove the clip.
2 Attach the cl ip in th e opposite direction.
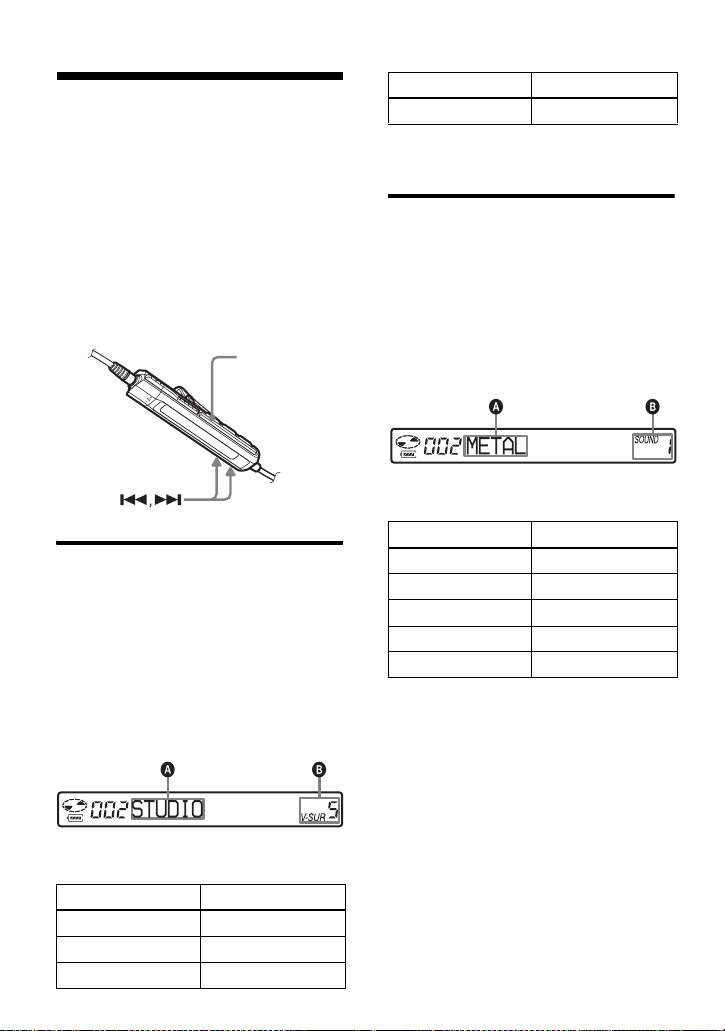
The display window of the remote control
A Disc indication
B Track number display
C Character information display
D Play mode indication
12
E SOUND indication
F Battery level indica tio n
G Group indication
Page 13
Getting started
Charge the rechar geabl e battery befor e using. Ev en if the rech arge able
battery is not charged, you can use the recorder as long as the AC
power adaptor is connected.
1
2
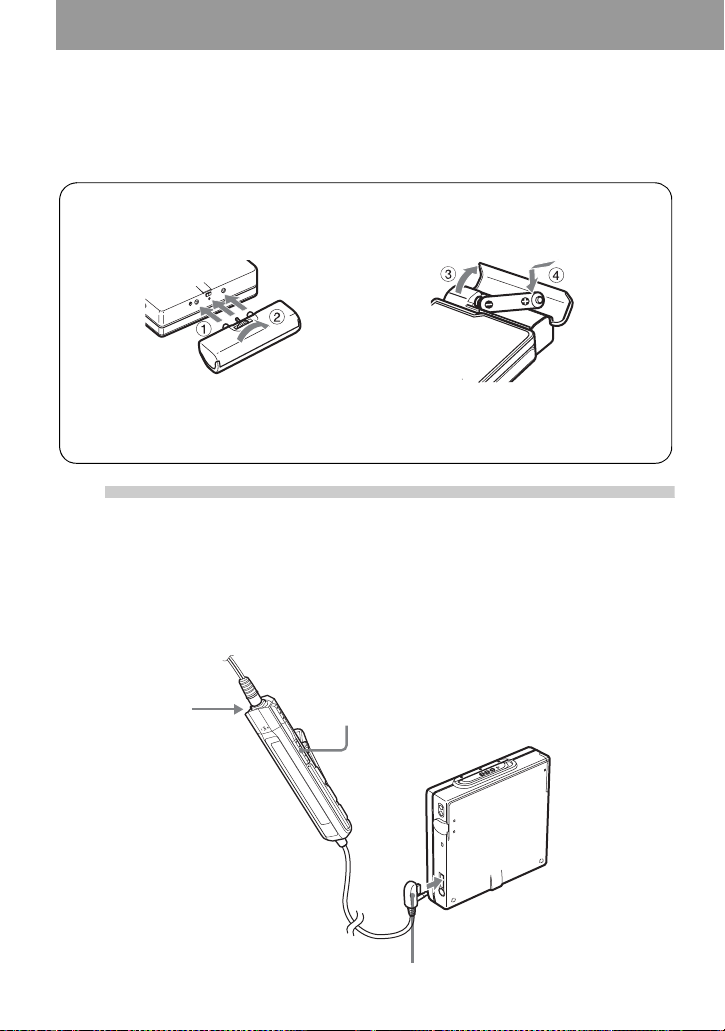
Insert the rechargeable battery.
Insert the NH - 14WM
battery compartment lid.
rechargeable battery minus
end first.
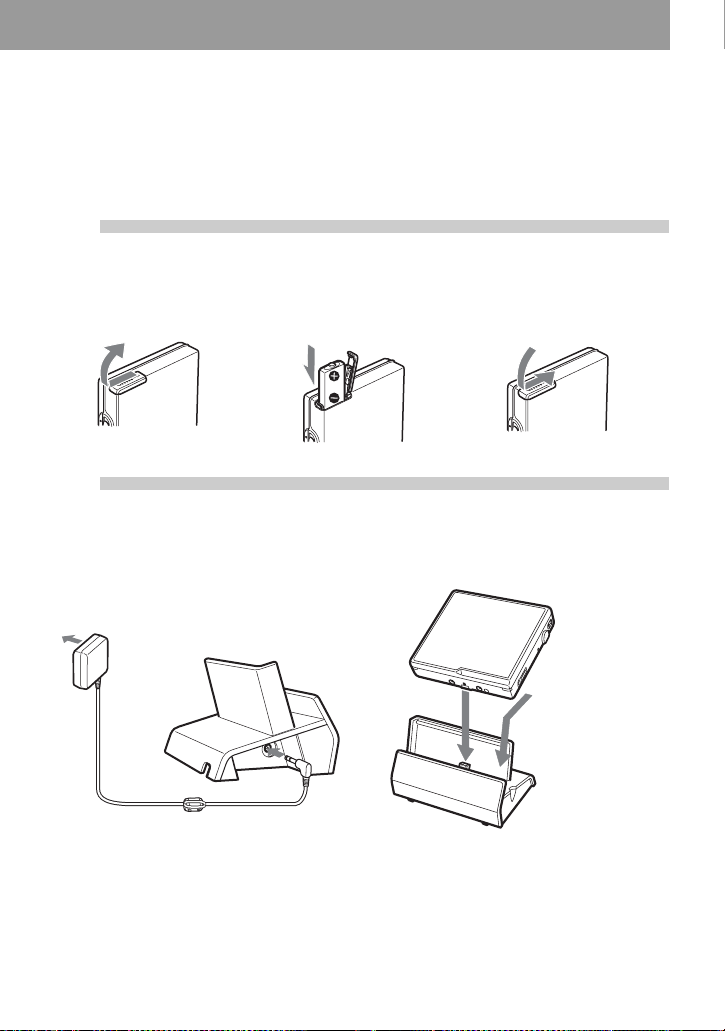
Charge the rechargeable battery.
1 Connect the AC power adaptor to the
battery chargin g st and and the AC
adaptor to a wall outlet.
To a wall
outlet
AC power
adaptor
Battery charging
stand
To DC IN 3V
Close the lid.Slide OPEN to open the
2 Place the recorder on the battery
charging stand.
Attach the
connector to the
jack firmly.
CHARGE/DA TA indicator lights in red, and
charging starts. When charging completed,
the CHARGE/DATA indicator goes off.
The battery is fully charged after charging is
continued 2 more hours.
13
Page 14
3 Remove the recorder from the batter y
charging stand.
For models supplied with the AC plug adaptor
If the AC power adaptor does not fit the wall outlet, use the AC plug adaptor.
Using the alkaline dry battery
Attach the dry batter y c ase to the recorder.
Rear of the
recorder
Insert an LR6 (size AA) alkaline dry battery.
To operate the recorder for the longest possible time, use the dry battery together with a
fully charged rechargeable battery.
Insert the battery mi nus end first.
3
Make connections and unlock the
controls.
1 Connect the headphones/earphones
with the remote control to i.
Connect firmly.
14
2 Slide HOLD to the opposite direction of
the arrow (.) on the remote c ont rol
to unlock the controls .
HOLD
To i
Connect firmly.
Page 15

z
Y ou can also char g e th e rech ar geab le b atte ry b y
connecting the A C p owe r adaptor d irectl y to th e
recorder.
Connect the headphones/ea rp hone s with the
remote control to i.
Connect the AC power adaptor to DC IN 3V on
the recorder, and then press x on the remote
control while the recorder is stoppe d.
“Charging” and e appear in the display and
charging starts. Full charging takes about 3.5
hours. Chargi ng is complete when
disappears. Charging time may vary depe nding
on the battery condit ion.
e
Notes
• If you start playback or do another operation
during charging, the charging will stop.
• “Charging” and e may not appear in the
display immediately after you place the
recorder on the battery char g ing stand. The
indication will, however, begin flashing after a
few minutes and charging will begin.
• Charge th e ba tt ery at a tem p erature of +5°C
(+41°F) to +40°C (+104° F).
Battery life
See page 30.
15
Page 16
Playing an MD right away!
1
Insert an MD.
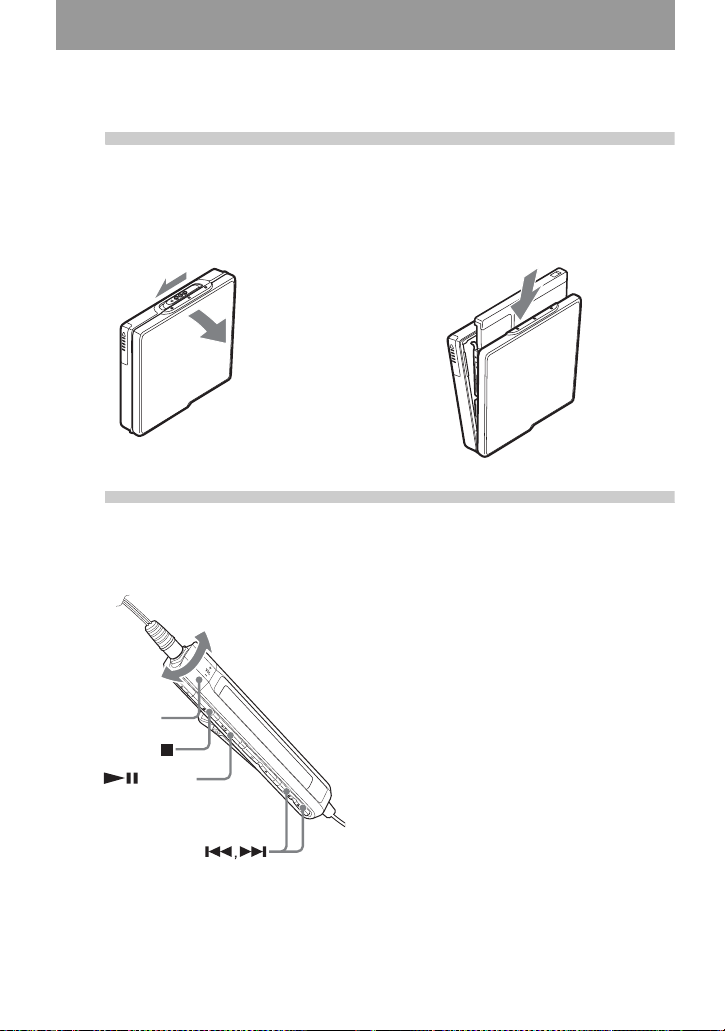
1 Press OPEN to open the lid. 2 Insert an MD to the direction of the
arrow with the label side facing front,
and press the lid down to clos e.
2
Play an MD.
1 Press NX/ENTER on the remote
control.
A short beep sounds in the headphones/
earphones when you operate.
2 Turn the volume control toward s VOL +
or – on the remote control.
Volume control
(VOL+, –)
/ENTER
The volume will be show n in the
display.
To stop play, press x.
A long beep sounds in the headphones/
earphones when you operate. After you stop the
recorder, the recorder will automatically turn
off in about 10 seconds.
Playback starts from the point you last stopped
playing.
To start with the first track of the disc, press
NX/ENTER on the remote control for 2
seconds or more.
16
Page 17
To Operation
Pause Press NX.
Press NX again to resume play.
Find the beginning of the current track Press ..
Press . repeatedly until you reac h the
beginnin g of the desired track.
Find the beginning of the next track Press >.
Go backwards or forward while playing Press and hold . or >.
Search for a point in a track while
viewing the elapse d time (Time search)
Search for a specific track while viewing
track numbers (Index search)
Cue to the beginning o f every 10th tr ac k
(only during playback of the disc with no
group settings)
1)
Remove the MD Press x and open the lid.
1)
For more details, see “Using the group func tion” (page 23).
2)
Once you open the lid, the point to start play will change to the beginning of the first track (except when
the disc information is stored to the Playback Information Memory).
While pausing, pr ess and hold . or >.
While the recorder is stopped, press and hold
. or >.
Press + or –.
2)
If the play does not start
Make sure the recorder i s no t lo cked (pages 11,
14).
Note
The playback sound may skip if:
• the recorder receives stronger continuous
shock.
• a dirty or scratched MiniDisc is played.
17
Page 18

Various ways of playback
This section explains the operations that
are done on the remote control. For details
on operations done on the recorder, see
the pages indicated for eac h op eration.
Viewing various information
You can check the track name, disc name,
etc. during playback. Group-related items
appear only when a track with group
settings is played.
DISPLAY
1 While playing, pres s D ISPLAY.
Each time you press DISPLAY, the
display changes as follows.
Display windo w on the remot e cont r ol
AB
Track number SP/LP mode of the
current track
Note
Depending on the group settings, the ope r ating
conditions, and the disc settings, you may not
be able to select certain indications or the
indications may ap pe ar differ e n tly.
Selecting the play mode
You can select the various play m odes
using the P MODE/ button.
P MODE/
/ENTER
1 Press P MODE/ repeatedly.
Each time you press the button, the
play mode changes as follows:
Play mode indication
Display: A/B
AB
Track nu m ber Elapsed time
Track number Track name
Numbers of
tracks in the
group
Numbers of
remaining
tracks
Track number Group name and track
Group name
Disc name
name
18
Indication
(none)
(normal Play)
1
(single-track
play)
SHUF
(shuffle play)
1)
Play mod e
All the tracks are
played once.
A single track is played
once.
All the tracks are
played in random order.
Page 19
Indication1)Play mode
PGM
(program play)
1)
Group play mode ( ) appears whenever you
play a disc with group settings. For more
details, see “Playing a track in group play”
(page 23).
Tracks are pl ayed in the
order that you
specified.
Playing a track repeatedly (Repeat P lay)
You can use th e r ep eat function for
normal play, single-track pl ay, shuffle
play, and program play mode.
1 While playin g in t he selected play
mode, press P MODE/ for 2
seconds or more.
appears in the dis play.
To cancel repeat play
Press P MODE/ for 2 seconds or more.
z
By pressing the P MODE/ button during
repeat play, you can change the play mode to
used with repeat play.
3 Repeat step 2 to program mor e tracks.
You can prog ram up to 20 tracks.
4 After programming the tracks, press
NX/ENTER for 2 seconds or mor e.
The program is st ored and playback
starts from the first track.
z
The program play setting will remain in
memory even after playback finishes or is
stopped.
Note
If you open the lid, all program settings are
canceled.
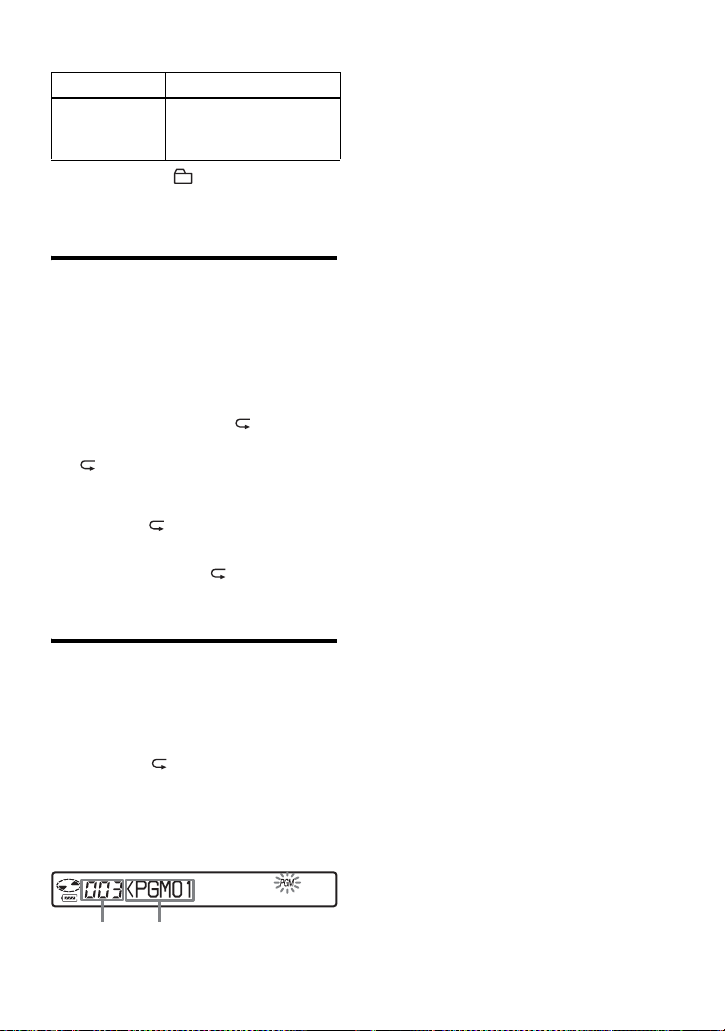
Listening to tracks in a desired sequence (Program Play)
1 While playing, press
P MODE/ repeatedly unti l
“PGM” appears in the display.
2 Press . or > repeatedly to
select a track, and th en press NX/
ENTER to enter that track.
Track
number
Programmed sequence
19
Page 20
Adjusting the sound (Virtual-Surround • Digital Sound Equalizer)
You can vary the virtual sound to create
differe nt acous tics, o r modify the sound t o
suit your taste and store it for later use.
The following two effect can be selected.
V- SUR (Virtual-Surround)
Provides 4 kinds of virt ual surround
conditions.
Digital Sound Equalizer
Provides 5 different sound qualities.
SOUND
Varying the virtual sound to create different acoustics (Virtual-Surround)
1 While playing, press SOUND
repeatedly to select “V-SUR”
2 Press SOUND for 2 seconds or more.
3 Press . or > repeat edly to
select the surround mode.
AB
CHURCH V-SUR C
4 Press NX/ENTER to enter the
selected surround mode.
Selecting the sound quality (Digital Sound Equalizer)
1 While playing, press SOUND
repeatedly to select “SOUND.”
2 Press SOUND for 2 seconds or more.
3 Press . or > repeatedly to
select the sound mode.
Each time you press . or >, A
and B change a s follows:
AB
METAL
SOUL
JAZZ
TECHNO
USER
SOUND 1
SOUND 2
SOUND 3
SOUND 4
SOUND U
4 Press NX/ENTER to enter the
selected sound m ode.
To cancel the procedure
Press x for 2 seco nds or more.
Each time you press . or >, A
and B change as follows:
AB
STUDIO
LIVE
HALL
V-SUR S
V-SUR L
V-SUR H
20
To cancel the setting
Press SOUND repeatedly until the indication at
B disappears.
Page 21
To modify and store the sound
You can modify the so und and store the
results in “USER”.
1 Do steps 1 to 3 of “Selecting the sound
quality (Digital Sound E qualizer )” (page20),
. or > repeatedly until
and press
“USER” appears.
2 Press NX/ENTER.
. or > repeatedly to select the
3 Press
frequency.
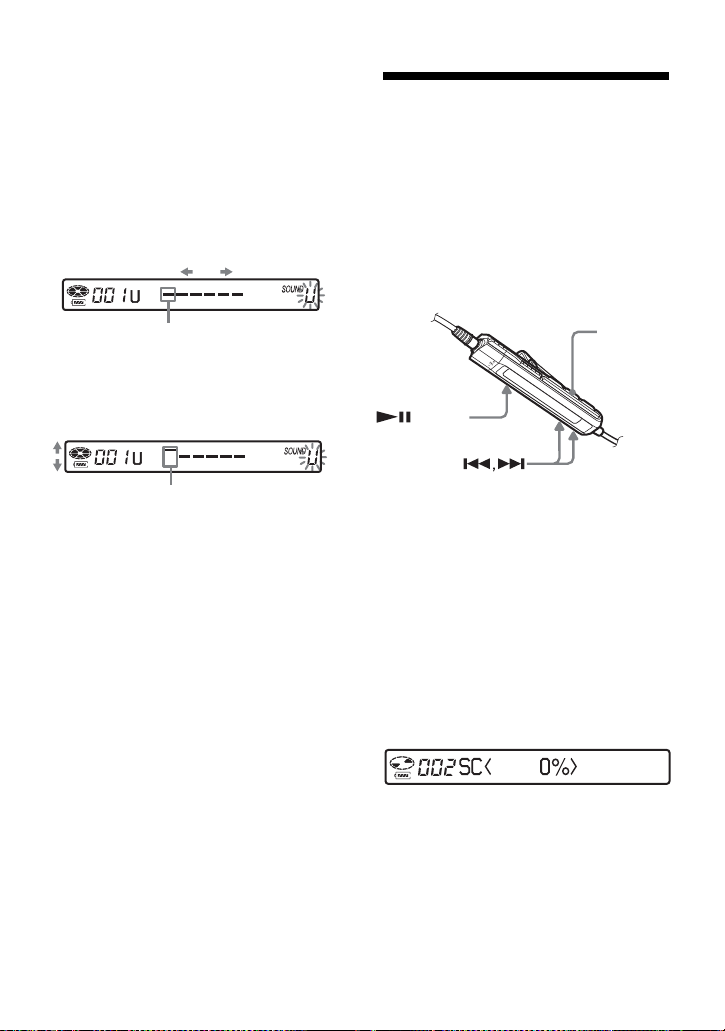
Changing playback speed (Digital Speed Control)
The speed contro l function is useful for
language study and other purpose. Thi s
function changes the playback speed
without changing the playback pitch.
The playback speed can be varied from
+100% to –50% the normal speed, in 13
steps.
Frequency (100 Hz)
From the left, you can se lec t 1 00 H z,
250 Hz, 630 Hz, 1.6kHz, 4 kHz, or 10 kHz
4 Turn the volume con trol repeatedly to adjus t
the level .
Level (+6 dB)
You can select from among five lev els .
–6 dB, –3 dB, 0 dB, +3 dB, +6 dB
5 Repeat steps 3 and 4 to adjust the level for
each frequency.
6 Press NX/ENTER to enter the selection.
To cancel the procedure
Press x for 2 seconds or more.
To return to the preceding
setting
Press x.
DISPLAY
/ENTER
1 While playing, press DISPLAY for 2
seconds or more.
2 Press . or > repeatedly until
“USEFUL” appea rs in th e di splay,
and then press
NX/ENTER.
3 Press . or > repeatedly until
“SpeedCtrl” appears in the display,
and then press
The player changes to speed-s et t i ng
mode. Select th e speed while
listening the sound.
NX/ENTER.
4 Press . or > repeatedly to sele ct
the desired play back speed, and then
NX/ENTER to enter the
press
selection.
“SC” appears in the display.
To cancel the procedure
Press x for 2 seconds or more.
21
Page 22

To return to the preceding
setting
Press x.
z
Once you open the lid, the playback speed
reverts to the normal speed (0%).
Note
When using digital speed control, you may hear
noise or an echo in the playback.
22
Page 23
Using the group function
What is the group function?
The group function is provided to allow
playback of di scs with gr oup sett ings. The
group function is convenient for playb ack
of MDs on which several albums or CD
singles have been recorded in MDLP
(LP2/LP4) mode.
What is a disc with group
settings?
The recorder ca n operate various
functions in units of group; that is tracks
that have been recorded on a disc as part
of separate grou ps , as shown below.
Note
It will not be possible to make a group setting if
the tracks, groups and disc name on a disc
exceed the maximum number that can be input.
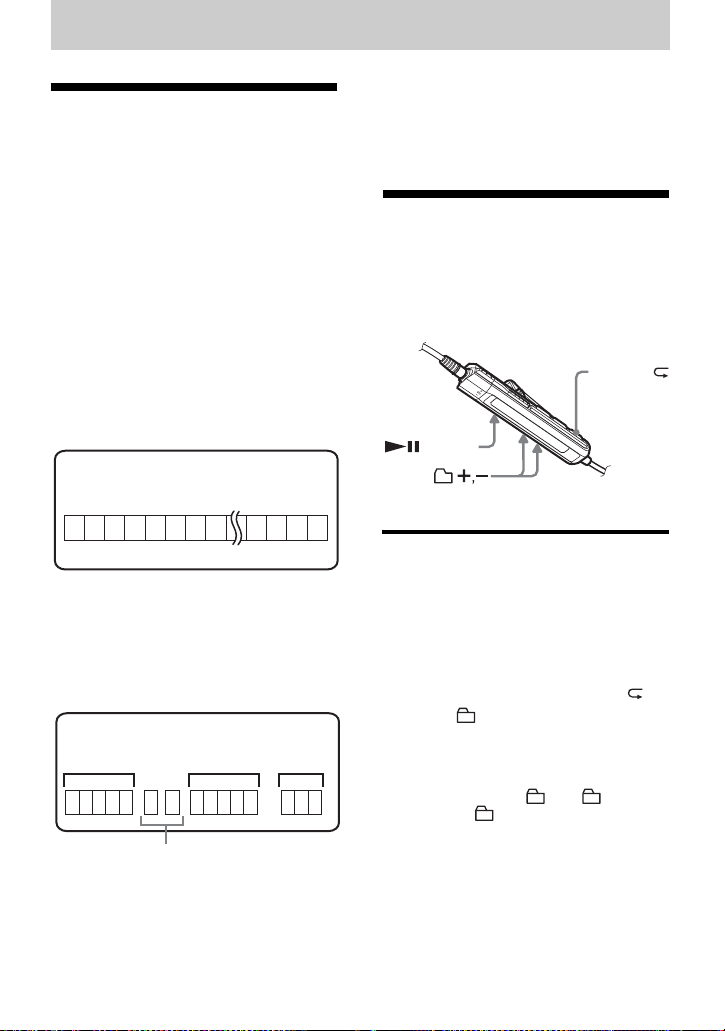
Using the group function when playing
The recorder ca n operate various
playback wit h a disc which has group
setting.
P MODE/
Before group settings are m ade
Disc
3
2 4 5 6 7 8 12 131415
1
Track 1 to 5 are assigned to group 1.
Track 8 to12 are assigned to group 2.
Track 13 to15 are assigned to group 3.
m
Track 6 to 7 are assigned to no group.
After group assignments hav e been made
Disc
Group 1
1
2345 6
Tracks that were not assigned to a group
are treat ed as being part of “Group - -” .
You can create a maximum of 99 groups
on a disc.
Group 2
712345
Group 3
1
23
/ENTER
Playing a track in group play
In group play, all groups are played in
order, starting with group 1, followed by
the unassigned t racks (“Group -- ”) .
Playback stops after all the tracks have
been played.
1 While playing, press P MODE/
until “ ” appears in the display.
To cue to the start of a group
(Group Skip)
1 While playin g, pre ss + or –.
Pressing the – button cues to the first
track in the current group. Pressing the button
again cues to the first track of the previous
group.
23
Page 24

Selecting the play mode for group play (Group Play Mode)
The shuffle play and progr am play
function can be use d during group play
mode.
1 Press P MODE/ repeatedly.
After normal playback, the following
play modes are displayed.
Display Play mode
All tracks in the groups
(Normal
Group Play)
, SHUF
(In-Group
Shuffle)
, PGM
(Group
Program)
Repeat play for the selected group play mode (Group Repeat Play)
play back once (starting
with the first track in
group 1).
Shuffle play starts with the
group that is currently
playing, and co ntinues
with the succeeding
groups.
The groups are played in
the order that you
specified.
Playing groups in a desired sequence (Group Program Play)
Do the procedure explai ned in “Listening
to tracks in a desired sequence (Progr am
Play)” (page 19) to playback grou ps in a
desired sequence. You can program up to
10 groups. The seque nce of tracks within
the groups cannot be changed.
Suppressing the skips of the
sound (E.A.S.S. GP)
The E.A.S.S. GP func tion was developed
to provide a higher level of shock
resistance than that of existing players.
Note
The playback sound m ay skip if:
• the recorder received stronger
continuous shoc k.
• a dirty or scratc hed MD is played.
1 While playing in the selected group
play mode, press P MODE/ for 2
seconds or more.
Playback repea ts in th e respective
group mode.
Display Play mode
, Repeat play of tracks
, SHUF Repeat shuffle play of
, PGM Repeat play for gr oup
24
within a group.
tracks within a group.
program.
Page 25

Other operations
Useful settings
The recorder has many menus with useful functions for operation.
The following table shows the menu items that you can select.
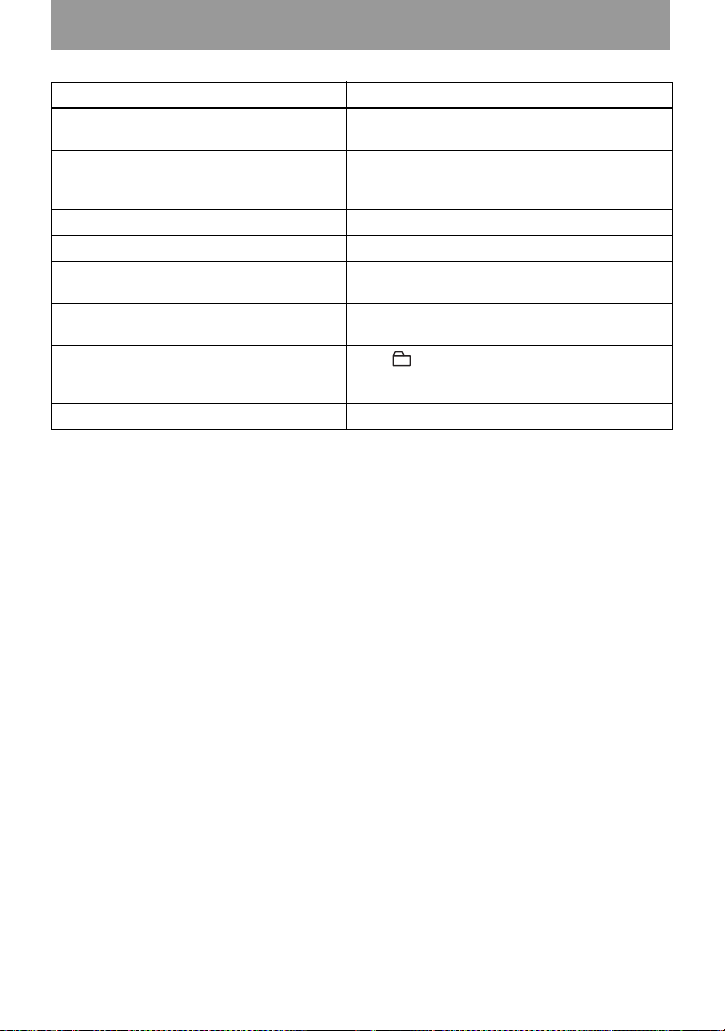
Category Function What it does Site
General
operations
Playing Starting playback
Display Select ing the
Useful
functions
Beep on/off Turns the beep sound on or off. page 26
Power saving Maximizes the battery life. page 26
quickly
Limiting the
maximum volume
backlight status
Playback
Information Memory
Sets the recorder to start playback or
cue to a tra ck quickly.
Sets a limit on the maximum volume
to protect your hearing.
Selects the status of the backlight in
the display window on the rem ote
control.
Stores the recorder settings. page 28
page
page 27
page 27
page 28
25
Page 26

How to use the menu items
To set the menu items, do the following procedure.
On the remote control:
1 Press DISPLAY for 2 seconds or more to
enter the menu.
Press . or > repeated ly to select
2
the item.
NX/ENTER to enter the
3 Press
selection.
4 Repeat steps 2 and 3.
The setting will be entered when you
NX/ENTER at the last.
press
To return to the preceding
setting
Press x.
To cancel the operation while setting
Press x for 2 seconds or more.
DISPLAY
/ENTER
Turning off the beep sound
You can turn off/on the beep sound on the
remote control.
1 Enter the menu and select “OPTION”
- “BEEP”.
2 Select “BEEP OFF”.
To turn on the beep sound
Select “BEEP ON”.
26
Preserving battery power (Power Save Mode)
This function allows you to maximiz e the
operating life of the bat t er y w hen playing
the recorder with headphones/earph ones
(with a remote control) or a line cable
connected to the i jack. Power
consumptio n is re duce d b y t urni ng of f th e
display when no operation has been made
for a while.
1 Enter the menu and select “OPTION”
- “PowerMode ”.
2 Select “PowerSave”.
To tu r n the setting to normal
Select “NORMAL” .
Page 27

Starting the playback quickly (Quick Mode)
After pressing the playback button or
cueing to the track, the playback can start
quickly.
Protecting your hearing (EAR GUARD)
The EAR GUARD function keeps down
the maximum volume to protect your
ears.
1 While the recorder is stopped or
playing, enter the menu and select
“OPTION” - “PowerMode”.
2 Select “QUIC K ”.
To switch back to the normal
setting
Select “NORMAL”.
Notes
• When the power mode is set to “QUICK”, the
power remains on within the recorder even
when nothing appears in the display. This
leads to a shorter battery life. For th is r ea son,
it is recommended that you charge the ba tt ery
daily.
• If no recorder operation (including opening or
closing of the lid) occurs for 17 hours, the
power in the recorder autom at ically turns off.
For this reason, the next time you start
playback or do another operation, the recorder
will not respond quickly. The unit, however,
will return to quick mode afterwards.
1 Enter the menu and select “OPTION”
- “EAR GUARD”.
2 Select “EAR G. ON”.
When you try to turn the volume too
high, “EAR GUARD” appears in the
display . The volu me is kep t to a
moderate level.
To cancel the EAR GUARD
Select “EAR G. OFF”.
27
Page 28

Turning on/off the backlight
The backlight of the display window of
the remote control can be set t o remain on
or off.
1 While the recorder is stopped, enter
the menu and select “OPTION” “BACKLIGHT”.
2 Select the desired item.
Display Set ting
AUTO Th e backlight lights when
you operate the rec or der or
the remote control, and
automatically turns off when
no operation is made for a
few seconds.
ON The backlight lights when
the recorder is operating.
OFF The backlight stays off.
Storing the settings for individual discs (Playback Information Memory)
The recorder can store the various settings
for each disc, and then retrieve them
automatically whenever the disc is
inserted.
The following setting can be stored:
• Volume
• Play mode
• Group mode
• Program play
• Sound quality (Virtual Surround/Digital
Sound Equalizer)
• Playback speed (Digital Speed Control)
1 When the recorder is stopped,
playing, or play-paused, enter the
menu and select “USEFUL” - “PLAY
INFO”.
“Entry?” appe ars in the display.
2 Press NX/ENTER to enter the
selection.
“Entry OK” appears in the display
and the disc settings are stored in the
recorder.
Erasing the disc information
1 Insert the disc whose info rm a tion is to be
erased and verify its contents.
2 Select “Erase?” after step 1.
“Erase OK” appears in the display and the
disc information is erased.
Note
If you try to erase the disc information of a disc
that have ne ver been stored, “No Entry!”
appears in the display for a few seconds.
z
“PLAY INFO” appears when the disc with its
setting stored is inserted.
Notes
• The settings for up to 20 discs can be stored.
Any settings stored afterw ards wil l replace t he
settings for the least used disc among the 20.
• If you add tracks or perform an editing
operation (not including la bel ing) to a disc
whose settings have been stored on the
recorder, the disc will no longer be
recognizable by the recorder and the store d
information will become useless. In this case,
store the settings ag ai n.
28
Page 29

List of me nu s
Menus on the recorder
Items listed under “Menu 1” are the sel ectable items which appear when you pr ess
DISPLAY for 2 seconds or more. Item s li sted under “Menu 2” are the selectable items
which appear when you select an item in Menu 1, and “Men u 3” are the selectabl e i tems
which appear when you select an item in Menu 2.
Note
Different indication may be displayed depending on the operating conditions a nd disc settings.
Menu 1 Menu 2 Menu 3
USEFUL PLAY INFO Entry? y Erase?
SpeedCtrl —
OPTION EAR GUARD EAR G. OFF (factory setting) y EAR G. ON
BEEP BEEP OFF y BEEP ON (factory setting)
BACKLIGHT AUTO (factory setting) y ON y OFF
PowerMode NORMAL (factory setting) y QUICK y
PowerSave
29
Page 30

Power sources
You can use the recorder on house current
or as follows.
• a nickel metal hydride rechargeable
battery NH-14WM
• LR6 (size AA ) al kaline dry battery
(used with the supplied dry battery case)
It is preferable to use the recorder on
house current when recording for a long
time. When poweri ng the recorder with
batteries, make sure the rechargeab le
battery is fully charged or that the alkalin e
dry battery is new to prevent battery
exhaustion in the mid dl e of a recording
operation.
Battery life
The battery life may be shorter due to
operating conditions, the temperature of
the location, or the type of alkaline dry
battery bei ng used.
When playing
Batteries SP
Nickel metal
hydride
rechargeable
battery
LR6 (SG)
Sony alkaline
dry battery
Nickel metal
hydride
rechargeable
battery
+ One LR6
4)
(SG)
1)
Measured with the power save mode on (see
“Preserving battery power (Power Save
Mode)” (page 26)).
2)
Measured in accordance with the JEI T A
(Japan Electronics and Information
Technology Industries Associa tion) standard.
3)
When using a 100% fully charged nickel metal
hydride rechargeable battery.
1)
(Unit: approx.hours)(JEITA2))
LP2
Stereo
Stereo
31 38 45
3)
47 57 69
4)
80 95 114
3)
LP4
Stereo
4)
When using a Sony LR6 (SG) “STAMINA”
alkaline dry battery (produced in Japan).
When to replace the batteries
When the dry battery or rechargeable
battery is weak, flashing
e or “LOW
BATT” appears in the display. Replace the
dry battery or charge the rechargeable
battery.
The battery lev el indicato r is approximat e.
It may be more or less than the indication
depending on the operating condition or
the operating environment.
Note
Stop the recorder before replacing the battery.
30
Page 31

Additional information
Precautions
On safety
Do not put any foreign objects in the DC IN 3V
jack.
• Nev er use th e recorder where it will be
subjected to extremes of light, temperature,
moisture or vibration.
• Nev er wrap the recor der in an ything whe n it is
being used with the AC power adaptor. Heat
build-up in the recorder may cause
malfunction or damage.
On power sources
• Use house current, nickel metal hydride
rechargeable battery, LR6 (size AA) batt ery,
or car battery.
For use in your house: For the supplied battery
•
charging stand, use the AC power adaptor
supplied with this recorder. Do not use any other
AC power a daptor since it may cause the r ecorder
to malfunction.
Polarity of the
plug
• Connect the AC power adaptor to an easi ly
accessible AC outlet. Should you notice an
abnormality in the AC power adaptor,
disconnect it from the AC outlet immediate ly.
• The recorder is not disconnected from the AC
power source (mains) as long as it is
connected to the wall outlet, even if the
recorder itself has been turned off.
• If you are not going to use this recorder for a
long time, be sure to disconnect the power
supply (AC power adaptor, dry battery,
rechargeable battery, or car battery cord) and
remove the reco rder from the bat tery cha rg ing
stand. To remove the AC power adaptor from
the wall outlet, grasp the adaptor plug itself;
never pull the cord.
On heat build-up
Heat may build up in the recorder if it is used
for an extended period of time. This, however,
is not a malfunction.
On installation
• If you use the recorder at a place subject to
static or electrical noise, the recordin g may
not be properly done or the recorded data may
be lost. If you perform a check-out or check-in
operation at such a p lace, th e track's check- out
or check-in authorization may be lost.
On the headphones/earphones
Road safety
Do not use headphones/earphones while
driving, cycling, or operating any motorized
vehicle. It may create a traffic hazard and is
illegal in many areas. It can also be potentia lly
dangerous to play your recorder at high volume
while walking, especially at pedestrian
crossings. You should exercise extreme caution
or discontinue use in pot en ti a l ly hazardous
situations.
Preventing hear ing damage
Avoid using headphones/earphones at high
volume. Hearing ex pe rt s ad v ise ag ainst
continuous, loud and extended play. If you
experience a ringing in your ears, reduce the
volume or discontinue use.
Caring for others
Keep the volume at a moder ate level. This will
allow you to hear outside sounds and to be
considerate of the people around you.
On the remote control
The supplied remote control is designed for use
with this recorder only. The recorder cannot be
operated with a remote control that was
supplied with another device.
On charging
• The supplied battery charging stand can be
used only with this recorder. Any other
models cannot be charged.
• Do not use the supplied battery charging stand
to charge any other battery besides the
supplied one or the one designated for it (NH14WM).
• Be sure to use the supplied AC power adaptor.
• Charge the rechargeable battery at a
temperature of +5° C (+41°F) to +40°C
(+104°F).
31
Page 32

• Though the battery charging stand and the
battery may become hot during the charging
procedure, this pos e s no danger.
• If you charge the battery for the first time or
after a long period of disuse, the battery may
not charge up to its rated capac it y. This is a
normal characteristic. After you use and
recharge the battery a few times, it will return
to its norma l charge capacity.
• If the capacity of the rechargeable battery
drops to half the normal amount, replace with
the new one .
On the dry battery case
The supplied dry battery case is designated for
this recorder only.
On the MiniDisc cartridge
• When carrying or storing the MiniDisc, keep
it in its case.
• Do not break open the shutter.
• Do not place the cartridge where it will be
subject to light, extreme temperatures,
moisture or dust.
• Attach the supplied MD label only in the
space designated for it on the di sc . Do not
stick it on any other disc surface.
On cleaning
• Clean the recorder casing with a soft cloth
slightly moistene d w ith water or a mild
detergent solution. Do not use any type of
abrasive pad, scouring powder or solvent such
as alcohol or benzene as it may ma r th e finish
of the casing.
• Wipe the disc cartridge with a dry cloth to
remove dirt.
• Dust on the lens may prevent the unit from
operating properly. Be sure to close the disc
compartment lid a f te r inserting or ejecting an
MD.
• To obtain the best sound quality, use a dry
cloth to wipe the plugs of the headphones/
earphones or the remote control. Dirty plugs
may cause sound distortion or inte r mi tte nt
breaks in the sound.
On batteries
Incorrect battery usage may lead to leakage of
battery fluid or bursting battery. To prevent
such accidents, observe the following
precautions:
• Install the + and – poles of the batte ri es
correctly.
• Do not try to recharge dry battery.
• When the recorder is not to be used for a long
time, be sure to remove the ba tte r ie s .
• If a battery leak should develop, carefully and
thoroughly wipe away battery fluid from the
battery compart ment before ins e rting new
ones.
On mechanical noise
The recorder gives off mechanical noise while
operating, which is caused by the power-saving
system of the recorder and it is not a problem.
To protec t a recorded MD
To record-protect an MD, slide open the tab at
the side of the MD. In this positi on, the MD
cannot be recorded. To record again, slide the
tab back so the tab is visible.
Tab
Back of the MD
Recorded material is
protected.
Recorded materia l is
not protected.
32
Page 33

On maintenance
Clean the terminals periodically with a
cotton swab or a so ft cl oth as illustrated.
If you have any questions or problems
concerning your recorder, please consult your
nearest Aiwa dealer. (If a trouble occurred
when the disc was in the recorder, we
recommend that the disc be left in the recorder
when you consult your Aiwa dealer so that the
cause of trouble may be better unde rstood.)
33
Page 34

Specifications
Audio playing system
MiniDisc digital audio syste m
Laser diode properties
Material: GaAlAs
Wavelength: λ = 790 nm
Emission duration: continuous
Laser output: less than 44.6 µW
(This output is th e value measured at a distance
of 200 mm from the lens surface on the optic al
pick-up block with 7 mm aperture.)
Recording and playback time (when
using MDW-80)
Maximum 160 min. in monaural
Maximum 320 min. in LP4 stereo
Revolutions
350 rpm to 3,600 rpm (CLV)
Error correction
ACIRC (Advanced Cross Interleave Reed
Solomon Code)
Sampling frequency
44.1 kHz
Coding
ATRAC (Adaptive TRansform Acoustic
Coding)
ATRAC3 — LP2/LP4
Modulation system
EFM (Eight to Fourteen Modu la tion)
Frequency response
20 to 20,000 Hz ± 3 dB
Outputs
i: stereo mini-jack (dedicated remote control
jack)/194 mV (10 kΩ)
Maximum output (DC)
Headphones:
4 mW + 4 mW (16 Ω) (European models)
5 mW + 5 mW (16 Ω) (Other models)
Power requirements
Sony AC Power Adaptor connected at the DC
IN 3V jack:
120 V AC, 60 Hz (Models for USA, Canada,
Mexico and Taiwan)
230 V AC, 50/60 Hz (Models for continental
Europe and Chili)
240 V AC, 50 Hz (Model for Australia)
220 V AC, 50 Hz (Models for China)
230 V AC, 50 Hz (Models for U.K. and
Hong Kong)
220 V AC, 60 Hz (Model for Korea)
100 - 120 V/220 - 240 V AC, 50/60 Hz
(Other models)
34
The recorder:
Nickel metal hydride rechargeable battery
NH-14WM, 1.2 V, 1,350 mAh (MIN),
Ni-MH
LR6 (size AA) alkaline battery
Battery charging stand:
AC power adaptor DC 3V
Battery operation time
See “Battery life” (page 30)
1)
Dimensions
Approx. 78.9 × 72.2 × 17.2 mm (w/h/d)
1
(3
/8 × 2 7/8 × 11/16 in.)
(excluding projecting parts and controls)
Mass
Approx. 85 g (3.0 oz) the recorder only
1)
Measured in accordance with JEITA.
US and foreign patents licensed fro m Dolby
Laboratories.
Design and specifications are subject to change
without notice.
Optional accessories
Nickel metal hydride rechargeable battery NH14WM
Page 35

Troubleshooting and explanations
Troubleshooting
If a problem occurs during recorder operation, follow the steps described below before
consulting the nearest Aiwa dealer. If any messages appear, it is recommended to take
notes.
1 Check to see if the problem is listed in “Troubleshooting”.
Check “Messages ” (page 39) for the problem as wel l.
2 If after step 1 you still cannot solve the pr oblem, consult your nearest Aiwa dealer.
While charging
Symptom Cause/Solution
The rechargeable
battery does not
start charging. The
rechargea ble battery
cannot be fully
charged.
The rechargeable
battery has become
drained e ven when
the recorder was not
used for a while.
Even when fully
charged, the life of
the battery is only
about half wha t i t
normally is.
• The rechargeable battery or the dry battery has been inserted
incorrectly or the AC power ada pt or has been connected
incorrectly.
, Insert the battery cor rectly or connect th e AC power adaptor
correctly.
• The terminals of th e battery charging stand is di rt y.
, Clean the terminals with a dry cloth.
• Because of the battery’s characteristics, th e capacity of the
rechargeable battery may be smaller than normal when it is used
for the first time or after a long period of disuse.
, Charge and discharge the battery several times. The normal
battery life will be restored.
• The rechargeable batter y i s dr ained (nothing appears in the
display window).
, Charge the rechargeable battery. It takes one minute after
placing the recorder on the battery charging stand for an
indication to appear and charging to start. If charging does not
start even after a minute, replace the recorder on the battery
charging stand again.
• The quick mode was set to “QUICK”.
, If you set the quick mode to “QUICK”, the power stays on
inside recorder even when there is no operation, causing the
battery life to shorten. If the battery is not fully charged, the
rechargeable batt er y may become drained after a while. If this
happens, charge the rechargeable batte ry again.
• The useful life of the rechargeable battery may be ending.
, Replace the recharge abl e battery with the new one.
continued
35
Page 36

Symptom Cause/Solution
The battery
charging stand and
the recorder become
hot during the
charging procedure.
• This is normal and poses no danger.
While playing
Symptom Cause/Remedy
An MD is not
played normally.
An MD is not
played from the
first track.
Playback soun d
skips.
Sound has a lot of
static.
Volume cannot be
turned up.
No sound comes
through the
headphones/
earphones.
• Repeat play is se le ct ed.
, Press P MODE/ for 2 seconds or more to change back to the
normal play (page 18).
• Playback mode is changed.
, Press P MODE/ for 2 seconds or more to change back to the
normal play (page 18).
• Disc playing stopped before it came to the last track.
, Press NX/ENTER for 2 seconds or more to start playing.
• The disc information has been stored to the Playback Information
Memory.
, Erase the disc informat i on from the Playback Information
Memory (page 28).
• The recorder is pl aced where it receives continuous vibratio n.
, Put the recorder on a stable place.
• A very short track may cause sound to ski p.
, Try not t o create a short track.
• Strong magnetis m from a television or such devic e is interfering
with operation.
, Move the recorder away from the source of st rong magnetism .
• EAR GUARD is on.
, Release EAR GUARD settings (page 27).
• The “USER” on “S O UND” settings are being applied .
, This is not malfuntion. When this setting is applied, the
maximum volume setting will be limited to a certain level to
prevent excessive loudness.
• The headphones/e ar phones plug is not firmly connected.
, Plug in the plug of the h eadphones/earpho nes firmly to the
remote control. Plug in the plug o f th e r emote co nt ro l firmly to
i.
• The plug is dirty.
, Clean the plug.
36
Page 37

While using group function
Symptom Cause/Remedy
The group
function does no t
operate.
• While using a disc with out group setting, an att em pt was made to
select some group-related menu.
, Use a disc with gr oup setting.
Others
Symptom Cause/Remedy
The recorder does
not work or works
poorly.
• The rechargeable batter y is not charged.
, Charge the rechargeable battery.
• The volume is low.
, Turn up the volume.
• No disc is inserte d.
, Insert a recorded disc.
• The HOLD function is turned o n.
, Disable HOLD by sliding the HOLD switch to the opposite
direction of th e arrow
• The lid is not firmly closed.
, Close the lid until it clicks. Then slide OPEN to open the lid.
• Moisture has condensed inside the r ecorder.
, Take the MD out and leave the recorder in a warm place for
several hours until the moisture evaporates.
• The AC power adaptor is not firmly connected.
, Connect the AC power adaptor firmly to the DC IN 3V jack on
the recorder or the battery charging stand and to the house
current.
• The rechargeable battery or dry battery is weak (“LOW BATT”
flashes or nothin g appears).
, Charge the rechargeable battery or replace the dry battery with
a new one (page 13 ), or use the supplied AC power adapto r.
• The dry battery has b een inserted inco rrectly.
, Insert the battery correctly (page 14).
(pages 11, 14).
37
Page 38

Symptom Cause/Remedy
The recorder does
not work or works
poorly.
The display
window is not
normal.
When using with
the AC power
adaptor, the display
window of the
recorder will
remain faintly lit
for some time ev en
after the recorder is
stopped.
The playing time of
a checked- out tra ck
is different from
the time that
appears on your
computer monitor.
• The disc is damag ed or does not contain pr oper recording or
editing data.
, Reinsert the disc. Rerecord the disc. If the error message still
appears, replace it with anot her disc.
• There is an internal malfunction in the system.
, Remove the dedicated USB cable from the reco rder, restart
your computer, and then connect the cable to the recorder
again.
• While operating, the recorder received a mechanical shock, too
much static, abnormal powe r voltage caus ed by lightning , et c.
, Restart the operation as fol l ows.
1 Disconnect all the power sources.
2 Leave the recorder for about 30 secon ds.
3 Connect the power source.
• The recorder wa s di sconnected from the power source.
, Let the recorder sit f or a while, o r disconne ct the po wer sourc e,
reconnect i t , and then press an y of the operation buttons.
• This is due to the MiniDisc system limitation. The recorder turns
off 10 senconds after the recorder has stopped in order to allow the
charging time on the de di cated USB cradle to b e calculated.
This is due to a calculation discrepancy between the recorder and
the computer.
38
Page 39

Messages
If the following error messages flash i n th e display window on the r em ote control, check
the chart below.
Error message Meaning/Remedy
BLANKDISC • An MD with no recording on it is inserted.
CannotCHG • You tried to charge the battery at a place with a temperature outside
Charging • The rechargeable batt ery is being charged.
EAR GUARD • EAR GUARD is set to "EAR G.ON" and so the volume cannot rise
ERROR • Ther e i s an internal malfunction in the sy st em.
Hi DC in • Vo lt age of the power supply is to o high (The supplied AC power
LOW BATT • Batte ri es are weak.
NO DISC • You tried to play or record with no disc in the recorder.
No Entry! • Y ou tried to erase a setting in the Playback Information Memory on
READ ERR • The recorder cannot read the disc information correctly.
SLOW CHG • You tried to charge at a place where the temperat ur e is to o l ow.
TEMP OVER • Heat has built up in the recorder.
TOC ERR • The recorder cannot read the disc information correctly.
TR FULL • Track number 254 has been rea ched.
the specified ran ge for the recorder.
, Charge the battery at a temp er at ure of +5°C (+41°F) to +40°C
(+104°F).
higher.
, Set EAR GUARD to "EAR G. OFF" (page 27).
, Restart the operation by doing steps 1 to 3 on page 38. If the
message appears again, pl ease consult your nearest A i w a dealer.
adaptor or the recommended car battery cord is not used).
, Use the supplied AC power adaptor or the recommended car
battery cord.
, Charge the rechargeable battery or replace the dry battery
(page 13).
, Insert an MD.
a disc that contains no settings in the Playback Information Memory
(page 28).
, Reinsert the disc.
, Charge the battery at a temper at ure of +5°C (+41°F ) t o + 40°C
(+104°F).
, Let the recorder cool down.
, Insert another disc.
39
Page 40

Explanations
Restrictions on the editing of tracks checked out from your
computer
This unit was designed so that editing functions (i.e., eras in g track s , addi ng t rac k marks, and
erasing track marks) do no t function for tracks that have been chec ked out from your computer.
This is to prevent the loss of check-in authori zation by the checked- out tra cks. To edit these
tracks, first check them back into the computer, and then edit them on the computer.
About the DSP TYPE-S for ATRAC/ATRAC3
This recorder supports DSP TYPE-S, a specification for hig h-l evel Sony MiniDisc decks
equipped with digital signal processors (DSP). This specification allows the rec order to produce
high-quality sound from tracks recor de d in MDLP mo de . Since it retain s DSP TYPE -R support,
the recorder produces superi or results during recording or playback in SP (normal stereo) mode.
Suppressing the skips of the sound (E.A.S.S GP)
The E.A.S.S GP function was developed to provide a higher level of shock resistance than that of
existing players.
40
Page 41

41
Page 42

Recording audio data to
your computer
You can record audio data to your computer from
sources such as audio CDs and the Internet (page 50).
Audio CDs
Internet
On the computer
Listening
You can listen to an audio CD in the CDROM drive of your comp uter, or audio
data in the hard disk drive (page 57).
42
Page 43

What is a Net MD?
Net MD is a standard that enables th e transf er of audio data from a computer to a MiniDisc
device. To use this Net MD with your computer requires a software application called
“SonicStage”.
SonicStage software provides a database for managing audio data in the computer and
functions for playing the audio data in various play modes, editing the data, and
transferring th e results to other d evice s and hardware con nected to the comp ut er. It is an
integrated software application with a variety of functions for enj oying music.
Transferring audio data to
the Net MD
You can transfer audio data stored in your computer to an MD
(page54).
To a Net MD
Software Operation
Editing
You can easily edit audio data or add
labels fro m t he keyboard (p age 53).
Creating a music
library
You can create a music library of your
favorite songs on your computer.
43
Page 44

Basic Operations
Basic operational flow using the Net MD
The following is the bas ic steps that y o u will take following the purchase of your reco rder.
Through these steps, you will prepare and set up your computer for use of your recorder as
a Net MD. Do the following steps, and refer to the indicated pages for details.
1 Providing the required system
environment.
(page 45)
2 Installing the software onto your
computer.
(page 46)
3 Connecting the Net MD to your computer .
(page 49)
4 Storing audio data to your computer.
In this manual, reco rdi ng from an audio CD is explained.
(page 50)
5 Transferring audio data from your
computer to an MD (Check-out).
6 Listening to an MD.
You can listen to audio data that have been checked out from your computer to your Net
MD.
44
(page 54)
(page 57)
Page 45

Providing the required system environment
System requirements
The following hardwar e and software are requi red in order to use the So nicStage software
for the Net MD.
Computer IBM PC/AT or Compatible
• CPU: Pentium I I 400 MH z or hi ghe r (Pe nti um II I 45 0 MHz or hig her
is recommended.)
• Hard disk drive space1): 120 MB or more
• RAM: 64 MB or more (128 MB or more is recommended)
Others
• CD-ROM drive (capable of digita l pl a yback by WDM)
• Sound Board
• USB port (supports USB (conventionally called USB 1.1))
Operating
System
Display High Color (16bit) or higher, 800 × 480 dots or better (800 × 600 dots
Others • Internet access: for EMD services and CD information services
1)
See page 63 for details.
This software is not supported by the following environments:
• Macintosh
• Windows XP versions other than Home Edition or Professiona l
• Windows 2000 versions other than Professional
• Windows 98 versions other than Second Edition
• Windows NT
• Windows 95
• Personally constructed PCs or operating syste ms
• An environment that is an upgrade of the original manufacturer-installed operating sys te m
• Multi-boot environment
• Multi-monitor environment
Notes
• We do not ensure trouble-free operati on on a ll c omputers that satisfy the syst em requi r em e nts.
• We do not ensure trouble-free operation of the syst em suspe nd, sleep, or hibernation function on al l
computers.
Factory installed:
Windows XP Home Edition/Windows XP Professional/Windows
Millennium Edition/Windows 2000 Professional /Windows 98 Second
Edition
or better is recomme nded)
• Windows Media Player (version 7.0 or higher) installed for playing
WMA files
45
Page 46

Installing the software onto your computer
This section explains the in stall ation o f the Soni cStage Ver.1.5 sof tware suppli ed with you r
Net MD.
Before installing the software
1 Make sure to note the following before installing t he software.
Do not connect the dedicated USB cable before the installation!
The SonicStage softw ar e m ay not correctly load or operate if the dedica t ed U SB
cable is connecte d to your computer dur in g t he installation.
Close all other Windows applications before startin g the in stal lation!
Make sure to close any virus-check software, as such software usually demand large
amounts of system resources.
2 Depending on the following operating system or software already installed
on your comp uter, refer to the referenc e pages before installi ng the
software.
Windows XP
, page 60
Windows Millennium Edition
, page 61
Windows 2000
, page 61
OpenMG Jukebox,
SonicStage, SonicStage
Premium, or SonicStage
Simple Burner
, page 62
• To install this software, you must log on with a
user name with “Computer Administrator”.
• If you perfor m the “System Restor e” function in
the Windows “System Tools” menu, the tracks
managed by Soni cStage may becom e corrupted
and rendered unp layable.
• If you perfor m the “System Resto re” function of
the Windows “System Tools” menu, the tracks
managed by Soni cStage may becom e corrupted
and rendered unp layable.
• You must log on as “Admini strator” before
installing the software.
• Depending on th e version of your softwar e, th e
existing software may be ov er written by the new
version or it may co-exist with SonicStage
Ver.1.5. As the installation process w i ll depend
on the version, see the reference page for details.
46
Page 47

Installing SonicStage Ver.1 .5
1 Turn on your computer and start up Windows.
2 Insert the installation CD-ROM for SonicStage into the CD-ROM drive of
your computer.
The setup progra m st arts up automatic al ly
and the SonicStage Ver.1.5 installation
window appears.
3 Click to select [SonicStage 1.5].
To use this software with the Net MD, you must install SonicStage Ver.1.5 and the Net
MD driver.
Click [SonicStage 1.5]
• When installing SonicStage for
the first time
• When OpenMG Jukebox,
SonicStage, SonicStage
Premium, or SonicStage
Simple Burner is installed on
the computer
continued
47
Page 48

4 Follow the displayed instructions.
Read the instructions carefully.
The installation may take 20 to 30 minutes,
depending on yo ur system environment
(page 69).
5 After the installation is completed, click [Restart] to restart the computer.
Make sure to restart your computer only aft er
the installation has completed.
Was the installation successful?
If any trouble occurs during the installation, see “Troubleshooting” (page 66).
Notes
• Do not delete, move, or edit any of the installed folders using Explorer or any other application. Doing
so could cause the SonicStage da ta ba se to become unstable or corrupted.
• While the installation is still in progress, do not interrupt the operation or take the CD-ROM out of the
CD-ROM drive. Doing so may render it impossible to install the software thereafter.
48
Page 49

Connecting the Net MD to your computer
After the software installation is completed, connect the Net MD to your computer.
Refer to the operating instructions of the Net MD as well.
1 Insert a recordable disc into the Net MD.
2 Make the power source and the dedicated USB cable connections with the Net
MD and the computer.
AC
power
adaptor
To the DC IN
jack
* If a cradle is supplied with your Net MD, connect the dedicated USB cable to the
USB cradle and place the Net MD onto the USB cradle.
To the USB jack/
dedicated jack
Net MD
devices*
Dedicated
USB cable
To the USB
connecting
terminal
Computer
3 Check the connections.
When the connect ions have been properly made, “PC ppMD”* appears in the display
of the Net MD.
* Depending on the device, “Net MD” or “PC>>MD” may be displa ye d.
Notes
• When using the Net MD connected to your computer, make sure to run the recor de r from an AC
outlet. We do not assure the results should there be a mis-operation, ch ec k- out failure , or destruction
of audio data caused by insufficient battery power.
• Place the recorder on a stable surface so that the dedicated USB cable does not become detached.
49
Page 50

Storing audio data to your computer
This section e x plai ns ho w to reco rd an d st or e audi o d ata from an audi o CD to t he h ard di sk
drive of your computer.
The procedure in th is section is used to record all tracks on an aud io C D . To record only
specific tracks from a CD , or from other sound s ources, see the online help for details
(page 58).
Note
The system may malfunction if your computer changes to system suspend or hibernation mode while
the software is playing, recordin g, or co nne c ting to an external device or media* such as a Net MD.
Make sure to disable any changes to suspend or hibe r na ti on mode. See page 63 for details.
∗ For this software, the word “MD” refers to the built-in MD slot on the computer, and “Device/
Media” to a Net MD that is externally connected over a USB cable.
Starting SonicStage
Do one of the following:
• Double click ([SonicStage] icon) on the computer.
• Select [Start] - [Programs]* - [SonicStage] - [SonicStage].
∗ [All Programs] in the case of Windows XP
SonicStage starts up and the main window appe ar s.
50
Page 51

Recording audio CDs to the hard disk drive
In SonicStage Ver.1.5, the hard disk d rive is called the “Music Drive”. The Musi c D rive
manages all audio data stored by SonicStage.
1 Insert the audio CD that you want to record into the CD-ROM drive of your
computer.
The CD window appears i n t he di splay.
Note
When you record an audio CD from your CD-ROM drive for
the first time, the “CD Drive Optimization” dialog box
appears when you insert the audio CD. Cl ic king [Start]
initiates a check of the CD-ROM drive to verify that the CDROM drive is able to perform the recording properly.
2 Click .
The recording navigation window* appears in the
display.
∗The recording navigation window makes it easy to make a
recordin g . S imply by doing 1, 2 and 3 in the next step,
you can select the audio source in the left panel and the
recording destination in the right pa ne l.
3 Select (CD) for [1 Music Source] and (Music Drive) for [2
Destination], then click 3 [Jump to Record Window].
The display changes to the recording w indow.
continued
51
Page 52

4 Click in the middle of the recording window and
select the recording mode.
When recording data in LP2 mode:
select ATRAC3 132kbps
When recording data in LP4 mode:
select ATRAC3 66kbps
Click here
5 If the list panel is not displayed, click .
List panels appear under the recording w i ndow. The
contents of the audio CD appear in the left list panel.
6 Click [Record All].
Recording start s.
Upon completio n, rec orded tracks appear i n t he r ight list panel.
To stop reco rding
Click ([Stop]).
To resume recording, click . When recording is resumed, it starts from the beginning
of the track that was last stopped.
52
Page 53

Labeling audio data
After recording has completed, y ou can label th e audio data in the Music Dri v e. Once audio
data in the Music Drive is labeled, the label information will be transferred to a disc along
with the audio data, allowing you to view the data on your Net MD.
1 Start up SonicStage (page 50) and click (Music Drive).
“All Playlists” appears and all the al bums sto red on the
Music Drive appear in the
Music Drive window.
2 Double click the desired album name.
A list of the audio files in that album appears.
3 Click in the lower right part of the display.
The editing panel appears in the display.
4 Select an item by clicking [Title], [Album], [Artist], or [Genre], and then
right-click and select [Rename].
Y ou can also click [V] at [Alb um] or [Arti st] to disp lay a dr opdo wn li st, an d then se lect
an item from the list.
5 When the track title is highlighted, enter the text data from the keyboard.
z
The ([CD Info]) button for track and album labeling can also be used to import names from Internet
databases. See the online hel p for de ta ils (page 58).
53
Page 54

Transferring audio data from your computer to the Net MD (Check-out)
Audio data stored on t he Music Drive can be transfer red to your Net MD. Th is process is
called “Check-out”. The number of times a track can be checked out is restricted in this
software for the protection of copyrights (page 71).
Playlist
Checking out audio files to the Net MD
This section explains how to check out all audio files in a playl i st *.
∗ A playlist is a container that al lows the store d au dio files in the Music Drive to be classified by
genre, artist, etc.
Note
Check-outs should be done at a te mperature of +5 °C (+41 °F ) or higher.
1 Click to display the recording navigation window.
2 Select (Music Drive) for [1 Music Source] and (Device/Media)
for [2 Destination], then click 3 ([Jump to Record Window]).
The display changes to the recording window.
54
Page 55

3 Click in the middle of the display and select the
recording mode ( pa g e52).
Standard transfer mode: Data are transferred in the format of the original files.
Maximum available transfer space: All data are transferred in LP4 mode.
SP transfer mode: All da ta are converted and transferre d in n or m al stereo mode. Select
this mode if you listen to checked-out data on equipment that does not support
MDLP mode.
4 If the list panel is not displayed, click .
A playlist appear s i n the display.
5 Confirm that the audio files you are about to check out are okay for checking
out.
The music notations beside the track number in the left
panel of the list represent the number of times the file
can be checked out (e.g. = the track can be checked
out three more times). If appea rs beside the track
number, the file cannot be checked ou t.
6 Click [Check-Out All].
Checking out of the files starts.
All files in the playlis t are checked out to the conn ect ed Net MD.
To cancel a check-out
Click ([Stop]).
55
Page 56

Notes
• Make sure not to disconnect the dedicated USB cable or power source until the operation has
completed once the check-out (or chec k- in) operation has begun. Failu re to do this may result in the
loss of check-out authorization. Even if a check-out fails, the audio file may be considered checked
out on the SonicStage side and the file’s check-out authorization may be reduced.
• Make sure not to bump the Net MD after check-out has started. If you do, the contents of the
recording may not be stored correctly.
• Due to the limitations of the M D system, you may not be able to record the full amount of re ma ining
recording time .
• Due to the limitations of the MD system, a maximum of about 1,700 characters can be stored for disc
name, group names and track names on the disc. Take note of this fact when checking out a large
number of tracks.
56
Page 57

Listening to an MD
You can listen to an MD on the Net MD while it is connected to your computer. When
disconnected from your computer, the Net MD can be used as an ordinary MiniDisc
device.
For details on Net MD operations, refer to the “Recorder Operation” section.
Listening to an MD with the Net MD connected to the computer
If you listen to an MD with the Net MD connected to the computer, be sure to listen with
the Net MD itself (connecting to the headphones/earphones, speakers, etc.). The MD sound
cannot be heard from headphones/ earphones that ar e connected to the computer.
Listening to an MD with the Net MD disconnected from the computer
Listen to the MD af t er disconnecting th e dedicated USB cab le from the comput er and the
Net MD.
Notes
Generally, you cannot erase or divide/combine checked-out audio files. If you want to edit such files,
check them back in first. Check ed-ou t f ile s can be edit ed on some M D de vi ces; ho we v er, erasing a track
will decrease the number of time s the file can be checked out, and dividing or combining tracks will
render the file impossible to check back into the computer (page70).
57
Page 58

Advanced operation s
Using other functions!
Using the SonicStage online help
This manual explains onl y the basic operatio ns of the SonicStage so ft w ar e. H owever, the
software has a host of other functions that allow you to carry out various operations, such
as importing audi o files from the Internet , cl assifying and managing audio files, and
playing in various play m odes. For information and details on the vario u s menus and
operations, go to the online help.
To di spl ay online help
Click (help) while the SonicStage
software is runnin g.
z
You can display the online help by selecting the following:
[Start]–[Programs]*–[SonicStage]–[SonicStage Help]
∗ [All Programs] in the case of Windows XP.
58
Page 59

Viewing online help
The Tabs
The left side frame
The right side frame
Let’s find out how to use the online help first. An explanation on the use of the online he lp
can also be foun d in the online help.
1 Double click [Overview] in the left-hand frame.
2 Click [About this Help file].
The explanation wil l a ppear in the right-ha nd frame.
3 Read the text.
Scroll the display if necessary.
Click underlined words to jump to their explanations.
Note
In the online help, “Device/Media’ is the
general term for external devices such as Net
MDs and MusicClips.
Device/Media
59
Page 60

Other information
Settings and Precautions
Settings according to OS
The settings and precautions will differ according to the operating system being used.
Check the items tha t a ppl y t o your system.
For Windows XP users
Restrictions when running the SonicStage software unde r W indows XP
• To install this software, you must log on with a user name with “Computer
Administrator”* as an attribute.
• You must log on with the user name “Administrators” or “Power Users” to use the
SonicStag e software.
• Both edition of Windows XP (Hom e/ Professional) can be used.
• The NTFS form at of Windows XP H ome Edition or Windows XP Professi onal (factory
installed) can be used only with the standard (factory) settings.
∗ To check whether the user name has the attribute of “Computer Administra tor ”
Go to [Start]- [Control Panel]-[User Account], and then check the user name displayed on the
window.
When using SonicStage under Windows XP
If you use the “System Restore” function in Windows “System Tools”, audio data managed
by SonicStage ma y become corrupted and rendered unpla yable.
Before executing the system restoration procedure, you should first back up all audio files
and restore them after doing the system restoration procedure.
For details about backup procedures, ref er to online help.
Note
Restoring backup data requires access to the Internet. If an audio file becomes unplayable after
restoring the system, an error dialog box may appear. If this occurs, do as instructed by the message .
60
Page 61

For Windows Millennium Edition users
When using SonicStage under Windows Millen nium Edition
If you use the “System Res tore” functio n in Windows “System T ools”, audi o data managed
by SonicStage ma y become corrupted and rendered unpl ayable.
Before executing the s ystem restoration p rocedure, you should first back up all audio files
and restore them after doing the syst em restoration proc edure.
For details about backup procedures, refer to online help.
Note
Restoring backup data requ ires access to the Internet. If an audio file becomes unplay ab le after
restoring the system, an erro r di al og box m ay a ppe a r. If this occurs, do as instruc te d by the message.
For Windows 2000 users
Restrictions when running the SonicStage softwar e under Windows 2000
• You must log on as “Administrator” to install the SonicSta ge softwa re.
• You must log on with the user name “Administrators” or “Power Users” to use the
SonicStage software.
• Of the Windows 2000 versions, SonicSta ge i s s upported only by Windows 2000
Professional.
• The NTFS format of Windows 2000 Pr ofessional (factory in stalled) can be used only
with the standard (factory) settings.
For Windows 98 Second Edition users
Importing MP3 files to the computer or playing WAV files on the computer
Microsoft Medi a Pl ayer version 7.0 or high er is required for importi ng MP3 files or
playing WA V files . Users of earlier v ersions can downlo ad the most recent v ersion fr om the
Microsoft website (http://www.microsoft.com/).
61
Page 62

For users with OpenMG Jukebox, SonicStage, SonicStage
Premium, or SonicStage Simple Burner instal led on their co m puter
Note
Confirm whether any track s have been checked out from your computer.
If tracks have been checked ou t fr om O penMG Jukebox, an earlier version of SonicStage,
or SonicStage Premium, it may not be possible to check those tracks back in with
SonicStage Ver.1.5. It is recommend ed to check in the track s be fore installing So nicStage
Ver.1.5.
Check the following contents before installing Soni cSt age Ver.1.5.
The install at ion items and procedure will vary de pending on the software ins talled on your
computer.
Users with OpenMG Jukebox inst alled
Installed Version What to do
Ver.1.0~2.1 Install SonicStage 1.5. OpenMG Jukebox Ver.1.0-2.1 is
automatically un i nstalled and replac ed.
Ver.2.2 OpenMG Jukebox Ver.2.2 and SonicStage Ver.1.5 can co-
exist in the computer.
If you install SonicStage Ver.1.5, then OpenMG Jukebox
Ver.2. 2 will be automatic al ly upgraded to the lates t v er si on.
1)
Audio files recorded with OpenMG Juke box Ver.1.0 -2 .1 ar e automatically converted to Sonic St ag e
Ver.1.5 files. For safety sake, it is reco mm e nde d that you back up your audio data with the back-up
tool before doing the upgrade to Sonic St ag e Ver.1. 5.
Users with an earlier version of SonicStage installed
Installed Version What to do
Ver.1.0~1.5 Install SonicStage Ver.1.5. The earlier version is
automatically uninstalled and replaced.
1)
Audio files recorded with SonicStage Ver.1.0-1.5 are automatically converted to SonicStage Ver.1.5
files. For safety sake, it is recommended that you back up your audio data with the back-up tool before
doing the upgrade to SonicStage Ver.1.5.
1)
1)
Users with a SonicStage Premium installed
Installed Version What to do
SonicStage Premium Install SonicStage Ver.1.5. SonicStage Premium and
SonicStage Ver.1.5 can co-exist in the computer.
Users with a SonicStage Simple Burner installed
Installed Version What to do
SonicStage Simple Burner Install SonicStage Ver.1.5. SonicStage Simple Burner and
SonicStage Ver.1.5 can co-exist in the computer.
62
Page 63

Precautions on the co-existence of SonicStage Ver. 1.5 with OpenMG Jukebox
Ver.2.2 or SonicStage Premium
• Make sure the OpenMG Jukebox Ver .2.2 icon is not displayed in the task tray. If it is, the Net MD may
not be recognized by your computer.
• Audio data recorded on the computer are stored in a common file and used by both applications.
Therefore, if you delete an audio file (e.g., one album) in one application, it will be deleted in the other
software as well.
Precaution on using a computer on which OpenMG Jukebox Ver.1.0-2.1 or
SonicStage Ver.1.0-1.2 is installed
After installing SonicStage Ver. 1.5, make sure you do not replace SonicStage Ver.1.5 with OpenMG
Jukebox Ver.1.0-2.1 or SonicStage Ver.1.0-1.2, as all audio data in the Music Drive may be lost. If you
begin the installation of OpenMG Juke box Ver.1.0-2.1 or SonicStage Ver.1.0-1.2 by mistake, sto p the
installation im mediately.
Note on hard disk drive space
120 MB or more f re e space on the hard dis k drive is required. If your com puter does not
have enough space, the software will not be properly installed. The required free space
differs according to the version of your Windows OS, or the amount of audio files that you
handle.
Notes on system suspend/hibernation mode
• If the computer changes to system suspend/hibernation mode during the recording of a
CD or the checking in/out of a data file, the audio data may be lost or the computer may
not wake up properly. The computer susp end/hibernation f unction should therefore be
turned off.
• If you change the media while the computer is in system suspend/hibernation mode,
audio data may be lo st af ter the computer wa kes up.
• If the computer changes to system suspend/hibernation mode, the computer may not
recognize the Net M D w h en it wakes up. If this hap pens, disconnect the dedicated USB
cable and reconne ct it again.
Backing up the audio data
Before doing any pr ocedure that may affect the operating system itself (such as a system
recovery), you should back up all of your audio dat a w ith the [SonicStage backup tool]
from the [Start] - [Programs] - [SonicStage].
63
Page 64

Uninstalling the SonicStage software
To uninstall the SonicStage software, follow the procedures b el ow.
For Windows XP users
Log on with a user name with “Computer Administrator” as an attribute.
Refer to the operating instructions of your computer for details on logging on as an
administrator.
1 Click [Start]–[Control Panel].
The “Control Panel” wi ndow appears.
2 Double-click [Add/Remove Programs].
The “Add/Remove Progra m s” dialog box appears.
3 Click [Change or Remove Programs].
4 Click [SonicStage 1.5.XX] in the “Currently Installed Programs” list, and
then click [Change and Remove].
5 Click [OpenMG Secure Module 3.X]* in the “Currently Installed Programs”
list, and then click [Change and Remove].
Do as instructed by the message and restart the computer. When the computer restarts,
the uninstallation will be completed.
* If SonicStage Ver.1.5 is co-existing with OpenMG Jukebox Ver.2.2 or SonicStage Premium on your
computer, and you uninstall one or th e oth er, ma ke sur e [Ope nMG Secure Module 3.X] is not
uninstalled since it is commonly used wit h both software applications.
For Windows Millennium Edition/Windows 98 Second Edition users
1 Click [Start]–[Settings]–[Control Panel].
The “Control Panel” wi ndow appears.
64
Page 65

2 Double-click [Add/Remove Programs].
The Add/Remove Programs Properties window ap pears.
3 Click [SonicStage 1.5.XX] in the list of programs for automatic removal, and
then click [Add/Remove].
4 Click [OpenMG Secure Module 3.X]* in the list of programs for automatic
removal, and then click [Add/Remove].
Do as instructed by the message and restart the computer. When the computer resta r t s,
the uninstallation will be completed.
For Windows 2000 users
Log on as “Administrator”, and then follow the instructions below.
Refer to the opera ting instructions of your computer for de ta il s on logging on as an
administrator.
1 Click [Start]–[Settings]–[Control Panel].
The “Control Panel” wind ow appears.
2 Double-click [Add/Remove Programs].
The “Add/Remove Programs” dialog box appears.
3 Click [Change or Remove Programs].
4 Click [SonicStage 1.5.XX] in the “Currently Installed Programs” list, and
then click [Change/Remove].
5 Click [OpenMG Secure Module 3.X]* in the “Currently Installed Programs”
list, and then click [Change/Remove].
Do as instructed by the message and restart the computer. When the computer resta r t s,
the uninstallation will be completed.
* If SonicStage Ver.1.5 is co-existing with OpenMG Jukebox Ver.2.2 or SonicStage Premium on your
computer, and you uninstall one or the othe r , make sure [OpenMG Se c ure M odule 3.X] is not
uninstalled since it is commo n ly us ed with both software applications.
65
Page 66

Troubleshooting
Please do the following steps if you encounter a problem while using the SonicStage
software. In case a m essage appears, it is recommended that you write it down.
Step 1: Check the symptoms in this “Troubleshooting” section.
A variety of inf ormat ion ca n also be fo und in t he ope rati ng pro cedu res and “Sett ings and
Precautions” (page 60) as well.
Step 2: Check the symptoms in the SonicStage 1.5 online help
(page 58).
Check “Troubleshooting” under “Additional information” in the online help.
Useful information may also be found in other sections in the online help.
Step 3: If the trouble cannot be solved after checking the above
references.
Check the following table and then consult your nearest Aiwa dealer.
66
Page 67

Computer
• Manufacturer:
• Model:
• Type: Desktop type / Laptop type
Name of operating system:
RAM capacity:
Hard disk drive (contai ni ng SonicStage and aud io data)
• Capacity of the drive:
• Free space:
Installed folde r containing SonicStage (if other than th e default folder)
1)
• Location of the installed folder:
Version of the software (SonicStage Ver.1.5)2):
Error Message (if one appeared):
If an externally co nnected CD-ROM drive is used
• Manufacturer:
• Model:
• Type: CD-ROM / CD-R/RW / DVD-ROM / Other ( )
• Type of connection to the computer: PC card / USB / IEEE1394 / Other ( )
If another device with USB connection is used
• Name of the device (or devices):
1)
If you do not specify the destination, the software is installed at C: \P r ogr a m Fi le s\ Sony\SonicStage.
2)
To check the SonicStage software version, go to [Menu] - [About SonicStage] in the SonicStage
window, or see the version information on the supplied CD-ROM.
67
Page 68

If your computer does not recognize the Net MD
• Is the Net MD connected correctly to your computer?
— If the Net MD is not firmly connected to the computer, the Net MD will not be
recognized by yo ur computer.
— Reconnect the dedicated USB cab le . If t he computer still does not recognize the N et
MD, disconnect t he N et MD, restart the computer, and connect the de di cated USB
cable again.
• Is an MD inserted in the Net MD ?
Check if an MD is inserted in the Net MD.
• If your computer does not recognize your Net MD even when the Net MD is
connected and a disc is in serted, the Net MD driver may not be correctly
installed.
Go to the [USB Controller] in the Windows Device Manager window to verify that your
Net MD is correctly recognized.
A [!] mark in the Device Manager window indicates that your Net MD is not correctly
recognized. Re install the Net MD driver.
[Start]–[Settings]–[Control Panel].
1 Click
2 Double click [System] in the control panel.
1)
2)
3 Click the [Hardware]3) tab, and then click [Device Manager].
The Device Manager window appears.
1)
In Windows XP, select [Start]–[Control Panel].
2)
In Windows XP, double click [System] if the contr ol panel is in the “classic” format, or clic k
[Performance and Main tena nce] and th en [ System ] if t he c ontro l p anel i s in the “ cat egory ” format .
3)
Depending on your system, the [Hardware] tab may not be provided. In this case, click the [Device
Manager] tab to display the Device Manager window.
If the installation was not successful
• Be sure to close all Windows applications before you start the installation.
If you start the inst al l at ion while other programs are running, a m al f unction may occur.
This is especially true for programs that require large amounts of system resources, such
as virus-chec k software.
• Be sure not to connect the Net MD to your comp uter before you start the
installation.
If the dedicated USB cable is connect ed to your computer before the installa ti on, the
installa t ion cannot be done correctly. Connect the dedicat ed USB cable afte r t he
installation completed.
• Make sure your computer has enough hard disk drive space.
120 MB of free space or more on the hard di sk drive is required. If your computer does
not have enough space, the installation may not be possible.
68
Page 69

• If the installation seems to be stopped
It may take 30 minutes or more for the installation to complete, depending on your
computer or CD- ROM drive.
During the installation, watch out for the occurrence of any of the following problems.
Problem Cause/Remedy
The installation appears to have
stopped before it has
completed.
The progress bar on the display
is not moving. The access lamp
has not lit for a few minutes.
• If the installation is still unsuccessful after all that you have done.
— The installation can be done by copyi ng all files to the hard disk as f ol l ows:
1 Create a new folder on the hard di sc.
2 Insert the supplied CD-ROM (SonicStage Ver.1.5) into the CD-ROM drive.
3 When the installation window appears, click [Exit] to cancel the installation.
4 Right-click the star t m enu and start up Explorer.
5 Select [SS15E] on the C D -ROM dr ive, and then click [Edit] -[Se le ct A ll].
6 Click [Edit]-[Copy to Folder] (or [Edit]-[Copy]) to copy all files to the folder that you
created in step 1.
7 Remove the CD-ROM from the CD-ROM dri v e, op en th e folder that was copi ed to t he
hard disk and doub l e -click [setup . exe].
8 When the installation window appears, follow the displayed instructions to install
[SonicStage 1.5].
— The installation may be done b y installing the sof t war e from [Start]-[ R un].
Check for the appearance of an error message beneath
the installation window.
t Press the [Tab] key while holding down th e [Alt]
key. If an error message has appeared, press the [Enter]
key. The installation will resume. If there is no
message, the installatio n is s till in progr ess. Wait a little
while longer.
The installation is progressing normally. Please wait.
69
Page 70

Information and explanations
Net MD FAQ
This section intro duces frequently as ked questions and ans w er s on the Net MD.
On the Net MD
What is a “Net MD”?
Net MD is a specification that allows audio data in a computer to be transferred to a
MiniDisc through a USB cable.
Till now, MiniDiscs could be used to record only analog sources (through a microphone or
analog input) or P C M sources such as CDs . Recording audio files on a computer was
impossible. However, thanks to SonicStage and other music management software based
on such copyright protection technology as “OpenMG”
audio files to the ATRA C or ATRAC3
3)
format used on MDs became possible, enabling the
recording of computer files to MDs.
1)
Copyright protection techn ology for managing audio data recorde d on computers, etc.
2)
Technology for verifying the cop yr ight - pr ote c tion status of audio data in check-out/c he c k- in
operations between a computer and a Net MD de vice.
3)
File type for recording to an MD.
How does the SonicStage software make using MDs mor e co nvenient?
• It allows you to record audio data from your computer to your MD.
• Editing opera t io ns are easily done using on-screen oper at ions.
— Labeling: Al lows use of keyboard for easy la beling of contents.
— Moving tracks or gro ups: Allows tracks or groups t o be moved simply by dragging
and dropping. Track movements are easy to see.
— Group settings: Groups are easy to create or release.
These operations can be used to edit tracks on a disc in the Net MD. If you w ant to edit
the contents of an MD , connect the Net MD to your computer, and edit the tracks in the
SonicStage Device/Media window.
1)
and “MagicGate”2), conversion of
Can tracks recorded on the Net MD be checked in to a comput er ?
No, they cannot.
Audio data that was originally checked out from a computer can only be checked back into
the same comp ut er. Tracks that ar e r ec or ded on t he N et MD usi ng a micr op hon e or t hrou gh
an analog or digital connection cannot be t ransferred to the com puter or copied.
Computer k MiniDisc : OK.
MiniDisc k Computer : OK only for tracks originally checked out from the computer.
70
Page 71

On copyright protection
The OpenMG technology* allows you to enjoy digital music, while maintaining the
copyrights of its ho ld er s. OpenMG Jukebox encrypts audio files in Ope nM G format and
stores them on the hard disk of your computer to prevent unauthorized distribution.
* The copyright protection technolo gy of this software conforms to SDMI (Secur e Digit al Music
Initiative) specif ications.
This software places some restr ic ti ons on recordin g and playback to protect copyrights.
You can check in audio f ile s only to the same comput er fro m which the y were checke d out.
They cannot be copi ed or checked in to other computers.
For details, see “Features by copyright protection by Op enMG” (page 72).
You can check-in audio files
only to the computer whic h
they were checke d ou t .
Check-out can
be made for
three times.
You cannot copy or
move audio files to
another computer.
continued
71
Page 72

Restrictions on audio content
High-quality digital audio content is widely a vailable through music distribution services
on the Internet. To protect the copyrig h ts of its hol d ers from unauthor ized distri bution,
some audio con te n t is distributed with certain restrictio ns on recording an d pl ayback. For
example, the playback p er iod o r p l ayb ac k cou n t fo r the data may be limited. In such c as es ,
checking out of the audio contents may n ot be possible.
Depending on the contents, some au di o data that could be checked out are subjec t to
editing restricti ons on the Net MD; e.g., audio contents cannot be erased or tra ck marks
cannot be added or er ased.
It is not possible to ch eck in tracks other than those that were checked out from your
computer (for example, tracks recorded using a microphone or through analog or digital
connection).
Features by copyright protection by OpenMG
The SonicStage software features OpenMG, a copyright protection technology developed
by Sony to protect music copyrights. OpenMG uses high-level cryptographic technology to
protect music contents with computers.
Users should be aware o f t he r estrictions descri be d below.
• Music record ed on the hard disk using the SonicStage software canno t be pl ayed when
copied to other computers.
• Installation of the same SonicStage software to other computers is not permitted.
• Usage Rules
If Usage Rules are included in the music by way of the copyright holder or the distributor,
operation will be restricted to use permitted by the Usage Rule. For music, such as
compact discs, that does not contain a Usage Rule, the Default Usage Rule of SDMI will
apply. This Default Usage Rule states that one file can be checked out up to th ree times
only.
• On music contents that are not compatible with the SonicStage software
Under the supervision of SDMI, this software prohibits recording of music with a copy
prohibition signal.
• Upgrading Soni cStage software
This software was developed in accordance w i th the current arran gement between Sony
and SDMI. If this arrangement is modified in the future, some of the software functions
may become unavailable. Sony m ay offer an upgrade kit in t hi s case at additional u se r
expense.
72
Page 73

Glossary
ATRAC3
ATRAC3, which stands for Adaptive Transform Acoustic Coding3, is audio compression
technology that satisfies the demand for high sound quality and high compression rates.
The ATRAC3 compression rate is approximately 10 times higher than that of the Audio
CD, resulting an increased data capacity for the media.
“Check-In /Check-Out”
Check-out is to t ra nsfer music files from a personal comput er to an external device/media
(such as a Net MD). Returning check ed-out music f iles to the same computer i s to check in.
(You cannot move checked-out music fi l es to another computer . )
You can chec k out a music fil e, check it back in , and then check it ou t again an infi nite
number of times. The SDMI rules provide that up to four copies of a music file can be
checked out at one time. OpenMG employs a method whereby three copies of a song can
be checked out simultaneously, while the fourth copy is maintained as a master on your PC.
Electronic Music Distribution (EMD) service*
EMD is a website that distributes music files which are available for purchase.
The use of EMD services requires installation of player software on your computer. Audio files should
be downloaded in a format that is supported by the SonicSta ge sof tware (s uc h as Labe l Ga te MQ
format). For details on EMD services support by S onic S ta ge , pl ease co nta c t to the r es pect ive
companies.
* EMD may not be available in certain areas of the wor ld.
MP3
MP3, which stands for MPEG-1 Audio Layer3, is a standard for audio file compression
determined by the Motion Picture Expe rt s Group, an ISO (International Organization fo r
Standardization) working group. It enables compression of audio files to about 1/10 of the
data size of a standard compact disc. Since the MP3 encoding algorithm is disclosed, there
are vario us en coder s/de coders that are compl iant wi th th is st anda rd, in cludi ng fr ee ware that
is available for no charge. The MP3 standard is therefore widely used in the computer field.
Music Drive
Music Drive is a music data base for managin g audio data on a comp uter. In Music Dri ve,
audio files can be managed along with such i nf ormation as artist nam es, track names, and
CD jacket images, or can be combined and categorized in different playlists.
OpenMG
Copyright protecti on technology for the im port and managem ent of m usical content from
distribution services or CDs. By using software that are compliant with OpenMG, audio
contents can be encrypted before storage on a hard disk drive to allow playback of those
audio files on that computer. OpenMG also prevents the unauthorized dist ri bution of the
contents via th e Internet or other net w orks.
continued
73
Page 74

Playlist
A playlist is like a container that can be used to hold and categorize files stored in Music
Drive. For example, by making a “jazz” playlist and t h en putting your favorite jazz tracks
into the playlist, yo u can play all of the tracks r epeatedly or check the m all out at the same
time.
Recording mode (Bit rate)
This is a measure of data volume per s econd. The r ate is expr essed in bp s (bit s per second ).
In SonicStage, the bit rate can be selec te d for recording an au di o CD or converting MP3
and WAV form at audio files into ATRAC3 format from among three ra te s: 132 kbps, 105
kbps or 66 kbps. In the case of 105 kbps, 105,000 bits of information is processed per
second. If the bit rate is large, that means a large amount of information is used to play the
music. Thus, 105 kbp s data produces bette r s ound quality than 66 kbp s data, and 132 kbps
data provides better sound quality than 105 kbps data. However, audio files in formats such
as MP3 have different encoding methods, and so the sound quality is not determined by the
bit rate alone.
SDMI
SDMI, which stands for Secure Digital Music Init iat ive, is a forum that consists of o v e r
130 companies in the fields of r ecorded audio cont ent , com puters, and consum er
electronics. It is dedicated to the development of integrated copyright protection
technology that can be used worldwide.
SDMI is working to create a framework for preventing the improper usage of audio files
and to promote legal music distribution services. The copyright protection technology
OpenMG is based on the SDMI standard.
Windows Media Technology (WMT)
This is a technology that includes a content s m anagement system called Windows Media
Rights Manager w hich encrypts con t ents and distributes mu s ic contents along w ith their
conditions for usage, distribution, et c. Copyright-protec ted audio files supported by
Windows Media Technology (WMT) cannot be converted to the ATRAC3 format and
coded in the OpenM G f ormat.
Windows Media Audio (WMA)
This is an audio compression technol ogy that includes the m anagement system called
“Windows Media Rights Manager”. Windows Media Audio (WMA) format files supported
by Window Media Technology (WMT) cannot be converted to the ATRAC3 format and
coded in the OpenM G f ormat.
74
Page 75

Index
A
Accessories
ATRAC3 70, 73
Audio CD 42, 51
B
back up 63
Backlight 28
Battery
BEEP 26
C
CD-ROM 45
Charging 13
Check-in 70, 73
Check-out 54, 70, 73
Cleaning 32
Connecting 49
copyright protection 71
D
delete (software) 64
Device/Media 54, 59
Digital Sound Equalizer 20
Digital Speed Control 21
DSP TYPE-S 40
E
E.A.S.S. GP 24
EAR GUARD 27
EMD services 73
G
Group
Group Program Play 24
H
hard disk
I
Installing 47
34
optional
supplied 9
battery life
dry battery 14
rechargeabl e battery 13
when charging 13
play
skip 23
free space
storing 51
15, 30
23
45, 63
L
labeling 53
M
Menus 29
MP3 73
Music Drive 51, 73
N
Net MD 43, 70
Net MD driver 68
O
Online help 58
OpenMG 73
OpenMG Jukebox software 46, 62
P
Play mode
Playback Information Memory 28
Playlist 54, 74
Program Play 19
23
groups
tracks 18
Q
Quick mode 27
R
Recordin g mode (Bit rat e) 52, 55, 74
Recording navigatio n window 51
S
SDMI 74
SonicStage Premium 46, 62
SonicStage software (earlier version) 46, 62
start (software) 50
System environment 45
System limitations 45
T
Transferring
to the computer
to the Net MD 54
50
U
Uninstalling
Windows 2000
Windows 98 Second Edition 64
Windows Millennium Edition 64
Windows XP 64
65
75
Page 76

USB
cable
9
V
Virtual Surround 20
W
Windows 2000 61, 65
Windows 98 Second Edition 61, 64
Windows Millennium Edition 61, 64
Windows XP 60, 64
WMA 74
WMT 74
76
Page 77

77
Page 78

Page 79

Page 80

http://www.aiwa.com/
Printed in Japan
 Loading...