

Page 1
USER MANUAL
Curved Glass
Canopy Rangehood
60cm/90cm
MODEL
ARGC60BTS/ARGC90BTS
Page 2

Residentia Group
—
Head Office
118 Campbell Street
Collingwood, VIictoria
Australia 3066
—
ACN.
600 546 656
—
Online.
residentia.group
Dear Customer,
Congratulations on purchasing your new rangehood. The Airvolution
brand is proudly distributed within Australia by Residentia Group Pty Ltd.
Please refer to the warranty card at the rear of this manual for information
regarding your product’s parts and labour warranty, or visit us online at
www.residentia.group
At Residentia Group, we are customer obsessed and our Support Team
are there to ensure you get the most out of your appliance. Should you want
to learn more about optional accessories (such as carbon filters) or most
importantly taking care of your rangehood when cleaning, our Support Team
are here to help.
You can use our online Support Centre at anytime by visiting
http://support.residentiagroup.com.au, or you can contact us via telephone
by dialling 1300 11 HELP (4357).
It is important that you read through the following use and care manual
thoroughly to familiarise yourself with the installation and operation
requirements of your appliance to ensure optimum performance.
Again, thank you for choosing an Airvolution appliance and we look forward
to being of service to you.
Kind Regards,
The Airvolution & Residentia Teams
Postage.
PO Box 341
Mt Eliza, Victoria
Australia 3930
Telephone.
1300 11 4357
Email.
[email protected]
Page 3

CONTENTS
PAGE
4
5
6
7
9
10
11
SECTION
Safety Instructions
Your Rangehood
Operating Your Rangehood
Installation Instructions
Cleaning & Maintenance
Troubleshooting & Technical Data
Notes
12
14
Warranty Information
Purchase Details
Page 4

SAFETY INSTRUCTIONS
This rangehood must only be installed in accordance
with the instructions provided. Incorrect installation
may cause harm to persons, damage property and void
the product’s warranty.
Important
Please ensure that you read the entire instructions before
beginning the installation of your rangehood.
Warning
All electrical work must be done in accordance with local
and national electrical codes as applicable and should be
undertaken by licenced and qualified persons only.
– This rangehood is designed for domestic household
use only.
– This appliance is not intended to be used by
children, or persons with reduced physical, sensory
or mental capabilities, or lack of experience and
knowledge, unless they have been given supervision
or instruction concerning the use of the rangehood
by a person responsible for their safety.
– Young children should be supervised to ensure that
they do not play with the appliance.
– You must read the instructions concerning the
method and frequency of cleaning.
Unpacking
During transportation, protective packaging was used
to protect the appliance against any damage. After
unpacking, please dispose of all elements of packaging
in a way that will not cause damage to the environment.
All materials used for packaging the appliance are
environmentally friendly; they are 100% recyclable
and are marked with the appropriate symbol.
Caution! During unpacking, the packaging materials
(polythene bags, polystyrene pieces, etc.) should be kept
out of reach of children.
Disposal of the appliance
Old appliances should not simply be disposed of with
normal household waste, but should be delivered to a
collection and recycling centre for electric and electronic
equipment. A symbol shown on the product, the
instruction manual or the packaging shows that it is
suitable for recycling.
Materials used inside the appliance are recyclable
and are labelled with information concerning this. By
recycling materials or other parts from used devices you
are making a significant contribution to the protection
of our environment.
Important!
There is a risk of fire if cleaning isn’t carried out in
accordance with the instructions.
– Never flambé under the rangehood.
– Exhaust air must not be discharged into an existing
flue which is used by other appliances for exhausting
fumes.
– If the power supply cord of this rangehood is
damaged in any way, it must only be replaced by
Residentia Group or one of it’s authorised service
agents. Please call the Residentia Support Team for
further assistance.
– Your new rangehood is guaranteed against electrical
or mechanical defects, subject to certain exclusions
that are noted in the Warranty Terms and Conditions
(at the rear of this user manual). The foregoing does
not affect your statutory rights.
– The use of this rangehood for any other purpose
or in any other environment, without the express
agreement of Residentia Group, will invalidate any
warranty or liability claim.
– No modifications to the appliance are permitted by
Residentia Group.
– Repairs may only be carried out by authorised service
agents.
– Cleaning of the rangehood should be carried out on
a regular basis.
Information on appropriate disposal centres for used
devices can be provided by your local authority.
There shall be adequate ventilation of the room when
the range hood is used at the same time as appliances
burning gas or other fuels (not applicable to appliances
that only discharge the air back into the room).
CAUTION: Accessible parts may become hot when
used with cooking appliances.
4
Page 5
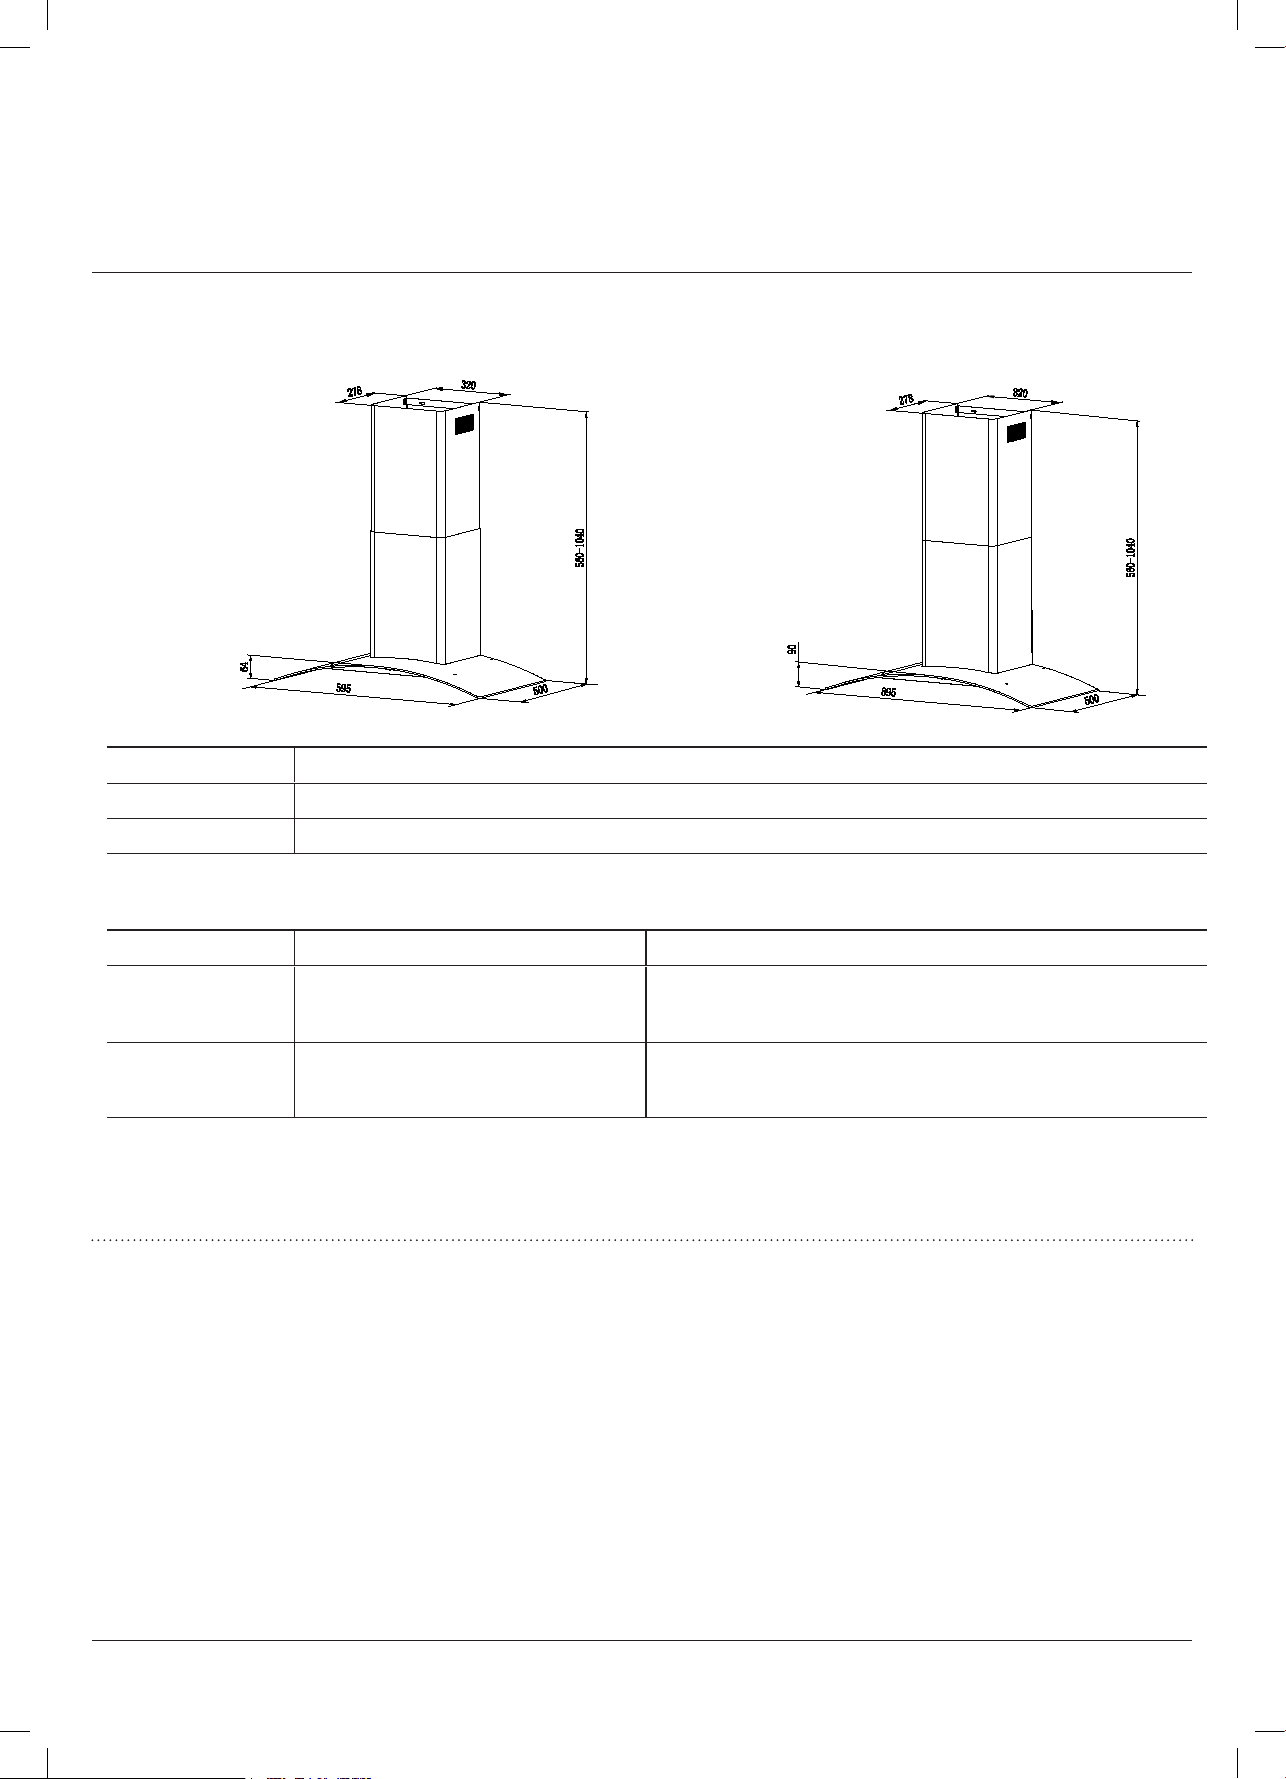
Specifications
YO
UR RANGEHOOD
ARGC60BTS
Model Product dimensions (W,D,H mm)
ARGC60BTS
ARGC90BTS
Model Extraction Other features:
ARGC60BTS
ARGC90BTS
595mm,500m,560-1040mm
895mm,500m,560-1040mm
1000 m3/hr extraction
1000 m3/hr extraction
ARGC90BTS
- 4 speed Touch Control with digital display
- 2 X 1.5W LED Lamp
- 1 X Baffle Filters
- 4 speed Touch Control with digital display
- 2 X 1.5W LED Lamp
- 2 X Baffle Filter
Rangehood components
Your Airvolution Canopy Rangehood is supplied with:
– 1 × Rangehood
– 1 × Expandable 150mm ducting adapter
– 1 × Packet of fasteners and wall plugs
– 2 × Stainless Steel flue pieces (upper and lower)
– 1 × Wall Bracket (“hook”) for the rangehood
– 1 × Wall Bracket for the inside of the chimney pieces
– 1 × “Outside Chimney” bracket
Typical installation tools required
You’ll most likely require the following tools/equipment
(not supplied) for the installation of your rangehood.
– Electrical drill
– Tape Measure
– Screw-driver
– Spirit Level
If ducting your rangehood, you’ll also most likely require:
– Jig saw
– Ladder
– Duct-tape
– Ducting
5
Page 6
OPERATING YOUR RANGEHOOD
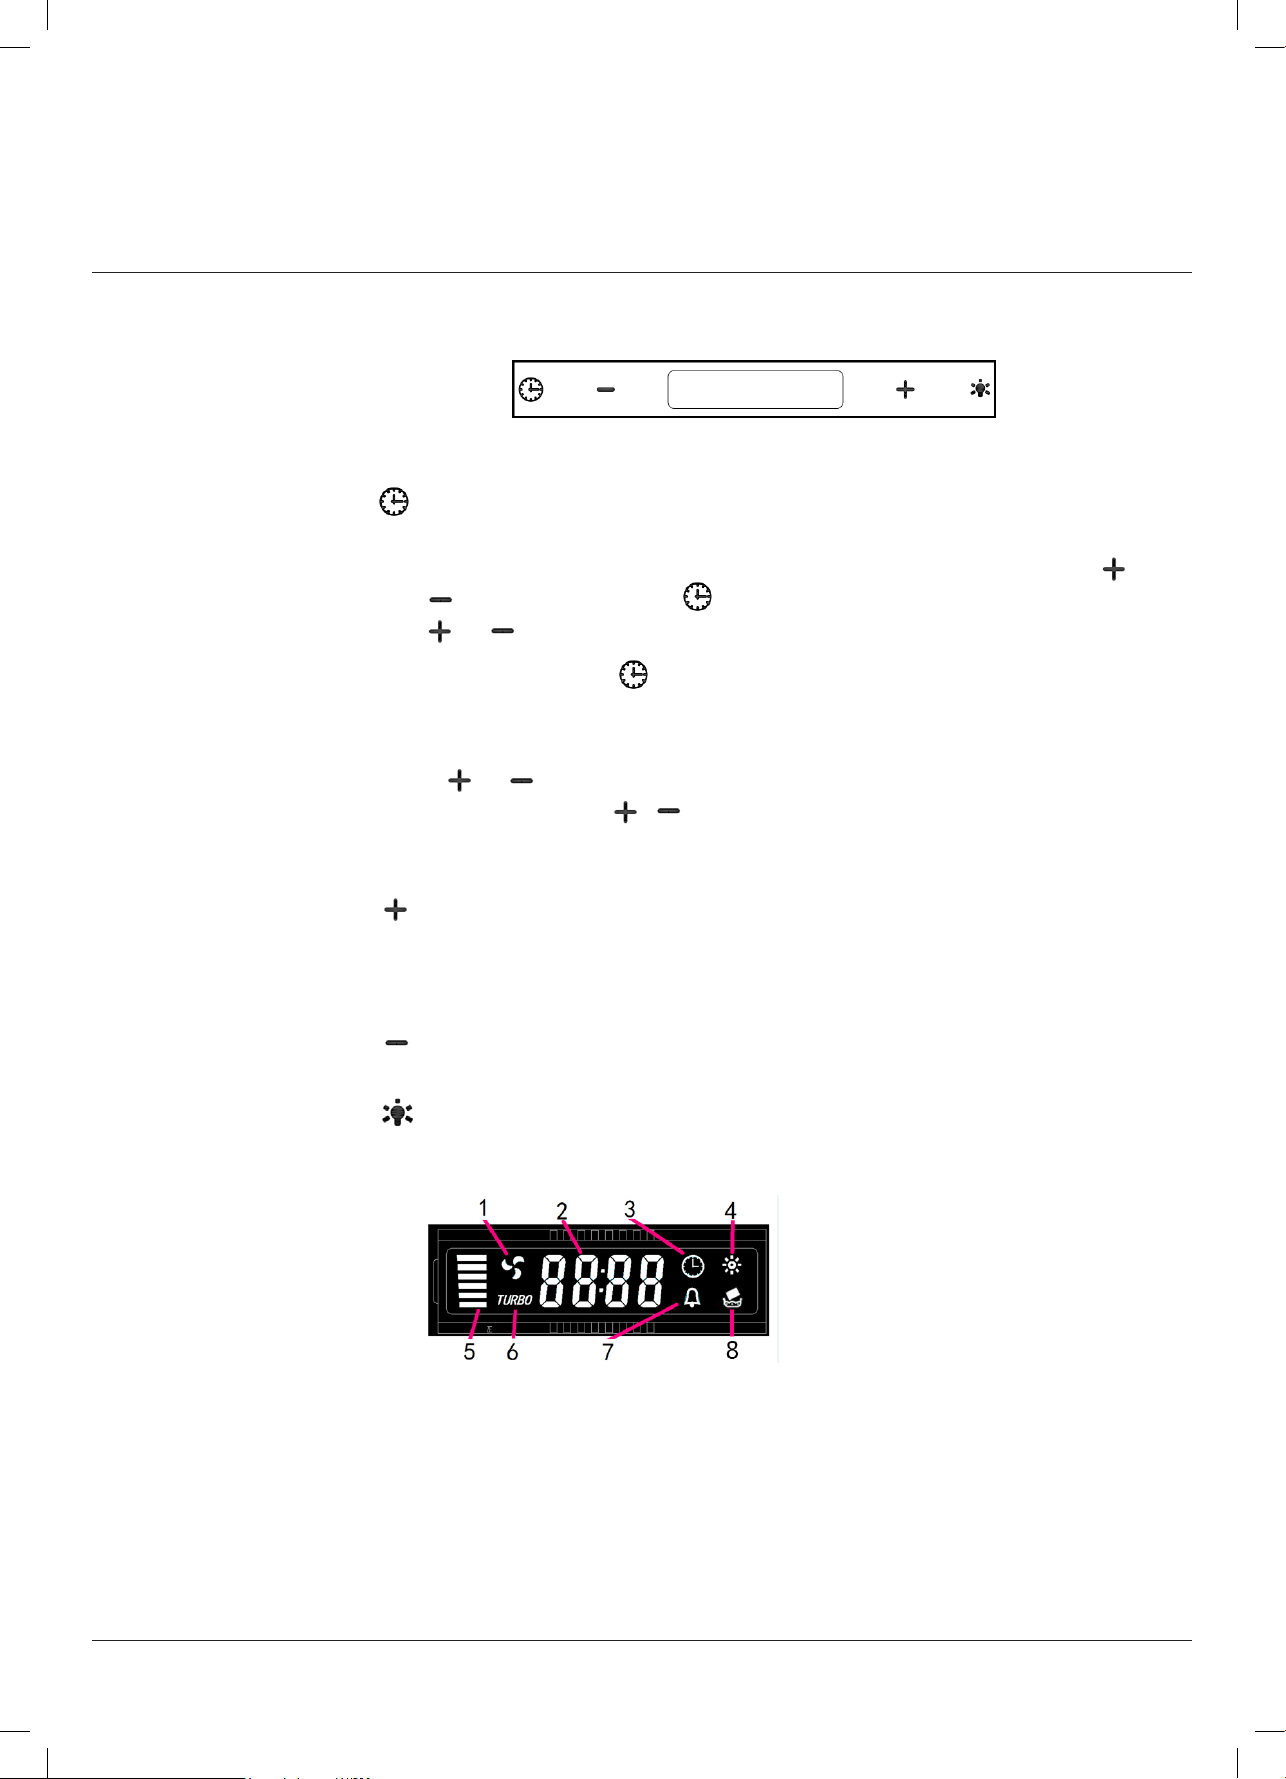
Controls
Your Airvolution Canopy rangehood features touch controls with four speed
levels of extraction.
After plug in power, will into Stand By mode automatic.
Timer button
Time setting:
Keep pressing it when the machine is in stand by mode, it would start the time
setting. After
" to do the setting. Press" " again, change to minute setting, press"
"or" " to do the setting.
The third time press" " or wait 10s, the time setting would finish.
Timer setting:
Short press during working mode, pre-set cycle :
off→15min
" "or" " is used for adjusting timer time, except "off" timer setting.
Quick timer: Press & hold for 1 second, the digital display will be flashing
and starting the 5 minutes counting down. After 5 minutes working, the motor &
light will turn off automatically & Buzzer
pressing, the hour display would be flashing, you could press" "or"
s→30mins→45mins→60mins→off.
sound on.
Speed plus button
For increasing the speed of the motor. Totally 4 speeds.
When the “TURBO” speed symbol appear, the motor reach the highest speed.
After 5 minutes
automatically.
Speed decrease button
For decreasing the speed of the motor.
Light button
Short press for lamp power control.
Display explanation:
1.Motor symbol, will rotate when the motor is working;
2.Time display;
3.Timer symbol, will appear when timer is setting and counting;
4.Light symbol;
5.Motor speed;
6.Turbo speed symbol, will appear when the speed is highest setted;
7.Alarm symbol, will appear 5 seconds when the counting down of timer is over.
8.Cleanning symbol, appear when total working time up to 14 hours or at the first
time using after pluging.
working
in Turbo
mode, the motor would change to
the third speed
6
Page 7
INSTALLATION INSTRUCTIONS
It’s important to carefully read the following installation
instructions before beginning the installation of your oven.
Important installation safety – Always switch the power off prior to beginning the installation.
– Stainless steel is very easily damaged during installation. Wherever possible,
protect the rangehood with the cardboard box or plastic wrap during the
installation.
– For safety reasons, this Rangehood must be earthed.
– A power point must be located within 1.5m of the power cord exit from the
rangehood, and it should be always accessible to allow isolation from power
during cleaning or maintenance.
– A 150mm round ducting adapter is supplied, however all other ducting
accessories are not.
– All ducting must comply with building codes and local requirements.
– If you are re-circulating the air, rather than ducting, please ensure that the side
outlet grilles are not obstructed in any way as this will effect the effi ciency of
the rangehood.
– Ensure that the rangehood is mounted in a level position, both horizontally
and vertically. This is essential to ensure the rangehood operates correctly and
prevents grease build up at one end.
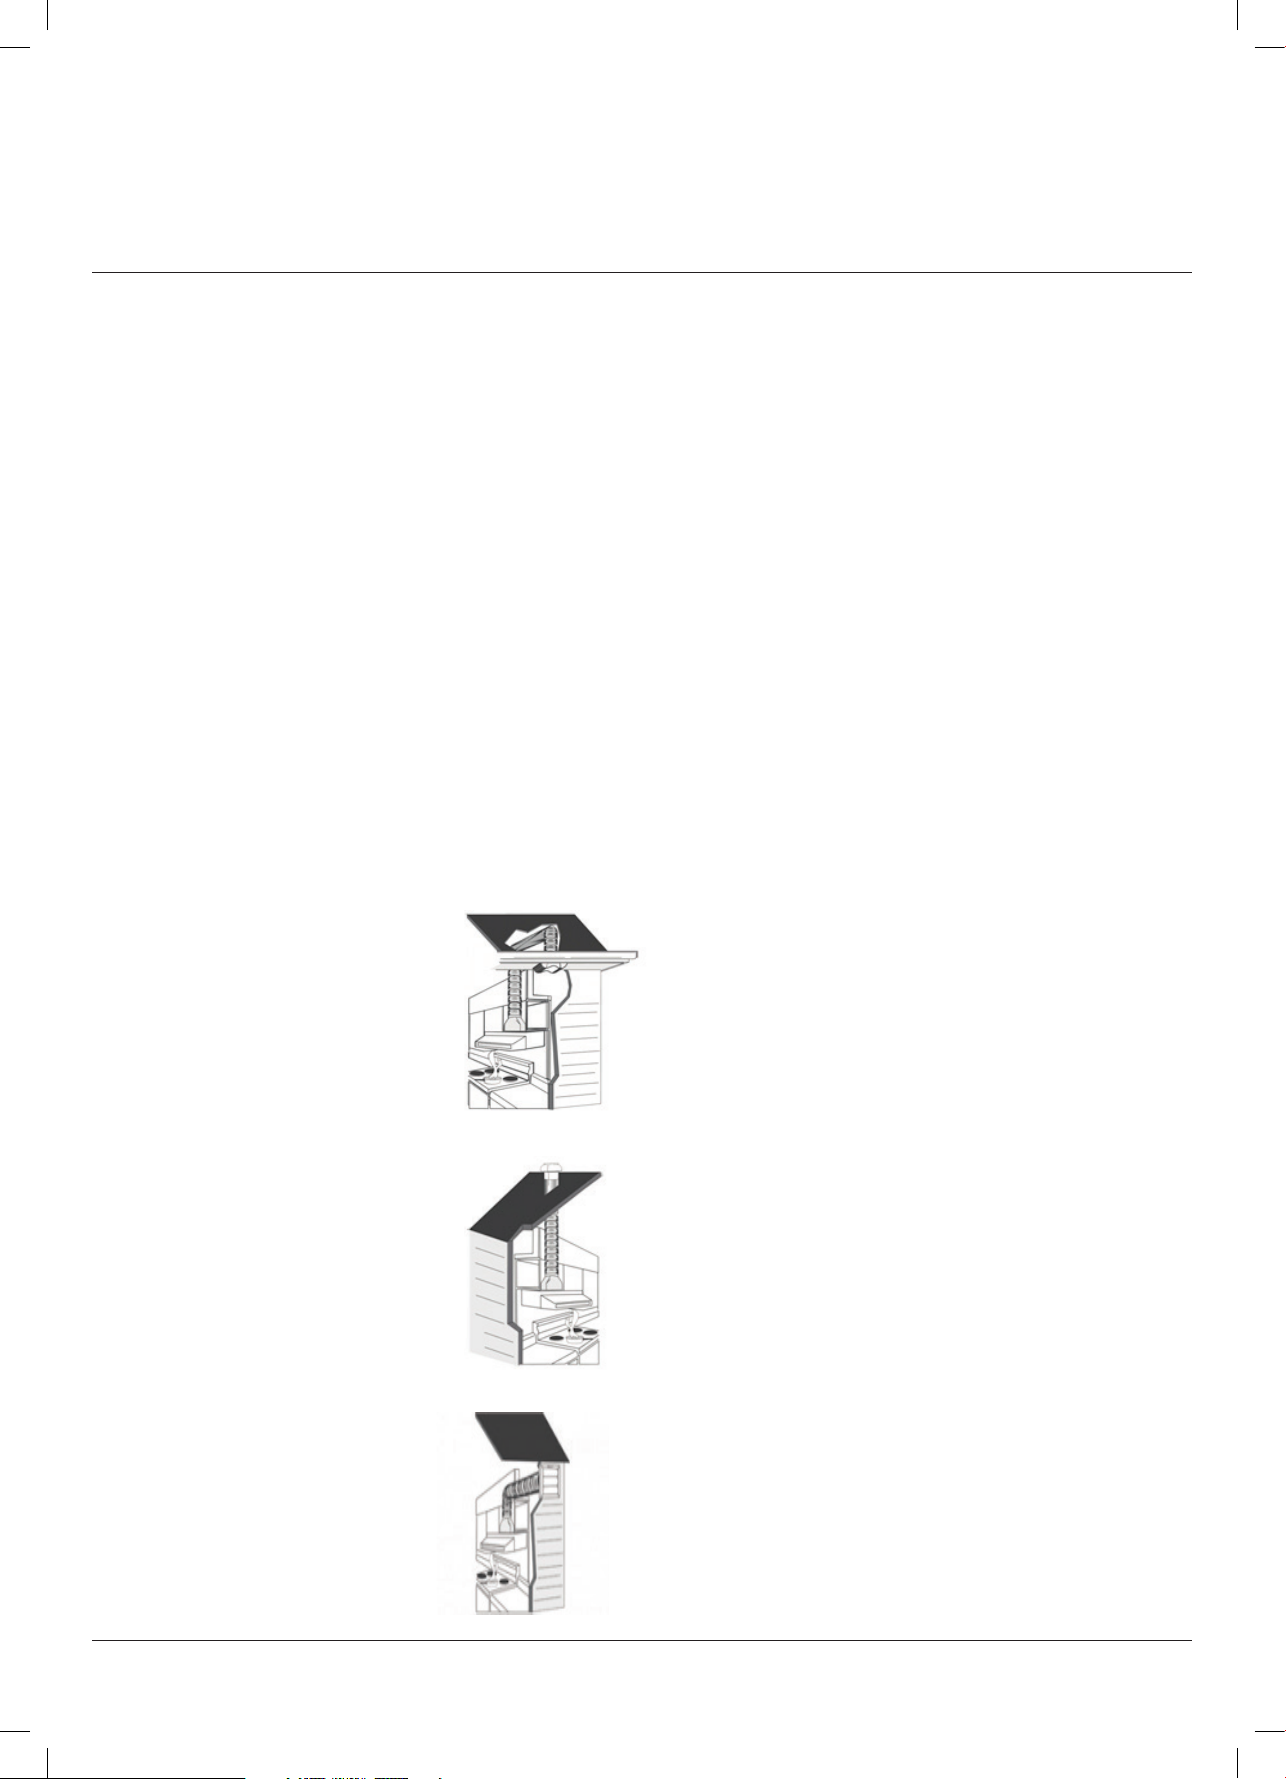
Ducting options Before beginning the installation of your rangehood, the method of ducting should be
considered and selected. The guide below illustrates the various ducting options.
Note: This rangehood can be operated in recirculation mode where required,
although Airvolution recommends to duct wherever possible.
1. Into your ceiling cavity and then vented through your eaves.
2. Straight up and through your tiled or metal roof.
7
Page 8
INSTALLATION INSTRUCTIONS
CONTINUED
Through your wall
Further to your various ducting options, below are some
tips on how to correctly duct your rangehood:
– Always use correctly sized ducting
— DO NOT reduce the size of the ducting
– Always use solid ducting
– Always use non-flammable ducting
– Always duct to the outside atmosphere
– Do not use flexible ducting
– Do not duct into the ceiling space- always vent to the
outside atmosphere.
– Avoid sharp 90 degree bends as much as possible,
use 45 degree bends instead wherever possible
– Duct to the outside atmosphere using the shortest
duct run possible
– Use cylindrical ducting whenever possible
Positioning the rangehood
Installation heights
– Over gas and electric cookers, Airvolution
recommends our rangehoods to be mounted
at a height of between 600-800mm above the
cooking surface.
– Electric cooktops must have a minimum height of
600mm from the underside of the rangehood to the
cooktop face.
– Gas cooktops must have a minimum of 650mm from
the burner to the underside of the rangedhood.
– It is not recommended to install the rangehood
outside or over open flame grillers or barbecues.
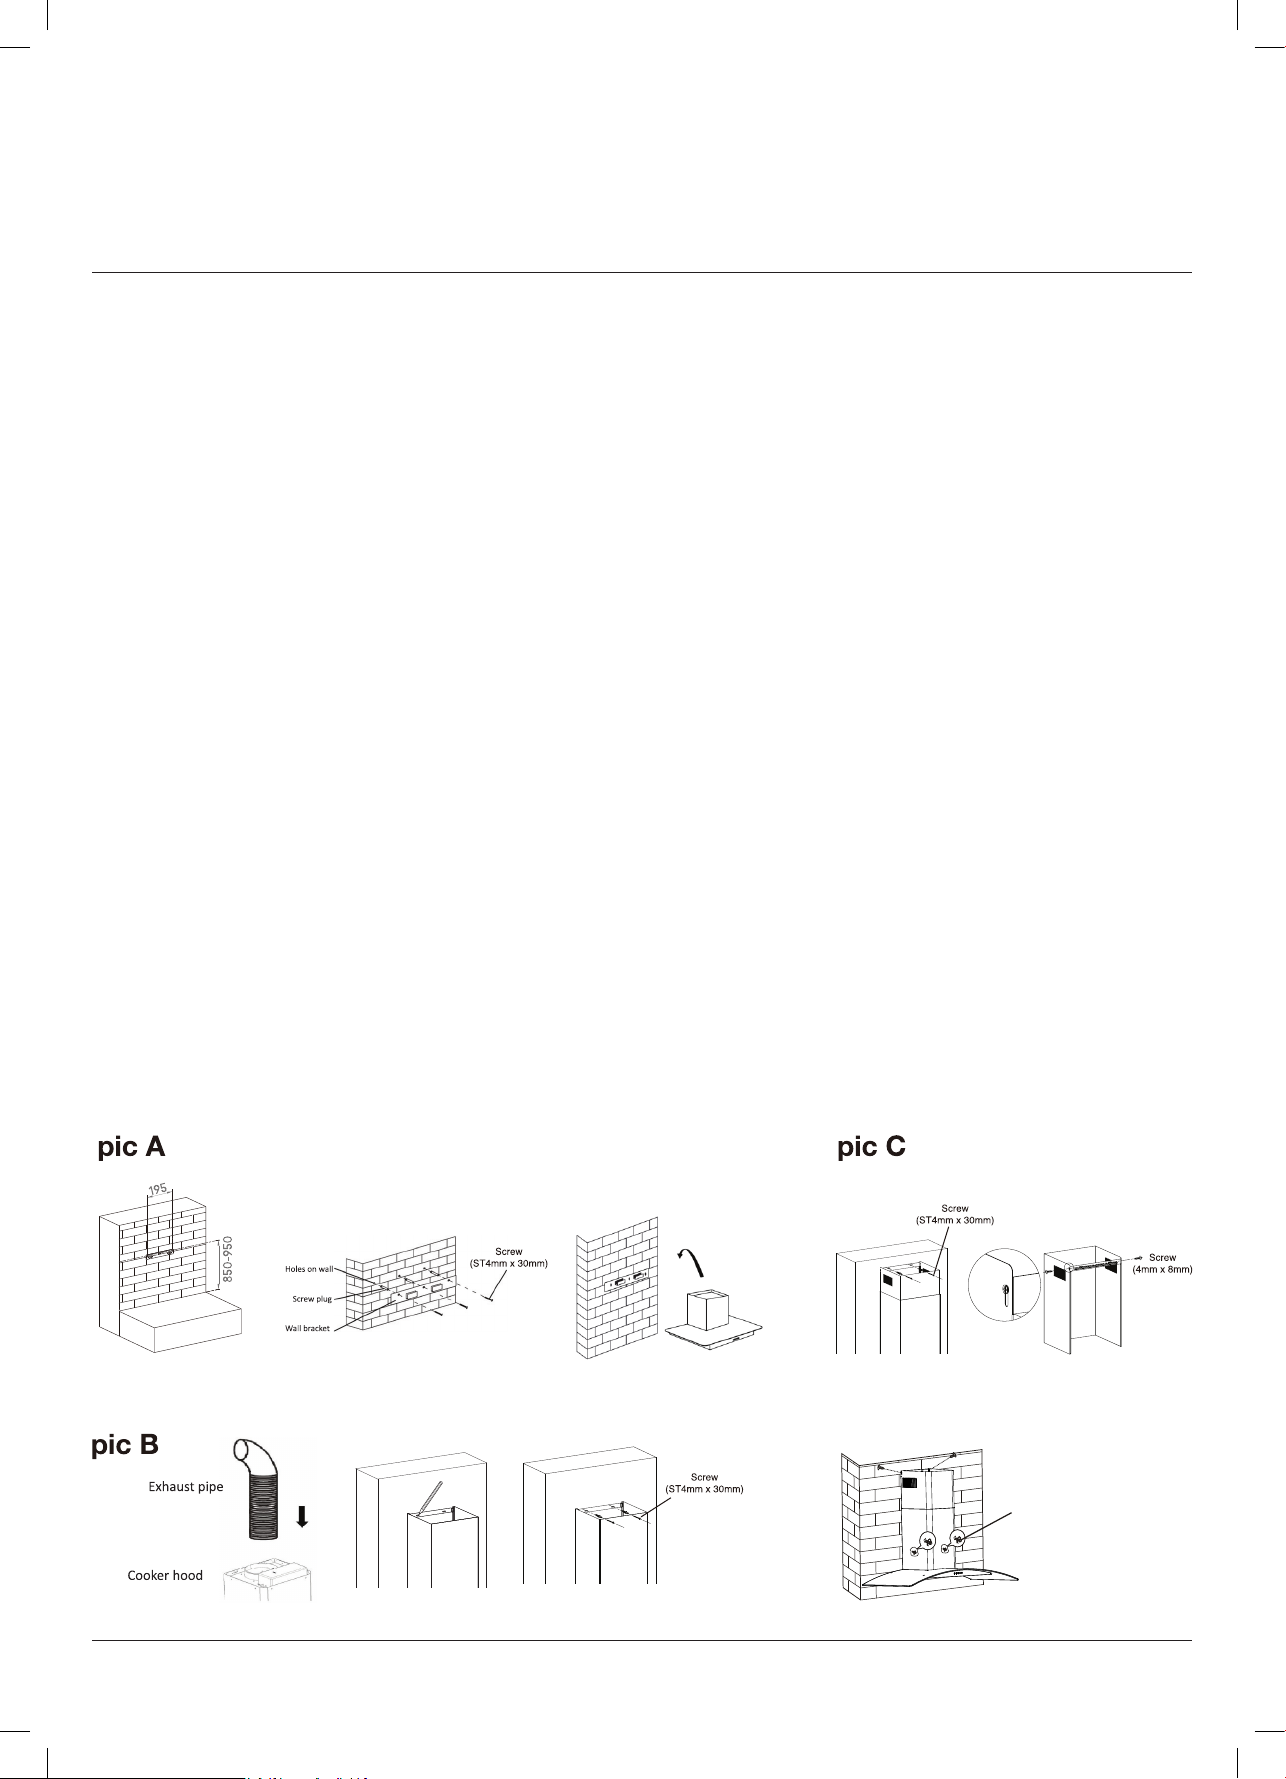
Installing the rangehood
See illustration below
– Once you’ve determined your installation height,
drill 3 holes to install the mounting bracket (hook)
onto the wall ensuring that it’s secured in a level
position, Tighten the bracket with the screw plug
and screw (ST4mm X 30mm).
– When finished, line up the hood and hang onto the
wall bracket hook. (See pic A )
– Attach the extensible 150mm tube to the canopy.
Put the inside chimney with the outside chimney
together, ensure that the inner chimney piece can
move freely inside. Now attach the chimney to the
hood. When finished, fix the outside chimney to the
canopy, mark the hole and drill 2 holes, then tighten
the outside chimney bracket with screw plug and
screw (ST4mm X 30mm). (See pic B )
If you need the safety screws fixed into the hood,
please mark, drill and tighten the hood with screw
plug and screw (ST4mm X 30mm). Note, you will
need to remove the grease filters first. (See Pic C )
– Slide the inner chimney to adjust the inner chimney
height. When the height you required is reached,
mark it and accommodate the inner chimney bracket
with screw plug and screw (ST4mm X 30mm).When
finished, fix the inner chimney with the screws (4mm
X 8mm) to the inner chimney bracket . (See pic C )
Warning
Failure to install the screws or fixing device in
accordance with these instructions may result in
electrical hazards. The warning shall be in the same
part of the instructions that include details of how
to mount the equipment.
8
Screw
(4mm x 8mm)
Safety screw
(ST4mm x 30mm)
Page 9

CLEANING & MAINTENANCE
By ensuring proper cleaning and maintenance of your
Airvolution rangehood, you can ensure that it will have
a long and fault free operation.
C
leaning the baffle filters
Keeping this filter clean will keep the rangehood
extraction performance at an optimum. Please strictly
follow the guidelines below.
–
The baffle filter is made of stainless steel. Please
ensure you never use a corrosive detergent during
cleaning.
–
M
ethod 1: Put the baffle filter into 40–50°C clean
water with a small amount of regular dishwashing
liquid, and soak for 2–3 mins. Wear gloves and clean
with a soft brush. Please do not apply too much
pressure, or the baffle filter will damage easy.
–
M
ethod 2: You can wash your rangehood baffle filter
in your dishwasher, however please ensure they aren’t
washed at a temperature above 60°C degrees.
Cleaning the cooker hood
To protect the main body of your rangehood from
corrosion or stains, the cooker hood should be cleaned
with hot water with a non-corrosive detergent every two
months. For stubborn stains or marks, you can try using
a specific stainless steel cleaner available from most
supermarkets.
Warning! Please do not use a corrosive
detergent, or abrasive clothes,
as it will damage the body.
– Keep the motor and other spare parts free from
water, as this will cause damage to the appliance.
– Before cleaning the rangehood, always switch the
power off at the outlet and unplug the rangehood.
– If your rangehood has a damaged plug or cord,
please ensure your rangehood remains unplugged
and contact the Residentia Support team for
further assistance. Any electrical work should
only be completed by a suitably licenced and
authorised person.
– If you’re using a carbon filter, it should never be
exposed to heat.
9
Page 10

TROUBLESHOOTING
Operation in case of emergency
In the event of an emergency you should:
– Switch off all rangehood controls.
– Switch the rangehood off at the power outlet and immediately unplug.
– Call the Residentia Support Team on 1300 11 HELP (4357).
Some minor faults can be fixed by referring to the instructions given in the
Troubleshooting section below. There is also a self-help section online at
https://residentia.zendesk.com/
Important! If your appliance appears to be operating incorrectly, then you
Warning! Do not attempt to repair the rangehood yourself.
& TECHNICAL DATA
should disconnect it from your electrical supply and then contact the
Residentia Group Support team on 1300 11 HELP (4357).
Please note that if an engineer is asked to attend whilst the product is under warranty
and finds that the problem is not the result of an appliance fault, then you may be liable
for the cost of the call out charge.
The appliance must be accessible for the engineer to perform any necessary repair.
If your appliance is installed in such a way that an engineer is concerned that damage
will be caused to the appliance or your kitchen, then they will not complete a repair.
This includes situations where the rangehood has been tiled in or sealed in with a
sealant.
Please refer to the conditions of that appear on the warranty card at the rear of this
user manual.
Fault: Common Cause: Common Solutions:
The lights work, however the motor
does not work
Neither the lights or the motor works Beside the above mentioned, check the following:
The motor is blocked or jammed or
the capacitor is damaged.
The capacitor damaged Call the Residentia Support team
Light globes are damaged or blown Replace the light globe(s)
Call the Residentia Support team
for further guidance.
for further guidance.
The power cord is loose. Ensure that the rangehood is
The rangehood is vibrating against the
wall
Insufficient suction The distance between the rangehood
Technical data
Electrical details
The rangehood canopy is not fixed to
the wall correctly.
and your cooktop is too great.
ated Voltage: AC 220 – 240 V, 50Hz
R
10
correctly plugged in and the power
outlet is switched on.
Ensure that the internal safety
screws have been used and tight.
Have your installer re-adjust the
installation position, ensuring
that the minimum distances are
observed as per the building code.
Page 11

NOTES
11
Page 12

WARRANTY
Warranty terms and conditions
Cooking appliances (rangehoods)
This document sets out the terms and conditions of the
product warranties for Residentia Group Appliances. It is
an important document. Please keep it with your proof of
purchase documents in a safe place for future reference
should you require service for your Appliance.
1. In this warranty
(a) ‘acceptable quality’ as referred to in clause 10 of
this warranty has the same meaning referred to
in the ACL;
(b) ‘ACL’ means Trade Practices Amendment
(Australian Consumer Law) Act (No.2) 2010;
(c) ‘Appliance’ means any Residentia Group
product purchased by you accompanied by this
document;
(d) ‘ASR’ means Residentia Group authorised
service representative;
(e) ‘Residentia Group’ means Residentia Group Pty
Lt
d of 118 Campbell St Collingwood Victoria
3083, ACN 600 546 656 in respect of
Appliances purchased in Australia;
(f) ‘major failure’ as referred to in clause 10 of
this warranty has the same meaning referred
to in the ACL and includes a situation when
an Appliance cannot be repaired or it is
uneconomic for Residentia Group, at its
discretion, to repair an Appliance during the
Warranty Period;
(g) ‘Warranty Period’ means:
(i) where the Appliance is used for
personal, domestic or household
use (i.e. normal single family use)
as set out in the instruction manual,
the Appliance is warranted against
manufacturing defects for 24 months,
following the date of original purchase
of the Appliance;
(h) ‘you’ means the purchaser of the Appliance not
having purchased the Appliance for re-sale, and
‘your’ has a corresponding meaning.
2. This warranty only applies to Appliances purchased
and used in Australia and is in addition to (and does
not exclude, restrict, or modify in any way) any nonexcludable statutory warranties in Australia.
3. During the Warranty Period Residentia Group or
its ASR will, at no extra charge if your Appliance
is readily accessible for service, without special
equipment and subject to these terms and
conditions, repair or replace any parts which it
considers to be defective. Residentia Group or its
ASR may use remanufactured parts to repair your
Appliance. You agree that any replaced Appliances or
parts become the property of Residentia Group. This
warranty does not apply to light globes, batteries,
filters or similar perishable parts.
4. Parts and Appliances not supplied by Residentia
Group are not covered by this warranty.
12
Page 13

WARRANTY CONTINUED
5. You will bear the cost of transportation, travel and
delivery of the Appliance to and from Residentia
Group or its ASR. If you reside outside of the service
area, you will bear the cost of:
(a) travel of an authorised representative;
(b) transportation and delivery of the Appliance
to and from Residentia Group or its ASR, in all
instances, unless the Appliance is transported
by Residentia Group or its ASR, the Appliance is
transported at the owner’s cost and risk while in
transit to and from Residentia Group or its ASR.
6. Proof of purchase is required before you can make a
claim under this warranty.
7. You may not make a claim under this warranty unless
the defect claimed is due to faulty or defective parts
or workmanship. Residentia Group is not liable in the
following situations (which are not exhaustive):
(a) the Appliance is damaged by:
(i) accident
(ii) misuse or abuse, including failure to
properly maintain or service
(iii) normal wear and tear
(iv) power surges, electrical storm
damage or incorrect power supply
(v) incomplete or improper installation
(vi) incorrect, improper or inappropriate
operation
(vii) insect or vermin infestation
(viii) failure to comply with any additional
instructions supplied with the
Appliance;
(b) the Appliance is modified without authority from
Residentia Group in writing;
(c) the Appliance’s serial number or warranty seal
has been removed or defaced;
(d) the Appliance was serviced or repaired by
anyone other than Residentia Group, an
authorised repairer or ASR.
8. This warranty, the contract to which it relates and the
relationship between you and Residentia Group are
governed by the law applicable where the Appliance
was purchased.
9. To the extent permitted by law, Residentia Group
excludes all warranties and liabilities (other than as
contained in this document) including liability for any
loss or damage whether direct or indirect arising
from your purchase, use or non use of the Appliance.
10. For Appliances and services provided by Residentia
Group in Australia, the Appliances come with a
guarantee by Residentia Group that cannot be
excluded under the Australian Consumer Law.
You are entitled to a replacement or refund for a
major failure and for compensation for any other
reasonably foreseeable loss or damage. You are also
entitled to have the Appliance repaired or replaced
if the Appliance fails to be of acceptable quality and
the failure does not amount to a major failure. The
benefits to you given by this warranty are in addition
to your other rights and remedies under a law in
relation to the Appliances or services to which the
warranty relates.
11. At all times during the Warranty Period, Residentia
Group shall, at its discretion, determine whether
repair, replacement or refund will apply if an
Appliance has a valid warranty claim applicable to it.
12. To enquire about claiming under this warranty, please
follow these steps:
(a) carefully check the operating instructions, user
manual and the terms of this warranty;
(b) have the model and serial number of the
Appliance available;
(c) have the proof of purchase (e.g. an invoice)
available;
(d) telephone the numbers shown below.
IMPORTANT
Before calling for service, please ensure that the steps in
point 12 have been followed.
The Australian Consumer Law requires the inclusion of the following
statement with this warranty:
13. You accept that if you make a warranty claim,
Residentia Group and its ASR may exchange
information in relation to you to enable Residentia
Group to meet its obligations under this warranty.
Telephone contacts
► Service: Please call 1300 11 HELP (4357)
► Spare Parts: Please call 1300 11 SPARE (7727)
Our goods come with guarantees that cannot be excluded under the
Australian Consumer Law. You are entitled to a replacement or refund for a
major failure and for compensation for any other reasonably foreseeable loss
or damage. You are also entitled to have the goods repaired or replaced if the
goods fail to be of acceptable quality and the failure does not amount to a
major failure.
13
Page 14

PURCHASE DETAILS
For your records, please record details of your purchase
below and staple your receipt on the opposite page.
Store details
Store name
Address
Telephone
Purchase date
Product details
Model no.
Serial no.*
|
|
|
|
|
|
* Note. Your serial number can be found on the inside of the rangehood, underneath the grease filter.
14
Page 15

RECEIPT
15
Page 16
DELICIOUS AROMAS
WITHOUT THE ODOURS
...
VERSION
NUMBER
.2
1
ONLINE
WWW.AIRVOLUTION.SPACE
 Loading...