

Airstream Flying Cloud 2014 Owner's Manual

Flying Cloud Owner’s Manual

Publication Date: January 2013

Introduction
1
Safety
General Information
Floor Plans and Specifications
Interior
Exterior
2
3
4
5
6
Towing
Maintenance
7
8

DISCLAIMER AND COPYRIGHT
Disclaimer:
All information, illustrations and specications contained in this manual are based on the latest product information
available at the time of publication approval. If and when new materials and production techniques are developed
that can improve the quality of its product, or material substitutions are necessary due to availability, Airstream
reserves the right to make such changes.
Airstream Flying Cloud Travel Trailer Owner’s Manual
©2013 Airstream, Inc. All rights reserved
iv Flying Cloud

TABLE OF CONTENTS
PAGE
INTRODUCTION . . . . . . . . . . . . . . . . . . . . . . . . . . 1-1
SAFETY . . . . . . . . . . . . . . . . . . . . . . . . . . . . . 2-1
SAFETY PRECAUTIONS . . . . . . . . . . . . . . . . . . . . . 2-2
CHEMICAL SENSITIVITY AND VENTILATION . . . . . . . . . . . . 2-2
ALARMS AND DETECTORS . . . . . . . . . . . . . . . . . . .2-3
GENERAL INFORMATION . . . . . . . . . . . . . . . . . . . . . .3-1
LIMITED WARRANTY POLICY . . . . . . . . . . . . . . . . . . 3-3
SERVICE . . . . . . . . . . . . . . . . . . . . . . . . . . . 3-6
CAMPING . . . . . . . . . . . . . . . . . . . . . . . . . . . 3-6
FLOOR PLANS AND SPECIFICATIONS . . . . . . . . . . . . . . . .4-1
FLOOR PLANS . . . . . . . . . . . . . . . . . . . . . . . . . 4-2
SPECIFICATIONS . . . . . . . . . . . . . . . . . . . . . . .4-4
INTERIOR . . . . . . . . . . . . . . . . . . . . . . . . . . . . 5-1
GENERAL INFORMATION AND CLEANING . . . . . . . . . . . . . 5-4
PLUMBING . . . . . . . . . . . . . . . . . . . . . . . . . . 5-6
ELECTRICAL . . . . . . . . . . . . . . . . . . . . . . . . . 5-8
APPLIANCES . . . . . . . . . . . . . . . . . . . . . . . . 5-14
EXTERIOR . . . . . . . . . . . . . . . . . . . . . . . . . . . .6-1
CLEANING . . . . . . . . . . . . . . . . . . . . . . . . . . 6-2
GENERAL INFORMATION AND OPERATION . . . . . . . . . . . . . 6-3
TOWING . . . . . . . . . . . . . . . . . . . . . . . . . . . . . 7-1
TOW VEHICLE . . . . . . . . . . . . . . . . . . . . . . . . . 7-2
BRAKES . . . . . . . . . . . . . . . . . . . . . . . . . . .7-2
Flying Cloud v

Table of Contents (Continued)
MAINTENANCE . . . . . . . . . . . . . . . . . . . . . . . . . . 8-1
MAINTENANCE SCHEDULE . . . . . . . . . . . . . . . . . . . 8-4
SUGGESTED MAINTENANCE AND REPLACEMENT PARTS . . . . . . 8-5
TIRES . . . . . . . . . . . . . . . . . . . . . . . . . . . .8-7
Model . . . . . . . . . . . . . . . . . . . . . . . . . . . 8-10
All Others . . . . . . . . . . . . . . . . . . . . . . . . . 8-10
ELECTRICAL DIAGRAMS . . . . . . . . . . . . . . . . . . . 8-19
FAQS AND ANSWERS . . . . . . . . . . . . . . . . . . . . . 8-40
vi Flying Cloud
RA-400 Patcher for UD
Section 1
INTRODUCTION
1
The Owner’s Manual for your new Airstream trailer
is designed to respond to the most frequent inquiries
regarding the operation, function, and care of the many
systems that make modern trailering a joy.
Airstream realizes our customers possess varying
degrees of expertise in the area of repairing and
maintaining the appliances in their trailer. For this
reason, the service information found in this manual is
directed toward those with average mechanical skills.
We also realize that you may be more familiar with
one area than you are with another. Only you know
your capabilities and limitations. We want you to use
this manual and hope you will nd the information
contained in it useful. However, should you ever feel
that you may be in need of assistance, please consult
your Airstream dealer for advice on repairs that may be
required.
A brief explanation of the operation of the appliances
such as refrigerator, furnace, water heater, and others,
are explained in this manual. However, you will also
nd the manufacturer’s information, supplied in a
packet included with this manual, to be more detailed.
All information, illustrations, and specications
contained in this manual are based on the latest
product information available at the time of publication
approval. If and when new materials and production
techniques are developed that can improve the quality
of its product, or material substitutions are necessary
due to availability, Airstream reserves the right to make
such changes.
We have provided many important safety messages
in this manual. Always read and obey all safety
messages.
WARNING
A warning is used for a hazardous situation which,
if not avoided, could result in death or serious
injury to persons.
CAUTION
A caution is used to advise caution when
performing actions that could result in minor or
moderate injury to persons and/or damage to
equipment.
NOTE
A note is used to address practices not related
to personal injury. This applies to hazardous
situations invoving property damage only.
Optional items may be available on all, or particular
models. Additionally, some optional items can only be
included during the manufacturing phase and cannot
later be added to the trailer.
The inclusion of optional items information in this
manual does not imply or suggest the availability,
application suitability, or inclusion for any specic unit.
Flying Cloud 1-1

Introduction
NOTES:
1-2 Flying Cloud

RA-400 Patcher for UD
Section 2
SAFETY
PAGE
SAFETY . . . . . . . . . . . . . . . . . . . . . . . . . . . . . 2-1
SAFETY PRECAUTIONS . . . . . . . . . . . . . . . . . . . . . 2-2
Passenger Stowing . . . . . . . . . . . . . . . . . . . . . . 2-2
2
Towing and Weight Distribution . . . . . . . . . . . . . . . . . . 2-2
Control Sway . . . . . . . . . . . . . . . . . . . . . . . .2-2
Lug Nut Torquing . . . . . . . . . . . . . . . . . . . . . . . 2-2
Tire Safety . . . . . . . . . . . . . . . . . . . . . . . . . .2-2
Appliances and Equipment . . . . . . . . . . . . . . . . . . . 2-2
Mold . . . . . . . . . . . . . . . . . . . . . . . . . . . . 2-2
CHEMICAL SENSITIVITY AND VENTILATION . . . . . . . . . . . . 2-2
Chemical Sensitivity . . . . . . . . . . . . . . . . . . . . . . 2-2
Formaldehyde . . . . . . . . . . . . . . . . . . . . . . . . 2-3
Ventilation . . . . . . . . . . . . . . . . . . . . . . . . . . 2-3
Do Not Smoke . . . . . . . . . . . . . . . . . . . . . . . .2-3
Medical Advice . . . . . . . . . . . . . . . . . . . . . . . . 2-3
ALARMS AND DETECTORS . . . . . . . . . . . . . . . . . . .2-3
Smoke Alarm . . . . . . . . . . . . . . . . . . . . . . . . . 2-3
Carbon Monoxide Alarm . . . . . . . . . . . . . . . . . . . . 2-4
What Is Carbon Monoxide . . . . . . . . . . . . . . . . . . . . 2-4
Symptoms of Carbon Monoxide Poisoning . . . . . . . . . . . . . 2-5
Liquid Propane Gas (LPG) Detector . . . . . . . . . . . . . . . . 2-5
Low Voltage . . . . . . . . . . . . . . . . . . . . . . . 2-6
Detector Test . . . . . . . . . . . . . . . . . . . . . . 2-6
Fire Extinguisher . . . . . . . . . . . . . . . . . . . . . . . 2-6
Flying Cloud 2-1

Safety
Safety Precautions
Many things can be construed as safety related, but
the most important is your common sense. If you are
careless with matches, cigarettes, ammable material,
or any other hazardous material, you surely realize
your potential for accidents is greatly increased.
You will nd many safety recommendations in this
section and throughout the manual. The following
recommendations are the ones we consider to be the
most important.
Transporting of Passengers
The transporting of people in the trailer puts their
lives at risk and may be illegal. The trailer does not
have seat belts, therefore, it is not designed to carry
passengers.
Towing and Weight Distribution
Weight distribution is an important factor when loading
your travel trailer. A recreational vehicle with the cargo
distributed properly will result in efcient, troublefree towing. Refer to Section 7 - Towing for more
information.
Control Sway
Sway or shtailing is the sideways action of a trailer
caused by external forces. Excessive sway of your
travel trailer can lead to the rollover of the trailer and
tow vehicle, resulting in serious injury or death. Refer
to Section 7 - Towing for more information.
Lug Nut Torquing
Making sure wheel mounting nuts (lug nuts) on
trailer wheels are tight and properly torqued is an
important responsibility that trailer owners and users
need to understand and practice. Inadequate and/or
inappropriate wheel nut torque (tightness) is a major
cause of lug nuts loosening in service. Loose lug nuts
can rapidly lead to a wheel separation resulting in
potentially serious safety consequences. See torque
pattern in the Section 8 - Maintenance for tightening
sequence, and follow torque specications in Section
4 - Floor Plans and Specications.
Tire Safety
Appliances and Equipment
The appliances (stove, refrigerator, etc.) and equipment
(hot water heater, furnace, etc.) typically operate on
LP gas. LP gas is ammable and is contained under
high pressure. Improper use may result in a re and/
or explosion. Make sure to follow all instructions and
warnings in this manual as well as those in the specic
owner’s manuals of the appliances and equipment.
Mold
Mold and mold spores exist throughout indoor and
outdoor environments. There is no practical way
to eliminate all mold and mold spores in the indoor
environment, however, the way to control indoor
mold growth is to control moisture. Refer to Section
3 - General Information (Camping) for information on
controlling condensation and molds.
Chemical Sensitivity and Ventilation
Chemical Sensitivity
Immediately after the purchase of your new
recreational vehicle, and sometimes, after it has been
closed up for an extended period of time, you may
notice a strong odor and/or experience a chemical
sensitivity. This is not a defect in your recreational
vehicle. Like your home, there are many different
products used in the construction of recreational
vehicles, such as carpet, linoleum, plywood, insulation,
upholstery, etc. Formaldehyde is also the by-product of
combustion and numerous household products, such
as some paints, coatings, and cosmetics. However,
recreational vehicles are much smaller than your home
and therefore, the exchange of air inside a recreational
vehicle is signicantly less than in a home. These
products, when new or when exposed to elevated
temperatures and/or humidity, may off-gas different
chemicals, including formaldehyde. This off-gassing, in
combination with the minimal air exchange, may cause
you to experience irritation of the eyes, nose, and
throat and sometimes headache, nausea, and a variety
of asthma-like symptoms. Elderly persons and young
children, as well as anyone with a history of asthma,
allergies, or lung problems, may be more susceptible to
the effects of off-gassing.
Properly maintained tires improve the steering,
stopping, traction, and load-carrying capability of your
vehicle. Refer to Section 8 - Maintenance for tire care
and safety information. Also, be sure to read the Tire
Safety Manual Addendum included with your owner’s
packet.
2-2 Flying Cloud

Safety
Formaldehyde
Formaldehyde is a naturally occurring substance
and is an important chemical used widely by industry
to manufacture building materials and numerous
household products. It is also a by-product of
combustion and certain other natural processes.
Thus, it may be present inside the trailer with some
individuals being sensitive to it. Ventilation of the unit
normally reduces the exposure to a comfortable level.
Trace levels of formaldehyde are released from
smoking, cooking, use of soaps and detergents, such
as carpet shampoos, cosmetics, and many other
household products. Some people are very sensitive to
formaldehyde while others may not have any reaction
to the same levels of formaldehyde. Amounts released
decrease over time.
Your Airstream trailer was manufactured using
low formaldehyde-emitting (LFE) wood products,
use of which is typical in the recreation vehicle
industry. Formaldehyde has an important role in
the adhesives used to bind wood products used in
recreation vehicles. The wood products in your trailer
are designed to emit formaldehyde at or lower than
industry guidelines and should not produce symptoms
in most individuals.
While LFE wood products typically do not emit
formaldehyde at a level that would cause symptoms
in most individuals, it is possible, though not likely, for
that to occur when the trailer is not properly ventilated.
Ventilation is an essential requirement for trailer use,
for many reasons. Any effects of formaldehyde can be
greatly reduced by actions such as opening windows,
opening roof vents, running the air conditioner, or
some combination thereof. In addition, the emission of
formaldehyde by these products naturally decreases
rapidly over time.
Airstream strongly suggests that you take measures to
properly ventilate your trailer on a regular basis. If you
have any questions with respect to proper ventilation
of your trailer, please do not hesitate to contact your
dealer or Airstream.
Ventilation
To reduce or lessen exposure to chemicals from offgassing, it is of utmost importance that you ventilate
your recreational vehicle. Ventilation should occur
frequently after purchase and at times when the
temperatures and humidity are elevated. Remember,
off-gassing is accelerated by heat and humidity.
Open windows, exhaust vents, and doors. Operate
ceiling and/or other fans, roof air conditioners, and
furnaces. and use a fan to force stale air out and bring
fresh air in. Decreasing the ow of air by sealing the
recreational vehicle increases the formaldehyde level
in the vehicle’s indoor air.
Do Not Smoke
It is recommended that you do not smoke inside your
recreational vehicle. In addition to causing damage to
your recreationnal vehicle, tobacco smoke releases
formaldehyde and other toxic chemicals.
Medical Advice
Questions regarding the effects of formaldehyde on
your health should be submitted to your doctor or local
health department.
Alarms and Detectors
Smoke Alarm
A smoke detector is provided with your trailer. A manual
pertaining to the detector is included in the paper work
given to you at the dealership. Please read and follow
all care, maintenance, and safety information contained
in the smoke alarm manual.
The smoke alarm will beep once a minute for at least
30 days when the battery is weak. The battery must
immediately be replaced with a fresh one.
WARNING
Alarm battery is shipped deactivated. Check your
alarm for proper battery installation. To activate
battery, new Airstream owner must install included
battery to proper orientation.
WARNING
Smoke alarms have a limited life. The unit should
be replaced immediately if it is not operating
properly. You should always replace a smoke alarm
after 10 years from the date of purchase. Write the
purchase date on the space provided on the back
of unit.
If service is required or you have not received a smoke
alarm users manual, please contact the Consumer
Affairs Division at 800-323-9005.
2
Flying Cloud 2-3

Safety
Carbon Monoxide Alarm
Carefully read and understand the contents of this
instruction manual before using the alarm.
Store the manual in a safe place for future reference.
Pay particular attention to the safety warnings. Pass
the manual on to any subsequent users of the alarm.
If you have not received the Owner’s manual for the
Carbon Monoxide Alarm, please contact Airstream
factory Customer Service or Quantum Group Inc. at
1-800-432-5599
WARNING
Failure to replace this product by the “REPLACE
BY DATE” printed on the alarm cover may result in
death by Carbon Monoxide poisoning. Replace By
Date is six (6) years from the date of manufacture.
WARNING
Activation of your CO alarm’s audible horn
indicates the presence of carbon monoxide (CO)
that can kill you. Leave the area immediately!
NOTE
This carbon monoxide alarm is designed for indoor
use only. Do not expose to rain or moisture. Do not
knock or drop the alarm. Do not open or tamper
with the alarm as this could cause malfunction. The
alarm will not protect against the risk of carbon
monoxide poisoning when the batteries are dead or
missing. The alarm will only indicate the presence
of carbon monoxide gas at the sensor. Carbon
monoxide gas may be present in other areas.
Important Safety Precautions:
• Carbon monoxide is produced by the incomplete
combustion of fuels such as wood, charcoal, coal,
heating oil, parafn, gasoline, natural gas, propane,
butane, etc.
• Ideally, it is recommended that a carbon monoxide
alarm should be installed in or near every room
that has a fuel burning appliance such as any room
heaters, water heaters, cookers, grills, etc.
• Ensure that the alarm horn can be heard by all those
who are intended to hear it. Seek medical help if it
is suspected that a user of the RV is suffering from
carbon monoxide poisoning.
WARNING
This product is intended for use in ordinary, indoor
locations of family living units. It is not designed
to measure compliance with occupational safety
and health administration (OSHA) commercial or
industrial standards. Individuals who are at special
risk from carbon monoxide exposure by reason of
age, pregnancy, or medical condition may consider
using warning devices which provide audible and
visual signals for carbon monoxide concentration
under 30 ppm. If in doubt, consult your medical
practitioner.
This Carbon Monoxide Alarm Is Not:
• Designed to detect smoke, re, or any gas other than
carbon monoxide.
• To be seen as a substitute for the proper servicing of
fuel-burning appliances.
• To be used on an intermittent basis, or as a portable
alarm for spillage of combustion products from fuelburning appliances.
• If the alarm sounds, make sure to investigate the
problem. Ignoring the alarm may result in sickness,
injury or death. (CO may be present even if nothing
is seen or smelled by the user.)
• Room spaces should be well ventilated when
household cleaning supplies are used as these may
cause a false alarm.
• Alarm should be tested once per week. If further
details are required, which do not appear in this
manual, contact BRK Brands Inc. First Alert.
What Is Carbon Monoxide
Carbon monoxide (CO) is a highly poisonous gas that
is released when fuels are burned. It is invisible, has
no smell, and is therefore, very difcult to detect with
the human senses. Under normal conditions, in a room
where fuel-burning appliances are well maintained and
correctly ventilated, the amount of carbon monoxide
released into the room by appliances is not dangerous.
These fuels include: wood, coal, charcoal, oil, natural
gas, gasoline, kerosene, and propane. Common
appliances are often sources of CO. If they are not
2-4 Flying Cloud

properly maintained, are improperly ventilated, or
malfunction, CO levels can rise quickly. CO is a real
danger in air-tight trailers with added insulation, sealed
windows, and other weatherproong can trap CO
inside.
The following conditions can result in potentially
dangerous CO situations:
1. Excessive spillage or reverse-venting of fuel-
burning appliances caused by outdoor conditions,
such as:
• Wind direction and/or velocity, including high
gusts of wind. Heavy air in the vent pipes (cold/
humid air with extended periods between
cycles).
• Negative pressure differential resulting from sue
of exhaust fans.
• Simultaneous operation of several fuel-burning
appliances competing for limited internal air.
• Vent-pipe connections vibrating loose from
clothes dryers, furnaces, or water heaters.
• Obstructions in or unconventional vent-pipe
designs which can amplify the above situations.
2. Extended use of un-vented fuel burning devices.
3. Temperature increase that can trap exhaust gases
near the ground.
Symptoms of Carbon Monoxide Poisoning
The following symptoms are related to CO
POISONING:
• Mild Exposure - Slight headache, nausea, vomiting,
fatigue (u-like symptoms).
• Medium Exposure - Throbbing headache, drowsiness,
confusion, fast heart rate.
• Extreme Exposure - Convulsions, unconsciousness,
heart and lung failure. Exposure to carbon monoxide
can cause brain damage and/or death.
Safety
WARNING
Test units used in RVs after the vehicle has been in
storage, before each trip, and once a week while in
use. Failure to test units used in RV’s as described
may remove your protection.
Liquid Propane Gas (LPG) Detector
2
This alarm has a seven year life; see end-of-life
notication in LPG detector manual. Please read entire
detector manual before operating unit.
The LPG detector is located in the kitchen area. LPG
is a mixture of gases produced and sold commercially
as a fuel for heating and cooking appliances. LPG is
highly ammable and, as a result, can be explosive
if ignited under certain circumstances. LPG is
heavier than air and, if conned in a closed space,
will accumulate close to the oor. The LPG detector
is designed to alarm at less than 25% of the legal
explosive limit. It will provide a visual and audible alarm
by sounding an alarm every 5 seconds and lighting the
red LED.
Your LPG detector is wired directly to your trailer
battery and incorporates a 1 amp, in-line fuse. It has no
internal battery backup. In normal stand-by mode, the
LED indicator will be green.
WARNING
Many causes of reported CARBON MONOXIDE
POISONING indicate that while victims are aware
that they are not well, they become so disoriented
that they are unable to save themselves by either
exiting the building or calling for assistance. Also
young children and pets may be the rst to be
affected.
Flying Cloud 2-5

Safety
Low Voltage
The operating voltage for the detector is 12 VDC. The
actual voltage supplied to the detector in a recreational
vehicle may drop below the minimum 8 VDC. The
detector provides the user with a low voltage warning
before reaching that level and will provide additional
distinct, clear warnings and alarms after the 8 VDC
level is reached. However, if available power supplied
to the unit is below the operating voltage of 8 VDC, the
detector will not detect gas or provide protection against
dangerous levels of LPG.
WARNING
Activation of this detector indicates the possible
presence of LPG, which can cause an explosion
and/or re, causing serious injury or death. This
normally indicates a leak in the LPG installation
or an LPG appliance. Extinguish all open ames,
open your windows and door, and evacuate the unit
immediately. Do not activate any electrical switch.
Turn off the LPG at your gas tank(s). Do not re-enter
your unit until a qualied repair technician has
corrected the problem and certied the system as
safe.
WARNING
Have a qualied technician check your LPG system
annually or if you detect any signs of leaks or
malfunctions.
NOTE
Refer to Section 5 - Interior and Section 6 -
Exterior for additional LPG warnings and safety
information.
Fire Extinguisher
The re extinguisher, just inside your forward door,
should be checked for charge on a regular basis.
Make sure your family, especially the cook, knows
how to release the extinguisher storage bracket, and
how to properly operate the extinguisher. Check with
your local re department for professional advice on
its operation and use if you nd the directions on the
extinguisher unclear. They will be able and willing to
assist you and your family.
WARNING
It is not recommended that the detector be
disconnected from the battery during periods of
storage. There is a small heater on the sensor of
the device that burns away impurities in the air
during periods of normal use. During periods when
power is interrupted, impurities can build up on the
sensor. When power is returned to the detector,
the detector alarm may activate until the impurities
are burned off. This could take a number of hours,
during which time the alarm will be constantly on.
Detector Test
The Test/Rest button is used to verify proper alarm
function. Executing the test function sounds the alarm
and lights up the red LED. The test will sound the
alarm twice, with four beeps in 1 second, followed by
5 seconds of silence. By pressing the button, you can
verify that the alarm sounds and the LED functions
properly.
2-6 Flying Cloud

RA-400 Patcher for UD
Section 3
GENERAL INFORMATION
PAGE
GENERAL INFORMATION . . . . . . . . . . . . . . . . . . . . . .3-1
LIMITED WARRANTY POLICY . . . . . . . . . . . . . . . . . . 3-3
Warranty Coverage . . . . . . . . . . . . . . . . . . . . . . 3-3
Limitation of Implied Warranties . . . . . . . . . . . . . . . . . .3-3
Items Not Covered . . . . . . . . . . . . . . . . . . . . . . . 3-3
Disclaimer of Incidental and Consequential Damages . . . . . . . . . 3-4
Obtaining Warranty Service . . . . . . . . . . . . . . . . . . . 3-4
Dealer Representations Excluded . . . . . . . . . . . . . . . . . 3-4
Warranty Transfer . . . . . . . . . . . . . . . . . . . . . . .3-4
Changes In Design . . . . . . . . . . . . . . . . . . . . . . 3-5
Statute Of Limitations . . . . . . . . . . . . . . . . . . . . .3-5
Explanation Of Airstream Limited Warranty . . . . . . . . . . . . . 3-5
Exclusions . . . . . . . . . . . . . . . . . . . . . . . . . . 3-5
Normal Wear . . . . . . . . . . . . . . . . . . . . . . 3-5
Accident . . . . . . . . . . . . . . . . . . . . . . . . 3-5
Abuse . . . . . . . . . . . . . . . . . . . . . . . . . 3-5
3
Exposure . . . . . . . . . . . . . . . . . . . . . . . . 3-5
Overload . . . . . . . . . . . . . . . . . . . . . . . . 3-5
Chemical Gassing . . . . . . . . . . . . . . . . . . . . 3-6
SERVICE . . . . . . . . . . . . . . . . . . . . . . . . . . . 3-6
Reporting Safety Defects . . . . . . . . . . . . . . . . . . . . 3-6
CAMPING . . . . . . . . . . . . . . . . . . . . . . . . . . . 3-6
Suggested Pre-Travel Check List . . . . . . . . . . . . . . . . . 3-6
Interior . . . . . . . . . . . . . . . . . . . . . . . . . 3-6
Exterior . . . . . . . . . . . . . . . . . . . . . . . . . 3-7
Flying Cloud 3-1

General Information
Table of Contents (Continued)
Trailer Equipment and Accessories . . . . . . . . . . . . . . 3-7
Motoring Essentials . . . . . . . . . . . . . . . . . . . . 3-7
Overnight Stop . . . . . . . . . . . . . . . . . . . . . . . . 3-7
Extended Stay . . . . . . . . . . . . . . . . . . . . . . . .3-8
City Water Hook-Up . . . . . . . . . . . . . . . . . . . . . . 3-8
Waste Water System . . . . . . . . . . . . . . . . . . . . . . 3-9
Things Not To Put Into Toilet Or Drains:. . . . . . . . . . . . . . . 3-9
Shoreline Power Supply . . . . . . . . . . . . . . . . . . . .3-9
Remote Generator Hookup . . . . . . . . . . . . . . . . . . . 3-9
Cable TV Inlet . . . . . . . . . . . . . . . . . . . . . . . . 3-9
Section 3
General Information
Winter Traveling . . . . . . . . . . . . . . . . . . . . . . . . 3-9
Effects Of Prolonged Occupancy . . . . . . . . . . . . . . . . 3-10
Tips To Controlling Condensation . . . . . . . . . . . . . 3-10
Molds . . . . . . . . . . . . . . . . . . . . . . . . . . . 3-11
Contributing Factors To Mold Growth . . . . . . . . . . . . 3-11
Inhibiting Mold Growth . . . . . . . . . . . . . . . . . . 3-11
Safety . . . . . . . . . . . . . . . . . . . . . . . . . . . 3-11
3-2 Flying Cloud

General Information
Limited Warranty Policy
Warranty Coverage
Airstream Inc. (“Airstream”) warrants that it will
repair or replace defects in material or workmanship
in any components of a new Airstream trailer
purchased from an authorized Airstream dealer in
the United States or Canada for a period of twentyfour (24) months from the date the trailer is rst
delivered to the original retail purchaser. In order
to obtain coverage under this Limited Warranty,
you must notify an authorized Airstream dealership
or Airstream of the warrantable defect no later
than ten (10) days following expiration of this
Limited Warranty. Airstream’s obligation to repair
or replace defective materials or workmanship is
the sole obligation of Airstream under this Limited
Warranty. Airstream reserves the right to use new or
remanufactured parts of similar quality to complete
any warranty work.
Limitation of Implied Warranties
Implied warranties arising under applicable law, if
any, including but not limited to implied warranties of
merchantability or tness for a particular purpose, are
hereby limited in duration to the term of this limited
warranty. All other warranties, express or implied,
are hereby disclaimed by Airstream. Some states do
not allow limitations on how long an implied warranty
lasts, so the above limitations may not apply to you.
Items Not Covered
This Limited Warranty does not provide coverage for
any of the following:
1. Tires, batteries, stereo, television, range/stove,
furnace, refrigerator, water heater, microwave,
generator, and other materials, parts, and
components warranted by persons or entities
other than Airstream. Please refer to the
warranties of component manufacturers for terms
and conditions of coverage;
2. Any part or component of the trailer that was not
manufactured or installed by Airstream;
3. Normal deterioration due to wear or exposure,
including but not limited to rust, corrosion,
oxidation, and cosmetic blemishes;
4. Normal maintenance and service items, including
but not limited to light bulbs, fuses, lubricants,
sealants and seals, door adjustments, and
awning tension;
5. After-market equipment or accessories installed
on the trailer after completion of manufacture by
Airstream, or any defects or damage caused by
such items;
6. Trailers not purchased through an authorized
dealer of Airstream trailers, and trailers purchased
directly or indirectly through auction, salvage,
repossession, or other non-customary sale means;
7. Defects or damage caused by, in whole or in part,
or in any way related to:
a. Accidents, misuse (including off-road use), or
negligence.
b. Failure to comply with the instructions set forth
in any owner’s manual provided with the trailer.
c. Alteration or modication of the trailer, except
such alterations or modications approved in
writing by Airstream.
d. Acts of God or other environmental conditions,
such as lightning, hail, salt, or other chemicals
in the atmosphere.
e. De-icing agents or other chemicals applied to
the trailer.
f. Failure to properly maintain or service the
trailer, including, but not limited to, the maintenance of lubricants, sealants, and seals.
g. Condensation and the results of condensa-
tion, including water damage and the growth of
mold or mildew. Mold and mildew are natural
growths, given certain environmental conditions, and are not covered by the terms of this
Limited Warranty.
h. Use of the trailer other than for temporary rec-
reation purposes, including, but not limited to,
use of the trailer for residential, disaster relief,
commercial, or rental purposes.
i. The addition of weight to the trailer that causes
the trailer’s total weight to exceed applicable
trailer weight ratings, or addition of weight
causing improper distribution of the weight of
the trailer.
j. Selection, use, and operation of any hitch as-
sembly.
k. Failure to seek and obtain repairs in a timely
manner.
l. Failure to use reasonable efforts to mitigate
damage caused by defects.
3
Flying Cloud 3-3

General Information
m. Failure to properly ventilate the trailer.
n. Improper electric power supply or improper
vehicle hookup to other facilities.
o. Acts or omissions of any person or entity other
than Airstream.
Disclaimer of Incidental and Consequential Damages
Airstream hereby disclaims any and all incidental and
consequential damages arising out of or relating to
the trailer, including expenses such as transportation
to and from vehicle dealerships and Airstream
repair facilities, loss of time, loss of pay, loss of use,
inconvenience, commercial loss (including lost prots),
towing charges, bus fares, vehicle rental, service call
charges, gasoline expenses, incidental charges such
as telephone calls and facsimile transmissions, and
expenses for lodging. This disclaimer is independent
of any failure of the essential purpose of any
warranties provided with a trailer, and shall survive
any determination that a warranty failed of its essential
purpose. Some states do not allow the exclusion or
limitation of incidental or consequential damages, so
the above limitation or exclusion may not apply to you.
Obtaining Warranty Service
In order to obtain warranty service under this Limited
Warranty, the owner must do all of the following:
1. Owner and dealer representative must complete
and return the Customer Performance Checkout
within 10 days from delivery of the trailer;
2. Notify Airstream or one of its authorized,
independent dealers, of any claimed defect within
the warranty period or 10 days thereafter;
3. Provide notication of a defect within 10 days of
discovery of that defect;
4. Promptly return the trailer to an authorized
Airstream dealer or Airstream for repairs.
If you believe a defect covered by this Limited Warranty
still exists after an attempted repair by an authorized
Airstream dealer, you must contact Airstream at the
following address, specifying:
1. The complete serial number of the trailer;
2. The date of original purchase and the date of
original delivery;
AIRSTREAM, INC.
419 West Pike Street
P.O. Box 629
Jackson Center, Ohio 45334-0629
Attention: Owner Relations Department
Airstream may direct you to an authorized Airstream
dealer, or may request that you bring your trailer to the
Airstream factory in Jackson Center, Ohio for repairs.
Airstream does not control the scheduling of repairs
at its authorized Airstream dealers, and repairs at the
Airstream factory may not be immediately available.
Therefore, you may encounter delays in scheduling
repairs and/or completion of repairs. All costs
associated with transporting the trailer for any warranty
service shall be the sole responsibility of the owner.
Dealer Representations Excluded
The entire Limited Warranty provided by Airstream is
set forth herein. Airstream will not be responsible for
any additional representations or warranties made
by any person or entity other than Airstream, and
Airstream’s obligations are solely as set forth in the
terms and conditions of this Limited Warranty.
Warranty Transfer
This Limited Warranty is transferable to subsequent
owners for the remaining duration of the warranty
period, upon approval from Airstream. Transfer of this
Limited Warranty will only be approved by Airstream
upon all of the following:
1. Airstream’s receipt of a completed transfer
application form;
2. The payment of a $250.00 processing fee to
Airstream; and
3. The completion of an inspection of the condition
of the trailer, at the owner’s expense, by an
authorized Airstream dealer in accordance with
Airstream’s required procedure and Airstream’s
receipt of a written report as to the results of such
inspection.
Transfer application forms are available from
your dealer or Airstream’s Service Administration
Department.
3. The name of the selling dealer; and
4. The nature of the problem and the steps or service
which have been performed.
3-4 Flying Cloud

General Information
Changes In Design
Airstream reserves the right to make changes in design
and improvements upon its products from time to time,
without imposing upon itself any obligation to install
additional features in your trailer.
Statute Of Limitations
No action may be brought against Airstream for
breach of this Limited Warranty, any applicable implied
warranty, or for any other claim arising out of or relating
to an Airstream trailer, more than thirty (30) days after:
(1) expiration of the twenty-four (24) month Limited
Warranty period; or (2) expiration of the ten (10) day
notice period that follows expiration of the Limited
Warranty period, if such notice is given.
This warranty gives you specic legal rights, and you
may also have other rights that vary from state to state.
Explanation Of Airstream Limited Warranty
The Airstream Limited Warranty is detailed on a
Warranty Card. It is lled out by the dealer and
presented to the owner during delivery of a new unit.
The Limited Warranty must be presented to a dealer to
obtain warranty service. It should be kept in the trailer
during the warranty period.
Exclusions
Normal Wear
Items such as curtains, upholstery, oor coverings,
window, door, and vent seals will show wear or may
even wear out within the 2 year warranty period,
depending upon the amount of usage, weather, and
atmospheric conditions.
Accident
We strongly urge our dealers and customers to inspect
the trailer upon receipt of delivery for any damage
caused by accident while being delivered to the dealer,
or while it is on the dealer’s lot. Damage of this nature
becomes the dealer or customer’s responsibility upon
acceptance of delivery, unless Airstream is notied
and the person making the delivery veries the
damage. Glass breakage, whether obviously struck or
mysterious, is always accidental and covered by most
insurance policies.
Abuse
Lack of customer care and/or improper maintenance
will result in early failure for which Airstream cannot be
held responsible.
Exposure
Not unlike a car, the steel parts of a trailer can and will
rust if subjected to prolonged exposure to moisture, salt
air, or corrosive air-borne pollutants without repainting.
Aluminum oxidizes when unprotected under similar
conditions, and renery chemicals of a sulfurous nature
are harmful to nishes if not washed off periodically.
Extremely hot or direct sunlight will deteriorate rubber
and fade curtains and upholstery. Conditions of this
nature, although they may be normal for the area,
are beyond Airstream’s control and become the
responsibility of the owner.
It is the responsibility of the owner to take such
preventative measures as are necessary to maintain
the exterior caulking and sealer of your unit. It is the
responsibility of the owner to use reasonable, prudent
care to prevent foreseeable secondary damage from
rain, plumbing leaks, and the natural accumulation
of moisture in your unit, such as a delaminated oor;
stained upholstery, carpeting, or drapes; mold formation
and growth; furniture damage, etc. Mold is a natural
growth, given certain environmental conditions, and is
not covered by the terms of the Limited Warranty.
Overload
Damage due to loading, either beyond capacity or to
cause improper towing because of improper balance, is
beyond Airstream’s responsibility. The Airstream trailer
is engineered to properly handle the gross vehicle load
rating on the certication label. Load distribution has
a denite effect upon the towing characteristics and
attitudes of the trailer. Level hitch installations are a
necessity, and very important on a tandem axle trailer.
There are limits to the amount of load that can be
safely transported, depending upon speed and road
conditions, and reasonable cause to believe these
factors have been exceeded could void the Airstream
warranty. For additional information on the loading
of your trailer, consult your Owner’s Manual or gross
vehicle weight rating plate.
The axle is manufactured to a tolerance of 1-degree
camber and 1/8 in. toe-in. These tolerances will only
change if the trailer is subjected to abuse, such as
dropping off a sharp berm, striking a curb, or hitting
a deep hole in the road. Such damage could be
considered as resulting from an accident, of which risks
are not covered under the warranty. Abnormal tire wear
and/or wheel alignment resulting from such damage is
not covered under the terms of the warranty.
3
Flying Cloud 3-5

General Information
Chemical Gassing
Chemical gassing is not a “Defect” in your recreational
vehicle and is not covered by the Limited Warranty.
Please follow the recommendations in this manual to
address this concern.
Service
Before leaving the factory, every vital part of the trailer
is tested for performance. Each test is signed and
certied by an inspector. After the trailer arrives on your
dealer’s lot, all vital parts and systems are again tested.
When you take delivery of your new trailer, you will
receive a complete check out.
At that time, a specied list of performance checks
on your trailer equipment will be conducted, and any
deciencies you have experienced since taking delivery
will be corrected.
Please contact your dealer if your trailer needs service.
Major service under your Airstream Limited Warranty is
available through our nationwide network of Airstream
Dealer Service Centers. An up-to-date list of Dealer
Service Centers will be sent to you with an Owner’s
Survey shortly after your trailer is delivered. Our web
site, www.Airstream.com also has a dealer locator on it.
This list is current as of the date of this publication.
Occasionally, dealerships change, or new dealers are
added who may not appear on this list. For this reason,
it is suggested that you contact your local dealer from
time to time for an updated list. Additional copies are
available if you need them. All centers operate on an
appointment basis for the utmost efciency.
When you require service for your trailer from the
Airstream Factory Service Center, or a Certied Dealer
Service Center, please contact the service manager
for an appointment, and inform him if you are unable
to keep the appointment date, or wish to change it.
Service may be arranged at the Factory Service Center
by contacting the Service Coordinator at:
Airstream Factory Service Center,
P.O. Box 629, 419 W. Pike Street,
Jackson Center, Ohio 45334-0629
Phone: (937) 596-6111 or (877) 596-6111
Reporting Safety Defects
If you believe that your vehicle has a defect which
could cause a crash or could cause injury or death, you
should immediately inform the National Highway Trafc
Safety Administration (NHTSA), in addition to notifying
Airstream Inc.
If NHTSA receives similar complaints, it may open an
investigation, and if it nds that a safety defect exists
in a group of vehicles, it may order a recall and remedy
campaign. However, NTHSA cannot become involved
in individual problems between you, your dealer, or
Airstream Inc.
To contact NHTSA, you may either call the Vehicle
Safety Hotline toll-free at 1-888-327-4236 (TTY: 1-800424-9153), go to http://www.safercar.gov, or write to:
Administrator,
NHTSA,
1200 New Jersey Avenue, S.E.,
Washington, DC 20590.
You can also obtain other information about motor
vehicle safety from http://www.safercar.gov.
Camping
Suggested Pre-Travel Check List
Interior
1. Turn off water pump switch.
2. Check battery water level.
3. Close windows and vents.
4. Lock all interior cabinet doors.
5. Latch refrigerator door. (Seal containers rst)
6. Hold down or stack securely all loose, hard, and
sharp objects.
7. Fasten sliding and foldette doors.
8. Drain toilet bowl.
9. Turn off interior lights.
10. Set table in upright position.
11. Pull up or retract step.
12. Lower blinds.
13. Secure and lock main door.
3-6 Flying Cloud

General Information
Exterior
1. Disconnect and stow the electrical hookup cord,
and the sewer (ush out) and water hookup hoses.
2. Turn off gas at LP tanks.
3. Retract stabilizing jacks.
4. Check hitch for proper attachment.
5. Check safety chains and breakaway switch cable.
6. Fully retract hitch jack. Remove and stow jack
stand or wood block.
7. Check clearance and stoplights.
8. Check lug nuts.
9. Check tires for correct pressure.
10. Check that TV antenna is properly stowed.
11. Adjust tow vehicle mirrors.
12. Pull forward about 50 ft, test brakes, and check site
for forgotten objects and cleanliness.
Trailer Equipment and Accessories
1. Water hose, 5/8 in. high pressure, tasteless,
odorless, non-toxic, (2-25 ft. sections)
2. Y connection -- water hose.
3. Sewer hose with clamp.
4. Drain cap with hose drain.
5. Holding tank cleaner and deodorizer.
6. Power cord adapter, 30-amp capacity.
7. 50 ft. electric cord, 12-3 wire, 30-amp capacity.
8. 25 ft. electric cord, 10-3, 30-amp capacity.
9. Woodblocks for leveling.
10. Wheel chocks.
11. Hydraulic jacks.
12. Cross-type lug wrench and a torque wrench.
13. Quality tire gauge.
14. Emergency road warning triangle.
Motoring Essentials
1. Display the tow vehicle and trailer registration
properly.
2. Carry driver’s license.
3. In Canada, bring along a non-residence liability
insurance card and your birth certicate.
4. In Mexico, you must have special auto insurance.
5. Carry an extra set of the ignition and truck keys in
a separate pocket, or in your wallet.
6. Keep an operating ashlight with fresh batteries in
the glove compartment.
7. Pack the trunk so that you can reach the tools and
spare tire without completely unpacking.
8. Keep sharp or hard articles securely packed,
wherever they may be.
9. Do not pack things in the passenger seating area.
You will need the maximum space for comfort.
10. Wear easy wash, drip-dry traveling clothes.
11. Do not make your vacation trips a mileage
marathon. Stop and relax frequently.
12. Carry a rst-aid kit.
13. Carry your pet’s dish, food, leash, and health and
registration papers.
Overnight Stop
Airstream owners have parked virtually in every place
imaginable, from lling stations to farmlands. In time,
you’ll develop a knack for spying wonderful little
roadside locations by turning off the main highway and
exploring.
There are many modern parks, including State, County
and Federal parks, with good facilities where you
might obtain hookups of electrical, water, and sewer
connections. Directories are published which described
in detail these parks and tell what is available in the
way of services and hookups.
On overnight or weekend trips, chances are you will
not use up the capacity of the sewage holding tank,
deplete the water supply, or run down the batteries that
supply the 12-volt current.
On a longer trip, when you have stayed where sewer
connections and utility hookups were not available, it
will be necessary for you to stop from time to time to
dispose of the waste in the holding tank and replenish
the water supply. Many gas stations (chain and
individually owned) have installed sanitary dumping
stations for just this purpose. Booklets are available
that list these dumping stations.
When stopping for the night, your Airstream is built
to be safely parked in any spot that is relatively level
and where the ground his rm. Your facilities are with
you. You are self-contained. Unless the tow vehicle
is needed for transportation, it is not necessary to
unhitch.
3
Flying Cloud 3-7
General Information
WARNING
At each campsite, make sure you have not parked
in such a manner as to block the operation of the
escape window by being too close to trees, fences,
or other impediments. Scenic views are one reason
for traveling, but don’t park so the beautiful lake or
steep cliff is just outside your escape window.
Choose the most level parking spot possible.
Stabilizing jacks or blocks may not be required for
an overnight stay. However, if you put the jack pad
on the hitch jack and run the hitch jack down to take
the weight off the tow vehicle’s springs, it will provide
some stability. If you must park on a slope, park facing
downhill. It is easier to level the trailer this way.
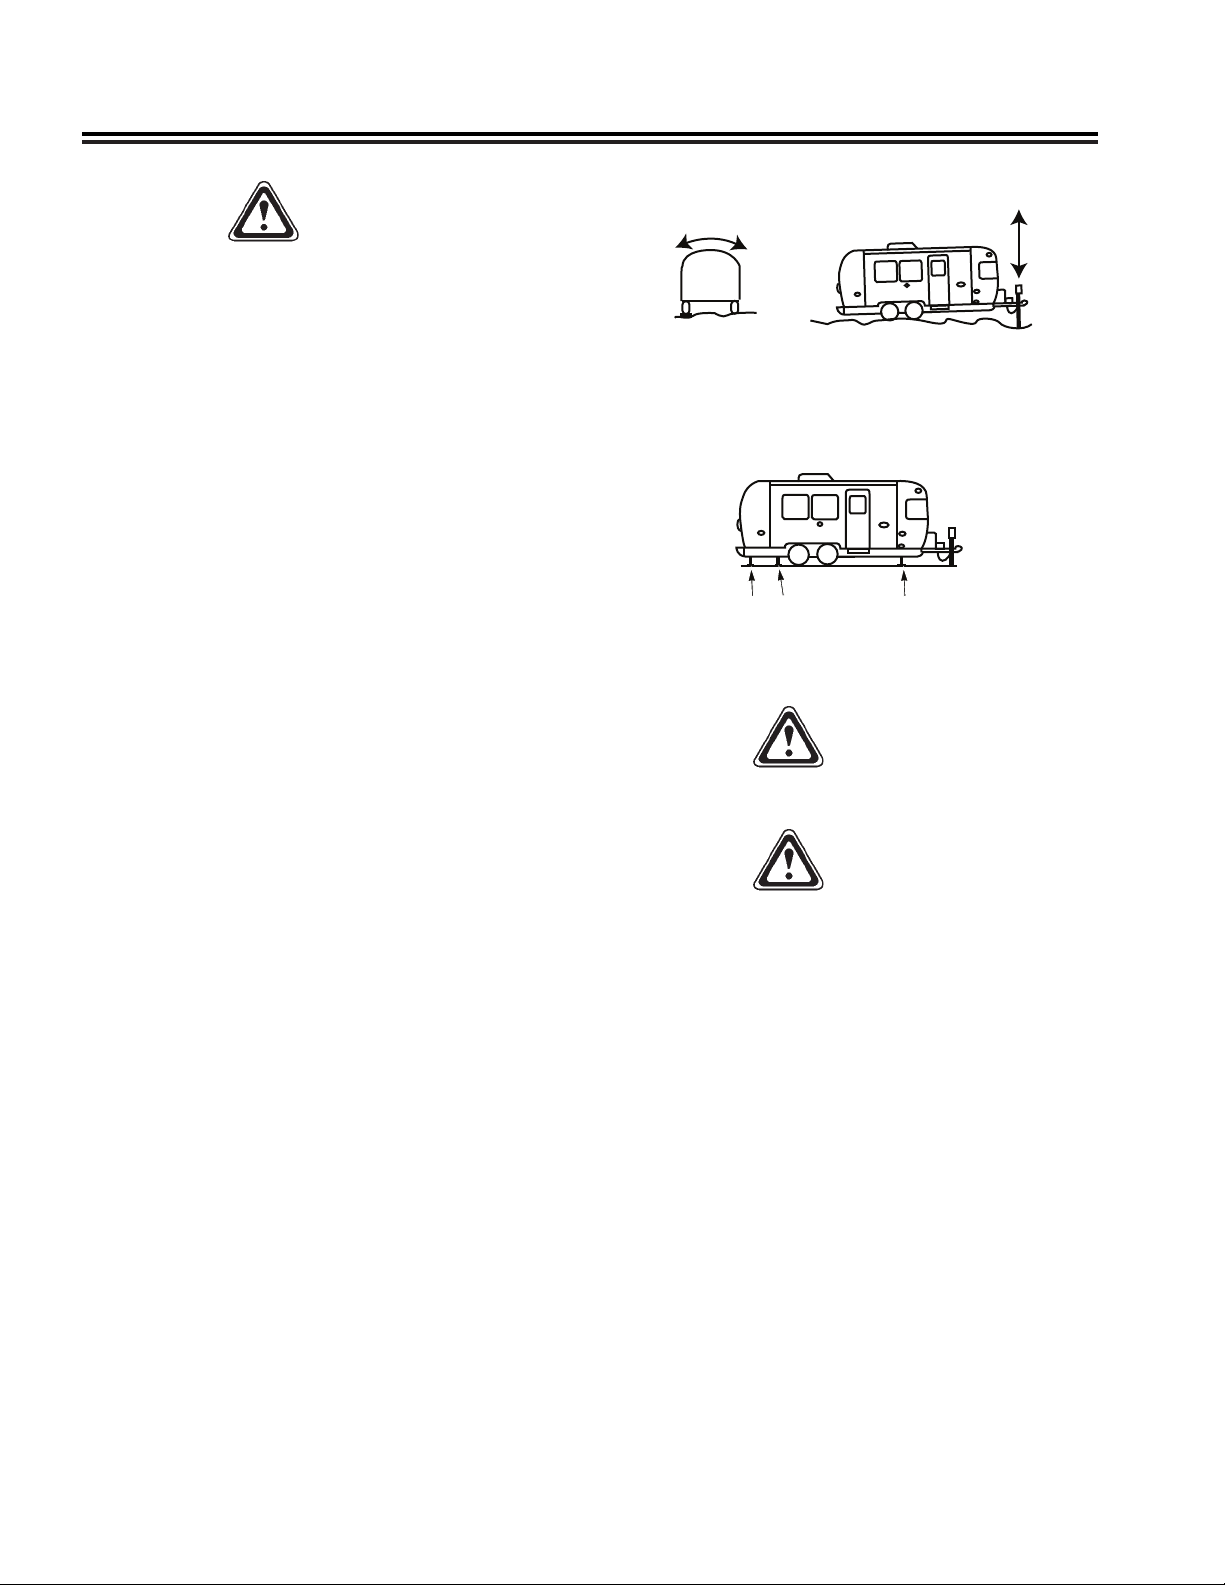
Leveling
1
1. Side to Side
2. Front to Rear
Jack Locations
2
039
All you need to do to enjoy the self-contained luxury
of your Airstream is to turn on the LPG and light any
appliance pilot lights.
Before moving on, check your campsite, both for
cleanliness and also, to be sure you haven’t left
anything behind. Turn off the gas supply and make
sure everything is properly stowed. Use your pre-travel
check list and you are ready for more travel adventure.
Extended Stay
Making a long trip in your Airstream is not very different
from making a weekend excursion. Since everything
you need is right at hand, you are at home wherever
you go. When packing for an extended trip, take
everything you need, but only what you need.
When you plan to stay in the same place for several
days, weeks or months, you will want your trailer to
be as level and steady as possible. Check the attitude
with a small spirit level set on the inside work counter
or the trailer hitch A-frame (see diagram that follows
under Leveling). If a correction is necessary, you must
level from side to side rst. This can he done easily
by backing the trailer up onto one or more 2x6 boards
(see diagram that follows under Leveling). We do not
recommend placing tires in a hole for leveling.
Level from front to rear by disconnecting the hitch from
the tow vehicle, putting the jack pad under the hitch
jack, and adjusting the jack up or down until you are
level. Block or chock the wheels to keep the trailer
from rolling. Use stabilizing jacks at all four corners, as
shown in the diagram, to eliminate the natural spring
action of the axles.
112
1. Stabilizing Jack Location
2. Lifting Jack Location
040
WARNING
Stabilizing jacks should only be used to stabilize
trailer. Do not use jacks to lift the trailer.
WARNING
Whenever the trailer must be lifted with a jack, as
when changing a tire or leveling on very rough
terrain, always place the lifting jack under the
main frame rail. A label is provided to indicate the
proper position for the jack. Never use stabilizing
jacks to lift the trailer.
Refer to Section 8, page 8-7 for further information
on jacking.
City Water Hookup
Simply connect hose to your trailer’s internally
regulated (65 PSI) City Water Inlet and the source,
open the valve, and you have pressurized faucets,
toilet, and water heater. Open faucets to purge trapped
air from the water system. Allow the water heater to
ll before lighting. Refer to Plumbing in Section 5 -
Interior for more information.
3-8 Flying Cloud
General Information
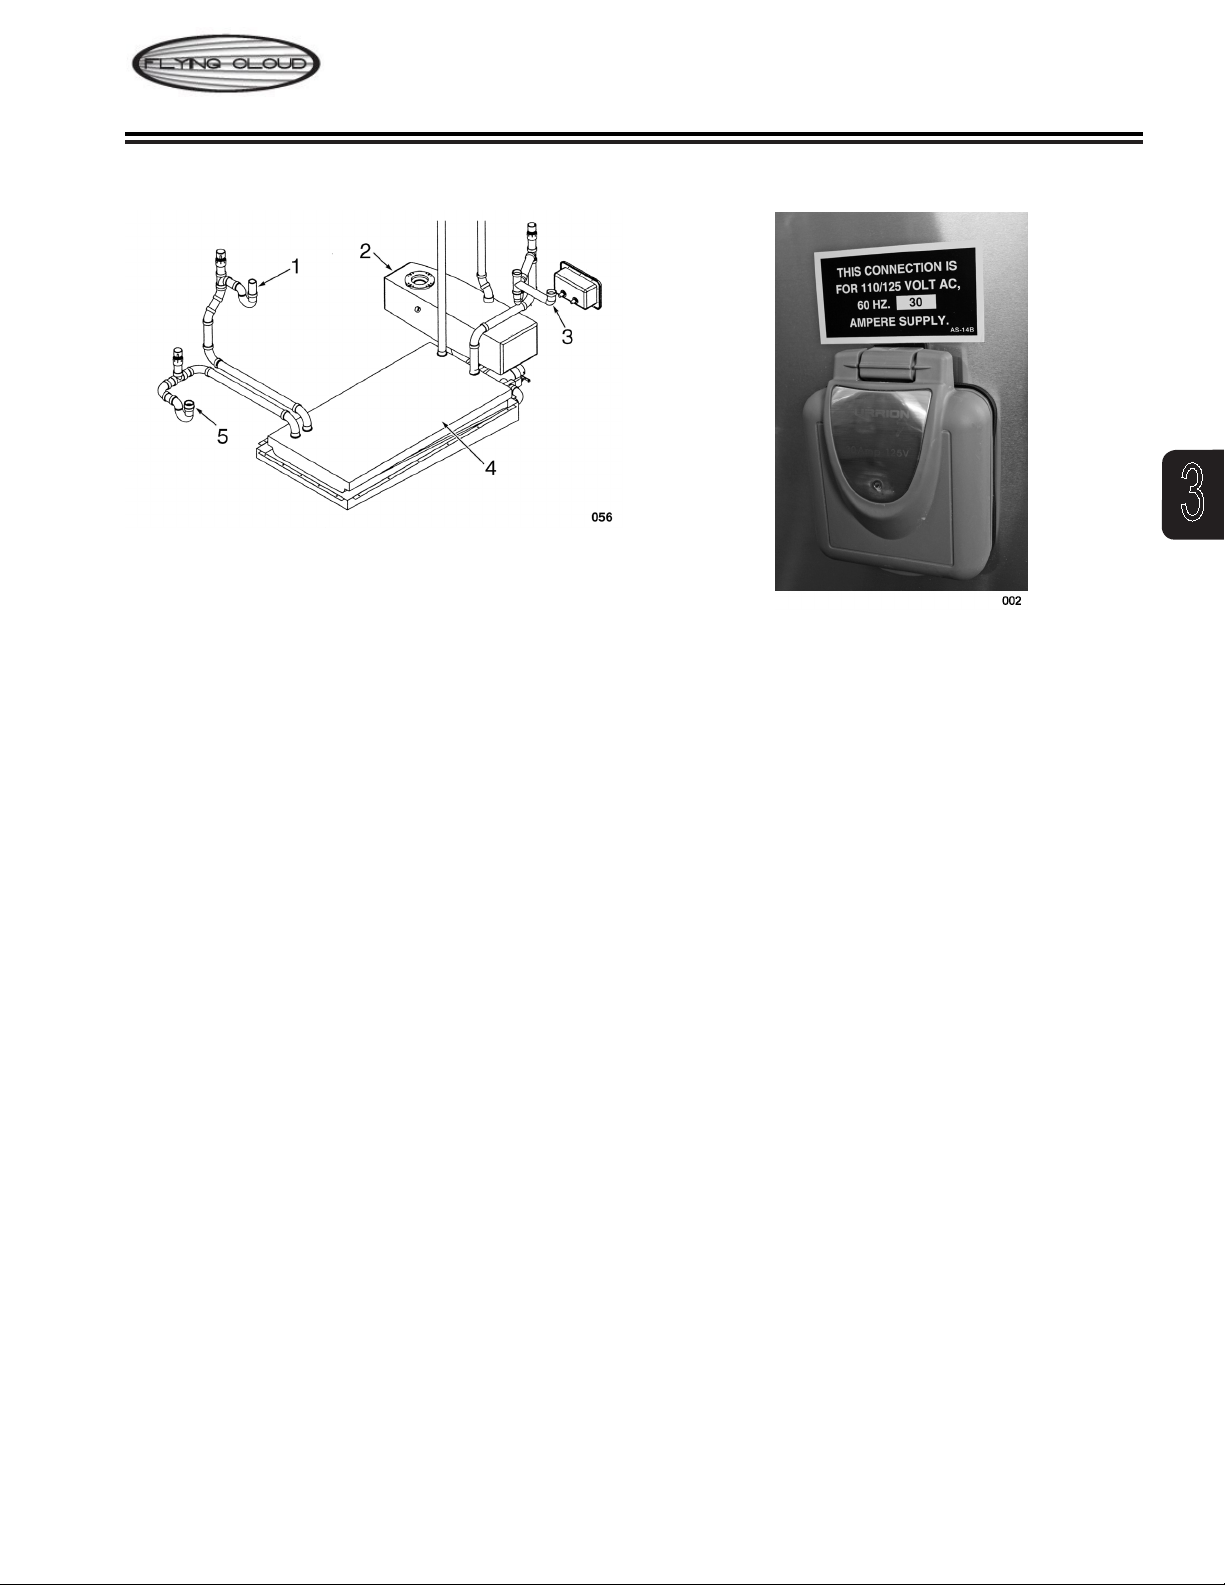
Waste Water System
1. Lavatory Drain
2. Black WaterTank (Toilet)
3. Galley Drain
4. Gray Water Tank
5. Shower Drain
The main parts of the waste water system are the
toilet, dual holding tanks, and tank dump valves (See
Section 8 - Maintenance for dump valve information).
The system is designed to provide complete selfcontained toilet facilities, while on the road or parked,
without being connected to a sewage line. It may also
be used in the stationary position while connected to a
sewage hose.
Keep the dump valves closed with either method and
empty the tanks when they are nearly full. The idea is
to send a large volume of water through the tanks and
hose at the same time to oat solids away.
After the sewage tank has been emptied, close the
gate valves and put approximately ve gallons of water
in the sewage holding tank. This will help prevent
solids from building up in the sewage holding tank. The
addition of a deodorizing agent like Aqua-Kem will help
prevent odors.
Shoreline Power Supply
3
The Power Cord hookup is located on the side of the
trailer. The cord may be stored in the rear exterior
compartment. The power cord is plugged into the trailer
receptacle and the City Power Service.
NOTE
Use a minimum 10/3 cord with a maximum length
of 25 ft.
Many campgrounds provide less than 30 amp service,
and your hookup may blow their fuse or circuit breaker.
If this happens, reduce the load and replace the fuse or
reset the breaker.
Remote Generator Hookup
NOTE
The remote generator hookup is not available with
50 amp service.
On units 25 ft. and longer, a remote generator hookup
will be located on the front plate of the trailer behind
the LPG tanks. A generator can be plugged into the
110-volt system using this feature.
Should you ever have a buildup of solids, close the
valves, ll the tanks about 3/4 full with fresh water,
drive a distance to agitate the solids, and drain the
tanks.
Things Not To Put Into Toilet Or Drains:
• Facial tissues (they do not dissolve like toilet paper).
• Automotive antifreeze, ammonia, alcohols, or
acetone.
• Table scraps or other solids that may clog the drains.
Flying Cloud 3-9
Cable TV Inlet
The exterior inlet is located on the side or rear panel of
the trailer and is labeled for your convenience. It also
includes a hookup for a portable satellite dish.
Winter Traveling
Traveling in sub-freezing temperatures will require
certain precautions to protect the plumbing system
and your personal belongings from being damaged by
freezing.

General Information
Whenever possible, the heat should be kept set to a
constant temperature. It is easier for the furnace to
keep a constant room temperature than allow the trailer
temperature to drop to 50°F, then attempt to raise it to
room temperature.
The furnace on Flying Cloud models including the 23
ft. Front Bed but excluding the 20 ft. and 23 ft. rear
bed models, are ducted to provide heat to tanks and
plumbing to prevent freezing.
The 20 ft. and 23 ft. (23 ft. Front Bed model excluded)
models have 12-volt heat pads installed with the fresh,
gray, and black water tanks. These pads are individually
switched. This feature allows the saving of battery
power in a dry camping situation. To conserve battery
power, RV antifreeze may be used to protect the gray
and black tank. Battery power will last about 3 hours
using all three heat pads.
The 19 ft. fresh water tank is above-oor in the heated
area of the trailer. The gray holding tank is below oor,
insulated and a 2 in. duct from the furnace supplies
heat to it. The black tank is insulated, however, no
heat is ducted to it. Use RV-approved antifreeze in the
black holding tank to prevent damage to it and belowoor drain plumbing, if used in temperatures below the
freezing point.
NOTE
Drain and winterize all models if the water systems
are not being used during winter traveling. Refer
to Section 8 - Maintenance in this manual for
winterizing instructions.
Some states do not allow LPG to be turned on while
moving. While traveling in these states, simply use
your common sense. How cold is it? How long will
it be before you can turn the heat back on? Is the
temperature dropping or rising? Remember, when
towing at 50 MPH, the wind chill factor will cause the
interior of the trailer to cool much faster than a trailer
that is parked.
When parked in sub-freezing temperatures, make sure
to keep a full supply of LPG and plug into a 110-volt
power source whenever possible. A fully charged
battery will not last more than 8 to 10 hours if the
furnace is running almost constantly and 110-volt power
is not available.
Leave cabinet doors, wardrobes, and bed doors partially
open to allow warm air to circulate around plumbing
lines and xtures. Insulate and/or wrap your exterior
water lines with heat tape.
Effects Of Prolonged Occupancy
Your trailer was designed primarily for recreational use
and short-term occupancy. If you expect to occupy the
trailer for an extended period, be prepared to deal with
condensation and the humid conditions that may be
encountered.
Moisture can condense on the inside surfaces of the
trailer during cold weather when relative humidity of the
interior air is high. This condition is increased because
the insulated walls of a recreation vehicle are much
thinner than house walls. Also, the relatively small
volume and tight, compact construction of modern
recreational vehicles means that the normal living
activities of even a few occupants will lead to rapid
moisture saturation. Estimates indicate that a family
of four can vaporize up to three gallons of water daily
through breathing, cooking, bathing, and washing.
Unless the water vapor is carried outside by ventilation,
or condensed by a dehumidier, it will condense on
the inside of the windows and walls as moisture, or
in cold weather, as frost or ice. It may also condense
out of sight, within the walls or the ceiling, where it will
manifest itself as warped or stained panels.
Appearance of these conditions may indicate a serious
problem. When you recognize the signs of excessive
moisture and condensation in the trailer, action should
be taken to minimize their effects.
Tips To Controlling Condensation
Allow excess moisture to escape to the outside when:
• Bathing, washing dishes, hair drying, etc.
• Laundering, using appliances and non-vented gas
burners.
• Cooking (Always use the stove vent hood).
Avoid dead air spaces by:
• Using a fan to keep air circulating.
• Leaving closet and cabinet doors partially open.
To help alleviate cold weather condensation:
• Keep the temperature as reasonably cool during cold
weather as possible.
• Allow your trailer to breath, do not make it airtight.
• Allow some warm air to be removed and some cool
outside air in.
• Do not allow the furnace to recycle humid interior air
provide reasonable ventilation.
3-10 Flying Cloud

General Information
In hot weather, starting the air conditioner early
will help remove excess humidity from the air while
lowering temperatures.
NOTE
Your trailer is not designed, nor intended, for
permanent housing. Use of this product for
long-term or permanent occupancy may lead
to premature deterioration of structure, interior
nishes, fabrics, carpeting, and drapes. Damage
or deterioration due to long-term occupancy may
not be considered normal, and may, under the
terms of the warranty, constitute misuse, abuse,
or neglect, and may therefore reduce the warranty
protection.
Molds
Molds are microscopic organisms that naturally
occur in virtually every environment, indoors and
out. Outdoors, mold growth is important in the
decomposition of plants. Indoors, mold growth is
unfavorable. Left unchecked, molds break down
natural materials, such as wood products and fabrics.
Protect your investment by understanding the potential
risks that mold imposes.
Contributing Factors To Mold Growth
For mold growth to occur, temperatures, indoor or
outdoors, must be between 40° and 100°F, and must
also have a source of moisture, such as humidity,
standing water, damp materials, etc. Indoors, the most
rapid growth occurs with warm and humid conditions.
Inhibiting Mold Growth
By controlling relative humidity, the growth of mold and
mildew can be inhibited. In warm climates, use of the
air conditioner will reduce the relative humidity. Vents
are located in the bathing and cooking areas. Constant
use of these vents is advised during food preparation
and bathing, even during colder weather. Additionally,
opening a window during these activities will assist in
ventilation. In extremely humid conditions, the use of a
dehumidier can be helpful.*
Frequent use of your trailer, or cleaning regularly,
are important preventive measures. Additionally, any
spills should be wiped up quickly and dried as soon
as possible. Avoid leaving damp items lying about.
On safe surfaces, use mold or mildew-killing cleaning
products. Check sealants regularly, and reseal when
necessary to avoid water leaks. Proper preventive
maintenance to the trailer and its accessories, as
described both in this manual and in accompanying
literature, will provide the best protection to the trailer.
For more information concerning controlling moisture in
the trailer, read Tips to Controlling Condensation in this
section.
*If using a dehumidier, please read and follow all
manufacturer instructions and recommendations for
the use and cleaning of the dehumidier.
Safety
As always, safety should be a top priority. Ensure that
you, and everyone traveling with you, can operate the
main door and emergency exit window rapidly, without
light. Contemplate other means of escape in case the
designated exits are blocked.
The escape windows(s) are identied by their red
release handles. Lift up on both latches to release the
escape window. Push out on the glass and it will swing
clear.
WARNING
The window operation should be checked before
each trip and the latches lubricated with WD-40 or
an equivalent lubricant every six months.
WARNING
Read the directions on the re extinguisher
carefully. If you have any doubts as to its
operation, you and your family should practice,
then replace or recharge the extinguisher. Your
local re department will be able to assist you and
answer any questions.
WARNING
Don’t smoke in bed. Keep matches out of reach
of small children. Don’t clean with ammable
material. Keep ammable material away from open
ame. Always shut off the LP gas at the bottles
when fueling a tow vehicle.
We have all heard the above warnings many times,
yet the situation or occurences they discuss are still
among the leading causes of res.
Safety information concering the LPG system of your
trailer is located in Section 6 - Exterior of this manual.
3
Flying Cloud 3-11

General Information
NOTES:
3-12 Flying Cloud

RA-400 Patcher for UD
Section 4
FLOOR PLANS AND
SPECIFICATIONS
PAGE
FLOOR PLANS AND SPECIFICATIONS . . . . . . . . . . . . . . . .4-1
FLOOR PLANS . . . . . . . . . . . . . . . . . . . . . . . . . 4-2
19 Flying Cloud . . . . . . . . . . . . . . . . . . . . . . . . 4-2
4
20 Flying Cloud . . . . . . . . . . . . . . . . . . . . . . . . 4-2
23 Flying Cloud . . . . . . . . . . . . . . . . . . . . . . . . 4-2
23FB Flying Cloud . . . . . . . . . . . . . . . . . . . . . . . 4-2
25 Flying Cloud . . . . . . . . . . . . . . . . . . . . . . . . 4-2
25FB Flying Cloud . . . . . . . . . . . . . . . . . . . . . . . 4-3
27FB Flying Cloud . . . . . . . . . . . . . . . . . . . . . . . 4-3
28 Flying Cloud . . . . . . . . . . . . . . . . . . . . . . . . 4-3
30 Flying Cloud . . . . . . . . . . . . . . . . . . . . . . . . 4-3
30 Bunk Flying Cloud . . . . . . . . . . . . . . . . . . . . . . 4-4
SPECIFICATIONS . . . . . . . . . . . . . . . . . . . . . . .4-4
Specication Chart . . . . . . . . . . . . . . . . . . . . . . . 4-4
Specication Tags . . . . . . . . . . . . . . . . . . . . . . . 4-5
Measuring Hitch Ball Height . . . . . . . . . . . . . . . . . . .4-5
Tire Size with Maximum Ination Pressure Cold . . . . . . . . . . . 4-5
Flying Cloud 4-1
Floor Plans And Specications
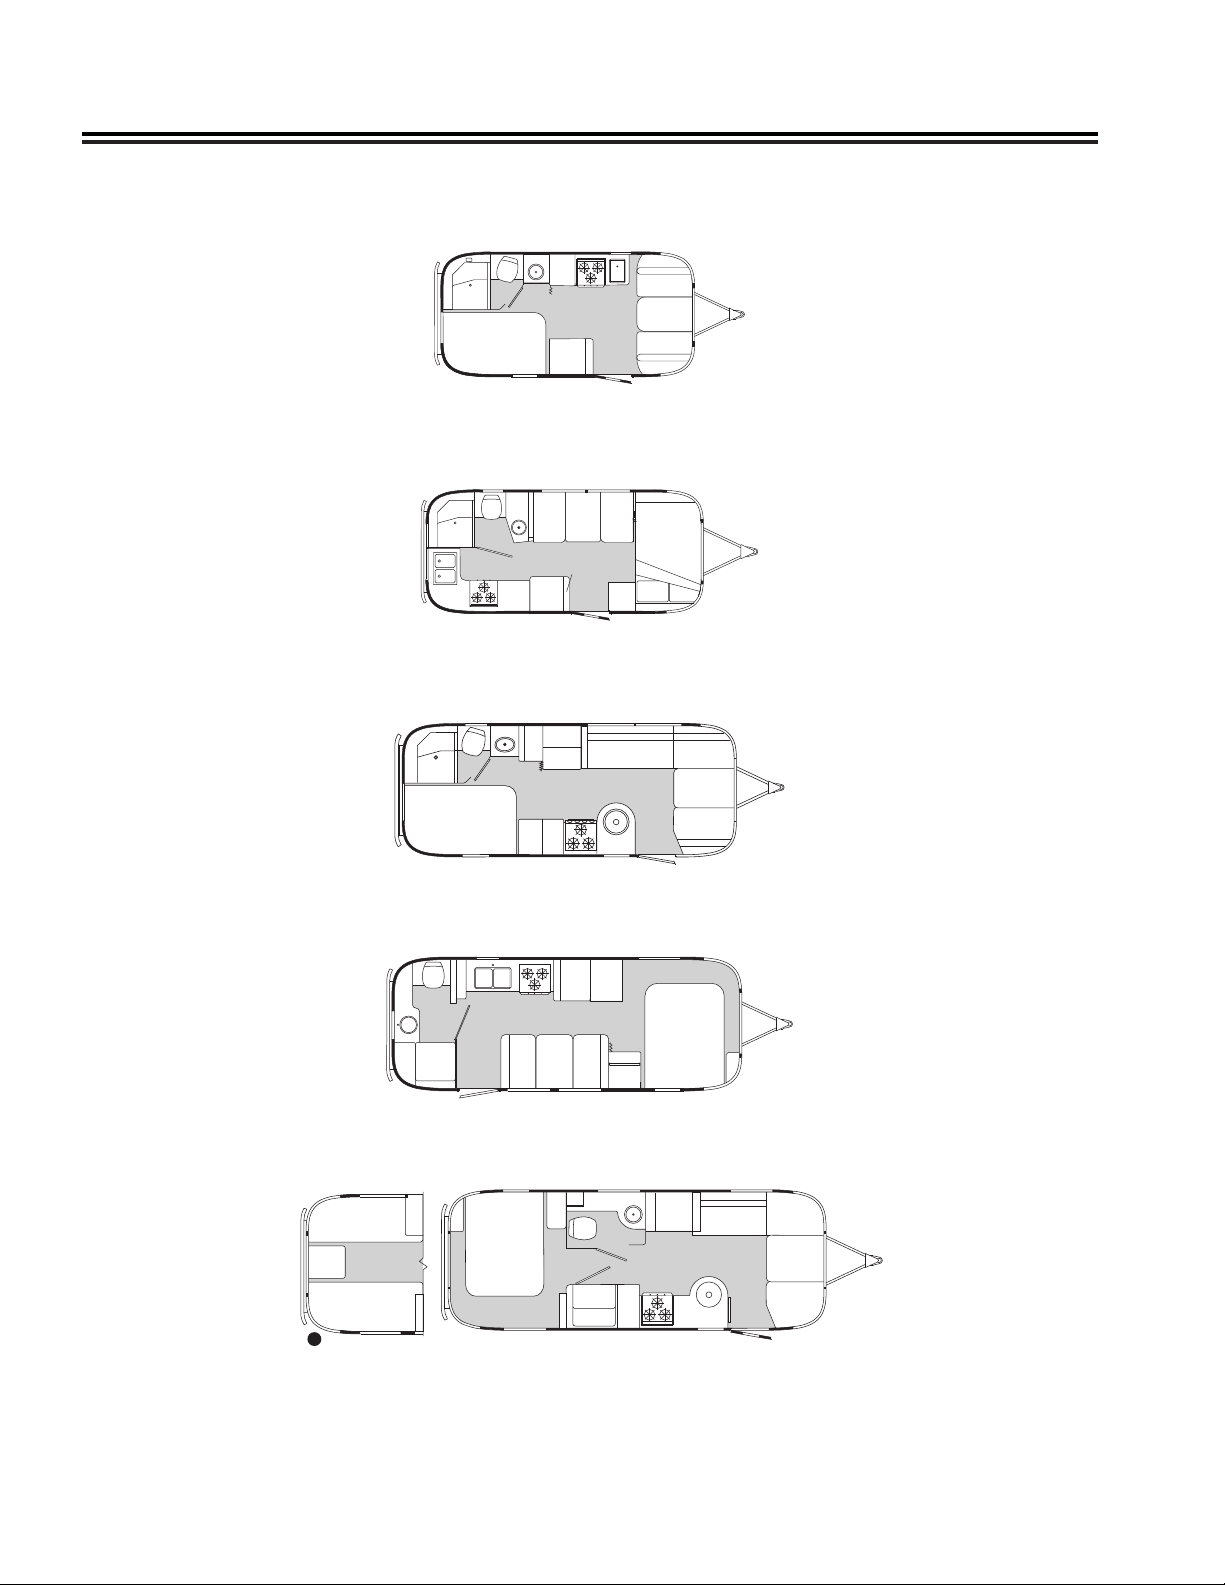
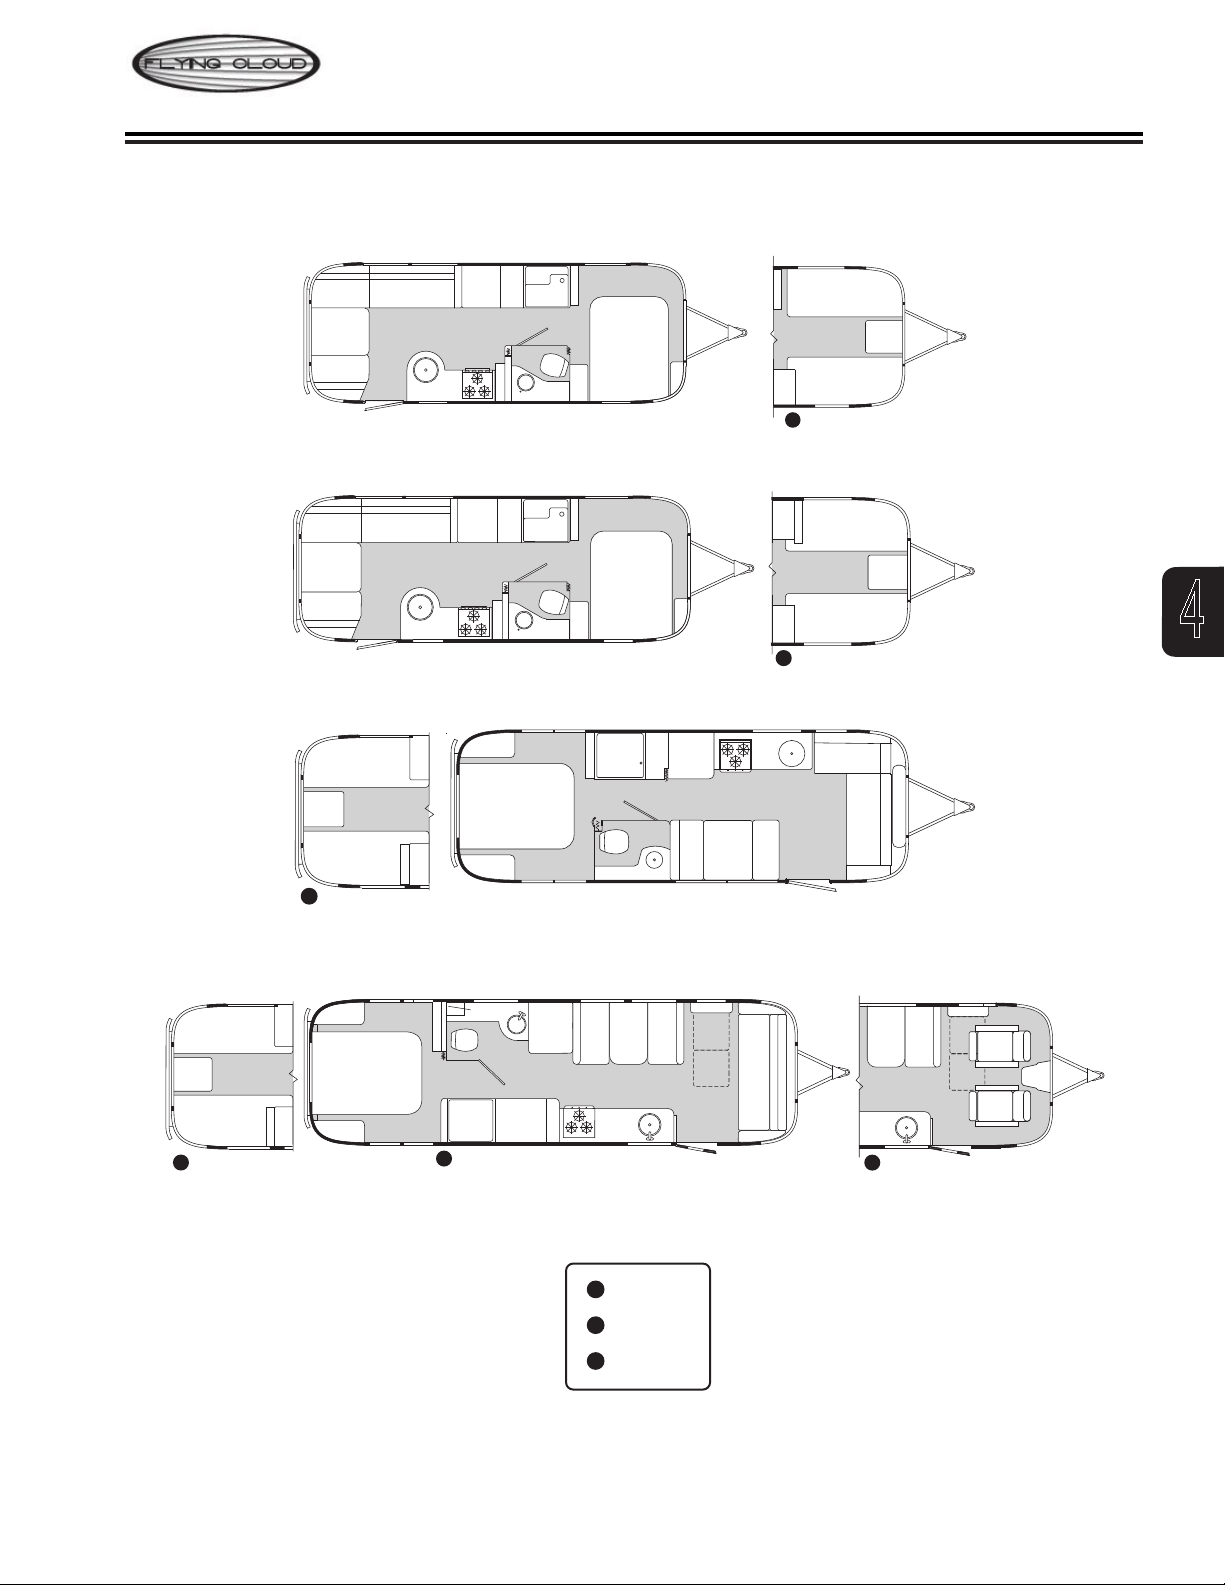
Floor Plans
19 Flying Cloud
SHOWER
BED
48" x 75"
20 Flying Cloud
WARD
ROBE
4.0 CU. FT.
FRIDGE/
LED TV
ABOVE
GALLEY
DINETTE
40" x 74"
PANTRY
005
23 Flying Cloud
23FB Flying Cloud
SHOWER
SHOWER
SHOWER
GALLEY
48" x 75"
LED TV
WARD
ROBE
GALLEY
WARD
ROBE
66" SOFA
WARDROBE
w/DRAWERS
HAMPER
HAMPER
BED
48" x 78"
BED
60" x 75"
006
DINETTE
42" x 76"
007
N/S
008
DINETTE
38" x 76"
COAT/SHOE
STORAGE
4 CU. FT.
PANTRY
FRIDGE/
BELOW
LED TV
ABOVE
LAVY
5 CU.FT.
FRIDGE/
ROBE
WARD
MI
CROWAVE
OVERHEAD
BED
ROBE
WARD
PANTRY
5 CU. FT.
FRIDGE
DINETTE
38" x 76"
LED TV
PANTRY
GALLEY
25 Flying Cloud
w/DRAWERS
34" x 78"
34" x 78"
WARDROBE
WARD
NIGHT
STAND
QUEEN
BED
OPT. LED TV
w/DRAWERS
OPT. LED TV
BATHROOM
SHOWER w/
HALL ENTRY
NIGHT
STAND
TWIN BED
TWIN BED
T
4-2 Flying Cloud
7 CU. FT.
REFER
& MICRO
LOUNGE
LED TV
PANTRY
WAVE
ROBE
WARD
GALLEY
DINETTE
SEAT
DINETTE
TABLE
DINETTE
SEAT
009
010
25FB Flying Cloud
27FB Flying Cloud
DINETTE
42" x 76"
DINETTE
42" x 76"
66" SOFA
66" SOFA
GALLEY
GALLEY
LED TV
LED TV
7 CU. FT.
FRIDGE
7 CU. FT.
FRIDGE
WARD
ROBE
PANTRY
WARD
ROBE
PANTRY
SHOWER
SHOWER
Floor Plans And Specications
TWIN BED
OPT. LED TV
BED
60" x 75"
N/S
WARDROBE
w/DRAWERS
OPT. LED TV
BED
60" x 75"
N/S
WARDROBE
w/DRAWERS
OPT. LED TV
HANGING
WARDROBE
T
SHELF
STORAGE
OPT. LED TV
HANGING
WARDROBE
T
34" x 78"
TWIN BED
34" x 78"
TWIN BED
34" x 78"
TWIN BED
34" x 78"
NIGHT
STAND
NIGHT
STAND
4
011
28 Flying Cloud
30 Flying Cloud
WARDROBE
TWIN BED
34" x 78"
NIGHT
STAND
w/TRUNK
WARDROBE
OPT. LED TV
TWIN BED
34" x 78"
T
HANGING
HANGING
NIGHT
STAND
w/TRUNK
T
CLOSET W/
NIGHTSTAND
CLOSET W/
NIGHTSTAND
TWIN BED
34" x 78"
TWIN BED
34" x 78"
BED
60" x 75"
OPT. LED TV
WARDROBE
HANGING
WARDROBE
HANGING
OPT. LED TV
S
CLOSET w/
NIGHTSTAND
CLOSET w/
NIGHTSTAND
VANITY
CABINET
SHOWER
BED
60" x 75"
WARDROBE
8 CU. FT.
FRIDGE
OPT. LED TV
SHOWER
DINETTE
LED TV
42" x 76"
GALLEY
PANTRY
7 CU. FT.
FRIDGE
WARDROBE
LED TV
LIFT UP
TABLE
DINETTE
42" x 76"
GALLEY
SOFA
74"
L-SOFA
80" x 44"
DINETTE
R
012
RECLINER
LIFT-UP
TABLE
RECLINER
LOUNGE
CONSOLE
013
= Twin
T
= Recliners
R
= Sofa
S
Flying Cloud 4-3

Floor Plans And Specications
30 Bunk Flying Cloud
SHOWER
OPT. LED TV
BED
54" x 76" LOWER
BED
29" x 78" UPPER
PANTRY
WARD
w/DRAWERS
REFER
GALLEY
LED TV
U-DINETTE
42" x 76"
72" LOUNGE
LED TV
BED
60" x 76"
WARDROBE
WARDROBE
075
Specications
Specication Chart
NOTE
All weights listed in the Specication Chart are checked and updated throughout the model year.
Your production trailer may vary from weights listed.
Model 19’ 19’
csa
Length - Exterior 19’ 2” 19’ 2” 20’ 10” 23’ 23’ 23’ 9” 23’ 9” 25’ 11” 25’ 11” 28’ 27’11” 30’11” 30’11’’
Width - Exterior 8’ 8’ 8’ 8’ 8’ 8’ 8’ 8’ 5 ½” 8’ 5 ½” 8’ 5 ½” 8’ 5 ½” 8’ 5 ½” 8’ 5 ½”
Width-Interior 7’ 7” 7’ 7” 7’ 7” 7’ 7” 7’ 7” 7’ 7” 7’ 7” 8’ 1” 8’ 1” 8’ 1” 8’ 1” 8’ 1” 8’ 1”
Height-Ext. w/A/C 9’ 5” 9’ 5” 9’ 5” 9’ 5” 9’ 5” 9’ 5” 9’ 5” 9’ 7” 9’ 7” 9’ 7” 9’ 7” 9’ 7” 9’ 7”
Height-Int. w/A/C 6’ 4½” 6’ 4½” 6’ 4½” 6’ 5” 6’ 5” 6’ 5” 6’ 5” 6’ 5” 6’ 5” 6’ 5” 6’ 5” 6’ 5” 6’ 5”
Hitch Ball Size 25/16” 25/16” 25/16” 25/16” 25/16” 25/16” 25/16” 25/16” 25/16” 25/16” 25/16” 25/16” 25/16”
*Hitch Ball Height 17¼” 17¼” 17¼” 17¾” 17¾” 17¾” 17¾” 17 ¾” 17 ¾” 17¾” 17¾” 17¾” 17¾”
Hitch Weight
(Dry, no options)
550 550 631 779 779 467 467 835 837 791 976 880 885
GVWR (lb) 4500 5000 5000 6000 6300 6000 6300 7300 7300 7600 7600 8800 8800
UBW (lb) 3852 3852 4271 4761 4761 4806 4806 5600 5503 5868 5979 6382 6422
NCC (lb) 648 648 1239 1239 1539 1194 1494 1700 1797 1732 1621 2418 2378
Fresh Water (Gal) 23 23 23 39 39 39 39 39 39 39 39 54 54
Gray Water (Gal) 21 21 21 21 21 30 30 35 37 37 37 38 39
Black Water (Gal) 18 18 18 18 18 18 18 37 39 39 35 38 37
Aluminum Wheel
Torque (Max) ft lb
Steel Wheel
110 110 11 0 11 0 110 11 0 110 110 110 110 110 110 11 0
100 100 100 100 100 100 100 100 100 100 100 100 100
Torque (Max) ft lb
20’ 23’ 23’
csa
23’ FB 23’ FB
csa
25’ 25’ fb 27’ FB 28’ 30’ 30’
Bunk
4-4 Flying Cloud
 Loading...