

Page 1

IAS-2000 v2
Internet Access Gateway
User’s Manual
1
Page 2

e
e
n
s
s
t
t
g
h
r
n
Declaration of Conformity
We, Manufacturer/Importer
OvisLink Corp.
5F., NO.6, Lane 130, Min-Chuan Rd.,
Hsin-Tien City, Taipei County, Taiwa
Declare that the product
Internet Access Gateway
AirLive IAS-2000 v2
is in conformity with
In accordance with 2004/108 EC Directive and 1999/5 EC-R & TTE Directive
Claus
■ EN 55022:1998 Limits and methods of measurement of radio disturbanc
■ EN 61000-3-2:2000 Disturbances in supply systems caused by household appliance
■ EN 61000-3-3:1995/ Disturbances in supply systems caused by household appliance
A1:2001 and similar electrical equipment "Voltage fluctuations
■ EN 55024:1998/A1 Information Technology equipment-Immunity characteristics-Limi
:2001/A2:2003 And methods of measuremen
■ CE markin
Description
characteristics of information technology equipme
and similar electrical equipment "Harmonics
Manufacturer/Importe
Signature :
Name : Albert Ye
Position/ Title: Vice President (Stamp) Date: 2008/10/9
Page 3

AirLive IAS-2000 v2 CE Declaration Statement
Country Declaration Country Declaration
cs
Česky [Czech]
da
Dansk [Danish]
de
Deutsch
[German]
et
Eesti [Estonian]
en
English
es
Español
[Spanish]
el
Ελληνική [Greek]
fr
Français [French]
it
Italiano [Italian]
lv
Latviski [Latvian]
sv
Svenska
[Swedish]
OvisLink Corp. tímto prohlašuje, že tento AirLive
IAS-2000 v2 je ve shodě se základními
požadavky a dalšími příslušnými ustanoveními
směrnice 1999/5/ES.
Undertegnede OvisLink Corp. erklærer herved, at
følgende udstyr AirLive IAS-2000 v2 overholder
de væsentlige krav og øvrige relevante krav i
direktiv 1999/5/EF.
Hiermit erklärt OvisLink Corp., dass sich das
Gerät AirLive IAS-2000 v2 in Übereinstimmung
mit den grundlegenden Anforderungen und den
übrigen einschlägigen Bestimmungen der
Richtlinie 1999/5/EG befindet.
Käesolevaga kinnitab OvisLink Corp. seadme
AirLive IAS-2000 v2 vastavust direktiivi
1999/5/EÜ põhinõuetele ja nimetatud direktiivist
tulenevatele teistele asjakohastele sätetele.
Hereby, OvisLink Corp., declares that this AirLive
IAS-2000 v2 is in compliance with the essential
requirements and other relevant provisions of
Directive 1999/5/EC.
Por medio de la presente OvisLink Corp. declara
que el AirLive IAS-2000 v2 cumple con los
requisitos esenciales y cualesquiera otras
disposiciones aplicables o exigibles de la
Directiva 1999/5/CE.
ΜΕ ΤΗΝ ΠΑΡΟΥΣΑ OvisLink Corp. ΔΗΛΩΝΕΙ
ΟΤΙ AirLive IAS-2000 v2 ΣΥΜΜΟΡΦΩΝΕΤΑΙ
ΠΡΟΣ ΤΙΣ ΟΥΣΙΩΔΕΙΣ ΑΠΑΙΤΗΣΕΙΣ ΚΑΙ ΤΙΣ
ΛΟΙΠΕΣ ΣΧΕΤΙΚΕΣ ΔΙΑΤΑΞΕΙΣ ΤΗΣ ΟΔΗΓΙΑΣ
1999/5/ΕΚ.
Par la présente OvisLink Corp. déclare que
l'appareil AirLive IAS-2000 v2 est conforme aux
exigences essentielles et aux autres dispositions
pertinentes de la directive 1999/5/CE
Con la presente OvisLink Corp. dichiara che
questo AirLive IAS-2000 v2 è conforme ai
requisiti essenziali ed alle altre disposizioni
pertinenti stabilite dalla direttiva 1999/5/CE.
Ar šo OvisLink Corp. deklarē, ka AirLive
IAS-2000 v2 atbilst Direktīvas 1999/5/EK
būtiskajām prasībām un citiem ar to saistītajiem
noteikumiem.
Härmed intygar OvisLink Corp. att denna AirLive
IAS-2000 v2 står I överensstämmelse med de
väsentliga egenskapskrav och övriga relevanta
bestämmelser som framgår av direktiv
1999/5/EG.
lt
Lietuvių
[Lithuanian]
nl
Nederlands [Dutch
mt
Malti [Maltese]
hu
Magyar
[Hungarian]
pl
Polski [Polish]
pt
Português
[Portuguese]
sl
Slovensko
[Slovenian]
sk
Slovensky [Slovak]
fi
Suomi [Finnish]
Íslenska [Icelandic]
no
Norsk [Norwegian]
Šiuo OvisLink Corp. deklaruoja, kad šis AirLive
IAS-2000 v2 atitinka esminius reikalavimus ir kitas
1999/5/EB Direktyvos nuostatas.
Hierbij verklaart OvisLink Corp. dat het toestel AirLive
IAS-2000 v2 in overeenstemming is met de
essentiële eisen en de andere relevante bepalingen
van richtlijn 1999/5/EG.
Hawnhekk, OvisLink Corp, jiddikjara li dan AirLive
IAS-2000 v2 jikkonforma mal-ħtiġijiet essenzjali u ma
provvedimenti oħrajn relevanti li hemm fid-Dirrettiva
1999/5/EC.
Az OvisLink Corporation kijelenti, hogy az AirLive
IAS-2000 v2 megfelel az 1999/05/CE irányelv
alapvető követelményeinek és egyéb vonatkozó
rendelkezéseinek.
Niniejszym OvisLink Corp oświadcza, że AirLive
IAS-2000 v2 jest zgodny z zasadniczymi wymogami
oraz pozostałymi stosownymi postanowieniami
Dyrektywy 1999/5/EC.
OvisLink Corp declara que este AirLive IAS-2000 v2
está conforme com os requisitos essenciais e outras
disposições da Directiva 1999/5/CE.
OvisLink Corp izjavlja, da je ta AirLive IAS-2000 v2 v
skladu z bistvenimi zahtevami in ostalimi relevantnimi
določili direktive 1999/5/ES.
OvisLink Corp týmto vyhlasuje, že AirLive IAS-2000
v2 spĺňa základné požiadavky a všetky príslušné
ustanovenia Smernice 1999/5/ES.
OvisLink Corp vakuuttaa täten että AirLive IAS-2000
v2 tyyppinen laite on direktiivin 1999/5/EY oleellisten
vaatimusten ja sitä koskevien direktiivin muiden
ehtojen mukainen
Hér með lýsir OvisLink Corp yfir því að AirLive
IAS-2000 v2 er í samræmi við grunnkröfur og aðrar
kröfur, sem gerðar eru í tilskipun 1999/5/EC.
OvisLink Corp erklærer herved at utstyret AirLive
IAS-2000 v2 er i samsvar med de grunnleggende
krav og øvrige relevante krav i direktiv 1999/5/EF.
A copy of the full CE report can be obtained from the following address:
OvisLink Corp.
5F, No.6 Lane 130,
Min-Chuan Rd, Hsin-Tien City,
Taipei, Taiwan, R.O.C.
This equipment may be used in AT, BE, CY, CZ, DK, EE, FI, FR, DE, GR, HU, IE, IT, LV, LT, LU, MT, NL, PL, PT, SK,
SI, ES, SE, GB, IS, LI, NO, CH, BG, RO, TR
Page 4

This device uses software which is partly or completely licensed under the terms of the GNU General Public License. The author of the
software does not provide any warranty. This does not affect the warranty for the product itself.
To get source codes please contact: OvisLink Corp., 5F, No. 96, Min-Chuan Rd, Hsin-Tien City, Taipei, Taiwan, R.O.C. A fee will be
charged for production and shipment for each copy of the source code.
GNU GENERAL PUBLIC LICENSE
Version 2, June 1991
Copyright (C) 1989, 1991 Free Software Foundation, Inc.
51 Franklin Street, Fifth Floor, Boston, MA 02110-1301, USA
Everyone is permitted to copy and distribute verbatim copies
of this license document, but changing it is not allowed.
Preamble
The licenses for most software are designed to take away your freedom to share and change it. By contrast, the GNU
General Public License is intended to guarantee your freedom to share and change free software--to make sure the
software is free for all its users. This General Public License applies to most of the Free Software Foundation's
software and to any other program whose authors commit to using it. (Some other Free Software Foundation software
is covered by the GNU Lesser General Public License instead.) You can apply it to your programs, too.
When we speak of free software, we are referring to freedom, not price. Our General Public Licenses are designed to
make sure that you have the freedom to distribute copies of free software (and charge for this service if you wish), that
you receive source code or can get it if you want it, that you can change the software or use pieces of it in new free
programs; and that you know you can do these things.
To protect your rights, we need to make restrictions that forbid anyone to deny you these rights or to ask you to
surrender the rights. These restrictions translate to certain responsibilities for you if you distribute copies of the
software, or if you modify it.
For example, if you distribute copies of such a program, whether gratis or for a fee, you must give the recipients all the
rights that you have. You must make sure that they, too, receive or can get the source code. And you must show them
these terms so they know their rights.
We protect your rights with two steps: (1) copyright the software, and (2) offer you this license which gives you legal
permission to copy, distribute and/or modify the software.
Also, for each author's protection and ours, we want to make certain that everyone understands that there is no
warranty for this free software. If the software is modified by someone else and passed on, we want its recipients to
know that what they have is not the original, so that any problems introduced by others will not reflect on the original
authors' reputations.
Finally, any free program is threatened constantly by software patents. We wish to avoid the danger that redistributors
of a free program will individually obtain patent licenses, in effect making the program proprietary. To prevent this, we
have made it clear that any patent must be licensed for everyone's free use or not licensed at all.
The precise terms and conditions for copying, distribution and modification follow.
TERMS AND CONDITIONS FOR COPYING, DISTRIBUTION AND MODIFICATION
0. This License applies to any program or other work which contains a notice placed by the copyright holder saying it
may be distributed under the terms of this General Public License. The "Program", below, refers to any such program
or work, and a "work based on the Program" means either the Program or any derivative work under copyright law:
that is to say, a work containing the Program or a portion of it, either verbatim or with modifications and/or translated
into another language. (Hereinafter, translation is included without limitation in the term "modification".) Each licensee
is addressed as "you".
Activities other than copying, distribution and modification are not covered by this License; they are outside its scope.
The act of running the Program is not restricted, and the output from the Program is covered only if its contents
constitute a work based on the Program (independent of having been made by running the Program). Whether that is
true depends on what the Program does.
1. You may copy and distribute verbatim copies of the Program's source code as you receive it, in any medium,
provided that you conspicuously and appropriately publish on each copy an appropriate copyright notice and
disclaimer of warranty; keep intact all the notices that refer to this License and to the absence of any warranty; and
give any other recipients of the Program a copy of this License along with the Program.
You may charge a fee for the physical act of transferring a copy, and you may at your option offer warranty protection
in exchange for a fee.
2. You may modify your copy or copies of the Program or any portion of it, thus forming a work based on the Program,
and copy and distribute such modifications or work under the terms of Section 1 above, provided that you also meet all
of
these conditions:
a) You must cause the modified files to carry prominent notices stating that you changed the files and the date of any
change.
b) You must cause any work that you distribute or publish, that in whole or in part contains or is derived from the
Program or any part thereof, to be licensed as a whole at no charge to all third parties under the terms of this License.
c) If the modified program normally reads commands interactively when run, you must cause it, when started running
for such interactive use in the most ordinary way, to print or display an announcement including an appropriate
copyright notice and a notice that there is no warranty (or else, saying that you provide a warranty) and that users may
redistribute the program under these conditions, and telling the user how to view a copy of this License. (Exception: if
the Program itself is interactive but does not normally print such an announcement, your work based on the Program
is not required to print an announcement.)
These requirements apply to the modified work as a whole. If identifiable sections of that work are not derived from the
Program, and can be reasonably considered independent and separate works in themselves, then this License, and
its terms, do not apply to those sections when you distribute them as separate works. But when you distribute the
same sections as part of a whole which is a work based on the Program, the distribution of the whole must be on the
terms of this License, whose permissions for other licensees extend to the entire whole, and thus to each and every
part regardless of who wrote it.
Thus, it is not the intent of this section to claim rights or contest your rights to work written entirely by you; rather, the
intent is to exercise the right to control the distribution of derivative or collective works based on the Program.
In addition, mere aggregation of another work not based on the Program with the Program (or with a work based on
the Program) on a volume of a storage or distribution medium does not bring the other work under the scope of this
License.
3. You may copy and distribute the Program (or a work based on it, under Section 2) in object code or executable form
under the terms of Sections 1 and 2 above provided that you also do one of the following:
a) Accompany it with the complete corresponding machine-readable source code, which must be distributed under the
terms of Sections 1 and 2 above on a medium customarily used for software interchange; or,
b) Accompany it with a written offer, valid for at least three years, to give any third party, for a charge no more than
your cost of physically performing source distribution, a complete machine-readable copy of the corresponding source
code, to be distributed under the terms of Sections 1 and 2 above on a medium customarily used for software
interchange; or,
c) Accompany it with the information you received as to the offer to distribute corresponding source code. (This
alternative is allowed only for noncommercial distribution and only if you received the program in object code or
executable form with such an offer, in accord with Subsection b above.)
The source code for a work means the preferred form of the work for making modifications to it. For an executable
work, complete source code means all the source code for all modules it contains, plus any associated interface
definition files, plus the scripts used to control compilation and installation of the executable. However, as a special
exception, the source code distributed need not include anything that is normally distributed (in either source or binary
form) with the major components (compiler, kernel, and so on) of the operating system on which the executable runs,
unless that component itself accompanies the executable.
If distribution of executable or object code is made by offering access to copy from a designated place, then offering
equivalent access to copy the source code from the same place counts as distribution of the source code, even
though third parties are not compelled to copy the source along with the object code.
4. You may not copy, modify, sublicense, or distribute the Program except as expressly provided under this License.
Any attempt otherwise to copy, modify, sublicense or distribute the Program is void, and will automatically terminate
your rights under this License. However, parties who have received copies, or rights, from you under this License will
not have their licenses terminated so long as such parties remain in full compliance.
5. You are not required to accept this License, since you have not signed it. However, nothing else grants you
permission to modify or distribute the Program or its derivative works. These actions are prohibited by law if you do not
accept this License. Therefore, by modifying or distributing the Program (or any work based on the Program), you
indicate your acceptance of this License to do so, and all its terms and conditions for copying, distributing or modifying
the Program or works based on it.
6. Each time you redistribute the Program (or any work based on the Program), the recipient automatically receives a
license from the original licensor to copy, distribute or modify the Program subject to these terms and conditions. You
may not impose any further restrictions on the recipients' exercise of the rights granted herein. You are not responsible
for enforcing compliance by third parties to this License.
7. If, as a consequence of a court judgment or allegation of patent infringement or for any other reason (not limited to
patent issues), conditions are imposed on you (whether by court order, agreement or otherwise) that contradict the
conditions of this License, they do not excuse you from the conditions of this License. If you cannot distribute so as to
satisfy simultaneously your obligations under this License and any other pertinent obligations, then as a
consequence you may not distribute the Program at all. For example, if a patent license would not permit royalty-free
redistribution of the Program by all those who receive copies directly or indirectly through you, then the only way you
could satisfy both it and this License would be to refrain entirely from distribution of the Program.
If any portion of this section is held invalid or unenforceable under any particular circumstance, the balance of the
section is intended to apply and the section as a whole is intended to apply in other circumstances.
It is not the purpose of this section to induce you to infringe any patents or other property right claims or to contest
validity of any such claims; this section has the sole purpose of protecting the integrity of the free software distribution
system, which is implemented by public license practices. Many people have made generous contributions to the wide
range of software distributed through that system in reliance on consistent application of that system; it is up to the
author/donor to decide if he or she is willing to distribute software through any other system and a licensee cannot
impose that choice.
This section is intended to make thoroughly clear what is believed to be a consequence of the rest of this License.
8. If the distribution and/or use of the Program is restricted in certain countries either by patents or by copyrighted
interfaces, the original copyright holder who places the Program under this License may add an explicit geographical
distribution limitation excluding those countries, so that distribution is permitted only in or among countries not thus
excluded. In such case, this License incorporates the limitation as if written in the body of this License.
9. The Free Software Foundation may publish revised and/or new versions of the General Public License from time to
time. Such new versions will be similar in spirit to the present version, but may differ in detail to address new problems
or concerns.
Each version is given a distinguishing version number. If the Program specifies a version number of this License which
applies to it and "any later version", you have the option of following the terms and conditions either of that version or
of any later version published by the Free Software Foundation. If the Program does not specify a version number of
this License, you may choose any version ever published by the Free Software Foundation.
10. If you wish to incorporate parts of the Program into other free programs whose distribution conditions are different,
write to the author to ask for permission. For software which is copyrighted by the Free Software Foundation, write to
the Free Software Foundation; we sometimes make exceptions for this. Our decision will be guided by the two goals of
preserving the free status of all derivatives of our free software and of promoting the sharing and reuse of software
generally.
NO WARRANTY
11. BECAUSE THE PROGRAM IS LICENSED FREE OF CHARGE, THERE IS NO WARRANTY FOR THE
PROGRAM, TO THE EXTENT PERMITTED BY APPLICABLE LAW. EXCEPT WHEN OTHERWISE STATED
IN WRITING THE COPYRIGHT HOLDERS AND/OR OTHER PARTIES PROVIDE THE PROGRAM "AS
IS" WITHOUT WARRANTY OF ANY KIND, EITHER EXPRESSED OR IMPLIED, INCLUDING, BUT
NOT LIMITED TO, THE IMPLIED WARRANTIES OF MERCHANTABILITY AND FITNESS FOR A
PARTICULAR PURPOSE. THE ENTIRE RISK AS TO THE QUALITY AND PERFORMANCE OF THE
PROGRAM IS WITH YOU. SHOULD THE PROGRAM PROVE DEFECTIVE, YOU ASSUME THE COST OF
ALL NECESSARY SERVICING, REPAIR OR CORRECTION.
12. IN NO EVENT UNLESS REQUIRED BY APPLICABLE LAW OR AGREED TO IN WRITING WILL
ANY COPYRIGHT HOLDER, OR ANY OTHER PARTY WHO MAY MODIFY AND/OR REDISTRIBUTE THE
PROGRAM AS PERMITTED ABOVE, BE LIABLE TO YOU FOR DAMAGES, INCLUDING ANY GENERAL,
SPECIAL, INCIDENTAL OR CONSEQUENTIAL DAMAGES ARISING OUT OF THE USE OR INABILITY
TO USE THE PROGRAM (INCLUDING BUT NOT LIMITED TO LOSS OF DATA OR DATA BEING
RENDERED INACCURATE OR LOSSES SUSTAINED BY YOU OR THIRD PARTIES OR A FAILURE OF
THE PROGRAM TO OPERATE WITH ANY OTHER PROGRAMS), EVEN IF SUCH HOLDER OR OTHER
PARTY HAS BEEN ADVISED OF THE POSSIBILITY OF SUCH DAMAGES.
END OF TERMS AND CONDITIONS
How to Apply These Terms to Your New Programs
If you develop a new program, and you want it to be of the greatest possible use to the public, the best way to achieve
this is to make it free software which everyone can redistribute and change under these terms.
To do so, attach the following notices to the program. It is safest to attach them to the start of each source file to most
effectively convey the exclusion of warranty; and each file should have at least the "copyright" line and a pointer to
where the full notice is found.
one line to give the program's name and an idea of what it does.
Copyright (C) yyyy name of author
This program is free software; you can redistribute it and/or modify it under the terms of the GNU General Public
License as published by the Free Software Foundation; either version 2 of the License, or (at your option) any later
version.
This program is distributed in the hope that it will be useful, but WITHOUT ANY WARRANTY; without even the implied
warranty of MERCHANTABILITY or FITNESS FOR A PARTICULAR PURPOSE. See the GNU General Public
License for more details.
You should have received a copy of the GNU General Public License along with this program; if not, write to the Free
Software Foundation, Inc., 51 Franklin Street, Fifth Floor, Boston, MA 02110-1301, USA.
Also add information on how to contact you by electronic and paper mail.
If the program is interactive, make it output a short notice like this when it starts in an interactive mode:
Gnomovision version 69, Copyright (C) year name of author Gnomovision comes with ABSOLUTELY NO
WARRANTY; for details type `show w'. This is free software, and you are welcome to redistribute it under certain
conditions; type `show c' for details.
The hypothetical commands `show w' and `show c' should show the appropriate parts of the General Public License.
Of course, the commands you use may be called something other than `show w' and `show c'; they could even be
mouse-clicks or menu items--whatever suits your program.
You should also get your employer (if you work as a programmer) or your school, if any, to sign a "copyright
disclaimer" for the program, if necessary. Here is
a sample; alter the names:
Yoyodyne, Inc., hereby disclaims all copyright interest in the program `Gnomovision'
(which makes passes at compilers) written by James Hacker.
signature of Ty Coon, 1 April 1989
Ty Coon, President of Vice
This General Public License does not permit incorporating your program into proprietary programs. If your program is
a subroutine library, you may consider it more useful to permit linking proprietary applications with the library. If this is
what you want to do, use the GNU Lesser General Public License instead of this License.
Page 5

IAS-2000 v2
User’s Manual
Copyright
The contents of this publication may not be reproduced in any part or as a whole, stored, transcribed in an
information retrieval system, translated into any language, or transmitted in any form or by any means, mechanical,
magnetic, electronic, optical, photocopying, manual, or otherwise, without the prior written permission.
Trademarks
All products, company, brand names are trademarks or registered trademarks of their respective companies. They
are used for identification purpose only. Specifications are subject to be changed without prior notice.
FCC Interference Statement
The IAS-2000 v2 has been tested and found to comply with the limits for a Class B digital device pursuant to Part 15
of the FCC Rules. These limits are designed to provide reasonable protection against radio interference in a
commercial environment. This equipment can generate, use and radiate radio frequency energy and, if not installed
and used in accordance with the instructions in this manual, may cause harmful interference to radio
communications. Operation of this equipment in a residential area is likely to cause interference, in which case the
user, at his own expense, will be required to take whatever measures are necessary to correct the interference.
CE Declaration of Conformity
This equipment complies with the requirements relating to electromagnetic compatibility,
EN 55022:1998, EN 61000-3-2, EN 61000-3-3/A1, EN 55024/A1/A2, Class A.
.
1
Page 6

IAS-2000 v2
User’s Manual
Contents
Chapter 1. Before You Start .....................................................................................................................................1
1.1 Audience ........................................................................................................................................................1
1.2 Document Conventions..................................................................................................................................1
Chapter 2. Overview.................................................................................................................................................2
2.1 Introduction of IAS-2000 v2..........................................................................................................................2
2.2 System Concept..............................................................................................................................................2
Chapter 3. Hardware Installation............................................................................................................................5
3.1 Panel Function Descriptions...........................................................................................................................5
3.2 Package Contents...........................................................................................................................................6
3.3 System Requirement ......................................................................................................................................6
3.4 Installation Steps............................................................................................................................................7
Chapter 4. Network Configuration on PC...............................................................................................................9
4.1. Internet Connection Setup for Windows XP..................................................................................................9
4.2. TCP/IP Network Setup.................................................................................................................................12
Chapter 5. Web Interface Configuration...............................................................................................................16
5.1 System Configuration...................................................................................................................................18
5.1.1 Configuration Wizard (Also served as Quick Installation).........................................................................19
5.1.2 System Information.....................................................................................................................................28
5.1.3 WAN1 Configuration..................................................................................................................................30
5.1.4 WAN2 & Failover.......................................................................................................................................33
5.1.5 LAN1 Configuration...................................................................................................................................36
5.1.6 LAN2 Configuration...................................................................................................................................43
5.2 Network Configuration ................................................................................................................................49
5.2.1 Network Address Translation......................................................................................................................50
5.2.2 Privilege List...............................................................................................................................................53
5.2.3 Monitor IP List............................................................................................................................................56
5.2.4 Walled Garden List .....................................................................................................................................58
5.2.5 Proxy Server Properties ..............................................................................................................................59
5.2.6 Dynamic DNS.............................................................................................................................................60
5.2.7 IP Mobility ..................................................................................................................................................61
5.3 User Authentication......................................................................................................................................62
5.3.1 Authentication Configuration .....................................................................................................................63
i
.
Page 7

IAS-2000 v2
User’s Manual
5.3.2 Policy Configuration...................................................................................................................................87
5.3.3 Black List Configuration.............................................................................................................................95
5.3.4 Guest User Configuration...........................................................................................................................98
5.3.5 Additional Configuration............................................................................................................................99
5.4 Utilities.......................................................................................................................................................118
5.4.1 Change Password......................................................................................................................................119
5.4.2 Backup/Restore Setting.............................................................................................................................120
5.4.3 Firmware Upgrade....................................................................................................................................121
5.4.4 Restart.......................................................................................................................................................122
5.5 Status..........................................................................................................................................................123
5.5.1 System Status............................................................................................................................................124
5.5.2 Interface Status..........................................................................................................................................127
5.5.3 Current Users............................................................................................................................................129
5.5.4 Traffic History...........................................................................................................................................130
5.5.5 Notification Configuration........................................................................................................................135
5.5.6 Online Report............................................................................................................................................138
5.6 Help............................................................................................................................................................140
Appendix A. External Network Access...............................................................................................................141
Appendix B. Console Interface Configuration..................................................................................................143
Appendix C. Specifications.................................................................................................................................146
a. Hard ware Specification...................................................................................................................................146
b. Technical Specification...................................................................................................................................146
Appendix D. Proxy Setting for Hotspot..............................................................................................................148
Appendix E. Proxy Setting for Enterprise..........................................................................................................151
.
ii
Page 8

IAS-2000 v2
User’s Manual
Chapter 1. Before You Start
1.1 Audience
This manual is for Hotspot owners or administrators in enterpri ses to set up network environ ment using IAS-200 0 v2.
It contains step by step procedures and graphic examples to guide MIS staff or individuals with slight network
system knowledge to complete the installation.
1.2 Document Conventions
For any caution or warning that re quir es sp ecia l attention of readers, a highlight box with the eye-catching italic font
is used as below:
Warning: For security purposes, you should immediately change the Admi nistrator’s password.
Indicates that clicking this button will return to the homepage of this section.
Indicates that clicking this button will return to the previous page.
Indicates that clicking this button will apply all of your settings.
Indicates that clicking this button will clear what you set before these settings are applied.
.
1
Page 9
IAS-2000 v2
User’s Manual
Chapter 2. Overview
2.1 Introduction of IAS-2000 v2
IAS-2000 v2 is a Network Access Control System specially designed for middle-scaled or large network
environments while retaining network efficiency. IAS-2000 v2 delivers “manageability”, “efficiency” and “friendly
interface” and suits perfectly for campuses, libraries, gymnasiums, small and middle enterprises, factories,
Hotspots and community hospitals.
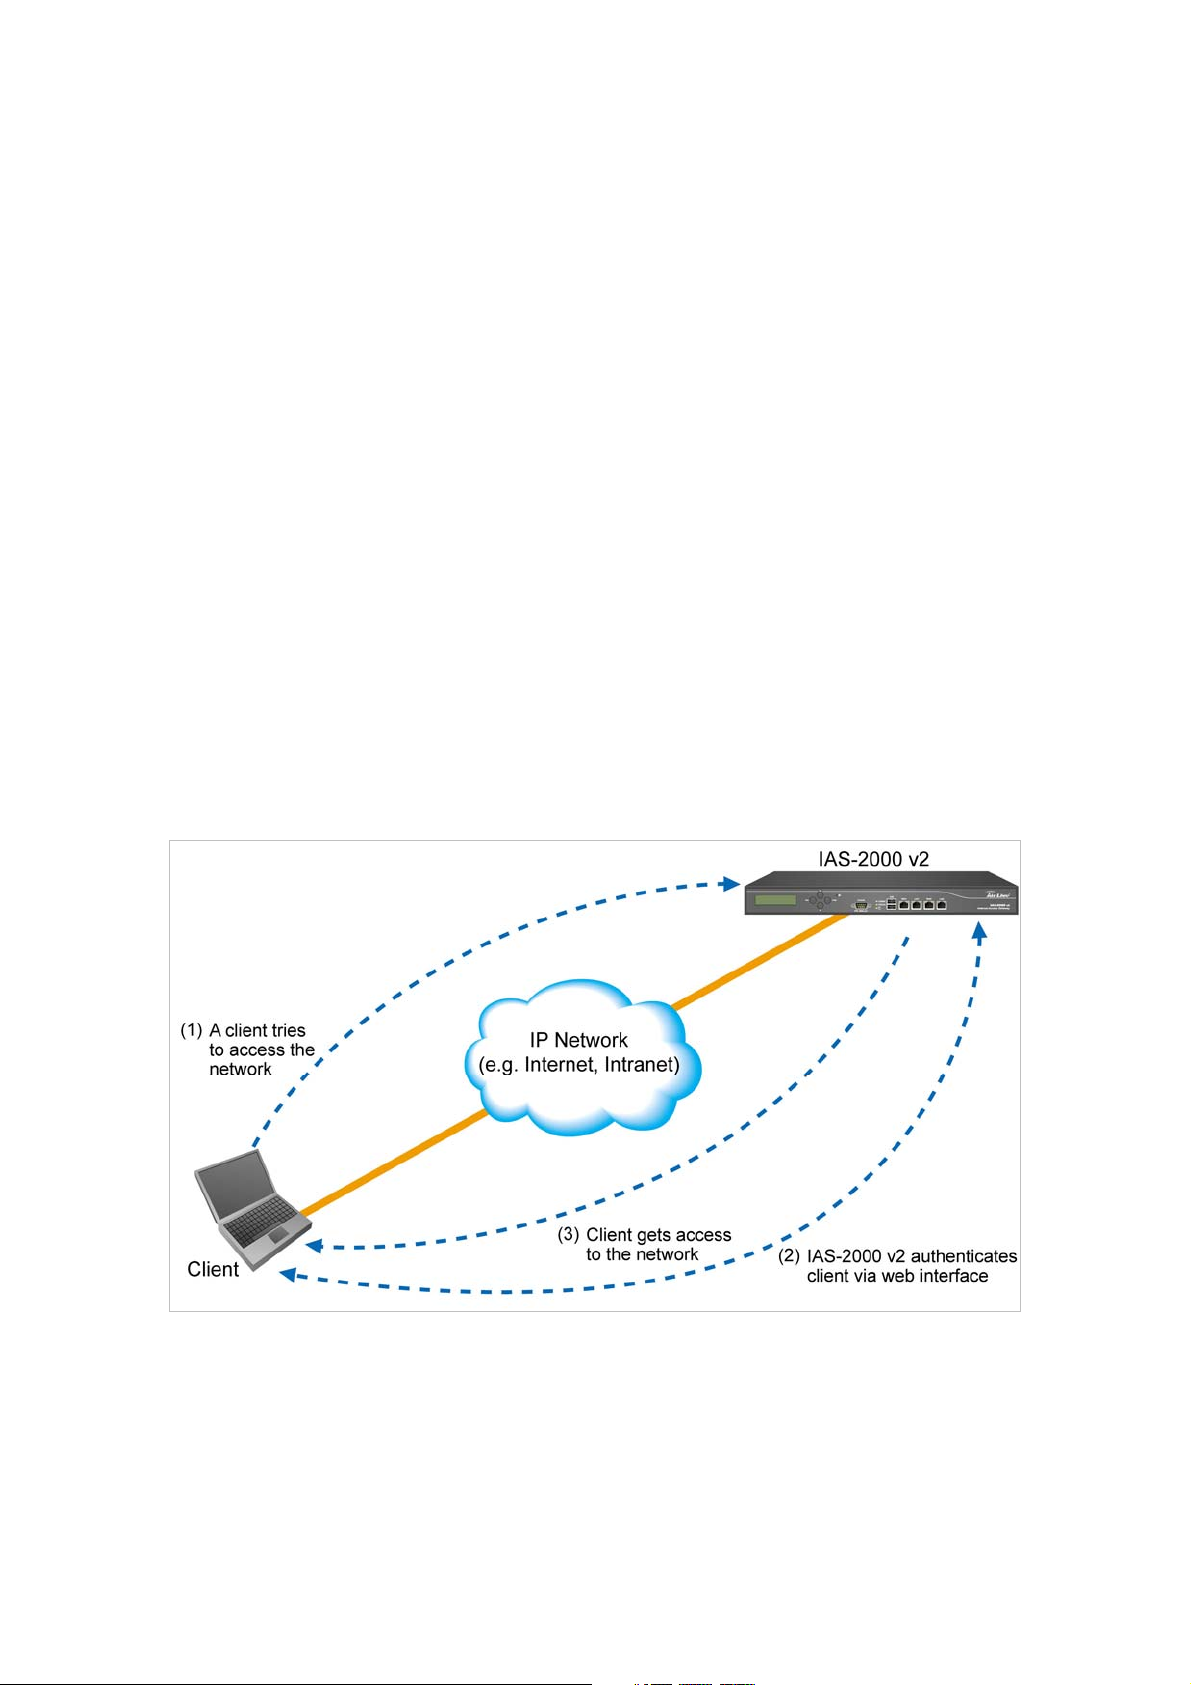
2.2 System Concept
IAS-2000 v2 is dedicatedly designed for controlling all network data passing through the system. The users under
the managed network must be authenticated to access the network beyond the managed area. The authentication
mechanism at the user’s end is provided by the IAS-2000 v2 server, and the SSL encryption is used to protect the
webpage. In the system, IAS-2000 v2 is responsible for authentication, authorization, and management functions.
The user account information is stored in the IAS-2000 v2 database, or other specified external authentication
databases.
The process of authenticating the user’s identity is executed via the SSL encrypted webpage. Using the web
interface, it can be ensured that the system is compatible to most desktop systems and palm computers. When a
user authentication is requested, the IAS-2000 v2 server software will check the authentication database at the rear
end to confirm the user’s access right. The authentication database can be the local dat abase of IAS-2000 v2 or any
external database that IAS-2000 v2 supports. If the user is not an authorized user, IAS-2000 v2 will refuse the user’s
2
.
Page 10

IAS-2000 v2
User’s Manual
request for the access. In the meantime, IAS-2000 v2 will also continue blocking the user from accessing the
network. If the user is an authorized user, then IAS-2000 v2 will authorize the user with an appropriate access right,
so that the user can use the network. If the online user remains idle without using the network f or a time exceeding a
predetermined idle time on IAS-2000 v2 or the online user logs out of the system, IAS-2000 v2 will exit the working
stage of such user and terminate the user’s access right of the network.
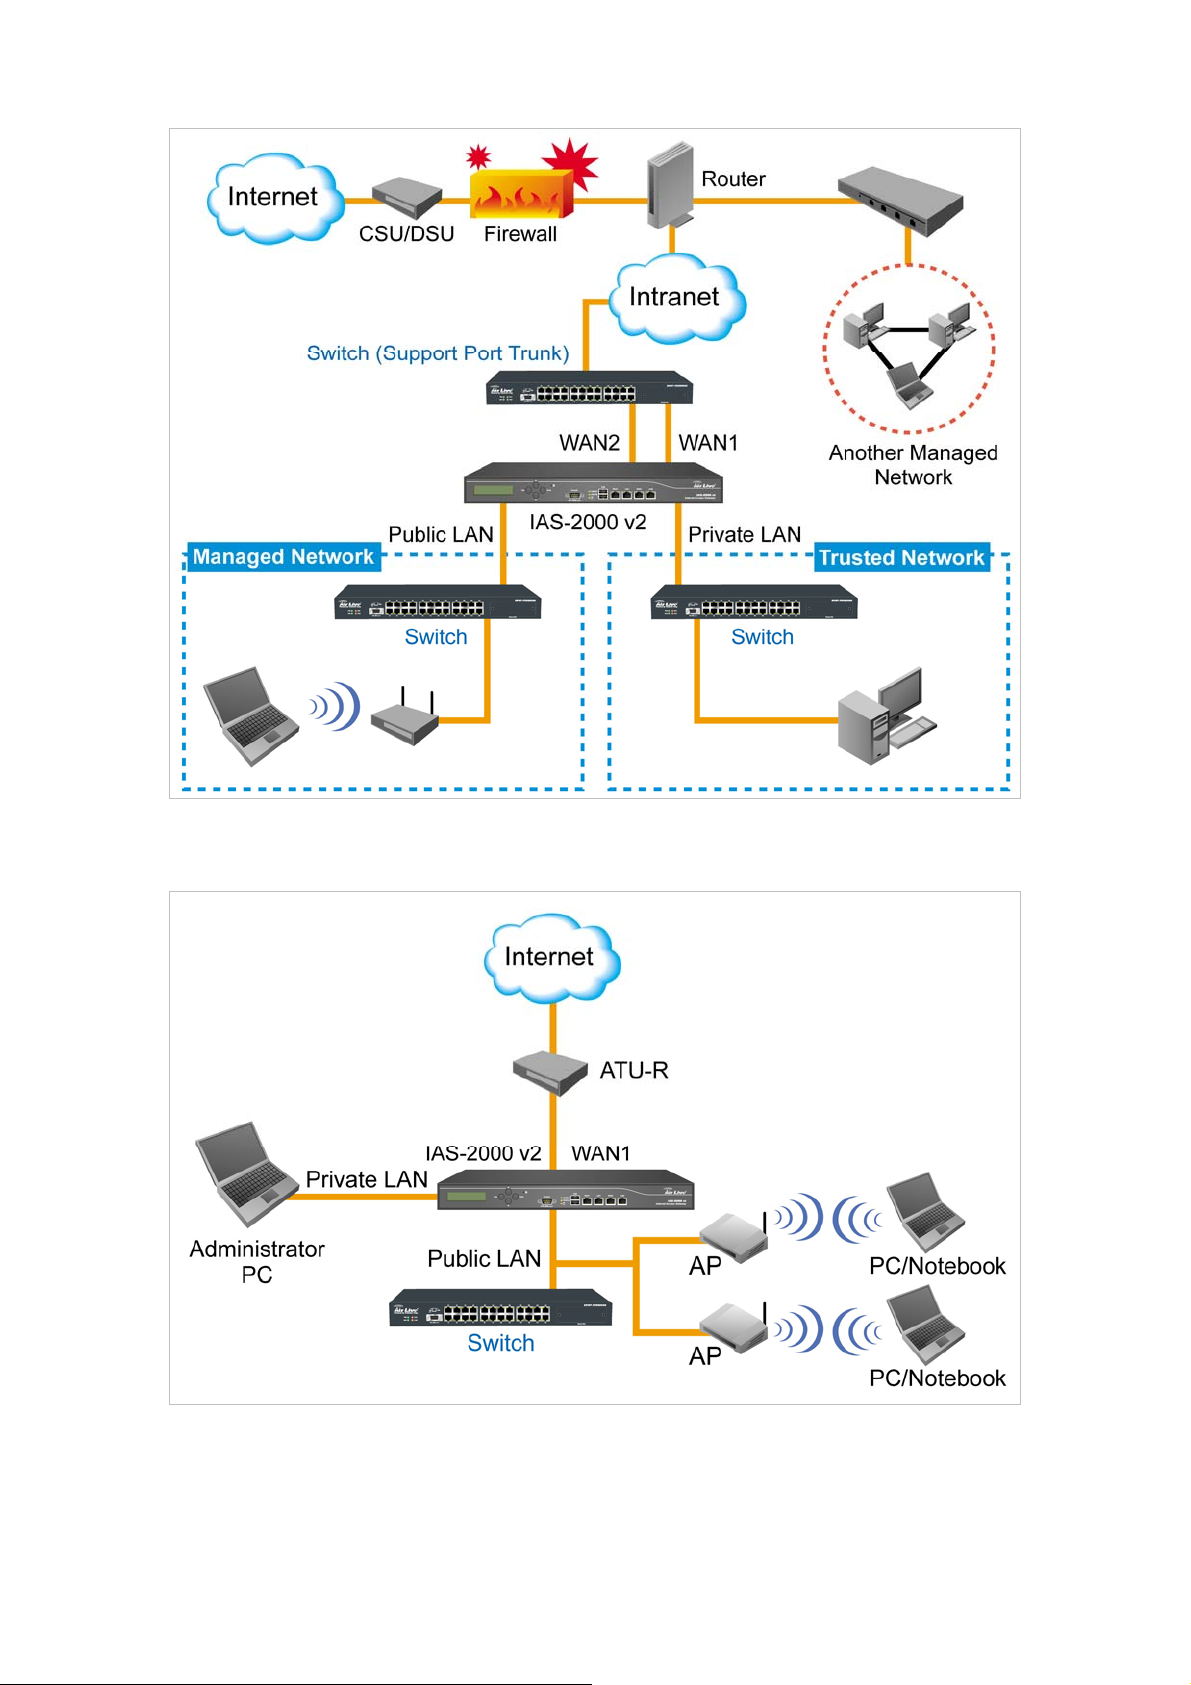
The following figure provides a simple example of setti ng up a small enterprise n etwork. IAS-2000 v2 is set to control
a part of the company’s intranet. The whole managed network includes cable network users and wireless network
users. In the beginning, any user located at the managed network is unable to access the network resource without
permission. If the access right to the network beyond the managed area is required, an Internet browser such a s the
Internet Explorer must be opened and a connection to any website must be performed. When the browser attempts
to connect to a website, IAS-2000 v2 will force the browser to redirect to the user login webpage. The user must
enter the username and password for authentication. After the identity is authenticated successfully, the user will
gain proper access right defined on IAS-2000 v2.
Attention: Public LAN
Authentication is required for the users to get access of the network; And, Private LAN is referred to as the LAN
port with the authentication function disabled.
is
referred to as the LAN port with the authentication function enabled from where the
Another setup example is shown in the following figure. The WAN1 and WAN2 of IAS-2000 v2 simultaneously
supports the Switch of 802.3ad (Support Port Trunk), and the bandwidth of the Switch will be the sum of the WAN1
and WAN2 bandwidths, which aims at eliminating the bottleneck caused by the narrow bandwidth between
IAS-2000 v2 and the 802.3ad Switch.
3
.
Page 11
IAS-2000 v2
User’s Manual
.
4
Page 12

Chapter 3. Hardware Installation
3.1 Panel Function Descriptions
Front Panel
LED Color Status Description
POWER Green On Power on the device
Off BIOS running
Status LED Green
WAN1, LAN1,
WAN2, LAN2
(L)
WAN1, LAN1,
WAN2, LAN2
(R)
Orange Blink Sending / Receiving
Green
Orange On 1000 Mbps
Blink OS running
On System ready
Off 10 Mbps
On 100 Mbps
IAS-2000 v2
User’s Manual
Port Description
WAN1 / WAN2
LAN1 / LAN2
Console Port
Panel Button
LED: There are four kinds of LED, power, status, port speed and link/act, to indicate diff erent status of the system.
Console Port: The system can be configured via HyperTerminal. For example, if you need to set the Administrator’s
Password, you can connect a PC to this port as a Console Serial Port via a terminal connection program (such as
the super terminal with the parameters of 9600, 8, N, 1, None flow control) to change the Administrator’s Password.
LAN1/LAN2: The two LAN ports can be independently configured such that users cannot access Internet before
authentication. Thus, administrators can choose to force the authentication for users connected to these ports.
WAN1/WAN2: The two WAN ports are connected to a network which is not managed by the IAS-2000 v2 system,
and this port can be used to connect the ATU-Router of ADSL, the port of Cabl e Modem, or the Switch or Hub on the
Connect to Internet or Intranet
Connect to the open environment. It can be chosen to require authentication to
access network resources and Internet.
9-pin serial port connector to resume the factory defaults or reconfigures the
system.
LCD Panel to display system info and network interface info
LAN of a company.
.
5
Page 13

Rear Panel
System Fan: Keep the machine cool.
Power Fan: Keep the power cool.
Power Socket: The power cord attaches here.
Power Switch: Turn on and off the machine.
3.2 Package Contents
IAS-2000 v2
User’s Manual
The standard package of IAS-2000 v2 includes:
y IAS-2000 v2 x 1
y CD-ROM x 1
y Power Cord x 1
y Ethernet Cable (Crossover) x 1
y Ethernet Cable (Straight) x1
y Console Cable x 1
y Accessory Packing x 1
3.3 System Requirement
y Standard 10/100BaseT including five network cables with RJ-45 connectors
y All PCs need to install the TCP/IP network protocol
.
6
Page 14
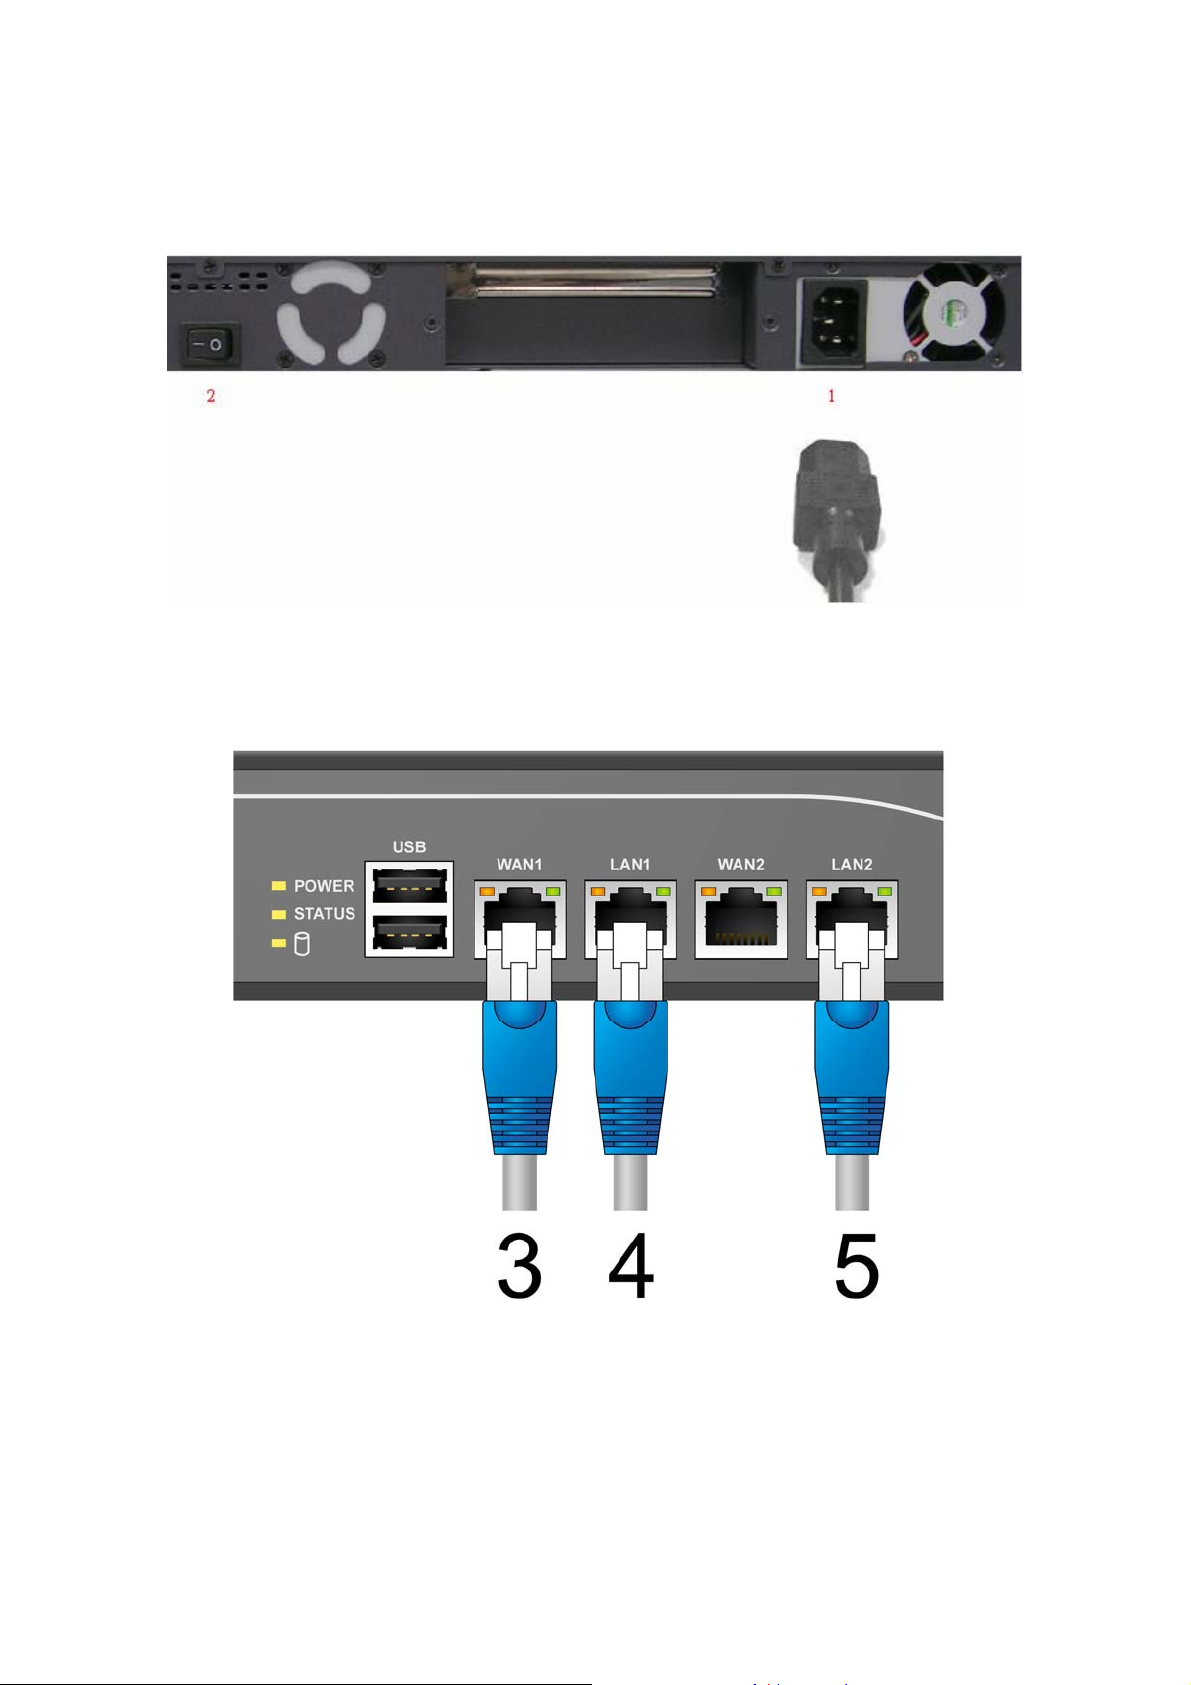
3.4 Installation Steps
Please follow the following steps to install IAS-2000 v2:
1. Connect the power cord to the power socket on the rear panel.
2. Turn on the power switch on the rear panel. The Power LED will light up.
IAS-2000 v2
User’s Manual
3. Connect an Ethernet cable to one LAN port with the user authentication function enabled on the front panel.
The default port is LAN1 port. (Note: Authentication is requi red for the u sers to access the network via this LAN
port. The LAN port with authentication function is referred to as Public LAN.) Connect the other end of the
Ethernet cable to an AP or switch. The LED of this LAN port should be on to indicate a proper connection.
7
.
Page 15

IAS-2000 v2
User’s Manual
4. Connect an Ethernet cable to one LAN port with the user authentication function disabled on the front panel.
The default port is LAN2 port. (Note: No authentication is required for the users to access the network via this
LAN port. The LAN port without authentication function is referred to as Private LAN and the administrator can
enter the administrative user interface to perform configurations via Private LAN.) Connect the other end of
the Ethernet cable to a client’s PC. The LED of this LAN port should be on to indicate a proper connection.
5. Connect an Ethernet cable to one of the WAN ports on the front panel. Connect the other end of the Ethernet
cable to ADSL modem, cable modem or a switch/hub of the internal network. The LED of this WAN should be
on to indicate a proper connection.
Attention: Usually a straight RJ-45 could be applied if IAS-2000 v2 is connected to a hub/computer which supports
automatic crossover, such as the Access Point. However, after the Access Point hardware reset, IAS-2000 v2
should not be able to connect to Access Point while connect ing with a straight cable unless t he cable wa s pulled out
and plug-in again. This scenario does NOT occur while using a crossover cable.
After the hardware of IAS-2000 v2 is installed completely, the system is ready to be configured in the following
sections. The manual will guide you step by step to set up the system using a single IAS-2000 v2 to manage the
network.
.
8
Page 16
IAS-2000 v2
User’s Manual
Chapter 4. Network Configuration on PC
After IAS-2000 v2 is installed, the following configurations must be set up on the PC: Interne t Connection Setup
for Windows XP and TCP/IP Network Setup.
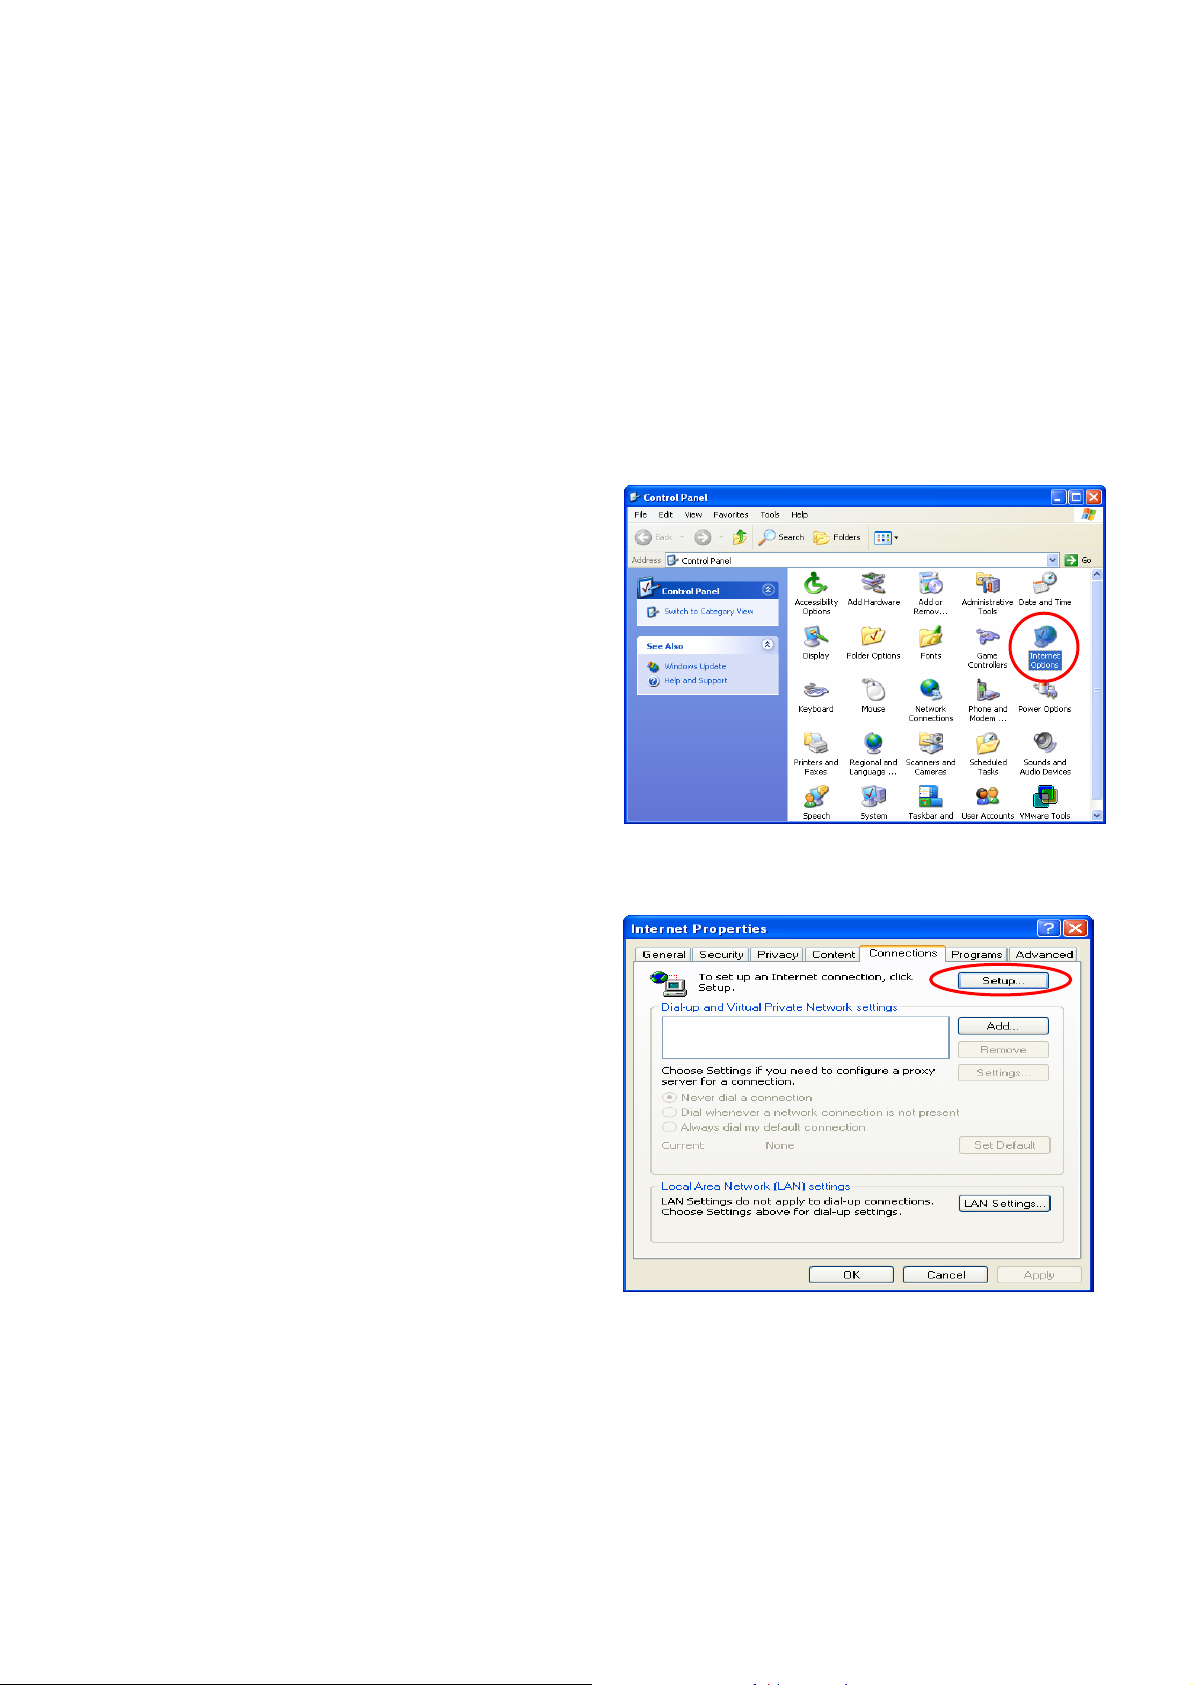
4.1. Internet Connection Setup for Windows XP
1. Choose Start > Control Panel > Internet Options.
2. Choose the “Connections” label, and then click
Setup.
.
9
Page 17

3. Click Next when Welcome to the New Connection
Wizard screen appears.
4. Choose “Connect to the Internet” and then click
Next.
IAS-2000 v2
User’s Manual
5. Choose “Set up my connection manually” and then
click Next.
.
10
Page 18

6. Choose “Connect using a broadband connection
that is always on” and then click Next.
7. Finally, click Finish to exit the Connection Wizard.
Now, the setu p has been completed
IAS-2000 v2
User’s Manual
.
11
Page 19
IAS-2000 v2
User’s Manual
4.2. TCP/IP Network Setup
If the operating system of the PC in use is Windows 95/98/ME/2000/XP, keep the default settings without any
change to directly start/restart the system. With the factory default settings, duri ng the process of st arting the system,
IAS-2000 v2 with DHCP function will automatically assign an appropriate IP address and related information for
each PC. If the Windows operating system is not a server version, the default settings of the TCP/IP will regard the
PC as a DHCP client, and this function is called “Obtain an IP address automatically”.
If checking the TCP/IP setup or use the static IP in the LAN1 or LAN2 section is needed, please follow the steps
below
Check the TCP/IP Setup of Window XP
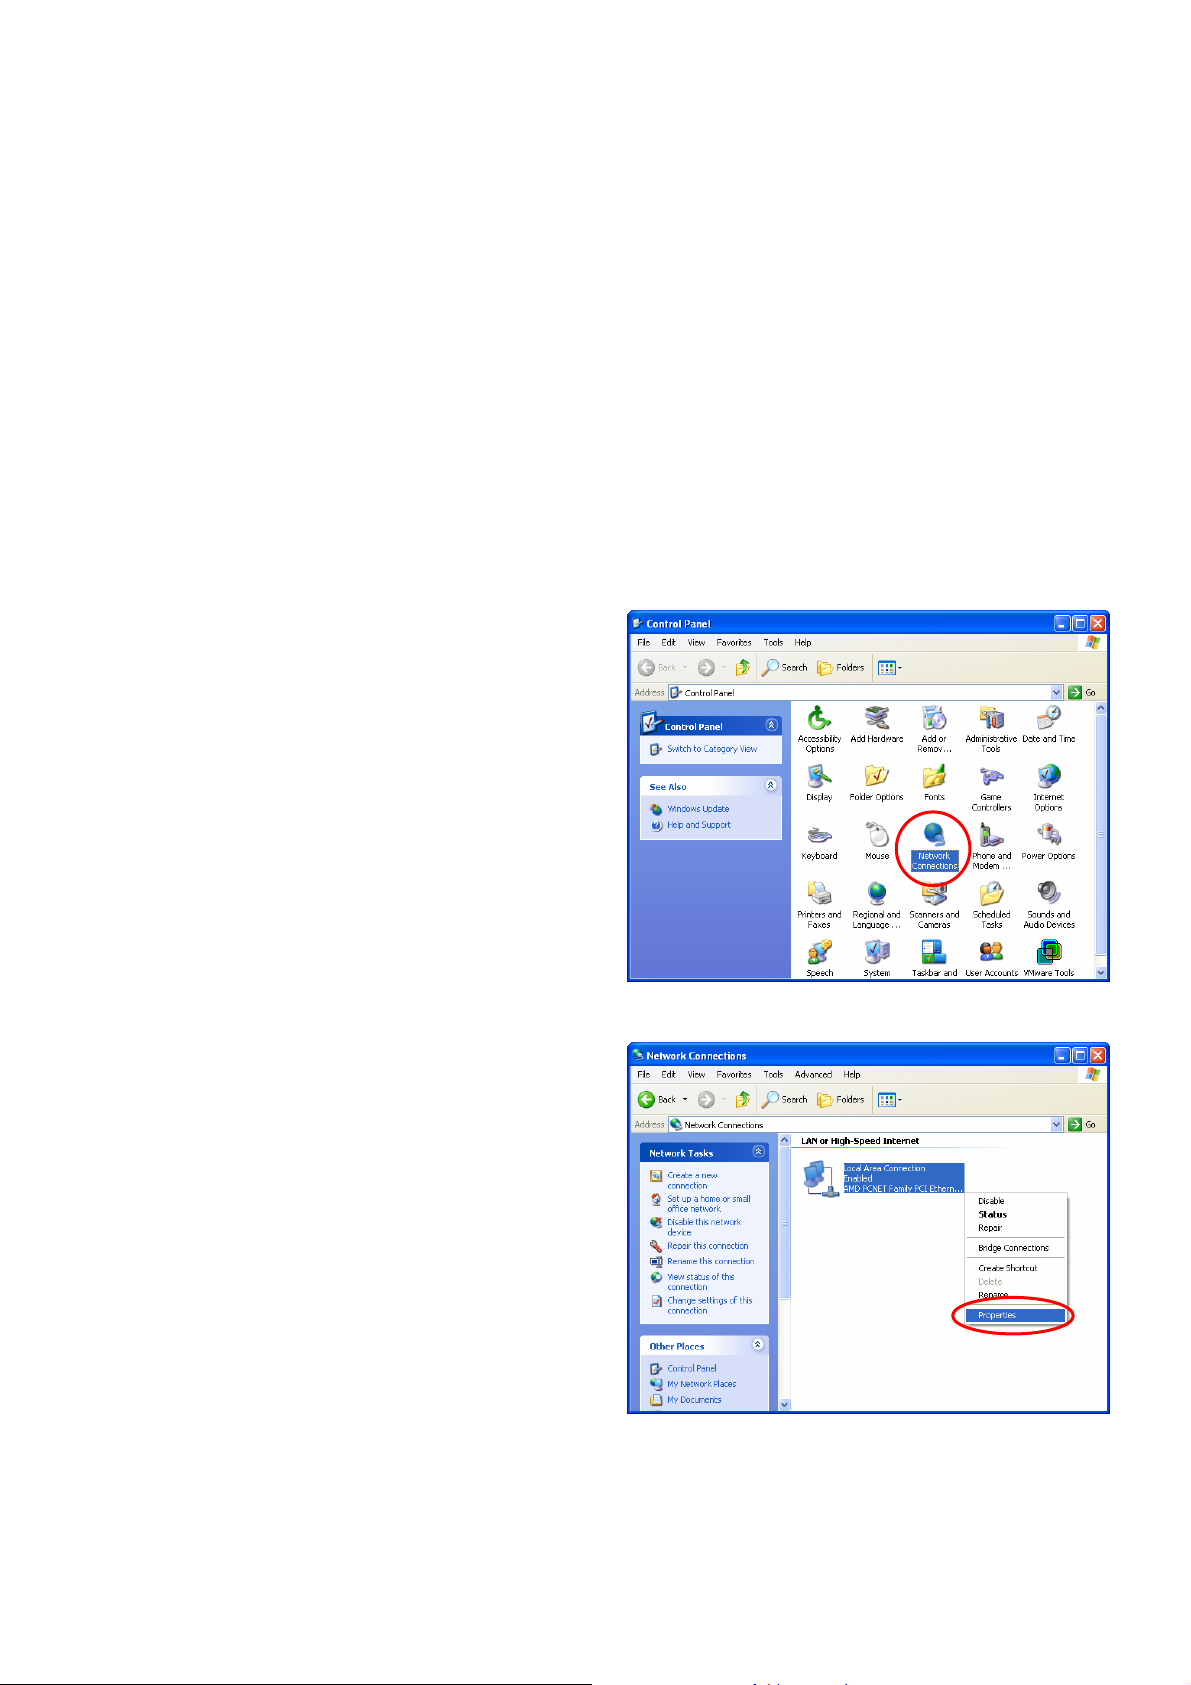
1. Select Start > Control Panel > Network
Connections.
2. Click the right button of the mouse on the “Local Area
Connection” icon and select “Properties”
.
12
Page 20
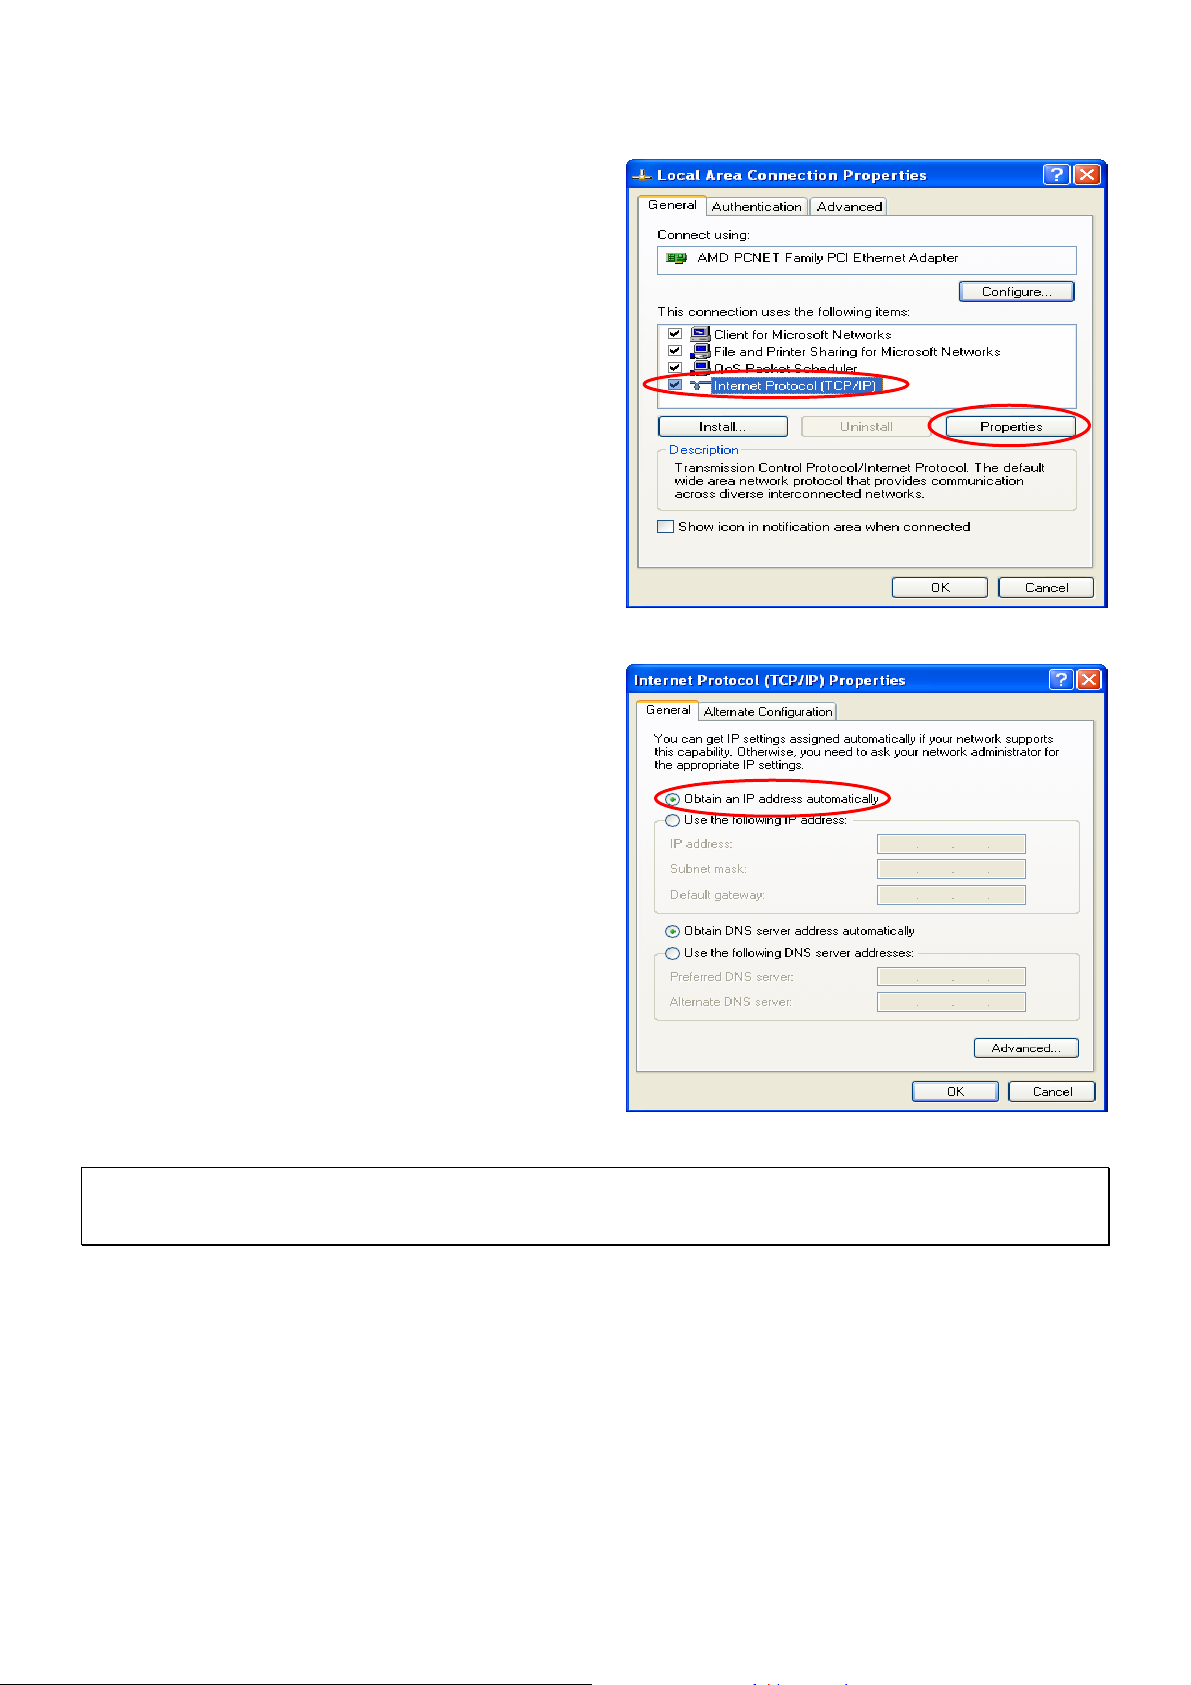
3. Select “General” label and choose “Internet Protocol
(TCP/IP)” and then click Properties. Now, choose to
use DHCP or specific IP address.
IAS-2000 v2
User’s Manual
4-1. Using DHCP: If using DHCP is desired, please cho o se
“Obtain an IP address automatically” and click OK.
This is also the default setting of Windows. Then,
reboot the PC to make sure an IP address is obtained
from IAS-2000 v2.
4-2. Using Specific IP Address: If using specific IP
address is desired, ask the network administrator for
the information of the IAS-2000 v2: IP address,
Subnet Mask, New gateway and DNS server
address.
Caution: If your PC has been set up completed, please inform the network administrator before modifying the
following setup.
.
13
Page 21
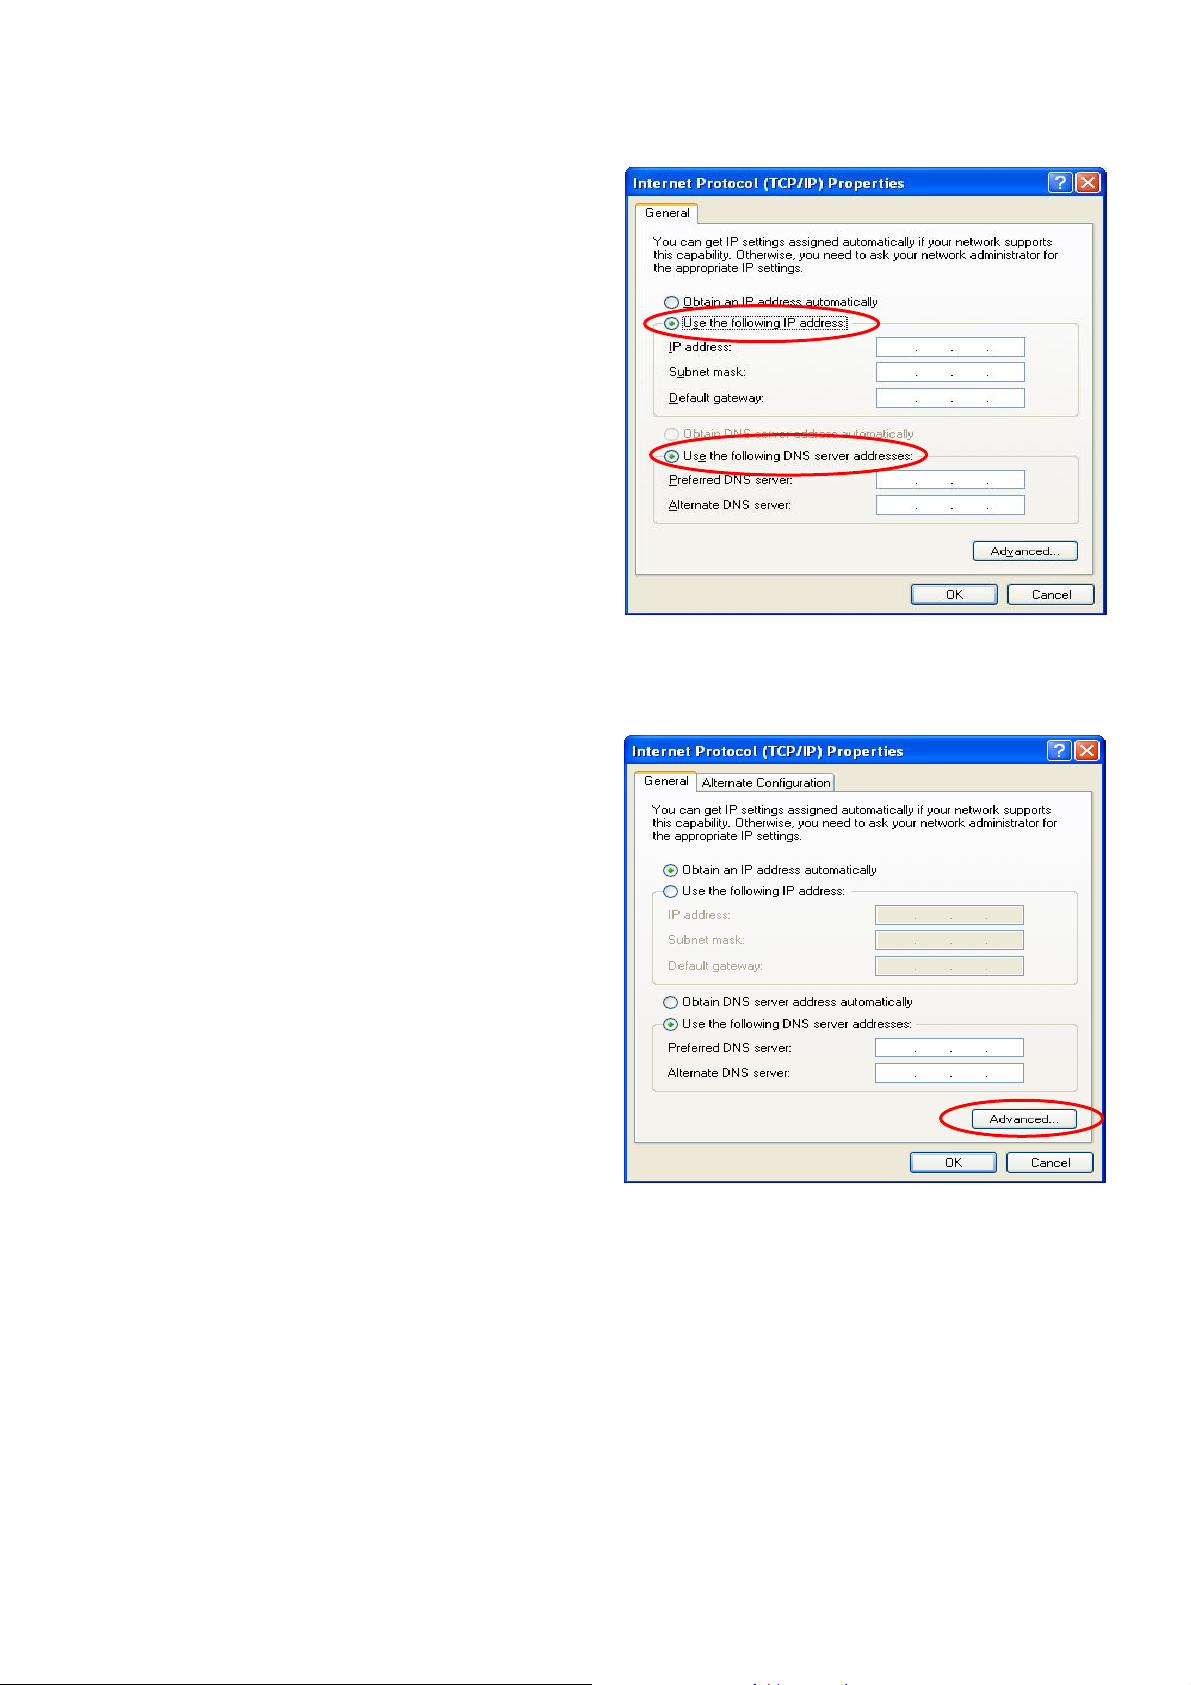
y Please choose “Use the following IP
address:” and enter the information given from
the network administrator in “IP address:” and
“Subnet mask:” as well as “Default gateway”
If the DNS Server column is blank, please
choose “Use the following DNS server
addresses:” and then enter a known DNS
address or the DNS address provided by ISP
and then click OK.
IAS-2000 v2
User’s Manual
y Then, click Advanced in the window of
“Internet Protocol (TCP/IP) Properties”.
.
14
Page 22
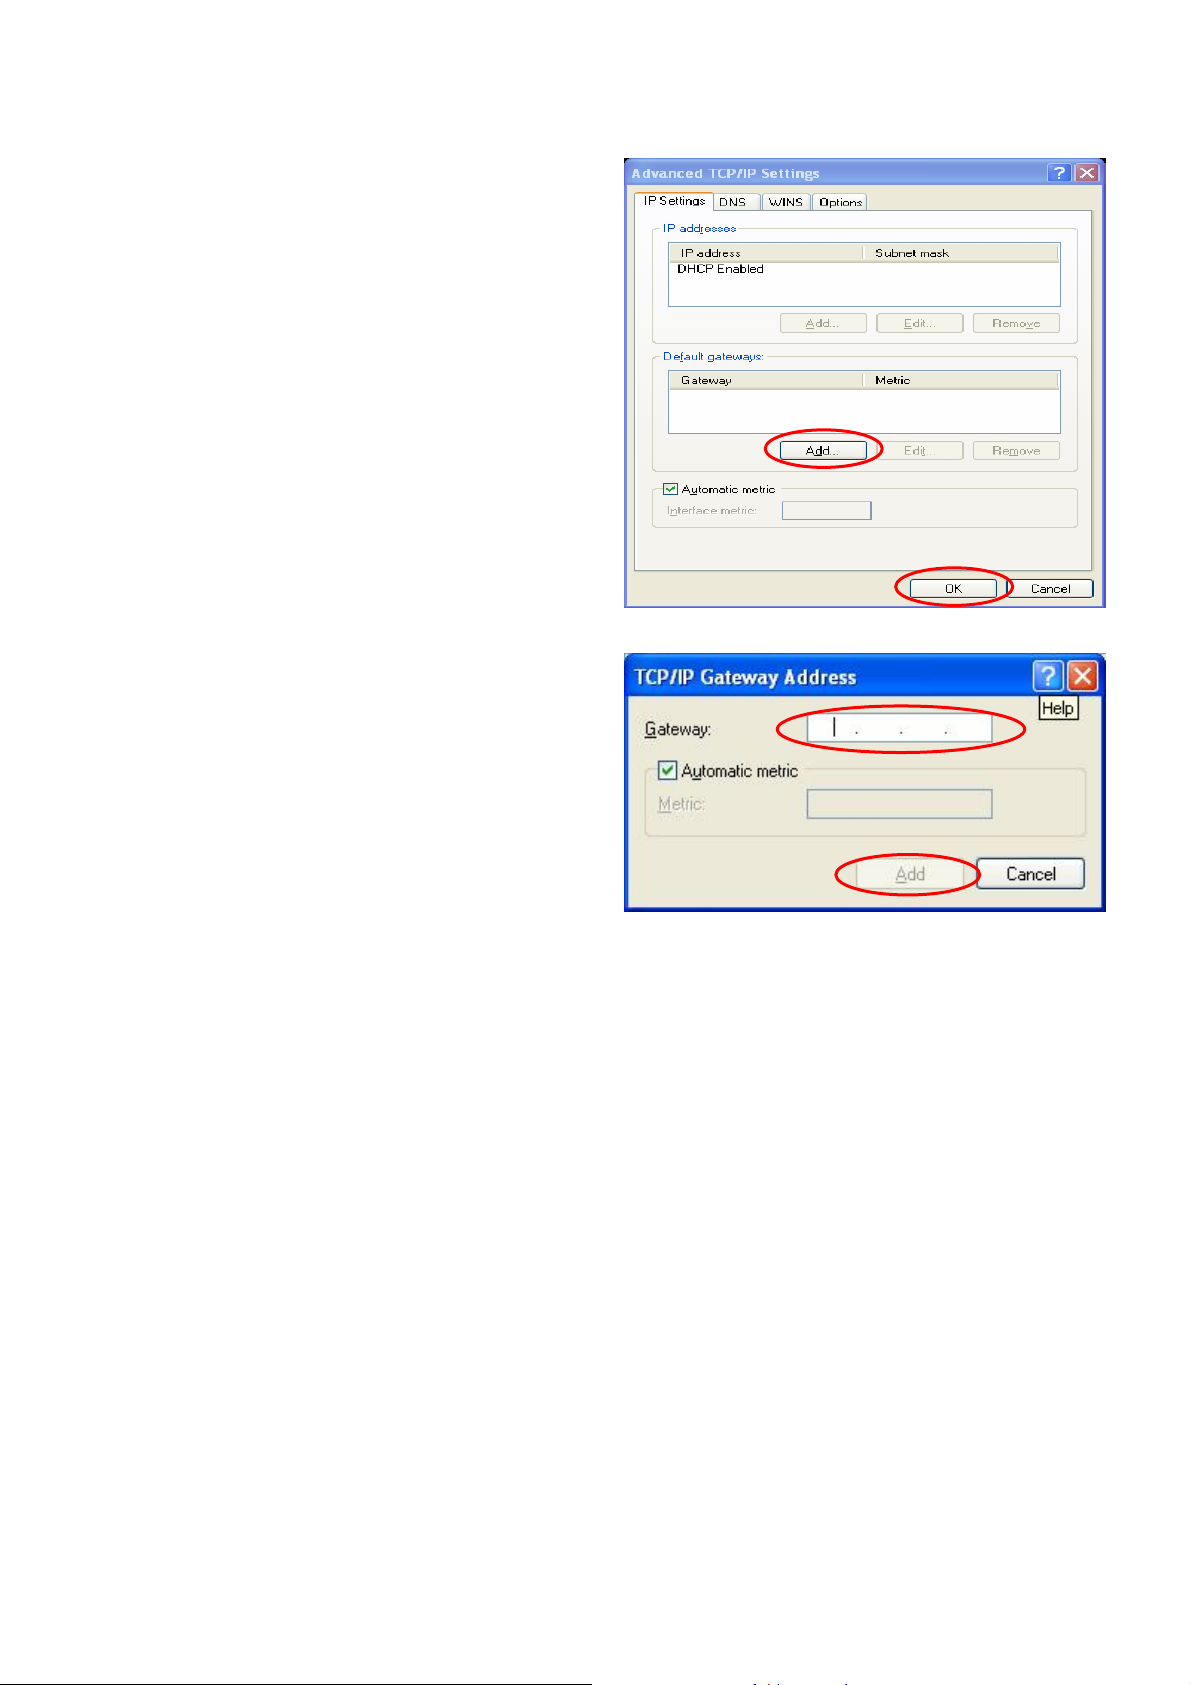
y Choose the “IP Settings” label and click “Add”
below the “Default gateways” column and the
“TCP/IP Gateway Address” window will
appear. Enter the gateway address of IAS-2000
v2 in the “Gateway:” of “TCP/IP Gateway
Address” window, and then click Add. After
returning to the “IP Settings” label, click OK to
finish.
IAS-2000 v2
User’s Manual
.
15
Page 23

IAS-2000 v2
User’s Manual
Chapter 5. Web Interface Configuration
This chapter will present further detailed settings. The followin g table shows all the functions of IAS-2000 v2.
OPTION
FUNCTION
System
Configuration
Configuration
Wizard
System
Information
WAN1
Configuration
WAN2 & Failover
LAN1
Configuration
LAN2
Configuration
IP Mobility
Network
Configuration
Network Address
Translation
Privilege List
Monitor IP List
Walled Garden
List
Proxy Server
Properties
Dynamic DNS Online Report
User
Authentication
Authentication
Configuration
Policy
Configuration
Black List
Configuration
Guest User
Configuration
Additional
Configuration
Utilities Status
Change Password System Status
Backup/Restore
Interface Status
Setting
Firmware Upgrade Current Users
Restart Traffic History
Notification
Configuration
Caution: After finishing the configuration of the settings, please click Apply and pay attention to see if a restart
message appears on the screen. If such message appears, system must be restarted to allow the settings to take
effect. All on-line users will be disconnected during restart.
After the basic installation shown previously has been completed, IAS-2000 v2 can be further configured with the
following steps
1. Use the network cable of the 10/100BaseT to connect a PC to the Private Port, and then start a browser (such
as Microsoft IE). Next, enter the gateway address for that port, the default is
https://192.168.2.254. In the
opened webpage, an administrative login page will appear. Enter “admin” as the default username and
password “airlive”. Click Enter to log in.
16
.
Page 24

IAS-2000 v2
User’s Manual
Caution: If you can’t get the login page, you may have in correctly set your P C t o obtain an I P address au tom atically
from authentication LAN port or the IP address used does not have the same subnet as the URL. Please use default
IP address such as 192.168.2.xx in your network and then try it again.
2. After successfully logging into IAS-2000 v2, enter the web management interface and see the welcome page.
There is a Logout button on the upper right corner to log out the system.
17
.
Page 25
IAS-2000 v2
User’s Manual
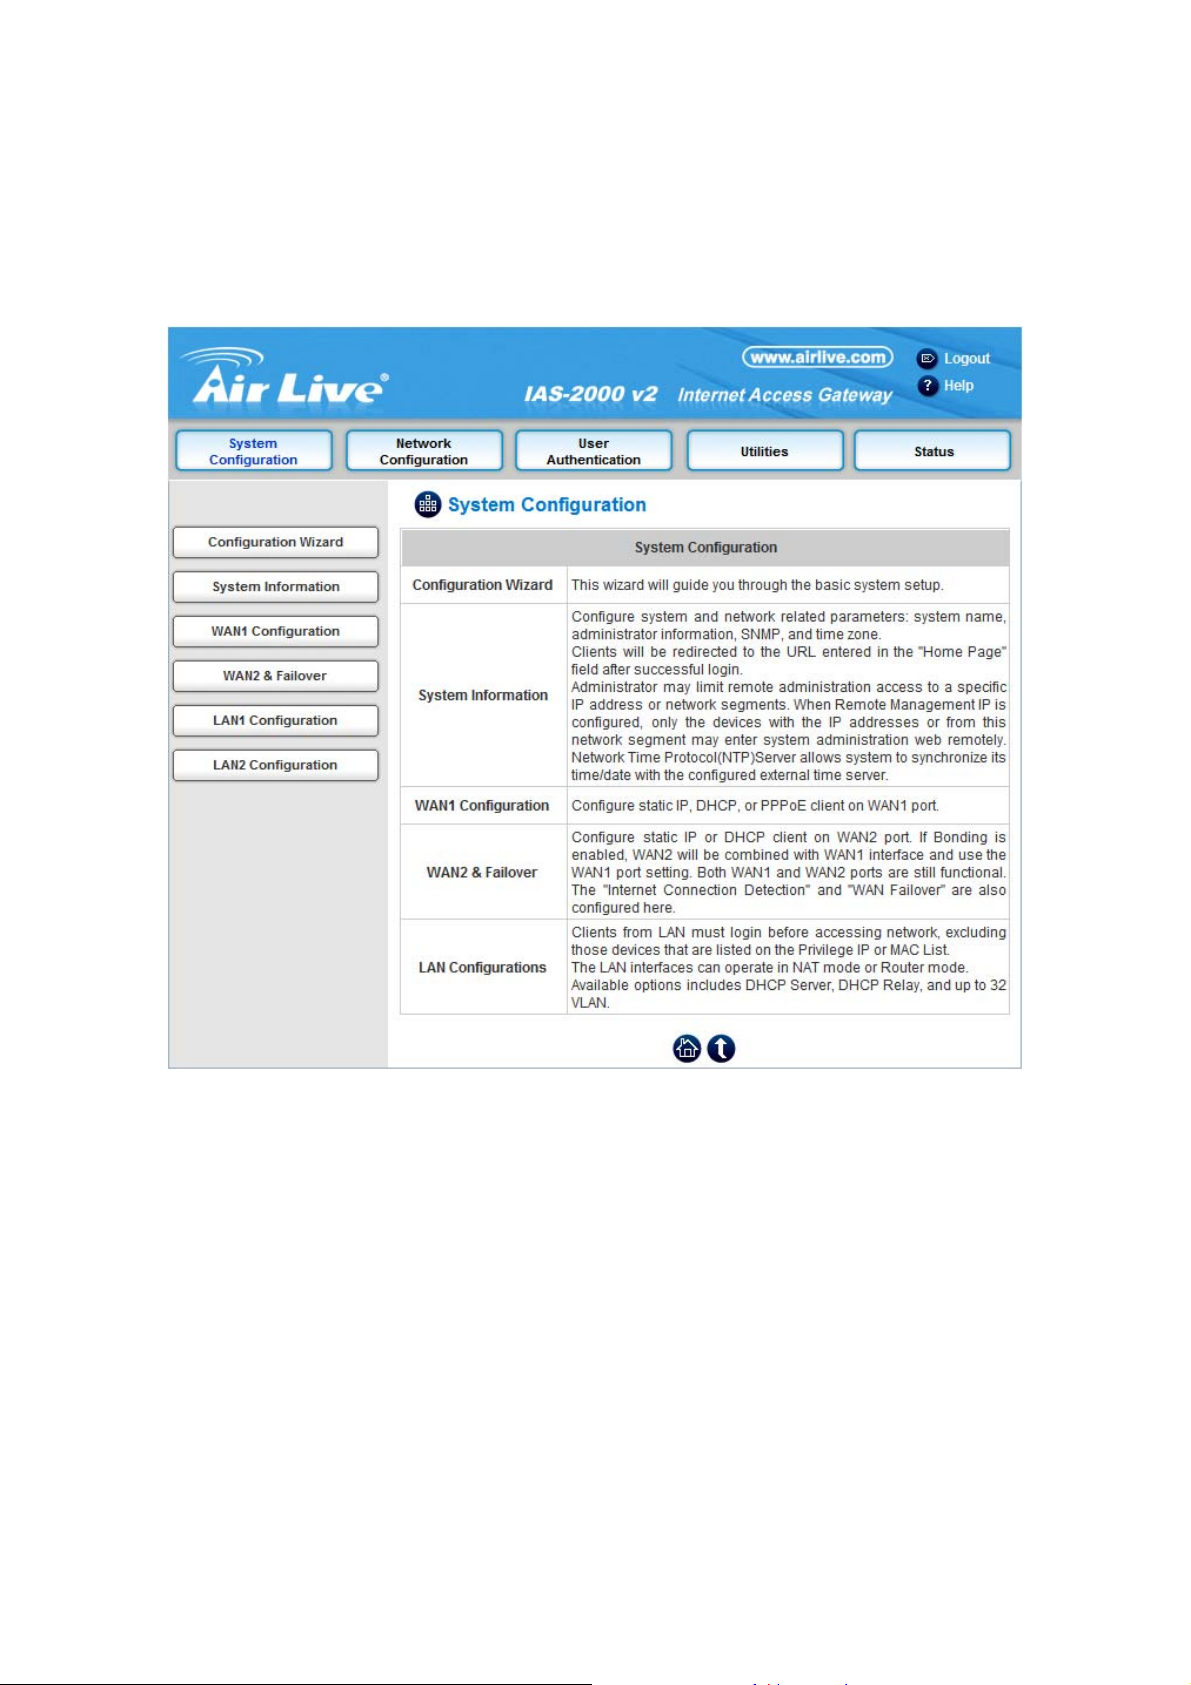
5.1 System Configuration
This section includes the following functions: Configuration Wizard, System Information, WAN1 Configuration,
WAN2 & Failover, LAN1 Configuration and LAN2 Configuration.
18
.
Page 26
IAS-2000 v2
User’s Manual
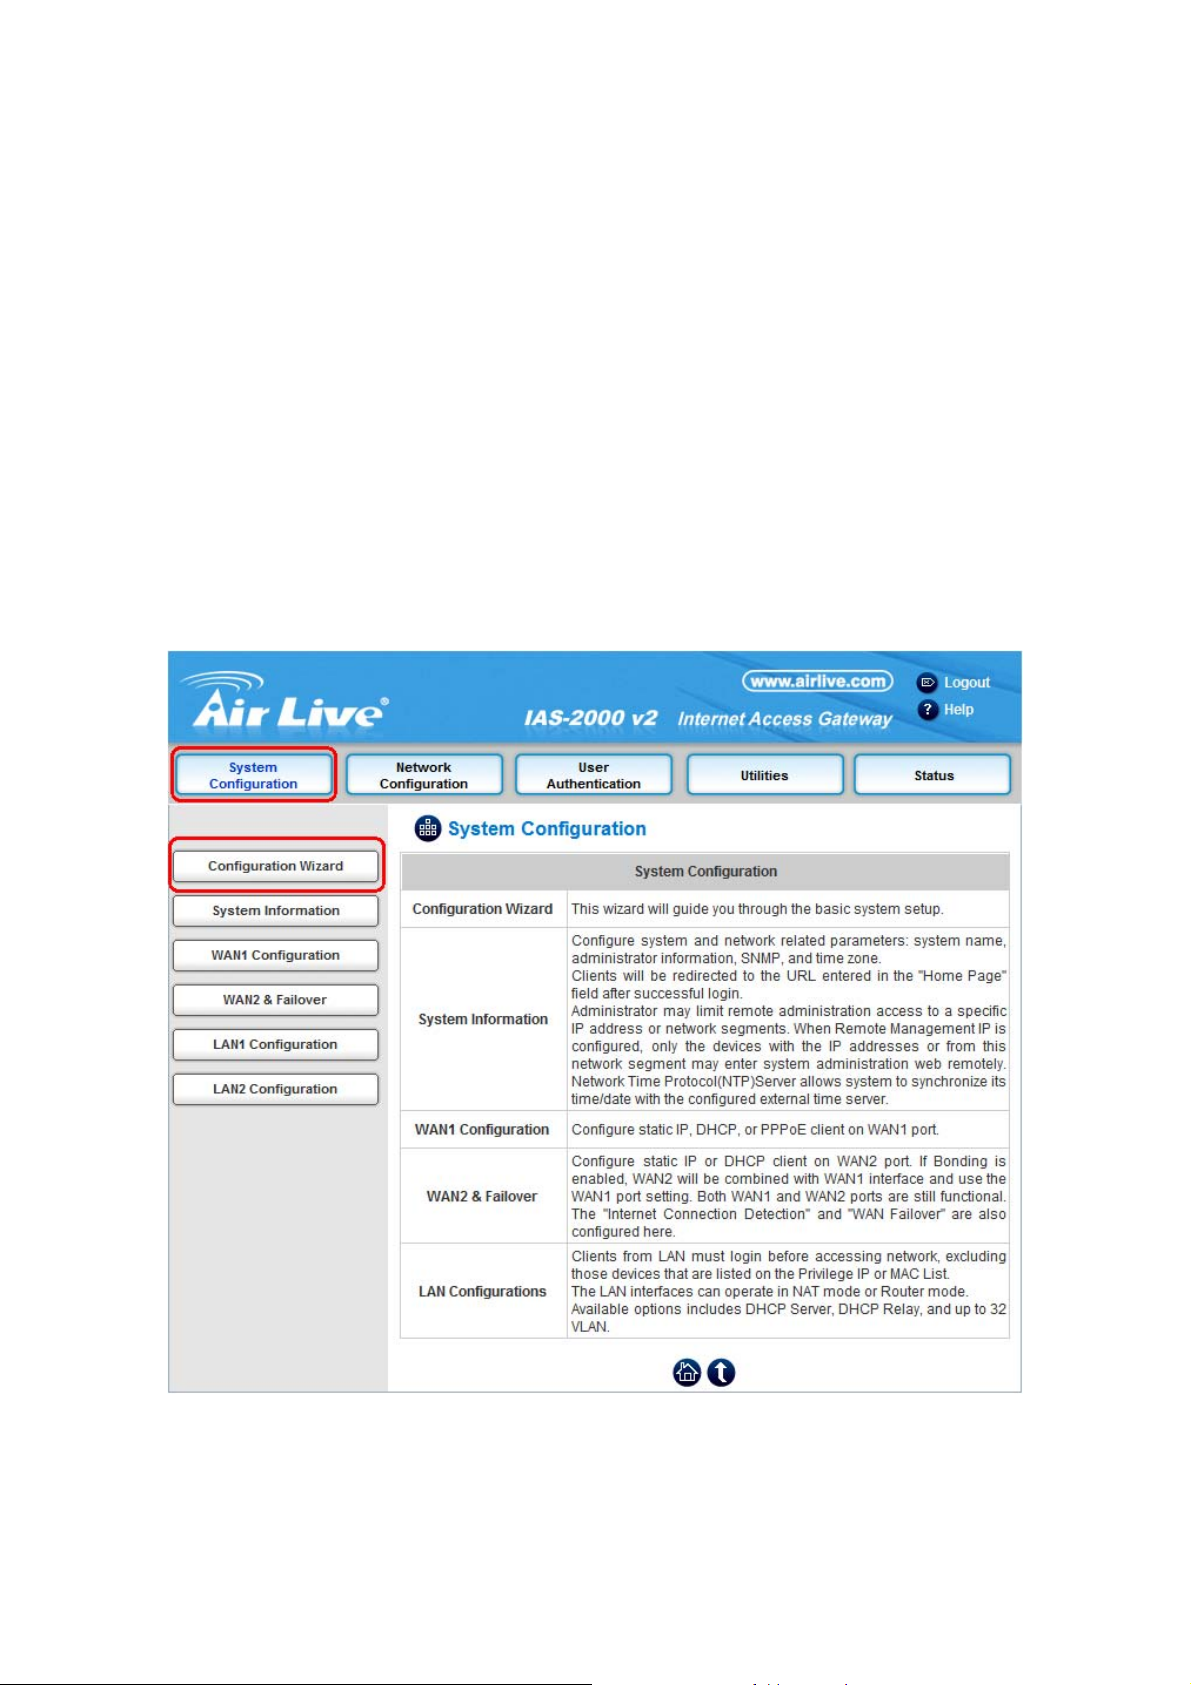
5.1.1 Configuration Wizard (Also served as Quick Installation)
There are two ways to configure the system: using Configuration Wizard or change the setting by demands
manually. The Configuration Wizard has 7 steps providing a simple and easy way to set up IAS-2000 v2 and can be
served as Quick Installation. There are 7 steps as listed below:
1. Change Admin’s Password
2. Choose System’s Time Zone
3. Set System Information
4. Select the Connection Ty pe for WAN1 Port
5. Configure LAN1
6. Select Authentication Method
7. Restart
Now, click the System Configuration from the top menu and the System Configuration page will appear.
.
19
Page 27
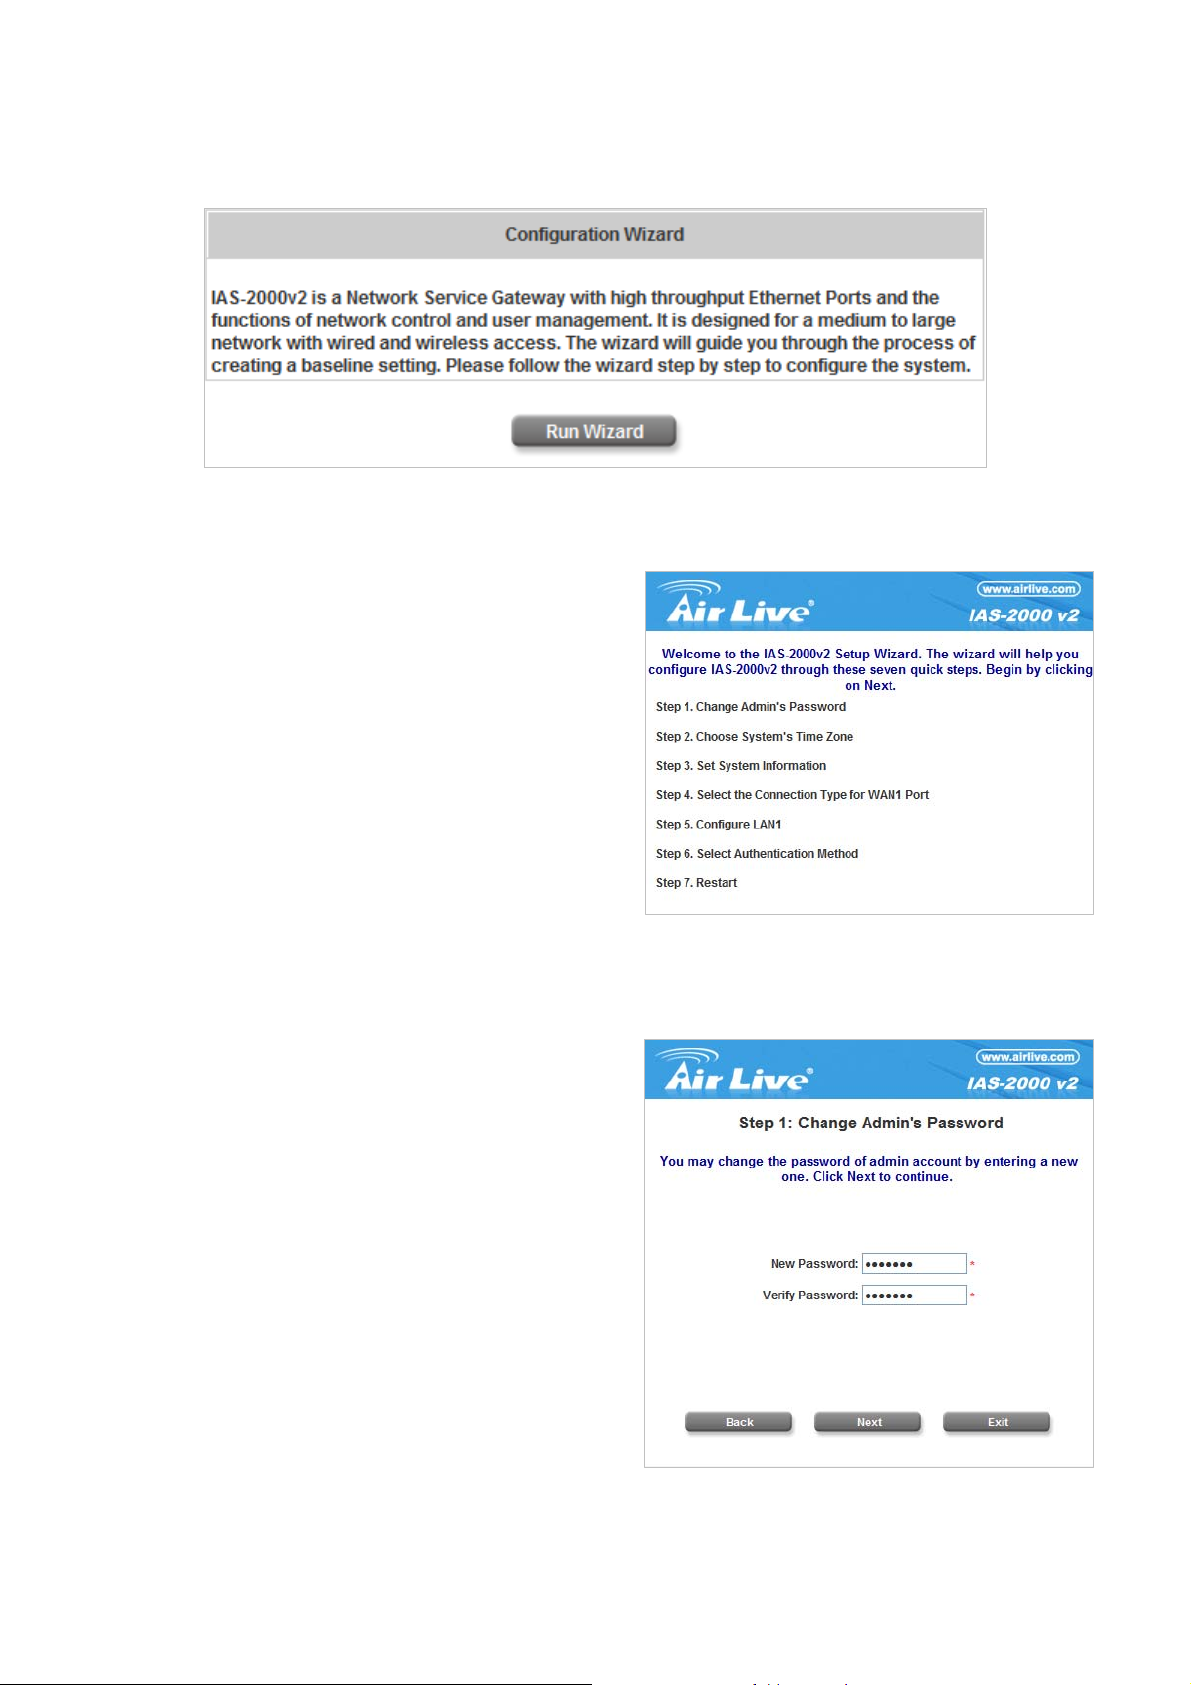
Then, click on Configuration Wizard and click the Run Wizard button to start the wizard.
y Running the Wizard
A welcome screen that briefly introduces the 7 steps will
appear. Click Next to begin.
IAS-2000 v2
User’s Manual
y Step 1: Change Admin’s Password
Enter a new password for the admin account and retype
it in the verify password field (twenty-character
maximum and no spaces).
Click Next to continue.
.
20
Page 28

y Step 2: Choose System’s Time Zone
Select a proper time zone via the pull-down menu.
Click Next to continue.
IAS-2000 v2
User’s Manual
y Step 3: Set System Information
Home Page: Enter the URL to where the clients should
be directed when they are properly authenticated.
NTP Server: Enter the URL of external time server for
IAS-2000 v2 time synchronization or use the default.
DNS Server: Enter a DNS Server provided by the ISP
(Internet Service Provider). Contact the ISP if the DNS
IP Address is unknown.
Click Next to continue.
y Step 4: Select the Connection Type for WAN1 Port
There are three types that WAN1 port supports: St atic
IP Address, Dynamic IP Address and PPPoE Client.
Select a proper Internet connection type and click Next
to continue.
¾ Dynamic IP Address
If this option is selected, an appropriate IP address
and related information will be assigned
automatically.
Click Next to continue.
21
.
Page 29

¾ Static IP Address: Set WAN1 Port’s Static IP
Address
Enter the “IP Address”, “Subnet Mask” and
“Default Gateway” provided by the ISP.
Click Next to continue.
¾ PPPoE Client: Set PPPoE Client’s Information
IAS-2000 v2
User’s Manual
Enter the “Username” and “Password” provided
by the ISP.
Click Next to continue.
y Step 5: Configure LAN1’s Information
IP Address: Enter the Public LAN port IP Address or
use the default.
Subnet Mask: Enter the Public LAN port Subnet Mask
or use the default.
Disable DHCP Server: If the DHCP server is disabled,
the clients in Public LAN must be configured with an IP
address manually.
Enable DHCP Server: When the option is selected,
IAS-2000 v2 will automatically provide the necessary IP
address to all clients in Public LAN.
Click Next to continue.
22
.
Page 30

y Step 5: Set LAN1 DHCP Server
If Enable DHCP Server option is selected, fields marked
with red asterisk must be filled in.
Start IP Address: The start IP address that will be
assigned to the Public LAN clients.
End IP Address: The end IP address that will be
assigned to the Public LAN clients.
(Note: Be sure that IP addresses assigned from
Start IP address to End IP address are NOT used in
other settings by IAS-2000 v2.)
Domain Name: Enter a domain name provided by the
ISP (e.g. airlive.com).
IAS-2000 v2
User’s Manual
WINS Server: Enter the IP address of the WINS Server (Windows Internet Naming Service Server). This field
is optional.
Preferred DNS Server: The DNS Server settings are provided by the ISP. Only the Preferred DNS Server field
is mandatory. Contact the ISP if the DNS Server settings are unkn own.
Alternate DNS Server: The DNS Server settings are provided by the ISP. This field is optional.
Click Next to continue.
y Step 6: Select Default Authentica tion Server
Set the user’s information in advance. Enter an easy
identified name as the postfix name in the Postfix
Name field (e.g. airlive) and choose an authentication
method.
Click Next to continue.
.
23
Page 31

¾ Local User- Add User
A new user can be added to the local user data
base. To add a user here, enter the Username (e.g.
test), Password (e.g. test), MAC (optional) and
assign it a policy (or use the default). Upon
completing a user adding, more users can be
added to this authentication method by clicking the
ADD bottom.
Click Next to continue.
¾ POP3 User- Authentication Method-POP3
IAS-2000 v2
User’s Manual
Enter IP/Domain Name and server port of the POP3
server provided by the ISP, and then choose enable
SSL or not.
Click Next to continue.
¾ RADIUS User- Authentication-RADIUS
Enter RADIUS server IP/Domain Name,
authentication port, accounting port and secret key.
Then choose to enable accounting service or not,
and choose the desired authentication method.
Click Next to continue.
.
24
Page 32

¾ LDAP User- Authentication Method-LDAP
Add a new user to the LDAP user data base. Enter
the “LDAP Server”, “Server Port” and “Base
DN” and select one kind of Binding Type and
Account Attribute to access the LDAP server .
If User Account binding type is selected, the
system will use the Base DN to be the user account
to access the LDAP server .
If Anonymous binding type is selected, the system
IAS-2000 v2
User’s Manual
will access the LDAP servers without requiring
authentication.
If Specified DN binding type is selected , username
and password in the “Bind RDN” and “Bind
Password” fields must be entered to access the
LDAP server .
.
25
Page 33

If Windows AD binding type is selected, please
enter the domain name of Windows AD to access
the LDAP server.
Click Next to continue.
¾ NT Domain User- Authentication Method-NT
IAS-2000 v2
User’s Manual
Domain
When NT Domain User is selected, enter the
information for “Server IP Address”, and
enable/disable “Transparent Login”. After this
setup is completed, click Next to continue.
y Step 7: Restart
Click Restart to save the current settings and restart
IAS-2000 v2. The Setup Wizard is now completed.
.
26
Page 34

IAS-2000 v2
User’s Manual
y During IAS-2000 v2 restart, a “Restarting now. Wait
for a minute.” message will appear on the screen.
Please do not interrupt IAS-2000 v2 until the message
has disappeared. This indicates that a complete and
successful restart proce ss has finished.
Caution: During every step of the wizard, if you wish to go back to modify the setting. Please click the Back button
to go back to the previous step.
.
27
Page 35

IAS-2000 v2
User’s Manual
5.1.2 System Information
These are some main information about IAS-2000 v2. Please refer to the following description for these blanks:
y System Name: Set the system’s name or use the default.
y Device Name: FQDN (Fully-Qualified Domain Name). This is used as the domain name used in login p age. For
example, if Device Name=IAS-2000v2.com, the URL of login page will be
https://IAS-2000v2.com/loginpages/login.shtml
y Home Page: Enter the website of a Web Server to be the homepage. When users log in successfully, they will
be directed to the homepage set here. Usually, the homepage is the company’s website or a popular website,
such as
redirect to this page after login.
http://www.airlive.com. Regardless of the original webpage set in the users’ computer, they will be
y Remote Management IP: Set a specific IP or the IP range or subnet with a system which is able to connect to
the web management interface via the WAN port. For example, 10.2.3.0/24 means that as long as an
administrator is within the IP address range of 10.2.3.0/24, user can reach the administration page of IAS-2000.
y SNMP: IAS-2000 v2 supports SNMPv2 and SNMPv3. If the function is enabled, assign the Manager IP and the
community of SNMPv2 and SNMPv3 to access the management information base (MIB) of the system.
y User Logon SSL: Enable SSL when user login with encryption to have a safer login process.
28
.
Page 36

IAS-2000 v2
User’s Manual
y System Time: IAS-2000 v2 supports NTP communication protocol to synchronize the network time. Please
specify the IP address of a NTP server and select the desi red time zone in the system configuration interfa ce for
adjusting the time automatically. (Universal Time is Greenwich Mean Time, GMT). Time can also be set
manually when by selecting “Set Device Date and Time”. Please enter the date and time for these fields.
y History Report Interval: T i me interval for sending the history notice.
.
29
Page 37

IAS-2000 v2
User’s Manual
5.1.3 WAN1 Configuration
There are 3 methods that WAN1 Port supports: Static IP Address, Dynamic IP Address, and PPPoE Client.
y Static IP Address: Manually specifying the IP address of the WAN1 Port which is applicable for the network
environment where the DHCP service is unavailable. The option of 802.3ad for WAN2 is only available when
WAN1 is using a static IP address. The fields with red asterisks are required. Please fill in these fields.
¾ IP Address: The IP address of the WAN1 port.
¾ Subnet Mask: The subnet mask of the WAN1 port.
¾ Default Gateway: The gateway of the W A N1 port.
¾ Preferred DNS Server: The primary DNS Server of the W A N1 port.
¾ Alternate DNS Server: The substitute DNS Server of the WAN1 port. This is not required.
¾ Enable Bridge Mode: WAN1 is set to use a static IP address and “Enable Bridge Mode” is checked,
WAN2 and all LAN ports will share the WAN1 IP address an d go into bridge mode as well. See the following
figures. The PC connected to LAN1 or LAN 2 must be set to static IP address manually, or it can receive the
IP address from upper DHCP server via WAN1. The IP address they received is the same IP subnet with
WAN1 IP.
.
30
Page 38

IAS-2000 v2
User’s Manual
y Dynamic IP address: It is only applicable for the network environment where the DHCP Server is available in
the network. Click the Renew button to get an IP address.
31
.
Page 39

IAS-2000 v2
User’s Manual
y PPPoE Client: When selecting PPPoE to connect to the network, please enter the “Username” and
“Password”. There is a Dial on demand function under PPPoE. If this function is enabled, you can set a
Maximum Idle Time. When the idle time is reached, the system will automatically disconnect itself.
32
.
Page 40

IAS-2000 v2
User’s Manual
5.1.4 WAN2 & Failover
There are 3 methods of obtaining an IP address for the WAN2 Port: None, Static IP Address, and Dynamic IP
Address.
y None: The W A N2 Port is not functional.
¾ Warning of Internet Disconnection: Enable to dete ct the WAN1 port connection status.
y Static IP Address: Specify the IP Address, Subnet Mask, Default Gateway of WAN2 Port and Preferred DNS
Server, which should be applicable for the network environment. Up to three URLs can be entered. Check
“Warning of Internet Disconnection” to work with the WAN Failover function.
¾ WAN Failover: When WAN1 connection fails, the traffic will be routed to WAN2 automatically.
¾ Fallback to WAN1 when possible: When WAN1 connection is recovered, the routed traffic will be back to
WAN1.
33
.
Page 41

IAS-2000 v2
User’s Manual
y Dynamic IP Address: Select this when WAN2 Port can obtain IP address automatically, such as a DHCP
Server available from WAN2 Port. Up to three URLs can be entered. Check “Warning of Internet
Disconnection” to work with the WAN Failover function.
34
.
Page 42

User’s Manual
For Dynamic IP Address, WAN Failover and Fallback to WAN1 when possible also can be enabled like as
the function for Static IP Address. If Warning of Internet Disconnection is enabled, a warning message can
be entered to indicate what the system should display when Internet connection is down.
IAS-2000 v2
.
35
Page 43

IAS-2000 v2
User’s Manual
5.1.5 LAN1 Configuration
User authentication can be chosen to enable or disable in LAN1 port. In this part, you can set the related
configurations about LAN1 port and DHCP server.
36
.
Page 44

y DHCP Server Configuration
¾ Disable DHCP Server: Disable the function of the DHCP Server.
IAS-2000 v2
User’s Manual
¾ Enable DHCP Server: Enter proper setting of Start IP Address, End IP Address, Preferred DNS Server,
Alternate DNS Server, Domain Name, WINS Server, Lease Time, and Reserved IP Address List. See the
following figure. Fields marked with red asterisks must be filled in.
37
.
Page 45

IAS-2000 v2
User’s Manual
Reserved IP Address List: Click on the Reserv ed IP Address List on the management inte rface to
fill in the reserved IP addresses if desired. Then, the setup of the Reserved IP Address List as shown
in the following figure will appear. Enter the related Reserved IP Address, MAC, and Description (not
compulsory). When finished, click Apply to complete the setup.
¾ Enable DHCP Relay:Specify other DHCP Server IP address if using DHCP Relay is desired. See the
following figure.
38
.
Page 46

IAS-2000 v2
User’s Manual
y Enable VLAN: If you want to split LAN1 to several VLANs, please select the Enable VLAN. After Enable VLAN
is selected, the following screen will appear. Choose the desired Item and click Edit for further configuration.
See the following figure.
The system will need confirmation for enabling individual VLAN segment. Click Enable to continue. See the
following figure.
After enabling this VLAN segment, the following screen will appear. See the following description and figure for
details.
.
39
Page 47

y Enable User Authentication (on this individual VLAN):
IAS-2000 v2
User’s Manual
¾ Enable: Enable this VLAN segment.
¾ Enable User Authentication: Choose to enable or disable user authentication for this individual VLAN
segment.
¾ VLAN T ag : Enter any integ er number within the range of 2~4094 as the Tag for this VLAN segment.
¾ Mode: Two modes are provided: NAT mode and ROUTER mode.
NAT: All IP addresses externally connected through the VLAN port (these IP addresses must belong
to the same network of the VLAN port) will be converted into the IP address of the WAN1 port
by IAS-2000 v2 and onward to outside the network.
Router: All IP addresses externally connected through the VLAN port use its original IP addresses
for external connection. Thus, IAS-2000 v2 acts like a Router.
¾ IP Address: Enter the desired IP address for this VL AN.
¾ Subnet Mask: Enter the desired Subnet Mask for this VLAN.
.
40
Page 48

IAS-2000 v2
User’s Manual
y VLAN DHCP Configuration
¾ Disable DHCP Server: Disable the function of the DHCP Server of IAS-2000 v2.
¾ Enable DHCP Server: If you want to use the DHCP Server function of IAS-2000 v2, set proper
configurations is necessary. Related information needed on setting up the DHCP Server is described as
follows: Start IP Address, End IP Address, Preferr ed DNS Server, Alternate DNS Server, Domain Name,
WINS Server, Lease Time, and Reserved IP Address List. See the following figure.
41
.
Page 49

IAS-2000 v2
User’s Manual
Reserved IP Address List: If you want to use the reserved IP address function, click on the
Reserved IP Address List on the management interface. Then, the setup of the Reserved IP
Address List as shown in the following figure will appear. Enter the related Reserved IP Address,
MAC, and Description (not compulsory). When finished, click Apply to complete the setup.
¾ Enable DHCP Relay: If you want to enable this function, you must specify a DHCP Server IP address. See
the following figure.
42
.
Page 50

5.1.6 LAN2 Configuration
User authentication can be chosen to enable or disable in LAN2 port. In this part, you can set the related
configurations about LAN2 port and DHCP server.
IAS-2000 v2
User’s Manual
43
.
Page 51

y DHCP Server Configuration
¾ Disable DHCP Server: Disable the function of the DHCP Server.
IAS-2000 v2
User’s Manual
¾ Enable DHCP Server: Enter proper setting of Start IP Address, End IP Address, Preferred DNS Server,
Alternate DNS Server, Domain Name, WINS Server, Lease Time, and Reserved IP Address List. See the
following figure. Fields marked with red asterisks must be filled in.
44
.
Page 52

IAS-2000 v2
User’s Manual
Reserved IP Address List: Click on the Reserv ed IP Address List on the management inte rface to
fill in the reserved IP addresses if desired. Then, the setup of the Reserved IP Address List as shown
in the following figure will appear. Enter the related Reserved IP Address, MAC, and Description (not
compulsory). When finished, click Apply to complete the setup.
¾ Enable DHCP Relay:Specify other DHCP Server IP address if using DHCP Relay is desired. See the
following figure.
45
.
Page 53

IAS-2000 v2
User’s Manual
y Enable VLAN: If you want to split LAN2 to several VLANs, please select the Enable VLAN. After Enable VLAN
is selected, the following screen will appear. Choose the desired Item and click Edit for further configuration.
See the following figure.
The system will need confirmation for enabling individual VLAN segment. Click Enable to continue. See the
following figure.
After enabling this VLAN segment, the following screen will appear. See the following description and figure for
details.
y Enable User Authentication (on this individual VLAN):
46
.
Page 54

IAS-2000 v2
User’s Manual
¾ Enable: Enable this VLAN segment.
¾ Enable User Authentication: Choose to enable or disable user authentication for this individual VLAN
segment.
¾ VLAN T ag : Enter any integ er number within the range of 2~4094 as the Tag for this VLAN segment.
¾ Mode: Two modes are provided: NAT mode and ROUTER mode.
NAT: All IP addresses externally connected through the VLAN port (these IP addresses must belong
to the same network of the VLAN port) will be converted into the IP address of the WAN1 port
by IAS-2000 v2 and onward to outside the network.
Router: All IP addresses externally connected through the VLAN port use its original IP addresses
for external connection. Thus, IAS-2000 v2 acts like a Router.
¾ IP Address: Enter the desired IP address for this VL AN.
¾ Subnet Mask: Enter the desired Subnet Mask for this VLAN.
y VLAN DHCP Configuration
¾ Disable DHCP Server: Disable the function of the DHCP Server of IAS-2000 v2.
¾ Enable DHCP Server: If you want to use the DHCP Server function of IAS-2000 v2, set proper
configurations is necessary. Related information needed on setting up the DHCP Server is described as
follows: Start IP Address, End IP Address, Preferr ed DNS Server, Alternate DNS Server, Domain Name,
WINS Server, Lease Time, and Reserved IP Address List. See the following figure.
47
.
Page 55

IAS-2000 v2
User’s Manual
Reserved IP Address List: If you want to use the reserved IP address function, click on the
Reserved IP Address List on the management interface. Then, the setup of the Reserved IP
Address List as shown in the following figure will appear. Enter the related Reserved IP Address,
MAC, and Description (not compulsory). When finished, click Apply to complete the setup.
¾ Enable DHCP Relay: If you want to enable this function, you must specify a DHCP Server IP address. See
the following figure.
48
.
Page 56

IAS-2000 v2
User’s Manual
5.2 Network Configuration
This section includes the following functions: Network Address Translation, Privilege List, Monitor IP List,
Walled Garden List, Proxy Server Properties, Dynamic DNS and IP Mobility.
.
49
Page 57

IAS-2000 v2
User’s Manual
5.2.1 Network Address Translation
There are three parts, DMZ, Virtual Servers and Port and IP Redirect, need to be set.
y DMZ
DMZ (De-Militarized Zone) allows administrators to define mandatory external to internal IP mapping; hence a
user on WAN side network can access the private machine via the external IP (similar to DMZ usage in firewall
product). There are 40 sets of static Internal IP Address and External IP Address available. If a host needs a
static IP address to access the network through WAN port, set a static IP for the host. These settings will
become effective immediately after clicking the Apply button.
50
.
Page 58

IAS-2000 v2
User’s Manual
y Virtual Servers
This function allows the administrator to set 40 virtual servers at most, so that the computers not belonging to
the managed network can access the servers in the managed network via WAN port IP of IAS-2000 v2. Please
enter the “External Service Port”, “Local Server IP Address” and “Local Server Port”. According to the
different services provided, the network service can use the TCP protocol or the UDP protocol. In the Enable
column, check the desired server to enable. These settings will become effective immediately after clicking the
Apply button.
y Port and IP Redirection
This function allows the administrator to set 40 sets of the IP addresses at most for redirection purpose. When
the user attempts to connect to a destination IP address listed here, the connection p acket will be converted and
redirected to the corresponding destination. Please enter the “IP Address” and “Port” of Original Destination,
and the “IP Address” and “Port” of Redirect to. According to the different services provided, choose the
“TCP” protocol or the “UDP” protocol. These settings will become ef fective immediately after clicking Apply.
51
.
Page 59

IAS-2000 v2
User’s Manual
52
.
Page 60

IAS-2000 v2
User’s Manual
5.2.2 Privilege List
There are two parts, Privilege IP Address List and Privilege MAC Address List, need to be set.
y Privilege IP Address List
If there are some workstations belonging to the managed server that need to access the network without
authentication, and enter the IP addresses of these workstations in this list. The “Remark” blank is not
necessary but is useful to keep track. IAS-2000 v2 allows 100 privilege IP addresses at most. These settings will
become effective immediately after clicking Apply.
Warning: Permitting specific IP addresses to have network access rights without going through standard
authentication process at the authenticated LAN may cause se curity problems.
53
.
Page 61

IAS-2000 v2
User’s Manual
y Privilege MAC Address List
In addition to the IP address, the MAC address of the workstations that need to access the network without
authentication can also be set in this list. IAS-2000 v2 allows 100 privilege MAC addresses at most. The list can
be created by entering data in the table or by import from a file. The list can be exported as well.
Be sure to enter the MAC address (the format is xx:xx:xx:xx:xx:xx) as well as the remark (not necessary) if
manually creating the list is desired, and select a policy for the individual entry. These settings will become
effective immediately after clicking Apply.
Attention: No matter how you choose to create the list, you must select an Access Gateway first.
Warning: Permitting specific MAC addresses to have network access rights without going through standard
authentication process at the authenticated LAN may cause se curity problems.
54
.
Page 62

IAS-2000 v2
User’s Manual
¾ Import List: Select an Access Gateway and then click Import List to enter the Upload Privilege MAC
Address List interface. Click the Browse button to select the text file for the user account upload. Then click
Submit to complete the upload.
The uploading file should be a text file and
the format of each line is " MAC, Policy, Remark" without the quotes.
There must be no spaces between the fields and commas. The MAC field could be omitted but the trailing
comma must be retained. When adding user accounts by uploading a file, the existing accounts in the
embedded database will not be replaced by new ones.
¾ Export List: Click this to
export the Mac List to create a .txt file and then save it on disk.
55
.
Page 63

IAS-2000 v2
User’s Manual
5.2.3 Monitor IP List
The system will send out a packet periodically to monitor the connection status of the IP addresses on the list. If the
monitored IP address does not respond, the system will send an e-mail to notify the administrator that such
destination is not reachable. After entering the related information, click Apply and these settings will become
effective immediately. Click Monitor to check the current status of all the monitored IP. The system provides 40 IP
addresses a most on the “Monitor IP List”.
y Send From: The e-mail address of the administrator in charge of the monitoring. This will show up as the
sender’s e-mail.
y Send To: The e-mail address of the person whom the monitoring result is for. This will be the receiver’s e-mail.
y Interval: The time interval to send the e-mail report.
y SMTP Server: The IP address of the SMTP server .
56
.
Page 64

IAS-2000 v2
User’s Manual
y Auth Method: The system provides four authentication methods, PLAIN, LOGIN, CRAM-MD5 and NTLMv1, or
“NONE” to use none of the above. Depending on which authentication method selected, enter the Account
Name, Password and Domain.
y Send Test Email: Click “Send” to send out a test e-mail of the IP monitoring report.
y IP Address: The IP addresses under monitoring.
In the Monitor IP result page, green light means the IP address is alive and reachable. On the other hand, red light
means the IP address is not reachable now. The administrator can understand the some networking devices by this
feature.
.
57
Page 65

IAS-2000 v2
User’s Manual
5.2.4 Walled Garden List
This function provides some free services to the users to access websites listed here before login and authe ntication.
Up to 20 addresses or domain names of the websites can be defined in this list. Users without the network access
right can still have a chance to experience the actual network service free of charge. Please enter the website IP
Address or Domain Name in the list and these settings will become effective immediately after clicking Apply.
58
.
Page 66

IAS-2000 v2
User’s Manual
5.2.5 Proxy Server Properties
IAS-2000 v2 supports Internal Proxy Server and External Proxy Server functions. Please perform the necessary
configurations.
y Internal Proxy Server: IAS-2000 v2 has a built-in proxy server. If this function is enabled, the end users will be
forced to treat IAS-2000 v2 as the proxy server regardless of the end-users’ o riginal proxy settings.
y External Proxy Server: Under the IAS-2000 v2 security management, the system will match the External Proxy
Server list to the end-users’ proxy setting. If there isn’t a matching, then the end-users will no be able to reach
the login page and thus unable to access the network. If there is a matching, then the end-users will be directed
to the system first for authentication. After a successful authentication, the end-users will be redirected back to
the desired proxy servers depending on various situations.
Please click Apply and these settings will become effective immediately.
For more details about how to set proxy servers, please see Appendix D and E.
59
.
Page 67

IAS-2000 v2
User’s Manual
5.2.6 Dynamic DNS
IAS-2000 v2 provides a convenient DNS function to translate the IP address of WAN port to a domain name that
helps the administrator memorize and connect to WAN port. If the DHCP is activated at WAN port, this function will
also update the newest IP address regularly to the DNS server. These settings will become effective immediately
after clicking Apply.
y DDNS: Enabling or disabling of this function.
y Provider: Select the DNS provider.
y Host name: The IP address/domain name of the WAN port.
y Username/E-mail: The register ID (username or e-mail) for the DNS provider.
y Password/Key: The register password for the DNS provider.
Please click Apply and these settings will become effective immediately.
.
60
Page 68

IAS-2000 v2
User’s Manual
5.2.7 IP Mobility
y IP PNP
Clients can use any IP address to connect to the syst em. Regardless of what the IP address at the client end is,
he or she can still authenticate through IAS-2000 v2 and access the network.
y Mobile IP
If several sets of IAS-2000 v2 are used to construct a network environment, a client can use the same group of
IP configurations. When a client roams into different locations, the connection will be kept alive; therefore no
disconnection will occur when, for example, downloading data.
.
61
Page 69

IAS-2000 v2
User’s Manual
5.3 User Authentication
This section includes the following functions: Authentication Configuration, Policy Configuration, Black List
Configuration, Guest User Configuration and Additional Configuration.
62
.
Page 70

IAS-2000 v2
User’s Manual
5.3.1 Authentication Configuration
This function is to configure the settings for different authentication servers. The system provides 10 servers (Local,
POP3, RADIUS, LDAP and NT Domain), one On-demand User and one PMS User that the administrator can apply
with different policies. Click on the server name to set the related configurations for that particular server. After
completing and clicking Apply to save the settings, go back to the previous screen to choose a server to be the
default server and enable or disable any server on the list.
.
63
Page 71

5.3.1.1 Local Server
This server is only for “Local User” and the authentication method can not be changed for this server.
IAS-2000 v2
User’s Manual
y Server Name: Set a name for the server using numbers (0 to 9), alphabets (a to z or A to Z), dash (-),
underline (_) and dot (.) with a maximum of 40 characters, all other letters are not allowed.
y Sever Status: The status shows that the server is enabled or disabled.
y Postfix: Set a postfix that is easy to distinguish (e.g. Local) for the server by using numbers (0 to 9), alphabets
(a to z or A to Z), dash (-), underline (_) and dot (.) with a maximum of 40 characters, all other letters are not
allowed.
y Blacklist: There are five sets of the black lists. Select one of them or choose “None”. Please refer to 5.3.3
Black List Configuration
y Local User Account: Click the Local User Setting hyperlink to set the further configuration.
y Policy Name: There are ten policies to choose from to apply to this particular server.
.
64
Page 72

Click the Local User Setting hyperlink for further configuration.
y Edit Local User List: Click this to enter the “Local User List” screen.
IAS-2000 v2
User’s Manual
¾ Add User: Click this button to enter the Add User page. Fill in the necessary information such as
“Username”, “Password”, “MAC” (optional) and “Remark” (optional). Select a desired Maximum
Bandwidth, Request Band width and Policy.
65
.
Page 73

Click Apply to complete adding the user or users
IAS-2000 v2
User’s Manual
¾ Import User: Click this to enter the Upload User Account page. Click the Browse button to select the text
file for the user account upload. Then click Submit to complete the upload process.
66
.
Page 74

IAS-2000 v2
User’s Manual
The uploading file should be a text file and the format of each line is "ID, Password, MAC, Policy , Remark" or
“ID, Password, MAC, Max bandwidth, Request bandwidth, Policy, Remark” without the quotes. There
must be no spaces between the fields and commas. The MAC field could be omitted but the trailing comma
must be retained. When adding user accounts by uploading a file, the existing accounts in the embedded
database will not be replaced by new ones.
67
.
Page 75

¾ Export List: Click this to create a .txt file and then save it on disk.
IAS-2000 v2
User’s Manual
¾ Refresh: Click this to refresh the list.
68
.
Page 76

IAS-2000 v2
User’s Manual
¾ Search: Enter a keyword of a username to be searched in the text filed and click this button to perform the
search. All usernames matching the keyword will be listed.
¾ Del All: This will delete all the users at once.
¾ Delete: This will delete the users individually.
¾ Edit User: If editing the content of individual user account is needed, click the username of the desired user
account to enter the Edit User Interface for that particular user, and then modify or add any desired
information such as “Username”, “Password”, “MAC”, “Maximum Bandwidth”, “Request Bandwidth”,
“Policy” and “Remark” (optional) . Then, click Apply to complete the modification.
.
69
Page 77

IAS-2000 v2
User’s Manual
y Radius Roaming Out / 802.1x Authentication: These 2 functions can be enabled or disabled by checking the
radio button. Checking either of them makes the hyperlink called Radius Client List show up.
Click the hyperlink of Radius Client List to enter the Radius Client Configuration interface. Choose the
desired type, Disable, Roaming Out or 802.1x and key in the relat ed dat a and then cli ck Apply to complete the
settings.
¾ Radius Roaming Out: When “Radius Roaming Out” is selected, local users can login from other domai n s
by using their original accounts.
¾ 802.1x Authentication: 802.1x is a security standard for wired and wireless LANs. It encapsulates EAP
(Extensible Authentication Protocol) processes into Ethernet packets instead of using the protocol's native
PPP (Point-to-Point Protocol) environment, thus reducing some network overhead. It also puts the bulk of
the processing burden upon the client (called a supplicant in 802.1x parlance) and the authentication server
(such as a RADIUS), letting the "authenticator" middleman simply pass the packets back and forth.
70
.
Page 78

IAS-2000 v2
User’s Manual
5.3.1.2 POP3 Server
POP3, RADIUS, LDAP and NT Domain Server can be chosen to be the authentication method. Choose “POP3” in
the Authentication Method field, the hyperlink beside the pull-down menu will become “POP3 Setting”.
y Server Name: Set a name for the server using numbers (0 to 9), alphabets (a to z or A to Z), dash (-),
underline (_) and dot (.) with a maximum of 40 characters, all other letters are not allowed.
y Sever Status: The status shows that the server is enabled or disabled.
y Postfix: Set a postfix that is easy to distinguish (e.g. Local) for the server by using numbers (0 to 9), alphabets
(a to z or A to Z), dash (-), underline (_) and dot (.) with a maximum of 40 characters, all other letters are not
allowed.
y Blacklist: There are five sets of the black lists. Select one of them or choose “None”. Please refer to 5.3.3
Black List Configuration
y Authentication Method: There are four authentication methods, POP3, Radius, LDAP and NTDomain to
configure from. Select the desired method and then click the link besides the pull-down menu for more
advanced configuration.
y Policy Name: There are ten policies to choose from to apply to this particular server.
.
71
Page 79

IAS-2000 v2
User’s Manual
Click the hyperlink of POP3 Setting for further configuration. Enter the related information for the primary server
and/or the secondary server (the secondary server is not required). The blanks with red asterisks are necessary
information. These settings will become effective immediately after clicking the Apply button.
y Server IP: Enter the IP address/domain name given by the ISP.
y Port: Enter the Port given by the ISP. The default value is 110.
y SSL Setting: If this option is enabled, the POP3 protocol will perform the authentication.
.
72
Page 80

IAS-2000 v2
User’s Manual
5.3.1.3 Radius Server
Choose “Radius” in the Authentication Method field, the hyperlink beside the pull-down menu will become
“RADIUS Setting”.
y Server Name: Set a name for the server using numbers (0 to 9), alphabets (a to z or A to Z), dash (-),
underline (_) and dot (.) with a maximum of 40 characters, all other letters are not allowed.
y Sever Status: The status shows that the server is enabled or disabled.
y Postfix: Set a postfix that is easy to distinguish (e.g. Local) for the server by using numbers (0 to 9), alphabets
(a to z or A to Z), dash (-), underline (_) and dot (.) with a maximum of 40 characters, all other letters are not
allowed.
y Blacklist: There are five sets of the black lists. Select one of them or choose “None”. Please refer to 5.3.3
Black List Configuration
y Authentication Method: There are four authentication methods, POP3, Radius, LDAP and NTDomain to
configure from. Select the desired method and then click the link besides the pull-down menu for more
advanced configuration.
y Policy Name: There are ten policies to choose from to apply to this particular server.
.
73
Page 81

IAS-2000 v2
User’s Manual
Click the hyperlink of RADIUS Setting for further configuration. The Radius server sets the external authentication
for user accounts. Enter the related information for the primary server and/or the secondary server (the secondary
server is not required). The blanks with red asterisks are necessary information. These settings will become
effective immediately after clicking the Apply button.
y 802.1X Authentication: Enable this function and the hyperlink of Radius Client List will appear. Click the
hyperlink to get into the Radius Client Configuration list for further configuration. Please refer to Radius
Roaming Out/802.1x Authentication in 5.3.1.1 Local User.
y Trans Full Name: When e nable d, the ID and po stfix will be transferred to the RADIUS server for authentication.
When disabled, only the ID will be transferred to RADIUS server for authentication.
y Server IP: Enter the IP address/domain name of the RADIUS server.
y Authentication Port: Enter the authentication port of the RADIUS server and the default valu e is 1812.
y Accounting Port: Enter the accounting port of the RADIUS server and the default value is 1813.
y Secret Key: Enter the key for encryption and decryption.
y Accounting Service: Select this to enable or disable the “Accounting Service” for accounting capabilities.
y Authentication Protocol: There are two methods, CHAP and PAP for selection.
Notice: If Radius Server does not assign idle-timeout value, IAS-2000 v2 will use the local idle-timeout instead.
74
.
Page 82

IAS-2000 v2
User’s Manual
5.3.1.4 LDAP Server
Choose “LDAP” in the Authentication Method field, the hyperlink beside the pull-down menu will become “LDAP
Setting”.
y Server Name: Set a name for the server using numbers (0 to 9), alphabets (a to z or A to Z), dash (-),
underline (_) and dot (.) with a maximum of 40 characters, all other letters are not allowed.
y Sever Status: The status shows that the server is enabled or disabled.
y Postfix: Set a postfix that is easy to distinguish (e.g. Local) for the server by using numbers (0 to 9), alphabets
(a to z or A to Z), dash (-), underline (_) and dot (.) with a maximum of 40 characters, all other letters are not
allowed.
y Blacklist: There are five sets of the black lists. Select one of them or choose “None”. Please refer to 5.3.3
Black List Configuration
y Authentication Method: There are four authentication methods, POP3, Radius, LDAP and NTDomain to
configure from. Select the desired method and then click the link besides the pull-down menu for more
advanced configuration.
y Policy Name: There are ten policies to choose from to apply to this particular server.
.
75
Page 83

IAS-2000 v2
User’s Manual
Click the hyperlink of LDAP Setting for further configuration. Enter the related information for the primary server
and/or the secondary server (the secondary server is not required). The blanks with red asterisks are necessary
information. These settings will become effective immediately after clicking the Apply button.
y Server IP: Enter the IP address/domain name of the LDAP server.
y Port: Enter the Port of the LDAP server, and the default value is 389.
y Base DN: Enter the distinguished name of the LDAP server.
y Binding Ty pe: There are four binding types, User Ac count, Anonymous, Specific DN and Windows AD to select.
¾ User Account: Use the user account’s login usernam e and p a ssword of the syst em, and th en sele ct one
Account Attribute (UID, CN or sAMAccountName) to access the LDAP server.
76
.
Page 84

IAS-2000 v2
User’s Manual
¾ Anonymous: Access the LDAP servers without requiring authentication but only select one Account
Attribute (UID, CN or sAMAccountName).
¾ Specified DN: Enter more information for the specific DN username and password in the “Bind RDN”
and “Bind Password” fields, and then select one Ac count Attribute (UID, CN or sAMAccountName) to
access the LDAP server.
¾ Windows AD: Enter the domain name of Windows AD to access the LDAP server.
.
77
Page 85

IAS-2000 v2
User’s Manual
5.3.1.5 NT Domain Server
Choose “NTDomain” in the Authentication Method field, the hyperlink beside the pull-down menu will become
“NT Domain Setting”.
y Server Name: Set a name for the server using numbers (0 to 9), alphabets (a to z or A to Z), dash (-),
underline (_) and dot (.) with a maximum of 40 characters, all other letters are not allowed.
y Sever Status: The status shows that the server is enabled or disabled.
y Postfix: Set a postfix that is easy to distinguish (e.g. Local) for the server by using numbers (0 to 9), alphabets
(a to z or A to Z), dash (-), underline (_) and dot (.) with a maximum of 40 characters, all other letters are not
allowed.
y Blacklist: There are five sets of the black lists. Select one of them or choose “None”. Please refer to 5.3.3
Black List Configuration
y Authentication Method: There are four authentication methods, POP3, Radius, LDAP and NTDomain to
configure from. Select the desired method and then click the link besides the pull-down menu for more
advanced configuration.
y Policy Name: There are ten policies to choose from to apply to this particular server.
Click the hyperlink of NT Domain Setting for further configuration. Enter the server IP address and enable/disable
the transparent login function. These settings will become effective immediately after clicking the Apply button.
y Server IP address: Enter the server IP address of the NT domain controller.
y Transparent Login: If this function is enabled, when users log into the Windows domain, they will log into
IAS-2000 v2 automatically.
78
.
Page 86

IAS-2000 v2
User’s Manual
5.3.1.6 On Demand User
This is for the customer’s need in a store environment. When the customers need to use wireless Internet in the
store, they have to get a printed receipt with username and passwo rd from the st ore to log in the system for wirel ess
access. There are 2000 On-demand User accounts available.
y Server Status: The status shows that the server is enabled or disabled.
y Postfix: Set a postfix that is easy to distinguish (e.g. Local) for the server by using numbers (0 to 9), alphabets
(a to z or A to Z), dash (-), underline (_) and dot (.) with a maximum of 40 characters, all other letters are not
allowed.
y Receipt Header: There are two fields, Receipt Header 1 and Receipt Header 2 , for the receipt’ s head er. Enter
receipt header message or use the default.
y Receipt Footer: Enter receipt footer message here or use the default.
y Monetary Unit: Select the desired monet ary unit for a region or input the needed monetary unit if not listed.
y Policy Name: Select a policy for the on-demand user.
y WLAN ESSID: Enter the ESSID of the AP.
y WEP Key: Enter the WEP key of the AP.
y Remark: Enter any additional information that will appear at the bottom of the receipt.
y Billing Notice Interval: While the on-demand user is still logged in, the system will update the billing notice of
the login successful page by the time interval defined here.
79
.
Page 87

IAS-2000 v2
User’s Manual
y Users List: Click to enter the On-demand User List screen. In the On-demand User List, detailed information
will be documented here. By default, the On-demand user database is empty.
¾ Search: Enter a keyword of a username to be searched in the text filed and click this button to perform
the search. All usernames matching the keyword will be listed.
¾ Username: The login name of the on-demand user.
¾ Password: The login password of the on-demand user.
¾ Remain Time/Volume: The total time/Volume that the user can use currently.
¾ Status: The status of the account. Normal indicates that the account is not in-use and not overdue.
Online indicates that the account is in-use and not overdue. Expire indicates that the account is overdue
and cannot be used.
¾ Expire Time: The expiration time of the account.
¾ Delete All: This will delete all the users at once.
¾ Delete: This will delete the users individually.
.
80
Page 88

IAS-2000 v2
User’s Manual
y Billing Configuration: Click this to enter the Billing Configuration screen. In the Billing Configuration page,
Administrator may configure up to 10 billing plans.
¾ Status: Select to enable or disable this billing plan.
¾ Type: Set the billing plan by “Data” (the maximum volume allowed is 999,999 Mbyte) or “Time” (the
maximum days allowed is 999 Hrs).
¾ Expired Info: This is the duration of time that the user can use the account after the generation of the
account. If the account is not activated during this duration, the account will self-expire.
¾ Valid Duration: This is the duration of time that the user can use the account after the activation of the
account. After this duration, the account will self-expire.
¾ Price: The price charged for this billing plan.
.
81
Page 89

y Create On-demand User: Click this to enter the On-demand User Generate page.
¾ Pressing the Create button for the desired plan, an On-demand user will be created, then click Printout
to print a receipt which will contain this on-demand user’s information. There are 2000 On-demand user
accounts available.
IAS-2000 v2
User’s Manual
82
.
Page 90

IAS-2000 v2
User’s Manual
5.3.1.7 PMS User
The system integrates a hotel in-door billing system, PMS, developed by Micros Fidelio, and it is usually used in the
hotel environment. When the customers need to use wireless Internet in the hotel, they have to get printed receipts
with usernames and passwords from the hotel to log in the system for wireless access.
y Server Status: The status shows that the server is enabled or disabled.
y PMS Server IP: Enter the IP address of the PMS server.
y PMS Server Port: Enter the Port of the PMS server.
y Postfix: Set a postfix that is easy to distinguish (e.g. Local) for the server by using numbers (0 to 9), alphabets
(a to z or A to Z), dash (-), underline (_) and dot (.) with a maximum of 40 characters, all other letters are not
allowed.
y Policy Name: There are ten policies to select from.
y Receipt Header: There are two fields, Receipt Header 1 and Receip t Header 2, for the receipt’s header.
Enter receipt header message or use the default.
y Receipt Footer: Enter receipt footer message here or use the default.
y WLAN ESSID: Enter the ESSID of the AP.
y WEP Key: Enter the WEP key of the AP.
y Remark: Enter any additional information that will appear at the bottom of the receipt.
y Users List: Click to enter the PMS User List page. In the PMS User List page, detailed information will be
documented here. By default, the PMS user database is empty.
.
83
Page 91

User’s Manual
¾ Search: Enter a keyword of a username to be searched in the text filed and click this button to perform
the search. All usernames matching the keyword will be listed.
¾ Room No.: The room number of the PMS user.
¾ User Name: The login name of the PMS user.
¾ Password: The login password of the PMS user.
¾ Remain Time: The total Time/Volume th at the user can use currently.
¾ Status: The status of the account. Normal indicates that the account is not in-use and not overdue.
IAS-2000 v2
Online indicates that the account is in-use and not overdue. Expire indicates that the account is overdue
and cannot be used.
¾ Expire/Valid Time: The Valid Time indicates the duration of time that the user can use the Internet
service after the account is activated. After this duration, the account will self-expire. The Expire Time
indicates the duration of time that the account needs to be activated after the generation. If the account is
not activated during this duration, the account will self-expire.
¾ Delete All: This will delete all the users at once.
¾ Delete: This will delete users individually.
y Billing Configuration: Click this to enter the PMS User Billing Configuration page. In the PMS Billing
Configuration page, the administrator may configure up to 5 billing plans.
84
.
Page 92

IAS-2000 v2
User’s Manual
¾ Status: Select to enable or disable this billing plan.
¾ Hr. Purchased: This is the duration of time that the user purchases. 1-99 9 hour(s) can be entered.
¾ Valid Period: This is the duration of time that the user can use the Internet service after the activation of
the account. After this duration, the account will self-expire. 1-999 hours can be entered.
¾ Assign to Policy: Assign a policy for this billing plan.
¾ Price: The price charged for this billing plan.
Note: There is an Auto Expired mechanism is for preventing that an account is created but never logged in. If the
account is created but never been logged in, the account will be invalid after a period.
y Create PMS User: Click this to enter the PMS User Generation page. There are 5000 PMS user accounts
available.
85
.
Page 93

IAS-2000 v2
User’s Manual
By default, the PMS user database is empty. After entering “Room Number” and “Maximum User” then
pressing Create button by the desired plan, a PMS user will be created. Click Printout to print a receipt
which will contain this PMS user’s information. See the following figure.
.
86
Page 94

IAS-2000 v2
User’s Manual
5.3.2 Policy Configuration
There are ten policies that IAS-2000 v2 supports and a Global policy. Every Policy has three profiles, Firewall
Profile, Specific Route Profile, and Schedule Profile as well as one Bandwidth setting for that policy. But Global
policy only has Firewall Profile and Specific Route Profile settings.
y Global Policy
¾ Select Policy: Select Global to set the Firewall Profile and Specific Route Profile.
¾ Firewall Profile: Click the hyperlink of Setting for Firewall Profile, the Firewall Profiles page will appear .
Click the numbers of Filter Rule Item to edit individual rules and click Apply to save the settings. The
rule status will show on the list. Check “Active” to enable that rule.
.
87
Page 95

Rule Item: This is the rule selected.
Rule Name: The rule name can be changed here.
Enable this Rule: After checking this function, the rule will be enabled.
IAS-2000 v2
User’s Manual
Action: There are two options, Block and Pass. Block is to prevent packets from passing and
Pass is to permit packets passing.
Protocol: There are three protocols to select, TCP, UDP and ICMP, or choose ALL to use all three
protocols.
Source MAC Address: The MAC address of the source IP address. This is for specific MAC
address filter.
Source/Destination Interface: There are five interfaces to choose, ALL, WAN1, WAN2, LAN1 and
LAN2.
Source/Destination IP: Enter the source and destination IP addresses.
Source/Destination Subnet Mask: Enter the source and destination subnet masks.
.
88
Page 96

User’s Manual
¾ Specific Route Profile: Click the hyperlink of Setting for Specific Route Profile, the Specific Route
Profile page will appear.
IAS-2000 v2
Profile Name: The profile name can be changed here.
Destination IP Address: The destination IP address of the host or the network.
Destination Subnet Netmask: Select a destination subnet netmask of the host or the network.
Gateway IP Address: The IP address of the next router to the destination.
View System Route T able: Click the hyperlink of V iew Sy stem Route Table to see the information
of the hosts or the networks.
89
.
Page 97

User’s Manual
¾ Maximum Concurrent Sessions: The concurrent sessions for each user; it can be restricted by
administrator. When a user reaches the session limit, this user will be implicitly suspended from any new
connection for a fixed time period.
y Policy 1~Policy 10
IAS-2000 v2
¾ Select Policy / Policy Name: Select a desired policy and rename it in the Policy Name field if desired.
¾ Firewall Profile: Click the hyperlink of Setting for Firewall Profile, the Firewall Profiles page will appear .
Click the numbers of Filter Rule Item to edit individual rules and click Apply to save the settings. The
rule status will show on the list. Check “Active” to enable that rule.
90
.
Page 98

IAS-2000 v2
User’s Manual
Rule Item: This is the rule selected.
Rule Name: The rule name can be changed here.
Enable this Rule: After checking this function, the rule will be enabled.
Action: There are two options, Block and Pass. Block is to prevent packets from passing and
Pass is to permit packets passing.
Protocol: There are three protocols to select, TCP, UDP and ICMP, or choose ALL to use all three
protocols.
Source MAC Address: The MAC address of the source IP address. This is for specific MAC
address filter.
91
.
Page 99

User’s Manual
Source/Destination Interface: There are five interfaces to choose, ALL, WAN1, WAN2, LAN1 and
LAN2.
Source/Destination IP: Enter the source and destination IP addresses.
Source/Destination Subnet Mask: Enter the source and destination subnet masks.
¾ Specific Route Profile: Click the hyperlink of Setting for Specific Route Profile, the Specific Route
Profile page will appear.
IAS-2000 v2
Profile Name: The profile name can be changed here.
Destination IP Address: The destination IP address of the host or the network.
Destination Subnet Netmask: Select a destination subnet netmask of the host or the network.
Gateway IP Address: The IP address of the next router to the destination.
Default: Check this option to apply to the default values.
¾ Schedule Profile: Click the hyperlink of Setting for Schedule Profile to enter the Schedule Profile list.
Select “Enable” to show the list. This function is used to restrict the time the users can log in. Please
enable/disable the desired time slot and click Apply to save the settings. These settings will become
effective immediately after clicking the Apply button.
92
.
Page 100

IAS-2000 v2
User’s Manual
¾ Bandwidth: Choose one bandwidth limit for that particular policy.
93
.
 Loading...