

Page 1

GB-1
OPERATION MANUAL
M201
14" (34cm) COLOUR TELEVISION
WITH DVD PLAYER
P1450BGVD1(UOC+8281S)Eng ib 1221.p65 2006/1/6, 下午 12:331
Page 2

GB-2
INSTALLATION
LOCATE the receiver in the room where direct light does not strike the screen. Total darkness
or a reflection on the picture screen can cause eyestrain. Soft and indirect lighting is recommended for comfortable viewing.
ALLOW enough space between the receiver and the wall to permit proper ventilation.
AVOID excessive warm locations to prevent possible damage to the cabinet or component
failure.
CONNECTION
This TV receiver can be connected to AC: 220-240V~ 50Hz .
AUTOMATIC DEGAUSSING
All color television receivers are sensitive to m agnetic influences, usually caused by either
moving the receiver from one place to another or using certain electrical appliances near the
receiver. This residual magnetism as it is called, sometimes causes distortion which gives rise
to " blotchy " areas of color in the picture. To avoid these eff ects the receiver incorporates an
automatic degaussing ci rcuit which operates for a short while immediately each time the receiver is switched on using the mains switch. This circuit removes any residual magnetism in
the metal parts of the picture tube and therefore ensures that each time the receiver is switched
lifelike. If the set is moved or f aced in a different direction, the mains switch must be switched
off at least 10 minutes in order that the automatic degaussing circuit operates properly.
CAUTION: TO REDUCE THE RISK OF ELECTRIC SHOCK. DO NOT REM OVE COVER (OR
BACK).
NO USER SERVICEABLE PARTS INSIDE. REFER SERVICING TO QUALIFIED SERVICE PERSONNEL.
The graphic symbols on the back cover of the set mean the following:
The li ghtni ng flash w ith arrowhead symbol w it hin an equilateral triangl e is intended to alert the user to the presence of uninsulated " dangerous voltage " within
the product's enclosure that may be of sufficient magnitude to constitute a risk of
electric shock to persons.
The exclamation point within an equilateral triangle is intended to alert the user to
the presence of important operating and maintenance (servicin g) in structions in
the l iterature accompanying the appliance.
WARNING :
• To reduce the risk of fire or elec tric shock, do not expose this appliance to rain
or moisture.
• T he apparatus shall not be exposed to dripping or splashing and that no objects
filled with liquids, such as vases, shall be plac ed on the apparatus.
• The mains p lug is used as the dis connect dev ice, the di sconnect de vice shall
remain readily operable.
P1450BGVD1(UOC+8281S)Eng ib 1221.p65 2006/1/6, 下午 12:332
Page 3

GB-3
CAUTION
Never tamp er with any components ins ide your set , or any other adjustmen t contr ols not
mentioned in this manual. All television receivers are high voltage instruments. Your PICTURE
TUBE is highly evacuated. If broken, glass fragments will be violently expelled. Scratching,
shipping or undue pressure is dangerous and should be avoided. W hen you clean up dust or
stick or a water drop on the PICTURE TUBE FACE or CABINET, the power cord should be pulled
out from the wall then wipe the receiver with a dry soft cloth. All " inside work " on your receiver
should be perf ormed only by the Professional Service Personnel.
DANGER
Manufactured under license from Dolby Laboratories “ Dolby ”, “ Pro Logic ” and the double-D
symbol are trademarks of Dolby Laboratories. Confidential unpublished works.© 1992-1997
Dolby Laboratories,lnc.All rights reserved.
Invisible laser radiation when open
and i nterl oc k fail ed or defeated .
avoid direct exposure to laser beam.
LASER SAFETY
Thi s unit employs an optical laser beam system i n the CD
mechanism,designed with built in safeguards. Do not attempt
to disassemble, refer to qualified service personnel.
Exposure to this invisible laser light light beam may be harmful
to the hum an eye.
THIS IS A CLASS-1 LASER PRODUCT. USE OF CONTROLS,
OR ADJUSTMENTS OR PROCEDURES OTHER THAN THOSE
SPECIFIED HEREIN, MAY RESULT IN HAZARDOUS
LASER LIGHT BEAM EXPOSURE.
P1450BGVD1(UOC+8281S)Eng ib 1221.p65 2006/1/6, 下午 12:333
Page 4

GB-4
This product incorporates copyright protection technology that is protected by U.S.
patents and other intellectual property rights. Use of this copyright protection technology
must be authorized by Macrovision, and is intended for home and other limited viewing
uses only unless otherwise authorized by Macrovision. Reverse engineering or
disassembly is prohibited.”
Instructions on env ironment protection
Do not dispose of this product in the usual household garbage at the end of its life
cycle; hand it over at a collection point for the recycling of electrical and electronic
appliances. The symbol on the product, the instructions for use or the packing will
inform about the methods for disposal.
The materials are recyclable as mentioned in its marking. By recycling, material
recycling or other forms of re-utilization of old appliances, you are making an
important contribution to protect our environment.
Please inquire at the community administration for the authorized disposal location.
P1450BGVD1(UOC+8281S)Eng ib 1221.p65 2006/1/6, 下午 12:334
Page 5

GB-5
LOCATION OF CONTROL
1. Speaker
2. Power Button
3. Remote Sensor
4. TV/AV/DVD Button
5. Channel Buttons
6. DVD Open/ Play/Stop Button
7. DVD Loader
8. Volume Buttons
9. MENU Button
10. Earphone Jack
11. Front Video Input (AV 2)
12. Front Audio (L) Input (AV 2)
13. Front Audio (R) Input (AV 2)
14. 75 ohm Antenna
15. Scart counector (AV 1)
16. Audio digital Out Socket (For DVD only)
17. Audio out (R) for DVD
18. Audio out (L) for DVD
19. Video out for DVD
20. S-Video out for DVD
P1450BGVD1(UOC+8281S)Eng ib 1221.p65 2006/1/6, 下午 12:335
Page 6
GB-6
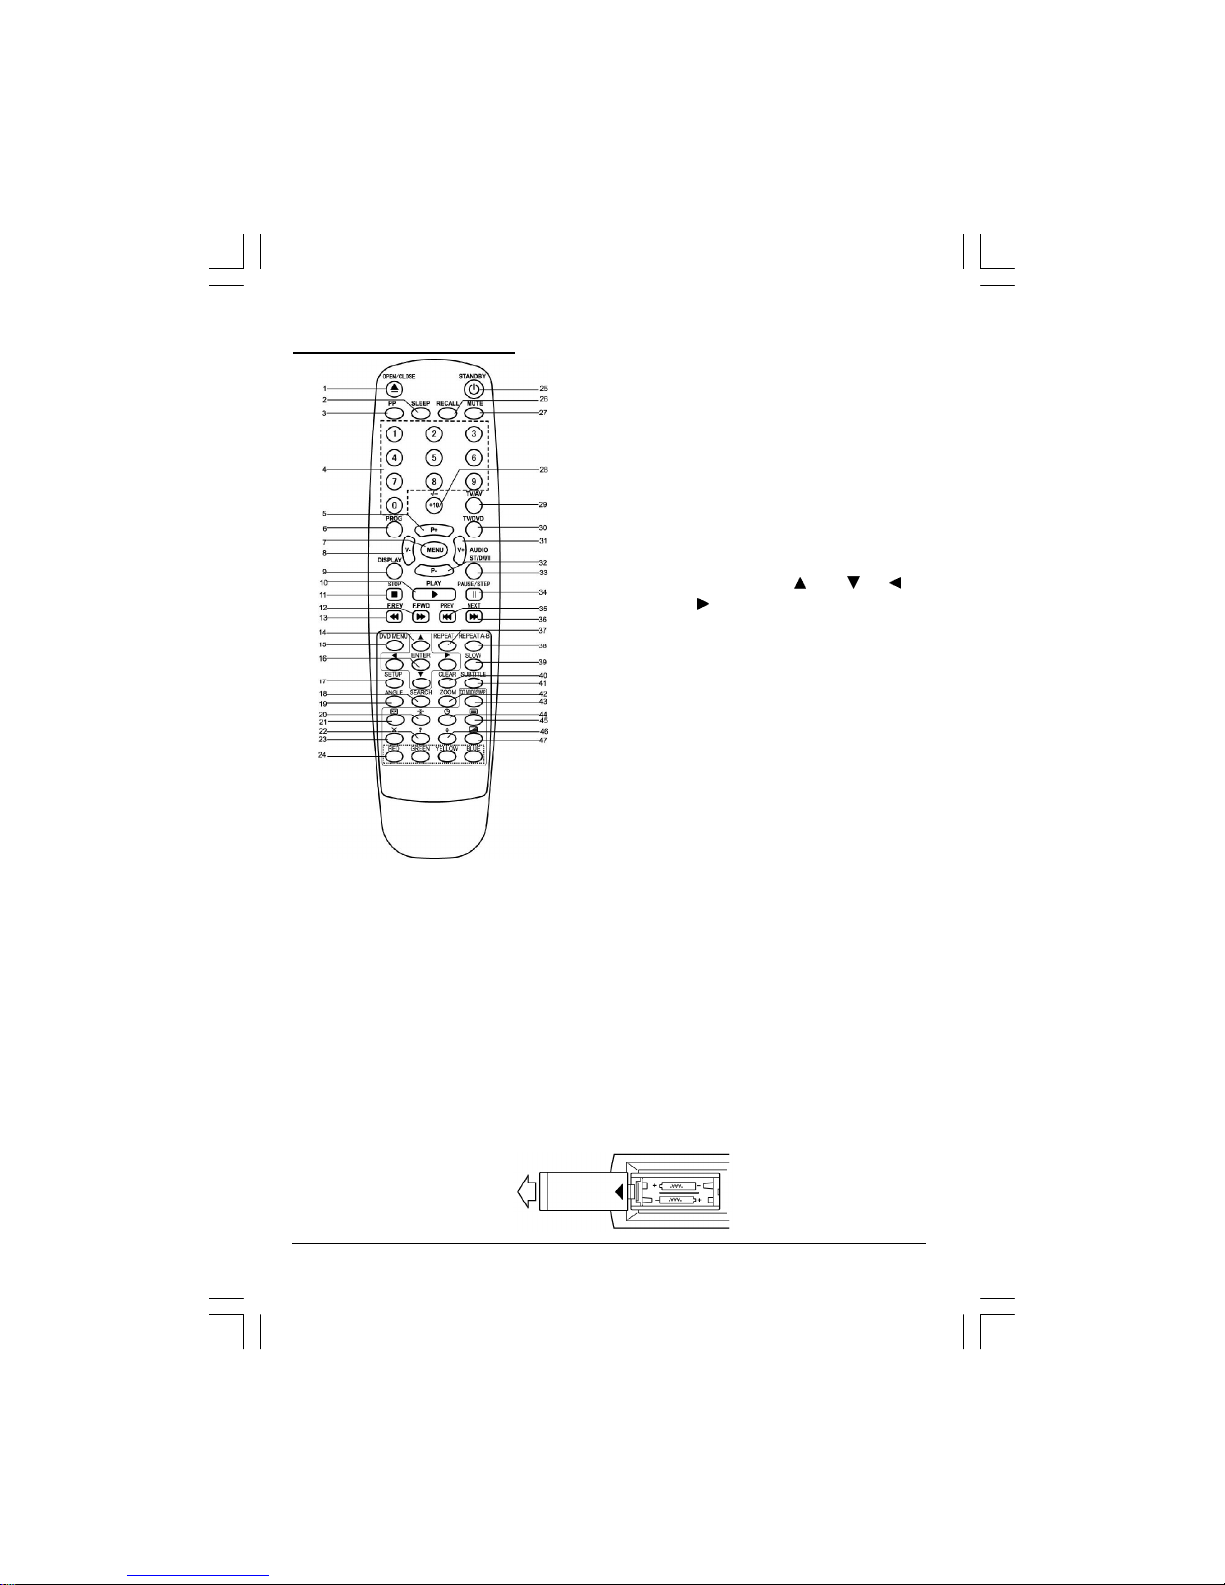
REMOTE CONTROL UNIT
BATTERY INSTALLATION
• Insert two pcs "AAA"; "R03" batteries (not included) as illustrated and replace the battery
cover.
• Corrosion, oxidation, battery-leakage and any other gradually acidic defect of this nature will
invalidate the guarantee.
1. Open/Close Button
2. Sleep button
3. PP Button
4. Numeric Buttons
5. P+ Buttons
6. Program button
7. Menu Button
8. Volume - Button
9. Display Button
10. Play Buttons
11. Stop Button
12. Fast Forward Button
13. Fast Backward Button
14. Direction Buttons( Up Down Left
Right )
15. DVD Menu Button
16. Enter Button
17. Setup Button
18. Search Button
19. Angle Button
20. Teletext Stop Button
21. Teletext Index Button
22. Teletext conceal Button
23. TV System/Teletext Cancel Button
24. Fast Teletext direct Page Button/Menu direct
Page button
25. Standby Button
26. Recall Button
27. Mute Button
28. +10/Two Digital program Button
29. TV/AV Button
30. TV/DVD Button
31. Volume + Button
32. P- Buttons
33. Audio(DVD)/ ST/D/I/II(TV) Button(For Nicam/
A2 stereo version only)
34. Pause/Step Button
35. Previous Button
36. Next Button
37. Repeat Button
38. Repeat A-B Button
39. Slow Button
40. Clear Button
41. DVD Subtitle Button
42. DVD Zoom Button
43. Txt Mode/SwapButton
44. Teletext Time Display Button
45. Teletext /TV Mode Button
46. Teletext Enlarge Button
47. Teletext Mix Mode Button
P1450BGVD1(UOC+8281S)Eng ib 1221.p65 2006/1/6, 下午 12:336
Page 7

GB-7
OPERATING THE TELEVISION RECEIVER
Connect your TV aerial to the aerial input socket located on the back of the TV.
Push the Main Power Switch, Power Indicator will be illuminated. After a f ew seconds the TV
screen will light up. Should white dots appear on the screen the TV will require tuning into the
available TV stations in your area.
Pre -setting th e TV stat ions i nto the M em ory
(Not e: Pre set tuning can only be carried out in TV Mode)
1.TUNE
• Press the MENU button four times to select the TUNE
mode as show in FIG.1
• Press the “P+/P-” button to select the SOUND then
press “V+/V-” button to change the desired sound
system BG or DK.
AUTO SEARCH
• Press the “P+/P-” button to select the AUTO SEARCH
as shown in FIG. 2
• Press the “V+/V-” button to start the automatic
scanning processes,the scanning starting from VHF
to UHF and the TV stations will automatic store into
memory as shown in FIG. 3
• W hen scanning is completed, the set will tune to
lowest program and show lowest program number
on the screen.
• If want to stop auto search f unction to press MENU button.
FIG.1
TUNE
AUTO SEARCH
SEARCH
BAND VHF-L
FINE TUNE
COLOUR AUTO
SOUND BG
SKIP OFF
PROGRAM 1
FIG.2
TUNE
AUTO SEARCH
SEARCH
BAND VHF-L
FINE TUNE
COLOUR AUTO
SOUND BG
SKIP OFF
PROGRAM 1
FIG.3
AUTO SEARCH
VHF-L
-|||||||||| +
P1450BGVD1(UOC+8281S)Eng ib 1221.p65 2006/1/6, 下午 12:337
Page 8

GB-8
OPERATING THE TELEVISION
SEARCH(M anual)
1) Press the “P+/P-” button to select the PROGRAM.
then press the “V+/V-”button or numeric button to
select the desired Program number.
2) Press the “P+/P-”button to select the BAND. then
press the “V+/V-” button to select VHF-L,VHF-H and
UHF.
3) Press the “p+/p-” button to select the COLOUR then
press “V+ /V-” button to change the desired colour
system AUTO, PAL, N3.58, N4.43, SECAM.
4) Press the “P+/P-” button to select the SOUND then
press “V+/V-” button to change the desired sound
system BG or DK.
5) Press the “P+/P-” button to select the SEARCH then press the “V+/V-” button to start the
station search. The TV screen will show the tuning and when the first station received is
located, the tuning will stop and stored automatically. Repeat steps 1,2,3,4 to search the
next TV station. as shown in FIG.4, FIG.5.
• If want to stop search(manual) funtion to press MENU button.
Notes:
• If ghost / noisy stations have been stored when using the AUTO SEARCH method these
stations can be removed from the channel list by entering the SKIP Mode shown in the TUNE
menu. Press the “V+/V-” button and change the OFF state to ON. Press the MENU button to
return to normal viewing. The unwanted station will be removed from the channel list when
you change TV channels and cannot be viewed.
• The SKIPPED station can be restored by re entering the TUNE menu and changing the SKIP
ON status to OFF.
• To exit the TUNE mode press MENU button two times.
TUNE
AUTO SEARCH
SEARCH
BAND VHF-L
FINE TUNE
COLOUR AUTO
SOUND BG
SKIP OFF
PROGRAM 1
FIG.4
FIG.5
SEARCH
VHF-L
-|||||||||| +
P1450BGVD1(UOC+8281S)Eng ib 1221.p65 2006/1/6, 下午 12:338
Page 9

GB-9
OPERATING THE TELEVISION
2. PICTURE
• Press the MENU button to select the PICTURE mode
as show in FIG.6.
• Press the “P+/P-” button to select the BRIGHTNESS/
COLOUR/CONTRAST/SHARPNESS/HUE
• Press the “V+/V-” button to adjust the desired level,
The steps can be adjust from 0~63.
• HUE item for NTSC system only, the level setting can
be adjust from “-31” to “+31”.
• To exit the PICTURE mode press the MENU button
five times.
3. SOUND
• Press the MENU button two times to select the
SOUND mode as show in FIG.7
• Press the “V+/V-” button to adjust the level of the
Volume. The level setting can be adjust from “0” to
“63”.
• To exit the SOUND mode press the MENU button four
times.
4. SETUP
LANG.
• Press the MENU button three times to select the
SETUP mode, as shown in FIG.8
• Press the “P+/P-” button to select the LANG.then
press the “V+/V-” button to select the desired
language ENGLISH, RUSSIAN, DUTCH, ITALIAN,
GERMAN, FRENCH, SPANISH, PORTUGUESE,
ARABIC, FARSI, or TURKISH.
BLUE BACK
• Press the “P+/P-” button to select the BLUE BACK and press the “V+/V-” button to adjust the
blue Back-ground ON or OFF.
• To exit the SETUP mode press the MENU button three times.
FIG.6
PICTURE
BRIGHTNESS 32
COLOUR 32
CONTRAST 32
SHARPNESS 32
HUE 0
SOUND
VOLUME 10
FIG.7
FIG.8
SETUP
LANG. ENGLISH
BLUE BACK ON
P1450BGVD1(UOC+8281S)Eng ib 1221.p65 2006/1/6, 下午 12:339
Page 10

GB-10
OPERATING THE TELEVISION RECEIVER
5. PROG.EXCHANGE
After stored TV stations by AUTO SEARCH or MANUAL SEARCH, the position of TV program
can be exchange by the following method:
• Press the MENU button five times to select the PROG.
EXCHANG mode as shown in FIG.9
• Press the “P+/P-” button to select PROG I then press
the “V+/V-” button or numeric button to select the
disired program number to be exchange.
• Press the “P+/P-” button to select the PROG II then
press the “V+/V-” button or numeric button to select
the disired program number to be exchange.
• Press the “P+/P-” button to select the EXCHANG then press the “V+/V-” button. the position
of PROG I program number and PROG II program number will be exchanged.
• To exit the PROG. EXCHANGE mode press the MENU button.
CHANNEL SELECT AND VOLUME CONTROL
1) Press P+/ P- buttons to select TV station. (TV Mode Only)
0 249
Press CHANNEL." ", the program no.
wil l appear on th e top righ t corner and
change from higher no. to lower no.
Press CHANNEL. " ", the program no.
will change from lower no. to higher no.
2) Press V+ /V - button to adjust sound level.
VOLUME
-|||||||||| + 10
FIG.9
PROG. EXCHANGE
PROG. I 1
PROG II 5
EXCHANGE
P1450BGVD1(UOC+8281S)Eng ib 1221.p65 2006/1/6, 下午 12:3310
Page 11

GB-11
OPERATING WITH REMOTE CONTROL
TO SELECT TV STATION USING THE PROGRAM NUMBERS:
• Program Number Up and Down
Press the " P+ " or " P- " button to select a higher or lower program number.
• 0 - 9 Digital Button
To select TV stations using program numbers 0 - 9, selecting program number will be
shown in the right corner of the top of screen in green colour.
For example:
Press "9" digit button to select program "9".
• Two Digital Program Number
To select TV station using program numbers "10" - "99".
For example: selecting program “12”
* Press the button "+10/-/-- ",on screen will show “--”.
* Then press the number "1" button, on screen will show "1-"
* Then press the number "2" button, channel "12" will show.
• Three Digital Program Number
To select TV station using program numbers “100”- “249”.
For example: selecting program “123”
* Press the button "+10/-/-- ",on screen will show “---”.
* Then press the number "1" button, on screen will show "1--"
* Then press the number "2" button, channel "12-" will show.
* Then press the number "3" button, channel "123" will show.
PP Bu tton (person al pre ference )
Press “PP” button to select the picture effect.
PP MILD STANDARD DYNAMIC
STANDBY Button ( )
• Press the " " button to switch on/off the picture and sound.
MUTE Button
• Press the mute button to switch OFF the sound, press once again to switch ON the sound.
TXT MODE/SAWP Button
• Press the TXT MODE/SAW P button,A program number that current program number with
recent proceeds to exchange .
P1450BGVD1(UOC+8281S)Eng ib 1221.p65 2006/1/6, 下午 12:3611
Page 12

GB-12
SLEEP Button
• Press the SLEEP button to select a predetermined time the TV will turn off,the sleep time can
be set to count down from 15 to 240 minutes.
RECALL Button
• Press the RECALL button,on screen will show the program number, press again to cancel.
TV /AV Butt on
• Press the TV/AV Button to select AV mode,Press again back to TV mode.
TV AV1 AV2
TV/DVD Button
• Press the TV/DVD Button to select DVD mode, press again back to TV mode.
(There will be a few seconds delay before entering the DVD mode.)
AUTO POWER-OFF FUNCTION
• When the T V is in TV or AV(video) mode and it’s without a signal for about 8 minutes, it will
automatically power off(standby mode) to save the energy.
P1450BGVD1(UOC+8281S)Eng ib 1221.p65 2006/1/6, 下午 12:3312
Page 13

GB-13
OPERATION WITH REMOTE CONTROL
TELETEXT FUNCTION CONTROL
Teletext - is an information system that displays text on your TV screen. Using the Teletext
information system you can select a page of information on a subject that is available in its list
of contents (index).
To Opera te Teletext
1. Press the T V Mode Button
To select a TV station on which Teletext is being transmitted (check with a T V programme
guide).
2. Press the Teletext Button ( )
Using the list of contents (index) is display on the screen.
3. To select a Page of Teletext
Press the appropriate Digit button for the required Teletext page number.
The selected page number is displayed at the top lef t corner of the screen. T he Teletext
page counter searches until the selected page number is located, so that the required
information is displayed on the screen.
4. Program + (CH )
Press the Program “ + ” button to set up to the next higher teletext page.
5. Program - ( CH )
Press the Program “ - ” button to set up the next lower teletext page.
6. Press the ( ) button to return the teletext page to page number 100.
To Exit Teletext
Press the Teletext button ( ), the previously selected TV station will appears again on the
screen .
Mix Mode Button ( )
• Press button " " to superimpose the text over the TV program on the screen.
• Press once again to return to Teletext page.
Enlarge Button ( )
• Press button " " to display top half of the page at double height text.
• Press again to display bottom half of the page.
• Press again to get f ull page at normal height text.
Stop Button ( )
More information may follow the page of Teletext you have selected, and it i s automatically
displayed after a short period of time.
• Press button " " to hold the page.
• Press again to resume automatic page changing.
P1450BGVD1(UOC+8281S)Eng ib 1221.p65 2006/1/6, 下午 12:3313
Page 14

GB-14
OPERATION WITH REMOTE CONTROL
TELETEXT FUNCTION CONTROL
Cancel Button ( x ) (Sy stem)
To switch between Teletext and TV programme.
• Press button " x " the TV programme appears.
• Press once again to return to the Teletext page.
Conceal Button ( ? )
Sometimes a Teletext page contains concealed information, for example, in a quiz or puzzle.
• Press button " ? " to display the concealed information, press once more to clean.
Fast teletext button (RED,GREEN,YELLOW,BLUE)
• In fast TEXT mode the user can direct enter the TEXT page by use the(Red, Green, Yellow,
Blue)button.
TOP&FLOF M ODE Button(TXT MODE/SAWP)
• Press this button the teletext page will go to TOP MODE.
• Press once again to return to FLOF MODE.
E/W EUROPE Teletext button (Audio/ST/D/I/II)
• Press this button the teletext language will go to EAST EUROPE teletext language, press
once again to return to W EST EUROPE teletext language.
To Display the Time ( ) (In T V Programme Mode)
• Press button " ", the current time is displayed in the top right corner of the screen (e.g.
21:00).
• Press the button again to remove the time display.
Note: T he time can only be display when Teletext is available on the selected TV station.
To Select a Subcode Page
Subcode pages are subsections of long Teletext pages that can only be displayed on the
screen one section at a time.
• Select the required Teletext page.
• Press the " " button.
• Press a digit button (f or the required subcode page).
• If the subcode page is not immediately available then press the " x " button to return to the
TV programme. W hen the subcode page becomes available, the subcode number is dis
played in the top lef t corner of the screen.
• Press the " x " button to display the subcode page.
P1450BGVD1(UOC+8281S)Eng ib 1221.p65 2006/1/6, 下午 12:3314
Page 15

GB-15
DVD PLAYER OPERATION
Basic O peratio n
1. Switch the unit out of standby by pressing the STANDBY button then press the “ TV/AV/DVD
” button on the unit or press the DVD MODE direct key on the remote handset to turn DVD
mode to "ON".
2. Press “ OPEN / CLOSE (EJECT) ” button to open the disk tray. Place a disk, face up, on the
tr ay.
3. Press “ OPEN / CLOSE ” button to close the tray.
• Hold the disc without touching either of its surf aces, position it with the printed title side
facing up.
Playi ng Disks
1. Press the OPEN/CLOSE Button on the front panel and load the Disc on the tray.
The label side should be facing upwards. For a Double-sided DVD Disc, put the disc with label
A/1 up.
2. Press the OPEN/CLOSE button again to close the tray and the disc will be loaded.
3. T he Disc will be played automatically.
• If it is a DVD disc, it will show the Menu/Title Page on the screen.
• If it is a CD, it will play the first track directly.
4. Press the STOP Button if you want to stop the Disc playback You can resume playback by
pressing the PLAY button and it will start at the location where you have pressed stopped
(Resume Play).
5. Press the STOP Button twice to completely stop the DVD.
|| (Pause)/ Step
This function is available for DVD and CD audio only.
• For DVD, the picture will freeze.
• For CD audio, it will mute the sound.
1. Press the ( ||/Step ) Button to pause play.
2. Press the PLAY Button again to resume Play.
DVD SETUP M ODE
• Setup Mode provides a menu for the configuration of SYSTEM SETUP, LANGUAGE SETUP,
VIDEO SETUP, and DIGITAL SETUP .
To enter the SETUP Menu press the Setup button on the remote control.
The full setup menu is only available if the DVD is in the STOP mode. If a DVD is playing,
and SETUP is selected, certain menu items will be greyed out and unavailable.
The available menu items depend on whether the DVD is in the PRESTOP or PLAY mode
• Item selection in the SETUP menu is done by using the DIRECTION buttons and the ENTER
button.
• To exit the SETUP Mode, press the SETUP button again or select the EXIT and press the
ENTER button.
P1450BGVD1(UOC+8281S)Eng ib 1221.p65 2006/1/6, 下午 12:3315
Page 16

GB-16
SYSTEM SETUP
In stop mode, press SETUP button and highlight SYSTEM setup then press ENTER button to
confirm.
To select the desired item by using the direction buttons ( / / / ), then press ENT ER
button to confirm the selected item.
• TV SYSTEM
- NTSC
- PAL (default)
- AUTO
• SCREEN SAVER
- ON (default)
- OFF
• TV TYPE
- 4:3 PS (Pan Scan)
- 4:3 LB (Letter Box) (default)
- 16:9 (W ide screen)
• PASSWORD:_ _ _ _
The password option is initalized lockec, and you cannot set the
ratings limit or change the password. In order for the Rating
feature work, the password mode must be turned on. If you want
to set the rating limit, you will need to enter the default password,
which is 0000, then press ENTER to confirm. To change the
password, you will be prompted for the old password, then be
prompted for a new. Enter a 4-digit number (this is your password).
• RATING
When playing disc with parental lock function, you may select an
age c ontrol grade accor ding to grade of disc and your own
preference.
For example, if PG is selected, DVD video disc rated higher than
the PG guide cannot be played.
1 KID SAFE
2 G
3 PG
4 PG 13
5 PG - R
6 R
7 NC 17
8 ADULT (default)
• DEFAULT : RESTORE
Choose this option to resume all the setup options to default
settings.
SYSTEM SETUP
TV SYSTEM
SCREE N SAVER
TV TYPE
PASS W ORD
RAT I NG
4
1 K ID SA FE
DE F A ULT 2 G
3 PG
EX IT SETUP 4 PG 13
5 PG - R
6 R
7 NC 17
8 A DU LT
SYSTEM SETUP
TV SYSTEM
SCREE N SAVER
TV TYPE
PASS W ORD
4
- - - RAT I NG
DE F A ULT
EX IT SETUP
SYSTE M SE T UP
TV SYSTEM
SCREE N SAVER
TV TYPE
4
4:3 PS
PASS W ORD 4:3 LB
RAT I NG 16 : 9
D EF A ULT
EXIT SETUP
SYSTEM SETUP
TV SYSTEM
SC REE N SAVER
TV TYPE
PAS S W O RD
R AT I N G
D E FA ULT
4
R ESTO RE
EX IT SETUP
SYSTEM SETUP
TV SYSTEM
SCREE N SAVER4O N
TV TYPE O FF
PASS W ORD
RAT I NG
DEFA ULT
EXIT SETUP
SYSTE M SETUP
TV SYSTEM
4
N T S C
SCREE N SAVER PA L
TV TYPE
AUTO
PASS W O RD
RAT I NG
DEFA ULT
EX IT SETUP
P1450BGVD1(UOC+8281S)Eng ib 1221.p65 2006/1/6, 下午 12:3716
Page 17

GB-17
LANGUAGE SETUP
In stop mode, press SETUP button and press direction / buttons to highlight LANGUAGE
setup then press ENTER button to confirm.
OSD LANGUAGE
Press direction / button to highlight the OSD LANGUAGE
and press ENTER button, then press direction / button to
select the desired OSD language.
- ENGLISH (default)
- GERMAN
- SPANISH
- FRENCH
- ITALIAN
AUDIO LANGUAGE
Press direction / button to highlight the AUDIO LANG andnd
press ENTER button, then press direction / button to
select the desired AUDIO language.
- ENGLISH (default)
- GERMAN
- SPANISH
- FRENCH
- ITALIAN
SUBTITLE LANGUAGE
Press direction / button to highlight the SUBTITLE LANG
and press ENTER button, then press direction / button to
select the desired SUBTITLE language.
- ENGLISH (default)
- GERMAN
- SPANISH
- FRENCH
- ITALIAN
- OFF
MENU LANGUAGE
Press direction / button to highlight the MENU LANG and
press ENTER button, then press direction / button to
select the desired MENU language.
- ENGLISH (default)
- GERMAN
- SPANISH
- FRENCH
- ITALIAN
LANGUAGE SET UP
OSD LA NGUAGE4E NGLISH
AUDIO LA NG G ER M AN
SUBTITLE LA NG SPA N ISH
ME N U LA NG FRE N CH
ITAL I AN
EXIT SETUP
LANGUAGE SETUP
OSD LANG UAGE
AUDIO LANG4EN G L I SH
SUBTITLE LANG GER M A N
ME NU LANG SPA N I SH
FRE N CH
EXIT SETUP ITA L I A N
LANG UAGE SET UP
OSD LANG UAGE
AUDIO LA NG
SUBTITLE LANG4ENG L ISH
ME NU LA NG GER M AN
SPA N I SH
EXIT SETUP FRE N C H
ITAL I AN
O FF
LANG UAGE S ETUP
OSD LANG UAGE
AUDIO LA NG
SUBTITLE LA NG
MENU LA NG4ENG LISH
GER M A N
EXIT SETUP SPA N ISH
FRE N CH
ITAL I AN
P1450BGVD1(UOC+8281S)Eng ib 1221.p65 2006/1/6, 下午 12:3317
Page 18

GB-18
VIDEO SETUP
In stop mode, press SETUP button and press direction / buttons to highlight VIDEO setup
then press ENTER button to confirm.
BRIGHTNESS
Using direction / button to move the scroll and adjust the
brightness.
CONTRAST
Using direction / button to move the scroll and adjust the
contrast.
HUE
Using direction / button to move the scroll and adjust the
hue.
SATURATION
Using direction / button to move the scroll and adjust the
sauration.
VIDEO S ETUP
BRI G HT NESS
4
----- ----- 1 2
CO N TR AST ----- ----- 1 0
H UE ----- ----- 8
S ATUR ATI ON ----- ----- 6
------ ----- 4
EXIT SETUP ----- ----- 2
----- ----- 0
VIDEO SETUP
BR I G HT NESS ----- ----- 1 2
CO NT R AST
4
----- ----- 1 0
H UE ----- ----- 8
SAT UR ATION ----- ----- 6
----- ----- 4
EXIT SETUP ----- ----- 2
----- ----- 0
VIDEO SE TUP
BR I G HTNESS ----- ----- + 6
CO N TR AST ----- ----- + 4
H U E
4
----- ----- + 2
S ATU R ATIO N ---- ----- 0
----- ----- - 2
EXIT SETUP ----- ----- - 4
----- ----- - 6
VIDEO SE TUP
BRIGHTN ESS ----- ----- 1 2
CO NTR A ST ----- ----- 1 0
HU E ----- ----- 8
S AT UR A T IO N
4
----- ----- 6
----- ----- 4
EXI T SETUP ----- ----- 2
----- -----
0
P1450BGVD1(UOC+8281S)Eng ib 1221.p65 2006/1/6, 下午 12:3318
Page 19

GB-19
DIGITAL SETUP
In stop mode, press SETUP button and highlight DIGITAL SETUP then press ENTER button to
confirm.
DOWN MIX :
- LT / RT
- STEREO (default)
LT/RT
Choose this setting, it will be sound like in a movie theatre if
the original movie was recorded from encoded in the
ProLogic Dolby Digital format.
AUDIO OUT
- SPDIF / RAW (default)
- SPDIF / PCM
• SPDIF / RAW
Choose this setting, if your DVD player is connected to a
power amplif ier with a coaxial cable or an optical cable.
When playing a disc recorded with Dolby Digita, DT S and
MPEG audio formats, the corresponding digital signals will be
output from the Coaxial Output jack. this player is digital
output jackes are designed for a connection to a Dolby Digital,
DTS or MPEG receiver or decorder.
• SPDIF / PCM
Choose this setting, if your DVD player is connected to a 2channel digital stereo amplifier. When playing a disc recorded
with Dolby Digital and MPEG audio formats, audio signal will be
modulated into a 2-channel PCM signal and it will be output
from the Coaxial Output jack or Optical Output jack.
DOLBY DIGITAL SETUP
- FULL
- 6/8
- 4/8 (default)
- 2/8
- OFF
When LINE OUT is selected, choose this setting to adjust the
line out ratio and get differenct effect. If adjusting to FULL,
the audio signal peak volume will be the minimum; while
adjusting to OFF, value will be maximum.
Note: T his option will be validated when the DOWNMIX is off.
DIG ITAL SETUP
DO W N M IX
4
LT / RT
AUD IO OUT STE REO
DY NA M IC RANGE
EXIT SETUP
DIG ITAL SE TUP
DOW N M IX
AUD IO O UT
4
SPD I F / RAW
DY NAM I C RANGE SPD IF / PCM
EXIT SETUP
DIGITAL SETUP
DOW N M IX
AUD IO O UT ----- ---- F ULL
DY NA M IC RA NGE4---- ---- 6 / 8
---- ---- 4 / 8
EXIT SETUP ----- ---- 2 / 8
----- ---- O FF
P1450BGVD1(UOC+8281S)Eng ib 1221.p65 2006/1/6, 下午 12:3319
Page 20

GB-20
DVD Menu Play
The DVD Menu Play function is only applicable for DVD movie. User can access the Casting
informationm, Production History, Movie Introduction etc. directly through this function.
1. Press the DVD MENU button on the remote control to enter the Root Menu.
2. Use the Direction button ( / / / ) or input the item index through the Number keys (0-9) to
do the selection.
3. Press ENTER to confirm the selection.
Audio
This function is applicable for DVD and CD audio but with different effects.
- Pressing the AUDIO key will change the Audio channel.
PREV. / Next
During playback, press PREV or NEXT key :
• When the PREV. key is pressed once, playback returns to the beginning of the PREVIOUS
playing chapter or track.
• W hen the NEXT key is pressed once, playback starts at the beginning of next chapter or
track.
Slow Play
The Slow Forward is only available for DVD. T here are 6 steps of slow motion speed:
1/2, 1/3, 1/4, 1/5, 1/6, 1/7. Press SLOW key to cycle playback speeds.
Note :
• Press PLAY key to resume normal playback speed.
• This function is not available for CD-G.
Repeat Mode
This function is applicable for DVD and CD audio but with different effects.
• For DVD disc playback, user can choose to repeat the current chapter, current title and disc.
Subsequent button press of the REPEAT button can change between these three options.
• For CD, user can choose to repeat the current track or the whole disc (Repeat All).
Subsequent button press of the REPEAT button can change between these two options.
Repeat AB
User can specify the repeating interval by marking the starting point and the end point.
1. Press the REPEAT AB button to mark the starting point (Playback will continue).
2. Press the REPEAT AB button to mark the end point (The marked part will be repeated
automatically.)
Note :
• Press the REPEAT AB button during repetition will disable the Repeat mode.
• This function is not available for CD-G.
Subti tle
This function is only applicable for DVD disc. It can change the subtitle language shown on the
screen .
Note :
• Number of subtitle available depends on the DVD disc.
• This function is not available for CD-G.
P1450BGVD1(UOC+8281S)Eng ib 1221.p65 2006/1/6, 下午 12:3320
Page 21

GB-21
An gl e
Some discs may have multiple viewing angles during production. T he ANGLE button is to select
the viewing angle shown on the screen.
Note : The number of Angle of View depends on the disc.
Se ar ch
The user can access a specific location or a specific track by keying in the targent time or the
track number.
1. Press the SEARCH button to enter to search mode.
2. Input the target time to the number button (0-9) and press the ENTER button. The player will
jump to the target location immediately.
Display
This funciton is to show the time and status information on the screen.
Resum e Play
This function is in playback mode. When the STOP button is pressed once, the player will enter
the Resume Play mode. At this time, if the PLAY button is pressed, the player will resume
playback at the location when the STOP button is pressed. If the STOP button is pressed a
second time, resume mode cancels.
Z o om
This function is enlarge or reduce a still picture or a moving picture by pressing the ZOOM button
to select the levels of zooming (2, 3, 4, 1/2, 1/3, 1/4)
Note :
• Use the direction buttons ( / / / ) to navigate within the image.
• This function is not available for CD-G.
Program Mo de
This function is applicable for DVDand CD audio. User can assign the playback sequence according
to his/her preference. For CD audio, user can assign the track sequence. For DVD
disc, user can assign both the Title and Chapter sequence.
• CD/CDG
1. Press the PROGRAM Key. The Program
Sequence table will be shown on the screen.
2. Enter the track numbers according to the
user preference through the Number keys
(0-9) on the remote control.
PROG
1 - - - - 5 - - - - 9 - - - - 13 - - - -
2 - - - - 6 - - - - 10 - - - - 14 - - - -
3 - - - - 7 - - - - 11 - - - - 15 - - - -
4 - - - - 8 - - - - 12 - - - - 16 - - - -
PLAY CLEAR
1 0001 5 - - - - 9 - - - - 13 - - - -
2 0003 6 - - - - 10 - - - - 14 - - - -
3 0005 7 - - - - 11 - - - - 15 - - - -
4 - - - - 8 - - - - 12 - - - - 16 - - - -
PLAY CLEAR
PROG
P1450BGVD1(UOC+8281S)Eng ib 1221.p65 2006/1/6, 下午 12:3321
Page 22

GB-22
3. After assigning the playback sequence,move the
highlight cursor to the PLAY option by using the
Navigation Arrows.
Press ENTER on the remote controller to confirm.
• DVD
1. Press the PROGRAM Key. The Program Sequence
table will be shown on the screen.
2. Enter the Title number with the Number keys (0-9) on
the remote controller.
3. Enter the Chapter number of the Title selected in the
last step.
4. Repeat step 2 – 3 to input the sequence.
5. Af ter assigning the playback sequence, move the
highlight cursor to the START option by using the
Navigation Arrows. Press ENTER on the remote
controller to confirm.
To cancel the program move the highlight cursor to desired Program By using the DIRECTION
buttons, then press the CLEAR button to delete the selected program.
1 0001 5 - - - - 9 - - - - 13 - - - -
2 0003 6 - - - - 10 - - - - 14 - - - -
3 0005 7 - - - - 11 - - - - 15 - - - -
4 - - - - 8 - - - - 12 - - - - 16 - - - -
PLAY CLEAR
PROG
PROG
T C T C T C T C
1 -- : -- 5 -- : -- 9 -- : -- 13 -- : -2 -- : -- 6 -- : -- 10 -- : -- 14 -- : -3 -- : -- 7 -- : -- 11 -- : -- 15 -- : -4 -- : -- 8 -- : -- 12 -- : -- 16 -- : --
PLAY CLEAR
T C T C T C T C
1 02 : -- 5 -- : -- 9 -- : -- 13 -- : -2 -- : -- 6 -- : -- 10 -- : -- 14 -- : -3 -- : -- 7 -- : -- 11 -- : -- 15 -- : -4 -- : -- 8 -- : -- 12 -- : -- 16 -- : --
PLAY CLEAR
PROG
T C T C T C T C
1 02 : 03 5 -- : -- 9 -- : -- 13 -- : -2 -- : -- 6 -- : -- 10 -- : -- 14 -- : -3 -- : -- 7 -- : -- 11 -- : -- 15 -- : -4 -- : -- 8 -- : -- 12 -- : -- 16 -- : --
PLAY CLEAR
PROG
T C T C T C T C
1 02 : 03 5 -- : -- 9 -- : -- 13 -- : -2 01 : 01 6 -- : -- 10 -- : -- 14 -- : -3 03 : 04 7 -- : -- 11 -- : -- 15 -- : -4 - - : - - 8 -- : -- 12 -- : -- 16 -- : --
PLAY CLEAR
PROG
T C T C T C T C
1 02 : 03 5 -- : -- 9 -- : -- 13 -- : -2 01 : 01 6 -- : -- 10 -- : -- 14 -- : -3 03 : 04 7 -- : -- 11 -- : -- 15 -- : -4 - - : - - 8 -- : -- 12 -- : -- 16 -- : --
PLAY CLEAR
PROG
P1450BGVD1(UOC+8281S)Eng ib 1221.p65 2006/1/6, 下午 12:3322
Page 23

GB-23
MP3
Place a MP3 / JPEG disc into the tray, and the player will auto search the directories saved MP3
/ JPEG files. Af ter searching, it will auto go to the first directory saved MP3 files (to the disc
containing both mp3 and jpeg files; To the disc containing single type of files, it will auto go to the
first directory) and play the first song in the directory (“01:” is highlighted).The screen displays
as the picture below:
Current MP3/JPEG file name. If a JPEG
file playing,the name should be*.jpg.
Current directory name
The playing file
is a MP3 music.
The playing file
is a JPEG picture.
Use the direction / / buttons to enter the Directory and highlight the desired directory, then
the first track under it starts playback.
MP4 Operation
This unit can playing MP4 file system CD-ROM navigation. Multi-Media files such as MP4 thus can
be played in the player.
Note:Use the MP4 operation function and MP3 also.
Picture CD
Load a picture CD into the tray, the disc can be identified. The player will start showing the
picture (JPG) one by one (slide show).
Opera ti on
During Slide Show Mode:
• Press the STOP button, it will shift to the Digest Mode in which 6 pictures will be shown on
the screen each time.
• Press the PAUSE button, it will freeze the screen so that the current picture can be held for
a long time. To resume the slide show mode, press PLAY button.
• Press the NEXT button on the remote control to skip to the next picture.
• Press the PREVIOUS button on the remote control to repeat the current picture.
File Switch Region:
Displays the file type
of the p layin g and
the switch ing.
P1450BGVD1(UOC+8281S)Eng ib 1221.p65 2006/1/6, 下午 12:3323
Page 24

GB-24
SPECIFICATION
TV SECT ION
Receiving Channels
VHF
L
CH 2 - 4
VHF
H
CH 5 - 12
UHF CH 21- 69
Tuner Type 250 Channel ,VS TUNING
DVD SECTION
Laser W ave length 655nm
Laser p ower : Class 1
Signal System PAL / NTSC output
Digital audio output Coaxial digital output; pin jack
S-video Y output level 1Vp-p (75 Ohm);
C output level 0.300Vp-p (75 Ohm) (PAL),
0.286Vp-p (75 Ohm) (NTSC)
Headphone
Stereo in DVD mode
Mono in TV mode
GENERAL SECTION
AC Power Input AC 220 - 240V ~ 50 Hz
AC Power Consumption 74 W
Speaker 3” x 1.5” 8ohm x 2
Audio Output 1.8 W + 1.8 W
Dimensions L390 x W 394 x H420 (mm)
Net Weight 11.2 Kg
Region coding: All DVD discs are coded by the sales territory. Please note the player is factory
set to region 2 coding (UK and Europe) and cannot be changed. T herefore discs purchased
outside of UK or Europe cannot be played. This is in compliance with the DVD patent requirements.
P1450BGVD1(UOC+8281S)Eng ib 1221.p65 2006/1/6, 下午 12:3324
 Loading...