

Page 1
QUICK START
Congratulations on purchasing this AIRIS LRD TV.
This guide will help you to start using its basic functions and identify the parts of
the screen.
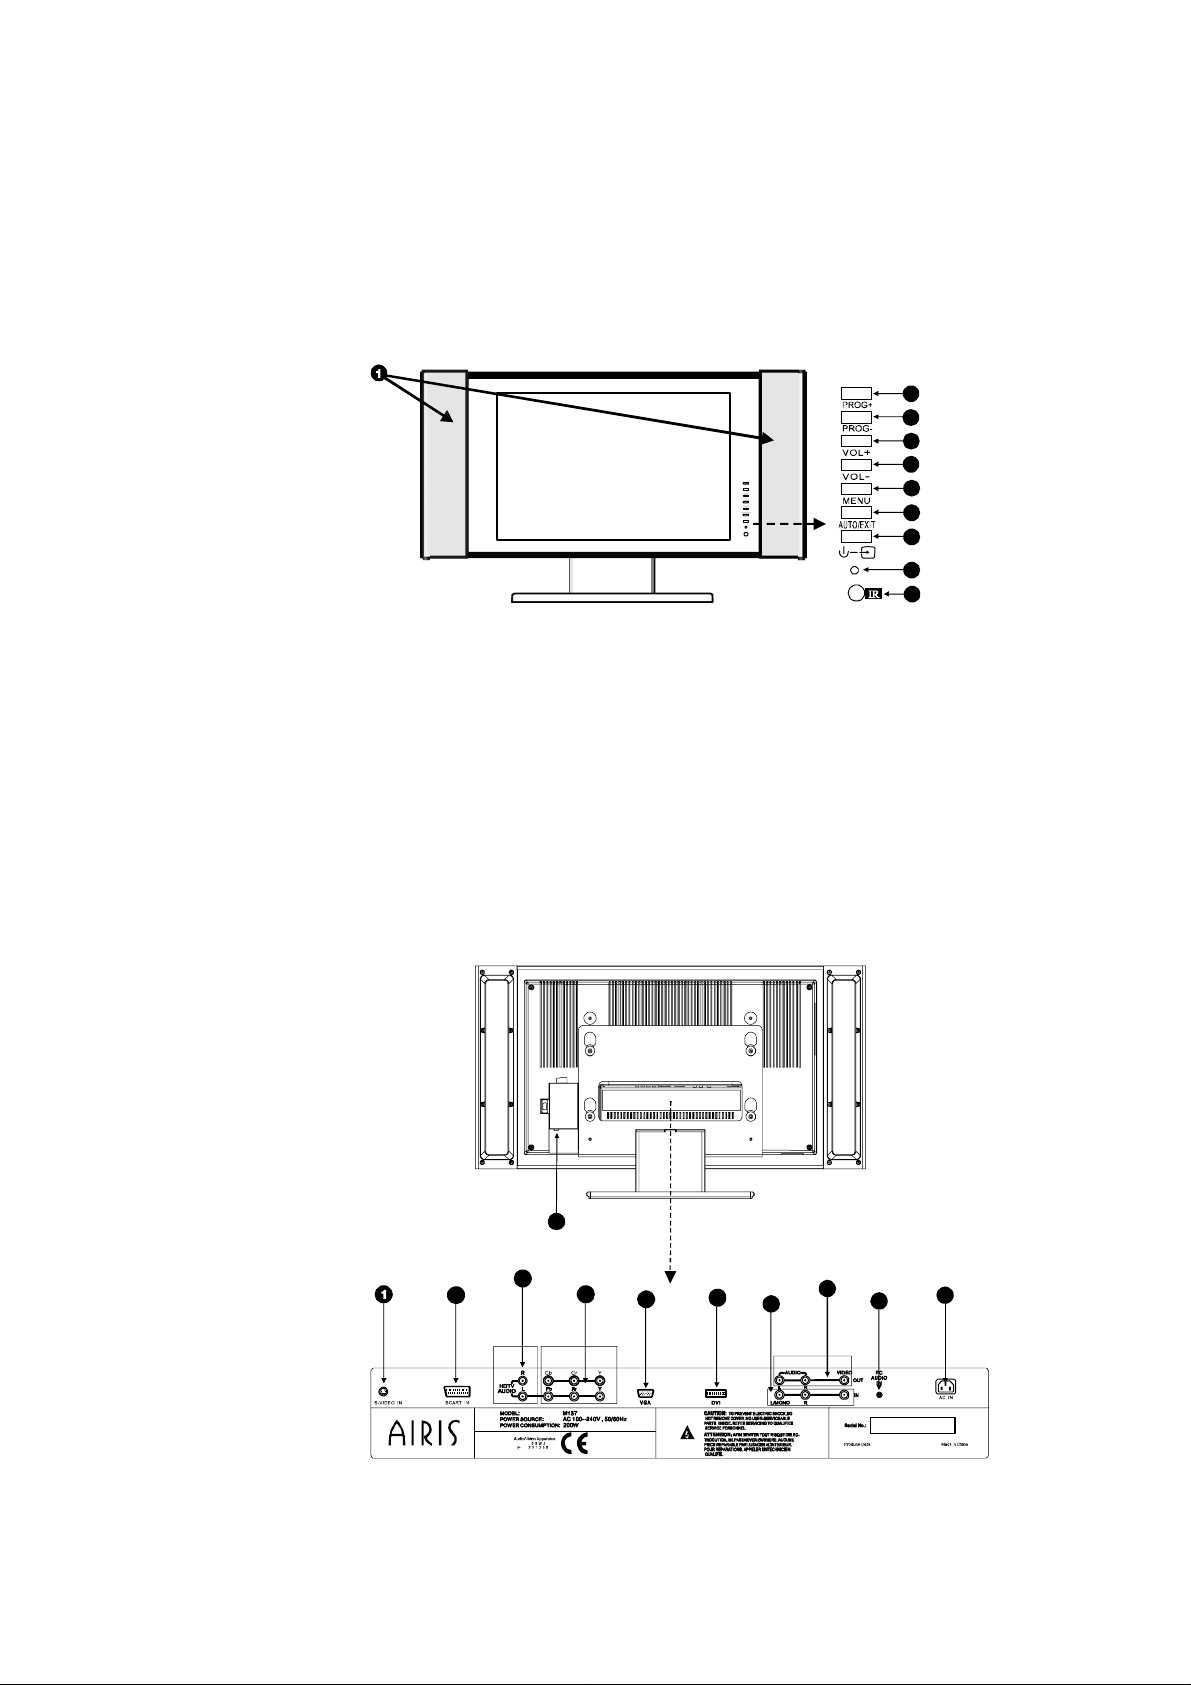
Front Part
2
3
4
5
6
7
8
9
10
1. Speakers 7. Automatic image adjustment/exit
2. Raise channel from signal OSD
3. Lower channel 8. ON/signal selector
4. Raise volume 9. STANDBY/Operation indicator:
5. Lower volume on green when the screen is
6. Menu functioning
10. Infrared sensor
Rear Part (connections)
11
2
3
4
5
6
8
7
9
10
Page 2

Rear Part (connections ) (cont.)
1. S-Video input 7. Compound video & stereo audio
2. Euroconnector input input
3. Audio input for connections 8. Compound video & stereo audio
by components input
4. Video inputs by components 9. Stereo audio input (3.5 mm mini (interlinked YCbCR and Progressive jack) for VGA and DVI video
YPbPr) inputs
5. VGA input 10.Power cable connection
6. DVI input 11 Aerial input
Remote Control Device Description
10
2
6
3
21
20
18
19
13
14
9
12
4
11
5
8
17
7
16
15
1. ON/Standby button: Press this button to turn the screen on or off. In the
Standby mode, press the button and the image and sound will appear after
a few seconds.
2. Numerical buttons: Press these directly to select the required channel.
They also serve to insert the page numbers in the Teletext mode.
Page 3

Remote Control Device Descriptoin (cont.)
To insert a one-digit number use the numerical keys from 0 to 9.
To insert a two-digit number (10-99) first press any button from 0-9 to insert the
first digit and then the second digit in less than 2 seconds, using the buttons from
0-9.
3. Volume Control Keys (+/-): press the + key to raise the volume and the –
key to lower it.
4. Channel keys (+/-): press the + key to go to the next tuned-in channel.
Press the – key to go to the previous channel. In the Teletext mode,
pressth e+ key to go to the next page and – to go to the previous page.
5. Menu key: press this key to access the screen control menu.
6. SLEEP button: this key is used to activate the screen off timer function
and set it from 10 to 240 minutes. The programming time will appear in
the lower right-hand corner of the screen. It will then disappear and be
shown again when one minute remains before it is turned off. To
deactivate it, press the button until the word OFF appears on the screen.
7. REVEAL Button: press this button to show the current channel number,
system data, etc. on the screen.
8. VIEW Button: press this button to return to the programme being
watched previously
9. Source Select Button: use this button to select the external video sources
that are connected to the screen. Every time the button is pressed, changes
it to the new input source, in the following order:
PC Æ DVI Æ TV Æ AV ÆS-VIDEO Æ YcbCr Æ SCART Æ HDTV
Å__________________________________________________|
10. MUTE Button: press this button to lower the volume temporarily. Press
it again to reactive the volume.
11. MONO/STEREO Button: when a channel is being received in stereo,
this button can be used to select from among the different audio modes
(stereo, mono, Dual A, DualB, Nicam, etc.) available during transmission.
12. PIP Button: press this button to superpose a window with another image
source (not another TV channel) on the main image. When selecting the
VGA or DVI input, this function will only be available if the VGA signal
is set to 1024x768/60 Hz and the video source is set to full screen.
13. SOUND Button: press this button to select the different sound effects:
Personal/Cinema/Music and Dialogue.
Page 4

14. Image Button: press this button to select the different image modes from
among Personal, Bright, Medium and Standard.
15. AUTO Button: press this button to adjust the image automatically.
(continues on next page)
(continued from previous page)
Remote Control Device Description (cont.)
16. SCREEN Button: this button enables you to selecting the screen format
from among those available : Full screen, 4 :3, wide-screen, cinema,
intelligent setting and 14:9. Press it to change from one to another.
17. Subpage Button (only NTSC): press this button to select CC1, CC2,
TEXT1, TEXT2, XDS, CC3, CC4, TEXT3 and TEXT4 de los closed
captions.
18. HOLD Button: press this button to digitally freeze the image you are
viewing on the screen at that time.
19. INDEX Button: pres this button to show the information on the channel
you are viewing at that time on the screen.
Signal Å--------------------------------- TV
Current time Å-------------------------- 13:15
Current channel name Å--------------- SZTV1
(defined in the channels edition)
TV channel & sound system Å------- CH 9 I
20. TELETEXT Button: press this button to activate the teletext screen,
combining the teletex screen with the TV image or to deactivate the
teletext.
21. Direction Keys: use these keys to move around in the different
configuration menus offered by the screen.
Function Keys with the Teletext option activated:
18. HOLD Button: some pages of the teletext contain several subpages that
rotate automatically. Press this button to stop the rotation on the current
page.
19. Subpage Button: some pages have an attached subpage. Pres this
button to view it.
20. INDEX Button: press this button to go to the index page of the
Teletext, which is usually page 100.
21. REVEAL Button: use this button to show the solutions.
22. BLUE, RED, YELLOW and GREEN Buttons: by pressing these
buttons you can go straight to the pages that correspond to the different
colours. These pages are defined by the teletext of each channel.
Page 5

Channel-Tuning
To start tuning in the TV channels, check that the aerial is properly connected and
that you have selected the channel setting menu on the screen.
FIGURE 1
The menu has the following options:
Colour system: the options available are PAL, AUTO and NTSC. It is advisable
to leave it on AUTO.
Channel search: by selecting this option you can enter the channel tuning submenu.
Sound system: to hear the sound correctly in Spain, set it to PAL/BG.
Current programme: this shows you the number of the programme selected at
the present time.
SKIP: this option enables you to deactivate the tuned-in channel in the current
programme. Select ON to deactivate it.
Channel SWAP: when tuning in the channels, these are stored sequentially as
they are found by the tuner. This option enables you to exchange the positions in
which they were stored, so that they can be set according to your preferences.
Programme label: this option enables you to name the programmes so that you
can find the channel being tuned in at any time. When doing this, the programme
number will be shown followed by the name input (TVE1, ANT3, TELE5,
etc…). When selected a key will appear on the screen. Use the direction keys to
select the desired numbers or letters and then press the MENU key to select each
one. When this operation has been completed, highlight the END, FINISH or
FIN options to store the programme label.
2. Select the option Channel Search and press the RIGHT direction key to
enter the channel tuning sub-menu:
FIGURE 2
Page 6

The menu has the following options:
Search Mode: Tune in or Surf. Select the SURF option if the TV system is
NTSC. Select Tune In if the TV system is PAL.
Aerial Type: this enables you to choose between cable or Air. Select AIR to
tune in the channels available in Spain.
Automatic Search: select this option for the screen to start searching for
channels throughout all the frequency bands. The channels found will be stored in
the order in which they were found (RECOMMENDED OPTION).
Manual Search: select this option to tune in to each separate channel manually.
Fine Tune: this option enables you to set the tuning of each separate channel to
obtain the best possible quality image and sound.
3. Select the Automatic Search option and press the RIGHT direction key . The
screen will start searching for the available channels and the following progress
bar will be shown:
FIGURE 3
This process takes a few minutes.
After processing, it is returned to the main menu. If this is not the case and the
screen shows the TV image, press the MENU key until figure 1 appears.
4. Once back in the Tuning Menu, select the Channel Swap option. As
already explained above, this option enables you to change the positions of
2 channels to adjust them to your personal preferences.
Example:
The national channel TELE5 has been memorised in programme number 14
and you want to store it in number 5.
To do this, enter the Tuning menu by pressing the MENU key.
Select the option CURRENT PROGRAMME using the direction keys
and . Once in this option, use the and direction keys to select programme
14, which is the number of the programme where the TV has stored TELE5.
Then use the and direction keys to select the option Channel SWAP, and
press the direction key to enter this option. Figure 4 will be shown on the
screen.
FIGURE 4
Use the and direction keys to change programme 14, the current number, to
5, which is where you want to store the TELE5 TV channel.
Page 7

Lastly, press the MENU key to confirm the change.
Follow the same steps with any of the channels you wish.
 Loading...